
Kingdom Chronicles
Platform: Mac, Windows

![]() Ready to get dragged into an undeniably captivating strategy and resource management building game? Kingdom Chronicles by Aliasworlds casts you in the role of humble do gooder John Brave, resident unlikely hero hero. I know what you're thinking, been there done that. But wait! It's not only about being sexy and knowing it while having damsels in distress swooning in their tallest tower prisons. I promise.
Ready to get dragged into an undeniably captivating strategy and resource management building game? Kingdom Chronicles by Aliasworlds casts you in the role of humble do gooder John Brave, resident unlikely hero hero. I know what you're thinking, been there done that. But wait! It's not only about being sexy and knowing it while having damsels in distress swooning in their tallest tower prisons. I promise.
 John Brave arrives in his native land after a long voyage to discover the sinister Moomrabac has nabbed the throne from King Edward and locked him away, and poor Princess Jane has been snatched and imprisoned as well. So, unlike us regular people who would probably scamper off somewhere to drown our sorrows in some unhealthy substance or another (hello cookie dough), John Brave takes it upon himself to right the wrongs of the treacherous Moomrabac. Town by town, quarry by quarry, troll by troll, it is your good fortune to be in charge of fixing the problems for those who would otherwise grumble about autocracies and being oppressed.
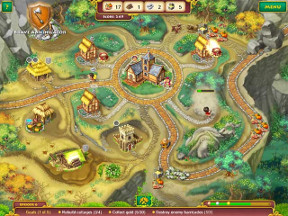
At the beginning you're presented with a map showing the winding path you must travel to rescue the realm. Similar to games like My Kingdom for the Princess, Rescue Team, and Roads of Rome, you need to guide groups of workers to gather items, including logs, food, gold, and stones, build buildings or clear the road of troublesome debris. Resources you gather can be used to repair or upgrade structures in each level, allowing you to erect lumber mills, houses that earn rent, town halls, stone quarries, and so on. Later, you even have to fight off barbarians and hire clerks to collect rent!
Each level comes with a set of tasks you must complete in order to proceed. The faster you complete the stage, the better reward medal you'll get. The strategy comes from choosing which order to perform tasks, as it's not always a completely linear path from A to B. Should you clear the stones from the road first, or go ahead and set up the farm to create food? How about guiding the workers, which tasks should they focus on, and how efficiently can you direct them? It's a little bit of simulation and a little bit of time management, and it all falls together in a perfectly handsome way.
 Analysis: The "building" genre has become more and more crowded in recent years, with a few very big series taking off and attracting everyone's attention. So how do you make yourself stand out in a world filled with Build-a-lots? You do it by making smart design decisions. Kingdom Chronicles was created for players and fans of the simulation building genre. Things like workers pausing after completing a task in case you have another job for them or the extra-handy queueing system that allows you to chain together actions so you can focus on the game, not where your minions are, really make a difference. The handful of little gameplay tweaks along with the game's flawless presentation add up to something very big in the end.
Kingdom Chronicles has that "just one more level" ability to keep you clicking until way past your bedtime. With several hours of content available it's easy to immerse yourself in this world that seems to be abound in resources. The game pacing is perfect for beginner and expert alike because it starts off easy but increases in difficulty towards the end, especially for those who really want to make it through with all gold medals. Different achievements add another layer of fun because getting that little medal mid-level fuels on that resource collector in you. The cartoon graphics are endearing and the plot lines are worth reading if you need a good chuckle.
For those newly introduced to this genre or those who are seasoned veterans, Kingdom Chronicles is a fun reminder of how good a resource management game can be. Sure, you may feel like you've collected that stupid log more times than you can count, but then you upgrade your quarry and bam!, you're back in full swing. If you're looking for a game with a silly narrative and gameplay that will keep you glued to your computer screen for longer than you should ever admit to then look no further!
A Collector's Edition is also available. It contains bonus gameplay, an art gallery, strategy guide, and more. Remember that Big Fish Game Club Members pay only $13.99 for Collector's Editions (or 2 club credits), and collector's editions count 3 card punches of 6 total needed for a free game.
![]() Windows:
Windows:
Download the demo
Get the full version
Also available: Collector's Edition
![]() Mac OS X:
Mac OS X:
Download the demo
Get the full version
Also available: Collector's Edition


Walkthrough Guide
(Please allow page to fully load for spoiler tags to be functional.)
Kingdom Chronicles Walkthrough
General Information
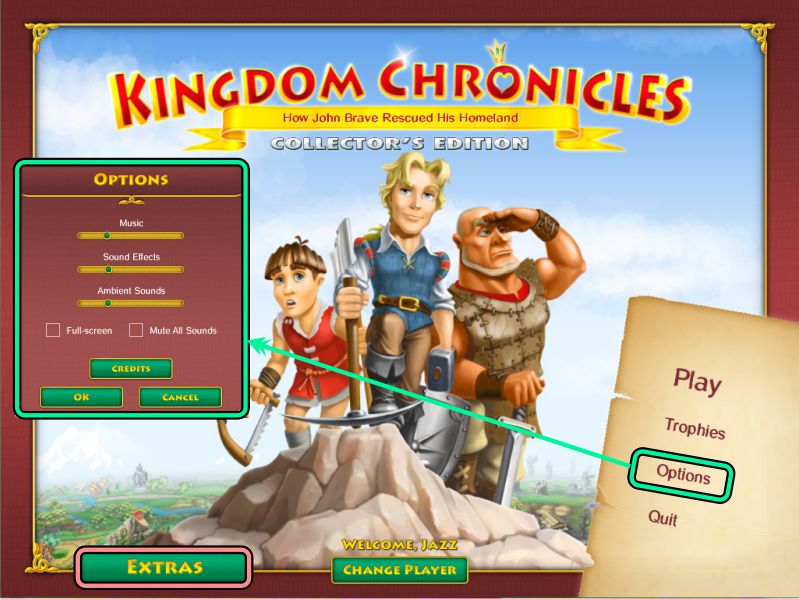
From the Main Menu, you can Play or Quit the game, choose your Options, and pick your player name.
Options are Music, Sound Effects, and Ambient Sounds volume, or you can Mute All Sounds.
If you purchased the Collector's Edition, you can also view the Extras, including an Art Gallery, Strategy Guide, and Bonus Levels you can play once you have completed the game.
You have a choice of Full or Windowed screens, and you can view the Credits.
After you have begun to play the game, if you quit in the middle of an Episode, you will need to restart the Episode.
There is no Hint button, but you will have a Tutorial at the beginning that you can skip or complete to get a Trophy.
If you choose Skip the Tutorial, it will remain as a Help button until it is completed, for you to use when needed.
If you pause game play, the menu will give you your choice to Resume, Restart the current Episode, change your Options, go to the Main Menu, or go to the Map.
If you wish to go back and play a particular Episode, just click on that Episode on the Map.
There is a timer in the game that keeps track of which medal you will earn for the Episode.
If you run out of time, you can still finish the Episode, but you won't receive a medal.
There is no choice of difficulty in the game because the Episodes get more complicated as the game progresses.
Screenshot
Trophies
As you progress through the game, you will collect Trophies that will be shown at the end of each Episode and can also be viewed from a link on the Main Menu.
First Success: First Episode completed successfully
Diligent Apprentice: Complete the tutorial
Skill Discovery: Acquire one magic skill
Skill Master: Acquire all skills
Good Farmer: Gather 100 food
Seasoned Farmer: Gather 1000 food
Happy Lumberjack: Gather 100 wood
Capable Lumberjack: Gather 1000 wood
Merry Mason: Gather 100 stones
Skillful Mason: Gather 1000 stones
Gold Prospector: Mine 100 gold
Expert Miner: Mine 1000 gold
Brave Cleaner: First blockage removed
Novice Carpenter: First building restored
Boisterous Builder: Build one building
Seasoned Builder: Build 100 buildings
Daring Rent Collector: Collect first rent
Debtors' Terror: Collect 1000 rent
Good Deal: Make a trade deal
Expert Dealer: Make 100 trade deals
Major Dealer: Make 500 trade deals
Fearless Defender: Repulse the first attack
Invincible Fighter: Defeat 100 enemies
Great Warlord: Defeat 500 enemies
Brave Annihilator: Destroy your first enemy structure
Hardened Destroyer: Destroy 50 enemy structures
Terminator: Smash 100 enemy structures
Knight of the Crown: Freeing the King
King of the Heart: Free the Princess
What a Hero: Earn all the trophies
Skill Tester: Use skill for the first time
Skill Artist: Use all skills within one Episode
Skilled Sovereign: Use skills 100 times
Bronze Medals Earned: Number of medals collected is shown
Silver Medals Earned: Number of medals collected is shown
Gold Medals Earned: Number of medals collected is shown
Champion: Earn gold medals for every episode
Courageous Liberator: Complete the entire game
The Invader: Complete the bonus Episodes
Special Skills
Work Skill: Speeds up work 2 times faster
Run Skill: Everybody runs 2 times faster
Produce Skill: Speeds up resource production 3 times faster
Fight Skill: Warriors fight 4 times faster
Scene Navigation
On the top of the scene is your Resource Bar with the number of various items in your Inventory.
At the bottom of the scene is your list of goals for each Episode, above which is the timer.
Each task you perform to reach your goals will have a box that appears above it, if you mouse over the item.
For gathering, the box will show you how many workers you need and the amount of the resource you will get for your inventory.
If you need to clear or repair and item, you will learn how many workers you need and the amount of each resource it will cost you from your inventory to complete the task.
When you have sufficient resource to build something, the little gray shield by the building will turn green.
Once you have completed all of your goals, there may be left-over resources you can no longer collect.
The number of items in your resource inventory will have an effect on your score for that Episode, so you need to make a choice as to whether your score or a medal is more important.
If you assign a task to someone and decide to cancel it, right-click on it with your mouse.
If you look at the screenshots of the various locations, you can see your progression along the path on the map.
Clicking on all available resources that aren't blocked will speed things up, as will remembering to use your skill buttons when you get them.
Remember to plan ahead before you begin so you will most efficiently use your workers and resources.
Should you need help with a particular goal, click on it in the bar at the bottom.
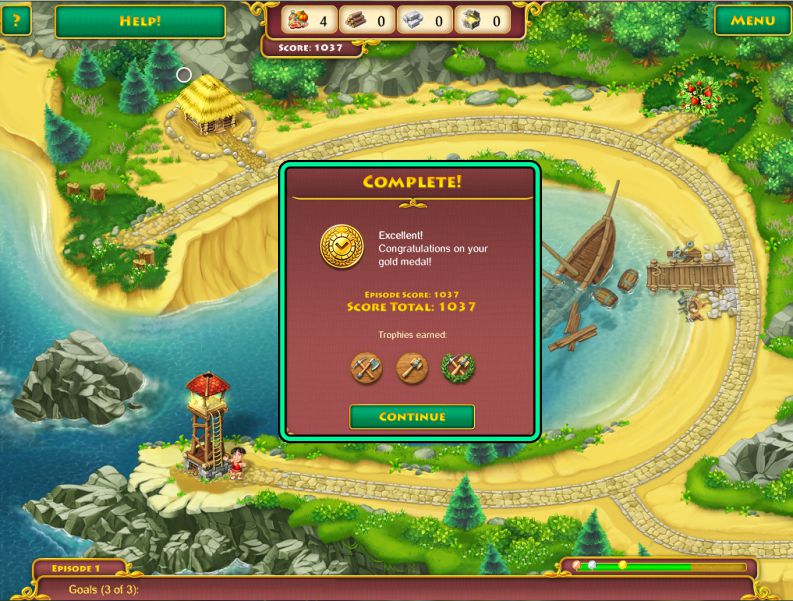
Once you have completed an Episode, you will have a score card with medals earned, the Episode Score, total score for the game, and any Trophies earned.
Screenshot
Episode Goals and Tips
Episode 1: Arrival
Your primary goal is to repair the lighthouse, but you first need to clear the road in order to get there.
The secondary goal is to repair the wharf.
All of your tasks can be completed by one worker.
See the screenshot for resources gathered and resource requirements for each task.
Screenshot
Episode 2: Useful Things
Your goals are to build a lumber mill and farm, upgrade your hut to 2 workers, clear and repair the road.
Once you have upgraded the hut, you can use 1 worker for gathering resources and the other for clearing and repairing the road.
Screenshot
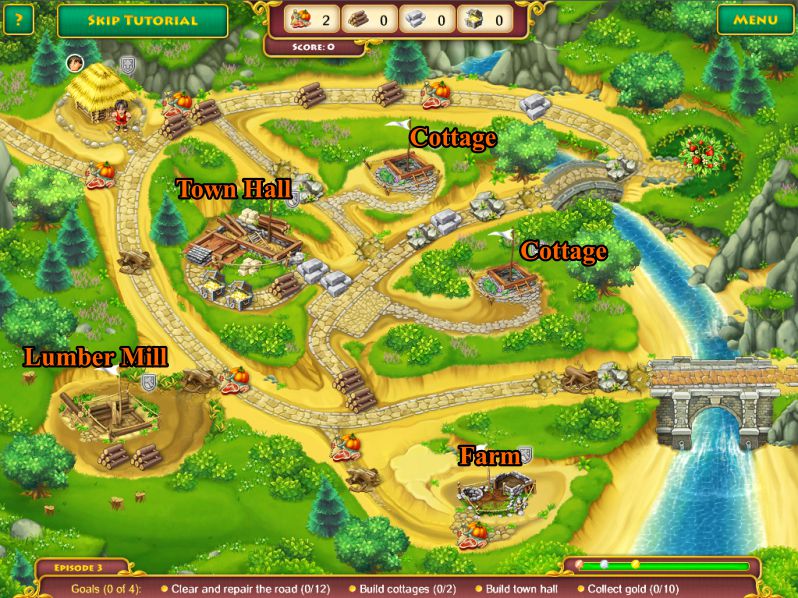
Episode 3: Help the Mayor
The Mayor wants his village brought back to life, so your goals are to clear and repair the road, build 2 cottages and a town hall, and make certain the town clerks collect at least 10 chests of gold for you from rent.
Before you get started with the building, clearing, and repairing, collect all the available resources.
The Farm is important as a source of food.
Screenshot
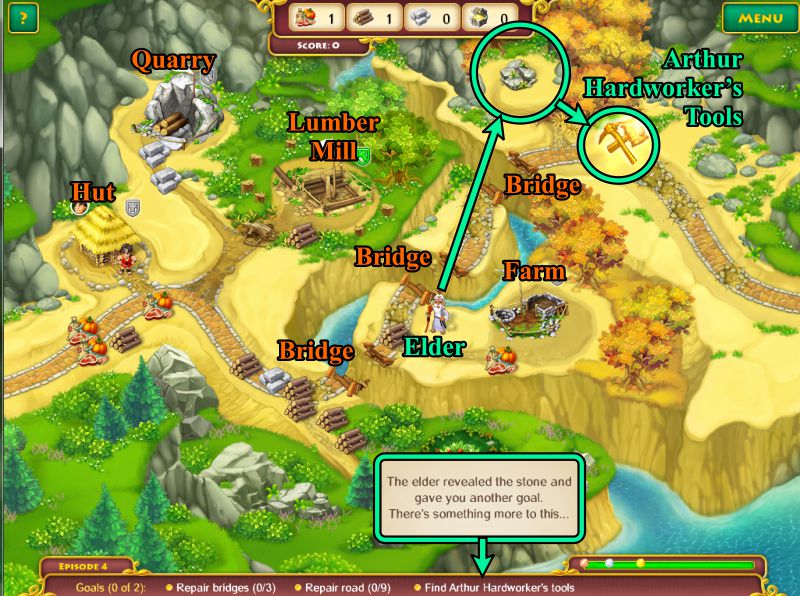
Episode 4: Necessary Skills
Your goal is to repair the road and 3 bridges.
Don't forget to upgrade the worker's hut so you can delegate the tasks to more than one worker.
The Elder tells John he needs some special skills to speed up progress, and he will tell him where to find Arthur Hardworker's magic tools for 4 food.
Once he reveals the stone, the Elder presents you with another goal: Find Arthur Hardworker's tools.
The stone the Elder revealed is hiding something, so you need to get to it and haul it away.
Once you find Arthur Hardworker's tools in the stone, collect them, and click on the Work Skill button that appears just above your goals to see how much faster your workers do their job.
Screenshot
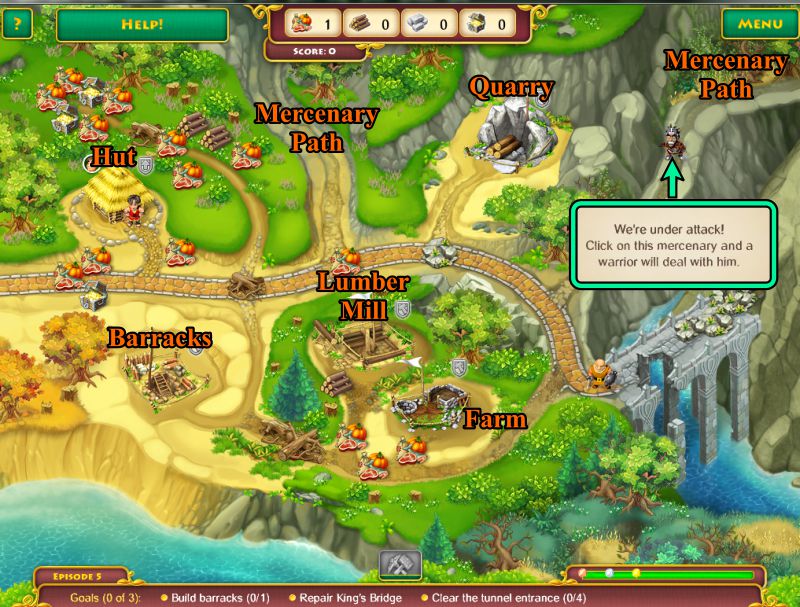
Episode 5: Warriors
Moomrabac is furious to learn about John Brave's projects and wants him stopped.
Your goals are to repair King's Bridge so you can clear the tunnel, and to build a barracks.
Try to collect all your resources and build everything else before the Barracks, because once the barracks are built, you will be subject to attacks from mercenaries.
Your warrior will take care of the mercenaries when you click on them, but it's one more thing to consider in reaching your goals.
Screenshot
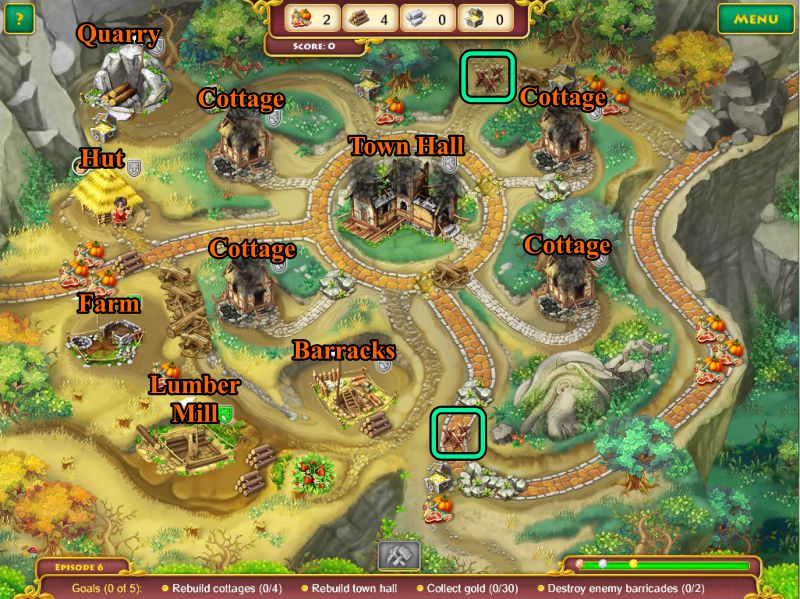
Episode 6: Home Sweet Ruins
John arrives in his hometown of Echo Valley to find it in ruins, and so vows Moomrabac will answer for the destruction.
Your goals are to rebuild 4 cottages and the town hall, collect 30 gold, clear the huge stone blockage, and destroy the 2 enemy barricades (marked in turquoise in the screenshot).
Remember to upgrade your hut to get more help with your tasks.
Try collecting as many resources as you can and building all other structures before the barracks in order to avoid the intruders as long as possible.
Screenshot
Episode 7: Farmers' Valley
The farmers tell John that if he will help restore their valley, they will help him find the Running Boots.
Your goals are to rebuild the 5 ruined farms, repair the road, collect 200 food, and find the Running Boots.
A trader appears on the scene and is eager for you to give him 3 stones in exchange for 2 wood.
Since there is a quarry but no lumber mill, you need to get your quarry actively producing to help you get the wood to build the farms.
In order to find the Running Boots, you need to upgrade your hut so the 2 of you can take down the huge rock pile in the upper right corner.
The Running Boots will allow everybody to run 2 times faster.
Screenshot
Episode 8: Clear the Road
The mercenaries have now set up camp and placed barriers, so they sneak around looking for something to attack and destroy.
The warriors will take care of them once you build the barracks and take down the barricades, but try to achieve as many of your other goals first.
You need to repair 5 bridges (marked in gold in the screenshot), and then destroy the 5 enemy structures (marked in turquoise in the screenshot).
Remember to click on your Skills to speed up the processes.
Screenshot
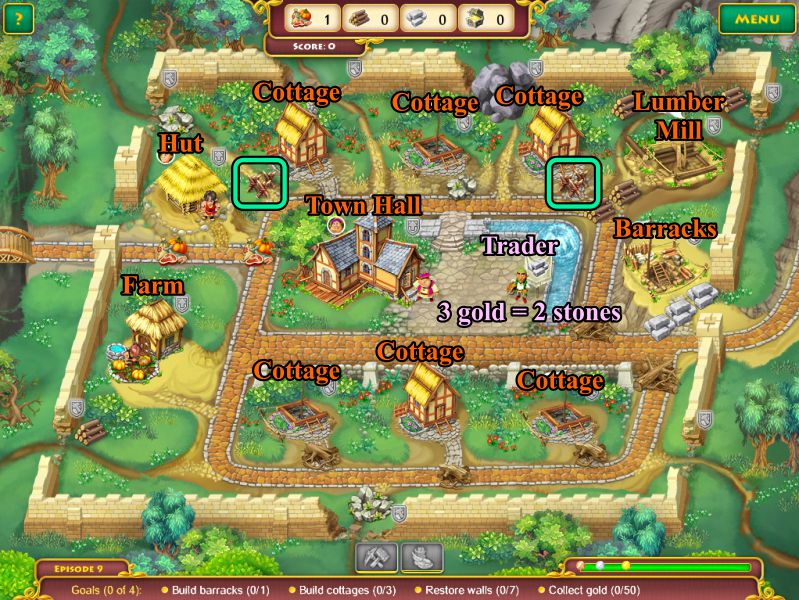
Episode 9: No More Robbers
Walltown is suffering from bad neglect and has now fallen prey to robbers, so in order to defend it, you need to first restore its 7 broken walls.
Other than restoring the walls, you need to build 3 cottages and a barracks, plus collect 50 gold for cottage rent.
Focus on a way to first rebuild the broken walls where robbers can enter and steal rent or resources.
Make certain your clerks are prompt in collecting rent from the 2 already-built cottages that aren't barricaded.
Your farm will provide you with food, and the Trader will exchange 3 of your gold to give you 2 stones.
Additional stones are available from clearing away what is blocking robber intrusion paths in the broken walls.
If your worker is running around too much, upgrade the hut to get him some more help, and don't forget to click on the Skills for additional help.
Screenshot
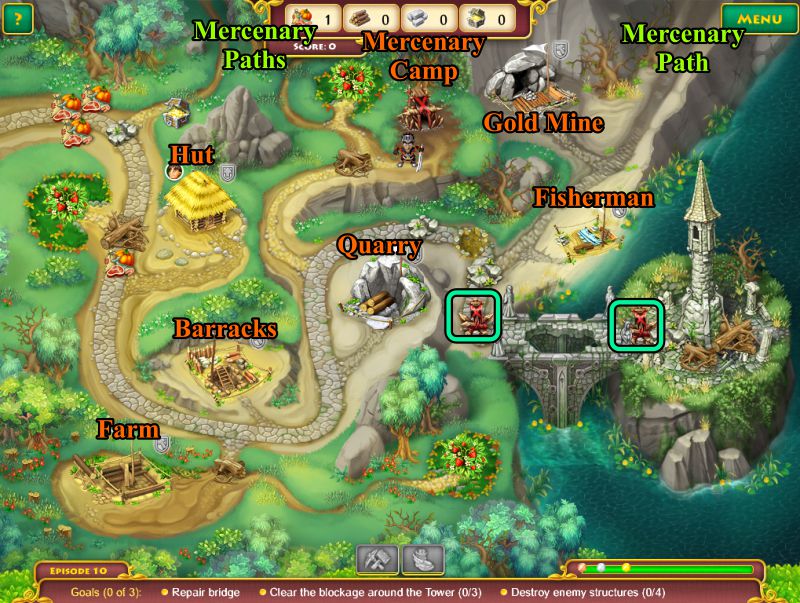
Episode 10: The Mysterious Tower
You come upon a strange tower in the distance, so need to repair the bridge to the tower and clear all of the blockage so you can investigate.
There are 2 mercenary paths for invasion and an established mercenary camp, giving you 4 enemy structures to destroy, plus the necessity to deal with them once you build the barracks.
Do all that you can before building the barracks, and then let your warriors deal with the enemy problem.
Screenshot
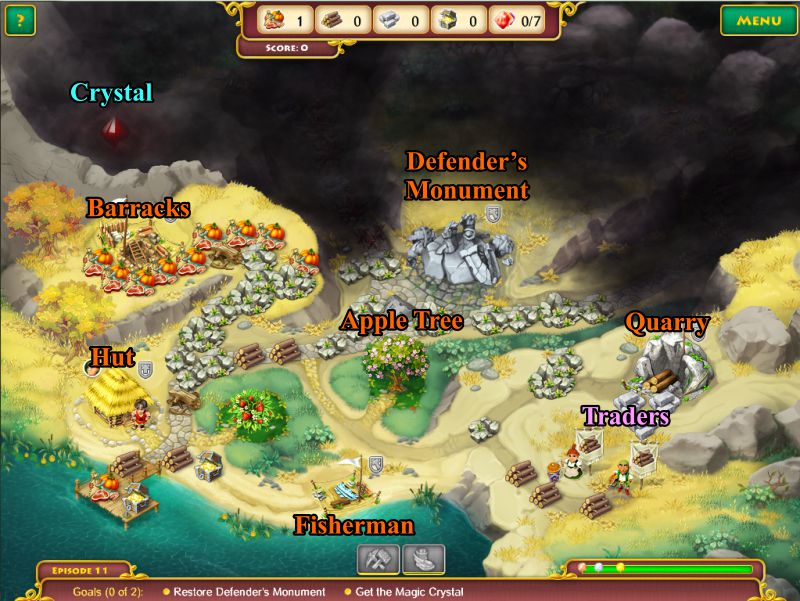
Episode 11: The First Crystal
The first Magic Crystal is within site, but you are going to have to restore the Defender's Monument before you can get to it.
You will notice that a new resource has been added to your inventory, for you will need to collect 7 Magic Crystals in order to free the Princess.
Two Traders are available to assist you. The female will exchange 5 food for 2 wood and the male will exchange 5 stones for 3 wood.
Other than the food lying around, you can collect 5 food from the fisherman, 5 from the apple tree, and 2 from the berries.
Stones are available by removing the stones blocking your path and getting the quarry up and running.
In order to restore Defender's Monument, you will need another worker, 25 food, 20 wood, and 10 stones to get to level 1.
For level 2, you need an additional 55 food and 30 stones.
Remember to keep activating your Skills.
Screenshot
Once you have completed both levels and restored Defender's Moment, a whole new area will open up.
Collect all the available resources on the way to the gold mine before you build the barracks.
When the barracks are built and a warrior is available to remove the 4 barricades on the road to the Crystal, you will come under siege from mercenaries on both roads.
Screenshot
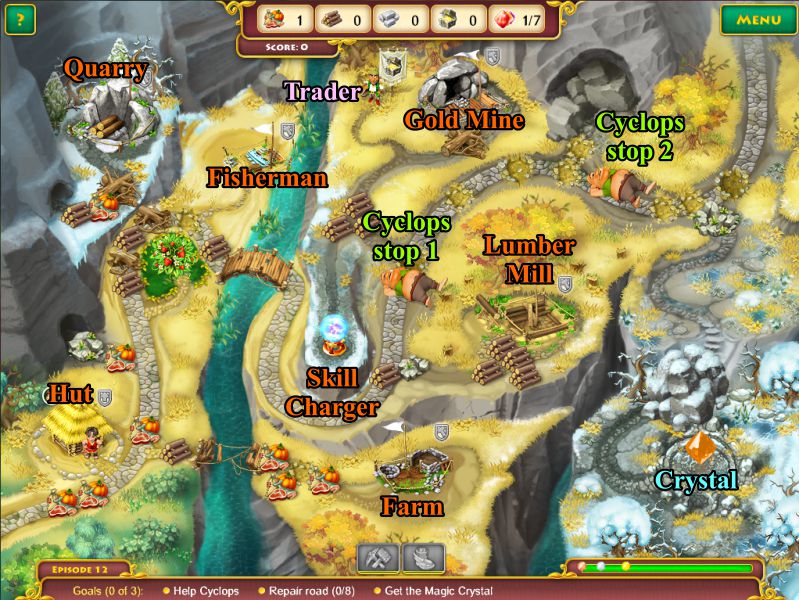
Episode 12: Help Cyclops
The Cyclops is suppose to be upset about something, but I think he just wants you to work for him to get him food and then gold so he will move along for you to clear the road.
Your goals are to help the Cyclops, repair the road, and get the Magic Crystal.
In order to leave his first stop blocking the road, the Cyclops wants 30 food, but to get him to move from his second stop, you will have to give him 30 gold.
Once you have made the Cyclops happy with food and gold, he moves a body length and then complains he can't get into his cave, so you need to remove the huge rocks to get rid of him.
The Trader with swap you 6 food to get 3 gold, so your farm and fisherman are important.
You will need to upgrade your hut, not only to help you collect and repair, but to remove the huge rock pile near the Crystal.
A new item, called a Skill Charger, has be added to the scene. It will make your Skills immediately recharge when you click on it and one of the workers takes care of the task.
You will still need to click on your Skills to activate them.
Screenshot
Episode 13: Happy Town
The Mayor seems to think their town only needs you to build them a barracks to defend against robbers since there is a mercenary camp nearby.
There seems to be plenty of wood around because everything is built, except the barracks, but if you need more wood, the Elder says he can help for 20 food and 10 gold.
Screenshot
Did you notice the crack in the ground in the last screenshot? Because it seemed to have spread by an earthquake, and now the town is divided in sections, and cottages are in ruins.
You are stranded with only the farm and berries as your resources once you collect the few other resources you can get to.
Then a "strange place" appears over one part of the canyon which requires the town clerk to investigate at the cost of 2 food and 2 gold.
Upon investigation, he discovers a bridge underneath that you can build to cross over to see the Elder as soon as have sufficient resources.
When you pay him, the Elder will produce 30 piles of wood, and there is also another strange place to have investigated.
Eventually, there will be 8 strange places, marked in magenta in the screenshot, with bridges to build so you can reconnect the town.
Once you have enough wood and can get to them, you can rebuild the cottages and build the barracks.
Remember to recharge your skills.
Screenshot
Episode 14: Serpentine Road
Two barracks have been ruined, so you will eventually have to repair them so the warriors can destroy the enemy barricades marked in turquoise in the screenshot.
Since the road winds around, the storage hut that you need to build halfway will help your workers be more efficient.
Your ultimate goal is to collect another Magic Crystal.
Remember to recharge your skills and to collect as many resources as you can before the enemies appear.
Since the left barracks is barricaded, you will need to build the right one first so you have a warrior to destroy the barricade.
Screenshot
Episode 15: Here Come the Trolls
The Trolls have been summoned, so you now have a new nuisance to deal with.
You goals are to collect 200 food, repair 2 bridges, and destroy 3 enemy barricades (marked in turquoise in the screenshot).
Do as much as you can before you need to build the barracks and the Trolls come, and always remember to charge your skills.
Screenshot
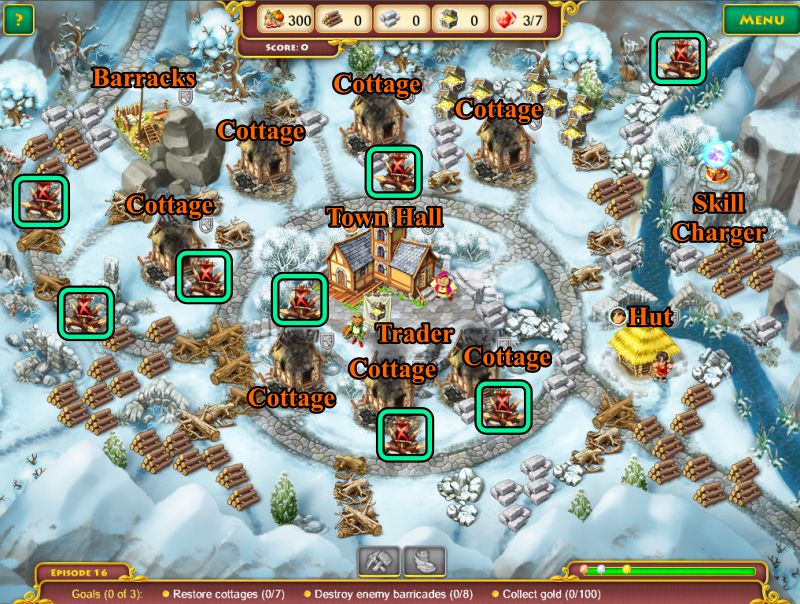
Episode 16: Troll Tricks
Your goals are to restore 7 ruined cottages, destroy 8 enemy barricades (marked in turquoise in the screenshot), and collect 100 gold.
You are definitely going to need another worker to help gather everything and destroy the huge stones in front of the barracks.
All the lumber lying around will help you repair the cottages, but once you get the cottages repaired, you will also need another town clerk, so you will need to upgrade Town Hall.
Upgrading the barracks is another good plan, so you have 2 warriors to stop the intruders from stealing your gold.
Screenshot
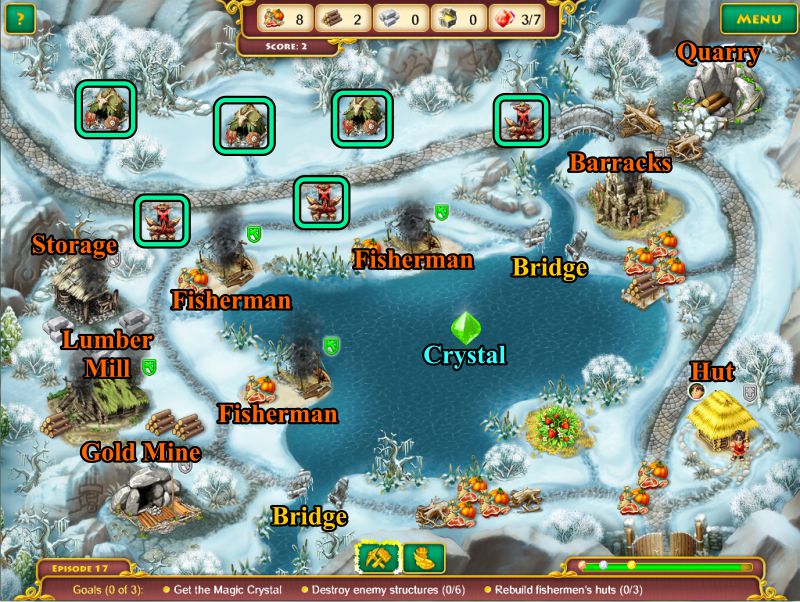
Episode 17: Good Fishing
This location has good fishing until the mercenaries come and burn down most of the structures, destroy the bridges, and put up 3 barricades blocking their camps.
You now need to rebuild as well as destroy 6 enemy structures marked in turquoise in the screenshot.
Try to get as many resources as you can before building the barracks and dealing with the Trolls who come to attack.
You definitely need two workers to do all that running around, but you can get by with just one warrior.
Screenshot
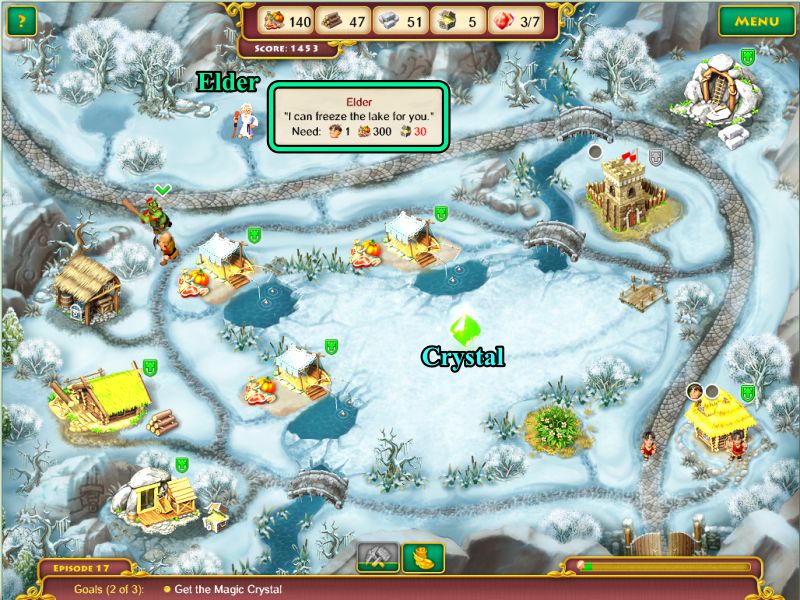
Your ultimate goal is to collect the Magic Crystal that is in the middle of the lake.
When all the enemy structures are destroyed, the Elder appears on the scene with an offer to freeze the lake for 300 food and 30 gold.
You now have a new goal of collecting the necessary resources so you can run out on the frozen lake to collect the Crystal.
Screenshot
Episode 18: Ambush the Trolls
It appears that the only way to deal with the Trolls is to fight them, so you will need to rebuild the ruined barracks.
Your additional goals include rebuilding the guard arch and finding the Magic Gear.
You will also need to destroy 4 enemy structures (marked in turquoise in the screenshot), plus the barricade marked in green that a mercenary puts up once the barracks is built.
In order to get to the guard arch, you will once again need to deal with the Cyclops, who wants 10 food.
Since the only structures you have to produce resources are the gold mine and quarry, you will need to collect everything you can and then rely on the traders.
The female trader will exchange 4 gold for 4 food, and the male trader will take 4 stones to give you 4 wood.
The Elder has a deal for you and will produce food if you give him 5 gold.
When you satisfy the Elder, he will create a berry bush and a skill charger in the tree area in the upper right corner.
Once you feed the Cyclops, he will wander off, leaving behind the Magic Gear that will install itself as the Produce Skill, which makes production 3 times faster.
Collect everything you can before building the barracks, and remember to charge your skills.
You will eventually need to upgrade your worker's hut in order to build the guard arch, and you will need to have two warriors to remove the large barricade at the end of the road.
Screenshot
Episode 19: Hot Spring Peak
Your goals are to collect 150 gold and 150 food, as well as to clear the road to the peak because the trolls plugged up the hot spring with boulders.
Your only source for food until you build the farm and clear the road is the trader, who will give you 3 food for 3 gold. Upgrading your buildings will get you more production.
Other than debris and potholes, there are also 3 barricades that will need to be removed.
There are two strange places, circled in magenta in the screenshot, that need to be investigated by the town clerk.
Screenshot
The 2 strange places turn out to be a quarry and lumber mill.
When the Hot Springs are repaired, you will get a skill charger to use.
Screenshot
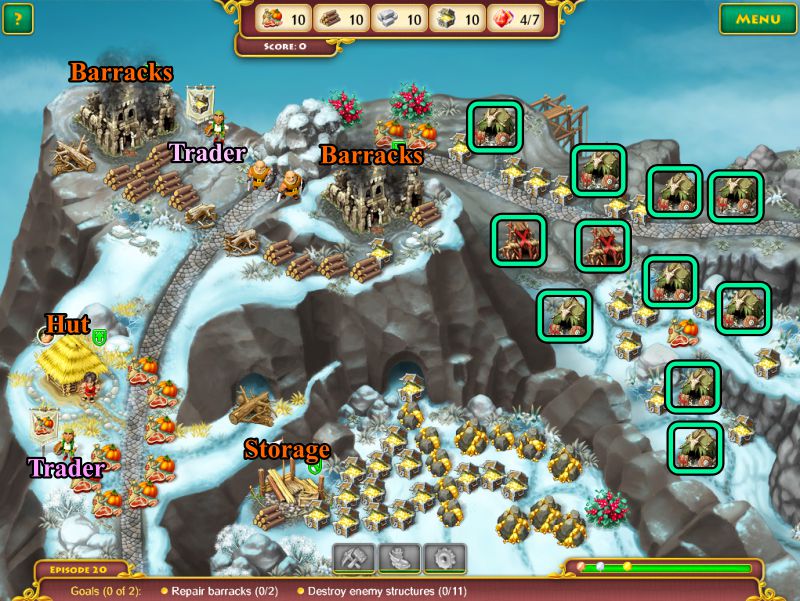
Episode 20: Clear the Pass
Your goals are to destroy 11 enemy structures (marked in turquoise in the screenshot) and repair the 2 ruined barracks.
Repairing the 2 barracks will get you 4 warriors to deal with the trolls and mercenaries, but you will need to upgrade your hut to get 2 workers.
There are two traders to help balance the resources since there are no resource producing buildings and the mercenaries are stealing all the food.
The upper trader will turn 3 stones into 2 gold, and the lower trader will give you 4 food for 3 gold.
Screenshot
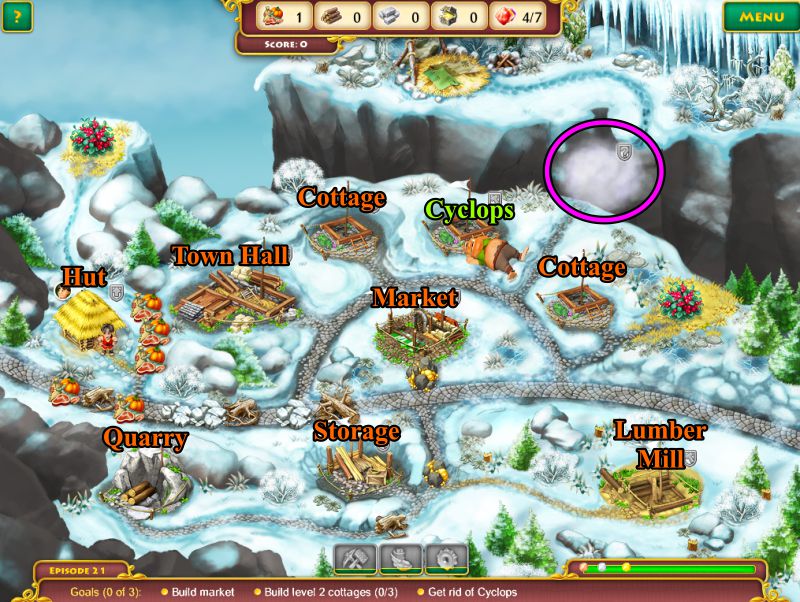
Episode 21: Market
The Cyclops is back, so one of your goals is to get rid of him for 20 food and 30 gold.
Your other goals are to build a market that will give you resources you are missing and to upgrade 3 cottages to level 2.
Once you give the Cyclops what he wants, he's still taking up space so you can't build the cottage and collect the gold.
Now he wants a bridge built over the canyon, so you will need to upgrade town hall in order to have two clerks investigate the strange place at a cost of 20 food and 60 gold.
Screenshot
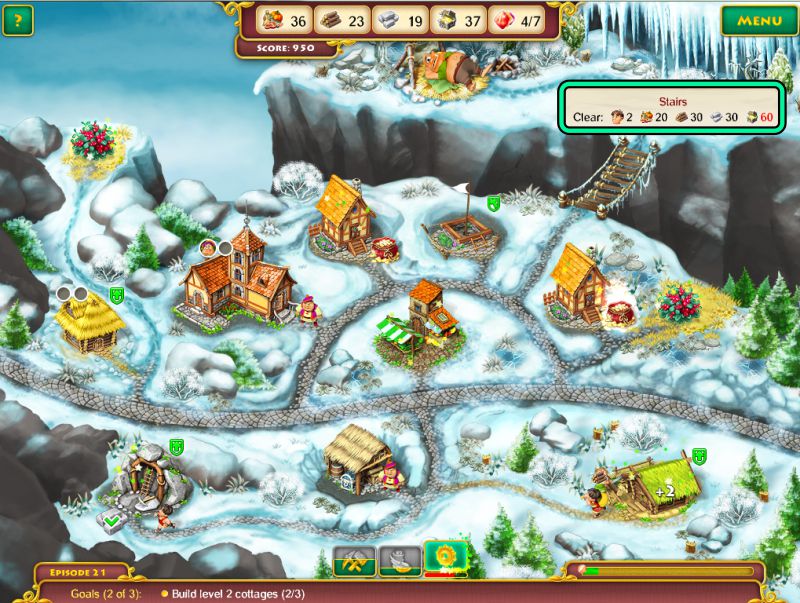
In order to build the bridge, you now need 20 food, 30 wood, 30 stones, and 60 gold.
Once the bridge is finished, the Cyclops goes off to his resting place, and all you need to do is build the last cottage, upgrade it to level 2, and you're done.
Screenshot
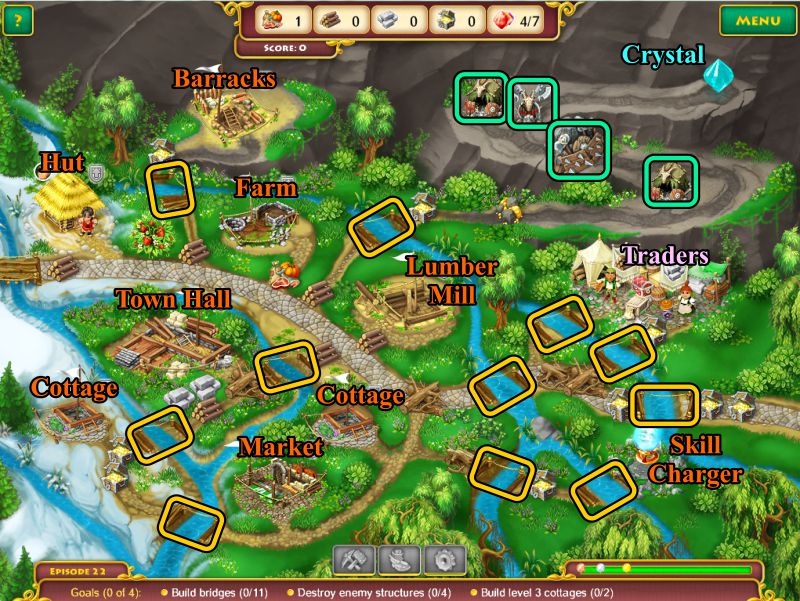
Episode 22: Up A Creek
In order to get the Magic Crystal, you will have to build 11 bridges that were flooded out, destroy 4 enemy structures, and build 2 cottages to level 3.
Two traders are available: the male will give you 2 wood for 3 food, and the female wants 6 gold in exchange for 8 stones.
Since there is no quarry in this location, you will need to trade to get stones.
Each bridge (marked in gold in the screenshot) requires 4 food and 5 wood to build it.
Remember to recharge your skills.
Two workers are a definite advantage, and you will need to upgrade your barracks for 2 warriors to remove the large barricade.
Screenshot
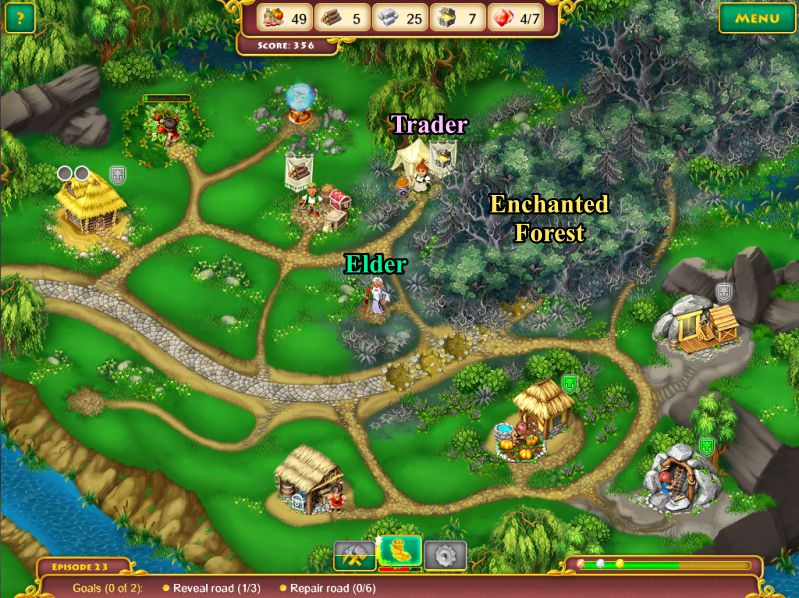
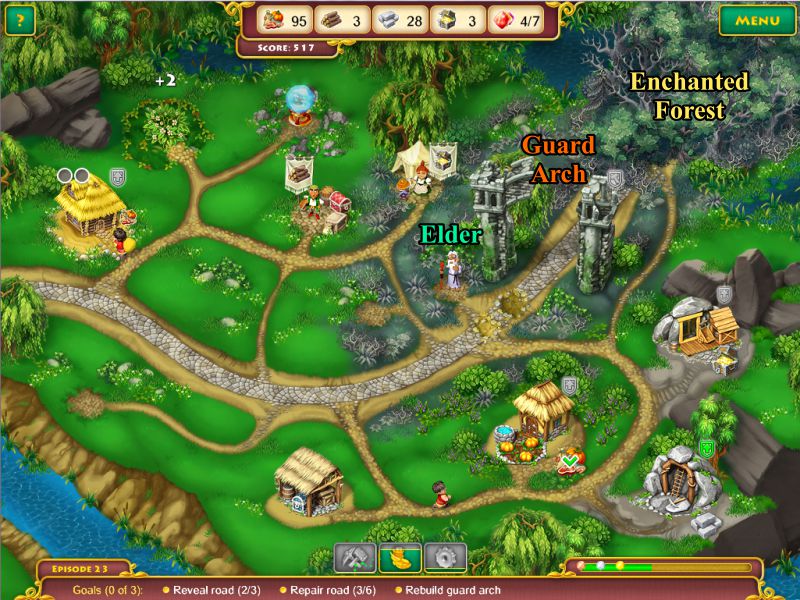
Episode 23: Enchanted Forest
The main road is overgrown by the enchanted forest, so you won't be able to go through it without the help of the Elder. Your main goal is to find that road, which means you have to give him whatever he wants so he will help you.
The Elder wants 20 gold for his help in clearing the forest.
You don't have many resources, but the trader is willing to take 4 food to give you 3 wood.
You do have a gold mine and a farm you can build, as well as the quarry after you upgrade to another worker and enough food to clear away the huge pile of stones.
Screenshot
The Elder cleared part of the forest and revealed another trader, who is willing to give you 5 gold if you give her 6 stones.
You need to repair the road to get to the Elder, who now wants 40 gold to clear more of the forest.
Screenshot
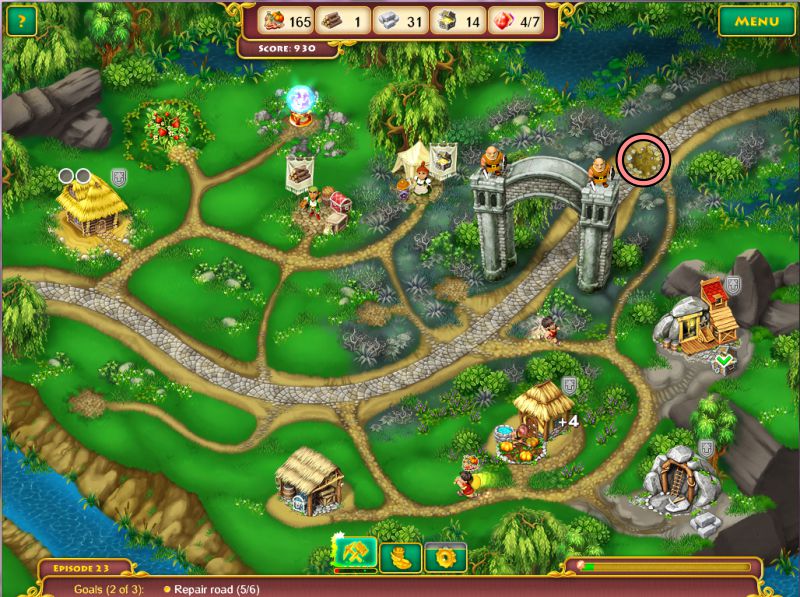
More of the forest has been cleared, but you now have additional goals of repairing the road and building the guard arch.
The Elder is still hanging around and will clear the rest of the forest for 80 gold, so you might want to think about upgrading the gold mine for greater production.
Screenshot
Once you pay off the Elder, you only have one more road repair and you're on your way.
Screenshot
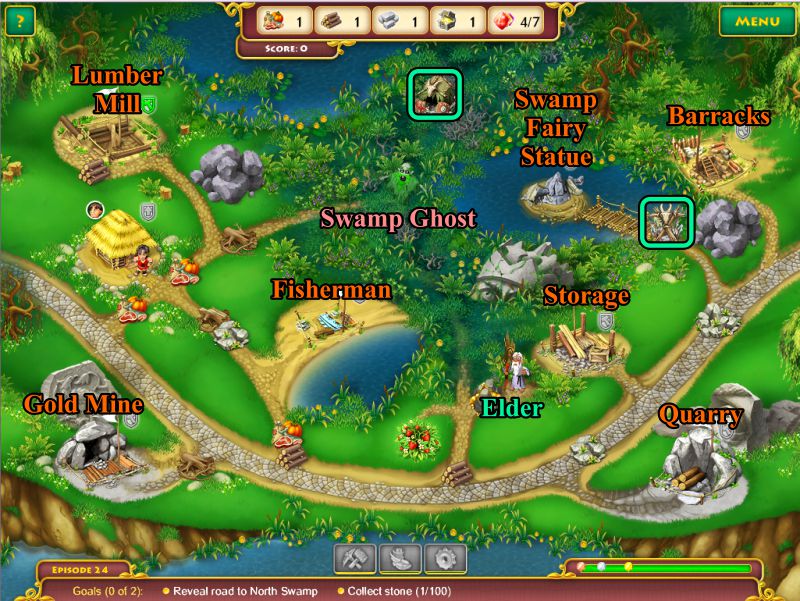
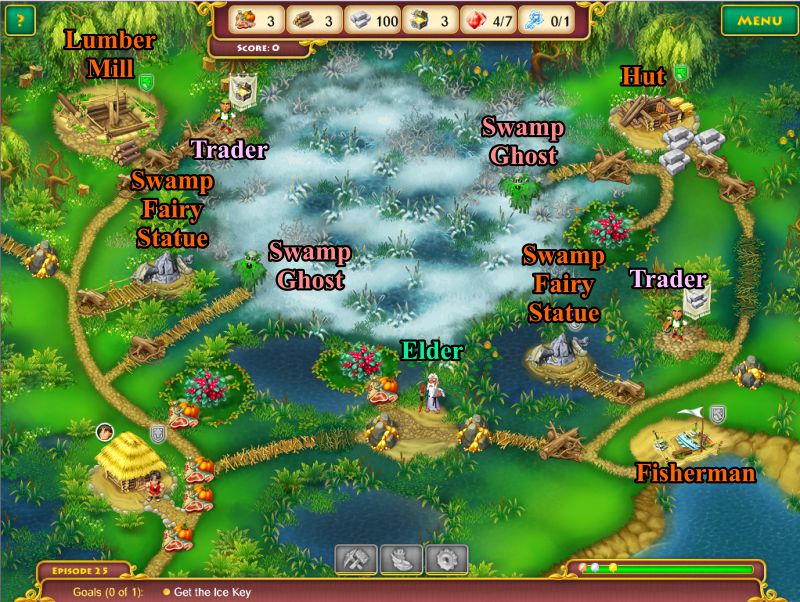
Episode 24: The Swamp Sage
The Elder says you must go to North Swamp because there is something interesting there, and he will reveal the road for 20 gold.
A swamp ghost has shown up, but you don't need to deal with him.
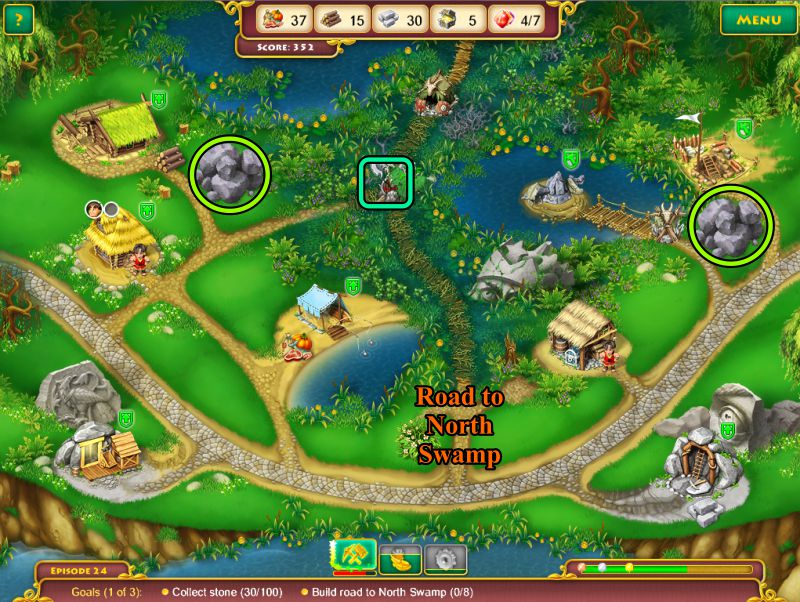
Your goal is to collect 100 stones and find the road to North Swamp.
You will also need to repair a ruined swamp fairy statue and have your warrior destroy 2 enemy structures.
Remember to use your special skills.
Screenshot
Once the road to the North Swamp is revealed, you will need to rebuild the log road in sections at a cost of 3 food, 4 wood, and 3 gold per section.
Removing the 2 huge piles of stones marked in green in the screenshot will get you 12 stones from each.
Once the swamp fairy statue is repaired, the swamp ghost will disappear, revealing a new barricade behind him.
When the barricade is removed, you can finish the road, so once you have collected your 100 stones, you will be on your way.
Screenshot
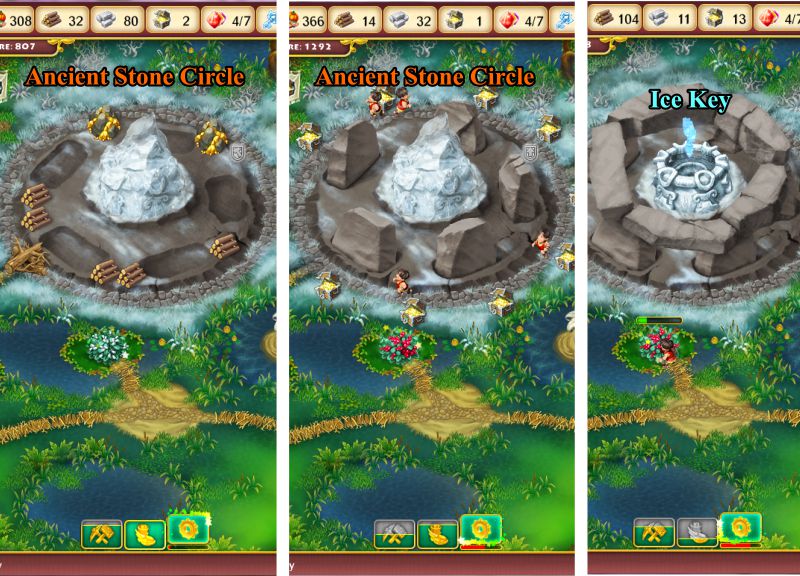
Episode 25: The Ice Key
In order to free the King, the Elder tells John he will need the Ice Key that is sealed in a block of ice in the Frozen Glade.
For 20 gold, the Elder will reveal the secret place where the ancient Stone Circle must be built in order to get the key to Fire Mountain.
There are 2 traders: the one on the left will give you 4 gold for 5 wood, and the one on the right requires 8 food to give you 6 stones.
There are 2 swamp fairy statues to be rebuilt so you can get rid of the swamp ghosts.
Screenshot
The Stone Circle has been revealed, and it needs 5 stones to be built by 5 workers, 10 food, 20 wood, 40 stones, and 20 gold.
Your only source of gold is the trader who wants wood in exchange, so you will need to upgrade your lumber mill to give you greater production.
To get 5 workers, you will also need to upgrade your main hut to give you a total of 4 workers because the secondary hut cannot be upgraded.
Once the ancient stone circle is built, you will need to upgrade it.
The upgrade to level 2 requires 5 workers, 60 food, 10 wood, 60 stones, and 40 gold.
Your only resources are wood and food, so you are now at the mercy of the traders.
You may want to again upgrade your Lumber Mill to more wood and pick it up as fast as it is produced.
Once the Ancient Stone Circle is upgraded to level 2, you can collect the Ice Key.
Screenshot
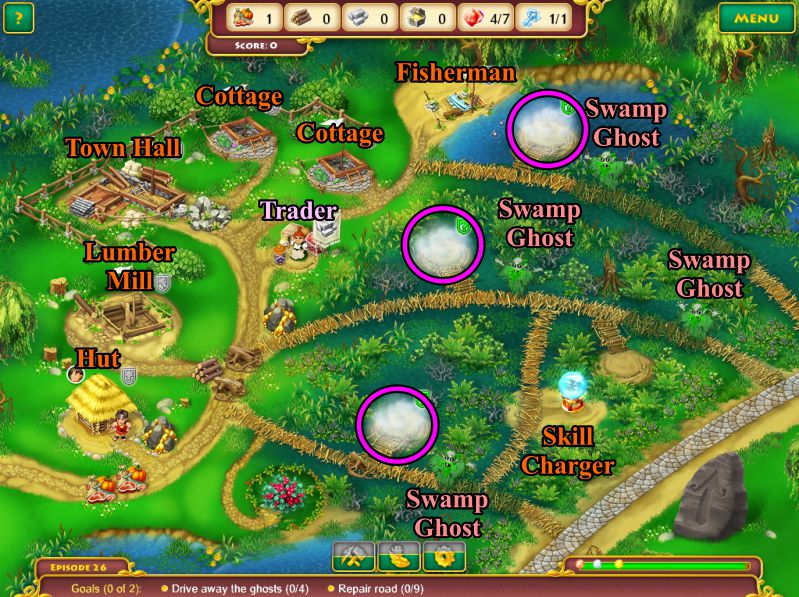
Episode 26: Swamp Ghosts
All the trails are guarded by swamp ghosts, so you can go no farther unless you drive the 4 ghosts away and repair the road.
There is a trader to exchange 5 food to give you 6 stones.
Once you build the town hall, 3 strange places (marked in magenta) will appear for your clerk to investigate at a cost of 8 gold each.
Screenshot
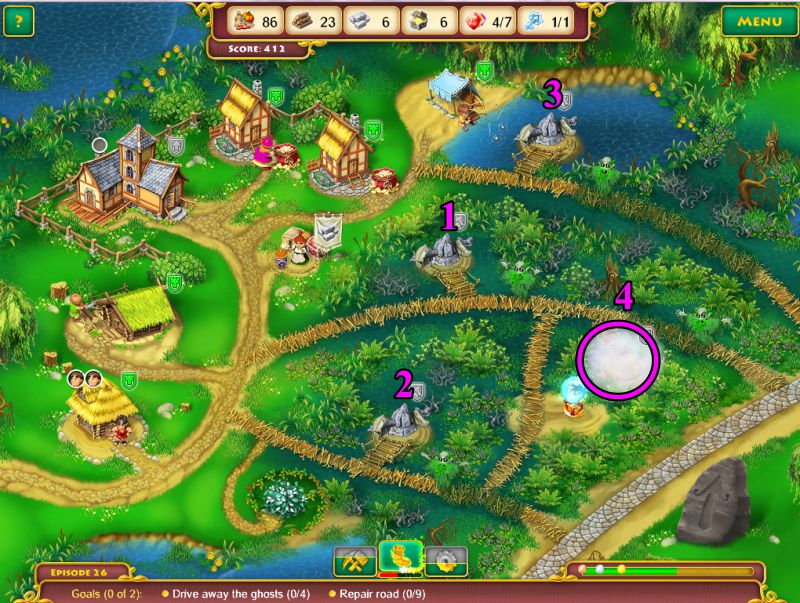
When investigated, the strange places turn out to be ruined swamp fairy statues, each requiring 10 food, 6 wood, 20 stones, and 10 gold to repair.
I suggest repairing the statues in the order numbered in the screenshot.
Once you get rid of the first ghost, you get access to the skill charger and create another strange place to be investigated.
The second statue will give you closer access to the skill charger, and the third will give one worker the task of repairing the road while the other collects resources.
The fourth strange place requires 2 clerks to investigate, so you will need to upgrade town hall before you can tackle that task.
Screenshot
Episode 27: The Bridge of Heroes
The Bridge of Heroes has been destroyed, and it will take 3 workers, 50 food, 30 wood, 50 stones, and 200 gold to repair it.
In addition, you need to build 3 level 3 cottages that you can't get to until the bridge is repaired, or you build the 2 wood bridges marked in gold.
The bridges are a definite priority because the robbers come and burn the town hall and carry off all the gold.
To stop the enemy, you can build the 2 outposts marked in turquoise.
You will then need to rebuild the town hall so the clerk can collect the rent from the cottages, so build the fisherman hut to get enough food and the market for other resources.
Since you can't do all of this by yourself, another worker will become essential because you are going to be at the mercy of the robbers until you can get enough resources.
With all the running around once everything on your side of the bridge gets built, you may want to consider upgrading to the third worker you will need to build the bridge.
Screenshot
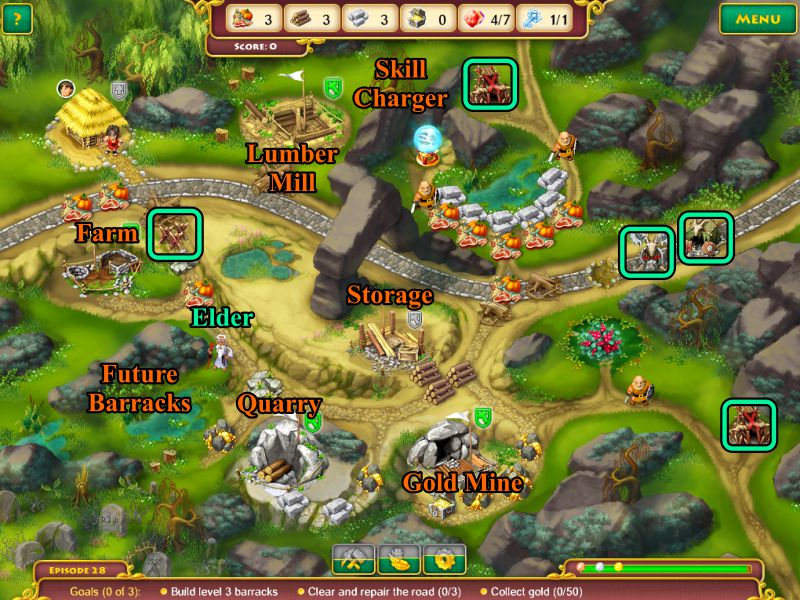
Episode 28: Ambush Ahead
The enemies are hiding in the boulders, but there are 3 warriors to forge the road ahead as soon as you build a level 3 barracks for them.
There are 4 enemy structures your warriors need to remove.
Since there doesn't seem to be any place for the barracks in sight, the Elder says he can help with that for 10 food and 10 gold.
Once you build the first level of the barracks, act fast to catch the mercenaries who come from the rocks by the skill charger, or they will burn down your storage hut.
Also note that you will need 3 workers to build level 3 of the barracks.
You also need to clear and repair the road and collect 50 gold.
Screenshot
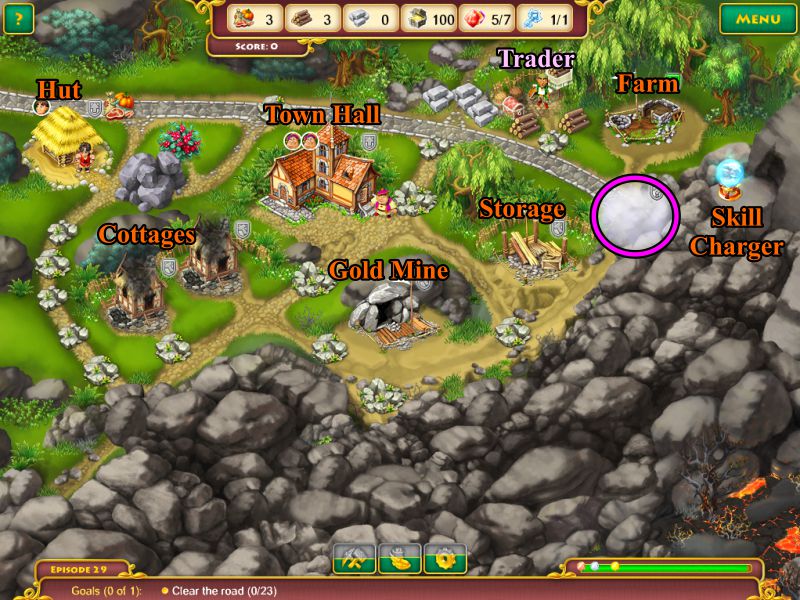
Episode 29: No More Road
The Trolls have blocked the road with boulders so you have 23 blockages to remove to clear the road.
There's a trader willing to sell you 6 wood in exchange for 4 stones, which should be plentiful with all the blockage.
Town hall is already upgraded to 2 clerks, but the cottages are in ruins, so until you can rebuild the cottages they can check out the strange place.
Screenshot
Episode 30: Combat Skills
Your goal for this Episode is to get the Magic Sword.
The trader will give you 7 wood in exchange for 4 stones.
The barracks and quarry are in ruins, there are 20 enemy structures to destroy, and 2 bridges (marked in gold) to build.
When you move the blockage in the road, marked in green, the Magic Sword transfers to the rock in the middle of the lava flow.
Be sure to upgrade your farm once it is built because it is your only source of food other than the berry bush.
You will also want to get the bridge built by the storage hut because it's a long way to go around.
Screenshot
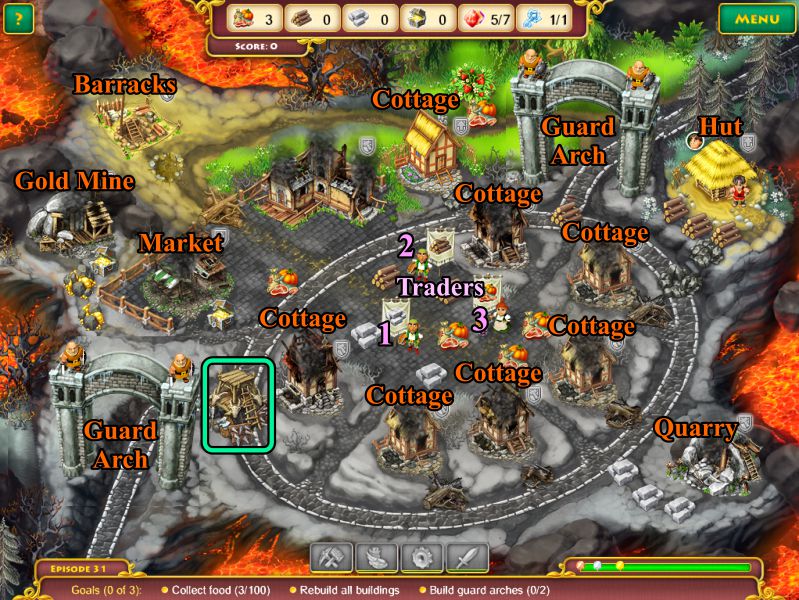
Episode 31: Merchantville
Your goal is to collect 100 food, rebuild all the buildings, and build 2 guard arches.
The guard arches will first appear as special places to be investigated. The arch locations are shown in the screenshot.
There are 3 traders: #1 will take 5 gold for 8 stones, #2 will take 4 gold for 8 wood, and #3 will take 4 gold for 12 food.
Since gold is the big trading resource, you will want to get your gold mine started, your town hall rebuilt, and your cottages restored.
You will need another worker as well as an additional town clerk to keep up with the pace, and telling all of them what to do will be a challenge for you too.
Eventually, you will need 3 workers to upgrade your barracks to 3 warriors to remove the large barricade.
Screenshot
Episode 32: The Quarries
Your goal is to restore the 6 quarries to level 4 and collect 1000 stones.
The Cyclops says the mercenaries are coming, so you need his help for 20 food.
There are 2 traders: the female will give you 10 wood for 6 food, and the male will give you 12 food for 8 stones.
After you first feed the Cyclops, he moves along the path to a second stop and offers to block the road to save you from the mercenaries at a cost of 20 food and 20 gold.
When you next pay off the Cyclops, he makes his third stop and says that if you give him 50 gold that the mercenaries won't bother you.
I'd suggest not upgrading the quarries beyond level 1 until you get help from the Cyclops; otherwise a mercenary will come and destroy it.
Upgrading the gold mine will get you gold faster, and keeping up your food supply from the berry bushes will let you buy wood for the upgrades.
The Cyclops' fourth stop is blocking the road, so you can now save up for your upgrades.
There are also 2 bridges to be built, one of which will get you access to the skill charger.
Screenshot
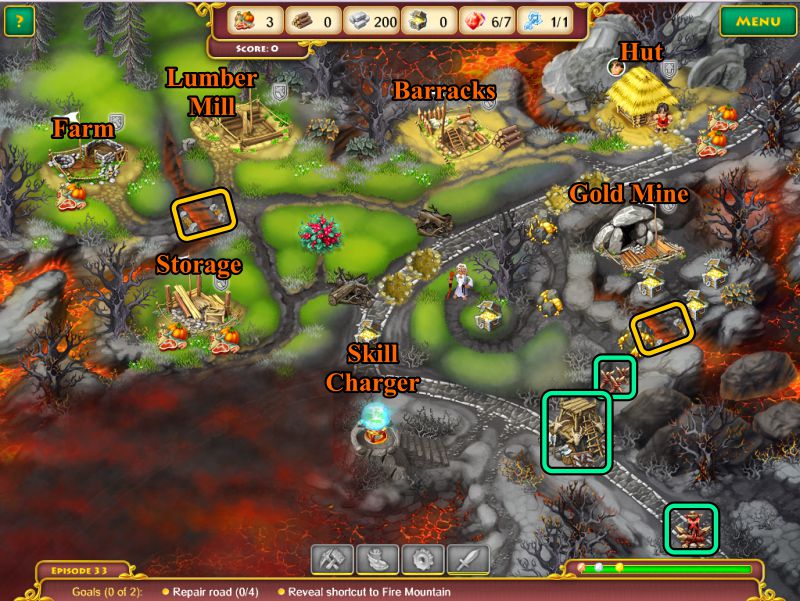
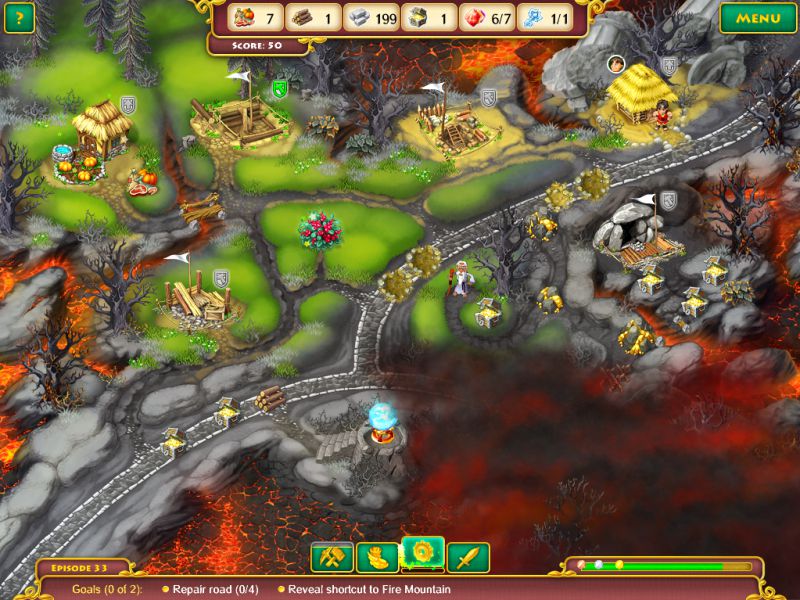
Episode 33: A Shortcut
The Elder is back with an offer to reveal a shortcut to Fire Mountain and says he won't ask for much in return, but the price is 50 gold.
Other than finding the shortcut, you will need to repair the road and remove a large barricade that will require 3 warriors, 18 food and 20 gold.
Screenshot
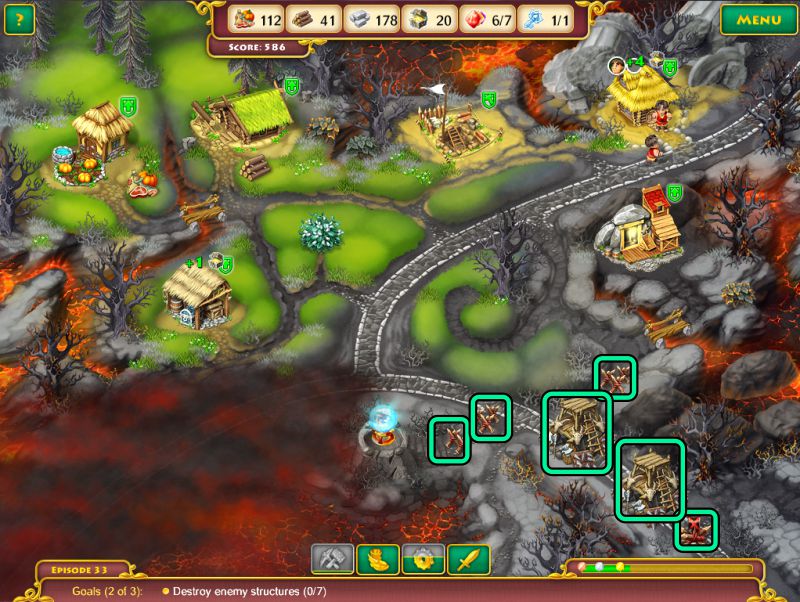
As you start collecting resources, the road will change from the left fork to a right fork with several resources and access to the skill charger.
Screenshot
After you pay off the Elder, the right fork disappears in the fog and the left fork reappears with additional barricades.
Once you build the barracks, trolls begin appearing from the fog where the right fork was.
After you remove the two small barricades to get to the skill charger, mercenaries enter from that path.
When the first large barricade is removed, there is another small one that appears, so you will be removing a total of 7.
Screenshot
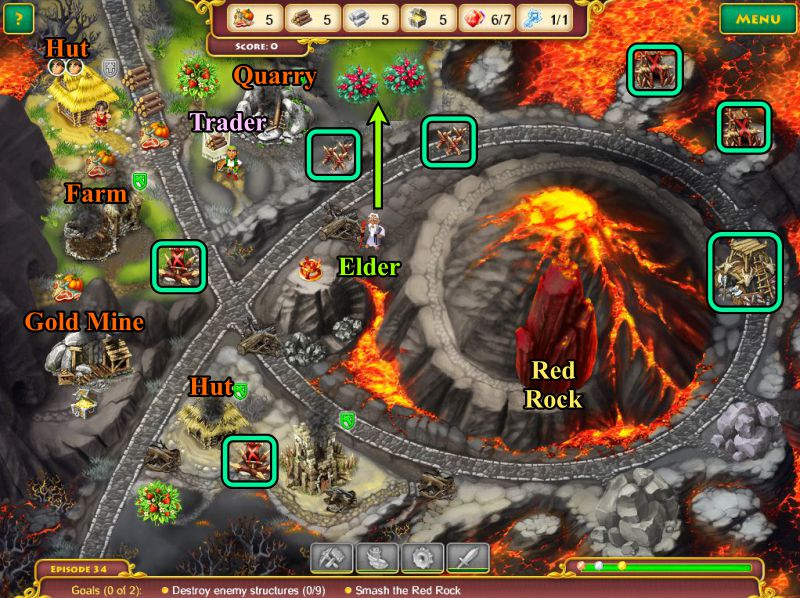
Episode 34: Fire Mountain
You have arrived at Fire Mountain and need to destroy 9 enemy structures and smash the Red Rock before you find the door to free the King and his men.
The trader will give you 7 wood if you supply him with 8 food, and the Elder says that you will need more food to defeat your enemies and that he will supply it if you give him 10 food.
You begin with two workers and will gain another one when you restore the other hut.
The Elder produced two berry bushes, but you can't get to them until the barricade is removed.
Smashing the Red Rock will require 5 workers, 50 food, and 50 gold.
Once all the barricades have been removed, it becomes difficult to collect resources with all the enemy running around, so I found it helpful to keep one warrior near the barracks to catch the troll who come in from the lower left road and is close enough to destroy structures.
Screenshot
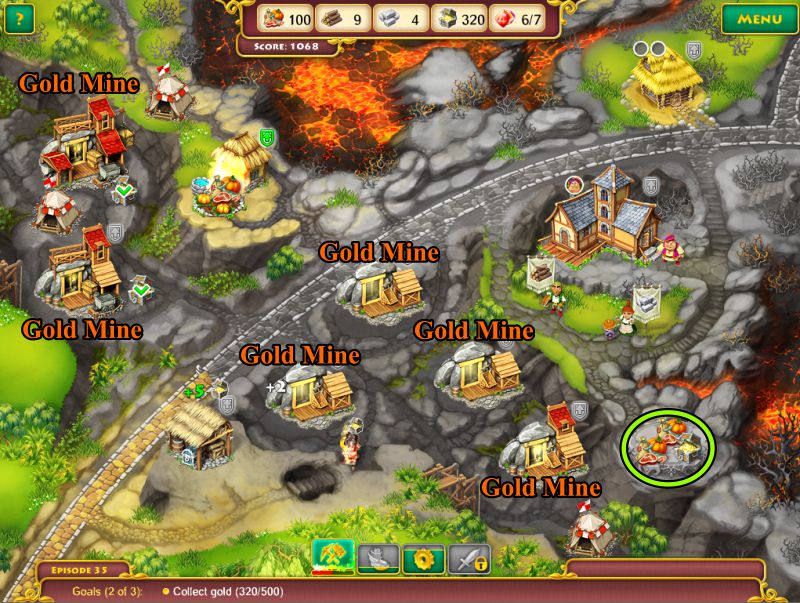
Episode 35: Gold Rush
The gold mining town has been burned to the ground, so you need to build 6 gold mines, collect 500 gold, and repair the road.
Collect all the available resources, build the farm for food, and look out for the mercenary who will come down the path behind the farm to steal the food.
There are 2 traders: the male trader will give you 7 wood for 3 of your gold, and the female trader will collect 3 gold and give you 7 stones.
You will need the clerk from town hall to investigate each strange place, marked in magenta in the screenshot, in order to uncover the gold mines.
There are 3 outposts, marked in turquoise, you can build to block the mercenaries.
Screenshot
In addition to the farm, there is a rock table, marked in green, that will provide you with food and gold.
Once built, you will have 3 level 1 gold mines and 3 level 2.
Screenshot
Episode 36: Logging
Your goal is to get the Magic Crystal and collect 500 wood, but first you will need to rebuild the 4 lumber mills which are level 1 through 4.
To get the Magic Crystal, you are going to need to build a bridge, but all of the lumber mills have been destroyed.
Town hall, 2 cottages, a storage hut, and 3 bridges (marked in gold) have also been destroyed.
There is a trader available to provide you with 8 stones for 8 wood, so you need to get the lumber mills working.
The stone table, marked in green, keeps refilling with food and stones.
You will need 2 clerks to investigate the 2 strange places that become the bridge foundation. See the magenta marking in the screenshot.
Once the bridge is built and you have the Crystal, you can concentrate on the side of the river with the lumber mills until you collect your 500 wood.
Screenshot
Episode 37: The Last Crystal
Your goal is to get the Magic Crystal and destroy the enemy barricades.
The Cyclops is blocking your path to the tower and the gold mine, and he wants 30 food to move.
There are also 2 bridges you need to build to cross the river.
As usual, the Cyclops doesn't move far, so he now wants 30 food and 30 gold.
Just when you have enough to pay him off, a new Cyclops plants himself at the door of the tower and won't move unless you give him 100 gold.
Time to build the barracks, remove the barricade, and get the cottages producing gold.
Eventually, you will need 3 workers to build the barracks to level 3 because you need 3 warriors to destroy the big barricade.
Screenshot
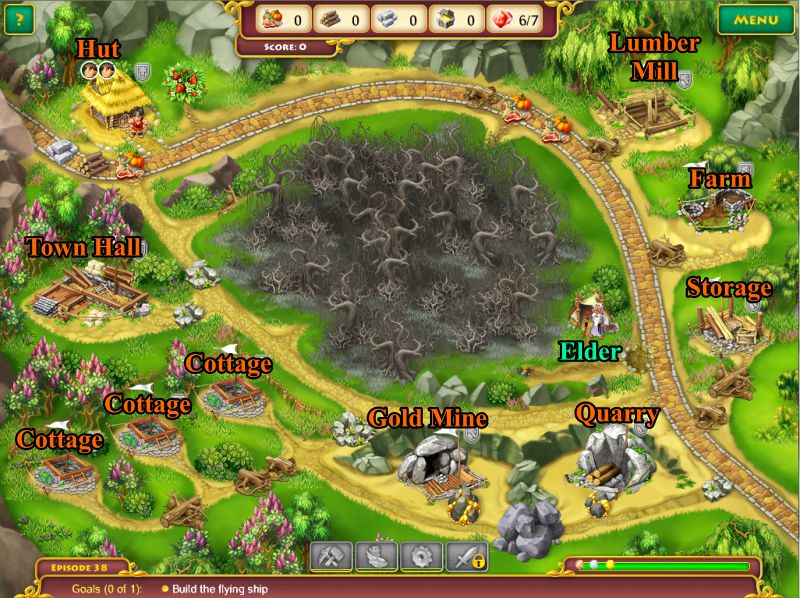
Episode 38: The Flying Ship
The Elder has returned with a new proposition. If you give him 50 gold, he will tell you where you can build a flying ship to use in your rescue of the Princess.
Screenshot
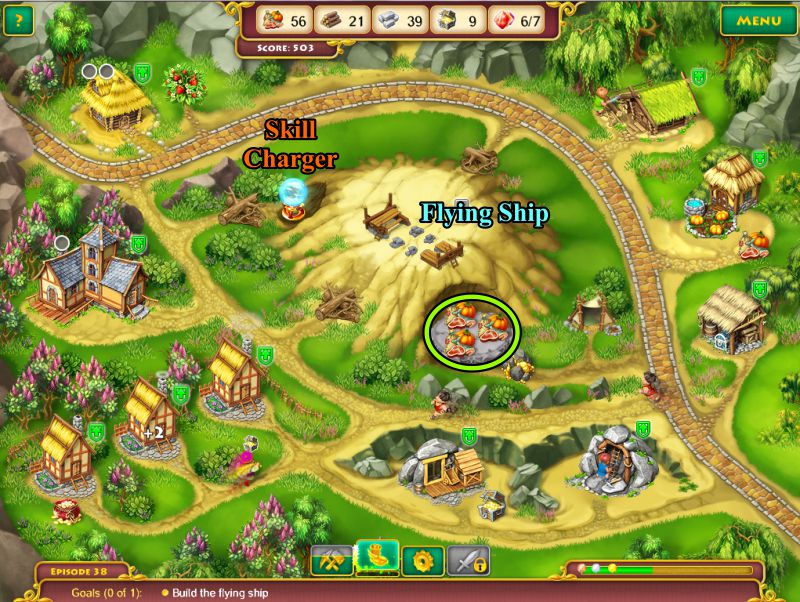
Once paid his gold, the Elder opens up the whole center of the scene with a skill charger, stone table with food (circled in green), and the Flying Ship foundation.
In order to build the Flying Ship, you will need your 2 workers, 30 food, 20 wood, 30 stones, and 20 gold for level 1.
For level 2, you need 4 workers, 100 food, 60 wood, and 120 gold.
Screenshot
With Crystals in hand, John flies off to rescue Princess Jane, and fortunately for us, he must decide where all the Crystals go on the tower, so watch the scenes.
After too much time staring into each other's eyes, the King reminds John they must still finish the journey.
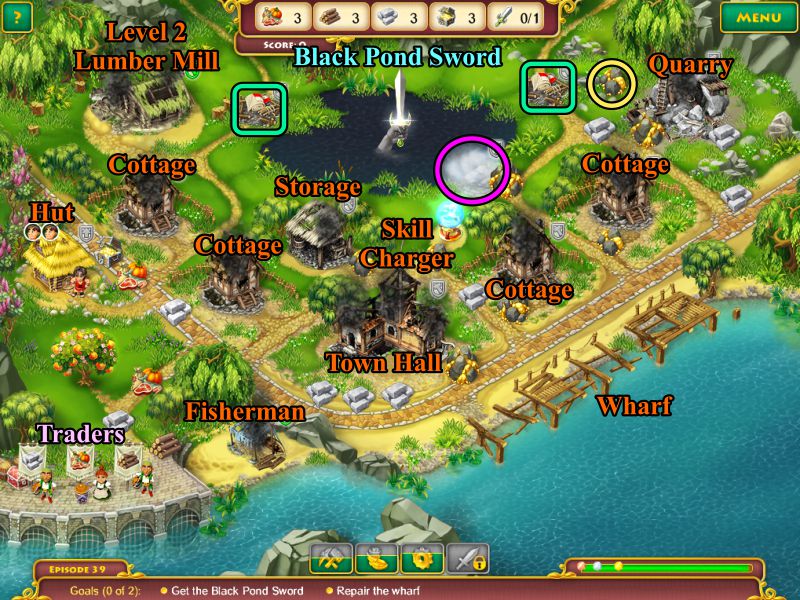
Episode 39: The Sword of Black Pond
The King informs John that they need the Magic Sword of the Black Pond in order to overcome Moomrabac, because he will be hiding in his enchanted fortress on Castlerock.
You will need to repair the wharf and get your hands on the Black Pond Sword.
Gold is the big resource you will need because there are 3 traders, and all of them will only trade for gold.
As numbered in the screenshot, trader 1 will give you 5 stones for 4 gold, trader 2 will give you 6 food for 4 gold, and trader 3 will give you 7 wood for 4 gold.
All the cottages are level 2, so when you have the resources to build them and the town hall, they will more quickly produce gold.
Everything in the town has been destroyed and will need to be rebuilt.
To rebuild the entire wharf will require 3 workers, 50 food, 40 wood, 10 stones, and 10 gold.
There is a special place to investigate at the pond that will reveal how to get to the sword.
The first most important tasks to finish are to build the outposts, marked in turquoise, to keep the mercenaries from stealing all your resources.
After investigating the strange place, it is revealed that you will be building a stone path to the sword at a cost of 10 food, 5 wood, 20 stone, and 30 gold for the first section with an escalation of workers needed as well as resources.
There also seems to be an endless supply of gold and stone from the gold vein circled in yellow because it doesn't disappear once you tap into it.
Screenshot
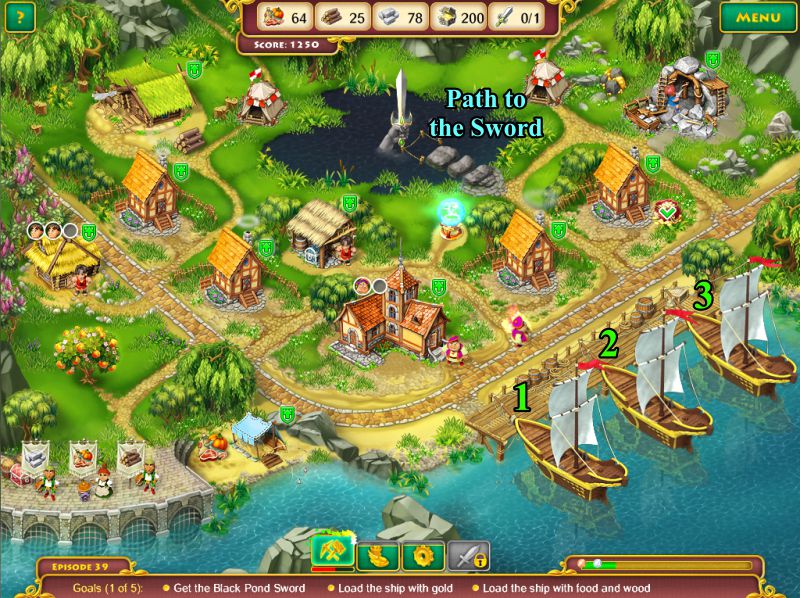
The second section requires 20 food, 15 wood, 20 stone, and 20 gold.
The third stepping stone requires 3 workers, 30 food, 30 wood, 40 stones, and 30 gold.
Once you build the wharf, 3 ships will dock.
Each one wants to be loaded with the following resources.
Ship 1 can be loaded with 200 gold.
Ship 2 can be loaded with 200 food and 200 wood.
Ship 3 can be loaded with 200 stones.
After you load each ship with its requirements, it will sail away.
Once you have completed this new goal, you will be able to move on to your final location.
If necessary, just keep going to the trader, who provides wood until you get the 200 you need to send off the last boat.
Screenshot
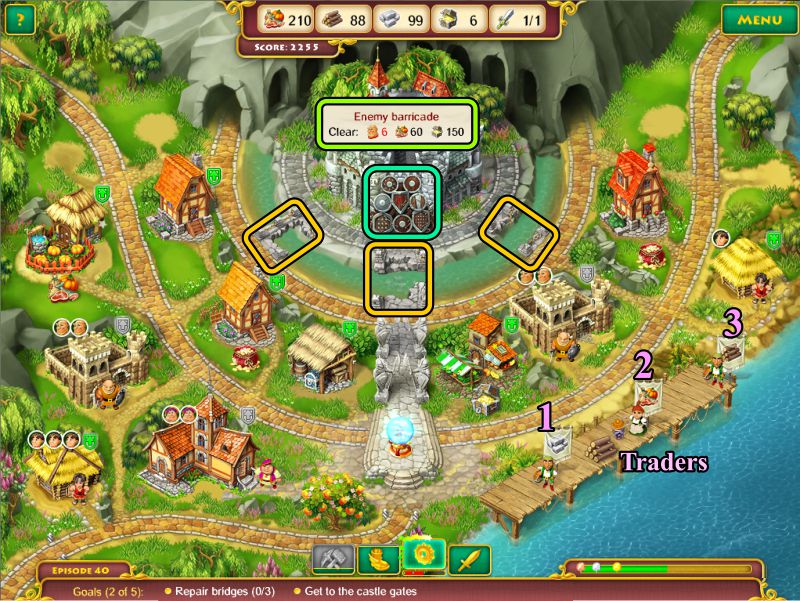
Episode 40: Castlerock
You have reached your final location where Moomrabac is holding up in the King's castle and has destroyed Castlerock.
Your goal is to repair the wharf, rebuild all the buildings, destroy the 12 enemy barricades, and repair 3 bridges.
The Elder shows up after the mercenary camps are destroyed and offers to clear out all the enchanted bushes for 80 gold.
Your warriors will have mercenaries, robbers, and trolls to keep them busy.
As a hint, we are told to complete the tasks in the order listed in order to earn a gold medal.
Once the wharf is completed, a ship will arrive, but will leave once all the traders have disembarked.
Screenshot
The first trader will give you 13 stones for 8 gold, the second trader will provide 12 food for 8 gold, and the third will sell you 14 wood for 8 gold.
You will need to upgrade both of your barracks because once all the bridges, marked in gold, are built, you will need 6 warriors, 60 food, and 150 gold to take down the barricade in front of the castle door.
Screenshot
Watch John destroy the gates with the magic sword from the Black Pond, as well as the rest of the ending, for you have finished your journey and restored the true King to his throne.
Posted by: Jazz |
June 11, 2012 4:22 PM
|
June 11, 2012 4:22 PM