
Umiga
As silent and weird as a Detarou can be, there is also much puzzle love to be found inside any escape-the-room game from this developer. Umiga is no exception: the puzzles massage your grey matter while surreal and oddball humor keeps a grin on your face. You'll need to do some extra footwork and thinking to put together clues, but it's always the right amount of difficulty to be exceedingly fun.
Read More10 Comments
Umiga Walkthrough
Starting Out and Exploration
-
You begin facing the double-image of a blue-haired girl. Click the lower edge of the game screen to back up. Now you can see the blue-haired girl poster on the left, a door, and part of some machine on the right.
-
Go through the door. Inside this room is a leaf dancer person dancing between two sets of lockers:
-
First, open all the lockers on the left:
-
Then, examine each of the lockers on the right, taking note of what you find:
-
The top left corner locker is locked. Notice the keyhole has a square etched on it.
-
Inside the top middle: a red left eye, which corresponds to the #9 in the other set of lockers.
-
The second row, left locker has green lips, corresponding to #8.
-
In the very middle locker is a picture of an old man eating a watermelon.(In the picture's background, you can see a picture being hung and a cabinet with three ovals cut out of the drawers.)
-
A blue nose is in the bottom, left...#6.
-
Three symbols—square, circle, triangle—in the bottom middle.
-
And...a yellow right eye in the bottom righthand corner or #2.
-
Back out of the locker room and turn right. You can see the whole aparatus from this view...
-
Zoom in to examine the left side of the machine, a golden face:
-
You can click on the eyes and mouth.
-
The nose is missing.
-
Back up and then look closer at the middle, two doors that just can't be forced open:
-
Is that bit of brown behind the struggling man another door?
-
Back up again and check out the right side of the machine, a glass-encased red button:
-
Those little specks around the button...what are they? A picture you saw in the lockers is another clue.
-
There also appears to be a tube opposite the button that runs into the other room.
-
Back up.
-
Turn right and now you can see a locked door flanked by two rectangular pillars. Examine each, zooming in and backing up as needed.
-
The pillar on the left needs a 4-digit number code. It has a star marking the top of the code box.
-
The pillar on the right seems to need a 4-color code.
-
The door has a bronze handle and a circle etched around the keyhole.
-
Turn right again to see a bookcase, another door, and the edge of a window.
-
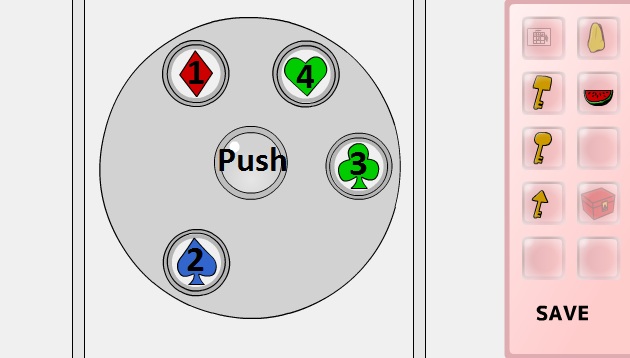
Zoom in on the door to the right of the bookcase. The "second knob" to the left of the door is a puzzle:
-
You can click either side to change which symbol is showing. Each symbol comes in more than one color.
-
You can also click the button in the center of the doorknob.
-
Back up twice.
-
Examine the bookcase. On the middle shelf is a piece of paper. Pull on it.
-
Keep pulling until it comes out (along with whatever was keeping it stuck).
-
Click on the man's head to pick up the PAPER...it's a CLUE, so read it:
-
Put the clue away and back up.
-
Turn right to face the long window. Outside is a woman in deep thought, standing on the beach. Turn right away from the window.
-
On the wall is a little niche...
-
Looking closer, you can see three keyholes and a red button.
-
Maybe it has something to do with the doorway that you can't access at the moment?
-
Turn right three times to face the locked door flanked by two boxes again. You're ready to start solving puzzles.
Look inside each locker to find its number...
3--9--5
8--1--4
6--7--2
Colorblind Help:
As if positioned on a clock, the symbols are...
12 o'clock - red spade
1 - green heart
2 - blue heart
3 - green club
4 - green diamond
5 - blue diamond
6 - red club
7 - blue spade
8 - green diamond
9 - red heart
10 - blue club
11 - red diamond
At the top is a star with an arrow going from right to left.
Then, there is a 3x3 grid with a left on the right:
1-4-3
x-2-x
x-x-x
Left Pillar "Star" Code
-
Put together the clues from the bookcase paper and the locker room to come up with the code.
-
After inputing the correct numbers into the code box, click the rectangular button to enter the code.
-
The pillar will, uh, stand up so you can...
-
Get the CIRCLE KEY.
-
Back up.
SOLUTION:
The PAPER CLUE from the bookcase tells you to look in the lockers on the left side of the leaf dancer.
Get the numbers from the top left, middle-middle, top right, and top-middle lockers...3159
Then, according to the clue, enter them in the opposite order, giving you this code:
9 5 1 3
Secrets of the Panda Room
-
Zoom in on the door flanked by two rectangular pillars (one has hairy legs).
-
When you look closely at the keyhole, you can see it has a circle etched around it...
-
Get the CIRCLE KEY by entering the correct 4-digit number in the "star code" pillar to the left of the door (see previous spoiler).
-
Click on the unlocked door to enter the bad panda room; your first sight are two "pandas" apparently in the midst of some giggle-inducing gossip.
-
You can click all around these pandas, but they won't respond to you.
-
On the other hand, to the left, on the floor, there's a piece of yummy cheesecake...
-
Click on the cheesecake to get the bad panda ending.
-
But, it's best to ignore gossiping pandas, so turn left. Here you see a tube...
-
This is the tube that leads to the red button for the door machine in the other room.
-
You can look closer into the tube, but it's too long for you to ever reach the other end.
-
Back up and turn right twice. You see a face-cabinet, a panel and a framed sketch art.
-
Look through the doors and "drawers" of the cabinet...
-
In the middle "drawer" face is the TRIANGLE KEY. Take it.
-
Back up twice.
-
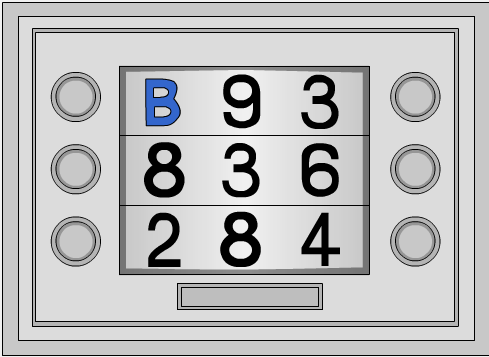
Then examine the panel in the center of the wall...
-
There are three rows of numbers.
-
Clicking through them, you find that each row has one colored letter:
-
Back up twice.
-
Take a closer look at the framed picture...
-
Within the artwork, you'll see some familiar images...
-
Back up three times to leave the panda room.
Bad Panda Ending:
**SAVE YOUR GAME!**
Top Row=Blue "B"
Middle Row=Green "C"
Bottom Row=Red "A"
Lips...right eye...nose...left eye
....and the second face's mouth looks like a code box we saw earlier.
Right Pillar "Color Code"
-
Based on what you've seen in your explorations of the panda room and the locker room, you now know the code for the pillar on the right side of the door.
-
Enter the correct colors and press the rectangular button to unlock this pillar.
-
With the correct colors entered, the front of the pillar falls open to reveal...
-
A tomato-headed airline pilot and he's offering you something.
-
Get the SQUARE KEY.
-
Back up twice and turn left three times.
SOLUTION:
The picture in the panda room gives you this order: lips, right eye (lashes are on the right), nose, left eye (lashes are on the left).
The lockers to the right of the leaf dancer give you the colors...green lips, yellow right eye, blue nose, red left eye.
So the code is:
GREEN-YELLOW-BLUE-RED
Colorblind Help
Starting with white, the colors change in this order...
Red (1 click)
Yellow (2 clicks)
Green (3 clicks)
Blue (4 clicks)
Black (5 clicks)
White (0 or 6 clicks)
Three Keys and a Red Box
-
If you've solved the two pillars' codes and thoroughly explored the panda room, you should now have three keys:
-
On the wall to the right of the long window overlooking the beach scene, there is a niche...look there to see three keyholes:
-
A clue inside the locker room tell you how to use the keys.
-
Insert the keys in the correct order and press the red rectangle.
-
If correct, the button turns green and the doorway opens.
-
Take back each of the THREE KEYS.
-
Back up, turn right, and pick up the RED BOX:
-
Notice that the keyhole on the box has a triangle design etched around it.
-
Use the TRIANGLE KEY to open the box.
-
Take the golden NOSE.
-
Back up. Enter the door to the locker room.
-
Then, on the right side of the leaf dancer, examine the locked locker door (in the upper left corner)...
-
Since it has a square etched around its keyhole, use the SQUARE KEY to unlock this locker's door.
-
Get the WATERMELON
-
and make note of the clues written inside this locker:
-
Back up three times to leave the locker room.
A square key, a circle key, and a triangle key.
SOLUTION:
The bottom-middle locker to the right of the leaf dancer gives you the key order...
SQUARE-CIRCLE-TRIANGLE
...exactly how they appear in your inventory from top to bottom.
A B C C
diamond(button)spade(button)club(button)heart
"Card Suits" Doorknob to 4th Room
-
From the blue-haired girl poster, turn three times to face the bookcase wall. Zoom in on the doorknob to the left of this door:
-
Using clues found in the locker room and the panda room, change the symbols and click the center button accordingly.
-
After turning the knob to the proper card suit symbol, click the center button to enter it, then turn to the next symbol, etc.
-
When done correctly, the door to the 4th room is unlocked.
-
Go inside the 4th room. Here you see a grey-haired farmer on his plot of earth:
-
To his left is a board. Look at it for a hint:
-
The FARMER seems friendly, so take him with you!
-
Click on him a couple times and THE FARMER will be added to your inventory.
-
Back out three times to leave the farmer's room.
SOLUTION:
In the panda room, the letters on the wall panel give you the colors: A is red, B is blue and C is green.
In the top, left door of the lockers to the right of the leaf dancer, you get the clue: A B C C. The symbols are also given.
Translated, you get this code:
RED DIAMOND--BLUE SPADE--GREEN CLUB--GREEN HEART
8 8 9 6 2 6 (leaf)
(leaf) O
Note the direction of the arrow as well.
The Golden Face
Now that you've been to the farmer room, you're almost ready to leave. To open the sliding doors, you need to activate two sides of the door machine: the red button on the right and the golden face on the left.
-
Turn around until you're facing the man struggling against the sliding doors. On the right is a golden face. Zoom in on it:
-
Put the NOSE (found in the red box) on the face.
-
Then, using the clues from the locker room and the farmer's plot of land, click the face's features in the correct sequence...
-
The light in the golden face's forehead turns green on the proper sequence. It will also make the left button above the sliding doors turn green.
-
Back up.
SOLUTION:
The board inside the farmer's room had a series of numbers...
8 8 9 6 2 6 (leaf)
(leaf) O
That last "O" is referring to the golden face while the numbers refer to features.
Each facial feature inside the lockers on the right corresponds to a number in the lockers on the left...lips are 8, left eye is 9, nose is 6 and right eye is 2. So, you press the facial features on the golden face in this order:
LIPS-LIPS-LeftEYE-NOSE-RightEYE-NOSE
The Red Button
-
While facing the sliding doors, turn right and enter the door to the panda room.
-
Turn left and then examine the end of the tube.
-
You have what you need to reach that button now...clues around the red button and inside one of the lockers tell you what to do.
-
Zoom in on the FARMER in your inventory.
-
Give the WATERMELON (from the locked locker) to the farmer.
-
Put the watermelon-eating farmer at the end of the tube and watch what happens!
-
Now that you've opened the sliding doors (and if you haven't, see the solution for the golden face in the previous spoilers), do you want to have more fun and, possibly, exact some revenge?
-
Click on the farmer to put him back in your inventory.
-
Turn around to face the pandas.
-
Put the WATERMELON-EATING FARMER by the pandas.
-
Back out into the main room and turn left.
-
Examine the glass case housing the red button:
SOLUTION:
There's watermelon seeds around the red button and a picture of the grey-haired farmer eating a watermelon in that very room...
Here is a new clue...
A B C
8 9 3
The Exit Key and Normal End
-
After opening the sliding doors, you'll find a new clue inside the glass case to the right of the doors (see the previous spoiler).
-
Back up from the sliding doors, turn right, and go through the door into the next room. Turn right to face the wall with the cabinet, panel and picture.
-
Zoom in on the panel:
-
You need to arrange the rows of numbers and colored letters to show the proper 3-digit combination...
-
Use clues from the red button case to solve this code.
-
Use the buttons on the left and right of each row to cycle through the numbers until the correct code is in the middle column (imagine this like a combination lock's dial).
-
After putting in the correct code, click the rectangular button to open the panel:
-
Get the EXIT DOOR KEY.
-
Back up four times to leave the other room. Then turn left and go past the flattened sliding doors to the brown door.
-
Use the EXIT DOOR KEY to unlock the door.
-
Go through the unlocked door to experience the normal ending.
SOLUTION:
9 (B is in the top row)
3 (C is on the middle row)
8 (A is in the bottom row)
Explanation: according to the clue, row A is 8, row B is 9 and row C is 3. So the answer, on the dials, looks exactly like this...
**SAVE YOUR GAME**
Red Stamp "Perfect" Ending
-
After unlocking the exit door, back up and turn right.
-
Go back into the panda room then turn right and look at the picture on the wall by the faces cabinet:
-
Click on the picture to make it fall off the wall.
-
Note the colors.
-
Back out of the room, turn left and examine the golden face:
-
The colors behind the picture and the icons in the lockers tell you which order to press the golden face's features:
-
Doing so will make the golden face open its mouth:
-
Get the RED STAMP.
-
Back up from the golden face, go back to the exit door, and this time—with the RED STAMP in your possesion—you can go through the exit door and get the perfect ending.
RightEYE-NOSE-LIPS-LeftEYE-NOSE
Congratulations to you!

Out... Dammit Elle. One day you'll post a Detarou game while I'm not at work, and I'll be able to get out before you post the walkthrough. ;)
Same as usual with Detarou: Oddness with logically progressing puzzles. The only thing:
I can't believe I sat there and counted the moves the dancer was making, all for nothing.....
[Yep. Detarou is a brat that way. Also, I'll check with you next time before I post a walkthrough, Matt. ;-) elle]
After hitting the red button...
take watermelon guy and sick him on the pandas
...ahhh, sweet justice.
The rotating colored shape lock isn't working. I put in the code but nothing happens. I even checked the walkthrough, so it should be working :/
Hi novascottch,
Are you pushing the center button for each symbol? It needs to be pressed every time you have the correct symbol selected, not just at the end.
Take a look at this screenshot if you need additional help.
hahahaha! Did anyone else notice this?
After the watermelon spitter activates the button for you, you can take him and place him by the panda and his minion. Then he'll attack them with watermelon seeds. It's hilarious!
I have to know, does anyone know what the cake says right before you get the Bad Ending?
I like this fellas games but this one was spoilt as far as I'm concerned, by the last puzzle (the ABC 893 one) which was completely illogical and unintuitive.
A shame.
A little help, please? I'm not understanding something in the walkthrough.
How do I
get the picture to fall off the wall for the red stamp ending? I've tried clicking all over it - this is the two faces one, isn't it? Nothing seems to happen - do you have to hit a particular spot, or in a particular order?
Thanks
Hi Toonster,
To get the red stamp...
Remember to unlock the exit door first. Don't leave, but you must unlock the door to activate the final "red stamp" puzzle. Then you can go back to the room with the picture and a simple click should make it come off the wall.
Leave a comment [top of page]

Game of the week

Walkthrough Guide
(Please allow page to fully load for spoiler tags to be functional.)
Umiga Walkthrough
Starting Out and Exploration
You begin facing the double-image of a blue-haired girl. Click the lower edge of the game screen to back up. Now you can see the blue-haired girl poster on the left, a door, and part of some machine on the right.
Go through the door. Inside this room is a leaf dancer person dancing between two sets of lockers:
First, open all the lockers on the left:
Look inside each locker to find its number...
3--9--5
8--1--4
6--7--2
Then, examine each of the lockers on the right, taking note of what you find:
The top left corner locker is locked. Notice the keyhole has a square etched on it.
Inside the top middle: a red left eye, which corresponds to the #9 in the other set of lockers.
The second row, left locker has green lips, corresponding to #8.
In the very middle locker is a picture of an old man eating a watermelon.(In the picture's background, you can see a picture being hung and a cabinet with three ovals cut out of the drawers.)
A blue nose is in the bottom, left...#6.
Three symbols—square, circle, triangle—in the bottom middle.
And...a yellow right eye in the bottom righthand corner or #2.
Back out of the locker room and turn right. You can see the whole aparatus from this view...
Zoom in to examine the left side of the machine, a golden face:
You can click on the eyes and mouth.
The nose is missing.
Back up and then look closer at the middle, two doors that just can't be forced open:
Is that bit of brown behind the struggling man another door?
Back up again and check out the right side of the machine, a glass-encased red button:
Those little specks around the button...what are they? A picture you saw in the lockers is another clue.
There also appears to be a tube opposite the button that runs into the other room.
Back up.
Turn right and now you can see a locked door flanked by two rectangular pillars. Examine each, zooming in and backing up as needed.
The pillar on the left needs a 4-digit number code. It has a star marking the top of the code box.
The pillar on the right seems to need a 4-color code.
The door has a bronze handle and a circle etched around the keyhole.
Turn right again to see a bookcase, another door, and the edge of a window.
Zoom in on the door to the right of the bookcase. The "second knob" to the left of the door is a puzzle:
You can click either side to change which symbol is showing. Each symbol comes in more than one color.
Colorblind Help:
As if positioned on a clock, the symbols are...
12 o'clock - red spade
1 - green heart
2 - blue heart
3 - green club
4 - green diamond
5 - blue diamond
6 - red club
7 - blue spade
8 - green diamond
9 - red heart
10 - blue club
11 - red diamond
You can also click the button in the center of the doorknob.
Back up twice.
Examine the bookcase. On the middle shelf is a piece of paper. Pull on it.
Keep pulling until it comes out (along with whatever was keeping it stuck).
Click on the man's head to pick up the PAPER...it's a CLUE, so read it:
At the top is a star with an arrow going from right to left.
Then, there is a 3x3 grid with a left on the right:
1-4-3
x-2-x
x-x-x
Put the clue away and back up.
Turn right to face the long window. Outside is a woman in deep thought, standing on the beach. Turn right away from the window.
On the wall is a little niche...
Looking closer, you can see three keyholes and a red button.
Maybe it has something to do with the doorway that you can't access at the moment?
Turn right three times to face the locked door flanked by two boxes again. You're ready to start solving puzzles.
Left Pillar "Star" Code
Put together the clues from the bookcase paper and the locker room to come up with the code.
SOLUTION:
The PAPER CLUE from the bookcase tells you to look in the lockers on the left side of the leaf dancer.
Get the numbers from the top left, middle-middle, top right, and top-middle lockers...3159
Then, according to the clue, enter them in the opposite order, giving you this code:
9 5 1 3
After inputing the correct numbers into the code box, click the rectangular button to enter the code.
The pillar will, uh, stand up so you can...
Get the CIRCLE KEY.
Back up.
Secrets of the Panda Room
Zoom in on the door flanked by two rectangular pillars (one has hairy legs).
When you look closely at the keyhole, you can see it has a circle etched around it...
Get the CIRCLE KEY by entering the correct 4-digit number in the "star code" pillar to the left of the door (see previous spoiler).
Click on the unlocked door to enter the bad panda room; your first sight are two "pandas" apparently in the midst of some giggle-inducing gossip.
Bad Panda Ending:
**SAVE YOUR GAME!**
You can click all around these pandas, but they won't respond to you.
On the other hand, to the left, on the floor, there's a piece of yummy cheesecake...
Click on the cheesecake to get the bad panda ending.
But, it's best to ignore gossiping pandas, so turn left. Here you see a tube...
This is the tube that leads to the red button for the door machine in the other room.
You can look closer into the tube, but it's too long for you to ever reach the other end.
Back up and turn right twice. You see a face-cabinet, a panel and a framed sketch art.
Look through the doors and "drawers" of the cabinet...
In the middle "drawer" face is the TRIANGLE KEY. Take it.
Back up twice.
Then examine the panel in the center of the wall...
There are three rows of numbers.
Clicking through them, you find that each row has one colored letter:
Top Row=Blue "B"
Middle Row=Green "C"
Bottom Row=Red "A"
Back up twice.
Take a closer look at the framed picture...
Within the artwork, you'll see some familiar images...
Lips...right eye...nose...left eye
....and the second face's mouth looks like a code box we saw earlier.
Back up three times to leave the panda room.
Right Pillar "Color Code"
Based on what you've seen in your explorations of the panda room and the locker room, you now know the code for the pillar on the right side of the door.
Enter the correct colors and press the rectangular button to unlock this pillar.
SOLUTION:
The picture in the panda room gives you this order: lips, right eye (lashes are on the right), nose, left eye (lashes are on the left).
The lockers to the right of the leaf dancer give you the colors...green lips, yellow right eye, blue nose, red left eye.
So the code is:
GREEN-YELLOW-BLUE-RED
Colorblind Help
Starting with white, the colors change in this order...
Red (1 click)
Yellow (2 clicks)
Green (3 clicks)
Blue (4 clicks)
Black (5 clicks)
White (0 or 6 clicks)
With the correct colors entered, the front of the pillar falls open to reveal...
A tomato-headed airline pilot and he's offering you something.
Get the SQUARE KEY.
Back up twice and turn left three times.
Three Keys and a Red Box
If you've solved the two pillars' codes and thoroughly explored the panda room, you should now have three keys:
A square key, a circle key, and a triangle key.
On the wall to the right of the long window overlooking the beach scene, there is a niche...look there to see three keyholes:
A clue inside the locker room tell you how to use the keys.
SOLUTION:
The bottom-middle locker to the right of the leaf dancer gives you the key order...
SQUARE-CIRCLE-TRIANGLE
...exactly how they appear in your inventory from top to bottom.
Insert the keys in the correct order and press the red rectangle.
If correct, the button turns green and the doorway opens.
Take back each of the THREE KEYS.
Back up, turn right, and pick up the RED BOX:
Notice that the keyhole on the box has a triangle design etched around it.
Use the TRIANGLE KEY to open the box.
Take the golden NOSE.
Back up. Enter the door to the locker room.
Then, on the right side of the leaf dancer, examine the locked locker door (in the upper left corner)...
Since it has a square etched around its keyhole, use the SQUARE KEY to unlock this locker's door.
Get the WATERMELON
and make note of the clues written inside this locker:
A B C C
diamond(button)spade(button)club(button)heart
Back up three times to leave the locker room.
"Card Suits" Doorknob to 4th Room
From the blue-haired girl poster, turn three times to face the bookcase wall. Zoom in on the doorknob to the left of this door:
Using clues found in the locker room and the panda room, change the symbols and click the center button accordingly.
SOLUTION:
In the panda room, the letters on the wall panel give you the colors: A is red, B is blue and C is green.
In the top, left door of the lockers to the right of the leaf dancer, you get the clue: A B C C. The symbols are also given.
Translated, you get this code:
RED DIAMOND--BLUE SPADE--GREEN CLUB--GREEN HEART
After turning the knob to the proper card suit symbol, click the center button to enter it, then turn to the next symbol, etc.
When done correctly, the door to the 4th room is unlocked.
Go inside the 4th room. Here you see a grey-haired farmer on his plot of earth:
To his left is a board. Look at it for a hint:
8 8 9 6 2 6 (leaf)
(leaf) O
Note the direction of the arrow as well.
The FARMER seems friendly, so take him with you!
Click on him a couple times and THE FARMER will be added to your inventory.
Back out three times to leave the farmer's room.
The Golden Face
Now that you've been to the farmer room, you're almost ready to leave. To open the sliding doors, you need to activate two sides of the door machine: the red button on the right and the golden face on the left.
Turn around until you're facing the man struggling against the sliding doors. On the right is a golden face. Zoom in on it:
Put the NOSE (found in the red box) on the face.
Then, using the clues from the locker room and the farmer's plot of land, click the face's features in the correct sequence...
SOLUTION:
The board inside the farmer's room had a series of numbers...
8 8 9 6 2 6 (leaf)
(leaf) O
That last "O" is referring to the golden face while the numbers refer to features.
Each facial feature inside the lockers on the right corresponds to a number in the lockers on the left...lips are 8, left eye is 9, nose is 6 and right eye is 2. So, you press the facial features on the golden face in this order:
LIPS-LIPS-LeftEYE-NOSE-RightEYE-NOSE
The light in the golden face's forehead turns green on the proper sequence. It will also make the left button above the sliding doors turn green.
Back up.
The Red Button
While facing the sliding doors, turn right and enter the door to the panda room.
Turn left and then examine the end of the tube.
You have what you need to reach that button now...clues around the red button and inside one of the lockers tell you what to do.
SOLUTION:
There's watermelon seeds around the red button and a picture of the grey-haired farmer eating a watermelon in that very room...
Zoom in on the FARMER in your inventory.
Give the WATERMELON (from the locked locker) to the farmer.
Put the watermelon-eating farmer at the end of the tube and watch what happens!
Now that you've opened the sliding doors (and if you haven't, see the solution for the golden face in the previous spoilers), do you want to have more fun and, possibly, exact some revenge?
Click on the farmer to put him back in your inventory.
Turn around to face the pandas.
Put the WATERMELON-EATING FARMER by the pandas.
Back out into the main room and turn left.
Examine the glass case housing the red button:
Here is a new clue...
A B C
8 9 3
The Exit Key and Normal End
After opening the sliding doors, you'll find a new clue inside the glass case to the right of the doors (see the previous spoiler).
Back up from the sliding doors, turn right, and go through the door into the next room. Turn right to face the wall with the cabinet, panel and picture.
Zoom in on the panel:
You need to arrange the rows of numbers and colored letters to show the proper 3-digit combination...
Use clues from the red button case to solve this code.
SOLUTION:
9 (B is in the top row)
3 (C is on the middle row)
8 (A is in the bottom row)
Explanation: according to the clue, row A is 8, row B is 9 and row C is 3. So the answer, on the dials, looks exactly like this...
Screenshot: A B C dial solution
Use the buttons on the left and right of each row to cycle through the numbers until the correct code is in the middle column (imagine this like a combination lock's dial).
After putting in the correct code, click the rectangular button to open the panel:
Get the EXIT DOOR KEY.
Back up four times to leave the other room. Then turn left and go past the flattened sliding doors to the brown door.
**SAVE YOUR GAME**
Use the EXIT DOOR KEY to unlock the door.
Go through the unlocked door to experience the normal ending.
Red Stamp "Perfect" Ending
After unlocking the exit door, back up and turn right.
Go back into the panda room then turn right and look at the picture on the wall by the faces cabinet:
Click on the picture to make it fall off the wall.
Note the colors.
Back out of the room, turn left and examine the golden face:
The colors behind the picture and the icons in the lockers tell you which order to press the golden face's features:
RightEYE-NOSE-LIPS-LeftEYE-NOSE
Doing so will make the golden face open its mouth:
Get the RED STAMP.
Back up from the golden face, go back to the exit door, and this time—with the RED STAMP in your possesion—you can go through the exit door and get the perfect ending.
Congratulations to you!
Posted by: elle |
February 11, 2013 10:51 AM
|
February 11, 2013 10:51 AM