
The Secret of Grisly Manor
They called your grandpa a crazy inventor, and looking at his house, so chock full of tricks and puzzles, you might be inclined to agree. He might have gone missing, but he somehow still manages to send you a letter asking you to come visit... as long as you can uncover the Secret of Grisly Manor, of course! A simple but fun little point-and-click adventure players of all ages will enjoy, and packed with just the right amount of puzzles for a short break of mystery.
Read More139 Comments
It's not coming up. Sometimes I get the ad, sometimes not. Then just a blue background image. I have Firefox 3.6.
[The game is HTML5, so you may need to upgrade your browser. It's working just fine in Firefox 5 and 6. -Jay]

Very nice! I really enjoyed that.
Hmm..what to do next?
I have
matches, goldfish bowl with fish in and a 3 figure code
left in my inventory
The last thing I did was to
activate some light at the bottom of the trunk
but not sure what that did...
Am now touring the house in vain...help?
Have you explored all of upstairs?
click to the right of the bathroom door to find another door
Also, make sure to look
under the bed in the girl's room
Anyone figure out the globe?
That got it. I've been procrastinating on updating Firefox. Thanks Jay.
Clue to globe is in the upstairs study
U need to close secret passage and go in the other way
I figured out the globe without closing the secret passageway--a clue is in the caption for the dog painting--but I don't know what to do with the prize. Stuck with a fishbowl, a sealed cube, a combo, and some matches.
Phew, made it! Thanks to stupidcheese boy, was stuck for ages on the globe. Good game.
My sticking point is the stupid
goldfish/fire/bathtub nexus. Is there a stopper for the tub, is that what I'm missing? I wish it would just let me sacrifice the freakin' fish to put out the fire to get the burnt cube thingy!
The stopper for the bathtub is
in the clock
which is opened using the clue you get from the
rays of light in the cave under the stump
Thank you!
Made it!
Still cant figure out globe
Quite simply, this was an AMAZING game! The closest thing to a free Mystery Case File Game you can find. For those unfamiliar, the MCF series is the epitome of point and click games. There was no changing cursor, but there was also no pixel hunting. The areas that you needed to click were so obvious that a changing cursor would have been unnecessary and made the game a little too simple. The puzzles flowed logically and although you had to think a little, nothing made you beat your head against the wall. The visuals and sounds were nice and atmospheric and if I had any complaint it was with the constant fade ins and outs, but they did not distract from the overall experience. Kudos Fire Maple! I hope to see more from you in the (near?) future.
Kranin, Think about what the poster on the other side of the secret door into the study said.
LOVE
is the key to the world. Where did you see
letters
that corresponded with
colors
?
Aaa-. Where to find time for clock ?
I can't figure out what to do with the tree stump.
Stuck. Waiting for a walk-through or a hint for idiots like me who can't figure out the clocks, birds, combinations or symbols. Just wandering around trying to pour my fish into various things.
For the birds:
Your childhood was very influential
That was fun, but as I find in all point-and-click games, there was one object I couldn't find that made it frustrating (for a while). For this game, it was
underneath the far right corner of the rug in the main hallway.
Infant Tyrone , about birds.
Have you seen the picture of car with four wheels ? Look at this wheels carefully - that is the hint for birds.
Globe. Hint is word Study. I see the color letters on fridge - probably it is the hint too. but what is the Word ?
Ah! Thanks Baramburum! See, I kind of thought that, but since
the wheels have eight segments, and the birds only five positions, it didn't make any sense. I have a feeling the clock and the globe colors may be the same not-quite-intuitive puzzle.
Infant Tyrone, i found the clock puzzle.
Lights in the cave shows the hint. For light you have to enter the code from the chest on the garret. To open the cave you have to find the golden rod. Golden rod in the box in the stairs to second floor. To open the box you have to find the golden key. The golden key in the hidden room on the second floor. To open hidden room, you have to use the wrench in the bathroom. The wrench in the fridge. To kick the ice you need the chisel. chisel in the safe. To open safe you need the ruby heart. Ruby heart in candy machine. To open machine you need the coin. You can take coin from ping piggy. Brake pig by wooden hummer. wooden hummer in warehouse. Open warehouse by ringtone. I forgot where the ringtone was :-)
yes. I have solved the GLOBE !!.
Remember the electric door you opened on the second floor to enter the hidden room ? Close this door, walk around and read the poster - hint: the word LOVE. Use the fridge to decode it.
what's the deal? IE 9,my browser, is HTML5 so why can't i use it? weird.
It freezes after the letter, and I have FF5/WinXP. Can I ask what exactly this format is? I have a feeling the default browser was somehow changed for this type of file, but I can't find the program to disassociate it from the IE-type browser. Not really sure *how* to do it either, since it's a file that loads, not a file that downloads.
I have this problem with another game, too, and I think it's HTML5. I was playing the steampunk game earlier this month with no problem, but with someone else on this machine, I'm not really sure what to do. Thanks in advance.
[It's an HTML5 game, and it uses the canvas element and Javascript. There's no embedded file, really, so your browser just thinks it's an HTML page. It's a game that was released for free through the Chrome store, so you might want to try Chrome if your Firefox install is giving you issues. -Jay]
This game was really fun to play on my nook Color. The screen is much bigger than my iphone, and the touchscreen worked really well for the gameplay.
I put water in the empty fishbowl and used it to put out the fire in the fireplace. Nothing happened. What am I supposed to do with the friggin' bowl?
This game was utterly terrifying! At one stage, I was forced to put a
goldfish into soapy water!
This was GREAT! I loved everything about it. This is what a point-and-click should be!
At one point, I thought about reading the comments because I was stumped ... but I stuck it out and was able to finish.
Thanks
Pretty good game. I beat it, but my system is apparently ill equipped to run it, so it was painful to go through. I don't think I'll be writing a walkthrough, as that would require I play through it again.
This game was very annoying to play. The constant painfully slow iris wipe transitions made me want to not interact with any objects anywhere, and the occasional slow room slides weren't much better. If it had used instant transitions, given all the back-and-forth-in-and-out it makes you go through, it would have been a great game.
Even after viewing the walkthrough, I don't understand where the clue for the clock was supposed to have come from.
I was further mystified by the clue for the globe? The walkthrough holds up a clue that is seemingly unrelated right before solving the globe. I don't get it...
I'm only complaining about these inconsistencies because otherwise I was having a phenomenal gaming experience. Everything up to those sticking points was above and beyond the call of duty!
Arrrrrrrgghhhh, as far as i can tell i got to the end of the game, was at the blue door in the cellar and just had to solve the puzzle on the door and firefox crapped out on me :(
Don't bring up taskmanager if you find it running slow as i can't see anything in the game box now and have to close it! grrrr
I had the same thing as Paul ... IE9 does html5. But not very well. I went to a test page, and it scored 141 out of 450.
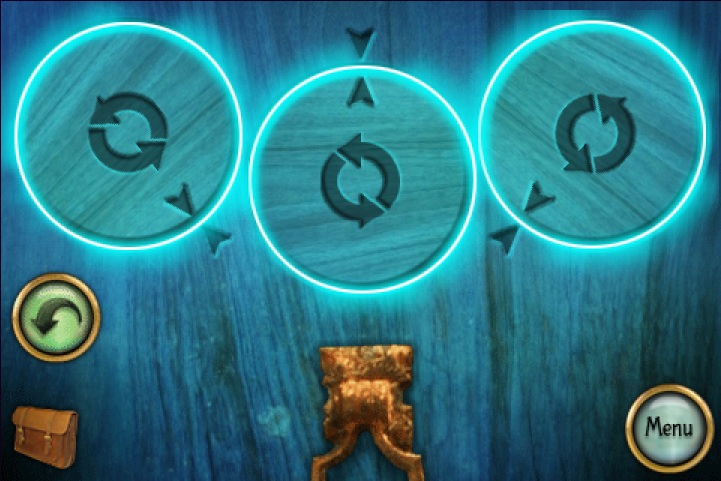
Right before you find
grandpa
you need to
open the last door with the glowing circles
what you need to do is
align the first, the left most, inner arrow, with the outside one. don't fiddle with the center circle at all. instead try aligning the right most circle with its outside arrow, and the center one will align itself. all three of them must be glowing and the door will only open if all the inner and outer arrows of each circle are facing each other.
hello all, i'm new to this. so apologies in advance if my spoiler's all messed up.
What a fantastic game! I love the absence of Flash. The game itself is very pretty and cultivates a great atmosphere. I had a problem with the color puzzle but that's just because I'm colorblind (it was particularly difficult because some of the hues appeared so close to each other). :P
I wanted to like this game, but it just wasn't possible. The puzzles were fine, though nothing special, but the unresponsive controls and the irritating, lagging animation at every scene change required me to click three or four times for each one click that should have been required. Games aren't fun when they make you want to put your fist through your monitor.
@Tim Curry
the clue to the globe is quite simple.
in the
the clue is in the secret room, behind the door that you open in the passageway with a handle after putting the fuse in place. once you're done with the room use the handle in the passage to close the and then walk back in from the side with the heart rubies. behind the door on the poster it says Love is the key to the world. Globe= World. the Use the fridge magnets to spell oyt love and use the Colours that spell out LOVE on the globe.
ps i suppose you need to first find the clue and then solve the puzzle.
yes, i know, the spoiler above is almost like a short story.
Czaerana,
light the fire again. You will need the fire to open the wooden cube founded in the globe.
Tim Curry,
lines of light in the cave shows you the key to the clock.
The last door was frustrating. I finished it and all 3 circles were glowing, but the door didn't open. I had to spin the circles around so they were reset basically. Then start over and finally after making them all glow 3 times it registered and the door opened.
There seems to be a problem with saved games. After I click "Continue," the game loads to a black screen with only the inventory and menu icons showing. Music plays, I can open the inventory and return to the menu, but I can't play the game.
After resetting my game, it loaded properly.
I'm using Chrome on Windows 7.
Update - I changed the default browser on Windows via "Add or Remove Programs" > Custom > Choose My Default Web Browser. Sadly, this did nothing for getting me beyond the letter screen.
This machine is maxed out, there is no way I can add yet another browser to it. Thanks Jay for the help.
Game doesn't work for me either.
1) When clicking on the options on the title screen, it won't allow me to go back to the main screen.
2) I get stuck after the letter shows up right at the start of the game.
Tried with Chrome 13.0.782.112 and Firefox 6 on Windows XP.
Zero-K, I'm in the same boat.
I've gotten them all glowing twice now, but no luck on the door opening. Now two of the circles are 'stuck' glowing no matter where they point, so I'm just going to have to give up. Extremely frustrating.
I'm using Safari for mac (the game wouldn't work at all in Chrome).
Zero-K
all 3 circles need to be touching the arrow. this was tricky to me too but i think once once you get certain ones placed in a ceertain position, the rest will fall into place.
I hope someone will at least make a walkthrough for the final puzzle. It is hard to get them aligned just right.
What happens after the blue door with the circles? Please tell me that's the end? I solved the door puzzle, but before going through the door I clicked to see if I could look under the stairs. Then all I got was a black screen - could still access my inventory, still access the menu, but couldn't move anywhere :o(
I agree that the animation transitions between scenes look great the first time, but they don't half irritate after a little while.
Xadoc,
The basement door with the glowing blue circles is the last puzzle. When you open the door, you find
your grandfather alive and well. He tells you that he discovered time travel, and all the puzzles were to make sure no-one but you found him and his secret. The end.
Guys, please don't forget to use "spoiler" tags to hide spoiler-revealing clues from readers who don't want to see them. If you have questions on how to use spoilers, please read our spoiler help guide.
Thanks!
How do you open the stomp?
What is the trick for setting the blue circles?
Walkthrough
Your first scene is the Front of the House. Touch the protruding blue brick
on the wall. Your first item is the Skeleton Key. Open your inventory, touch
the key then touch the front door. It will open; touch the doorway to go
inside.
Once in the foyer (which means the entrance to the house) touch the left side
of the screen to scroll left. We'll call this the Left Foyer. Touch the Matches
on the table to obtain them.
Go back to the Foyer, touch the paintingand get the Ripped Piece of Paper
and go Upstairs. You'll see 4 doors. Touch Door 3 and get
the Goldfish Bowl. Touch under the pink bed and get the Chess Piece.
Go back to Upstairs and go inside Door 4. Touch the butterfly frame on the left
wall and get the Jewelled Butterfly.
Go downstairs to the Foyer and touch the right side of the screen. This is the
Right Foyer. Touch the chess set on the table and put the Chess Piece into its
correct position. This will unlock the Silver Key.
Go Upstairs and put the Silver Key into Door 1. Go inside, this is the Attic.
Touch the chest and solve the picture puzzle. Rotate a piece by tapping it.
When you're done, a butterfly-shaped lock will appear. Place the Jewelled
Butterfly into place. Open the chest and retrieve the Magnet on a String.
Remember the 4 weird characters you see. You will need this later.
Go to the Foyer and tap the top part of the carpet on the floor. Tap the grate
on the floor. Use the Magnet on a String to get the Tuning Fork.
Go to the Right Foyer and go through that door to the Refrigerator Room. Tap
the door and go Outside. Here, you'll see a Shed and a Stump. Go to the Shed.
Get a log then tap the ear on the wall. Place the Tuning Fork here and you'll
be allowed entrance to the Shed. Go inside the Shed and get the Wooden Mallet
and Carved Falcon.
Go to Door 4 and break the piggy bank with your Wooden Mallet and take the
Brass Token. Look at the picture of the car on the wall. Notice the location
of the white triangles on the four wheels. Think of them as a clock. The
first wheel is in the 5 o'clock position, second wheel is in the 6 o'clock
position, third wheel is in the 9 o'clock position, and then fourth wheel is
in the 8 o'clock position.
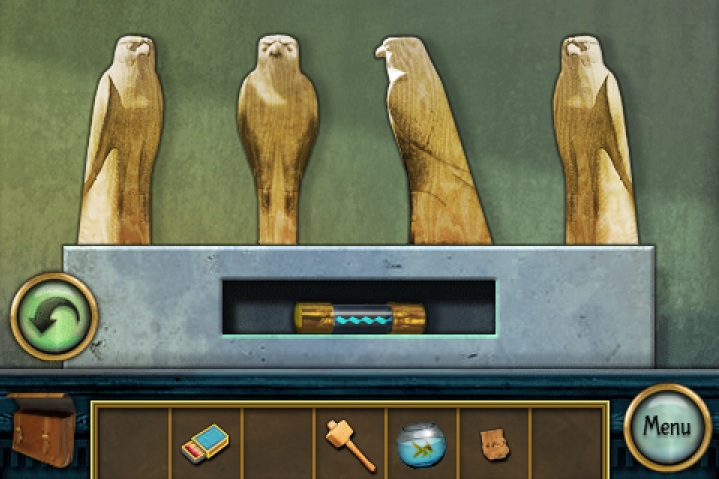
Go to the Right Foyer. Tap the falcons on the mantelpiece. Place the missing
Carved Falcon where it belongs. Rotate the falcons so that it corresponds to
the time we found earlier. The first falcon should be turned so that if you
look at it from the top, it'd be pointed toward 5 o'clock. Then 6, 9, and 8
o'clock. The Fuse will be unlocked.
Go to the Left Foyer and put the Brass Token into the gumball machine. Get the
heart-shaped Jewel that comes out.
Go Upstairs. Notice there is another hallway in between Door 2 and Door 3. Go
into that hallway by tapping in between the two doors. Place the heart-shaped
Jewel in the heart-shaped notch. A small door will slide open. Get the small
silver Knob and Ice Pick.
Go to the Refrigerator Room and put the small silver Knob into the drawer's
hole. Open the drawer and get the Rusty Key. Open the refrigerator and use the
Ice Pick on the ice to get the Wrench. Go Outside then into the Shed and use
the Rusty Key on the compartment on the wall. Get the Second Ripped Piece of
Paper. You now have the full combination of "42-34-15".
Go Upstairs and go inside Door 2. Put the Wrench on the hexagonal-shaped
protuberance on the wall. Tap the Wrench on the wall to open the trapdoor.
This is the Trapdoor Room. Put the Fuse into the fuse box. Tap the lever to
open the door on the left.
This room is the Study. Take the Golden Key on the desk. Now listen carefully.
Tap the door on the left to open it, but do not go through it (it just leads to
the Hallway.) Go back the way you came by going in the right door back to the
Trapdoor Room.
CLOSE the door on the left by tapping the lever. Go right back
to the Bathroom then to the Hallway upstairs. Go through the door and back to
the Study. Notice the poster on the right which wasn't shown before because the
door was open. Tap it to see that "LOVE IS THE KEY TO THE WORLD!" Remember
"LOVE".
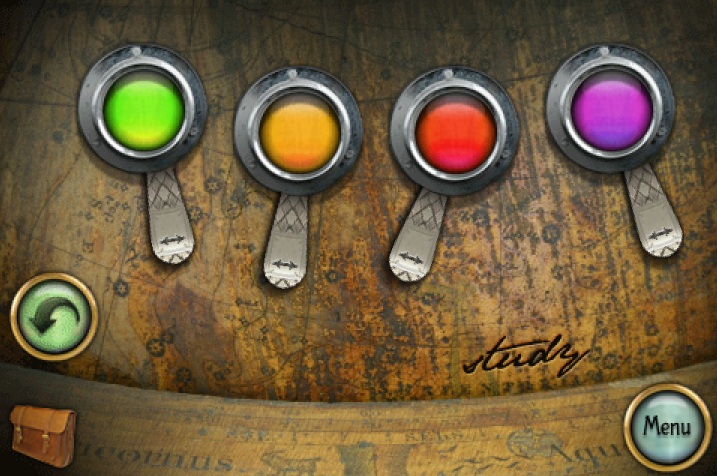
Go to the Refrigerator Room and look at the magnet alphabet on the
refrigerator. Remember the four colors that spell the word "LOVE". They are:
green, orange, red, and purple, in that order.
Go to the Right Foyer and touch the globe. Change the colors to green, orange,
red, and purple. The globe will open and reveal a Sealed Wooden Box. Put the
Log into the fireplace and light it with your Matches. Throw the Sealed Wooden
Box into the fire. We'll come back to this later.
Go to the Foyer. You'll see that one of the steps on the stairs has a keyhole.
Put the Golden Key into the hole and get the Ornate Rod. Go Outside and touch
the Stump. Put the Ornate Rod into the hole on the Stump. Go inside the Stump.
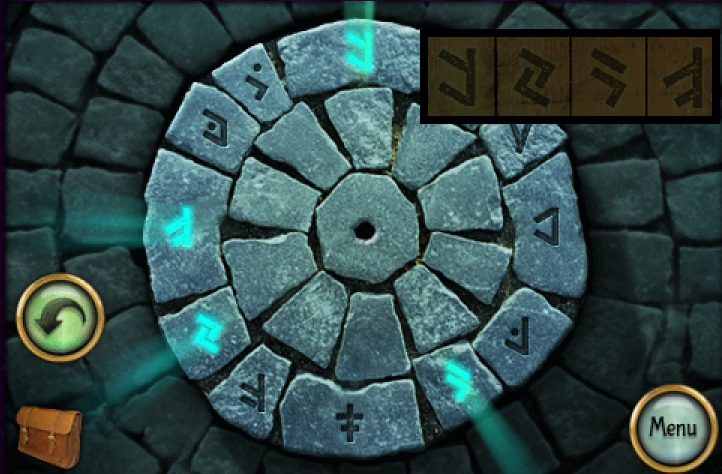
This next room is called the Underground. Touch the circular stone object in
the middle of the room and touch the symbols in the order that you saw them in
the chest in the Attic. If you're too lazy, the symbol at the top will be #1,
going clockwise, the last one is the backwards "L" with the dot on top is #12.
Touch 1, 9, 6, and 10.
Notice the two lines of light that appear. Think of these light lines as hands
on a clock. The time is about 8:20 according to the light lines. Go to the Left
Foyer and touch the clock on the top of the wall. Set the time to 8:20 and get
the Stopper that comes out.
Go to the Bathroom and touch the bathtub. Put the Stopper into the drain. Turn
on the water to fill the tub. Dump the Goldfish into the tub. Fill the empty
bowl with water by tapping the empty bowl then the tub. Go to the Right Foyer
to dump the water on the fire to put out the fire. Get the 5 Ounce Weight.
Go to the Study and put the 5 Ounce Weight on the balance scale on the desk.
The picture frame will slide down and reveal the safe. Input the Combination of
"42-34-15". Get the Iron Key from the safe.
Go to the Foyer and use the Iron Key on the door in the middle of the Foyer.
Go in the door; this leads to the Basement. Solve the puzzle on the blue door.
The first circle controls all three dials. The second circle controls the first
and second dials. The third circle controls the second and third dial. I do not have a specific walkthrough on this but you need to just keep turning the dials until all 3 are on the arrow. All 3 circles will light up with or without them being set to the arrow,so that will give you an idea on where to make your next move,. If anyone has a specific walkthrough 9on this part, please post here.
Go outside the Blue Door and you are out.
Never mind! Got the circles. Ending was pretty anti-climatic, IMO.
The Secret of Grisly Manor Walkthrough
Front Porch
-
Click the loose brick on the right wall under the columns to zoom in.
-
Click the brick to remove it, revealing the Key.
-
Use the Key from your inventory to unlock the front door.
-
Go through the open door into the foyer.
Foyer
-
Click the painting above the stairs to zoom in.
-
Take the Ripped Piece of Paper tucked into the upper left side of the frame.
-
Go up the stairs to the hallway, then go into the second door on the right into the child's bedroom.
Child's Bedroom
-
Take the Goldfish Bowl on the bedside table.
-
Click under the bed to zoom in.
-
Take the Chess Piece on the floor.
-
Go back to the hallway then into the first door on the right to enter the grandfather's bedroom.
Grandfather's Bedroom
-
Click the framed butterflies on the left wall to zoom in.
-
Take the Jewelled Butterfly at the upper right corner.
-
Click the drawing on the wall to the left of the bed for a closer look.
-
Note the position of the white triangles inside the circle: SE, S, W, SW
-
Go back to the lounge.
Lounge
-
Click the chessboard to zoom in.
-
Add the Chess Piece from your inventory to the board.
-
Take the Silver Key from the revealed cache.
-
Return to the upstairs hallway.
Hallway
-
Use the Silver Key from your inventory on the door to the far left.
-
Go up the stairs into the attic.
Attic
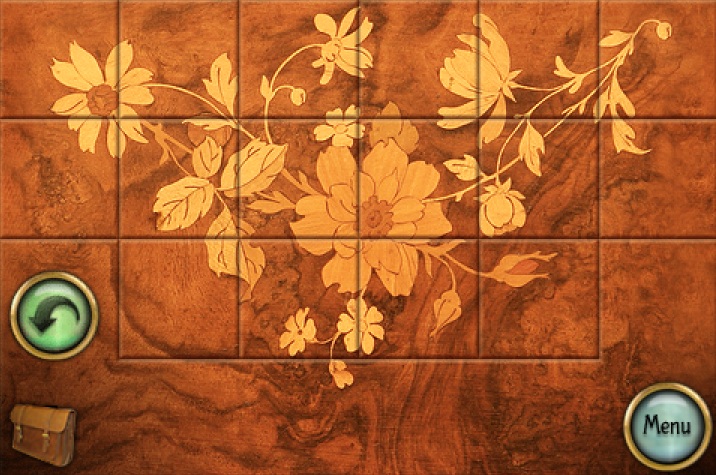
-
Click the large trunk to zoom in.
-
Rotate the tiles to complete the image of the flowers.
-
Once the puzzle is solved, the tiles will slide open revealing a butterfly shaped recess.
-
Place the Jewelled Butterfly from your inventory into the space.
-
Click the trunk to open it, then click it again to look inside.
-
Take the Magnet on a String inside the trunk.
-
Note the four runes written on the bottom.
-
Go back to the foyer.
Foyer
-
Click the upper right corner of the rug to lift it, revealing a grate on the floor.
-
Click the grate to zoom in.
-
Use the Magnet on a String from your inventory on the grate to receive the Tuning Fork.
-
Go through the lounge to the kitchen, out the door to the yard, and then forward to the shed.
Shed
-
Click the pile of wood to take the Log.
-
Click the plaque on the wall to zoom in.
-
Use the Tuning Fork from your inventory on the speaker under the ear.
-
Go through the open door inside the shed.
-
Take the Wooden Mallet and the Carved Falcon on top of the work table.
-
Go back to the lounge.
Lounge
-
Click the falcons on top of the fireplace to zoom in.
-
Add the Carved Falcon from your inventory into the third space on the mantle.
-
Turn the falcons according to the drawing in the grandfather's bedroom.
-
Starting with the falcon on the far left, turn the first one facing Southeast, the second facing South, the third facing West, and the fourth facing Southwest.
-
Take the Fuse from the hidden compartment.
-
Return to the grandfather's bedroom.
Grandfather's Bedroom
-
Use the Wooden Mallet from your inventory to smash the piggy bank.
-
Click the piggy bank to zoom in and take the Brass Token.
-
Go back to the foyer and then left to the dining room.
Dining Room
-
Take the box of Matches on the table.
-
Click the gumball machine on the table to zoom in.
-
Use the Brass Token from your inventory on the coinslot.
-
Turn the handle and take the heart-shaped Jewel from the dispenser.
-
Return to the hallway.
Hallway
-
Go right at the end of the hallway to face the hidden door.
-
Place the Jewel from your inventory into the notch at the bottom of the right gargoyle.
-
Click the opened cache to zoom in.
-
Take the silver Knob and the Ice Pick.
-
Go back to the kitchen.
Kitchen
-
Put the Knob from your inventory inside the hole of the drawer to the left of the fridge.
-
Click the drawer to look inside and take the Rusty Key.
-
Click the freezer to open it.
-
Use the Ice Pick from your inventory on the block of ice to reveal the Wrench.
-
Go back to the hallway and then through the rear door into the bathroom.
Bathroom
-
Use the Wrench from your inventory on the large bolt on the wall.
-
Click the wrench to turn it, revealing a secret passage.
-
Go through the open door into the passageway.
Passageway
-
Click the door of the fusebox to open it.
-
Place the Fuse from your inventory inside the box.
-
Click the lever to the left of the fusebox to lift the wall.
-
Go through the revealed doorway into the study.
Study
-
Take the Golden Key on the desk.
-
Click the door on the left to open it.
-
Go back to the passageway.
Passageway
-
Click the lever to lower the wall again.
-
Return to the hallway then go through the door at the end of the hall to re-enter the study.
Study
-
Click the poster on the wall blocking the secret passageway to zoom in.
-
Note the message at the bottom, "Love is the key to the world"
-
Go back to the Kitchen.
Kitchen
-
Click the magnets on the fridge to zoom in.
-
Note the colors of the letters that make up the word "Love"
-
L is Green, O is orange, V is red, and E is purple.
-
Go back to the lounge.
Lounge
-
Click the globe by the fireplace to zoom in.
-
Turn the handles on the dials to change the colors so that they match the colors of the fridge magnets in L-O-V-E order (Green, Orange, Red, Purple).
-
Once the puzzle is solved the globe will split open, revealing the Sealed Wooden Box.
-
Place the Log from your inventory into the fireplace.
-
Light the log with the Matches.
-
Add the Sealed Wooden Box to the fire.
-
Go back to the foyer.
Foyer
-
Click the third step on the stairway to zoom in.
-
Use the Golden Key from your inventory on the keyhole inside the stair.
-
Take the Ornate Rod from the secret cache.
-
Return to the yard outside the kitchen door.
Yard
-
Click the large stump in the grass to zoom in.
-
Use the Ornate Rod from your inventory on the metal socket in the center of the stump.
-
Click the stump again to zoom in, then go down the ladder to the cave.
Cave
-
Click the stone pedestal in the center of the room to zoom in.
-
Click the runes in the circle that match the four runes found at the bottom of the trunk in the attic.
-
Once the puzzle is solved, two beams of light will come out from the center of the circle.
-
Note the position of the lights resembles the position of the hands on a clock, if the time was about 8:25.
-
Return to the dining room.
Dining Room
-
Click the cuckoo clock on the wall to zoom in.
-
Turn the dials to move the minute hands on the face of the clock.
-
The left dial moves the hour hand, the right dial moves the minute hand.
-
Set the time to match the beams of light from the cave at 8:25.
-
Once the clock is set the cuckoo will come out, revealing the Stopper.
-
Return to the bathroom.
Bathroom
-
Click the bathtub to zoom in.
-
Use the Stopper from your inventory to plug the drain.
-
Click the faucet to fill the tub with water.
-
Use the Goldfish Bowl on the tub full of water to release the goldfish and receive an Empty Bowl.
-
Use the Empty Bowl on the tub to make it a Bowl of Water.
-
Go back to the lounge.
Lounge
-
Use the Bowl of Water to douse the flame.
-
Click the fireplace to zoom in.
-
Take the 5 Ounce Weight from the ashes.
-
Return to the shed.
Shed
-
Use the Rusty Key from your inventory on the cabinet on top of the work table.
-
Take the second piece of ripped paper inside the cabinet, completing the Combination.
-
Go back to the study.
Study
-
Use the 5 Ounce Weight from your inventory on the left side of the scale on the desk.
-
Click the revealed safe behind the dog painting to zoom in.
-
Enter in the Combination from your inventory to the numbers on the safe.
-
42-34-15
-
Take the Iron Key from the opened wall safe.
-
Go back to the foyer.
Foyer
-
Use the Iron Key from your inventory on the door behind the stairs.
-
Go through the open door to the basement.
Basement
-
To open the door, rotate the three discs so the arrow inside each circle lines up with the adjacent arrow outside the circle.
-
Starting from the left Disc #1 rotates all three circles, Disc #2 rotates 1 and 2, and Disc #3 rotates 2 and 3.
-
If the circle is stuck glowing, align the arrows of the glowing circle, then rotate a different disc to move the glowing circle away from the arrow and it will fade back to normal.
-
Once the puzzle is solved, go through the open door.
Click the blue door to zoom in.
The End
Hey Dora thanks for the Silent Hill 2 reference!
Similar problems to H Stern @ 11:29 AM:
1) When clicking on the options on the title screen, it won't allow me to go back to the main screen.
2) I get stuck after the letter shows up right at the start of the game
I am using a MacBook Pro, Mac OS X 10.6.8 with up to date Chrome of 13.0.782.112
Chasmosaur:
I had the same problems -- had to use Safari
Argh...think I've found a bug. At the very end after solving the circles, the doorway lit up but I clicked on the dark area to the right instead of the doorway and I'm now trapped in darkness forever!
now why did i try putting the goldfish down the sink drain?
@peter:
Thanks - worked fine in Safari...
Some of the music is from Remnants of Skystone...
-_^.
there is no 5oz weight in the fireplace. I have doused the fire with the fresh water in the fish bowl and clicked and clicked the entire fireplace and all it says is there is a log in the fireplace. HELP?????
This game was short lived. Is there a part 2?
Could not enter the first two numbers on the lock in the study. I tried for half an hour but the numbers I needed would not appear no matter how carefully I tried to position the tumbler. I was able to get the last number. Any idea what I'm doing wrong?
JiGuest,
Have you found both pieces of paper to complete the combination 42-34-15? The first piece of paper is in the picture frame above the stairs in the Foyer, and the second piece is in the locked cabinet in the Shed.
If you have the complete combination, it should work when you move the first two sliders. They can be a bit fussy, so make sure to move them very slowly in order not to skip any numbers.
If you are still having difficulties after that, it may be linked to a technical issue or lag. Make sure you have the latest version of flash installed, clear your browser cache, and close any other applications you may have running. Have you tried running the game in a different browser?
For some reason i cannot move the knobs, for the wall safe in the study, to the right numbers... anyone knows why that is happening to me?
Ed -
Read the spoiler comment just above your comment.
I'm having the same problem with the fire. I dowse the flames and then it say, there is a log in the fireplace. So I light it again, dowse it again and still, there is a log in the fireplace. WTF???
JiGuest,
Did you put the Sealed Wooden Box in the fire before dousing it with the water? (This is mentioned in the walkthrough at the Lounge area, after solving the globe puzzle) The point of the fireplace is to burn the box to destroy it, then douse the flames afterwards so you can take the Weight that was inside the box.
they wont let me any ashes in the fireplace it just says theres a log in the in the fireplace
xjcdfcdh -
Read the spoiler just above your comment.
Solved the circles on the door in the basement... door does nothing???
i Love the game . Its the first game i bought on my KIndle Fire. It wasnt that easy but just right. Twas too too short! More please
Where is the gargoyle and the secret door at the right of the stairs it talks about? Help me please!!
I am completely stuck. I have a fishbowl, matches and the paper with numbers on it. Someone help me! I have been in every room and tapped on everything.
Tami -
Have a look at the walkthrough above the comments!
I have repeatedly made all the rings glow on the basement door and nothing happens. I try to open door, it doesn'[t open, I hit back to get full door to open it, but it doesn't open. Then I go back to the rings and do it all over again. What am I doing wrong???
im trying to use the red heart and i know you have put into one of the statues by the hallway door but there not there am i just looking in the wrong place.... Please Help!!!
loftlin -
Check the basement segment of the walkthrough above the comments. There is a complete explanation and a screenshot.
samantha Roberts -
Have a look at the walkthrough above the comments.
I solved everything but I'm still stuck on the last puzzle, even with the hints & walkthrough! Can someone help me out? So frustrating!
rachel- Looking for the hallway with the gargoyles?
Go up the stairs. Click on the wall inbetween the bathroom and little girls bedroom. It's actually a hallway.
samantha Roberts- Look at my spoiler for rachel on finding the hallway with the gargoyles.
I have the coin with the star on it but I can't make it work on the bubble gum machine
nancy -
Have a look at the walkthrough above the comments to see if you may have skipped a task that is keeping it from working.
I would have NEVER finished this game. I guess my brain doesn't work right for these kinds of games! Thanks for the walk through!
AWESOME game. . . FUN. . . .CAPTIVATING!!!!! My kids hope there are more planned. . .
I made all 3 circles line up and glow, exactly like basement solution picture but the door does not open.
Where do I find the ringtone for the warehouse ?
Hi,
when I set the clock at 8:25, nothing happens ......? Any idea how to get the Stopper?
I dont know what to do, I'm stuck. I haven't gotten to the study, I haven't got the key for the stairs, I cant figure out the globe or the clock. I cant find the plug. If someone can help me or give me a hint I'd appreciate it.
[Have you checked our walkthrough? It appears just above the comments here on this page. -Jay]
Alfred,
Have you been to the Cave area first? You should be able to get the Stopper if you've set the correct time on the clock, but only after viewing the example on the stone dial in the Cave.
Refer to this screenshot for the solution.
Leon,
You may be encountering a slight bug previously mentioned by other commenters. If one circle is correctly positioned but then moves from that spot, it may appear to still be glowing even though it is actually incorrect.
Refer to the Basement section of the Walkthrough above the comments for instructions on how to fix a broken glowing circle.
Michelle, are you referring to the speaker on the outside wall of the Shed?
Follow the instructions in the Walkthrough above the comments for a step-by-step guide to access that building.
I'm playing on IPhone IOS5 and have completed the dining room and am now stuck in the hallway as I can't zoom in on the hidden door to use the Jewel, can anyone help??
Once i get to the hallway with the jewel, I cant seem to move to the right to go outside where the gargoyle is. Any help?
Our walkthrough that is posted above the comments should help you, even if you are playing the game on your iPhone or iPad.
Im playing on my Iphone and I can't figure out the clue on the clock, the bird and the globe.. I've got matches and ripped piece of paper... hays!
I can't figure it the puzzle on the globe, where you tip the goldfish or where the plug for the bathtub is or how to get into the shed. Please help.
katie,
Have you had a look at the Walkthrough above the comments? The solutions to all of those puzzles can be found there.
Where do i find the log to put in the fireplace?
BVBfan,
Please consult the Walkthrough above the comments for the step-by-step guide to all of those puzzles.
Lisbeth,
The Log is found in the wood pile outside the Shed.
Awesome game. I really enjoy these types of games, I hope there will be more. Keep up the good work
There is a new game out, longer better "the lost city" 2012!!!
when i saw the grandpa, is that the end?
nice game btw *thumbs up*
for the globe: you go to the kitchen and look at the alphabet on the fridge the colours for the word love are the colours for the globe then you put the box in the fire and it burns.
Now i think you have to put the fish in the bath so you can put the fish water in the fire but i dont know how HELP ME !!!!!!!!
Got the time right but nothing happens!!! Help?!
I finish solving the bird but I do not have the fuse! Help
There is a walkthrough for the download PC version of the game posted above the comments.
Sil,
Did you skip the puzzle in the Cave area? The clock won't accept even the correct solution until after you've seen the clue in the Cave first.
I've run into a problem, I made it to dousing the fire with the fishbowl w/out any help but was stuck for about 2 hours after, I came here looking for clues, it says to check the ashes but I can't. After I put out the fire it says "there is a log in the fireplace" and idk if I have to move it somehow, or if my game is glitched. Btw I'm playing on iPhone version if the game.
Jtoro,
It's not a glitch, sounds like you just skipped an earlier step. You need to first place the Sealed Wooden Box from your inventory into the lit fire. Douse the flame with the fishbowl water, then take the 5 Ounce Weight from the fireplace.
Im lost and it's frying my head.. I can't find the bird for the fire place I can't get the plug for the bath and iv set the dials to 8.25 an nothing happened. What's the cave? How do I get the wrench and the thing in the freezer
Danielle,
Have you had a look at the Walkthrough above the comments? The answers to all of your questions can be found there.
This game is awesome! :D I finished it just now and i played it for only 3hrs! Hahaha! I hope there's a part 2!!
[Not a part 2, but an entirely new (and bigger!) game just released: The Lost City. Go check it out! :) -Jay]
I got the right colors to the globe but it doesn't work! Is there a problem here?
Cindyluvzmj -
You didn't say which version of the game you are playing, but you might want to have a look at the walkthrough above the comments for some help.
Nice game. Thanx for the info :)
I have nearly completed the whole game but I am stuck on the last bit I can't get all the dials in the right place to open the door I have looked at the walk through but still can't get it!! Please help!!
Laura,
You may be experiencing a common bug that can cause a disc to stay lit even when it's in the incorrect position.
Or is it the mechanics of the puzzle itself that's giving you trouble?
The basic principal of the puzzle is that the arrows inside each of the three discs need to be touching points with the arrows outside of the circles.
You can click and drag a disc to rotate it clockwise or counterclockwise, but that will also rotate at least one of the other circles.
The easiest method I found was to adjust discs 3 and 2 first, then to align all three with disc 1.
finally!! i finished it ;) thank guys
I'm playing on iPhone and am stuck in the hallway after collecting the jewel. I've followed the walk through but can't get to the gargoyle, can anyone help please?
people pls !!! what to do with a wooden box????
Can anyone help. I'm playing the game on the iPhone and I've filled the fish bowl with water from the bathroom, but every time I try to douse the fire, it says "there's a log in the fireplace". I've checked the walk through and cannot see that I've missed anything. Can anyone help as I'm getting really frustrated now!
Clare,
It can be a bit tricky the first time to find the right spot in order to face the side doorway where you use the Gem.
The best way to describe it would be to click the corner past the second door at the end of the right wall.
nat,
Please refer to the Walkthrough above the comments to find the step-by-step instructions for using the Wooden Box.
Screwball 21,
Did you remember to first place the Sealed Wooden Box from your inventory into the lit fire? After the box is in the fireplace, you can successfully douse the flame to find the 5 Ounce Weight.
I need some help - I have put out the flame with the water from the fish bowl, but the 5 ounce weight is not there!!! My brother and I have been trying to find it, but it's just not there!!! Please let me know if there is something else I have to do, because I just HAVE to finish this game!! Thx! <3 <3 <3
Morgan,
Please read the spoiler I addressed to Screwball 21 in the comment directly above yours.
I put the fire out with fish bowl. But it tells me that it has a log in fireplace. How do I remove log? Will not zoom in to fireplace.
peekaboo766,
Have you had a look at the third Lounge section in the walkthrough above the comments?
It's not something you need to take out of the fireplace, rather something you need to put in...
You have to light the log with the matches and put the sealed wooden box inside the fire. Douse the flames with the water from the fish bowl, then you can take the 5 ounce weight that was in the box from the ashes.
Sorry ending very anti clamatic no answers completed game in about 30 minutes.........boring to say the least not worth the 99 cents even . Played via nook color. Again very boring
Here is another great escape game on Android, I think it is more addictive and trilling Curse Breakers: Horror Mansion
I'm getting the "This browser does not support HTML5.
Try the latest version of Safari, Firefox, or Chrome." I'm using Firefox 19, which was released only this week (week of 20 February 2013), so I highly doubt the error message is correct.
[Try it again, I think it's fixed. -Jay]
Well this finally loaded for me-- fairly enjoyable, tricksy in just the right spots. And not very tricksy at all in a few too many places. Great art. Not terrible grisly, however. Good for a few chuckles.
I'm trying to figure out if I'm missing something. I have the right colors on the globe and it won't "spin open". Green, orange, red, purple. I have the log and the fire and the water but came to find the "spoiler" cause I was pretty sure I have the globe right but nothing is happening. I play on my HTC one and so far the whole game works great.
kjkrogh84 -
You might want to have a look at the walkthrough above the comments, as well as read the other comments because a lot of them relate to the globe.
I am stuck in darkness :X Bug in the game!!
Leave a comment [top of page]

Game of the week

Walkthrough Guide
(Please allow page to fully load for spoiler tags to be functional.)
The Secret of Grisly Manor Walkthrough
Front Porch
Click the loose brick on the right wall under the columns to zoom in.
Click the brick to remove it, revealing the Key.
Use the Key from your inventory to unlock the front door.
Go through the open door into the foyer.
Foyer
Click the painting above the stairs to zoom in.
Take the Ripped Piece of Paper tucked into the upper left side of the frame.
Go up the stairs to the hallway, then go into the second door on the right into the child's bedroom.
Child's Bedroom
Take the Goldfish Bowl on the bedside table.
Click under the bed to zoom in.
Take the Chess Piece on the floor.
Go back to the hallway then into the first door on the right to enter the grandfather's bedroom.
Grandfather's Bedroom
Click the framed butterflies on the left wall to zoom in.
Take the Jewelled Butterfly at the upper right corner.
Click the drawing on the wall to the left of the bed for a closer look.
Note the position of the white triangles inside the circle: SE, S, W, SW
Go back to the lounge.
Lounge
Click the chessboard to zoom in.
Add the Chess Piece from your inventory to the board.
Take the Silver Key from the revealed cache.
Return to the upstairs hallway.
Hallway
Use the Silver Key from your inventory on the door to the far left.
Go up the stairs into the attic.
Attic
Click the large trunk to zoom in.
Rotate the tiles to complete the image of the flowers.
Solution.
Once the puzzle is solved, the tiles will slide open revealing a butterfly shaped recess.
Place the Jewelled Butterfly from your inventory into the space.
Click the trunk to open it, then click it again to look inside.
Take the Magnet on a String inside the trunk.
Note the four runes written on the bottom.
Go back to the foyer.
Foyer
Click the upper right corner of the rug to lift it, revealing a grate on the floor.
Click the grate to zoom in.
Use the Magnet on a String from your inventory on the grate to receive the Tuning Fork.
Go through the lounge to the kitchen, out the door to the yard, and then forward to the shed.
Shed
Click the pile of wood to take the Log.
Click the plaque on the wall to zoom in.
Use the Tuning Fork from your inventory on the speaker under the ear.
Go through the open door inside the shed.
Take the Wooden Mallet and the Carved Falcon on top of the work table.
Go back to the lounge.
Lounge
Click the falcons on top of the fireplace to zoom in.
Add the Carved Falcon from your inventory into the third space on the mantle.
Turn the falcons according to the drawing in the grandfather's bedroom.
Starting with the falcon on the far left, turn the first one facing Southeast, the second facing South, the third facing West, and the fourth facing Southwest.
Solution.
Take the Fuse from the hidden compartment.
Return to the grandfather's bedroom.
Grandfather's Bedroom
Use the Wooden Mallet from your inventory to smash the piggy bank.
Click the piggy bank to zoom in and take the Brass Token.
Go back to the foyer and then left to the dining room.
Dining Room
Take the box of Matches on the table.
Click the gumball machine on the table to zoom in.
Use the Brass Token from your inventory on the coinslot.
Turn the handle and take the heart-shaped Jewel from the dispenser.
Return to the hallway.
Hallway
Go right at the end of the hallway to face the hidden door.
Place the Jewel from your inventory into the notch at the bottom of the right gargoyle.
Click the opened cache to zoom in.
Take the silver Knob and the Ice Pick.
Go back to the kitchen.
Kitchen
Put the Knob from your inventory inside the hole of the drawer to the left of the fridge.
Click the drawer to look inside and take the Rusty Key.
Click the freezer to open it.
Use the Ice Pick from your inventory on the block of ice to reveal the Wrench.
Go back to the hallway and then through the rear door into the bathroom.
Bathroom
Use the Wrench from your inventory on the large bolt on the wall.
Click the wrench to turn it, revealing a secret passage.
Go through the open door into the passageway.
Passageway
Click the door of the fusebox to open it.
Place the Fuse from your inventory inside the box.
Click the lever to the left of the fusebox to lift the wall.
Go through the revealed doorway into the study.
Study
Take the Golden Key on the desk.
Click the door on the left to open it.
Go back to the passageway.
Passageway
Click the lever to lower the wall again.
Return to the hallway then go through the door at the end of the hall to re-enter the study.
Study
Click the poster on the wall blocking the secret passageway to zoom in.
Note the message at the bottom, "Love is the key to the world"
Go back to the Kitchen.
Kitchen
Click the magnets on the fridge to zoom in.
Note the colors of the letters that make up the word "Love"
L is Green, O is orange, V is red, and E is purple.
Go back to the lounge.
Lounge
Click the globe by the fireplace to zoom in.
Turn the handles on the dials to change the colors so that they match the colors of the fridge magnets in L-O-V-E order (Green, Orange, Red, Purple).
Solution.
Once the puzzle is solved the globe will split open, revealing the Sealed Wooden Box.
Place the Log from your inventory into the fireplace.
Light the log with the Matches.
Add the Sealed Wooden Box to the fire.
Go back to the foyer.
Foyer
Click the third step on the stairway to zoom in.
Use the Golden Key from your inventory on the keyhole inside the stair.
Take the Ornate Rod from the secret cache.
Return to the yard outside the kitchen door.
Yard
Click the large stump in the grass to zoom in.
Use the Ornate Rod from your inventory on the metal socket in the center of the stump.
Click the stump again to zoom in, then go down the ladder to the cave.
Cave
Click the stone pedestal in the center of the room to zoom in.
Click the runes in the circle that match the four runes found at the bottom of the trunk in the attic.
Solution.
Once the puzzle is solved, two beams of light will come out from the center of the circle.
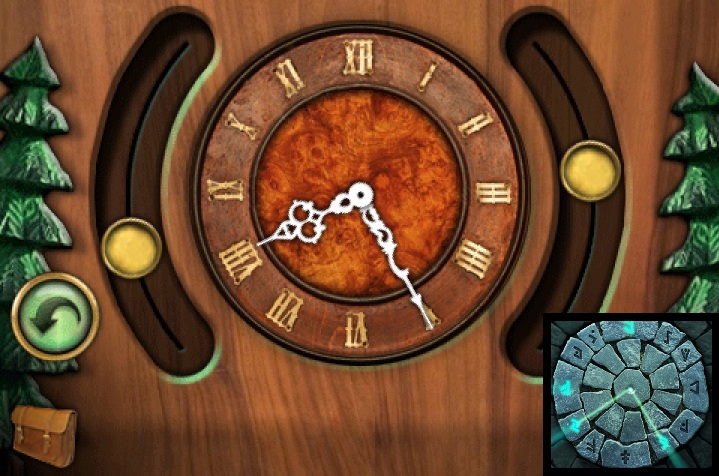
Note the position of the lights resembles the position of the hands on a clock, if the time was about 8:25.
Return to the dining room.
Dining Room
Click the cuckoo clock on the wall to zoom in.
Turn the dials to move the minute hands on the face of the clock.
The left dial moves the hour hand, the right dial moves the minute hand.
Set the time to match the beams of light from the cave at 8:25.
Solution.
Once the clock is set the cuckoo will come out, revealing the Stopper.
Return to the bathroom.
Bathroom
Click the bathtub to zoom in.
Use the Stopper from your inventory to plug the drain.
Click the faucet to fill the tub with water.
Use the Goldfish Bowl on the tub full of water to release the goldfish and receive an Empty Bowl.
Use the Empty Bowl on the tub to make it a Bowl of Water.
Go back to the lounge.
Lounge
Use the Bowl of Water to douse the flame.
Click the fireplace to zoom in.
Take the 5 Ounce Weight from the ashes.
Return to the shed.
Shed
Use the Rusty Key from your inventory on the cabinet on top of the work table.
Take the second piece of ripped paper inside the cabinet, completing the Combination.
Go back to the study.
Study
Use the 5 Ounce Weight from your inventory on the left side of the scale on the desk.
Click the revealed safe behind the dog painting to zoom in.
Enter in the Combination from your inventory to the numbers on the safe.
42-34-15
Solution.
Take the Iron Key from the opened wall safe.
Go back to the foyer.
Foyer
Use the Iron Key from your inventory on the door behind the stairs.
Go through the open door to the basement.
Basement
Click the blue door to zoom in.
To open the door, rotate the three discs so the arrow inside each circle lines up with the adjacent arrow outside the circle.
Starting from the left Disc #1 rotates all three circles, Disc #2 rotates 1 and 2, and Disc #3 rotates 2 and 3.
If the circle is stuck glowing, align the arrows of the glowing circle, then rotate a different disc to move the glowing circle away from the arrow and it will fade back to normal.
Solution.
Once the puzzle is solved, go through the open door.
The End
Posted by: Trinn |
August 18, 2011 1:54 PM
|
August 18, 2011 1:54 PM