
Prizma Puzzle Challenges
Prizma Puzzle Challenges is more of an expansion pack than a true sequel to the Prizma Puzzle series of tile-based puzzle games by Silen Games, but what it lacks in originality, it makes up for in steady competence. There are no rough edges here, just pure, smooth, 3D goodness.
Read More7 Comments
Here's a BIG hint for later puzzles:
Don't expect symmetrical puzzles to have symmetrical solutions.

I got seventy billion "achievements" just by completing the tutorial (a straight line with no obstacles). It's REALLY off-putting. Does it go on like that?
@JIGguest
Yes, it does slow down a lot after the Green Zone.
Prizma Puzzle Challenges Walkthrough
General Information
-
The goal on each level is to make it to the Finish square without running out of energy.
-
You start each level with five available moves, and can increase this number by landing on energy spaces
-
Once you have touched a space, you cannot touch it again. Or in other words, no backtracking or path crossing.
-
Cannons shoot you across the board to the next chargeable square. They cost one move, regardless of how far you go. Paths you take from cannons can cross each other, but once you have used a cannon, you cannot use it again.
-
Teleporters allow you to start a new path on any start symbol. Teleporting does not cost a move.
-
Switches make blocks of the same color disappear, and crystal breaker allows you to pass by the pink crystals.
-
You can collect up to three stars per level. Advanced levels are unlocked by collecting enough stars. You don't need to collect all stars to unlock all the levels, but you do need to collect most of them.
-
Challenge levels (levels 21 to 40) do not have stars
-
Scoring is based on number of moves (more moves lead to higher scores) and speed.
-
For each level, the walkthrough contains a hint under the spoiler tag and the full solution on the accompanying image.
Green Zone
Level 1
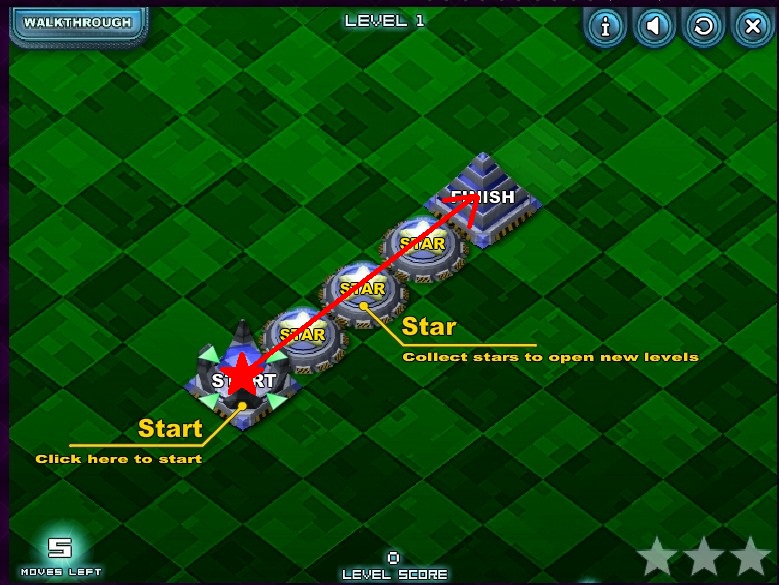
Tutorial level: just go straight.
Screenshot
Level 2
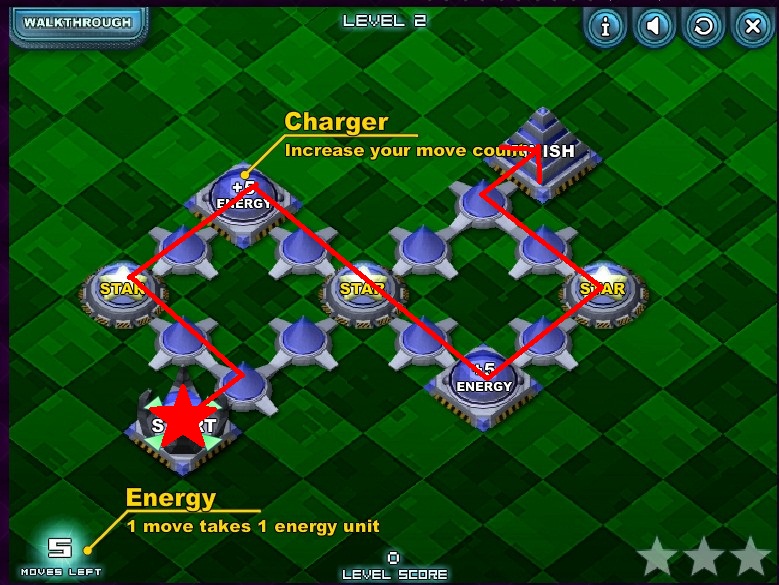
Remember, you can't backtrack over spots you've already charged.
Screenshot
Level 3
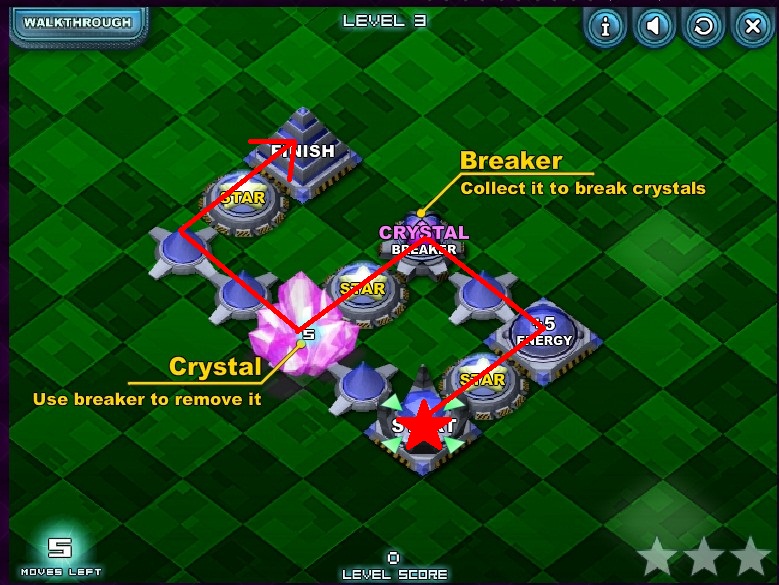
You'll need the Crystal Breaker before you can pass the pink crystal.
Screenshot
Level 4
Another level where you need to remember the no back-tracking rule.
Screenshot
Level 5
This level teaches you about cannons. There's only really two choices at the beginning.
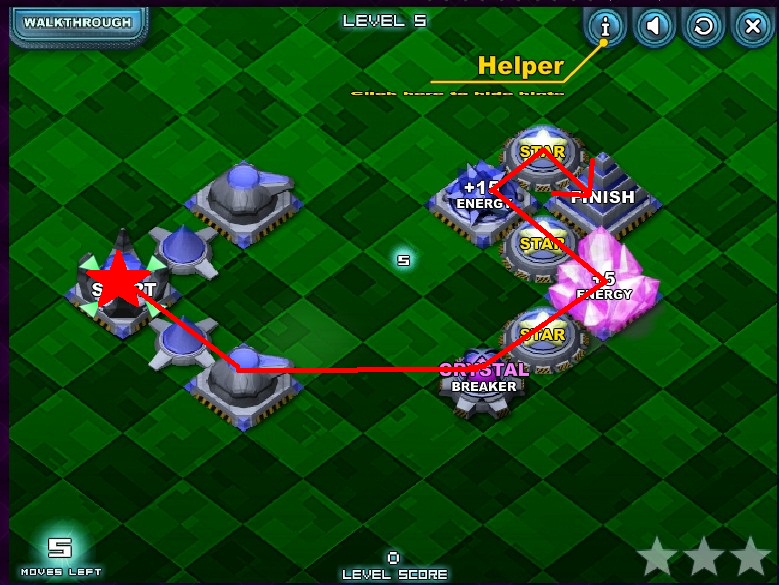
Yellow Zone
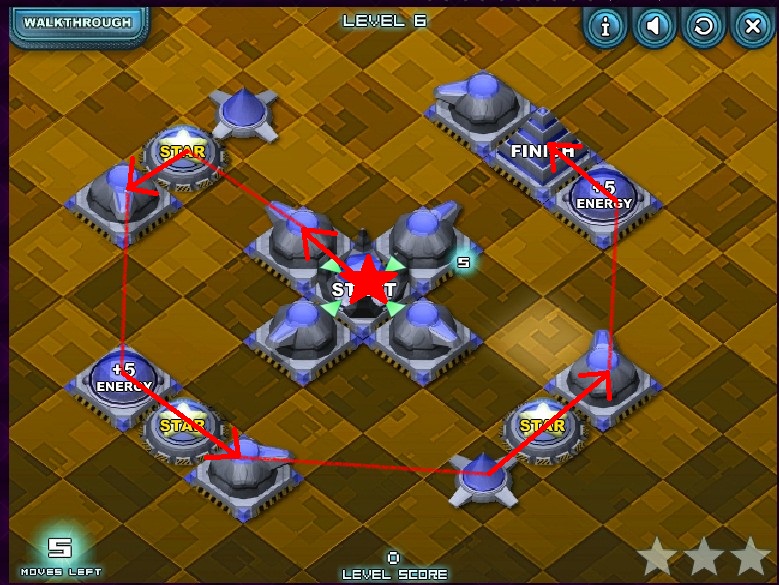
Level 6
Pay close attention to which direction all the cannons are firing. Once you leave the center island, you don't have any more choices about where to go.
Screenshot
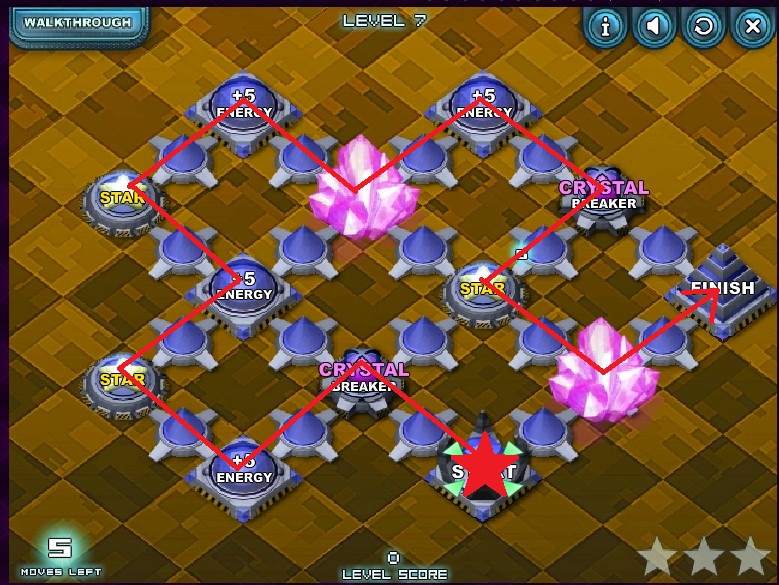
Level 7
To get all the stars, you'll need to break both crystals.
Screenshot
Level 8
Once you collect the 10 energy, don't go straight to the nearest star.
Screenshot
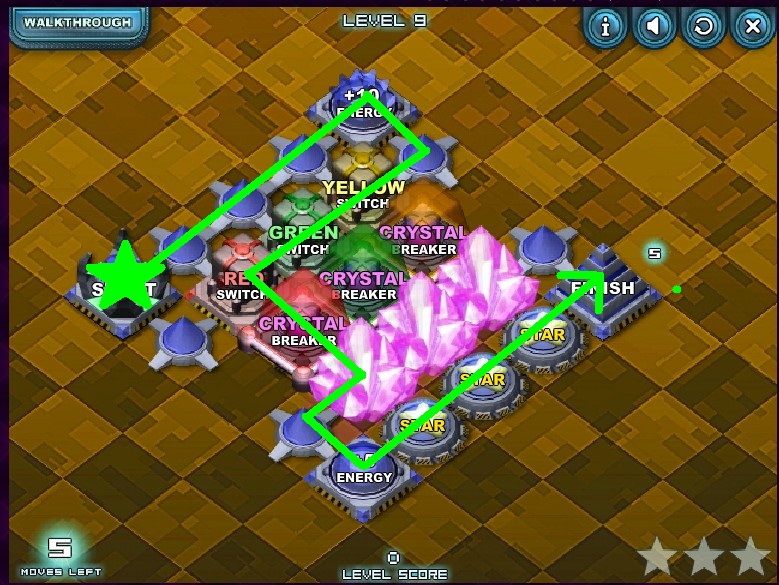
Level 9
There's only one energy source within 5 steps of the start.
Screenshot
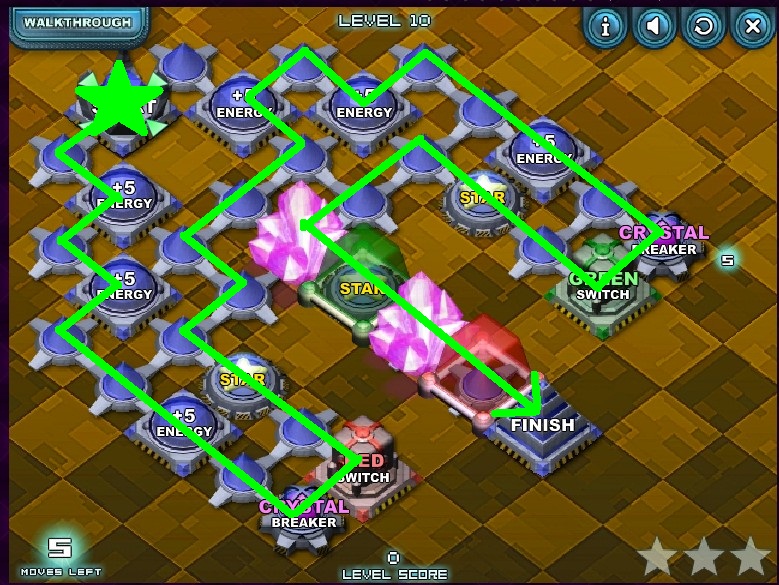
Level 10
You need both crystal breakers and to hit both switches, which means you need to leave yourself space to go down and back both branches.
Red Zone
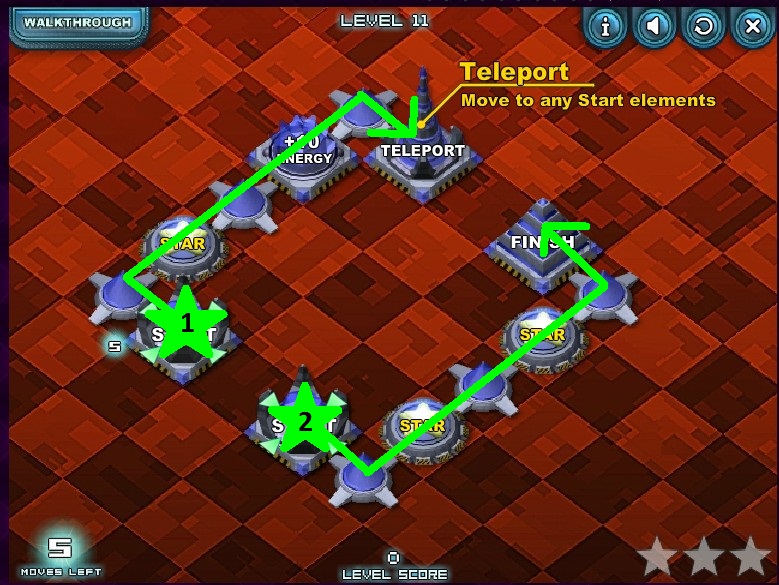
Level 11
This level teaches you about teleporters and should be straightforward.
Screenshot
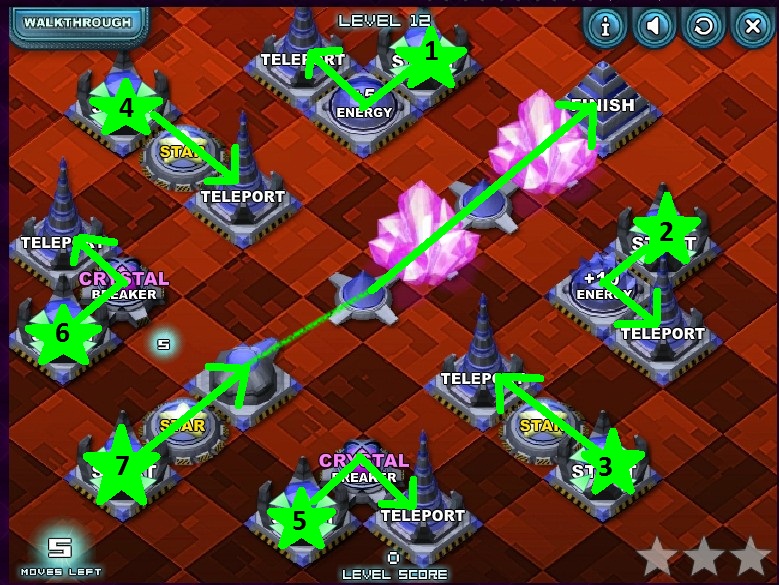
Level 12
You'll need to use every teleporter on this level if you want all the stars. Make sure to collect the energy sources first!
Screenshot
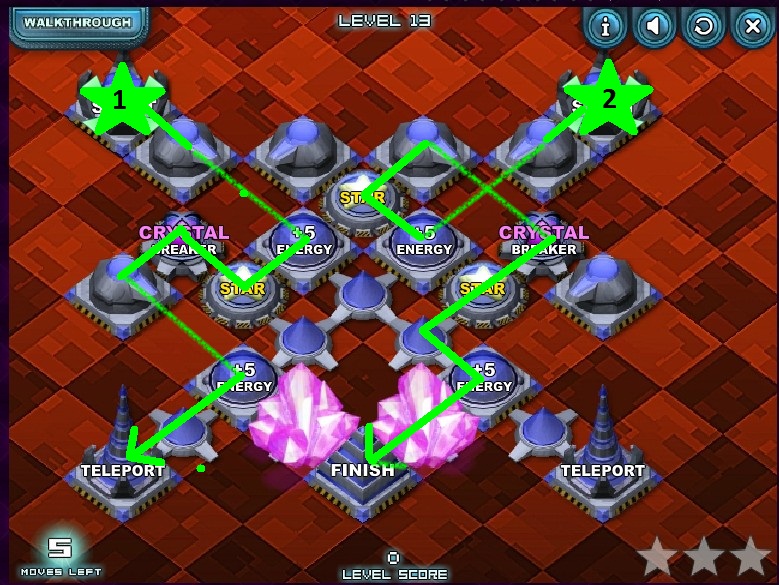
Level 13
You only need one crystal breaker, but you'll end up collecting both of them if you want all three stars.
Screenshot
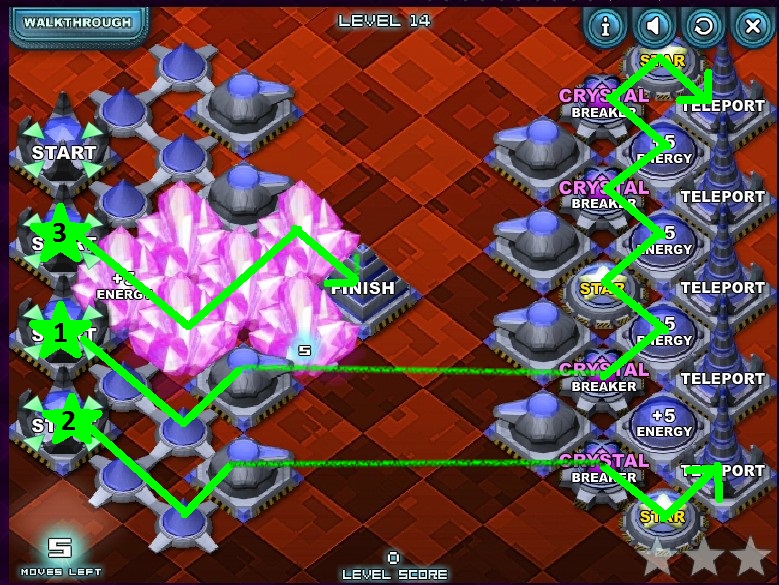
Level 14
You can't start at either the top or the bottom start point, as that will leave you without access to one of the stars.
Screenshot
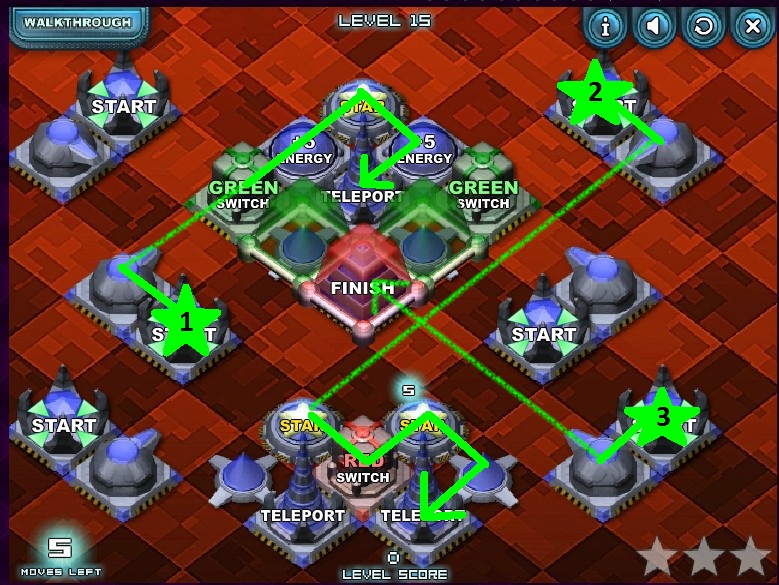
Level 15
Look at the items you need to collect (stars, energy, switches). Now look for a cannon that points at them.
Black Zone
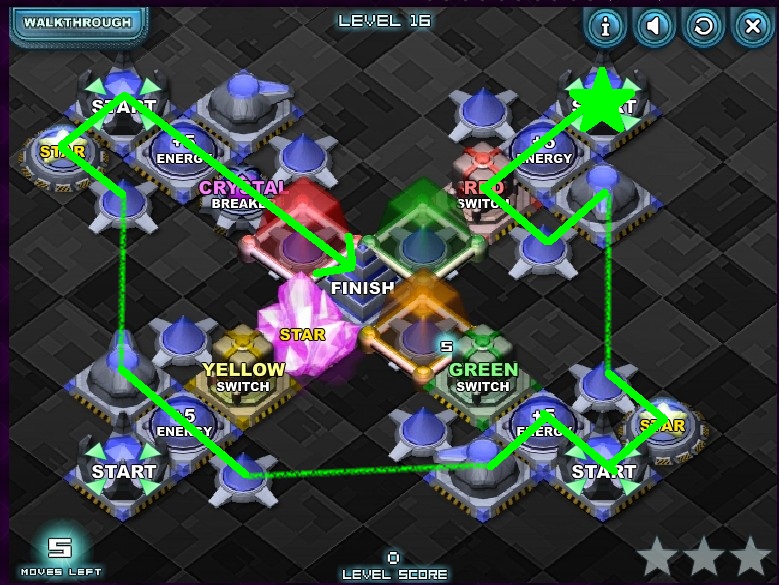
Level 16
You only need to clear one obstacle (ie, one of the switches or the crystal breaker) to get at the finish point.
Screenshot
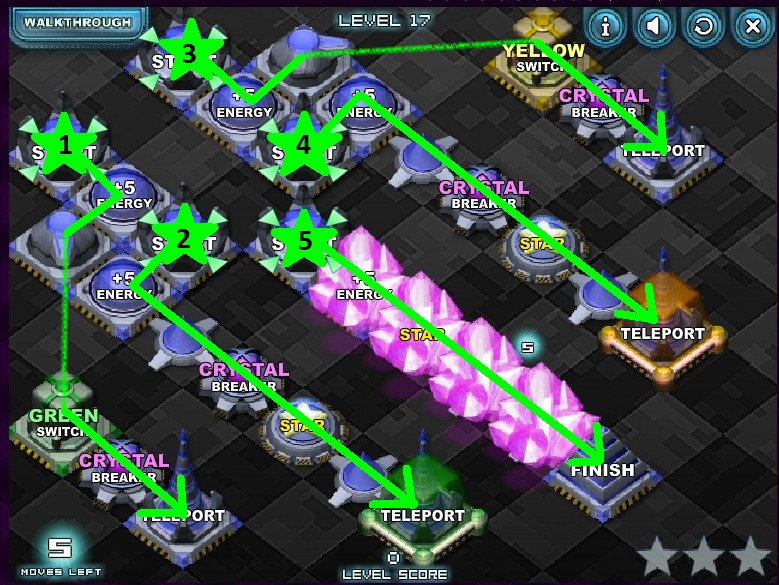
Level 17
You need all the crystal breakers on the board, which means you also need to hit both switches.
Screenshot
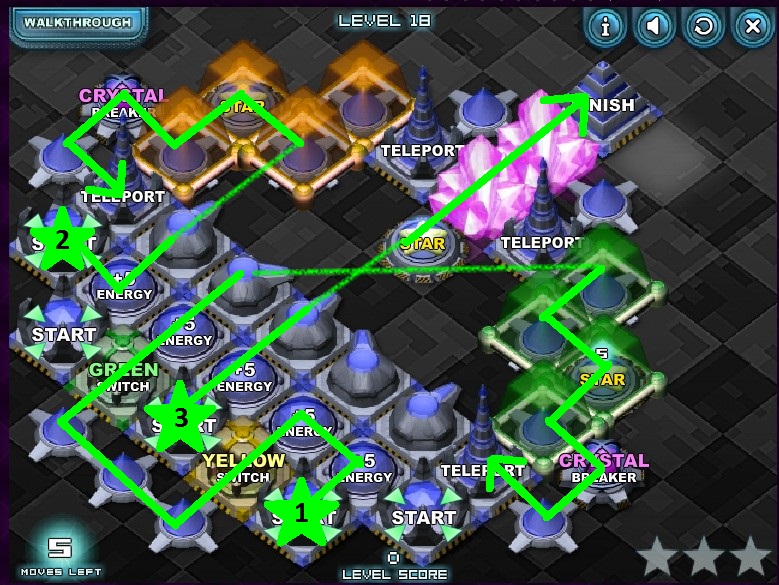
Level 18
Don't try to find a symmetrical path through this level. Oh, and start with making sure you have enough energy for the level without blocking your path to the finish.
Screenshot
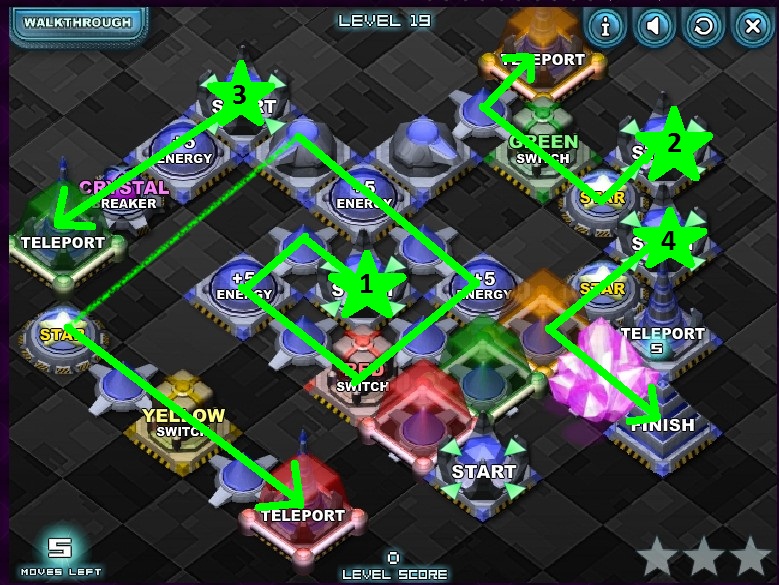
Level 19
There is only one start location where the path to the teleporter isn't obstructed. Start there.
Screenshot
Level 20
The idea here is to collect the stars while breaking as few crystals as necessary. You'll need to start at one of the start points that has an energy source nearby.
Crystal Challenge
Level 21
Every possible path to the finish requires breaking two crystals.
Screenshot
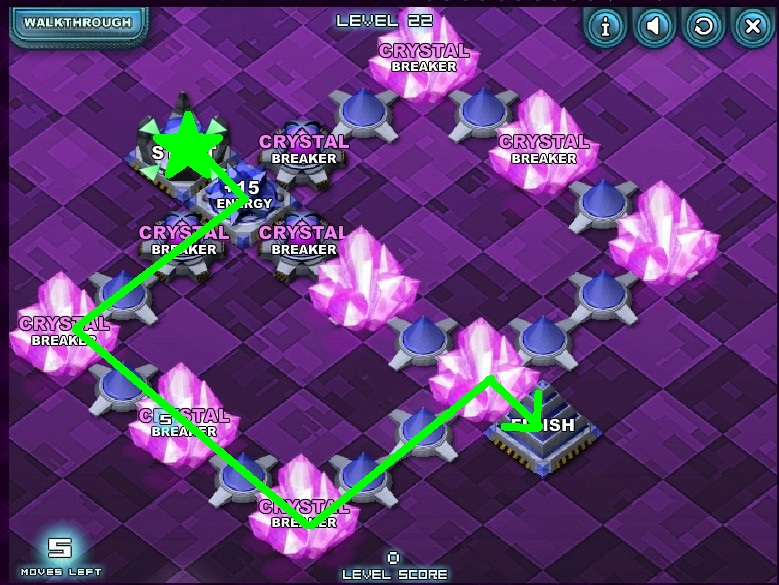
Level 22
There are three branches you can choose. Only one of them contains enough crystal breaker.
Screenshot
Level 23
On this level you need to collect both crystal breaker and energy early.
Screenshot
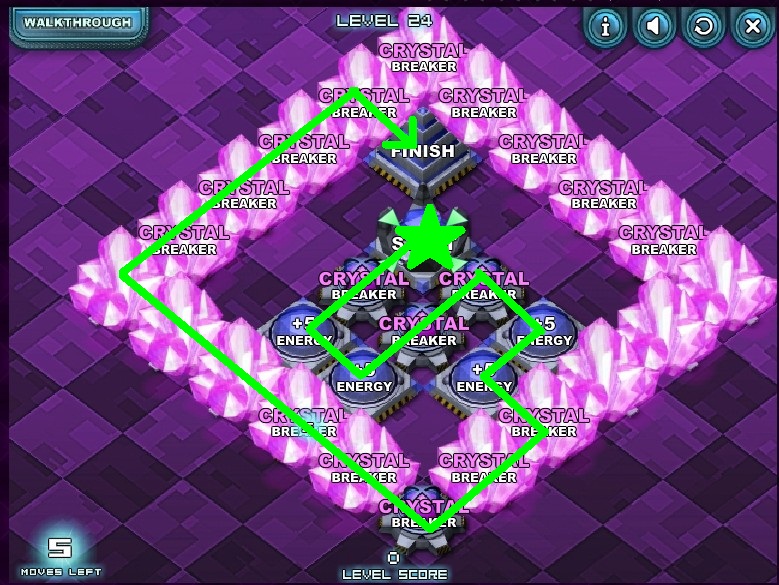
Level 24
You need the crystal breaker in the bottom corner of the board.
Screenshot
Level 25
There's not much crystal breaker around the finish, which means you should collect some on the way there.
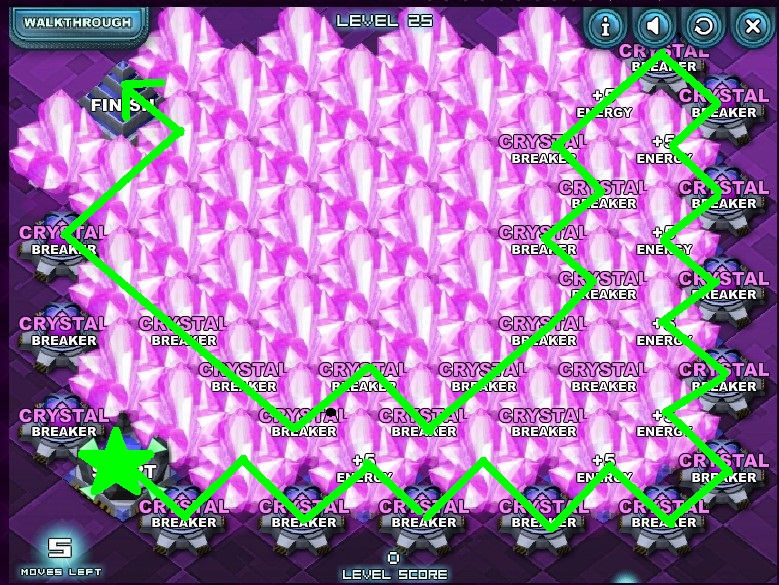
Cannon Challenge
Level 26
You only have 10 total moves, and just getting from left to right takes 8 of them, leaving aside travel up and down the screen.
Screenshot
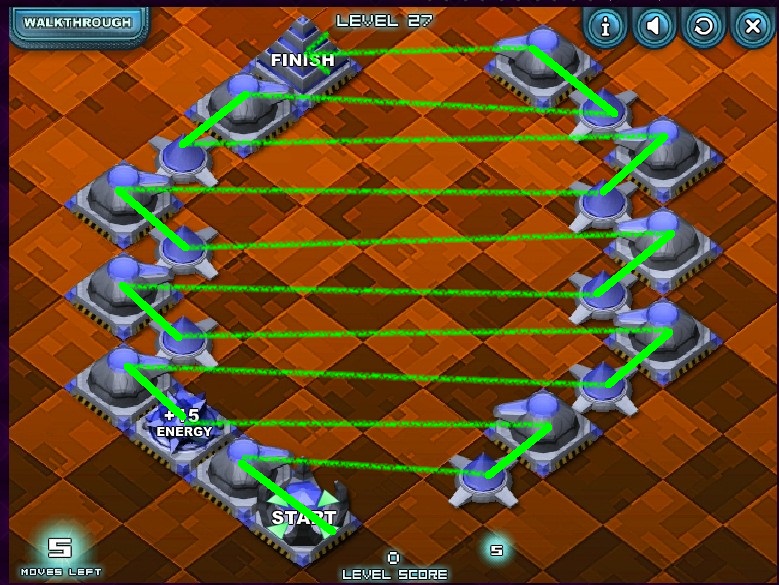
Level 27
At each point, there is only one valid move to make.
Screenshot
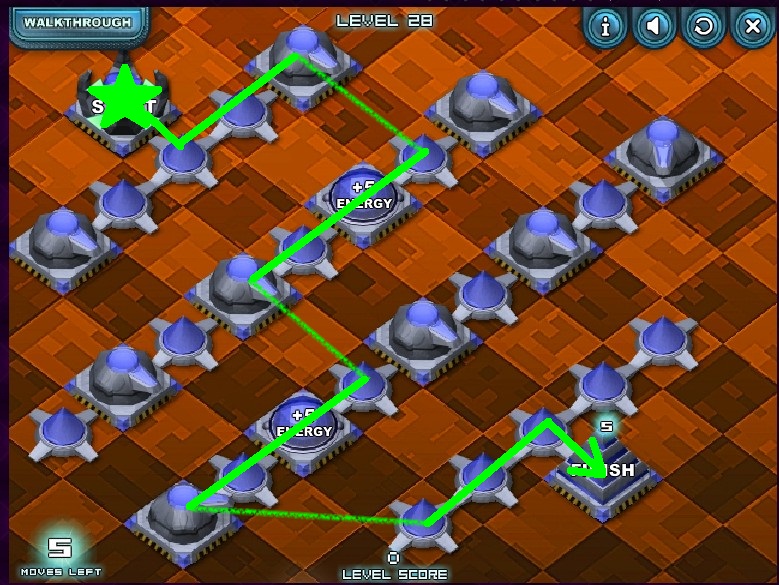
Level 28
On each row, make sure you land as close to the energy source as possible.
Screenshot
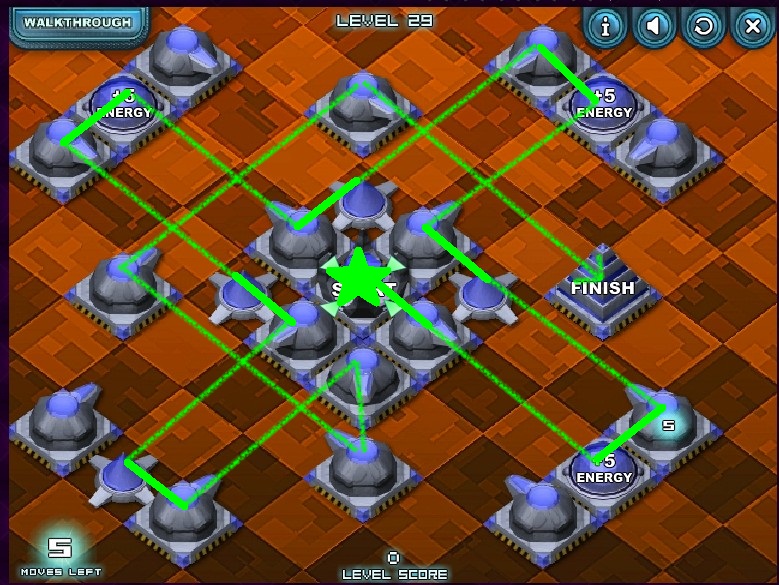
Level 29
Pay close attention to which way the cannons are facing and where the energy sources are.
Screenshot
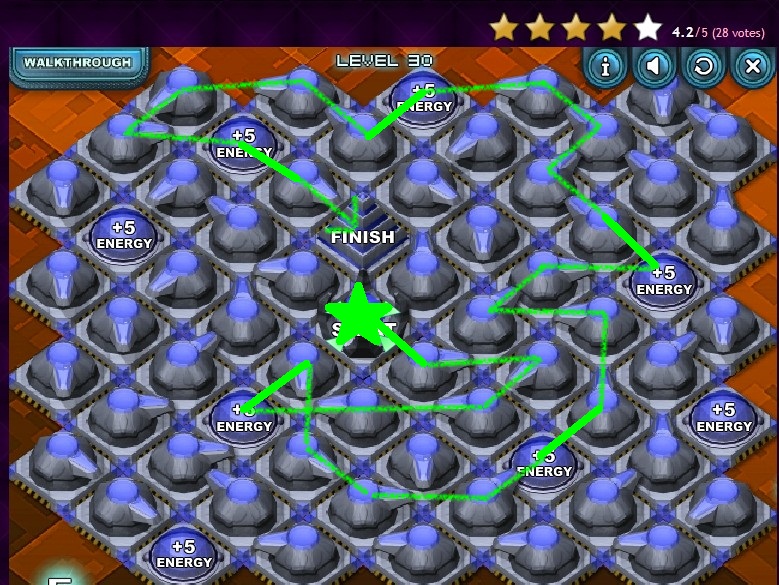
Level 30
Pay close attention to which way the cannons are facing and where the energy sources are.
Barrier Challenge
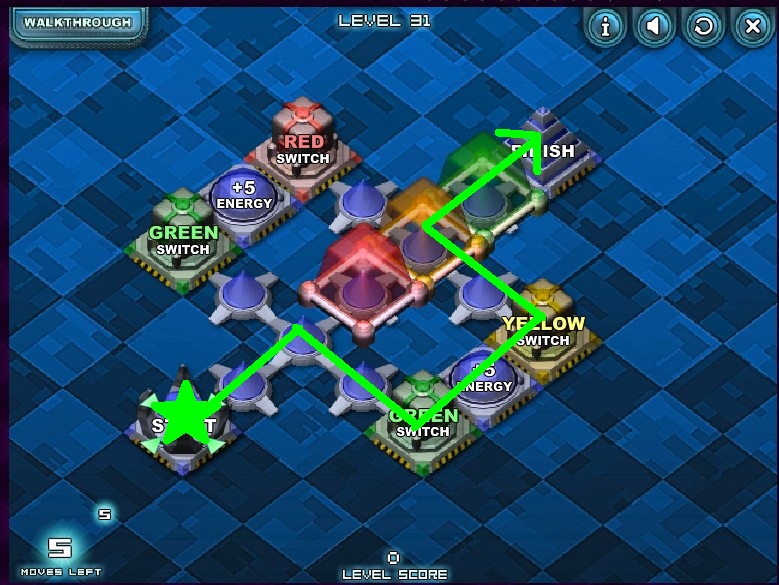
Level 31
You need to clear the yellow switch to solve this level.
Screenshot
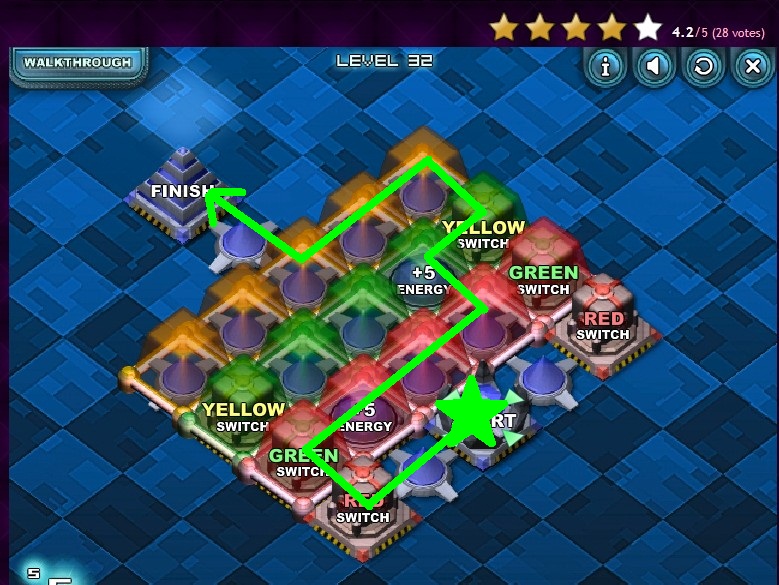
Level 32
You have to get both energy sources to get out of this level.
Screenshot
Level 33
The yellow blocks are the first obstacle you need to clear.
Screenshot
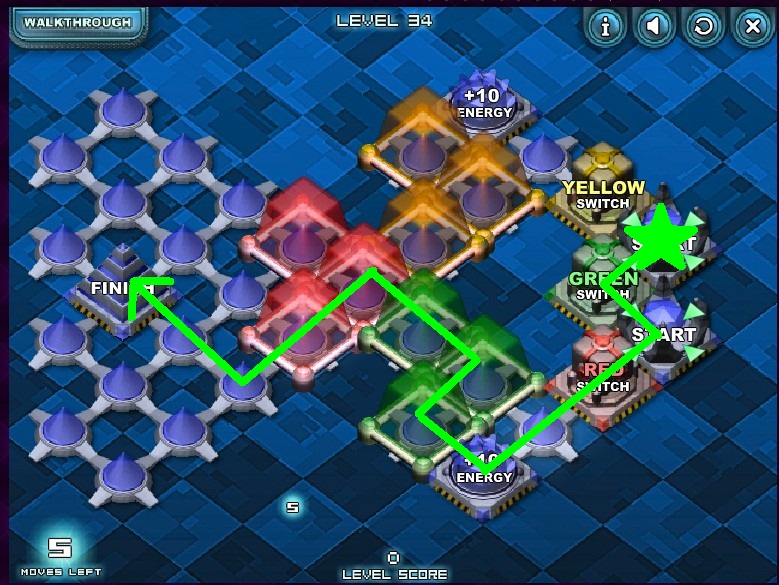
Level 34
The red blocks have to be cleared, even though that means ignoring another color block.
Screenshot
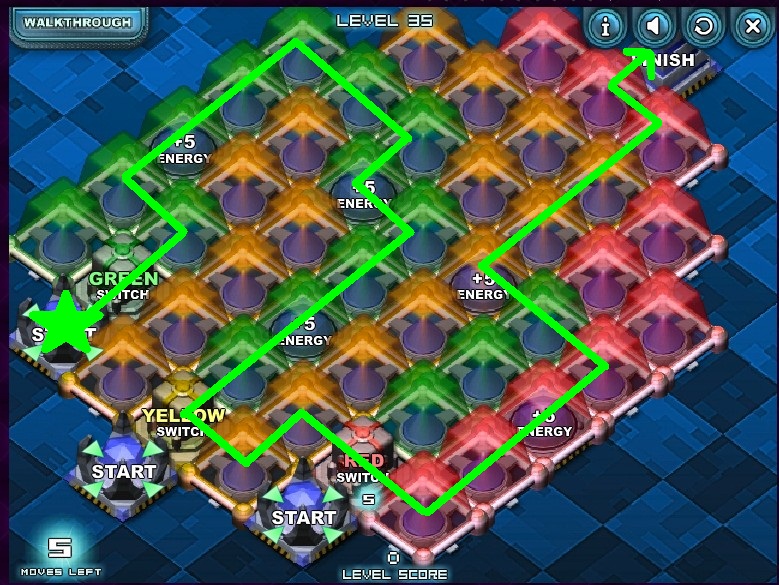
Level 35
Start with the green switch. You can't start with red, since the red areas aren't connected, and you can't start with yellow, since there's no energy close enough to the start.
Teleport Challenge
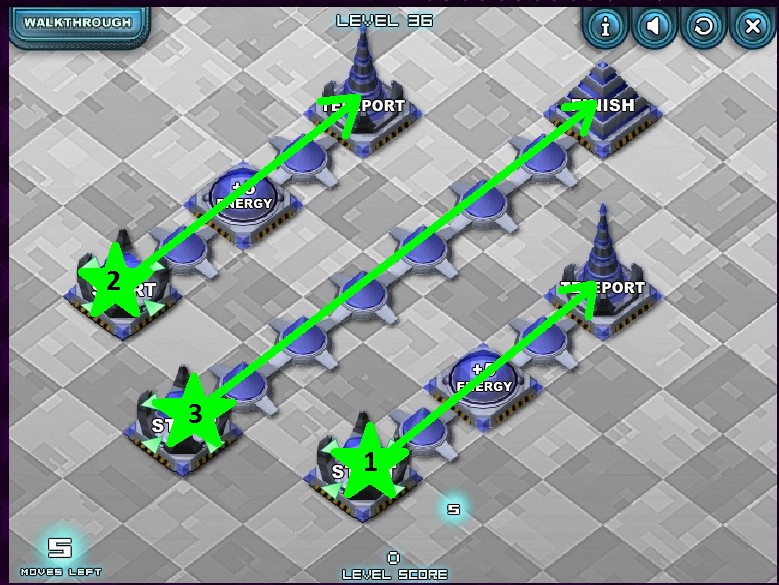
Level 36
The center path is two steps too long for your starting energy. Happily each side path is only four steps long.
Screenshot
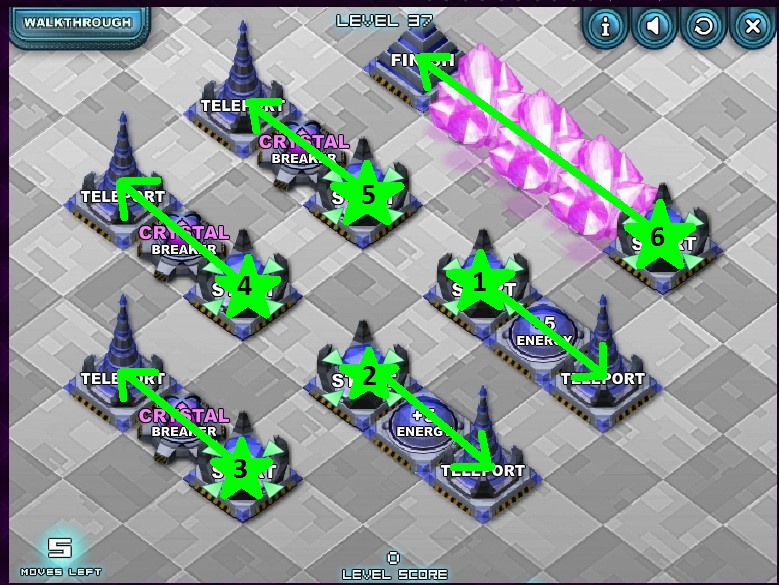
Level 37
You need all the energy and all the crystal breaker on this level.
Screenshot
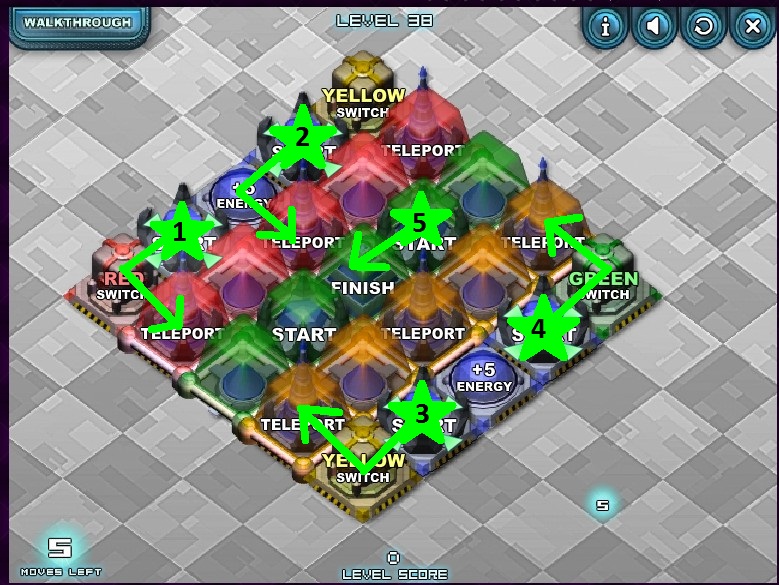
Level 38
There are several ways to solve this level, but in each case, you need to pick up some energy.
Screenshot
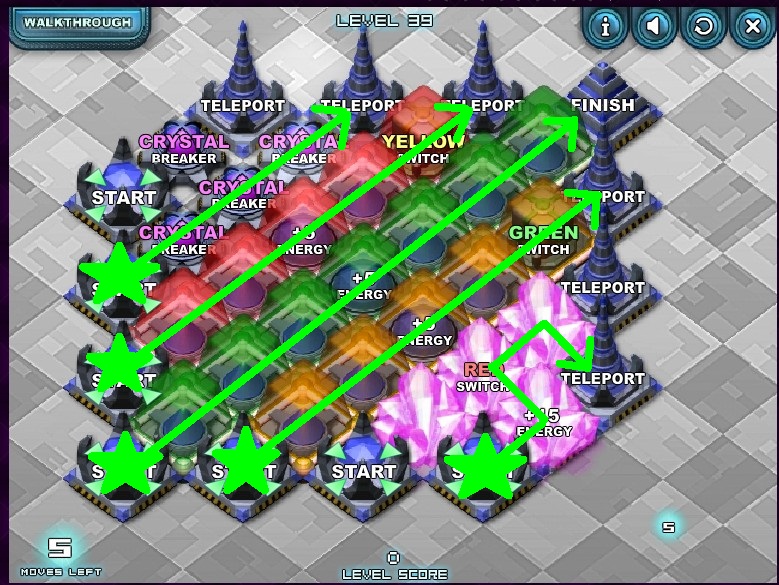
Level 39
There's a nice big block of energy under a crystal. And you only need three crystal breakers to get at it and then get to the teleport.
Screenshot
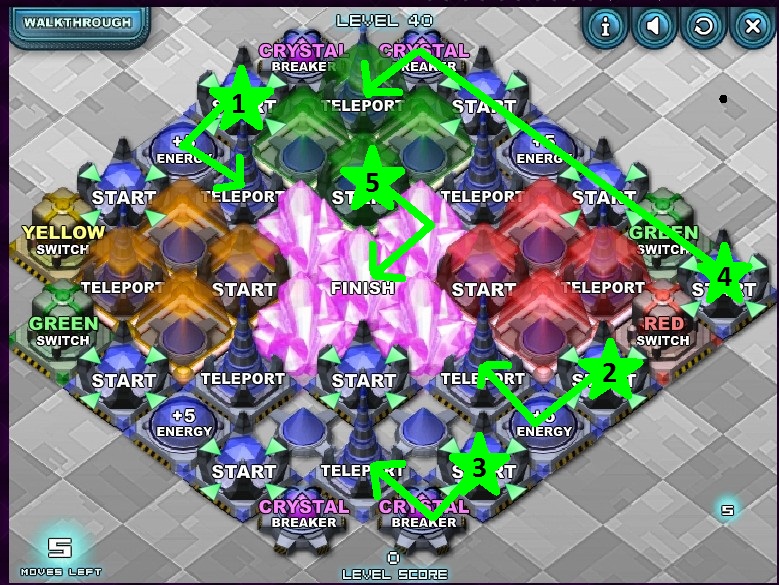
Level 40
There are four crystal breakers on this level, but because of the location of the start and teleport spaces, you can only collect two at maximum. Luckily that's all you need to get to the finish.
The screenshot for Level 14 is broken.
[Thanks, fixed! -Jay]
The walkthrough for level 16 only gives two stars.
This is what I did for that level:
Choose the Start at the top-left corner, get the star there, get the 5+ energy and the crystal breaker, use the cannon.
Get the 5+ energy next to the top-right Start, use the cannon there.
Get the star next to the Start in the bottom right hand corner, get the 5+ energy, use the cannon again.
Finally, get the 5+ energy, cross the yellow switch and the crystal (which gives you the third star), and then finish.
Hope that helps!
Leave a comment [top of page]

Game of the week

Walkthrough Guide
(Please allow page to fully load for spoiler tags to be functional.)
Prizma Puzzle Challenges Walkthrough
General Information
The goal on each level is to make it to the Finish square without running out of energy.
You start each level with five available moves, and can increase this number by landing on energy spaces
Once you have touched a space, you cannot touch it again. Or in other words, no backtracking or path crossing.
Cannons shoot you across the board to the next chargeable square. They cost one move, regardless of how far you go. Paths you take from cannons can cross each other, but once you have used a cannon, you cannot use it again.
Teleporters allow you to start a new path on any start symbol. Teleporting does not cost a move.
Switches make blocks of the same color disappear, and crystal breaker allows you to pass by the pink crystals.
You can collect up to three stars per level. Advanced levels are unlocked by collecting enough stars. You don't need to collect all stars to unlock all the levels, but you do need to collect most of them.
Challenge levels (levels 21 to 40) do not have stars
Scoring is based on number of moves (more moves lead to higher scores) and speed.
For each level, the walkthrough contains a hint under the spoiler tag and the full solution on the accompanying image.
Green Zone
Level 1
Tutorial level: just go straight.
Screenshot
Level 2
Remember, you can't backtrack over spots you've already charged.
Screenshot
Level 3
You'll need the Crystal Breaker before you can pass the pink crystal.
Screenshot
Level 4
Another level where you need to remember the no back-tracking rule.
Screenshot
Level 5
This level teaches you about cannons. There's only really two choices at the beginning.
Screenshot
Yellow Zone
Level 6
Pay close attention to which direction all the cannons are firing. Once you leave the center island, you don't have any more choices about where to go.
Screenshot
Level 7
To get all the stars, you'll need to break both crystals.
Screenshot
Level 8
Once you collect the 10 energy, don't go straight to the nearest star.
Screenshot
Level 9
There's only one energy source within 5 steps of the start.
Screenshot
Level 10
You need both crystal breakers and to hit both switches, which means you need to leave yourself space to go down and back both branches.
Screenshot
Red Zone
Level 11
This level teaches you about teleporters and should be straightforward.
Screenshot
Level 12
You'll need to use every teleporter on this level if you want all the stars. Make sure to collect the energy sources first!
Screenshot
Level 13
You only need one crystal breaker, but you'll end up collecting both of them if you want all three stars.
Screenshot
Level 14
You can't start at either the top or the bottom start point, as that will leave you without access to one of the stars.
Screenshot
Level 15
Look at the items you need to collect (stars, energy, switches). Now look for a cannon that points at them.
Screenshot
Black Zone
Level 16
You only need to clear one obstacle (ie, one of the switches or the crystal breaker) to get at the finish point.
Screenshot
Level 17
You need all the crystal breakers on the board, which means you also need to hit both switches.
Screenshot
Level 18
Don't try to find a symmetrical path through this level. Oh, and start with making sure you have enough energy for the level without blocking your path to the finish.
Screenshot
Level 19
There is only one start location where the path to the teleporter isn't obstructed. Start there.
Screenshot
Level 20
The idea here is to collect the stars while breaking as few crystals as necessary. You'll need to start at one of the start points that has an energy source nearby.
Screenshot
Crystal Challenge
Level 21
Every possible path to the finish requires breaking two crystals.
Screenshot
Level 22
There are three branches you can choose. Only one of them contains enough crystal breaker.
Screenshot
Level 23
On this level you need to collect both crystal breaker and energy early.
Screenshot
Level 24
You need the crystal breaker in the bottom corner of the board.
Screenshot
Level 25
There's not much crystal breaker around the finish, which means you should collect some on the way there.
Screenshot
Cannon Challenge
Level 26
You only have 10 total moves, and just getting from left to right takes 8 of them, leaving aside travel up and down the screen.
Screenshot
Level 27
At each point, there is only one valid move to make.
Screenshot
Level 28
On each row, make sure you land as close to the energy source as possible.
Screenshot
Level 29
Pay close attention to which way the cannons are facing and where the energy sources are.
Screenshot
Level 30
Pay close attention to which way the cannons are facing and where the energy sources are.
Screenshot
Barrier Challenge
Level 31
You need to clear the yellow switch to solve this level.
Screenshot
Level 32
You have to get both energy sources to get out of this level.
Screenshot
Level 33
The yellow blocks are the first obstacle you need to clear.
Screenshot
Level 34
The red blocks have to be cleared, even though that means ignoring another color block.
Screenshot
Level 35
Start with the green switch. You can't start with red, since the red areas aren't connected, and you can't start with yellow, since there's no energy close enough to the start.
Screenshot
Teleport Challenge
Level 36
The center path is two steps too long for your starting energy. Happily each side path is only four steps long.
Screenshot
Level 37
You need all the energy and all the crystal breaker on this level.
Screenshot
Level 38
There are several ways to solve this level, but in each case, you need to pick up some energy.
Screenshot
Level 39
There's a nice big block of energy under a crystal. And you only need three crystal breakers to get at it and then get to the teleport.
Screenshot
Level 40
There are four crystal breakers on this level, but because of the location of the start and teleport spaces, you can only collect two at maximum. Luckily that's all you need to get to the finish.
Screenshot
Posted by: MmeTurbulence |
October 13, 2011 4:11 PM
|
October 13, 2011 4:11 PM