
Heart of Tota
Raided any tombs lately? Pencil Kids brings us a fun and surprisingly tricky little point-and-click puzzle adventure that sees you in search of the legendary Heart of Tota. Standing in your way? A series of tricky mechanisms designed to keep you out. Of course, that's not going to stop you. Just remember; never leave your hat behind.
Read More23 Comments
Well, that was a nice distraction. Exactly what I just needed. Missed 11 of the coins (and clicked about a billion times), but don't really feel the need to go hunting for them now, or "improve" my score.
My only real complaint is that all of the foley noises for each scene start up from the start each time you enter the scene, and when you're running between them quickly it's quite jarring, especially outside where the distinct bird calls are quite noticable.
I don't think it needs the story it lacks, honestly. I mean, at first glance we all know that it's a quick game, and it's an Indiana Jones wannabe, so any added story (while not unappreciated) could've taken away from the quick pick up and play it has now. But yeah, no replay value at all.
The coins are a nice touch... they can make you feel like you're making some progress when really you're not, so you don't become frustrated while dwelling on a stupid puzzle.
Speaking of stupid puzzles, there was one that I had to brute-force (it only had 64 combinations, after all) because, while I had all the pieces, I couldn't figure out what crazy brand of developer logic was applied to it... or at the very least, it would've been slower than just guessing.
Thanks JiG, for pointing out a nice adventure-y way to end my day =)

Bug: the pedestal with the staff went down for me before I had solved the telescope puzzle. Not sure why. This was a major red herring for me because I kept trying to get light to bounce along the mirrors, and it never showed up.
Fun little game, but I thought the scary pop-up-face after
the mirror puzzle
was totally unnecessary for this game.
Hint for the dice-puzzle:
The answer is on the roster
The hint is found on the left wall
O=C means you have to look under the O in Outside and in the line of the C from CAMP.
Huge bug.
The scepter descended before the light was activated through the gem. So that means I got as far as putting the heart in before the program just got stuck.
I like pencil kids point and clicks but am suffering a few frustrations:
In the in-game walkthrough a rectangular mirror appears in the inventory between screens 11 & 12... any hints?
Also the walkthrough doesn't explain how to achieve all the solutions,such as the six 2 dot puzzle ... anyone?
Fun little distraction. I always enjoy the pencil kids puzzles. Perfect for a lunch break.
@stupidcheeseboy: The dots are a distraction. Look at the pattern.
stupidcheeseboy:
The six tile, 2 dot puzzle has nothing to do with the dots. A simple hint would be to go with the flow. Put plainly:
You want to click the tiles to rotate out options starting with the left tile and making sure the gray swirly design/line continues to match up from left to right until you close out "flow" on the rightmost tile. Counting from left to right the fifth tile is already in the correct position.
finally found the rectangular mirror...
in the screen with the telescope, move the rocks, you can just see the top of it
Dang that pop up face scared the heck out of me. I just had to walk out of the room for a few seconds after that. I didn't expect things like that from these games.
This game has a pop fright
@Isa WP and @Trish916: Yeah tell me about It! It was late at night. All the lights were off. I was alone and totally not expecting that shrill of terror lol.
At first I hated it. But then got a kick out of it. Usually, I don't like to be scared unless it's Halloween lol.
A pop up fright? Superb. I'm just that kind of person that retreats from a game if it's scary. Sounds silly, okay, but I'm extremely jumpy and would probably throw my monitor over if I come across it. Great.
Can't find the round mirror :-(
Glitch, have picked up the crowbar and can't put it down.
@ Monty Zoomer
The round mirror is
In the room which opens up once you solve the slider puzzle. There is a big concrete slab that you need to move twice, first time to get a coin and second time to collect the round mirror. You'll also find the scepter in this room.
Have you solved the slider puzzle?
Yeah but didn't notice the big rock!?!?!
@Chaotick: You're lucky. You saw the warning in the review before you decided not to play it. I, on the other hand, just went to the Pencilkids site and played the new game right up to that point.
I like Pencilkids games a lot (still hoping for a new Bowja game), but that jump scare that was both not expected in a Pencilkids game and totally unnecessary. Would be nice if there was some kind of warning system for these things. Ever since that car video, man.
During the game, the status shows X coins out of 100, but as the final screen reveals, it's actually X out of 60. Oops!
The "impossible" 64 choice puzzle... just look at the name of the game
Heart of Tota Walkthrough
General Information:
-
On the Main Screen there are links to Instructions and you can check out your Achievements when you've completed the game.
-
You can check the High Scores and enter your score when you are finished.
-
There are more games from Pencilkids that you can check out or just click Play for this one.
-
The game has no timer or penalty for too much clicking and hints are available.
-
Your cursor will turn into a hand when you should pick up an object.
-
Most close ups will have an "X" to get out of them when you are done but a few are automatic.
-
Coins are available at each location and subtract from your final click score.
-
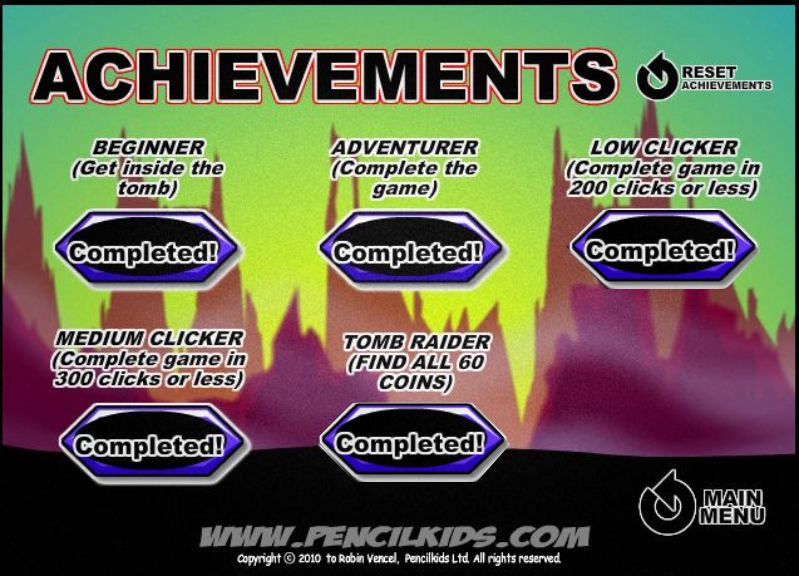
When you have completed the game you will be able to view your Achievements as shown on the screen shot.
Walkthrough
-
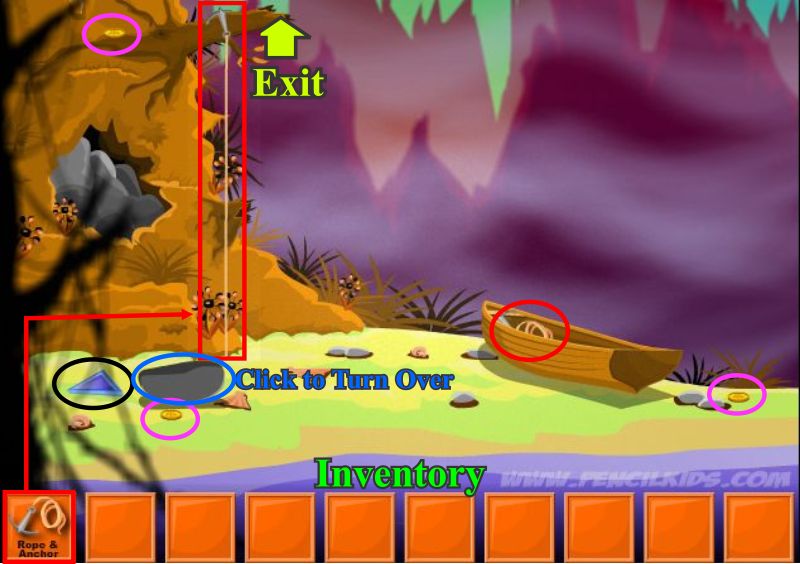
Collect 3 coins.
-
Click on the rock to turn it over and pick up the triangle mirror.
-
Pick up the anchor and rope from the boat and it will go into your inventory at the bottom of the screen.
-
Throw the anchor up on the tree branch and climb it to exit the scene.
-
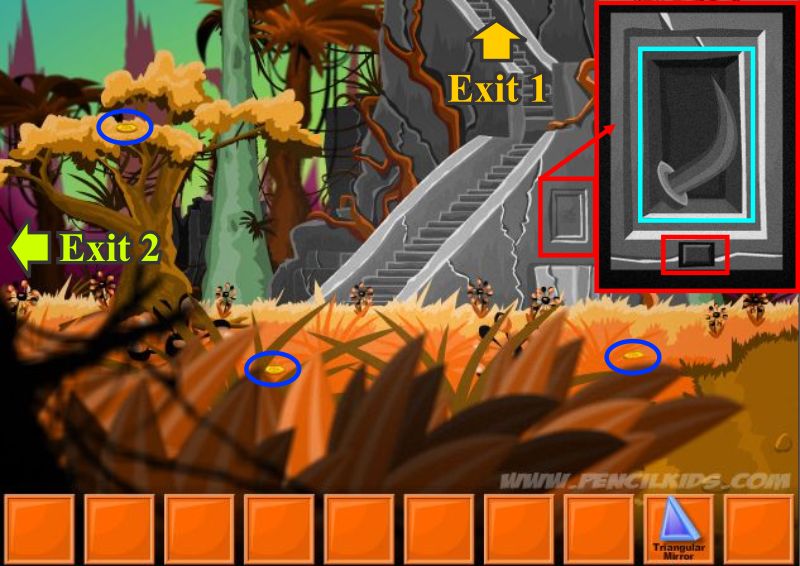
Collect the 3 coins.
-
Click on the apparatus for a close up view and move the arrow to match the insert in the screen shot.
-
Exit out of the close up.
-
Exit to the left of the scene.
-
Pick up the 3 coins.
-
Click on the indentation on the wall to the right of the stairs.
-
In the close up you will need to click on the button at the bottom to open the door and collect the horn.
-
Exit out of the close up.
-
Exit up the stairs.
-
Pick up the 2 coins and the crowbar.
-
Exit back down the stairs and go to the left of the scene to arrive at your next destination.
-
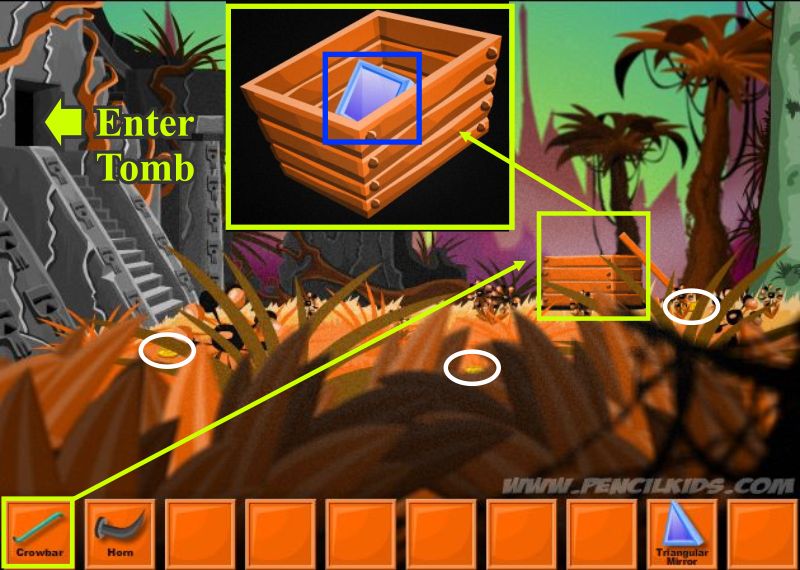
Pick up the 3 coins.
-
Use the crowbar in your inventory on the crate and then put it back in inventory.
-
Take the square mirror and exit out of the close up.
-
Enter the tomb.
-
You are now in Room 1 of the Tomb.
-
Each room will be numbered because you will be roaming around and there is no map available.
-
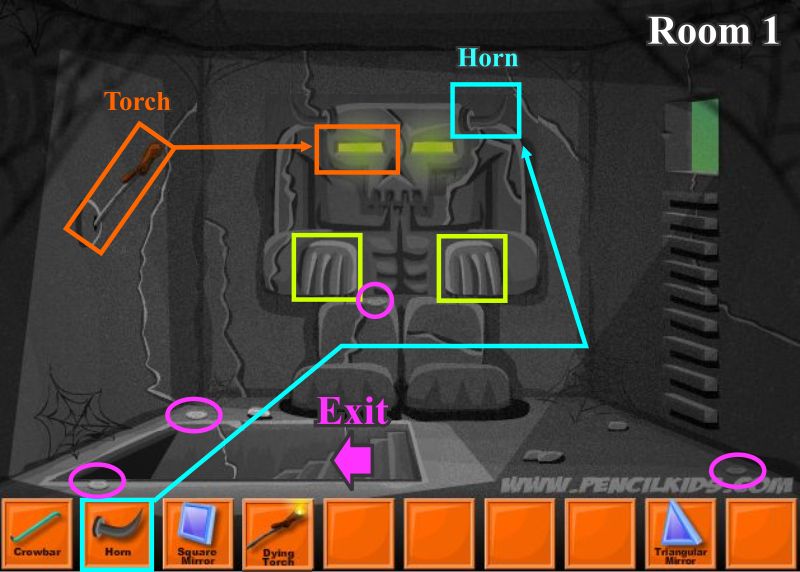
Pick up the 4 coins.
-
Turn the statues hands down.
-
Place the horn from you inventory on the right side of his head as you see it.
-
Click on the dying torch and light it from one of his eyes that are now glowing since you attached the horn.
-
The lighted torch will go into your inventory and even though it is still called "Dying Torch", it will be available to light up later rooms.
-
The floor has opened to produce a stairwell for you to exit so take it.
-
Use your torch to light the room and then put it back in inventory.
-
Collect 5 coins and exit to the next room down to the right.
-
Use your torch to light the room and then put it back in inventory.
-
Collect the 4 coins.
-
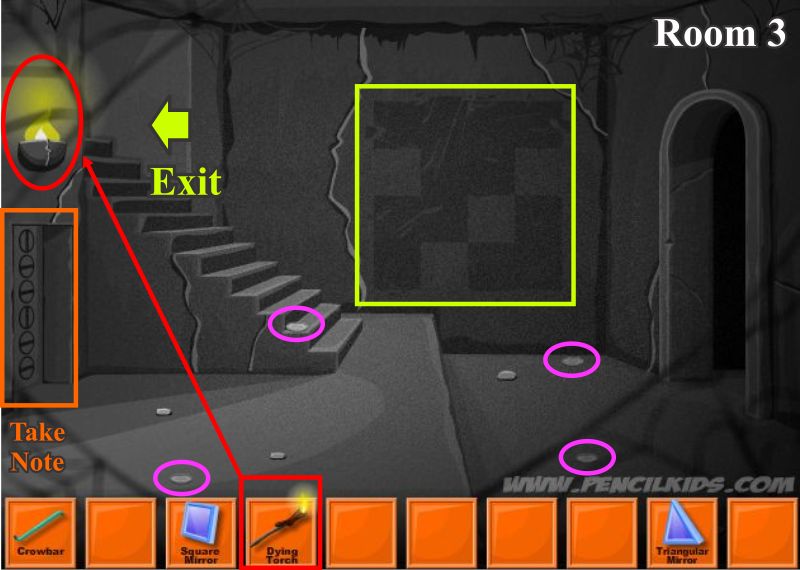
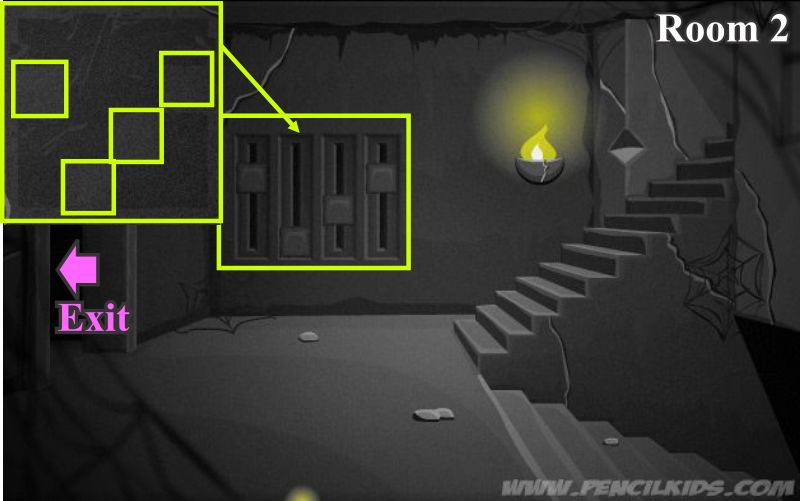
Take note of the door on the left and the way the code is arranged.
-
The back wall has the combination to the lock in Room 2 so note it and exit back upstairs to Room 2.
-
Use the combination you just found to change the sliders on the back wall to match.
-
The door at the left will open so exit through it.
-
Pick up the 4 coins.
-
Remember the door in Room 3...now you must use what your learned from that door so you can open it.
-
The code starts from the bottom up because you will be climbing the latter toward a higher level of the tomb so the first disc needs to be horizontal.
-
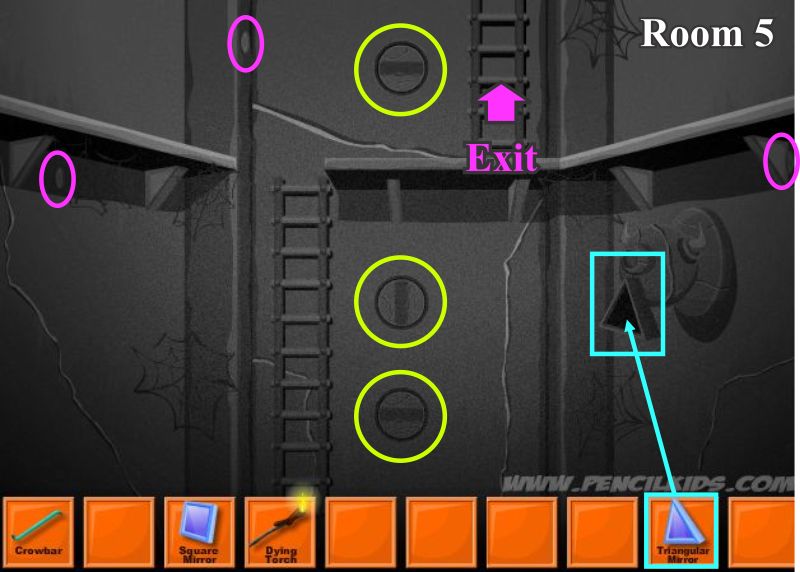
Exit up the ladder to the next higher level.
-
For Room 13 you have the triangle mirror so place it.
-
There are 3 discs to be turned for your code to open the door in Room 3 so turn them as shown.
-
Collect the 3 coins before you exit up the ladder to the next level.
-
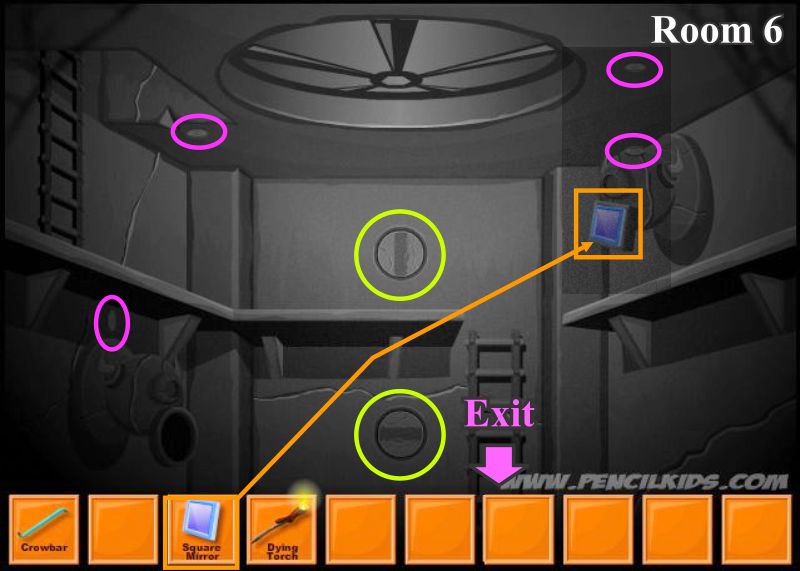
Collect the 4 coins.
-
Turn the 2 discs as shown.
-
Place the square mirror.
-
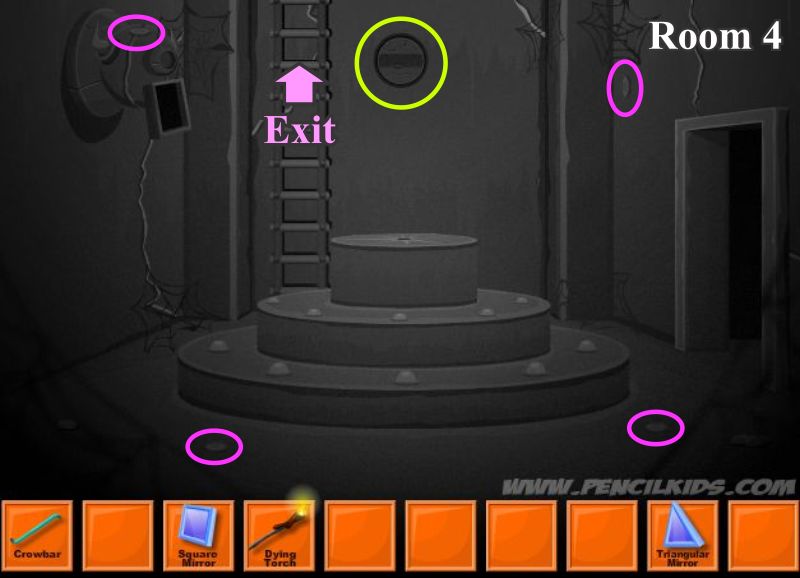
Keep exiting down the ladder until you get to the bottom which is Room 4.
-
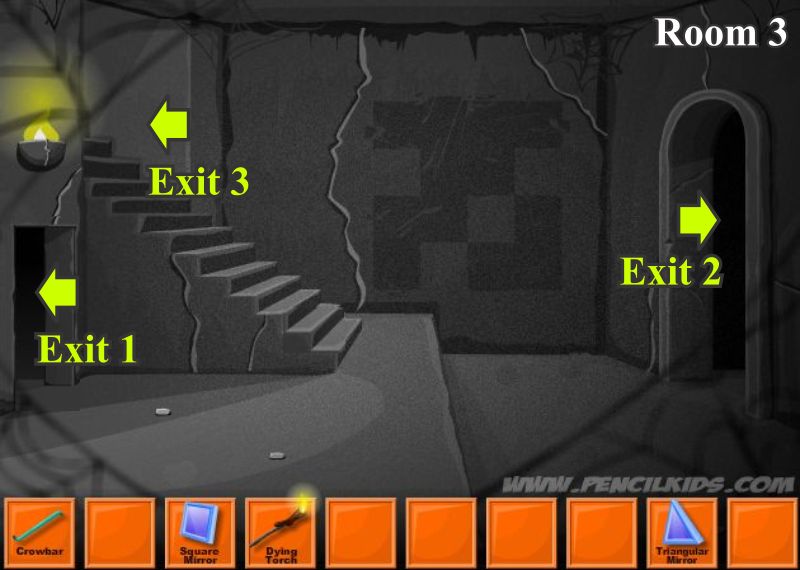
Click down twice and go right twice to Room 3.
-
You have opened the room with the code so enter "Exit 1"on the left.
-
Use your torch to light the room and then put it back in inventory.
-
Click on the block in the foreground twice to move it.
-
Pick up the 3 coins and the round mirror.
-
Click on the left wall and the back wall to check out the close ups for later use.
-
Pick up the staff.
-
Exit to the right out the door and go across the room and enter Room 8..
-
Use your torch to light the room and then put it back in inventory.
-
Pick up the 2 coins.
-
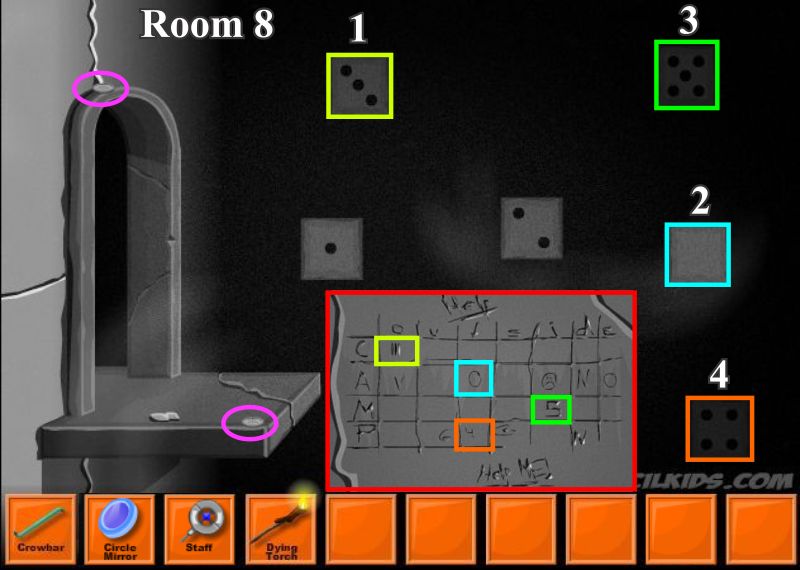
You picked up the combo for the game off the wall in Room 7 so now is your turn to use it.
-
Check the insert to find out that you need to click on the dice in the following order numbered as 1-4 but actually needs to be 3 - 0 - 5 - 4.
-
When you are finished, exit right to Room 9.
-
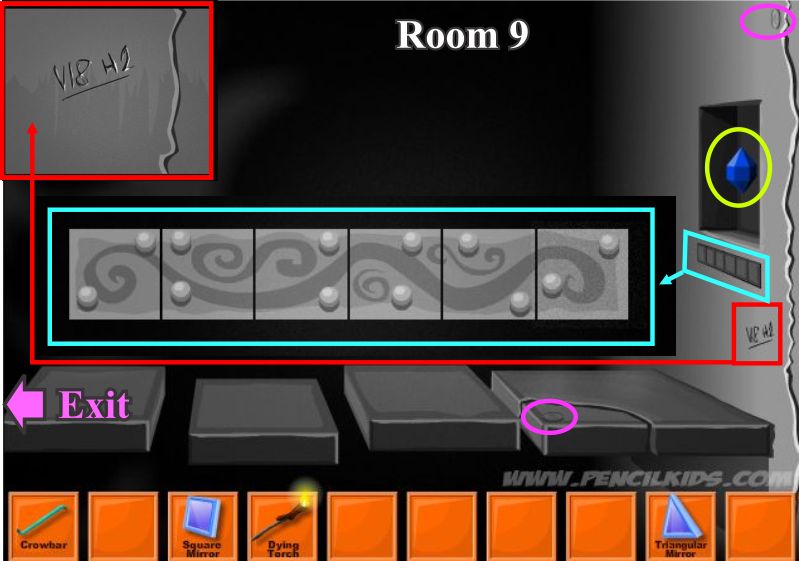
Pick up 2 coins.
-
Click on the red marking on the screen shot for a close up to remember later.
-
Click on the panel under the wall box for a mini game.
-
Make the panel look like the screen shot so that the wall will open and give you the gem.
-
Exit and follow the next directions.
-
Go left twice and up the left stairs then through the left door.
-
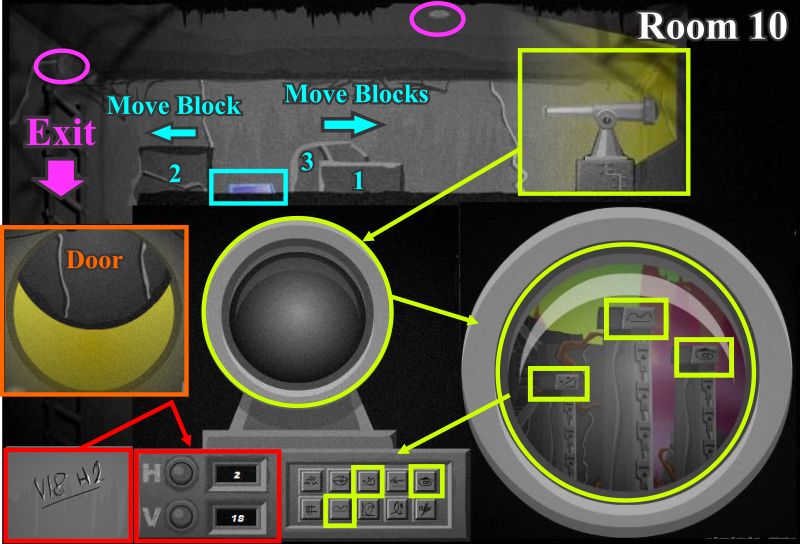
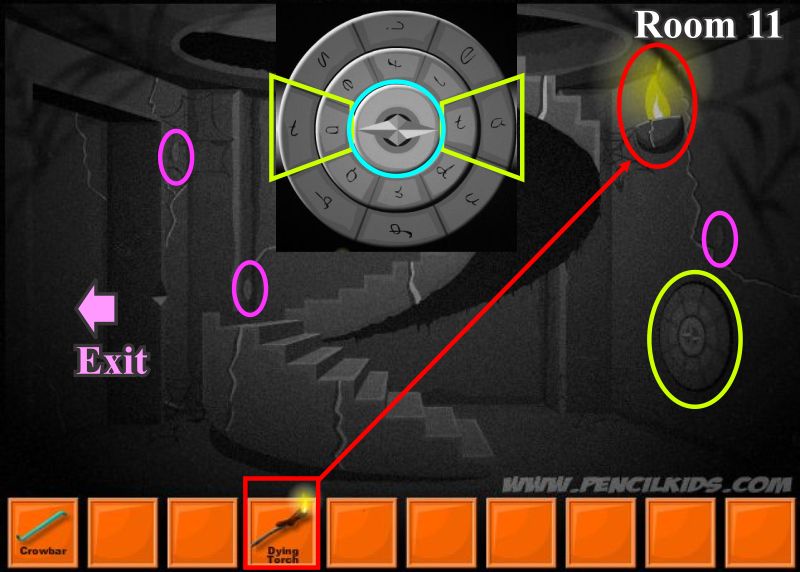
Climb 3 ladders until you end up at the top in Room 10.
-
Pick up the 2 coins.
-
Move the 3 blocks as shown in the order indicated.
-
Click on the telescope and use the coordinates you received earlier as shown in the insert.
-
Click to enter the coordinates and then click on the telescope screen again to bring up another close up that will show you the symbols to use on the telescope.
-
Return to the telescope and click on the symbols you found to activate the telescope and open the door that will shine light and radiate on the mirrors.
-
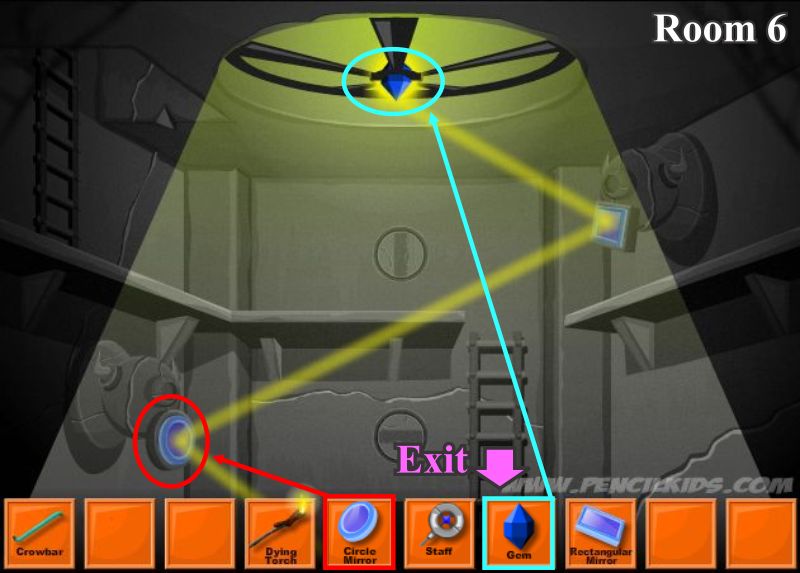
Exit down to see the light shining on the level below.
-
If you have not already done so, place the gem in the top of the scene and the circle mirror where it belongs and watch the reflection.
-
Exit to the next level below.
-
Exit down 2 more levels to Room 4.
-
Place the rectangular mirror where it belongs.
-
Put the staff in the middle of the cake-like configuration and watch it all sink.
-
Exit down the stairway that is created by the sinkhole.
-
Use your torch to light the room and then put it back in inventory.
-
Collect the 3 coins.
-
Click on the dial on the right wall to bring up a mini game.
-
Make it say "tota" and then click on the center to open the door.
-
Use your torch to light the room and then put it back in inventory.
-
Collect the 4 coins.
-
Get your crowbar from your inventory and smack the crack on the wall 3 times to make a super big hole and find a heart.
-
Place the heart on the statue and Tota will start glowing.
-
When the heart turns blue click it.
-
Stand back because the whole place is now going to start to fall apart.
-
You need to figure out how to get out of the tomb so exit the door on the right.
-
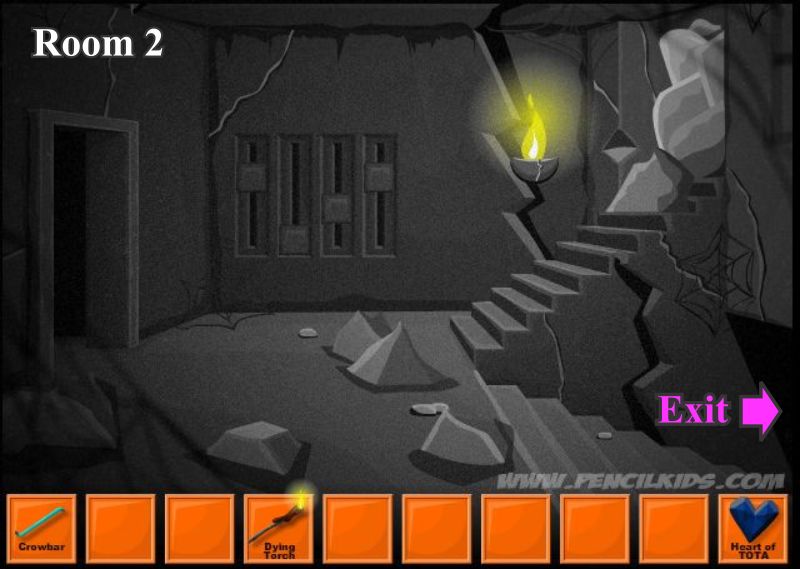
Room 11 is starting to crumble so go the stairs to Room 4.
-
Room 4 is a disaster and crumbling so exit right.
-
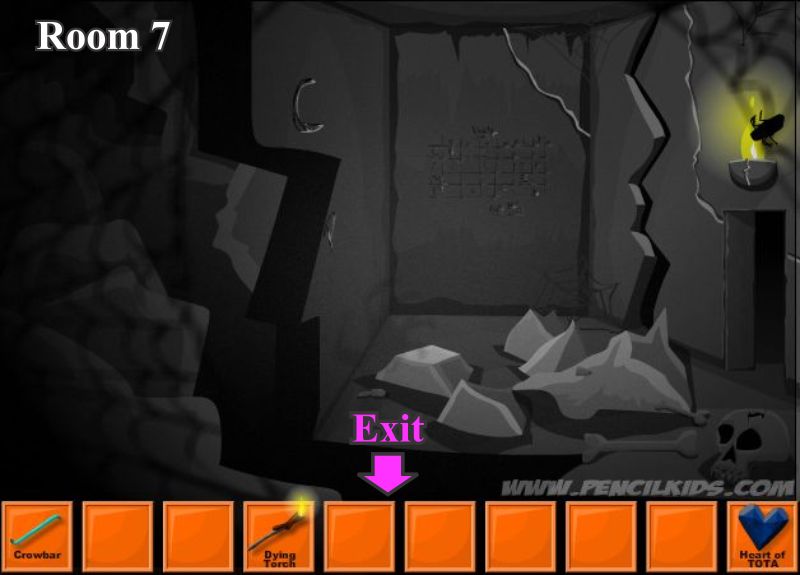
You are back in Room 2 but the upper stairway on the right is blocked so go downstairs to the right to Room 3
-
Room 3 is blocked at the right exit so use the door on the left and go to Room 7.
-
Everything is a mess in Room 7 so jump down the dark hole.
-
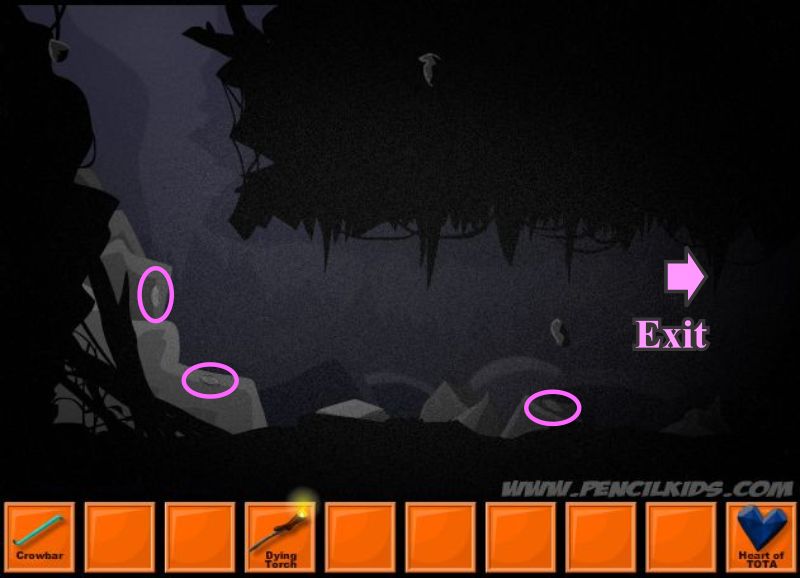
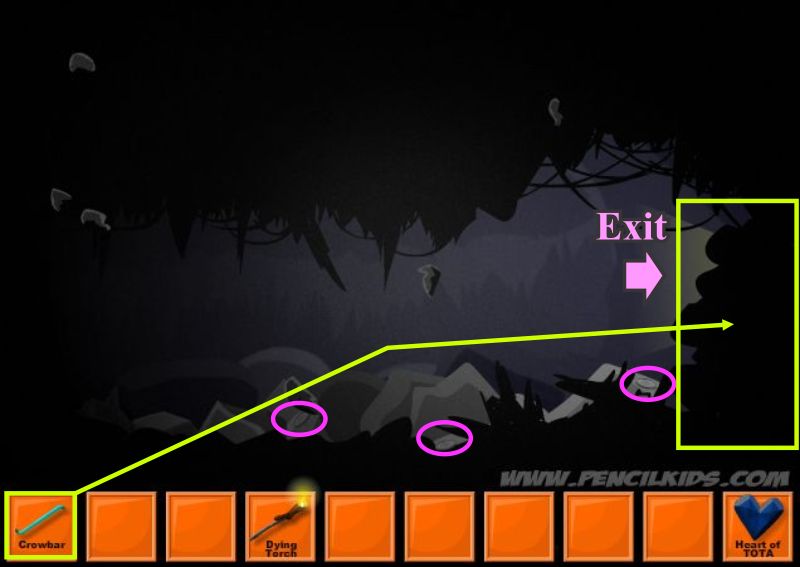
You are finally outside so pick up the 3 coins and exit to the right side of the screen.
-
Pick up the 3 coins.
-
Use your crowbar 3 times on the big bunch of rocks on the right side of the scene.
-
Put it back in your inventory and exit.
-
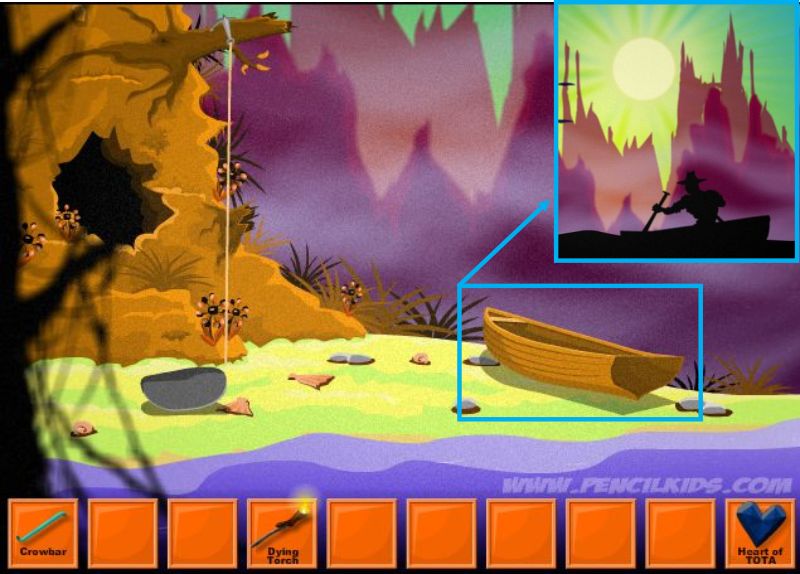
You are back where you began so click on the boat and start rowing.
-
You have completed your journey and now have the Heart of Tota so check out your achievements and see how well you did with the game.
Special thanks to Jazz for this kicking walkthrough!
that pop up face was highly unnecessary...it reminds me of tombscape...still gives me shudders
can't find the blue gem?????
pop...up...face...shrill....scream....all...alone...in....dark....room......*shivers*
i came across it before i read about it dayng!
aaaaaaannnnd my cat is scratching at my window, once more making me jump. be strong, heart...be strong.
Leave a comment [top of page]

Game of the week

Walkthrough Guide
(Please allow page to fully load for spoiler tags to be functional.)
Heart of Tota Walkthrough
General Information:
On the Main Screen there are links to Instructions and you can check out your Achievements when you've completed the game.
You can check the High Scores and enter your score when you are finished.
There are more games from Pencilkids that you can check out or just click Play for this one.
The game has no timer or penalty for too much clicking and hints are available.
Your cursor will turn into a hand when you should pick up an object.
Most close ups will have an "X" to get out of them when you are done but a few are automatic.
Coins are available at each location and subtract from your final click score.
Screenshot
When you have completed the game you will be able to view your Achievements as shown on the screen shot.
Screenshot
Walkthrough
Collect 3 coins.
Click on the rock to turn it over and pick up the triangle mirror.
Pick up the anchor and rope from the boat and it will go into your inventory at the bottom of the screen.
Throw the anchor up on the tree branch and climb it to exit the scene.
Screenshot
Collect the 3 coins.
Click on the apparatus for a close up view and move the arrow to match the insert in the screen shot.
Exit out of the close up.
Exit to the left of the scene.
Screenshot
Pick up the 3 coins.
Click on the indentation on the wall to the right of the stairs.
In the close up you will need to click on the button at the bottom to open the door and collect the horn.
Exit out of the close up.
Exit up the stairs.
Screenshot
Pick up the 2 coins and the crowbar.
Exit back down the stairs and go to the left of the scene to arrive at your next destination.
Screenshot
Pick up the 3 coins.
Use the crowbar in your inventory on the crate and then put it back in inventory.
Take the square mirror and exit out of the close up.
Enter the tomb.
Screenshot
You are now in Room 1 of the Tomb.
Each room will be numbered because you will be roaming around and there is no map available.
Pick up the 4 coins.
Turn the statues hands down.
Place the horn from you inventory on the right side of his head as you see it.
Click on the dying torch and light it from one of his eyes that are now glowing since you attached the horn.
The lighted torch will go into your inventory and even though it is still called "Dying Torch", it will be available to light up later rooms.
The floor has opened to produce a stairwell for you to exit so take it.
Screenshot
Use your torch to light the room and then put it back in inventory.
Collect 5 coins and exit to the next room down to the right.
Screenshot
Use your torch to light the room and then put it back in inventory.
Collect the 4 coins.
Take note of the door on the left and the way the code is arranged.
The back wall has the combination to the lock in Room 2 so note it and exit back upstairs to Room 2.
Screenshot
Use the combination you just found to change the sliders on the back wall to match.
The door at the left will open so exit through it.
Screenshot
Pick up the 4 coins.
Remember the door in Room 3...now you must use what your learned from that door so you can open it.
The code starts from the bottom up because you will be climbing the latter toward a higher level of the tomb so the first disc needs to be horizontal.
Exit up the ladder to the next higher level.
Screenshot
For Room 13 you have the triangle mirror so place it.
There are 3 discs to be turned for your code to open the door in Room 3 so turn them as shown.
Collect the 3 coins before you exit up the ladder to the next level.
Screenshot
Collect the 4 coins.
Turn the 2 discs as shown.
Place the square mirror.
Keep exiting down the ladder until you get to the bottom which is Room 4.
Screenshot
Click down twice and go right twice to Room 3.
You have opened the room with the code so enter "Exit 1"on the left.
Screenshot
Use your torch to light the room and then put it back in inventory.
Click on the block in the foreground twice to move it.
Pick up the 3 coins and the round mirror.
Click on the left wall and the back wall to check out the close ups for later use.
Pick up the staff.
Exit to the right out the door and go across the room and enter Room 8..
Screenshot
Use your torch to light the room and then put it back in inventory.
Pick up the 2 coins.
You picked up the combo for the game off the wall in Room 7 so now is your turn to use it.
Check the insert to find out that you need to click on the dice in the following order numbered as 1-4 but actually needs to be 3 - 0 - 5 - 4.
When you are finished, exit right to Room 9.
Screenshot
Pick up 2 coins.
Click on the red marking on the screen shot for a close up to remember later.
Click on the panel under the wall box for a mini game.
Make the panel look like the screen shot so that the wall will open and give you the gem.
Exit and follow the next directions.
Screenshot
Go left twice and up the left stairs then through the left door.
Climb 3 ladders until you end up at the top in Room 10.
Pick up the 2 coins.
Move the 3 blocks as shown in the order indicated.
Click on the telescope and use the coordinates you received earlier as shown in the insert.
Click to enter the coordinates and then click on the telescope screen again to bring up another close up that will show you the symbols to use on the telescope.
Return to the telescope and click on the symbols you found to activate the telescope and open the door that will shine light and radiate on the mirrors.
Exit down to see the light shining on the level below.
Screenshot
If you have not already done so, place the gem in the top of the scene and the circle mirror where it belongs and watch the reflection.
Exit to the next level below.
Screenshot
Exit down 2 more levels to Room 4.
Place the rectangular mirror where it belongs.
Put the staff in the middle of the cake-like configuration and watch it all sink.
Exit down the stairway that is created by the sinkhole.
Screenshot
Use your torch to light the room and then put it back in inventory.
Collect the 3 coins.
Click on the dial on the right wall to bring up a mini game.
Make it say "tota" and then click on the center to open the door.
Screenshot
Use your torch to light the room and then put it back in inventory.
Collect the 4 coins.
Get your crowbar from your inventory and smack the crack on the wall 3 times to make a super big hole and find a heart.
Place the heart on the statue and Tota will start glowing.
When the heart turns blue click it.
Stand back because the whole place is now going to start to fall apart.
You need to figure out how to get out of the tomb so exit the door on the right.
Screenshot
Room 11 is starting to crumble so go the stairs to Room 4.
Screenshot
Room 4 is a disaster and crumbling so exit right.
Screenshot
You are back in Room 2 but the upper stairway on the right is blocked so go downstairs to the right to Room 3
Screenshot
Room 3 is blocked at the right exit so use the door on the left and go to Room 7.
Screenshot
Everything is a mess in Room 7 so jump down the dark hole.
Screenshot
You are finally outside so pick up the 3 coins and exit to the right side of the screen.
Screenshot
Pick up the 3 coins.
Use your crowbar 3 times on the big bunch of rocks on the right side of the scene.
Put it back in your inventory and exit.
Screenshot
You are back where you began so click on the boat and start rowing.
Screenshot
You have completed your journey and now have the Heart of Tota so check out your achievements and see how well you did with the game.
Special thanks to Jazz for this kicking walkthrough!
Posted by: grinnyp |
June 10, 2010 6:50 PM
|
June 10, 2010 6:50 PM