
Harry Quantum 2: Unmasked
Crime never sleeps, and Harry Quantum, the star of TurboNUKE's point-and-click sleuthing adventure series is back on the case! This time he's trying to clear the name of a pro-wrestler who was wrongfully implicated in a museum heist. With FBI agents, ancient artifacts, dinosaurs, and poo-mints aplenty, it's a quirky little title packed with puns and goofy humour.
Read More7 Comments
Harry Quantum 2 Walkthrough
Part 1
Office
-
Open the bottom drawer to find the Camera.
-
Pick up the Camera, then place it in your inventory.
-
Take a picture of the robot with the Camera to find PIP (1/20).
-
Open the door and exit the Office to travel to the Museum.
Museum
-
Click the small robot in the lower left shelf to find PIP (2/20).
-
Take a picture of the professor with the Camera to find PIP (3/20).
-
Exit the Museum to go to the Plaza.
Plaza
-
Speak to the vendor behind the newspaper stand to reveal the secret agent on the hill.
-
Take the Newspaper and the Mints from the shelves at the front of the newspaper stand.
-
Pick up the dinosaur Toy from the upper right shelf on the stand labeled "Gifts".
-
Show the Toy to the man in the dinosaur suit to find the PIP (4/20).
-
Go right to re-enter the Museum.
Museum
-
Add the Mints to the bowl on the desk containing the professor's lunch.
-
Go back outside to the Plaza, then continue up the hill to the Agent's Car.
Agent's Car
-
Pick up the Superburro Poster on the ground in front of the bush to reveal the rabbit hole.
-
Take the Rock in the grass to the right of the agent's feet.
-
Give the Toy to the secret agent to receive the Broken Toy.
-
Use the Broken Toy on the Rock to create the Meteorite.
-
You can go back to the Museum and show the Meteorite to the professor to find the PIP (5/20).
-
Place the Meteorite in the rabbit hole.
-
Speak to the agent to distract him with the meteorite.
-
Take the X-ray Specs out of the box in the trunk of the car.
-
Look inside the trunk a second time to find the PIP (6/20).
-
Go back to the Plaza.
Plaza
-
Use the X-ray Specs on the dinosaur man to find the PIP (7/20).
-
Speak with the dinosaur to receive the Brochure.
-
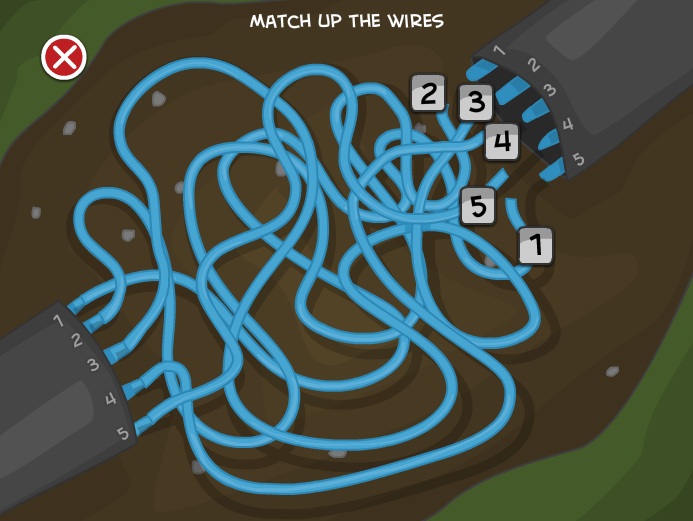
Click the exposed section of the wires in the ground to start the puzzle.
-
Trace the wires starting from the left and ending at the right, then change the number in the boxes to label the wires from 1-5.
-
Go through the right door to enter the Museum.
Museum
-
Click the empty bowl on the desk to find the PIP (8/20).
-
Use the X-Ray Specs on Harry to find the PIP (9/12).
-
Use the X-Ray Specs on the bathroom door to find the PIP (10/20).
-
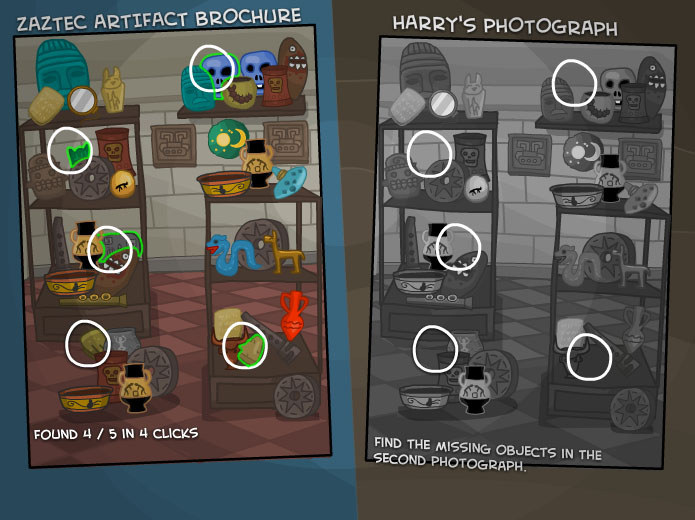
Pick up the Note at the bottom of the Mona Lisa painting.
-
Go back out to the Plaza.
Plaza
-
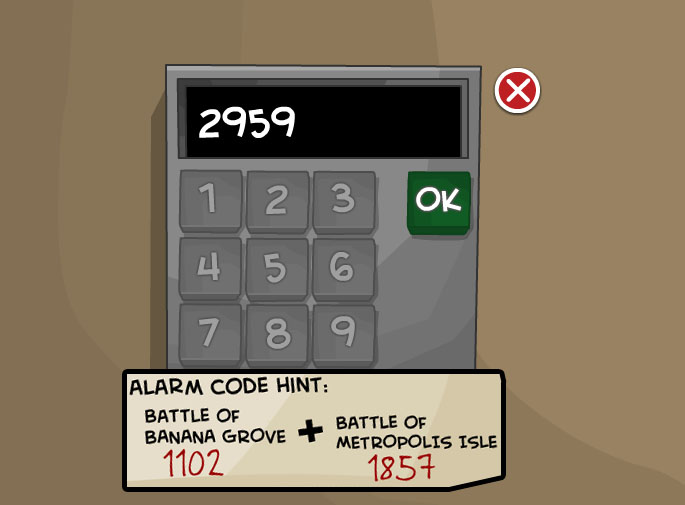
Show the Note to the dinosaur to learn the alarm code hint.
-
Battle of Banana Grove + Battle of Metropolis Isle.
-
1102 + 1857 = 2959
-
Return to the Museum.
Museum
-
Use the X-Ray Specs on the museum exhibit door to reveal the combination lock, then click the lock to zoom in.
-
Press the buttons on the keypad to enter the 4 digit combination found on the Note.
-
Use the Camera on the open exhibit door to take the Photo.
-
Exit to the Plaza, then continue left to return to the Office.
Part 2
Office
-
Speak to Graeme the robot to start the spot-the-difference game.
-
Click the items in the left picture that are missing from the right picture.
-
If you can solve the puzzle in only 5 clicks, you will receive a PIP (11/20).
-
Look in the trash bin beside the desk to find a Key.
-
Pick up the Key and use it to open the locked drawer at the top of the file cabinet.
-
Take the Flashlight and the blue Skull from the floor.
-
Use the Flashlight on the box of junk in front of the robot to find PIP (12/20).
-
Leave the room to travel to the Desert.
Desert
-
Click the fence in front of the right cactus to find a PIP (13/20).
-
Click the coat lying on the ground to pick up the Gloves.
-
Use the Gloves to pull out the Spines on the left cactus.
-
Unlock the door to the shop with the Spines.
-
Go through the open door into the Shop.
Shop
-
Take the Coathanger from the wall to the left of the door.
-
Move away the boxes to find the secret hatch in the floor.
-
Use the Coathanger to open the hatch door.
-
Go down the stairway to the Crypt.
Crypt
-
Use the Coathanger on the generator to find PIP (14/20).
-
Replace the melted candle next to the skeleton with the Flashlight.
-
Add the Skull to the headless skeleton.
-
Use the X-Ray Specs on the skeleton to find the PIP (15/20).
-
Use the X-Ray Specs on each of the three doors to find the safe one that isn't trapped.
-
Turn off the generator to reveal the glowing symbols on top of the three doors.
-
Click the tablet the skeleton is holding to start the puzzle.
-
Arrange the blue symbols on the right door to match the white image shown on the tablet.
-
Click the button with 1 dot to change all three symbols, click the button with 2 dots to change the top 2 symbols, and click the button with 3 dots to change only the top symbol.
-
You can also click the reset button to start over from the beginning.
-
Click the buttons in the following order:
-
Click button 1 twice.
-
Click button 2 four times.
-
Click button 3 four times.
-
Go through the open door to the Trap Door Pit.
Trap Door Pit
-
Take the Helmet and Spear from the skeleton in the corner.
-
Put the Helmet on Harry to receive the PIP (16/20).
-
Use the Spear to grab the Cape hanging from the hole in the ceiling.
-
Continue right to the Cave.
Cave
-
Use the X-Ray Specs on the bat hanging from the tree to find the PIP (17/20).
-
Put the Cape in the puddle to get another PIP (18/20).
-
Use the Flashlight on the puddle to find a third PIP (19/20).
-
Put the Helmet in the puddle to collect the water.
-
Combine the Coat Hanger with the Spear to create a Device.
-
Add the Cape to the Device to complete the Catcher.
-
Use the Catcher to grab the Bat on the tree branch.
-
Use the Gloves on the loose blocks in the wall to move them aside.
-
Go right to the Idol Room.
Idol Room
-
Pick up the Circuitboard lying on the ground.
-
Go back to the Cave.
Cave
-
Use the Circuitboard on the green resin on the tree root to make a Sticky Board.
-
Return to the Idol Room.
Idol Room
-
Add the Sticky Board to the broken board in the middle of the idol.
-
Use the Bat on the idol's mouth to fill it with blood.
-
Pour the Helmet filled with water into the idol's eyes.
Arena
-
Use the poster on the left Superburro first and the right Superburro second to find the imposter.
-
Click the idol's right hand to activate the right stone fist.
-
Put the Gloves on the idol's hands to find the last PIP (20/20).
-
Pick up the Heart on the floor above the blue skull.
-
Insert the Heart into the carving in the middle of the statue's chest.
-
Click the gold ring in the statue's open mouth.

One quick correction to the walkthrough: at the end, when the two Superburros are fighting...
it isn't always the right one that's the imposter. It may be whichever one you use the poster on second, or it may be random.
[Fixed! Thanks :) -Trinn]
Nothing is happening when I click clock in plaza. I followed walkthrough exactly.
revelations21.4,
Sorry you're having trouble, but the walkthrough actually makes no mention of the clock ;) Instead, follow these instructions to set the time:
First, put the Mints inside the professor's lunch at the Museum. Next, go out to the Plaza and click the blue wires under the ground to start the puzzle. If you're having trouble locating the blue wires, they're in the dirt just below the path leading up to the doorway to the Museum.
Harry also apparently has magic eyes, because interactive zones in each area will glint periodically, which seems like a rather handy (though unfair) skill for an investigator to have.
Actually, if I'm not mistaken, they only glint whenever you click in a non-interactive region.
thank you
Aw, I wanted to turn off the music but leave the sound effects on. The music was ok at first, but it got really tiresome after a couple of minutes. Getting rid of the music beat wanting to hear the sound effects, so I played the game silently.
Good game, so Five mushrooms even so. If I could have taken off just half a mushroom for the missing sound effects, I would have.
Leave a comment [top of page]

Game of the week

Walkthrough Guide
(Please allow page to fully load for spoiler tags to be functional.)
Harry Quantum 2 Walkthrough
Part 1
Office
Open the bottom drawer to find the Camera.
Pick up the Camera, then place it in your inventory.
Take a picture of the robot with the Camera to find PIP (1/20).
Open the door and exit the Office to travel to the Museum.
Museum
Click the small robot in the lower left shelf to find PIP (2/20).
Take a picture of the professor with the Camera to find PIP (3/20).
Exit the Museum to go to the Plaza.
Plaza
Speak to the vendor behind the newspaper stand to reveal the secret agent on the hill.
Take the Newspaper and the Mints from the shelves at the front of the newspaper stand.
Pick up the dinosaur Toy from the upper right shelf on the stand labeled "Gifts".
Show the Toy to the man in the dinosaur suit to find the PIP (4/20).
Go right to re-enter the Museum.
Museum
Add the Mints to the bowl on the desk containing the professor's lunch.
Go back outside to the Plaza, then continue up the hill to the Agent's Car.
Agent's Car
Pick up the Superburro Poster on the ground in front of the bush to reveal the rabbit hole.
Take the Rock in the grass to the right of the agent's feet.
Give the Toy to the secret agent to receive the Broken Toy.
Use the Broken Toy on the Rock to create the Meteorite.
You can go back to the Museum and show the Meteorite to the professor to find the PIP (5/20).
Place the Meteorite in the rabbit hole.
Speak to the agent to distract him with the meteorite.
Take the X-ray Specs out of the box in the trunk of the car.
Look inside the trunk a second time to find the PIP (6/20).
Go back to the Plaza.
Plaza
Use the X-ray Specs on the dinosaur man to find the PIP (7/20).
Speak with the dinosaur to receive the Brochure.
Click the exposed section of the wires in the ground to start the puzzle.
Trace the wires starting from the left and ending at the right, then change the number in the boxes to label the wires from 1-5.
Solution.
Go through the right door to enter the Museum.
Museum
Click the empty bowl on the desk to find the PIP (8/20).
Use the X-Ray Specs on Harry to find the PIP (9/12).
Use the X-Ray Specs on the bathroom door to find the PIP (10/20).
Pick up the Note at the bottom of the Mona Lisa painting.
Go back out to the Plaza.
Plaza
Show the Note to the dinosaur to learn the alarm code hint.
Battle of Banana Grove + Battle of Metropolis Isle.
1102 + 1857 = 2959
Return to the Museum.
Museum
Use the X-Ray Specs on the museum exhibit door to reveal the combination lock, then click the lock to zoom in.
Press the buttons on the keypad to enter the 4 digit combination found on the Note.
Solution.
Use the Camera on the open exhibit door to take the Photo.
Exit to the Plaza, then continue left to return to the Office.
Part 2
Office
Speak to Graeme the robot to start the spot-the-difference game.
Click the items in the left picture that are missing from the right picture.
If you can solve the puzzle in only 5 clicks, you will receive a PIP (11/20).
Solution.
Look in the trash bin beside the desk to find a Key.
Pick up the Key and use it to open the locked drawer at the top of the file cabinet.
Take the Flashlight and the blue Skull from the floor.
Use the Flashlight on the box of junk in front of the robot to find PIP (12/20).
Leave the room to travel to the Desert.
Desert
Click the fence in front of the right cactus to find a PIP (13/20).
Click the coat lying on the ground to pick up the Gloves.
Use the Gloves to pull out the Spines on the left cactus.
Unlock the door to the shop with the Spines.
Go through the open door into the Shop.
Shop
Take the Coathanger from the wall to the left of the door.
Move away the boxes to find the secret hatch in the floor.
Use the Coathanger to open the hatch door.
Go down the stairway to the Crypt.
Crypt
Use the Coathanger on the generator to find PIP (14/20).
Replace the melted candle next to the skeleton with the Flashlight.
Add the Skull to the headless skeleton.
Use the X-Ray Specs on the skeleton to find the PIP (15/20).
Use the X-Ray Specs on each of the three doors to find the safe one that isn't trapped.
Turn off the generator to reveal the glowing symbols on top of the three doors.
Click the tablet the skeleton is holding to start the puzzle.
Arrange the blue symbols on the right door to match the white image shown on the tablet.
Click the button with 1 dot to change all three symbols, click the button with 2 dots to change the top 2 symbols, and click the button with 3 dots to change only the top symbol.
You can also click the reset button to start over from the beginning.
Click the buttons in the following order:
Click button 1 twice.
Click button 2 four times.
Click button 3 four times.
Solution.
Go through the open door to the Trap Door Pit.
Trap Door Pit
Take the Helmet and Spear from the skeleton in the corner.
Put the Helmet on Harry to receive the PIP (16/20).
Use the Spear to grab the Cape hanging from the hole in the ceiling.
Continue right to the Cave.
Cave
Use the X-Ray Specs on the bat hanging from the tree to find the PIP (17/20).
Put the Cape in the puddle to get another PIP (18/20).
Use the Flashlight on the puddle to find a third PIP (19/20).
Put the Helmet in the puddle to collect the water.
Combine the Coat Hanger with the Spear to create a Device.
Add the Cape to the Device to complete the Catcher.
Use the Catcher to grab the Bat on the tree branch.
Use the Gloves on the loose blocks in the wall to move them aside.
Go right to the Idol Room.
Idol Room
Pick up the Circuitboard lying on the ground.
Go back to the Cave.
Cave
Use the Circuitboard on the green resin on the tree root to make a Sticky Board.
Return to the Idol Room.
Idol Room
Add the Sticky Board to the broken board in the middle of the idol.
Use the Bat on the idol's mouth to fill it with blood.
Pour the Helmet filled with water into the idol's eyes.
Arena
Use the poster on the left Superburro first and the right Superburro second to find the imposter.
Click the idol's right hand to activate the right stone fist.
Put the Gloves on the idol's hands to find the last PIP (20/20).
Pick up the Heart on the floor above the blue skull.
Insert the Heart into the carving in the middle of the statue's chest.
Click the gold ring in the statue's open mouth.
Posted by: Trinn |
March 22, 2012 10:23 PM
|
March 22, 2012 10:23 PM