
Gatiko
From the bizarre and intriguing world of Detarou, this escape-the-room game manages to balance between offensively outlandish and laugh-out-loud wacky. Easier than most of Detarou's offerings, Gatiko's puzzles offer the perfect level of challenge. There's multiple endings, as well. If you have shied away from Detarou before, here's your chance to dip your toes into a cult favorite and find out what all the fuss is about.
Read More22 Comments
I found one bad ending and one ok ending, but there's an item I haven't used. I don't know where to use it...
The thing from the toilet. Is that a ball gag? A slingshot? Does it have anything to do with the fisherman?

And I have no idea what to do with the statue.
I'm also stuck with the statue... I don't know what to do with the clue given by the statue...
@grayk Hey, I'm sure this'll end up being a POP, but what obvious thing am I missing on the
hashtag grid w/ the 1/2/3/4 in it? I've tried half a dozen different combinations of various numbers but no success)
.
That clue gets combined with two other areas in the room.
Oh, and forgot to add,
I suspect it's related to the 3X3 cabinet that's missing one knob, but thus far I can't open that either
.
@swooning
Have you used it with the cabinets?
@swooning:
What about the thing on the opposite wall from the cabinets? Left from the statue view?
i'm stuck with a strange two side hook get from the left of the panda poster, a thing from the toilet, with not getting the key.
i get the two ending too (bad and ok/normal one)
i'm continue with
cilck at the up of the bath
bearharry
Maybe, the hook is related to:
fishing?
For the better ending:
Use the first knob (which you get out of the nose of the guy in the pond) on the cupboard up in the attic crawl space.
The two-sided hook goes on the fishing line (look up from the scene with the guy in the pond)...this causes the pond guy to open mouth and spit out key card.
Insert key card in the statue and note which hands move and when. Use that same pattern on the device in the cubbies (right column, middle cubbie) to get the second half of the heart shape. Combine that with the first half (found in the toilet).
This will allow you to open the center cubby and get the Red Stamp. Press the red button inside this cubby, go fetch the other knob...Then complete the game as you would with the normal ending.
i have found the "full" ending, with filling all 10 grid. but i still thing it is not the real end as i having the stamp not used.
bearharry,
The stamp is used after you exit. ;-)
It's the Detarou equivalent to a happy coin. Having it when you exit changes the scene you get at the end.
Detarou is famous for games that make you say, "...Wut?"
Gatiko Walkthrough
Items List
-
Heart Half (1/2) is found inside the toilet in the Bathroom.
-
Heart Half (2/2) is from the puzzle box inside the middle locker on the right row at the Locker Room.
-
The Heart is made by combining the two Heart Halves in your inventory.
-
Handle (1/2) is found in the nostril of the giant face floating in the water at the Bath House.
-
Handle (2/2) is found in the nostril of the mask hanging on the wall at the Living Room, but only after you push the red button inside the center locker at the Locker Room.
-
The Glass of Water is on the table in the side room past the sliding doors in the Living Room.
-
The Hook is found behind the metal door at the end of the Vent.
-
The Gold Key is found in the top right locker in the Locker Room.
-
The Stamp is found in the center locker in the Locker Room.
Full Ending
Hallway
-
You start the game in the Hallway facing a white door.
-
Before you open the door, turn left to face the Toilet.
Toilet
-
Open the door to the bathroom, then click the toilet for a close-up.
-
Lift the lid and take the Heart Half (1/2) inside the toilet bowl.
-
Go back then turn right to face the white door again.
Hallway
-
Open the white door and move forward into the Living Room.
Living Room
-
Click the sliding doors to zoom in.
-
Click the doors again to open them, which will give you a view of the side room.
-
Click the man in the pharaoh mask for a closer look.
-
Pick up the Glass of Water on top of the table.
-
Go back to the main view of the living room, then turn left twice to face the cupboard.
-
Click the cupboard doors to open them.
-
Throw the Glass of Water on the businessmen stuffed in the cupboard.
-
Inspect the lines on the back wall of the cupboard.
-
Pour the Glass of Water on the lines to reveal a pattern with 4 shapes.
-
Go back twice then turn right to face the row of white sliding doors.
-
Click the lock in the middle of the doors to zoom in.
-
Press the buttons to enter in the 4 shapes found at the back of the cupboard.
-
Push the large button at the bottom of the lock to enter in the combination.
-
Go through the open sliding doors to enter the Locker Room.
Locker Room
-
Click the red circular sign hanging on the wall to zoom in.
-
Note the positions of the numbers 1-4 inside the squares.
-
Go back to the main view of the room, then turn left.
-
Click the square panel of small grey doors on the wall for a closer look.
-
Opening a door on this panel will open the matching locker on the other side of the room.
-
Open the doors in the 1-4 order shown on the red sign to find their corresponding numbers inside the lockers.
-
The number behind locker 1 is 8.
-
The number behind locker 2 is 9.
-
The number behind locker 3 is 3.
-
The number behind locker 4 is 4.
-
The final combination is 8-9-3-4.
-
Go back to the Living Room.
Living Room
-
Turn left then move forward to face the side room.
-
Click the glass doors to view the combination lock.
-
Enter the combination found in the lockers at the Locker Room.
-
8-9-3-4
-
Go through the open glass door to the Bath House.
Bath House
-
Take the Handle (1/2) out of the nose on the face floating in the water.
-
Go back to the Locker Room.
Locker Room
-
Turn left to face the two white sliding doors.
-
Open the door then go inside the closet.
-
Click the loose roof panel to climb into the Vent.
Vent
-
Move forward three times until you reach the sign.
-
Ignore the arrow and turn left, then move forward.
-
Add the Handle (1/2) to open the small metal door.
-
Take the Hook inside the opened compartment.
-
Go back to the Bath House.
Bath House
-
Look up to face the fisherman.
-
Add the Hook to his fishing rod, then go back to the main view of the area.
-
Pick up the Access Card floating in the water by the giant head.
-
Return to the Locker Room.
Locker Room
-
Move towards the statue in the alcove.
-
Click the base of the statue for a closer look.
-
Insert the Access Card into the slot by the statues feet.
-
Watch the hands of the statue and note the order that they slap the face 7 times.
-
The hands hit the face in the following order: Upper left, lower left, upper left, lower right, upper right, lower right, lower left.
-
Go back twice then turn left to face the grey panel of small doors.
-
Open the right door in the middle row of doors.
-
Go back once and turn right twice to view the lockers.
-
Open the right locker in the middle row of lockers.
-
Click the white box inside the locker for a closer look.
-
Press the buttons to match the order that the hands slapped the statue's face.
-
If you push and hold down the red buttons, you'll find that they don't highlight their adjacent hands (i.e. the lower left button does not light the lower left hand, etc).
-
Instead, the top left button lights the lower left hand, the bottom left button lights the upper right hand, the top right button lights the lower right hand, and the bottom right button lights the upper left hand.
-
Refer to the screenshot below and click the buttons in the following order: C, A, C, B, D, B, A.
-
Take the Heart Half (2/2) from the opened box.
-
Go back three times and turn left twice to face the grey panel of small doors.
-
Open the door in the very center to find the heart-shaped insert.
-
Inspect the Heart Half (1/2) in your inventory then combine it with the Heart Half (2/2) to complete the Heart.
-
Place the Heart inside the insert to unlock the center locker.
-
Go back twice then turn right twice to face the lockers.
-
Open the center locker, then click the locker to look inside.
-
Take the Stamp inside the locker.
-
Push the red button to view the location of the Handle (2/2).
-
Go back to the Living Room
Living Room
-
Click the mask hanging on the wall for a closer look.
-
Take the Handle (2/2) sticking out of the mask's nostril.
-
Return to the Locker Room.
Locker Room
-
Turn left to face the grey doors panel.
-
Click the panel to zoom in and open the top right corner door.
-
Go back once and turn right twice to face the lockers, then click the top right corner locker to zoom in.
-
Add the Handle (2/2) to open the locker.
-
Take the Gold Key inside the locker.
-
Go back to the Hallway.
Hallway
-
Click the exit door to zoom in.
-
Use the Gold Key to open the lock.
-
Go through the open door for the Happy Stamp End!
Quick Ending
-
To get the regular ending, follow the full guide until you get the Handle from the face in the Bath House.
-
Go to the Locker Room.
-
Turn left to face the grey doors panel.
-
Click the panel to zoom in and open the top right corner door.
-
Go back once and turn right twice to face the lockers, then click the top right corner locker to zoom in.
-
Add the Handle to open the locker.
-
Take the Gold Key inside the locker.
-
Return to the Hallway.
-
Click the exit door to zoom in.
-
Use the Gold Key to open the lock.
-
Go through the open door for the normal end.
Dead End
-
To get the bad ending, follow the full guide up to the point where you climb into the Vent from the Locker Room.
-
While inside the vent, move forward three times until you reach the sign.
-
Follow the arrow and turn right, then move forward towards the light.
Puzzle Guide
Sliding Door Symbols Puzzle
-
Take the Glass of Water from the table in the Side room.
-
Open the cupboard in the living room, then throw the Glass of Water on the men stuffed inside the cupboard.
-
Use the Glass of Water again on the lines written on the back of the cupboard to reveal the hidden symbols.
-
Go back twice and turn right to face the white sliding doors, then click the lock to zoom in.
-
Press the up and down buttons to cyrcle through the symbols, then press the bottom button enter the combination found inside the cupboard.
Glass Doors Combination Puzzle
-
On the left wall in the Locker Room is a small grey 3x3 square that contains 9 doors.
-
At first, the bottom right door is open, but you can click any adjacent door to open it instead.
-
Whichever door is open on the grey panel will open the matching locker on the right side of the room.
-
Click the red circular sign hanging on the middle wall (to the left of the statue) to zoom in.
-
There are 4 numbers written in the squares that represent the 4 lockers you have to open in order to find the glass door combination.
-
First, go to the grey doors panel and open the left door in the middle row.
-
With the matching door opened, you can now open the left locker in the middle row to find the number 8 inside.
-
Return to the grey doors panel and open the middle door on the bottom row.
-
Turn back to the lockers and open the middle locker on the bottom row to find the number 9.
-
Face the grey doors panel, then open the middle door on the top row.
-
Go back to the lockers and open the middle locker at the top row to find the number 3.
-
Turn around towards the grey doors panel and open the left door at the bottom row.
-
Return to the lockers, then open the left locker at the bottom row to find the last number 4.
-
Put all the numbers together in order to find the final combination:
-
8934.
-
Go to the glass doors at the side room.
-
Click the locker for a close-up, then enter in the combination to open the door.
Slapping Statue Puzzle
-
After you insert the Access Card into the card slot at the bottom the statue, the hands of the statue will start slapping the face.
-
The hands will slap the face seven times, then repeat the same pattern over and over.
-
Note which of the four hands slaps the face; in order from 1-7 it's:
-
Upper left hand.
-
Lower left hand.
-
Upper left hand.
-
Lower right hand.
-
Upper right hand.
-
Lower right hand.
-
Lower left hand.
-
After you've learned the pattern, turn left to face the grey doors panel.
-
Open the right door in the middle row to unlock the matching locker.
-
Turn to the lockers and open the right locker in the middle row to find the white puzzle box.
-
Pushing one of the four red buttons will also highlight one of the hands on the box.
-
The hands at the corners of the box represent the statue's hands; the tricky part is that the buttons are out of order (the lower left button does not light the lower left hand, etc).
-
Instead, the top left button lights the lower left hand.
-
The bottom left button lights the upper right hand.
-
The top right button lights the lower right hand.
-
And the bottom right button lights the upper left hand.
-
Press the buttons to highlight the hands in the same order from 1-7 that they slapped the statue's face.
-
Refer to the screenshot below and press the buttons in the following order:
-
C
-
A
-
C
-
B
-
D
-
B
-
A
-
If you pressed the buttons in the correct order, the box will open and you can take the Heart Half 2/2 inside.
Well I will never claim to be a Detarou fan, although some of his stuff makes me smile - in a wtf sort of way
who knew you could get 5 bankers out of a closet with one glass of water, let that be a lesson to the world
but I played this through 3 endings - yes I know him enough to know I was being led to certain fail on the fail exit but it has to be done!
What I am curious about is the guy on the rings
When I went back and looked at him at the end, was he dead or what?!
Oh, good observation, yaddab. I don't know what it's supposed to mean but...
He's still holding on so, well, that has to mean something... I guess he's just standing on his head?
Detarou is usually too strange for me...I thought this particular release as less so...but now, after the acrobat oddity, I'm a wee bit creeped out.
That's a little macabre! I thought
The red button maybe lowers the rings, which smacks his head on the table.
While that was thoroughly amusing/strange (translation: typical Detarou fare), I was a bit disappointed that I didn't get to
extract further revenge on that (explitives deleted) panda
this time.
Oh well, I'll just have to settle for what Tumaru offers in that regard, I guess!
So I take it you pretty much have to start over if
you use Handle 1 on the locker instead of the metal door in the vent.
Yes, the save button is your friend. I should have mentioned that in the review. Sorry!
Leave a comment [top of page]

Game of the week

Walkthrough Guide
(Please allow page to fully load for spoiler tags to be functional.)
Gatiko Walkthrough
Items List
Heart Half (1/2) is found inside the toilet in the Bathroom.
Heart Half (2/2) is from the puzzle box inside the middle locker on the right row at the Locker Room.
The Heart is made by combining the two Heart Halves in your inventory.
Handle (1/2) is found in the nostril of the giant face floating in the water at the Bath House.
Handle (2/2) is found in the nostril of the mask hanging on the wall at the Living Room, but only after you push the red button inside the center locker at the Locker Room.
The Glass of Water is on the table in the side room past the sliding doors in the Living Room.
The Hook is found behind the metal door at the end of the Vent.
The Gold Key is found in the top right locker in the Locker Room.
The Stamp is found in the center locker in the Locker Room.
Full Ending
Hallway
You start the game in the Hallway facing a white door.
Before you open the door, turn left to face the Toilet.
Toilet
Open the door to the bathroom, then click the toilet for a close-up.
Lift the lid and take the Heart Half (1/2) inside the toilet bowl.
Go back then turn right to face the white door again.
Hallway
Open the white door and move forward into the Living Room.
Living Room
Click the sliding doors to zoom in.
Click the doors again to open them, which will give you a view of the side room.
Click the man in the pharaoh mask for a closer look.
Pick up the Glass of Water on top of the table.
Go back to the main view of the living room, then turn left twice to face the cupboard.
Click the cupboard doors to open them.
Throw the Glass of Water on the businessmen stuffed in the cupboard.
Inspect the lines on the back wall of the cupboard.
Pour the Glass of Water on the lines to reveal a pattern with 4 shapes.
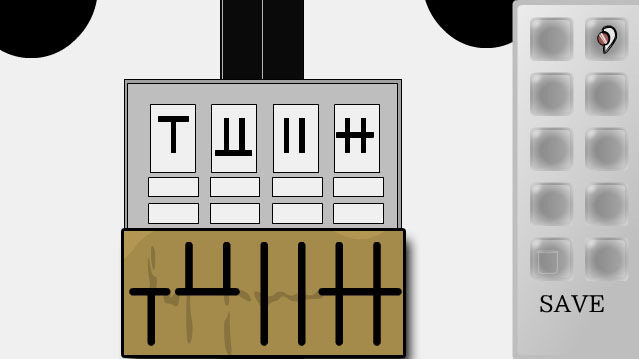
Go back twice then turn right to face the row of white sliding doors.
Click the lock in the middle of the doors to zoom in.
Press the buttons to enter in the 4 shapes found at the back of the cupboard.
Push the large button at the bottom of the lock to enter in the combination.
Screenshot.
Go through the open sliding doors to enter the Locker Room.
Locker Room
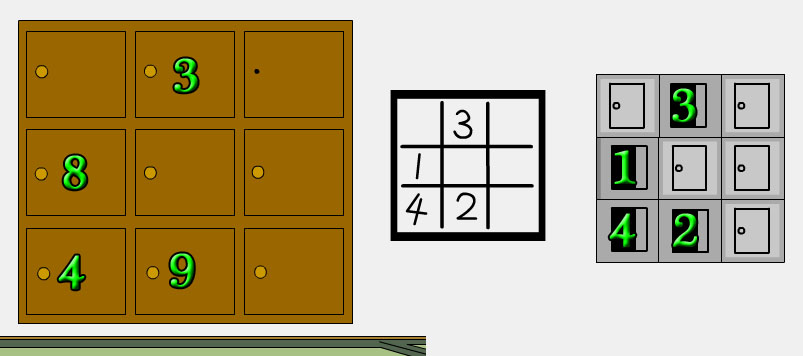
Click the red circular sign hanging on the wall to zoom in.
Note the positions of the numbers 1-4 inside the squares.
Go back to the main view of the room, then turn left.
Click the square panel of small grey doors on the wall for a closer look.
Opening a door on this panel will open the matching locker on the other side of the room.
Open the doors in the 1-4 order shown on the red sign to find their corresponding numbers inside the lockers.
Screenshot.
The number behind locker 1 is 8.
The number behind locker 2 is 9.
The number behind locker 3 is 3.
The number behind locker 4 is 4.
The final combination is 8-9-3-4.
Go back to the Living Room.
Living Room
Turn left then move forward to face the side room.
Click the glass doors to view the combination lock.
Enter the combination found in the lockers at the Locker Room.
8-9-3-4
Go through the open glass door to the Bath House.
Bath House
Take the Handle (1/2) out of the nose on the face floating in the water.
Go back to the Locker Room.
Locker Room
Turn left to face the two white sliding doors.
Open the door then go inside the closet.
Click the loose roof panel to climb into the Vent.
Vent
Move forward three times until you reach the sign.
Ignore the arrow and turn left, then move forward.
Add the Handle (1/2) to open the small metal door.
Take the Hook inside the opened compartment.
Go back to the Bath House.
Bath House
Look up to face the fisherman.
Add the Hook to his fishing rod, then go back to the main view of the area.
Pick up the Access Card floating in the water by the giant head.
Return to the Locker Room.
Locker Room
Move towards the statue in the alcove.
Click the base of the statue for a closer look.
Insert the Access Card into the slot by the statues feet.
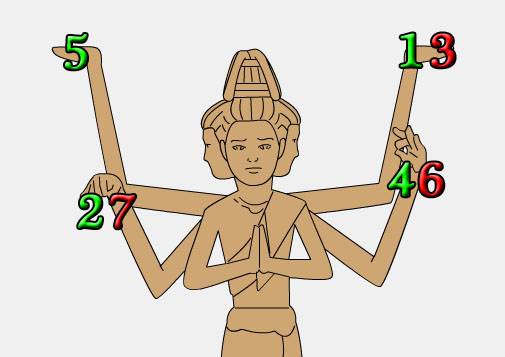
Watch the hands of the statue and note the order that they slap the face 7 times.
The hands hit the face in the following order: Upper left, lower left, upper left, lower right, upper right, lower right, lower left.
Screenshot.
Go back twice then turn left to face the grey panel of small doors.
Open the right door in the middle row of doors.
Go back once and turn right twice to view the lockers.
Open the right locker in the middle row of lockers.
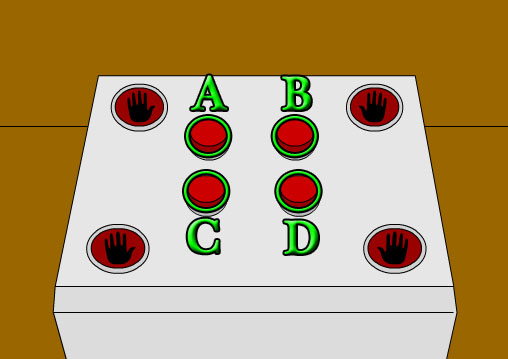
Click the white box inside the locker for a closer look.
Press the buttons to match the order that the hands slapped the statue's face.
If you push and hold down the red buttons, you'll find that they don't highlight their adjacent hands (i.e. the lower left button does not light the lower left hand, etc).
Instead, the top left button lights the lower left hand, the bottom left button lights the upper right hand, the top right button lights the lower right hand, and the bottom right button lights the upper left hand.
Refer to the screenshot below and click the buttons in the following order: C, A, C, B, D, B, A.
Screenshot.
Take the Heart Half (2/2) from the opened box.
Go back three times and turn left twice to face the grey panel of small doors.
Open the door in the very center to find the heart-shaped insert.
Inspect the Heart Half (1/2) in your inventory then combine it with the Heart Half (2/2) to complete the Heart.
Place the Heart inside the insert to unlock the center locker.
Go back twice then turn right twice to face the lockers.
Open the center locker, then click the locker to look inside.
Take the Stamp inside the locker.
Push the red button to view the location of the Handle (2/2).
Go back to the Living Room
Living Room
Click the mask hanging on the wall for a closer look.
Take the Handle (2/2) sticking out of the mask's nostril.
Return to the Locker Room.
Locker Room
Turn left to face the grey doors panel.
Click the panel to zoom in and open the top right corner door.
Go back once and turn right twice to face the lockers, then click the top right corner locker to zoom in.
Add the Handle (2/2) to open the locker.
Take the Gold Key inside the locker.
Go back to the Hallway.
Hallway
Click the exit door to zoom in.
Use the Gold Key to open the lock.
Go through the open door for the Happy Stamp End!
Quick Ending
To get the regular ending, follow the full guide until you get the Handle from the face in the Bath House.
Go to the Locker Room.
Turn left to face the grey doors panel.
Click the panel to zoom in and open the top right corner door.
Go back once and turn right twice to face the lockers, then click the top right corner locker to zoom in.
Add the Handle to open the locker.
Take the Gold Key inside the locker.
Return to the Hallway.
Click the exit door to zoom in.
Use the Gold Key to open the lock.
Go through the open door for the normal end.
Dead End
To get the bad ending, follow the full guide up to the point where you climb into the Vent from the Locker Room.
While inside the vent, move forward three times until you reach the sign.
Follow the arrow and turn right, then move forward towards the light.
Puzzle Guide
Sliding Door Symbols Puzzle
Take the Glass of Water from the table in the Side room.
Open the cupboard in the living room, then throw the Glass of Water on the men stuffed inside the cupboard.
Use the Glass of Water again on the lines written on the back of the cupboard to reveal the hidden symbols.
Go back twice and turn right to face the white sliding doors, then click the lock to zoom in.
Press the up and down buttons to cyrcle through the symbols, then press the bottom button enter the combination found inside the cupboard.
Screenshot.
Glass Doors Combination Puzzle
On the left wall in the Locker Room is a small grey 3x3 square that contains 9 doors.
At first, the bottom right door is open, but you can click any adjacent door to open it instead.
Whichever door is open on the grey panel will open the matching locker on the right side of the room.
Click the red circular sign hanging on the middle wall (to the left of the statue) to zoom in.
There are 4 numbers written in the squares that represent the 4 lockers you have to open in order to find the glass door combination.
First, go to the grey doors panel and open the left door in the middle row.
With the matching door opened, you can now open the left locker in the middle row to find the number 8 inside.
Return to the grey doors panel and open the middle door on the bottom row.
Turn back to the lockers and open the middle locker on the bottom row to find the number 9.
Face the grey doors panel, then open the middle door on the top row.
Go back to the lockers and open the middle locker at the top row to find the number 3.
Turn around towards the grey doors panel and open the left door at the bottom row.
Return to the lockers, then open the left locker at the bottom row to find the last number 4.
Put all the numbers together in order to find the final combination:
8934.
Go to the glass doors at the side room.
Click the locker for a close-up, then enter in the combination to open the door.
Screenshot.
Slapping Statue Puzzle
After you insert the Access Card into the card slot at the bottom the statue, the hands of the statue will start slapping the face.
The hands will slap the face seven times, then repeat the same pattern over and over.
Note which of the four hands slaps the face; in order from 1-7 it's:
Upper left hand.
Lower left hand.
Upper left hand.
Lower right hand.
Upper right hand.
Lower right hand.
Lower left hand.
Screenshot.
After you've learned the pattern, turn left to face the grey doors panel.
Open the right door in the middle row to unlock the matching locker.
Turn to the lockers and open the right locker in the middle row to find the white puzzle box.
Pushing one of the four red buttons will also highlight one of the hands on the box.
The hands at the corners of the box represent the statue's hands; the tricky part is that the buttons are out of order (the lower left button does not light the lower left hand, etc).
Instead, the top left button lights the lower left hand.
The bottom left button lights the upper right hand.
The top right button lights the lower right hand.
And the bottom right button lights the upper left hand.
Press the buttons to highlight the hands in the same order from 1-7 that they slapped the statue's face.
Refer to the screenshot below and press the buttons in the following order:
C
A
C
B
D
B
A
Screenshot.
If you pressed the buttons in the correct order, the box will open and you can take the Heart Half 2/2 inside.
Posted by: Trinn |
April 4, 2012 12:12 PM
|
April 4, 2012 12:12 PM