
Mystery Case Files:
Escape from Ravenhearst
Platform: Mac, Windows

![]() It's been a long time coming, hasn't it? First you explored Mystery Case Files: Ravenhearst, that twisted house of horrors. Then you returned to Ravenhearst in, appropriately, Mystery Case Files: Return to Ravenhearst and found even more evil lurking within. Now in the newest chapter it's time to escape in Mystery Case Files: Escape from Ravenhearst, the latest adventure/hidden object hybrid from BigFish Studios. Yes, Charles is back as is his crazed son Victor and they are out for revenge!
It's been a long time coming, hasn't it? First you explored Mystery Case Files: Ravenhearst, that twisted house of horrors. Then you returned to Ravenhearst in, appropriately, Mystery Case Files: Return to Ravenhearst and found even more evil lurking within. Now in the newest chapter it's time to escape in Mystery Case Files: Escape from Ravenhearst, the latest adventure/hidden object hybrid from BigFish Studios. Yes, Charles is back as is his crazed son Victor and they are out for revenge!
 If you are one of the two people on earth who has never played a Ravenhearst game, here's a brief synopsis: There's this evil guy named Charles who, when thwarted by the love of his life, disposed of her and trapped her spirit in the gloomy recesses of Ravenhearst, his maze-like house. Playing the master detective, you first freed poor Emma in the original story, then went back and freed her maid and the maid's twin daughters whose spirits were also trapped, burning down the mansion in the process. However, a taunting package has arrived that lures you back for a third time with the news of mysterious disappearances in the Blackpool area.
Are Charles and his crazy son at it again? You betcha! As you arrive back at the scene of so much evil Emma and her cohorts return as well to help you on your way, although they spend most of their time warning you, you Master Detective you, to turn back. Unfortunately you don't heed their cries and pretty soon you and they are "guests" of Charles, traveling through his nightmarish past. Can you find the missing people and help them and the spirits escape before you go as insane as the Dalimars? Delve deep and find out, although you might need a shower afterwards.
Like Return to Ravenhearst, Mystery Case Files: Escape from Ravenhearst plays as a point-and-click adventure with some hidden object elements incorporated. The great surprise this time around is that the designers have jettisoned the classic "list" type of hidden object scenes and replaced them with something far trickier: morphing objects. The premise of morphing objects has been seen in previous Mystery Case Files games like Mystery Case Files: Madame Fate and Dire Grove, but this time around they are taken to a whole new level. The spirits of Emma and the others cannot help you directly, they can merely cause objects in the background to "morph", or change shape, directing your attention to them. When entering a morphing object scene the only clues you receive are from Emma's locket, which tells you how many morphing objects can be found. Find them all and the spirit will direct you to an area of interest where there is something helpful or handy to be found and placed in the bottom-loading inventory, all the while warning you about getting any closer. Items in the inventory are then used to progress to new areas or launch a varied array of mini-games and puzzles that are clever and unique. A changing cursor helps you navigate the dangerous grounds and a pleasant surprise is the lack of "sparkles" to indicate areas of interest, eliminating a lot of hand-holding which plagues many adventure/hidden object hybrids.
 Analysis: Mystery Case Files: Escape from Ravenhearst brings the story of Charles and Victor to roaring life with its intense storyline and out-and-out stunning graphics. Just be warned right now, while the first two games were already pretty dark, Escape from Ravenhearst is even more twisted. BigFish has a disclaimer on the game page: "This is an intense psychological thriller that may reveal deep-seated fears. Not for the young or faint of heart. Consider yourself warned." Seriously, they are not kidding. Once you become a guest of Charles you learn the history of the Ravenhearst story from his point of view, and he's one sick puppy.
Lots of hybrids on the market have stunning graphics, but few have all of the bells and whistles that BigFish studios has poured into this amazing game. Along with breathtaking locales you will find dramatic music and incidental sounds to match, together with some of the best puzzles seen in this series in a long, long time. The change from classic hidden object scenes to the morphing object scenes is just whipped cream and nuts with a cherry on top.
The lack of sparkles and other directional hints makes for more challenging gameplay, as do the morphing objects which are not confined to the morphing scenes but are scattered around in other locations as well. Folks who like classic "list" types of hidden object scenes might be disappointed, however, with the new type of gameplay. And granted the morphing scenes do slow the gameplay down a bit, although the refilling hint timer does refill pretty quickly, eliminating some of the drag. The mini-games are fun and challenging, and best of all skippable if they turn out to be not your cup of tea. There is a bit of back-and-forth backtracking, although not nearly as much in Return to Ravenhearst as Escape from Ravenhearst is divided up into more manageable sections.
Mystery Case Files: Escape from Ravenhearst is bound to be controversial. Some will love the leap from classic hidden object scenes to morphing object scenes, some will not. Some will love the live actors and voice overs (especially Charles'), some might object to the drag they sometimes place on the story. Most of all, though, this is a deeply disturbing game which might not be for everyone. If dark and twisted with a side of gorgeous is your cup of tea, though, then this is definitely the game for you!
A Collector's Edition is also available. It includes a bonus collect and match quest, a bonus quest featuring the detective's case book, additional hidden object scenes, and a huge integrated strategy guide. Remember that Big Fish Game Club Members pay only $13.99 for Collector's Editions (or 2 club credits), and collector's editions count 3 card punches of 6 total needed for a free game.
![]() Windows:
Windows:
Download the demo
Get the full version
Also available: Collector's Edition
![]() Mac OS X:
Mac OS X:
Download the demo
Get the full version
Also available: Collector's Edition


Walkthrough Guide
(Please allow page to fully load for spoiler tags to be functional.)
Mystery Case Files: Escape from Ravenhearst Walkthrough
(Chapters 1 & 2)
Chapter 1 - Ravenhearst
Inside the Car
Open the glove compartment on the left side of the dashboard and take the Matches.
Exit the car to go to the Manor Gates.
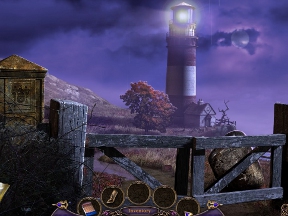
Manor Gates
Click the grate (A) on the ground below the large puddle to zoom in.
Click the gold heart-shaped Locket to add it to the toolbar, to the right of your inventory.
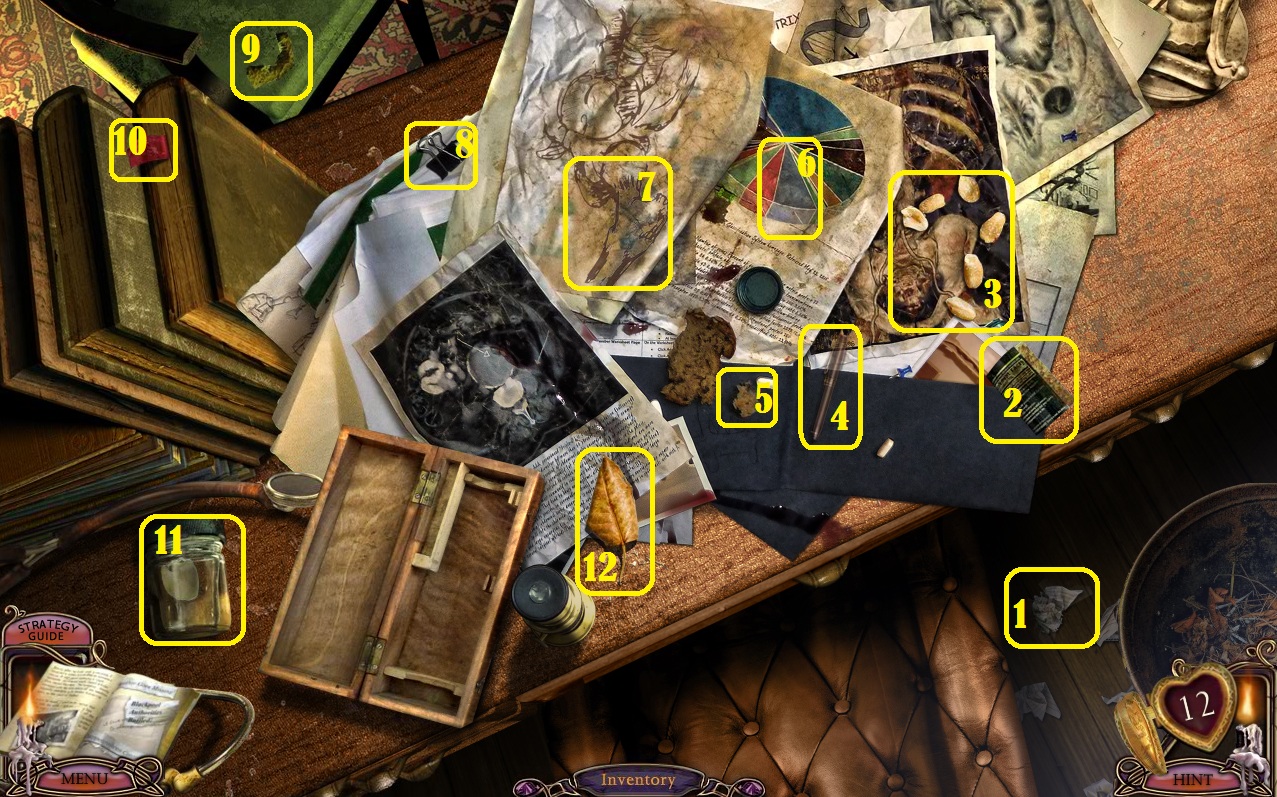
After speaking with the ghost, click the first Morphing Object (1), on the hood ornament of the car.
Click the Morphing Object (2), on top of the gate.
Click the Morphing Object (3), in the flowerbed to the left of the gate.
Click the Morphing Object (4), beside the roses in the bottom right corner of the screen.
Click the Morphing Object (5), inside the mailbox to the right of the gate.
Screenshot.
Click the broken lantern that falls to move it aside, revealing the Bottle Opener.
Follow the path up to the Swing, then go right to the area Underneath the Bridge.
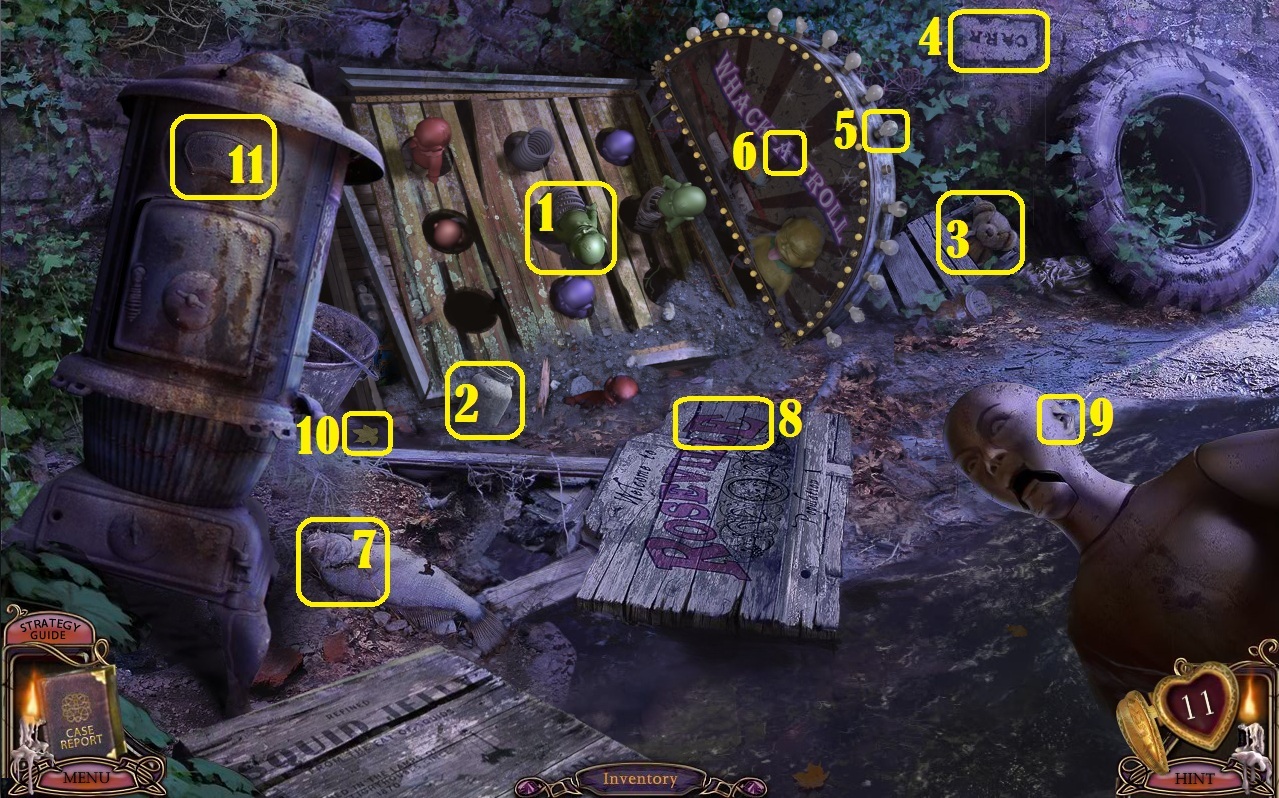
Underneath the Bridge
Click the mannequin floating in the water to begin the morphing object scene.
Click the Morphing Object (1), in the middle hole of the Whack-A-Troll game board.
Click the Morphing Object (2), on the ground directly below the hole in the bottom left corner of the game board.
Click the Morphing Object (3), in the box to the left of the tire.
Click the Morphing Object (4), on the sign on the wall above the tire.
Click the Morphing Object (5), on the middle light of the Whack-A-Troll sign.
Click the Morphing Object (6), the letter "A" or "O" in the Whack-A-Troll sign.
Click the Morphing Object (7), at the head of the dead fish on the ground beside the base of the stove.
Click the Morphing Object (8), at the end of the word Roseville on the welcome sign lying on the ground
Click the Morphing Object (9), at the ear of the mannequin.
Click the Morphing Object (10), on the ground between the bucket at the bottom left corner of the Whack-A-Troll game board.
Click the Morphing Object (11), at the top of the stove.
Screenshot.
Once the morphing object scene is complete, take the Rag that falls out of the bucket.
Go back to the Swing, then move up the path to the Lighthouse Gate, then continue forward one more time to the Lighthouse Entrance.
Lighthouse Entrance
Click the middle of the pile of rocks beside the path to zoom in.
Use the Bottle Opener to lift the wedged rock, then click the Large Rock to add it to your inventory.
Click the revealed key on the top rock to drop it into the hole.
Go back to the Swing.
Swing
Use the Large Rock three times on the bent iron bar at the end of the fence.
Take the broken Metal Bar that falls to the ground.
Return to the area Underneath the Bridge.
Underneath the Bridge
Click the stove beside the left wall to zoom in.
Use the Metal Bar on the door to the stove.
Take the Lighter Fluid behind the opened stove door.
Go back to the swing, then go right across the bridge to the Cottage Lawn, then move forward a final time to reach the Cottage Entrance.
Cottage Entrance
Click the broken doorknob to zoom in.
Use the Metal Bar on the gap between the door and the frame to pry the door open.
Go forward into the Cottage.
Cottage
Click the Morphing Object (1), mounted on the wall above the window.
Click the Morphing Object (2), in the corner of the wall shelf to the left of the hanging lantern.
Click the Morphing Object (3), underneath the bottom of the sink.
Click the Morphing Object (4), in the middle of the pile of wood, just to the right of morphing object #3.
Click the Morphing Object (5), in the middle of the top desk drawer.
Click the Morphing Object (6), in the word "Potato" on the potato sack.
Click the Morphing Object (7), on the work table directly underneath the green toolbox.
Click the Morphing Object (8), sticking out of the pile of junk inside the barrel.
Click the Morphing Object (9), in the piece of the broken right wall.
Click the Morphing Object (10), at the top of the rake, just to the right of morphing object #9.
Click the Morphing Object (11), in the middle of the bicycle wheel on the wall beside morphing object #10.
Click the Morphing Object (12), on the left handle of the sink tap.
Click the broken window (A) to zoom in.
Screenshot.
Click the cracked window pane to break off a piece of glass, then click the Glass Shard to add it to your inventory.
Go back to the Cottage Lawn.
Cottage Lawn
Click the stack of letters sticking out of the mailbox to zoom in.
Use the Glass Shard three times to cut the twine holding the letters together, then click the Twine to add it to your inventory.
Go back to the Swing.
Swing
Click the rope of the swing tied to the tree branch to zoom in.
Use the Glass Shard four times to cut through the Rope, adding it to your inventory.
Return to the Cottage.
Cottage
Use the Rope on the pile of scrap metal above the desk drawers.
Click the end of the rope that is drawn through the pulley above the pile of junk to raise the scrap metal.
Take the revealed Chain on top of the desk.
Go back to the Manor Gates.
Manor Gates
Click the cluster of locks attached to the gate to zoom in.
Add the Chain to the locks around the gate.
Click the front of the car for a closer look.
Click the chain hook lying on the ground to attach it the grill of the car.
Go back to enter the Inside of the Car.
Inside the Car
Click the gear stick with the 8 ball on top to send the car into reverse.
Exit the car, then go over the broken gate on the right to reach the Well.
Well
Click the well to look inside.
Click the rope three times to pull the bucket up to the top of the well.
Use the Glass Shard three times to cut through the rope and receive the Bucket.
Go forward up the stairs to the Manor Entrance.
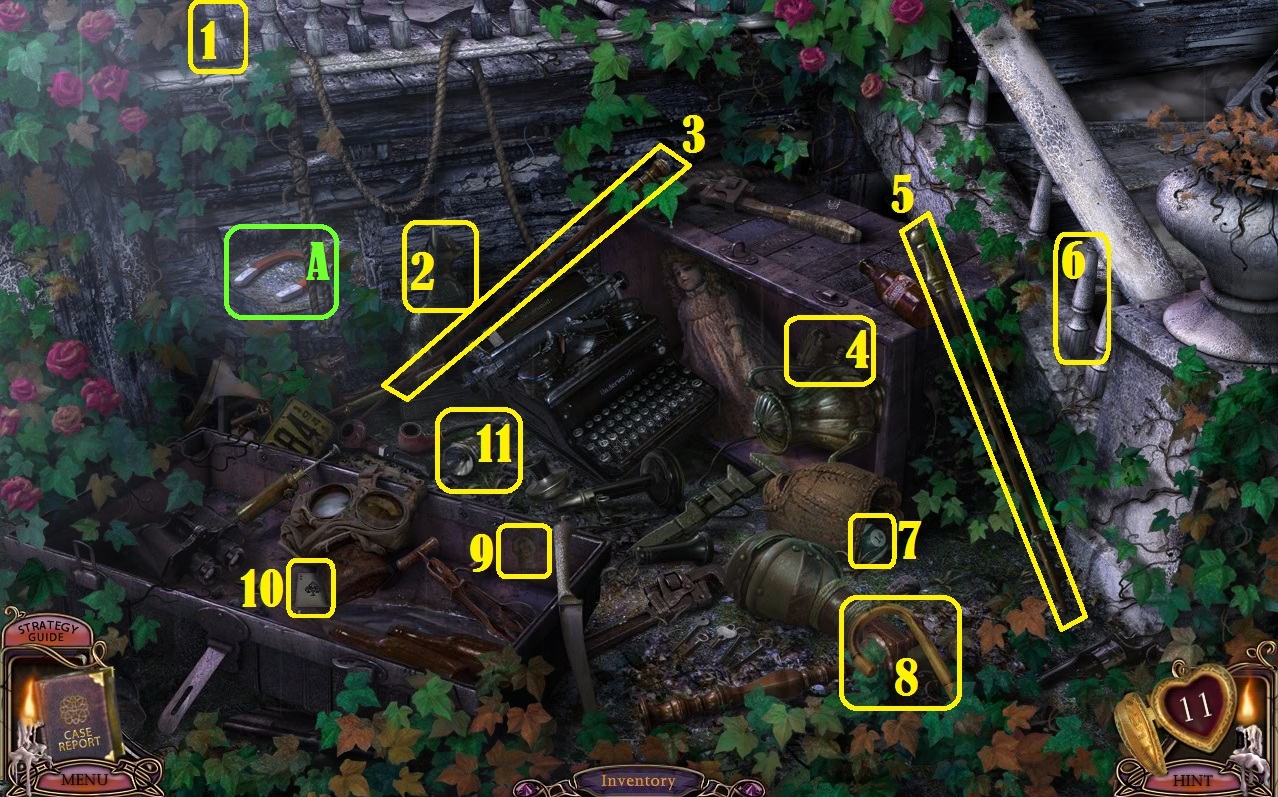
Manor Entrance
Take the Ladder lying on top of the stairs.
Click the plant-covered area to the left of the stairs to start the morphing object scene.
Click the Morphing Object (1), at the far left railing near the upper left corner of the screen.
Click the Morphing Object (2), at the head of the cat statue to the left of the typewriter.
Click the Morphing Object (3), the walking stick above the typewriter.
Click the Morphing Object (4), the photograph inside the right box to the right of the doll.
Click the Morphing Object (5), the walking stick leaning against the right side of the overturned box.
Click the Morphing Object (6), the second banister railing on the left side of the stairs.
Click the Morphing Object (7), on the ground inside the baseball glove.
Click the Morphing Object (8), sticking out of the vine leaves directly below the baseball glove.
Click the Morphing Object (9), on the inside upper right corner of the left box.
Click the Morphing Object (10), underneath the gas mask inside the left box.
Click the Morphing Object (11), on the ground beside the two smoking pipes.
Screenshot.
Take the Magnet (A) on the ground behind the broken boards and the noose.
Go back to the Lighthouse Entrance>
Lighthouse Entrance
Click the middle of the pile of rocks beside the path to zoom in.
Use the Magnet on the key inside the hole between the rocks.
Attach the Twine to the magnet.
Click the combined twine and magnet to receive the Lighthouse Key.
Click the door of the lighthouse for a closer look.
Use the Lighthouse Key on the keyhole to unlock the door, then go through the open door into the Lighthouse Base.
Lighthouse Base
Click the stove in the rear left corner of the room to zoom in.
Douse the wood with the Lighter Fluid, then light the fire with the Matches.
Click the books beside the globe on the desk for a closer look.
Take the Magnifying Glass
on top of the books, then note the four symbols carved into the book cover under the hourglass.
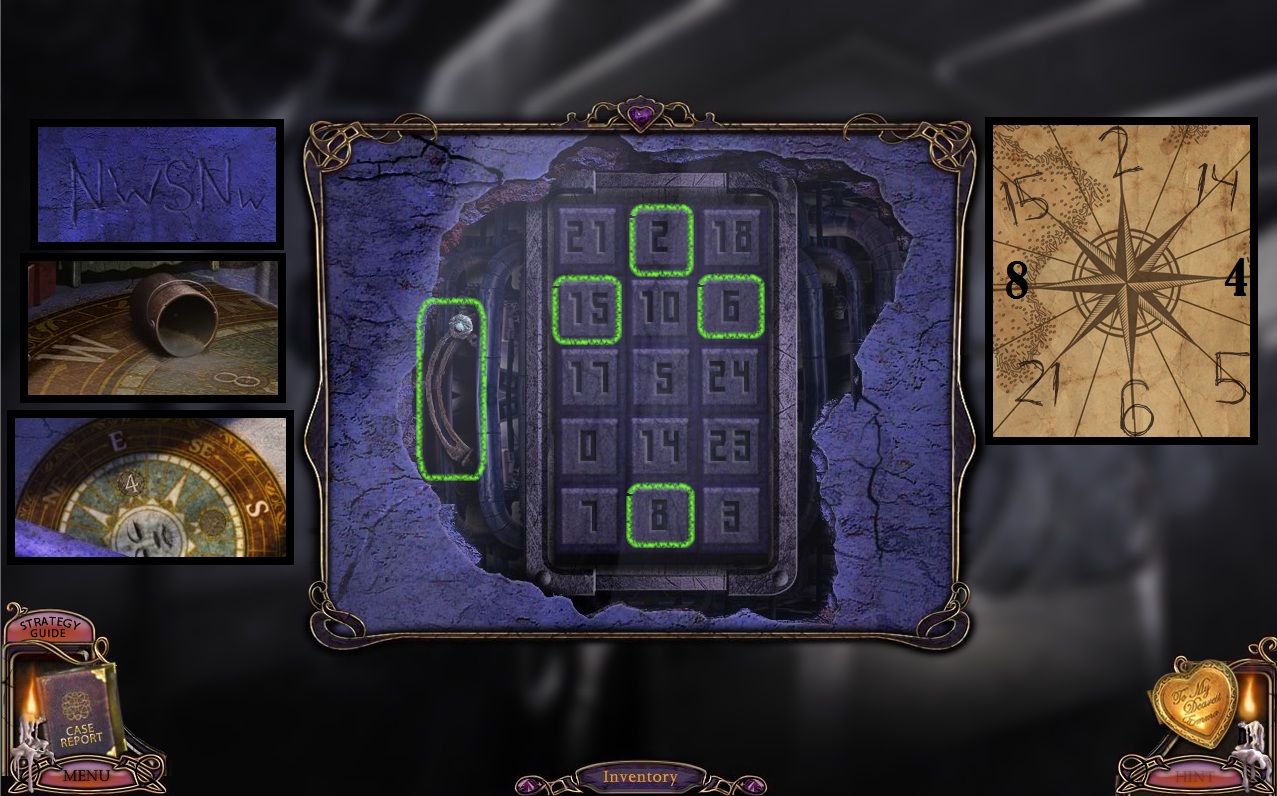
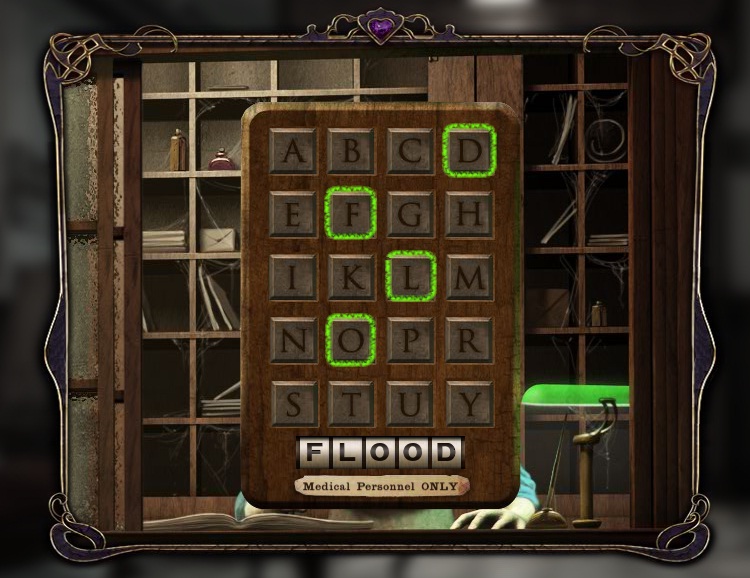
Click the map on the wall to the right of the doorway to zoom in. Note the six numbers written around the compass rose.
Click the chest directly underneath the map to start the puzzle.
To solve this puzzle, arrange the numbers to match the code found on the carving in the book cover on the desk; this code is randomized each game.
Click the + or - buttons around the square of numbers to add or subtract 1 from the value of two corresponding numbers in a horizontal, vertical, or diagonal line.
Solution.
Once the puzzle is solved, click the open chest to look inside.
Click the small journal to read it and note the information found inside, including the four numbers of the reset code.
Go forward to the Stairway Bottom.
Stairway Bottom
Click the overturned can of paint on the ground to zoom in.
Use the Rag three times on the puddle of paint.
Note the number 8 is now revealed next to the "W" or west on the compass rose painted on the floor.
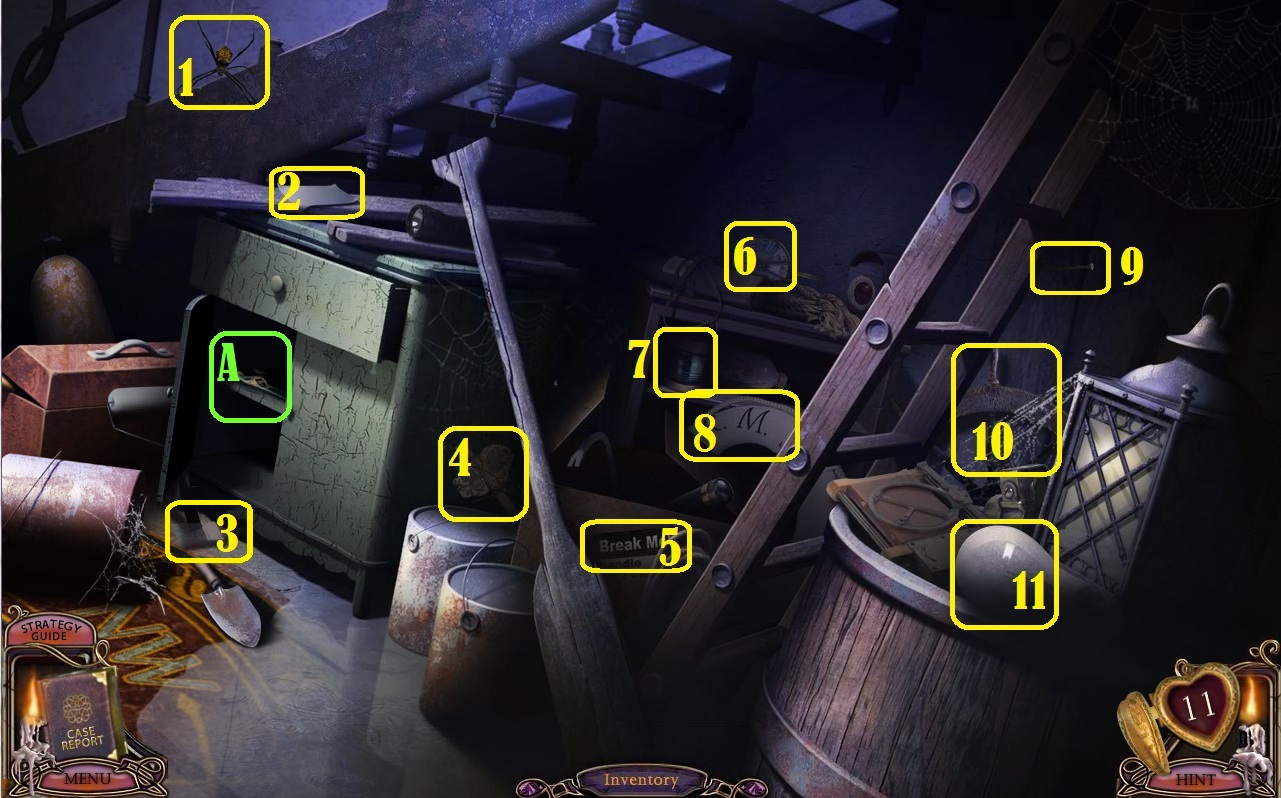
Click the pile of junk underneath the stairwell to start the morphing object scene.
Click the Morphing Object (1), the spider dangling from the web above the end of the stairs.
Click the Morphing Object (2), the paper on the plank of wood on top of the green cupboard.
Click the Morphing Object (3), the paintbrush under the bottom of the cupboard.
Click the Morphing Object (4), the hammer behind the paint cans on the right side of the cupboard.
Click the Morphing Object (5), the label on the box between the oar and the ladder.
Click the Morphing Object (6), the compass on top of the shelves.
Click the Morphing Object (7), the color changing bulb of the lantern on the top shelf.
Click the Morphing Object (8), the letters written across the life preserver.
Click the Morphing Object (9), the nail sticking out of the ladder under the 2nd highest step.
Click the Morphing Object (10), the ship's wheel against the wall underneath the ladder.
Click the Morphing Object (11), the top of the lightbulb on the barrel beside the lantern.
Screenshot.
Take the Wrench (A) from the top shelf of the open cupboard.
Go back outside to the Lighthouse Entrance.
Lighthouse Entrance
Click the water pump to the left of the path to zoom in.
Use the Wrench on the rusted tap to remove the Garden Hose.
Return to the Cottage Entrance.
Cottage Entrance
Click the water tap in the wall to the left of the doorway for a closer look.
Attach the Hose to the tap.
Click right to look over the fence, then click down to climb the hose to the cliff.
Cliff
Take the Shovel lying on the ground at the edge of the cliff.
Place the Ladder over the chasm to the second ledge.
Click the paper stuck between the rocks on the second ledge for a closer look.
Click the paper again to add the Clue Fragment to your inventory.
Return to the Manor Entrance, then continue forward to the Destroyed Manor.
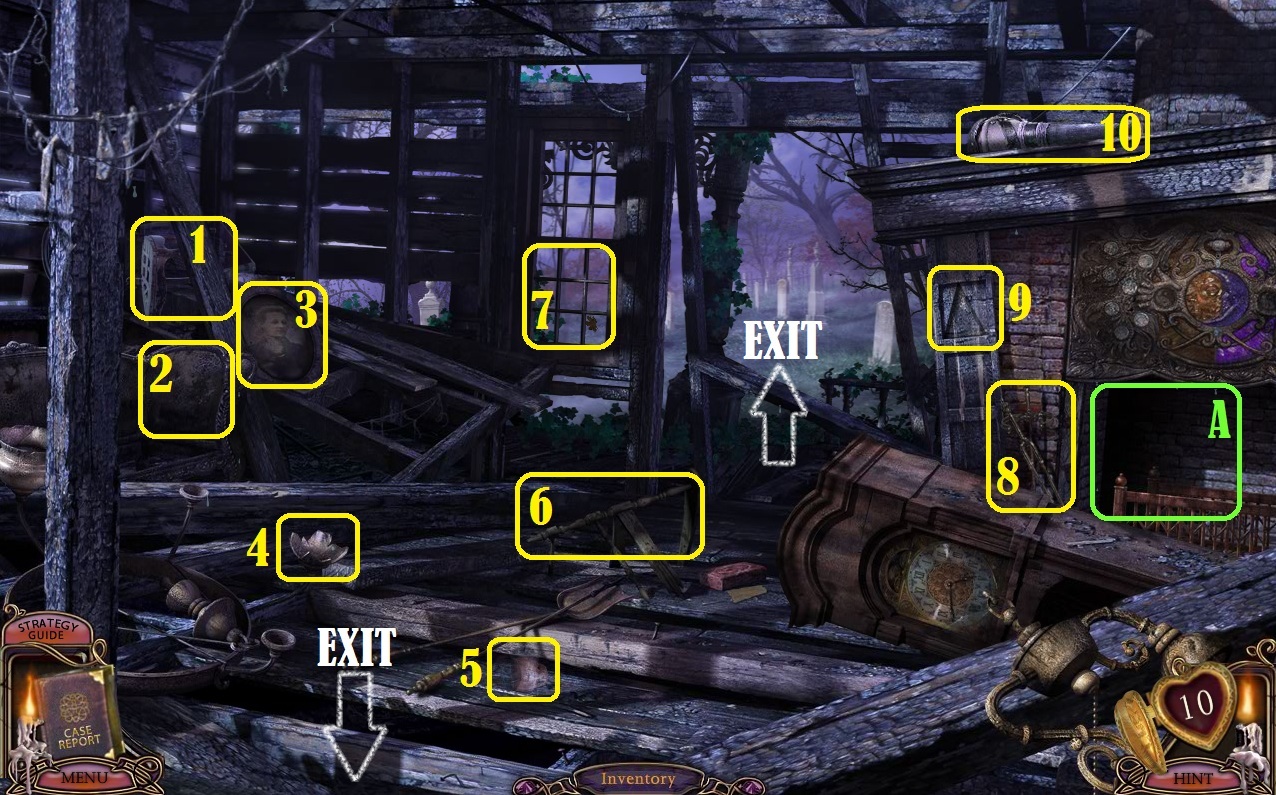
Destroyed Manor
Click the Morphing Object (1), behind the fallen board in the rear left corner of the room.
Click the Morphing Object (2), in the seat backing of the sofa directly underneath morphing object #1.
Click the Morphing Object (3), in the framed portrait to the right of morphing objects 1 and 2.
Click the Morphing Object (4), on top of the pile of broken beams beside the fallen chandelier.
Click the Morphing Object (5), on the floor to the right of the fireplace shovel and poker.
Click the Morphing Object (6), on top of the broken railing above the shovel and poker.
Click the Morphing Object (7), in the middle of the bottom window pane.
Click the Morphing Object (8), leaning against the wall to the left of the fireplace.
Click the Morphing Object (9), on the wall beside the fireplace above morphing object #8.
Click the Morphing Object (10), on the top of the fireplace mantle.
Click the inside of the fireplace (A)to zoom in.
Remove the loose brick at the back of the fireplace to reveal the V Key.
Click the red brick on the floor to the left of the grandfather clock for a closer look.
Screenshot.
Read the letter hidden underneath the brick; note the word "Last" is underlined.
Add the Clue Fragment to the torn bottom of the letter and note the numbered arrows.
Go forward to the Graveyard.
Graveyard
Click the first grave to the left of the path, note that the name "Last" is the same as the note found in the Destroyed Manor.
Also note the 5 numbers engraved into the tombstone underneath the name.
Return to the Stairway Bottom inside the lighthouse, then go up one flight to the Stairway Middle.
Stairway Middle
Note the flashing letters carved into the wall to the left of the stairs.
Look over the railing to see the number 4 underneath the "E" for east on the compass rose painting on the floor.
Continue up to the Stairway Top.
Stairway Top
Look over the railing a final time to see the number 2 painted under the "N" for north on the compass rose painted on the floor.
Click the knob on top of the left post, where a beam of light is pointing from the floorboards above.
Click the newly made hole on the wall to zoom in.
Enter in the combination using the clues found around the lighthouse so far:
The map on the wall at the Lighthouse Base shows a compass rose with 6 numbers, but is missing two numbers at the west and east points.
The compass rose painted on the floor of the Stairway Bottom reveals that the value for West is 8 and the value for East is 4, and verifies that the value for North is 2.
Enter the combination of numbers according to the order shown flashing on the wall carving at the Stairway Middle, then press the button to the left of the button panel.
Solution.
Go up the ladder to the Lighthouse Tower.
Lighthouse Tower
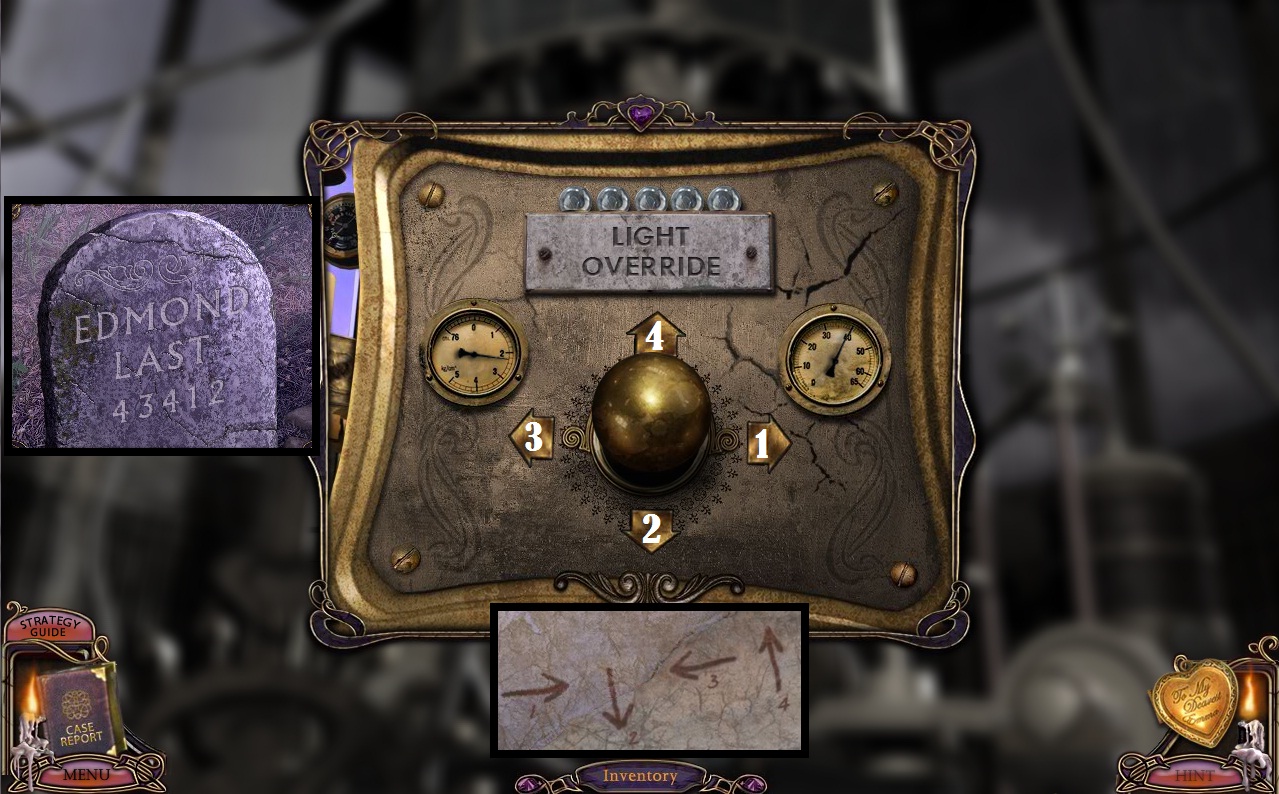
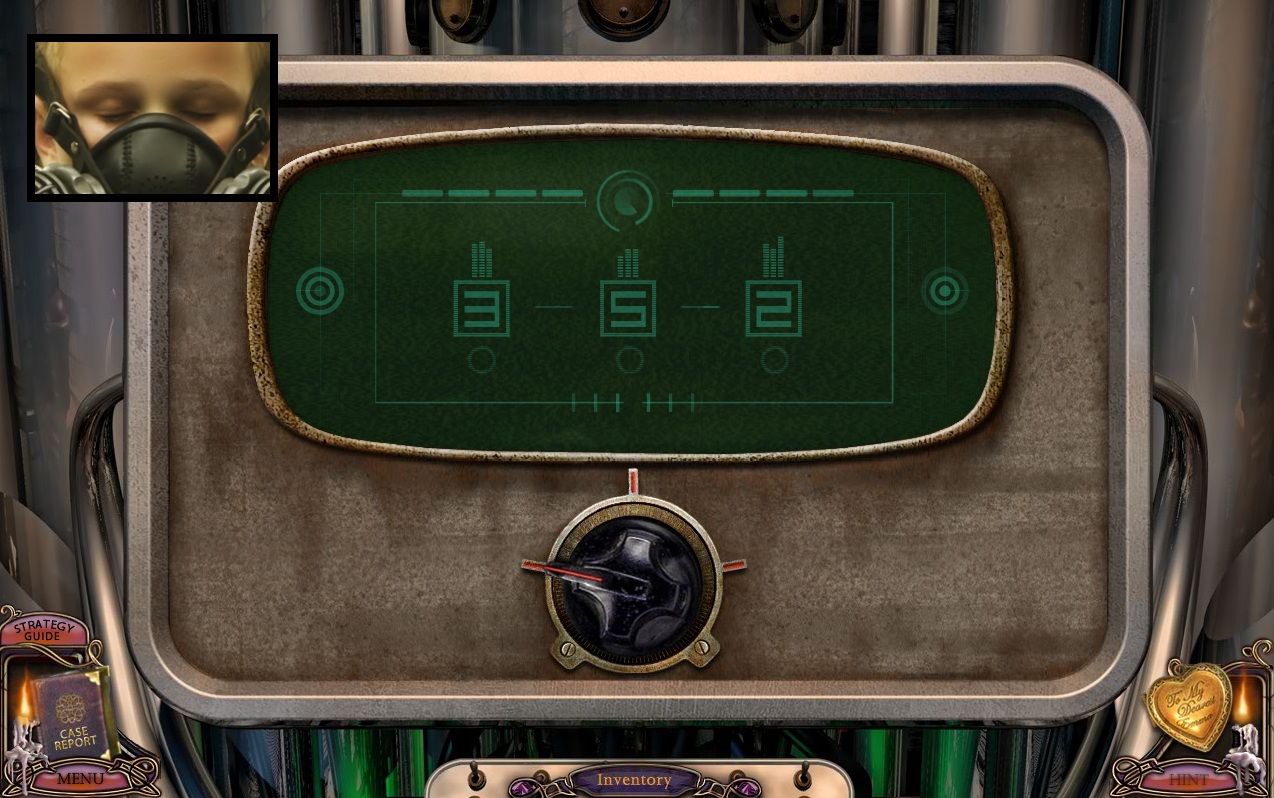
Click the Light Override mechanism to zoom in.
Press the lever upwards three times to activate the override.
Go back to the area Underneath the Bridge.
Underneath the Bridge
Fill the Bucket with the river water.
Go back to the Manor Gates.
Manor Gates
Click the front of the car to zoom in.
Use the Rag on the hood of the car to open it.
Pour the Bucket of Water on the steaming engine.
Click the fuse box on the right side of the machinery to open it, then take the Car Fuse inside.
Return to the Lighthouse Gate.
Lighthouse Gate
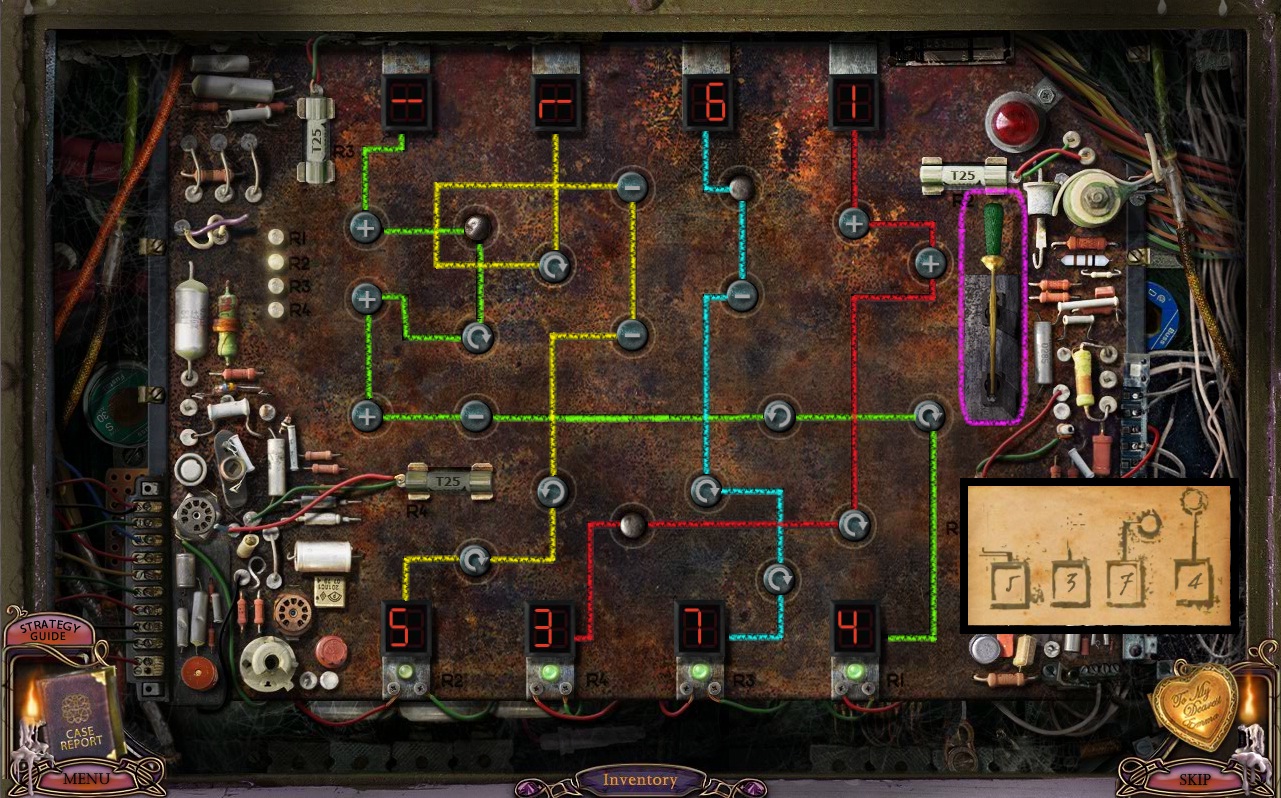
Click the sparking electric box behind the fence for a closer look.
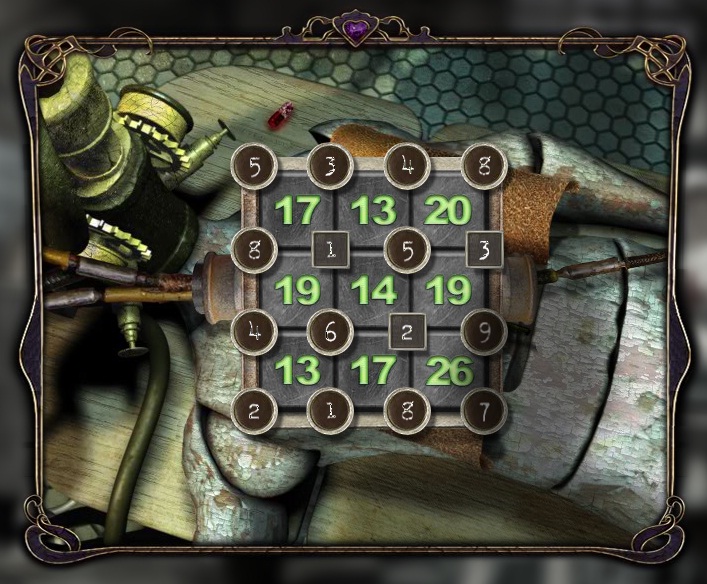
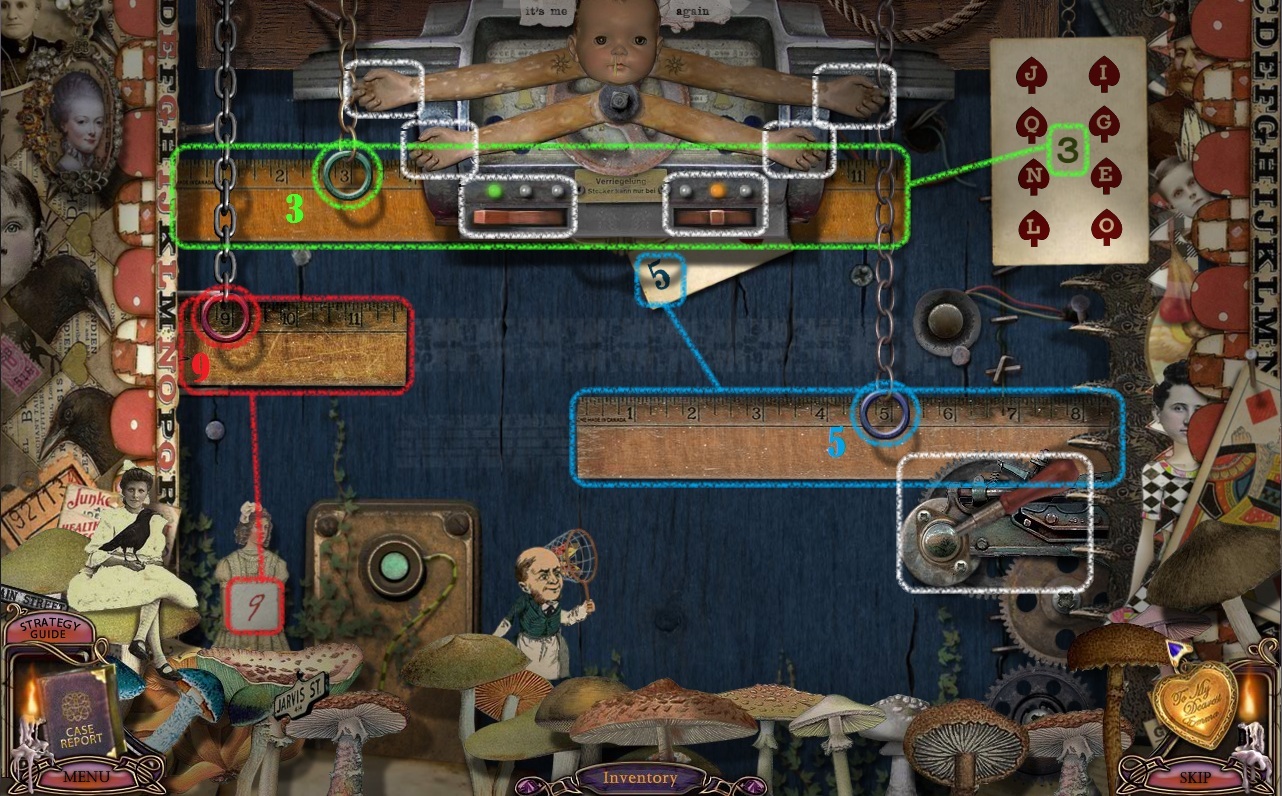
Add the Car Fuse to the sparking empty space on the fuse panel to start the puzzle.
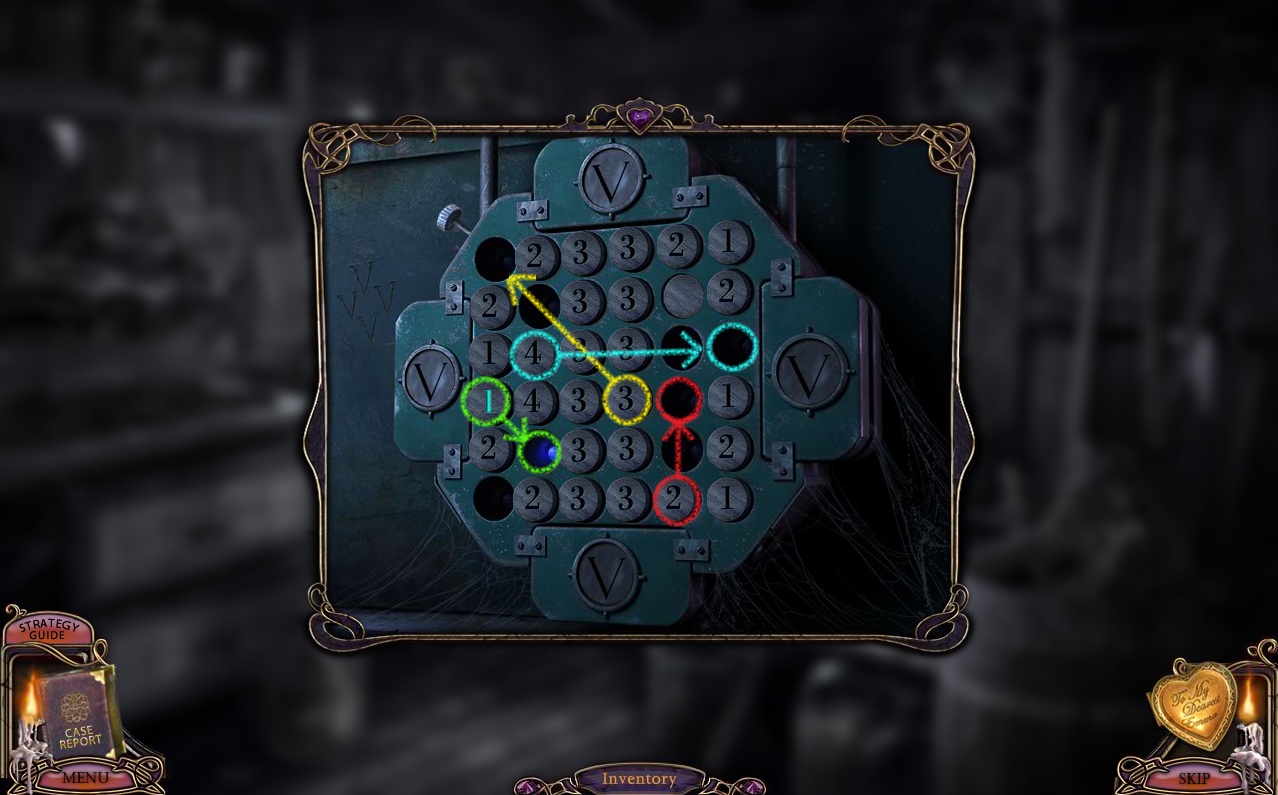
To solve this puzzle, arrange the buttons so that the numbers at the bottom follow the combination found in the lighthouse keeper's note: 5-3-7-4; the starting numbers on the top are randomized each game.
The numbers need to be the correct value, in the correct order, and positioned upright.
To begin with, follow path of each number to find where it stops at the bottom to determine whether its value should be 5, 3, 7, or 4 in order from left to right.
Once you know what each number needs to be when it reaches the end of the track, click the round buttons to either + or - to add or subtract 1 to that number when it passes the button.
When you have the correct number, all you need to do is rotate it so that it is facing the right direction; click the round buttons again to choose between the clockwise or counterclockwise position to rotate it in that direction.
Along each number's track are buttons (some are silver, some are hidden under regular buttons) with secret effects on the number passing over them by either adding or subtracting from the number or rotating it.
Pull the green lever at the right side of the fuse panel to test your solution.
Solution.
Return to the lighthouse tower.
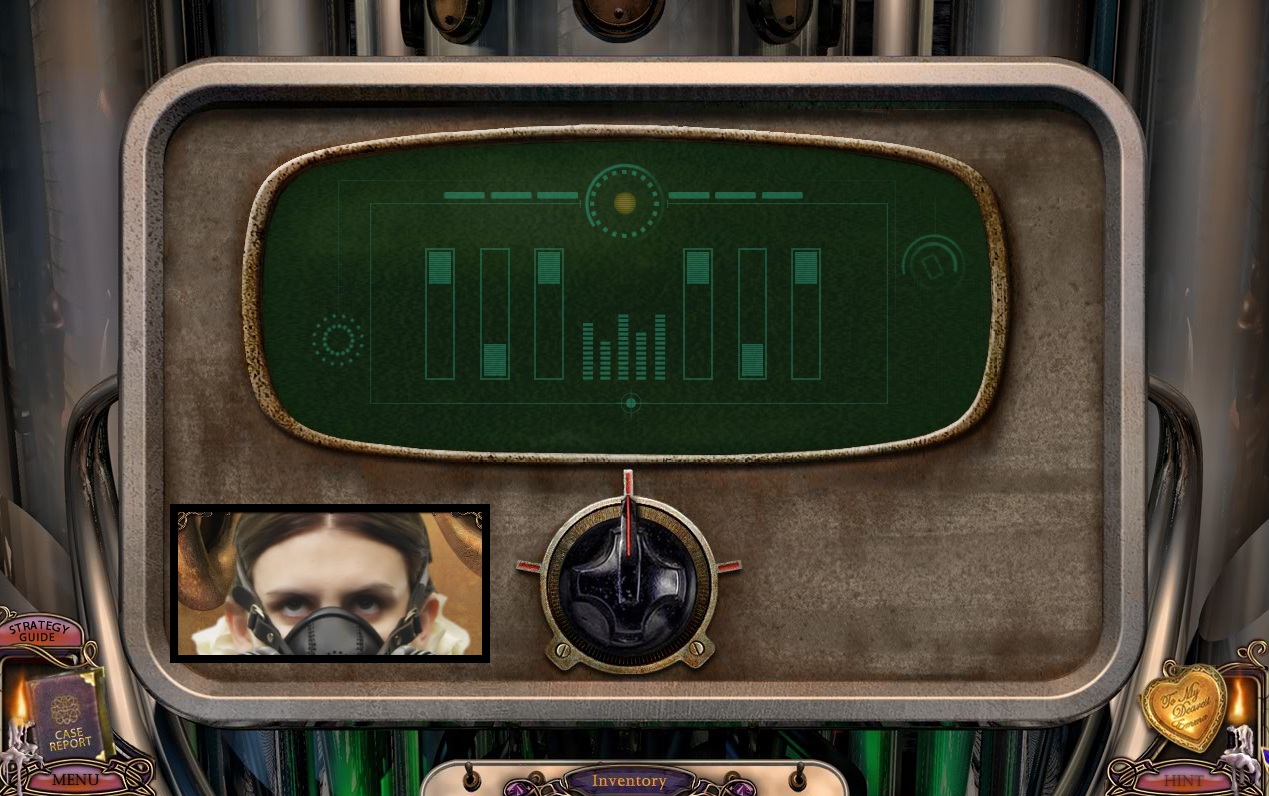
Lighthouse Tower
Click the light override panel to zoom in.
Using the clues from the note in the Destroyed Manor and the grave of Edward Last in the Graveyard, press the lever in the correct directions (this order is randomized each game).
Screenshot.
Go back to the Graveyard.
Graveyard
Use the Shovel three times on the dirt in front of the closest grave.
Click the grave to look inside.
Chapter 2 - The Hospital
Tank Chamber
Click the wrapped gift at the foot of the golden door.
Click the present again to open it, then take the Raven Key.
Click the center of the raven door to zoom in.
Use the Raven Key on the keyhole to unlock the door.
Go through the open door to the Hospital Entrance.
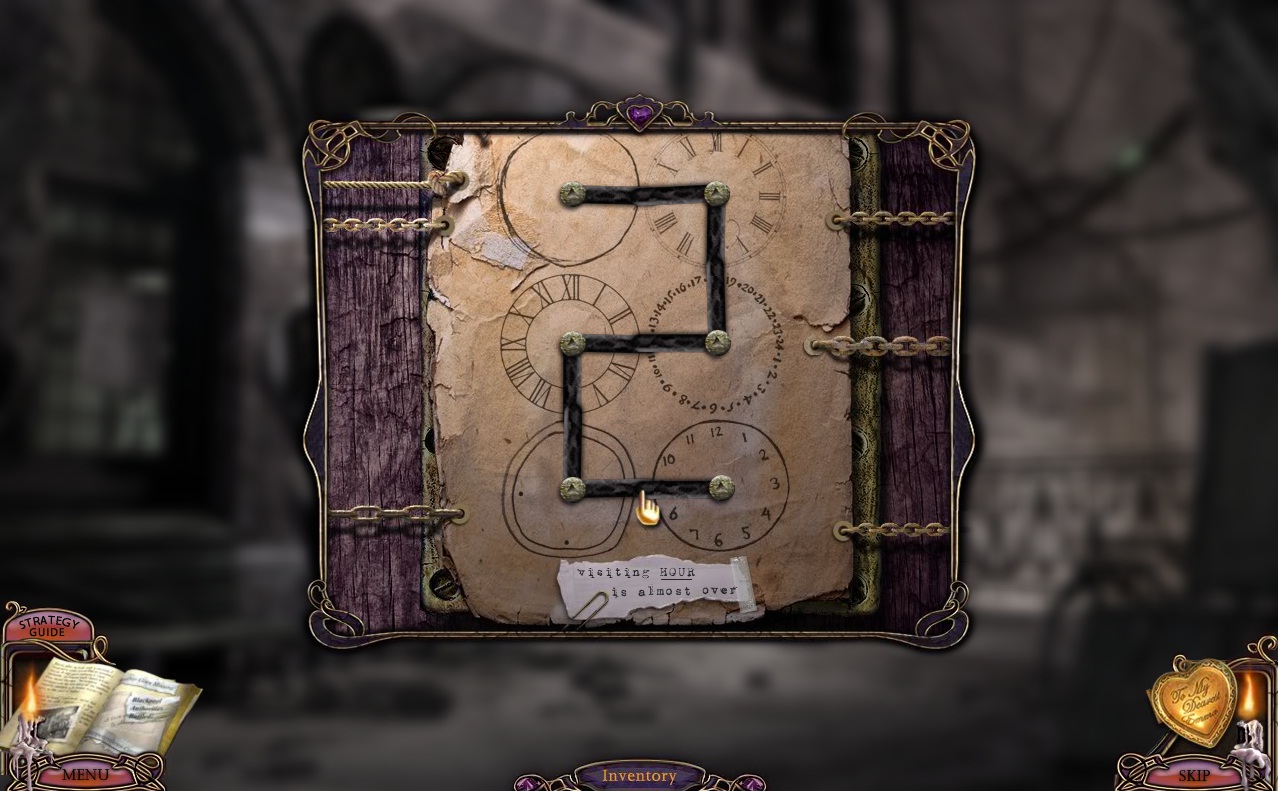
Hospital Entrance
Click the speaker on the wall to the right of the door.
Click the board under the entrance sign and note that visiting hours are at 2.
Click the door to the hospital to start the puzzle.
Click and drag the hands of the clocks to arrange them into the shape of the number 2.
Solution.
Go through the open door into the Waiting Room
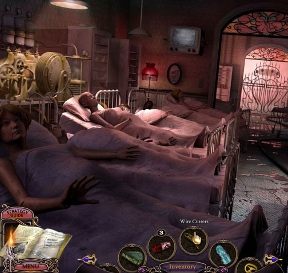
Waiting Room
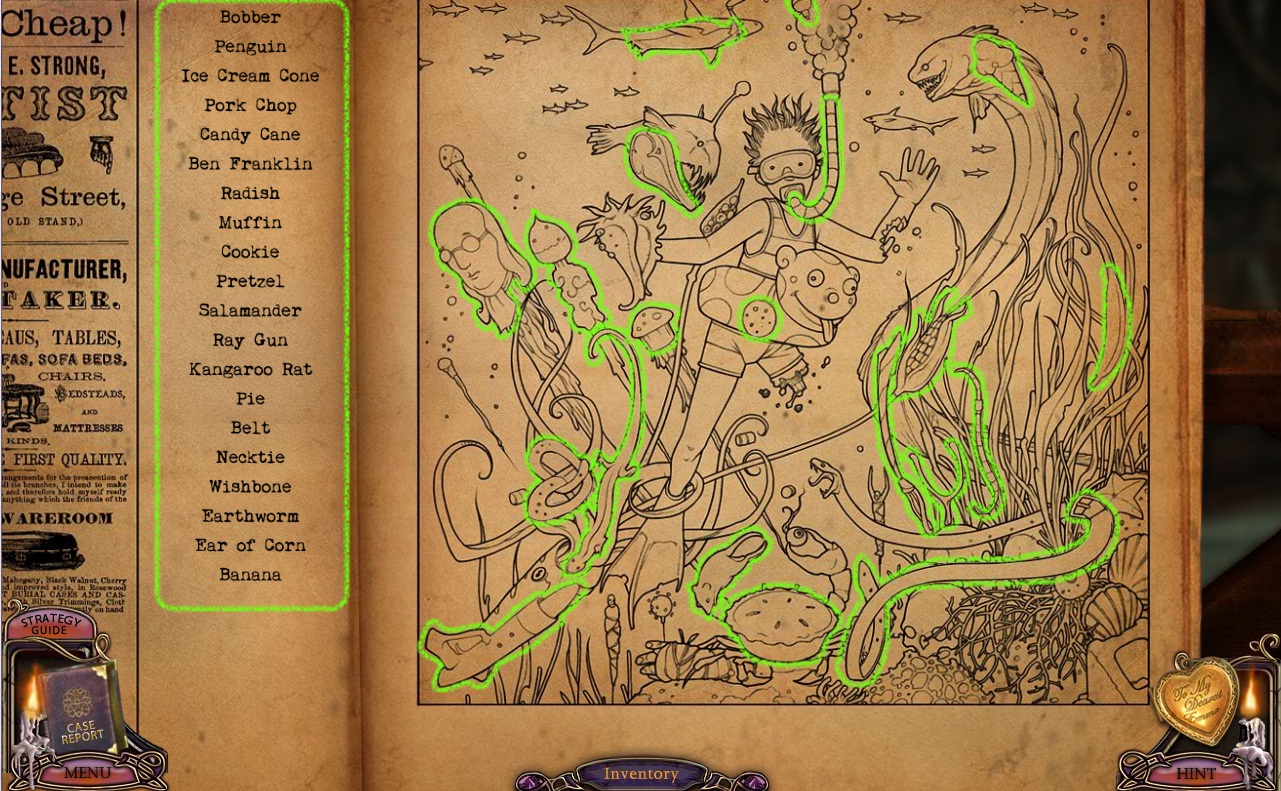
Click the magazine on the seat of the red sofa, then open the book to start the hidden object scene.
Screenshot.
Once the hidden object scene is complete, take the Feather from the inside of the book.
Go forward to the Hallway.
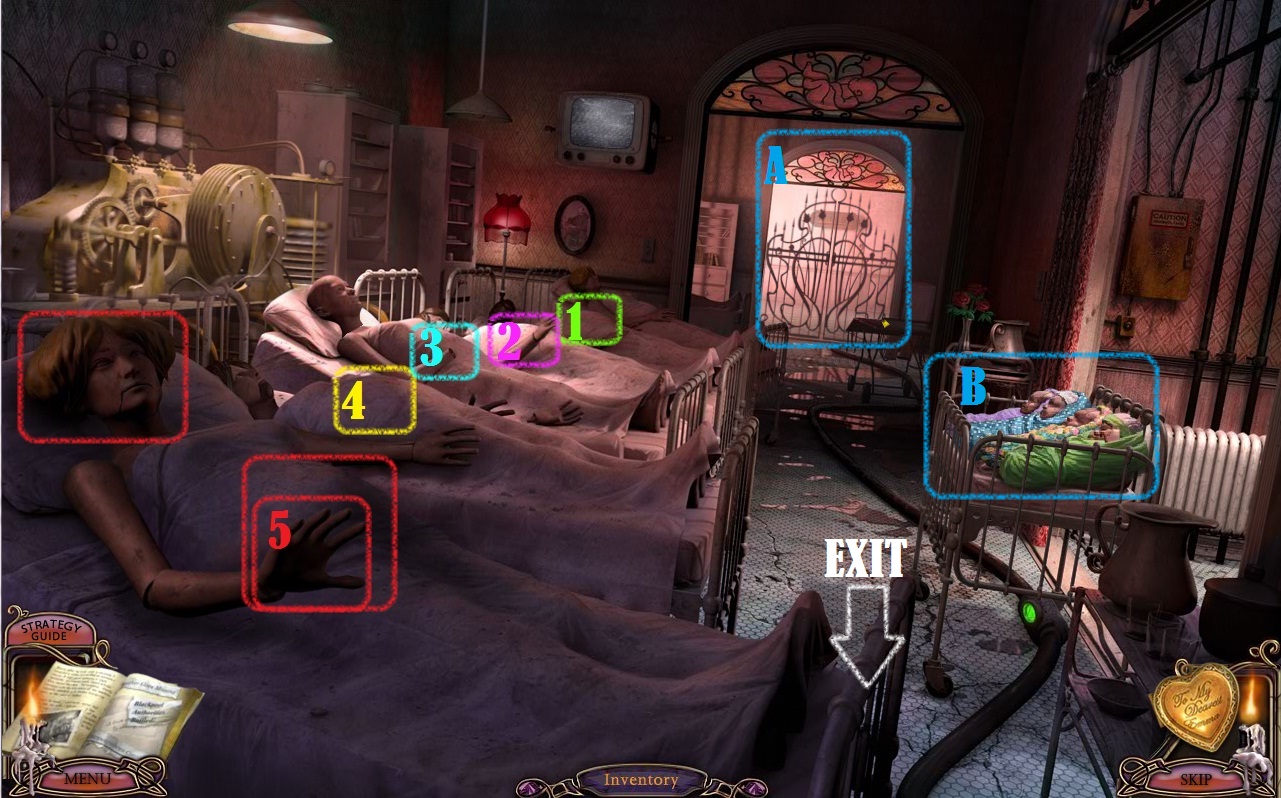
Hallway
Take the Parenting Book 1/3 on top of the left stretcher.
Click the pile of rubble beside the left wall to start the morphing object scene.
Click the Morphing Object (1), in the sink water to the right of the doll.
Click the Morphing Object (2), at the drain of the sink.
Click the Morphing Object (3), in the broken wall behind the sink.
Click the Morphing Object (4), in the broken wall to the left of object #3.
Click the Morphing Object (5), on the crumpled newspaper to the left of the sink.
Click the Morphing Object (6), at the bottom of the newspaper, underneath object #5.
Click the Morphing Object (7), on top of the photographs on the ground.
Click the Morphing Object (8), the picture inside the photograph under object #7.
Click the Morphing Object (9), on the floor in the pile of coat hangers.
Click the Morphing Object (10), on the blue cloth to the right of object #9.
Click the Morphing Object (11), on the open book above the blue cloth.
Click the Morphing Object (12), on the wall to the right of the sink.
Screenshot.
Take the Wire Cutters (A) that fall out of the hole in the wall.
Click the X-ray machine on the right wall to zoom in and take the Red Pill (1/4).
Go forward to the Surgery.
Surgery
Click the robot on the operating table to zoom in.
Take the Red Pill 2/4 on the corner of the operating table.
Use the Wire Cutters on the three wires in the middle of the robot's chest.
Click the revealed chest panel to start the puzzle.
To solve this puzzle, click the buttons so that the numbers at each corner of the squares equal the sum in the middle.
You cannot reuse any numbers in a single square, and you cannot change the value of the square buttons.
When the correct sum is made with the four numbers, it will glow green; if the sum is incorrect, it will flash red.
Solution.
Once the puzzle is solved, take the Stork Key from the opened chest.
Click the left door to open it, then go through it to the Morgue.
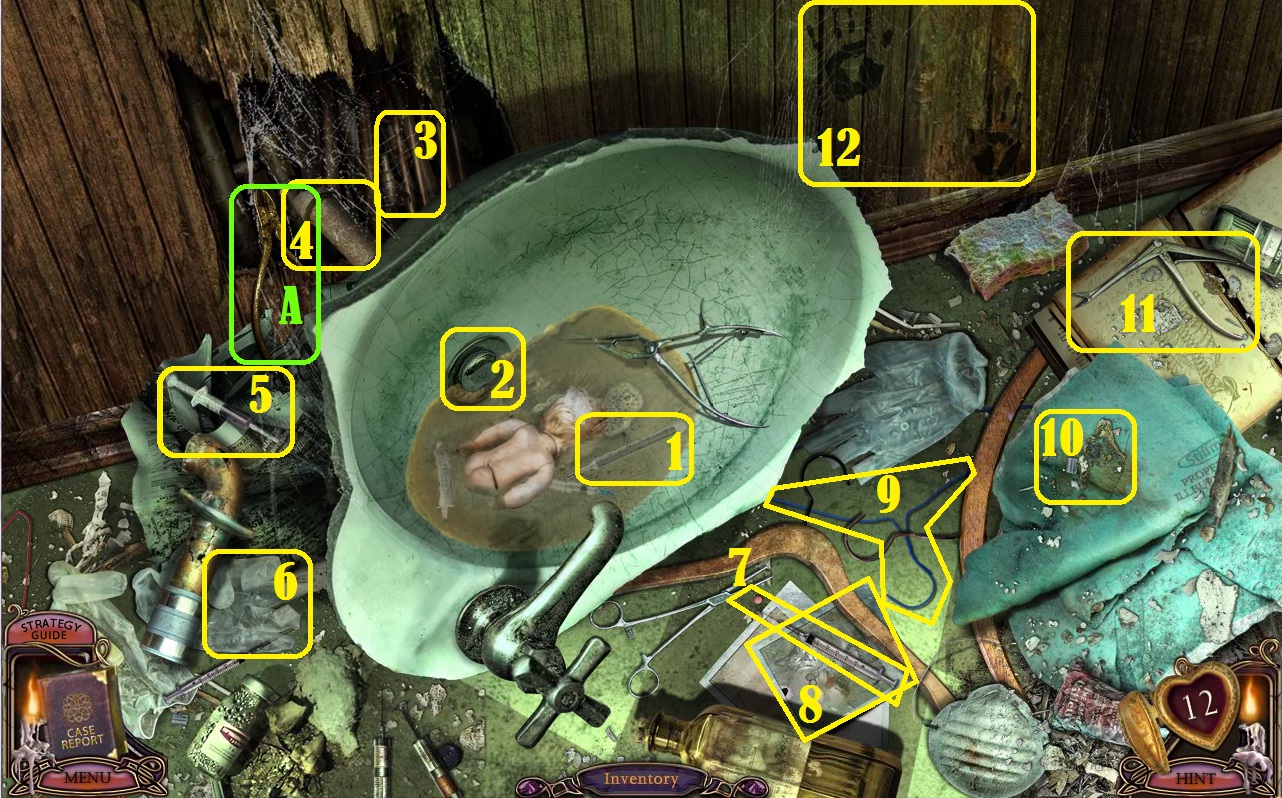
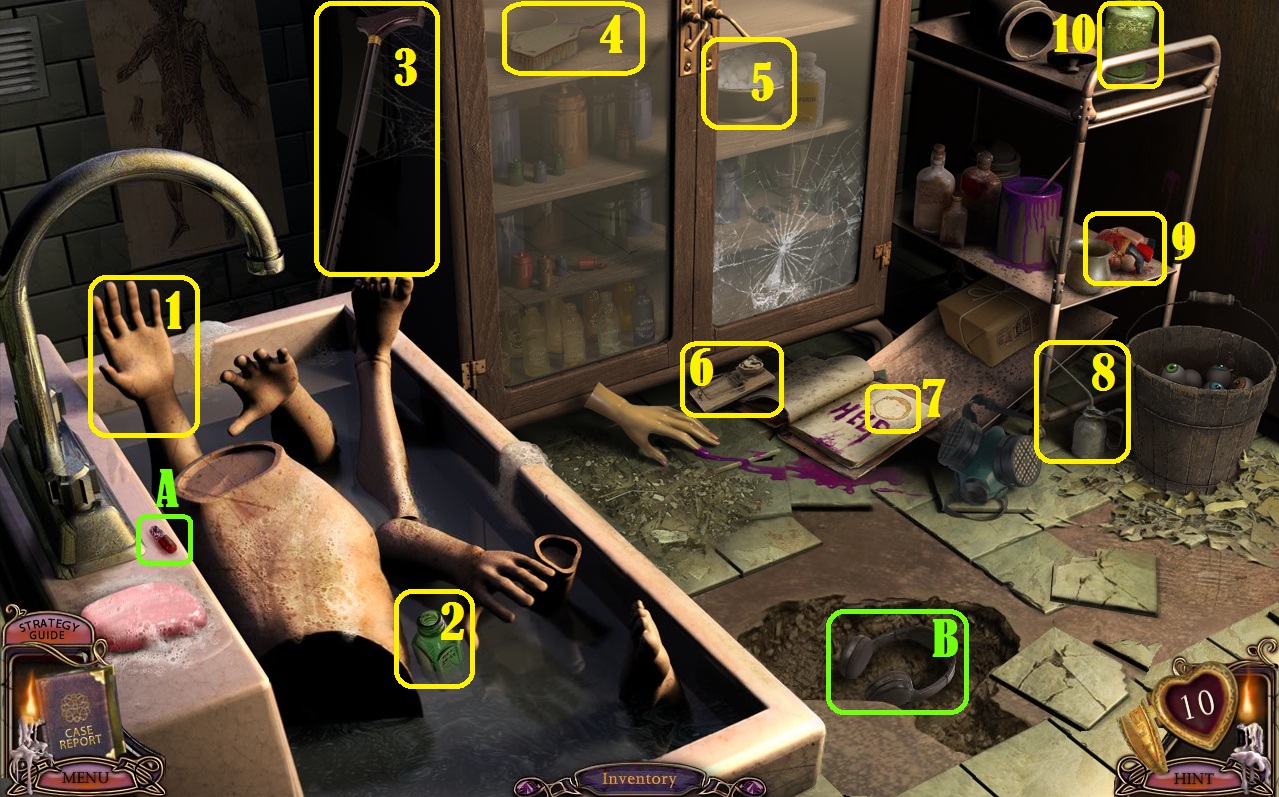
Morgue
Click the sink with the pile of robot limbs to start the morphing object scene.
Click the Morphing Object (1), sticking out of the water in the upper left corner of the sink.
Click the Morphing Object (2), floating in the water beside the torso in the sink.
Click the Morphing Object (3), leaning against the left side of the medicine cabinet.
Click the Morphing Object (4), on the top left shelf of the medicine cabinet.
Click the Morphing Object (5), in the bowl on the right shelf of the medicine cabinet.
Click the Morphing Object (6), in the mousetrap at the bottom of the medicine cabinet.
Click the Morphing Object (7), in the book above the word "HELP".
Click the Morphing Object (8), on the floor to the left of the bucket filled with eyeballs.
Click the Morphing Object (9), on the bottom shelf above the bucket, to the right of the purple can of paint.
Click the Morphing Object (10), on the right side of the top shelf above the bucket.
Screenshot
Take the Red Pill 3/4 (A) on the sink beside the water tap.
Take the Headphones (B) in the hole in the floor.
Go back to the Surgery.
Surgery
Click the surgeon for a closer look.
Use the Headphones on the surgeon's head.
Click the back of the surgeon's smock to zoom in.
Use the Wire Cutters three times on the pouch sewn on to the back of the gown to reveal the Screwdriver.
Go back outside to the Hospital Entrance.
Hospital Entrance
Click the speaker on the left side of the door to zoom in.
Use the Screwdriver on the screws at the corner of the speaker to open it.
Note the four numbers written on the paper at the bottom of the device: They are randomized each game.
Return to the Morgue.
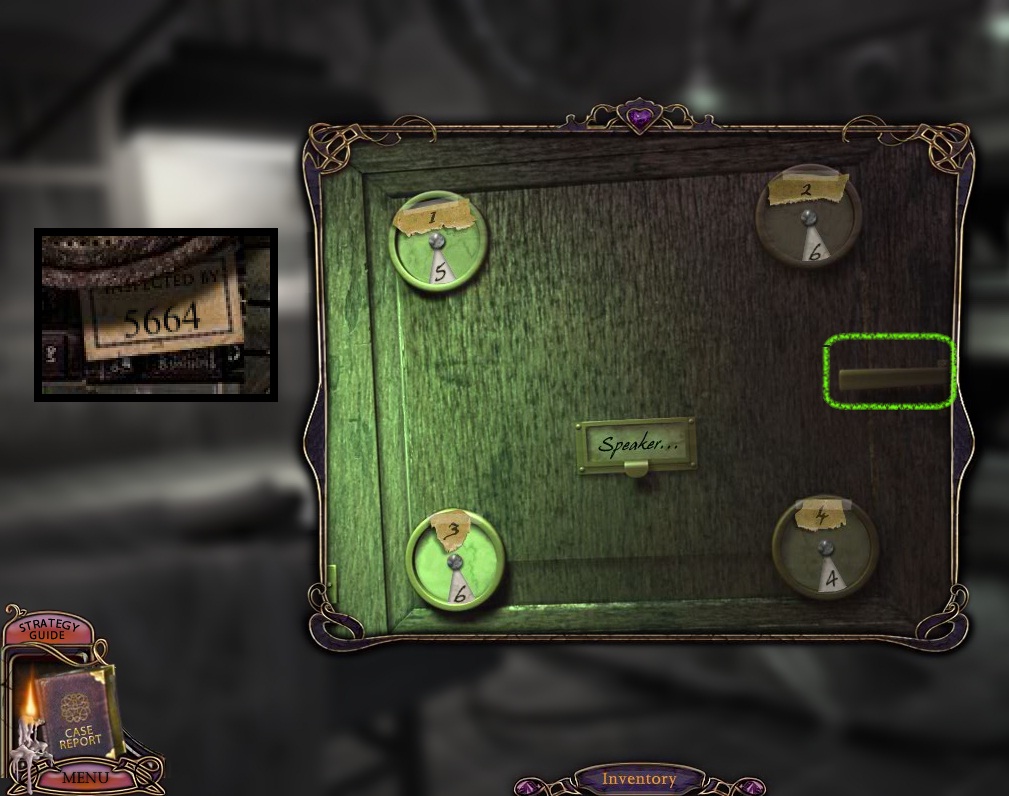
Morgue
Click the center body cooler to zoom in.
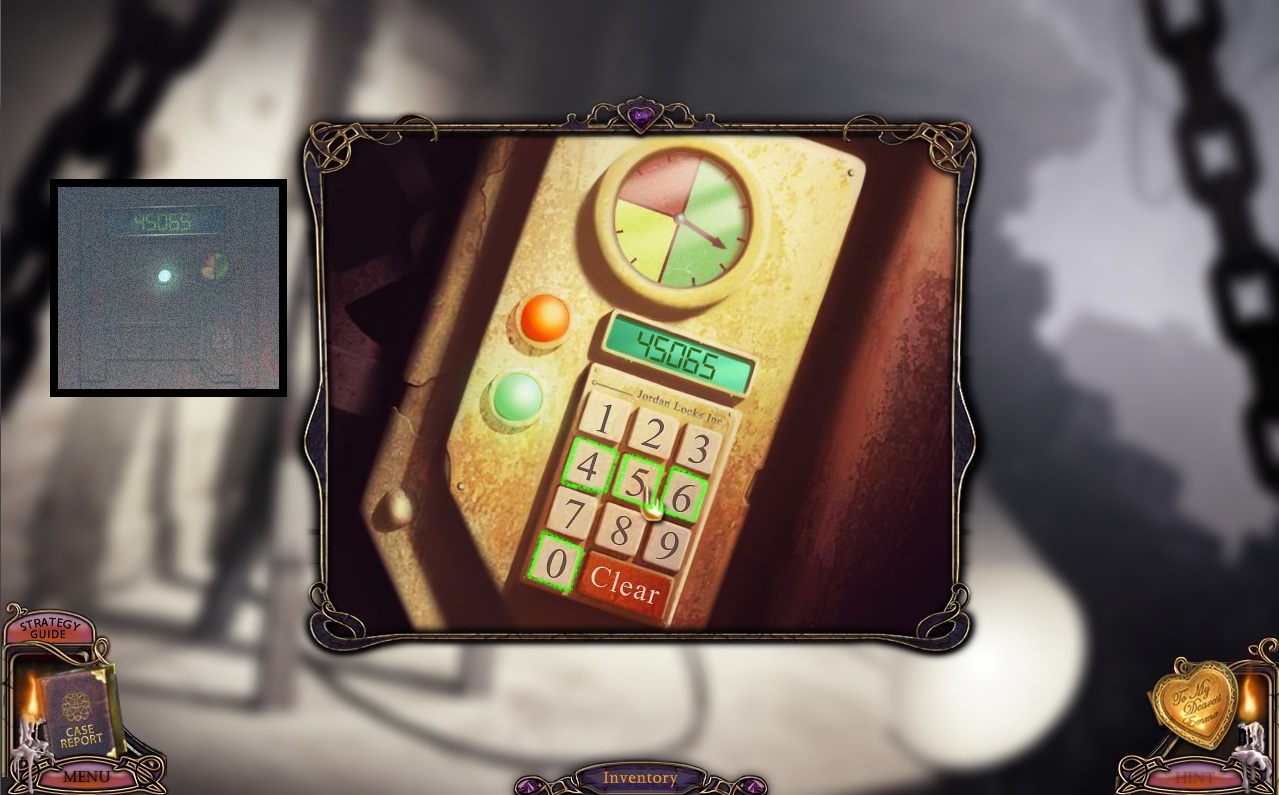
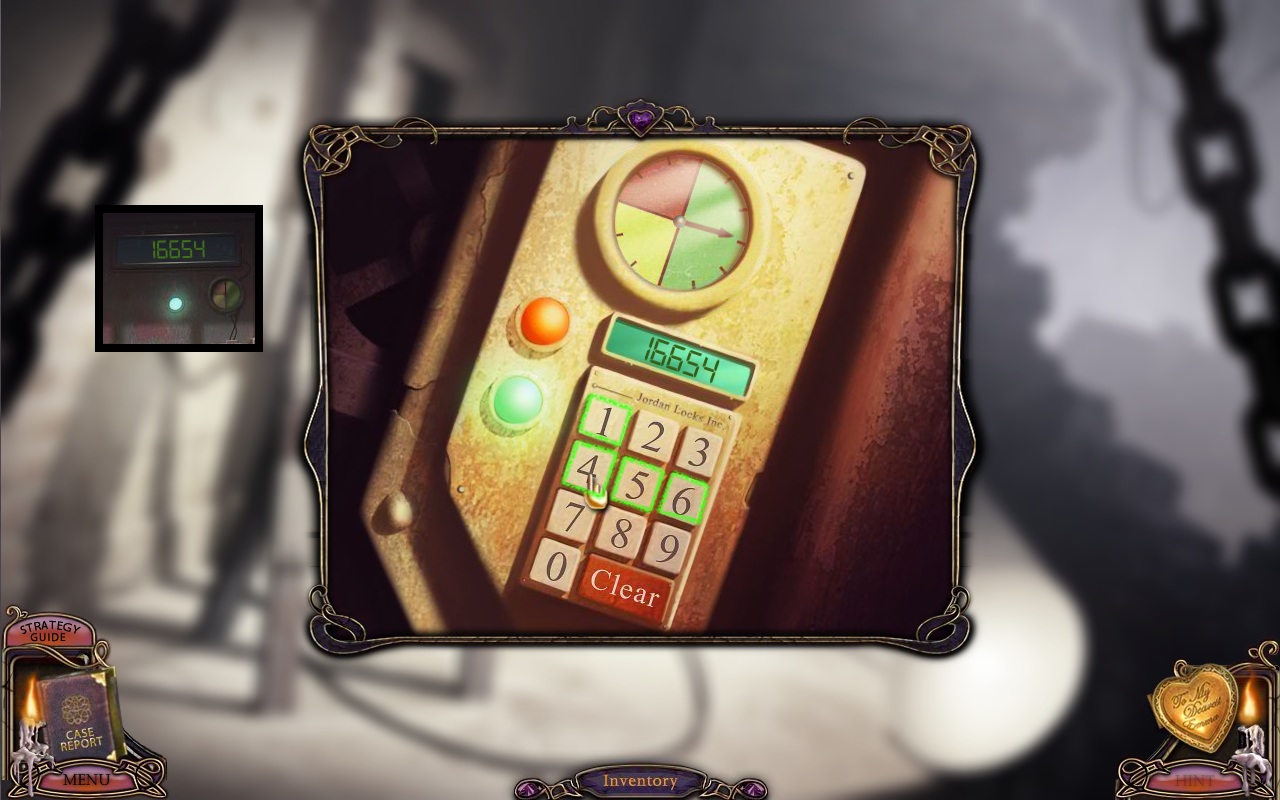
Enter the four digit code found inside the speaker at the Hospital Entrance.
The first number goes in the upper left corner, the second number goes in the upper right corner, the third number goes in the lower left corner, and the last number goes in the lower right corner.
Screenshot
Click the handle to open the cooler and pull out the body inside.
Click the feet of the 5 bodies in the coolers to read their toe tags.
Note their order by the name "Anonymous Soul #1-5" and their height circled on the tag; these numbers are randomized each game.
Go back to the Hallway.
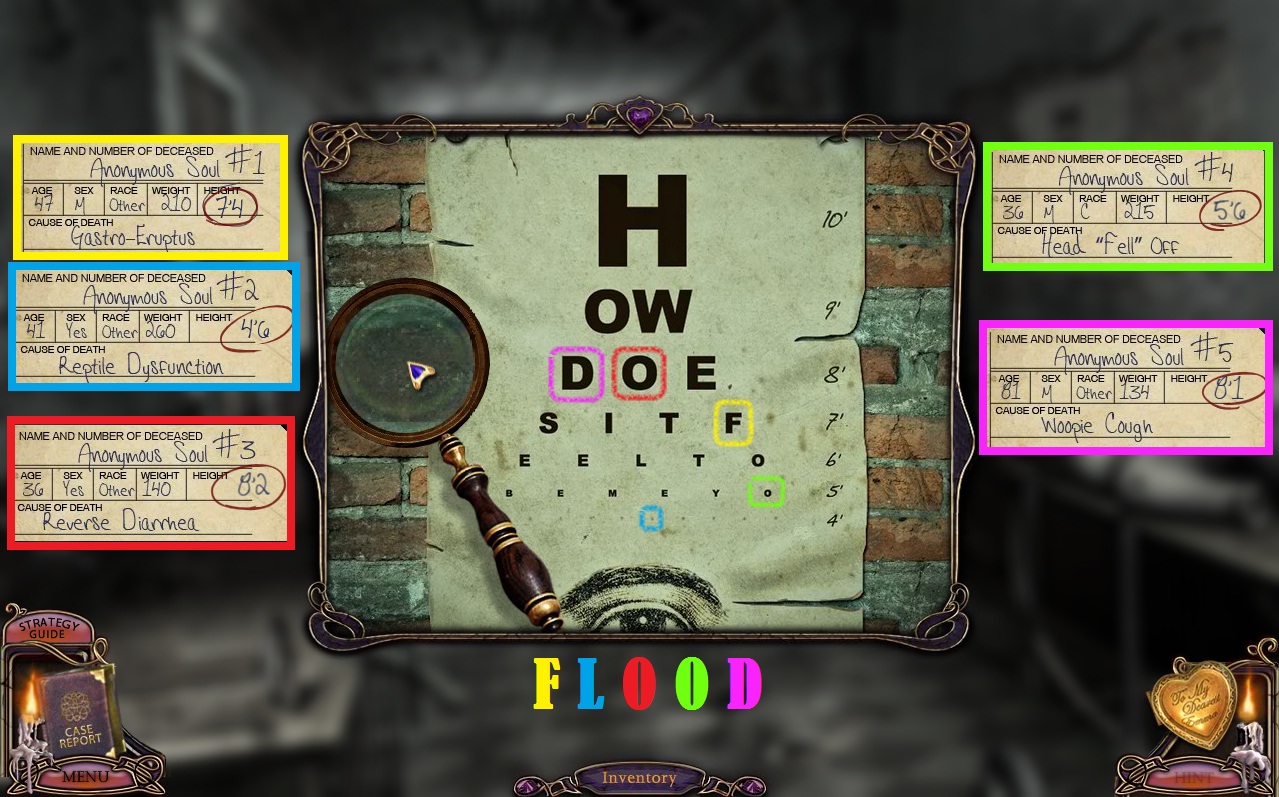
Hallway
Click the eye chart on the right wall to zoom in.
Use the Magnifying Glass on the chart to view the letters.
Use the information from the toe tags in the morgue to find the correct letters on the chart.
Go in order, starting with the height Anonymous Soul #1: first find the height in feet from the numbers shown vertically on the right side of the eye chart; then, in the horizontal line of letters next to their height in feet, move from left to right the number of inches in their height.
For example, if the person was 6'5" you would go up to the 6' line of letters and then move from left to right to the 5th letter, which is "O".
Continue following the chart until you have all 5 letters in order to form a complete word, which is randomized each game.
Screenshot
Go back to the Waiting Room.
Waiting Room
Click the Check-In window to open it, then click the board in the nurse's chest for a closer look.
Enter in the 5-letter word found in the eye chart in the hallway.
Screenshot
Go through the open door on the right into the Maternity Ward.
Maternity Ward
Screenshot
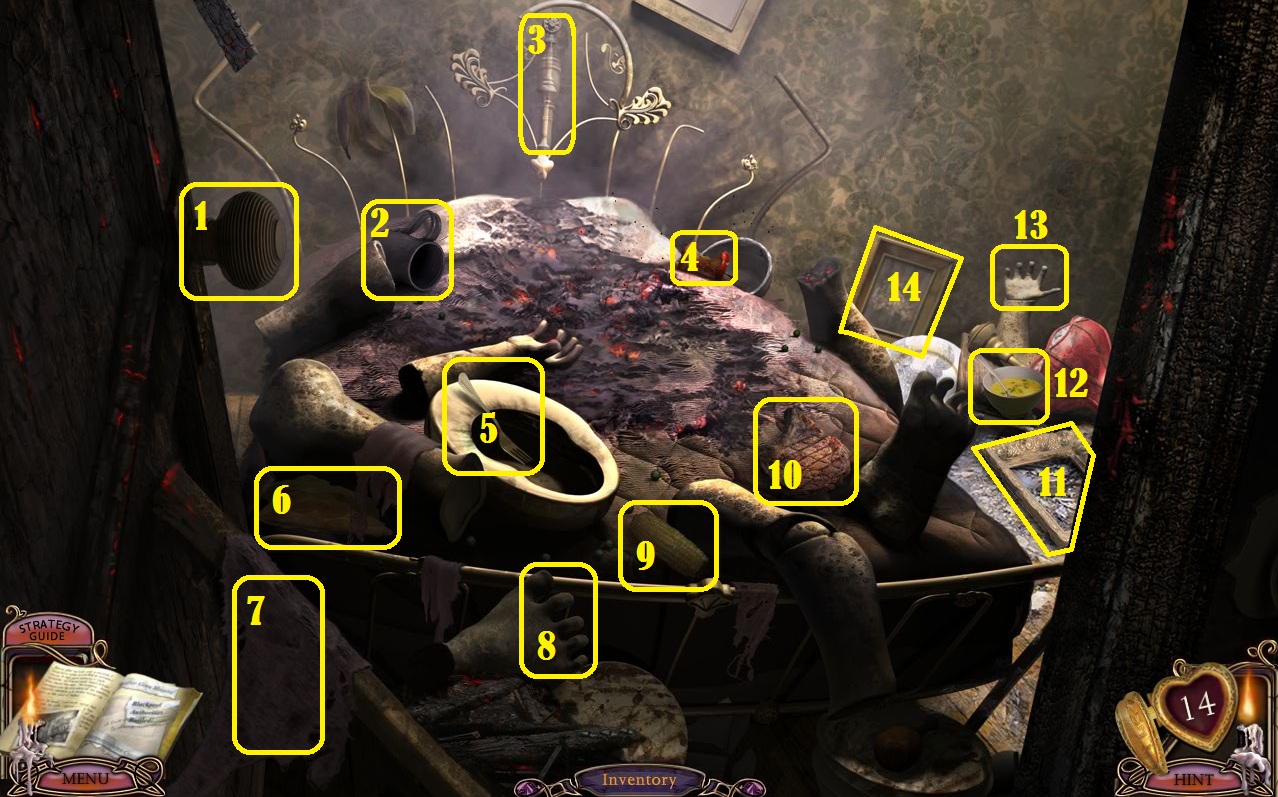
When you enter the room, there is a minigame involving the six robots in bed lined in a row.
Ignore the robot at the very end and start by clicking the stomach of the second farthest robot (1) two times.
Move on to the next robot (2) and click her stomach twice as well.
Repeat the same thing by double clicking the stomachs of robots (3), (4), and (5), until every robot except 5 has an inflated stomach.
Finally, click the closest robot's (5) hand to inflate her stomach.
Click the head of the closest robot in bed (5) to zoom in, then take the Red Pill 4/4 inside its open mouth.
Click the iron gate at the back of the room (A) for a closer look.
Note the numbers carved into the wall, 4592.
Click the crib (B) to the right of the beds to zoom in.
Take each baby robot out of its crib.
Go back to the Hallway.
Hallway
Click the X-Ray machine in the wall to zoom in.
Place each baby into the X-ray machine to find the number hidden inside them.
Baby in Purple is 2, Baby in Green is 5, Baby in Crochet is 9, and Baby in Blue is 4.
Return to the Maternity Ward.
Maternity Ward
Click the empty cribs to zoom in.
Now that you know the number of each baby, place them in order of the combination found carved into the wall past the gate: 4592.
Screenshot
Go through the open gates into the Delivery Room.
Delivery Room
Click the control panel under the ultrasound monitor to zoom in.
Note the three letters at the top of each of the sliders, D-N-A.
Go back to the Hallway.
Hallway
Click the left door to zoom in, then the metal panel to start the puzzle.
This puzzle is a memory game where you must click each new eye as it appears on the board.
If an eye is correctly clicked, the doors will close and a new eye will appear on the board; click the new eye and repeat the process.
If the wrong eye is selected, the puzzle will reset.
Once the puzzle is solved, go through the open door on the left into the Patient Ward.
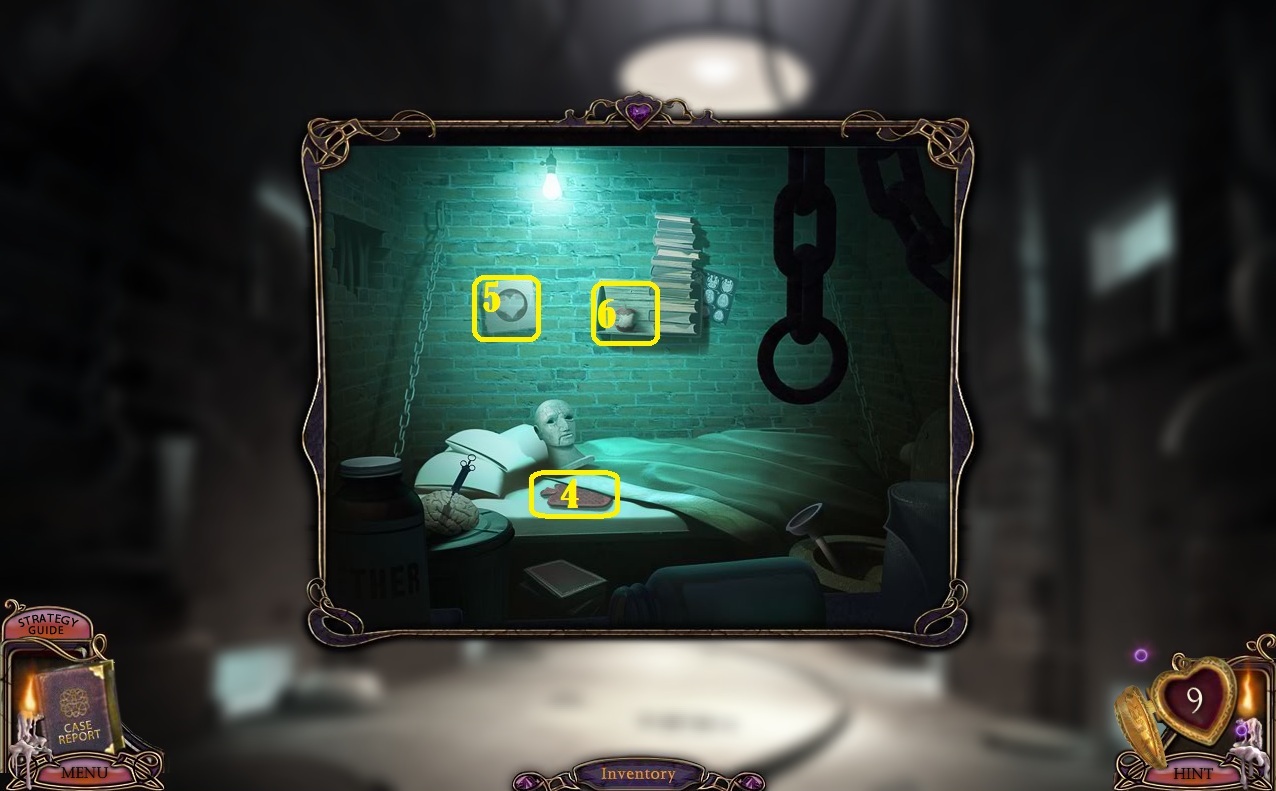
Patient Ward
Click the IV beside the robot patient's bed to zoom in.
Place the four Red Pills into the funnel at the top of the IV.
Click the certificate of birth in the mannequin's hand for a closer look.
Lift the letters D, N, and A in the name on the certificate to find the three numbers underneath (these numbers are randomized.
Return to the Delivery Room.
Delivery Room
Click the pressure meters above the pipes in the bed to zoom in.
Note how the pressure gauges point to a certain number 1-12 on the dial.
Click the ultrasound device for a closer look.
Adjust the sliders to match the amounts under D, N, and A to the number found under the same letters on the birth certificate in the Delivery Room.
Once the pressure gauges are properly set, push the green button hanging at the top right corner of the room.
Screenshot
Click the mechanical baby that falls out of the machinery into the large bowl to zoom in.
Click the baby robot's head to open its eyes, then note the color each time the eyes are open.
When the eyes flash green cut the green wire, when they flash blue cut the blue wire, and when they flash red cut the red wire.
If you make a mistake and the baby explodes, click the hanging green button again to dispense another robot.
Screenshot
Once the wires are cut, take the robot Baby Charles.
Leave the hospital and go back to the Tank Room.
Tank Room
Click Charlotte's tank to zoom in.
Use the Stork Key on the keyhole in the stork-shaped lock in the middle of the tank.
Go through the open doorway to the House Entrance.
Posted by: Trinn |
November 25, 2011 6:00 PM
|
November 25, 2011 6:00 PM
Mystery Case Files: Escape from Ravenhearst Walkthrough
(Chapters 3-6)
Chapter 3 - The Dalimar House
House Entrance
Click the carriage on the left side of the fence to zoom in.
Place the robot Baby Charles inside the carriage.
Click the mailbox on the right side of the fence to zoom in.
Click the mailbox door to open it and take the Blue Pill 1/5 in the bottom right corner.
Go through the open door into the Foyer.
Foyer
Click the small bookcase under the flower pot for a closer look.
Put the Parenting Book 1/3 into the top shelf of the bookcase.
Continue forward to the Kitchen.
Kitchen
Click the Morphing Object (1), on the left wall above the dumbwaiter.
Click the Morphing Object (2), at the cracked corner of wallpaper on the back wall above the dumbwaiter.
Click the Morphing Object (3), at the right end of the curtain rod.
Click the Morphing Object (4), the sash tied around the middle of the right curtain.
Click the Morphing Object (5), sticking out of the mug on the table, to the right of the pie in the window.
Click the Morphing Object (6), the glasses on the table between the pitcher and the scale.
Click the Morphing Object (7), on the dish on the floor to the left of the overturned chair.
Click the Morphing Object (8), at the rip in the top of the seat of the overturned chair.
Click the Morphing Object (9), the teapot on the left side of the stove.
Click the Morphing Object (10), the portrait on the wall between the cupboard and the right curtain.
Click the Morphing Object (11), the design on the top of the cupboard.
Click the Morphing Object (12), the teacup on the top shelf of the cupboard.
Screenshot
Click the open stove (A) to zoom in and take the Parenting Book 2/3 and Sparky's Chicken.
Go back to the Foyer.
Foyer
Click the small bookshelf for a closer look.
Place the Parenting Book 2/3 in the space at the top shelf.
Click the top of the grandfather clock to zoom in.
Take the Blue Pill 2/5 in front of the clock face.
Go up the stairs to the Corridor.
Corridor
Take Sparky's Liver beside the lamp on the small table.
Click the door at the end of the hall to start the puzzle.
To solve this puzzle, highlight every tile on the board following the order of suits shown at the bottom: Diamond -> Club -> Heart -> Spade.
Click the Diamond to begin, then click an adjacent tile with the next symbol, Club, to continue.
Only tiles that are to the left, right, above, or below the previous tile can be selected, and all tiles can only be clicked once.
Solution
Go through the open door to the Bedroom.
Bedroom
Use the Feather on one of the mannequin's feet.
Take the Parenting Book 3/3 that falls to the floor.
Go back to the Foyer.
Foyer
Click the small bookcase to zoom in.
Put the Parenting Book 3/3 in the bottom bookshelf.
Click the open cache under the stairs for a closer look.
Take the Wire Hanger hanging from the light cord.
Take Sparky's Fish to the right of the journal.
Click the journal beside the overturned chair to look inside.
Take the Blue Pill 3/5 and note the times not yet crossed out and their corresponding chores.
Click the grandfather clock to the right of the stairs to zoom in.
Drag the hands of the clock to change the time to 4:25.
Go up the stairs to the Corridor.
Corridor
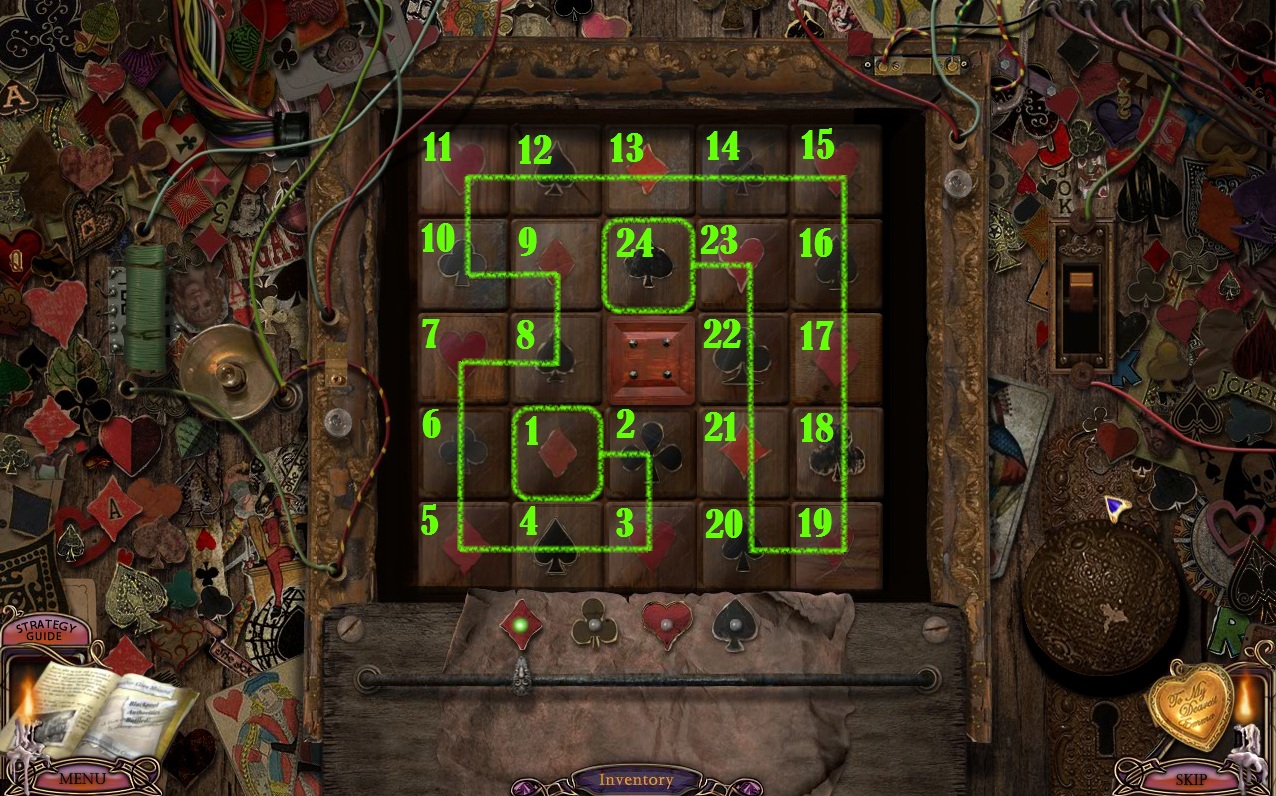
Click the doorway on the right to start the puzzle.
To solve this puzzle, arrange the dice in order of the four lists at the corners of the board.
Click each die to cycle through the numbers 0-6.
When the dice are placed in the correct order according to the lists, the dice will become highlighted yellow, and its sequence on the list will be crossed out in red.
Solution
Go through the open door into the Bathroom.
Bathroom
Click the mirror above the sink to zoom in, then click the knob to open the medicine cabinet.
Click the vial of poison to move it aside, revealing the Battery 1/2.
Click the bottle on the bottom right corner of the shelf to move it as well, revealing the Blue Pill 4/5.
Click the bathtub to look inside.
Use the Wire Hanger on the tub to drain the water.
Take the Nail Clippers on the floor of the tub to the left of the mannequin head.
Return to the Bedroom.
Bedroom
Click the left foot to zoom in and take the Battery 2/2.
Use the Nail Clippers to cut the toenails on both of the mannequin's feet.
After each toe has been clipped, take the 10 Nail Clippings that fall on to the bed around the feet.
Go back to the Foyer.
Foyer
Click the grandfather clock for a closer look.
Drag the hands on the face of the clock to change the time to 7:40.
Return to the Bedroom.
Bedroom
Click the mannequin's face for a closer look.
Use the Wire Cutters on the hairs sticking out of the mannequin's nose.
Pick up the 5 Nose Hairs that fall on to her cheeks.
Go back to the Foyer.
Foyer
Click the face of the grandfather clock to zoom in.
Turn the hands on the clock to the time 10:00.
Return to the Bedroom.
Bedroom
Click the mannequin's face for a closer look.
Click the pimples to pop them: on the left eye, the right cheek, above each eyebrow, and above the upper lip.
Collect all of the Pimple Pus that pops out of the pimples on the robot's face.
Go back to the Kitchen.
Kitchen
Click the jar of "Momma's Leavings" on top of the scale on the table.
Put the 10 Toe Clippings, 5 Nose Hairs, and 5 Pimple Pus inside of the jar.
Click the open dumbwaiter to look inside.
Click the dumbwaiter rope to pull up the tray, then take the Boiler Crank on top of the tray.
Click the pie in the window to zoom in.
Click the crust of the pie three times to reveal the V Key
Take the Blue Pill 5/5 on the windowsill beside the pie.
Go through the left doorway into the Pantry.
Pantry
Click the flickering light at the top of the shelves to zoom in.
Place the two Batteries into the battery slots above the lightbulb.
Go back to the full view of the room to start the morphing object scene.
Click the Morphing Object (1), on the second shelf of the narrow cupboard to the left of the green cupboard.
Click the Morphing Object (2), the lid of the pot at the bottom of the narrow cupboard.
Click the Morphing Object (3), the handle on the top drawer on the far left side of the screen.
Click the Morphing Object (4), on top of the large, green cupboard.
Click the Morphing Object (5), on the left side of second to last shelf of the green cupboard.
Click the Morphing Object (6), between the two red cans on the bottom shelf of the green cupboard.
Click the Morphing Object (7), in the middle of the top wall shelf to the right of the apron.
Click the Morphing Object (8), on the left side of the second wall shelf.
Click the Morphing Object (9), under the three red boxes on the left side of the third wall shelf.
Click the Morphing Object (10), on the third wall shelf, to the right of object #9.
Click the Morphing Object (11), hanging out of the bucket on the floor to the left of the broom.
Click the Morphing Object (12), on the warning label of the large jug, between the lamp and the bucket.
Screenshot
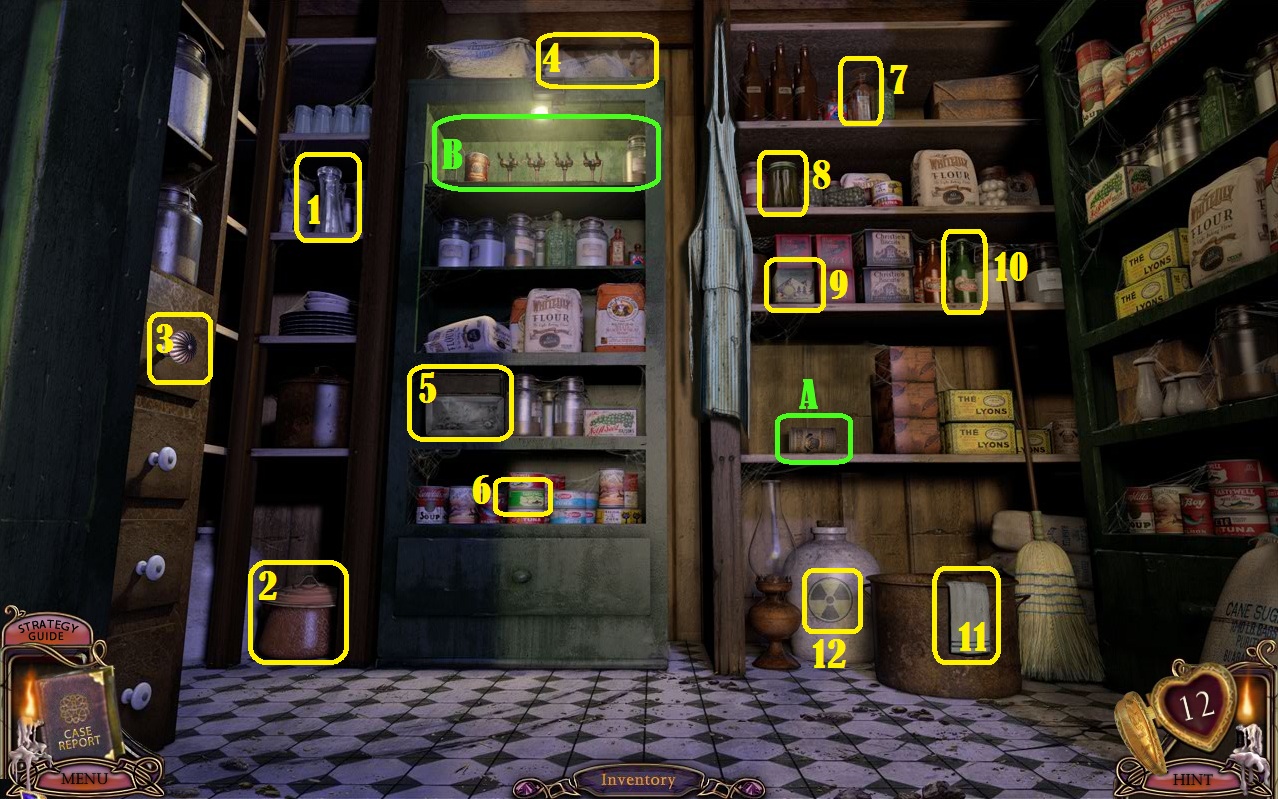
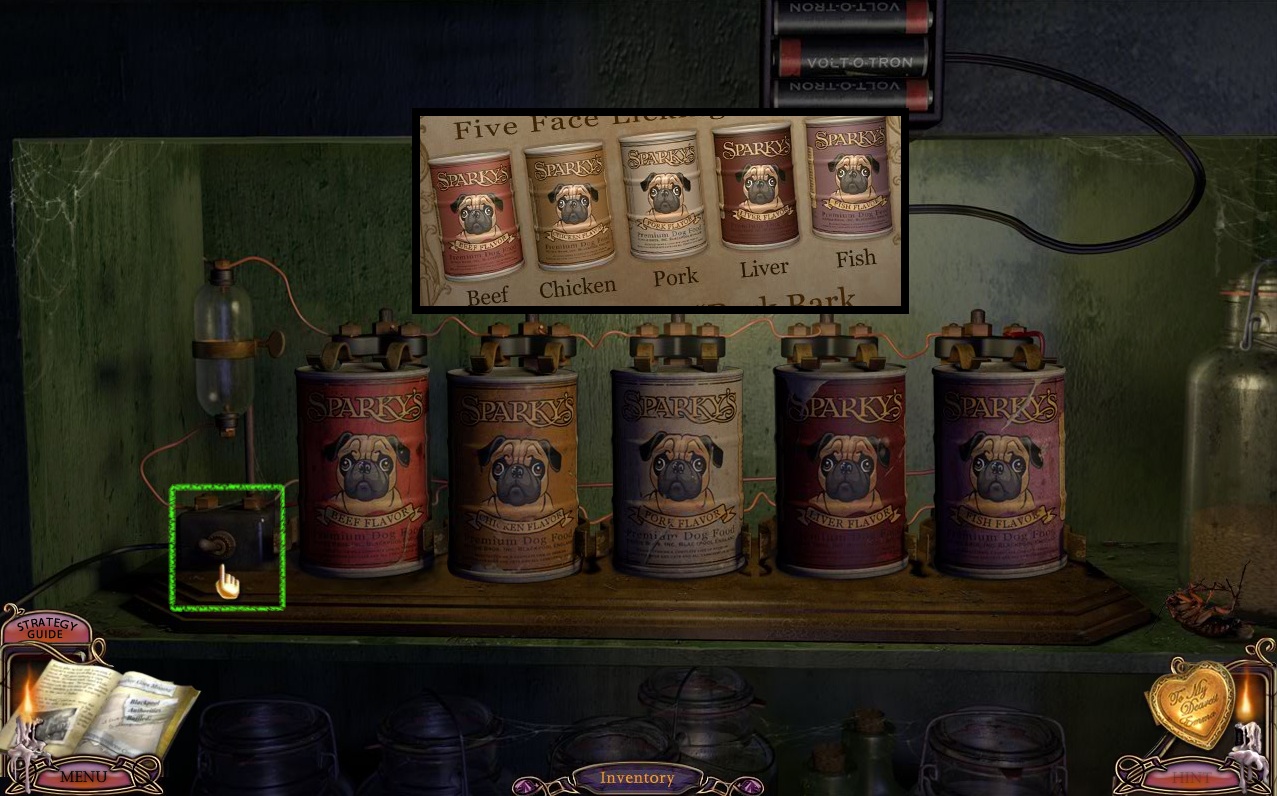
Once the morphing object scene is complete, take the can of Sparky's Pork (A) on the bottom wall shelf, just above the lantern on the floor.
Click the top shelf of the green cupboard (B) to zoom in.
Arrange the cans of dog food from your inventory in the order found in the magazine on the table of the hospital Waiting Room.
Once you have them in order, click the switch under the unlit lightbulb.
Solution.
Go through the revealed hidden passageway into the Cellar.
Cellar
Click the boiler underneath the lightbulb to zoom in.
Place the Boiler Crank into the hole to the left of the crank already attached to the boiler.
Click both cranks once to turn on the boiler.
Go back to the Bathroom.
Bathroom
Click the sink to zoom in and take the Razor.
Click the left handle labeled "H" beside the faucet to turn on the hot water.
Go back to the full view of the room, then click the mirror above the sink for a closer look.
Note the image of the lock drawn from the steam on the mirror, with the four circles inside the lock that are much darker than the other circles.
Return to the Cellar.
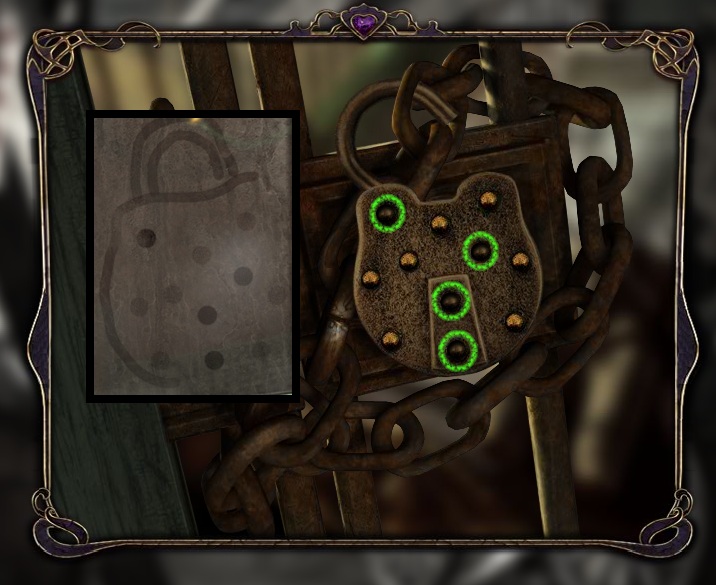
Cellar
Click the lock on the right side of the cage to zoom in.
Click the four buttons on the lock that are in the same position as the dark circles from the imagine in the mirror on the bathroom.
Solution.
Click the open cage door to look inside.
Take the Bed Sheet from the mannequin's head, then click the television to watch the video.
Read the note on the cage floor beside the mannequin's leg.
Leave the Dalimar house and go back to the Patient Ward inside the hospital.
Patient Ward
Click the IV next to the floating orange balloon to zoom in.
Place all 5 Blue Pills into the funnel above the IV.
Click the heart rate monitor on the wall for a closer look.
Push the red buttons at the lower right corner of the machine to crack the small glass case on the top.
Click the glass case to zoom in and take the Madman Key.
Go back to the Tank Room.
Tank Room
Click Gwendolyn's tank to zoom in.
Use the Madman Key on the keyhole in the middle of the tank.
Go through the open doorway on the right to the Asylum Gate.
Chapter 4 - Asylum
Asylum Gate
Click the door of the security room to look inside.
Click the board covered with pictures on the right wall to start the morphing object scene.
Click the Morphing Object (1), in the numbers on the chart underneath the photo of the child in the top left corner of the board.
Click the Morphing Object (2), in the picture of the telephone poles to the left of the men with bicycles.
Click the Morphing Object (3), the picture of the animal directly below object #2.
Click the Morphing Object (4), in the middle of the picture of the men with bicycles.
Click the Morphing Object (5), in the picture of the tower at the top right corner of the board.
Click the Morphing Object (6), on the back of the woman in the swimsuit, the picture to the left of the gear.
Click the Morphing Object (7), the bottom half of the cape in the picture directly above the x-ray photograph of a sternum.
Click the Morphing Object (8), the picture of an ostrich, to the right of the image of a skeletal torso.
Click the Morphing Object (9), inside the flexing man's hand held behind his back.
Click the Morphing Object (10), in the right half of the photograph of the kissing couple.
Click the Morphing Object (11), the head of the man in the suit directly below object #10.
Click the Morphing Object (12), the second animal on the left in the picture to the left of object #10.
Click the Morphing Object (13), the bottom of the snowman in the picture to the left of object #12.
Screenshot.
Once the morphing object scene is complete, click the lever labeled "Gate" in front of the frozen security guard.
Go back outside and then through the open gate to the Asylum Entrance.
Asylum Entrance
Click the papers on the lap of the mannequin man on the bench to zoom in. Note the photograph shows a picture of the bed in the Patient Ward.
Leave the Asylum and go back to the Patient Ward in the hospital.
Patient Ward
Click the left corner of the bed by the patient's head to zoom in.
Click the pillow to lift it, revealing the Red Handle.
Leave the hospital and return to the Asylum Entrance.
Asylum Entrance
Click the front door to open it.
Go through the open door to the Great Hall, then go up the stairs and to the left to reach the Passageway.
Passageway
Click the door on the left to open it.
Continue through the open door to the Laboratory.
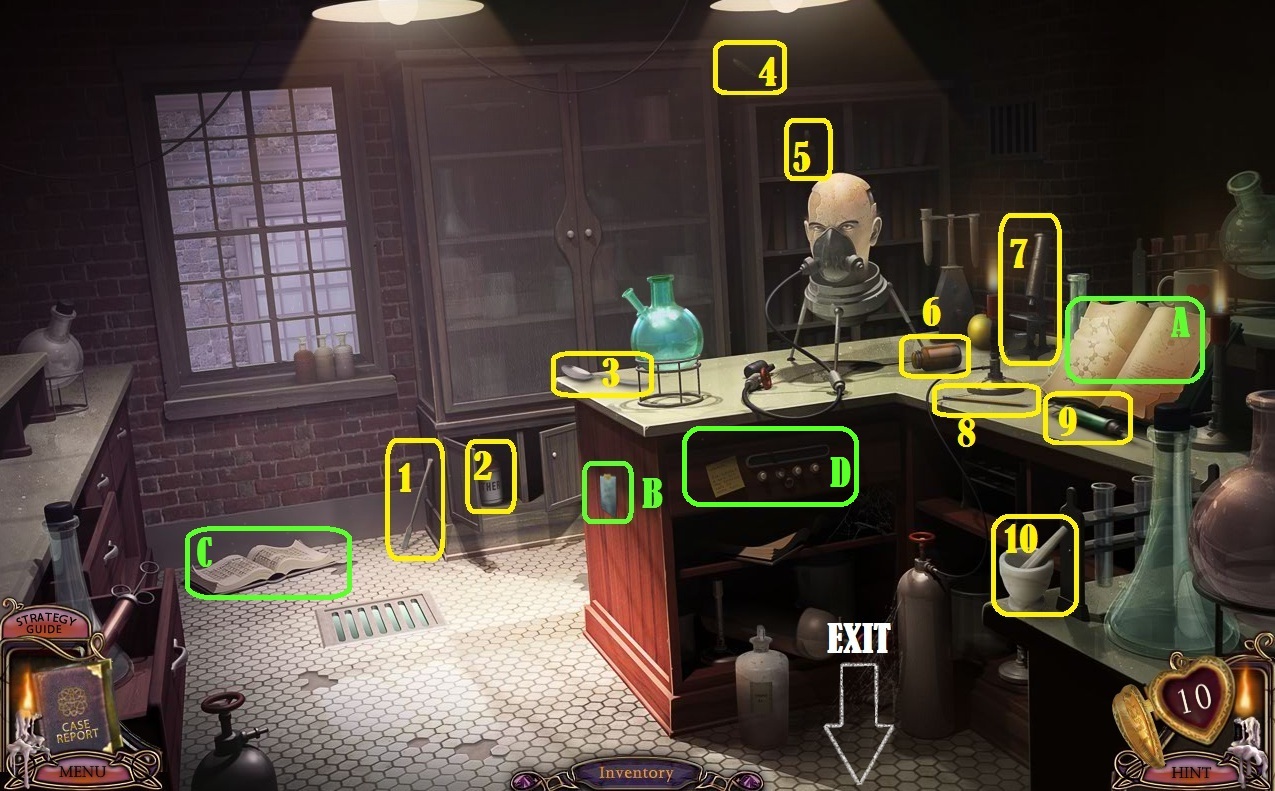
Laboratory
Click the Morphing Object (1), under the window, leaning against the bottom of the large cupboard.
Click the Morphing Object (2), in the bottom left drawer of the cupboard, to the right of object #1.
Click the Morphing Object (3), the utensil on the corner of the counter beside the beaker.
Click the Morphing Object (4), which is difficult to see at the top left corner of the bookcase.
Click the Morphing Object (5), which is also dark and difficult to see between the books in the upper left shelf of the bookcase.
Click the Morphing Object (6), the bottle laying on its side by the right tripod leg of the weird head mechanism.
Click the Morphing Object (7), the microscope on the counter to the right of object #6.
Click the Morphing Object (8), the pencil on the counter below object #6 and #7.
Click the Morphing Object (9), the fuse on the counter underneath the book and to the right of object #8.
Click the Morphing Object (10), the mortar on the edge of the lower right corner of the counter.
Screenshot.
Click the book (A) to zoom in, then click the right page to rip it off, revealing the Eyedropper.
Click the note (B) taped to the bottom of the counter to read it.
Click the book (C) on the floor under the window to view a chart of the periodic table.
Click the button panel (D) above the top left shelf under the counter to zoom in.
Note the hint on the paper calls for "MoRe RaIn".
Refer to the period table again to find Mo-42, Re-75, Ra-88, In-49.
Click the buttons from left to right to enter the numbers in order.
Screenshot.
Once the correct combination is entered, click the open drawer and take the Liquid Nitrogen inside.
Go back downstairs to the Great Hall, then go through the door on the right to the Office Room.
Office Room
Click the desk to start the morphing object scene.
Click the Morphing Object (1), the crumpled paper on the floor beside the wastebasket.
Click the Morphing Object (2), the bottle on the top right corner of the open blue wallet on the desk.
Click the Morphing Object (3), scattered on top of the picture of a skeletal torso, above object #2.
Click the Morphing Object (4), the pen at the middle of the wallet, to the left of object #2.
Click the Morphing Object (5), the crumb on the wallet, to the left of object #4.
Click the Morphing Object (6), the large lower piece of the pie chart in the picture beside object #3.
Click the Morphing Object (7), the bottom of the drawing on the crumpled paper to the left of the pie chart.
Click the Morphing Object (8), the clip at the top of the papers, to the left of object #7.
Click the Morphing Object (9), the tear in the fabric in the seat of the green chair behind the desk.
Click the Morphing Object (10), the tab in the middle of the far right book, stacked on the left side of the desk.
Click the Morphing Object (11), the bottle at the lower left corner of the desk, under the piece of the stethoscope.
Click the Morphing Object (12), the leaf at the bottom of the desk, to the right of the open wooden box.
Screenshot.
Once the morphing object scene is complete, take the Reel from the open desk drawer.
Click the right candlestick on the mantle of the fireplace to lower the bookcase and reveal the hidden mirror.
Click the mirror to find the picture of "Something Borrowed".
Click the door on the right to open it, then go inside to the Surveillance Room.
Surveillance Room
Click the chair to turn it around, then take the Pick Axe on the seat.
Click the middle shelf on the bookcase to the left of the monitors for a closer look.
Take the Cabinet Key hanging on a little hook to the right of the books.
Click the thin black book to see a diagram of the ventilation system.
Click the middle-left screen in the upper row of monitors to zoom in.
Press the button to cycle through the camera images until you reach one with a picture of a door and 5 numbers.
Go back to the Office Room.
Office Room
Click the short cabinet to the left of the desk to zoom in.
Use the Cabinet Key on the lock at the upper right corner of the top drawer.
Click the lined paper sticking out of the files to read it. Note the underlined words at the bottom.
Return to the Passageway.
Passageway
Click the right door to start the puzzle.
To solve this puzzle, complete the four minigames.
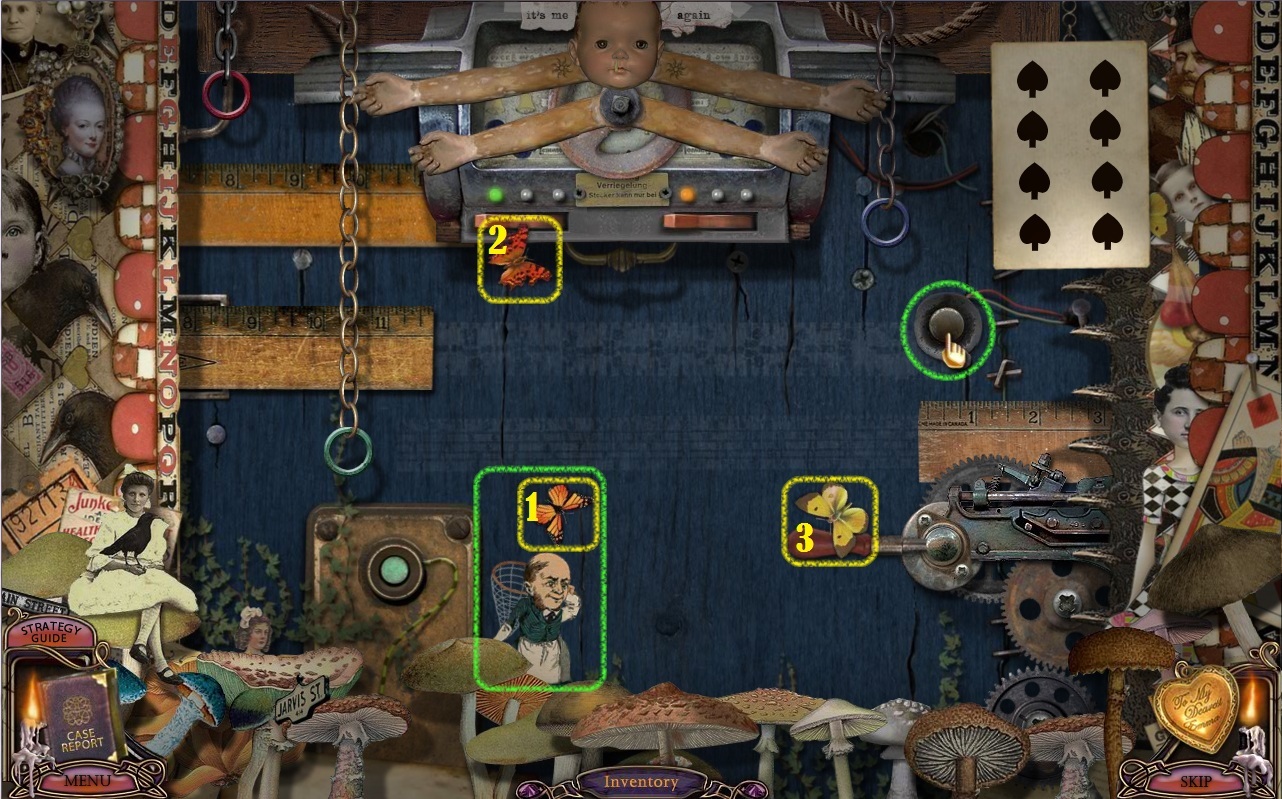
The first challenge is to capture all of the butterflies.
To begin, click each of the butterflies to release them, and they will fly around the board following a specific pattern.
As they fly past the figurine of the man with the net, push the black button under the lower left corner of the playing card to swing the net.
If you timed it correctly, the man will swing his net and catch the butterfly inside.
Repeat this with the remaining two butterflies, and a picture of a girl will flip up in the lower left corner holding the number 9.
Solution.
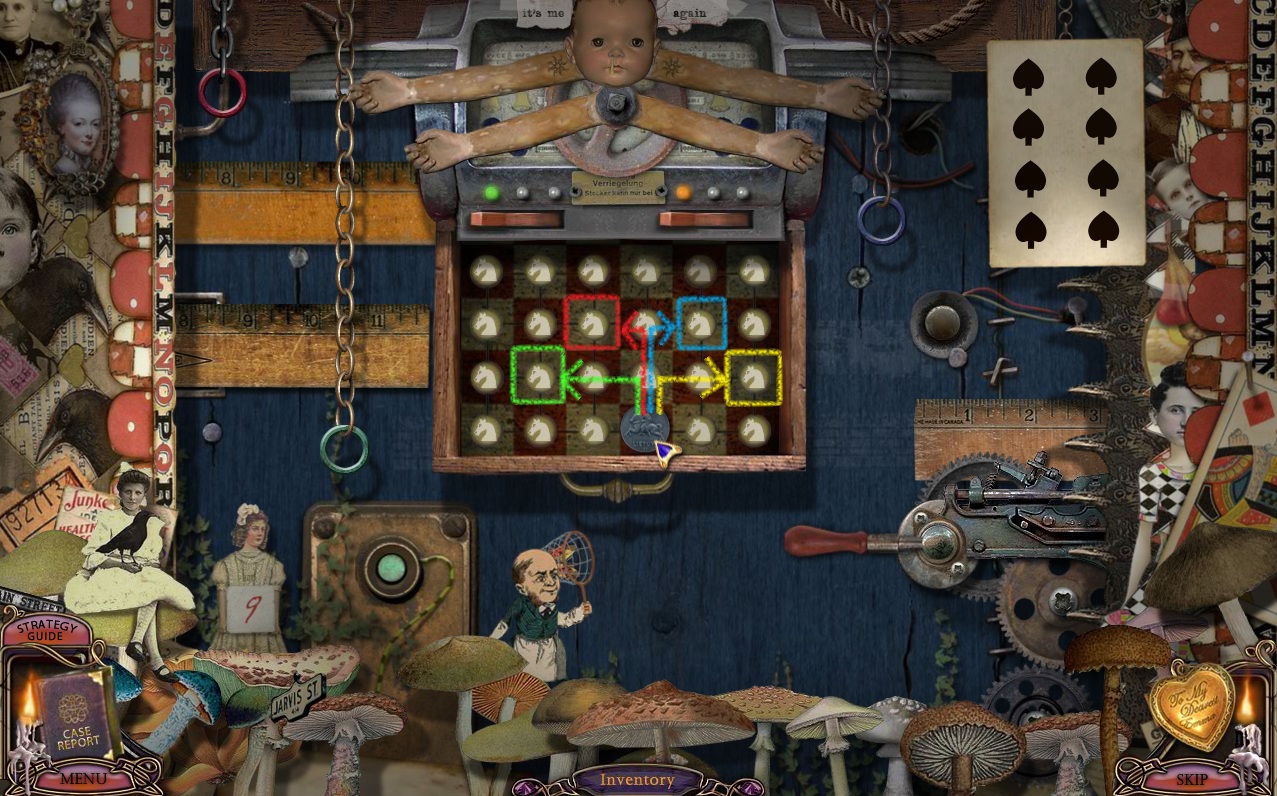
The second challenge is to move the knight token over all of the spaces on the board until they are all lit.
Click the green button to the left of the man with the net to lower the board.
The knight token moves the same way a knight in a game of chess would move: two squares horizontally and one square vertically, or one square horizontally and two squares vertically.
Example.
Click a position on the board to move the knight to that space, causing that tile to illuminate; moving over the same tile twice will cause it to go dim again.
Continue to move across the board until every tile is illuminated; a card with the number 5 will partially drop down from the box at the top.
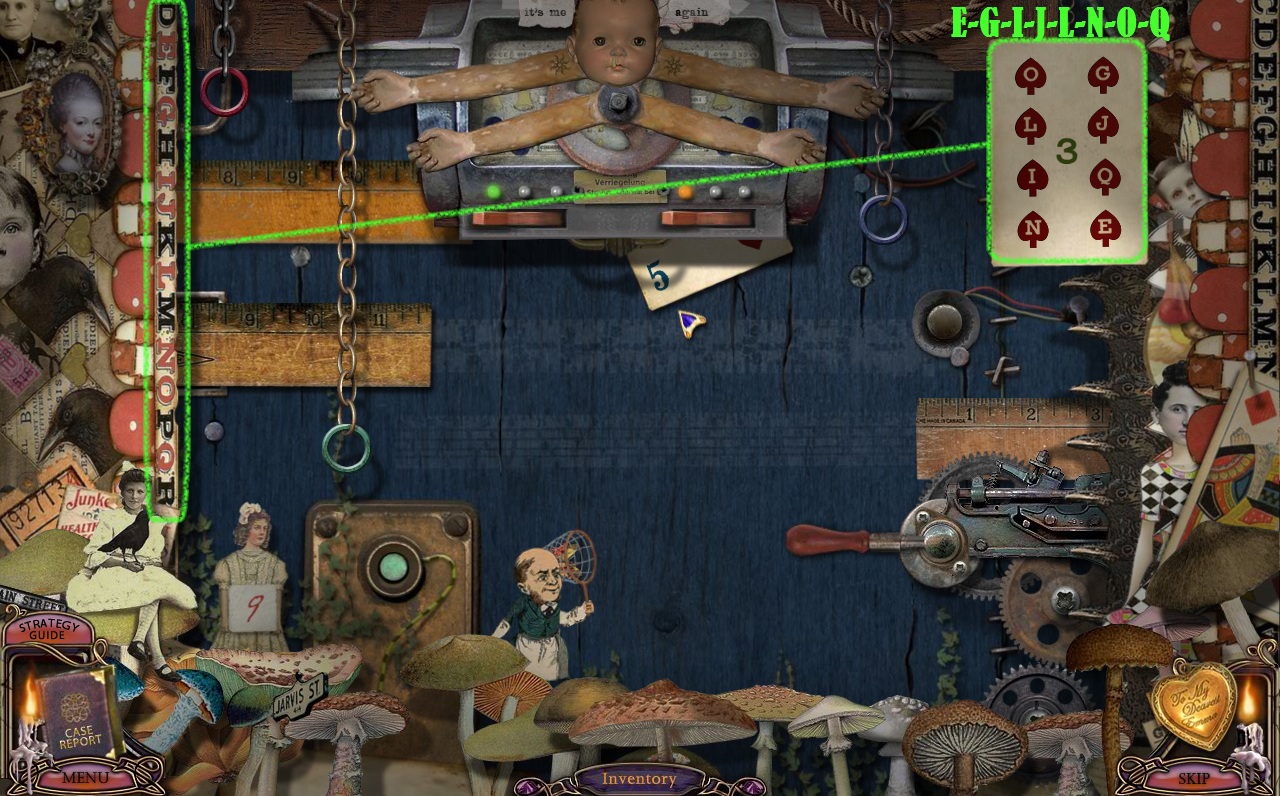
The third challenge is to find all of the red letters on the playing card in the correct order.
The list of letters is shown in a vertical line on the left side of the board; note the order of the red colored letters from top to bottom: E-G-I-J-L-N-O-Q.
The positions of the letters on the card are randomized each game, so the best way to start is by experimentation: click any of the spade symbols on the playing card to reveal the letter hidden underneath.
The card has two sides, so if the first letter you picked was correct (the letter E), then the card will stay on the same side and you can guess again to find the next letter (G).
If you guess the wrong symbol and it's a letter out of order, the card will flip over to the other side where you can guess again.
It's much easier to solve this puzzle by memorizing only one side of the card, so simply click the same place again to flip the card return to the original side.
Continue to follow the trial and error process until you have found every red letter on the card, then the card will flip over revealing the number 3.
Solution.
Now that you have found all the numbers on the board—a red 9, a blue 5, and a green 3—the last challenge is to position the rings over those numbers on the three rulers at the left and right sides of the board.
At the top of the board is a box with four arms and two switches: one switch with a green light above it and one switch with an orange light above it. In the lower-right area of the board is a crank which you can rotate in a full circle clockwise or counter-clockwise.
The switch underneath the green light cycles between which of the three rings hanging from the chains is currently selected.
The first green light selects the red ring, the second green light selects the green ring, the third green light selects the blue ring.
Click and drag upwards either of the two longer arms at the top to move the selected ring chain up.
Click and drag downwards either of the two shorter arms at the bottom to move the selected ring chain down.
The switch underneath the orange light cycles between which of the three rulers is currently selected.
The first light selects the top ruler on the left side.
The second light selects the lower ruler on the left side.
The third light selects the ruler on the right side.
Click and drag the crank at the lower right corner to move the ruler in or out: clockwise will push the ruler to the right, counter-clockwise will pull the ruler to the left.
Position the upper left ruler so that the number 3 is parallel to the green ring.
Position the lower left ruler so that the number 9 is parallel to the red ring.
Position the right ruler so that the number 5 is parallel to the blue ring.
Now that the rulers are in position, use the arms to move the rings up or down so that each ring encircles the correct number as precisely as possible (it's quite picky).
Solution.
Once the puzzle is solved, go through the open door on the right to the Shock Therapy Room.
Shock Therapy Room
Take the Ice Pick (A) on the corner of the table top in the lower left side of the screen.
Click the window (B) to open it.
Click the Morphing Object (1), the bucket on the floor under the bottom of the operating table.
Click the Morphing Object (2), the portrait on the wall above the phonograph.
Click the Morphing Object (3), on the left side of the cupboard on the wall, to the right of object #2.
Click the Morphing Object (4), the clipboard hanging on the right side of the wall cupboard above the mannequin's head.
Click the Morphing Object (5), the face of the clock on the wall, to the right of object #4.
Click the Morphing Object (6), the bottom image of the framed picture of brains under object #5.
Click the Morphing Object (7), the button at the bottom left corner of the electroshock machine, below object #6.
Click the Morphing Object (8), the third light from the left underneath the electroshock machine, below object #7.
Screenshot.
Once all the morphing objects have been found, the mannequin will be electrocuted by the machine.
Click the mannequin's face to zoom in.
Use the Eyedropper on the water covering the mannequin's face to receive a Dropper of Sweat.
Go back to the Laboratory.
Laboratory
Click the large beaker at the end of the counter to zoom in.
Use the Dropper of Sweat (the first ingredient to the Blood, Sweat, and Tears) on the beaker to receive an empty Eyedropper.
Return to the Shock Therapy Room.
Shock Therapy Room
Use the Bed Sheet on the open window to make a rope.
Climb out the window to the Courtyard.
Courtyard
Click the manhole in the ground to the right of the mannequin in the wheel chair to zoom in.
Use the Liquid Nitrogen on the lid of the manhole to freeze it.
Use the Ice Pick on the frozen lid to break it.
Go down the manhole into the Sewer.
Sewer
Click the crate at the bottom of the ladder for a closer look.
Click the lid to open the crate, then take the Dynamite inside.
Click the tape recorder to zoom in.
Press the red button to stop the tape, then click the tapes to remove them.
Place the Reel on the tape player, then press the green button to play the recording.
Note Charles Dalimar's patient number: 7149.
Use the Pick Axe three times on the rock wall to the right of the ladder.
Go through the revealed passage to return to the Cliff.
Cliff
Take the Ladder over the gap between the two ledges.
Go up the hose and then back to the Manor Gates.
Manor Gates
Click the intercom in the left gate post to zoom in.
Use the Wire Cutters to cut off the Green Wire,Red Wire,Yellow Wire, and the Blue Wire.
Exit the Ravenhearst area the same way you came, through the broken wall at the Cliff, then go back to the Foyer in the Dalimar House.
Foyer
Click the sparking broken cable in the middle of the floor to zoom in.
Place the Green Wire, Red Wire, Yellow Wire, and the Blue Wire in to their matching place between the torn sides of the cord to repair the power cable.
Click the red button mechanism on the floor to the right of the repaired cable for a closer look.
Push the red button to start the spanking machine.
Click the child mannequin's face to zoom in.
Use the Eyedropper on the tears dripping from the mannequin's eye to receive a Dropper of Tears.
Leave the Dalimar House and return to the Laboratory in the Asylum.
Laboratory
Click the beaker at the end of the counter for a closer look.
Use the Dropper of Tears (The second ingredient of Blood, Sweat, and Tears) on the beaker to receive an empty Eyedropper.
Exit the Asylum and return to the Surgery room in the Hospital.
Surgery
Click the top of the cabinet to the left of the operating table to zoom in.
Use the Eyedropper on the pool of blood spilled out of the beaker to receive a Dropper of Blood.
Exit the Hospital and go back to the Laboratory in the Asylum.
Laboratory
Click the beaker at the end of the counter for a closer look.
Use the Dropper of Blood (The last ingredient of Blood, Sweat, and Tears) on the beaker, then take the completed concoction of Sleeping Potion.
Go back to the Great Hall, then go down the hall to the Recreation Room.
Recreation Room
Click the ventilation at the bottom of the left pillar to zoom in.
Use the Ice Pick to remove the grating from the wall.
Put the Sleeping Potion inside the ventilation duct.
Click the head of the mannequin sitting at the table for a closer look.
Use the Razor three times to shave off the patch of hair on the side of its head.
Use the Ice Pick to pry the square panel off the side of the skull.
Use the Ice Pick again on the hole in the center to turn the dial from Normal to Lobotomy.
Click the table in front of the seated mannequin to start the card game.
Click any of the cards to win, then click the mannequin's exploded head to zoom in and take the Proposal Key.
Go back to the Great Hall, then go up the stairs and to the right to the Cell Block.
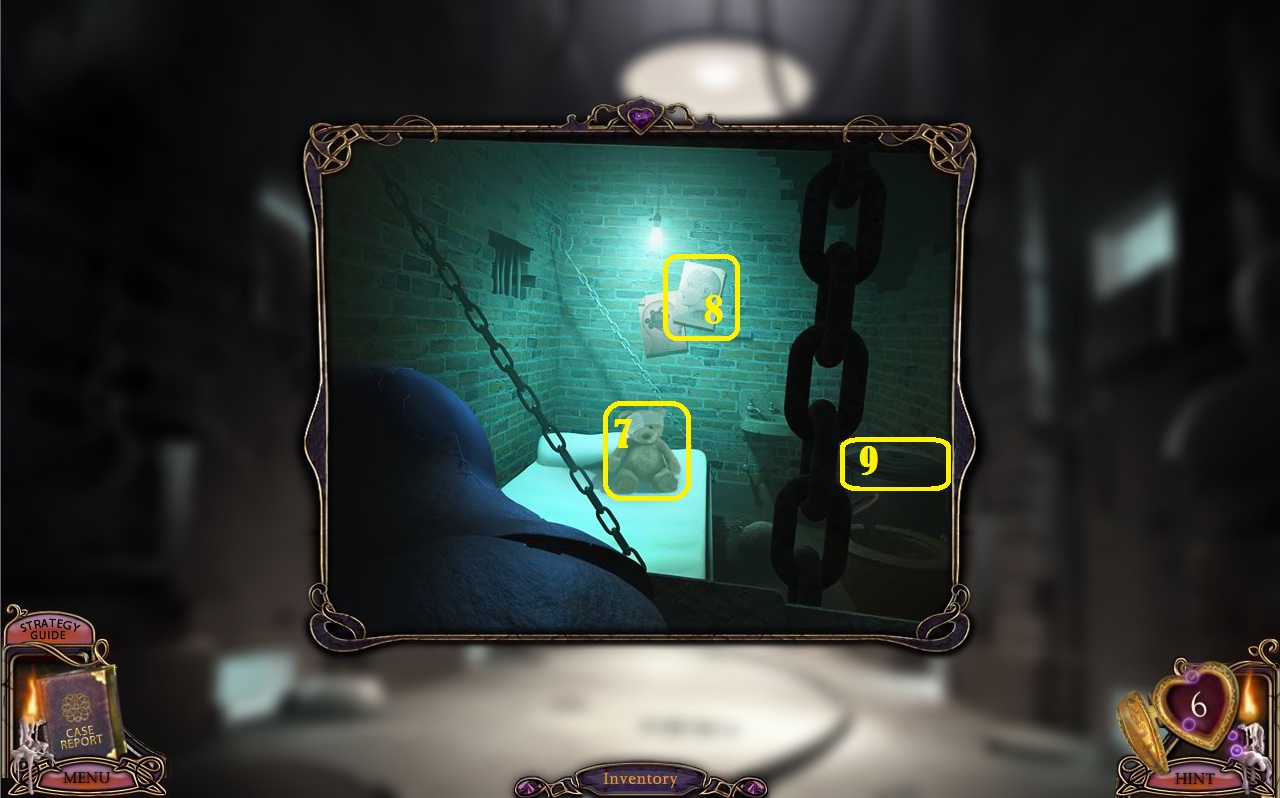
Cell Block
Click the first door on the left to look inside the window.
Click the Morphing Object (1), the ball on the floor below the cot.
Click the Morphing Object (2), the coin sticking out of the crack in the lower left side of the viewing window.
Click the Morphing Object (3), the baseball figuring on the right side of the ledge of the viewing window.
Screenshot.
Click the second door on the left to look inside the window.
Click the Morphing Object (4), the hotpad on top of the bed.
Click the Morphing Object (5), the first aid kit on the wall.
Click the Morphing Object (6), the apple on the wall shelf, to the right of object #5.
Screenshot.
Click the first door on the right to look inside the window.
Click the Morphing Object (7), the teddy bear on the bed.
Click the Morphing Object (8), the higher poster on the back wall.
Click the Morphing Object (9), the lid of the trash can above the toilet.
Screenshot.
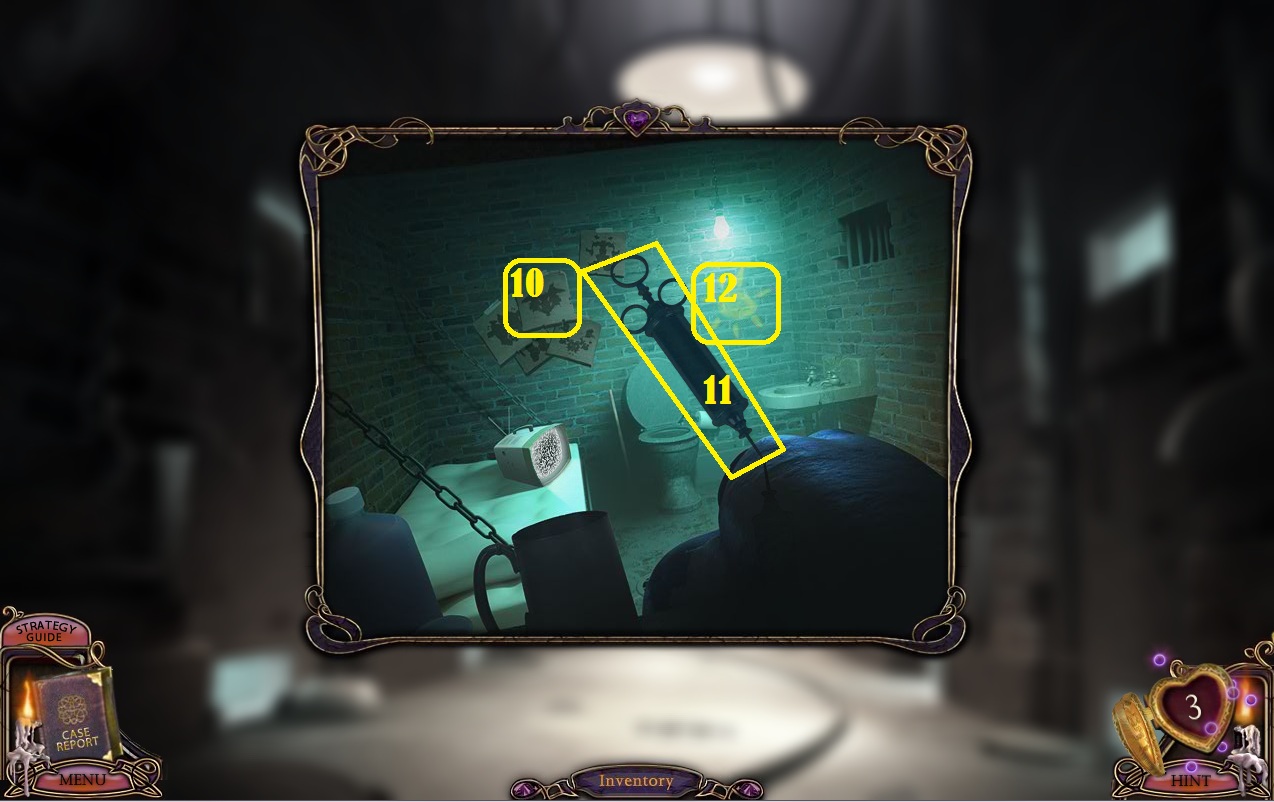
Click the second door on the right to look inside the window.
Click the Morphing Object (10), the middle Rorschach picture on the wall.
Click the Morphing Object (11), the top of the syringe.
Click the Morphing Object (12), the painting on the wall underneath the lightbulb.
Screenshot.
Once all the morphing objects have been found, go through the open doorway at the end of the hall to the Roof.
Roof
Click the pile of crates by the broken wall to zoom in.
Note the picture of "Something New".
Leave the Asylum and go back to the Bathroom at the Dalimar House.
Bathroom
Click the pipes underneath the sink to zoom in.
Take the Green Handle on the floor beside the pipe.
Leave the Dalimar House and return to the Surveillance Room at the Asylum.
Surveillance Room
Click the upper left monitor to view the image on the screen.
If you haven't already, press the button at the lower right corner of the screen several times until you see the image of a door with 5 numbers above it.
Quickly note the numbers (they will change over time), then hurry back to the Roof.
Roof
Click the keypad on the large door on the right to zoom in.
Enter in the 5 numbers seen on the monitor in the Surveillance Room.
The clock at the top indicates how much time you have left to enter in the combination: green means you have plenty of time, yellow means you have less than half left, and red means time has almost run out.
If you were too slow and the combination no longer works, return to the Surveillance Room and check the screen for a new set of numbers.
Screenshot.
Go through the open door to the Prisoner Cell.
Prisoner Cell
Click the picture on the back wall to view a photo labeled "Something Blue".
Leave the Asylum and go back to the Well at the Ravenhearst Manor.
Well
Click the bottom of the eagle fountain to zoom in.
Take the Blue Handle floating in the water.
Leave the Ravenhearst estate and go back to the Courtyard at the Asylum.
Courtyard
Use the Ladder on the window of the left building.
Click the window to look inside the room.
Note the 5 numbers at the top of the door and hurry back to the Roof.
Roof
Click the keypad on the large door to the left to zoom in.
Enter the 5 numbers seen at the top of the door in the cell window of the Courtyard.
Just like the security lock to the other door, you have a limited amount of time to enter in the combination before it resets and a new code is randomized.
Screenshot.
Go through the open door into Charles' Cell.
Charles' Cell
Click the red book on top of the desk to zoom in.
Note the words "Patient Number" scratched onto the cover.
Enter in the 4 digit number heard on the recording in the Sewer that named Charles' patient number: 7149.
Screenshot.
Read the journal entry inside the red book and note the image of the pie and dynamite at the bottom.
Leave the Asylum and return to the Kitchen in the Dalimar House.
Kitchen
Click the pie in the window for a closer look.
Use the Dynamite on the inside of the pie, then click the Pie to add it to your inventory.
Go upstairs to the Bedroom.
Bedroom
Click the mannequin's face to zoom in.
Use the Pie on Abigail's mouth three times, go downstairs to the Foyer, then return back to the Bedroom to start the morphing object scene.
Click the Morphing Object (1), the doorknob at the side of the charred door on the left.
Click the Morphing Object (2), at the upper left side of the mattress, to the right object object #1.
Click the Morphing Object (3), the metal bar the middle of the headboard of the bed.
Click the Morphing Object (4), the apple on the upper right side of the mattress.
Click the Morphing Object (5), the utensil inside the chamber pot at the bottom of the bed.
Click the Morphing Object (6), at the lower left corner of the mattress, between the door and the chamber pot.
Click the Morphing Object (7), the rip in the cloth hanging from the wooden beam at the lower left area of the screen.
Click the Morphing Object (8), the toenails on the foot, directly below the chamberpot.
Click the Morphing Object (9), the corn cob at the foot of the bed.
Click the Morphing Object (10), the steak in the lower right corner of the bed, to the left of the second dismembered foot.
Click the Morphing Object (11), the picture frame on the ground.
Click the Morphing Object (12), the bowl of soup on the ground above object #11.
Click the Morphing Object (13), the hand of the dismembered arm on the ground above object #12.
Click the Morphing Object (15), the picture frame in the pile of debris to the left of object #13.
Screenshot.
After all of the morphing objects are found, click the center of the bed to zoom in.
Click the heart-shaped box to open it and take the Wedding Ring inside.
Leave the Dalimar House and go back to the Tank Room.
Tank Room
Click Rose's tank for a closer look.
Use the Proposal Key on the keyhole in the middle of the tank.
Go through the open door on the far left to the Cave.
Chapter 5 - The Wedding
Cave
Click the pile of rocks and debris on the left side of the tunnel past the violinist to zoom in.
Use the Pick Axe three times on the rubble to find the Yellow Handle and the V Key 3/3.
Continue forward to the Tunnel.
Tunnel
Click the Morphing Object (1), the tree branch sticking out of the end of the tunnel on the upper left side.
Click the Morphing Object (2), the animal figurine on the top right side of the gondola.
Click the Morphing Object (3), the heart relief in the center of the design at the back of the gondola.
Click the Morphing Object (4), the finger of the gondolier's hand.
Click the Morphing Object (5), the gondolier's name tag.
Click the Morphing Object (6), the middle nail on the upper right side of the frame to the gondola.
Click the Morphing Object (7), the lantern's cord, hanging over the edge of the stone step.
Click the Morphing Object (8), the highest envelope on the step, to the right of object #7.
Click the Morphing Object (9), the label on the glass bottle to the left of the lantern.
Click the Morphing Object (10), the bent spike at the edge of the fence, poking out behind the lantern.
Click the Morphing Object (11), the pillow on the seat to the right of the gondolier.
Screenshot.
Once the morphing object scene is complete, the gondolier will start to row, allowing you access to the Dock.
Dock
Click the front right mannequin with the box labeled "Something Old" to zoom in.
Place the Red Handle on the side of the box.
Click the front left mannequin with the box labeled "Something New" to zoom in.
Place the Green Handle on the side of the box.
Click the back left mannequin with the box labeled "Something Borrowed" to zoom in.
Place the Yellow Handle on the side of the box.
Click the back right mannequin with the box labeled "Something Blue" to zoom in.
Place the Blue Handle on the side of the box.
Continue forward to the Wedding Chapel.
Wedding Chapel
Click the mannequin groom's outstretched hand for a closer look.
Place the Wedding Ring on the mannequin's ring finger.
After watching Charles' video on the television screen, take the Heart Key hanging from the mannequin priest's mouth.
Go back to the Tank Room.
Tank Room
Click the last tank on the far right to zoom in.
Use the Heart Key on the keyhole in the center.
Go through the sewer path of the Asylum to return to the Cottage in the Ravenhearst Manor area.
Chapter 6 - The Underground Mansion
Cottage
Click the lock mechanism in the middle of the green toolbox on the workbench to zoom in.
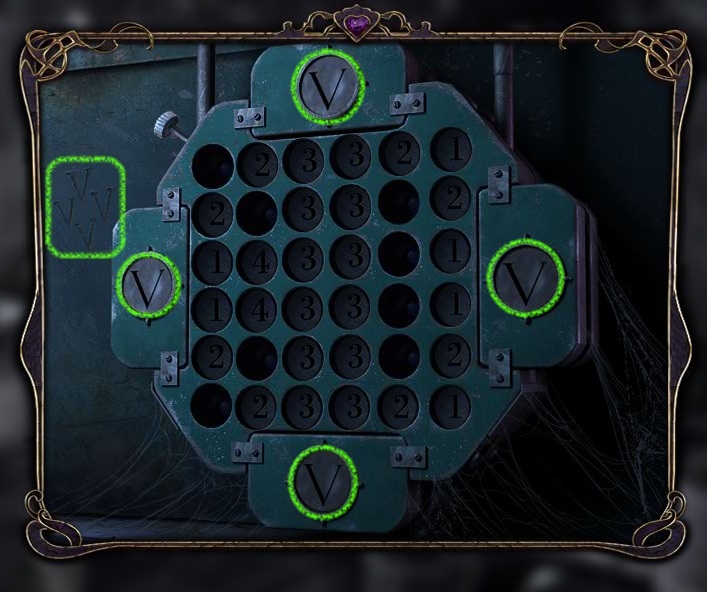
Place all 3 V Keys into the large spaces at the top and left and right sides of the lock to start the puzzle.
For the first part of the puzzle, click the V keys so that they are all turned upright as shown in the carving in the box, just to the upper left of the lock.
Click any key to rotate it; this will also rotate its partner key(s).
Clicking the top V rotates the top, right, and bottom keys.
Clicking the right V rotates the right and left keys.
Clicking the bottom V key rotates the bottom and top keys.
Clicking the left key rotates the left and bottom keys.
Solution.
To solve the next part of the puzzle, move all of the numbered tokens into an empty space.
Each token has a number from 1-4 indicating how many spaces it must move to be placed into a hole.
Moving a token to an empty space will cause it to lock in place.
Tokens can be moved horizontally, vertically, or diagonally so long as they move the correct number of spaces.
Example.
There are a number of possible solutions to this puzzle; an easy way to start is to move all of the 1's and 4's first because they are the most difficult to place.
Once the puzzle is complete, the toolbox will open.
Click the stack of papers inside the box for a closer look and take the Override Switch at the top of the papers.
Go back to the Tank Room, then go through the doorway on the far right to the Bridge in front of the Underground Mansion.
Bridge
Continue forward to the Mansion Entrance, then go through the front door to the Organ Room; from there, continue up the stairs and then up the ladder to the Generator Room.
Generator Room
Click the generator machine to zoom in.
Use the Override Switch on the panel in the middle of the machine.
Go back to the full view of the room, then enter through the second door on the right to the Twin's Chamber.
Twin's Chamber
Click either of the twins to zoom in.
Count the number of times the girl blinks, 3 times - 5 times - 2 times.
Go back to the Generator Room, then go through the first door on the right to Emma's Chamber.
Emma's Chamber
Click the shackled Emma in the middle of the room to zoom in.
Watch the direction she looks at in order: Up, Down, Up, Up, Down, Up.
Go back to the Generator Room, then go through the left door to Rose's Chamber.
Rose's Chamber
Click Rose's face for a closer look.
Watch the direction she looks at in order: Right, Right, Left, Left, Right, Left.
Go back to the Generator Room.
Generator Room
Click the machine in the center of the room again to zoom in.
Click the override switch to point to the far left, where you see a combination of three numbers on the screen.
Click the boxes to cycle throught the numbers 1-9.
Enter in the combination found from the twin girls' blinking: 3-5-2.
Solution.
Click the switch again to turn it towards the middle dial.
Click the bars to move the square inside of each to either the up or down position.
Enter in the combination found from the directions of Emma's glances in order: Up, Down, Up, Up, Down, Up.
Solution.
Click the circles to move the inner circle to the left or right side.
Enter in the combination found from the directions of Rose's glances in order: Right, Right, Left, Left, Right, Left.
Solution.
The End
Posted by: Trinn |
November 27, 2011 12:05 PM
|
November 27, 2011 12:05 PM
Mystery Case Files: Escape from Ravenhearst Walkthrough
Collector's Edition Bonus Content
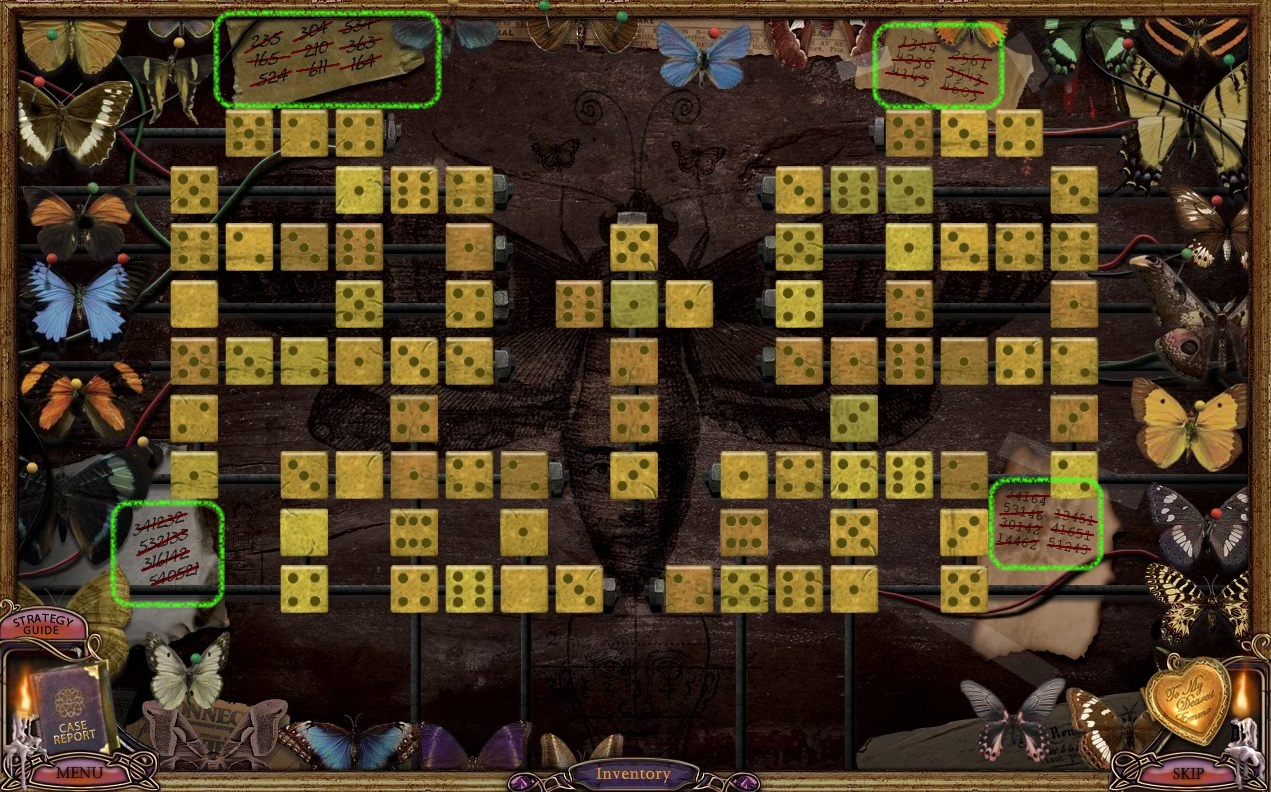
Case Report Morphing Object Locations
On many of the pages in the entries of the Case Report book on the lower left hand side of the screen are morphing objects.
Find and collect all of the morphing objects inside the journal to unlock 2 bonus hidden object scenes and a secret 40th page in the Case Report.
Yellow Tab
On page 1: Morphing Object 1/16 in the yellow tab is the word Blackpool/Slackpool at the top of the middle newspaper clipping above "Authorities Baffled!".
Screenshot.
On page 3: Morphing Object 2/16 in the yellow tab is the piece of tape at the upper right corner of the polaroid showing the toolbox in the Cottage.
Screenshot.
On page 6: Morphing object 3/16 in the yellow tab is the coffee stain at the lower left side of the right page, to the left of the words "Too dark to see!"
Screenshot.
On page 7: Morphing Object 4/16 in the yellow tab is the heart-shaped bottom of the control panel mechanism, between the control pannel and the spiked bottom.
Screenshot.
On page 11: Morphing Object 5/16 in the yellow tab is the tiled wall beside the surgeon's hand inside the polaroid image.
Screenshot.
On page 15: Morphing Object 6/16 in the yellow tab is the frame at the top left corner of the photograph.
Screenshot.
On page 18: Morphing Object 7/16 in the yellow tab is the large piece of food at the bottom of the left page, to the right of the dirty silver foil dish.
Screenshot.
On page 20: Morphing Object 8/16 in the yellow tab is the sentence above the doctor's signature on the letter to Abigail Dalimar.
Screenshot.
On page 22: Morphing Object 9/16 in the yellow tab is the heart/spade at the top of the middle playing card.
Screenshot.
On page 24: Morphing Object 10/16 in the yellow tab is the book on the right side of the counter in the drawing of the Laboratory.
Screenshot.
On page 27: Morphing Object 11/16 in the yellow tab is the patterned quilt on top of the bed in the photo of Charles' Cell.
Screenshot.
On page 30: Morphing Object 12/16 in the yellow tab is the wheel at the bottom of the bed in the polaroid labeled "something old...".
Screenshot.
On page 35: Morphing Object 13/16 in the yellow tab is the design in the center of the chalice over the left page.
Screenshot.
On page 37: Morphing Object 14/16 in the yellow tab is the curved staff of notation on the right side of the top piece of sheet music.
Screenshot.
On page 38: Morphing Object 15/16 in the yellow tab is the ventilation between the twin's heads in the polaroid on the right page.
Screenshot.
On page 39: Morphing Object 16/16 in the yellow tab is the swing hanging from the tree in the picture of the Graveyard.
Screenshot.
After all of the yellow tab morphing objects have been found, click the tab to view the hidden object scene.
Screenshot.
Orange Tab
On page 2: Morphing object 1/15 in the orange tab is the rose bush in the lower right corner of the polaroid picture of the locket.
Screenshot.
On page 5: Morphing object 2/15 in the orange tab is the round/square grate on the ground just to the left of the two flowers in the bottom right corner in the picture of the Manor Gates.
Screenshot.
On page 9: Morphing object 3/15 in the orange tab is the center of the raven door in the picture of the Tank Room.
Screenshot.
On page 10: Morphing object 4/15 in the orange tab is the top left clock on the right page.
Screenshot.
On page 13: Morphing object 5/15 in the orange tab is the question marks written in red pen at the bottom of the clipboard.
Screenshot.
On page 14: Morphing object 6/15 in the orange tab is the top of the gate on the left page.
Screenshot.
On page 17: Morphing object 7/15 in the orange tab is the keyhole in the lock underneath the door handle.
Screenshot.
On page 19: Morphing object 8/15 in the orange tab is the nail clipper in the grooming kit on top of the left page.
Screenshot.
On page 23: Morphing object 9/15 in the orange tab is the piece of tape on the lower left corner of the polaroid photo of the Cell Block.
Screenshot.
On page 25: Morphing object 10/15 in the orange tab is the mannequin between the fountain and the window in the drawing of the Courtyard on the left page.
Screenshot.
On page 26: Morphing object 11/15 in the orange tab is the 5 key on the keypad in the picture on the right page.
Screenshot.
On page 29: Morphing object 12/15 in the orange tab is the charred piece of food on the mattress in the photo of Abigail's bed in the Bedroom.
Screenshot.
On page 32: Morphing object 13/15 in the orange tab is the light in the middle of the ceiling in the picture of the Tank Room.
Screenshot.
On page 33: Morphing object 14/15 in the orange tab is the old, black & white portrait on top of the stack of pictures above the left page.
Screenshot.
On page 34: Morphing object 15/15 in the orange tab is the head of the front right groomsman in the picture of the Dock.
Screenshot.
After all of the orange tab morphing objects have been found, click the tab to view the hidden object scene.
Screenshot.
Door Token Locations
Door Tokens are part of the Collector's Edition bonus content. At the end of every chapter, after using a key on one of the tanks, you will receive a number of Door Tokens.
The image inside each door token represents an actual location inside the game.
Find the hidden locations indicated in each token, then align the token over it and click to charge it. You will then receive an "Activated Token" with glittering green sparkles over the token.
After all of the tokens have been activated, return to the Tank Room and place the tokens back in the round slots around the keyhole to their appropriate tank.
The tank will then drop, and you can continue along your adventure!
Raven Door
Take the two Door Tokens from the Raven Door.
Screenshot
Token #1: Align the door token with the word "Together" engraved above the left lamp in the Tank Room.
Token #2: Align the door token with the word "Again" engraved above the right lamp in the Tank Room.
Screenshot
Replace all of the activated tokens into the empty slots at the Raven Door.
Stork Door
Take all of the Door Tokens from the Stork Door.
Screenshot
Token #1: Go to the Waiting Room in the Hospital. Click the reception desk to zoom in. Align the door token with the bottles in the shelf behind the nurse.
Screenshot
Token #2: Go to the Morgue. Click the mannequin with its feet sticking out of the body cooler with the toe tag reading Anonymous Soul #5. Align the door token with the last three toes on the foot.
Screenshot
Token #3: Go to the Patient Ward. Click the IV drip with the funnel at the top, beside the floating orange balloon to zoom in. Align the door token with the second wallpaper flower on the right vertical line.
Screenshot
Token #4: Go to the Delivery Room. Align the door token with the left side of the IV drip, behind the vase of flowers.
Screenshot
Token #5: Go to the Waiting Room. Align the door token with the canes and walking sticks in the holder at the bottom right corner of the reception desk.
Screenshot
Token #6: Go to the Morgue. Click the sink to view the back of the room. Align the door token with the bottles on the bottom shelf beside the purple can of paint.
Screenshot
Replace all of the activated tokens into the empty slots at the Stork Door.
Madman Door
Take all of the Door Tokens from the Madman Door.
Screenshot
Token #1: Go to the Bathroom in the Dalimar House. Click the medicine cabinet to look inside. Click the bottle of poison on the third shelf to push it to the left. Align the door token with the poison bottle and the larger bottle beside it.
Screenshot
Token #2: Go to the Cellar. Click the circus poster on the wooden beam to zoom in. Align the door token with the raven on the poster under the word "Freak".
Screenshot
Token #3: Go to the Pantry. Align the door token with the lantern on the floor to the left of the broom and the iron pot.
Screenshot
Token #4: Go to the House Entrance. Align the door token with the numbered plaque at the top of the front door.
Screenshot
Token #5: Go to the Surgery in the Hospital. Align the door token with the red light beside the upper right corner of the door frame to the Morgue.
Screenshot
Token #6: Go to the Maternity Ward. Align the door token with the jug and the vase of roses on the table behind the infant cribs.
Screenshot
Replace all of the activated tokens into the empty slots at the Madman Door.
Proposal Door
Take all of the Door Tokens from the Proposal Door.
Screenshot
Token #1: Go to the Foyer in the Dalimar House. Click the red button in the middle of the floor to zoom in. Turn the dial to the III setting. Align the door token with the dial to the Spank-A-Tronic.
Screenshot
Token #2: Go to the Surveillance room in the Asylum. Click the second screen from the left in the top row of monitors to zoom in. Push the button at the lower right corner of the screen to cycle through the images until you see a close-up of the nurse at the reception desk. Align the door token with the nurse on the screen.
Screenshot
Token #3: Go to the Foyer in the Dalimar House. Click the cuckoo clock to zoom in. Set the time to 5:35, then align the door token with the face of the clock.
Screenshot
Token #4: Go to the Delivery Room in the Hospital. Click the ultrasound device to zoom in. Click and drag the left lever under the letter D down to the bottom of the bar. Click the pressure gauges on the side of the bed to zoom in. Align the door token with the left meter.
Screenshot
Token #5: Go to the Office in the Asylum. Click the file cabinet to zoom in. Align the door token with the file tabes in the open drawer.
Screenshot
Token #6: Go to the Lighthouse Gate in the Ravenhearst Manor area. Align the door token with the upper left side of the tree in the middle of the field in front of the lighthouse.
Screenshot
Replace all of the Activated Tokens into the empty slots at the Proposal Door.
Heart Door
Take all of the Door Tokens from the Heart Door.
Screenshot
Token #1: Go to the Dalimar House Entrance. Click the red speaker on the right side of the gate to zoom in. Align the door token with the top of the speaker.
Screenshot
Token #2: Go to the Asylum Gate. Align the door token with the top of the speaker on the pole on the left side of the gate.
Screenshot
Token #3: Go to the Hospital Entrance. Click the speaker to the right of the front door to zoom in. Align the door token with the center of the speaker.
Screenshot
Token #4: Go to the Cave in the Wedding Area. Align the door token with the violinist's hand holding the neck of the violin.
Screenshot
Token #5: Go to the security guard shack at the Asylum Gate. Align the door token with the bottom two buttons at the back of the mannequin guard's coat.
Screenshot
Token #6: Go to the Dock at the Wedding area. Align the door token with the coil of rope between the feat of the two mannequins on the left side of the dock.
Screenshot
Replace all of the Activated Tokens into the empty slots at the Heart Door.
Posted by: Trinn |
November 29, 2011 3:11 PM
|
November 29, 2011 3:11 PM
Frequently Asked Questions
General Gameplay
Help! I dont see the answer to my question here.
If the answer you're looking for isn't addressed in the FAQ, check the Walkthrough section above the comments for step-by-step instructions to each chapter including Collector's Edition bonus content.
What are morphing object scenes?
A morphing object scene is an area in the game where you are required to find a number of morphing objects. These are stationary items that will alternate between two different appearances over time.
The remaining number of objects left to be found is tracked by the number inside the open locket at the lower right corner of the screen.
After completing each morphing object scene, the power of the locket will alter the scenery, often revealing an item that can be added to your Inventory.
Random clicking or mis-clicking too many times will return discovered morphing objects back into the scene, so click carefully!
What are Door Tokens and how do I use them?
Door Tokens are items exclusive to the Collector's Edition version of the game.
Inside the Tank Room are 5 golden doors. When you use the appropriate key at each door, the Door Tokens will appear from the slots around the lock and can then be collected and added to your Inventory.
Each Token shows a smaller image that represents an actual area within the game. Find the matching location, align the Token as closely as you can to the area, then click to activate the Token.
After all of the Tokens from a door have been activated, return them to the slots around the lock to open the door.
Refer to the Door Tokens section of the Collector's Edition Walkthrough above the comments for the solutions to each door.
What are the numbers at the top of the Case Report tabs?
The orange and yellow tabs at the top of the Case Report are exclusive content to the Collector's Edition version of the game.
31 of the pages in the Case Report contain a morphing object either in the text or the image on the page. 16 of the objects go to the Yellow tab when found and 15 go to the Orange tab when found.
After all of objects of a tab are found, you can click the tab to start a hidden object scene.
Refer to the Case Report section of the Collector's Edition Walkthrough above the comments for the solutions to journal tab and both hidden object scenes.
Why can't I zoom in/click on an area anymore?
There are several reasons why an area might be unresponive: the most often cause is because you've completed everything that needs to be done in that area and have no need to look at it anymore.
Another common reason is because you have not yet visited a prerequisite area (for example, you cannot click the combination buttons to Charles' diary in the Asylum without having first listened to the recording in the Sewers).
Many areas are also unresponsive because they contain one of the four colored handles; before you can access a handle's hidden spot, you must first find the polaroid that "reveals" its location.
Skip to the question "Where are all the polaroids required to find the handles?" in the Proposal section of the FAQ if your unresponsive area is one of the handle locations for the complete solution.
Ravenhearst Manor
How do I get the key to the Lighthouse?
Travel to the Lighthouse Entrance, then click the pile of stones beside the path to zoom in.
Use the Bottle Opener to remove the Large Rock from the top of the pile, then click the Key and it will drop into the hole.
Return when you have the Twine (from the stack of letters at the Cottage Gate) and the Magnet (from the Destroyed Manor morphing object scene).
Use the Magnet on the hole of the stones, then attach the Twine to Magnet and use the combined items to retrieve the Key from the hole.
How do I open the Cottage door?
Travel to the Swing. Use the Large Rock (from the pile of stones at the Lighthouse Entrance) to break off the Metal Bar from the end of the iron fence.
Go to the Cottage Entrance. Click the broken doorknob at the side of the door to zoom in, then use the Metal Bar on the large crack between the door and the wall beside the doorknob to pry the door open.
How do I go down to the Cliff?
Go to the Lighthouse Entrance. Click the water pump beside the path to zoom in.
Use the Wrench (from the complete morphing object scene at the Stairway Bottom in the lighthouse) to remove the Hose from the tap.
Go to the Cottage. Click the spigot sticking out of the lower section of the vine-covered wall to the left of the door to zoom in.
Attach the Hose to the tap, then go right over the fence and down to the Cliff.
How do I solve the electric box puzzle at the Lighthouse Gate?
First find the combination 5-3-7-4 from the lighthouse keeper's journal inside the chest at the Lighthouse, then you can start the puzzle at the gate.
Arrange the symbols on the buttons around the panel so that the numbers travel to the bottom in the correct order of the combination from the lighthouse keeper's note.
The numbers need to be the correct value, in the correct order, and positioned upright.
To begin with, follow the path of each number to find where it stops at the bottom to determine whether its value should be 5, 3, 7, or 4 in order from left to right.
Once you know what each number needs to be when it reaches the end of the track, click the round buttons to either + or - to add or subtract 1 to that number when it passes the button.
When you have made the correct value, all you need to do is rotate it so that it is facing the right direction; click the round buttons again to choose between the clockwise or counterclockwise position to rotate it in that direction.
Along each number's track are buttons (some are silver, some are hidden under regular buttons) with random effects on the number passing over them by either adding or subtracting from the number or rotating it.
If the number at the bottom looks correct but you still get a red light, check for two possible causes: An upside down 2 is identical to the number 5 and an upside down number 3 is identical to the right-side up number 3.
Why can't I dig with the shovel in the Graveyard?
Because it's still too dark to see. First, you need to complete the lighthouse override puzzle then return to the closest grave where you should be able to dig without a problem.
How do I solve the Lighthouse override puzzle?
Start by going down to the Cliff. Place the Ladder (from the steps of the destroyed Ravenhearst Manor Entrance) over the gap between the ledges of the cliff.
Click the face of the rock wall to zoom in. Take the torn piece of paper sticking out of the wall.
Go inside the destroyed Ravenhearst Manor. Click the brick lying on the floor to zoom in, then click the brick again to lift it. Attach the torn piece of paper from your inventory to the ripped sheet of paper underneath the brick to complete the page.
Note that the word "Last" is underlined and the four numbered arrows at the bottom of the page: Right arrow is 1, Down arrow is 2, Left arrow is 3, Up arrow is 4.
Go to the Graveyard. Click the second grave to view Edmond Last's tombstone; at the bottom of the tombstone are five numbers (which are random each game). The numbers on the grave correspond to the numbered directional arrows from the note under the brick.
Go to the top of the Lighthouse Tower. Click the override panel to zoom in. Press the lever in the same direction as the numbered arrows in the order found on the tombstone (e.g. if your tombstone number is 12341 you would push the lever Right, Down, Left, Up, Right).
Where are the V Keys and what do I do with them?
V Key 1/3 is in the destroyed Ravenhearst Manor. After completing the morphing object scene, click the fireplace to look inside. Remove the loose brick to find the V key.
V Key 2/3 is at the Kitchen of the Dalimar House. Click the pie on the windowsill to zoom in. Break the crust of the pie three times to reveal the V Key inside it.
V Key 3/3 is in the Cave through the proposal door. To the right of the violinist, near the mouth of the cave, is a pile of dirt and debris. Click the pile to zoom in then use the Pick Axe to clear away the rocks uncovering the V Key.
When you have all 3 V Keys, go to the Cottage. Click the lock on the green toolbox to zoom in, then place the V Keys into the circular spaces at the sides of the box.
How do I solve the first part of the V Key puzzle?
The first part of the puzzle is solved by clicking the four V keys around the lock to turn them all upright.
Clicking the top V rotates the top, right, and bottom keys.
Clicking the right V rotates the right and left keys.
Clicking the bottom V key rotates the bottom and top keys.
Clicking the left key rotates the left and bottom keys.
When all of the V Keys are upright, the second part of the puzzle begins.
How do I solve the second part of the V Key puzzle?
To solve the second half of the puzzle, move all of the numbered tiles into an empty space.
Click a tile to select it; empty spaces with a blue indicate you can move the tile to that area.
A tile can only move vertically, horizontally, or diagonally into a space that is an equal distance away as the number shown on the tile.
When a tile is moved, it will lock in place; all tiles must be moved for the puzzle to be completed.
Hospital
How do I get into the Maternity Ward/How do I use the Eyechart in the Hallway/What are the toetags in the Morgue for/How do I solve the receptionist's puzzle?
All of these questions are a part of the solution to the same puzzle for the nurse at the Reception Desk.
The first step is to travel to the Morgue. Click the toe tags on all 5 of the corpses to view their information; you're looking for 2 things: the Patient Number and the Height (which is random each game).
After you've noted the height of all five patients, go to the Hallway. Click the eye chart on the wall to zoom in. Use the Magnifying Glass in your inventory (from the table top in the Lighthouse) to view the tiny letters at the bottom of the chart.
Starting with Patient #1, use their height to identify the corresponding letter. If Patient #1 is 6'2" then you would start at the line next to the 6' mark and then go from left to right to the 2nd letter which would be "E".
Repeat this process until you have the letter for all 5 patients, which should complete a five letter word (The word is random but common examples are Lefty, Feely, and Flood).
Go to the nurse at the Reception desk. Click the board in the center of her torso to zoom in. Press the letters to spell the word you found using the eye chart; if the word is correct, the door to the Maternity Ward will open.
What do I do with the pregnant mannequins' stomachs in the Maternity Ward?
The inflatable stomachs are a mini-game puzzle that you solve by enlarging the bellies of all of the women lying on the hospital beds.
Starting from the second to last woman on the right, click her belly twice. This will inflate the belly of the woman to her right.
Continue moving left and clicking the stomachs of each woman two times to inflate the belly of the woman to her right until you reach the last mannequin.
Click her stomach twice to inflate the belly of the mannequin to her right, then click her outstretched hand to inflate her own stomach.
When all of the stomachs are inflated, the far left mannequin will open her mouth, revealing the Red Pill.
What do I do with the babies in the crib?
Collect all four babies from the crib in the Maternity Ward. Click the gate in the back of the room to look through the bars, then note the numbers carved into the wall: 4-5-9-2.
Go to the Hallway, then click the X-Ray machine to zoom in. Drop each of the babies into the input of the machine to view the numbered block hidden inside each baby.
The baby wrapped in the blue polka dotted blanket contains the #4 block.
The baby wrapped in the green blanket contains the #5 block.
The baby wrapped in the multi-colored quilt contains the #9 block.
The baby wrapped in the purple blanket contains the #2 block.
Go back to the Maternity Ward. Replace the babies back in the crib in the order of the combination found on the wall, 4-5-9-2 from left to right.
Where are the 4 red pills and what do I do with them?
All of the Red Pills are found in the areas around the Hospital.
Red Pill 1/4 is on top of the X-Ray machine in the Hallway, right next to the slot with the word "Input".
Red Pill 2/4 is next to the patient on the operating table in the Surgery room. Click the operating table to zoom in and you will see it just above the mannequin's shoulder.
Red Pill 3/4 is in the Morgue at the morphing object scene area. Zoom in to the sink in the back of the room to find the pill beside the bar of soap and the faucet.
Red Pill 4/4 is in the mannequin's mouth in the Maternity Ward. Solve the puzzle with the inflated bellies, and the far left mannequin will open her mouth. Click her face to zoom in and take the last pill.
When you have collected all 4 of the red pills, go to the Patient Ward. Click the IV drip at the side of the patient's bed to zoom in, then drop all the red pills into the funnel; the patient will raise his arm holding Charles' birth certificate.
Where are the 5 blue pills and what do I do with them?
All of the Blue Pills are found in the areas around the Dalimar house.
Blue Pill 1/5 is in the medicine cabinet at the Bathroom, behind the pill bottle in the right corner of the bottom shelf.
Blue Pill 2/5 is in the Kitchen on the windowsill, just beside the pie.
Blue Pill 3/5 is in the closet under the stairs, between the pages of the journal on the floor.
Blue Pill 4/5 is in the Foyer of the house, just under the face of the cuckoo clock.
Blue Pill 5/5 is outside the Dalimar house, at the bottom right corner on the inside of the speaker box to the right of the gate.
When you have collected all 5 of the blue pills, go to the Patient Ward in the hopsital. Click the IV drip at the side of the patient's bed to zoom in, then drop all the blue pills into the funnel.
After the patient dies, click the heart monitor to the left of the bed to zoom in. Click the red buttons at the top of the machine to crack the glass case open, revealing the Madman Key inside.
What do I do with Charles Dalimar's birth certificate?
Click any of the letters D, N, and A on the certificate to lift the tabs revealing the numbers underneath. Note the three numbers (they are random every game), then go to the Delivery Room.
Click the ultrasound machine with the panel containing three sliders under the letters D, N, and A.
Moving these sliders also moves the pressure gauges at the side of the patient's bed; dragging the slider to the top sets the gate at 1 and dragging the slider to the bottom sets to the gauge to 12.
Set the slider under each letter to match the pressure gauges with the numbers under the D/N/A letter tabs of the birth certificate.
If the gauges are set correctly, you can press the green button to deliver the baby.
What do I do with the baby from the machine?
Click the robotic baby to open its eyes. The color of its eyes will begin to cycle between green, red, and blue.
When the baby's eyes are green, use the Wire Cutters to clip the green wire; when the baby's eyes are red, use the Wire Cutters again to clip the red wire; and finally when the baby's eyes are blue, use the Wire Cutters a third time to clip the blue wire.
The blue wire has a smaller interactive area than the other wires; if you click outside the box it may accidentally minimize and reset the puzzle.
If you clip a wire when the baby's eyes are a different color or when the eyes are closed, the baby will explode and you will have to push the green button and start again.
When the puzzle is solved, take the Baby Charles from the machine.
Dalimar House
Where are the three Parenting Books and what do I do with them?
Parenting Book 1/3 is in the Hallway of the Hospital, on top of the stretcher against the left wall.
Parenting Book 2/3 is in the Kitchen of the Dalimar House. Complete the morphing object scene, then take the book inside the opened oven.
Get the Feather from the Reception Area of the Hospital by completing the hidden scene in the magazine on the seat of the sofa. Parenting Book 3/3 is in the Bedroom of the Dalimar House. Use the Feather to tickle Abigail's feet, then take the book when it falls from the bed to the floor.
How do I use the clock to complete Momma's chores?
In the closet under the stairs is a journal with a list of chores and the time at which they have to be done. To complete the three chores, you need to change the time on the cuckoo clock and then go to the Bedroom to complete the task assigned for that time.
If you are having difficulty getting the next chore to start, try these two steps: first return to the Bedroom to make sure you have completed the last chore by collecting -all- of the remains around the bed (10 toenails/5 nose hairs/5 pimples) then go down to the closet under the stairs and open & read the Journal again for the time to the next chore.
How do I clip Momma's toenails?
Click the cuckoo clock beside the stairs in the Foyer to zoom in, then drag the hands of the clock to change the time to 4:25. Abigail will shout from upstairs that it's time to clip her toenails.
Go upstairs to the Bedroom. Use the Wire Cutters (from the completed morphing object scene in the Hallway of the Hospital) to clip all 10 nails on the toes of both feet. Make sure you collect all 10 of the toenails that drop to the surface of the bed.
When you have all 10 toenail clippings, you can return to the closet under the stairs. Check the journal for the time to the next chore. Change the time on the cuckoo clock to 7:40. Abigail will shout from upstairs that it is time to trim her nosehairs.
If Abigal does -not- shout and the next chore isn't started, return to the bedroom and make sure you have collected ALL of the toenails as you cannot continue until you have all 10 (it also works if you put the toenails into the jar in the Kitchen).
How do I trim Momma's nose hairs?
Return to the Bedroom. Click Abigail's face to zoom in, then use the Wire Cutters (from the completed morphing object scene in the Hallway of the Hospital) to clip the nose hairs sprouting from her nostrils. Collect all 5 trimmed Nose Hairs from her cheeks.
When you have all 5 nose hairs, go back to the closet under the stairs. Check the journal again for the last chore. Change the time on the cuckoo clock to 10:00, and Abigal will shout that it's time to pop her pimples.
If Abigal does -not- shout and the next chore isn't started, return to the bedroom and make sure you have collected ALL of the nose hairs as you cannot continue until you have all 5 (it also works if you put the nose hairs into the jar in the Kitchen).
How do I pop Momma's pimples?
Go to the Bedroom. Click Abigail's face to zoom in, then click all of the pimples around her face to pop them. Pick up all the pimple pus left on her cheeks to collect all 5.
If you have not done so yet, go to the Kitchen and place all of the remains from the three chores (The toe nails, the nose hairs, and the pimple pus), then put them into the jar labeled Momma's Leavings. When all of the parts are in the jar, the dumbell in the kitchen should open.
How do I use the boiler to turn on the hot water?
First, go to the Cellar and click the boiler to zoom in.
Place the Boiler Crank (from the dumbwaiter in the Kitchen) into the space at the front of the boiler beside the right handle.
Click each boiler handle -only- one time to turn on the heat.
Go to the Bathroom upstairs. Click the sink to zoom in, then turn the left "H" tap to turn on the hot water (do not touch the "C" cold water tap).
If the boiler is working properly, the hot water from the sink should steam up the bathroom mirror.
How do I open the lock to the cage in the Cellar?
When the steam covers the mirror in the bathroom, the image of a lock with several circles inside will appear.
Four of the circles will be slightly darker than the other surrounding circles. Note the position of those darker circles, then go down to the Cellar.
Click the padlock on the cage to zoom in; the buttons that are raised up will be light gold in color while buttons that are pressed down will be much darker.
Click the 4 buttons on the lock so that the pressed down buttons are in the same position as the dark circles from the steam image on the mirror.
How do I fix the button to the Spank-A-Tronic machine?
Go to the Manor Gates in the Ravenhearst Manor area (the first scene at the start of the game). Click the broken intercom in the middle of the left pillar to zoom in.
Use the Wire Cutters (from the completed morphing object scene in the Hallway of the Hospital) to cut off the Blue Wire, Green Wire, Yellow Wire, and Red Wire.
Go to the Foyer of the Dalimar House. Click the frayed wire on the floor to zoom in. Place the colored wires in the space between the frayed ends of the wires with matching color (Red Wire on top, Yellow Wire second, Green Wire third, Blue Wire on the bottom)
Asylum
How do I change the card-dealing mannequin's brain from Normal to Lobotomy?
Take the Ice Pick from the counter in the lower left corner of the Shock Therapy Room, then go to the Recreation Room.
Click the card-dealing mannequin's head to zoom in. Use the Razor (from the Bathroom sink in the Dalimar House) to shave the hair off the man's head.
Use the Ice Pick on the hole at the side of the head to remove the square panel, then use the Ice Pick again on the hole in the center of the panel to change the arrow from Normal to Lobotomy setting.
How do I solve the Knight token puzzle on the Office door?
Imagine the board where columns are numbered from left to right 1-6 and the rows are lettered from up to down A-D; following that example, in this screenshot the token is at the position D4.
The token can move just like a knight in a game of chess: either two spaces horizontally and one space vertically, or two spaces vertically and one space horizontally.
You can move the token to the same spot more than once, but doing so will toggle the light at that square on or off every time.
Start by moving the token to space D4, then push the green button to reset the puzzle (the board resets but the token should stay in place at D4).
Now move the token to the following spaces in this exact order:
C6, A5, B3, A1, C2, A3, C4, D6, B5, C3, D1, B2, A4, B6, D5, B4, A6, C5, D3, C1, A2, C3, B1, D2, B1, C3, B1.
There are many possible ways to solve this puzzle; this is just one example.
How do I make the Sleeping Potion?
The recipe for the Sleeping Potion (found in the file cabinet at the Office) includes 3 ingredients: blood, sweat, and tears.
Go to the Surgery in the Hospital. Click the cabinet against the left wall to zoom in. Use the Eyedropper (from the open book on the counter after completing the morphing object scene) on the pool of blood spilled from the beaker.
Go to the Laboratory in the Asylum. Use the Dropper of Blood on the beaker on the counter to add the first ingredient to the potion.
Go to the Shock Therapy Room in the Asylum. Complete the morphing object scene to electrocute the mannequin, then click his face to zoom in. Use the Eyedropper to take the drops of sweat from his face.
Go to the Laboratory in the Asylum. Use the Dropper of Sweat on the beaker on the counter to add the second ingredient to the potion.
Go to the Foyer in the Dalimar House. Click the Spank-A-Tronic button on the floor to zoom in, then press the red button to start the machine (if you have not yet fixed the button, refer to the question "How do I fix the button to the Spank-A-Tronic machine?" in the Dalimar House section). Click the boy's face to zoom in and use the Eyedropper to collect the tear from his cheek.
Go to the Laboratory in the Asylum. Use the Dropper of Tears on the beaker on the counter to add the third and final ingredient to the potion.
Take the completed Sleeping Potion from the stand.
How do I get through the grasping hands in the Cell Block?
Go to the Recreation Room in the Asylum. Click the vent at the bottom of the left pillar to zoom in.
Use the Ice Pick to remove the grate, then put the Sleeping Potion inside the ventilation duct. This will put all of the prisoners in the Cell Block to sleep.
How do I open the left (Charles Dalimar's) prison cell door on the Roof?
Go to the Courtyard of the Asylum. Place the Ladder against the wall under the window, then click the window to look inside the room.
Note the 5 numbers on the panel above the door then travel to the Roof as quickly as you can.
You now have 60 seconds to open the door before it resets and a new set of 5 numbers is generated. The arrow of the timer points to the green section up to the 30 second mark, then the yellow section until the 45 second mark, and the red section for the last 15 seconds til the 60 second mark.
Click the left door to zoom in to the lock, then press the buttons to enter the combination seen above the door in the courtyard cell. When the correct combination is entered, the green light will flash and the door can be opened.
If the door does not open, make sure you're using the correct combination, as the solution resets to a new string of random numbers every minute; also, make sure you are viewing at the lock to the correct door (Charles' door is on the left, the unknown prisoner's is on the right).
How do I open the right prison cell door on the Roof?
Go to the Surveillance Room in the Asylum. Click the center screen in the top row of monitors to zoom in.
Click the button to change the channel to the image showing the door through the Courtyard window with a new set of numbers above it.
Again, you have 60 seconds to return to the Roof then enter the combination into the lock on the right door.
If the door does not open, make sure you're using the correct combination as the solution resets to a new string of random numbers every minute; also, make sure you are viewing at the lock to the correct door (Charles' door is on the left, the unknown prisoner's is on the right).
Proposal
Why can't I click on the pile of rocks in the Cave to zoom in?
Because the Yellow Handle is hidden in the rocks. Before you can find one of the colored handles, you must first find the polaroid that "reveals" its location or its hidden area will remain unresponsive - please refer to the following question for all polaroid solutions.
Where are all the polaroids required to find the colored handles?
The "Something Old" photograph reveals the location of the Red Handle. Go to the outide Entrance of the Asylum. Click the male mannequin sitting on the bench to find the polaroid on his lap.
The "Something New" photograph reveals the location of the Green Handle. Go to the Roof of the Asylum. Click the stack of crates by the broken wall to find the polaroid.
The "Something Borrowed" photograph reveals the location of the Yellow Handle. Go to the Office in the Asylum. Click the right candlestick on top of the fireplace mantle to lower the bookshelf, revealing a secret one-way mirror. Click the mirror to find the mannequin banging his head against the glass with the polaroid around his neck.
The "Something Blue" photograph reveals the location of the Blue Handle. Go to the Prisoner Cell on the roof of the Asylum. Click the polaroid stuck to the back wall of the cell.
Where are all of the colored handles and what do I do with them?
The Red Handle is in the Patient Ward in the Hospital. Click the pillow on the bed to look underneath and find the handle.
The Green Handle is in the Bathroom in the Dalimar house. Click the pipes underneath the sink to zoom in and find the handle.
The Yellow handle is in the Cave in the Proposal area. Click the rocks and debris on the floor of the cave to zoom in, then use the Pick Axe three times to reveal the handle.
The Blue Handle is by the Well in the Ravenhearst Manor area. Click the water of the eagle fountain to zoom in and find the handle.
Go to the Dock at the Proposal area. Four mannequins stand holding music boxes with a space at the side for each of the handles: The Red Handle goes in the box labeled "Something Old", the Green Handle goes in the box labeled "Something New", the Yellow Handle goes in the box labeled "Something Borrowed", the Blue Handle goes in the box labeled "Something Blue".
Posted by: Trinn |
January 8, 2012 2:23 AM
|
January 8, 2012 2:23 AM