


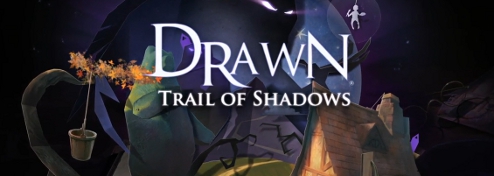
Drawn: Trail of Shadows
Platform: Mac, Windows
![]()
 Drawn has returned. The third game in the series, Drawn: Trail of Shadows, dares to outdo its predecessors, Drawn: The Painted Tower and Drawn: Dark Flight, in what simply must be the most enchanting hidden object adventure hybrid game to date. The visuals have improved (if you can believe it!), the storytelling is even more intriguing, and the puzzles are as rich as before. Good hidden object games are hard to come by, so when you find a game this great, you'd best dive right in.
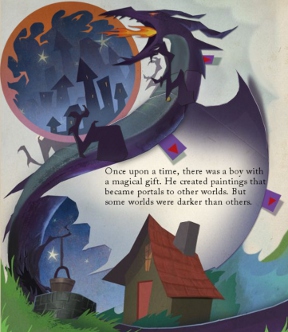
 There was once a young boy who loved to paint. His drawings were so vivid, they transformed themselves into magical portals that led to other worlds. But one day, he created a door he never should have painted, and out came an evil wizard. The wizard took the boy with the intention of forcing him to paint evil into every corner of existence, removing the sun and stars from the sky itself. Just as he was being pulled into the painting, however, the boy realized he wasn't alone. This is where you, young Iris, enter the story.
Just like Drawn: Dark Flight, Trail of Shadows manages to fill out the story introduced in the previous games without alienating new players. So, if you've never played a Drawn game, you won't feel left out starting with number three. If you're already a Drawn fanatic (which, you really should be), Drawn 3 adds some nice pre-Iris backstory and keeps things moving forward nicely.
 Gameplay falls firmly on the casual adventure side of things, keeping jarring lists of objects out of the picture in favor of organic inventory items and scattered clues. Each small section is composed of several screens, many of which have sparkling areas you can zoom in and interact with. To solve the puzzles and move on to the next area, you'll need to climb around and search everywhere for items. Sometimes they're well-hidden, sometimes they're in pieces, and other times, you'll have to jump through a few hoops in order to make them appear.
Drawn: Trail of Shadows features a number of great mini-games, all of which fit perfectly in the fairytale storybook setting, They aren't revolutionary in terms of content, but they're good diversions and always simple to complete. Besides, you can skip them after a few moments if you aren't in the mini-game sort of mood. And yes, before you get too curious, the wonderful pop-up book sections from before have returned!
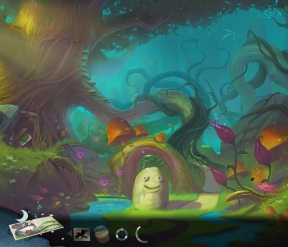
 Analysis: Drawn: Trail of Shadows is phenomenal. Adjectives don't do the game justice, as it's a marvelous thing to see in action. The visuals, as pretty and lush as before, have been upgraded to produce a shifting effect when you move your cursor. It looks as if you're actually standing in a forest meadow, as the foreground and background move independently. It sounds trivial, but when you see it in motion, you'll wonder how you'll ever play a standard hidden object game again.
The Drawn series has always aimed to do things a little differently than the rest. Adding itself to a crowded genre can be a frightening thing to do, but the series stands out thanks to some excellent artwork, storytelling, and puzzle design. Drawn also skips right over most pitfalls hidden object/adventure games fall victim to, showing remarkable polish that leads to a near perfect gaming experience. Trail of Shadows continues this tradition without feeling too much like its predecessors, removing any fear of copy/paste game design before you even start playing.
Don't be afraid of Drawn: Trail of Shadows because it's the third in a series. Newcomers can play it just as easily as veterans. And don't shrug your shoulders because of the genre label shared with all those other games. Drawn: Trail of Shadows is expertly-crafted to provide an adventure experience unrivaled in the casual gaming world, and it's got something every player can enjoy.
A Collector's Edition is also available. It contains a soundtrack, achievements, concept art, wallpapers, behind the scenes information, and more. Remember that Big Fish Game Club Members pay only $13.99 for Collector's Editions (or 2 club credits), and collector's editions count 3 card punches of 6 total needed for a free game. A standard edition will likely be available in a few weeks.
![]() Windows:
Windows:
Download the demo
Get the full version
Also available: Collector's Edition
![]() Mac OS X:
Mac OS X:
Download the demo
Get the full version
Also available: Collector's Edition


Walkthrough Guide
(Please allow page to fully load for spoiler tags to be functional.)
Drawn: Trail of Shadows Walkthrough
General Information
Main Menu and Options
From the Main Menu you can choose your Player name and Options, check out the Extras, and Play or Quit the Game.
Options include Music and Sound FX Volume, Custom Cursor, Full Screen or Windowed Mode, Aspect Ratio adjustment, and you can cancel the Screen Movement by moving the bar all the way to the left.
When you choose your Profile, you will be given your choice of Difficulty Modes. Choose wisely, because there is no option to change modes once you begin play.
The differences between the two play modes seem to be the usual: In Casual Mode, there are sparkles for areas of interest, plus Hint and Skip buttons recharge faster.
Experienced Mode doesn't show areas of interest, and the Hint and Skip buttons take longer to recharge.
Extras gives you access to Credits, World of Drawn, your Achievements, Concept Art, Wallpaper, Soundtrack selections you can export, and the BFG Forum, all of which are immediately available to you.
Screenshot
Scene Navigation
You can access the Menu, get a Hint and go to the Help Menu in the lower right corner.
Menu will give you the following choices: Resume Game, Options, also access to the Help Menu, returning to the Main Menu, or Quitting the Game.
There is a padlock at the lower right of the screen that you can lock to keep your Inventory always within your view.
Inventory is in the lower center of the scenes; don't forget to move the arrows to find items when there are a lot of items available for use.
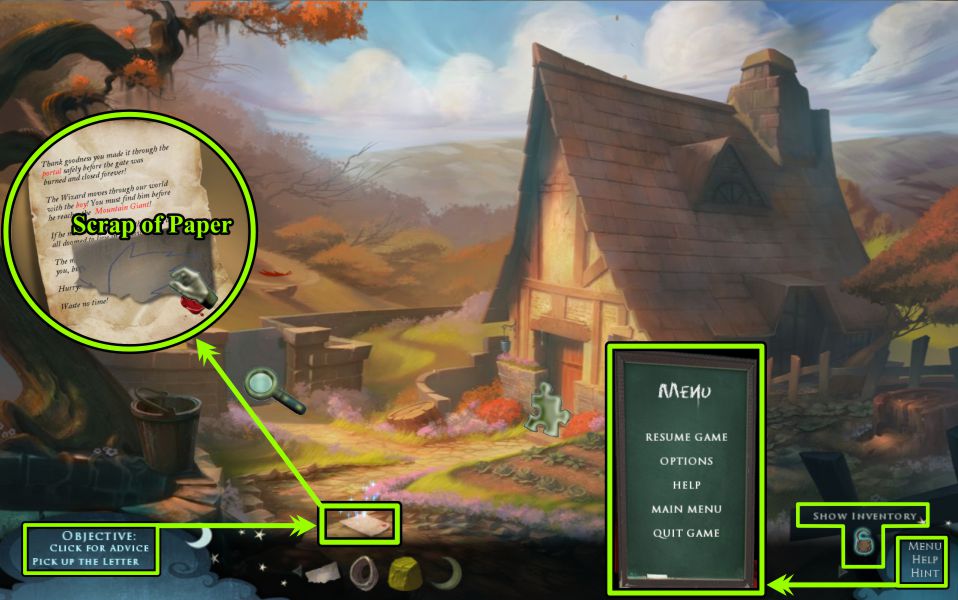
At the lower left of the scene, you can click to find the current Objective and ask for advice.
There are many Notes throughout the game that will give you important information, so don't forget to check them out; they may also have items you need, such as the one shown in the screenshot.
Screenshot
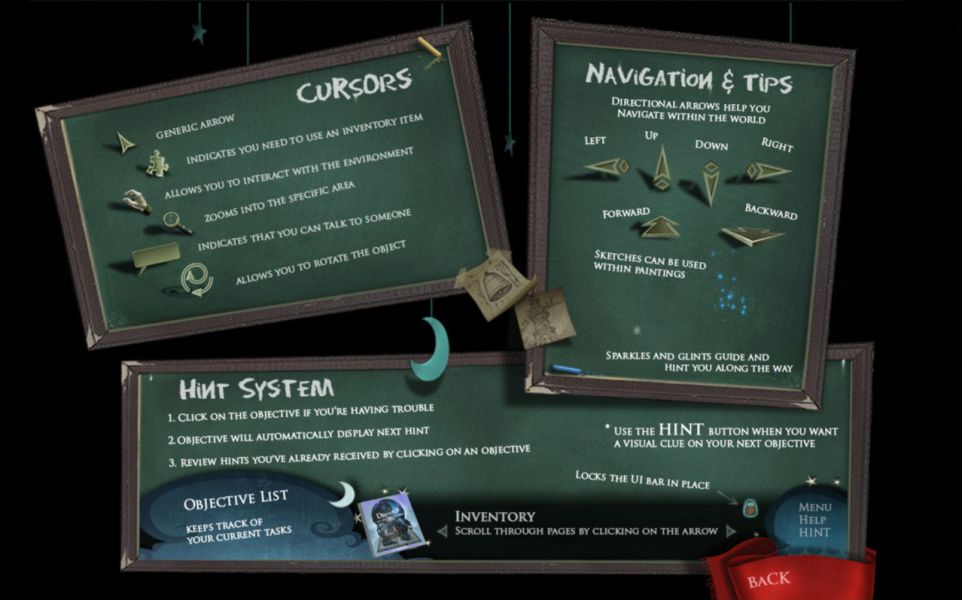
Help Menu
The Help Menu shows you explanations of the cursors, gives you Navigation Tips, and explains the Hint System.
Screenshot
Achievements
Drawn Legacy: Finish the game on Experienced Mode
Never Boaring: Collect 27 Pigs/Hogs
Bee Careful: Fill up the hunny (honey) jar without wasting a single drop
Marbelous Job: Solve the Dark Forest Stone Face Puzzle
No Sneak Peeks: Light up all 19 tabs in the Eye Puzzle
Fairway Fever: Trigger 6 objects in Croquet
Wicket Shot: Beat the Lamplighter Croquet in under 10 turns
Eggsactly: Paint 3 eggs perfectly the first time around
Pass with Flying Colors: Finish painting the flowerbeds using every color
Never Hertz to Shine: Connect the mushrooms without using any resets
First Contact: Find an alien in the game (use spaceship in A Chalk World in The Cave)
The Collector's Addition: Collector's Edition Bonus Area Complete
It's Snow Problem: Animate the clouds parting as the sun rise
Scat Daddy: Play the tune of the mountain giant on the cat statue
Taken for Granite: Flick every rock on the giant's finger
The Whittle Things: Align the code to activate the windmill
That Was Murder: Solve the ferry door puzzle in under 10 moves
Beetlegeuse: Bloom the 3 flowers to light up the room
Head Over Heels: Match all the symbols on the head puzzle
Why the Long Face: Defeat the evil wizard
Location of 27 Pigs
Chapter 1: Page 1 of the Storybook
Move the dragon's hinged underside.
Move the dragon's wing.
In the bucket once you lower and raise it from the well.
Chapter 1: Page 2 of the Storybook
Behind the leaves and hinged post at the right side of page.
Behind the leaves just above the crows flying in a circle.
In the root of the tree.
Chapter 2:
On the lamplighter sketch (below the sticky wicket sign).
Chapter 2: Page 4 of the Storybook
In the bushes, on the left side of the scene.
Underneath the tab on the checkered path.
Under the heart in the tree trunk at the right.
Behind the elephant's ear once he is placed on his square.
Chapter 3: Page 5 of the Storybook
Pull the tab just below the root at the upper left of the screen and take the tape to get the pig.
Above the tab with the gear at the lower left of the screen.
In a flap just above the spiral root, underneath the tape.
Chapter 4:
Chasm close-up of shield in the mountain on the upper right once the stones are removed.
Chapter 4: Page 6 of the Storybook
Underneath the tab on the bottom left corner.
Behind the post on the bottom right corner.
On the bottom of the post card.
Once the lock on the top left of the scene is opened.
Under the flap on the tree near the squirrel.
On the bush fold down near the right edge of the scene.
On top of the bush to the right of the windmills.
Flying through the clouds by the giant's head.
Chapter 5: Page 7 of the Storybook
Inside the mouth of the monkey at the right.
Under the head of the left monkey.
Move the hinged foot of the left monkey.
Chapter 1: The Cottage
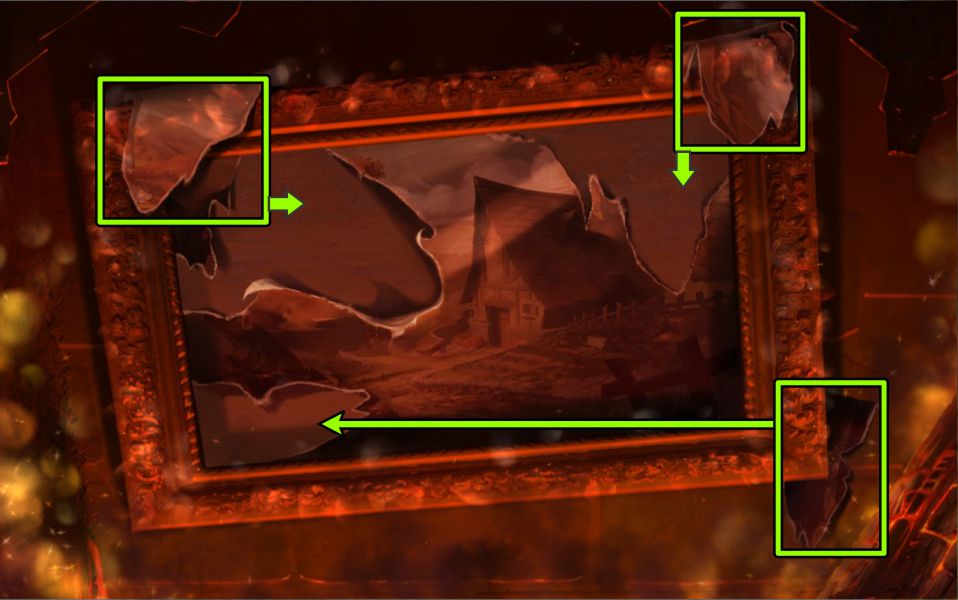
Burning Room
Repair the canvas of the picture with the three scraps shown in the screenshot.
Screenshot
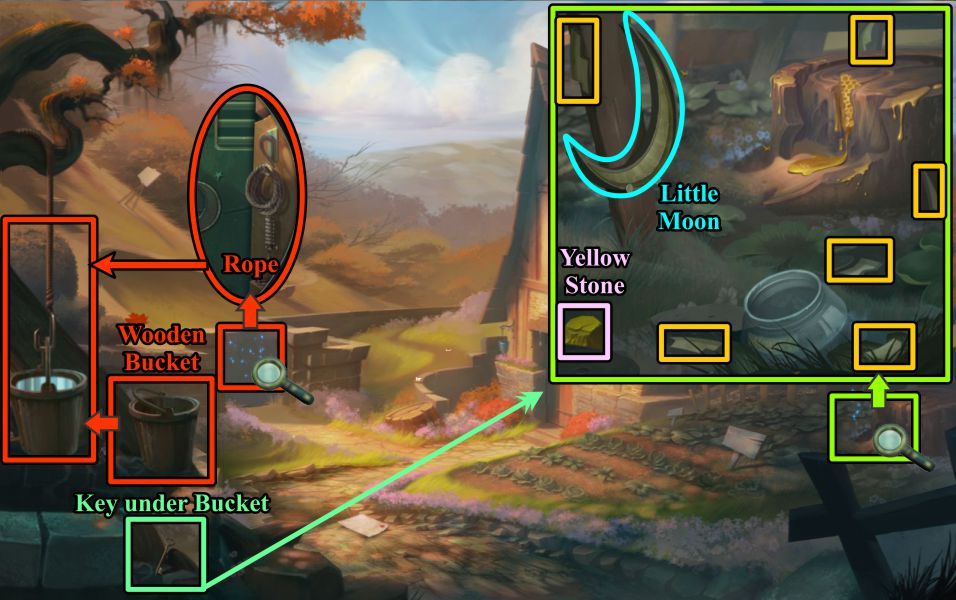
Cottage Yard
Zoom in on the gate and take the Rope.
Place the Rope as shown in the screenshot, pick up the bucket, and place it on the hook.
Pick up the Key on the well when the bucket is removed.
Zoom in on the Honeycomb Stump.
Pick up the Yellow Stone and collect all the pieces of the Little Moon.
As you collect the pieces, they will place themselves in the frame so you can collect the completed moon.
Use the Key to open the cottage door.
Screenshot
Inside Cottage
Zoom in on the box at the left, collect the Blue Stone, and read the note.
Pick up the Metal Pot.
Zoom in on the fireplace, pick up the Tongs and use them to retrieve the Glowing Sun.
Go to the desk and take the Charcoal on top of the book.
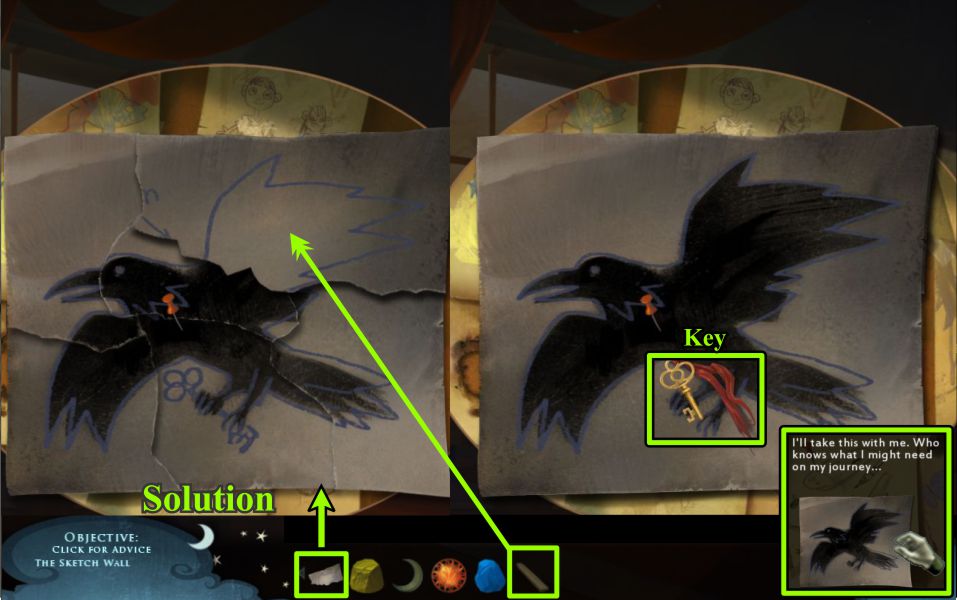
Zoom in on the Sketch Wall for a Puzzle.
Screenshot
Charcoal Raven Puzzle
Place your scrap of paper and put the puzzle together, as shown in the screenshot.
Use your Charcoal to fill in the wing, and take the Key.
Screenshot
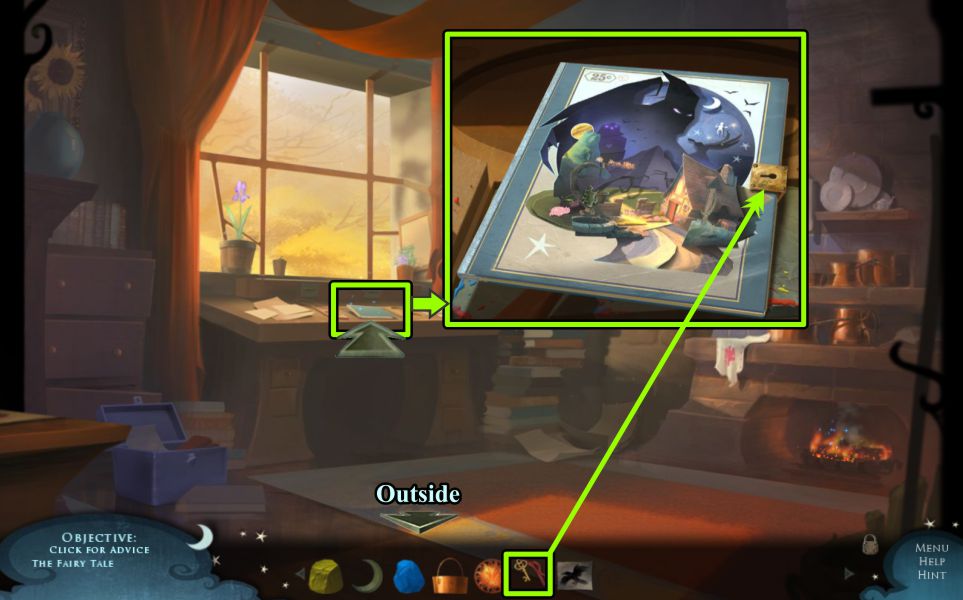
Cottage Desk
Go to the Desk and use the Key to open the book.
Screenshot
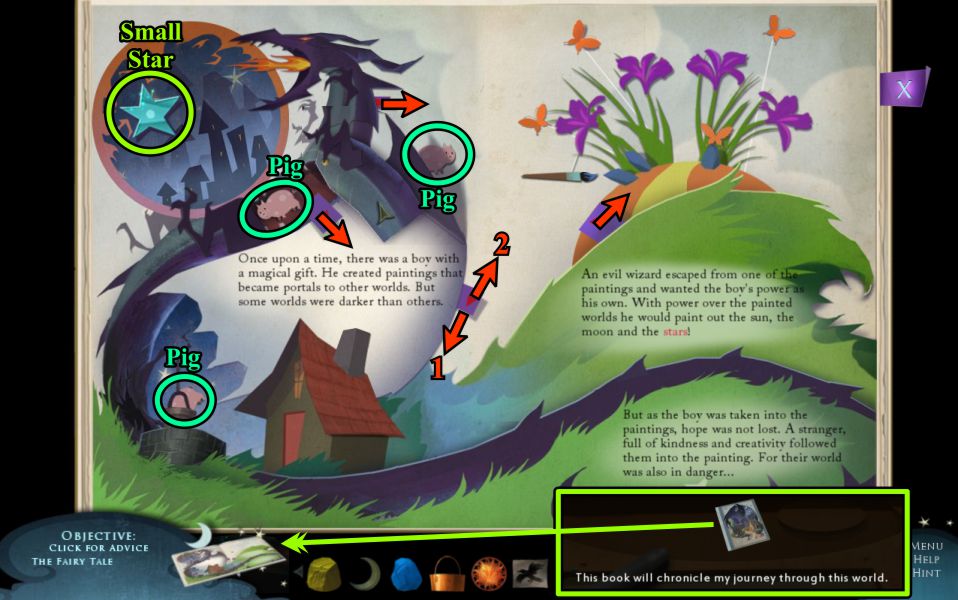
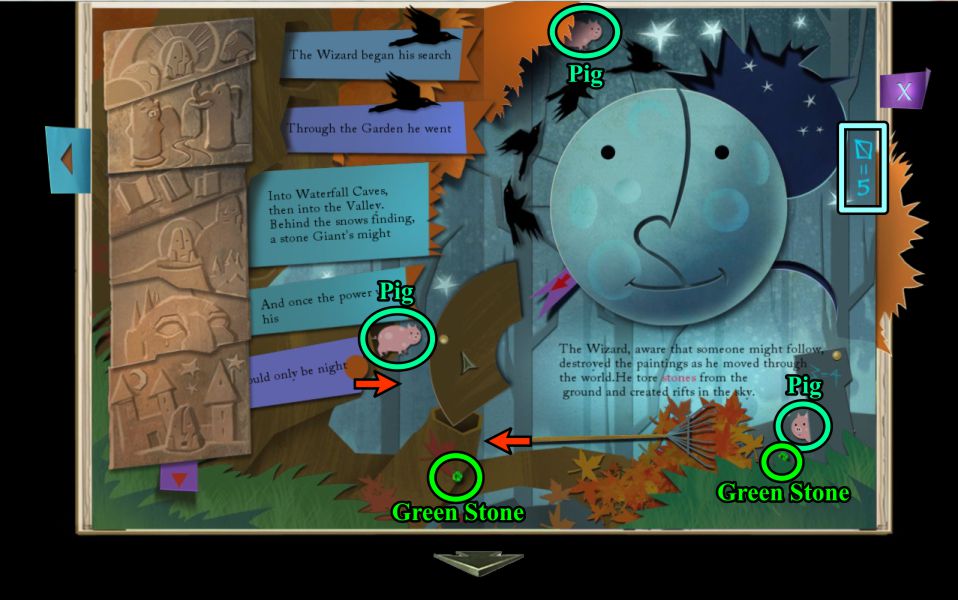
Golden Book Page 1
Lower the bucket into the well and pull it up to find the pig.
Pull the other tabs shown in the screenshot.
Pick up the Small Star and collect your first 3 of the 27 Pigs.
Collect the Golden Book that will now be to the left of your Inventory and chronicle your journey.
Screenshot
Cottage Gate
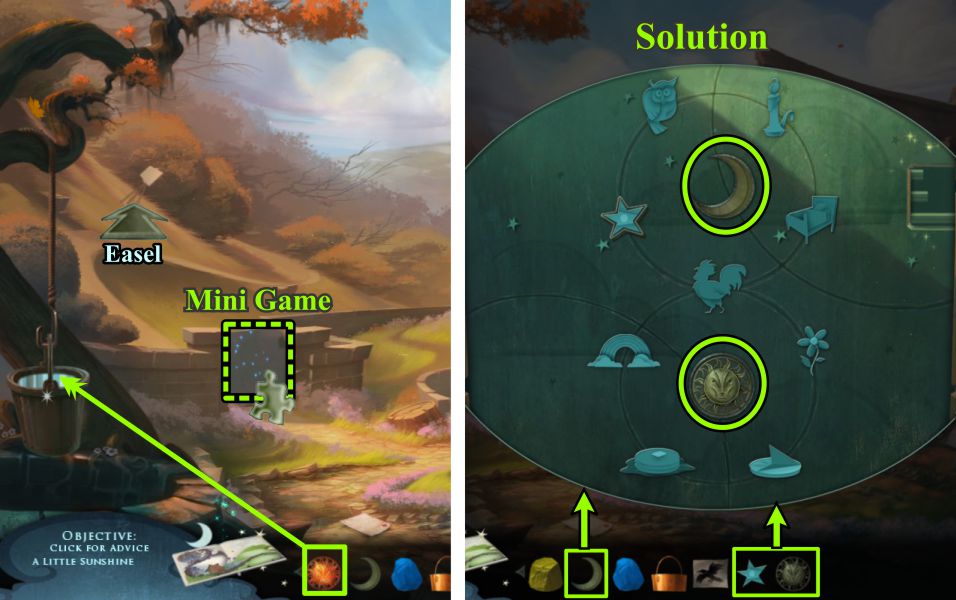
Go outside and dip the Glowing Sun in the bucket of water to cool it off.
Zoom in on the Gate for a Mini Game.
Place your Sun, Moon, and Star to trigger the game.
Your goal is to rotate the Moon and Sun so that all the nighttime figures surround the Moon, and all the daytime figures surround the Sun.
See the screenshot for the solution, and go through the gate once it is open.
Screenshot
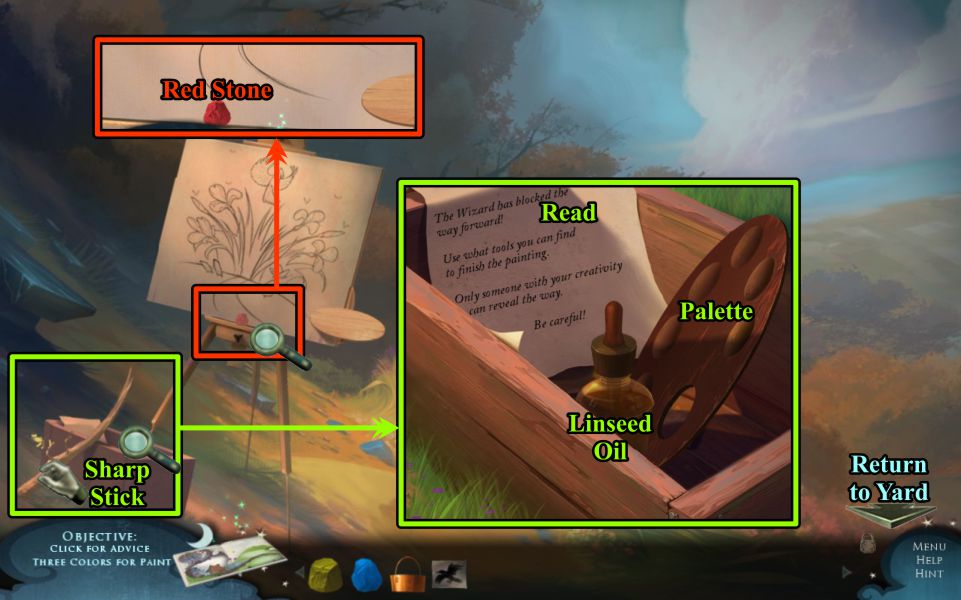
Hillside
Zoom in on the easel and take the Red Stone.
Pick up the Sharp Stick, then look in the box.
Collect the Palette and Linseed Oil, and read the note.
Screenshot
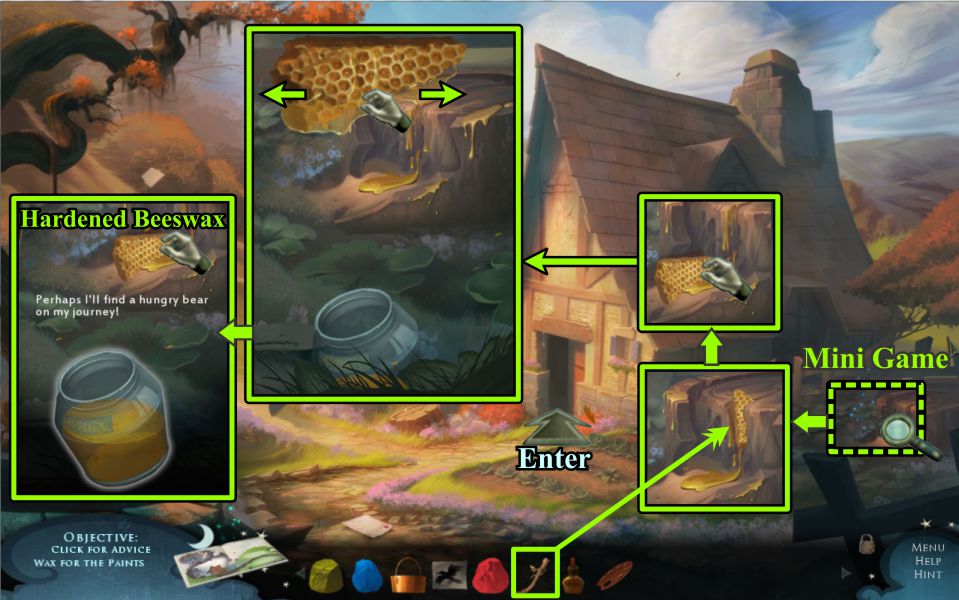
Honeycomb Stump
Return to the Yard and zoom in on the Honeycomb Stump.
Pry the honeycomb loose from the stump using your Sharp Stick.
Pick up the honeycomb and move it back and forth to collect the dripping honey in the Hunny Jar.
Collect the jar and the Hardened Beeswax, then go inside the Cottage.
Screenshot
Inside Cottage
Zoom in and hang the Metal Pot on the hook in the fireplace.
Place the Beeswax in the pot to soften it for your paints.
Go to the desk.
Screenshot
Paint Mixing
Place the items from your Inventory as shown in the screenshot.
Screenshot
The colors you need to create are shown on the paper in back of the Palette.
Pick up the pestle and crush the stones, all at once, or when you need them.
Place a spoonful of color on the metal plate, and add some Softened Beeswax and Linseed Oil.
Use the palette knife to mix the color, and it will automatically go into your Palette.
Do the same thing for each of the colors you need. Check the screenshot for the colors and combinations.
When you have finished, take the Palette, then go to the Hillside.
Screenshot
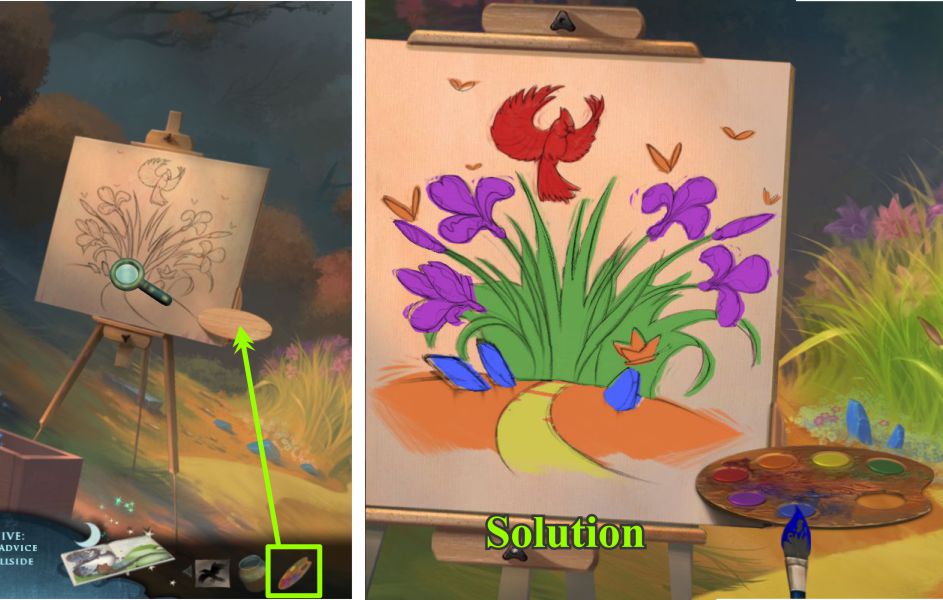
Easel Canvas
Zoom in on the canvas and place your Palette.
Dip your brush in whatever color you need and paint the canvas.
See the screenshot for the colors to paint the canvas.
Screenshot
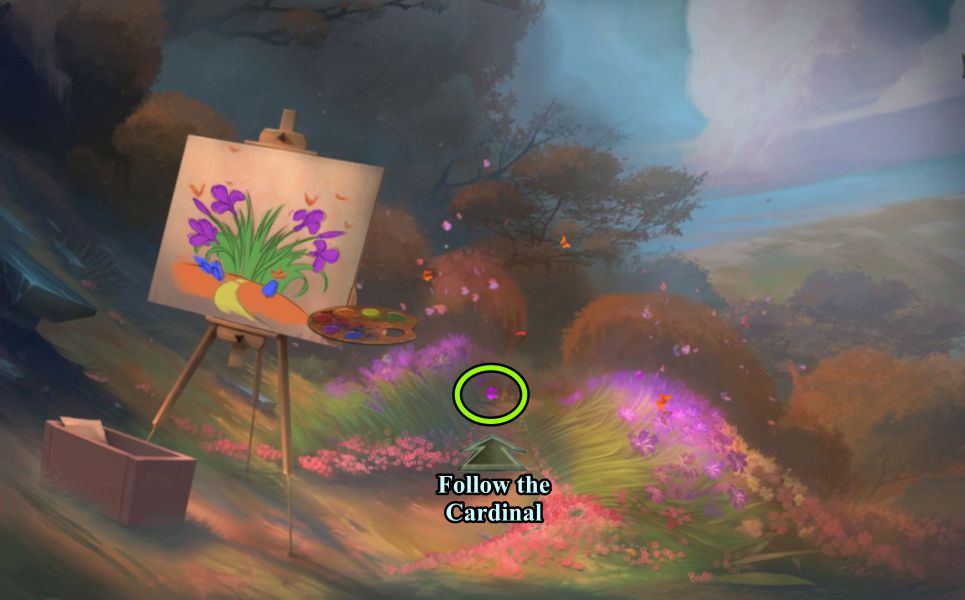
When you have completed the canvas, the Cardinal will come to life and create a path in the flowers, so follow the Cardinal.
Screenshot
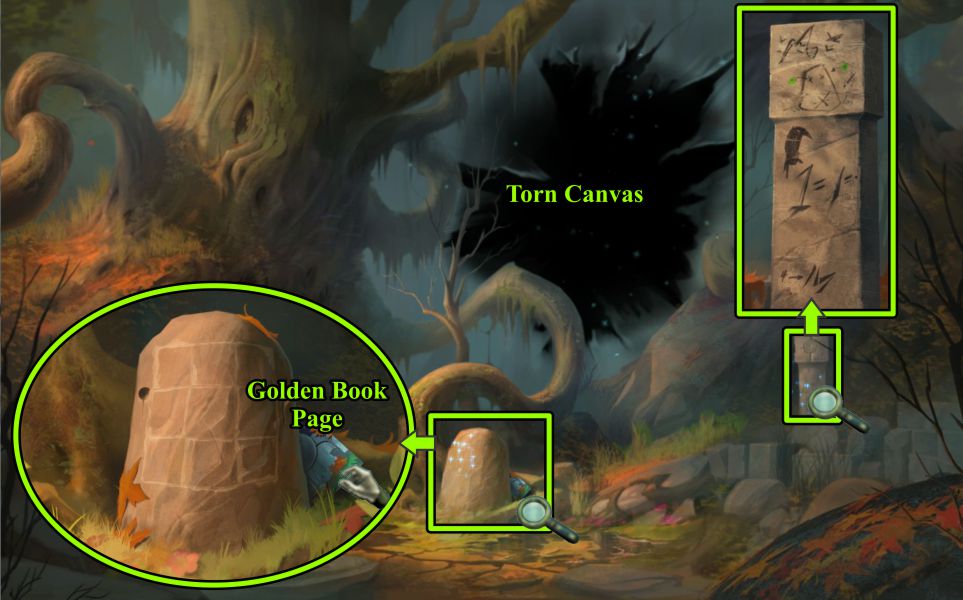
Dark Forest
Zoom in on the column at the right and note the images.
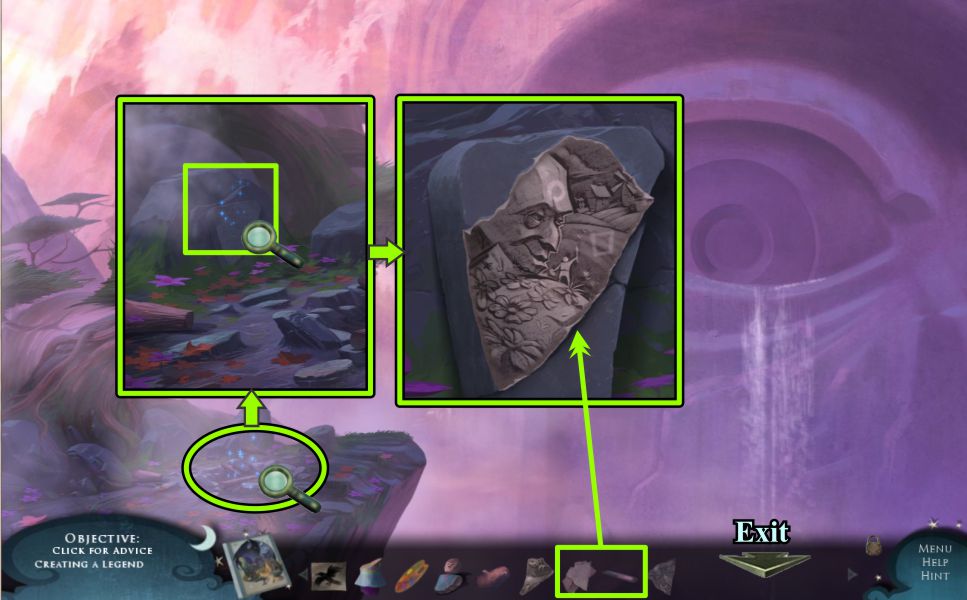
Zoom in on the statue and take the Golden Book Page.
Screenshot
Golden Book Page 2
Pull out all the tabs marked in the screenshot, then move the foliage shown.
Move the post at the right to find out a Pig is behind it.
Move the rack over to the leaves.
Screenshot
Grab the Pig behind the tree root, pull the leaves away and take the Pig there, and get the one behind the tree foliage.
Pick up the two Green Stones. Note the symbol under the foliage at the right.
Screenshot
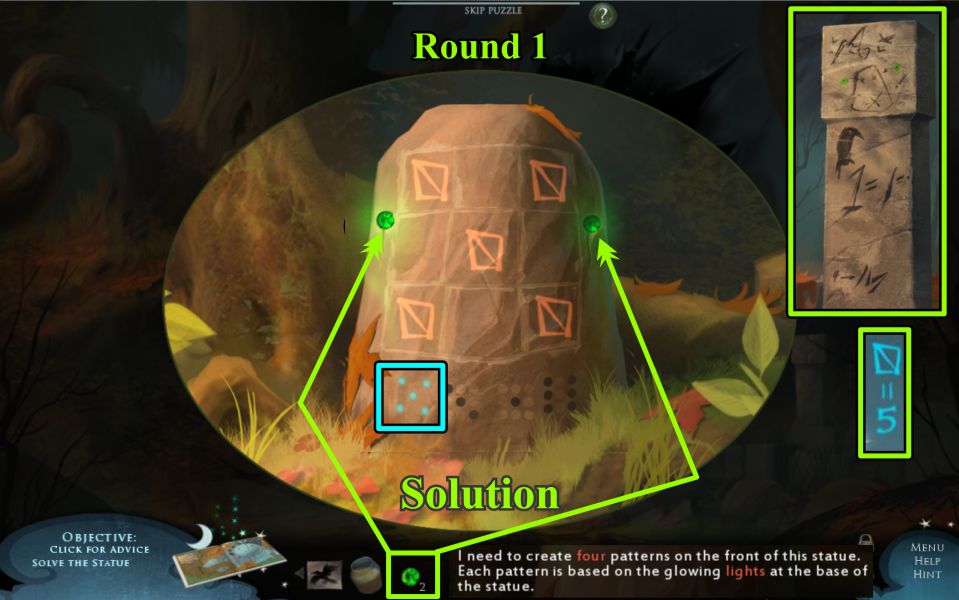
Statue Mini Game
Use the two Green Stones as eyes for the statue to trigger a Mini Game.
Your goal is to create four patterns on the front of the statue to match the shape of the glowing dots at the base of the statue.
Click on the squares to cycle through the choices to create the pattern you need.
The images from the column and Golden Book Page will help you.
See the screenshot for the solution to Round 1.
Screenshot
The solution of Round 2 is shown in the screenshot.
Screenshot
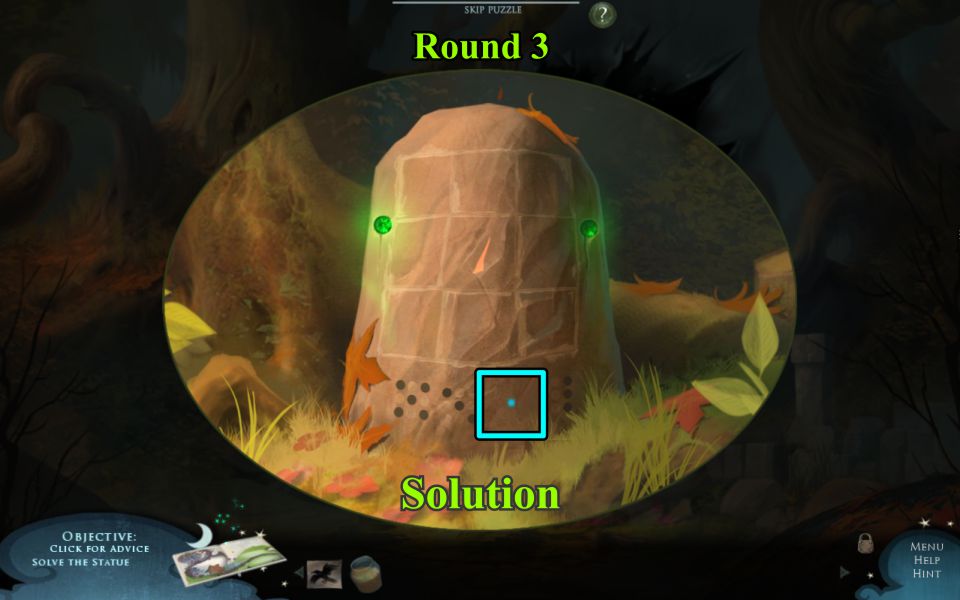
Just 1 correct image in the center will complete Round 3.
Screenshot
The Round 4 pattern is available in the screenshot.
Screenshot
The statue is happy and opens its mouth to give you a Forest Scrap.
Screenshot
Patch the Canvas
Use the Forest Scrap to patch the canvas in back of the statue so you can enter the Garden.
Screenshot
Chapter 2: The Garden
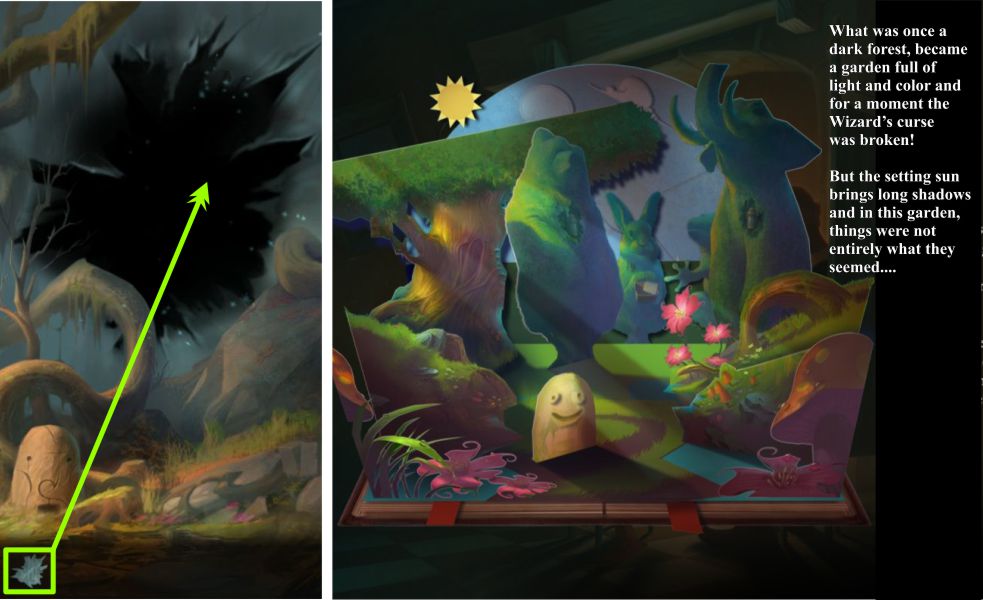
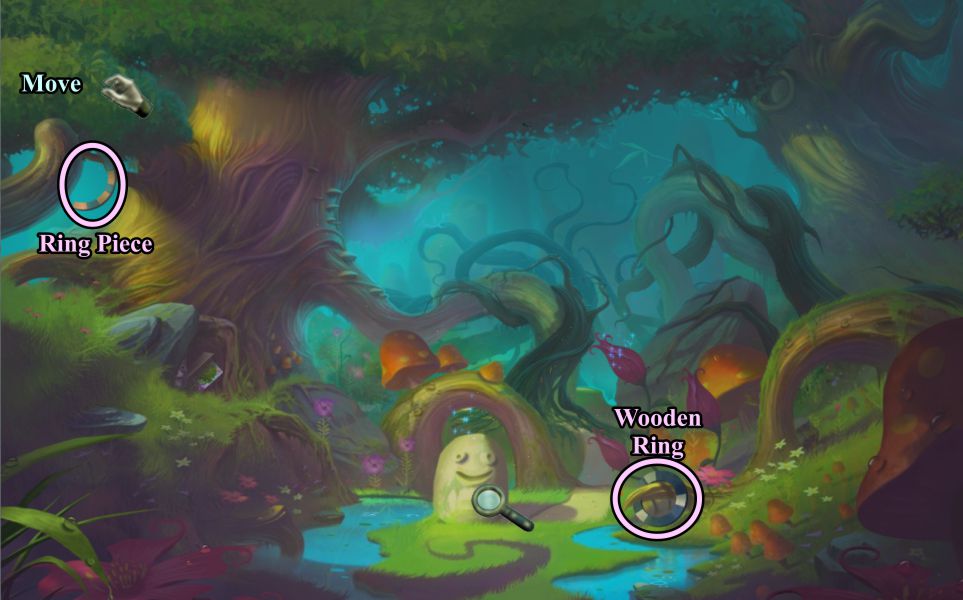
Dark Garden
The ravens fly through and darken the garden.
Pick up the Ring Piece and Wooden Ring.
Move the tree foliage above the Ring Piece.
Screenshot
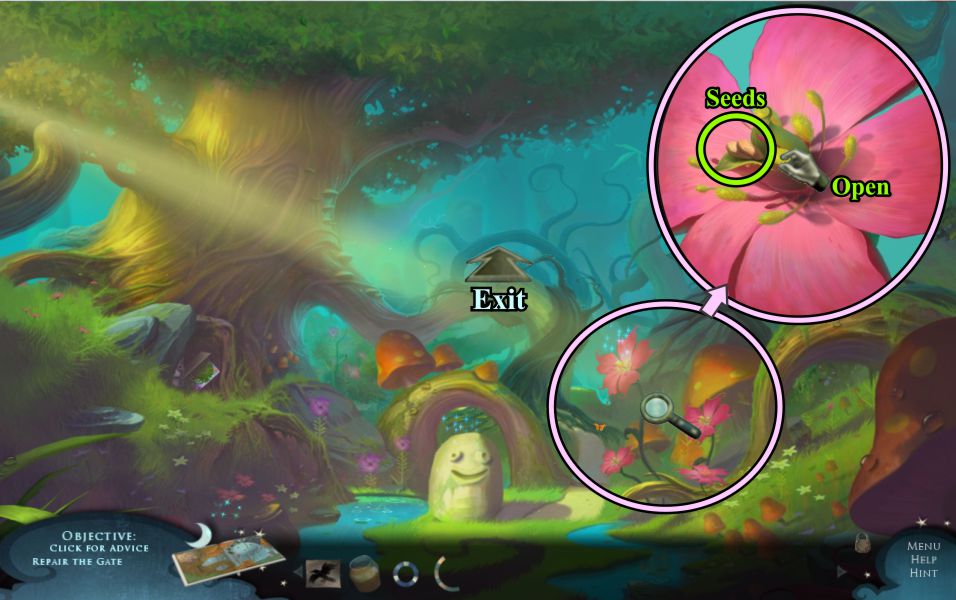
The light illuminates the flowers, so zoom it to have a look.
Open the pod and take the Seeds.
Exit at the back of the scene.
Screenshot
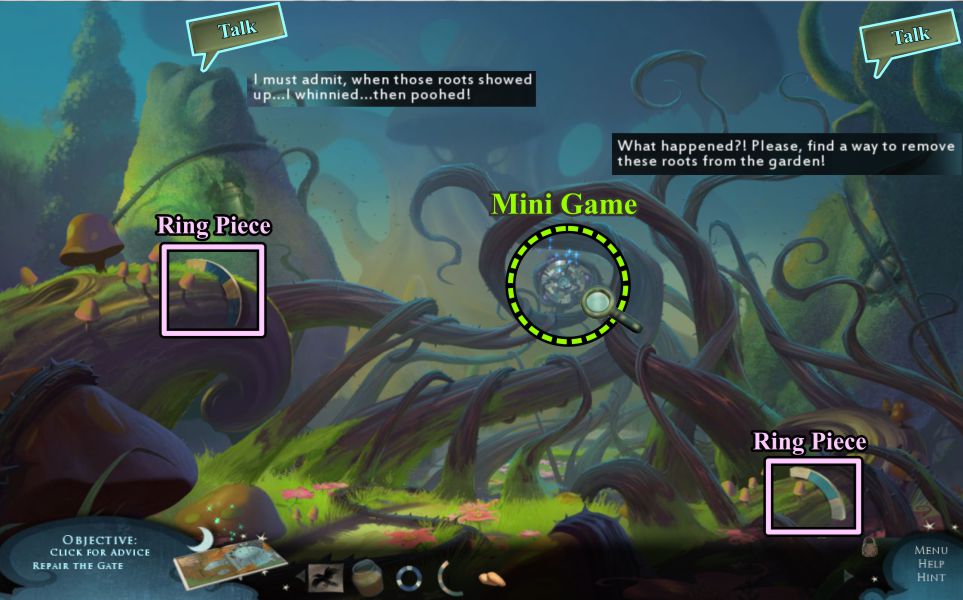
Pick up the two ring pieces and talk to the Topiary Animals.
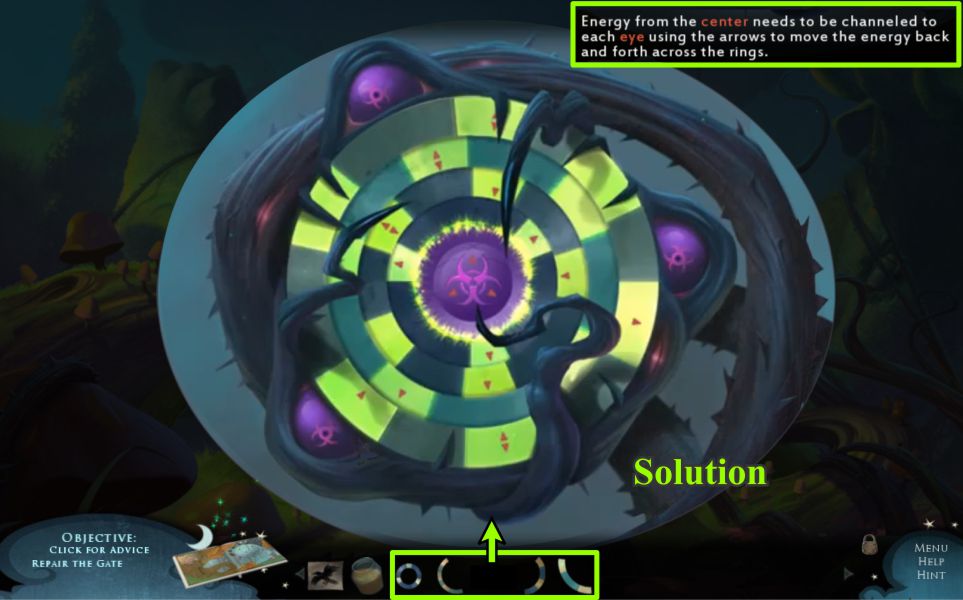
Zoom in on the tangled roots for a Mini Game.
Screenshot
Weed Whack Whirl Mini Game
Place your Ring Pieces to start the game.
Your goal is to transfer energy from the purple center to the 3 purple eyes next to the outer ring.
There are arrows on each of the 19 tabs to show which way the energy can be transferred.
Click on the center to light up the 3 tabs on the first ring, and be sure to light them again once you have transferred them to the next ring.
Keep transferring the energy outward to each ring and refill the tabs when they are dark.
Your final task is to transfer energy from the outer ring to the purple eyes.
If all your tabs are lit, you will earn an Achievement, but this is not a quick task, so you must have patience to complete it.
Screenshot
Topiary Garden
The dark vines have been defeated and the Topiary Garden is light.
Talk to the animals, zoom in on the base at the right and take the Croquet Scrap.
Exit forward at the back of the scene.
Screenshot
Lamplighter Sign
After the Wizard and Boy leave, zoom in on the sign at the right.
Place your scrap to produce the Sticky Wicket poster.
Pick up the 3 crayons and pull out the tab.
Collect the Pig and use the crayons to color the Lamplighter as shown in the screenshot.
Screenshot
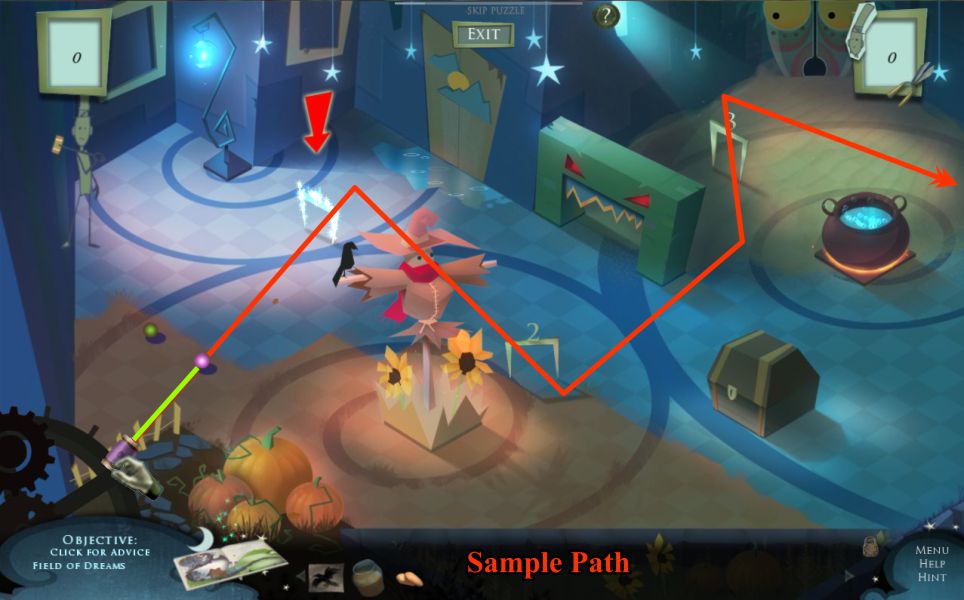
Croquet Mini Game
You are invited to play a game of croquet with the Lamplighter to get a pair of Golden Shears.
Your shots won't count until you go through the first wicket. You can practice to see how far the ball goes depending upon how far you pull out the mallet.
You can use the walls and various objects in the room to bounce off of or even travel through.
It doesn't matter from which side you go through the wicket, as long as you go through it. A sample path is shown in the screenshot.
As a suggestion, don't try to hit the ball too hard.
Screenshot
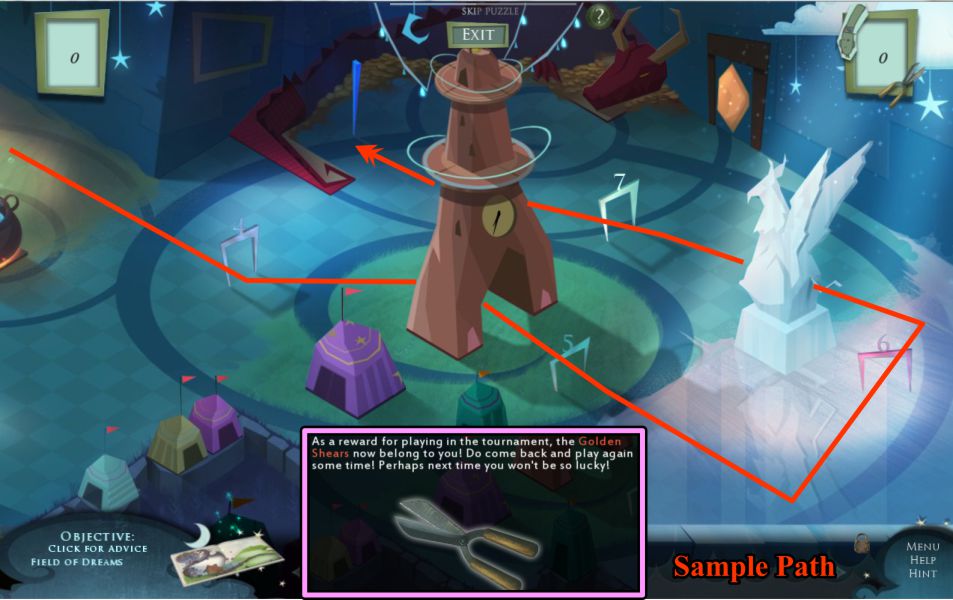
This is the second stage of the course with the remainder of the wickets.
Your goal is to finish up at the blue exit light.
Again, a sample path is shown in the screenshot.
Win or lose, you still get the Golden Shears.
Screenshot
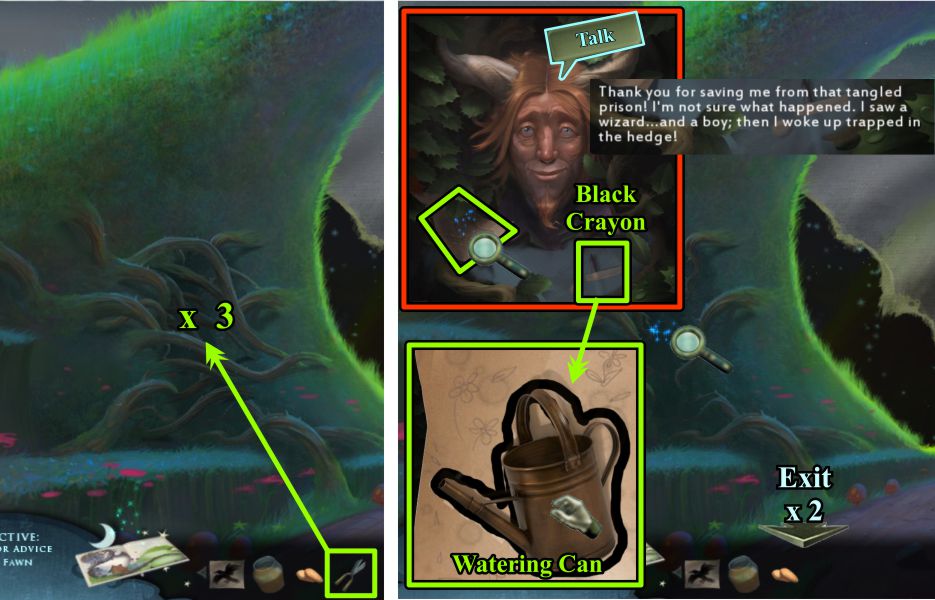
Fawn Hedge
Use the Golden Shears to clear away the roots trapping the Fawn in the Hedge.
Talk to him, pick up the Black Crayon from his shirt pocket, and click on the note on his shoulder.
Use the Black Crayon to draw the outline of the Watering Can, then collect it when it becomes solid.
Exit down twice to fill the Watering Can with water.
Screenshot
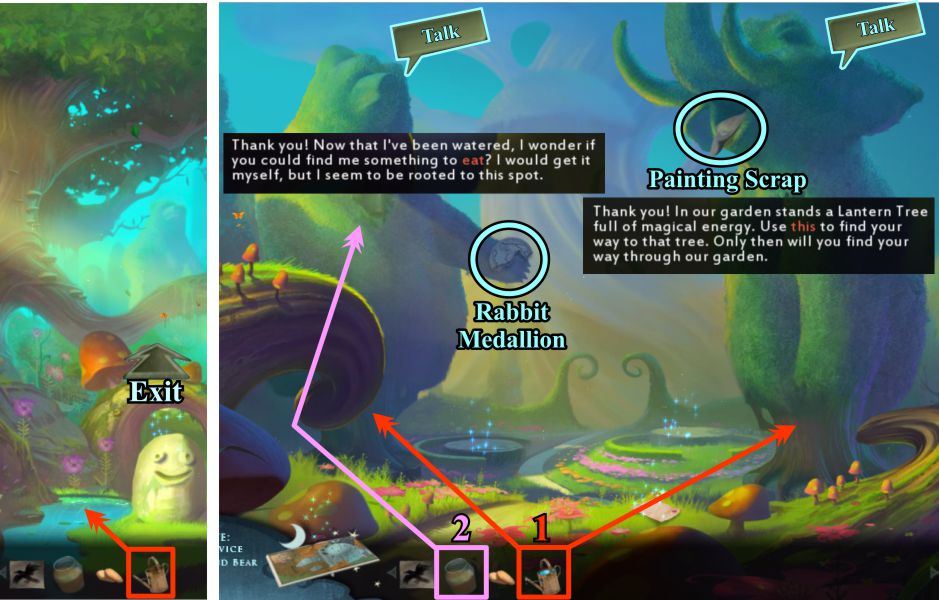
Light Garden and Topiary Garden
Fill the Watering Can and go to the Topiary Garden.
Water the roots of both topiaries, talk to them, and give the Hunny Pot to the bear.
Take the Rabbit Medallion from the bear and the Painting Scrap from the Elephant.
Screenshot
Topiary Rabbit
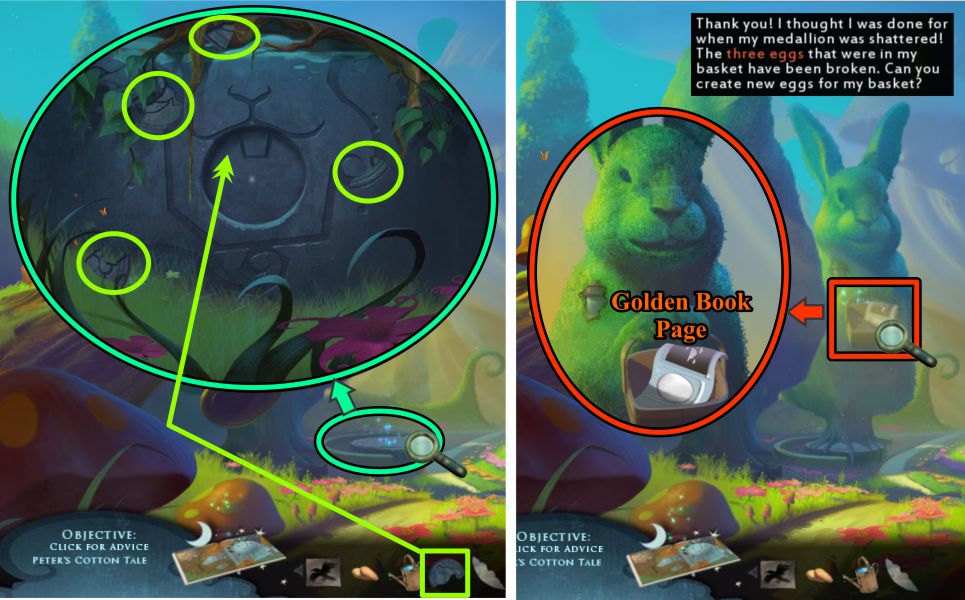
Zoom in on the left pedestal base and place the Rabbit Medallion.
Pick up all the other pieces of the medallion that are marked in the screenshot, and they will automatically fill out the entire medallion.
The Topiary Rabbit will grow out of the base and talk to you.
He has lost three eggs, which you must design and recover from the Golden Book Page that he gives you.
Screenshot
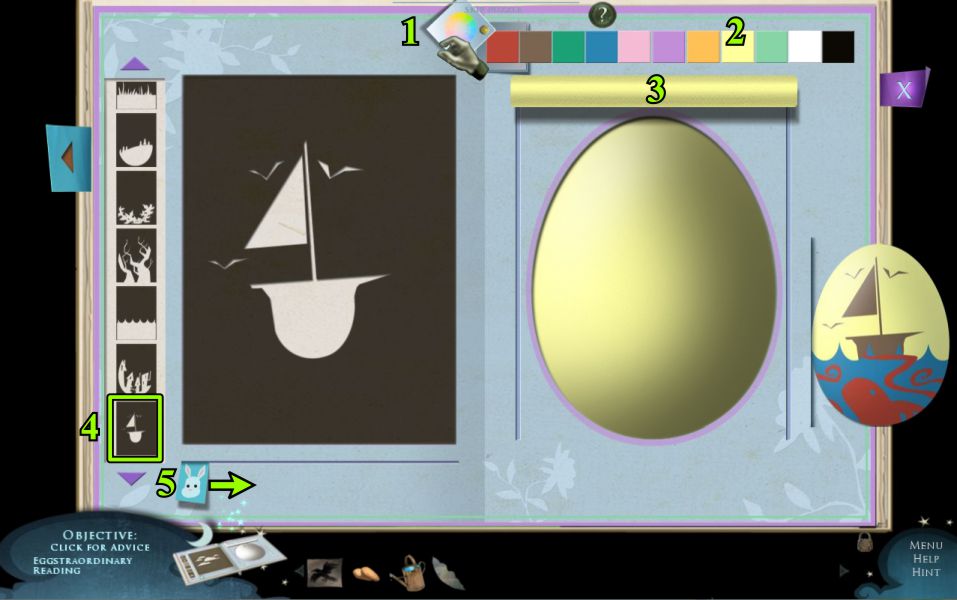
Golden Book Page 3
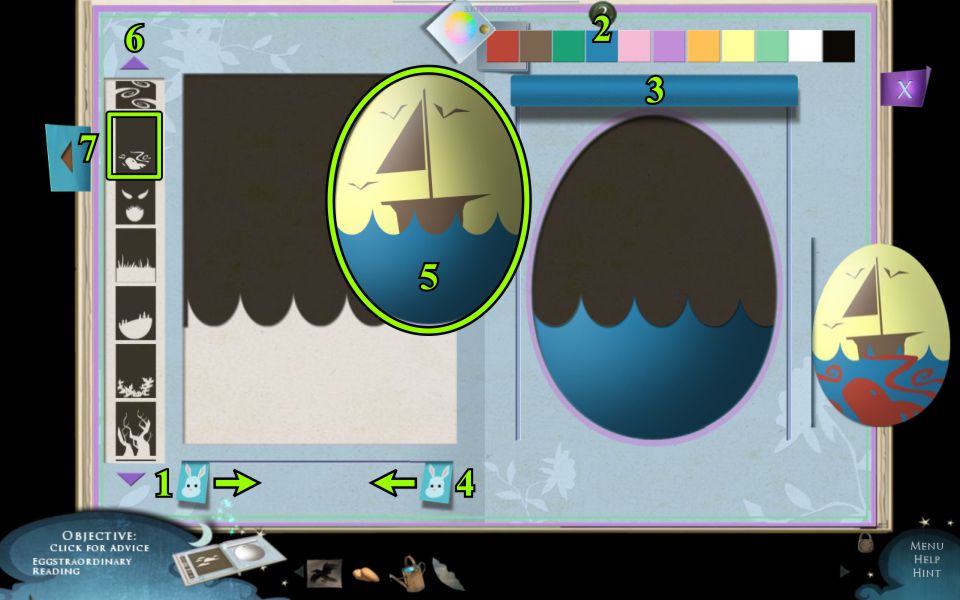
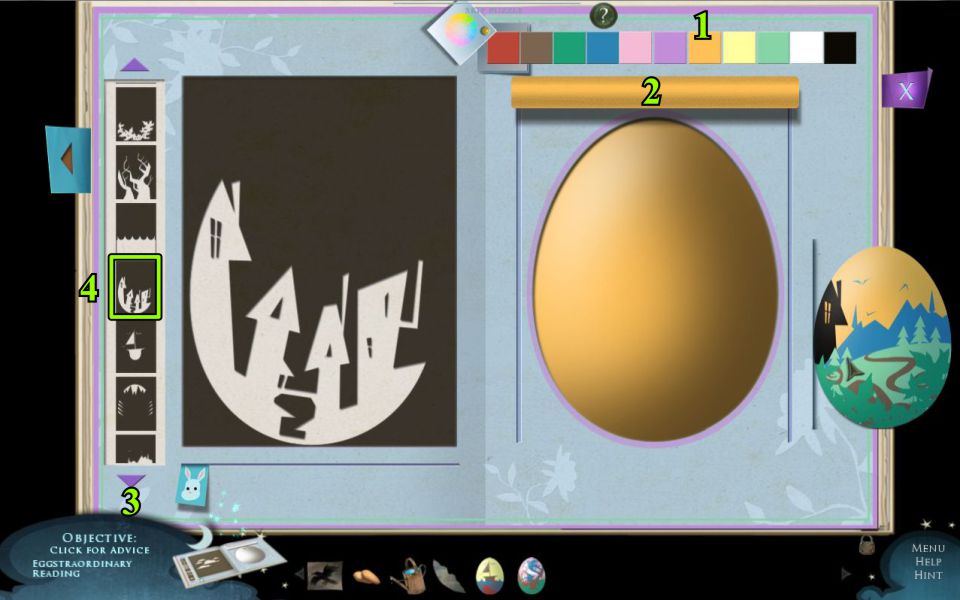
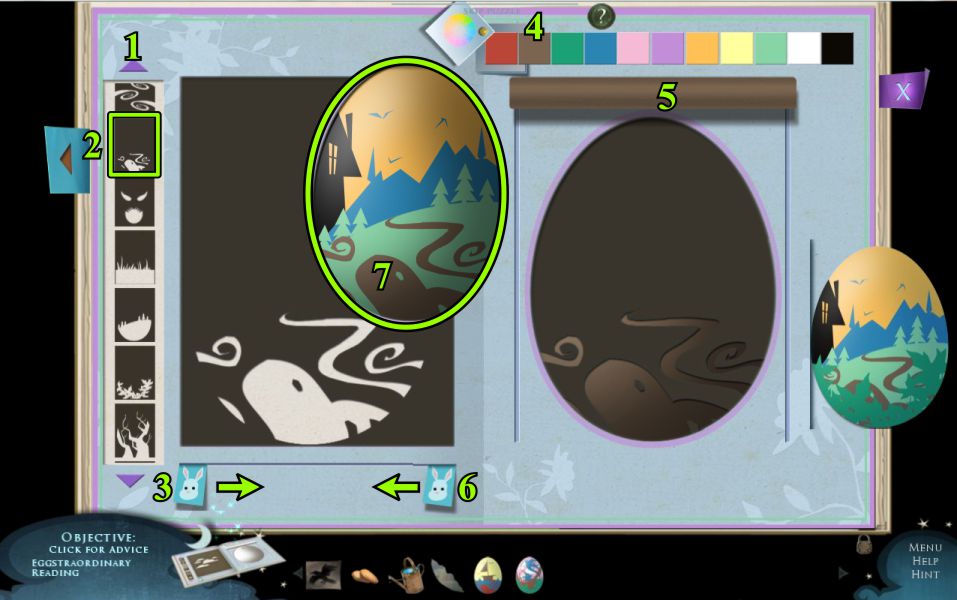
Your goal is to create 3 eggs to give to the Topiary Rabbit.
Open the color chart to see the colors available for your use.
At the left of the page are stencil choices to choose to use in a certain order.
For the first egg, choose yellow from the color chart, roll the color down over the egg, select the stencil shown in the screenshot and move the rabbit tab to the right.
Screenshot
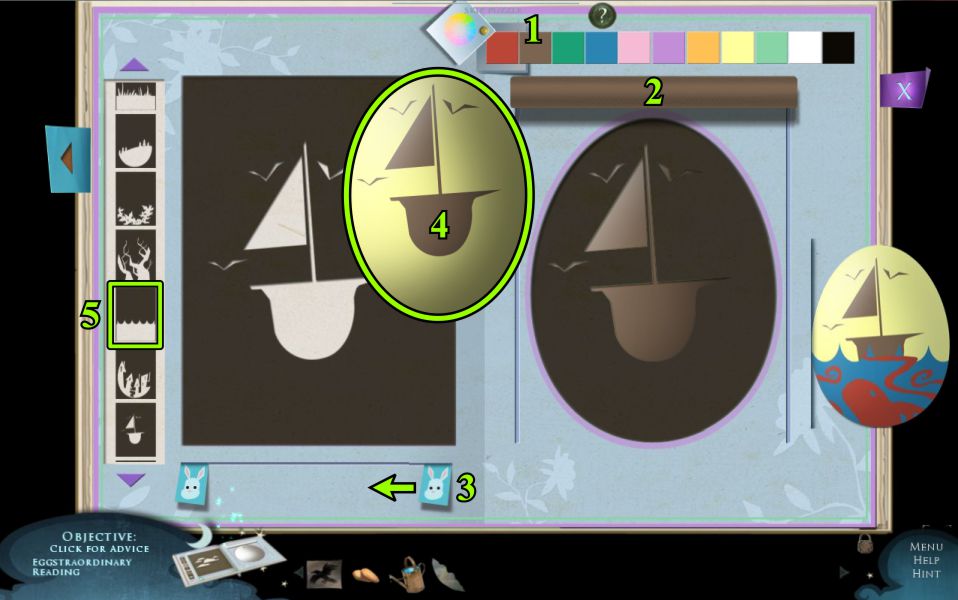
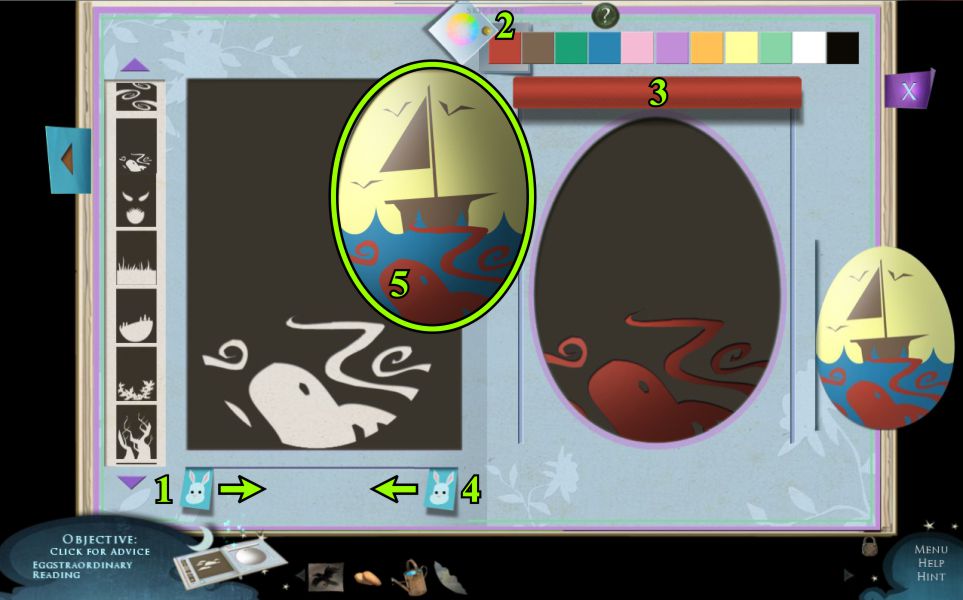
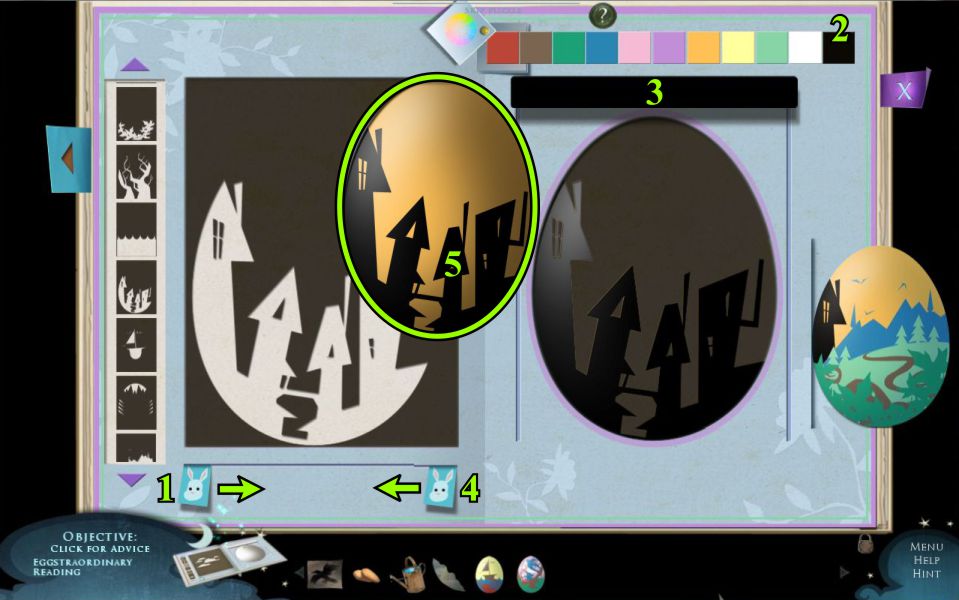
Choose brown to use on the stencil and roll the color over the stencil.
Remove the stencil and choose the next one, as shown in the screenshot.
Screenshot
See the screenshot for the sequence to add the water.
Screenshot
Check the screenshot to see what to do to complete your first egg.
Screenshot
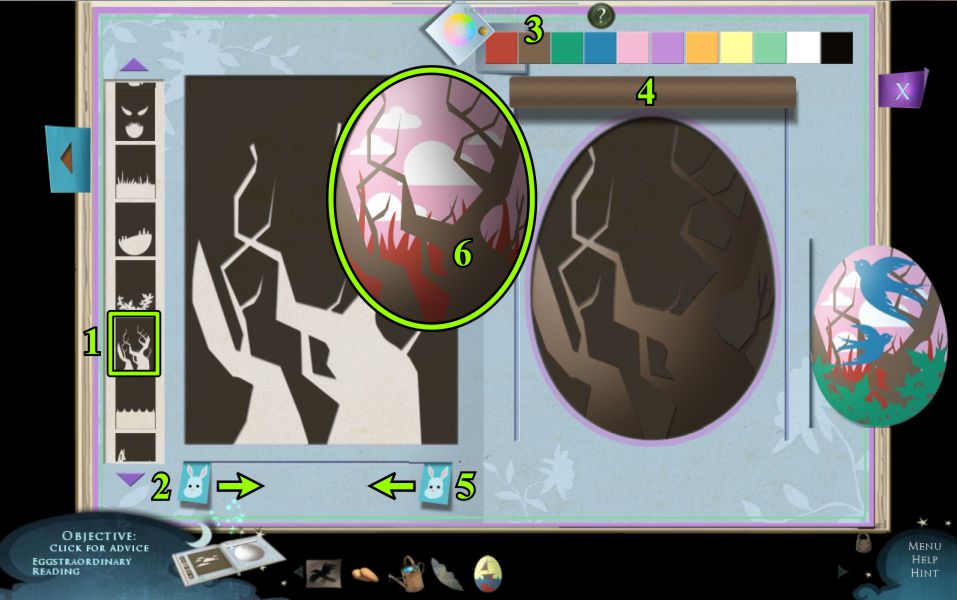
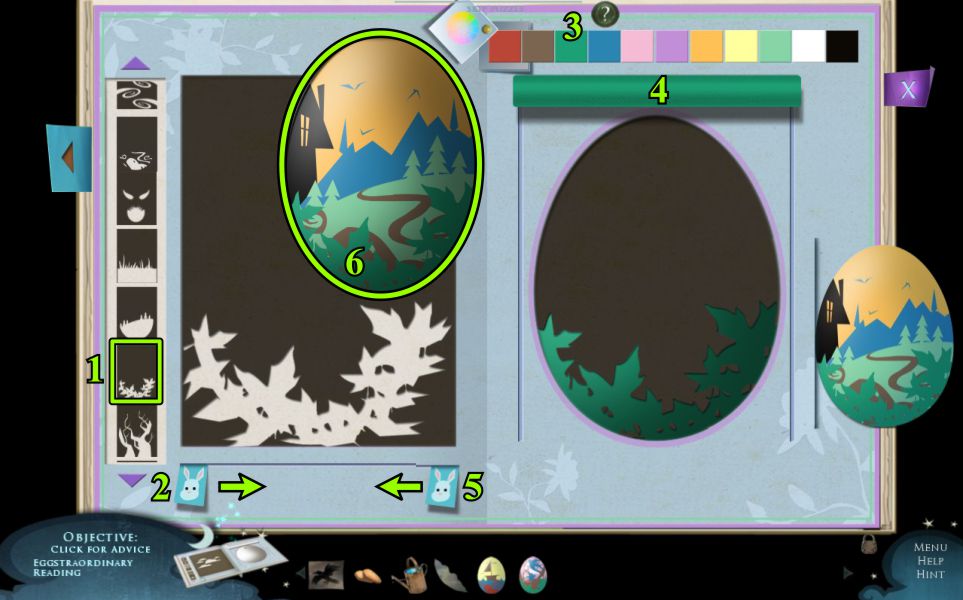
For Egg 2, start with a pink background.
See the screenshot for the choice of the first stencil.
Screenshot
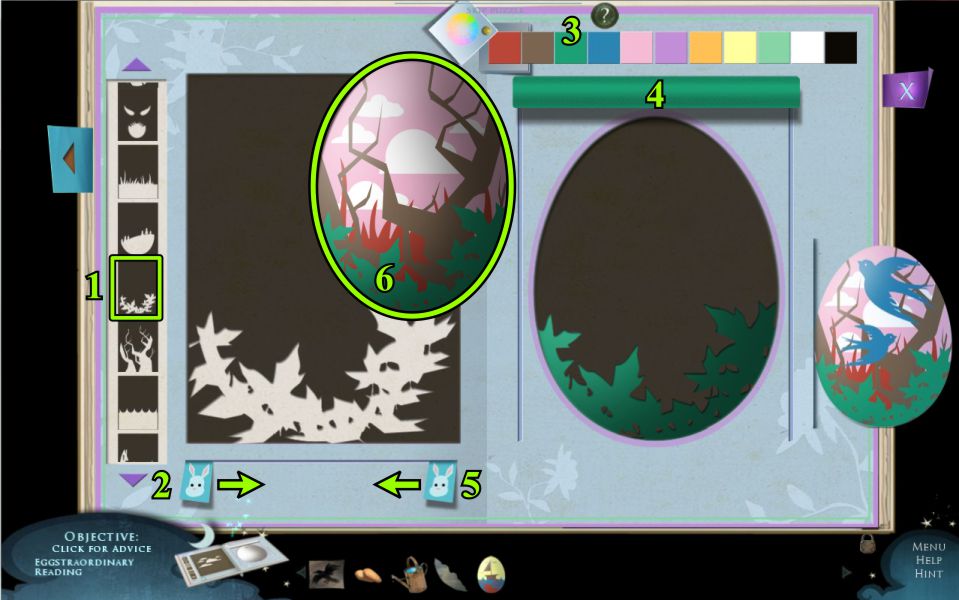
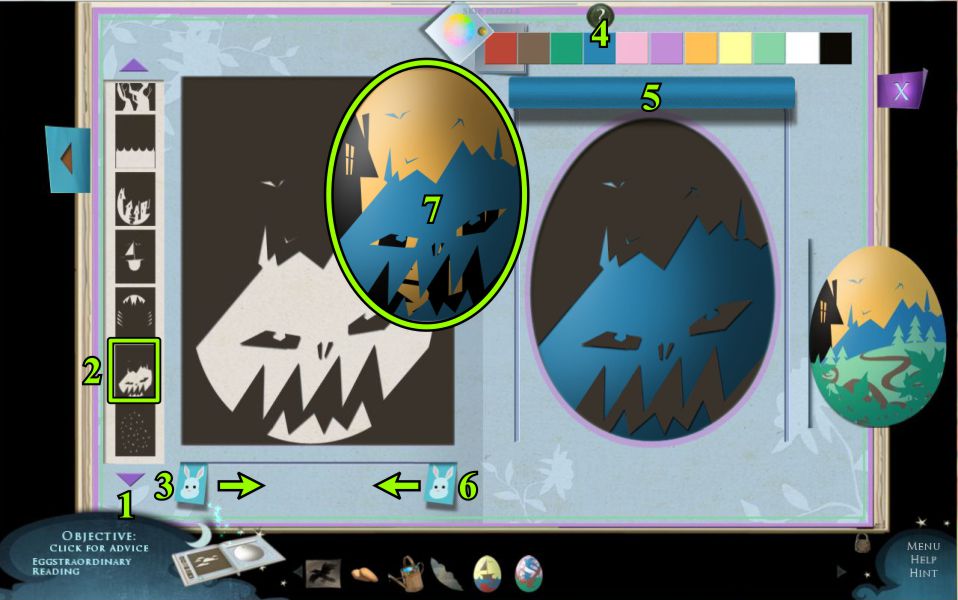
Add the clouds and scroll down to find the next stencil.
Screenshot
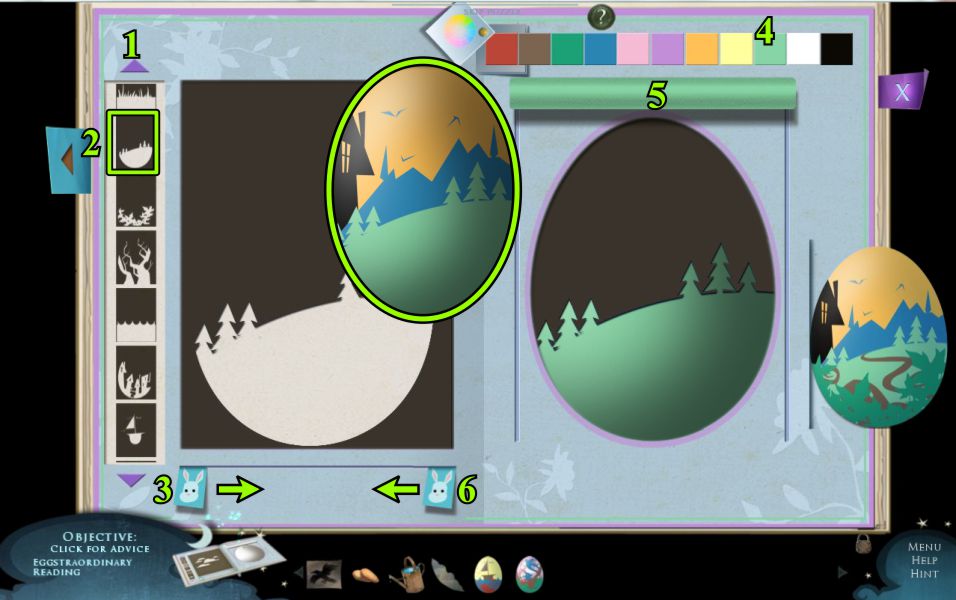
See the screenshot for the addition of the grass.
Screenshot
Select the tree stencil and follow the sequence in the screenshot.
Screenshot
Next stencil is the green foliage shown in the screenshot.
Screenshot
To complete Egg 2, add the birds as shown in the screenshot.
Screenshot
Egg 3 begins with an orange background and selection of the building stencil shown in the screenshot.
Screenshot
Add the black buildings as shown in the screenshot, but only the one on the left will ultimately show on the egg.
Screenshot
Choose the stencil shown in the screenshot and fill in the blue.
Screenshot
Scroll up to find your next stencil, and check the screenshot to see how it looks when added.
Screenshot
To add the path, see the screenshot sequence.
Screenshot
Lastly, add the green foliage to complete Egg 3.
All three eggs are automatically added to your Inventory when they are each completed.
Screenshot
Frog Topiary
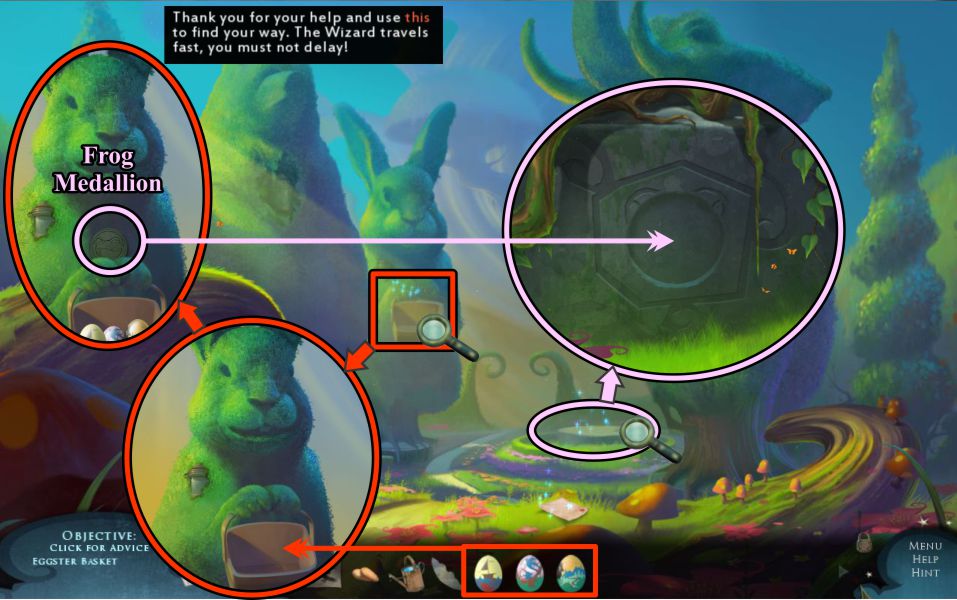
Give the eggs to the Topiary Rabbit, and he will give you the Frog Medallion.
Zoom in on the base next to the elephant and place the Frog Medallion.
Screenshot
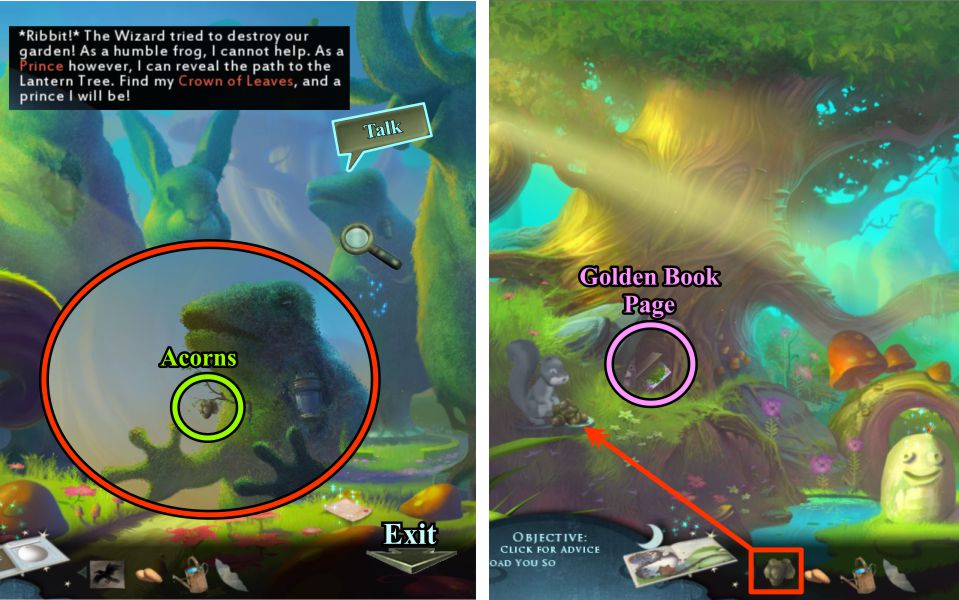
Take the Acorns from the frog and talk to him.
Exit down in search of his Crown of Leaves.
Place the Acorns on the rock at the left, and the squirrel with leave the Golden Book Page unguarded for you to collect.
Screenshot
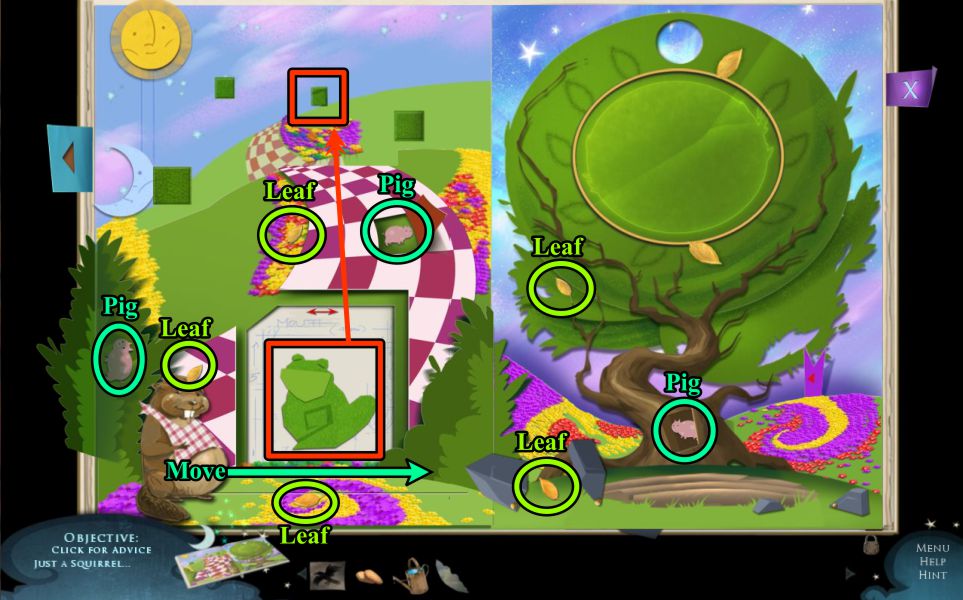
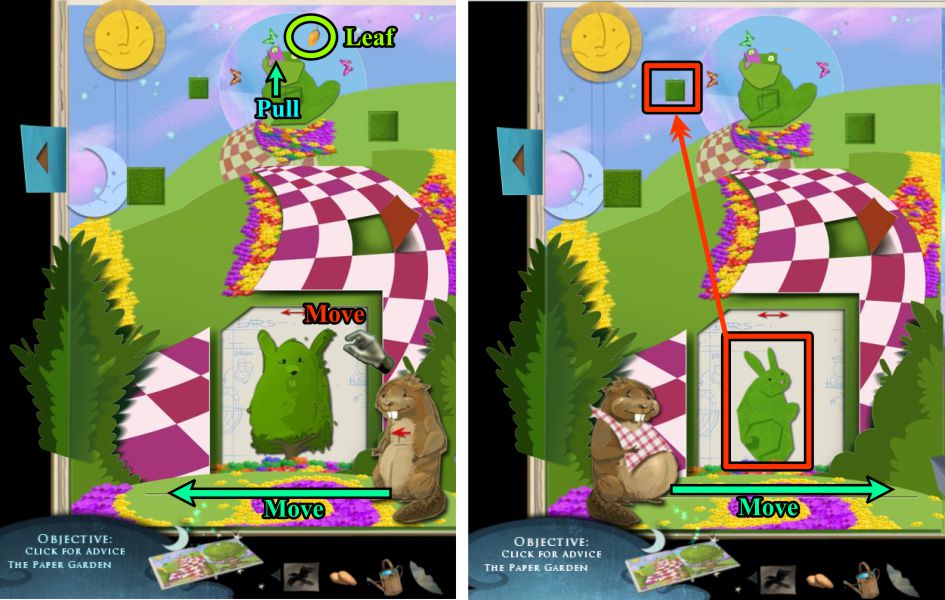
Golden Book Page 4
Move and open all the places shown in the screenshot.
Take the two leaves that are marked, then move the beaver to the left after you have opened the checkered door.
Screenshot
Pick up the leaves and Pigs shown in the screenshot.
Move the Frog to his pedestal and the beaver back to his original position to the right.
Screenshot
Pull the tab on the Frog and take the Leaf.
Move the open door to the next animal, then move the beaver back to the left to trim up the rabbit.
Place the Rabbit on his pedestal and move the beaver to the right.
Screenshot
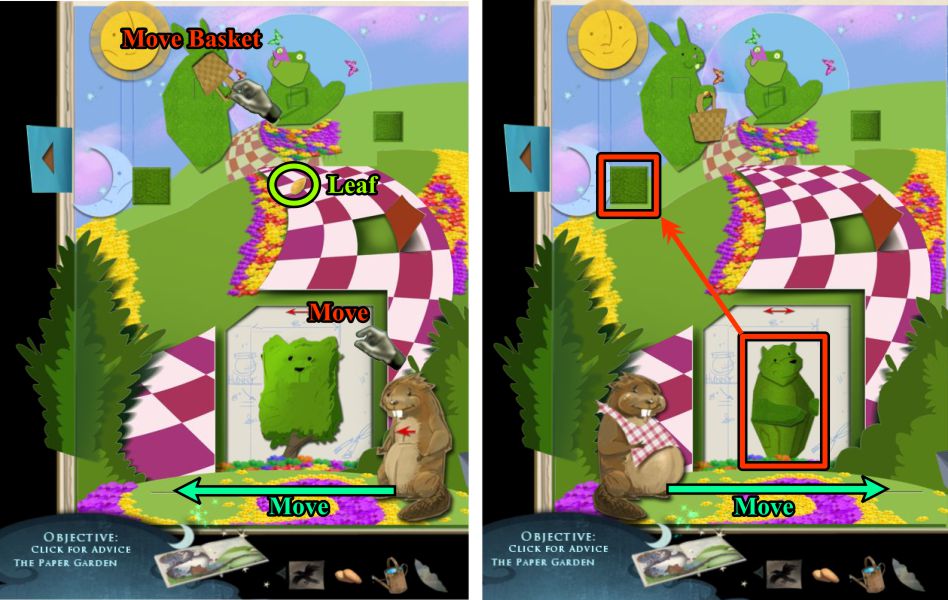
Turn the Rabbit's basket upside down, pick up the Leaf, and move on to the next topiary.
Move the beaver to the left and place the trimmed bear on his pedestal.
Move the beaver back to the right.
Screenshot
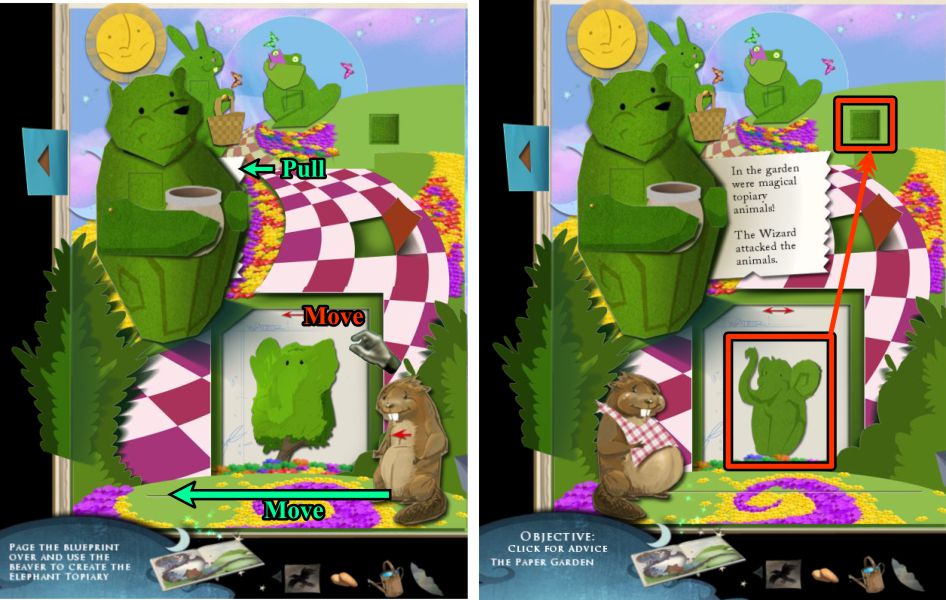
Select the next animal to trim and move the beaver to the left.
Pull out the tab on the bear.
Place the trimmed elephant on his pedestal.
Screenshot
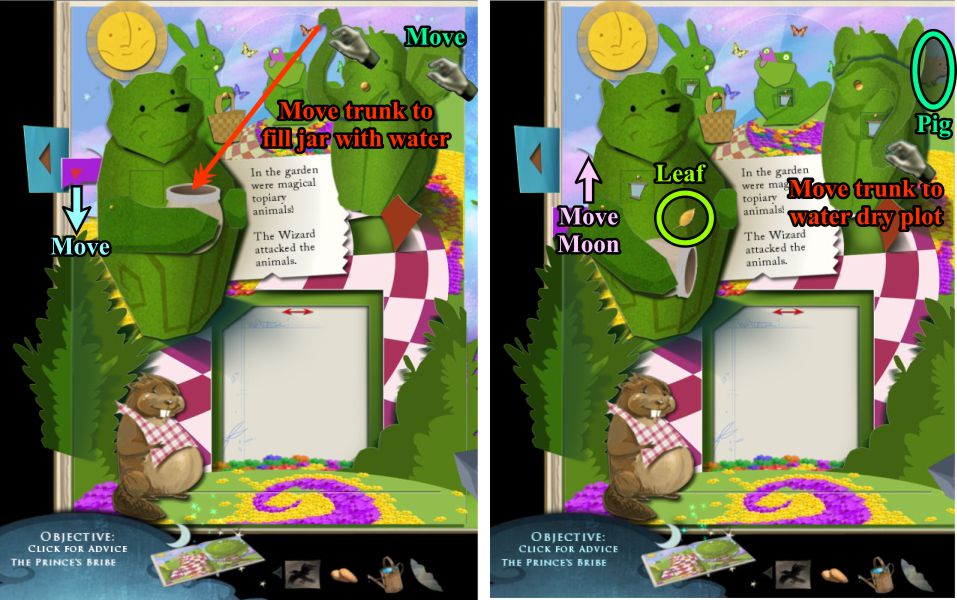
Move the elephant's trunk to fill the bear's jar with water.
Move the tab on the back of the bear and the elephant's ear.
Collect the Pig and Leaf, and move the moon up.
Move the elephant's trunk to water the dry plot on the right side of the page.
Screenshot
While it is dark, the animal's lanterns light up. Have a look, then move the moon back down.
Take the last Leaf from the flower bed and move the tab on the tree to see the rest of the messages.
Collect the Crown of Leaves.
Screenshot
Frog Prince
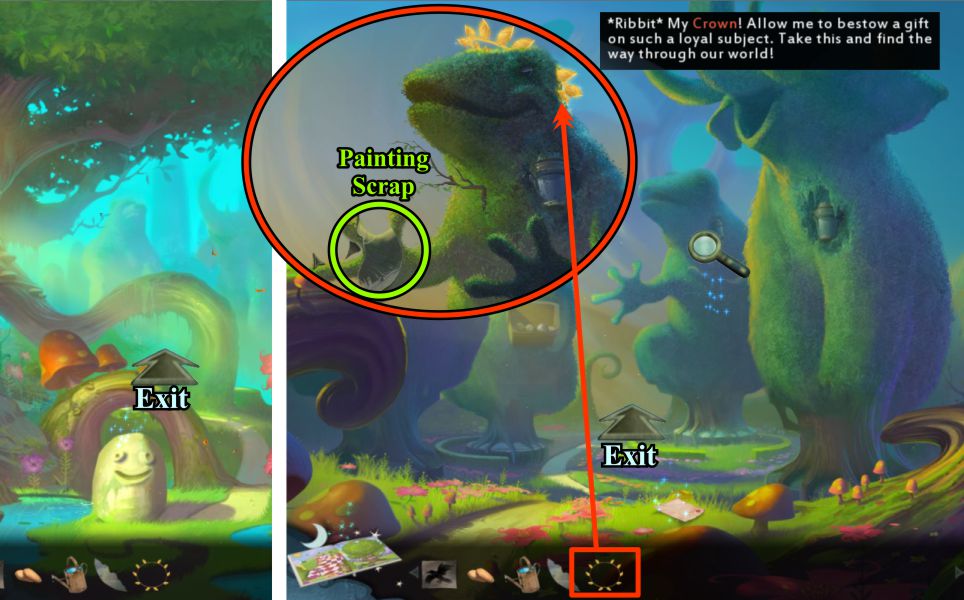
Return to Topiary Garden and zoom in on the Frog.
Give him his Crown of Leaves, and he will give you a Painting Scrap.
Exit forward to the left of the Frog.
Screenshot
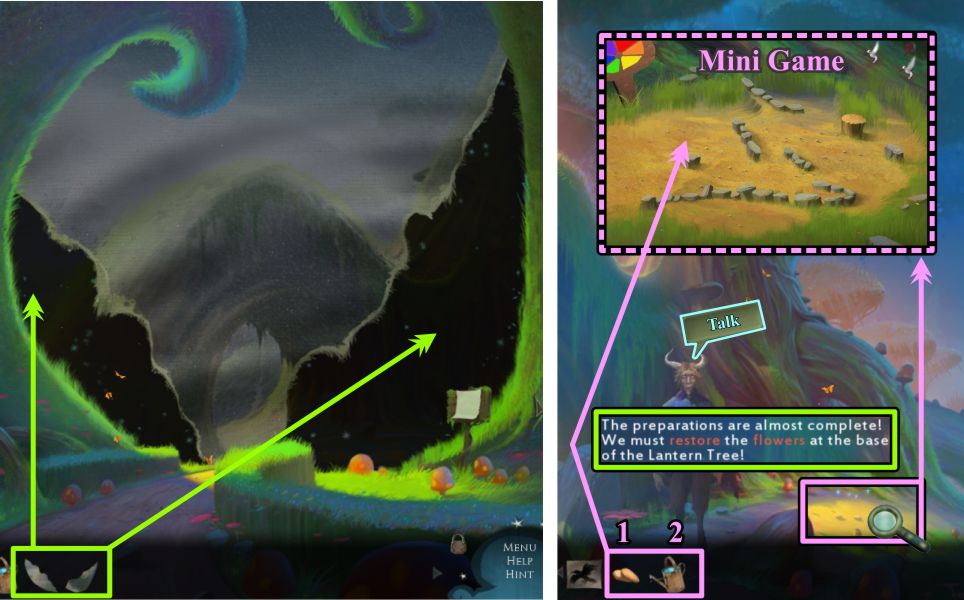
Canvas Patch and Lantern Tree
Patch the two black portions of the scene with your scraps.
The Fawn is waiting for you, so talk to him.
Zoom in on the area marked in the screenshot, place your seeds, and water them to trigger a Mini Game.
Screenshot
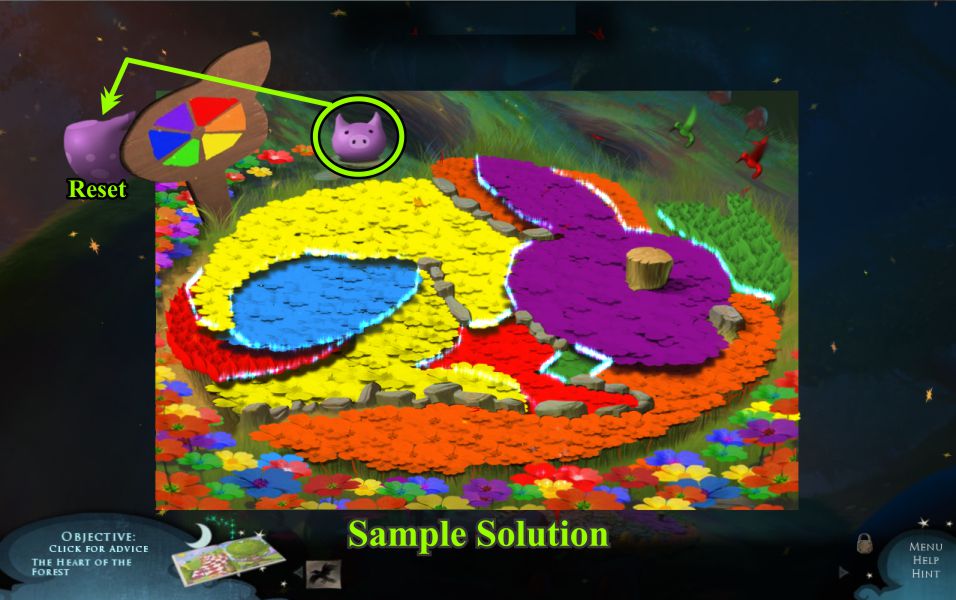
Flower Fill Mini Game
Your goal is to fill in the colors of the flowers, making certain that no colors touch that are on either side of that color in the chart shown.
If you make a mistake, put the Pig head on the body to reset the scene.
The stones are considered separators and keep some of the colors from actually touching.
See the screenshot for a sample solution.
Screenshot
Topiary Lights
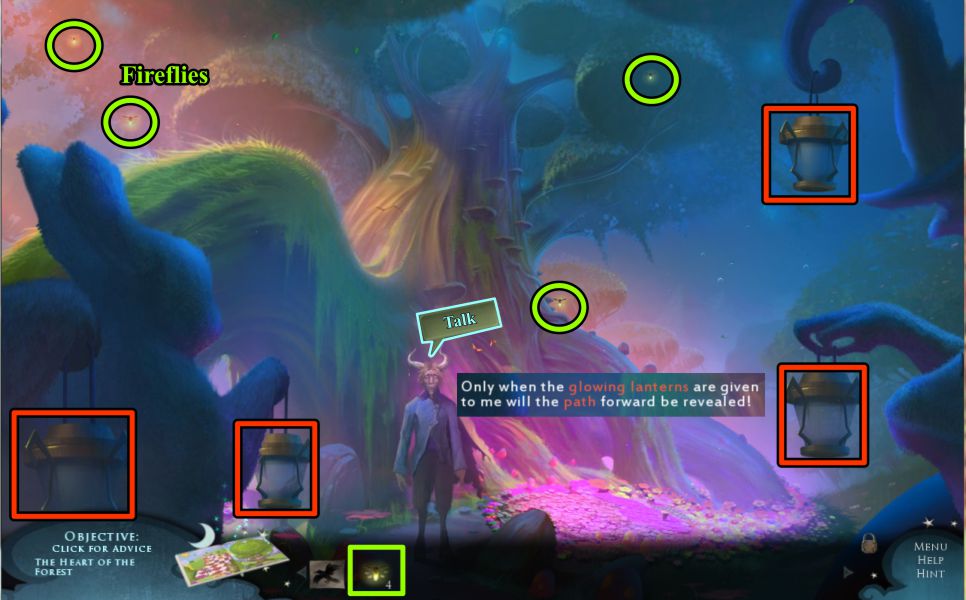
See what the Fawn has to say.
The topiary animals arrive with their lanterns that must be lit.
Catch the 4 fireflies flitting around and place one in each lantern.
Screenshot
Chapter 3: The Cave
Cave Entrance and Upper Cave
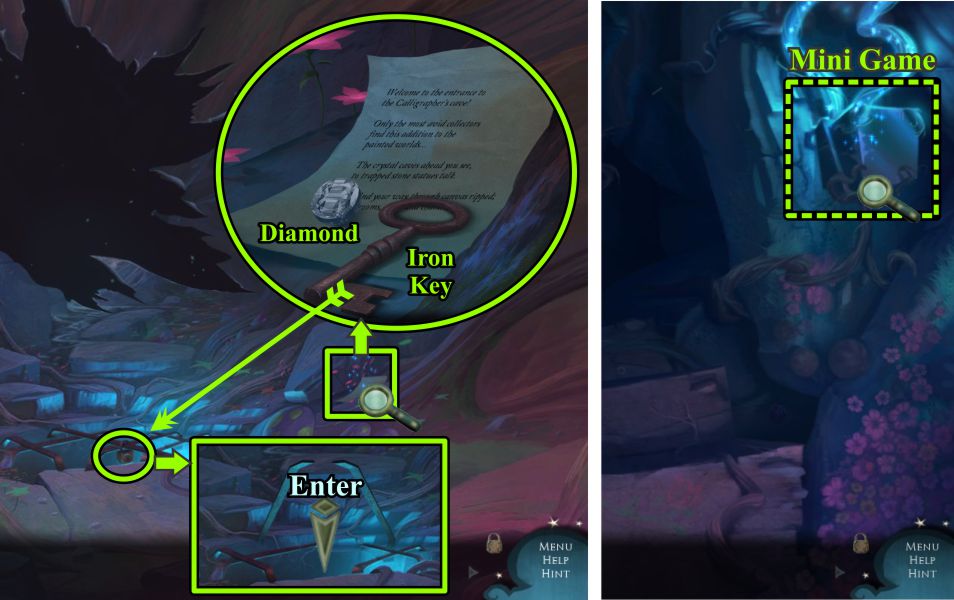
Enter the Cave to begin the Collector's Edition "Bonus Addition" chapter.
Click on the note on the ground, take the Iron Key and Diamond, and read the note.
Use the Key to unlock the grate and enter the Upper Cave.
Zoom in on the lighted roots at the right for a Mini Game.
Screenshot
Mushroom Mini Game
Each of the mushrooms on the root has a value between 1 and 5, which represents the number of connections to be made between it and other mushrooms in order to light it.
See the screenshot for a sample solution.
Screenshot
Lantern Tree Roots
The roots of the Lantern Tree have penetrated the cave and can help to light your way once you have repaired them.
See the screenshot for the location of the root pieces and where they belong.
Pick up the Ruby, Emerald and Stone Head.
Screenshot
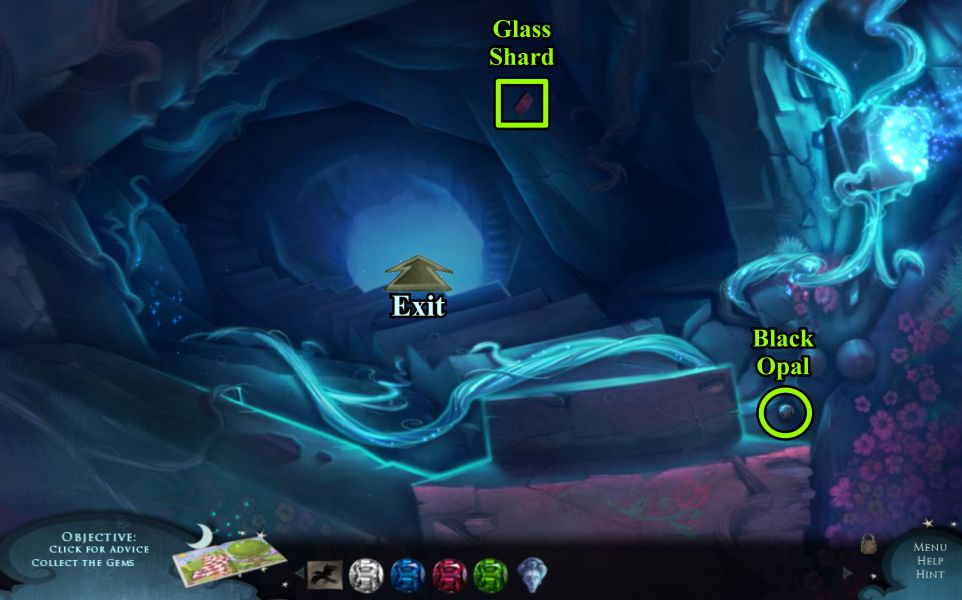
Upper Cave
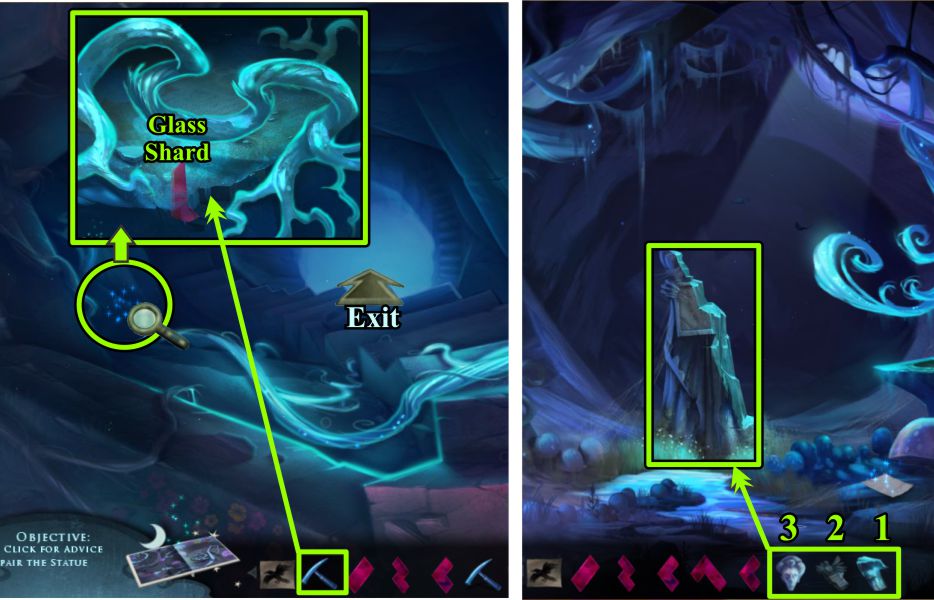
Collect the Glass Shard and Black Opal before exiting at the back of the scene.
Screenshot
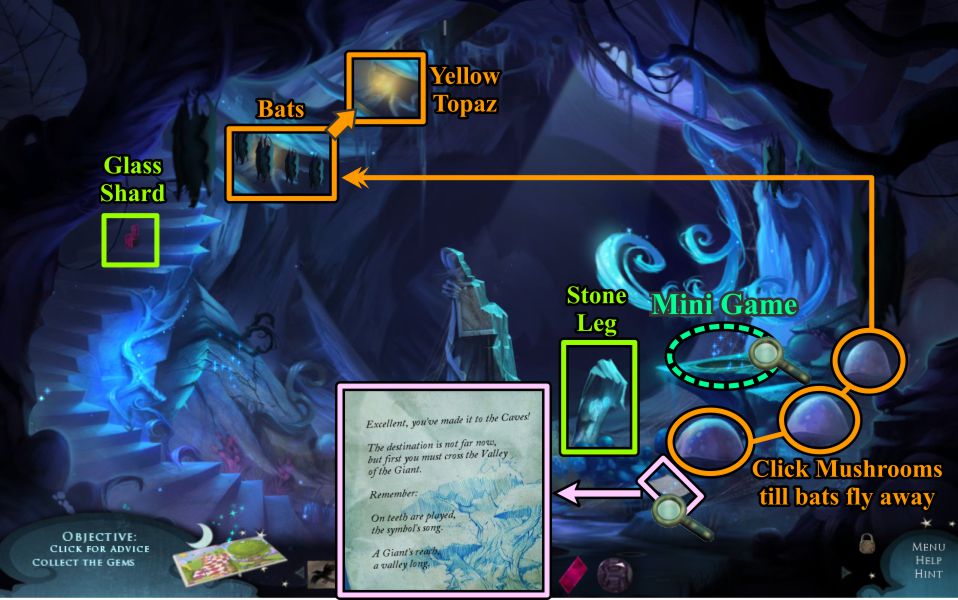
Lower Cave
Pick up the Glass Shard and Stone Leg, then read the note.
You need to get rid of the Bats so you can get the Yellow Topaz, so click each of the mushrooms at the right as many times as you need to until the bats fly away.
Collect the Yellow Topaz, then click on the place marked in the screenshot for a Mini Game.
Screenshot
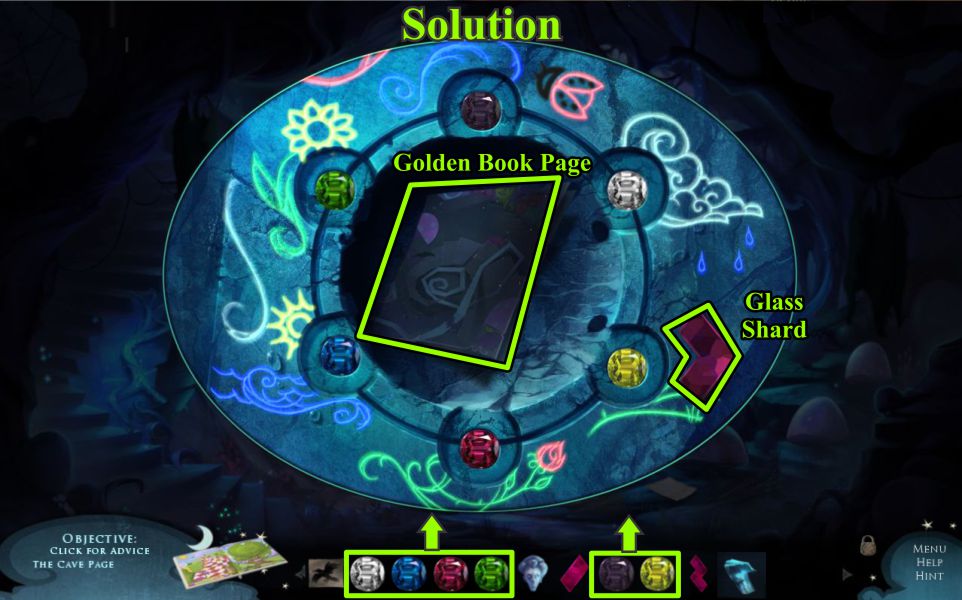
Gem Mini Game
Your goal is to put all the Gems in their proper places in order to open the bars.
See the screenshot for the solution, and collect the Glass Shard and Golden Book Page.
Screenshot
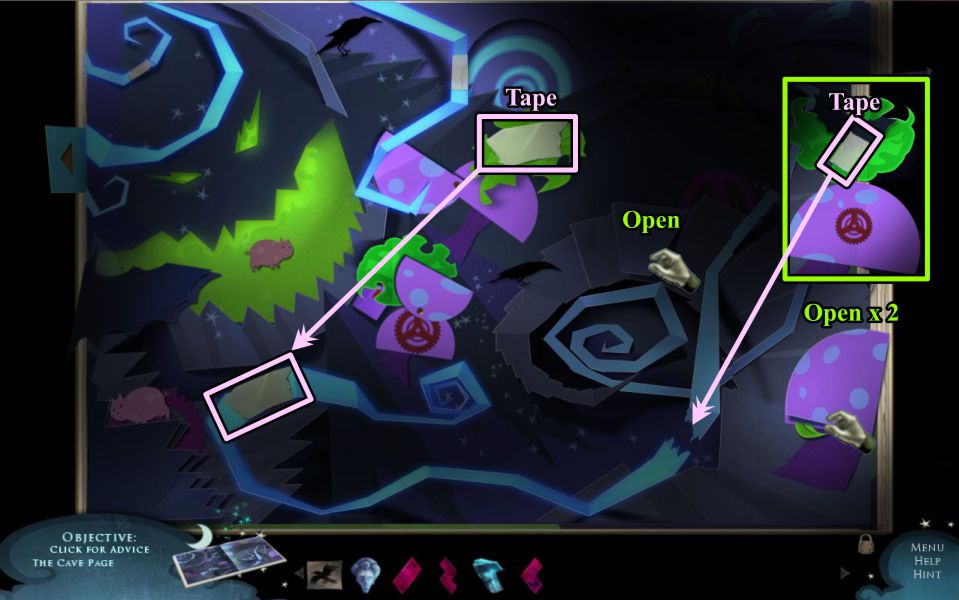
Golden Book Page 5
Place the piece of Tape on the broken root.
Pull the tab to find another piece of tape to mend the next root.
Open the mushroom shown in the screenshot.
Screenshot
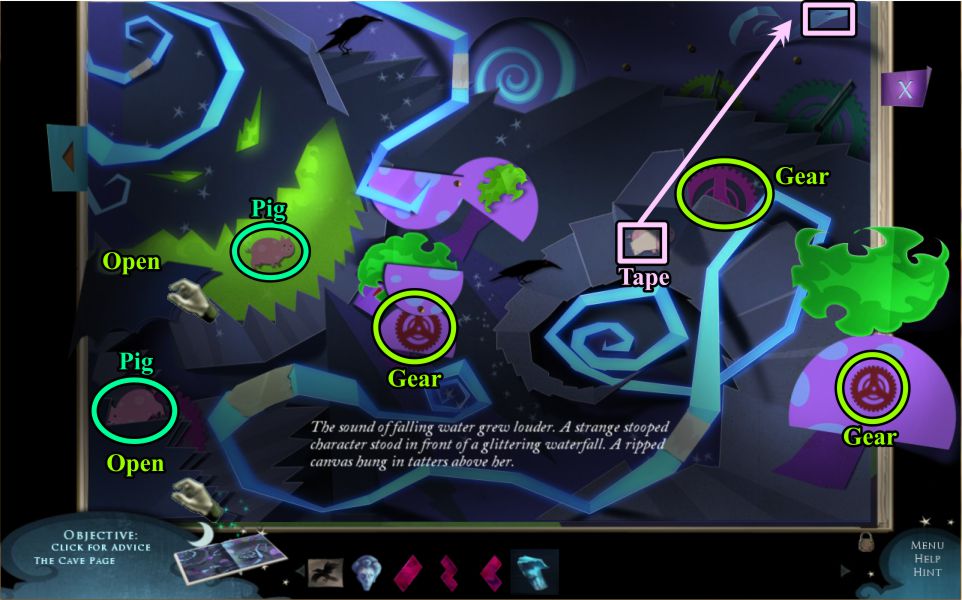
Open the mushroom at the right twice.
See the screenshot for the Tape to repair the next two broken roots.
Screenshot
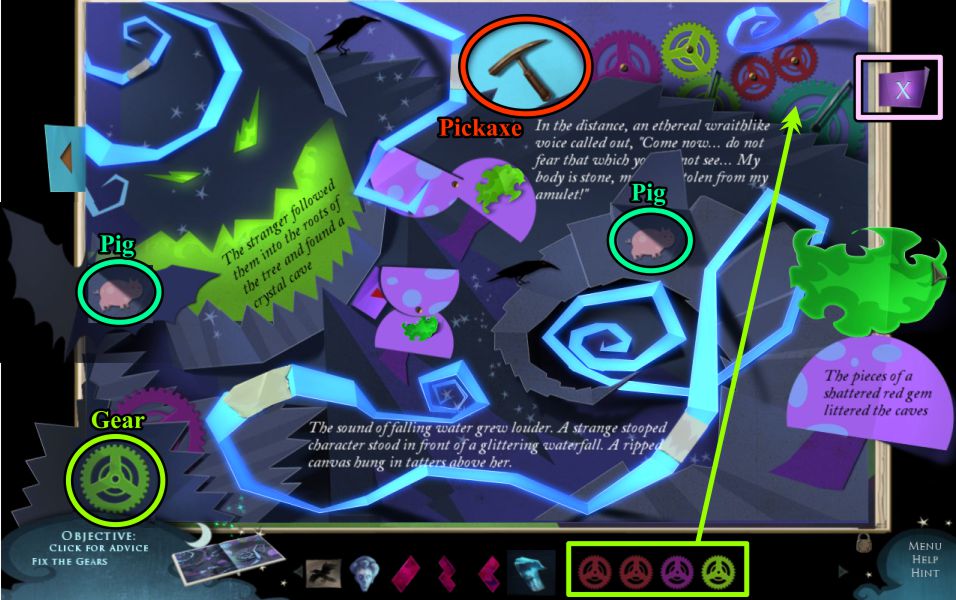
Collect the 2 Pigs and 3 Gears, open the bat wing at the left, and place the piece of Tape as shown.
Screenshot
Collect the 2 pigs and Gear.
Place the 4 gears as shown in the screenshot, then collect the Pickaxe.
Screenshot
Cave Rock
Zoom in on the rock at the left and use your Pickaxe 5 times.
Collect the Stone Torso and Glass Shard before going upstairs.
Screenshot
Upper and Lower Cave
Zoom in on the Lantern Tree root, use the Pickaxe to get the Glass Shard, and return downstairs.
Place the Stone Leg on the statue, then the Torso, and lastly the Head.
Screenshot
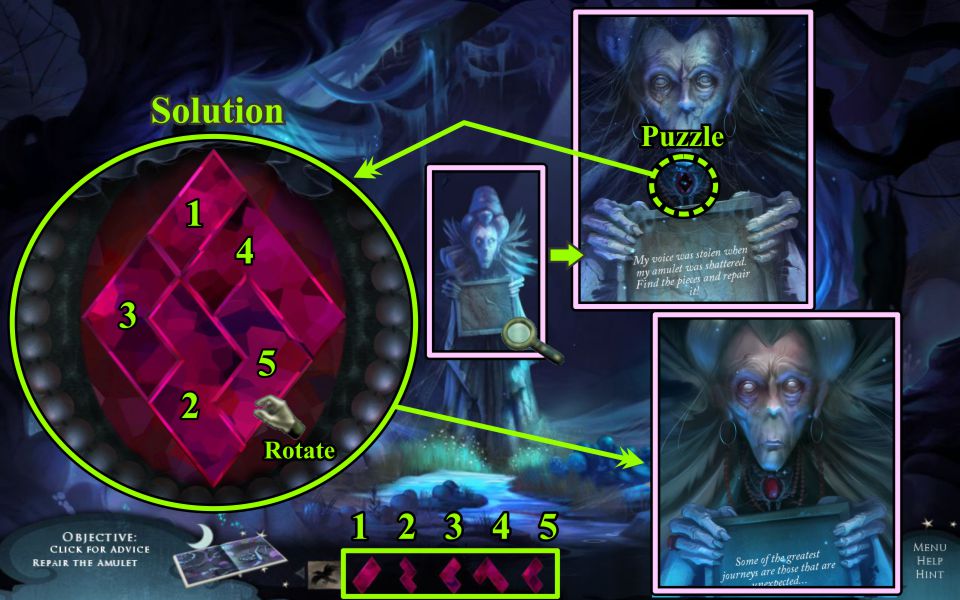
Statue and Glass Shard Amulet
The statue is trying to communicate with you via the chalkboard because she needs her amulet restored.
Place the Glass Shards as shown in the screenshot, and be sure to rotate #5 before trying to place it.
Screenshot
Chalk World Mini Game
You are given an outline picture on the chalk board for you to draw.
Pick up the Chalk and draw the figure.
The completed drawing triggers the Chalk World Mini Game.
Screenshot
Your goal is to choose the correct image from Iris' thought cloud to use for each drawing.
You then need to fill in the outlined object so you can progress from one scene to the next.
Make sure to return your Chalk to Inventory for each scene.
Mind Your Step
For the scene in the screenshot, choose the stairs.
Screenshot
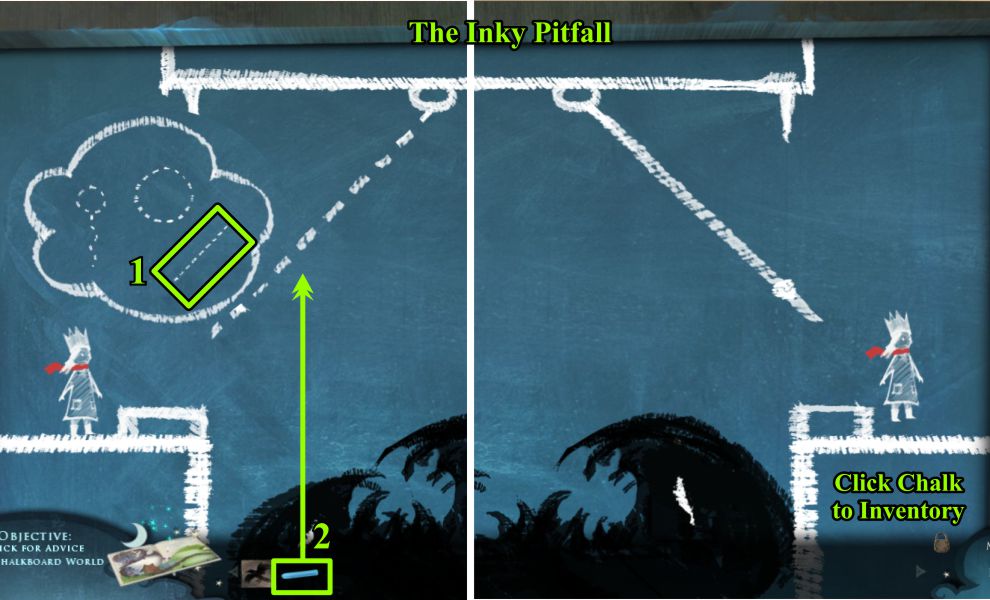
The Inky Pitfall
Choose the rope to swing across.
Screenshot
Cornered
The only way out is a door.
Screenshot
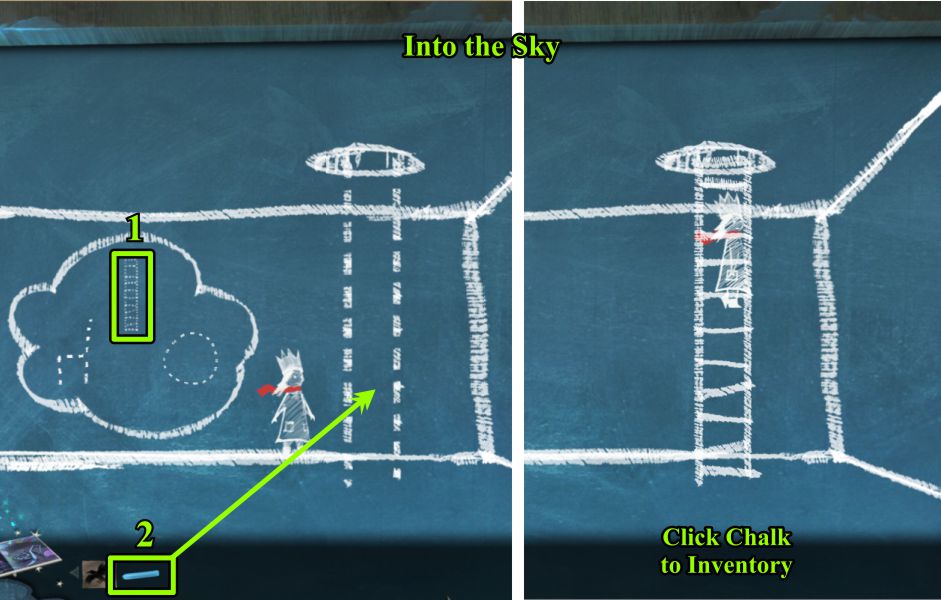
Into the Sky
Use the ladder to get to the hole above.
Screenshot
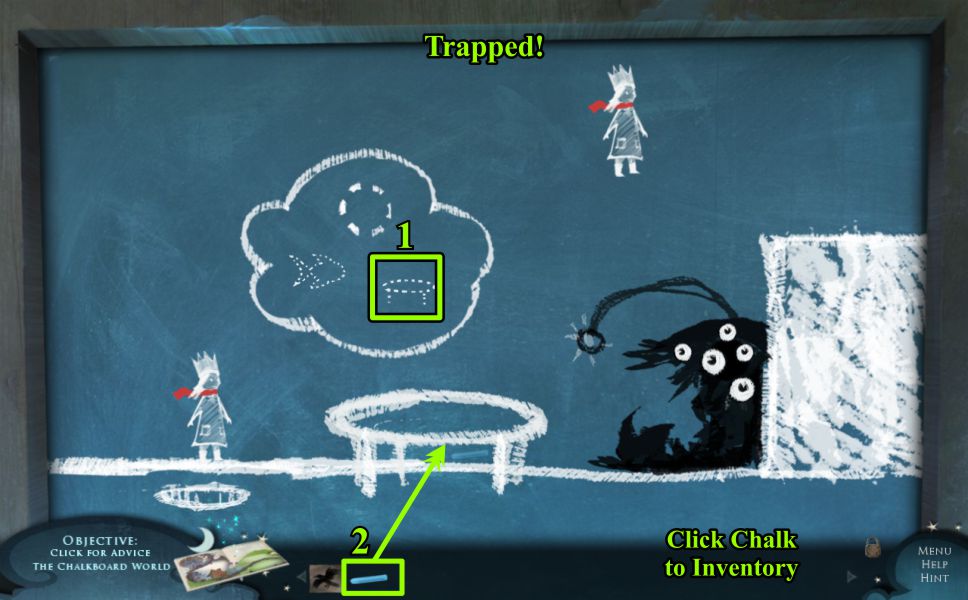
Trapped
If you choose the fish, the monster will eat it, so try the trampoline.
Screenshot
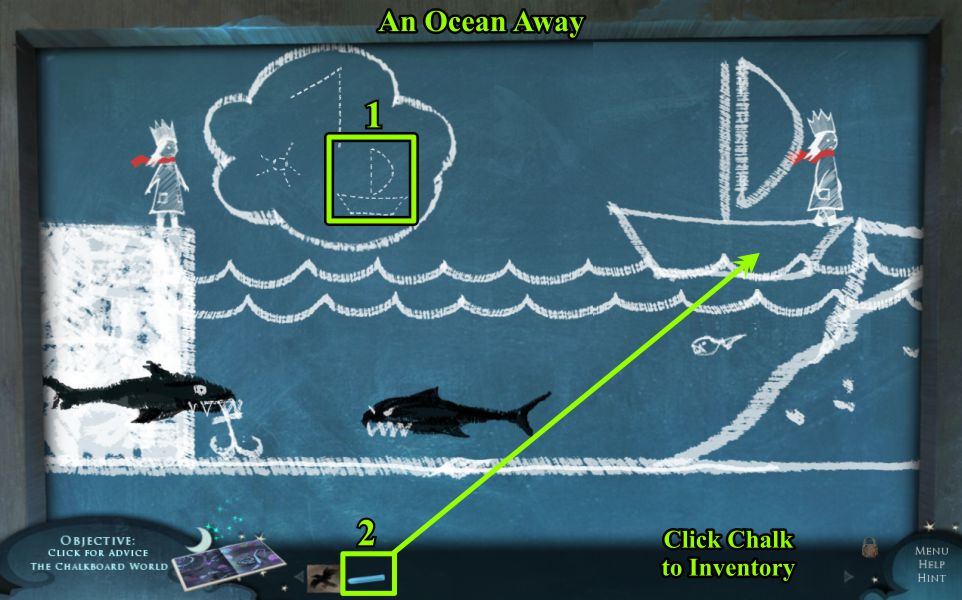
An Ocean Away
You'll have smooth sailing if you choose the boat.
Screenshot
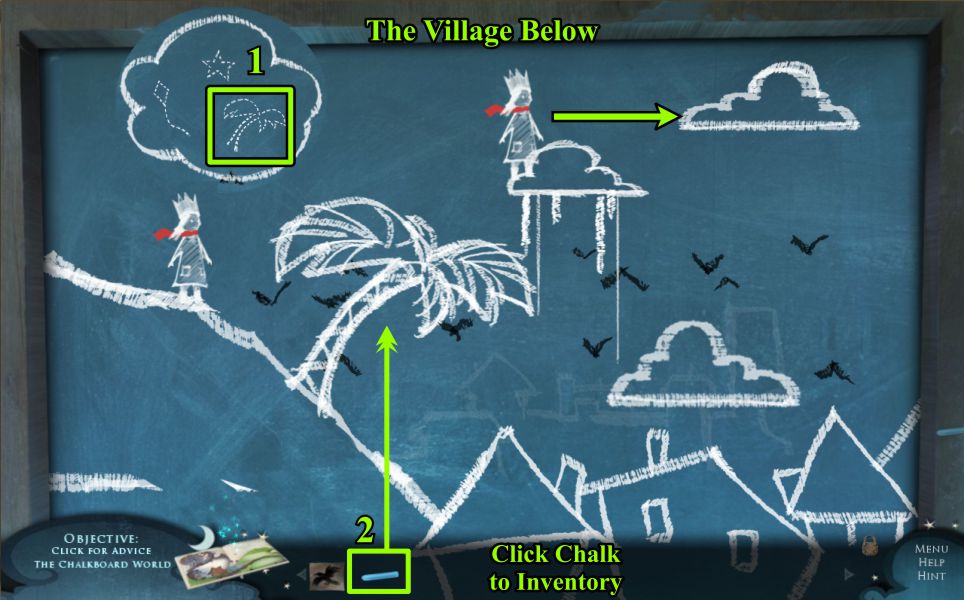
The Village Below
A kite won't work, so you need the palm tree as a stepping stone to the clouds.
Screenshot
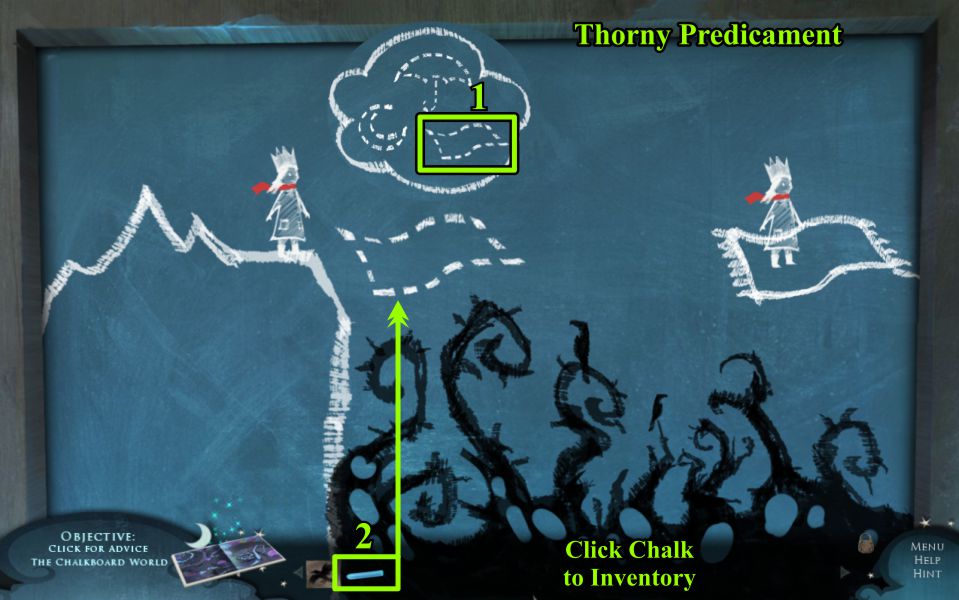
Thorny Predicament
Try the flying carpet, because the other choices will get you in trouble.
Screenshot
Locked
You can't shoot your way through a locked door, so hang the bucket on the lever to lower it.
Screenshot
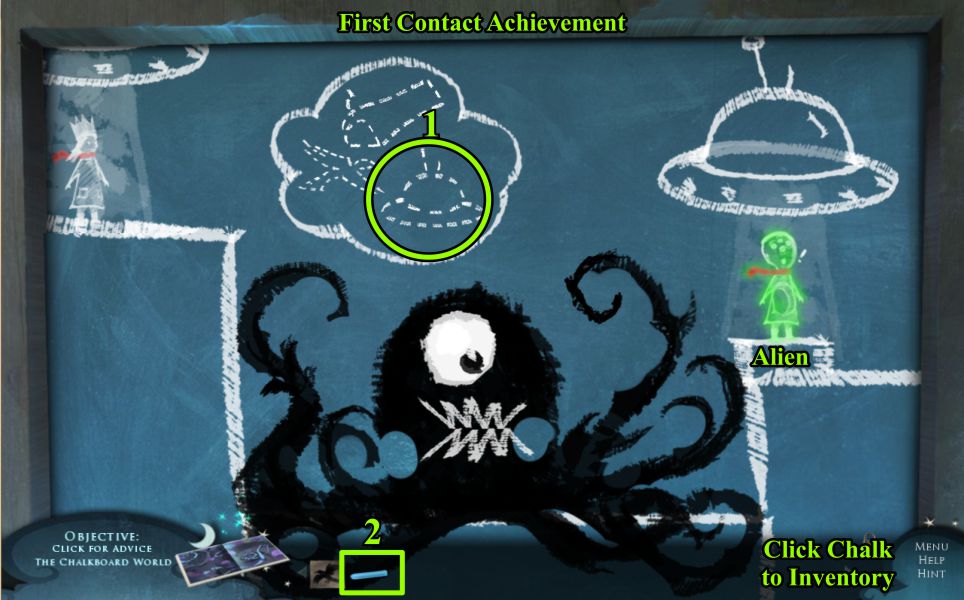
The Alien
For this one, you need to choose the wrong object so you can get an Achievement.
Select the spaceship that transports Iris and turns her into an alien.
Click on the alien just to make sure the event is recorded.
Screenshot
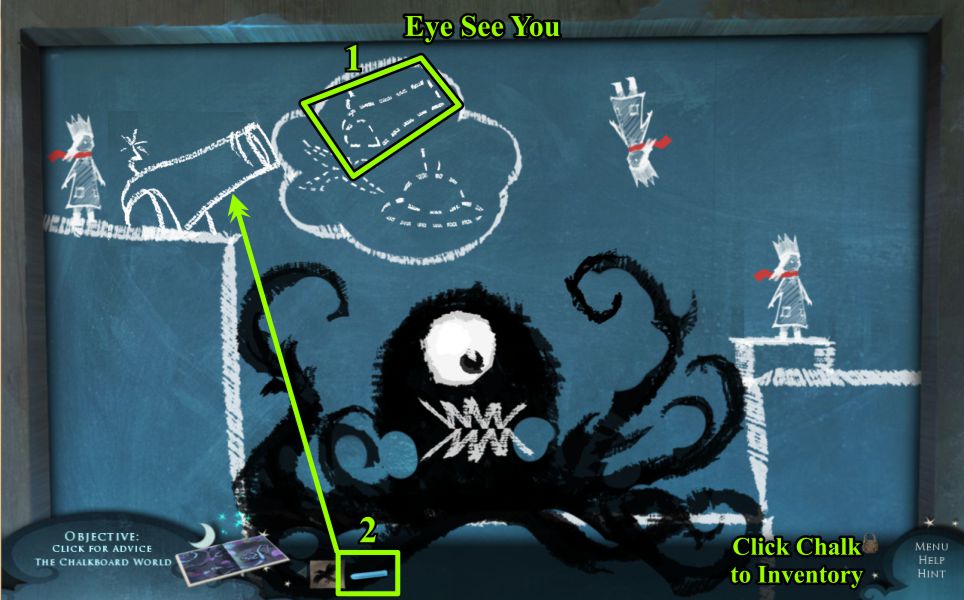
Eye See You
You still need to get past the monster, so choose the cannon and Iris will propel to the other side.
Screenshot
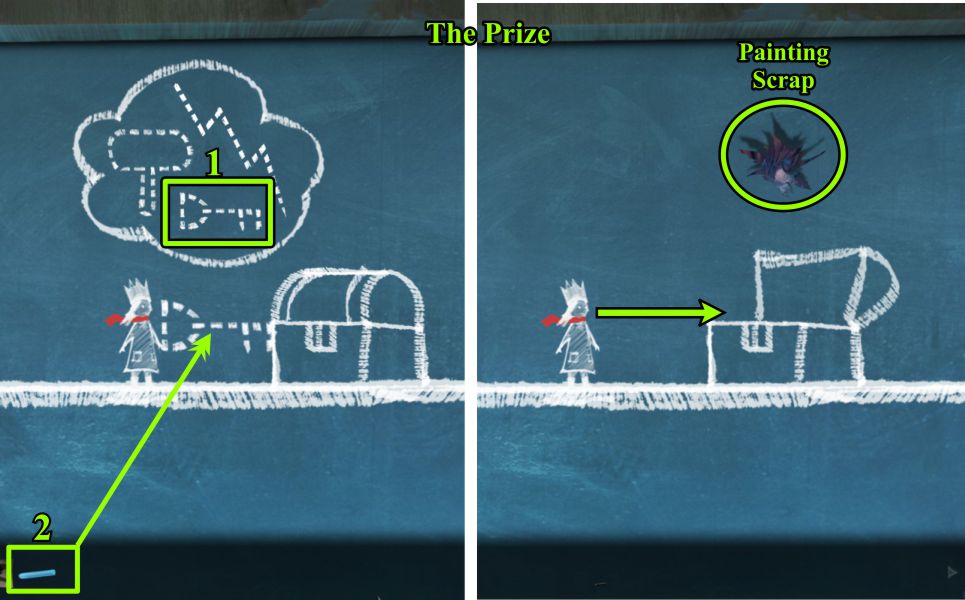
The Prize
At last the prize is near. Select the key, and you will get a Painting Scrap from the chest.
Once you collect the scrap, Iris will jump into the box to finish the game.
Screenshot
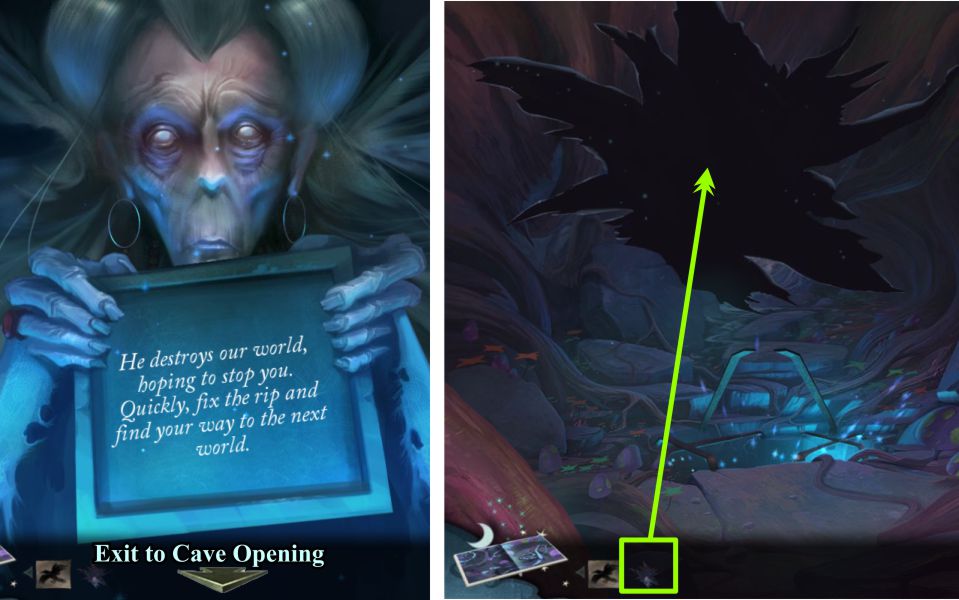
Patch the Canvas
The statue has a final message for you.
Go back to the Cave Entrance where you started this venture, and place the patch on the torn canvas.
Screenshot
Deep Cave
You have now entered the deepest part of the cave.
Take the Stone Disk, check out the birdcages, and zoom in on the stone wall.
Take the Stone Disk and exit forward.
Screenshot
Snowy Cliffside
Nowhere to go at the moment, so zoom in on the icy cat and take the Stone Disk.
Zoom in on the far left of the scene, take the Sunstone, Stone Disk, and remove the snow 5 times.
Return to the Cave.
Screenshot
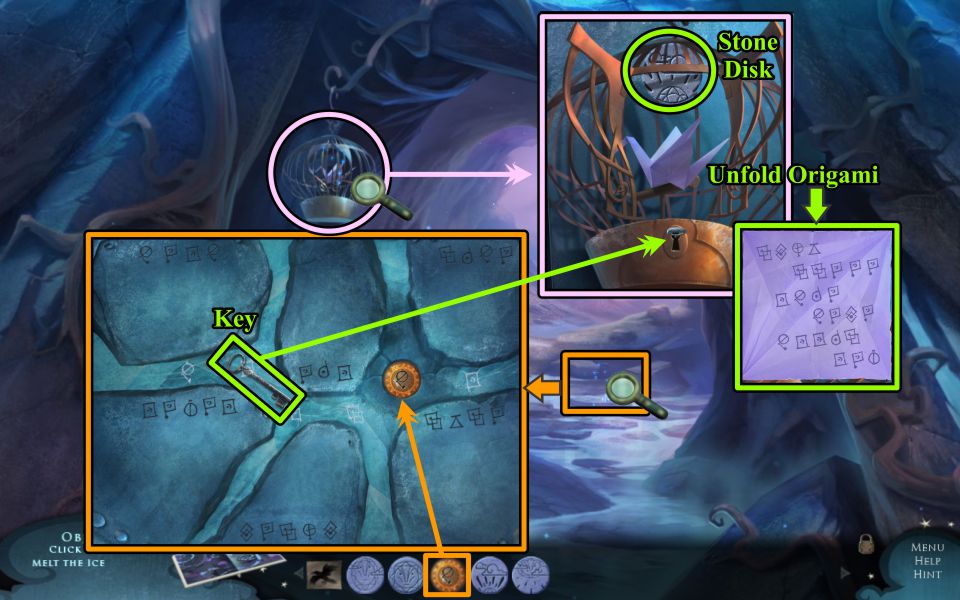
Left Birdcage
Zoom in on the stone wall, place the Sunstone, and take the Key.
Zoom in on the left bird cage, and use the Key to open it.
Take the Stone Disk, unfold the Origami Bird, and take the diagram.
Screenshot
Stone Wall Mini Game
Zoom in on the wall and place your diagram for a Mini Game.
The various stones are numbered in the screenshot to correspond with the diagram. The scenes depicted are also labeled.
Take the Ceramic Tab.
Screenshot
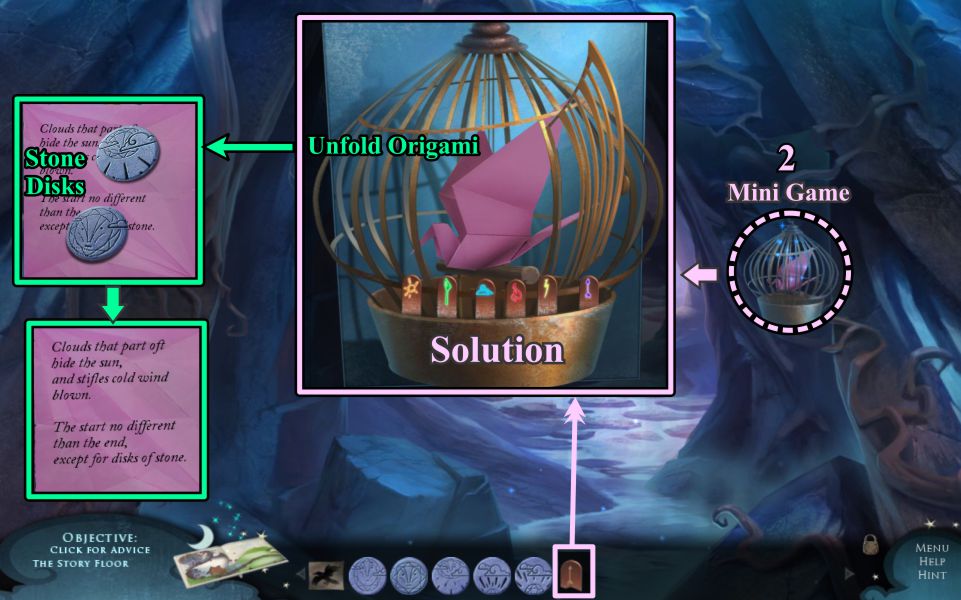
Right Birdcage Mini Game
Zoom in on the right birdcage and place the Ceramic Tab to trigger a Mini Game.
Exchange the tabs as shown in the screenshot to unlock the birdcage.
Unfold the Origami Bird 4 times, take the 2 Stone Disks, and read the note.
Exit to the cliff.
Screenshot
Stone Disk Mini Game
Zoom in on the area to the left and place the Stone Disks, as shown in the screenshot solution.
Once you have them all in place, press the button to check your solution.
Screenshot
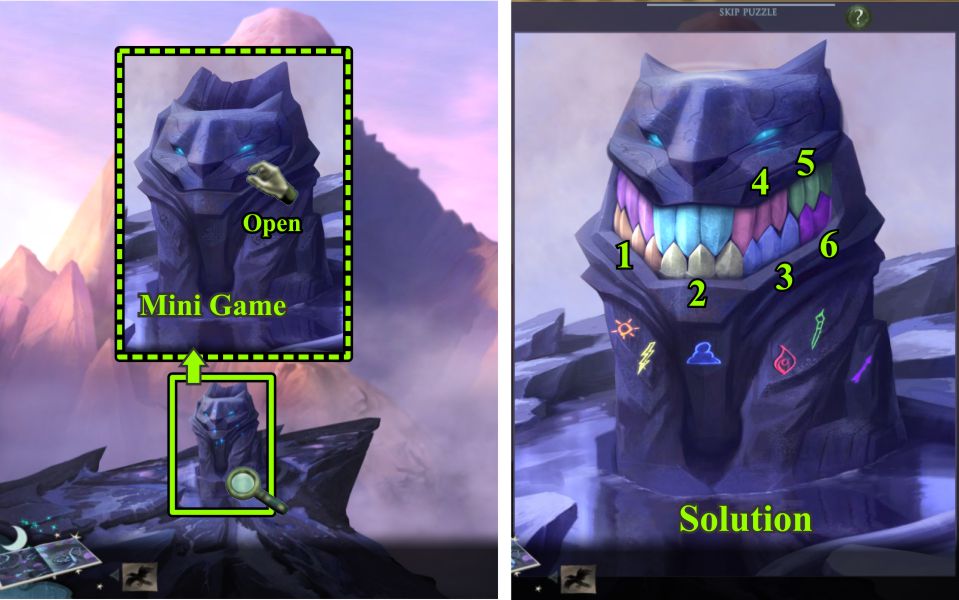
Scat Daddy Mini Game
Zoom in on the defrosted Scat Cat, and open his mouth to trigger a Mini Game.
Your goal is to play a tune to summon the Guardian of the Mountain.
See the screenshot for the solution.
Screenshot
You have completed the Bonus Collector's Edition chapter.
Chapter 4: The Mountain
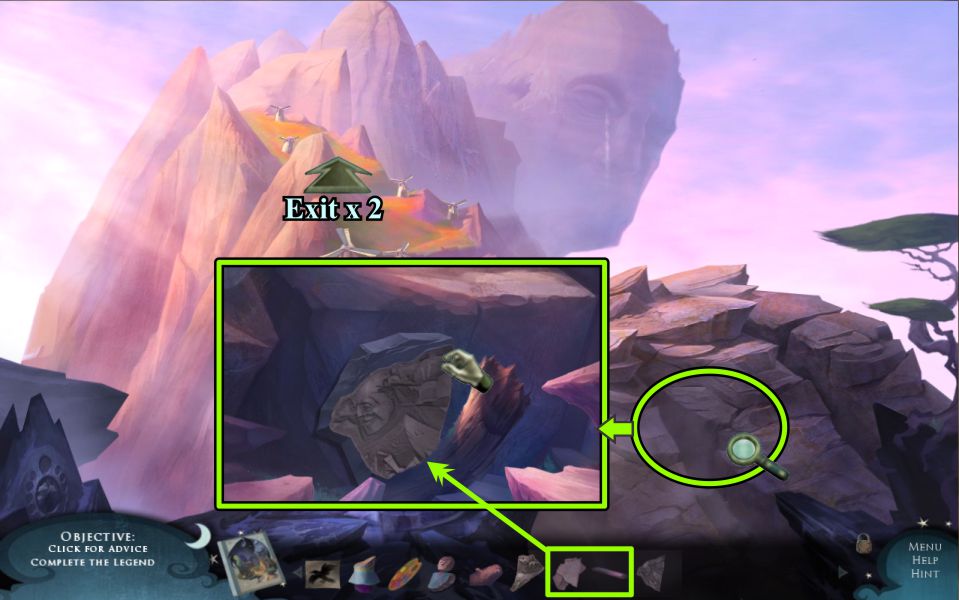
Rubble
The Guardian extends his arm, creating a bridge from the cliff to the mountain.
Zoom in on the rubble marked in the screenshot and remove all the loose rocks to get an Achievement.
Once you pick up the Sharp Rock, there will be a Pig behind it.
Use the Sharp Rock to remove all the vines so you can take the Shield.
Exit forward.
Screenshot
Windmill Meadow
Pick up the Broken Statue and the Palette, read the note and go forward past the meadow.
Screenshot
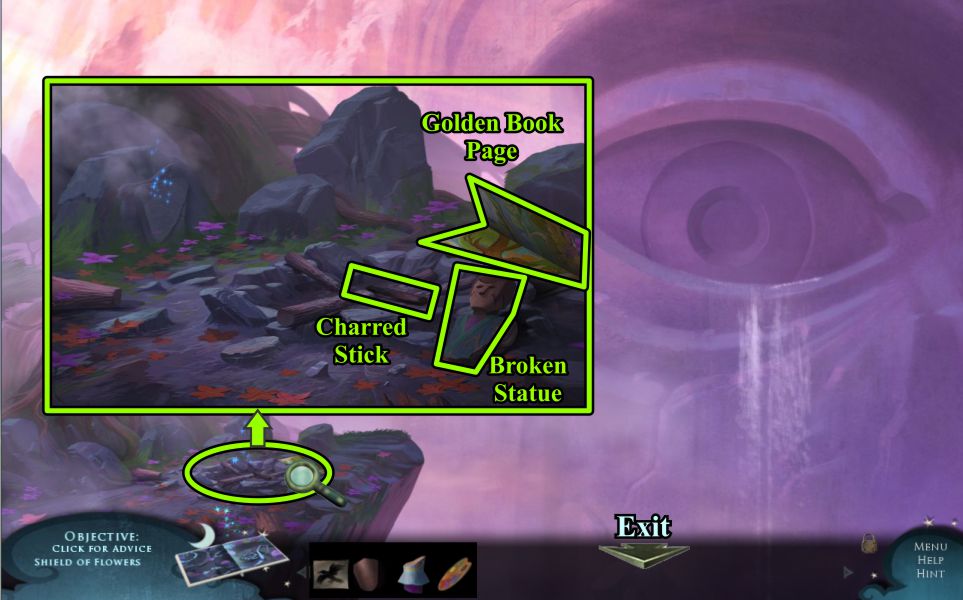
Overlook Campfire
Zoom in on the Campfire.
Take the Broken Statue, Charred Stick and Golden Book Page.
Screenshot
Golden Book Page 6
Pull or open the places marked in the screenshot and collect the 2 Pigs.
Screenshot
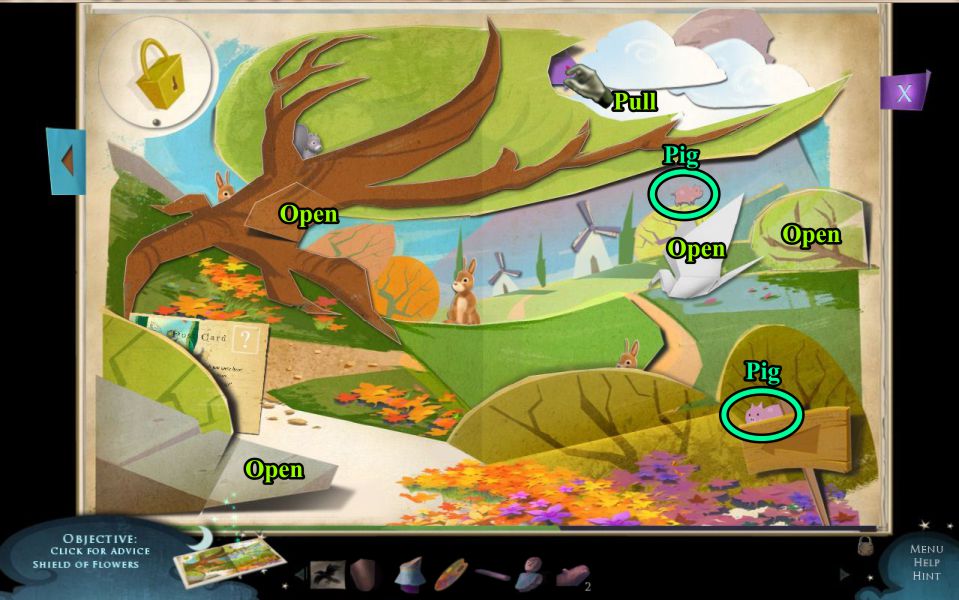
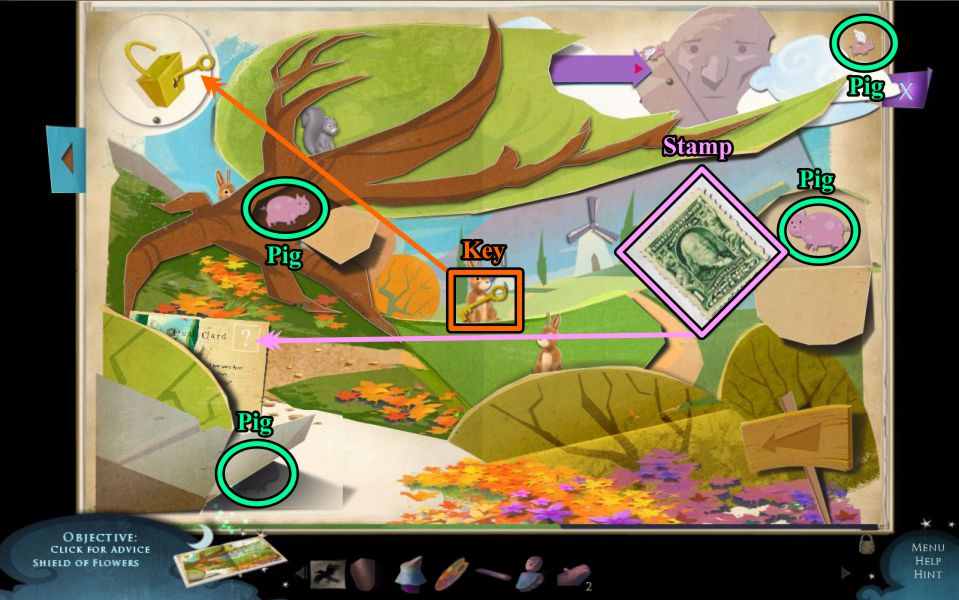
Collect the 4 Pigs shown in the screenshot, open the Origami Bird 4 times, and place the Stamp on the post card.
One of the 3 rabbits has a Key for you to grab and use on the lock in the upper corner.
Each time they pop up, it will be a different rabbit, so be quick to grab it.
Screenshot
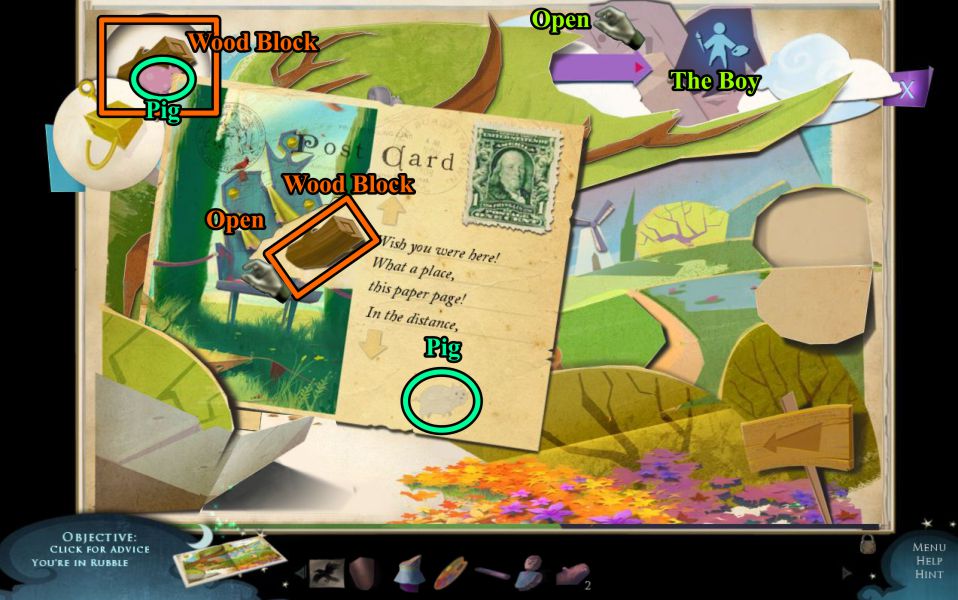
Unlock the lock, then collect the Pig and Wood Block.
Open the Giant Head for a silhouette of the Boy.
Pull out the post card, take the Pig, and open the fold to take the Wood Block.
Screenshot
Windmill Workbench
Enter the right Windmill.
Place the Shield and Palette, and take the Paper and Cloth.
Dip the Cloth in the Metal Polish and use it to polish the Shield.
Screenshot
Windmill Meadow Rubbing
Zoom in on the left side of the scene in back of the Windmill, place a piece of your Paper, and use the Charred Stick to make a rubbing of the etching.
Exit down to the Rubble.
Screenshot
Rubble Rubbing
Zoom in and place your Paper and make your rubbing using the Charred Stick.
Exit forward twice to the Overlook.
Screenshot
Overlook Rubbing
Zoon in to the left or the Campfire, place your Paper and make the rubbing.
Exit down to the Meadow.
Screenshot
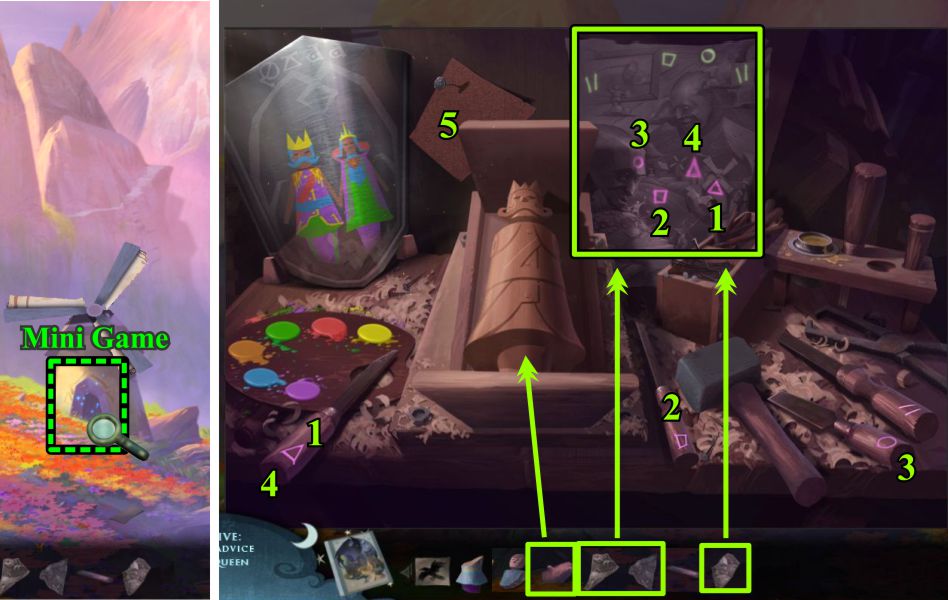
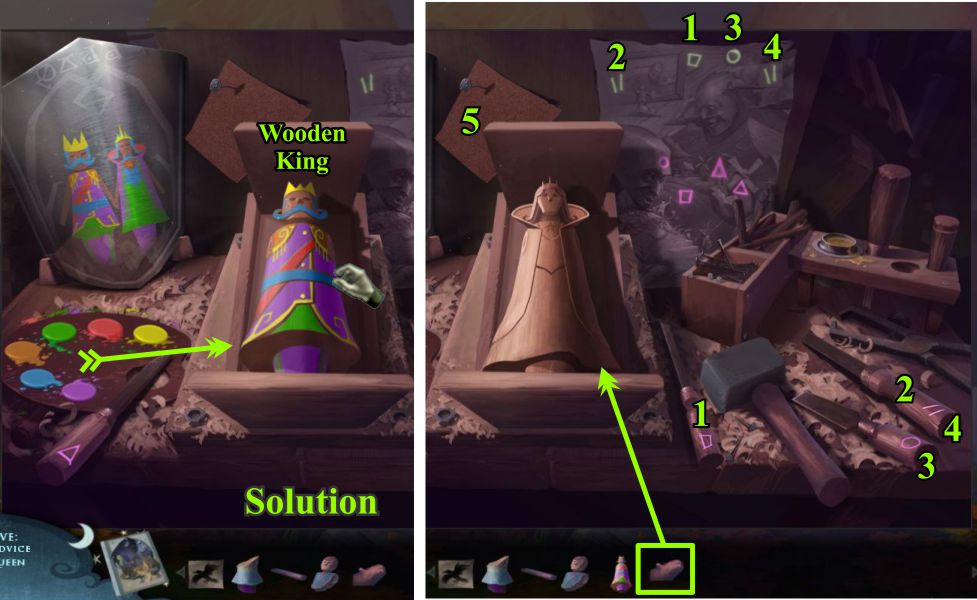
Wooden King and Queen
Enter the right Windmill and place your rubbings to trigger a Mini Game.
Place and Wood Block on the workbench and use the tools in the order marked in the screenshot.
Screenshot
Paint the Wooden King as shown and collect him.
Place the other Wood Block and use the tools in the order shown to carve the Queen.
Screenshot
Paint the Wooden Queen as shown, collect her, and go to the other Windmill.
Screenshot
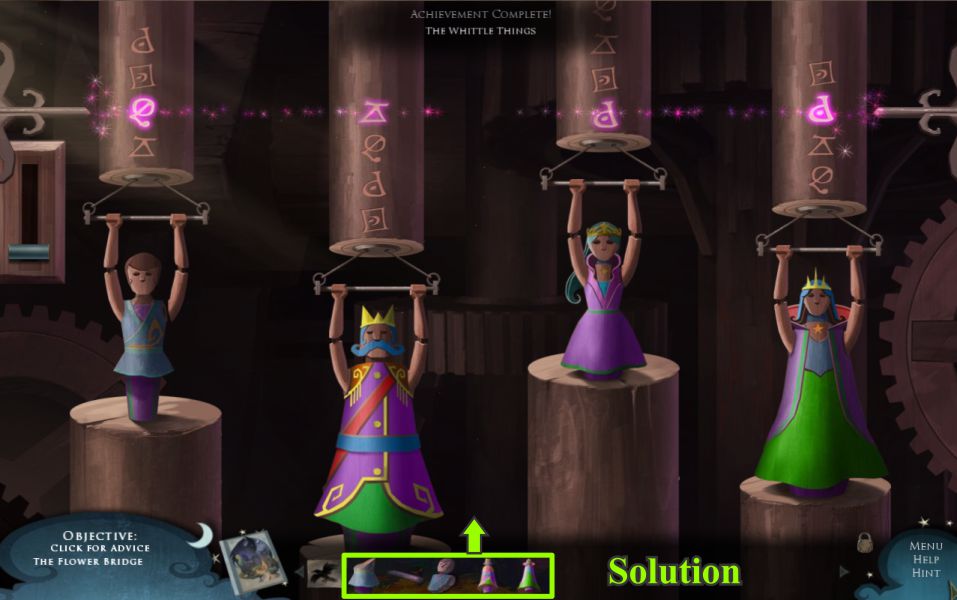
Windmill Pedestal Mini Game
Repair the boy with the pieces of his statue and move him to the left.
Move the girl, and place the King and Queen as shown in the screenshot solution.
Screenshot
Flower Bridge and Canvas Patch
The Windmills start and create a flower bridge at the Outlook, so go there and follow the path.
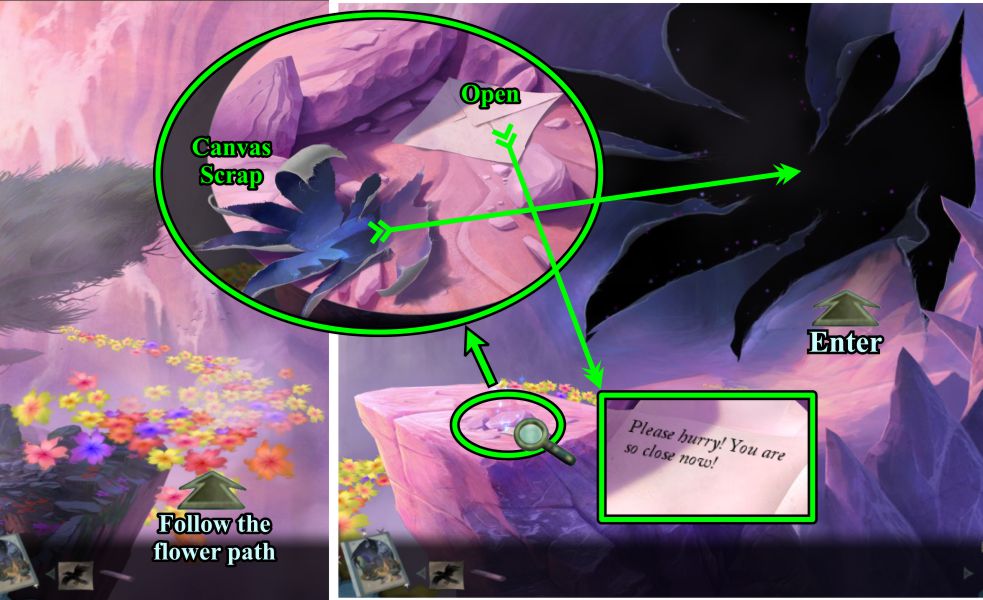
Zoom in and pick up the Canvas Scrap.
Open the envelope and read the note.
Place the Canvas to path the hold and enter.
Screenshot
Chapter 5: The Giant's Head
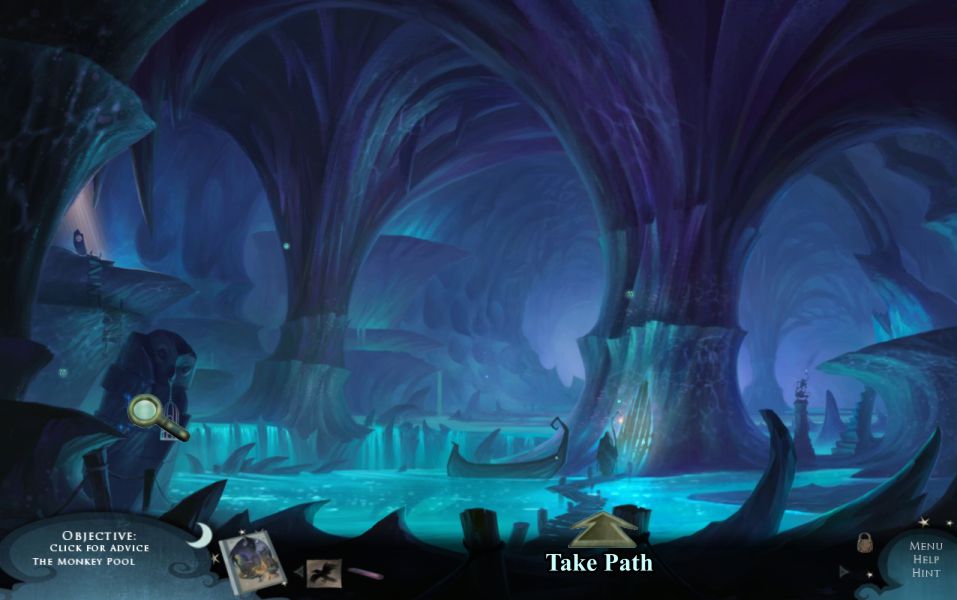
Giant Caves
Check out the Owl and follow the bridge path.
Screenshot
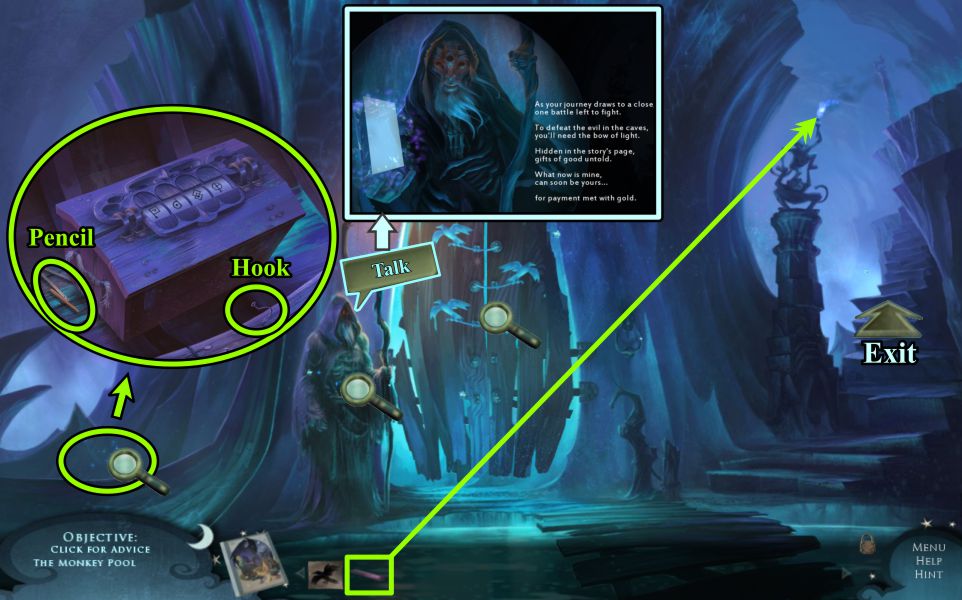
The Boatman
Talk to the Boatman, zoom in on the chest in the boat, and take the Pencil and Hook.
Light your Charred Stick in the monkey's torch before going up the stairs.
Screenshot
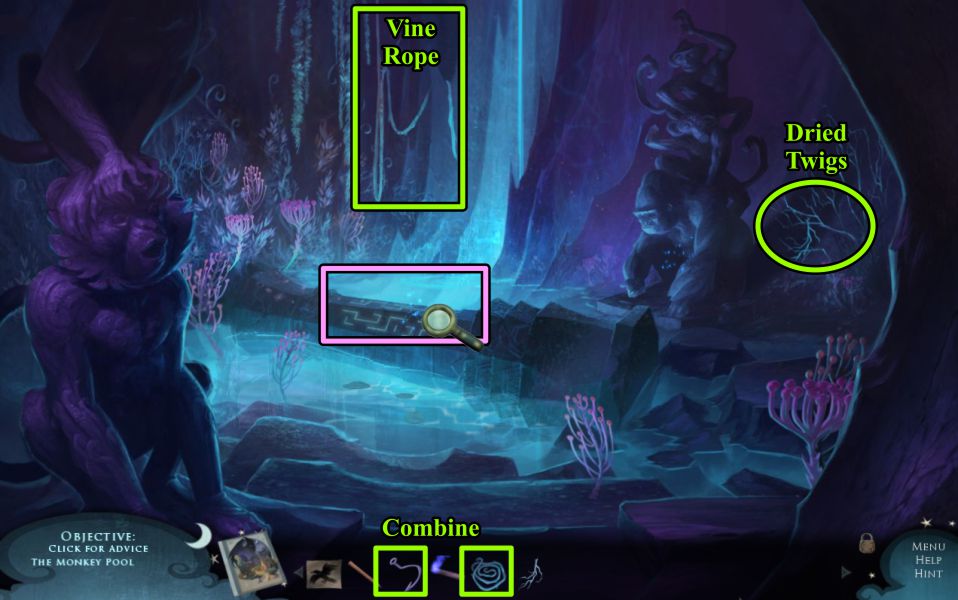
Monkey Pool
Take the Vine Rope and Dried Twigs.
Combine the Vine Rope with the Hook and zoom in on the pool.
Screenshot
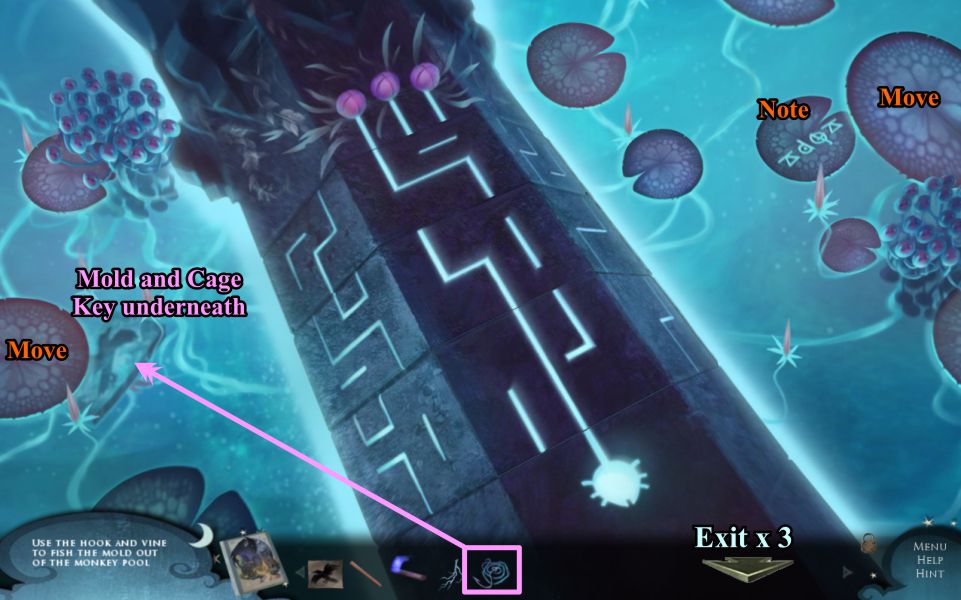
Move the lily pads, note the symbols, and use your hooked rope to get the Mold and Cage Key that is underneath it.
Exit down 3 times to the Owl.
Screenshot
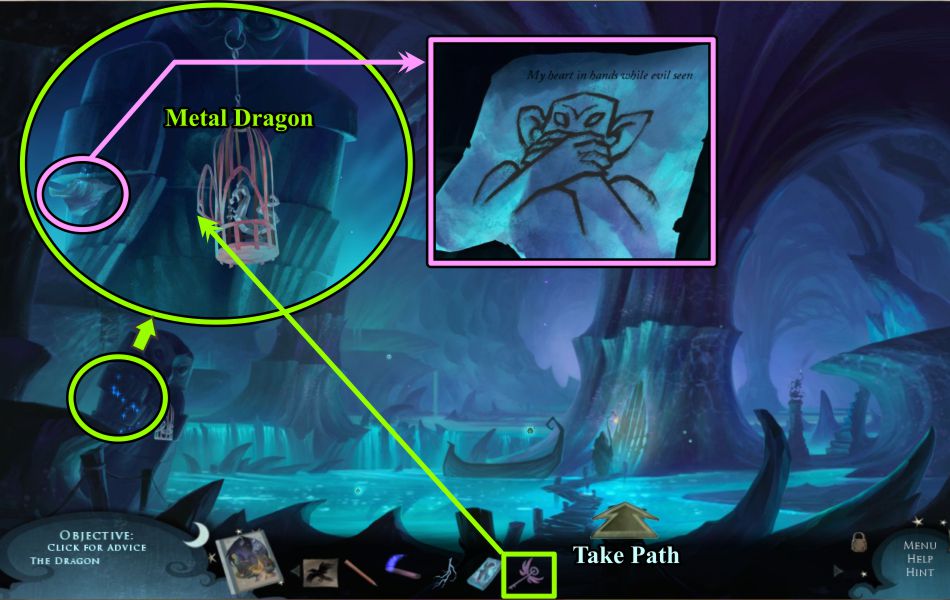
Owl and Cage
Zoom in on the Owl and use the Key to open the cage.
Take the Metal Dragon and check out the paper next to the cage.
Return to the Monkey Pool.
Screenshot
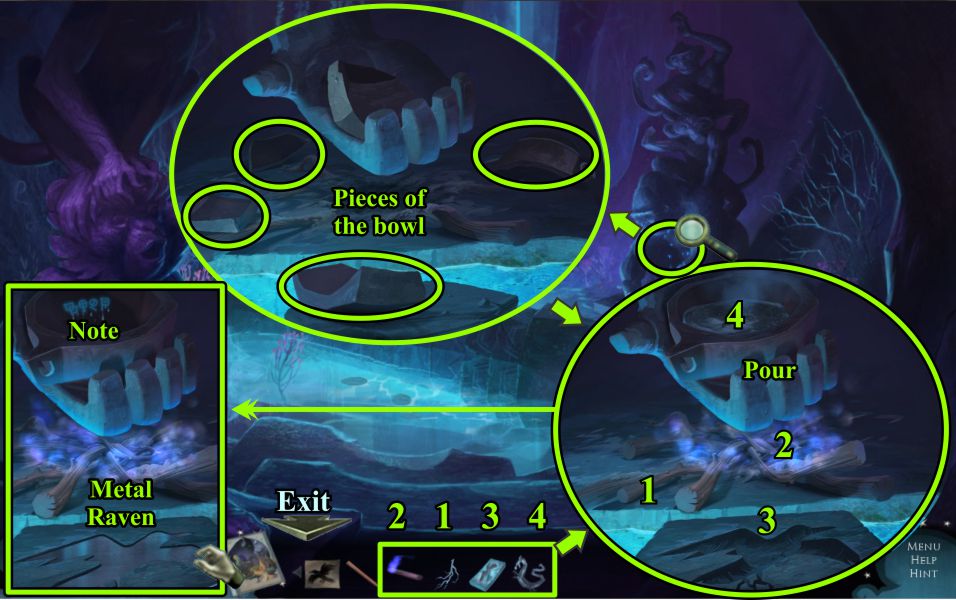
Monkey Bowl and Raven Mold
Zoom in on the Monkey's hand shown in the screenshot and pick up the pieces of the bowl that will automatically go into place.
Place the numbered items from your Inventory as shown, and pour the melted metal into the mold.
Note the symbols in the empty bowl, then take the Metal Raven.
Exit down once.
Screenshot
Raven Door Mini Game
Place your Metal Raven and Raven Sketch on the door.
There is a reset handle to the right of the door, and the step-by-step solution is shown in the screenshot.
When the door opens, enter.
Screenshot
Monkey Room and Monkey Pool
Catch one of the Beetles when it lands on the stump.
Go to the Monkey Pool and zoom in on the Column for a Mini Game.
Screenshot
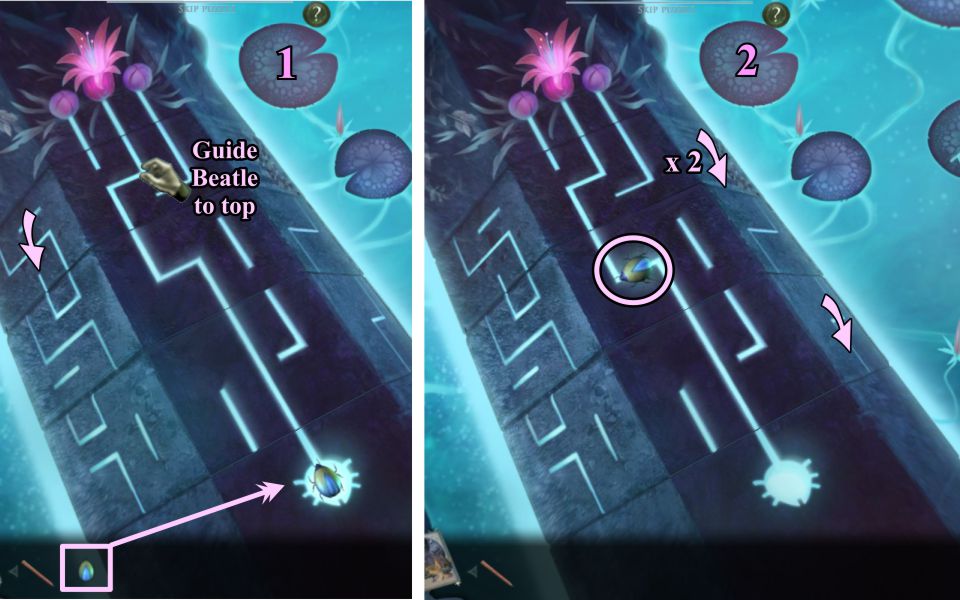
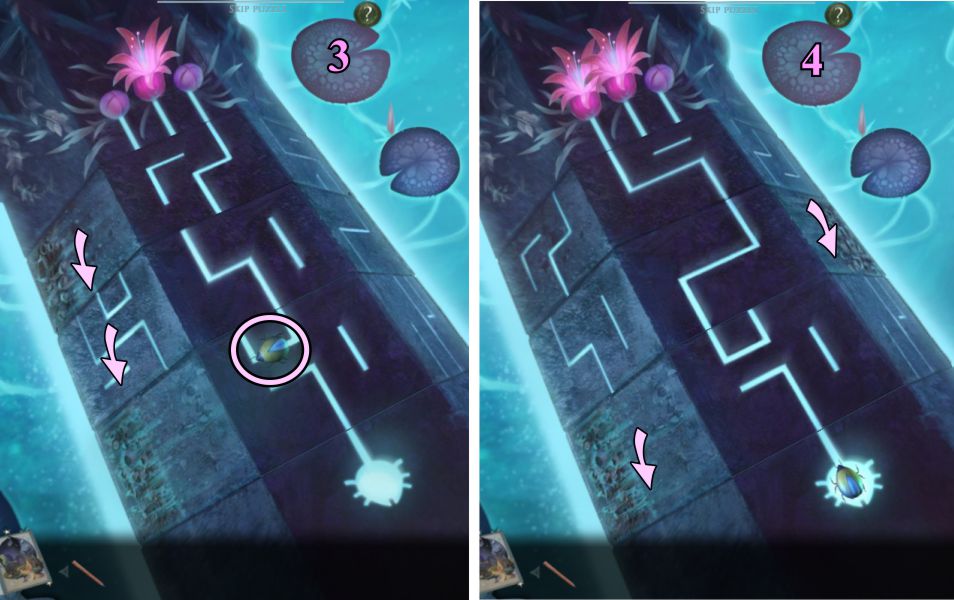
Monkey Column Mini Game
Place the Beetle at the bottom of the column.
Your goal is to guide the Beetle to the top to open all three flowers.
The column sections rotate producing various paths for him to take.
Each time a flower opens, the Beetle returns to his place at the bottom of the column.
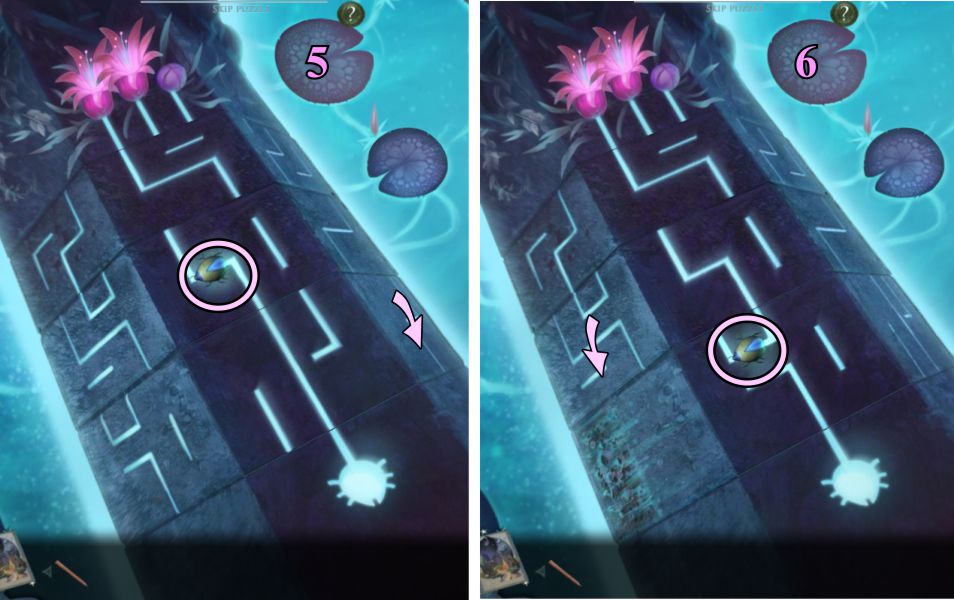
See the screenshot for the solution to the middle flower, and the first steps to take for the next round.
Screenshot
See the screenshot for the finishing steps to open the left flower.
Screenshot
This screenshot shows the first steps for opening the right flower.
Screenshot
Continue with the instructions in the screenshot for the right flower.
Screenshot
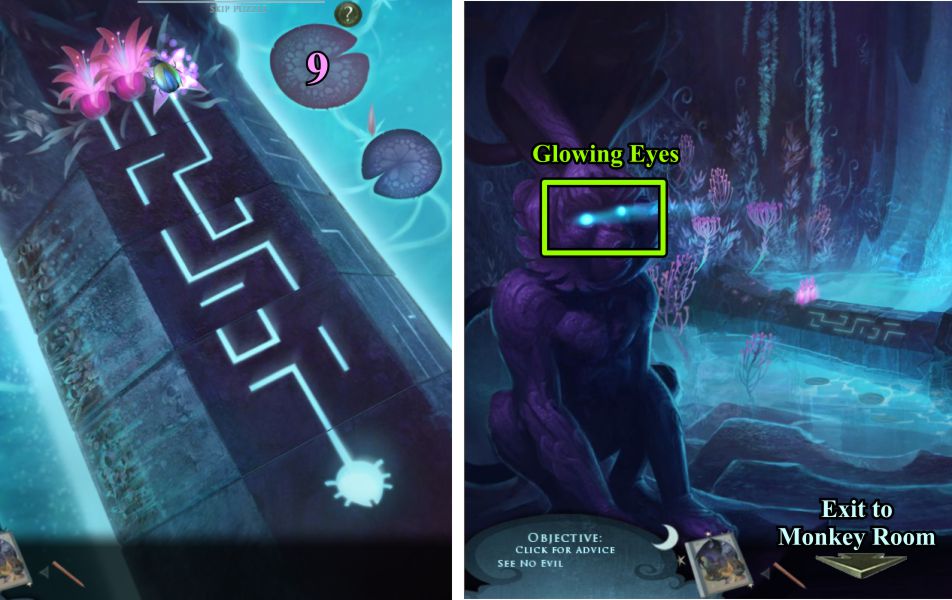
He has reached the top in this screenshot, and the Monkey on the left has Glowing Eyes for you to collect.
Exit downstairs to the Monkey Room.
Screenshot
Monkey Room: See No Evil
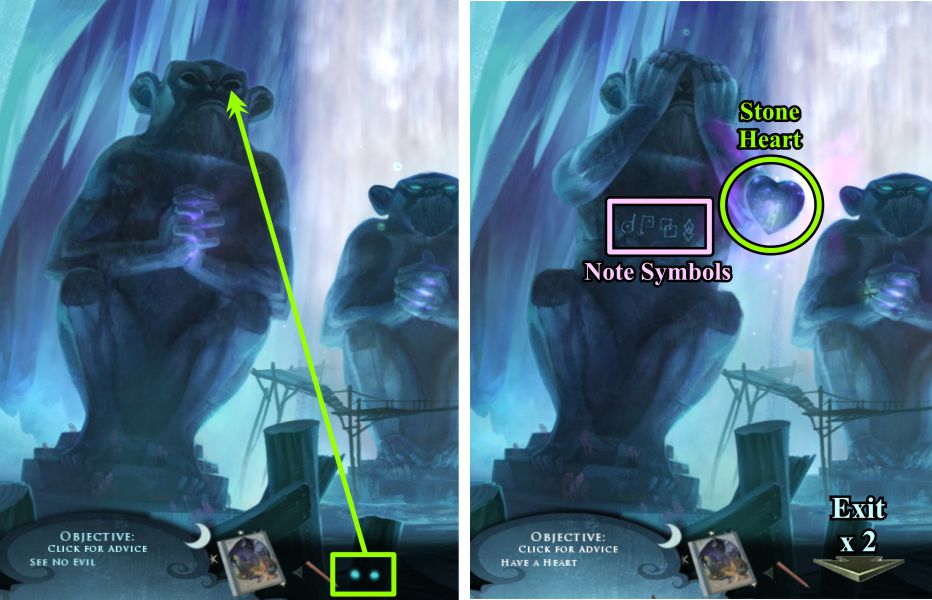
Give the Glowing Eyes to the Monkey on the left, and he will give you a Stone Heart.
Note the symbols on his body when he covers his eyes.
Exit down twice to go see the Owl.
Screenshot
Owl and Magical Bridge
Zoom in on the Owl and give him the Stone Heart.
He will end up in pieces, creating a Magical Bridge to an opening in the Cave.
Screenshot
Cat Pool and Boatman's Chest
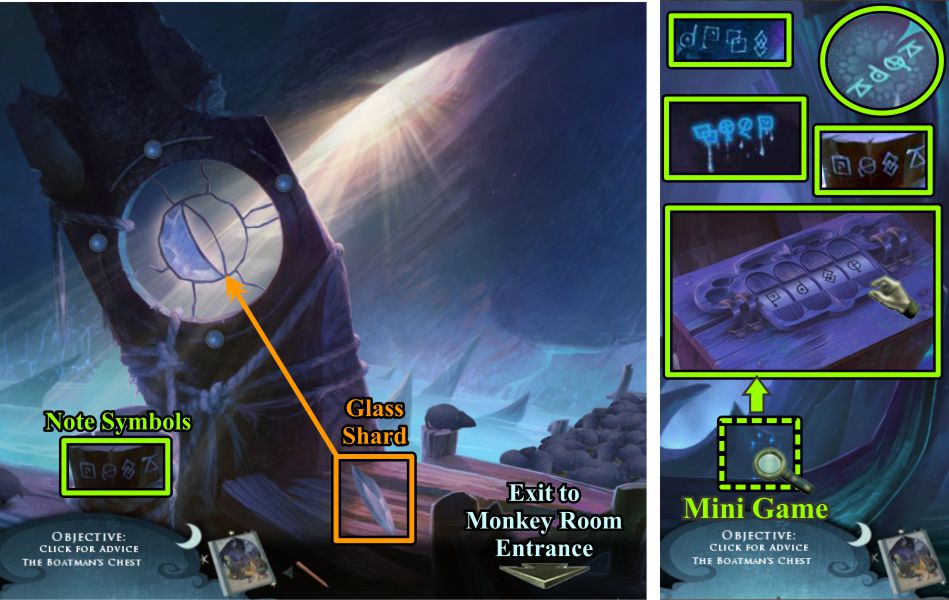
Note the symbols to the left of the lens.
Place the Glass Shard on the lens, then exit to the boat in front of the Monkey Room.
Zoom in on the Boatman's Chest to open it. The 4 sets of symbols you need to open it are shown in the screenshot.
Use the pads under and over the roller to change the symbols.
It doesn't matter what order you enter the symbols as long as you use all 4 sets.
Screenshot
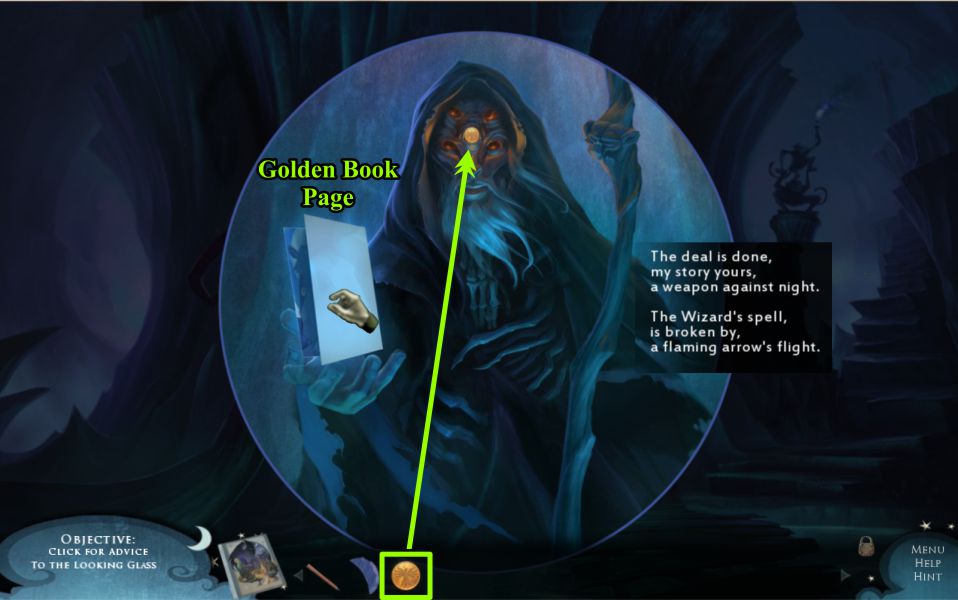
Boatman
Take the Glass Shard from the chest and Gold Coin off the paper.
Zoom in on the Boatman.
Screenshot
Place the Gold Coin on his forehead, and he will give you a Golden Book Page.
Screenshot
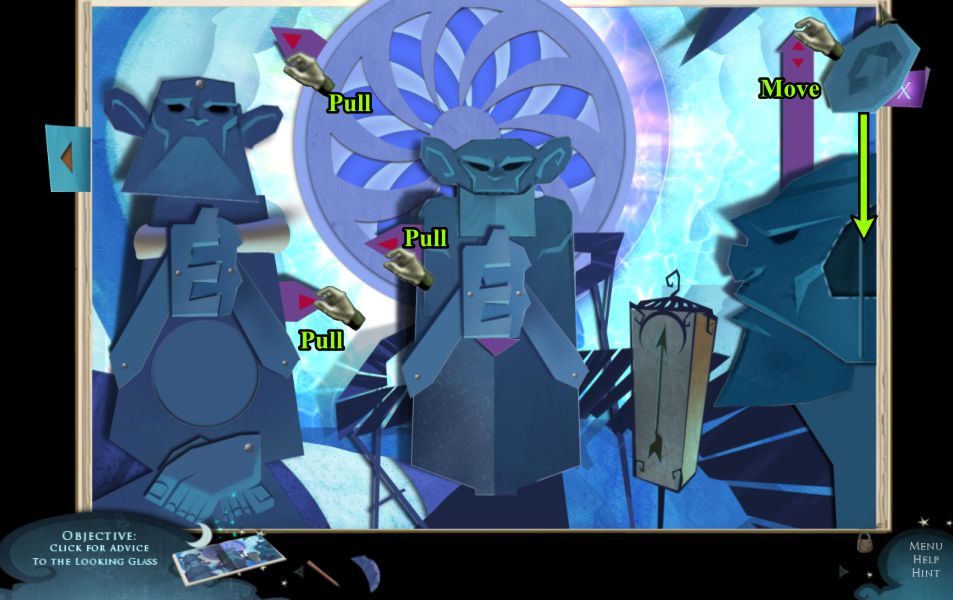
Golden Book Page 7
Pull the tabs shown in the screenshot.
Move the right Monkey's ear to its proper place.
Screenshot
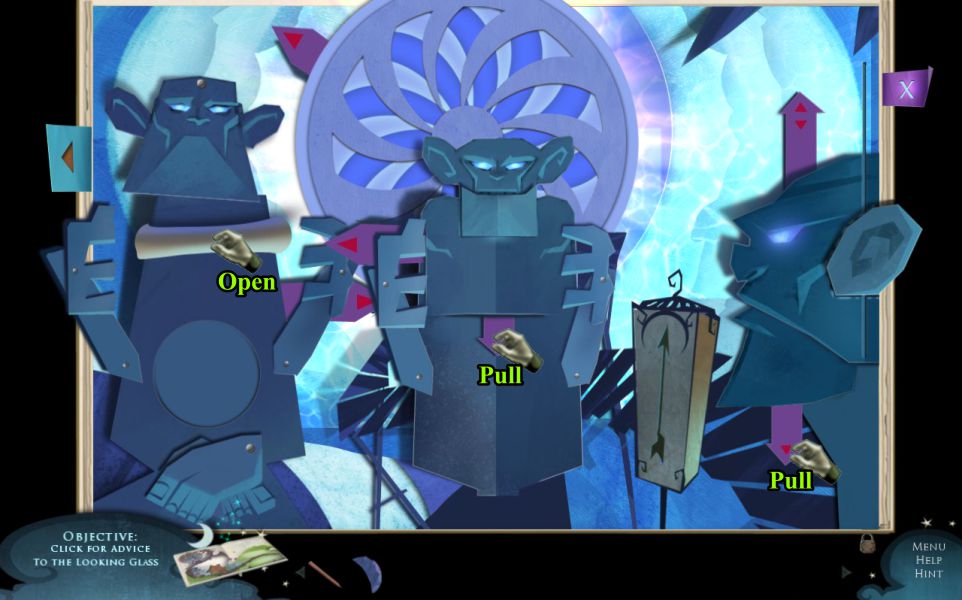
Open the Scroll and pull the other two tabs shown in the screenshot.
Screenshot
Use your pencil to draw the arrow on the scroll and collect all the Beetles roaming around. The Beetles fill up the arrow in the lantern.
Collect the Pig.
Screenshot
Take the Bow, move the Monkey's head, and take the Pig.
Screenshot
Move the left Monkey's foot when the scroll closes, and collect the last two Beetles.
Take the Arrow and go to the pool across the Magical Bridge.
Screenshot
Cat Pool Lens Mini Game
Place your Glass Shard to trigger a Mini Game.
Your goal is to merge all three cat pictures into one using the knobs surrounding the lens. See the screenshot for the solution.
Watch the cat get rid of the rats. Now that the rats are gone, you can cross the bridge.
Screenshot
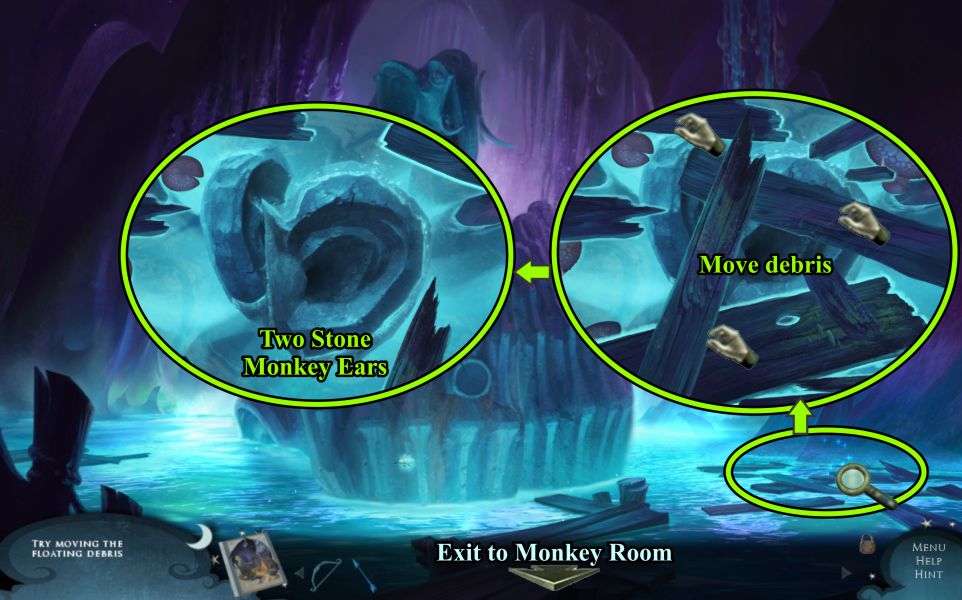
Elephant Pool
Zoom in on the pool and move all the debris around until you uncover two Stone Monkey Ears.
Take the ears and go to the Monkey Room.
Screenshot
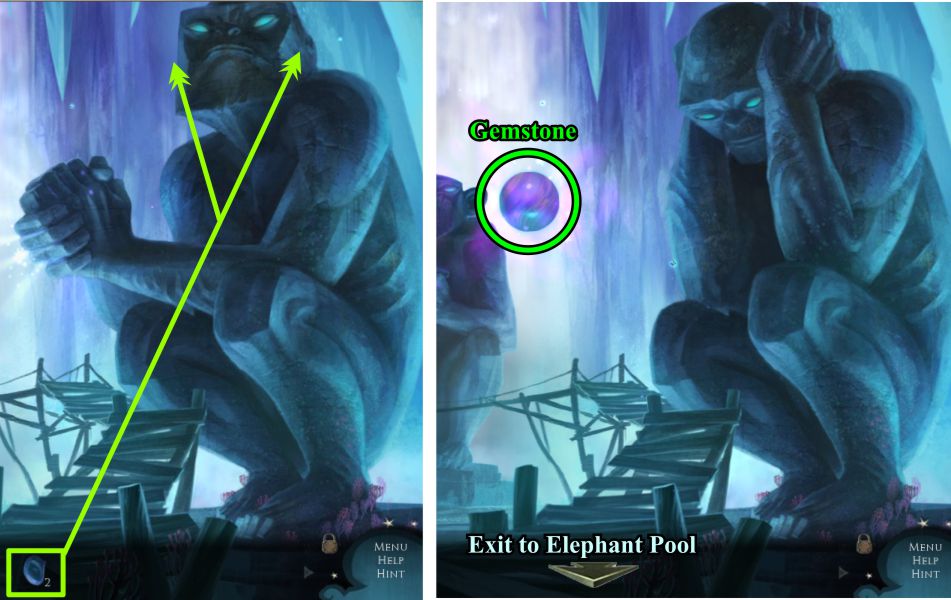
Monkey Room: Hear No Evil
Zoom in on the Monkey at the right and place the ears.
He will give you a Gemstone.
Return to the Elephant Pool.
Screenshot
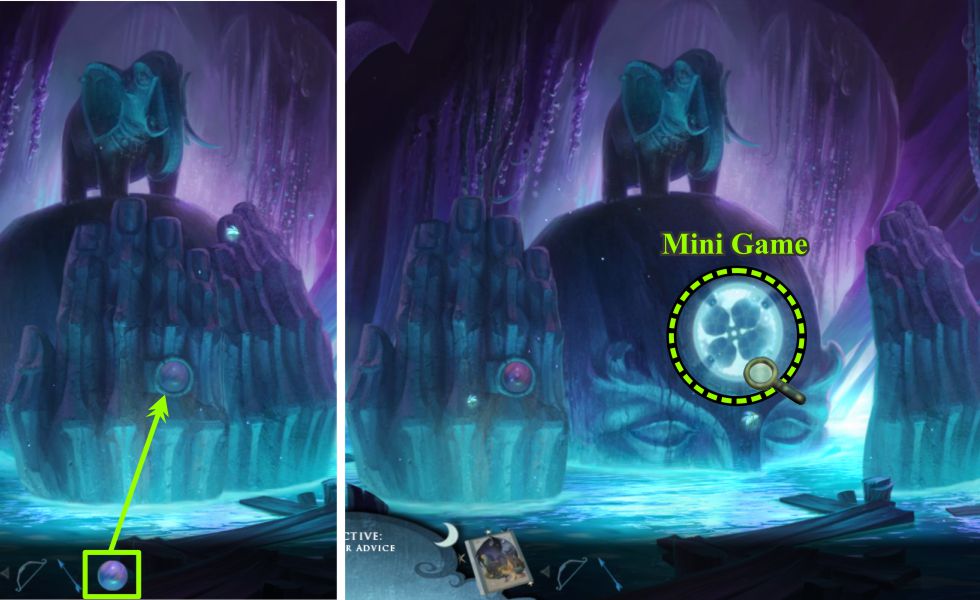
Elephant Pool
Place the Gemstone on the ring on the Giant's finger.
The hands will part with a circle in the middle of his head. Zoom in for a Mini Game.
Screenshot
Match Mini Game
There are 4 circles and 5 mini circles within, plus another set of 4 reverse circles when you use the knobs to rotate them so they are visible.
You can only rotate the circles when the knob is near them and lighted.
Your goal is to match related objects as shown in the screenshot.
You can match objects from a circle that is visible with its reverse circle by choosing the object in the visible circle, then turning it to make your next choice.
Once you have completed the game, the elephant will produce a Stone Monkey Mouth.
Exit to the Monkey Room.
Screenshot
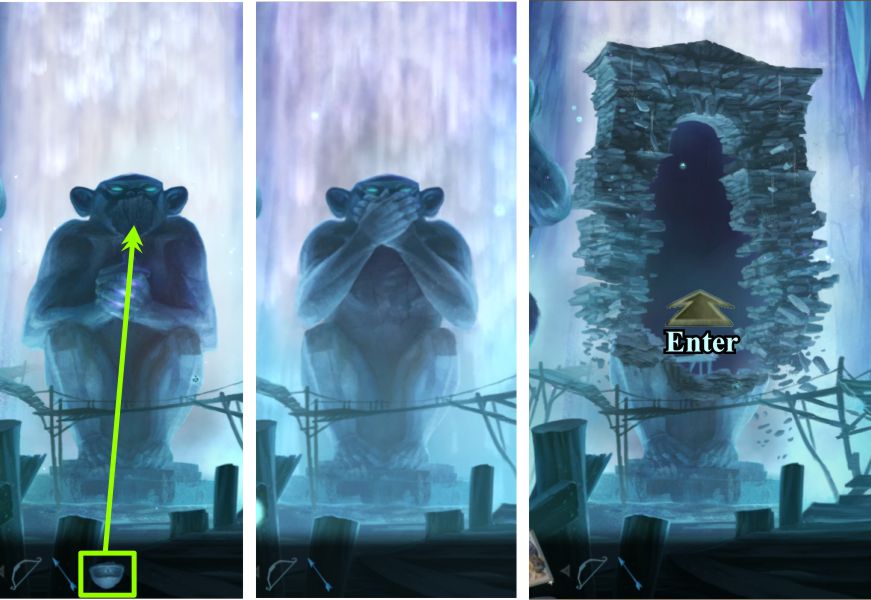
Monkey Room: Speak No Evil
Give the Stone Mouth to the center Monkey, who will transform into an archway above his pedestal.
Go through the archway.
Screenshot
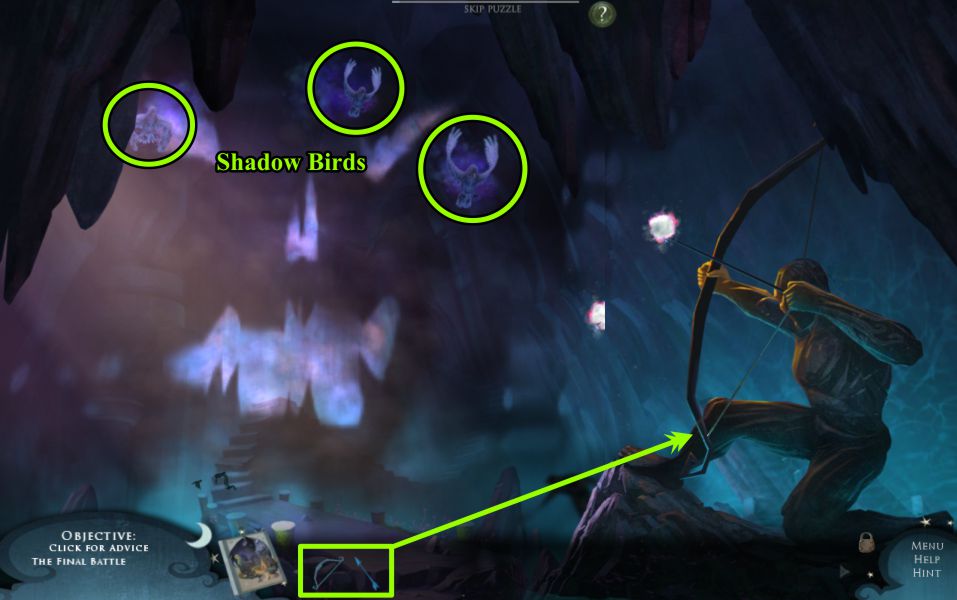
Archer and Shadow Birds
Give the Bow and Arrow to the Archer to trigger a Mini Game.
Your goal is to make all three Shadow Birds disappear.
Each time you miss, the birds grow stronger, so take careful aim by moving the Archer's arm up and down.
It will take more than one shot at each bird to get rid of them. Don't give up, because you will get an Achievement for your efforts.
Screenshot
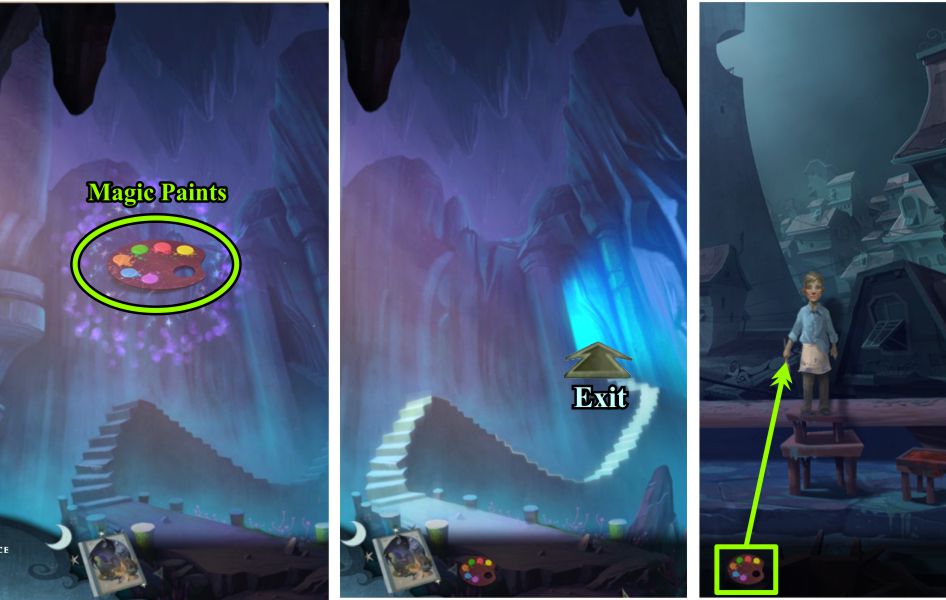
Magic Paints
Collect the Magic Paints and climb the transformed stairs.
Give the Mage Paints to the boy you meet.
Screenshot
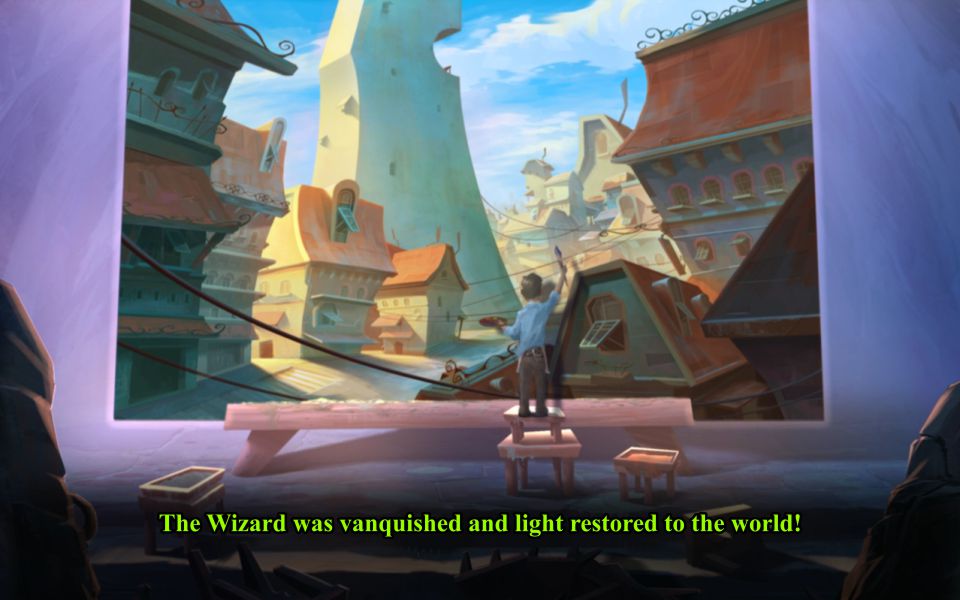
A World Restored
The Boy will once again be able to paint in a world that has been restored because the Wizard was vanquished.
Screenshot
Congratulations, you have completed the Collector's Edition of Drawn: The Trail of Shadows.
The story doesn't seem to end here though, if you notice the vacant space for an additional painting on the wall.
Posted by: Jazz |
November 8, 2011 5:29 PM
|
November 8, 2011 5:29 PM