
Macabre Mysteries:
Curse of the Nightingale
Platform: Mac, Windows

![]() Blue Tea Games, a studio that knows its hidden object adventure genre better than a chef knows how to boil water, is at it again. Following series such as Enlightenus, Dark Parables, and Forgotten Riddles is a tough job, but Macabre Mysteries: Curse of the Nightingale definitely holds its own, crafting an environment filled with intrigue, danger, mystery, and loads of shiny objects to find. It's a hidden object/casual adventure game for the most discriminating fans, and it never fails to impress from beginning to end.
Blue Tea Games, a studio that knows its hidden object adventure genre better than a chef knows how to boil water, is at it again. Following series such as Enlightenus, Dark Parables, and Forgotten Riddles is a tough job, but Macabre Mysteries: Curse of the Nightingale definitely holds its own, crafting an environment filled with intrigue, danger, mystery, and loads of shiny objects to find. It's a hidden object/casual adventure game for the most discriminating fans, and it never fails to impress from beginning to end.
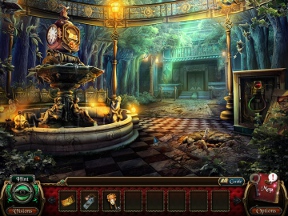 The Nightingale Theater was destroyed by a devastating fire over 40 years ago, leaving charred ruins and destroyed careers in its wake. You receive a golden ticket in the mail from your grandfather inviting you to attend what promises to be an amazing ballet performance. Unfortunately, the only ballet you see is a malefic ghost who stalks the theater grounds, following you from room to room and causing havoc. On top of that, you notice several other apparitions who stalk the area, and before you know it, you're trapped in the haunted theater, alone and frightened. Some dance performance this turned out to be!
Gameplay is a balanced mix between item hunting, puzzle solving, and hidden object scenes. Much of your time is spent moving from area to area, clicking on sparkling spots to get more information or to take a closer look at something important. There's a surprising amount of inventory items just sitting on the ground. You have to keep your eyes open for things on just about every screen, clicking on anything that seems even remotely interesting. You never know when it'll come in handy!
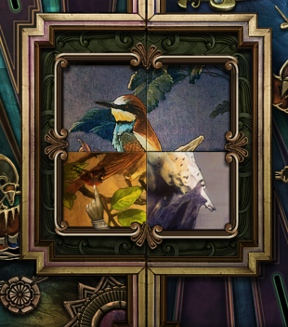
Hidden object scenes are a definite strong point in Macabre Mysteries, and even if you're "meh" about hidden object games in general, this game provides some honestly engaging item hunts. Instead of looking for names from a list below, you're assembling pieces of things based on pictures at the bottom of the screen. Some of objects are genuinely challenging to find, and instead of storing a series of names in your head while your scour the screen, you have to take a different approach to each area. Things like "a strappy thing with gold bits on the end", "swirly golden whatsit", or "cheese grater" will become a common shorthand while you search for items, but it's a good time and a great way to approach hidden object scenes.
 Analysis: If you're familiar with Blue Tea Games, especially the studio's Dark Parables series, you pretty much know what to expect with Macabre Mysteries: Curse of the Nightingale. As far as gameplay and general structure is concerned, of course. Storywise and puzzlewise, Macabre Mysteries is on its own, and it's an experience even hidden object veterans will love jumping into. The game even includes a few nice additions such as "morphing" objects and a bit of time travel-esque abilities!
The hint system in Macabre Mysteries is worth talking about, as it's very precise and allows for a lot of directed information to be spilled your way. Within hidden object scenes, the hint button shows you precisely where an item is stashed. Fair enough, pretty standard, there. Outside, though, you get to drag inventory items to the hint spot and a little window appears showing you where that item can be used. Pretty nice! Also, the map has less obvious hints that points you to the area you should be investigating. You can basically "cheat" your way through most of the game, but nobody's forcing you to use those hints!
Macabre Mysteries: Curse of the Nightingale gets a lot of the more technical aspects of a hidden object game spot-on perfect. It's easy to play, has a storyline that's a bit trite but workable for the genre, and features plenty of mini-games and smart puzzles you keep you engaged from beginning to end!
A Collector's Edition is also available. It contains exclusive bonus gameplay and an in-game strategy guide. Remember that Big Fish Game Club Members pay only $13.99 for Collector's Editions (or 2 club credits), and collector's editions count 3 card punches of 6 total needed for a free game.
![]() Windows:
Windows:
Download the demo
Get the full version
Also available: Collector's Edition
![]() Mac OS X:
Mac OS X:
Download the demo
Get the full version
Also available: Collector's Edition


Walkthrough Guide
(Please allow page to fully load for spoiler tags to be functional.)
Macabrie Mysteries: Curse of the Nightingale walkthrough
General Information
Title Screen
The title screen lets you start a new game, view game options, view credits, select a new player, and exit the game.
If you have the Collector's Edition of the game, you may also choose to play the Extra Game or view Bonus Content. The Extra Game Play is available only after beating the main game, and the bonus content is only available after completing the extra content.
You can also create new player profiles, or select between existing profiles, by clicking the Player button at the right of the screen. This lets different players play the game without impeding each others experience.
Options include music and sound volume, toggling full screen mode, and viewing a quick help page for instructions.
Gameplay
At the beginning of the game, you may choose to have a brief tutorial. This doesn't add any extra gameplay, but instead guides you through the first few scenes of the game.
Controls are entirely mouse-based. Like other games of this type, click to move or interact with a scene, person, or object. Be on the lookout for "sparkles," which will guide you to areas of interest.
Your cursor will change over certain objects, depending on what can be done with that object.
Arrows indicate that you can move on to a new scene.
Magnifying glasses indicate places where you can take a closer look, or areas of general interest.
Index fingers indicate objects that can be picked up.
Speech bubbles indicate characters you can talk to.
In the lower left corner is a green hint meter. You can use this to drag items from your inventory to find how they might be used. Clicking this will also give hints about the location of items in hidden object scenes.
Below the hint meter is the Visions button, which you can use to review all the "Night of the Fire" cutscenes you have seen.
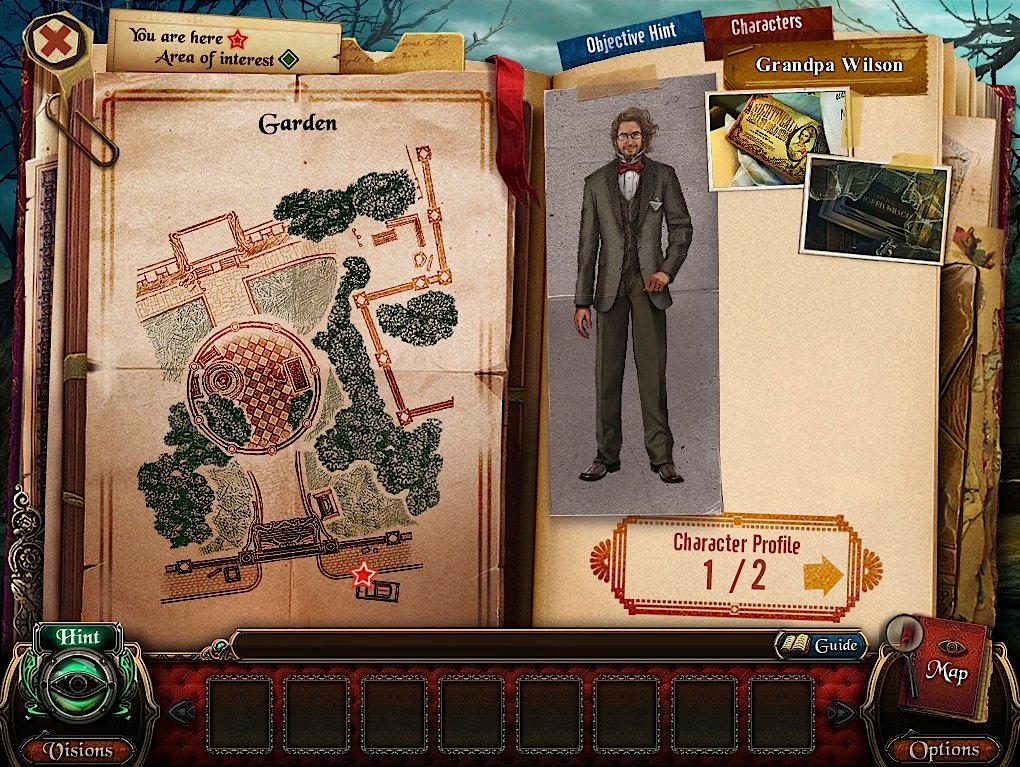
In the lower right corner is your Map.
The red star on the left page of your mapbook shows your current location.
A green square on a room indicates an area of interest, such as a new hidden object scene.
You can hover over rooms that you have visited to get their names.
You can also click on blue arrows to page through places you have already visited.
This book also records missions and character profiles on its right side.
Below the Map is the Options menu. These are the same Options that are available on the Title Screen, with the additional option of returning to the title screen. The game saves automatically, so you can always return to your previous spot in the game.
To the left of the Map is the Guide (if you have the Collector's Edition), which will give you puzzle solutions and the like.
Your inventory bar is at the bottom. Scroll through it with the arrows on the left and right. Click an item, then click where you wish to use it on the screen.
Screenshot
Hidden Object Scenes
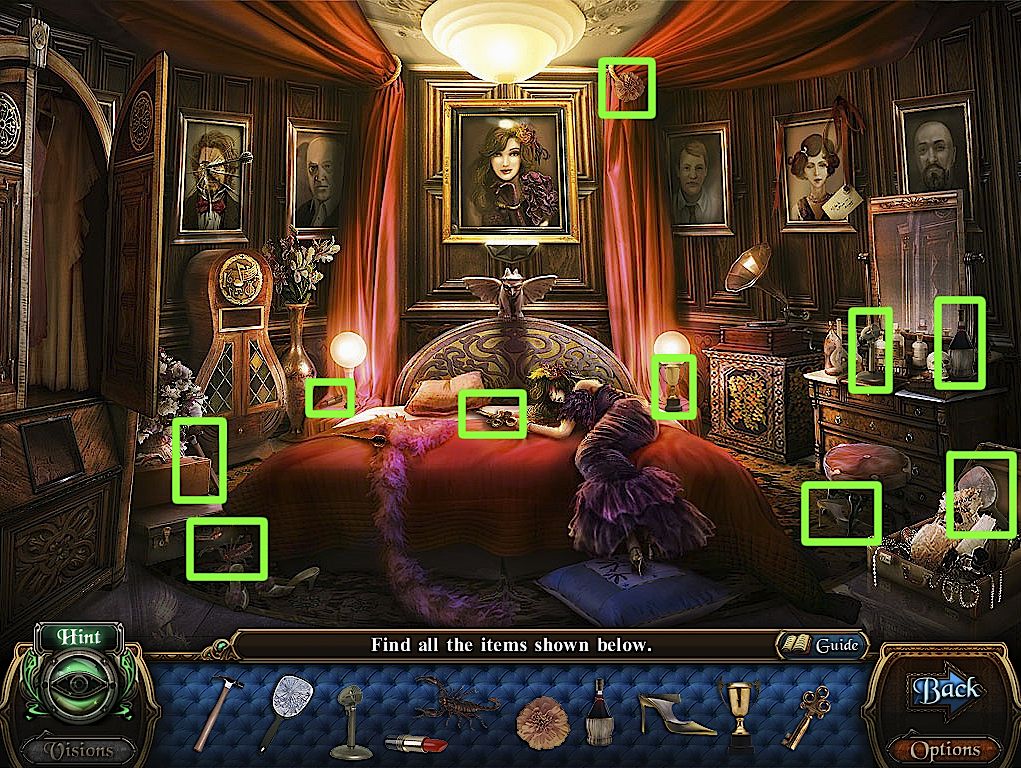
For all hidden object scenes, simply look for the items shown at the bottom of the screen and click on them when they are found.
Hidden object scenes culminate in a single item for your inventory. Click on the item to collect it.
If you resort to clicking rapidly on the screen, the game will disable your cursor for a few seconds.
Use the hint meter to reveal the location of one hidden object. This meter recharges over several seconds. The more Macabre Objects you find during the course of the game, the faster the hint meter recharges.
There are two sorts of hidden object scenes in Curse of the Nightingale.
Most scenes involve collecting pieces of a single object. These pieces are grouped into three larger pieces, which are finally assembled into the sought-after item at the end of the scene. It does not matter what order you collect the smaller pieces.
For these scenes, it can be a little tough to find objects since they are often abstractly shaped. It can be helpful to pick up on how these objects don't match their background. For example, perhaps the colors or textures don't match, or maybe there is an absence of symmetry where there should be.
Note also that these objects are often not to scale.
The other sort of hidden object scene occurs whenever you click the blue Vision icons that appear periodically. These are much more like traditional hidden object scenes, with concrete items to find.
During these scenes, you can also examine certain parts of the scene and hear what certain characters have to say. This isn't necessary but can help to advance the story.
Minigames
You can skip minigames, but this will disable your hint features for five minutes.
Three sorts of minigames occur frequently throughout the game.
The first occur whenever you click the red "Night of the Fire" Vision icons that appear periodically. These ask you to switch the order of five pictures so they form a sequence.
For the first of these puzzles, switching between two pictures is a simple matter of pulling the chord between them. For the rest, switching is a little more complicated, as described in the sections on the individual puzzles in this walkthrough.
Focus on starting from the left and working your way towards the right. You will inevitably need to disrupt your order to put certain pieces in the proper place, but by remembering how you disordered the pictures, you can reverse the steps and restore them.
Pull the chord on the right to check if your solution is correct.
Pictures will light up green from left to right if they are in the proper spot. If a picture is wrong, it will light up red, and the game will stop checking your solution. In this way you can try out different solutions if you are unsure of the proper order.
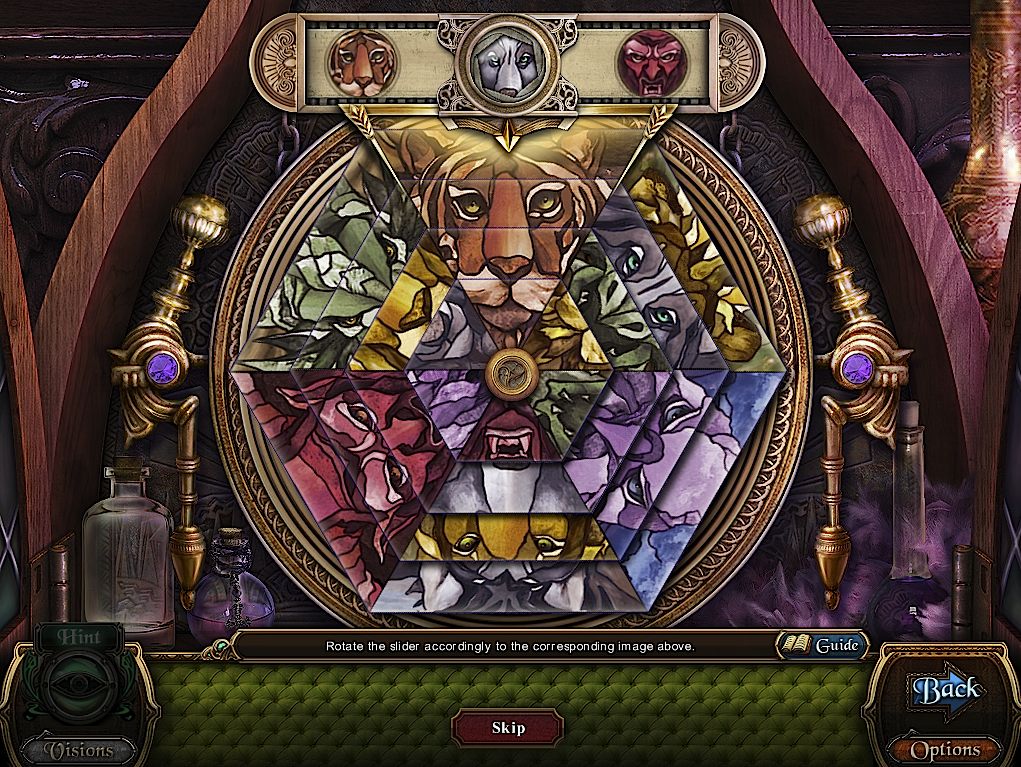
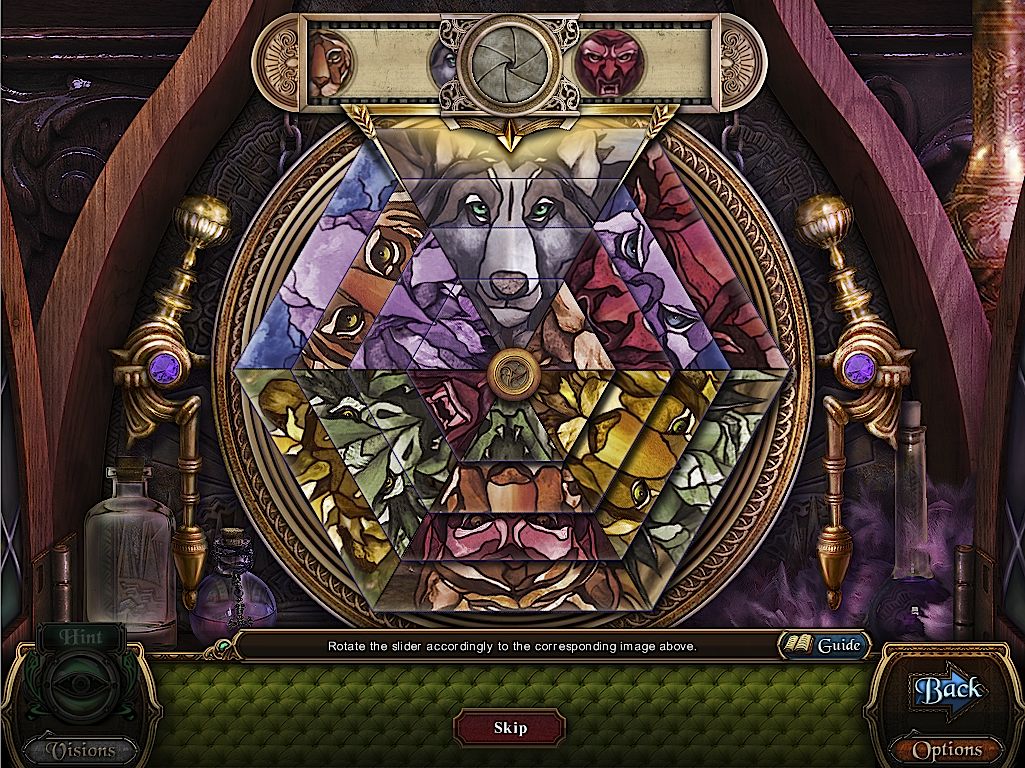
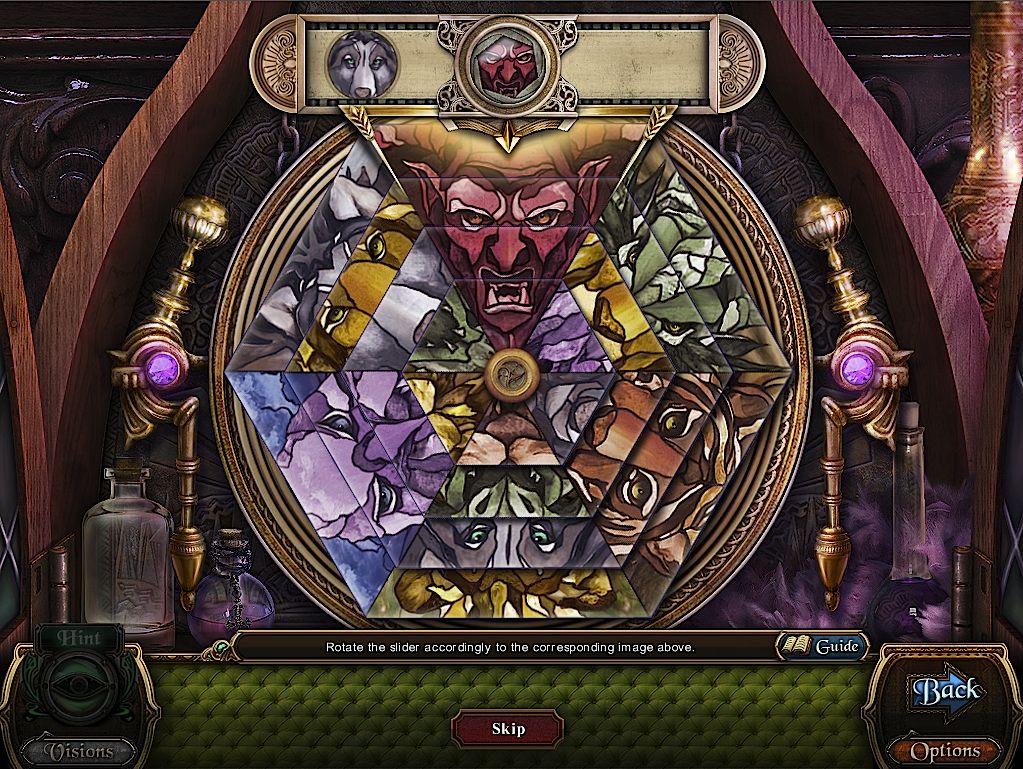
The second sort of puzzle often occurs when you need to open a door or safe. These involve sliding tiles across a diamond-shaped field, so the pictures on the tiles in certain rows are all related in some way.
These puzzles are similar to sliding tile puzzles you may have seen before, but are a little easier since not every tile has to be properly positioned.
The easiest way to solve these sorts of puzzles is to start with one row, say the row in the top left, then complete the row below that, and so on. Start by putting the tiles in the proper relative position anywhere on the board, then file them into place.
The third sort of puzzle occurs in each of the first four performance stages, and once just outside of Rose's stage. For the first four, it is to collect the four dancing figurines that are needed to activate the fifth.
You need to collect four to six of a certain type of item to activate these puzzles. The solution involves putting these items in their proper place. Often this is as simple as matching pictures or colors.
Click one item, then another, to switch their places.
Other sorts of unique minigames occur in the game, and are described individually in the walkthrough.
Main Walkthrough
Chapter 1: The Nightingale
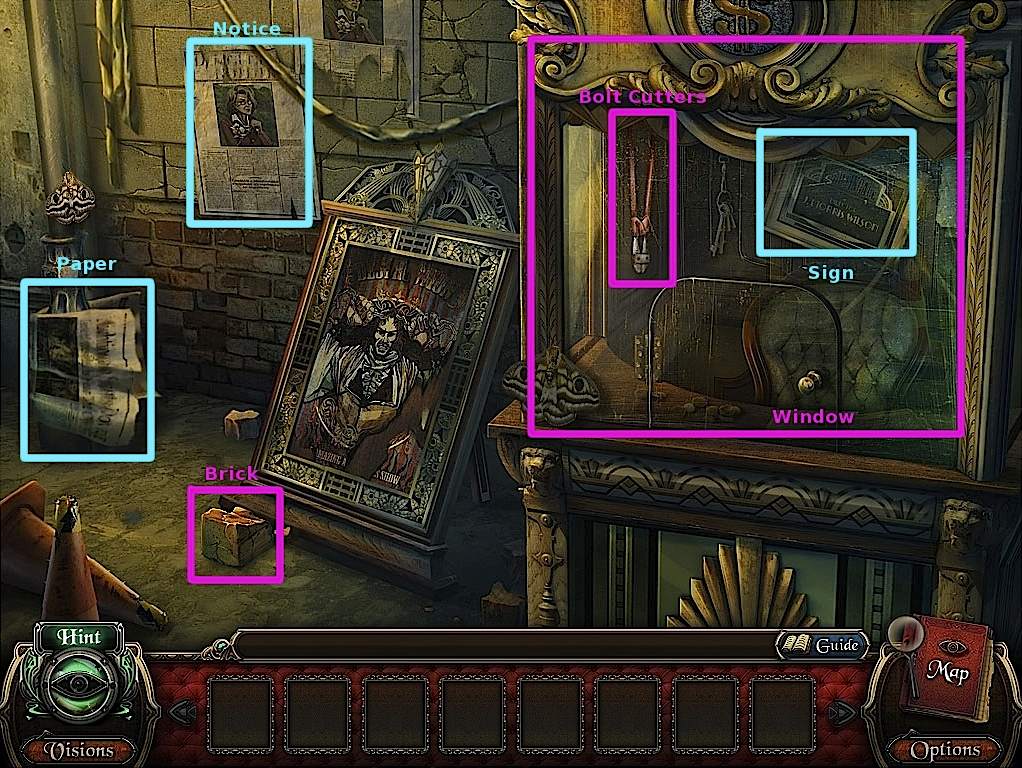
Theater Front/Ticket Booth
Click the ghost.
Cutscene. Go left to the ticket booth.
Look at the newspaper and posted notice.
Take the brick on the ground near the poster and use it on the booth glass.
Take the bolt cutters and look at the sign in back of the booth.
Screenshot
Go back to the main gate.
Zoom in on the car and take the golden ticket.
Take the hammer leaning on the barricade in front of the street.
Zoom in on the gate.
Screenshot
Use the hammer on the lock, then the bolt cutters on the chain.
Enter the opened gate.
Courtyard/Theater Entrance/Announcement Area
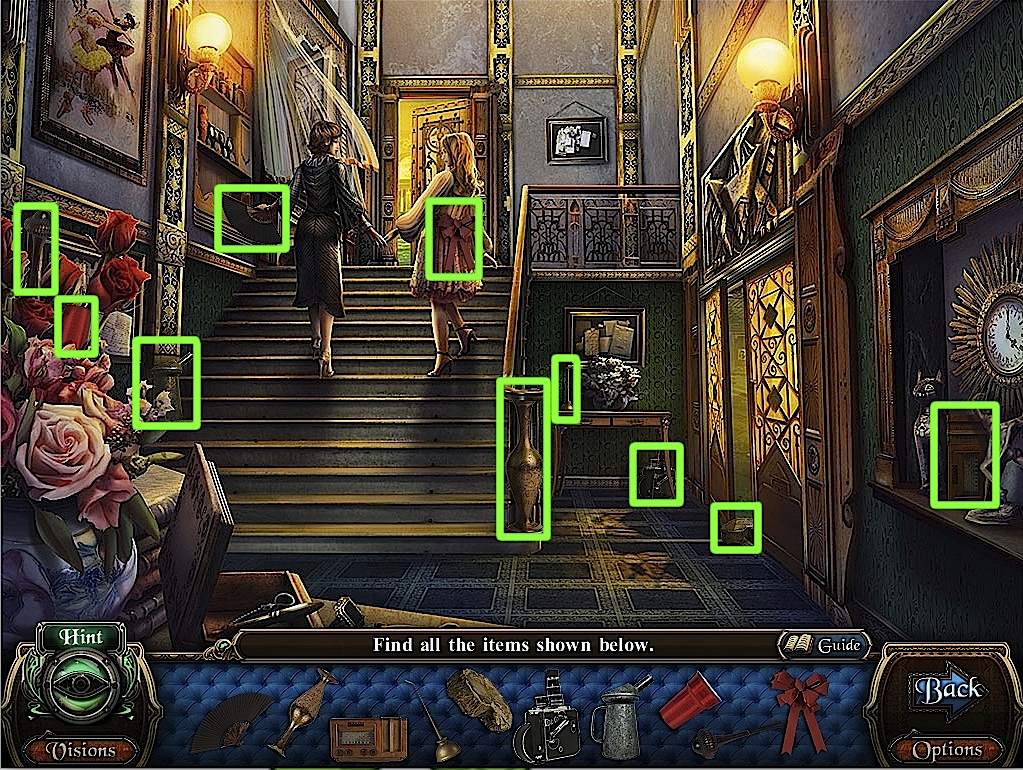
Click on the fountain. Play the Hidden Object scene for an Access Card.
Screenshot
Go forward to the theater entrance.
Zoom in on the bail and take the electrical tape.
Go right to the Announcement Area.
Click on the figure standing in the gap in the wall.
Zoom in on the glowing trinket on the ground, then click the light.
Click the blue Vision icon. Play the hidden object scene for a shovel.
Screenshot
Go back to the courtyard.
Courtyard/Gate
Use the shovel on the dirt pile.
Take knife from body. Examine the slippers. Zoom out, then go back to the gate.
Cutscene. Examine the gate, then take the rod.
Examine the poster to the right.
Click the pamphlet display. Play the hidden object seen for the Peking Opera Scholar hat (oriental mask 1/5).
Screenshot
Turn around again. Use the rod on the backup power box on the right.
Use the electrical tape with the exposed wires.
Go to the Announcement area.
Announcement area/Theater Entrance
Click on the bench. Play hidden object scene to get Door Handles.
Screenshot.
Go left to the theater entrance.
Click the bundle again. Use the knife to reveal the machine.
Use the access card on the machine.
Click on the door for two mini games.
Click throught the tiles until you get a complete picture.
You are looking for a picture of the nightingale.
Screenshot
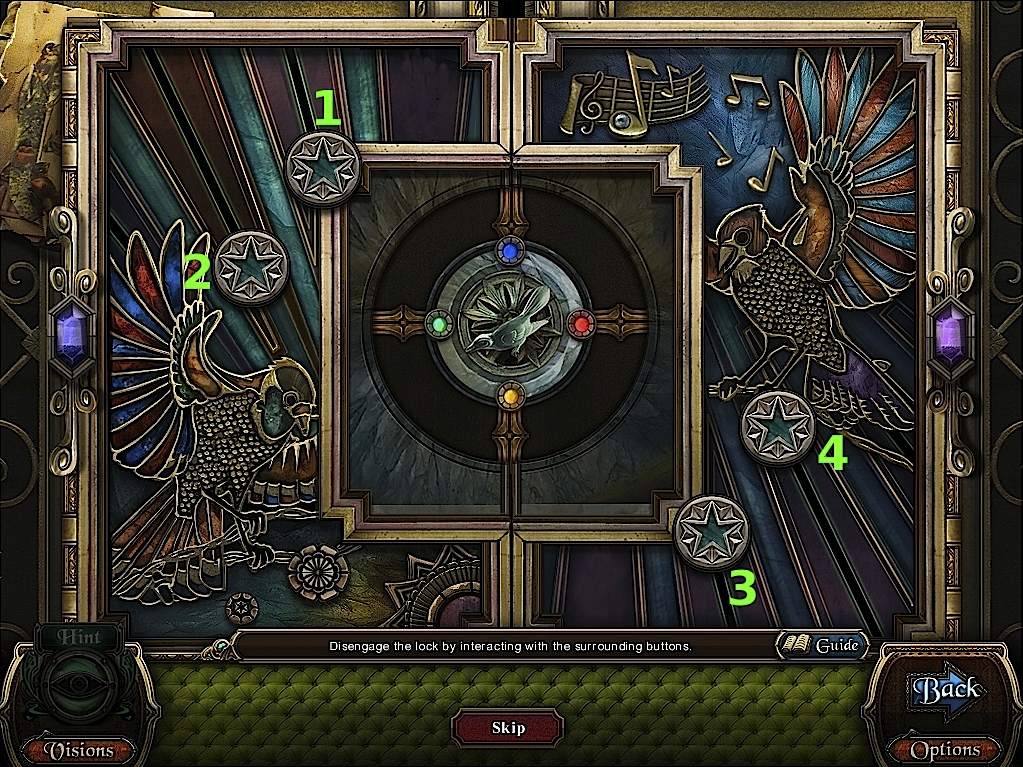
Now, unlock the mechanism by clicking the four buttons. They are numbered in the screenshot below.
Button 1 activates the blue, turquoise, and yellow lights (North, West, and South).
Button 2 activates the blue and turquoise lights (North and West).
Button 3 activates the turquoise and yellow lights (West and South).
Button 4 activates the turquoise and red lights (West and East).
Screenshot
After being sure that none of the lights are lit, click Buttons 1, 4, 2, 3, and 1 again.
Zoom in on the door. Use the door handles on the exposed areas.
Enter the open doors.
Lobby/Solo Show Theater
Cutscene. Take the crank leaning against the right stairway.
Enter the center door.
Take the Bird Emblem Half from the left side of the stairs.
Examine the machine on the right.
Exit to the lobby, then enter the upper right doorway.
Guest Hall/Dining room
Take rust remover under Rose's portrait on the right.
Take oriental mask (2/5) under "Hog-dini's" portrait on the left.
Screenshot
Enter the left door.
Take the sledgehammer from the floor under the easel on the left side.
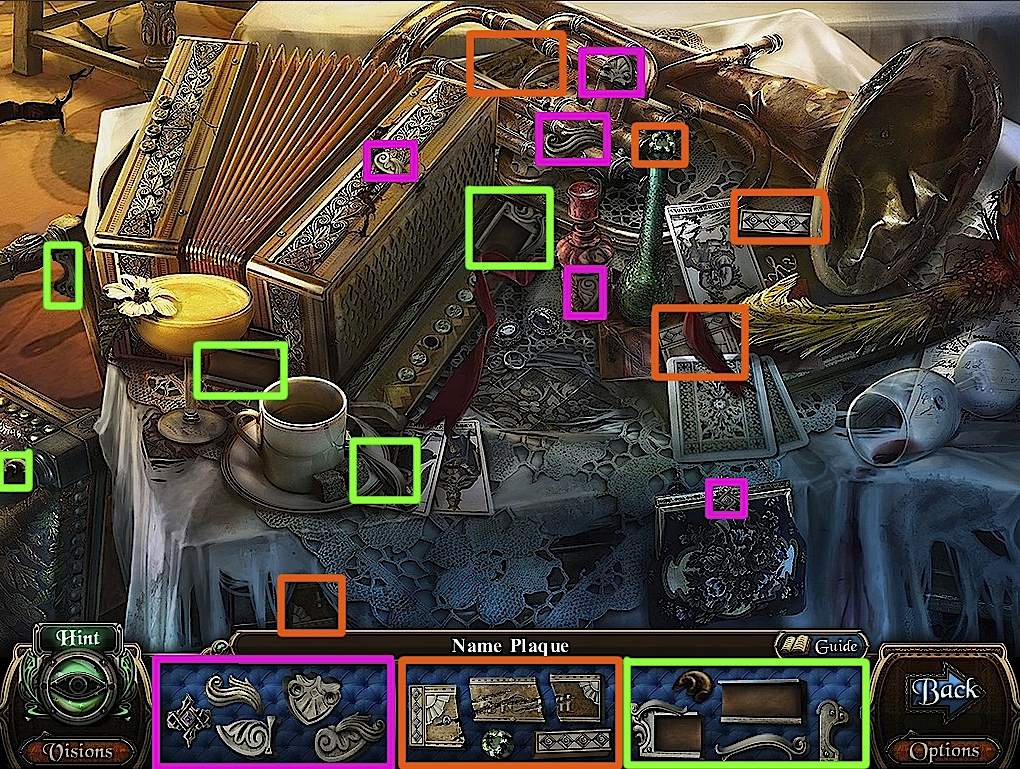
Examine the table. Finish the hidden object scene to get a Name Plaque.
Screenshot
Finishing the Painting
Go back to Lobby. Use the sledgehammer on the brittle wall on the left, under the leftmost statue, then take the painting piece.
Go to the guest hall. Use the name plaque on the slot below the painting on the left. Use the painting piece to finish the painting.
Take perfume vial from beneath the painting.
Go back to the lobby, then enter the door on the left.
Office Hallway/Lobby
Click on the man, then back away.
Cutscene. Click the plant on the left and take the key.
Zoom in on the bottle in front of the debris.
Return to the lobby
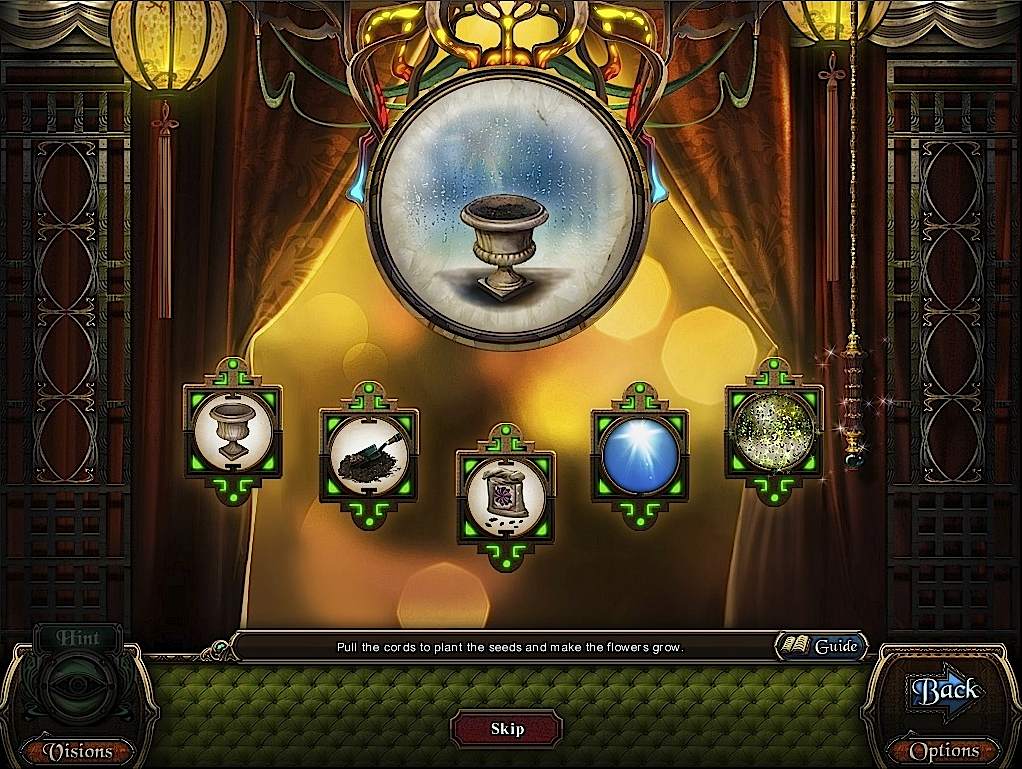
Use the key with the crystal box, then click the red Vision icon for a minigame.
Arrange the pieces in the correct order. Click cord between icons to switch places. Click cord on right to activate.
pot, dirt, seed, light, raindrops
Screenshot
Cutscene. Get the green ticket for the Peking Opera Show.
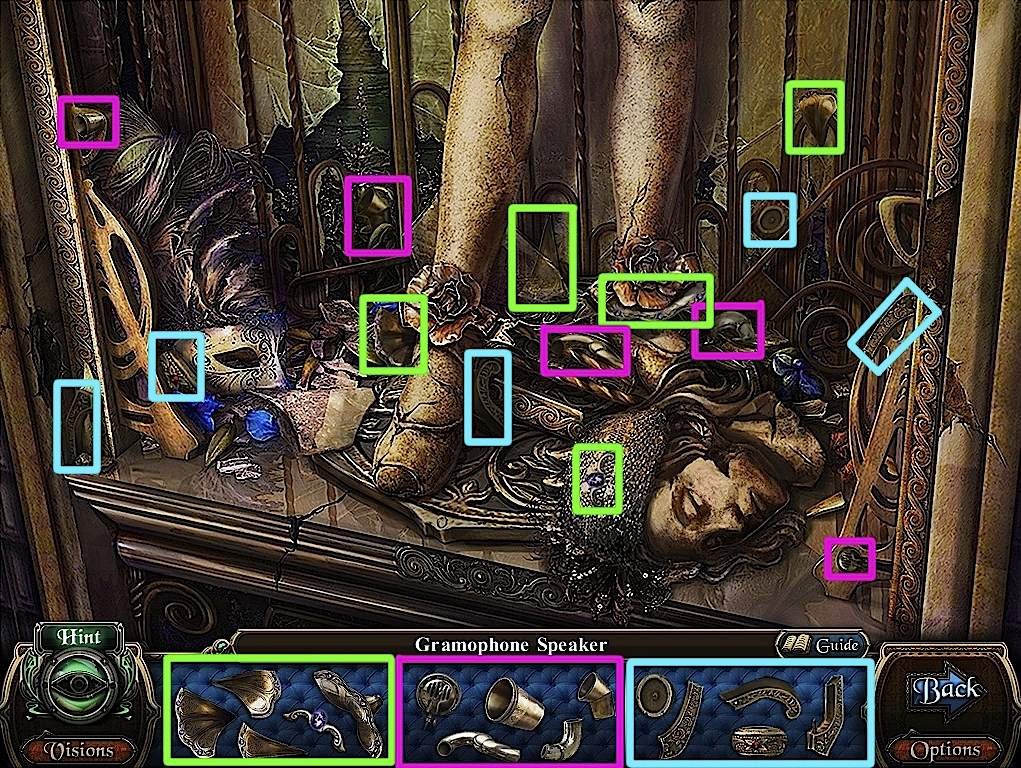
Click the broken statue on the right. Play the hidden object scene for a Gramophone Speaker.
Screenshot
Go back to the dining room.
Dining room
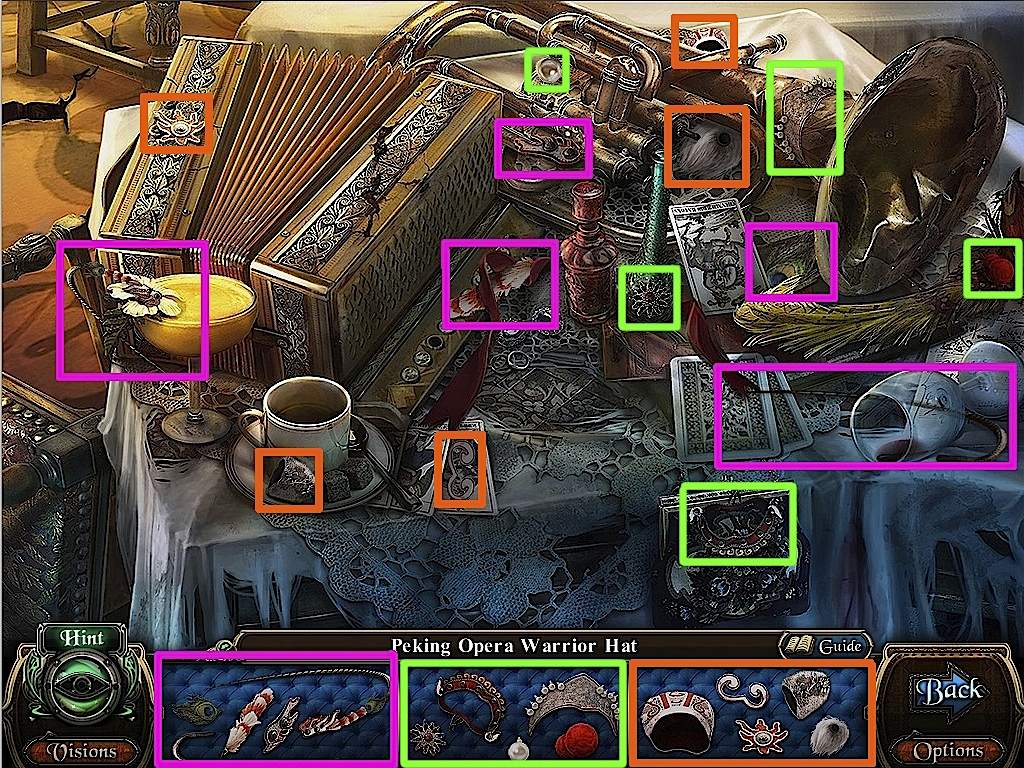
Replay the hidden object scene on the table for the Peking Opera Warrior Hat (oriental mask 3/5).
Screenshot
Place the handle and speaker on the Gramophone. Take the ruby from the open drawer.
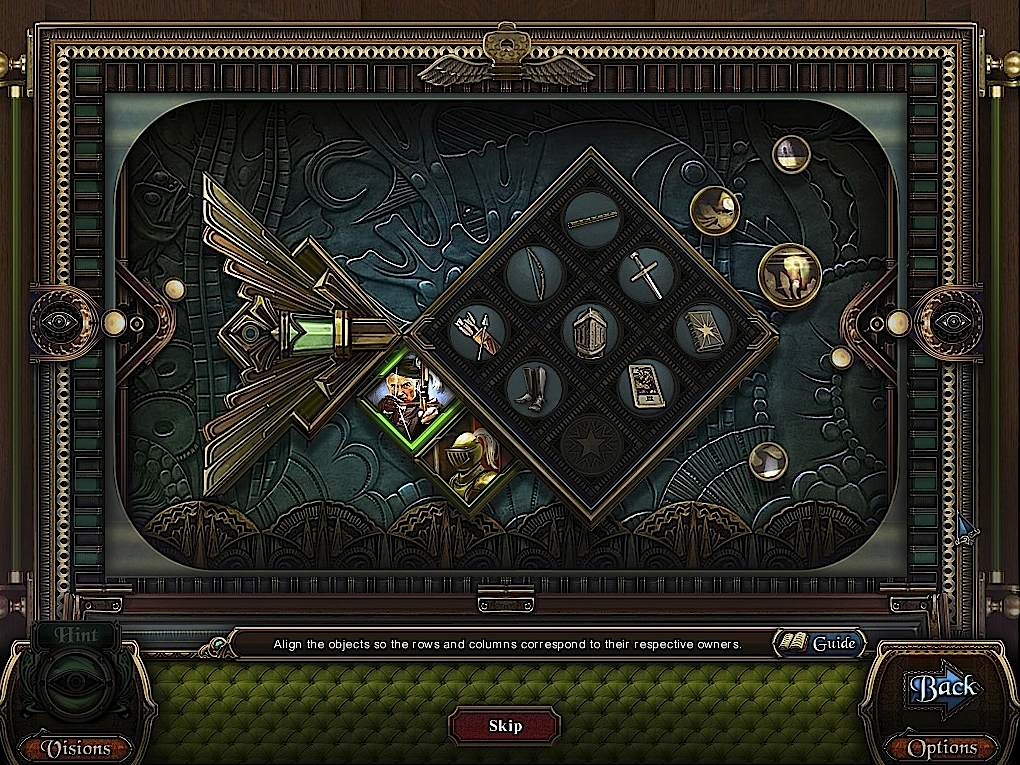
Go to the guest hallway, then look at rear door. Use the ruby on the lion's other eye.
Click the open panel for a minigame.
Move tiles to match their owner.
Archer: bow, quiver, flute.
Knight: sword, helmet, boots.
Screenshot
Cutscene. Enter the rear door.
Chapter 2: Peking Opera Show
Rest Area
Take the mask (4/5) from the wall near the aquarium.
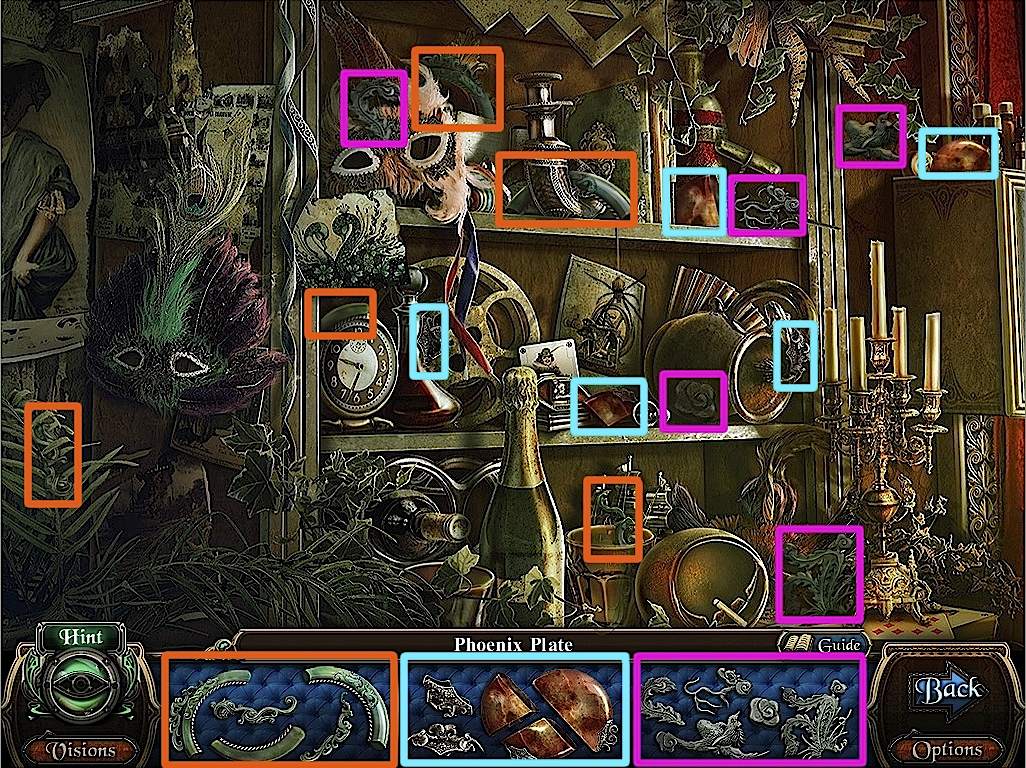
Click on the shelf in the back left. Play hidden object scene to get a Phoenix Plate.
Screenshot
Click the near corner of the table and take the lighter.
Enter the right door.
Oriental Performance Hallway/Rest Area
Take the pickaxe.
Go back to the Rest area. Use the pickaxe on the exposed floor and take the Black Tinted Key.
Enter the left door.
Acrobatic Show Hallway/Oriental Performance Hallway
Talk to the girl.
Click the blue Vision icon and play the hidden object scene. Take the Powder Room Key.
Screenshot
Return to the Oriental Performance Hallway.
Use the Powder Room Key on the door to the right, then enter.
Powder Room
Take the crowbar leaning against the vanity.
Take the lightstick from the sofa.
Zoom in on the vanity table. Use the dark key with the black box.
Examine the photo and take the brush.
Examine the table near the mirror.
Screenshot
Examine the trophy. Use the brush with the powder, then take it back to get a Powder Brush.
Go back to the Acrobatic Show Hallway.
Acrobatic Show Hallway
Zoom in on rocks and use the crowbar.
Talk to girl to get the Sun Emblem.
Take the rope cutting knife from where Rebecca was standing.
Go to the Oriental Show Hallway.
Oriental Show Hallway
Examine the decor above the main doorway. Finish the hidden object scene for a White Tinted Key.
Screenshot
Go to the powder room.
Powder Room
Examine the mannequin. Finish the hidden object scene for a Puppet Arm.
Screenshot
Zoom in on the vanity table. Use the White Key with the white box, then take the puppet arm.
Use the rope-cutting knife with the drapes.
Screenshot
Examine the window and click the figure.
Zoom out and take the rope from the sofa.
Exit to the Oriental Show Hall.
Oriental Show Hall/Oriental Performance Stage
Talk to Rebecca, who opens the safe.
Use the lightstick with safe.
Take the moon emblem.
Use the sun and moon emblems with the sockets to the right.
Use the puppet arms with the ticket-taking puppet.
Use the green ticket with the puppet.
Cutscene. Head through the open doors.
Screenshot
Click the seat in the front row and take the clown doll (1/5).
Click the stage. Play the hidden object scene for an Elegant Chinese Fan.
Screenshot
Go back to the Powder Room.
Powder Room/Rest Area
Use the fan on the slot in the left wardrobe. Take the fishing rod.
Screenshot
Go back to the Rest Area.
Use the fishing rod with the aquarium to get the Dragon Plate.
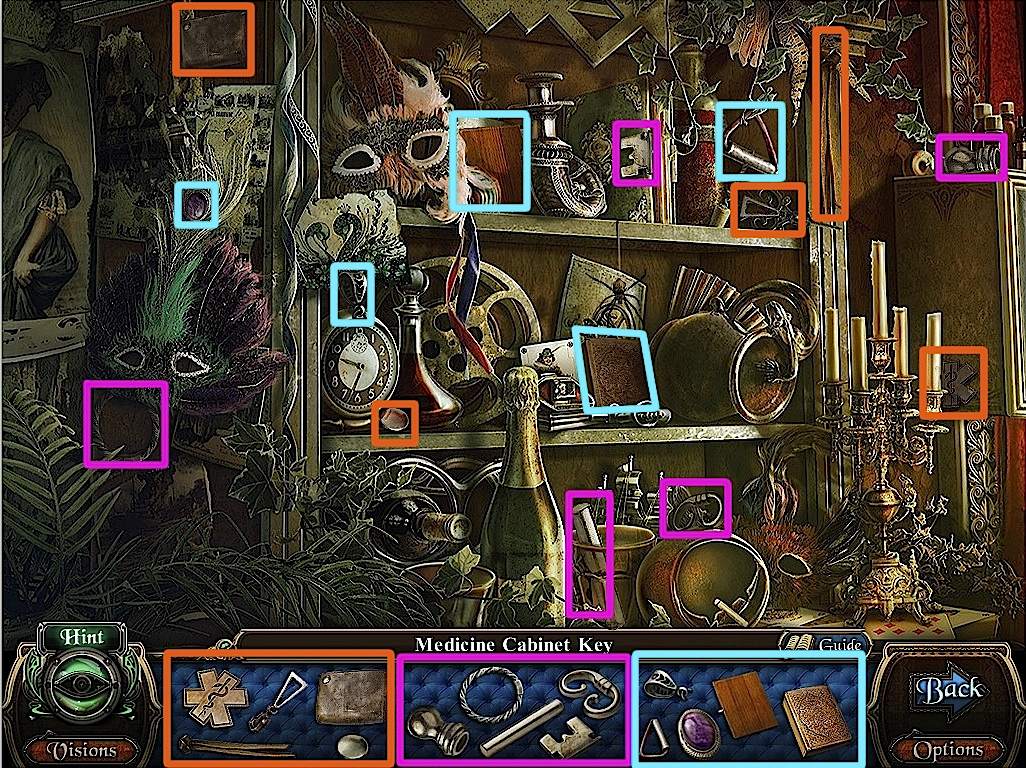
Replay the display shelf hidden object scene for the Medicine Cabinet Key.
Screenshot
Use the Key with the medicine cabinet near the shelf.
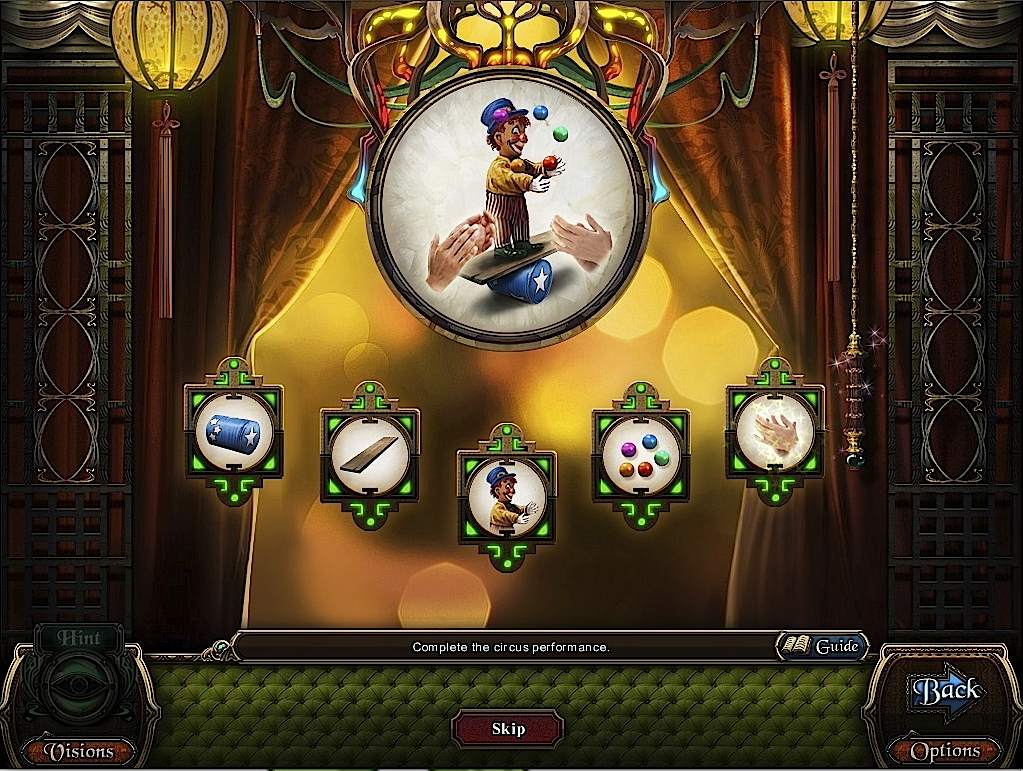
Click red Vision icon for a minigame.
Arrange the pieces in order.
Cord 1 switches icons 1 and 2
2: 1 and 3
3: 2 and 5
4: 4 and 5
barrel, board, clown, balls, applause
Screenshot
Cutscene. Get the red ticket for the Acrobatic Show.
Go back to the Oriental Stage.
Oriental Performance Stage
Zoom in on the plaque on the lower left corner of the stage.
Use the Dragon and Phoenix plates in their respective slots.
Take the mask (5/5) and chisel. Read the note.
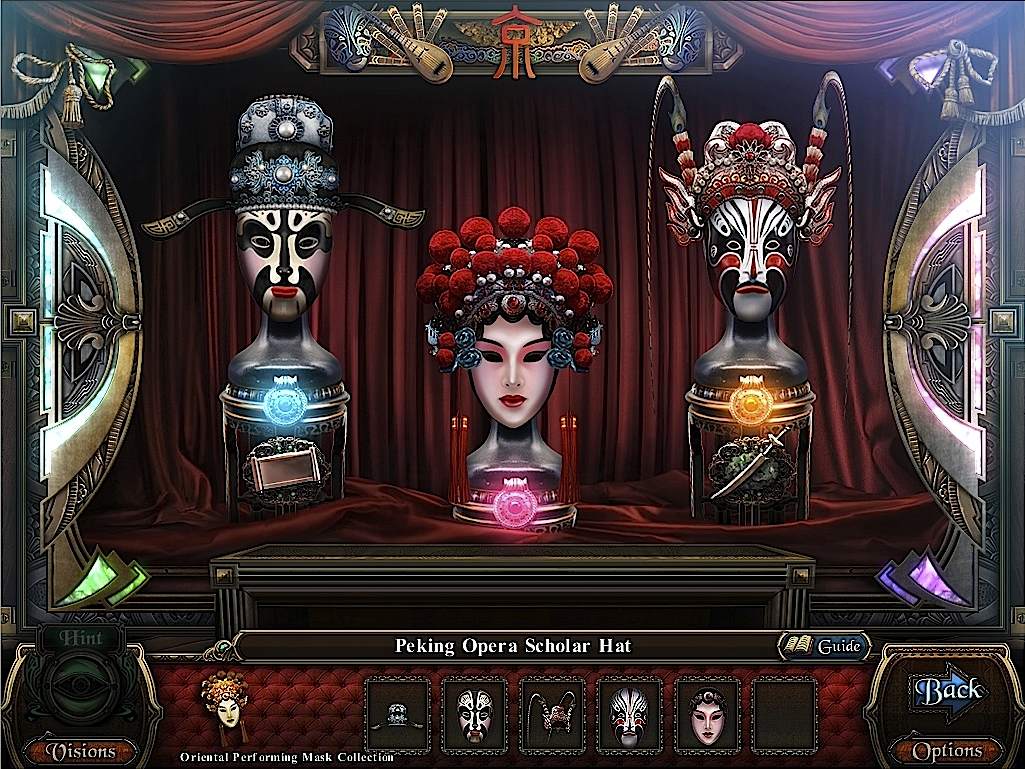
Zoom out. Click the machine on the left for a minigame.
Put the proper mask and hat on each stand, based on the symbol below. Click one, then the other, to switch two masks or hats.
The scholar is on the left, the princess in the middle, and the warrior on the right.
Screenshot
Take the Dancing Figurine (1/4).
Exit the stage.
Chapter 3: Acrobatic Destruction Show
Oriental Hallway/ Acrobat Hallway/Skylight Corridor
Replay the hidden object scene above the door in the hallway to get the Door switch.
Screenshot
Go to the Acrobat Hallway and use the door switch in its place to the right of the left doors. Exit through the open doors.
Take the clown figure (2/5) and pesticide.
Use the rope with the well. Examine the bucket. Take the Owl Eyes and read the note.
Screenshot
Exit left.
Ballroom/Skylight Corridor
Take the Instrument plate (1/5) from the left angel statue.
Examine the waxy table.
Use the lighter on the wax. Take the Clown Doll (3/5) and the chest handle.
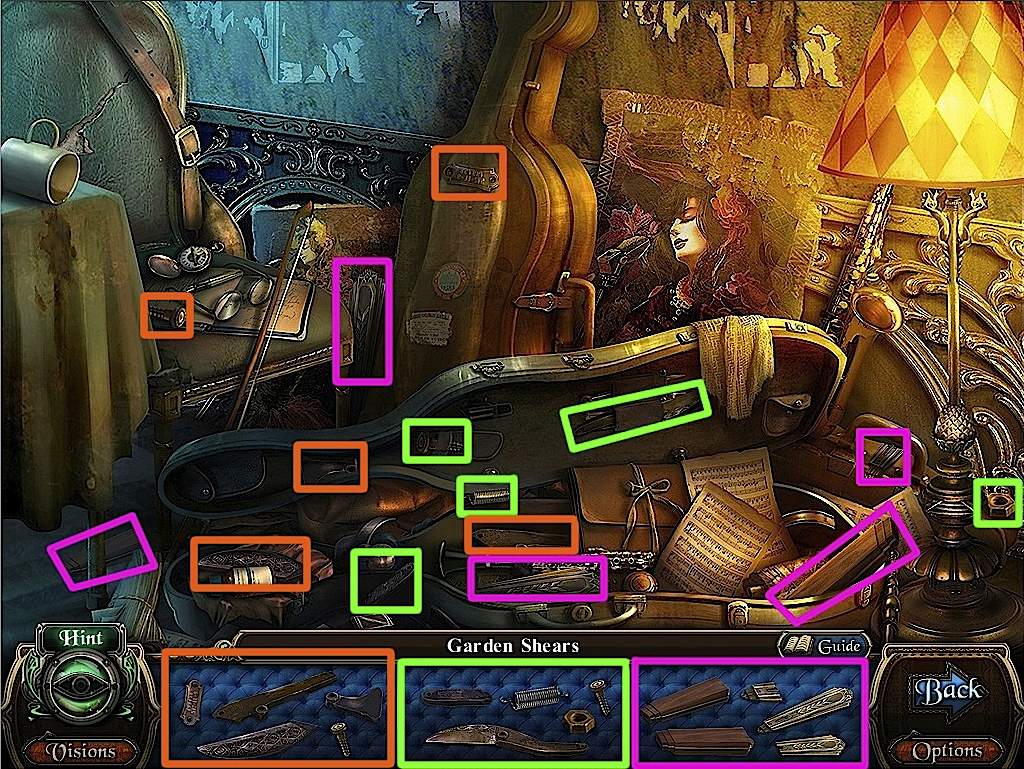
Check out the instrument cases on the right. Finish the hidden object scene for Garden Shears.
Screenshot
Return to the Skylight Corridor.
Use the shears on the plant. Take the Owl Wings.
Go to the Acrobatic Hallway.
Acrobatic Hallway/Acrobatic Stage
Use the Owl Eyes and Wings on the Owl statue above the ticket taker.
Zoom in and use the red ticket on the machine.
Enter the open doors.
Take the clown doll (4/5) from the right side of the stage.
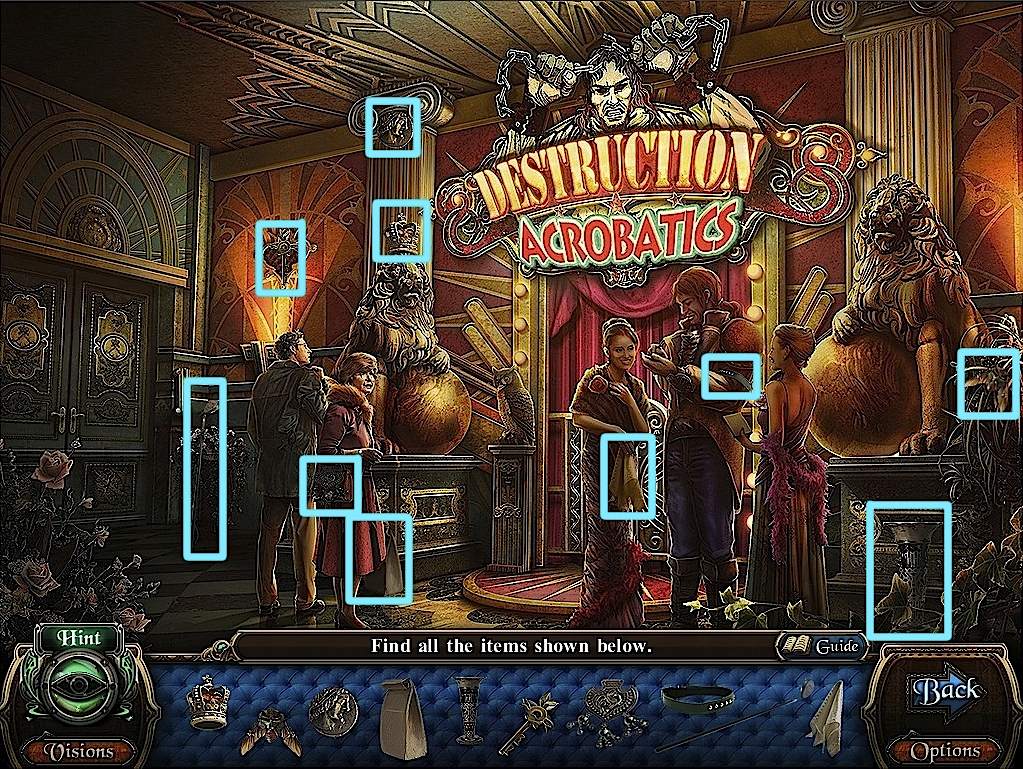
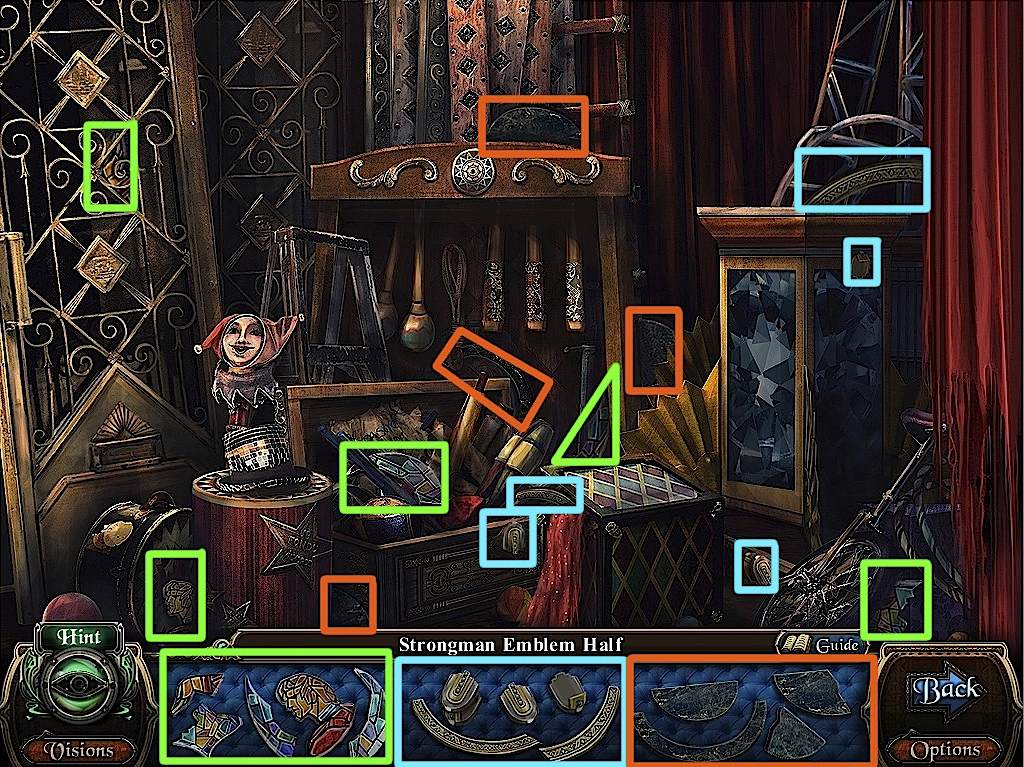
Zoom in on the doors on the left. Finish the hidden object scene to get the Strongman Emblem.
Screenshot
Exit the Stage and talk to Mayor Linden.
Go back to the ballroom.
Ballroom/Skylight Corridor
Replay the instrument case hidden object scene for the Black Locket.
Screenshot
Go back to the Skylight Corridor.
Zoom in on door. Use the Bird and Strongman emblems in their slots. Click the open area for some minigames.
Click on the smaller icon to reverse the positions of the two neighboring larger icons.
Arrange the large icons so that they relate to the small icons that neighbor them.
Solution 1
Solution 2
Enter the center doors.
Andreas' Room/Ballroom
Click the bed and take the Instrument plate (2/5) from underneath.
Use the black locket on the black rose to the right.
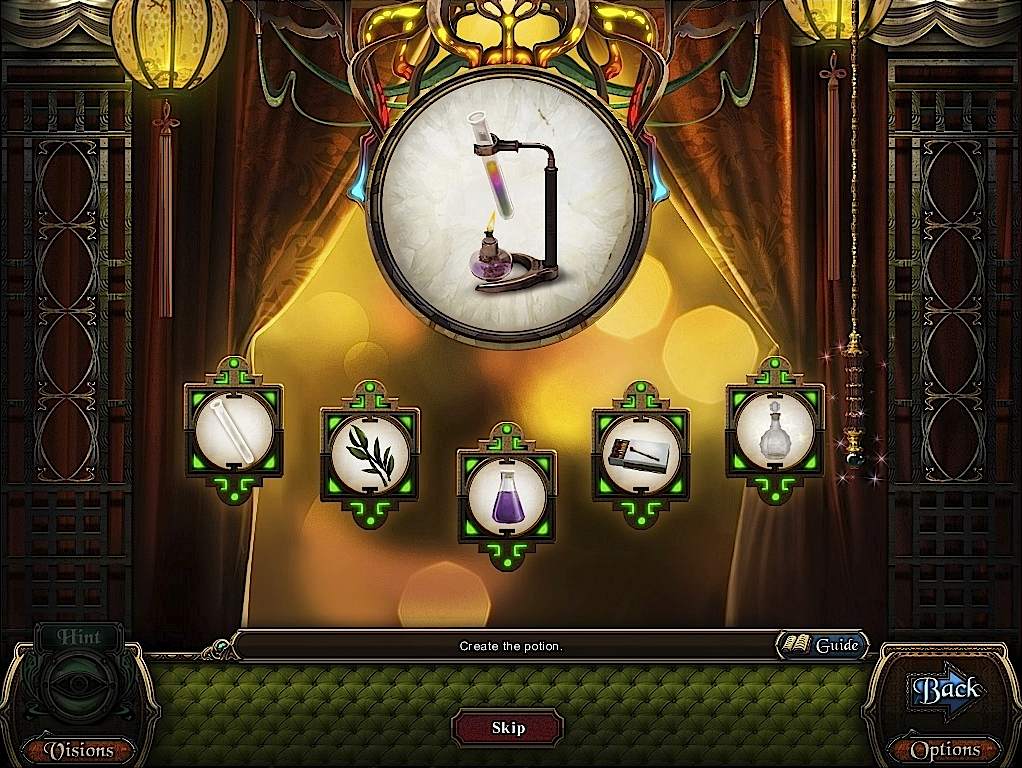
Click the red Vision icon for a minigame.
Arrange the pieces in order.
Cord 1 switches icons 1 and 2
2: 1 and 3
3: 2 and 5
4: 4 and 5
test tube, leaves, purple beaker, matches, decanter
Screenshot
Cutscene. Get the blue Velvet Diva ticket.
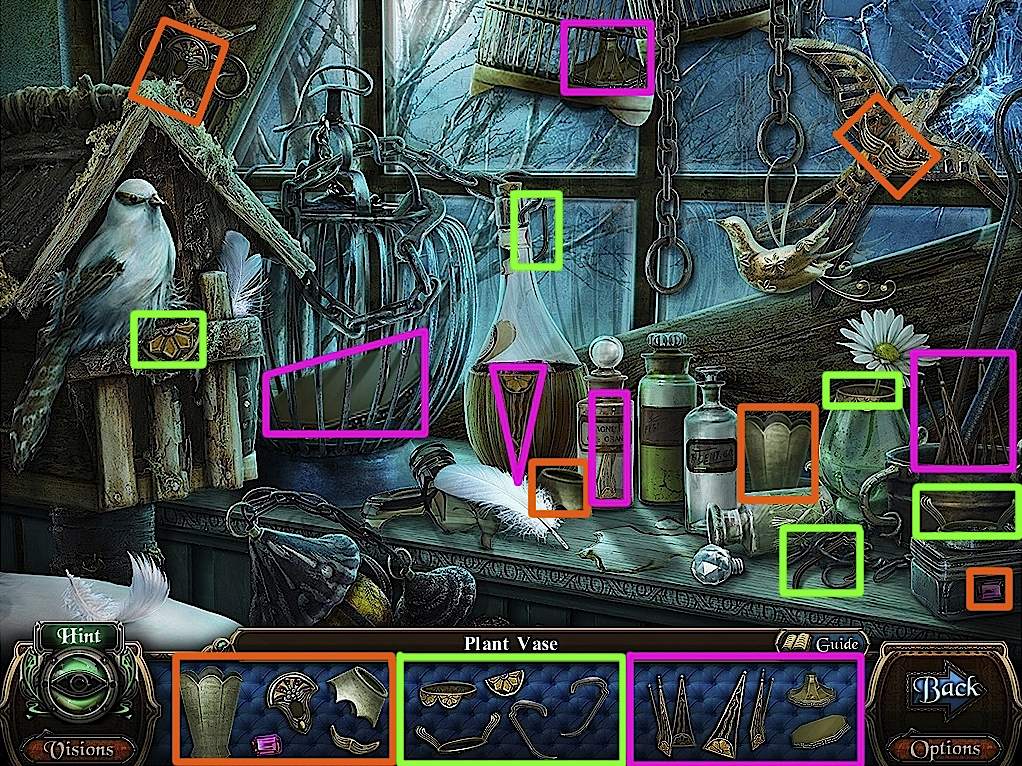
Click the back window. Finish the hidden object scene for a Plant Vase.
Screenshot
Return to the ballroom.
Use the vase with its spot near the other vase in the case on the left. Take the Birdcage Key.
Go back to Andreas' room.
Examine the big birdcage. Use the key with the cage.
Click on the birdcage again. Take the Chest Key and the Bird Figurine. Read the note.
Go to the Acrobatic Stage.
Acrobatic Stage
Zoom in on the chest. Use the chest handle and key with the chest.
Take the clown doll (5/5) and the left angel wing.
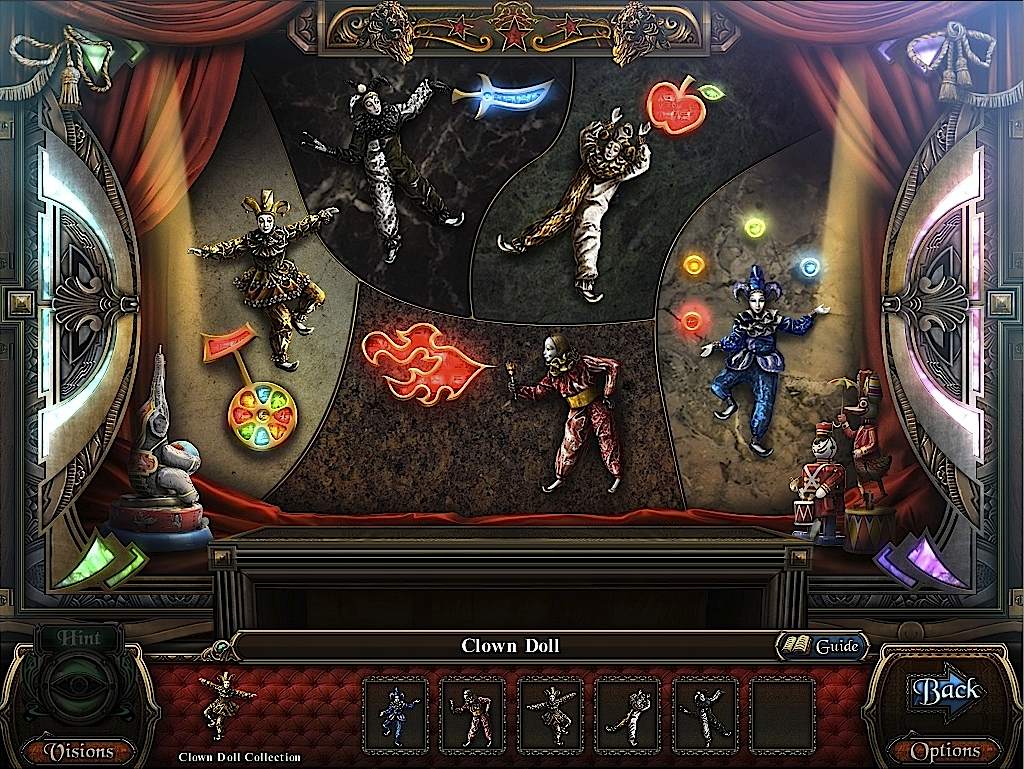
Zoom in on the machine on stage for a minigame.
Arrange the clowns so they are performing the acts associated with the symbols nearby. Click one clown, then another to switch them.
Red clown: fire
Blue clown: juggling balls
White clown: apple
Black clown: knife
Yellow clown: unicycle
Screenshot
Take the Dancing Figurine (2/4).
Go back to Andreas' Room.
Chapter 4: Velvet Diva Show
Andreas' Room/Ballroom
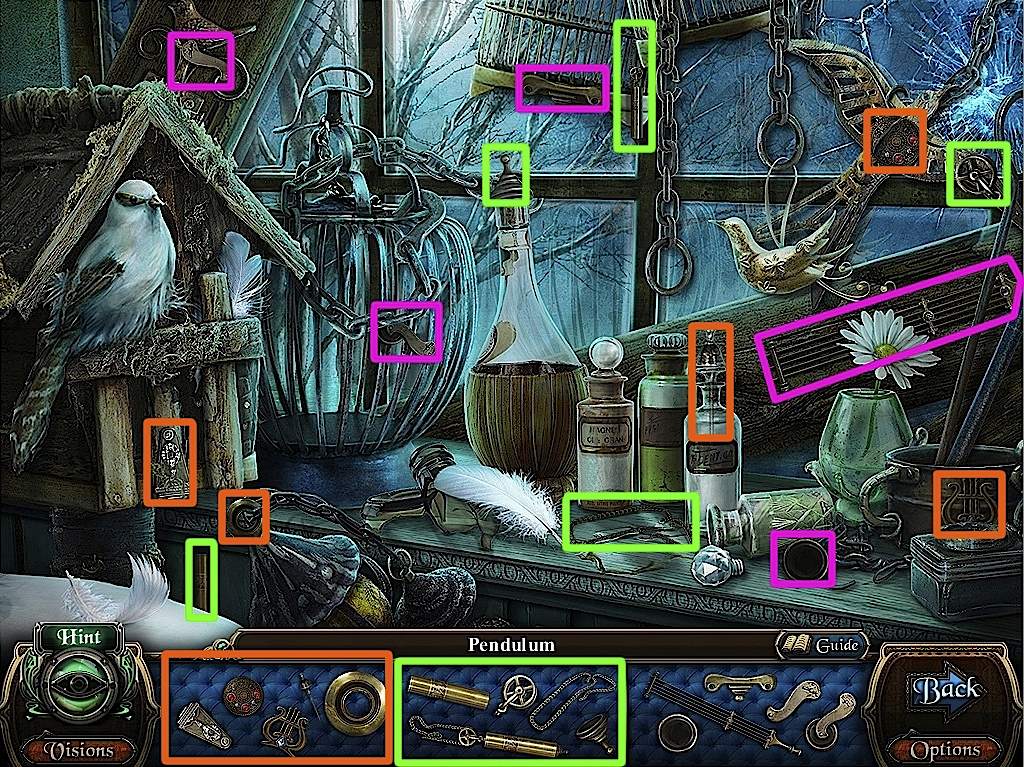
Replay the window hidden object scene for a Pendulum.
Screenshot
Go to the Ballroom.
Use the Pendulum on the clock to the left. Look at the open compartment.
Take the right angel wing. Read the note.
Use the angel wings on the right angel statue, above the ticket reader.
Use the blue ticket on the ticket reader.
Enter the open doors.
Velvet Diva Stage
Zoom in on the music on the piano. Take the ruby wings and read the note.
Take the Instrument (3/5) from lower right corner.
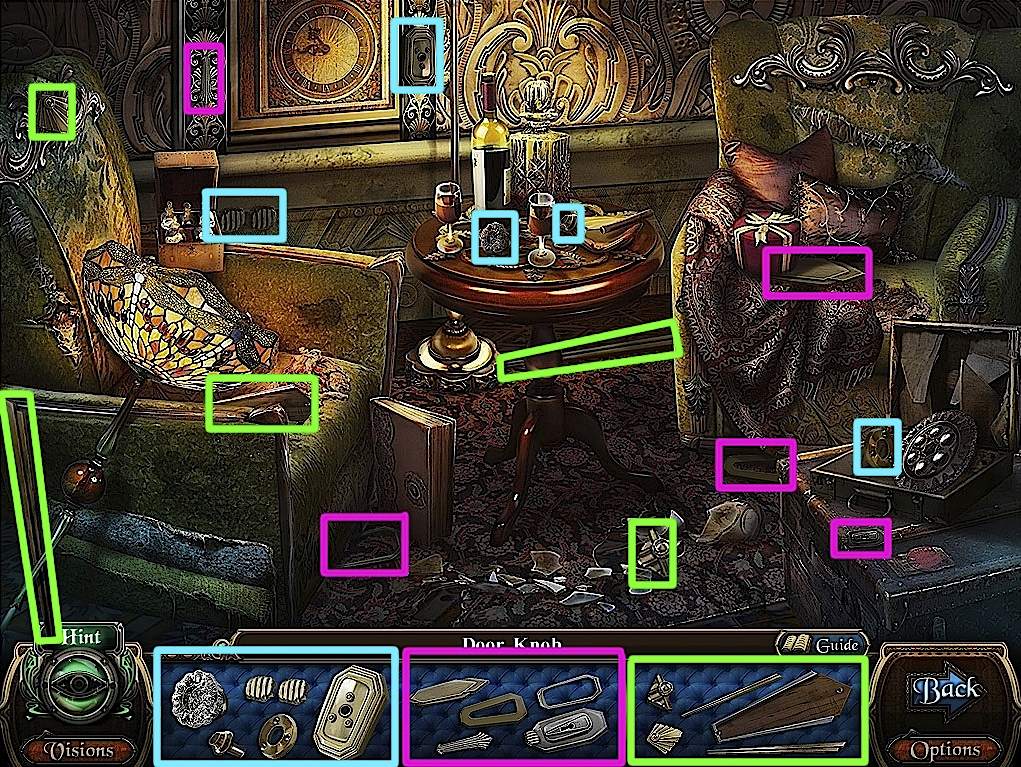
Look at the lounge chairs in the back. Play the hidden object scene to get a Door Knob.
Screenshot
Exit to the Ballroom. Use the Doorknob on the small door to the left. Enter.
Staircase
Click the blue Vision icon to play the hidden object scene. Take the oil can.
Screenshot
Take the Instrument emblem (4/5) from the front of the room.
Use the Pesticide on the spider to the right, then take the Instrument emblem (5/5).
Return to the Velvet Diva stage (via the door at the top of the stairs).
Velvet Diva Stage
Zoom in on the machine in the back for a minigame.
Match the emblems to the figures below them. Click one emblem, then another to switch them.
Take the Dancing Figurine (3/4).
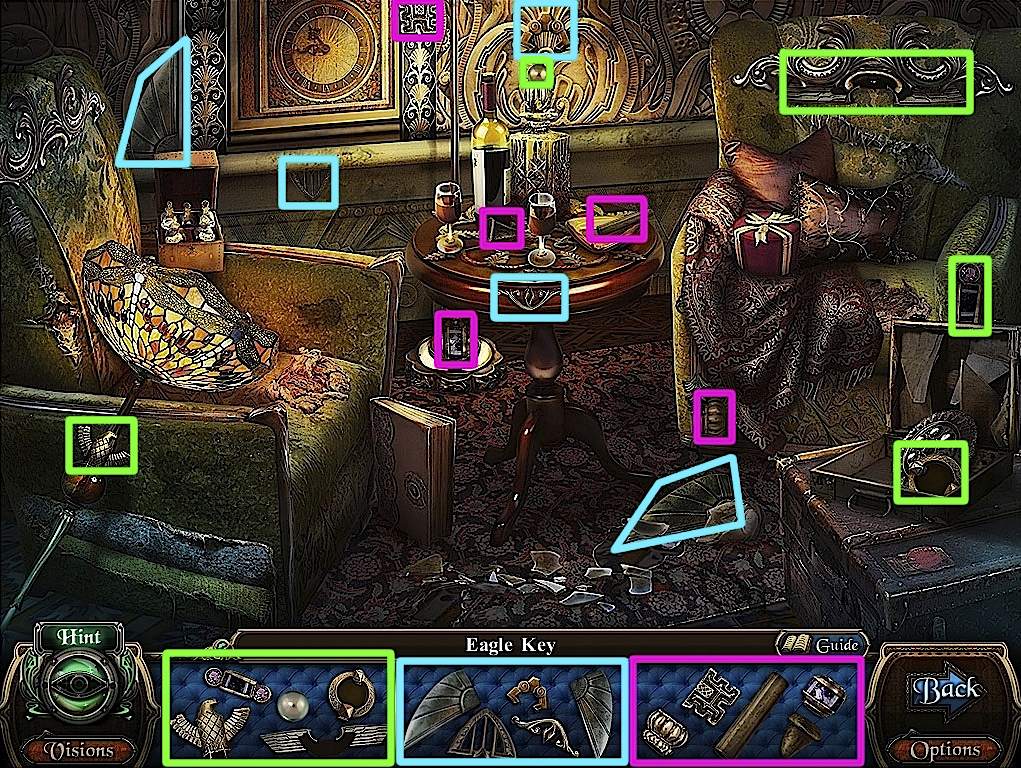
Replay the lounge hidden object scene for the Eagle Key.
Screenshot
Return to the staircase.
Chapter 5: Magician's Show
Staircase/Lobby/Office Hallway
Zoom in on the door at the bottom. Use the rust remover, then the Eagle Key on the lock. Enter the doors.
You are in the Office Hallway. Exit back to the Lobby.
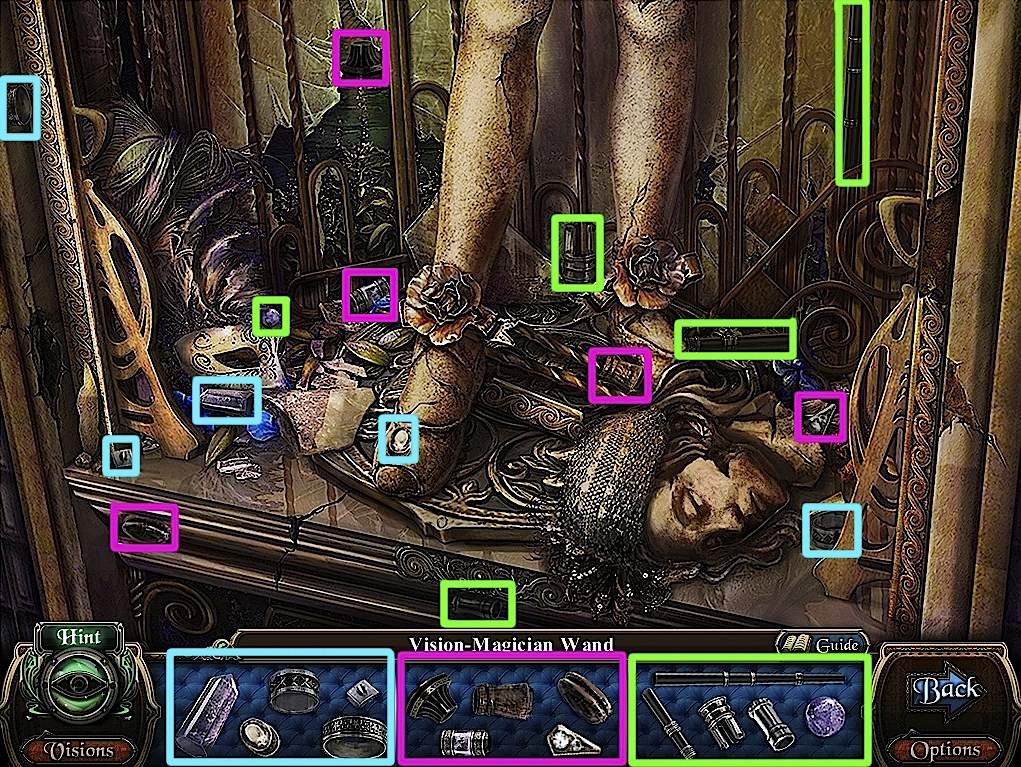
Replay the broken statue hidden object scene for the Vision-Magician Wand.
Screenshot
Go back to the Office Hallway.
Zoom in on the doors to the right.
Use the chisel, then the Vision-Magician Wand on the lock.
Enter the open doors.
Director's Office
Click on Mayor Linden.
Take the matches from the table on the right.
Read the note on the floor.
Examine the picture on the back wall.
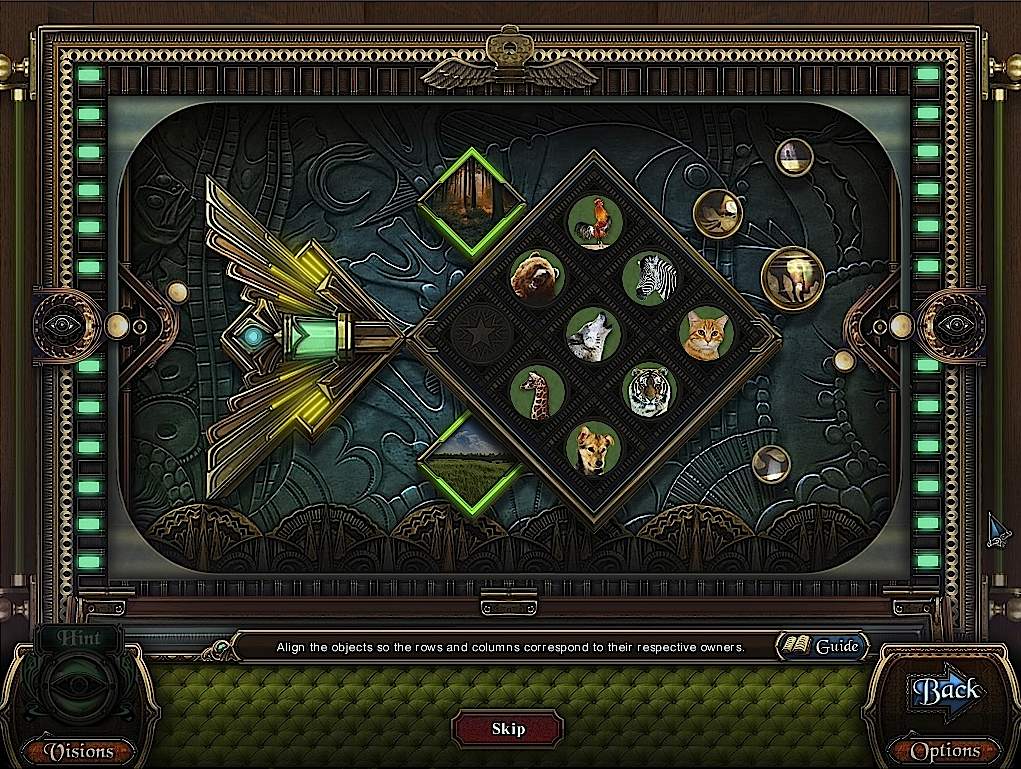
Click on the safe below the bust for a minigame. Slide the animals to match their environments.
Forest: tiger, wolf, bear. Plains: giraffe, wolf, zebra.
Screenshot
Take the Sapphire Butterfly Wing from the open safe.
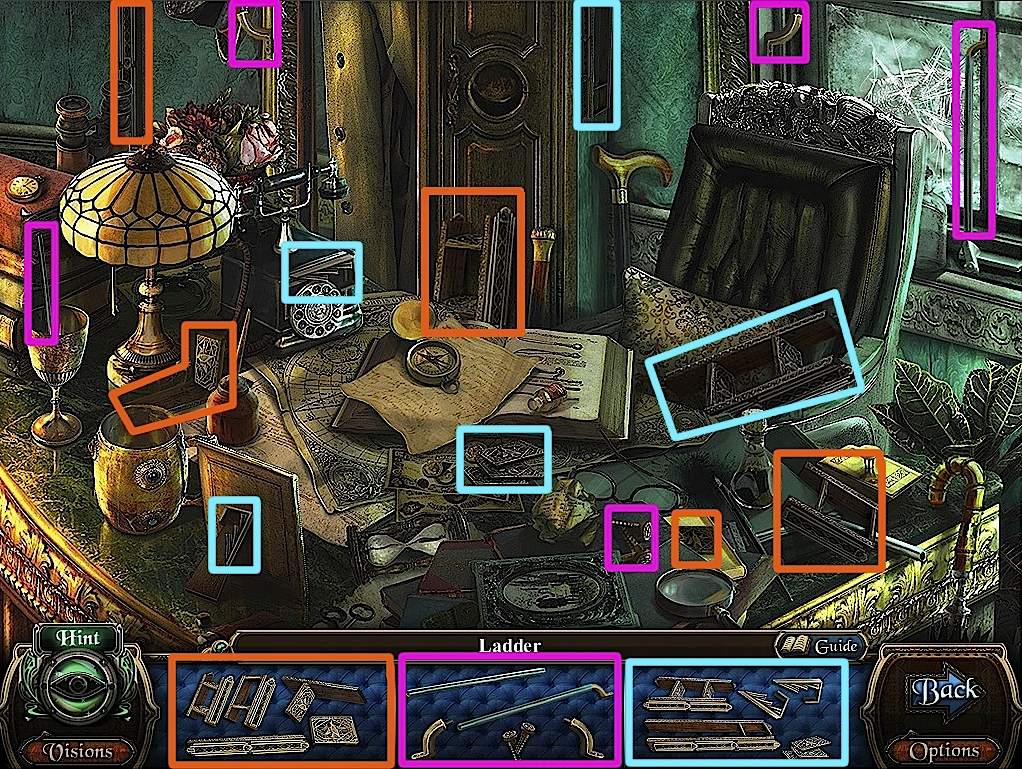
Examine the desk. Finish the hidden object scene for a ladder.
Screenshot
Go to the office hallway. Use the ladder with the hole in the ceiling. Go up.
Exhibition Hall/Magician Show Hallway
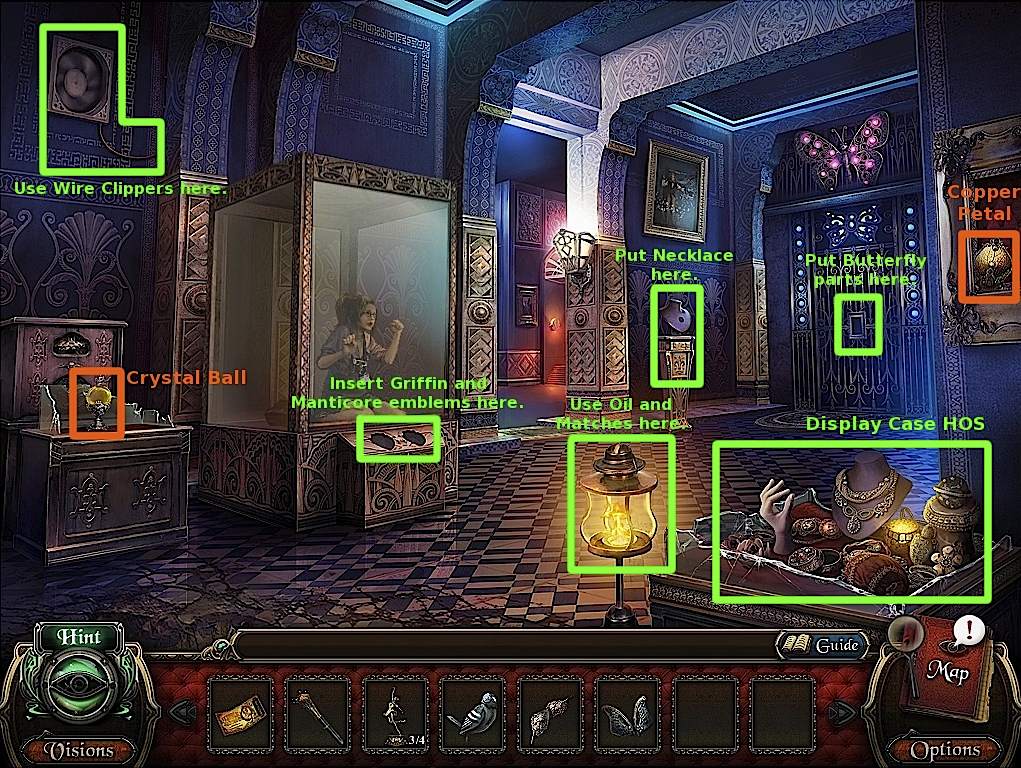
Use the oil, then the matches, on the lantern in the front of the room.
Take the Copper Petal from the alcove on the right.
Take the Crystal Ball (1/6) from the broken case on the left.
Screenshot
Enter the passage to the center.
Take the door handle from the torn poster on the left.
Go back to the Exhibition Hall.
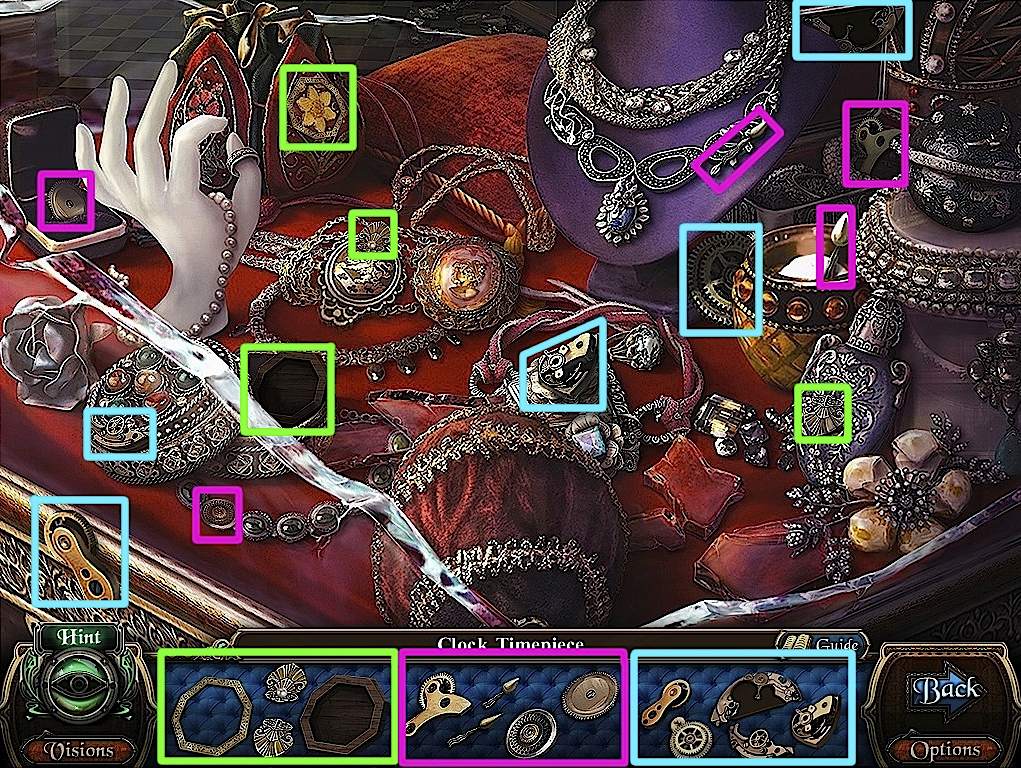
Check out the jewelry display in the front right corner of the room. Finish the hidden object scene to find a Clock Timepiece.
Screenshot
Go back to the office.
Director's Office
Use the Clock Timepiece with the panel on the table to the right.
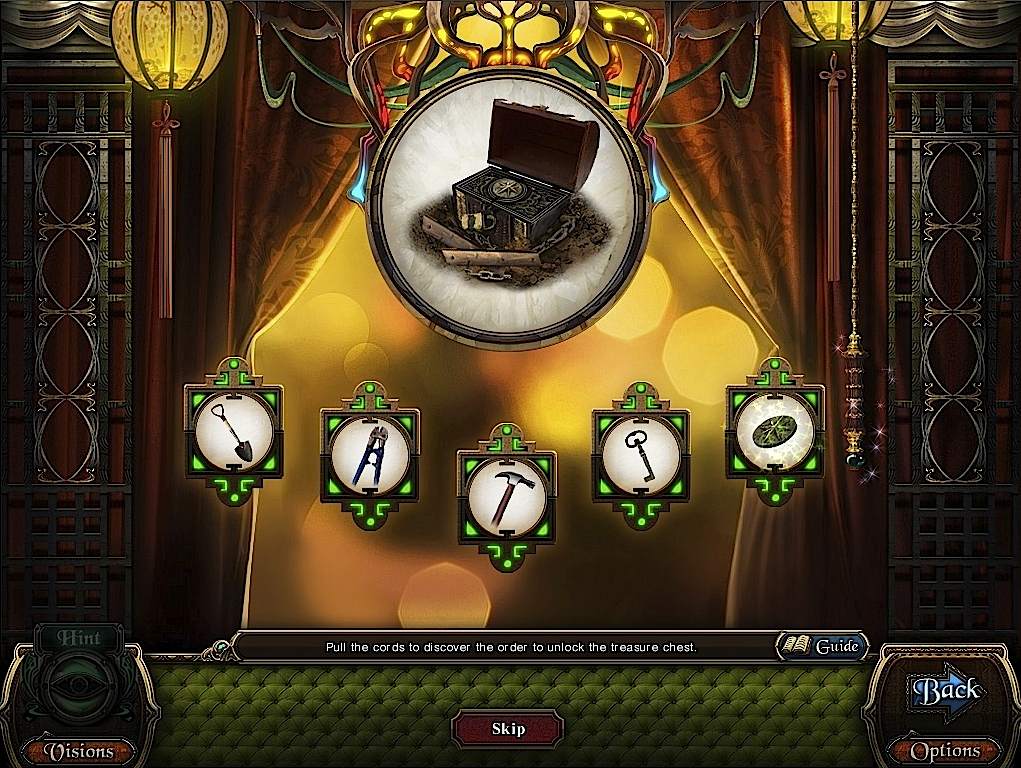
Click the red Vision icon for a minigame.
Arrange the pieces in order.
Cord 1 switches icons 1 and 2
2: 1 and 3
3: 2 and 5
4: 4 and 5
Shovel, bolt cutters, hammer, key, plate.
Screenshot
Cutscene. Get the White Rose Key.
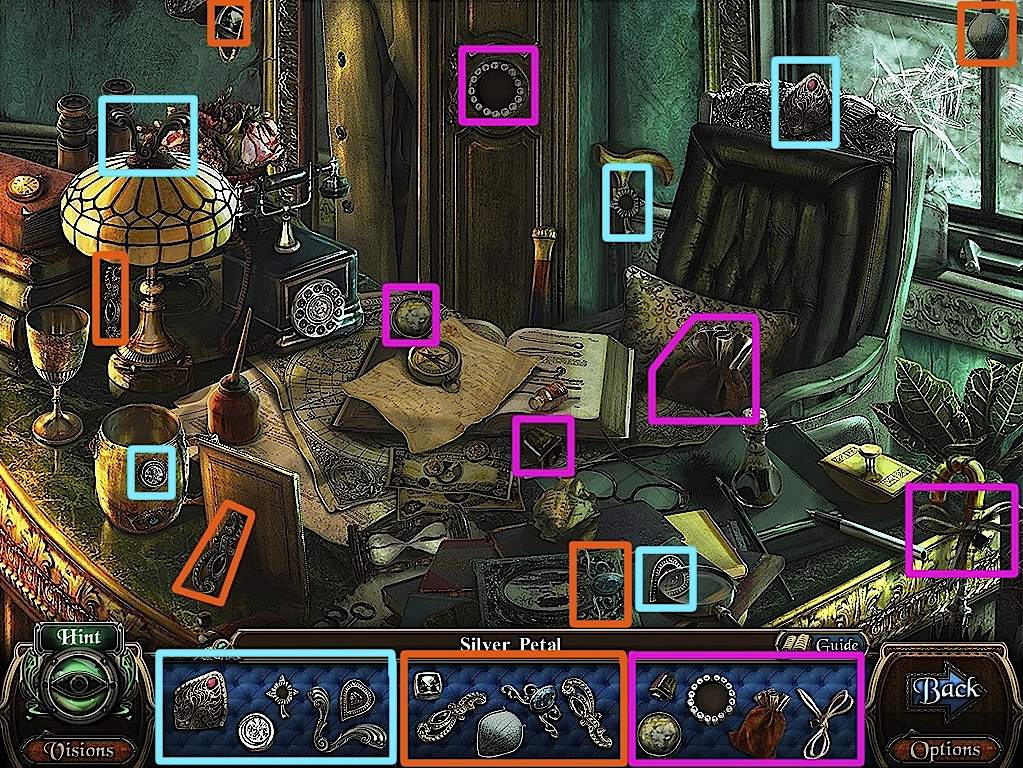
Replay the desk hidden object scene for a Silver Petal.
Screenshot
Use the Drawer Handle on the drawer beneath the bust and zoom in. Take the screwdriver and read the note.
Go to the Magician's Hall.
Magician's Hall
Use the screwdriver on the grate to the left.
Take the Gold Petal.
Zoom in on the door to the right. Use the three jeweled petals and the Rose Key on the lock.
Enter the open door.
Rose's Room
Take the wire cutter from the floor, leaning against the vanity.
Use the Bird Figurine with the music box. Zoom in and take the crystal ball (2/6).
Screenshot
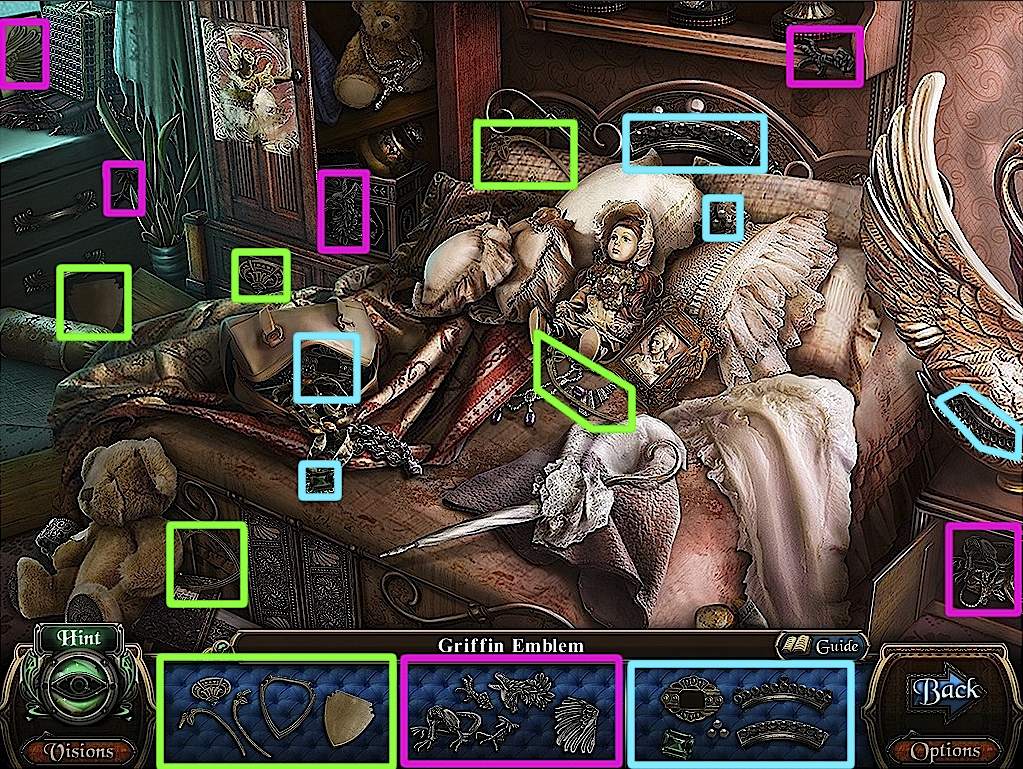
Examine the bed. Finish the hidden object scene to get the Griffin Emblem.
Screenshot
Go back to the Exhibition Hall.
Exhibition Hall
Use the wire cutter on the red wire leading to the fan in the upper left corner.
Zoom in on the fan and take the Manticore Emblem.
Place the Griffin and Manticore Emblems in the slots in the case Rebecca is trapped in.
Screenshot
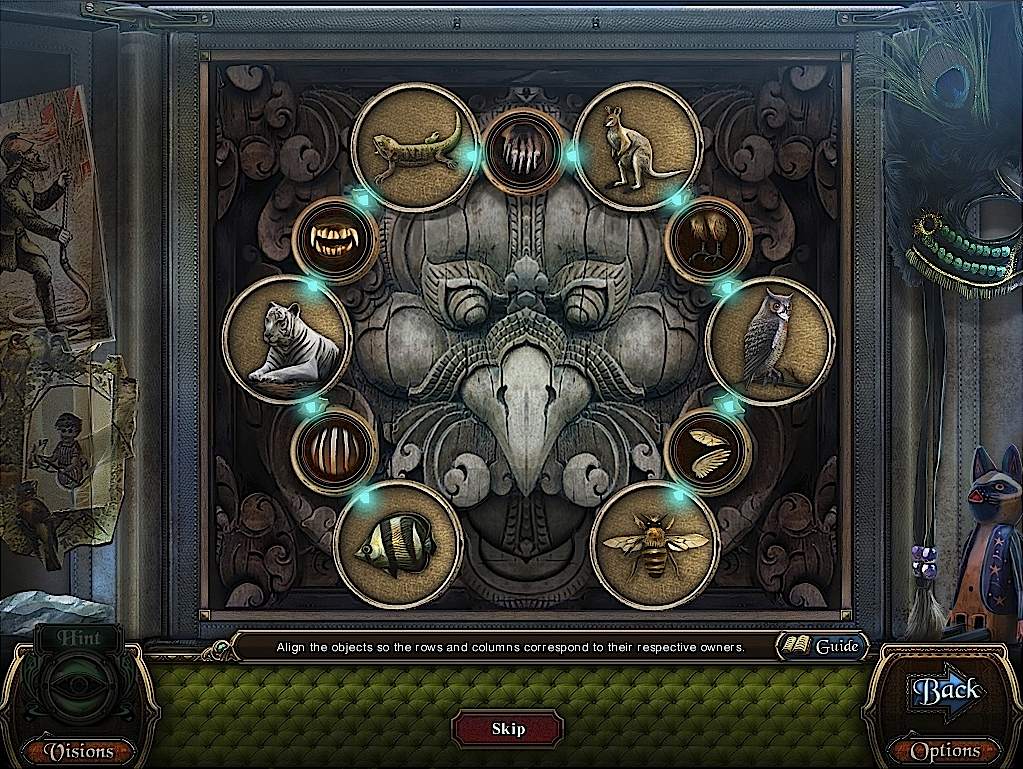
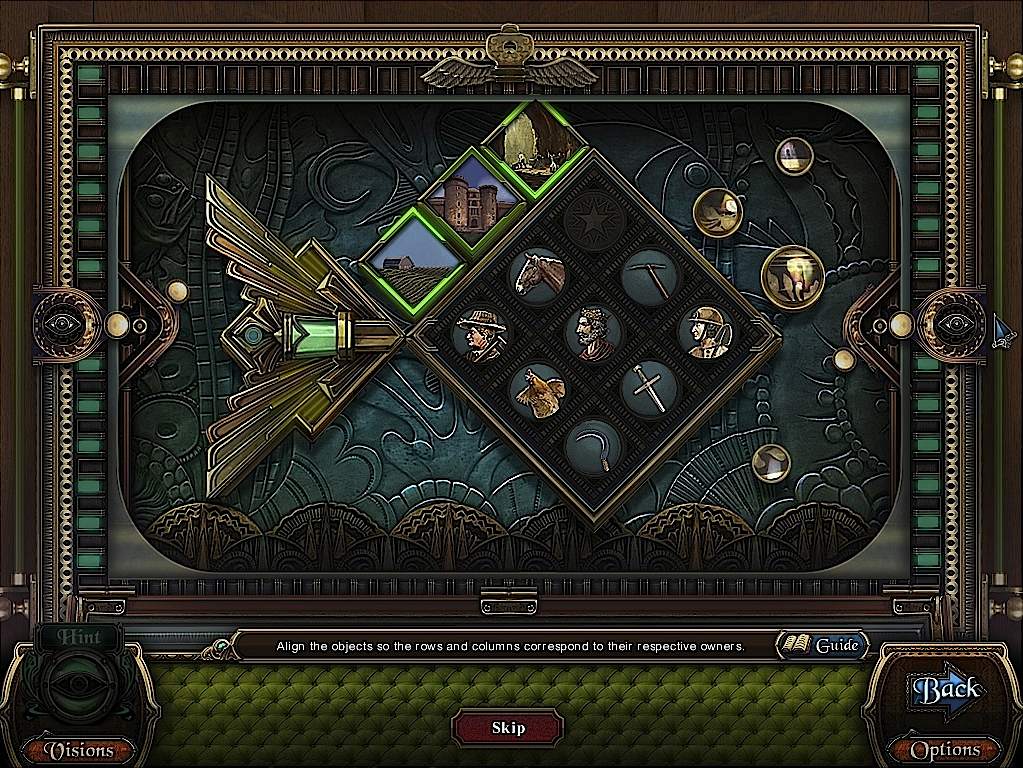
Click below the case for a minigame. Align the tiles according to the place where they belong.
Farm: farmer, sickle, rooster. Castle: king, sword, horse. Mine: miner, pickaxe.
Screenshot
Talk to Rebecca.
Replay the jewelry display hidden object scene for an Award Trophy.
Screenshot
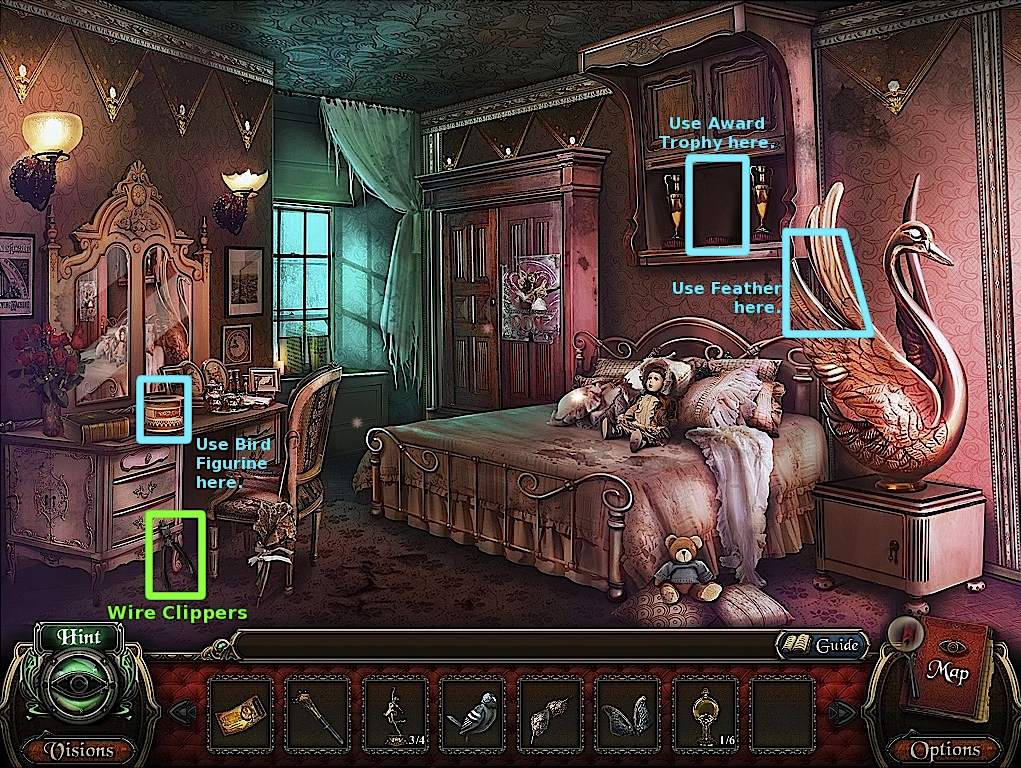
Go back to Rose's room.
Use the trophy on its spot on the shelf above the bed. Take the Butterfly Body.
Screenshot
Go back to the Exhibition Hall.
Zoom in on the door in the back. Use the two Butterfly Wings and the Butterfly Body on the lock. Enter the opened door.
Abigail's Room/Rose's Room/Exhibition Hall
Zoom in on the vanity mirror. Use the Powdered Brush on the mirror.
Examine the bed. FInish the hidden object scene for the Left Black Heart Gem.
Screenshot
Go back to Rose's room.
Replay the bed hidden object scene for the Necklace.
Screenshot
Go back to the Exhibition Hall.
Zoom in on the purple jewelry display to the right of the doorway. Use the necklace on its spot and take the Right Black Heart Gem.
Screenshot
Return to Abigail's room.
Abigail's Room/Rose's Room
Use both halves of the Black Heart Gem on their spots on the bottom of the mirror.
Take the Heart coin and Poison Bottle.
Return to Rose's Room.
Click the blue Vision icon.
Finish the hidden object scene for the Eye Coin.
Screenshot
Return to the office.
Director's Office
Zoom in on the safe with the two round slots.
Use the Heart and Eye Coins in the slots to open the safe.
Take the purple ticket and cabinet key. Look at the box.
Replay the desk hidden object scene for the green Crystal Ball (3/6).
Screenshot
Go outside to the office hallway.
Use the cabinet key on the cabinet near the office door. Take the wand.
Go to the Magician's Hallway.
Magician's Hallway/Magician's Stage
Use the wand on the magician statue above the ticket reader.
Take the crystal ball (4/6) from the magician.
Use the purple ticket on the ticket reader.
Enter the open doors.
Take the feather from the ground.
Screenshot
Check out the stairway. Finish the hidden object scene to receive the red Crystal Ball (5/6).
Screenshot
Return to Rose's Room.
Rose's Room/Abigail's Room
Use the feather on the swan statue.
Click the red Vision icon for a minigame
Arrange the pieces in order.
Cord 1 switches icons 1 and 2
2: 1 and 3
3: 2 and 5
4: 4 and 5
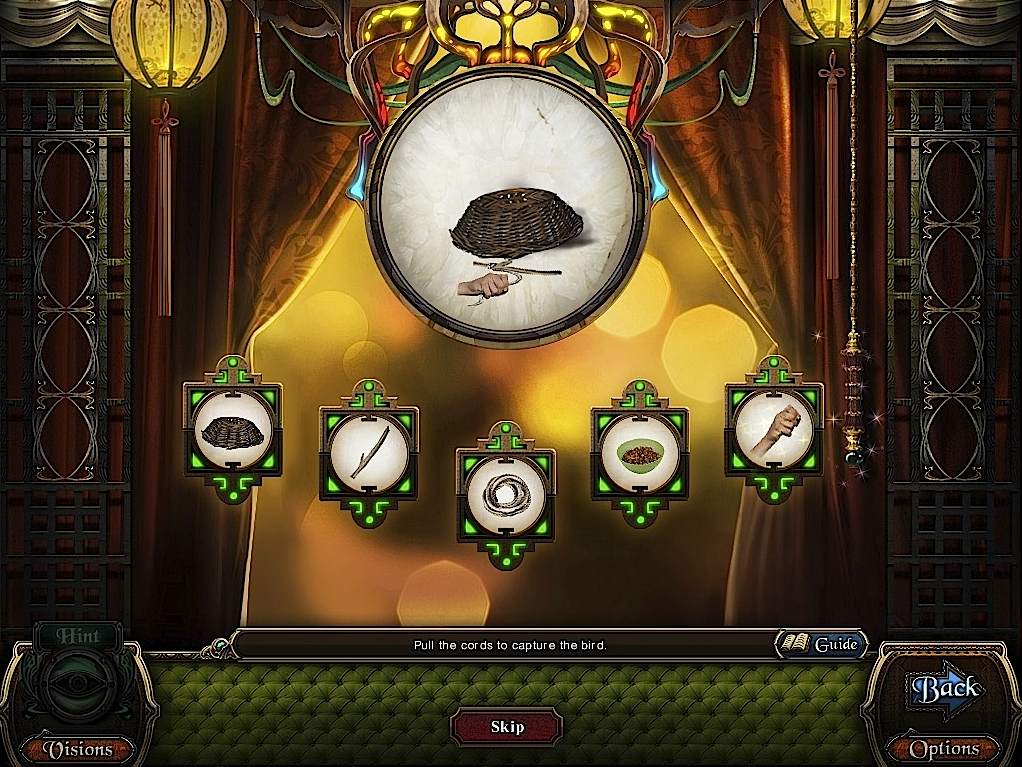
basket, stick, rope, seed, hand
Screenshot
Cutscene. Get the skull gem. Go back to Abigail's room
Use the skull gem with its place in the vanity. Take the tarot card.
Go to the Magician's Stage.
Magician's Stage/Abigail's Room
Give the tarot card to the fortune reader.
Take the crystal ball (6/6).
Screenshot
Examine the machine for a minigame.
Match the colored crystal balls with the colored gems on the pedestals.
Red, green, blue, white, orange, yellow.
Take the dancing figurine (4/4).
Go back to Abigail's room.
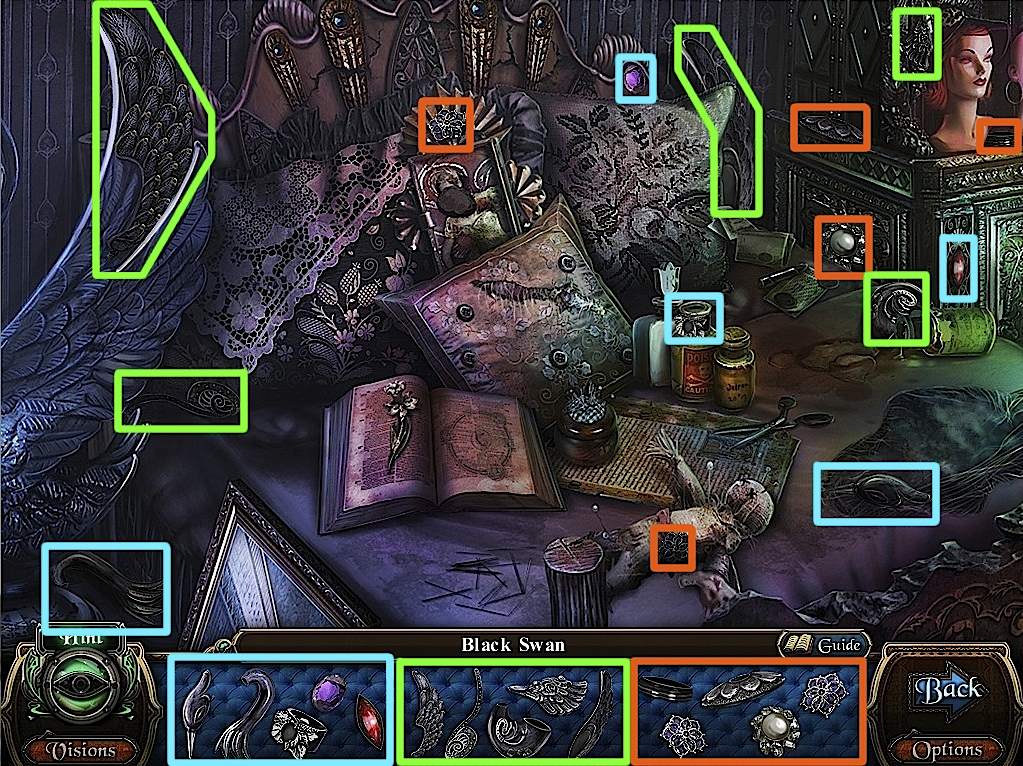
Replay the bed hidden object scene for a Black Swan.
Screenshot
Go back to the Solo Show Hallway, via the Lobby.
Chapter 6: Rose's Solo Show
Solo Show Hallway
Examine the machine on the right for a minigame.
Match the colors of the dancing figurines with the bases.
Yellow, green, pink, blue.
Take the battery.
Use the battery, then the golden ticket, with the ticket reading machine.
Solo Show Stage/Magician's Theater
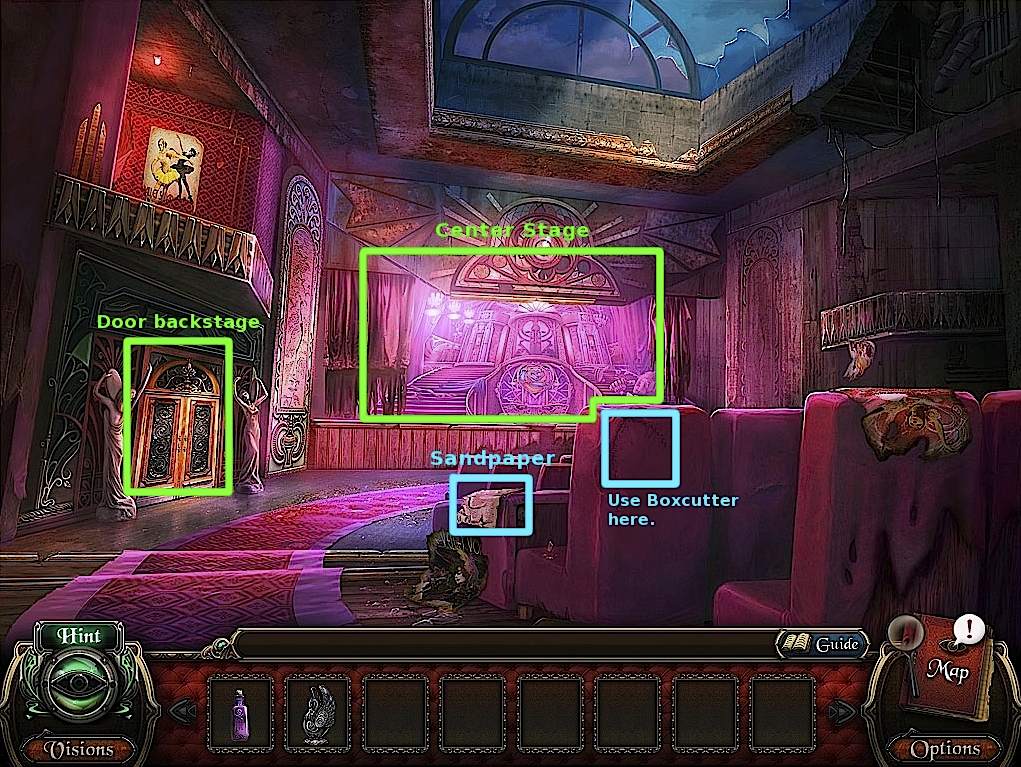
Take the sandpaper from the seat in the middle of the screen.
Screenshot
Zoom in on the stage.
Give Andreas the poison bottle, as proof of Abigail's guilt.
Take the box cutter from the step on the left.
Look at the stairs on the right. Finish the hidden object scene for the White Swan.
Screenshot
Use the sandpaper with the two pedestals in the middle of the stage.
Put both the Black and White Swan statues on the pedestals.
Take the Fire Handle and read the note.
Zoom out. Use the box cutter with the back seat to get the Water Handle.
Screenshot
Go back to the Magician's Stage.
Replay the stairway hidden object scene for the Stone Book.
Screenshot
Return to Rose's Solo Stage.
Solo Show Stage/Backstage
Zoom in on the doors to the left. Use both the Fire and Water Handles with their spaces on the door.
Zoom out. Enter the open door on the left.
Use the Stone Book with the slots in the shelf on the right. Go back to Rose's Stage.
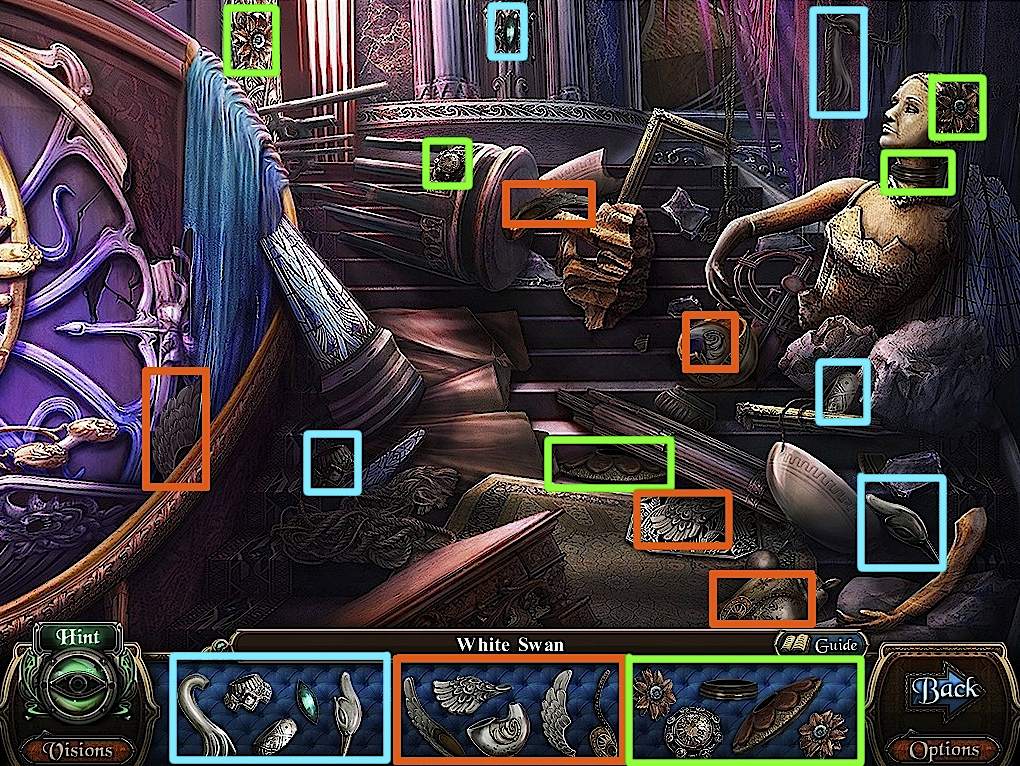
Zoom in on the stage. Replay the stair hidden object scene for the Marble Book.
Screenshot
Zoom out and go Backstage again through the open doors on the left.
Use the Marble Book with the remaining slot in the shelf on the right.
Examine the open niche, then look at the map.
Finding the Eagle Lamps
Head to the Announcement Area outside.
Replay the bench hidden object scene for the red Eagle Lamp (1/3).
Screenshot
Head to the Courtyard.
Replay the fountain hidden object scene for the yellow Eagle Lamp (2/3).
Screenshot
Head to the Gate.
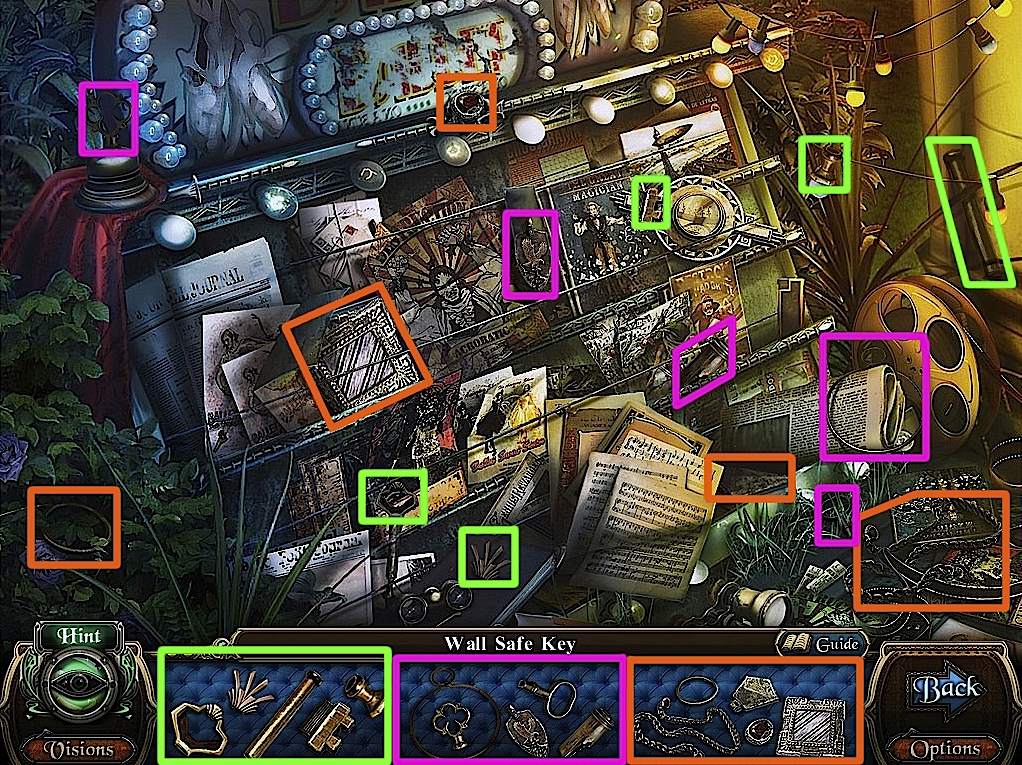
Replay the pamphlet display hidden object scene for the Wall Safe Key.
Screenshot
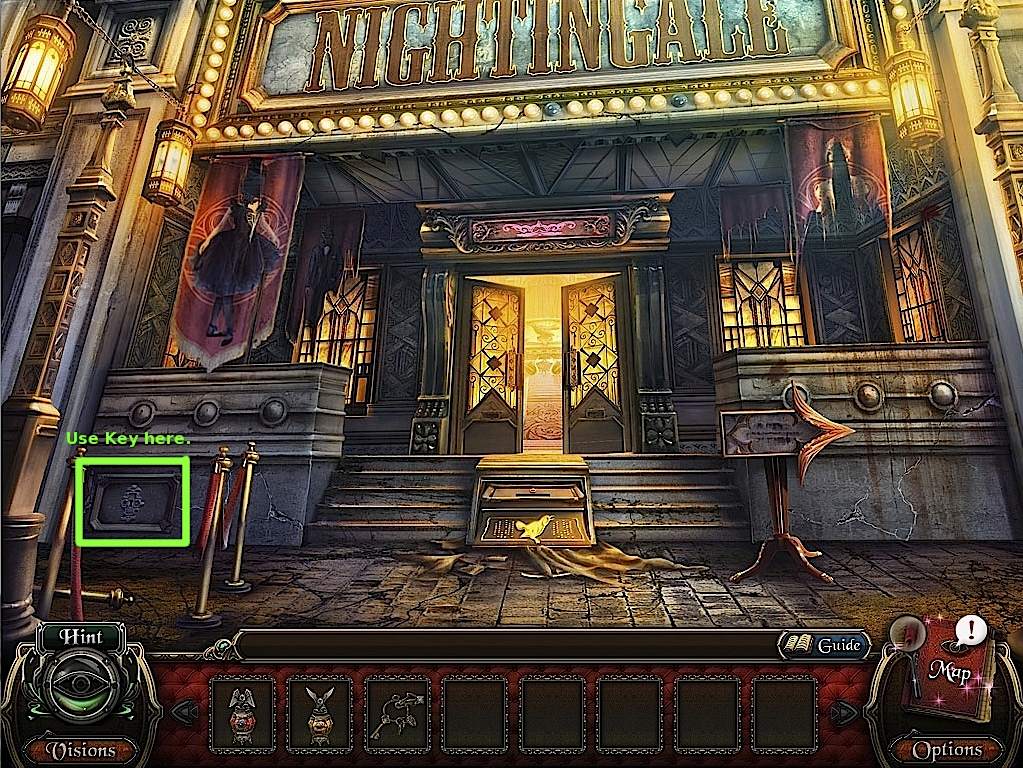
Go back to the Main Entrance.
Use the key with the safe in the lower left corner. Take the blue Eagle Lamp (3/3).
Screenshot
Return backstage via Rose's Solo Stage.
Backstage
Zoom in on the niche.
Place the Eagle Lamps on their respective spots.
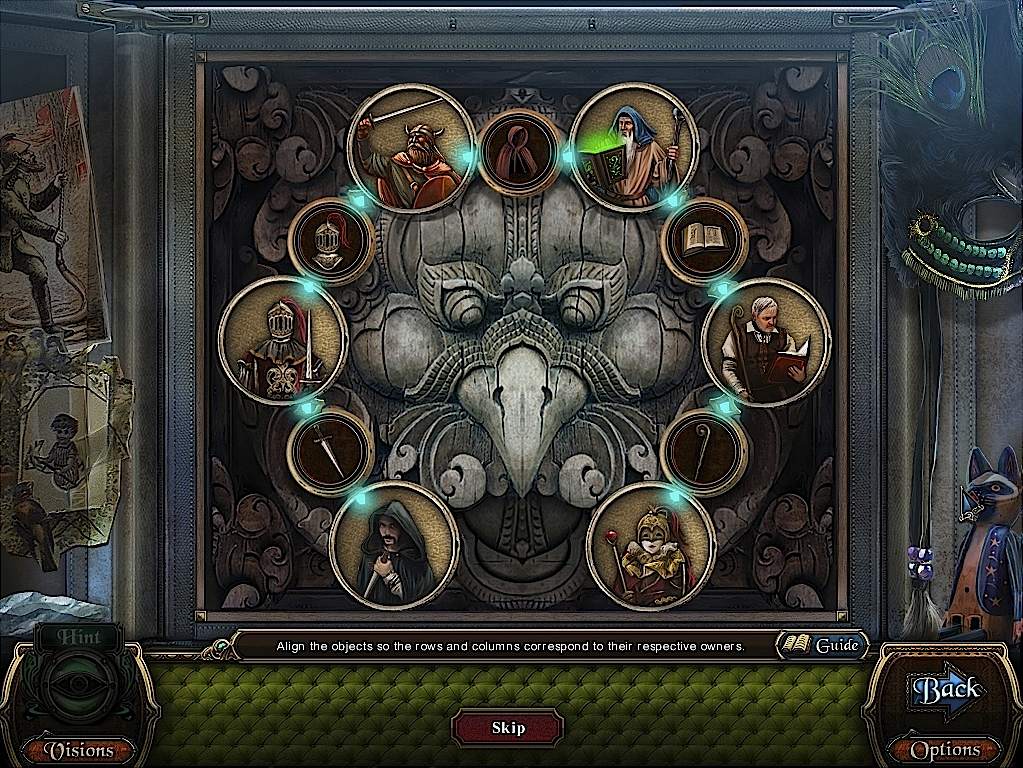
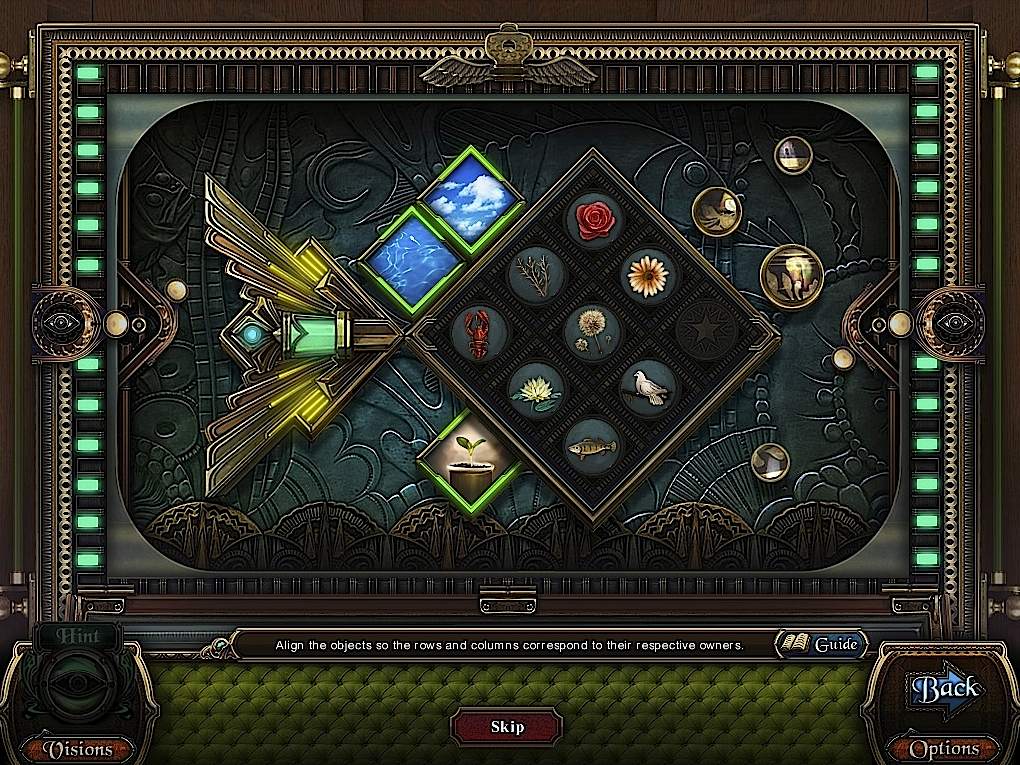
Zoom in on the open panel in the door for a minigame.
Align the tiles according to the place where they belong.
Sea: lobster, lilly, fish. Sky: bird, dandelion. Pot: lily, dandelion, thorns, rose, and/or daisy.
Screenshot
Head through the open door upstairs.
Finding the Vision Fragments
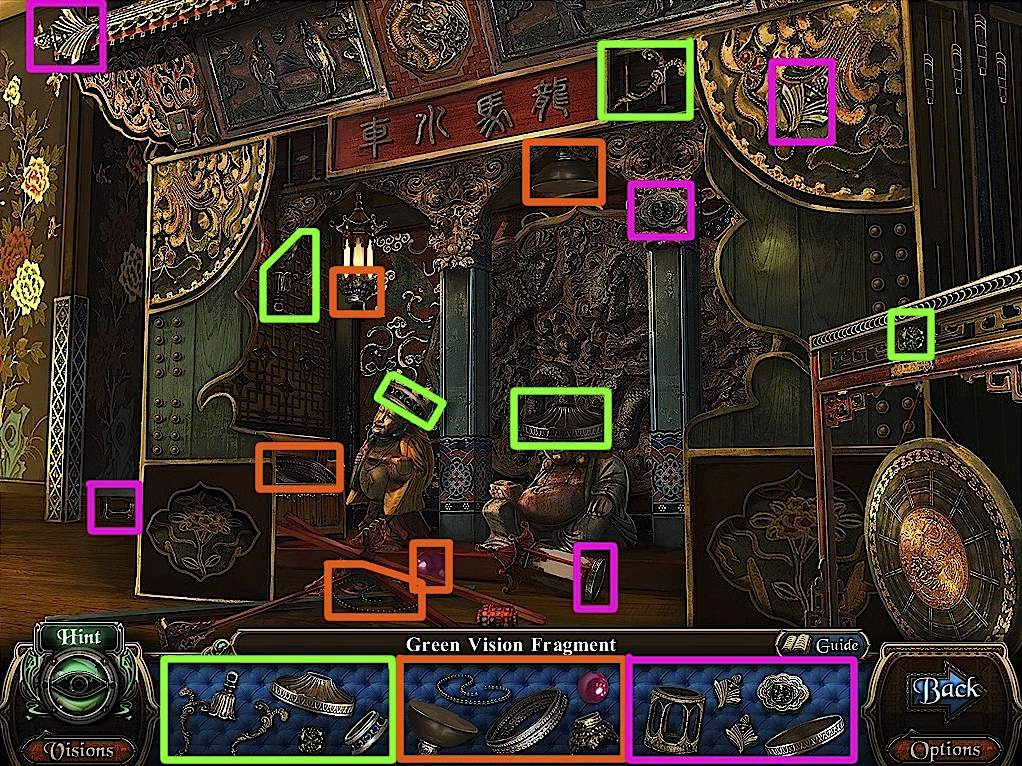
Watch the cutscene. Go back and head to the Oriental Stage.
Replay the hidden object scene on the stage for the green Vision Fragment (1/4).
Screenshot
Go to the Acrobatics Stage.
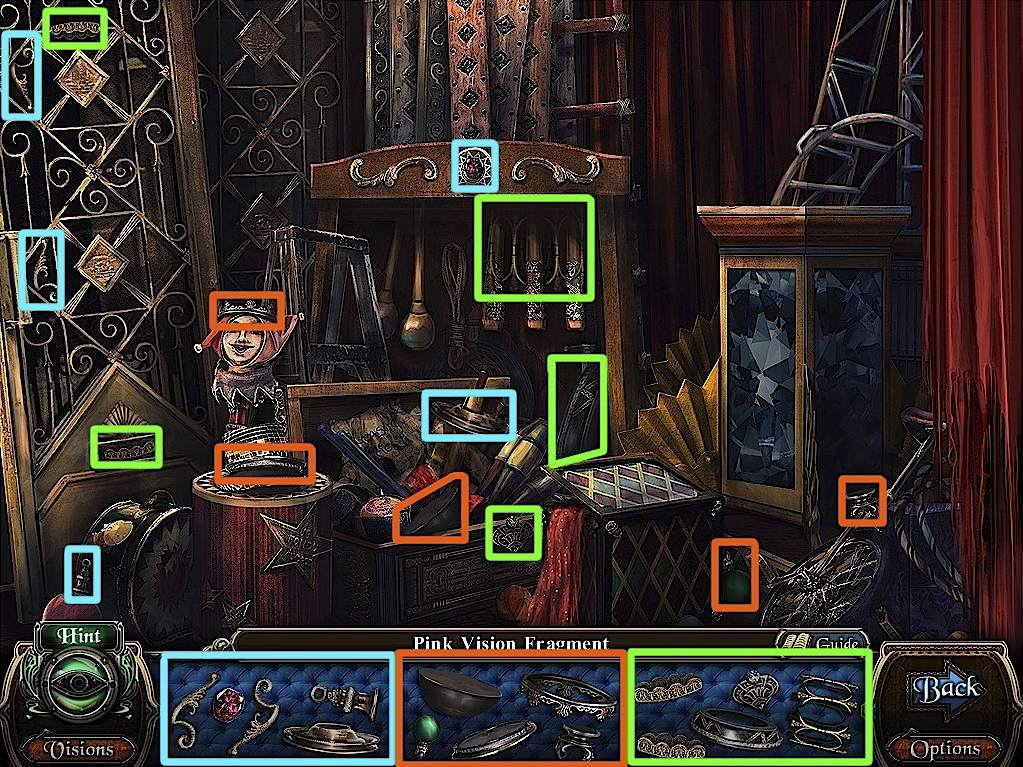
Replay the hidden object scene in the back for the pink Vision Fragment (2/4).
Screenshot
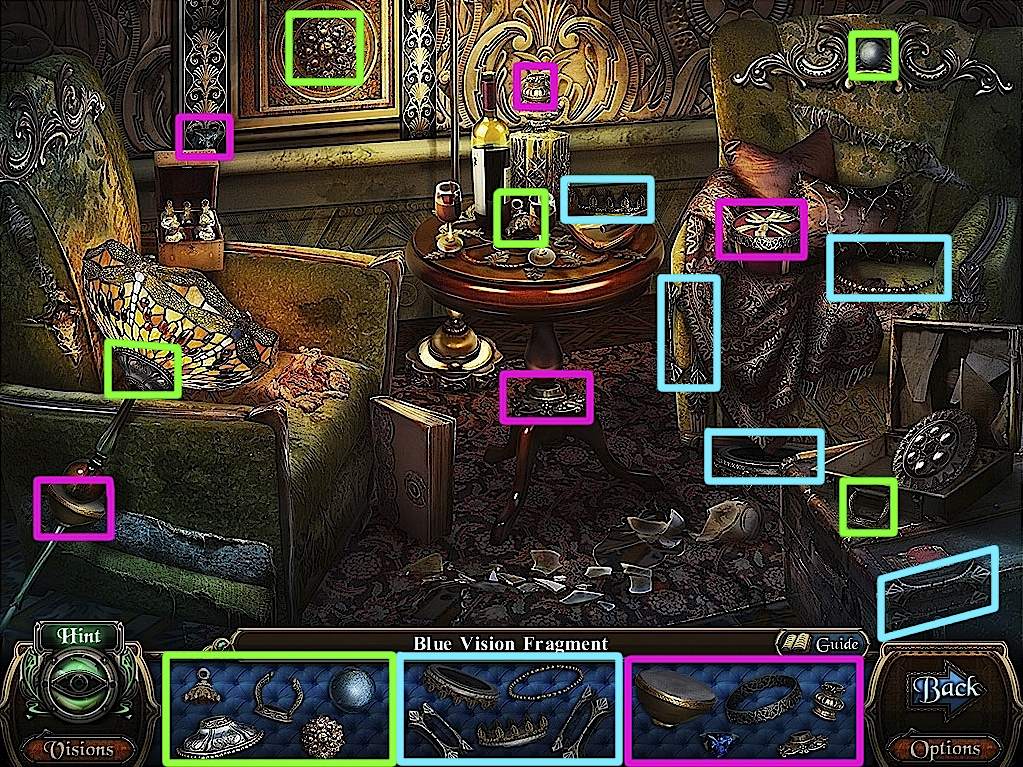
Go to the Velvet Diva Stage.
Replay the hidden object scene near the lounge chairs for the blue Vision Fragment (3/4).
Screenshot
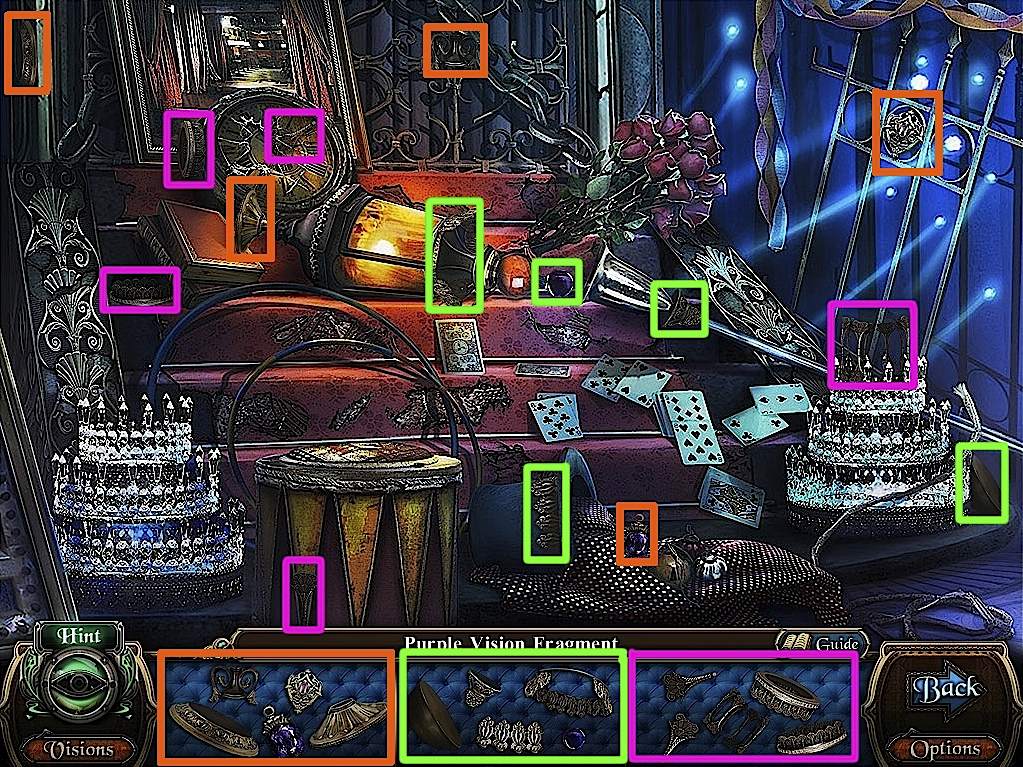
Go to the Magician's Stage.
Replay the hidden object scene on the stairs for the purple Vision Fragment (4/4).
Screenshot
Finale
Go to Rose's Stage and zoom in on the main stage.
Cutscene. Click on the big red Vision icon.
Cutscene. Go to the Balcony via the backstage area to the left.
Cutscene. Give the Visions to Andreas.
Cutscene.
THE END
Macabre Objects
There are twenty Macabre Objects hidden throughout the Nightingale Theater. These are items that morph into other objects if you wait long enough.
Macabre Objects do not appear until after you have completed certain tasks.
It is not necessary to collect these items to win the game, but the more of them you collect, the faster your hint meter fills up.
The Macabre Objects, their locations, and when they appear, are listed below.
The clock on the fountain, in the Courtyard, after restoring power to the Nightingale.
The top of the left door, in the Acrobatic Hallway, after rescuing Rebecca from the rocks.
The left lantern, in the Oriental Hallway, after rescuing Rebecca from the rocks.
The ashtray on the table, in the Rest Area, after fishing the dragon plate from the aquarium.
Over the upper right door, in the Lobby, after installing the door switch in the Acrobatic Hallway.
The lamp over the right wall, while facing the Gate, after installing the door switch in the Acrobatic Hallway.
The big purple flower to the right, in the Announcement Area, after installing the door switch in the Acrobatic Hallway.
The iron pitcher on the table, in the righthand corner of Andreas' Room, after collecting the instrument plate and finishing the hidden object scene.
The gargoyle over the piano, in the Velvet Diva Stage, after getting the doornkob from the hidden object scene.
The larger picture over Grandpa Wilson's picture, in the Director's Office, after opening the safe under the bust.
In the window sill, Rose's Room, after collecting all the items and finishing the hidden object scene in Rose's Room.
The left lamp over the vanity, Abigail's Room, just after entering.
The right rabbit, over the Magician's Stage, after picking up the swan feather.
The clock/trophy over the fireplace, in the Dining Room, after getting the crystal ball from the Magician's hidden object scene.
The third panel from the left, at the very top of the Oriental Stage, after getting the crystal ball from the Magician's hidden object scene.
The panel near the floor, between the stage and the left doors, Rose's Solo Stage, after seeing Andreas at Rose's Stage.
The plaque on the wall to the very right, Magician's Hallway, after getting the Water Handle.
The clover-like decoration on the left wall, near the back wall in the Solo Show Hallway, after leaving the Balcony.
The books/picture underneath Rose's portrait, in the Guest Hallway, after leaving the Balcony.
The archway over Abigail's Room, in the Exhibition Room, after leaving the Balcony.
Posted by: Mike |
August 25, 2011 10:54 PM
|
August 25, 2011 10:54 PM
Collector's Edition Bonus Material
Bonus Chapter
Entering the Vision Magic Stage
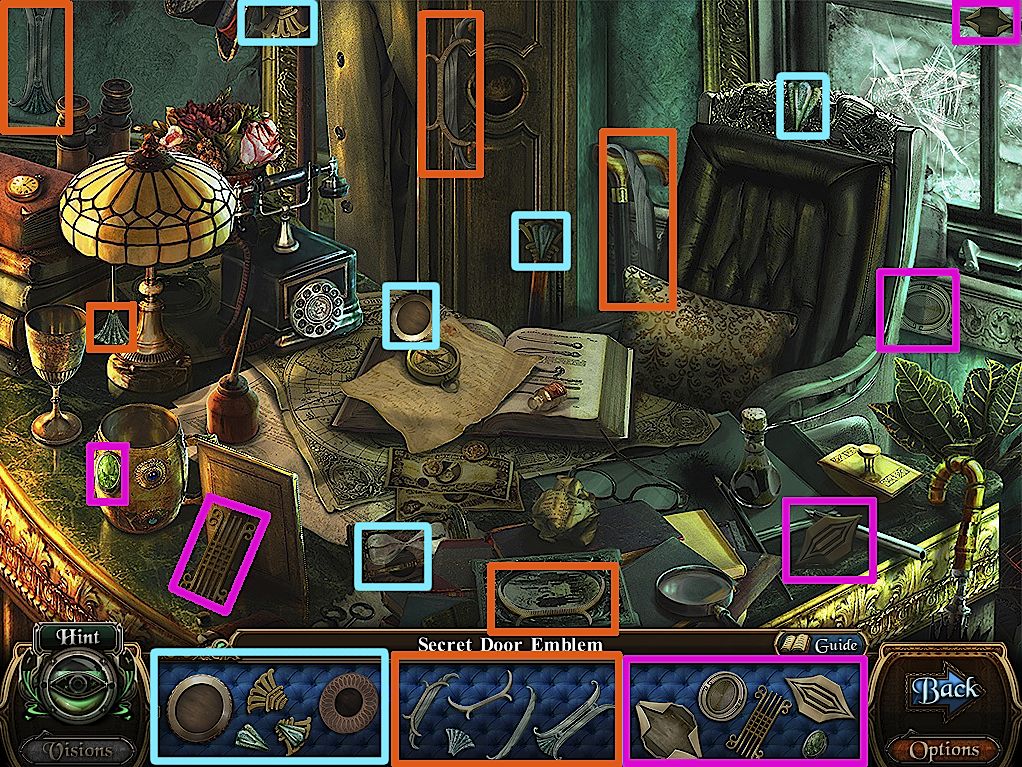
Click the desk. Play the hidden object scene for the Secret Room Emblem.
Screenshot
Use the Emblem with the space in the door on the left.
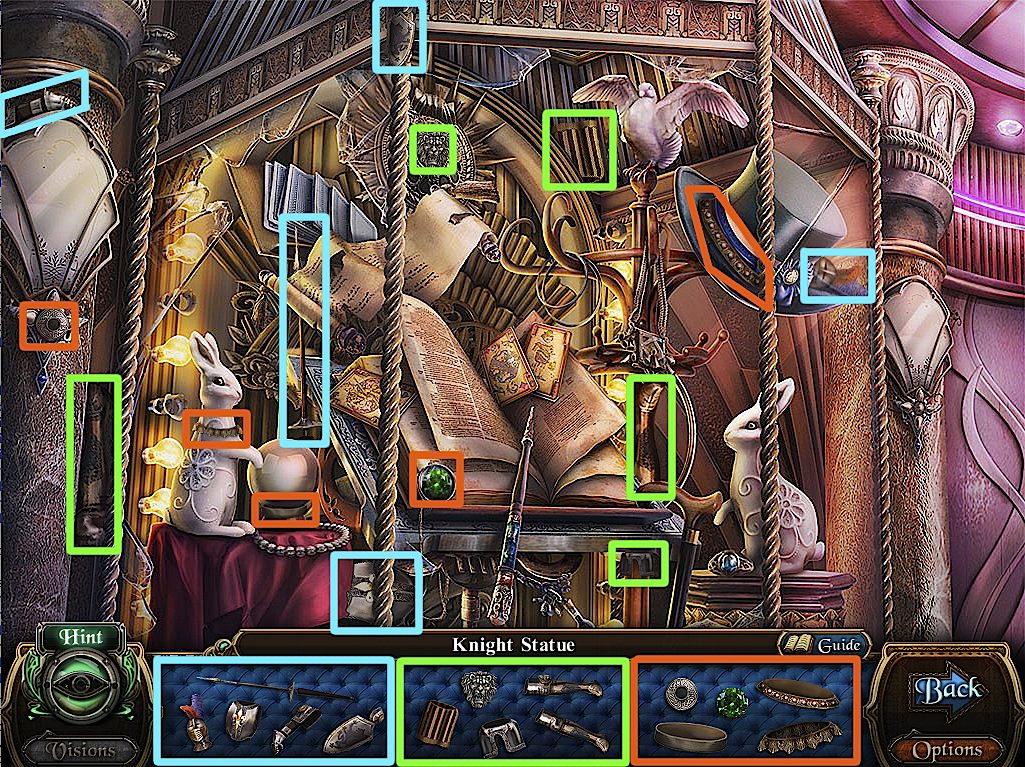
Click the case to the left. Play the hidden object scene for the Knight Statue.
Screenshot
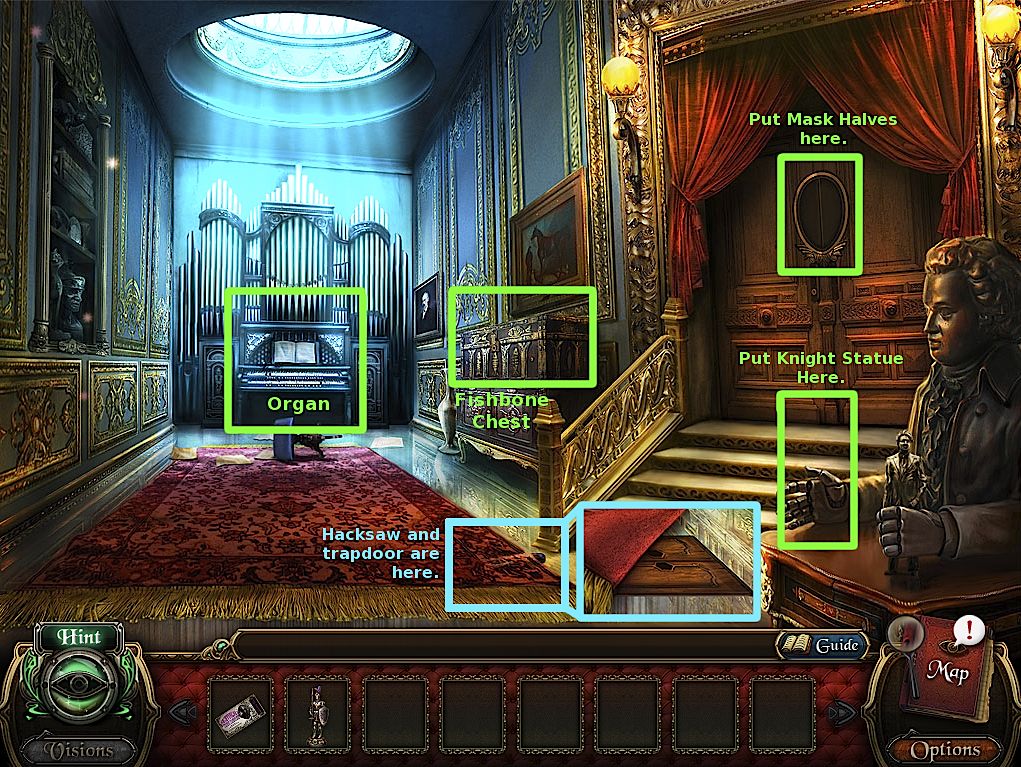
Head to the right.
Use the knight statue in the open hand of the large statue on the right. Take the Statue of Mr. Wilson from its other hand.
Click on the right corner of the rug. Click again and take the Hacksaw.
Screenshot
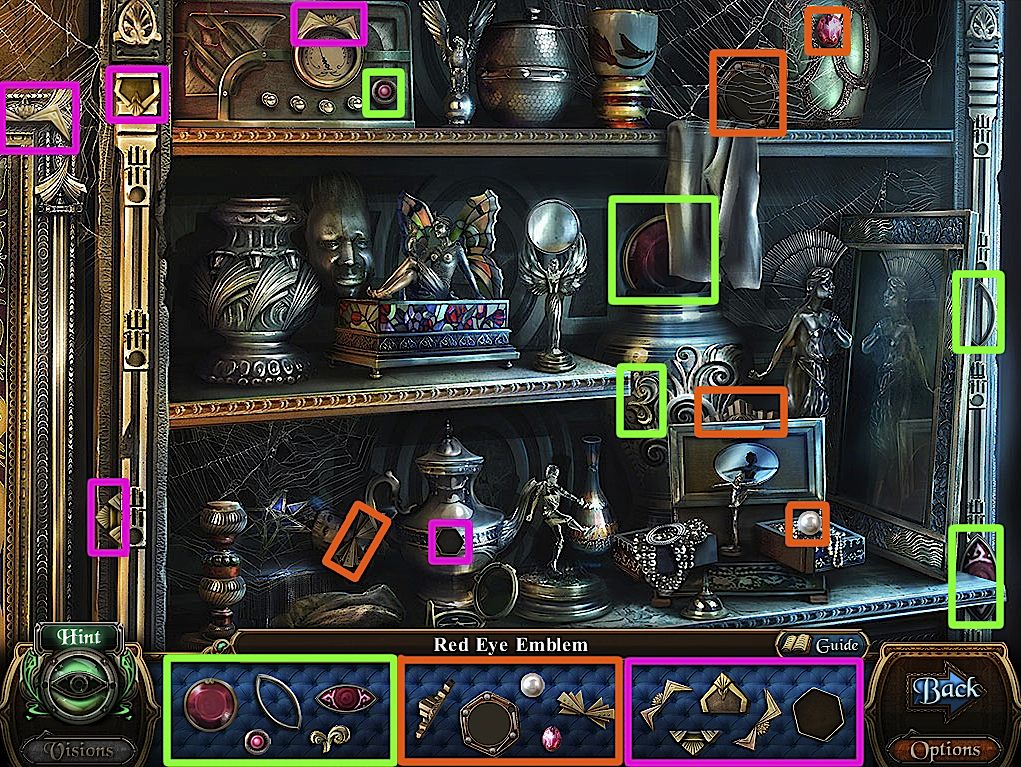
Click on the shelf to the left. Finish the hidden object scene to get the Red Eye Emblem.
Screenshot
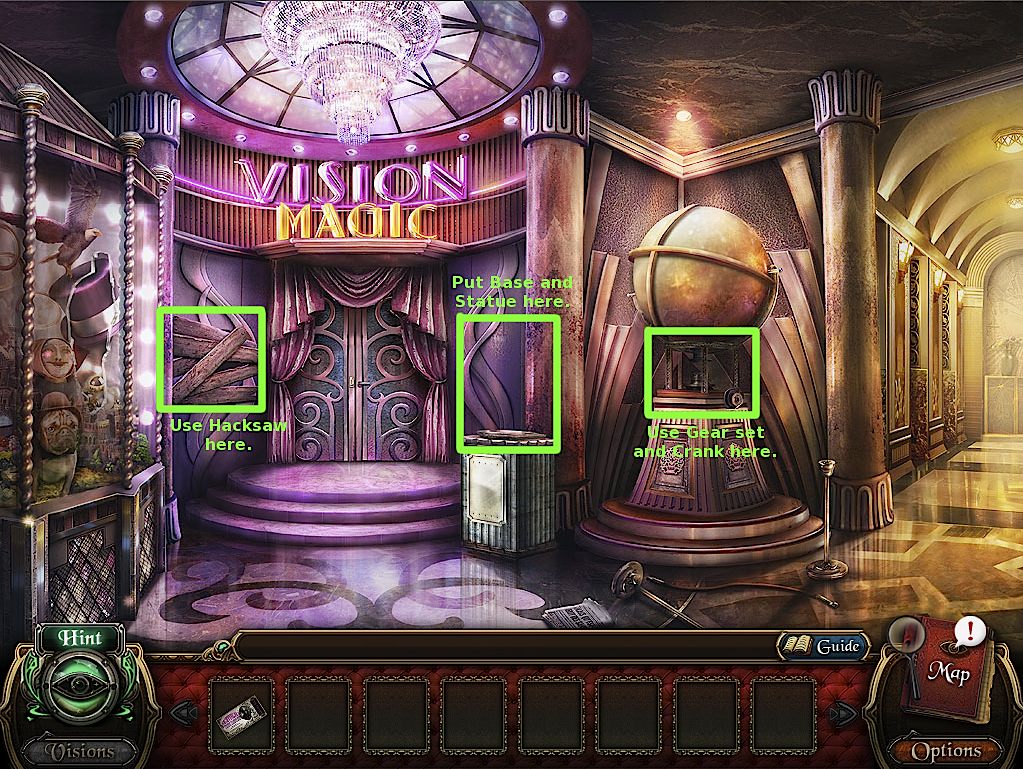
Go back to the Vision Magic Hallway. Use the hacksaw on the boards to the left of the doors.
Zoom in and take the statue base, then read the note.
Use the statue base, then the statue on the ticket reader (between the door and the globe sculpture).
Screenshot
Use the white ticket on the ticket reader and enter the open doors.
Entering the Velvet Voice's Room
Click on the safe hanging over the stage for a minigame.
Each tile is associated with one or more characters, who will be highlighted as you hover the cursor over each tile.
Clicking on a tile changes the picture it shows. Set each tile so that its image corresponds to the character or characters with which the tile is associated.
Click the green button to see if you guessed successfully. Each tile will highlight green from left to right if it is correct.
Screenshot
Examine the opened safe, read the note, and take the Organ Key (1/5).
Click the prop chest on the left. Play the hidden object scene for an Iron Gear Set.
Screenshot
Go back, then to the right, to the Organ Room.
Replay the shelf hidden object scene for an Iron Crank.
Screenshot
Go back to the Vision Magic Hallway.
Use the Iron Crank and Iron Gear set on the globe sculpture.
Screenshot
Examine the open compartment at the base, read the note, and take the Half Velvet Mask.
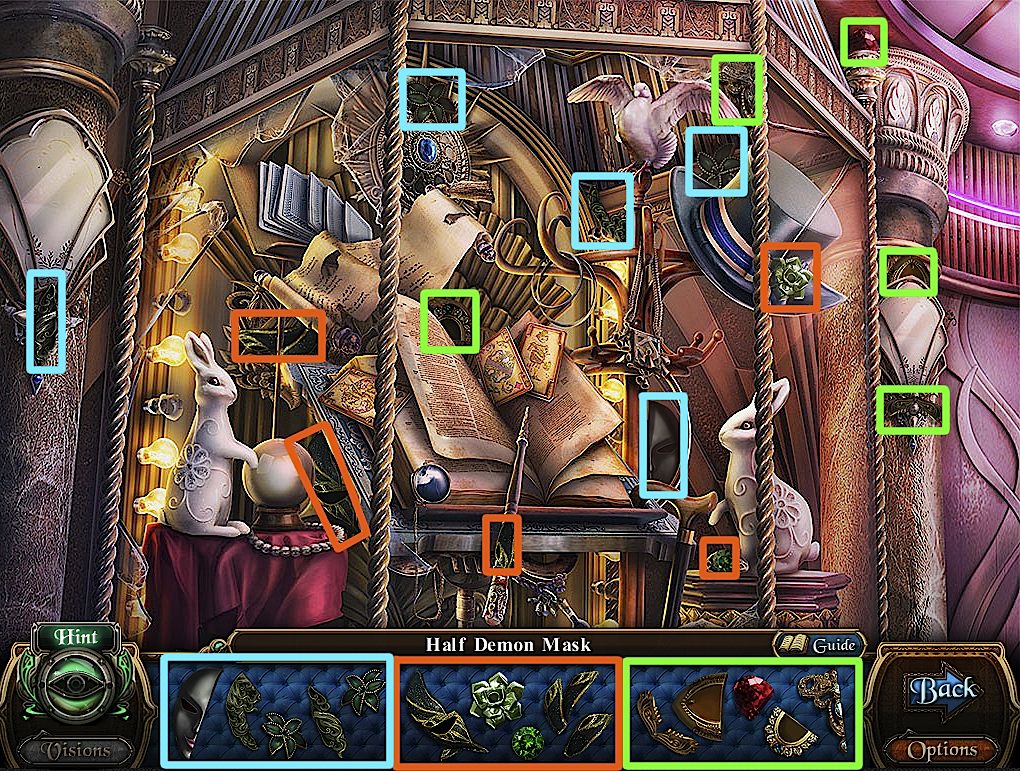
Replay the case hidden object scene for the Half Demon Mask.
Screenshot
Go right to the Organ Room. Use the two Mask halves on the double doors, then enter.
Screenshot
Opening the Eye
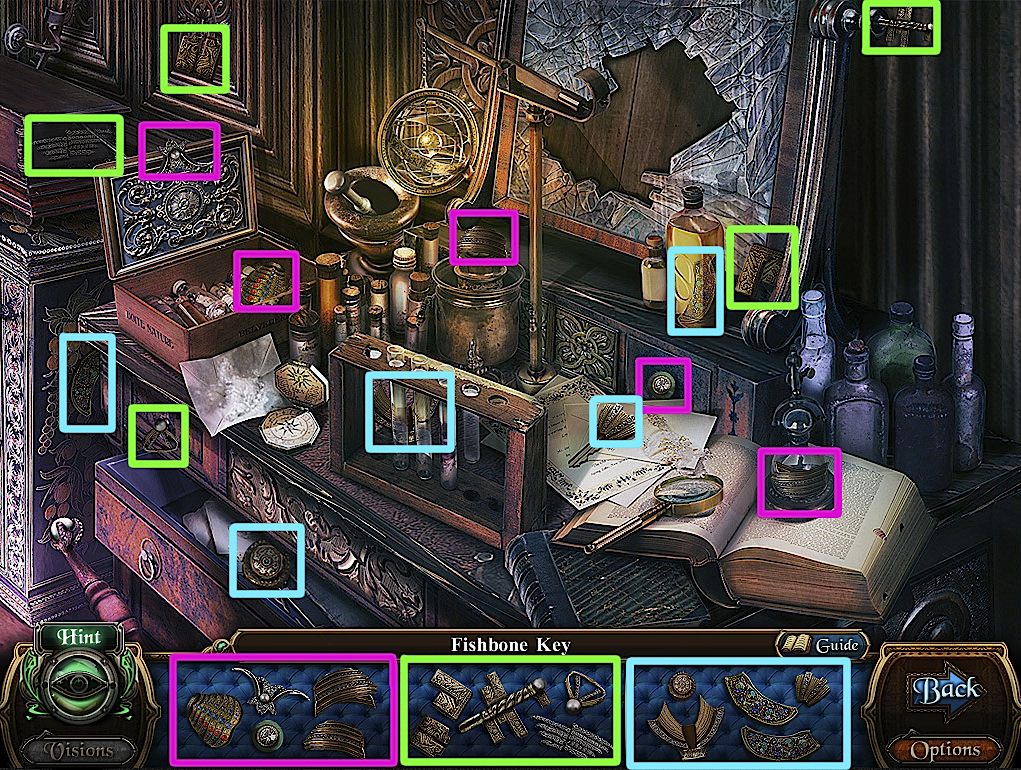
Click the vanity on the right. Play the hidden object scene for the Fishbone Key.
Screenshot
Go back and click on the big chest to the left of the doors. Use the Fishbone Key to open it.
Screenshot
Read the note and take the Organ Key (2/5).
Go back to the Vision Magic Hallway. Replay the case hidden object scene for the Sleep Handle.
Screenshot
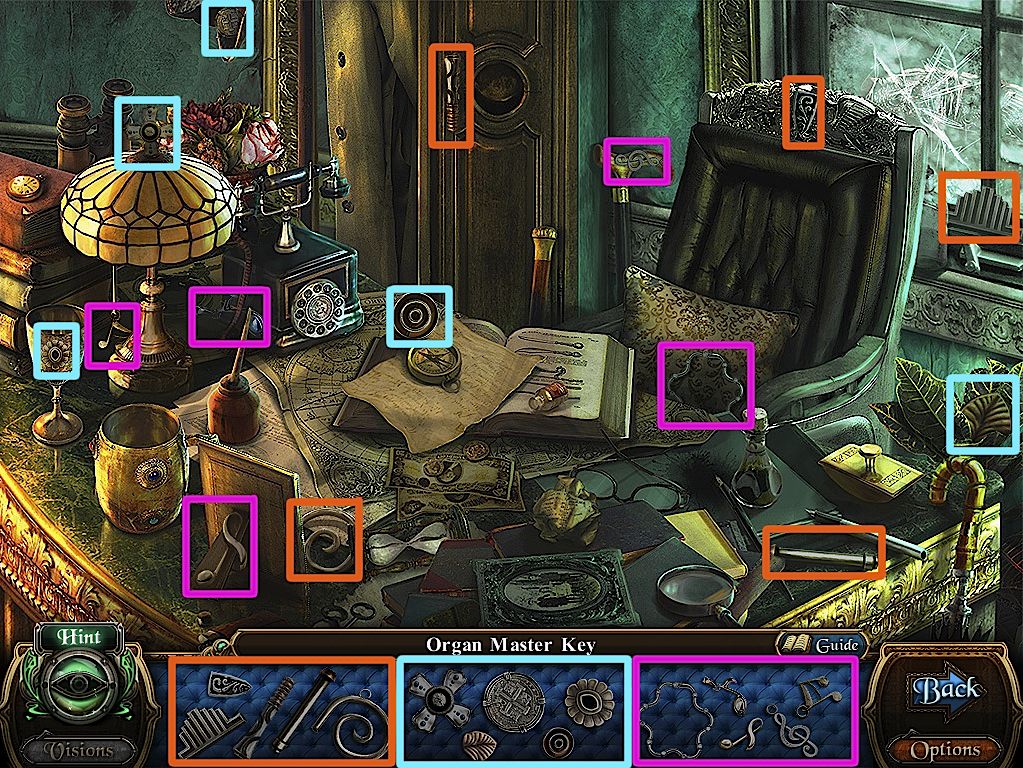
Go back to the Office. Replay the desk hidden object scene for the Organ Master Key.
Screenshot
Go forward, then through the doors to the Vision Magic Stage. Replay the chest hidden object scene for the Dark Scriptures.
Screenshot
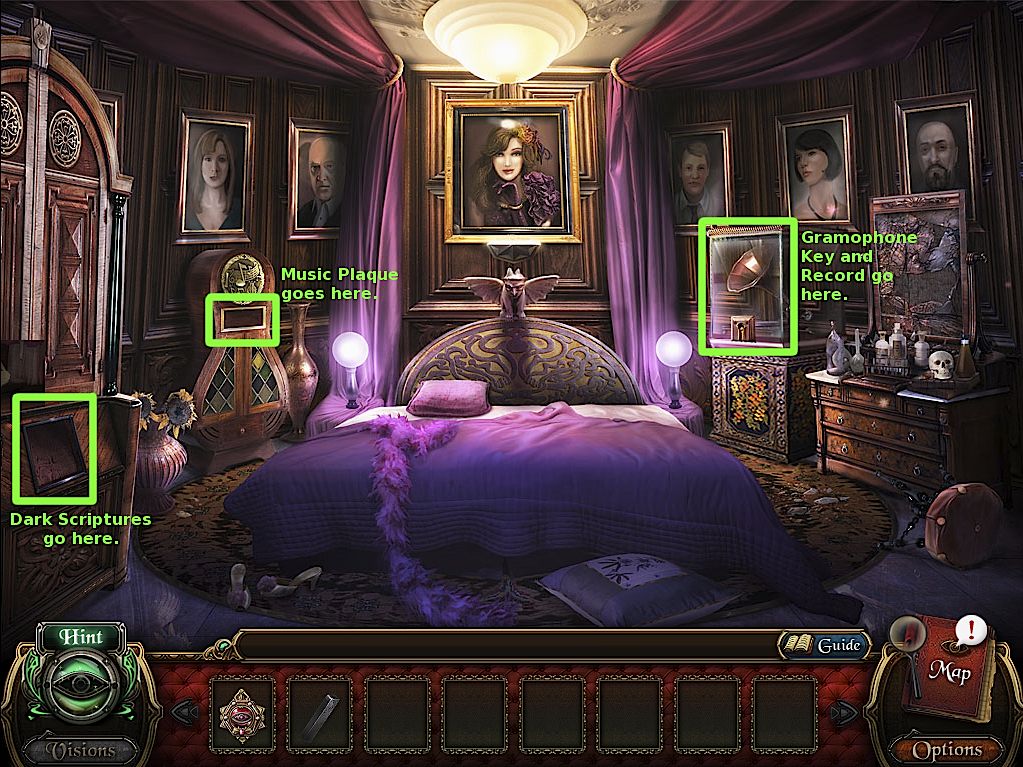
Go back to Darcy's Room (back, right, through the doors). Place the Dark Scriptures in the square slot underneath the wardrobe on the left.
Screenshot
Read the note and take the Organ Key (3/5).
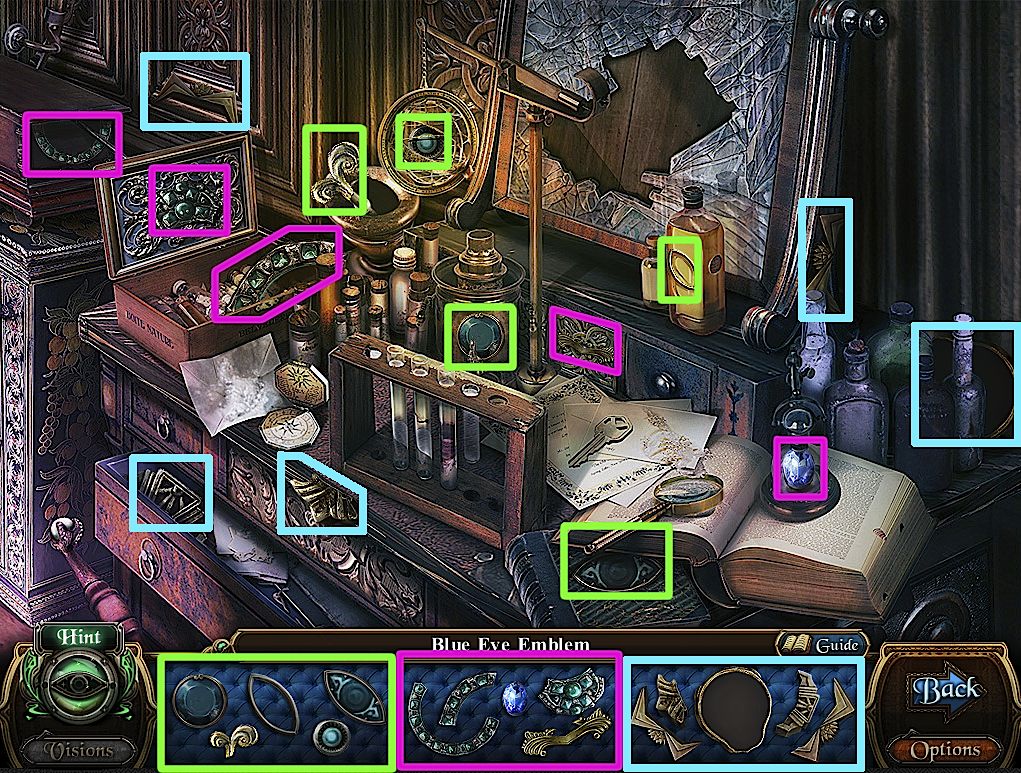
Replay the vanity hidden object scene to get the Blue Eye Emblem.
Screenshot
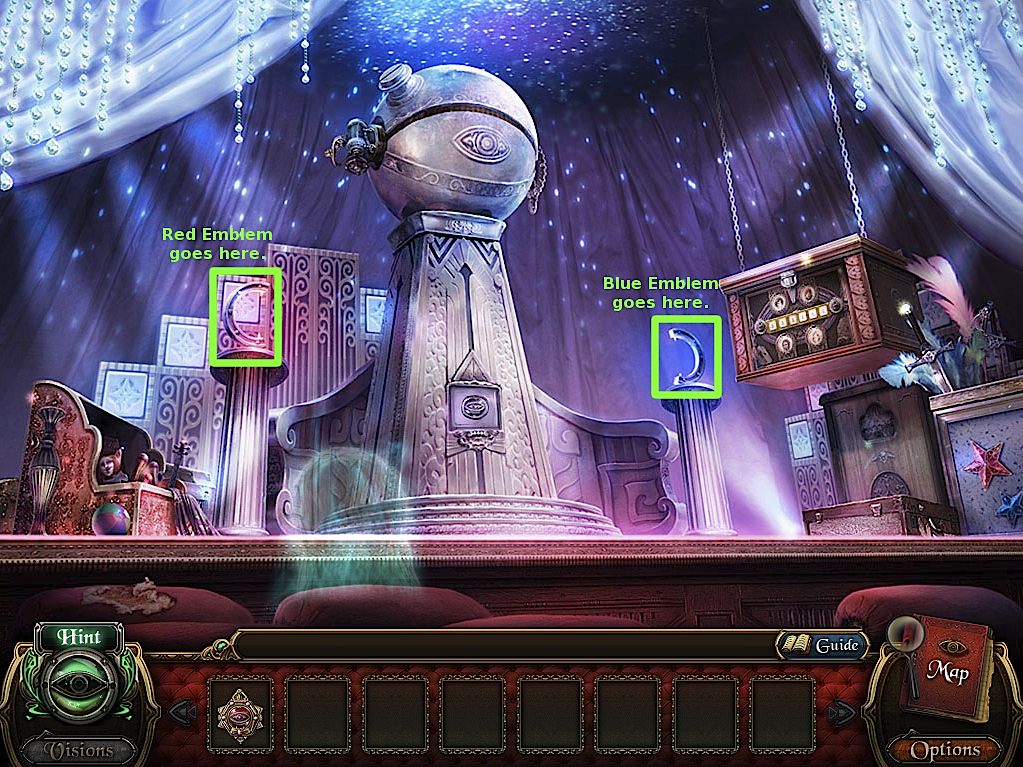
Go back to the Vision Magic Stage. Place the Red Eye Emblem in the red crescent on the left side of the stage. Do the same with the Blue Eye Emblem and the blue crescent to the right.
Screenshot
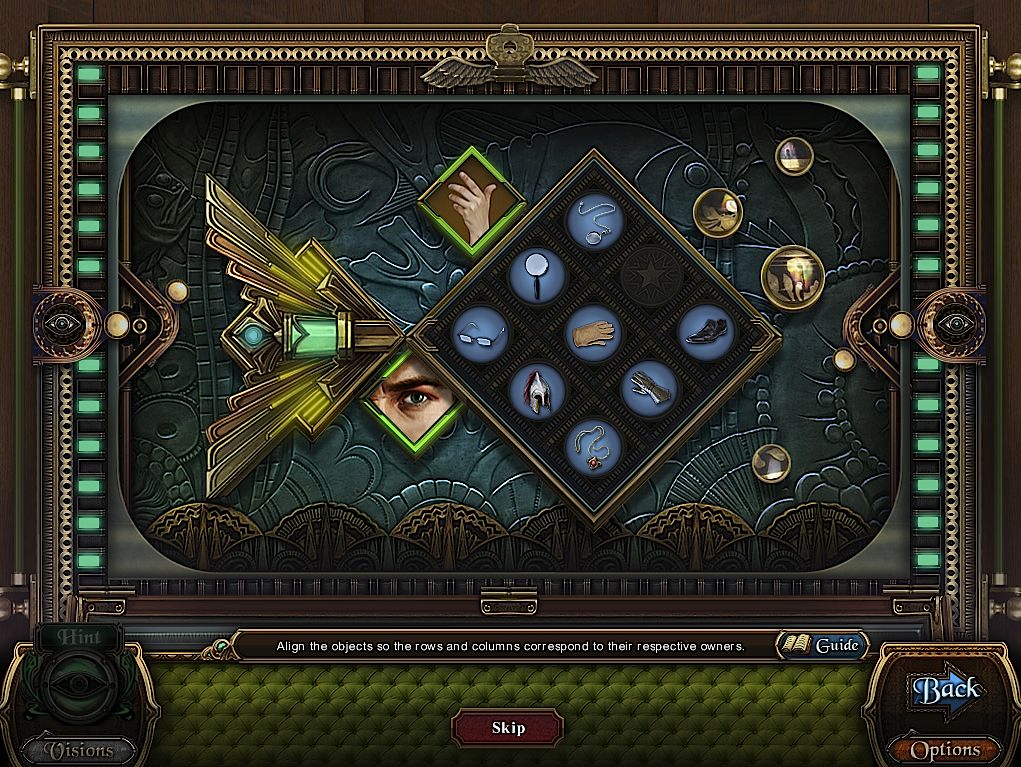
Click on the open compartment to play a minigame. Slide the tiles so they match each row.
Hand: magnifying glass, glove, gauntlet. Eye: glasses, magnifying glass, monocle.
Screenshot
Read the note and take the Organ Key (4/5).
Finale
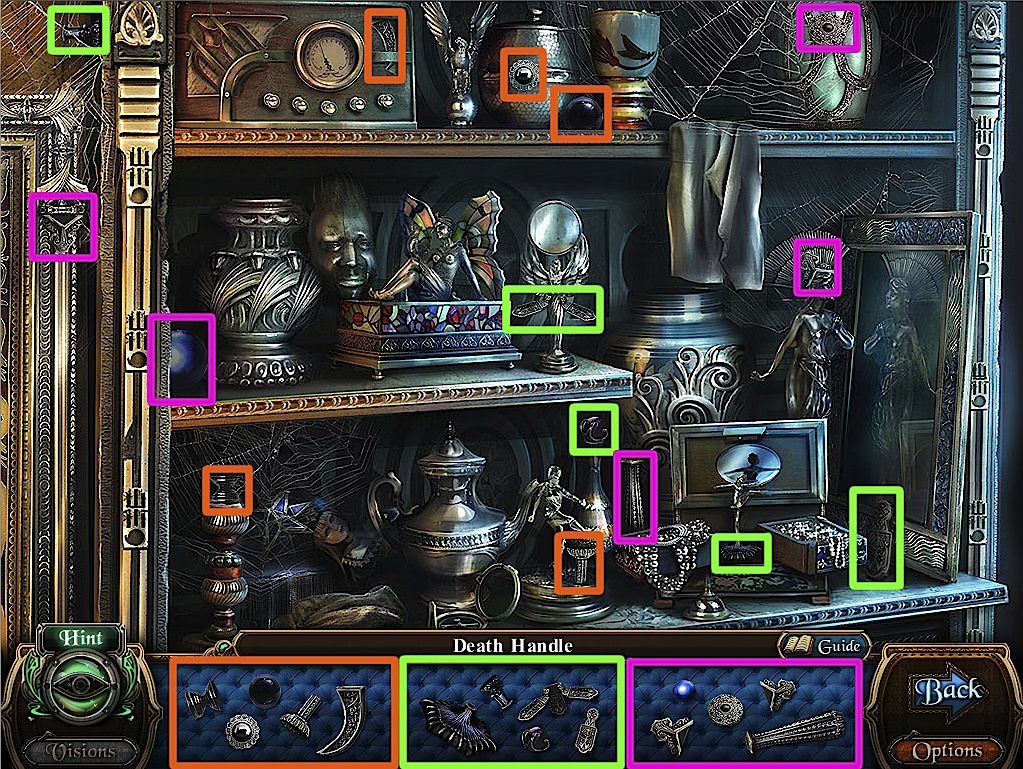
Go back to the Organ Room. Replay the shelf hidden object scene for the Death Handle.
Screenshot
Zoom in on the exposed doors underneath the rug.
Use the Sleep and Death Handles in their places. Take the Organ Key (5/5).
Zoom in on the organ in the back of the room.
Screenshot
Use the five keys with the keyboards.
Use the organ key with the open keyhole. Take the Musical Note Plaque and read the note.
Return to Darcy's Room. Click the blue Vision icon and play the hidden object scene for the Gramophone Key.
Screenshot
Use the plaque with the recess in the music-note cabinet, below the leftmost portrait. This activates a minigame.
Click to spin the hexagonal plates to match the image shown above. Going by matching colors is the easiest way.
The first one is easy.
Screenshot
The second one is just a little trickier, in that the clicking the innermost plate will also spin the outermost plate two spots counterclockwise.
Set the innermost plate first, and the rest is easy.
Screenshot
The last is the trickiest, since clicking one plate will rotate other plates, except for one. If the innermost plate is 1, and the outermost is 4:
Clicking 1 also spins 4 two spots counterclockwise.
Clicking 2 just spins 2.
Clicking 3 also spins 4 one spot counterclockwise, and 2 two spots counterclockwise.
Clicking 4 also spins 2 one spot counterclockwise.
Set plate 1, then 3, then 4, then 2, for the easiest solution.
Screenshot
Click the Old Record to take it.
Use the key with the gramophone case to the right of the bed, then use the record on the gramophone.
Screenshot
THE END
Bonus Puzzles
After you complete the bonus chapter, you can access eight bonus puzzles by clicking on the Bonus Content button on the main menu.
The first four puzzles are the pull-cord type, where you try to put the pictures in order. For all such puzzles, this is what each cord does:
First cord on the left switches pictures 1 and 2 (where 1 is the leftmost picture.
Second cord switches 1 and 3.
Third cord switches 2 and 5.
Fourth cord switches 4 and 5.
The large cord on the right checks the solution.
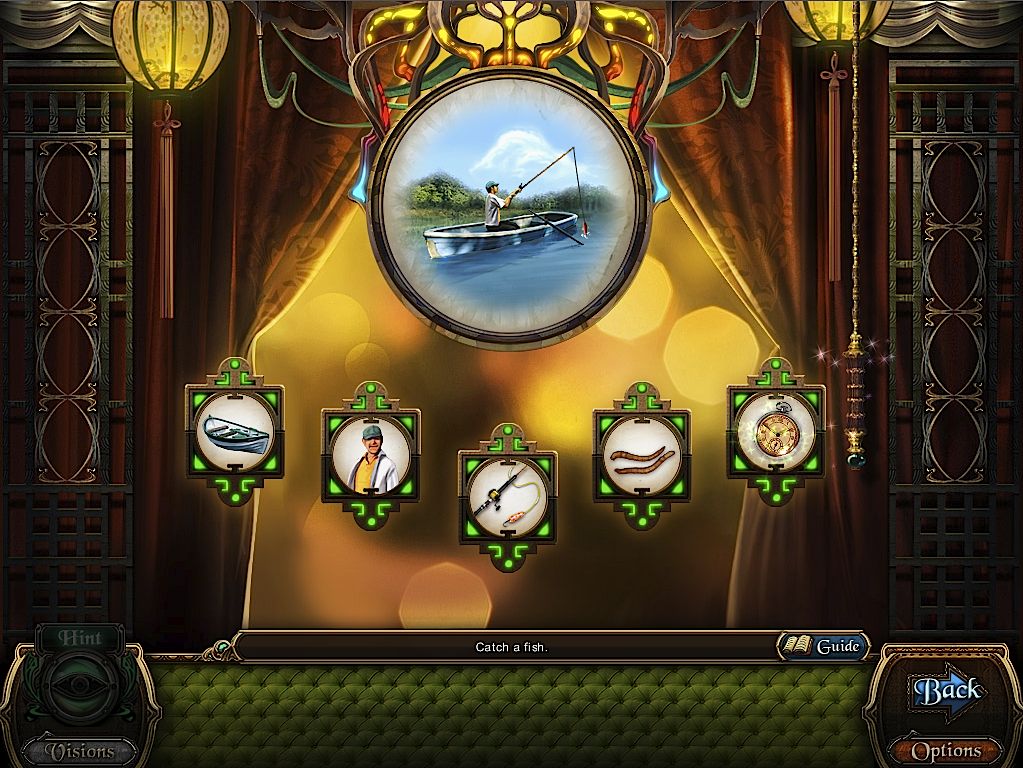
Fishing Puzzle Solution
Boat, man, rod, worms, watch.
Girl Puzzle Solution
Bear, book, bouquet, ring, bottle.
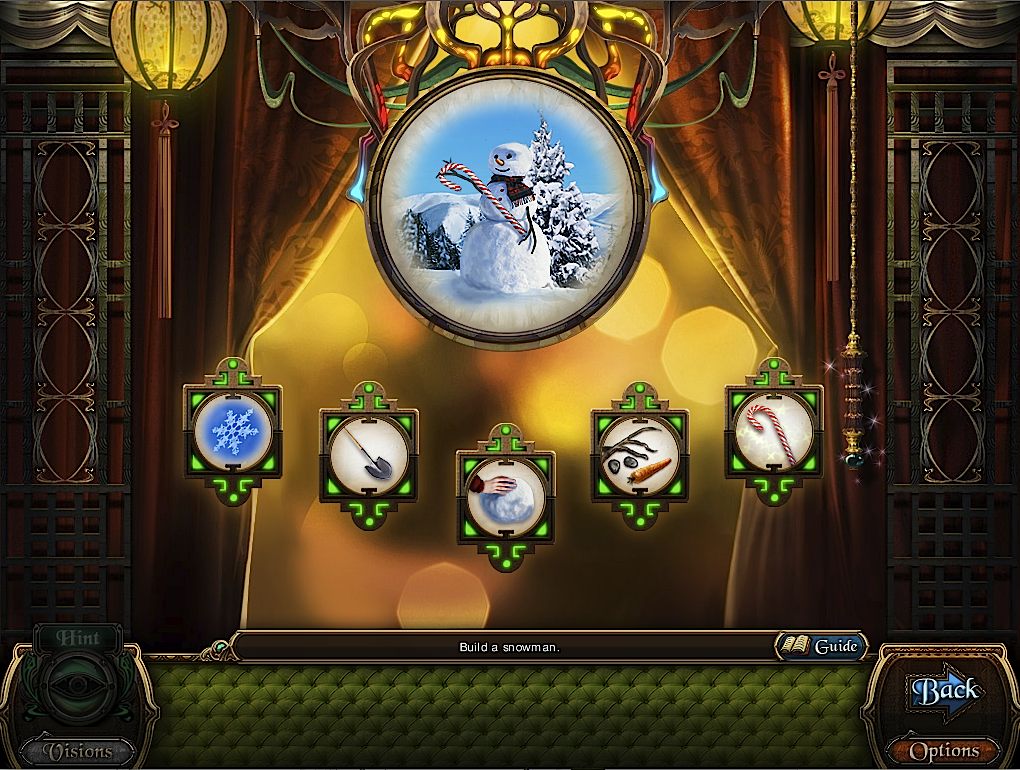
Snowman Puzzle Solution
Snowflake, shovel, snowball, carrot etc., candy cane.
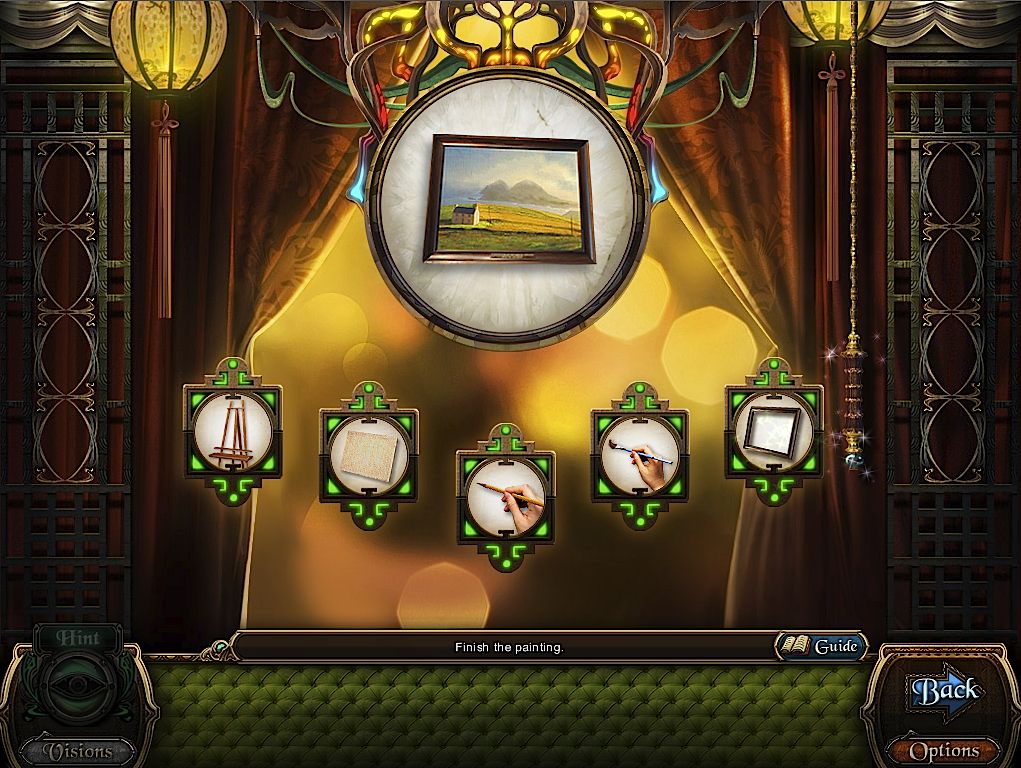
Painting Puzzle Solution
Easel, canvasse, pencil, brush, frame.
The last four puzzles are all the sliding tile type, where you set each row so that each tile belongs to the picture.
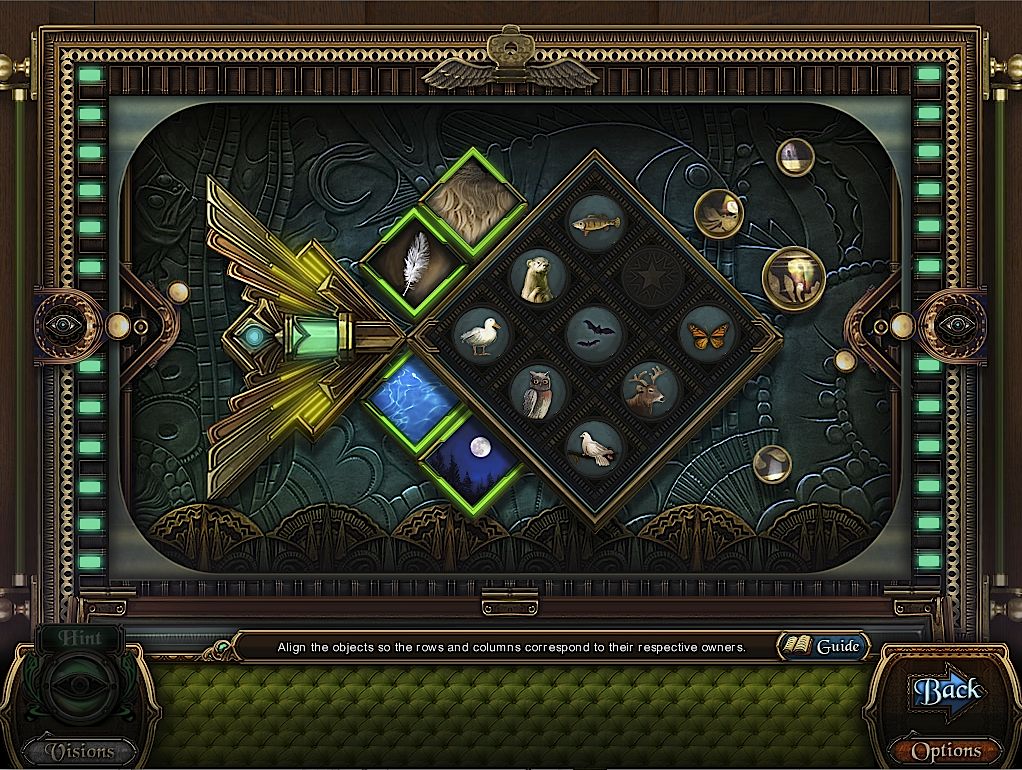
Animal Puzzle Solution
Feather: duck, owl, dove. Fur: otter, bat, stag. Water: duck, otter, fish. Night: owl, bat.
Accessory Puzzle Solution
Hand: purse, cigarette, ring. Foot: socks, shoe. Lips: lipstick, cigarette.
Profession Puzzle Solution
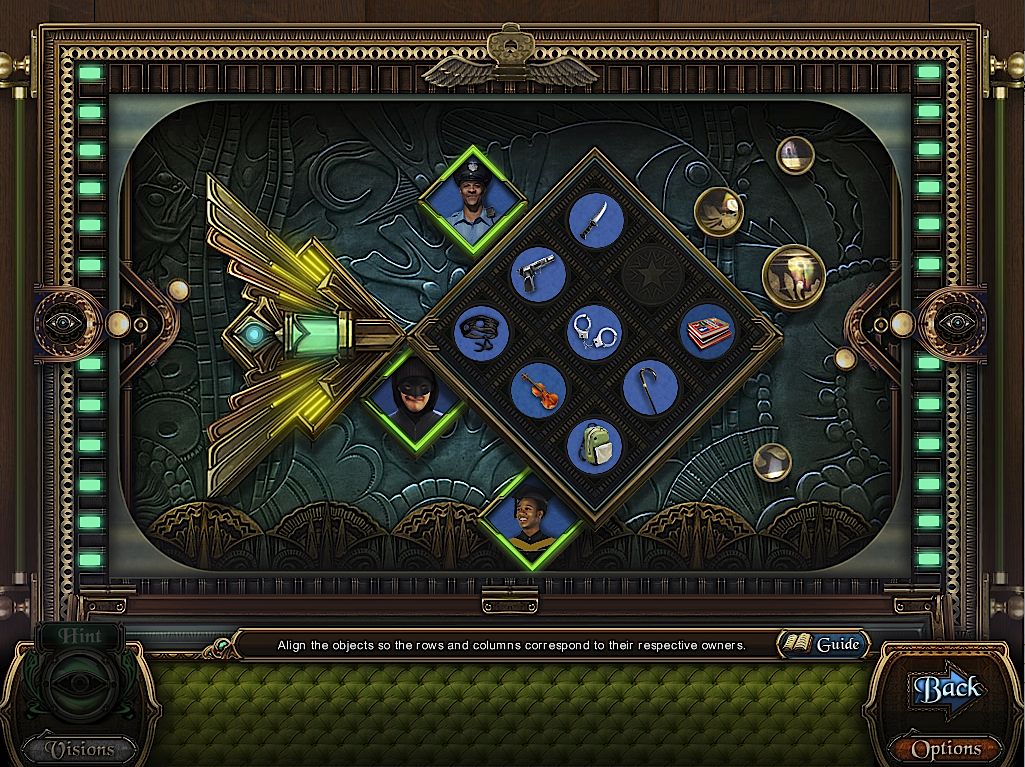
Cop: gun, handcuffs. Robber: mask, gun, knife. Student: backpack, books.
Fantasy Puzzle Solution
Waves: fish, mermaid, ship. Monster: vampire, werewolf. Fairy: fairy queen, mermaid. Pirate: skull and bones, ship.
Posted by: Mike |
September 1, 2011 6:15 PM
|
September 1, 2011 6:15 PM