
The Adventures of Red
![]()
 When you're hungry, there's only one thing better than a delicious muffin, and that's a delicious FREE muffin. So when a little yellow creature mysteriously named Red spies a sign advertising a free muffin, nothing's going to stop him. Of course, this muffin turns out not to be so much a "free as in no strings attached" muffin. It's more of a "free as in you must first complete a gauntlet of puzzles while pointing and clicking your way around a mysterious castle" kind of muffin. Made by Rob and John Donkin, The Adventures of Red serves up some classic challenges and a few twists of its own.
You use the mouse throughout, clicking to move Red around the screen and to manipulate objects. When you mouse over a hotspot, your cursor will change. Most of the time you simply click on things to interact, but occasionally you'll need to drag something. If that's the case, the game helpfully pops up a little bit of text reading "drag me". At first, you'll be on your own to figure out where you are, but if you keep your eyes peeled you'll eventually pick up map pieces which will assist in navigation. There are also some bonus pieces, such as 20 little gems for your "gotta collect 'em all" impulses, not to mention a number of snazzy hats.
Most of the puzzles are likely to be old hat (pardon the pun) to any puzzler or point and clicker worth his pixels, like the Towers of Hanoi and spot the difference. But everything is presented in such a gentle, relaxing style that it's like going to a party where a bunch of old friends are going to be, but you don't know which ones. Part of the pleasure is recognizing everybody. "Ah, there's Rotate the Tiles Into a Picture by the chips and dip! And is that good ol' Repeat the Flashing Light Pattern doing a cannon ball into the pool? Oh, Repeat, what a card you are." One could also point out that the puzzles didn't get to be classics for no reason. I still found a challenge or two lurking in the muffin mansion.
The gentle music, adorable art and amusing storyline contribute to the general feel of a game made for a relaxing break and stress reliever, not one of those games where the stress relief comes from how relieved you are to be getting back to flipping burgers or flipping houses or flipping through the air on the flying trapeze or whatever it is that you do in normal life. Only one puzzle remains unsolved: why is a little yellow creature called Red? One for the ages, my friends.


Walkthrough Guide
(Please allow page to fully load for spoiler tags to be functional.)
The Adventures of Red Walthrough
Welcome
Click on the blue key lying on the table.
Click on the blue padlock.
Mona Lisa
Click on the top hat on the table.
Click on the tiles of the Mona Lisa painting to rotate them and complete the painting.
Click on the red key that appears.
Click on the red padlock.
4 Shields
Click on the light blue object just behind the potted plant to collect a gem.
Note the pattern of colours on the shields.
Complete the blank shield by continuing the pattern.
Top left - Dark blue [two clicks]
Top right - Dark green [four clicks]
Bottom left - Dark green [four clicks]
Bottom right - Dark blue [two clicks]
Collect the green key when it appears.
Click on the chest to collect the map of the castle.
Click on the green padlock.
Matching pairs
Note the circular patterns on the scroll.
This is a matching pairs game.
The combination changes each time you play.
Match each pair to reveal the blue key.
Click on the blue key then click on the blue padlock at the top of the screen.
Two Shields
Note the clue written across the top banner - 5 is a magic number.
Click to the lower left of the banner to collect a blue gem.
The goal is to spot five differences between the two shields.
Screenshot.
Click on the blue key and then click on the blue padlock.
Four Jars
Click on the uppermost second window from the left to collect a blue gem.
Click on the mallet just right of the door.
Click on each of the jars to smash them and collect a green key and a blue key.
You can also collect a cowboy hat here.
Go right and then down to where the matching puzzle was and click on the blue padlock to the left.
Crest of the Phoenix
Click on the head of the phoenix on the crest to collect a gem.
To the right on the floor is a stone.
Click and drag it to reveal a yellow key.
Click on the key and click on the yellow padlock.
Numbers
Note the latin graffiti which suggests something Roman.
Note the MIX also written on the wall.
What is MIX in Roman numerals?
M=1000
IX=9
Click on the dials so that they read 1009.
Click on the blue key.
Click on the green padlock at the top of the screen.
Four Gems
Note the clue written on the scroll on the wall.
The order to click on the gems:
1 = Ruby [red: click on the 2nd gem]
2 = Emerald [green: click on the 3rd gem]
3 = Diamond [blue: click on the 1st gem]
4 = Amber [yellow: click on the 4th gem]
Click on the yellow key.
Click to go back down, then right twice, then up and then click on the yellow padlock to the right.
Five Bells
Click on the middle bell to collect a blue gem.
Click the rightmost bell to reveal a white key.
Click and drag the white key to the chest to get a map update.
Note the musical score on the scroll on the wall above the bells.
Play the bells to learn the pitches they sound from lowest to highest, and use the score to figure out what bells to play.
The combination is 3, 1, 2, 5, 4, 3.
Click on the green key.
Click on the trapdoor.
3 Poles
Click to the left near the table leg to collect a small blue gem.
Move the pieces from the left to the right, and only small pieces can be on top of larger pieces.
Number the poles 1 to 3 from left to right. For each step, click on the top disk of the first pole, then click the second pole.
Pole 1 to 2
Pole 1 to 3
Pole 2 to 3
Pole 1 to 2
Pole 3 to 1
Pole 3 to 2
Pole 1 to 2
Pole 1 to 3
Pole 2 to 3
Pole 2 to 1
Pole 3 to 1
Pole 2 to 3
Pole 1 to 2
Pole 1 to 3
Pole 2 to 3
Collect the yellow key when it appears.
Click on the yellow padlock.
Red Bucket
Click on the blue gem peeking out from behind the sand.
The aim here is to fill the bucket with sand so that it weighs the same as the skull.
Note the clue on the wall.
The skull = 6 rounded piles.
The bucket = 2 rounded piles.
3 scoops of sand = 2 rounded piles.
So if the bucket already weighs 2 rounded piles, we only need four more rounded piles.
Drag 6 scoops of sand to the bucket, and then drag the bucket, by its handle, to the skull. Then place the skull in the skull shaped hole to reveal the yellow key.
Take the yellow key, then click on the yellow padlock.
A Wall of Keys
Hover the mouse over each chest to get a key code for each which shows up on the right side banner.
Match each code by hovering over the keys, and the banner on the left will show a negative image.
When you've located the matching key, drag it to the chests, and when they open you can move on to the next
You can pick up a Viking's helmet here.
Collect 2 red keys here.
Click on the red padlock.
Four Gems - part 2
Collect the small blue gem from the far right amber gem.
Now for a game of Simon Says.
Click on the button above the door to the left to display the combination of gems that you need to recreate.
Follow the pattern successfully 3 times to reveal the green key.
Collect the green key and go left twice and then back up back to the 3 poles room, and click on the green padlock.
Sliding Skull
Note the order of colours clue on the right hand side.
The goal is to get the skull to the centre of the tile puzzle by getting it to follow a path.
The skull will need to follow the path according to the colour code, which in this case is red, blue, yellow, green.
Click on each coloured tile to rotate it so that the skull can follow the path.
Screenshot.
Collect the blue key.
Click on the red padlock at the top of the screen.
Wizard Skull
Click to the left of the left-side candle, and your map will be updated to show which keys can be found in which room.
Click on the wizard hat to wear it.
Click to the top of the right-side torch to collect the small blue gem.
Go back down the ladder and to the right, and click on the blue padlock.
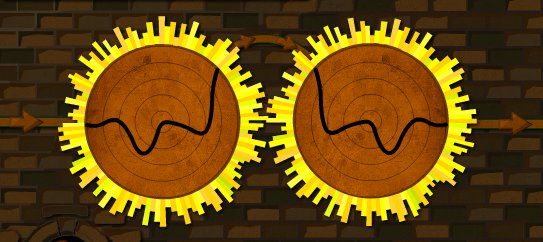
Two Sundials
Click towards the top of the right-side sundial to collect a blue gem.
Note the arrows running along the wooden beams from left to right and up between the sun dials.
Click on the circles within each dial so that the lines are connected to the wooden arrows.
Screenshot.
The chests will open, revealing a yellow key and a blue key, so click on them to collect.
Click on the yellow padlock above.
3 Windows, 2 Shields
Collect the small blue gem from the upper left of the screen.
Drag the white key from the upper left to the chest to wear the knight's helmet.
Click on the green padlock at top.
Nine Torches
Light all the torches.
Click on them in the following order:
Top right.
Very Centre.
Bottom left.
Top right.
Top left.
Take the blue key and the blue gem hidden behind the candle.
Click on the blue padlock to the left.
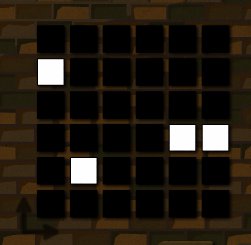
Black Squares
Move the rock that's near the left door.
Look closely to see clues around the screen.
E3
B2
F3
A5
Use the clues and click on the corresponding squares.
Screenshot.
Click on the yellow key.
Click on the yellow padlock to the left.
Find the Right Way
This is like a word search puzzle.
The banner at the top is the clue to the words you need to find.
You need to find a path that has the words 'the right way' all connected.
Hint - start at the bottom left, second square from the bottom which is a 't'.
From the 't' find the connecting letters.
The words run across the bottom half of the grid.
Once completed, take the green key.
Move the stone under the puzzle to collect a blue gem.
Click on the green padlock.
The Ring of Fire
Click on the ring that's on the center table and drag it to the torch on the right.
The ring will the glow with a number combination.
This may change each time you play, but in this instance it's:
615423
Note the 6 red buttons above the table.
Click on them according to the number code revealed by the ring.
Take the red key.
Collect the blue gem from the upper left shield.
Click on the red padlock to the left.
Objects d'Art
Note the words on the wall.
They're scrambled words relating to some of the objects onscreen.
Sword
Diamond
Shield
Candle
Click on the objects according to the order of the words.
Take the green key.
Click on the green padlock.
Abstract Art
Another Mona Lisa style puzzle.
Click on each tile to rotate it and piece the puzzle back together.
Collect the yellow key.
Collect a blue gem that's well hidden in the top of the upper left window.
Go back right and click on the blue padlock.
We are the Knights who say Ni!
Oh yay, it's a game where you have to get the knight's from one side to the other while getting the knights from the opposite side across as well.
Click on the individual knights to move them, and then when complete, collect the blue key.
The knights who say Ni face right and start on the left side of the scroll. The knights who say Ekki Ekki etc face left and start on the right side of the scroll. Click the knights in the following order.
Front Ni knight
Front Ekki knight
Middle Ekki knight
Front Ni knight
Middle Ni knight
Rear Ni knight
Front Ekki knight
Middle Ekki knight
Rear Ekki knight
Front Ni knight
Middle Ni knight
Rear Ni knight
Middle Ekki knight
Rear Ekki knight
Rear Ni knight
Click on the blue padlock to the left.
Wall of Shields
Simply find the two matching shields to reveal the green key.
An incorrect guess will shuffle the shields.
This changes each time you play.
When successful, collect the green key.
Click on the upper yellow padlock.
Foras Sesto Pondero Ver
Collect the blue gem hidden to behind the upper left of the sign with Latin words on it.
Collect the hat, and then go back down and to the right, and then click on the green padlock.
Black and White
All squares need to be turned white by moving the skull on to them.
Click on the squares
Left
Down
Right
Right
Left
Up
Left
Up
Right
Right
Left
When completed, take the red key and click on the red padlock to the right.
Find the Key
Note the clues on the banners at the top.
Note that there is a three letter code needed.
Note that the middle banner states 'find the key'.
Also note that the number of letters in the legible words is different to the number of letters in the codes.
The words in the list on the right are out of order.
Look for the four letter word and match it to the four letter code.
The solution is the word 'key' in code.
Click the first button x10.
Click the second button x4.
Click the third button x24.
Collect the blue key and click on the blue padlock to the right.
You can also collect a Santa hat from this scene.
Colours
Click on the chest to collect a blue gem.
Note the clue on the left.
The goal is to get the four squares of each colour to match the pattern of the clue.
Clicking on the squares will rotate them in groups of four.
Match the pattern to proceed.
Collect the red key.
Click on the red padlock to the right.
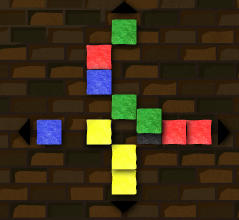
A Colourful Cross
Again there's a clue to the right as to the outcome of this puzzle.
Click on the ends of the cross to move them and to swap the coloured tiles around so as to match the illustration at right.
As best as I can manage here's a list of the directions:
Up
Right
Down x 4
Left
Up x 6
Right
Down x 5
Left
Up x 4
Right
Down x 3
Left
Up x 2
Right
Down
Up
Up
Left
Down
Left x 3
Up
Right x 6
Down
Left x 4
Up
Right x 4
Down
Left x 3
Up
Right x 2
Down
Red's Chocolate Muffin should now descend from the ceiling.
Enjoy!!!
Thanks to chiktionary for the walkthrough!
Posted by: Mike |
May 27, 2011 11:42 AM
|
May 27, 2011 11:42 AM