
![]()
 Usually when you hear that a game has a bunch of new water levels, it's a call for trepidation, especially when the liquid appears as brackish as it does here. However the Dark Liquid Level Pack, an add-on to Smart Code Games' popular physics puzzler Liquid Measure 2, is just as refreshing a drink as the original. Not much is changed, but, as my amateur plumber dad can tell you, it isn't wise to fix a pipe that isn't broken.
As before, the goal of the game is to direct flows of water into the proper receptacles without spilling any. As you might expect, the (now suspiciously-dark) water flows downwards unless directed by another implement. Using the mouse, drag and drop the various items to set up the liquid's route. In addition to the standard pipes and pots, there are other pieces available for use, including Overflow Pots, which catch a certain amount of water before releasing the extra, and Water Splitters, which splits the stream into two equal streams starting with the direction the arrow upon it is facing. You click the pipe on the right side of the screen, or hit the [spacebar], to turn the water-flow. 31 new levels are included, so water you going to do?
Level packs have a not entirely unjustified reputation for being "just like the main game but harder", and the levels included in Dark Liquid don't break this trend. This isn't entirely a bad thing: I quite enjoyed the original Liquid Measure 2, but felt that the easy challenge level and high number of tutorial levels worked against it. Dispensing with unnecessary instructions and ramping the difficulty up to "medium" is exactly what the series needed. Certainly, some levels are gimmes, but there are some real head-scratchers here, and it's for the best. I would have liked it better if the challenge was more progressive (it often felt like super-easy levels came right after the more difficult ones), but all in all, it's a satisfying addition.
There remains little to say. If, like many out there, you enjoyed Liquid Measure 2, you will enjoy the additional levels, and that is that. There seems to be little reason for them not to have been included in the original version, but I find it hard to get too annoyed at having more of a fun game to play. Now, if you excuse me, I think I hear my faucet dripping...


Walkthrough Guide
(Please allow page to fully load for spoiler tags to be functional.)
Liquid Measure 2: Dark Fluid Level Pack Walkthrough
General Information
There are three types of jars in this game. I refer to them as output jars, overflow pots, and buckets. Output jars are where the water starts at the beginning of the level. Overflow pots have an output spout which can attach to pipes to route water. Regular buckets have no output.
If you pour more liquid into a regular jar than the number of units it can contain, the water will spill, making you retry the level.
There are eight different pieces of plumbing you can use. There are two types of straight pipes, four types of curved pipe, and two types of splitters.
I will refer to the curved pipes by the direction water flows going from the top opening to the bottom opening: down-and-left; down-and-right; right-and-down; left-and-down.
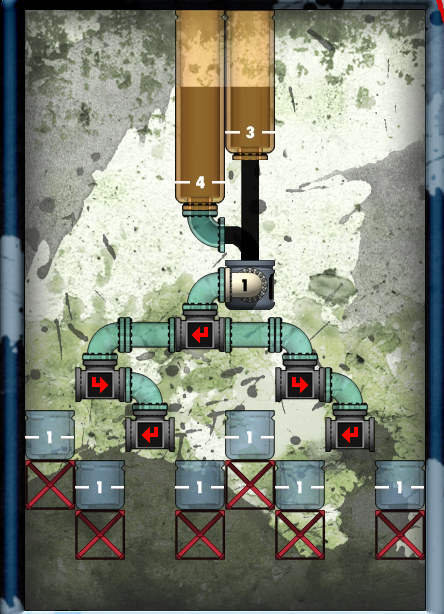
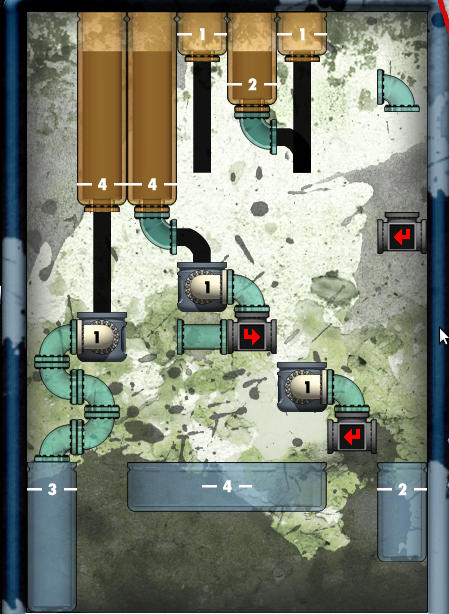
Level 1
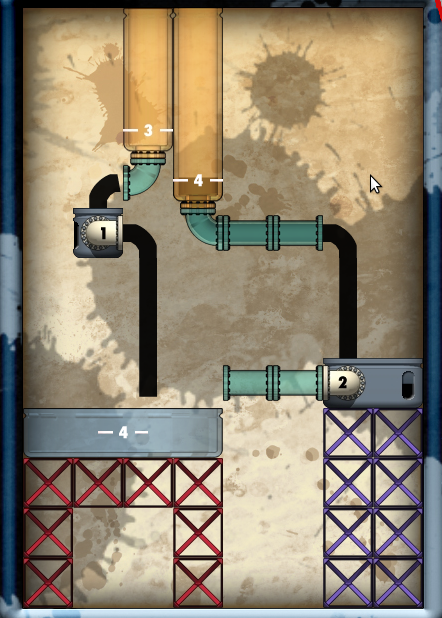
Use the horizontal pipes to route water from the 4-unit output jar to the 2-unit overflow pot.
Use the rest of the horizontal pipes to route water from the 2-unit overflow pot to the 4-unit bucket.
Route water from the 3-unit output jar through the 1-unit overflow pot to the 4-unit bucket.
Screenshot
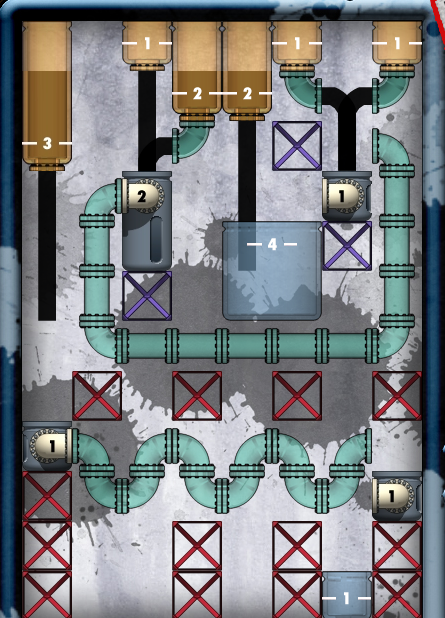
Level 2
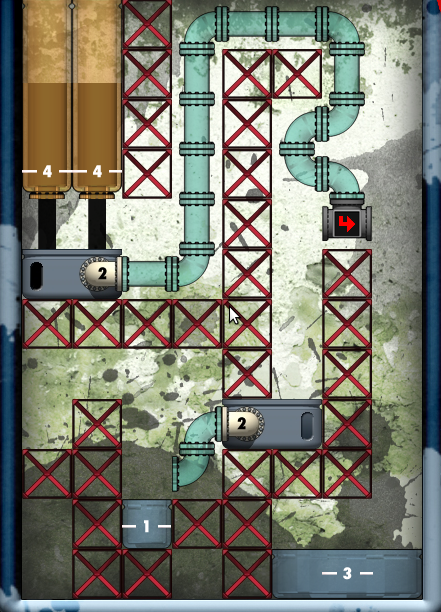
Use two downward-left spouts to route water from the output jars to the overflow pot
Put the splitter under the vertical pipe leading out from the overflow pot
Put the 1-unit bucket under the left-facing splitter
Put the 2-unit bucket between the purple cross blocks on the right
Use the remaining two pipe pieces to route water from the right-facing splitter into the 2-unit jar
Screenshot
Level 3
Put one overflow pot directly beneath the leftmost output jar
Put the second overflow pot to the right and below the first, right above the cross blocks
Use the down-and-left pipe piece and a horizontal pipe piece to route water from the right output jar to the right overflow pot
Use the remaining pipe pieces to route water from the right overflow pot to the open pipe end on the right.
Screenshot
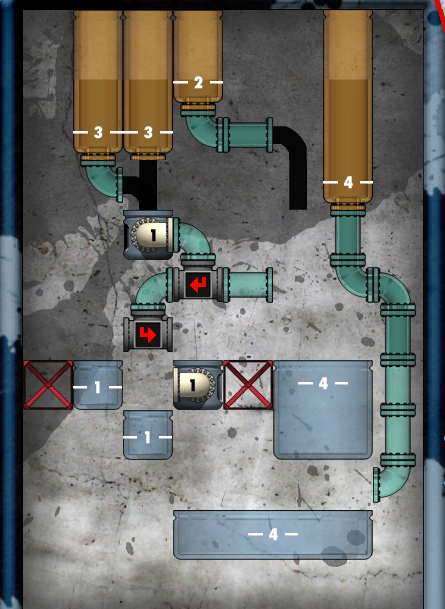
Level 4
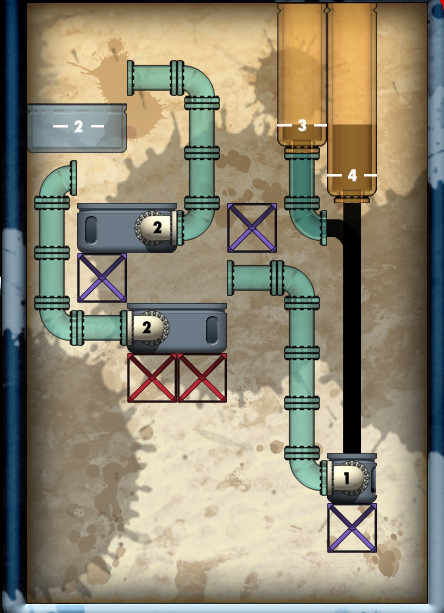
Place the right-facing 2-unit overflow pot under the output jars, connected to the fixed horizontal pipe.
Use all the vertical pipe pieces to connect the overflow pot with the fixed pipe at the top of the screen. Use the horizontal pipe to cross the gap between the fixed pipes at the top of the screen.
Connect a right-and-down pipe piece to the fixed pipe. Place the splitter beneath this pipe piece
Put the 2-unit overflow pot under the left branch of the splitter.
Use the left-and-down pipe piece to connect the overflow pot to the fixed down-and-left pipe piece.
Put the 1-unit bucket under the down-and-left pipe piece
Screenshot
Level 5
Connect a down-and-right pipe piece to the left hand output jar.
Connect a down-and-left pipe piece to the right hand output jar.
Place an overflow jar beneath these two pipe pieces so all the water flows into it first.
Put the second overflow jar above and to the right of the 2-unit bucket so water can flow from its output spout directly into the bucket.
Use the remaining pipe pieces to route water from the left hand overflow jar up the left side of the output jar, then across the tops of both output jars
Screenshot
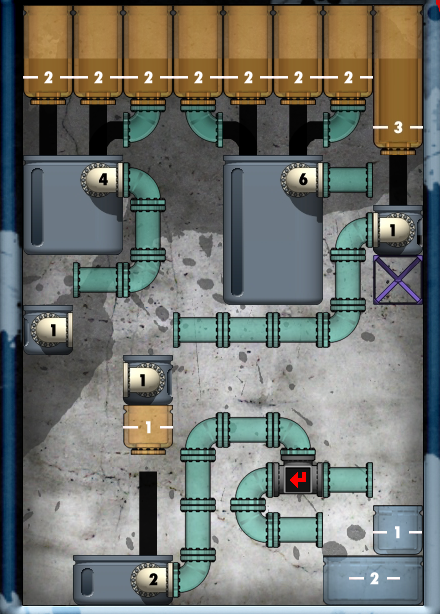
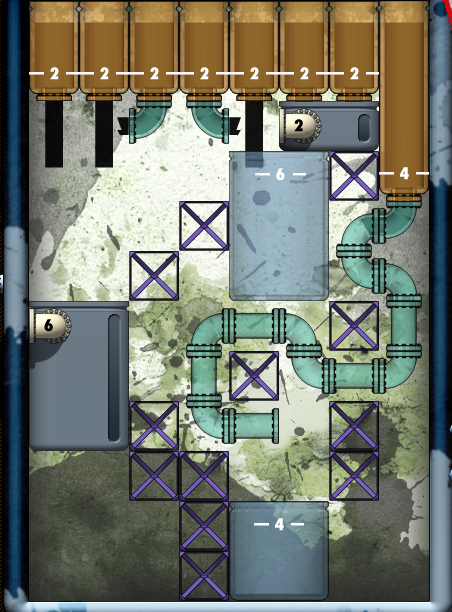
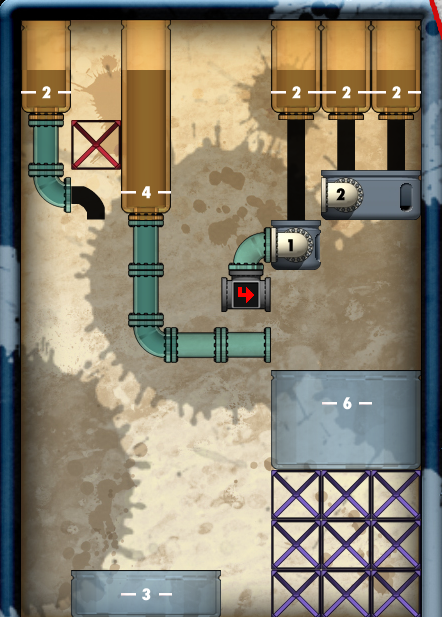
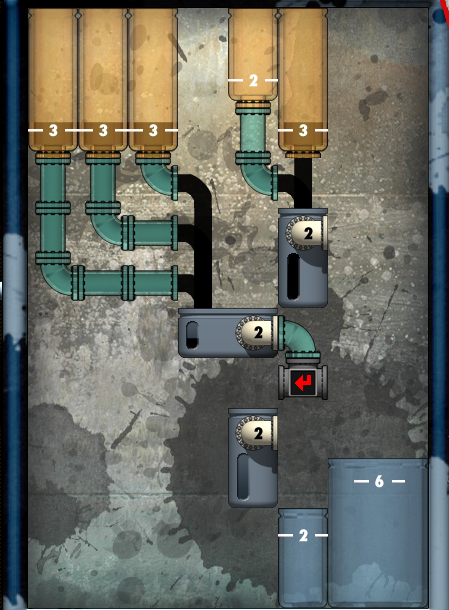
Level 6
Use a down-and-right piece to route water from the 3-unit output jar to the 1-unit overflow jar
Use two vertical pipe pieces and a down-and-right piece to connect the 1-unit over-flow jar to the fixed pipe pieces above it.
Use one horizontal pipe to route water from the fixed pipe pieces into the lower 2-unit overflow pot.
Use a left-and-down piece, a vertical piece, and a down-and-right piece to route water from the lower overflow pot to the upper overflow pot.
Use the remaining five pipe pieces to route water from the upper overflow pot up and left to the 2-unit bucket.
Screenshot
Level 7
Use down-and-left pipe pieces on the third and seventh output jars, counting from the left. Use a down-and-right pipe piece of the fourth output jar. All output jars should now be routed into one of the overflow pots.
Use a horizontal piece to route water from the 6-unit overflow pot to the 1-unit overflow pot.
Use another horizontal piece to route water from the 4-unit overflow pot to the other 1-unit overflow pot.
Use another pipe piece on the right branch of the splitter.
Use the last pipe piece to route water from the left branch of the splitter to the 2-unit bucket.
Screenshot
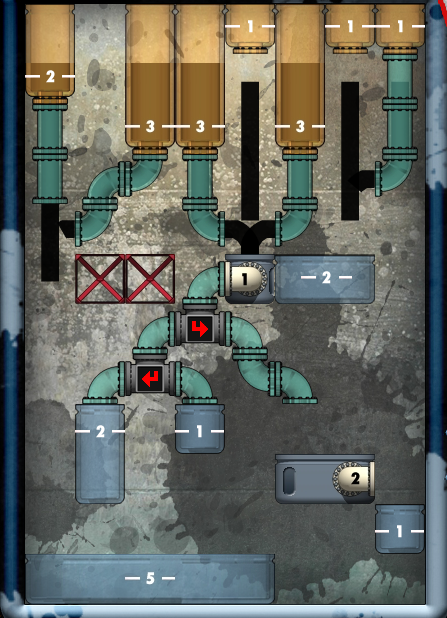
Level 8
Use two down-and-left pipe pieces to route water from the second output jar from the left (a 3-unit jar) into the 5-unit bucket.
Use another down-and-left pipe piece under the rightmost output jar to route its water into the 2-unit bucket.
Use a down-and-left piece and a down-and-right piece to route water from the remaining two 3-unit output jars into the 1-unit overflow pot.
Put the right-facing splitter under the pipe connected to the 1-unit overflow pot.
Put the left-facing splitter between the pipe pieces connected to the 1-unit and 2-unit buckets.
Screenshot
Level 9
Connect a down-and-left pipe piece to the 3-unit output jar.
Put the overflow pot to the left and under that pipe piece. Both output jars should route into the overflow pot.
Use a single horizontal piece to connect the overflow pot to the fixed pipe pieces.
Connect a left-and-down pipe piece to the 1-unit overflow pot.
Connect the splitter to the left-and-down piece.
Use two horizontal pipe pieces to connect the right side of the splitter to the fixed pipe pieces.
Screenshot
Level 10
Use a down-and-right piece to route water from the 1-unit output jar into the 3-unit bucket.
Connect a horizontal pipe piece to the right side of the upper splitter.
Use the remaining pipe pieces to route water from the 3-unit output jar around the blocks and into the 4-unit overflow pot.
Screenshot
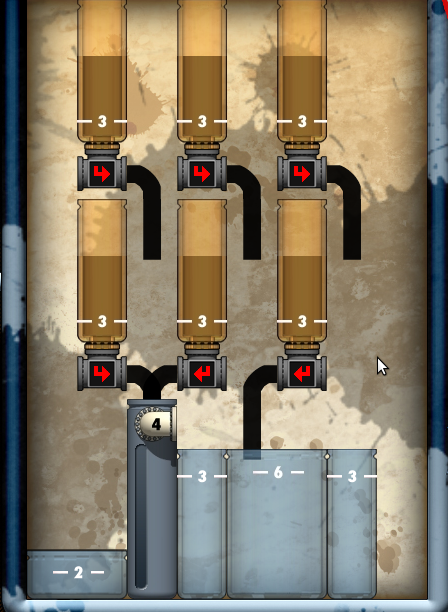
Level 11
Attach right-facing splitters to both output jars in the left column of output jars.
In the center column of output jars, use one left-facing splitting and one right-facing splitter. It does not matter which one goes on the upper or lower jar as long as they are different.
In the right column of output jars, use one left-facing splitter and one right-facing splitter. Again, it doesn't matter which is which.
Screenshot
Level 12
Attach each of the three down-and-right pipe pieces to one of three left-most output jars.
Use a horizontal pipe piece to route water from the 3-unit output jar to the fixed horizontal pipe pieces.
Put a left-facing 2-unit overflow jar under and to the right of the those pipe pieces. It should be directly above the cross blocks and catching water from the 3-unit output jar and one of the 2-unit output jars.
Put the second left-facing overflow pot below and to the left of the first one. It should collect water from the first overflow pot and the 4-unit output jar.
Connect a horizontal pipe to the second 2-unit overflow jar.
Put a 1-unit overflow pot under and to the left of the pipe connected to the 2-unit overflow pot.
Use a horizontal pipe piece to connect the 1-unit overflow pot to the fixed horizontal pipes.
Put the right-facing 2-unit overflow pot above and to the left of the 2-unit bucket. Water should flow from the 1-unit overflow pot to the 2-unit overflow pot to the 2-unit bucket.
Place the remaining 1-unit overflow pot above and to the left of the 1-unit bucket.
Screenshot
Level 13
Move the 3-unit overflow pot out of the way for now so you have room to manuever.
Put the 4-unit bucket in the bottom left corner of the available screen space.
Put a 3-unit bucket just above the 4-unit bucket, with the right sides of the buckets aligned. Water from the 4-unit output jar should fall into the 4-unit bucket, and water from the 3-unit output jar should fall into the 3-unit bucket.
Put the remaining 3-unit bucket in the bottom right corner of the available space.
Put the 2-unit overflow pot under the center output jar. The overflow pot should overlap the 3-unit bucket to the left.
Put the 2-unit bucked below the 2-unit overflow pot, so that it catches water from the pot, but not from the 3-unit output jar.
Put the 3-unit overflow pot under either of the right-hand output jars.
Screenshot
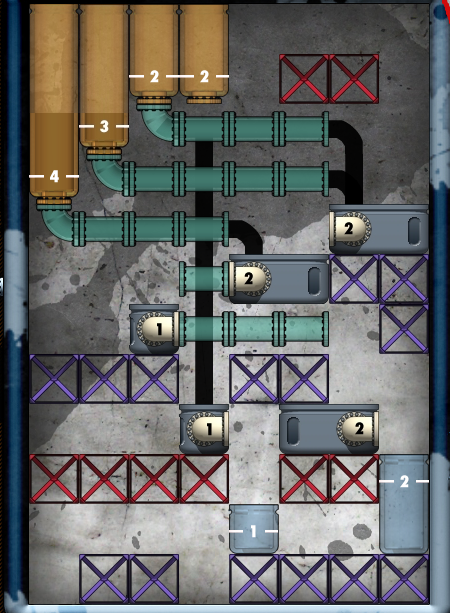
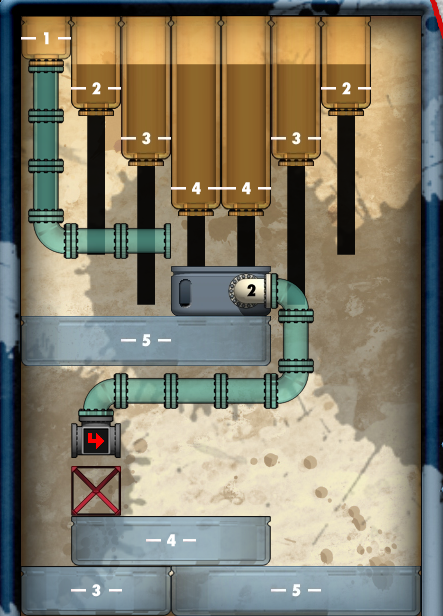
Level 14
Connect the 2-unit overflow pot to the fixed pipes in the center of screen. All water from the left three output jars should pour into this pot.
Put the left-facing 1-unit overflow pot under the fixed pipes so that water is routed from the 2-unit pot to the 1-unit pot.
Connect a left-and-down pipe piece to the left-facing 1-unit overflow pot.
Connect the left-facing splitter to the left-and-down pipe piece.
Connect the right facing 1-unit overflow pot to the top of the pipe on the right side of the screen. Water from both 2-unit output jars should flow into the pot.
Connect the right-facing splitter to the bottom of the fixed pipe on the right side of the screen.
Screenshot
Level 15
Connect the left facing splitter to the pipe leading from the 4-unit output jar.
Connect the right-facing splitter to the pipe leading from the 3-unit output jar.
Place a horizontal pipe piece under the right-facing splitter, routing water from the splitter to the 4-unit bucket.
Use two horizontal pipe pieces to route water from the left-facing splitter to the 2-unit overflow pot.
Put the 1-unit bucket under the pipe elading from the overflow pot.
Screenshot
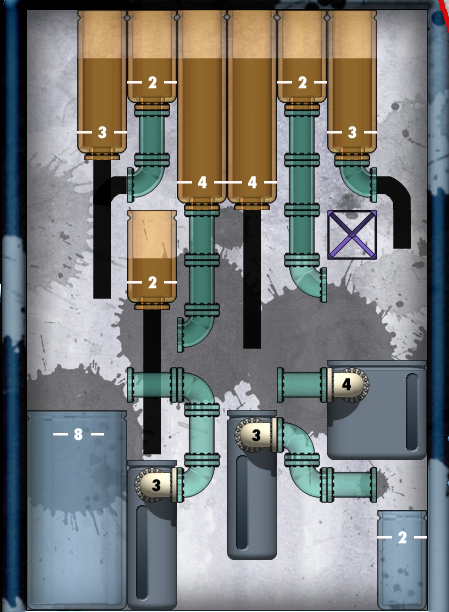
Level 16
Use a down-and-left piece to route water from the upper 3-unit output jar to the 2-unit overflow pot.
Use a down-and-right piece and a down-and-left piece to route water from the left and right 4-unit output jars into the 6-unit overflow pot.
Use the remaining pipe pieces to route water from the 4-unit overflow pot up and around into the upper 2-unit pot.
Screenshot
Level 17
Put the right facing overflow pot immediately beneath the rightmost output jar.
Use a horizontal pipe piece to connect the pot to the fixed pipe. Connect another horizontal pipe piece to the left of the fixed pipe piece.
Place a right-facing overflow pot under the horizontal pipe under the left 3-unit output jar.
Put the second right-facing overflow pot beneath and to the right of the first right-facing pot.
Put the 1-unit bucket beneath and to the right of the second right-facing pot.
Use a vertical pipe piece and a down-and-right piece to connect the leftmost output jar to the fixed pipe.
Connect the last pipe piece to the second output jar from the left.
Move the 8-unit bucket under the two 1-unit output jars.
Screenshot
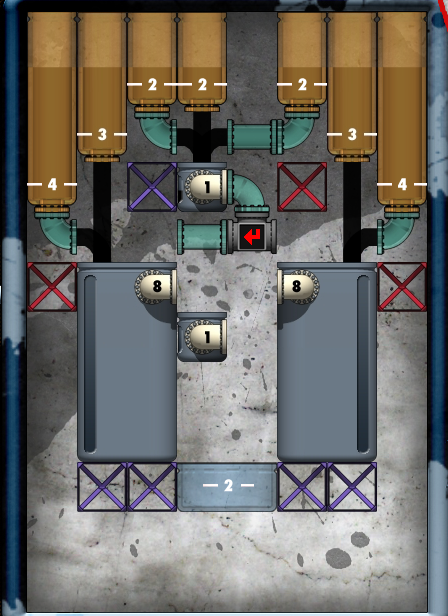
Level 18
Place the left-facing overflow pot against the right wall, with its output spout connected to the fixed pipe in the center right of the screen.
Place the right-facing 2-unit overflow pot beneath the pipe leading out from the left-facing pot. Its spout should connect to another fixed pipe that routes to the 3-unit bucket.
Connect the splitter to the pipe that leads from the leftmost output jar.
Put the 1-unit overflow pot below and to the right of the splitter, so that its output spout connects to the fixed pipe in the center of the screen.
Screenshot
Level 19
Place the 2-unit overflow pot immediate beneath the two right-most 2-unit output jars.
Place the 6-unit bucket immediately beneath and slightly to the left of the 2-unit overflow jar.
Use a down-and-right pipe piece to route water from the center 2-unit output jar to the 6-unit bucket.
Leave the 6-unit overflow pot where it is.
Use a down-and-left piece to route water from the third output jar from the left into the 6-unit pot.
Use a left-and-down piece and a down-and-right piece to route water from the 4-unit output jar to the fixed pipe pieces.
Use the remaining five pipe pieces to route water around and beneath the single cross block in the center of the screen.
Put the 4-unit bucket under the pipe that routes from the 4-unit output jar.
Screenshot
Level 20
Use a down-and-left piece to route water from the 1-unit output jar into the overflow pot.
Use a horizontal pipe piece to route water from the right-hand 3-unit output jar to the overflow pot.
Connect a left-facing splitter to the output of the overflow pot.
Connect the right-facing splitter to the fixed pipe piece attacked to the upper left-facing splitter.
Connect the left-and-down piece to the left of the right-facing splitter.
Put the second left-facing splitter between the two horizontal fixed pipes at the bottom.
Use the last horizontal pipe piece to route water from the upper splitter to the left hand bucket.
Screenshot
Level 21
Put a 2-unit overflow pot directly beneat the 3-unit and 2-unit output jars on the left.
Put the 3-unit overflow pot beneath and to the right of the first pot.
Put the last overflow pot beneath the 3-unit overflow pot.
Put the 2-unit bucket beneath the lower 2-unit over flow pot. Water from the 2-unit, 3-unit, and one 4-unit output jar should route through all three overflow pots into the 2-unit bucket.
Put the 3-unit bucket in the bottom right corner of the available screen space. It should catch water from the 3-unit output jar.
Leave one 4-unit bucket where it is. Move the other 4-unit bucket against the right wall of the screen, under the 4-unit output jar.
Screenshot
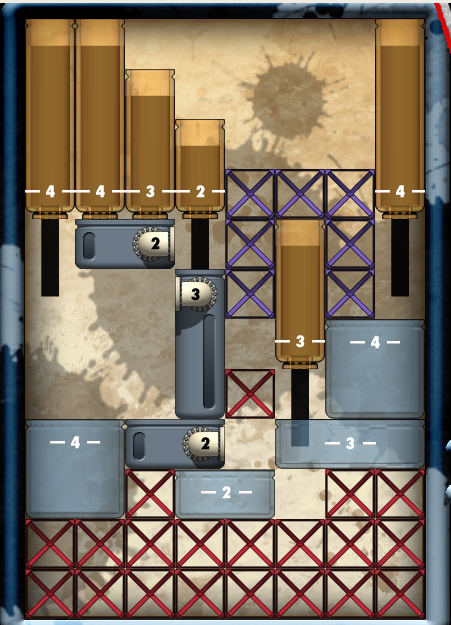
Level 22
Switch the positions of the two 8-unit overflow pots.
Use a down-and-right piece and a down-and-left piece to route water from the two 4-unit output jars into the two 8-unit pots.
Use a down-and-right piece to route water from the left 2-unit output jar into the fixed 1-unit overflow pot.
Use a down-and-left piece to route water from the right 2-unit output jar to the fixed horizontal pipe.
Connect the right-and-down piece to the fixed 1-unit pot.
Connect the splitter to the right-and-down piece.
Connect the horizontal pipe piece to the left of the splitter.
Put the remaining overflow pot below the horizontal pipe piece, so it routes water from the 8-unit overflow pot into the 2-unit bucket.
Screenshot
Level 23
Connect a vertical, down-and-right, and horizontal piece to the leftmost output jar.
Connect a down-and-right piece to the center-left output jar.
Connect a down-and-left piece to the center-right output jar.
Connect a vertical, down-and-left, and horizontal piece to the rightmost output jar. All the water should now pour into a stream in the center of the screen, down to the 1-unit overflow pot.
Use the last curved pipe piece, a left-and-down piece, to route water from the 1-unit output jar to the fixed horizontal pipe.
Use two pieces of horizontal pipe to connect the two pieces of fixed horizontal pipe.
Connect the splitter to the right-and-down pieces of fixed pipe on the right side of the screen.
Put the 3-unit overflow pot under the splitter, so water from the splitter flows through it to the 1-unit bucket.
Screenshot
Level 24
Put the overflow pot below the 3-unit output jar, so that it collects water from both output jars.
Connect a left-and-down piece to the overflow pot.
Connect a left-facing splitter to the bottom of the left-and-down piece.
Connect a horizontal pipe to the left side of the splitter
Connect a right-facing splitter to the fixed curved piece leading out from the left of the first splitter.
Connect a left-facing splitter to the curved piece leading from the second splitter placed.
Return to the first splitter place. Connect a horizontal pipe piece and the right-and-down pipe piece to the right side of this splitter.
Connect a right-facing splitter to the right-and-down pipe piece.
Connect a left-facing splitter to the fixed piece of right-and-down pipe.
Screenshot
Level 25
Slide the 4-unit bucket to the right, so that it is flush against the cross block and the horizontal pipe.
Connect a down-and-left pipe piece to the rightmost output jar.
Connect a down-and-right pipe piece to the second output jar from the right.
Connet a right-and-down piece to the vertical fixed pipe piece under the 1-unit output jar.
Put a left-facing 1-unit overflow pot under the three curved pieces that were just placed, just above the cross block.
Put the 2-unit overflow pot below the left 1-unit output jar, just above the cross block. Use a left-and-down piece to connect the overflow pot to the vertical pipe.
Connect a down-and-left piece to the left of the two 2-unit output jars.
Put the right-facing overflow pot under the 3-unit output jar, with its spoute connected to the squiggly line of fixed pipe.
Put the last left-facing 1-unit overflow pot under the right end of the squiggly line of pipe.
Put the 1-unit bucket under the bottom right overflow pot.
Screenshot
Level 26
Put the 2-unit overflow pot below the two rightmost output jars but above the 1-unit overflow pot. All the water from the three 2-unit output jars will eventually route through the 1-unit pot.
Connect the splitter to the fixed pipe attached to the 1-unit overflow pot.
Use two vertical pieces, one rounded piece, and two horizontal pieces to route water from the 4-unit output jar to the 6-unit bucket.
Use the remaining two pieces -- a vertical and a curved piece -- to route water from the left most output jar down and under the cross block.
Place the 3-unit bucket so that it collects water from both the leftmost output jar and the left side of the splitter.
Screenshot
Level 27
Use a down-and-right and a horizontal piece to route water from the 2-unit output jar to the upper 4-unit bucket.
Use a down-and-right and a right-and-down piece to route water from the 4-unit output jar to the lower 4-unit bucket.
Connect the overflow pot to the fixed curved piece in the center of the screen, so that it collects water from both 3-unit output jars.
Connect the left-facing splitter to the fixed curved piece.
Connect the last curved pipe piece, the left-and-down, to the left side of the splitter.
Connect the horizontal pipe to the right side of the splitter.
Connect the right-facing splitter to the left-and-down piece.
Screenshot
Level 28
Move the 6-unit bucket to the bottom right corner of the screen.
Use two vertical pipe pieces, a down-and-right piece, and a horizontal pipe piece to connect the leftmost output jar to the lower fixed horizontal pipe.
Use a vertical piece and a down-and-right piece to connect the second output jar from the left to the upper fixed horizontal pipe.
Connect a down-and-right piece to the third output jar from the left.
Connect the last down-and-right piece to the fixed vertical pipe attached to the 2-unit ooutput jar.
Connect the short and wide overflow pot to the fixed curved pipe piece leading into the splitter.
Put one tall narrow overflow pot under the rightmost output jar, so that it collects water from both the 2-unit and 3-unit output jars.
Put the last overflow pot under the splitter so that it routes water from the splitter to the 2-unit bucket.
Screenshot
Level 29
Use a down-and-left pipe piece to connect the 3-unit bucket to the 1-unit overflow pot.
Attach a down-and-right pipe piece to the second output jar from the left.
Connect the last down-and-right piece to the 2-unit output jar.
Connect any splitter to the curved piece leading from the upper overflow pot.
Connect any other splitter to the curved piece leading from the lower overflow pot.
Screenshot
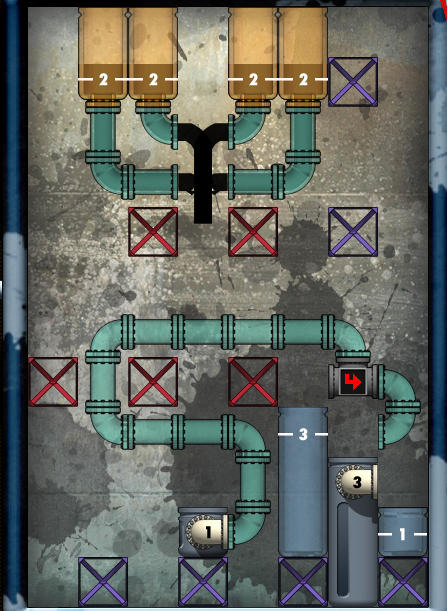
Level 30
Use a down-and-right pipe piece to route the second output jar from the right to the 4-unit overflow pot.
Use a horizontal pipe piece to route water from the 4-unit overflow pot to the 3-unit overflow pot.
Use a right-and-down piece, a down-and-right piece, and a horizontal piece to route water from the 3-unit overflow pot to the 2-unit bucket.
Use a down-and-left piece to route water from the left 4-unit output jar into the left 3-unit overflow pot.
Use the remaining pieces -- a horizontal, a right-and-down, a vertical, and a down-and left -- to route water from the 3-unit overflow pot up and left into the 8-unit bucket.
Screenshot
Level 31
Use all the pipes to route water from the 1-unit output jar to the overflow pot.
Attach the splitter to the end of the pipe leading out from the overflow pot.
Put a 5-unit bucket under the overflow pot and over the horizontal pipe.
Put the 3-unit bucket in the bottom left corner of the screen.
Put the 4-unit bucket above the 3-unit bucket, and shifted one space to the right.
Put the last 5-unit bucket in the bottom right corner of the screen.
Screenshot
Posted by: MmeTurbulence |
January 11, 2011 3:27 PM
|
January 11, 2011 3:27 PM