

![]() Haunted Legends: The Queen of Spades is a hidden-object adventure game that puts you in the role of an inspector who receives a letter from a colleague. It seems a young police officer who was investigating some disappearances in a countryside manor has gone and disappeared himself, and your colleague is too intimidated to look himself, having put much stock in the superstitious rumours that surround the old place of demons and curses. Hah! What nonsense. Poppycock, even! You're not scared of anyth-OHMYGODWHATSTHAT oh no it's cool, it was just a leaf brushing against my ankle. Heh. Sorry. Where were we? Oh, right, nerves of steel.
Haunted Legends: The Queen of Spades is a hidden-object adventure game that puts you in the role of an inspector who receives a letter from a colleague. It seems a young police officer who was investigating some disappearances in a countryside manor has gone and disappeared himself, and your colleague is too intimidated to look himself, having put much stock in the superstitious rumours that surround the old place of demons and curses. Hah! What nonsense. Poppycock, even! You're not scared of anyth-OHMYGODWHATSTHAT oh no it's cool, it was just a leaf brushing against my ankle. Heh. Sorry. Where were we? Oh, right, nerves of steel.
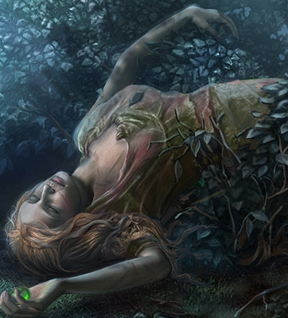 The site of all these strange happenings is the property of a woman who was once known locally as the Countess. Legend goes that hundreds of years ago she made a deal with the devil in return for a magic pack of cards, and built herself a massive fortune on them, rather than settle down and watch Judge Judy re-runs and play Keno on the weekends like every other respectable old lady. The Countess died alone, but the local villagers insist her home is still cursed... and once the bodies start piling up and someone starts following you, it gets harder to dismiss it as superstition. Will you solve the mystery, or will you too meet your fate at tiny murderous hands? Your investigation will take you all over the Countess' estate and the surrounding area, gathering items big and small to unravel the truth. Does the truth involve magical playing cards, or is there something even weirder going on?
Analysis: There have been a lot of horror- themed hidden-object adventure titles on the market lately, and while a month or so ago you might have been able to just pass this off as seasonal infatuation, it seems we just love anything the slightest bit dark and weird. Enter the Queen of Spades, which reminds me somewhat of a slightly less gory Elizabeth Bathory... with a gambling problem. While the music is probably going to sound a little familiar to anyone who's played any recent ERS Game Studio titles, the presentation here is still great. The developers have by now perfected the art of depicting shabby, once grand and elegant environments, and exploring the wonderfully creepy areas is a real treat for the eyes.
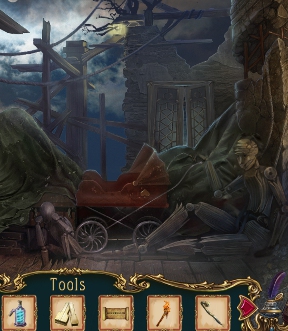 Surprisingly, and perhaps disappointingly, the game is fairly light on puzzles compared to other titles in the genre. Maybe that's a good thing when you consider how massive your inventory tends to get as you explore your surroundings... I didn't know Bags of Holding were standard issue for detectives. For the most part, item usage is pretty intuitive, and you'll usually be able to figure out which of the items you've picked up will best fit any situation. For the more abstract solutions, the sort of thing that you'd typically never figure out on your own, the game will usually tell you what items you need and it's a simple matter of tracking them all down. It's not particularly challenging, but it does make the game extremely accessible, and cuts out a lot of frustrating problem solving.
While the gameplay is fairly standard, Haunted Legends: The Queen of Spades is still a beautifully crafted, bizarre tale that will keep you busy for quite some time. It does a great job of keeping you interested and wanting to see how things play out, with a strange story that is anything but ordinary. While you might wish there was more of a challenge to it, if you're a fan of the mad and the macabre, you'll at least want to check of the demo. Just remember... when you stare into the gnome, the gnome also stares into you.
A Collector's Edition is also available. It contains a bonus chapter to play, wallpapers, strategy guide, and more. Remember that Big Fish Game Club Members pay only $13.99 for Collector's Editions (or 2 club credits), and collector's editions count 3 card punches of 6 total needed for a free game.
![]() Windows:
Windows:
Download the demo
Get the full version
Also available: Collector's Edition
![]() Mac OS X:
Mac OS X:
Download the demo
Get the full version
Also available: Collector's Edition


Walkthrough Guide
(Please allow page to fully load for spoiler tags to be functional.)
Haunted Legends: The Queen of Spades
General Information and Tips
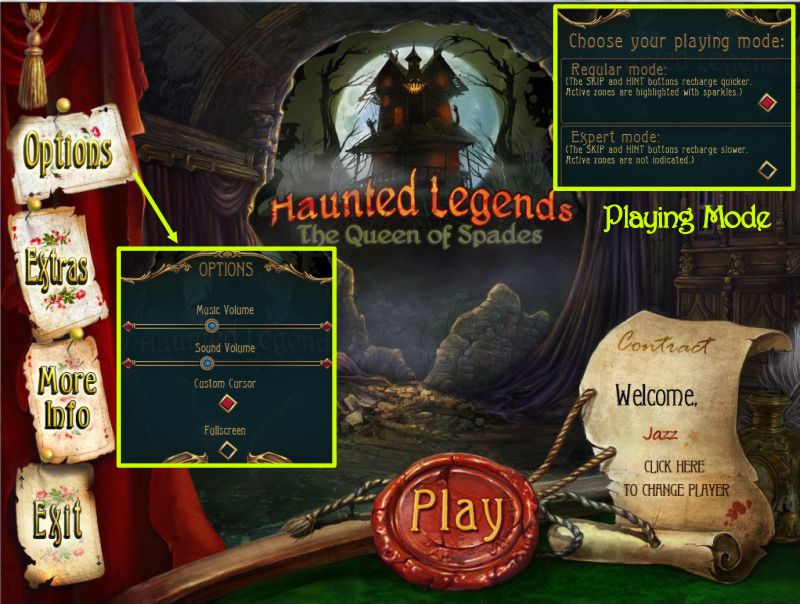
On the Main Menu you can choose your profile, play or exit the game, select your options which include Music and Sound volume, full screen or windowed, and a Custom Cursor or not.
Extras will be available once you have completed the basic adventure.
The game will give you a choice of playing Regular or Expert Mode.
In Regular Mode the Hint and Skip buttons will recharge faster and active zones in the scenes will have sparkles.
For Expert Mode, the Hint and Skip buttons recharge slower and the active zones are not indicated.
There is a click penalty, so if you click too much, your cursor will attract a group of flying card suit symbols.
When you Exit the game, your progress is automatically saved.
There are no specific chapters for the game that have been indicated by the developers, so I have divided the walkthrough into sections which I hope will be helpful for you in finding your way.
Screenshot
Scene Navigation
As you start the game, you will be asked if you wish for Interactive Help. If you choose to have the help, you can later skip the tutorial.
If you have the Collector's Edition, you can access the Strategy Guide from a link below the Menu in the scenes.
You will collect a deck of the Countess' Enchanted Cards throughout the game and use them in a game of cards at the end of your adventure.
The cards will all be marked in bright pink and you can view the number you have collected next to the Menu on the lower portion of each scene.
If you click on the card indicator, you can view the cards you have collected.
In the middle of the bottom of the scene will be Inventory items called Tools collected for future use or an item list when you are playing a Hidden Object Scene.
Sometimes, you will collect items that will not go into your inventory, but will be recorded in the Diary.
Be sure to look at anything that has sparkles or a magnifying glass and check Diary when the cover becomes animated.
The Diary is located at the far right of the bottom of the scene and can provide you with information for your adventure.
There is no Hint button for main scenes, but the Diary will turn into a Hint button for Hidden Object Scenes and a Skip button for Mini Games and Puzzles.
If you have chosen to play in Regular Mode, Hidden Object Scenes will be marked with sparkles.
Hidden Object Scenes are semi-random and will be marked because you will return to the same location more than once. You may find help with what you are looking for in one of the Hidden Object Scenes for that location.
For each Hidden Object Scene you will come away with a key object (marked in turquoise) for your Inventory when you have found all the objects.
Hidden Objects that require you to find more than one of the same item will be color coded for that item.
Occasionally in a Hidden Object Scene you will be required to perform an action to get an object so those items will be specially shown in the screenshots.
If you are not automatically returned to the main scene after a close up, you will need to exit out of it by clicking the "X", clicking somewhere on main scene, or exiting at the bottom of the scene where the arrow appears.
Mini Games are mostly puzzles to open door locks and can be skipped once the Skip button is fully charged.
The game has an auto-pause feature during which you can choose to continue the game, change your options, access the Help screens, or quit to the Main Menu.
Be sure to check out all of the screenshots for additional visual information.
Screenshot
Location Map
In order to help you find your way around the Countess' estate and the town, I have created a map. It is not intended to be architecturally perfect, but it should give you a good notion of how to navigate from room to room and place to place. Please view the screenshot when needed.
Screenshot
Chapter 1: Mansion Exterior
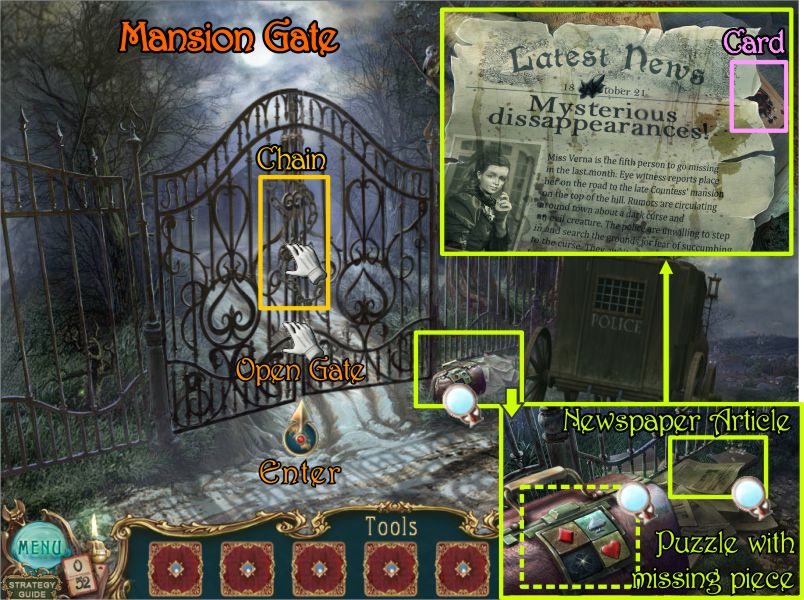
Mansion Gate
Check out the magnifying glasses shown in the screenshot to find the card and read the newspaper article.
When you find the missing piece for the bag, you will come back to play a puzzle.
Push the chain on the gate and it will fall for you to collect it.
Push again on the gate to open it and enter the estate.
Screenshot
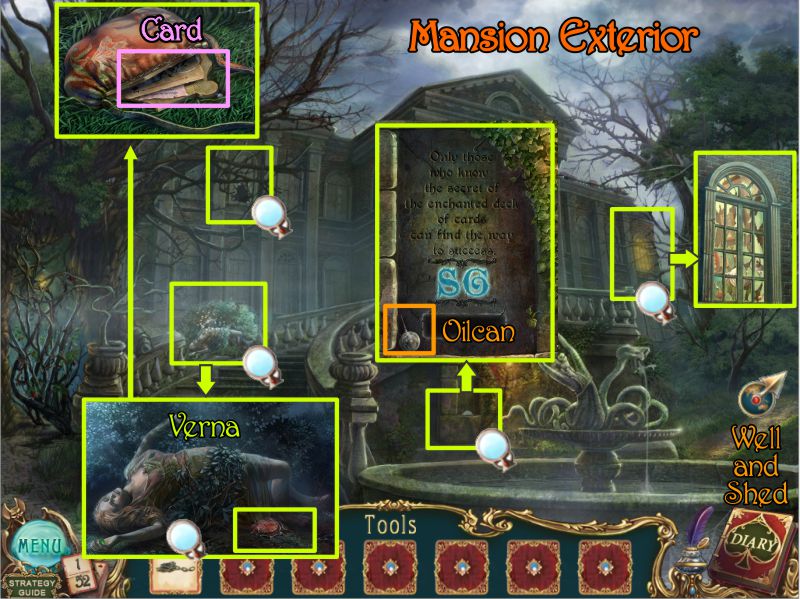
Mansion Exterior
Click on all the magnifying glasses shown in the screenshot for more information or tasks to perform.
The window at the right will provide a close up to show there is activity in the Mansion.
Click for a close up of the area behind the fountain and take the Oilcan.
Click on the sparkles to see Verna was poisoned and open her purse to get the card and read the note.
Take the path at the right to the Well and Shed.
Screenshot
Shed and Well
Click for a close up of the well and use your oilcan on the Hacksaw so you can collect it.
Take the Card on the roof. Note the Summerhouse in the distance and go to the Shed.
Screenshot
Shed
Try to grab the Evil Dwarf and he disappears.
Pick up the Spokes on the Ground.
Play the Hidden Object Scene.
Cluck for a close up of the safe, oil the hinges, lift up the diamond to see it needs a key. Take the Matches on the board at the left.
Click the chest to see there is a puzzle to unlock it, and that you need a part for it.
Screenshot
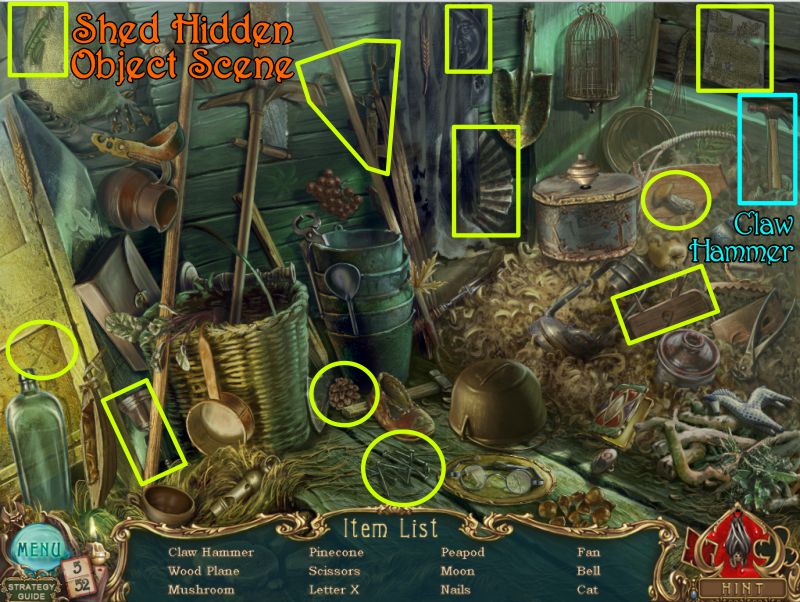
Shed Hidden Object Scene
Find everything on your list to get the Gas Can shown in the screenshot.
To get a Running Deer, press the top of the box and collect him once he starts running.
Screenshot
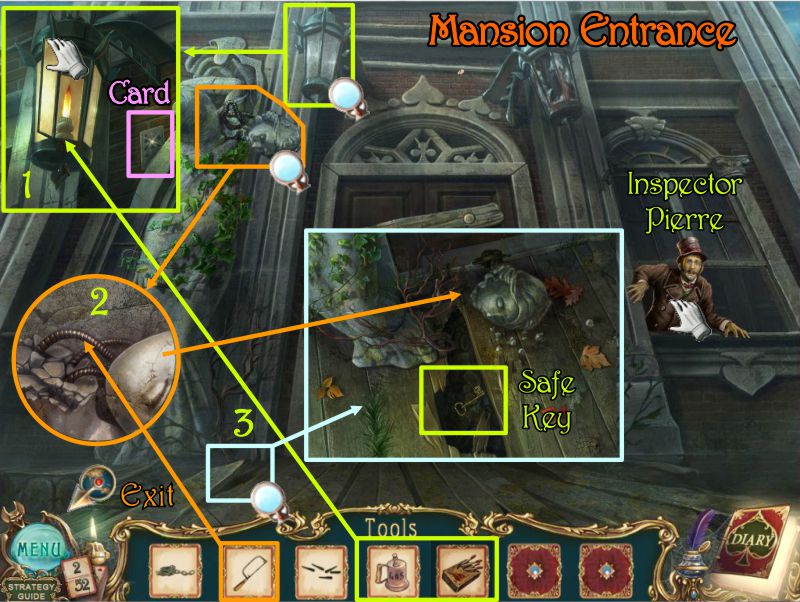
Mansion Entrance
Go back to the exterior of the Mansion and up the steps to the entrance.
Try to get Inspector Pierre and he will be pulled back inside by the Evil Dwarf.
Click for a close up of the lamp to the left above the door and take the card shown in the screenshot.
Open the lamp door, pour the gas on the lamp, light it with the matches and close the door.
Click on the broken statue and saw the head off with your hacksaw.
The head falls on the ground, breaking the boards and revealing the Safe Key for you to take.
Screenshot
Shed
Go back to the Shed, place the key in the safe keyhole, turn the key and turn the handle to open the Safe.
Take the card on the inside door and pick up the Slider.
Play the Hidden Object Scene and click on the box a puzzle to open it.
When you get the Slider, place it as shown in the screenshot to trigger the puzzle.
Screenshot
Shed Hidden Object Scene
Collect everything on your list to get the Claw Hammer.
Screenshot
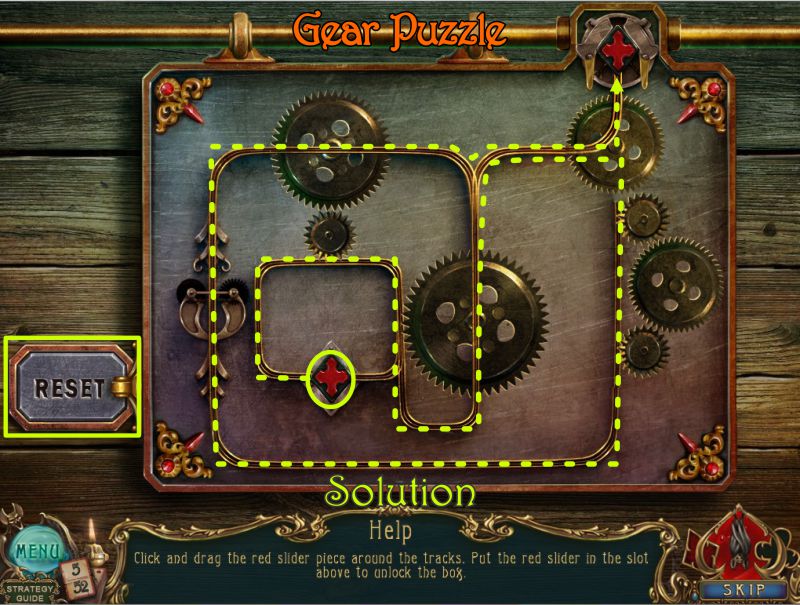
Gear Puzzle
Your goal is to get the slider to the exit by moving the gears to create a path along the tracks.
There is a Reset button if you make a wrong move. The solution is available in the screenshot.
Screenshot
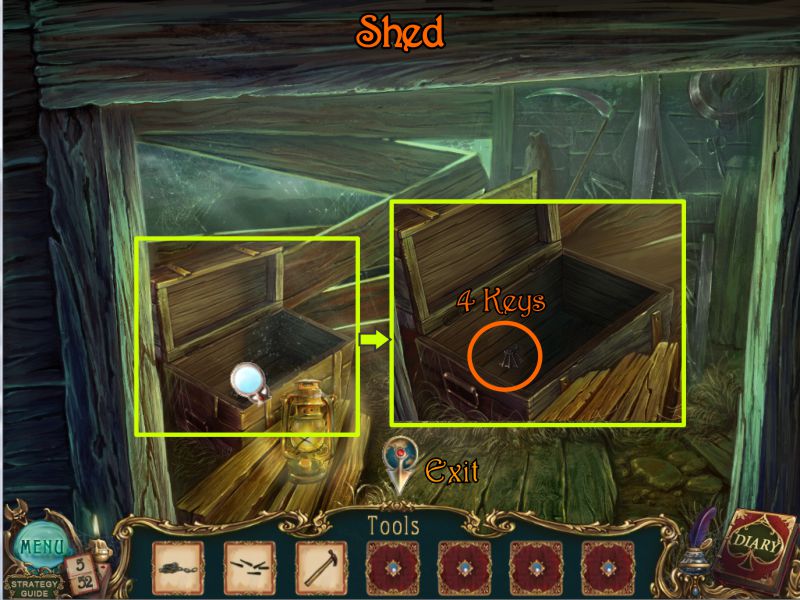
Shed
Once the box is open, take the 4 Keys.
Screenshot
Mansion Entrance
Go to the Mansion Entrance and remove the nails on the boarded up door with your Claw Hammer.
Click for a close up of the lock and place the 4 Keys on it.
Turn the keys, which are random, to form the spade solution as shown in the screenshot.
Click on the gears to unlock the door and enter.
Screenshot
Chapter 2: Mansion Interior
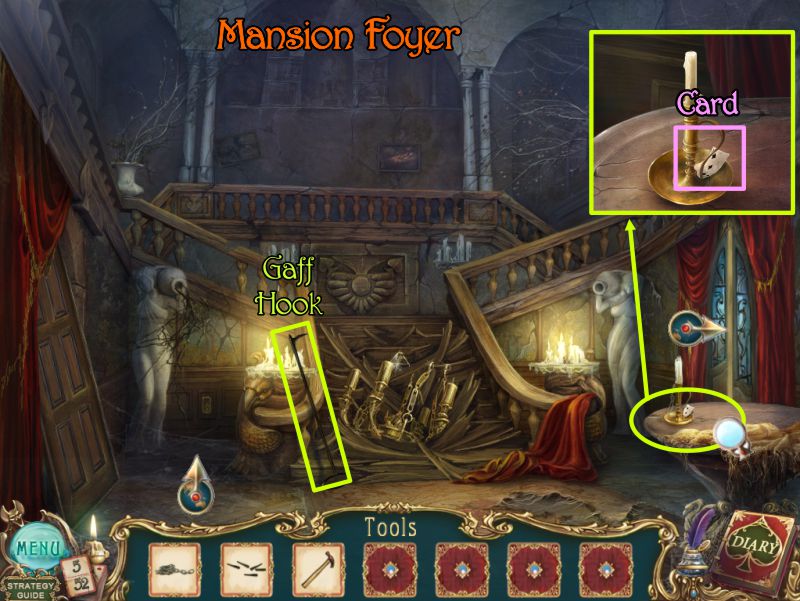
Mansion Foyer
There is a vision of a ghost going up the left staircase so you start to follow. The chandelier will fall, breaking up the stairs.
Click on the table at the right and take the Card next to the candlestick.
Grab the Gaff hook by the stairs and go through the left corner by the staircase.
Screenshot
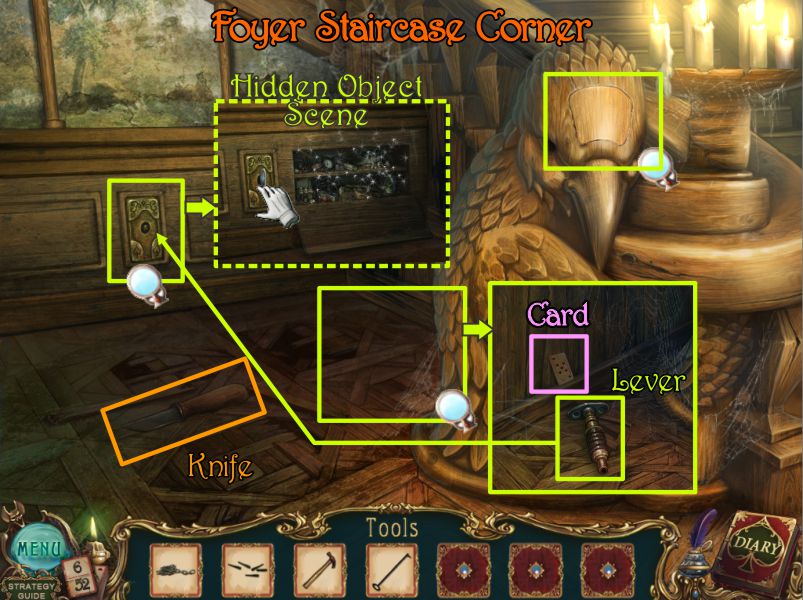
Foyer Staircase Corner
Pick up the Knife, look closer at the corner, and pick up the Card and Lever.
Note the secret panel in the bird's head.
Check the wall plate, place the lever there and turn it to trigger a Hidden Object Scene.
Screenshot
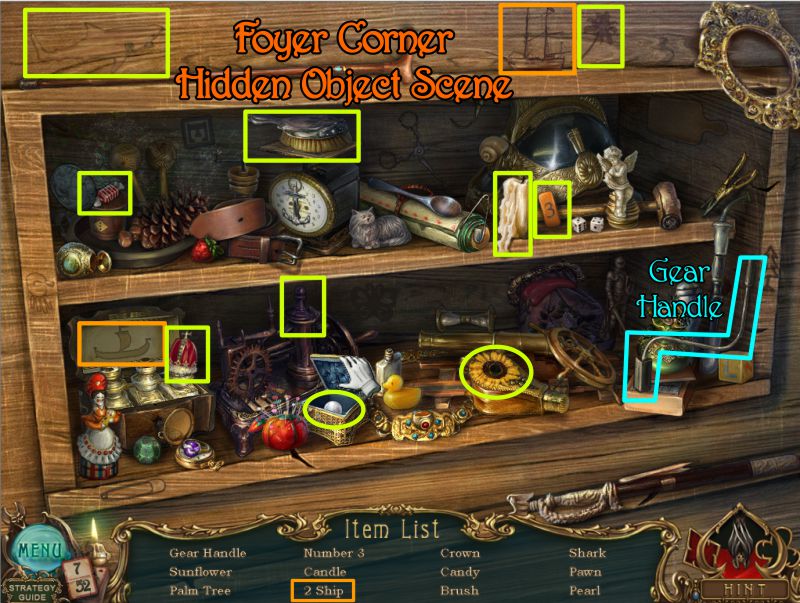
Foyer Corner Hidden Object Scene
Collect everything on your list including the Gear Handle.
Open the lid of the jewelry box to take the Pearl.
Screenshot
Salon
Go through the door on the right of the Foyer.
Try to get to the Evil Dwarf shown in the crack in the wall and he will disappear.
Check the table, pick up the Card, take the bottle with the Heart, and read the note.
Click on Andre and take the Diary Page from his coat.
Grab his pocket and read the note that will give you the code for his bag at the Gate.
Screenshot
Click on the little box marked in the screenshot and place the Gear Handle on the gears.
Pull the handle and the lamp will lower.
Use the Gaff Hook to connect the lamp and drape.
Cut the drape with your Knife and the lamp will swing into the crack in the wall making it large enough for you to go through it to the Private Salon.
Screenshot
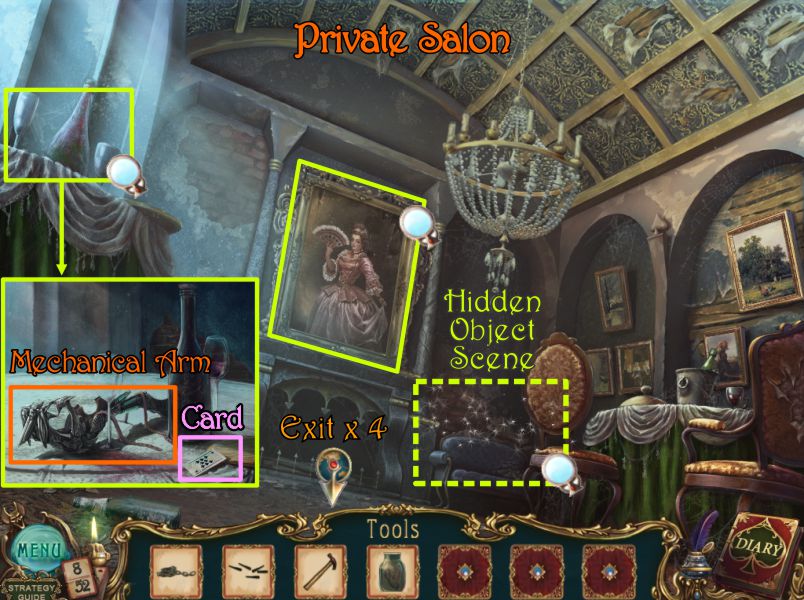
Private Salon
The Evil Dwarf goes up the fireplace, so you can't catch him.
Click on the table at the left and pick up the Mechanical Arm and Card.
Check out the portrait and click the sparkles for a Hidden Object Scene.
Screenshot
Private Salon Hidden Object Scene
Collect everything on your list to get the Garden Shears.
Exit down 4 times to the exterior of the Mansion.
Screenshot
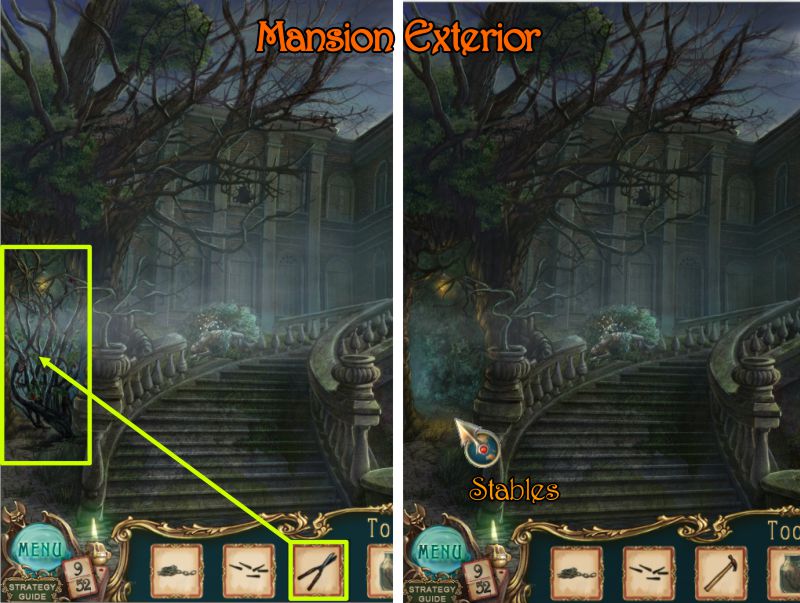
Chapter 3: Mansion Grounds
Mansion Exterior
Use your Garden Shears on the vines at the left of the stairs and go through the clearing to the Stables.
Screenshot
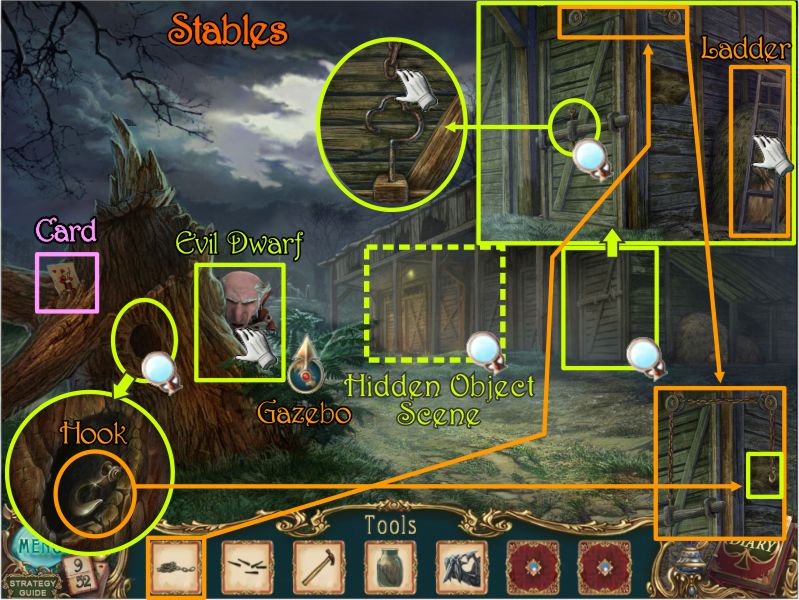
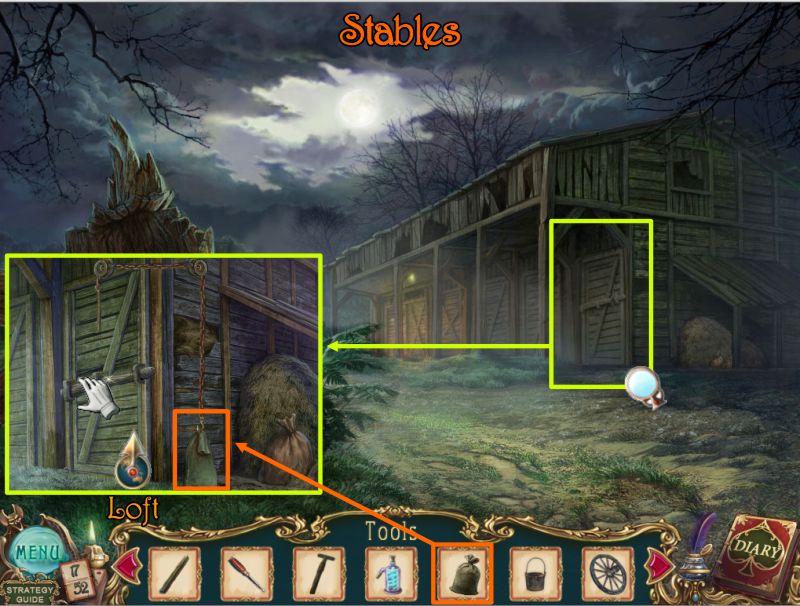
Stables
Try to catch the Evil Dwarf and he will once again disappear.
Check the screenshot to see all the magnifying glasses.
Take the Card and the Hook in the close up of the hole in the stump.
Click on the door and grab the ladder.
Place the Chain as shown.
Connect the Chain to the eyehook and put the Hook on the other end of the Chain.
Play the Hidden Object Scene.
Screenshot
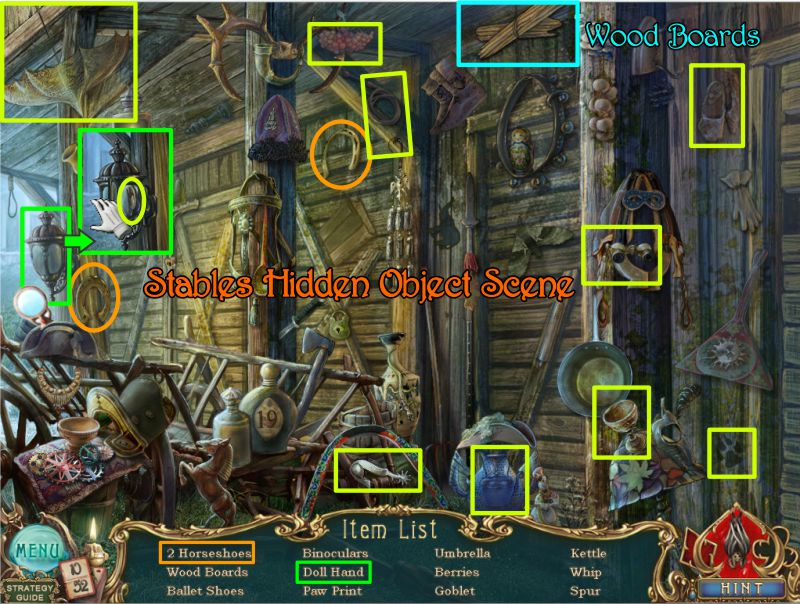
Stables Hidden Object Scene
Collect everything on your list to get the Wood Boards.
To get the Doll Hand, zoom in on the lamp, open it and take the hand.
Screenshot
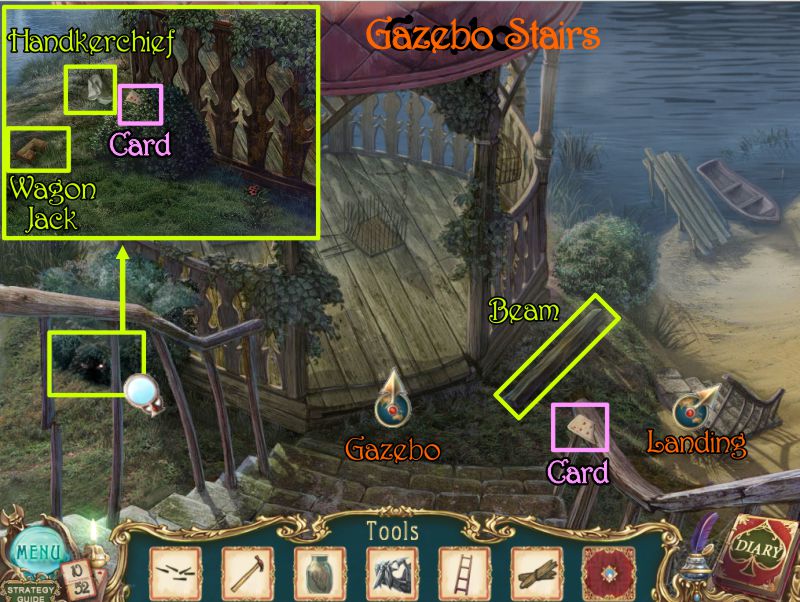
Gazebo Stairs
Go forward down the path past the Stables to the Gazebo Stairs.
Pick up the Card on the railing and the Beam at the bottom of the stairs.
Click for the close up shown in the screenshot and take the Card, Handkerchief, and Wagon Jack.
Screenshot
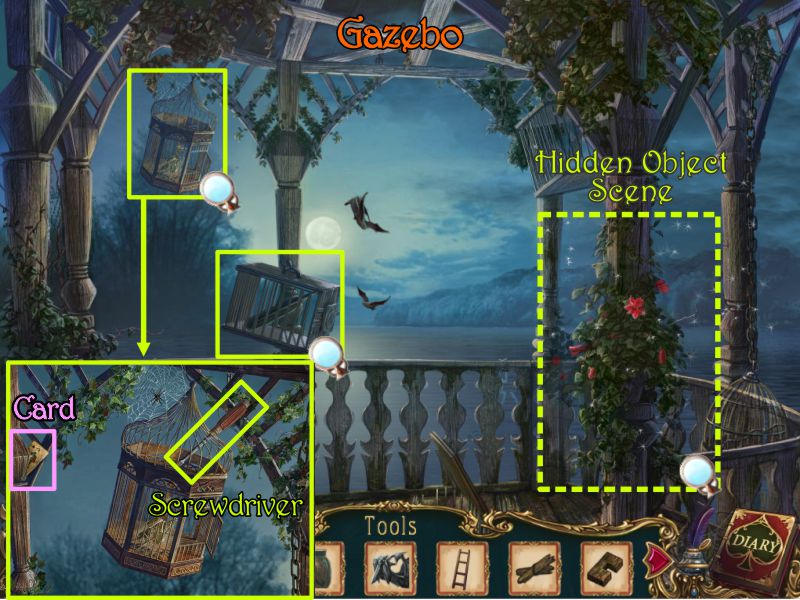
Gazebo
Go into the Gazebo and check out the two cages.
Take the Card and Screwdriver shown in the screenshot and play the Hidden Object Scene.
Screenshot
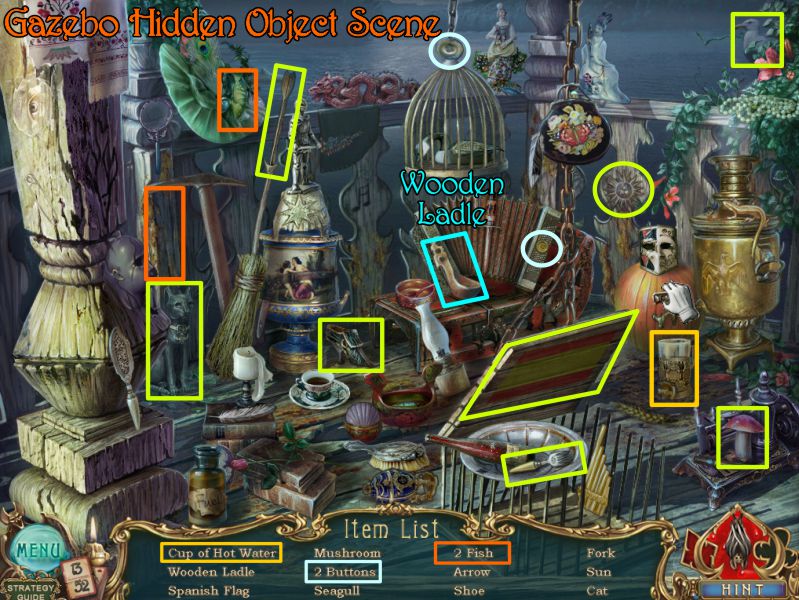
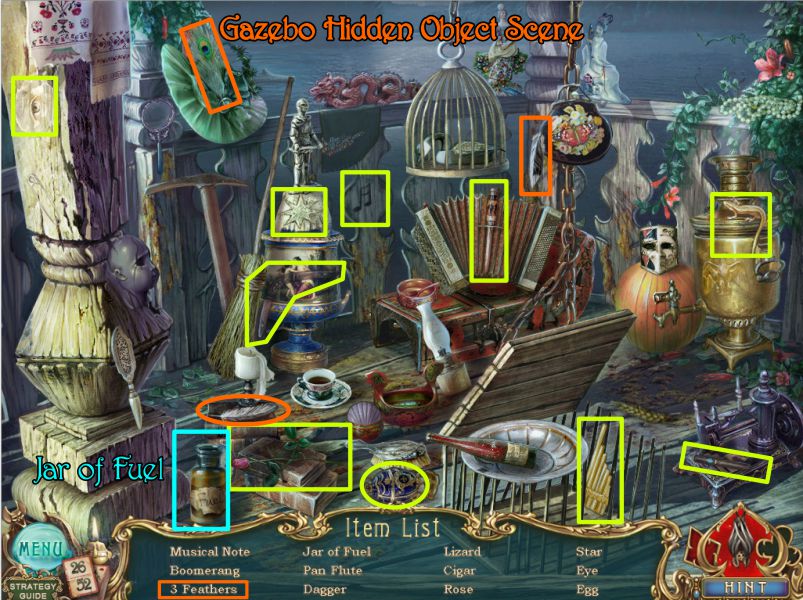
Gazebo Hidden Object Scene
Collect everything to get the Wooden Ladle.
Multiple items are color coded in the screenshot.
Click on the tap to fill the cup with hot water in order to get a Cup of Hot Water, marked in bright green.
Exit the Gazebo and go down the stairs to the Landing.
Screenshot
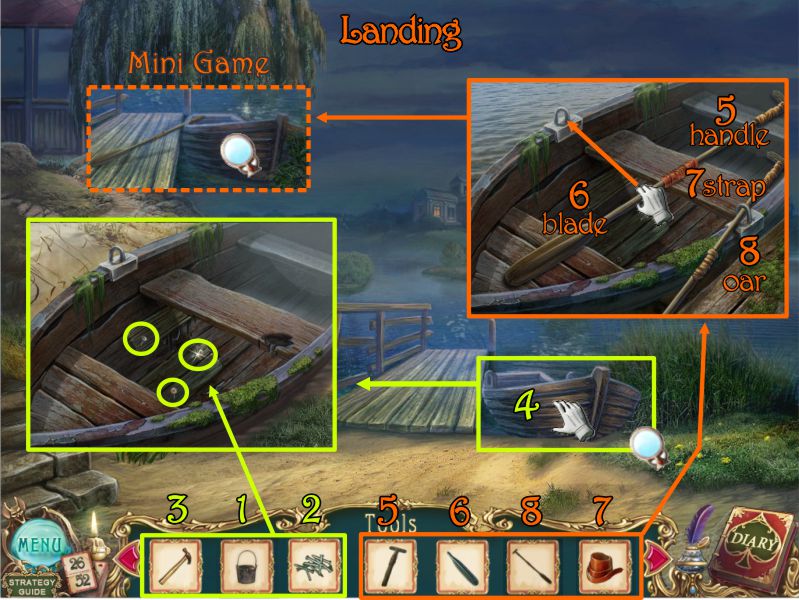
Landing
Drag the boat onto the land and use the Wooden Ladle to remove the water.
Take the Clubs Button and rag and place the Wooden Boards over the hole in the boat.
Click on the lily pond at the left of the dock (see screenshot) and take the Card and Oar Handle.
Go back up the Gazebo stairs, past the Stables and out to the Mansion Gate.
Screenshot
Chapter 4: The Road to Town
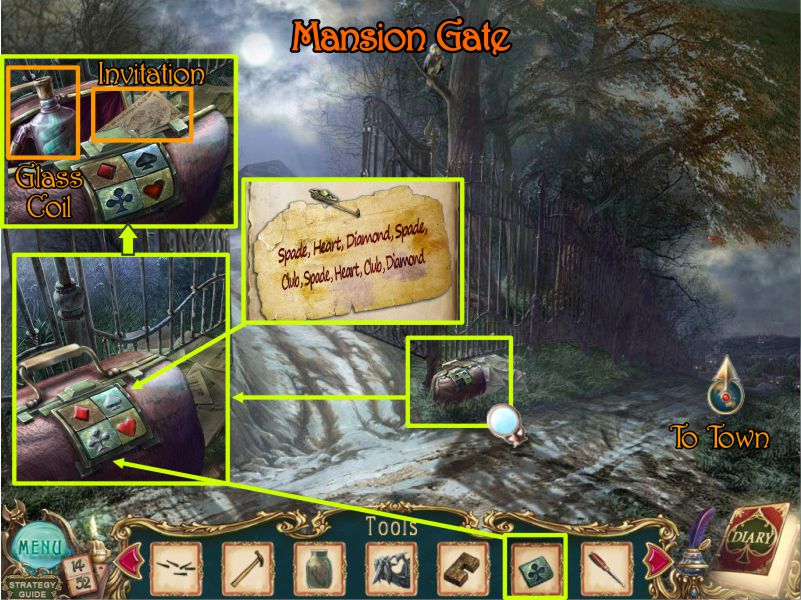
Mansion Gate
Just as you get to the Gate, the Police car drives off toward Town.
Click on Andre's bag and place the Club Button.
Press the card suits according to the note shown in the screenshot: spade, heart, diamond, spade, club, spade, heart, club diamond.
Take the Glass Coil from the open bag, pick up the Invitation for your Diary, and head off to Town.
Screenshot
Town Crossroads
Click on the door marked in the screenshot to see the results of the run-in with SG.
Take the Card on the right lamppost and pick up the Bucket of Pitch and Sandbag.
Read the note that is posted and go toward the Town Library.
Screenshot
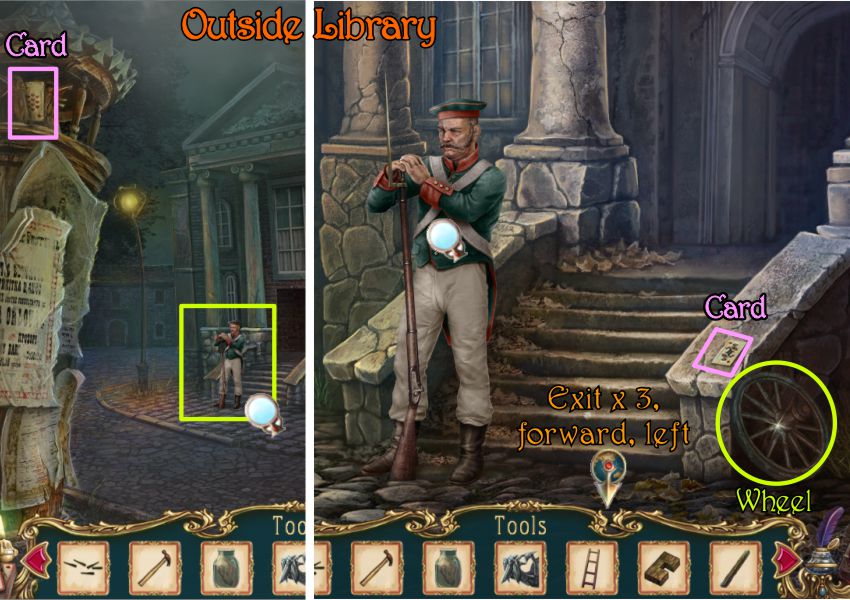
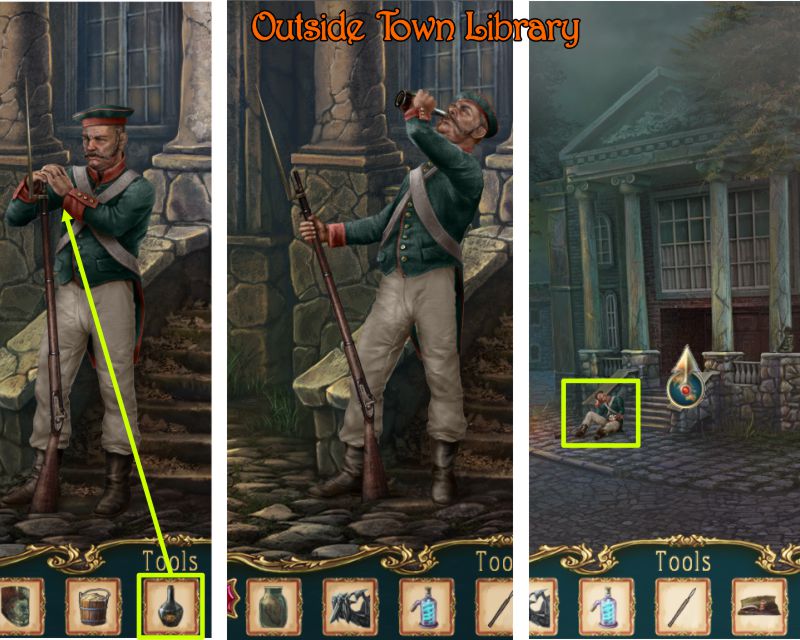
Outside Library
Take the Card on the Kiosk and go talk to the guard.
Pick up the Card on the railing and the Wheel next to it.
Screenshot
Chapter 5: Mansion Grounds
Stables
Go back to the Mansion Gate and to the Stables.
Zoom in on the door and place the Sandbag on the hook to lift the pin out of the latch.
Open the latch and go into the Stables.
Screenshot
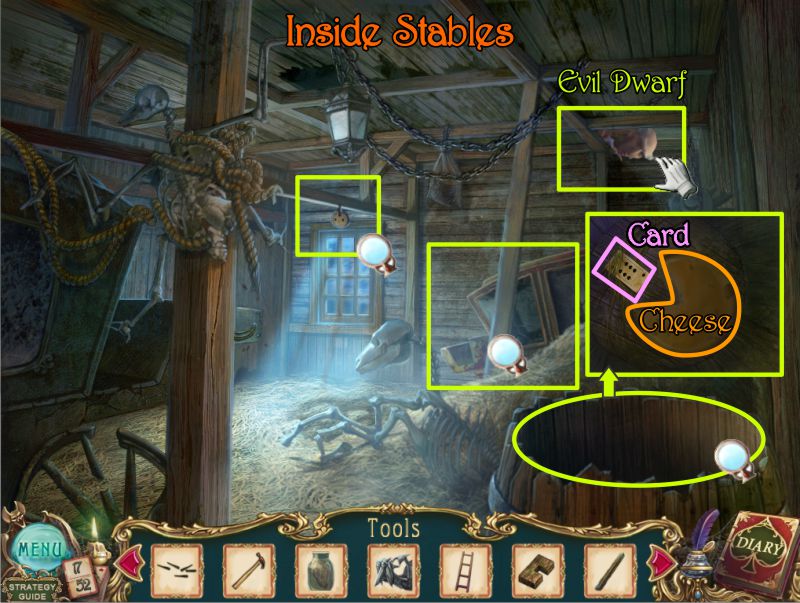
Inside Stables
The Evil Dwarf is in the Loft but disappears when you try to catch him.
Look inside the barrel and take the Card and Cheese.
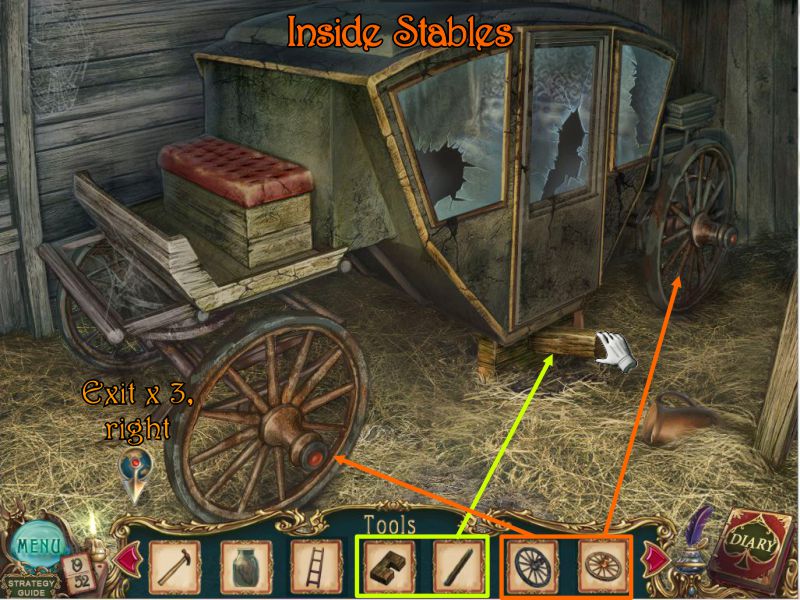
Check out the pulley and Coach shown in the screenshot.
Screenshot
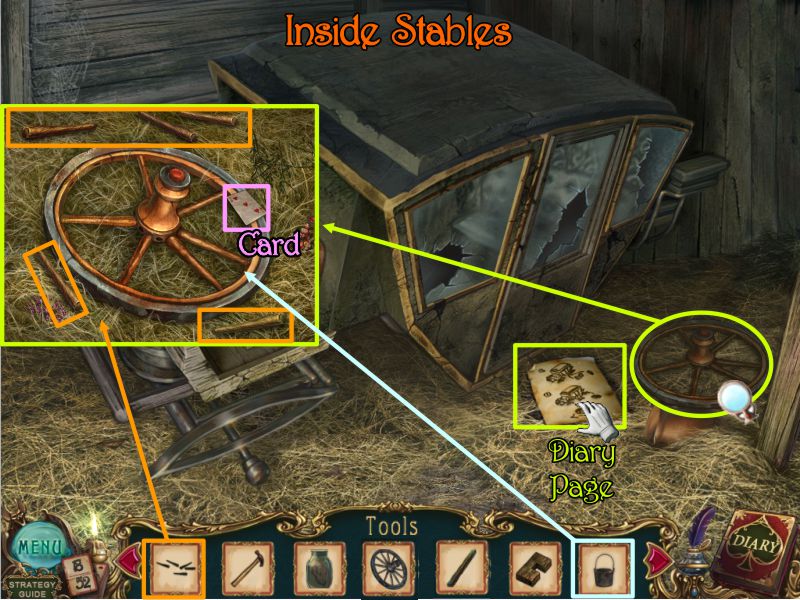
Pick up the Diagram by the coach for the Diary.
Click for a close up of the broken wheel, take the Card, and place the spokes in the scene.
Put some pitch on the wheel and drag the spokes to the wheel.
Screenshot
Place the Wheel Jack and Beam under the coach and jack it up so you can put the wheels as shown in the screenshot.
Exit down 3 times and go right to the Well.
Screenshot
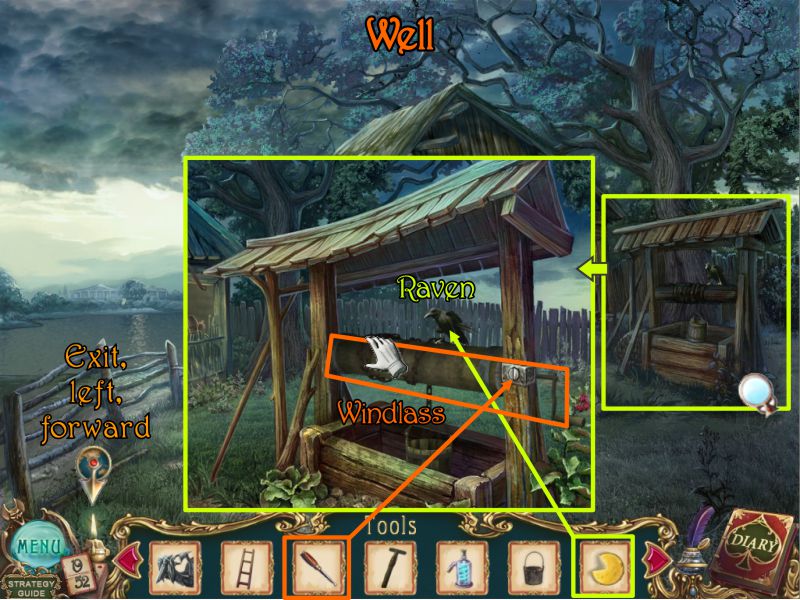
Well
Click for a close up of the Well. Give the Cheese to the Raven, who will vacate his post, unwinding the barrel on the rope.
Use your Screwdriver to unscrew the Windlass (see screenshot) and collect it.
Exit down, left, and forward to the Stables and go back inside.
Screenshot
Inside Stables
Zoom in on the rope and take it so you can put it on the pulley.
Put the Windlass where you took the rope and go for a close up of the coach.
Screenshot
Pick up the rope on the ground and attach it to the coach.
Go to the Windlass and pull the rope down to it so it will wind around.
Use the handle to wind the rope and move the coach.
Screenshot
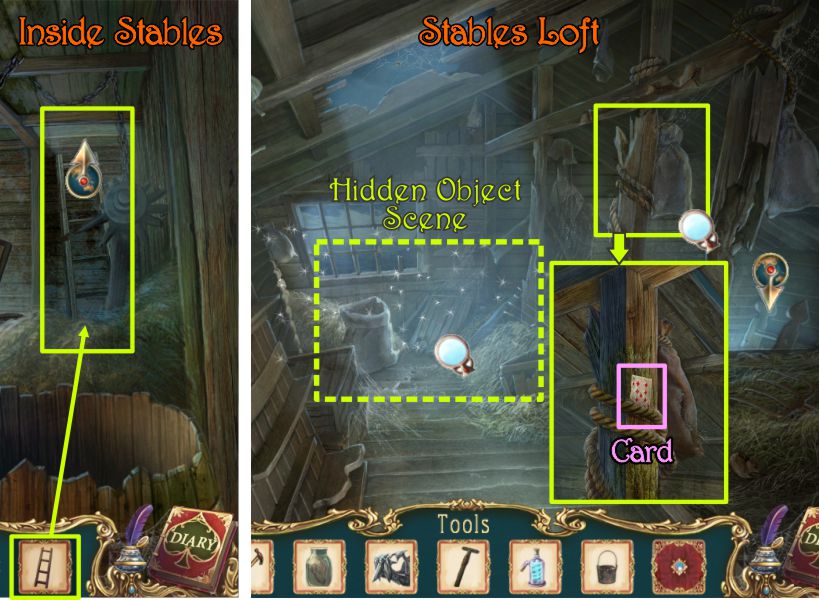
Stables Loft
Place the ladder against the wall and climb up to the Loft.
Click on the right post to take the Card. Note there is something inside the bag.
Click the sparkles to play the Hidden Object Scene.
Screenshot
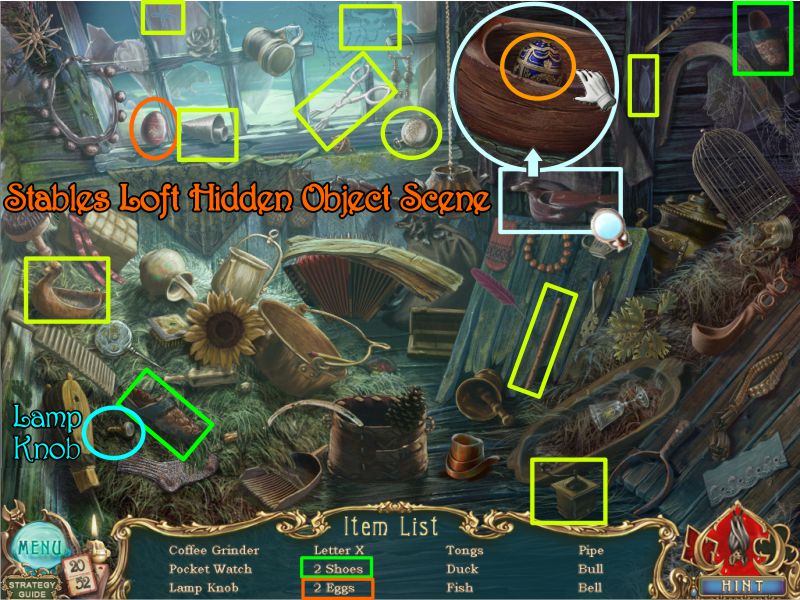
Stables Loft Hidden Object Scene
Collect the items on your list including the Lamp Knob.
To get one of the eggs, you will need to open the duck box marked in the screenshot.
Screenshot
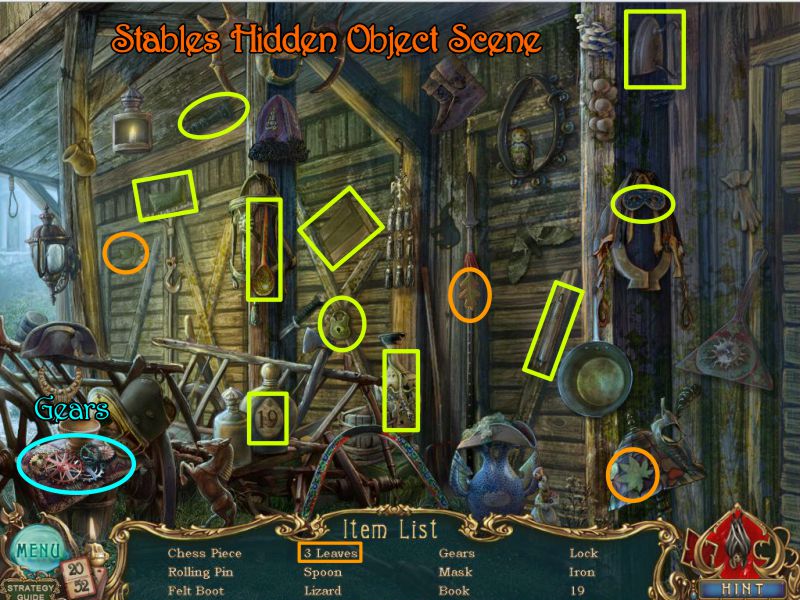
Stables Hidden Object Scene
Go downstairs and outside the Stables for another Hidden Object Scene.
Collect everything on your list including the Gears.
Screenshot
Chapter 6: Mansion Interior
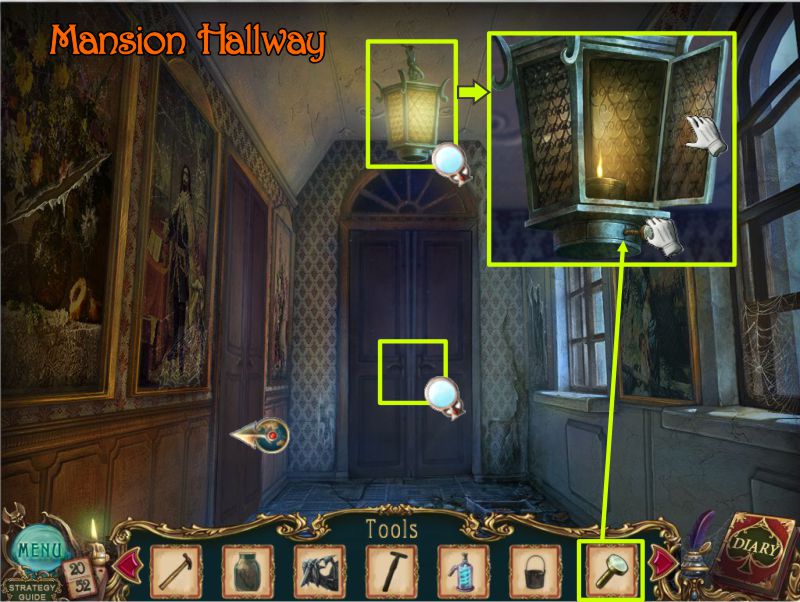
Hallway off Salon
Go to the Mansion Interior, through the Salon and the doorway to the right.
Click on the lamp and place the knob as shown in the screenshot.
Open the lamp door and turn the lamp knob so the flame goes higher. The door will close.
Enter the room on the left.
Screenshot
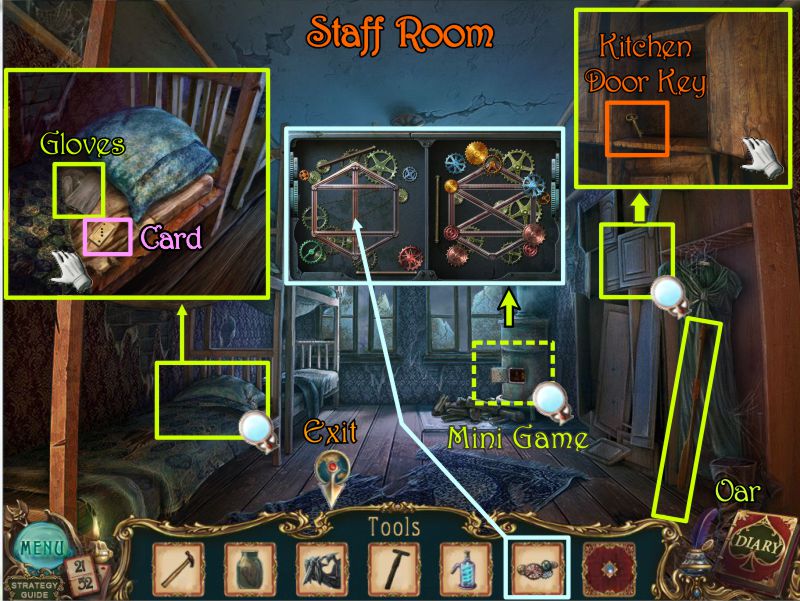
Staff Room
Click on the lower bunk bed and pull back the covers to find some gloves and a Card.
Take the Oar and open the cabinet at the right to get the Kitchen Door Key.
Zoom in on the furnace for a Mini Game and place the Gears as shown in the screenshot.
Screenshot
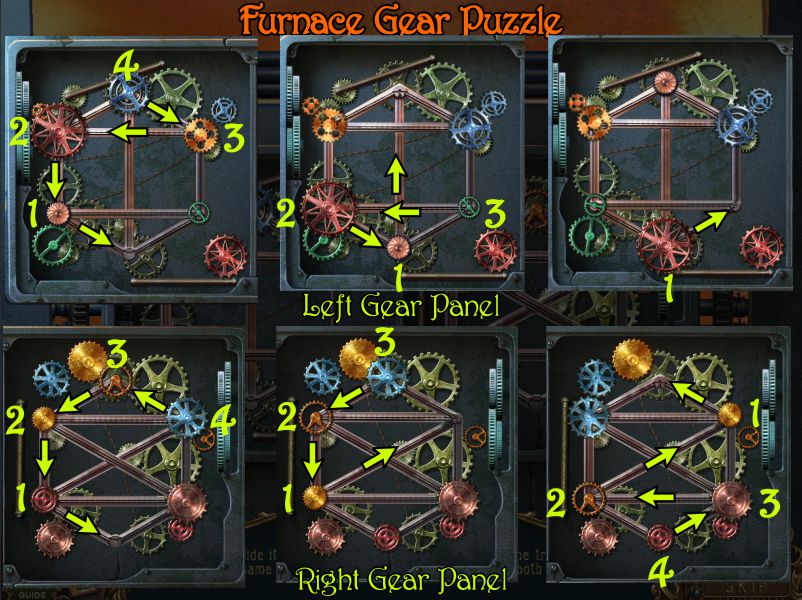
Furnace Gear Puzzle
The step-by-step solution shown in the screenshot deals with one side of the panel at a time.
There is more than one way to go about moving the gears around, but your ultimate goal is a solution.
Screenshot
Once the gears are all in place as shown in the screenshot, a Scalpel will appear. It is too hot to pick up without the gloves from your Inventory.
Screenshot
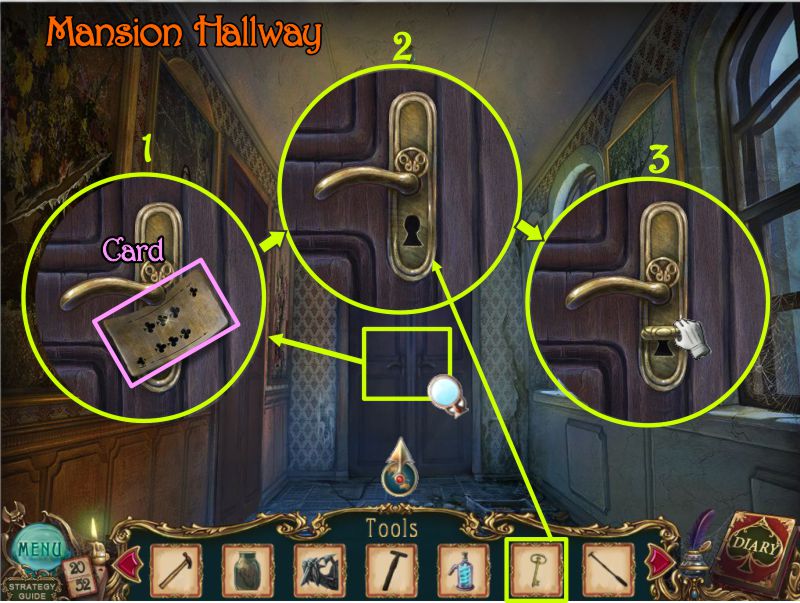
Kitchen Door in Hallway
Exit the room and go to the kitchen door at the end of the hall.
Pick up the card to reveal the keyhole.
Insert the key into the hole, turn the key, and enter the Kitchen.
Screenshot
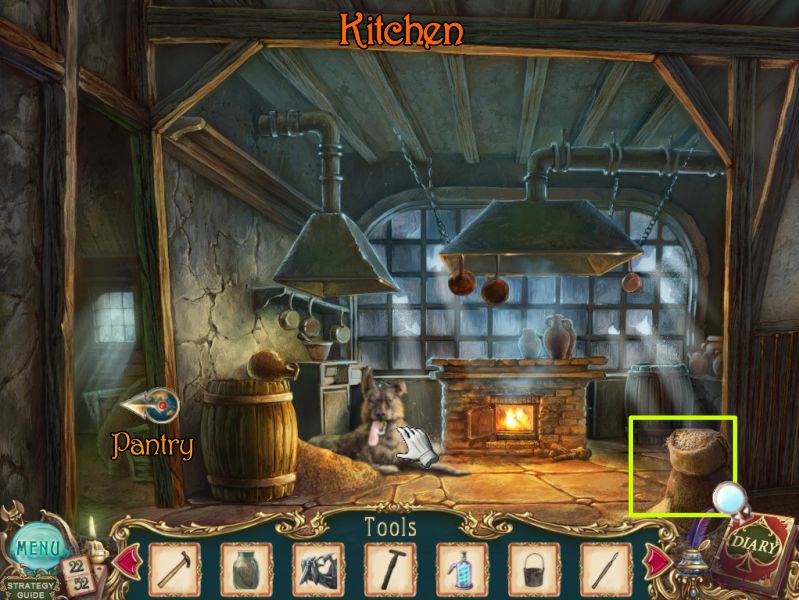
Kitchen
Try to touch the dog and you will find out he isn't friendly.
Click on the bag of grain to learn what you need to find, then go to the Pantry.
Screenshot
Pantry
Take the Card at the left, check on the mouse hiding in the box and play the Hidden Object Scene.
Screenshot
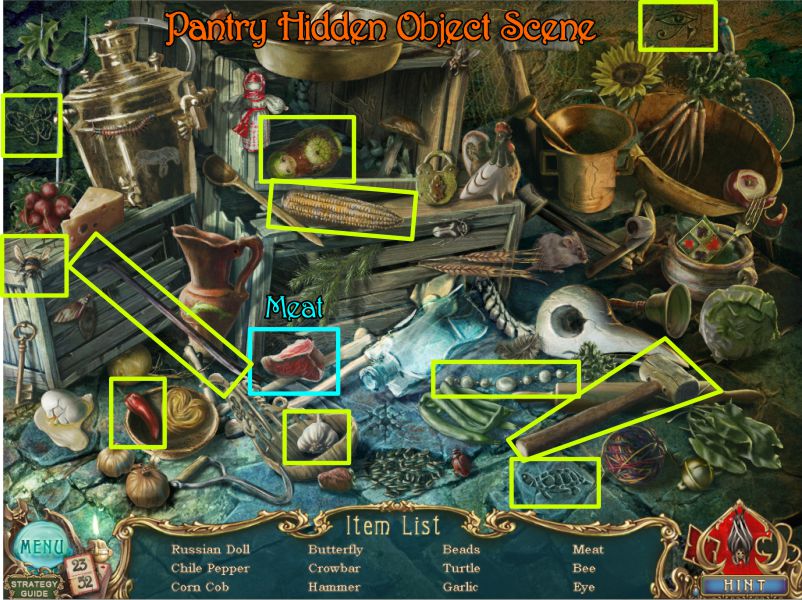
Pantry Hidden Object Scene
Collect everything on you list and you will get the Meat.
Screenshot
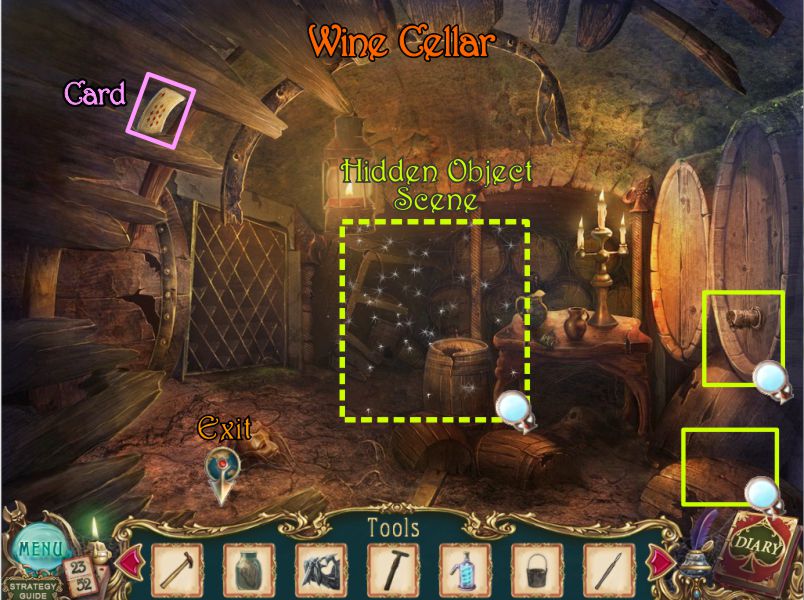
Wine Cellar
Go downstairs to the Wine Cellar.
Take the Card at the left and check the magnifying glasses in the screenshot.
Click on the sparkles for a Hidden Object Scene.
Screenshot
Wine Cellar Hidden Object Scene
When you have collected everything on your list, you will get a Mousetrap.
Screenshot
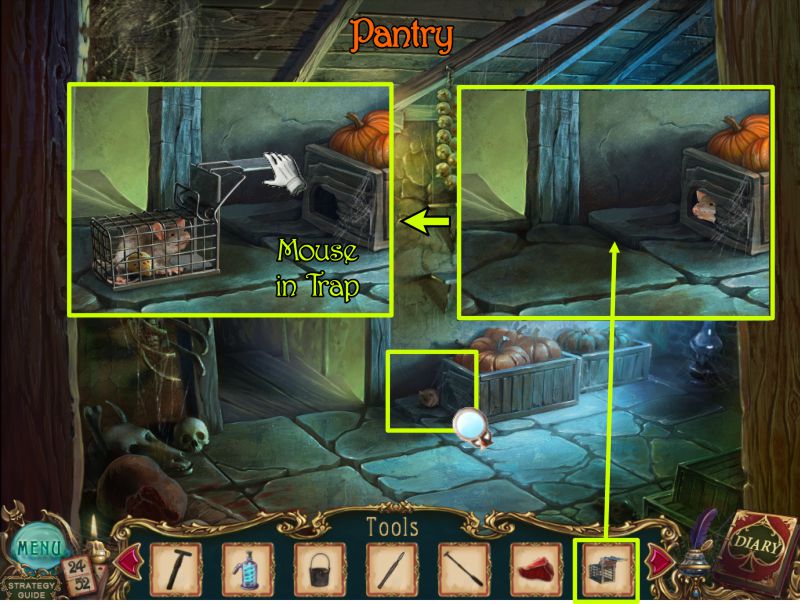
Pantry
Go back up to the Pantry and place the Mouse Trap next to the box.
When the mouse takes the bait, close the door and collect the Mouse in Trap.
Screenshot
Private Salon
Go through the Kitchen to the Hall and through the hole in the wall to the Private Salon.
Click on the Countess' portrait. Use your Scalpel on all 4 sides of the canvas to remove it from the frame and collect it.
Play the Hidden Object Scene.
Screenshot
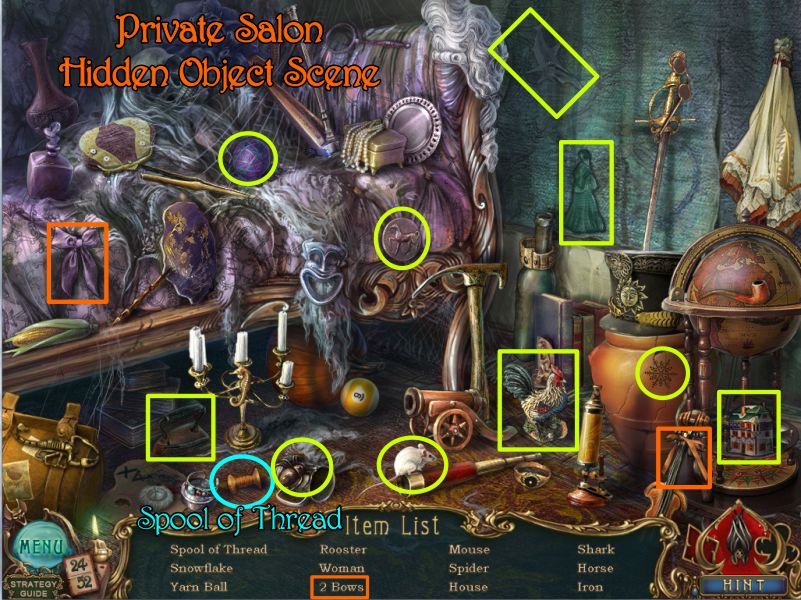
Private Salon Hidden Object Scene
When you collect everything on your list, you will get a Spool of Thread.
Screenshot
Kitchen
Go back to the Kitchen and click on the bag of grain.
Place the Meat, Mouse in Trap and Thread as shown in the screenshot.
The mouse will go chasing off with the steak tied to his tail. The angry dog follows him.
You can now get to the cabinet the dog was guarding. Take the Butcher's Knife and Card.
Screenshot
Exit to the Salon through the Hallway and then go to the Foyer.
Use the Butcher's Knife to break down the door at the left and enter the Ballroom.
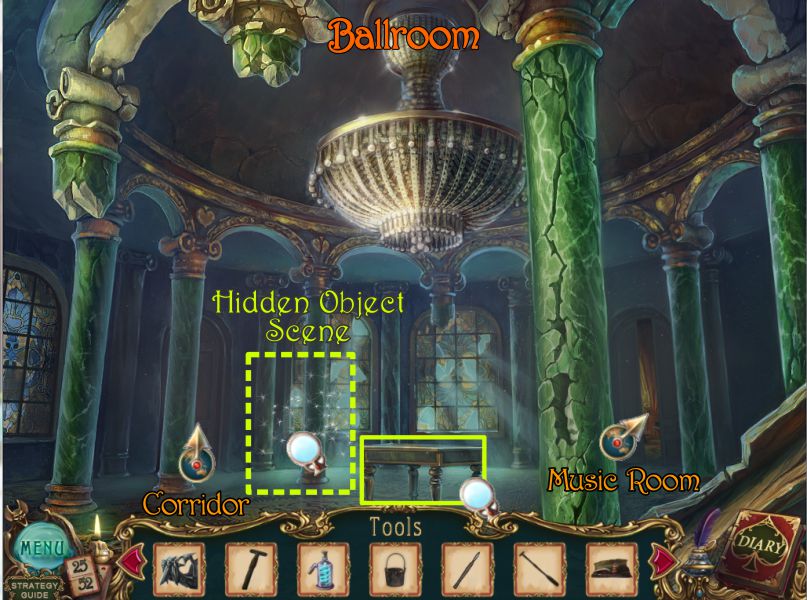
Ballroom
Check the table to see what you can do with it and play the Hidden Object Scene.
Screenshot
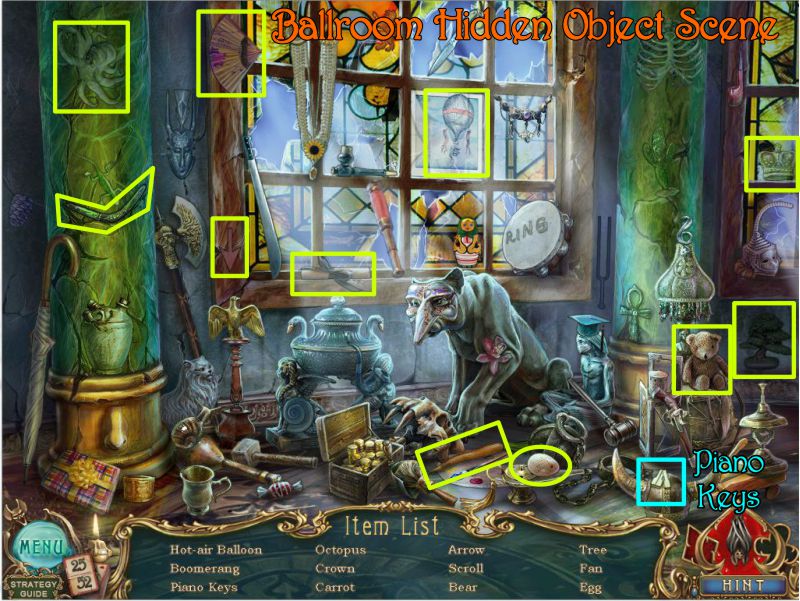
Ballroom Hidden Object Scene
Once you've collected the items on your list, you will get some Piano Keys.
Go through the door at the left.
Screenshot
Corridor off Ballroom
The Corridor is filled with poisonous gas, so grab the Nails shown in the screenshot and get out of there.
Screenshot
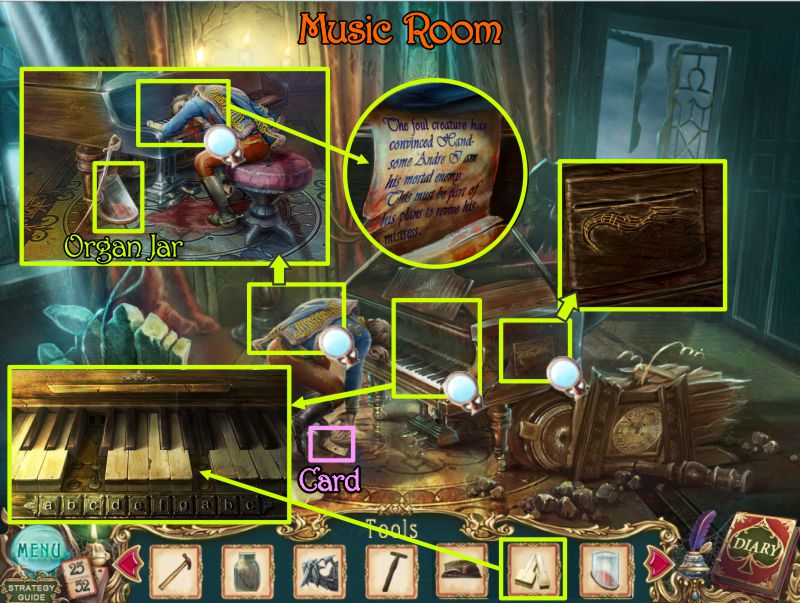
Music Room
Try the right door in the Ballroom.
There is a Grand Piano in the Music Room. Click on it and place the Piano Keys. You need to find music to play.
Click on the dead Cavalry Officer, pick up the Organ Jar and read the note.
Take the Card next to the piano stool and check out the compartment shown on the side of the piano.
Screenshot
Exit the Music Room to the Ballroom and on to the Foyer.
Go outside, down the steps and left to inside the Stables and up the ladder to the loft.
Chapter 7: Mansion Grounds
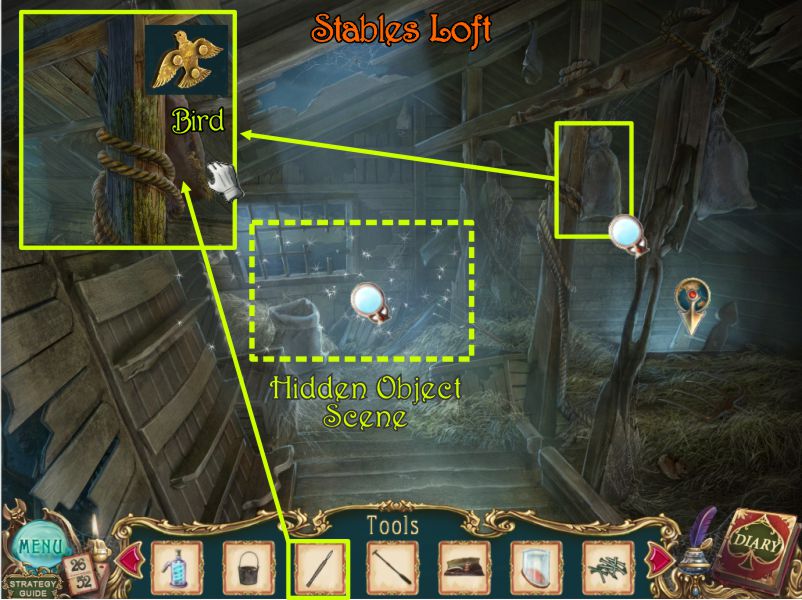
Stables Loft
Click on the post with the bag and slit it open with your Scalpel.
Take the Bird and play the Hidden Object Scene marked in the screenshot.
Screenshot
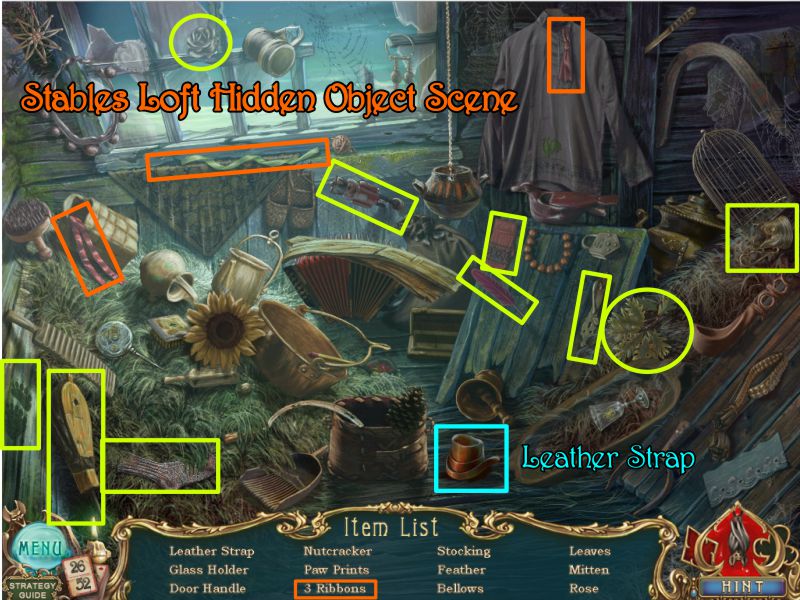
Stables Loft Hidden Object Scene
Collect everything on your list and you will come away with Leather Strap.
Screenshot
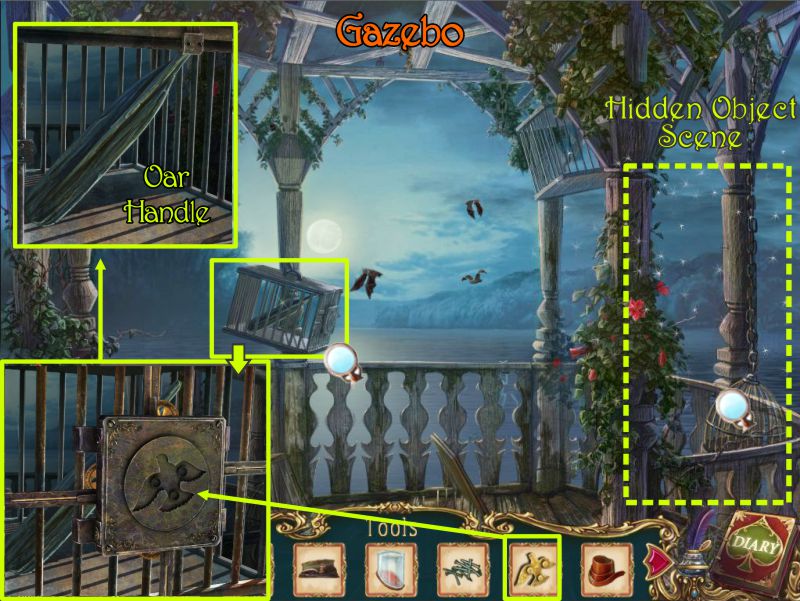
Gazebo
Go down the ladder and outside to take the path to the Gazebo.
Click on the birdcage marked in the screenshot and place the bird on it to open the door.
Take the Oar Handle and then click on the Hidden Object Scene.
Screenshot
Gazebo Hidden Object Scene
You will come away with a Jar of Fuel when you have collected everything on your list.
Screenshot
Chapter 8: Off to the Summerhouse
Landing
Go down the stairs to the Landing and click on the boat.
Place the pitch and nails in the boat and then hammer in the nails.
Push the boat back into the water and place the handle, blade, strap and oar as shown in the screenshot.
Push the assembled oar over to the oarlock on the far side of the boat.
Click on the boat when it is ready to go into the water and you will trigger a Mini Game.
Screenshot
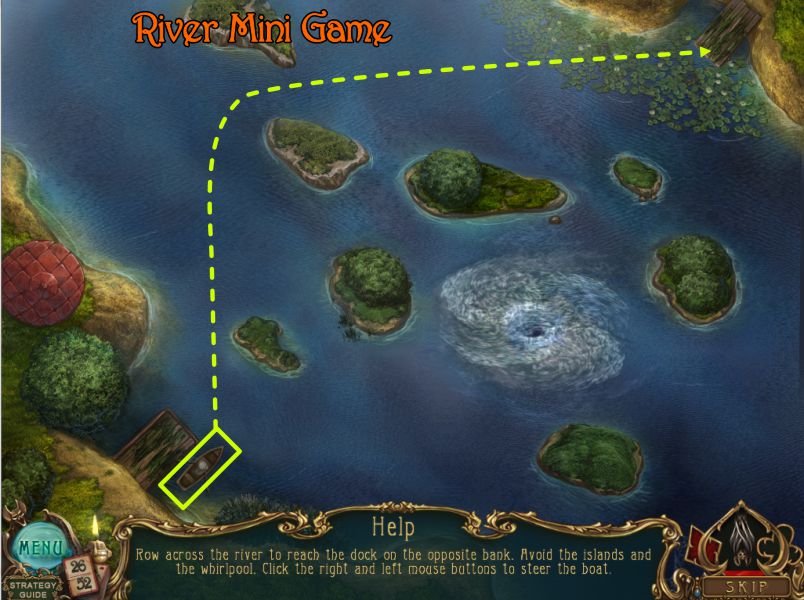
River Mini Game
Your goal is to get to the other side of the river without hitting an island or ending up in the whirlpool.
Click left to make the boat go left and right to make it go right.
A solution that works is mapped out in the screenshot.
Screenshot
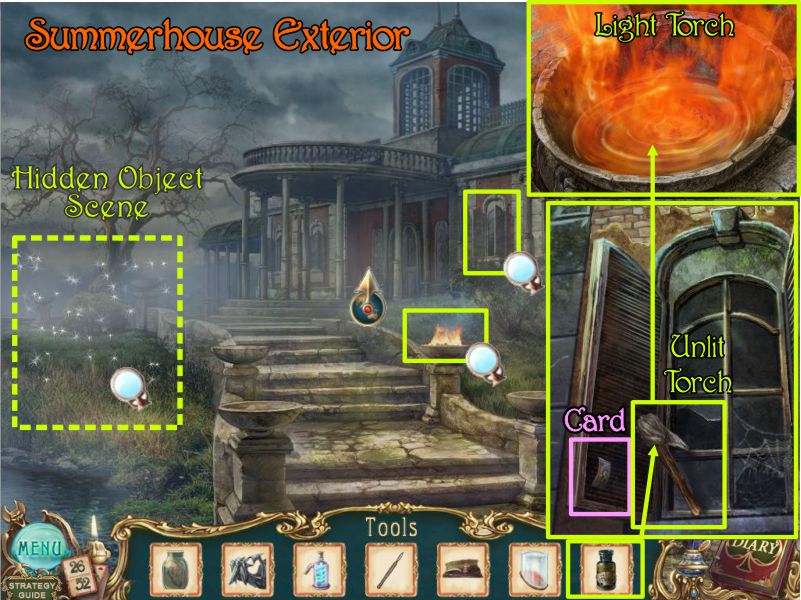
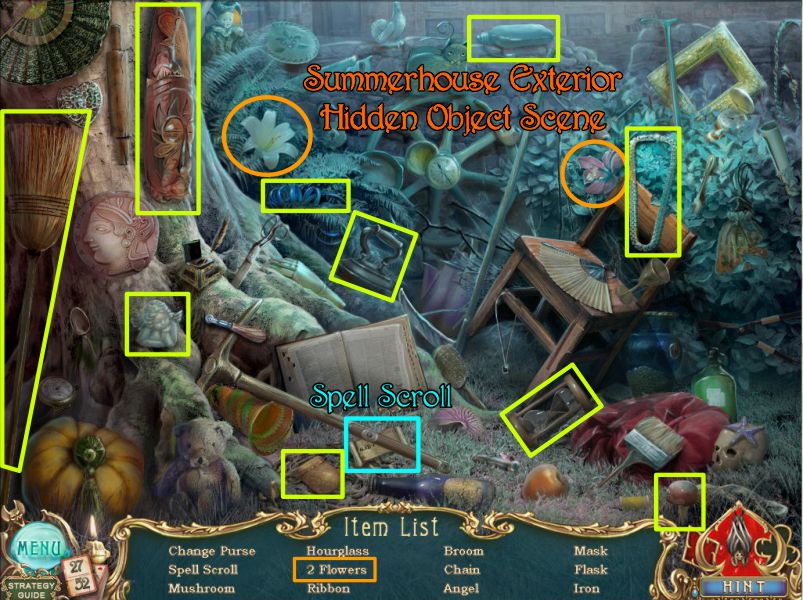
Summerhouse Exterior
You have arrived at the Countess' Summerhouse.
Click on the window marked in the screenshot and pick up the Card.
Place the Jar of Fuel on the torch and collect an Unlit Torch.
Zoom in on the burning bowl and light the Torch.
Play the Hidden Object Scene and then go to the front door and enter.
Screenshot
Summerhouse Exterior Hidden Object Scene
Collect everything on your list to get the Spell Scroll.
Screenshot
Summerhouse Interior
Click on the cabinet at the left and read the note.
Open the cabinet door, pick up the Gas Mask and the Card behind it (see screenshot).
Note the chest next to the sofa. Exit down twice to get back to the boat and you will be transported back across the river.
Screenshot
Chapter 9: Return to the Mansion Interior
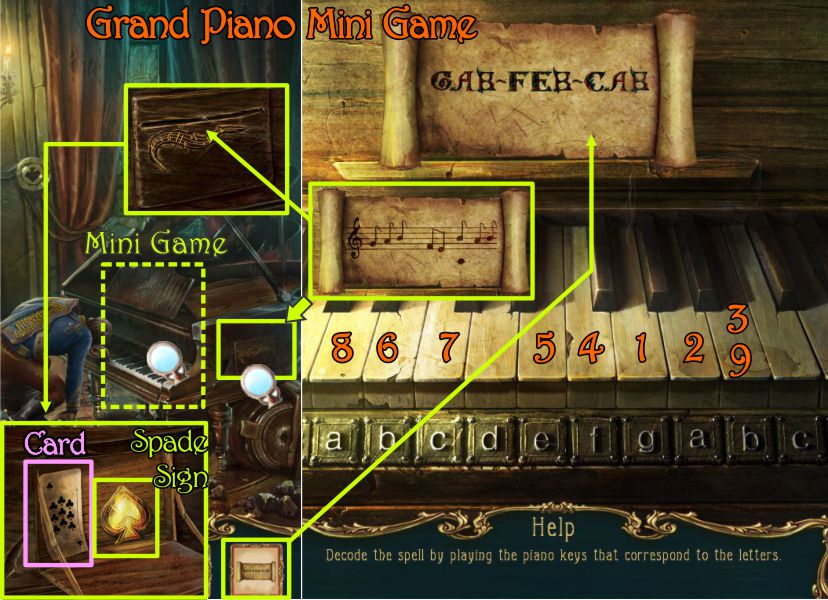
Grand Piano Mini Game
Navigate from the river to the Mansion, enter and go left to the Ballroom and into the Music Room on the right (see the map screenshot at the beginning of the walkthrough for help).
Click on the Grand Piano for a Mini Game.
Place the Spell Scroll on the piano and play the keys as numbered in the screenshot.
Since there are two sets of a-b-c, you can choose either of those letters you wish.
When you have finished the letters, you will get a sheet of music.
Feed the melody into the slot on the side of the piano and a panel will open for you to collect a Card and the Spade Sign.
Screenshot
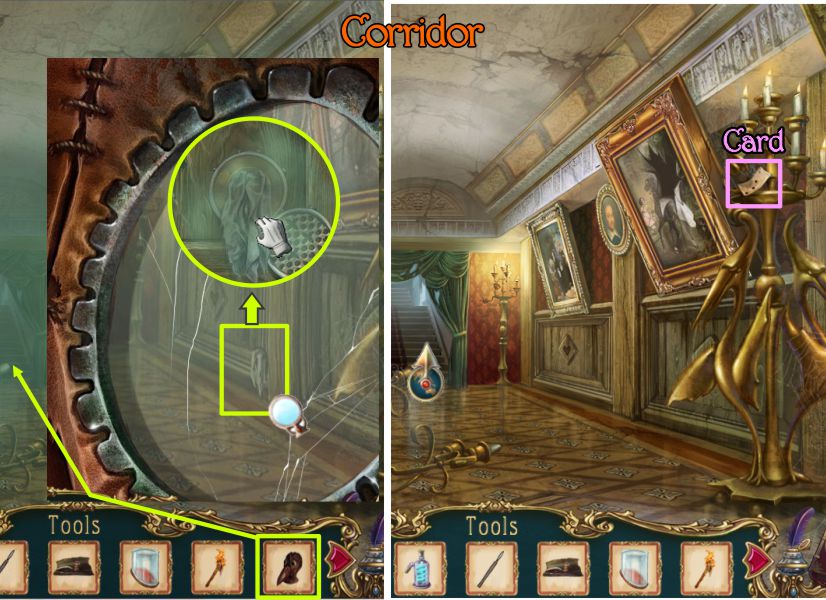
Corridor
Go back to the Ballroom and take the left door to the Corridor.
Place the Gas Mask anywhere in the scene and click on the outlet shown in the screenshot.
Remove the rag and all the Poisonous Gas will evaporate.
Take the Card on the candle stand and head up the Corridor.
Screenshot
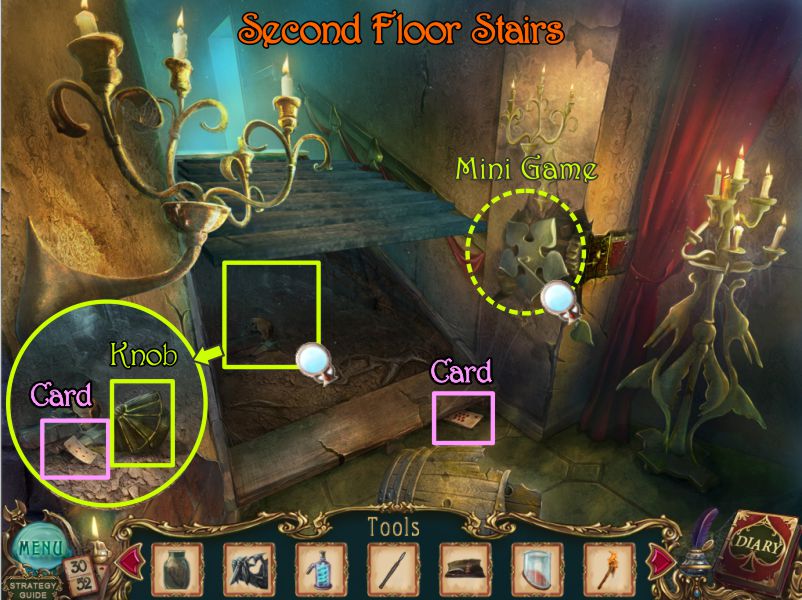
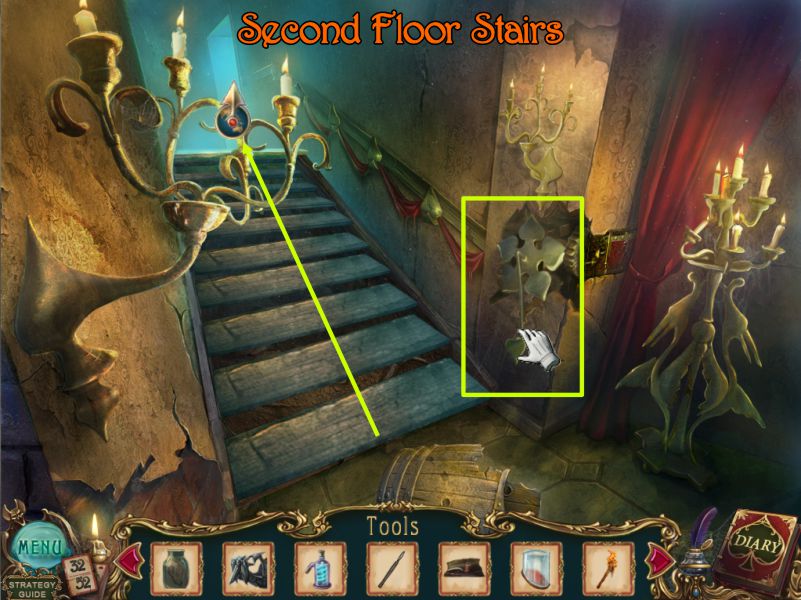
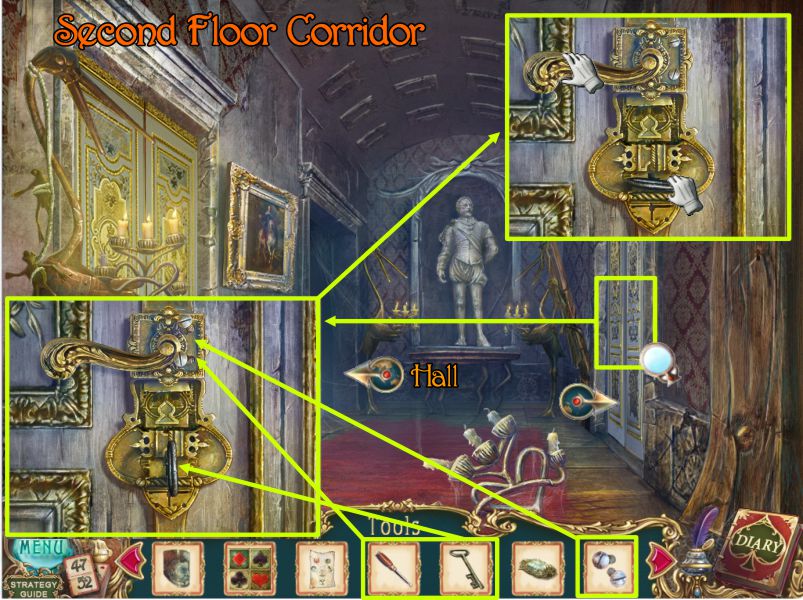
Second Floor Stairs
The stairs to the second floor are elevated so you will need to lower them.
Grab the card under the runner and click for a close up under the stairs to find another Card and a Knob.
Click on the handle at the right for a Mini Game.
Screenshot
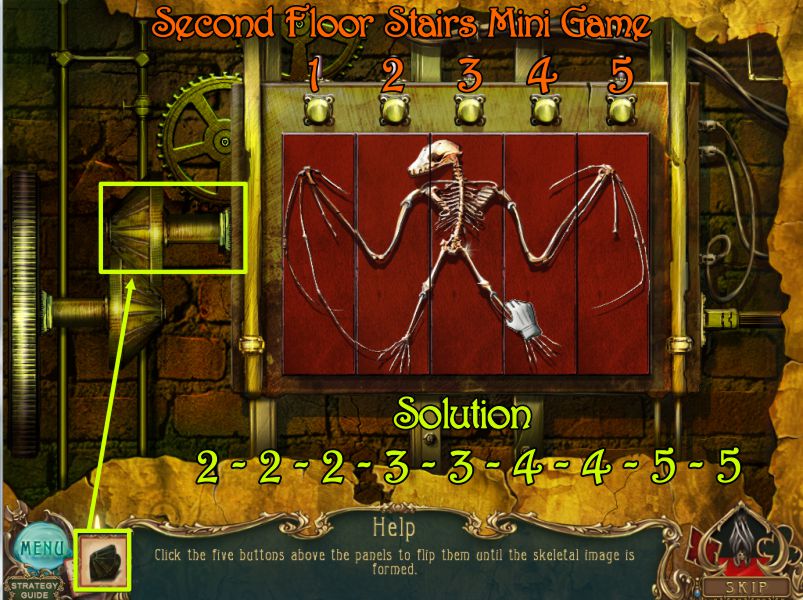
Second Floor Stairs Mini Game
Place the Knob on the mechanism and click the numbered buttons as indicated in the screenshot.
When you get the picture shown, take the skeleton.
Screenshot
Second Floor
The mechanism is fixed, so push the handle down and go upstairs through the door on the right.
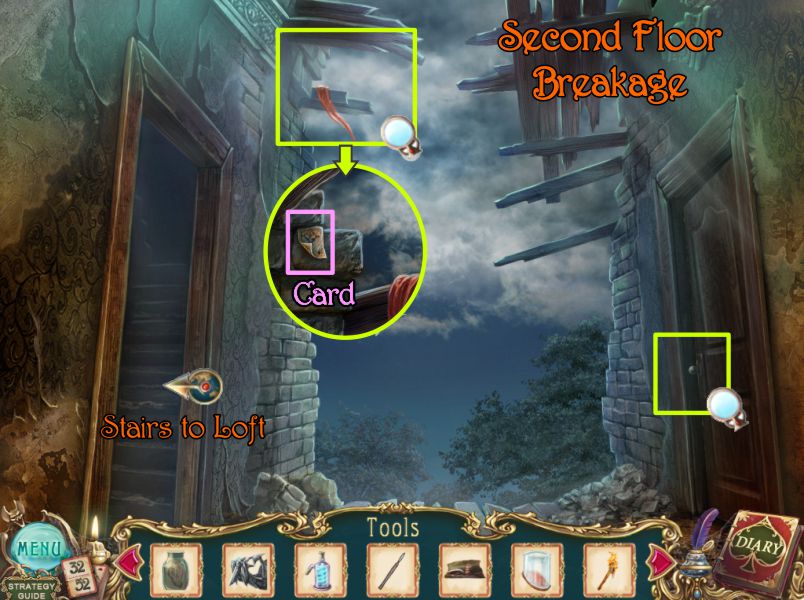
Screenshot
The wall is broken out. Click on the area marked in the screenshot to find a Card.
Since you can't open the door on the right, go left to the Loft Stairs.
Screenshot
Stairs to Loft
Use your Burning Torch to get rid of the cobwebs.
Take the Card and Lever shown in the screenshot and play the Hidden Object Scene before going up the stairs.
Screenshot
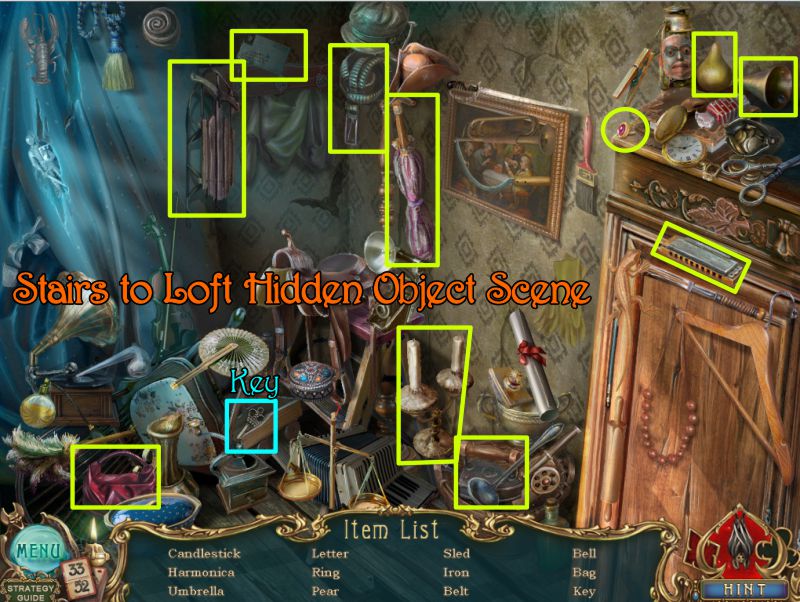
Stairs to Loft Hidden Object Scene
Collect everything on your list and you will get a Key.
Screenshot
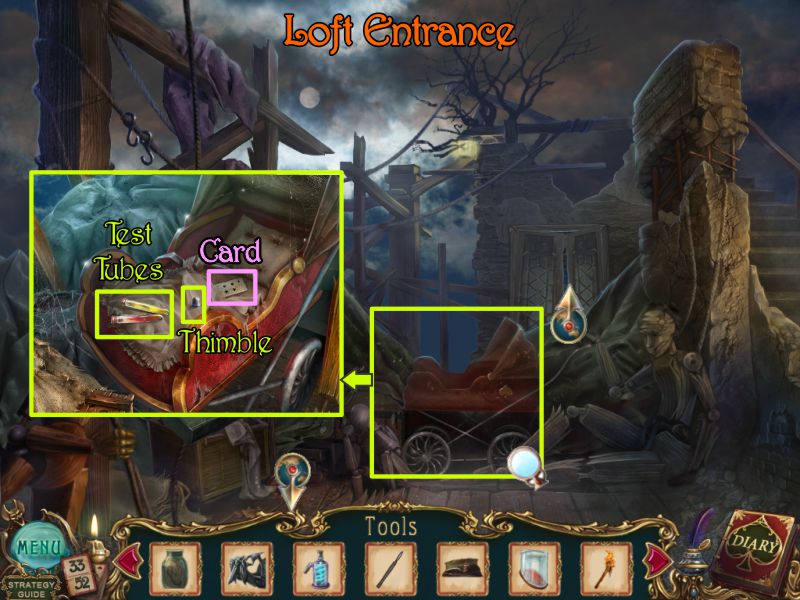
Loft Entrance
Zoom in on the baby buggy in the middle of the scene and pick up the items marked in the screenshot: a Card, Thimble and some Test Tubes.
Go through the doors at the back of the scene.
Screenshot
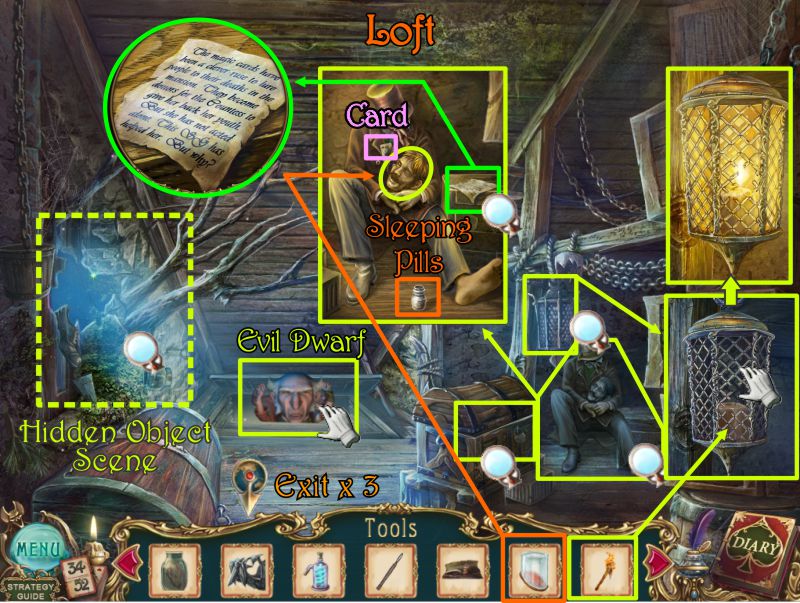
Loft
The Evil Dwarf, SG, is peeking at you from the hatch, but he disappears when you try to catch him.
Click on the lamp at the right and light it with your Burning Torch.
Click on Pierre (see screenshot) and pick up the Card and Sleeping Pills.
Read the note and use the Organ Jar to collect Pierre's head.
Play the Hidden Object Scene before going back to the Second Floor Breakage.
Screenshot
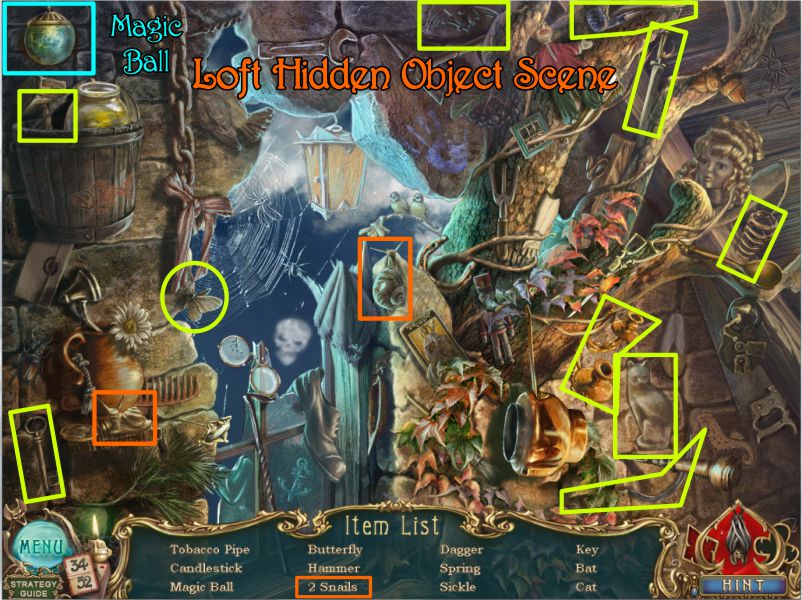
Loft Hidden Object Scene
Once you have collected everything on your list, you will receive a Magic Ball for your Inventory.
Screenshot
Second Floor Breakage
Click on the door, place your key in the keyhole and turn the key.
Enter the Library when the door opens.
Screenshot
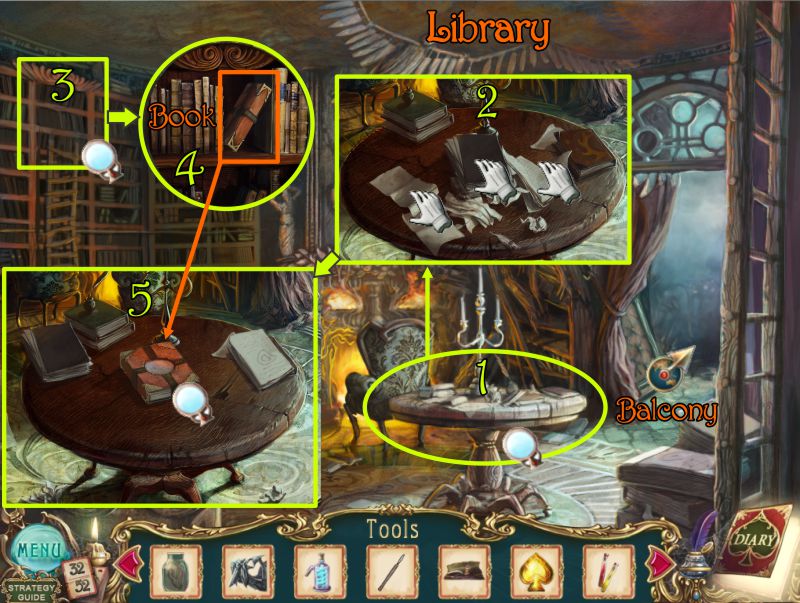
Library
Place the Lever on the drum in the left corner and pull the lever down.
Look inside and use the arrows around the picture to restore it to the solution shown in the screenshot.
Click on the Spade that appears and the bookcase ladder will move to the left.
Screenshot
Click on the table and move all the papers away to reveal a place for a book.
Zoom in on the bookshelves and take the book marked in the screenshot.
Place the book on the table and go to the Balcony.
Screenshot
Library Balcony
Pick up the Card and Bucket of Sand.
Play the first Hidden Object Scene and then click on the devil box for a Mini Game.
Go into the Library to trigger the second Hidden Object Scene when you return to the Balcony.
Screenshot
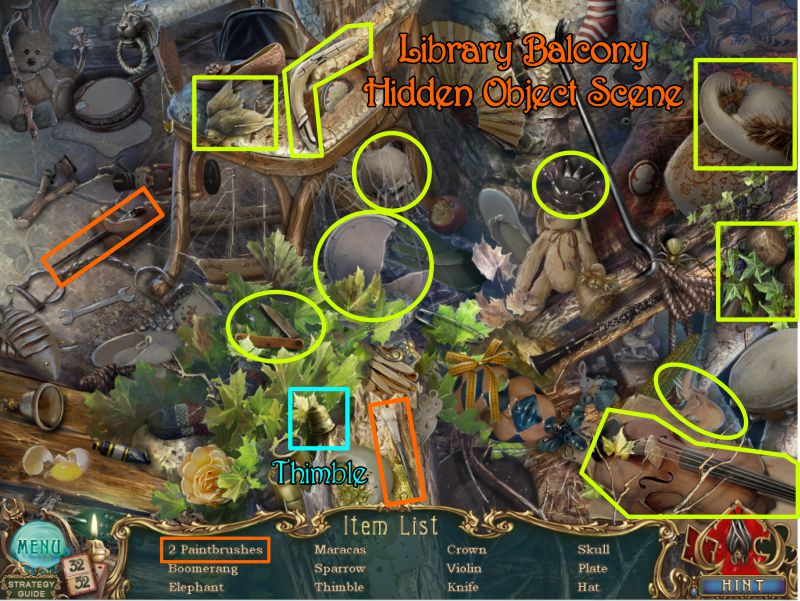
Library Balcony Hidden Object Scene
When you have collected everything on your list, you will have a second Thimble.
Screenshot
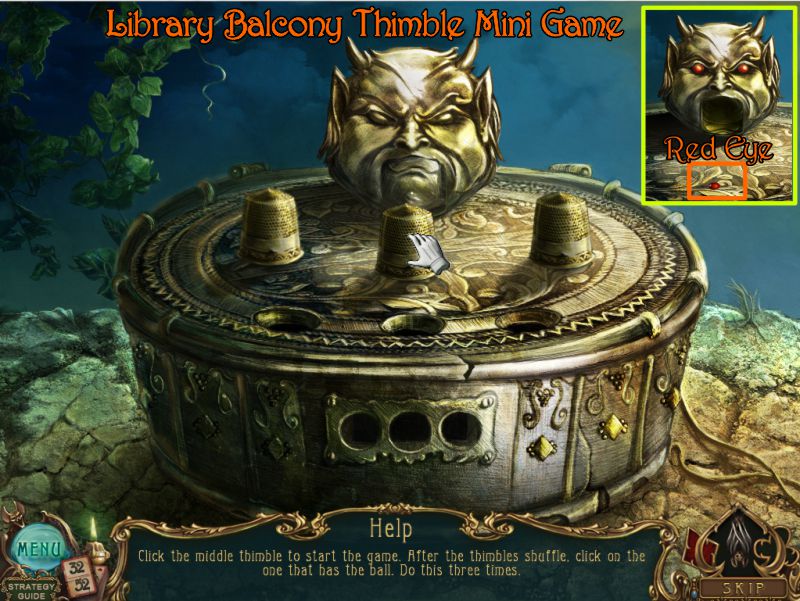
Library Balcony Thimble Mini Game
Place the two thimbles on the devil box.
This is a shell game with thimbles. Your goal is to keep your eye on the ball so you can find it when the thimbles stop moving.
Click on the center thimble to receive the ball from the head to one of the thimbles.
The game is random and you will receive a Red Eye when you successfully complete 3 rounds.
Screenshot
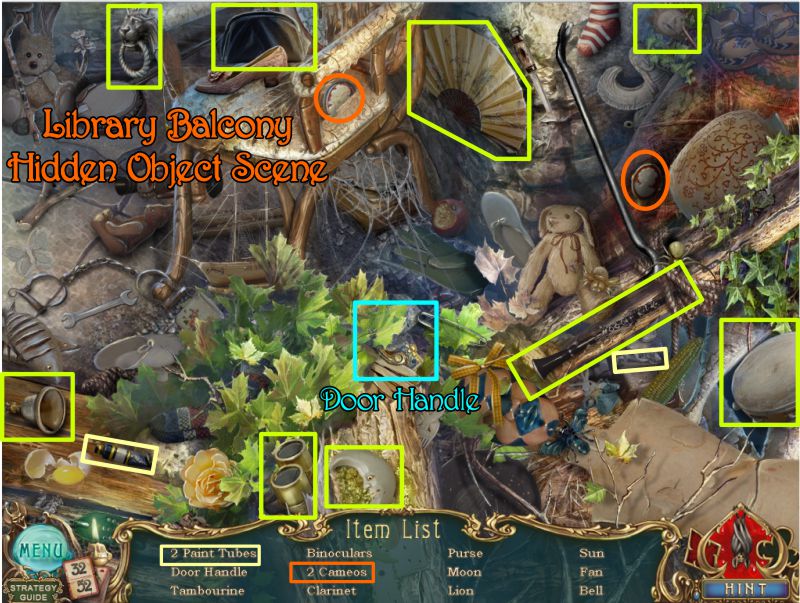
Library Balcony Hidden Object Scene
Collect your list to get the Door Handle.
Screenshot
Foyer and Staircase Corner
Go downstairs to the Foyer and into the corner where the bird is hugging the banister.
Place the Red Eye on the bird and the secret panel will open.
Take the Card and the Corkscrew.
Play the Hidden Object Scene on the shelves.
Screenshot
Foyer Staircase Corner Hidden Object Scene
Collect your list of items to receive the Mirror Frame.
Screenshot
Wine Cellar
Go through the door at the right, through the Salon and that door on the right, down the hall into the Kitchen, through the Pantry and down to the Wine Cellar.
Play the Hidden Object Scene to get the empty bottle.
Place the bottle as shown in the screenshot and use the Corkscrew on the cork in the wine barrel.
Put the Sleeping Pills in the bottle of wine and collect the bottle.
Screenshot
Wine Cellar Hidden Object Scene
Collect everything on your list to get the Empty Bottle.
Screenshot
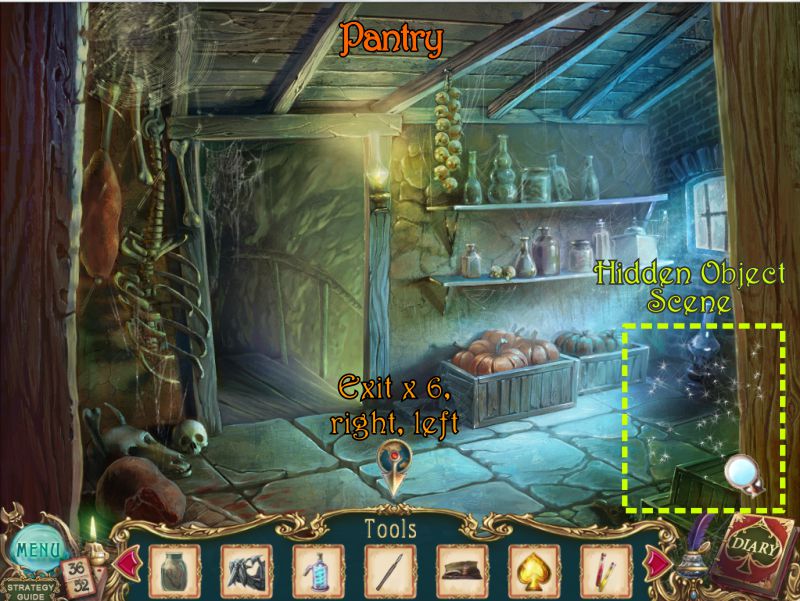
Pantry
Go to the Pantry and play the Hidden Object Scene.
Exit down 6 times, take the road to Town and through the archway to the Library.
Screenshot
Pantry Hidden Object Scene
Collect everything on the list to get the Suits.
Screenshot
Chapter 10: Go to Town
Outside Library
Give the drugged bottle of wine to the guard.
Once he is asleep, enter the Town Library.
Screenshot
Inside Library
Play the Hidden Object Scene to get the Punch Card.
Click on the projector. Take the Card and replace it with the Punch Card.
Click where the projector shines and take the Book and Card.
Place the book as shown in the screenshot.
Play the second Hidden Object Scene.
Click on the top of the book and place the Trapezoid to trigger a Mini Game.
Screenshot
Town Library Hidden Object Scenes
Collect everything to get the Punch Card.
Screenshot
The second Hidden Object Scene will get you the Trapezoid when you've collected everything.
Screenshot
Library Book Lock Mini Game
Your goal is to match up the colors. The game is random.
To swap tiles, click on 2 of them, then on the middle circle.
To flip a tile, click on it and then on the middle circle.
A sample solution is shown in the screenshot.
When you have completed the game, click in the center circle and take the Spell page from the book.
Screenshot
Chapter 11: Return to the Summerhouse
Summerhouse Exterior
Go back to the Mansion and take the left path all the way to the river.
Click on the Summerhouse and the boat will take you across the river.
Click on the fire bowl. Use your bucket of sand to put out the fire so you can take the Amulet.
Play the Hidden Object Scene and then go inside the Summerhouse.
Screenshot
Summerhouse Exterior Hidden Object Scene
Collect your list to get the Glass Cutter.
Screenshot
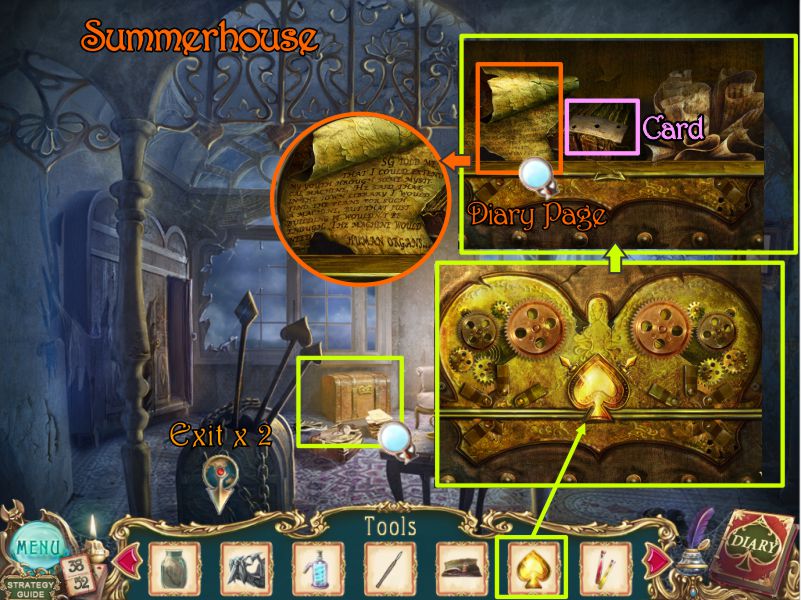
Inside Summerhouse
Click on the chest and place the golden spade as shown in the screenshot.
Take the Card and Diary Page.
Screenshot
Chapter 12: Mansion Interior
Mansion Library
Go back to the boat and return to the Mansion.
Go to the second floor and into the Library.
Zoom in on the book on the table and place the Amulet in the center.
Turn the Amulet and it will become a spade.
Take the Chemistry Notes and Card from the book.
Screenshot
Stairs to Loft
Go across the Breakage to the Loft Stairs and play the Hidden Object Scene before going to the Loft.
Screenshot
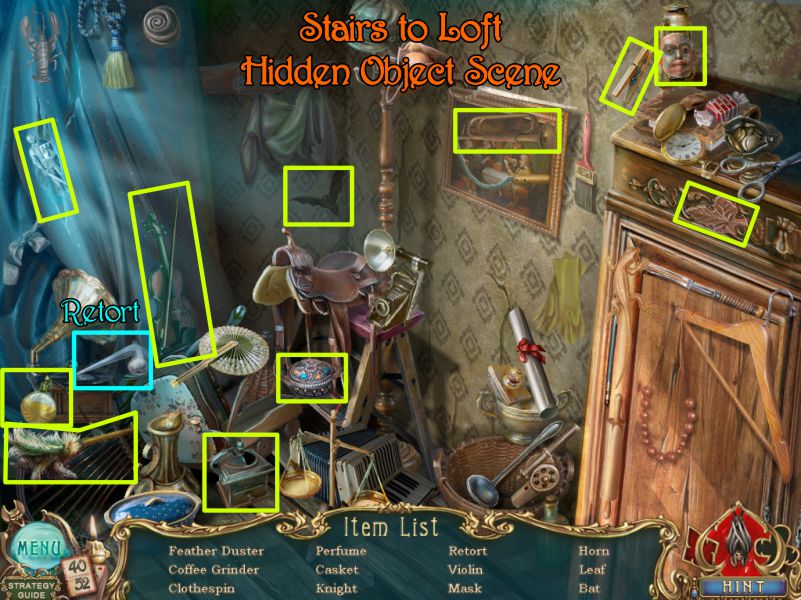
Stairs to Loft Hidden Object Scene
When you have collected everything on your list, you will get a Retort.
Screenshot
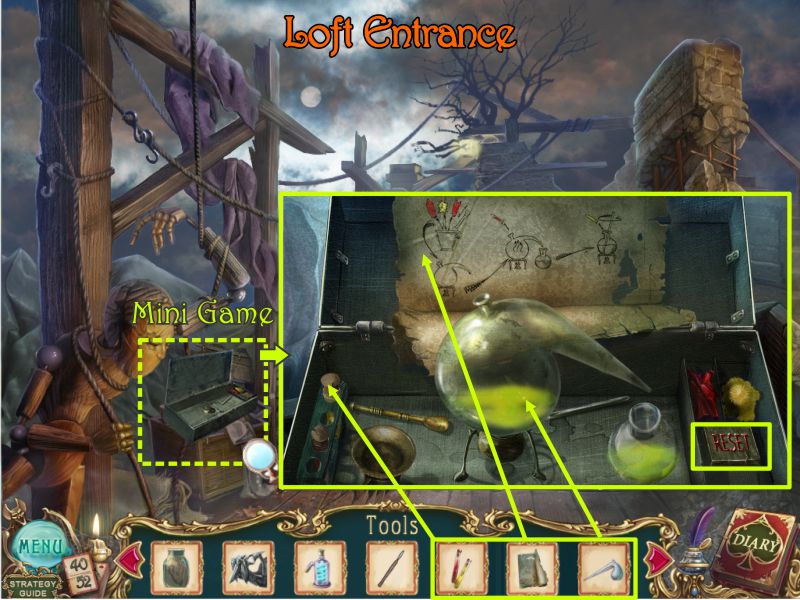
Loft Entrance
Click on the box at the left for a Mini Game.
Place the Chemistry Notes on the lid and the Retort and Test Tubes as shown in the screenshot.
There is a Restart button in case of need.
Screenshot
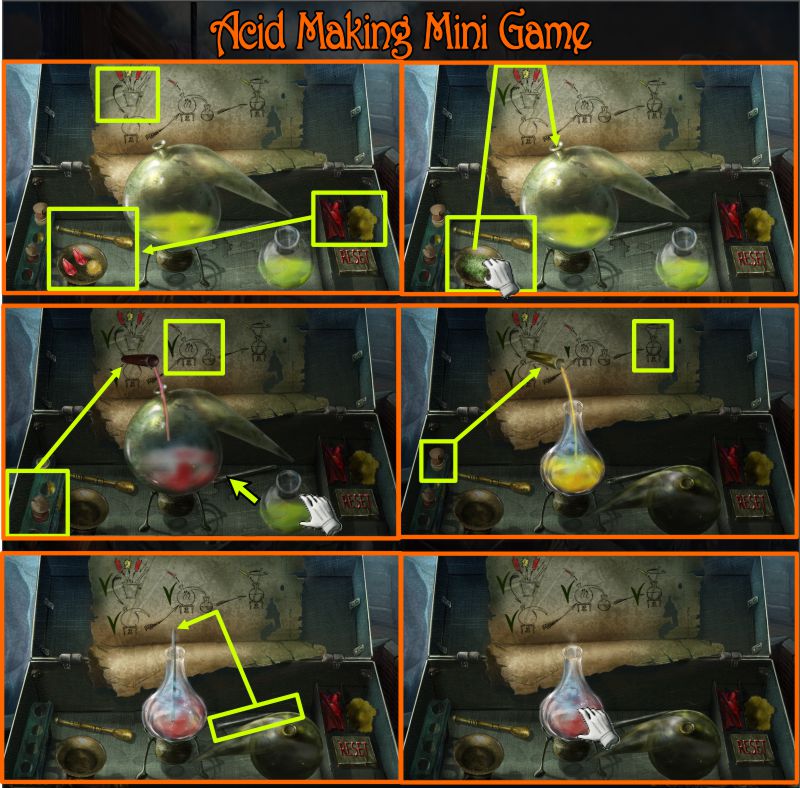
Acid Making Mini Game
Place 2 of the red crystals and one yellow puff in the mortar.
Grind them up with the pestle, pick up the powder and place it in the retort.
Pour the red test tube into the retort and the liquid will drip into the small flask. Swap the retort with the flask.
Pour the yellow test tube into the flask that is now on the burner.
Pick up the stir stick and place it in the flask to stir the mixture.
Take the flask with the acid you have created.
Screenshot
Loft
Go through the doors to the Loft and click for a close up of the hatch.
Pour the Acid on the lock, lift the hatch and go down to the Second Floor.
Screenshot
Chapter 13: Second Floor
Corridor under Loft
Take the 2 Cards shown in the screenshot and place the handle on the door.
You can't enter that room because you still need a key. Go across the hall and enter the Wardrobe Chamber.
Screenshot
Countess' Wardrobe
Take the Card on the left table next to the hat.
Check out the chest marked in the screenshot to discover it is too heavy to move.
Read the note in the back and play the Hidden Object Scene.
Screenshot
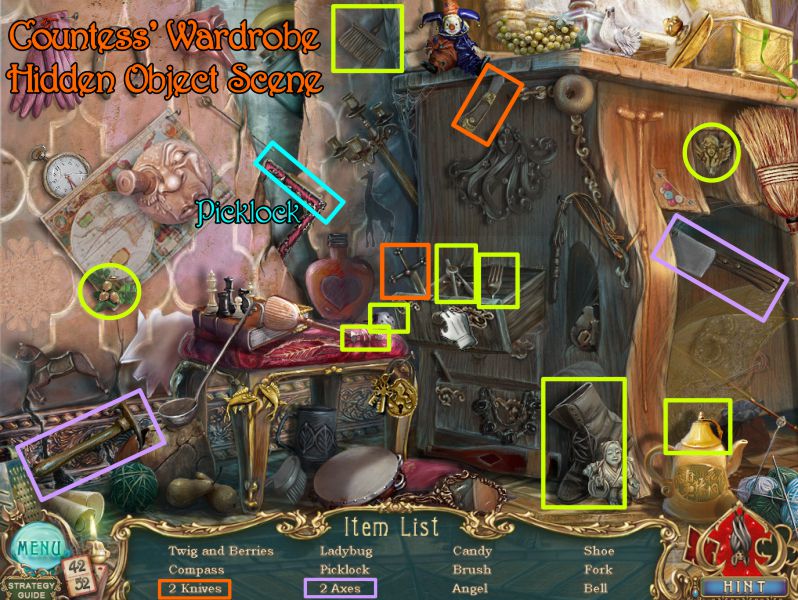
Countess' Wardrobe Hidden Object Scene
Collect everything to get a Picklock.
Screenshot
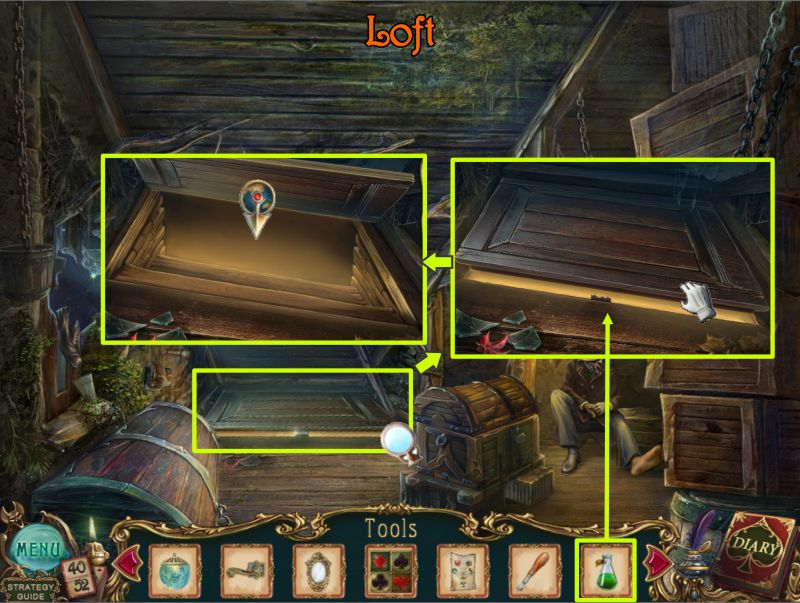
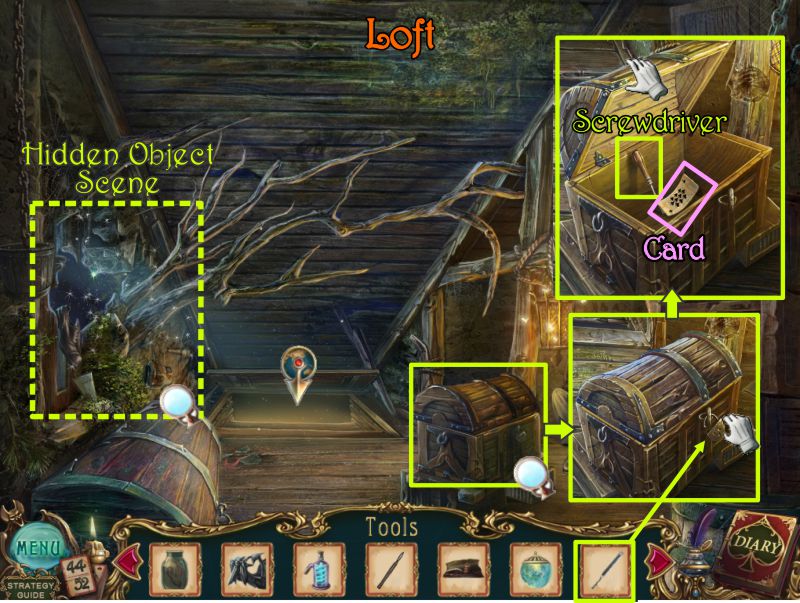
Loft
Go back up to the Loft and use the Picklock to open the chest.
Lift the lid and take the Screwdriver and Card.
Play the Hidden Object Scene before going back down through the hatch.
Screenshot
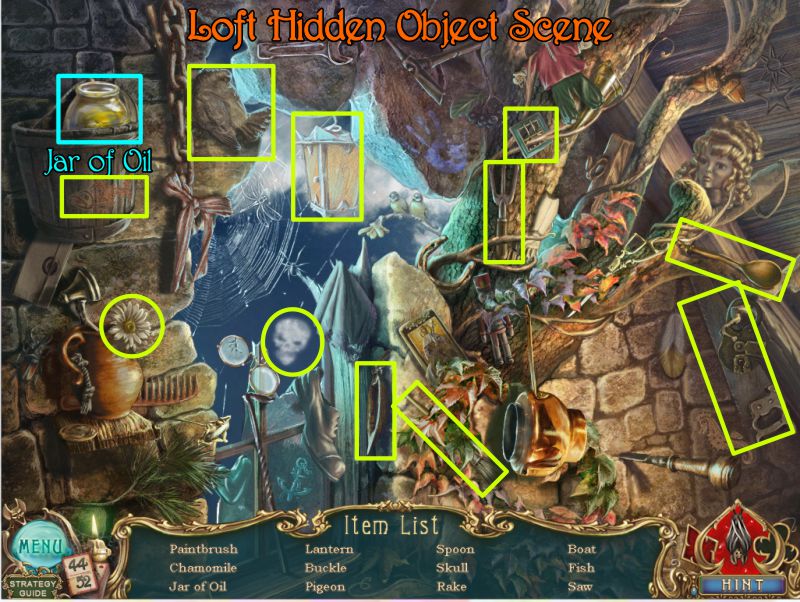
Loft Hidden Object Scene
Collect the Jar of Oil and everything else on your list.
Screenshot
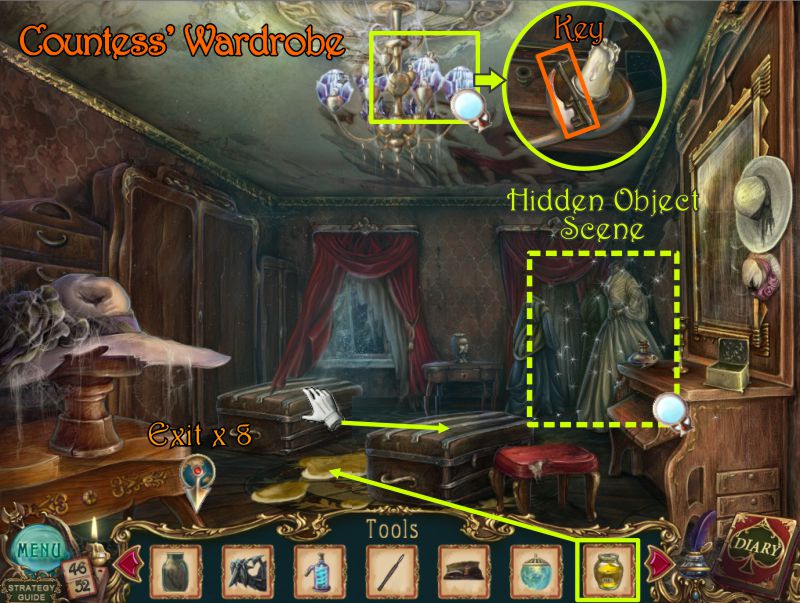
Countess' Wardrobe
Go into the Wardrobe and pour the oil in front of the chest so you can move it under the chandelier.
Take the Key from the chandelier and play the Hidden Object Scene; then click down 8 times to the Ballroom.
Screenshot
Countess' Wardrobe Hidden Object Scene
Collect your list of items for your Inventory, including the Glass.
Screenshot
Chapter 14: First Floor
Ballroom
Zoom in on the table and place the 5 Inventory items as shown in the screenshot.
Screenshot
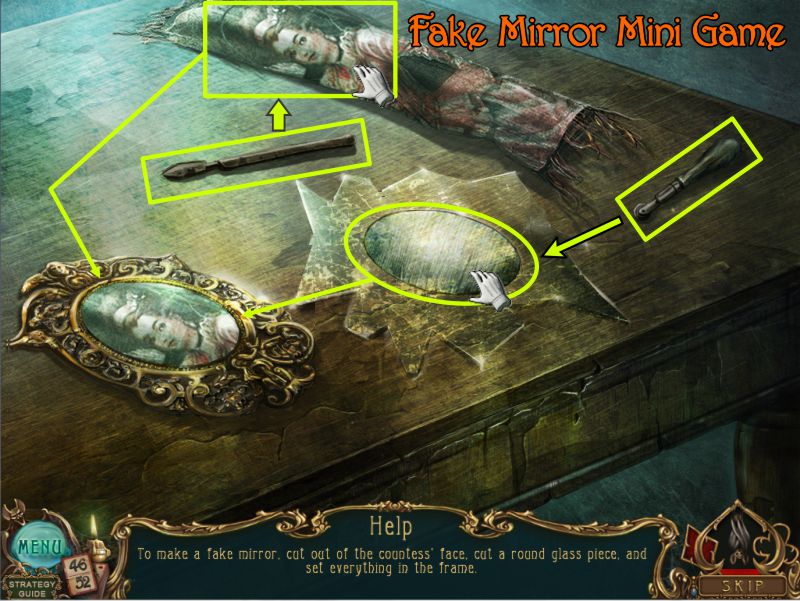
Fake Mirror Mini Game
Use the scalpel to cut the Countess' face from the portrait.
Cut a glass oval with the glass cutter.
Place the portrait oval in the mirror frame and the glass oval on top of it.
Take the Fake Mirror for your Inventory and take the corridor back upstairs to the Library.
Screenshot
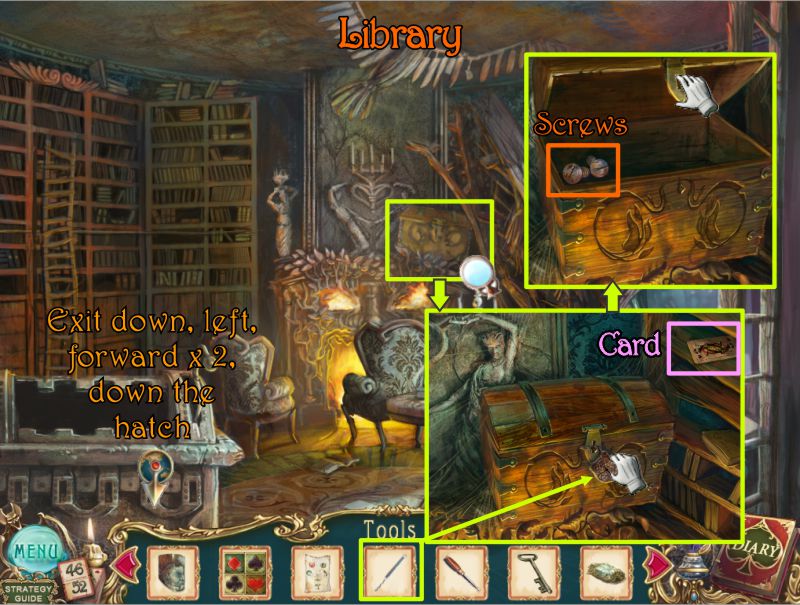
Mansion Library
Click on the chest above the fireplace and open it with the Picklock.
Take the Card to the right of the chest and lift the lid on the chest to get the Screws that are inside.
Exit according to the directions shown in the screenshot.
Screenshot
Chapter 15: Return to the Second Floor
Corridor
Go down the hatch and click on the door to the right.
Place the screws as shown in the screenshot and use your screwdriver to tighten them.
Put the key in the keyhole and turn it.
Pull down on the door handle and enter the room.
Screenshot
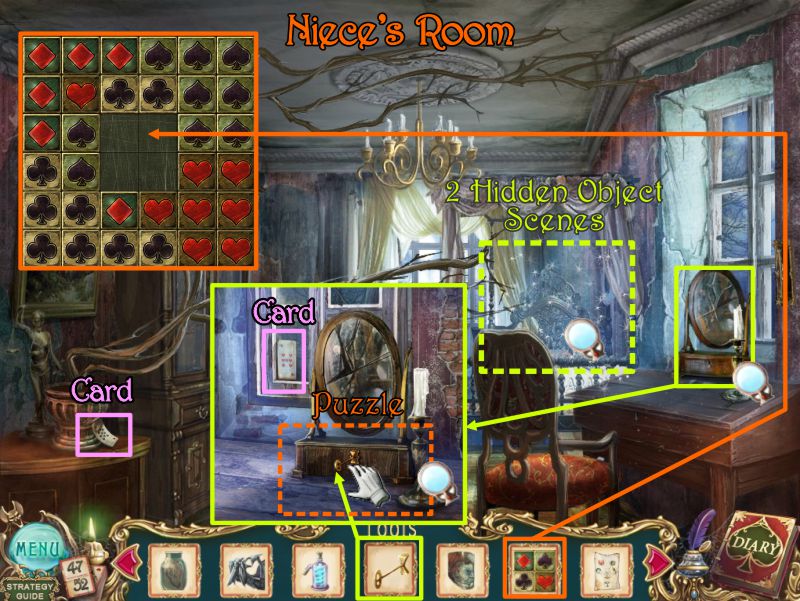
Niece's Room
Pick up the Card on the table at the left and play the Hidden Object Scene to get the Butterfly Key.
Click on the mirror for a close up and take the Card on the window.
Use the Butterfly Key to open the drawer for a Puzzle.
Place the Suits tile in the center of the puzzle to start the game.
The second Hidden Object Scene will be triggered once you complete the puzzle.
Screenshot
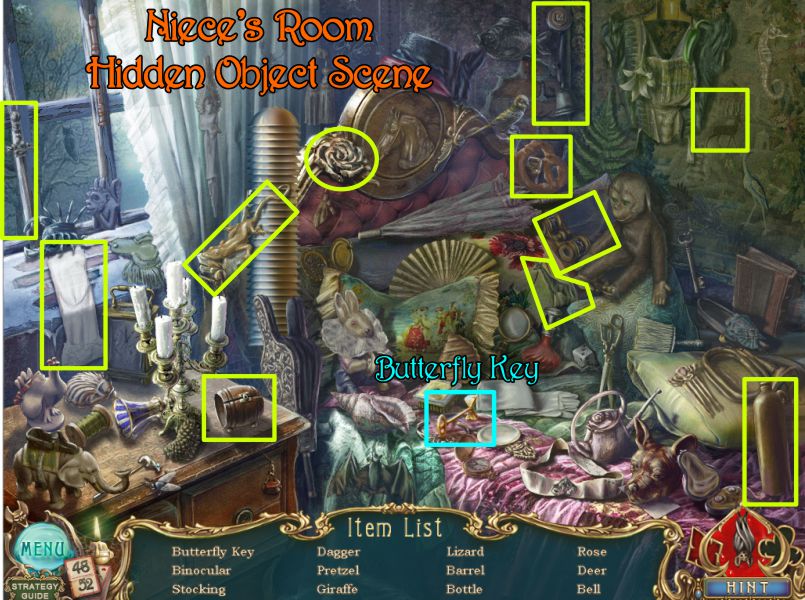
Niece's Room Hidden Object Scene
Collect everything including the Butterfly Key.
Screenshot
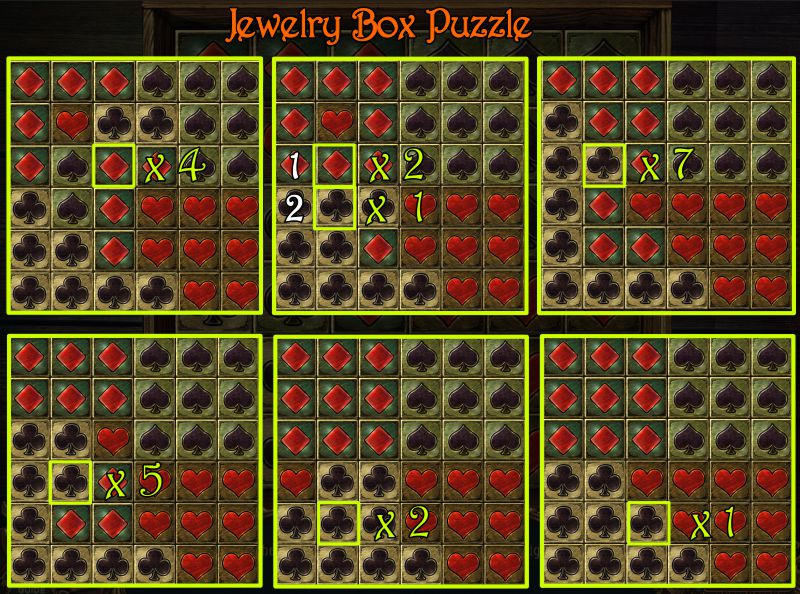
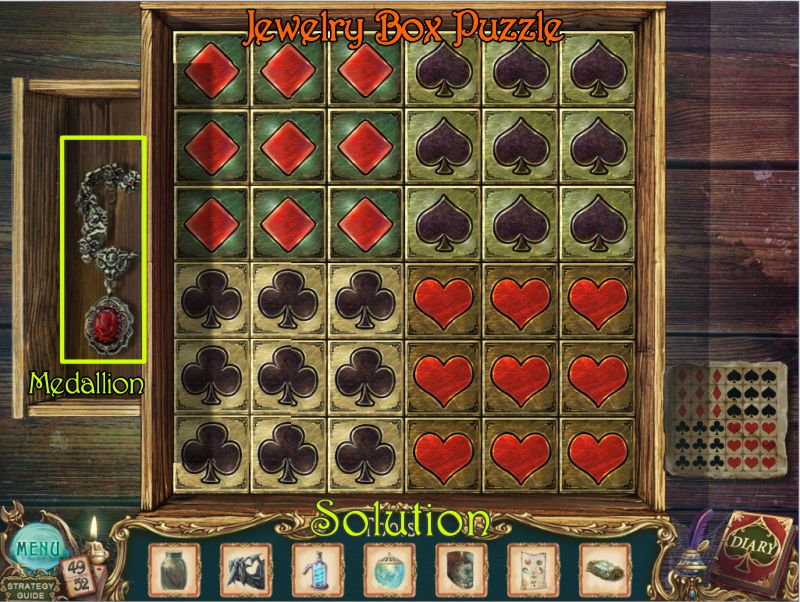
Jewelry Box Puzzle
Click on each of the tiles the number of times indicated in the screenshot.
Screenshot
The solution shown in the screenshot is a match for the diagram next to the box.
When you have completed the puzzle, the drawer will open for you to take the Medallion.
Screenshot
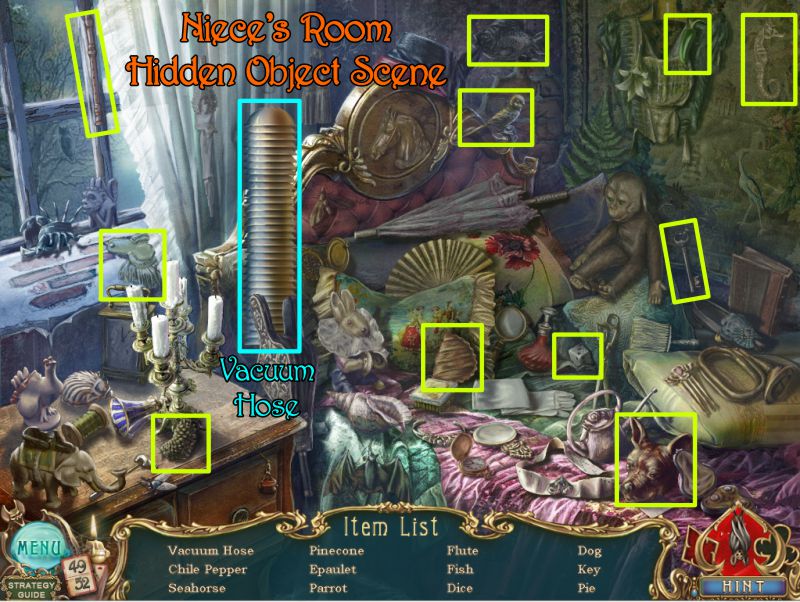
Niece's Room Hidden Object Scene
Collect the Vacuum Hose and the rest of your list.
Screenshot
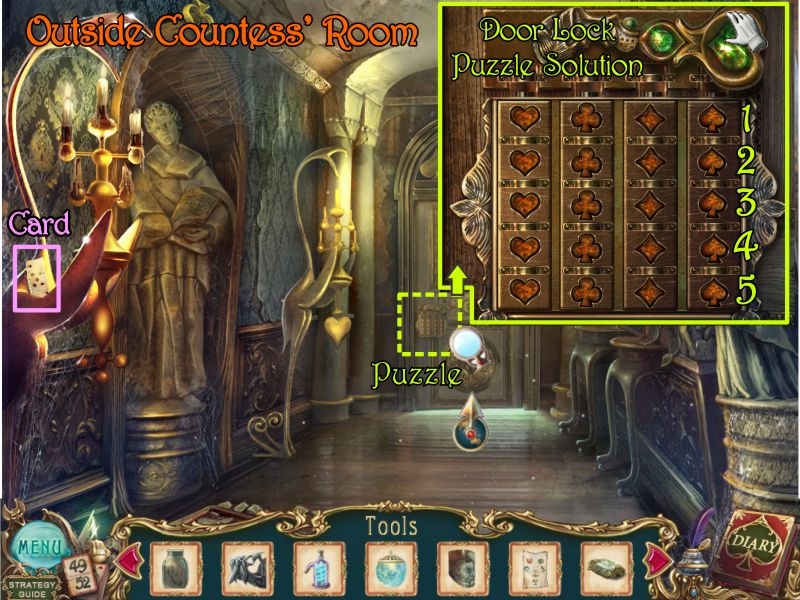
The Countess
Leave the room and go down the Corridor to the Hall on the left.
Take the Card by the Mirror and click on the door for a puzzle to open it.
Click on the spades as they are numbered in the screenshot solution.
Pull down on the handle and enter the room.
Screenshot
Pick up the Card on the small table with the dagger in it.
The Countess is barely alive, so you will need to revive her.
Remove the cover from the machine and click for a close up.
Once you revive the Countess, SG will appear at the far right of the scene. Try to grab him and then follow him to his room.
Screenshot
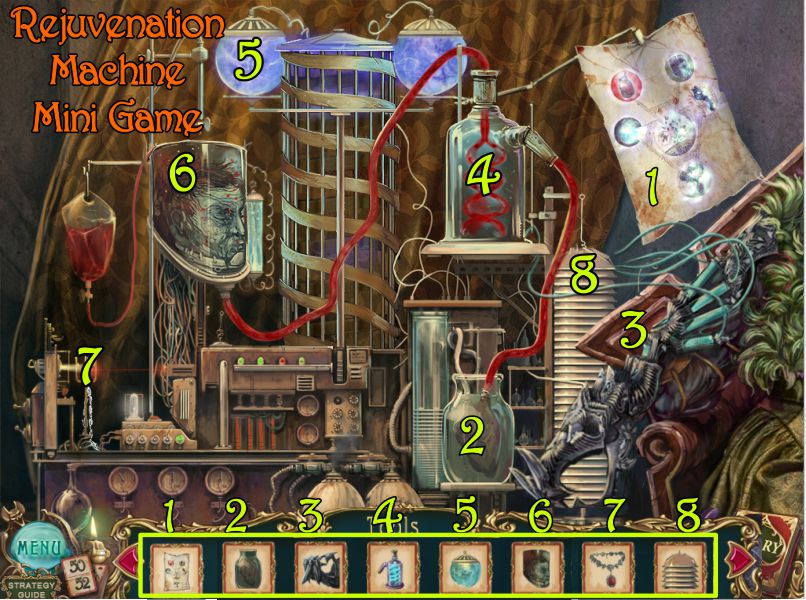
Rejuvenation Machine Mini Game
Place the Spell page to trigger the Mini Game.
Place all the items numbered in the screenshot in their corresponding places.
Screenshot
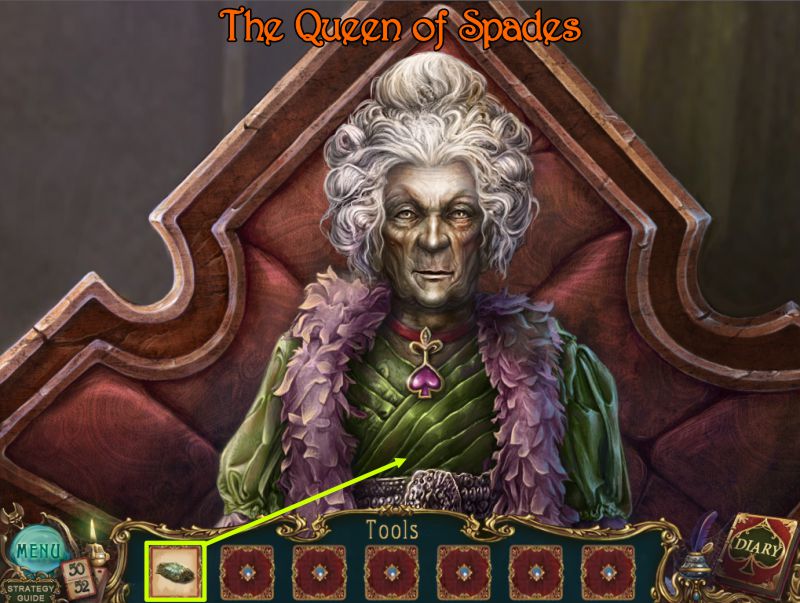
The Queen of Spades
The Countess comes to, so give her the fake mirror and she will think she is young again.
She will give you the final card: The Queen of Spades.
Screenshot
Chapter 16: The Enchanted Cards
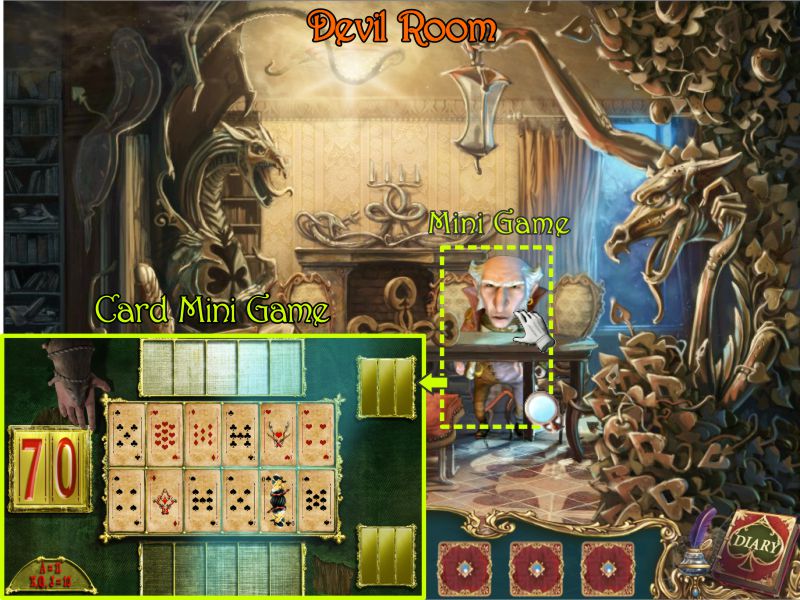
Devil Room
Try to touch SG and he will move over one seat.
Click on the table for a close up of SG who challenges you to a game of cards.
If you do not have all the cards, you will need to get any missing ones so check the list that is provided at the end of this Game.
The card game is random as are the points you need to achieve.
Screenshot
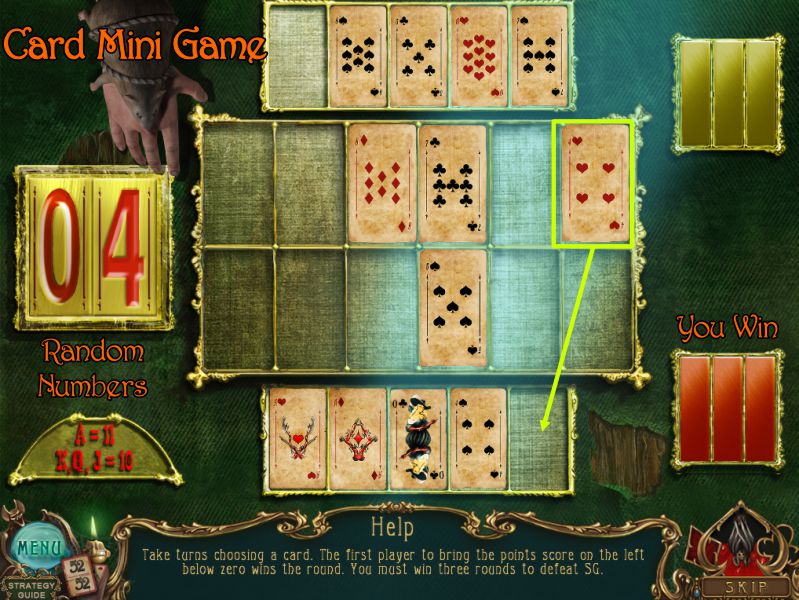
The Card Mini Game
You need to win 3 rounds to beat SG.
Your goal is to remove cards from the 12-card layout until the score is zero.
Start with the higher cards and be careful once the score gets so low that SG can't find the last card to beat you.
In the screenshot, the score is 4, so there is a 4 to take for the final card in this hand.
You do not need the exact card for the last hand because anything higher than the number you need will still make the score zero.
You get to start first for each round.
After you complete the game, watch what happens next.
Screenshot
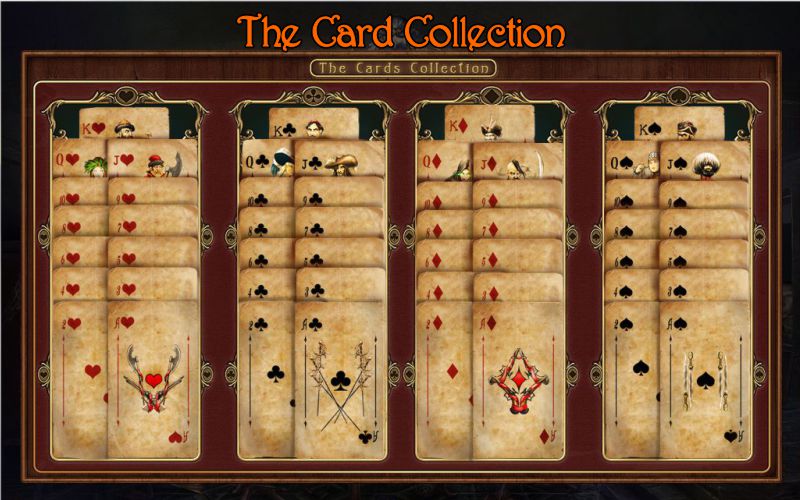
The Card Collection
The screenshot shows the entire collection of cards so you can see what you are missing if any.
Screenshot
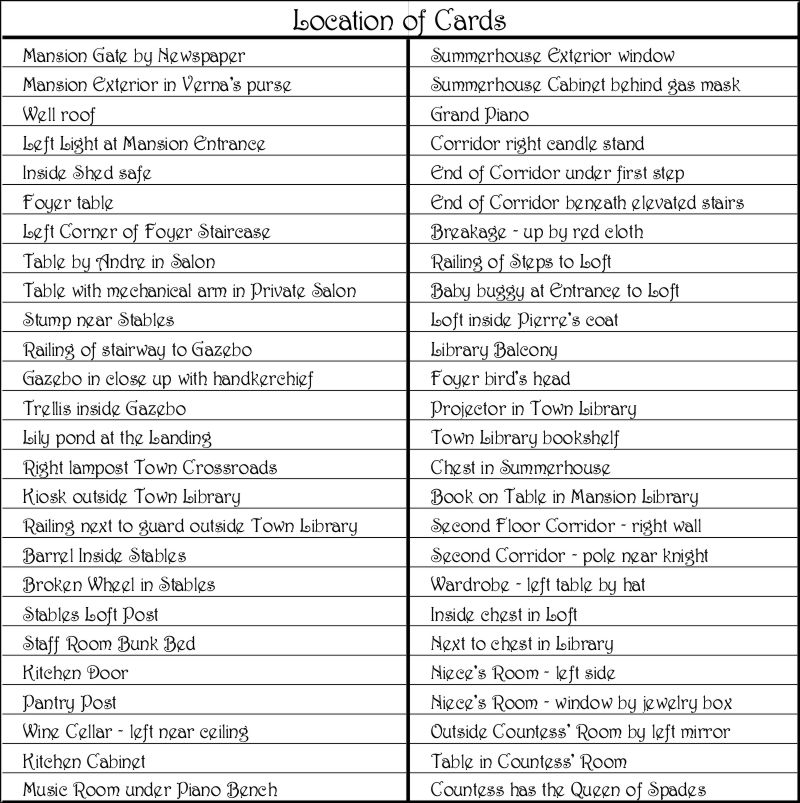
Location of Cards
The screenshot lists the location of all 52 cards.
Screenshot
Congratulations, you have defeated SG for now!
Posted by: Jazz |
January 6, 2011 9:35 PM
|
January 6, 2011 9:35 PM
Haunted Legend: The Queen of Spades Bonus Adventure
General Information and Tips
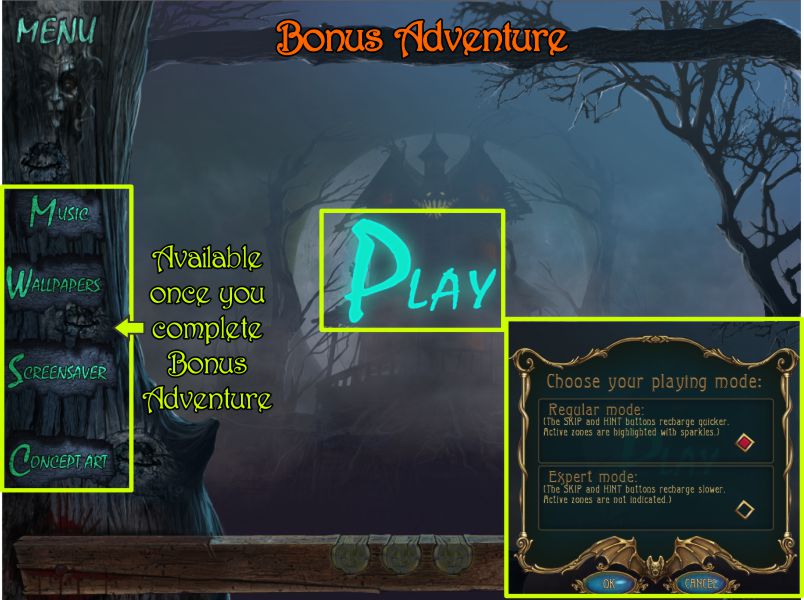
Once you have completed the Basic Adventure, you can play the Bonus Adventure if you have the Collector's Edition of the game.
You can access the Bonus by selecting "Extras" from the Main Menu.
You won't be able to access the other Extras until you have completed the Bonus Adventure.
You will once again be asked to select your playing mode: Regular or Expert.
There are no cards to collect in the Bonus.
Screenshot
Location Map
There are few locations in the Bonus Adventure but there are more places in Town to visit, so the screenshot shows where you will visit.
Screenshot
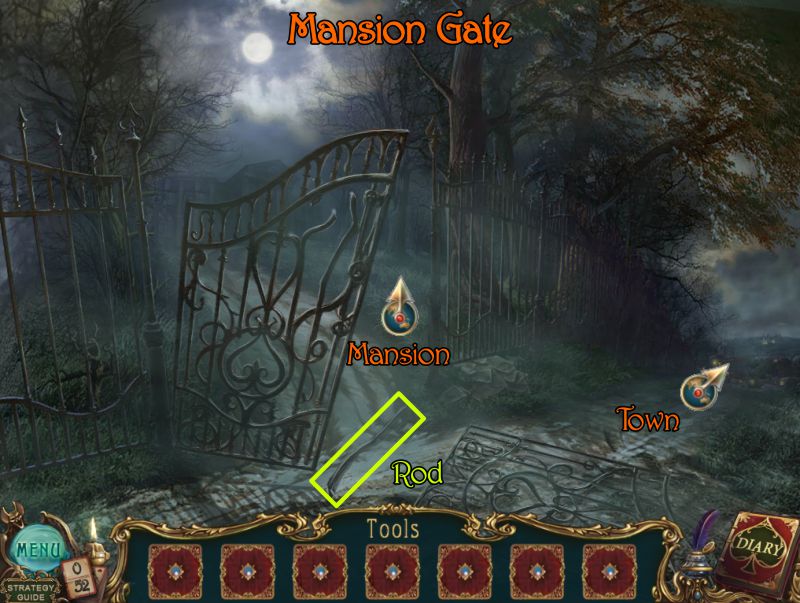
Mansion Gate
Once again, you start your adventure at the Mansion Gate. Pick up the Rod and head toward the Mansion.
Screenshot
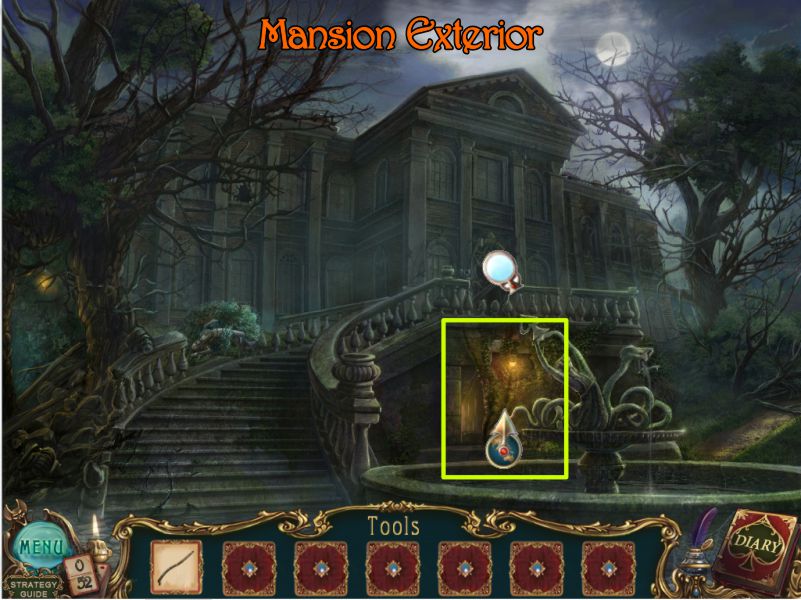
Mansion Exterior
The Mansion is a worse disaster since SG lifted the curse, so you won't be going inside.
You finally get to find out what is behind that mysterious plaque with SG on it. Go to the area behind the fountain.
Screenshot
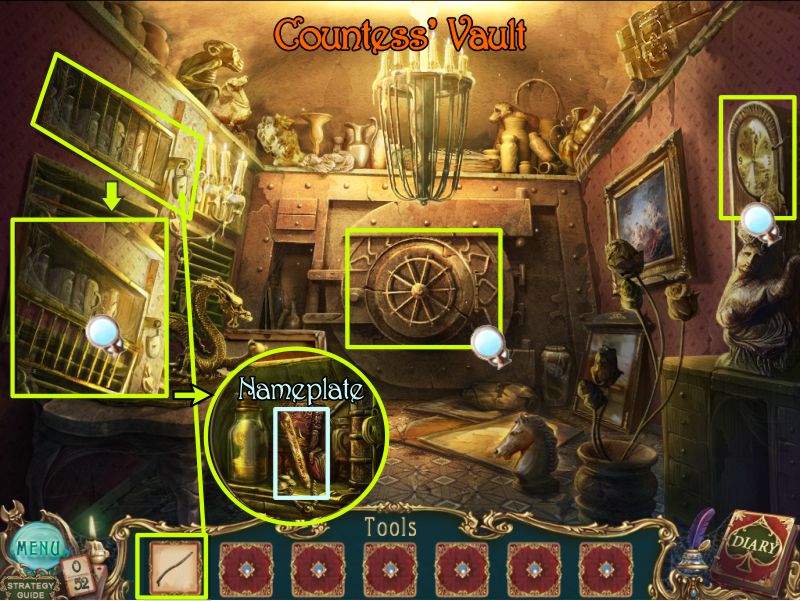
Secret Stairway and Countess' Vault
Go down the Secret Stairway to the Countess' Vault.
Check the magnifying glasses in the screenshot and the Rod from your Inventory to force open the lock on the grate at the left.
Take the Nameplate and go back up the stairs.
Screenshot
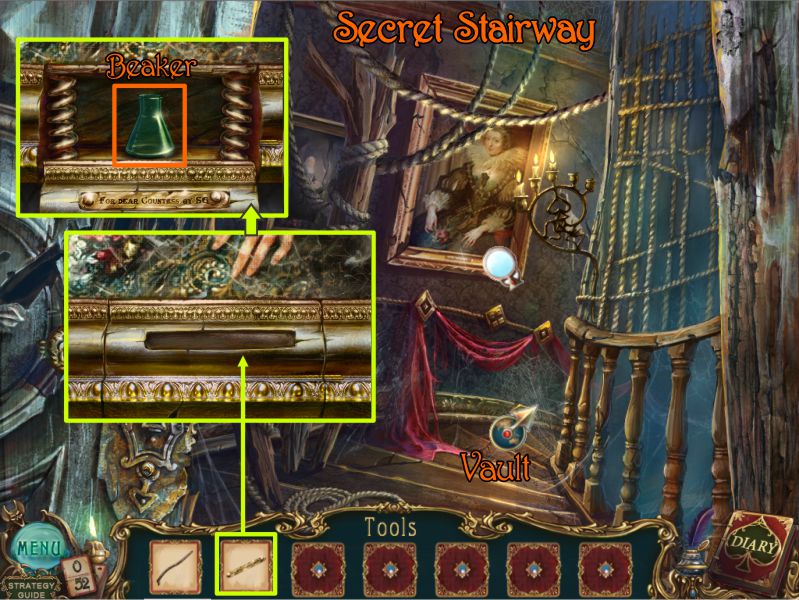
Click on the portrait and place the Nameplate on it.
Take the Beaker that is inside, go back to the Gate and head to Town.
Screenshot
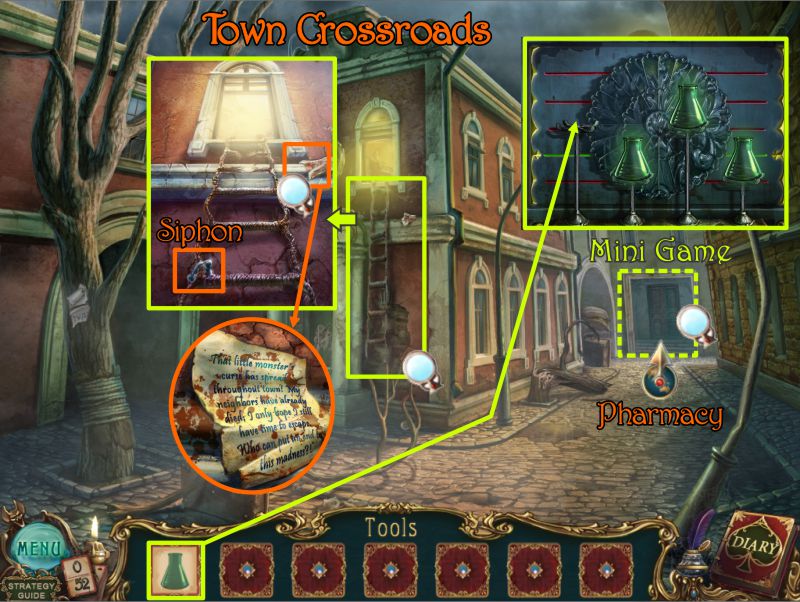
Town Crossroads
Climb up the ladder on the building and take the Siphon.
Zoom in on the piece of paper near the window and read it.
Go to the Pharmacy as marked in the screenshot and place your Beaker on the door to trigger a Mini Game.
Screenshot
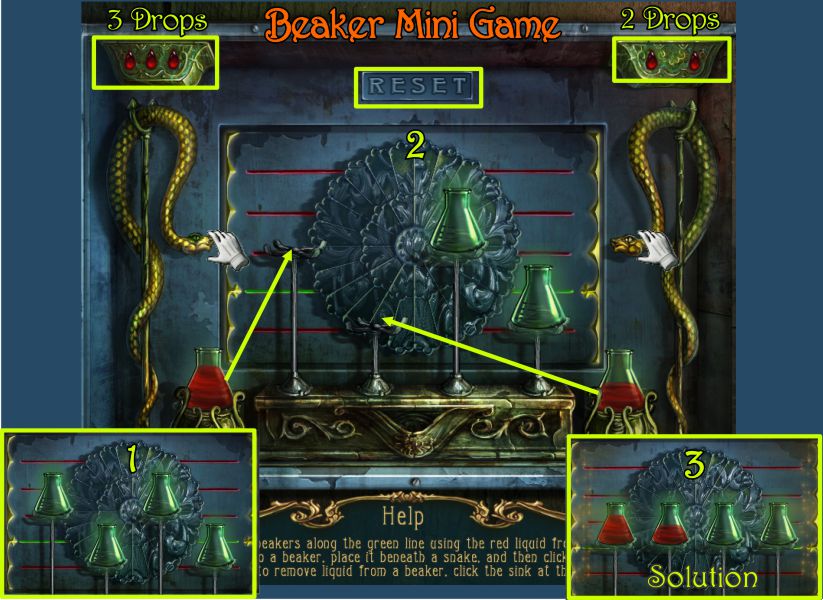
Beaker Mini Game
Your goal is to balance all of the beakers on the same level.
There is a Reset button in case of need.
Remove the first 2 beakers and place them under the snakes.
The snake on the left provides 3 drops of venom and the one on the right gives 2 drops.
Push on the snakeheads to get the venom.
Place the 2 beakers back as shown in the screenshot to achieve the solution.
Screenshot
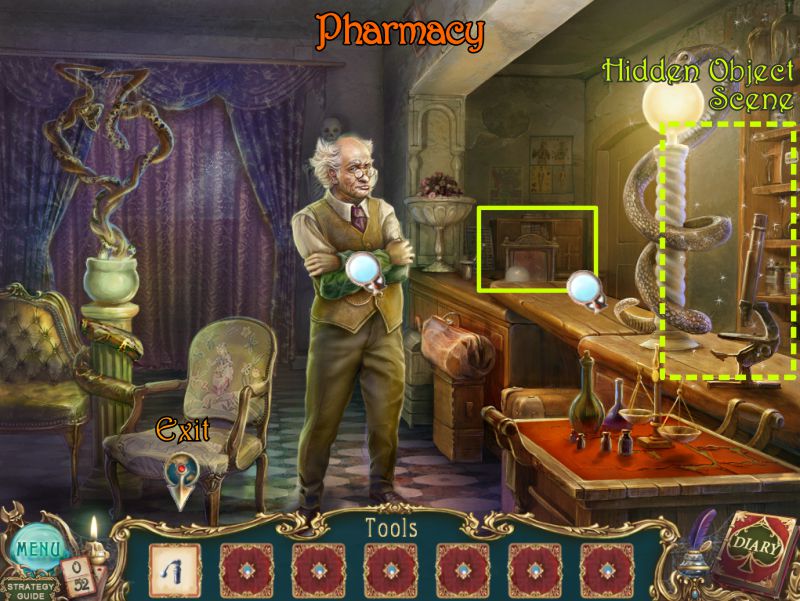
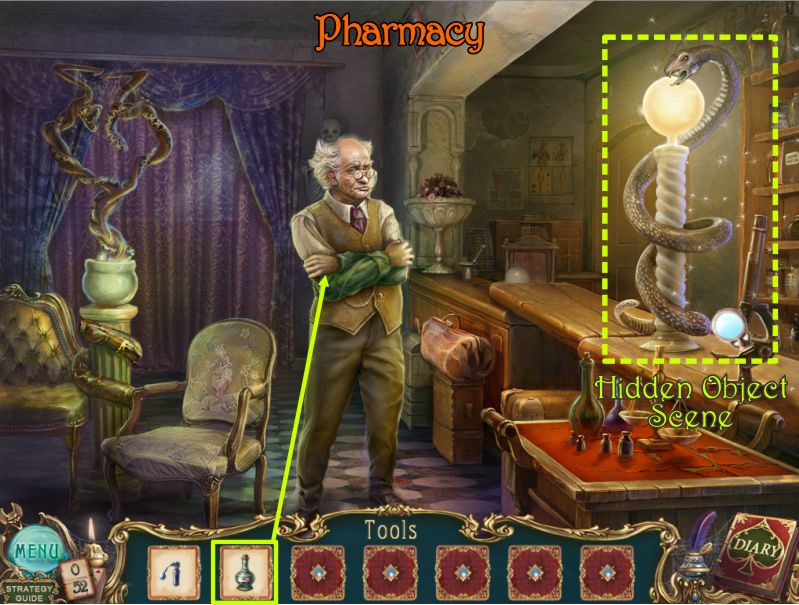
Pharmacy
Go inside the Pharmacy and talk to the pharmacist.
Check out the box at the end of the counter and play the Hidden Object Scene.
Screenshot
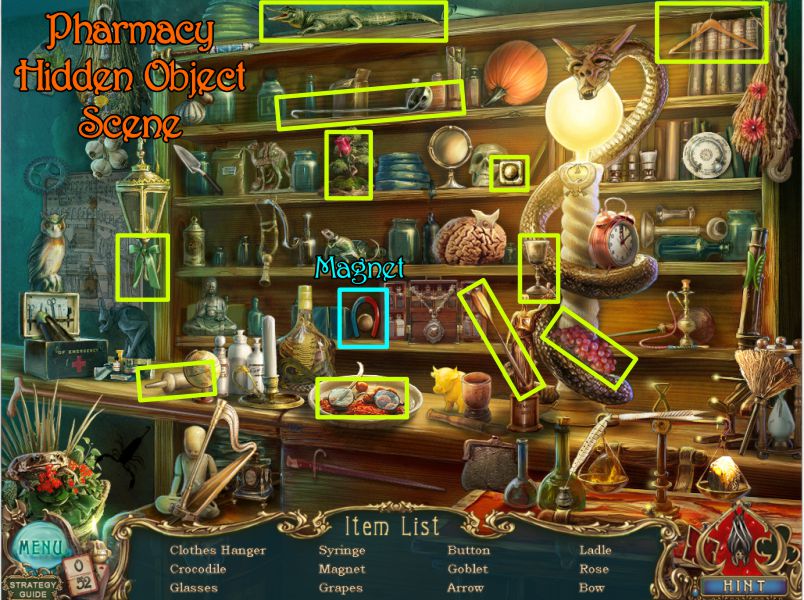
Pharmacy Hidden Object Scene
Collect everything on your list to get the Magnet.
Screenshot
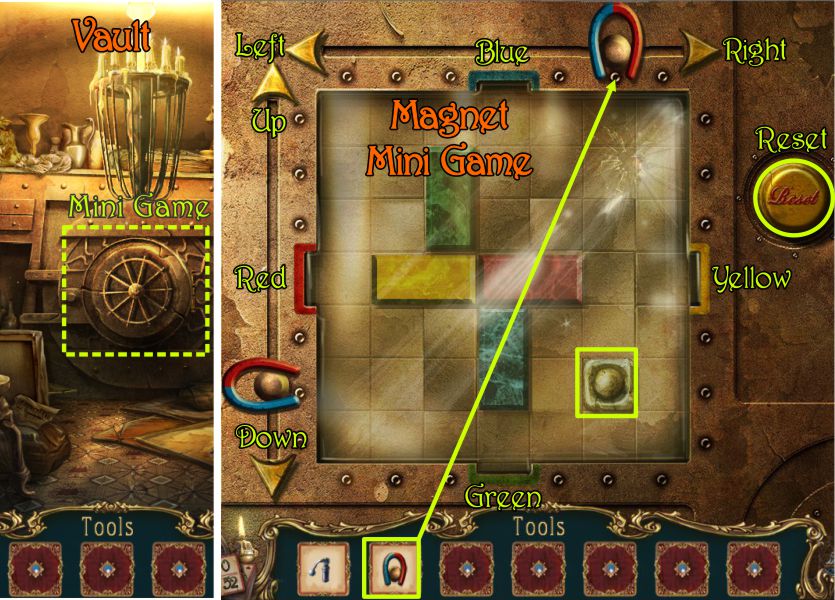
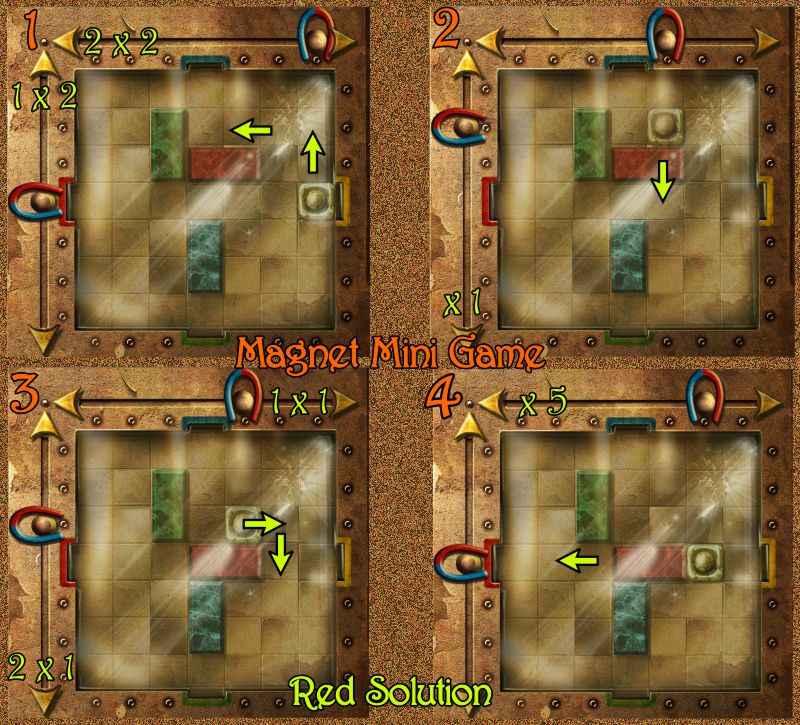
Vault and Magnet Mini Game
Go back to the Mansion and down the staircase to the Vault.
Click on the Vault and place the Magnet as shown in the screenshot to start a Mini Game.
Your goal is to use the ball to move the tiles to the slots matching their colors.
Use the arrows to move the ball around the board.
If you use the Reset button, it will reset the game to the very beginning even if you've already gotten rid of any tiles.
Screenshot
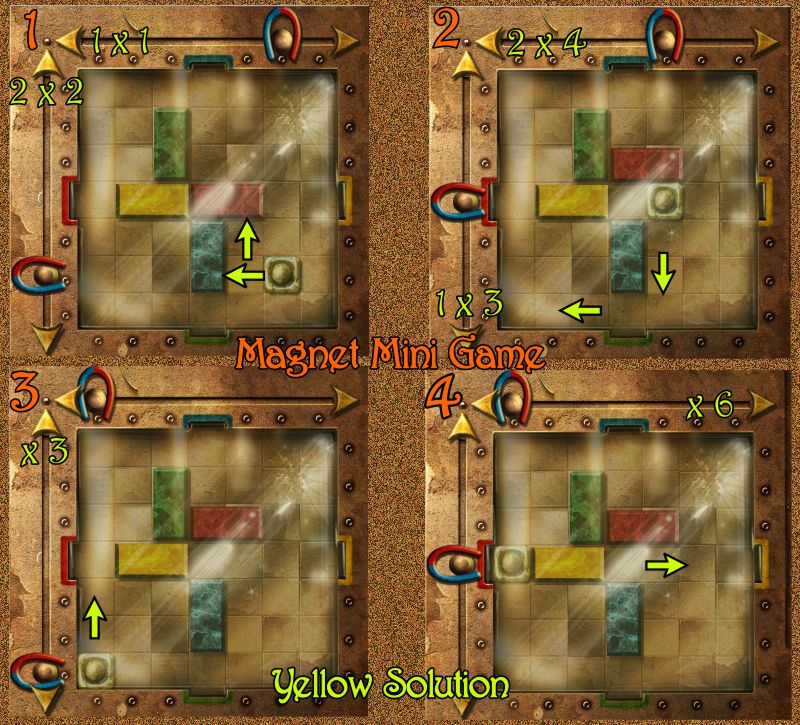
Magnet Mini Game Yellow Tile
Look at the screenshot for a step-by-step solution for the yellow tile.
Screenshot
Magnet Mini Game Red Tile
Look at the screenshot for a step-by-step solution for the red tile.
Screenshot
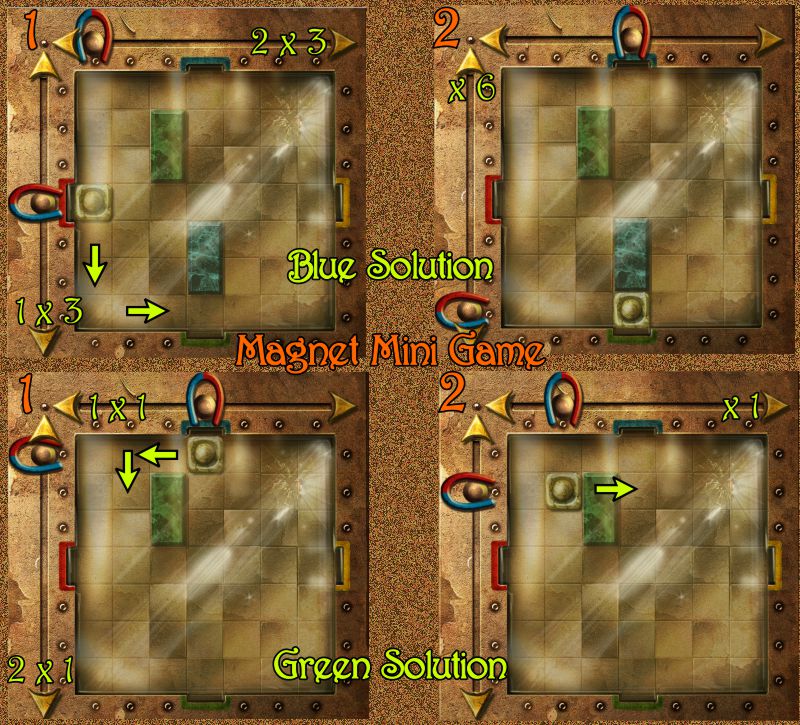
Magnet Mini Game Blue and Green Tiles
Look at the screenshot for a step-by-step solution for the blue tile and a partial solution for the green tile.
Screenshot
Look at the screenshot for the remainder of the step-by-step solution for the green tile.
The Vault will be unlocked when all the tiles are removed.
Pick up the Fishing Pole. Note there is another vault inside this one and read the note.
Screenshot
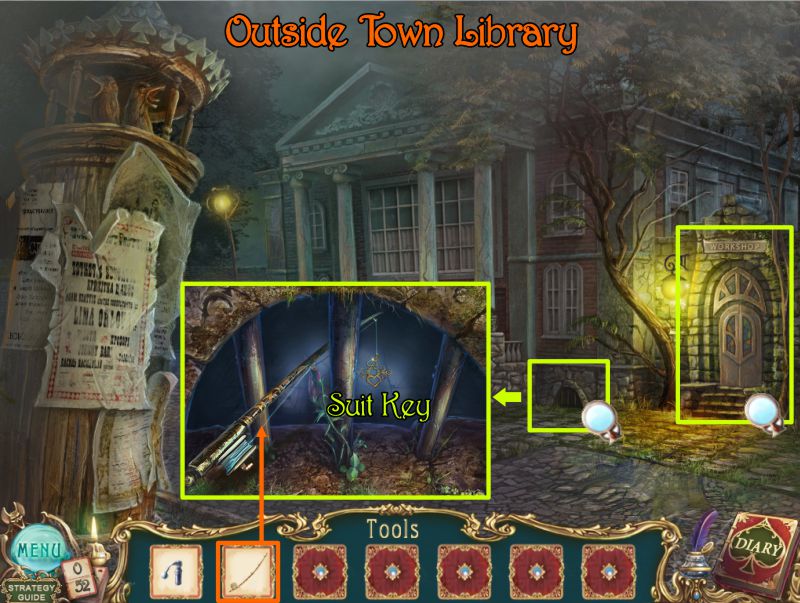
Outside Town Library
Go to Town and through the archway to Outside the Town Library.
Click on the barred vent shown in the screenshot and use your Fishing Pole to get the Suit Key.
Click for a close up of the Workshop door to see what is needed to get inside.
Screenshot
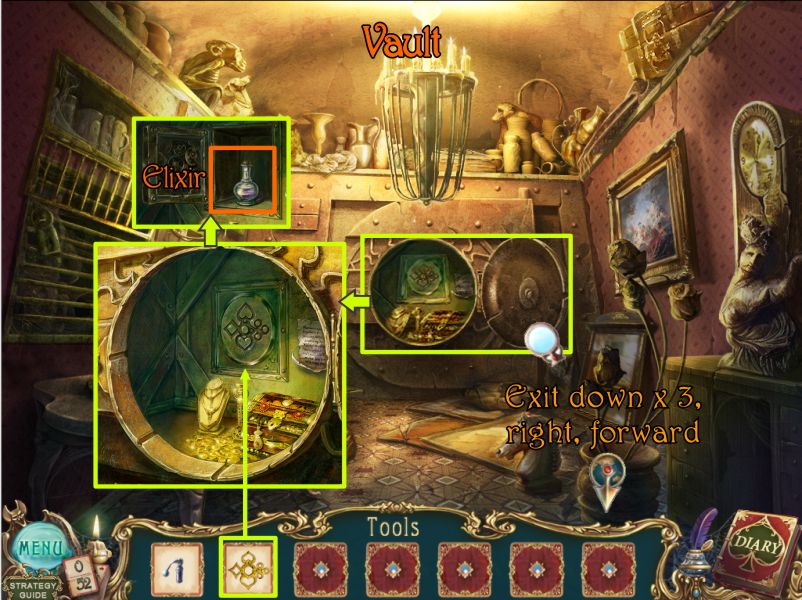
Vault
Go back to the Mansion and down to the Vault.
Place the Suit Key on the inner vault and take the Elixir.
Screenshot
Pharmacy
Go back to the Pharmacy and give the Elixir to the pharmacist. He will give you a key SG dropped.
Play the Hidden Object Scene.
Screenshot
Pharmacy Hidden Object Scene
Collect everything on your list and you will get a trowel, which they call a Spade.
Screenshot
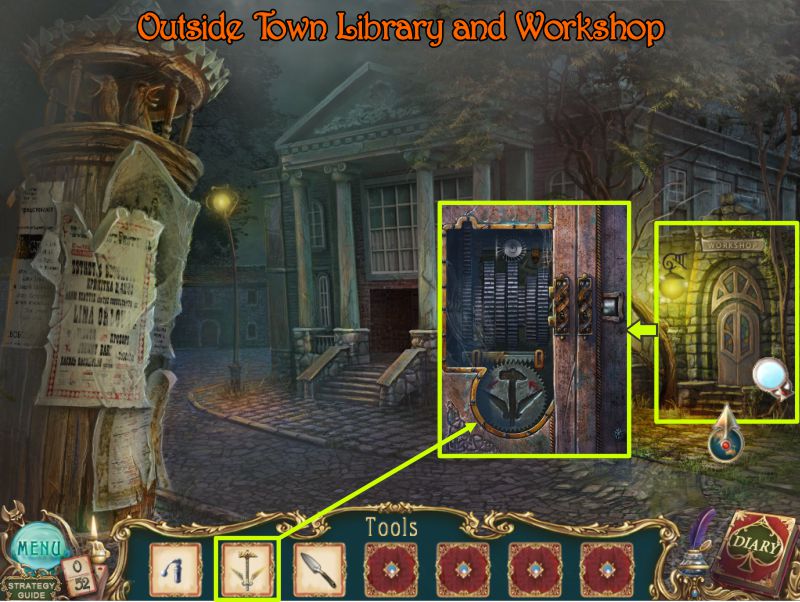
Outside Town Library and Workshop
Go to the Workshop next to the Library and zoom in on the door.
Place the key you got from the pharmacist on the lock and go inside the Workshop.
Screenshot
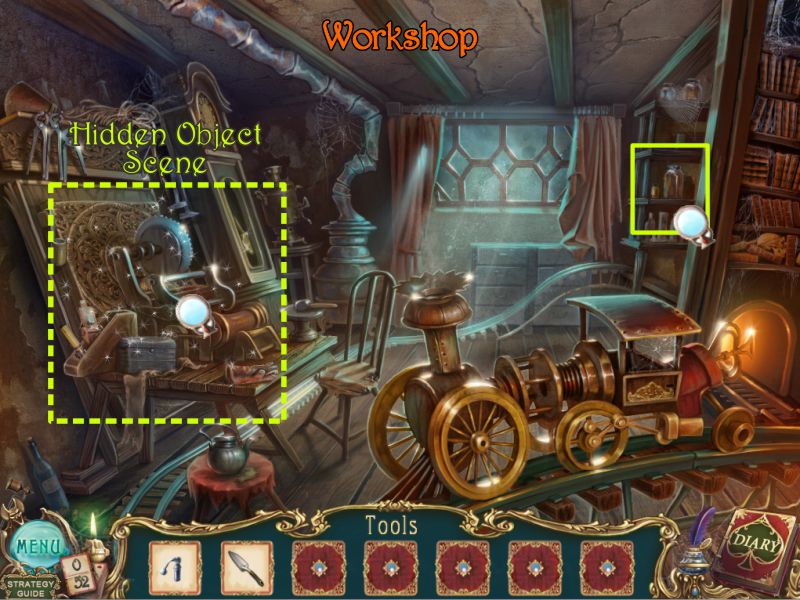
Workshop
Check out the magnifying glass on the right in the screenshot to see the token you can reach without more liquid for the jar.
Play the Hidden Object Scene.
Screenshot
Workshop Hidden Object Scene
When you collect everything on your list, you will come away with a Glass.
Screenshot
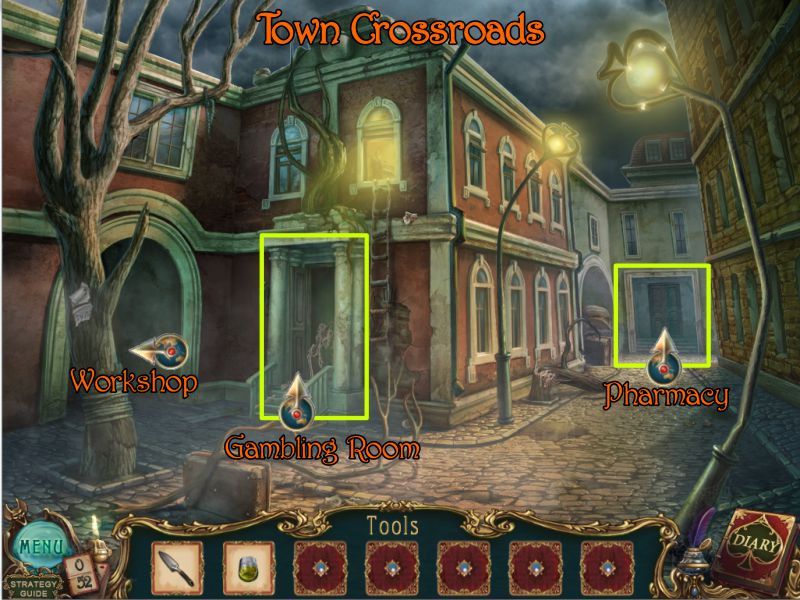
Town Crossroads
Go to the Town Crossroads and enter the Gambling Room.
Screenshot
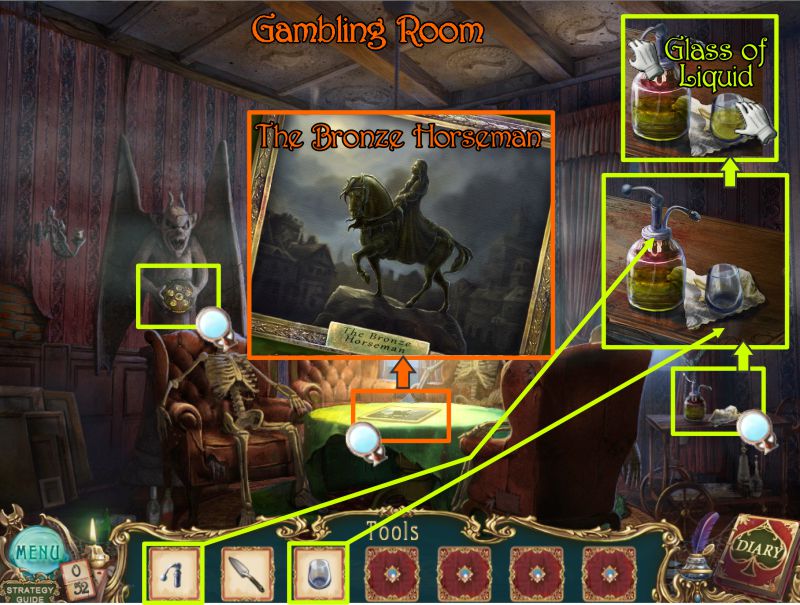
Gambling Room
Check out all the magnifying glasses in the screenshot.
The significance of the painting will be revealed later.
Place the Glass by the bottle at the right and put the Siphon on the bottle.
Press down on the siphon to fill the glass with liquid.
Screenshot
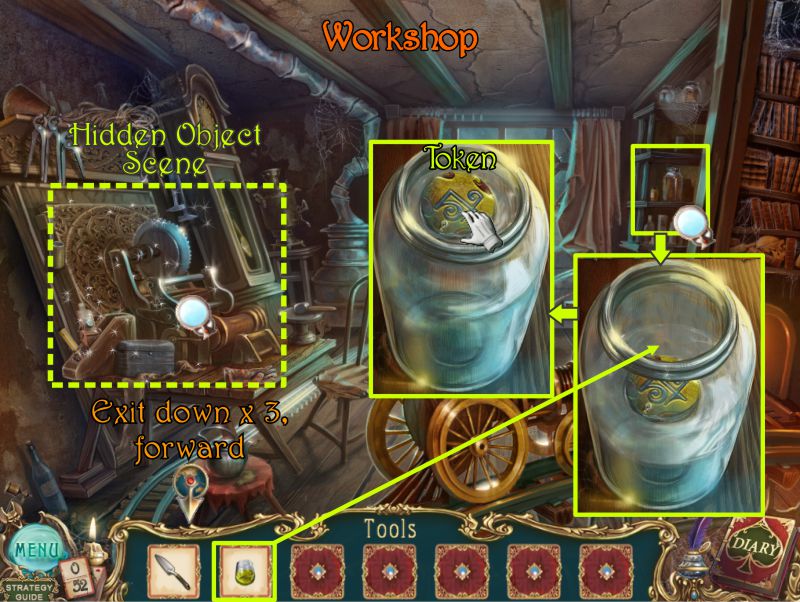
Workshop
Go back to the Workshop and zoom in on the jar.
Pour the glass of liquid into the jar and take the Token.
Play the Hidden Object Scene.
Screenshot
Workshop Hidden Object Scene
Collect your list of items including the clock Second Hand.
Screenshot
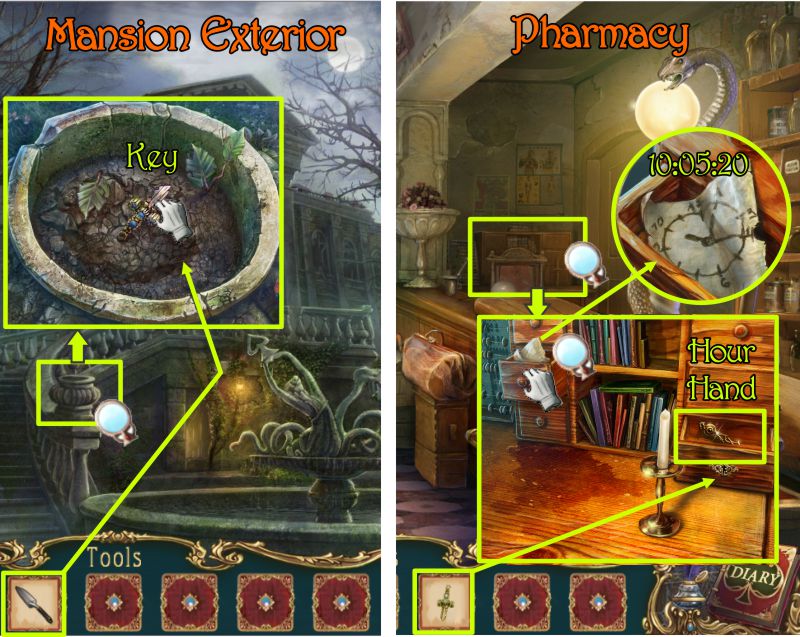
Mansion Exterior and Pharmacy
Go back to the Mansion and click on the pot shown in the screenshot.
Use your trowel to dig in the dirt and then take the Key you find.
Go to the Pharmacy in Town and click on the cabinet at the end of the counter.
Open the left middle drawer and view the diagram shown in the screenshot.
Use your Key to open the bottom drawer on the right in order to collect the Hour Hand.
Screenshot
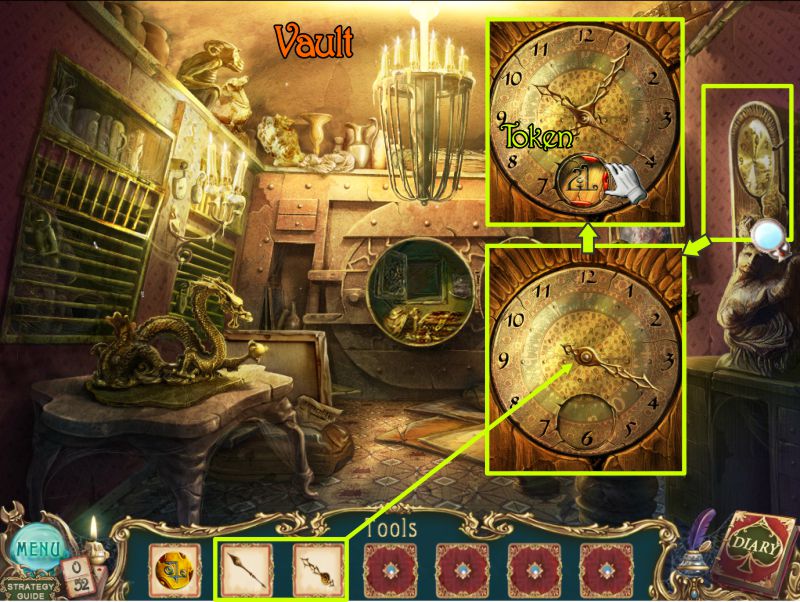
Vault
Go back to the Mansion Vault and click on the clock on the right wall.
Place the 2 clock hands from your Inventory on the clock and set the clock as shown to 10:05:20.
Take the Token that appears in the clock opening.
Screenshot
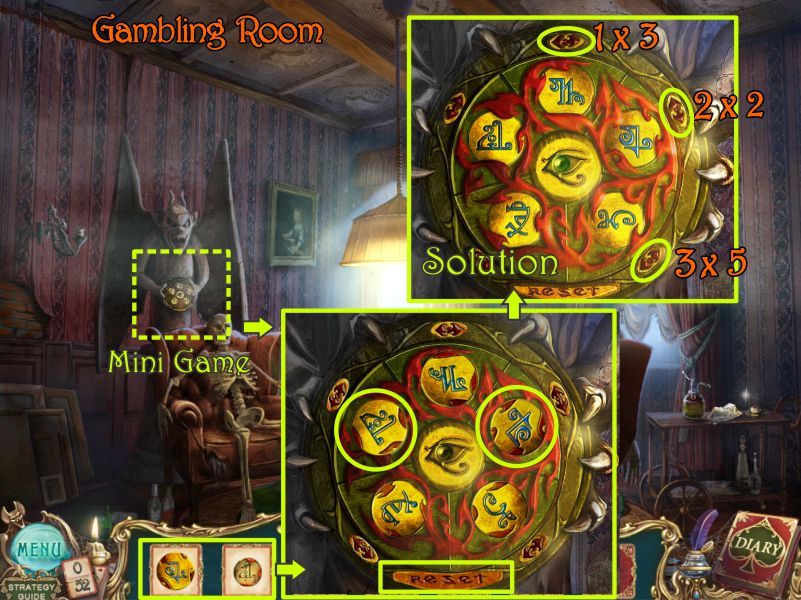
Gambling Room
Go back to Town and inside the Gambling Room.
Click on the statue for a Mini Game.
Place the 2 Tokens as shown and use the outer knobs to turn the symbols to the solution in the screenshot.
Screenshot
You have completed your part in the Bonus Adventure so watch the cut scene.
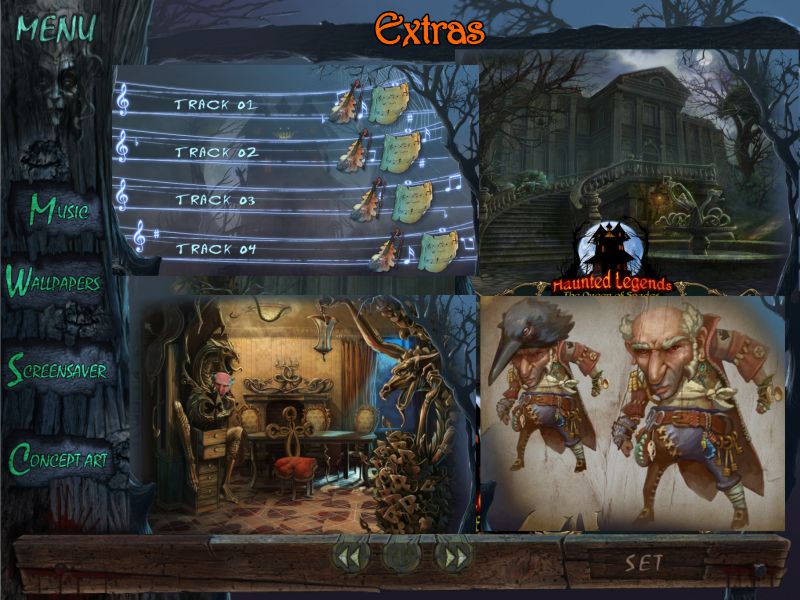
Extras
You can now access the Extras which includes Music, Wallpaper, Screensavers, and Concept Art.
A sample of each is shown in the screenshot.
Screenshot
Posted by: Jazz |
January 6, 2011 9:37 PM
|
January 6, 2011 9:37 PM