
Love and Death: Bitten
Platform: Mac, Windows
![]() If the horror genre is a schoolyard, vampires have long since been turned into the kid who gets pantsed at recess by the cooler kids. Love and Death: Bitten, the first in a new hidden-object/point-and-click series, is going to change all that. It's a sweeping, sprawling epic that will touch your heart and change the way you look at—AHAHAHA, I'm just yankin' your chain, it's totally goofy dude. Fortunately, it's packaged inside a game that is not only gorgeous to look at, but features top-notch voice acting, surprisingly clever puzzles, and cheesy charm.
If the horror genre is a schoolyard, vampires have long since been turned into the kid who gets pantsed at recess by the cooler kids. Love and Death: Bitten, the first in a new hidden-object/point-and-click series, is going to change all that. It's a sweeping, sprawling epic that will touch your heart and change the way you look at—AHAHAHA, I'm just yankin' your chain, it's totally goofy dude. Fortunately, it's packaged inside a game that is not only gorgeous to look at, but features top-notch voice acting, surprisingly clever puzzles, and cheesy charm.
 At the start of the story, we are introduced to Damon, a vampire being kept as a prisoner-slash-pet by a powerful witch who also happens to be a vampiress. (I think I've read fanfiction like this, only she was also a Jedi princess and half elf.) On the night when he's sent out to acquire a human for dinner, Damon spies Victoria, a mortal woman who immediately intrigues him. So he does what any gentleman would do; he follows her home, trashes her living room, and leaps out the window when she confronts him. (Actually, that's how I met my husband.) Victoria sets off after him, determined to find out who he is and put an end to the menace threatening her village. Right after she solves this mirror puzzle. And destroys that boat. And makes this soup.
Part hidden object game, part traditional point-and-click, Love and Death: Bitten combines both genres quite nicely. You'll know when a hidden-object scene is available because a raven will fly into the scene carrying a list of items for you to find. (Look, if you can believe wizards get mail via owls, you can believe this; I've had enough of your lip!) There's a hint button for a little guidance, and the puzzles also come with the option to skip them if you find yourself stuck on them for too long. During the day you'll play as Victoria, and during the night you play Damon. While there is a slight difference between what they can do, I was a little disappointed that they didn't play up Damon's vampiric powers more than, say, occasionally forcing him to grub under the floorboards for spilled blood.
 Analysis: While I at first dismissed Bitten because I prefer my vampires menacing Santa Carla, after trying the demo I was genuinely surprised at how enjoyable the game was. The plot, while as outlandish and predictable as you might expect, is at least fun and full of magic. Though the pacing of the plot is rather erratic, with Victoria and Damon rather abruptly deciding they love one another after spending the majority of the game making snide comments and minimal interaction, the dialogue is well written and the characters are mostly pretty likable. Not to mention, of course, how beautiful the whole thing is, with gorgeous scenery, hand-drawn artwork, and a lovely soundtrack.
Bitten provides a nice variety to its hidden object scenes, too; the difficulty steps up as you go and some scenes even require you to create things within them, such as... sandwiches and a puppet show. While the point-and-click "use x item here" sequences are never challenging, the puzzles are actually pretty varied. Make a soup from unicorn horns and bat wings to cure an old seer? I am so there, hand me that cheese grater so I can render this priceless evidence of mythological beasts into tasty shavings! The downside is that as the game goes on, it starts to suffer from "Do It Again, Only More Complicated" syndrome, and you'll find yourself having to hunt down masses of tiny items just to solve a single puzzle. As such, the latter half of the game winds up feeling padded compared to the tight design of the first.
Despite this and the cliffhanger ending you'll probably see coming, Bitten is a well put together example of its genre. Most players will probably finish it in about three to four hours, more or less depending on your eagle eyes, but that's becoming an unfortunate trend in these games lately. Whether you love vampires, hate them, or love to hate them, Love and Death: Bitten offers a surprisingly enjoyable romp through a fun, fairytale story. Hopefully, the sequel will greater explore the vampiric abilities we all know and love; press A to quote bad poetry! Press B to brood on top of a gothic cathedral in the rain! Minigames where you have to assemble the laciest manshirt! This is a goldmine, people!
![]() Windows:
Windows:
Download the demo
Get the full version
![]() Mac OS X:
Mac OS X:
Download the demo
Get the full version


Walkthrough Guide
(Please allow page to fully load for spoiler tags to be functional.)
Love and Death Bitten Walkthrough
General Hints and Tips:
There are 7 chapters in the game and play is relaxed mode with no timer.
You will play as both Victoria and Damon during the game - Damon by night and Victoria during the day.
There is not always an option to skip the dialog so sometimes you need to just click through it if you don't want to read it all.
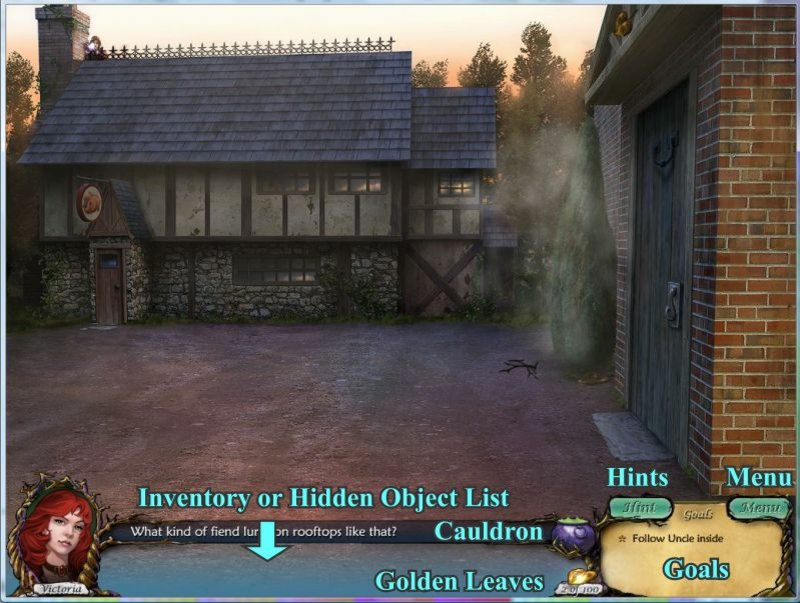
Goals are listed in the lower right hand corner of the scenes as is the link to the Menu and the Hint Button.
Hints are unlimited and seem to refill fairly quickly.
Hints are available to show you how to use an item from your Inventory, as instructions in Mini Games, and for finding items in hidden object scenes.
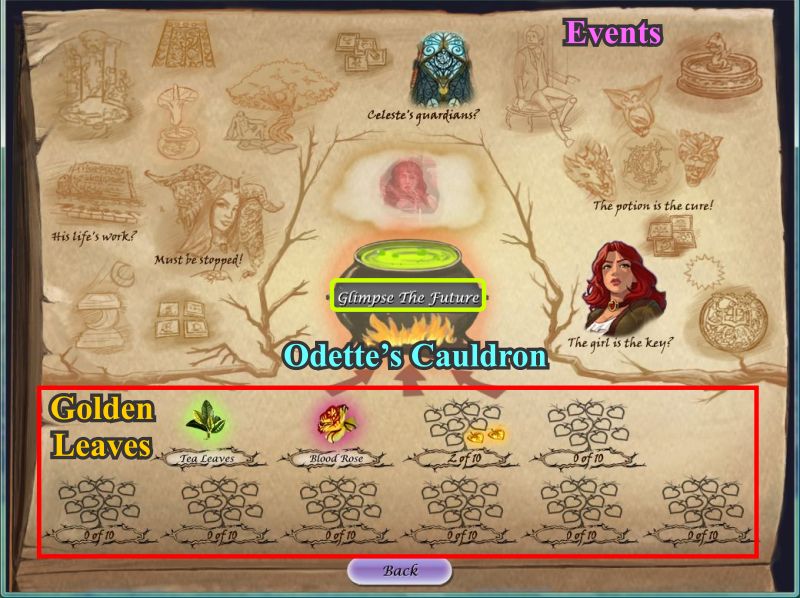
To the left of the Goals is a Cauldron from which you can access a glimpse of the future and see your progress in the game.
When you need to take a closer look at something your cursor will turn into a magnifying glass.
Your cursor will turn into a hand when you need to pick up an item and place it somewhere else.
If you randomly click, your cursor will swirl around for a short time.
White sparkles mean there is something for you to do.
From the Main Menu you can create a profile, choose your options, view Odette's Journal, start to play and exit as well as check out other games by PlayFirst.
Options include Sound, Music, Ambient and Voice Volume levels or you can "Mute All Sound". There is also a choice of Full Screen versus Window Mode.
To the left of the Cauldron and the Gold Leaf count is your Inventory. Items you collect to be used in the scene will go into your Inventory. If your Inventory gets full, you can scroll through it using the arrows on either side.
Screenshot
There are golden leaves in each location throughout the game and will be marked in gold (whenever possible) in the screen shots.
Sometimes the golden leaves are under other objects so will not be readily seen until that object is collected or used elsewhere.
Once you collect 100 leaves, you will be able to see what the future holds.
The tally of how many you have collected is to the left of your Goals at the bottom of the screen.
When you have collected 100 leaves you will no longer see the leaves in the game.
At some point in time I will stop picking them up so I can show you where they are in case of need.
If you feel you need more and have missed too many of them, you can revisit locations and have a look for them.
If you do not collect 100 of them, you will have to play the game again to try to collect the necessary 100 so you can get the Glimpse of the Future.
The Caldron will show you your progress in the game by displaying events and rewards for each set of 10 Golden Leaves.
Screenshot
A crow will appear in a scene with an item list in his beak when there are hidden objects to be found.
Click on the crow to reveal the list which will appear at the bottom the scene in place of your Inventory with the crow next to it.
You can click on the crow to close the hidden object scene and return to the previous scene for whatever reason - he will reappear when you return.
In hidden object scenes most items will be listed in white and are random so will not be marked in screen shots unless there are a number of the same items to be gathered.
Yellow objects require one or more items to be combined.
Blue objects require a sequence of items to be completed in a certain order and will become yellow when it is their turn to be used.
Mini games have a skip option once the button is full.
Hints are available to give you instructions when needed.
Chapter 1: The Search
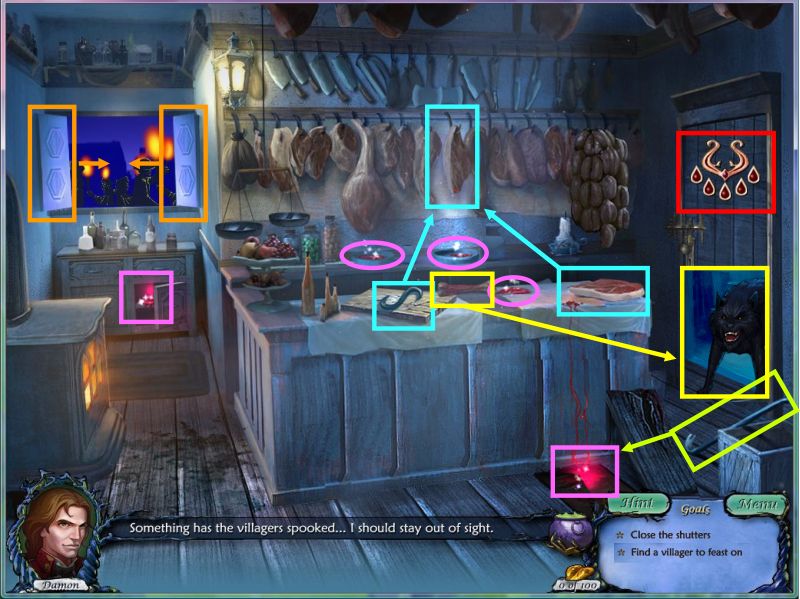
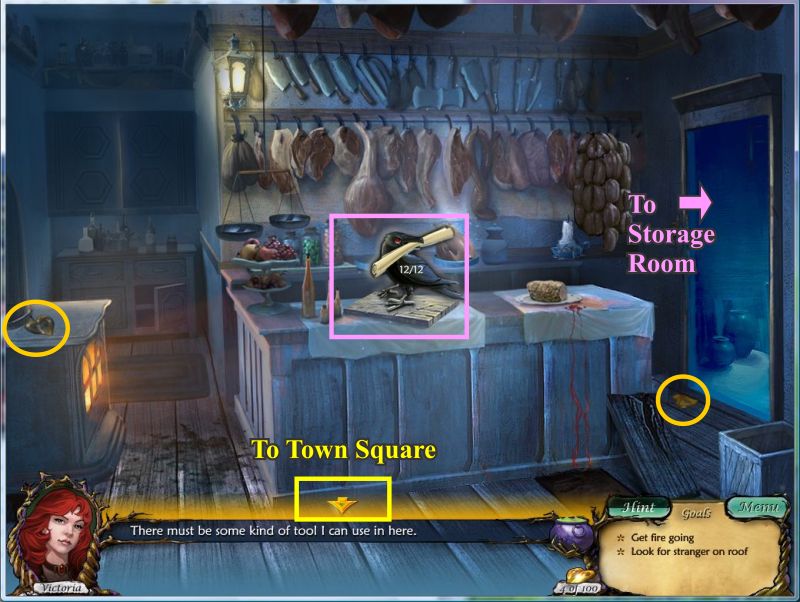
Damon arrives in town in search of a meal. He doesn't want to be seen so close the shutters in the Butcher Shop.
Click on the door to the Storage Room. He needs some strength to open the door to so collect 5 blood drops as shown on the door so look for the white sparkles for what you need to collect.
Take the crowbar which will go into your Inventory and use it on the grate.
Collect the meat on the counter and the hook. They will go into your inventory for you to use on the back wall with the other meat. The bloody meat will drip into the bowl beneath for you to collect the blood.
Click on the cabinet under the shutters and the door will open wider for you to collect the blood there.
When you have collected everything click on the Storage Room door to open it.
There is a hungry dog at the door so take the bone from the counter. It will go into your inventory to give to the dog so he will move and you can go into the Storage Room.
Screenshot
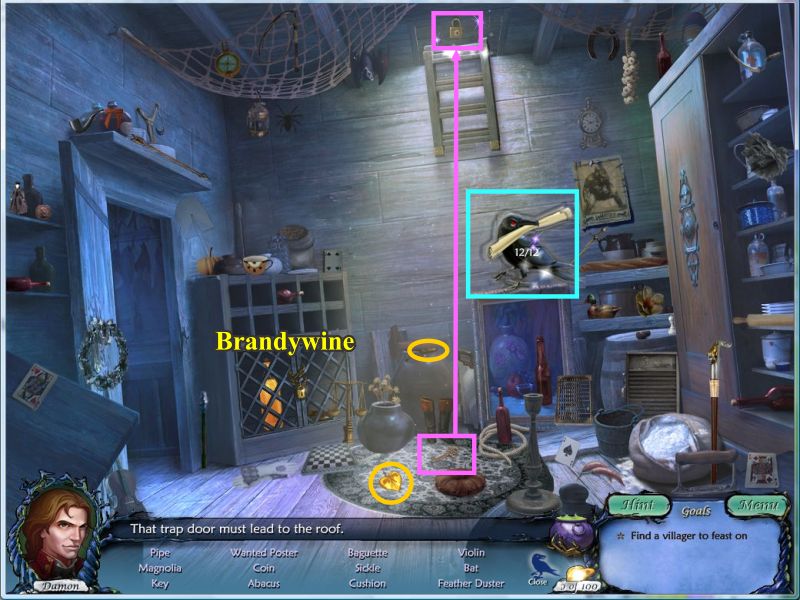
Pick up the 2 golden leaves. Click on the ladder to the roof and a crow will appear with a hidden object list. Click on him and find the items on your list which will include a key to the roof hatch - .the key will go into your Inventory once you have found all of the objects.
Use the key on the lock and go to the rooftop.
Screenshot
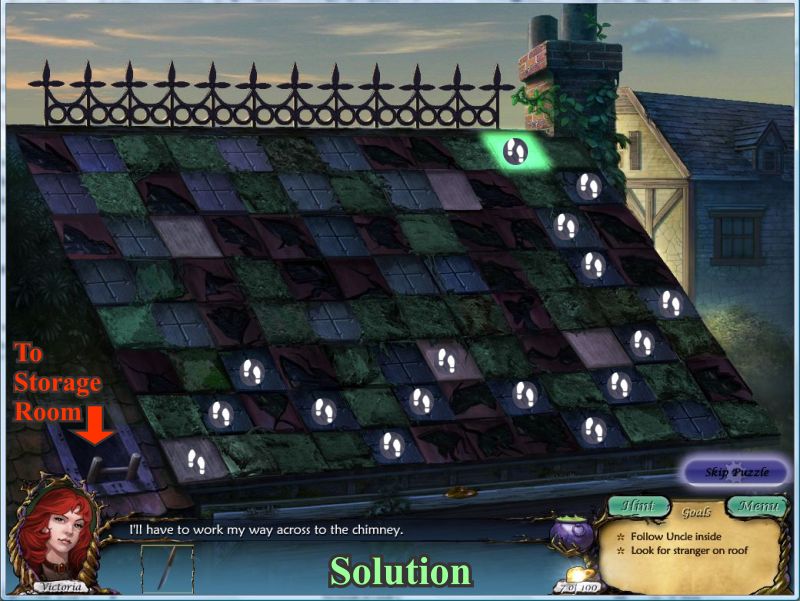
You need to get to the top of the roof but remember that a vampire cannot step on the squares with the crosses. Step on the first square at the bottom left and make your way to the green upper right square.
If you wish, you can skip the puzzle once the "Skip Puzzle" button is full.
Screenshot
Click on the villagers to see what they have to say. Click on Victoria when you see the sparkles on her.
Chapter 2: The Choice
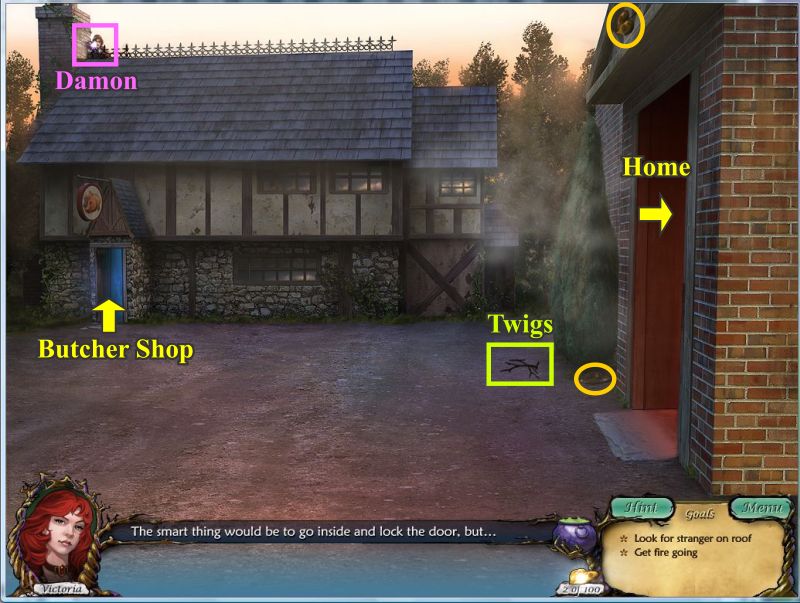
You are now playing as Victoria. Click on Damon on the rooftop at the top left of the screen. He will disappear and the doors to the Butcher Shop and Uncle's house will open.
Pick up the twigs and 2 golden leaves and enter the Butcher Shop.
Screenshot
Go into the Storage Room and click on the ladder to discover that you need a tool to pull it down.
Go back to the Butcher Shop and a crow will come with your hidden object assignment.
Collect the 2 golden leaves and click on the crow.
Screenshot
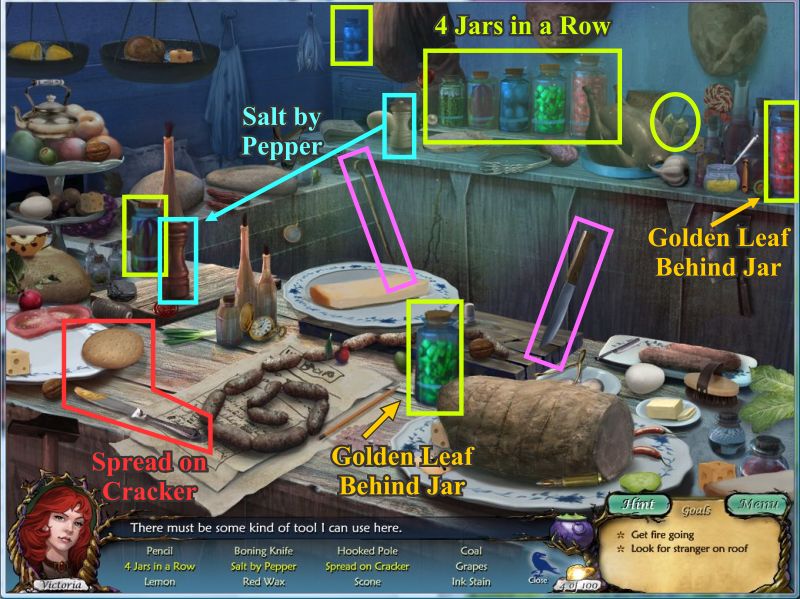
Place the 4 jars marked in green in a row where shown.
Pick up the 3 golden leaves - 2 will appear after you move the jars.
Use the table knife to spread on the cracker.
Put the salt shaker next to the peppermill.
The hooked pole and boning knife marked in red will go into your Inventory.
Screenshot
Return to the Storage Room.
Use the hooked pole from your Inventory on the ladder and climb up to the roof.
Cross the roof to the top.
Screenshot
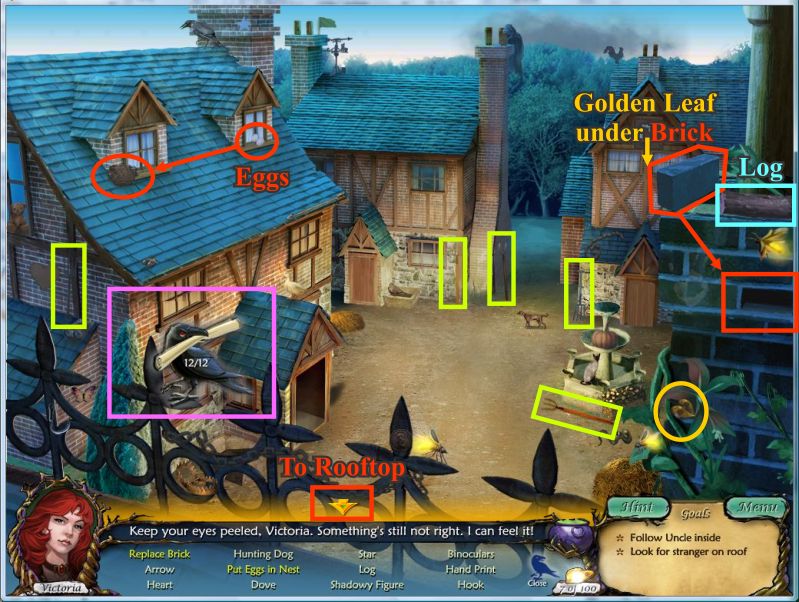
Click on the crow that appears and collect the items on your list.
Pick up the brick and place it where it belongs.
Put the eggs back in the bird's nest.
Take the log which will go into your Inventory when you have completed the scene.
Collect the golden leaves - one is under the brick.
In case of need the pitchforks are marked in green.
Screenshot
Go back to the rooftop and down the ladder to the Storage Room.
Exit to the Butcher Shop and then to the Town Square.
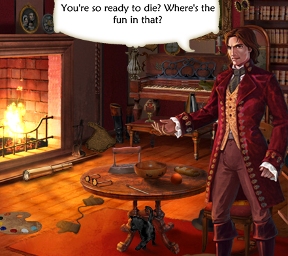
Go into your uncle's house.
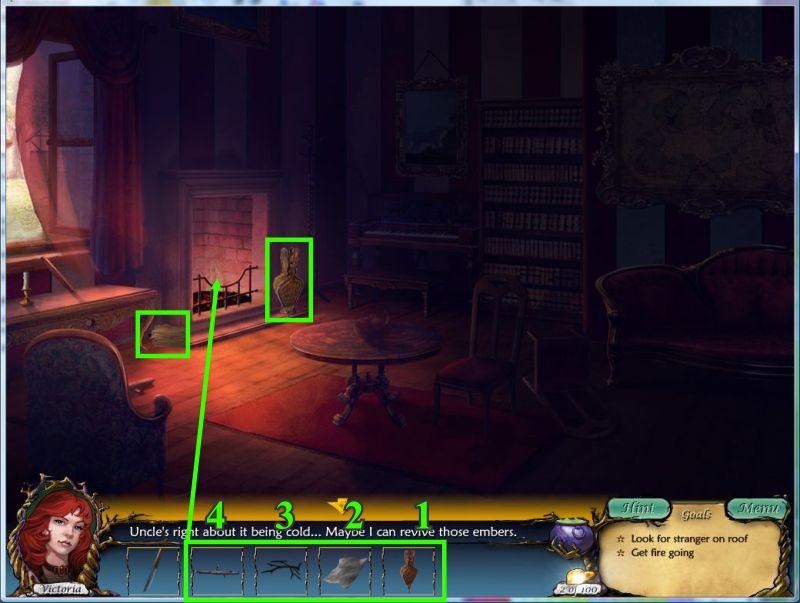
Pick up the crumpled paper and bellows. They will go into your Inventory.
Use the bellows on the fireplace and then place the crumpled paper, twigs and log in the fireplace in that order.
Screenshot
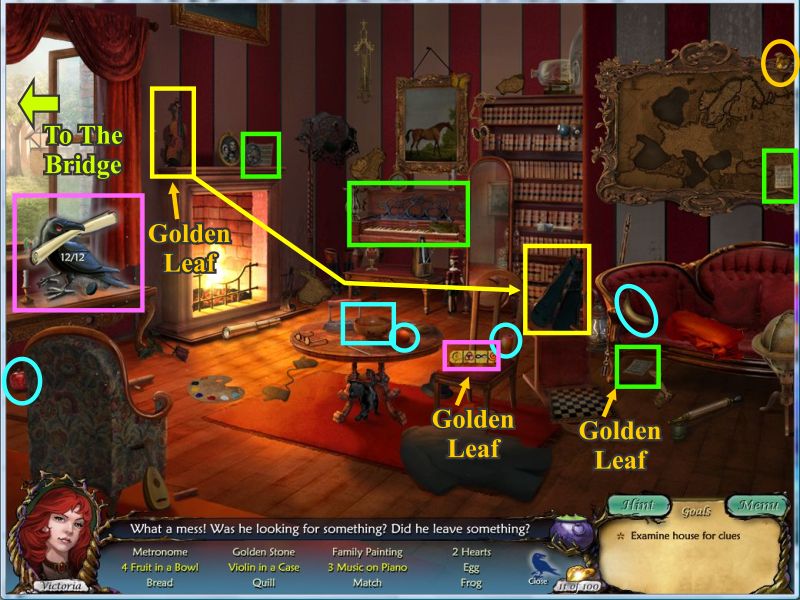
After Damon leaves a crow will arrive - click on him to get your list.
Put the violin in its case.
Collect the 4 pieces of fruit and place them in the bowl - all are marked in blue.
Collect the 3 pieces of music marked in green and place them on the piano
There are 4 golden leaves in this scene - one is visible, one is under the violin, one is under the sheet music under the sofa, and the other in back of the stone on the chair.
The stone and bread will go into your Inventory.
Exit through the window to the Bridge.
Screenshot
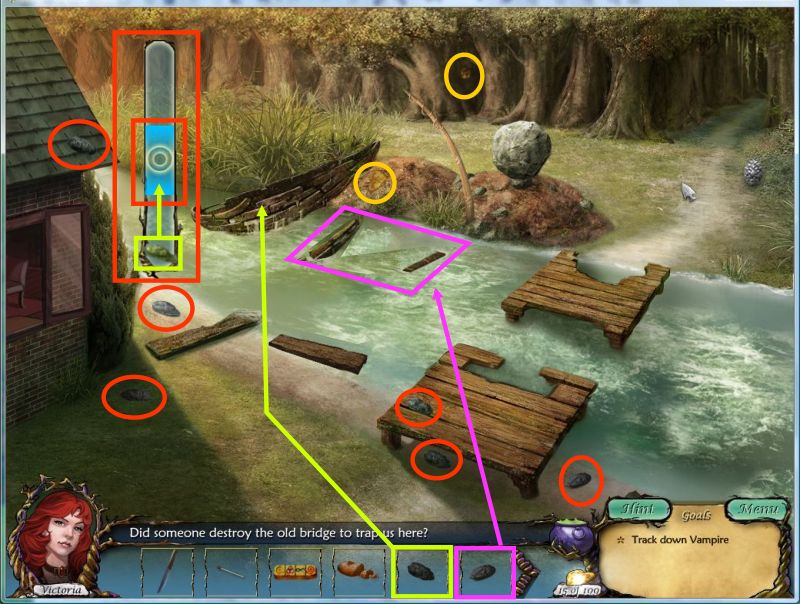
Collect the 2 golden leaves.
Pick up the 6 throwing stones marked in red.
Place one on the boat and the target will appear.
Click on the boat when the stone is within the center target area and the boat will begin to break up.
Use 2 more stones in the same way and the pieces of the boat will scatter as shown.
Use a stone in the same way on each of the 2 pieces marked in pink and they will wash up on shore like the other pieces.
Screenshot
Pick up the 4 pieces of wood which will go into your Inventory for you to place them on the Bridge.
Use your remaining stone on the large rock on the other side of the river - the target will once again appear.
Click on the rock when the stone is in the blue area and the rock will roll to the end of the Bridge.
Cross the Bridge, pick up and arrowhead and pinecone and head to the Forest.
Screenshot
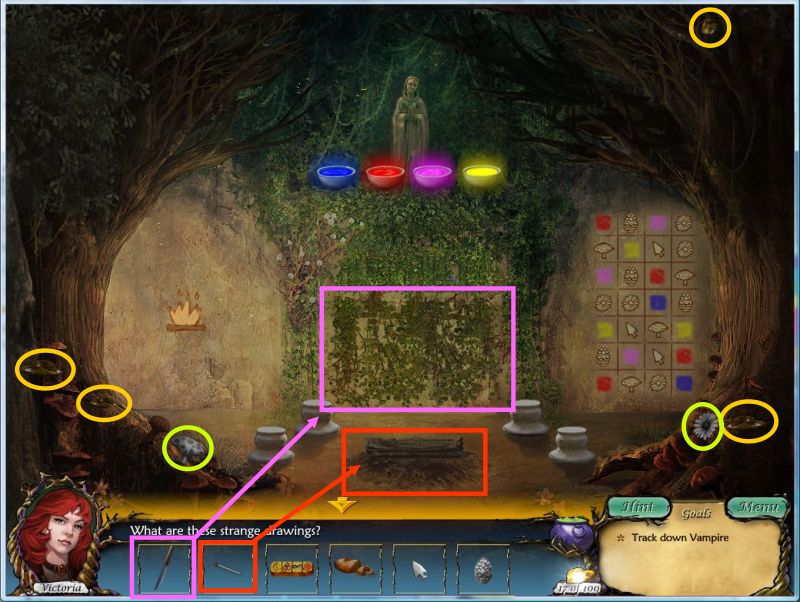
You come to what looks like a dead end - use the knife from your Inventory twice on the center square and everything will clear on both sides.
Pick up the 4 golden leaves as well as the white flower and mushroom for your Inventory.
Light the firewood in the center of the circle with the match from your Inventory.
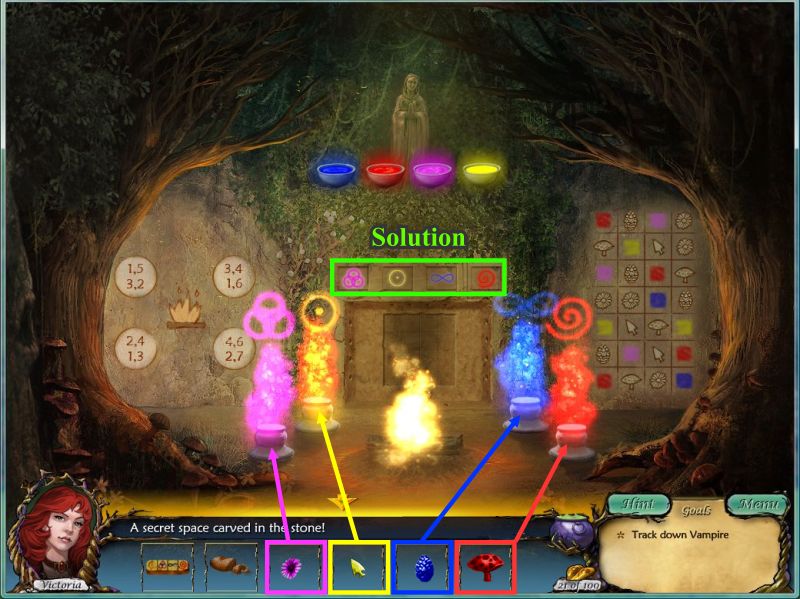
Screenshot
The fire makes numbers appear on the left wall surrounding the picture of the fire.
Dip the arrowhead in the yellow dust bowl to turn it yellow.
Dip the pinecone in the blue dust.
Dip the mushroom in the red dust.
Dip the flower in the pink dust.
Screenshot
Place the pink flower on the first pedestal at the left.
Place the yellow arrowhead on the pedestal to the right of the flower.
Place the red mushroom on the farthest pedestal to the right.
Place the blue pinecone to the left of the mushroom.
A bar will appear on the back wall under the dust bowls and the wall below it will open.
Change the symbols in the bar to match the symbol on top of each colored flame on the pedestals.
Screenshot
Take the Golden Stone from you Inventory and place it in the holder at the bottom center of the box.
5 indented symbols will appear. Click on the other squares to arrange the symbols so that there is only one of each in each of the rows.
Start with the bottom row and make it match the Golden Stone.
When a row is correct flames will come out of the holes on each side of the box.
Screenshot
When you have solved the puzzle two paths will appear - take the left path to the Castle Gate.
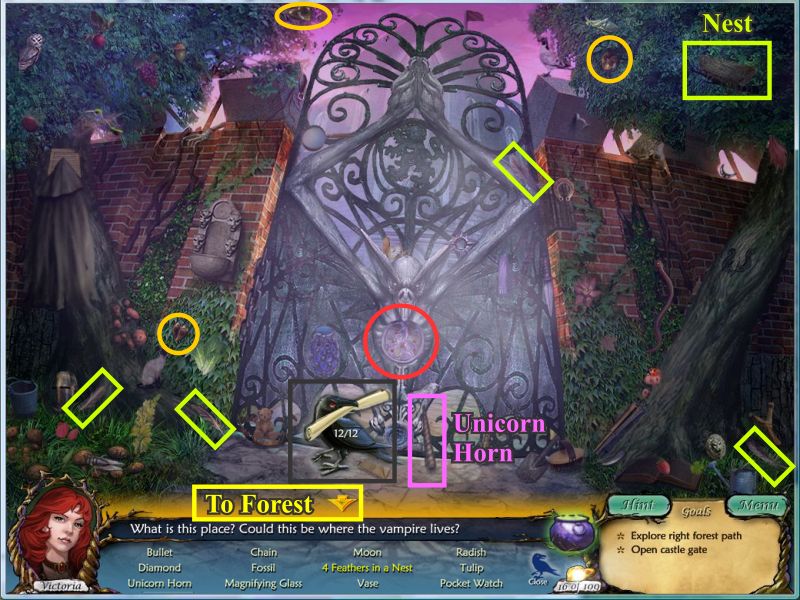
There is a crow to greet you at the gate so click on him for your hidden object list.
Collect the 3 golden leaves.
Pick up the 4 feathers and put them in the nest.
The unicorn horn will go into your Inventory when you have collected everything.
Screenshot
Click on the gate lock only to find out there are some pieces missing.
Exit to the Forest at the bottom of the screen and take the right path to the Forest House.
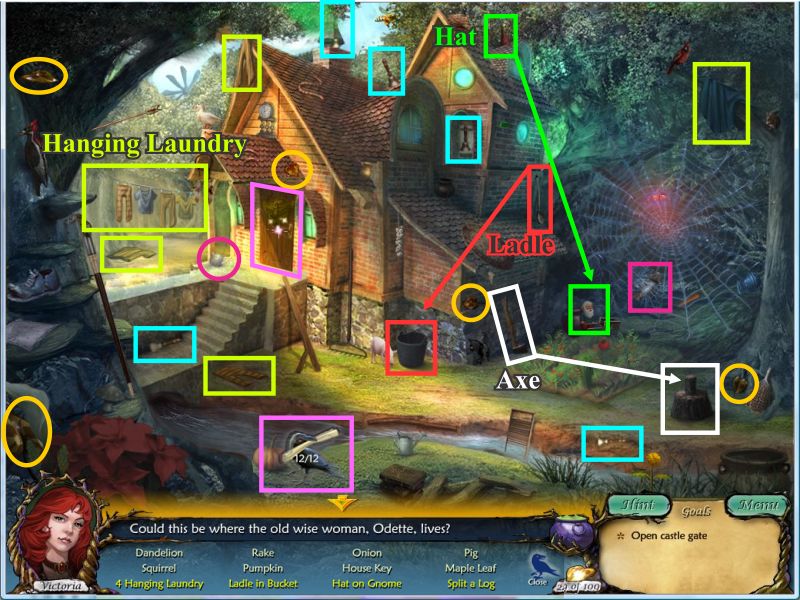
Click on the sparkling door and your crow will arrive with his list - click on him.
Collect the 5 golden leaves.
Pick up the 4 pieces of laundry and hang them on the line.
In case of need 5 bells are marked in turquoise.
Put the ladle in the bucket.
Put the hat on the gnome's head.
Use the axe to split the wood.
The onion and house key marked in magenta will go into your Inventory.
Screenshot
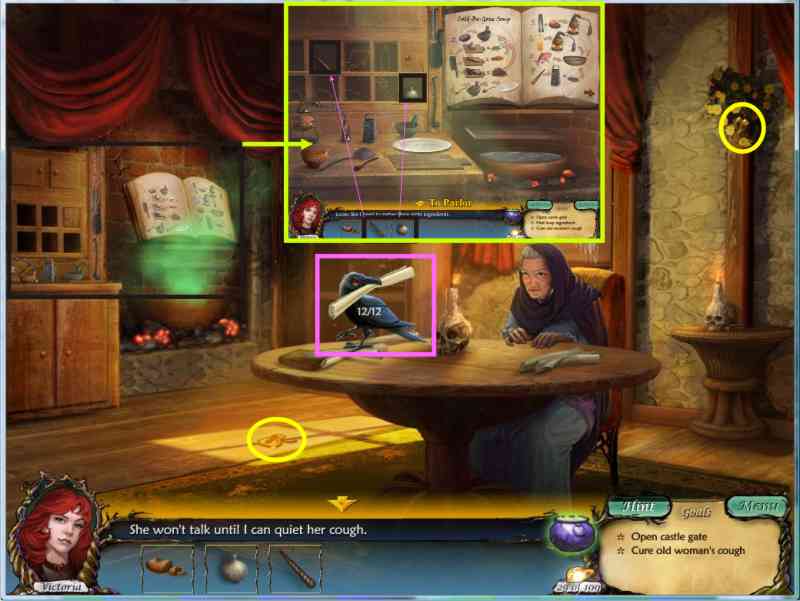
Use the house key to open the door and enter Odette's Parlor.
Odette is expecting Victoria but she needs her cough cured so click on the area above the cauldron.
Click on the recipe book and then on the niches and the Unicorn Horn and Onion in your Inventory will go into their spaces.
Screenshot
Return to the Parlor at the bottom of the screen and a crow will appear.
Collect the 2 golden leaves.
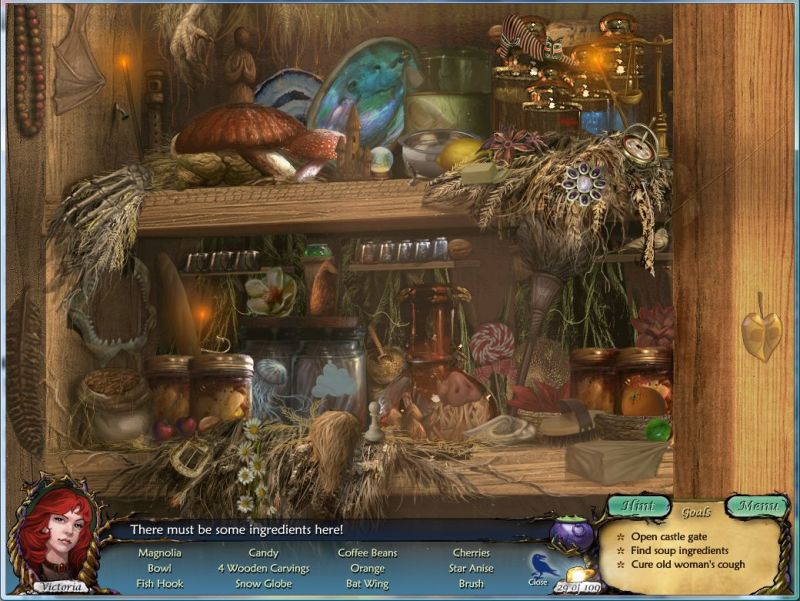
Click on the crow and you will get a close up of the cabinet next to the window to search for ingredients.
Collect the golden leaf.
The bat wing and fish hook will go into your Inventory when you have the rest of the items on your list.
4 wooden carvings are marked in light green in case they appear on your list.
Screenshot
Exit Odette's house at the bottom of the screen.
Click at the bottom of the screen two more times until you are at the Bridge.
Click on the window at the left and go inside Uncle's house.
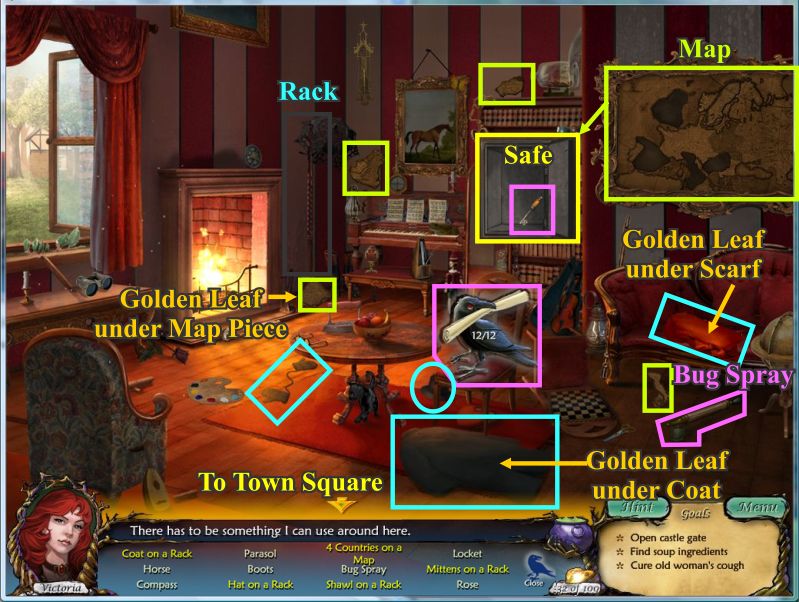
The crow arrives with your list so click on him.
Place the coat, mittens, hat and scarf on the rack - all are marked in blue.
Pick up the 4 maps pieces marked in green and put them on the map which has a safe underneath it.
The bug spray will go into your Inventory when the items are completed.
There are 3 golden leaves: 1 to the left of the rack under the map piece - 1 under the coat - 1 under the scarf.
Click on the open safe to see what's inside and collect the wine cabinet key.
Screenshot
Go to the Town Square and enter the Butcher Shop.
Click on the crow that arrives for a close up food scene.
The sandwich needs to be made in a certain order so the ingredients are numbered.
Place the lettuce on the bread.
Place the turkey on the lettuce.
Place the tomato on the turkey.
Place the pickle on the tomato.
Put some mustard on top of the pickle.
Finish up the sandwich by putting the bread on top of all of it.
Once you pick up the lettuce you will find a golden leaf underneath.
The potato, fishing line and one of the 3 eggs will go into your Inventory when you are done collecting.
Screenshot
You will be transported back to a full view of the Butcher Shop so go through the door on the right into the Storage Room.
Use the wine cabinet key from your Inventory to unlock the cabinet and take the Brandywine as well as the golden leaf that is next to it.
Exit to the Butcher Shop and then to the Town Square via the bottom of the scene.
Go inside Uncle's house and then out the window to the Bridge.
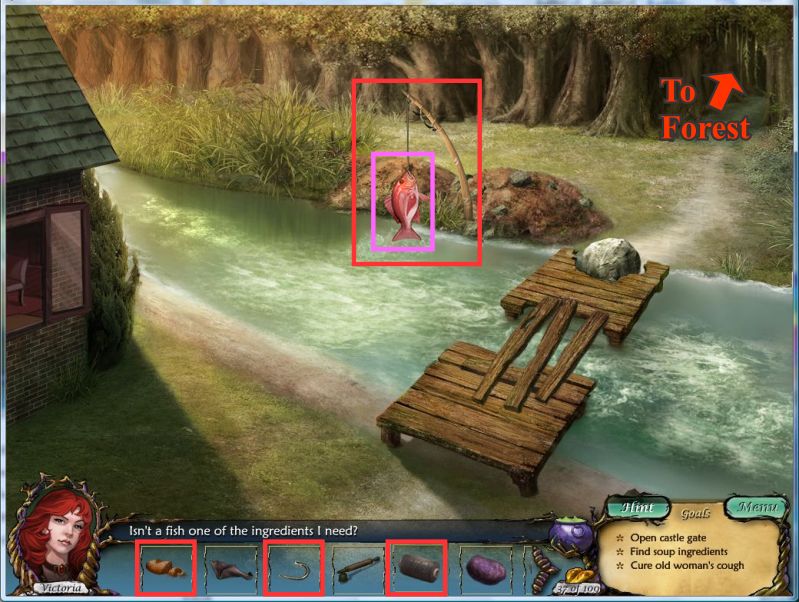
Take the fishing line and hook from your Inventory and put it on the fishing pole.
Place the bread on the pole and the target will appear once again so click the bread on the pole when you are in the hit area and catch a fish.
Screenshot
Collect the fish and head back into the Forest.
Take the right path to Odette's house.
You need a carrot for the recipe so use the Bug Spray in your Inventory on the spider and take the carrot.
Enter the Parlor through the open door.
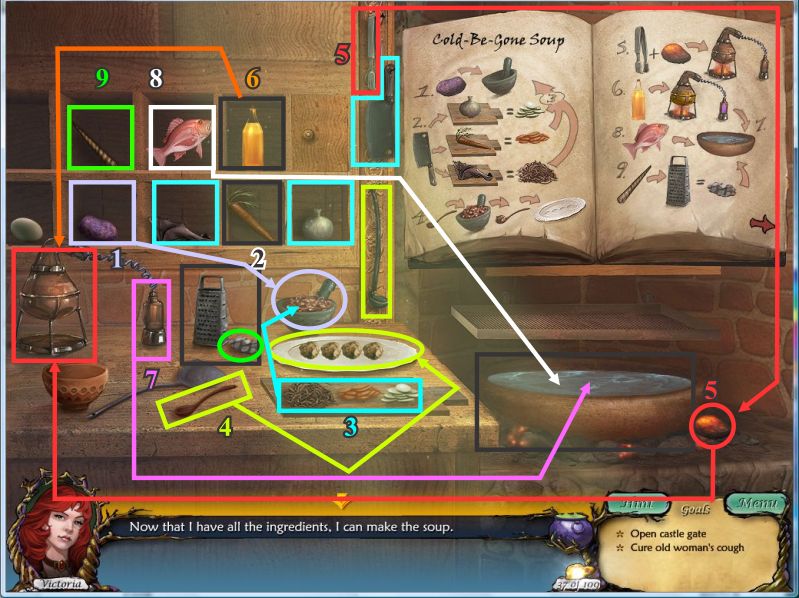
You have all the ingredients so click on the green misty cauldron area for a close up and all the ingredients will go into their niches ready to be used for the Cold-Be-Gone Soup.
Check the recipe to see that the ingredients need to be dealt with in numerical order.
Items and tools are color coded in the screen shot to show you what is used together.
Item 1 is the purple potato - place it in the mortar and pestle.
Secondly, cut up the onion, carrot and bat wing using the cleaver and put the results in the mortar and pestle - all of this is marked in blue in the screen shot and considered Number 3 in the recipe.
Number 4 wants you to take 4 scoops out of the mortar and pestle using the wooden spoon marked 4 and place them on the white plate where the 4 meatball looking things are shown.
For number 5, take the tongs and pick up the object shown and place it in the vessel on the burner.
Add the Brandywine to the burner and everything will transfer to the collector which should then be placed in the cauldron to complete step 6 and 7.
For step 8, place the fish in the cauldron.
And finally, grate the unicorn horn and place it in the caldron as step 9.
Turn the page on the recipe book to see the next steps.
Screenshot
Put the meatball looking things from the plate into the cauldron to complete step 10.
For 11 you will need to put the egg on the griddle.
Take the ladle and put 4 scoops of the meatballs into the bowl and 12 will be completed.
Step 13 wants you to take the spatula and pick up the fried egg so that you can finish with 14 by putting it on the top of the mixture in the bowl.
Screenshot
Pick up the Cold-Be-Gone Soup and collect the golden leaf under the bowl.
Give the soup to Odette who will give you the 2 mirror shards to open the Castle Gate.
Exit the Parlor and the house grounds and return to the fork in the Forest - click on the bottom of the scene twice and then take the left path to the Castle Gate.
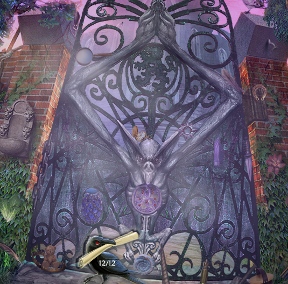
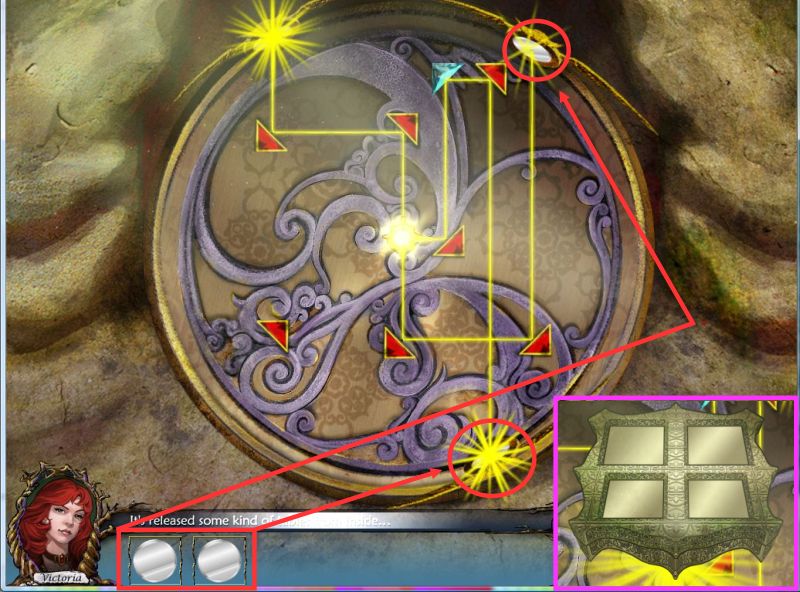
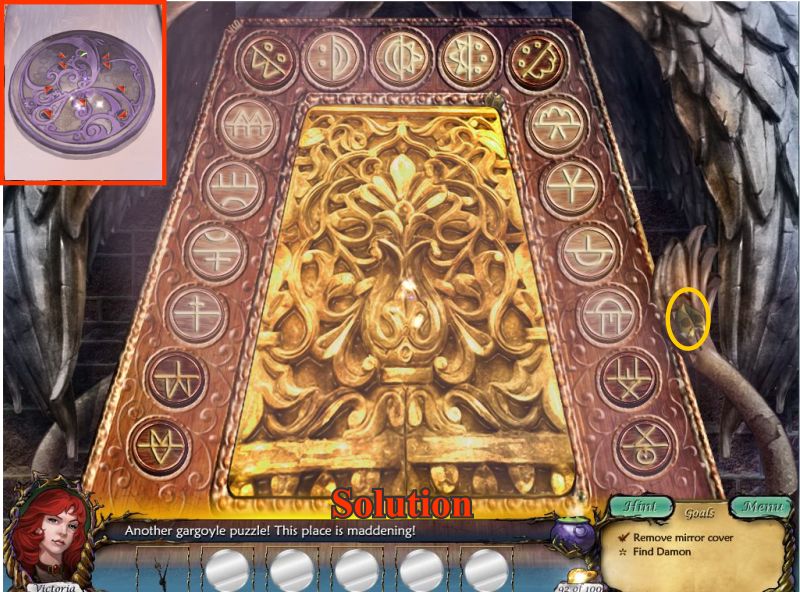
Click on the sparkling lock for a closer view and place the two mirrors where they belong.
Turn the arrows so that the light hits all the mirrors.
Screenshot
Pick up the mysterious tablet and go through the gate.
Chapter 3: The Vampire's Surprise
Victoria is attacked when she goes through the gate but Damon saves her and takes her to his sister's room and discovers the tablet that she has.
Take the gargoyle tablet from Victoria.
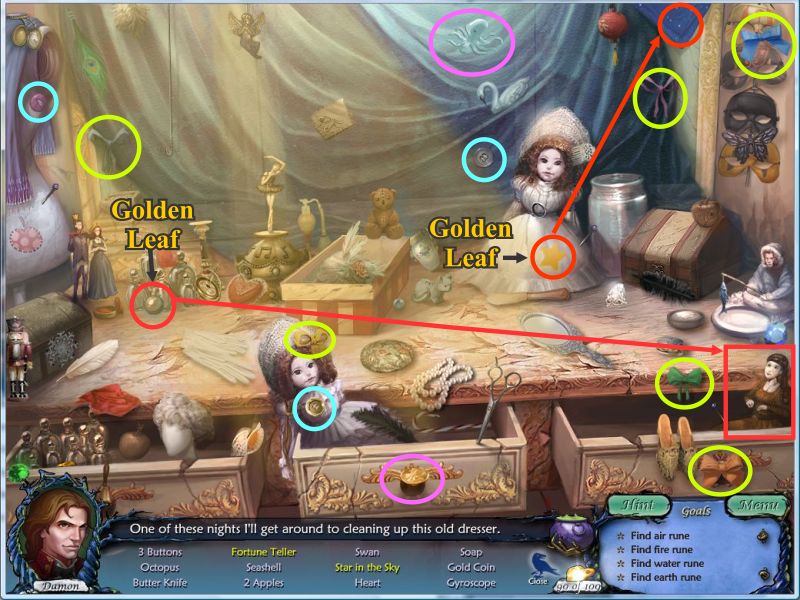
A crow arrives - click on him and you will get a close up of the dresser belonging to Damon's little sister.
Collect the 4 golden leaves - one is behind the ballerina and another is under the hat.
Put the hat in the box.
Place the dancer on the music box.
Put the fish on the fishing line.
The bandage, brush and iodine will go into your Inventory when you are finished.
Screenshot
You are back in the bedroom. Collect the golden leaf.
Put the iodine and bandage on Victoria's wound.
Exit to the Courtyard at the bottom of the scene.
Screenshot
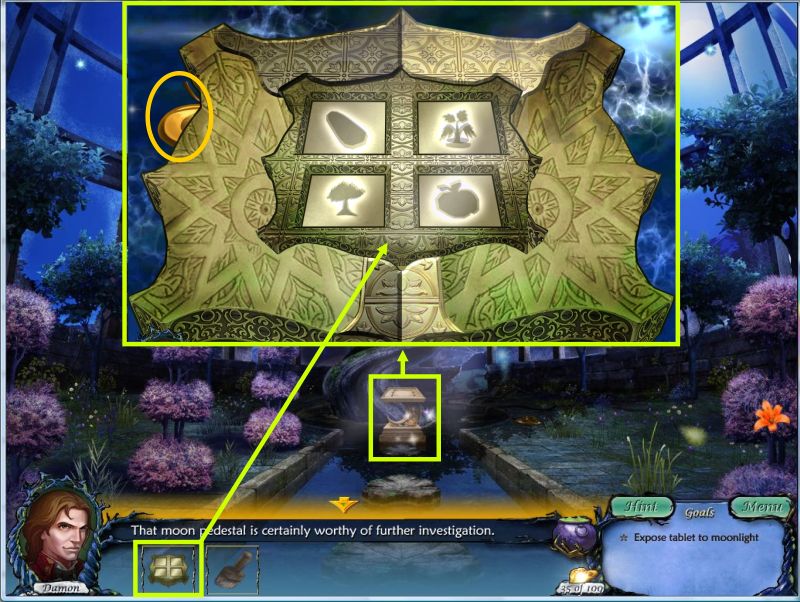
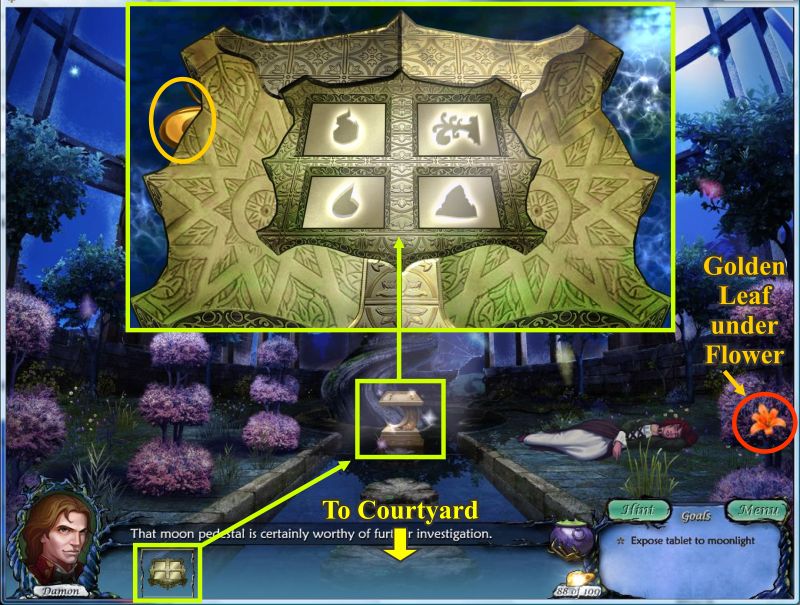
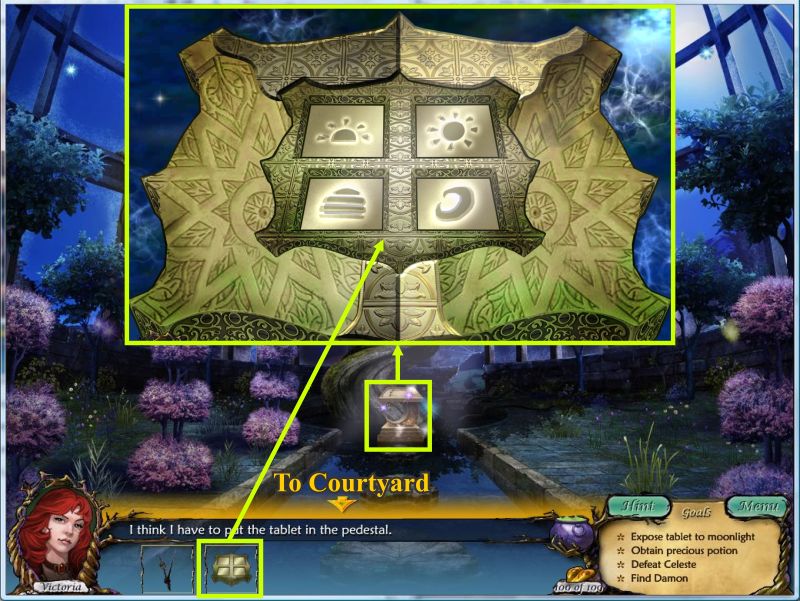
Go through the archway on the right and into the Aviary.
Click on the pedestal for a closer look and place the tablet on it.
The moon will cause symbols to appear.
Collect the golden leaf and go back to the Aviary at the bottom of the screen.
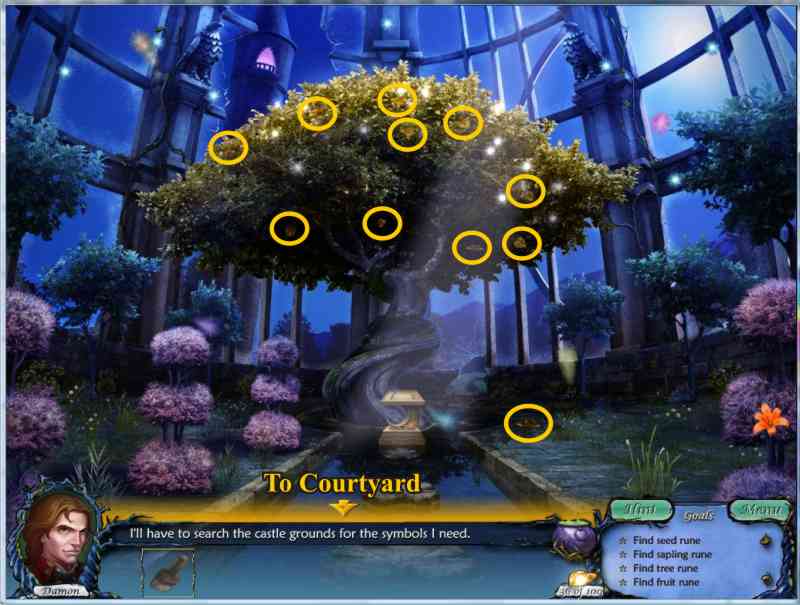
Screenshot
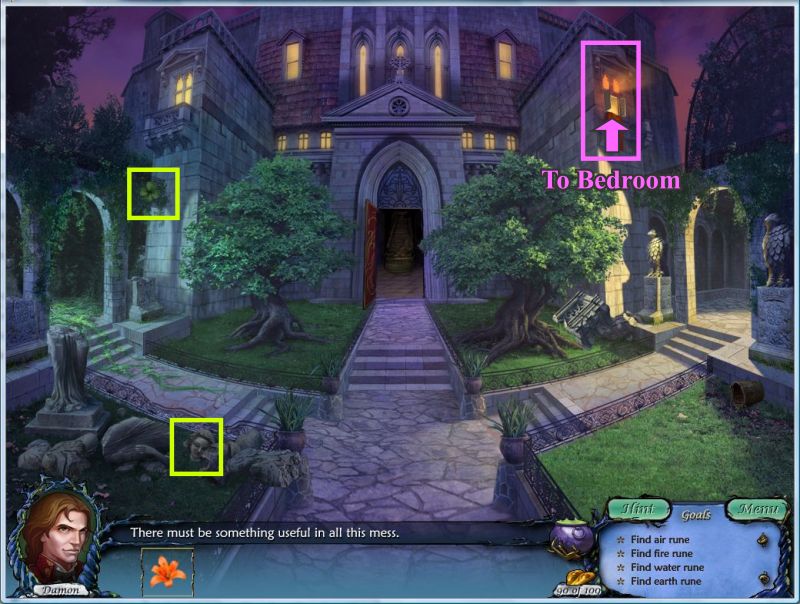
Collect 11 golden leaves in the Aviary and then exit to the Courtyard in search of the 4 runes for the tablet.
Screenshot
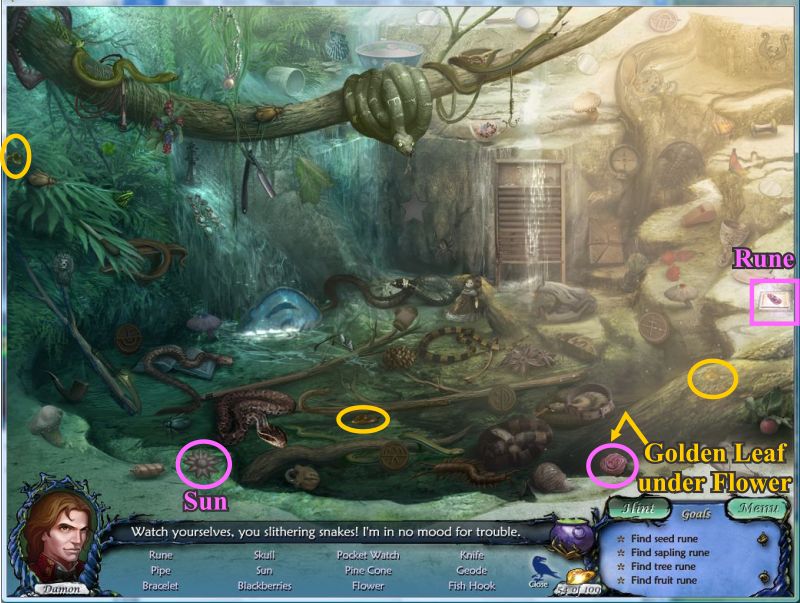
Go through the archway at the left and into the Garden.
Click on the Angel on the right and the crow will appear - click on him for a close up hidden object scene.
Collect the 4 golden leaves - one is under the flower.
The sun, flower and rune will go into your Inventory once you have collected everything on your list.
Screenshot
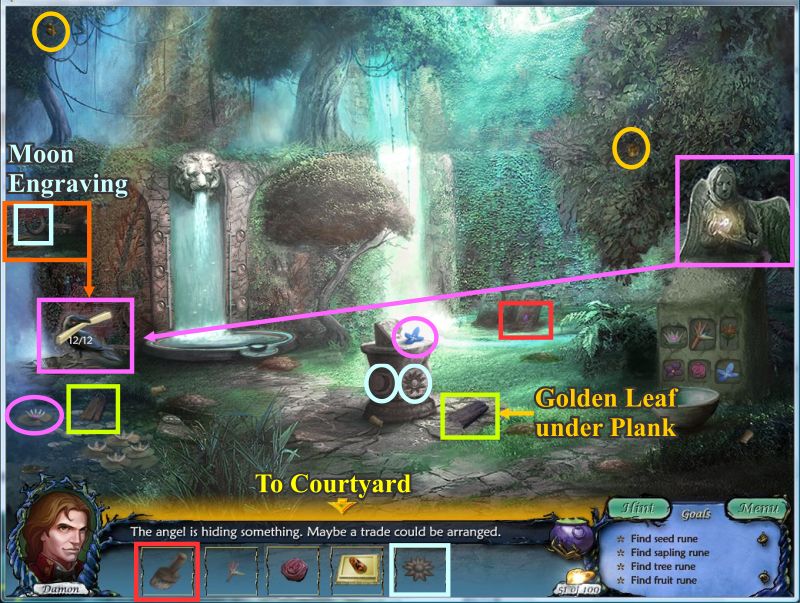
You are back in the garden.
Pick up the 2 wood planks marked in green for your Inventory.
Collect the 3 golden leaves - one is under the plank next to the sundial.
Use the brush from your Inventory on the tombstone and get another flower.
Pick up the flower in the pond.
Place the sun from your Inventory on the sundial.
Pick up the moon engraving from where the crow use to be and it will go into your Inventory to be placed on the sundial.
The sundial will turn revealing another flower for you to gather.
Go back to the Courtyard at the bottom of the scene.
Screenshot
Collect the 4 golden leaves.
Click on the sparkling area at the right to reveal the blood collection medallion.
Click on the bucket and it will fall over - collect the blood.
Click on the rock near the bucket and collect the blood there.
Collect the puddle of blood.
There is blood under the bark of the tree and under the paver on the steps.
Move the rock to the left of the bloody steps and pick up the flower.
Pick up the wood plank marked in blue.
Both the flower and plank will go into your Inventory.
Place the 3 planks on the pile of rocks at the left to move the rocks away so you can take the iron pipe for your Inventory.
Use the pipe on the paver on the steps.
Take the 3 sharp stones for you Inventory and gather the blood.
Use the 3 sharp stones on the tree bark and take the blood from there.
Click on the blood medallion and pick up the rune.
Exit at the bottom of the scene to the Castle Gate.
Screenshot
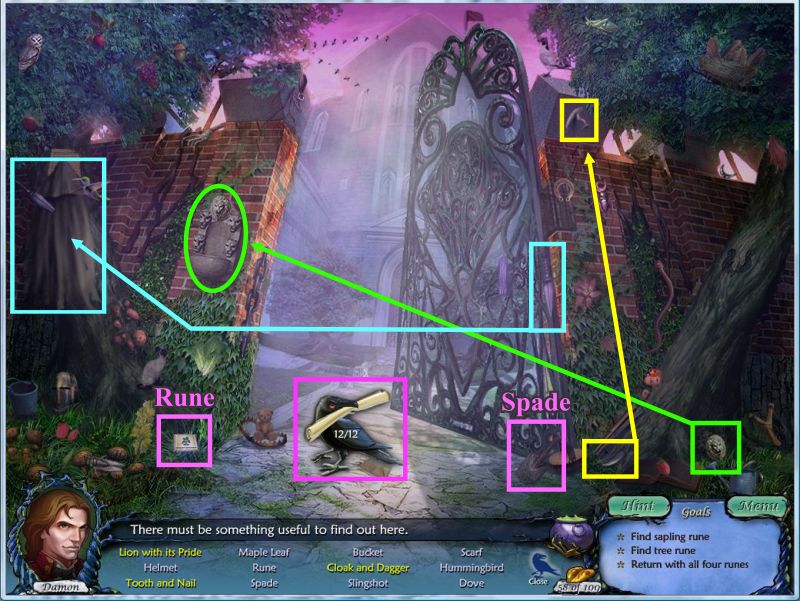
The crow will arrive so click on him to get your list.
Place the stone lion on the stone plaque with the others.
Place the dagger on the cloak.
Put the tooth with the nail.
Pick up the rune and spade for your Inventory.
Screenshot
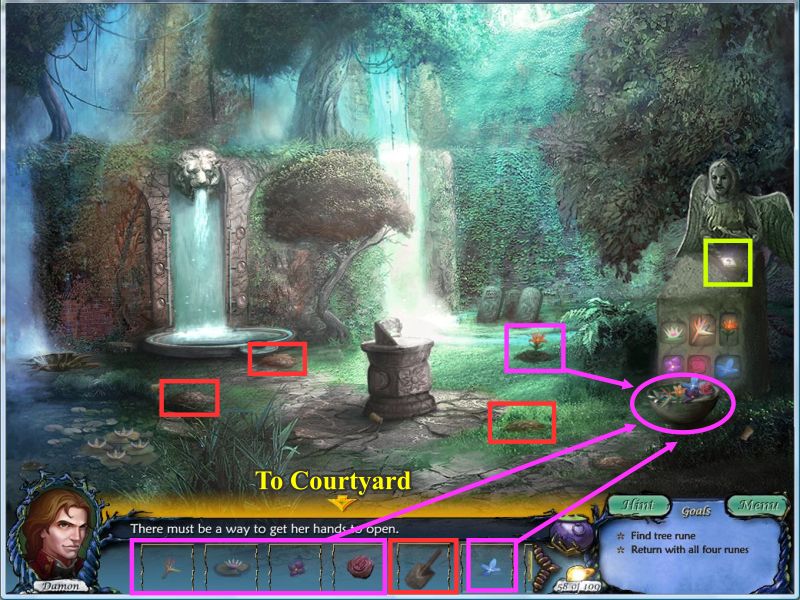
Go through the gate to the Courtyard and enter the Garden on the left.
You can use the spade from your Inventory on all 4 dirt plots or just pick the one in the screen shot with the flower.
Place all 6 flowers in the bowl in front of the angel.
Take the rune from the angel.
Go to the Courtyard and cross to the Aviary.
Screenshot
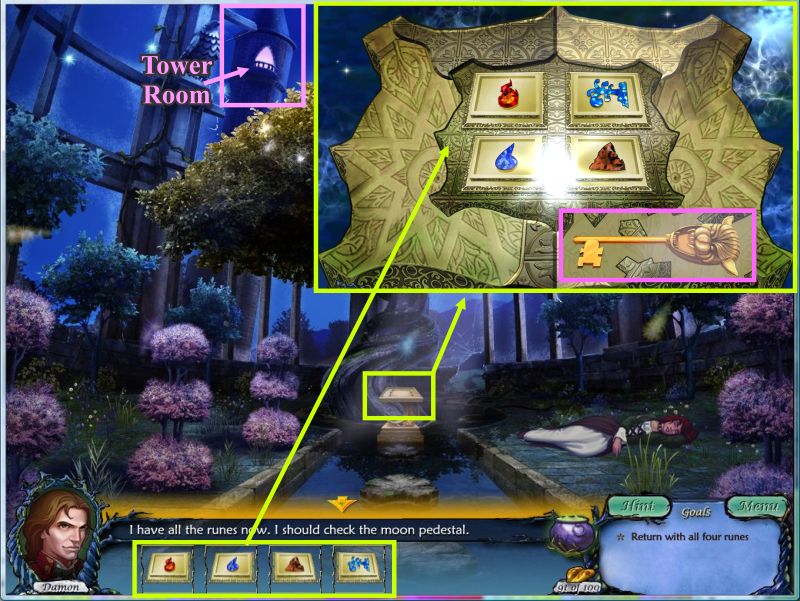
Click on the Moon Pedestal for a close up.
Place all 4 runes in their proper places.
You will receive a key for your Inventory.
Screenshot
Go to the Tower Room which is the pink triangular window at the top of the scene.
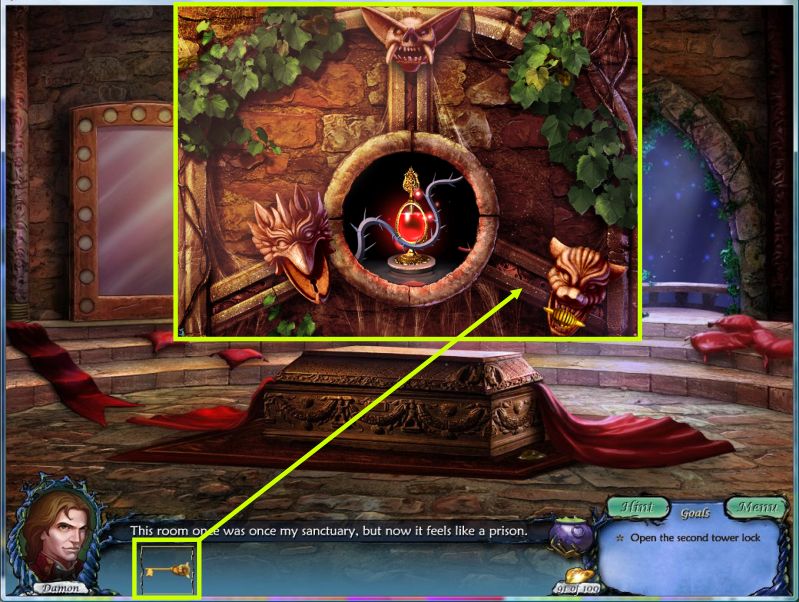
You are in Damon's Bedroom and Sanctuary.
Pick up the golden leaf next to the coffin.
Click on the Tower Lock on the back wall in the center of the scene for a close up view.
Collect the 3 golden leaves.
Place the key to open the matching lock as shown in the insert of the screen shot.
One of the thorny vines will go away as the lock is opened.
Screenshot
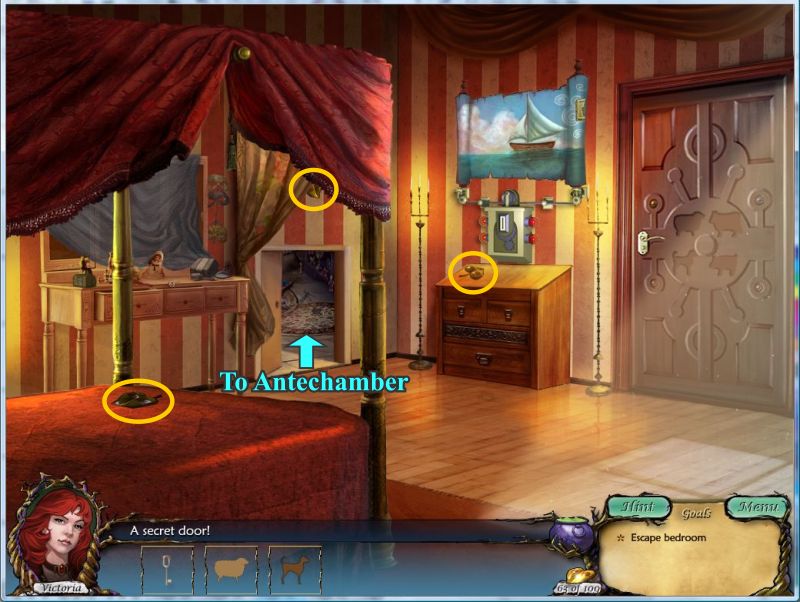
Chapter 4: A Change of Heart
Victoria wakes up to find Damon in her bed. He asks her to find him another box and then disappears.
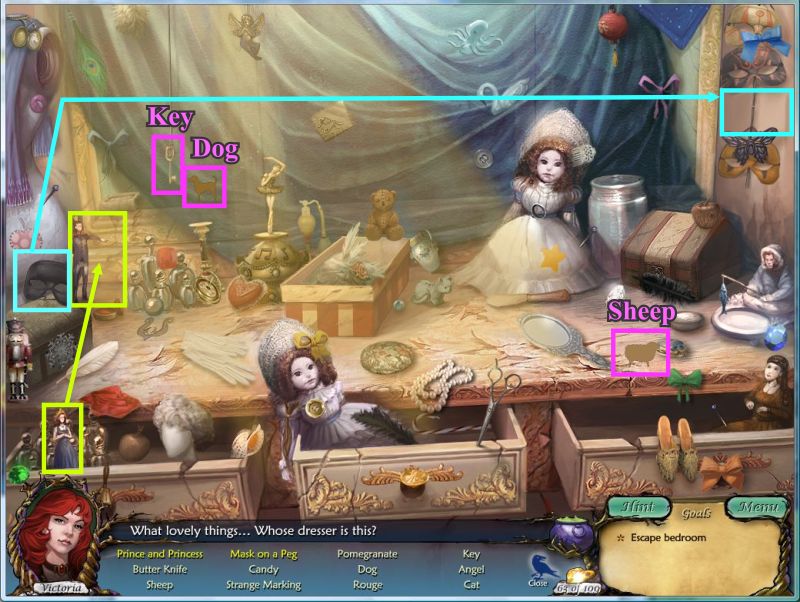
Click on the door and a crow will appear - click to get your list which is another close up of Damon's sister's dresser.
Place the Princess next to the Prince.
Hang the mask with the other masks.
The key, dog and sheep will go into your inventory when you are done with your list.
Screenshot
Collect the 3 golden leaves.
Click on the rug covering the opening to the Antechamber and enter.
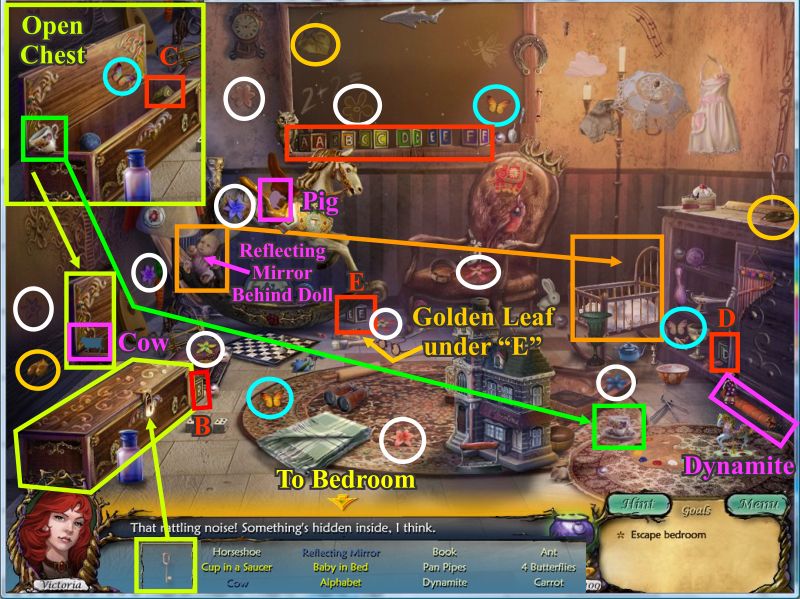
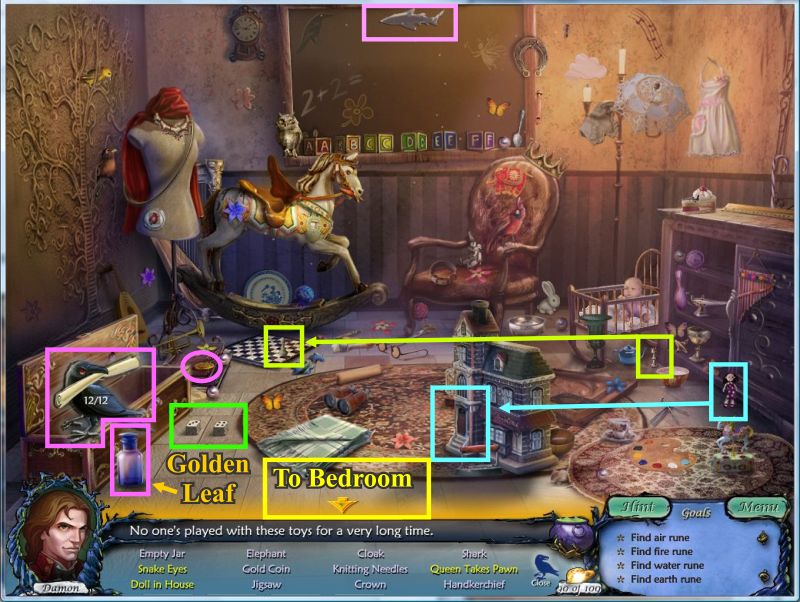
Screenshot
Click on the rocking horse to determine there is something inside of it.
Collect the 4 golden leaves including the one under the "E" block.
4 butterflies are marked in blue.
10 flowers are market in white.
Place the alphabet blocks marked in red in the screen shot on the blackboard in alphabetical order.
The cow will be visible on the edge of the chest when the cup is removed.
The reflecting mirror will be visible when the baby is moved to the bed.
The dynamite, cow, reflecting mirror and carrot will go into your Inventory.
Place the carrot on the rocking horse and the saddle will lift up for you to pick up the pig.
Screenshot
Exit to the Bedroom at the bottom of the scene.
Place the wooden sheep, dog, cow and pig that are in your Inventory in the cut-outs on the door and it will open to you can go into the hallway.
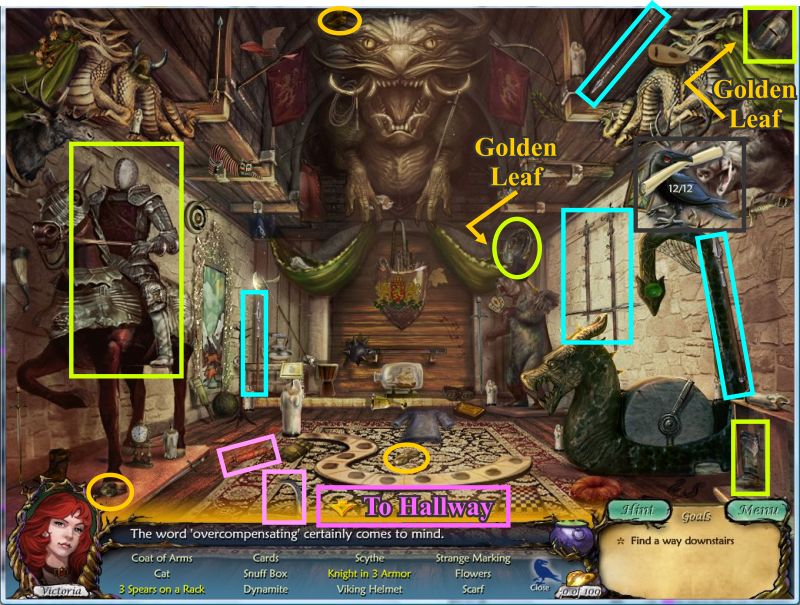
Screenshot
Take the door on the right into the Weapon Room.
A crow will land so click on him to get your list.
Collect the 5 golden leaves - 3 are visible, 1 is under the knight's helmet and another under the shield.
The scythe and dynamite will go into your Inventory.
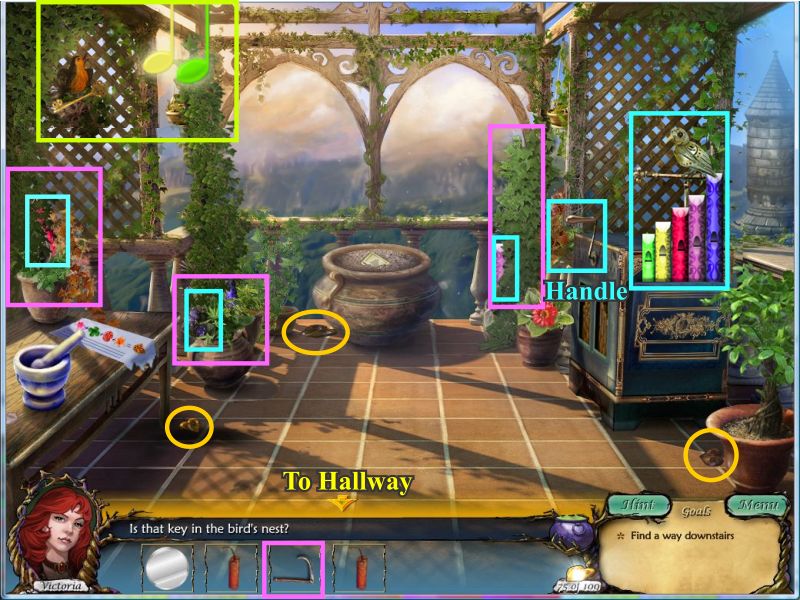
Screenshot
Go back to the hallway and use the scythe from your Inventory on the door with all the foliage so you can go out onto the balcony.
Collect the 3 golden leaves.
Click on the bird with the key.
He won't give it up but he will sing so you need to find a way to answer him.
Click the handle marked in blue to find out that it will play notes.
Use your scythe on the 3 areas of foliage marked in the screenshot.
Pick up the 3 flute pieces for your Inventory and place them with the other two flute pieces.
Click on the bird and watch his notes so you can then play them on the flutes.
There will be 4 sequences - if you have trouble remembering the sequence, write down the colors.
When you have completed the mini game the bird will fly over to the perch above the flutes so you can pick up the key.
Screenshot
Return to the Hallway.
Use the key you found to open the door at the end of the Hallway and enter the study.
Collect the 5 golden leaves including the one behind the mirror.
Pick up the piano tuner, dynamite, reflecting mirror and for your Inventory
6 wine bottles are marked on the screen shot.
Screenshot
Exit at the bottom of the scene to the Hallway.
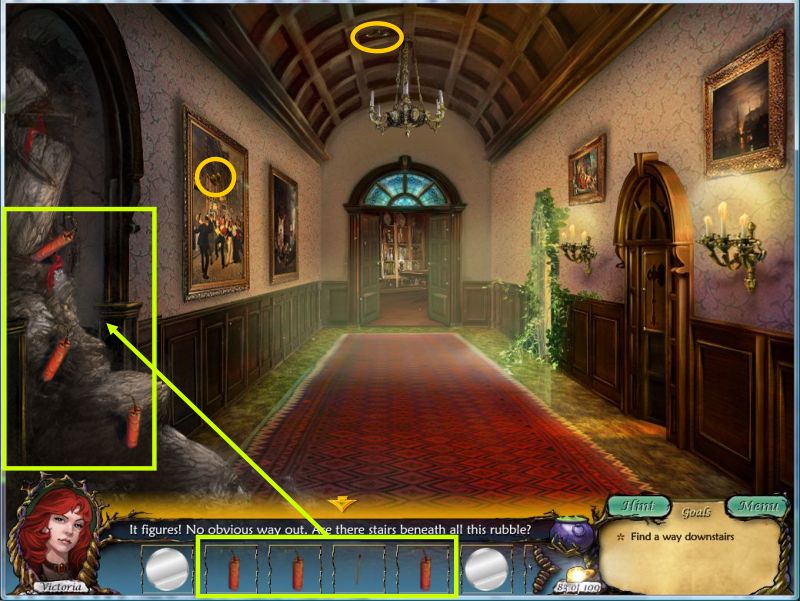
Place the 3 sticks of dynamite on the rubble at the left and light each of them with the match - all are in your Inventory.
Screenshot
Go downstairs to the Grand Foyer from the exit you created and enter the Ballroom on the right.
Click on the sparkling area at the right - .the pulley is missing to open the curtain.
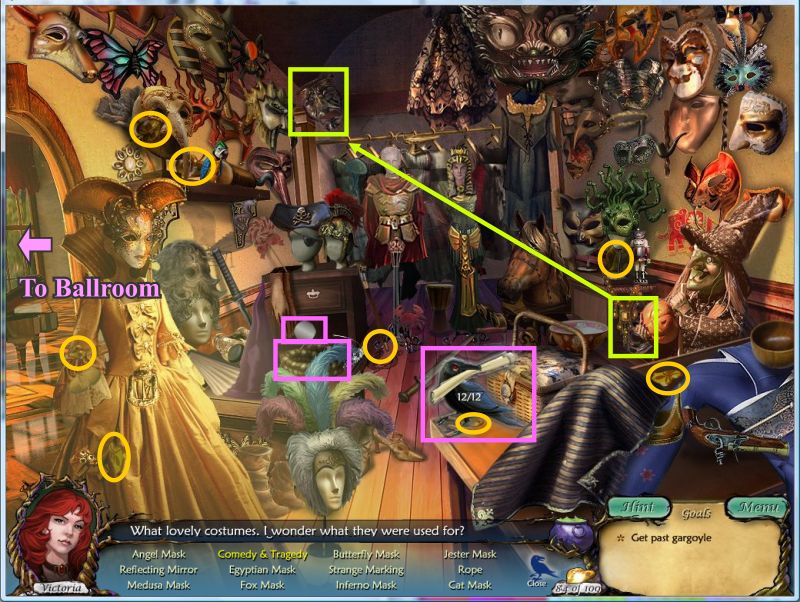
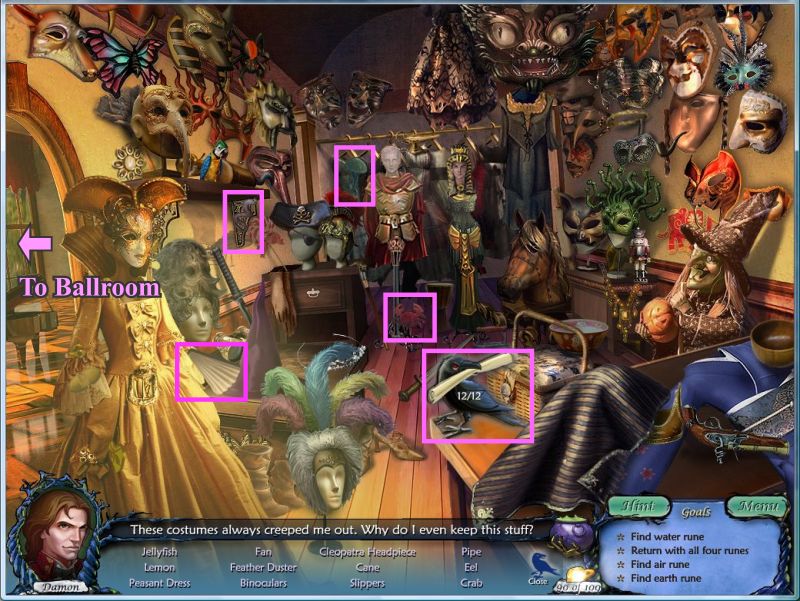
Go through the door on the right into the Costume Room and a crow will appear so click on him.
Collect the 8 golden leaves.
Exit through the door on the left to the Ballroom.
Screenshot
Get the pulley and it will go into your Inventory.
Place the pulley and rope and click on them to open the curtains.
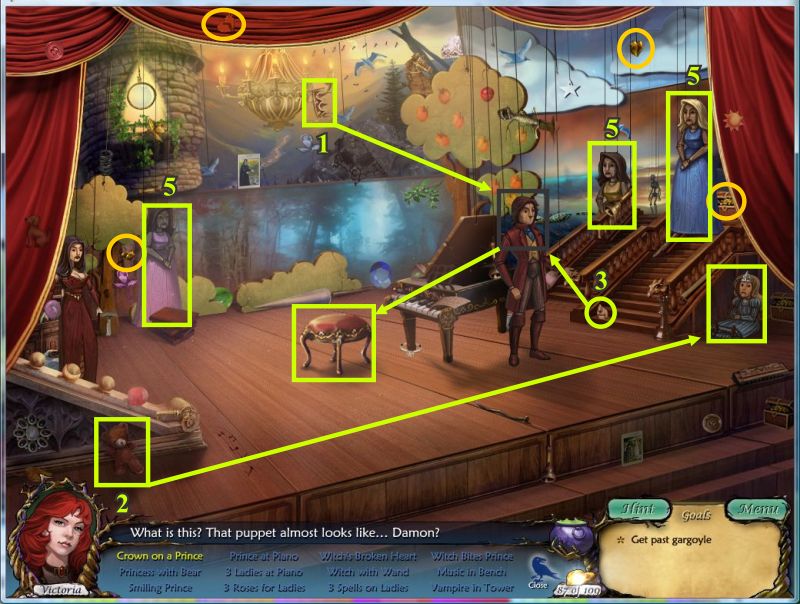
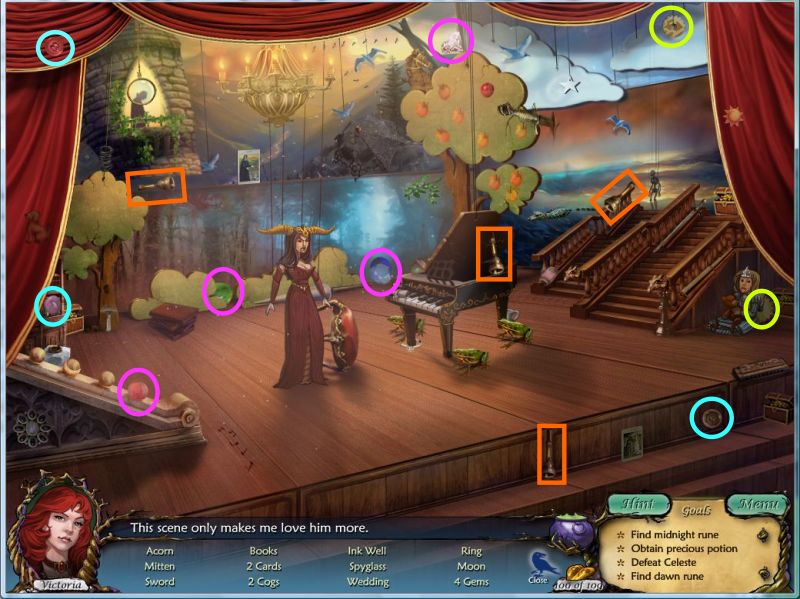
The crow will land so click on him for a close up of the stage.
Collect the golden leaves if you need them.
Since all but one of the items are listed in blue, they will need to be taken care of in order.
1 - Put the crown on the Prince's head.
2 - Hand the bear to the Princess.
3 - Put the smile on the Prince.
4 - Place the Prince on the piano stool.
5 - Place the 3 ladies at the piano.
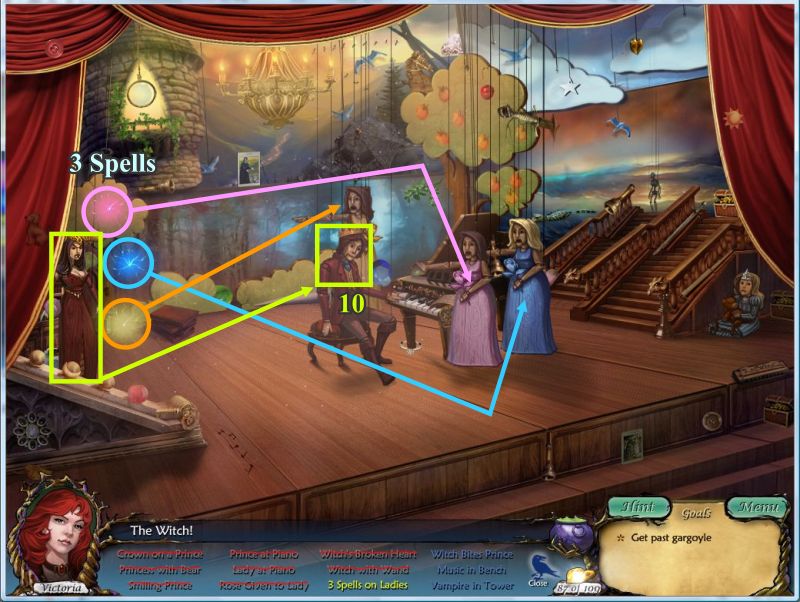
Screenshot
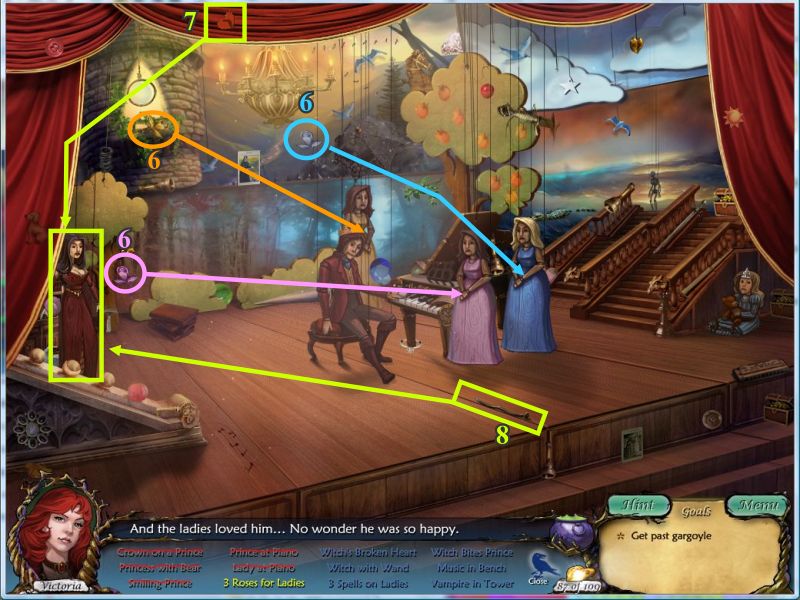
6 - Give the color coded roses to their respective ladies.
7 - Place the broken heart on the witch at the left.
8 - Give the witch the wand and she will cast 3 spells.
Screenshot
9 - Give each of the color coded 3 spells to the appropriate lady and she will turn into a frog.
10 - Move the witch next to the Prince and she will bite him.
Screenshot
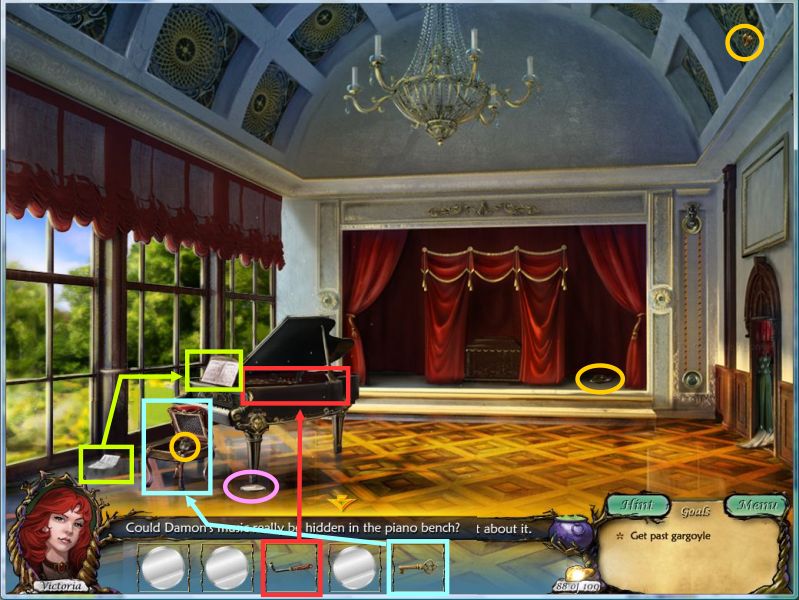
11 - Pick up the sheet music on the piano and put it in the bench.
12 - Pick up the Vampire Prince and take him to the tower.
The play is over and you will be rewarded with a key that will go into your Inventory.
Screenshot
You are zoomed out into the Ballroom.
Look for Damon's music - you will need to use the key from your Inventory on the piano bench.
There is a golden leaf inside the piano bench as well as 2 more that are marked in the screen shot.
Pick up the music that will go into your Inventory and place it on the piano stand.
The piano will play and then the music will return to your Inventory because the piano is out of tune.
Take the piano turner from your Inventory and put it on the piano.
Put the sheet music back on the piano and it will play again - Victoria thinks it isn't finished.
A reflecting mirror falls to the floor - collect it for your Inventory and go to the Grand Foyer.
Screenshot
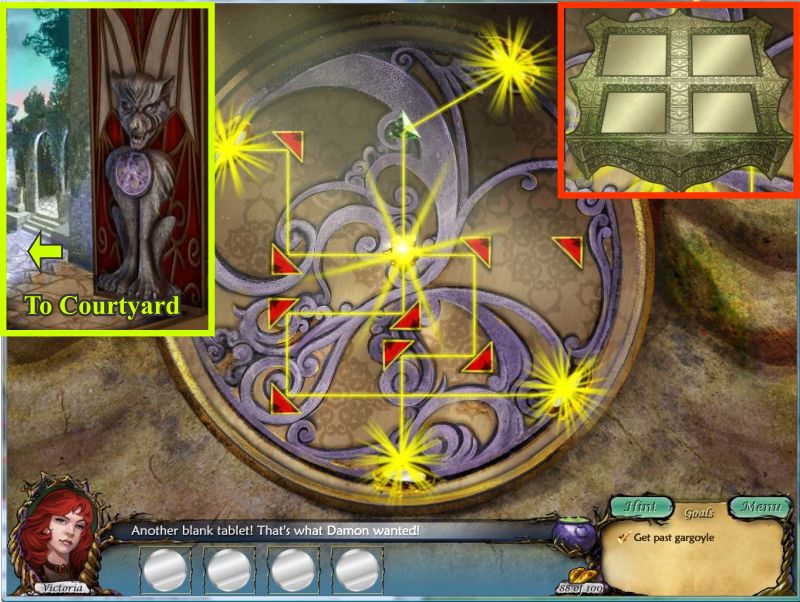
Click on the gargoyle at the left and place the 4 reflecting mirrors from your Inventory in their proper places.
Turn the arrows so that all of the mirrors reflect the light.
Take the tablet for Damon.
Exit to the Courtyard as shown in the insert.
Screenshot
It is starting to get dark and Victoria is attacked again - Damon saves her and says to run to the Aviary so go through the door on the right.
Converse with Damon and give him the tablet.
Chapter 5: Lovers Part
Click on the moon pedestal and place the tablet in the center.
Take the golden leaf.
Collect the flower in the Aviary and the golden leaf under it.
Exit to the Courtyard at the bottom of the scene.
Screenshot
Pick up the items marked for your Inventory.
Go to the Bedroom in the upper right corner.
Screenshot
Click on the crow for a close up of the dresser.
3 buttons and 6 bows are marked in the screen shot.
Give the crystal ball to the fortune teller.
Place the star in the sky.
There are golden leaves underneath the crystal ball and the star.
The octopus and coin will go into your Inventory when you are finished with your list.
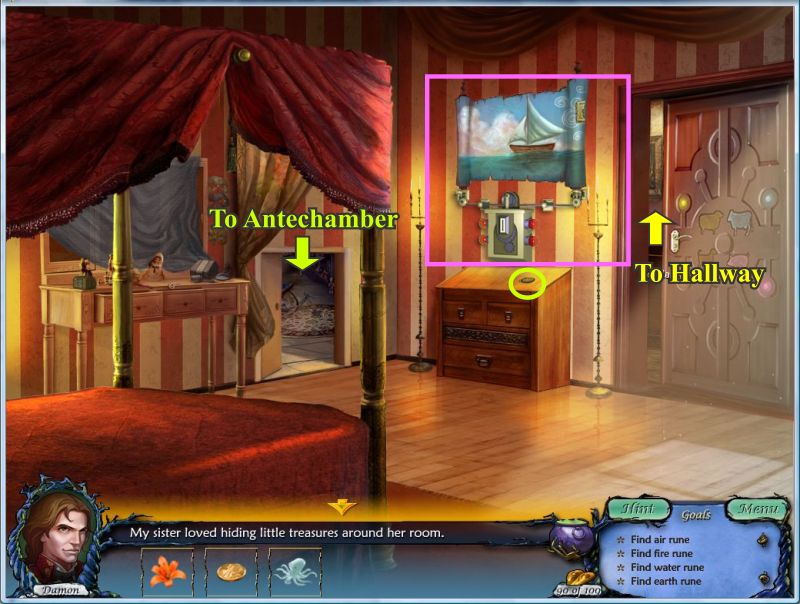
Screenshot
Examine the painting on the wall - you need to put coins in the box below to roll out the painting.
Pick up the coin on the chest.
Screenshot
Go to the Antechamber - click on the crow.
Place the doll at the door of the house.
Place the Queen on the chessboard.
Roll the dice until you get snake eyes.
There is a golden leaf under the empty jar.
The empty jar, coin and shark will go into your Inventory.
Screenshot
Go to the Bedroom and through the door to the Hallway which Victoria made a mess.
Enter the Study at the end of the Hallway.
4 rings are marked in blue.
5 handkerchiefs are marked in green.
Pick up the hammer on the floor and hit the mirror with it.
The foot pedal, coin and fish will go into your Inventory.
Screenshot
Exit to the Hallway and go to the Weapon Room - the first door on the right.
Click on the faded rune.
Pick up the 11 candles which will go into your Inventory.
Place them on the big candle under the rune and they will be distributed to the proper place on the holder.
Place the foot pedal from your Inventory and place it on the dragon.
Pick up the axe which will go into your Inventory and place it on the dragon.
The dragon will breathe fire as it sharpens the axe so lights the candles which will energize the rune.
Collect the rune and go to the Hallway and downstairs to the Grand Foyer.
Screenshot
Enter the Ballroom on the right and go into the Costume Room on the right.
Click on the crow that arrives.
The fan, jellyfish, crab and eel will go into your Inventory when you're done.
Screenshot
Go through the Ballroom to the Grand Foyer.
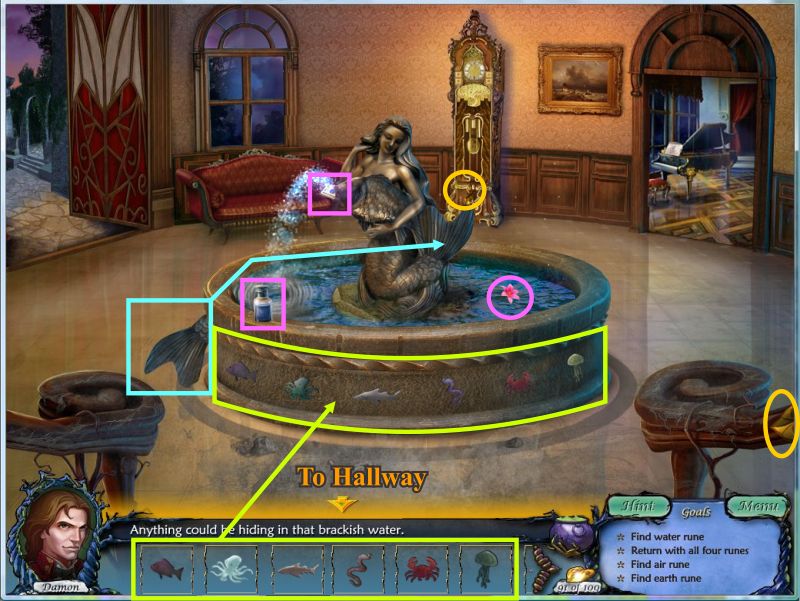
Click on the faded rune and find a way to restore it.
Place the fish, octopus, shark, eel, crab and jellyfish from your Inventory on the fountain.
Click on the tail at the left of the fountain and it will go into your Inventory.
Place the head and tail from your Inventory on the mermaid.
The rune is revitalized so pick it up.
Collect the flower that becomes visible in the fountain.
Take the empty bottle from your Inventory, fill it in the fountain and collect it again for your Inventory once it is full.
Screenshot
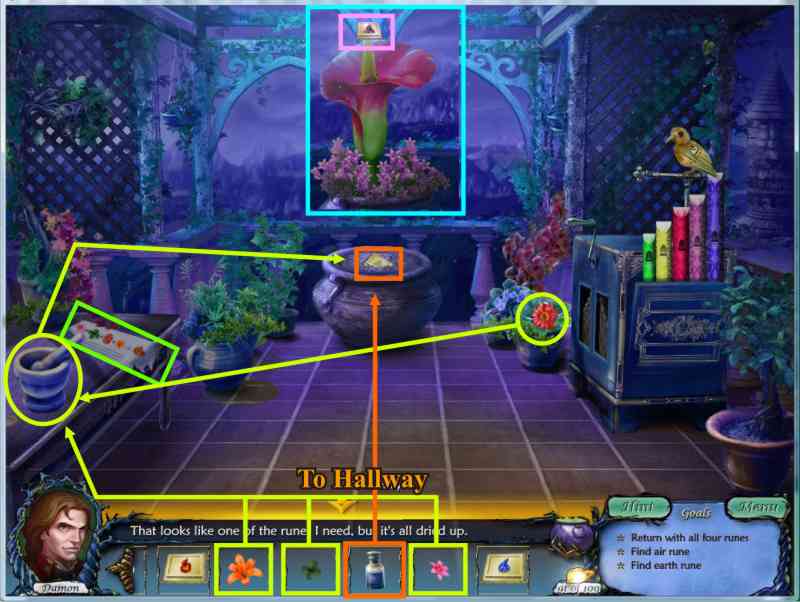
Exit at the bottom of the scene to the Hallway and go to the Balcony which is the second door on the right.
Water the pot with the rune.
Pick up the flower on your right which will go into your Inventory.
Place all 4 flowers from your Inventory into the mortar and pestle per the recipe next to it.
Once it is ground collect the mortar and pestle for you Inventory and use the mixture on the pot.
The rune will be revived as shown in the screen shot insert so collect it for your Inventory.
Screenshot
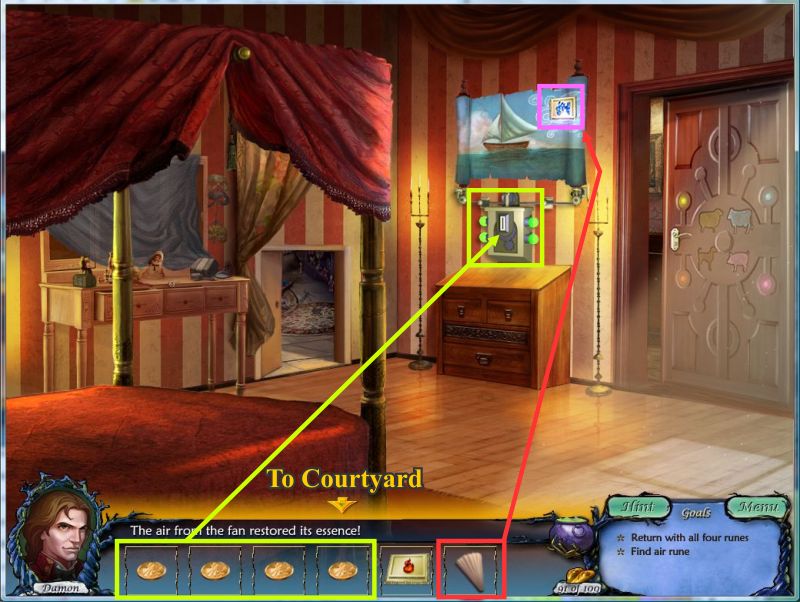
Exit to the Hallway and again at the bottom of the scene to enter the Bedroom.
Place the 4 coins from your Inventory into the slot in the machine below the painting.
Use the fan on the rune to activate it and take it.
Exit at the bottom of the scene to the Courtyard and enter the Aviary on the right.
Screenshot
Click on the Moon Pedestal for a close up and place the runes from your Inventory in their proper places.
You will get the second key so go to the Tower Room with the pink window.
Screenshot
Click on the wall to get a close up of the tower lock and place the key on the matching gargoyle in the lower right to remove another thorny vine.
Screenshot
Chapter 6: The Witch's Return
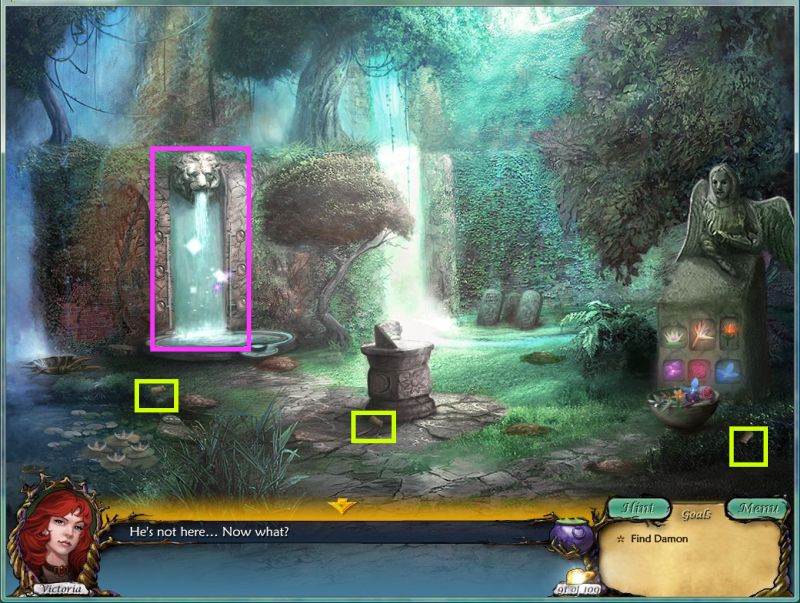
It's daylight and Victoria wakes up to find Damon gone - cross the Courtyard to the Garden.
Pick up 3 valves and take a closer look at the waterfall.
Screenshot
Place the 3 valves from your Inventory on each of the circles on the left side and they will fill up with colors like those on the right.
If you need them, pick up the golden leaves including the one hidden under the "Skip Puzzle" button.
The object of the game is to click on the valves to match the color in the basin. There are 10 sequences of combinations.
You can click on valves on the same side to get a color until you need more than one dose of the same color.
1 - blue so click either blue valve
2 - yellow so click either yellow valve
3 - orange = 1 red + 1 yellow
4 - purple = 1 blue + 1 red
5 - green = 1 blue + 1 yellow
6 - violet = 1 red + 2 blue
7 - reddish yellow = 1 red + 2 yellow
8 - yellow green = 1 blue + 2 yellow
9 - red violet = 1 blue + 2 red
10 - black = 1 red + 1 blue + 1 yellow
Notice how the correct combinations get you a stepping stone in the fountain.
The water on the wall will disappear leaving a set of clock hands.
Cross the stepping stones and take the clock hands see insert in screen shot.
The wall will open to reveal Celeste's Chamber so enter.
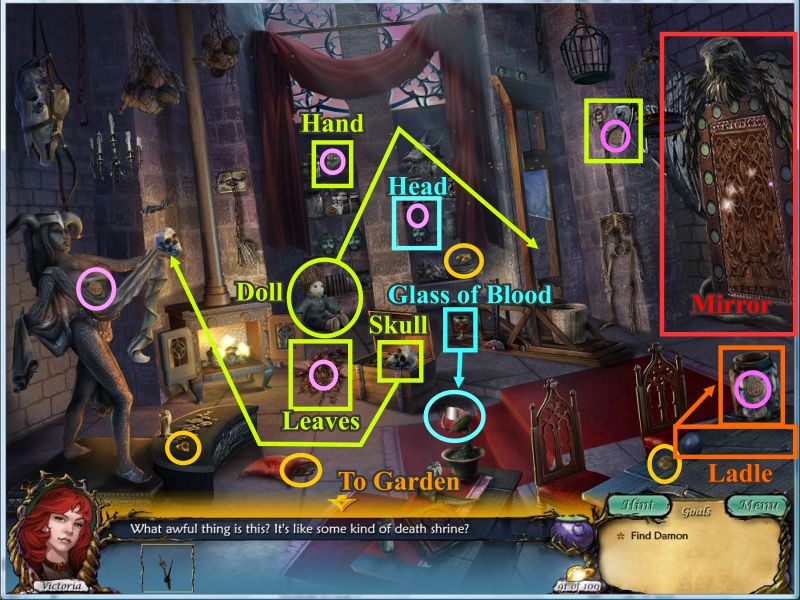
Screenshot
Check out the mirror on the right to find out it has 11 missing wooden discs.
Collect whatever golden leaves you still need including one on the mirror.
Click on the vulture next to the mirror and take the disc.
Click on the leaves next to the chest and take the disc that appears.
Click on the hand on the top shelf in back and it will open for you to take a disc.
Click on the head on the shelves and a reflecting mirror will appear - take it.
Pick up the ladle, skull, doll and glass of blood for your Inventory.
Use the ladle to retrieve the disc from the jar on the table.
Place the skull on Celeste's statue and take the disc that appears.
Give the glass of blood to the carnivorous plant and collect the reflecting mirror.
Put the doll on the guillotine, pull the lever on the side and take the disc.
Click twice at the bottom of the scene to go back to the Garden.
Screenshot
Click on the crow for a close up Hidden Object scene.
Collect the 5 wooden discs and 3 reflecting mirrors.
4 mushrooms are also marked on the screen shot.
Screenshot
Go through the waterfall door to Celeste's Chamber and click on the mirror.
Place the wooden discs on the mirror in the correct order by finding their relationship to neighboring discs.
Pick up the golden leaf if needed.
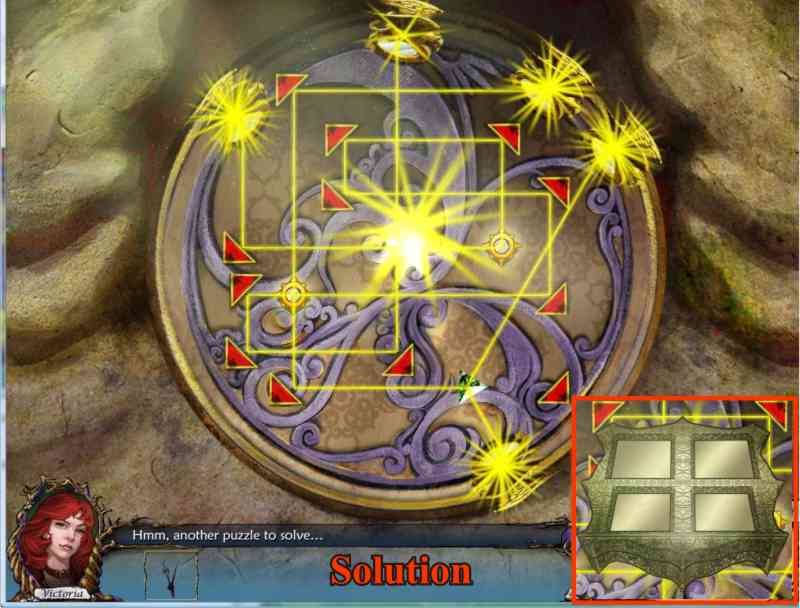
Click on the disc in the center that is shown in the screen shot insert to get yet another puzzle.
Screenshot
Place the reflecting mirrors and turn the arrows until the light hits all of the mirrors.
Take the box for Damon.
Screenshot
Chapter 7: Love and Death
Go through the broken mirror to the Tower Room.
Examine the Tower Lock close up.
Go back to Celeste's Chamber and click on the bottom of the scene 3 times to get to the Courtyard and enter the Aviary on the right.
Click on the Moon Pedestal and place the tablet in the closet up shot to discover the runes needed.
Screenshot
Exit to the Courtyard at the bottom of the scene and go through the door to the Grand Foyer.
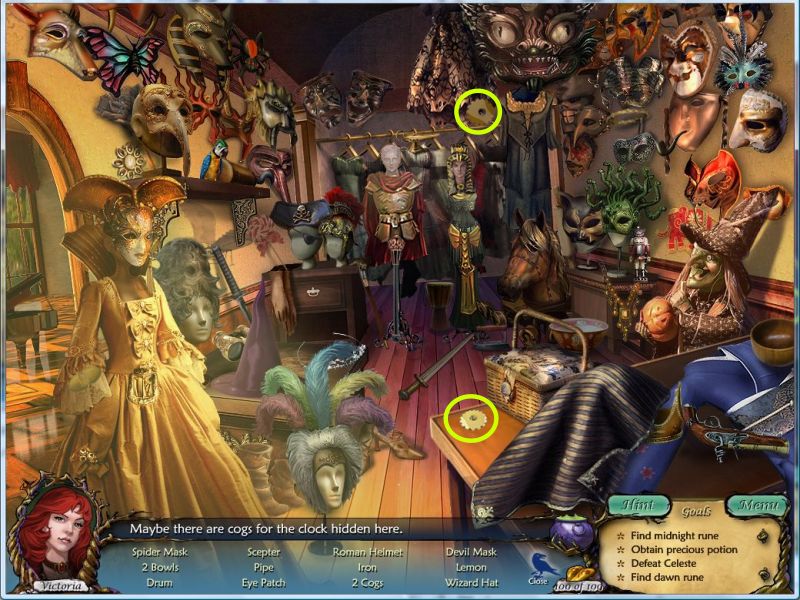
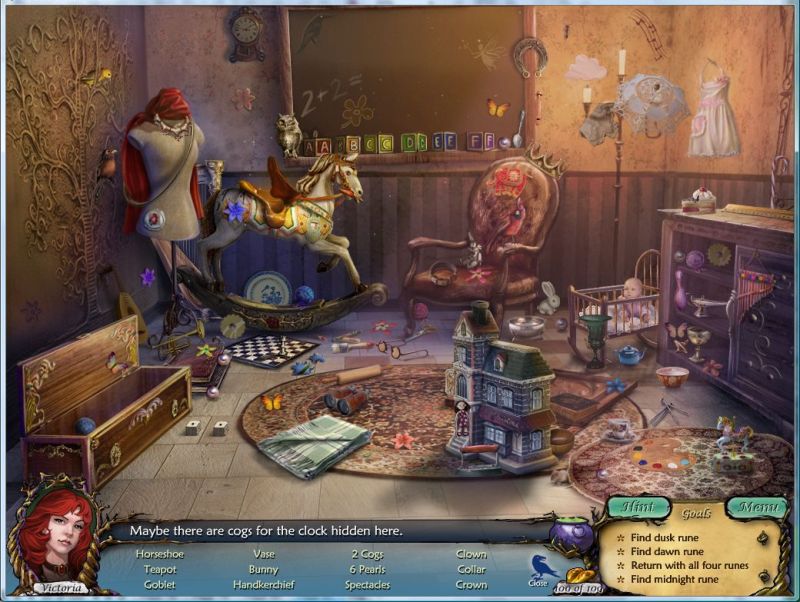
Click on the clock to see that it's missing parts and then go into the Ballroom on the right.
Click on the Crow for a close up of the stage.
Pick up the 2 cogs for the clock as well as the other items on your list.
4 bells, 4 gems and 3 buttons are marked on the screen shot.
Screenshot
Go right into the costume room and click on the crow.
Pick up the 2 cogs and the other items on your list.
Screenshot
Go to the Ballroom through the door at the left and then click twice on the bottom of the scene.
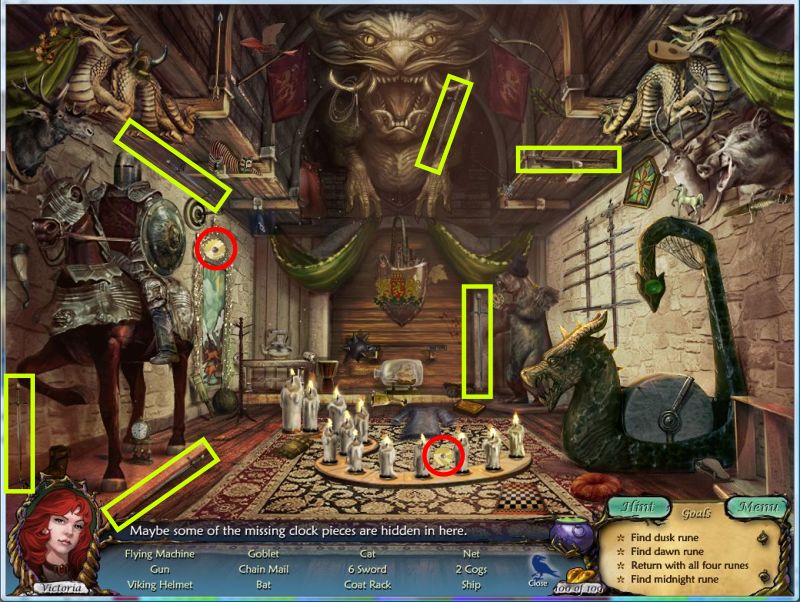
You are now in the Hallway so take the first door into the Weapon Room and click on the crow.
Pick up the 2 cogs.
6 swords are marked on the screen shot as well.
Screenshot
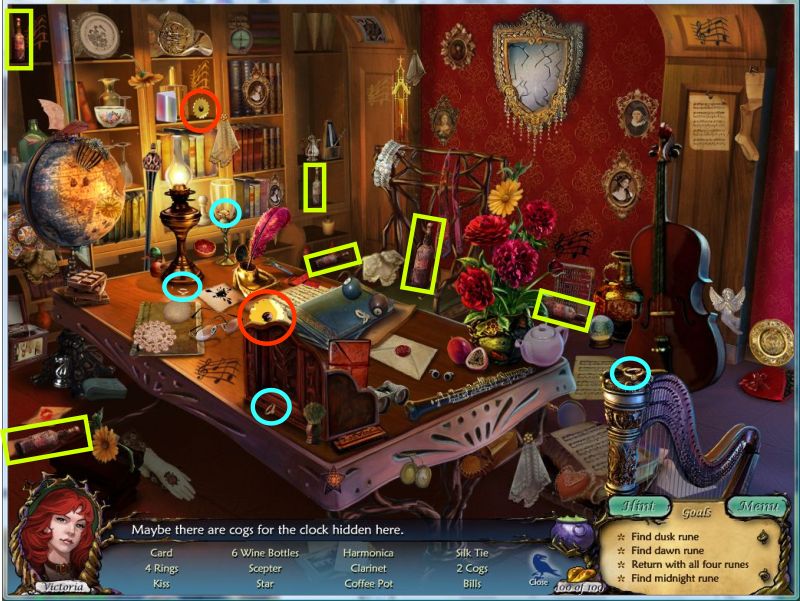
Go back to the Hallway at the bottom of the scene and head to the Study.
Click on the crow and collect your list.
There are 2 cogs here.
6 wine bottles and 4 rings are marked on the screen shot as a reminder in case of need.
Screenshot
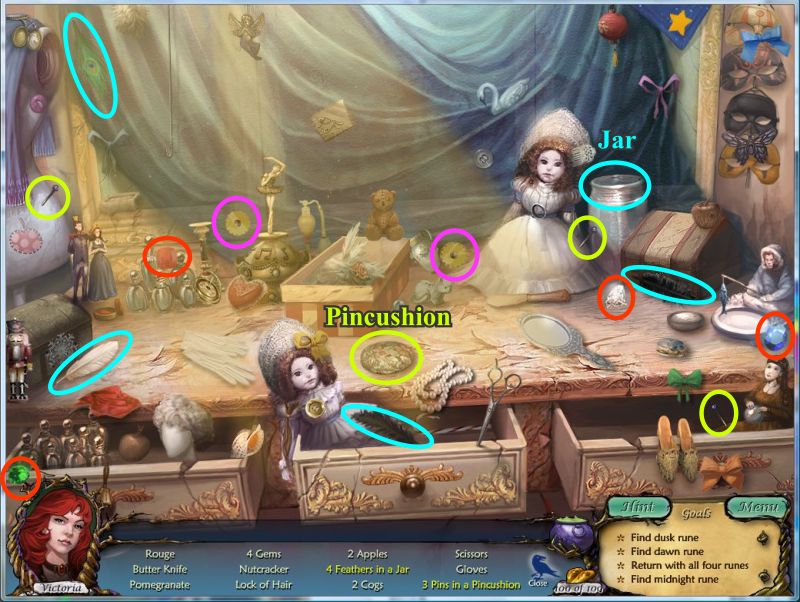
Click at the bottom of the scene twice to go to the Hallway and then Bedroom.
Click on the crow and collect the 2 cogs as well as the rest of your list on the dresser.
Pick up the 4 feathers and place them in the jar.
Grab the 3 pins and put them in the pincushion.
4 gems are also marked on the screen shot.
Screenshot
Go through the door to the Antechamber and click on the crow.
Pick up the 2 cogs.
4 balls of yarn and 6 pearls are marked in the screen shot.
Screenshot
Click to go to the Bedroom - exit to the Hallway and go down the stairs to the Grand Foyer.
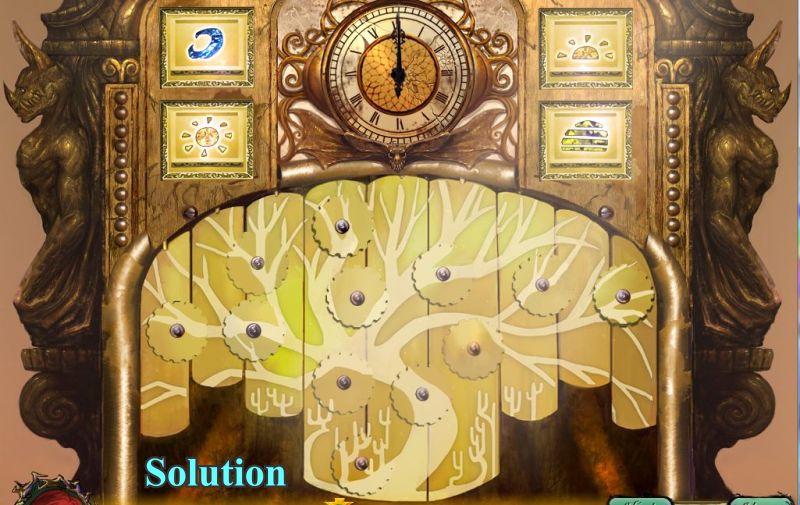
Click on the clock and place the hands from your Inventory.
There are 12 cogs to be placed in their particular place on the tree. Once they are placed correctly, they can be turned until they fit.
If you make a mistake and a cog won't turn, you can reset the puzzle.
The screen shot shows all of the cogs and they are numbered to show where they go.
Screenshot
The screen shot shows how the puzzle should look when you have finished.
Pick up the 4 runes and exit down to the Grand Foyer, out the door to the Courtyard and go right into the Aviary.
Screenshot
Click on the Moon Pedestal and place the 4 runes.
Take the third key and exit down to the Aviary and then down again to the Courtyard.
Screenshot
Cross the Courtyard to the Garden and go through the Fountain entrance to Celeste's Chamber.
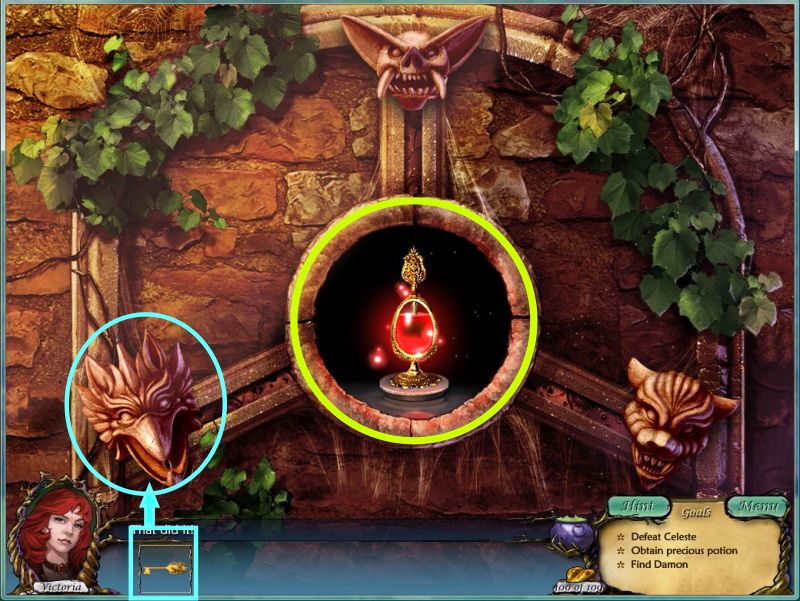
Go through the broken mirror to the Tower Room and click on the Tower lock.
Place the key in the last gargoyle and take the potion for Damon.
Exit down to the Tower Room and go back through the broken mirror on the left.
Click down 3 times until you get to the Courtyard. Go through the door to the Grand Foyer and right into the Ballroom.
Screenshot
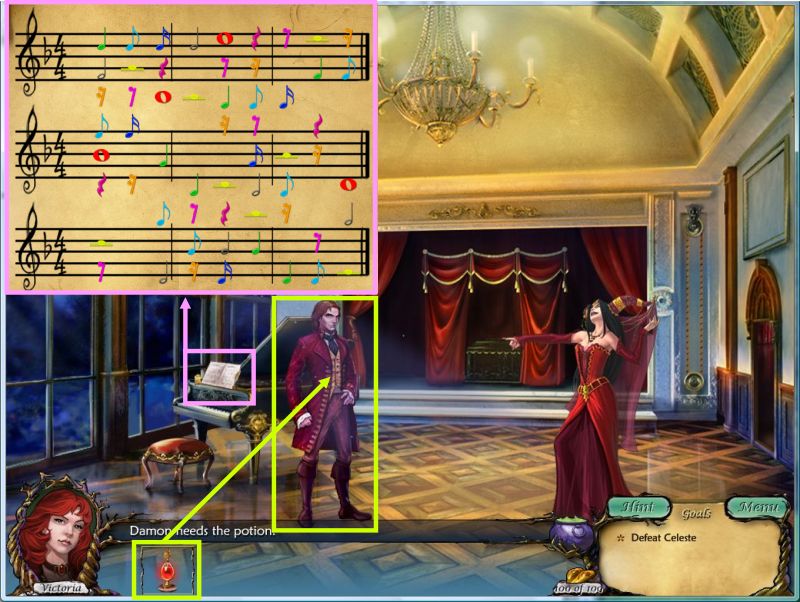
Give the Potion to Damon who cannot decide whether to drink it or not.
Click on his music at the piano to decide you can fix what is wrong.
Screenshot
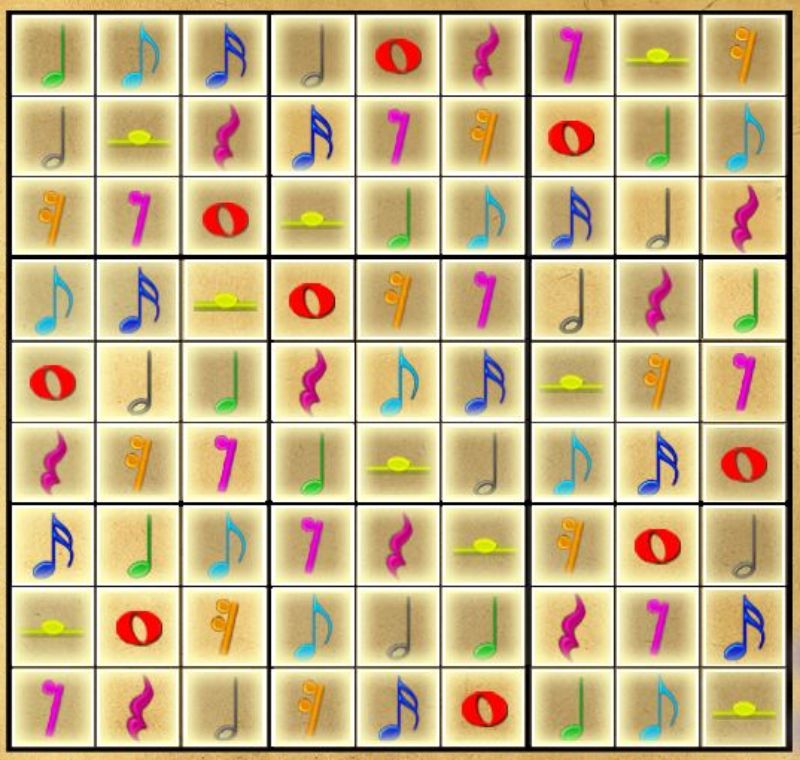
This mini game will require you to place the musical notes and characters so that there is only one of each for every horizontal and vertical row.
The screen shot has the solution.
Screenshot
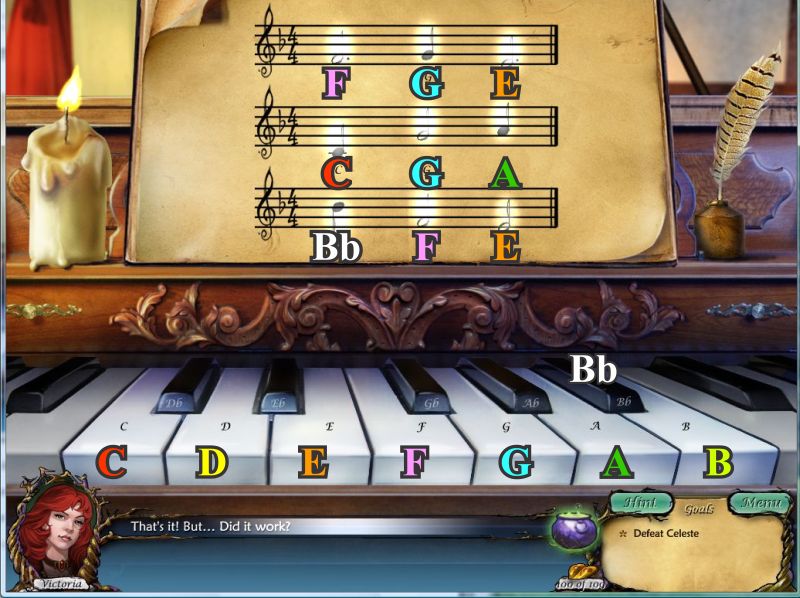
Now you need to play the corrected composition for Damon.
Screenshot
If you have all 100 Golden Leaves, click on the cauldron to trigger a mini game.
The ingredients for the Glimpse of the Future are shown for each 10 leaves you collected.
Screenshot
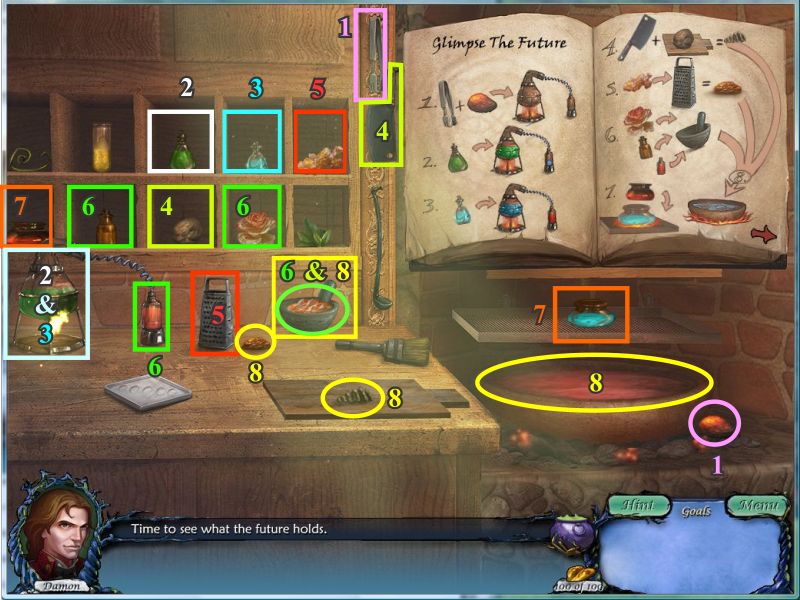
Glimpse of the Future:
All of the ingredients will go into the niches and the recipe in the book needs to be followed in order.
1 - Use the tongs to pick up the hot coal and light the burner marked in light blue.
2 - Place the green vial of spider venom in the burner.
3 - Pour the blue vial of fairy tears in the burner.
4 - Use the Cleaver to chop up the brown ball on the cutting board.
5 - Use the truffle on the grater.
6 - Place the blood rose, honey and contents of the burner vial in the mortar and pestle.
7 - Put the container of dragon blood on the tray above the bowl and it will turn blue.
8 - Place the two chopped and grated piles and the content of the mortar in the bowl and turn the page on the recipe book.
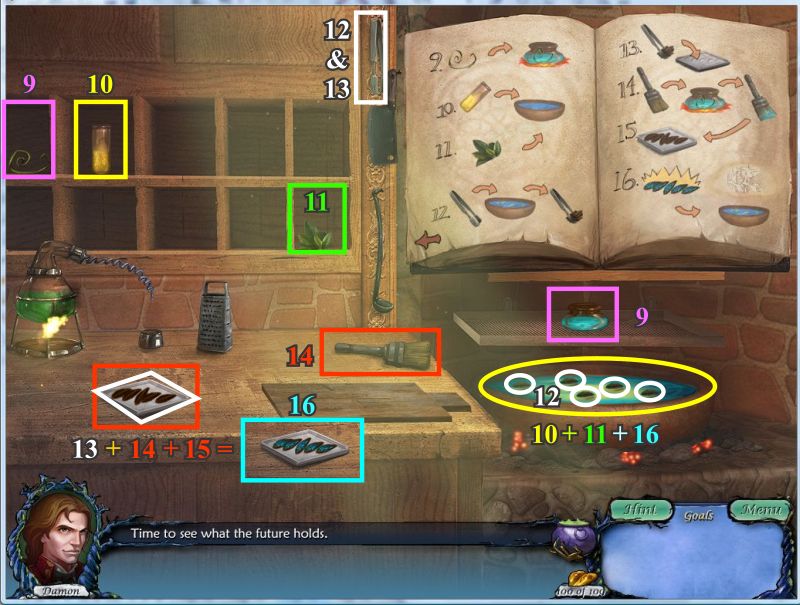
Screenshot
9 - Put the ogre hair in the cooked dragon blood.
10 - Pour the pixie dust in the bowl.
11 - Put the tea leaves in the bowl.
12 - Use the tongs to take the 5 pieces from the bowl.
13 - Place the chunks on the white plate.
14 - Dip the brush in the blue dragon blood and ogre hair mixture (#9).
15 - Paint each of the chunks on the white plate with it.
You need to do each piece separately so repeat steps 14 and 15 four more times.
16 - Place the marinated chunks in the bowl and wait for your Glimpse of the Future.
Screenshot
Congratulations! You have completed Love and Death Bitten!
Special thanks to Jazz for this fabulous walkthrough!
Posted by: grinnyp |
June 3, 2010 5:45 AM
|
June 3, 2010 5:45 AM