
Penny Dreadfuls Sweeney Todd
Platform: Mac, Windows

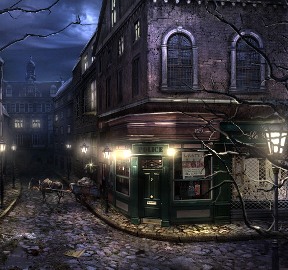
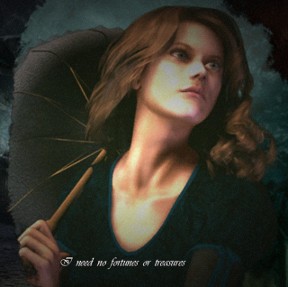
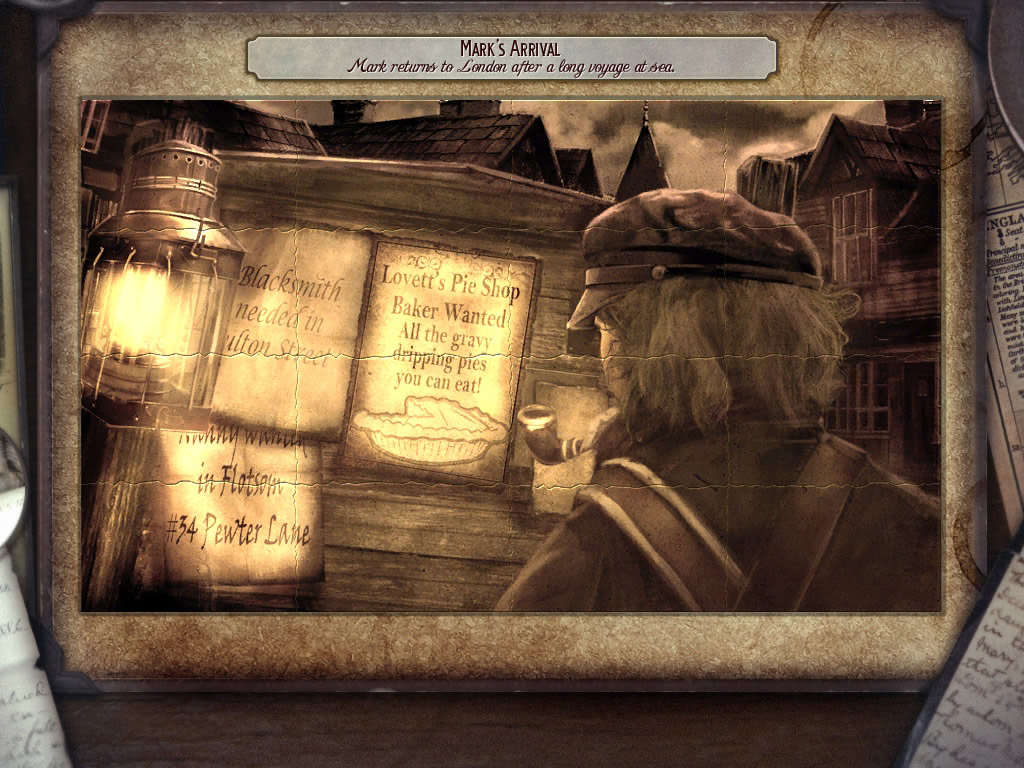
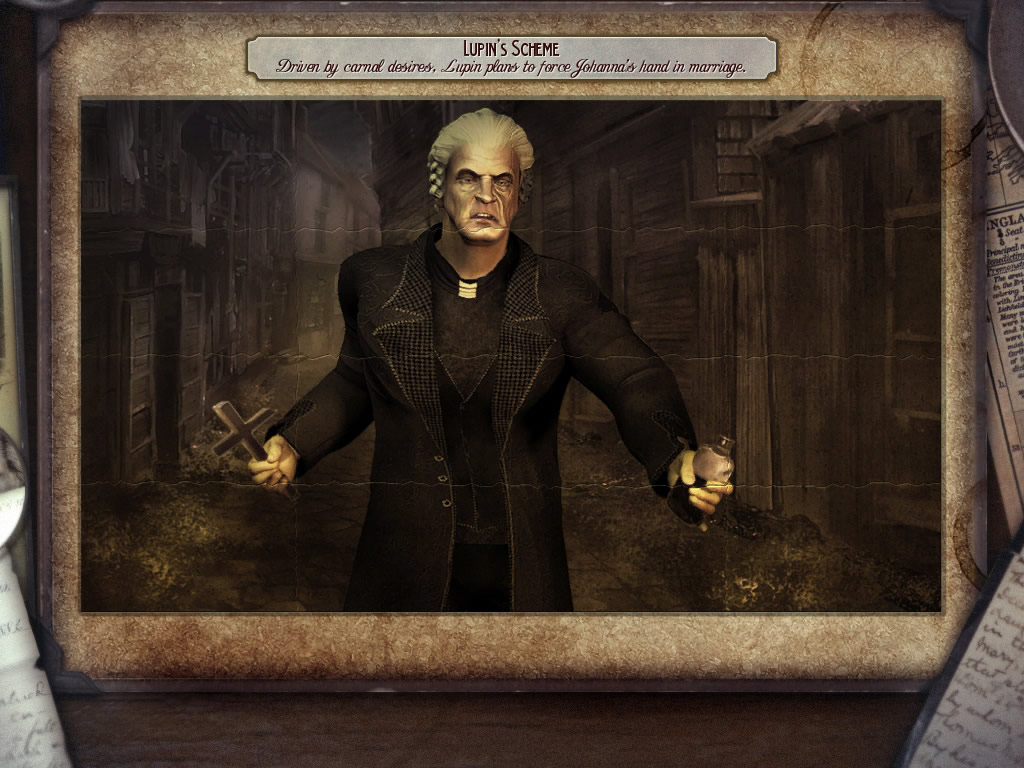
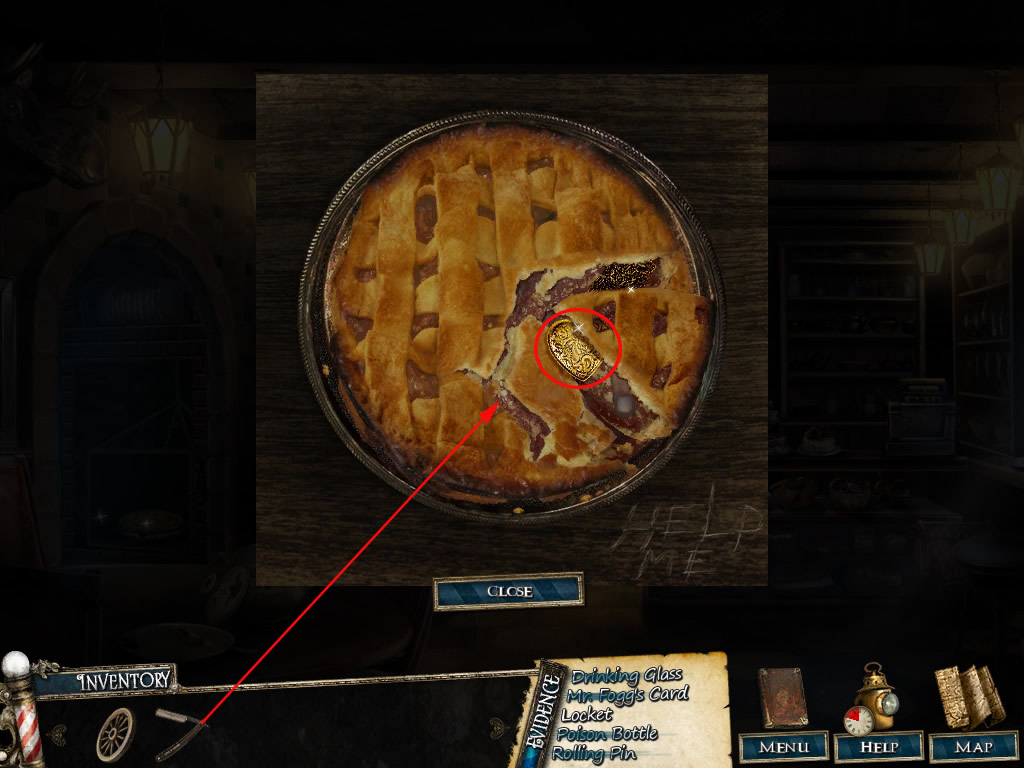
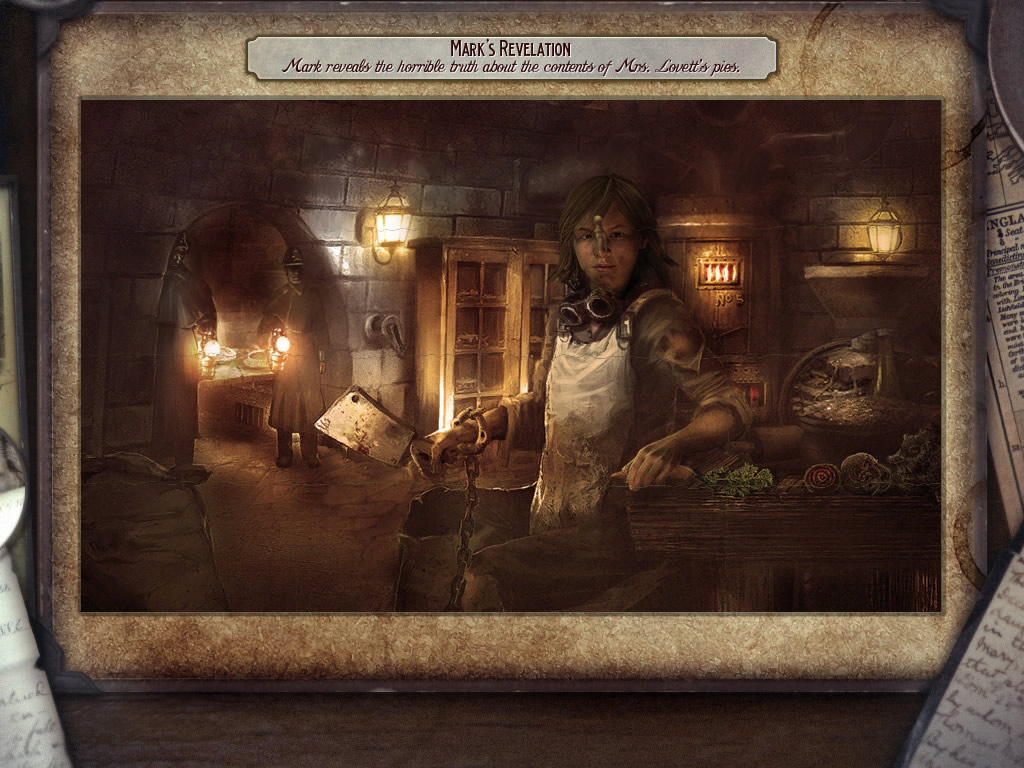
![]() I know what you need. You need a haircut. How can you expect to solve a crime with unruly locks like those? Johanna's fiance Mark has failed to return from his time at sea, made more mysterious by the claims people have made of seeing him on the streets of London until a short time ago. What begins as a quest to reunite two lovers ends up revealing a much more gruesome secret in Penny Dreadfuls Sweeney Todd, a hidden-object/point-and-click adventure with big production values and a grim story based on the original short story. Come to think of it, you look a bit peckish too. Fancy a slice of pie?
I know what you need. You need a haircut. How can you expect to solve a crime with unruly locks like those? Johanna's fiance Mark has failed to return from his time at sea, made more mysterious by the claims people have made of seeing him on the streets of London until a short time ago. What begins as a quest to reunite two lovers ends up revealing a much more gruesome secret in Penny Dreadfuls Sweeney Todd, a hidden-object/point-and-click adventure with big production values and a grim story based on the original short story. Come to think of it, you look a bit peckish too. Fancy a slice of pie?
 With the help ("help") of Fowler, one of London's finest, you'll need to scour London from edge to edge. Or at least, the seedier bits anyway. Navigation is left to the mouse, clicking on sparkles to investigate items or trigger hidden-object hunts. Once you gain the map, you can move through London by clicking on the map icon and choosing your location. Throughout each chapter, you're given a list of evidence to find, and once you've got it all, you'll have to literally piece together a puzzle to give you a clue as to what happened. And speaking of puzzles, you'll have your share of those, as well. The genre's old stand-by, "move this blocks to slide these pieces over here", makes an appearance, but the rest are a mostly clever mish-mash of various puzzle types that keeps the game from feeling stale.
Happily, Sweeney Todd's outstanding visuals lend themselves to some very well done hidden-object scenes. They're immensely detailed and can be challenging without being obnoxiously crowded. More than once I found myself reaching for the recharging hint button. It's a bit disappointing to see that they apparently couldn't find enough items from each scene's location to make the pictures look more natural, instead of stuffing, say, a laundress' work space with peas, lollipops, and other toys.
But while the HOG and puzzle scenes are by and large very well done, the standard adventuring on the streets of London falls to the same spotty logic that occasionally trips up other point-and-click games. Examples include making keys from the ground, triggering a bear trap, and cleaning a cash register with a solution you probably won't immediately think of unless you're a seventeenth century housewife. It's especially frustrating since at the time you'll have several items that could serve the purpose just as well. It's annoying because after the third time it happens, it starts feeling less like a misguided idea the developer had, and more like a cheap way to pad the gameplay.
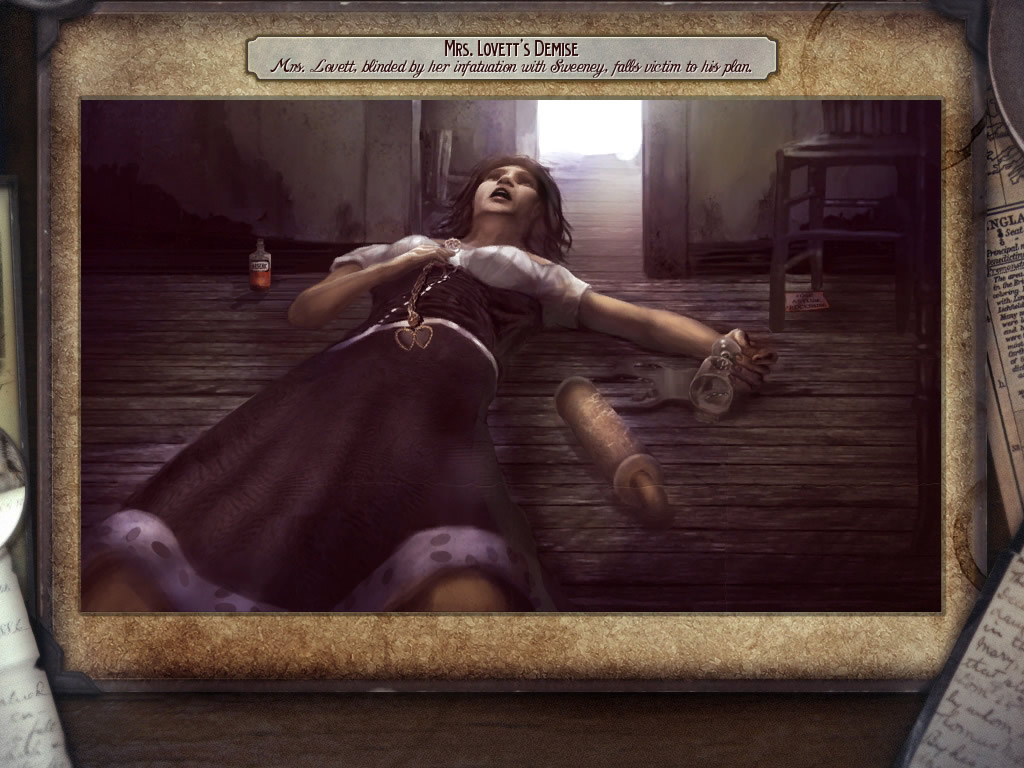
 Analysis: Based (loosely) upon the original penny dreadful story that started the legend, although much more pared down, this Sweeney Todd is less a tragic figure exacting his own brand of justice, and more a greedy fellow you wouldn't want to meet in a dark alley. At least, not without something protecting your sweet, luscious throat. The story unfolds in story-book style cutscenes between chapters, and while I might have wished they were integrated a bit more into the actual gameplay, I was typically enjoying myself too much to care. Sweeney Todd possesses one of the most all-around lavish presentations in a HOG to date. The environments are beautiful, the character models (mostly) well done, and it's extremely entertaining despite a somewhat anti-climactic ending.
The only sticking point, in fact, may be the singing. Sort of singing. What might be called singing. It's hardly the actors' fault, since most of them have perfectly serviceable voices. The trouble lies in the fact that they're not singing songs at all; just ordinary conversation. They pick up and drop tunes in the same sentence, and nobody really sounds like they're working from the same script. I actually enjoyed it, but depending on your approach to it, it's either hilariously over the top, or incredibly annoying. Imagine I came up to you and asked you where I could find the post office. Now imagine I did it by warbling each word into what could charitably be called an off-key tune. Not only would it be frustrating, but think of the inconvenient jail time after you started thrashing me when I refused to stop.
Penny Dreadfuls Sweeney Todd is a remarkably polished title and marks the start of a very high quality series to watch out for. You can expect to sink several hours into the game, if not longer. It isn't a perfect title, but it does definitely earn its place amidst the cream of the crop. Give the demo a chance to woo you over. And hey; it's also the only game out there that can give you the closest shave in town.
A Collector's Edition is also available. It contains an in-game walkthrough that can be handy for some of the game's more odd-ball puzzles, and the ability to instantly replay any hidden-object scene or puzzle from the Extras menu, along the soundtrack and more. Remember that Big Fish Game Club Members pay only $13.99 for Collector's Editions (or 2 club credits), and collector's editions count 3 card punches of 6 total needed for a free game.
![]() Windows:
Windows:
Download the demo
Get the full version
Also available: Collector's Edition
![]() Mac OS X:
Mac OS X:
Download the demo
Get the full version
Also available: Collector's Edition


Walkthrough Guide
(Please allow page to fully load for spoiler tags to be functional.)
Penny Dreadful's Sweeney Todd ~ Walkthrough
General
You have 2 possible modes:
Casual: No punishment for wrong clicks, active scenes are sparkling at once, the hint refreshes quickly
Challenge: Punishment for wrong clicks, active scenes start sparkling later, hint needs longer to refresh
After start playing you cannot change the chosen mode.
The lantern low left corner is your hint.
Click first an object on your list then the lantern - the object area will be shown with a red square.
Mini games can be skipped after a short waiting period.
Beside the normal search list, you will always have another list with objects for a complete chapter - this are the evidences and will be used for a puzzle at the end of each chapter.
Ho-scenes are random - after finishing them, you will receive an inventory object, that does not always appear on your list.
The walkthrough shows the fastest way through the game. You can choose another order of visiting the different areas in a chapter, but be aware, that some things might not work before others isn't done.
The walkthrough was made with the Collector - Edition - but basic game play should be exactly the same.
Investigation 1
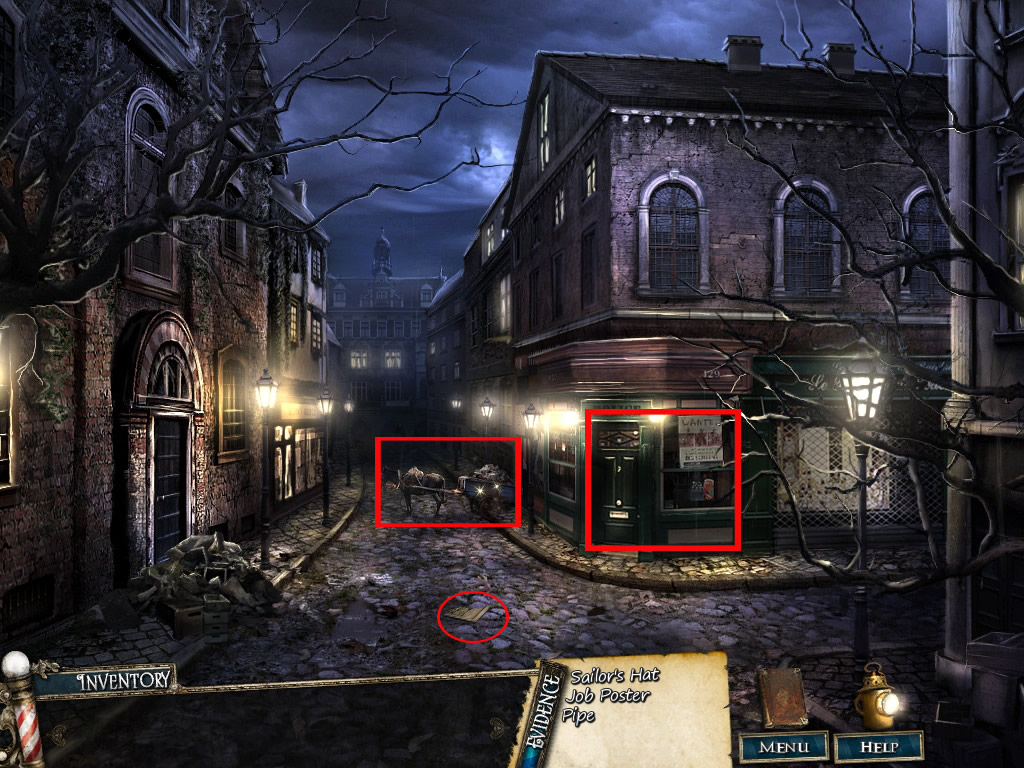
Watch Lane: On the Street
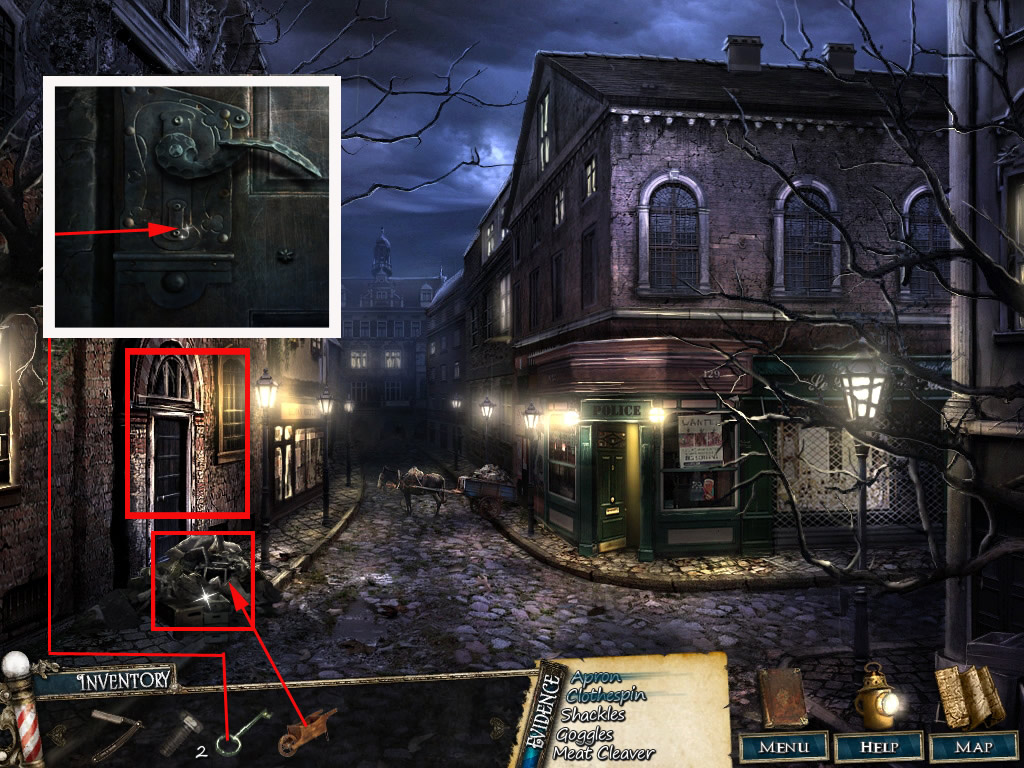
Pick up the part of a map and click the barrow in the back.
Play the hidden object scene - you will receive a puzzle stone.
Screen shot
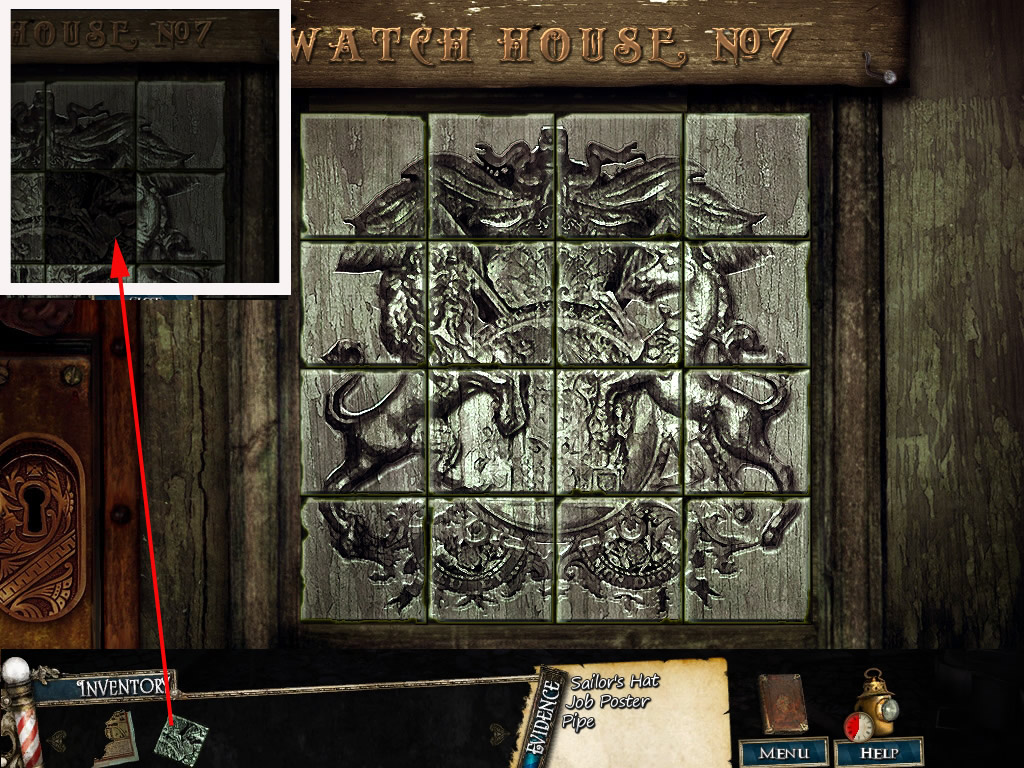
Click the watch house's door - a window opens - place the puzzle stone in the middle.
A puzzle opens - rotate the tiles by clicking them till the police emblem is correct again.
Screen shot
Click the door to enter the watch house.
Watch House - Inside
There is a lantern in the middle of the scene - grab it.
Click the newspaper on the chair left and pick up the coin in the closer view.
Play the ho-scene at the table far right - you will receive a whistle.
Click the card at the left wall and place your part of the map.
Now you have the London map inside your bar low right. You will need it to navigate from one place to the other.
Leave the watch house and play the second ho-scene at the barrow.
This time you receive bellows.
Use the map and choose Lime Wharf.
Screen shot
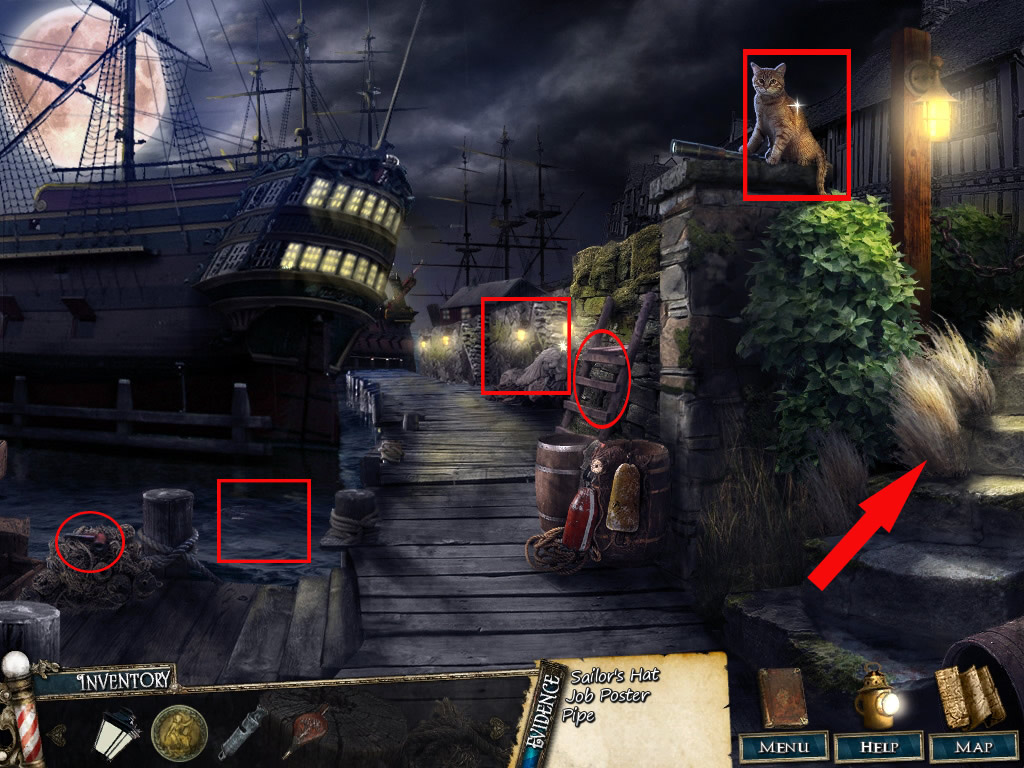
Lime Wharf - At the water
Low left corner you will find a smoking pipe.
Click the ho-scene at the wall in the back - you will receive a cannon ball.
You may click the water, something is there, but you do not have the right tool yet.
The cat is holding a spyglass, but there is no way to get it from her yet.
Get the ladder, leaning at the wall, left next to the cat.
Use the Steps.
Screen shot
Lime Wharf - Above the steps
Use the whistle to scare away the seagull.
After she flow away click the nest and get the egg and the stone out.
Click the showcase of the house right side - you will see a "Wanted" poster.
Use the stone to smash the glass and get it.
Click the hanging basket at the left to get a closer view.
Place the canon ball inside the basket and it will move done, lifting the bags in front of the laundry.
Enter the laundry.
Screen shot
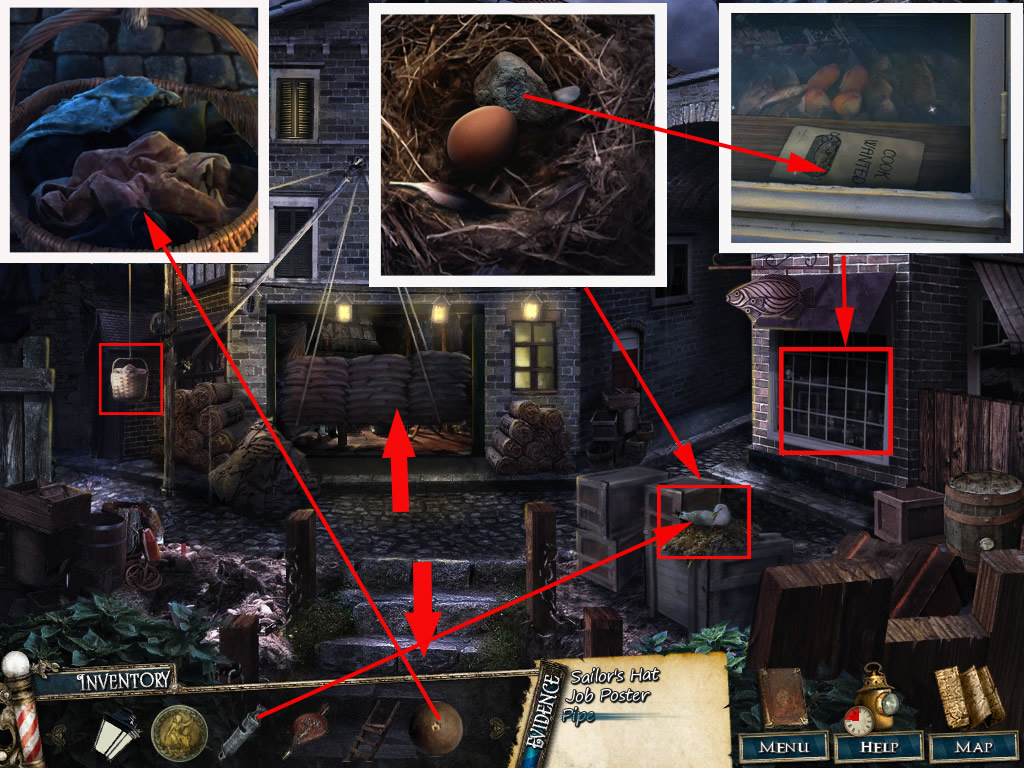
Lime Wharf - Laundry
Click the basket low left corner - in the closer view you can pick up a briquette.
Click the fireplace and place first the briquette, then use the bellows.
Now you can see - pick up the cloth from the table and play the ho-scene far right side.
You will receive a sailors hat.
Screen shot
Now you will have to solve a jigsaw to finish the first investigation.
Drag the parts with pressed mouse button at the right place and click again.
Correct placed parts will lock.
Screen shot
Investigation 2
Bakers Court - Inside
As there is nothing you can do outside, enter the bakery.
Click the sugar bowl on the table low left - in the closer view you can open it and get out a coin.
Take the cup, left side of the fireplace.
Click the showcase and play the ho-scene. You will receive matches.
You do not have the right tools for the other hot spots in this scenes.
Screen shot
Leave the bakery.
Click the news board left side.
You will get a closer view - place the lantern at the hook and light it with the matches.
Play the ho-scene and you will receive have a rose-emblem.
Screen shot
Choose Piccadilly Square on the map
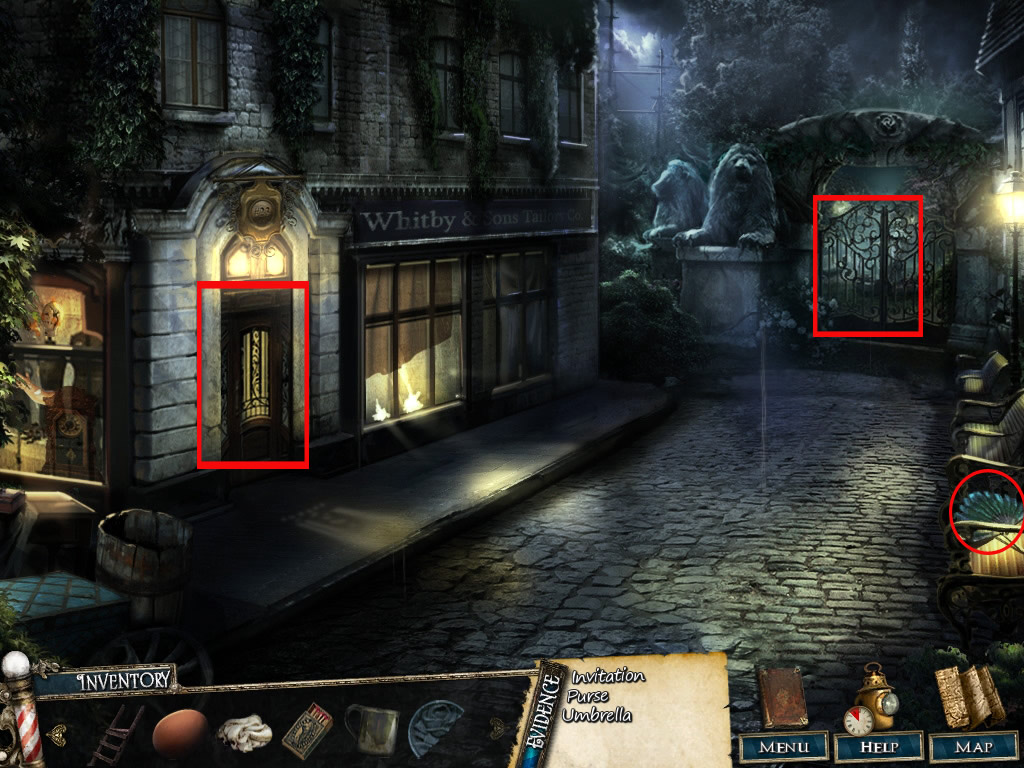
Piccadilly Square - Gate
Screen shot
Click the gate far right, as there is nothing you can do here right now.
Click the bird bath right next to the gate.
You will get a closer view - get the cup out of the inventory and fill it with water.
Click the cup to get it back into your inventory.
Inside the bath you can now pick up a handle.
Click the gate and use the handle to open it in the closer view.
Screen shot
Click the gate again, it will open and reveal a ho-scene at the fountain.
Play it to receive a coin.
Go back and pick up the fan low right side.
Enter the tailor.
Piccadilly Square- Tailor
Click the ho-scene far back. You will receive a scissors.
Get the umbrella right side.
Click the male mannequin - cut the pocket open with the succors and find half of a rose emblem.
Click the table left side and pick up the chalk in the closer view.
Screen shot
Go back to the gate.
Piccadilly Square - Gate
Examine the base of the lion statue on the left.
Place both rose emblems into the empty slots to trigger a puzzle.
Your goal is to arrange the blades so that no 2 blades overlap each other.
Drag a blade around to reposition it.
Use first the long yellow one and drag it till it stands vertical.
Now use the small yellow on and position it on 1 and 5 o'clock.
Now place the orange one.
For the solution please have a look at the screen shot
Screen shot
The base opens and you can pick up a purse.
Choose Bakers Court on the map
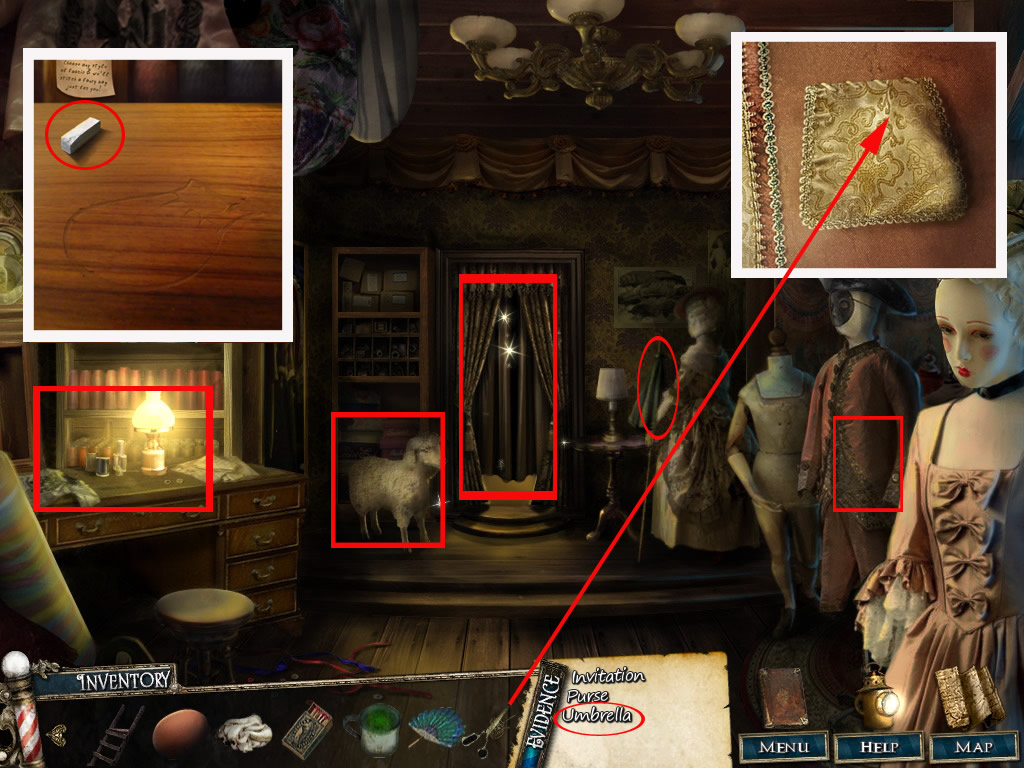
Bakers Court - Bakery
Enter the bakery and click the cash register.
Use first the chalk and then the cloth with it.
Now you can see empty spots for the three coins from your inventory.
Screen shot
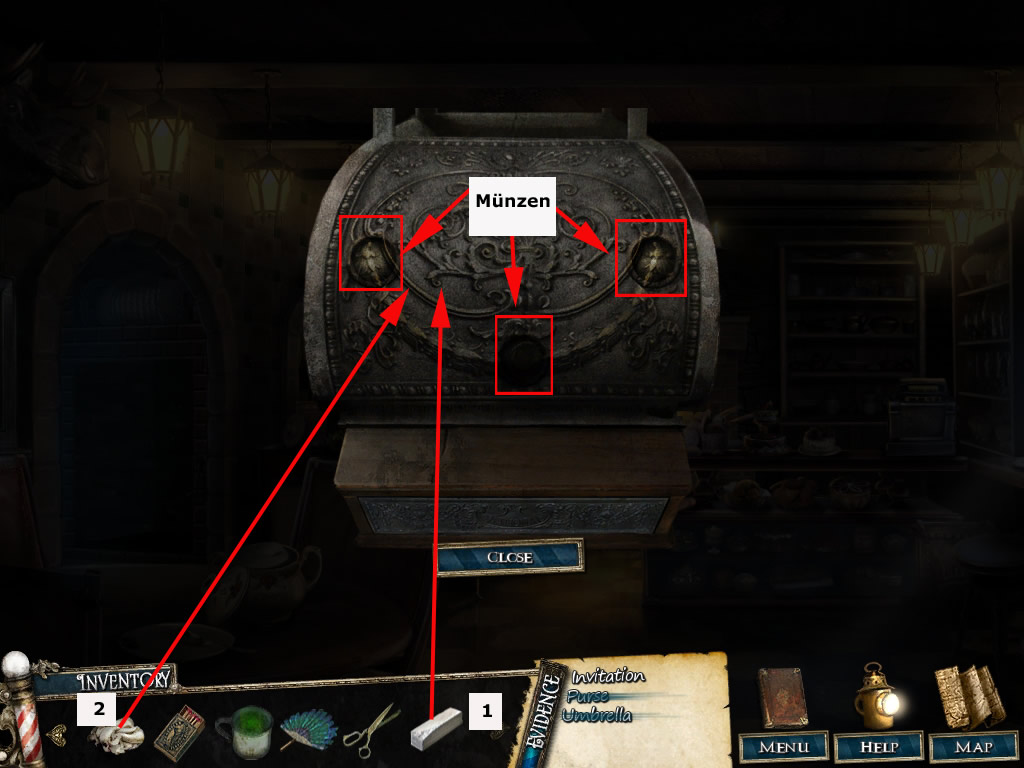
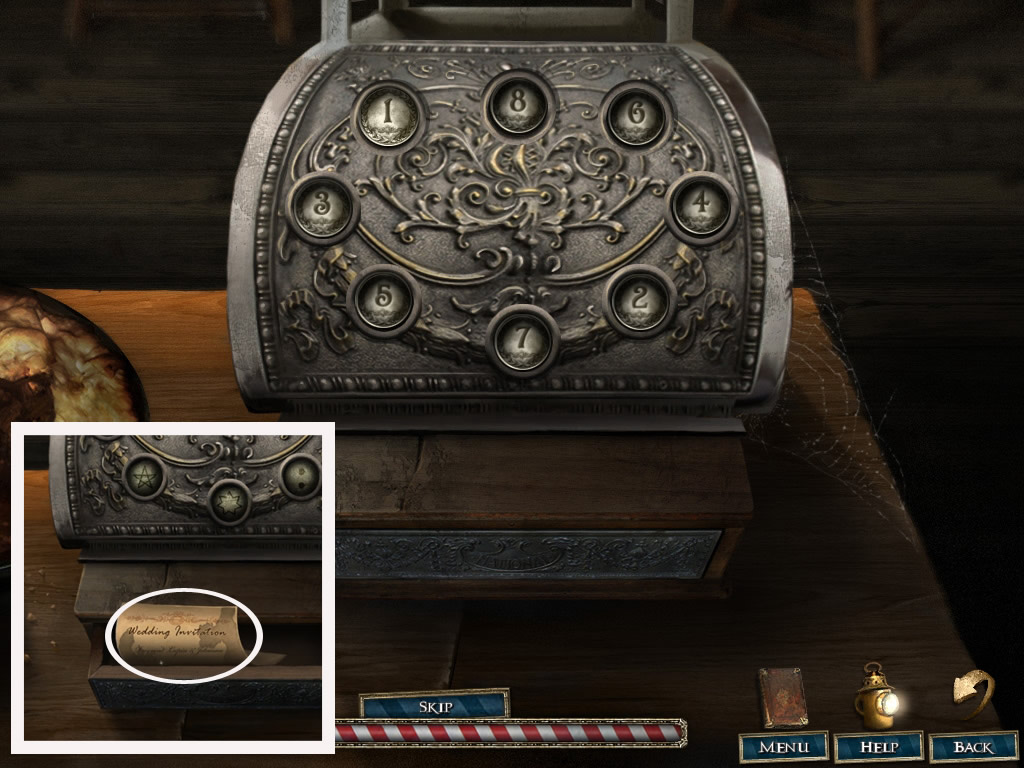
This will trigger a puzzle.
Click the coins you see and drag them a little to the side. Underneath you see a geometrical shape.
Count the edges of the shape - click then first the coin laying on this shape and then the coin with according edge number - as it they will swap places.
Do so till all coins are in the right slot.
The cash register opens and you can get the last evidence, the wedding invitation.
Screen shot
Now you will have to solve a jigsaw to finish the investigation.
Drag the parts with pressed mouse button at the right place and click again.
Correct placed parts will lock.
Screen shot
Investigation 3
Bell Tower - Outside
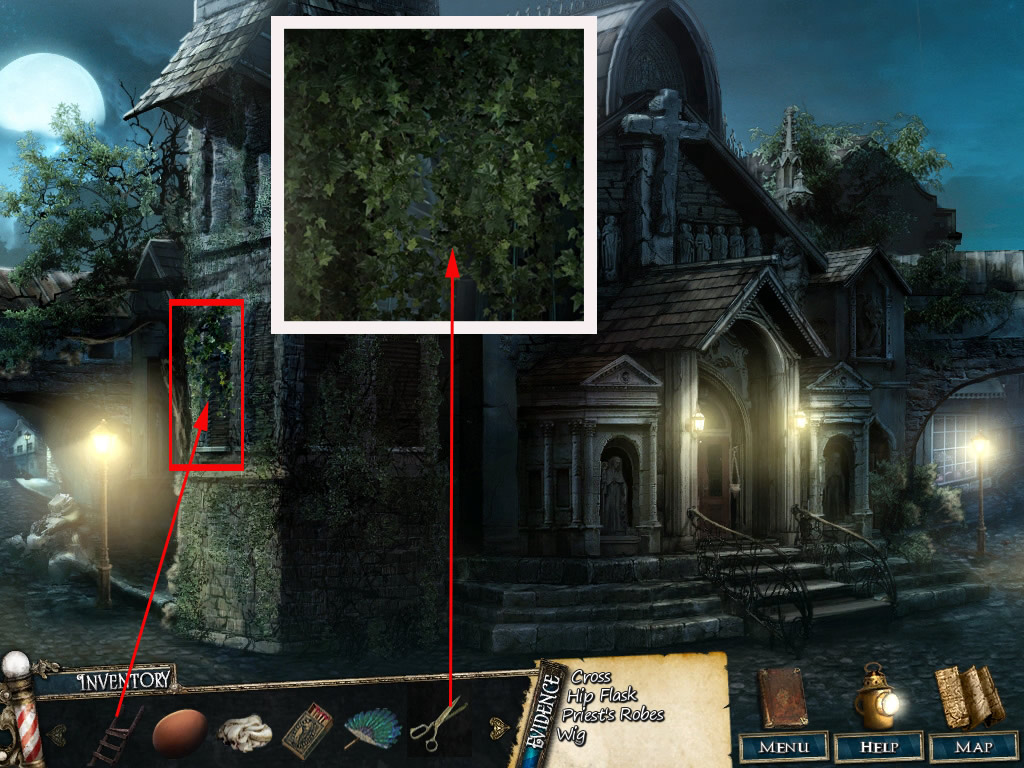
Click the window left side with the ladder.
Click the window again and remove the leaves in the closer view with the scissors.
Now you can play the ho-scene.
You will receive a book.
Screen shot
Choose Piccadilly Square on the map
Piccadilly Square - Fountain
Click the scene and play the new ho-scene at the fountain.
You will receive a fish.
Next place to go is Lime Wharf.
Lime Wharf - At the water
Give the cat the fish - she will let fall the spyglass and you can pick up a lens from the ground.
Choose Junk Street on the map
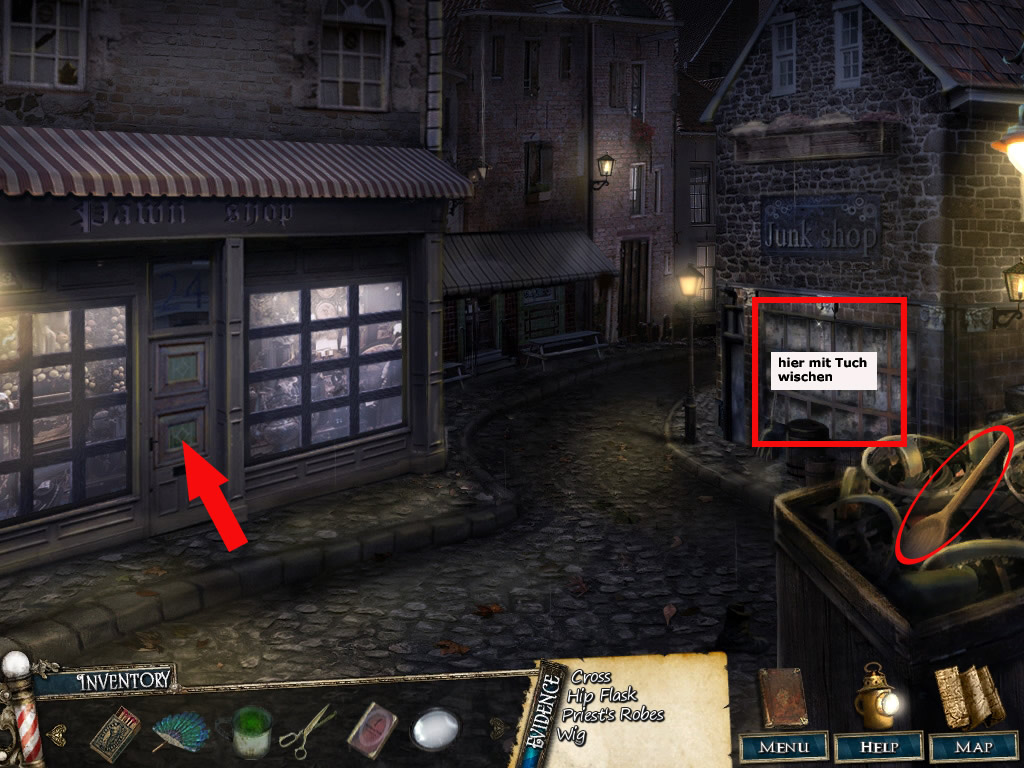
Junk Street - on the street
Get the wooden spoon out of the trash bin, low right corner
Get the cloth and clean the showcase right side.
Play the appearing ho-scene and receive a fishing rod.
Screen shot
Enter the pawnshop
Junk Street - Pawnshop
Get the cross out of the crate.
Use the succors to get a piece of cloth out of the flag upper right.
click the table in the back and drag the lens to the magnifier frame.
Screen shot
Play the ho - scene to receive a book.
Click the book crate right side and place your books from your inventory into the shelves, when you are in the closer view.
Screen shot
This triggers a puzzle.
Your goal is to place all the books in the right slots so that each row adds up to 15 and each column of books add up to 10.
Notice the markings all around the puzzle. These markings are clues as to how to place the books.
The solution is as follows, from top to right:
FIRST ROW: 3 - 5 & 2 - 4 & 1
SECOND ROW: 3 & 4 - 1 & 2 - 5
The books fall on the ground after they have been placed correctly.
Screen shot
Click the books on the floor and you will find incense.
Screen shot
Go back to Bell Tower.
Bell Tower - Outside
Click the door - give incense into the hanging bowl and and light it with the matches.
Click the handle - the door opens and you may enter.
Screen shot
Bell Tower Inside
Left side you have a ho-scene. You will receive organ keys for that.
Click the Organ and drag the keys at their place.
On top a candle appears - grab it.
Now click the altar - drag the candle in the closer view on the free holder in the middle.
Screen shot
This triggers a puzzle:
You goal is it to place the candles in the right order. From Sunday to Saturday, from long to small.
Which candle belongs into which holder you can see at the symbols on the holders and the book right side.
Sunday has in the book the symbol with the dot in the middle - look for this symbol at the holders and place the longest candle there.
Next size under Sunday has to come in the holder with the same symbol as the second one from top in the book.
Go on till you placed all candles.
Placing all candles right will light them.
Screen shot
The puzzle closes and a compartment at the altar opens.
Get out the hip flask for the evidence list.
Screen shot
Choose Lime Wharf on the map
Lime Wharf - At the water
Click the water in front of the ship and use the fishing rod to get out the priest's robe.
Click it to get it for your evidence list.
Screen shot
Use the steps and enter the laundry.
After playing the ho-scene you will receive the last evidence, a wig.
Now you will have to solve a jigsaw to finish the investigation.
Drag the parts with pressed mouse button at the right place and click again.
Correct placed parts will lock.
Screen shot
Investigation 4
Junk Street - Pawnshop
Go left into the pawnshop.
Play the hidden object scene to receive a lock pick.
Choose Fleet Street on the map.
Fleet Street - Outside
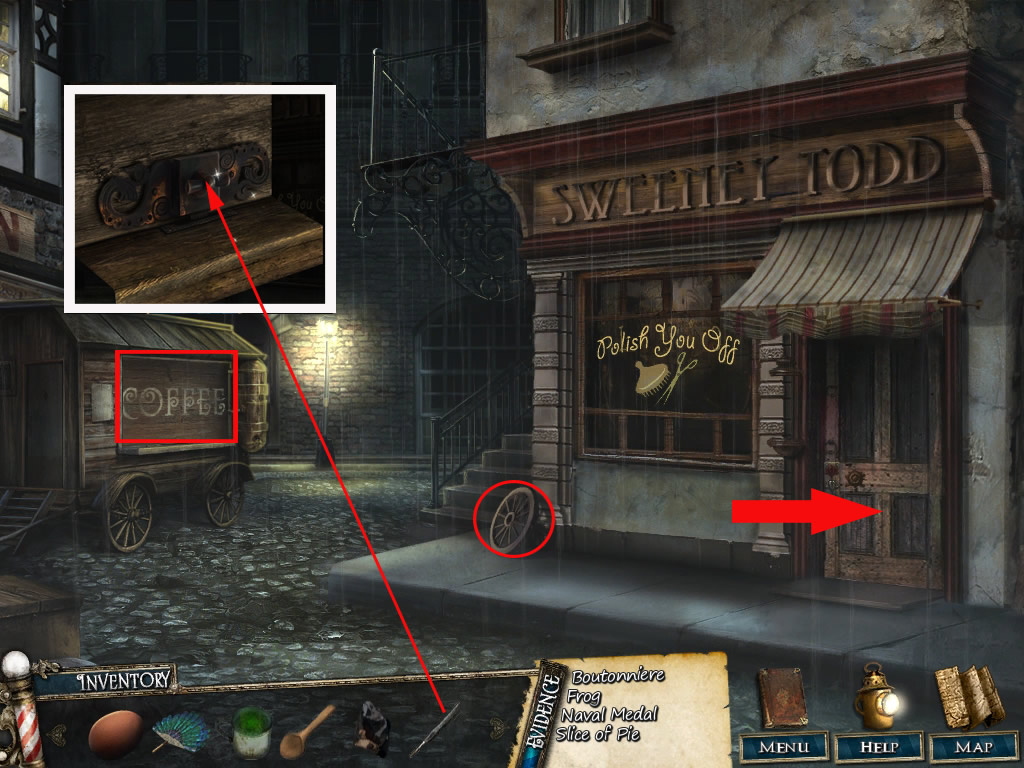
Get the wheel in front of the barber shop.
Click the window shutter from the coffee shop left.
Drag the lock pick onto the lock in the closer look and click again.
Screen shot
Play the ho-scene to receive milk.
Choose Piccadilly Square on the map.
Piccadilly Square - Tailor
Enter the tailor and play the ho-scene to receive needle and thread.
Click the table left side and drag the cloth onto the table.
Click needle and thread onto the cloth to sew a bag.
Click to get the bag into your inventory.
Screen shot
Choose Reagent Row on the map.
Lime Wharf - At the water
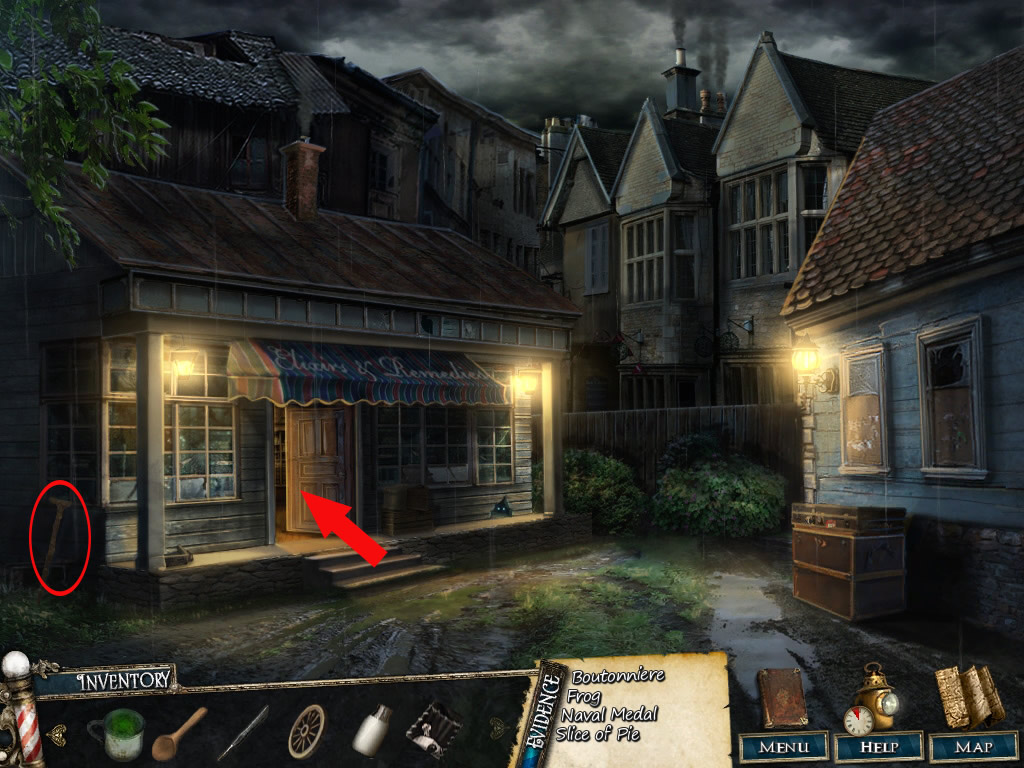
Get the crouch left next to the Elixirs Shop.
Enter the shop and play the ho-scene to receive a skull.
Screen shot
Your next location is Guttersnipe Alley.
Guttersnipe Alley - Outside
Click the wooden wheel from your inventory at the wheel barrow far middle.
Click the wheel barrow again to get it into your inventory.
Use the crutch to move the tent left side.
A ho-scene appears - you will receive a shoe.
Use this shoe to smash down the wasp nest above the door of the house right side.
Get the bag out of your inventory and click it at the wasp nest to remove it.
Screen shot
Enter the house.
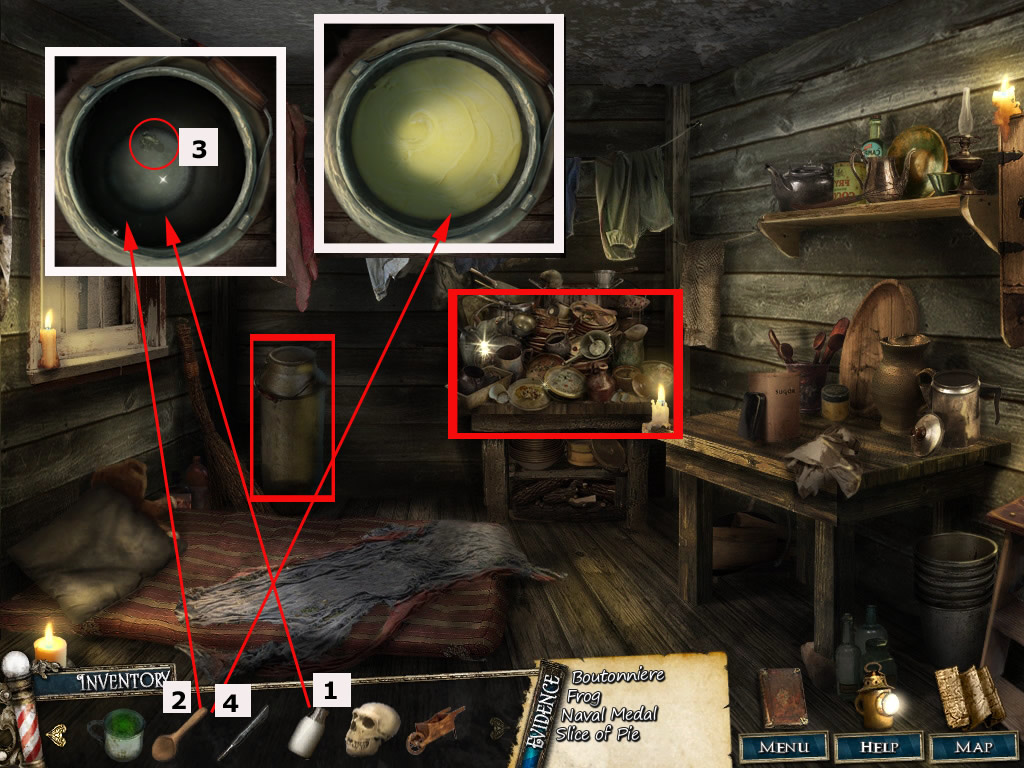
Guttersnipe Alley - Inside
Play the ho-scene in the back and receive a mouse trap.
Click the milk can far left - the closer view will show you a frog at the bottom of the milk can.
Drag the milk of your inventory into the can.
Use the wooden spoon a few times at the frog.
He will struggle with the legs and the milk becomes butter.
Click the frog for your evidence list.
Use the wooden spoon again with the butter and get it back into your inventory.
Screen shot
Go back to Reagent Row.
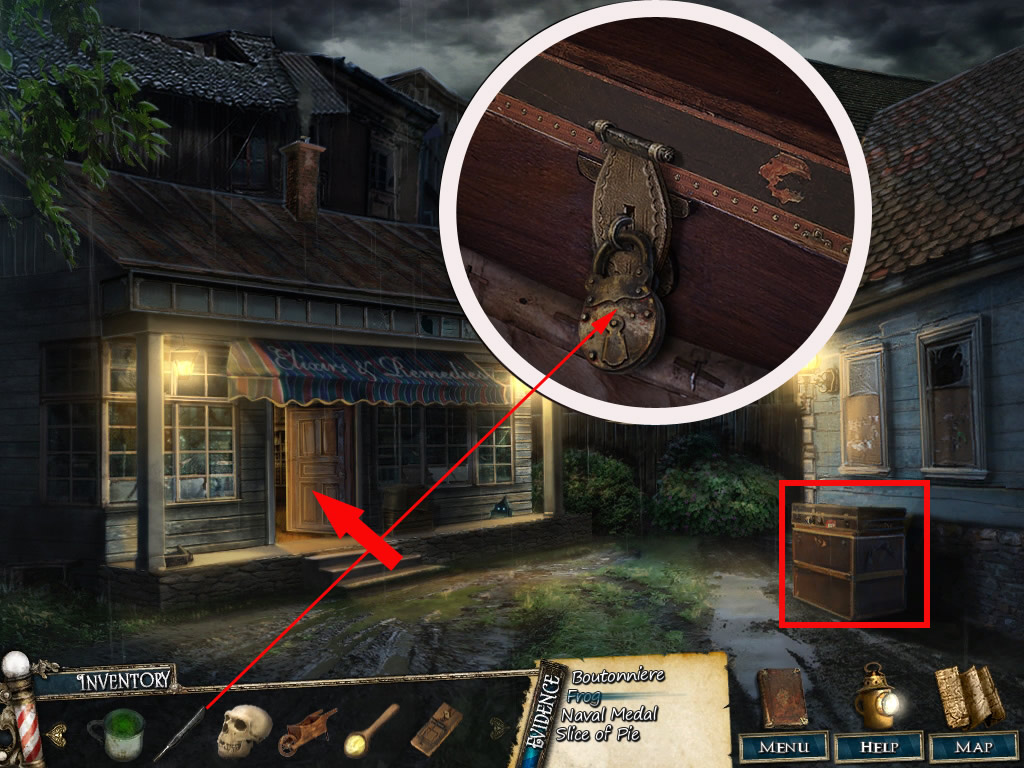
Reagent Row - Outside
Click the trunk right side - use your lock pick in the closer view to open the lock.
Play the ho-scene to receive peanuts.
Screen shot
Enter the Elixirs shop.
Reagent Row - Inside
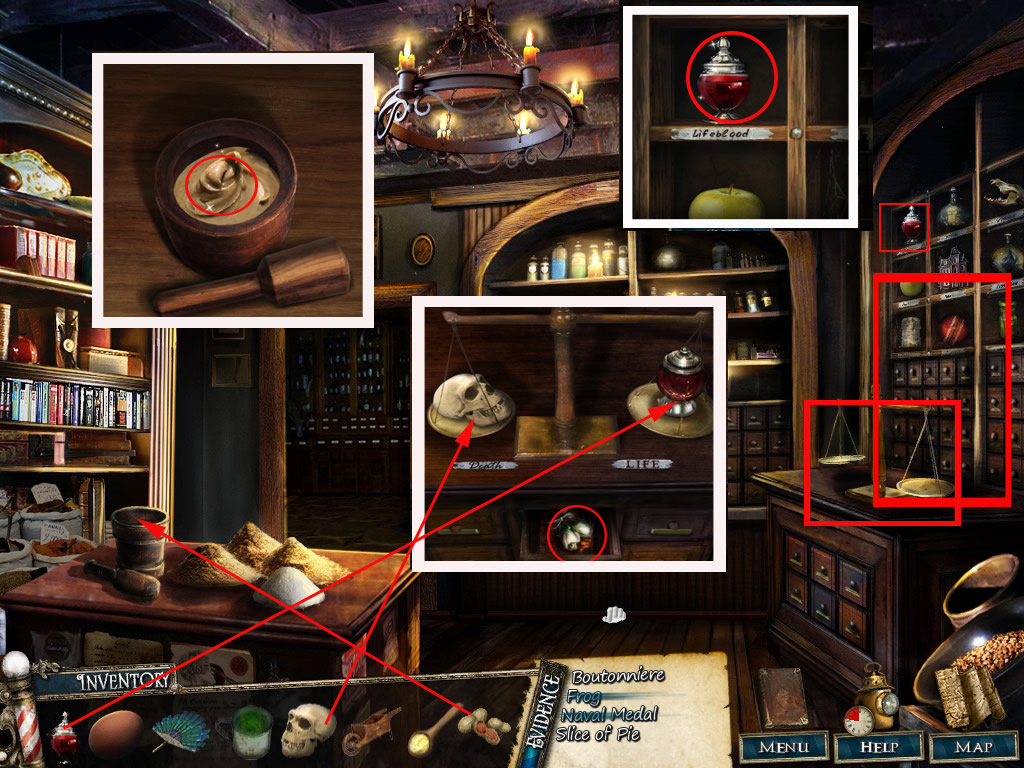
Click mortar and pestle on the table left side.
You will get a closer view - drag the peanuts into the mortar and use the pestle to make peanut butter.
Click the peanut butter to go into your inventory.
Screen shot
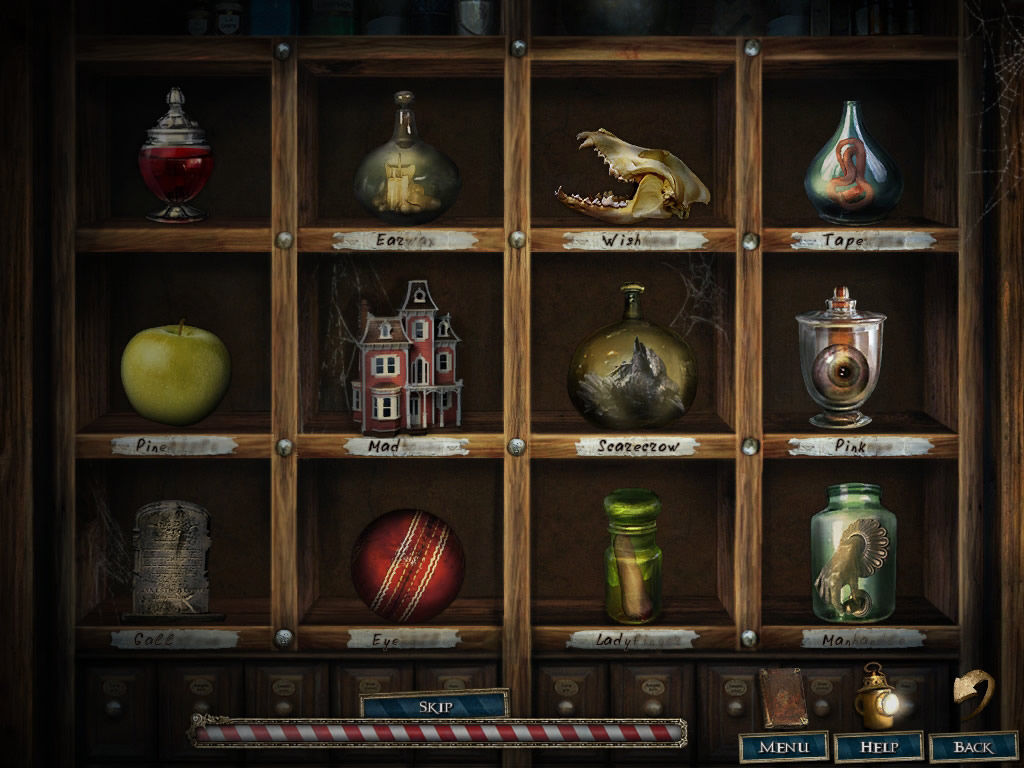
Click the shelf on the left to trigger a puzzle.
Your goal is to sort the jar into their proper slots.
The labels under each jar give you a partial word, this are your hints.
You must figure out which word might have a connection with the content of which jar.
Click on two items and they will swap places.
From left to right, the solution is:
Blood - Candle (Earwax) - Skull (Wishbone)- Worm (Tapeworm)
Apple (Pineapple) - House (Madhouse) - Crow (Scarecrow) - Eye (Pinkeye)
Tag (Calltag )- Ball (Eyeball) - Finger (Ladyfinger) - Hand (Manhandle)
Click the shelf again and grab the vial with blood.
Screen shot
Now click the scale at the left - drag the skull from your inventory to the left (Death) and the blood to the right (Life).
The drawer below will open and you can pick up a flower bouquet for your evidence list.
Leave the house.
Reagent Row - Outside
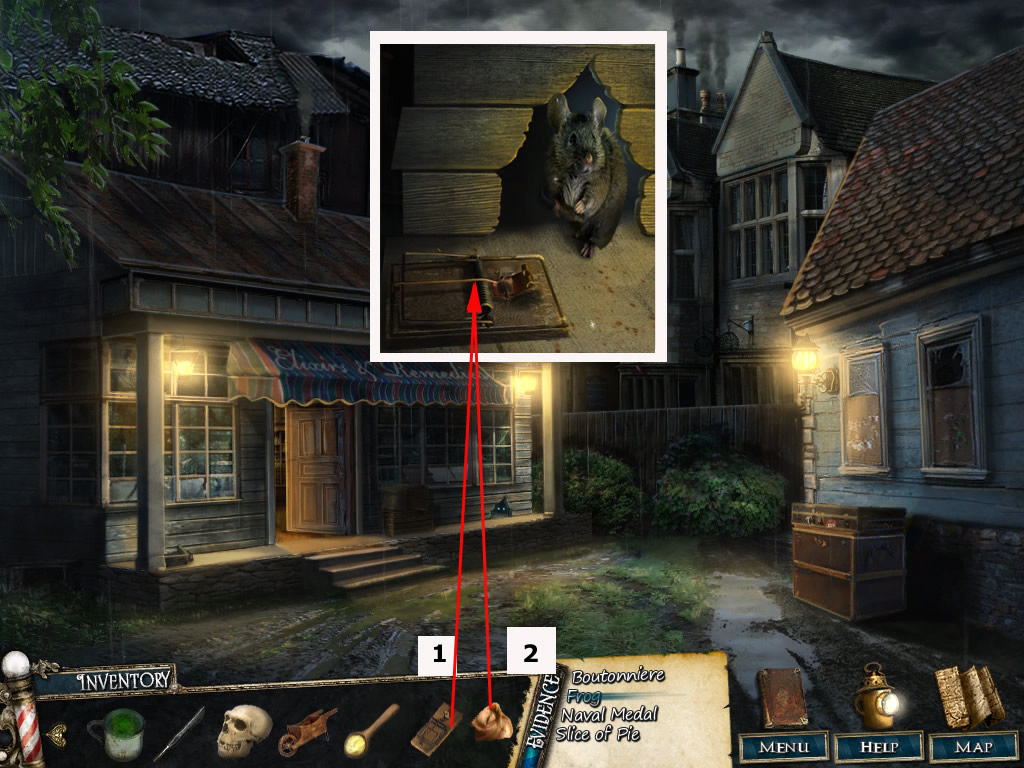
Click the mouse hole on the right side of the house.
You will get a closer view - place the mouse trap in front of the hole and the peanut butter onto the trap.
The mouse wants to have the butter - what give you the opportunity to grab the medal out of the hole.
Screen shot
Go to Bakers Court.
Bakers Court
Enter the bakery and play the ho-scene to receive a piece of cake.
Now you will have to solve a jigsaw to finish the investigation.
Drag the parts with pressed mouse button at the right place and click again.
Correct placed parts will lock.
Screen shot
Investigation 5
Lime Wharf - At the water
Click the ho-scene to receive mysterious meat.
Next stop is Bell Tower.
Bell Tower outside
Play the ho-scene at the window - you will receive a door knocker.
Choose Mr. Fogg's Asylum on the map.
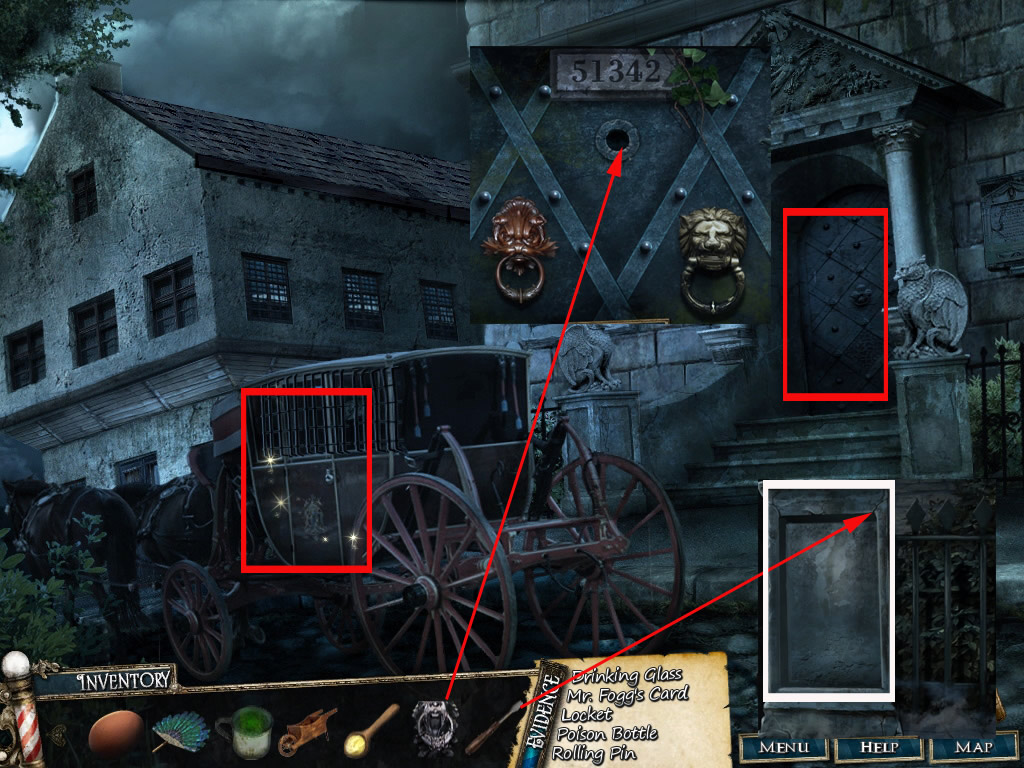
Mr. Fogg's Asylum
Play the ho-scene at the carriage to receive a glass.
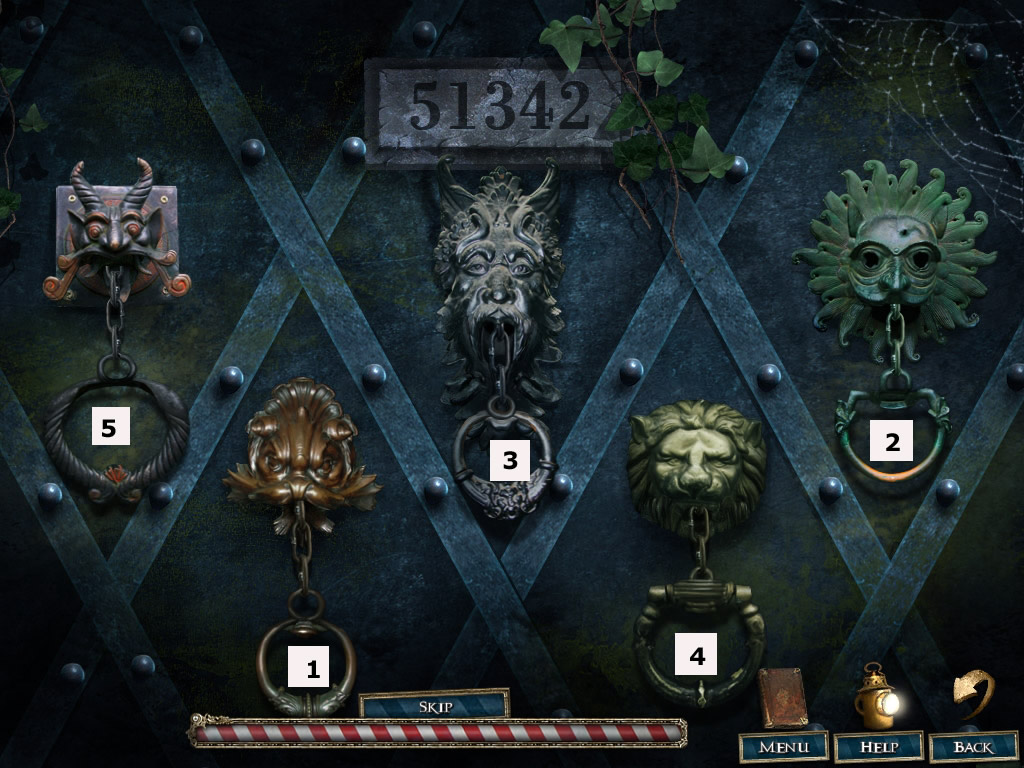
Click the door and drag the door knocker at its appropriate place.
A puzzle opens.
Your goal is it to click the door knockers in the right order.
There is a hint telling, that the first one has to be clicked last and for sure the solution has some to do with the plate with engraved numbers on the top, but I don't know what exactly. I can give the solution, but not the reason, why it is right :(
Top row you have to click (seen from left to right): 5 3 2,
Low row you have to click (seen from left to right): 1 4
Please also see screen shot
Screen shot
The entrance is a ho-scene - you will receive a screwdriver.
Click the right column at the stairs and you will get a closer view:
Use the screwdriver at the scratches top right.
Now you can get a limestone out of the opening.
Screen shot
Choose Reagent Row on the map.
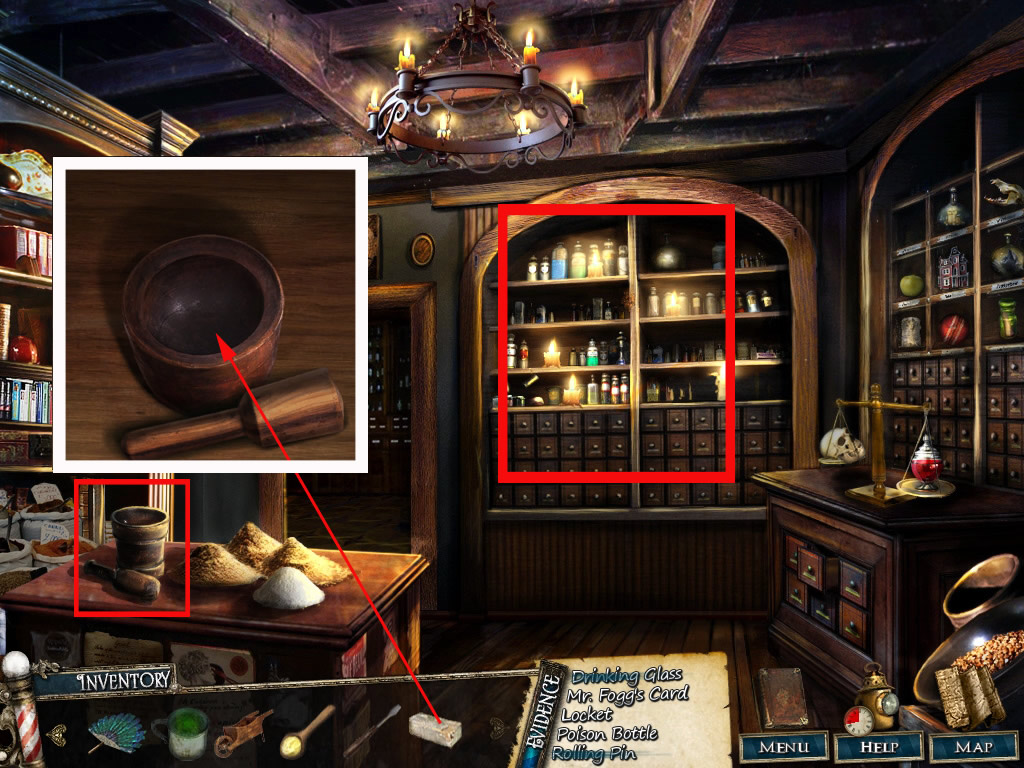
Reagent Row - inside
Enter the Elixirs shop and play the ho-scene to receive a rolling pin.
Click the table with mortar and pestle.
Drag the limestone into the mortar and use the pestle to get limestone powder.
Click the powder to get it into your inventory.
Screen shot
Choose Bakers Court on the map
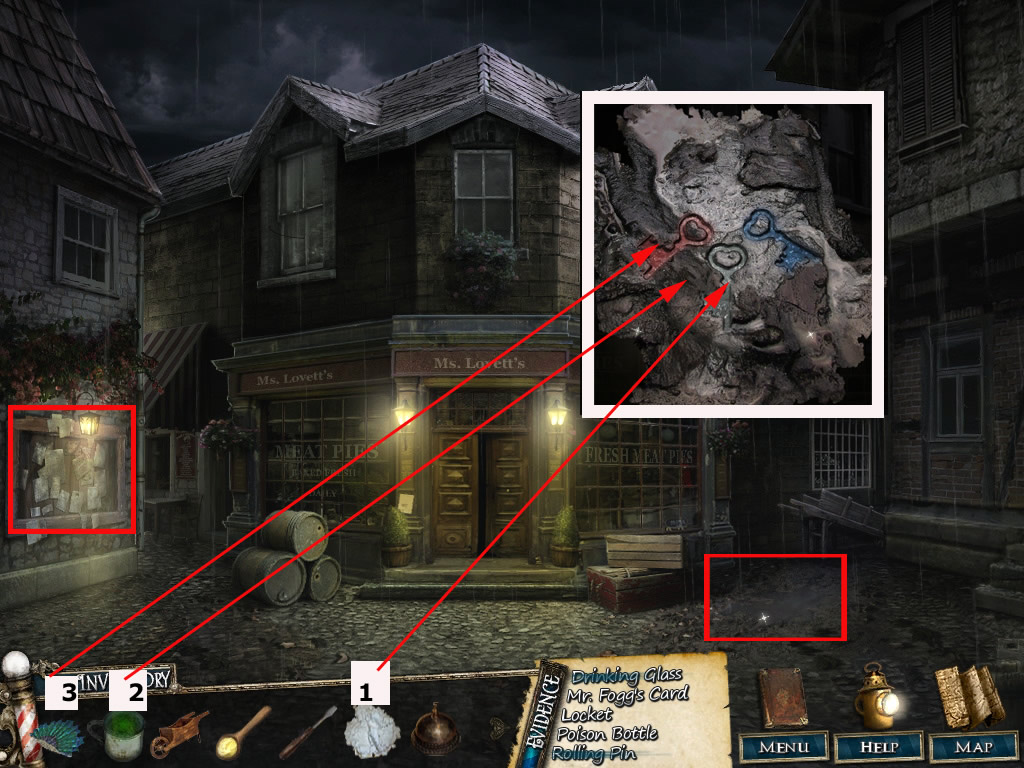
Bakers Court
Left at the news board you can play a ho-scene - you will receive a service bell for it.
Click the ground right next to the bakery entrance - you will find three key shapes.
Pour first the limestone powder, then the water from the cup over it.
To dry it use the fan from your inventory.
Click the keys into your inventory - they belong to the barber shop.
Screen shot
Enter the bakery.
Click the table far left and place the service bell next to the note.
Click the bell once.
Left side an elevator appears.
Click to see another note.
Place the spoon with butter, the egg and the meat inside and click the lever.
Now you will find a pastry inside, but you cannot use it right now.
Screen shot
Choose Junk Street on the map.
Junk Street
Play the ho-scene to receive a barber pole.
Go to Fleet Street.
Fleet Street - Outside
Click left side of the entrance an place the barber pole at the holders.
Now click the door and drag the keys onto the lock.
Now you have to click the poles in the right order and amount.
Look at the barber pole - on the colors you see roman numbers.
Click the keys in the order of the colors (top-down) and each key so often as according to the roman number.
Click red 2x, white 1x and blue 3x.
Click the door opener when you think you did it right.
When you are right, the door opens otherwise the keys reset to original state and you can try again.
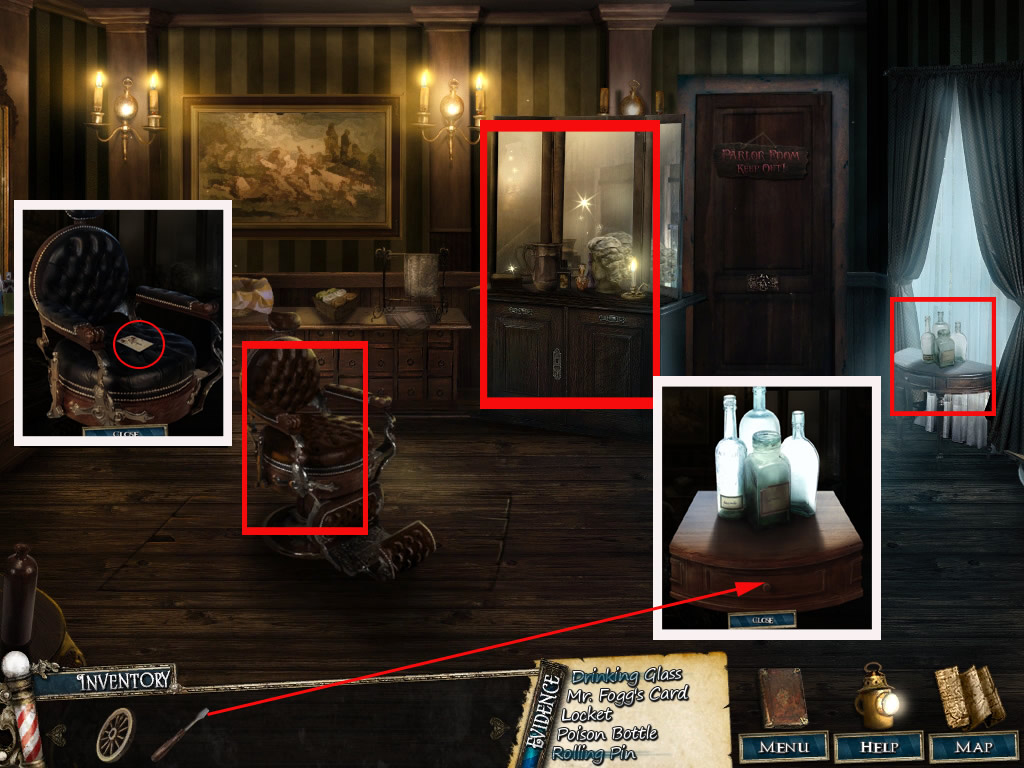
Enter the barber shop.
Fleet Street - Inside
Play the ho-scene in the back to get a shaving knife.
Click the chair in the middle and the the card of Mr. Fogg for your evidence list.
Click the table with the bottles.
In the closer view open the drawer with the screwdriver and get the poison bottle for the evidence list.
Screen shot
Go back to Bakers Court.
Bakers Court
Click the elevator and cut a piece of the pastry with the shaving knife.
Get the heart medallion for your evidence list.
Screen shot
Now you will have to solve a jigsaw to finish the investigation.
Drag the parts with pressed mouse button at the right place and click again.
Correct placed parts will lock.
Screen shot
Investigation 6
Piccadilly Square - Tailor
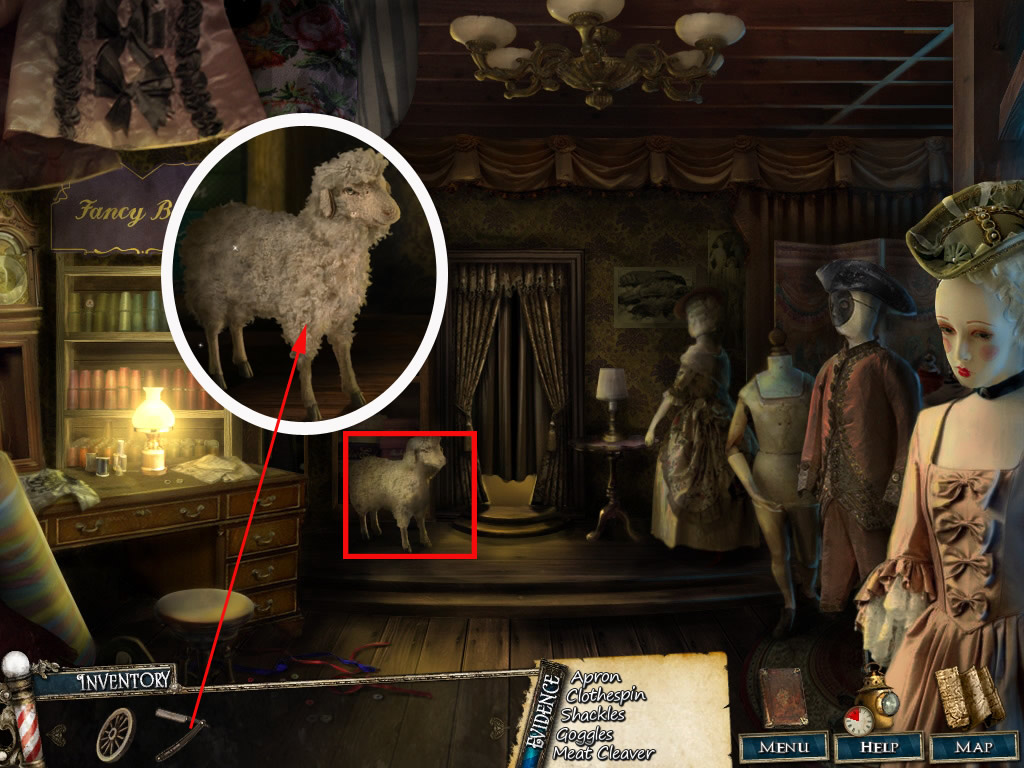
Enter the tailor and click the sheep.
Use the razor knife to get some wool and click it into your inventory.
Screen shot
Choose Guttersnipe Alley on the map
Guttersnipe Alley
Enter the house play the ho-scene - you will receive a clothespin for your evidence list.
Click the bed - use the wool from your inventory to refill the teddy bear.
Click the teddy bear to get it into your inventory.
Screen shot
Choose Fleet Street on the map.
Fleet Street
Play the ho-scene at the coffee shop - you will receive a oil can.
Enter the barber shop and play the ho-scene - you will receive a shaving brush.
Choose Reagent Row on the map
Reagent Row
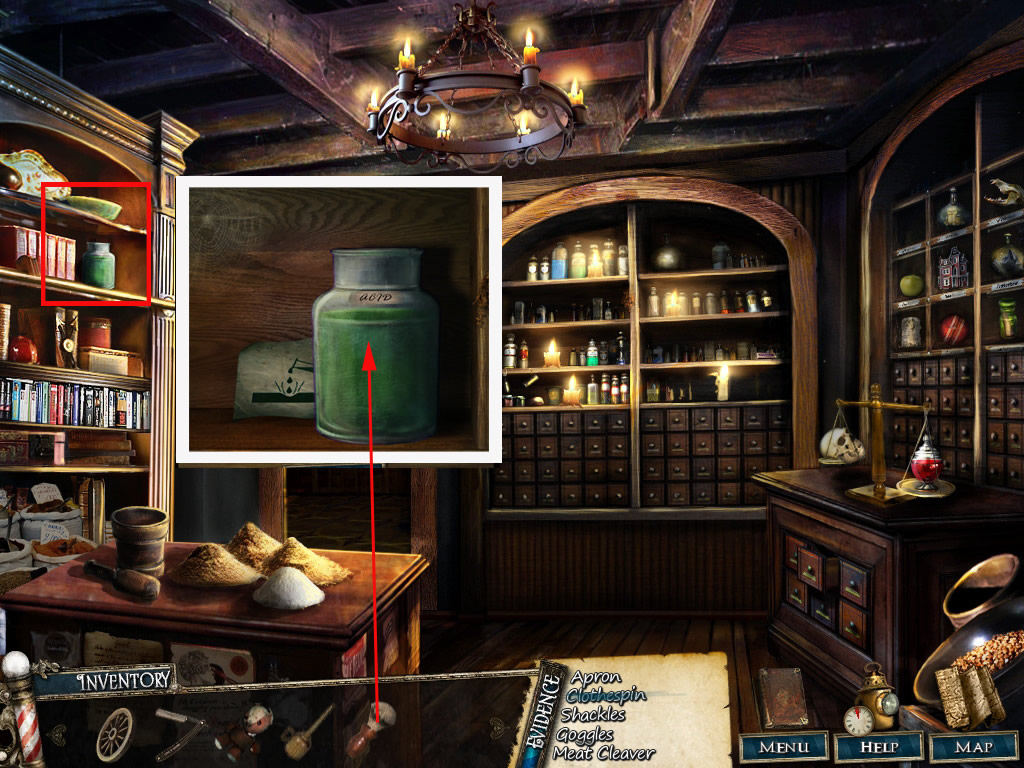
Enter the Elixirs shop and click the green jar top left shelf.
Click the shaving brush onto it in the closer view and click it again to get it out of the acid again.
One more click to get the acid - brush now into your inventory.
Screen shot
Choose Junk Street on the map
Junk Street
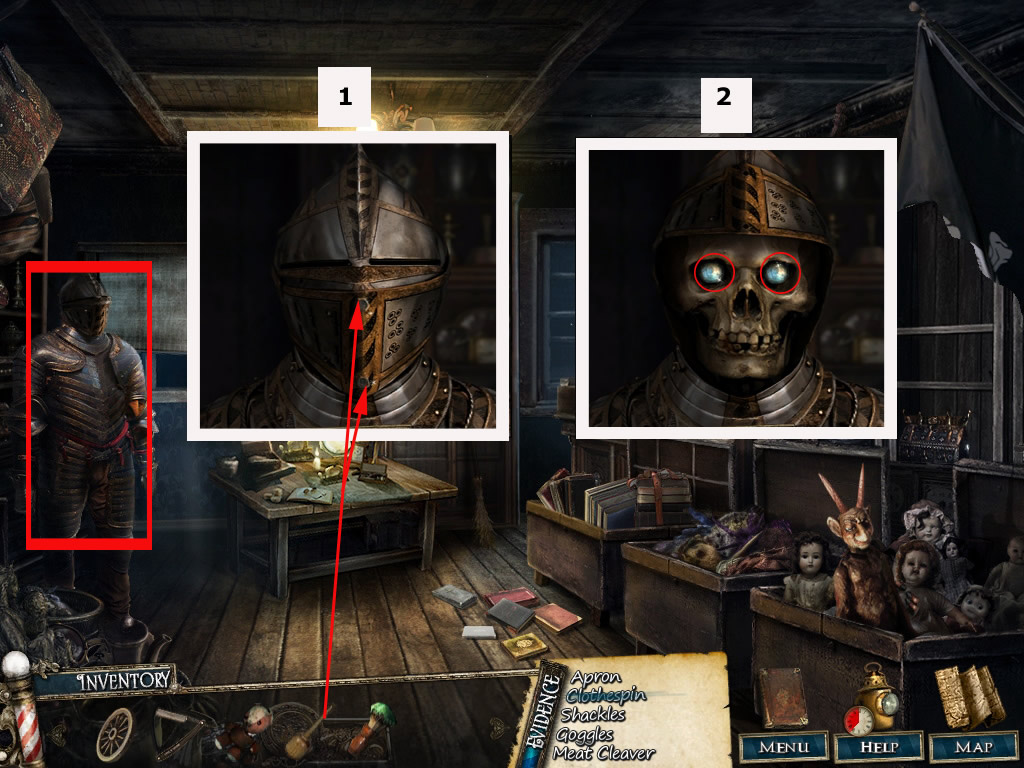
Enter the pawnshop and click the knight's helmet, left side.
Get the oil can and click on of the screws with it. Get the screw and do the same with the others.
Click the visor - it will open - click the both eye marbles.
Screen shot
Choose Mr. Fogg's Asylum on the map.
Mr. Fogg's Asylum
Click the entrance and play the ho - scene - you will receive a skeleton key.
Choose Fleet Street on the map.
Fleet Street
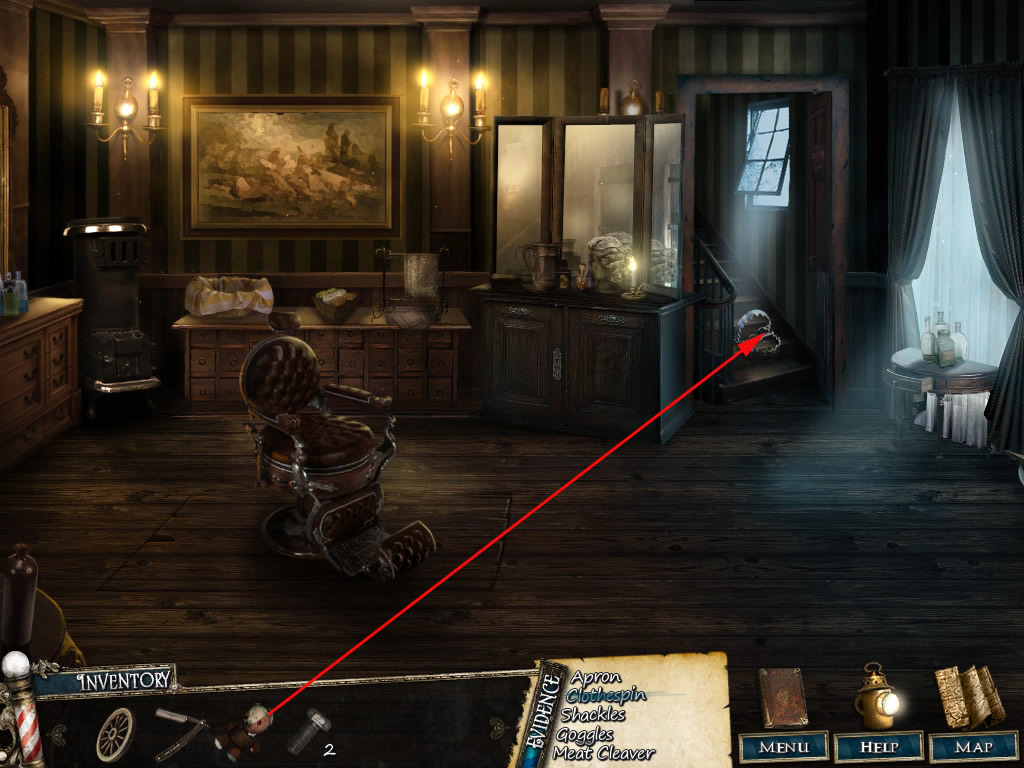
Enter the barber shop.
Click the door far right and you will get a closer view.
Use the razor brush with acid to remove the rust.
Place the marbles into the eye slots.
The skull opens its mouth - place the key into the now shown key hole.
Screen shot
A puzzle opens.
Your goal is to press the various shapes on the plate so they form the shape of a key.
Listen to the sounds the plates make when they are touched. You want to keep the plates down that make a locking sound (Like a key locking a door).
Once all the pieces are in place, the whole puzzle will glow.
Screen shot
The door opens, but on the stairs you see a bear trap.
Place the bear onto the trap - now you can click to remove it.
Screen shot
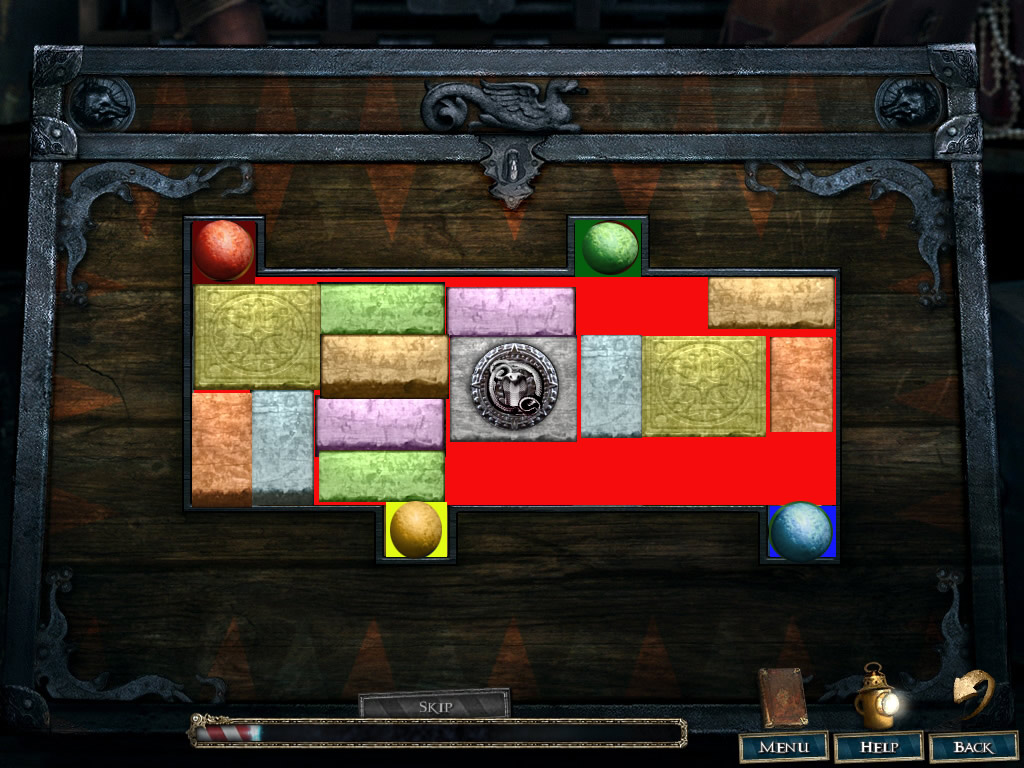
Left side you see a crate - click it to trigger a puzzle.
Your goal is it to bring the balls in the outer slots into the slots with the according color.
You can move colored blocks always to the next free tile but not into the outer slots.
The gay square in the middle can't be moved.
Clicking the arrow low right will let you leave the puzzle - when you come back you will find the puzzle in the original state.
Screen shot
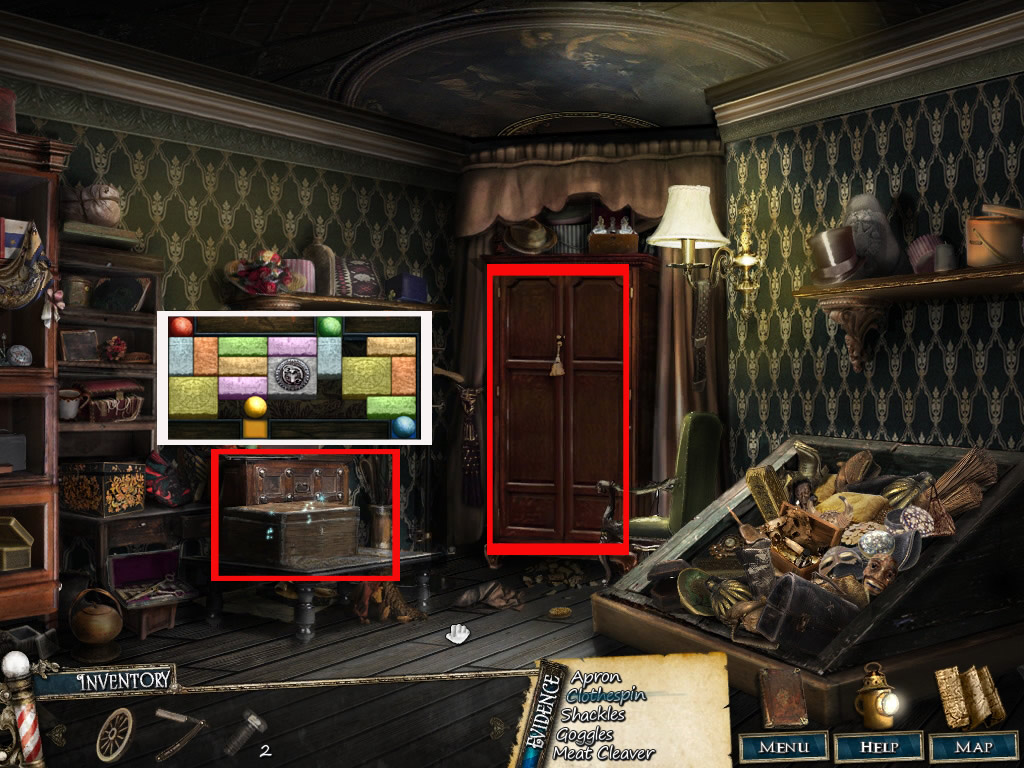
The crate opens and you can play a ho-scene - you will receive a key for it.
Click the close and play the ho-scene there - your will receive a walking cane for it.
Screen shot
Go downstairs again.
Click the planks below the chair.
In the closer view use the walking cane to lift the boards.
Click the walking stick again - get the apron out of the compartment.
Screen shot
Choose Watch Lane on the map
Watch Lane
Get the wheel barrow out of the inventory and remove the dirt left side with it.
Click the door.
In the closer view drag the key onto the keyhole and click it, till the door opens.
Screen shot
Enter the sewer.
Watch Lane - sewer
Get the wrench out of the crate far left.
Play the ho-scene and you will receive a valve.
Click the pipes upper right and drag the valve in the middle.
Click the valve two times to stop the water.
Screen shot
Enter the back part of the sewer.
Pick up the shackles left side on the ground.
Play the ho scene right side on the table to receive gloves.
Click the sacks low right and use the knife to cut them open.
You will find goggles
Click the large pipe at the oven.
In the closer view drag one of the screws from your inventory into the empty holes and use the wrench.
Do the same with the second screw.
Screen shot
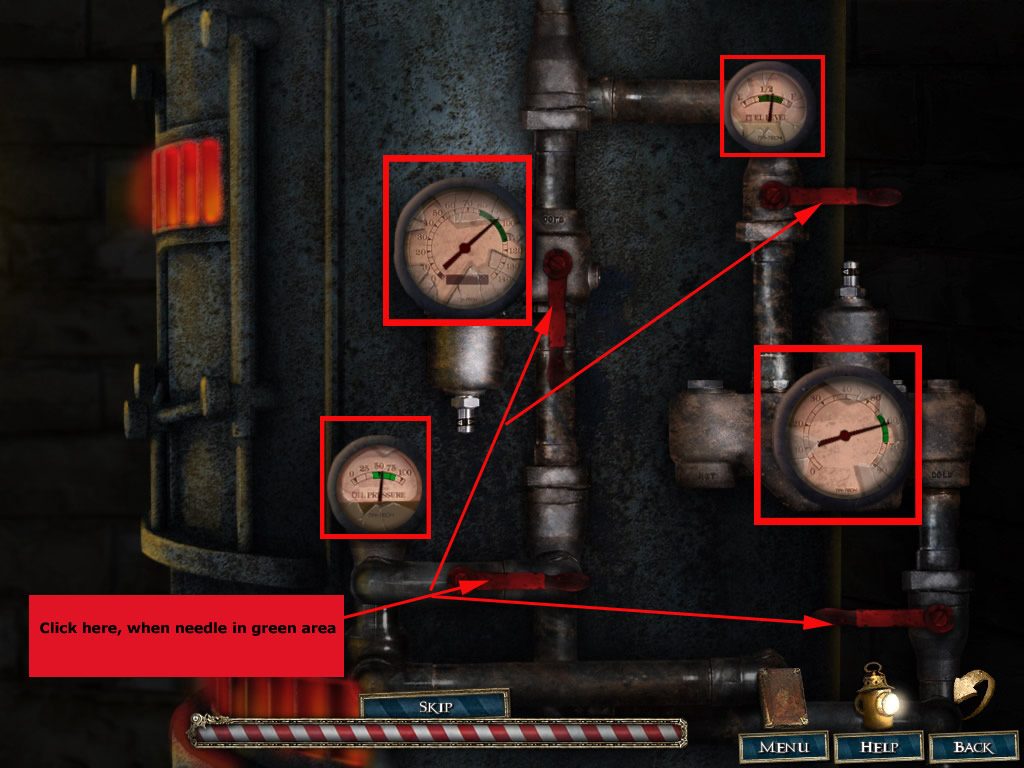
This will trigger a puzzle.
Your goal is to close each valve so the needle tied to its meter lands in the green zone.
Each meter you complete makes the other gauges go faster.
Start with the valves for the two bigger gauges.
Making a mistake will make you start again.
Screen shot
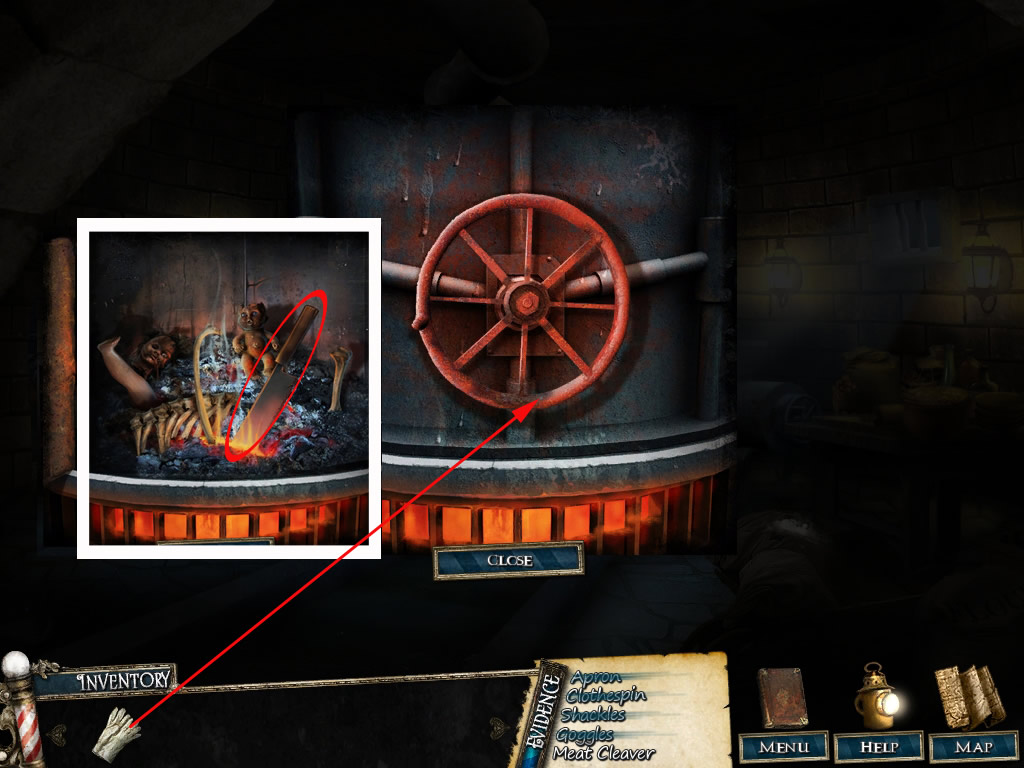
Click the oven door.
In the closer view use the gloves to open the door.
Get out the knife.
Screen shot
Now you will have to solve a jigsaw to finish the investigation.
Drag the parts with pressed mouse button at the right place and click again.
Correct placed parts will lock.
Screen shot
Finale
Now you will have to catch Sweeney.
When you do a step, Sweeny will make one two.
You can only always make one step along the line.
Try to bring Sweeney into one of the corners to catch him.
Screen shot
Enjoy the End
Walkthrough written by Kayleigh of JIG
Posted by: Kero |
February 3, 2010 10:51 PM
|
February 3, 2010 10:51 PM