
Nikopol:
Secrets of the Immortals
Platform: Windows
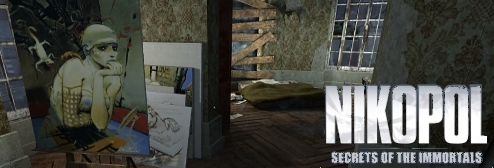
![]() Have you ever wished for something extraordinary to happen? For someone to step into your boring, everyday life and turn it on its head? Nikopol: Secrets of the Immortals, a large-file point-and-click adventure, may just make you think twice about that. Mixing stunning presentation with an off-beat story, it may not keep you wrapped up for days on end, but it offers a fascinating adventure into unfamiliar territory.
Have you ever wished for something extraordinary to happen? For someone to step into your boring, everyday life and turn it on its head? Nikopol: Secrets of the Immortals, a large-file point-and-click adventure, may just make you think twice about that. Mixing stunning presentation with an off-beat story, it may not keep you wrapped up for days on end, but it offers a fascinating adventure into unfamiliar territory.
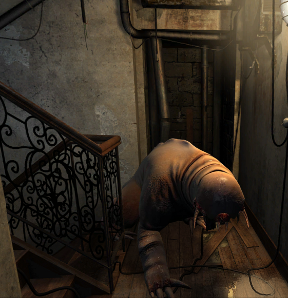
 Like everyone else in this unpleasant future, Nikopol lives under the thumb of a dictator masquerading as a prophet, where everything from how a person acts to what they believe is controlled by the government. Struggling to get by as an artist, he joins a rebellious underground religious group, only to find that not all the villains in the world are so easy to spot. He soon finds himself pulled deeper into a dangerous adventure that dredges up secrets about his family he never could have imagined. As if he didn't have enough to worry about with trying to make his rent, or that monster coming up the stairs...
You spend the game looking through Nikopol's eyes, and you can look all around you freely with the mouse, nudging the cursor around the edges of your view to turn around or look up and down. Click on objects to interact, and hit the [esc] key to open your inventory, to let you use items you've picked up, or access the menu where you can save and load your game. Speaking of, you'll want to save your game frequently. In this point-and-click adventure, things can be a little more dangerous than you might expect.
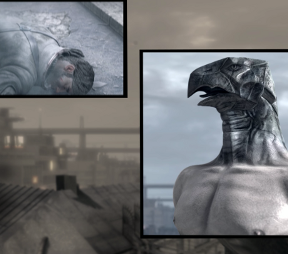
But danger aside, put on your best southern belle outfit and get ready to be woo'ed. The visuals here are knock-outs, from the detailed environments to the comic book-style panel progression in cutscenes. You'll want to take full advantage of the free-moving camera in every new area to catch all the little touches. Everything is tied together by some fantastically atmospheric audio, from the ambient soundtrack to the It's a shame, then, that the subtitles feature such a rocky translation and are liberally sprinkled with typos; not enough to actually impede understanding, just enough to look sloppy. It wasn't "nocessary"? Really, game? Really?
 Analysis: Nikopol is based on a trilogy of graphic novels written by Enki Bilal, and it shows. Nothing says "based on a book" like tossing a player into an unfamiliar environment with little ceremony and acting like it's all second nature. Despite how grim it is, Nikopol's world is fascinating, and I wish we were given more time to explore it. Instead we're left grabbing glimpses of a much more expansive mythology through the windows as we're pulled along with him. As it is, the game is very good at hooking you in, and the gaps in your knowledge wind up being more intriguing than anything else. It's just too bad the game wasn't longer and more open, the better to allow you to soak it all in.
What is a potentially crippling blow for less patient players is the frequently overcomplicated approach to traditional point-and-click adventuring, several steps of each action usually being completely unnecessary. "Open movie projector, put in movie, pull down display screen, close projector, then flick the start switch"? Are you kidding? And while some of the puzzles are interesting, most of them wind up feeling like they're there just to pad game's length rather than add anything to the experience. When was the last time you had to play a little mini-game when you wanted to destroy a wall with a hammer while you were running for your life? A little more carrot and a little less stick would be nice, Nikopol.
Because, honestly, I could care less about where I'm supposed to use the tire iron or how to break into the corpsesicle chamber. Nikopol has a genuinely intriguing cast of characters that I wish popped up more often. Religious zealots, being who may be gods... or not. You know what? Not that soaking up the ambiance in these decrepit buildings isn't super awesome, because they're honestly very pretty... but I'd rather go talk to the bird guy some more. Or, hey! I hear there's a magic floating pyramid in the sky, let's check that out!... no?... *sigh* I never get to do nuthin'.
Despite some poor decisions and a potentially unsatisfying ending, Nikopol still manages to be a contender for your time and your imagination. It's not as long as other large file titles, but if you're looking for a cinematic experience in a new world, you'll find a lot to like here. Just don't expect everything to make sense all of the time. It's all part of the world's mystique... and, besides. If the weirdest thing that happens to you today is a guy with a bird's head showing up on your doorstep, you're doing pretty good.
![]() Windows:
Windows:
Download the demo
Get the full version
![]() Mac OS X:
Mac OS X:
Not available.
Try Boot Camp or Parallels or CrossOver Games.


Walkthrough Guide
(Please allow page to fully load for spoiler tags to be functional.)
Nikopol: Secrets of the Immortals Walkthrough
Apartment
Pick up pink Lighter on right of bed.
Pick up Incense on right of bed.
Pick up Chain on window to the right.
Go across to painting studio.
Pick up Hammer and Chisel next to sculpture.
Pick up Painting Kit on the table on the right.
Leave studio, return to bedroom and open doors on right. Enter living room.
On the shelves on the right you will see Film Reels. Pick up Film Reel.
Reach up above the covered fireplace and pull down screen.
Go to front door on the left. Pick up and read Letter under the door.
Click on projector to open it up. Put Film Reel in the projector. Close projector door.
Return to studio. Pick up Easel on right and then pick up empty Canvas to the left of the bust.
Return to living room, place Easel down to right of projector and put Canvas on it.
Turn on projector with lever on the middle top of the projector.
After cut scene, rotate the projector towards Canvas by using the lever on the projector's leg.
Select Painting kit from inventory. Click on canvas. You must now use the Painting Kit to paint the image of your father.
Screenshot
Exit front door.
Facing away from front door you'll see a Pipe on the left. Use Pipe on front door to block monster.
Run to bedroom and put Chains on door. Put Incense in holder next to bed. Light Incense with Lighter to distract monster.
Return to Studio. Click the hoist and it will move next to the shelves. Use control right of the hoist twice to pick up then move the stone. Click hoist to move it back.
Return to bedroom door and remove Chain.
Quickly return to studio, move shelves in front of entrance. Click on hoist then lower stone on shelves.
Exit through doors in studio and return to bedroom doors
Close bedroom doors and use Chain to hold them shut.
Return to front door. You must move door to escape.
To move the door, clear some rubble to make a space. Pick up the large rectangular stone on the left and place it in this clearing. Pick up long white board lying on top of the door. Put it on the stone. Use Hammer on front door.
Your entrance is blocked to the right so turn around. You'll see a boarded up window. Use 5 hits of the hammer to break all the bricks. Each brick you hit is removed. All bricks touching the one you strike are half broken.
Screenshot
Cemetery
After cut scene you are given a Ritual Manual. Read the Ritual Manual.
Go to left. To the right you will see a vending machine with urns and a collection box. Continue ahead. You will see a freezer room. Go to the right and enter the crypt.
Use Lighter to find the light switch on the right. The bottom switch needs a key. Click the top switch.
There are 5 tiles to the right and left of you on the floor. Pick them up and place them on the floor in front of you. Pick up the piece of Chalk on the ground to the right. You are missing four elements for the floor: Urn, 2 Coins, Black Cross and Salt.
Use Chalk to draw out on each side panel the appropriate item according to the Ritual Manual
Screenshot
Return to vending machine. Gorgon is watching so pick up a stone from the ground beneath the collection box and throw it at the round mirror. Now you can grab the Coins from the collection box.
Take the Coins and place them in the vending machine. You are looking for the name in the Ritual Manual. Clemence Morganidon on the third row down. Click the green up arrow to get to the third row down. Click on the left arrow until you see the name. Press rectangular green button and pick up Urn and Coins.
Turn around and walk towards red and green stop light. Pick up Cross Key from the altar.
Turn back towards the crypt room. Take a left at the freezer doors. Look at bottom right storage shelf. Use Cross Key to un-bolt shelf. Click the shelf then click the vent to enter freezer.
Inside freezer, turn right and go straight. Turn left and go straight. On your right you will see a metal panel. Use the Cross Key to unscrew the bolt. Click the panel then turn the red valve. Open the freezer on the right. Use Chisel to break off a piece of Salt.
Return to crypt. Arrange 5 tiles, the Salt, Urn, Cross Key and Coins according to the Manual.
Screenshot
You are locked in. Pick up Cross Key. Unscrew bottom plate on door. Slide Ritual Manual under door. Use Chisel to push Keys out of lock. Pull in the Manual. Pick up Keys. Use Keys to unlock door.
Go to Gorgon's. Use Keys on padlock. Pick up Coded Letter from desk, Photo from wall above desk and Decoding Diagram on bookshelf. Return to crypt. Use Keys in lower light switch.
Place Coded Letter on shelf to the left. Decode the message according to the placement of the objects and the Decoding Diagram.
Screenshot
Exit crypt.
After cut scene you must run. Turn around and enter freezer. Turn right. Ahead there is a freezer you can push aside to reveal a secret door. Click the door.
Bunker Gate
Turn to left. Pick up Iron Bar. Go down stairs. Use Iron Bar 4 times on panel left of gate. Use Chisel on chain behind panel.
Go downstairs. Notice the train is blocking your way on the right. Go to left. Open metal doors on left. Click on right screen. Click 4 times on screen to place control spots which direct the electricity. Getting the electricity to flow right can be tricky. As long as you hit the X at the moment the items you want are powered, they will stay powered. You will probably be only able to power 2 items at once.
Power Line B and Console. Click the X and then Click the Console. Click the Line B power button. Return to screen on right.
Screenshot
Power Switch and Console. Return to Console. Turn A-B-O switch to A. Return to screen on right.
Screenshot
Power Console and Line A. Return to Console. Click the Line A power button.
Screenshot
After the trains hit, walk down the tracks to the right. You will see a ladder too high to reach. Look down and pick up a Rock. Throw the Rock at the ladder. Take ladder up.
Pick up the Knife from the table. Unplug the plug from wall on the right. Use Knife to cut the plug on the ground. Plug the plug back into the wall.
Pick up the wires at the end of the cord. Hit the Guard at the right with the wires. Pull his body into the alcove. You'll pick up a Magnetic Card.
Notice the map on the wall. You are in the Guard Station.
Cross the street. You'll click on the panel. Click on the red box on the top left. This light shows the lasers are on. Click the wires to switch the light from red to green.
Return to the Guard Station.
There is an intercom on the right wall. Click it twice to call the guard.
After the guard is fried, click on him to pick up a Key.
Use the key on the metal cabinet in the Guard Station. Pick up Gun.
Use Gun to shoot the first guard in the tower across the street. Cross the street and shoot the second tower guard on the other side of the street.
Return to panel across from Guard Station. On the bottom left is a laser control panel. Pull all the sliders down to knock out the lasers. X out of the panel.
Now, reprogram the Magnetic Card. Use the Card in the slot on the right. Click the top right hex shape until pattern 2 is showing. Match the pattern according to the rules.
Follow these clicks numbered 1 -10: Screenshot
Cross the street to the right. Turn to your left. You see another panel. Click the panel. First, turn off the power. Cut the black and grey wires to the speakers and cut one of the three solid colored wires to trip the alarm. Once the power bar drops all the way, go to the right and wait for the guard to leave his post.
Quickly cross to the left and slide the Magnetic Card in the door. Once activated, open the door on the left.
Bunker Tower
After cut scene go to the left. Notice crate on right is locked.
Talk to guard. Notice key on the left.
Walk back around to locked crate. Wait for guard to move from his post then quickly take the Key.
Return to crate, unlock it with Key and step inside.
After cut scene, use Lighter to look around crate. Find the lock mechanism. To open the lock, do the following things in order:
1 Use Cross Key on bolt
2 Use Chisel on right plate
3 Click long metal part
4 Use Knife on spring in center
5 Use Cross Key on bolt
6 Use Knife on long vertical spring
7 Click brass bolt on right
8 Use Knife on long horizontal spring
9 Click latch on left
Click the lid of the case.
Wait for guard to walk down right hall. Enter door. Go back out to the terrace before he comes back.
Click lowest vent cover. Click red switch to reverse air flow. Mix 2 chemicals into tub to make deadly gas.
Use the top right and bottom right bottles.
Once the right mixture is made, place tub under fan.
Go back inside. Go left into control room. Pull guard into room - you'll find a Hypodermic Gun. Click on the right and center screens. Click on the round red button on the right to open door across the way.
Go across the hall. Enter store room and go to the right. Go up the stairs. Use Hypodermic gun on Jellyfish. The monster falls asleep. Pick up Cardboard.
Go ahead. Pass the jellyfish. Go Left. See the monster on the left.
Return to the Jellyfish blocking the path. Use the Cardboard on the right side of the Jellyfish. You need something to start it burning. Place the Ritual Manual on the Cardboard. Use the Lighter on the Cardboard.
Walk past the Jellyfish. Pick up Tool Chest and throw it at the monster.
Pick up the hammer. Knock out all the blocks to get through, same as earlier puzzle.
Screenshot
Go straight ahead. Alarm will sound. Enter room straight ahead. Pick up Water Glass. Use Water Glass on faucet. Use Glass of Water on control panel.
Turn toward the bed. Pick up Black Feather from bed. Pick up Sheet from bed. Pick up Stool and throw it at the window. Use Sheet to pick up Glass Shard and make a Knife. Use Knife to cut Cord below window near floor. Cut other end of Cord to the left of the door. Approach the window.
Attach the Cord to wall hook on the right. Go down Cord.
L'Elyse'e
Click on screen to find out where your father is. Go through door to right to enter Salon. After message, go through either door on the left. Turn right. Go through hole in the wall.
Read message on door on the left. Keep going to the right. Take a left and enter main room. Alarm will sound.
Go to the left. On your left is a closet. Pick up Iron Bar and hide in closet.
After cut scene, cross to other side of room and go through two doors on the left to enter security room. In security room, click on the right screen to read notices. Click on the left screen to reposition guards. The position is correct when all the assignments are black:
1 Surveillance Hall - North
2 Patrol A-B-C
3 Surveillance Hall - South
Go to the room to the right. Turn right and enter next room. On the left, reprogram your Magnetic Card for 8.
Follow these clicks numbered 1 -12: Screenshot
Turn right. Use Knife to cut wires on ground. Return to Salon: Go through the door and go forward 3 clicks. Take a right. Look through hole in wall. Wait for guard to pass.
After guard passes, run to far door on left. Wait to hear signal of the other door opening then open your door. Enter and cross the room. Go through door and turn to left to get around the armoire. Push armoire in front of door to block it.
Turn right and use Magnetic Card to open door. Pull up gate from the bottom. Look at gun list on left. To pick out correct gun (BAR-89) remember the look of the gun. Pick up that Gun. Exit armory and go right.
Use Lucky Knife to cut mattress then use Iron Bar to open doors.
From balcony you will see three windows across plaza. Use phone and call "Invited Apartment 1." When you get an answer, X out of phone. Use Gun, aim at center window and shoot XB-2.
Return to mattress and pick it up. Throw it over side of balcony. Jump over balcony. To distract guards, use phone to call "Doors to Lounge." Cross plaza. Go to the right.
There are three doors: The first 2 require DNA authentication. The last door down the hall will open with alarm.
Use Feather on DNA screen at first door on right.
After cut scene, quickly pull the alarm to the right of door. Run down to the last door on the left and open it. Return to the roof (up the ladder where the mattress was).
Walk down to below the floating pyramid. Use Ankh on the pyramid.
(Walkthrough written by Walzar of JIG)
Posted by: Kero |
December 6, 2009 10:19 PM
|
December 6, 2009 10:19 PM