JayisGames.com is now available ad-free!
Jay is Games recommends Cheat Happens with 8,000+ games and 35,000+ trainers!

Dismantlement: Mouse


  • Currently 4.5/5
  • 1
  • 2
  • 3
  • 4
  • 5
Rating: 4.5/5 (183 votes)
Comments (59) | Views (22,687)

dismantlementmouse.jpgGrinnypIt's dismantling time yet again! Gam.ebb.jp is back with another "take this apart cuz you've got a screwdriver" game, and now it's personal! Well, it's a mouse, at any rate. A computer mouse, that is, not, you know, a live one. Although that might be interesting... nevermind. Yes, the third installment of the dismantlement series of point-and-click puzzles is here with Dismantlement: Mouse, just in time to brighten your day. Now with 50% fewer explosions! Maybe.

Once again you have nothing but your trusty screwdriver as a tool. Simply click to remove screws and click on other things to see what happens. There's a handy button at the top that allows you to move from the front to the back of the mouse as well as from close-up views to normal view. Everything is in plain sight, so there is very little pixel hunting to be had. Figuring out the rest is up to you.

Unlike Dismantlement: Tea Canister, this game features something that most of us have done at one time or another. Who hasn't had to open up a mouse before? Well, maybe if you missed the golden age of trackball-driven mice, but everyone else will be familiar with pulling that fuzzy gunk off the contacts inside. You may not recall your mouse having so many locked and inaccessible areas, though. Or bombs.

This Dismantlement is a throwback to the first game in the series, Dismantlement: Radio, in both gameplay and execution. Eschewing the various reflex-based puzzles of Tea Canister, Mouse moves back into the realm of logic. No music puzzles, no arcade-style antics, and only one puzzle that is slightly based on color guarantee that fans of the series will have a blast. No pun intended.

Analysis: What a perfect Christmas present! For those who enjoy this sort of thing, Dismantlement: Mouse is the perfect way to whittle away a few minutes. There's still a bomb, of course, but much less stress involved as you only encounter the timer at the last puzzle. A perfect way to take a break from the everyday. Gam.ebb.jp certainly has a thing about putting bombs into electronics. Perhaps it would be wise to never purchase appliances from them...

The only complaint this time around is that the fun is over too soon. There's really not that much inside a mouse, so there's only so much puzzle you can cram into such a small space. But still, Dismantlement: Mouse is casual gameplay at its finest. Fun, logical, and it appeals to that little part in all of us that revels in breaking something down to its basic components.

Play Dismantlement: Mouse

Walkthrough Guide


(Please allow page to fully load for spoiler tags to be functional.)

Dismantlement: Mouse Walkthrough

General Information

  • Use only a screwdriver.

  • You already have a screwdriver.

  • Use the brown button in the upper right to move from the front to the back. The button can also be used to back up from close ups and close things.

  • Don't blow up!

  • Remember, three mouses love cheese.

Start

  • Use the button to go to the bottom ("back") of the mouse.

  • Remove the four grey screws.

  • Click on the blue panel to remove it.

  • Click on the mouse ball for a close up.

  • Remove the mouse ball.

  • Once the ball is removed, notice that the area underneath is locked.

  • Back up ("return") to the long view.

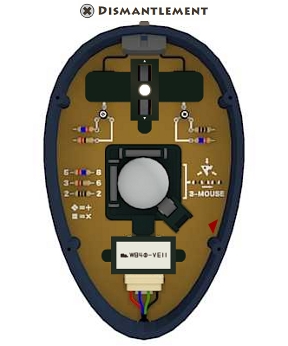
  • To the right of the area where the mouse ball was, you will notice some sort of diagram with the words "3-mouse" underneath. Click on it for a close up.

  • There are two things to notice here: The symbol of the cheese with the three mice facing it, and the five symbols underneath.

  • The five symbols are black and white, with the black and white in different places on the symbols.

  • Gee, that almost looks like mouse buttons, doesn't it?

    • The symbols correspond with clicking the buttons of a mouse, with the black area corresponding to a click.

    • The order is right, left, left, right, right.

  • Once you've examined the symbols back up to the long view.

  • Click on the button to go to the front of the mouse.

  • If you click on the graphic at the bottom of the mouse you will see the three mice with the cheese, but the mice are facing away from the cheese.

  • There's nothing you can do with them now, so back up to the long view.

  • Click on the upper part of the mouse where the buttons are for a close up.

  • Click the buttons in the order shown in the pattern on the back.

    • If you don't remember, it is right, left, left, right, right.

  • If you entered the correct sequence you should hear a click when finished.

  • Go back to the long view and turn the mouse over.

  • Click on the center area where the mouse ball was for a close up. Notice it is now unlocked.

  • Click on the area in close up to remove it.

  • Remove the revealed screw.

  • Click on the area again and the whole assembly will be removed.

  • Notice that a symbol is revealed showing a box inside a circle.

  • Back up to the long view.

The Bottom

  • At the bottom of the mouse is an area with a screw, a code, and wires going into the area. Click on the area for a close up.

  • Remove the screw at the top of the box.

  • Look closely at the box. The code is W, 8, 4, and a 0 with a line through it minus V, E, I, I.

  • Click on the box to open it.

  • Goody, we need a letter code.

  • Perhaps the code on the outside of the box?

    • To get the letter code subtract the second set of numbers/letters from the first set.

    • When you do the "subtraction" do it graphically. Look closely at the blocky letters and subtract visually.

      • For instance, W (the first letter in the first set) minus V (the first letter in the second set) leaves you with a V.

      • Subtracting the letter E from the blocky number 8 leaves you with a straight line, an "I".

      • Subtracting the third letter I from blocky number 4 leaves you with something that looks like an L.

      • Subtracting the fourth letter I from the zero with a line through it leaves you with an O.

      • The code, then, is V I L O.

  • Enter the code into the box.

  • The box will unlock and two screws will appear. Remove the screws.

  • Close the box using the brown button at the upper right.

  • Once the box is closed click on it to remove.

  • Look, another code revealed.

  • Click on the colored wires underneath to remove them as well.

  • Remove the revealed screw.

  • Back up to the long view.

The Mouse Wheel

  • Click on the area at the top where the bottom of the mouse wheel is.

  • There are some arrows here indicating up and down, but we don't seem to be able to turn the wheel.

  • Back up to the long view and then go to the front of the mouse.

  • Maybe if we clicked on the scroll wheel.

  • Click on the top of the mouse for a close up, then click on the scroll wheel.

  • Back up and go to the back of the mouse.

  • Now click on the upper part of the grey wheel and you will notice a symbol comes into view in the center circle.

  • That looks like half a lock symbol.

  • If we could only get the other half.

  • Back up, go back to the front of the mouse, and click on the mouse wheel again.

  • Go to the back of the mouse, and click on the mouse wheel for a close up.

  • Click on the visible part of the mouse wheel until the other half of the lock appears (it doesn't matter whether you use the upper or lower part, eventually the symbol will appear).

  • When the second half of the lock appears it unlocks.

  • Remove the screw that appears when the lock unlocks.

  • Click on the assembly covering the mouse wheel to remove.

The Transistors

  • On the left are some resistors with numbers on either side of them. Click on this area for a close up.

  • The top resistor has a short red stripe on the left and a long blue stripe on the right. The numbers are 5 on the left, and 8 on the right.

  • The middle resistor has a short red stripe on the left and a short black stripe on the right. The numbers are 3 on the left and 6 on the right.

  • The bottom resistor has three short black stripes and the number 2 on both sides.

  • Below the resistors is a code. Apparently a diamond composed of 4 diamonds equals +, and a square composed of 4 squares equals x. I'm sure that will become important.

  • Back up to the long view.

  • Now click on the top area where the mouse wheel is.

  • To the left and the right of the mouse wheel are two areas for codes, below those areas are two sets of resistors.

  • The ones on the left are hooked up to something with a diamond symbol, the ones on the right are hooked up to something with a square symbol.

  • I'm sure this has something to do with the resistors and patterns we just looked at.

    • To solve this problem you need to look closely at the resistors.

    • Notice that the ones on the left are the 5, 8 resistor and the 3, 6 resistor.

      • You need to take the number from the side of the resistor that is attached by a white line to the symbol.

      • Remember, that symbol stands for +.

        • If you looked very carefully, you will notice that the resistor is in a reverse position from the one down by the code.

        • Therefore, the side that the white line goes to is 5 (the short red stripe side) .

        • The number for the right side of the second resistor is 6 (the short black stripe side).

        • 5 + 6 = 11, which is the code.

  • Enter the code into the left code box.

  • Now look at the right code box.

  • Below that are the 2, 2 resistor and the 5, 8 resistor.

    • Again, notice that the 5, 8 resistor is reversed, and the white line is going to the 8 side.

    • The symbol above stands for x this time.

      • Multiply 8 (the long blue stripe side) by 2 (either side of this resistor is 2) to get 16.

  • Enter the code into the right code box.

  • If the code is entered correctly you will see and hear something shift at the very top of the mouse.

  • Before you leave, notice the half-filled box within a diamond to the right side of the left code box.

  • Back up to the long view.

The Mouse Cable

  • Click on the very top of the mouse where the cable enters.

  • Click on the cable to remove it and a grid is revealed.

  • Where have we seen a grid like this before?

  • Perhaps at the bottom of the mouse?

  • Back up and click on the bottom of the mouse.

  • Yes, there's the pattern. Top row: circle, diamond, blank, diamond. Second row: circle, diamond, circle, diamond.

  • Back up and click on the very top of the mouse.

  • Hmmm, those switches are white.

  • We saw some symbols on the back in a circle and a diamond.

  • The circle had the white in the upper position, the diamond had the white in the lower position.

  • Perhaps that relates to the switches?

    • Set the switches on the top row in this order: up, down, down.

    • Set the switches on the bottom row in this order: up, down, up, down.

  • When you set the switches correctly a screw appears.

  • Remove the screw.

  • Back up to the long view.

It's Explosion Time!

  • Notice the red triangle on the lower right side of the mouse?

  • Click on it to remove the rest of the assembly.

  • Almost to the end now! Remove the screw at the bottom of the black area and click on the black area to remove.

  • Now remove the screws visible on the grey areas.

  • Click on the grey areas to remove.

  • Click anywhere below the white lines and a bomb appears!

  • Click on the bomb for a close up.

  • Oh boy, less than three minutes.

  • Do not turn the screw, this will detonate the bomb.

  • Notice the arrows pointing outwards?

  • What have we seen that points outwards?

  • Back up to the long view and turn the mouse over to the front.

  • Click on the bottom of the mouse where the cheese symbol is.

  • The mice are pointing outwards.

  • Remember way back in the beginning when we saw that symbol with the mice pointing inwards towards the cheese?

  • Click on the mice and they will now rotate.

  • Quickly rotate each mouse until it is pointing towards the cheese.

  • Back up, turn the mouse over, and click on the bomb for a close up.

  • Now turn the screw to disarm the bomb.

  • Click on the timer to remove it.

  • Remove the screw below the timer.

  • Remove the upper assembly then the lower assembly.

  • Done!

59 Comments

CaptainLepton December 21, 2009 6:36 AM

Got to

maths puzzle

and noticed

22 + 36 = 58

but is that at all relevant?! Can't progress.

Reply
CaptainLepton December 21, 2009 6:37 AM

Ah just noticed:

Diamond and square patterns of squares on the transistors

Reply

Still trying to figure that part out here. I think the clue is trying to say that the orientation of the capacitor indicates its value; I've already caught that the symbols on the transistors are math symbols (+ and X), but I don't know what to do with the numbers I'm getting. Clicking the mouse buttons the number of times they seem to indicate is getting me nowhere.

Reply
CaptainLepton December 21, 2009 6:43 AM

Arithmetic puzzle:

The numbers to the left of the three clue resistors correspond to the left transistor puzzle and ditto for the right. Get the numbers from the resistors attached to the transistors and comparing to the three clue resistors below.

The numbers are

11 and 16 even though I think they should be 10 and 16!

Reply

I'm not sure how it happened, but I got the half-lock symbol on the mouse wheel to change sides...

Reply

Arithmetic Puzzle

The numbers at the sides of the resistors show the value of that end of each resistor. Use the number that corresponds to the end of each resistor that is connected to the transistor.

Reply

Never mind, I'm a moron...the mouse wheel puzzle is simple stuff.

Now I'm stuck again. I've got the cord out, solved the pin puzzle, and now there doesn't seem to be anything else I can meaningfully interact with.

Reply

Ryusui:

There are two half-locks, click the grey things on the top and the bottom till they line up.

Reply

Help with

pin puzzle under cord

please?

Reply

about the half lock symbol solution

after open the back. click middle mouse at front then go to back of the mouse again click the white area between arithmetic puzzle until you see half symbol then do it again to get full symbol.

Reply

There's two clues to the pin puzzle: the little four-by-two diagram and the circle and diamond symbols. But if you have to have it spoiled...

Far left two up, center-left two down, center-right one up, far right two down.

I've solved it and removed the screw but nothing comes out.

Reply

Thank you! But I don't see

this diagram anywhere!

I must not be as far along as I thought...

Reply
CaptainLepton December 21, 2009 7:11 AM

I think

you do one side then something else then the other side is activated

Do you know

what the alphabet code is? I thought it was RGB and something else (B for black, A for alpha, K for black in subtractive colour etc.)for the colour of the wires but no good

Reply

Missed the bloody red arrow. Now it's out. Thanks.

Reply
CaptainLepton December 21, 2009 7:15 AM

Once you have got the number puzzle right:

zoom out to back view and remove the cable at the top. Then you get those mini jumper switches underneath the cable. BUT WHAT PATTERN DO I NEED?!

Reply

The "alphabet code" is clever.

Think shapes, not letters. See the hyphen in the middle? Think of it as a minus sign. What happens when you subtract the shapes in "VEII" from "W840"?

Reply
CaptainLepton December 21, 2009 7:19 AM

Beautiful alphabet puzzle I love it.
Solution is:

VILO

Reply

I did it! All I needed was

the letter puzzle!

Hooray!

Reply

grinnyp:

The bomb is pretty easy. You just need to forget about the first half of the game.

Reply
CaptainLepton December 21, 2009 7:44 AM

Walkthrough

Throughwalk?

Click big cross in circle in first screen

Three mouses [sic] like cheese. i.e. they will want to point towards it at some point. And click again

Click to back remove four screws and click on backplate to remove

Zoom in on puzzle clue at right, not order of clicks required under pic of mice (RLLRR)

Go to front and enter clicks in that order on main mouse buttons. You will hear a click

Remove trackball and plate underneath which you unlocked with clicks. Undo screw and trackball assembly

Zoom out and in on rear of wheel assembly. Click up on wheel until one half of symbol appears. Go to front and click on middle of wheel then back to rear of mouse and click up or down until the other half lines up and unlocks. Remove screw and wheel cover to reveal arithmetic puzzle

Inspect resistors and symbols on transistors attached to number chips. Zoom out and inspect resistor and number clues on left and multiplication and addition symbol clues

Enter 11 and 16

Zoom out and click on cable at top. Click again to remove and see grid.

Zoom out and in on alphabet clue at bottom.

It is a shape puzzle: W - V = V etc. The code to enter is VILO. Remove screws click close and remove cover to reveal grid clue. Then remove bottom cable and revealed screw

Circles in grid clue are where you click to pop them out. Zoom out and in on grid at top and click all in 1st and 3rd columns to reveal a screw.

Which you remove

Zoom out on rear view and click on red arrow to remove PCB

Unscrew and remove assemblies then click on middle under where the trackball used to be to reveal...

A bomb! Oh Noes!

Zoom in and note arrows pointing outwards and screw dial pointing to "bomb armed" symbol

Zoom out to front view and in on the three-mice diagram

They must have an awful sense of smell as well as being blind. You will have to turn them towards the cheese.

When you've done that go back to the rear view, defuse the bomb with the now friendly screw

Click under timer to reveal screw

Remove, click, and you're done!

Reply

Beautiful puzzle, once again! Couldn't do it without the help of you guys, but SO much better than the tea container, simply because it makes sense to dismantle a mouse. That, and logic puzzles > reflex puzzles. And hooray for non-linear!

More of this! When is "Dismantlement: Cell phone" out?

Reply

A bomb in a mouse. That is sooo unexpected from the Dismantlement series. XD

Reply

Yay!

A dismantlement game done right after the awful mess of the tea canister!!!

Love it, love it, love it!

Reply

Okay maybe I am missing something but I have done EVERYTHING up to the red arrow.

But when I try to click the red arrow to remove the panel, nothing happens! I've clicked EVERYWHERE! All around and nothing! I even tried reloading the game and starting over in case there was a glitch or something! What could I possibly be missing, or am I just stupid or WHAT!

Reply

i hope they make more dismantlement games!! i love them!

Reply

I can't seem to get this game to load past 93%. Is anyone else having this problem?

Reply

Hothotpot:

I had a similar experience, only to realise I hadn't removed the wires that plug into the code box at the bottom of the mouse. There's a screw under them that needs to be undone. You might have already done that though, in which case disregard this :)

Reply

I like dismantlement games!

And I can solve them without walkthroughs, a rarity, but I don't know if this is makes the game better or worse. Probably helps that I have banged my head against many walls from other room escapes before confronting these.

Reply

I clicked and clicked for ages trying to get this started. For the life of me i couldn't figure out how to turn it over. Nearly gave up, then i noticed the "Back" button. duuuuhhhhhhhh

Reply

Yessss

This looks like it'll be exactly the "more" I was hungering for after playing Radio. It is like a little Christmas present! Thank you, Game.ebb.jp, and thanks JiG! I... of course I got presents for you too. Let me, er, just run to the store for a totally unrelated reason first; I'll be right back!

Reply

Good times. Though am I the only one kinda disappointed that the bomb just "materializes" out of nowhere?

Reply

This was very fun! But what's next? Dismantle a radio? A car engine? The most complicated light bulb in the world? A Computer motem? I can't wait! It's a good thing they make these things so fast!

Reply

I made a mistake last comment. I meant speaker, not radio. Radio was the first game.

Reply

A minor correction to the walkthrough:

These are transistors. These are resistors. The ones in the arithmetic puzzle are resistors, not transistors.

Cool game -- much better than the Canister. Thanks!

Reply

Ahh, good to see the Dismantlement series redeem itself after the Tea Canister frustration. The puzzles on this one were well designed, especially the resistor one. (Then again, all the years I spent as an electronics tech probably have me somewhat biased there. ^_^; )

I do have to wonder one thing, though...

How does a bomb small enough to fit behind the trackball of a mouse pack that much kaboom?

Reply

Love this series, and I felt this was much better than the canister puzzle! I think the author is definitely taking this in the correct direction. Less linearity, and more parts where we just get to take stuff apart.

Looking forward to the next one!

-SirNiko

Reply

Just for the record, in the walkthrough there is a section titled "The Transistors." Just wanted to point out that those are actually resistors and transistors are something completely different. I'm an Engineer and a stickler for stuff like that!

Reply

Maybe the black things the resistors are connected to contain transistors? I assume they would... :P

Reply

This is one of my new favorite flash game series. I can't wait to see what else we can dismantle! :D

Reply

No matter how much I click the mouse wheel, the stupid "half-lock" symbol won't appear. Anywhere. Ever. I've refreshed the page 3 times, and now I'm just quitting. Worst of the series, I think. Liked Tea Canister much better.

Reply

Another nice one.

Tags. Someone pointed out that "dismantel" games aren't "escape" games. As a pedant I'd have to agree alas there's another side to the argument. The tags aren't a perfect catalogue they are an evolving system - you don't want to have to few and worse still, you don't want to have too may.

I'd hate to think of people missing out on these puzzles just caused they only used he "escape" tag.

This is not the Oxford English Dictionary nor Yellow Pages. I wouldn't want to see no escape tag nor introduce a dismantel tag. Give grinnyp a break and let her put the "escape" tag back in.

E.G.

Reply

I added the escape tag as well as a new dismantlement tag for the entire series. I agree these aren't classic escape games, but the puzzles in them are puzzles you might find in one.

I agree that there needs to be some "slack" given when we attempt to categorize games, as many times games we feature just don't seem to fit into the little boxes we have created for them.

Tags are there to allow people to find these games after they are published on JIG, and so more tags, even if only partially applicable, are better than no tags.

Reply

Cheers, jay.

Merry Christmas and a Happy New Year to you and all at jayisgames

E G

Reply

I just wanted to say that I really love these dismantlement games. I hope they keep coming and other good puzzle designers take up the motif. Great work again, Gam.ebb.jpp!

Reply

Of course I didn't notice that the

resistors were backwards from the diagram.

Clever, subtle and aggravating. In a good way :)

-Joe

Reply
Pfaffinator January 16, 2010 12:27 PM

I'm falling in love with the dismantlement games! Oh, and by the way, grinnyp, they are resistors, not transistors.

Reply

i dont understand how you enter the

1116

code?!?!?!?! i have clicked all over the blocks to the left and right of the scroll wheel on the back, and nothings happeining. am i missing something???

Reply

this was an awesome game. i hope there isn`t really a time bomb cause im trying to do it with my mouse.

Reply

stef, you probably skipped ahead/missed something.

The puzzles in this one didn't need to be done in a definite order (which confused me a tiny bit when I was forced to consult the walkthrough). It was harder than the tea canister one, but some things I still managed to figure out on my own.

Reply

^ Scroll Up | Homepage >

Leave a comment [top of page]

Please consider creating a Casual Gameplay account if you're a regular visitor here, as it will allow us to create an even better experience for you. Sign-up here!
  • PLEASE UNDERSTAND SITE POLICIES BEFORE POSTING COMMENTS
  • You may use limited HTML tags for style:
    (a href, b, br/, strong, em, ul, ol, li, code, spoiler)
    HTML tags begin with a less-than sign: < and end with a greater-than sign: >. Always. No exceptions.
  • To post spoilers, please use spoiler tags: <spoiler> example </spoiler>
    If you need help understanding spoiler tags, read the spoiler help.
  • Please Preview your comment before posting, especially when using spoilers!
  • No link dropping, no domains as names; do not spam, and do not advertise! (rel="nofollow" in use)
chrpa Jayisgames needs your help to continue providing quality content. Click for details Welcome to the Roundup 66 - Retro with four games! After you find the ten monkeys in the chapter, look in the inventory. You will find a...  ...
chrpa Jayisgames needs your help to continue providing quality content. Click for details Welcome to the Roundup 65 with three games! As mentioned in the previous roundups, only odd-numbered episodes are featured since even-numbered are for Robin Vencel's patrons (the...  ...
chrpa Jayisgames needs your help to continue providing quality content. Click for details Hi! Weekday Escape and Weekday Puzzle are here! First we have two new cans from tomoLaSiDo and then two small rooms from isotronic. That's all for this...  ...
6,365 Views
0 Comments
chrpa Jayisgames needs your help to continue providing quality content. Click for details Welcome to Mobile Monday! We have another beautiful game from Nicolet and it's a winter game as it should be. Tasuku Yahiro have released another of their...  ...

HELP Jayisgames.com

Recent Comments


Display 5 more comments
Limit to the last 5 comments

Game of the week


Dark Romance: Vampire Origins Collector's Edition

Your Favorite Games edit

add
Save links to your favorite games here. Use the Favorites editor.

Monthly Archives