
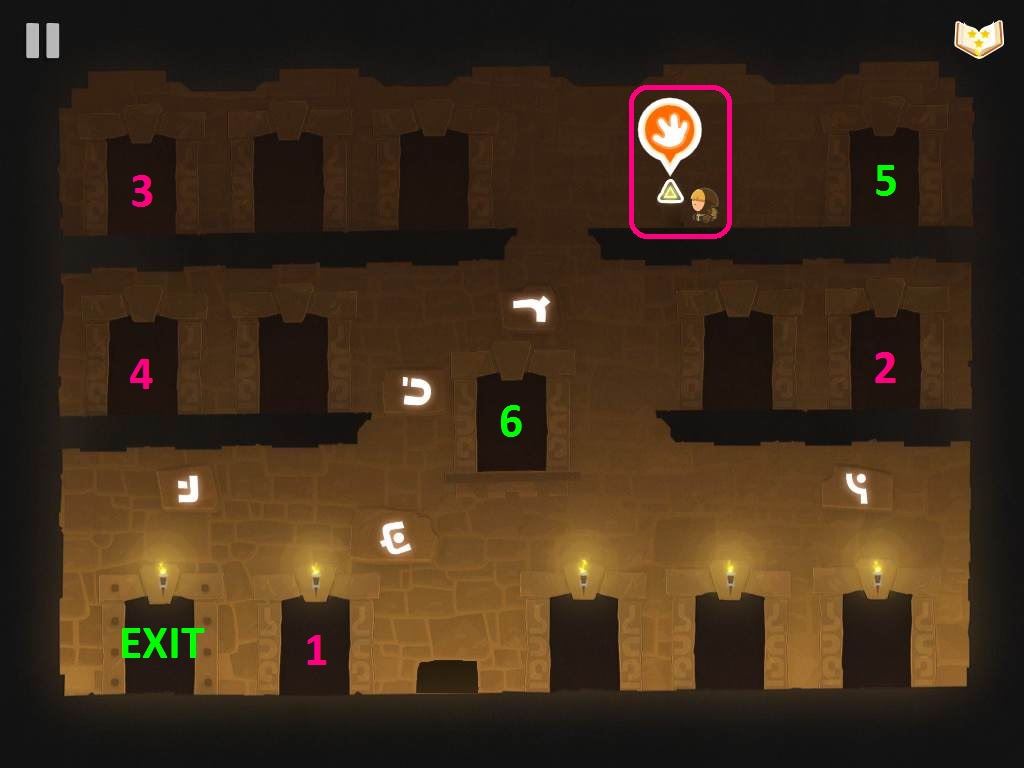
Tiny Thief
Platform: iOS, Android, Mac, Windows
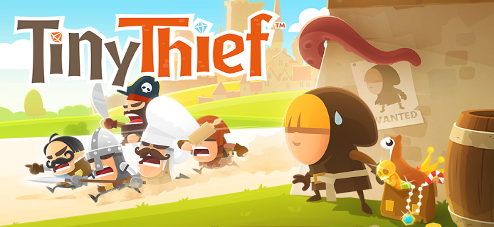
![]() If you are at all a fan of point-and-click puzzle games, stop what you're doing right now and go buy 5Ants's Tiny Thief for your iOS or Android device. Why? Because not only is it one of the most beautifully animated and adorable games to come down the river in a long time, but more importantly, it's fun, clever, and imaginative to boot. As the title suggests, you are a plucky little thief who, along with your sassy ferret sidekick, must steal, trick, and slink your way through six different chapters of adventures. Each chapter comes with its own story, revealed in comic book scenes between levels, and even level represents a puzzle with its own unique objectives to complete.
If you are at all a fan of point-and-click puzzle games, stop what you're doing right now and go buy 5Ants's Tiny Thief for your iOS or Android device. Why? Because not only is it one of the most beautifully animated and adorable games to come down the river in a long time, but more importantly, it's fun, clever, and imaginative to boot. As the title suggests, you are a plucky little thief who, along with your sassy ferret sidekick, must steal, trick, and slink your way through six different chapters of adventures. Each chapter comes with its own story, revealed in comic book scenes between levels, and even level represents a puzzle with its own unique objectives to complete.
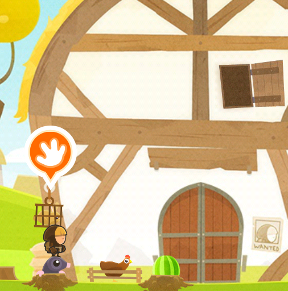 Tap anywhere onscreen to move, and if you're close enough, certain objects will pop up with an icon above them you can tap to interact. It might be a barrel to hide in for when the guards come your way, or a rope to untie, or a pie to bake, or any number of possibilities. Each stage after the training levels has three items to steal or find that grant you a star apiece... the main object needed to complete the stage, your ferret who hides around the scenery and can be collected when he appears with a tap, and an optional secret item (or two or three or more!) you'll need to experiment with your surroundings to figure out not only how to nab, but what you're nabbing!
It's impossible to be in a bad mood while playing Tiny Thief. It isn't just that the game is gorgeous, with expressive characters and detailed animations. A lot of games are gorgeous. What makes Tiny Thief so special is that it knows you need more than just a pretty face to make a game great, and the level design is no slouch either. It's really impressive how much work and detail has gone into making each one look and feel unique, especially considering how elaborate they get later on. The downside is that while most stages will allow you to go back and forth all over them, performing certain actions in some of them will lock you out of getting items or doing things that needed to be done beforehand, forcing a restart, which is frustrating considering that the patience and stealth required in a few of them can mean they go slowly. But Tiny Thief's strength is in how much fun solving all of those puzzles can be, exploring and setting of chain reactions of events that slip you past guards or otherwise help people. I'd call it the perfect bunch of bite-sized enjoyment, except that implies it's easy to put down, and chances are once you start playing you're not going to want to stop until you finish. Games like Tiny Thief prove mobile titles are capable of great things, and with its professional look and great level design, it deserves a spot of honour in your collection.
![]() Windows:
Windows:
Get the full version
![]() Mac OS X:
Mac OS X:
Get the full version
NOTE: This game was played and reviewed on the HTC One S. Game was available in the North American market at the time of publication, but may not be available in other territories. Please see individual app market pages for purchasing info.


Walkthrough Guide
(Please allow page to fully load for spoiler tags to be functional.)
Tiny Thief Walkthrough
(Part 1 - Stages 1, 2, & 3)
Stage 1: First Lessons
Level 1-1: A Sneaky Picnic
Tap the picnic basket beside the sleeping guard at the bottom of the tree, then tap the hand icon above it to take the BASKET (Star #1).
Tap the green exit at the far right side of the scene to complete the level.
Level 1-2: Unwanted Posters
Select the ladder and tap the arrow to climb up.
Tap the metal ring on the platform, then untie the rope from the ring to drop the guard.
Collect the WANTED POSTERS (Star #1) in the orange box at the right edge of the platform.
Climb back down the ladder, then tap the green exit to complete the level.
Level 1-3: A Key for Freedom
Climb up the ladder to get onto the left platform, then walk to the edge on the right.
Tap the small circle at the middle of the wall to swing to the right platform.
Take the KEY hanging on the hook.
Tap the circle on the wall again to swing back to the left platform. Climb down the ladder to return to ground level.
Select the padlock at the top of the butterfly jar, then use the KEY to open the lock and free the BUTTERFLIES (Star #1).
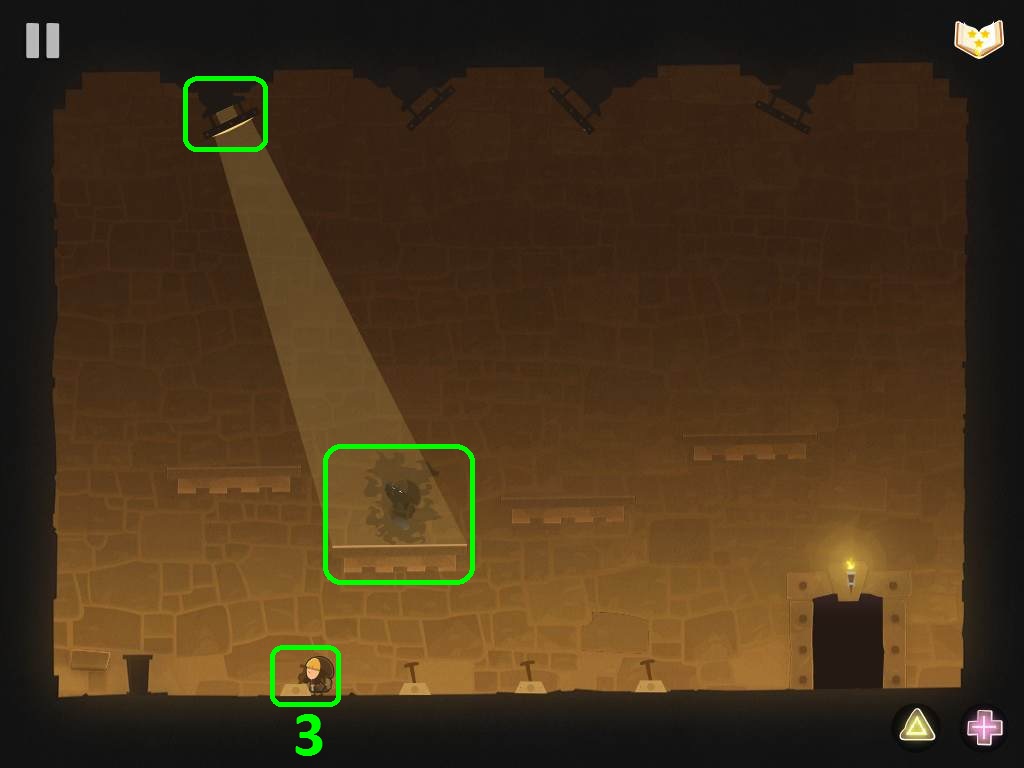
Tap the FERRET (Star #2) at the upper left side of the roof, then follow it to the exit.
Level 1-4: Harvest Time
Quickly tap the barrel and jump inside to hide from the gardener.
The gardener will catch you if he sees you, and he will automatically see you if you're out in the open when he's facing you.
Tap the FERRET (Star #2) when it pokes its head out of the large pot on top of the ledge above the plants.
Wait for the gardener to turn towards the right. Once he's facing away from you, quickly jump out of the barrel and climb up the left ladder.
Search the crate on the right side of the platform to take the VEGETABLES (Star #1).
Wait again for the gardener to face left, then climb down the ladder and run to the exit.
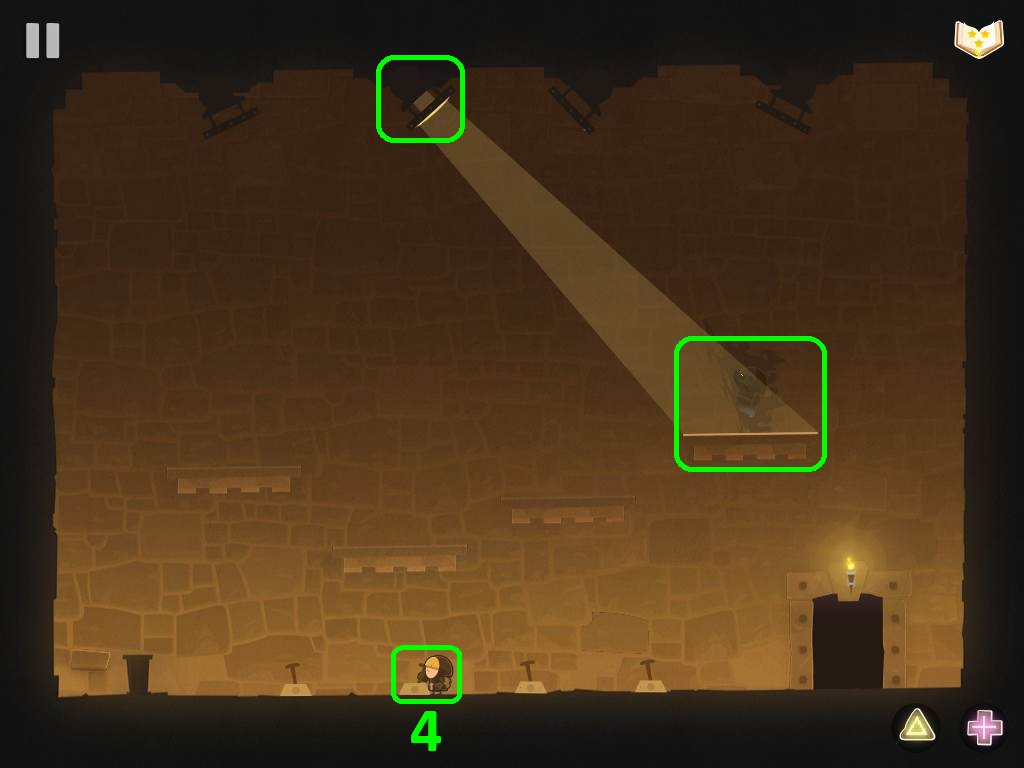
Level 1-5: The Sweetest Loot
Climb up the ladder to get onto the platform.
Open the large window on the right, tap the HARP (Star #1) to drop it onto the platform, then tap it again to collect it.
Select the arrow sign to move to the right half of the scene.
Tap the FERRET (Star #3) when it pokes its head out from the top of the small orange trees.
Wait for the guard to turn away, then quickly climb down the ladder and jump into the left barrel.
The guard will tap his spear three times before he turns, use that as a warning so you know when to hide.
Now wait for him to walk towards your hiding place. When he reaches you and then turns back around to face the right again, quickly hop out of the barrel and follow behind him.
Go the wooden cart and take the JAR OF HONEY (Star #2). Once you have the jar, hide inside the right barrel as fast as you can.
This time, wait for the guard to walk to the left past you while you're inside the right barrel, then get out of the barrel and run to the exit.
Stage 2: A Rumbling Stomach
Level 2-1: A Cheesy Plan
Tap the FERRET (Star #3) when it pokes its head out between the two eggs in the box at the top of the tall stack of crates.
Pick up the STINKY CHEESE on the far left crate.
Walk to the table beside the snoozing guard (be careful to tap the table and not the guard himself). Put the STINKY CHEESE on the table to chase the guard away.
Tap the jester who is juggling eggs on the ledge of the windmill.
The jester will drop one of the eggs into the bowl on the table below.
When the jester starts juggling pears, tap him again to drop a pear into the bowl with the egg.
Finally, he'll juggle apples. Tap the jester one last time to drop the apple into the bowl.
Take the GLASS BOWL full of ingredients from the table and put it into the oven at the pie booth under the white canopy.
After a moment, the thief will take out a freshly baked PIE (Star #1) from the oven.
Lift the glass jar on the table at the cheese booth to take the piece of CHEESE(Star #2).
Go to the exit to complete the level.
Level 2-2: A Starving Friend
Tap the FERRET (Star #3) when it pokes its head down from the middle of the archway, directly above the red and white awning over the butcher's booth.
Untie the bottom of the rope from the small ring on the ground to drop the sausage hanging in the butcher's booth.
Quickly jump into the barrel on the left so that the butcher does not catch you when the dog picks up the sausage.
After the butcher is gone, you can safely hop out of the barrel.
Wait for the musician on the roof to go to his glass of milk. Tap his LUTE (Star #1) to drop it to the ground, then pick it up and take it.
Take the CHEESEBURGER (Star #2) from the plat on the table at the butcher's booth.
Go to the exit to complete the level.
Level 2-3: Bait the Hook
Tap the FERRET (Star #3) when it pokes its head out from the basket on the table between the two tents.
Next, tap the crab in the basket on the table to the left of the blue and white tent to drop it to the ground.
Hop out of the barrel and pick up the CRAB (Star #1, part 1/2) from the ground.
Take the FISHING ROD leaning against the wall of the far left building.
Climb up the left ladder to the platform above, then walk to the middle of the giant orange fish statue.
Select the large flopping FISH (Star #2) on the table at the fish booth to reel it in with the FISHING ROD.
Tap the shaking clam on top of the stack of crates beside the right ladder, then tap the golden pearl to drop it onto the ground.
Wait for the guard to turn to the left, then quickly climb down the ladder and pick up the PEARL (Star #1, part 2/2).
Run to the exit before the guard has a chance to turn back around.
Level 2-4: Pumpkin Soup
Tap the FERRET (Star #3) when it pokes its head out from the crate of oranges or the crate of pears (it switches back and forth) to the left of the produce stand.
Jump out of the barrel and take a CARROT from the box of fruits and veggies on the produce stand table.
Select the horse and feed it the CARROT.
Now the horse will let you climb on top of it and up onto the wall above.
Tap the bird to make it fly away, then collect the COIN (Star #1, part 1/2) from the nest.
Walk to the right side of the wall, then go down the banner into the cart of hay below.
The produce vendor will now patrol back and forth between the green tent and the produce stand. You can safely hide from him while inside the hay cart.
Tap the pink jar of starberry jam on the shelf in the green tent to drop it onto the table.
Wait for the vendor to turn to the left, then quickly hop out of the hay cart and take the STRAWBERRY JAM (Star #1 part 2/2) from the table and the PUMPKIN (Star #2) on the ground.
Run to the exit to complete the level.
If you can't make it there in time, jump into the hay cart again, then wait for the vendor to face left and go to the exit.
Level 2-5: A Sad Piggy
Tap the WATERMELON in front of the door three times to roll it into the right molehill.
Stand on top of the left mole hill. When the mole comes up out of the hole, it will lift you a few feet up.
While you're raised by the mole, tap the cage above to release the rabbit.
Tap the chicken to let her out of the pen, then quickly run behind the farmer and wait for him to notice the chicken.
As soon as the farmer tackles the chicken, grab the JAR OF NUTS on the table and jump into the barrel before the farmer turns around.
Wait for the farmer to put the chicken back in the pen and return to his post at the table before climbing out of the barrel.
Walk to the stump to the left of the rabbit, then place the JAR OF NUTS onto the stump.
The nuts will lure out the raccoon, allowing you to safely climb the tree.
Take the BALLOON floating in the air to the left of the tree.
Select the RABBIT and then tie the BALLOON to it.
Tap the green bird that flies to the right side of the large tree.
The bird will move to the heart-shaped tree beside the roof of the barn. Tap it again.
This time the bird flies to the branch at the left side of the large tree. Tap it a third time.
Next, the bird will land on the wooden beam at the middle of the barn. Tap it once again.
Lastly, the bird flies to the short branch near the bottom of the large tree. Tap the bird for the fifth and final time to make it peck at the tree.
Pick up the BALL (Star #1, part 1/3) that falls out of the hole in the tree trunk and onto the ground.
Tap the FERRET (Star #3) when it pokes its head out of the left molehill.
Release the chicken and take the EGG (Star #1, part 2/3) she leaves in the pen.
Open the window to let the goose into the barn.
Take the GLASS BOTTLE (Star #1, part 3/3) that flies out of the window and lands in front of the door.
Untie the rope from the post to free the PIG (Star #2).
Go to the exit to complete the level.
Stage 3: A Corrupt Sheriff
Level 3-1: Candy Store
Climb down the ivy and take the HATCHET from the pile of chopped wood.
Tap the chimney at the top of the candy store building to fire out a piece of candy. Pick up the CANDY CANE(Star #1, part 1/4) that lands on the ground beside the ivy.
Tap the FERRET (Star #3) when it pokes its head out of the same chimney.
Climb back up the ivy, then enter the open window on the right.
The thief will come out of the other open window on the second story of the house.
Walk across the rope to get to the roof of the candy shop.
Search the jar of candy in the left window to take the LOLLIPOPS (Star #1, part 2/4).
Tap the dish of blue candies to drop one onto the ground below.
After the sheriff eats the first blue candy, tap the plate again to drop another piece on the ground.
The sheriff will follow the trail of candies and eat the second.
Tap the candy dish for a third and final time to lure the sheriff into the barrel.
Walk to the giant lollipop, then select the AXE to chop down the lollipop and smash the barrel.
Go back across the rope, walk through the window, climb down the ivy, and then go down the ladder to reach the street level.
Ring the pink bell hanging from the side of the large pipe on the candy store wall to call for the candy deliveryman.
Tap the candy deliveryman before he can make his delivery to drop the BOX OF CANDY (Star #1, part 3/4) down to the street, then go and collect it from the ground.
Tap the pink sign above the door to the candy store until all three parts of the sign make the image of a pink piece of candy.
Pick up the TEDDY BEAR (Star #1, part 4/4) that is dispensed on the floor at the far right side of the scene, in front of the cart full of flour sacks.
Take the PIGGY BANK (Star #2) on the ground beside the giant lollipop.
Go to the exit to complete the level.
Level 3-2: Jailbreak
Quickly climb up the ladder onto the bookcase before the sheriff arrives upstairs.
Wait for the sheriff to walk by the ladder, then climb down and run through the open door to reach the prison at the floor below.
Wait again for the sheriff to walk back to the safe. When he turns away from it and starts moving left, tap the door to go back up stairs.
Grab the BLUE KEY hanging by the upstairs door, then hurry through the door to go downstairs again.
Tap the blue lock on the far left cage and use the BLUE KEY to free the jester.
Take the WEIGHT left behind in the open cage.
Wait for the sheriff to turn left again before going upstairs, then quickly climb the ladder and jump onto the chandelier.
Tap the sheriff after he opens the safe to knock him out with the WEIGHT.
After the sheriff is taken care of, the jester will enter the room and throw a ball at the target to knock it off the wall, revealing a hidden cache.
Tap the purse inside the wall cache below the king's portrait to drop it down.
Climb down the ladder and pick up the PURSE (Star #1, part 1/3) and the RED KEY on the ground.
Go downstairs and select the red lock on the middle cage to open it with the RED KEY.
Take the TORCH hanging on the wall inside the middle cage.
Tap the FERRET (Star #3) when it pokes its head out from the bags of gold inside the opened safe upstairs.
Select the wall sconce between the door and the swords to place the TORCH and light the right side of the room.
Take the YELLOW KEY and the BADGE (Star #1, part 2/3) from the wall shelf in the newly lit area.
Open the right cage with the YELLOW KEY to free the old woman.
Wait for the OLD WOMAN (Star #2) to walk upstairs and get to the window. On her way there, she'll open the small metal safe in the wall to the left of the bookcase.
Go upstairs and collect the GOLD BAR (Star #1, part 3/3) in the compartment the old woman opened.
Go to the exit to complete the level.
Level 3-3: A Bedtime Story
Take the fancy HAT (Star #1, part 1/4) from the table in the bathroom.
Go to the bedroom, tap the clock on the wall, then quickly hide inside the closet.
Wait for the clock to chime, which will wake up the sheriff and chase away the cat.
When the sheriff leaves the room, quickly leave the closet and hide inside the bed until the sheriff's wife comes in and falls asleep.
Tap the circular painting on the wall to find the CRYSTAL SWAN (Star #1, part 2/4), then tap it again to drop it and collect it from the cat's bed.
Tap the FERRET (Star #3) when it pokes its head out of the potted plant in the dark room upstairs.
Go through the door in the bedroom to enter the dark upstairs room.
Take the VASE (Star #1, part 3/4) on the table at the right side of the room.
Go back to the bedroom. Tap the cuckoo clock to wind it again, then quickly hide inside the bed.
When the woman wakes up, you'll be launched into the air for just a second.
Quickly tap the hand icon beside the chandelier hanging from the ceiling to to grab hold of it and take the DIAMOND (Star #2).
Open the shower curtain in the bathroom and take the Gramophone (Star #1, part 4/4) in the tub.
Go to the exit to complete the level.
Level 3-4: The Birthday Cake
Tap the chimney on the roof of bakery to fill the room with smoke.
The baker will open the upstairs window, revealing the GOLDEN FORK (Star #1, part 1/3). Tap the fork to drop it out the window and pick it up off the street.
Watch the window at the top of the right building.
When the little boy runs past the window, tap him and then pick up the AIRPLANE (Star #1, part 2/3) that flies down to the ground.
Take the PIE steaming in the bakery window, then quickly hide inside the crate at the far left side of the scene.
Place the PIE on the bottom window of the right building.
Knock on the door to bring the boy out of the house. He'll take the pie in the window and start eating it.
Take the new, freshly baked pie on the bakery windowsill and hide inside the crate again.
When the baker comes out, he'll see the little boy eating the old pie and start yelling at him.
Quickly hop out of the crate and enter the bakery through the front door to take the CAKE (Star #2, part 1/3). Once you have the cake, hide back inside the crate until the baker leaves.
Take the MOUSE that's eating the pie crumbs by the bench between the two buildings.
Put the MOUSE on the bakery windowsill and then quickly hide inside the crate.
Wait for the baker to chase the mouse away, then run into the bakery building to take the second CAKE (Star #2, part 2/3). Hide in the crate again before the baker returns.
When the delivery men arrive at the bakery, jump out of the crate and take the stack of FLOUR SACKS.
The thief will carry them into the bakery, take the CAKE (Star #2, part 3/3) inside the building, and then climb out onto the roof.
Tap the FERRET (Star #3) that appears on top of the cake dish in the bakery display window.
Take the PINWHEEL (Star #1, part 3/3) on the bakery rooftop.
Walk off the right side of the roof to drop down. Go to the exit to complete the level.
Level 3-5: To Steal a Thief
Ring the bell at the top of the tower and then quickly tap the guard on the ledge to drop him into the hay cart.
Wait for the guard on top of the tax carriage to turn away from you, then leave the bush and take the HEAD from the scarecrow. Run back to hide in the bush before the guard turns back around.
Once the guard faces right again, leave the bush and take the fallen guard's CROSSBOW (Star #1, part 1/3) on the ground.
Quickly leave the scene by tapping the sign to the left of the bush, which will take you to the circus.
If the guard is about to turn around before you can make it to the sign (indicated by tapping his spear three times), hide in the bush and wait for him to turn around again before leaving.
Tap the apples in the tree to drop them for the orangutan.
Pick up the TOP HAT (Star #1, part 2/3) that the orangutan drops into the box under the tree.
Tap the llama when it pokes its head out of the circus car.
Next, wait for the giraffe to pop out and tap it as well.
Lastly, tap the FERRET (Star #3) when it pokes its head out of the top of the circus car.
Tap the handle at the bottom of the flag pole to take the FLAG.
Get inside the cannon to launch the thief on top of the bear cage.
Lift the cafe door to release the bear, then jump off the left side of the cage to go back to the ground.
Pick up the STILTS that the jester left on the ground beside the cage.
Select the bush to the left of the orangutan's tree, then tap the outfit icon to change into a disguise.
Now that you're wearing the stilts, you can take the the BEEHIVE hanging on the tree branch.
Tap the arrow sign to go back to the tower scene.
Walk right to the sheriff, then tap the "money bag" bubble above his head to give him the BEEHIVE.
After the bees chase away the sheriff, pick up the TOUP�E that fell on the ground in front of the pile of treasure.
Go left and tap the sign to return to the circus scene.
Go to the open circus car and take the CLOWN NOSE (Star #1, part 3/3) hanging on the front door.
Return to the tower scene by clicking the arrow sign, then go to the exit to complete the level.
Posted by: Trinn |
July 14, 2013 9:15 AM
|
July 14, 2013 9:15 AM
Tiny Thief Walkthrough
(Part 2 - Stages 4, 5, & 6)
Stage 4: The Cursed Treasure
Level 4-1: Red Parrot Tavern
Wait for the bartender to walk to the right side of the bar.
As soon as he moves to the right of the ladder, quickly climb the ladder and run left. Take the JAR off the table, then hide in the barrel.
Tap the blindfolded man sitting on the platform above the bar to play a game with him.
He will lift one of the cups to reveal a small ball, then start quickly switching the cups around.
Follow the cup that was holding the ball. After he stops moving them, tap the cup you believe holds the ball to make your selection.
If you chose correctly, the blindfolded man will drop a red die onto the ground beside the barrel.
Wait for the bartender to face away, then pick up the DIE (Star #1, part 1/4) and climb back down the ladder into the celler.
Now wait for the bartended to walk left past the ladder, then quickly climb up and go through the door on the right to head upstairs
Tap the silhouette of the FERRET standing still by the corner at the right side of the roof.
Take the KEY hanging on the wall next to the torch.
Go to the red tub of liquid on the right (the one with a flame label) and fill the JAR with the hot sauce.
When the bartender turns his back to the door, go downstairs and climb into the cellar to hide.
Wait for the bartender to walk to the right table, then quickly go up the ladder and put the JAR of hot sauce on the left table, then run back down to the cellar.
Use the KEY to open the small chest and find the SPYGLASS (Star #1, part 2/4).
Go the ladder on the far right and climb up to enter the captain's room.
Pull the rope hanging from the ceiling to call for the bartender. He'll bring the jug to the captain, so quickly climb back down to the cellar to hide.
After the captain drinks the hot sauce, tap the ship in the bottle above the captain's table to drop it into the cellar.
Pick up the MODEL SHIP (Star #1, part 3/4) that slides to the middle of the floor.
Sneak past the bartender (use the barrel or climb into the cellar if you need to hide) and take the JAR again.
Return to the upstairs room and this time fill the JAR with milk at the white jug on the left.
Go back down to the bar through the door and place the JAR of milk on the table, making sure not to get caught by the bartender.
Head down to the cellar and then up the right ladder to re-enter the captain's room.
Pull the rope to call for the bartender again then climb down the ladder tohide in the cellar.
This time, the captain will throw his pocketwatch into the bar.
Wait for the bartender to walk to the left side of the room, then climb up the ladder and pick up the POCKETWATCH (Star #1, 4/4) on the floor by the door to the captains room.
Quickly go through the door or climb down the ladder to hide before the barman turns around.
Take the JAR from the table in the bar one last time while the bartender isn't looking.
Once you have the JAR, sneak back to the upstairs room.
Fill the JAR once again, this time from the blue jug in the middle, to fill it with sleeping potion.
When the barman isn't looking, sneak downstairs and put the JAR of sleeping potion on the left table.
Go down to the cellar and climb the right ladder to enter the captain's room again.
Pull the rope in the room one final time to call the barman in. Hide in the cellar before the bartender enters the room
The captain will drink the potion and fall asleep, allowing you to take the GOLD STATUE (Star #2) on the table in front of him.
Tap the exit to complete the level.
Level 4-2: The Wandering Fear
Open the second window from the left in the upper row of windows, then tap the chef. Pick up the CLEAVER (Star #1, part 1/4) the chef drops down to the dock.
Search the lunchbox by the sleeping pirate's feet to find the HOT DOG.
Pull the red lever to lower the crane. Go to the lowered platform and take the ROPE tied around the baguettes.
Go to the sleeping pirate and attach the HOT DOG & ROPE to turn him into shark bait.
Climb down the ladder to go into the ocean.
Tap the clam to open it, swim over the clam, and take the PEARL (Star #1, part 2/4) inside.
Tap all of the fish so that all of them are the color green. The school of fish will swim past the sand and reveal a TRIDENT (Star #1, part 3/4) at the left side of the ocean floor.
Climb back up the ladder to return to the dock, then tap the arrow sign to walk to the right scene of the area.
Move to the fishing pole hanging off the edge of the dock.
Watch the bobber closely. When it starts to wiggle, tap the fishing pole to reel a fish into the bucket.
Keep reeling in the line of the fishing rod every time it bobs in the water until you pull out a GOLD BRACELET (Star #1, part 4/4) then pick it up from the dock.
Take the BUCKET OF FISH, then tap the left arrow to return to the ship scene.
Hang the BUCKET OF FISH on the red lever to lure in the pelican.
While the pelican is flying down to the lever, quickly move to the crane platform.
Tap the FERRET (Star #3) that pokes its head out of the crate on top of the ship, to the left of where the pelican was first standing.
The pelican will take the fish from the bucket and pull the lever, which will lift you and the platform up to the top of the ship.
Tap the SHIP'S WHEEL (Star #2) at the left side of the ship deck to complete the level.
Level 4-3: Yer Treasure Map
Hop out of the barrel and stand on top of the elevator.
Wait for the pirate on the second floor to turn away and start walking to the right.
Push the elevator button to go up to the second floor. Follow closely behind the patrolling pirate, then hide inside the orange cot hanging on the wall.
Now wait for the pirate to start walking left before getting out of the cot.
Pick up the GUNPOWDER from the ground by the barrels, then climb up the ladder to go to the third floor before the pirate turns around.
Tap the framed pickture of the ship three times to drop it off the wall.
Tap the PIRATE HAT (Star #1, part 1/4) to drop it from the revealed wall cache and pick it up from the ground.
Go up the left ladder to enter the side room on the top floor. Take the BANANAS from the basket.
Climb down the ladder to return to the third floor and then go up the right ladder to reach the upper deck of the ship.
Tap the doors covering the cannons at the side of the ship to close them.
You'll see that each door has a symbol: a skull, a shark, or an apple.
If you try to close two different doors, both will pop open. Instead, close the doors by tapping the matching pairs.
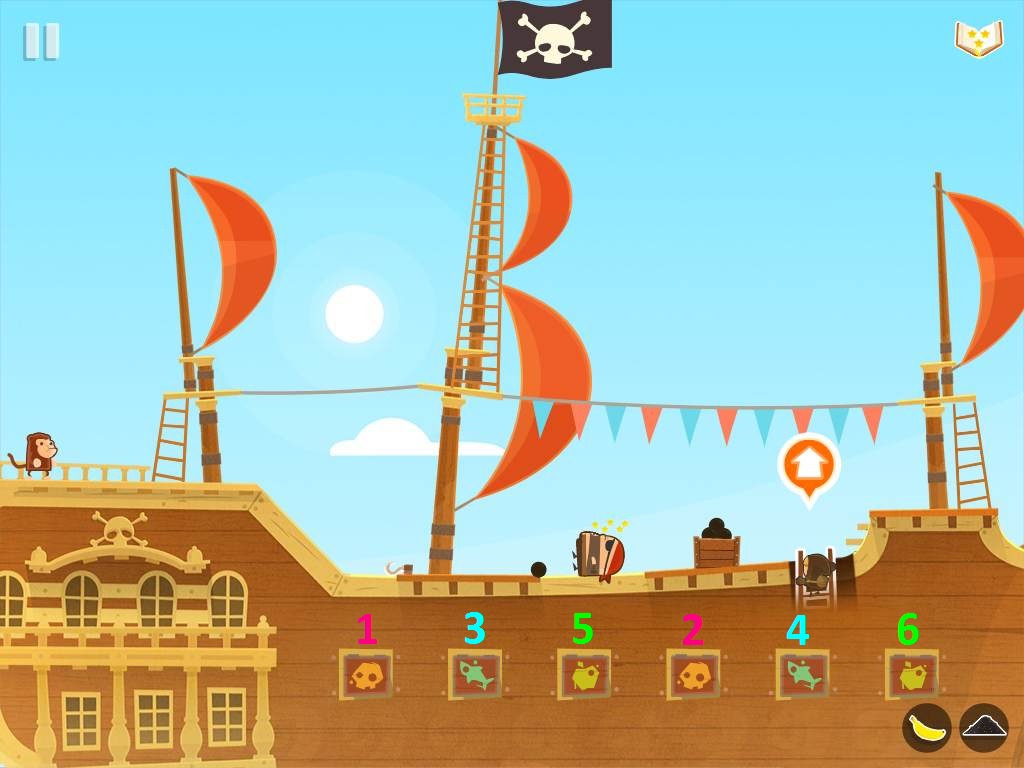
Refer to the screenshot below and tap the doors in the following order to complete the puzzle:
Screenshot
When you close all the doors the cannons will fire and knock out the patrolling pirate, and also knock the pirate hook onto the deck of the ship.
Go up the ladder to climb on to the deck.
Take a CANNONBALL from the crate and pick up the HOOK (Star #1, part 2/4) on the floor.
Hop onto the platform at the right side of the deck and then climb up the right ladder. Walk left across the rope and down the left ladder to reach the monkey.
Give the monkey the BANANAS to receive a CRACKER in exchange.
Walk to the right to slide down the ramp, then climb down the ladder to return to the third floor of the ship interior.
Move left to the pink shampoo bottle on the table.
Tap the FERRET (Star #3) when it pokes its head out of the brown cot above the sleeping pirate.
If you miss it the first time, just back up and walk to the shampoo bottle again and it'll pop out at the same time.
Go down the ladder, walk left to the elevator, and push the button to go to the bottom floor.
Put the GUNPOWDER and CANNONBALL into the cannon. Fire the cannon to blast off the door guarding the treasure.
Take the CROWN (Star #1, part 3/4) from the pile of treasure.
Take the KEY hanging by a rope from the ceiling.
Use the elevator and then climb up the right ladder to return to the third floor of the ship.
Go to the caged parrot and feed it the CRACKER.
Tap the padlock at the corner of the fishtank and unlock it with the KEY. The thief will enter the aquarium and take the TREASURE MAP (Star #2)
When you enter the aquarium, the captain will briefly leave his shower to fetch the shampoo bottle from the table.
While he's out, quickly open the shower curtain and tap the RUBBER DUCKIE (Star #1, part 4/4) to drop it onto the floor.
After the captain leaves, you can pick up the duck from the floor beside the shower.
Go to the exit at the crow's nest on the ship deck to complete the level.
Level 4-4: Meet the Tribe
Hide inside the barrel until the warrior turns around to leave the area.
Once it's safe to leave, quickly hop out and take the COCONUT on the ground at the far left side of the scene, then climb up the right palm tree.
Wait for the warrior to stand under the palm tree, then throw the COCONUT down at him to knock him out.
Pick up the KEY he drops onto the ground. Use the KEY to unlock the orangutans' cages.
Take the GOLDEN SKULL the monkey offers you as a reward.
You will then be transported to the village scene.
Tap the chameleon to stick out its tongue. If you time it just right, you can catch the three flies that are moving in a circle in front of the chameleon's mouth.
After it eats the third fly, tap it one more time to make it spit out the GOLD NUGGET (Star #1, part 1/3) onto the lower platform of the left tree where you can pick it up
Tap the door to the straw hut to bring out the shaman and awaken the giant stone idol.
Pay attention to the color of the idol statue's eyes. They can turn a light blue, pink, or green color.
The shaman will also briefly summon three orbs of the same color, tab the orb that matches the color of the statue's eyes to cast a spell.
If the statue's eyes are red, tap the shaman's red spell.
This will summon a cloud of rain that causes the FLOWER (Star #1, part 2/3) to grow from the ground to the left of the shaman's hut.
If the eyes are blue, tap the shaman's blue spell to call for a tornado.
Tap the FERRET (Star #3) blowing around in the tornado to capture it. If you miss it the first time, you can use the shaman's blue spell the next time the statue eyes turn blue to try again.
If the eyes are green, tap the shaman's green spell to call down a bolt of a lightning.
The lightning will strike the masked warrior patrolilng the area, which will cause his MASK (Star #1, part 3/3) to fall to the ground at his feet.
You can pick up both the mask and flower now if you sneak past the guard, or later once you've gotten rid of all the villagers.
Wait for the patrolling warrior to walk to the right away from the ladder. Quickly climb down and pick up the DAGGER from the ground.
Climb up both ladders to reach the top platform of the left tree. Walk to the edge of the platform and use the monkey to swing over to the right tree.
Move to the tree branch to stand above the pirate captain hanging over the boiling pot.
Use the KNIFE to cut the captain's rope, ridding the area of all your enemies.
Place the GOLDEN SKULL into the space in the door between the two other skulls.
Climb the ladder down the right tree and take the GOLD IDOL (Star #2) from the demon statue's mouth.
While you're down here, make sure to pick up the MASK and FLOWER if you haven't already!
Go to the exit to complete the level.
Level 4-5: The Lost Temple
Memorize the 5 symbols in order from left to right at the center of the skull statue's forehead.
Go into the open door on the left to enter the first puzzle room.
You'll see five tiles on the wall in this room with symbols that match the ones you saw on the skull in the temple room.
Press the tiles to light them in the same order they appeared on the skull.
Screenshot
Take the APPLE (Star #1, part 1/3) that appears in the revealed space in the wall between the doors at the bottom level.
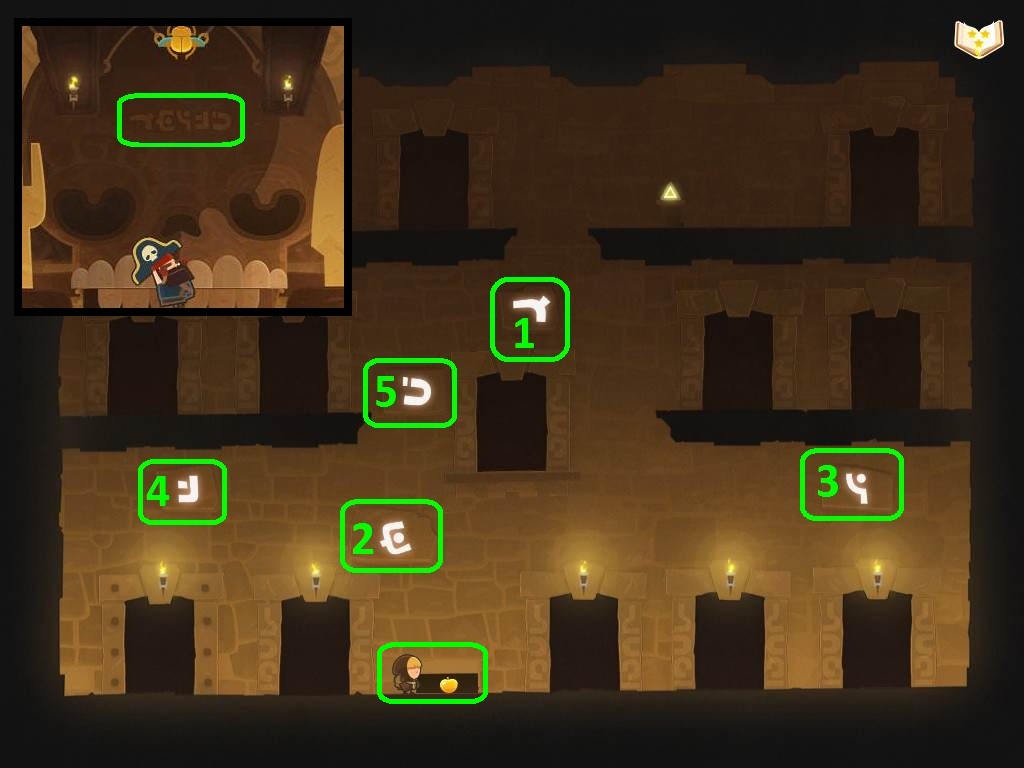
The goal in this room is to walk through the trick doors to reach the triangle on the pedestal at the upper right platform.
Enter the doors 1 through 4 in the order shown in the screenshot below to arrive at the upper right platform.
Take the TRIANGLE SHAPE from the pedestal, then go through doors 5 and 6 indicated in the screenshot to find the exit.
Screenshot
Next, go through the middle open door to enter the second puzzle room.
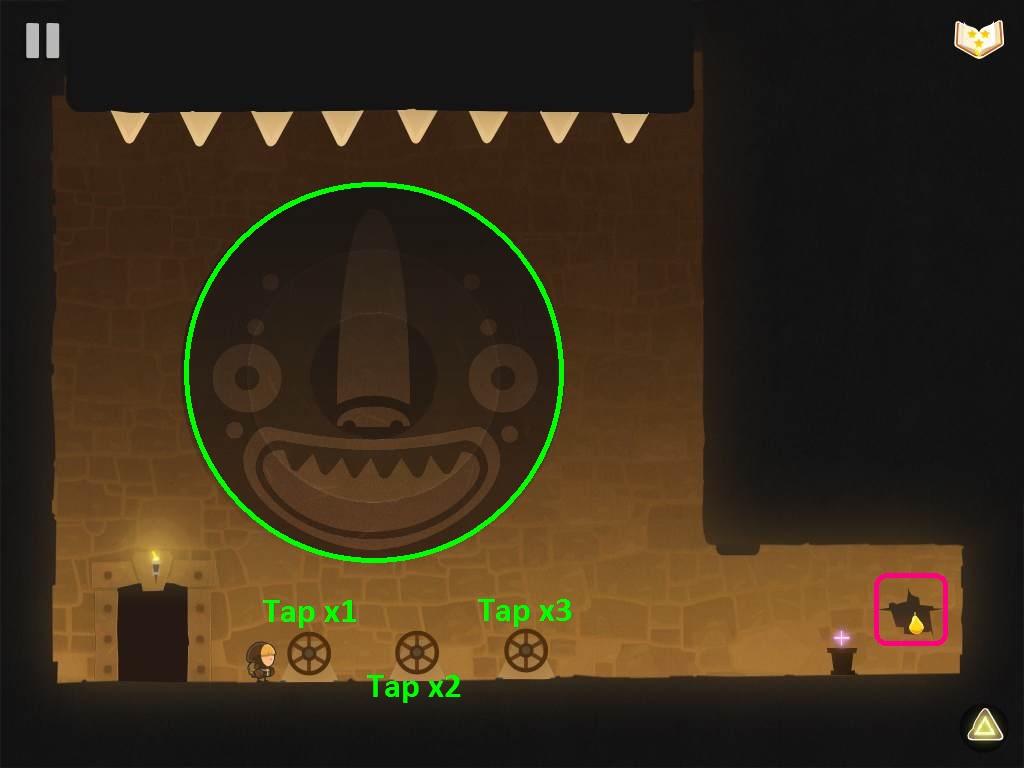
As soon as you enter the room, run to the wheels and quickly turn them to arrange the disc puzzle on the wall.
Turn the left wheel once, the middle wheel twice, and the right wheel three times to rotate the discs and correctly assemble the image of a smiling face.
If you don't have enough time before the spiked ceiling comes down, you can run out the door and back in to reset the puzzle.
Screenshot
Tap the cracked section of the wall at the far right side of the room two times to reveal the PEAR (Star #1, part 2/3).
Take the CROSS SHAPE on the pedestal, then go through the door to return to the main temple room.
Tap the right open door to enter the third puzzle room.
Walk towards the left side of the room to spawn the shadow creature.
Pull the switches to turn on the lights. Select the lights that are aimed at the platform the shadow creature is standing on to shine them at him.
Step 1
Step 2
Step 3
Step 4
After you've hit the shadow creature with the four lights, pick up the CIRCLE SHAPE it drops to the middle of the floor.
Tap the loose brick in the wall to the left of the pedestal to reveal a secret wall cache above the far right switch. Take the BANANA (Star #1, part 3/3) from the cache.
Exit through the door to return to the temple room.
Climb down the ladder to the right of the doorway.
Insert the TRIANGLE, CROSS, and CIRCLE shapes into the matching spaces on the wall beside the ladder. Each shape you place into the wall will activate the statue and scare off one of the pirates.
Go up the ladder and through the open door to reach the bottom level of the temple.
Push the button at the bottom of the skull statue to start the pyramid puzzle.
At the bottom level of the pyramid, you must figure out the pattern in the sets of three tiles, then change the middle tile to follow that patern.
The tiles on the left are all pictures of fruit (an apple, a pineapple, and a banana) and the tiles on the right are all pictures of meat (a chicken leg, a burger, and a sausage).
Change all three middle tiles to a picture of seafood. The middle tile in the left set of three is a fish, the middle set is a crab, and the right set is an octopus.
On the second level of the pyramid you must swap the tiles so that the shape shown in the tile matches the outer shape around the tile (circle tile within the circle outline, square tile within the square outline, etc.).
Simply tap a tile to move it into an empty space. There are multiple ways to solve this puzzle, but one possible way is by selecting these tiles in order:
Circle - Hexagon - Triangle - Diamond - Pentagon - Vertical Rectangle - Circle.
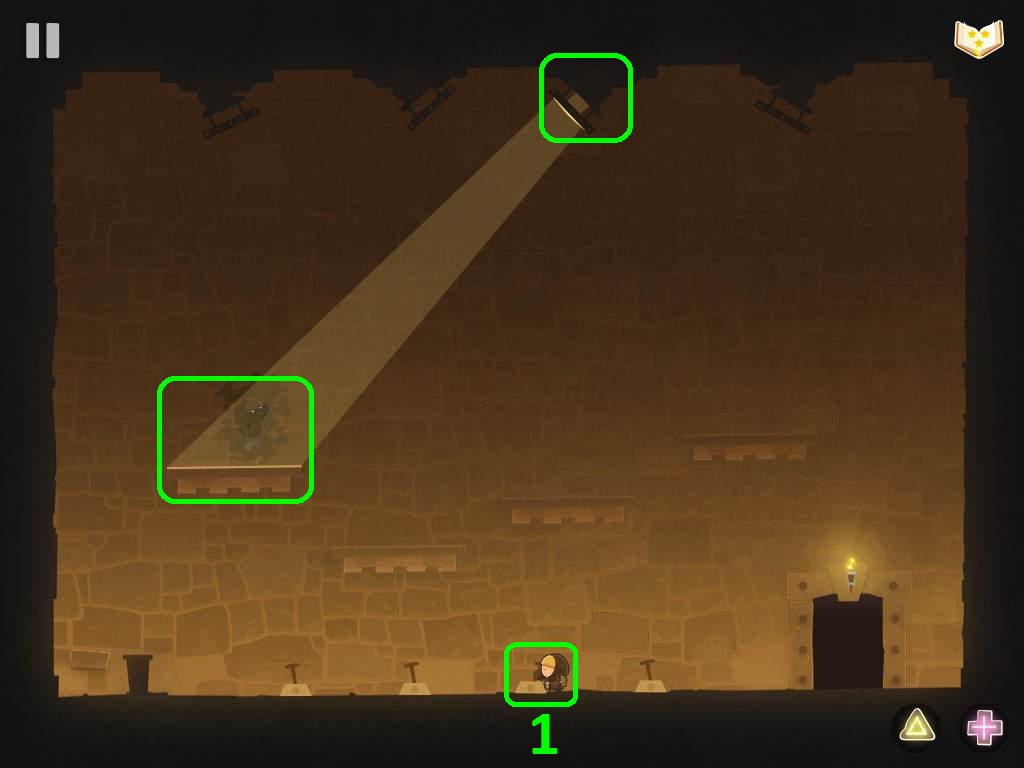
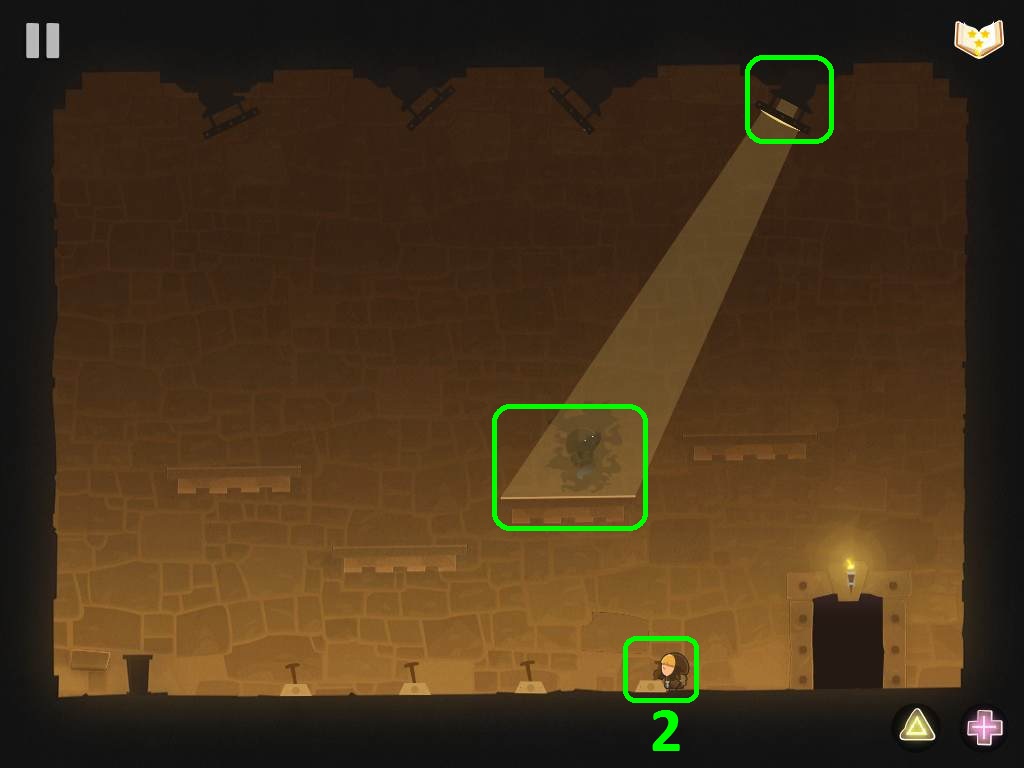
At the third level of the pyramid, you must tap the eyes in the correct order so that all four eyes are open at the same time.
As quickly as you can, tap the far right eye, then the middle left eye, then the middle right eye, and lastly the far left eye.
Solution
Once you reach the top level, tap the FERRET (Star #3) when it appears in the black space between the shapes on the second level of the pyramid.
Take the GOLDEN SCARAB (Star #2) at the top of the pyramid.
Go to the exit to complete the level.
Stage 5: A Royal Rescue
Level 5-1: Friendship in Bloom
Keep an eye on the gardener trimming the bush nearby. When his head is down, leave the clay pot you start the level hiding inside.
Quickly grab the BIRD in the tree to the left, then hide in the left clay pot again.
Wait for the gardener to duck his head down again. Jump out of the pot and stand underneath the green garden gnome on the shelf above the gardener's head.
Tap the GREEN GNOME (Star #1, part 1/3) twice to drop it off the shelf and catch it. If you are not standing under the gnome, it will break on the ground and you will have to reset the level to restore it.
Quickly hide in the clay pot to the right of the gardener in the bush before he lifts his head again.
When it's safe to come out again, leave the clay pot and take the HOSE hanging on the wall beside the right gardener who is watering a pot of flowers.
Jump into the green pipe to travel to the middle level of the garden before you're seen by the left gardener.
While the patrolling gardener on this level is facing towards the left, jump out of the left green pipe and run to the right one. Hop inside this pipe to reach the underground tunnel.
Stand under the red and blue garden gnome on the shelf at the right side of the tunnel.
Tap the RED GNOME (Star #1, part 2/3) two times to drop it off the shelf. Just like the other gnome statue, if you aren't standing near enough the gnome when it drops, it will break on the ground.
Go back into the green pipe to return to the middle level of the garden.
Wait for the patrolling gardener to face left again, then quickly run and hide behind the left bush.
Now wait for the gardener to walk to the bush beside the one you're hiding in.
Leave your hiding place as quickly as possible and take the FLOWERS (Star #2, part 1/3) out of the flower pot. Climb up the ivy vine on the wall to escape to the top level of the garden before the guard turns around.
Attach the HOSE to the y-shaped stick to make a slingshot. Fire the BIRD with the slingshot to dispose of the gardener beside the giant carnviorous plant.
Take theFLOWERS (Star#2, part 2/3) from the flower pot on the right ledge of the roof.
Drop the flower pot over the ledge to dispose of the two guards on the ground floor.
Wait for the remaining guard at the middle level of the garden to turn to the right.
Quickly climb down the ivy. Turn the red valve at the far left side of the area two times, once to turn on the fountain and again to turn it off.
Tap the FERRET that appears at the fountain spout, then climb up the ivy to hide before the gardener catches you.
Once it's safe to climb back down, hide behind the bush again.
Wait for the pink clock at the top of the princess's tower to reach 7 o' clock. Tap the clock carving on the wall (that also shows a time of 7:00) to reveal another gnome statue.
As soon as the guard walks past you to go left, hop out of the bush, stand under the PINK GNOME, and tap it twice to drop it into the thief's hands. Afterwards, hide behind the bush or in the green pipe
When it's safe to come out, leave your hiding spot and pick up the pink WATERING CAN on the ground between the two green pipes. Enter the left pipe to return to the ground floor of the garden.
Take the last bunch of FLOWERS (Star #2, part 3/3) from the small flower pot beside the large clay pot with a heart on it.
The princess will drop down a bag of beans onto the ground.
Go through the green pipe to return to the middle level of the garden. When it's safe, leave the pipe and pick up the BEANS, then go back into the left green pipe again.
Plant the BEANS in the large pot with the heart on it. Next, water the beans with the WATERING CAN to grow a giant beanstalk.
Climb up the beanstalk to complete the level.
Level 5-2: A Royal Perfume
Solve the sliding tile puzzle in the picture frame above the entrance.
Simply tap a tile to move it into an adjacent empty space. Arrange the tiles to complete the portrait of the princess.
Once the puzzle is solved, the small portrait of the queen beside the puzzle will swing open to reveal a hidden compartment.
Tap the pink DIARY (Star #1, part 1/4) in the compartment to drop it near the entrance door, then tap it again to pick it up off the ground.
Climb down the pink rope (which will also pull the rope to call for the servant) then quickly hide inside either vase beside the bed.
Wait for the maid to exit the room. Pick up the jug of LEMONADE she leaves on the table by the queen.
Next, pull the yellow rope to call the chef. Hide before he enters the room in the vases or by climbing up the ladder to the upper platform.
When he exits the room, take the piece of CAKE (Star #1, part 2/4) the chef leaves on the table.
Now pull the orange rope to call the jester into the room. Climb up the ladder and stand at the right side of the platform before he arrives.
As soon as the jester starts to juggle by the queen, quickly pour the LEMONADE on him to make him drop his juggling balls.
Go back down the ladder and pull the yellow rope for the chef again. Hide up the ladder or inside a vase.
This time, the chef will slip on one of the jester's juggling balls and hit the queen, who will call for the guard. Wait for the guard to start bouncing on the bed before you leave your hiding place.
Now that the door's been left open you can enter the pink side room on the left and take the CROWN (Star #1, part 3/4) from the frog on the windowsill.
Take the PERFUME (Star #2) on the footstool between the cake and the door.
Go through the doorway to enter the bathroom upstairs.
Tap the valve at the right side of the bathtub to run the water.
Open the bathroom mirror above the sink to find the heart-shaped box of CHOCOLATES (Star #1, part 4/4).
Tap the FERRET (Star #3) when it floats to the top of the overflowing bathtub.
Go to the exit to complete the level.
Level 5-3: A Cursed Hat
Climb down the ladder and enter the box on the left to go to the platforms at the right side of the room.
Open the book on the bookstand. Tap the book to cast the first spell, which summons an egg.
Tap the window above the bookstand twice (once to open it and once to close it). The gust of wind while the window is open will turn the spellbook to a new page. Tap the book to summon an ice cream cone.
Open and close the window again to turn the page. Tap the book to summon a bag of flour.
Once more, open and close the window to turn the page to a new spell. Tap the book to summon a GINGERBREAD MAN (Star #1, part 1/3).
Climb down the ladder to the lower platform. Tap the mirror to turn it downwards - this part is important so don't forget it!
Drink the green potion from the vial on the table to turn invisible.
Quickly climb up the ladder and go into the box to return to the left platforms. Go up the ladder and enter the wardrobe at the left side of the upper platform to travel to the ground floor.
Walk to the right side of the room - the wizard won't see you while you're invisible - and take the PEPPER from the plant.
Move to the left of the wizard before the potion wears off.
Watch the star-patterned curtain beside the wardrobe. When the curtain sways, open it to find the FERRET (Star #3).
Locate the three orbs around the room: one is above the wardrobe on the upper left platform, another is above the invisibility potion at the lower right platform, and the third is above and to the right of the curtain.
These orbs constantly change color from orange to blue to purple. Tap any orb to select whatever color it currently is, which will make the orb glow and stop the color from changing.
Stop all of the orbs at the same color (it doesn't matter which, so long as they're all orange, or all blue, or all purple) to summon a MIRROR (Star #1, part 2/3) which falls to the ground beside the wizard.
Drink the strength potion on the table to the left of the wizard to make the thief buff.
Before the potion wears off, quickly go into the wardrobe to travel to the upper left platform. Climb down the ladder and enter the heart box to travel to the upper right platform.
Tap the cage to bend it open with your new magical strength and take the CRYSTAL.
Return to the lower left platform through the heart box, then place the CRYSTAL into the staff mechanism.
Climb up the ladder and feed the PEPPER to the caged lizard to set off a chain reaction that zaps the wizard and frees the CAT (Star #2).
Feed the lizard a second PEPPER to shoot off a planet from the mobile hanging above the ground floor.
Go through the wardrobe and pick up the PLANET (Star #1, part 3/3) on the floor beside the cat.
Go to the exit to complete the level.
Level 5-4: A Dark Threat
Take the two gold KEYS hanging on the wall. Give one KEY to the princess, which she'll put into the left keyhole.
Insert the other KEY into the right keyhole to lower the bridge.
Wait for the guard to go into the dragon skull and turn away, then climb up the ladder to the platform.
Take the SWORD from the weapon display rack on the wall and use four times it to cut the rope the second guard is hanging from.
The first three times you use the SWORD, the guard will throw three gold COINS out to you. Pick up the first two COINS that land on the platform; the third coin will fall into the water.
Wait again for the guard in the skull to face the right. Quickly go down the ladder and use the SWORD to chop the stick holding the skull open.
Climb on top of the skull, go up the rope, and then tap the right arrow sign to move to the next scene.
Take the SILVER KEY hanging under the far right shield.
Turn the shields on the wall so that the chess piece on each shield is turned upright.
The far left King shield should point up, the middle left Rook shield should point to the left, the center Pawn shield should point down, the middle right Knight shield should point to the right, and the far right Bishop shield should point up.
If the shields are arranged correctly, the middle shield will lift to reveal a KNIGHT STATUE (Star #1, part 1/3).
Tap the left arrow sign to return to the previous scene.
Slide down the rope and down the dragon skull, then climb up the ladder.
Use the SILVER KEY to unlock the door, then go through it to reach the small side room.
Pull the lever at the bottom of the left wall to drain the moat.
Go back downstairs and walk to the right side of the lowered drawbridge. Tap the arrow icon above the ladder to climb down it.
Climb down the rope and pick up the third gold COIN on the ground.
Tap the arrow sign to move right to the next area. Go down the ladder then tap the left arrow sign to reach the dragon egg.
Tap the FERRET (Star #3) when it pokes its head out of the broken egg shell. Tap the right arrow sign to go back to the previous scene.
From there, go down the ladder and tap the lower right arrow sign to find a dead end with a pile of skulls and bones.
Take the GREEN KEY hanging at the far right side of the tunnel, then tap the left arrow sign to return to the previous room.
Climb up both ladders and then tap the right arrow sign. Go down the two ladders on the left to reach the treasure chest room.
Open the chest with the GREEN KEY to release the rat inside.
Go back up the two left ladders, then climb down the two right ladders. Tap the right arrow sign to enter a room with three patterned vases.
Break all three of the vases to find a CRYSTAL (Star #1, part 2/3) in the last vase.
Tap the upper left arrow sign to go back to the previous room, then tap the upper left arrow sign in this area as well to find the dragon's cave.
Pull the blade out of the crying dragon's foot to make friends with the dragon.
Take the TREASURE (Star #1, part 3/3) on the ground behind the dragon.
Enter the tunnel to the left of the dragon to return to the drawbridge in the castle where you started the level.
Go up the dragon skull, climb up the rope, and tap the right arrow sign to move to the right side of the castle.
Climb down the ladder and go left to the armor vending machine.
Insert the three gold COINS into the coinslot to power the machine.
Tap the machine to put on a suit of armor.
Move to the right towards the evil knight and the king.
A question mark will appear above the evil knight's head as a warning a couple seconds before he turns around.
When you see it, quickly hop onto the nearest display stand to hide from him. After he faces away from you, get off the pedestal and quickly move to the next one.
Approach the knight and hide on the stand 3 times until you reach the red button at the right side of the room. Press the button to lower the giant flail and rescue the king.
Take the SHIELD (Star #2) from the king.
Go to the exit to complete the level.
Level 5-5: Castle Under Siege
Use the rope to swing on top of the tower. Walk to the left side of the roof and jump onto the top of the metal dragon head. Move to the left side of the dragon head and drop down to the small platform below it.
Pull the lever to activate the dragon's fire breath. Tap the FERRET (Star #3) that appears in the open window at the top of the tower.
The green guard in the side room will quickly come running. As soon as he enters dragon from the small bridge at its middle, climb down the arrows on the right wall to evade him.
Run to the ladder and climb it to the upper room before the guard returns.
Take the KEY hanging at the left side of the room.
Open the door and go up the stairs to the upper right room.
Use the KEY to unlock the wardrobe and change into the dragon costume.
Go down the ladder and through the door on the right to reach the bottom floor.
Approach the two fighting knights to chase them off, then take the KNIFE stuck in the barrel at the end of the hall.
Tap the lever at the very bottom of the dragon mechanism to activate the battering ram.
Hit the door with the battering ram three times to break it down.
Climb up the short ladder at the bottom of the dragon machine. Pull the lever to drive the machine away.
Pick up the HORN (Star #1, part 1/3) that falls to the ground.
Go through the door to return to the middle level of the castle.
Tap the large flame burning above the door and to the right of the stairway three times to put it out.
Once the fire is gone, collect the golden GOBLET (Star #1, part 2/3) revealed in the wall.
Return to the wardrobe in the upper right room by climbing the ladder and then the stairs. Enter the wardrobe to change into the princess costume.
Climb up the arrows stuck in the wall to the left of the wardrobe to reach the roof of the castle.
Go down the ladder, hop across the gap in the platforms, then climb up the rope. From there, you can push the barrels to knock out the evil knights.
Slide back down the rope to swing onto the left side of the rooftop. Tap the green knight to receive a silver ARROW (Star #1, part 3/3).
Go down the arrows to return to the castle. Climb down the ladder and tap the right arrow sign to move to the next scene.
Tap the rope tied to the chandelier to try to cut it with the KNIFE. When the guards show up, the thief will rescue the KING (Star #2).
Go to the exit to complete the level.
Stage 6: Rattling Bones
Level 6-1: R.O.B.O.T.
Tap the right lever to select the right robot hand (it's the robot's left hand, but on your right).
Pull the left lever to lift the robotic hand up. Press the button to activate the hand, which will flick the guard off the platform.
Go up the two ladders on the left to the other lever and button.
First pull the lever to move the giant magnet to the right. Press the button to activate the magnet, which will pull the WRENCH out of the toolbox.
Pull the lever again to move the magnet back to the left, then push the button to deactivate the magnet and drop the WRENCH onto the lower platform.
Climb down the ladder and pick up the WRENCH while the guard heads up to the toolbox, then climb back up the ladder again.
Tap the lever to move the magnet right once more. Push the button to turn on the magnet, which will capture the guard in his suit of armor.
Pull the lever to move the magnet and guard to the left and tap the button to drop the guard on to the hook.
Take the gold KEY from the guard's belt.
Go up the two ladders and move left towards the brain tank. Use the KEY to unlock the case and take the BRAIN.
Climb down the top ladder, then insert the BRAIN into the empty space at the right side of the robot's head.
Go down the two short ladders to reach the robot's sparking arm joint.
Use the WRENCH on the bolts to repair the arm.
Push over the barrel to incapacitate the second guard. Go down to the ground floor, then climb up the orange ladder and pick up the GAMEBOY (Star #1, part 1/3) the guard dropped onto the platform.
Go down the orange ladder to return to the two levers and the red button.
Activate the right lever to select the left hand, the one you recently repaired.
Pull the left lever to lift the hand up which creates a bridge between the two platforms.
At the bottom of the area you'll see four dark squares which you can tap to light up.
If the correct light is tapped, it will glow green. If the incorrect one is tapped, they will all turn red and the lights will reset.
Tap all four lights in the correct order to turn them all green:
First tap the far left light, then tap the far right light. Next tap the middle right light, and lastly tap the middle left light.
If the puzzle is solved correctly, a tiny robot will appear and jump down to the ground.
Tap the robot three times to chase it onto the platform at the giant robot's feet.
Go up the ladder and tap the small robot again to chase it onto the platform underneath the hanging guard.
Go down the short orange ladder and up the tall grey ladder, then tap the ROBOT (Star #1, part 2/3) one last time to capture it.
Climb up the left ladder then climb down the middle ladder. Go across the robot's hand to reach the right platform.
Take the canister of OIL, then go up the three ladders to reach the top of the robot.
Pour the OIL into the fuel funnel at the right side of the robot's head.
Go down the ladder and enter the robot through the opened door to start operating it.
Tap the FERRET (Star #3) when you see it running at the bottom of the robot's feet.
Shortly after, the ROBOT (Star #2) will trip, fall, and crash down.
Pick up the FLOPPY DISK (Star #1, part 3/3) on the ground at the left side of the destroyed robot.
Go to the exit to complete the level.
Level 6-2: Sword of Power
Take the wanted poster on the wall to make it into a paper plane that will alert the princess. She'll shout to the evil knights to create a distraction for you.
Climb up the vines on the left to reach the upper level without alerting the guards.
Take the ROPE from the clothesline hanging from the staff of the flag. Next, take the leg of MEAT cooking above the camp fire.
Go down the ivy, then climb down the short vines to the lower level.
Tap the green crystal on the ground in front of the cave. Tap all the pairs of eyes that appear in the cave to chase away the bats.
Once all the bats are gone, you can pick up the CRYSTAL (Star #1, part 1/3).
Tap the new pair of open eyes that appear in the cave to find the FERRET (Star #3).
Stand on top of the platform above the bubbling lava spout. Tap the platform to lift it with a surge of lava, then walk left to the tent.
Search inside the tent to find a HELMET (Star #1, part 2/3).
Tap the platform above the small volcano to raise it again. Once it drops, walk right and climb up the ivy.
Go to the dead tree at the edge of the cliff. Tie the ROPE to the tree and slide down to arrive at the next scene.
Tap the 10 fireflies floating around the cave to create a bridge to the right cliff.
Go across the glowing bridge and take the PLANT (Star #1, part 3/3) from the ground.
Walk to the egg inside the cave. Tap the egg twice to crack the egg and free the dragon.
Feed the dragon the MEAT you stole from the camp. It's still hungry, so you'll have to come back later.
Climb up the rope to return to the previous scene.
Wait for the patrolling guard to walk towards the left, then quickly go up the right vines and climb up into the tree before the guard turns back around.
Go to the upper left branch of the tree and take the APPLES.
Once the guard is turned away from you, leave the tree and return to the dragon in the lower scene.
Feed the dragon the APPLES to start a short cut scene. After the cutscene is over, pick up the SWORD from the ground.
Go to the exit to complete the level.
Level 6-3: Skeleton Army
Tap the diamond the demonic statue is holding to brush off the dust, then pick up the clean DIAMOND (Star #1, part 1/4) from the ground.
Watch the sky closely. When the silhouette of a flying witch appears, tap her to drop her BROOM (Star #1, part 2/4) to the floor.
Quickly tap all five of the sleeping owls to make them sing in unison. Pick up the FEATHER (Star#1, part 3/4) that floats down from the sky.
Take the SHOVEL stuck in the ground beside the crate.
Tap the right arrow sign to move to the next scene.
Get inside one of the empty coffins to ride it up to the wizard. The wizard will cast a spell that turns you into a ghost, allowing you to see other spirits.
Dig up the dirt to the left of the slide with the SHOVEL to find a BALL.
Tap the left arrow sign to return to the previous scene.
Go to the ghost dog, then throw the BALL to the dog to reunite it with its owner. Pick up the SKELETON ARM the dog drops to the ground.
Use the SKELETON ARM on the nest in the tree branch to the left of the tomb to find a KEY.
Unlock the tomb door with the KEY and then enter the crypt.
Take the silver SHIELD from the statue.
Tap the dirt at the right side of the crypt six times to reveal a secret tunnel.
Go up the ladder and take the SKULL at the end of the tunnel.
Exit the crypt, then tap the right arrow sign to go to the other scene.
Tap the FERRET when it pokes its head out at the right side of the giant tree trunk.
Go inside an open coffin again, this time armed with the silver SHIELD.
The SHIELD will reflect the wizard's spell and knock the corrupted CRYSTAL (Star #2) from the hat on his head. Afterwards, the thief will automatically ride a coffin to the exit.
Level 6-4: Golden Tickets
Jump inside one of the ferris wheel cars that arrive at the left side of the platform.
If you're too slow to get into one, you can hide inside the space in the wall to evade the guard who is also riding in one of the cars.
Wait for the car to reach the top of the ferris wheel, then take the COIN hanging from the ceiling.
Leave the car when it arrives at the toy claw machine on the left platform.
Insert the COIN into the machine. Wait for the claw to move above the toy at the bottom of the machine, then tap it to capture the toy.
Take the octupus toy from the dispenser to wear it as a disguise.
Get back into one of the ferris wheel cars and ride it down to the bottom, then exit it to reach the middle level of the carnival. From there, go down the ladder to the dock by the water.
Tap the clock beside the wheel of fortune to set the alarm. Tap the wheel to make the skeleton spin it.
When the alarm goes off, quickly tap the wheel to move it while the skeleton isn't paying attention. He will reward you with your first PRIZE TICKET.
Go up the ladder and enter the tunnel at the far left side of the area to go to the mine scene.
Take a stick of DYNAMITE from the crate under the mine car track.
Climb up the ladder and enter the mine car to start the minigame. The skeleton on the left side of the track will jump out of the way of the car and drop his hammer on the ground by the dynamite.
In this section, you must tap the screen to make the mine car jump. Time your jumps carefully to hop over gaps in the rails and to avoid obstacles.
Look at the top of the cave ceiling at the start of the ride and quickly tap the FERRET as soon as it appears.
If you crash, you'll be returned to the entrance of the tunnel where you can hop in the cart to try again.
After the ride is done, pick up the DOLL (Star #1, part 1/3) at the end of the track, then hop off the left side of the rails.
Attach the DYNAMITE to the large red crystal. Push the detonator device, then take the MAGNETIC GEM from the center of the exploded crystal.
Hop into the yellow tube to return to the entrance of the tunnel.
Take another stick of DYNAMITE from the crate and pick up the HAMMER on the ground.
Tap the right arrow sign to return to the carnival.
Use the HAMMER from the mines on the test of strength carnival game to receive a second PRIZE TICKET.
Get into one of the ferris wheel cars and ride it to the toy claw machine on the left platform again, then disembark.
Put the stick of DYNAMITE into the toy dispenser, then pick up the pile of GOLD COINS that the machine spits onto the ground.
Ride one of the ferris wheel cars back to the ground.
Give your stacks of GOLD COINS to the little boy in the skeleton costume to receive his jarred FROG.
Go to the skeleton by the carnival game with the stack of cans. Replace the ball on the counter with the MAGNET GEM to throw the gem and win the game. The skeleton will award you with the third PRIZE TICKET and then close his booth.
Tap the dusty cobwebs above and to the right of the closed booth (just below the right side of the string of flags) two times to reveal a skeleton fish in a fishbowl. Tap the FISHBOWL (Star #1, part 3/3) and pick it up from the ground.
Climb down the ladder and walk left to the prize ticket vendor. Give the vendor your 3 PRIZE TICKETS. He'll lower the draw bridge to the boat for you.
Cross the bridge and enter the BOAT (Star #2) to complete the level.
Level 6-5: Eye of the Tentacle
Climb down the ladder to go into the water. Swim to the right side of the scene to find a golden OCTOPUS (Star #1, part 1/3). Climb back up the ladder to return to the starting point.
Quickly run past the left tentacle. Jump on top of the tentacle after it smashes into the ground to ride it to the lower left cliff.
Try to climb up the ladder. The first time you go up, another tentacle will smash into the side of the cliff and get stuck in the rock.
Go up the ladder now before the tentacle pulls out of the cliff.
Next, try to climb up the rocks at the side of the next cliff three times. Each time, another tentacle will knock you down and break away some of the cliff.
On the third attempt, it will knock down the box of tools and drop the WRENCH beside the left barrel. Go back down to pick it up from the ground.
Wait for the spotlight from the giant octopus to move from the left barrel to the middle barrel.
Run to the middle barrel (by the time you reach it, the light should have moved to the right barrel) and hide inside it as quickly as you can.
Wait again for the light to move to the left barrel, then jump out of the middle barrel and run to the ladder.
Climb up the ladder onto the right platform. Use the WRENCH to remove the right bolt at the side of the octopus's head.
Sneak back down the ladder and across the bridge to the boat at the beginning of the level again. Use the barrels to hide from the spotlight.
Alternatively, you can let yourself be caught and knocked into the water, then just climb up the short ladder on the left.
Lure the far left tentacle and then dodge it to make it smash into the ground. Jump on top of the tentacle to ride it back up to the lower cliff.
Go up the ladder to get the tentacle stuck in the cliff again. Climb all the way up the ladder this time, then hop off the right side of the cliff to reach the left wooden platform.
Jump to the middle platform. Use the WRENCH to remove the bolt at the left side of the octopus's head and deactivate the spotlight.
Tap the skeleton in the cage to lower the yo-yo to the princess, who will throw it down beside the bottom of the far right ladder.
Jump back to the left platform, then walk across the tentacle to the cliff. Climb up the rock wall to reach the top of the cliff.
Tap the little black dots on the ground to collect the JAR OF BUGS (Star #1, part 2/3).
Tap the skeleton in the cage again to make it drop his RUBIK'S CUBE (Star #1, part 3/3).
Go down to the ground level, then climb down the left ladder and swim to the middle of the water to retrieve it.
Climb back up the left ladder to return to the dock.
Move to the barrel on the bridge, being careful not to get too close to the far right tentacle.
Wait for the giant octopus to be distracted by the shouting evil knight, then quickly run right to the ladder.
Once you've made it to safety, pick up the YO-YO from the ground.
Walk a little to the left and wait for the octopus to capture you. Use the YO-YO on its eye to hypnotize it. The evil knight will zap the octopus with the laser to wake it back up
Tap the FERRET (Star #3) when it appears at the left side of the octopus's head.
The ferret will move the laser gun, so the next time the evil knight activates the laser he will zap himself, allowing the thief to rescue the PRINCESS (Star #2) and complete the level.
Posted by: Trinn |
July 23, 2013 1:12 PM
|
July 23, 2013 1:12 PM
April 5, 2014 update: NEW TINY THIEF EPISODE ADDED!
Tiny Thief: "Bewitched" Walkthrough
Level 7.1 "Trick or Treat"—WALKTHROUGH
This section only explains how to complete the level, without revealing secret items or the ferret's hiding spot
(Locations of the secret items and the ferret are in the next section).
Watch as the SKELETON KEY, the item goal of this level, is tossed inside a jack-o-lantern. Then, talk to the little red-haired witch by the cauldron: she wants an egg, an eyeball and a blue berry.
Walk upstairs to the door...
Ring the DOORBELL and be turned into a caterpiller.
AS A CATERPILLER, go to the left edge of the scene.
Follow the LEFT ARROW to go to the next scene.
Continue moving left until you reach a mushroom on the ledge.
Grab the MUSHROOM to eat it; this will make you a bit bigger.
Continue crawling to the edge of the overhang and then crawl under the ledge to reach a BLUE BERRY.
When you reach the BLUE BERRY, grab it and it will be knocked into the pool of green ooze.
Return to the top of the ledge.
Climb the TRACKS up the side of the tree.
Go to the end of the tree branch on the left until you reach another MUSHROOM: eat it.
Move slightly to the right until you're under a GREEN CLUMP of leaves...
Now that you've eaten two mushrooms, you're fat enough to pull the clump of leaves all the way down.
This makes a wide beam of sun shine on the spider's web, catching the whole web on fire.The spider flees the scene.
With the spider gone, you can climb down the curve of the branch, then grab the EYEBALL, knocking it to the ground below.
Continue to the end of the branch and drop down to the ledge.
Climb back up the TRACKS on the tree trunk and continue right toward the COCOONS.
Click the UP ARROW. You'll turn into a butterfly and travel up to the next scene.
AS A BUTTERFLY, fly over to the BASKET OF RED BERRIES on the witch's broom without being seen by her.
Grab the BASKET OF RED BERRIES before the witch sees you.
To return to the previous scene, fly near the witch and wait for her to see you....
She'll cast a spell on you, turning you back into a caterpiller, and you'll drop back down to the tree trunk.
Climb down, follow the right arrow to return to the first scene.
TO RETURN TO NORMAL, crawl over to the trio of little witches by the cauldron:
When you near her, the red-haired witch will wave her wand, transforming you back to your normal self.
IN NORMAL FORM, go left and follow the LEFT ARROW to scene 2.
Walk over to the EYEBALL on the left side of the scene and grab it.
Then climb down the VINE and walk into the pool of green ooze.
Swim over to the BLUE BERRY and pick it up.
WHILE YOU'RE STILL GLOWING from the green ooze, swim back out of the pool, climb the vine, and cross back over to the tree trunk.
Enter the DOORWAY in the tree trunk to enter the snake's cave (you need to be glowing, else it will be too dark to see inside):
Walk over to the EGG.
Use the BASKET OF RED BERRIES to toss the berries into the snake's mouth when it tries to bite the thief; this makes the snake fall asleep.
Now you can safely take the EGG.
Leave the cave and go right to the first scene.
Now that you have the BLUE BERRY, EYEBALL and EGG, talk to the red-haired little witch again:
One by one, give the berry, eyeball and egg to red-haired witch.
Each time, she'll toss candy to the JACK-O-LANTERN/PUMPKIN, which will eat the candy and grow bigger each time.
Walk over to the remaining PIECE OF CANDY and pick it up.
Feed the last PIECE OF CANDY to the pumpkin and it explodes:
Walk over to the SKELETON KEY and pick it up.
TO EXIT: climb the stairs to the door and use the KEY to unlock it.
The scene ends as you exit through the now open door.
Level 7.1 "Trick or Treat"—FERRET and SECRET ITEMS
FERRET:
While glowing from the pool of green ooze, enter the cave entrance at the base of the tree in scene 2.
The ferret is hiding in the pile of skulls on the left side of the cave.
You can see him wiggling near the top of the pile. Click there to find the FERRET.
TENNIS RACKET:
As a butterfly in scene 3, click the CROW that's perched just under the berry-picking witch. This sends the crow flying to the previous scene.
In scene 2, you'll find the CROW sitting on the right arrow sign. Click it again and it'll fly over to the 1st scene.
In scene 1, now the CROW is on a window ledge....
Click the CROW and it'll make noise, causing the witch inside the house to open the window and swing at it with a tennis racket.
While she's in the window swinging the racket, click on the witch to make her drop it.
Walk over to the RACKET and pick it up.
KITE:
In normal mode, enter the pool of green ooze in scene 2.
Leave the pool and, while glowing, quickly walk right to the first scene.
Your glow will attract a swarm of bats. They'll fly around you a bit until they start glowing, too.
When the glowing bats return to their cave, you'll be able to see a kite inside their cave on the upper right side of the scene.
Quickly click on the KITE to make it drop to the ground.
Walk over to the KITE and grab it.
MAGIC LAMP:
After the pumpkin explodes, walk over to the trio of young witches and ask them for help.
The three witches will pull the chain to lift up the grate under the witch's house.
Enter the culvert under the house to retrieve the MAGIC LAMP.
Level 7.2 "A Bad Student"—WALKTHROUGH
This section explains only how to complete level 7.2 without revealing secret items or the ferret's hiding spot
(Locations of the secret items and the ferret are in the next section).
Sneak up to the DESK BELL and ring it.
While the receptionist witch is distracted, continue to the CRYSTAL BALL and push it toward the other end of the desk.
Continue toward the DOOR.
Wait until the guard on the other side of the door has turned her back, then go through the door...
Immediately proceed to the STAIRS. Go down to the second floor.
Continue through the door to the CLASSROOM...
Move to the WASTE BASKET and grab it; you'll make a paper airplane and throw it.
Immediately move to the CABINET and climb inside before the teacher sees you.
The teacher will blame another student for the airplane and send him out.
Go to the empty desk and take the MAGIC WAND.
Leave the classroom and proceed to the PIPE ORGAN.
Grab the SHEET OF MUSIC to begin playing.
As soon as you can, go left and go through the CLASSROOM DOOR before the old grey-haired wizard comes downstairs and sees you.
Wait until the old wizard has turned past the stairs...then immediately go back UPSTAIRS to the second floor.
Quickly grab the KEY RING before the old wizard returns then go left toward the LOCKERS.
Use the KEYS to open the middle locker:
Take the POINTY HAT.
Leave the lockers area and move back toward the sleeping witch.
Use the magic wand to change the SLEEPING WITCH's hat to a tall rectangular hat.
Next, use the wand to the CACTUS to a square-shaped hedge.
Last, change the STATUE to a short, round-headed statue.
Now go to the STEPLADDER and climb up...
Once up on the chest of drawers, move slightly to the right until you can grab the SPELLBOOK off the top of the bookcase.
Go up the STAIRS to the top floor.
Now that you have a pointy hat and wand, you can easily pass the guard.
Continue to the left side of the scene.
Move through the DOORWAY to exit scene 1.
In scene 2, you're inside another classroom where the teacher demostrates levitation of a feather...
Sit down at the EMPTY DESK.
The teacher will then call up a student to practice.
While they're distracted, go over to the podium and put the SPELLBOOK on it.
Return to your desk and sit down again.
The next student will be called up to practice. This time the teacher is turned into an owl!
Walk over to the OWL and take it.
With the OWL, HAT and WAND, you can now proceed through the door on the right to exit the stage.
Level 7.2 "A Bad Student"—FERRET and SECRET ITEMS
FERRET:
After you get the MAGIC WAND, change the cactus/square hedge into a Christmas tree.
Wait until the FERRET peeks out from the top of the tree then click on him.
LOLLIPOP:
On the second floor, click on the pictures to change them all to candy:
Clockwise, from the far left...
change the pumpkin to a striped sucker
change the small hat to a blue candy
leave the red candy as is
change the bat to a green candy
change the big hat to a candy corn
When all the pictures are of candy, magic happens and a LOLLIPOP appears. Walk over to it and pick it up.
TROPHY:
Once you get the KEY RING, use the red key to open the last locker on the left.
Click on the TROPHY to knock it down.
Walk over to the TROPHY and grab it.
INKWELL:
Once you get the MAGIC WAND, go up a file cabinet by the receptionist desk and use the wand on a SMALL MOUSE.
The mouse will turn a BIG MOUSE and chase away the receptionist.
Now you walk up to the DESK CHAIR and click on it...
You'll move behind the desk, find an INKWELL and take it.
GLASS EYE:
After making your way to the upstairs classroom, knock down and pick up the SHEET MUSIC that's pinned to the chalkboard (upper left corner).
Go back to the bottom floor and place this new SHEET MUSIC on the pipe organ and begin to play.
This time, the ghosts' musical performance will cause a red GLASS EYE to pop out of the organ and land on the floor. Go over to it and pick it up.
Level 7.3 "Gretel Factory"—WALKTHROUGH
This section explains only how to complete level 7.3 without revealing secret items or the ferret's hiding spot
(Locations of the secret items and the ferret are in the next section).
Make a PURPLE CANDY:
Go over to the nearest COLOR DIAL and change the color from blue to red (so that there's each a RED AND BLUE).
Return to the INTERCOM and use it to start the production line, making a purple candy.
Make a GREEN CANDY:
Go over to the nearest COLOR DIAL and change the color from red to yellow (so there's each a YELLOW AND BLUE).
Return to the INTERCOM and use it to start the production of green candy.
After making both kinds of candy properly, the gretel factory manager (man in pink-striped hat) leaves the scene.
Make a YELLOW KEY to unlock the swirly lollipop.
Move right to the other COLOR DIAL and change it to yellow (so you have YELLOW AND YELLOW on both dials).
Continue right to the SHAPE SELECTOR and change it to a KEY-SHAPE.
Go back to the INTERCOM and call down to start production, creating yellow keys.
Move slightly to the left of the intercom and pull the LEVER to bring up the elevator.
Take the ELEVATOR DOWN to the bottom floor.
Move to the BOXES near the first factory worker...
Look inside the boxes to get the YELLOW KEY.
Continue right until you reach a tiny red cupboard near the start of the production line.
Open the cupboard to get the FIRE EXTINGUISHER.
Return to the ELEVATOR, GO UP to the top floor again.
Move to the locked case and use the YELLOW KEY to open it:
Get the SWIRLY LOLLIPOP.
With the lollipop in your possession, move to the top left corner of the scene. Follow the LEFT ARROW to proceed to scene 2.
In scene 2, go left across the roof until you're near the BOY IN THE WHEEL:
Use the LOLLIPOP to make the boy run.
The cauldron will fire up, making the witches run away.
Go right and climb down the TREE ROOT to the ground.
Go left then up the LADDER into the attic...
Pull the SWITCH inside the attic.
The hook will grab the factory manager and pick him up, causing him to drop a key.
Climb back down the ladder, go over to the KEY and pick it up.
Go to the bottom right corner of the scene and follow the RIGHT ARROW back to scene 1.
Move slightly to the right and press the BUTTON to open the gate.
Continue right and take the ELEVATOR UP to the top floor.
Then, go to the FIREPLACE and use the EXTINGUISHER to put out the fire...
A keyhole is revealed.
Use the KEY you took from the factory manager to unlock the safe.
Get the GREEN POTION.
Use the elevator to go back down to the production line. Change the worker beasts back into people:
Go up to each factory worker and use the GREEN POTION; the potion will break the curse and return them to normal, freeing them.
After rescuing all the workers, a BIG PINK BALL of candy appears.
Roll the BIG PINK BALL into scene 2...
The big pink ball will knock the BOY out of the wheel and he runs off.
With the boy rescued, go left to exit the stage.
Level 7.3 "Gretel Factory"—FERRET and SECRET ITEMS
FERRET:
The ferret can only be found before you rescuce the factory workers...
Make several orders of candies to lower liquid inside the giant bulb of pink candy liquid.
After the bulb is more than half empty, watch for the FERRET
to poke his head up out of the pink candy liquid.
As soon as he does that, click on the FERRET to find him.
SUCKER:
The clue to this secret can only be found before you rescue the production line workers...
After making 6 batches of candies, the pink liquid in the giant bulb of pink candy liquid is low enough to reveal the clue: four colored shapes.
On the top floor of the gretel factory, there are four small square buttons...two on each side of the big round light.
Match each of the buttons to the designs on the giant bulb of pink candy liquid:
from left to right...
blue triangle, orange square, pink circle and red hexagon
When the shapes are correct, a panel will open on the left side of the room, revealing a yellow SUCKER. Click on it to drop it to the floor.
Walk over to the SUCKER and grab it.
YELLOW BIRD:
After you roll the big pink ball into the house, freeing the boy, go back into the factory and go upstairs.
Exit from the top left corner and cross over the roof to reach the YELLOW BIRD in the cage.
When you're near the BIRD, click on it to take it.
TOY BUNNY:
After you get the green potion, go to scene 2.
Use the POTION on the beast in the cage...
He'll transform back into a boy and give you a TOY BUNNY.
Level 7.4 "The Magic Bazaar"—WALKTHROUGH
This section explains only how to complete level 7.4 without revealing secret items or the ferret's hiding spot
(Locations of the secret items and the ferret are in the next section).
Take the BOWL from the flute-playing brown wizard.
Go left and take the HAMMER from the merchant with an eyepatch.
Climb up the LADDER on the left to the second floor...
Wait for the witch to turn her back, then use the RED FIRE WAND.
This makes the soup pot get hotter.
Again, when the witch isn't looking, use the BLUE ICE WAND...
Walk right to the newly made ICE CUBES and pick them up.
Go right to the LEMONADE STAND....
Put the ICE in the lemonade pitcher.
You'll receive a GLASS OF LEMONADE.
Go down the ladder to the bottom floor. Then go right slightly and enter the BOX...
This takes you to the left, middle platform.
Go right to the PIPE just under the tomato soup merchant.
Use the HAMMER on the pipe to cause a leak.
Re-enter the box and go back down to the first floor, climb up the ladder, then go left to stand under the DRIPPING SOUP.
Use the BOWL, filling it up to be a BOWL OF SOUP.
Go right and down the ladder again to the brown wizard...
Return the BOWL OF SOUP to the flute-wielding brown wizard.
He'll give you his FLUTE.
Climb up the ladder, go right, go up another ladder until you reach the SNAKE CHARMER:
Give the snake charmer your FLUTE.
He'll play the flute, causing a rope to rise up...
Climb the new ROPE to the top floor.
Go left to the ladder. Climb down the ladder to the middle platform...
Pick up the CANDLE.
Move to the left to stand by the FISHING POLE:
Using the fishing pole, fish in the giant soup pot to get a BONE.
Go back up the ladder, right, down the rope, down the ladder, left, and down the last ladder.
Go left to stand by the FIRE:
Use the CANDLE on the fire to light it. Now you have a BURNING CANDLE.
Continue to the bottom left corner to stand by the DOG:
Give the dog the BONE and it'll run off, taking the eyepatched merchant with him.
Now you can approach the baby DRAGON...
Pull the DRAGON'S TAIL and he'll breath fire, heating up the soup pot.
This makes the pepper merchant in the sombrero get too hot.
Climb up the ladder and move to the MAN IN THE SOMBRERO.
Give the sombrero-wearing man the GLASS OF LEMONADE.
He'll give you a PEPPER in return.
Go down the ladder then enter the BOX to the left middle platform.
Stand by the CHEF:
Put the PEPPER in his bowl of tomatoes.
This makes the chef leave his knife behind to inspect the pot.
Take the KNIFE.
Go through the box again then climb all the way back up to the top floor.
Go to the BARREL OF FIREWORKS on top right edge of the scene...
Use the BURNING CANDLE to ignite the FIREWORKS.
The guard by the lever will fall into the pot.
Walk left past the lever to the pulley's rope. Use the KNIFE on the ROPE.
The chef will be knocked into the pot.
When you're ready to exit the scene...Go left to the LEVER and pull it.
The lid will go down, and the pot will overheat.
Go over to the lever, climb down the rope to the lid of the POT, and the explosion will propell you off stage.
Level 7.4 "The Magic Bazaar"—FERRET and SECRET ITEMS
FERRET:
In the bottom left corner of the scene is a fortune-teller's cart with a CRYSTAL BALL on it.
Watch the crystal ball for 30 seconds. Click on the crystal ball when see the FERRET's face appear in it.
GOLD RING:
Go up to the witch's wand tent on the second floor.
Stand by the YELLOW LIGHTENING WAND...
When the witch on a flying broom is at the soup merchant above you, and the wand witch isn't looking, use the YELLOW LIGHTENING WAND.
This shoots a bolt of lightening at the flying witch, causing her to drop a gold ring.
Walk over the GOLD RING and pick it up.
ALARM CLOCK:
Go up to the FISHING POLE.
After fishing the bone out of the pot of soup, go fishing two more times...
The second casting will pull up nothing.
But, on the third cast of the fishing line, you'll get an ALARM CLOCK.
GEMSTONE:
Wait a while after giving soup to the brown wizard and he'll empty his bowl.
Go back to the brown wizard and take his BOWL again...
Refill the bowl with more SOUP.
Give the brown wizard a SECOND BOWL OF SOUP.
He'll give you a GEMSTONE.
FIRECRACKERS:
After igniting the rockets/fireworks, climb into the supposedly EMPTY BARREL:
Inside you'll find a small pack of FIRECRACKERS.
Level 7.5 "Dark Magic"—WALKTHROUGH
This section explains only how to complete level 7.5 without revealing secret items or the ferret's hiding spot
(Locations of the secret items and the ferret are in the next section).
Arrange the TOTEMS to form steps up to the middle platform:
With the far-left dais open, tap the TALLEST TOTEM and it'll move to the first position on the left.
Now, if second dais is occupied by the shortest totem, tap on it to move it. Then, tap the MID-SIZED TOTEM to the second position.
Finally, move the SHORTEST TOTEM to the third position.
The empty dais should be on the far right.
Stand by the EMPTY DAIS and tap it. You'll climb up the TOTEM STEPS.
Wait until the ghost has turned away, then climb up to the platform....
Quickly move to the ALCOVE and hide in it.
Wait again until the ghost has passed you, and run quickly to the SKELETON:
Take a BONE from the skeleton.
Run quickly back to the alcove to hide.
Now that you have the bone, wait in the alcove for the ghost to pass, then run over to the HANDHOLDS and quickly climb up to the top left platform.
Go left and grab the ROPE.
Go right and use the ROPE/BONE combination to create a bridge to the highest platform.
Climb up the VINES to the top of the tower.
Go left until you reach a LADDER at the top of the tower.
Make sure you've done everything you can on the outside of the tower before you enter it, because you can't return to this scene again...
Climb down to the inside of the tower.
Once inside the tower, on the top floor, go left and take the PUSH-BROOM.
Climb up to the top of the tower and go right to stand just behind the witch.
Replace the witch's FLYING BROOM with the ordinary PUSH BROOM.
As you fly off on her broom, the witch will try to follow on the ordinary broom, falls, then returns as a dragon.
Climb down the ladders to the bottom floor, take the CROWBAR.
Go up to the CRATE OF FOOD.
Use the CROWBAR to break the lock.
Take a HAM LEG and a MELON.
Go to the middle floor and pull the GATE LEVER to raise the gate.
Climb down to the bottom floor and stand by the HOOK:
Attach the HAM LEG to the hook.
Continue out toward the ledge, when the dragon isn't looking, and place the MELON on the PEDESTAL.
Stand there until the dragon sees you. When the dragon tries to breath ice on you, you'll run by the melon is collatoral damage.
When the dragon isn't looking, return to the pedestal and grab the FROZEN MELON.
To exit: with the frozen melon in your possession, pull the HOOK LEVER to swing the ham toward the dragon...
The dragon will lunge at the meat and stay there.
Quickly climb up to the GATE LEVER and pull it, trapping the dragon further.
Hurry up to the top of the tower and stand by the FROZEN KING...
From this position, and while the dragon is still trapped by the gate, you can drop the FROZEN MELON like a cannon ball. It'll crush the dragon's ice scale, turning it to stone.
Now the king is free and you have saved the day. Click the exit to end this chapter of Tiny Thief!
Congratulations!
Level 7.5 "Dark Magic"—FERRET and SECRET ITEMS
FERRET:
You must get the ferret before climbing down the ladder into the tower.
After you've arranged the TOTEMS into the proper order (from left to right: highest to shortest), look for the FERRET's TAIL to appear from behind the TALLEST TOTEM.
When you see his tail, click it to find the FERRET.
EMERALD:
You must get the emerald before climbing down the ladder into the tower.
There's a loose stone in the tower wall, just under the skeleton.
Tap on the stone to break it, revealing the EMERALD's hiding spot.
Arrange the TOTEMS from shortest to tallest (left to right).
Climb up the makeshift totem-pole-steps to reach the EMERALD and take it.
STAR CHARM:
You must get the star charm before using the rope to read the top of the tower.
After getting the ROPE, attach it to the PEDESTAL on the ledge.
Climb down the rope to reach the STAR CHARM and take it.
HOURGLASS:
After climbing down the ladder into the tower, you'll see a series of four pictures on the wall: some are lit up, some aren't.
Tap the pictures in the proper order until all are lit up.
Tapping a picture will cause the adjacent pictures' lights to turn on/off.
SOLUTION:
From the beginning (1st and 3rd pictures are lit)...
Tap the 3rd picture (all but the 3rd will light up).
Tap the 1st (only the 4th will be lit).
Tap the 2nd (now all the pictures' lights are on and a hidden panel will open).
Climb down a ladder to the newly opened panel:
Take the HOURGLASS.
HORSE STATUE:
After climbing down ladder into tower, go down the LADDER to the second platform.
Go left until you're standing below the right end of a shelf with the HORSE STATUE.
Tap the shelf until it slants down, causing the statue to slip off into the tiny thief's hands.
Note: you must be standing in the right spot or the statue will break as it lands on the floor.
If you still need help or have a question about this walkthrough, please post in the comments section below.
This completes Tiny Thief Stage 7: Bewitched. Enjoy!
Posted by: elle |
April 5, 2014 9:56 PM
|
April 5, 2014 9:56 PM