
![]() Remember one thing, and it might lead to remembering another. It might be difficult to, say, remember the house where you lived as a child, but try thinking hard about something that happened there. What room were you in? What's outside the door, or down the hall? In Palette, a free narrative puzzle adventure made by Yoshitaka Nishida and translated by Vgperson (whose other translations include Ib, The Witch's House, and The Crooked Man), Dr. Sianos B. Sian needs to travel down a much twistier trail— B.D., his new patient, barely remembers anything, and it's up to him to take her one remaining memory and guide her through the process of recovering her past.
Remember one thing, and it might lead to remembering another. It might be difficult to, say, remember the house where you lived as a child, but try thinking hard about something that happened there. What room were you in? What's outside the door, or down the hall? In Palette, a free narrative puzzle adventure made by Yoshitaka Nishida and translated by Vgperson (whose other translations include Ib, The Witch's House, and The Crooked Man), Dr. Sianos B. Sian needs to travel down a much twistier trail— B.D., his new patient, barely remembers anything, and it's up to him to take her one remaining memory and guide her through the process of recovering her past.
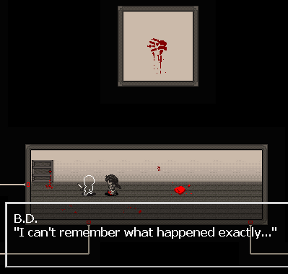 Call up B.D. and explore her memories, fleshing them out as best as you can, forming connections, and pushing past her mental blocks. To make it harder, B.D. only has so much emotional energy, which she expends with every bit of digging, old or new. With so many directions available from the start, you'll have to pick and choose your battles. Can B.D. handle this path? That one? Some directions are best left for when she's feeling stronger, and you might need to play with a notebook in hand to keep track of them all— Palette isn't just going to test B.D.'s memory, it's going to test yours, too.
The original Japanese version of Palette took home the grand prize in the Fourth ASCII Entertainment Software Contest , and even got a PlayStation re-release, And it won for a reason: this game is good. It's a sharp, tricky puzzle that's much more original than it seems, and it's likely to stay with you long after the credits roll. On the other hand... Palette won that contest in 1998. It's very dated-looking, and though it still plays on new computers, it doesn't play perfectly. Sometimes the semi-monochrome effect is missing, or the sound files stack into a cacophonous heap of bleating noise.
 Palette has a few smaller problems, too: Dr. Sian could have easily been left out, some aspects of the story might test your suspension of disbelief, and the gameplay is nicely expanded, but pretty one-note. There are plenty of reasons why Palette just isn't a game for everyone. But on the other other hand, if you're looking for a great story, a simple but thoughtful puzzle, or a tiny piece of amateur game development history, this might be one for you. Palette, to me, is like a catchy song. Even if it's been a while since I've heard it in full, sometimes a few bars pop into my head and I think of it and smile. Memories are funny like that, huh?
![]() Windows:
Windows:
Download the free full version
![]() Mac OS X:
Mac OS X:
Not available.
Try Boot Camp or Parallels or CrossOver Games.


Walkthrough Guide
(Please allow page to fully load for spoiler tags to be functional.)
Palette Walkthrough
Notes on the walkthrough:
Palette's puzzles, aside from the narrative itself, revolve around spatial navigation-- usually "where was that thing" or "how do I get to that thing without running out of energy?" It's very difficult to give effective hints for a game like this, so please be aware, this is not a hint-through. What I've done is give very specific directions on how to complete each portion of the game, so watch out for spoilers.
If you need help but don't want to be spoiled, please consult the Game Mechanics and/or Maps sections of the walkthrough. The mechanics are left for the player to puzzle out instead of directly explained, so if you're stuck in the early stages of the game, taking a look at how everything works might help. As for maps, I've included a full-game map with the rooms as displayed in-game, a censored full-game map with just scene names, and maps highlighting the relevant rooms for collecting each Memory Shred. These Partial Maps are the least spoilery option.
If you're stuck on the story, please consult the Story Hints section of the walkthrough. I've chosen not to provide outright story spoilers, but the hints I've given should be helpful in putting it all together.
For easier reference, locations are bolded, and Memory Shreds are italicized. I've also referred to the rooms' dual scenes as "memory view" (where outlines are visible and examinable, and B.D. cannot leave the room) and "normal view" (where outlines are not visible, and B.D. can leave the room.) These aren't official names, but it was convenient to have something to call them.
If the game isn't displaying properly:
According to Vgperson, Palette runs best if you emulate Windows 98. If you already have an emulator or you're one of the few people who can be bothered to wrestle with one, that option is recommended.
For the rest of us...
The semi-monochrome effect will never show up in windowed mode.
If the game appears entirely monochrome to you (which can affect playability), try switching to windowed mode. You'll get a full-color Palette instead of a semi-monochrome one, but the playability issues will be gone.
If you're really attached to the semi-monochrome effect, try saving your game in windowed mode, exiting the game, opening it again, and loading your previous save. Doing this sometimes worked for me to restore the semi-monochrome effect, although a few odd colors occasionally showed up.
I'm using Windows 7, so if you're using a different OS and you find something else that works, please post a comment and let people know!
Game mechanics:
In normal view, B.D. can travel between locations by examining the red rectangles on the borders of the room. White rectangles indicate a path that hasn't yet been unlocked; new paths are unlocked as you progress through the game and recover more memories. Examining a significant object in the room will switch you to memory view, if there's one available (for example: the mirror in the bedroom, or the smudge/handprint on the wall in Scene 47: Corridor.)
In memory view, B.D. can examine outlines and turn them into more concrete objects (or if they're human shapes, slightly more individualized outlines with a color or an accessory) that will be visible from both views. Some outlines can't be identified right away- those require a Memory Shred in your inventory. Memory Shreds can be used as many times as you need, and some go to more than one room.
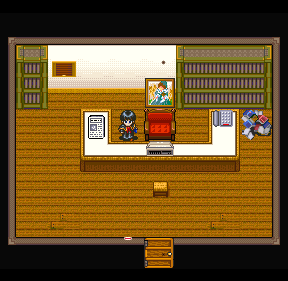
When you travel between rooms or step through a glass block, B.D. will lose 1 bar of energy. She starts with 3 bars, and gains one with each Memory Shred found, for a total of 20. In some passageways, an oval will appear on the floor when she's down to her very last bar (though in a certain room, the oval is almost always present). Examine it, and you can choose to "Take a break," which will restore some energy. Once you run out of energy, you'll be Dr. Sian again, in his office. Examine the phone to return to playing as B.D. You'll start in the bedroom, but keep the rest of your progress.
The menu is accessed by pressing [Esc]. You can check your Memory Shreds, and, through the System Button, you can save, load, change your screen mode (fullscreen or windowed) and exit the game. You can usually save whenever you want as B.D., but you can't save as Dr. Sian. Unlike in newer RPG toolkit games, it's on you to name your own saves and remember where you put them.
Tips:
Saving frequently is a good idea, since you're able to do it whenever you want. If you're going to use multiple save files, try to name them clearly since you'll have to select them from your folder.
Don't worry if you end up making a lot of trips back to Dr. Sian's office! That's normal in this game. Try not to get frustrated when you have to start over-- what's important is making a little bit of progress or learning something new about B.D.'s mental landscape each time.
If you're having trouble remembering how to get where you want, try drawing a map. The game is pretty big and there are a lot of places to keep track of, so having a visual representation of that, it can really help.
New paths open up all the time, and not necessarily in the most obvious places. If you don't know where to go, try visiting places you've been before and seeing if some of the previously closed routes have opened up.
Sometimes you might get stuck trying to reach an area that's meant for later in the game. Sometimes you'll need to do something tricky to progress, but more often than that, an area you can't reach is going to be an area you're not supposed to reach quite yet. Again, there's a lot of game to explore, so try seeing if you can come back later with another Memory Shred or two under your belt.
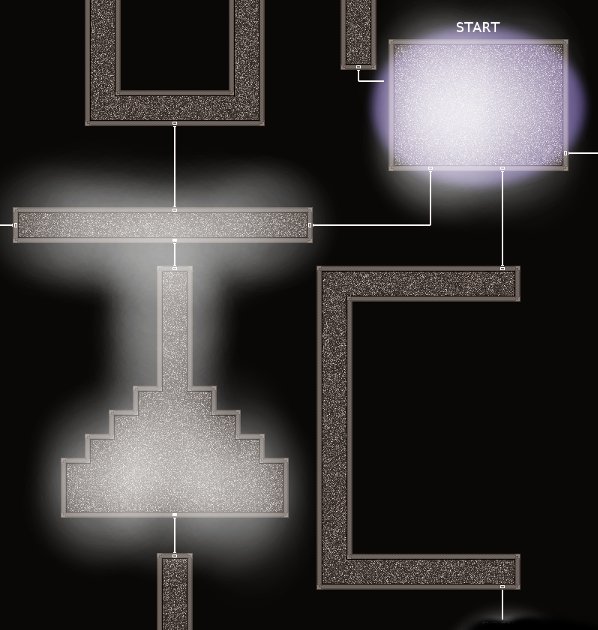
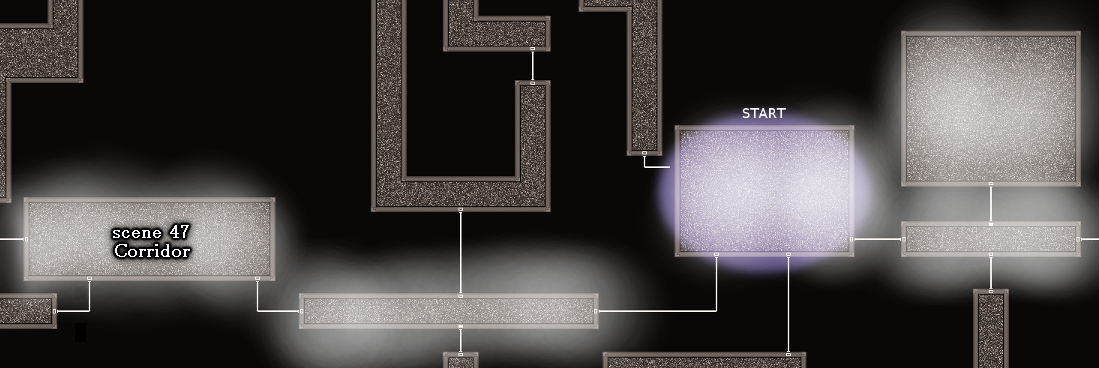
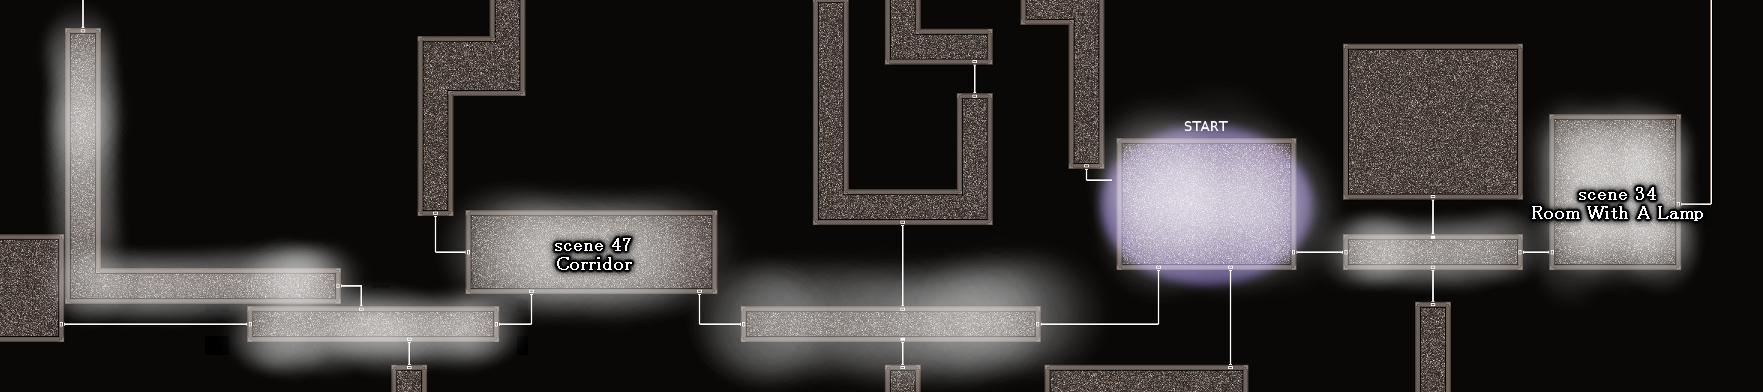
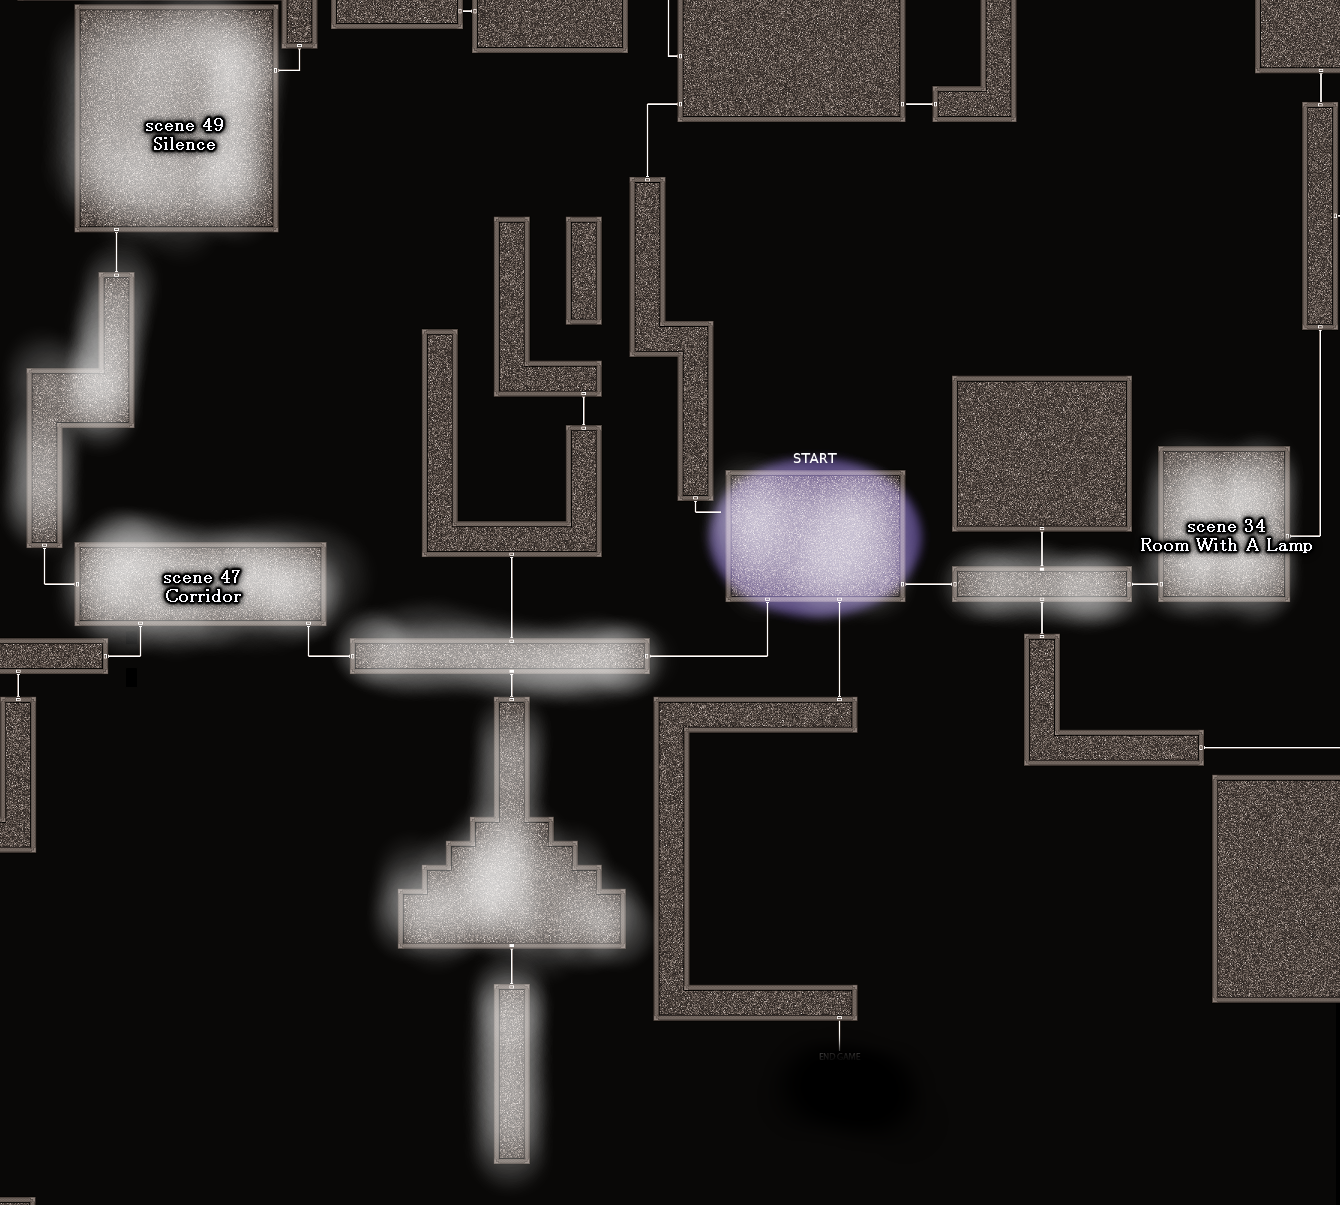
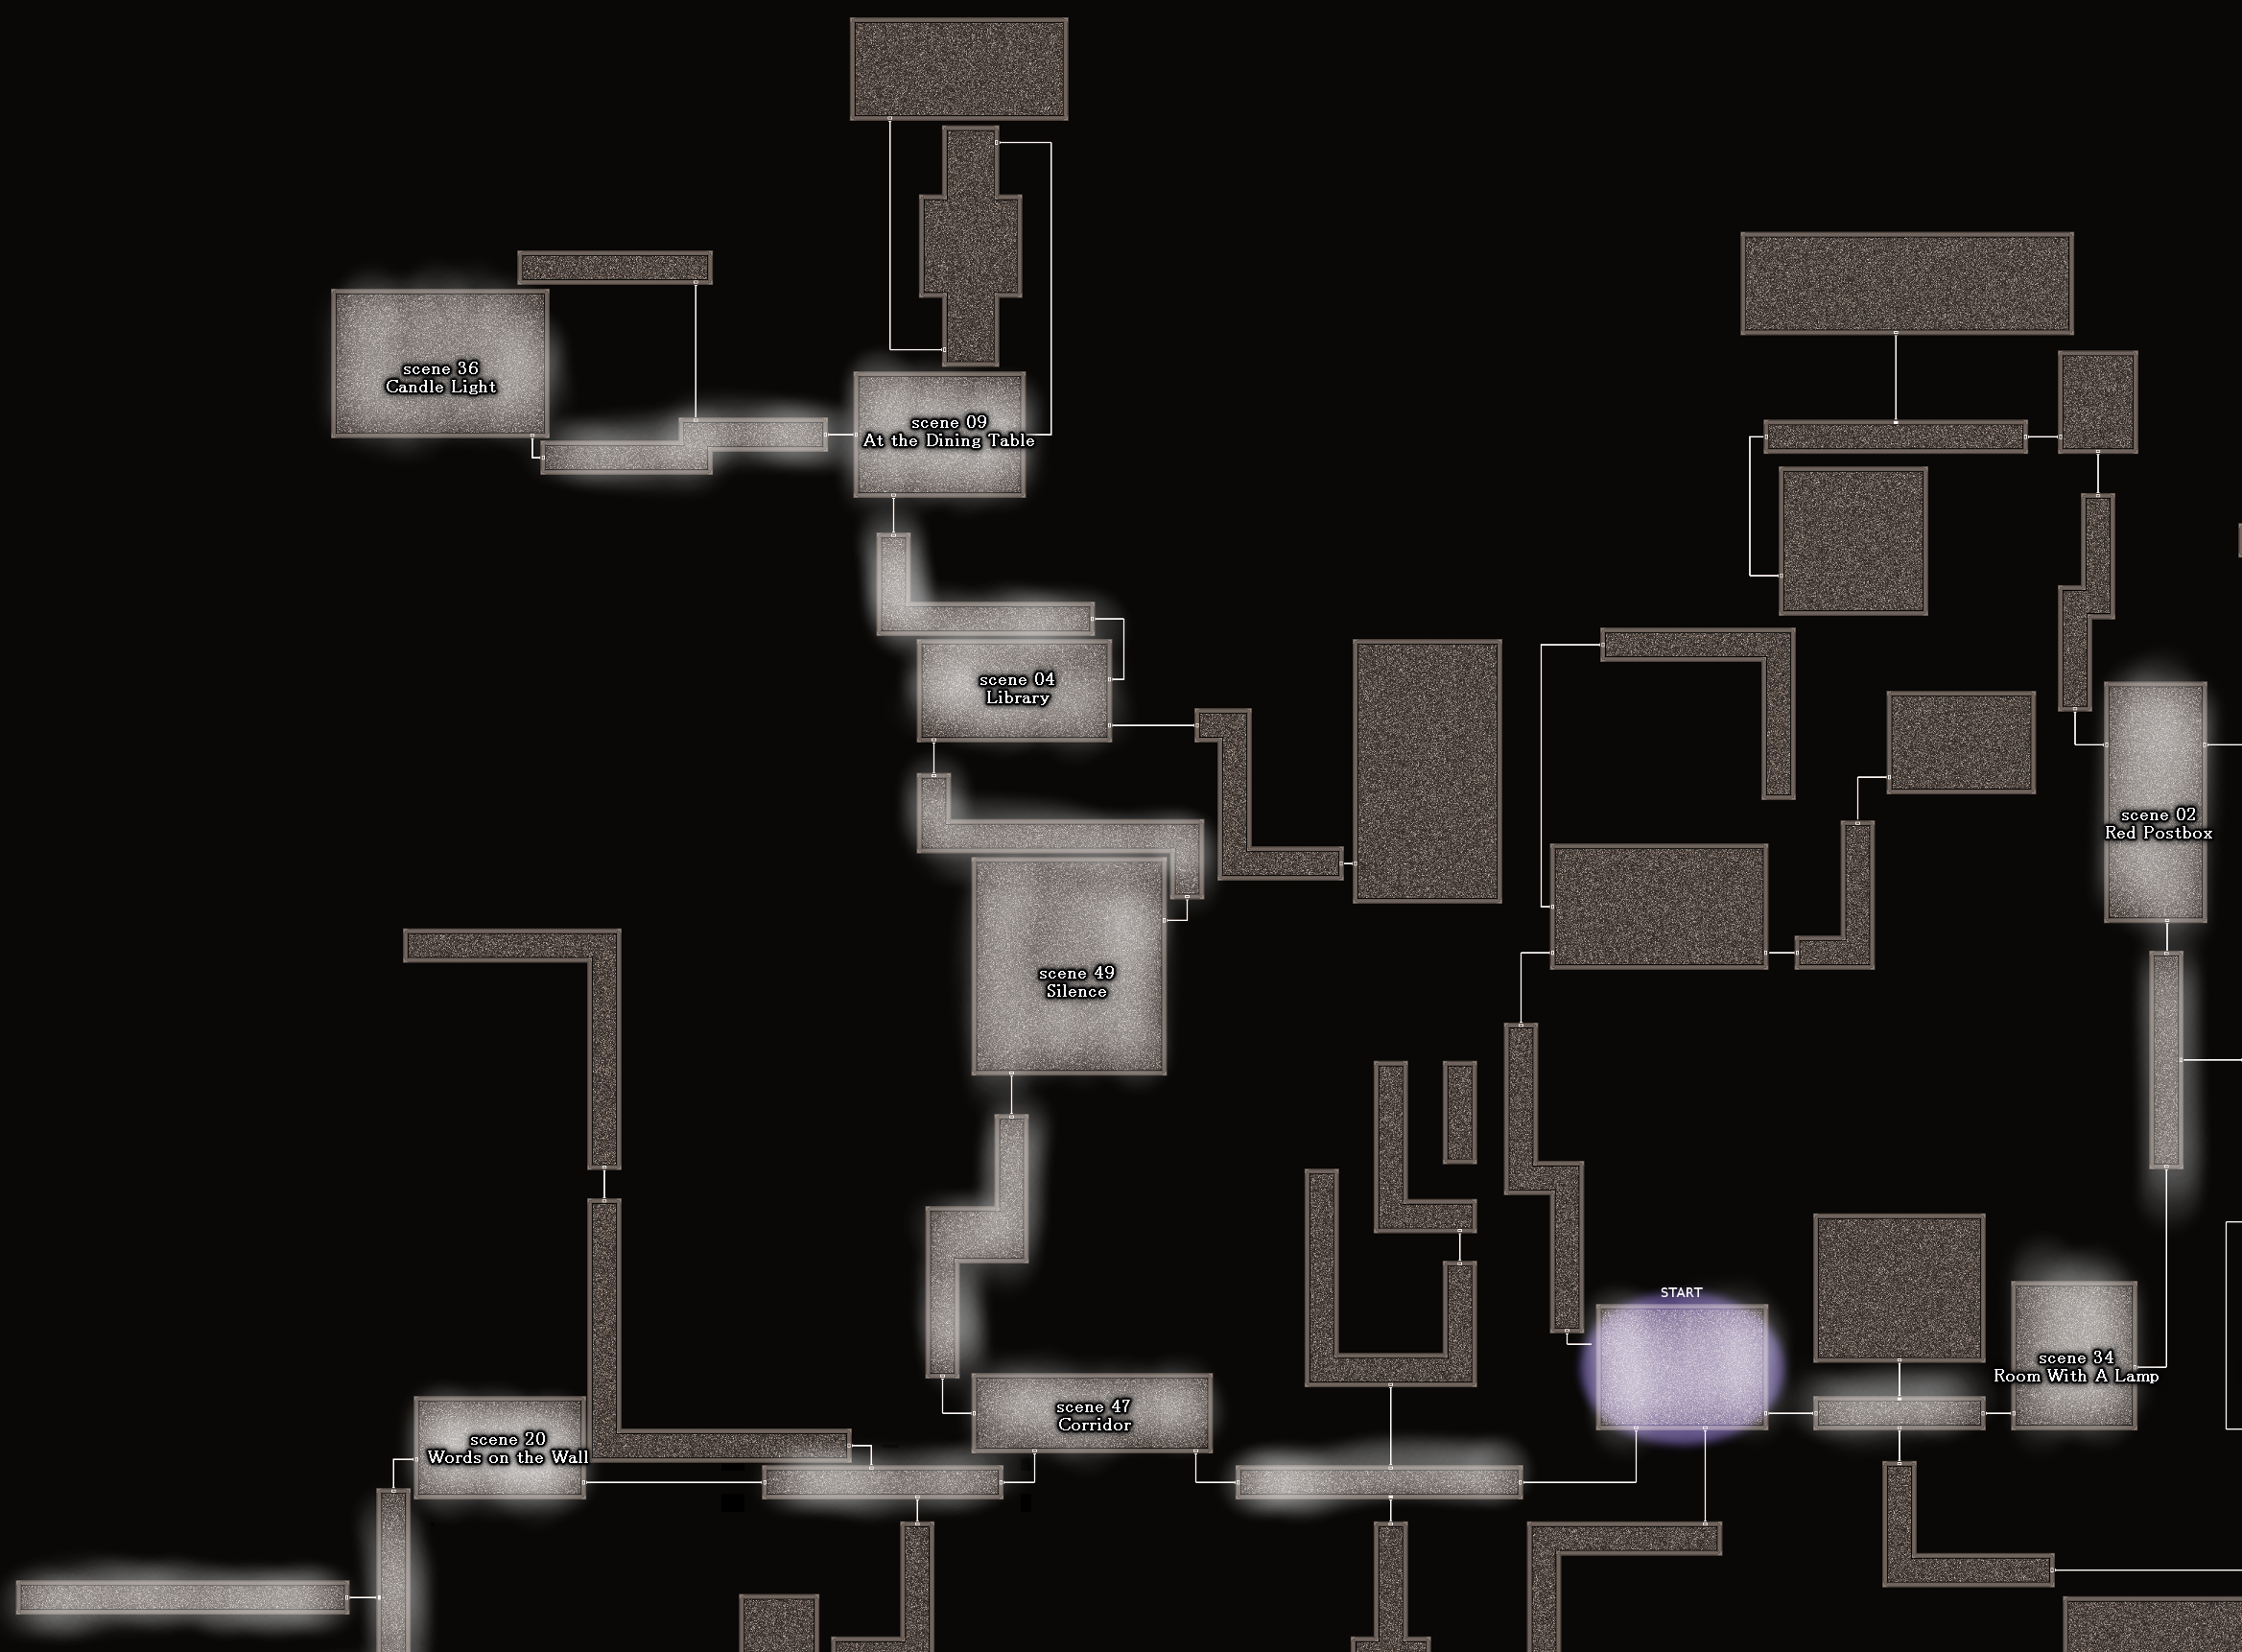
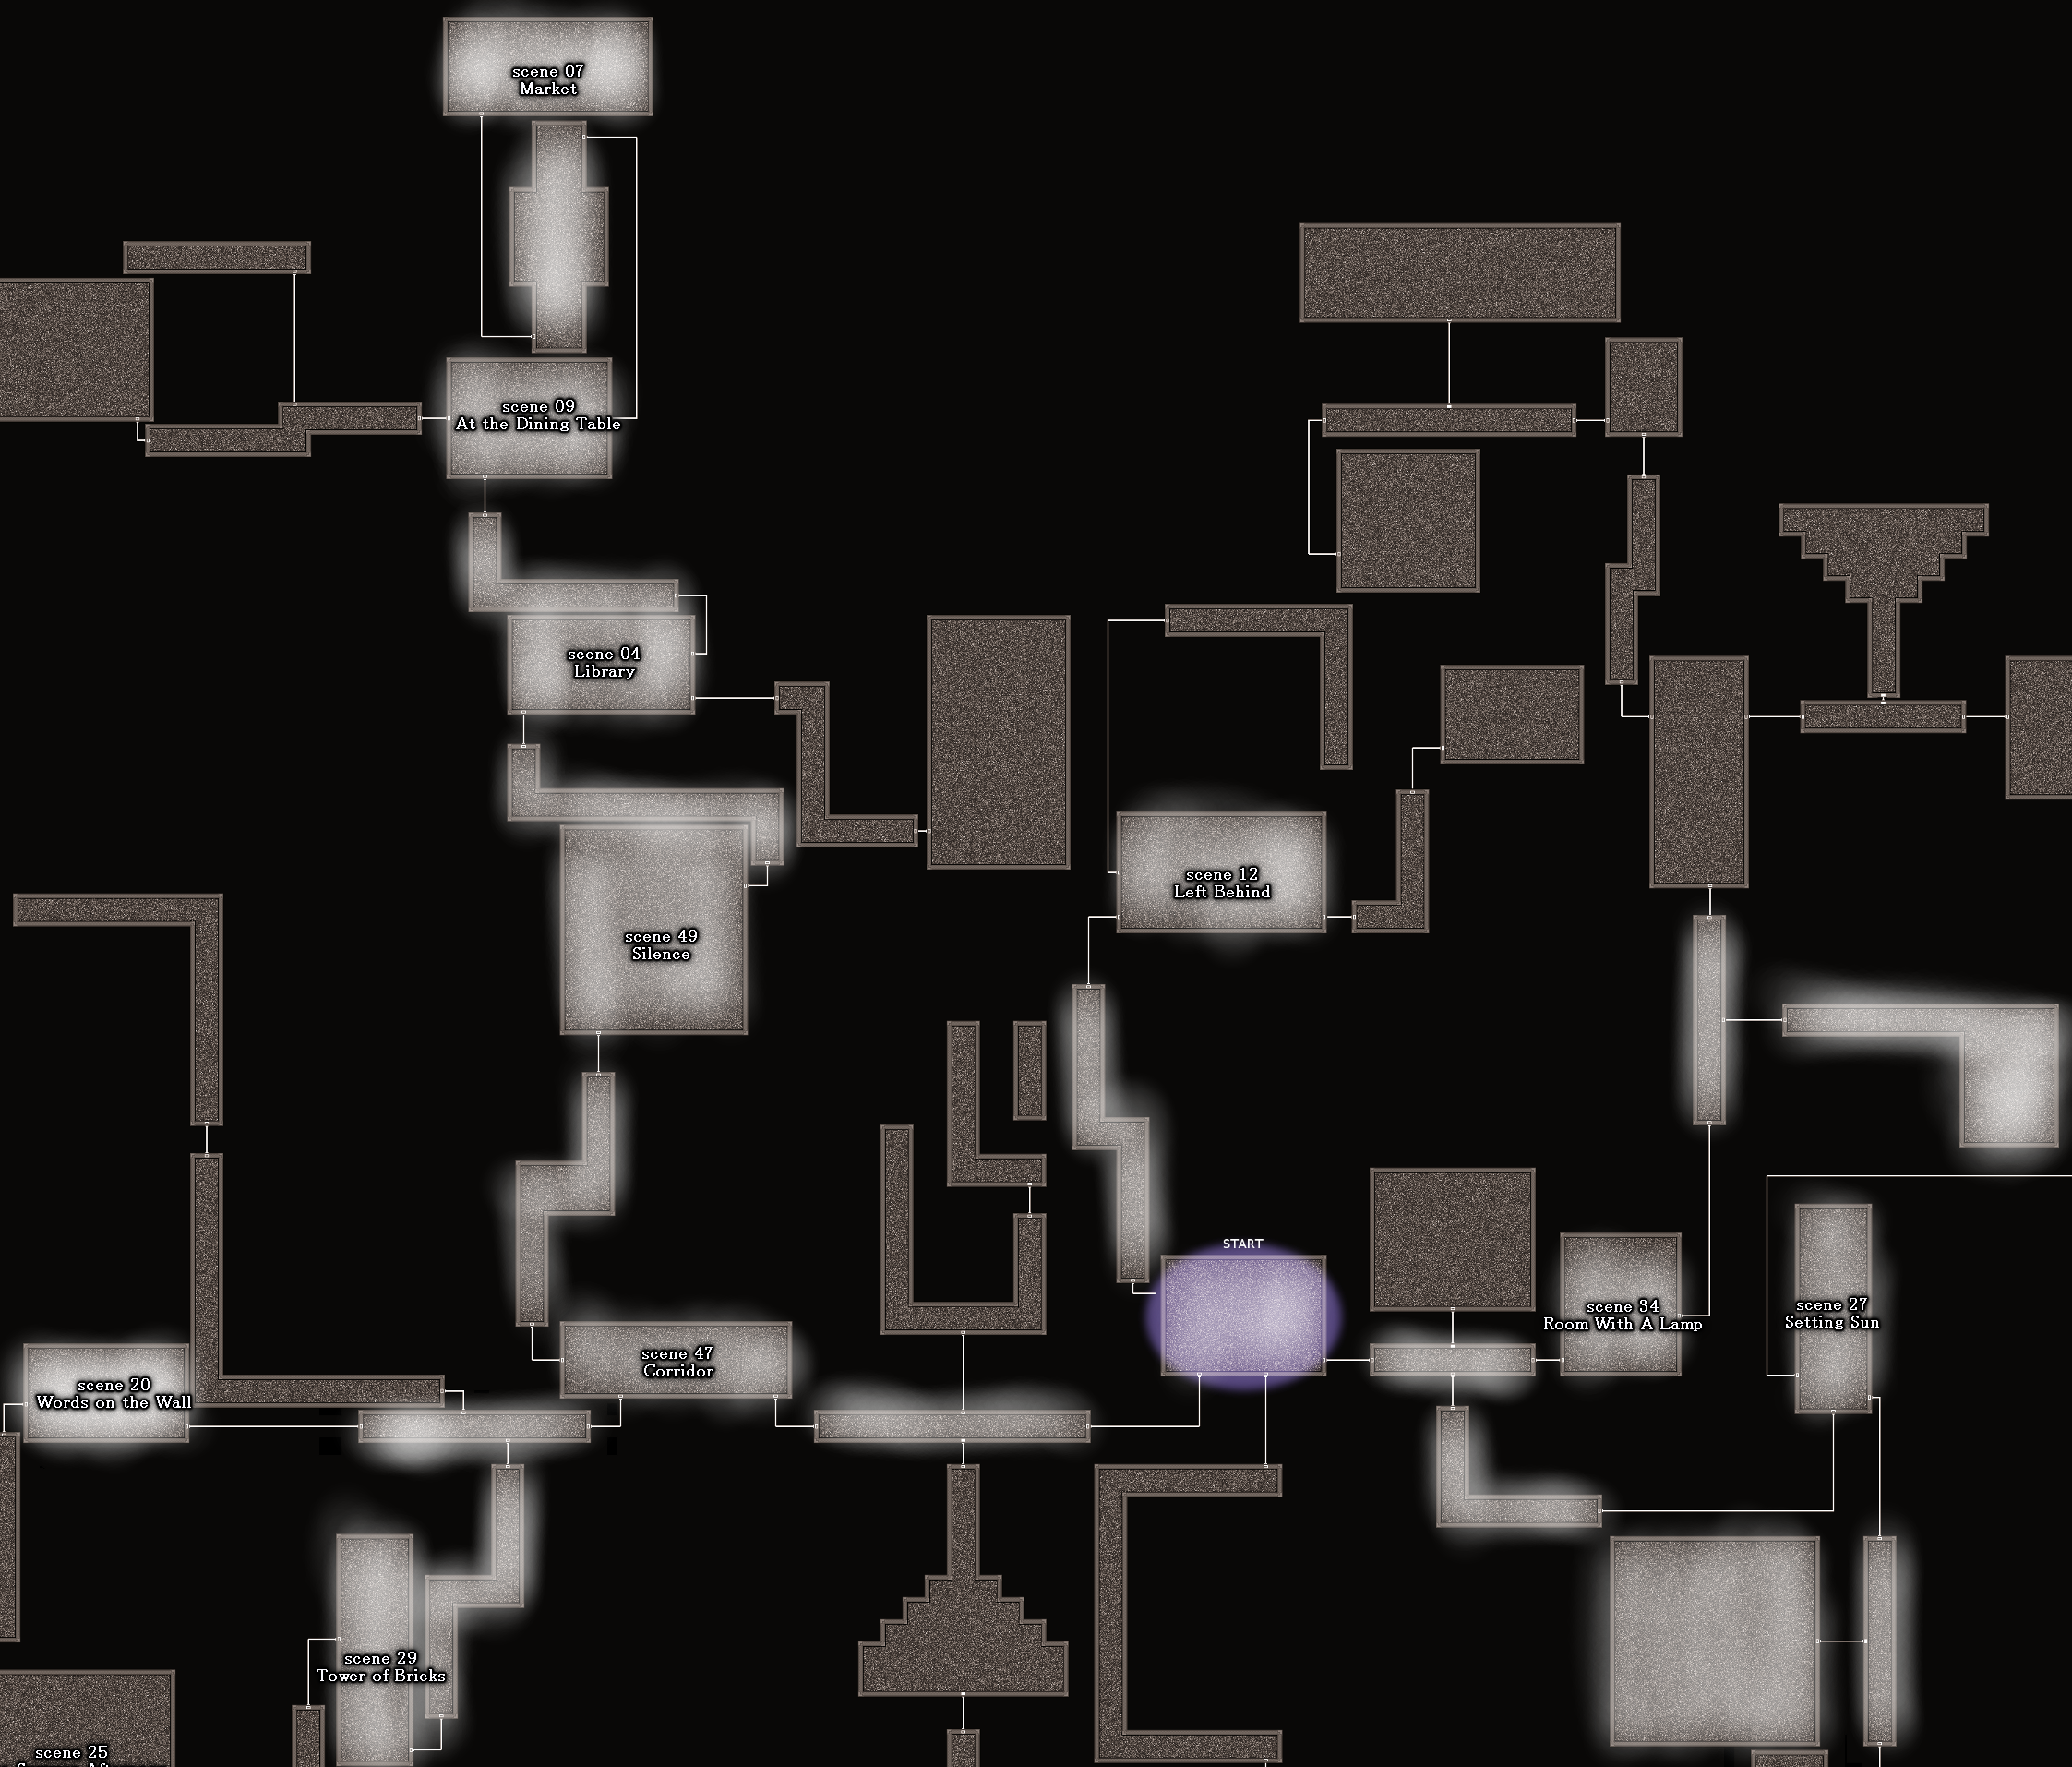
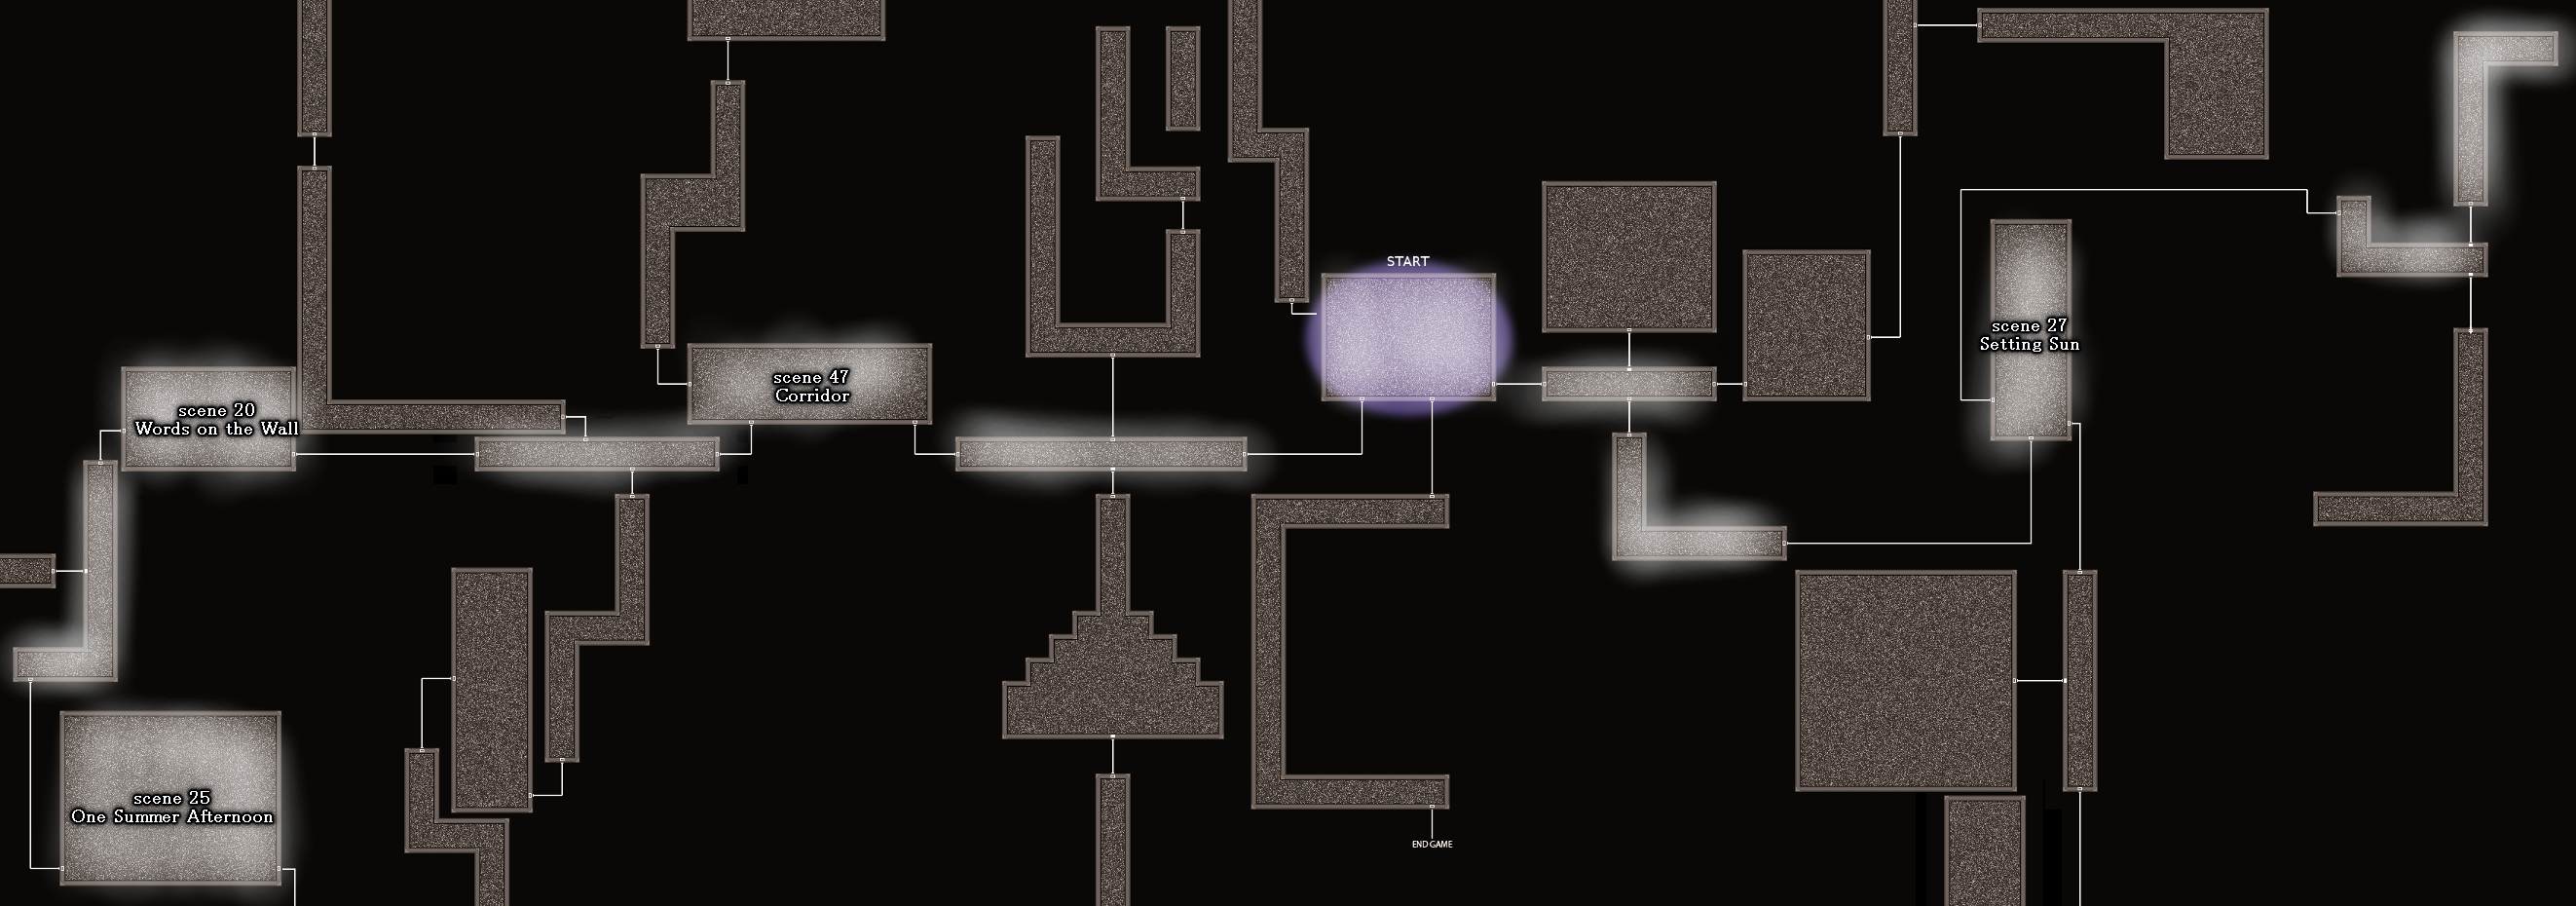
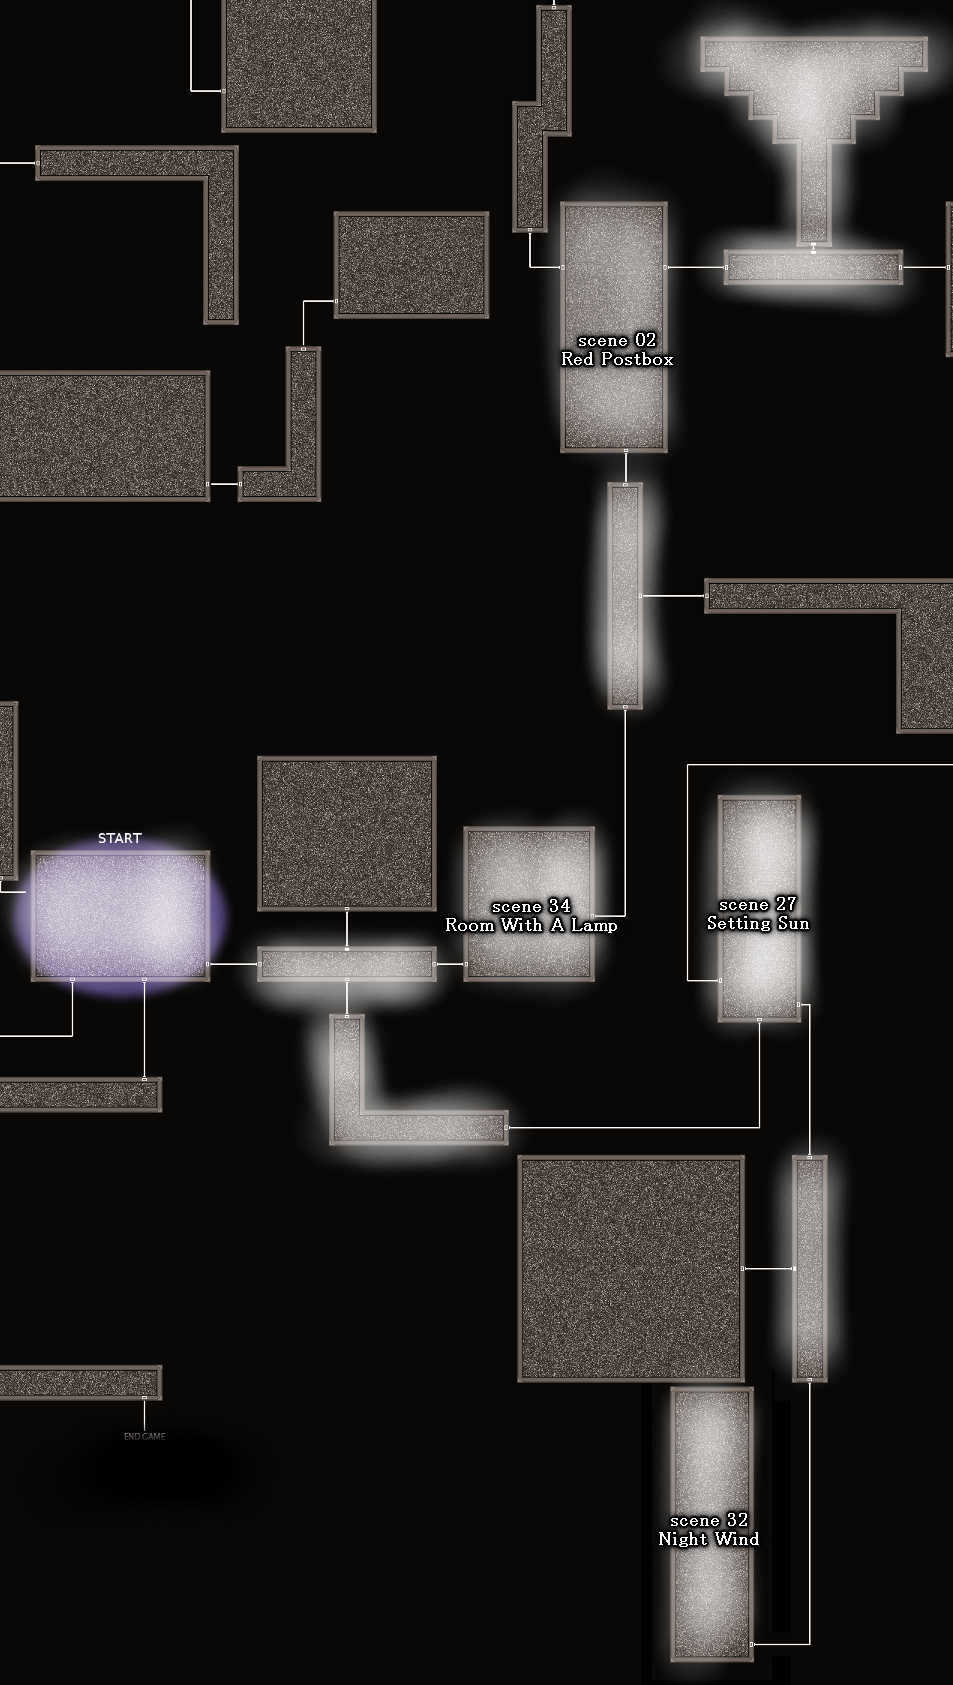
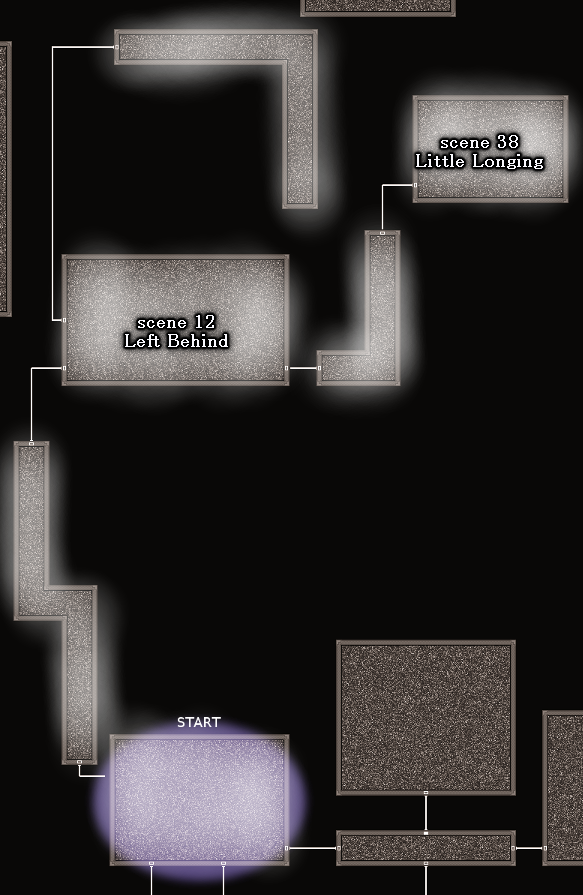
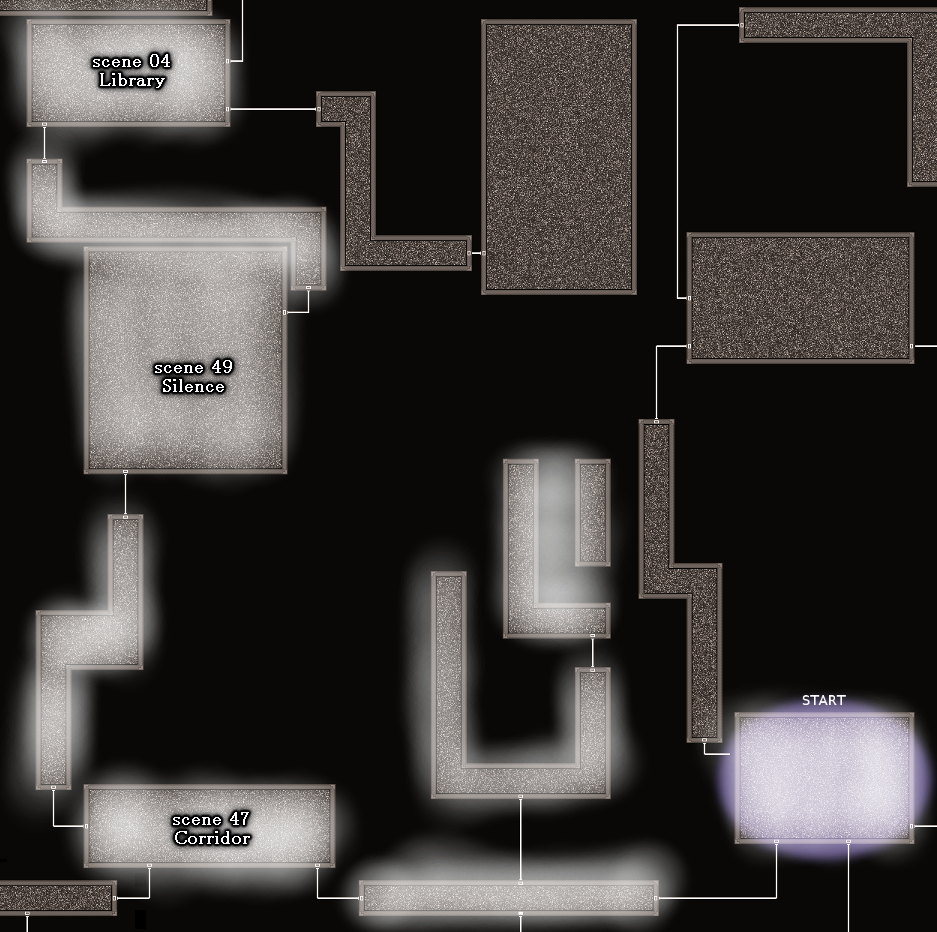
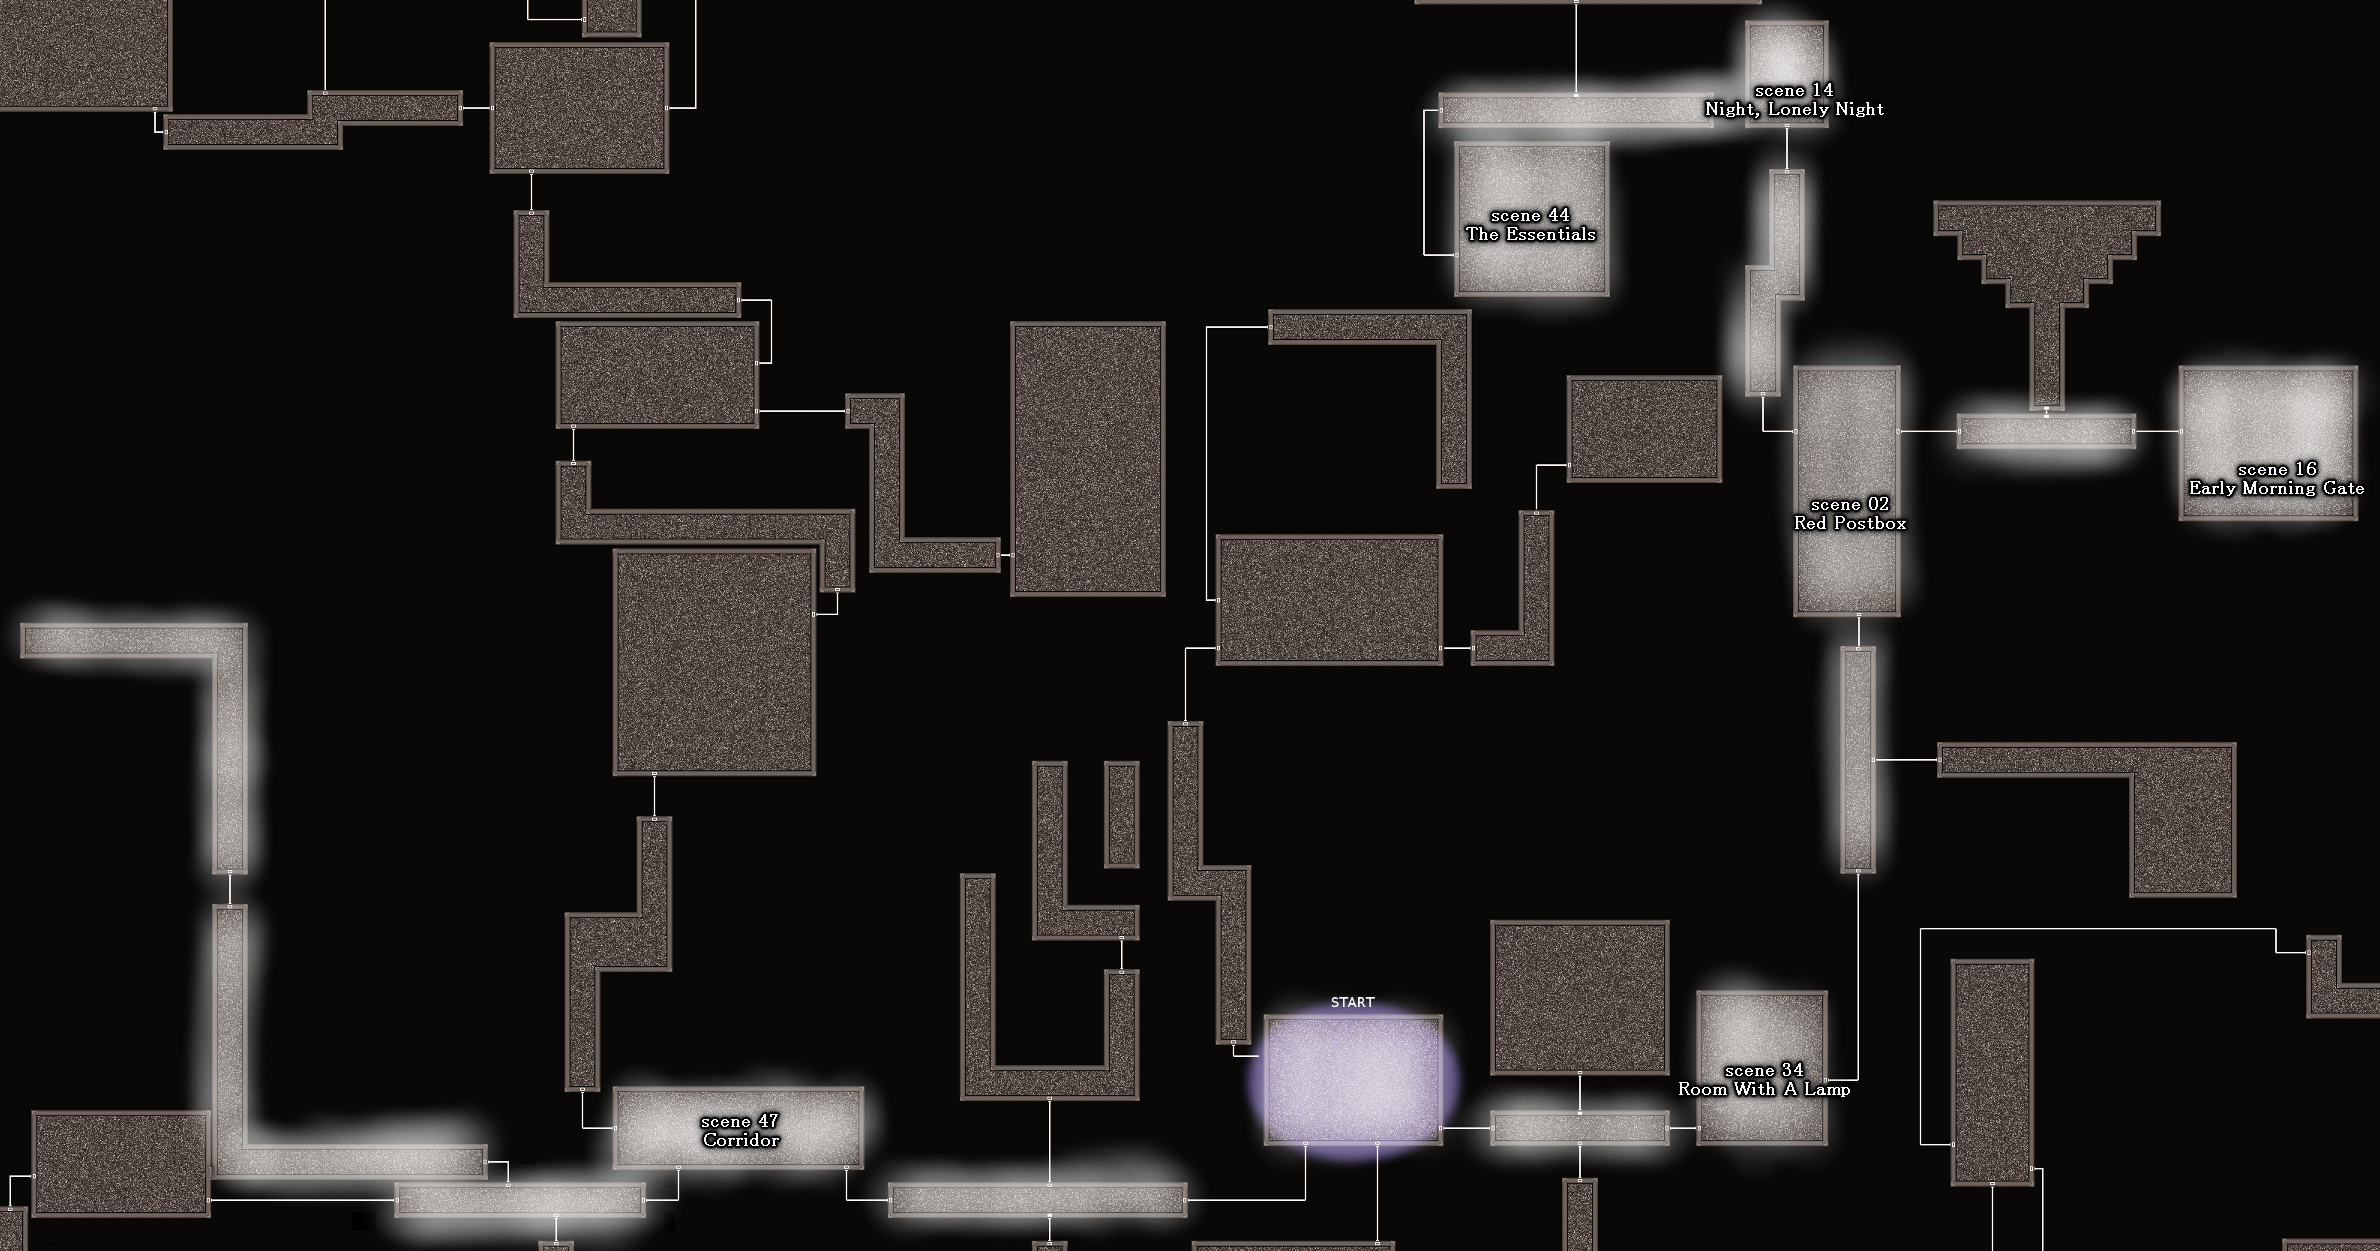
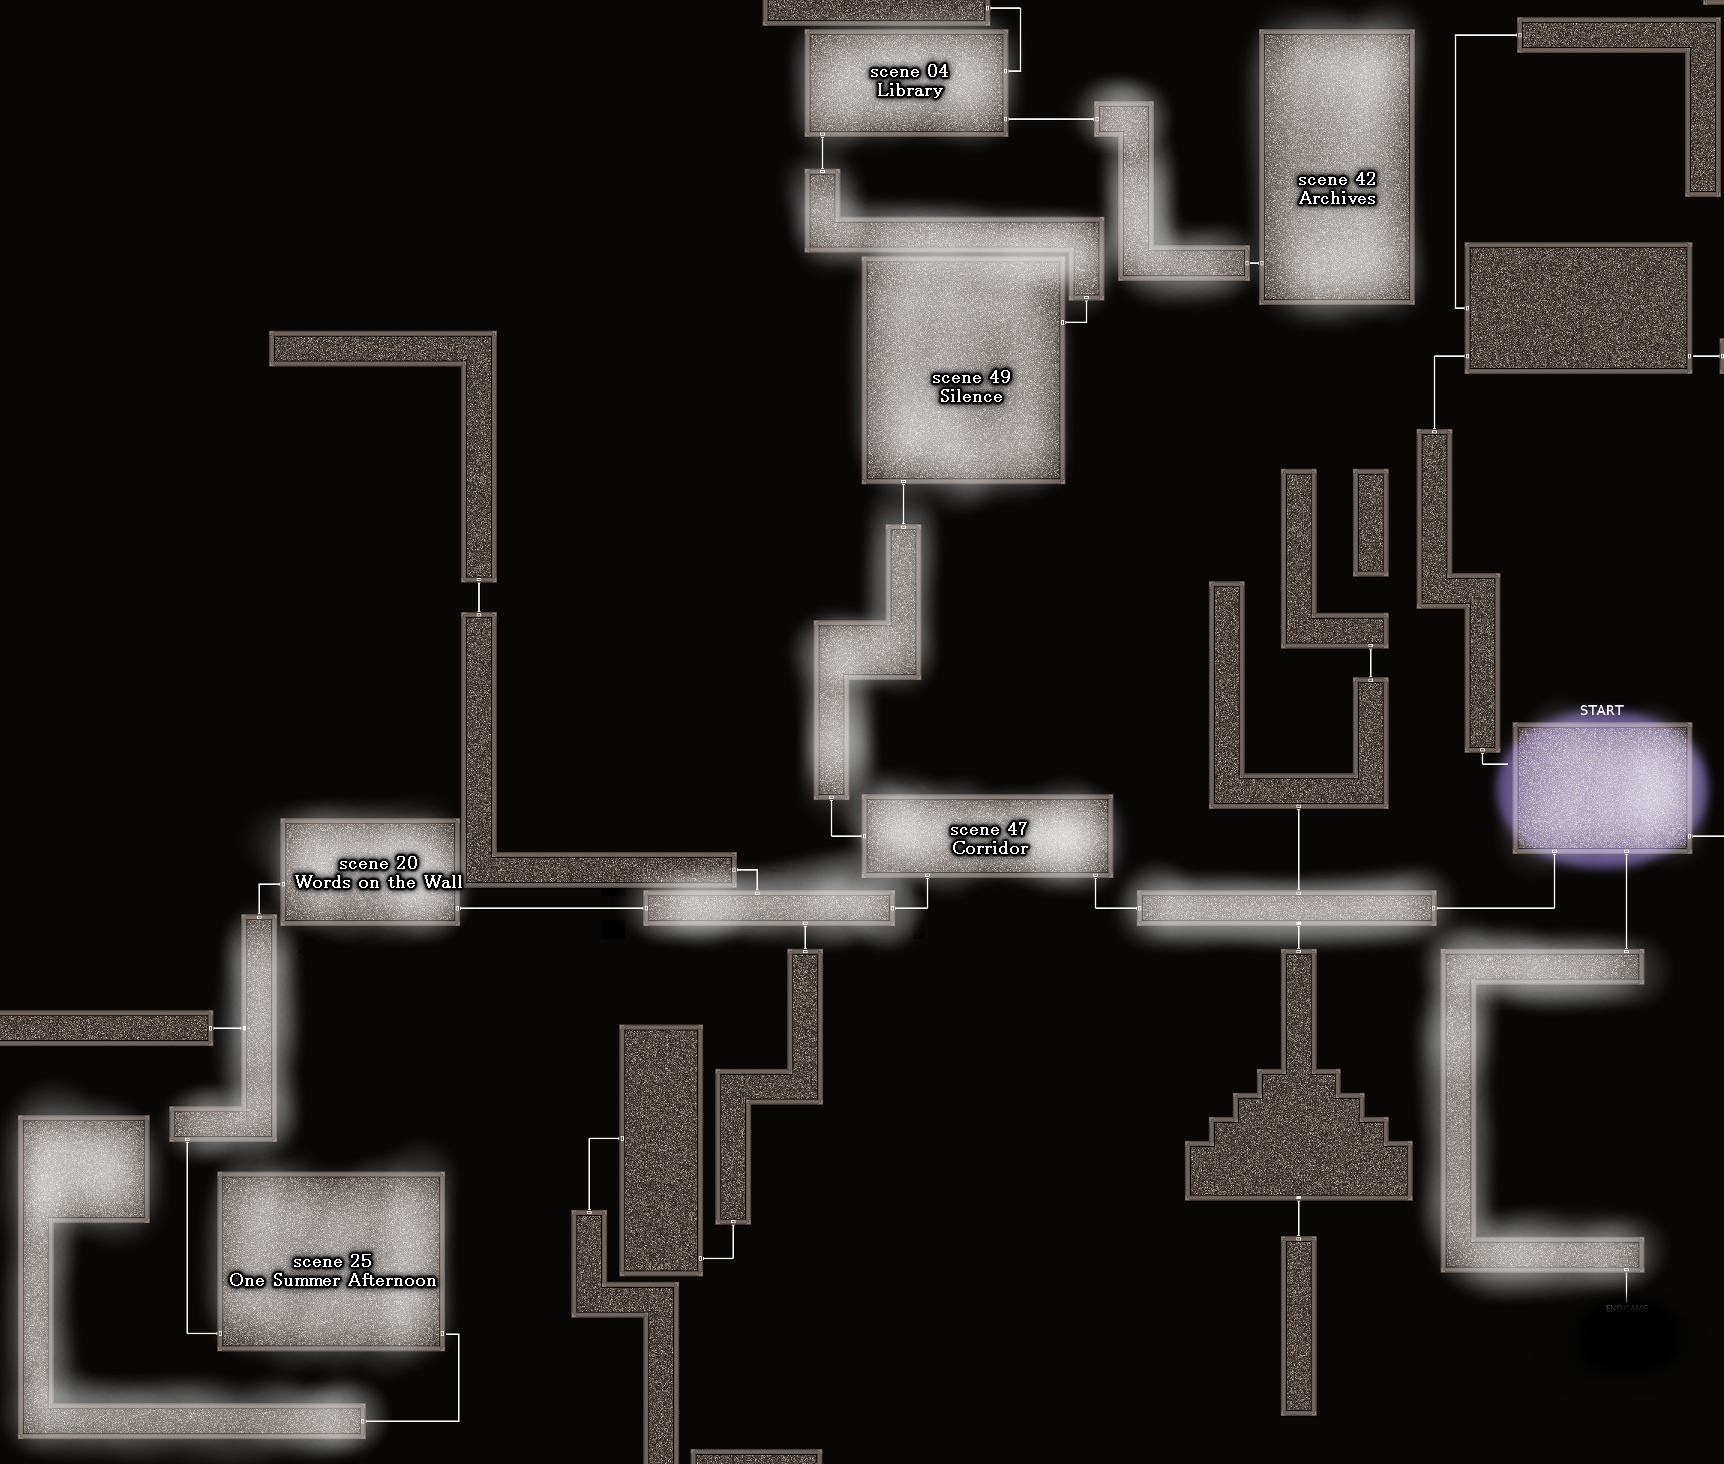
Maps (and Partial Maps-- a less spoilery option!):
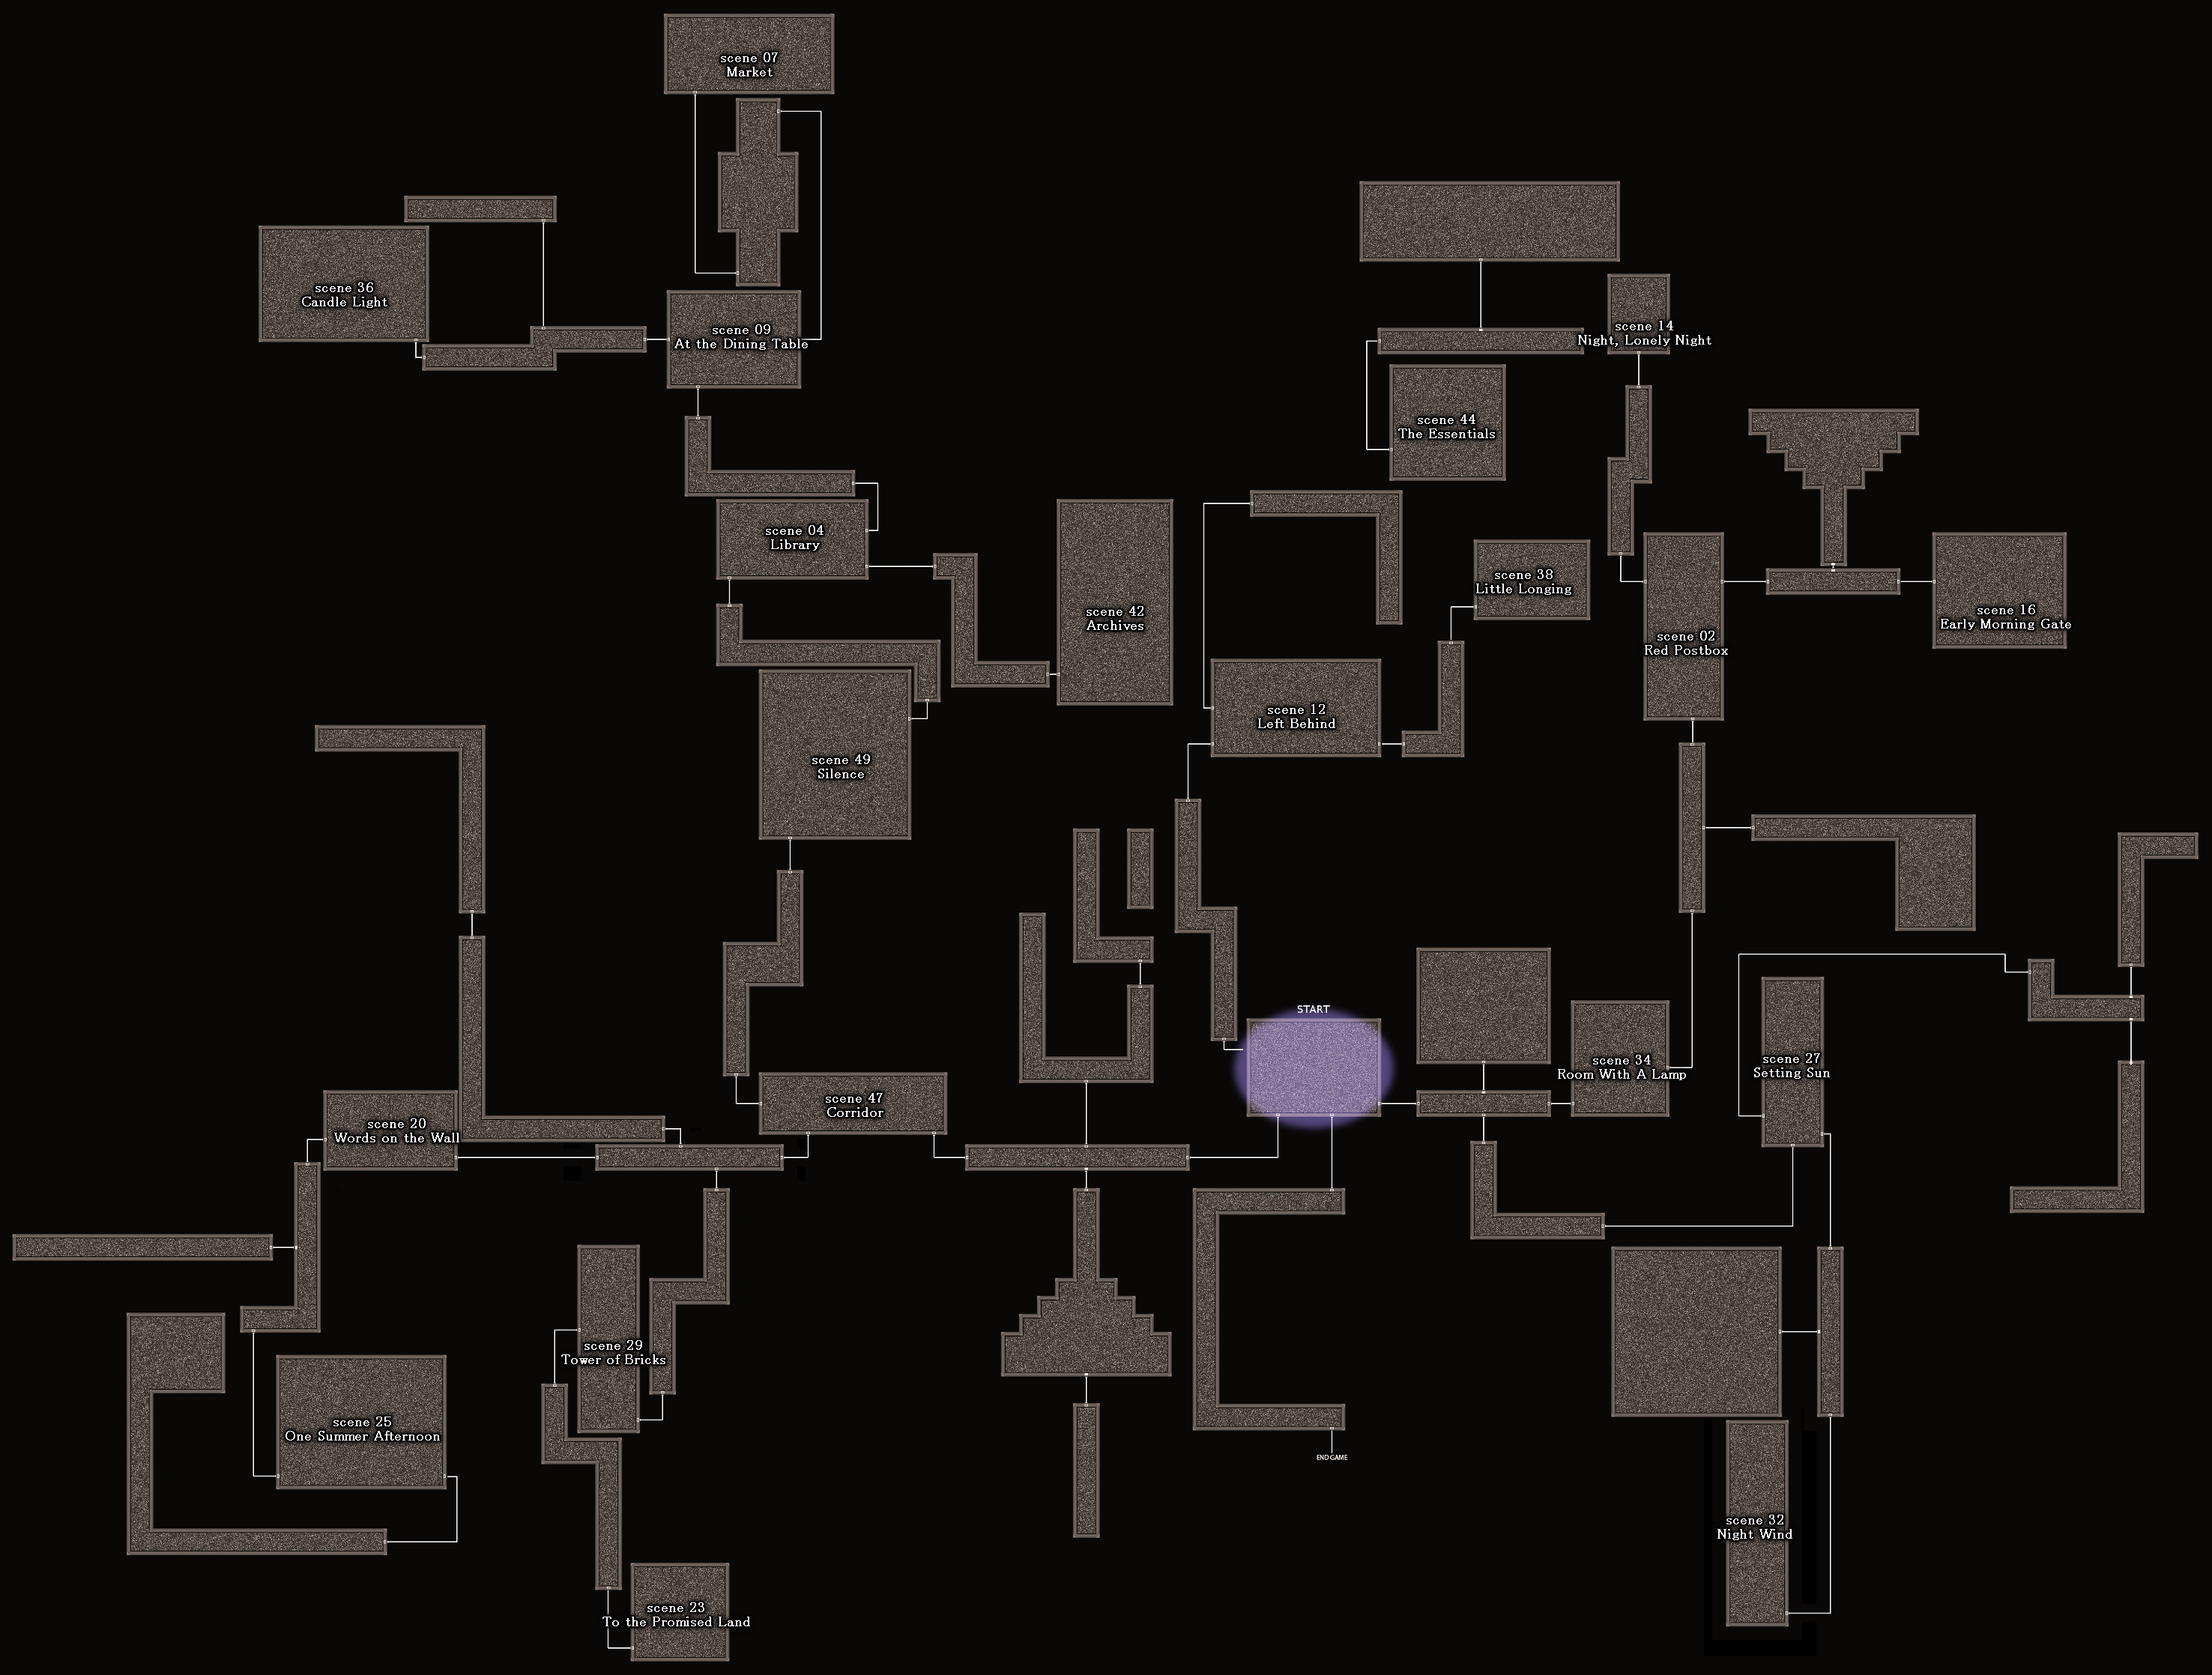
Full maps display every accessible area of Palette and how they connect to each other, and are labelled with every scene's normal view name.
Uncensored Full Map -- Shows the contents of each area. Recommended if you need to orient yourself and you're better at remembering the appearance of an area than the name.
Censored Full Map -- The contents of the areas are censored, leaving only the names. Recommended if you need to orient yourself and you'd prefer to minimize spoilers.
Partial maps display all the areas related to collecting and using a particular Memory Shred, including exploration unlocks. They're drawn off the censored maps, so no image spoilers here. All relevant areas are highlighted and labelled. Recommended if you like figuring things out yourself, you just need a nudge for a particular point in the game. Shreds are listed in the order in which they appear in the game, so if you're stuck after finding and using one, just move on down the list.
Knife Shred Map
Inherited Sin Shred Map
Video Shred (1) Map
Red Silhouette Shred Map
Newspaper Shred Map
Black Hat Shred Map
Cat Shred Map
Wall Bruise Shred Map
Straw Hat Shred Map
Grave Shred Map
Moon Shred Map
Log Pile Shred Map
Dress Shred Map
Notice Shred Map
Video Shred (2) Map
Document Shred Map
Forbidden Shred and Endgame Map
Thanks to Joey for contributing the original map (link goes to a personal blog and may contain NSFW content.) Couldn't have done it without you!
Walkthrough:
Examine the window, the light switch, the door, and then the phone. Attempt to leave your office. When you have control again, answer the phone a second time.
You're now in the bedroom. Examine the mirror to switch to memory view (Scene 46: Red of Beginning), then examine all of the outlined objects. You'll be able to identify all but the thin object in the back of the room. Examine the mirror again to switch back to normal view. Take the bottom left exit, then the bottom one. Examine the oval to take a break. Then, step through the glass, examine the outline, and get the Knife Shred.
From the bedroom, switch to memory view, and examine the remaining unidentified outline. Switch back to normal view and take the bottom left exit, then the left one. You're now in the hallway, Scene 47: Corridor. Examine the smudge on the wall to switch to memory view (Scene 48: Voices Past the Door) and examine all of the outlined objects. You'll be able to identify every object in the scene. Switch back to normal view and take the left exit. Avoid the glass, step on the oval to take a break, then take the top exit. You're now in Scene 49: Silence. Examine the human outline twice to switch to memory view (Scene 50: Red of Closing). You'll be able to identify everything but the second human outline and the missing book on the shelf.
From the bedroom, take the right exit, then the top one. Examine the bookshelf to get the Inherited Sin Shred.
Go back to Scene 49: Silence (from the bedroom: bottom left, left, left, step through the glass, step on the oval and take a break, top) and examine the book.
As Dr. Sian, examine the red book on the shelf.
As B.D., from the bedroom, take the bottom left exit, then the left one, then the bottom left one. Step through the glass, and take a break. Go through the top exit. Step through the glass until you reach the square outline, then examine it for the Video Shred (1).
From the bedroom, take the right exit, then the right one again. You're now in Scene 34: Room With a Lamp. Examine the lamp table to switch to memory view (Scene 35: Lies and Deceit) and examine all of the outlined objects (examing the square outline on the table will show you a scene). You'll be able to identify everything but the pile of objects in the back and the other person.
From the bedroom, take the bottom left exit, then the bottom one. Step through the glass, and take the bottom exit. Step through the glass, take a break, step through the other glass block, and examine the human outline to get the Red Silhouette Shred.
Go back to Scene 34: Room With a Lamp (from the bedroom: right, right) and examine the human outline.
Go back to Scene 49: Silence (from the bedroom: bottom left, left, left, top), switch to memory view, and examine the second human outline.
Switch back to normal view, and take the right exit. Step through the glass, take a break, step through the second block of glass, then take the top exit. You're now in Scene 04: Library. Examine the clock to switch to memory view (Scene 05: Central News) and examine all of the outlined objects. You'll be able to identify everything but the items on the board.
From the bedroom, take the bottom left exit, then the top one. Examine the rectangular outline at the upper left to get the Newspaper Shred.
Go back to Scene 04: Library (from the bedroom: bottom left, left, left, top, right, step through the glass, top). Switch back to memory view, and examine the large rectangle on the board. Read each article.
Switch back to normal view, and take the top right exit, step through the glass, take a break (make sure to face upward or downward, because if you're facing the block, you'll break it and lose your last bar of energy), step through the other glass block, and take the top exit. You're now in Scene 09: At the Dining Table. Examine the flowers from behind the table to switch to memory view (Scene 10: Two of Us - A). You'll be able to identify everything but the human outline. If you can't see the other outlines, it's a good time to switch to fullscreen.
From the bedroom, take the right exit, step through both glass blocks (even though only one is necessary to proceed, both are necessary to proceed with the right amount of health), take the bottom exit, step through all the glass blocks, take a break, and take the right exit to Scene 27: Setting Sun. Take the left exit, then the bottom exit. Take a break. Step through all but one glass block, then take a break again. Step through the remaining block and examine the human outline to get the Black Hat Shred.
Go back to Scene 09: At the Dining Table (from the bedroom: bottom left, left, left, top, right, take a break, top, top right, take a break, top). Switch back to memory view, and examine the human outline.
Switch back to normal view, and take the left exit, step through both blocks of glass and take a break, and take the left exit again. You're now in Scene 36: Candle Light. Examine the top candleholder from behind the table to switch to memory view (Scene 37: Two of Us - B). You'll be able to identify everything but the section of wall. Again, this may be a good time to switch to fullscreen.
From the bedroom, take the bottom left exit, then the left one, then the bottom left one again, then the left one again. You're now in Scene 20: Words on the Wall. Examine the outline on the wall to switch to memory view (Scene 21: Atonement). You won't be able to identify either outline.
Switch back to normal view, and take the left exit. Step through both glass blocks, take a break, and take the exit on the left wall. Step through the glass blocks and examine the animal outline to get the Cat Shred.
After the scene, go back to Scene 20: Words on the Wall (from the bedroom: bottom left, left, bottom left, left.) Switch back to memory view, and examine the animal outline.
From the bedroom, take any exit, then go back to the bedroom (so you're back where you started, but with two fewer bars of health). Take the right exit, the right exit again, then the right exit a third time. Step through two glass blocks, then take a break. Step through the glass again, and take the top exit. You're now in Scene 02: Red Postbox. Examine the postbox to switch to memory view (Scene 03: Twilight Gate). You'll be able to identify everything but the rectangular outline on the walk.
Switch back to normal view, and take the upper left exit. Step through both glass blocks, then take a break. Take the top exit. You're now in Scene 14: Night, Lonely Night. Examine the TV to switch to memory view. You'll be able to identify everything. Switch back to normal view and take the left exit, then the top one. Step through the glass and examine the wall to get the Wall Bruise Shred.
Go back to Scene 36: Candle Light (from the bedroom: bottom left, left, left, top, right, take a break, top, top right, top, left, take a break, left.) Switch to memory view and examine the outlined section of wall.
Take the bottom exit. Step through both glass blocks, then take a break. Take the right exit. From Scene 09: At the Dining Table, take the right exit. Step through the whole second-from-the-left column of glass blocks, then take a break. Take the bottom left exit. You're now in Scene 07: Market. Examine the rightmost basket twice to switch to memory view (Scene 08: The Red Fruit). Examine the the lone apple for a scene, then examine the outlined objects. You'll be able to identify everything but the pile of objects.
From the bedroom, take the left exit, then the top one. You're now in Scene 12: Left Behind. Examine the outline on the table to switch to memory view (Scene 13: Straw Hat). You won't be able to identify anything right now.
From the bedroom, take the bottom left exit, the left exit, the bottom left exit, the bottom exit, and then the bottom exit again. You're now in Scene 29: Tower of Bricks. Examine the building from the front to switch to memory view (Scene 30: Invisible Wall). You'll be able to identify everything.
From the bedroom, take the right exit, the bottom exit, the right exit, and then the right exit again. Step through the first two glass blocks, carefully take a break, and then take the left exit. Step through the glass and examine the outline to get the Straw Hat Shred.
Go back to Scene 12: Left Behind (from the bedroom: left, top.) Switch to memory view and examine the box-shaped outline.
Go back to Scene 20: Words on the Wall (from the bedroom: bottom left, left, bottom left, left). Switch to memory view and examine the human outline.
From the bedroom, take the right exit, the bottom exit, the right exit, the left exit, and then the top exit. Step through the first glass block and take a break. Step through the other and examine the outline twice to get the Grave Shred.
From the bedroom, take the bottom left exit, the left exit, the bottom left exit, the left exit, the left exit again, and then the bottom exit. You're now in Scene 25: One Summer Afternoon. Examine the gravestone outline to switch to memory view (Scene 26: Macilt Krim's Grave). You'll be able to identify everything.
From the bedroom, take the right exit, the right exit again, the right exit a third time, the top exit, the right exit, and the top exit again. Examine the oval outline to get the Moon Shred.
From the bedroom, take the right exit, the bottom exit, the right exit, the right exit again, and then take the bottom exit. You're now in Scene 32: Night Wind. Examine the sky from the top left corner of the balcony to switch to memory view (Scene 33: The Unchanging). Examine Red Silhouette.
From the bedroom, take the right exit, the right exit again, the right exit a third time, and the right exit a fourth time. Step through the four unavoidable blocks of glass, then go straight down from the top right corner of the room. Examine the outline to get the Log Pile Shred.
After the scene, go back to Scene 34: Room With a Lamp (from the bedroom: right, right). Switch to memory view, and examine the pile outline.
Go back to Scene 07: Market (from the bedroom: bottom left, left, left, top, right, top, top right, top, right, left.) Switch to memory view and examine the pile outline.
From the bedroom, take the left exit, the top exit, and then the left exit. Step through the glass blocks and examine the squiggly outline to get the Dress Shred.
From the bedroom, take the left exit, the top exit, the right exit, and then the top exit. You're now in Scene 38: Little Longing. Examine the left dresser twice to switch to memory view (Scene 39: Into the Closet). You'll be able to identify everything.
From the bedroom, take the bottom left exit, the top exit, and the top exit again (past the glass blocks.) Step through all the glass blocks and examine the bulletin board to get the Notice Shred.
Go back to Scene 04: Library (from the bedroom: bottom left, left, left, top, right, top). Switch to memory view, and examine the remaining bulletin board outlines.
Go back to Scene 14: Night, Lonely Night (from the bedroom: right, right, right, top, left, top). Examine the TV. After the scene, take the left exit, then the left exit again. You're now in Scene 44: The Essentials. Examine the fireplace to switch to memory view (Scene 45: Those Freed). You'll be able to identify everything.
From the bedroom, take the right exit, the right exit again, the right exit a third time, the top exit, the right exit, and the right exit again. You're now in Scene 16: Early Morning Gate. Examine the door twice to switch to memory view (Scene 17: Light and Crowds). Examine every human outline you can, then switch back to normal view. You won't be able to examine everything; in this particular room, that's okay.
From the bedroom, take the bottom left exit, the left exit, the bottom left exit, the top exit, and the top exit again. Step through all of the glass blocks, and examine the small rectangular outline to get Video Shred (2). Optionally, go back to Scene 34: Room With a Lamp (from the bedroom: right, right) and examine the video on the table a second time.
From the bedroom, take the bottom left exit, the left exit, the left exit again, the top exit, and then the right exit. Take a break, then take the top exit, the top right exit, the top exit, the left exit, and then the top exit. Step through all of the glass blocks, and examine the rectangular outline to get the Document Shred.
From the bedroom, take the bottom left exit, the left exit, the bottom left exit, the bottom exit, the bottom exit again, the left exit, and then the bottom exit. You're now in Scene 23: To the Promised Land. Examine the rectangular outline twice to switch to memory view (Scene 24: Seal). Examine the document, then Red Silhouette, then the document again.
Go back to Scene 02: Red Postbox (from the bedroom: right, right, right, top). Switch to memory view, and examine the rectangular outline.
From the bedroom, take the bottom left exit, the left exit, the bottom left exit, the left exit, the left exit again, the bottom exit, and then the right exit. Step through all of the glass blocks, then examine the outline of the book on the shelf to get the Forbidden Shred.
From the bedroom, take the bottom left exit, the left exit, the left exit again, the top exit, and then the right exit. Take a break, then take the top exit, the bottom right exit, and then the right exit again. You're now in Scene 42: Archives. Examine the clock to switch to memory view (Scene 43: Sealed Room). You'll be able to identify everything.
From the bedroom, take the bottom right exit. Go through all the glass blocks, then take the bottom exit. It might be a good idea to save before you examine the human outline-- if you still have questions after the end, a save file with everything unlocked will be the easiest way to go back and look at the scenes again. Examine the human outline and watch the scene. Congratulations, you've finished the game.
Story Hints:
Don't worry about figuring out the order of events-- they're numbered chronologically. All you need to do is remember them and put them in order.
Try playing through the game again, or revisiting the rooms from a save file with everything unlocked.
The important characters here are B.D., Retro Vector, Macilt Krim, and Red Silhouette. Figure out the relationship between these characters. If you completed the game, you'll already know B.D.'s relationship to Red Silhouette. Understanding the other relationships between these characters is a big part of understanding the story in general.
In particular, pay attention to Krim and Vector's relationship to each other, and their general states of being alive/dead and free/imprisoned. Make a timeline, at least mentally-- you'll need to think about certain events to determine their relationships to the other characters, and it'll help to know where one or the other would be at the time.
Posted by: Alice |
April 13, 2013 5:26 AM
|
April 13, 2013 5:26 AM