
![]()
 Meet Pixle: a grey humanoid with white glowing eyes. He lives in a world where plants are green circles, rocks are brown circles, and water is blue lava going through a perpetual animation cycle. He's got an alphabetic hankering that can only be satisfied by collecting letter blocks, which conveniently open a metallic portal to another area containing more letter blocks ripe for the collecting. Such is the premise of the new Adventures of Lolo-inspired, tile based puzzler by Divine Games named after our little hero, Pixle.
Move around the grid with either the [arrow] keys or [WASD] and push objects by simply running into them. You can only push, not pull, so watch out for those pesky corners! After a few tutorial levels introducing you to the mechanics of the game, you are exposed to spike squares which can shoot at you in all four directions. In order to walk by, you must figure out how to move objects around to block the deadly spikes. As the game progresses, this becomes harder and requires more planning. You eventually earn the ability to shoot projectiles with [X] and [Z], which expand your abilities to move things around and can change your strategy. If you get stuck, use [R] to reset the level and try again.
The graphics may be simple, but what will really catch you is the gameplay. I was too sucked into the puzzle to care that the circle I was running into was meant to represent a tree. I just had to figure out that level so I could finish it and consider it 'defeated' by my ingenuity. I was pleasantly reminded of Chip's Challenge by Epyx, one of the best casual games of my childhood. If you're too young to know what that is or I just unknowingly referenced an obscure game, then by all means forget I said it. Just go play Pixle and let this game be a great memory for you!


Walkthrough Guide
(Please allow page to fully load for spoiler tags to be functional.)
Pixle Text Walkthrough
General Help
Before tackling a level, assess the situation; look at the dangers and where you can't cross yet.
Things that block spikes: letters, golden blocks, grey/white circles, brown/rock circles.
Things that don't block spikes: water, green/plant circles.
If you can't remember how a particular square functions, push [ESC], choose "Level Select" and replay the particular tutorial level.
This walkthrough focuses on neutralizing the danger, so while you may collect letters between given steps, you will not be instructed to do so until it is safe. The solutions below are not necessarily the only ones, so if you think you know another way, don't be afraid to give it a try!
Tutorial Levels
T1
Collect all L's.
Exit.
T2
Going to the right of the L, push the golden block down one square.
Collect the L.
Exit
T3
Head straight up.
Collect the L's.
Come back down on the left and exit.
T4
Push the bottom golden block up and to the left one square.
Push the right golden block up to trap the horizontal-moving spike to the right.
Finish pushing the first golden block to the left to trap the spike above it.
Collect both L's and exit.
T5
Collect the bottom X.
Shoot (with [X]) one of the grey circles to the left and push it up so you can pass to the right.
Collect the rest of the X's.
Shoot the top grey circle twice to destroy it and exit.
If you blocked the top grey circle with the first one, you can destroy it too.
T6
Walking across the water block, collect the L and exit.
T7
Collect the X, shoot the grey circle, push it into the water and exit.
T8
Collect the bottom L before the top L and exit.
T9
Collect the P, shoot one of the rocks with [Z] and exit.
Main Levels
Level 1
Collect all four L's and exit.
Level 2
Move the first golden block to the left to block the spike above it.
Approaching from above, move the golden block in the lower left corner down to block the spike from the right.
Move the last golden block to the right.
Collect all L's and exit.
Level 3
Move the lowest golden block up one square.
Move the next golden block to the right to block the middle spike from above.
Approaching from the left or going around the L, push the last golden block down one square.
Collect all L's and exit.
Level 4
Move to golden blocks to the left to block each of the lower left spikes, the inner one before the outer one.
Do the same thing for the lower right spikes.
Push the last two blocks over and up to block the remaining spikes from the inside.
Collect all L's and exit.
Level 5
Going to the right, push the golden block just above you one square to the right to block the spike through the plant.
Push the bottom golden block up one square then to the right to block the lower right spike from above.
Of the lower four golden blocks, push the top one up until it's between the spike and plant.
Move the remaining of those golden blocks up and right to block the upper right spike.
Collect all L's and exit, being sure not to pass down the far left.
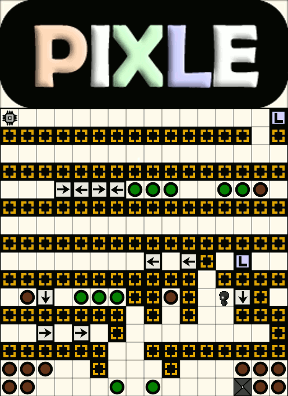
Level 6
Screenshot
Using the above screenshot as reference, first follow the red line, collecting the L's along the pink lines.
Next follow the green line, again collecting the L's along the pink.
Follow the red line again until the upper right corner and exit.
Level 7
Push the golden block above you up and to the right through the up arrow to block the spike in the upper right.
Move one of the golden blocks next to you to the left to block the spike in the upper left.
Go back and move the other golden block to the left and down to block the left hand spike across the water.
Collect all L's and exit.
Level 8
Move six of the golden blocks to the left, right and bottom of the lower two spikes.
Push the remaining two golden blocks up to block the inner side of the top spikes.
Collect all the L's, going under and around the lower spikes to get the L's on the far left and right.
Exit.
Level 9
Starting at the top and moving clockwise, move each golden spike to block the exposed side of the nearby spike.
Once at the bottom, go up into the plant square.
Go around the right of the L, push the last golden square down and to the left.
Collect the L and exit.
Level 10
Go right and up to the golden block. Avoid being underneath the spike with no blocking object above you.
Push the golden block left and up at your convenience so the spike is to the left.
Move the golden block all the way to the left, trapping the spike.
Collect all the L's and exit.
Level 11
Head down underneath the S-shaped hedge and push a golden block to each exposed side of the stationary spike.
Move the last available golden block up, trapping the moving spike to the left. You have to use the leftside of the two-square opening.
Collect all L's and exit.
Level 12
Push the upper golden blocks up, trapping each spike toward the middle.
Use the lower golden blocks to trap the bottom spike in the middle square.
Collect all L's and exit.
Level 13
Push the four nearby golden blocks to block the exposed sides of both spikes in the middle.
Use the top golden block to shield you across the water from the lower right spike.
The bottom golden block should be pushed to that spike's left.
Be careful of pushing the blocks into a corner.
Level 14
The specific blocks used don't matter as much as where the blocks end up. Use your discretion in picking which ones to move.
Push three golden blocks to shield you on the top, bottom and right from the leftmost spike.
Use two more golden blocks to cover to the left and bottom of the topmost spike.
Push another golden block above the upper right spike.
Use the last two golden blocks above and to the left of the bottom right spike.
Collect L's and exit, being careful not to pass down the far left.
Level 15
Collect the X in the middle.
Shoot the grey circle to the left, and move it up and all the way to the left to block the nearby spike.
Collect the 3 X's to the right.
In the lower left, shoot the grey circle and quickly:
Move it up one square.
Circle around to its left side.
Push it to the right of the lower left spike.
Collect the last X and move the top three grey circles, right to left, to block the left side of the three spikes from bottom to top.
Collect the three L's and exit.
Level 16
Move the two golden blocks just above you out one square each.
Of the three golden blocks now above you, move the outer two ones up, then the middle one to the side.
Push the golden block to the right all the way to the wall.
Of the line of golden blocks above you, push up the third and fifth ones from the right. Push the one between them to the side.
Push the golden block to your right to the right hand wall.
Now push the second and fourth golden blocks from the right up and the third block to the side.
Push the two golden blocks on each side out one square.
Again, create a path upward by moving the second, third and fourth golden blocks.
Push the lefthand block all the way to the far wall.
Now counting from the left, create a path using the second, third and fourth golden blocks.
Push each block out one square and again use the three blocks above you to create an opening.
Move the righthand golden block all the way to the right wall.
Push one of the blocks above you up to shield you from the spike to the left.
Collect the last L and head back down.
Along the bottom row of golden blocks, push one of the right hand ones down to create a way to the exit.
Level 17
Collect the two X's available to you and destroy the grey circle just above.
Push the golden blocks to block from above each of the bottom two spikes.
Shoot the far right grey circle and quickly move it up and left to block the far left spike from above.
Going back around the square hedge and L, shoot the remaining grey circle and move it up one square.
Collect the L and exit.
Level 18
Collect the X in the lower left corner.
Being careful of the moving spikes, move the lower of the adjacent golden blocks to the right a little.
Move the upper golden block up one square to block the bottom moving spike to the left.
Again being careful of the spikes, move the topmost golden block up to trap the top spike to the left.
Move the top golden block as far left as you're comfortable while avoiding the middle spike, preferably to line up with the golden block trapping the bottom moving spike.
Shoot the top grey circle and quickly move it up to trap the middle spike to the left. The spike should have no more than three squares to move across.
Move the last free golden square down the left side of the group of rocks in the middle, then left to block the stationary spike above.
Collect all L's and exit.
Level 19
Move the upper left golden block down and left to trap the upper left spike below it.
Avoiding the spike below, collect the L in the middle.
Now move the lower left golden block up and to the left to block the lower left spike above it.
Repeat these steps for the opposite side.
Collect the rest of the L's and exit.
Level 20
Collect the L above.
Move the lowest golden square across the water plate to block the bottom spike on the right.
Using the nearby water plate to push the golden square by the plant to the left, move the golden block up and over the upper water plate.
Now using the water plate on the corner, push the golden square to block the spike across the water.
Go back up and push this golden block below the row of plants and collect the X.
Shoot the grey circle and move it above the lower spike.
Move the golden block to the right to block the exposed side of the nearby spike.
Being careful of which water plates you cross, collect the remaining L's and exit.
Level 21
Collect the right X.
Move the golden square up a few squares.
Shoot the grey circle and move it to block the spike above the row of plants.
Move the golden square just across the top water plate to block the topmost spike.
Using the lower water plate, collect the bottom X.
Shoot the grey circle above and move it up and right to block the leftmost spike from the right and the top spike from below.
Move the golden square to block the rightmost spike from below.
Collect the last X.
Shoot the upper right grey circle and move it down and right to block the exposed side of the nearby spike.
Collect the L's and exit.
Level 22
Move the above golden square up and collect the X.
Being careful of the moving spike, shoot the middle grey circle and move it up and left to trap the spike.
Move the two lowest golden squares to shield the space between the two lower spikes.
Being careful not to pass above the middle spike, collect the L's and exit.
Level 23
Move the golden block directly below the exit to the left two squares.
Move the golden block below you down one square.
Head to the right of that golden block and push the golden block below you down one square.
Go back left and push the golden block below the rock one square to the right.
Circling back around the rock, collect the L and push the golden square below down two squares.
Go right. Push the golden square below you one square to the left.
Now push that golden square down three squares.
Collect the remaining L's and exit.
Level 24
Collect the X.
Shoot the grey circle to the right and push it all the way to the right so it blocks the spike below.
Collect both available X's and shoot the grey circle to the far left, pushing it one square left.
Collect the X above and shoot the nearby grey circle, pushing it to either side.
Shoot the next grey circle and push it all the way to the right.
Collect the upper right X.
Shoot the grey circle below and push it to the right.
Collect the last X and exit.
Level 25
Push the golden block at your left between the two rows of plants along the left wall.
Collect the X below.
Shoot the grey circle on the right side of the lake and push it into the water above the golden block.
Push the golden block down and around to the right of the leftmost spike.
Push the other nearby golden block left over the spike.
Circling under the lake, collect the middle X.
Circle back around the lake and push the grey circle adjacent to the top spike one square right.
Collect the X below.
Shoot the grey circle in the middle and push it into the opening at the top to block the top spike on the right.
Collect the last X.
Shoot the grey circle to the left of the golden block below the lake and push it into the water above.
Push the last goldend square to the left of the top spike and exit.
Level 26
Move the upper left golden square to the right and collect the X above.
Do the same in the lower left to grab another X.
Shoot the upper grey circle on the left and move it up into the water.
Push the golden block one square to the right.
Do the same thing for the lower half.
Of the two golden blocks to the right, push the bottom one down over the water plates to the right of the lower left spike.
Cross back over and do the same for the spike in the upper left.
Push the next golden block down and to the right to block the spike below.
Now push the golden block below you down to block the same spike to the left.
Collecting the bottom L, cross around and down the bottom lake to the lower right golden block.
Push the golden block to the left and collect the X below.
Do the same for the upper right blocks.
Of the remaining grey circles, shoot the left one and push it up into the water.
Now push the golden block one square to the left and collect the L below it.
Shoot the last grey circle and push it left and up the last water plate bridge until it is left of the upper right spike.
Collect all L's and exit.
Level 27
Push one of the golden blocks up to the top wall to block the spike to the left.
Collect the X to the right.
Going under the L below the upperleft spike, shoot the grey circle in the corner and push it up to collect the last X.
Push one of the golden blocks down to block the middle spike but not to its immediate left.
Going around this golden block, shoot the grey circle below and push it up to the middle spike's immediate left.
Push one of the golden blocks up and the the right to block the spike in the lower right corner.
Push the last golden block between the upper left spike and the L below it.
Collect all L's and exit.
Level 28
Avoiding the lower left spike, collect both nearby L's.
Of the three golden blocks before you, push the top one to the left a few squares.
Avoiding the spike again, push the golden square down a square before pushing it against the wall, trapping the spike below it.
Push the golden block down.
Going back to the group of golden blocks, push the bottom one left and the middle one out and up toward the middle of the board for later. Be sure to avoid the moving spike on the left.
Push one of the golden blocks to the left and down to trap the moving spike below it.
Push another golden block to the exposed side of that trapped spike.
Collect one of the X's on the left, shoot the grey circle at the top and push it up to block the spike's left side.
Collect the other X's.
Push the two remaining golden blocks under and to the right of the top spike.
Shoot the lower grey circle to the right and push it down and over the spike to the left.
Shoot the remaining grey circle and push it into the top water square.
Collect any remaining L's and exit.
Level 29
Push the golden block on your right upward underneath the top spike.
Push the golden block in the middle upward to the left of the top spike.
Push the golden block near the bottom all the way to the right to block the top of the lower right spike.
Collect the three available X's.
Heading to the island in the lower left, destroy the first grey circle, shoot the grey circle below that and push it in the water.
Collect the last X and push the golden block to the right.
Shoot the grey circle above and push it up to the right of the top spike.
Collect the L and exit.
Level 30
Collect the first two X's to your right.
Shoot the lower of the grey circles on your left and push it one square left to partially block the spike above.
Shoot the lowest grey circle and push it into the water.
Push the golden block on the left upward onto the up-arrow to block the moving spike.
Collect the nearby X.
Shoot the nearby grey circle and push it right into the water.
Push the golden block to the immediate left of the moving spike, trapping it.
Head back across the water and push the golden block all the way up to cover the top spike's exposed side.
Collect the two nearby L's and shoot the last grey circle on the left side, pushing it into the water.
Push the last golden block up over the rightmost spike.
Collect the last X.
Shoot the rightmost grey circle and push it down and right under the right hand spike.
Collect the two L's, bottom one first, and exit.
Level 31
Push the golden block up one and right two squares to block the spike from the left.
Collect the nearby X.
Shoot the lowest grey block and pushing it over the row of rocks, move it down to trap the spike between it and the golden block.
Collect the two available X's.
Shoot the grey block above and push it up into the water.
Collecting the last X, shoot the last grey circle to push it right into the water and exit.
Level 32
Push the golden block adjacent to the three arrows left and up to the right side of the upper left spike.
Push the golden block below to the left.
Collect the two top L's.
Push the top of the two adjacent golden blocks to the right, under the first pink circle.
Collect the nearby L and the top X.
Shoot the middle grey circle and quickly push it down and right to block the top of the spike.
Collect the X above.
Shoot the top grey circle and push it down underneath the two pink circles.
Push the far golden block to the left until it's immediately above the spike and collect the X.
Shoot and push the last grey circle down and left to the left spikes immediate right.
Push the remaining golden block left and downward so it is below the left spike and right of the lower left pink circle.
Going around the bottom of this block, collect the last X.
Again going under the golden block, cross the water plate, collect the last L and exit.
Level 33
Collect the X to your right.
Push the golden block in the upper right down one square and collect the X just to the left.
Shoot the grey circle in the top middle and push it into the water square.
Now shoot the grey circle before you and push it under the upper left spike.
Push the left hand golden block at the top to the right of the upper left spike and collect the X.
Collect the the upper of the left two X's and push the golden block below to the right of the lower left spike.
Shoot the nearby grey circle and push it above the lower left spike.
Collect the X above and the one in the lower middle.
Going around the row of plants, push the nearby golden block to below the lower left spike.
Shoot the grey circle to the lower left and quickly push it up to above the upper left spike.
On the right, shoot the top grey circle and push it right to be under the upper right spike.
Shoot the grey circle just to the bottom left of the right hand column of plants and quickly push it up to be above the upper right spike.
Being careful which plants you go around, push the golden block at the top to under the lower right spike.
Collect the X below.
Shoot the nearby grey circle and push it above the lower right spike.
Collect the L's, being careful to not pass between the pink circle and grey circle below it after collecting them all.
Exit.
Level 34
Collect the two X's just to your right and left.
Shoot the grey circle to the right and push it into the water below the moving spike.
Move the lower left golden block one square to the left, then shoot the grey circle above the left water plate and push it down to above the lower left spike.
Crossing over the white circle, collect the X above that spike.
Being careful of the moving spike, move the top right golden block to above the X in the middle and collect the X.
Now move the top left golden block to the right to completely trap the spike.
Shoot the upper right grey circle and move it one square to the right, under the spike.
Push the nearby golden square over the right water plate and on top of the lower right spike.
Collect the X above, crossing over the white circle.
Shoot the grey circle just above the water and quickly move it over the right water plate and to the left of the lower right spike.
Shoot the grey circle to the right and push it down so it's right of the lower left spike.
Collect the two bottom X's.
Shoot and push a grey circle on each side to the inside of both upper spikes.
Now, exit.
Level 35
Move the golden square up so you can move past it.
Move the golden squares by the lower spikes out to block them from below.
Now move the lowest golden squares out and down to block the pink circles from the inside.
On the right, move the golden square to the left of the lower right spike so it's above it.
Move the next golden square above down and right to block the upper right spike from below.
Move the upper right golden square to the right.
Move the upper two golden squares on the left to match the ones on the right and collect the P.
Shoot out the rock to the left of the right hand X and collect it.
Shoot the lower grey circle, push it up into the water and collect the P.
Move one of the remaining golden squares to the left of the lower left spike.
Shoot one of the rocks above the lower left spike and push the golden square through.
Collect the final X.
Shoot and move the grey circle into the last water square.
Collect the L's and exit.
Level 36
Collect the X.
Shoot the grey circle below you and push it to the left of the upper right spike.
Collect the right L and the upper of the middle two X's.
Shoot the right grey circle and push it into the water square.
Push the three golden blocks to:
Above the upper right spike.
Left of the right pink circle.
Right of the lower left spike, being careful not to pass between the bottom spike and X.
Collect the upper right P and shoot the lower left rock.
Push the three golden blocks to:
Two squares above the bottom spike, left of the lower right spike.
Left of the bottom spike.
Below the lower left spike.
Collect the bottom P and middle X.
Shoot the lower right rock and push the three golden blocks to:
Left of the lower right spike.
Right of the bottom spike.
Below the lower right spike.
Collect the lower right X.
Shoot the top two grey circles and push them above and to the right of the upper left spike.
Collect the last X.
Shoot the remaining grey circle and push it up to the right of the left pink circle.
Collect the L and exit.
Level 37
Push the top golden block to below the upper right spike. You will have to go completely under the rows of plants/rocks.
Collect the lower right X and push the bottom and third from bottom golden squares to the left one square.
Push the second from bottom golden square up and collect the P.
Shoot the third rock up from the bottom.
Now shoot the bottom grey circle and push it above the bottom spike.
Collect the X above.
Back to the set of golden blocks, push the top one left.
Push the one below you down a square, then the one left of you across the right water plate.
Going around the middle X, shoot the upper grey circle and push it left of the upper right spike.
Collect the middle X.
Push the golden block that went across the water to two squares below the upper left spike.
Crossing over the arrow, push the golden block in the lower right to the left of the lower left spike and collect the X.
Push the last available golden block upward to the lower right of the top grey circle.
Standing two squares below the top grey circle, shoot it twice and quickly hide behind the golden circle to the right.
Push the golden block above you up and right to trap the spike.
Collect the X and push the nearby golden square to below the moving spike. You will have to push it down first so you can move it right.
Shoot the last grey circle near the bottom and move it all the way down.
Collect the L's and exit.
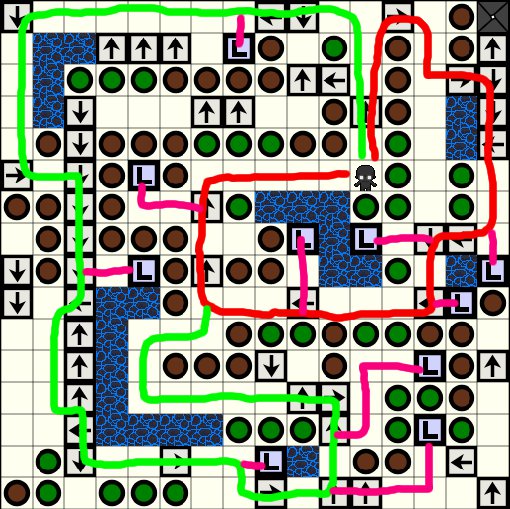
Level 38
Screenshot
Using the above screenshot as reference, create a path along the lines in rainbow order (red, orange, yellow, green, blue).
Level 39
This level requires quick movement, so be prepared to play it several times! If you're having trouble with this route, please try the method suggested by Earl Grey in the comments.
Push each golden block out one square.
Being careful of the spike above, push the left golden block to the left above the right spike and quickly grab the X above.
Carefully go back to the center and, watching the right spike, push the top golden block up two squares.
Again being careful of the right spike, step around the top column of rocks and grab the top right P.
Shoot the grey circle below and push it down one square.
Carefully head back to the far left, below the row of rocks.
Shoot one of the rocks above and collect the P.
Being careful of the spike below, push the right golden block to the right to trap the spike above it.
Collect the L below the trapped spike and shoot one of the rocks on the row below.
Circle the water counterclockwise, collecting the P in the middle.
Standing above the nearby L, quickly grab it.
Now quickly move the bottom golden block down to block the bottom spike on its right. Be careful of the left spike.
Collect the nearby L and shoot one of the rocks to the left.
Carefully grab the last L and head back to the middle.
Push the top golden block up to trap the top spike and grab the X, careful of the bottom spike.
Again careful of the bottom spike, exit! The easiest way to get to the right, avoiding the bottom spike might be holding right toward the grey circle.
Level 40
Collect the X and P above.
Shoot the grey circle below and push it all the way down.
Collect the lower left P.
Shoot the rock to the left of the lower golden block to the right.
Push that golden block to the right and all the way up to the left of the top X.
Now push the golden block below that spike all the way up.
Push the remaining golden block up and right so it's below the spike to the right of the top X.
Push the golden block just below you all the way down so it's blocking the lower left spike through the plant.
Shoot the rock just below the lower right golden block and push the block all the way up.
Now push the golden block at the bottom of the middle column of rocks so it's below the spike just to the right of that column.
Collect the X below and go back to the push the grey circle all the way up.
Collect the last X.
Shoot the rock to the right of the last golden block.
Now push that block to below the upper right spike.
Shoot the last grey circle and push it through the hole to the right so it's blocking the pink circle above.
Collect the L and exit.
Level 41
Push the far right golden block down and left over the down arrows until it's over the X.
Collect the X and shoot the grey circle to the left of the down arrows until it's over the P.
Collect the P and shoot the rock at the corner of the up and right arrows.
Push one of the bottom golden squares right and up to below the last X.
Collect the X and shoot the upper left grey circle, pushing it into the water square.
Push the left golden square to below the top L and collect it. You will have to push it down over the leftmost up arrow.
Push the remaining two golden squares between the spikes and two L's.
Collect the L's and exit.
Level 42
Go into the upper right corner and collect the first X.
Push the golden square to one side of the spike, collecting the freed X.
Shoot the grey circle and push it to the other side of the spike to collect the last X in that corner.
Shoot the grey circle to the left of the double arrows and push it to the left.
Now shoot the grey circle between the lower two corners and push it down one square.
Go into the lower left corner.
Push the golden square to one side of the spike, collecting the freed X.
Shoot the grey circle and push it to the other side of the spike to collect the last X in that corner.
Now shoot the grey circle just above the lower right corner and push it into the area to the left of the spike.
Collect the X below, then shoot and push the other grey circle to above the spike to collect the last X in that corner.
Going into the upper left corner, put the golden block to one side and the grey circle to the other.
Collect the X and, moving the grey circle over the right arrow, exit.
Level 43
Push the golden block to the left over to the right of the top spike.
Now push the lower of the other two golden blocks right one square and collect the upper right X.
Push the upper one to the left until it's below the top spike.
Now push the other golden square down until it's to the right of the far left spike and still above the bottom spike.
Collect the X to the right.
Shoot the top grey circle and push it down one square.
Now shoot and push the left grey circle to above the right spike.
Push the nearby golden block to the left of the top spike.
Head across the water plate, collecting the X.
Push the last golden block down until it's right of the spike.
Shoot the lower grey circle and push it below the spike, blocking through the plants.
Collect the letters below.
Shoot the top grey circle and push it into the water across from the X.
Shoot the remaining grey circle and push it all the way left and exit.
Level 44
Push the left golden block left and up to block the lower left spike, but don't push it all the way to its right.
Push the right golden block one square to the right so you can then push it left and out towards the up arrows. Be careful of the moving spike.
Push the golden block over the second arrow so it's just left of the upper right X.
Being careful of the moving spike, collect the middle right X and move back.
Now finish pushing the golden block up, blocking the moving spike to the right.
Shoot the grey circle and push it to underneath the top spike.
Collect the nearby X.
Shoot the grey circle above the down arrow and push it down to the immediate right of the lower left spike.
Collect the X in the middle, below the row of plants.
Shoot the grey circle in the lower left and move it left to collect the lower left X.
Now shoot and move the lower right grey circle to cover the spike's bottom.
Collect the X, then, moving around the P, shoot and move a grey circle to cover the spike's left.
Collect the P.
Shoot the rock just above the golden block in the upper left.
Now move the golden block below the nearby X and collect it.
Going back to the lower right, shoot the last grey circle and move it to above the lower right spike.
Push the golden block up and right until it's below the moving spike.
Collect the X below.
Shoot the grey circle to the lower left of the top spike and move it up.
Collect the L and exit.
Level 45
Collect the X.
Shoot the top of the two grey circles and move it left over the spike.
Collect the X.
Shoot the higher grey circle and push it into the water across from the golden block to the left.
Push the golden block under the two pink circles and head back across over the white circle.
Move the higher golden block above you all the way to the top wall.
Push the golden block below you to the left, then cross over the white circle and up over the whole water plate.
Now push that golden block down and right so it's to the immediate left of the lower spike.
Heading back to the golden block you pushed to the top, now push it all the way right.
Of the two golden block below, push the lower one right and then up so it's under the upper right spike.
Collect the L below and head over the two upper water plates.
Collect the last two L's (top then bottom) and exit.
Level 46
Collect the X and go over the left arrows.
Push the golden block in front of you to the left and the block below you down.
Shoot the grey circle to the right and push it down so it's over the bottom middle spike.
Collect the X to the left and the one between the right arrows.
Push the golden block in the lower right so that it's to the right of the lower middle spike.
Shoot one of the grey circles to the left of the P and push it over the water plate.
Shoot the other grey circle and push it into the water over the golden block.
Collect the P and push the golden block over the left arrows and put it to the right of the upper left spike.
Push the golden block between the arrows up and over the left arrows until it's under the previous golden block.
Now push it right one square so it's under the down arrow.
Looping around the arrows and plant circles, push the golden block down and place it to the left of the lower middle spike.
Collect the first X to the left and push one of the three golden blocks down.
Circle back around to the right side and shoot the rock.
Shoot one of the grey circles and push it to the left of the lower right spike.
Collect the right X.
Shoot the other grey circle and push it below the lower middle spike.
Collect the X below and push the bottom golden spike all the way to the left.
Now push the two nearby golden blocks so that one is under the middle left spike and the other is above the lower left spike.
Collect the X.
With the two adjacent grey circles in the upper right, push one across the water plate and the other into the water below the golden block.
Collect the X and push the golden block across to the left and put it above the middle left spike.
Collect the last X.
Push the upper right grey circle up and the upper left grey circle to the left over the spike.
Exit.
Level 47
Collect the bottom two X's in the lower right.
Shoot the middle of the three grey circles in the upper left corner and push it into the water to the right.
Now shoot the grey circle in front of you push that into the water to the right.
Push the golden block in front of you right one square, then push the golden block below you right and the previous one up so that there's a block below and to the left of the spike.
Collect the two available X's.
Shoot the bottom of the grey circles in the upper left corner and push it right and down into the water so that it's above the grey circle below.
Now shoot the grey circle before you, push it down into the water and Collect the last three x's.
From below, shoot the grey circle at the bottom of the lower left corner and push it up and to the right into the water left of the nearby grey circle.
Shoot that grey circle and push it right into the water.
Now shoot the grey circle in the lower right corner and push it right and up so that it's right of the spike, across the water.
Go back to the golden block and push it over and up so that it's above the spike, across the water.
Collect the remaining L's and exit.
Level 48
Collect the X in the lower right, the one above the golden block and the one in the upper middle.
Going back to the golden block, push it up and left so that it's immediately right of the top spike. You will have to move around some of the plants and be careful of the moving spike.
Shoot the nearby grey circle and push it to just below the spike, being careful of the moving spike again.
Collect the P in the upper right corner and shoot the lower of the two rocks near the right wall.
Heading through the up arrow, collect the L and push the golden block through the hole to a few square left.
Now go through the down arrow, collect the L and push the golden block down so you can go through the hole.
Then go back through the up arrow and push the golden block to left of the pink circle.
Push the golden block that you pushed out the hole down to above the rightmost rock by the bottom.
Destroy the lower right grey circle and quickly hide above the golden block.
Push the golden block right and down to trap the moving spike to its right.
Move through the left and up arrows in the lower left, collecting the X on the way.
Shoot the grey circle and move it all the way left.
Move the golden block up and all the way left.
Collect the P and push the golden block up and right of it to the right until it's above the up arrow.
Circle around and push the golden block up until it's just right of the upper left rock.
Shoot the rock and go back to collect the L.
Now push the golden block left and all the way up, then exit.
Level 49
Push the nearby golden block over the down arrow and to the right so it's to the left of the far right spike.
Push the golden block below so that it's above the lower right spike.
Now push the remaining golden block to above the far right spike.
Collect the X above and the X in the middle.
Shoot the left of the three grey circles and push it down into the water.
Push the golden block on the left to the left and collect the X below.
Of the three golden blocks, push one to the left of the lower right spike and another to the right of the lower left spike. You will have to push one to the right first before it can go down and left.
Collect the freed X.
Shoot the upper right grey circle and push it into the water just above the right arrow.
Push the last of the three golden blocks upward to just below the top spike. You will have to push it from left of the two grey circles.
Shoot the right of the two grey circles above and push up into the water to the left of the up arrow.
Shoot the remaining grey circle and push it all the way up then left into the water, connecting to the area where you started.
Push one of the golden blocks to either side of the top spike and collect the X on that side.
Push the remaining golden block to the exposed side of the top spike and collect that side's X.
In the lower left, shoot the top grey circle and push it into the water on the right.
Collect the X.
Now shoot the other grey circle and push it all the way down to collect the nearby L.
Shoot the last grey cirle (in the lower middle area) and push it below the far right spike.
Collect the last L and exit.
Level 50
Push the nearby golden block down and left so that it's to the right of the left spike.
Careful of the top and bottom moving spikes, collect the upper right X.
Shoot the grey circle above the P and push it all the way right and down, trapping the vertical spike below it.
Collect the P and shoot the rock to the left and one row above the middle spike.
Push the nearby golden block down and right to the square above the middle spike, being careful of the other spikes.
Go back and around to grab the X above the middle spike.
Head back to the right and push the bottom golden block in the upper right to the left and up, one square from the top.
Move the nearby golden block up to trap the spike in the corner.
Shoot the left grey circle at the far left and push it down into the water.
Collect the X below.
Push the bottom of the three golden blocks right a few squares, avoiding the bottom spike.
Now push the middle block out then all the way down, staying to the left of the previous block.
Push that golden square all the way to the right, trapping the bottom spike.
Circling around the first golden block, shoot the grey circle to the left of the far right X and push it into the corner, above and left of the two spikes.
Collect the newly exposed X.
Push the golden block above the water to the left so that it's above the white circle.
Circle around and push the golden block up and left, blocking the left spike through the plants.
Collect the P in the lower left corner.
Shoot the rock to the right and one row below the middle spike.
Shoot the available grey circle to the lower right and push it to just below the middle spike.
Collect the X below.
Push the last two golden blocks at the bottom around the right and place each between the pink circles, leaving a path between them.
Shoot the grey circle below and push it up and left over the top of the far left spike.
Collect the top two L's.
Now collect the L in the bottom left corner and exit, being sure to pass between the golden blocks between the pink circles.
Exit! Congratulations and take a last victory run down at the the credits!!
Posted by: Kyh |
August 19, 2011 11:33 PM
|
August 19, 2011 11:33 PM
There are a lot of steps in this walkthrough for Level 39. The order means you have less risky move but if it says quickly it means quickly!
Abbreviation: BCO is Beign Careful of.
Rearrange the golden blocks.
Push the top golden block up 1 square [to protect from the right spike].
Push the bottom golden block down 1 square [to protect from on the left spike].
Being careful of (BCO) the high spike, push the left golden block left 2 squares
[to protect from the high spike].
BCO the low spike, push the right golden block right 4 squares
[to protect from the right spike].
Pixle is now in the same column as the door.
Trap the low spike.
BCO the right spike, move down 2 squares.
BCO the left spike, move down 2 squares [collecting an L on the way].
Pixle is now in the on the arrow square of the column with the door. Pixle needs to get back to this square after the next step.
Circle the water counterclockwise [collect the P on the way] and return to the same arrow.
BCO the left spike, move up 2 squares.
BCO the right spike, move up 1 square and down 1 square [to let Pixle face down].
BCO the low spike, shoot the rock below and quickly return to the starting square.
BCO the left spike, push the bottom golden block down 3 squares [one row above the low spike].
Push the bottom golden block down 1 squares [so it protects the L from the low spike].
Collect the L. Push the bottom golden block right [to trap the low spike on the poolside arrow].
Return to the square where the L was.
Trap the left spike.
Move up 2 squared [to the right of a tree].
BCO the left and high spikes [and seeing how the left golden block protects from the high spike] quickly move to the left of the tree.
Move to the bottom row then, BCO the high spike, collect the L.
Return to the square to the right of the tree.
Return to the starting square.
BCO the high spike, quickly push the left golden block 2 squares left [to protect the X] and collect the X.
Push the left golden block down [to trap the left spike against the rocks below].
BCO the high spike, return to the starting square.
Trap the right spike.
Move right 4 squares [to the left of the right golden block].
BCO the right spike, collect the top P.
Move down 3 squares. Shoot the grey circle and push it down 1 square.
BCO the right spike, move to the left hand side of the right golden block.
Push the right golden block 1 square right [to trap the spike above it].
Trap the high spike, open the door and exit.
Collect the last L [but the door doesn't open].
Return to the starting square. Move 1 square left.
From here, BCO the high spike, move to the far left. Move up, shoot the wall and collect the P.
Move down 2 squares [and remember that arrow two squares to your right]. Return to here!
Return to the square one left of the starting square.
BCO the high spike, quickly move on to the that arrow square.
Move up 1 square.
[See the two rocks below?] BCO the high spike, shoot the rock then quickly move below the two rocks.
Again, BCO the high spike, return to the starting square.
Push the top golden block 3 squares [to trap the top spike]. Collect the X [and the door opens].
Exit!
Posted by: Earl Grey | August 28, 2011 2:28 AM