
Robin's Quest: A Legend Born
Platform: Mac, Windows

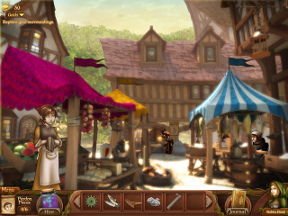
![]() Built like an adventure game from the ground up, Robin's Quest: A Legend Born is a cure for the common hidden object game. The gorgeous release from Gogii Games puts you in the now-feminine shoes of Robin Hood as she escapes prison and starts doing what the legend is famous for: taking money from the rich Prince John and giving it back to the people!
Built like an adventure game from the ground up, Robin's Quest: A Legend Born is a cure for the common hidden object game. The gorgeous release from Gogii Games puts you in the now-feminine shoes of Robin Hood as she escapes prison and starts doing what the legend is famous for: taking money from the rich Prince John and giving it back to the people!
 Robin's Quest has a unique structure that differs from most casual games. For starters, you don't follow the hero from point A to point B. Instead, you have a great amount of freedom to explore areas on your own, solving puzzles and completing scenes in whatever order you like. You receive meta-quests that continue as you move around, things like finding pieces of Friar Tuck's pardon letter. The papers can be found in several of the scenes early on, you just have to keep it in mind to watch for them. You're also hunting for wanted posters of yourself, collecting them and ripping them to shreds so the guards can't recognize you.
Hidden object scenes make an appearance in this adventure, but they're more of an afterthought and sit alongside a host of other well-integrated mini-games. In each one you're presented with several columns of item "cards", the top ones being the only ones visible. Find the listed item and that card vanishes, turning the next card on its face. When the scene is complete, you'll often keep several of the items in your inventory to use for later.
When it comes down to it, Robin's Quest: A Legend Born is all about gathering inventory items to complete puzzles throughout the game. You'll do a lot of exploring and a lot of backtracking, but that's what gives the game such a grand scope. More than once you'll encounter a blocked doorway, sealed hatch, or secret area you need a specific item to access. When you do, it's back to previous areas to do some more exploration.
 Analysis: Robin's Quest: A Legend Born is a very organic experience. While many games feel like they could have been churned out of a factory, this one comes across as a natural extension of telling an interactive story. You need to make it to the fields beyond town, and the baker's shop has a back door. To get through the gate, though, you need to distract the guards. Fortunately you overhear one of them talking about pie, so naturally you find the ingredients and set one in a nearby windowsill. The entire process is fun to complete and a joy to experience, something a game stamped out of a genre mold couldn't accomplish.
Robin's Quest not only plays smooth, it looks luscious as well. The countryside of 15th century England is flush with warm light and soft featured, buildings and people colored with smooth lines and gentle tones. You just want to jump in and wrap yourself in it like a fuzzy blanket.
Another aspect of Robin's Quest that makes it unique are special abilities earned when members of the Merry Men join your quest. Friar Tuck, for example, is tops at negotiation and can talk otherwise uncooperative non-player characters into helping you out. When you can use a special ability, a small menu will appear on the screen, allowing you to choose which skill to unleash. And yes, Robin's bow and arrow prowess is a special ability!
A unique design produces an original game that stands far out in front of the pack of genre clones. Robin's Quest: A Legend Born is grand storytelling and creative gaming wrapped into one irresistible package.
![]() Windows:
Windows:
Download the demo
Get the full version
![]() Mac OS X:
Mac OS X:
Download the demo
Get the full version


Walkthrough Guide
(Please allow page to fully load for spoiler tags to be functional.)
Robin's Quest: A Legend Born Walkthrough
General Tips and Information
Once the arrow hits the tree you will be at the Main Menu where you can choose a profile and select your options, start the game or exit it.
Graphic Options include settings for full screen versus windowed, auto pause, and a custom cursor.
Audio settings include volume for sound effects, music and dialogue.
The game has no timer or click penalty and saves itself automatically.
Navigation
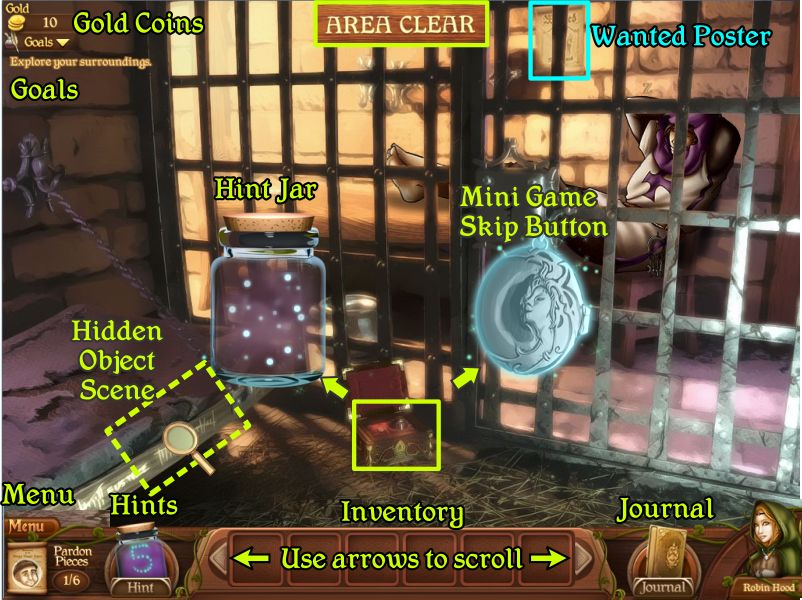
You will be collecting Gold Coins throughout the game for use at various times.
The Gold Coins will usually require you to move something or use an Ability in order to get them.
Your current availability of coins is shown in the upper left corner of the scene.
Below that you will find your current goal for the scene.
On the bottom of the screen is a link to the Menu and your Jar of Hints once you have retrieved it.
Once you begin to collect Pardons the number of pieces you have collected for a certain person will show below the Menu button.
Next are the available items in your Inventory which you can use to help you continue your Quest.
The Journal will show you your current Quest and the progress you have made so far.
You can see what Medals you have won, check the Bios of the people you've met, and view a map showing where you are at any point in time.
Robin is in the lower right corner and will sometimes have information for you.
Sparkles indicate you need to take a look at a Hidden Object scene.
When you have completed all of the tasks in a particular location you will receive an "Area Clear" notice.
There are various mini games and puzzles throughout the game and if you wish, the Medallion will give you a chance to skip them once it opens up.
Screenshot
Hints
You will collect your Hint Jar and a Medallion in the Jail Cell in a box that is delivered to you which you later find out is a gift from the Gypsy.
You will start out with 3 Hints which increase to 5 before you get to the Town Center.
Lady Nadja the Gypsy tell you to collect more Indonesian Fireflies on your Quest and that you need 5 for them to work together.
The only time I saw and Fireflies was when I once had to use a Hint so grabbed one that appeared to replace the Hints to 5 which apparently happens anyway without capturing a Firefly because I tested it with a different profile.
If you've done everything else in a scene, you can use a hint to reveal a Collectible.
Hidden Object Scenes
The Hidden Object lists are random, but the Key Objects will always be the same and will go into your Inventory when you have completed the scene.
If for any reason you think you need to leave a Hidden Object scene, you can click on the "X" in the upper right hand corner or just click the background surrounding it.
Hidden Object scenes in some locations may not appear until you have taken care of another task there.
Collectibles
There are 4 Collectibles in the game: Pardon Pieces, Gold Coins, Wanted Posters, and Fireflies.
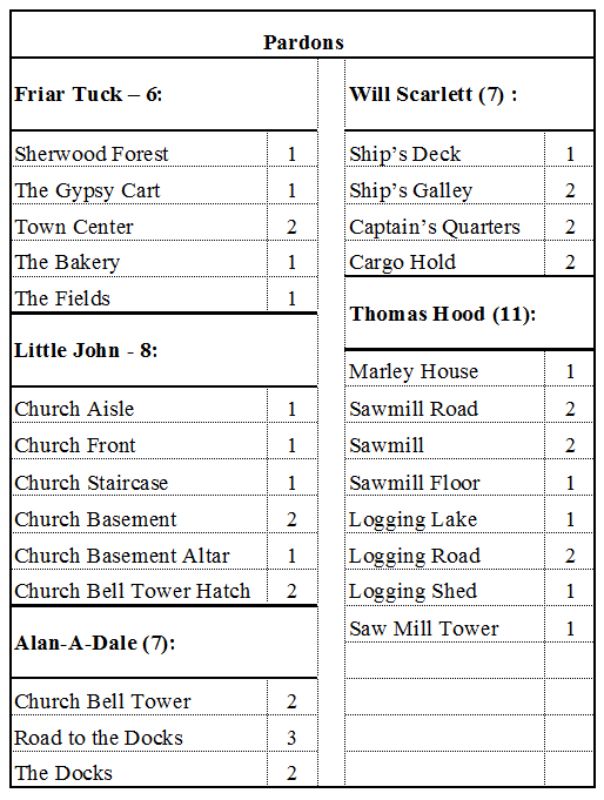
There are 39 Pardon Pieces which will be marked in bright pink: 6 for Friar Tuck, 8 for Little John, 7 for Alan-A-Dale, 7 for Will Scarlett, and 11 for Thomas Hood.
The 38 Gold Coin Caches will be marked in red.
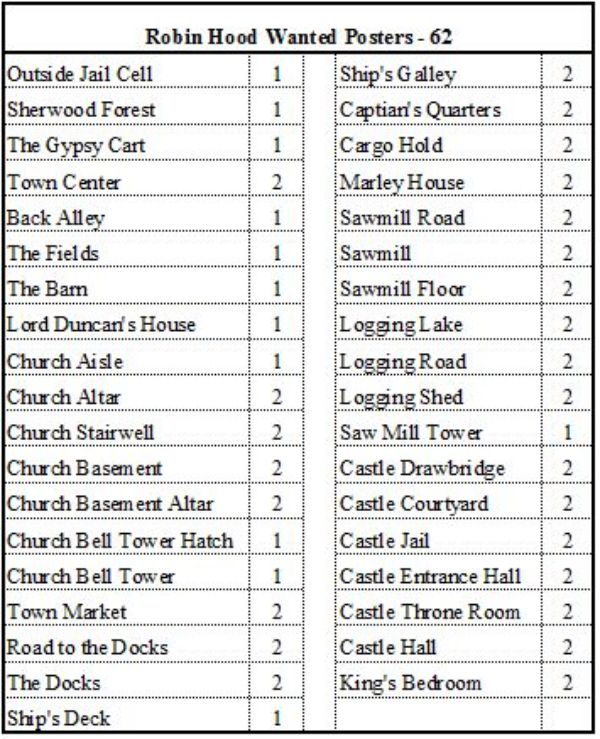
The 62 Wanted Posters for Robin will be marked in turquoise blue.
Fireflies are elusive white dots with a blue outline that float around and disappear so if you see one capture it quickly.
Locations of Collectibles
Pardons
Screenshot
Wanted Posters
Screenshot
Gold Coin Caches
Screenshot
Robin Hood and the Merry Men
Robin Hood: The Hoods: Mr. and Mrs. Hood, descendents of Scottish nobility and widely liked in the town of Nottingham, lived happy and simple lives under the watchful eye of Prince John. Although never vocal, they were critics of Prince John and his heavy taxation. They vowed someday to make a difference, for the people of Nottingham and the people of England.
Friar Tuck: Friar Tuck: Friar Tuck and Robin Hood owe each other their lives. This mutual appreciation is the seed of a great friendship and the two are never far apart. Friar Tuck helps Robin Hood get in and out of places she needs to be with his irresistible voice of persuasion. After all, who can say no to a man of the cloth?
Little John: Little John: Robin Hood's closest friend, Little John is far from little. Standing at 6' 4'' tall and weighing 7 stone, he has the ability to intimidate the fiercest of foes. His weapon of choice is a bow staff although rarely used. It comes in most handy as a lever for moving or lifting heavy things. Little John is probably Robin Hood's most useful friend.
Will Scarlett: Will Scathlock, aka Will Scarlett, is a roguish young chap who is not only a snappy dresser, but an accomplished thief as well. It is said that no finer pickpocket exists in all of England. He is fun-loving and adventurous - and well-regarded by the women of Nottingham for his quick sense of humor and charisma.
Alan-a-Dale: Alan-A-Dale: Alan-A-Dale is a jokester and a light-hearted friend of Robin Hood. Robin is always happy to have Alan and his music around and finds that others find his music... enchanting. Alan-A-Dale is a master of distraction.
Maid Marion: Maid Marion: Lady Marion of Leaford is a ward of the court. An orphaned noblewoman, her feistiness and headstrong ways have gained her the favor of King Richard, who has taken her into his protection. She is quick of mind, and despite her young age, can use her charms to tame even the toughest of opponents.
Special Abilities
There are 7 Special Abilities you will acquire along the way some of which are directly related to each of The Merry Men.
You will need to use a Special Ability when your cursor turns into a hand holding a star.
Click to see your Special Ability choices.
If you choose the wrong one, you will get a red circle with a diagonal line through it and will need to choose again.
Sometimes there will be items in a scene that require a Special Ability that you don't have as yet so you can wait until you have completed the game and then go back to check that all locations have been cleared and pick up any items you could not get on your first visit.
Arrow
This is a general purpose arrow used to hit targets and knock things down that are out of reach.
You will acquire this ability when you meet Johnny Goodshot in Sherwood Forest and he teaches you how to shoot a bow.
Persuade
The Persuade ability is used on other people to get what you want. People usually do whatever Friar Tuck asks. He has a way with people so you will acquire this ability when he joins The Merry Men.
Fire Arrow
This is an arrow that can be used to light something at a distance on fire. Be careful when using in wooded areas.
You will find these arrows in the Church Stairwell and acquire the ability to use them.
Strength
With the help of Little John you can lift or move heavy objects using his bow-staff for leverage. His strength and size are also quite intimidating even to the toughest of foes.
He will join The Merry Men in the Church when you collect all his pardon pieces.
Music
Use Alan-A-Dale's music to distract or lull overworked people to sleep.
He will join The Merry Men on The Docks.
Sneak
Will Scarlett is amazingly sneaky and this ability can come in handy to pick-pocket or sneak up on people.
You will meet him in the Cargo Hold of Shamir's Ship and he will join up.
Charm
Little Maid Marion's irresistible charm can help her get in to the most off-limit places.
She will join The Merry Men before you go to the Castle.
Archery Competitions
The Town Billboard has town announcements on it. Check back here occasionally for wanted posters or if you'd like to try your hand at the town Archery Competitions.
The Town's Archery Competitions are optional mini-games to test your skills with a bow and arrow. Enter them if you'd like a quick break from Quests.
The optional Free-For-All Competitions cost money to enter, but you can earn a lot of gold if you do well in them.
There are 6 "Cups" you can win in the various competitions: Junior's Cup, Amateur's Cup, Pro Cup, Archer's Cup, Royal Cup, and The Master's Cup.
For each competition you will be given a total of 10 arrows with 10 targets to hit. The goal is to hit as many targets as you can because you will be awarded 10 additional gold coins for every Bulls eye.
Not all targets are stationary as some may swim or fly by or collapse and then stand up again.
If you don't like you how you are doing, you can restart the competition and you can also reject your award at the end and try again.
Robin's Primary Quest
In an attempt to steal Prince John's tax collection cart, Robin and her husband Thomas end up in jail cells at opposite ends of Nottingham Castle. Robin's first goal is to free herself from the jail cell and recruit a band of Merry Men to help her free her husband, capture Prince John and liberate Nottingham from Prince John's tyranny and return the town's tax money. Your Goal is to free Thomas Hood from the Castle's jail and to capture Prince John so you can return the town's tax money.
Escape from Nottingham Castle
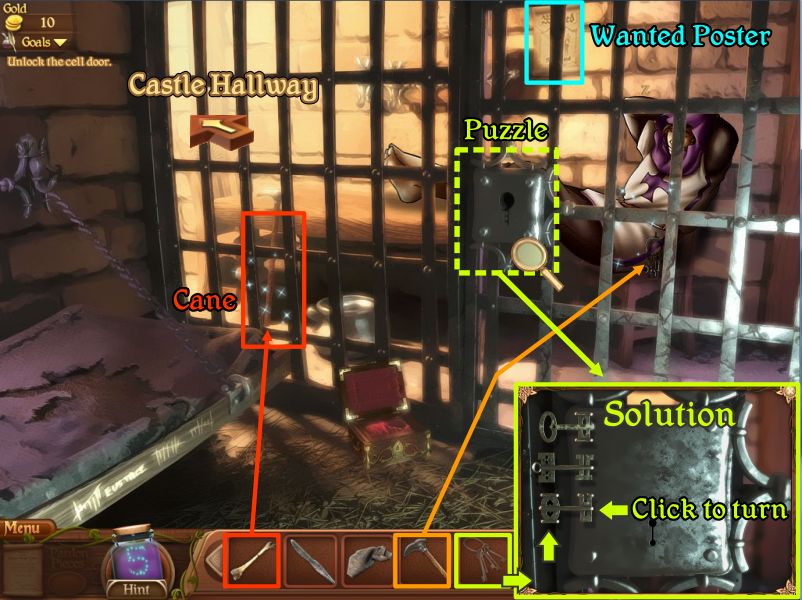
Jail Cell
Open the chest and collect the Jar and Medallion.
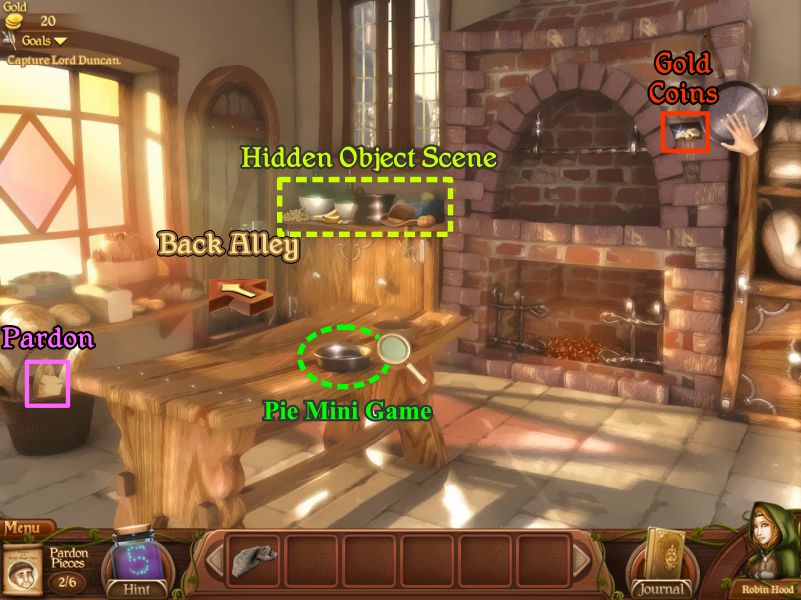
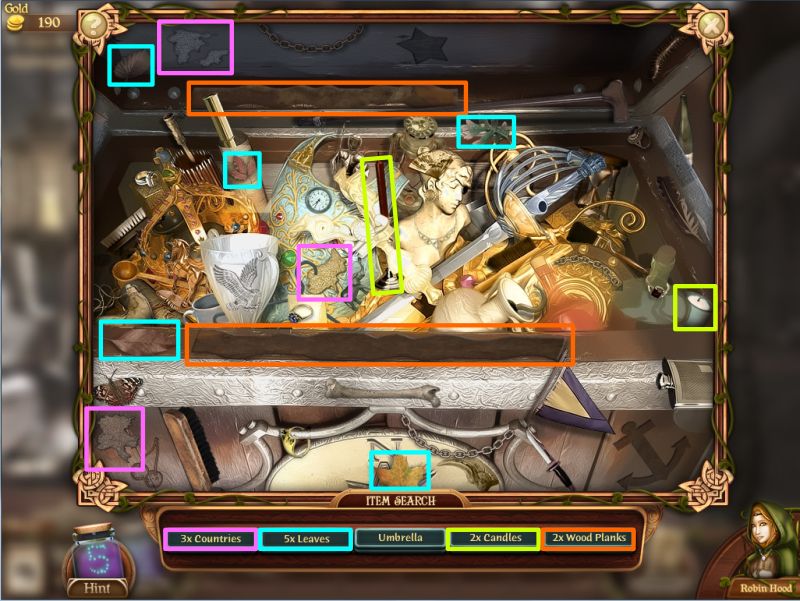
Click on the sparkles for a Hidden Object scene from which you will come away with a Bone, Dinner Knife and Cloth.
Screenshot
Use the Bone to get the Cane which you will use to get the Keys.
Click on the lock for a close up and place the Keys on the lock for a Puzzle.
The keys each have 2 ends that can possibly fit in the keyhole.
You can access the opposite end by clicking the key when you have picked it up.
The solution is the opposite end of the bottom key.
Once the cell door is open, grab Robin's Wanted Poster off the wall and exit to the Castle Hallway.
Screenshot
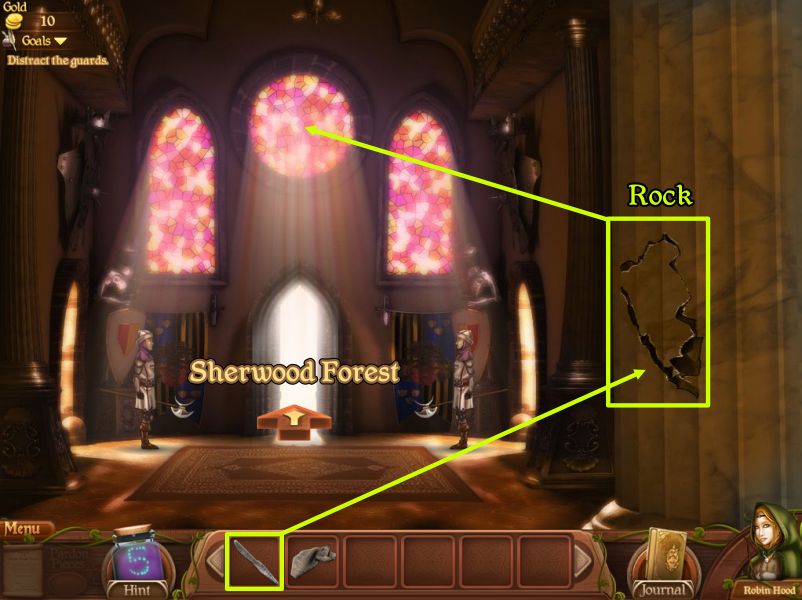
Castle Hallway
There are 2 talking guards in the way of the front door so you need to get them out of the way.
Use the Dinner Knife on the ripped portion of the right wall and a rock will go into your inventory.
Throw the Rock one of the window and the guards will run out to see what happened.
Screenshot
When Robin exits through the door Friar Tuck meets up with her and gives her a cloak to wear and takes her out another exit.
Sherwood Forest
Talk to Johnny Goodshot who offers to teach you how to shoot a bow so when you take him up on the offer you will get the Arrow Ability.
Take a shot at the target and pick up the Collectibles to clear the area and move on to The Gypsy Cart.
Screenshot
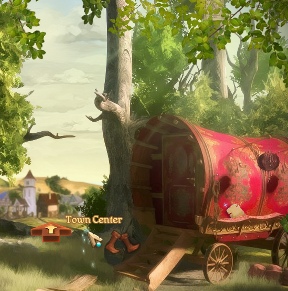
The Gypsy Cart
Pick up the Collectibles and go into the cart to talk to Lady Nadja before moving on to the Town Center.
Screenshot
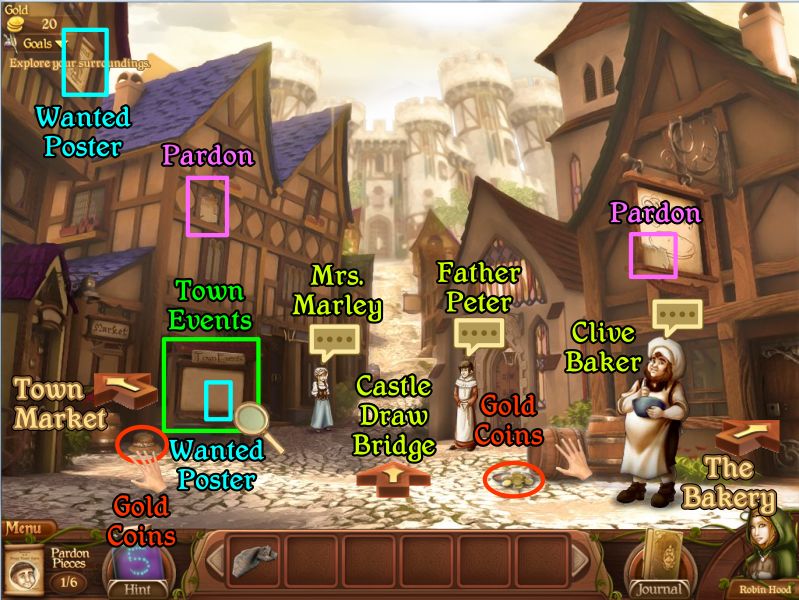
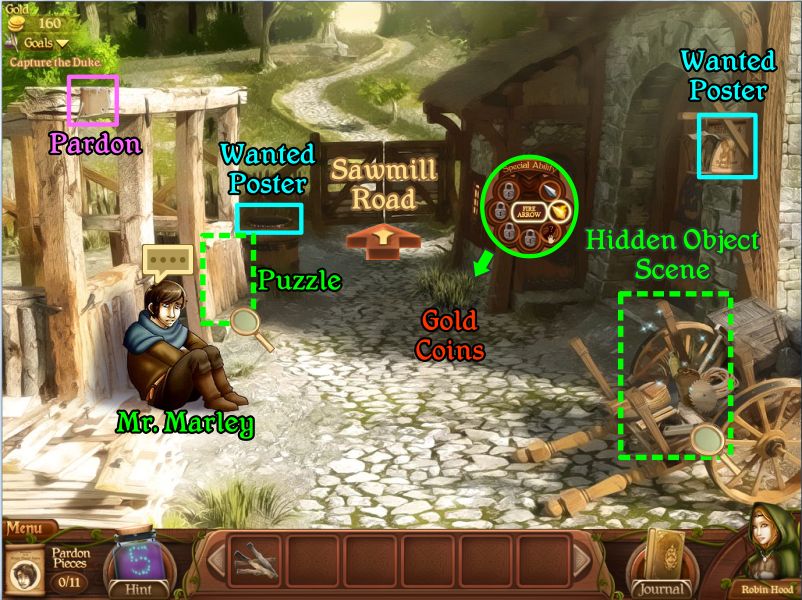
Mission 1: The Dilemma of Lord Duncan
Lord Duncan has purchased all the fields surrounding Nottingham so he is driving the cost of wheat up which is putting everyone in hard times, especially the town Baker so your mission is to help him recover the money he has been overcharged.
Town Center
Talk to everyone and pick up all the Collectibles and then enter the Bakery.
Screenshot
The Bakery
Pick up the Collectibles and play the Hidden Object scene to get the pie ingredients.
Once you have the ingredients, click on the table to assemble the pie.
Screenshot
Collect everything on your list including what you need to make the pie: Eggs, Egg Beater, Flour, Water Jug, Rolling Pin, Apples, Knife, Cinnamon, Sugar.
Screenshot
Make the Pie Mini Game
Place the ingredients on the table and as they scroll across the bottom of the scene, click on the appropriate one on the table when it gets to the green square that says "Add Item".
You now have a raw pie which you need to put on the hearth to bake but you need more wood for the fire so go through the door on the left to the Back Alley.
Screenshot
Back Alley
Click on the firewood and pick up the Collectibles.
Since you don't want to steal the wood, click on the door to talk to George Woodsmith.
Screenshot
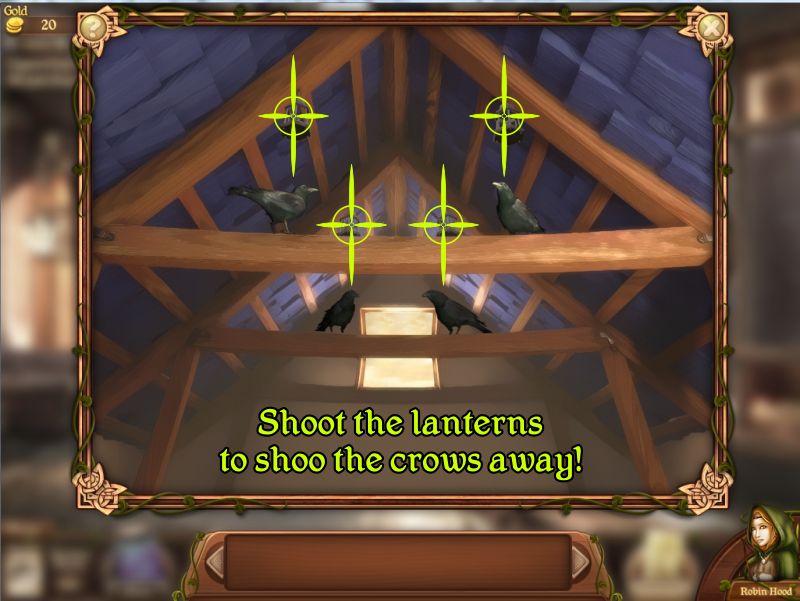
Get the Firewood Puzzle
George Woodsmith says he will give you the Firewood you need to bake the pie if you get rid of the crows in his workshop.
Aim at the 4 lanterns above each crow and shoot an arrow at each of them and the crows will fly out the window.
Screenshot
Take the Firewood and go back into the Bakery.
The Bakery
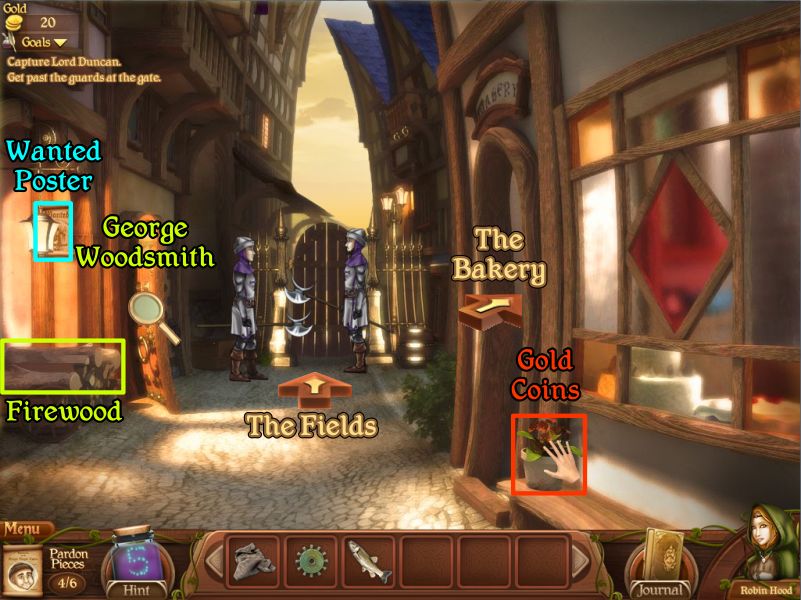
Put the logs on the fire, take the baked pie and place it on the sill of the open window.
Go to the Alley and watch the guards leave to go get the pie and exit through the gate to The Fields.
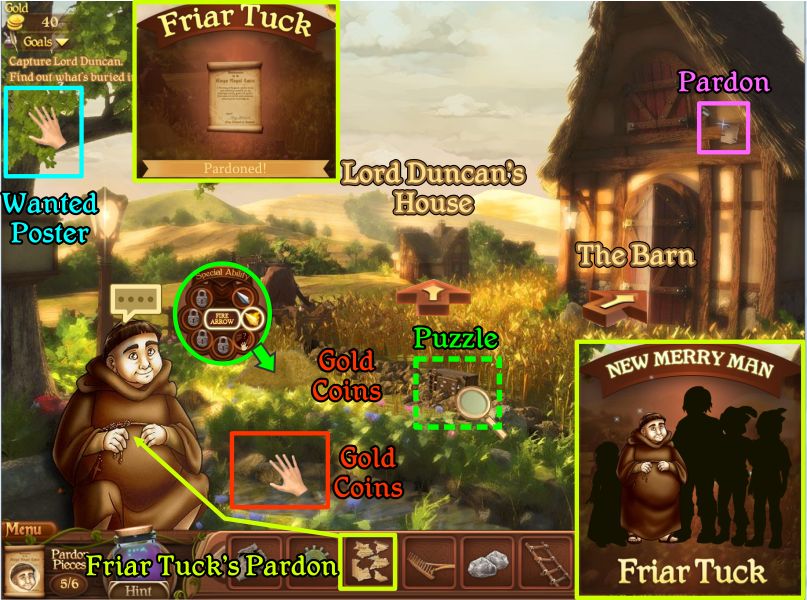
The Fields
Pick up the Collectibles that you can and talk to Friar Tuck.
You will need to return later after you have the Fire Arrow Ability so you can get the second gold cache.
Give Friar Tuck his Pardon Pieces and he will join the Merry Men giving you the Persuade Ability.
Go into the Barn next and later off to Lord Duncan's House.
Screenshot
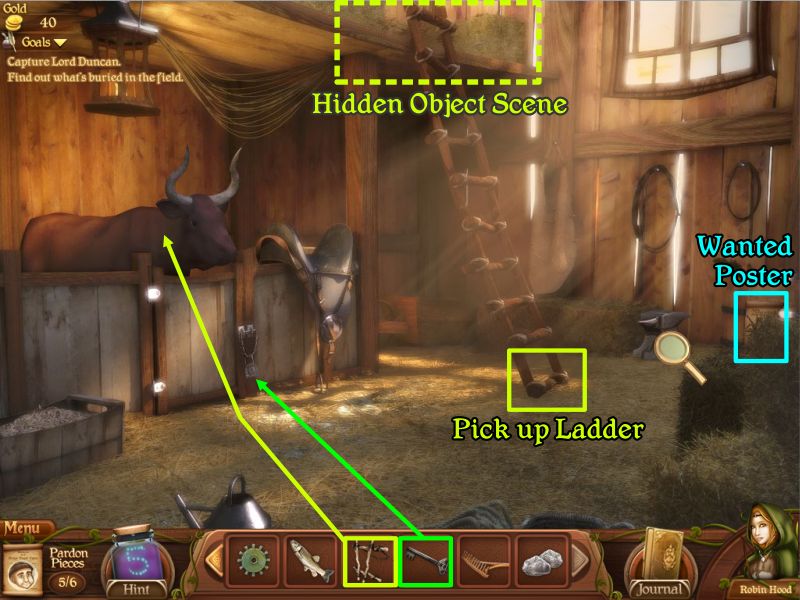
The Barn
Pick up the Wanted Poster and check the Anvil which you cannot move until you acquire the Strength Ability.
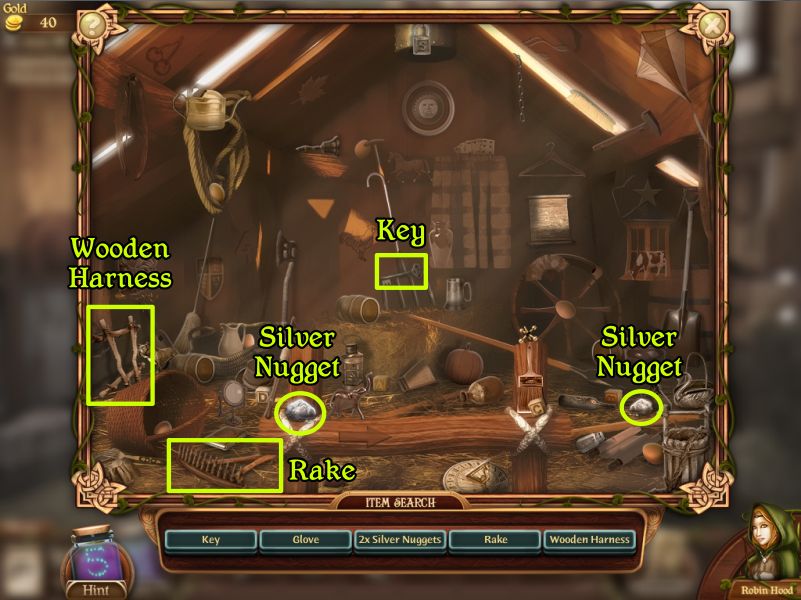
Play the Hidden Object scene and then take the ladder when you are finished with it.
Place the Wooden Harness when you get it and use the key to open the lock so you can collect the Harnessed Bull.
Screenshot
Collect everything on your list including the 2 Silver Nuggets, the Wooden Harness, the Rake, and the Key.
Screenshot
You are finished at the Barn for now so go across the Field to Lord Duncan's House.
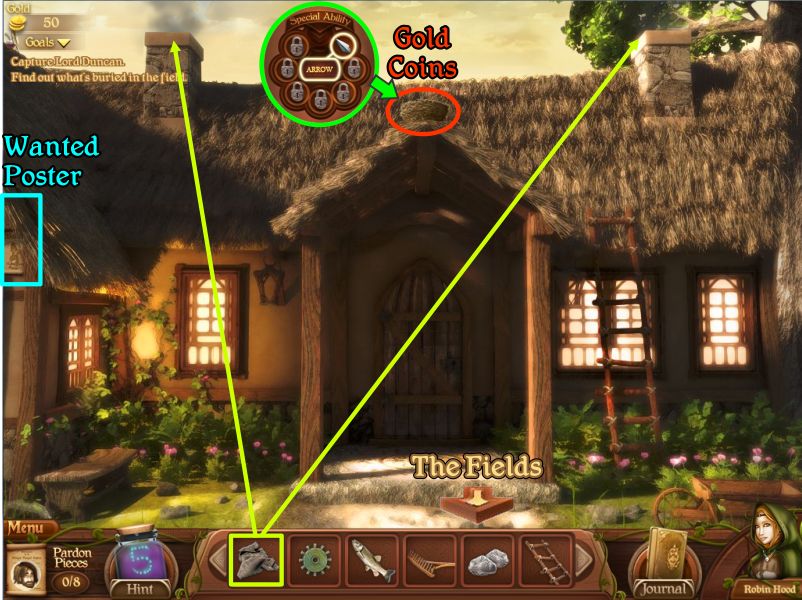
Lord Duncan's House
Collect the Wanted Poster and use an Arrow on the bird's nest to tip it over and get the gold.
Place the ladder against the house so you can put a cloth in each of the chimneys and smoke out Lord Duncan.
Click on him to stop him from running around and he will give you a rod and tell you to have the Blacksmith make the other one which should say: smiles, truth, clay, balled, said.
Screenshot
Exit down twice to the Back Alley and go through the Bakery to the Town Center and through the door on the left to the Town Market.
Town Market
At the moment the only business you have is with the Blacksmith so click for a close up.
Place your Silver Ore in the oven and when it is melted use the tongs to pick it up and place it on the anvil for the Blacksmith to forge it into the Rod.
Collect the Rod and go back to The Fields.
Screenshot
Lord Duncan's Treasure Chest
Click on the chest and place the 2 Rods on the close up.
Arrange the rods so that the lock says: I am but clay the sinner pleads; Who led each vain desire; Not only clay another said; But worse for thou art mire.
When the chest opens take the Baker's Gold and head back to the Town Center.
Screenshot
Give the Baker his gold and then use a Persuade Ability on the Priest who will accept your help and let you into the Church.
Mission 2: The Baneful Bishop
Bishop Rottenberry has been giving the Church donation money to Prince John even though the money is badly needed to help the poor so your mission is to help the Priest Peter and his church by capturing the Bishop and returning the money to the church.
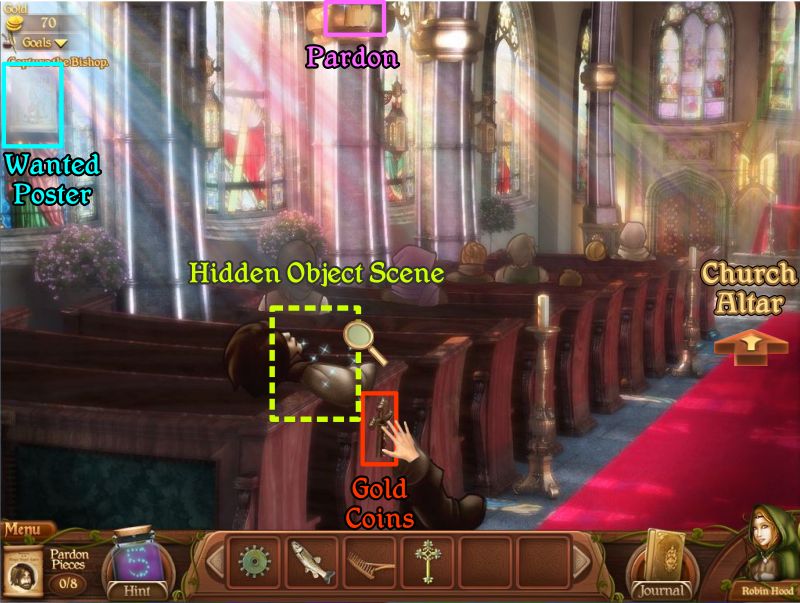
Church Aisle
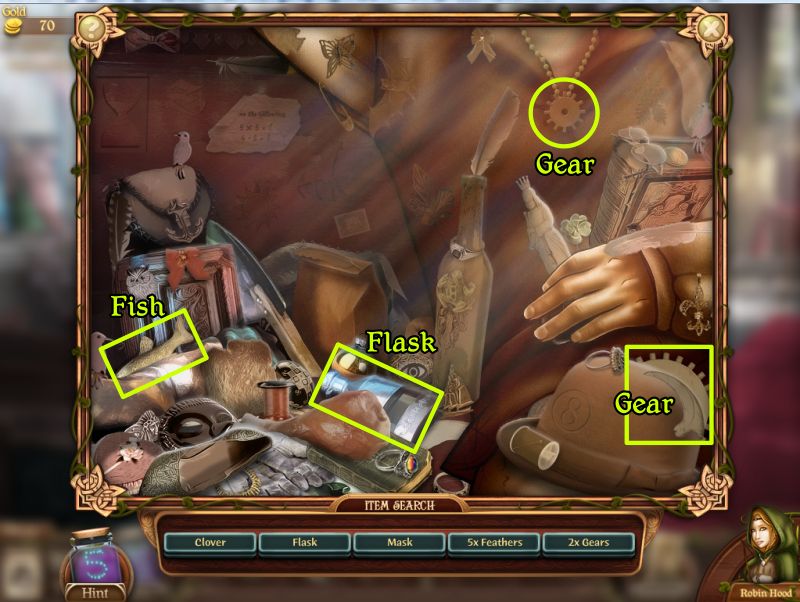
Pick up the Collectibles and play the Hidden Object scene.
Screenshot
Collect everything including the 2 Gears, a Fish and a Flask.
Screenshot
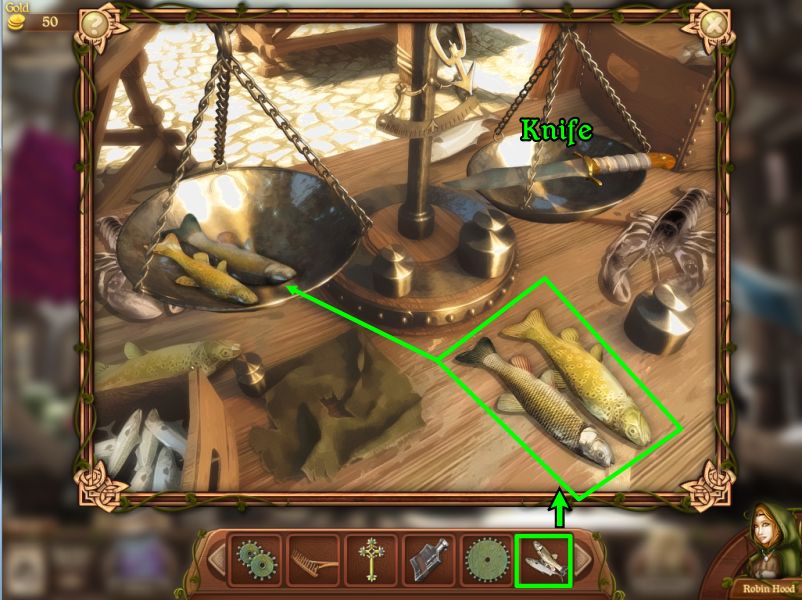
Town Market Fisherman
Before you continue in the Church, go back to the Market and click on the Fisherman who will trade you your two fish for a knife.
Screenshot
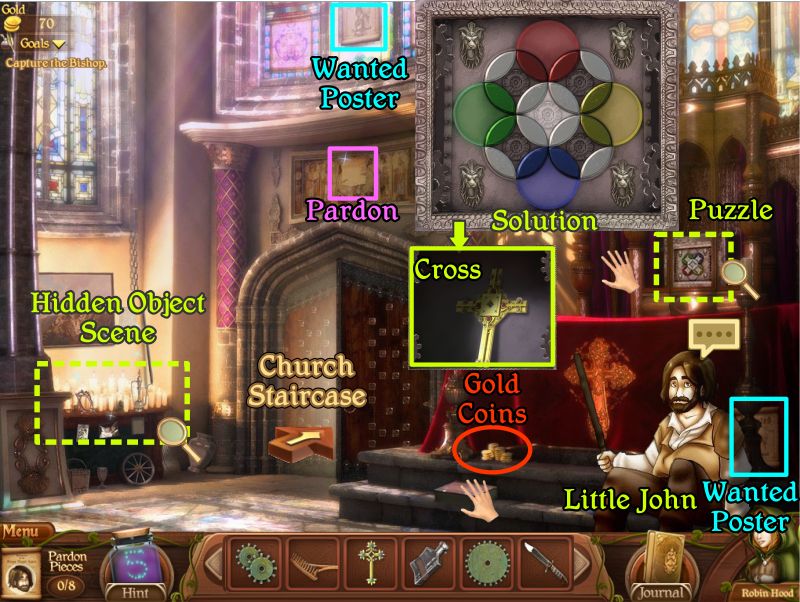
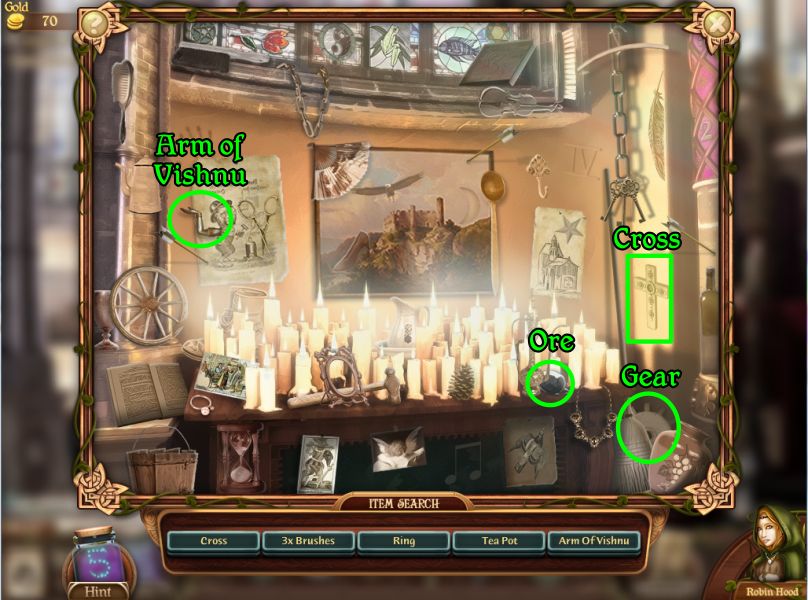
Church Altar
Go back to the Church and forward to the Church Altar and talk to Little John.
Pick up the Collectibles and play the Hidden Object scene.
Click on the curtain in back of the Altar for a puzzle.
Your goal is to rotate the circles so that the fragment pieces match with the colored discs.
Use the center circle to transfer the fragments.
Screenshot
Collect everything including the Arm of Vishnu, Cross, Ore, and Gear.
Screenshot
Church Staircase
Go through the door to the Church Staircase.
Pick up the Collectibles and move the Tapestry on the left wall to reveal a loose stone.
Click for a close up and use your Knife to remove the stone to collect the Cross and Fire Arrows which will give you a new Ability.
Click on the Basement door for a puzzle and place each of your 4 Crosses on the lock.
Click on each one to move it up and the door will open for you to enter.
Screenshot
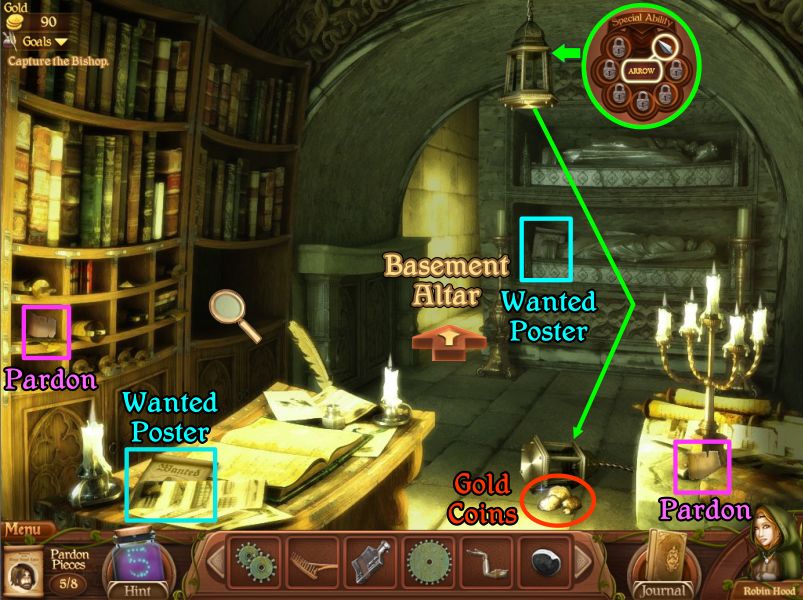
Church Basement
Pick up the Collectibles and use an Arrow Ability on the light fixture so it will drop and you can collect the gold.
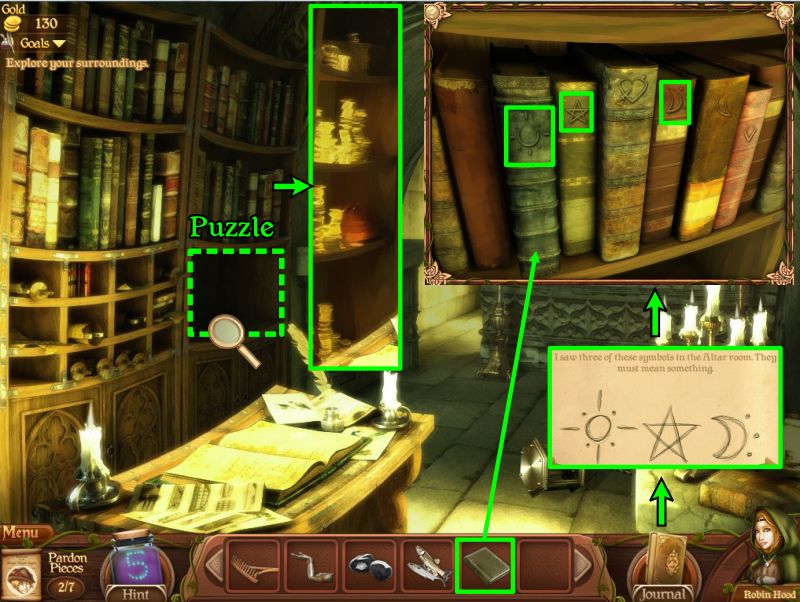
Check out the bookcase to see it might be a secret panel because of the fake books and one is missing.
Screenshot
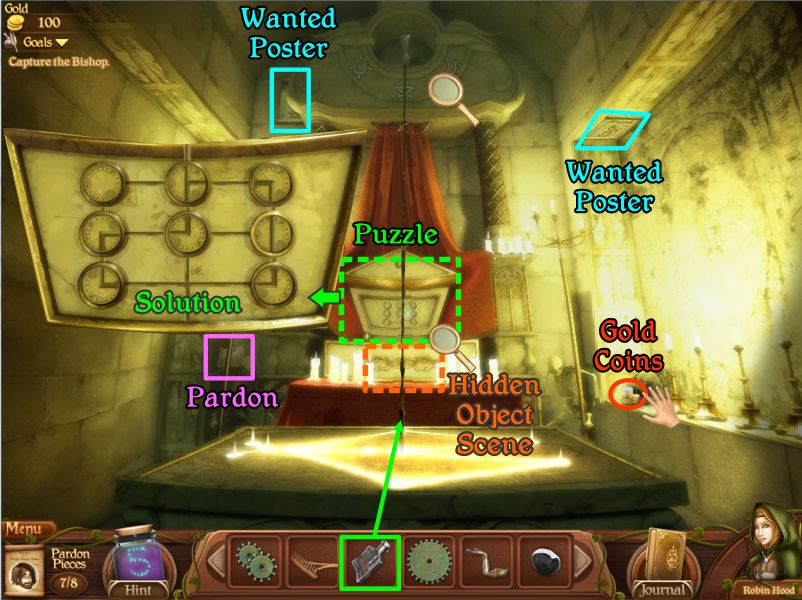
Basement Altar
Go through the door to the Basement Altar and note the symbols over it.
Open the Skulls mouth for the gold cache and pick up the other Collectibles.
Click on the Altar for a puzzle and arrange the discs like the solution.
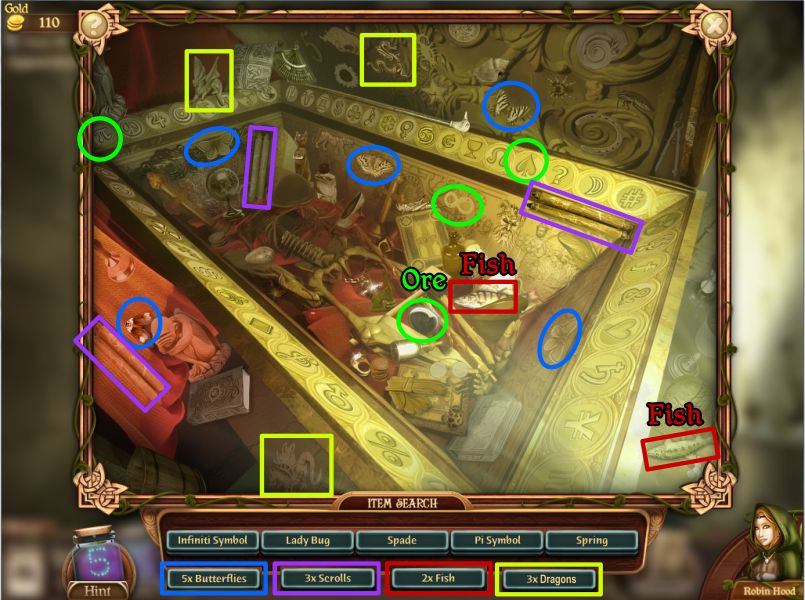
There is now a stream of oil so fill your flask and then click on the Altar for a Hidden Object scene.
Screenshot
Collect everything including the Ore and 2 Fish.
There are a number of multiple items that can appear on your list so some of them are marked.
Screenshot
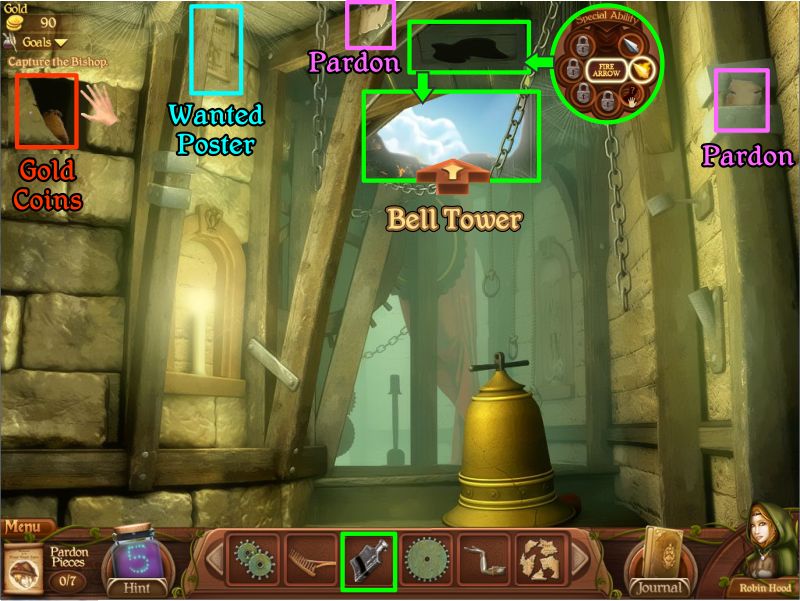
Bell Tower Hatch
Go upstairs to the Bell Tower Hatch and pick up the Collectibles which will require you to move part of the broken stone at the left to get the gold.
Pour your flask of oil on the hatch and use a Fire Arrow Ability on it to open it and go to the Tower.
Screenshot
Bell Tower
Pick up the Collectibles and use Little John's Strength Ability to tip over the bell to get the gold.
Click on the sparkles at the right for a puzzle to start the bell mechanism.
Place the large gear at the bottom center and each of the 3 smaller gears above it.
Ring the center bell by clicking on the ring above it.
When Bishop Rottenberry appears click on him to talk and he will give you the missing book.
Screenshot
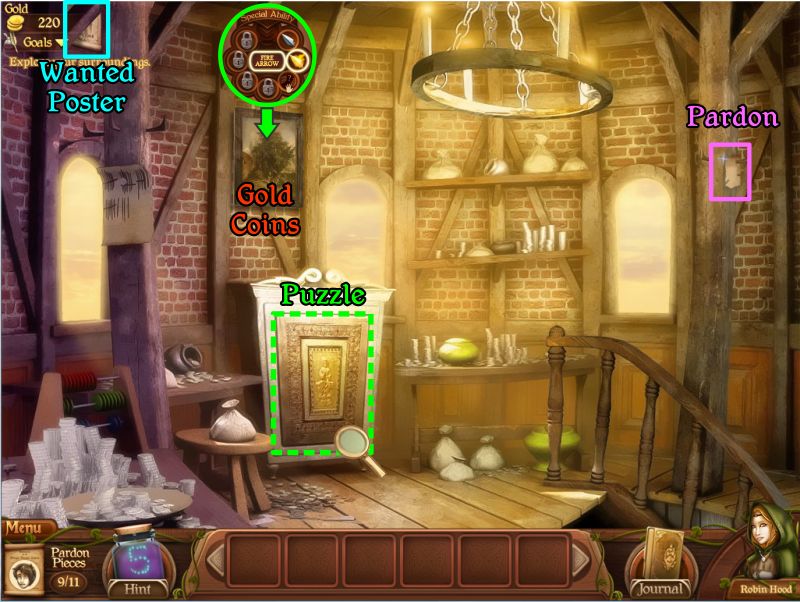
Church Basement
Go back to the Basement and click on the bookshelf for a puzzle.
Place the missing book and click on the books with the icons that were above the Basement Altar.
The panel will open for you to collect the treasure.
Screenshot
Go to the Town Center and give the treasure to the Priest.
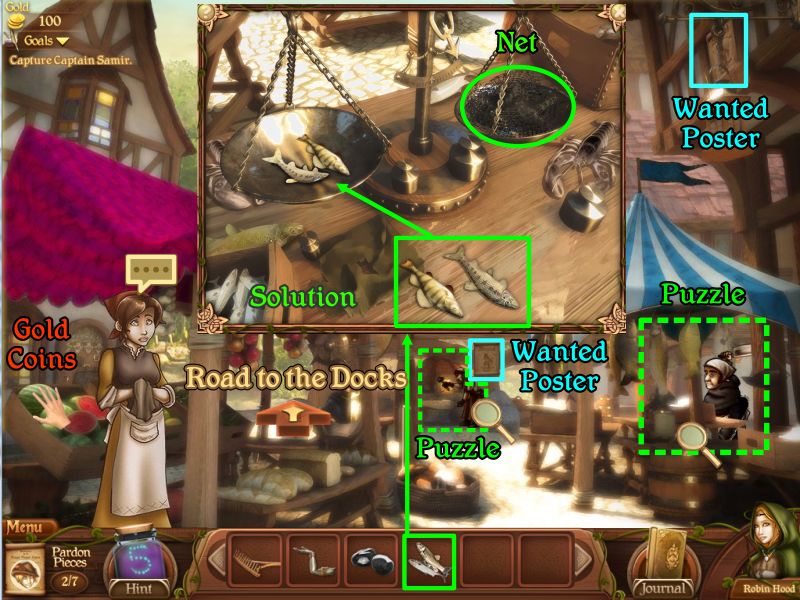
Mission 3: Shady Shamir's Ship Struggle
Captain Shamir owns a trades ship which has been smuggling illegal goods into Nottingham for which he has been giving a gut to Prince John so he will let him do it so your mission is to sneak on board Shamir's ship and capture him so you can find his illegal earnings and return them to the people.
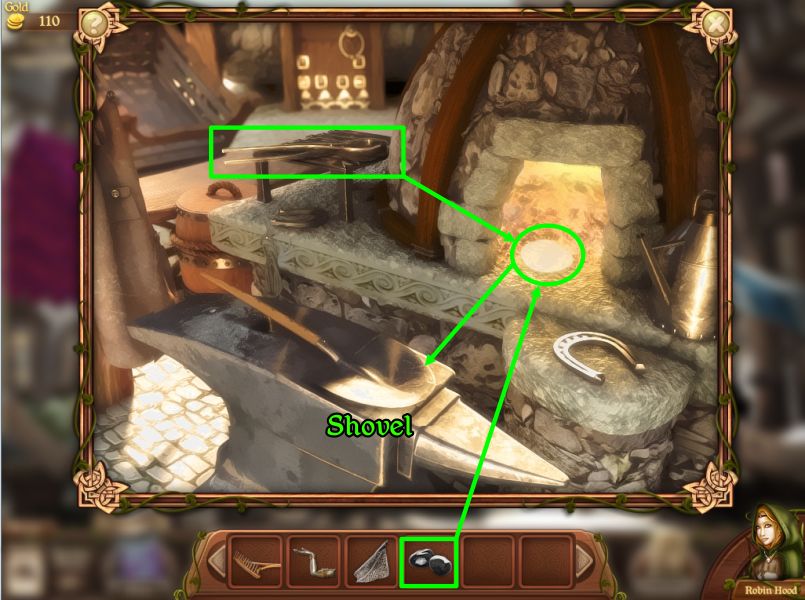
Town Market
Go to the Town Market and talk to Mrs. Goods.
Move the watermelon to get the gold and pick up the other Collectibles.
Click on the Fisherman to trade your fish for a Net.
Screenshot
Click on the Blacksmith and place your Black Ore in the fire to melt.
Pick it up with the tongs and place it on the anvil for the Blacksmith to forge you a Shovel.
Collect the Shovel and head to the Road to the Docks.
Screenshot
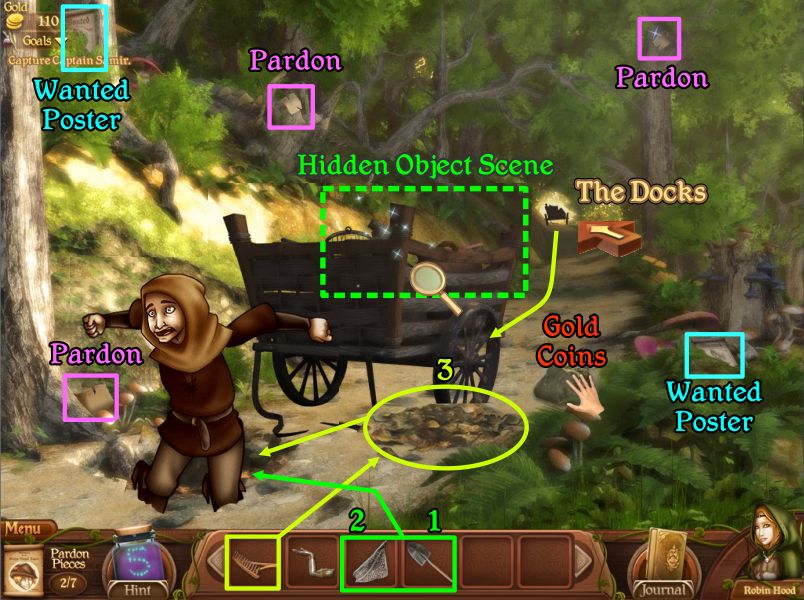
Road to the Docks
Move the rock to get the gold and collect the rest of the Collectibles.
Use your Shovel to dig a hole near the tree.
Place the net over the hole and use your rake to move the leaves into the net to cover the hole.
The Prince's servant comes along with a wagon and disappears into the hole leaving you to rummage through the cart in a Hidden Object scene.
Screenshot
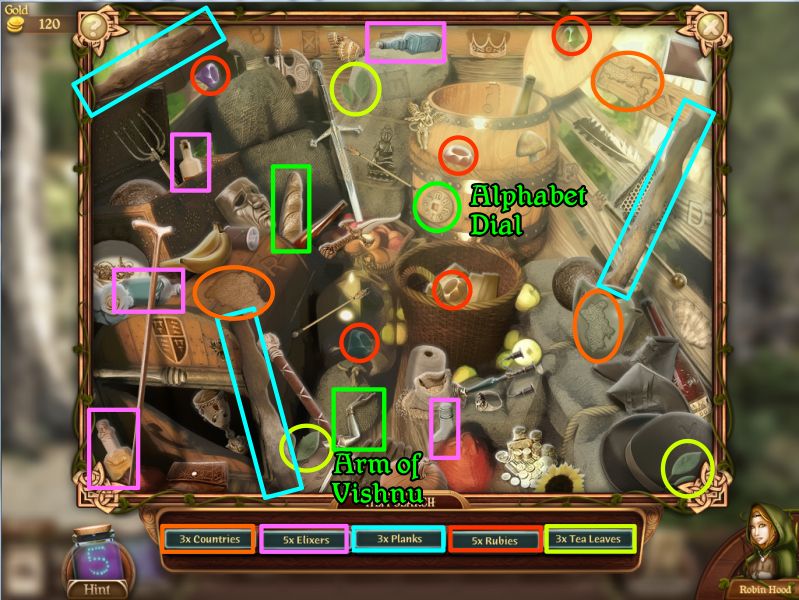
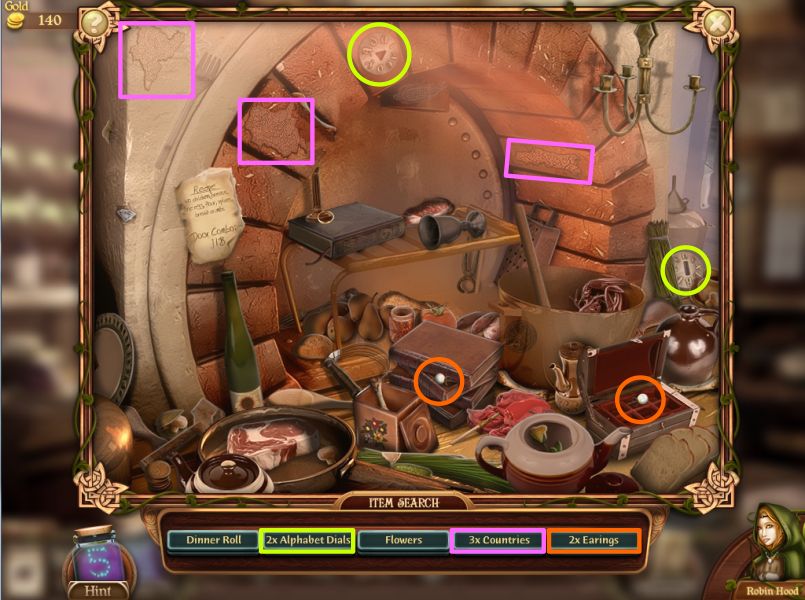
Multiple items are marked so collect everything including the Alphabet Dial and Arm of Vishnu as well as the 3 Planks and 3 Countries.
Screenshot
The Docks
Head up the road to The Docks and talk to Alan-a-Dale.
Get Little John to use his Strength Ability on the barrel to get the gold and pick up the rest of the Collectibles.
Screenshot
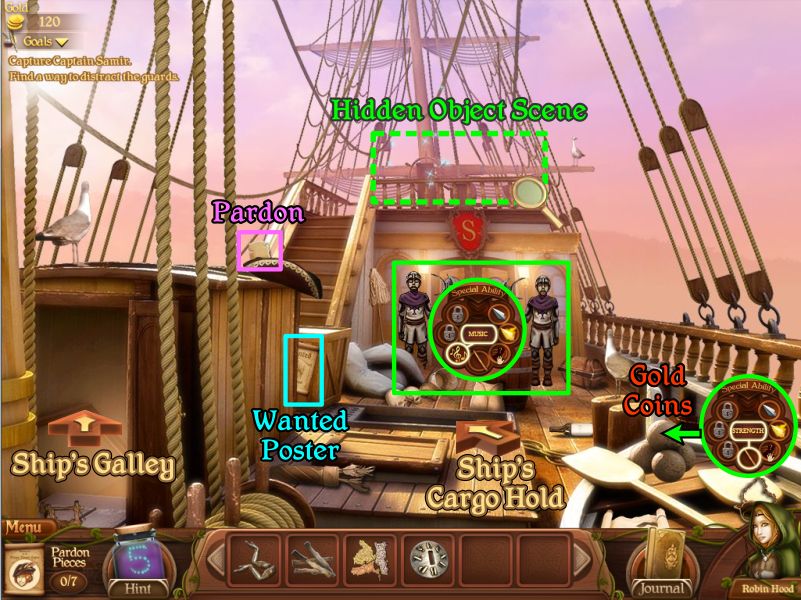
Ship's Deck
Use Alan-a-Dale's Music Ability to lull the guards to sleep.
Have Little John use his Strength Ability to move the cannon ball and get the gold.
Pick up the other Collectibles and play the Hidden Object scene.
Screenshot
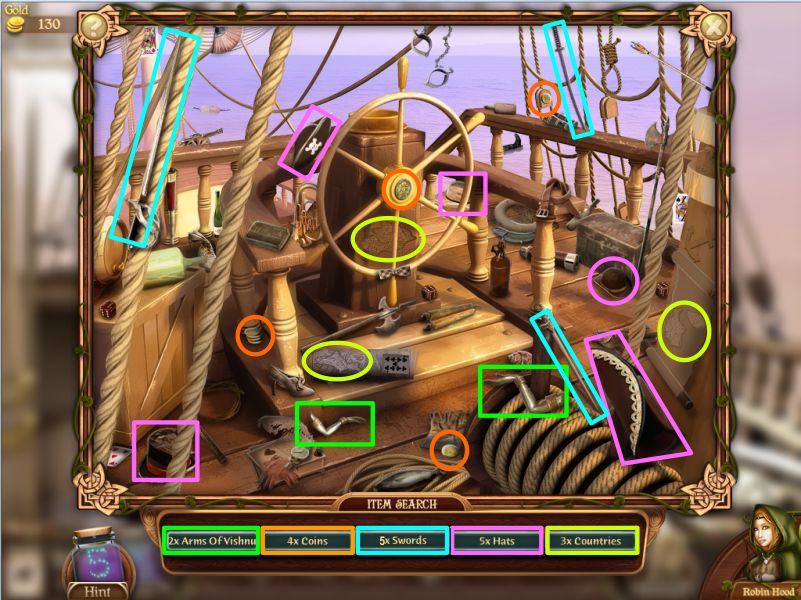
Multiple items are marked and you will come away with 2 more Arms of Vishnu and 3 Countries.
Screenshot
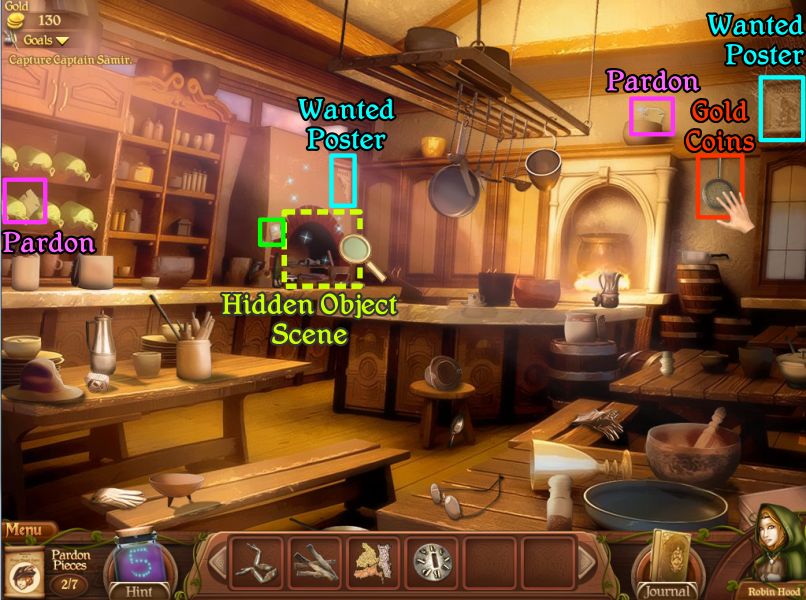
Ship's Galley
Move the frying pan on the wall to get the gold and pick up the rest of the Collectibles.
Pick up the recipe scrap next to the Hidden Object scene which has the door combination written on it.
Play the Hidden Object scene to clear the area.
Screenshot
Collect everything including the 3 Countries and 2 Alphabet Dials.
Screenshot
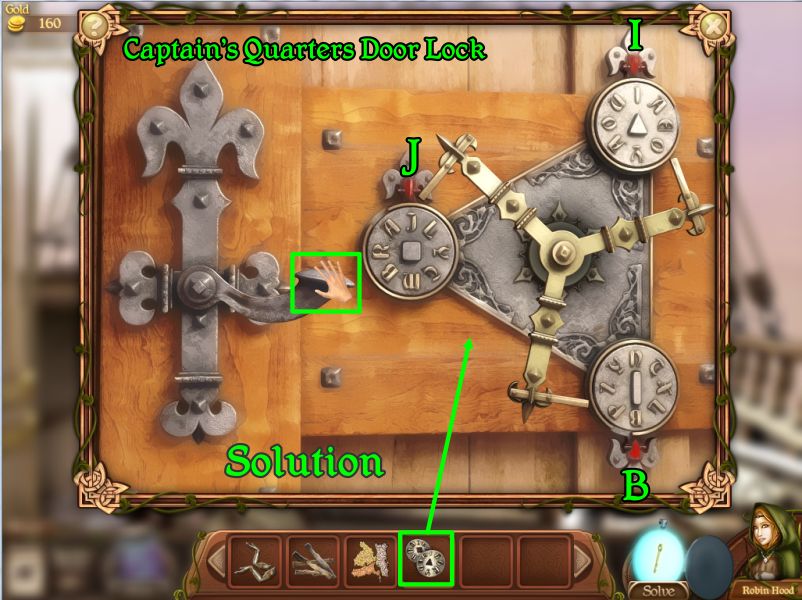
Captain's Quarters
Go back up on deck and click on the door to the Captain's Quarters.
Place the 3 Alphabet Dials on the lock and use the combination from the recipe scrap: J I B.
Be sure to note that the "B" dial arrow is on the bottom and not the top.
Move the lever to open the lock and enter the Captain's Quarters.
Screenshot
Use Little John to move the floor board and get the gold.
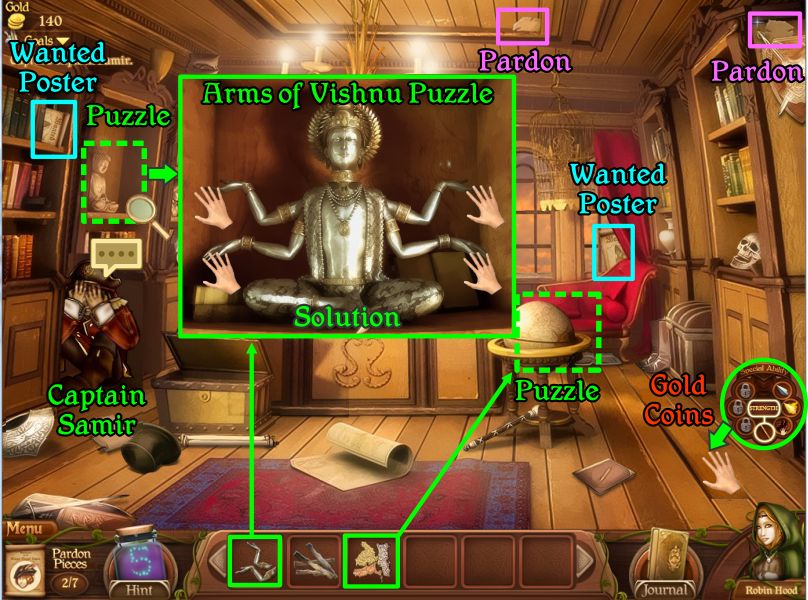
Pick up the rest of the Collectibles and click on the Vishnu statue at the left for a closer look.
Place the 4 arms on the statue and click on each one to move it down.
A secret panel will open to reveal Captain Shamir's hiding place.
Click on him for a talk and he will give you a compass lock to get his treasure.
Screenshot
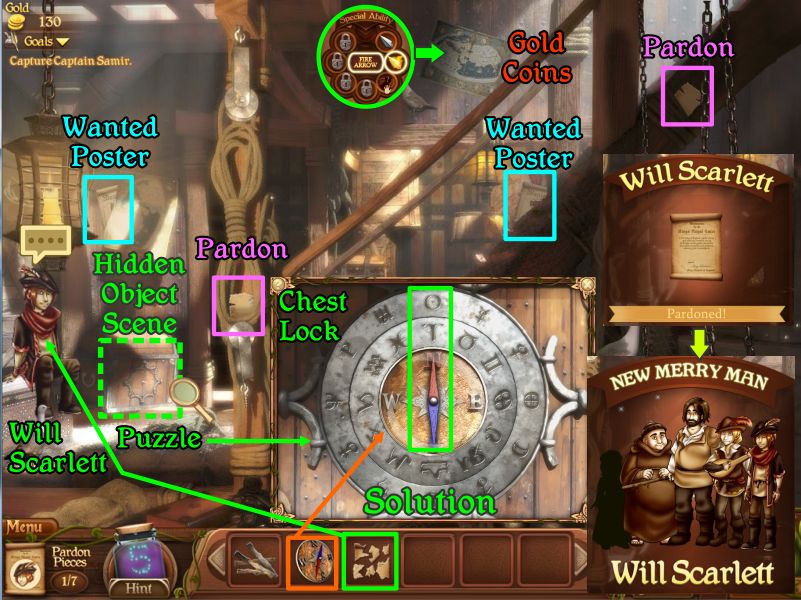
Ship's Cargo Hold
Use a Fire Arrow on the picture on the back wall to get the gold.
Pick up the rest of the Collectibles and click on Will Scarlett to talk to him.
You should have all his Pardon Pieces by now so give them to him and he will join The Merry Men.
Click on the chest next to him and place the Compass you got from Captain Shamir.
Move the two rings so the red portion of the dial points North.
Click on the open chest for a Hidden Object scene.
Screenshot
Collect the 3 Countries and 2 Planks as well as the rest of your list.
Screenshot
Captain's Quarters Globe Puzzle
Go back to the Captain's Quarters and click on the globe for a puzzle.
Place the group of Countries on the close up and then place them where they belong.
Don't worry about them being smaller or larger than the globe shapes because they will adjust when you press them into place.
The globe will open for you to collect Vendor's Gold.
Screenshot
Go back to the Town Market and give the gold to Mrs. Goods.
Mission 4: Dealing with the Duke
The Duke has the only Mill for 50 miles and has stopped providing lumber for the town unless they pay him an exuberant amount up front. The town has been left with many people unable to complete their homes and businesses
Town Square
Go to the Town Square and talk to Mrs. Marley and then enter her house.
The Marley House
Talk to Mr. Marley and pick up the Collectibles.
You will need to shoot a Fire Arrow at the grass to get the gold.
Play the Hidden Object scene and then the puzzle with the planks and Mr. Marley will open the gate to Sawmill Road.
Screenshot
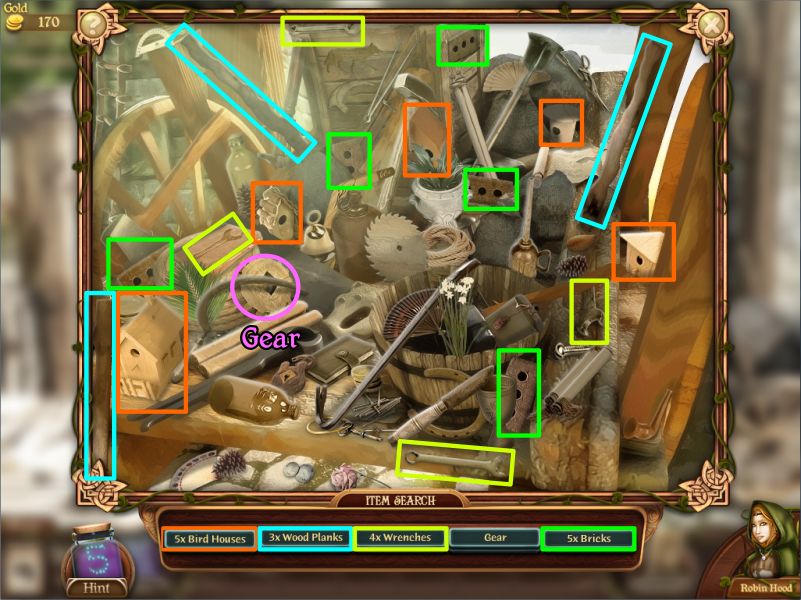
Collect the Gear and Planks and the rest of your list.
Screenshot
Build the Wall Puzzle
Place the 8 Planks you have collected to help build a wall of the Marley House.
Screenshot
Sawmill Road
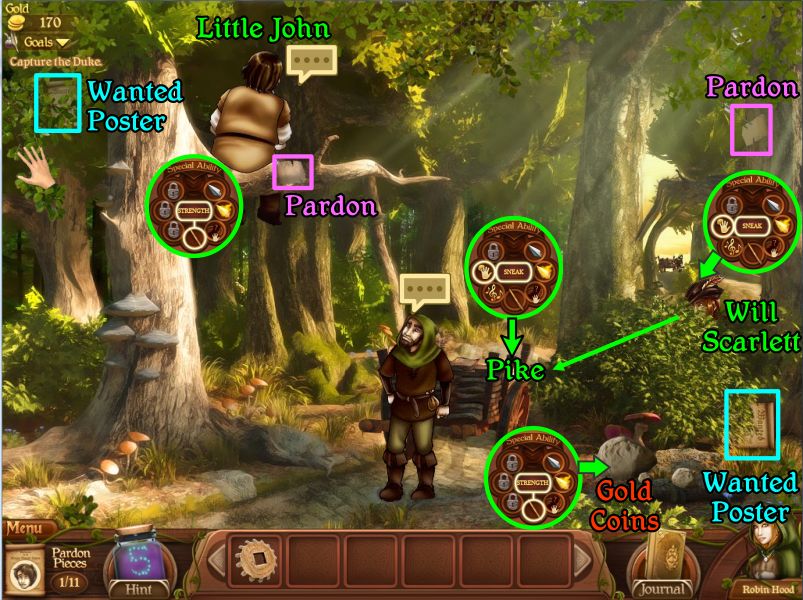
Have Little John move the rock so you can pick up all the Collectibles.
Click on the bush at the right and use the Sneak Ability to have Will Scarlett hide there.
Click on the tree to select the Strength Ability and Little John will climb the tree and sit on the limb.
When the Prince's servant comes with the cart Little John distracts him so you can use the Sneak Ability on the cart and have Will Scarlett steal the Pike.
Screenshot
Sawmill
The man with the cart will move on so go up the road to the Sawmill.
Use the Pike to remove the log jammed into the wheel.
Use Strength to move the log in the river and pick up all the Collectibles before entering the Sawmill.
Screenshot
Sawmill Floor
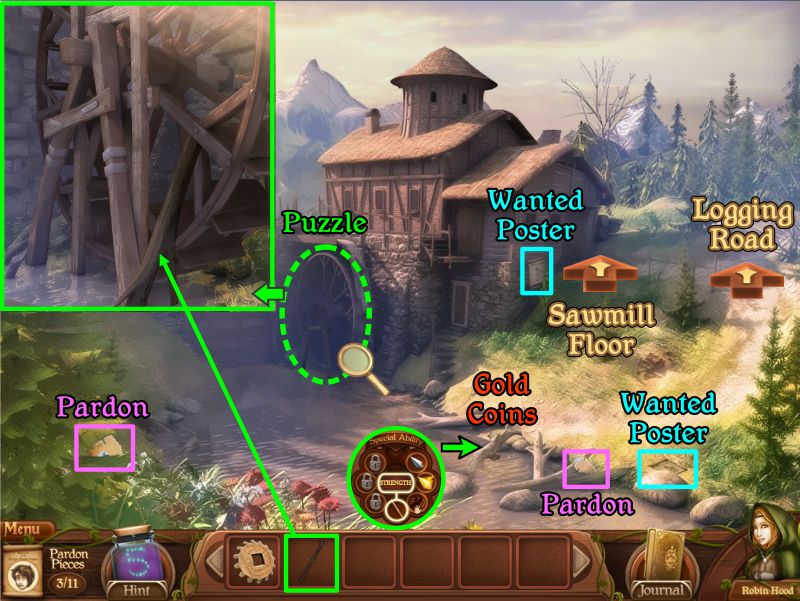
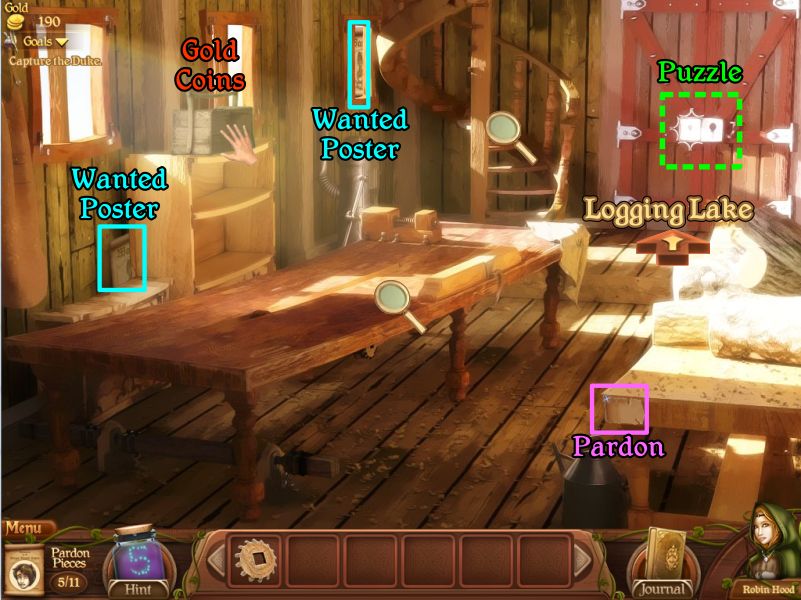
Pick up all the Collectibles and note the stairway to the tower is missing some steps.
Click on the lock to the Logging Lake door for a puzzle.
Screenshot
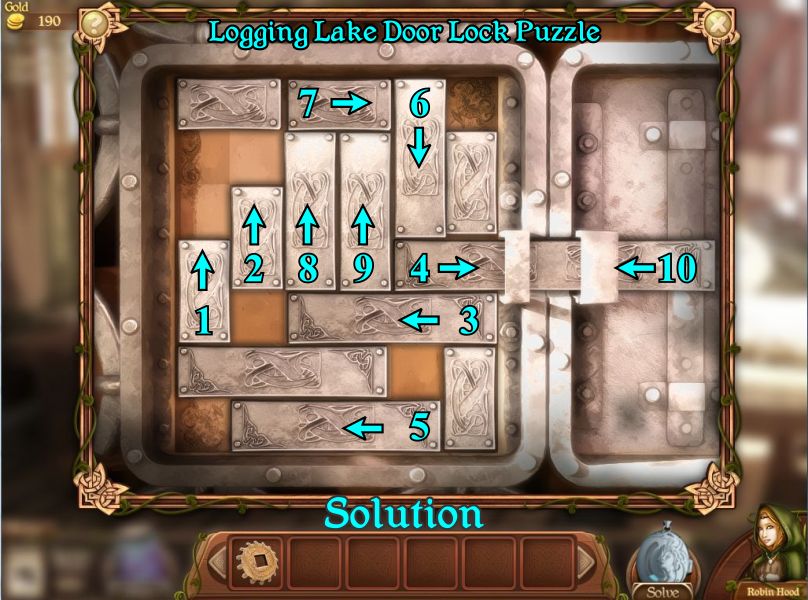
Logging Lake Door Puzzle
This is a slider puzzle to open the lock so follow the numbered tumblers to unlock the door.
Screenshot
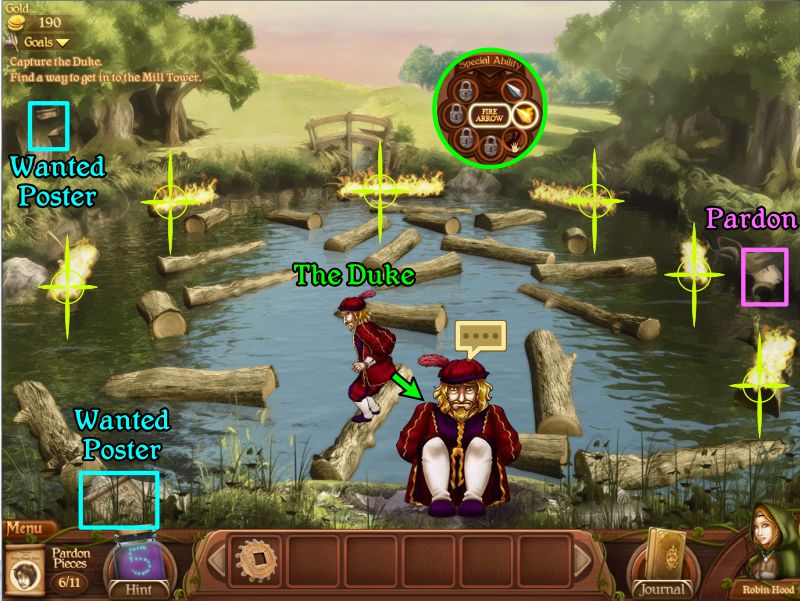
Logging Lake
The Duke is hopping around on the logs trying to find a way to cross the lake.
Pick up the Collectibles and select the Fire Arrow to shoot at the surrounding logs to stop The Duke.
He will stop and sit down at the edge of the lake so click to hear what he has to say.
You will get a log which you can later use to make steps to get to the Tower.
Screenshot
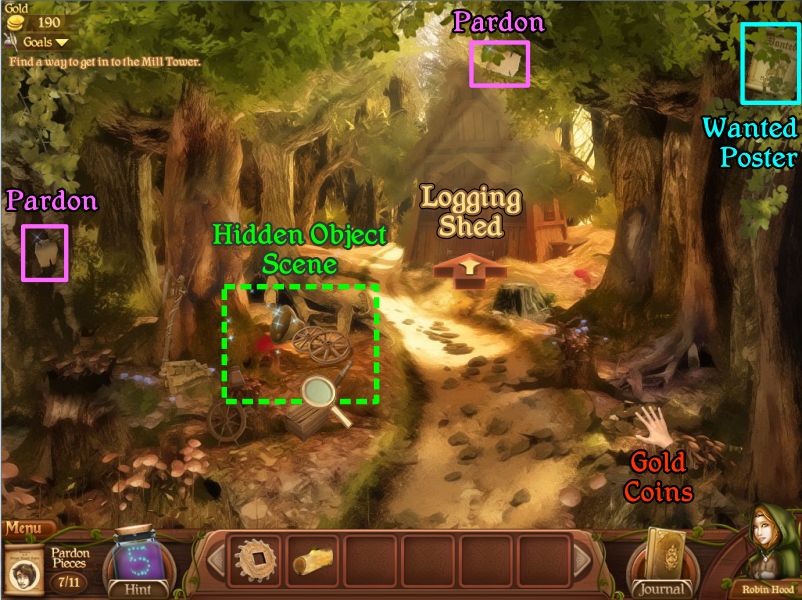
Logging Road
Go back through the Sawmill and up the Logging Road.
Pick up the Collectibles and click for a Hidden Object scene.
Screenshot
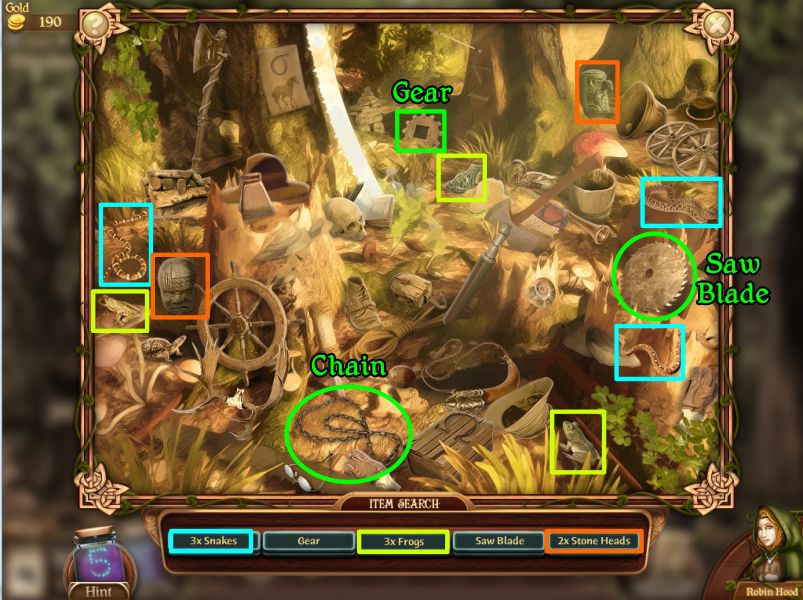
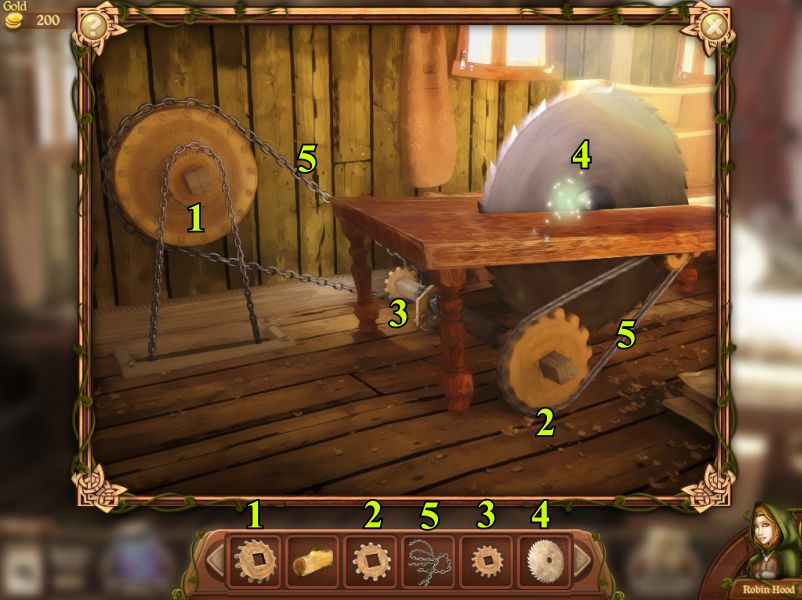
Collect everything including a Saw Blade, Gear and Chain and then go into the Logging Shed.
Screenshot
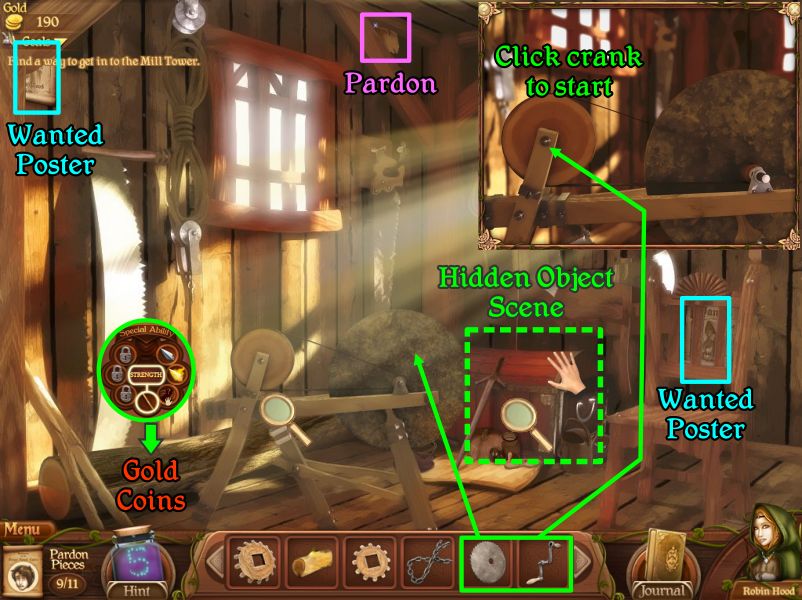
Logging Shed
Pick up the Collectibles and use Strength to get the coins.
Play the Hidden Object scene to get a crank to start the grinding wheel.
Go to a close up view, place the crank and click to start it.
Place the dull saw blade on the wheel to sharpen it.
Screenshot
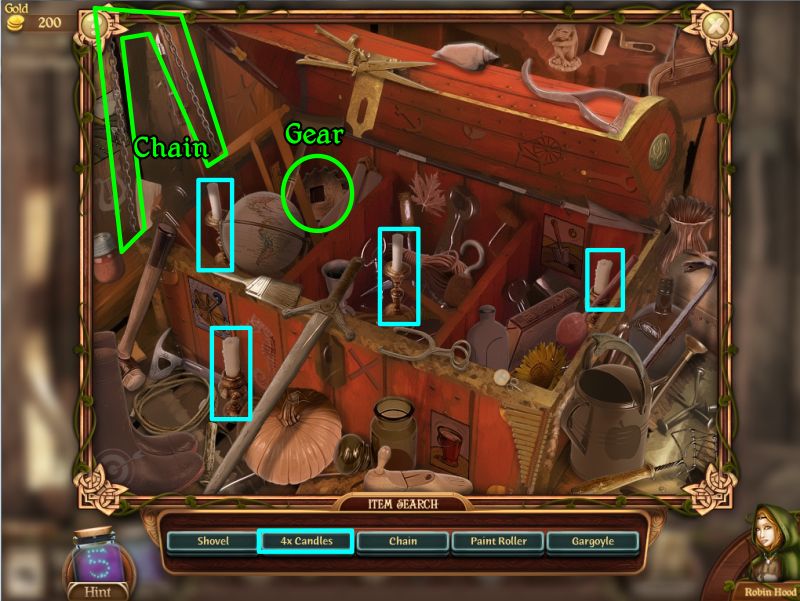
Collect your list including a Chain and Gear.
Screenshot
Assemble the Saw on the Sawmill Floor
Go back to the Sawmill Floor and click on the table for a close up view.
Place the Gears, Chains and Saw Blade.
Screenshot
Put your log on the table and pick up each of the pieces of wood that is cut.
Click on the stairway and place the wood steps.
Screenshot
Sawmill Tower
Use a Fire Arrow to get the coins and pick up all the Collectibles.
Click on the safe for a puzzle to open it.
Screenshot
Duke's Treasure Puzzle
You goal is to turn all the tumblers horizontal to open the lock.
Take the gold and go back to Town Center to give it to Mrs. Marley.
Screenshot
Mission 5: Sack the Shifty Sheriff
The Sheriff is holding Robin's husband in the Tower Jail. Use the combined skills of your Merry Men to free him, dethrone the Prince, and find his treasure hold to finally return Nottingham to its rightful peace and wealth.
Town Center
Maid Marion appears in the scene so talk to her and she will join the Merry Men and bring the Charm Ability.
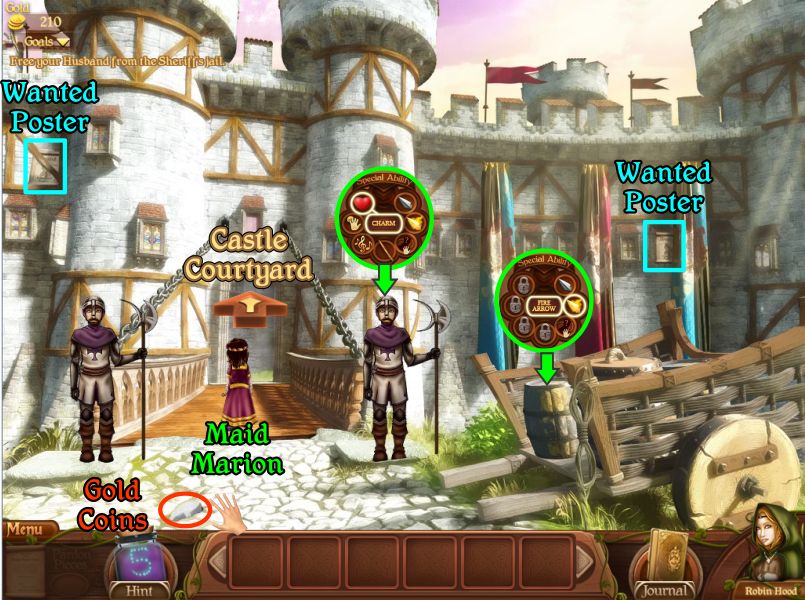
Castle Drawbridge
Use Maid Marion's Charm Ability on the guards to get the drawbridge lowered.
Shoot the barrel in the cart with a Fire Arrow and the guards will run away.
Pick up the Collectibles and cross the drawbridge.
Screenshot
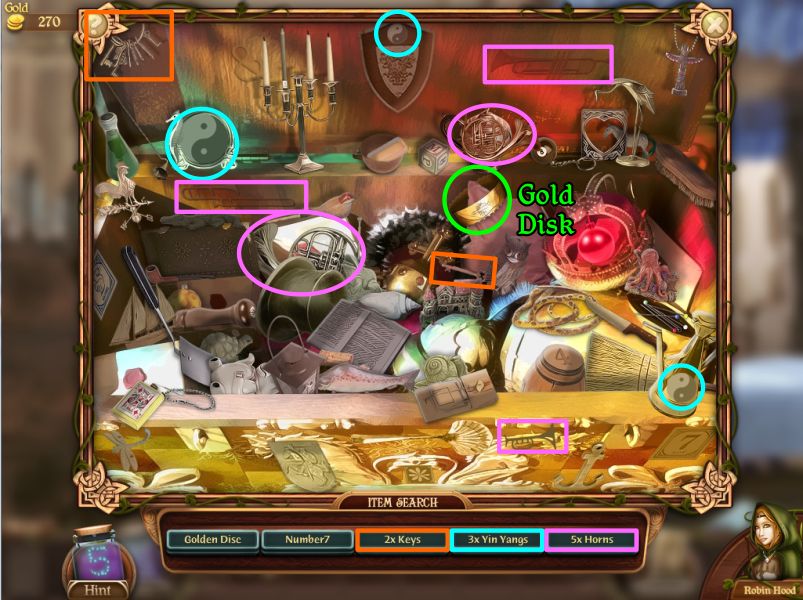
Castle Courtyard
Use a Fire Arrow on the flag to the left of the Jail and pick up all the Collectibles.
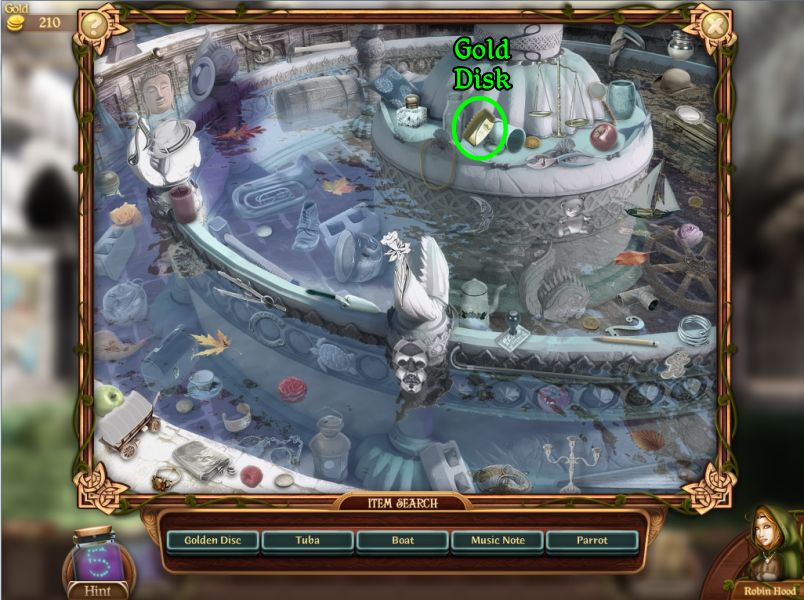
Click on the fountain for a Hidden Object scene.
Screenshot
The one thing you need to come away with is the Gold Disk so collect it and everything on your list.
Screenshot
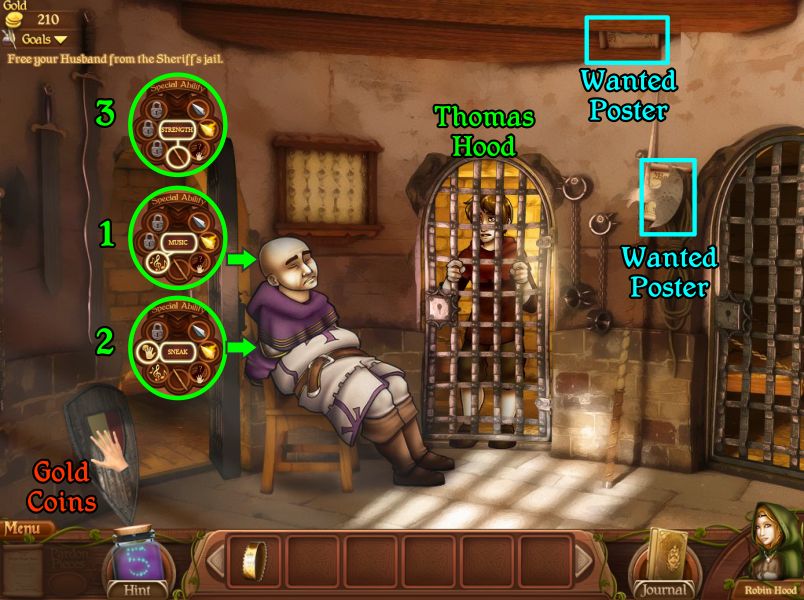
Castle Jail
Go to the jail and use Music to put the Sheriff to sleep, then use the Sneak Ability to have Will Scarlett tie him up.
Finally, ask Little John have a talk with him to find out which key will open the cell door.
The Sheriff refuses to tell so Little John kicks gives him a swift kick and sends the chair flying into the next room.
Screenshot
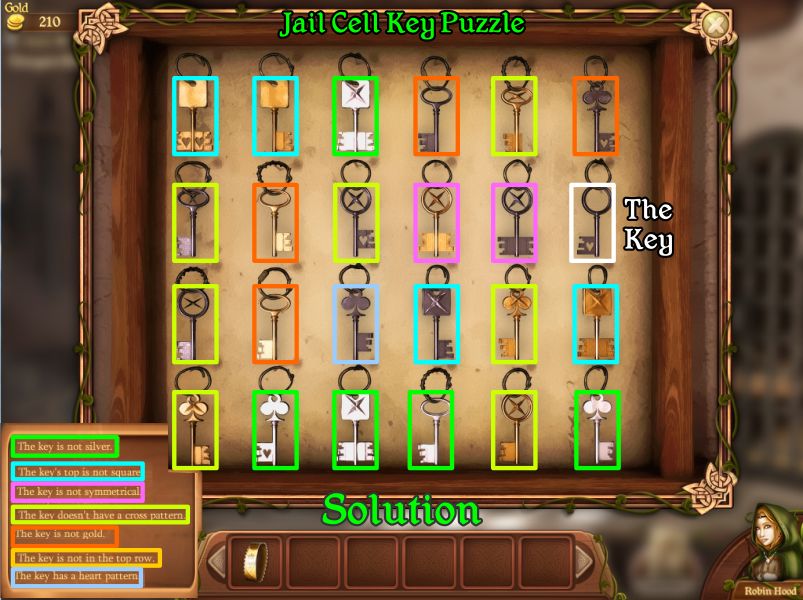
Jail Cell Key Puzzle
The Sheriff tells which keys are not the right one so there are several rounds to the puzzle.
The key is not silver.
The key's top is not square.
The key is not symmetrical.
The key doesn't have a cross pattern.
The key is not gold.
The key is not in the top row.
The key has a heart pattern.
Eliminate all the keys until you can collect the last key.
Screenshot
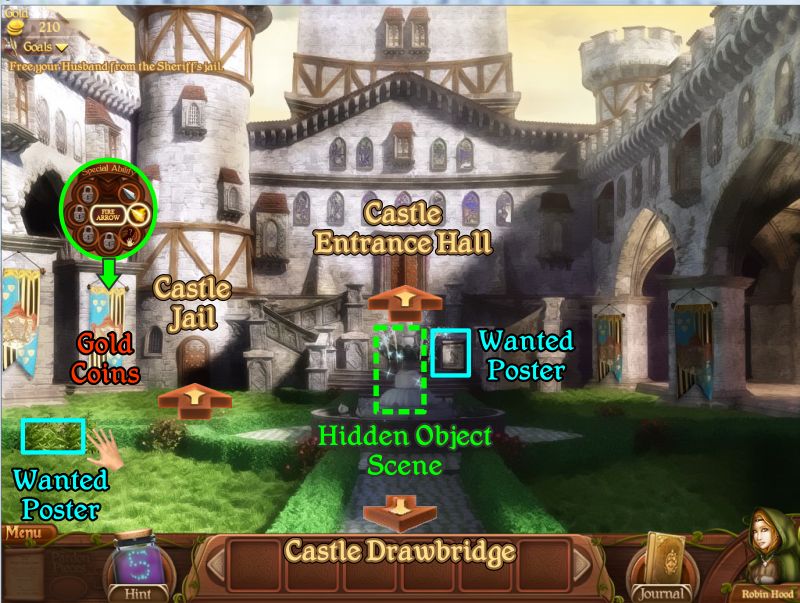
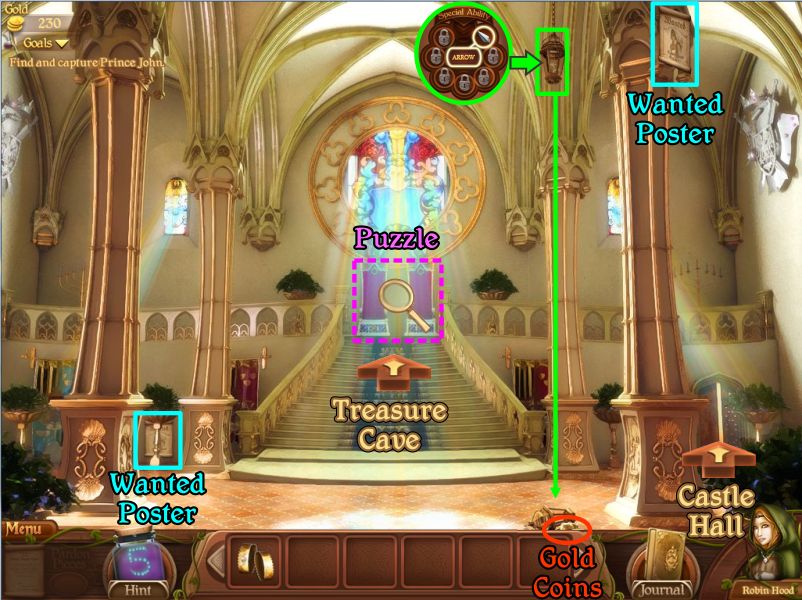
Castle Entrance Hall
Shoot the vase off the right front column with your Arrow Ability and collect the coins.
Use a Fire Arrow on the tapestry above the door at the back and a Gold Disc will fall to the floor.
Pick up the rest of the Collectibles and click on either the right or left tapestry at the front of the scene for a puzzle.
After the puzzle click on the numbers on the columns in the order indicated and the door to the Throne Room will open for you to enter.
Screenshot
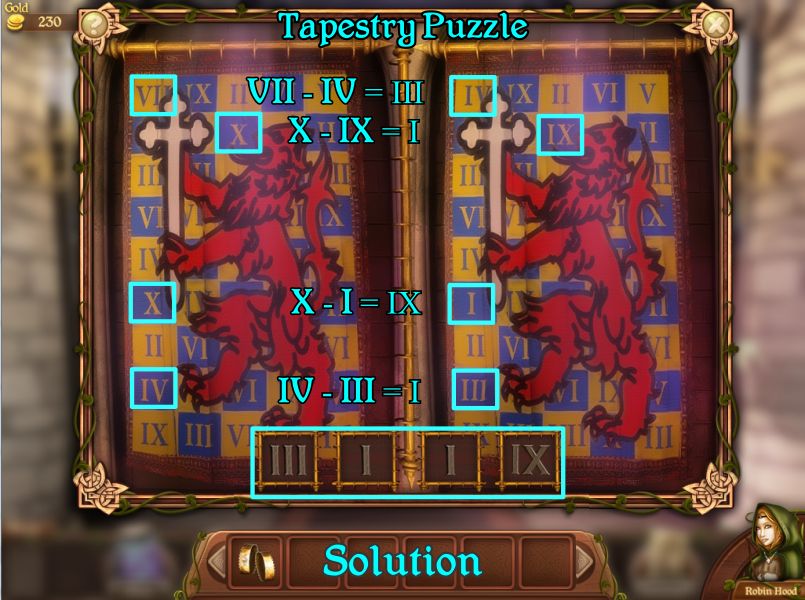
Tapestry Puzzle
Find the differences between the two tapestries.
The number on the right tapestry will be subtracted from the one on the left tapestry and the result recorded in the boxes at the bottom.
The numbers at the bottom are on the columns in the hallway and are what you will use to open the door.
Screenshot
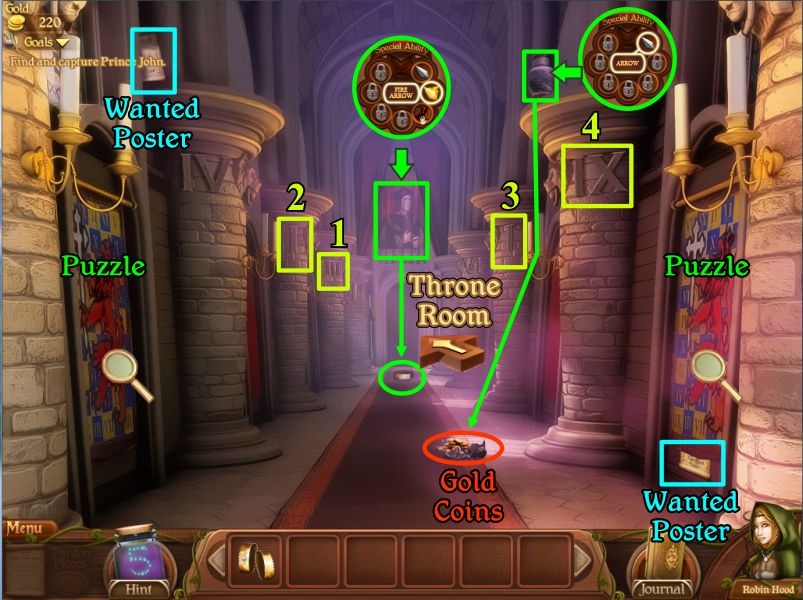
Throne Room
When you enter the Throne Room Prince John will disappear through a secret panel in back of the thrones.
Pick up the Wanted Posters and hit the hanging lamp with an Arrow so you can get the gold.
Go through the doors on the right to the Hall.
Screenshot
Castle Hall
Use Maid Marion's Charm on the guard to open the door and he will leave.
Collect the Wanted Posters and use a Fire Arrow on the candle at the left and the Strength on the planter next to it to collect 2 caches of Gold Coins before entering King Richard's Bedroom.
Screenshot
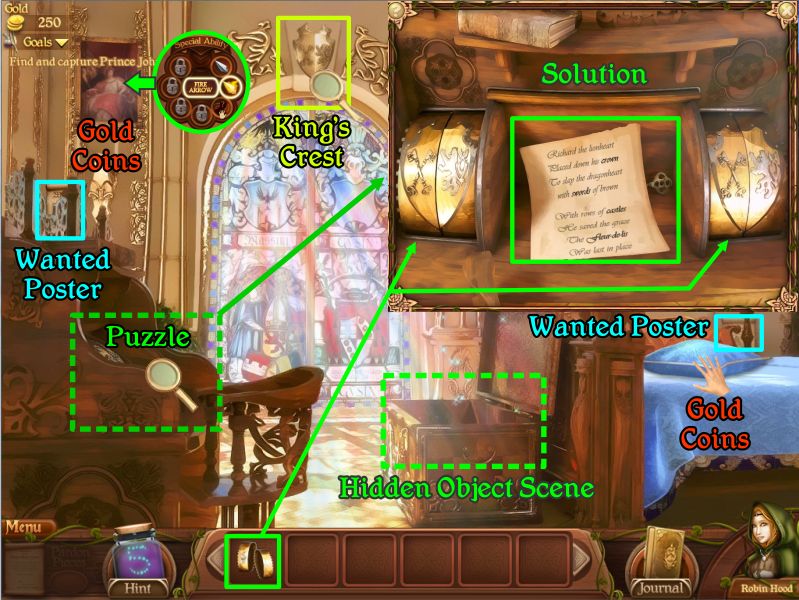
King's Bedroom
Move the pillow on the bed and use a Fire Arrow on the painting at the left so you can pick up all the Collectibles.
Play the Hidden Object scene in the trunk to get the last Gold Disk.
Take note of the King's Crest above the window which has crossed keys and a lion on it.
Click on the desk for a puzzle and place all 4 of your Gold Disks on the spindles at either side.
Turn the disks until you have crossed keys and a lion and the desk will open with a note and key for you to take.
The note has 4 words in bold print: crown, swords, castles, and fleur-de-lis.
Screenshot
Play the Hidden Object scene to get the fourth Gold Disk.
Screenshot
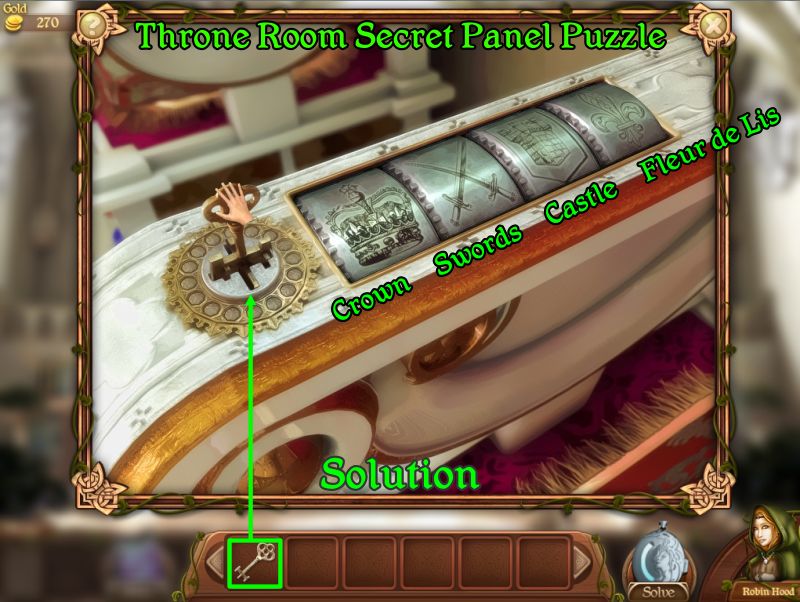
Throne Room Secret Panel Puzzle
You now have the combination and a key to use to open the secret panel behind the thrones so go to the Throne Room and click for a close up of the thrones.
Place the key in the slot and rotate the dials to crown, swords, castle, and fleur de lis.
Click on the key to open the passage.
Screenshot
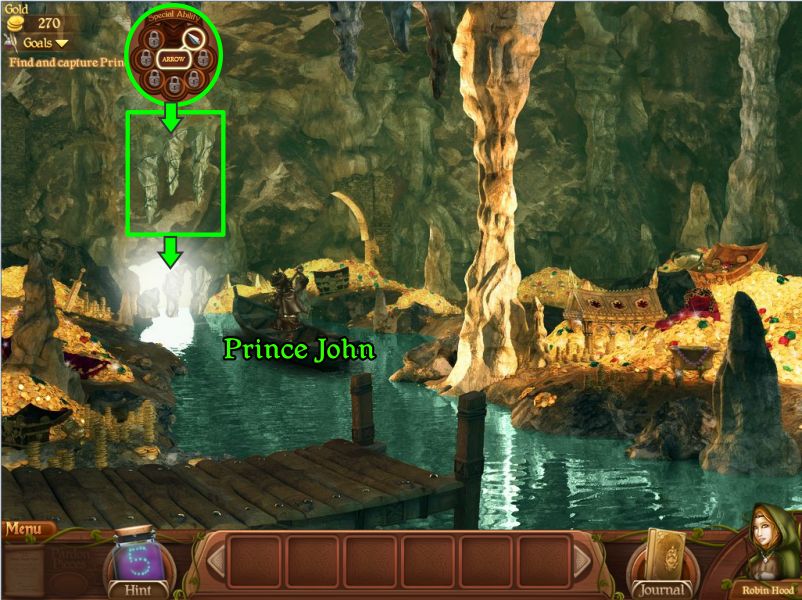
Treasure Cave
Prince John is busy shoveling gold into the boat but gets in it and starts paddling when you arrive.
Shoot the 3 stalactites above the cave opening with your Arrow Ability and he will come back and surrender.
Screenshot
Watch the closing movie and then check your Journal to make sure you have all the Collectibles.
If you have not collected everything, you back and see which scenes do not have an "Area Clear" sign.
The Town Center and Town Market will not show as cleared.
You can also check the Town Events bulletin board and play the Archery Contests to get the awards.
Posted by: grinnyp |
September 7, 2010 2:58 AM
|
September 7, 2010 2:58 AM