
World of Zellians:
Kingdom Builder
Platform: Mac, Windows
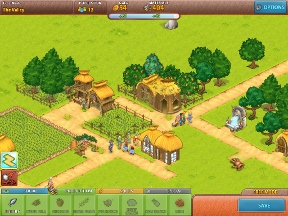
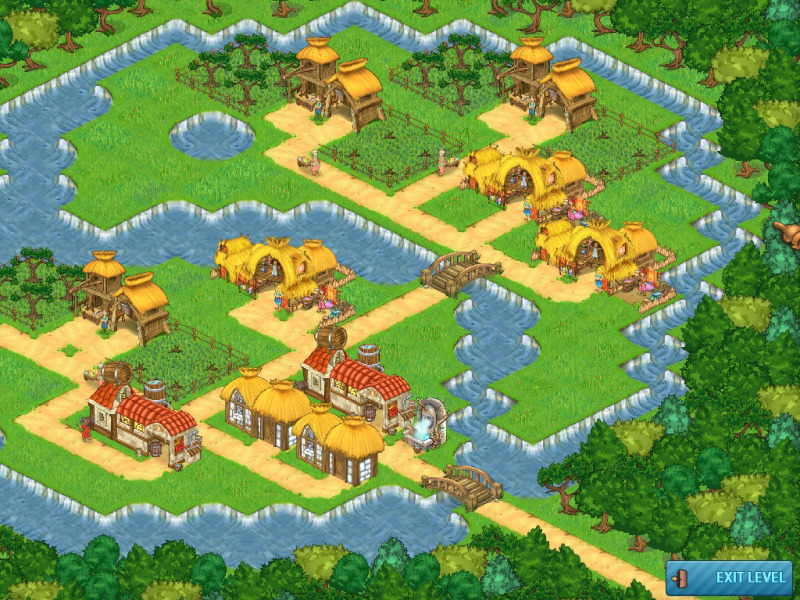
![]() World of Zellians: Kingdom Builder is a simulation and city building game along the lines of My Kingdom for the Princess and Build-a-lot. Set in a moderately whimsical fantasy realm, your job is to repair a broken kingdom by mending roads, setting up farms, and getting each area's economy up and running again. It's a colorful, light-hearted and straightforward game you can jump right into and start enjoying.
World of Zellians: Kingdom Builder is a simulation and city building game along the lines of My Kingdom for the Princess and Build-a-lot. Set in a moderately whimsical fantasy realm, your job is to repair a broken kingdom by mending roads, setting up farms, and getting each area's economy up and running again. It's a colorful, light-hearted and straightforward game you can jump right into and start enjoying.
 The game begins with Zorm, the famous city planner and your new mentor, promising to let you meet the queen if you can patch up a few roads and villages to make the travel easier. Soon you'll find yourself moving around the countryside repairing kingdoms for distressed rulers in all sorts of climates, ranging from green meadows to snowy fields, the desert, and more!
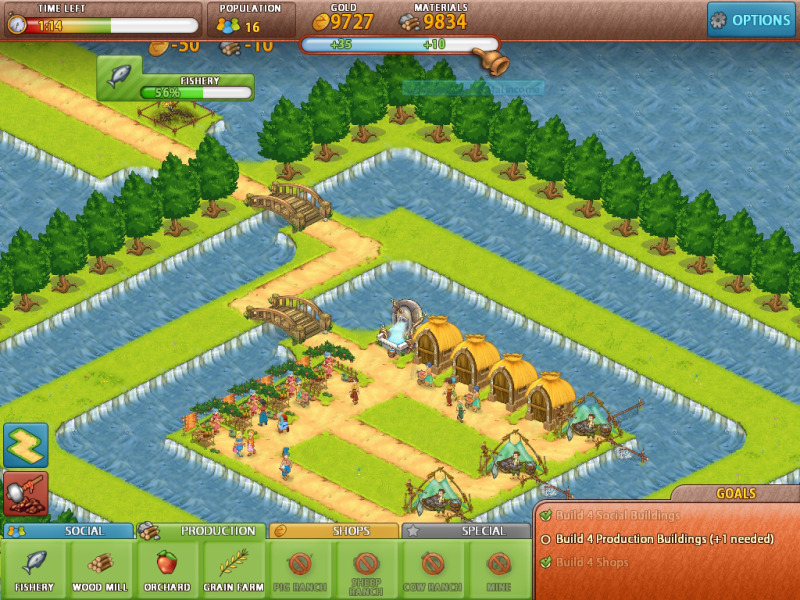
Your goals for each level vary but usually involve constructing a certain number of buildings and raising the population (or your income) to a pre-defined level. Your first task in each stage is to connect the buildings to the road and make sure the road leads to the fountain. Without a connection to those vital lifelines, your city will not function. Roads are free and you can build them anywhere you like, but usually its best to keep buildings on a tight grid, as space quickly becomes a valuable commodity.
The menu at the bottom of the screen contains everything you can build, ranging from "social" structures such as houses to production-based buildings (pig farms and orchards), shops (grocery stores) and more. Each unit has a cost in resources along with a prerequisite or two. You can't have a juice stand without an orchard, for example, and ice cream parlors require both an orchard and a dairy farm. As you move from kingdom to kingdom, the number of buildings you have access to increases.
Dealing with prerequisites is where the bulk of the challenge comes in with World of Zellians. Gold and materials, the only traditional resources you have to worry about, are automatically gathered each turn by buildings from the production and shop tabs. As long as you have a few mills or ranches it's a simple matter of waiting for your cash to build up before you lay down all the buildings you need.
 Analysis: It's easy to overlook a game like World of Zellians: Kingdom Builder. Landing in a field scattered with clones, the game doesn't do too much to set itself apart from the pack. Instead of innovating in one area or another, World of Zellians scales back the complexity, offering up its own version of Build-a-lot with cartoonish visuals and a decidedly more casual slant to the gameplay. Instead of worrying about making rent, all you have to do is manage a few building prerequisites and you're good to go.
The game's straightforward nature can either be the its biggest selling point or the number one reason to stay away. World of Zellians doesn't offer much of a challenge, even for the most casual of casual gamers. A tutorial holds your hand for several levels, making sure you do everything just right, and after that there's no real risk of losing. Your resources constantly regenerate, there's no time limit, and you can destroy buildings and recover spent resources. Apart from the occasional natural disaster, very little happens to cause problems in your village.
Gameplay aside, World of Zellians has a remarkably compelling visual presentation. Watch the villagers mill about the town or flowers blossom at the apple orchard. There's a surprising amount of charm and detail lurking in this game. With no pressure to compete, you'll certainly have time to stop and check things out.
If you're looking for a challenging building sim where your choices deeply impact gameplay, stick with Build-a-lot. If you want something a little more casual with a lot of eye candy, World of Zellians is most certainly your game.
![]() Windows:
Windows:
Download the demo
Get the full version
![]() Mac OS X:
Mac OS X:
Download the demo
Get the full version


Walkthrough Guide
(Please allow page to fully load for spoiler tags to be functional.)
World of Zellians: Kingdom Builder -Walkthrough
If there is a level you are having trouble in placing your buildings and we did not provide a screenshot, please leave a note in the comments and we will upload a screenshot for this one.
General Tips/Strategy Tips
There is no time limit except the bonus level
All goals are shown at the low left side.
Have a look around the scene before you start to build.
As doing so you will not only see what kind of buildings you already have but also find all rocks, specially the ones with gold or gems inside.
Have a good look, very often all kind of rocks are half or more hidden by trees or buildings.
Keep your mouse button pressed and drag the scene to the left, right, up and down to see the complete scene.
Use the mouse wheel or your up and down keys on the keyboard to zoom in or out the scene.
Your goal in this game is not to build in time but build everything and find the place for it.
With the hammer icon in the low left corner you can smash gold, streets, bridges and everything you built.
You cannot smash trees, ruins and sometimes buildings, which are already built for you. I
In some levels you can smash benches, which have been there when you start the level.
You can always smash houses, which are already built for you.
Tearing down buildings will give you back the total amount of gold and material, that was needed to built it.
There is always one main street and one spring in each scene.
All buildings and houses have to be connected with both of these, directly or by other streets.
First thing to do, when you start a level is always to look if everything is already connected. If not, do it.
Not connected buildings do not work, bring no income.
To build a street makes no costs and no material is needed.
Smashing a street with the hammer won't give you gold or material.
A street becomes automatically a bridge, when you have to over cross water, but you will only be able to build at parts of the water, where it is very tide.
A building, house or street shown red, when you try to build, can't be placed there, because there is an obstacle or the scene is at the end.
The dark shadows on all four sides of the scene mark the end, you can't build there.
There are three types of houses:
1. Small house - for 4 residents.
2. Family house - for 8 residents.
3. Big house - for 12 residents.
Except the bonus level you will always need at least 1 small house for building other buildings.
It doesn't matter if you build yourself or the house was already given to you.
Keep an eye on the amount of needed residents for buildings and make sure, you have enough, when it is time to build some.
Gold and material are not being moved to the next level - when you do not have a special goal to gather a certain amount, spend as much as you want.
A golden star on the map shows, that you successfully finished this level.
A level can't be replayed, but you can restart it as often as you want.
After finishing the level you can only visit to see, what you have done.
A blue star on the map shows the next place to go.
A star in rainbow colors shows you the bonus level.
You will receive the bonus level after you finished the other level in this kingdom.
Bonus Level do have a certain time limit.
When you fail, you will be asked, if you want to try again.
These level you do not have to play immediately, you can decide to leave it and come back later or not play them at all.
Playing them has not influence for proceeding in the main game
You will get a more than enough amount of gold and material.
Restrictions as needed amount of residence or other building before building some are not required in these levels. You can build everything immediately.
There are four different tabs containing the list of the buildings are available for you:
Social: You will find the residential homes and buildings needed for residents as school, fire station, hospital and so on. These buildings have no income in material or gold.
Production: Building, which will have mainly material income as granary, sheep farm, cow farm and so on. They will also bring gold income.
Shops: Shops as juice stand, shoe shop, ice cream parlor - these buildings will raise your gold income, they do not bring material income or if, very less.
Special: These buildings are only available in the kingdom, you are just working at, so they change from kingdom to kingdom. They will raise your gold income, sometimes material, sometimes it will be simply decoration.
Nearly all houses and buildings do have, beside gold and material, special requirements before you can build them.
For example, you need 24 residents to build a fire station or a granary before you can build a pig farm.
In exact words these requirements say: To build xxxx as much as you want you need to have xxxx of xxx - all requirements only have to be fulfilled once.
Hovering your mouse (without clicking) over the building inside the tab will show you all requirements.
Clicking an already built building will show you the income of material and gold.
The alert lamp on the top right shows you the problems of the complete area.
A building, that is not connected to main street or spring, a building on fire, a thief in the town or others.
Click the alert lamp to see the drop down menu with all momentary problems.
To jump to the place, where the problem is, double click the the icon in the drop down menu and keep your mouse cursor on this icon.
To extinguish a fire, you need a fire station.
You will see a circle above the burning building. This circle is a meter, that fills up slowly.
Click it and the meter will stop filling, the fire men will run to extinguish the fire.
When you do not have a fire station and the circle meter is completely filled, the building will burn down. Remove the leftover and build new.
While burning a building has no income and it will influence other buildings - for example:
A pharmacy is burning - that means, that the hospital can't work and a running around mad-man can't be cured. Or a house is burning, you do not have enough residents anymore, the fire station is not able to work.
When it starts burning and you do not have a fire station yet, you still have enough time to save the building by building a fire station at once.
Madmen need a doctor and this includes, you need a hospital.
He also has a circle meter above his had.
Click it and the doctor will take care of him.
As soon as you click the circle, the Madman will stop running.
When a Madman's meter is filled, he will destroy something. That might be just a part of the street, but can also be a building.
A thief will go into your houses, maybe destroy them and steals gold from the shops and production buildings.
Click the meter above his head and he will stop, the police will come and give you back the gold he stole.
When a thief's meter is filled, he will leave town - with your gold.
A oil refinery can bring you a lot of money - or cost you money.
When you see, that you suddenly loose a lot of money, have a look at your refineries. There will be one, producing just green smoke.
Destroy it and build another one.
Refineries also stop bringing money after a while. So when you are in need of gold, build another refinery somewhere else and tear down the dry one.
It does not only cost money but might effect your residents as well, so make sure to build them as far away from residential homes as possible.
The last level (not bonus level) always includes a special building for the king/queen of the kingdom.
This building is already build but inactive and needs up to five updates.
Hoover over the building and you will see the requirements for the update.
There is a an arrow shown at these buildings. As long as it is grey, you will still need to fulfill one or more of the needed requirements.
When it shows blue/gold simply click to update.
While updating the alert lamp sometimes shows, that the building is not connected to the spring or main street. You do NOT have to take care about it, after the update is finished, everything will be ok again.
When this last level includes a goal for a certain amount of material or gold income, have a look at the income of the special building.
Specially in the higher levels, you will see, that the income amount of these buildings are high, so you are not in need to build too much other shops or productions to reach your goal.
A walkthrough is only particular possible, as you can build where ever you want and there is no time limit (except bonus level).
The valley is nearly complete a tutorial, so we "only" provide a tip for one level and of of course the solution for the bonus level.
For all other kingdoms, you will find a description what to build in which order. You will also find instructions, when it is needed to build some in a certain place and tips how to do it best.
You or others might have a different order or way and its working well also, this is just the way, we made it through :).
All bonus level and some of the higher level provide a screenshot, how we built up the kingdom.
The last bonus level you will only get access to after the credits.
By the way: Take your time and revisit the places after you built them. Zoom it, look at the characters and how busy they are.
Take your time during the level and have a look at the fire men, running to extinguish a fire or at the doctor, curing a mad man.
It's fun and great made.
Valley
Level 2 - Village of Clear lake
Build a wood mill first, so you will not have to wait that long for material and income.
Build the needed houses for the resident-goal at last.
BONUS LEVEL - Island of Tartour
Extend the street from the bridge straight ahead to the end.
Place four houses next to the fountain.
Extend the street from the fountain down.
Build left side of the street 4 Juice stands.
Build one fishery next to the last house, two more at the left side of this square.
Add streets to the two fisheries.
Build the last fishery top left of the scene, behind the trees.
Screenshot
The Prairie
Level 6 - Big Lake
Smash all rocks to gather additional gold an material.
Build an orchard.
Build a small house.
Build in the following order:
Grain Farm, 2 Groceries, 1 Pig Farm and 3 houses.
Level 7 - Village of Kingsroad
To reach the required amount of material build:
4 graneries, 2 pig farms and 1 orchard.
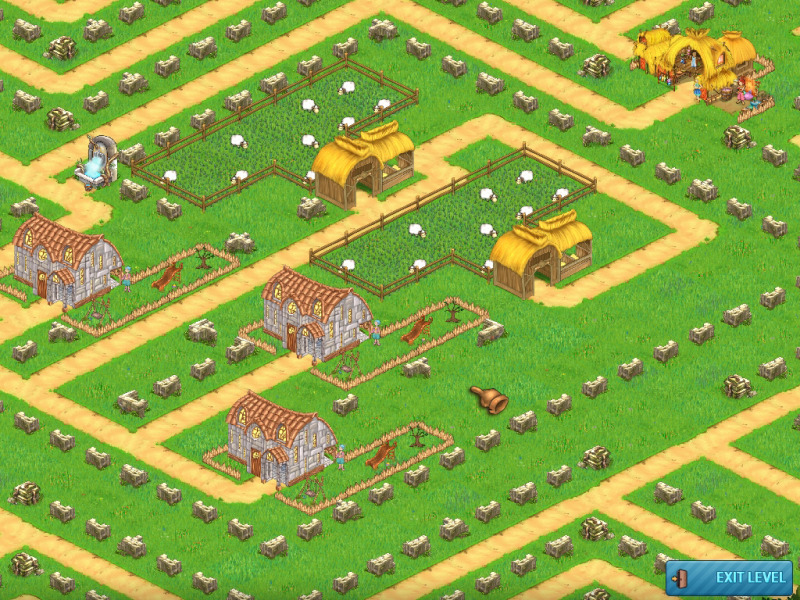
Level 8 - Village of Whitewool
Build a grainery as it is required for a pig farm.
To reach the material goal you need to build 4 pig farms and 3 sheep ranchs.
Level 9 - Town of Warmmilk
Build first a granary and an orchard in the middle.
Build four grocery stores at the left side.
Build one family house to get the required amount of population for the cow ranch.
Build one cow ranch right side of the river, the other one left side of the river, behind the tree.
Connect both with the main street.
Build family houses to reach the population goal.
Level 10 - Town of Hoofstomp
To be able to update the kings farm first look for all stones to smash them.
Connect the fisheries at the very bottom of the scene, left side, with the main street and the main street with the fountain.
Build one cow ranch right next to the kings farm (make sure, that you leave the space to connect the farm with the street.
Build another cow- and a sheep ranch.
Build the family houses to get the needed amount of population.
Upgrade the kings farm.
To fulfill the material goal build 1 more fishery, 1 sheep- and 3 pig farms.
BONUS LEVEL - Land of Popcrop
Build four family houses - three right, one left to the fountain.
Connect all with street and fountain.
Go to the left and build 4 grocery stores with their back at the second fields seen from the fountain.
Connect the stores with the street.
Build a wood mill behind the fountain and connect it with the street.
Build five orchards between the field in front of the fountain and houses.
Screenshot
The Forest
Level 11 - Village of Lotwood
Extinguish the fire and get rid of the burnt wood by using the hammer.
Build a family house.
Build a granary top right of the scene.
Build orchards and connect them with the street till you reach the income goal.
Level 12 - Lakeleave Forest
Build 2 family houses and 1 small house.
Build a granary.
Build a fire station.
Now build a sheep ranch and 10 shoe shops.
Level 13 - Berryisland Woods
Build a granary, an orchard, 2 fisheries and a family house.
Build a Fire station.
Build a sheep ranch and a wood mill.
To reach the income goal, build 6 shoe shops, 5 groceries, one orchard and 2 more fisheries.
Build family homes to fulfill the population goal.
Level 14 - Village of Midtree
Connect all houses and buildings with the main street and the fountain.
Build 2 family houses to get enough population for a fire station.
Build a wood mill to get faster material.
Build fire station.
Build a granary and a sheep ranch.
Build 4 shoe shops and 6 boutiques.
Level 15 - Pinewood Woods
Connect all buildings with the main street and the fountain.
Make sure to look everywhere or use the alert lamp to find everything.
Build one small house and two family houses to get the population you need for a fire station.
Build a fire station.
Now build a wood mill, a granary and two sheep ranches.
Build four shoe shops and upgrade the shoe world (lower part of the scene).
Build four boutiques and a cow ranch.
Upgrade the fashion plaza.
Build a grocery store.
BONUS LEVEL- Lonely Fountain
Build at once a fire station left next to fountain and connect it with it the street and the fountain.
The street needs to get left up next to the fire station, so you can build a bridge over the water above.
Build 2 family houses underneath the fire station and connect them with the street.
Build a wood mill at the complete left at this part of the scene and connect it with the street.
I built a second fire station underneath the family houses, as everything was burning and it took too long, till the firemen could take care about everything (I know, in this case I have a social building to much, but the idea came AFTER i already built the two houses ;) ).
Build a boutique behind the wood mill and connect it with the street.
Build a wood mill at the complete left on the part over the bridge.
Build the third wood mill at the top of this part.
Connect both mills with the bridge.
Build one boutique right under the upper wooden mill.
Build the third boutique right next to it.
Screenshot
The Ruins
Level 16 - Stonemoon Ruins
Connect the fountain with the main street.
Look around and smash all stones to get additional material
Remember, you can't smash ruins.
Build 2 Orchards.
Build 1 small and 2 family houses.
Wait till you have the needed 150 gold and build a fire station.
Build a granary.
Wait for gold and material, then build a school.
Build 3 additional family homes to fulfill the population goal.
Level 17 - Village of Dalstone
Look around and smash rocks to get additional material.
You do not need to keep all the street parts, already existing, just smash, what is not needed or in your way.
Build 2 family homes to get the needed population for a fire station.
Build the fire station.
Wait till you have the gold and build 1 orchards.
Build two juice stands. That will give you a little additional income.
Build a second orchard to have more income.
Build a granary.
Build the 2 herbal pharmacies.
Build 2 more family houses and a small house to fulfill the population goal.
Build the 2 schools.
Level 18 - Town of Old wood
Build to family homes and a fire station on top at the main street.
Build the 8 wood mills underneath the main street.
You will have enough space - just smash the already existing streets and build them new as needed.
Build the 2 sheep ranches.
Level 19 - Village of the Wise
Build a fire station.
Build 2 grocery stores.
Build a herbal pharmacy for a little additional income.
Build 2 schools.
Build a granary for additional material.
Build a university.
Build family homes to reach the population goal.
Level 20 - Ruins of Alanmar
Do not build underneath the Heritage Center - you will need this space to build the university later.
Build 1 orchard and 1 family home.
Build the fire station.
Build 3 wood mills a the left, smash the existing road elements and connect your wood mills.
Build 1 grain farm and 2 groceries.
Build 2 schools and the university underneath the Heritage Center - remove the existing street elements and connect your university.
Build 1 sheep ranch and 1 shoe shop.
Build a boutique and houses till you reach 96 residents.
Upgrade the Heritage Center.
Build an additional fire station and 5 boutiques to earn money faster for the second upgrade.
Wait till you have enough gold and upgrade the Heritage Center the second time.
BONUS LEVEL - The Old City
Build 3 at the lower part of the inner square 3 schools and 2 sheep farms above.
There is a gap on top of the inner square.
Remove the street elements, build the boutique and connect it downwards and then left with the spring.
Screenshot
The Mountains
Level 21 - Snowbloom
Connect the main street with the spring and tear down sheep and pig ranch.
Build instead a granary and two orchards.
Build 2 family houses and a fire station.
Build 2 groceries and 6 ice cream parlors.
Build 12 groceries.
Level 22 - Crystalpeak
The "Madman" needs a hospital, which is already built but not active.
When ever the circle meter above his head is full, he will destroy some, so keep an eye on him.
While building leave free the wide parts top and bottom right to the hospital free to build there the university and a cow ranch.
Build a granary and 2 orchards.
Build to pharmacies and 2 family houses.
Build a fire station and 3 groceries.
Build 2 schools and the university bottom right next to the hospital.
Click the Madman's circle to send the doctor.
Build a cow ranch top right next to the hospital.
You will have to smash a little of the road surrounding the hospital.
Build 2 ice cream parlors.
Level 23 - Whitecross Village
Build 2 orchards and a family house.
Build 2 groceries.
Build 2 schools and 2 pharmacies.
Build 1 family house and 2 cow ranches.
Build 1 university and 2 family houses.
Build a fire station and 6 more pharmacies.
Build 1 hospital, a small house and the second hospital.
Level 24 - Village of Lonela
Build a wood mill and 2 family houses.
Build 1 orchard and 1 granary.
Build a fire station and a sheep ranch.
Build 2 groceries and 2 schools.
Build a pharmacy and a university.
Build a hospital and wait till you reached the required amount of material.
Level 25 - Kingdom Highway
Do not built at the huge free space top left, as you will need this for cow ranch, university, pig ranch and wood mill.
Build everything as close as possible next to each other.
Connect all buildings with the main street. Do not waste any room, stay near at the sides.
Tear down the grocery top right, you will need the money and the material.
Smash all rocks for additional gold and material but also for space.
Build in the lower part of the scene 1 orchard, 1 granary, 1 grocery.
Look for gaps and build 1 family house and 1 small house.
Also at the bottom build a fire station and 1 school.
Build a second grocery and the second school.
Build 2 pharmacies.
Build top left but as much down as possible 3 wood mills.
Use a gap somewhere to build a family house.
Build on top, above the wood mills the university and the hospital.
Top left, right side build a cow ranch and next to it 2 pig ranches.
Build a second fire station and upgrade the fire service-
Build family houses till you have 65 residents and upgrade the food center.
Upgrade the kingdom highway and look for the room for 5 ice cream parlors.
Upgrade the ice cream factory.
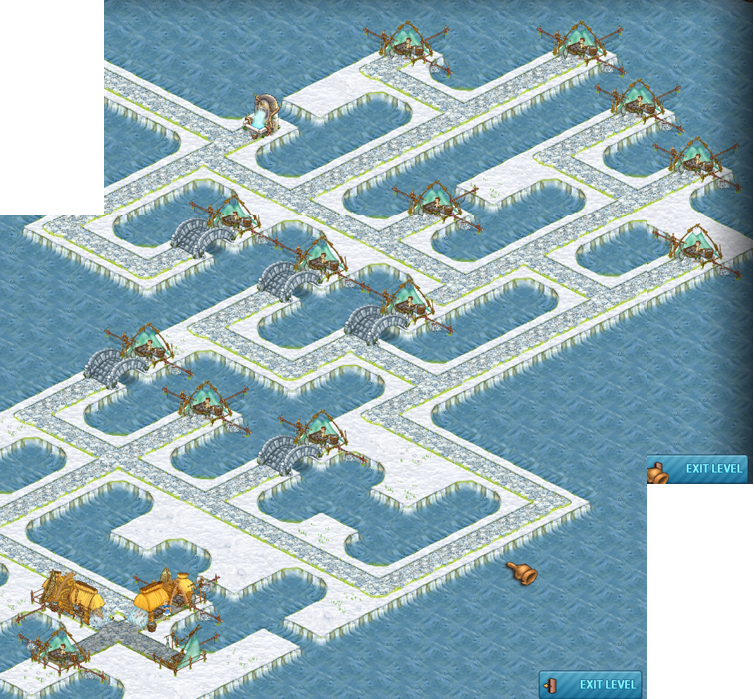
BONUS LEVEL - Snowstorm Peak
The trick in this level is to smash the streets getting right from the fountain downwards and rebuild them right side of the river.
To get a connection to the main street, you want to build bridges.
As soon as the level starts, get the hammer and smash the streets downwards on the right side and rebuild them left side of the river.
Also remove the horizontal street at the first corner down.
Build at the bottom of the first vertical part a hospital.
Build a bridge over the river and connect it with the main street.
As soon as the hospital is ready, click the mad men.
Now build 4 schools above the hospital, 3 schools left next to the hospital and 2 schools on the second part downwards.
Please also have a look at the screenshot.
Screenshot
The Tundra
Level 26 - Snowflake Town
Build the smaller buildings in the lower part of the scene - on the top you will have enough room for the bigger ones.
Build a big house and a fire station.
Build a fishery and an orchard.
Build a granary and a pig ranch.
Wait till you have enough gold and build 2 diners.
Build a second orchard and a cow ranch.
Build 2 groceries, a pharmacy and 2 schools.
Build a university, a family home and a hospital.
Build 3 ice cream parlors.
Level 27 - Town of Icewater
Build 1 orchard and a pharmacy.
Build 2 groceries and 4 fisheries.
Build 2 schools and 1 university.
Build 1 pig- and 1 sheep ranch.
Build 1 wood mill and a shoe shop.
Build the 2 big fisheries.
Level 28 - Frostbite River
Build a small house and 2 orchards.
Build a family house and a granary.
Build a big house and 2 groceries.
Build 2 pharmacies and 1 fire station.
Build 2 schools and 1 cow ranch.
Build 1 university and 1 hospital.
Build 1 big house and 4 ice cream parlors.
Build a gourmet temple.
Level 29 - Town of Nearnorth
The fruit market and the cow ranch do have to come in the middle because of their size. Same for hospital and university.
Build tide as you will need all big buildings.
Build a fire station and 4 fisheries.
Build 2 orchards and 2 groceries.
Build 2 schools and 1 university.
Build 2 pharmacies and 1 big house
Build 1 hospital and 1 wood mill.
Build 1 sheep ranch and 1 shoe shop.
Build 1 cow ranch and 1 big house.
Build 1 gourmet temple and 1 diner.
Level 30 - Town of Whitelime
Build 2 groceries and one big house.
Build a fire station and 2 schools.
Build a university and 1 big house.
Build 2 pharmacies and 1 hospital.
Build a fishery and another university.
Build a pig ranch and 2 diner.
Build 2 big houses and Zargor's Delight.
Build a Gourmet Temple and 4 orchards.
Build 4 juice stands and 1 fruit market.
Build 1 old cellar and upgrade the Food Temple.
Upgrade the Sweet Palace.
BONUS LEVEL - The Icy Strallows
Build the fisheries on the top and middle.
Build the big fishery at the lower part of the scene.
Screenshot
Volcano
Level 31 - Magmaville
Build a wood mill and a big house.
Build 2 mines and 1 fire station.
Build a granary and a 2nd wood mill.
Build 1 orchard and 2 groceries.
Build 2 big houses and 1 great oven.
Build mines till you reach your material goal.
Level 32 - Town of Goldust
Beside the fire station you will from now on also a police station as Zorm is sending thieves, which will destroy your houses and steal your gold.
Build a big house and a fire station.
Build a granary and an orchard.
Build a grocery and a school.
Build a police station and 2 big houses.
Build 2 big houses and 6 Gold smiths.
Level 33 - Gargoyle Peaks
There are a lot of rocks with gold and emeralds. Make sure to collect them all.
First connect all buildings, as this you will already have a fire station.
Build a granary and an orchard.
Build a grocery and a school.
Build a police station and a wood mill.
Build the 2nd school and an university.
Build jeweleries till you reach your gold goal.
Level 34 - Emerald Crater
The trick in this level is to ignore the Madman and the thief AND to be fast.
By ignoring them, you have no need to build a police station, schools, university.
It is possible, that the Madman will destroy your Spa - restart your level then. He need three times a full circle meter before he destroys your streets, thats why you have to be fast.
Destroy at the beginning all street parts on the left side and connect houses and the spring with the bridge on the right side.
Destroy all rocks in the middle.
When you are in need of gold or material destroy rocks with emeralds, you will find them at the sides. Do not destroy them from the beginning, as the thief will steal to much.
Build as near as possible 3 big houses down from the family houses on the top.
Build a fire station in front of these family houses.
Build as close as possible a granary and an orchard.
Build 4 fruit stands, look for gaps.
Build 2 pharmacies, 2 more big houses, 2 wood mills and 2 groceries.
As soon as you have everything needed for the spa, build it.
Build the two special buildings at the lower part of the scene.
Build everything you still might need and upgrade the spa.
Please have a look at the screen shot to see, where the buildings have to go.
Screenshot
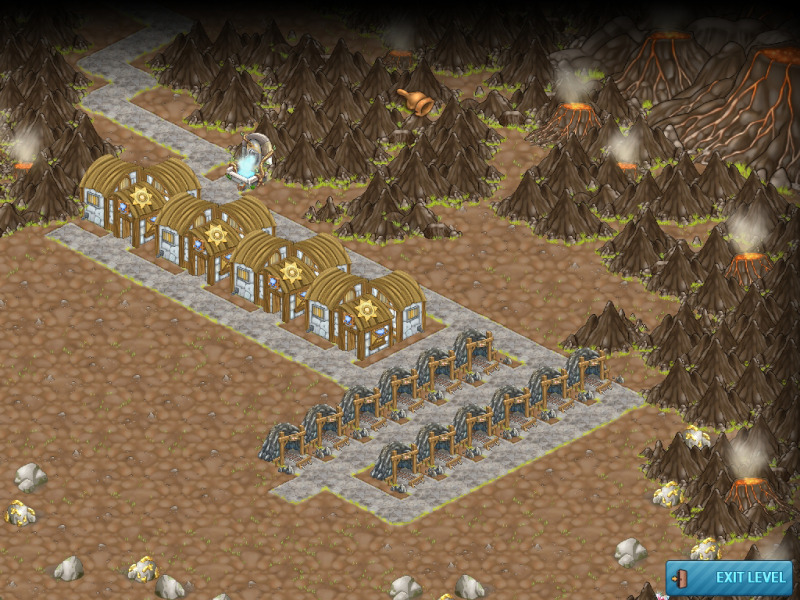
Level 35 - Old Mines of Azuri
Go completely to the right and connect the houses with spring and main street.
Build 1 orchard and 1 granary.
Build 1 big house and 1 fire station.
Connect the mine on the left using the upper entrance and stay tide to the rocks.
Build a wood mill and 4 mines.
Build 2 big houses and 1 Goldsmith.
Build a school and a grocery.
Build a police station and upgrade the mine the first time.
Build 3 Goldsmith and 2 wood mills.
Build a grocery and big houses till you have at least 64 residents.
Build a great oven and upgrade the mine for the second time.
Build a school and 1 university.
Build 3 jeweleries and big houses till you have at least 82 residents.
Upgrade the mine for the third time.
When you are still in need for gold, build 1 or 2 more jeweleries.
BONUS LEVEL - The Forgotten Crater
Scroll up to the spring and take away the the rocks.
As this you will automatically get your gold-goal.
Build underneath the spring 4 police stations and connect them with main street and spring.
Build 12 mines and connect them as well.
Screenshot
The Desert
Level 37 - Farfey Oasis
Build 3 big houses and 3 fire stations.
Build 3 wood mills and 3 groceries.
Wait till you have gold and material for the first refinery
Build 2 more refineries.
Level 38 - Town of Windysands
Build 3 big houses and 1 fire station.
Build a wood mill and 1 grocery.
Build 1 school and 1 police station.
Build 2 fire stations.
Scroll left side down, connect the street and build 3 refineries there. When a refinery only produces green toxic gas, destroy it and build another one somewhere else.
Build 2 more police stations and a big house.
Build 2 palm banks.
Level 39 - Palm Oasis
Build 4 small houses and a fire station.
Build a police station and 5 dune markets.
Build 6 small houses and 2 fire stations.
Build 3 refineries and take care, that none is producing toxic gas.
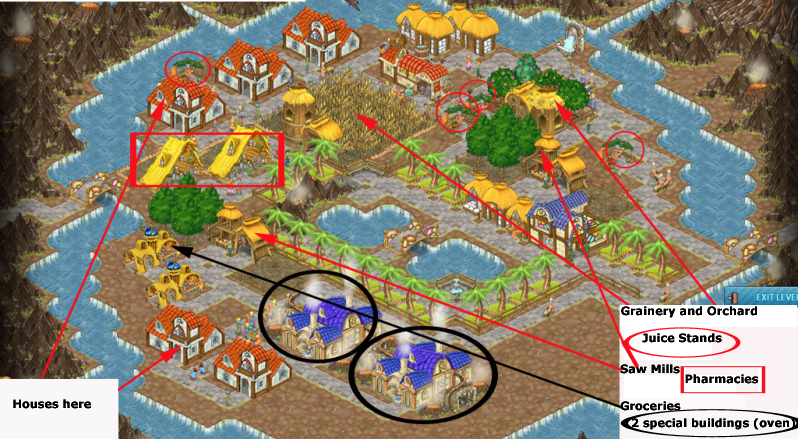
Level 40 - The Royal Palace
First thing to do: Scroll up and place the Palace West Wing. It only fits at on particular place, so try out.
Connect palace, orchard and granary with the main street and spring.
Build a small house, 1 family house and 2 big houses.
Build 1 fire station and 2 groceries.
Build 1 school and a police station.
Build a second school and 2 pharmacies.
Build a wood mill and 1 pig ranch.
Build a university and a hospital (both should be placed on the left side).
Build 2 more fire stations and 2 more police stations.
Build big houses till you have at least 50 residents.
Build three refineries, a palm bank and 2 dune markets.
Upgrade the palace.
Build 5 mines and a fishery.
Build 2 diner and wait till you have enough gold - upgrade the palace the second time.
When one of the refineries stops producing, tear it down and build another one somewhere else to get the needed gold faster.
Screenshot
Level 41 - City of Stonerose
Build 2 groceries and 2 big houses.
Build a fire station and a school.
Build a police station and 1 sheep ranch.
Build a wood mill and 3 dune markets.
Build a shoe shop and a boutique.
Build 3 pharmacies and 1 big house.
Build an "Essence of Al-Zagur" and a "1001 Night Clothes".
Build big houses till you have at least 66 residents.
Upgrade "Zellia's Bridal Dream" 1 x.
Build a school and a university.
Build big houses till you have at least 77 residents.
Build Desert Rose Hair and upgrade it 1x.
Build 2 more "Essence of Al-Zagur" to get a higher income.
Upgrade "Zellia's Bridal Dream" a second time.
BONUS LEVEL - Fort Palmer
All you need to do is catch all thieves, till you have enough gold.
Place yourself in the middle, so you will have a good look at all entrances.
The Coast
All special buildings (except fountains, benches, palm trees) in this kingdom need to have "Sea view" - make sure, that you do only build other building at the coast line, when there is no other way! Level 42 - Damana's Beach
To connect the two sea side cafés in this level you will need to tear down at least one of the benches between the palms.
Build 1 orchard and a granary.
Build 2 wood mills and a sheep ranch.
Build a shoe shop and a boutique.
Build big houses till you have at least 32 residents.
Build 2 party shops and 1 more orchard.
Build a cow ranch and 1 ice cream parlor.
You may want to build a second fire station. I'm not absolutely sure, if this means, that fires can be extinguished faster, but I had the impression.
Build big houses till you have at least 60 residents.
Build the 2 Seaside Cafés.
Level 43 - Lonely Delta
Connect the spring, but take care, that you use a less space as possible for this.
There is only one place for the bridge, so take care, that you find the best way to there.
Start building at the spring.
Build 1 orchard and 1 granary.
Build 2 big houses and 1 fire station.
Build 2 wood mills and 2 pharmacies.
Build 2 groceries and a school.
Build 1 police station and a second school.
To build the university and the hospital, remove the street at the right side, bottom.
Take care to rebuild, what the Madmen might have destroyed till the hospital is build.
Build a university and a hospital.
Build 8 benches and 16 palm trees.
Build 4 fountains.
It doesn't matter, where you build these things. You can make it nice or just place it every where or all on one spot.
Level 44 - Island of Sardor
It is very important to not waste space left side of the palm trees, as a lot of buildings have to be placed there.
Build 3 big houses and a fire station.
Look for rocks with gold and emeralds as it takes to long, till you have enough material and gold to go on building.
Build an orchard and 1 granary
Build a grocery and 2 wood mills.
Build a school and a police station.
Build 1 juice stand and 2 pharmacies.
Build a cow- and a pig ranch.
Build a sheep ranch and a shoe shop.
Build 1 boutique and upgrade the Honeymoon Suite.
Build a fishery and 1 diner.
Upgrade the Honeymoon Suite.
Build a surf shop and upgrade the Honeymoon Suite.
Build a ice cream parlor and a Seaside Cafe.
Upgrade the Honeymoon Suite.
Build 2 party shops and upgrade the Honeymoon Suite one last time.
Screenshot
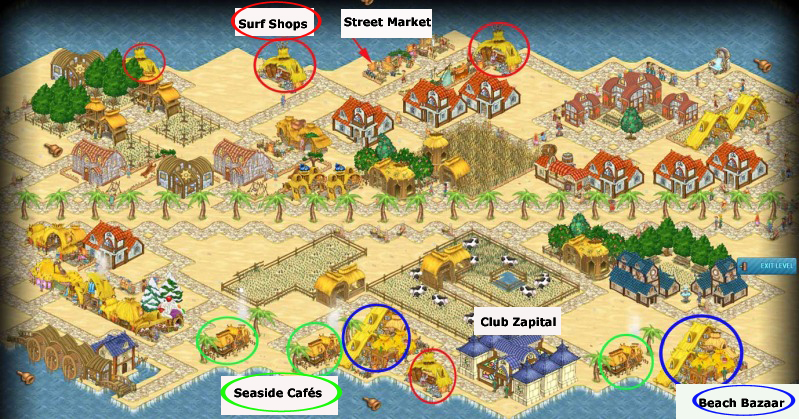
Level 45 - Kingcoast Avenue
This is one of the most challenge level in this game.
The problem is not, that you do not have enough room, but there is only very less space for the "sea view" buildings.
Start by connecting water plant, spring and houses.
While building keep in mind: You will need on the top coastline room for 3 surf shops and 1 street market, at the bottom coast line for the club, 3 Seaside Cafés and 2 Beach Bazaars.
The club can only be build at one place. Count the street egdes at the bottom. The club has to be placed at the 4th seen from right.
Build 3 big houses and 1 fire station.
Build 1 orchard and 1 granary.
Build 2 groceries and 2 schools.
Build 2 pharmacies and 2 wood mills.
Build 1 university and 1 hospital
Build 1 sheep- and 1 cow ranch.
Build 1 shoe shop, 1 boutique and 1 ice cream parlor.
Build the street market and the 3 surf shops.
Build houses till you have at least 79 residents.
Build the Club Zaptial, the 2 Beach Bazaars and the Seaside Cafés.
Screenshot
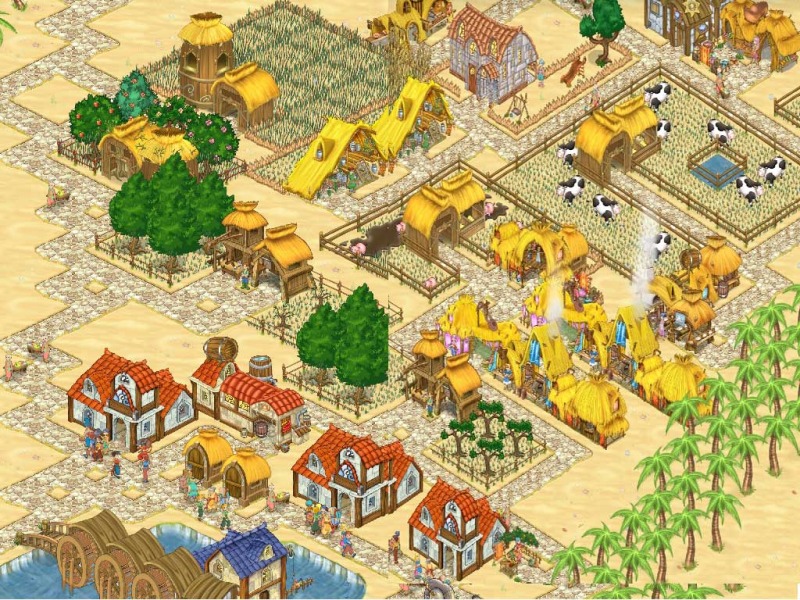
Level 46 - Lovers Beach
Just think about only to build at the coast line, what really needs to go there.
Build a small house and a family house.
Build 1 big house and a fire station.
Build 1 granary and 2 orchards.
Build 2 wood mills and 2 groceries.
Build 2 schools and a police station.
Build 2 pharmacies and 1 university.
Build a hospital and a pig ranch.
Build a fishery and 1 dinger.
Build big houses till you have at least 50 residents.
Build a cow ranch and 1 ice cream parlor.
Build a sheep ranch and 1 Seaside Café.
Upgrade the "Wedding Ceremony" 1x.
Build a shoe shop and 2 boutiques.
Build 4 party shops and 1 street market.
Build big houses till you have at least 75 residents.
Build a Beach Bazaar and upgrade the "Wedding Ceremony" for the second time.
Build the Club Zapital and big houses till you have at least 100 residents.
Upgrade the "Wedding Ceremony" once again.
CONGRATULATION - YOU FINISHED ALL NORMAL LEVEL
You will have access to the last bonus level after the credits.
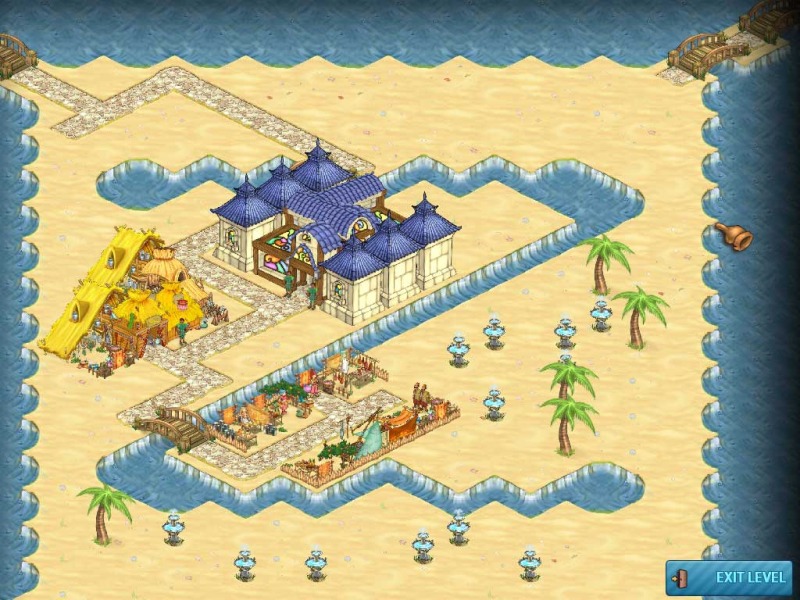
BONUS LEVEL - Z marks the spot
Zoom out and connect to the main street with a bridge.
The Club Zapital, street market and beach bazaar find place inside the Z.
As 20 special buildings use benches, palm trees or fountains where ever you want to place them.
Screenshot
Thanks to Kayleigh for putting together such an awesome walkthrough \o/ Wooty-tooty!
Posted by: Kero |
October 4, 2009 1:25 PM
|
October 4, 2009 1:25 PM