

![]() Reincarnation: one of the great mysteries of our time. Are such things as past lives reality, or are they the stuff of legend? When Jane, a professional copywriter, gets the chance to make a break from her usual pallet of fashion reviews and make-up tips, she jumps at it. The article, a serious look at reincarnation, has almost everything that a good article needs: facts, testimonials, theories. It's only missing one thing: a personal perspective from the writer. Reincarnations: Awakening follows Jane as she attempts to gain that perspective.
Reincarnation: one of the great mysteries of our time. Are such things as past lives reality, or are they the stuff of legend? When Jane, a professional copywriter, gets the chance to make a break from her usual pallet of fashion reviews and make-up tips, she jumps at it. The article, a serious look at reincarnation, has almost everything that a good article needs: facts, testimonials, theories. It's only missing one thing: a personal perspective from the writer. Reincarnations: Awakening follows Jane as she attempts to gain that perspective.
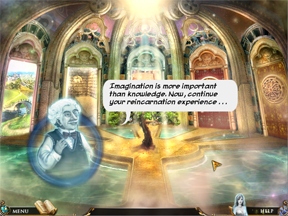
 A mysterious CD soon makes its way to Jane, advertising the services of a Dr. Herzle. At the urging of a friend, Jane sets up an appointment with the doctor. In his office under hypnosis, she navigates her subconscious and begins to experience past lives. In each of these lives, Jane experiences a former self at a critical point in their own life, where a decision either one way or another will have a profound impact. It is up to Jane to help her past selves through the tasks that are required by the decisions to be made. If she can complete the tasks and solve the puzzles, she will be able to move on to the next past life and eventually gain a greater understanding of not only her past lives, but reincarnation itself.
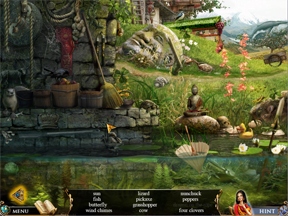
Reincarnations: Awakening is an absolutely gorgeous hidden-object game from Vogat Interactive, the same developers that brought us the match-3 game Cindy's Travels: Flooded Kingdom. As you help Jane through her past lives, you will encounter a variety of hidden-object scenes. They are, for the most part, very straight forward. Objects listed in yellow cannot be located without first performing some sort of action, such as opening a drawer, or swinging a hanging lamp out of the way. A sparkling area of the scene shows something that must be looked at or activated in order to progress. If you can't remember what you're supposed to be doing, a list of tasks is always available. Of course, if you get well and truly stuck, you can always click on the "hint" button, and a circle will appear over the area where one of the objects is located.
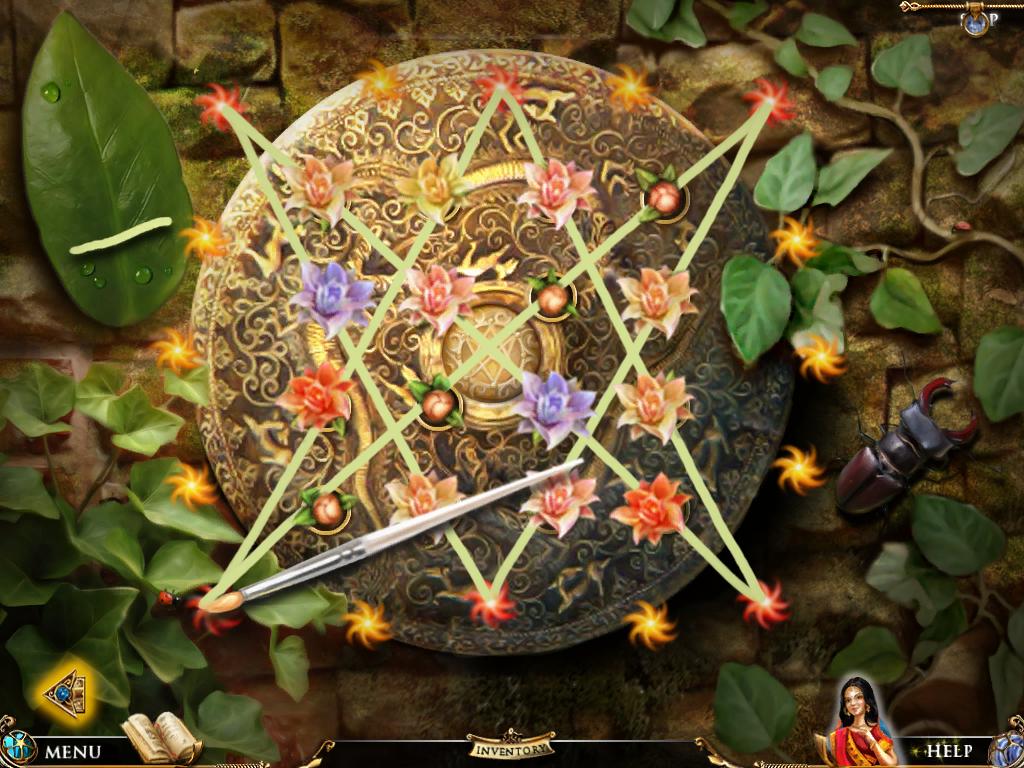
In and around the various hidden-object scenes, you will also encounter a number of puzzles. Some of them are very simple, such as a memory game to open a locked door, or a jigsaw puzzle to reconstruct a map. Others are more difficult, such as a string puzzle to open flowering buds, or using differing lengths of fuse to properly time an explosion. To help in solving these puzzles, look in Jane's diary. The solutions will be laid out for you. If you are absolutely stuck and just cannot solve the puzzle, after a certain length of time you will be able to click the "solve" button, and be able to go on to the next part of the game.
Analysis: Reincarnations: Awakening has the look and feel of a top-notch hidden-object title. The graphic design is beautiful, the gameplay is excellent, and the story, while a bit hokey, is at least well thought out.
 The painted style of the scenes in Reincarnations: Awakening is at once realistic and mystical, as brush strokes meet details in scenes that are a wonder to behold. The design of the hidden-object scenes are detailed enough to never make it a pixel-hunt when looking for objects from the laundry list. And objects, for the most part, look like you would expect them too, although it's jarring to encounter out-of-place items (a lizard in a ladies changing room, a dollar bill in a Parisian street market) shoved in scenes where they do not belong.
The puzzles that you run into throughout the game are also well implemented. Most of the time, the operation of the puzzle is obvious. And, if not, a quick glance at the help button will give you a quick run-down on how things are supposed to work. You can either try to solve it yourself, look at Jane's diary and try to reach the solution that way, or wait until the "solve" button becomes active to skip the puzzle. Either way, if you are stumped, you won't have to wait too long.
The soundtrack for Reincarnations: Awakening is also quite beautiful, and a joy to listen to. There are different styles based on where you are and what you are doing at the time, but for the most part, it is a lovely understated flow of melody below the activity on screen. Never too loud or raucous to detract from what you are doing. Just enough to underscore the feeling at the time, and help to draw you further into the story of the game.
While we could leave it at this, there are a few flaws that keep the game from being a truly awesome experience. Firstly, the puzzles, while numerous and varied, are not exactly difficult. Most can be solved by simple trial-and-error, and a couple seem to have no logical solution at all, requiring you to use random choices in an attempt to solve them. You never get a sense of urgency to solve them, either, knowing that if you simply wait a few minutes, you will be able to skip the puzzle with no penalty. It makes the puzzles seem less of a requirement for finishing the game, and more of a momentary nuisance.
While the story is well done and does a good job of drawing you into the game, the voice acting is truly horrid. If I had to listen to Dr. Herzle's voice in order to be hypnotized, I'd remain wide awake. There is absolutely nothing soothing about that voice. The other voices of the game come off as wooden, quite often seemingly unaware of the emotion they are supposed to be portraying at that moment. I think this game would have done better to leave them out and have the player stick with subtitles and conversation balloons.
When it comes right down to it, Reincarnations: Awakening is a fun, if not completely fulfilling experience. While it will probably be no spiritual awakening for anyone, there is enough to like about the game to make it worth checking out. Who knows, maybe you'll have your own past-life experience while helping Jane through her's?
![]() Windows:
Windows:
Download the demo
Get the full version
![]() Mac OS X:
Mac OS X:
Download the demo
Get the full version


Walkthrough Guide
(Please allow page to fully load for spoiler tags to be functional.)
Reincarnations: Awakening Walkthrough
General Tips and Strategies
Many of the hidden object scenes have a few items listed in gold instead of white. These require more than one step to find. The object/area you need to interact with to reveal the desired object will be sparkling in the scene, and you will be prompted about the next steps.
Most of the puzzles and mini-games can be skipped if you like.
Hints will often appear in the lower right hand corner if you are having difficulty figuring out what to do next.
Introduction
Shortly after the cutscene you will receive a fax. Click it to view it, then click the sparkling area on the left for a hidden object scene where you will receive the historical data.
A CD will be slid under the door. Pick it up and place it in the disk holder of the projector on the table, then hit the light switch.
Hit the arrow in the bottom left to explore the other side of the room.
Pick up the reincarnation sketch sparkling on the floor. Then click on the boat on the right and move the cushions around until you find the statistical data.
Finally click on the bulletin board on the left and place the historical data, statistics, and image in the correct locations.
A sticky note will fall giving you the password to your laptop. Click the ringing cell phone, then zoom in on the laptop on the table.
Use the password you found on the sticky note to use the laptop. This will be different every time.
The web search will happen automatically and you'll go to the next scene.
Dr. Herzle's Mansion
Click the front door for a memory matching puzzle.
Once inside, click the stained glass window on the left for a puzzle. Solution: Screenshot When completed you'll receive the blue gem.
Click the plant to find a light bulb.
Examine the sparkling painting above the stairs for a puzzle. Click any two puzzle pieces to switch them. When one is in the correct location it will make a happy sound and sparkle. You will get the elevator gear upon completion.
View the reproduction on the left and note the positions of the arms, legs, and feet. Then examine the relief above the gated area and match the parts to mimic the reproduction. Then you can do the store room hidden object scene to find the knife switch, the final elevator part.
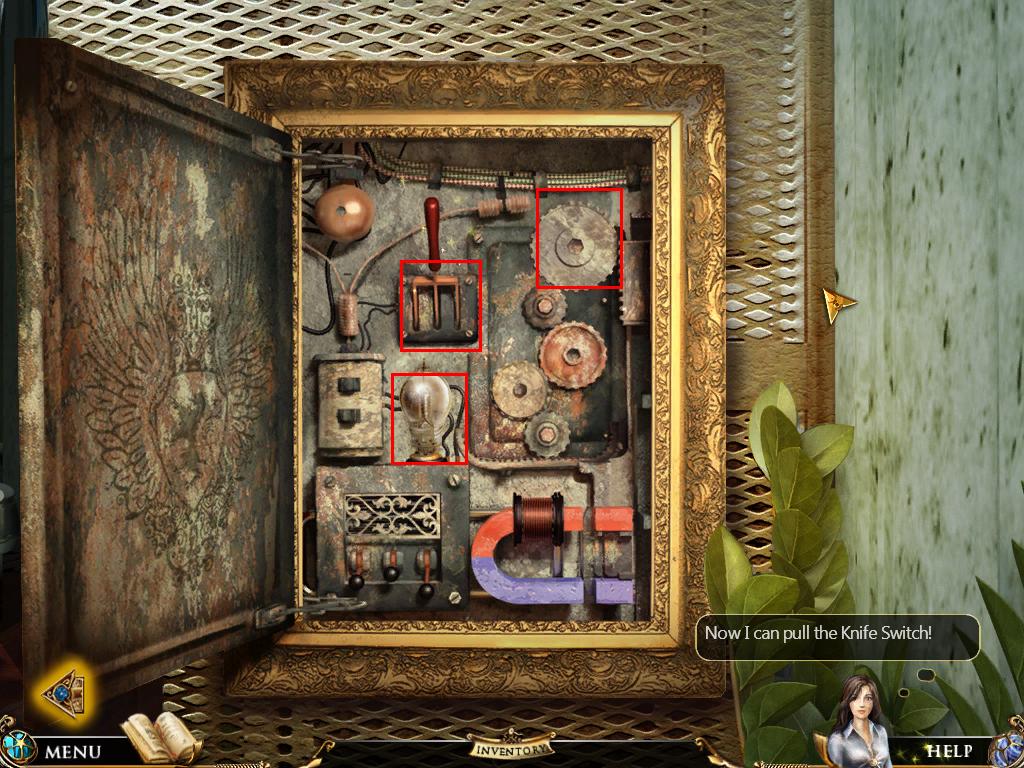
Zoom in on the elevator control panel and put the parts in their proper locations. Solution: Screenshot Then click the switch to use the elevator.
Click the crystal ball and place the blue gem in the slot to the left.
Click the armchair. After the cutscene, place the purple gem in your inventory in the purple door.
The Temple
Examine the hanging tiles for a puzzle. The object is to click the tiles in an order such that an image is revealed. Solution:
Numbering the tiles left to right, top to bottom 1 - 16, click in the following order. 1, 4, 13, 16, 5, 8, 13, 16, 14, 15
Afterwards you will get a flute picture.
Enter the temple and click the prayer mat for a puzzle. Select colors of yarn on the right and click spots on the mat to make it match the image. If you make a mistake you can simply click over it. Note that you can place continuous rows or columns of the same color by clicking and dragging the mouse. When complete you will receive a Melody Scroll.
Click the sparkling area on the right of the temple for a hidden object scene. You'll receive a drumstick. Use it on the drum for a cutscene.
Go outside the temple and click the tea house on the left. Inside the tea house, examine the shelves on the left for a hidden object scene and get the flute.
Examine the music stand and place the flute, flute image, and melody scroll on the stand. For the mini-game, hit the hole on the flute that corresponds to the color indicated on the flute image. Be sure to hit double notes when marked. If you make a mistake you can just continue.
Click the tea table for another mini-game. Simply click the items in the order on the diagram.
Back outside click under the bridge for a hidden object scene and receive the garden shears. Use these to cut the shrub in the right foreground.
Click the shield for a puzzle. Solution: Screenshot When solved you will get the buddha's third eye.
Go into the temple and place the third eye on the buddha's forehead and receive the green gem.
In the portal, place the green gem in the green door to enter the next past life.
Freedom
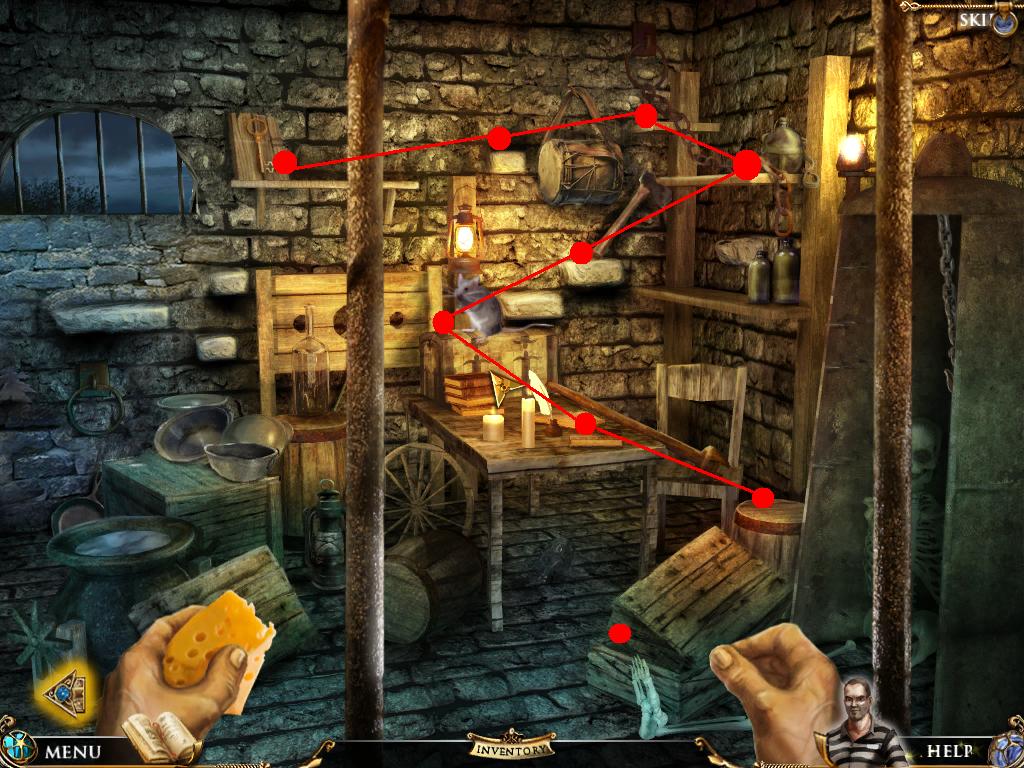
Look under the bed for a hidden object scene where you find cheese.
Examine the window in the upper right to get the cupboard handle and read the secret message.
Use the cupboard handle on the sparkling cupboard to get the rat.
Examine the cell door for a mini-game. Lead the rat to the key. Solution: Screenshot Then pick up the key and use it in the door.
Enter the storeroom and examine the shelves on the left for a hidden object scene. Receive a crowbar.
Use the crowbar on the large wooden crate to gain access to the mine.
Go back to the hallway outside the storeroom and take the rope in the right corner. Return to the storeroom and use the rope on the bars above the hole to the mine.
Go down to the mine and examine the handcart to find two red fuses and an elegant key. Another red fuse is next to the lantern in the main mine area.
Go back up to the storeroom using the rope and examine the elegant trunk on the floor on the right. Use the elegant key on the lock for a hidden object scene and the last red fuse.
Return to the mine and examine the junk pile to the right of the cart for a hidden object scene. You will receive dynamite.
Zoom in on the cart and examine the piece of paper on the ground. It tells you the length of the mine tunnel - 90 feet.
Now use the fuses on the cart. They will appear to the right of the cart. Place the dynamite in the cart. Select the fuses with lengths that add up to 90 - 30 feet and 60 feet. Place these on the dynamite. Then drag the lit candle to the fuses.
When you get your freedom you will get the pendulum gem. At the portal use the gem on the center blue door.
The Magician
Invisible Rabbit Trick
Examine the piece of paper on the floor, the calendar, and the newspaper on the right.
Examine the fortune teller display and zoom in again for a puzzle. Solution:
Rabbit, squid, lady, cat, bird on top (all animate creatures). Mug, moon, pumpkin, key, leaf on bottom.
You can then access your Magician's diary to practice your act.
Pick up the gold, sparkling map piece to the right of the fortune teller.
Zoom back out and examine the wagon on the right for a hidden object scene and get the cage handle.
Examine the invisible rabbit trick. Use the cage handle on the knob on top and find six keys. Screenshot
Once you've found all the keys a puzzle will begin where you have to rotate the keys to make the mirrors match the background. This puzzle is different every time. A general strategy is to work from one side to the other, only moving to the next mirror once all the preceding ones match. Then pull the handle to do the trick.
Lucky Harry Trick
Click the arrow in the bottom left to go to the City Square.
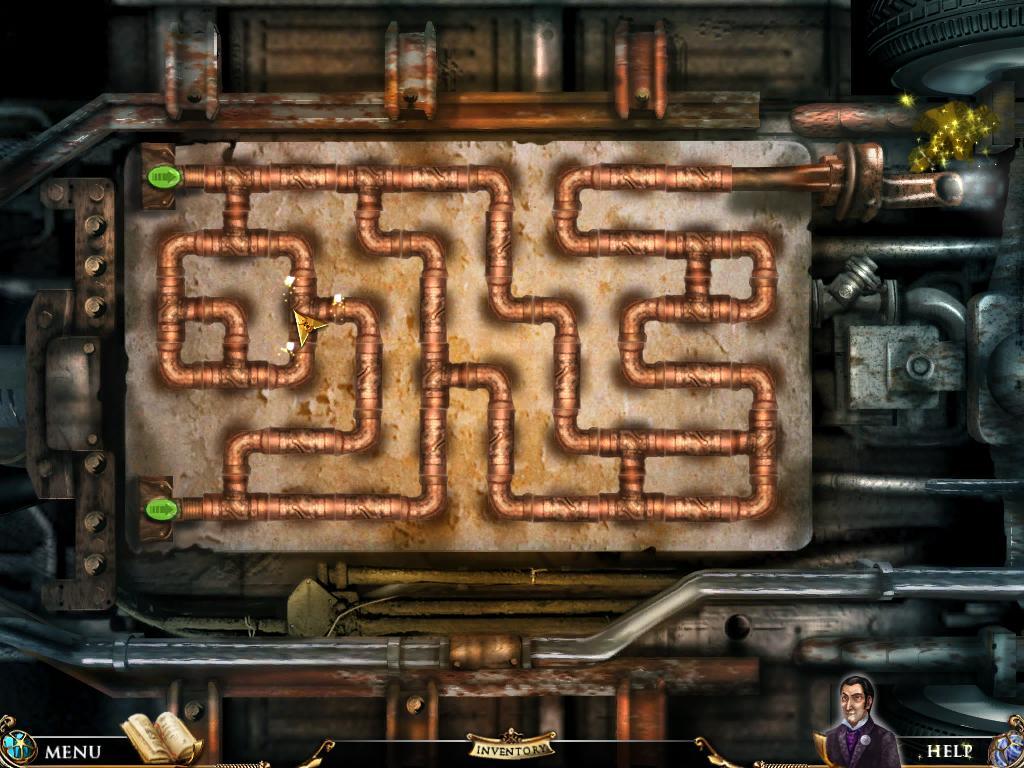
Examine the car for a pipe puzzle. Solution: Screenshot You will receive another map piece when you solve it.
Zoom in on the fountain for another map piece.
From the town square enter the Barbershop. Look inside the box on the floor to the right and move the objects around until you find the map piece.
Examine the shelves on the left for a hidden object scene and receive the throwing knives.
Zoom in on the wig case in the back for a mini-game. Arrange the wigs according to the diagram on the right of the room. Solution:
Men's wigs on top and women's on bottom, each shortest to longest from left to right.
Afterwards you will receive the final map piece.
Click the button below the dummy to reveal the hidden panel. Then zoom in for a magnet puzzle. The object is to move all the magnets within the dummy body to the matching locations outside. Simply match the dots. The magnets will turn dark when in the correct location.
Now pick up the knives in the left and thrsow them at the dummy - they will be drawn to the magnets.
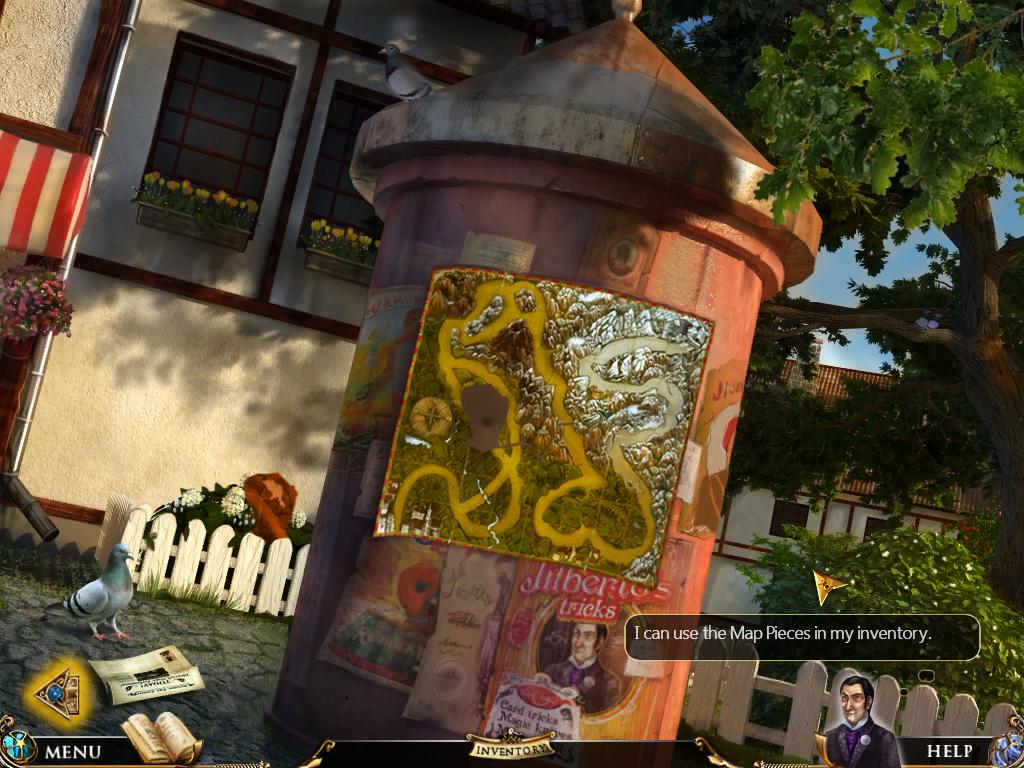
Get to the Blimp
Return to the town square by clicking the arrow in the bottom left. Zoom in on the pillar. The remainder of the map pieces are scattered throughout this scene. Place them in the correct locations in the map, and then add the five pieces from your inventory. Solution: Screenshot
Click the Mayor's Porch for a hidden object scene to receive the circular Barber's Key.
It is hidden in the wheel of the bike.
Return to the Barber's and use the key in the door. Turn the lock until the key matches the lock. Hit the handle to go out to the blimp.
You will enter a hidden object scene - get the Pull. Use it in the blimp on the ceiling near the front window where indicated.
Click the Pull, then place the Map on the board. This will trigger a mini-game. The object is to follow the path with the blimp, using the mouse to turn the steering wheel. You will have to fight the wind, represented by a little man on either side of the map.
After the cutscene receive the red gem and use it in the fourth door at the portal.
A Dog's Life
Enter a hidden object scene and get a fish.
Zoom out to meet the love of your life. Then enter the kitchen.
Click the cutting board for a hidden object scene where you receive a recipe book.
Return to the close up of the cutting board for a mini-game where you make veggie animals. Look at the picture and find vegetables in the scene to match those in the image. You will be told how many ingredients are remaining. You will get a bowl of vegetable animals when complete.
Click the stove on the right. Put the bowl of veggies on the counter. You must place tools to create an apparatus. Solution:
Place the can, the spoon, the soup ingredients, the knife and broom, the watermelon, then hit the broom.
Get the Funny Soup.
Return to your love and give her the Funny Soup.
Zoom in on the truck. Distract the cat with the fish in your inventory. Then click the medicine case for a puzzle. Solution: Screenshot You will receive a Medicine Bone.
Take the Medicine Bone to your love.
Examine the back of the truck bed for a hidden object scene where you get a hot water bottle.
Return to the kitchen and zoom in on the sink to fill the hot water bottle. Solution:
Hot water, cold, hot, cold, hot.
Take the water bottle to your love.
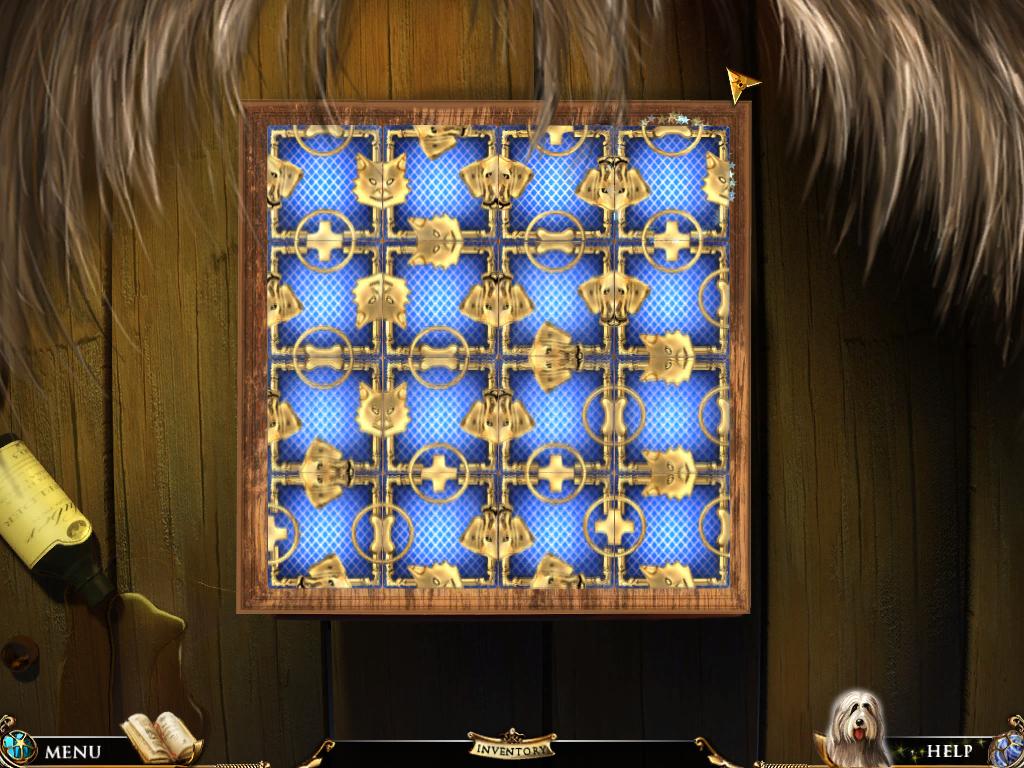
Examine the crates for a puzzle. Move the vegetables around to find six pink bows around the area. You will receive a box of bows.
Return to your love and place the bows on her according to Dogs' Fashion Magazine.
One on the center of her head, two on each ear, one at the base of her tail.
You will receive a yellow gem - use it on the last door in the portal.
Space Teddy
Zoom in on the star cannon, then the trailer on the right for a hidden object scene. Receive the capsule.
Zoom in on the star cannon again twice until you can view the hatch. Use the capsule on the hatch, then put the bear and letter inside.
Go back to the park and examine the bench for a hidden object scene and get an Index Dial.
Examine the gazebo from the park. There are several statue pieces in the scene. Place them on the statue base from bottom to top. The piece will only join the statue if it is in the correct order. You will receive another Index Dial.
Examine the gate for a Zodiac puzzle. You must slide the pieces so they appear horizontally in the exact order they start out. Solution: Screenshot Use the extra spaces to the right and down to move pieces out of the way and store pieces you will want to use soon.
Go up to the observatory and click the bookshelves for a hidden object scene. Get the telescope wheel. Zoom in on the table for a puzzle. Solution:
Mercury, Venus, Earth, Mars, Jupiter, Saturn, Uranus, Neptune, Pluto
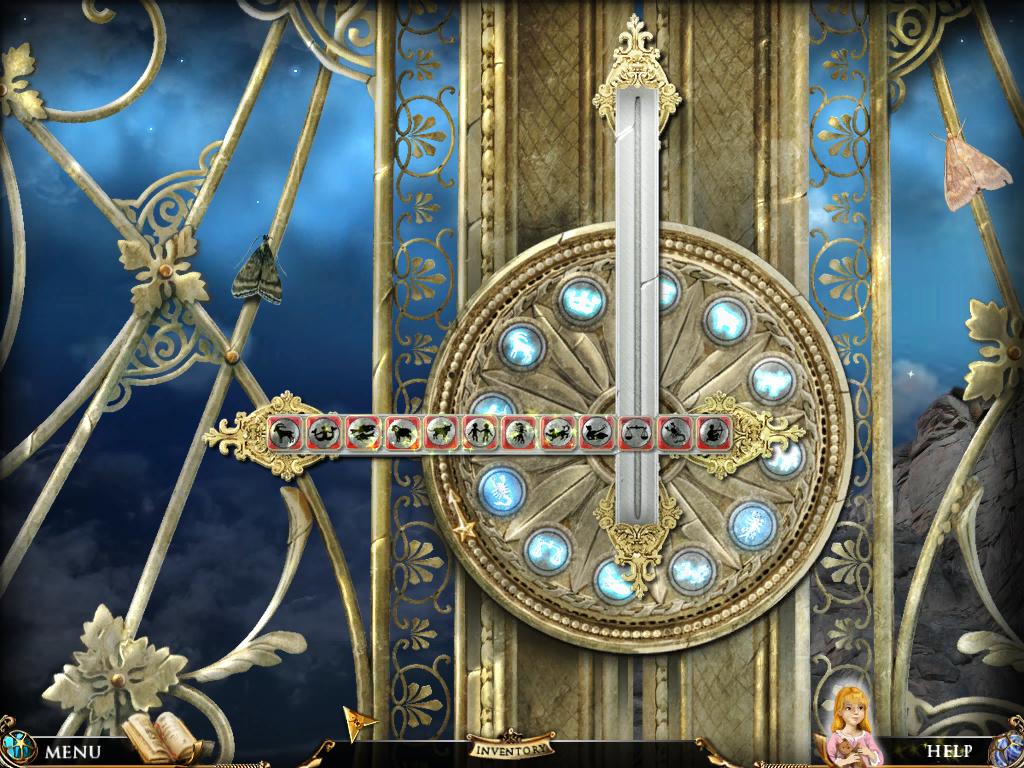
Put the wheel on the telescope for a constellation puzzle. The object is to trace the constellation by bringing each star into focus. Use the sliders on the right and bottom to move the window of focus. Each star will turn blue when it is in focus - then hit the red star button. Screenshot
When the constellation is complete, the focus will move to the dragon's eye - hit the red star button to receive the star coordinates.
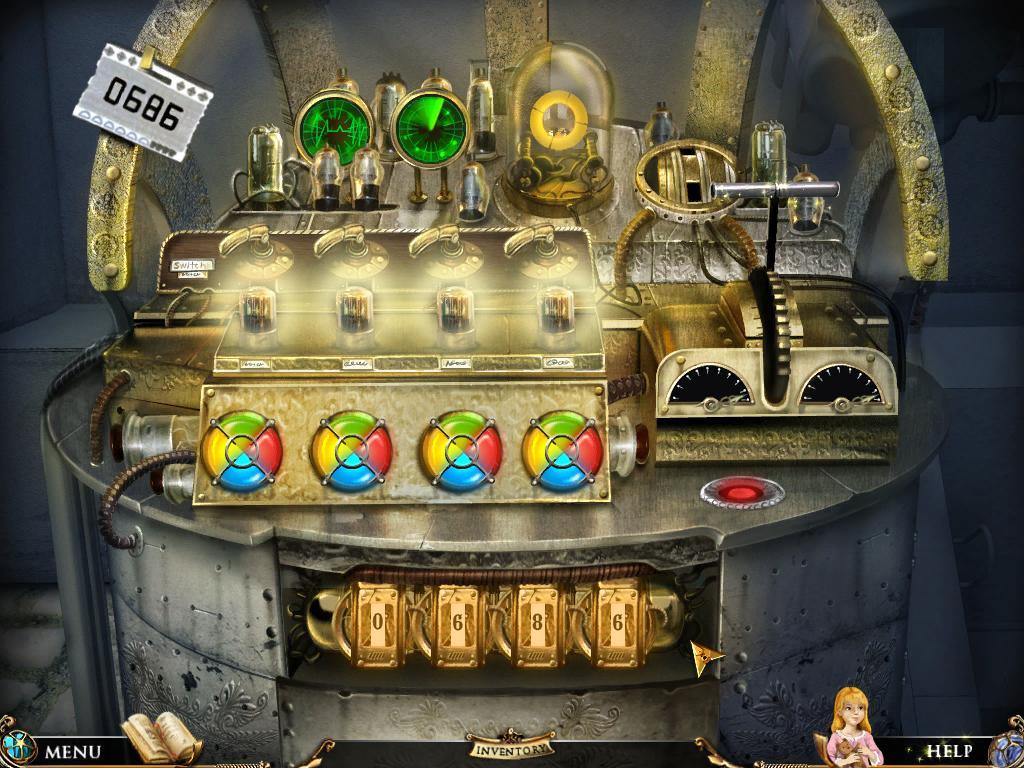
0686
Zoom in on the clock. Open your diary to the page regarding the clock. You need to adjust the weights until they match the picture in the diary. Solution:
From left to right you need: two small cones, one big cone, one big cone above and small below, and one small cone.
When complete you will receive the last Index Dial.
Return to the control panel of the Star Cannon and place the Index Dials for a puzzle. The object is to match the colors on the dials to the colors given on the handles. Once you have done this, you can change the number below. Do this four times to change the four numbers to the coordinates you found earlier. Screenshot
0686
Then pull the knife switch to launch the teddy bear.
You will get a blue gem.
After the cutscene, place the blue gem in the center of the tree of life and match the past lives with the corresponding colors.
Thanks to eileen for whipping up this awesome walkthrough!! \o/
Posted by: Kero |
October 19, 2009 2:00 PM
|
October 19, 2009 2:00 PM