
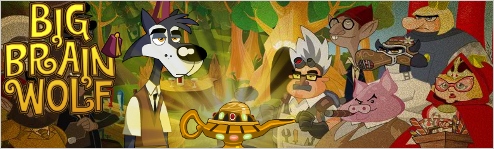
![]() Once upon a time, in a kingdom ruled by a red-hooded princess, there lived a young wolf. Unlike the rest of his family, this wolf was neither very big nor particularly bad. In fact, he wasn't too fond of eating people, preferring to eat vegetables and play chess instead. His mother wasn't too pleased with this, and she reminded him every day how he brought shame to the family. One morning her musical howl didn't fill the air, and the not-so-big, not-so-bad wolf knew something was wrong. Thus begins Big Brain Wolf, an adventure/puzzle game that parodies nearly every fairy tale and fairy tale character you can imagine, providing some surprisingly challenging puzzles along the way.
Once upon a time, in a kingdom ruled by a red-hooded princess, there lived a young wolf. Unlike the rest of his family, this wolf was neither very big nor particularly bad. In fact, he wasn't too fond of eating people, preferring to eat vegetables and play chess instead. His mother wasn't too pleased with this, and she reminded him every day how he brought shame to the family. One morning her musical howl didn't fill the air, and the not-so-big, not-so-bad wolf knew something was wrong. Thus begins Big Brain Wolf, an adventure/puzzle game that parodies nearly every fairy tale and fairy tale character you can imagine, providing some surprisingly challenging puzzles along the way.
 Big Brain Wolf is built from an adventure game blueprint and uses brain teaser-style puzzles to provide challenge. Point and click your way through a lush cartoon world, examining objects and speaking to NPCs on every screen. When an obstacle prevents passage, such as someone requiring a password or some activist sheep blocking your way, it's time to get solving. Puzzles range from the ordinary to unique, simple to brutally challenging. A basic hint system provides a nudge or two, but otherwise it's just you and your skull full of wiggling cells.
The story in Big Brain Wolf is one of the game's big draws, and it paints a deliciously complete satire of fairy tales as a whole. Watch as Pinnochio the lawyer tries to prove his client's innocence (and that he's a real boy)! Thrill as the three not-so-little pigs try to buy real estate! Chortle as every wolf in the game pokes fun at you for being an asthmatic vegan! The nuances in both dialogue and animation are deep and encourage you to click everything in sight just to get a laugh.
Living up to its "brain" name, Big Brain Wolf features half a dozen brain games designed in collaboration with neuroscientists from Brain Center International. Each one is designed to help with specific functions of the brain and can be played as often as you like from the menu screen. Earning points in these games scores you keys that unlock hints in the main adventure, so not only are you getting a mental workout, you're helping yourself beat the game, too.
 Analysis: Big Brain Wolf has the reworked fairy tale feeling found in Emerald City Confidential along with the sense of humor from Fairy Godmother Tycoon or the Shrek movies. There's also a Professor Layton vibe for those of you acquainted with the Nintendo DS titles. From the game's opening through every puzzle and scene, Big Brain Wolf is dripping in parody, and you'll lap up every ounce of it.
While it may have a cartoon exterior, Big Brain Wolf isn't designed for kids. The humor will go over the heads of most children, the puzzles are more challenging than many kids can wrap their heads around, and there are one or two instances of mild language. It might be a good one to sit down and play with your kids, however, and with over 60 puzzles to solve across five chapters, there's several hours of game waiting to be played.
Moving around in Big Brain Wolf leaves something to be desired, as once you click, the animation is set and you can't break stride. Some actions require the wolf to move to a certain part of the screen, leaving you to stare as he lumbers across the ground, helpless to interact. This sluggish performance may discourage some players from exploring, as it can feel like a chore waiting for the wolf to respond. Don't let a tiny wait turn you away from going click-crazy, though, as Big Brain Wolf rewards the inquisitive in hilarious ways.
It's a bit of a surprise hit, but Big Brain Wolf hits the sweet spot between humor and serious adventure/puzzle gaming. It's more cerebral than the Sam & Max series, and more structured, varied and adventure-like than The Amazing Brain Train. This is a game you'll want to pick up for the writing and visual presentation but will love for its humor and great puzzles.
![]() Windows:
Windows:
Download the demo
Get the full version
![]() Mac OS X:
Mac OS X:
Not available.
Try Boot Camp or Parallels or CrossOver Games.
Big Brain Wolf is available to download from these affiliates:


Walkthrough Guide
(Please allow page to fully load for spoiler tags to be functional.)
Big Brain Wolf Walkthrough
General Tips and Strategies
By doing the brain exercises in the lamp menus, you can acquire keys which can then be used to open up to three hints for each puzzle.
Make sure you talk to everyone, sometimes several times. Also, you generally want to exhaust all the conversation options with each character to make sure you don't miss any puzzle opportunities.
Sometimes there is little indication of what items in a scene will trigger a puzzle, so click everywhere.
By looking at the puzzle menu in the genie lamp at the bottom left, you can check which puzzles you've encountered. There are 12 for each chapter. If you haven't opened a puzzle, it will appear as "locked" in the menu. You can also go back and replay old puzzles using the same menu.
Chapter 1
Click anywhere to begin conversation with your genie tutor. Click again to receive basic game directions. When this conversation ends, follow the brief movement tutorial.
Click on the glowing scroll on the left to begin...
PUZZLE 1: Shining Star
Solution: Link every dot without repeating a line.
Click the wooden laptop. Click the bedroom door - it is disabled.
Click on the laptop again to begin...
PUZZLE 2: Ace Shuffle
Solution:
Row 1: Spade, Club, Diamond, Heart
Row 2: Club, Spade, Heart, Diamond
Row 3: Diamond, Heart, Spade, Club
Row 4: Heart, Diamond, Club, Spade
The bedroom door will be unlocked once the puzzle is completed. Click the door to leave the room.
Re-enter the bedroom to do an optional puzzle. Go all the way to the left screen (where the window is) and click on the chemistry set.
PUZZLE 3: Smart Drink
Solution:
Compartment 1: 10 spaces, Compartment 2: 7 spaces, Compartment 3: 3 spaces.
Move everything from compartment 1 into compartment 2
Then, 2 into 3
3 into 1
2 into 3
3 into 1
2 into 3
1 into 2
2 into 3
3 into 1
Enter the kitchen. Examine note on refrigerator to decode mom's note.
PUZZLE 4: The Fridge Note.
Solution: "All the better to eat you with."
Exit door to leave house. You will enter the world map and go to the pub.
Go to the right and talk to the leprauchaun outside the VIP room. Find out that you need a passphrase from the bartender to leave the main gate.
Talk to the bartender again until a challenge is triggered.
PUZZLE 5: Upside Down
Solution: take the two end pieces off the row of five and put them on the ends of the row above. Take the single piece from the top and put it on the bottom. The bartender will now tell you the password for the gate.
You can talk to the speaker next to the gate beyond the VIP room to leave the academy.
PUZZLE 6: The Broken Pyramid
Solution: Drag and rotate the pieces to complete the pyramid.
When completed, you can leave the academy. You will emerge in the world map, and go to the fountain.
Talk to the hitchhiking fox.
PUZZLE 7: Toggle Puzzle Stripe
Solution: click the four corners. Then click the center square in the 2nd and 4th row.
Go further to the right and talk to the grasshopper fiddler.
Click on the paved road near the grasshopper.
PUZZLE 8: Magic Square
Solution:
294
753
618
Go to the next screen to the right and click on the door to the court.
PUZZLE 9: Switching Places
Solution: Click the blocks in the following order: blue, yellow, green, red, yellow, blue, red, yellow, blue, red.
Enter the courthouse.
Click one of the dwarf lawyers.
PUZZLE 10: Pull My Finger
Solution: 23
Talk to Bratney, and then click on the lantern to her left.
PUZZLE 11: Lamp Challenge
Solution: 34215
Go to the right one screen to where Bratney is. Click the window on the right.
PUZZLE 12: Pixel Swivel
Solution:
Key: Letter each of the nine intersection of numbers with the letters A - I from left to right.
A B C
D E F
G H I
g left, b left, f left, i left, f left, e left, h left, d left, a left, d left, e left, f left, i left, e left, c left
Walk to the right and talk to your mother. She asks you to come see her in jail.
Leave the courthouse to end chapter one.
Chapter 2
Talk to the pigs outside the courthouse.
PUZZLE 13: The Greater Maze
Solution: Go right to 32, up to 79, right to 98, up to 138, right to 149, up to 150.
Go right back to the wolves and talk to the one wearing red sneakers. Go all the way to the left and talk to the sheep to the left of the phonebooth.
Walk to the right and talk to the second sheep. Walk to the right and talk to the white sheep in front of the courthouse.
PUZZLE 14: Four Queens
Solution:
X X Q X
Q X X X
X X X Q
X Q X X
Talk to Sara, then the wolves, then go left two screens and talk to the Black Sheep.
PUZZLE 15: Safe Travel
Solution: Blue line runs along the very top and right edge, green along the left and bottom edges and back up. Red and yellow connect in the center.
Go back to the courthouse and click the arrow on the top of the screen in front of the courthouse. Go through the back door.
Click on the three bricks to the upper left of the doorway.
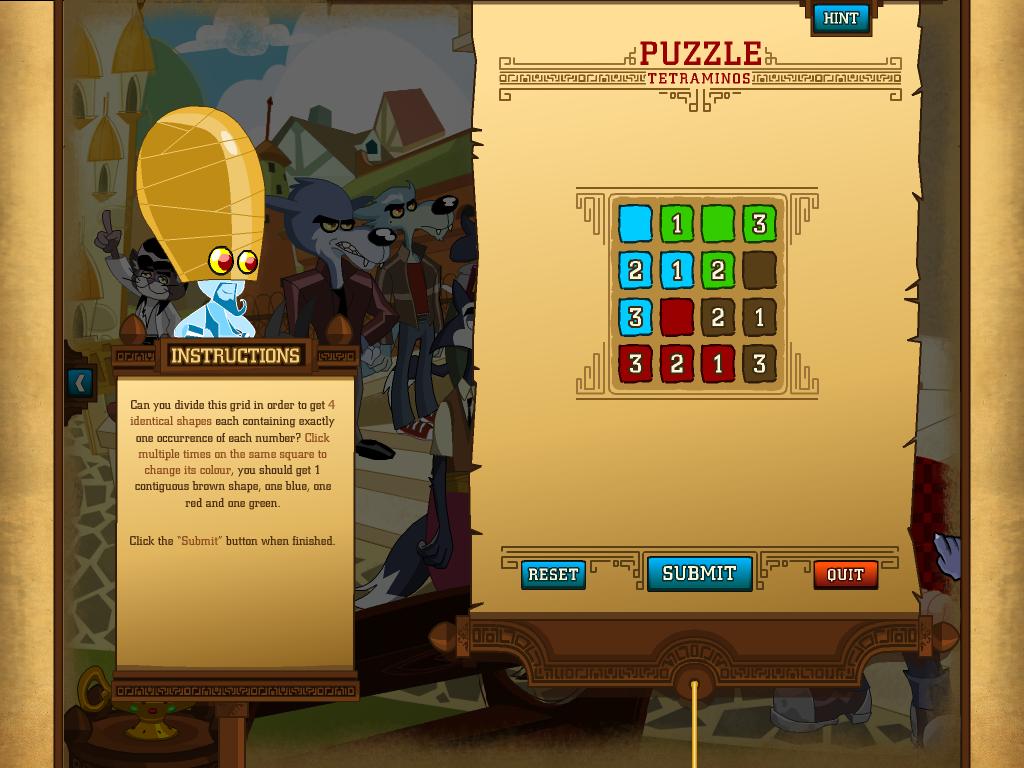
PUZZLE 16: Tetraminos
Solution: screenshot
Click the cylinder with blades to the left of the doorway.
PUZZLE 17: Painless
Solution: 3rd arrow from the left.
Click on the mom and talk to her until she tells you to deliver a message to Tom Thumb.
Go back through the door and talk to the sheep until he mentions the security system. Click on the security system keypad - it will say it's wet.
Click the puddle under the keypad.
PUZZLE 18: Hanoi Stack
Solution: Key: Letter the pieces A - D from smallest to largest.
A to II, B to III, A to III, C to II,
A to I, B to II, A to II, D to III,
A to I, B to III, A to II, C to I,
A to I, C to III, A to II, B to III, A to III
Now click on the keypad.
PUZZLE 19: 1, 2, 3
Solution: Each line describes the amount of each number in the sequence above it. For example, there is one "1" in the first line, so the 2nd line says "one 1". The second line has two "1"s so the third line says "two 1".
The solution is 13112221.
Click on the arrow to the right of the screen. Then click the grid of blocks on the wall to the left of the safe.
PUZZLE 20: Genie Sets
Solution:
               1      2


             *3*   *4*


             *5*    6


             *7*    8
Talk to Sara who will tell you to press the button on the detonator.
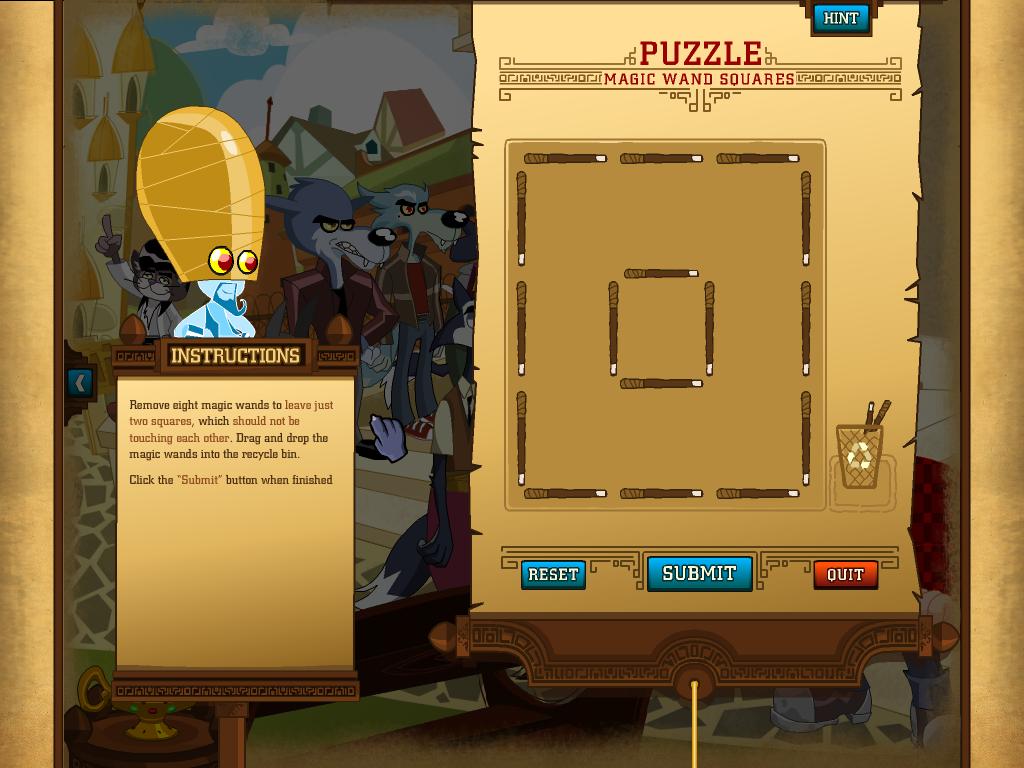
PUZZLE 21: Magic Wand Squares
Solution: screenshot
Talk to Sara until puzzle is activated.
PUZZLE 22: Directmate 101
Solution: move the Queen up 5 spaces.
Talk to the guard that drops from the ceiling, who tells you to inform the other agent.
Click on the arrow to the left of the screen to return to the previous room: talk to the other guard. Go back to the room on the right, then click on the up arrow on top of the screen. Click on the horse.
PUZZLE 23: Knight Stroll
Solution:
16 15 8 1
7 4 11 14
12 9 2 5
3 6 13 10
Talk to the black sheep. When you try to leave, Hook will talk to you. Click on Hook until he mentions the demagnetizer, then click the left arrow to move to the dragon.
Click on the open part of the locker behind you.
PUZZLE 24: Toggle Puzzle X
Solution: Hit the blocks according to the order listed below:
1 - - - 3
- - 2 - -
- 8 - 4 -
- - 6 - -
7 - - - 5
End the chapter by exiting above.
Chapter 3
Go to the right one screen, then click the black sheep to demagnetize him. Talk to him then click the up arrow at the top of the screen.
Click on the stack of logs.
PUZZLE 25: Swapping Places
Solution: Blue Red Brown Blue Red Brown Blue Red Yellow Green Brown Blue Red Yellow Green Brown Blue Red Yellow Green
Go left one screen and talk to Sara.
PUZZLE 26: Thirst Quencher
Solution: A is 80, B is 50, C is 30.
A to B, B to C, C to A, B to C, A to B, B to C, C to A
Talk to Sara, then go right back and talk to the lumberjack.
PUZZLE 27: Lumber Letters
Solution: Not by the hair on my chinny chin chin.
Talk to the lumberjack again then move left to talk to Sara again.
Move back to the right. Then go to the newly opened right.
Click on the giant pair of shoes on the right.
PUZZLE 28: Giant Prank
Solution: Look for knot with alternating pattern of "under" and "over" every time two segments overlap.
Talk to cat, then click on the disco ball.
PUZZLE 29: The Disco Threat.
Solution: 1(unexplored area), 2, 1, 5, 6, 7, 3, 4, 8, 12, 11, 10, 9, 13, 14 ,15 ,16
Click on right to move to the next screen, then click on the fairy at the top of the page.
PUZZLE 30: Five Queens
Solution:
X X Q X X
Q X X X X
X X X Q X
X Q X X X
X X X X Q
Go back to the left then walk out the wooden door. Click left and talk to the bartender. Then go back to the screen with the door you entered through. Click to the right and click on the shrubbery.
PUZZLE 31: Fresh Flowers
Solution: Daisies = 6, Tulips = 2
Return to the wolves. Talk to the wolf wearing the purple jacket then the one in the red sneakers who mentions the boss.
Talk to the wolf with the tie.
PUZZLE 32: Drag-a-Letter
Solution:
B
E H F
C A D
G
Click on the bottle with the brown liquid in front of the bartender.
PUZZLE 33: Latin Square
Solution: Number the intersections of the numbers on the grid as indicated below.
A B C
D E F
G H I
D left 2 times, E left 2 times, F left 2 times, G left 2 times, H left 2 times, G left once, I left once, H left 2 times, I left 2 times
Walk back into the VIP room and go right. Click on Tom Thumb and talk to him.
PUZZLE 34: Enclosed
Solution: 13 (by forming a diamond)
Click on the woman next to Tom Thumb.
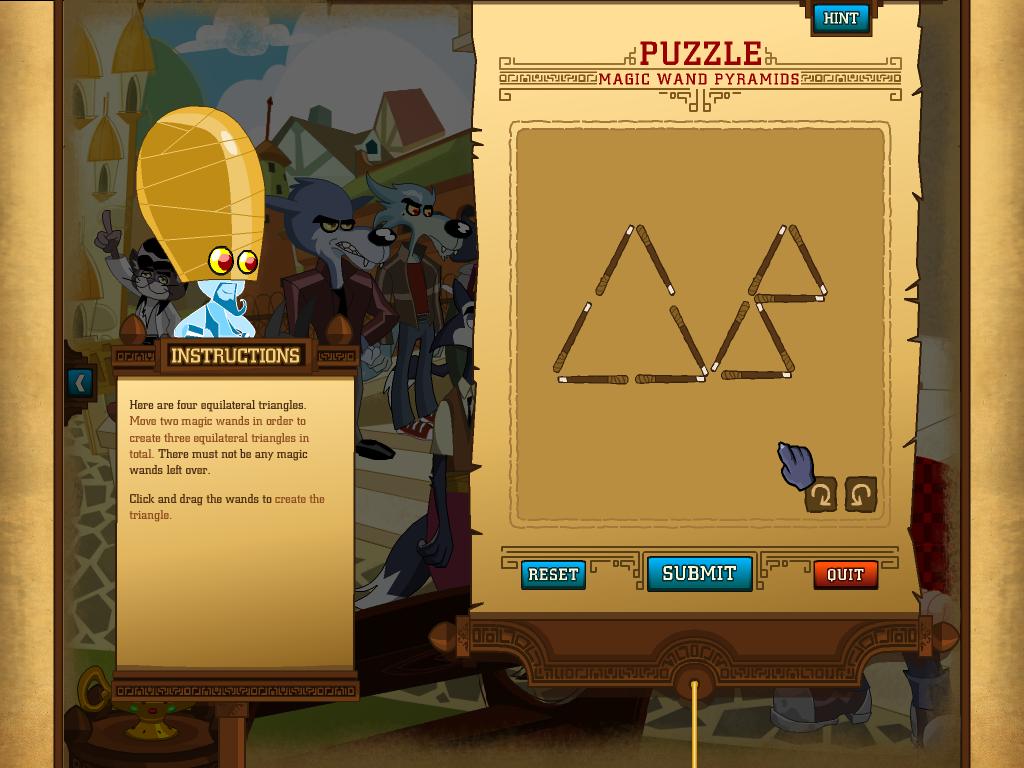
PUZZLE 35: Magic Wand Pyramids
Solution: screenshot
Click on the ogre twice.
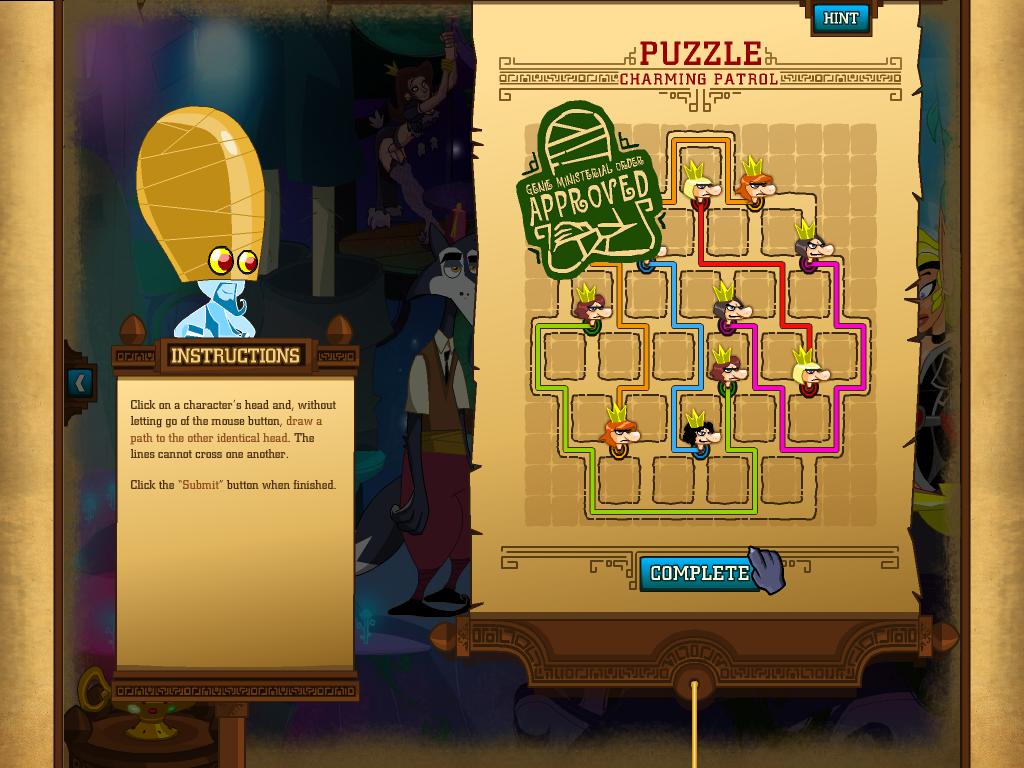
PUZZLE 36: Charming Patrol
Solution: screenshot
Talk to Tom Thumb again until a new arrow appears on the right of the screen. Click on this.
Chapter 4
Talk to Pinocchio, then move to the left and talk to Geppetto.
PUZZLE 37: For the Record
Solution: 5 1 3 6 2 4
Click on Geppetto's computer on the desk.
PUZZLE 38: The Two Mover
Solution: Move the queen 1 square down and 1 square left.
Talk to Geppetto again until he mentions Pinocchio. Then talk to Pinocchio twice.
PUZZLE 39: Fairy Enough
Solution: CPKW (there is a pattern for the number of segments that forms each letter)
Click on the fairy godmother that appears to move to the Closet. Click on Pinocchio once you get to the closet. Then click on the lowest paper on the bulletin board.
PUZZLE 40: Three Queens
Solution:
X Q X X X
X X X X X
X X Q X X
Q X X X X
X X X X X
Click on Pinocchio again, who wants to find food. Then click on the note in the pocket of the right-hand janitor uniform.
PUZZLE 41: Hanoi Temple
Solution: Letter the pieces from A-D from smallest to largest.
A to II, B to III, A to III, C to II, A to I, B to II, A to I,
D to III, A to III, B to I, A to I, C to III, A to II, B to III,
A to III, E to II, A to II, B to II, A to I, C to II, B to III,
C to II, D to I, A to I, B to III, A to III, C to I, A to II,
B to I, A to I, E to III, A to II, B to III, A to III, C to II,
A to I, B to II, A to II, D to III, A to III, B to I, A to I,
C to III, A to II, B to III, A to III
Click on the new arrow on the right of the screen. Then click on the dustpan inside of the tent.
PUZZLE 42: Shifting Places
Solution: Bl, Br, G, R, Y, Br, G, R, Y, Br, Bl, G, R, Y, Br, Bl, R, G
Walk back to the left and click on the guard.
PUZZLE 43: The Tricky Tie
Solution: Follow the path by connecting the labeled points in the following order: A, B, C, D, E, F, G, B, H, I, J, K, L, M, H, K, E, N
           G------------F

         /    M-------L    \

       /    /              \    \

A---B---H -----------K---E---N

       \     \             /     /

         \     I-------J     /

          C-------------D
Talk to Peter Pan, then move to the left and click on the dragon.
PUZZLE 44: Toggle Puzzle
Solution:
Key: Label the grid as follows:
A1 B1 C1 D1 E1
A2 B2 C2 D2 E2
A3 B3 C3 D3 D4
A4 B4 C4 D4 E4
A5 B5 C5 D5 E5
Hit the lights in the following order:
B1, B2, B3, B4, B5
C1, C5, D1, D2, D4, D5,
E2, E3, E4,
A4, A5, B3, C2,
C3, C5, D1, D3, D5,
E1, E2
Click on Pinocchio and then click on the stalk that grows after he drops the magic bean. Click on the microwave oven.
PUZZLE 45: Magic Triangle
Solution:
1
8 9
6 4
2 7 5 3
Click on the wooden box behind Pinocchio.
PUZZLE 46: Rectangle Lock
Solution: screenshot
Examine the elevator.
PUZZLE 47: Elevator Hoist
Solution: Second arrow to left.
Click on the box in the center of the room. Then click on the other safes in the room until the genie tells you to try the large crate in the center again. This will reveal a chest. Click on the chest until shards of glass appear, then click on the glass.
PUZZLE 48: Go Round
Solution:
Key - Section 1: 16 pieces, Section 2: 7 pieces, Section 3: 9 pieces.
1 to 3, 3 to 2, 2 to 1, 1 to 3,
3 to 2, 2 to 1, 3 to 2, 1 to 3,
3 to 2, 2 to 1, 3 to 2, 1 to 3,
3 to 2, 2 to 1, 3 to 2, 1 to 3,
3 to 2, 2 to 1
Talk to Pinnochio to move on to chapter five.
Chapter 5
Click on the crates to the left.
PUZZLE 49: Hanoi Tower
Solution: Letter the pieces A-F from smallest to largest.
A to II, B to III, A to II, C to II,
A to I, B to II, A to II, D to III,
A to III, B to I, A to I, C to III,
A to II B to III, A to III, E to II,
A to I, B to II, A to II, C to I, A to III, B to I, A to A, D to II,
A to II, B to III, A to III, C to II, A to I, B to II, A to II, F to III,
A to III, B to I, A to I, C to III, A to II, B to III, A to III, D to I,
A to I, B to II, A To II, C to I, A to III, B to I, A to I, E to III,
A to II, B to III, A to III, C to II, A to I, B To II, A to II, D to III,
A to III, B to II, A to I, C to III,
A to II, B to III, A to III
Click on the right guard and talk to him. Then talk to the guard on the left. Talk to Pinocchio, then talk to the guard on the right again.
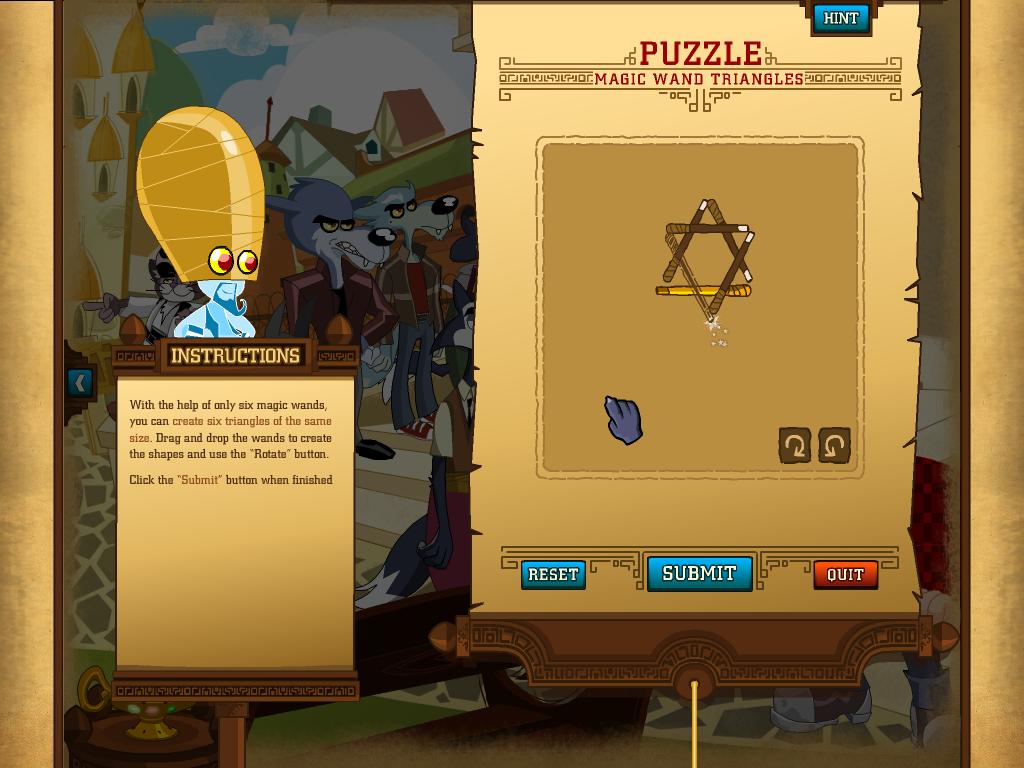
PUZZLE 50: Magic Wand Triangles
Solution: screenshot
Finish conversation with the guards. You are now captured. Click on the casino.
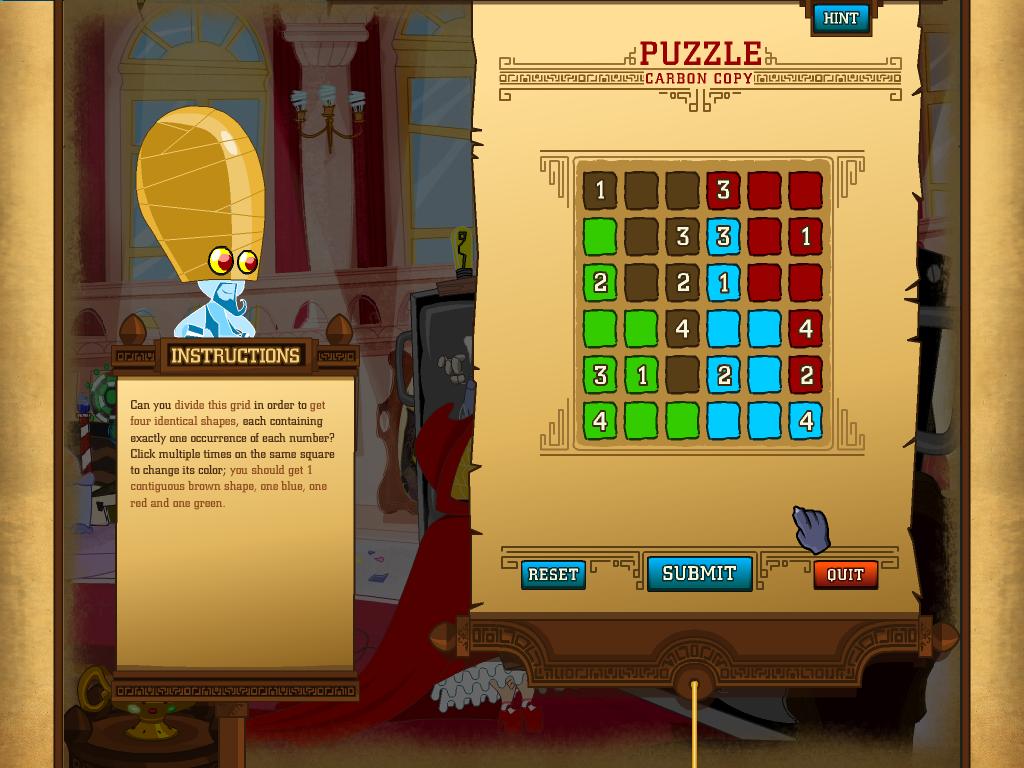
PUZZLE 51: Carbon Copy
Solution: screenshot
Talk to Little Red Ridinghood until you activate puzzle.
PUZZLE 52: Knight Tour
Solution: Move the knight to the spaces in the following order:
19 12 17 6 21
2 7 20 11 16
13 18 1 22 5
8 3 24 15 10
25 14 9 4 23
You will be released from bondage. Click on the casino again.
PUZZLE 53: Try Your Luck
Solution: BECAUSE FLUSHING CASH DOWN A TOILET CAN ACTUALLY CLOG THE PIPE
Click on the painting of the queen on the back wall behind the sheep.
PUZZLE 54: Eight Queens
Solution:
X Q X X X X X X
X X X X X Q X X
Q X X X X X X X
X X X Q X X X X
X X X X X X X Q
X X X X Q X X X
Talk to Sara. She points out a mirror on the bottom right. Talk to the guard at the bottom of the stairs.
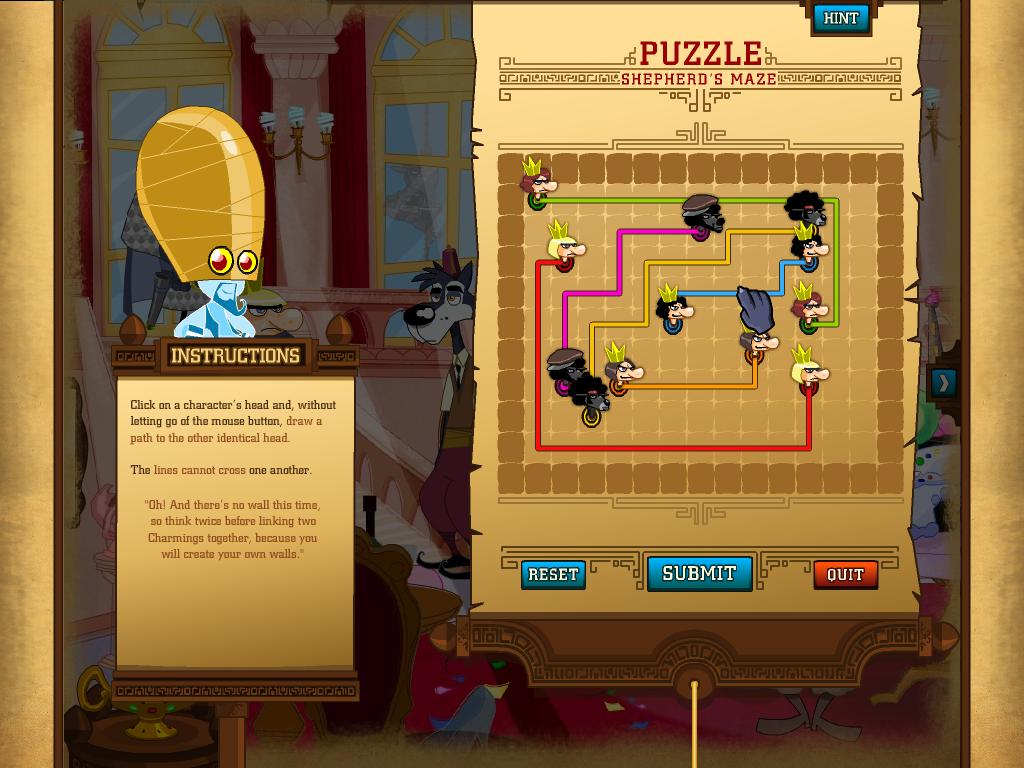
PUZZLE 55: Shepherd's Maze
Solution: screenshot
Talk to the black sheep.
PUZZLE 56: Peaceful Solution
Solution: Key - Number the pieces B3 B2 B1 R1 R2 R3
B1 forward 1, R1 jump, R2 forward 1,
B1 jump, B2 jump, B3 forward,
R1 jump, R2 jump, R2 jump,
B1 forward 1, B2 jump, B3 jump,
R2 forward, R3 jump, B1 forward
Go to the right and click the mirror.
PUZZLE 57: Secret Code
Solution: MURDER
Talk to Sara, then Merlin, then Pinocchio. You will be transported to the Fountain. Walk to the right and talk to the Charmings.
PUZZLE 58: Serial Letters
Solution: SENT (the letters stand for the first letter of the spelled number)
Go to the courtyard entrance and talk to the lumberjack.
PUZZLE 59: The Three Mover
Solution: D4
Talk to your mother, then to the wolf in the red tie. Next talk to Tom Thumb, then Pinocchio, then the Charmings, then the black sheep, then Sara.
PUZZLE 60: Good Offices
Solution: The two on the bottom and the one on the top right.
Congratulations! The end!
Posted by: eileen |
July 9, 2009 3:18 PM
|
July 9, 2009 3:18 PM