
Alabama Smith in
Escape from Pompeii
Platform: Mac, Windows
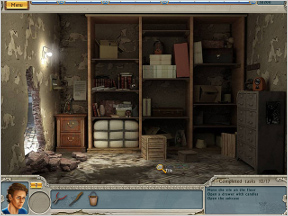
![]() Alabama Smith in Escape from Pompeii is a new adventure game that builds inventory puzzles into a hidden object-style interface. You play the young Alabama Smith, an archaeology student who has just been given the opportunity to study in Naples. His mentor tells him of a mysterious amulet buried in the ruins of Pompeii that is rumored to grant the owner the ability to travel through time.
Alabama Smith in Escape from Pompeii is a new adventure game that builds inventory puzzles into a hidden object-style interface. You play the young Alabama Smith, an archaeology student who has just been given the opportunity to study in Naples. His mentor tells him of a mysterious amulet buried in the ruins of Pompeii that is rumored to grant the owner the ability to travel through time.
 The adventure begins in the university library with one seemingly not-so-simple goal in mind: find a long-lost hidden room. Surprisingly, a few clicks later you'll be staring down its dusty staircase and into a forgotten chamber. Making your way there is a simple matter of solving puzzles by finding items and either combining them in your inventory or using them directly on objects in the scene.
One key difference between Alabama Smith in Escape from Pompeii and most casual adventure titles is this game spells your tasks out on a list at the bottom of the screen. Instead of blindly fumbling for items and ways to combine them, all you have to do is check the window next to your inventory and try to accomplish the tasks listed, usually in order from top to bottom. While this does take some of the oomph out of the adventure, casual players will appreciate the light hand-holding.
An interesting option available early in the game (which can be toggled between levels) is the choice between Casual and Expert mode. Expert is more like a traditional adventure game where you look for items and figure out how to use them with the puzzles at hand. With Casual, however, you're presented a list of items to find (much like a hidden object game) along with additional in-game hints and the ability to skip mini-games. The choice is entirely up to you.
 Analysis: Simply dropping the word "Pompeii" in a game's title will immediately conjure epic images in your mind. Alabama Smith had me from the title screen, and its simple combination of item puzzles and no-frills storytelling was just enough game to keep my attention the whole way through.
Here's where Alabama Smith in Escape from Pompeii starts to stand on shaky ground: puzzle construction. I mentioned earlier that your tasks are listed at the bottom of the screen. While unconventional for an adventure game, it's an acceptable solution to make the game more accessible to casual players. But even with things spelled out in front of you, you'll still have to resort to the hint system in order to get things done. This is purely because a handful of the game's puzzles make no logical sense.
Most adventure games (especially interactive fiction) relies on the player's ability to see a game world and extrapolate uses for the items provided in the scene. Alabama Smith encourages just the opposite, however, and wants you to stick to the list and keep your creative instincts to yourself. It feels a bit stifling to an old-school adventure gamer like myself, but I still found plenty of enjoyment in completing puzzles and working my way through the story.
Alabama Smith in Escape from Pompeii sets its sights high and wants to be listed amongst the best-known casual adventure games. Even though the story is interesting (if a tad contrived) and the game mechanics themselves easy to use, more logical puzzles and less reliance on lists would put the final level of polish on the title that would make it outshine most games of its genre. As it stands, however, you've still got a grand adventure.
![]() Windows:
Windows:
Download the demo
Get the full version
![]() Mac OS X:
Mac OS X:
Download the demo
Get the full version


Walkthrough Guide
(Please allow page to fully load for spoiler tags to be functional.)
Alabama Smith in: Escape from Pompeii Walkthrough
Generally
A lot of items items will automatically combine themselves in the inventory once both pieces have been found. So don't be surprised, when you suddenly see objects, you never put in your inventory or can't find others ;)
You can choose between two modes to play and you can switch back and forth between these two modes at any time during the game. To do so, click on "Menu", choose "Change Difficulty" and you will be given the choice to change to the mode.
Expert Mode: Find objects within a scene and then figure out the best way to use those objects in order to finish the tasks.You will earn more points in this mode since you have to figure out on your own how to combine certain items. You cannot skip any puzzles or mini games. The hints take approximately 45 seconds to refill themselves
Casual Mode:Find objects from a list, that is given to you. You get more help, to figure out, what to do and how to use the objects. You earn less points. You can skip most of the minigames in this mode. The hints take approximately 30 seconds to refill
The hints do not really let you know, where and how you have to use your inventory items, but you can use your cursor to help. The cursor will flash green, when the item, you are carrying with it, is in the right location to be placed. If it does not show green, the item does not belong yet here or belongs someplace else
This walkthrough shows not the exactly order of the tasks, you will see during the levels. I choosed the most logical way to come through a level. So of course you can make things in a different order, but be aware, that some things might not work out, before you haven't done other things before. The points will be the same, if you chosse to do the tasks in the shown order or not
Walkthrough Alabama Smith in Escape from Pompejii
Neapel
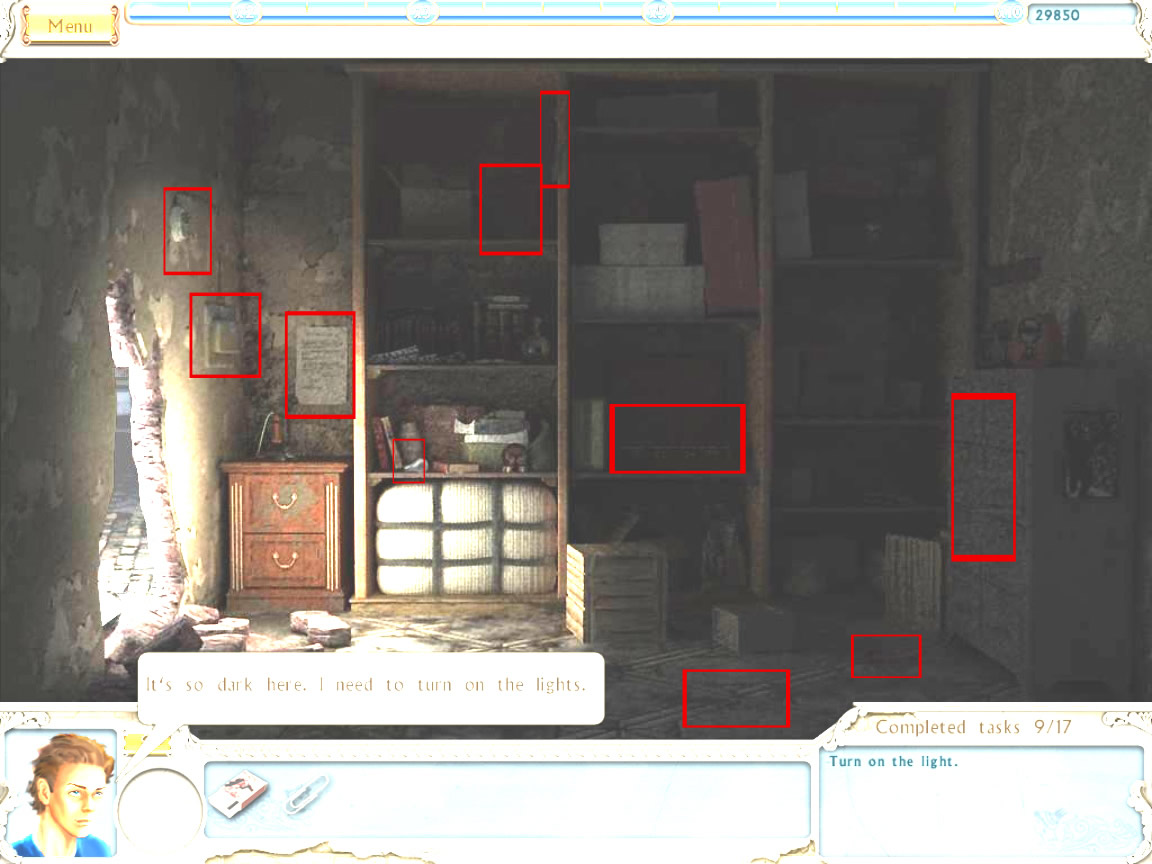
Library
Grap the lighbulb from the desk and click it at the desk lamp
Click the book on the desk, you will find the words "VICIS EX MENS"
Take the key from the right bookshelf, third shelf from top
Open the desk drawer with the key and grab out the feather duster and the ruler
With the duster, wipe away the spiderweb from the left bookshelf
Take out the book, that says "vicis ex mens" and click it to get a closer look, you will get a note, which says: 22:07
Click the grandfather clock in the background
In the closer look, set the clockhands on 10 (big one) and short after 5 (small one) and click then the little level, left from the seven
As Alabama can't open the door complete, help him by using the ruler at the clockdoor
Screenshot Library
Classroom
Grab the chair leg from the floor, left in the back and click it at the chair in the back
Click on the portrait above the chair and you will find a key on its backside
Click the little box on the drawer left side of the scene
By moving the circles, you can reconstruct the figure on it. The inner circle does not move, so you can take this as reference point to start
When the box is open, take the puzzle piece and the glue
Use the key to open the drawer's door
There is a wooden pole in it, take it
It will combine with the glue, when it goes into your inventory
Click the spear now at the statue in the back, left side
Find the other 8 puzzle pieces (for their position please see screenshot)
When you have all nine pieces, click at the frame, that is laying left side on the second table, seen from the front
A minigame opens, you have to click to pieces, to make them swap
When a piece is at its right position it will be highlighted for a moment
When you finished it correctly, it will go back into your inventory as complete slide
Now click the slide at the projector left
Put off the light by clicking the switch right from the chalkboard
Click again the projector and at the chalkboard a number will appear (4014)
Click the statues arm once
Click the opening at the wall right side
Enter with your mouse the code from the chalkboard into the keypad
You discovered the secret room
Screenshot Classroom
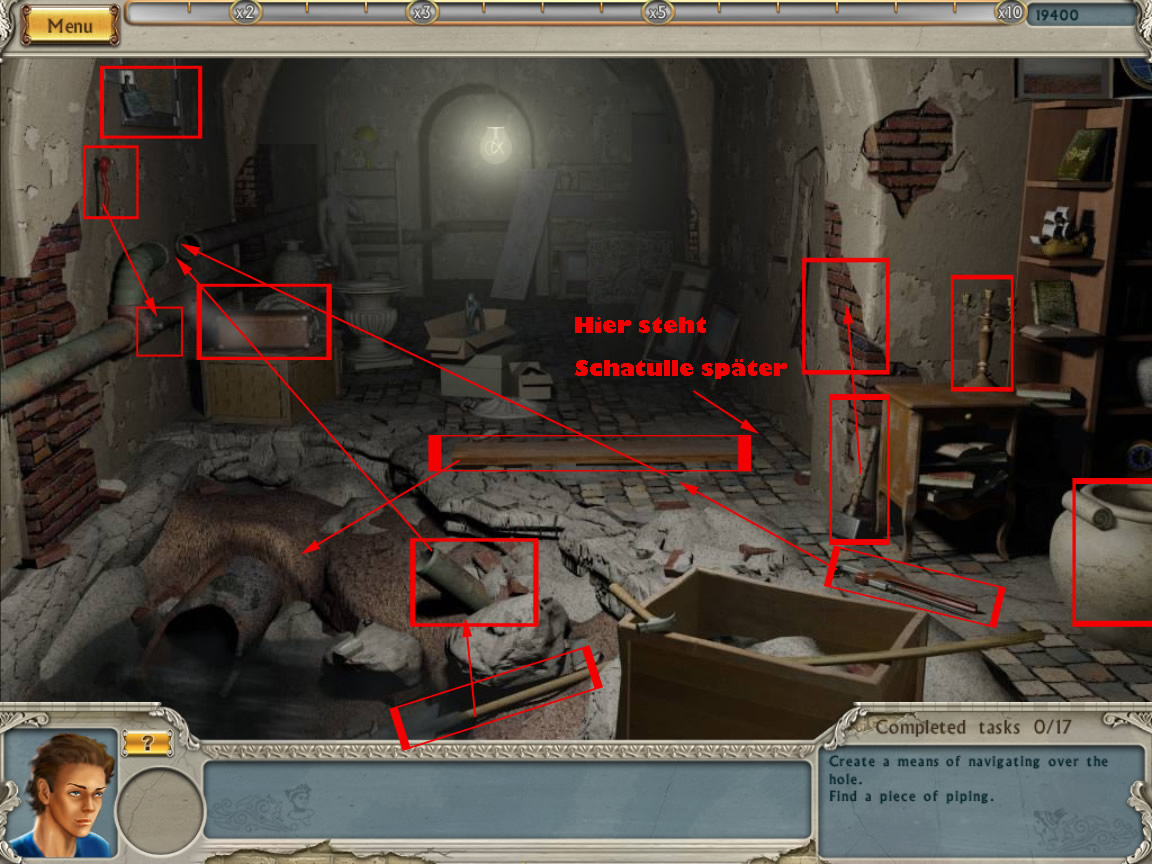
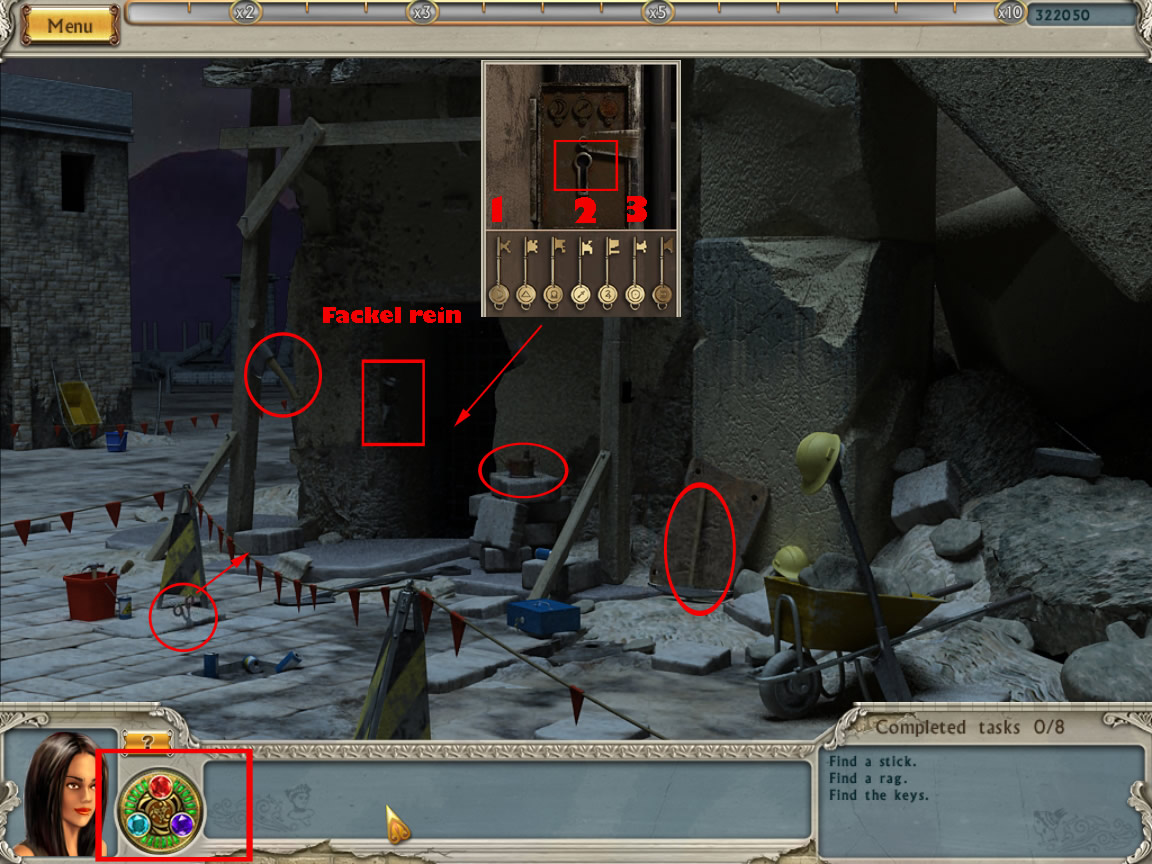
Secret Room
Grab the plank, laying in the middle on the floor
Take the shovel, located at the lower screen, right to the hole
Place the shovel in the lower left side at the pipe part, that's lurking out of the hole
Pick up the adjustable wrench, laying on the floor right side of the screen, left to the vase
Get the hammer, laying in front of the lette cabin right
Click the big vase on the right side, a pop up window opens
Grab the matches and the paperclip out of it
Get the plank out of the inventory and place it on the hole
Take the red lever, left on top at the wall
Place the pipe left side at the wall, at the part where obviously something is missing
Place the red lever at the lower pipe, at the part, where a little steam is coming out
Click the lever, till you don't see anymore steam
Now place the adjustable wrench at the upper pipe, where you see the steam
Click the suitcase you see in the back on top of the crate
A minigame opens: Click the pictures at the left side and place them to the right time periode on the right side. On top you place the antique artefacts, in the lower part the modern items
Screenshot Suitcase Puzzle
Click the capsule, that is inside the suitcase and pick up the key, that comes out
Place the key at the window, left side above the pipes
Click the window again to open it
At the other side at the wall you see something shimmering. Use the hammer there. You found the secret entrance to a storage room.
Click it to enter
Screenshot Secret Room
Storage room
Take the bulb, that is laying on the lowest shelf left
Now click the fuse box, right to the door
A pop up window with a minigame opens
Your goal is it to turn all lamps to green. Every fuse activates or deactives different lamps
Seen from left to right, activate the fuses in the following order: 6-5-2-3-4-1-3
Now place the bulb from your inventory on the lamp above the fuse box
Pick up the pliers, located on the floor at the right side, a little in the back
There is a colored tile on the right side of the floor. Click it to open another minigame
You have to click the parts with the same color and in this you have to be quick. When you take to much time by clicking the second one, the first will change color again or a already grey pair will be colored again
When you managed it, you will see a grate and a bottle with a note in it under the grate
close the window for now
Get the bucket, which is standing on the upper left shelf
Pick up the saw, that is hanging between the first and second shelf, seen from left
Click the paper, which is hanging at the wall, left from the shelf. It shows dates and what was deliverd to the storage at that day
You need the 5.September, because candles have been delivered at the fifth
Now click the ledger, which is located on the bottom shelf left
Look at the number next to the 5 and hold in mind 942
Click the file cabinet right side. The drawers are locked
You can change the numbers by left or right mouseclick (left up, right down)
Give in the number 942 und grab the candles out of the drawer
Get the stick out of the inventory (combination from pliers and paperclip and no, I have no clue, what sense this should make… ) and place it at the suitcase in the bottom shelf in the middle
Click again, till you see the matches
The matches combine in the inventory with the matchbox to a burning match
Go back into the secret room
Screenshot Storage Room
Secret Room
Click the bucket at the waterhole left
The filled bucket goes back into your inventory
Place the candle at the candleholder on the little cabinet right and lit it with the burning match
Go back into the storage room
Storage room
Click at the opening on the floor (where you had the puzzle before) and place the bucket with the water on it, when the pop up window opens
The bottle is swimming on top now
Click it once to get it out, second time to open ist and third to pick up the piece of paper, that comes out. It seems to be empty
Go back in the secret room
Secret Room
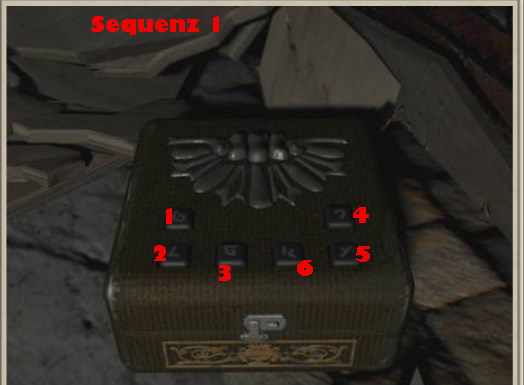
Click the paper at the candle and after a moment you will see a combination of symbols
Now you see a little box on the floor in front of the storage entrance
Click it to get a closer look and now click the symbols on the box in the same order, you see on the paper
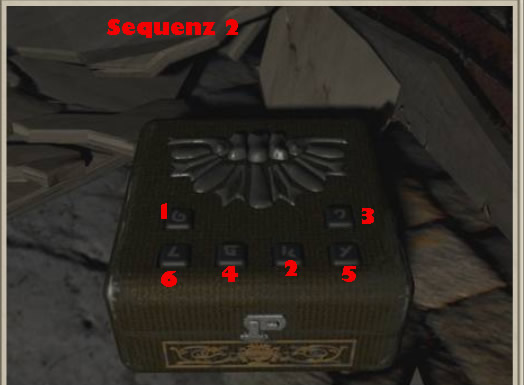
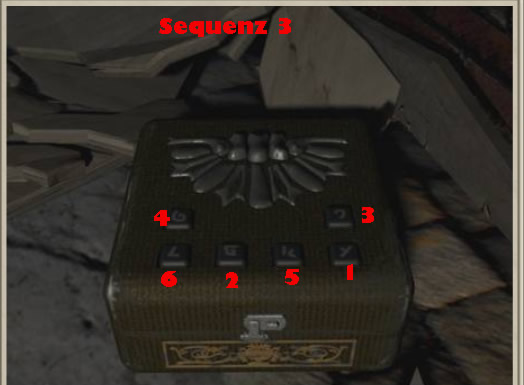
After this, you will see the symbols highlighted in a special order. You will have to match the color sequences on the box 3 times
Screenshot first sequence
Screenshot second sequence
Screenshot third sequence
The box opens and you will find a scroll
Before you can leave here, you have to make sure, that nobody sees, that you have been here
Find the 10 items from your list on the right side and place them at the right place them on the left side
Screenshot third sequence
Library
Open the left desk drawer of the second desk seen from the front and get out the cable. You also see a note with numbers on it (5816)
Place the cable at the PC in the background between the two bookshelfs
A pop up window opens: Enter the number you found in the drawer
Next to the PC left in the shelf you will find a box with cd's. Click it to open a minigame
You have to match the cds with their fitting outlets. One cd will remain. Click it to get it into your inventory
Place the cd at the PC
Now get the scroll out of your inventory and place it at the scanner below the PC
In the right bookshelf you will find in the 3. shelf seen from the top a book called "Caesar's Code"
Take it and place it on the first desk (seen from your view)
Click the book
Take the disk out, you will find in there
Below this, you will find scrabs of paper
Click them to activate the minigame
It's a little puzzle, you have to reconstruct the picture
Screenshot Puzzle
You will see the numbers 24, an empty spot and then 07
Get the disc out of your inventory and click it at the second bookshelf, seen from right. At heigh of the third shelf from below at the outside, you will find a spot, where it fits
The bookshelf is moving a little and you will see at the backwall, left to the PC a little device
Click it and a puzzle does open
You see a disc with three circles, which can be moved
Move the outside circle to the 24
Move the inside circle to the 15
The middle circle will now shown the numbers 07
Enter the complet combination 240715 into the PC
Screenshot Libary
Pompeii - Amphitheatre
Pick up the fire wood from the floor in front of the oven
Click the crowbar, located between box and oven
Get the paper, that is inside the box right next to the oven
Take the gas cylinder, which is located in front of the excavation field
Get the lighter, right lower corner on a stone
Lighter and gas will combine in the inventory and you will have a burning lighter
Now give first the wood, then the paper in the oven and lit it after with the lighter
Pick up the shovel, which lays behind the toolbox
Now use the crowbar to open the toolbox
Grab everything out there (paper, magnet, pencil, glue and brush)
Get the pliers, which is hanging at the wall in the back above the clay
Left behind the clay on the floor in the arch, you will find a ring
Get some clay by clicking the shovel on it
Now the the bowl, which is standing on the oven
It will go together with the clay, once it is in your inventory
Get the clay bowl out of your inventory and click it at the leeking pipe in the back, right to the clay
The wet clay will go back into your inventory automatically
Click the metal plate, you see right on top of the arch
A pop up window opens and you click first the brush, then the paper and at last the pen on it
Now you can see symbols, the same as you see on the arch
Click the arch symbols in the following order: left: middle, bottom, top - right: bottom, middle, top
right beside the arch a little hole opens
Place the ring from your inventory there
A small compartment with a case opens
Now use the magnet from your inventory and click it on the excavation field
Another minigame opens:
You have to move your cursor along the curved lines without interruptions and without falling off the line. Click at the beginning of the curve, lower left side, where you see the red arrow. Once you click on it, the bars will turn green. When you fall off the path, you will have to start over from the beginning until you can get it right. If it happens, the bars turn red
At the end of the first picture you will automatically get a second one
When you are done, you will receive a key
Place the key at the case in the compartment. You will find a amulett, which is missing three gems and wooden shapes
The shapes combine in the inventory with the clay
Place the shapes now at the oven and use the pliers to get them out again
They will now combine with the glue, and you see now a statue in your inventory
Place the statue on the stone right side of the clay
Another memory game opens
Screenshot Excavation
Pompeii - Fountain/Fresco
Fountain
Get the flashlight, a oilcan and a piece of a mirror(1) out of the bottom shelf right
on the floor you will find four pieces of the mirror (2,3,4,5) (for exact positions please see screenshot)
At the outside of the scaffold you will also find a piece of a mirror(6)
Pick up the piece of a mirror left side of the fountain, at the bottom of the wall(7)
Inside the fountain, you will find a dry cloth
There are garden shears on the left side of the fountain entrance
With the garden shears cut of the rope from the scaffold
At the bottom of the statue, right side of the fountain, you will find a piece of a mirror (8)
At the scaffold you will find a strap
Right side down of the scaffold you will find another piece of the mirror (9)
Right side on the floor is a hook, which will combine in the inventory with the rope
At the left side of the right column, you will find in the middle a piece of a mirror(10)
Pick up the plank from the floor, left side
Click the plank at the big stone left in the back to use it at a lever
Click the plank one or two time, to really push the stone to the side
Pick up the mirror frame and a piece of a mirror(11)
Click the rope with the hook at the opening top left
Get the piece of a mirror(12) and the lever from the roof
Place the dry cloth at the bucket, standing on scaffold, right. It will go back as a wet cloth into your inventory
At the outside of the fountain you will see some Graffiti
Clean it with the wet cloth and you will see three symbols
Place the mirror frame at the statue and click the 12 pieces at the frame
A pop up window opens: Drag the mirror pieces onto the inside of the frame. When a piece is correct it will flash green and lock into place
After the mirror is fixed, you will see at the column left also three symbols, the same, you found under the graffiti
Click them (at the column) and a minigame opens
By clicking, you can change the symbols. Click, till they do have the same order as the one on the fountain
Have a good look, some symbols just look like… but its not ;)
When you made it, you will find a gem, which goes in your amulett and a gear
Under the symbols at the fountain, you see a little door.
Click to open and click inside to get rid of the dirt
Now click first the gear, than the strap and at last the oil can on the opening
Place the lever left to it
Click once the lever once again and the door inside the fountain will open
Place the flashlight there to enter
Screenshot Excavation
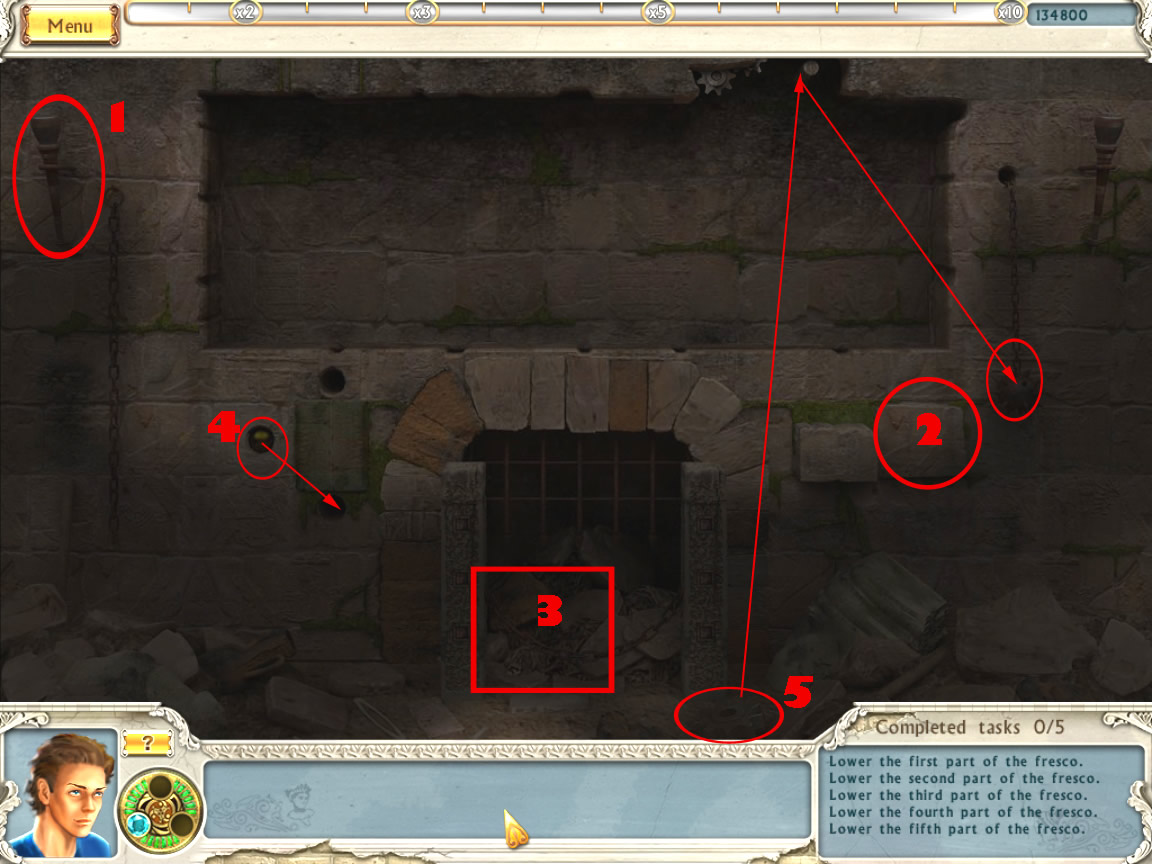
Fresko
The Fresco is a bit tricky. When you click wrong, you will have to start from the beginning again
Left side at the wall you see a golden ball
Click it to get in your inventory and get it out again to place it in the empty space under the place, where it was before - the fourth fresko comes down
You have to light up all buttons by clicking, but every button activates and deactivates different lamps. I do not have a solution for it, just click them all and it will work out soon - when its done, the third fresco is coming down
Click the torch at the left side - that will bring down the first fresco
Pick up the gear, laying on the floor right side of the entrance. Place it on the wall on top between the fourth and the fifth fresco. Now click the ball, that is hanging right - the fifth fresco is coming down
Right side of the entrance are two loose stones. Klick the right(!) one and the second fresco come down
Screenshot Fresco
Pompeii - House/Shrine for Diana/Differences
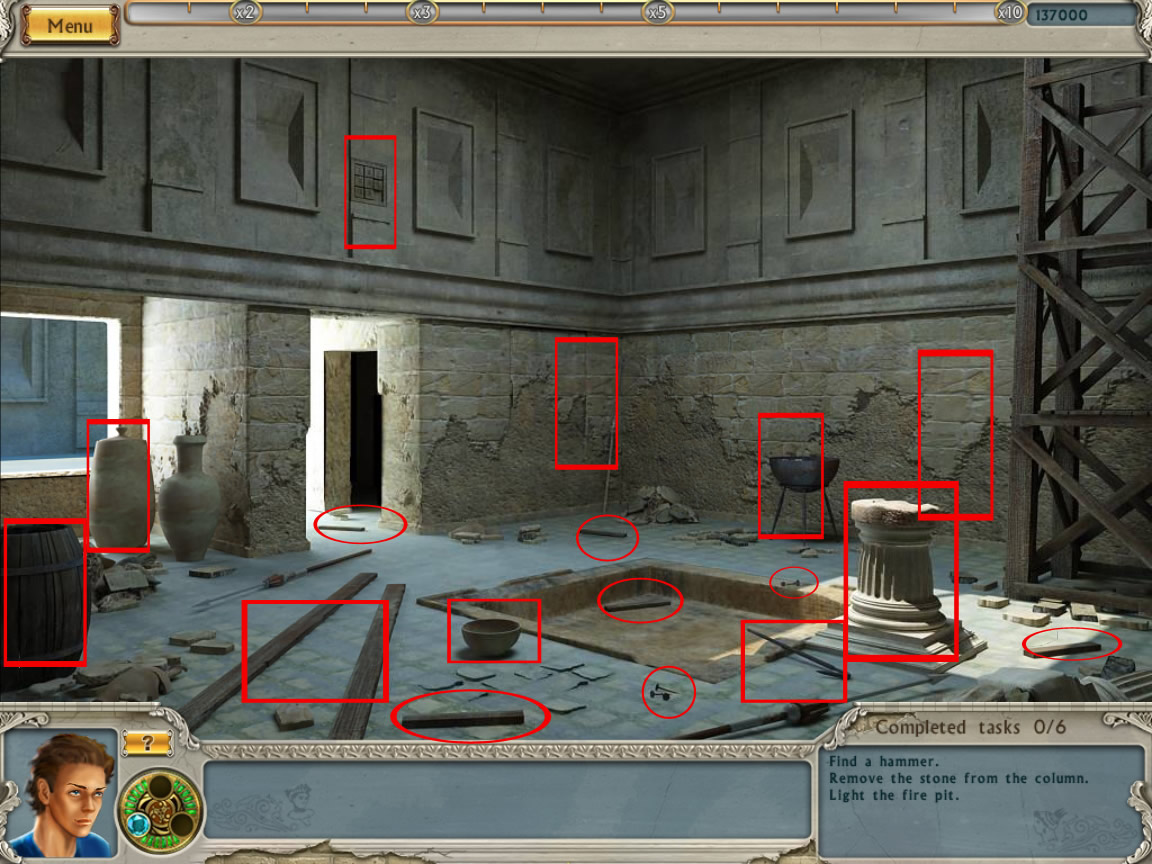
House
Collect the five planks from the floor (for positions please have a look at the screenshot)
Pick up the nails from the floor in front of the pool and behind the pool
At the front of the pool you can pick up a bowl
Place the bowl at the dark barrel left side. The bowl will be filled with water and goes automatically into your inventory
Grab the crowbar, that is standing in front of the little colum with the stone on it
Right at the bottom is the lighter, pick it up
Use the crowbar to remove the stone from the column. It is hollowly and you can take out a plank with nails
Lit the barbecue, standig at the back wall, with the lighter
Place the plank with the nails in it
Extinguish with the water bucket
4 nails are going automatically into your inventory
Click the left of the two big jars in the back left side. It will move to the side and you will find the hammer
Now click first the planks, then the nails and at last the hammer at the two long planks on the floor left side
You now have a ladder. Place it in the back middle at the wall
Click the square with the roman numbers on top of the wall
It's a slider puzzle, you have to bring the numbers in the right order
top row (seen from left to right): I - II - III
middle row (seen from left to right): IV - V - VI
bottom row (seen from left to right): VII - VIII
At the back wall a compartment opens and a statue appears
Left beside the scaffold another compartment opens and you can grab a gem and arrow with bow
The gem will go automatically to your amulett
Give the arrow and bow to the statue
A secret door opens
Screenshot House
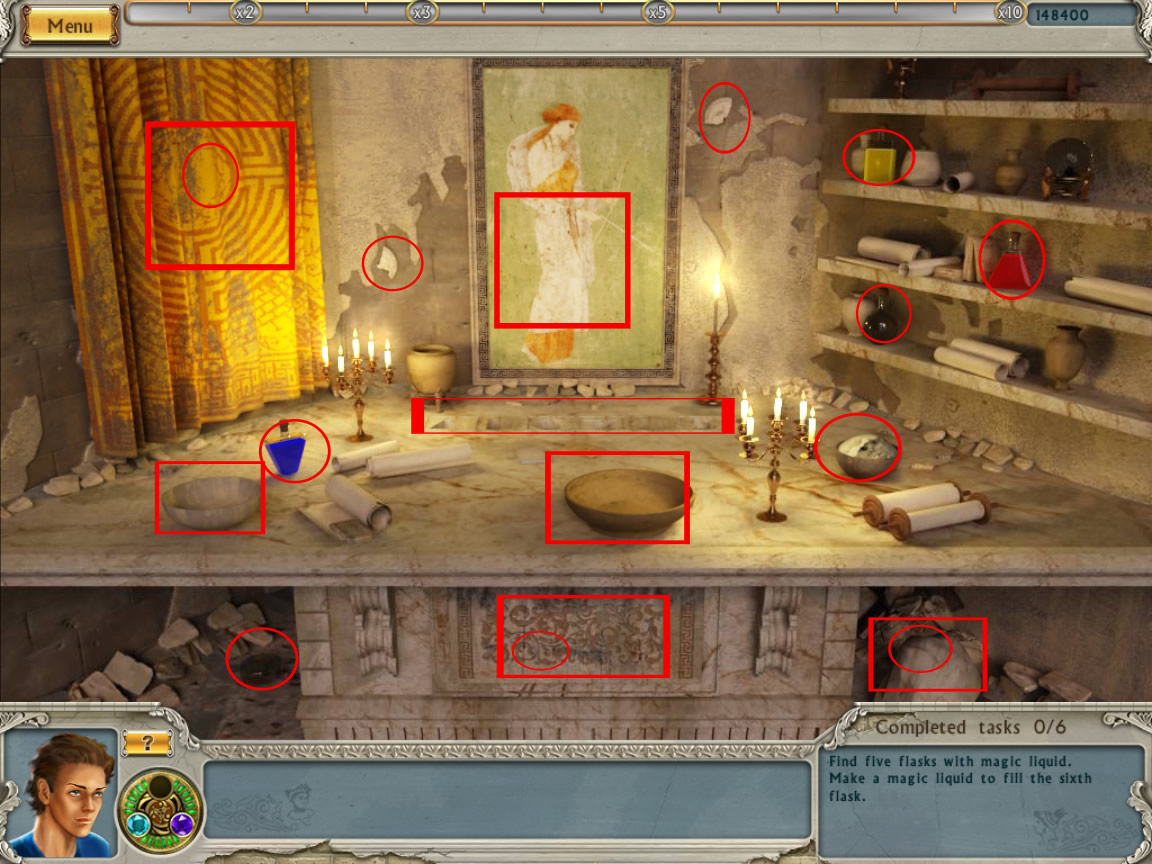
Dianas Shrine
First collect all bottles
green: left side, click the curtain
blue:left on the floor
empty: bottom left inside the opening
with water: right shelf, bottom
pink: click the big stone in the opening right bottom
red:second shelf from below
yellow: third shelf from below
Right on the floor a bowl with powder is standing, grab it
Click the bottle with water and the powder in the empty bottle on the floor left
A minigame opens: Your goal is it to click the words, which are highlighted. You have to do this five times.
1. AB-IMO-PECTORE - 2. LITTERA-SCRIPTA-MANETE - 3. AB-EXTERIORIBUS-AB-INTERIORA - 4. ARTE-ET-HUMANITATE-LALORTE-ET-SCIENTA - 5. FELIX-QUI-POTUIT-RERUM-COCGNOSCERE-CAUSAS
Now you have magical water. Click the empty water at that water
Under the wallpainting of Diana is a stair. Click it
You have to place the bottles from your inventory in the shapes, which correspond with the bottles
From left to right: red, yellow, no color, blue, pink, green
A the bottom a compartment opens, get the knife, which is in there
Right on top beside the painting of Diana and left side in the middle beside it, you will find a part of a medallion
Click the round bowl on the floor in the middle. It turns around. Place the knife at the medallion piece to get it
Click the medallion in the round empty space, where has been the knife before
A little compartment opens at Diana's painting
Grab the last gem
Screenshot Diana's Shrine
The last hour - In front of the prison: Present and Past
The time travel starts. By clicking the amulet you change between past and present. Start in the present
In front of the prison - present
Grab the pick axe, right side next to the entrance
Pick up the oilcan, right next to the entrance on a stone
Get the axe from the left beam
On the floor, behind the back yellow-black sign, a scissors is stucked
With the scissors you have to cut off a part of the tape
Click the amulet to change to the past
In front of the prison - past
Lower left side is a jar with tar, grab it. Inside the inventory it will combine with the tape
Use your axe to get a part of the stake from the cart, lower left side of it. Inside of the inventory it will combine with the tape stake, so that you now have a torch
Lit the torch at the fire, it will go back burning into your inventory
Use the pickaxe to tear down the wooden wall right in the back und you will find the keys
Go back to the present
In front of the prison - present
Place the burning torch at the torch holder, left side of the entrance
Now you can see the door lock, click it
A pop up window opens: Your goal is it, to open the lock. To do so, first click the oilcan at the lock.
On top of the lock you see two symbols, the third one is to dirty to see what it is
Now click first the key with moon, then the one with the line and at last one is the one with a circle and a point in it
You have to click the keys in this order
Do you make a mistake, you have to start again
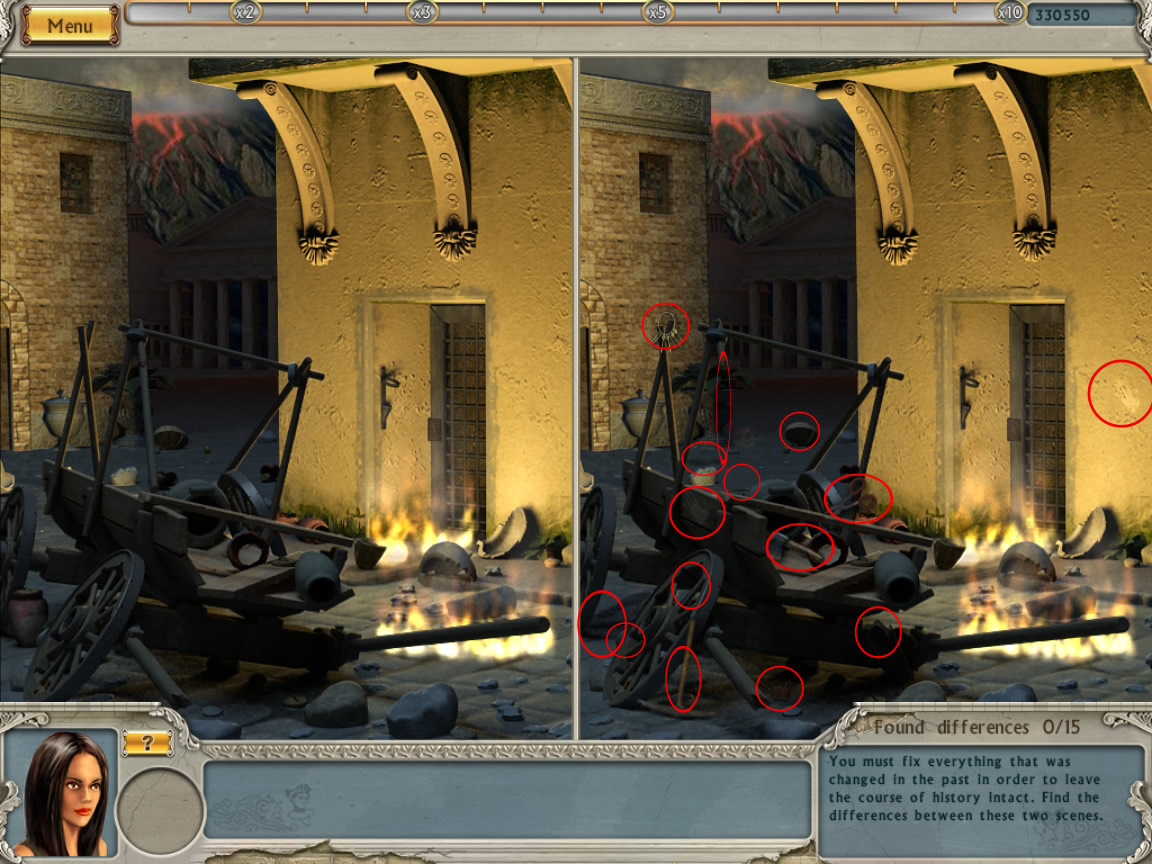
Before you can go, you have to clean up, so find the 15 differences
Screenshot 15 Differences
Screenshot In front of prison - present
Screenshot In front of prison - past
The last hour: Inside prison - Present and Past
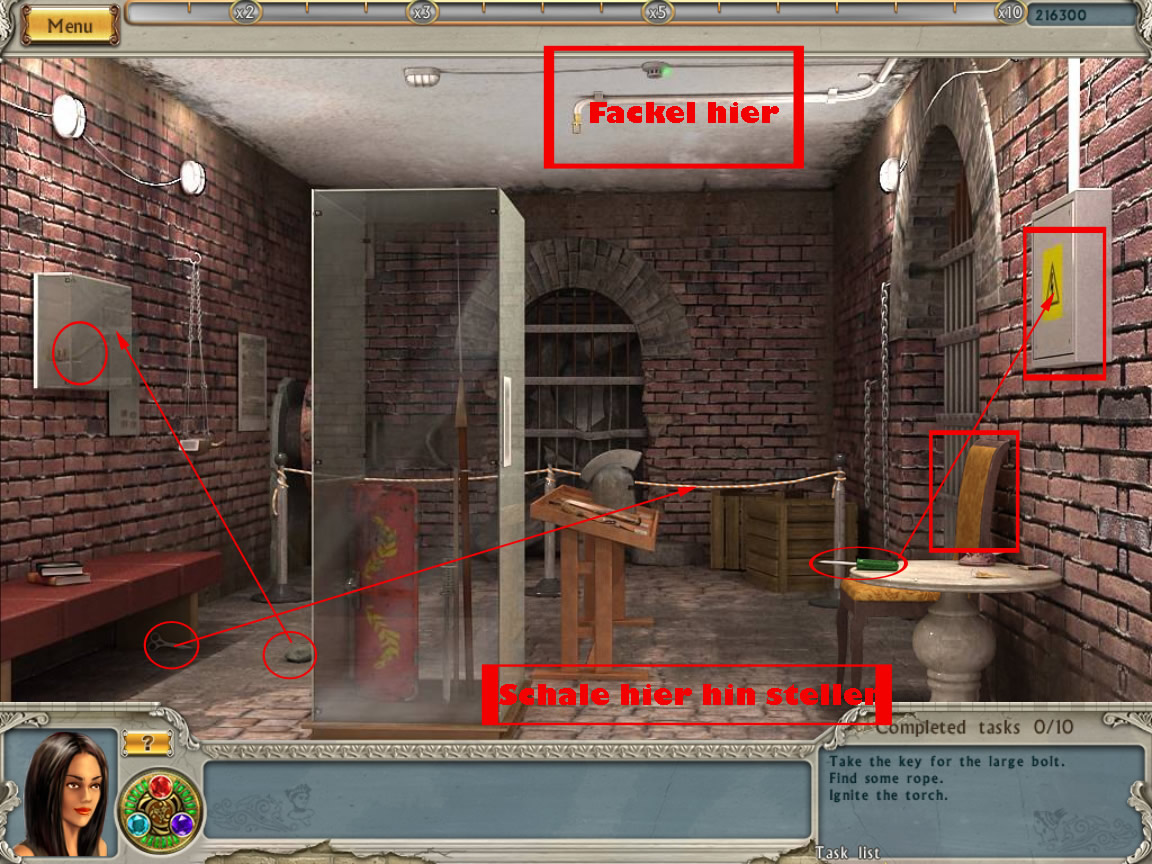
Inside Prison - Present
Take the screwdriver from the table, right side
Grab the scissors from under the bench, left
Use the scissors to cut off a part of the rope, right side in the back
Left behind the glas cabinet a stone is laying on the floor. Take it
With the stone smash the glass case, hanging at the left wall
Get out the stake
Use the amulet to go to the past
Inside Prison - Past
Get the bowl, laying on the floor left
Grab the torch, right on the floor
Lit the torch at the fire, it goes back burning into your inventory
Change to the present
Inside Prison - Present
Place the torch at the fire alarm at the ceiling
Place the bowl on the floor, right side to the glass cabinet
The bowl fills with water, click it to take it back into your inventory
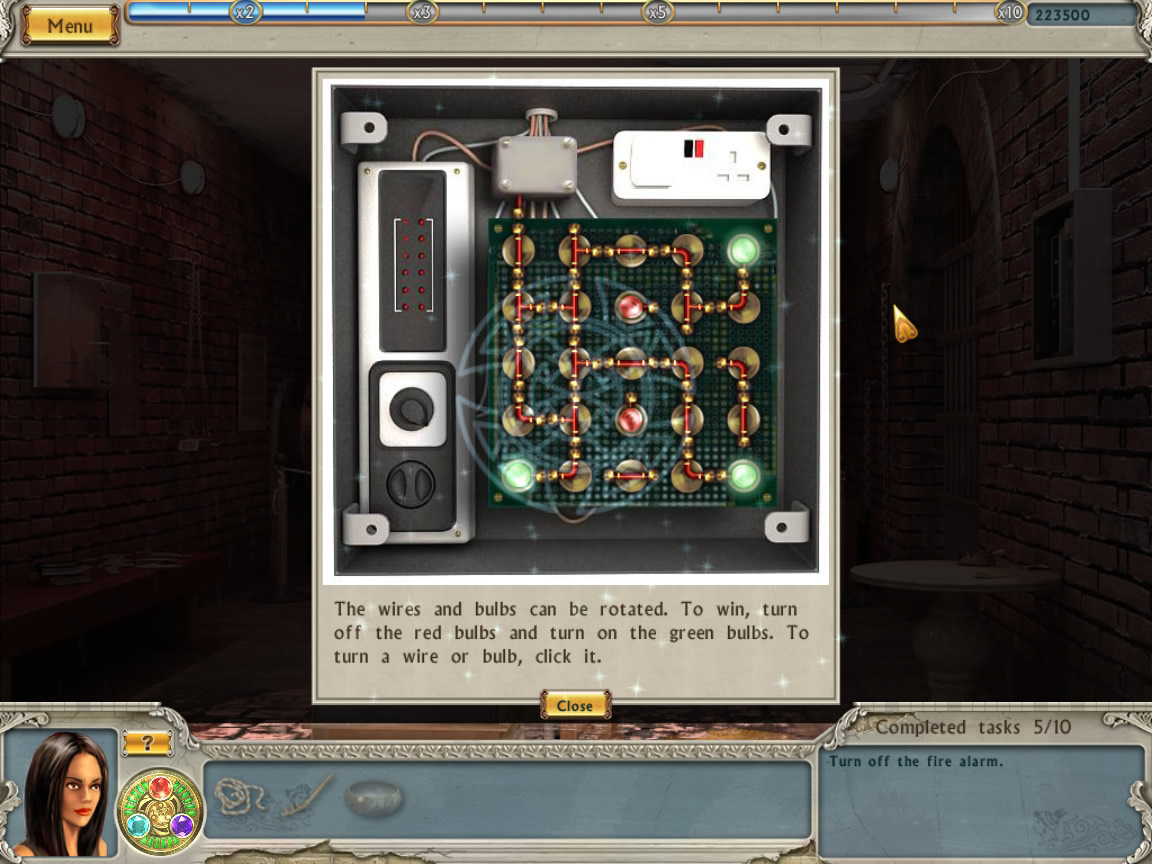
Place the srewdriver at the fusebox at the right wall. A minigame opens
Your goal is it to deactivate the red and activate the green lamps
All wires and lamps can be turned around by clicking
There are several ways to solve it, the screenshot shows an example
Screenshot Fusebox
Screenshot In Prison - Present
When you are done, go back into the past
Inside Prison - Past
Extinguish the fire with the water from the bowl
Click the stake at the lock of the back grille
Place the rope at the other part of the rope in the left upper corner
Now click the big wheel and it will open the grille
Click on the opening and a minigame opens. Match by clicking the each two foot prints. One will remain. Its Alabama's foot print, showing you the way
Screenshot In Prison - Past
Before you can move on, you have to clean up. Find the 16 differences
Screenshot 16 Differences
The last hour: The Cells - Present and Past
The Cells: Past
Get the lever, hanging at the wall between the cells
Get the round amulet from the middle of the floor
Left side, between the barrel, there is a scroll. When you click it, it will fall down
Click it again and you will see, that it is a plan, showing, that the prison has 16 cells. Remind that for later
Left side of the cells, there is copperplate, which shows, that the prison had 11 guard. Remind that for later
Go back into the present
The Cells - Present
Get the cloth right on the desk and it will clean the amulet in your inventory
You need three pieces of paper: In front of the cabinet, left side in the back on the floor (1), right side on the floor (2), in the paper bin (3)
The three pieces will combine in the inventory to a document
In the back right you see a light board, under it is a fuse - put it in the socket
Place the document at the light board
Its telling you, that the safecombination has three parts: Amount of prisoners at the 21st of September, the amount of cells and the amount of guards
Click at the safe. It tells you, that you need to have the correct fingerprint and the right number combination
Click at the bottom of the cabinet in the back left. Glue will go into your inventory and combine with the lever
Get the bowl from the top shelf
Go back to the past
The Cells - Past
Place the lever at its place and click again. The left cell door opens
Click the ashes inside the cell, it will go into your inventory
Go back to the present
The Cells - Present
Click the little drawer in the middle. You will get a tool box
Get the brush, which will combine in the inventory with the ashes
Take the knife and use it then to get a piece of the tape, laying on top of the drawer
Pick up the lense, that is laying in the left cell on the floor
Place first the lense at the mikroscope on the desk and then the amulet
Click again to get a closer look. You see symbols, you already have seen in the past
Get the amulet back into your inventory
Go back to the past
The Cells - Past
Click the amulet next to right cell door at the symbol above the barrel
A compartment with a scroll opens
Click the scroll and you will see a table with roman numbers, which shows the amount of prisoners in September
As you already know, that you need the amount of the 21st September, remind the signs standing next to XXI (21) - LXIII
Go back to the present
The Cells - Present
Click the paper, laying right on the desk and you will see, that the signs LXIII are the roman signs for 63
Click now the brush at the glass on the desk
You see a fingerprint
Place the tape at the fingerprint - it goes back to your inventory automatically
Now place the tape with the fingerprint at the safe and click the safe again
A disc opens. You have to move now the circles into the right combination: Outer Ring - 63 (amount of prisoners at the 21st of September), middle ring - 11 (amount of guards), inner ring - 16 (amount of cells)
Screenshot Safe Disc
The safe opens and you can get out a glas with acid
Go back to the past
The Cells - Past
Click the acid at the lock of the right cell
Click again the cell bars to open the door
Before you can lean back and enjoy the finale, you have to clean up
Screenshot Differences
Thanks so much to Kayleigh for doing this walkthrough! You rock!
Posted by: Kero |
April 9, 2009 10:18 PM
|
April 9, 2009 10:18 PM