


![]()
 It's safe to say by now that Detarou has lovably weird down to an art. Nowhere else but in those strategically crafted, surreal worlds could you catch yourself thinking "Well of course that swarthy ballerina has my cable, but what color was the monkey again?" Even more strange, yet endearing, characters (and the return of an evil panda lurking behind their amusing facade) await you in Detarou's escape game, Pattsun March.
In tradition with the Detarou canon, puzzles follow a bizarre sense of logic for the most part, and you'll have to rely heavily on your problem solving skills. Being able to observe your environment, translate those often absurd elements into necessary clues, and apply them to practical use are the keys to open the many locked doors in this maniacal morsel of a room escape. Keep your eyes peeled for helpful hints and a wary cursor over that save button ready for potential hazards. Once again, you are assisted by the handy-dandy changing cursor, but the clean design makes it hardly necessary while there is nary a pixel hunt in sight. So put on your smarty pants and equip those thinking caps, folks. If you want that oh-so-rewarding feeling of finding all three endings, you're gonna need 'em!


Walkthrough Guide
(Please allow page to fully load for spoiler tags to be functional.)
Pattsun March Walkthrough
Red Stamp - Full End
Open the Color Code Drawer
Main Room
You start the game facing a cabinet with the symbols "Club = B" written on it.
Click the drawers at the lower left side of the cabinet for a closer look.
Open the bottom drawer and take the Pink Clip inside.
Go back to the original view of the cabinet, then turn left twice.
Click the door with the heart symbol on it to travel to the Heart Room.
Heart Room
Turn left to face the man in the ballerina costume.
Click the man to zoom in, then take the Plug tied around his wrists.
Go back and right twice to face the man in a suit sitting at a desk.
Use the Pink Clip from your inventory on the man's nose to receive the Empty Glass.
Turn right towards the exit door.
Note that written on the other side of the heart door is the number 3.
Exit to the Main Room, then continue through the door with the club symbol on it to enter the Club Room.
Club Room
Turn left to face the three pedestals.
Note the symbols written on the wall "Spade - Club = A".
Click the right pedestal for a close-up view.
Open the lid and remove the wig from the man hiding inside to find a folded note with the Animal Code.
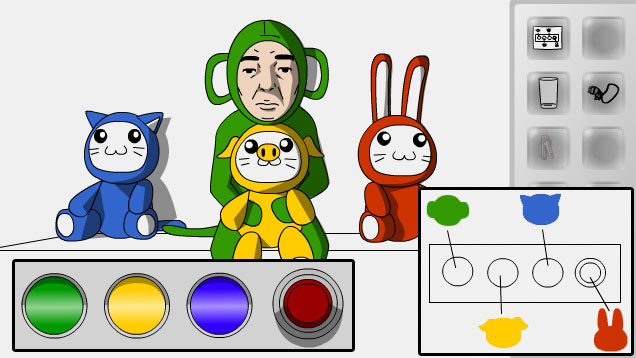
Turn left twice towards the stuffed animals.
These heads of the stuffed animals (and one creepy guy) look identical to the the silhouettes on the Animal Code.
If you read the code from left to right and combine the silhouette of the heads over each circle with its matching colored stuffed animal the order is:
Green Monkey, Yellow Pig, Blue Cat, Red Rabbit
Go back and turn right to face the exit.
Note the number 4 is written on the other side of the club door.
Continue out to the Main Room.
Main Room
Turn right twice to face the cabinet.
Inspect the locked drawer at the lower left corner.
Push the buttons to enter in the color code found in the Club Room.
Green - Yellow - Blue - Red
Solution.
Take the Valve from the opened drawer.
Unlock the Middle Pedestal
Main Room
Turn left three times to face the back wall of the room.
Click the tan plate with a face at the bottom of the wall to zoom in.
Insert the Plug from your inventory into the face.
Go back once then click the metal pipe going into the floor for a close-up view.
Put the Valve onto the empty socket in the middle of the pipe.
Leave the pipe so that it's twisted out, not in.
Go back to the main view of the back wall, then inspect the now working monitor in the middle of the control panel.
Note the six numbers at the bottom of the screen:
0(inside a triangle)-1-8-1-4-4
Inspect the buttons on the control panel to the right of the monitor.
Turn the dial so that the line points vertically.
Go back twice and turn right twice to face the door with the diamond symbol on it, then continue through the door into the Diamond Room.
Diamond Room
Turn left towards the wall covered in numbers.
The 0 inside a triangle seen on the monitor at the Main Room is here again, as well as the other numbers 1, 8, and 4.
Remember for later that 0 is on the bottom, 8 is directly above it, 4 is at the upper left, and 1 is at the upper right.
Turn left to face the exit door.
Note the number 7 is written on the other side of the diamond door.
Return to the Club Room.
Club Room
Turn left to face the three pedestals.
Inspect the lock at the top of the middle pedestal.
There's that familiar triangle shape again, as well as three other triangles.
We already know that the 0 is at the bottom triangle facing downward, but what about the other three numbers?
Remember the wall in the Diamond Room: 0 was at the bottom, 8 was above it in the middle, 4 was at the upper left, and 1 was at the upper right.
Assuming that the numbers are on the same position on the triangles as they were on the wall, push them in the correct order from the combination found on the monitor in the Main Room.
018144
Solution.
Opening the lock will unblock the first water pipe (which is visible on the monitor in the Main Room).
If you remembered to turn the dial vertically on the control panel while you were in the Main Room, turn right to face the man sitting in the sink.
Turn on the tap to start the flow of water.
Use the Empty Glass from your inventory on the stream of water to collect the Glass of Water.
Go back to the Main Room.
Unlock the Left Pedestal
Main Room
Click the monitor in the middle of the control panel to zoom in.
Note the numbers at the bottom have changed to a series of arrows.
Keep in mind that there is also a long arrow at the bottom pointing left, indicating that you should read the arrows from right to left rather than left to right.
The order then becomes: Left, Right, Right, Left, Left, Right.
Return to the Club Room.
Club Room
Turn left to face the three pedestals.
Click the left pedestal for a close-up view.
To open the lock, press the arrows in the correct order found on the control panel in the Main Room.
Don't forget that the long arrow pointing left indicates you should read the order from right to left.
Press Left, Right, Right, Left, Left, Right.
Solution.
Take the Spade Key from the opened compartment.
Exit to the Main Room.
Open the Garage Door
Main Room
Turn left to face the spade door.
Click the lock under the handle to zoom in.
Use the Spade Key from your inventory to open the lock.
Continue forward into the Spade Room.
Spade Room
Inspect the bald head sticking out of the dirt between the two dancing flowers.
Pour the Glass of Water from your inventory onto the head to make it an Empty Cup again.
Take the Lever from the man who grows out of the ground.
Turn right to face the wall with letters.
Remember for later that the letters go in order of B-C-A.
Turn right again to face the exit.
Note the number 5 is written on the other side of the spade door.
Exit to the Main Room.
Main Room
Click the control panel at the back wall to for a close-up view.
Insert the Lever from your inventory into the slot to the left of the dial.
Turn the dial so that the line is now pointing horizontally to redirect the flow of water.
Enter the Heart Room.
Heart Room
Now that the glass tank is full of water, you can see the symbols that were written on the wall.
Spade + Heart = C
Go to the Diamond Room.
Diamond Room
Turn right to face the garage door.
Click the key pad on the right side of the door to zoom in.
To open this lock, you need to enter the value of the 3 letters found in the Spade Room: BCA.
You already know the first letter from the written note at the middle of the cabinet: Club = B.
You've also found two equations for the remaining two letters:
Spade - Club = A
Spade + Heart = C
To solve the equations for A and C, substitute the symbols with the numbers written on the back of each symbol door.
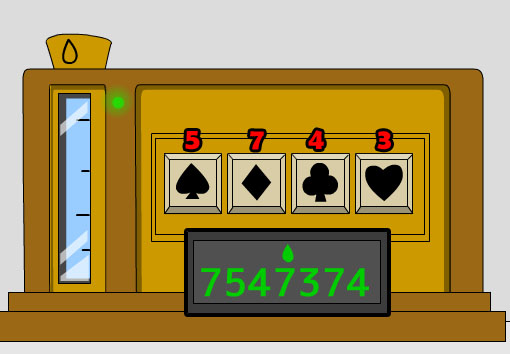
Diamond = 7, Spade = 5, Club = 4, Heart = 3.
Symbol Doors Screenshot.
The final equations are:
5 - 4 = A = 1
5 + 3 = C = 8.
Press the buttons to enter the final combination into the lock, then push the bottom button to submit your solution.
A = 1, B = 4, and C = 8, but remember to put them in the correct order.
The combination is 4-8-1
Solution.
Go through the opened door into the Garage.
Open the Metal Door
Garage
Click the two men in white suits to zoom in.
Click the man on the wheeled platform to roll him out.
Take the Wrench from his hand.
Go back to the Main Room.
Main Room
Click the control panel for a close-up view.
Turn the dial to point the white line vertically and direct the water to the sink in the Club Room.
Enter the Club Room.
Club Room
Click the man in the sink to zoom in.
Turn the tap to start the flow of water.
Use the Empty Glass from your inventory to refill the Glass of Water.
Exit to the Main Room.
Main Room
Click the bolted square at the bottom of the control panel for a closer look.
Use the Wrench from your inventory to remove the bolts at the corners.
Insert the plug on the floor into the socket in front of the man with ice cream to turn on the power to the lever.
Inspect the lever at the top of the control panel.
First, turn the dial to point the white line horizontally.
This will allow you to flip the lever to point downwards (or to the right on the monitor).
Finally, turn the dial vertically again to direct the path of water to the engine in the Diamond Room.
The metal door in the Diamond room should now be open.
Solve the First Monitor Puzzle
Main Room
Click the H-shaped pattern in the middle of the room to zoom in.
Note that there is also a small circle directly above the square.
Inside the square are four connected blocks at the top and two connected blocks at the bottom, all surrounded by black spaces.
Go to the Spade Room, then turn left and go through the door into the Hallway.
Hallway
Click the hole in the middle of the right wall to get a peek at the angry panda and his camera man.
Click the monitor in the back wall for a close-up view.
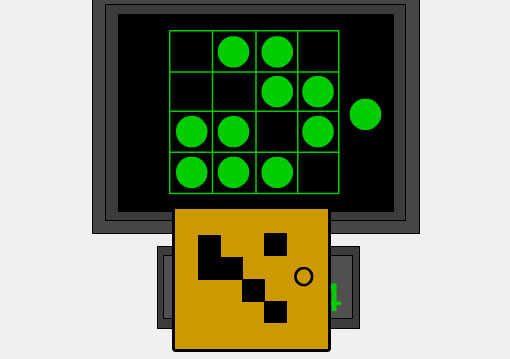
The shape looks exactly like the square pattern on the floor at the Main Room.
It's missing the H-shape inside the grid, however.
Leave the spaces blank that were black on the floor pattern, but the squares that were filled should be marked with a green circle.
Note that the circle outside of the square is now on the right side, indicating that you should rotate the original image 90 degrees clockwise.
Push the green circle to enter your solution.
Solution.
Note the seven numbers that appear at the bottom of the screen:
7547374.
Return to the Diamond Room.
Open the Symbol Box
Diamond Room
Inspect the box in the middle of the open doorway beside the working engine.
Pour the Glass of Water from your inventory into the graduated cylinder at the side of the box.
Note there are four buttons with each of the four symbols in the middle of the box.
Remember the values for each symbol found on their doors?
Combine that information with the 7 digit combination from the monitor in the Hallway.
Since Spade = 5, Diamond = 7, Club = 4, and Heart = 3 and the combo from the monitor is 7547374, you can now find the correct order to push the buttons on the box.
Diamond - Spade - Club - Diamond - Heart - Diamond - Club.
Solution.
Take the Gold Key from the opened box.
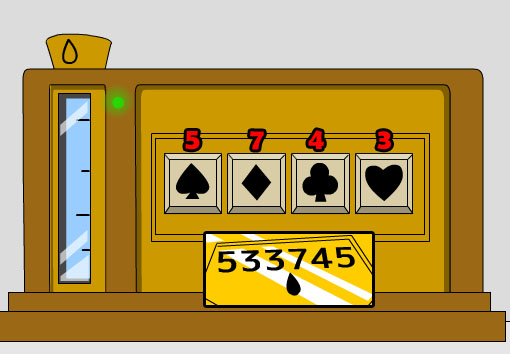
Inspect the Gold Key in your inventory, then flip it over to find a six digit combination: 533745.
Close the lid on the box, then press the symbol buttons to enter in the new combination.
Spade - Heart - Heart - Diamond - Club - Spade.
Solution.
The box will open again, this time revealing a pattern of black squares and an empty circle.
It's another pattern for the grid monitor in the Hallway!
Go to the Hallway.
Solve the Second Monitor Puzzle
Hallway
Click the monitor in the middle of the wall to zoom in.
Fill in the squares to recreate the pattern seen in the box at the Diamond Room.
Remember that black squares indicate an empty space on the grid, so fill the area around those squares to make the final shape.
Push the green circle outside of the square to submit your solution.
Solution.
Take the Red Stamp from the opened compartment at the bottom of the grid.
Return to the Main Room.
Escape!
Main Room
Turn to face the wall with the cabinets.
Click the grey door at the back of the hall to the left of the cabinet for a closer look.
Use the Gold Key from your inventory to open the door.
Exit to freedom!
Normal End
Follow the instructions in the Red Stamp - Full End walkthrough until you open the symbol box for the first time and take the Gold Key.
Instead of opening the box again or going to the monitor, simply exit to the Main Room.
Turn to face the cabinets and click the door at the back of the hall to zoom in.
Unlock the door with the Gold Key.
Exit the room without the Red Stamp in your inventory to complete the Normal End.
Bad End
Main Room
Turn left to face the diamond door.
Go through the door into the Diamond Room, then turn left and continue through the blank door to the Dark Room.
Dark Room
Move forward to the middle of the room.
Click the panda head hanging from the edge of the lamp string.
It's a trap!
Posted by: Trinn |
June 5, 2012 12:57 PM
|
June 5, 2012 12:57 PM