


Shaolin Mystery:
Tale of the Jade Dragon Staff
Platform: Mac, Windows
![]() Yu already has enough problems. Not only is she one of many citizens suffering under the rule of an oppressive emperor, but her place in the rebellion is to buy the food. Then her childhood friend Zihao is arrested and sentenced to be executed in two days. It turns out that he is the rightful heir to the throne, but the only way he can prove that is with the Jade Dragon Staff (genetic testing being such an inexact science in medieval China). So it falls upon our heroine to find this staff, restore it and help Zihao take his rightful place — before the executioner does his job.
Yu already has enough problems. Not only is she one of many citizens suffering under the rule of an oppressive emperor, but her place in the rebellion is to buy the food. Then her childhood friend Zihao is arrested and sentenced to be executed in two days. It turns out that he is the rightful heir to the throne, but the only way he can prove that is with the Jade Dragon Staff (genetic testing being such an inexact science in medieval China). So it falls upon our heroine to find this staff, restore it and help Zihao take his rightful place — before the executioner does his job.
 Shaolin Mystery: Tale of the Jade Dragon staff is another enticing hidden object game release. As you travel through various exotic locations, you have to find objects solve puzzles and unlock doors to new areas. The journey is pretty epic, starting in the streets of an ancient Chinese city, through a ruined town, along a spirit-filled forest and increasingly more exotic places, including a world in an entirely different realm (the flying snails were a clue...). In each of the seven chapters you encounter a variety of challenges. One type requires you to find objects scattered in the room to activate something. Every now and then you have to mix a potion, plus you encounter puzzles in fair regularity — both of the familiar type and some more unique challenges. And then there is the ever-present hidden object side, picking up a selection of random objects in a smorgasbord of junk, all towards recovering one vital tool you need to get past an obstacle in the game.
Along the way Yu meets a few interesting characters, though they only serve as one way to narrate puzzles. Like similar games you do a lot of traveling between scenes in a chapter, perhaps quite a bit more than usual, because most objects unveil themselves sequentially as you need them. To make sure things don't get too frustrating, there is the ubiquitous hint button, which never penalises you but does require a bit of time to charge after you use it.
Analysis: Shaolin Mystery doesn't push the genre envelope, so if you have played any of the recent games in this genre (Magic Encyclopedia: Illusions is incredibly similar) you know what to expect. But if you are a fan of these games, it will entertain with some great lateral puzzles and pretty gorgeous locations. The hidden object scenes do feel a bit cluttered at times and some objects look like they have been hastily placed there instead of integrated within the picture, but it's a nitpick. The stuff you need tends to be easy to spot, thanks to the crisp graphics. In fact, visually the game is very good; not much better than other top offerings on the market, but it holds its own.
 On the puzzle side it is less challenging. Some obstacles take a little bit of lateral thinking, but things are handled pretty sequentially, so you never really scratch your head. If you don't have the item you need, you'll have it pretty soon—most likely in the clutter of a reactivated hidden object screen. The mini-games are a spot harder and cover the gamut of familiar ones: following note sequences, sliding pictures, matching duplicate symbols and so forth. It also has a few new (or rarely-seen) puzzles — overall there are a lot of mini games to keep you stumped. These can also be skipped, but where is the fun in that?
One annoyance is the presentation of the story. The narrator sounds pretty unengaged and slightly bored, something that isn't helped with less than great audio (the exception being the nice soundtrack). And the finale seems a bit like a wasted opportunity - after recovering the full staff you don't rush back to save your friend. Yu does, but it's all represented as a slide show with the narrator's unenthusiastic drawl covering the events. That was a bit of an anticlimax to what is really a fun and rich puzzle/HOG game. Also, you meet one Shaolin guy and all he wants is medicine. There was certainly no mystery as far as he was concerned.
After Magic Encyclopedia this game feel adequate, but hardly remarkable. It was fun while it lasted and had all the standard boxes checked. But Shaolin Mystery lacks the shine and enthusiasm that the top games in the genre enjoy. It's still well worth the seven bucks asked for it, but don't expect it to knock your favourite puzzle/hidden object game off its perch.
![]() Windows:
Windows:
Download the demo
Get the full version
![]() Mac OS X:
Mac OS X:
Download the demo
Get the full version


Walkthrough Guide
(Please allow page to fully load for spoiler tags to be functional.)
Shaolin Mystery: Tale of the Jade Dragon Staff Walkthrough
General Tips
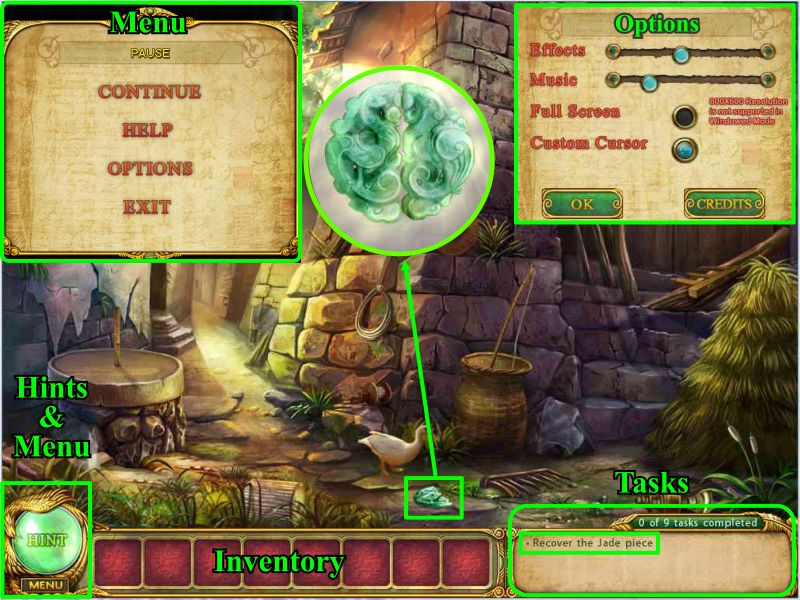
From the Main Menu you can create, choose or delete a profile as well as play, exit, and access options.
Options give you a choice of a custom cursor or not, full screen versus windowed mode, and volume for music and effects.
The game has no timer and hints are unlimited but once used, the hint button needs to refill before it can be used again.
There is no click penalty and the game is automatically saved for you.
The Mini Games have a "Skip" option as soon as the button is full and when applicable they have a reset button in case of need.
Navigation
Hints and Menu, Inventory and your Tasks are at the bottom of the screen.
From the menu under hints you can choose to pause the game, continue, go to Help or Options, and exit to the Main Menu.
The total number of tasks and how many you have completed are shown at the top of the taskbar.
Objects are collected several ways. Some are visible in the scene and others require something to be moved or opened so you can find the object.
Other objects may need to be assembled for you to use them so will bring up an Object Circle with other circles around it containing fragments or additional objects you need to collect.
When you find items for an Object Circle they will need to be individually placed in the circle.
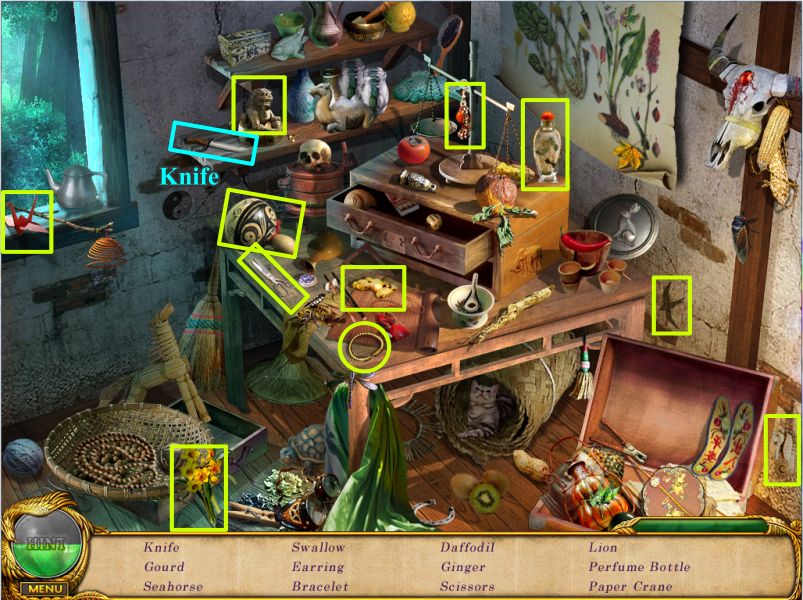
Hidden Object scenes are somewhat random but many of the items may appear another time you play a Hidden Object scene for the same area so the objects will be marked.
Hidden Object scenes will always have a Key Object which is mostly the first item on the list and will be marked in turquoise blue.
The Jade piece on the ground was dropped when the man was arrested and it is one of a pair belonging to Yu and her childhood friend Zihao.
Screenshot
Help Instructions
"Help" can be accessed at any time from the Menu and you can choose to start the game with a Tutorial.
If there is something you should take for your inventory, a hand will appear to grab it.
The hand will also help to move or open items.
A magnifying glass wants you to take a closer look.
A bubble with dots in it means you should talk to the person.
Directional arrows show you how to navigate to another location.
White sparkles mean you need to use an item from your inventory.
Green sparkles mean you should click on the area for a close up view.
A white twinkle appears when you need to move or pick up an item.
Chapter 1: A Chance Encounter
Collect the Jade Piece.
Click on the door which will open to show a hungry dog holding a hat so you need to find him a treat in order to get the hat.
Click on the mill and collect the pieces to assemble the mill.
Click on the basket and collect the parts of a fishing rod.
Move the hat so you can pick up the hook.
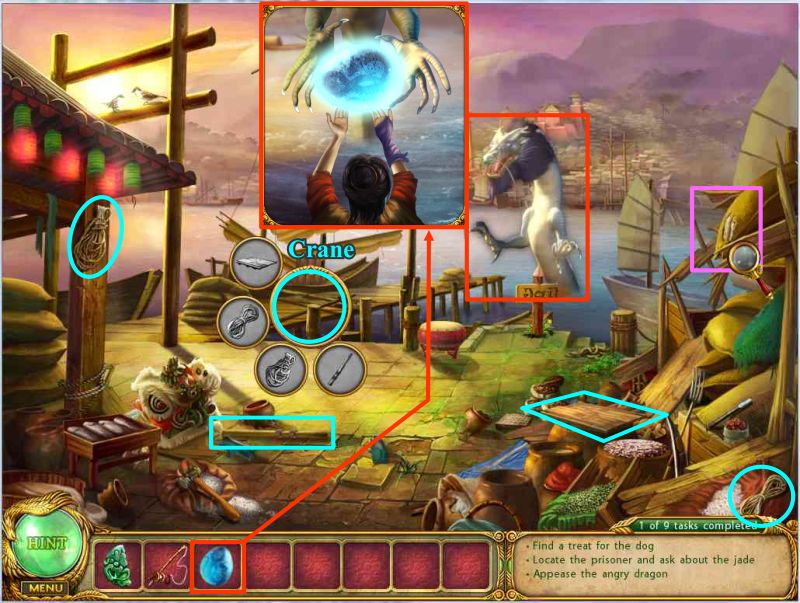
Exit to the wharf.
Screenshot
There is an angry dragon in the water who wants her child back so click on the sparkling area in the lower right for a Hidden Object scene.
Collect the items on your list and the dragon egg which will go into your Inventory.
Screenshot
Hand the dragon egg to the dragon as shown in the insert.
Click on the crane collect the items to repair it.
Click on the battered sack on the right side of the screen and some of its contents will trickle out.
Screenshot
Click on the crate on the dock and collect the tools to open it.
Click on the crate again for a closer look and use the tools on each of the front 3 nails to pry the lid off.
Click on it again to remove the lid and pick up the contents.
Follow the arrow down the stairs to the jail.
Screenshot
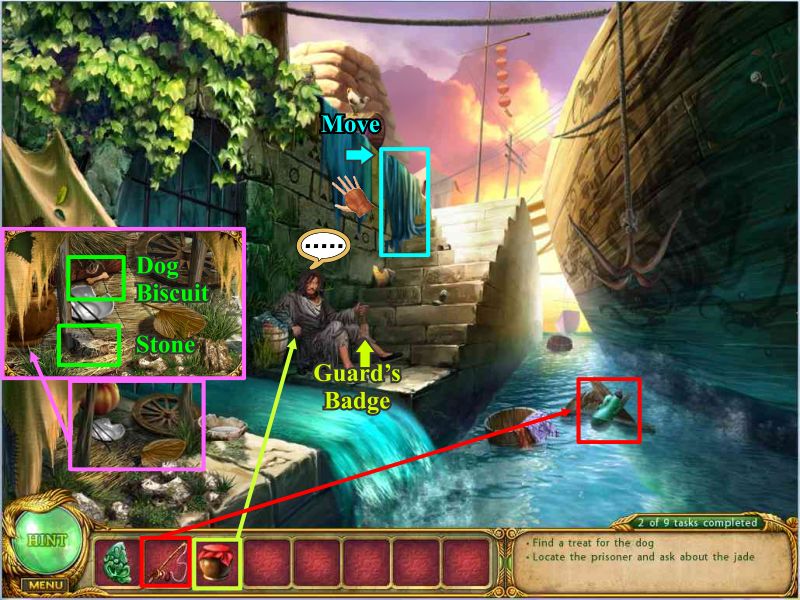
Talk to the vagrant who says he will give you the guard's badge in trade for some alcohol so give him the alcohol from your Inventory.
Click on the area in the lower left for a close up and pick up the dog biscuit and rock.
Move the blue cloth to reveal characters on the bricks underneath.
Use your fishing pole to retrieve the bottle from the water.
Screenshot
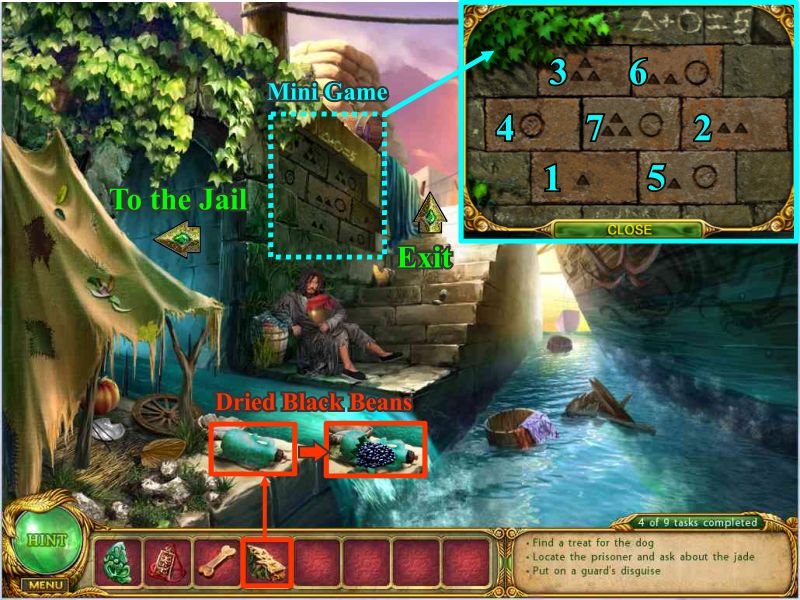
Use the stone from your inventory to break the bottle and take the beans
Open the Jail Gate
Click on the wall for a closer look and press the bricks in the order shown to open the entrance to the jail.
If you enter the jail now, the guards will kick you out so exit up the stairs to the wharf and click on the same sparkling area for a Hidden Object scene.
Screenshot
Collect everything on your list including a guard's uniform and exit at the bottom of the wharf scene to go back to the house where the dog is.
Screenshot
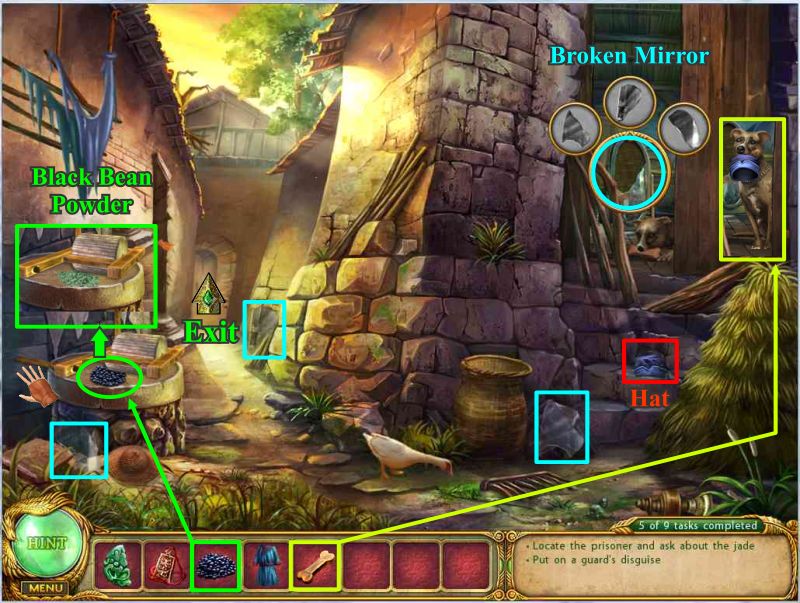
Give the bone to the dog and he will drop the hat for you to pick it up.
Place the beans on the mill and click it to grind them and collect the finished product.
Click on the broken mirror in the house and collect the shards to assemble it.
Click on the mirror to take a closer look and place the uniform, hat and badge on Yu.
Exit to the wharf and back down the stairs to the jail.
Screenshot
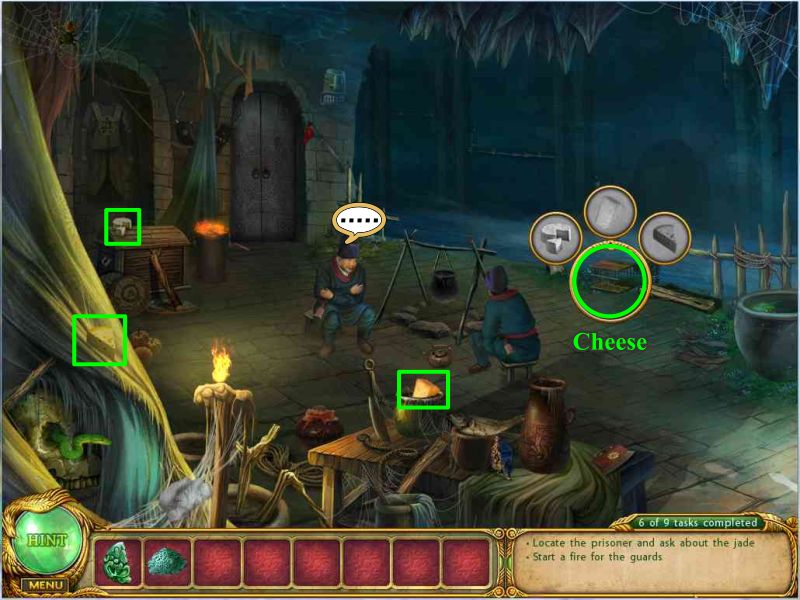
Talk to the guard who wants you to make a sleeping potion and test it on the rat.
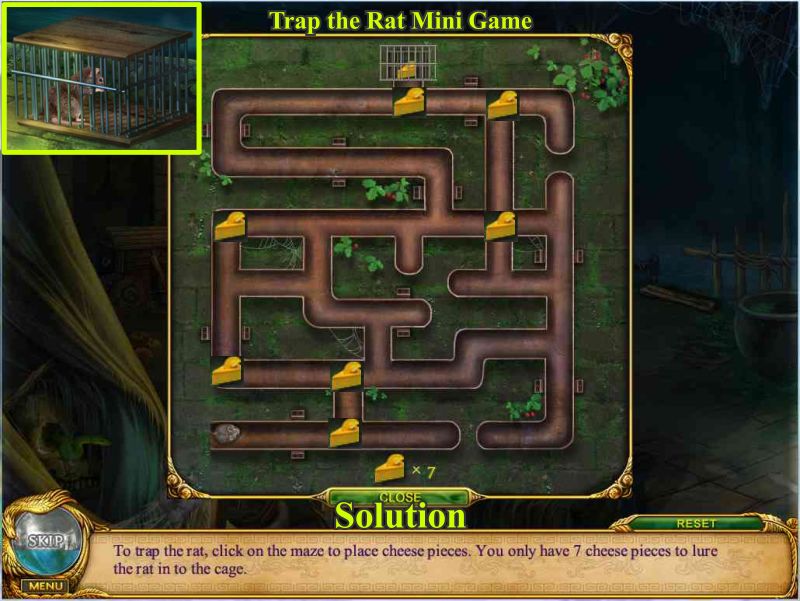
Click on the cage and collect the cheese to trap the rat.
Screenshot
Trap the Rat Mini Game
Your goal is to place the 7 pieces of cheese so the rat will follow the trail and enter the cage.
Screenshot
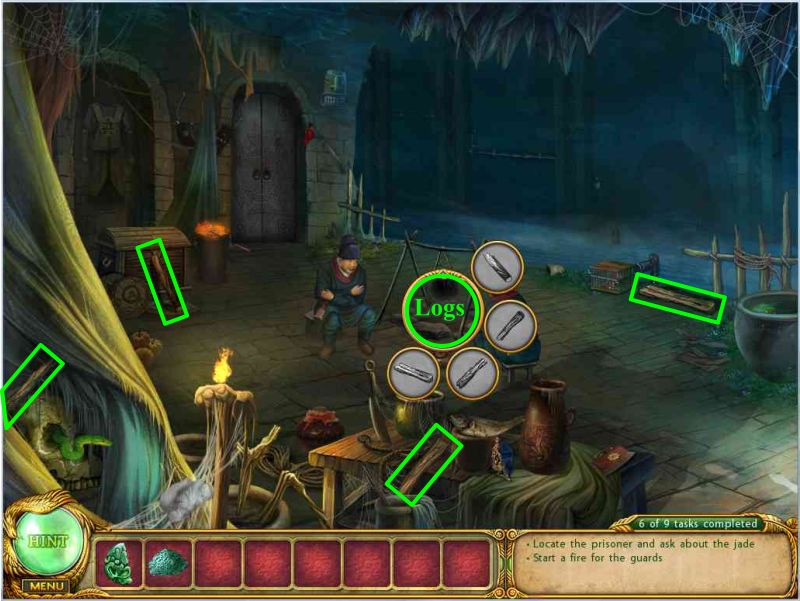
You need to start a fire so click on the logs and collect more wood.
Click on the fire area again and get flint to start the fire then click again to get a close up and start the fire.
Screenshot
Put the powdered beans in the pot and after it stirs, click on the spoon and it with pour some of the liquid in the bottle.
Collect the bottle, click on the rat cage and give the rat some of the sleeping potion which works so the guard sends you to the jail cell to give some to the prisoner.
Screenshot
The doors open so go to the cell and take the torch in the lower left corner back to the fire outside to light it.
Light the 2 torches in the cell area and give Zihao the jade piece to gain his trust so he will talk to you.
Chapter 2: The Lion Dance
Talk to Yu's brother, the puppeteer and the girl at the window who has lost her hair ornament to the bird.
Click on the bird nest and collect the items to form a net so you use the net to retrieve the hair ornament.
Give the hair ornament to the girl and she will drop a handkerchief for you to pick up.
Take a closer look at the wanted poster.
You can't get into the Inn because there is a cart blocking the door so exit at the end of the alley.
Screenshot
Talk to Yu's brother who says a squirrel ran off with the Rebel Insignia which you will need to find before it is discovered.
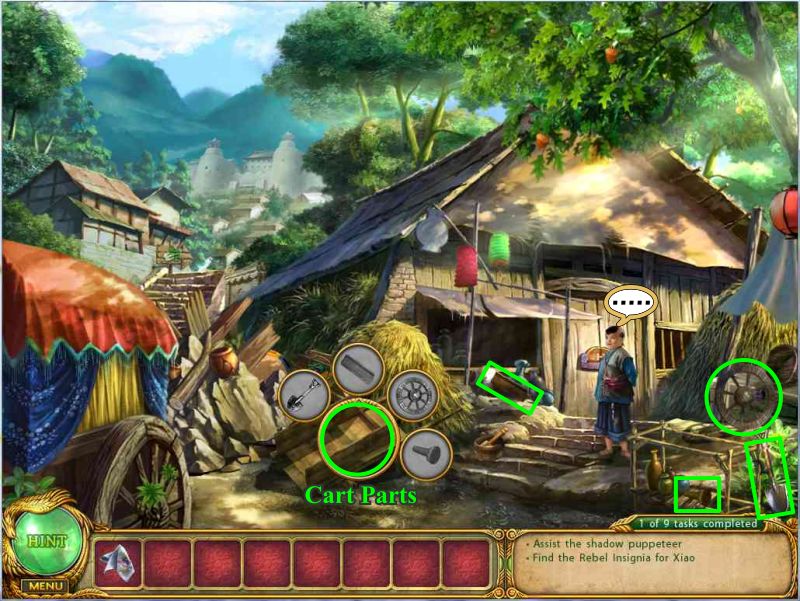
You can't exit to the marketplace because the broken cart and a bunch of trash block the path so click on the cart and find the parts to fix it.
Screenshot
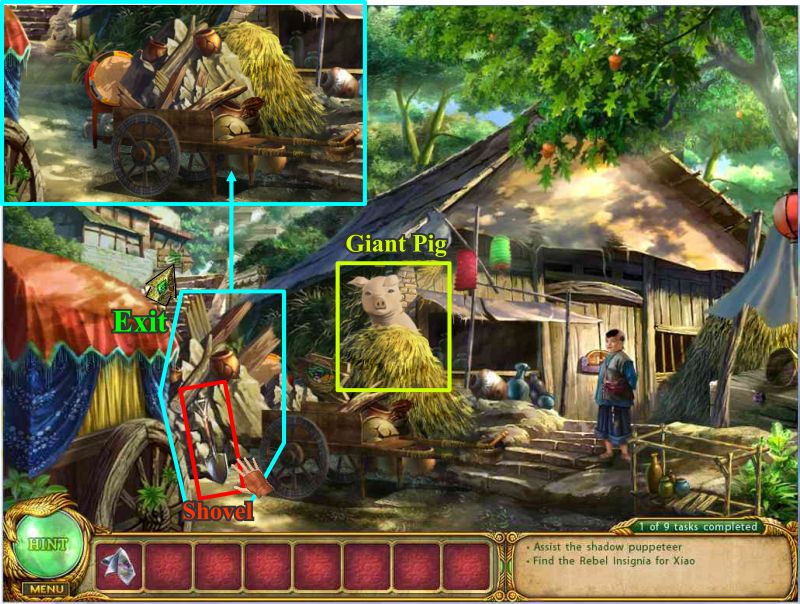
Click on the shovel and it will start filling the cart. Keep clicking on it 2 more times and when it is done the cart rolls away.
Click on the haystack and a giant pig pops up, then exit up the stairs at the left.
Screenshot
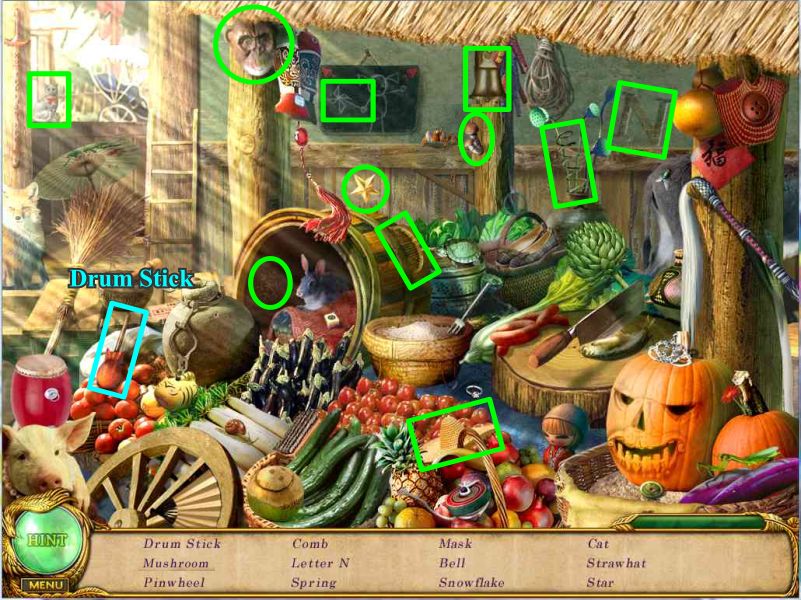
Talk to everybody and then take a closer look at the green sparkle area at the lower right for a Hidden Object scene.
Collect everything on your list including the Drum Stick.
Screenshot
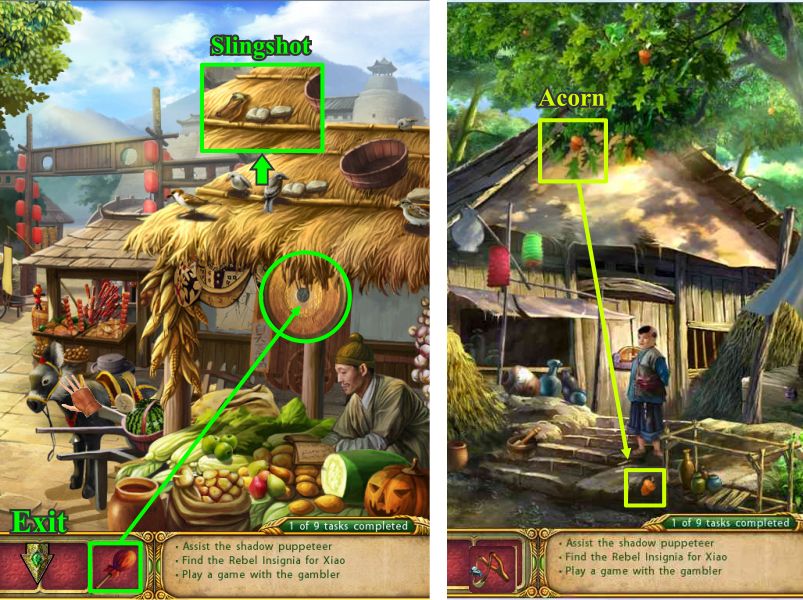
Use the drum stick on the gone to scare the birds away so you can pick up the slingshot.
The squirrel has the Rebel Insignia and you need something to trade for it so exit back to the house.
Place the slingshot on the acorn and it will shoot it down for you to pick it up off the ground so go back to the marketplace.
Screenshot
Give the acorn to the squirrel, he will drop the Insignia and run off to the roof to eat the acorn.
Pick up the Insignia and exit back to the house.
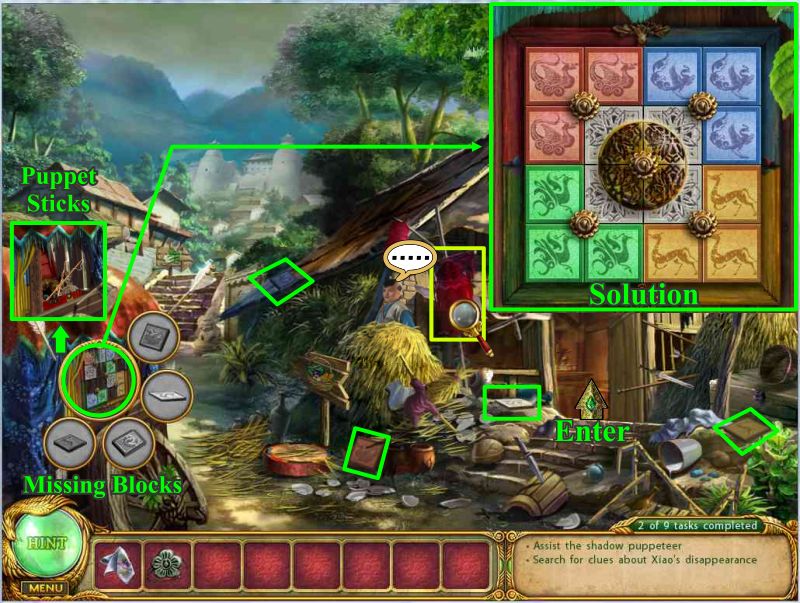
Yu's little brother is hiding in the haystack, the door is open and there is a notice posted that the home has been searched for rebellious activity.
Click on the curtain on the wagon at the left to open it, then click again to collect the missing blocks.
Collect the 4 blocks and click again to bring up a mini game.
Wagon Block Mini Game
Move the 4 knobs until the blocks look like the solution.
Each knob moves the 4 blocks surrounding it.
When you have completed the puzzle click on the center knob which will rotate to open the panel for you to take the puppet sticks that are inside.
Screenshot
Enter the house and open the flap on the tent at the right to see the muddy statue inside.
Use the handkerchief from your Inventory 3 times to wipe the mud off so you can read what is written there.
Click on the statue at the left to turn it and see the flower on its base.
Click on the right statue to bring up a close up mini game.
Turn the various parts of the statue by clicking on them until the statue is facing forward and a chest rises up from the floor.
Click on the chest to get a close up of the lock and insert the Rebel Insignia in the indentation.
The chest will open so look inside to find the slider game.
Screenshot
Slider Chest Lock Mini Game
Your task is to get the key at the upper left to the opening at the right by moving the wooden sliders.
You can start over by using the reset button at the lower right or you can skip the game by using the skip button at the lower left once it is full.
Move the sliders as far as they will go in the directions indicated and in the numbered order.
Take the envelope when the lock opens.
Screenshot
Open the envelope and read the letter then click on it and it will go into your Inventory.
Exit the house and click at the bottom of the screen to go back to the alley and see the puppeteer.
Give the puppeteer the puppet sticks and go into the Inn.
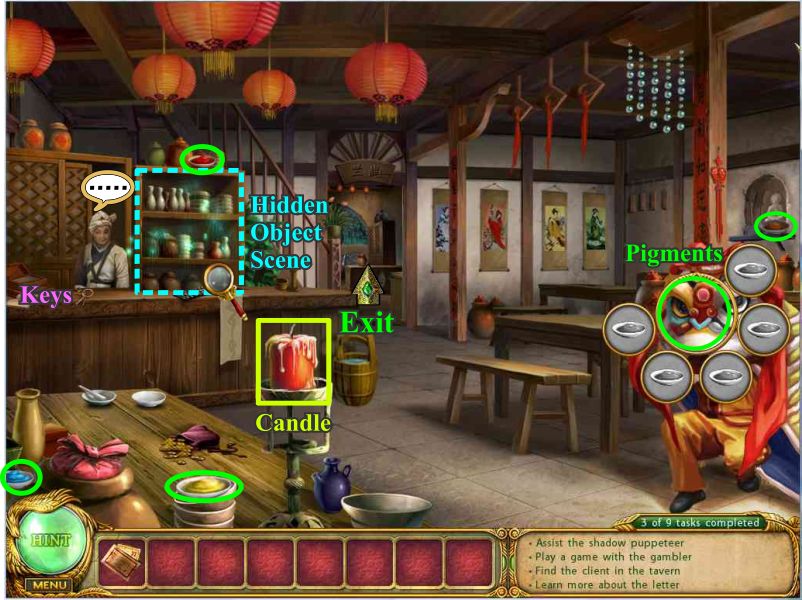
Talk to the innkeeper who won't let you have the keys until you cook her a fish dinner.
Click on the lion head and gather the pigment dishes available.
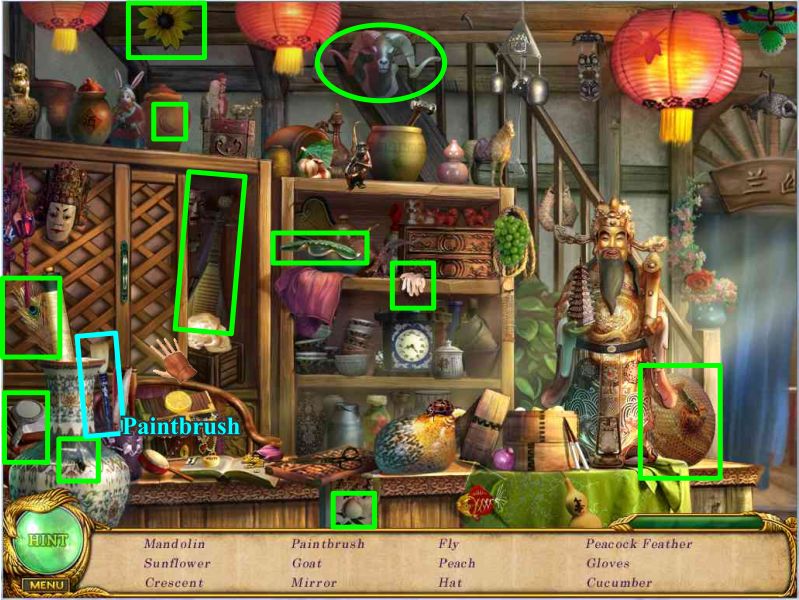
Take the candle and have a closer look at the shelves for a Hidden Object scene.
Screenshot
Collect the 12 items on your list and you will get a paintbrush to use on the lion head.
Open the cabinet to find the mandolin.
When you are out of the close up go through the door at the very back of the scene.
Screenshot
Pick up the blue pigment piece and take a closer look at the back wall for a mini game.
Animal Lantern Mini Game
Click on the animals and they will automatically go their predestined places.
The rabbit is in the correct position to begin with so just pick him up and put him back down.
Swap the lanterns according to the instructions on the wall:.
The Rabbit is on the right of the tiger..
Ox is not behind the rabbit.
The Rat is first..
Snake is not behind the monkey..
Horse is on the left of the monkey..
Monkey is not the last.
The correct order of the lanterns is labeled on the top of the lanterns in the screenshot.
Screenshot
When you are back in the room the wall will twinkle at you because there is an indentation to be filled but you don't have the object as yet so exit the room at the bottom of the screen.
Place the pigment piece from your Inventory into the mortar and pestle and it will grind it and pour it into the dish next to it on the table for you to collect and place with the others.
Paint the Dragon Mask Mini Game
All of the pigment dishes will appear on the floor so when you place your paint brush on them the mini game will pop up.
Your goal is to make the right side of the dragon mask match the left side by painting the colors in their proper places.
If you mess up a color, you can reset the game or if you get frustrated, you can click the "Skip" button when it is full.
The brush will attach to your cursor once you begin the game.
No need to clean your brush, just dip it in another color and paint until all of the white areas are filled in with color.
Screenshot
Pick up the whistle that he coughs up and go back to the next room,
Place the whistle on the bird and the whistle will sing so the bird will fly away knocking over the cage on the table.
Under the cage is the Jade Lotus you need for the back wall indentation.
Click on the wall to get the close up and place the jade piece where it belongs to get a coin.
Exit the room at the bottom of the screen and exit the Inn at the bottom of the screen.
Screenshot
Give the candle to the puppeteer and he will give you a free show.
At the end there will be a fan on the screen so collect it and exit up the alley then continue up the steps by the house to the marketplace.
Give the coin to the gambler to play the cup game.
The game is random so keep your eye on the cup.
There are 3 levels to complete or skip but at the end you will have 4 coins to buy a lemon.
Give the 4 coins to the lemon vendor and a lemon will go into your inventory.
Click on the green sparkles for a Hidden Object scene.
Find your 12 items including the raw fish.
Exit the marketplace at the bottom of the scene and go inside the house.
Screenshot
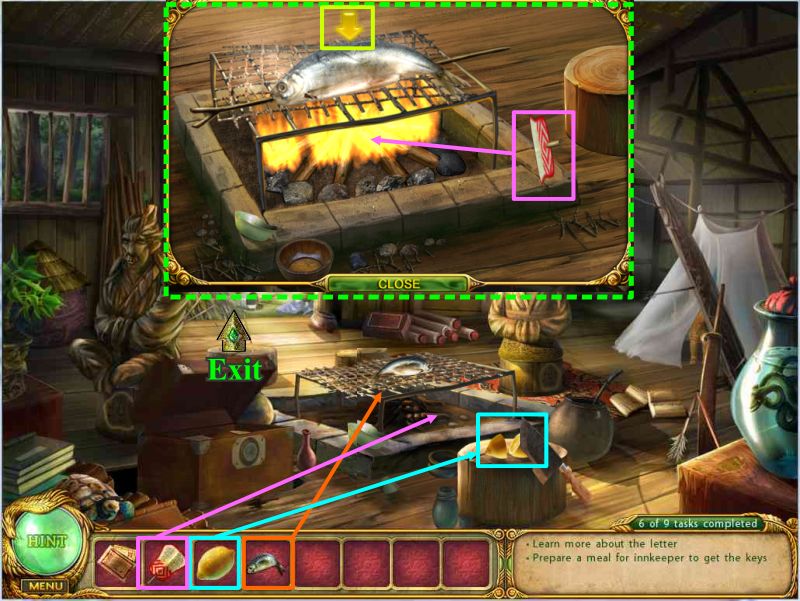
Grill the Fish Mini Game
Place the lemon on the block with the knife and it will be cut in half so collect the pieces.
Place your raw fish on the grate and fan the fire to get a close up view.
Keep the fire blazing with your fan and when the yellow arrow appears at the top of the fish click on the fish to turn it over.
When the fish is finished grilling put the lemon from your inventory on it and collect it.
Exit the bottom of the scene twice and enter the Inn.
Screenshot
Give the fish to the innkeeper and take the keys.
Zoom in on the green sparkle area for a Hidden Object scene.
Collect the items on your list and then go into the back room.
Screenshot
Use the keys to open the door on the right and enter.
Click on the cabinets at the back and on the letter on the table to collect the items needed.
Click on the wrapped package at the bottom of the screen and it will unwrap for you to pick up a piece of the letter.
When you have collected all 4 knobs the cabinet it will open so you can collect another piece of the letter.
Click on the completed letter on the table, read it and place the place the letter from your Inventory on the letter to compare the two.
Click on the 2 letters again to see the drawing on the back showing a secret staircase.
Use your crowbar on the bed and open the secret staircase to exit.
Screenshot
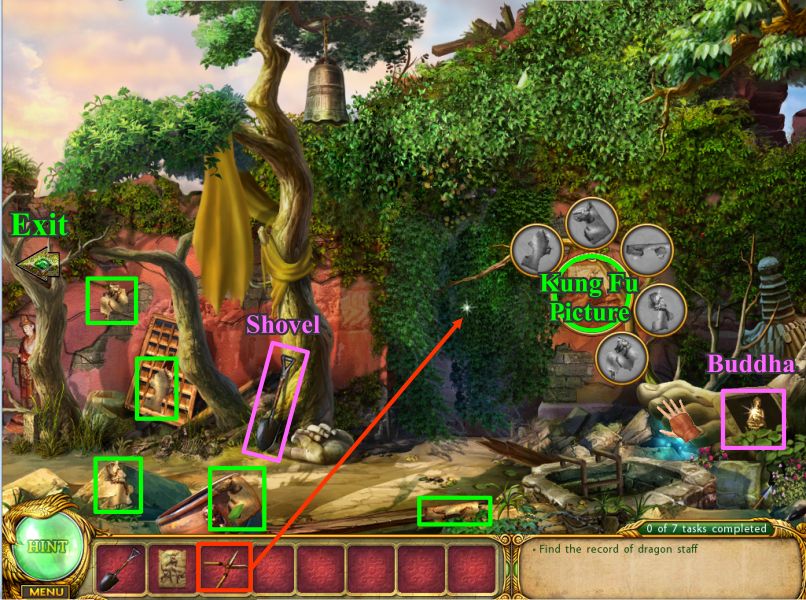
Chapter 3: The Ruined Temple
Move the toes of the stone foot to get the Buddha and pick up the Shovel.
Click on the wall with the partial Kung Fu Picture and find its parts then collect it.
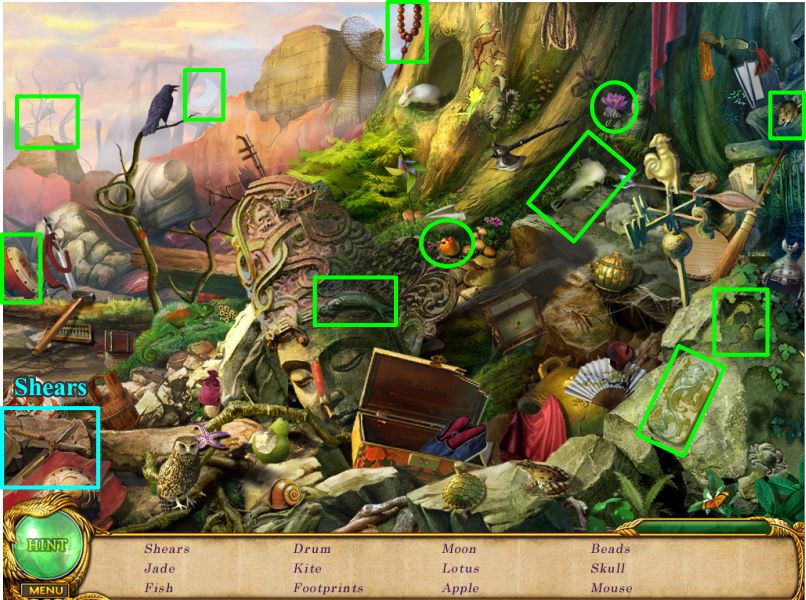
Exit left and click on the green sparkles for a Hidden Object scene.
Screenshot
Collect everything on your list including the Shears and return to the previous scene.
Screenshot
Kung Fu Gate Mini Game
Use the Shears on the vines covering the gate and place the Kung Fu Picture on it for a mini game.
Rotate the parts of the statues with arrow by click once so that they look like the picture and the solution shown.
Go through the gate when it opens.
Screenshot
Click on the broken statues to get the pieces to repair them.
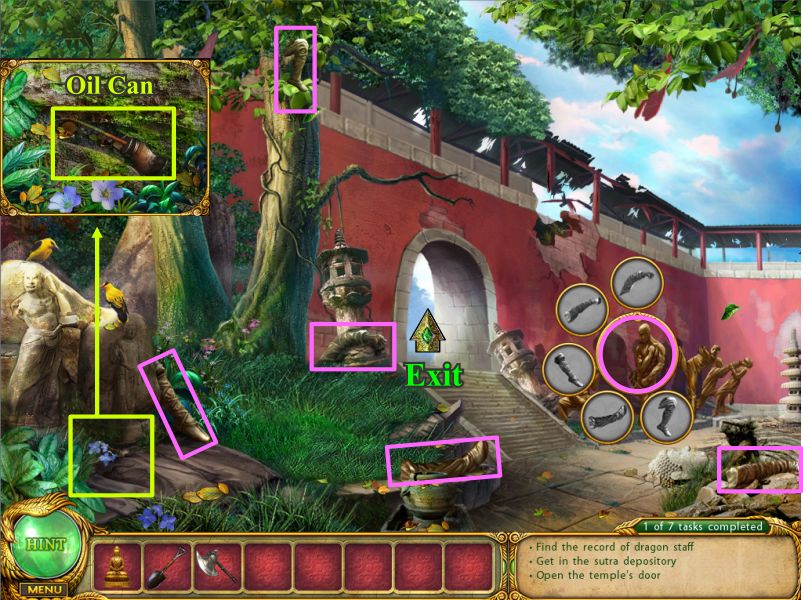
Click for a close up to get the Oil Can and then exit up the stairs.
Screenshot
Touch the sign and it will fall to the ground.
It is too rusty to open the back so use your oil on it.
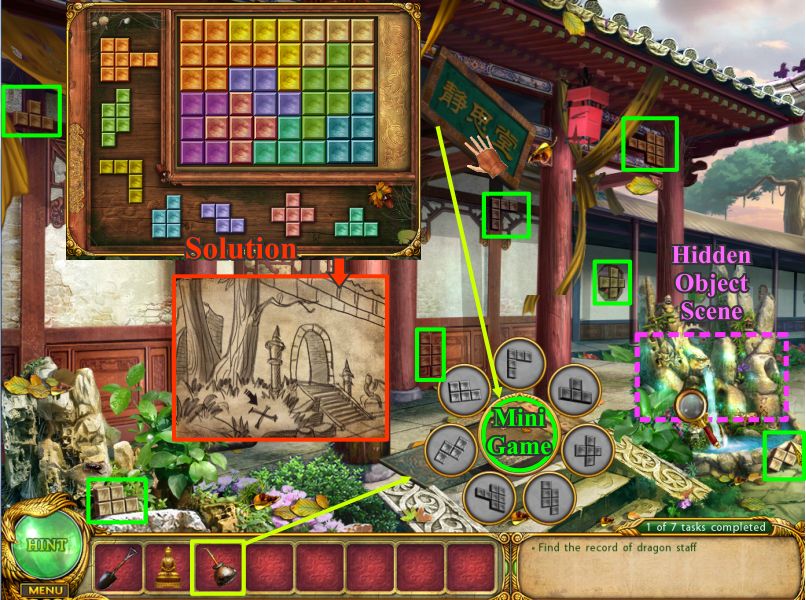
Click for a mini game but first you have to collect the missing pieces.
When you have all the pieces click again and arrange the pieces on the board as shown in the solution.
Click for a close up of the map inside.
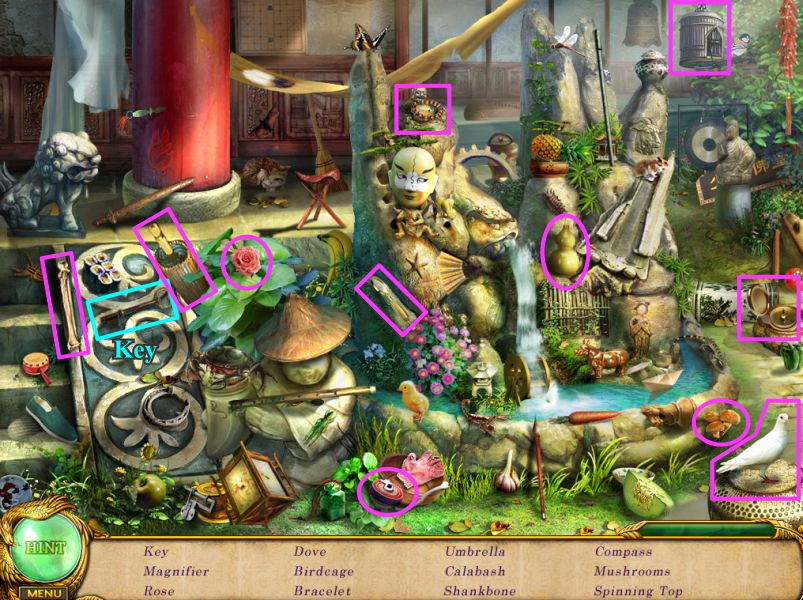
Click on the fountain for a Hidden Object.
Screenshot
Collect everything on your list including the Hammer and then exit back down the stairs.
Screenshot
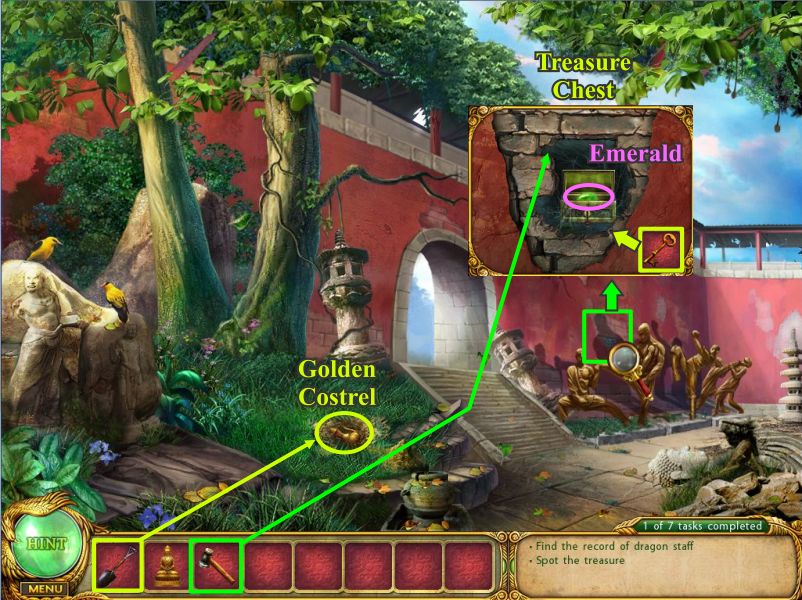
Use your Shovel on the "X" to dig up the Golden Costrel.
Click on the sparkle area in back of the statues for a close up of the wall.
Use your Hammer 4 times to reveal a Treasure Chest which is locked to go back up the steps and click on the fountain for a Hidden Object scene.
Screenshot
Collect everything on your list including the Key and exit back down the stairs to open the chest and take the Emerald.
Exit down through the gate and go left.
Screenshot
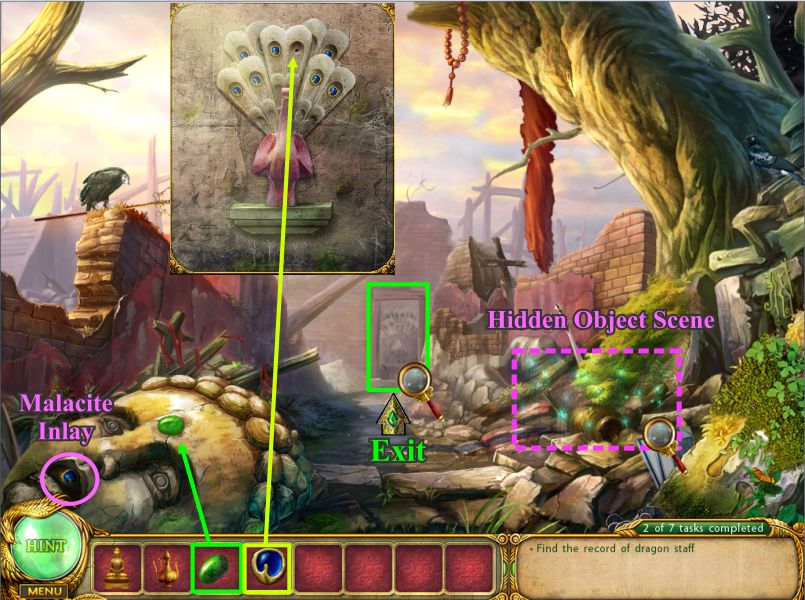
Place the Emerald in the indentation on the stone head and it will open its eyes and mouth so take the Malachite Inlay in its mouth.
Click on the door for a close up and place the Malachite on the peacock tail and the door will open.
Screenshot
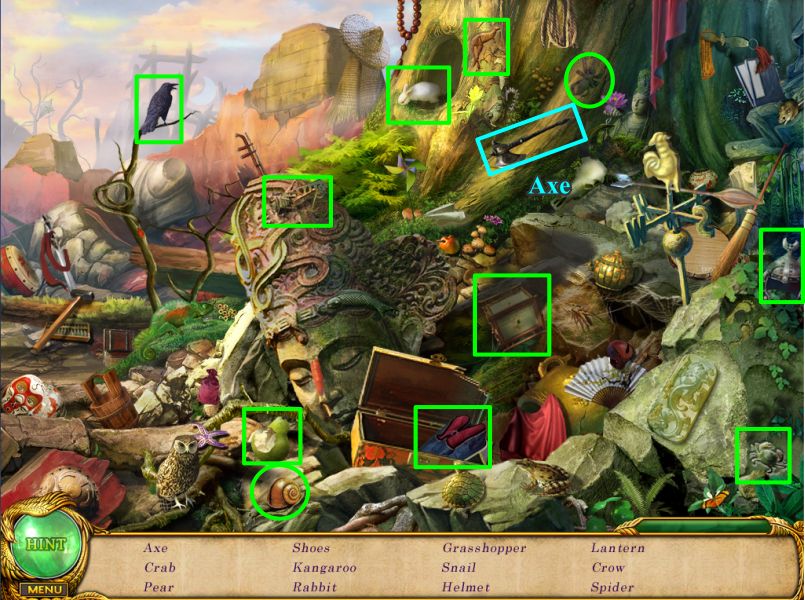
Play the Hidden Object scene to get the Axe and then go through the open door.
Screenshot
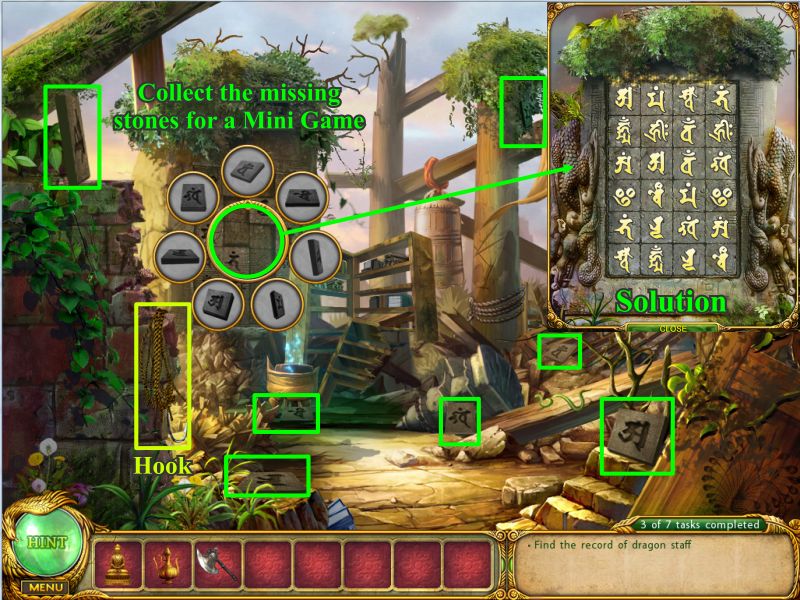
Collect the hook and click on the monolith to collect the missing stones.
Stone Monolith Match Mini Game
Click for a mini game which is a match the pairs.
Since it is not random, the solution is shown.
Screenshot
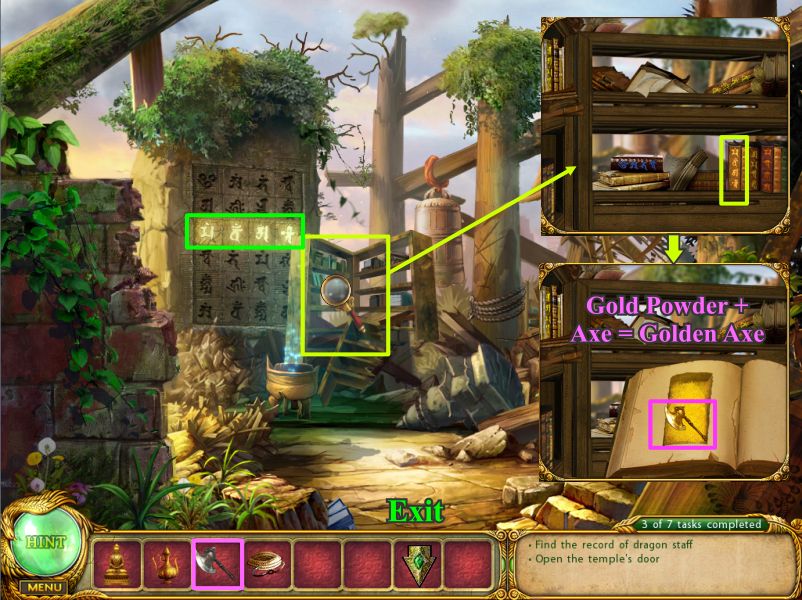
When you have completed the game you will get a lit row on the monolith so click for a close up of the book shelves and select the book with the characters on it.
It turns out that the only thing inside is Gold Powder but Yu thinks it is useful for something so dip your Axe in the powder and turn it into a Golden Axe to collect.
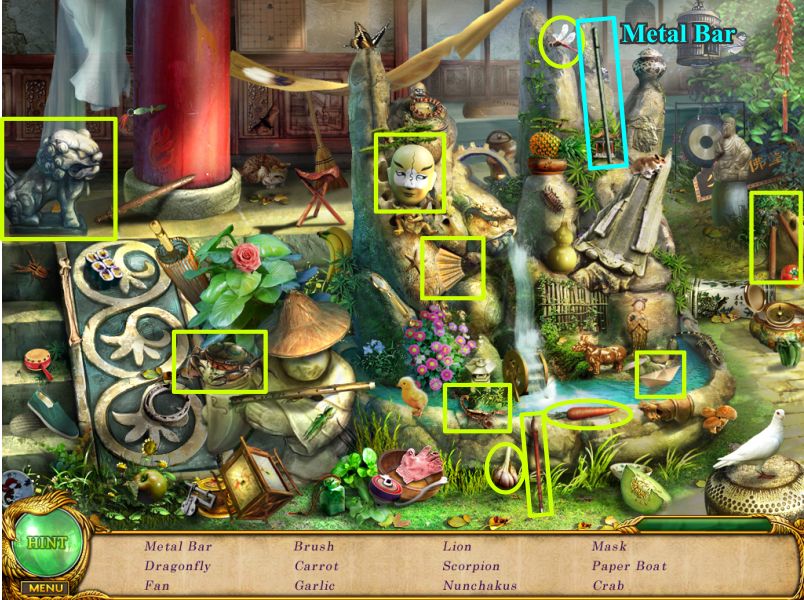
Exit back to the Temple doors and click on the fountain for a Hidden Object scene.
Screenshot
Collect everything on your list including the Metal Bar.
Screenshot
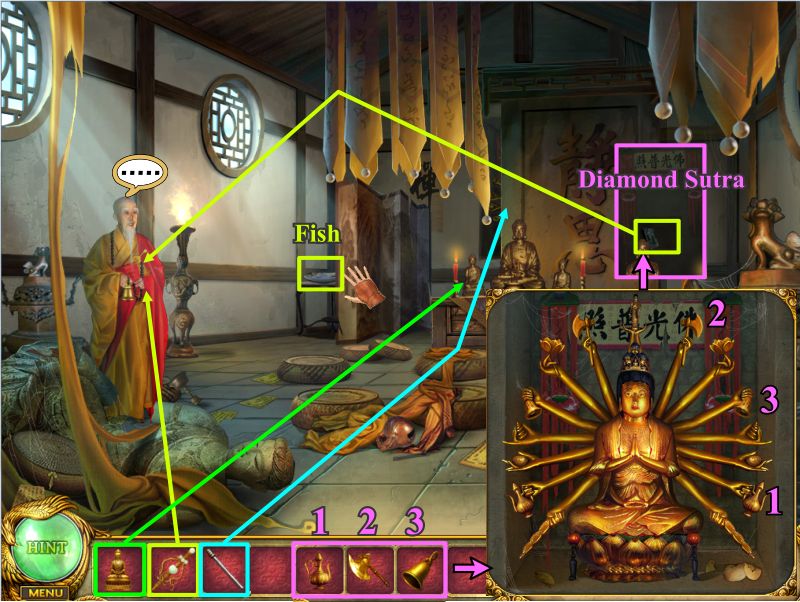
Click on the Temple Door for a close up and use your Hook on the broken glass area to open the lock and enter the Temple.
Talk to the Monk and move the screen at the left to get the Fish.
Place the Buddha from your Inventory on the Altar to complete it and the panel behind will start to slide but gets stuck.
Exit out of the Temple and down twice to the gate area and then go left where the Vulture is.
Give the Vulture the Fish in exchange for the Staff and return to the Monk in the Temple.
Give the Monk the Staff and he will give you a Bell.
Use your metal bar on the panel that is stuck to reveal the Botshiva and click for a close up.
Place the Golden Costrol, Golden Axe, and Golden Bell in the missing places on the Botshiva and it will reveal a secret panel with the Diamond Sutra so take it and give it to the Monk.
Screenshot
Chapter 4: The Forest of Spirits
Talk to the old man who is tied up by the roots.
Click on the Pagoda and find the parts to repair it.
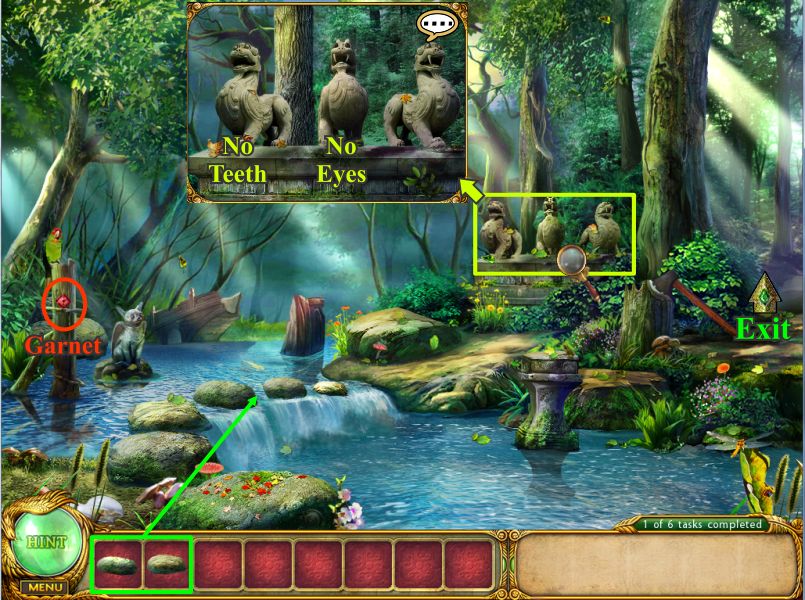
Pick up the 2 Stones and exit to the river.
Screenshot
Pick up the Garnet and place your 2 Stones to cross the river.
Click on the Gargoyles for a close up and talk to the one on the right who asks for your help.
His brothers are unhappy because one has no teeth and the other no eyes.
Take the path on the right.
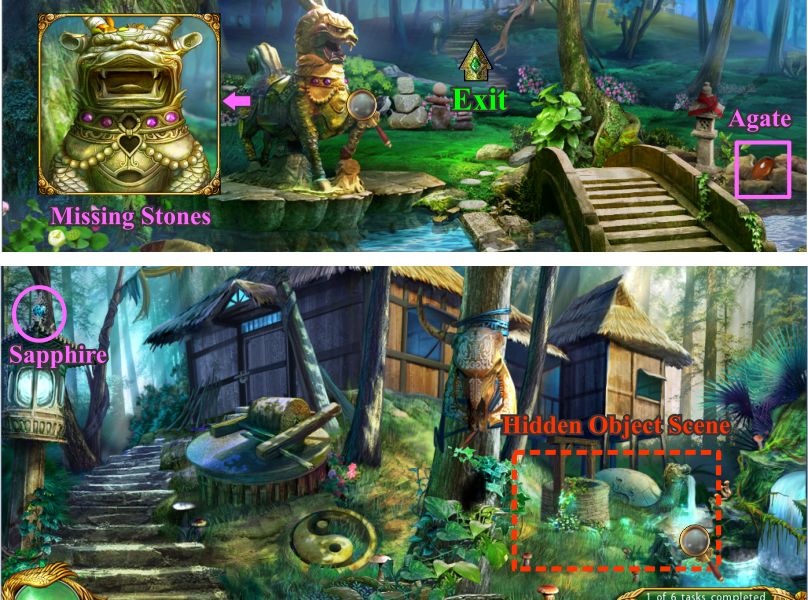
Screenshot
Pick up the Agate and take a closer look at the statue to see it is missing gems and then continue across the bridge.
Note the door to the Hut is locked and the animal head on the tree is missing a horn.
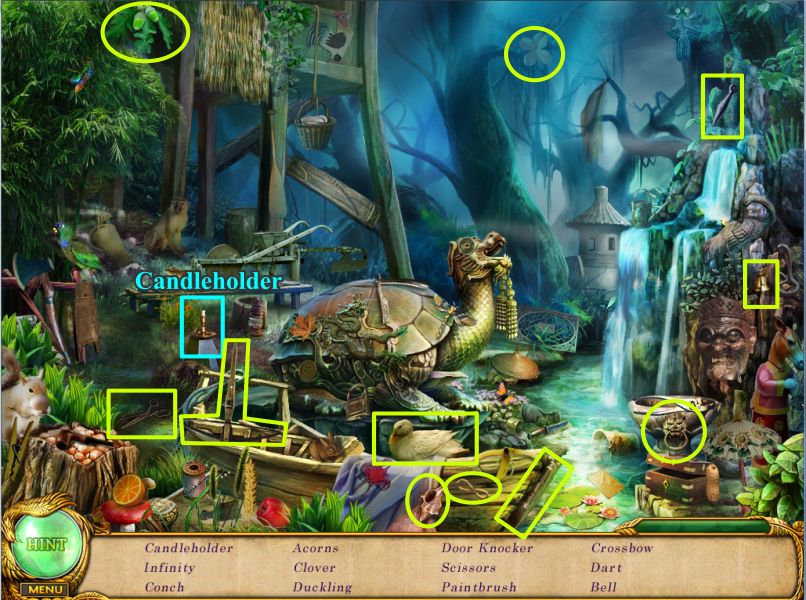
Collect the Sapphire and click on the sparkles for a Hidden Object scene.
Screenshot
Collect everything on your list including the Candleholder.
Screenshot
Go back to the previous scene and click for a close up of the statue to place the gems.
The statue starts breathing fire so light your candle.
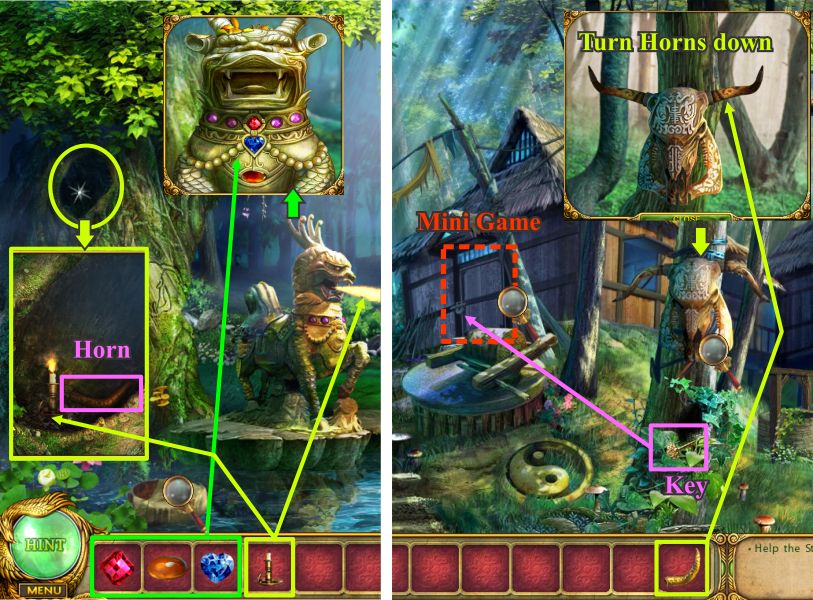
Click on the hole in the tree and place your lit Candleholder so you can see the horn.
Check on the covered bowl floating in the water and note you need to feed the fish to get it.
Take the horn back to the Hut area and place it on the animal head.
Click for a close up mini game and click the horns down until the look like the head on the tree.
The game is random but the end result is the head will cough up the key to the Hut door.
Place the key in the lock for a mini game.
Screenshot
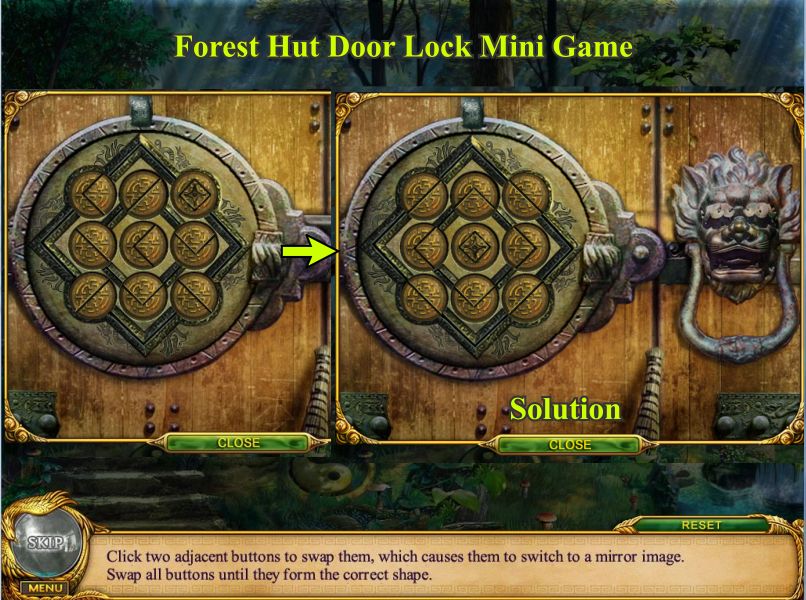
Forest Hut Door Lock Mini Game
Your goal is to swap the buttons until the lock looks like the solution on the right in the screenshot.
Each time you move a button it will change into its mirror image.
When you have completed the game the door will open so enter.
Screenshot
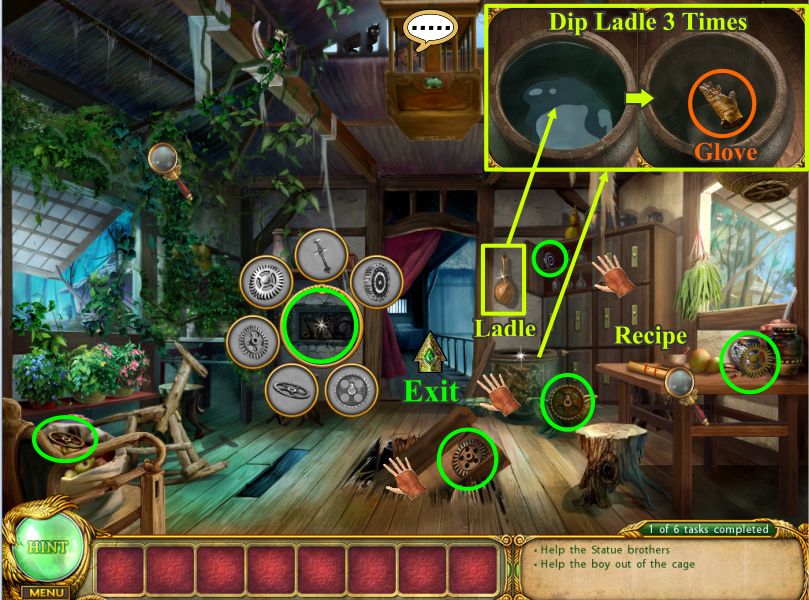
Talk to the boy in the cage, pick up the Ladle, open the cabinet and take the lid off the barrel.
Check the recipe on the table and click the pulley to gather the available parts to repair it.
Screenshot
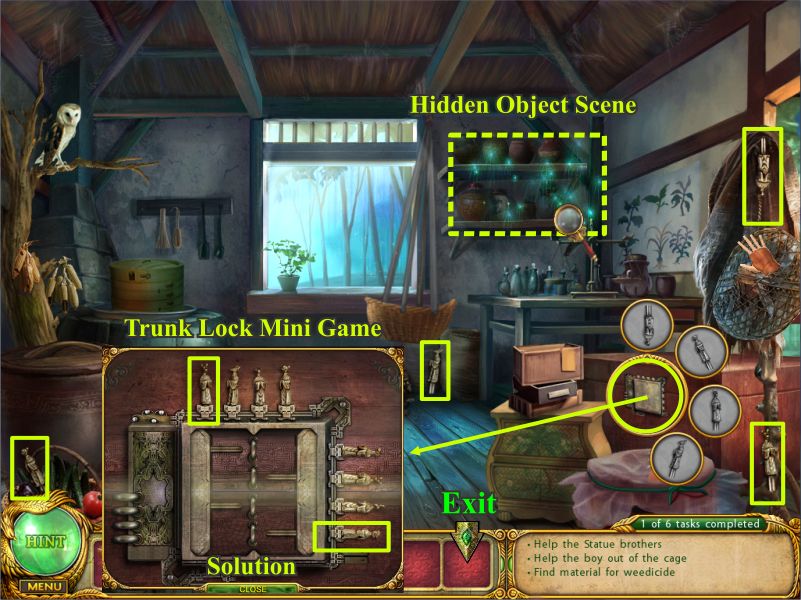
Go into the back room and click on the trunk lock.
Move the hat on the coat rack to get one of the parts for the lock.
When you have all the parts click on the lock for a mini game.
Press the left figure on the top and the bottom figure on the right to open the trunk.
Take the green Nebulizer that is in the trunk and click on the sparkles for a Hidden Object scene.
Screenshot
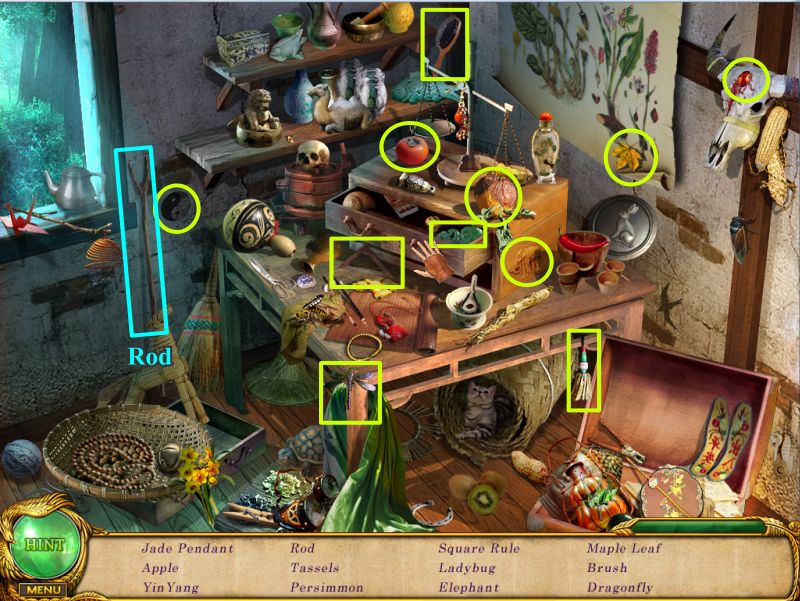
Collect your list including the Rod and go back to the front room.
Screenshot
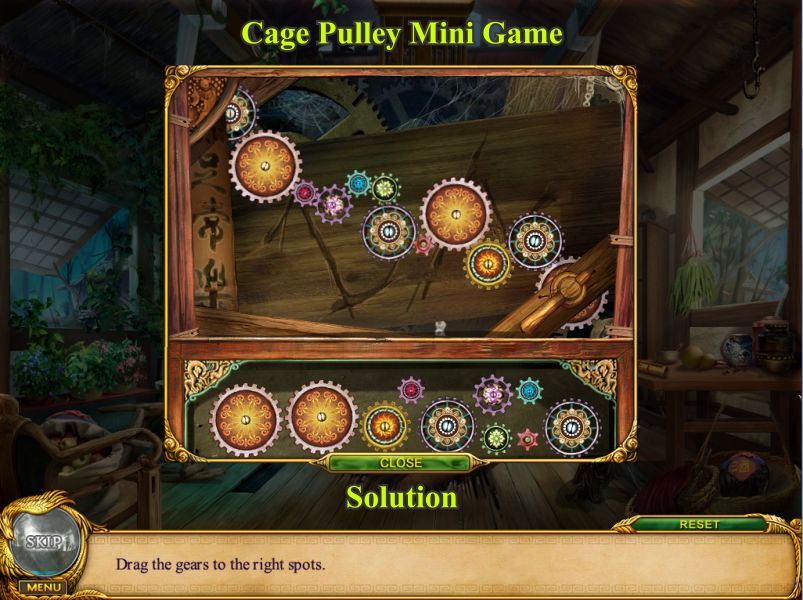
Use the Rod to take the hanging basket at the right off the hook, remove the cloth and place the last part for the pulley.
Cage Pulley Mini Game
Click on the pulley panel for a mini game to place the gears as shown in the solution.
Screenshot
Go outside and click on the green sparkles for a Hidden Object scene.
Collect your list including the Bellows.
Screenshot
Return to the Hut and go to the back room.
Use the Bellows to get the fire going.
Click on the bamboo basket on top of the stove and see the bread dough inside.
Once the dough has steamed use your glove to take a piece of steamed bread.
Exit the Hut, cross the bridge and place the steamed bread on the bowl.
The bread feeds the fish but the bowl floats downstream so take the path to where the Gargoyles are and cross the river to get to the bowl.
Open it and take the Sulfur that is in the bowl.
Got back to the Hut and into the back room.
Click on the green sparkles for a Hidden Object scene to get the Ladder.
Screenshot
Go to the front room and put the Ladder on the cage for the boy to climb down.
He is holding some stone eyeballs he found in the forest and offers them to you so take them.
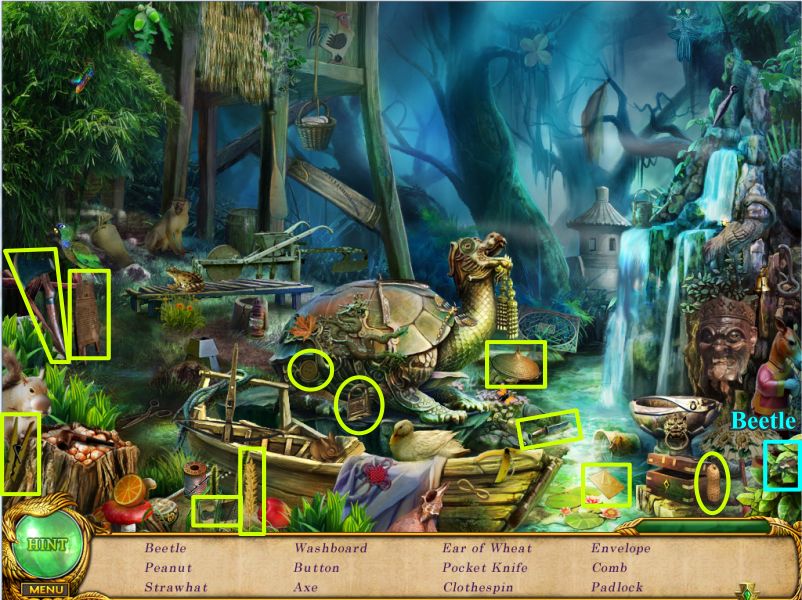
He leaves so go outside and click on the green sparkles for a Hidden Object scene.
Collect everything including the Beetle.
Screenshot
Go back into the house to the back room and click on the green sparkles for another Hidden Object scene.
Collect everything to get a Knife.
Screenshot
Use the Knife on the container next to the hat rack that the owl has been intently staring at and he will fly there dropping a feather for you to collect.
Place the Nebulizer, Sulfur, Beetle, and Owl Feather on the table at the right back of the scene for a mini game.
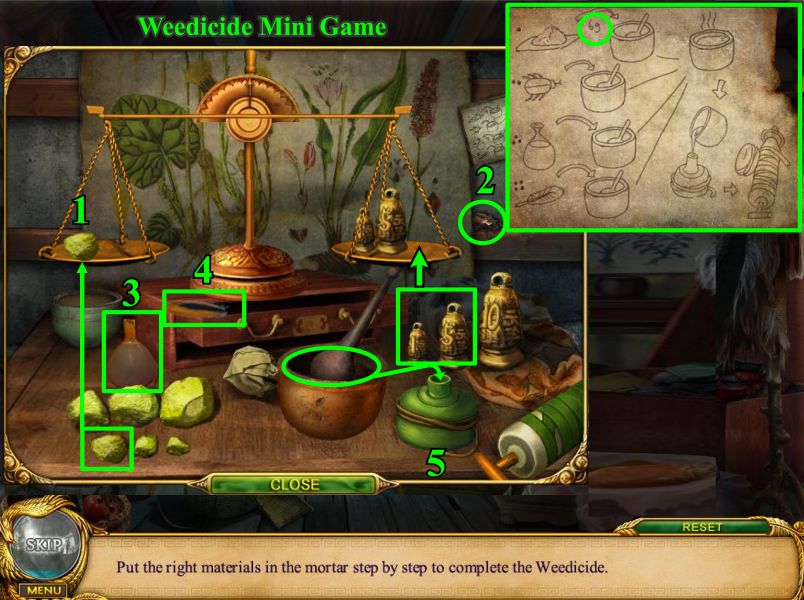
Weedicide Mini Game
Your goal is to follow the recipe and add the ingredients to the mortar in the correct order.
Place the small and medium weights on the right side of the scale and third smallest piece of Sulfur on the left side to see if it weighs 6 grams.
Put it in the mortar and the pestle will stir each item when added.
Next add the Beetle and then the liquid from the flask.
Add the Owl Feather and pour the mixture in the Nebulizer.
Screenshot
Go to the front room and use the Weedicide on the vines and the stone teeth will fall on the floor for you to collect.
Exit the Hut and go back to where the Gargoyles are.
Click for a close up and put the teeth on the left Gargoyle and the eyeballs on the middle one.
Back in the full scene click on the Gargoyles and they will slide left opening the coffin.
Click on the coffin for a close up of a skeleton holding the Coin-sword Talisman so take the Talisman for your Inventory.
Go back to the old man where you first entered the Forest and use the Talisman on the tree to free him.
He turns out to be the farmer the Monk was talking about and he gives Yu the piece of the Jade Dragon Staff that he rescued.
Chapter 5: A Dragon's Wisdom
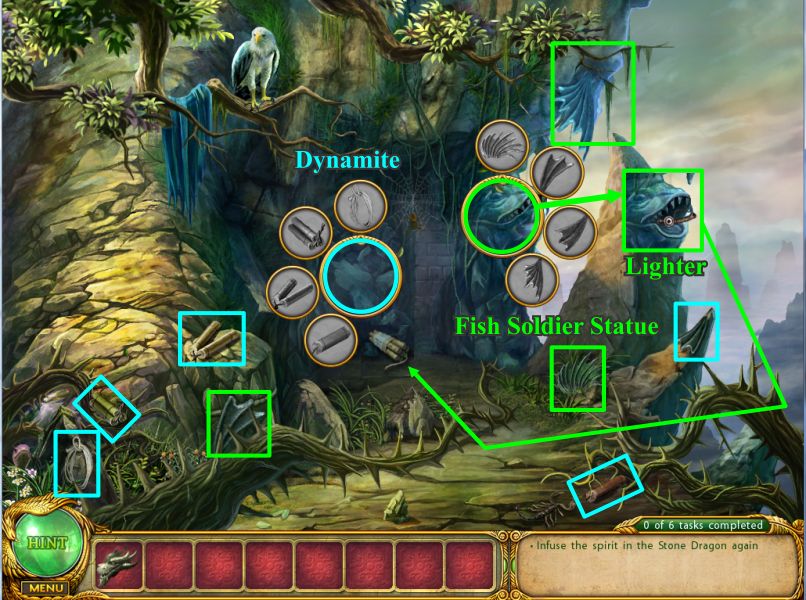
Click on the blocked entrance and the Fish Soldier Statue and find the dynamite and fish parts.
The statue will give you a lighter which you use on the dynamite to open up the cave so you can enter.
Screenshot
Talk to the center statue and click on both dragons to collect a few things.
The center statue will sink creating your exit so use the sword you get from the right dragon to cut some vines to tie to the rock next to the right dragon to exit down the hole.
Check the fire when it goes out and move some of the logs around to uncover the "Sadness Face".
Screenshot
Talk to the dragon on the left and take a look at the statue on the right to see that 2 of the faces are missing.
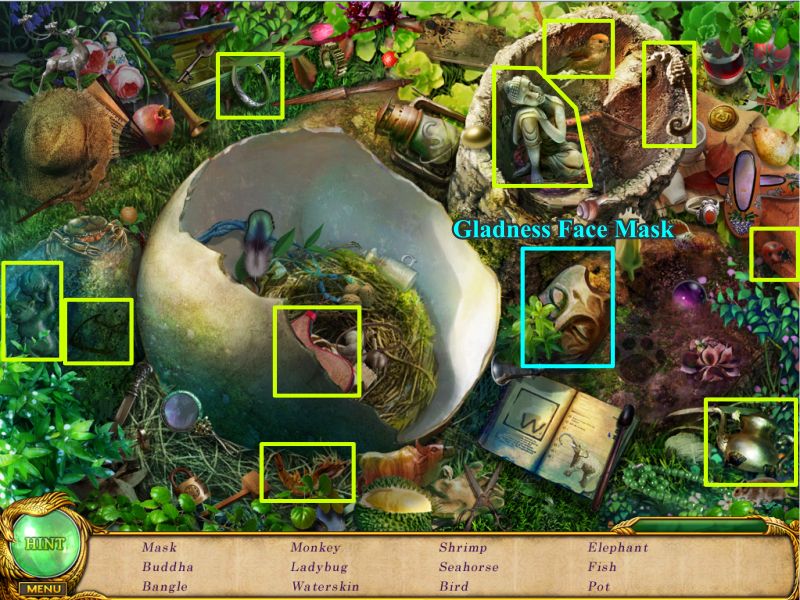
Click on the green sparkles at the back center for a Hidden Object scene.
Collect you list that includes a mask called a "Gladness Face".
Screenshot
Click on the statue with the missing faces and place your Gladness and Sadness masks.
The center face will open its mouth to give you a luminous green pearl that will let you swim underwater.
Place the pearl in the water and Yu turns into a mermaid in its protective bubble so exit through the funnel to the waters below.
Click on the right portal guardian to find the shells to restore it.
Click on the urchin and it will run away but grab the Chisel quickly before it comes back and you have to try again.
Use the Chisel on the Nautilus to get the Fuel.
Click on the right portal guardian for a close up and move the center piece.
Use the Fuel to light the dim glow and the back door will open for you to exit.
Screenshot
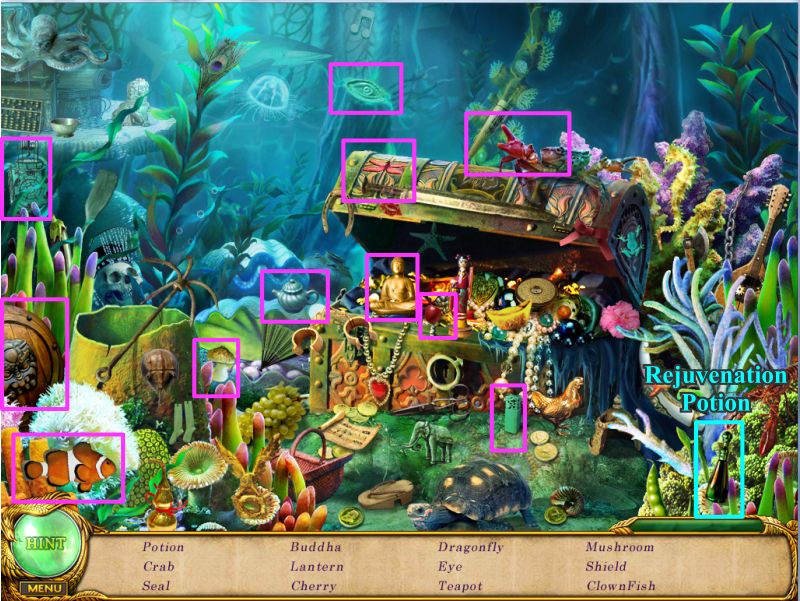
Click on the green sparkles for a Hidden Object scene to get the Rejuvenation Potion.
Head back to where the dragon is by going down and then back up the water funnel.
Screenshot
Give the Rejuvenation Potion to the dead plant in the lower right corner and collect the Diamond Dewdrop.
Give the diamond to the dragon and he will give you a Dragon Scale.
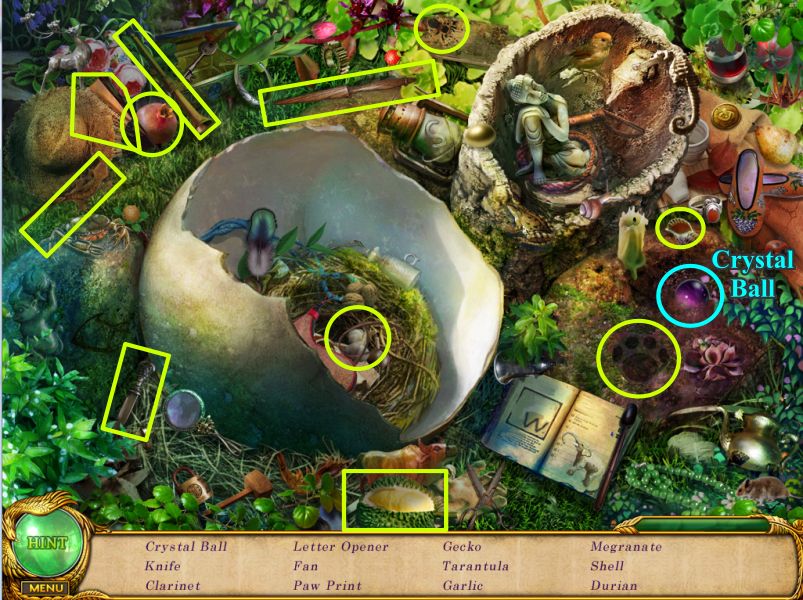
Click on the green sparkles at the back for a Hidden Object scene.
Collect everything on your list to get the Crystal Ball.
Screenshot
Exit down the water funnel and go through the entrance to where the shrimp soldier is standing guard and give him the Dragon Scale.
Click on the green sparkles in the lower right for a Hidden Object scene.
Collect everything on your list including the Dragon King's Crown and enter the castle.
Screenshot
Place the Crystal Ball on the stand in the middle.
Click on the stem to the right and collect the missing buds.
The shell will turn around so give the Dragon King Crown to the man sitting there and the shell will move left showing the exit.
Screenshot
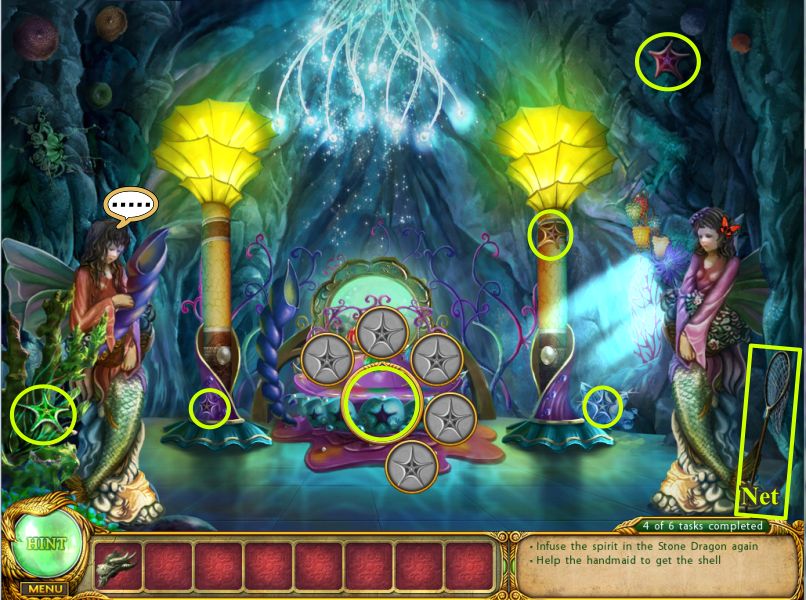
Talk to the mermaid on the left and collect the net at the right.
Click on the table in the middle and find the missing star shapes.
Screenshot
Exit down 3 times and go back up the funnel.
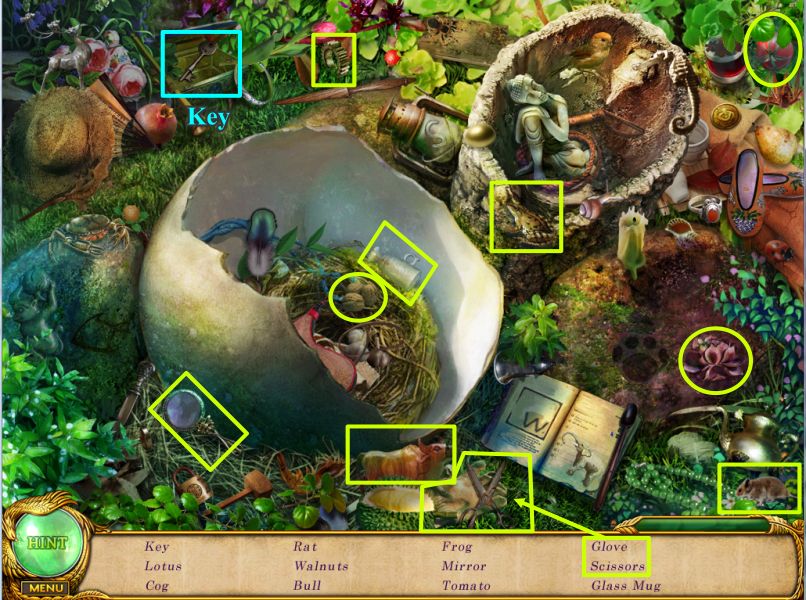
Use your net to capture the Golden Butterfly and click on the green sparkles for a Hidden Object scene.
When you collect everything you will have a Key.
Screenshot
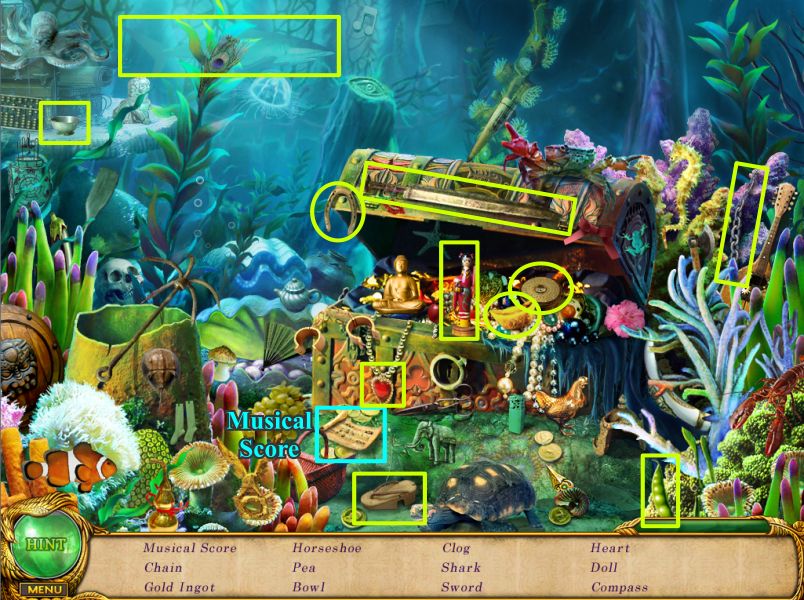
Return to the outside of the Castle and click on the sparkles for a Hidden Object scene to get the Musical Score.
Screenshot
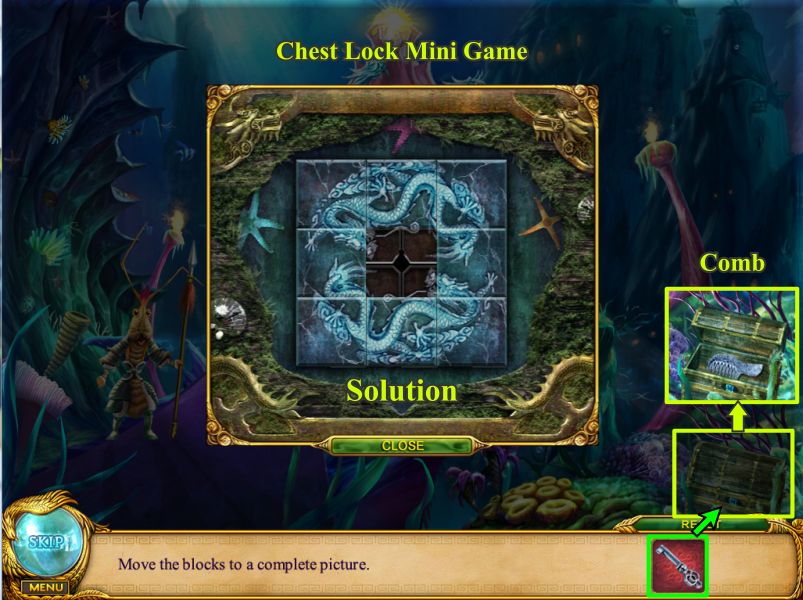
Use your Key on the chest in the lower right corner for a mini game.
Chest Lock Mini Game
Slide the tiles so the picture looks like the solution.
The chest will open for you to take the comb.
Screenshot
Enter the Castle and go to the back room.
Comb the hair of the left mermaid and place the butterfly in her hair.
She will give you the shell to place next to the table so take your musical score and place it on the table.
Click to play the musical mini game.
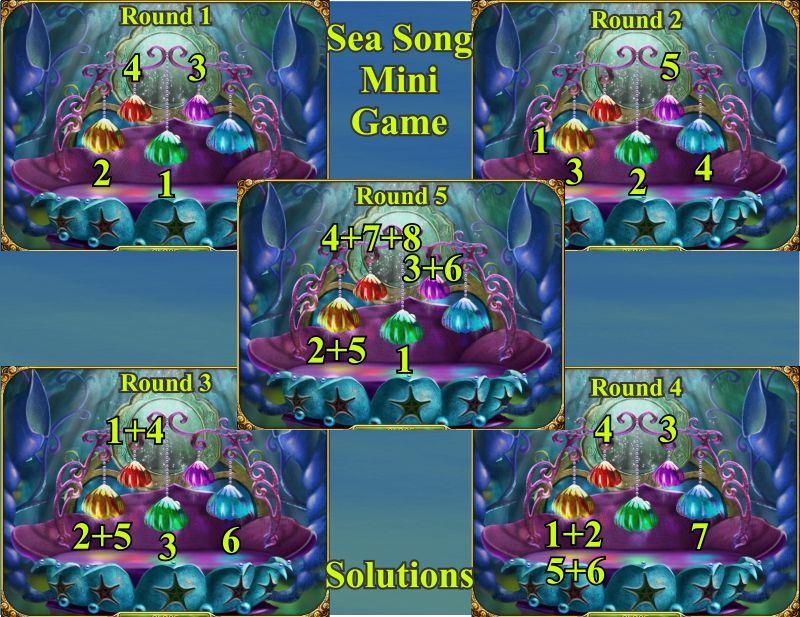
Sea Song Mini Game
There are 5 rounds of repeat the sequence so watch the color of the notes that float by and click on the sea bells in that order.
Each round adds one more note.
Round 1: green, yellow, pink, red.
Round 2: yellow, green, yellow, blue, pink.
Round 3: red, yellow, green, red, yellow, blue.
Round 4: yellow, pink, red, yellow, yellow, green, blue.
Round 5: green, yellow, pink, red, yellow, pink, red, red.
Screenshot
When you have completed the game the table will rise so place your stone dragon head on it.
The Dragon King will come, give you another piece of the Jade Dragon staff and send you on your way to find a Temple in the mist.
Chapter 6: The Hidden Gate
Talk to the Monk, pick up the Pagoda Top in the water below him, then go up the stairs and into the Hut on the right.
Click on the green sparkles for a Hidden Object scene to get a Ceramic Bowl.
Exit to the room on the left.
Screenshot
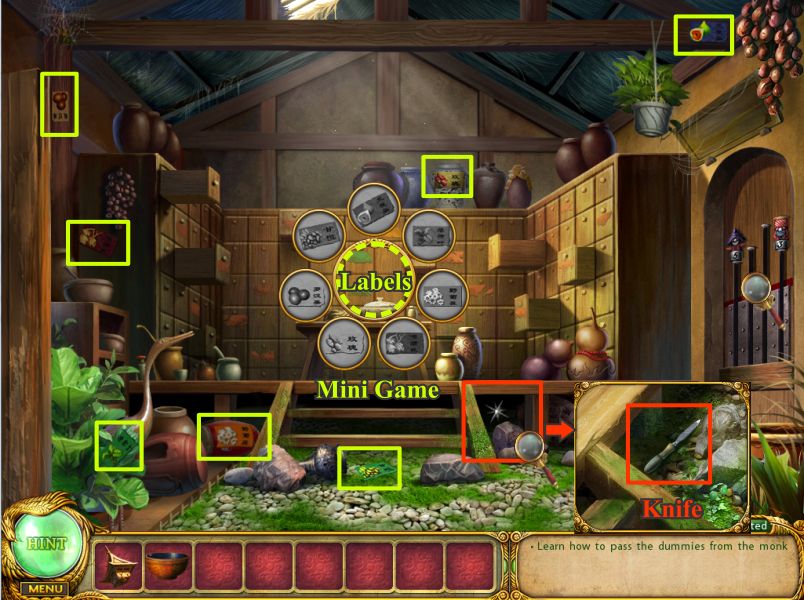
Click under the platform and pick up the knife.
Note there is a puppet missing at the right then click on the medicine cabinet.
Collect the missing labels and then click on the cabinet again for a mini game.
Screenshot
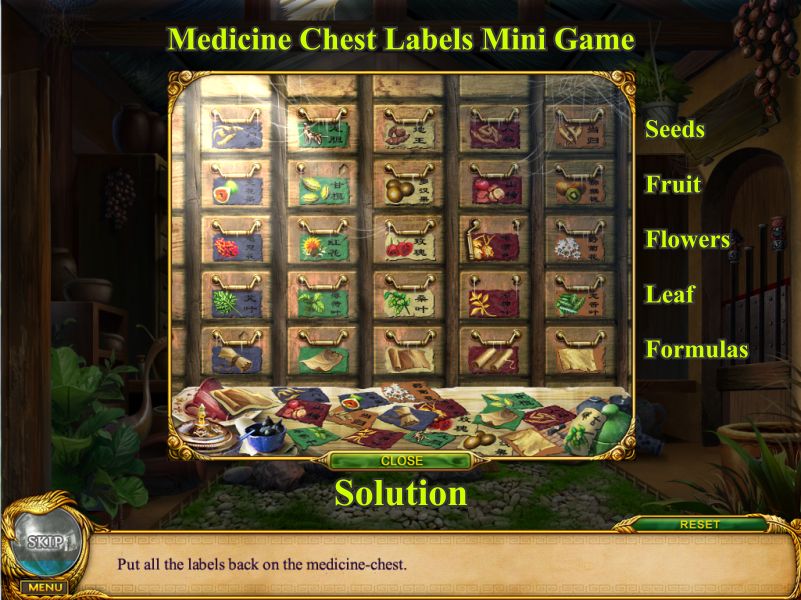
Medicine Chest Labels Mini Game
Put all the loose labels on the drawers by color and sequence.
The bottom drawer in the middle row will open and the Formula will go into your Inventory.
Screenshot
Exit down to the next room and use your file to remove the goop at the top of the large jar at the right of the scene.
Place you bowl on the jar and it will pour some Medicinal Liquor into it.
Go back outside and give the Medicinal Liquor to the Monk who tells Yu to try the balancing act so click on the dummies at the left for a mini game.
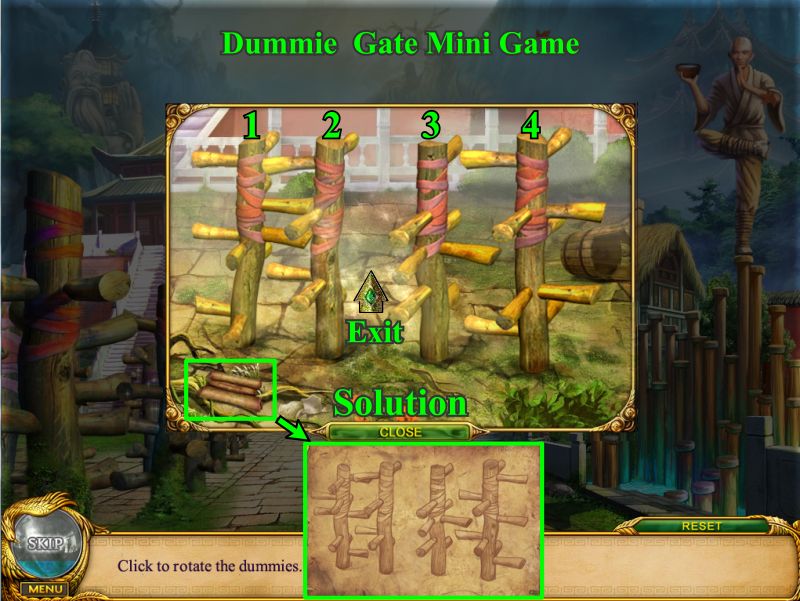
Dummie Gate Mini Game
Click on the scroll on the ground to see what they should look like when you've finished.
Click on the dummies in the following order: 1, 3, 2, 1, 2, 4, 4, 4, 3, 3, 2.
Screenshot
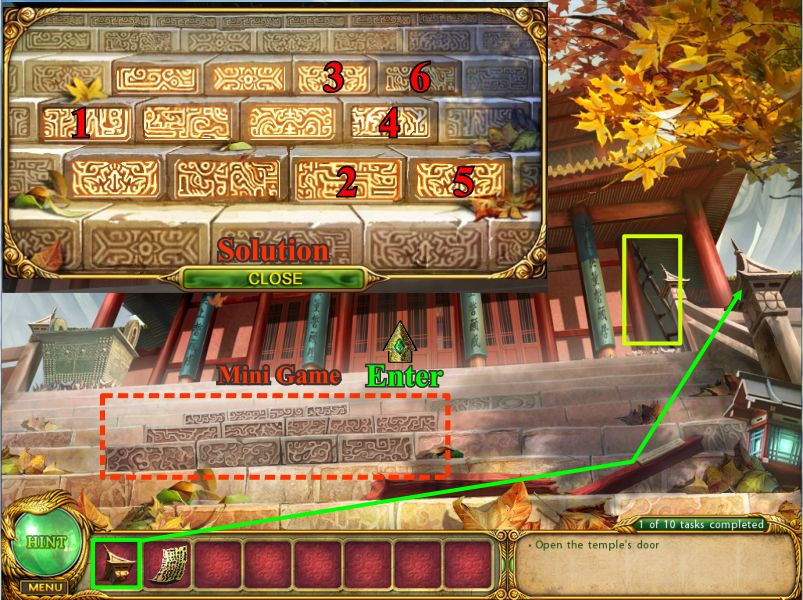
Temple Steps Mini Game
Take the ladder at the right side of the Temple and place your Pagoda Top on the railing post at the right.
The steps will get bricks with designs so click on them for a mini game.
Your goal is to light up all the bricks.
Each brick will light other bricks so follow the numbers in the solution and then enter the Temple.
Screenshot
Place the ladder and click to get the rungs to repair it.
Click on the Buddha and once you have collect the objects he will lower and a passageway will open in back of him.
Click on the ceiling to get the tiles to repair the fresco and then click on it again for a mini game to repair it.
Swap the tiles to complete the picture and the ceiling will open and a handle will fall to the floor for you to collect.
Screenshot
Go through the passageway and talk to the spirit.
Click on the left wall under the pink flower and read how the General died.
Click on the green sparkles for a Hidden Object scene.
Once you have collected everything and have the Hammer head to the Hut.
Screenshot
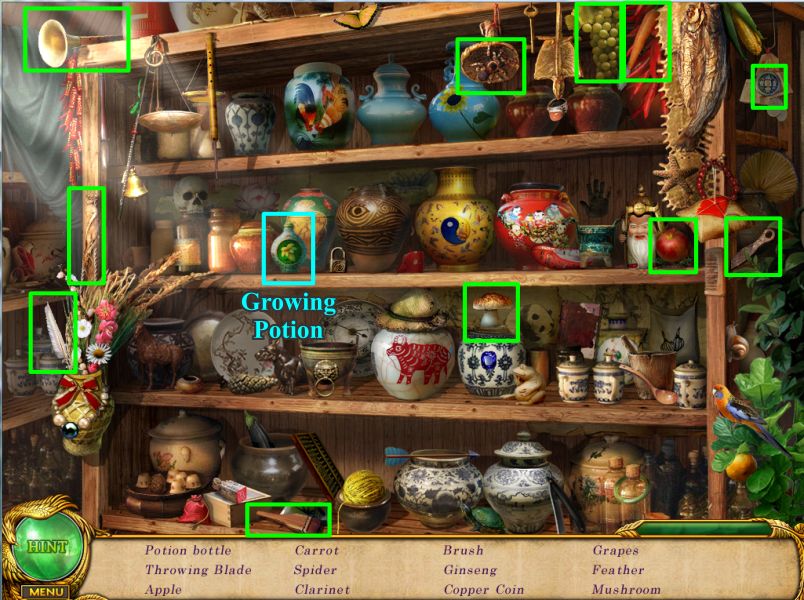
Use the Hammer on the terra cotta jar with the crack in it and collect the pollen inside.
Click on the sparkles for a Hidden Object scene to get the Growing Potion Bottle.
Screenshot
Go back to the room in the Temple where the General is and use the pollen on him.
His spirit will vanish and the door he was guarding will open so go through it.
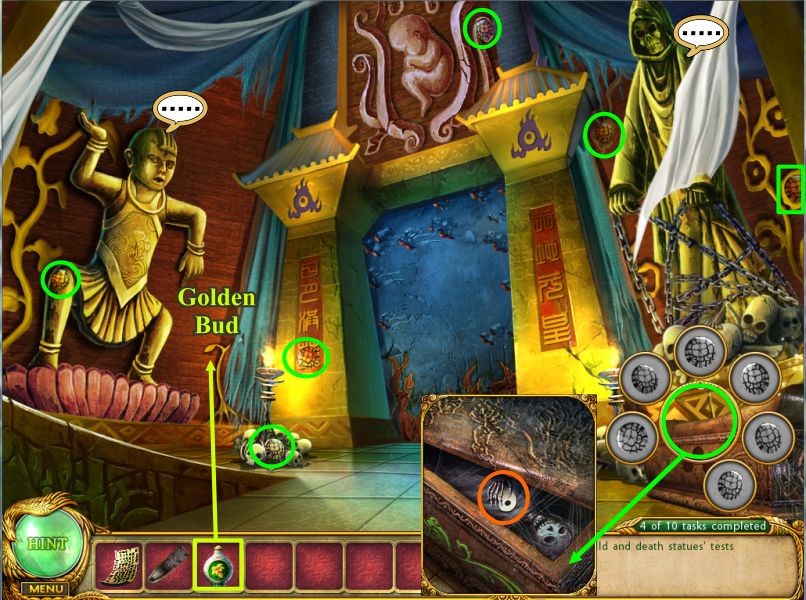
Talk to the child and the dead statue.
Use your Growing Potion on the Golden Bud to get a Golden Flower for the child.
Click on the coffin and find the gems to repair it then click again for an inside view.
Take the Yang Stone and go back to the previous room.
Screenshot
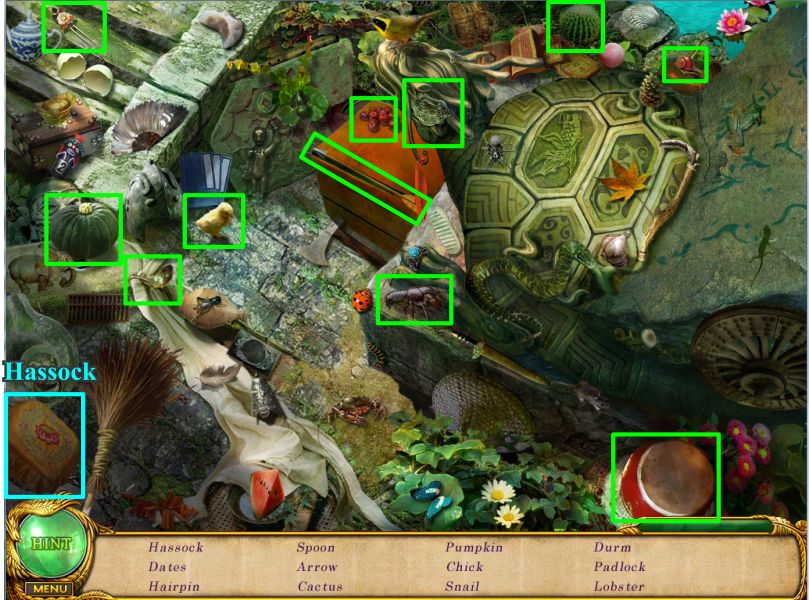
Click on the sparkles for a Hidden Object scene to get a Hassock.
Screenshot
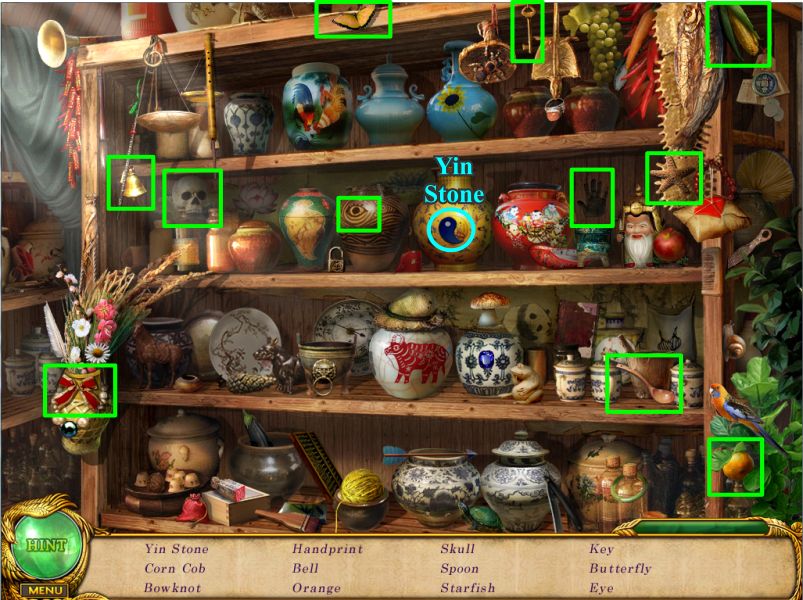
Go to the Hut and click on the shelves for a Hidden Object scene to get the Yin Stone.
Screenshot
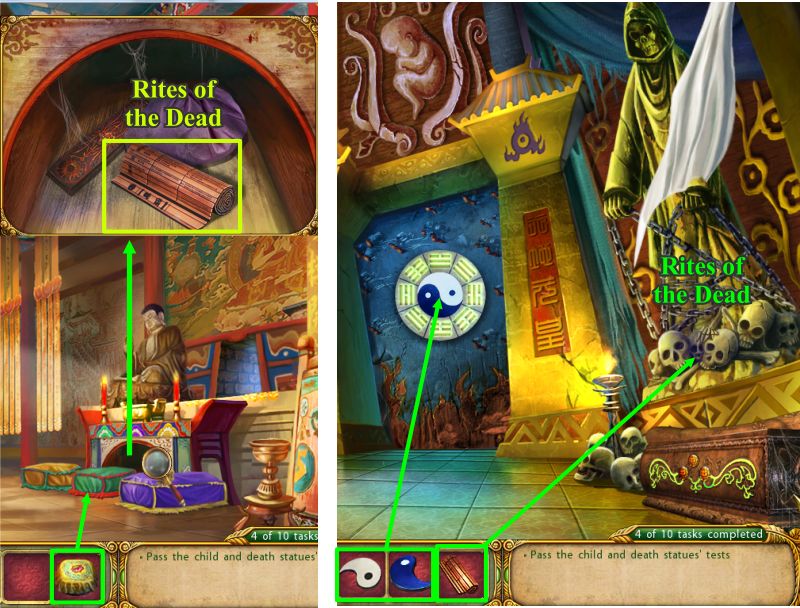
Head back to the Temple and place the Hassock between the two pillows and a secret panel will open.
Collect the Rites of the Dead and go back to the room with the dead statue.
Place the Rites of the Dead on the coffin and the will be at peace so you have satisfied all tests.
Place the Yin and Yang Stones on the door and it will open so exit.
Screenshot
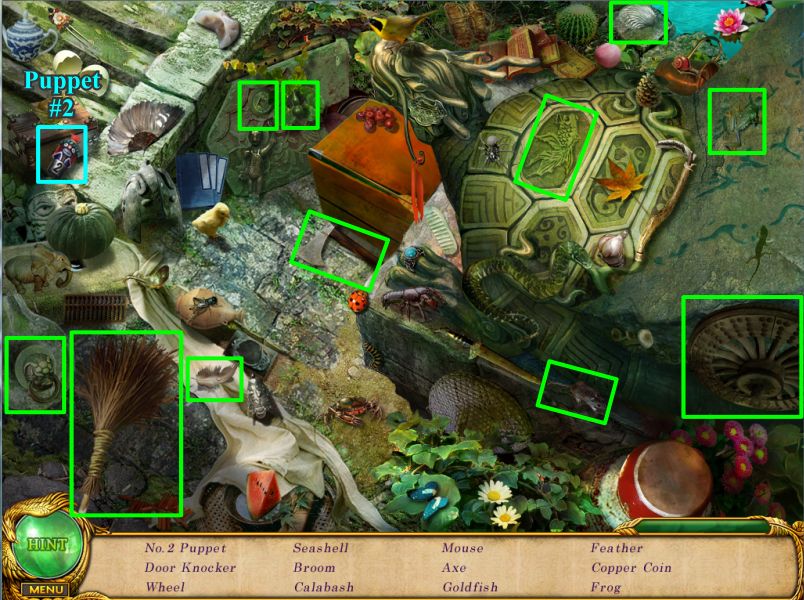
Talk to everyone in the room then exit down twice to the room with the two dragons and click on the sparkling area for a Hidden Object scene.
Collect everything on your list to get Puppet #2 and exit to the medicine chest room in the Hut.
Screenshot
Puppet Mini Game
Place Puppet #2 in the niche with the other puppets at the right side of the screen to get a mini game.
Your goal is to place the weighted puppets so that the symbols on the red highlighted line match the symbols on the bottom bar.
Screenshot
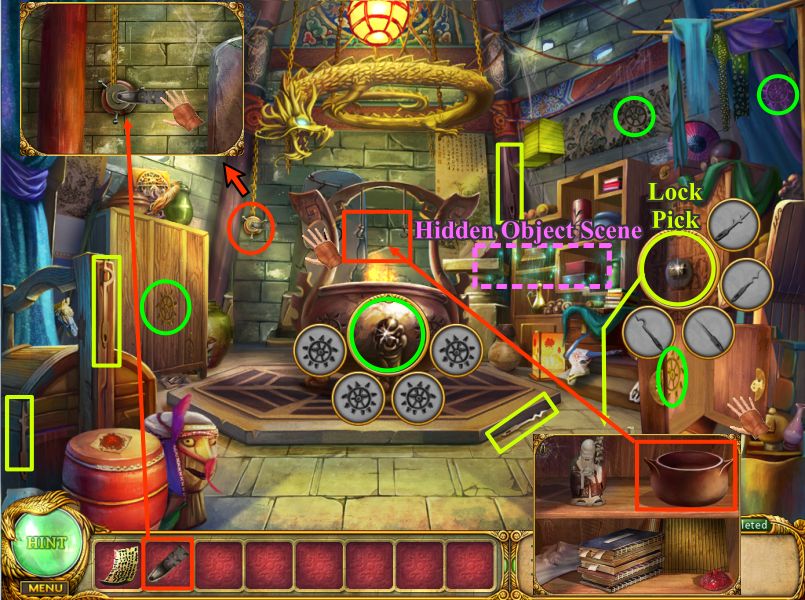
Go through the open door to the kitchen and click on the furnace to get the missing parts to open it.
Move the screen panel next to the left cabinet to uncover the pulley.
Place the handle from your Inventory on it and move it to lower the dragon who breathes fire in the furnace.
Click on the cabinet to the right and find the lock pick to open it and take the pot.
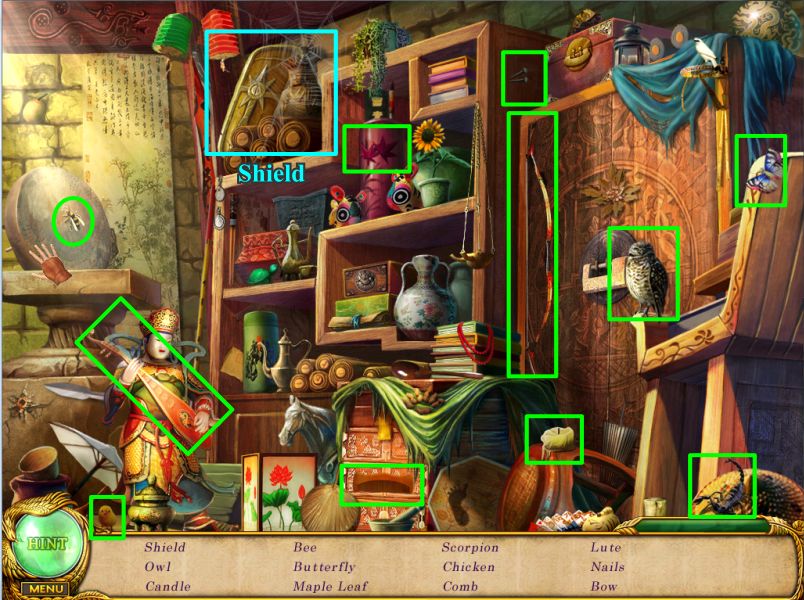
Hang the pot over the furnace and click on the sparkles for a Hidden Object scene.
Screenshot
Collect the Shield and everything else on your list.
Screenshot
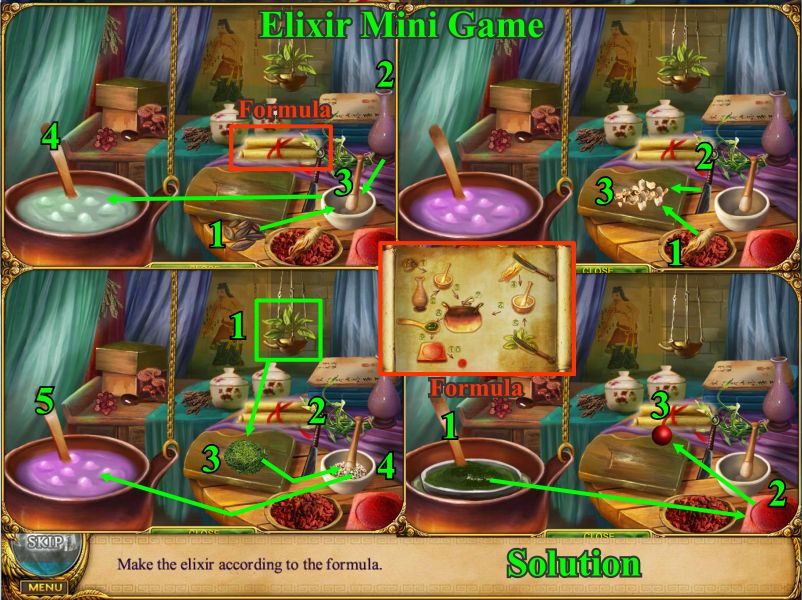
Click on the furnace again to collect the ingredients for the Elixir.
Click on it again for a mini game to create the Elixir.
Screenshot
Check the Formula to see what you need to use and in what order.
Place the beans in the mortar and the pestle will grind them.
Pour the liquid in the mortar and when it is stirred pick it up and pour it in the pot.
Click the spoon to stir the mixture and then place the root on the board.
Chop it with the knife and put the chopped root in the mortar for the pestle to grind.
Take the plant out of the hanging container and place it on the board.
Chop it up with the knife and place the greenery in the mortar.
When the pestle has combined all of it put the contents of the mortar in the pot and stir.
Use the spoon to scoop out some of the elixir and place it on the red indentation in the lower right corner for it to be rolled into a ball and automatically dropped into your Inventory.
Screenshot
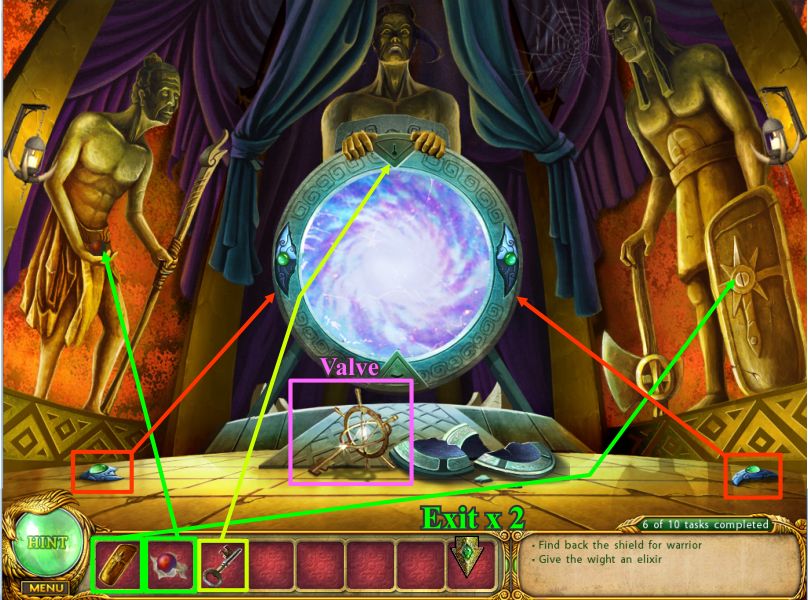
Exit back to the Temple room with the portal.
Give the Elixir to the Wight on the left and the shield to the warrior on the right.
Each of them will drop a piece for you to put on the portal.
Pick up the Valve the falls on the floor and exit down twice.
Screenshot
Place the Valve in the indentation on the front left wall and turn it to turn off the water.
Click on the water that is left by the left dragon and pick up the key.
Return to the portal and unlock the guardian's hands to activate the portal and go through it.
Chapter 7: The Jade Dragon's Fate
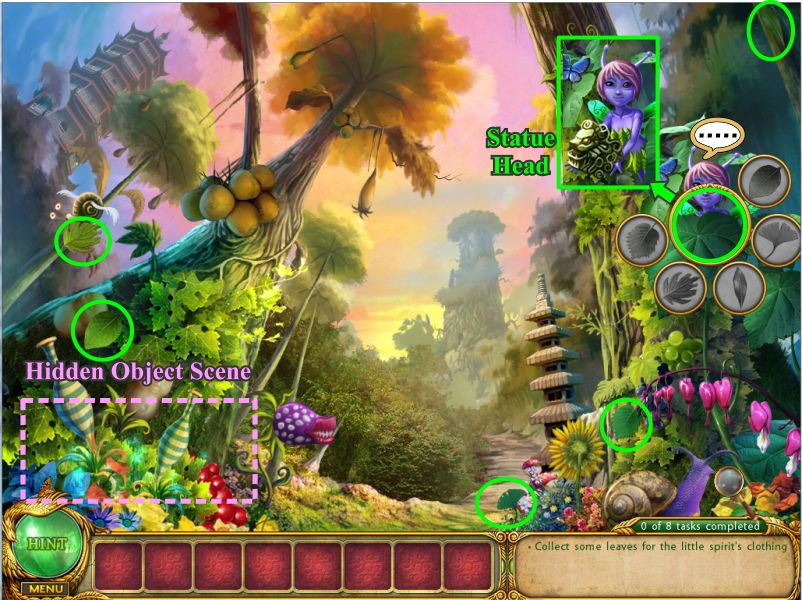
Click on the spirit girl behind the leaf and find her some leathery leaves to clothe herself and she will reward you with a statue head.
Click on the sparkles at the left for a Hidden Object scene.
Screenshot
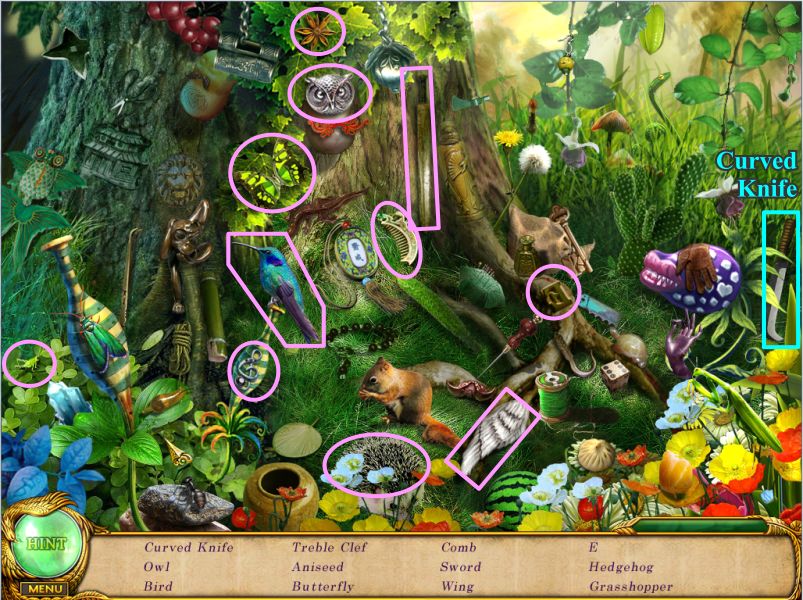
Collect the Curved Knife and the rest of your list.
Screenshot
Pick up the Pest and click on the hole in the ground so you can gather some seeds which will sprout and build a bridge across the river.
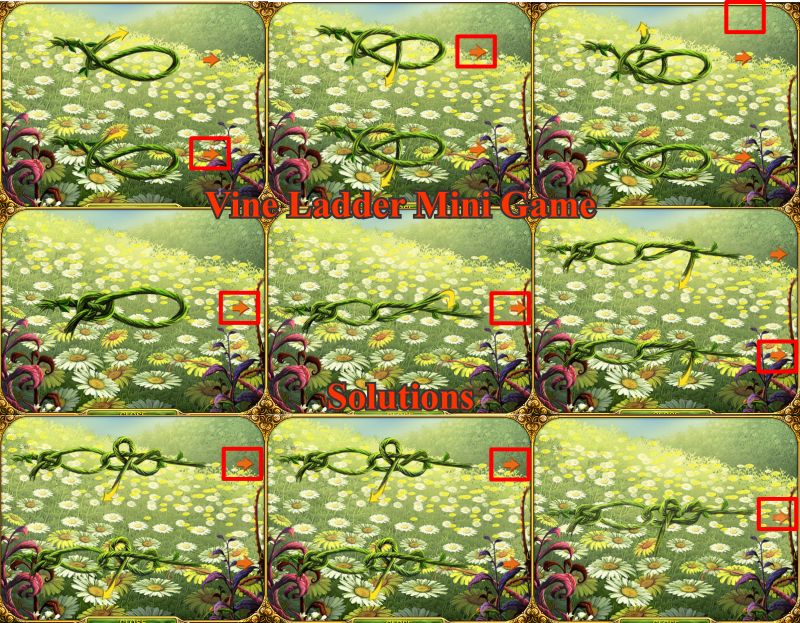
Use your Curved Knife on the sturdy vine and then click on the fallen vine for a mini game.
The yellow arrow shows which direction the knot will tie and the orange arrow activates the knot.
The final result will be a Vine Ladder.
Screenshot
Vine Ladder Mini Game
Use the arrows on the right to tie knots in the vine to make it into a ladder.
The step by step solution is shown in the screenshot.
When you are finished pick it up off the plant.
Screenshot
Cross the bridge and head through the trees.
Place the Statue Head on the statue at the left and a compartment will open for you to pick up a Red Crystal.
Give the Pest to the carnivorous plant and collect the Dew while the plant is chewing.
Check the bridge mechanism to see you are missing something to repair the bridge to the Tower so exit down twice.
Screenshot
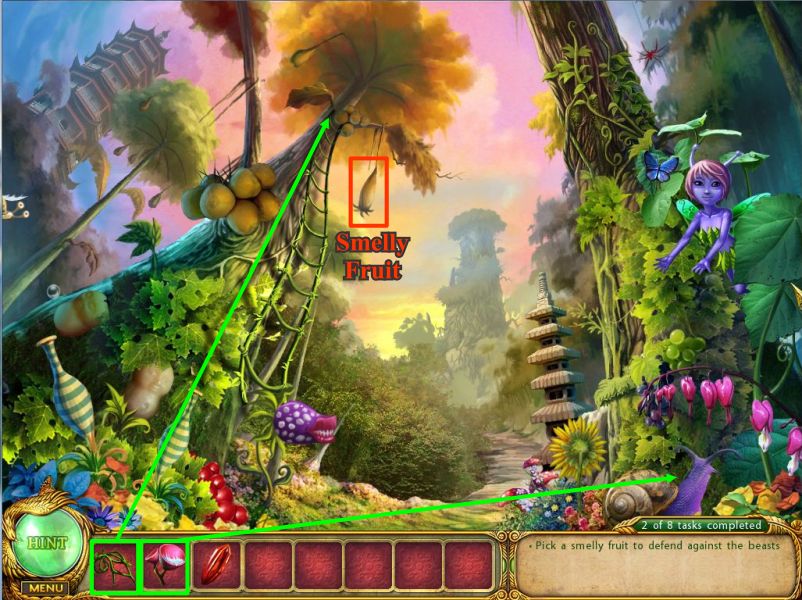
Place the Vine Ladder on the tall tree and pick the Smelly Fruit.
Give the Dew to the snail to heal him and he will move revealing a Stone Ball to pick up.
Screenshot
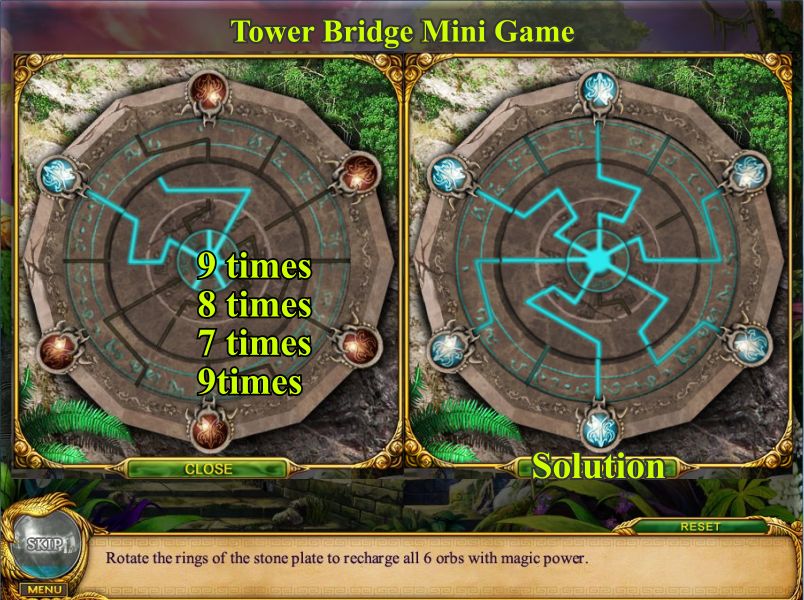
Tower Bridge Mini Game
Go back to the Tower bridge, click on the mechanism and place the Stone Ball to start the mini game.
Your goal is to rotate the rings of the plate so that there is energy connected to all 6 orbs.
See the screenshot for how to reach the solution.
Screenshot
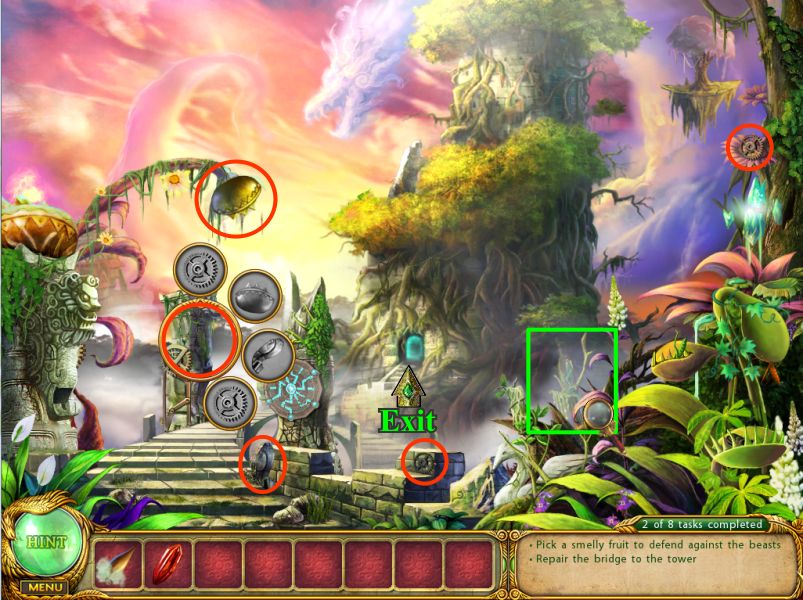
Part of the bridge is restored so click on the other mechanism and find the necessary parts.
The rest of the bridge is repaired so cross it and enter the Tower.
Click on the sparkles for a Hidden Object scene to get the Paper Lantern.
Screenshot
Click on the sparkles for a Hidden Object scene to collect the Paper Lantern.
Screenshot
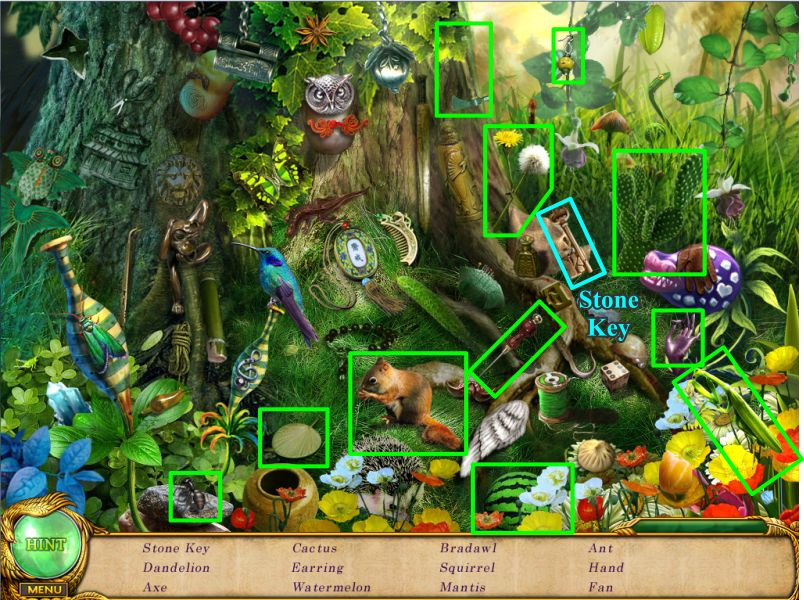
Exit down 3 times to where the Spirit is and click on the sparkles in the lower left for a Hidden Object scene.
Collect the Stone Key and the rest of your list before exiting back to the river.
Screenshot
Use your Paper Lantern to gather some Fireflies.
Click on the Buddha statue across the river and use your stone key to open the panel and take the Yellow Crystal.
Go forward twice to the inside of the Tower and click on the sparkles for a Hidden Object scene to get the Flute.
Screenshot
Go upstairs and give the smelly fruit to the spider to make him disappear.
Place the Red and Yellow Crystals above the frozen statue and check that the green one in the lower right of the scene is among poisonous mushrooms so you need to find a way to get it.
Continue upstairs now that the spider is gone and use your Fruit to wake the sleeping tree and talk to him.
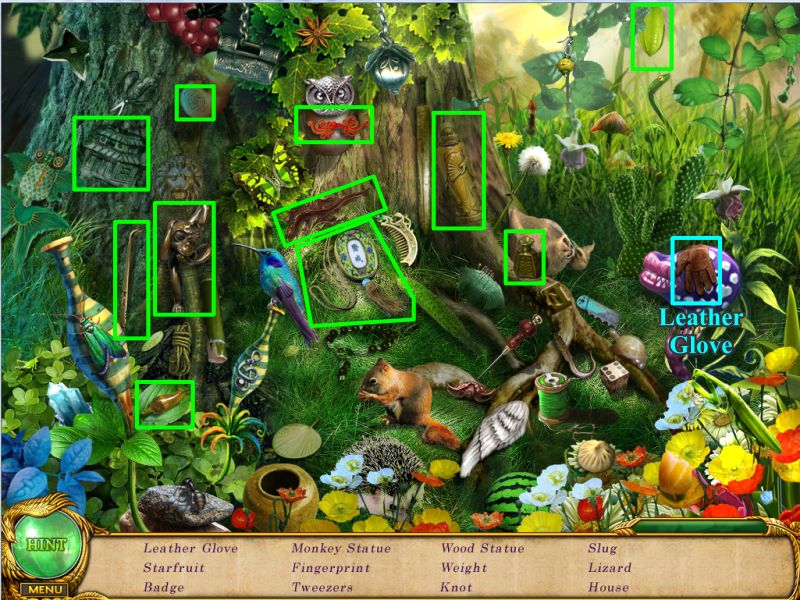
Exit all the way down to where the spirit girl is and click on the sparkles for a Hidden Object scene.
On your list is a Leather Glove so when you have collected everything go back to the Tower to be able to get the Green Crystal.
Screenshot
Use the Leather Glove to get the Crystal in the lower right corner and place it over the statue.
When the statue is defrosted take the Trident.
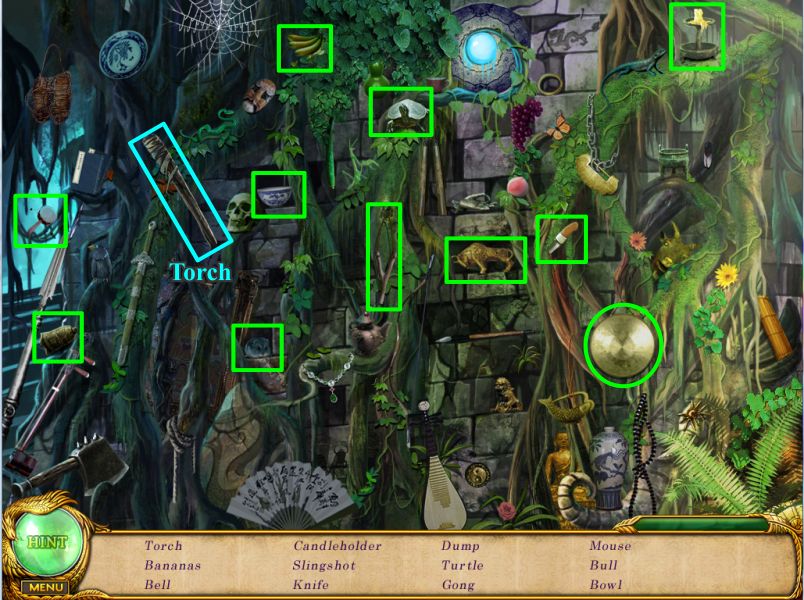
Go downstairs and click on the sparkles for a Hidden Object scene to get a Torch.
Screenshot
Place your paper lantern with the Fireflies on the broken crystal lantern to light it up.
Place the Trident on the door to the left of the lantern and it will open for you to take A Pot of Powder.
Go back to the Tower bridge and light the Torch on the flame at the left on top of the statue.
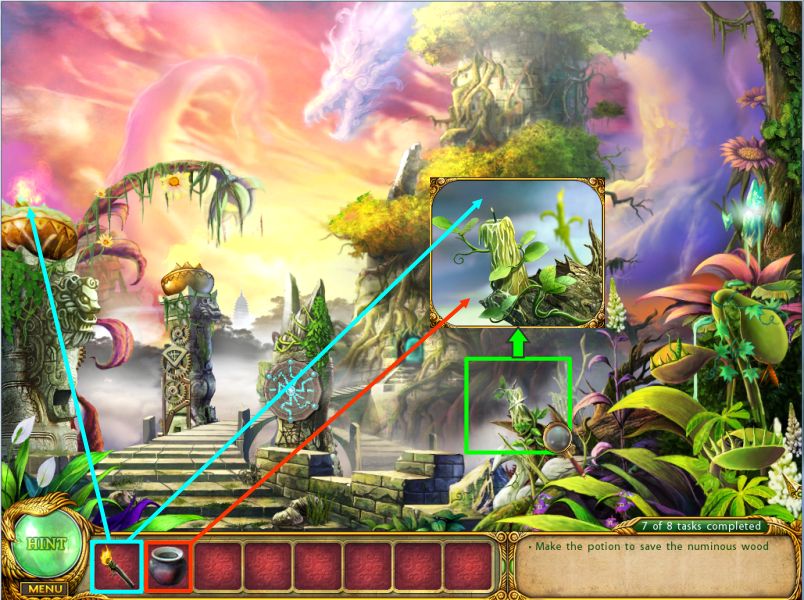
Click on the candle-like growth on the tree for a close up and light it with your Torch.
Catch a dew drop with the Pot of Powder and it will turn into Nutrition.
Screenshot
Go back to the top of the Tower to see the old tree.
Give the Nutrition to the numinous wood and watch it grow and restore the Jade Dragon Staff.
The old tree creates a portal for Yu to get back to the city and go save Zihao.
You have finished your part of the adventure so watch the ending movie.
Special thanks to Jazz for this fabulous walkthrough!
Posted by: grinnyp |
August 26, 2010 7:43 PM
|
August 26, 2010 7:43 PM