


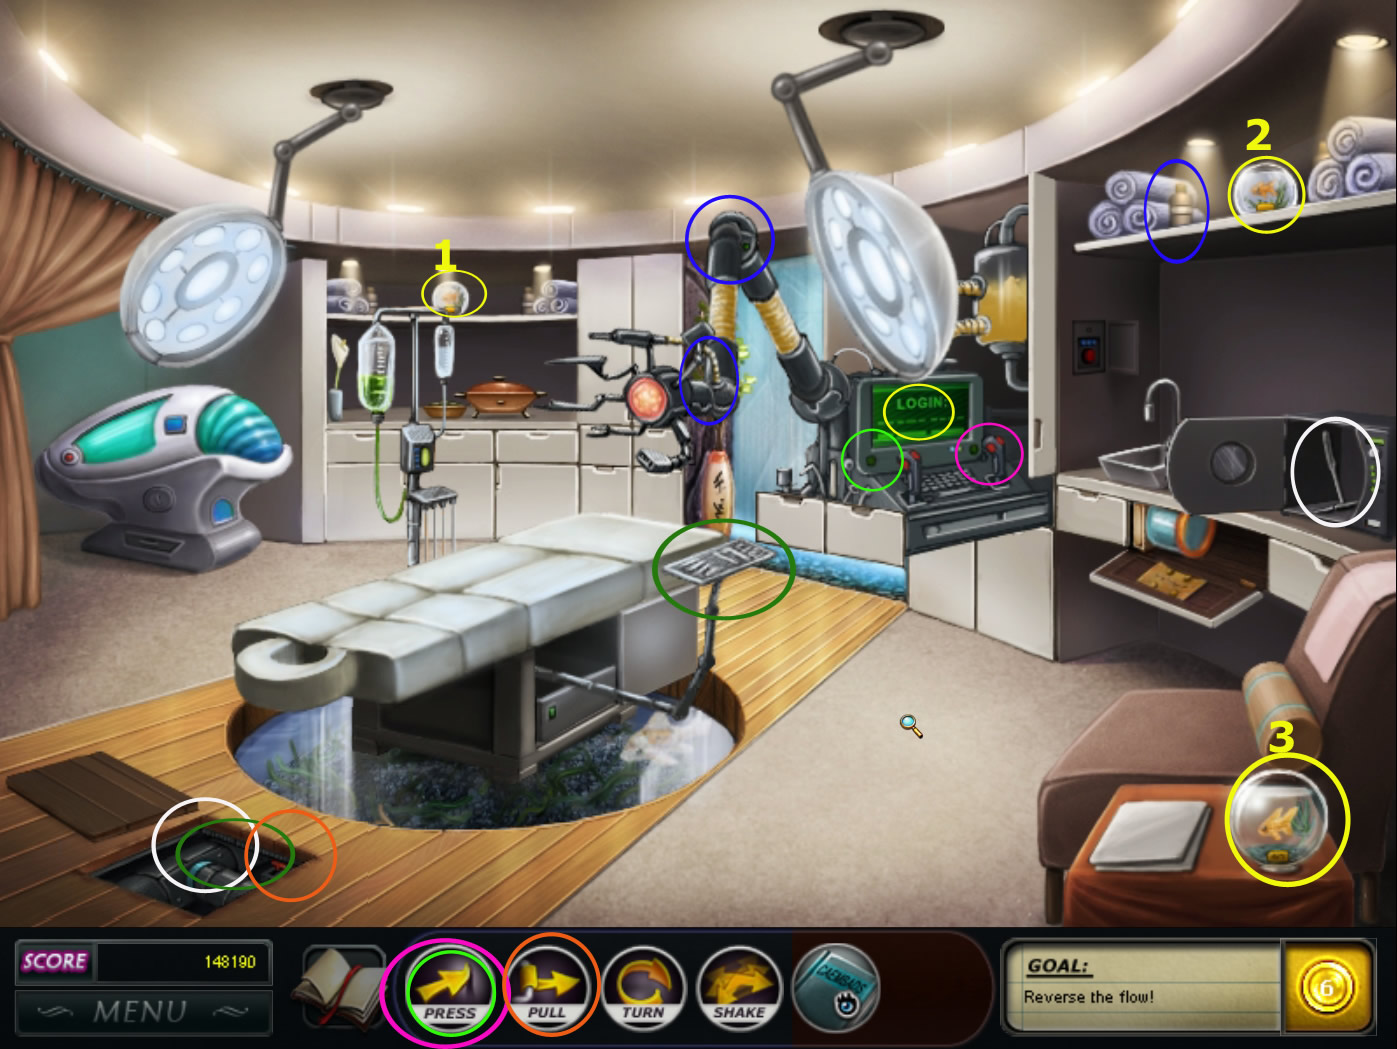
![]() Poor Nancy. One would think that after solving the mysterious accidents in Nancy Drew Dossier: Lights, Camera, Curses!, she would have easily earned herself a little break. But our plucky investigator gets no such respite and is already working on another case. This would be bad enough on its own, but having her next case take place in an ultra fancy spa/resort for the social elite where she is teased with the finest luxuries around, well, that's just beyond the pale. Having to pretend to be one of the serving staff, we like to call that salt, lemon juice, and battery acid in the wound.
Poor Nancy. One would think that after solving the mysterious accidents in Nancy Drew Dossier: Lights, Camera, Curses!, she would have easily earned herself a little break. But our plucky investigator gets no such respite and is already working on another case. This would be bad enough on its own, but having her next case take place in an ultra fancy spa/resort for the social elite where she is teased with the finest luxuries around, well, that's just beyond the pale. Having to pretend to be one of the serving staff, we like to call that salt, lemon juice, and battery acid in the wound.
 Yet in Nancy Drew Dossier: Resorting To Danger, our Miss Drew takes it all in stride. Okay, maybe she's a little put off by some of the comments that get tossed her way, but she shrugs them off like a trooper and gets down to the business at hand. And what is the business at hand? Well, this high end relaxation spot for the wealthy has fallen victim to a series of almost-harmless bombings. Yes, bombings, and because the Rodondo's manager is more afraid of bad publicity than he is of, you know, explosions, he's hired Nancy to take on the case as opposed to calling in the cops. If she could just use the phrase "construction accident" in lieu of "explosion" that would be just fabulous.
You take control of Nancy in this hidden object adventure and your responsibilities are twofold. Obviously you need to get to the bottom of the bombings. You'll look for clues, solve puzzles, play mini-games, and talk to people to get information out of them. Oh, and you might just be required to actually disarm a bomb or two every now and then, no big deal. But, remember, you're trying to solve this problem on the QT, so to speak, so you can't let the upper-crust guests find out that you're a detective. Thus, while you are tracking down a mad bomber, you'll also be spending quite a bit of your time giving facials, fetching beloved pets, etc.
The core gameplay remains largely unchanged from the first Nancy Drew Dossier game. For each setting you'll be asked to achieve one or more goals and to do this you will have to find and match up pairs of objects in the background. You won't have any item lists to contend with, or random items that have nothing to do with anything. Also, pay close attention to the clues you receive as you will often be quizzed on them during later conversations.
So, if you're ready to once again don the guise of Nancy Drew, could you please report to the reception? There are some... um... towels that need folding. Yeah, that's the ticket.
 Analaysis: With only two installments thus far, the Nancy Drew Dossier series is proving to be quite strong indeed. The key to its success is finding a perfect balance between the often hybridized point-and-click adventure and hidden object genres. What results is a game that provides a faster, more casual experience found in most adventures, while at the same time giving you a HOG with a bit more depth and purpose than usual.
In fact, Resorting to Danger manages to improve upon an already stellar formula, though only in subtle ways. Perhaps most notable is the fact that this time puzzles and mini-games are better integrated with the ongoing story. The bonus game from the first Dossier has been axed in favor of a different bonus game that is a direct part of the storyline. Also, small changes and adjustments to the interface allow for modest improvements in interacting with your environment.
Another thing I can't help but appreciate is the variety and quality of puzzles and mini-games, none of which seem to have been brought over from Curses. Of particular note here is the facial puzzle which is remarkably similar to Bart Bonte's Factory Balls.
The artwork, as one should expect, is superb. On top of that, the cut scenes have a more dynamic feel to them, most likely from an increase in the amount of animation. Unfortunately, Danger falls victim to its setting, and in this regard comes up a little short compared to its predecessor. Compared to a movie set/theme park, a spa/resort is nowhere near as intriguing and it shows. This is not to say that the backdrops don't look good, mind you, they just aren't as exciting.
Don't let that scare you off, though, as that's just about the only weakness Danger has. Given that for a resort there are still some pretty interesting rooms to comb through, this isn't much of a weakness at all. Beyond that, Resorting to Danger is most definitely a credit to the series. Excellent side games combine with that unique Nancy Drew brand of object finding to create yet another gaming experience that is tough to put down.
![]() Windows:
Windows:
Download the demo
Get the full version
![]() Mac OS X:
Mac OS X:
Not available.
Try Boot Camp or Parallels or CrossOver Games.


Walkthrough Guide
(Please allow page to fully load for spoiler tags to be functional.)
Nancy Drew Dossier: Resorting to Danger - Walkthrough
Chapter 1 - Introductions
Follow the tutorial - the walkthrough starts from the moment, you are on your own.
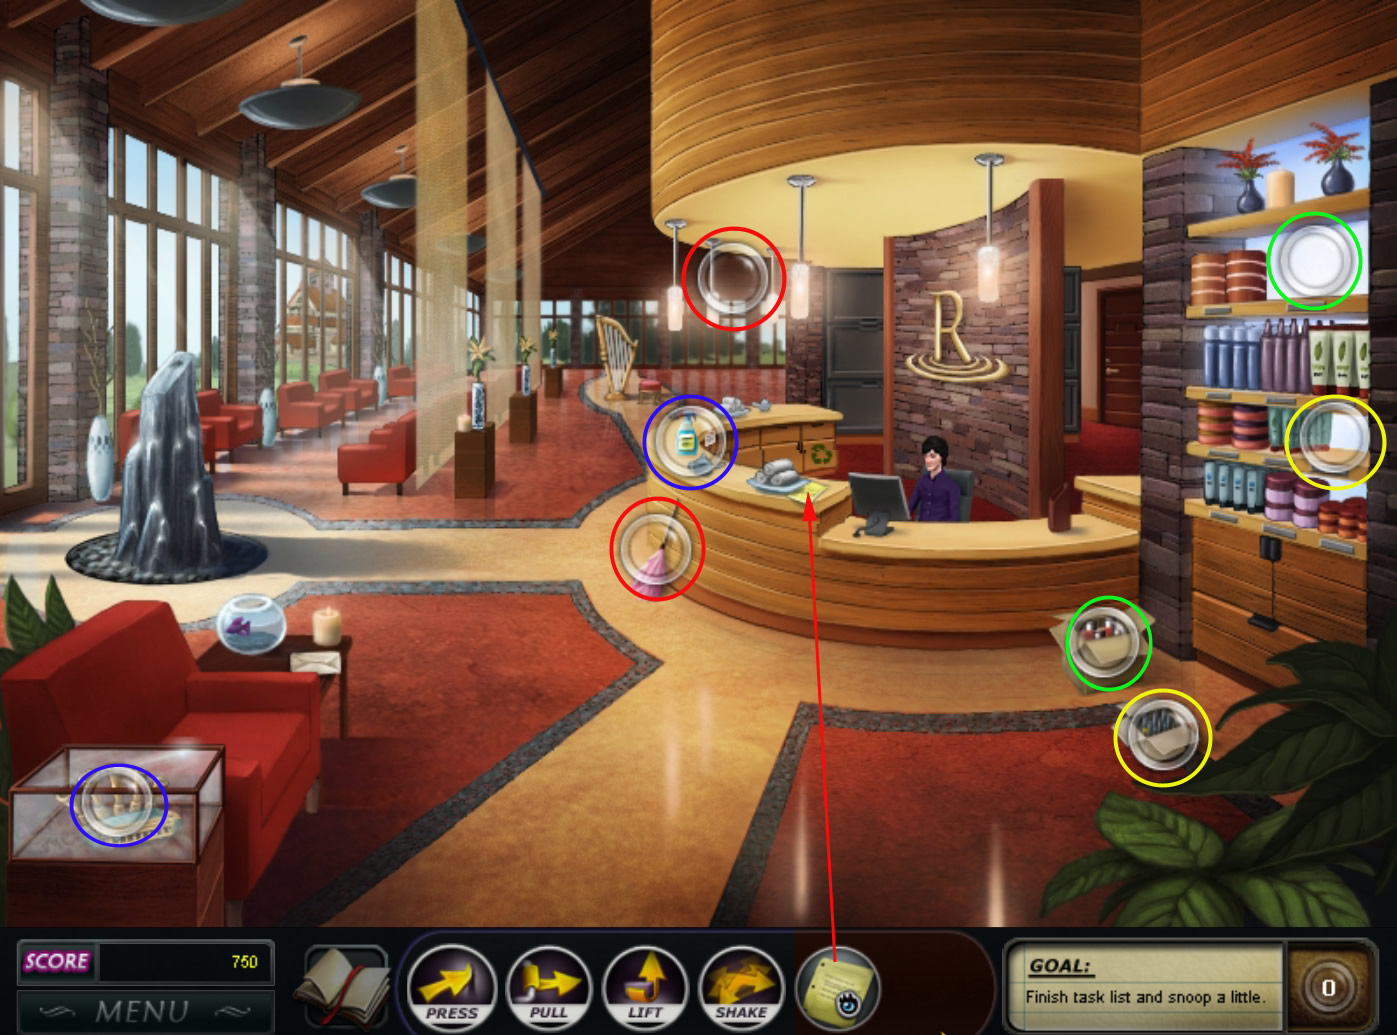
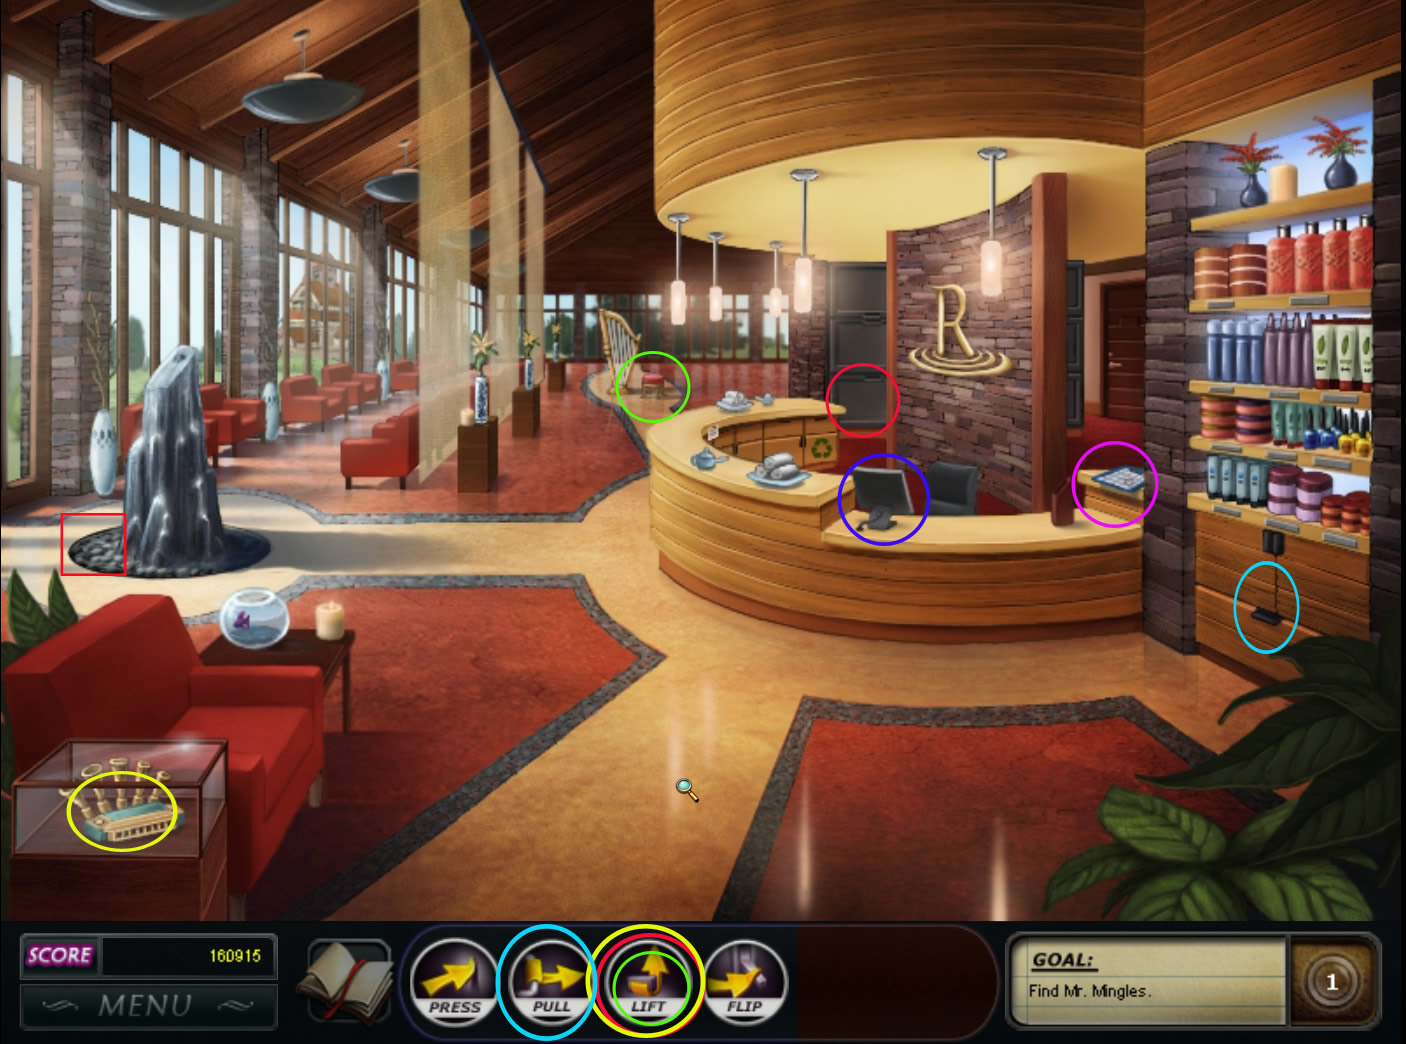
Get the task list from the reception desk, right next to the telephone.
Combine the left box, standing right side on the floor, with the empty place on the top shelf, right side.
Combine the right box, standing right side on the floor, with the empty place on the second shelf from down, right side.
Get the duster, standing in front of the reception desk and combine it with the lamps above the desk.
Combine the glas cleaner on the reception desk counter with the harmonica display, low left corner.
Screenshot
To open the harmonica display, combine it with the action button "Lift".
Open the drawer with the recycling sign at the reception desk with the action button "Pull".
Click the drawer again to find a screwdriver and combine it with the harmonica.
Screenshot
Click the note and read it.
You will talk with Cassidy and be brought into Mr. Bleski's office automatically.
Chapter 2 - The Job
You will have to give the right answers, during the conversation.
You will see that the answer is right, when it lights up green.
If not, you can try another answer, till you found the right one.
You will get less with points for the right answer with every wrong answer you gave before.
1. answer: Of course, you want me to investigate the bombings.
2. answer: Would you like me to go out there and fold towels?
You will be brought back to Cassidy.
Click the map to remove it from the screen.
You will get a note from Cassidy.
Click OK to activate a mini game.
Your goal is it to perform complete letters by swapping the pieces horizontal, vertical or diagonally.
Each swap needs to result in a complete letter.
By this time, you can only swap letters with adjacent tiles (diagonals included).
Top right, you can see, which letters you still need.
Top left you have help icons - two can scramble the pieces two times or use three hints to find a match.
After completing the mini game, the note of the bomber will appear.
You have to swap the letters to get a word, that will give you a hint for the location of the bomb.
The sentence above the letters gives you a hint.
Swap the letters to spell the word:
VINES
Click the Jungle Room to progress
Chapter 3 - Grumble in the Jungle
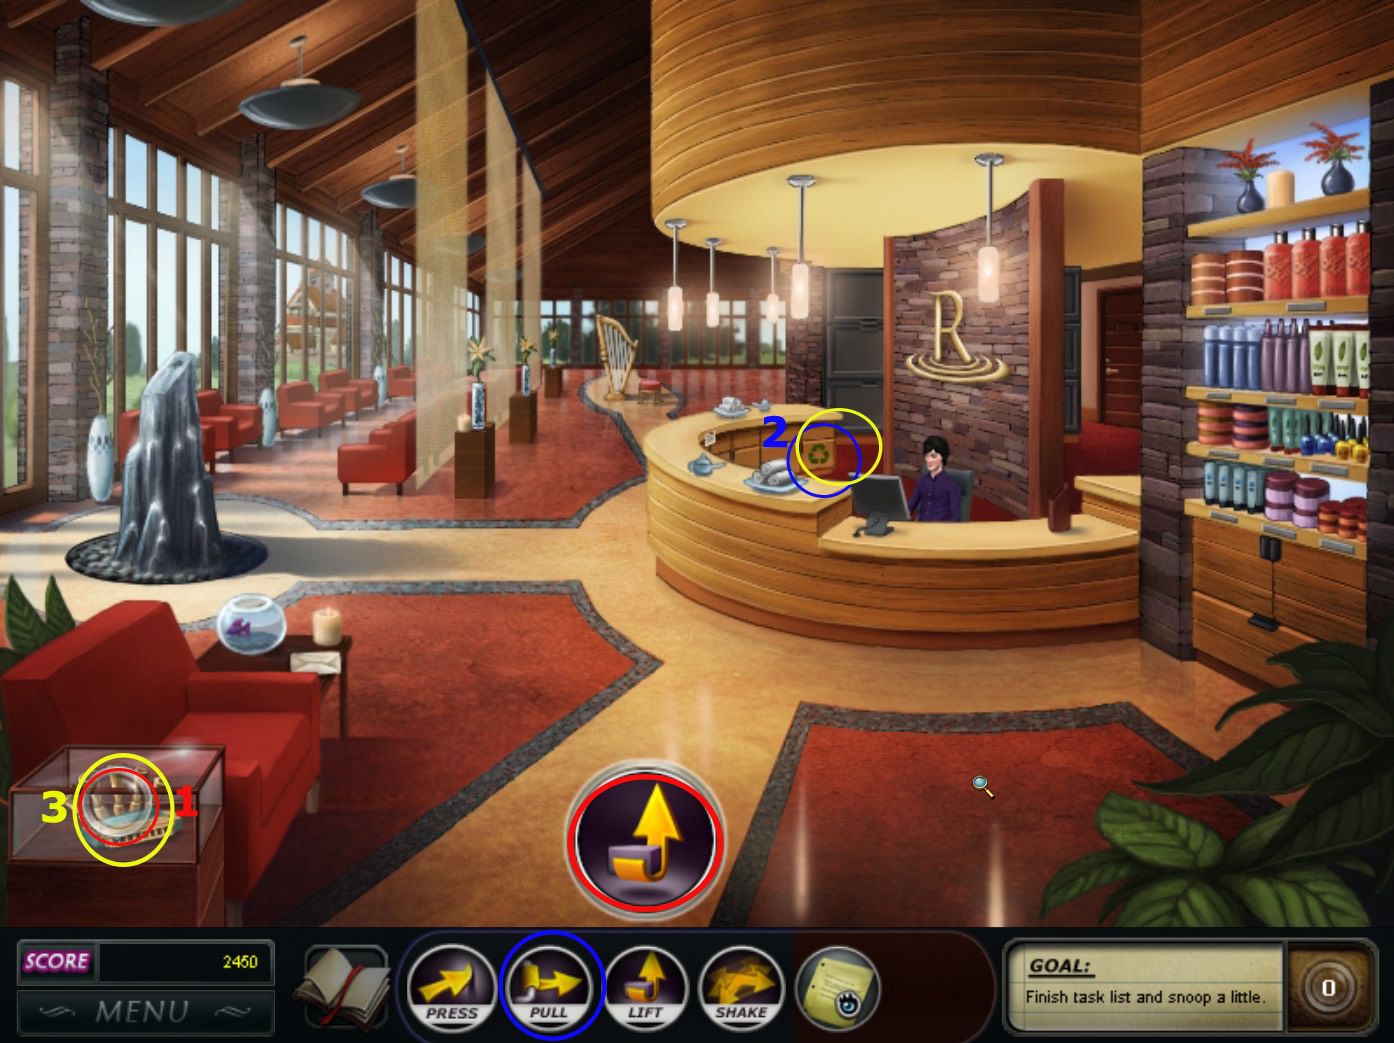
The answer is: Uh, no, I'm Nancy, the new general assistant.
Use the action button "Scratch" with Mrs. Montague.
Combine the button of the little compartment at the right side of the bath tube with the action button "Press".
Combine the valve inside the compartment with the action button "Turn".
To water the plant, combine the watering can in the far left with the little waterfall right next to the tube.
Now combine the filled watering can with the plant right side.
To entertain Mrs. Montague combine the little table drawer far left with the action button "Pull".
Click the drawer again to see the article. You will automatically read it to Mrs. Montague.
Screenshot
Open the refrigerator in the far left, right next to the waterfall with the action button "Pull".
Take out the tea leaves by choosing the tea bag and the strainer on the tea trolley low right.
Combine the strainer with the teapot right next to it and the teapot with the hot water dispenser left next to Mrs. Montague.
Combine the teapot now with the teacup on the tea trolley and the tea cup with Mrs. Montague.
Screenshot
Move your cursor over the shower head and click.
A green box will appear, click the handle twice to open it.
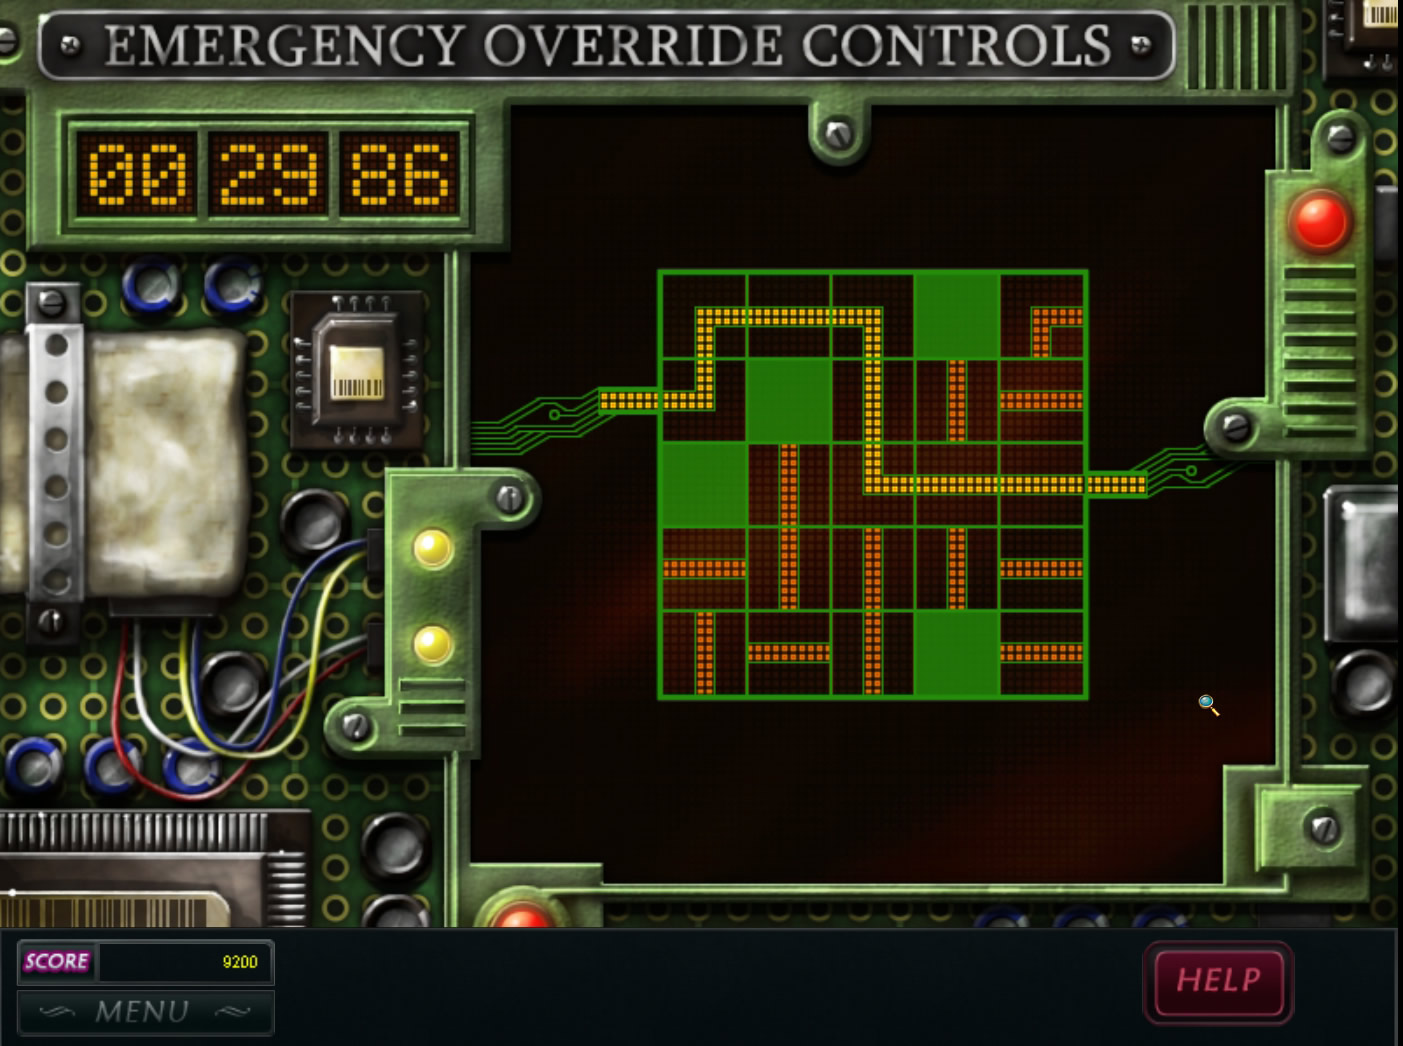
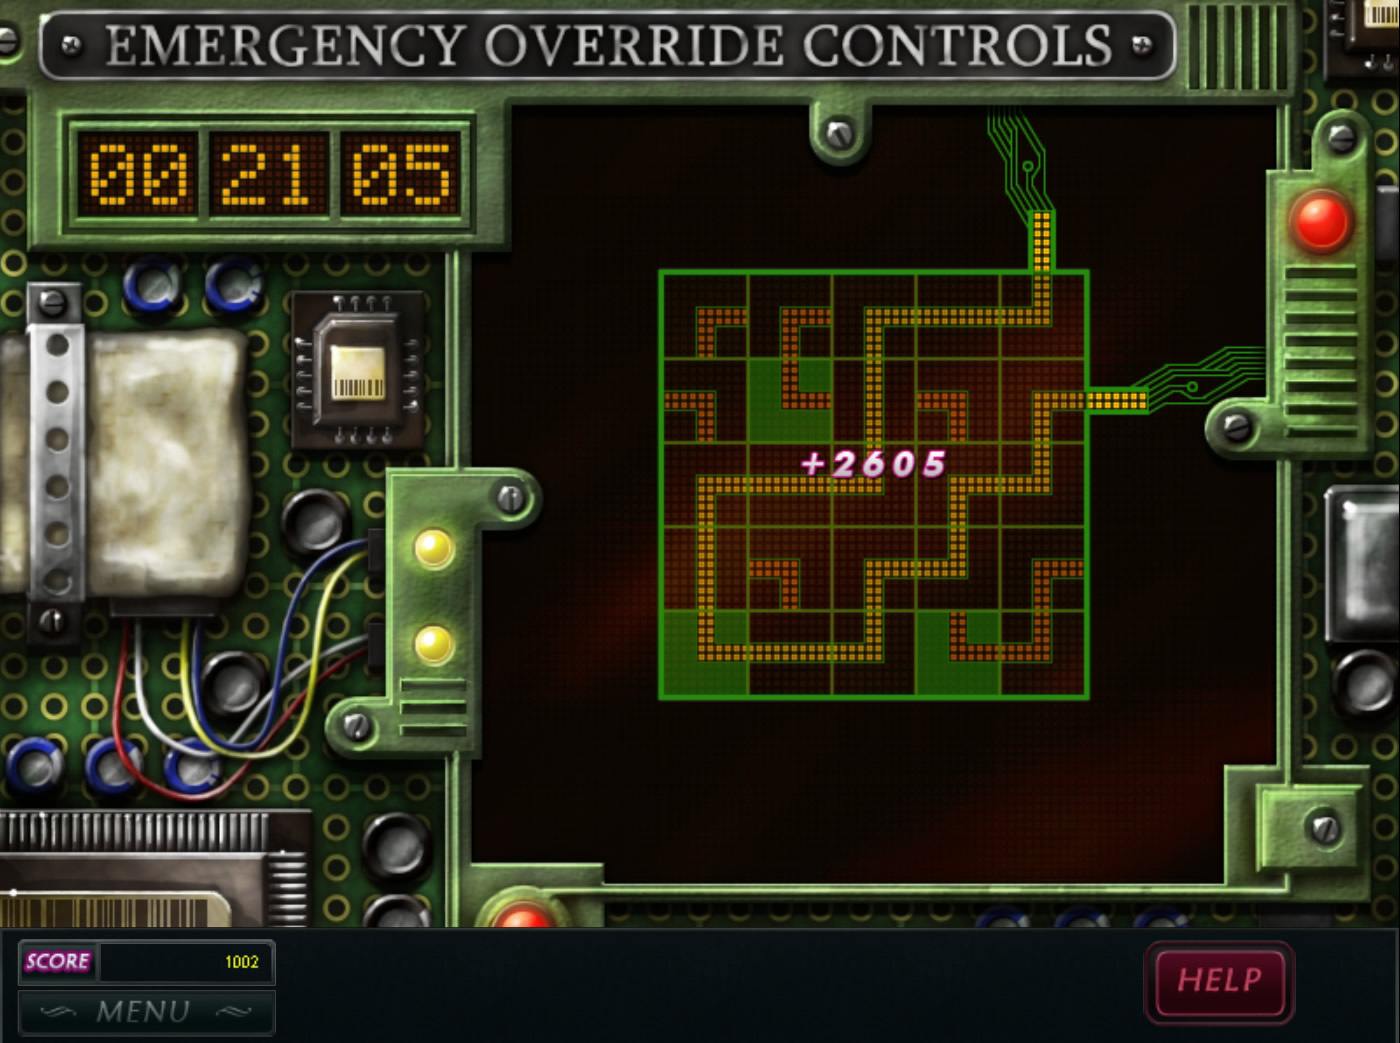
Click the bomb to activate a mini game.
A tutorial will show you how to play this game.
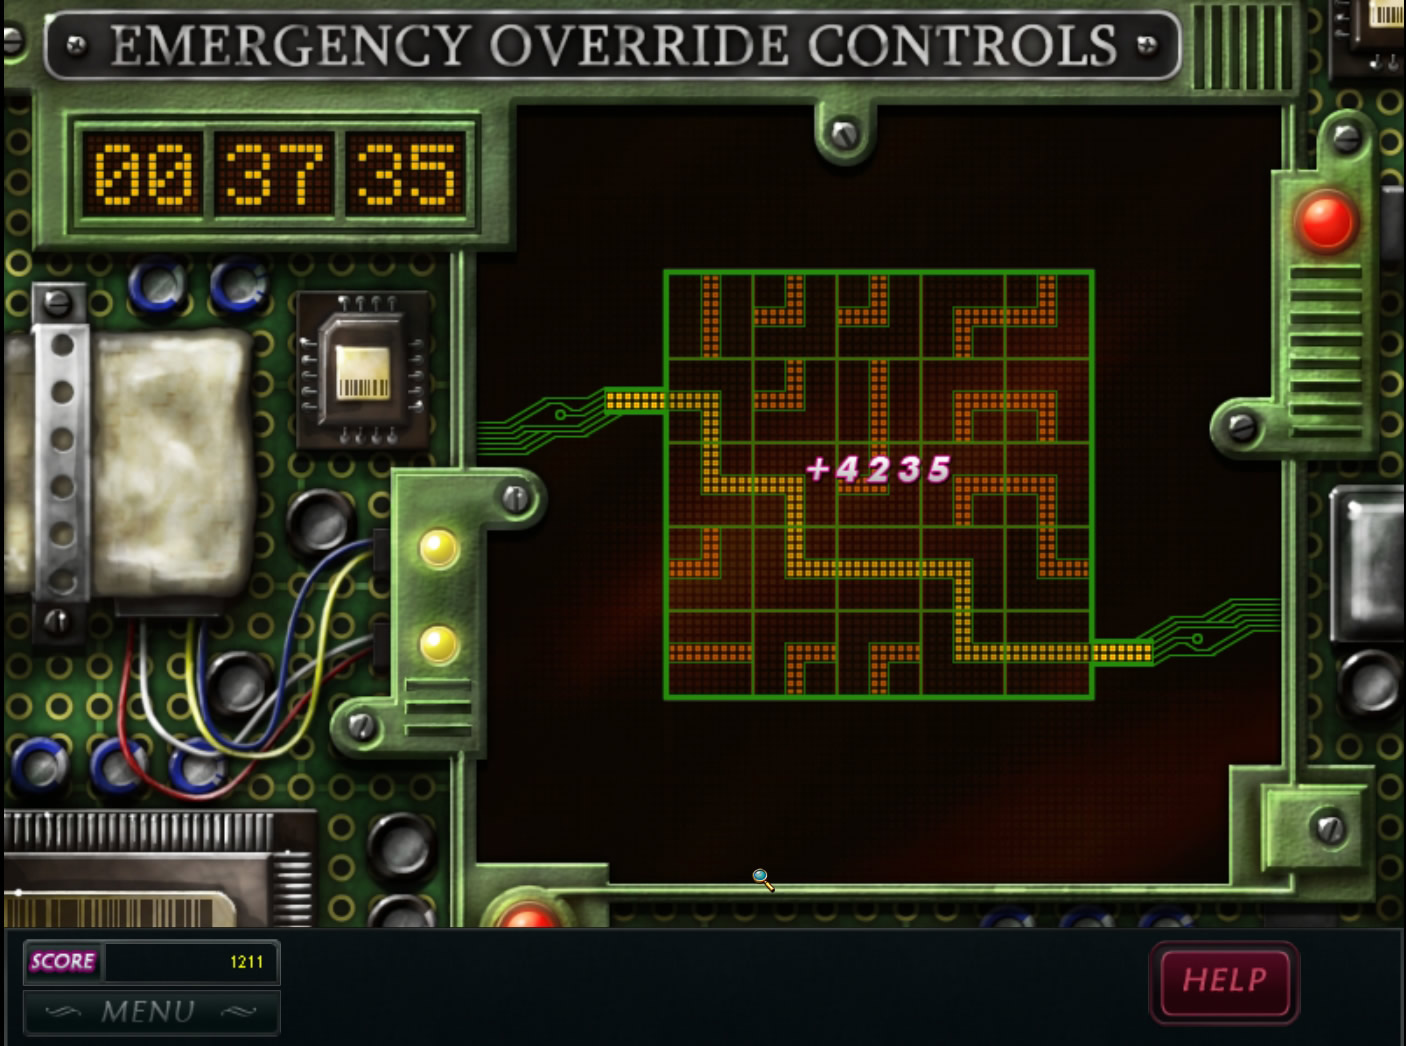
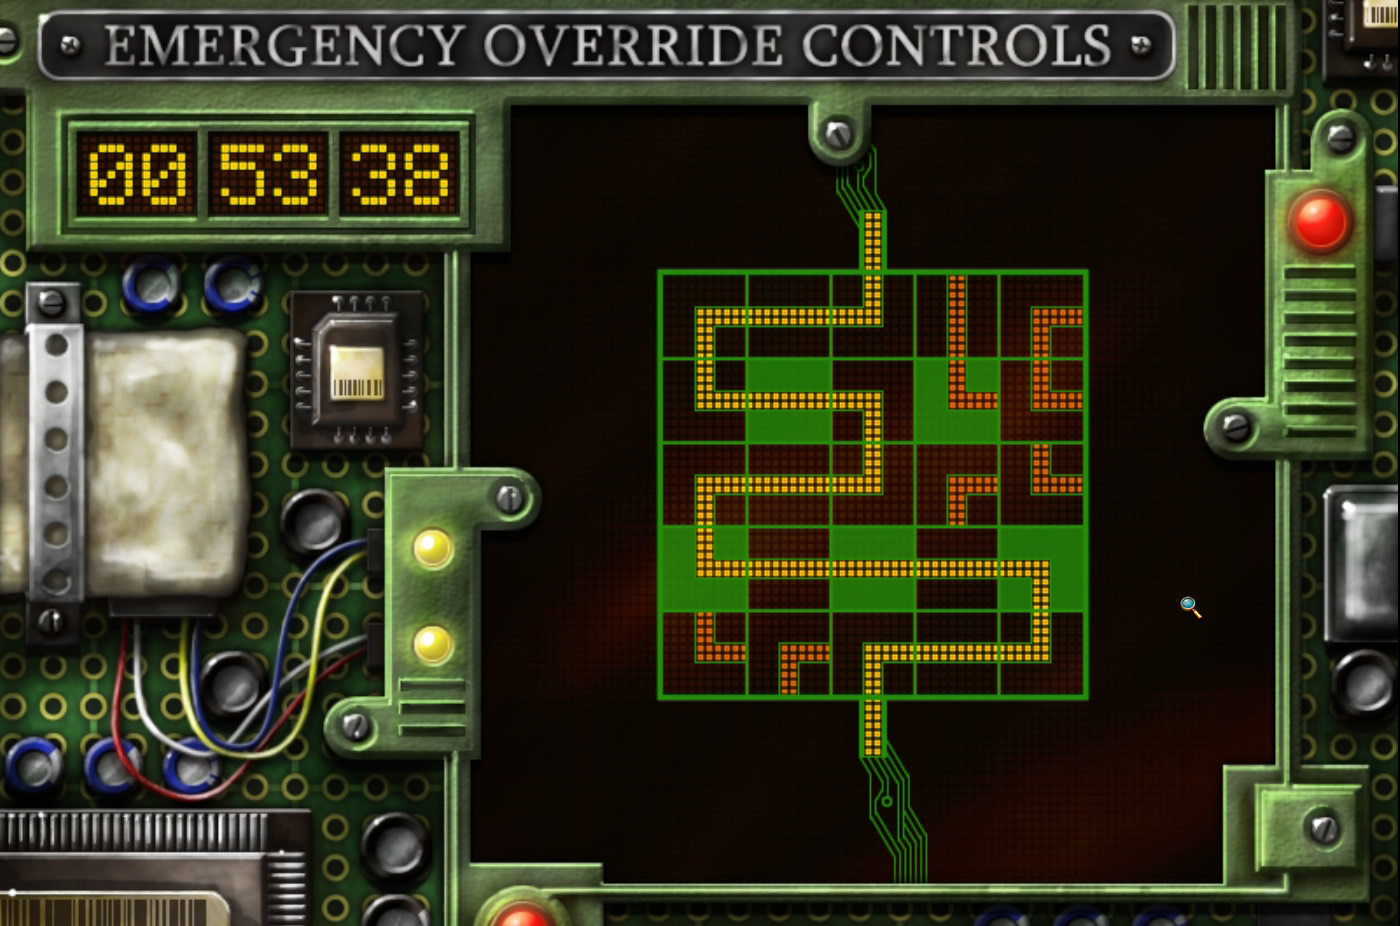
Your goal is it, to connect the two pieces left and right with the pipes.
Swap to pipes to make a path.
If you run out of time, the mini game will restart.
As faster you solve the game as more points you will receive.
The screenshot shows an example, there are several solutions possible.
Screenshot
Chapter 4 - Hair of the Dog
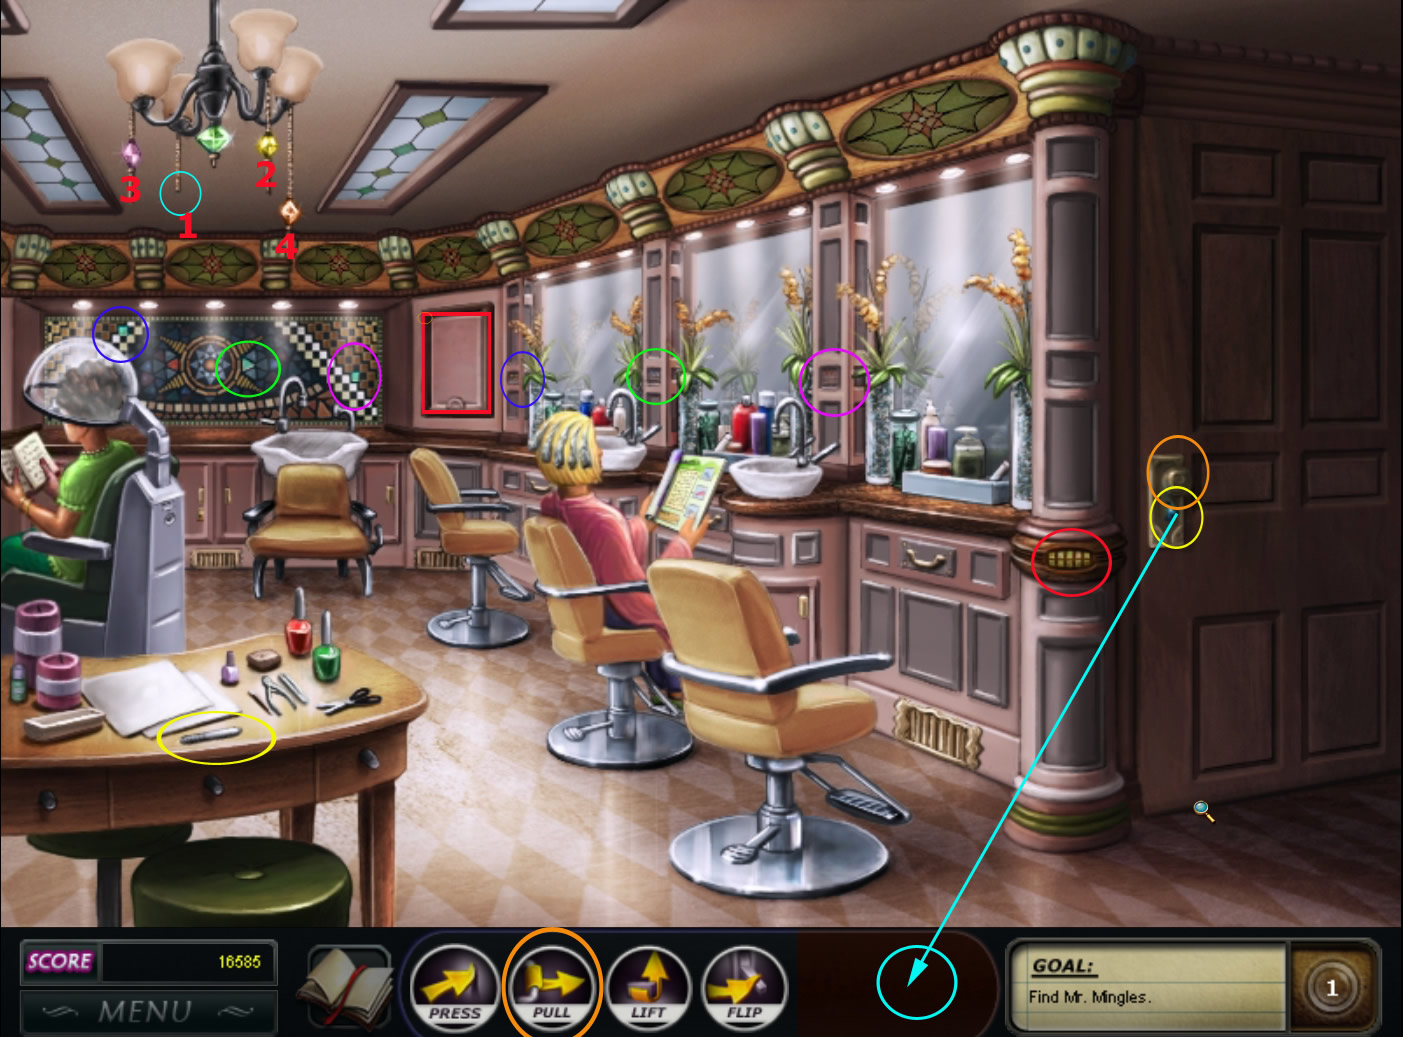
Click the dumbwaiter door in the far middle.
You can hear Mr. Mingles barking but not reach him.
Click the pillar on the left, left to the door, at its middle part.
A mini game will open.
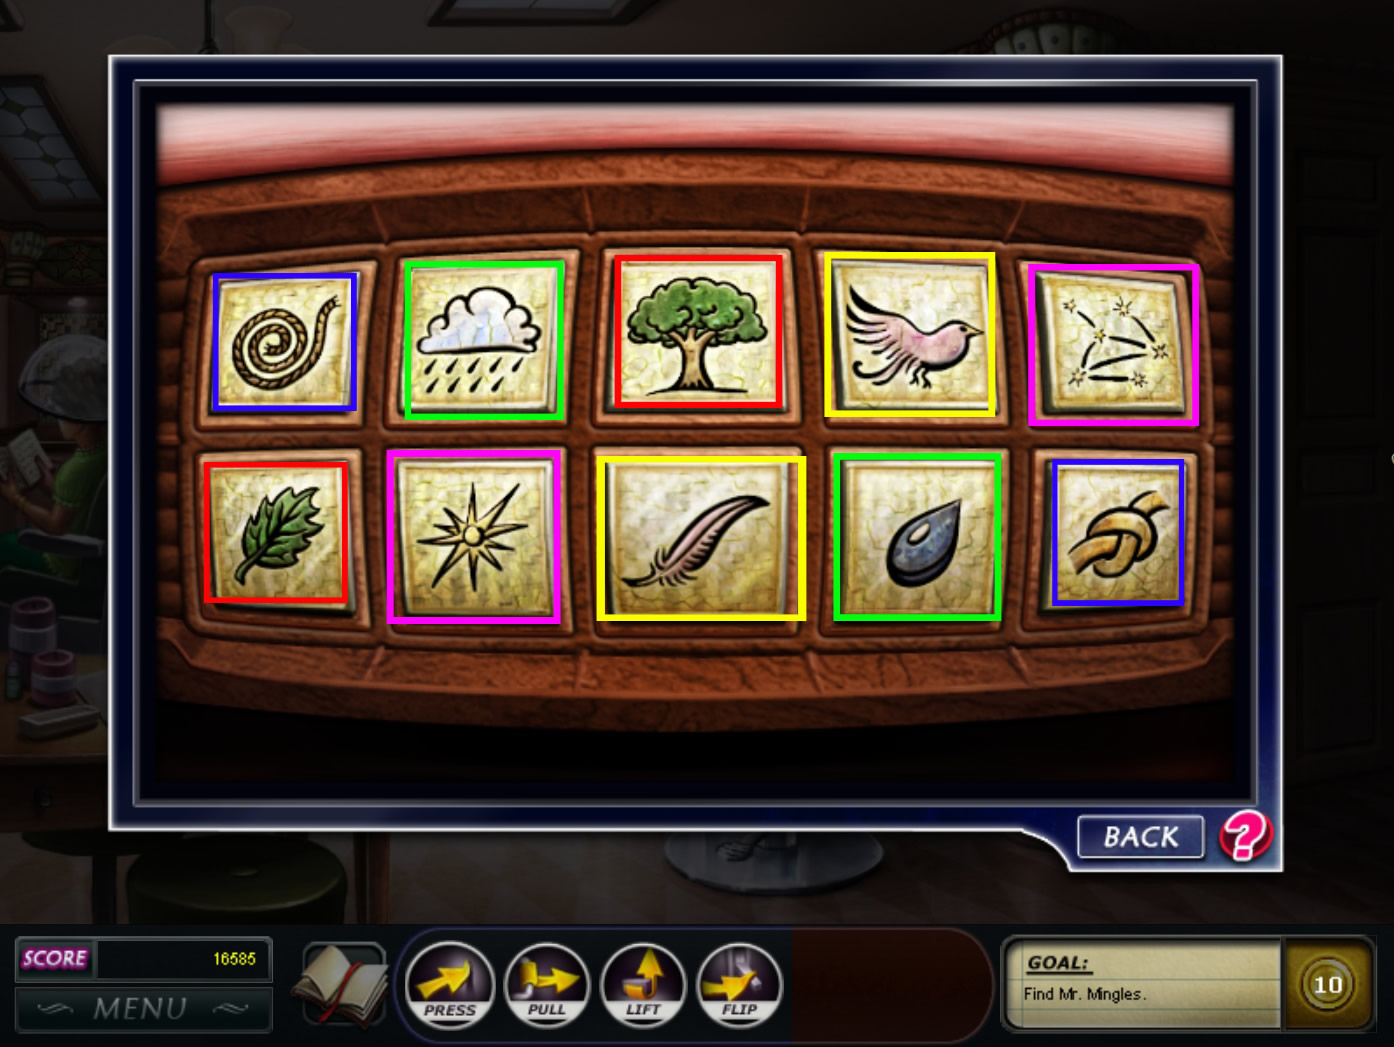
You need to find the matching parts. One tile of the upper row has a connection with one tile in the bottom row.
Click both and the tiles will lock.
Do this with all eight tiles.
The matching pieces are:
Rope & knot / cloud and rain drop / tree & leaf / bird & feather / constellation & star
Screenshot
A compartment opens below - click the letter inside and read it.
You learn, that there are more puzzles need to be solved, before the dumbwaiter opens.
Now click the middle of the rear pillar and another puzzle will open.
Read the four sentences and press the objects in the correct order:
Rose, cherries, heart, wine glass
Grab the square tile you will find now at the pillar.
Combine this tile with the mosaic at the left back wall. Click the top corner.
Click the second pillar from left to open the next puzzle.
Read the riddles below and press the tiles in the right order:
Piano, key, clock
Click the triangle tile, you will find now at the pillar and combine it with the back wall mosaic, choose the middle of the mosaic this time.
Click the third pillar from left to reveal another puzzle.
Read the riddles below and press the tiles in the right order:
Moon, cheese
You will find another square tile. Combine it with the right side of the back wall mosaic.
To get the blue diamond out of the key hole of the door right side, use the tweezers on the table low left corner.
Combine the blue diamond with the chandelier.
Now pull (just by clicking) the colored diamonds of the chandelier according to the order on the note:
Blue, yellow, purple, orange.
Use the action button "Pull" to open the door on the right side.
Screenshot
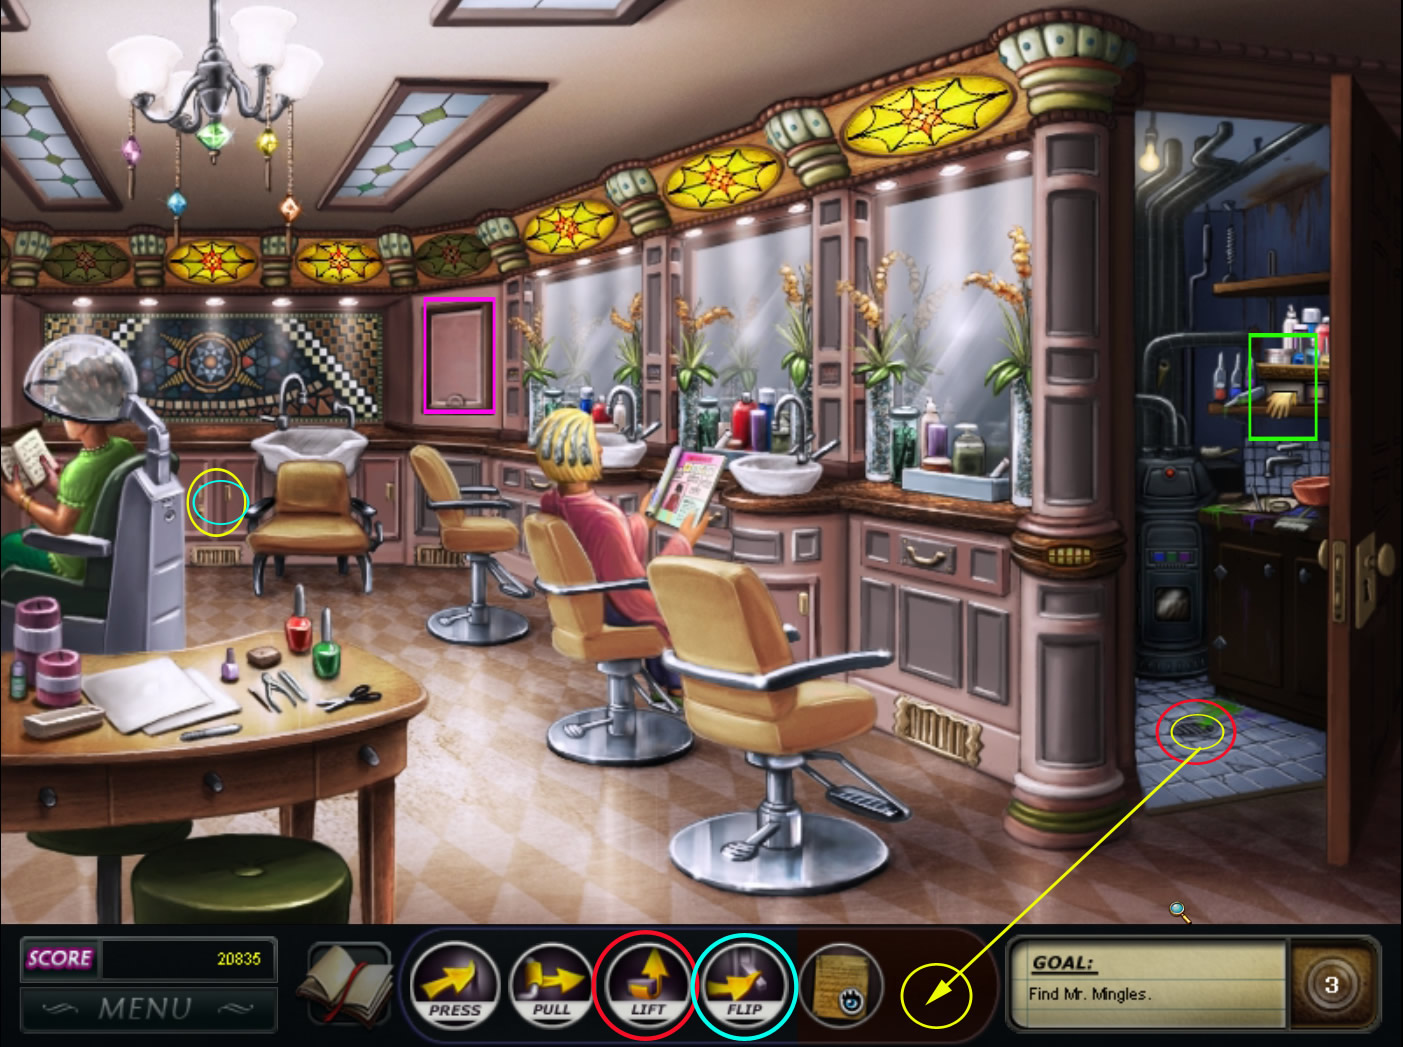
Click the drain cover on the floor of the room you just opened and combine the cover with the action button "Pull".
Combine the key, you find in there with the drawer underneath the back wall mosaic.
Use the action button "Flip" to flip the switch you found inside the drawer.
Click the shelf in the pantry to reveal a puzzle.
Screenshot
According to the note, you have to place the bottles, so that both shelves contain 15 onze.
Place the bottles so that one shelf has the little blue nail polish bottle, the big orange bottle and the light blue bottle.
The dumbwaiter will open and Mr. Mingles is free.
In the following conversation with Mrs. Montague choose:
1. Speaking of the green gooey mess that came out of the shower head
2. Helfdan?' Oh, you mean the biochemist?
Chapter 5 - On a Molecular Level
According to the conversation with Mrs. Montague, you will find "Helfdan" in the basement.
Click the laboratory left side of the building.
A mini-game is activated in which the object is to form the three molecules pictured.
You will have a tutorial to learn how the game works.
Rotate the balls on the board so that each red ring contains one color.
Left-click rotates the ball counter-clockwise, and right-click rotates the ball clockwise.
If you do not have three matching colors inside a red ring, make matches elsewhere on the board so that new pieces will move into play.
It does not matter, which color you choose as long the three ball are matching.
Always have a look at the top circles first, to make sure, that you do not already have possible matches there.
After finishing three molecules, you may ask Mr. Helgason a question:
I'm pretty sure it was meant to explode.
Cassidy has a new note for you, you will be automatically brought there.
Click the note, Cassidy is placing on the desk.
Your goal is it to perform complete letters by swapping the pieces horizontal, vertical or diagonally.
Each swap needs to result in a complete letter.
By this time, you can only swap letters with adjacent tiles (diagonals included).
Top right, you can see, which letters you still need.
Top left you have help icons - two can scramble the pieces two times or use three hints to find a match.
You will now also find blank tiles on the board. They do not contain letter parts but can be used for swapping with every tile, when needed.
This time you will have to earn yourself the helpers by matching tiles, containing the helper symbol.
If you do not use any helper, you will get additional bonus points.
After completing the mini game, the note of the bomber will appear.
You have to swap the letters to get a word, that will give you a hint for the location of the bomb.
The sentence above the letters gives you a hint.
Swap the letters to spell the word:
white
Choose the Ivory Room on the map.
Chapter 6 - Jasmine DANGER
You will have to do some facials now.
The tutorial will show you, how it works.
The face on the left is your example.
To reset a facial, click the soap on the left side.
1. Facial:
Use the yellow mud mask.
Place a kiwi on each eye and the orange slice on the mouth.
Apply the blue mud mask.
Remove both kiwi slices and the orange slice.
2. Facial:
Use first the brown mud mask.
Place a kiwi slice over each eye.
Now apply the yellow mud mask.
Remove both kiwi slices.
3. Facial:
You need the yellow mud mask first.
Place the orange slice on the mouth.
Place the half-mask on the face.
Apply the green mud mask.
Remove the half-mask and the orange slice.
4. Facial:
Place first the mint leaf on the nose.
Apply the green mud mask.
Place the chin cover.
Apply the blue mud mask.
Apply a dab of cherry paste on each cheek.
Remove the chin cover and the mint leaf.
5. Facial:
Use the brown mud mask.
Place a kiwi slice on the right eye.
Apply the yellow mud mask.
Place the half-mask on the face and apply the brown mud mask again.
Remove the half-mask and the kiwi slice.
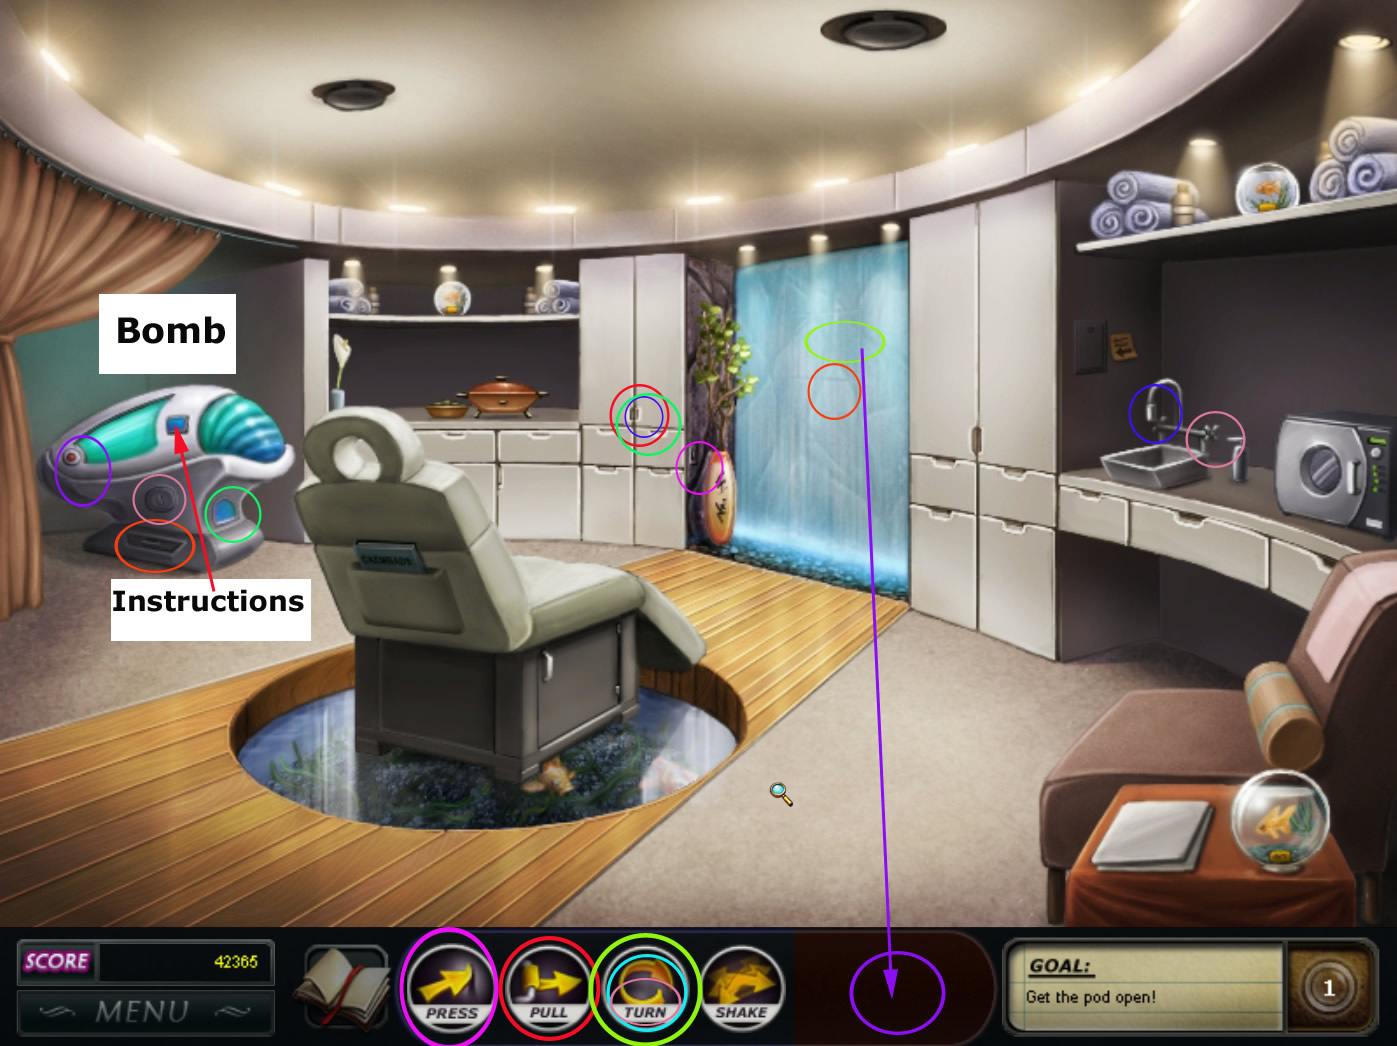
Move your mouse over the sensory deprivation unit far left and click when the indicator is at the far right.
Click the blue square button on the pod to reveal the instructions.
Combine the action button "Pull" with the cabinet left to the waterfall.
Combine the hose, you will find inside with the faucet at the sink right side.
Combine the hose with the spout at the bottom of the pod.
Combine the button at the wall left to the waterfall with the action button "Press".
A cabinet opens behind the waterfall - combine the salt in there with the receptacle at the pod.
On top of the cabinet you will find an uv bulb. Combine it with the action button "Turn".
It goes into your inventory. Combine it from there with the spot for the missing uv bulb left side of the pod.
Combine the action button "Turn" with the handle above the salt receptacle.
Combine the action button "Turn" with the faucet handle.
Screenshot
Click the knob twice to open the cover of the bomb.
Disarm the bomb.
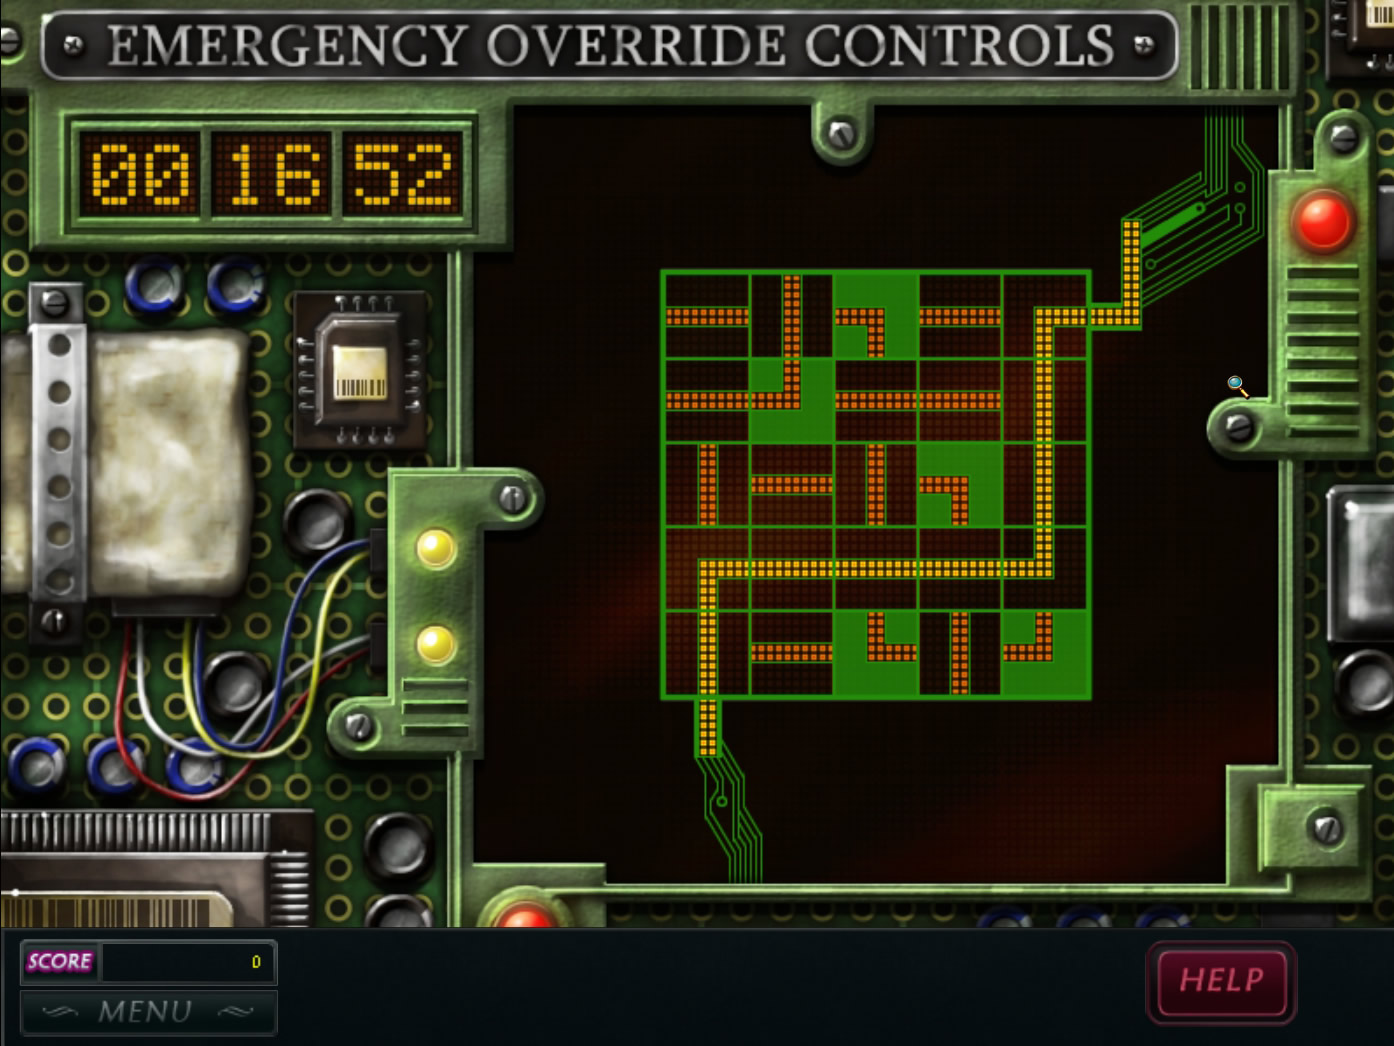
Your goal is it, to connect the two pieces left and right with the pipes.
Swap to pipes to make a path.
The green tiles are obstacles, you will have to build around them.
If you run out of time, the mini game will restart.
As faster you solve the game as more points you will receive.
The screenshot shows an example, there are several solutions possible.
Screenshot
Jasmine is coming. In the following conversation you will need to say:
Oh, just...a little preventative maintenance. I just found this note. It sounds kind of threatening.
Select the Guest Suite on the map.
Chapter 7 - Jasmine Help
Click the base of the pillar right next to the bed to activate a mini game.
Each named coin has to be place on one of the numbers.
Find out, where the connections might be - as for example: Freezing temperature is 0 degrees or Geminis are two.
The right order is:
0 - freezing
1 - unicorn
2 - Gemini
4 - clover
5 - star
7 - wonders
8 - octopus
10 - decade
Screenshot
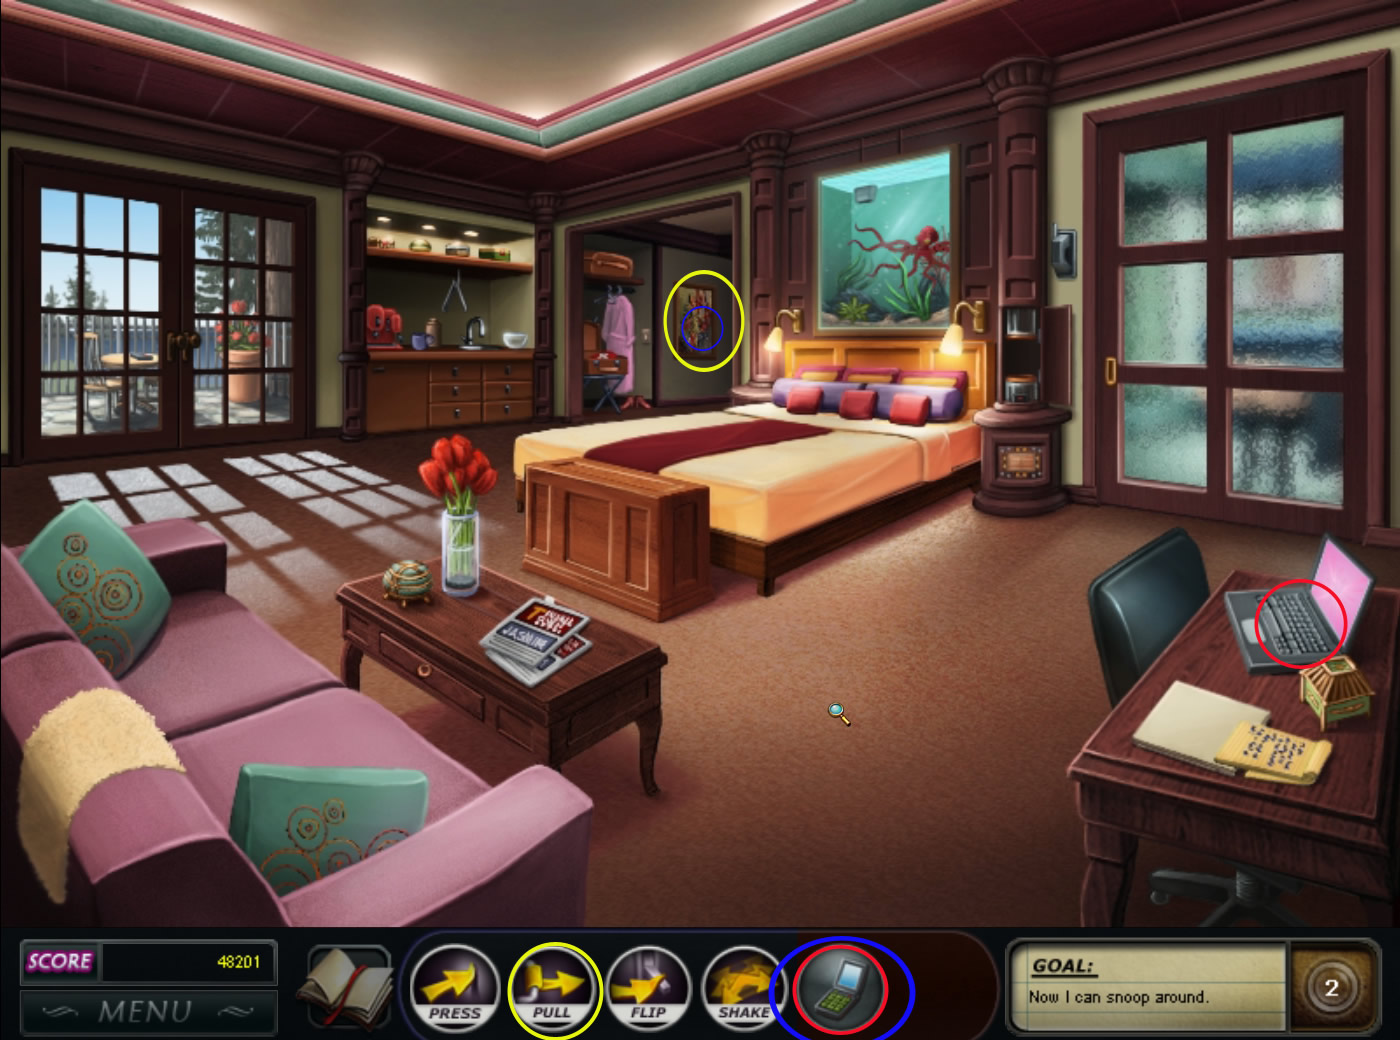
The solved mini game reveals a button. Combine it with the action button "Press".
Jasmine's cell phone falls out.
Click the cell phone, it will go into your inventory.
Combine the cell phone with the laptop on the desk, right side.
Read the Email.
Combine the painting at the wall far left with the action button "pull".
Combine the cell phone with the safe.
It opens. Read the notes you will find inside.
Screenshot
Chapter 8 - Suspects
You will be brought back to Mr. Mr. Bleski automatically.
Respond during the conversation as following:
1. I met Jasminee Ivy. And I found out that she has been getting threats.
2.Well, I managed to keep her from getting covered with goo.
3. Actually, according to Helfdan Helgason, the bomb in the Jungle room was a dud
Mr. Bleski wants you to snoop in Mr. Helgasons lab.
Choose the lab on the map.
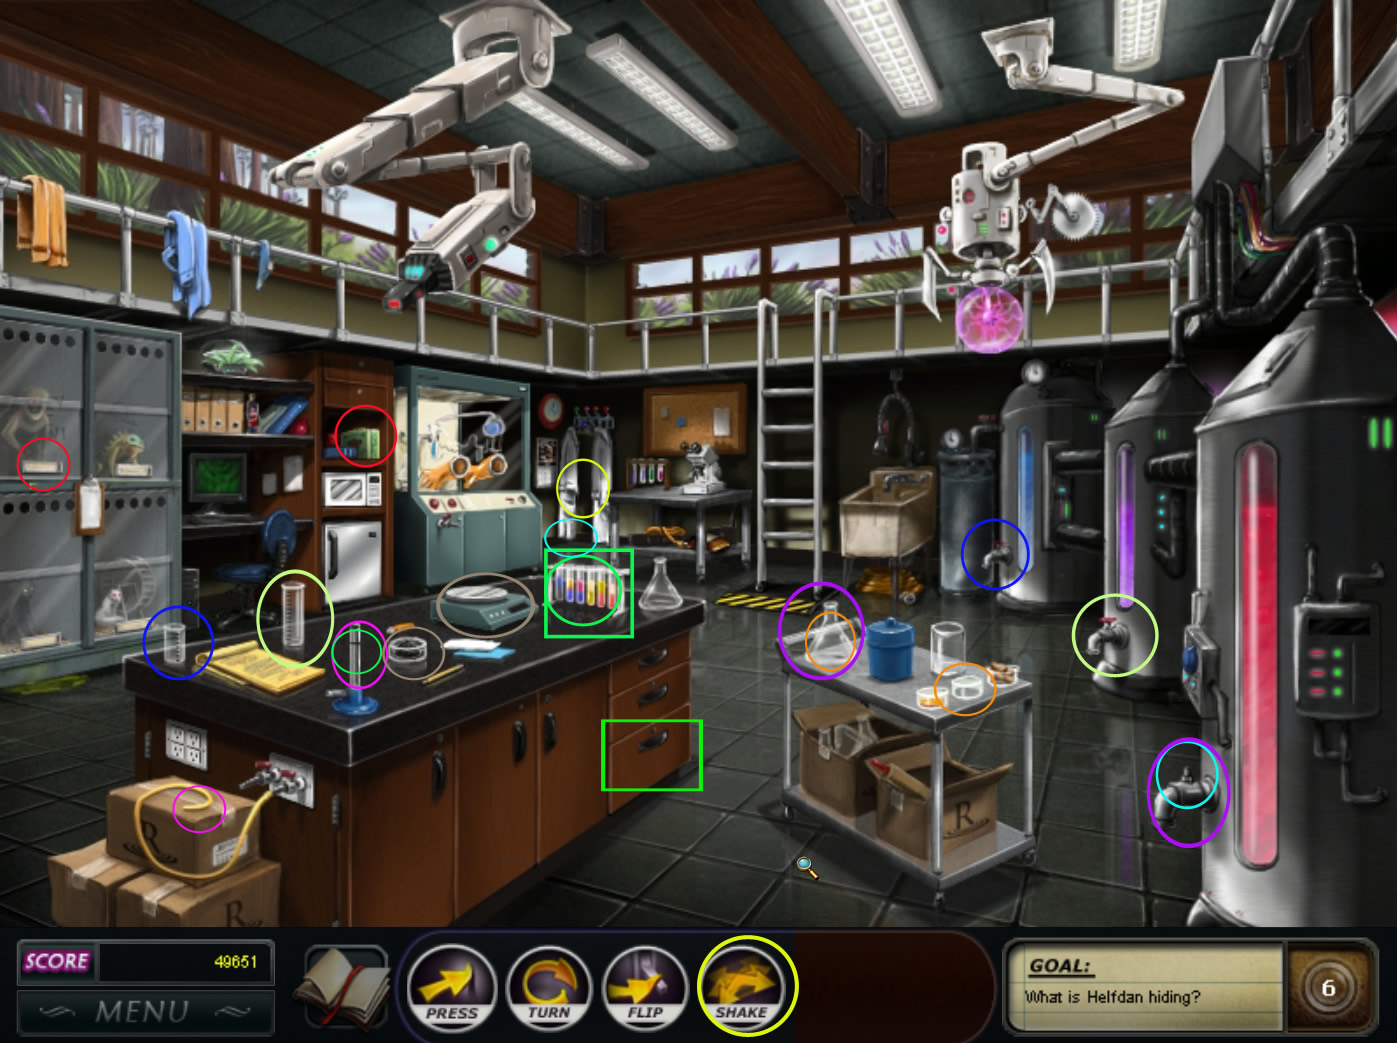
Chapter 9 - Cosmetological Caper
To find the code from the lunch box on the upper shelf above the fridge left side, you need to combine it with the monkey's name tag left upper cage.
Look inside the lunch box, read Mom's note and click it to see Helfdan's note.
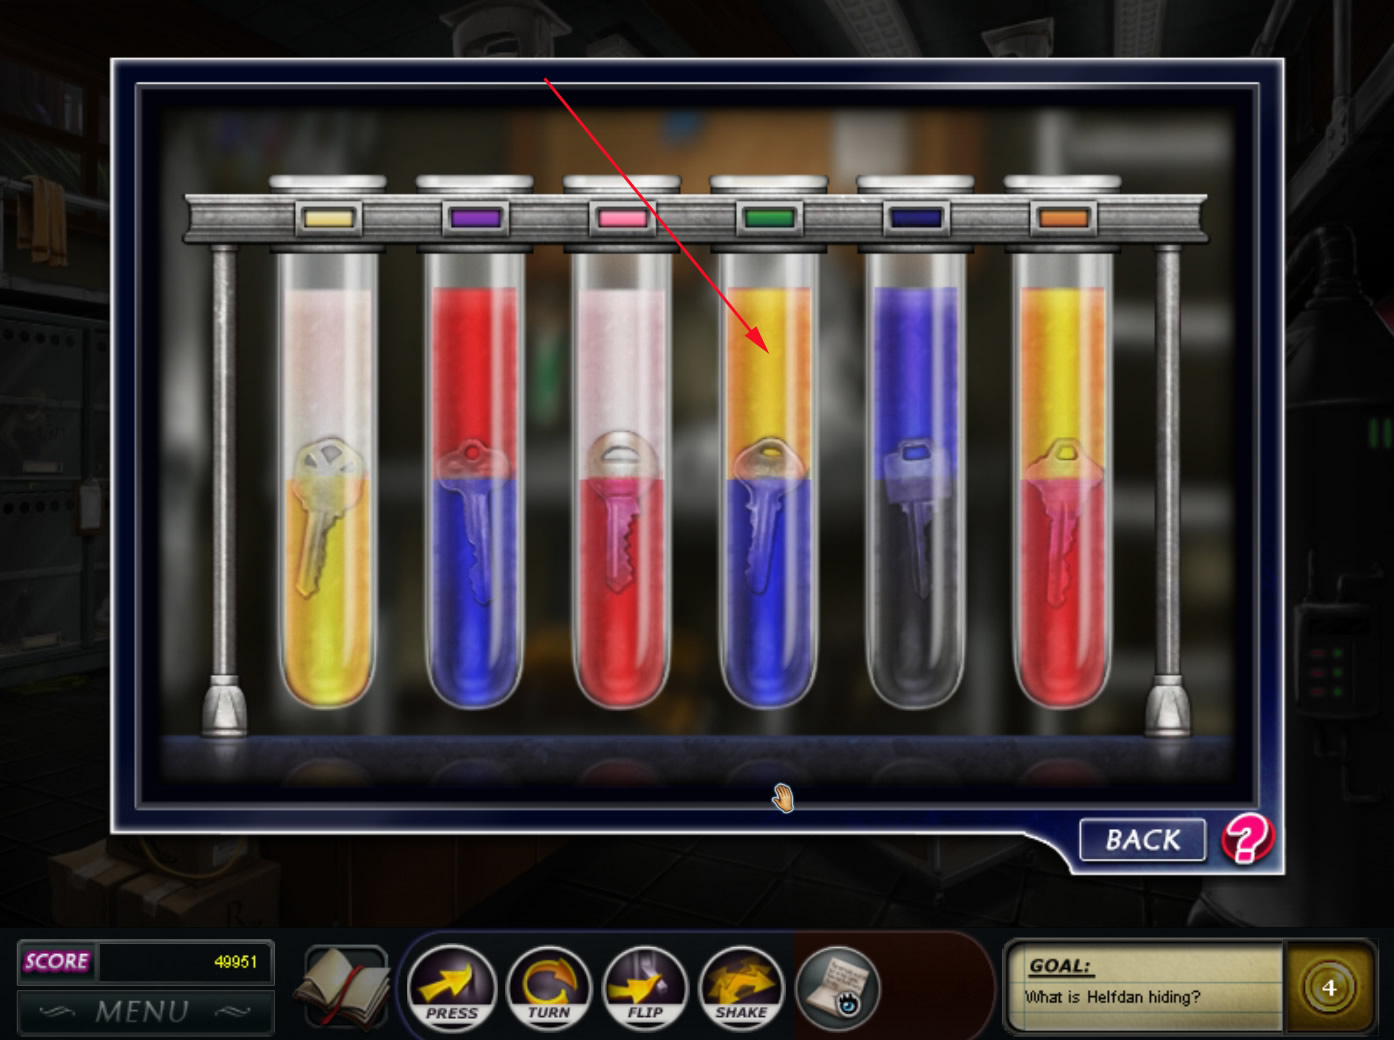
Select the test tube rack on the center desk to activate a mini game.
Your first goal is it, to arrange the test tubes in the right order.
You see little square colored buttons above each test tube.
Swap the test tubes are placed according to the colored button and the color, the mixed liquids in the test tube would show.
For example: Red and white will make pink.
After having the correct order choose the fourth test tube from right.
Please see screenshot for the right order of the test tubes.
Screenshot
There is the key in you need, but it is encased in jelly.
Combine the hose left next to the center desk with the Bunsen burner left side on the desk.
Combine the test tube with the burner to melt away the jelly and get the key.
Combine the key on the bottom drawer on the right side of the center desk.
Have a look at the folder and read the formula for Compound X.
Combine the action button "Shake" with the lab coat in the far left to get the valve for the tank with red liquid.
The valve will fall on the ground. Combine it with the tank with red liquid.
Combine the empty flask on the trolley in front of the liquid tanks with red liquid.
Use the gray powder in the Petri dish on the center desk together with the scale right next to it to get the right amount.
Combine the 500ml cylinder from the desk with the blue liquid.
Combine the 1000ml cylinder with the purple fluid.
Pour the purple fluid, the blue fluid and the gray powder into the flask with red liquid.
Combine this flask with the empty Petri dish on the trolley to trigger a mini-game.
You have to form the three molecules pictured.
Screenshot
After the cut scene choose the furnace room on the map.
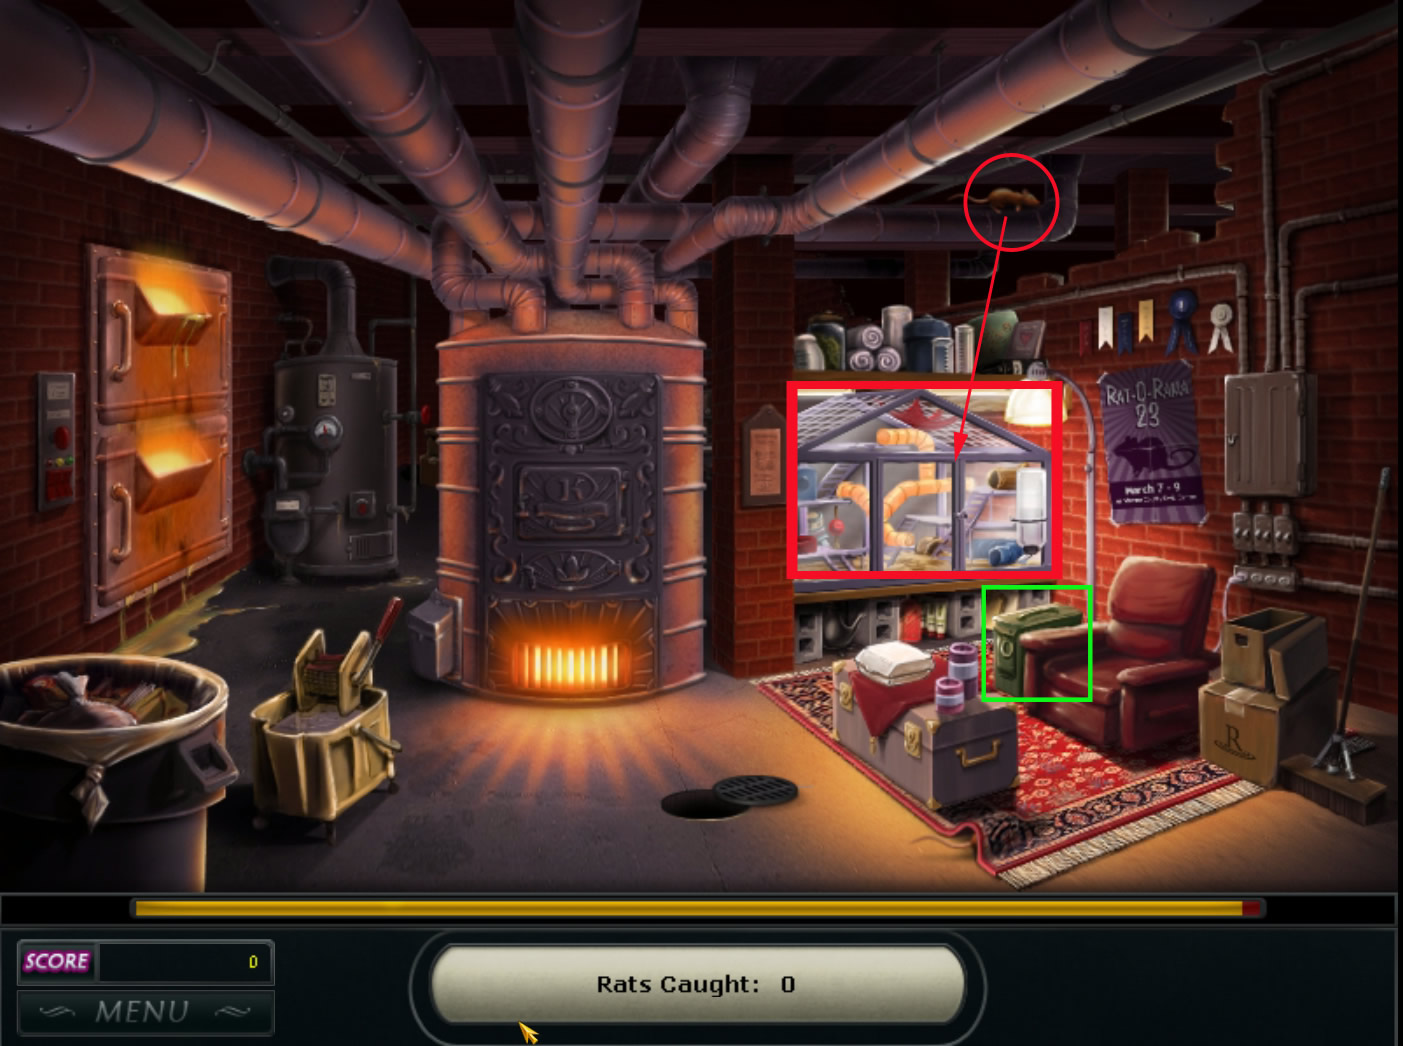
Chapter 10 - Belly of the beast
You will start with a bonus round.
Try to catch as many of the running around rats as you can.
Click and hold left mouse button to catch a rat, drag them to the rat house (glass cage middle right) and release the mouse button.
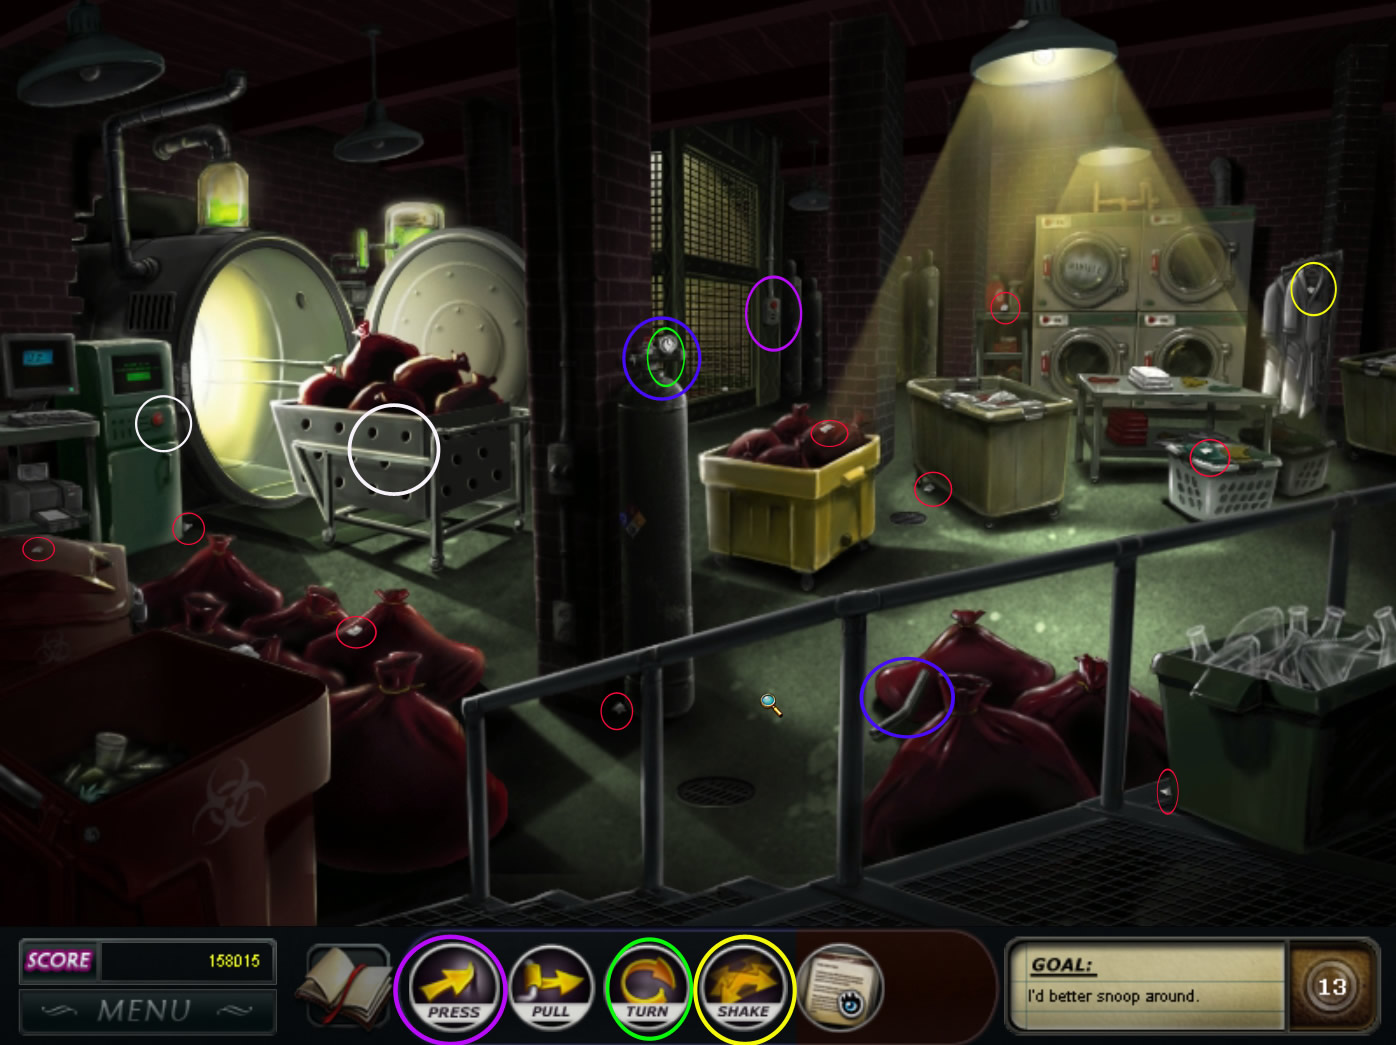
Find Mr. Mingles in the green box, half hidden behind the chair, right side in front of the rat house.
Screenshot
Joanna arrives. In the following conversation answer:
1. Joanna Brown. Right, you're the janitor.
2. Anyway, since you're, as you put it, 'invisible,' how much do you know about the 'construction accidents'?
You will be brought back to the reception.
Get the next bombers message from the reception desk
Goal: Decode the note
Your goal is it again to perform complete letters by swapping the pieces horizontal, vertical or diagonally.
Each swap needs to result in a complete letter.
You will find two new signs:
The lock indicates, that you cannot swap it. Anyway, you still can get it away from the board, when you do match it with a fitting tile.
The plane means, that you can swap this tile with any other tile on the board, as long as it makes a match. The second tile has not to be adjacent
If you do not use any helper, you will get additional bonus points. That does not mean, that you cannot use the tiles with a plane, using them will still give you the bonus as long as you did not use any other helpers.
After completing the mini game, the note of the bomber will appear.
You have to swap the letters to get a word, that will give you a hint for the location of the bomb.
The sentence above the letters gives you a hint.
Swap the letters to spell the word:
scissors
According to this hint, choose "Salon" on the map.
Chapter 11 - Salon horror
Click and hold left mouse button to catch a roach, drag them to the yellow biohazard bin (in front of the door, low right) and release the mouse button.
Chapter 12 - Nicking off the top
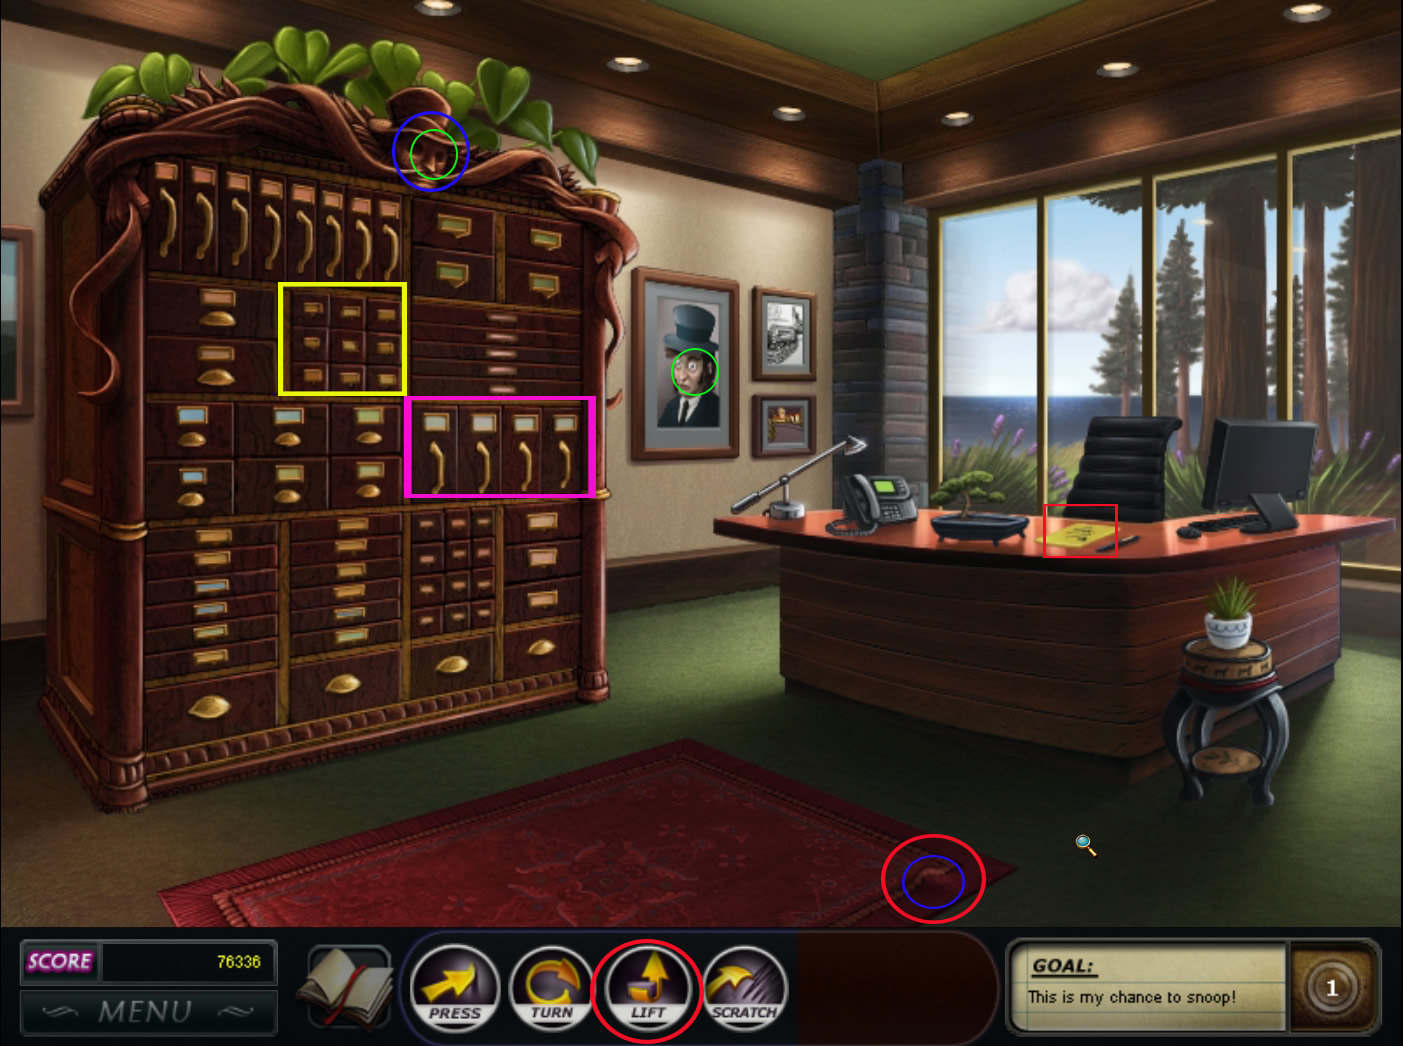
Grab the note on the desk, it will go into your inventory.
Use the action button "Lift" on the low right corner of the carpet.
Combine the eyeball you will find underneath with the head at the top of the cabinet.
Combine the eyeball on the painting right next to the cabinet with the head at the top of the cabinet.
Take and read the paper that appeared by the head.
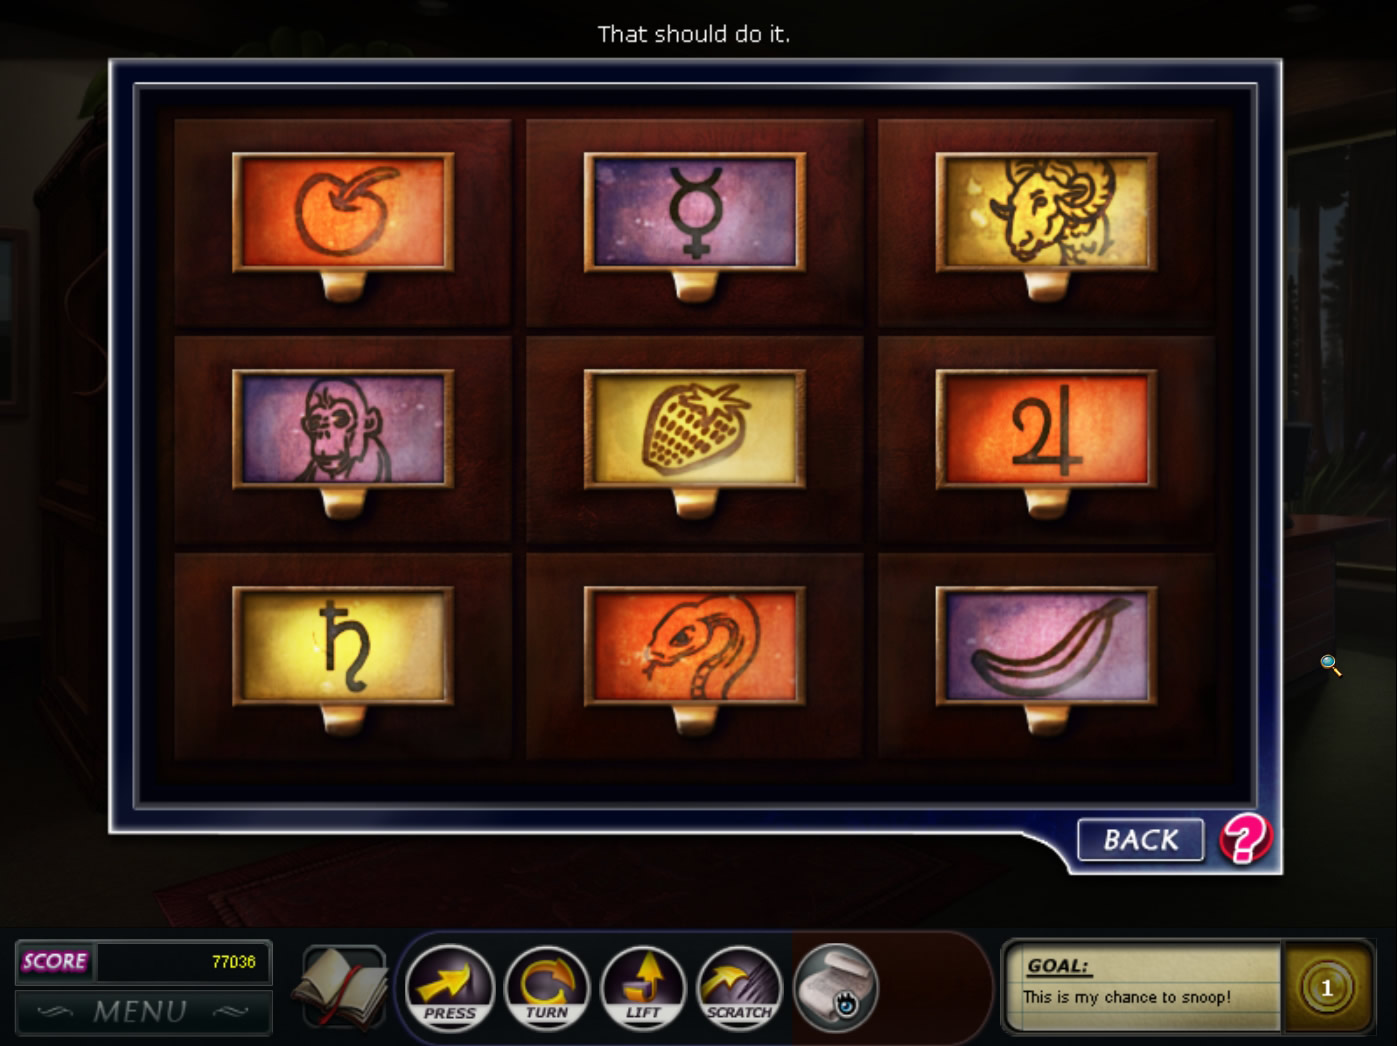
Click on the four drawers with the vertical handles on the right side to activate a mini game.
You will need to swap the animals to place them in the right order according to the hints written underneath.
From left to right: cat, frog, hare, dog, and rat.
Screenshot
Now click the nine little drawers left above the previous ones to activate another mini game.
It is kind of Sudoko. You will have to swap tiles so that each row and column only contains 1 animal, 1 hieroglyph, 1 fruit and one color.
Please have a look at the screenshot for the solution.
Screenshot
Get the note out of the drawer that opened at the bottom and learn that Mr. Bleski is embezzling money from the Redondo and the guests.
Screenshot
Choose the furnace room on the map.
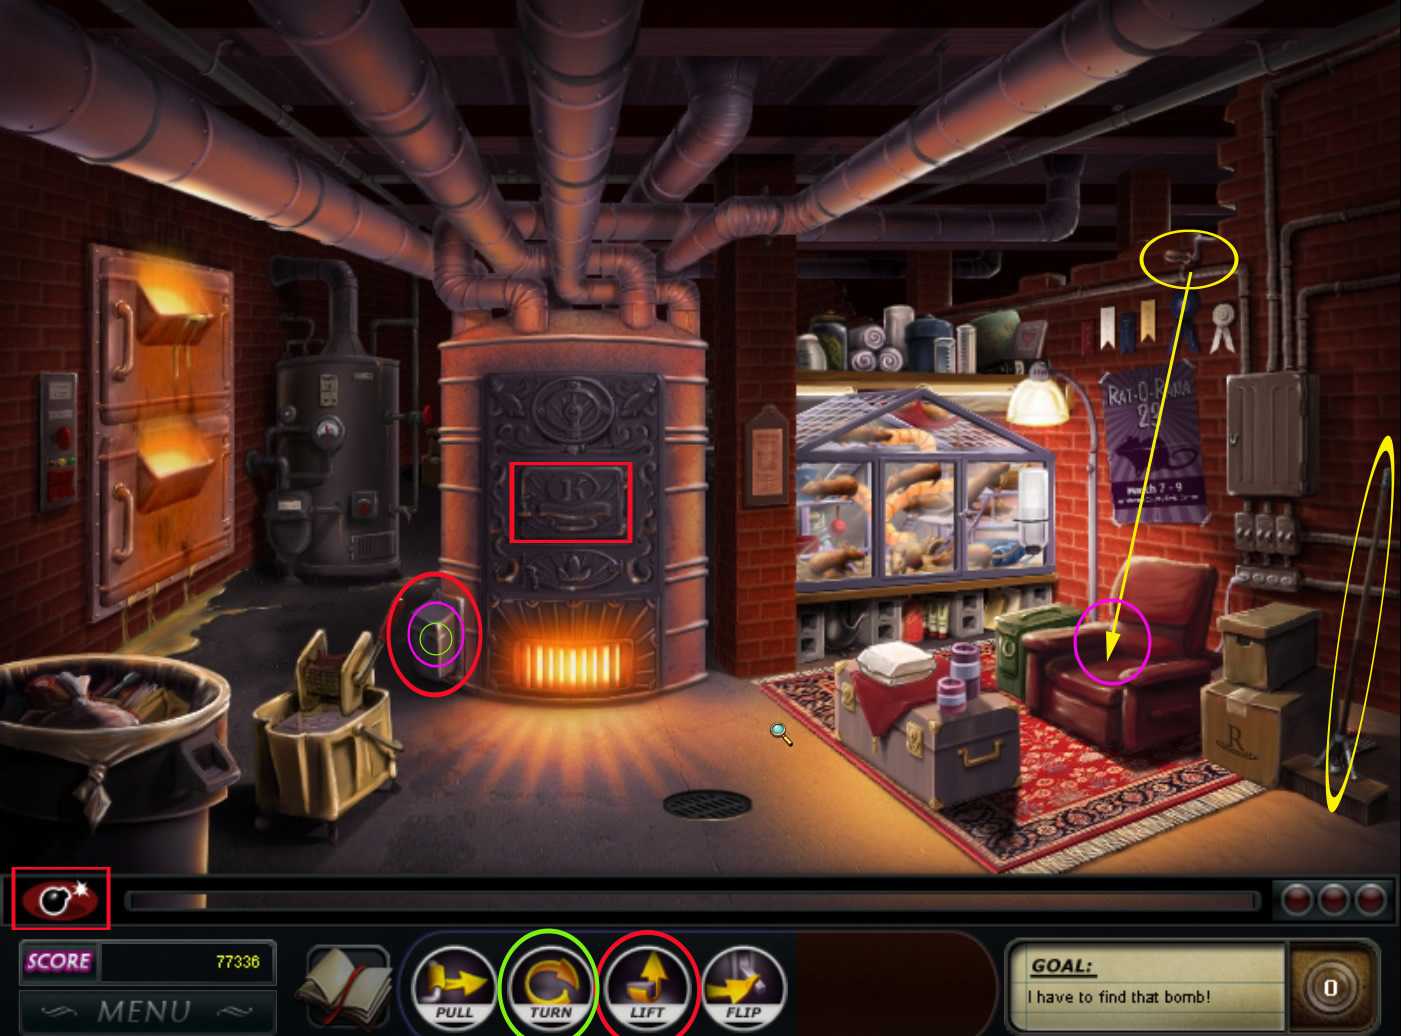
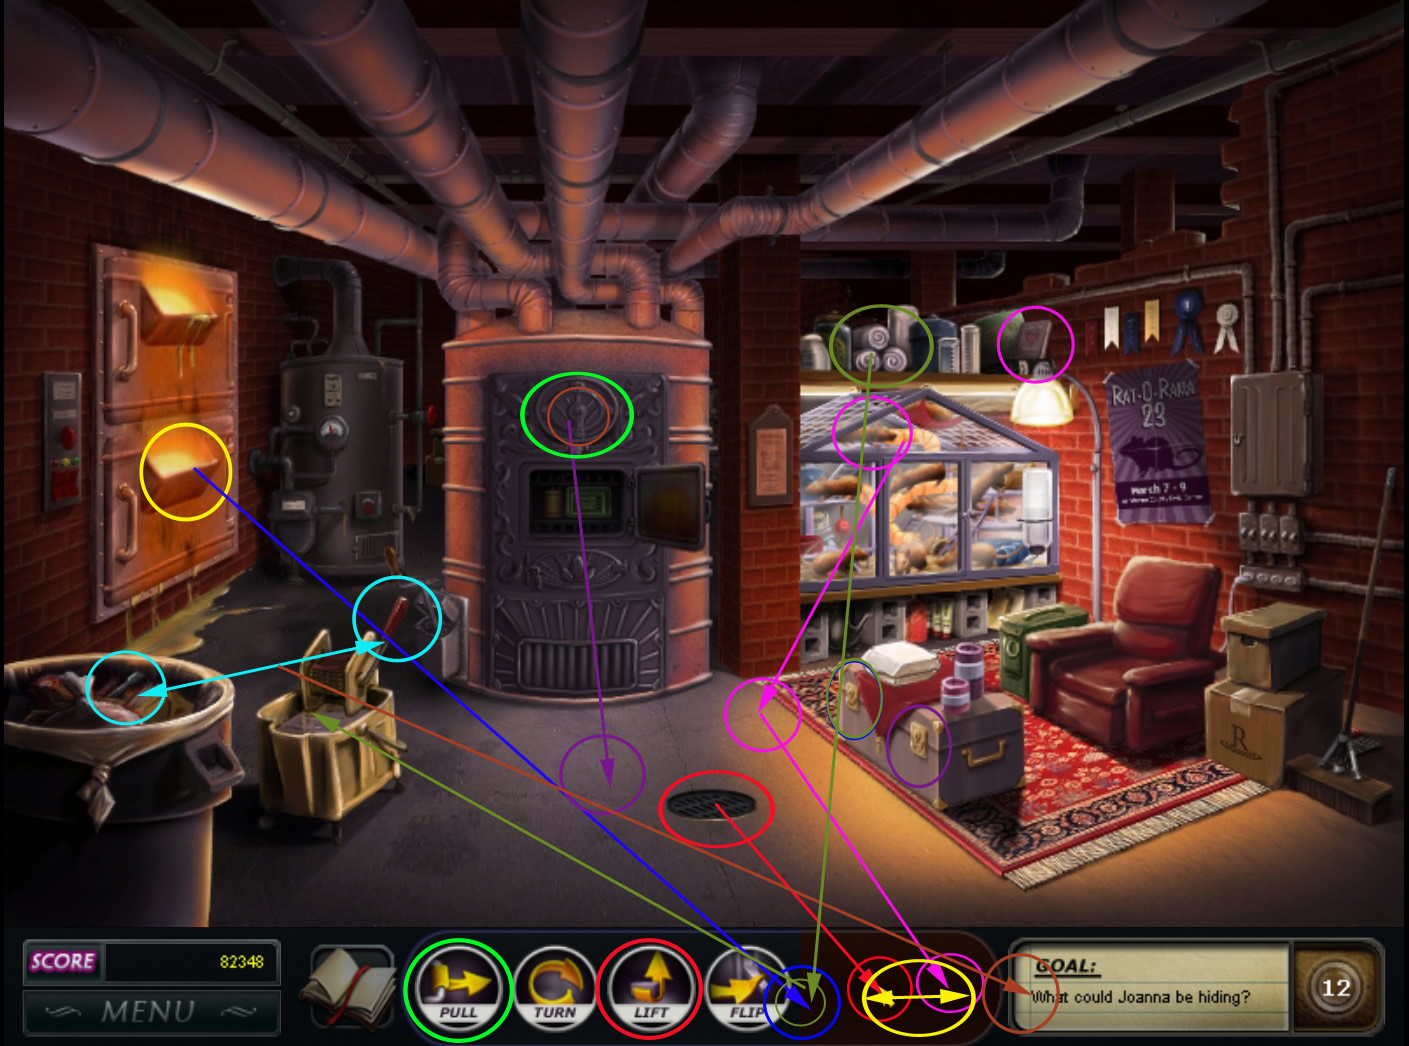
Chapter 13 - Furnace room
Move the cursor over the furnace and click when the indicator bar is to the far right.
Combine the action button "Lift" with the furnace control box left next to the furnace on the ground.
Click it to find out, that you need a crank. Deactivate the control box again.
Combine the crank, located on the top of the wall right side above the ribbons with the broom right side.
The crank falls down on the chair - combine it with the furnace control box.
Combine the action button "Turn" with the crank.
Click the furnace door to find the bomb.
Screenshot
Click the knob two times and click the bomb to activate the mini game.
This time there is only one solution possible, as you only have one horizontal bar.
Please have a look at the screenshot for the solution.
Screenshot
Combine the action button "Lift" with the drain cover on the floor and find a crucible. Click it to get it into your inventory.
Click the rat house to see a metal ingot stuck in a tube.
Click the book on the top shelf above the rat house.
Behind the book you will find rat food.
Combine the rat food with the rat next to the tube.
The metal ingot falls on the floor. Combine it with the crucible in the inventory.
Combine the crucible now with the furnace left side at the wall.
Combine the action button "Pull" with the lever and the lower right part of the chair, right side.
Combine the mold, you find underneath the chair with the melted metal.
Combine the towels left on the shelf with the hot mold and this combination with the mop water.
Combine your new key with left lock of the chest right side on the floor.
Combine the part of the screwdriver in the trash low left with the handle of the mop.
The screwdriver will go into your inventory. Combine it with the emblem on the furnace above the furnace door.
A key will fall on the floor. Combine it with the right lock of the chest.
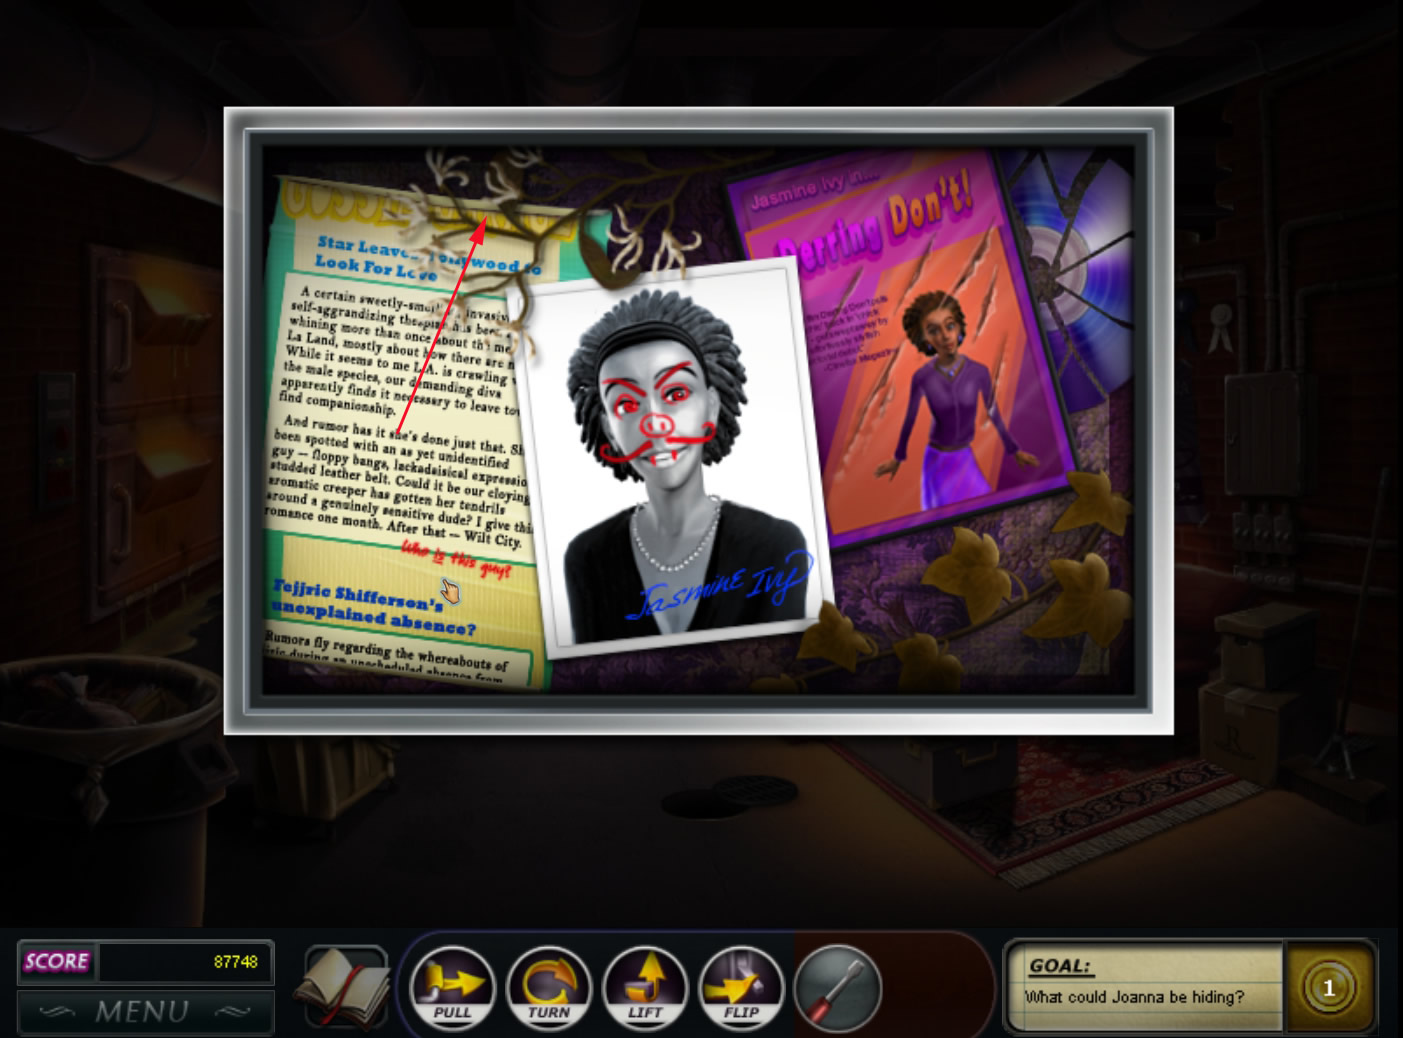
Screenshot
Look in the chest and click top left at the branch. Read the article.
Screenshot
Choose the Jasmine's room on the map.
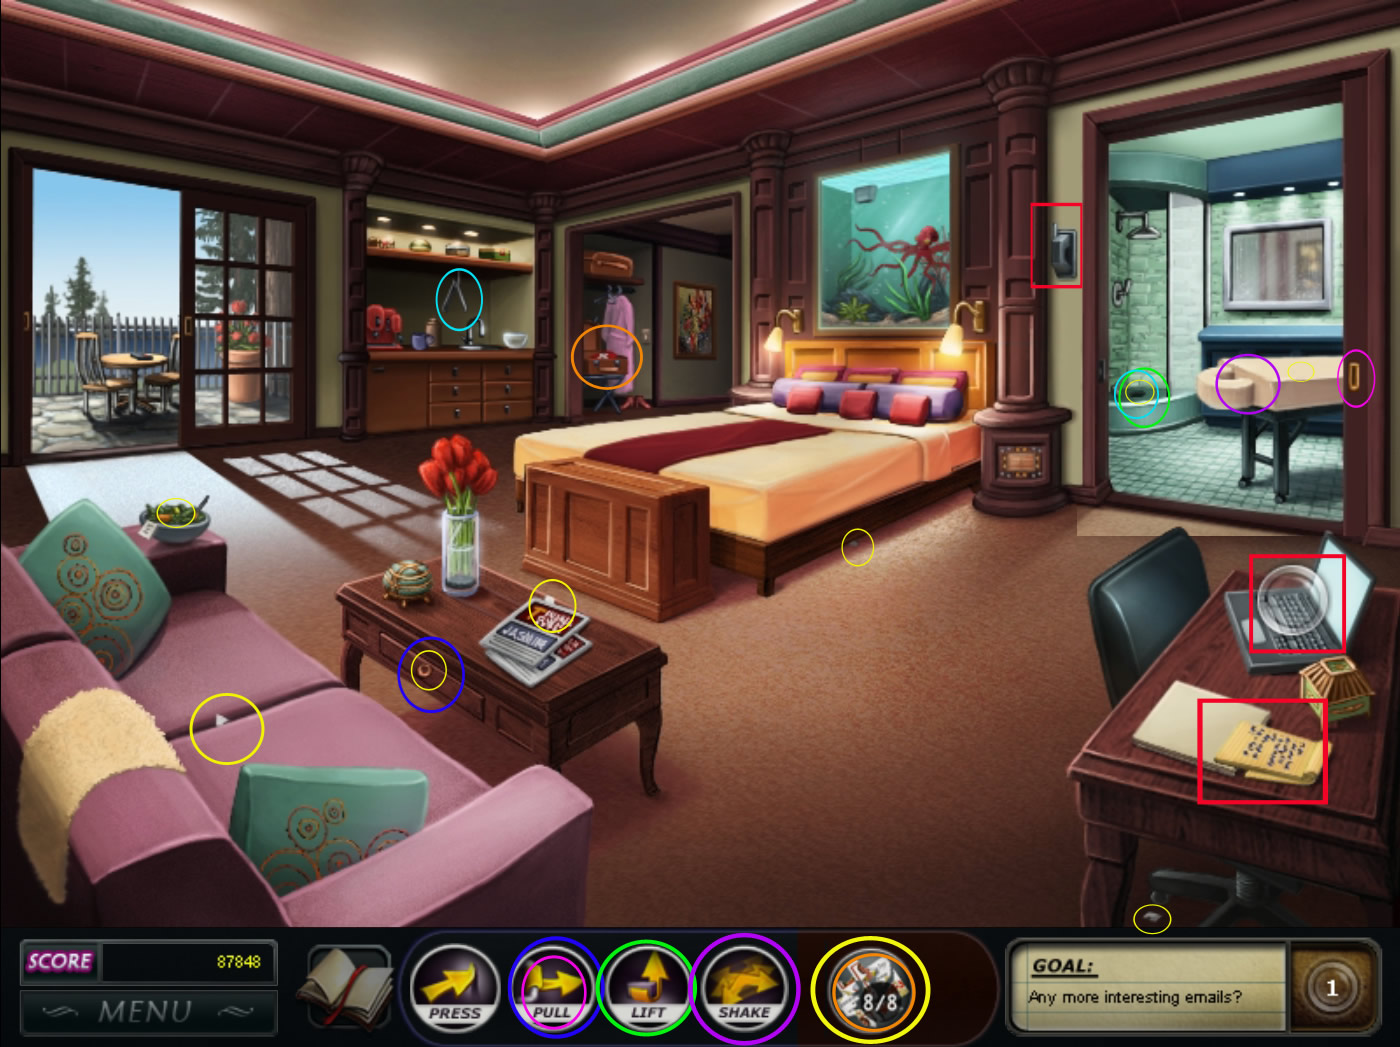
Chapter 14 - Ivys League
Read the To-do-list on the table.
Click the laptop to learn, that Jasminee is using a new password.
You need to find her phone.
Pick up the card scrap from under the desk.
Grab the one, laying on the couch.
Click the salad bowl, standing at the far end of the couch. A window opens. Read the note and grab the scrap.
Pick up the scrap that is laying on the floor, right next to the bed.
Use the action button "Pull" at the bathroom door right next to the bed.
Use the action button "Shake" at the massage table. The towel falls down and you can pick up a scrap from the table.
Use the action button "Lift" at the shower drain.
Activate the tongs on top of the pantry left side and combine it with the drain to get the scrap.
Click the magazines on the coffee table - a window opens. Read the article left and grab the scrap on top of the right page.
Use the action button "Pull" with the coffee table's drawer. Get the paper scrap out of the drawer.
Screenshot
You are having 8 scraps in the inventory now.
Combine them with the tape dispenser in the suitcase right next to the pantry.
A mini game appears - assemble the scraps.
Screenshot
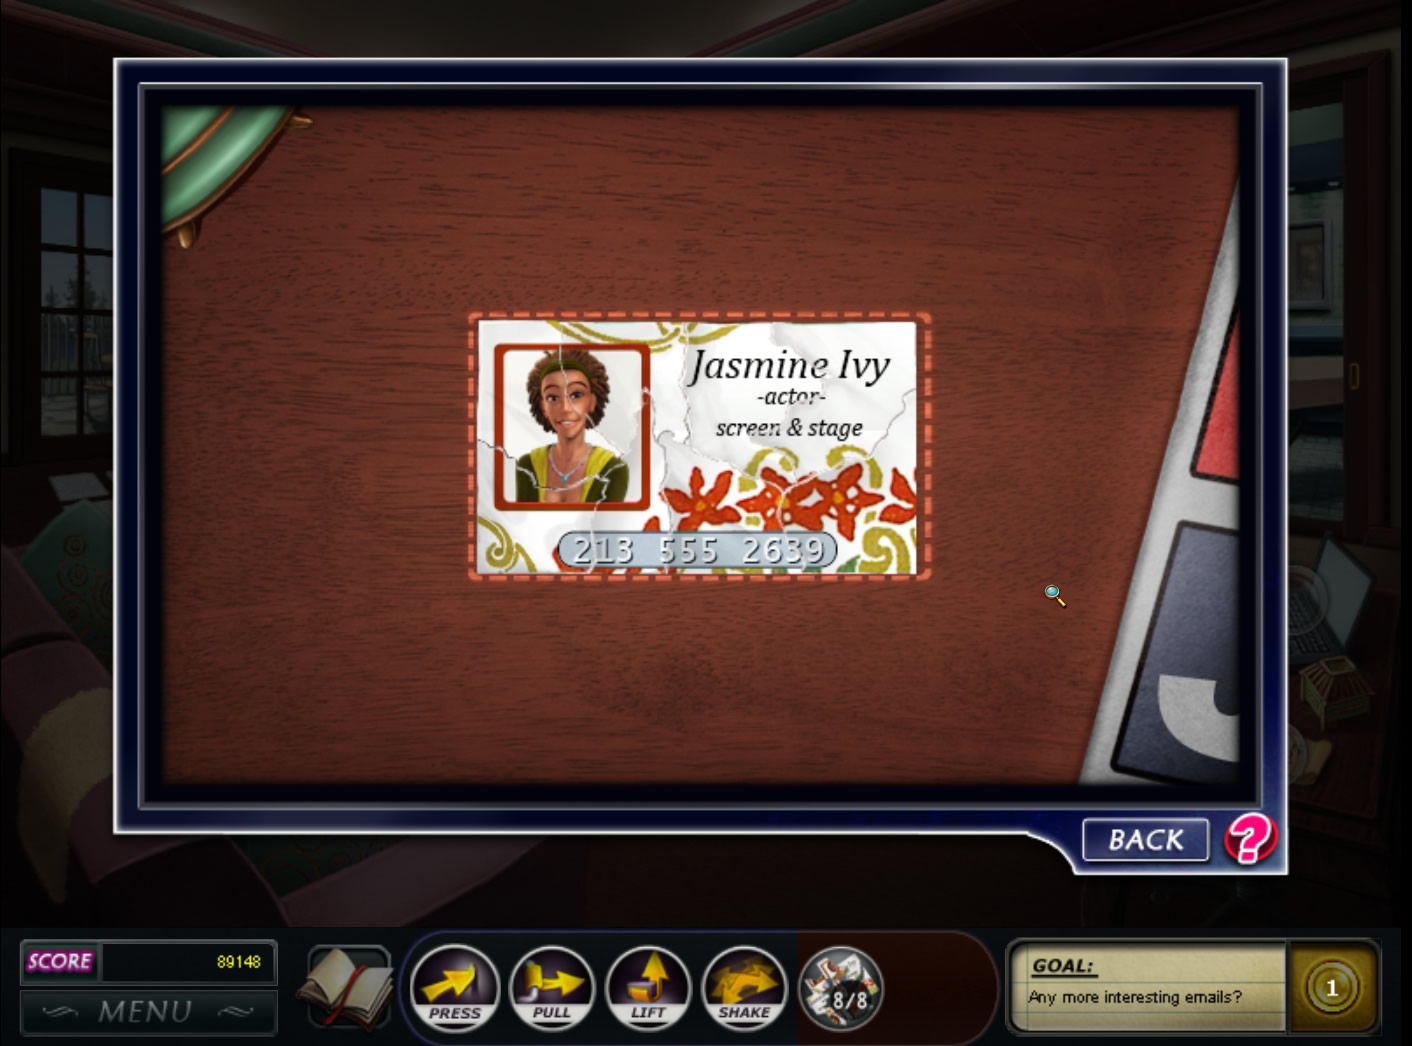
The business card goes into your inventory.
Combine it with the phone on the wall left next to the bathroom door.
The ringing comes out of the tv-chest in front of the bed.
Use the action button "Pull" with the patio door.
Combine the remote with the batteries in the suitcase.
Use the action button "Press" with the remote and the tv appears.
Get the cell phone from the right side on the tv.
Combine the cell phone with the laptop and read the Email.
Screenshot
Jasmine comes, talk to her and use the following responses:
1: Her. Her name's Joanna Brown. She has an interesting collection of rats.
2: I just read that you recently underwent plastic surgery.
3: Speaking of publicity, Eda Brooks, the star of the new 'Pharaoh' movie - is she really your sister?
Cassidy is calling for you, you will be brought back automatically to the reception.
Chapter 15 - Missing Cassidy
A mini game starts.
You need to transfer the incoming calls on the left to the correct extension on the right side.
Drag the button with the line number onto its right location.
A call in green is fresh, while yellow has been waiting, and red means you should take care immediately or you will loose the call.
The caller's request will show up at the top of the screen.
You need to transfer 20 calls. Five lost or wrong transfered calls will re-start the game.
There is no skip option, you will have to solve it.
The calls are pure random, so here are a few examples:
Furnace Room:
Let me talk to someone who can give me the specs on your water heater.
I would like to make an appointment for the warm water inspection.
Ivory Room:
I'd like to book an aquarium massage.
The room where they do all the high-tech treatments
I want to set up an appointment to get my face zapped with that laser again
I need a laser treatment
Salon:
Let me talk to someone who can dye my hair
Somebody there called me about repairing some stained glass
Be a doll and put me through to whomever schedules hair appointments
I'd like to get my hair colored
I'd like to schedule a manicure
R & D Laboratory:
Head of research, please. Got some data I think he'll be very interested in
I need to speak to Helfdan
This is Bill from Bill's Biochemicals. I need to confirm an order
Let me speak to your head biochemist, please
Manager's Office:
Put me through to your boss, please
Whoever runs that place, lemme talk to him
Mr. Bleski and be quick about it
Zen Room:
I'd like to talk to someone about meditative therapies
Put me through to where they do all those New Age, mystical-type therapy things
Whoever is in charge of spiritual health consultations, please
Guest Suite:
Put me through to Miss. Ivy. I'm her Stunt double
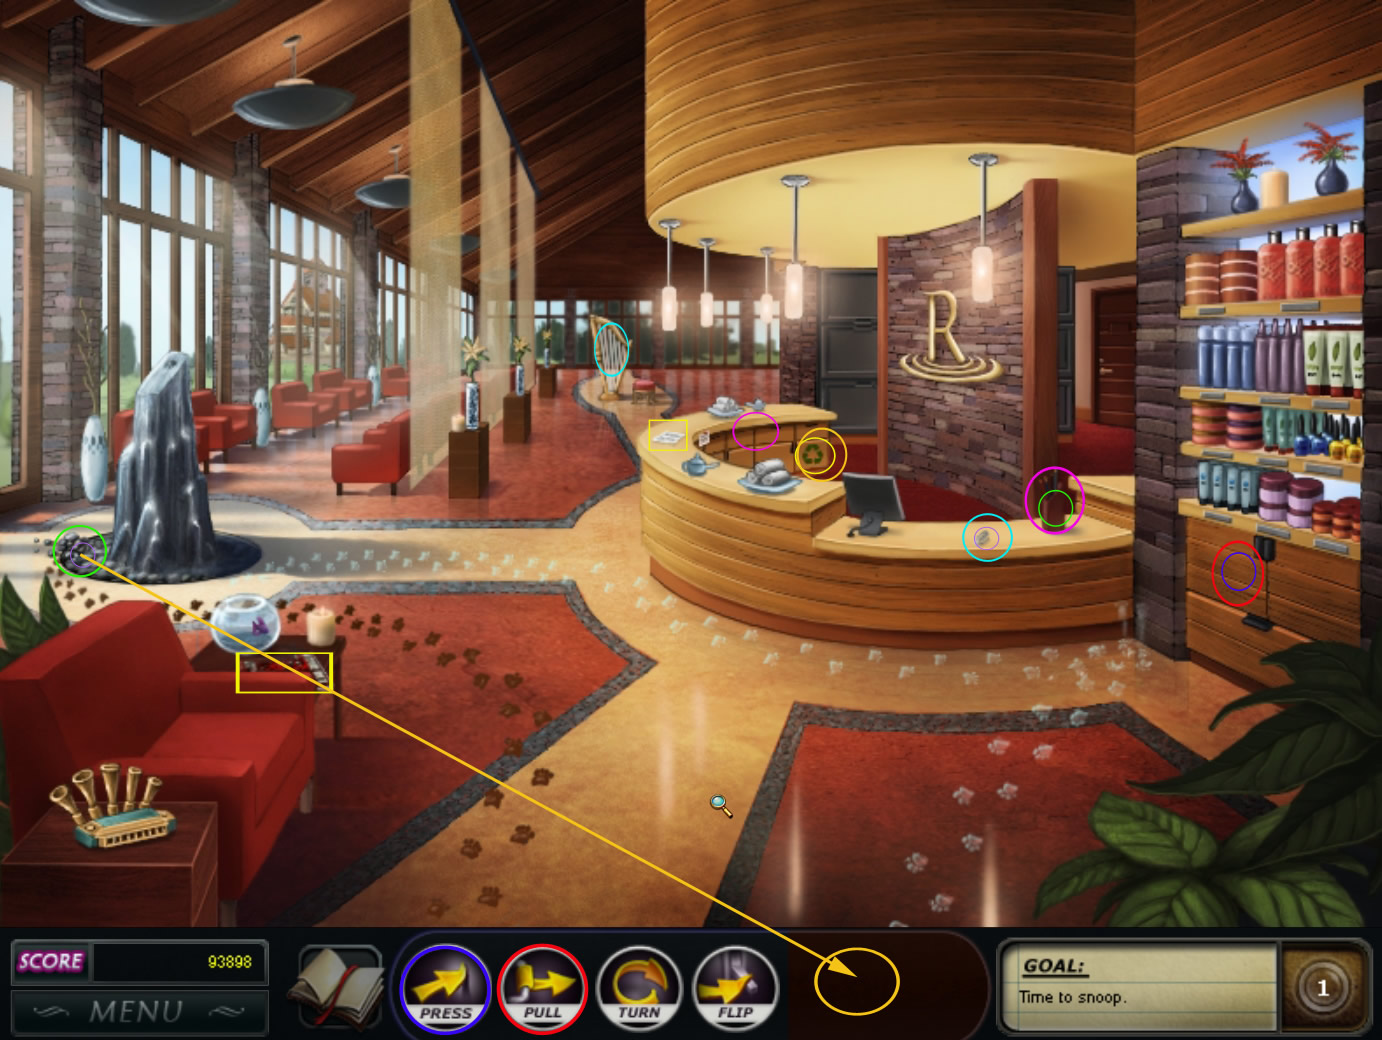
Look at the magazine on the coffee table. There is no mailing address so have a look at the recycling bin - unfortunately it is locked.
Look at the note on the reception desk far back and learn that Mr. Mingles has buried the keys by the fountain.
Combine the action button "Pull" with the cabinet at the right side underneath the product shelfs.
Combine the action button "Press" with the fountain power button, which is inside the cabinet.
Look at the base left side of the fountain - you need something to scoop in the stones.
Combine the pencil right side of the reception desk with the drawer left to the recycling bin.
Combine the pencil cup with the fountain base.
Combine a string from the harp in the far middle with the paper clip on the right side of the counter.
Combine this hook with the keys inside the pump.
Use the keys on the recycle bin.
Look in the recycle bin to learn that the magazine belongs to Cassidy.
Screenshot
Cassidy arrives. Use the following responses:
1. Not really. But I'm still trying to figure out a lot of stuff. Like, why did I find a piece of your magazine wedged in the last bomb?
2. But this magazine is addressed to you. And I can't help but wonder why you subscribe to a magazine that practically declares war on the wealthy.
Chapter 16 - Little blue doggy
Mr. Bleski has sent you to the Jungle room to capture Mr. Mingles.
Move the cursor over the bubbles and click them.
Click on Mr. Mingles as soon as you see him.
You will have to find him three times.
Mr. Bleski arrive. Use the following responses:
1. The thing is, Mr. Mingles is burping blue bubbles because he swallowed an explosive compound.
2. But it looked like Helfdan was being very secretive about this substance. I think he calls it Compound X.
You will be automatically sent to the Salon.
Chapter 17 - Gossip detective
You will have to do five facials
1. facial
Blue mud
Kiwi slice on the right eye.
Green mud.
Half-mask.
Brown mud.
Remove the half-mask and the kiwi slice.
2. facial
Yellow mud.
Orange slice on the mouth.
Green mud.
Kiwi slice on the left eye.
Brown mud.
Chin cover.
Blue mud.
Remove the chin cover, orange slice and kiwi slice.
3. facial
Place a mint leaf on the nose.
Yellow mud.
Remove the leaf.
Place a kiwi slice on the left eye.
Place an orange slice on the mouth.
Put the half-mask on the face.
Blue mud.
Remove the half-mask, orange slice and kiwi slice.
4. facial
Brown mud.
Kiwi slice on the right eye
Blue mud.
Orange slice on the mouth.
Kiwi slice on the right eye.
Green mud.
Chin cover.
Blue mud.
Dab the red on the left cheek once, twice on the right.
Remove the chin cover, kiwis, and orange slices.
5. facial
Orange slice on the mouth.
Yellow mud.
Remove the orange slice.
Half-mask.
Blue mud.
Remove the half-mask.
First orange slice, then half-mask.
Green mud.
Remove the half-mask and the orange slice.
Chin cover.
Brown mud.
Remove the chin cover.
Combine the action button "Pull" with the door handle from the door right side.
Click at the top of the machine in the back of the supply room and read the note, which goes in your inventory. Read it.
Combine the hook above the vacuum machine with the sky window, right next to the chandelier.
The vents open. All all full of hair. Combine the hair of one vent with the waste bin in the supply room right side.
Do the same with the hair in the two other bins.
Inside each vent is a paper with a code. Click the papers, they will go into your inventory.
Combine the papers
with the colored squares on the vacuum machine.
A mini game opens.
The three papers are showing numbers from 1-9 in three different colors. This are the order numbers in which you have to click the squares.
Click on the colored squares above in the sequence according to the paper.
Click on Green-Green-Purple-Green-Purple-Blue-Blue-Purple-Blue.
Click on the bottom of the vacuum. A window opens and you see a stuck screw.
Close the window and activate that part of the vacuum then with the tweezer from the trolley left side.
Now click a little bit higher to activate some of the vacuum details and combine them with the nail glue, right side on the trolley.
Now activate that part again and combine it with the nail file, also laying on the trolley.
Combine the red button on the vacuum with the action button "Press"
Screenshot
Listen to the gossip between the woman and choose the Zen Room from the map.
Chapter 18 - Ticking Away
The goal of this mini-game is to recreate the 4 facial pattern on the left.
1. facial
Green mud.
Kiwi slice on the right eye.
Blue mud.
Kiwi slice on the left eye.
Orange slice on the mouth.
Yellow mud.
Mint leaf on the nose.
Brown mud.
Remove the leaf, orange slice, and kiwi slices.
2. facial
Brown mud.
Kiwi slice on the right eye.
Yellow mud.
Half-mask.
Blue mud.
Remove the half-mask.
Orange slice on the mouth.
Green mud.
Chin cover and half-mask.
Brown mud.
Remove the chin cover, half-mask and the fruits.
3. facial
Brown mud.
Kiwi on the right eye.
Orange slice on the mouth.
Yellow mud.
Kiwi slice on the left eye.
Half-mask.
Blue mud.
Remove half-mask.
Orange slice and the leaf.
Green mud.
Remove all.
4. facial
Leaf.
Green mud.
Kiwi slices right and left.
Half-mask.
Brown mud.
Remove half-mask.
Orange slice.
Remove leaf.
Half-mask.
Yellow mud.
Remove half-mask.
Leaf.
Yellow mud.
Chin cover.
Blue mud.
Remove all.
Move your cursor over the chest and click to locate the bomb.
5 of the chest drawers are missing knobs.
Click one of the drawers without knob, look at its shape and find the according knob for each in the room.
Combine always the drawer with its according knob.
Screenshot
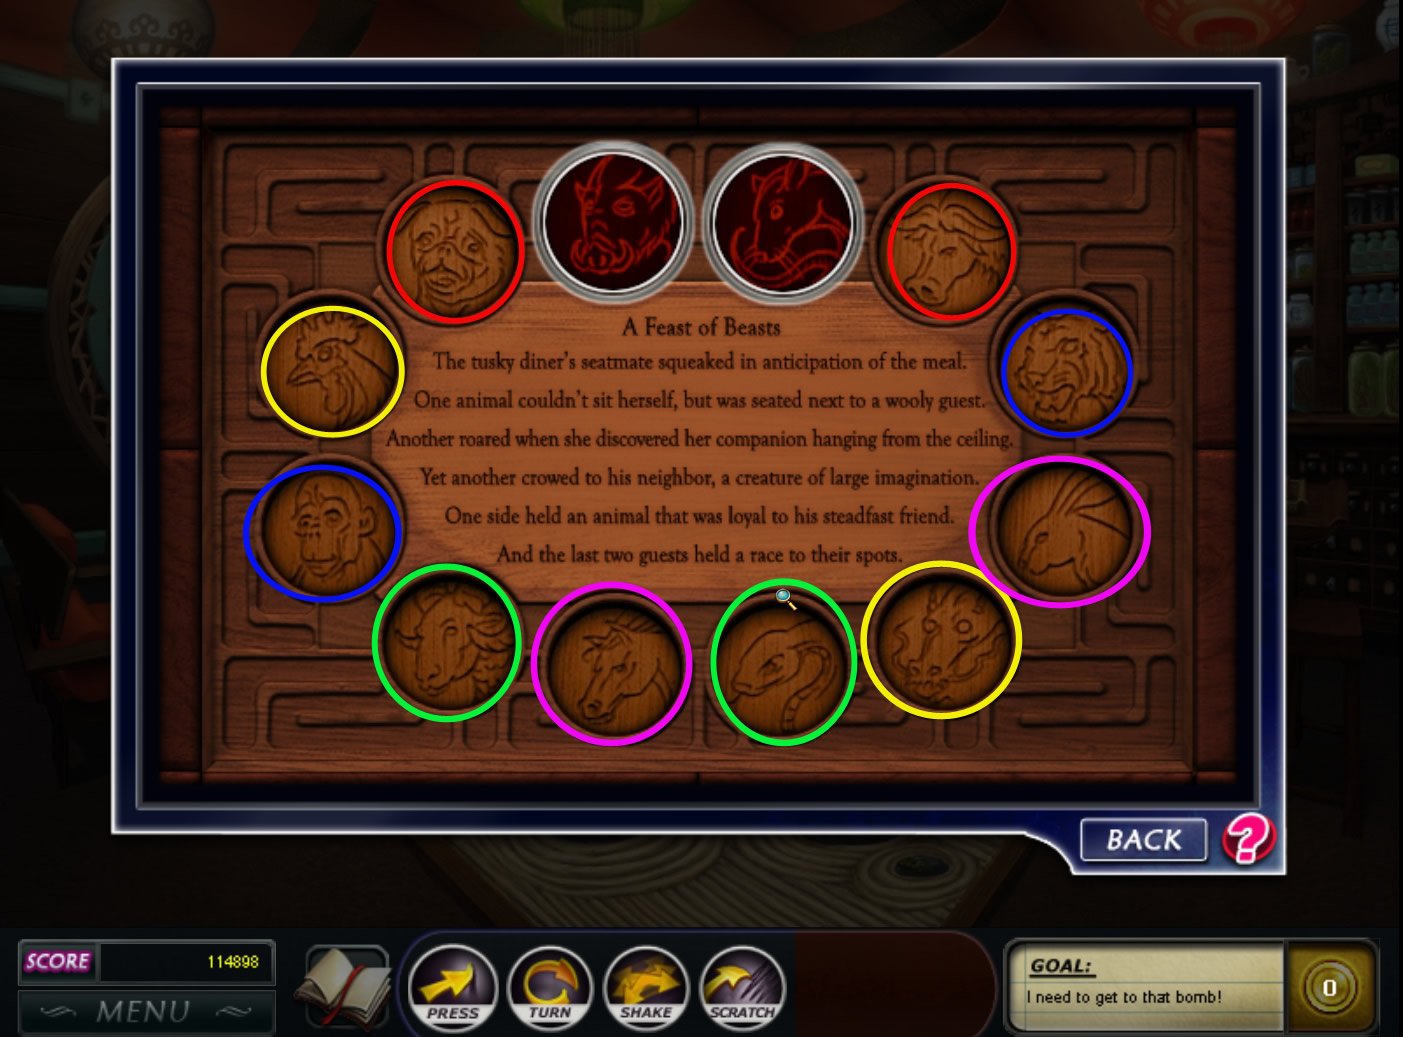
After finding all click the emblem in the middle of the chest to activate a mini game.
Your goal is to match the animals according to the riddles in the text.
The solution is:
sheep & snake
boar & rat
dog & bull
tiger & monkey
horse & rabbit
rooster & dragon
Screenshot
The compartment behind the emblem opens and you find the bomb.
Click the bomb to get the nearby view and click the knob twice to activate the mini game.
Again there is only one solution possible, as you only have one horizontal pipe.
Please have a look on the screenshot to see the solution.
Screenshot
After disarming the bomb, you will find a note inside the compartment.
Read it.
According to the note, your next place to go is the garden. Choose it on the map.
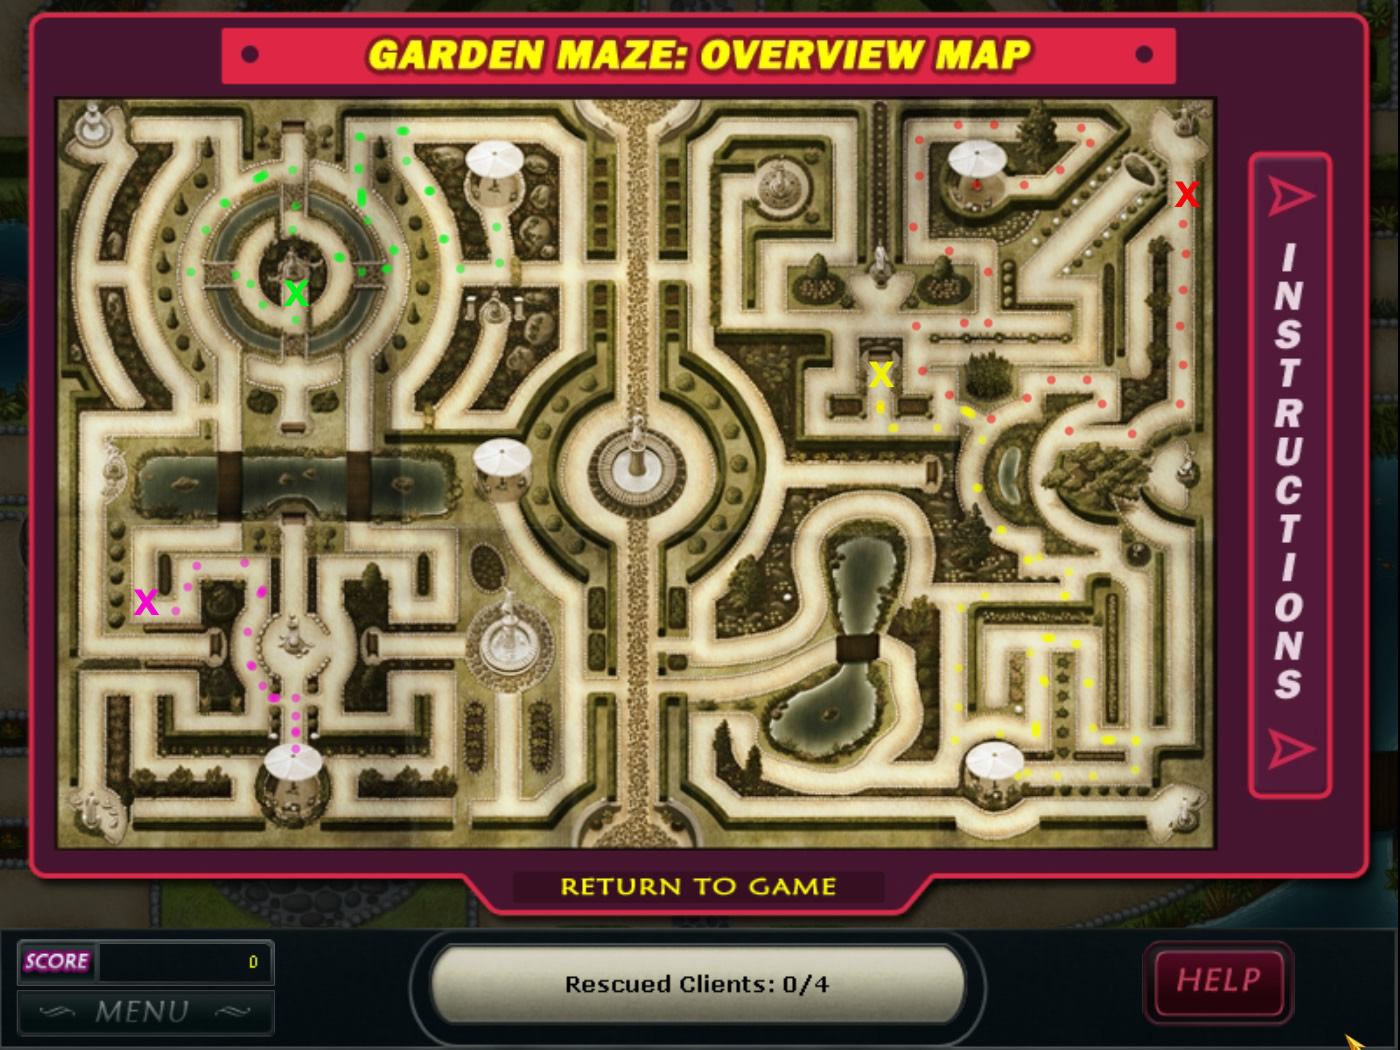
Chapter 19 - Garden of delights
Your first goal here is to escort lost Redondo guest to white umbrellas.
A red arrow will point towards the next client to find.
To move forwards, click and hold left mouse button in the direction you want to go or use the arrow keys on your keyboard.
Once you find a client, escort him to the next white umbrella.
Make sure, you act quickly, as they get upset and you may loose him.
Click the help button to see a map of the maze. So will find the white umbrella faster.
The locations of the guest are random. On the screenshots you will see ways marked, where I found clients.
Screenshot
After escorting 4 guest to a white umbrella, the next red arrow will point to the place, where Jasmine and Cassidy are.
Try to find them and reach the hear-area, which is marked by a clear circle you have to enter.
Avoid getting into the view-zone of the two, which is marked by a red.
You will be brought back to the reception automatically.
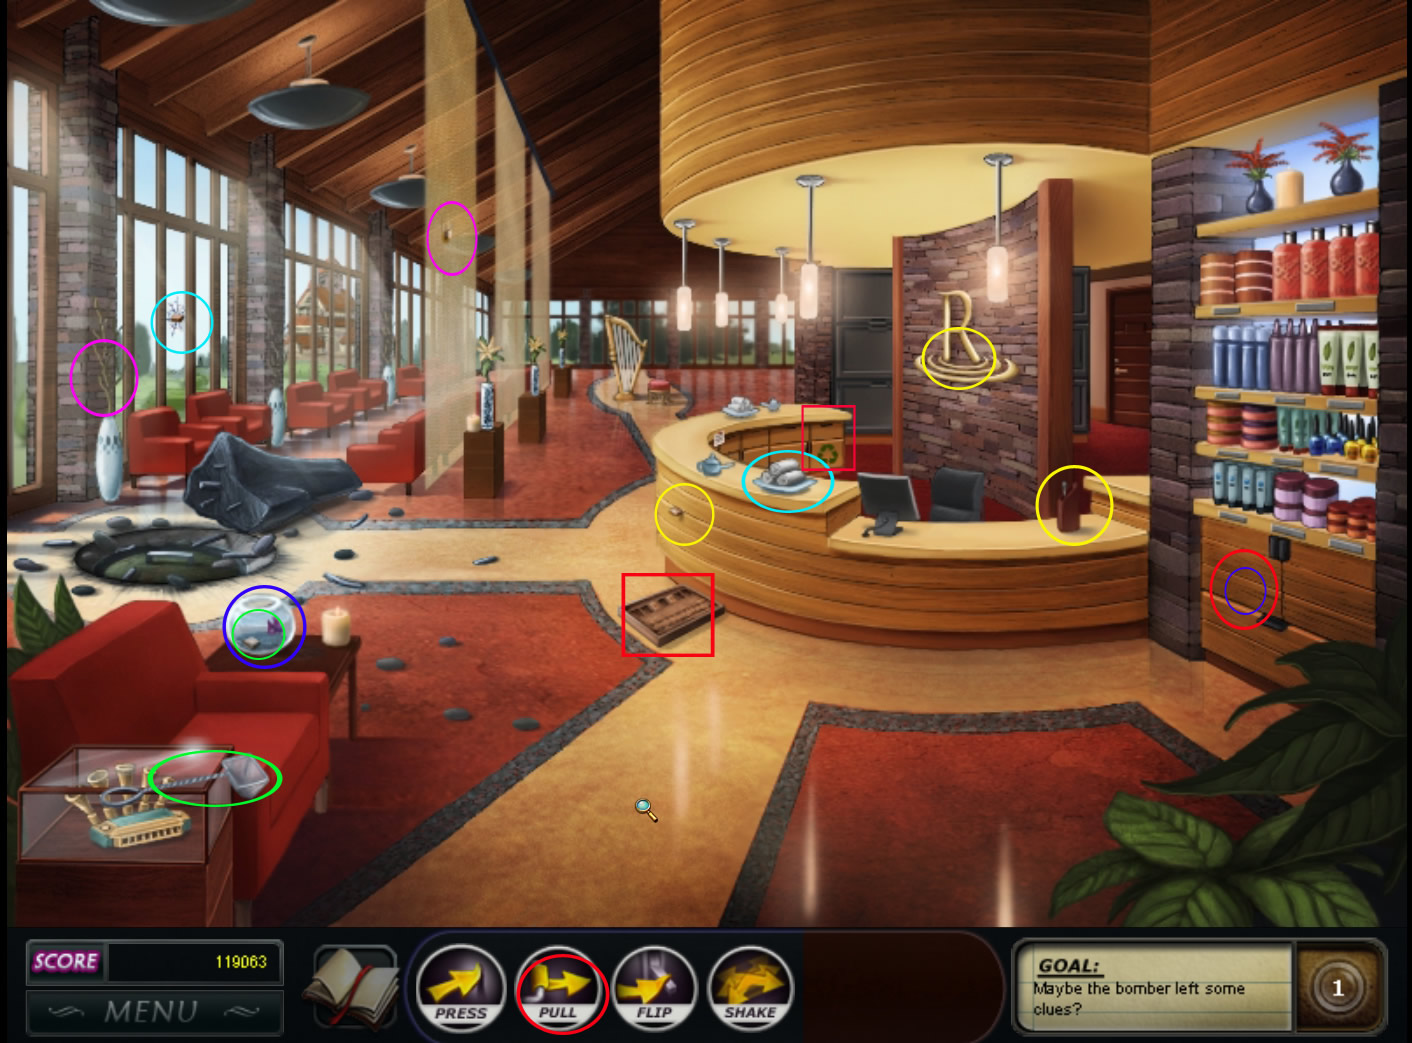
Chapter 20 - Reception ruins
Mr. Bleski is upset.
The correct answer is:
Sorry Mr. Bleski. I was eavesdropping on someone in the garden.
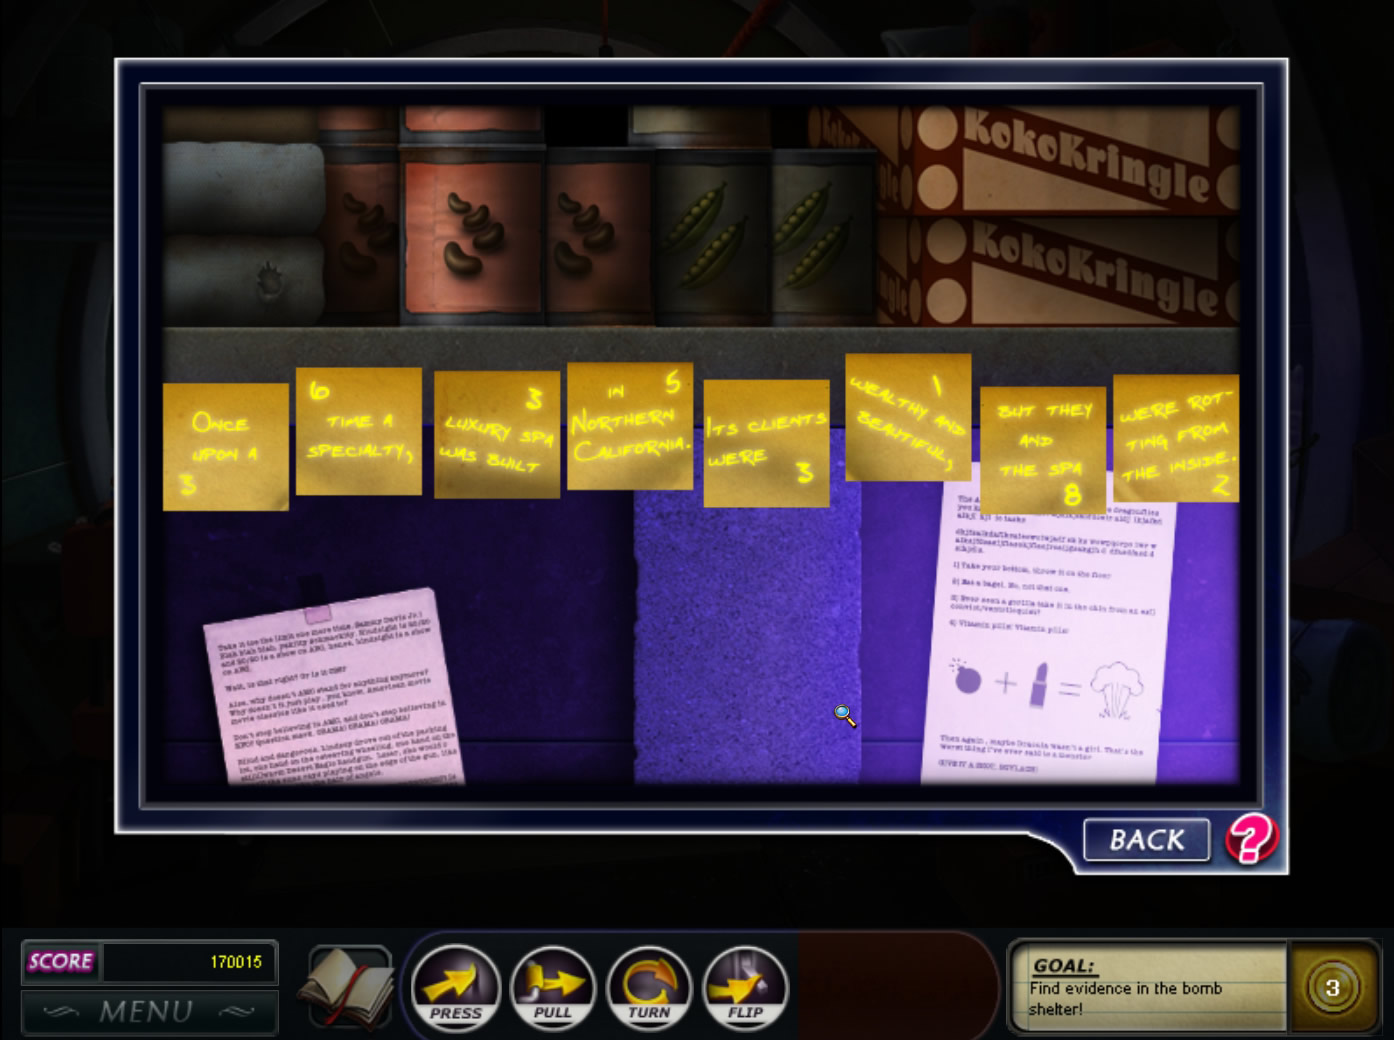
Look at the puzzle board on the ground and learn that it is from the bomber.
You need to find the missing tiles.
Use the action button "Pull" on the left cabinet door to find the fish food.
Combine the fish food with the fish tank left side, right next to the couch.
Combine the fish net on the harmonica show case, low left corner, with the fish tank.
Combine the towel on the reception counter with the tile stuck in the window.
Combine the screwdriver from the pen scoop right side of the reception desk with the tile stuck in the reception desk
Combine the screwdriver with the tile stuck in the resort logo at the wall behind the reception.
Combine the branch from the vase on the tile stuck in the first curtain, hanging down from the roof in the middle of the room.
Screenshot
Now the tiles on the bomber's puzzle.
Rescramble the tiles to find the next position.
The bomb is hidden in the recycling bin.
Use the action button "Pull" on the recycling bin.
Click the bomb inside, click the know two times and click the bomb to activate the mini game.
This time you are having no vertical pipe - only one solution is possible, please have a look at the screenshot.
Screenshot
Find a note from Helfdan to Cassidy after.
Choose the laboratory on the map.
Chapter 21 - Mad scientist
Find and read the clipboard, hanging at the cages left side.
Look at each of the cages.
Combine the gray powder on desk in the middle with the empty flask on the right trolley.
Combine this flask with the sink in the far middle.
Combine the flask now with the cat in the low left cage.
Combine the action button "Pull" with the refrigerator left side next to the desk.
Combine the tuna from the refrigerator with the cat.
Click the cat's cage again to get the paper scrap.
Combine the aloe on the top shelf above the left desk with the rolling pin in the box lower part of the trolley.
The gel will be on the middle desk on the white board.
Combine the aloe gel with the monkey.
Combine the monkey chow on the lower part of the trolley far left with the monkey in the top left cage.
Click the monkey's cage again to get the paper scrap.
Combine the glass of tea on the right trolley with the bunsen burner.
Combine the hot tea with the ice in the white box in front of the middle desk.
Combine the tea with the lizard in the top right cage.
Combine the action button "Shake" with the lab coat far left.
A loquat falls on the floor.
Combine the loquat with the lizard.
Click the lizard's cage again and get the paper scrap.
Combine the nuts in the petri dish on the right trolley with the rat in the low left cage.
Click the cage again to get the paper scrap.
Screenshot
Click the paper scraps, reassemble them to learn, that Helfdan is planning his own institute.
Listen to the conversation between Helfdan and Mrs Montague.
Choose the office on the map.
Chapter 22 - Mad scientist
Mr. Bleski wants to know who your prime suspect is.
You many choose any of the six as your suspect.
Mr. Bleski will ask if you are sure, and you can confirm your first choice or select another.
For this walkthrough, we have selected Mr. Bleski.
You will be brought to the Zen Room now.
Important:
Each suspect choice will give you a different ending and a different way of going on now.
Therefore we will name the spoilers from now on with the name of the locations.
The games inside the locations are still the same.
It is possible, that you will have a room that is not mentioned in the walkthrough while you do not have one the rooms mentioned in the walkthrough.
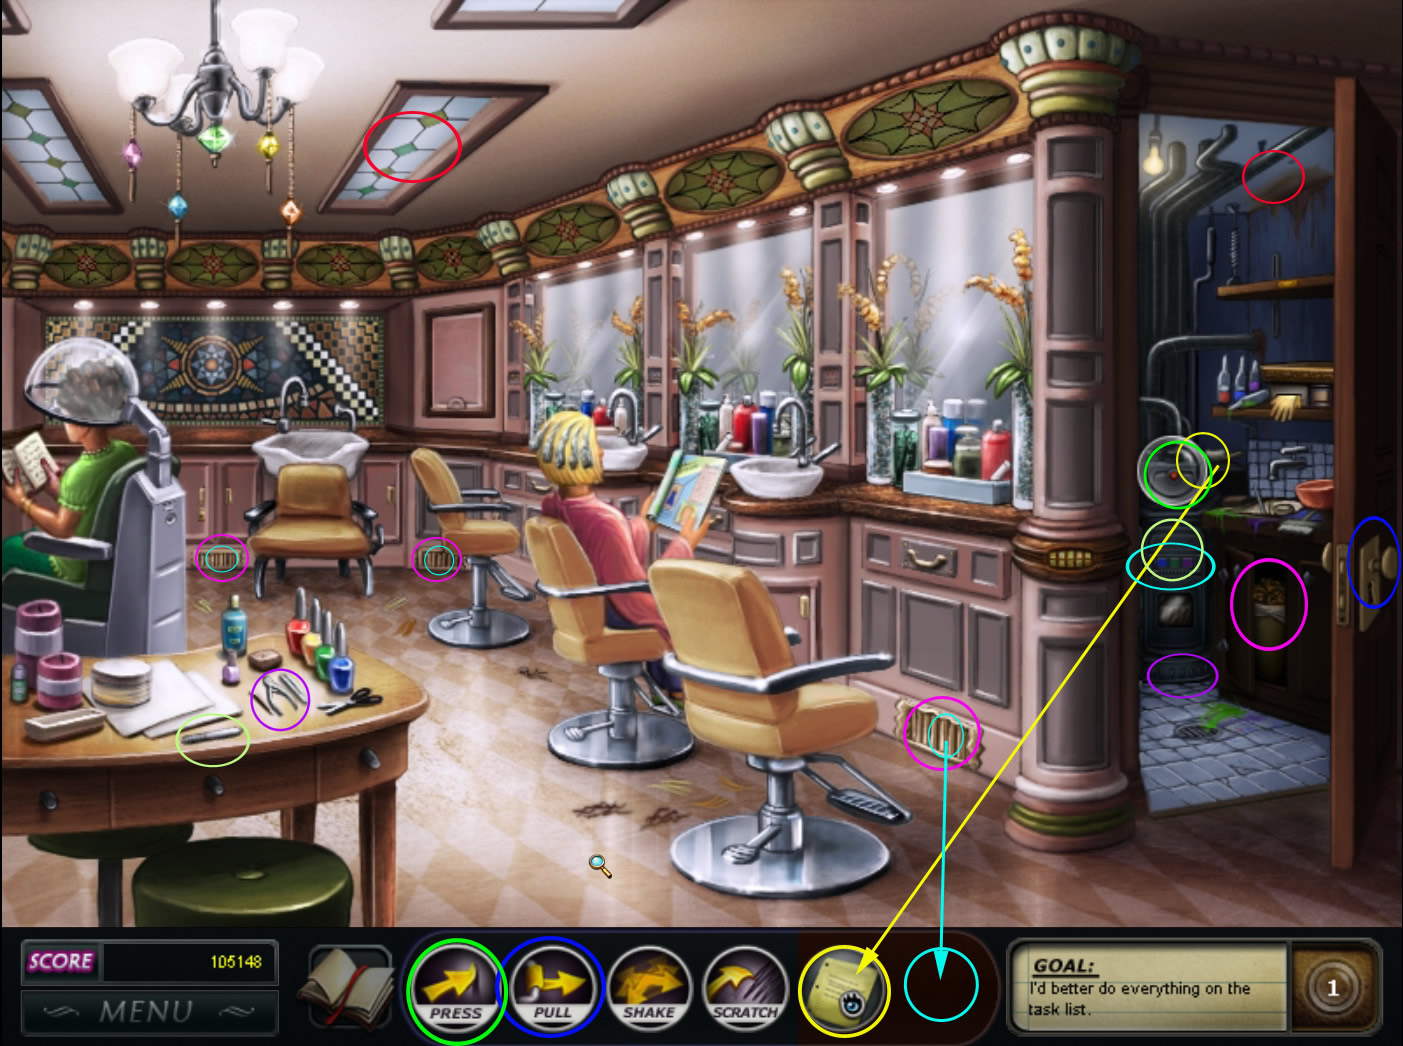
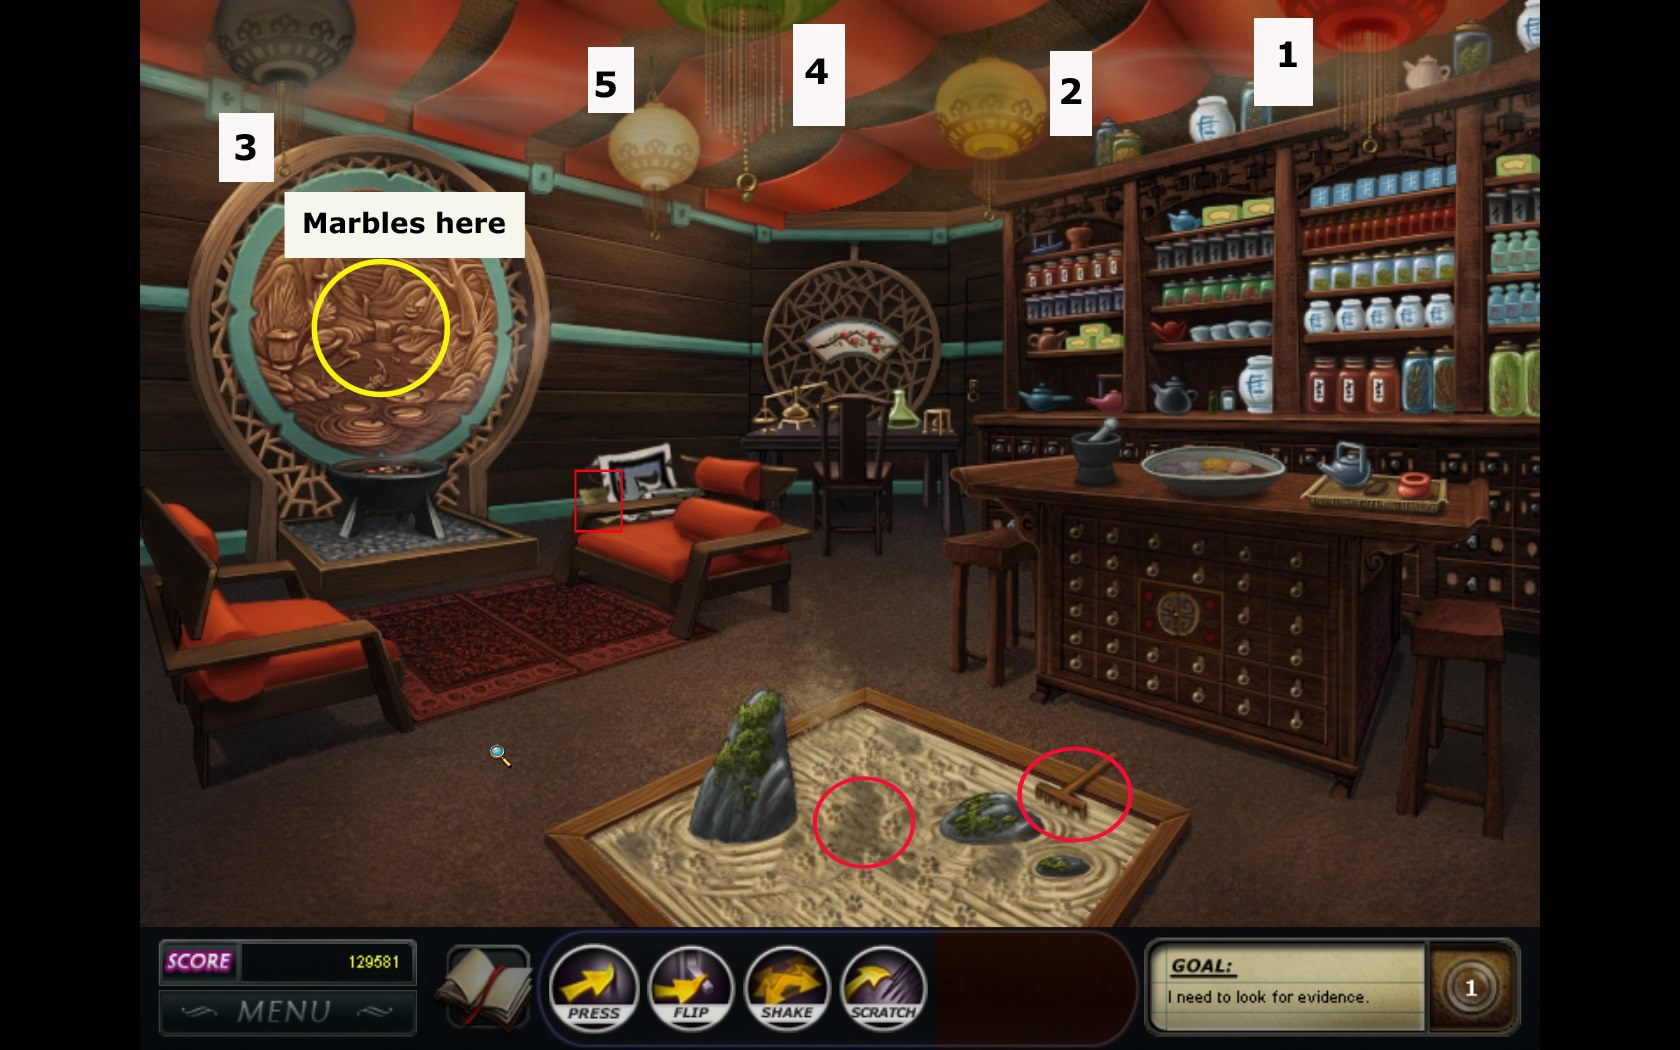
Chapter 23 - Zen Room
Find and read the note about the secret of the rock garden, behind the right chair at the wall.
Use the rake on the paw prints in the sand.
Light the lanterns in the order mentioned in the note: red, yellow, black, green, and white.
Gather all the marbles by clicking once in the sand garden.
Screenshot
Use the marbles on the center of the gong left side to activate a mini game.
Your goal is to combine the elements inside the wooden board with the correct marbles outside around.
Use the hints from the note to find the right combinations:
Wood: green, east and sight.
Metal: white, west and smell.
Water: black, north and hearing.
Fire: red, south and taste.
Earth: yellow, center and touch.
Screenshot
Have a look at the sand garden. All send disappears. Click and read the note, you will find in the center.
Cassidy calls you back to the reception.
Take the note from the reception desk and read it to activate the mini-game.
This time you will get a new helper - the sun will take away all locks from the board.
The foot tile can be swapped with any adjacent tile without making a match.
The following note gives the clue "Actress".
Chapter 24 - Guest Suite
Move with the cursor over the head part of the bed to locate the bomb.
Click and click the knob twice to open the box.
Click the bomb to activate the mini game.
The pieces in the green tiles cannot be moved but used.
There is only one solution possible.
Use all parts in the green tiles except the upper right.
Start at the bottom and move to the lower right side first.
Screenshot
Use the action button "Pull" on the bathroom cabinet.
Click and read the manual about Yorick, the octopus.
Combine the cow on the desk right side with the bowl on the right side of the pantry. The filled cow goes into your inventory.
Combine the action button "Pull" on the fridge in the pantry.
Combine the crabs in the fridge with the cow on the desk.
Combine the action button "Pull" with the panel left side of the aquarium.
Combine the action button "Press" with the button you will find under the panel.
Combine the cow from your inventory with the food clack on top of the aquarium.
Click the key, Yorick is giving you now out of the clack.
Combine the box on the coffee table with the crystal at the shower wall.
Combine the box on the desk with the crystal on top of the right patio door.
Combine the key from Yorick with the suitcase right next to the pantry.
Combine the key from the boxes with the diary inside the suitcase.
Read the diary.
Screenshot
Cassidy is calling for you.
You will be brought to the garden maze.
Chapter 25 -Garden maze - catching Mr. Mingles
Follow Mr. Mingles by using the red arrow as orientation.
As soon as Mr. Mingles stands still, walk very close to him to make him bury a piece of paper.
Walk to the mound of dirt to dig up the scrap.
You will have to do this five times.
Cassidy calls you - choose the Ivory Room on the map.
Chapter 26 - Ivory Room
Take and read the CAEMBADS manual at the back of the chair.
Read the note by the pneumatic tube, where Mr. Mingles disappeared to learn that the controls are in the floor.
Combine the action button "Pull" with the sterilizer door right side.
You will find a probe tool.
Read the post-it on the wall left of the sink to find the access panel.
Combine the probe tool on the access panel.
Combine the action button "Press" with the red button.
Combine the action button "Pull" with the compartment door, under the bed.
Combine the action button "press" with the red button inside the compartment.
Screenshot
Look at the three fishbowls.
On is on the top shelf far left - combine this first with the computer.
The second one on the shelf upper right
The third one on the table low right.
The password for the computer is SHARKBAIR
Combine each fishbowl with the computer for the password.
Combine the greasy lotion on the right upper shelf with the two stuck arm joints.
Combine the action button "Press" with the imaging button, on the lower left of the monitor.
Combine the action button "Press" with the laser button, on the lower right of the monitor.
Use the probe tool in the sterilizer to pry up the wood behind the bed.
Click the handle to learn it is broken.
Combine the glue on the metal panel right side at the bed with the broken lever handle.
Combine the action button "Pull" with the lever to reverse the flow.
Mr. Mingle disappears again, but he leaves the handbag.
Read the letter.
Screenshot
Cassidy is calling - there is another note of the bomber.
Get the note from the reception desk, read and close it to activate the mini game.
You will have a new symbol - a bomb this time.
Every match you make, that does not include a bomb, will let the bomb count down.
Did bomb count to zero, it will lock all nearby tiles.
To get rid of the bomb you need to match it with another tile.
The word you have to swap after the mini game is "discard".
Choose "Waste room" on the map.
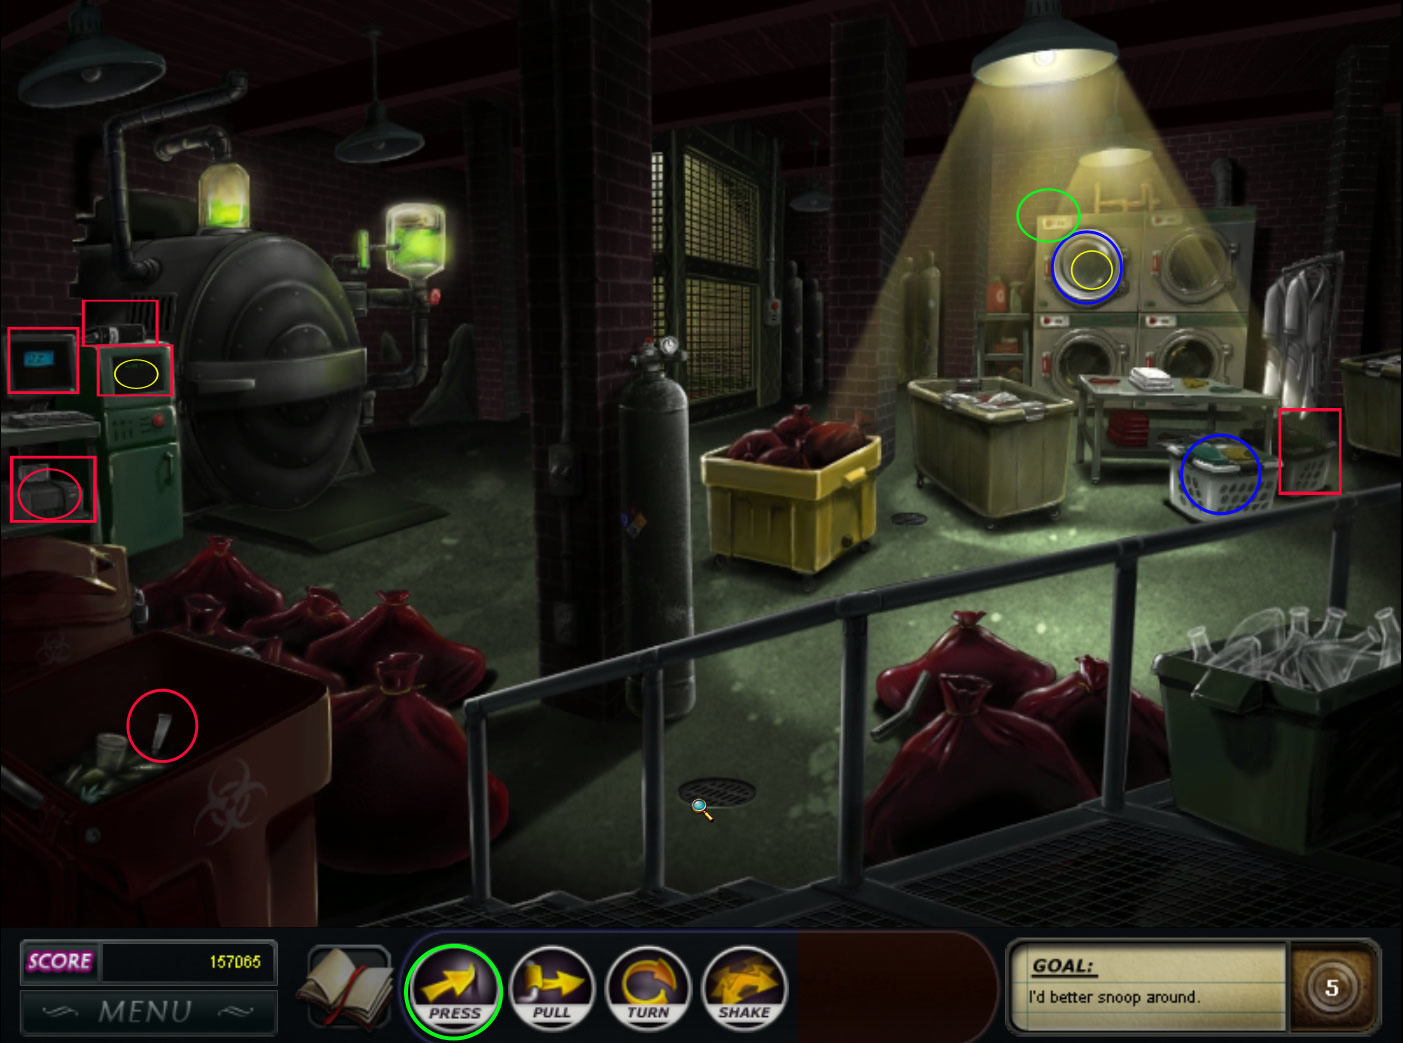
Chapter 27 - Waste Room
Move your cursor over the washing basket under the bathrobes far right. There is the bomb.
Click and activate the minigame.
This time you should place your parts without using the parts in the green tiles.
Screenshot
Look at the computer monitor left side. Someone had printed recently.
Look at the printer below the computer monitor, but it's stuck.
Combine the pry from the garbage low left corner with the printer.
Look at the printer to find that someone has been using special ink and paper.
Take and read the autoclave manual laying on the autoclave right next to the computer.
Click the autoclave monitor at the autoclave and see that you need a password.
Combine the action button "Pull" with the top left of the four dryers right side.
Combine the wet towels from the washing basket in front of the table with the open dryer.
Combine the action button "Press" with the dryer start button.
A series of numbers appears on the dryer door.
Combine this number with the autoclave.
Click the green screen of the autoclave.
Locate the twelve scraps that flew about after opening the autoclave.
Screenshot
You will have to find 12 paper scraps.
1. on the floor left next to the air tank in the middle.
2. on the floor left next to the bin with empty flasks, low right.
3. left side, second red sack.
4. left side, cover of red bin.
5. on the floor, right next to the autoclave.
6. on the top shelf left next to the dryers.
7. on the sacks in the yellow bin, middle of the roof.
8. on the towels you put in the dryer before.
9. on the floor next to the green bin left next to the table with clean clothes.
Combine the action button "Shake" with the bathrobes right next to the dryer - the scrap will fall on the floor. Pick it up.
Combine the action button "Press" with the elevator door button far middle. The door opens and you can pick up the scrap from the floor inside the elevator.
Look at the scrap that's on top of the lamp. It's too high.
Combine the air tank and the bent pipe, leaning at the three red sacks on the floor, right.
Combine the action button "Turn" with the valve to blow down the paper. Pick up the scrap.
Once you have all twelve pieces, look at them to discover that they are all blank.
Place the pieces in the autoclave bin.
Combine the action button "Press" action icon with the red button on the autoclave.
Click the bin again, when its done and reassemble the letter.
Read it.
Screenshot
Joanna comes. Talk to her.
Use the following answers:
1. In fact, why don't you tell me about your brother. You said he was some kind of writer?
2. Is he the one who wrote that book you have called 'Mid-Break at Waverly'?
You are called back to the reception.
Chapter 28 - Reception Room
You hear Mr. Mingles barking.
Combine the action button "Lift" with the low drawer of the dark grey safe cabinet behind the reception.
Click again to read the blue note.
Click the pc and click the SafeStuf.exe top right on the desktop.
A mini game appears.
You will have to enter the correct numbers based on the four clues.
Exit the computer.
Look at the calendar right side on the reception counter. Mary's birthday is March 6.
Combine the action button "Pull" with the cabinet door right side.
Look at the fish food inside the cabinet with the phrase Fortify Your Fish!
Combine the action button "Lift" with the harmonica case, low left corner.
Look at the harmonica and see the engraving: Too cool to play forever!
Combine the action button "Lift" with the music stool right next to the harp.
Inside the music stool you will find a sheet music. The title says: 1,2,3 To A Better Me.
Return to the mini game on the computer.
To solve this, you need to speak the clues loud. Then you will be able to hear the numbers.
Spades: Marine Feed - Fo(u)r ...tify your fish.
Enter the 4 in the spades column and click on submit.
Clubs: Popular notes - 1, 2, 3, t(w)o
Enter 1232 in the clubs column and click on submit.
Diamonds: Mary's birthday March (3) 6.
Enter 36 in the diamonds column and click on submit.
Hearts: T(w)oo, t(w)o, fo(u)r
Enter 224 in the hearts column and click on submit.
The safe opens, click Mr. Mingles.
Screenshot
Latest from now on, the game will be the same for everyone again.
Chapter 29 - Tunnel of danger
Now everyone seems to be around.
Respond as following:
1. You are so angry about his botched spinal manipulation.
2. So you're aware that Helfdan has been talking to Mrs. Montague about funding?
3. You mean, it's against the rules for staff members to date guests?
4. It's not what you did to her - it's what you did to her brother.
Use the bomb detector at the stones on the floor right side of the fountain.
Click again to find a map showing an underground bomb shelter.
The Garden entry looks to be the safest bet.
You are standing in front of a locked door, the lock looks unused.
There is a stone pig low left corner.
Click it to read: "He wrote about Charybdis's whirlpool."
Choose the garden maze on the map.
Chapter 30 - Secret garden
Walk straight ahead to the center of the garden and combine the pig with the Homer statue.
Take the coin from the plaque, that appears and you receive a scroll.
The same you will have to do with each statue: First combine the item with the statue, then get the coin and receive the next item.
The screenshot shoes a map with all Names and items and you will be able to see how to walk.
Screenshot
This are the statues in the correct order:
Pythagoras/scroll
Hermes/harp
Apollo/snake
Poseidon/trident
Hephaestus/axe
Hippocrates/scale
Aesop/grapes
Athena/feather
Artemis/hound
Hipparchus/sextant
Euclid/compass
Chapter 30 - Bomb lair
Place the coins in the lock based on the clues found on the plaques in the garden and the symbols shown.
You can find the text of the plaques in your book.
Use the arrows to rotate each wheel.
Left side:
Triangle - Pythagoras
Star - Hipparchus
Diamond - Euclid
Rabbit - Aesop
Longboat - Homer
Caduceus - Hippocrates
Right side:
Owl - Athena
Sun - Apollo
Fish - Poseidon
Bow and arrow - Artemis
Fire - Hephaestus
Winged foot - Hermes
Screenshot
Connect the two pieces of cord at the desk lamp right side and on the floor.
Combine the smoldering iron left side of the desk with the two cord pieces.
Combine the action button "Turn" with the fan in the far middle above the gramophone to open the grate.
Combine the spool of wire with the wire cutters, both on the table left.
Combine the piece of wire with the tape on the table right side.
Combine the taped wire with the fan grate to get the sharp metal piece.
Combine the metal piece with the phonograph.
Combine the action button "Turn" action icon on the phonograph crank.
The cabinet below opens.
Get black light bulb out of the cabinet and combine it with the desk lamp.
Screenshot
Click the post-its on the shelf above the table to activate a mini game.
Put the notes by swapping in the correct order based on the writing on each note.
The correct code has to be: 36353182
Screenshot
Combine the notes with the locked box on the opposite shelf.
Combine the blank journal with the lamp to expose the writings of the suspect you chose at the beginning.
Choose the right answer.
Your suspect will leave and you have to disarm your last bomb
Screenshot
Congratulations, you solved the case
Wooty tooty flip bam booty! Kayleigh did another great walkthrough! \o/
Posted by: Kero |
September 6, 2009 3:57 PM
|
September 6, 2009 3:57 PM