


![]() The best mobile games are the ones that make us feel smart, are easy to play in short bursts of time, and look better than a Renaissance painting. IQ Mission from YUMMY Factory is one such game, taking the very recognizable set-up of a brain training game and turning it into a spy-based series of missions around the world. On a quest for pieces of a map, you'll travel from Rapa Nui to London to Monte Carlo, solving a series of themed logic games with difficulty levels ranging from "no duh" to "...HELP!!!".
The best mobile games are the ones that make us feel smart, are easy to play in short bursts of time, and look better than a Renaissance painting. IQ Mission from YUMMY Factory is one such game, taking the very recognizable set-up of a brain training game and turning it into a spy-based series of missions around the world. On a quest for pieces of a map, you'll travel from Rapa Nui to London to Monte Carlo, solving a series of themed logic games with difficulty levels ranging from "no duh" to "...HELP!!!".
 There are eight cities to visit in IQ Mission, meaning there are eight games to play in all. You can scroll through and choose games as you like, hopping back and forth when one gets too intense to handle. You start with a simple sliding game where you push moai statues across a grid. From there, you can play an Egyptian version of the traffic game, a tangram-style block arranging puzzle, a dice game, a wall building game similar to Slither Link, and a very unusual "copy the picture" puzzle in Paris. The games, while recognizable at their base, are actually quite unique and present a great level of challenge, even for seasoned puzzle solvers.
IQ Mission looks fantastic, with dark and moody games presented by some crazy characters from each location. It's rare to see a serious brain game go for anything beyond a minimal color palette and a crisp Helvetica font, but you'll be pleased as pallium to see the attention to detail and aesthetics here. And beyond the pretty images on your screen, the game itself is filled with 120+ stages that are genuinely challenging to complete. All in all, a fantastic mobile puzzle game you won't regret trying!
NOTE: This game was played and reviewed on an iPad. Game was available in the North American market at the time of publication, but may not be available in other territories. Please see individual app market pages for purchasing info.


Walkthrough Guide
(Please allow page to fully load for spoiler tags to be functional.)
IQ Mission walkthrough (partial)
For the IQ Mission Epilogue walkthrough, go here.
Main Menu and Scene Navigation
The main menu gives you your choice of which city you wish to play.
The gears in the lower right corner will take you to your Achievements.
You can also contact the game center, e-mail, Facebook, or Twitter, or you can view more games by Yummy Factory.
In addition, you can turn the sound and music on or off, and view the game credits.
The telephone in the middle of the screen is a link to the App Store if you wish to purchase the IQ Mission Epilogue game.
The icon in the lower left corner will take you to the Map.
Your goal for the game is to collect the 8 pieces of a Map that has been split up by members of a secret brotherhood and hidden in 8 different cities around the world.
When all the missions are completed, you will need to complete the Map Puzzle in order to reveal the secret source of the Earth's energy that is needed to save humanity from destruction.
There are 16 levels for each city, and you must complete the levels in numerical order because the completion of one level will unlock the next one.
On the lower right of the scene is an arrow icon that will take you back to the previous screen.
The icon on the lower left will allow you to restart the current level.
The icon at the upper right will link you to a screen that will let you buy a hint key for the game, but you can also just use this walkthrough.
The first puzzle in each city is a tutorial to show you how to solve the puzzles for that city.
The solutions shown in the screenshot of this walkthrough are ones that are known to work but may not be the only solution for that level.
Achievements
The following is a list of the Achievements you can earn throughout the game.
The Search Hunter: Collect all the sacred scarabs hidden among the stone blocks of Hatshepsut's tomb.
The Touch of Osiris: Move all the elements you can find in the pharaoh's tomb.
The Grace of the Nile: Complete the entire Luxor mission.
The Consolation of the Unfortunate: Use all the possible moves of the dice in such a way as to not reach any destination.
Mister Orderly: Place three dice with 2 spots next to each other in a vertical line.
Casino Shark: Complete the entire Monte Carlo mission.
The Glitter of the Heart of Eternity: Find the Hearts of Eternity in one of the caskets.
The Master of Diamond Cutting: Rearrange the casket twice, once with diamonds of one color, then with diamonds of another color.
The Final Cut of the Diamond: Complete the entire Antwerp mission.
The Saviours of Rapa Nui: Complete the entire Rapa Nui mission.
The Wonder of Countability: Arrange an arabesque in 4 moves.
The Arabesque Artist: Complete the entire Marrakech mission.
The Beneficial Providence: Create a stained glass pane using all the elements given.
The Perfect Copy Maker: Complete the entire Paris mission.
The Infallible Builder: Build a wall without making any corrections.
The Divine Sign: Build a wall in the shape of the Tian character.
The Persevering Stone Mason: Complete the entire Beijing mission.
The Winner of Insignia: Find the royal insignia among the laser rays.
The Royal Laserologist: Complete the entire London mission.
The Golden Mind: Complete the entire IQ mission.
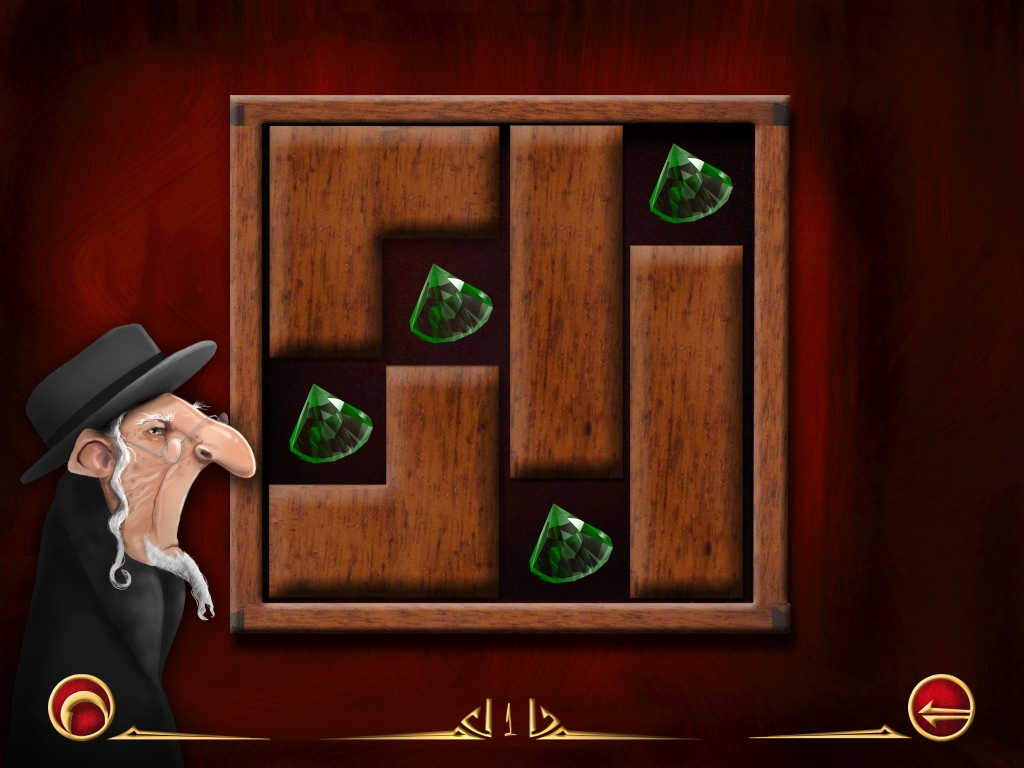
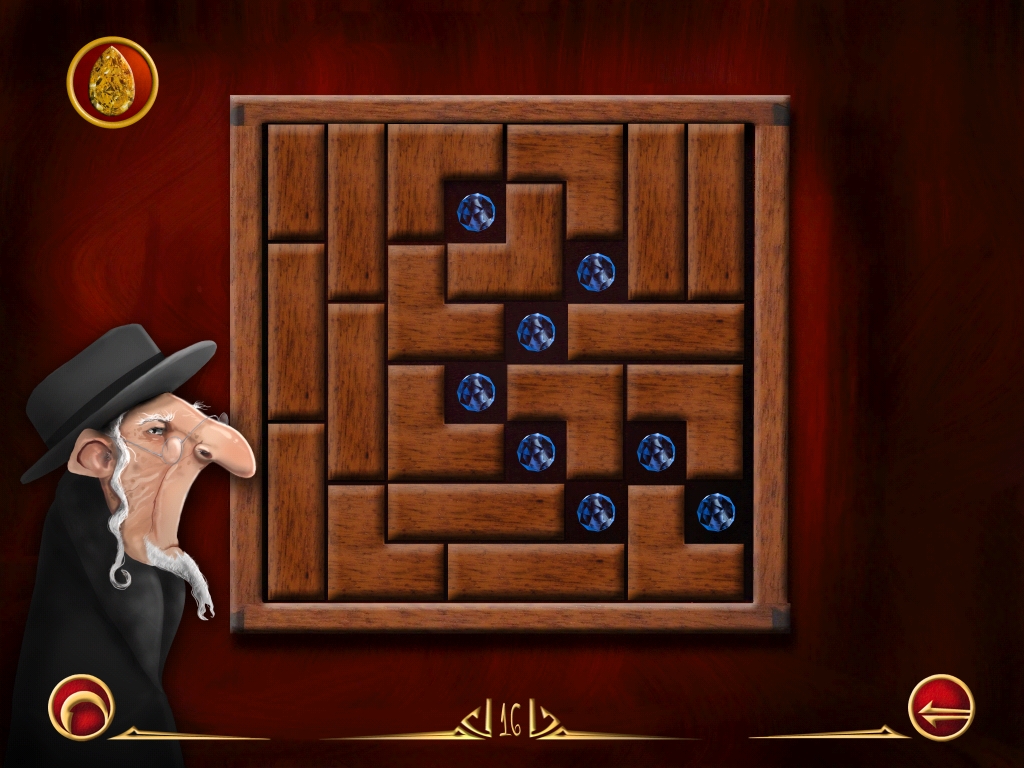
Antwerp (Belgium)
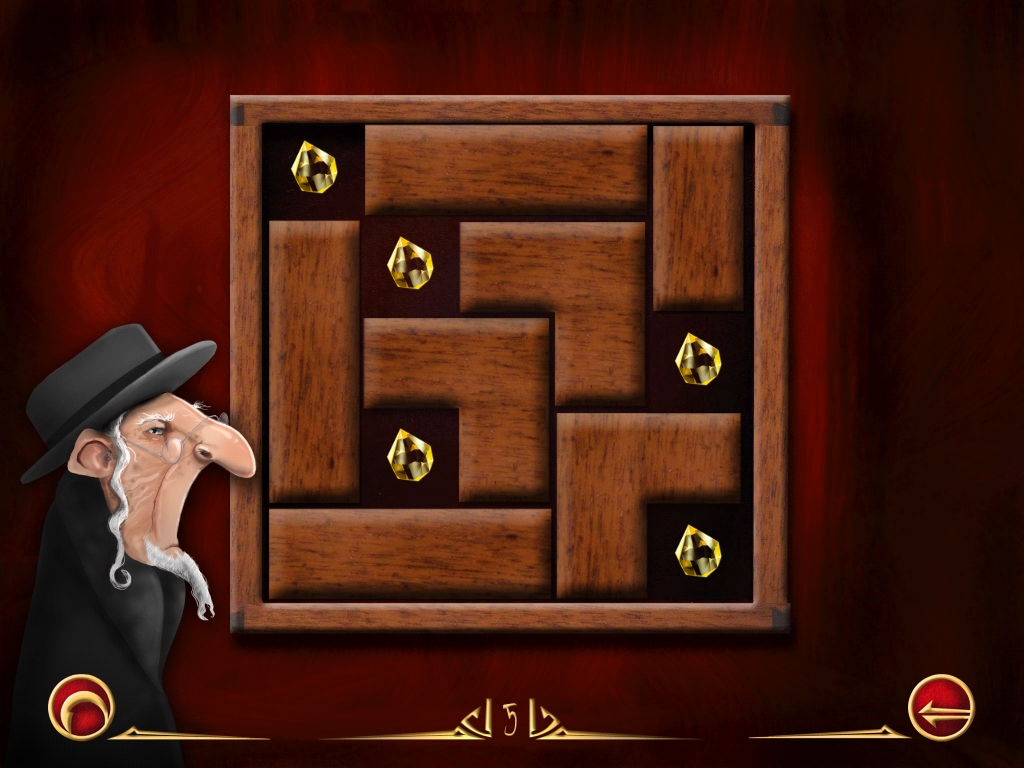
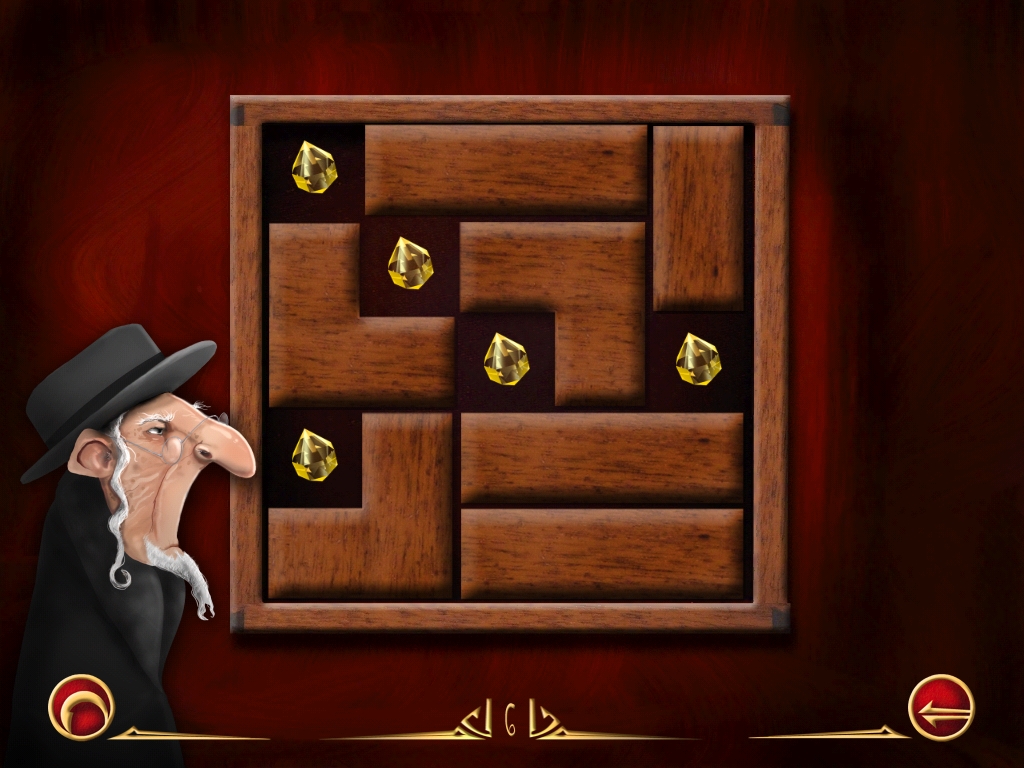
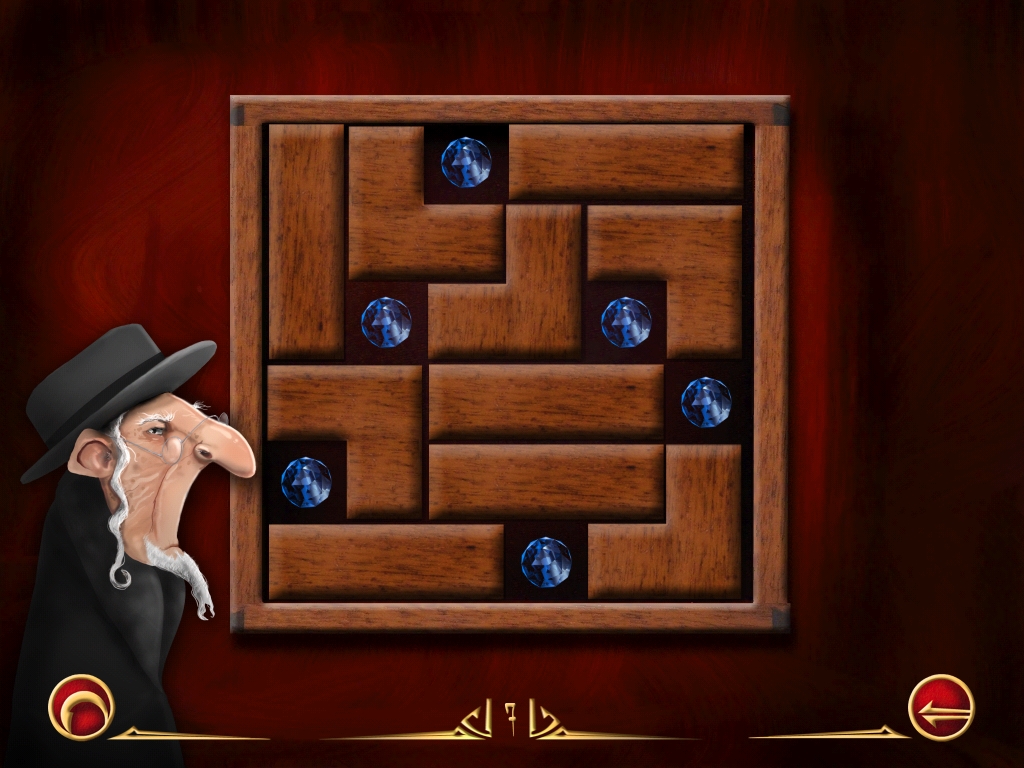
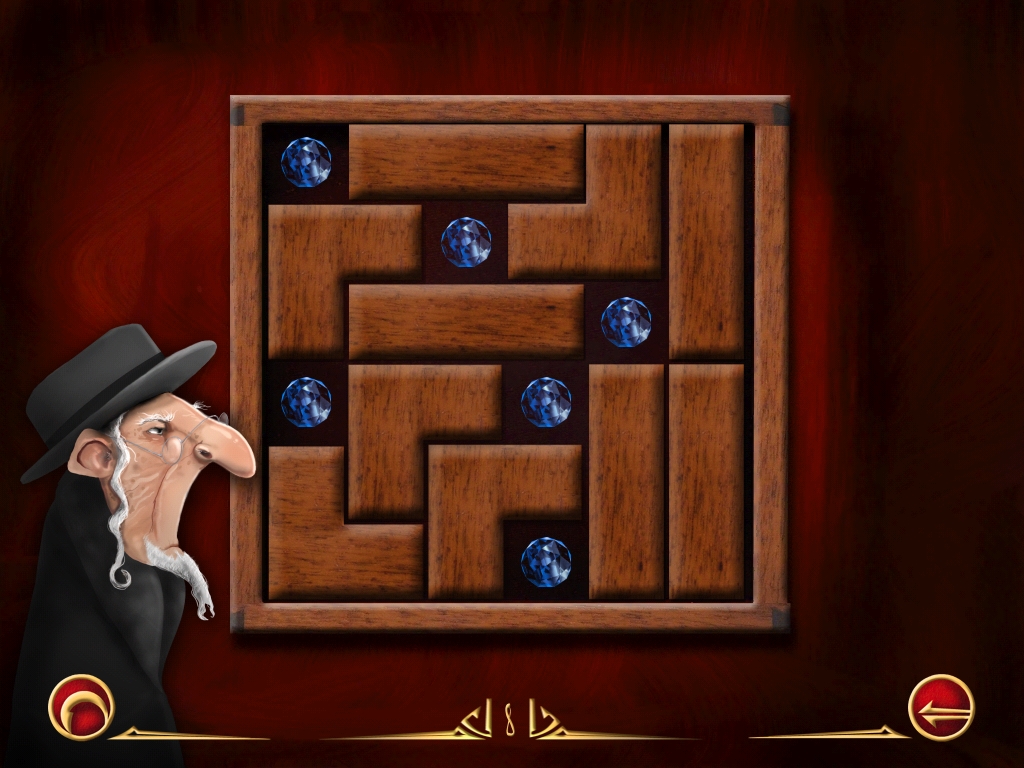
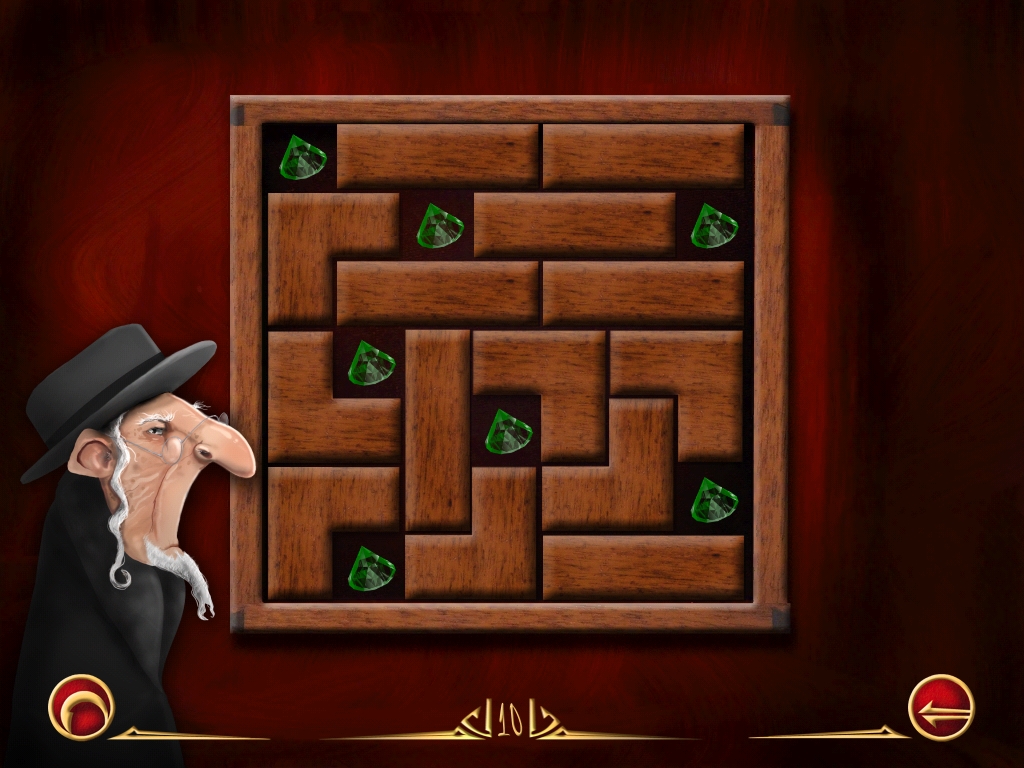
In order to charm Aaron Goldbaum into giving you his piece of the map, you will need to help him organize his cases of precious stones. You need to cover the diamonds in such a way that only the diamonds of the same color can be seen.
Use the wooden blocks, located on the right of the scene as the cover.
You can rotate a block by tapping on it once it is placed on the board and then place it as shown in the screenshots.
Keep the green gems showing.
Screenshot
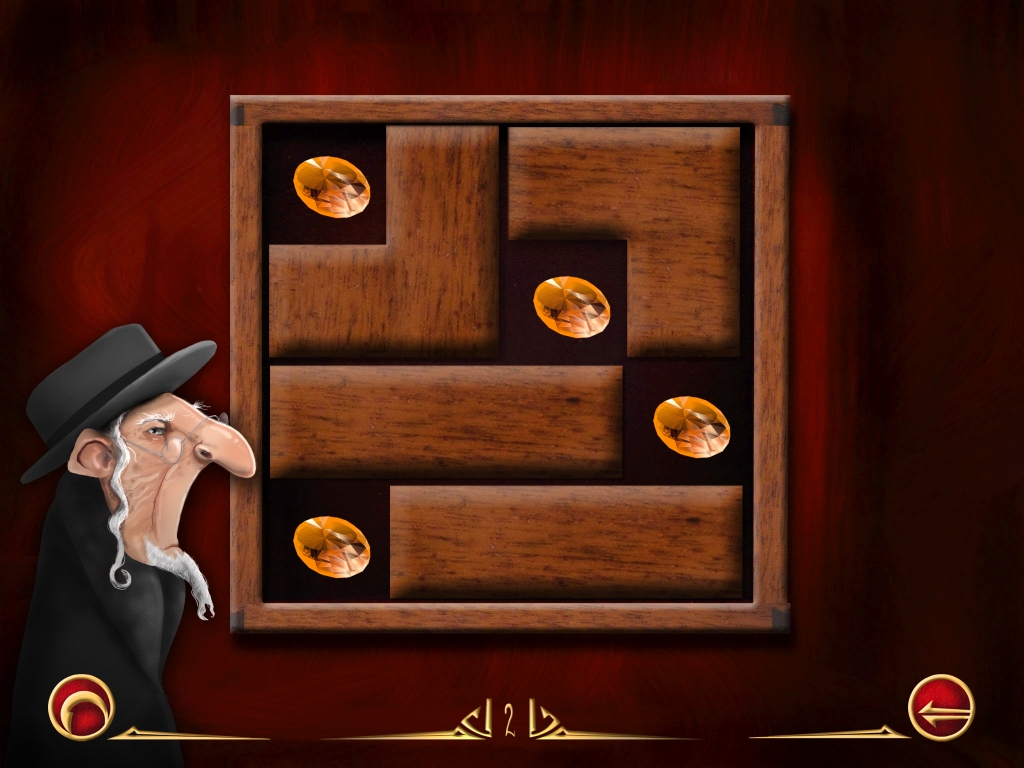
Keep the orange gems showing.
Screenshot
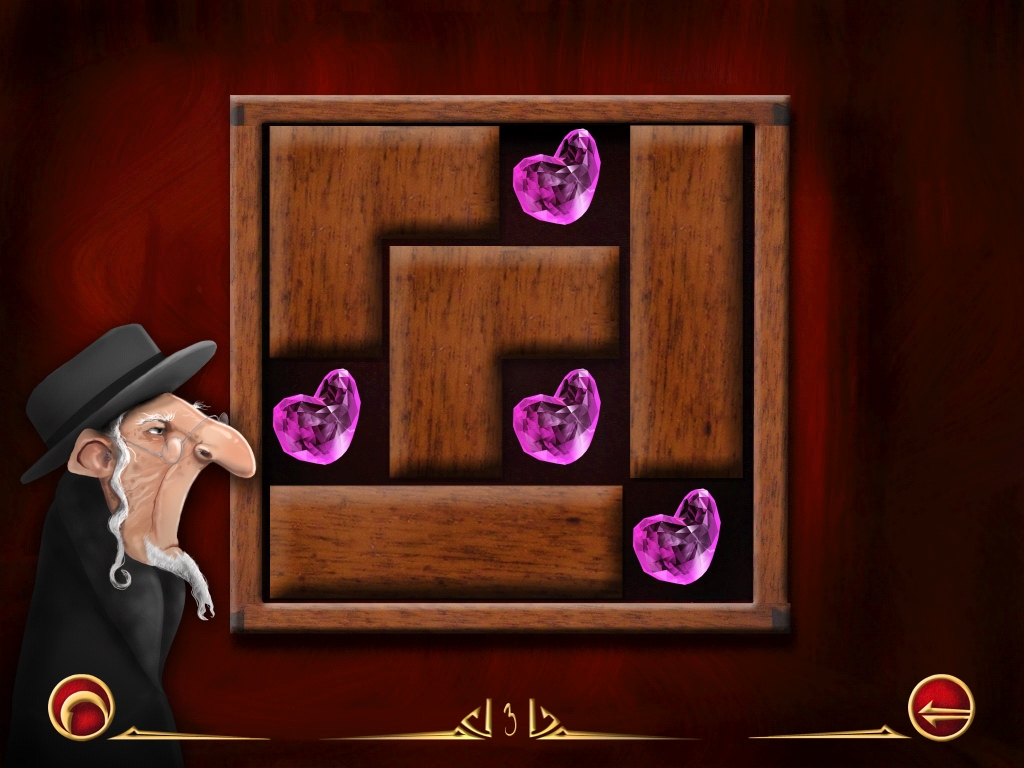
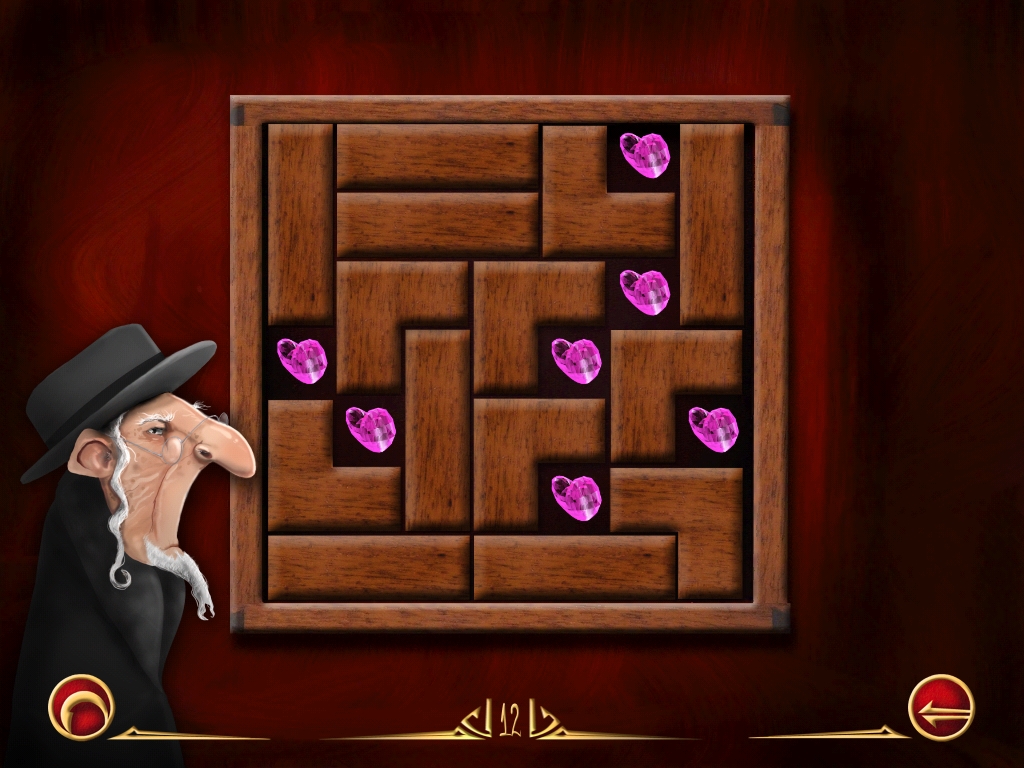
Keep the pink gems showing.
Screenshot
Keep the green gems showing.
Screenshot
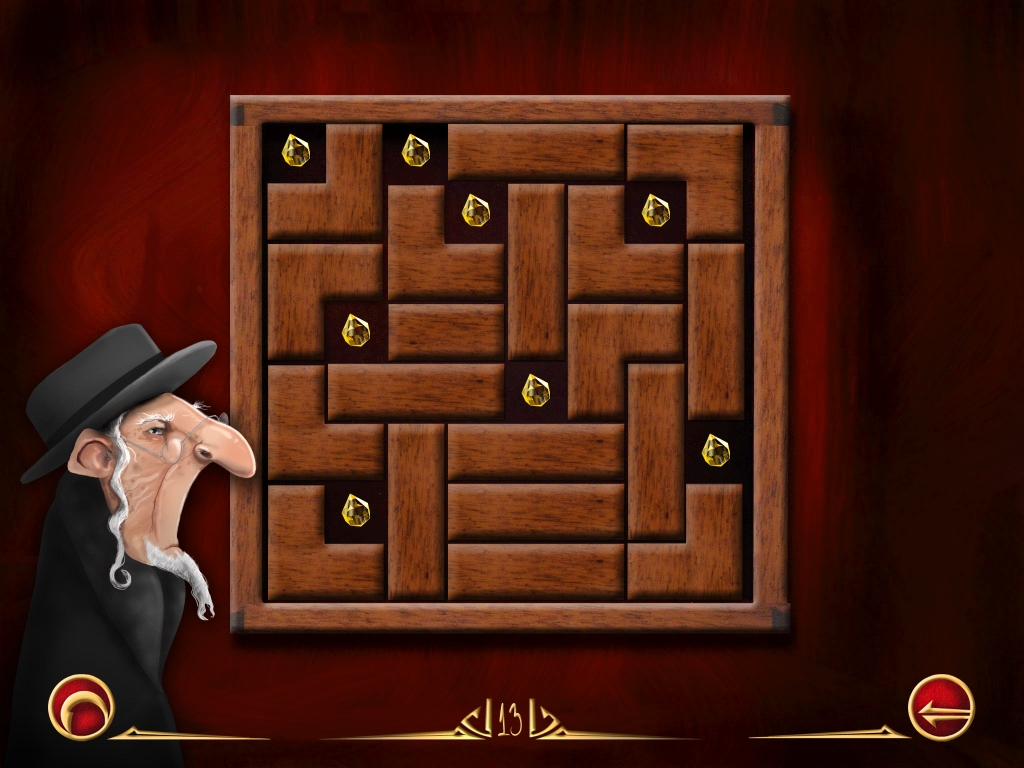
Keep the yellow gems showing.
Screenshot
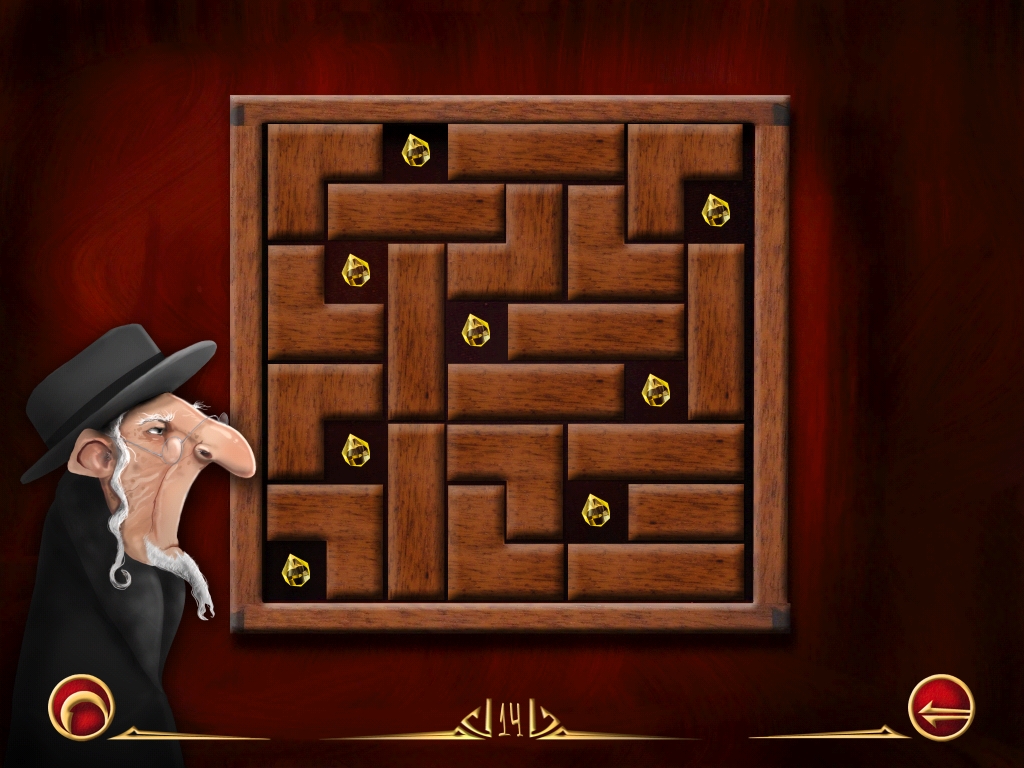
Keep the yellow gems showing.
Screenshot
Keep the blue gems showing.
Screenshot
Keep the blue gems showing.
Screenshot
Keep the purple gems showing.
Screenshot
Keep the green gems showing.
Screenshot
Keep the yellow gems showing.
Screenshot
Keep the pink gems showing.
Screenshot
Keep the yellow gems showing.
Screenshot
Keep the yellow gems showing.
Screenshot
Keep the blue gems showing.
Screenshot
Keep the blue gems showing.
Screenshot
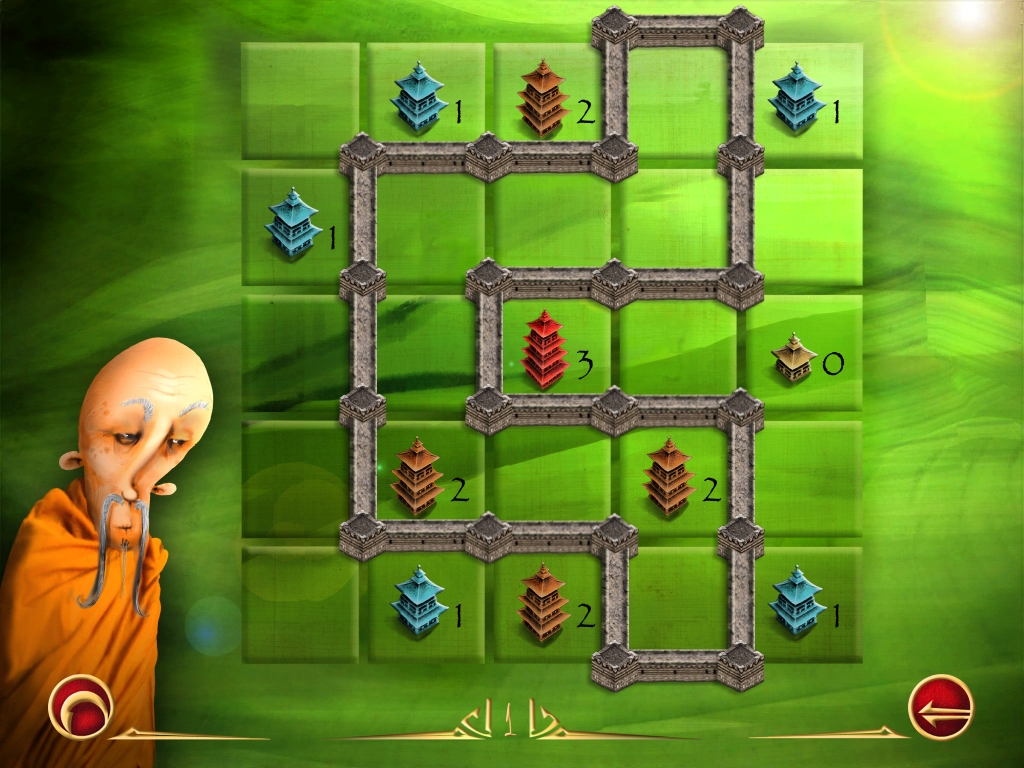
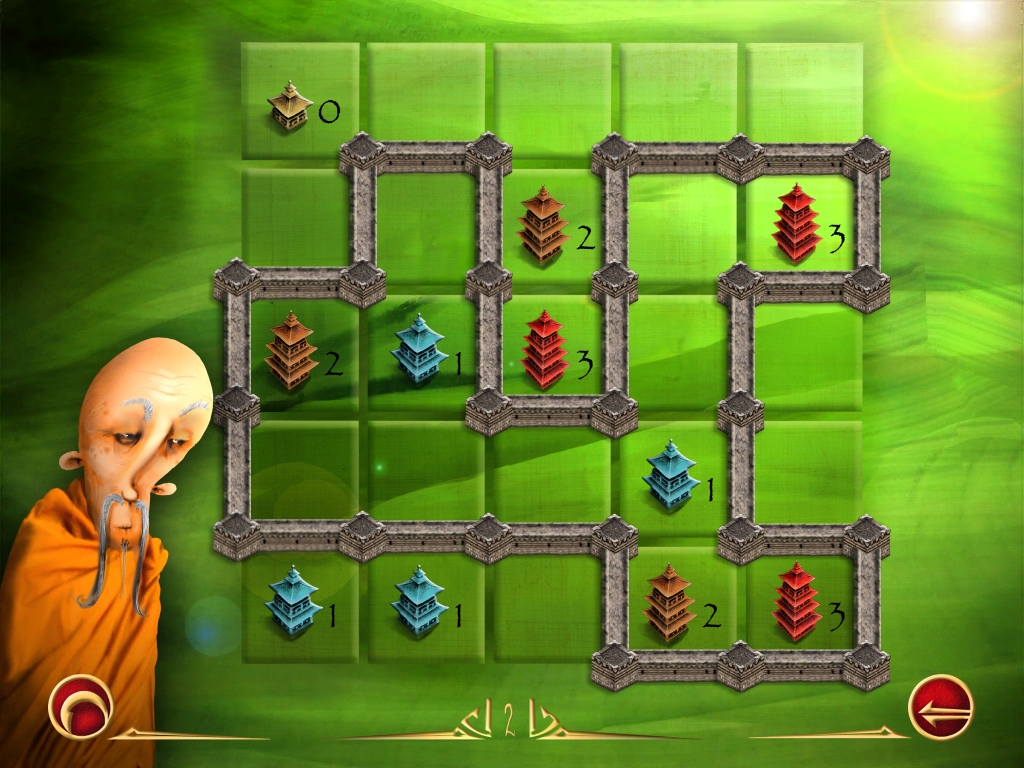
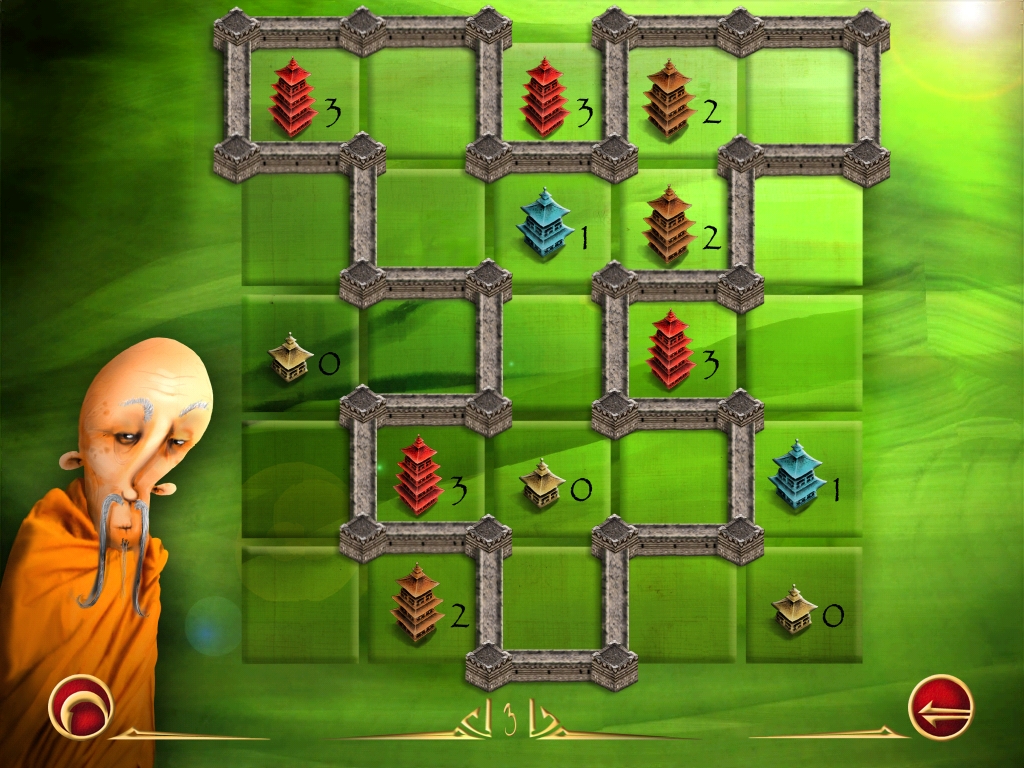
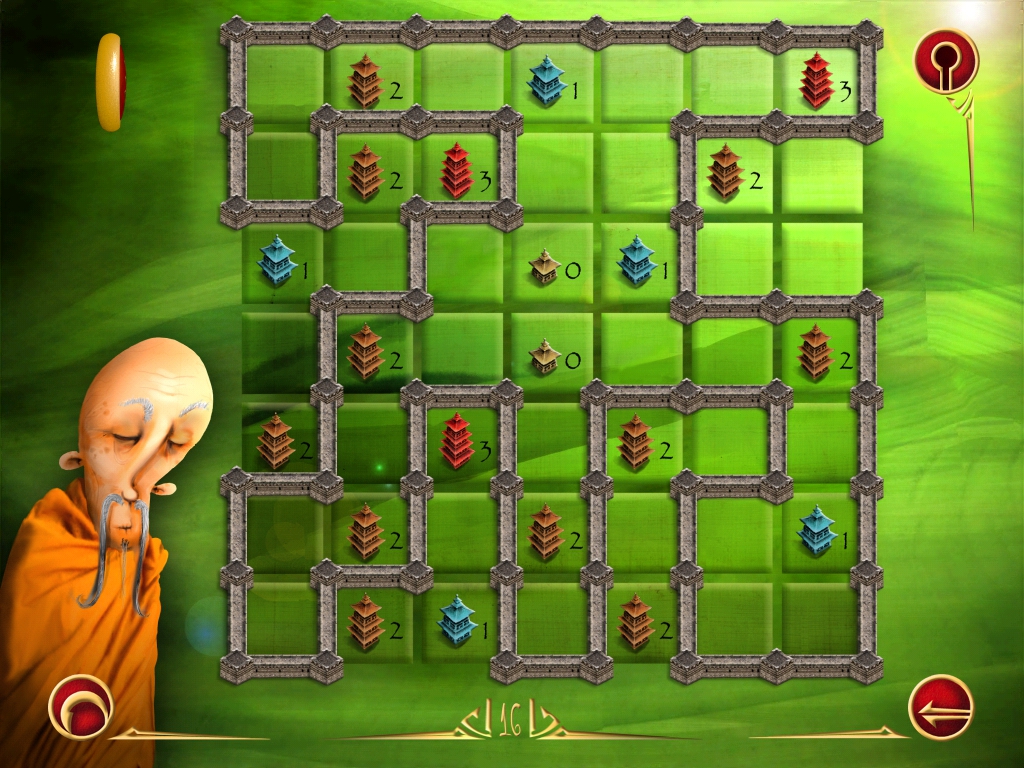
Beijing (China)
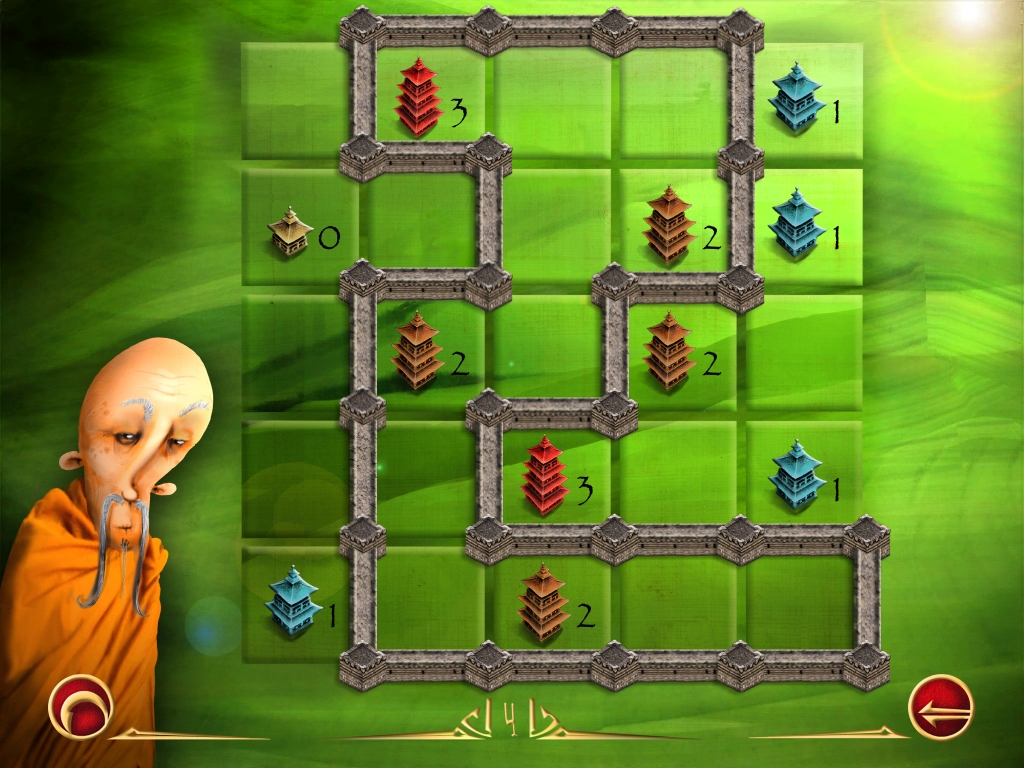
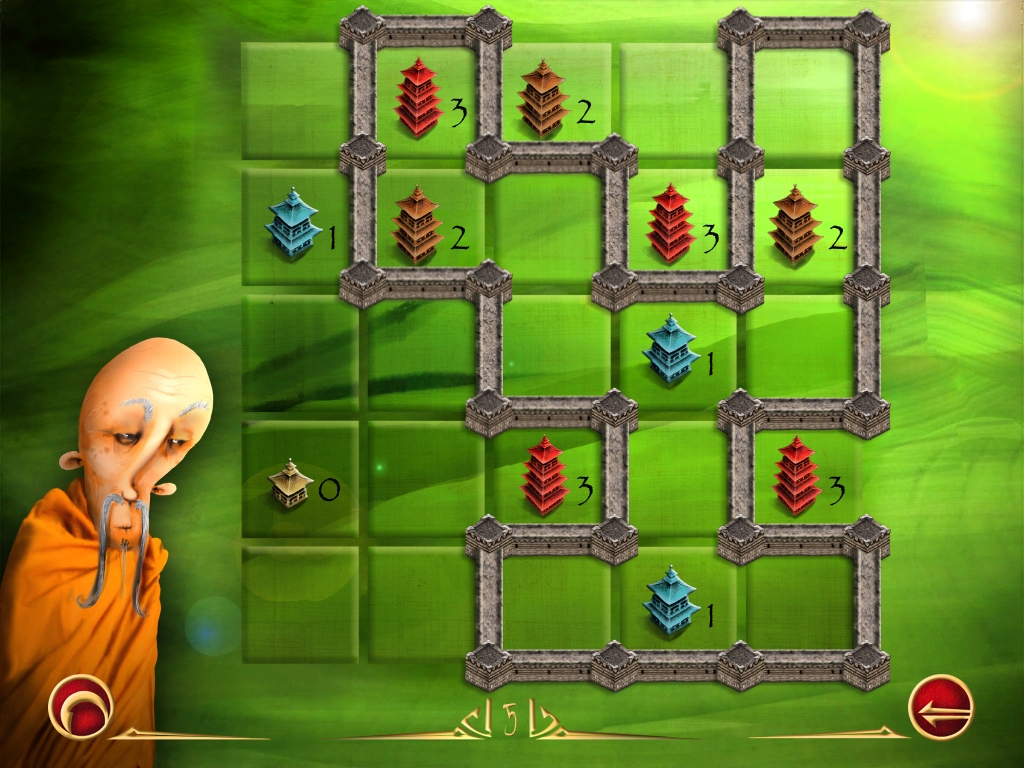
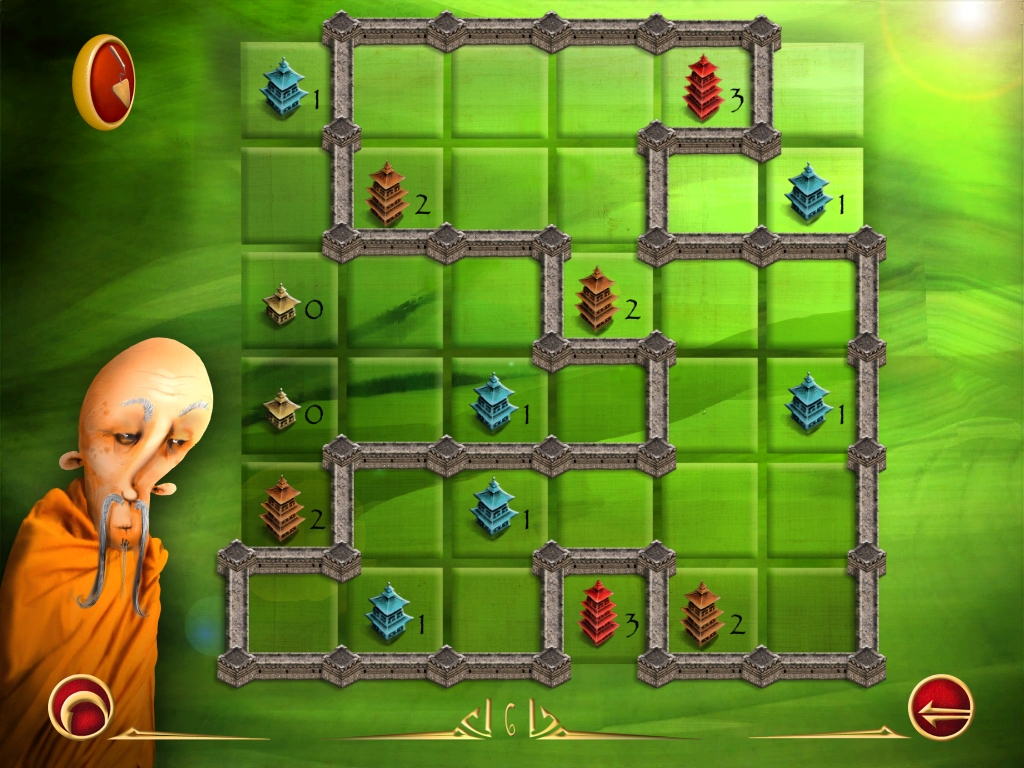
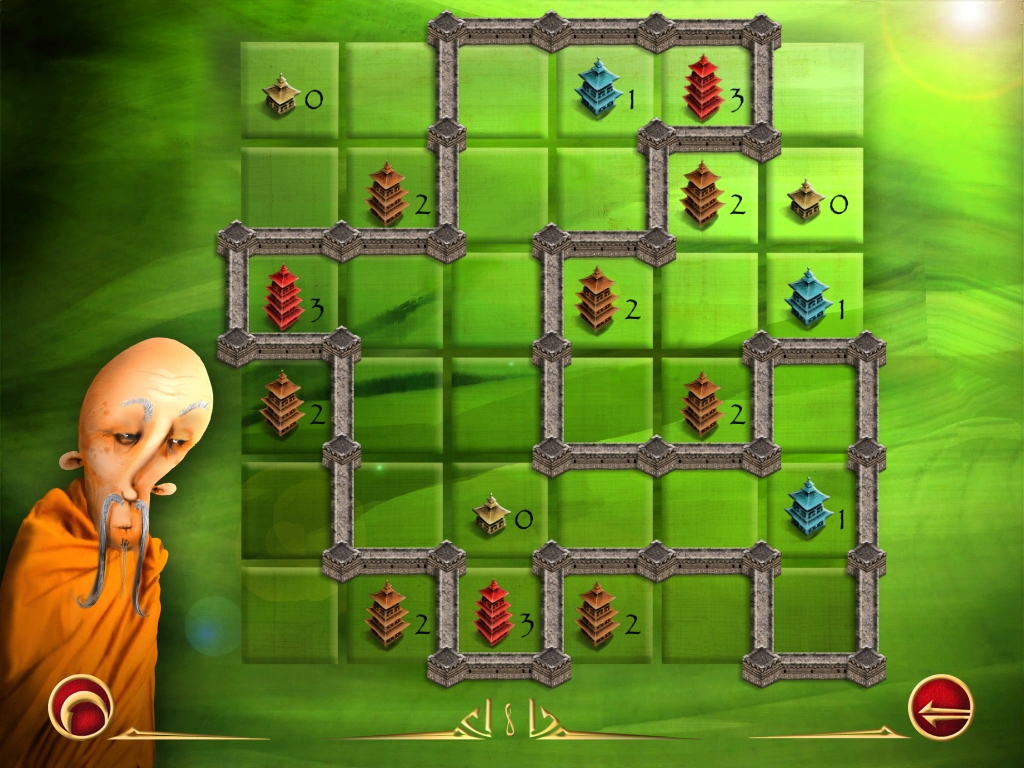
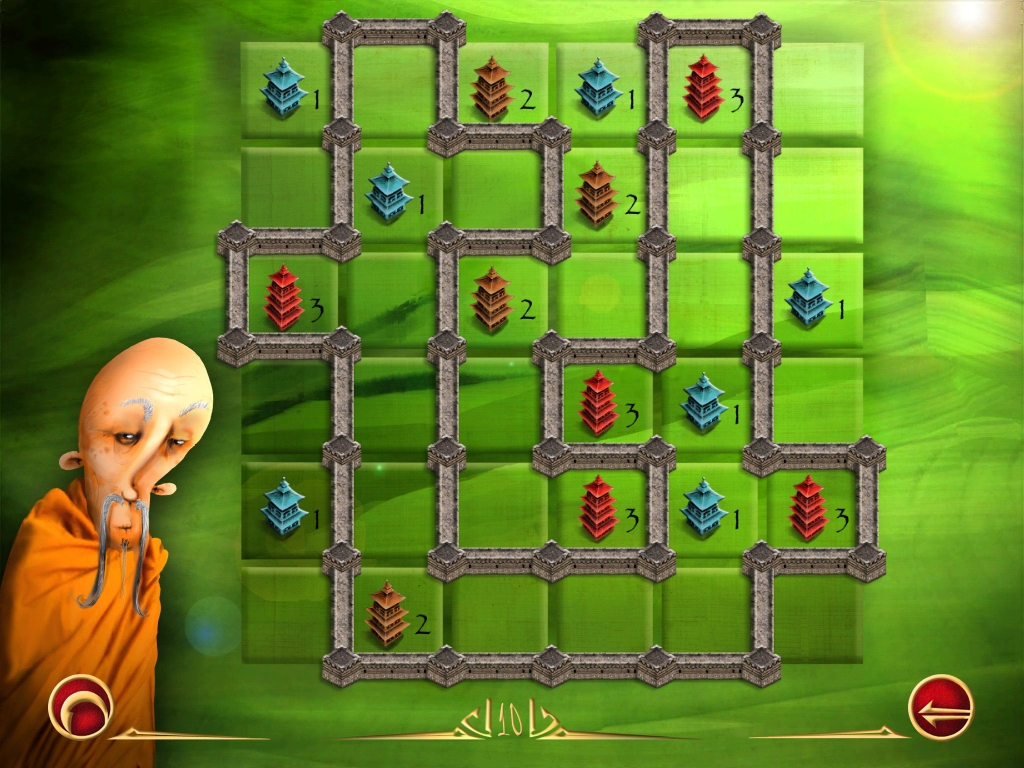
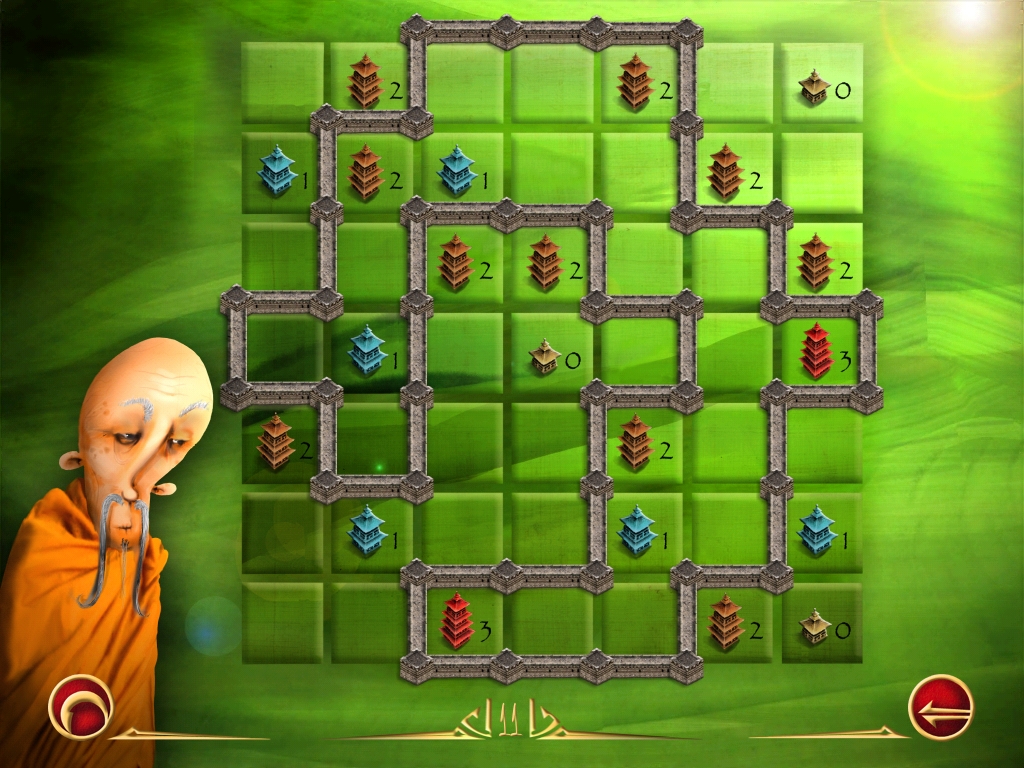
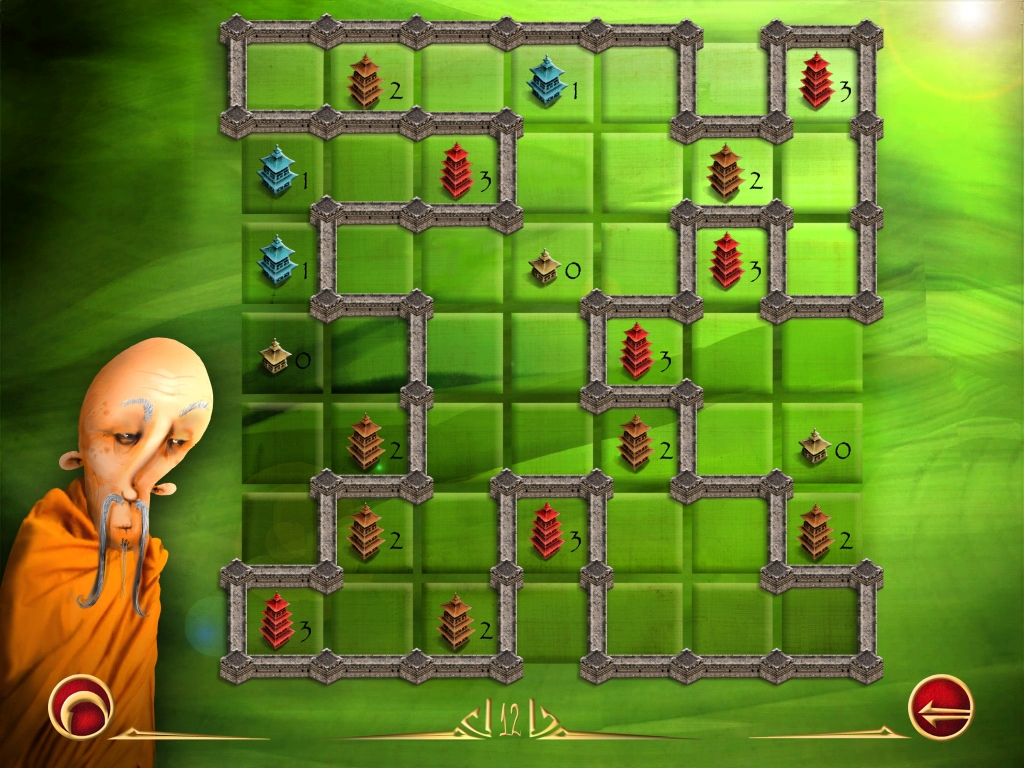
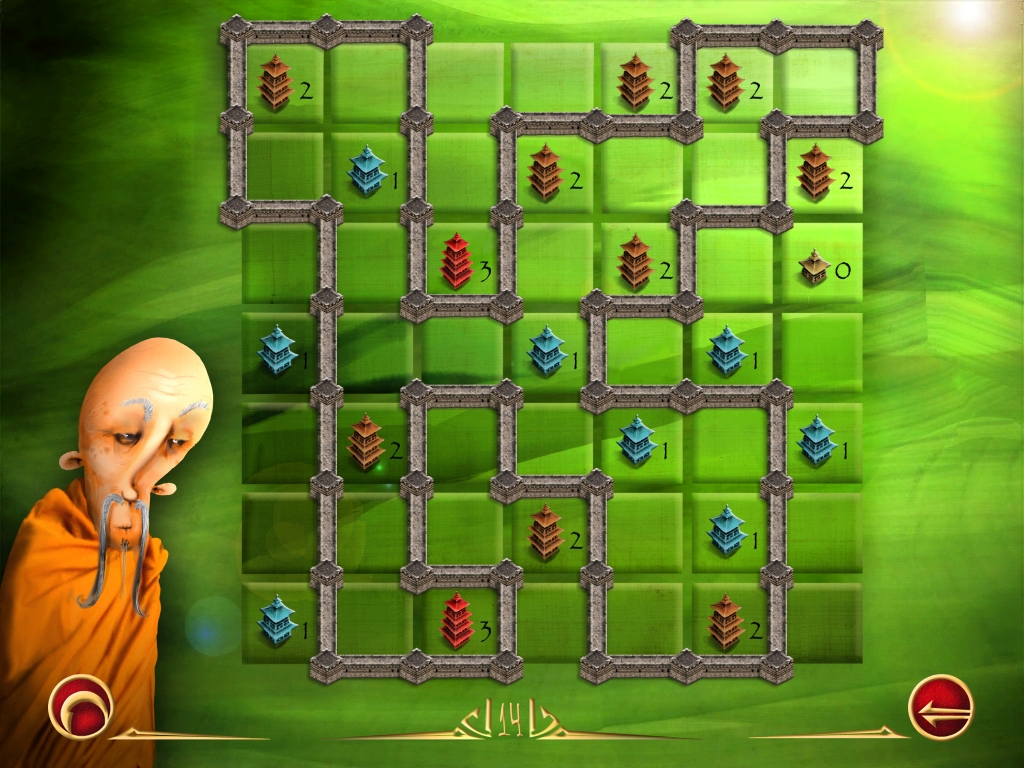
Lin Zi will give up his map piece if you rebuild the wall between the observation towers.
The most important thing to remember is that your wall must be closed, and you cannot create loops.
Each tower should be surrounded by as many sides as the number shown on the tower.
See the screenshots for the solutions.
Screenshot
Screenshot
Screenshot
Screenshot
Screenshot
Screenshot
Screenshot
Screenshot
Screenshot
Screenshot
Screenshot
Screenshot
Screenshot
Screenshot
Screenshot
Screenshot
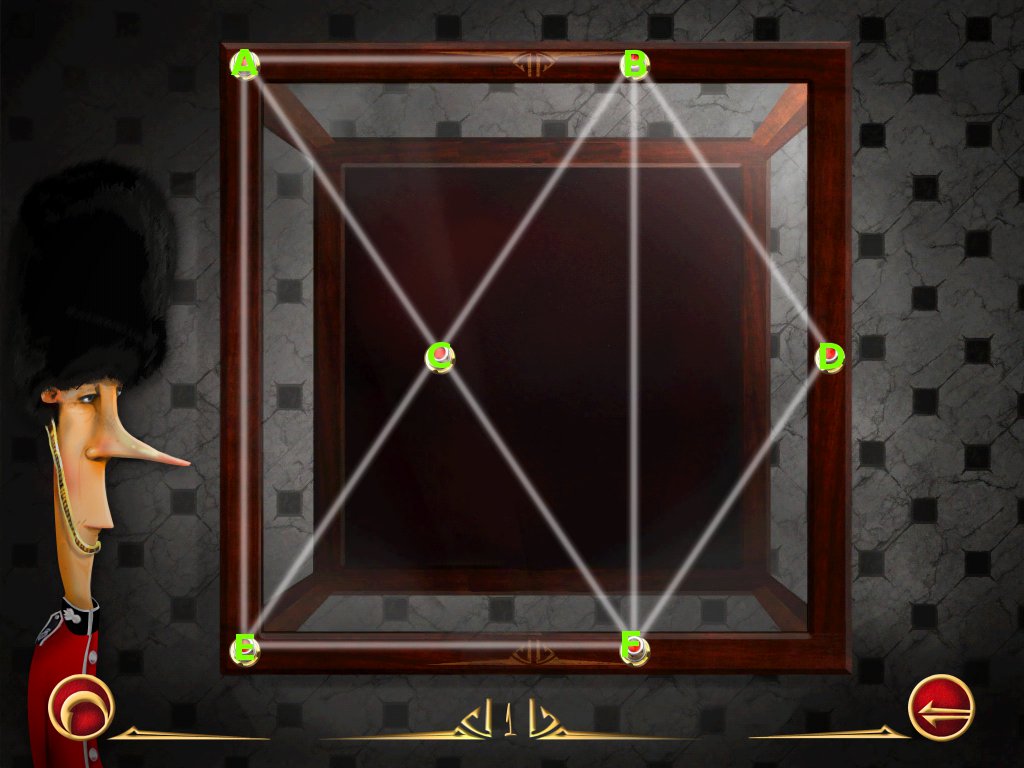
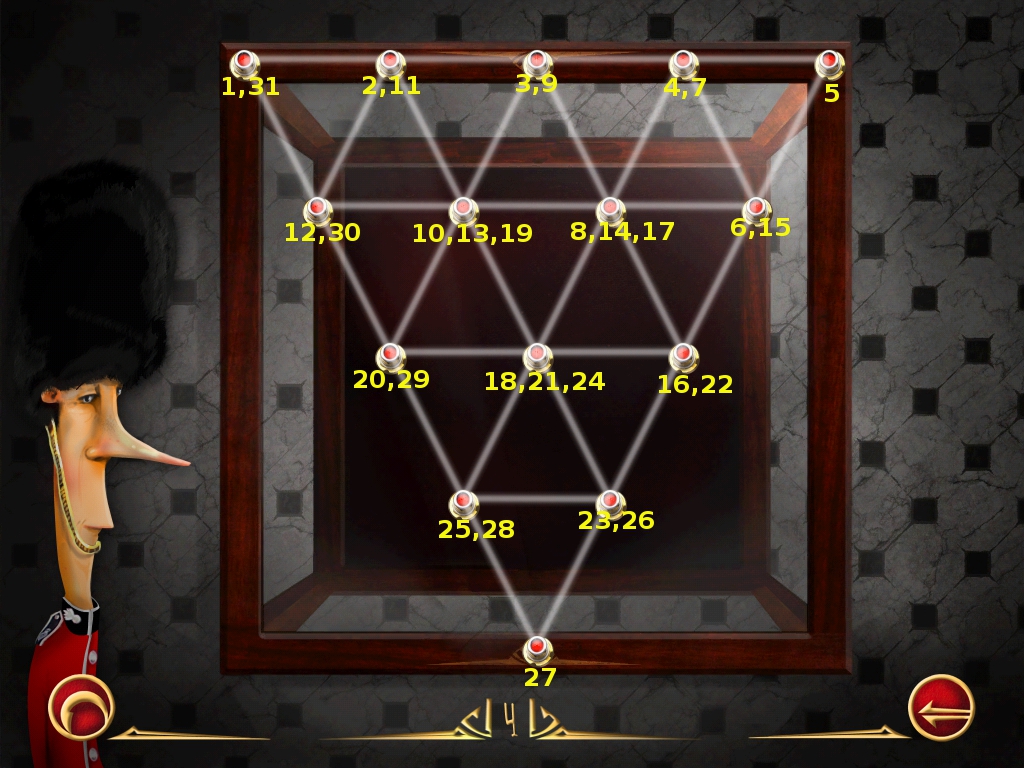
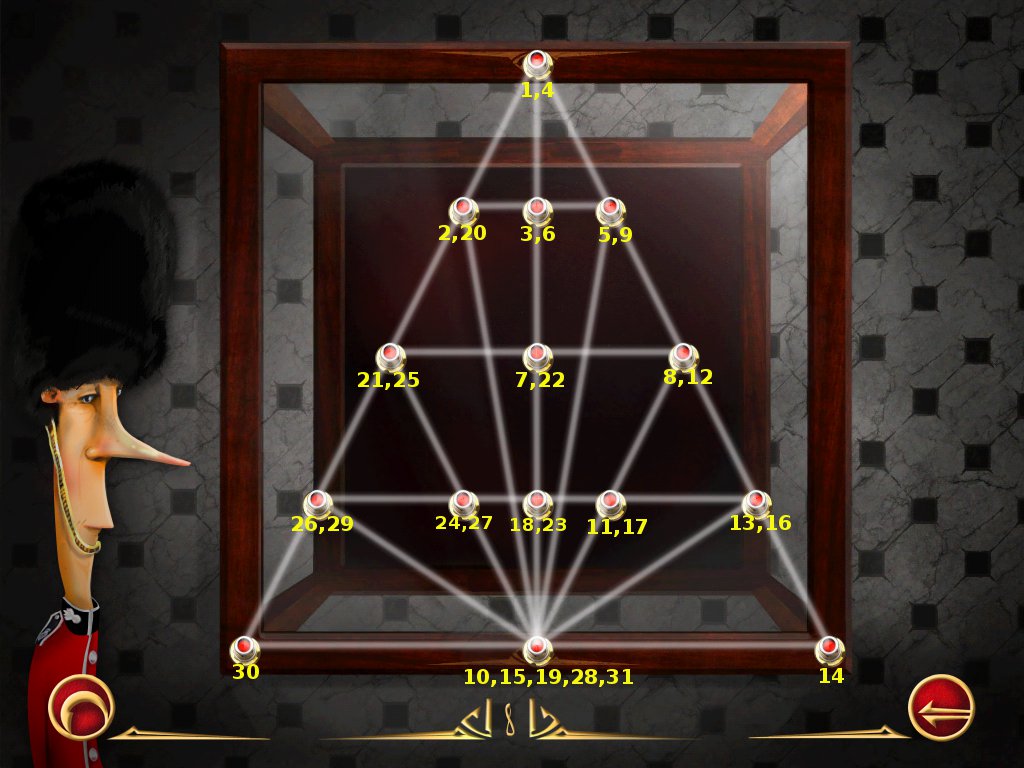
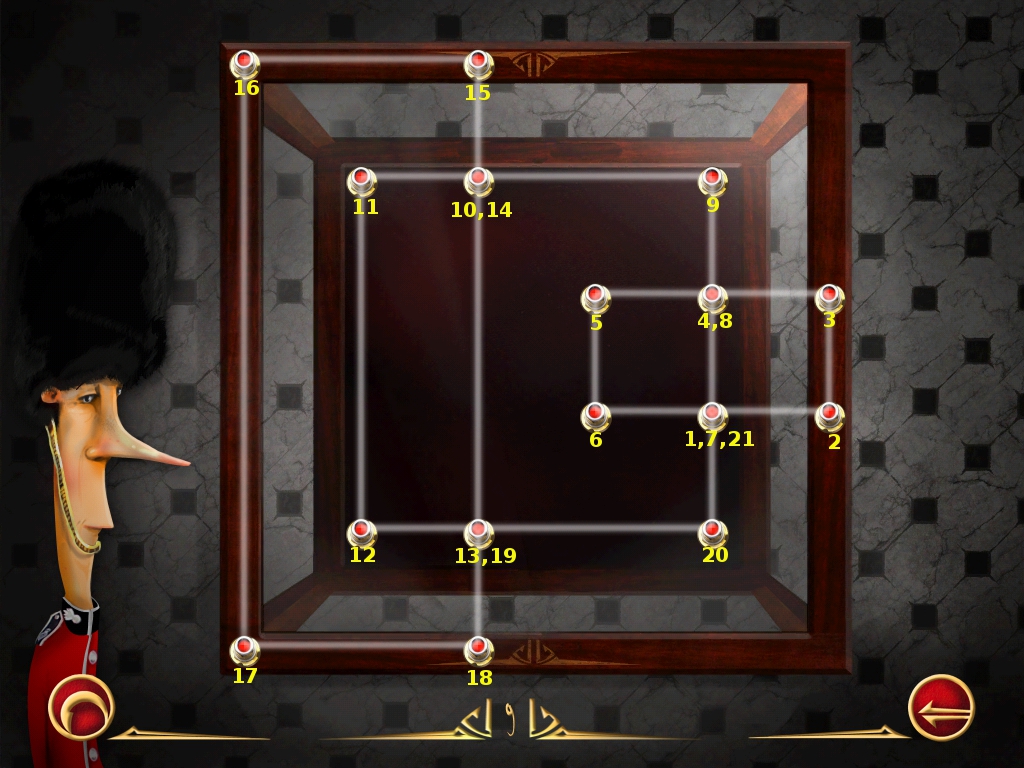
London (England)
Bob Atkins is requiring you to connect all of the laser beams.
In order to do so, you need to touch each connection of the beam to show it where you want it to go.
You cannot cross paths, so you must follow the paths shown in the screenshots to complete your journey.
Refer to the screenshot below and press the buttons in the following order: E-F-D-B-F-C-E-A-C-B
Screenshot
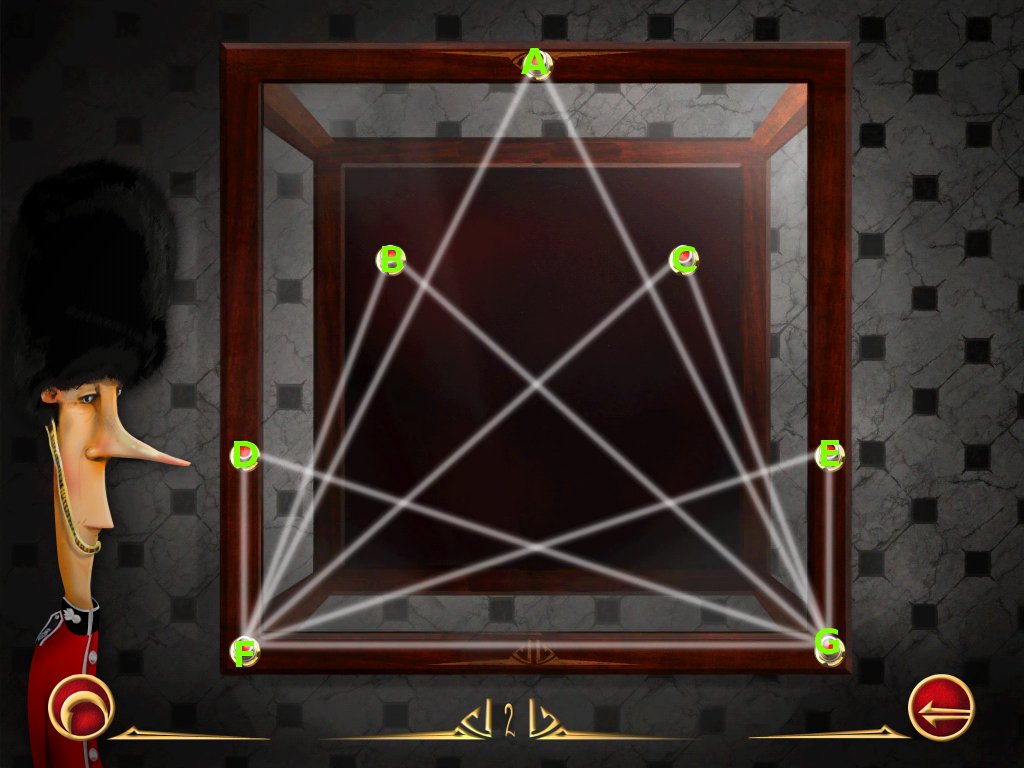
Refer to the screenshot below and press the buttons in the following order: D-F-G-C-F-A-G-B-F-E-G-D
Screenshot
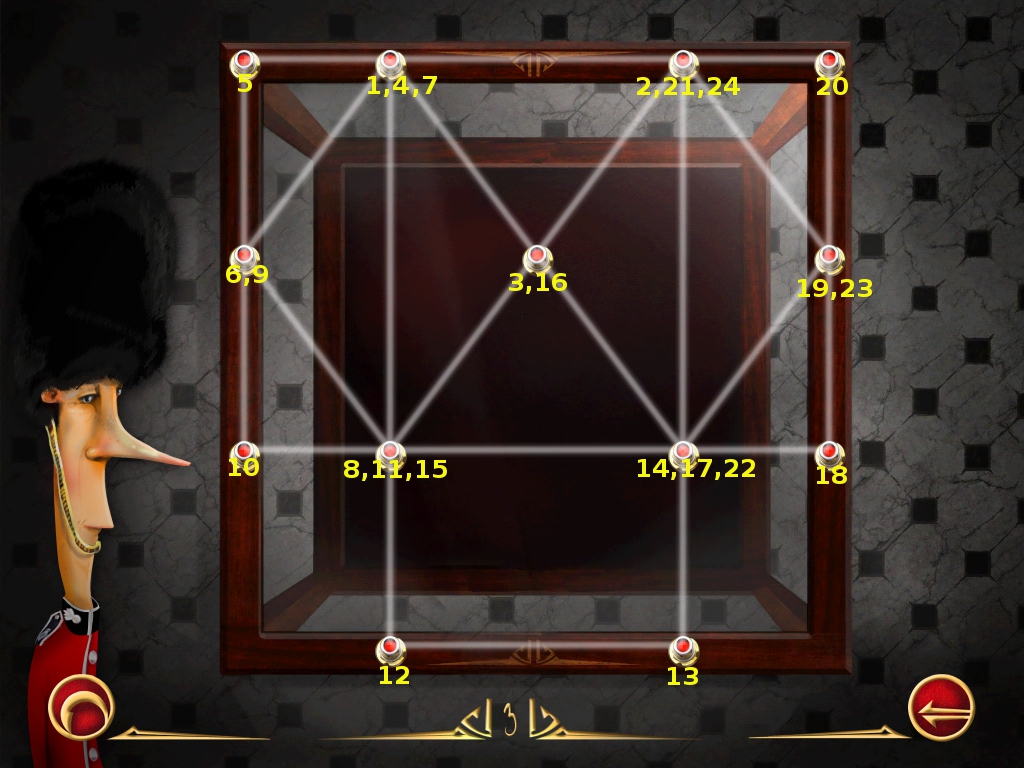
Refer to the screenshot below and press the buttons in numerical order.
Screenshot
Refer to the screenshot below and press the buttons in numerical order.
Screenshot
Refer to the screenshot below and press the buttons in numerical order.
Screenshot
Refer to the screenshot below and press the buttons in the numerical order.
Screenshot
Refer to the screenshot below and press the buttons in the numerical order.
Screenshot
Refer to the screenshot below and press the buttons in the numerical order:
Screenshot
Refer to the screenshot below and press the buttons in the numerical order:
Screenshot
Refer to the screenshot below and press the buttons in the numerical order:
Screenshot
Refer to the screenshot below and press the buttons in the numerical order:
Screenshot
Coming soon!
Coming soon!
Coming soon!
Coming soon!
Coming soon!
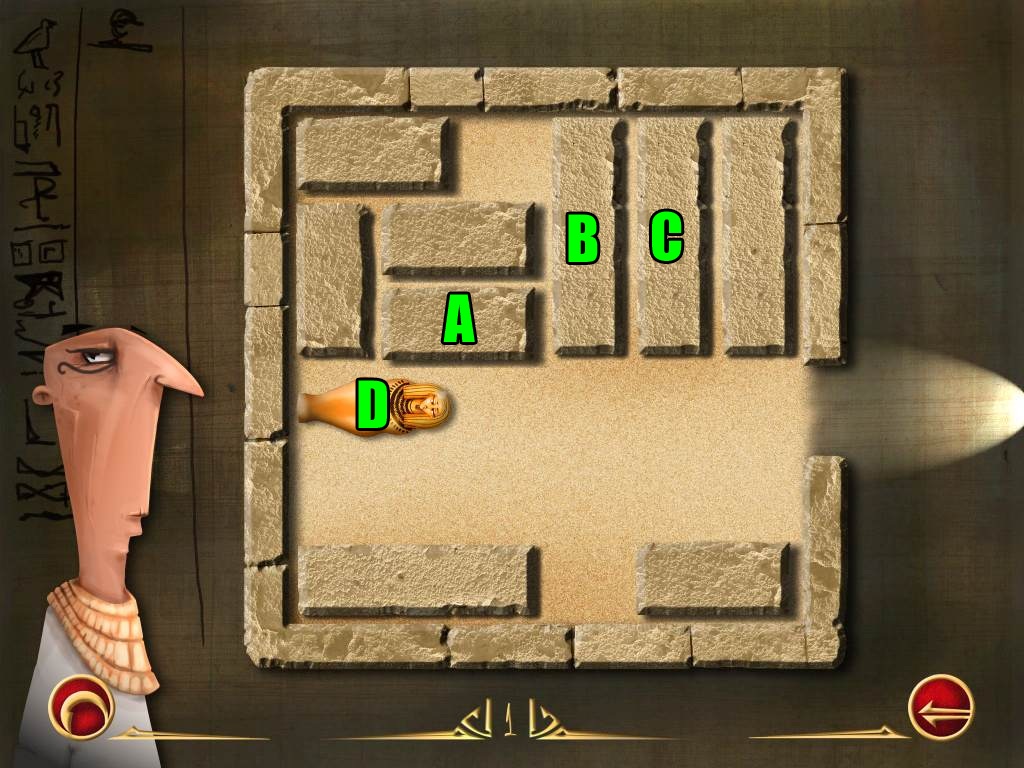
Luxor (Egypt)
Hapusenab made an oath to his Queen that he would make sure her soul found its way to Osiris, the lord of the dead. In order to help him make this happen, you will need to solve the slider puzzles to make a route for him through the stone blocks to move her sarcophagus out of the tomb.
The blocks only move right and left and up and down, so see the screenshots for the solutions.
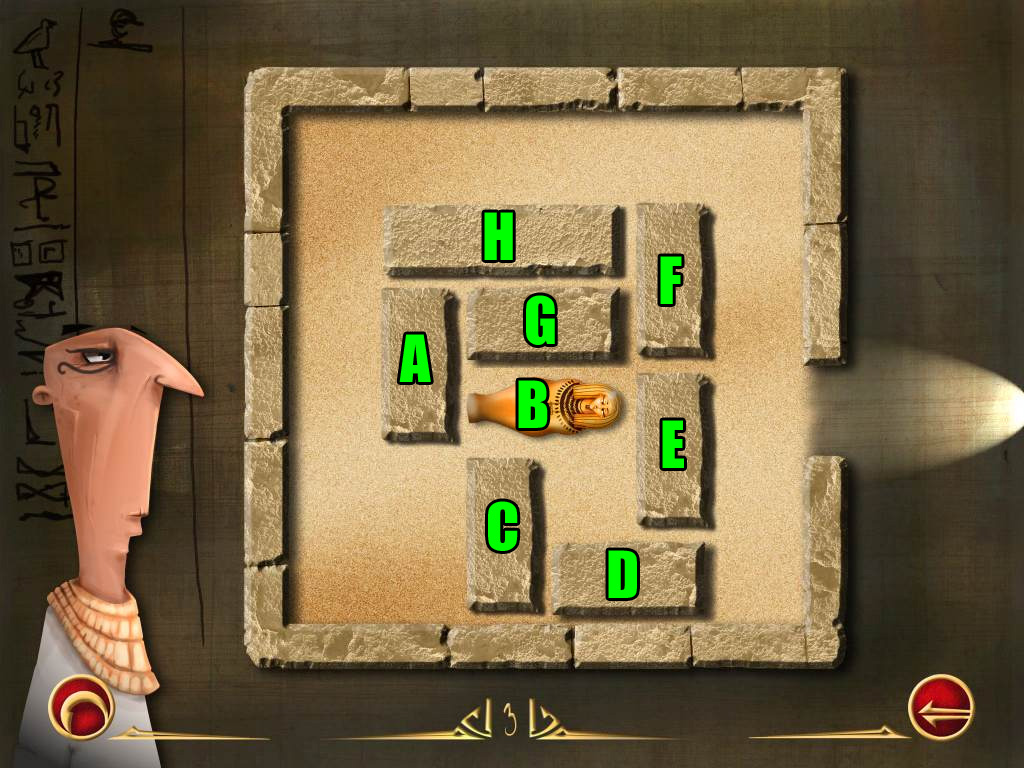
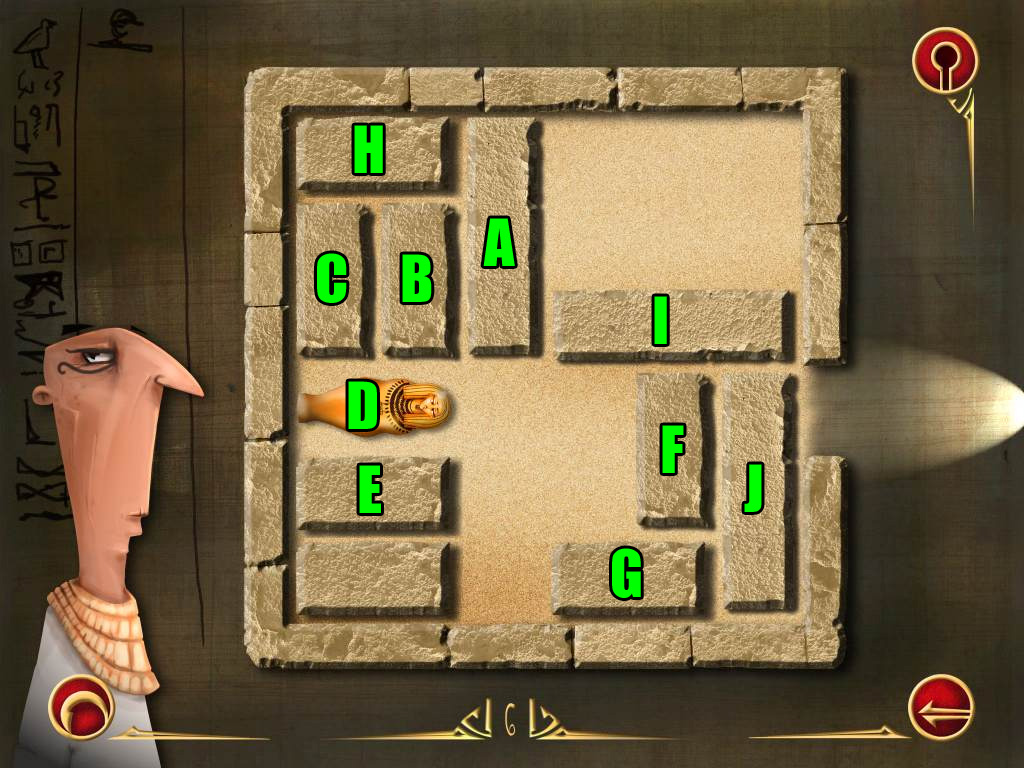
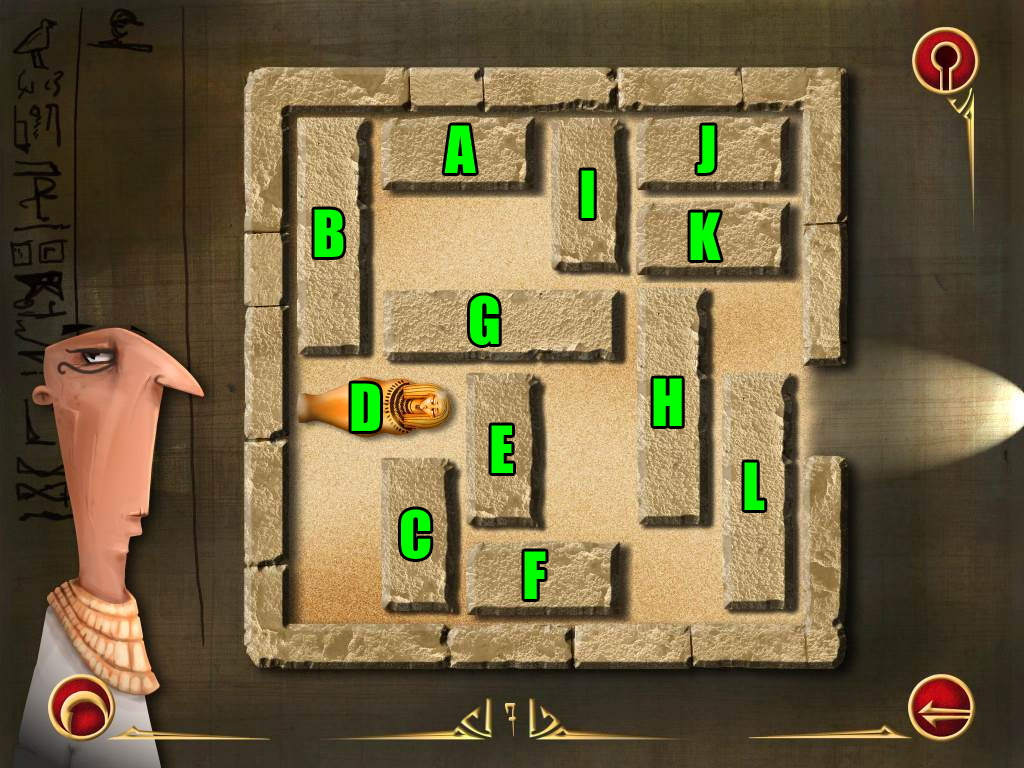
Level 1
Screenshot.
Slide Block A to the left.
Slide Block B up.
Slide Block C up.
Slide Sarcophagus D right to complete the puzzle.
Solution.
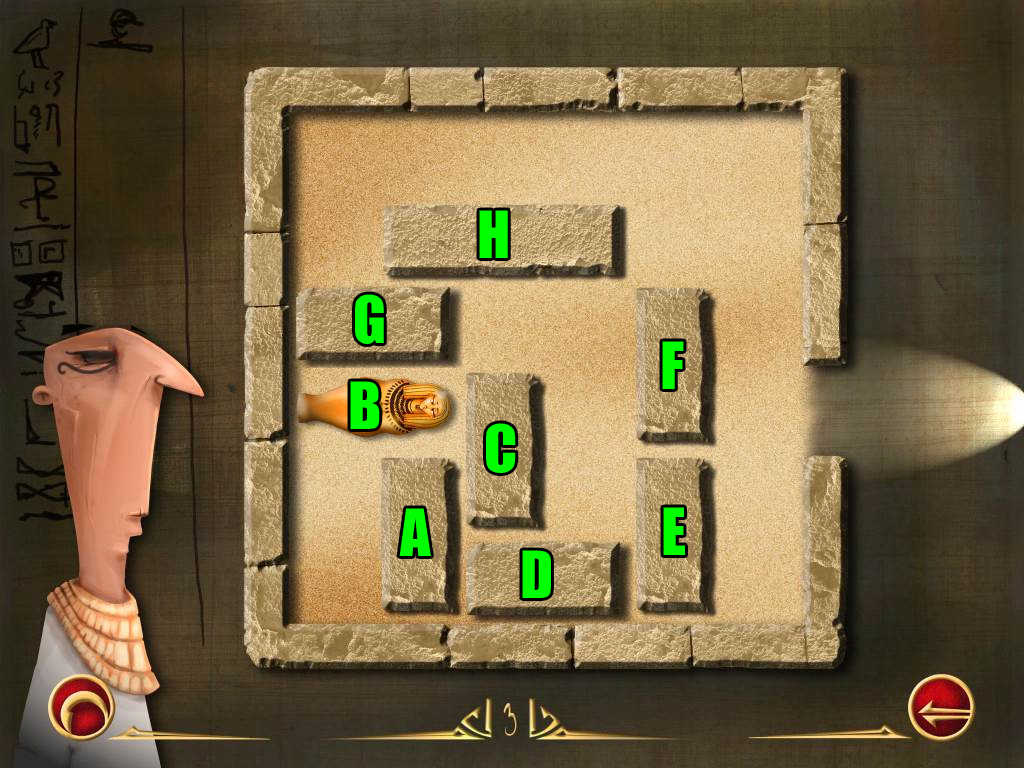
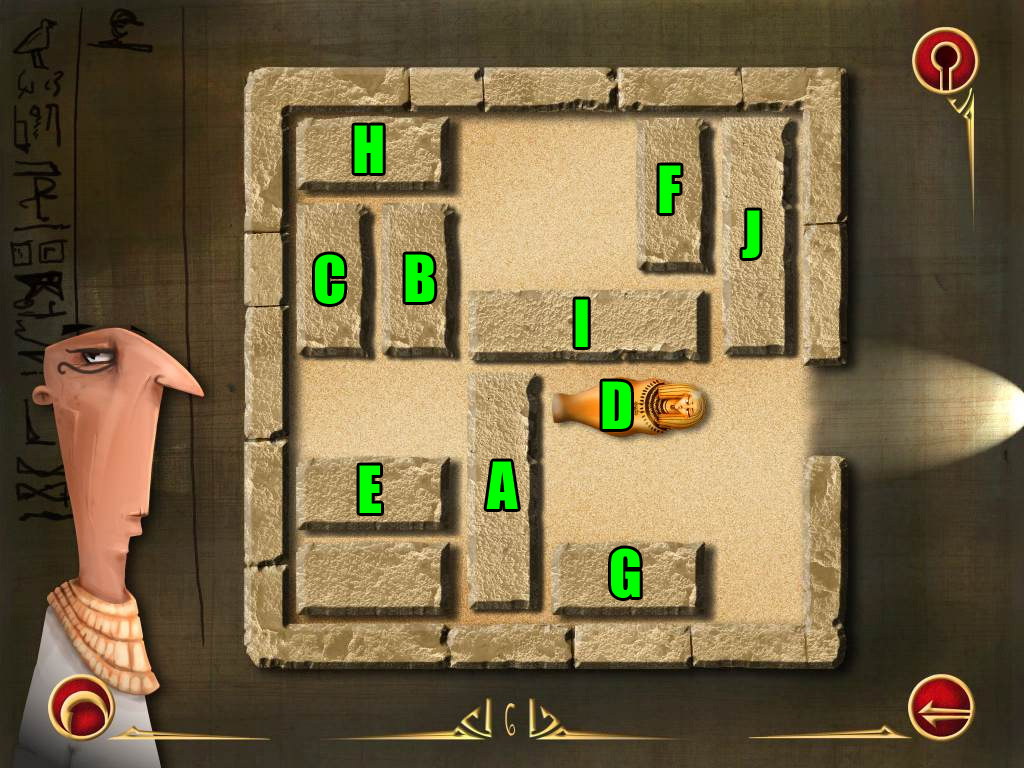
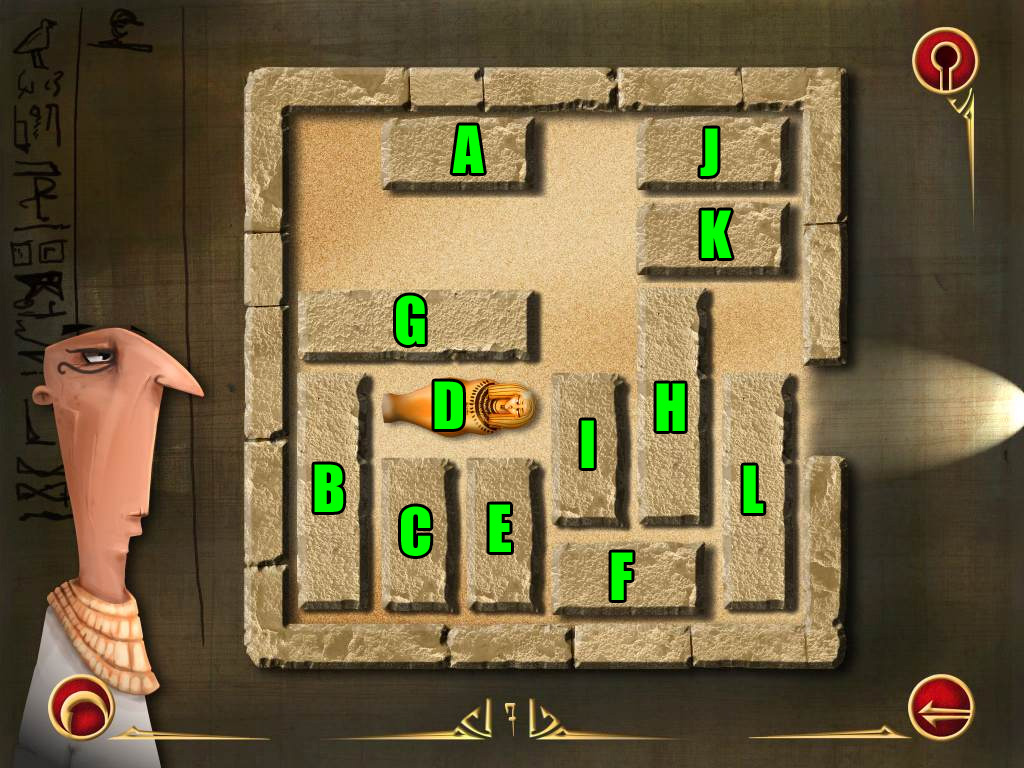
Level 2
Screenshot.
Slide Block A down.
Slide Block B left.
Slide Block C up.
Slide Block D up.
Slide Block E left.
Slide Block F down.
Slide Sarcophagus G right to complete the puzzle.
Solution.
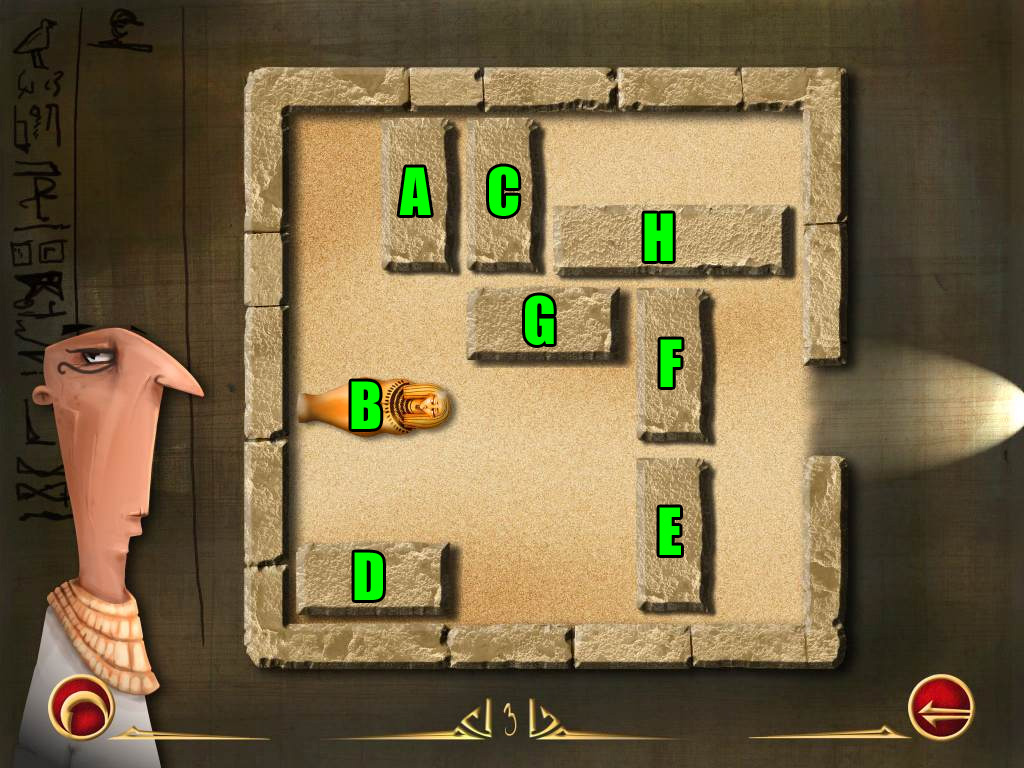
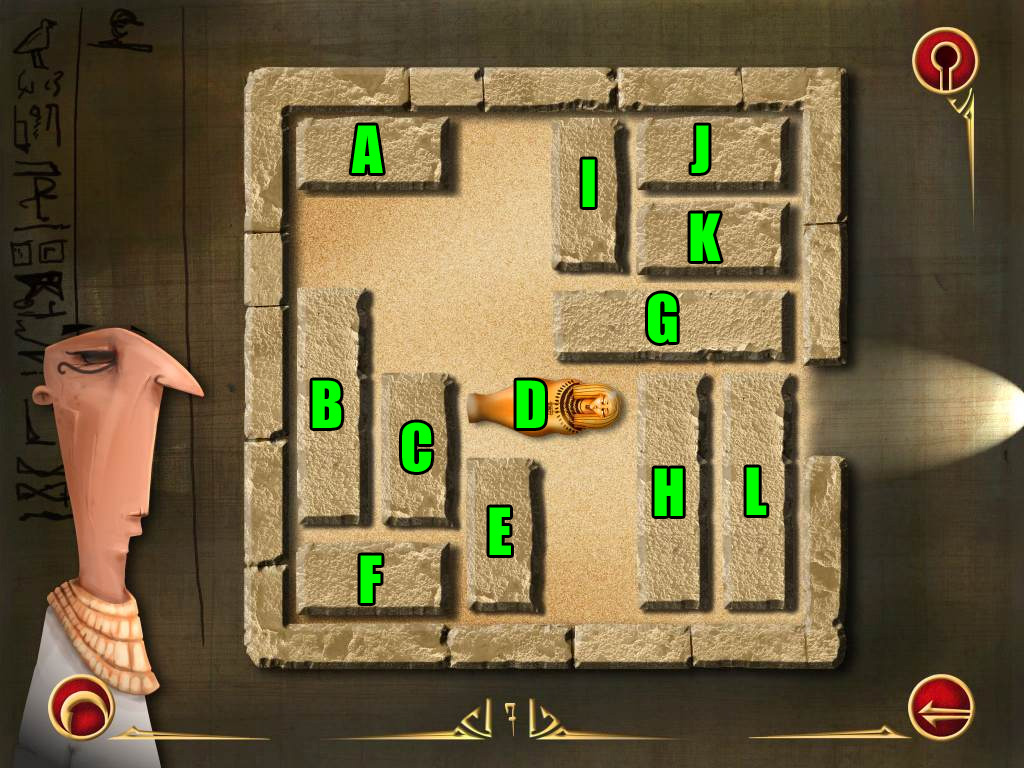
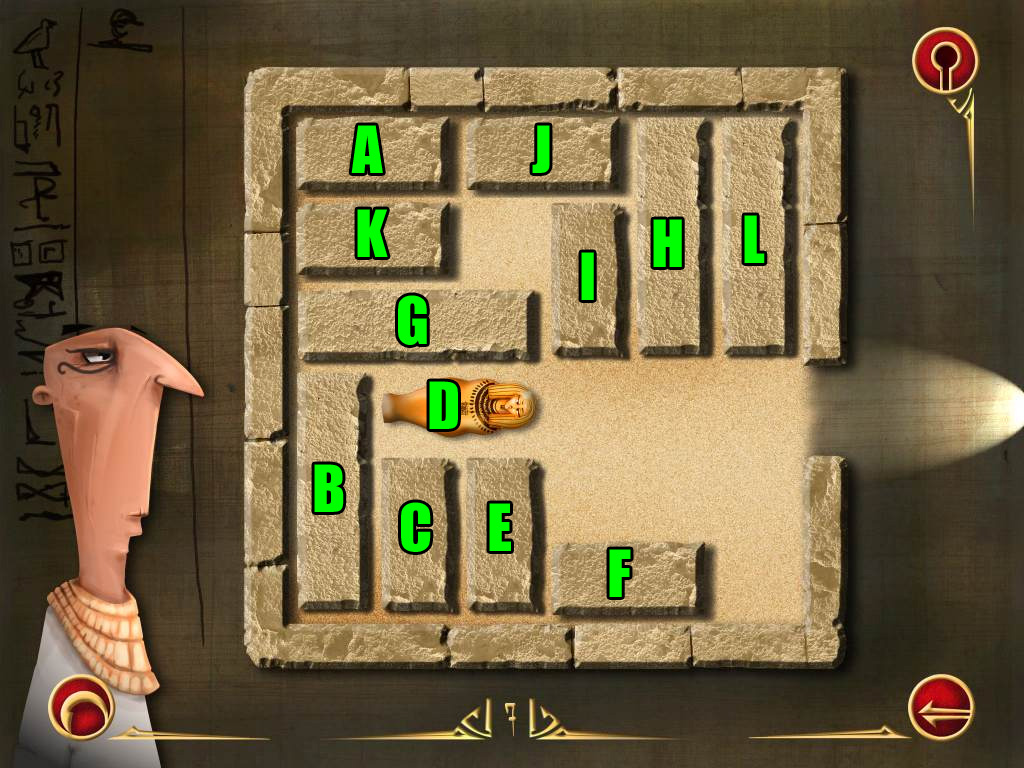
Level 3
Screenshot.
Slide Block A down.
Slide Sarcophagus B left.
Slide Block C up.
Slide Block D left.
Slide Block E down.
Slide Block F down.
Slide Block G left.
Solution Part 1.
Slide Block H right.
Slide Block C up.
Slide Sarcophagus B right.
Slide Block G right.
Slide Block A up.
Slide Sarcophagus B left.
Slide Block D left.
Solution Part 2.
Slide Block G left.
Slide Block C down.
Slide Sarcophagus B right.
Slide Block G right.
Slide Block A down.
Slide Block H left.
Slide Block F up.
Slide Sarcophagus B right to complete the puzzle.
Solution Part 3.
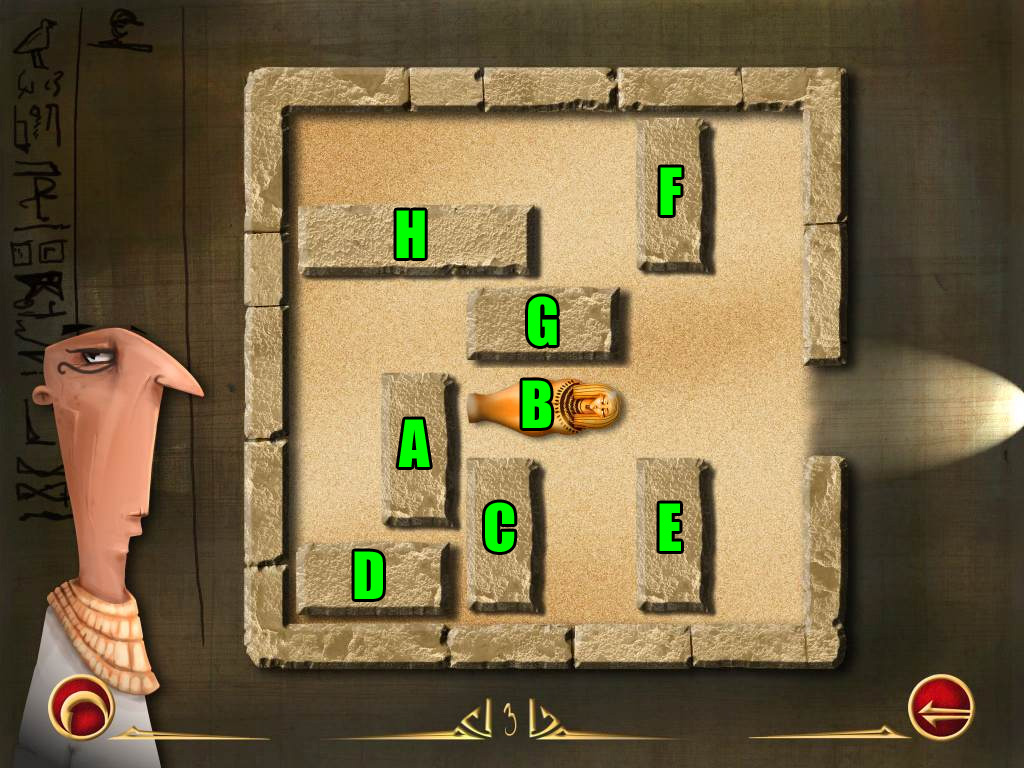
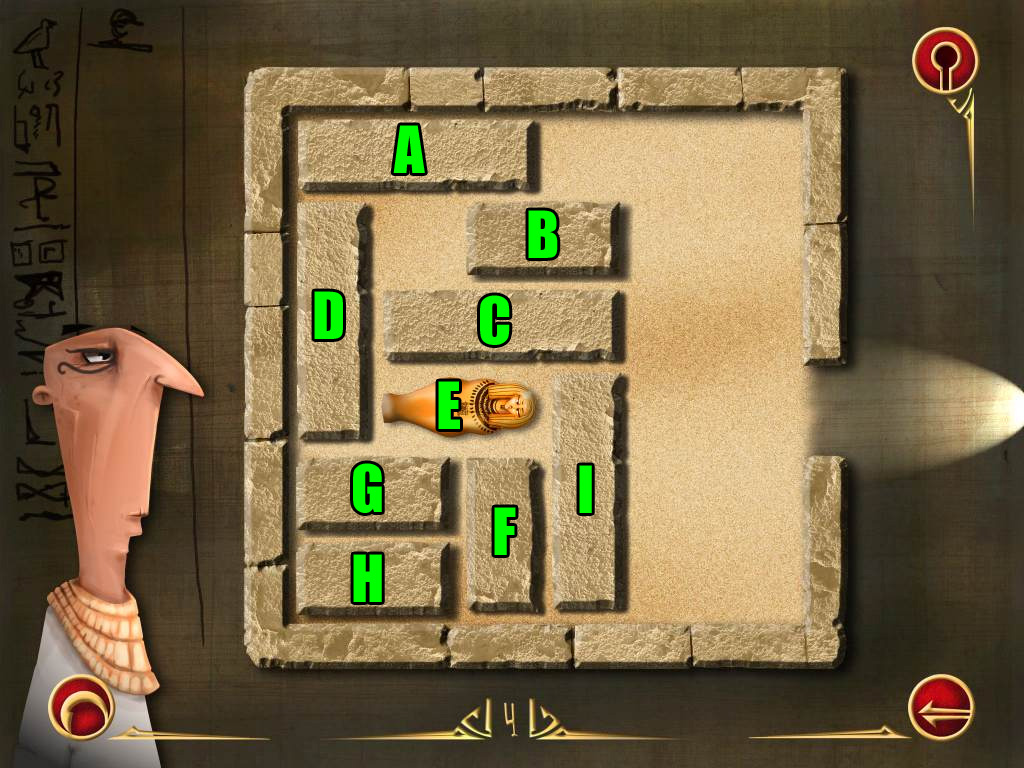
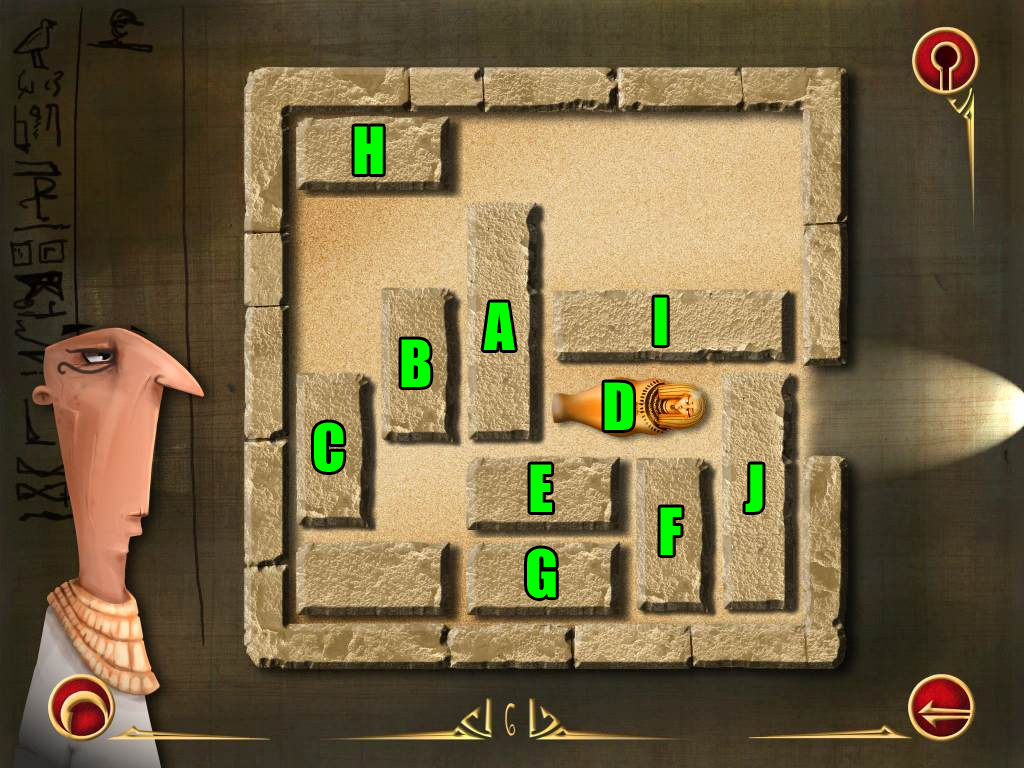
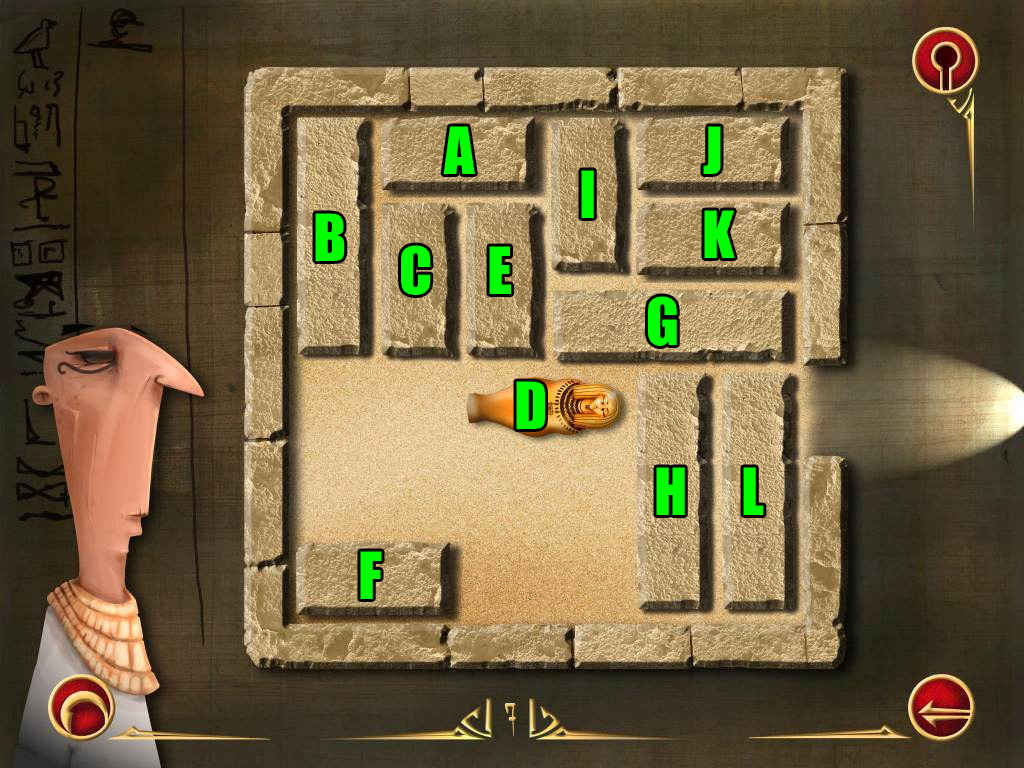
Level 4
Screenshot.
Slide Block A right.
Slide Block B right.
Slide Block C right.
Slide Block D up.
Slide Sarcophagus E left.
Slide Block F up.
Solution Part 1.
Slide Sarcophagus E right.
Slide Block G right.
Slide Block H right.
Slide Block D down.
Slide Block C left.
Slide Block I up.
Solution Part 2.
Slide Block G right.
Slide Block H right.
Slide Block I down.
Slide Block C right.
Slide Block D up.
Slide Sarcophagus E left.
Solution Part 3.
Slide Block F down.
Slide Sarcophagus E right.
Slide Block D down.
Slide Block A left.
Slide Block C left.
Slide Block I up.
Slide Sarcophagus E right to complete the puzzle.
Solution Part 4.
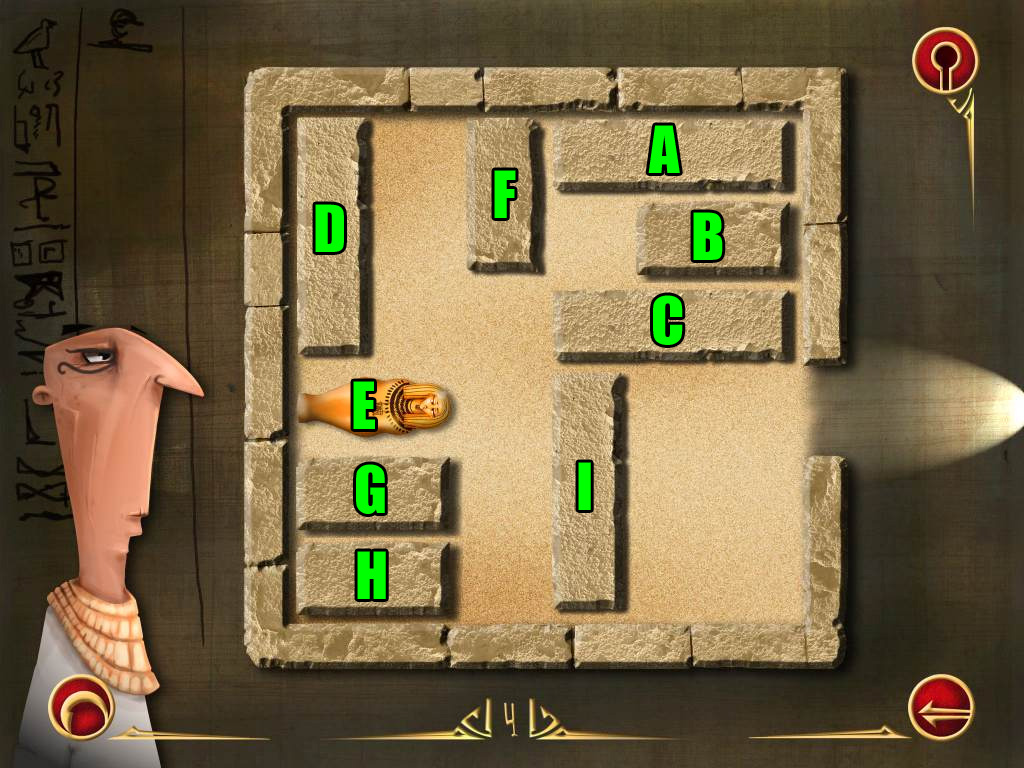
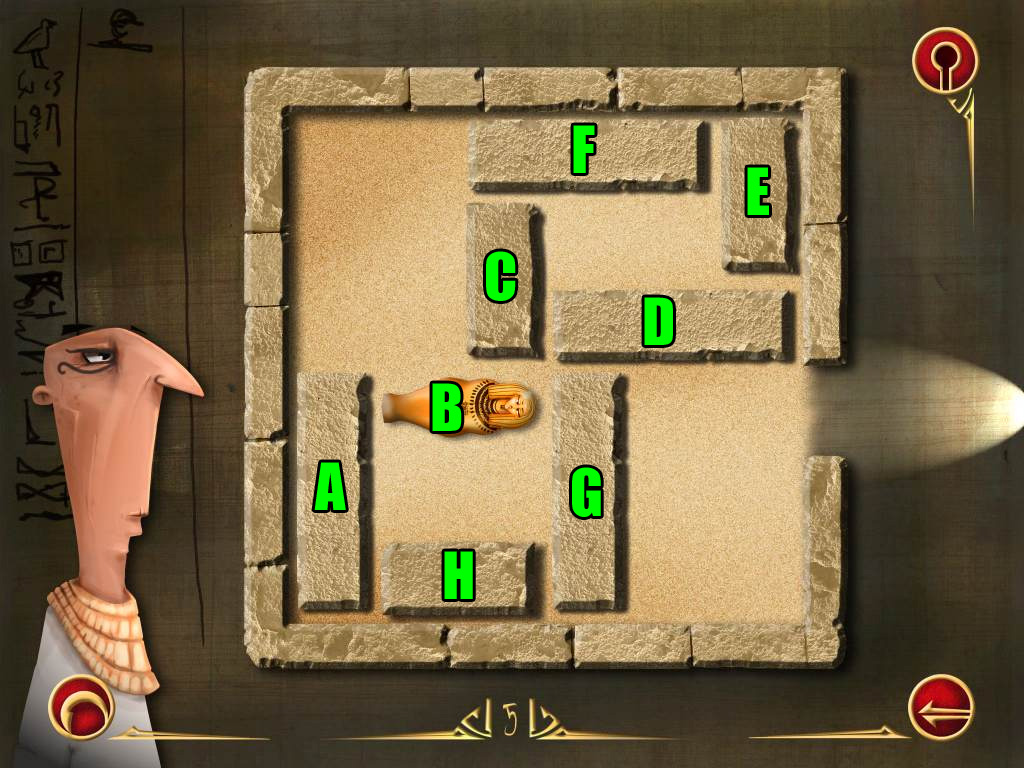
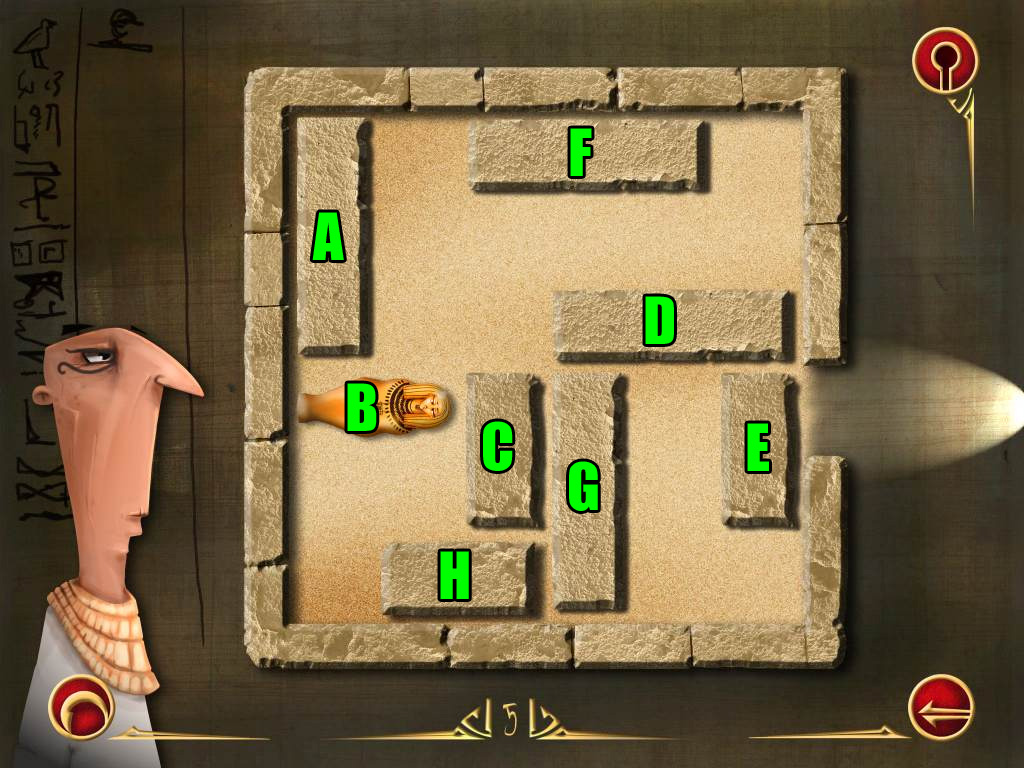
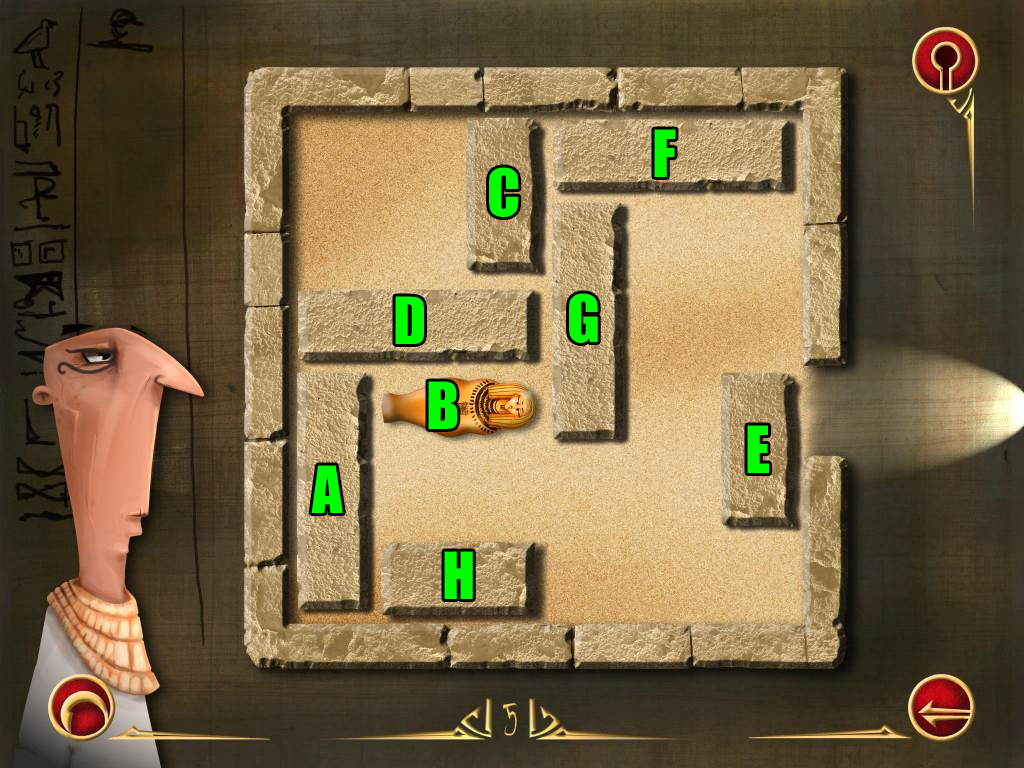
Level 5
Screenshot.
Slide Block A up.
Slide Sarcophagus B left.
Slide Block C down.
Slide Block D left.
Slide Block E down, one space away from the bottom.
Slide Block D right.
Solution Part 1.
Slide Block F right.
Slide Block C up.
Slide Block Sarcophagus B right.
Slide Block A down.
Slide Block D left.
Slide Block G up.
Solution Part 2.
Slide Block H right.
Slide Block G down.
Slide Block D right.
Slide Block A up.
Slide Sarcophagus B left.
Slide Block C down.
Solution Part 3.
Slide Block Sarcophagus B right.
Slide Block A down.
Slide Block D left.
Slide Block F left.
Slide Block G up.
Slide Block E up.
Slide Block Sarcophagus B right to complete the puzzle.
Solution Part 4.
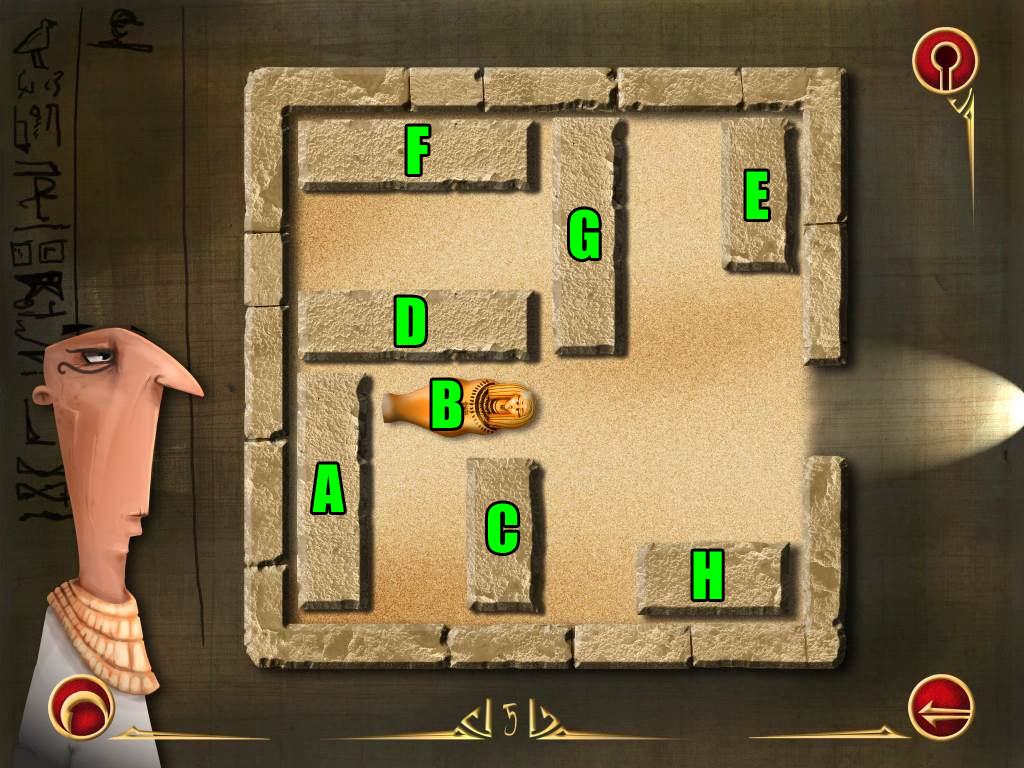
Level 6
Screenshot.
Slide Block A up.
Slide Block B up.
Slide Block C up.
Slide Sarcophagus D left.
Slide Block E left.
Slide Block F up.
Slide Block G right.
Solution Part 1.
Slide Block A down.
Slide Block H right to the middle of top row.
Slide Block B up.
Slide Block I left.
Slide Block F up.
Slide Block I right.
Slide Block B down.
Solution Part 2.
Slide Block H left.
Slide Block A up.
Slide Sarcophagus D right.
Slide Block A down.
Slide Block I left.
Slide Block J up.
Slide Sarcophagus D right to complete the puzzle.
Solution Part 3.
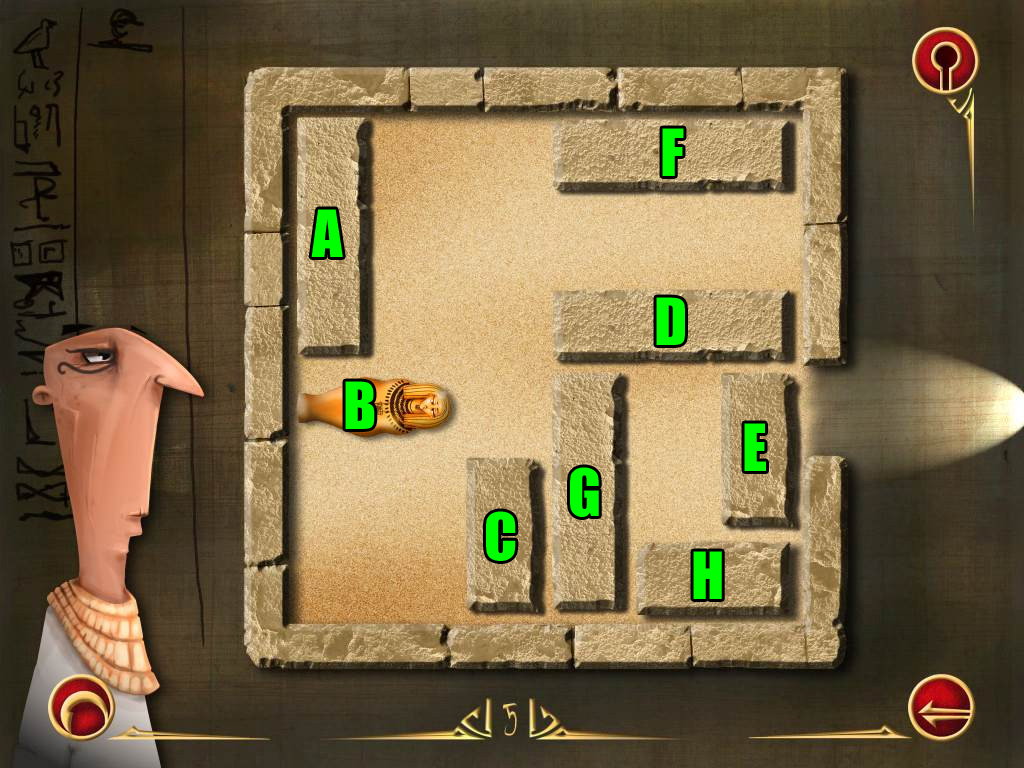
Level 7
Screenshot.
Slide Block A right.
Slide Block B up.
Slide Block C up.
Slide Sarcophagus D left.
Slide Block E up.
Slide Sarcophagus D right.
Solution Part 1.
Slide Block F right.
Slide Block C down.
Slide Sarcophagus D left.
Slide Block E down.
Slide Block G left.
Slide Block H up.
Solution Part 2.
Slide Block F right.
Slide Block E down.
Slide Sarcophagus D one space to the right.
Slide Block B down.
Slide Block G left.
Slide Block I down.
Solution Part 3.
Slide Block A left.
Slide Block J left.
Slide Block K left.
Slide Block H up.
Slide Block I up.
Slide Block L up.
Slide Sarcophagus D right to complete the puzzle.
Solution Part 4.
More levels coming soon!
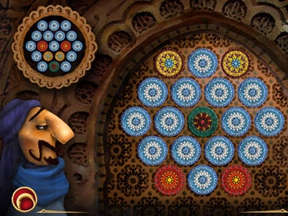
Marrakech (Arabia)
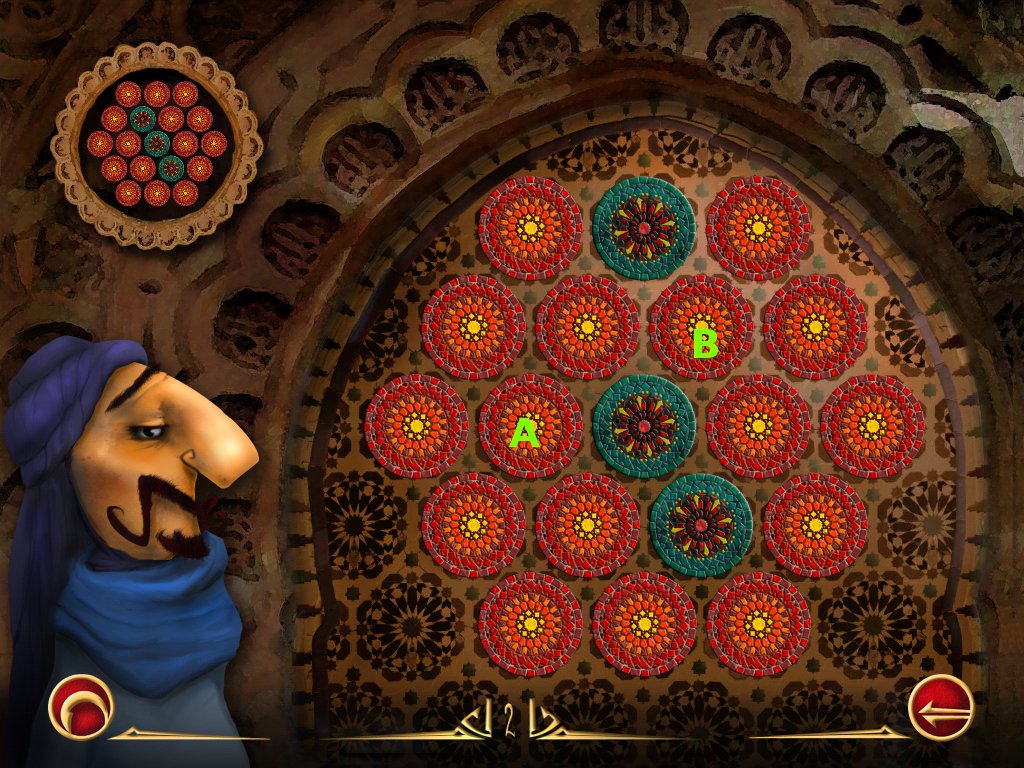
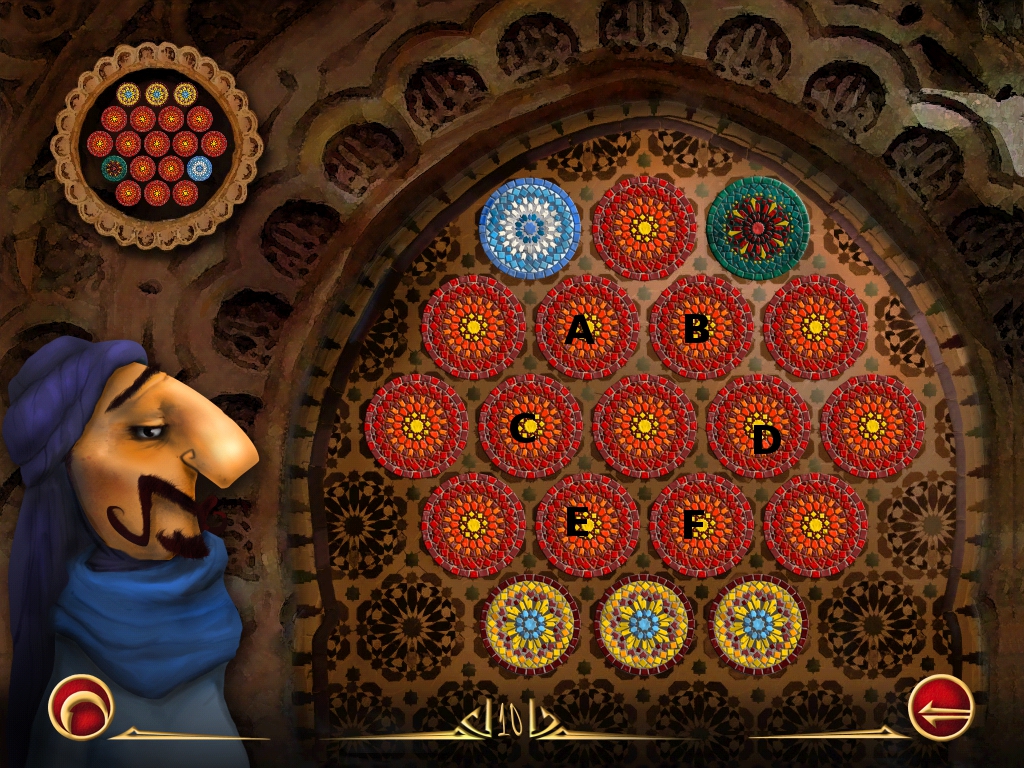
Mohammed Ben Karim wants you to restore all of the arabesques to their original design, and then he will give you his map piece.
You will need to move the circular elements of the arabesque in order to move the highlighted pieces to match the sample.
Keep in mind that there are various circulars in the design, so check the screenshots for the solutions.
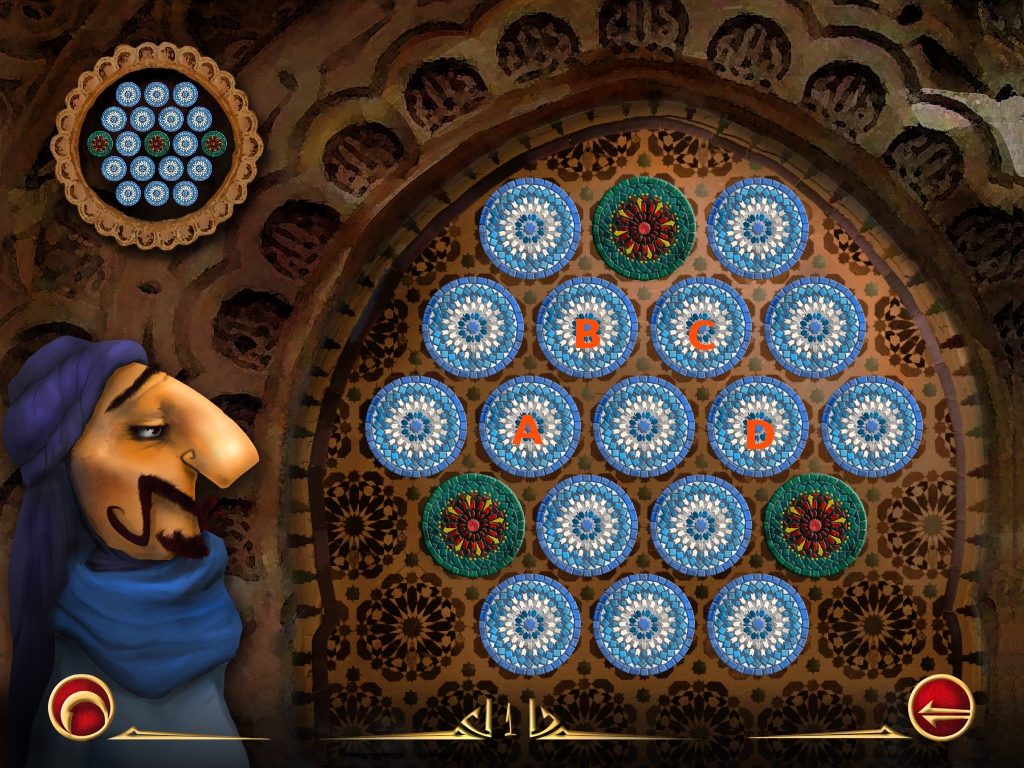
Refer to the screenshot below and press the buttons in the following order: A-D-D-C-C-D-B-B
Screenshot
Refer to the screenshot below and press the buttons in the following order: A-B-B-B-A-A-A-A-A-B
Screenshot
Refer to the screenshot below and press the buttons in the following order: A-A-A-A-C-C-C-C-B-B-C-C-B-B-B-B-B
Screenshot
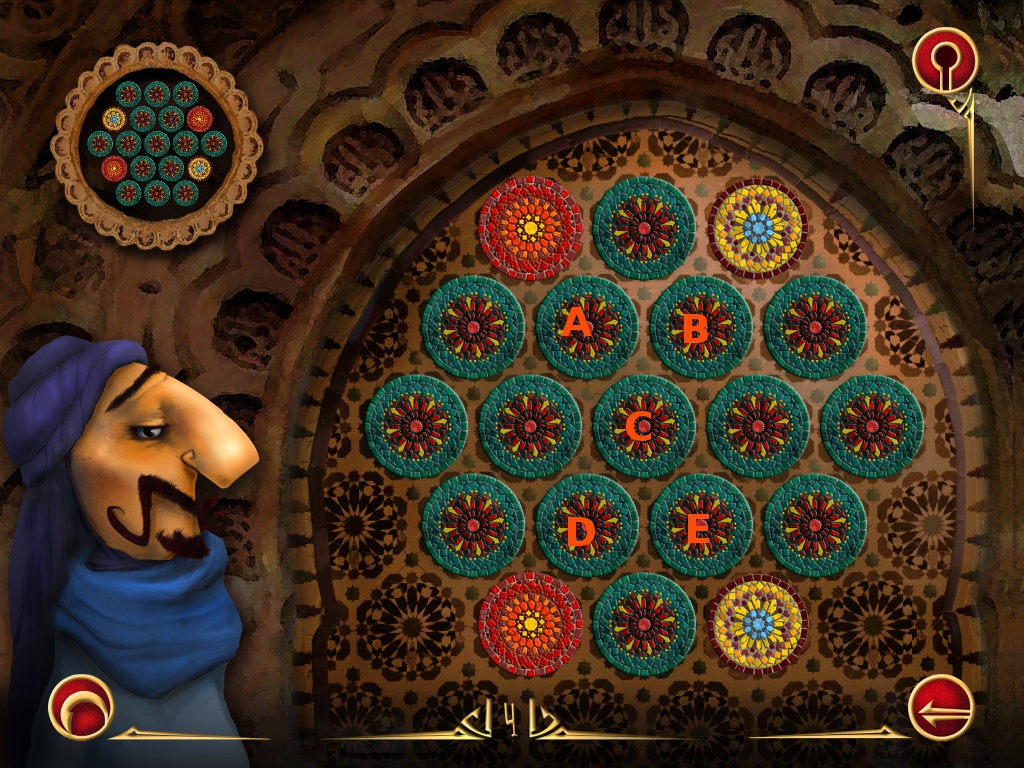
Refer to the screenshot below and press the buttons in the following order: E-E-C-A-B-B-E-D
Screenshot
Refer to the screenshot below and press the buttons in the following order: B-C-C-D-A-D-D-A-D
Screenshot
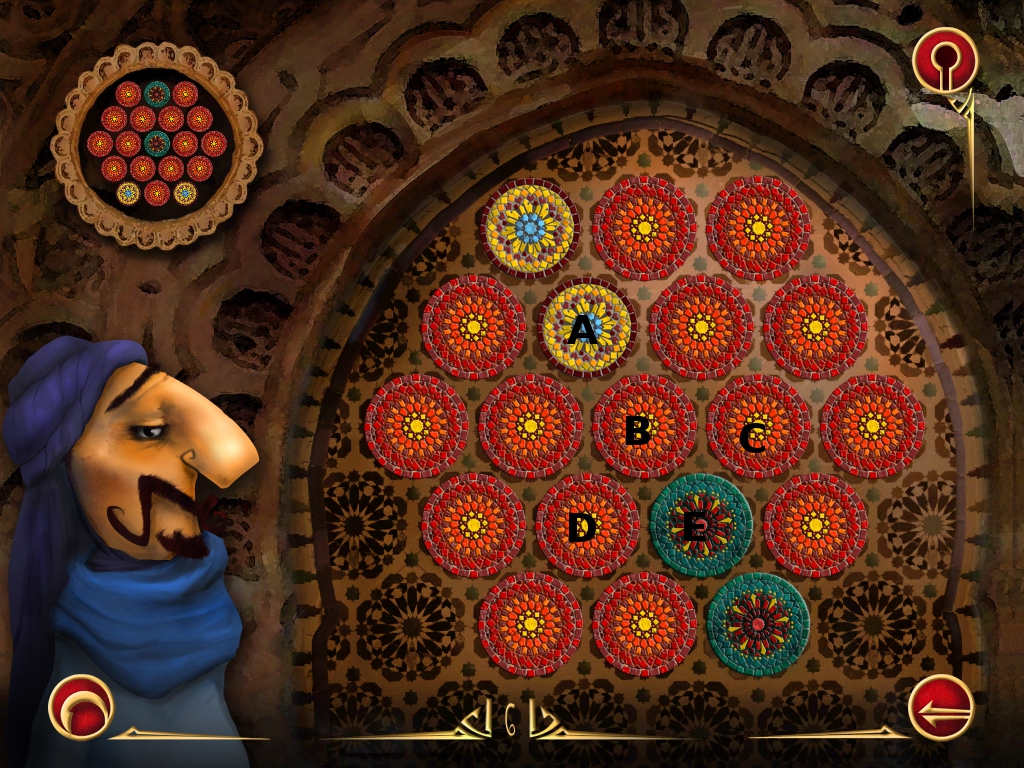
Refer to the screenshot below and press the buttons in the following order: B-B-A-A-A-E-E-E-D-C
Screenshot
Refer to the screenshot below and press the buttons in the following order: B-B-C-B-D-D-A-A-A-B-B-B-D-D-D-C-C
Screenshot
Refer to the screenshot below and press the buttons in the following order: C-C-D-D-D-D-A-A-B-B-A-B-B-B
Screenshot
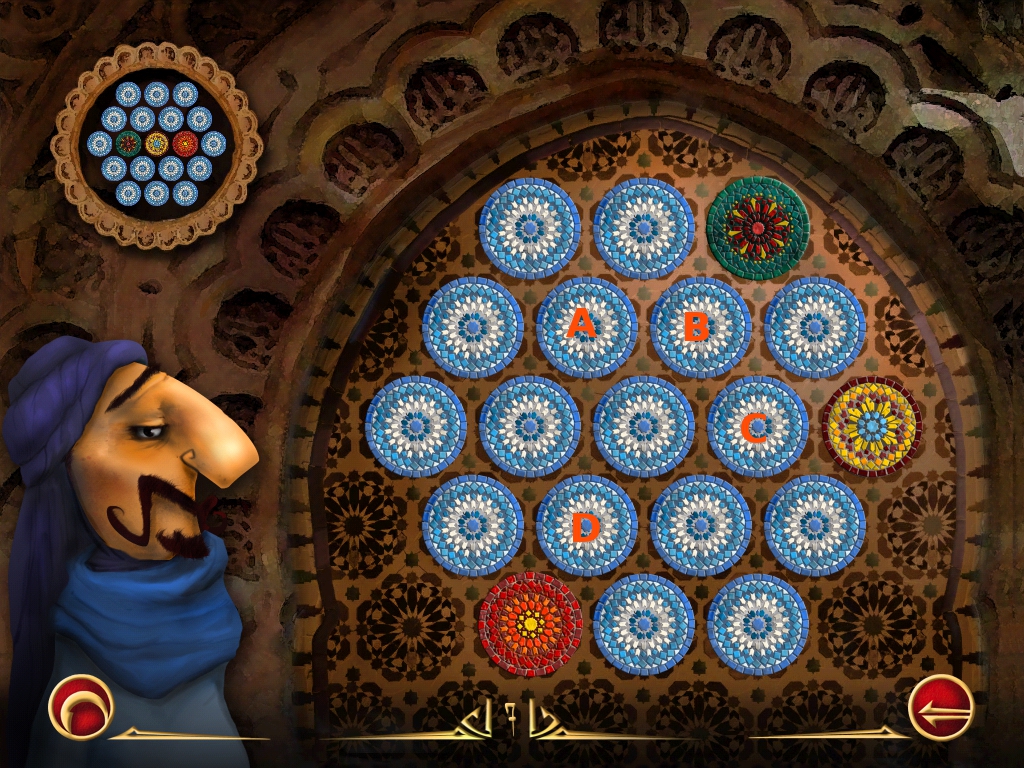
Refer to the screenshot below and press the buttons in the following order: B-B-C-C-C-A-A-A-A-A
Screenshot
Refer to the screenshot below and press the buttons in the following order: E-E-F-F-A-A-D-B-B-C-F-C-C-A-B-F-F-E-E-F-F
Screenshot
Coming soon!
Refer to the screenshot below and press the buttons in the following order:F-E-E-F-D-C-D-D-B-B-B-B-B-A-D-F-D-A-D-D-D-D-D
Screenshot
Coming soon!
Coming soon!
Coming soon!
Coming soon!
Paris (France)
Colette and her sisters of the Order of St. Augustine are praying that you can reproduce all of the patterns perfectly to complete this mission.
You must choose the shapes you need from those shown under the blank stained glass, then you need to drag them to the gray section of the circle to arrange them.
Note: All solutions given from the middle of the circle outwards. Alignment is important in this puzzle. You may have the shapes and colors correct, but if the tip of a triangle is pointing at 4 o'clock instead of 3 o'clock, you will not pass the level. Some times you just have to fiddle with it until you get it exactly right.
Solid yellow triangle
Solid red square
Solid purple circle
Empty red square
Green ring
Empty yellow square
Empty gray square
Solid purple triangle
Empty blue square
Solid blue square
Solid green square
Yellow ring
Red ring
Green ring
Solid yellow square
Blue diamond
Solid green circle
Yellow ring
Blue ring
Solid blue square
Yellow triangle
Blue ring
Blue diamond
Empty yellow square
Note: Although the red shows in the middle, it's easier to put the grey circle first.
Solid grey circle
Red diamond
Empty grey square
Grey ring
Solid grey square
Empty grey square
Empty grey square
Grey triangle
Empty purple square
Empty grey square
Solid yellow square
Purple triangle
Solid blue square
Solid yellow circle
Grey ring
Note: You may have to adjust which goes on top of what by tapping.
Solid grey square
Solid green square
Solid yellow square
Solid blue square
Solid purple square
Red ring
Solid red square
Grey ring
Empty red square
Solid yellow square
Red triangle
Empty yellow square
Empty grey square
Yellow ring
Red triangle
Solid red square
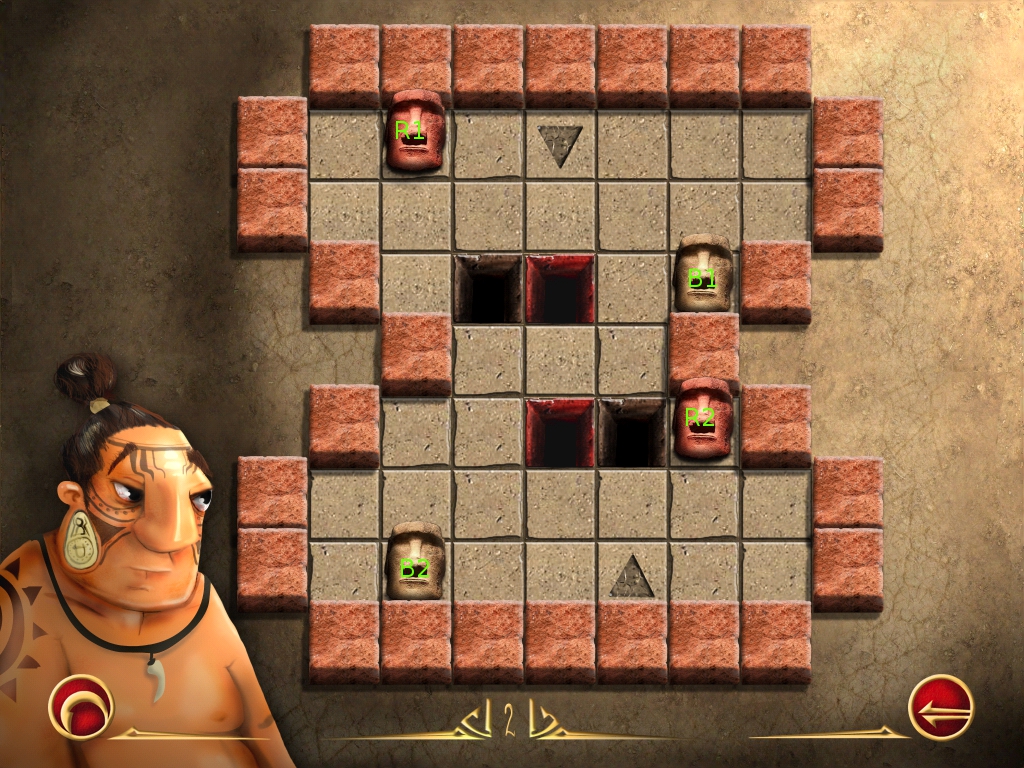
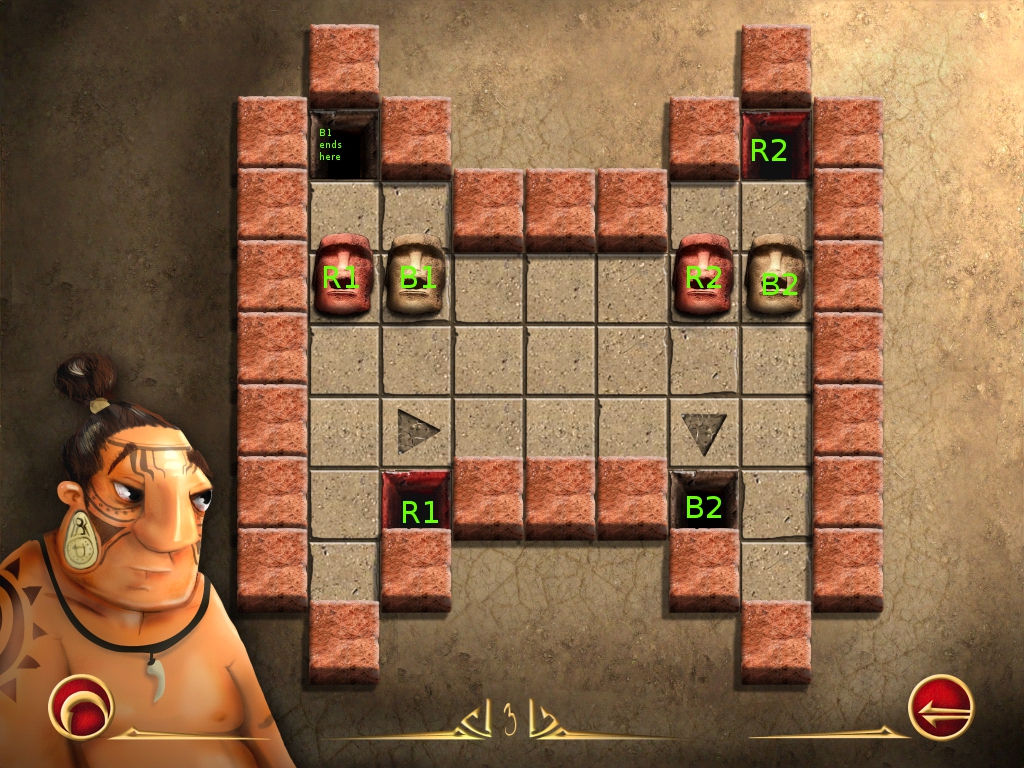
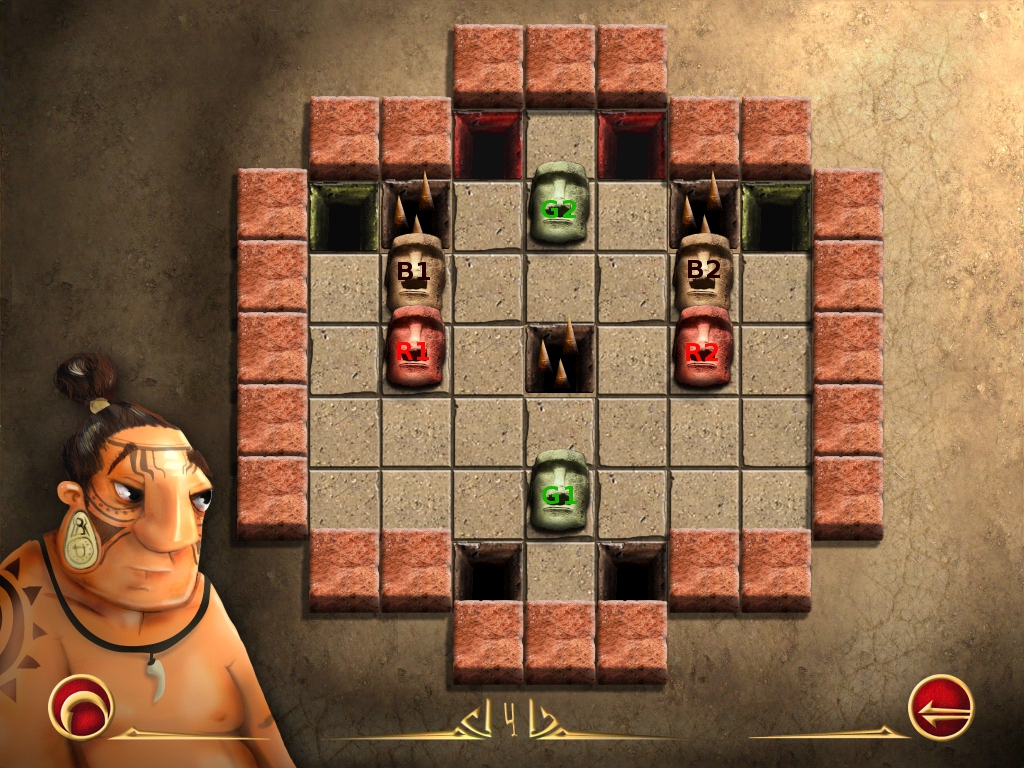
Rapa Nui (Easter Island)
Uru Kenu is your host for this city, and he needs you to position all the statues (moai) in just the right places.
You can move the moai either horizontally or vertically.
Once the statue is in motion, it can only be stopped by the boundary of the board, a stone barrier, or another statue that is not in its final place.
Be careful that you do not fall into a trap or a place that is already allocated for a different statue.
See the screenshots for the solutions.
Tutorial
Refer to the screenshot below and follow these instructions: R1 right. B1 left. B2 right. R2 left.
Screenshot
Refer to the screenshot below and follow these instructions: R2 up-right-up. B1 up-left. B2 left-down. R1 right. B1 down. R1 left-down-right. B1 up.
Screenshot
Refer to the screenshot below and follow these instructions: R2 down-left-up. B2 down-left-down. R1 down-right-up. B1 down-right. G1 up-left-down-left-up. B1 down. G2 right-up.
Screenshot
Thanks to Kimberly, Trinn, and Jazz for the walkthrough!
Posted by: Mike |
November 2, 2012 11:36 AM
|
November 2, 2012 11:36 AM