

Sherlock Holmes: Crimes and Punishments
Platform: Windows
![]() Holmes and Watson are back for more, and things are going to get messy in Frogwares' mystery adventure game Sherlock Holmes: Crimes and Punishments as you take on the role of the legendary and borderline insufferable detective solving a series of challenging (and sometimes gruesome) cases. Six cases, to be exact, each centering on a very different crime. A violent murder, a baffling disappearance, a daring theft and more... all of them will require Sherlock's unique mind and talents to solve. With the help of his own unique and formidable brain that will allow him to see things others don't as well as perform a variety of other useful abilities, you'll guide Holmes to uncover not just the truth behind the crimes committed by interrogating witnesses, solving puzzles, and tracking down evidence, but you'll also decide what, ultimately, you'll do with the perpetrator... as long as you can figure out who it is, since it's perfectly possible to accuse the wrong individual. While unfortunately Creepy Watson is a thing of the past, Crimes and Punishments still manages to deliver an engaging, carefully crafted adventure game with high production values and an immersive atmosphere.
Holmes and Watson are back for more, and things are going to get messy in Frogwares' mystery adventure game Sherlock Holmes: Crimes and Punishments as you take on the role of the legendary and borderline insufferable detective solving a series of challenging (and sometimes gruesome) cases. Six cases, to be exact, each centering on a very different crime. A violent murder, a baffling disappearance, a daring theft and more... all of them will require Sherlock's unique mind and talents to solve. With the help of his own unique and formidable brain that will allow him to see things others don't as well as perform a variety of other useful abilities, you'll guide Holmes to uncover not just the truth behind the crimes committed by interrogating witnesses, solving puzzles, and tracking down evidence, but you'll also decide what, ultimately, you'll do with the perpetrator... as long as you can figure out who it is, since it's perfectly possible to accuse the wrong individual. While unfortunately Creepy Watson is a thing of the past, Crimes and Punishments still manages to deliver an engaging, carefully crafted adventure game with high production values and an immersive atmosphere.
 For the most part, gameplay is about traveling around different maps, exploring locations, interrogating people, searching for clues, and playing dress-up with Holmes' wardrobe and makeup table. Sherlock has a variety of methods for pulling apart evidence, from assembling a mental picture based on scent to finding correlations between things you've spotted, but you'll need to guide him and point everything out because, well... video game. Holmes himself controls with [WASD] to move around and the mouse to interact whenever a prompt appears. By pressing [T] you can toggle Sherlock's keen sense of observation to help spot clues others have missed, recording them as evidence. When talking to people, you may be required to quickly press a key before time runs out, giving you the chance to choose the piece of evidence you've observed that will back up your statements. Arguably the most important tool in Sherlock's arsenal, however, is Baker Street itself, which you'll have to return to frequently to consult with our hero's formidable archives, make use of chemistry, change disguises, exasperate Watson, and more.
 Hitting [B] will open a menu that will allow you to combine elements, observations, clues, and people to form deductions that will drive your case. This allows you to construct a psychological map of connections, and the way you choose to interpret them will impact the outcome of a case. You could, for instance, choose to believe an item at a murder scene belonging to someone is merely circumstantial evidence, or clear proof that person is a suspect, and combining that train of thought with a clear motive and means will allow you to accuse that suspect of the crime. If a node turns red, it means the deduction you've made conflicts something you've already established, such as claiming someone is the murderer despite previously tagging them as having no motive. You can swap out and change any of these elements at any time, but when you're finally ready to decide who comitted the crime, you then have to decide how you want to do so. Do you accuse them of premeditated murder? Were they merely protecting themselves? Lead astray by someone else?
 Analysis: Yeah, I admit, Crimes and Punishments won me over a little right from the get-go with its snappy little opening cinematic like I was watching House or Hannibal, and then the way the very first gameplay had me play as Watson dodging wild shots around the furniture as a blindfolded Holmes took potshots at vases for funsies. It established a certain amount of character, tone, and charm, and when it popped up with a little visual representation of how Holmes could know who was coming up his stairs before they even came into the room, I was hooked. Having a scene in which you get to conduct harpoon experiments on a pig carcass, Mythbusters-style, was just the icing on the cake. Make no mistake, this Sherlock is closer to a more reserved and smug version of Robert Downey Jr's interpretation of the iconic detective than Steven Moffat's, but it's still nice to see him depicted as a brilliant yet rude and socially distant jerkward instead of a brilliant, aloof, perfect ladies' man as some interpretations have done.
Though the tank-driven controls are still, ehhh, clunky to be charitable, Crimes and Punishments is actually a very solid and effortlessly playable game. Though it initially seems like the game piles a bit too many different minor gameplay elements on you when you're trying to hunt for clues or make certain deductions, it's actually a good way to illustrate the way Sherlock's mind works and how he constructs his conclusions and connections. Some of which, incidentally, seem like rather large leaps of deductive reasoning, but I suppose that's why he's Sherlock and I'm writing this in my novelty kitty pajamas. The game is good at nudging you where it wants you to go and never goes quite so far as holding your hand, though it never quite feels like it develops enough teeth. There's no penalty for failure, so if you give a character the wrong answer the game just reloads that dialogue option and lets you try again until you get it. Puzzles will even let you skip them without much prompting. It makes for a game that's accessible to everyone, to be sure, but it also would have been nice to have multiple difficulty settings to avoid all the pop-ups and guidance.
 Each crime and scenario is distinct and well-crafted with layers of depth and possible suspects. Though you'll find there's a lot of backtracking involved, the game is great at providing you with a brisk pace and keeping you involved with tasks that feel critical to your work, rather than acting as simple busywork to pad the length. Each case has a distinct cast of characters, and offers up new locations as well, keeping the game fresh the whole way. Occasionally it feels like the game's "best" outcome for each case is perhaps a little too predictable and boring compared to some of the incorrect solutions, and several puzzles, such as the locks, are repeated throughout the game. Most cases will likely only take around two hours or so to complete, despite gradually increasing in complexity, and some of them are easily more cozy than others, though it's fun to see how your decision in one case may be referenced in another.
Crimes and Punishments is, it must be said, an absolutely gorgeous, gorgeous game from every conceivable angle. Most areas are limited in their interaction to things relating directly to your investigation, but you can still spend a long time just wandering around them and admiring all the detail that went into crafting every single environment. Sure, there's a badly mutilated corpse pinned to the wall over there, but gosh look at the wee little garden and the way the sunlight comes in through the windows! Characters tend to have difficulty expressing emotion, unfortunately, with faces that don't quite move or flex enough to really bring them to life, though the voice acting is on the whole very well done. (Which helps to make up for the numerous typos and errors in the subtitles, sadly.)
Despite its flaws, Sherlock Holmes: Crimes and Punishments is still one of the best adventure games to come along in a long, long time. The passion behind the subject matter is clear, with intriguing cases to solve and stunning locales to explore, and the writing is top-notch. It's the sort of game that's likely going to take you a lot longer than an evening to play through, but you'll do your best to burn the midnight oil with it because, like any good mystery, it's hard to put down. Crimes and Punishments is a Sherlock game to be proud of, balancing wit and inventiveness with the more horrific aspects of its crimes, and a worthy addition to any fan's archives indeed.
![]() Windows:
Windows:

![]() Mac OS X:
Mac OS X:
Not available.
Try Boot Camp or Parallels or CrossOver Games.


Walkthrough Guide
(Please allow page to fully load for spoiler tags to be functional.)
Sherlock Holmes: Crimes and Punishments Walkthrough
(Part 1 - Case 1: Black Peter and Case 2: Riddle on the Rails)
Case 1 - Black Peter
Part 1 - Beginning at 221B Baker Street
Move the cursor over the right side of the sofa.
Click the icon that appears over the sofa to take cover behind it.
Next, move the cursor above the bear skin rug and to the right of the table and click the icon to take cover again.
Lastly, click on Sherlock's leg to approach him.
After the cinematic, press the [Tab] key to open your Casebook.
Select the "Tasks" tab of the Casebook to have a look at your current goals.
We'll get to investigating Peter Carey and Woodman's Lee soon, but first let's focus on the third task on the list: pick out a suit to wear.
Walk forward and open the door on the right to enter Holmes' room.
Open the wardrobe to view the available outfits and costumes.
Click the right or left arrows at the lower right corner of the screen to cycle through the outfits, then select any one of suits and press [Esc] to put the suit on.
Additionally, you can use the Make-up Table to change your hairstyle, facial hair, and glasses, but it isn't necessary at this time to do so.
Once you're ready, open the Casebook and select the green Map tab to view a map of London and its surrounding areas. Click the Woodman's Lee icon to travel to that location.
Part 2 - Join Lestrade at Woodman's Lee
As soon as you arrive, Inspector Lestrade will call to you from the upper level of the garden. Follow the stone path and walk up the stairs to join him.
On your way, there are two pieces of evidence you should examine.
First, you can click the patch of plants on either side of the path to inspect the Garden, which is added to your list of Evidence in the Casebook.
Second, on the left side of the path near the constable with the magnifying glass you will find a set of footprints. Press the [T] key to use Sherlock's investigative talent View, turning the screen black and white.
Hold the cursor over the Footprints for a few seconds until they flash and glow yellow, then click the prints to add the Unidentified Footprints to your Evidence.
Note that a question mark icon remains beside the prints, indicating that we'll need to use another piece of evidence here. We don't have the required item just yet.
Approach Lestrade and, after a brief cinematic, Holmes will begin to question the first witness, Mrs. Carey.
Before asking her any questions, however, you should first click the Character Portrait icon at the bottom of the screen, which will allow you to take a close look at the witness and the surrounding area.
While in Character Portrait mode, press and hold the [D] key until the camera moves down to Mrs. Carey's shirt. Click the Cameo locket hanging from her neck.
Move the camera forward to Mrs. Carey's hand. Now click the Catholic Rosary around her wrist.
Next, move the camera until it reaches the right side of the table. Click the Crested Tit on the bound journal and the Gardening Gloves beside it.
Press the [D] key one last time to turn the camera to the left side of the table. Click the top of the Birdhouse. Now your Character Portrait of Mrs. Carey should be complete and you can resume your dialogue with her.
Select the dialogue option "Everything will become easier."
When the quick-time event appears, press the [Q] key before the timer runs out.
Choose the line "Pilgrimage". This will also add a note to the Evidence tab in your Casebook
Exhaust all the remaining dialogue options until you're finished questioning Mrs. Carey, for now.
Meet Inspector Lestrade outside of the cabin, then click the cabin door.
Switch to Sherlock's talent View again and move the cursor target over the scratched lock under the door handle.
Zoom in on the door handle and click the Scratches. Once Holmes confirms that someone tried to break in, you can click the door to enter the Cabin.
Part 3 - The Crime Scene at Woodman's Lee Cabin
When you enter the cabin, turn left and examine the wall shelf to take a closer look.
Turn on Sherlock's talent View (by pressing [T]) and move your cursor over the blank space on the right side of the shelf.
Click the Outline in the Dust to inspect it.
At this point, Holmes will deduce that a small box has disappeared from this place on the shelf. He will "imagine" the box instead. You can toggle Imagination on or off by pressing the [F] key.
Turn towards the center wall and click the chest on the floor.
Open the chest and take Peter Carey's Boots inside.
Take a look at the bookshelves on the wall above the opened chest.
Examine the middle of the lower shelf to note the Ships Logs. They'll be added to your Evidence, but you'll see there's an Object of Interest still missing. We'll have to come back again later.
Move to the corpse against the wall and click Dead Peter Carey to examine the body.
While viewing the body you can examine the following areas: Peter Carey's Face, Peter Carey's Clothes, the Harpoon, and his Pierced Chest.
Next, click the Pool of Blood to view the ground underneath Carey.
Take the Sea Knife on the floor by Carey's feet.
Examine the blood on the edge of the Blade and the end of the Wooden Handle.
Now click the Notebook to pick it up and view it more closely
Examine the Inscription at the middle of the notebook and the Blood on the lower right corner.
Open the Notebook and click the Abbreviations written on the first page.
Turn to the window on the right and click the Table beside the body to examine it.
Take the Tobacco Pouch to get a closer look.
Examine the initials burned on to the front of the pouch.
Drag the right mouse button to rotate the pouch and view the back side. Left click the Flap to open the pouch. Turn the pouch again to look inside, then click the Tobacco.
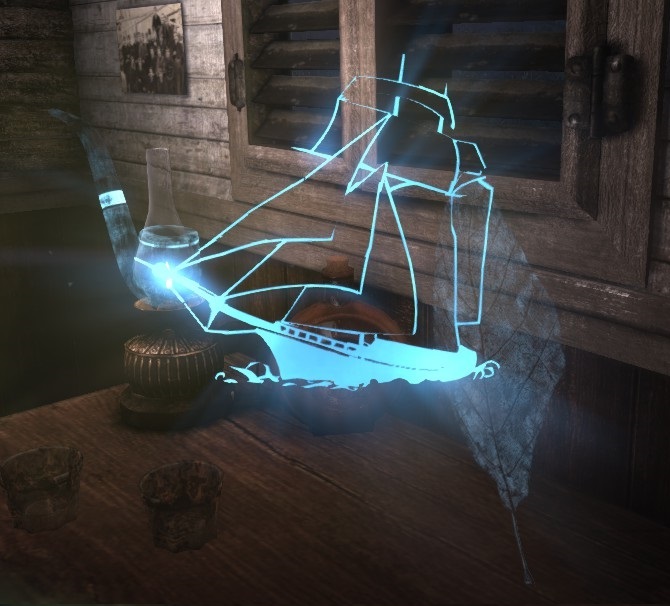
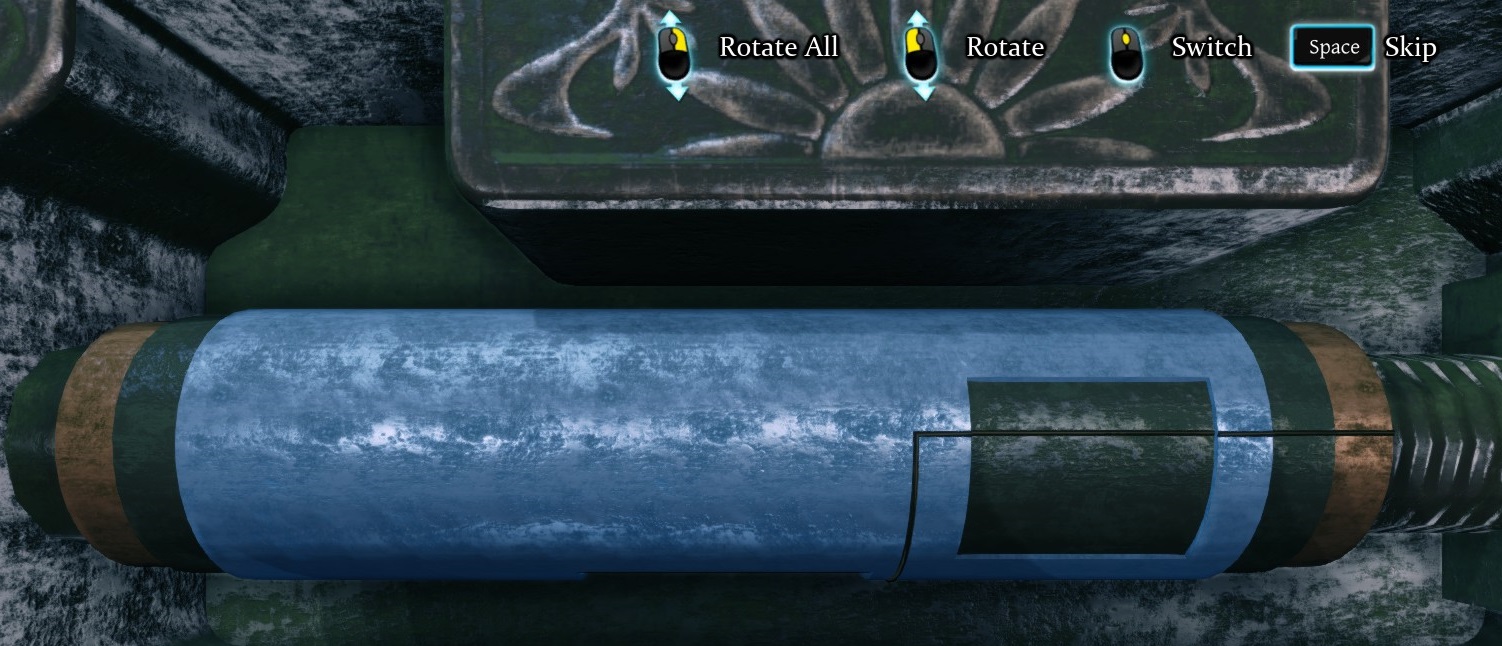
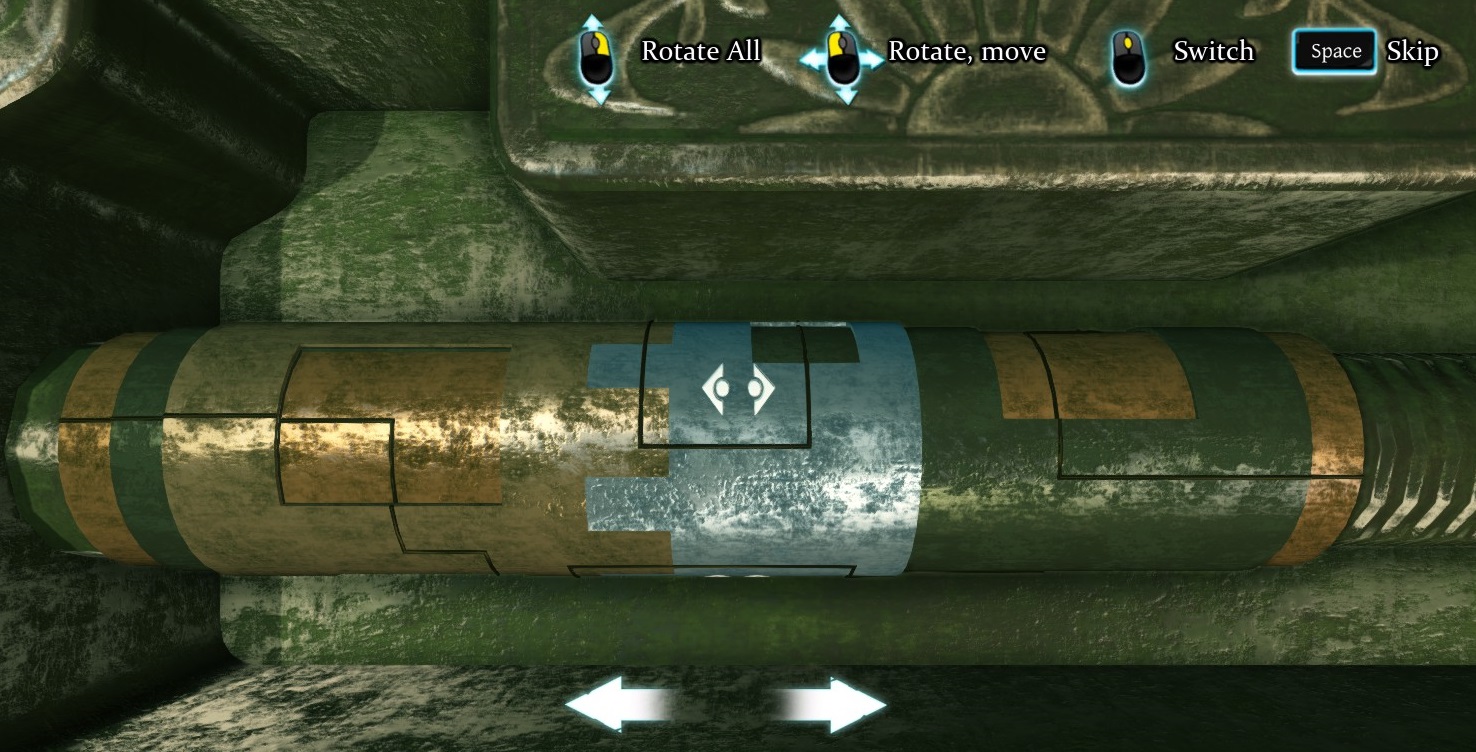
A minigame will start after you collect the evidence from the Tobacco Pouch
Arrange the blue lines to complete the image of a ship.
Rotate the blue lines using the right mouse button. Drag the Tobacco Leaf and the Smoking Pipe with the left mouse button to move the lines on those two objects up or down.
The puzzle will complete automatically once the image is correctly aligned. If you're having difficulty solving the puzzle, you can press the [Spacebar] key to skip it.
Solution.
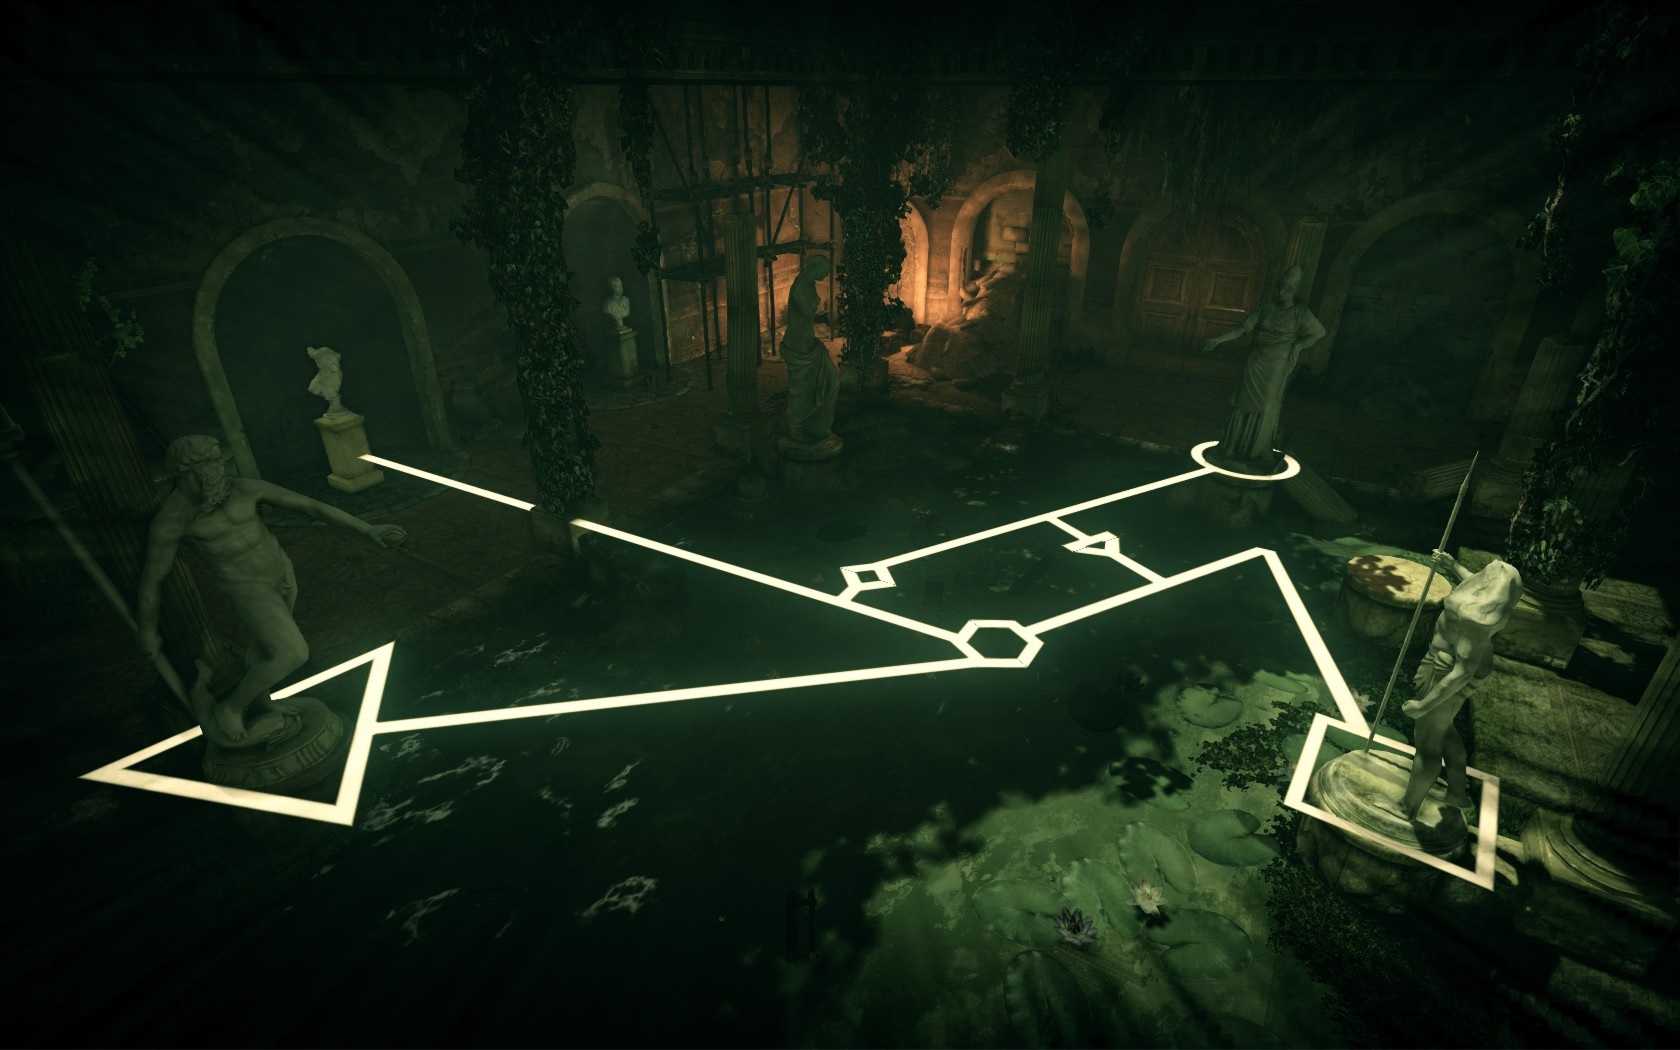
After you've completed the puzzle, press [Esc] to step away from the table, then press [B] to view your Deductions page.
At the Deductions page, you can attempt to combine clues to make a deduction. Sometimes, combining clues may give you multiple theories and you must select between the possible options to form a deduction.
Click a clue note to select it, then click another note to try to combine the two. If your clues are correctly combined, they will form a deduction on the page. Press space to toggle between all available clues and all completed deductions
At this time, you have enough clues to make one deduction.
First select "Notebook" then click "Break-in Attempts".
Click the completed deduction to see you've now found a new Task: Make an Ambush.
Exit the Cabin to return to the Garden.
Walk towards the constable with the magnifying glass near the garden path.
Click the Footprints you found earlier to take a closer look.
Select the Footprint again to hold Peter Carey's Boot (that you found in the chest at the Cabin) above it.
Drag the boot down to the Footprint using the left mouse button to compare the size of the shoe to the print.
Return to Inspector Lestrade in front of the Cabin. Speak with him to organize an ambush for the suspect.
Move behind the cabin, then click the window labelled Hiding Place to hide there until nightfall.
After the cinematic, return to the inside of the Cabin. Once the second cutscene is over, you'll be automatically taken to Scotland Yard
Part 4 - Interrogate the First Suspect at Scotland Yard
Walk through the open doorway on the left to reach the hallway. Open the first door on the right and enter the Evidence Room (you should see the label for the room beside the door).
Click the shelf on the table to view Neligan's Belongings.
You can view the Notebook you found earlier at the Cabin, as well as a Pocket Knife, and an embroidered Handkerchief.
Take the Ring among the belongings to view it more closely.
Rotate the object with the right mouse button, then click on all three parts of the message engraved on the inside of the ring: "From R. Dawson... to my friend... and partner, 1883."
Holmes will note the name Dawson and suggest you look it up in his Archives later.
Leave the Evidence Room, then open the gate door at the end of the hall. Take the door on the left to the Interrogation Room.
Click John Neligan to speak with him.
Before questioning him you should click the Character Portrait at the bottom of the dialogue choices to examine the suspect.
From the starting view, you can click the Shabby Cap on Neligan's head.
Turn the camera backward by holding the [A] key until you are looking at the side of his face. Click his Thin Neck.
Pan the camera forward with the [D] key, then stop when it reaches his shoulder where you'll see the Patch on his suit.
Continue moving the camera forward to Neligan's arm. Click the sleeve of his suit to note the Expensive Fabric.
Move the camera further down to the lower half of the torso and then click the Elaborate Buttons beside the pocket.
Lastly, rotate the camera to Neligan's hands. Here you can click the Short Sleeves on Neligan's bare wrists, the Callus on his right hand, and the Scars on his left hand.
After you've completed the Character Portrait, select the dialogue option "Gold Ring"
When the quick-time event appears, press the [Q] key before the timer runs out.
Choose the line "Ring's Engraving".
Now you can ask about the "Ring's Owner" which prompts another quick-time event. Again, press [Q] before time runs out.
This time, choose the line "Father's Jacket".
Finally, ask about the Notebook and Sea Knife to complete your interrogation.
Press [B] to open up your Deductions page.
Now you can combine two more clues to form a new deduction.
Select "Neligan's Notebook" and "Break-In Attempts".
Click the combined clues to view your new deduction on your Deduction page: Retrieving the Notebook.
Press [Spacebar] to return to the Clues, then combine "Swift Actions" and "Pinned to the Wall".
This will add the following Task: Experiment Required.
Open your Casebook and select the Map tab. Click Baker Street to travel there now.
Part 5 - Enlisting Watson's Help at Baker Street
Speak with Watson to ask for his help with your harpoon experiments. We'll go there momentarily, but there's still more to do here.
Approach the overflowing shelves of Newspapers on the right side of the fireplace to examine the documents.
Compare the information from the Ring's Engraving, then select the proper document from the list on the right to research the ring.
Select the Newspaper article: "Dawson and Neligan are bankrupt."
Read both pages of the article, then press the [E] key to close the page.
Before you can join Watson you'll need a harpoon. We'll get one soon, but for now let's question Neligan again with the information you found in the archives at Baker Street. Use the Map to travel to Scotland Yard.
Part 6 - More Questions for Neligan at Scotland Yard
Return to the Interrogation Room through the left door at the end of the hallway.
Click John Neligan to question him again.
Select the dialogue option "Dawson and Neligan."
We've learned all we can for now. Open the Map and take a quick detour trip to Woodman's Lee.
Part 7 - Return to Woodman's Lee
Follow the dirt path to the upper level of the Garden, then click Mrs. Carey to ask her a couple new questions.
Select the dialogue options "Peter's private papers" and "Was Peter a smoker?"
Go down the stairs and enter the Cabin.
You'll find a rack on the center wall (above the open chest) inside the Cabin where you can take a Harpoon.
Inspect the bookshelf beside the harpoon rack and take a look at the Ship Logs.
Select the August tab above the right page. Take the torn Bond Certificate from the page.
Open the Map again and travel to the Whitechapel Butcher.
Part 8 - Whitechapel Butcher & A Brief Stop at Baker Street
Click on Watson to speak with him and begin the experiment.
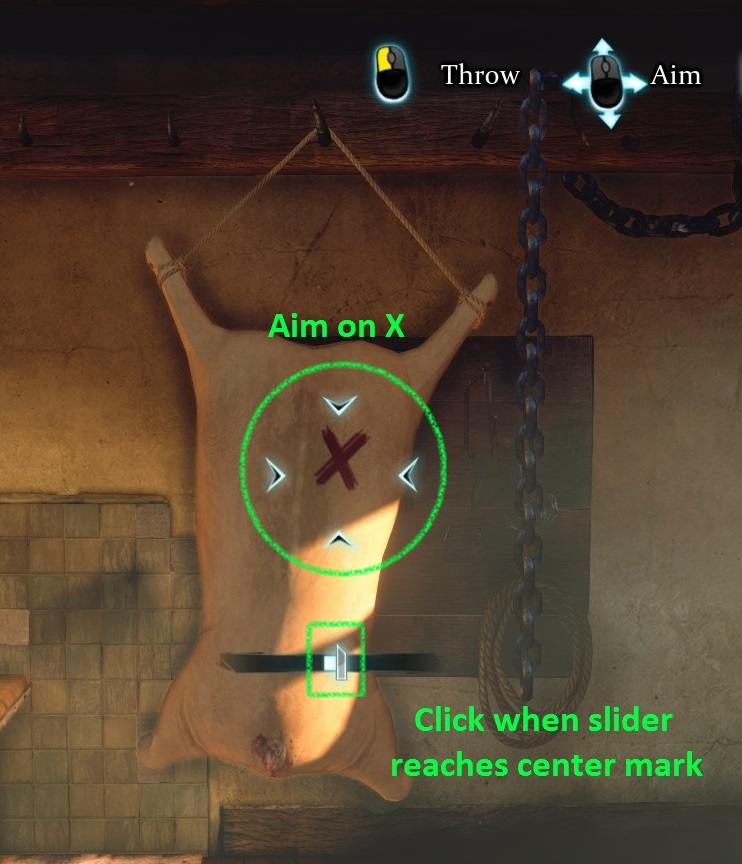
The goal for this minigame is to impale the pig with the harpoon.
First aim the cross-hairs over the red "X" on the pig carcass.
Left click to Hold Breath, which will focus Holmes' aim.
A bar will appear at the bottom of the screen with a slider moving left and right and a white space in the middle.
Left click at the precise moment when the slider reaches the center space to throw the harpoon.
If you time your throw and aim correctly, the harpoon will strike the X. If not, simply Hold Breath and try again.
After each attempt, the center space will get slightly larger and easier to hit.
Solution.
Once you've finished your experiment, press [B] to open the Deductions page.
Combine two of the clues to create a new deduction.
Select and combine the two clues "Strength requirement" and "Pinned to the wall".
You must choose between one of two theories: "Feat of strength" or "Lucky throw"
The correct choice is the "Feat of strength".
Open your Map and travel back to Baker Street with Watson.
After your conversation with Watson, approach the Window that overlooks the street. Click the Window to summon Wiggins to the apartment.
A constable will arrive after Wiggins leaves to call for Holmes on Lestrade's behalf. Use the Map to travel back to Scotland Yard.
Part 9 - Interrogate the Second Suspect at Scotland Yard
Once you arrive at Scotland Yard, take a few steps forward to speak to Inspector Lestrade.
Go to the hallway and take the first door on the right to enter the Evidence Room.
Inspect the left box on the table to take a look at Hurtley's Belongings.
Take the Boots and Stained Letter inside the drawer. You can also examine the Pen at the lower right corner of the drawer.
Now inspect the right box on the table to re-examine Neligan's Belongings.
Click the Abbreviations inside the notebook to compare them with the Bond Certificate from your inventory.
Underline the correct abbreviation associated with the bond scrap.
Select the letters C.P.R. which stands for the title at the top of the bond, the Canadian Pacific Railway.
Press [B] to open your Deductions page. Combine your new clues to form a new deduction.
Select the clues "Missing papers" and "Missing tin box" to make a deduction: "Stolen valuable papers."
Two of your completed deductions, "Stolen valuable papers" and "Retrieving the notebook" will automatically tie together to form a third deduction: "Neligan's motive."
Now combine the clues "Missing papers" with "Break-in attempts". Choose between the two possible theories: "Retrieving the notebook" or "Looking for papers."
The correct choice is "Looking for papers". After you select this theory, another two deductions "Stolen valuable papers" and "Looking for papers" will tie together to form yet another choice of theories.
Pick again between two choices; this time it's "Neligan's motive" or "Neligan's innocence."
The correct choice is "Neligan's innocence". Now that we've ruled out one of the suspects, it's time to continue our investigation!
Leave the Evidence Room and continue to the end of the hallway. Click Liam Hurtley who is hanging on to the prison door to speak with him in the Interrogation Room.
Click the Character Portrait to examine the suspect.
Move the camera forward with the [D] key, then click the large Old Scar at the side of Hurtley's neck.
Continue turning the camera down to his hip, where you'll find a Handkerchief with Crested Tit sticking out of his coat pocket.
Turn the camera further down towards Hurtley's legs. Click his pants to note Plant Remains.
Lastly, pan the camera forward up to his hands, then click them to find that they're Gardener's Hands.
Leave the Interrogation Room and return to the jail cell at the end of the hallway. This time, click John Neligan to question him one last time.
Ask Neligan about the "Break-in" to trigger another quick-time event. Quickly press [Q] before time runs out.
Select the line Bond Certificate.
After you finish interrogating Neligan, open the Map and travel to Baker Street.
Part 10 - Experiments at Baker Street
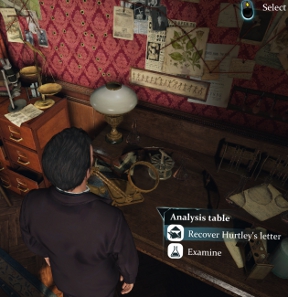
Approach the Analysis Table to the left of the window to begin your experiments on Hurtley's Letter.
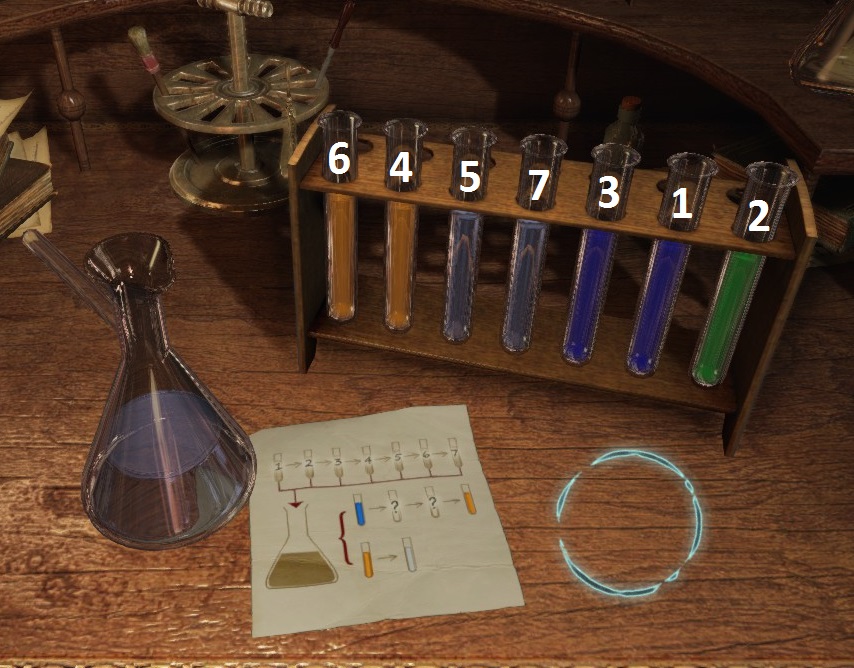
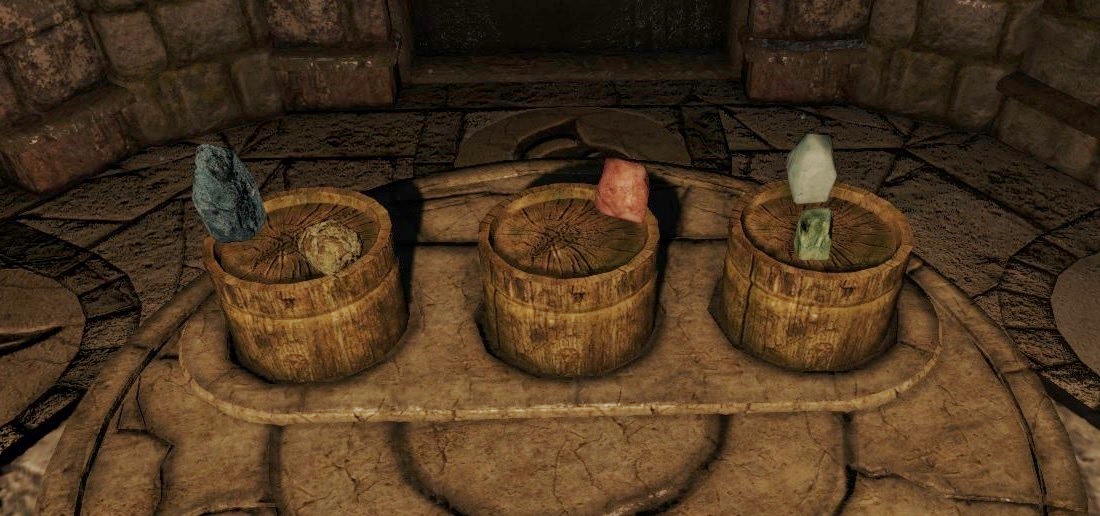
In this minigame, you must pour the chemical test tubes into the beaker in the correct order.
The note on the table gives you three requirements to solving this puzzle:
You must pour all seven of the test tubes into the beaker.
The Blue reagent is poured first, two mystery reagents are poured afterwards, and the fourth reagent must be Orange.
The Colorless reagent must be poured after the Orange reagent.
Following these three conditions, pour the reagents in the following order (additional instructions provided for the colorblind):
Blue reagent (Bottle 1).
Green reagent (Bottle 2).
Blue reagent (Bottle 3).
Yellow reagent (Bottle 4).
Colorless reagent (Bottle 5).
Yellow reagent (Bottle 6).
Colorless reagent (Bottle 7).
Another acceptable solution is starting with Blue-Blue-Green rather than Blue-Green-Blue.
Solution.
After you've completed your chemical concoction you can use the solution on Hartley's letter.
Click and hold down the left mouse button and drag it over the ink stains on the letter to reveal the hidden message.
The letter is a helpful clue, but we still have more evidence to gather. Open the Map and travel back to Woodman's Lee.
Part 11 - Collect More Evidence at Woodman's Lee Garden
Take the stone path towards the shed and look at the Footprints on the ground to the left of the path.
Click the center Footprint to take out Hurtley's boots, then drag them downward with the left mouse button to compare the size of the boot with the print.
Press [B] to open up your deductions page.
Combine your new clues to form another deduction.
Select "Hurtley's footprints" and "No gardener" to make the deduction: "Unexplained presence."
Go up the steps and speak again with Mrs. Carey to ask her about Liam Hurtley.
Now we need a talk with Hurtley himself. Use the Map to travel to Scotland Yard.
Part 12 - More Questions for Hurtley at Scotland Yard
Go to the end of the hall and click on Liam Hurtley inside the jail cell to speak with him in the Interrogation Room.
First ask Hurtley "What did you hide?" which prompts another quick-time event. Press [Q] before the timer runs out to continue the conversation.
Select the dialogue option "Hurtley's Letter".
Next, question him about "Woodman's Lee" to start yet another quick-time event. Again, press [Q] quickly.
This time, select the line "Hurtley's Boots Match".
Now choose the conversation option "Presence at Woodman's Lee" for a third and final quick-time event. Again, press [Q] quickly.
Choose the line "Gardener".
You're done questioning the suspects, but there's still one last lead to follow at Woodman's Lee. Use the Map to travel there now.
Part 13 - Access the Shed at Woodman's Lee
Approach Mrs. Carey to question her again.
Ask for "Access to garden tools" to receive a Small Key for the shed behind her.
Go to the shed door and click the lock to open it with her key.
Enter the shed then press [T] to activate Sherlock's investigative talent.
Look at the Shed's Floor, then focus on the area with the loose plank for a few seconds to find the ill-fitting plank.
Click the Wooden Floor to zoom in, then lift the Ill-Fitting Plank. Take the Small Wooden Box hidden underneath.
Try to open the box to begin another puzzle.
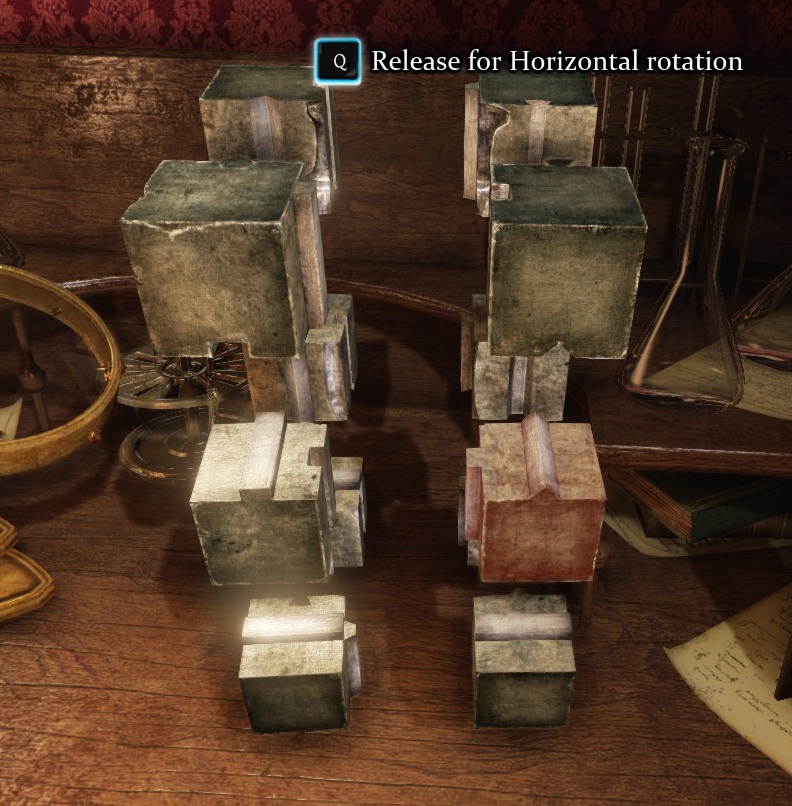
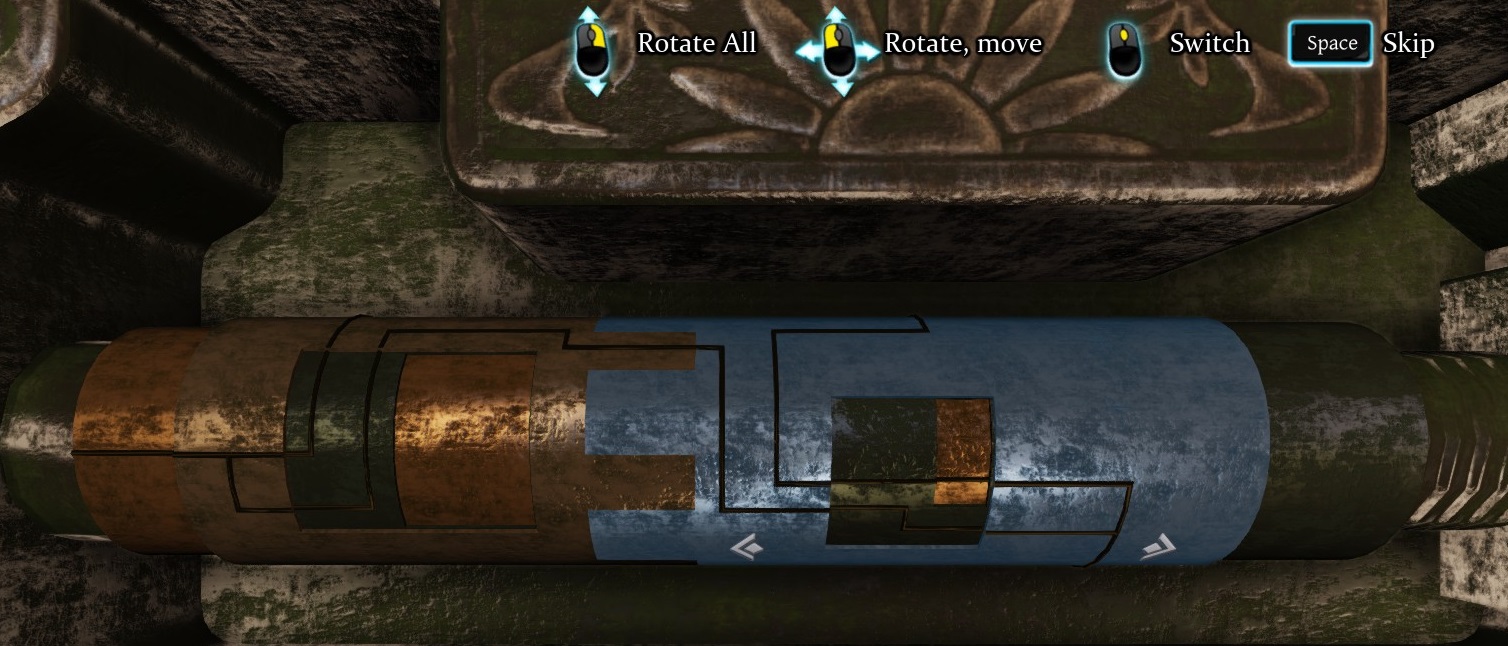
To solve the puzzle you must rotate the sections of the lock and correctly arrange the line pattern.
Use the mouse scroll button to select one of the three lock sections.
Left click and drag the mouse to rotate the selected section or right click to rotate all sections of the lock.
There are multiple sections you could focus on when aligning the lock segments, but the following screenshot shows one of the easier solutions:
Solution.
Take the Bunch of Letters from the box after you've unlocked it.
Exit the shed and talk to Mrs. Carey again.
Ask her about "You and Liam Hurtley" then press [Q] when the quick-time event icon appears.
Select the line "Romantic Correspondence".
Press [B] to open the Deductions page.
Combine your new clues to make another deduction.
Add the clues "Judith Carey's Confession" and "Judith Carey's Letter" to form the theory "Desperate Jealousy".
"Desperate Jealousy" will automatically tie together with "Unexplained Presence" to create "Hurtley's Motive".
Press [Spacebar] to view the page of clues again to combine another two.
This time, select the clues "Liam Hurtley's Letter" and "Judith Carey's Confession." which combine into: "Harmless flirting".
You must now choose between the two theories "Desperate Jealousy" and "Harmless Flirting".
The correct selection is "Harmless Flirting". Choosing this option will also form the deduction: "Hurtley's Innocence"
Again you must make another choice. Select either the theory "Hurtley's Motive" or "Hurtley's Innocence.
The correct final decision is "Hurtley's Innocence".
Holmes will mention he should meet with Wiggins after the deductions are finished. Open the Map and travel to Baker Street.
Part 14 - Prepare a Disguise at Baker Street
When you arrive home, Wiggins will present you with a list of sailors. Click the name on the list of the person you should investigate.
Underline the name of the living harpooner, Patrick Cairns.
Press [B] to reopen the Deductions page.
Combine the two clues "Patrick Cairns" and "Peter Carey a non-smoker" to receive a new Task: "Check Peter Cairns".
Before we can meet with Cairns, you'll need to put on a disguise to fit in at the sailor's pub. Go to Holmes' room through the right door.
Open the wardrobe and select the Sailor Outfit. You can also use the Make-up Table to put on more accessories for your disguise, but it isn't necessary.
Now use the Map and travel to the Sea Witch Pub.
Part 15 - Meet The Sailor at the Sea Witch Pub
You'll find Patrick Cairns sitting at the table in front of the fireplace. Click him to start another minigame.
To beat Cairns, you'll need to pay attention to his facial expression and to your Stamina meter.
Cairns makes three different faces: He grimaces when he's about to push, cringes when he's trying to restrain, and has a blank face when he's idle.
Time your pushes, restrains, and waiting to match his actions:
When Cairns pushes, hold down the Right mouse button to Restrain against his push.
When Cairns idles, click the Left mouse button repeatedly to push his hand towards the table.
When Cairns restrains, use that time to let your Stamina meter regenerate.
Continue following this pattern until you successfully pin his hand to the table.
After you beat Cairns once, click the Character Portrait to study him.
First click the Gold Earring in his left ear.
Move the camera forward with the [D] key until you can see his torso. Click his left arm to note the Cheap Clothes.
Continue forward to Cairns' forearm. Click the bare part of his arm to note his Strong Hands.
Lastly, move the camera to his right arm. Click Cairns' right hand to find Yellow Nails, then click the Sailor's Tattoo anchor on his left forearm.
Challenge Patrick Cairns to arm wrestling again and beat him a second time using the same tactics as before. Now you can begin to question him.
Ask all of the available dialogue lines. After you've talked to him about everything, choose to "[Plant Pouch]".
Click the pocket of Cairns' Jacket hanging on the chair to zoom in.
Left click and drag the Tobacco Pouch down into the pocket.
Talk to Patrick Cairns again. Ask him for "Tobacco" and to "Keep in touch."
You're finished with Cairns for now. Press [B] to open the Deductions page.
Combine the clues "Patrick Cairns" and "Patrick Cairns' Pouch".
Choose between the two resulting theories: "Pouch proves guilt" or "Pouch proves visit".
Select "Pouch proves guilt" to form the final conclusion: Cairns is guilty.
Click the conclusion, then select a choice of action. You can either Condemn Cairns for the murder of Peter Carey or Absolve Cairns for murder in self-defense.
This is a moral choice decision that has no true correct answer. However, your decision here will influence the final outcome of the case and may have future implications on the game.
Part 16 - Conclusion
If you chose to Condemn the murderer:
Patrick Cairns will meet you and Lestrade at Baker Street and begin a fist fight.
To win the encounter, quickly click on Cairns' face every time he tries to take a swing at Holmes.
When you are prompted by the quick-time event, push the [W] key before time runs out to finish Cairns.
If you Absolve the murderer, you only need to watch the cinematic to conclude the case.
Case 2 - Riddle on the Rails
Part 1 - Evesham Station
Click the far left door to leave Baker Street and head to the train station at Evesham.
When you reach the station walk up the left set of stairs then continue left to the train tracks.
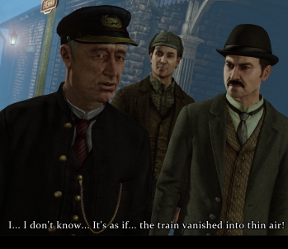
Walk to the Evesham sign near the end of the tracks (any further and the map will open) and press the [F] key when the prompt appears to imagine the missing train.
Now press the [T] key to use Holmes' investigation talent. Examine the following glowing areas:
The Rails on either side of the train tracks.
The Railway Sleepers at the center of the tracks.
The Ground Near the Rails just under the Evesham sign.
The Empty Bottle just below the patch of Ground Near the Rails.
Go back to the station platform and speak with the Evesham Station Master beside the bicycle.
Click the Character Portrait under the speech lines to examine the station master.
Press the [D] key to turn urn the camera towards the side of the station master's face, then click his Fully Grey Hair.
Move the camera back with the [A] key until it focuses on his left hand. Click the Spots of Earth on his dirty sleeve and the Wedding Ring on his finger.
Continue turning the camera back to view the station master's torso. Click the Honorary Badge pinned to his chest.
Ask the Station Master for "Information about train" which he tells Holmes can be found in his office.
Next, ask for a "Railway Map". He'll instruct you take the one pinned on the wall inside the Waiting Hall.
When you're finished questioning the witness turn left and take the second door to the Waiting Hall (there's a sign just beside the door to help you find it).
Inside the Waiting Hall you can take the Railway Map hanging on the wall above the middle bench. The Map is added to your Casebook.
Leave the Waiting Hall, walk around the building, and go through the door to the Ticket Office.
Open the door to the side room to enter the Station Master's office.
Click the Office Table to take a closer look.
Read the Telegram and the Train Composition.
Go back outside to the station platform and speak with the Evesham Station Master again.
Ask him about the "Special wagon," "Passengers of the train," and "Bridlington Station" to receive a new marker on your Map.
Open the Map and travel to Bridlington.
Part 2 - Bridlington Station
Go through the first door on the right to enter the Waiting Hall.
Talk to the Angry Passenger who is standing by the doorway.
Click the Character Portrait icon at the bottom of the screen to examine the man.
Move the camera forward to his chest, then click his shirt to note the Workclothes.
Continue down to the bottom of his jacket. Click the Cheap Ticket sticking out of his pocket.
Turn the camera further down to his left hand and click the wedding ring, proving he's Married.
Lastly, move the camera to his right hand, then click it to note his Rough Skin.
After you've completed the Character Portrait ask the passenger all the available questions: "What happened?", "Passenger of the vanished train?", and "Portrait of the rich."
Open the door under the "Private" sign and enter the ticket master's office.
When you enter the room, activate Holmes' investigate talent with the [T] key.
Look at the gap between the wall and the floor beside the telegraph table to find the Sheet of Paper. Click it to zoom in and take the Document, which adds the Prototype Insurance Policy to your Evidence.
Now speak with the Bridlington Station Master in the office.
Click the Character Portrait icon to study the station master's appearance.
Click his face to note his Young Age.
Move the camera down to his tie and click it to note the Clean Clothes.
Continue turning the camera down to the bottom of his coat. Click the Instructions pamphlet sticking out of his pocket.
Turn the camera a little bit lower to view his hand, then click the Ink Smudges on his thumb.
Once your Character Portrait is complete ask him about the "Problem with passengers" and then if there was "Anything unusual" to prompt a quick-time event.
Quickly press [Q] before the timer runs out.
Select the line Rookie station master.
Next, ask about a "Strange message" to receive a Telegram from Chesterfield Station, adding the Chesterfield Report to your Evidence.
Exit the office to return to the Waiting Room.
Approach Mr. Robinson, the man with the hat who is sitting on the nearest bench.
Click the Character Portrait icon at the bottom of the screen to examine Mr. Robinson.
First, click the Australian hat on his head.
Move the camera back with the [A] key until it's pointing at his torso. Click his vest to note his Expensive Clothes.
Continue turning the camera down to his shoes. Click the Fancy Shoes to find they're made of Crocodile Skin.
Lastly, move the camera back to his left hand, then click the Heavy Gold Ring on his pinky finger.
After your Character Portrait is done, select the speech line "Mr. Robinson" to ask him about himself, then ask about the "Special Wagon."
Select the dialogue "Insurance for prototype" to give him the Insurance Policy you found beside the telegram in the office.
Discuss all of the following subjects with Mr. Robinson: "Company direction", "Prototype value", "Were you on the train", and "Important grip-sack".
The question about his grip-sack will move his luggage into the storage room.
When you're done questioning Mr. Robinson, press [B] to open your Deductions page.
Select "Chileans stayed on the train" and "Train vanished with people".
Now you must decide between the two theories: "Accident" or "Chileans were left".
The correct answer is: Chileans were left.
Exit the Waiting Hall through the left door. Once you're outside, turn left and open the nearest door to enter the Left Luggage room.
Walk to the shelves at the back of the room. You'll find Mr. Robinson's Luggage on top of a crate between the shelves and the counter.
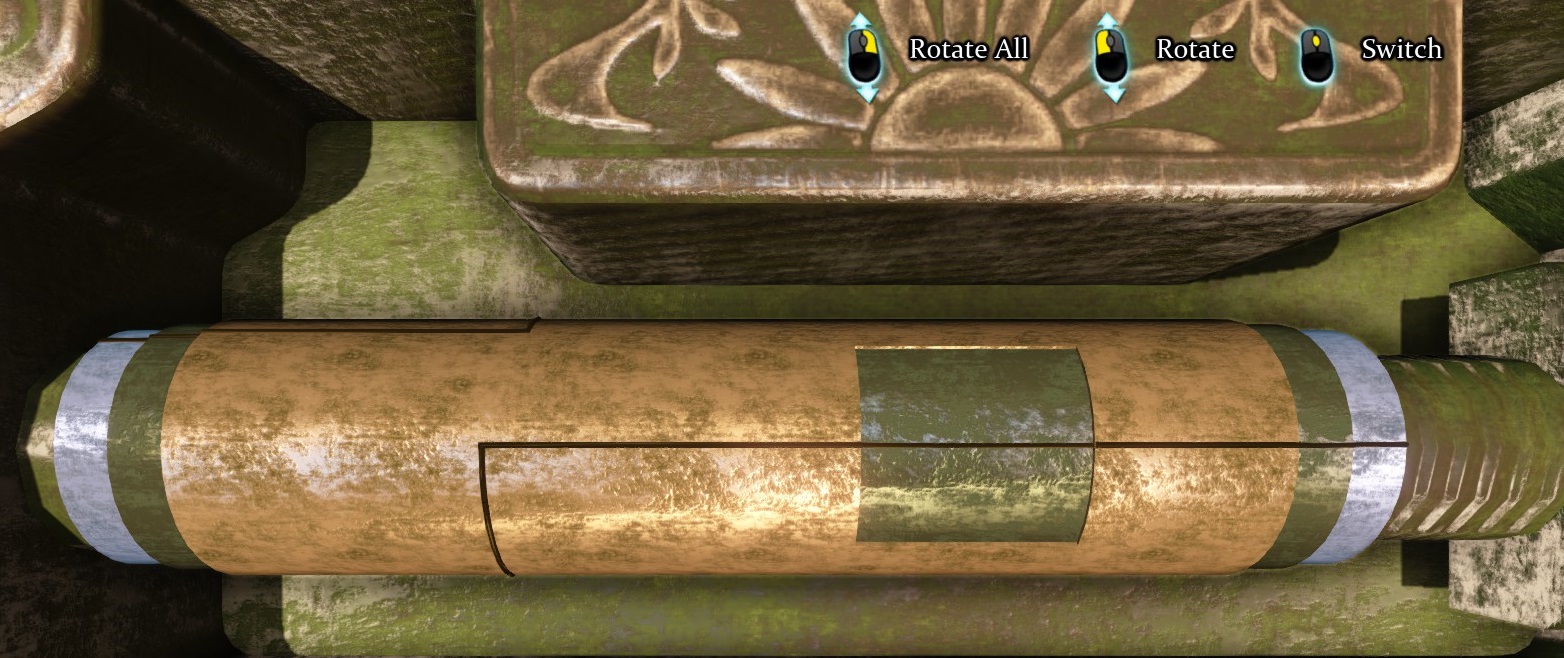
Examine Robinson's name tag attached to the handle to begin a minigame.
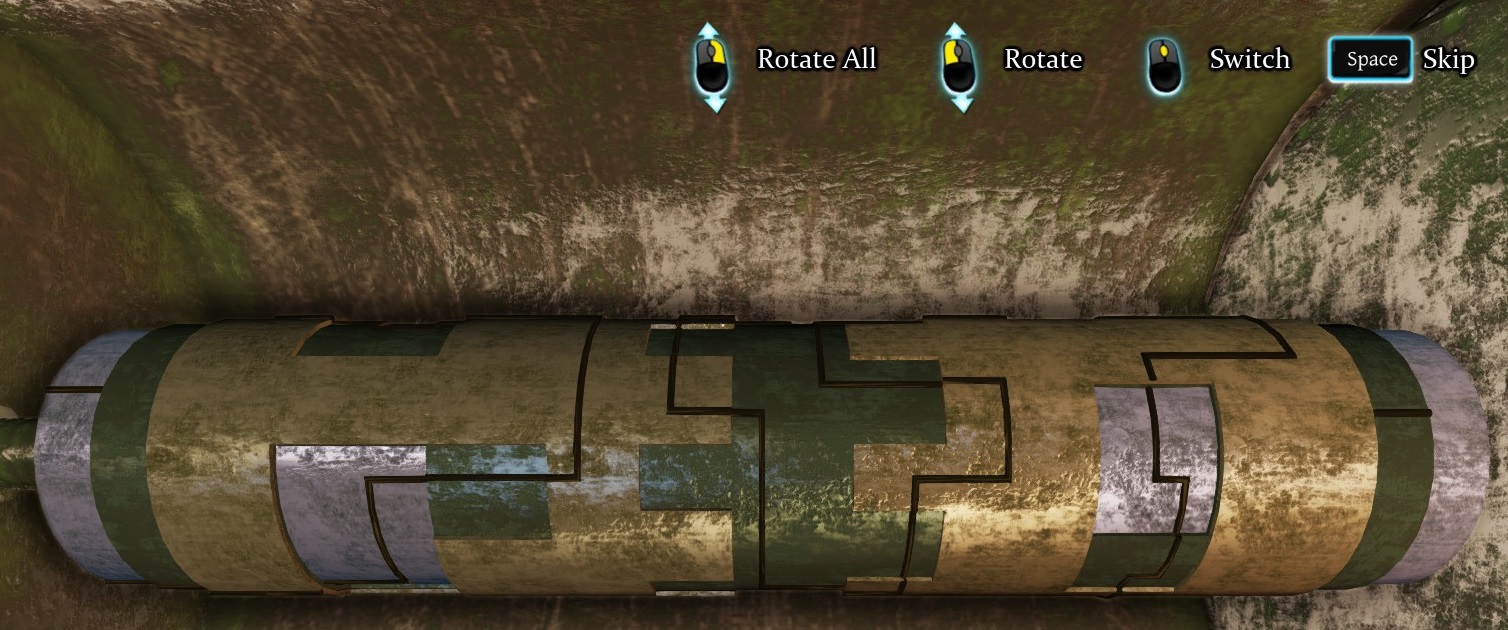
This puzzle is nearly identical to the lock puzzle from the first case. The major difference is that there are now four movable sections instead of three.
Use the mousewheel to select a section of the lock, then left click and drag to turn the currently selected piece.
Right click and drag to rotate all of the lock sections simultaneously.
The easiest way to solve this puzzle is to focus on the area where the short line segments meet at the right end of the lock.
Solution.
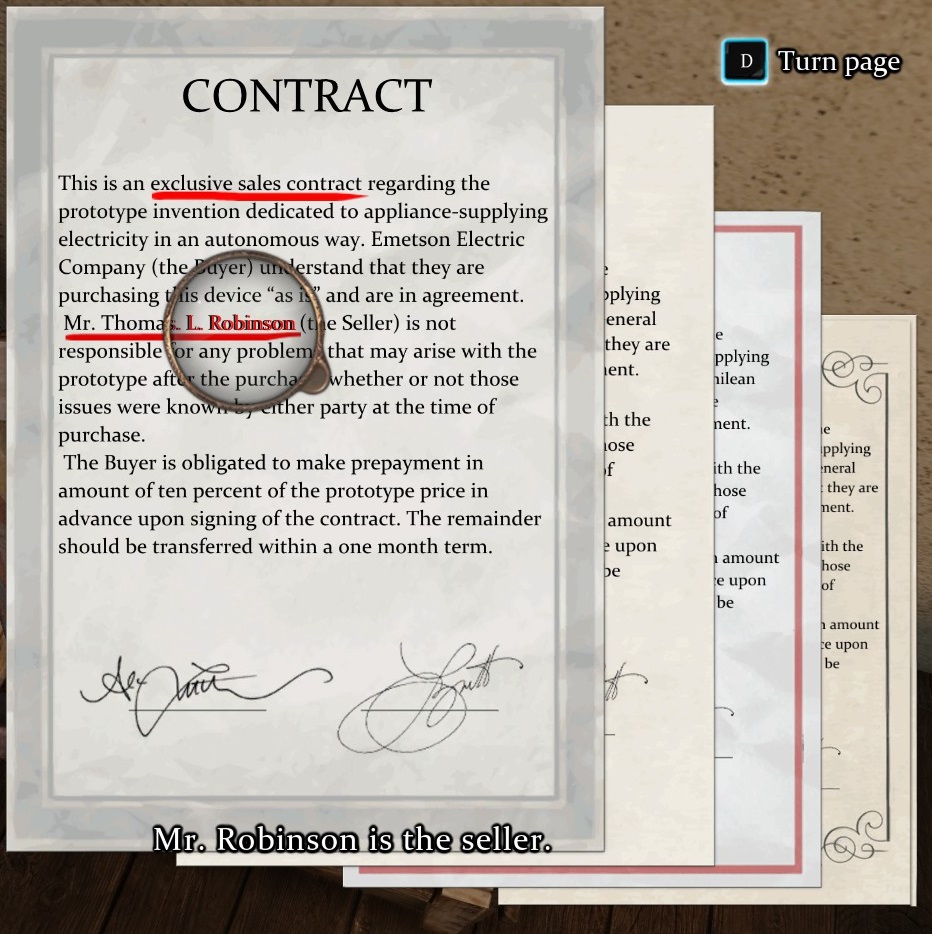
Click the Business Papers inside the opened briefcase to take a closer look. Underline the parts of the documents that appear suspicious.
Click to underline the phrases "exclusive sales contract" and "Mr. Robinson on each of the papers.
Example.
Press [B] to open the Deductions page and combine your new clues.
Select the clues "Prototype has insurance" and "Special Wagon" to form the theory "Robinson's Motive".
Now combine "Prototype has many customers" and "Special Wagon" to form a second theory, "Robinson's Innocence".
The correct choice is "Robinson's Innocence".
Open the Map and travel to Chesterfield.
Part 3 - Chesterfield Station
Go through the double doors into the Chesterfield station Ticket Office.
Open the door to the station master's private office.
Examine the Morse Code Alphabet and Telegraph on the table.
Next, speak with the Chesterfield Station Master who is "resting" at his desk.
Click the Character Portrait icon at the bottom of the screen to examine the station master.
At the starting view, click the man's Red Nose.
Move the camera forward slightly with the [D] key to the station master's shoulder. Click the strap on his shoulder to note the Clean Clothes.
Continue moving the camera down to his hand. Click the wedding ring on his ring finger which indicates that he is Married.
Just below his hand you can also see an Alcohol Flask poking out of his coat pocket.
Finally, turn the camera down to the bottom of his coat to find a Fishing Line coming out of his outer coat pocket.
First, ask the station manager about the "Train passengers".
Now ask about "Strange message" to start a quick time event. Press [Q] before the timer runs out.
Select the line "Binge Drinking".
When you're finished questioning the witness, press [B] to open the Deductions page.
Combine the clues "Chesterfield Master is untrustworthy" and "Chesterfield telegram".
We have two possible resulting theories: "Passed Chesterfield" or "Missed Chesterfield". However, we can't yet say for sure which one is the truth.
Exit the Ticket Office and go to the train platform outside. Take the last door on the left to enter the Warehouse.
Examine the Handcar Wheelbase in the middle of the room.
After the brief cinematic, press [B] to open your Deductions page.
Select the clues "Spare parts of a handcar" and "No traces of train" which creates a new Task: Fake Train Experiment.
Click the Handcar Wheelbase again to begin your experiment.
Select one of the handcar parts lying around the warehouse to pick it up, then click a space on the handcar to set the part in place.
If you're having trouble locating a part or a missing piece on the cart, remember that important areas and items are labelled, so just move your cursor over the objects in the room to reveal them.
Use the following pieces while facing the cart at the starting view:
Place Wheel (1/2) on the Wheel Axle at the right side of the handcar.
Attach the Small Gear to the Small Gear Housing in the center mechanism.
Put the Wooden Board into the large gap at the wooden base of the car.
Attach the Hand Rail to the top of the center mechanism.
Now click and drag the right mouse button to rotate the cart to the opposite side, then attach the remaining pieces:
Put the Wheel (2/2) on the Wheel Axle at the left side of the cart.
Attach the Breaks to the Break Joint between the two wheels.
Now that you have the completed handcar, you only need to find the right tools to make it look like a train. You can press [F] to use Holmes' imagination skill to give you an image of a proper steam train.
Take the following items from the Warehouse:
The Fire Extinguisher on top of the table.
The Long Pole leaning against the fallen grandfather clock.
Click the Train Spare Parts in the pile of junk at the left side of the room where you'll find another two items:
The Train Steam Whistle is on top of the broken barrel.
The Headlight with Dynamo Machine is on the stacked crates.
Go back outside and examine the handcar on the train tracks.
Click the handcar four times to attach all of the parts you collected in the Warehouse.
Once everything is assembled, click the Fire Extinguisher to ready the steam, click the Train Steam Whistle to blow the steam, then click the Handcar Lever to operate the lights.
Press [B] to reopen your Deductions page.
Select the clues "Fake train" and "Spare parts of a handcar" to combine them into a new deduction: "Vanished" Earlier.
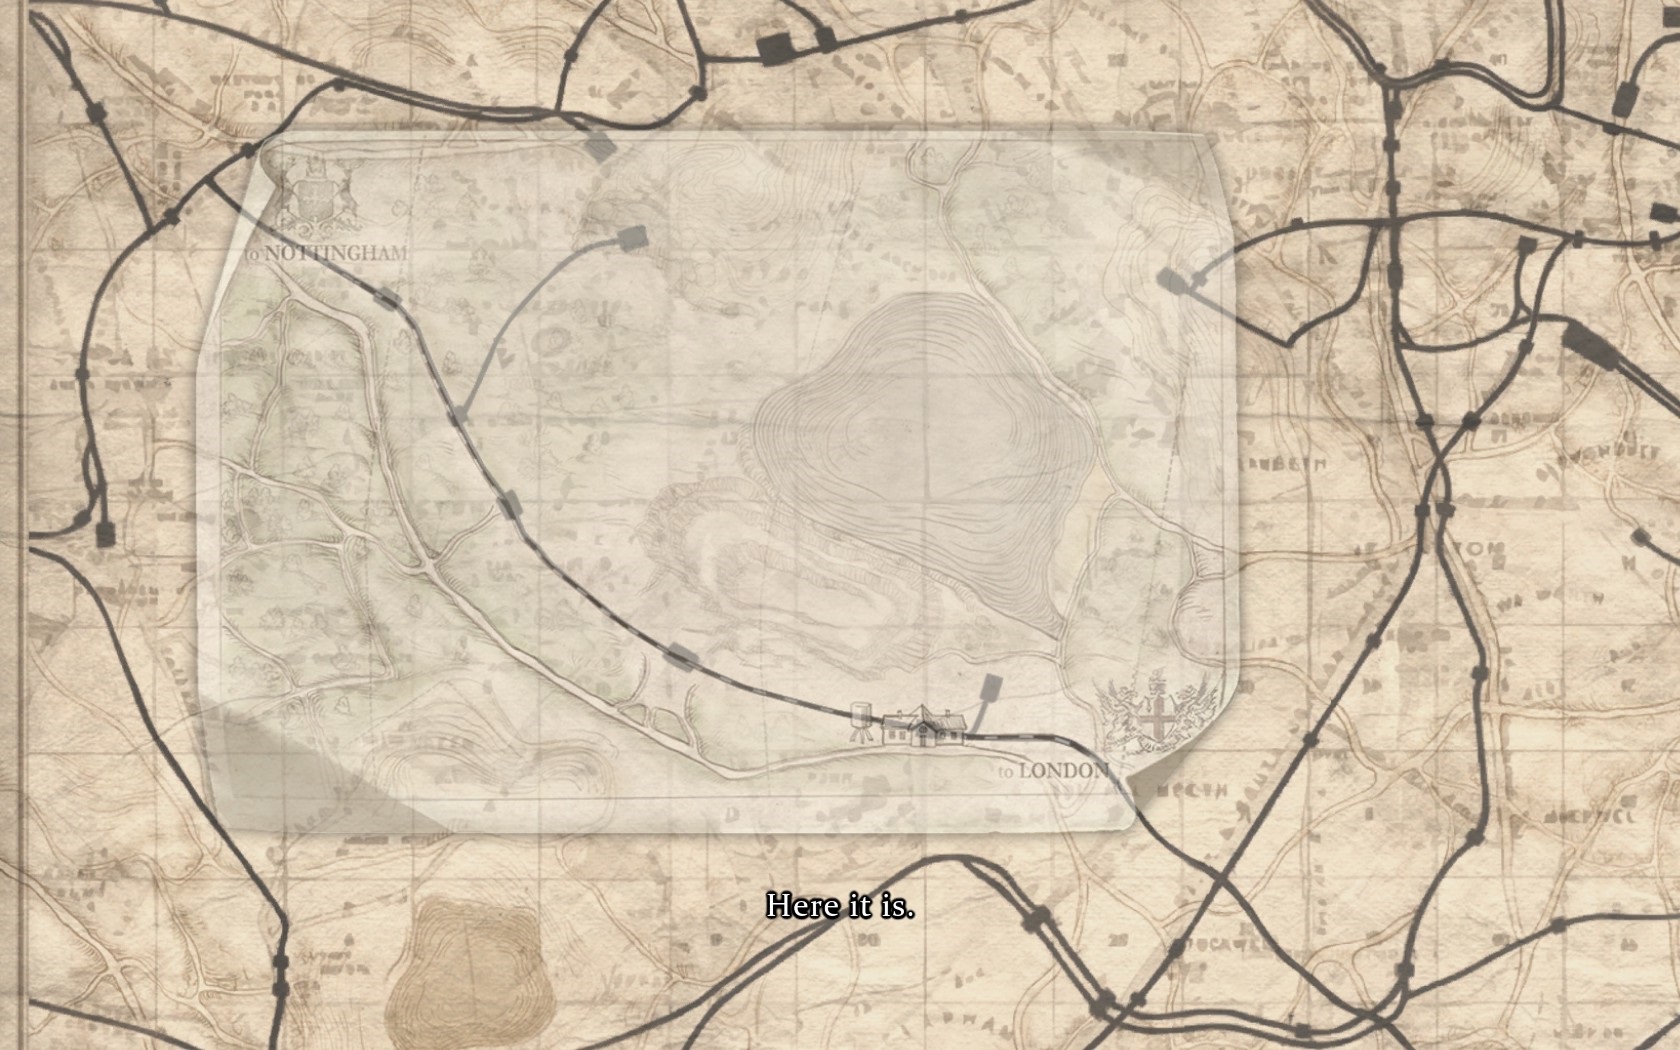
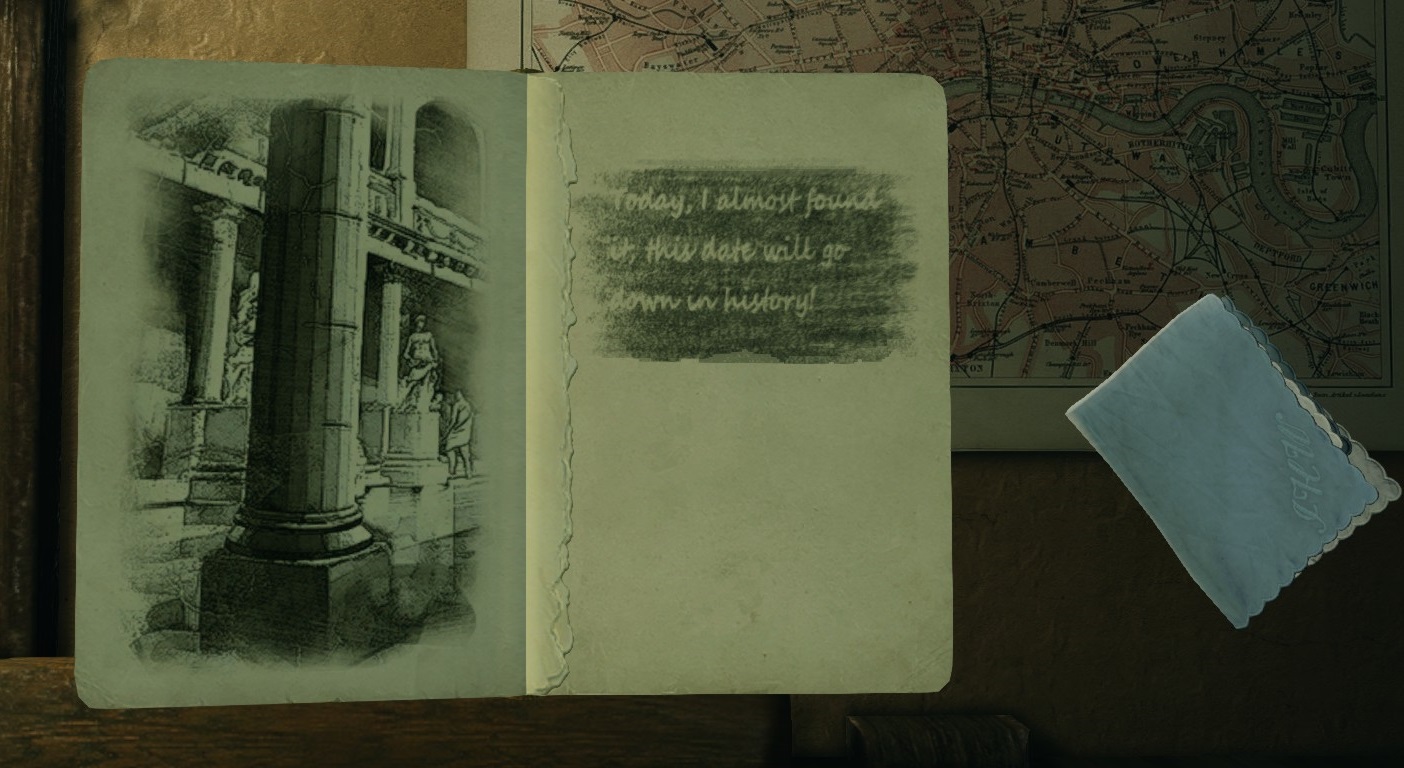
Walk to the waiting carriage behind the train station. Click the luggage at the back of the carriage to search the Portable Archives.
Position the local map from Evesham Station (the upper layer map) over the matching area on Holmes' more detailed map (the lower layer map).
Left-click and drag either map to move it. Look for landmarks like lakes and roads to help you find the correct orientation.
Solution.
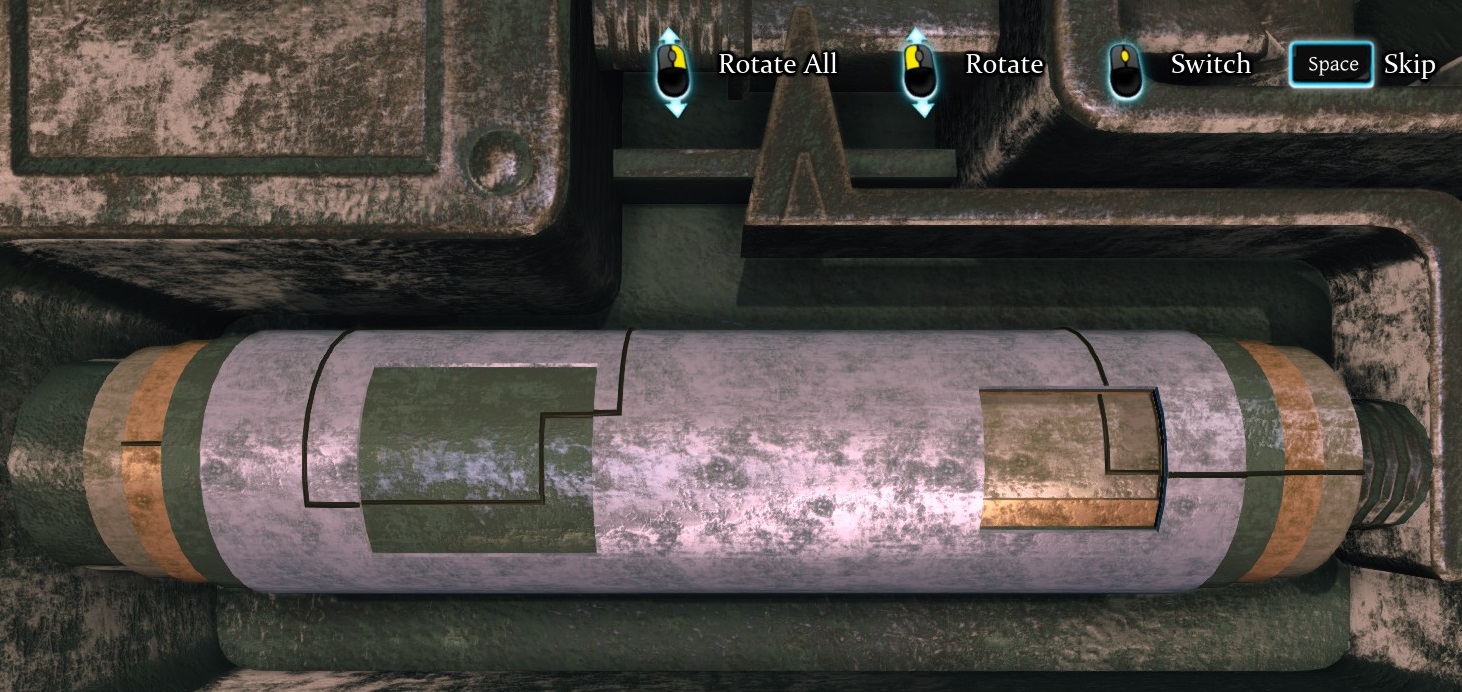
Go back to the train platform. Click the door to the Left Luggage room to begin another puzzle.
Just like the previous lock puzzles, you must rotate the lock segments to align the pattern.
Use the mousewheel to select a lock section. Left click and drag to rotate the selected section or right click and drag to rotate all lock sections simultaneously.
Remember the easiest way to solve these puzzles is to focus on the short horizontal lines at the right end of the lock.
Solution.
Once the puzzle is solved you can enter the Left Luggage room.
Activate your investigative talent with the [T] key as soon as you enter the room.
Examine the scratches on the floor, then click the Traces to view the bags.
Lift the sack to find the hidden Bottles underneath.
Next, inspect the Instruments and tools leaning against the wall.
Exit the Left Luggage room and go back to the station master's office.
Talk to the Chesterfield and ask him about the "Dirty instruments" and the "Workers?"
Open your Map and click the unnamed Station between Chesterfield and Evesham to travel to Doncaster.
Part 4 - Doncaster Station
When you arrive at the station go through the door directly in front of you to enter the Waiting Hall.
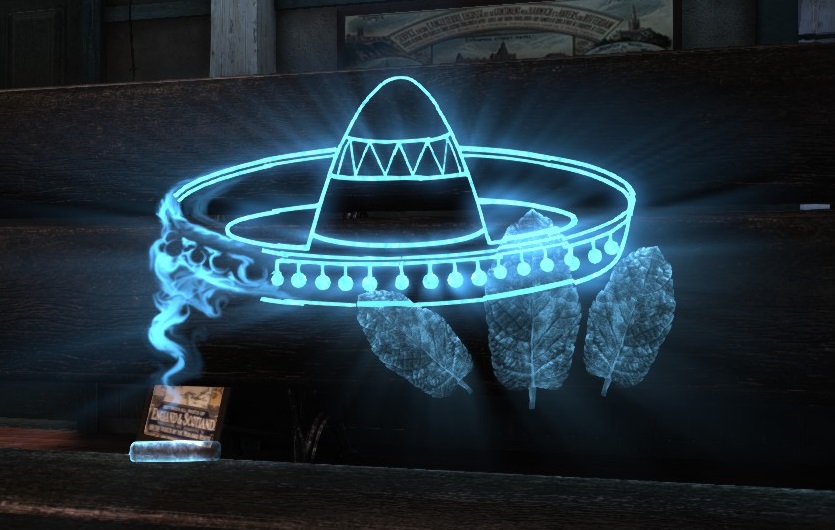
Approach the bench the stranger (who left when you entered the room) was leaning on. Look on the floor where you'll find his leftover Cigar Stub and click it to start another puzzle.
Just like the tobacco puzzle from the first case, the goal of this puzzle is to arrange the glowing blue lines to complete the picture.
Click and drag the main image to rotate it 180 degrees. You should now see most of a sombrero with a few missing pieces.
Drag the Cigar Smoke downward to fill the gap at the left side of the hat.
Drag the Mint Leaves to the right to complete the right side of the hat.
Solution.
Press [T] to activate Holmes' investigative talent.
Look inside the ashtray to locate the Piece of Burnt Paper.
Also examine the Cigar Stub and the pile of ashes in the Ashtray.
Go to the side room to enter the station master's office.
Click the Office Table to take a closer look.
Examine the Horse Racing Magazines and then pick up Horse Racing Tickets.
Rotate the tickets to view the back side, then click the Betting Ticket.
Exit the office and go outside to the train platform. Holmes and Watson will immediately note the flooded area opposite the railroad.
Speak with the Doncaster Station Master who sitting on some luggage at the far end of the platform.
Click the Character Portrait at the bottom of the screen to study his appearance.
Click his face to note his Melancholy appearance.
Press the [D] key to move the camera down to his torso. Click the Missing Button at the middle of his vest, then click his empty breastpocket to find there is No Watch.
Move the camera forward until it reaches his left hand. Click the Ring Mark on his ring finger.
Ask the station master about all the following subjects: "Flooded area", "The passengers", and "Mexican".
Question him about being a "Gambling Man" to begin another quick-time event. Press [Q] before the time runs out.
Select the line Horse Racing Tickets.
Turn around and go to the Left Luggage room through the second door on your left.
Examine the Station Master's Bag which is hanging from the hooks on the wall.
Take the Letter to Wife and Letter to Lawyer poking out of the front of the bag.
Press B to open the Deductions page and combine your new clues.
Select the clues "Doncaster telegram" and "Doncaster master received money".
Choose between the two new theories these clues created: "Passed Doncaster" or "Missed Doncaster"
The correct deduction is Missed Doncaster.
Exit the Left Luggage room. Step on to the railroad track, then turn left and follow the track up to the fork.
Click the Rail Switch to note that, while rusted, the switch is still operable.
Examine the right track which turns towards the Quarry.
Near the start of this side track, click to inspect the Rails.
Move forward to where the track ends then click the End of the Rails where the track meets the dirt.
Press [B] to reopen your Deductions page.
Combine the two clues "Old Railway to the Quarry" and "Flooded Quarry".
Now you *could* choose between the two possible theories, but let's put that off for now until we find some additional necessary evidence.
,/ul>
Open the Map and travel to the Beach.
Part 5 - Beach
As soon as you arrive, turn to the dirt path on your right. Click the Heavy Vehicle Traces on the ground to take a closer look.
Examine the Stone pressed down into the middle of the lower heavy trace.
Click the upper Heavy Vehicle Trace to examine it, then click it again to take a measurement.
Left-click and drag the measuring tape from the top line to the bottom line to take a measurement.
Walk to the end of the dirt path until you reach the water. Press [T] to use Holmes' investigative talent.
Focus on the Coastline marker at the edge of the shore, then pick up the Metal Label beside the refuse pile.
Click the front of the plate to note the "Las Zarpas" Inscription.
Return to the carriage, then click Holmes' portable archives at the back of the carriage to search for information on Las Zarpas.
Click the top right arrow to change the archive category to Encyclopedias.
Now click the right arrow beside the sub-category to change it to Technology.
Select the article "Las Zarpas - Barge Transportation".
Press [B] to open the Deductions page.
Select the clues "Special Transport" and "Mexican Caracal have Barges" to create the deduction Barges.
Open the Map and travel to the Railway Switch.
Part 6 - Railway Switch
Examine the Rail Switch beside the main railroad tracks to find that this switch, like the one at Doncaster, is still functional.
Click the "Mines" sign beside the curved rail path.
Press [F] to use Sherlock's Imagination skill; he will imagine the train possibly taking the path towards the mines.
The Mines map marker will be automatically added to your Casebook. Open the Map and travel there now.
Part 7 - Mines
When you arrive at the Mines, look to the ground and click the Vehicle Traces to take a closer look.
Click either of the Vehicle traces to use the measuring tape.
Drag the tape between the two traces to measure the distance between them.
After you've made your measurements, click one of the Vehicle Traces again to examine it.
Next, click the Wooden Beam on the right side of the wheel tracks.
Continue forward to the track leading to the caved in mine entrance. Press [T] to activate Sherlock's investigative talent.
Focus on the the Empty Place on the ground where the railroad track ends to take a closer look at the missing rails.
Click one of the glowing Screws lying in the dirt.
Approach the pile of rubble in front of the collapsed tunnel. Use [T] again to reactivate the talent.
This time, focus on the Pile of Stones at the front of the rubble.
Pick up the Strange Box wedged between the stones to take a closer look.
Remove the Box Paper by dragging away the Paper Cover on the corner.
Click the Sawdust inside the package.
When you're done inspecting the box, Watson will take out his pistol to shoot the package.
Right-click to aim down the sights of your pistol.
Carefully point the muzzle of the gun towards the bottom of the package, then left-click to fire.
Press [B] to open the Deductions page.
Combine the clues "Mines are collapsed" and "Mines were blasted" to create another two theories: Concealment and Sabotage.
We still don't have enough evidence yet to confirm which theory is correct, so we'll come back to that decision later.
Continue up the hill to the two sheds. Open the door on the left and enter the Mine Guards shed.
Examine the Metal Box on the floor at the rear left corner of the room.
Click the Lock at the front of the box to start another puzzle.
This puzzle should be familiar by now: rotate the lock sections to connect the lines.
Use the Mousewheel to select a lock section. Left-click and drag to rotate the selected section. Right-click and drag to rotate all of the lock sections simultaneously.
Just like before, the easiest way to solve the puzzle is to focus on the horizontal lines at the right end of the lock.
Solution.
After the puzzle is solved, take the Documents from the opened box.
Open the Map and travel back to Evesham.
Part 8 - Return to Evesham Station
Go to the Ticket Office, then enter the station master's private office through the side door.
Use the Telegraph on the table to contact Mycroft. Mycroft will respond with a document on the WEA Coal Company.
Press the [B] key to open the Deductions page.
Combine the two clues "Mexicans vs Chileans" and "WEA Coal and Chileans" to form the theory: "No Grudge".
This theory automatically ties together with the others to form the deduction "Theft" however, there is still more evidence needed to reach the correct conclusion.
/ul>
Exit the building and walk to the train platform. Go down to the railroad track, follow it a few feet to the right, then open the gate across the tracks.
Examine the Remains of a Building at the end of the right forked path.
Beside the rubble is a cart full of crates. Walk near the cart, then activate Holmes' investigative talent when the icon appears.
Focus on the Multiple Traces on the ground leading to the metal gate.
Click the Heavy Vehicle Traces in the dirt to take a closer look.
Examine either the upper or lower Heavy Traces, then left-click it to use your Measuring Tape.
Left-click and drag the tape from the top trace in the ground to the bottom trace in order to measure the distance between them.
Return to the train platform and talk to the Evesham Station Master who is still beside the bicycle.
Ask the station master about the "Disassembled warehouse".
With this new information, you're ready to make some new deductions! Press [B] to open the Deductions page.
Combine the two clues "Stolen rail track" and "Rails to mines are missing" to create the theory: "Road into the mines"
Now combine the clues "Stolen rail track" and "Old railway to the quarry" to form another theory: "Railway to quarry".
Select the correct theory to make your deduction; remember the evidence from the heavy tracks in the roads at all three locations!
The answer is Railway to Quarry.
Now that we know where the train ended up, we can finalize other theories that we passed on before.
First, choose between the theories we made at Chesterfield: "Passed Chesterfield" or "Missed Chesterfield".
The answer is Passed Chesterfield. The train would have had to pass Chesterfield in order to reach the quarry.
Next, choose between the two theories made at the Beach: "Could be sunk" or "Cannot be sunk".
The answer is Could be sunk. The train could reach the quarry if it had gone over the stolen rails, which were later re-removed.
Now four of your theories (Passed Chesterfield, Railway to quarry, Barges, and Could be sunk) will combine to form a single deduction: Was Sunk.
Thirdly, choose between the theories made at the Mines: "Concealment" or "Sabotage".
The answer is Sabotage. Now that we've deduced the train went to the quarry, it couldn't have possibly been concealed within the collapsed mine.
Because we still have the incomplete theory "Theft" from Mycroft's telegram, it will conflict with our current theory "Sabotage". Don't worry, though, we'll be able to clear that problem shortly with more evidence!
Open the map and travel once again to Doncaster station.
Part 9 - Return to Doncaster Station
Enter the Waiting Hall to confront the mysterious foreign stranger.
Click the Character Portrait icon at the bottom of the screen.
Click the Wrinkles at the corner of his eyes.
Move the camera a little forward to view his neck, then click his bowtie to note his Smart Clothes.
Next, click his chest to note his Strong Build.
Continue moving the camera down to his hand. Click the Expensive Cigar between his fingers and the back of his hand to find he's skilled in Martial Arts.
Ask the witness "I thought you were Mexican" to prompt a quick-time event. Press the [Q] key before the timer ends.
Select the line: Mexican Cigars.
Next ask "What is your business here?"
After you're finished speaking with the man, press [B] to open your Deductions page.
Combine the clues "Suspicious Mexican at Doncaster" and "WEA Coal and Chileans" to create a new theory: "Mexicans are angry."
Choose one of the two theories to form a deduction: "Mexicans are angry" or "No grudge" (the theory we found after receiving Mycroft's telegram).
The correct choice is Mexicans are angry.
This theory will connect with the earlier theory "Chileans were left" (the theory we made after questioning Mr. Robinson at Bridlington station) to form the deduction Mexican Trap.
At this point, all of your deductions should combine to create the final conclusion: Mexicans drowned Chileans.
Click the conclusion, then make your morale choice to decide how you should conclude the case, Blind Justice or Political Game. Select whichever one you prefer.
Part 10 - Conclusion
At the conclusion, Watson and Holmes will prepare a trap for two of the criminals. As soon as the cinematic is over, get ready for another quick time event!
You have three choices to make before running out of time:
Shoot the murderer in the head, killing him instantly.
Left-click the red circle over the man's head to shoot.
Wait until the murderer shoots and kills the Doncaster station master, then shoot the murderer in the head before he kills Holmes.
Shoot the murderer in the hand before he has a chance to fire in order to disarm him and avoid any more bloodshed.
Immediately left-click the red circle over the killer's hand to shoot it.
This action also awards the "Sharpshooter" trophy.
Posted by: Trinn |
October 5, 2014 3:10 PM
|
October 5, 2014 3:10 PM
Sherlock Holmes: Crimes and Punishments Walkthrough
(Part 2 - Case 3: Blood Bath and Case 4: The Abbey Grange Affair)
Case 3 - Blood Bath
Part 1 - Introduction at Baker Street
When Watson is performing his medical examination of Holmes, click the following areas:
The Pupil at the center of Holmes' eye.
The Forehead to check his temperature.
Lastly, the Wrist to begin a minigame.
Count Holmes' heartrate by Left-clicking every time a blip appears on the monitor. Click 8 blips to conclude the puzzle.
After speaking to Lestrade, open the Map and travel to the Strand Lane Bath.
Part 2 - Strand Lane Bath
When you arrive at the Lobby, ask Inspector Lestrade about the "Suspects", "The crime weapon", and "Witnesses".
Once Lestrade's finished briefing you on the details, approach the employee he points out at the reception desk, Mr. Phillips.
Click the Character Portrait icon at the bottom of the screen to study the witness's appearance.
Click his shirt's Starched Collar to note that he is Fastidious.
Click the Light Wrinkles under his eyes.
Click the side of his head to find that he cuts his own hair and Lives Alone.
Click the top Shiny Button on his coat.
Click the Manchester City patch sewn on the chest of his coat.
Click the Telegram Sent Today sticking out of his coat pocket.
Ask Mr. Phillips "Tell us what happened" and "Were there any other visitors?"
Turn right and take the door into the Apodyterium, the dressing room.
Examine the Champagne Bottle in the bucket of ice at the right side of the room.
Click the Wine Label and the Cork on the bottle.
Rotate the bucket with the right mouse button to look inside, then click the Melted Ice.
Continue through the next door to the Sudatorium, the sweat room.
Examine the body of Sir Rodney lying against the bench.
First click the Blood over his chest.
Next, click his face to take a closer look, then click the Wound over his right eye.
Now click his extended right hand to zoom in.
Examine his Wrist, the mark on his Ring Finger, and the Dirt under his thumbnail.
After the body is removed by the constable, click the pool of Blood left on the floor.
Click the Blood again to take a sample.
Press [T] to activate Holmes' investigative talent which will reveal a Key in the blood.
Examine the Brazier at the end of the room.
Note the lump of Melted Metal in the middle of the coals. It's too hot to grab just yet.
Inspect the Glasses on the left side of the brazier's rim.
Click the Thick Glass on the left lens and the Crack on the right lens.
Click the Steam Switch on the left wall near the brazier to take a closer look.
Pull the switch to fill the room with steam, showing what visibility would have been like at the time of the murder.
Activate Sherlock's investigative talent with the [T] key, then pull the switch again to turn off the steam.
Talk to Mr. Blinkhorn, Mr. Pitkin, and Mr. Garrow, then click the Blood on Mr. Garrow's towel.
Walk to the constable by the doorway, then examine the Grid on the wall next to him. The grid is irremovable, so the weapon can't have been hidden there.
Exit the room and return to the Lobby. Continue through the door across the room into the hallway that leads to the Frigidarium.
Walk to the end of the hall until the wall collapses. Click the pile of Fallen Rocks in the rubble to examine them.
Turn back around towards the entrance to the Frigidarium, then take the door on the left into Sir Rodney's office.
First, take a look at the table on the right.
Pick up the Document: Sir Rodney's Draft, the Newspaper: Daily Mirror, and the Newspaper: Baths Reopening.
Turn left and inspect the contents on the middle table.
Take another Document: Bentcliffe's Research.
Pick up the Perforated Plate for a close-up view.
Rotate the plate to its back side, then click the cut-out shape.
Click the Archaeological findings on the right side of the table.
Turn left once more and examine the top of the left table.
Grab the Tongs on the corner of the table.
Click the Archaeological tools piled at the center.
Next, take a look at the items on the Shelves beside the door.
Open the Box on the middle-left shelf.
Examine the label at the front of the box.
Click the Glass Plate Negative (second from the right), then click to note the space for a Missing Plate.
Go back to the Lobby and speak with Mr. Phillips at the front desk.
First ask "Who brought champagne?" Then ask him about "The steam room keys?" to prompt a quick-time event. Press [Q] before the timer disappears.
Select the dialogue option Morning Telegram.
Return to the Sudatorium and examine the Brazier a second time.
Navigate the tongs with your cursor. Left-click and hold when the pincers are above the center of the metal lump to pick it up.
Drag the metal over the bottom edge of the brazier to remove it, adding the Melted Metal to your Evidence.
Go back to the Lobby one last time to speak with Lestrade. Tell him you have "No objections" to taking the suspects to Scotland Yard.
Open the Map and travel to Baker Street.
Part 3 - Experiments at Baker Street
Go to the Analysis Table to begin your experiments, starting with the Dirt Sample.
Click the glass side to view the sample of dirt under the magnifier.
Scroll the Mousewheel down twice to focus the magnification on the dirt.
Click the Selenite in the center, the White Clay Particles at the top, and the Pyrite at the lower left area of the sample.
Holmes will circle the soil sample on the index at the bottom of the map. White London Clay is purple and indicated by the number 8. Click the 8 on the London map to locate the source of the clay.
Use the Analysis Table a second time to analyze the Blood Sample.
Click the glass slide to view the blood under the magnifier.
Again, scroll the Mousewheel down twice to focus the magnifier on the blood.
Pick up the Pipette from the holder on the table, use it on the bottle of Peroxide.
Click the Blood Sample three times (one on the left, one in the middle, and one on the right) to drip the peroxide on the sample.
Use the Analysis Table a third time to analyze the Melted Metal.
First, click the Metal Sample to examine it.
Pick up the Pipette and dip it in the bottle of Acid.
Use the acid-filled dropper on the Silver Coin and the Metal Piece to test their reactions.
Now that you've finished the experiments, take a look at the Newspapers in the bookcase near the door to Sherlock's room to search the archives.
Click the right arrow beside the date of the papers to view articles from the year 1893.
Select the article "Bentcliffe's Mummy". Read the article, then press [E] to continue.
Open the Map and travel to Scotland Yard.
Part 4 - Scotland Yard
Go to the hallway and enter the Evidence Room through the first door on the right.
Click the left tray on the table to inspect Pitkin's belongings.
Examine the Handerkchief and the Fountain Pen.
Click the Visiting Card to pick it up. Use the Right mouse button to rotate the card to the front, then click the details on the card.
Next, take a look at Garrow's Belongings in the second drawer.
Pick up the Drug Phail and click the bottle to identify the substance.
Examine the Bloody Towel.
Now inspect the third drawer containing Blinkhorn's belongings.
Examine the Pencil.
Take the envelope containing the Letter from Pitkin.
Lastly, inspect the far right drawer on the table containing Bentcliffe's Belongings.
Pick up the Roman Coin. Use the Right mouse button to view the 'tails' side of the coin, then click to examine it.
Now pick up the Ring Rotate the ring to its side and click the carved Old Symbol. Turn the ring slightly downwards and click the silver join labelled Ring.
Take the hand drawn Map.
Pick up the Notebook and click the cover to open it.
Click the Torn Pages to begin a minigame.
Left click and drag the pencil across the paper to reveal the message pressed into the page.
Press and drag the handerchief against the pencil shading to make the writing more legible.
Solution.
Exit the Evidence Room and return to the corridor. Take the second door on the right to enter the Morgue.
Head down the stairs and through the double doors, then click the Body on the table.
Examine the Wound on the victim's eye.
Examine the Chest Scar and Stomach Scar.
Click the shoulder to flip the body over, then click the markings on the victim's Bruised Back and Bruised Shoulder.
Exit the morgue and walk to the jail cell at the end of the hall. Talk to Mr. Garrow to question him first in the Interrogation Room.
Click the Character Portrait icon at the bottom of the screen to inspect Mr. Garrow's appearance.
Click his facial hair to note his face is Badly Shaven.
Click the Eye Bags under his eyes.
Click his forehead to find the Perspiration on it.
Move the camera down to his waist, then click the talisman sticking out from under his coat to note that he is Superstitious.
Turn the camera to the sleeve of his right hand, then click the stains by the wrist of his Dirty Clothes.
Ask Mr. Garrow about the following subjects: "Your profession", "Sir Rodney", "The murder", the "Ring", "Melted Silver", "Recent unusual event?", "Old coin", and his "Drug".
When you are finished questioning Mr. Garrow, click Mr. Blinkhorn to speak with him next in the Interrogation Room.
Click the Character Portrait icon at the bottom of the screen to inspect Mr. Blinkhorn's appearance.
Click his eyes to note his Attentive expression.
Move the camera down to his chest, then click the rusty bracers on his suspenders to find he is Not Wealthy.
Continue moving the camera down to his hands. Click the dirt stains proving Recent Earthwork on his sleeve and the Callus on his left hand.
Now ask Mr. Blinkhorn about his "Profession", "Sir Rodney", "What did you see?", "Anything unusual?", "Melted Silver", the "Ring", and the "Drug".
Question Mr. Blinkhorn about "Your Work" to prompt a quick-time event. Press [Q] before the timer ends.
Select the speech option Pitkin's Letter.
Once you've asked Blinkhorn all the available questions, click on Mr. Pitkin in the jail cell to question the final suspect in the Interrogation Room.
Click the Character Portrait icon at the bottom of the screen to inspect Mr. Pitkin's appearance.
Turn the camera to the front of Pitkin's face, then click his eye to note his Arrogant Look.
Click his mouth to note the Disdain in his expression.
Move the camera down to his hand. Click the Signet Ring on his finger, evidence of his Aristocratic Roots.
Continue moving the camera forward to his torso. Click the middle of his vest to find he is a Man of Wealth.
Ask Mr. Pitkin about the following subjects: "Your profession", "Sir Rodney", "The murder", "Recent unusual event?", "Drug", and "Melted Silver".
Question Pitkin about "Your work" to prompt a quick-time event. Press [Q] before the timer ends.
Select the dialogue option Pitkin's Letter.
Now that you're finished questioning the suspects, press [B] to open the Deductions board.
Combine the clues "Broken glasses" and "Inside brazier" to create the theory Possible Silver Weapon.
Press [spacebar] to return to the clues, then combine "Stolen notes" and "Sir Rodney's lie" to create the theory A Mortal Secret.
Click the resulting deduction which forms a new Task: The Last Expedition.
Next, select the clues "Strange wound" and "Very liquid blood" to create another two possible theories: "Steam Moisture" and "Unexplained Clue".
The correct choice is Unexplained Clue
Combine the clues "Pitkin's fight" and "Effective arrival" to create two theories: "Blinkhorn's humiliation" and "Blinkhorn's interest".
Although Blinkhorn claimed to admire Sir Rodney, the evidence and testimonies prove that the correct deduction is Blinkhorn's Humiliation.
Open the Map to travel back to Baker Street.
Part 5 - Return to Baker Street
Use the Map on the wall beside the exit door to start another puzzle.
Just like the previous map minigame (the Evesham map puzzle you completed at Chesterfield Station in Case 2), you must locate the matching area on the big map that is shown on the little map.
Compare the landmarks between the two maps to help you find the correct location.
Left-click and drag the small square map around the screen to move it to the lower right corner.
Align the two maps at the following position:
Solution.
After the puzzle is solved, open the Map in your Casebook and travel to Saint Albans.
Part 6 - Saint Albans
Open the Wicket gate, then follow the path to the cabin with the sign "Domum Hadriano".
Go through the door and examine the Desk in front of you.
Take the Document: Hidden temple of Mithras, then examine the Map of the dig site pinned to the wall.
Now turn and inspect the Shelf on the wall.
Take the Document: Curses and Beliefs from the stack of shelves.
Turn right again and examine the second Desk to the left of the doorway.
Pick up the Metal Cubes, Document: Mithraic Mysteries, and Document: Tauroctony Knife.
Exit the cabin and follow the left wooden platform to Area 1 - Triclinium. Head down the ramp to the fresco in the area below.
Click the upper left side of the Fresco to examine the picture, then click the faces of Vulcan and the Cyclops.
Go up the small set of stairs and turn left to reach Area 2 - Pits.
Note the Ropes on the crate beside the area sign. You can't take them now, but they'll be marked as an object of interest for later.
Examine the Pit on the right to pull up the basket of tools with the rope.
Take the Trowel from the set of Archaeological Tools.
Turn around and follow the wooden path through Area 3 - Arch of Hadrian. From there, walk forward to the sign for Area 4 - Tablinium, then head down the ramp.
When you reach the lower area of the Tablinium, press [T] to activate Sherlock's investigative talent.
Click the mud-covered Wall to use the trowel.
Left-click and drag the trowel from side to side across the wall in order to scrape off the mud and reveal the hidden picture.
Click the sign to the Frigidarium at the upper right side of the mosaic.
Solution.
Turn back around and head up the ramp. Continue forward to the statues in front of Area 5 - Temple.
Inspect the statue of Neptune on the left, the statue of Minerva on the right, and the Bull statue at the front.
In the middle of the floor of the temple behind the statues you'll find a crate filled with Hooks. Like the rope on the crate, you can't take the hooks just yet, but it will be marked as an object of interest for later.
Turn right and follow the dirt path to the platform overlooking the river. Click the Board on the left side of the platform to zoom in.
Examine the Map and the Schematic of the gastraphetes.
Step off the platform, turn right, and enter the second cabin with the sign "Arturus Domum".
Take a look at the pair of shelves on the wall.
Pick up the Document: Bentcliffe's Power on the top shelf and the Document: Gastraphetes from the bottom shelf.
Examine the Schematic on the wall and the Dismounted Device on the table below it. We cant assemble the device just yet, but you should note its location for later.
Press the [B] key to open the Deductions page.
Connect the clues "Pitkin's complaint" and "Effective arrival" to create two possible theories: "Pitkin's Hopes" and "Pitkin's Worries".
The correct solution is Pitkin's Hopes.
Open the Map and travel to the Strand Lane Bath.
Part 7 - Explore the Frigidarium at Strand Lane Bath
Go through the door on the left, then walk through the double doors at the end of the hall to enter the Frigidarium.
In this room is a set of statues and a row of columns with buttons. Look for the statues we found earlier at the dig site in Saint Albans.
When you enter the room, look to the statue on your left. Examine the Helmet button at the bottom of the column behind the statue of Minerva.
Click the button, then click the Symbol that appears at the bottom of the pushed in button.
Walk right to the statue of Neptune. Inspect the Trident at the bottom of the column behind the statue.
Push in the button then click the second revealed Symbol.
Go behind the headless statue holding a spear. Examine the One-Eyed Face (the Cyclops) button at the bottom of the column.
Push in the button, then click the third and final Symbol.
Press the [F] key to use Sherlock's Imagination skill and begin a puzzle.
Rotate the statues so that the white lines projecting from them are connected over the pool.
Left-click a Figure to select it, then move your cursor to rotate the statue.
Solution.
Press [T] to activate Holmes' investigative talent.
Examine and then rotate the female Bust near the statue of Neptune that was indicated by the puzzle you just completed.
Turn right and walk around the room to the archway in the corner near the collapsed bust. Enter the revealed side room and climb down the rope.
Inspect the Ground near the bucket in the corner of the room.
Take the Lamp, the Ice Box and Broken Glass Plate.
Examine the bag of Salt leaning against the wall.
Enter the hallway and examine the Fresco of Mithras on the right wall and the Fresco of Seven Grades of Mithras at the end of the hall.
Continue forward into the crypt. Note the Pillars of bones around the room.
Examine the side of each pillar and light the Brushwood in the middle of the pillar with your lantern.
The lit fire in the pillar will cast a shadow through the engraved plate and onto the floor.
After you've lit the first three pillars, examine the fourth Collapsed Pillar in the back left corner of the room.
Press [F] to use Holmes' imagination talent.
Examine the side of the imagined pillar, then click the space in the pillar to install the Perforated Plate (found in Sir Rodney's office) from your inventory.
Now you can inspect all four Shadows cast on the floor.
Open the Map and travel back to Baker Street.
Part 8 - More Experiments at Baker Street
Go to the Analysis Table to assemble the Metal Cube (from the Domum Hadriano cabin at Saint Albans).
Arrange all of the cubes in the correct position to connect them together.
The red cube Mould Part and the grey cube beneath it are already in the correct spots, so you only need to solve the remaining 10 cubes.
Right-click and drag to rotate the entire puzzle horizontally. Hold the [Q] key while dragging to rotate the puzzle vertically.
Left-click a Mould Part to select it. You can left-click a different cube to swap their positions or right-click and drag to rotate the cube individually.
Pay attention to the indentations and flat sides of the cube.
The flat side of the cube faces outward and does not connect with any other cubes. The flat sides also give a hint to where the cube belongs in the puzzle.
For example, if the top of the cube is flat, you know that this cube belongs at the top of the puzzle. Conversely, if the bottom of the cube is flat, then the cube should be in the bottom row.
Additionally, all of the cubes in the top row have a large section cut out of one corner. You must turn the cubes so that the cut-out corners face the center of the puzzle.
An indented side can only connect with the protruding side of an adjacent cube.
Solution.
After the puzzle is solved, you'll have a completed mould ready. Mix the ingredients on the analysis table to create a plaster.
Pour the Water into the Melting Pot.
Click the Spoon to mix the powder and water.
Click the Melting Pot to pour the Plaster Solution into the mould.
Open the mould and take the Cast inside.
Click the Analysis Table again to take a look at the Broken Glass Plate (from the cave at the Frigidarium).
Arrange the shards on the table to repair the glass plate.
Click a shard to select it. Move the shard around with your cursor or left-click to put the shard down on the table.
Start with the pieces that have flat sides first. After you've completed the border, fill in the broken shards in the middle.
Solution.
Once you've fixed the plate, Holmes will take a look at the resulting photograph.
Drag the cloth across the paper to reveal the picture.
Click the following objects in the photograph:
Archaeologist (1) sitting at the left side of the table.
Pyramids (2) in the background of the picture.
Ice (3) in the bucket atop the table.
The Salt (4) beside the ice bucket.
Ice Cream (5) in Sir Rodney's and the archaeologist's hands.
Rodney Bentcliffe (6) himself.
Inscription (7) at the top right corner of the photo.
Solution.
Now that you're finished with all your experiments, press [B] to open the Deductions page.
Combine the clues "Glass plate negative" and "Salt and ice" to create the theory "Ice trial".
Select "The mould form" with "Strange wound" to create another theory "Moulded weapon".
The theories "Possible silver weapon" and "Moulded weapon" automatically tie together to make the Task: Create a silver knife.
Additionally, the theories "Moulded weapon" and "Ice trial" tie together to make the Task: Create an ice knife.
Click the Analysis Table to begin the Ice Experiment.
Start by pouring the Water at the right side of the table into the Mould.
Solve the puzzle by repeating the following steps four times:
Use the Ice Pick to crush the Ice Brick in the bucket, which will be poured into the Ice-cream Maker automatically.
Watch the temperature drop on the thermometer, indicated by a blue arrow. A red arrow means the temperature is rising. An equals sign means the temperature is not changing yet.
When the equals sign (=) appears on the thermometer, quickly pour the salt into the Ice-cream Maker.
The temperature will drop again. Wait for the equals sign to reappear, then pour in the next batch of ice.
Repeat the process of ice = salt until the temperature drops all the way to -20 degrees Celsius.
When the puzzle is solved, open the Mould and examine the Cast of the frozen Ice Knife.
Click the Analysis Table again to begin the Silver Experiment.
Pick up the Silver Piece on the table and put it into the Saucepan.
Click the Gas Burner to turn on the fire.
Pour the melted silver in the Saucepan into the Mould.
Open the Mould and take the Silver Knife inside.
Press [B] to reopen the Deductions page.
Combine the clues "Silver Knife" and "Inside Brazier" to create the theory "Silver Weapon".
Next, combine "Champagne" and "Ice Weapon" to create the theory "Ice Weapon".
The two theories "Ice weapon" and "Unexplained Clue" will tie together automatically to form the deduction Method: The Ice Knife.
Open the Map and travel to Scotland Yard.
Part 9 - Return to Scotland Yard
Go to the jail cell at the end of the hallway.
Question all three of the suspects about "Mithras" and the "Champagne".
When you are interrogating Mr. Blinkhorn, ask him about the "Golden Knife".
Press [B] to open the Deductions page.
Combine the clues "Garrow's drug" and "Garrow's behavior".
Choose between the two resulting theories: "Garrow's Weakness" and "Garrow's Illness".
The correct selection is Garrow's Weakness.
Open the Map and travel back to Saint Albans.
Part 10 - Return to Saint Albans
First, walk to Area 2 of the dig site, the Pits.
Pick up the Ropes on top of the crates beside the sign.
Next, go to Area 5, the Temple.
Take the Hooks from the box at the right side of the temple floor.
Continue forward to the wooden platform overlooking the river.
Click the Bridge across the water to take a closer look.
Examine the Iron Ring at the sides of the bridge and the Hidden Place in the center.
Turn left and enter cabin, Arturius Domum, at the back of the dig site.
Click the Dismounted Device on top of the table to assemble the gastraphete.
First attach the Shutter to the Shutter Groove.
Next, put the Mechanism in the Mechanism Housing.
Third, place the Handle into the Handle Joint.
Rotate the device with the right mouse button to view the front of the crossbow.
Lastly, connect the Bow with the Bow Rabbet.
Return to the platform beside the river.
Click the Bridge to use the gastraphete.
Move the cursor to aim the crossbow. Left-click to hold your breath and focus your target. Left-click again to shoot.
Shoot all three of the rings on the bridge to attach a rope.
Click the Bridge again once the ropes are ready to walk across them.
Balance on the ropes with the [A] (to move left) and [D] (to move right) keys. When you are steady, left-click to step forward.
When a red arrow appears on the left or right side it means you are leaning too far towards the opposite side. You must move in the arrow's direction to keep from falling off the ropes.
Use quick, short taps to adjust your balance slightly. If you over-correct too far in one direction, you'll fall into the water.
Click quickly when the blue arrow appears in order to move forward.
When you make it across the bridge, you'll enter the Mithraeum.
Part 11 - The Mithraeum
Walk down the stairs to the first crossroads. Here you'll see a series of doors with symbols on the wall and floor by each door.
Open the Documents tab in your Casebook and take a look at the "Seven grades of Mithras initiation" page.
One of the symbols at the bottom grade is beside one of the doors in this room.
Go through the middle doorway with the symbol of the Scepter.
When you reach the second room, repeat the process of matching the symbols on the door with the symbols on the document (remember to read from the bottom of the list to the top).
Go through the right doorway with the symbol of the crown.
At this point you should arrive in a room with a Table With Stones. Click the table to zoom in on the next puzzle.
Place the stones on the columns to weigh them all down simultaneously.
Click a stone to select it, then click a weight to put it down. There are multiple possible solutions to this puzzle.
Solution.
Continue navigating the maze with the Mithras initiation document as your guide. Go through the doors in the following order:
Take the middle door with the symbol of Minerva's helmet (the one without decorations).
Take the left door with the twisted symbol.
Take the right door with the crescent moon symbol.
Take the right door with the symbol of the spiked yoke.
Take the left door with the decorated helmet symbol.
Walk up the stairs to enter the Temple of Mithras.
Approach the closed center gate, then examine the Broken Lamp on the floor and the Golden Dagger held by the statue of Mithras.
Turn around and walk through the open gate on the left. Click the Lever to open the gate at the opposite side of the room.
Press [Q] to switch control to Watson.
Go through the opened gate and pull the second Lever.
Switch back to Holmes. Release the switch he's currently holding and walk through the next gate immediately on your left.
As Holmes, you should now see three levers on the wall. Pull the Lever on the right.
Switch to Watson again. Release the lever and walk through the opened gate on your right.
As Watson, there should be two switches on the wall. Pull the Lever on the left.
Switch back to Holmes again. Release the lever he's holding and walk back to the center of the temple room.
Switch to Watson one more time. Release the left Lever, then pull the right Lever to open the large gate in front of the statue.
Make one more switch back to Holmes. Walk through the opened main gate and take the The Golden Knife from the Mithras statue.
Press [B] to open the Deductions page.
Combine the clues "Stolen notes" and "Golden knife" to create a new theory, "Valuable secret".
The theories "Valuable secret" and "Blinkhorn's humiliation" automatically tie together to form the deduction: Motive: Vengeance.
Click the final Conclusion: Blinkhorn (Ice-knife).
You must now make the decision to either Condemn or Absolve the murderer.
Case 4 - The Abbey Grange Affair
Part 1 - Introduction
Go to the writing table on the right side of the room and examine the Letter.
Inspect the Address and the Wax Seal.
Use the right mouse button to rotate the letter, then inspect the Brackenstall insignia on the back.
Open the Map and travel to Abbey Grange.
Part 2 - Abbey Grange
Open the left door to enter the Morning Room.
Holmes will begin questioning Lady Brackenstall as soon as he enters the room.
Click the Character Portrait icon at the bottom of the screen to study Lady Brackenstall's appearance.
Click the Fresh Bruises over her eye and forehead.
Move the camera to the other side of her face and click her unbruised Pale Cheeks.
Continue moving the camera forward to her upper torso. Click the gold brooch of Australian Origin on her collar.
Click the buttons at the middle of her blouse to note her Elegant Dress.
Turn the camera down to her hands. Click the Wedding Ring on her finger and the Old Bruises on the back of her hands.
Question the lady about "What happened last night" and "Is something missing".
Ask her if it was "Not a happy marriage" to prompt a quick-time event. Press the [Q] key before the timer runs out.
Select the line Old Bruises.
Next, speak with Theresa who is standing by the table.
Click the Character Portrait icon to inspect Theresa.
Click the Wrinkles around her eyes.
Move the camera down to her hands, then click the handkerchief in her hands which shows her Caring nature.
Click the rough skin on the back of her Working Hands.
Turn the camera down to her apron and click the Coffee Stain.
Ask the maid about "Last night".
Examine the small table beside the door that leads back to the entrance.
Take the Newspaper - Randall Gang's Burglary.
Next, examine the other small table against the back wall.
Pick up the framed Photograph, then click the Two Women in the picture.
Rotate the object to the back of the frame. Click the four Fasteners and the Backing Board to reveal the back of the photo, then click the Writing.
Press [T] to use Sherlock's investigative talent.
Move to the picture hanging beside the table. Click the Scratches on the wall.
Move the Picture off the wall to reveal the Safe.
Go back to Lady Brackenstall and ask her if she can open "The safe".
She doesn't know the safe combination, so you'll have to break it open. Click the wall Safe to begin the puzzle.
Rotate the dial with the [A] (for left) and [D] (for right) keys, and pay close attention to the three tumblers in the center. When the tumbler shakes, it means you've passed over the correct number.
Left-click to confirm the number currently selected on the dial. If you're correct, the red line on the tumbler will move up to the 12 o'clock position.
Repeat the process two more times to open the safe.
The correct combination is 15-5-17.
Look inside the opened safe once the puzzle is solved.
Examine the Money and Coins, then take the Medical Report.
Go back to Theresa and speak with her again.
Ask her about a "History of violence".
Press the [B] key to open the Deductions board.
Combine the clues "Randalls are well-known" and "Criminals identified".
This will create two possible theories: "Randalls Blamed" and "Randall Gang", but we don't yet have enough evidence to deduce which theory is correct.
Next, combine "From Australia" and "No personal life" to create another two theories: "No acquaintance" and "Acquainted with a sailor".
Again, you'll need more evidence to decide which of the two theories is correct.
Go back to the foyer and talk to Inspector Lestrade.
Ask Lestrade about "Sir Eustace's reputation".
Press [B] again to reopen the Deductions page.
Select the clues "Inspector's Tale" and "Violent behavior" to create the theory: Domestic Violence.
Go through the door on the right to enter the Dining Room.
Click the Body lying on the ground beside the fireplace to take a closer look.
Examine his bare Feet and the Stick on the floor beside them.
Click the victim's Head to zoom in, then click the Head Wound and the bloody Poker beside him.
Lastly, examine the blood on the Fireplace Grate.
Press the [T] key to activate Holmes' investigative talent.
Approach the Mantlepiece over the fire.
Click to inspect the Piece of Rope at the bottom of the bell cord hanging from the wall.
Click the Glasses on the table to zoom in.
Examine the following objects on the table: the Decanter, the Wine Bottle, and all three of the Glasses.
Turn left and inspect the Chair that has been pulled from the dining table to the middle of the floor.
Examine the Chair, then take the piece of Rope tied around the chair's arm.
Go to the cupboard surrounded by shards of broken plates, then click the Sideboard for a close-up look.
Examine any one of the wine Bottles in the rack. Click the Empty Cell missing a bottle in the lower rack.
Inspect the Candlestick and the empty Silverware Box to finish investigating the area.
Press [B] to reopen the Deductions page.
Combine the clues "Two Glasses" and "Glass with beeswing" to form two possible theories: "Two People" or "Three People".
Next, select the clues "Dead Body" and "Fireplace Grate" to create the theory "Deadly Accident".
Select "Dead Body" again with "Bent Poker" to form another theory: "Poker Blow".
Choose between the two theories to determine the cause of death "Deadly Accident" and "Poker Blow".
The solution is Poker Blow.
Return to the Morning Room and speak again with Lady Brackenstall.
Ask her about the "The three glasses on the table".
Open the Map and travel back to Baker Street.
Part 3 - Experiments at Baker Street
Click the Analysis Table to begin the rope experiment.
Examine the rope to view the fibers from the section of rope cut by the murderer.
Use the tools on the table to cut the loop of rope and compare the resulting fibers.
The object that leaves fibres identical to the murderer's cut rope is the Knife.
Press [B] to reopen the Deductions page.
Combine the clues "Knotted rope" and "Sharp knife" to create the theory: Sailor's Background.
Click Toby, the dog who is sitting by the window, to bring him along as a companion.
Open the Map and travel back to Abbey Grange.
Part 4 - Sniffing Out Clues with Toby at Abbey Grange
When you arrive at Abbey Grange, you'll see the room through Toby's eyes (and nose).
Follow the traces of the glowing scent trails to the French Window, then click the window to go outside. Use Toby's scent skills to locate the three clues in the garden:
Follow the green scent trail along the garden path, around the fountain, and to the Shed. Click the Shed door to locate Scent Clue #1.
Turn left and follow the scent trail further to the Well. Click the base of the Well to note Scent Clue #2.
Take the right path to the stone Wall. Click the bottom of the Wall to find Scent Clue #3.
Check all of the areas that Toby located, starting with the garden Shed. Open the Shed door to look inside.
Examine the Suitcase on the upper shelf, Toolbox on the lower shelf, and the Bags on the floor.
Take the Hook on the bench at the lower left corner of the screen.
Go to the Well and open the lid to examine the inside.
Click the Glittering Object in the water at the bottom of the well.
Remove the Bucket, then click the hanging Chain to attach the Hook you picked up from the shed.
Click the Windlass to lower the hook into the well and pull out the object.
Open the bag, then pick up the Fork inside to take a closer look.
Rotate the fork to its back side. Click the Coat of Arms at the top of the handle.
Lastly, examine the bottom of the Wall to the left of where Toby is waiting.
Return inside the house through the main entrance. Click Inspector Lestrade to talk to him once again.
Inform Lestrade that "I have the stolen silverware".
Enter the morning room and speak with Lady Brackenstall.
Tell her "Your silverware has been found."
Talk to Theresa next and tell her about the "Silverware" as well.
Press [B] to reopen the Deductions page.
Combine the clues "Silverware Found" and "Criminals Identified".
Choose between the two resulting theories: "Robbery is the Motive" and "Imitated Robbery".
The stolen silverware hidden in the well proves that this is a case of Imitated Robbery.
With this new information, you can solve all your remaining theories.
Now that we know the robbery is faked, it means that the Randalls were framed. The correct choice is Randalls Blamed.
Additionally, since the Randalls have been ruled out as suspects, we can infer that the crime was committed not by those three criminals, but by Two People instead.
This theory will tie together automatically with your other completed theories to form the deduction Murderous Visitor.
Lastly, since we've deduced that the home was visited by a mysterious person, yet Lady Brackenstall has no known friends, she must be Acquainted with a Sailor from the ship she travelled to England in.
These completed theories will create a new Task: Look for Sailor.
Open the Map and travel back to Baker Street.
Part 5 - Conclusion
Go to the bookcase full of Newspapers to search Holmes' archives.
Click the right arrow beside the date to look up articles from the year 1893, as indicated on the photograph.
Select the article "Rock of Gibraltar's Arrival" then press [E] to continue.
Click the window to call Wiggins to the apartment.
Examine the Register that Wiggins leaves on the table to view the crew lists.
Compare the list of crew members from the Rock of Gibraltar from 1893 on the left paper with the officers in the crew lists on the right paper.
Click to cross out these names of matching sailors who could not have been the suspect and to mark the names of the one person who was in London at the time of the crime:
Cross out these names found on the Gaia list:
Mr. Henry Southward
Mr. Ernest J. Woods
Rock of Gibraltar list:
Mr. Charles W. Chill
Mr. William Partledge
Saint Thomas list:
Thomas Walker
Herbert Whittington
Bass Rock list:
Mark the name of the last possible suspect Jack Crocker
Talk to Wiggins again to call for the suspect. When he arrives, click the Character Portrait at the bottom of the screen to examine his appearance
Click his eyes to note his Honest appearance.
Move the camera down to his chest. Click the area around his jacket lapel to note his Strong Build.
Click the Sea Knife tucked into the sheath beside his belt.
Turn the camera down to his hands. Click the Newspaper Ink on his fingers.
Continue moving the camera all the way down, then click his Clean Boots.
Ask the sailor about "Lady Brackenstall". Tell him "You tied her up" to prompt a quick-time event. Press [Q] before the timer runs out.
Select the answer Sailor's Knots.
Press the [B] key to open your Deductions page and make your final deductions.
Combine the clues "Captain Crocker" and "Crocker's Statment" to create two theories: "Crocker's Involvement" and "Crocker's Alibi".
The correct choice is Crocker's Involvement.
Your deductions will combine to form the final conclusion: The Captain is the Killer.
You must now choose whether to Condemn or Absolve the murderer. After you make your choice, they will be called into the apartment.
Captain Crocker will attempt to shoot himself with his own pistol. To prevent his suicide, you must succeed in three quick-time events.
First, click the red circle over his hand before he fires.
Next, rapidly click the left mouse button until the red circle shrinks within the white circle.
Lastly, press the [W] key before the timer runs out.
Posted by: Trinn |
October 5, 2014 3:19 PM
|
October 5, 2014 3:19 PM