

Love Story: The Beach Cottage
Platform: Mac, Windows

![]() What would you be willing to do to recapture your first true love? You'll get to explore the answers to that question in Media Art's Love Story: The Beach Cottage, the second adventure/hidden object hybrid game in the Love Story series that grabs the hopeless romantic in all of us and takes us on a journey that may (or may not) give us the "happily ever after" we're looking for.
What would you be willing to do to recapture your first true love? You'll get to explore the answers to that question in Media Art's Love Story: The Beach Cottage, the second adventure/hidden object hybrid game in the Love Story series that grabs the hopeless romantic in all of us and takes us on a journey that may (or may not) give us the "happily ever after" we're looking for.
 Sandra Walsh receives a letter from her father (who recently passed away), asking her to visit their family's beach cottage one last time before she sells it. She reluctantly does so, and we go along for the ride. Through flashbacks, we learn of Sandra's history with the cottage and explore her reluctance to return caused by bittersweet memories of a childhood love both found and lost on the rocky shore.
Love Story: The Beach Cottage has casual and expert modes, changing cursors to indicate navigable areas and places of interest, and sparklies to indicate hidden object scenes, collectible items, and mini-games. The inventory does more than just show an empty set of boxes where you can stuff items. Instead, you're treated to a view of tasks you need to complete in order to progress. And rather than the usual notebook/journal to track important plot points, Love Story: Beach Cottage includes a charming "memory chest" in which certain objects that relate to the central love story are placed. There's also a nice variety of puzzles and mini-games scattered throughout, all of which are skippable without penalty.
 Analysis: Love Story: Beach Cottage is a romantic whirlwind which captures haunting memories of childhood, love, and loss, all within the realm of a highly engrossing hidden object game. It's not exactly the pinnacle of action and adventure, but it does spin a timeless love story that will appeal to the hidden romantic buried deep within the most cynical of souls.
As pretty as the most scenic postcard ever produced, the backgrounds and objects of Love Story: Beach Cottage astound with their breathtaking clarity and color. Appropriately, the music is soft and haunting, and the incidental sounds recreate the experience of being next to the deep blue sea. Combined, it transports the gamer into Sandie's world, both past and present. The hidden object scenes are a nice combination of classic, interactive, pairing, and multiple items. The puzzles and mini-games familiar but with a nice twist and cover a wide range of difficulty.
What makes Love Story: Beach Cottage stand out is the balance between adventure, story, hidden object finding, and puzzles. The difficulty levels even in advanced mode are still not as difficult as they could be, making this more of an adventure for the beginning-to-intermediate crowd. A few minor problems with clickable areas being too close together can be slightly irritating as well.
Love Story: Beach Cottage is a perfect game for a rainy (or snowy) Saturday afternoon that will appeal to anyone who appreciates a good love story. Will Sandie get that happy ending? Journey to the beach cottage and find out!
![]() Windows:
Windows:
Download the demo
Get the full version
![]() Mac OS X:
Mac OS X:
Download the demo
Get the full version


Walkthrough Guide
(Please allow page to fully load for spoiler tags to be functional.)
Love Story: The Beach Cottage Walkthrough
General Information
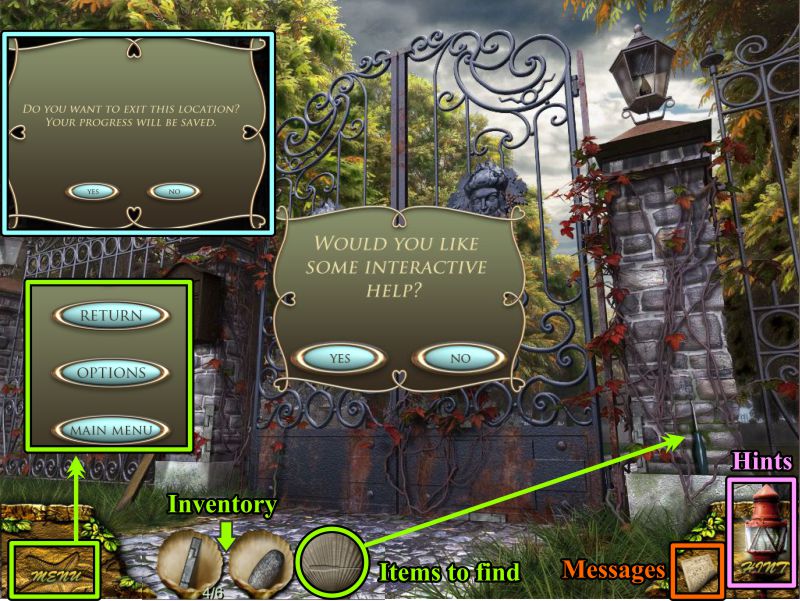
Main Menu and Options
From the Main Menu you can choose your Profile and Options, read the Credits, and Play or Exit the Game.
Options include Ambient and Sound Effects Volume, Music Volume, Custom Cursor, Full Screen or Windowed.
When you choose your Profile, you will be given your choice of two modes of play.
In Casual Mode, areas of interest are highlighted, Hint and Skip buttons recharge faster, and you will be shown objects to be found when you click on objects of interest.
In Expert Mode, areas of interest are not indicated, Hint and Skip buttons take longer to recharge, and there are no prompts for objects to find.
Screenshot
Scene Navigation
When you begin, you will be asked if you want Interactive Help.
You can access the Menu in the lower left corner, from which you can change your Options, go to the Main Menu, or return to the game.
If you wish to go to the Main Menu, your progress will be saved if you choose to exit the location.
Your Inventory is contained inside seashells at the bottom of the screen.
If you check out an area with a magnifying glass or gears, in Casual Mode, you will get the back of a seashell added to your Inventory with a silhouette of the item to find.
Once you start collecting Charlie's messages in bottles, they will be stored next to your Inventory.
Hints are the lighthouse at the bottom far right of the scene.
Question Marks in a scene provide information.
Screenshot
Chapter 1: Arrival at the Cottage
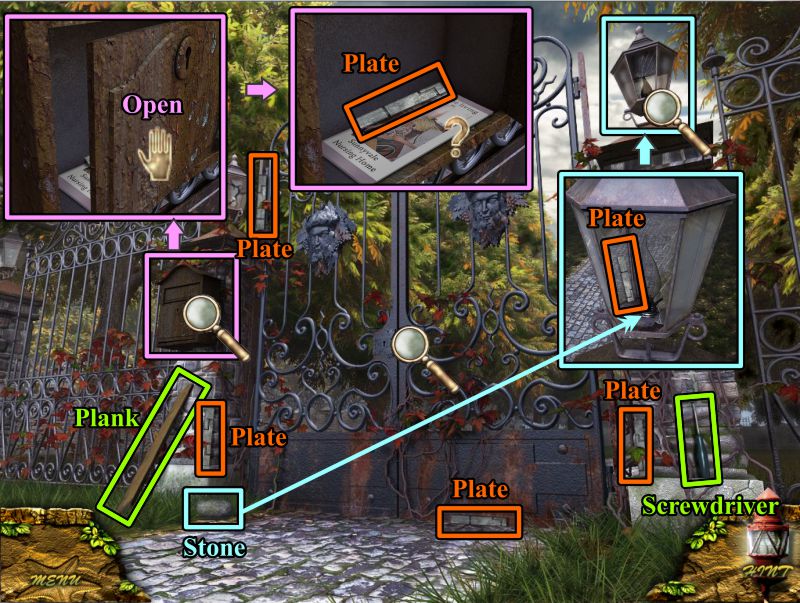
The Gate
Check out the Gate.
Collect the Plank, Stone, Screwdriver and 3 visible Plates.
Zoom in and open the mailbox so you can find another Plate.
Zoom in on the lamp at the right, smash the broken glass with the Stone, and take the last Plate.
Screenshot
Zoom in on the gate and use your Screwdriver to remove the 4 screws.
Individually place each of your 5 Plates to trigger a puzzle.
Arrange the Plates as shown in the screenshot and enter when the gate opens.
Screenshot
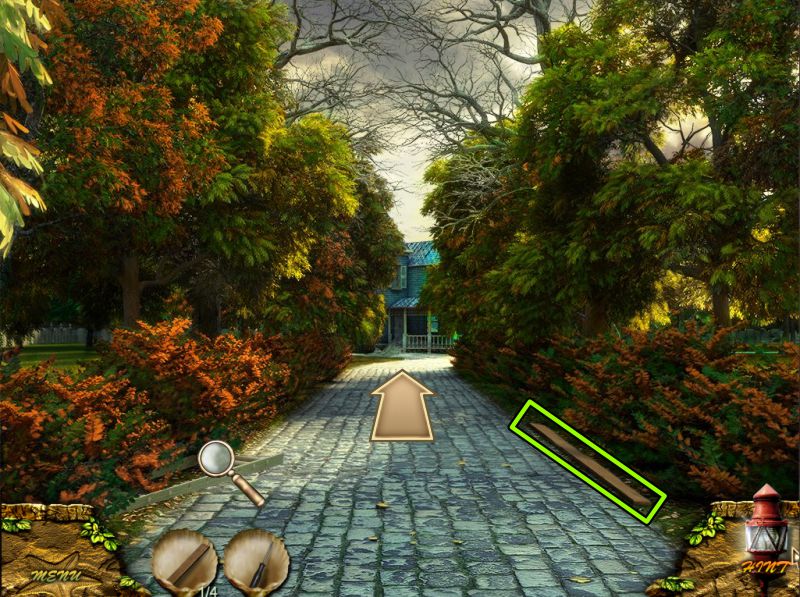
Path to the Cottage
Check out the ladder at the left, pick up the Plank at the right, and continue on to the Cottage.
Screenshot
Front of the Cottage
Check out all the magnifying glasses and gears shown in the screenshot to find out what you need.
Zoom in on the rock at the left, check out the gear and take the Stick.
Zoom in just in front of all the sand and take the Handle.
Go left around to the side of the Cottage.
Screenshot
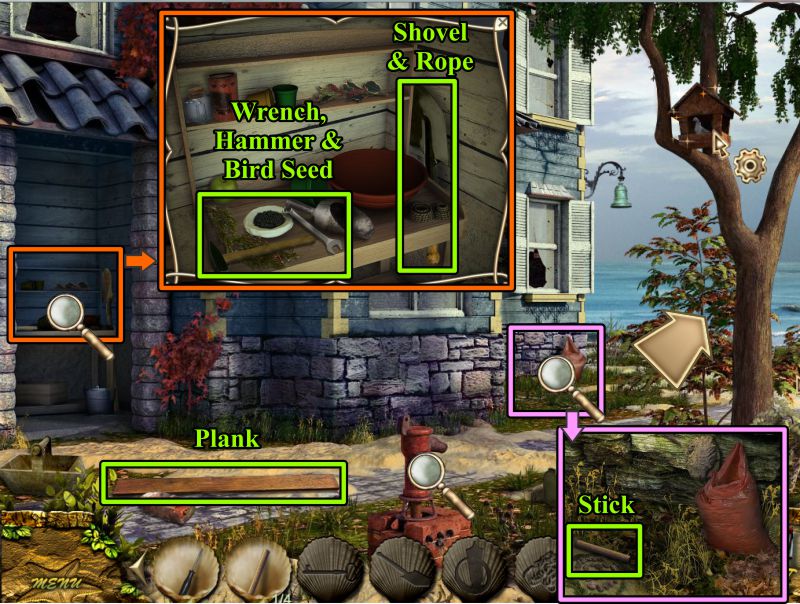
Side of the Cottage
Pick up the Plank and check out the Pump.
Zoom in on the indentation at the left and take the Wrench, Hammer, Bird Seed, Shovel, and Rope.
Check out the birdhouse in the tree at the right.
Zoom in on the bag of leaves and pick up the Stick.
Screenshot
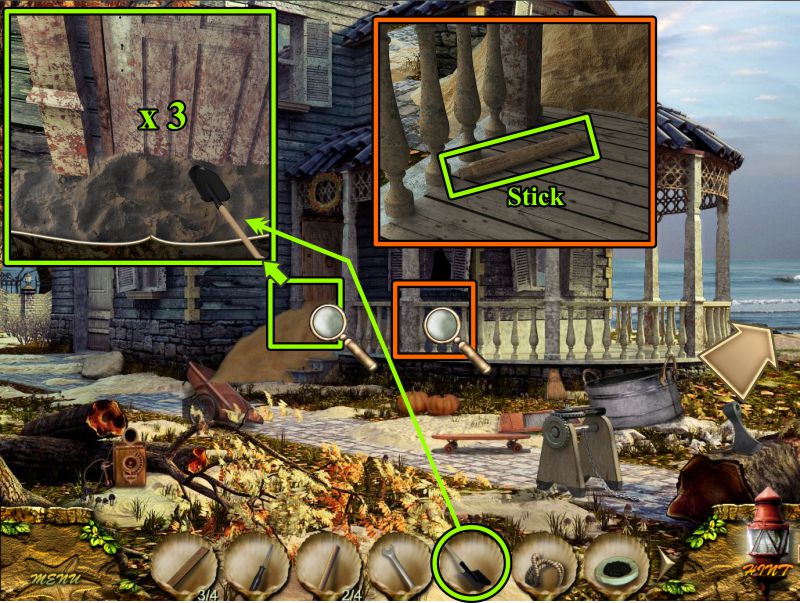
Front of the Cottage
Zoom in on the door and use the Shovel 3 times to clear the sand.
Check out the deck so you can get the Stick, then go around the right side of the Cottage to the Beach.
Screenshot
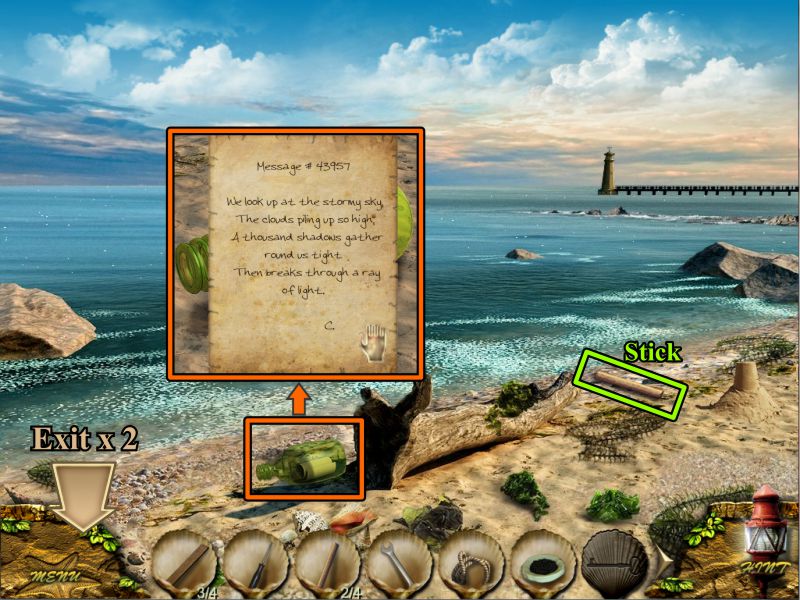
Beach
Pick up the Stick marked in the screenshot, then zoom in on the bottle.
Read and take the Message.
Exit down twice to the entry path.
Screenshot
Path to the Cottage
Zoom in on the ladder, place the Sticks and Rope, and the ladder will automatically go into your Inventory.
Exit to the Side of the Cottage.
Screenshot
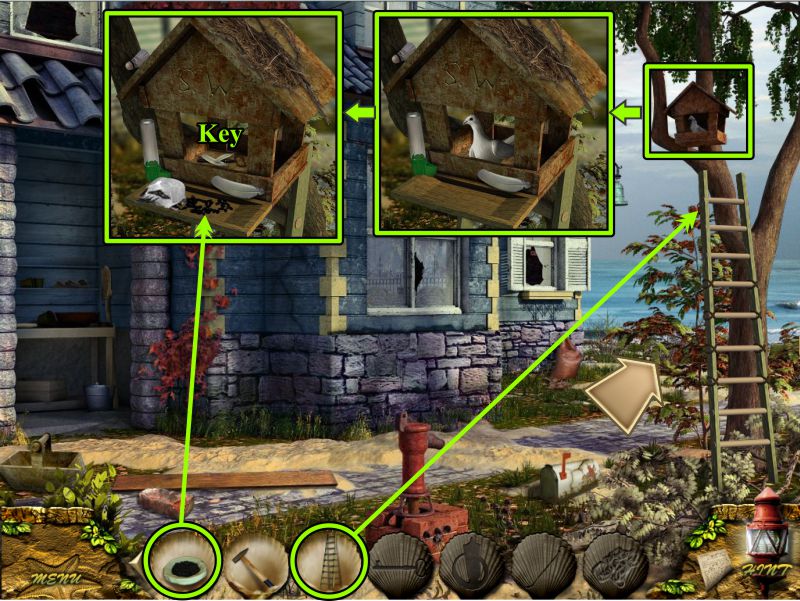
Side of Cottage
Place the Ladder on the tree by the birdhouse.
Place the Birdseed for the bird so you can collect the Key from the birdhouse.
Return to the front of the Cottage.
Screenshot
Cottage Door
Zoom in on the door, place your Handle and open the door with the Key.
Go inside the Cottage.
Screenshot
Chapter 2: Inside the Cottage
Foyer
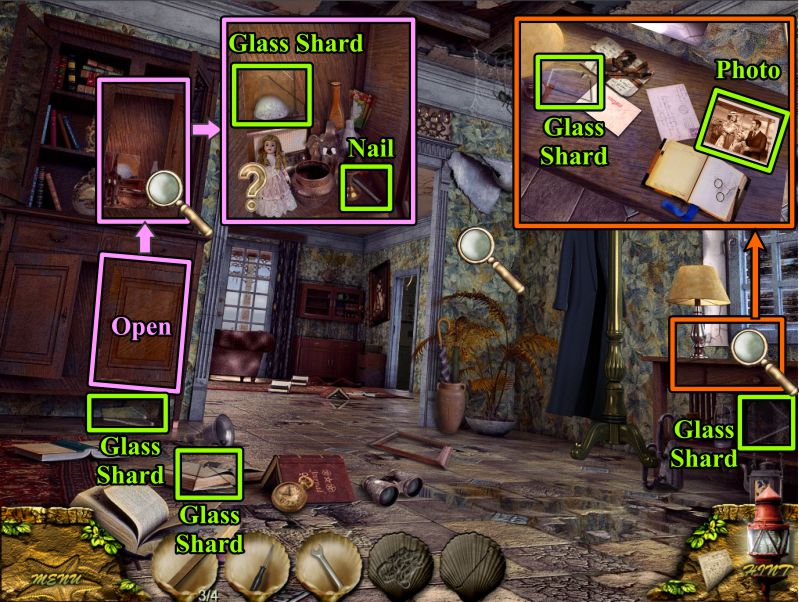
Pick up the available Glass Shards shown in the screenshot.
Zoom in on the desk at the right and take the Glass Shard and the Photo.
Open the cabinet door at the left, zoom in, note the doll, and collect the Glass Shard and Nail.
Screenshot
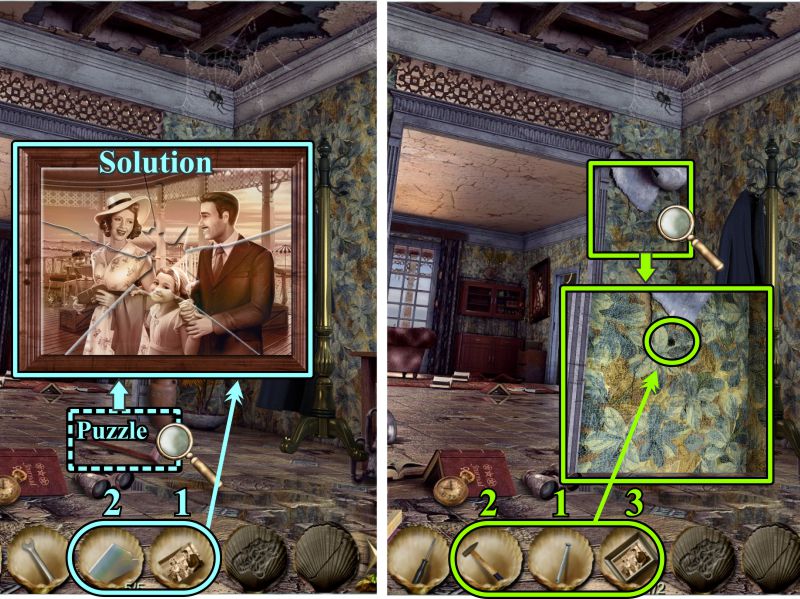
Zoom in on the frame on the floor to trigger a Puzzle.
Place the Photo, then the Glass Shards, as shown in the screenshot solution.
Zoom in on the wall marked in the screenshot, place the nail in the hole, hammer it in, and hang the picture.
Watch the flashback scene.
Screenshot
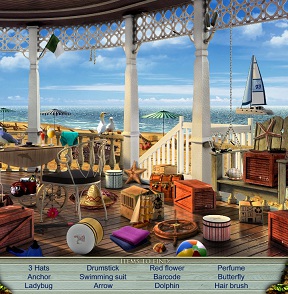
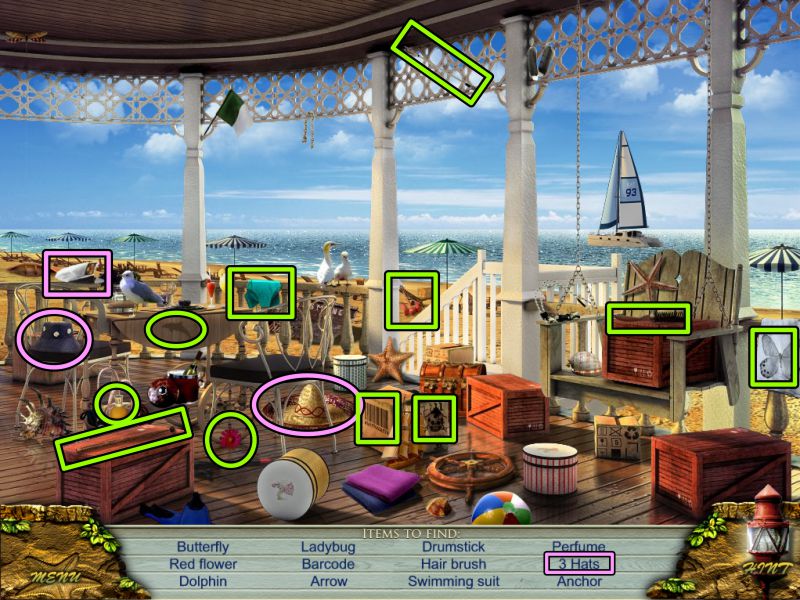
Porch Hidden Object Scene
Collect all the objects marked in the screenshot.
Screenshot
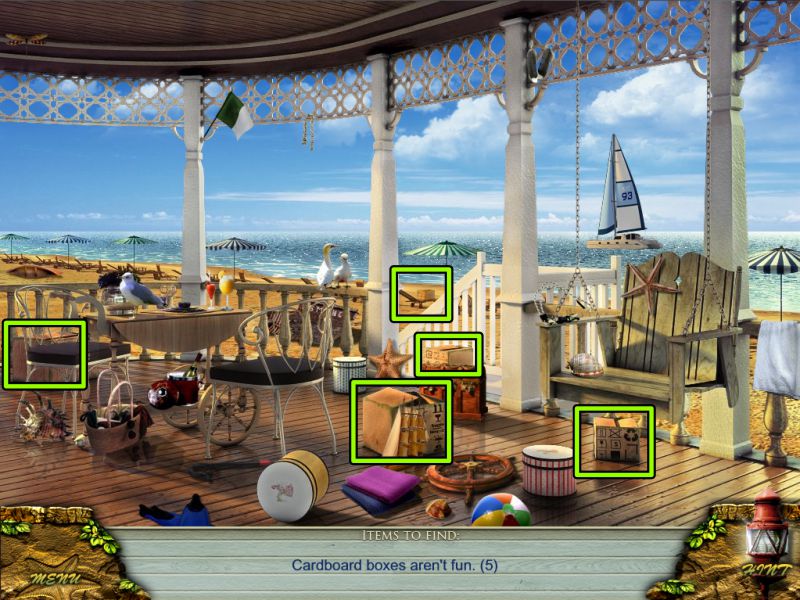
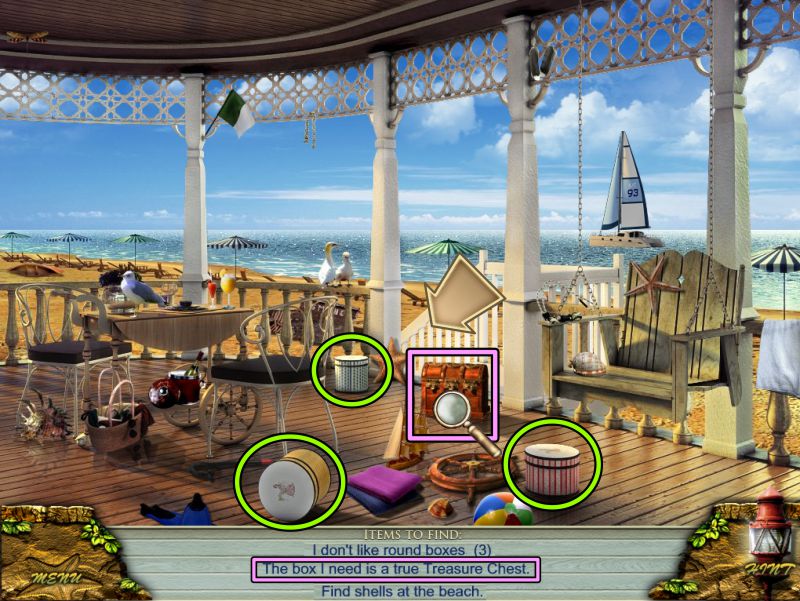
Porch Boxes
You will be asked to get rid of various sets of boxes, starting with 4 redwood boxes.
Screenshot
Remove the cardboard boxes.
Screenshot
Round boxes must go, then zoom in on the chest to see that you need to go to the beach to find shells for it.
Screenshot
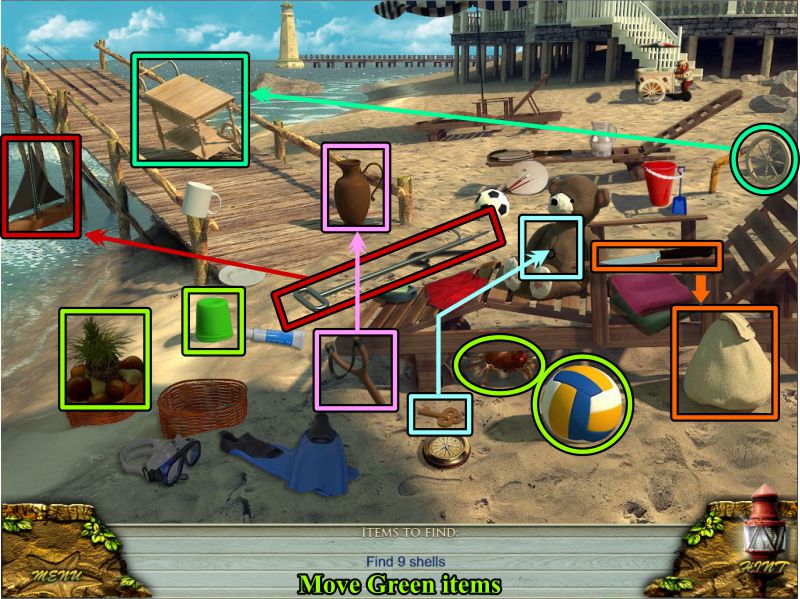
Beach
In order to find the 9 shells, you need to perform a number of tasks before you can collect them.
Move the items marked in green in the screenshot.
Pair up the color-coded objects: use the knife to open the bag, put the wheel on the cart, wind up the bear with the key, use the slingshot to break the vase, and hook the sailboat to bring it to shore.
Screenshot
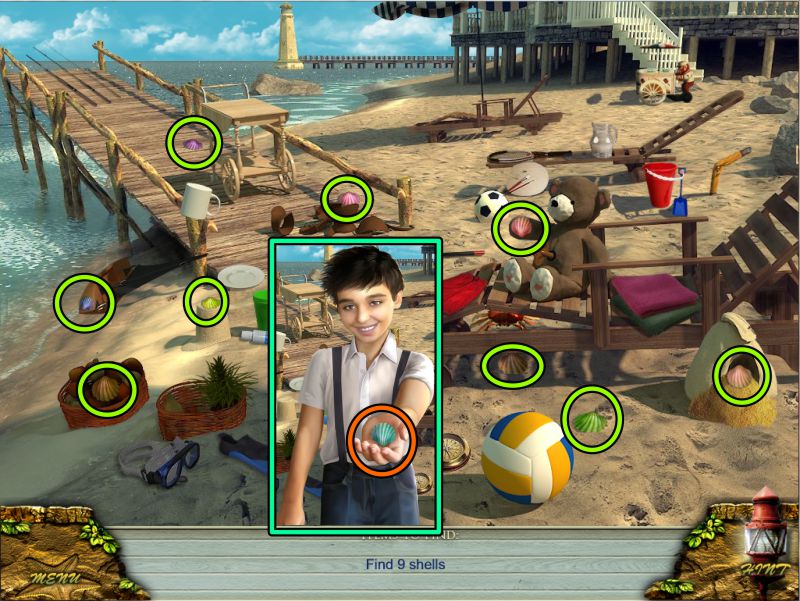
All of the shells are now uncovered and marked in the screenshot.
After you collect them, Charlie will come to offer you another shell.
Screenshot
Porch
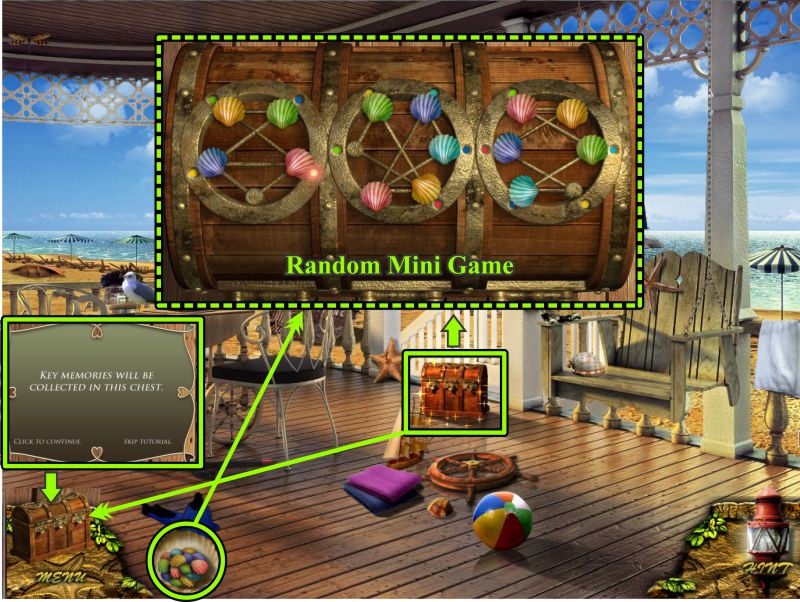
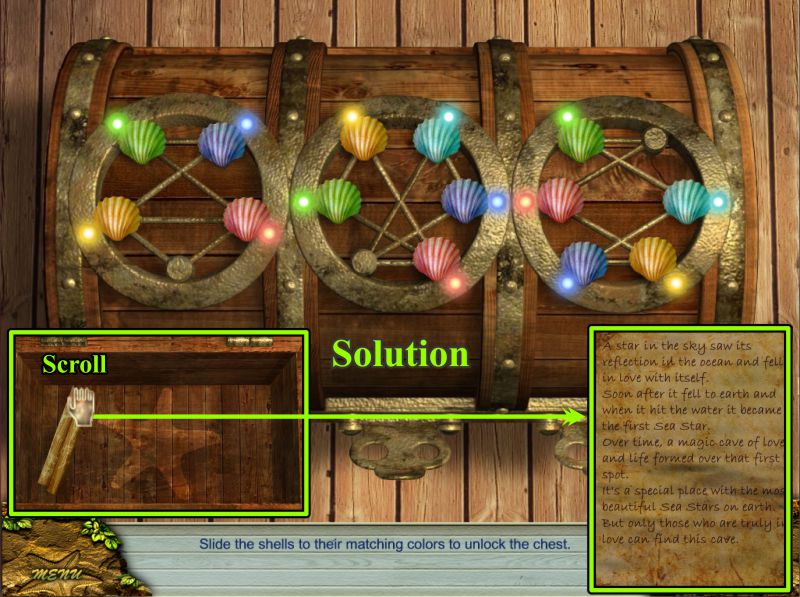
Zoom in on the Treasure Chest and place your Shells to trigger a Mini Game.
The beginning placement of the shells is random.
Your goal is to move the shells so they match the lights of the same color.
When you have completed the game, the chest will go to the lower left corner of your screen to collect the memories you find.
Screenshot
Memory Chest Mini Game
Slide the shells until all the lights are lit up, as shown in the screenshot solution.
When the chest opens, there is a Scroll inside for you to read.
Screenshot
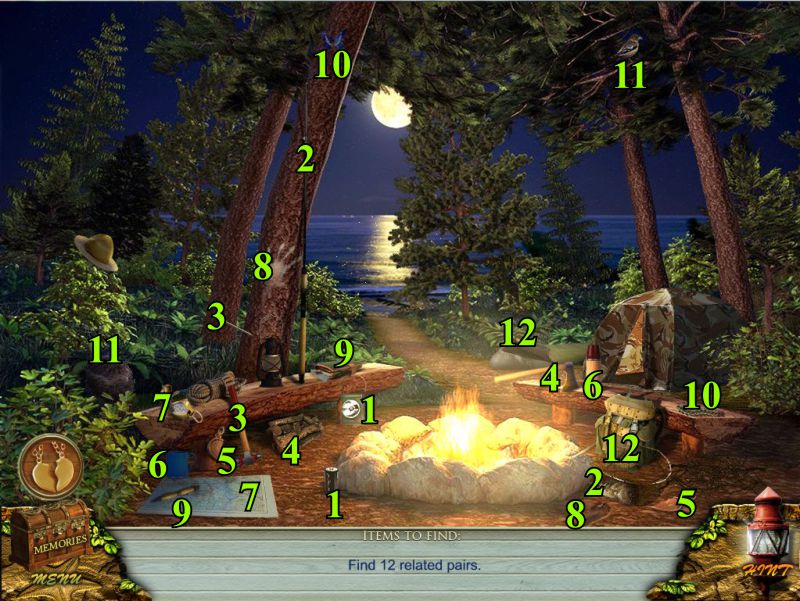
Camping Trip
Collect the 12 related objects that are numbered in the screenshot.
The broken locket goes into the memory chest, but Charlie wants to see it. He etches an "S" on one half and a "C" on the other half.
Screenshot
Foyer Electrical Panel Mini Game
Your have returned to the present time.
Zoom in on the electrical panel on the right wall for a Mini Game.
Flip all the switches off in the order shown in the screenshot.
Go to the Living Room.
Screenshot
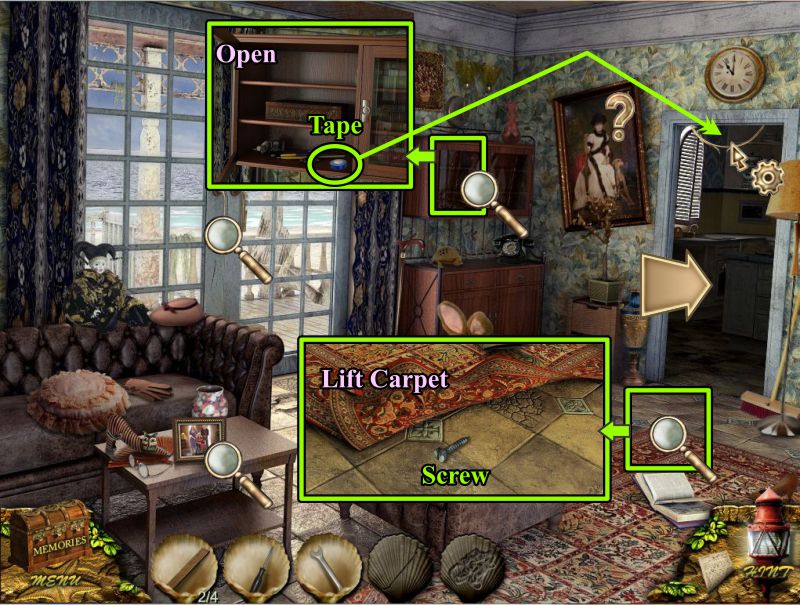
Living Room
Note all the items marked in the screenshot.
Lift up the carpet and take the Screw.
Open the cabinet and zoom in to get the Tape.
Use the tape on the frayed electrical wire, then enter the Kitchen.
Screenshot
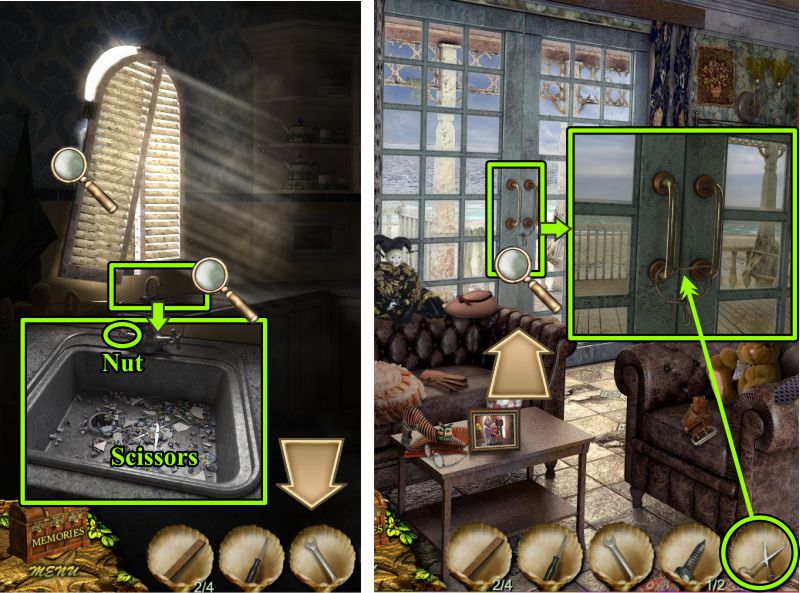
Kitchen and Living Room
Check out the shutter, then zoom in on the sink.
Take the Scissors and Nut.
Return to the Living Room, zoom in on the door, cut the rope, and go out to the Porch.
Screenshot
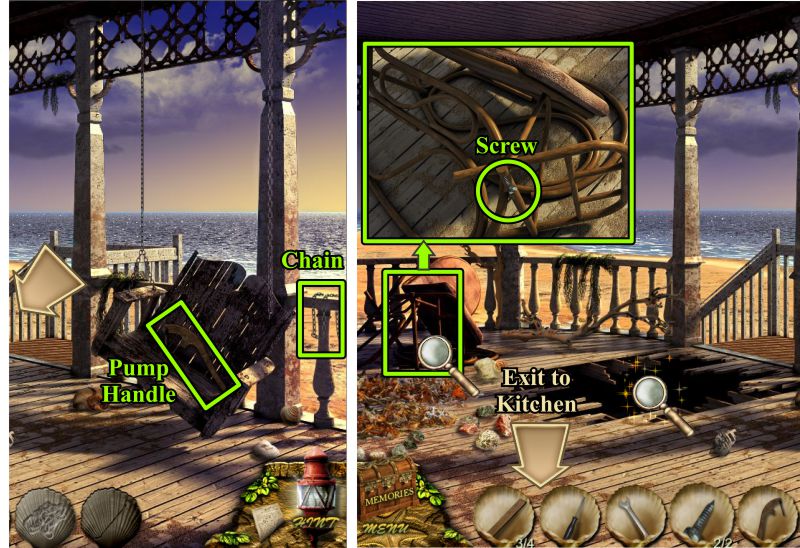
Porch
Take the Pump Handle and Chain, then zoom in on the chair to take the Screw.
Try to go to the Beach, and the Porch will cave in.
Go to the Kitchen.
Screenshot
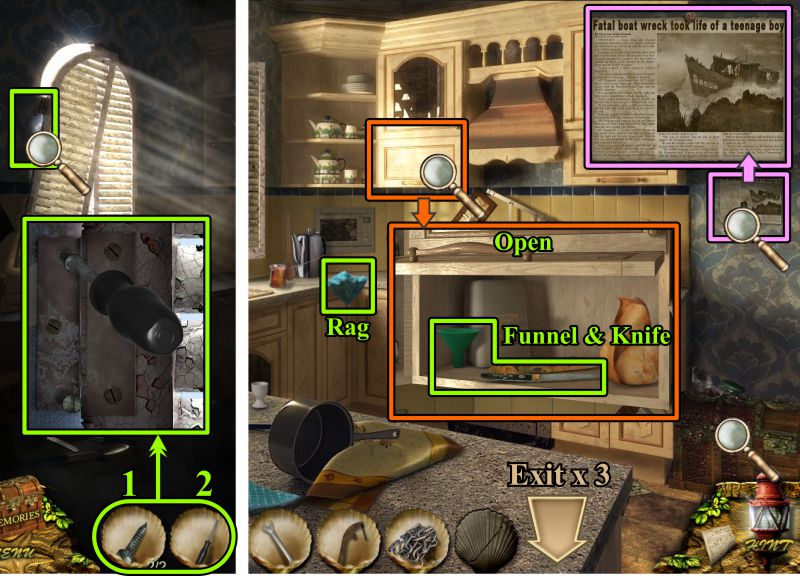
Kitchen
Zoom in on the shutter, place your two screws, and use the screwdriver to tighten them.
Take the Rag on the counter, open the cabinet door and zoom in to get the Funnel and Knife.
Check out the chest and zoom in on the newspaper article on the wall.
Exit down 3 times.
Screenshot
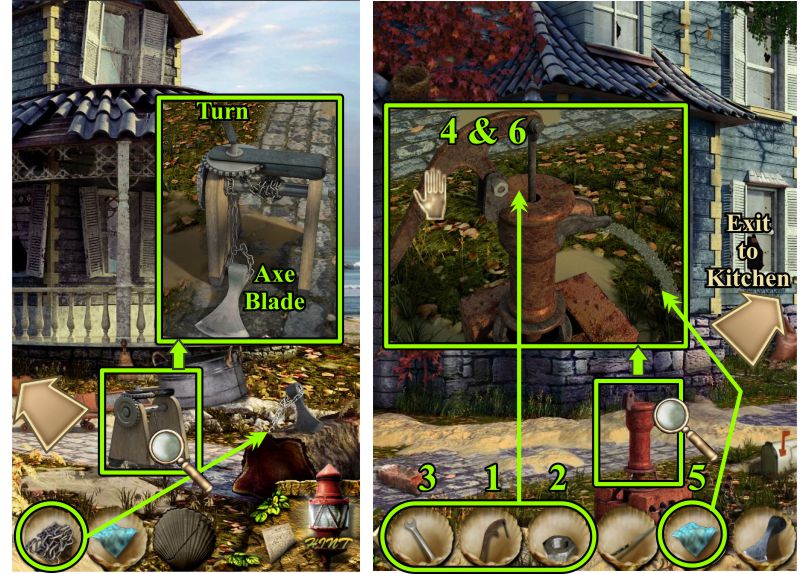
Front and Side of the Cottage
Place the Chain on the axe blade.
Zoom in on the tool and turn the handle to reel in the Axe Blade.
Take it and go to the side of the Cottage.
Zoom in on the water pump and place the Handle and Nut.
Use the Wrench to tighten the Nut.
Turn on the water, soak the Rag, turn off the water, and head to the Kitchen.
Screenshot
Kitchen
Zoom in on the chest and clean off the jam with your Wet Rag.
Open the right lock by hand, and use the Knife to flip open the 2 left locks.
Read the note inside, and you will be transported back to an earlier time.
Screenshot
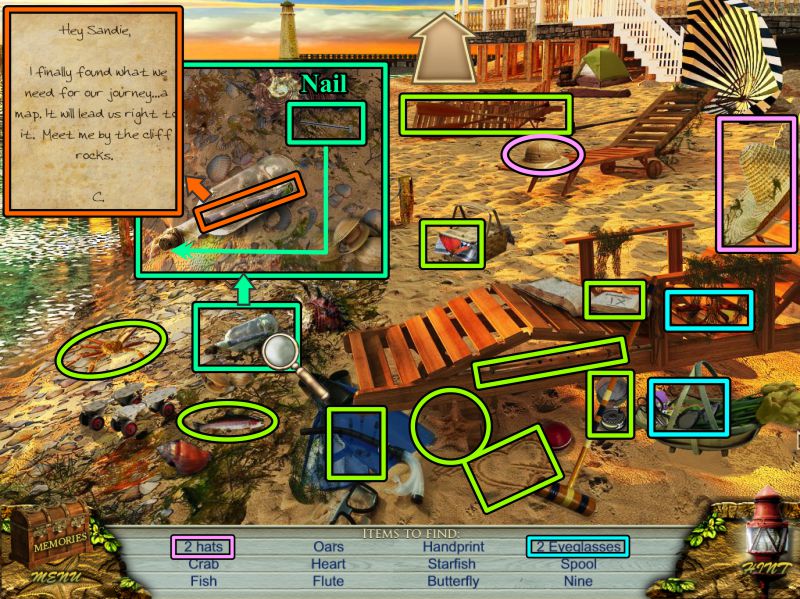
Chapter 3: The Beach
Beach Hidden Object Scene
Collect everything marked in the screenshot, then zoom in on the bottle.
Use the Nail to remove the cork so you can take the message.
Head to the Rocky Shore to meet Charlie.
Screenshot
Rocky Shore
Help Charlie collect the 12 Map Pieces marked in the screenshot.
Screenshot
Map Mini Game
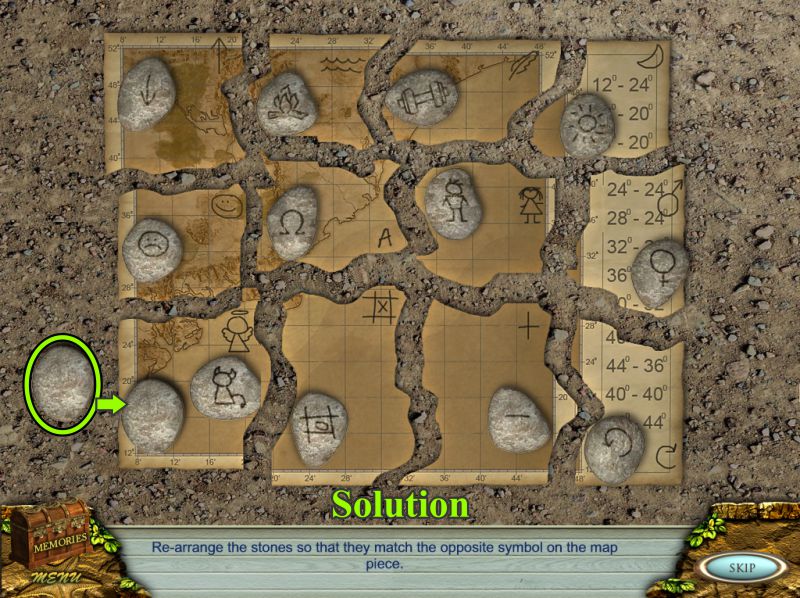
You need to put the map back together, but the pieces need to be held down by the stones so they don't blow away.
Exchange the stones to pair them up with the symbols on the map.
Make sure you have two stones on a piece of map when you are moving a stone.
See the screenshot for the solution.
Screenshot
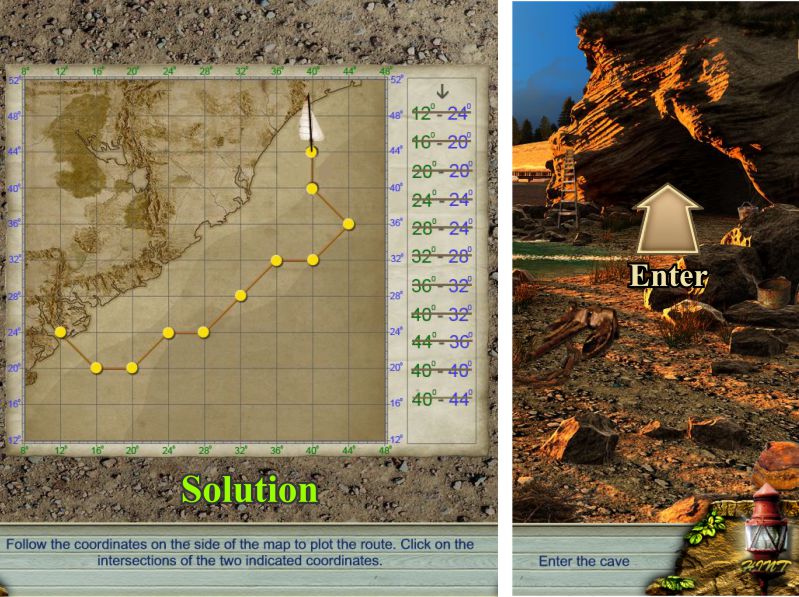
Magic Cave Mini Game
Using the coordinates, plot the route to the Magic Cave.
The map goes into your memory chest for safe keeping until you can find a place to store it.
Enter the cave at the right.
Screenshot
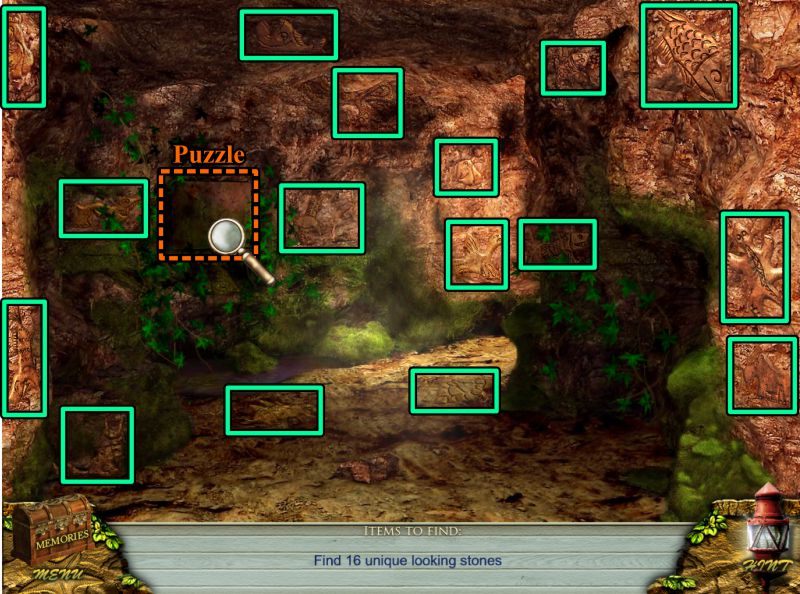
Secret Cave
Collect the stones marked in the screenshot, then zoom in on the back wall for a Puzzle.
Screenshot
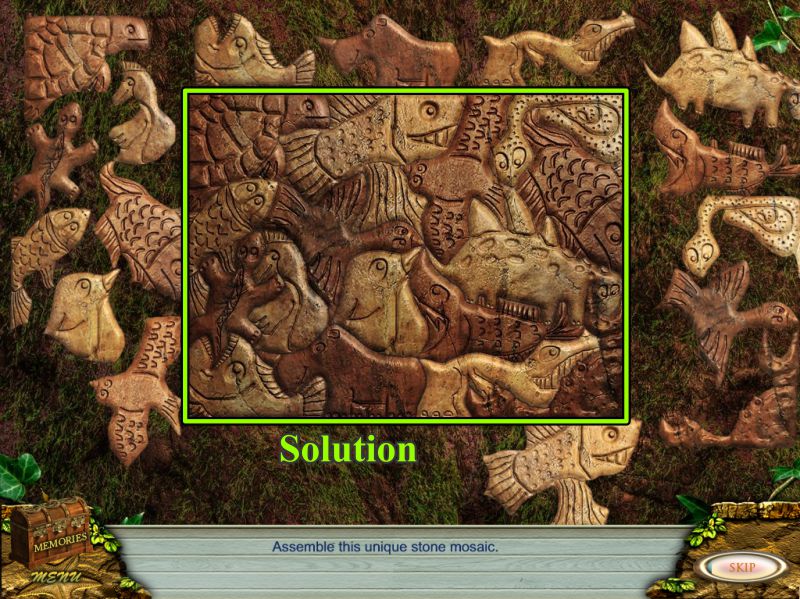
Stone Mosaic Puzzle
Arrange the stones as shown in the screenshot.
Screenshot
Secret Storage
The compartment opens for you to place the map from your memory chest in it for safe keeping.
Screenshot
Cottage Kitchen, Front of Cottage, and Beach
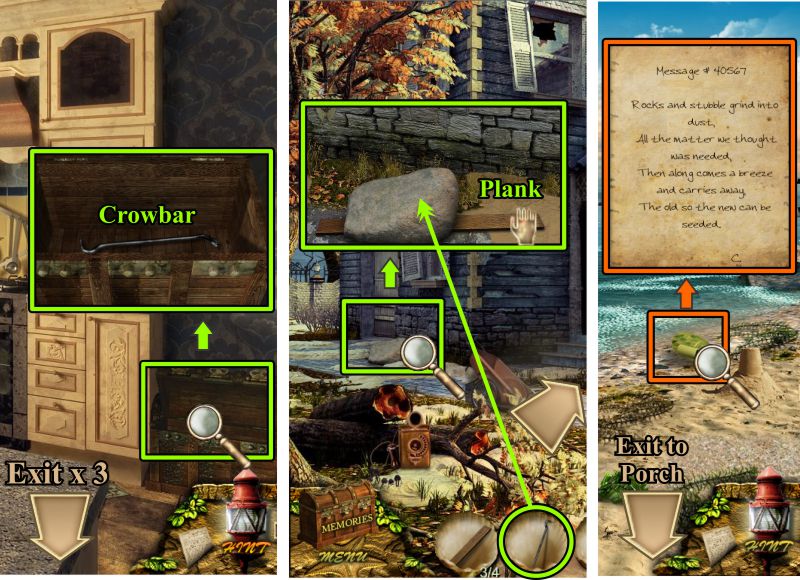
You are back in the present time. Collect the Crowbar from the chest.
Go outside and zoom in on the large rock.
Use the Crowbar to move the rock so you can take the Plank.
Go around the Cottage to the Beach and find the Message in the bottle.
Return to inside the Cottage and go to the Porch.
Screenshot
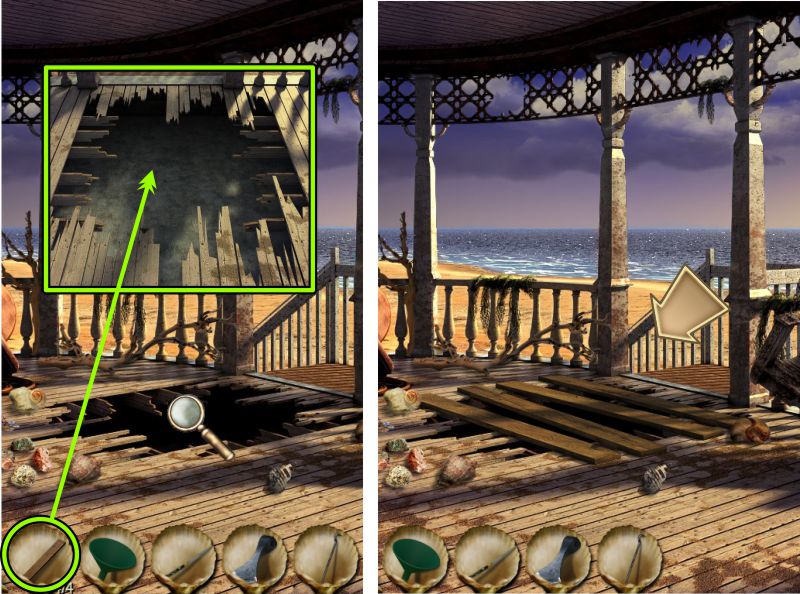
Porch
Zoom in on the hole and place your Planks so you can exit to the Beach.
Screenshot
Beach and Rocky Shore
Take the bottle with the Message and head to the Rocky Shore.
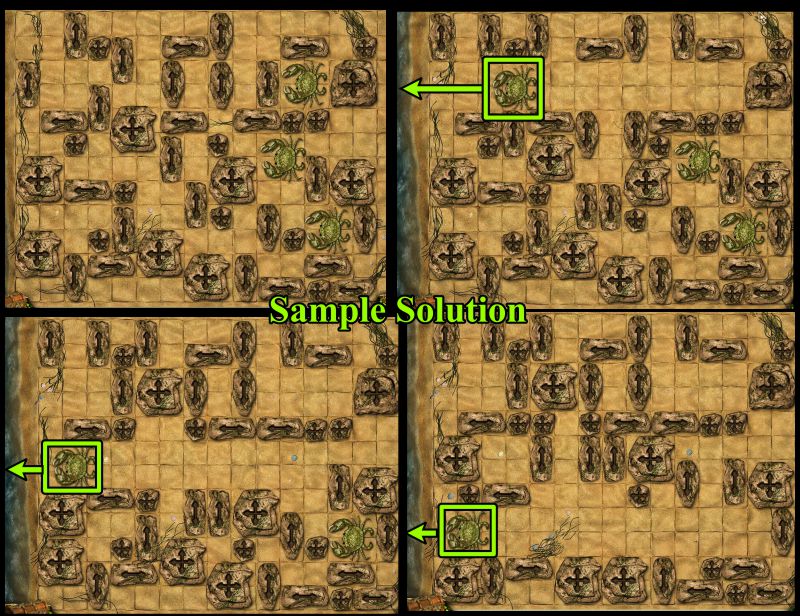
Some crabs have been beached, so zoom in on them to trigger a Mini Game.
Screenshot
Crab Mini Game
You goal is to move all three crabs to the water.
Move the rocks in the direction of the arrows to let the crabs pass.
A sample solution is shown in the screenshot.
Screenshot
Chapter 4: The Boat
Fishing Trip Hidden Object Scene
In this flashback, Charlie's dad is going on a fishing trip, so help Charlie find all the gear marked in the screenshot.
When you are finished, go with Charlie into the Dockhouse.
Screenshot
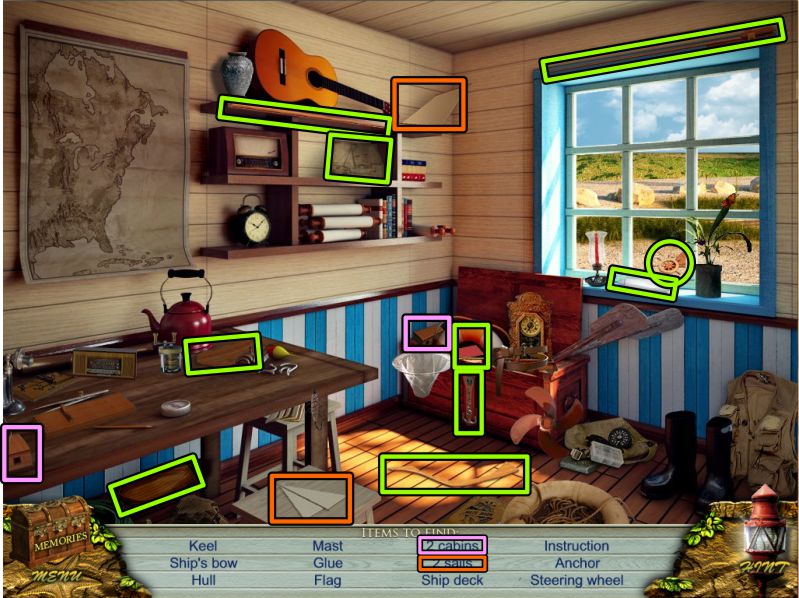
Dockhouse Hidden Object Scene
Collect all the items marked in the screenshot.
Screenshot
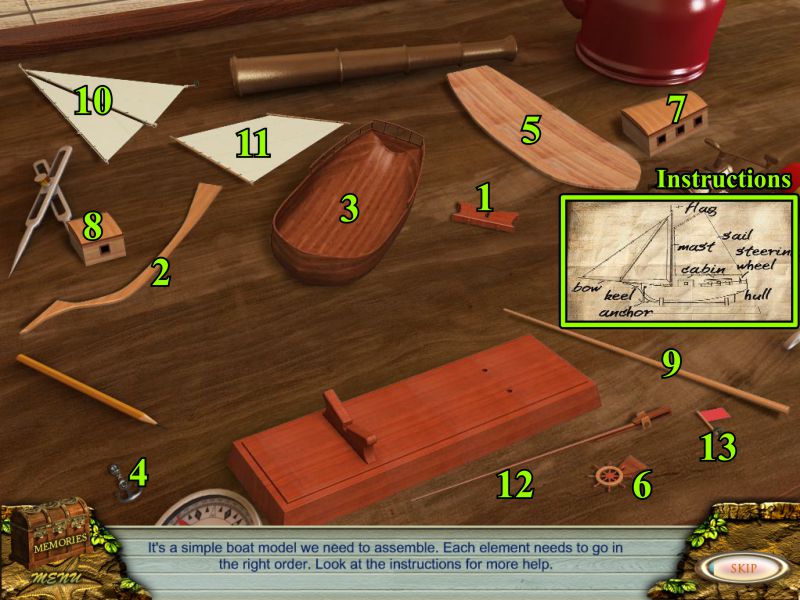
Model Boat Mini Game
Note the instructions for assembling the model.
The parts are numbered in the screenshot to show you one way of assembling it.
The first several parts need to be installed in the order numbered.
Screenshot
See the screenshot for the assembled model. Charlie puts on the finishing touch by naming the boat Sandie.
Screenshot
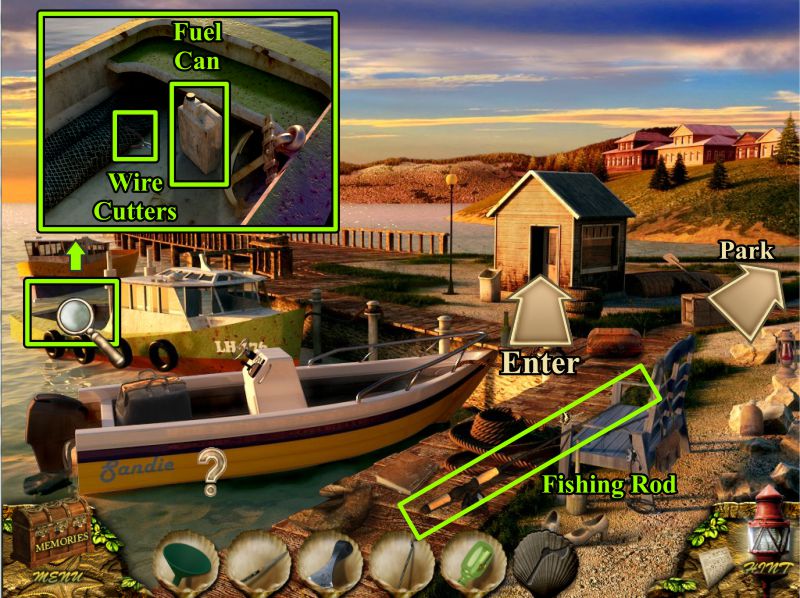
Dock
Back in the present, zoom in on the yellow boat to take the Fuel Can and Wire Cutters.
Grab the Fishing Rod and enter the Dockhouse.
Screenshot
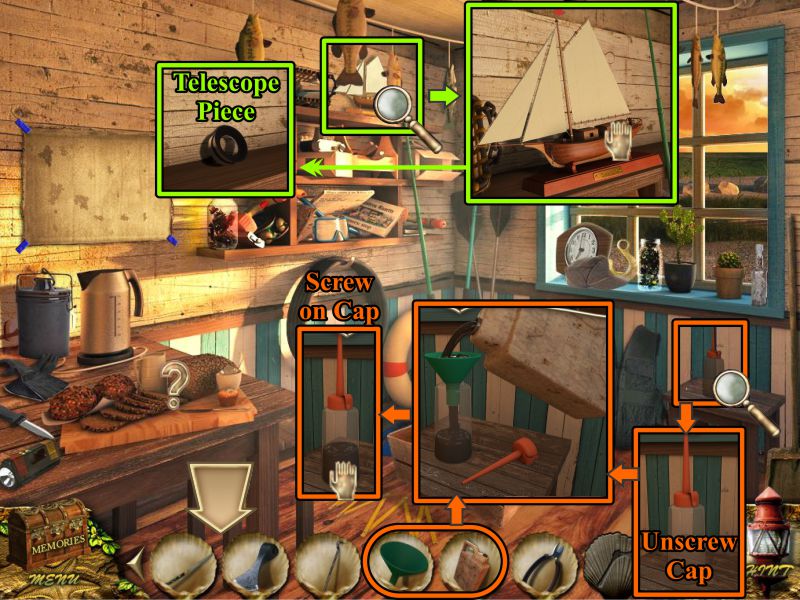
Dockhouse
Zoom in on the model on the shelf and take it for your memory chest.
There is a Telescope Piece behind it, so grab it.
Zoom in on the small table with the bottle.
Unscrew the cap, place the Funnel and pour in the Fuel Can.
Screw the cap back on and take the bottle before heading off to the Park.
Screenshot
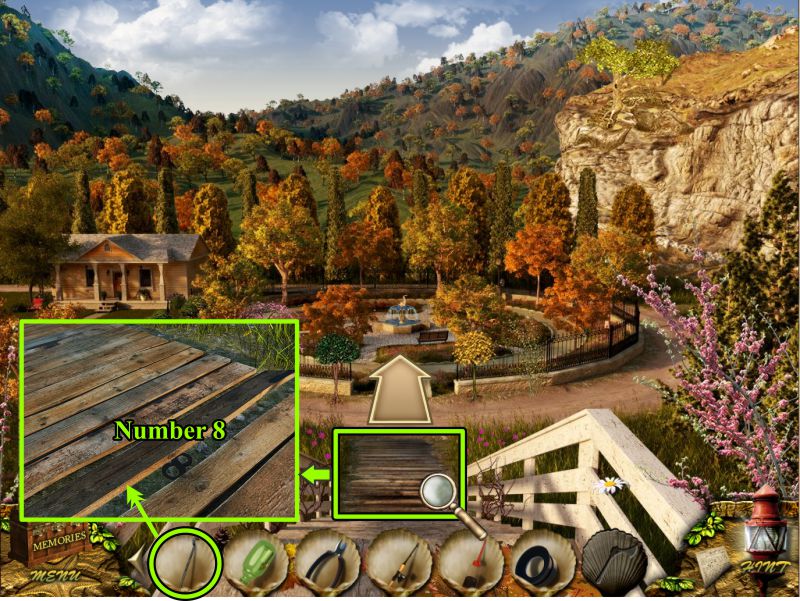
Park
Zoom in and use your Crowbar on the walkway at the bottom of the stairs.
Pick up the Number 8 and go forward into the Park.
Screenshot
Pick up the Rope, check out the fountain and clock, and zoom in on the grate at the left.
Open up the clips and remove the grate.
The Valve is missing, so you can't turn off the water.
Exit down 3 times.
Screenshot
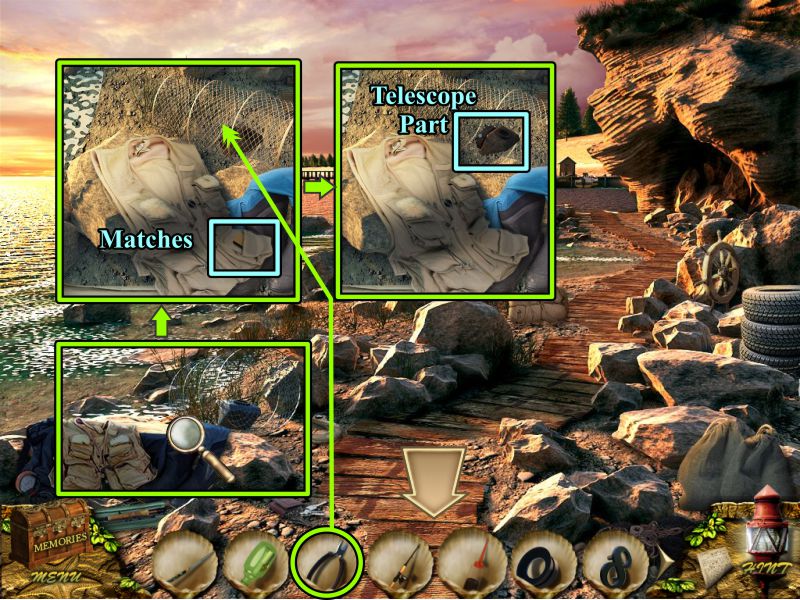
Rocky Shore
Zoom in on the clothing on the rocks and remove the Matches from the pocket.
Use your Wire Cutters to cut the wire and take the Telescope Part.
Exit down to the Beach.
Screenshot
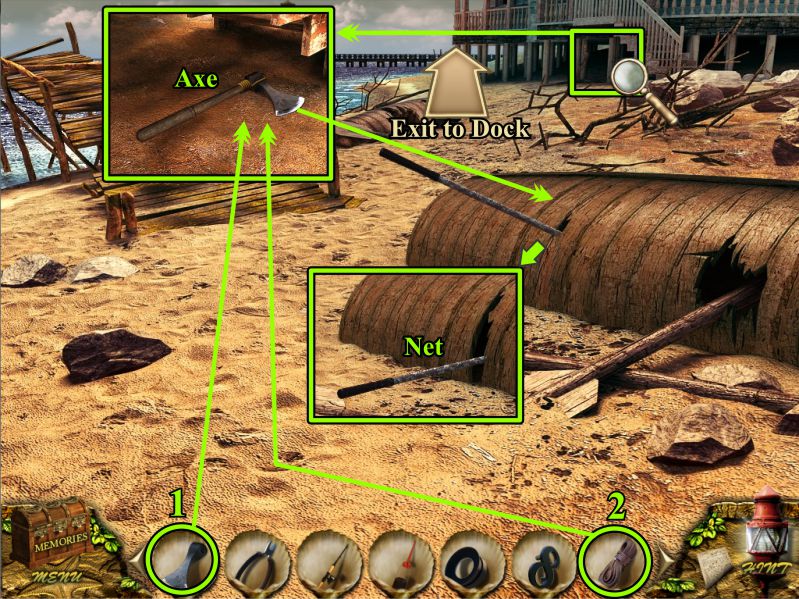
Beach
Zoom in under the stairs, place your Axe Blade on the handle, and use the Rope to tie it together.
Take the Axe and use it to get the Net.
Screenshot
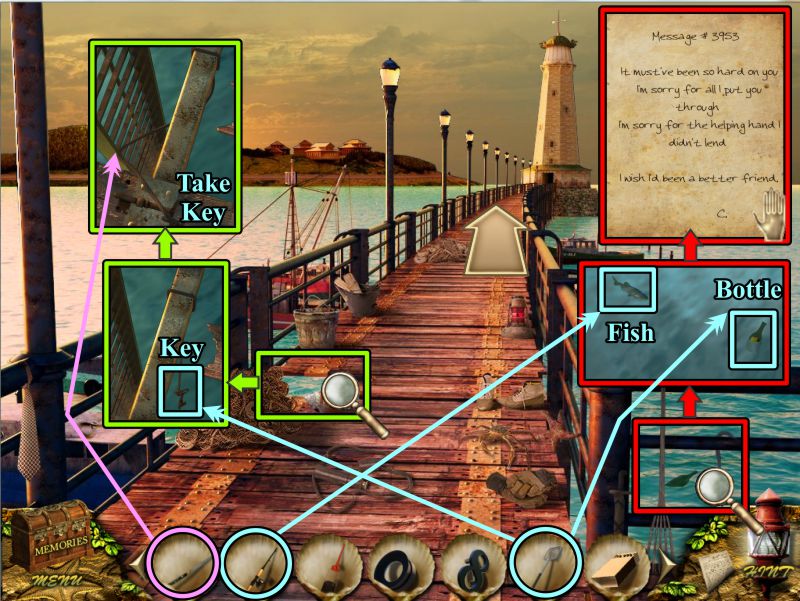
Pier
Exit to the Dock and start up the Pier toward the Lighthouse.
Zoom in on the water at the right and use your Net to get the Bottle.
Take the Message, then use your Fishing Rod to snag the Fish.
Zoom in on the hole in the pier and use your Net to bring up the Key.
Use your Knife to cut the rope, take the Key, and go to the Lighthouse.
Screenshot
Chapter 5: The Lighthouse
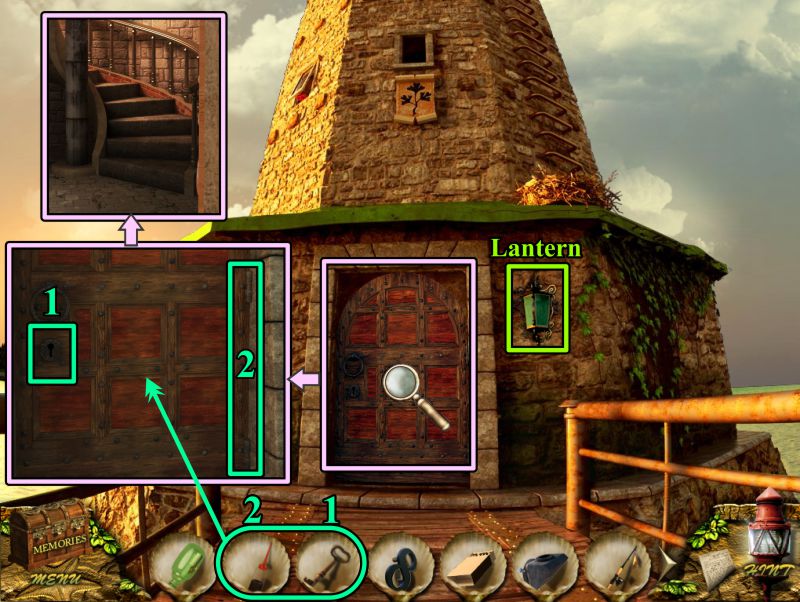
Door
Take the Lantern, then zoom in on the door.
Use your Key to open the door. The hinges are rusty, so oil them.
The door opens and you are taken to a flashback.
Screenshot
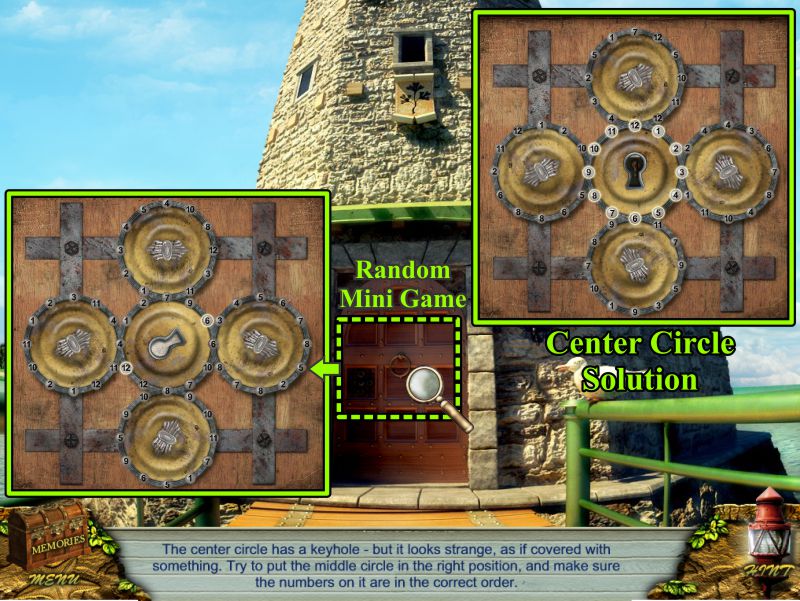
Door Mini Game
In the flashback, you need to open the door in a different way.
Zoom in on the lock for a Mini Game.
Your goal is to uncover the keyhole by putting the center circle in the correct position with all the numbers around it arranged like a clock.
All of the circles are random, so you will need to come to the solution shown in the screenshot on your own.
Each time you rotate the center circle, you can pick up the number you need for a certain position from one of the outer circles.
The lock is ready, but you still need to find the key.
Screenshot
Balloon Mini Game
There are 6 rounds to complete in order to find the key.
There are 7 different colors of balloons: dark blue, light blue, red, orange, yellow, green, and purple.
If you make a mistake, you will start the round over.
Round 1: Hit any 3 balloons except red.
Round 2: Hit 3 balloons the color of traffic lights - red, yellow, green.
Round 3: Hit 5 balloons that are not dark blue or yellow.
Round 4: Hit 5 balloons that are not orange, green, or purple.
Round 5: Hit 6 balloons that are a combination of yellow and blue. There aren't all that many green balloons, so you will have to have patience for this round.
Round 6: Hit 7 balloons in the right order of Richard of York's battle. Just hit one of each color balloon: I didn't find the order made any difference.
The key falls out of one of the balloons, so use it to open the door.
Screenshot
Lighthouse
Play the Hidden Object Scene, and when you get the Telescope, place it on the stand.
Screenshot
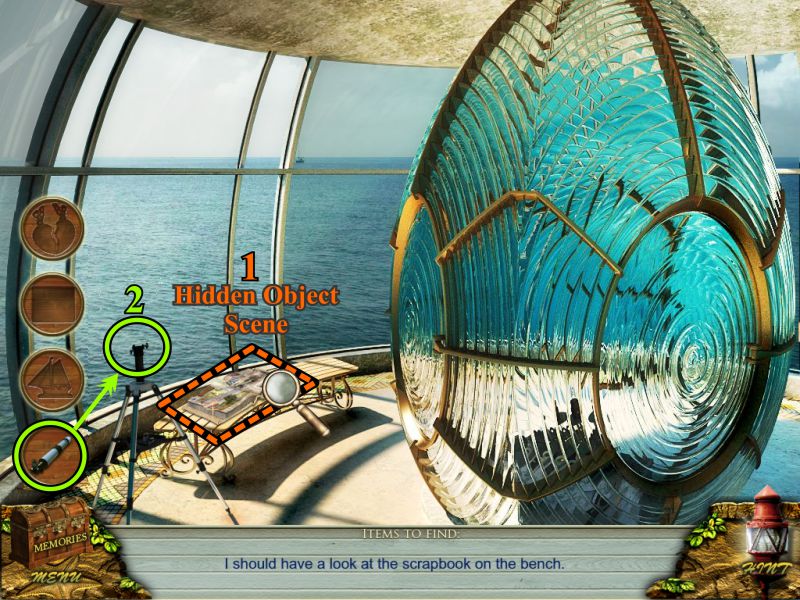
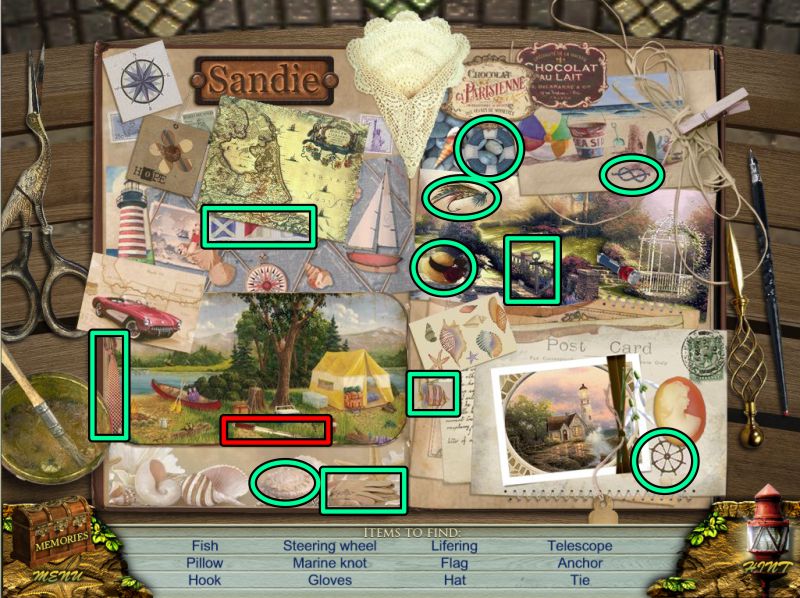
Scrapbook Hidden Object Scene
Collect everything marked in the screenshot to get the Telescope.
Screenshot
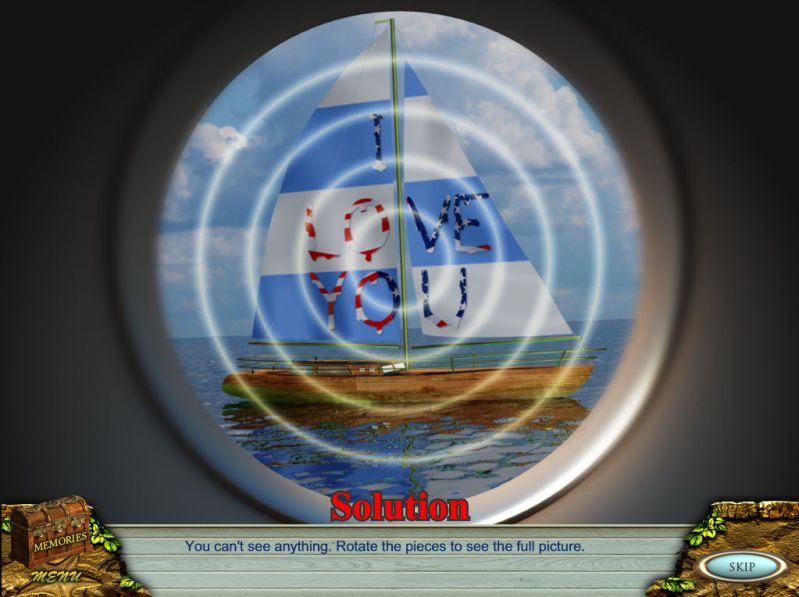
Telescope Puzzle
Charlie wants you to look through the telescope.
Arrange the circles like the screenshot so you can see the full picture.
Screenshot
Lighthouse Stairway
Back to the present and time to enter the Lighthouse.
Zoom in on the box and take the Brush.
Check out the window. Note you need something to prop the window open so you can get the Valve.
Continue on upstairs.
Screenshot
Top of the Lighthouse
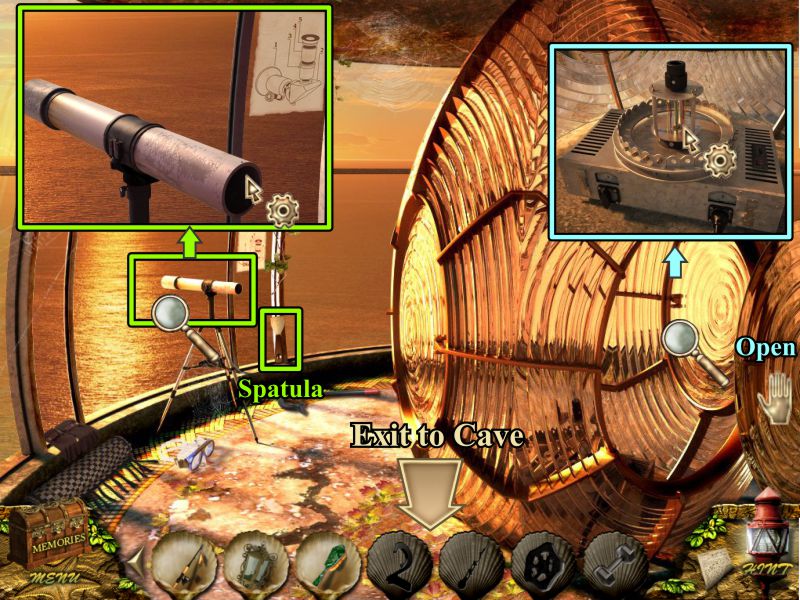
Take the Spatula. Take note of the telescope and lamp box to see what parts you need to make them work.
Exit to Cave with the Secret Storage.
Screenshot
Secret Cave
Zoom in on the wall and place the Lantern on the hook.
Light the Lantern with your Matches and identify the portion of the wall with the Secret Storage.
Brush off the moss and use the Spatula to open it.
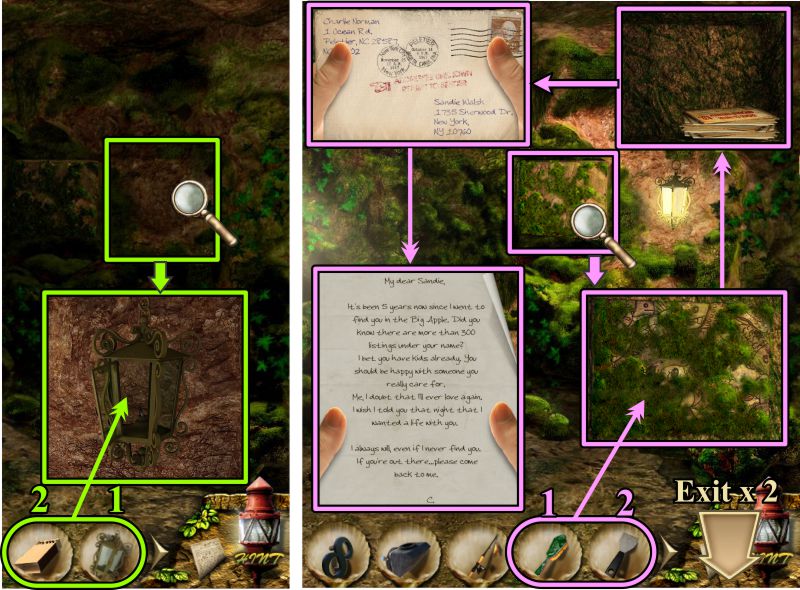
Pick up the letters and read one of them.
Screenshot
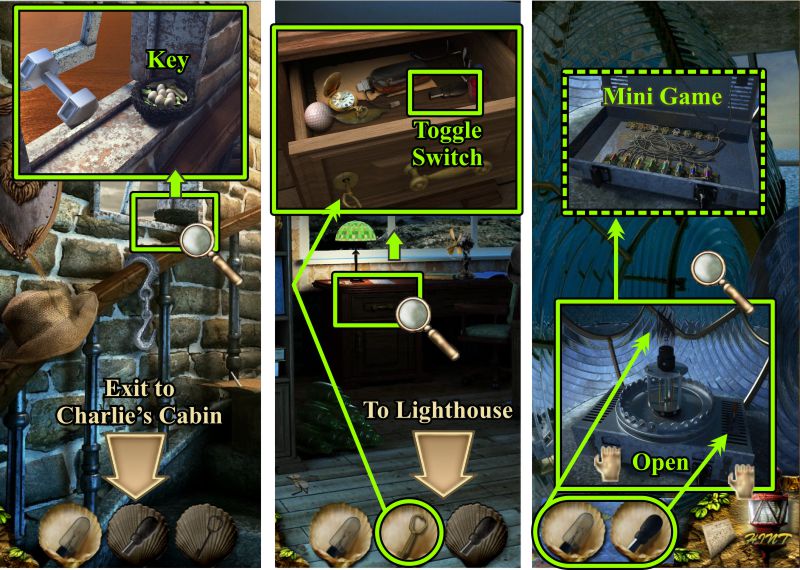
Chapter 6: Charlie's Cabin
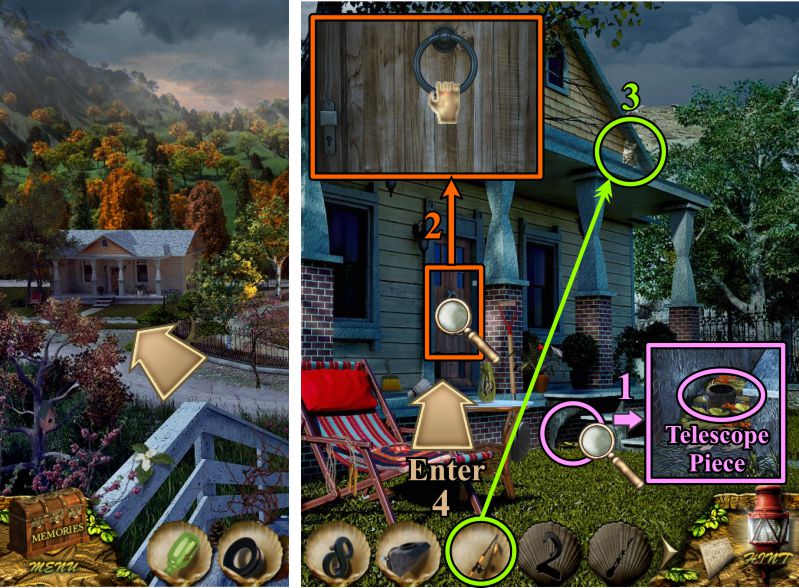
Dock
Go to the Park and turn left to the house where Charlie lived.
Zoom in under the porch and take the Telescope Piece.
Zoom in and knock on the front door.
Coax the kitty off the roof using your Fishing Rod with the fish on it.
Kitty goes in the house, so follow it.
Screenshot
Inside Charlie's Cabin
Check out the vase on the coffee table. Click twice to open the door to the bedroom and enter it.
Zoom in on the bookcase for a Puzzle, check out the desk, and grab the Dumbbell from under the bed.
Go to the Lighthouse.
Screenshot
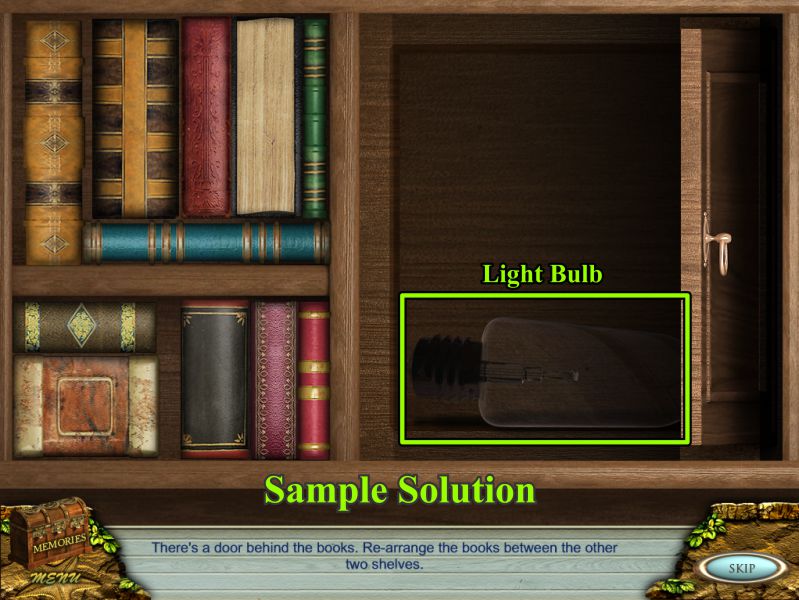
Book Puzzle
There is a door behind the books, so your goal is to move the books to the shelves on the left to see what's behind the door.
See the screenshot for a sample solution.
Take the Light Bulb from the compartment.
Screenshot
Lighthouse and Dockhouse
Zoom in on the window and place the Dumbbell so you can take the Valve.
Go to the Dockhouse and zoom in on the kettle for a Mini Game.
Screenshot
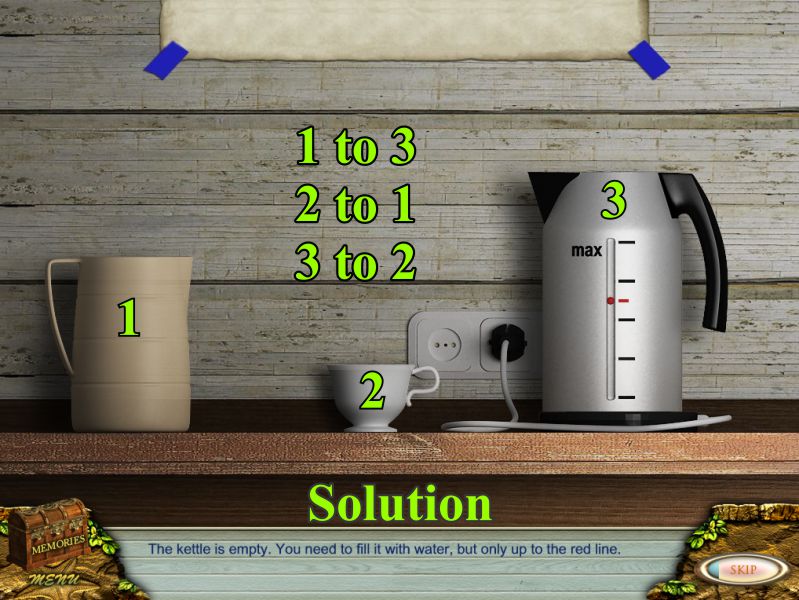
Kettle Mini Game
Your goal is to fill the kettle with water to the red line.
Pour the pitcher into the kettle.
Pour the cup into the pitcher.
Pour the kettle into the cup.
See the screenshot for a visual solution.
Screenshot
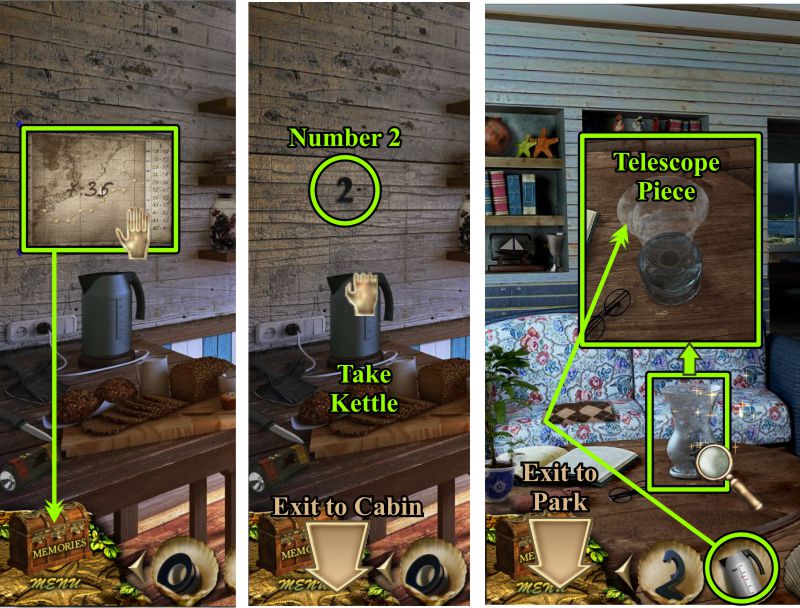
Dockhouse and Charlie's Cabin
The kettle produces steam that uncovers a time on the map above.
Take the map, the Number 2 behind it, and the Kettle.
Go to Charlie's Cabin, pour the water from the Kettle into the Vase, and take the Telescope Piece.
Exit to the Park.
Screenshot
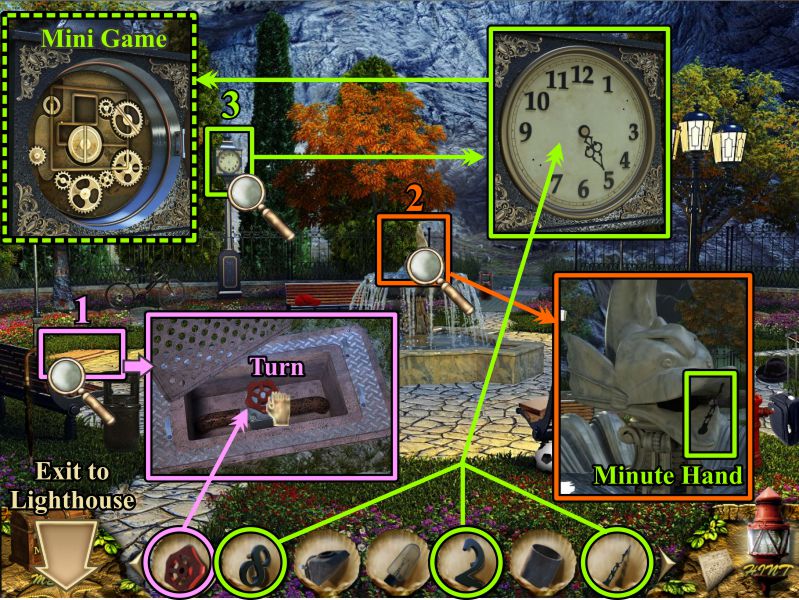
Park
Zoom in on the water turn off, place the Valve, and turn it off.
Zoom in on the dry fountain and take the Minute Hand out of the fish's mouth.
Zoom in on the clock. Place the Minute Hand and the Numbers 8 and 2 to trigger a Mini Game.
Screenshot
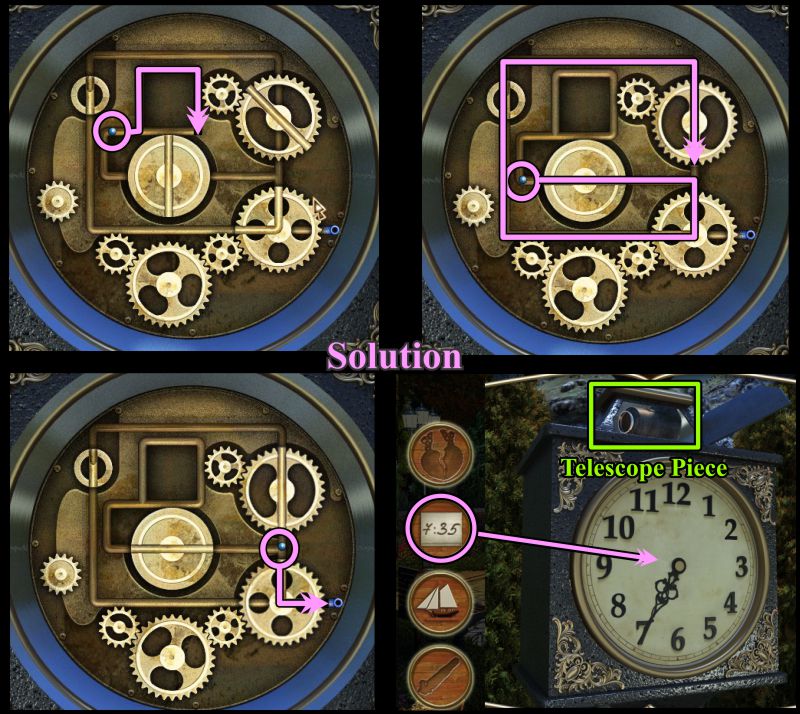
Clock Mini Game
There is a stone caught in the gears, so your goal is to remove it. See the screenshot for the solution.
Time to set the clock, so check your memory chest for the time.
Once the clock is set to 7:35, the top opens for you to collect a Telescope Piece.
Go to the Lighthouse.
Screenshot
Chapter 7: The Reunion
Lighthouse
Zoom in on the telescope, place the parts according to the schematic as numbered in the screenshot.
Look through the telescope to see Charlie.
Take the completed telescope for your memory chest.
Screenshot
Lighthouse Stairs, Cabin, and Lighthouse
Zoom in on the window and take the Key.
Go to Charlie's Cabin, zoom in and unlock the desk drawer to take the Toggle Switch.
Return to the Lighthouse and zoom in on the lamp mechanism.
Place the Light Bulb and Toggle switch.
Open the catches to open the box, and click for a Mini Game.
Screenshot
Lighthouse Lamp Mini Game
See the screenshot for the solution.
Click on a wire and then its numbered connector.
Screenshot
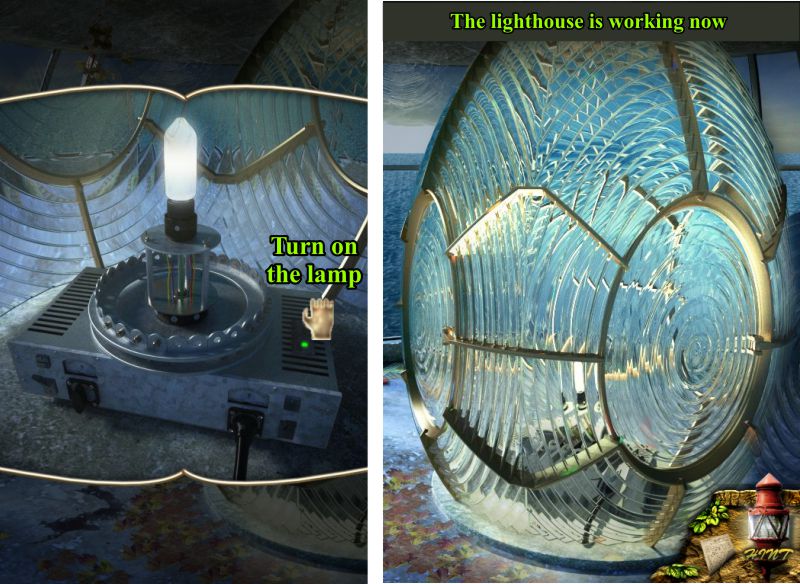
Lighthouse Lamp
Use the Toggle Switch to turn on the Lamp.
The Lighthouse is now working, so watch the reunion scenes.
Screenshot
Congratulations, you have reunited Charlie and Sandie and completed Love Story: The Beach Cottage.
Posted by: Jazz |
October 15, 2011 8:02 PM
|
October 15, 2011 8:02 PM