

![]()
 I don't know about you guys, but I love taking things apart to see how they work. I'm, um. Not so good at the whole "putting it all back together in proper working order" part, but maybe if my Grandmother's radio had had a bomb in it, I would've been a hero instead of just in trouble that one time when I was six. Gam.eBB.jp knows your curiosity will save the day, however, and rather than sending you to bed without any dessert, the Dismantlement series of point-and-click puzzle games rewards your ingenuity!... admittedly by not blowing you up, but hey, that's still something. Dismantlement: Mobile Watch is the latest installment, and once again it's up to you and your beloved screwdriver to expose the sinister, ticking heart behind this deceptively ordinary device.
As usual, the approach is straightforward; just click on various parts of the screen to interact with the watch and look for clues since the solutions won't always be obvious. Gam.eBB.jp has been exposing the insidious truth behind typical objects for nearly two years now, and if their popularity proves anything, it's that all of you harbour secret MacGuyver fantasies. (It's okay; I won't judge you, even though I'm more of a Magnum P.I. gal myself.) It seems unorthodox problem solving versus potential explosive death is a winning combination, and Mobile Watch is another solid installment in the quirky series. So get solving, and then call up anyone who ever got you in trouble for taking things apart as a child and tell them you weren't being a brat, you were just in training.


Walkthrough Guide
(Please allow page to fully load for spoiler tags to be functional.)
Dismantlement: Mobile Watch Walkthrough
General Information
When you start, the time on the watch will be the same time as your computer.
To change the time: click on the winding knob at the top of the watch once. From there you can move it left or right to control the minute hand.
Click on the winding knob at the top twice (all the way up) and you can use the left or right controls to move the hour hand.
Remember that Japan uses 24 hour time (also known as military time). 15:00, for instance, is 3:00 in the afternoon. When in doubt, subtract 12 from any number over 12 to get the correct time.
Good luck!
Getting the Back Casing Off
Click on the "To Rear" button in the upper right corner to go to the back of the watch.
Notice that between the 9 and the 3 are some diamonds. Look closely and you will see that one corner of each diamond is white tipped.
The white tipped areas of the diamonds are arrows. Looking at the pattern you will see: up, left, right, up, down, down.
Click the "To Front" button in the upper right corner to go back to the face of the watch.
You are going to use the arrow controls on the winding knob on the top of the watch. While you are following the directions, notice how the knob controls the hour and minute hand.
Move the knob up once, then left, then right, then up, then down, then down (after you click on it the first time to move it up, notice the arrows that appear to help you move it around).
Once you move the knob in the correct pattern you will hear a click, and you will see four sections of the back have released.
Click on the "To Rear" button to move to the back.
Click on the back casing to remove it.
Getting the Next Back Layer Off
There are a few things to notice here. First, there's something that says 6:00 sky. There are also a bunch of white buttons. Notice the word "start" near one of them.
Click on the "To Front" button to move to the watch face.
You need to set the time to 6:00 am. That means (for those who have gone entirely digital), put the big hand on the 12:00 position and the little hand on the 6:00 position.
Watch the sky scenery in the center as you are setting the watch. 6:00 am means dawn is just breaking, so the sun should just be making an appearance on the horizon on the left.
Remember, to move the big (minute) hand you need to move the knob up once, to move the small (hour) hand you need to move the knob up twice.
If you set it at 6:00 and the sky on the dial is dark, just move the hour hand all the way around the clock back to 6:00 again until you see the sun just beginning to appear on the left.
You will also know that you are in the correct place because you will see a constellation (with lines) appearing in the sky.
Look closely at the constellation. Does that look like the arrangement of buttons on the back (you can click on the watch face for a close up)?
Screenshot.
Go to the rear of the watch.
Now that you've set the time correctly notice that the flywheel is now working.
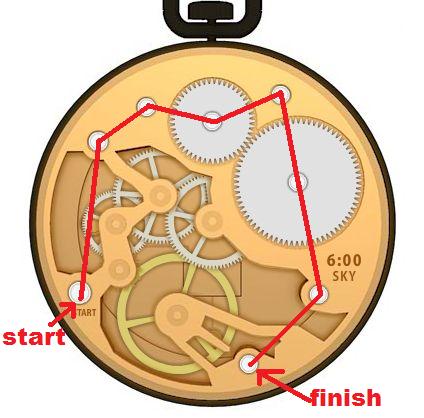
Look at the buttons on the back, and starting where you see "start", retrace the constellation pattern, clicking each button once.
Screenshot.
This will cause the buttons to disappear, revealing screws. Click on each screw to remove them (8 screws in all).
Once all of the screws are gone you can remove the two white gears on top of the back layer.
Once the gears are off, click on the back layer to remove it.
Now remove the rest of the gears (note which ones are on top of each other and take the topmost first).
This leaves you with the back inside casing.
Back Inside Casing (Part 1)
Notice that there are two small "flaps" in the casing, one in the lower middle and one in the upper left of the back casing.
Click on the one in the lower middle first for a close up, then click on the flap to open it.
This needs a four digit code. Underneath each of the code keys are some times: 17:00, 19:00, 11:45, and 12:15.
Above the code key is a circle with an arrow pointing to it.
Close the flap, back up, and go to the front of the watch.
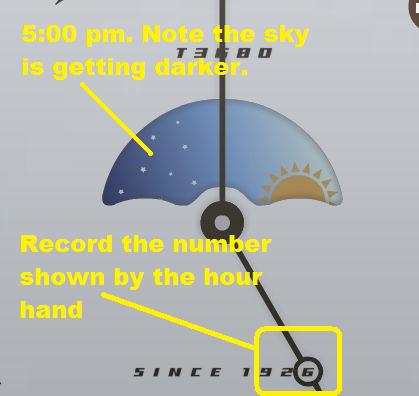
You need to set the time to match each of the four times you saw on the code key. Remember, this is 24 hour time, so 17:00 is 5:00 pm, 19:00 is 7:00 pm, 11:45 is 11:45 am, and 12:15 is 12:15 pm.
When you set the times, watch the sky in the background. At 5:00 pm, for instance, the sky should start getting dark on the left. At 7:00 pm, it should be dark. At 11:45 and 12:15, it should be full daylight.
As you set each time, notice that the hour hand has a circle on it, and at the set time it will stop so that a number is in the circle.
You will probably need to click on the watch face for a close up to read the numbers in the circle, they are small.
Each time will give you a different number.
Screenshot.
Once you set all four times, you should have the code 6 (5:00 pm), 5 (7:00 pm), 3 (11:45 am), 8 (12:15 pm).
Back up from the close up and go to the back of the watch.
Click on the lower middle flap for a close up, then click on the flap to open it.
Enter the code. If you entered it correctly you will hear a click and the little lock symbol in the lower right will go from closed to open.
Close the flap and back up.
Two more screws will have appeared, remove them.
Back Inside Casing (Part 2)
Now click on the flap in the upper right of the back casing for a close up. Click on the flap to open it.
This needs a four letter code.
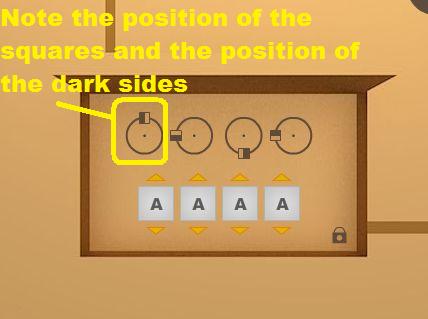
Above the code key are four circles. Each circle has a small square on it, in a clock position. From left to right: 12:00, 9:00, 6:00, and 9:00.
Each square has a dark side and a light side. Note the positions of the sides of the squares.
Close the flap, back up, and go to the clock face.
Basically, the clue is in the position of the square (the time it indicates) and which side is dark.
Screenshot.
Starting with the first position, 12:00. Notice the Roman Numerals on the face. Using the squares, determine which letter is in the "dark" position of the box and the "light" position of the box.
For instance, with 12:00, the X is in the left "dark" position of the box, the II is in the right "light" position. So the clue here is X.
For 9:00, the number is on its side, with I on the bottom and X on the top. The dark position of this box is on the bottom, so the letter is I.
For the 6:00 position, the number is upside down. The V is on the right and the I is on the left. The dark position of the box for this one is on the right, so the letter is V.
Back to the 9:00 position again, this time the dark side of the box is on the top, so the letter is X this time instead of I.
This gives you a clue of X I V X.
Go to the back of the watch, then click on the upper right flap for a close up.
Click on the flap to open it, then enter the code.
If you enter the code correctly you will hear a click, and the lock symbol in the lower right will move to open.
Close the flap and back up.
Two more screws will have appeared. Click on them to remove them.
Click on the back inside casing to remove it. You should now see a white back, the bomb, and a small dial underneath the bomb.
Activating the Bomb
You can't look at the bomb until you activate it.
Go to the front of the watch.
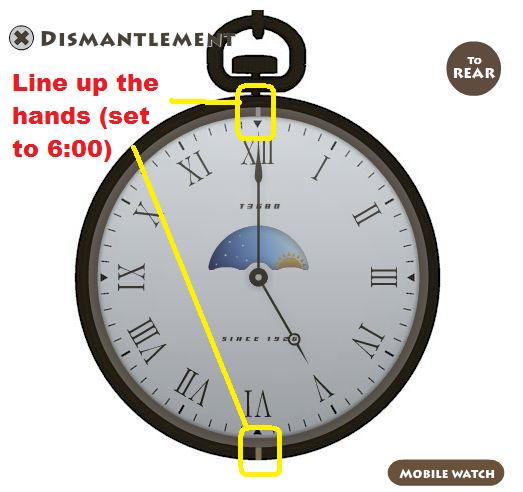
Look closely at the outside of the watch face. There are two small lines, one above the 12, one below the 6.
Remember the clue for 6:00, way back in the beginning?
You need to set the clock back to 6:00, so that the hands line up with the lines.
Screenshot.
Once the hands are lined up, go to the back of the watch.
Now click on that dial below the bomb for a close up.
Use the arrows to move the dial to the 6:00 (down) position.
Back up and go to the front of the watch.
Click on the watch face and you can remove the crystal (the watch face will turn white).
Click on the middle of the face for a close up and remove the minute and hour hands by clicking on them.
Once the hands are removed you will see a screw in the middle, remove it.
Back up and go to the back of the watch.
Click on the bomb area. You will see a nut below the red button and above the "danger" area. Click on the nut to remove it.
Now click on the "danger" plate to remove it.
The countdown has begun! You now have 5 minutes to dismantle the bomb.
Dismantling the Bomb
This requires a four letter code. Notice the pictures of what look like dice above the code key.
Don't try to click the dial in the lower right until you get the code, otherwise you will blow up.
The key to the code is in the dice. Look closely at the circles in the dice.
Each circle in the dice has a dark side and a light side. Consider the dark side as a directional arrow.
From a circle, draw a line in the direction of the dark side of the circle. If you do this for each of the dots, you will see blocky letters form.
Screenshot.
Draw the lines correctly and you will get the letters C E O H.
Enter the four letter code into the key, then click on the dial on the right to deactivate the bomb.
If done correctly the light above the bomb will turn green. If not, then boom.
Click on the countdown timer to remove it and expose another screw.
Click on the screw to remove it.
Now click on the black part of the bomb assembly (where the timer was) to remove it.
Back up.
Click on the gray area to remove it. The back should be completely white now.
Click on the white area to remove it and you are done!
Posted by: grinnyp |
March 5, 2011 4:15 AM
|
March 5, 2011 4:15 AM