

![]()
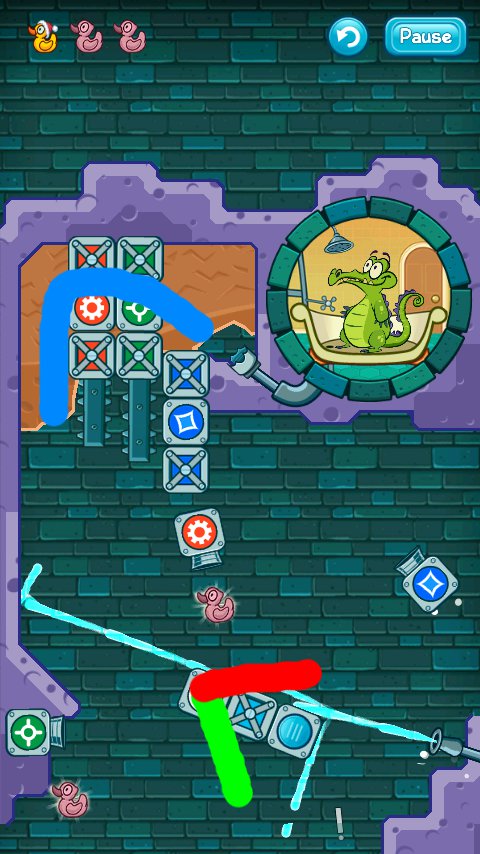
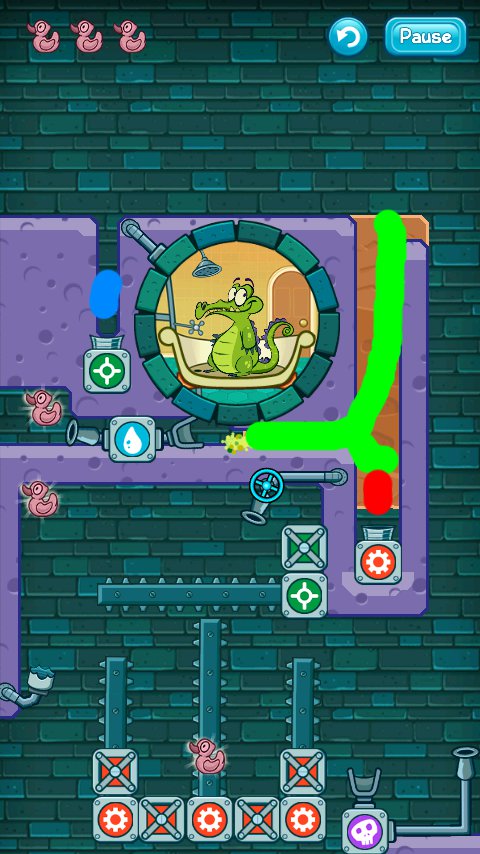
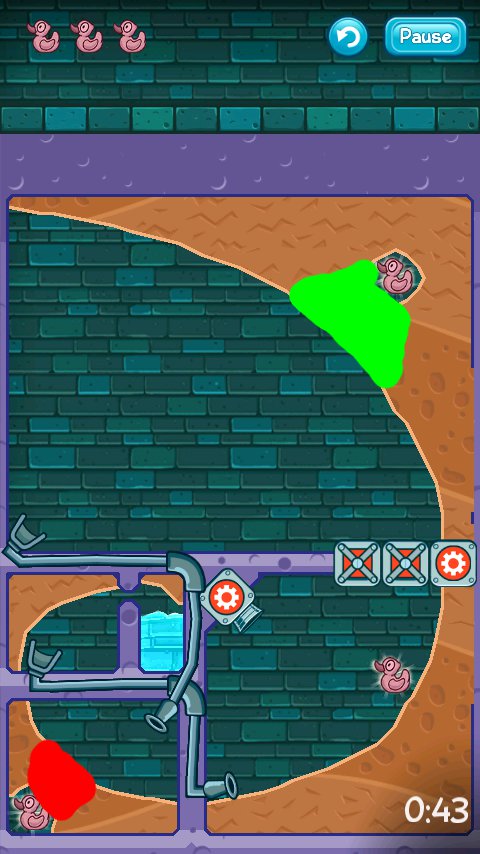
 Alligators aren't usually known for being picky about their personal hygiene. Swampy, the smiling 'gator who lives deep in the sewers, is quite a bit different. While the rest of the alligators are tearing up everything in the sewers, Swampy is getting ready to take a bath. It seems his shower isn't quite working, though, so you'll have to suss out the source of the problem. In Where's My Water?, a smartly-built physics-based puzzle game from Disney Mobile, its your job to cut holes in the soil to direct the water down to Swampy's tub. And with things like movable walls, puddles of acid, and lively bits of mold, that's much easier said than done.
 Where's My Water? keeps the mechanics pretty simple and allows you one real move to perform: digging in the dirt. By swiping your finger across the screen, you can remove trails of soil to make a pathway for the water to flow down. Every movement counts, as the gloopy water moves with quite a bit of realism, and any snag in the tunnel can cause unforseen difficulties down the road. Swampy's tub has an open end to receive the water you guide his way, so if you can get at least some of it on the move, his tub will be full and he'll be one happy alligator.
Beyond guiding water through soil, you'll also work with broken pipes throughout the levels, using them to swing water up and around tough areas. Pools of acid also exist, creating a sense of urgency when they start to burn through everything they come in contact with. Mold will block passageways if water comes in contact with it, and the dangerous purple liquid will eliminate water while burning away mold, making it a powerful but dangerous ally. You'll also want to collect the rubber ducks scattered around each stage. Touch them with enough water to grab them, raising your score with each one. In addition, some levels have hidden bonus items you can find and store in your collection available from the main menu.
Analysis: It's easy to overlook Where's My Water?. On the surface, the game looks too simple, too cute, and maybe even a bit too child-oriented. When you play it, though, you'll quickly realize it has a lot to offer even the sophisticated adult! The game is going for the same audience that enjoys Cut the Rope, and while Where's My Water? doesn't quite hit the same level of challenge or entertainment as that game, it comes very close in a number of ways.
The 80 or so levels in Where's My Water? are well-designed and quite varied, pushing a few action-oriented experiences in from time to time that force you to act immediately when the stage loads. The variety of contraptions you'll deal with also increases, and those movable gates become a bit of a puzzle later on. The difficulty never gets too high, making it a good casual diversion or even a great game for the kids to play.
Where's My Water? is a well-made, good-looking mobile game with a strong sense of personality. Its design is smart at every turn, creating an experience that flawlessly hooks you from the beginning and keeps you entertained for the whole ride through.


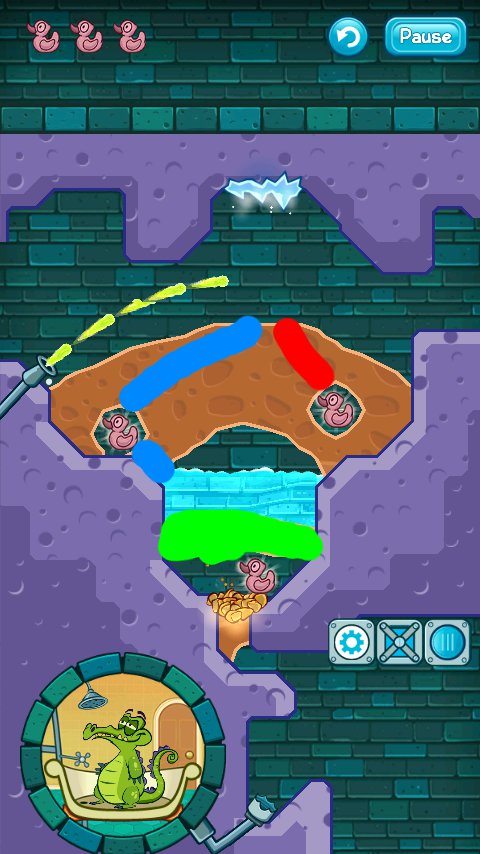
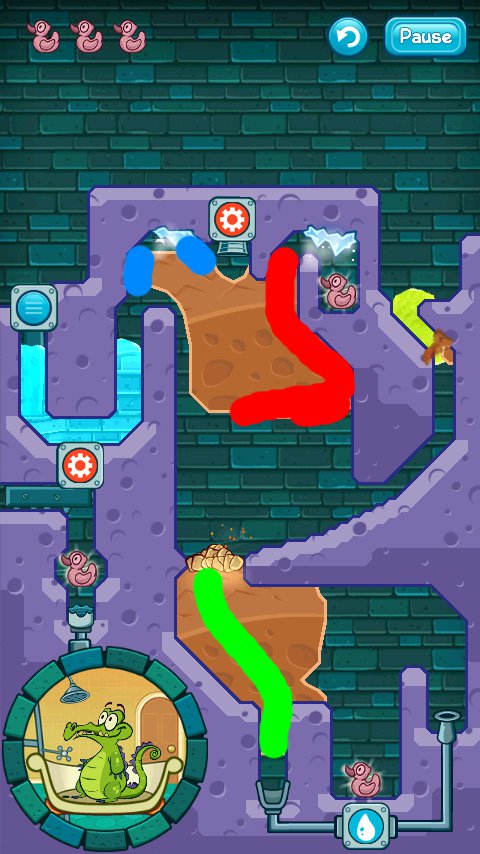
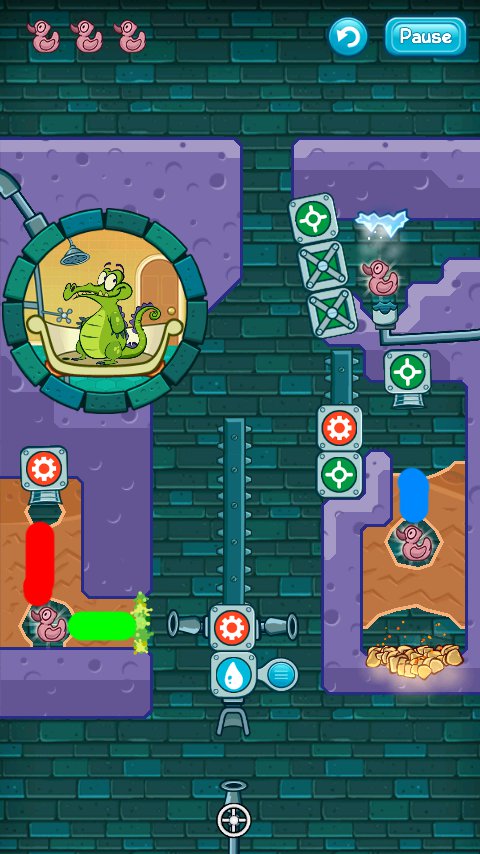
Walkthrough Guide
(Please allow page to fully load for spoiler tags to be functional.)
Where's My Water Walkthrough
(General Info, Sections 1-4)
General Info
Ducks
Ducks can only be collected with water.
Poison, ooze and bomb blasts kill them.
Gears
Bars are activated when their corresponding receivers get a liquid.
Red gears have a picture of a cog on them.
Green gears have a four-pointed star.
Blue gears have a concave-sided diamond.
Purple gears have a hexagon.
Blue gears that you can control have a colored cog and white background (opposite of the other gears).
Liquid Interactions
water + poison = more poison
water + ooze = both dissolved
poison + ooze = BOOM!
Plants
Plants are destroyed by poison.
They turn into stone with ooze.
They multiply when touched by water.
Any liquid that interacts with plants are absorbed.
Bombs
Bombs will go off when touched by a liquid.
They will also go off when a nearby bomb blows up.
Hot Coals
Both poison and water that touches hot coals will turn into steam, which then condenses into water when it touches ice.
Ooze will destroy them.
Balloons
Plain balloons contain water.
Balloons with a skull contain poison.
They will pop when sprayed with ooze.
Main Walkthrough
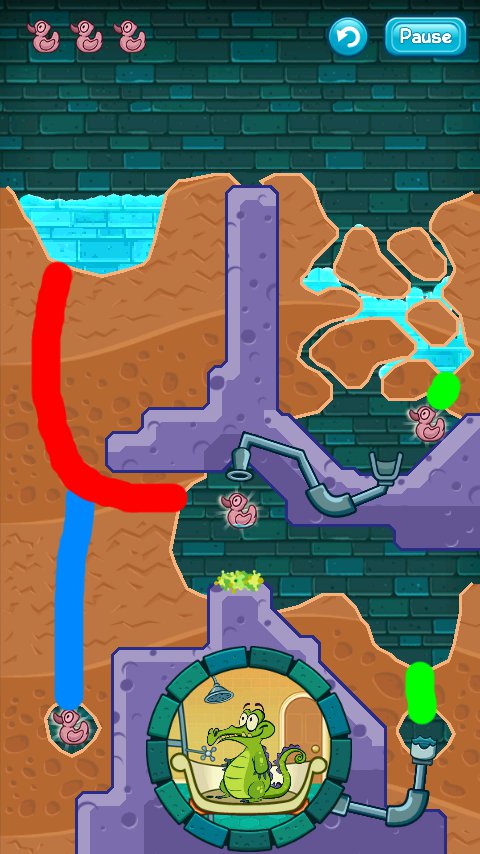
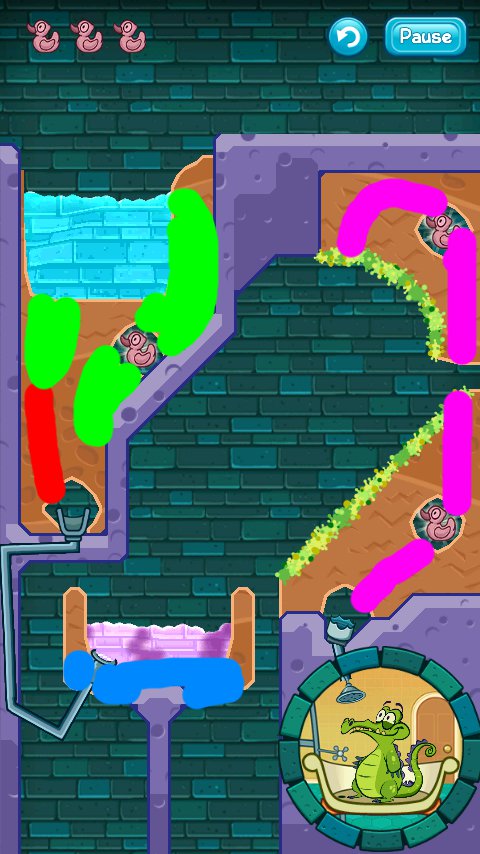
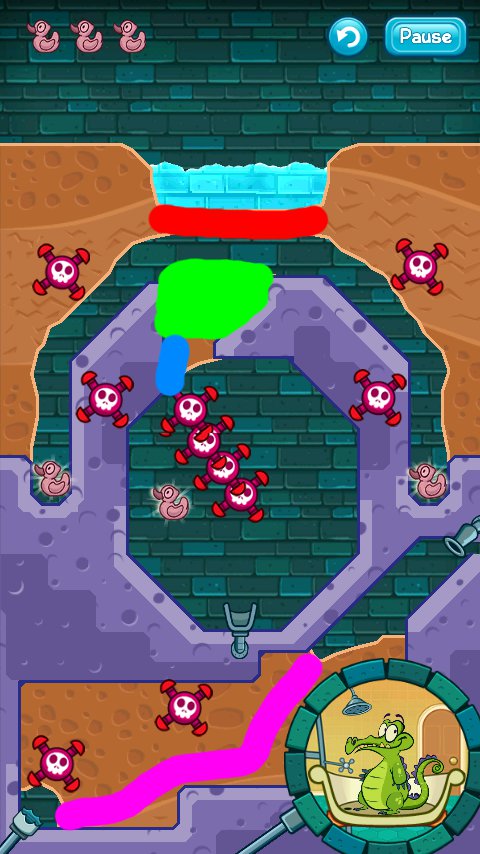
Section 1: "Meet Swampy"
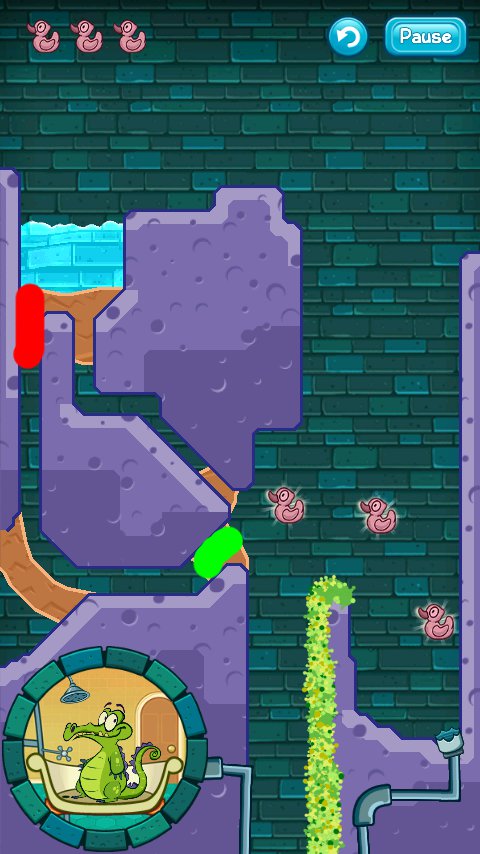
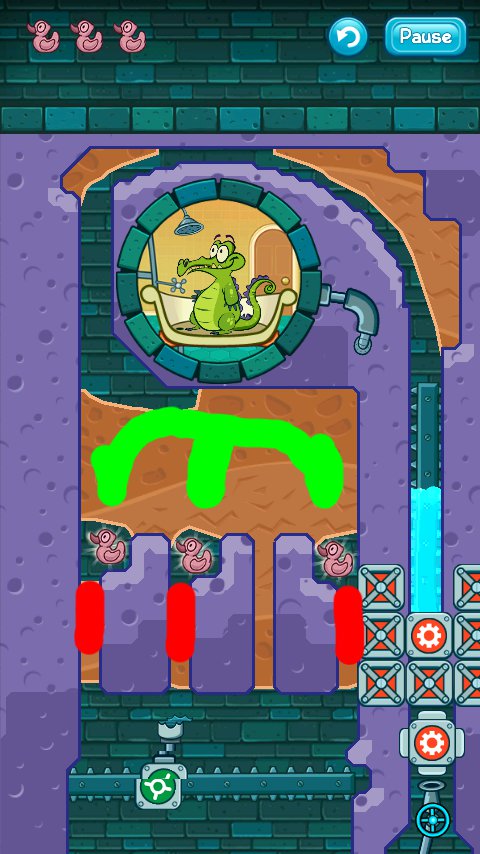
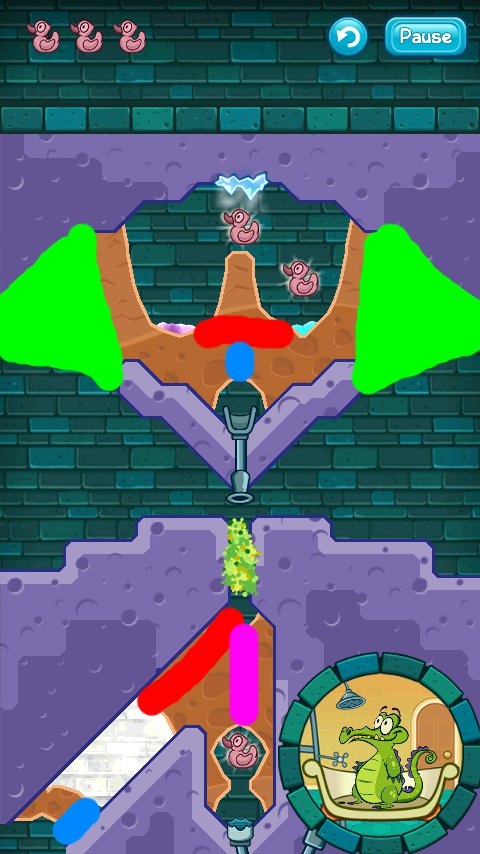
1-1: First Dig
Screenshot
Just as instructed, dig as indicated in green to collect all three ducks.
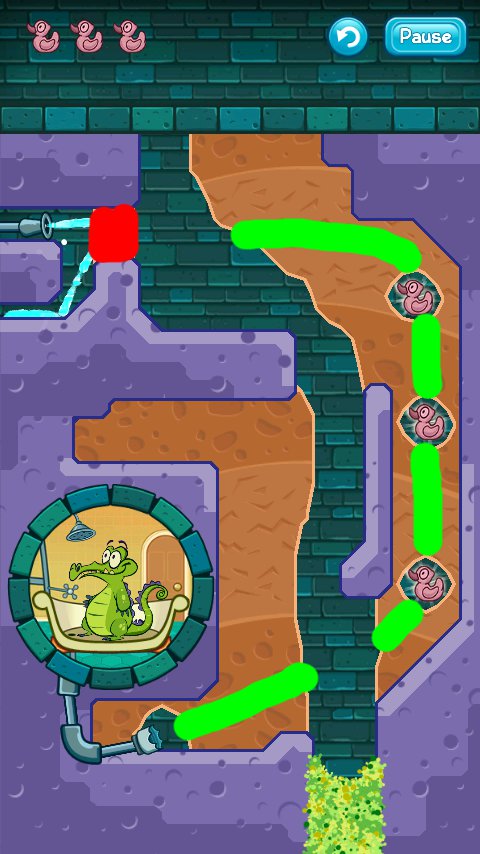
1-2: A Rock is a Hard Place
Screenshot
Dig as indicated in green to collect all three ducks.
1-3: Choose Wisely
Screenshot
Dig as indicated in green to collect all three ducks.
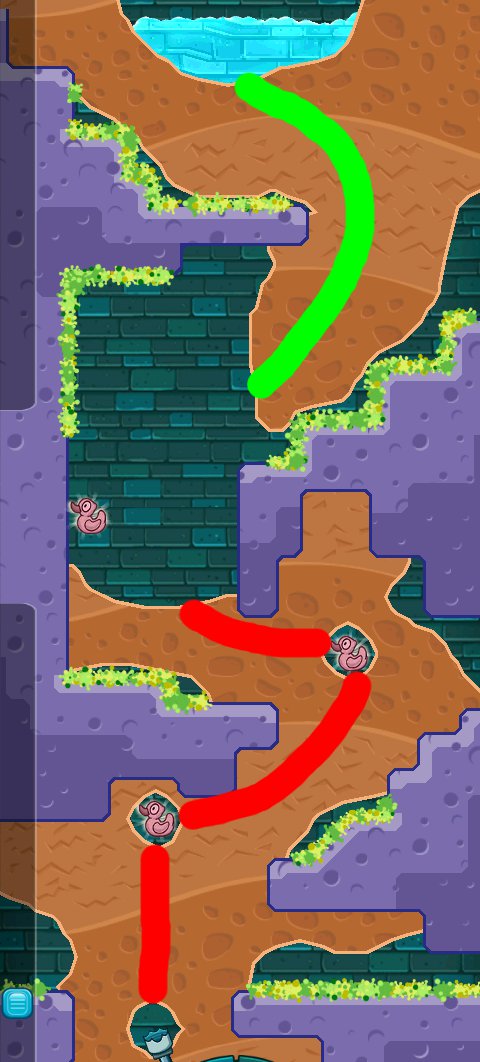
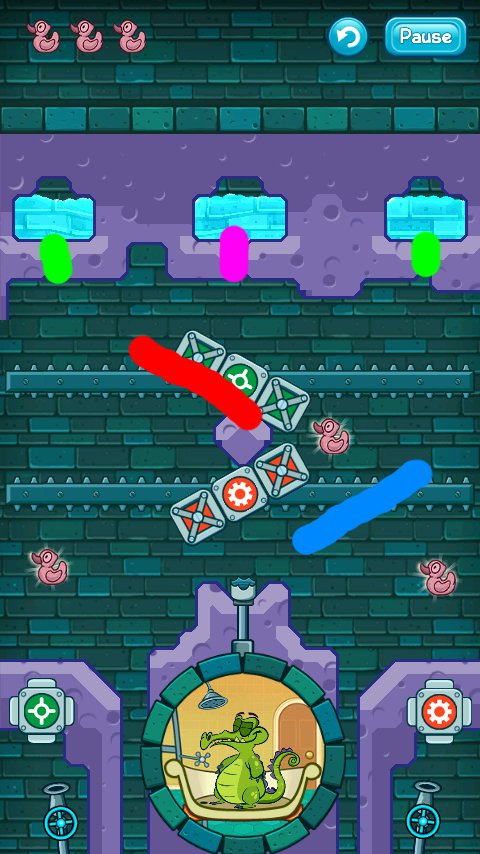
1-4: Do a Sweet Jump
Screenshot
Dig as indicated in green.
Now dig as indicated in red to collect all three ducks.
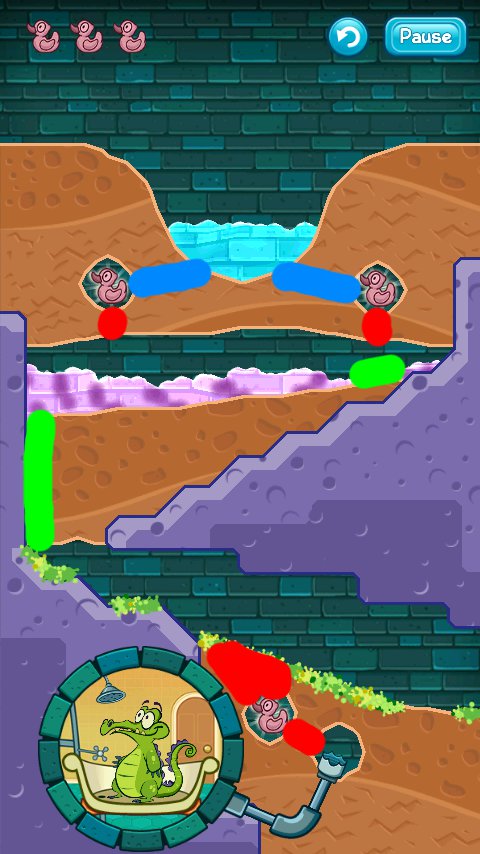
1-5: It'll Grow On You
Screenshot
Dig all areas indicated in green.
Now dig as indicated in red to collect all three ducks.
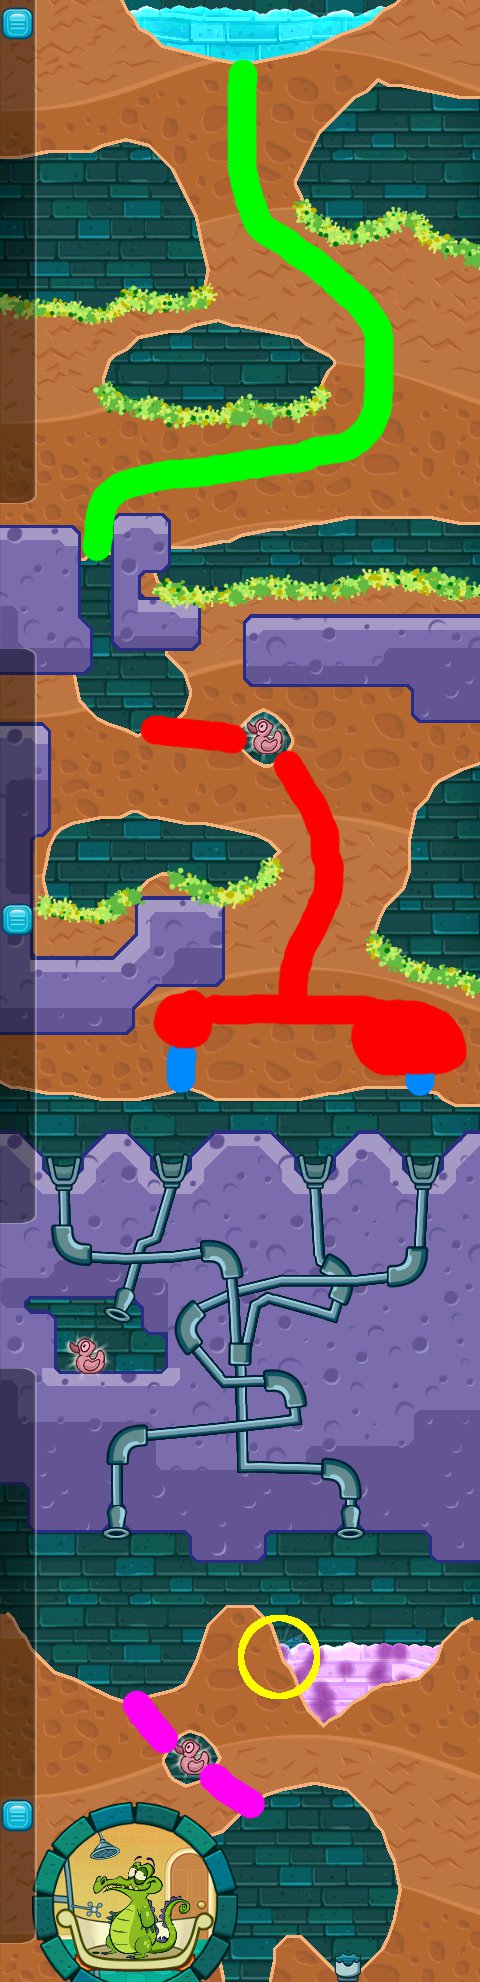
1-6: Deep Dig
Screenshot
The composite image in the screenshot above has been cropped for height.
Dig as indicated in green.
Once the top duck has been collected, dig all areas indicated in red. This should collect the last two ducks.
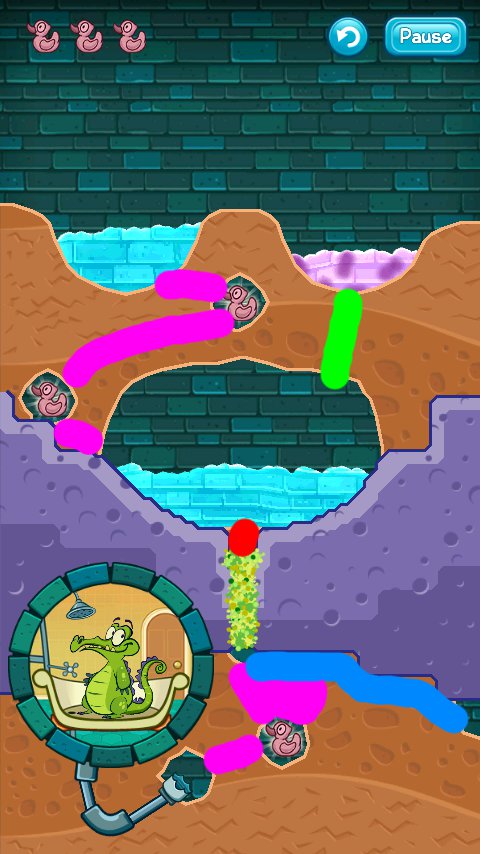
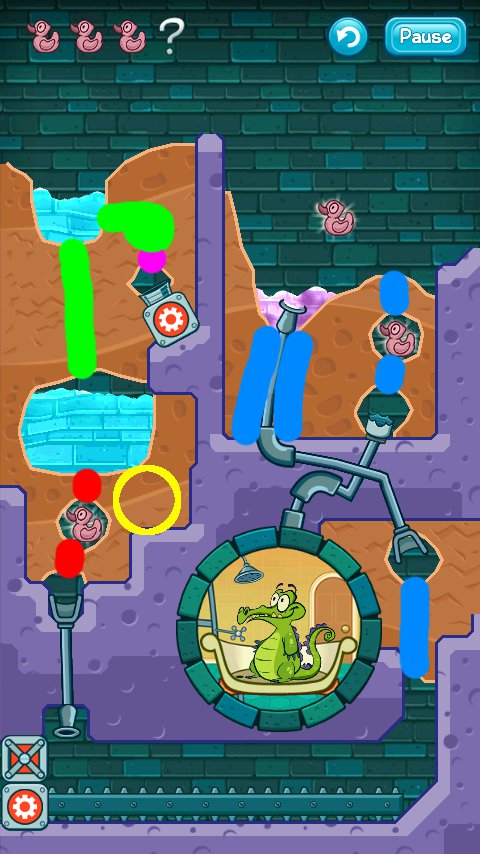
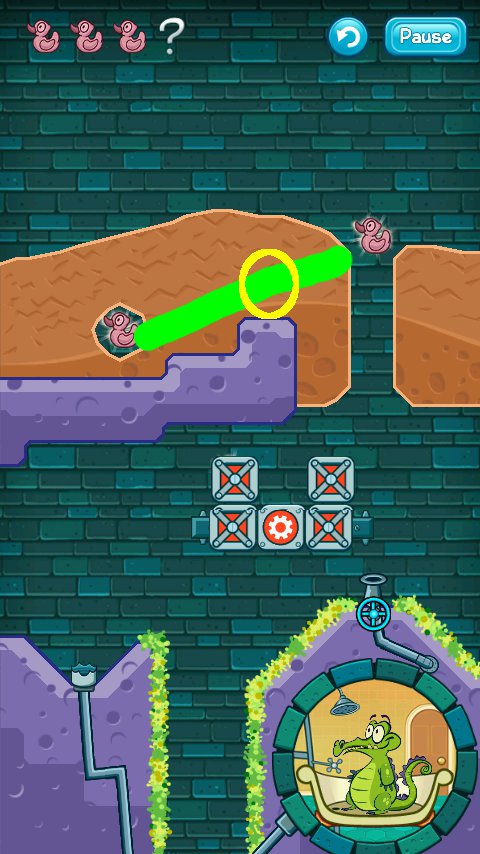
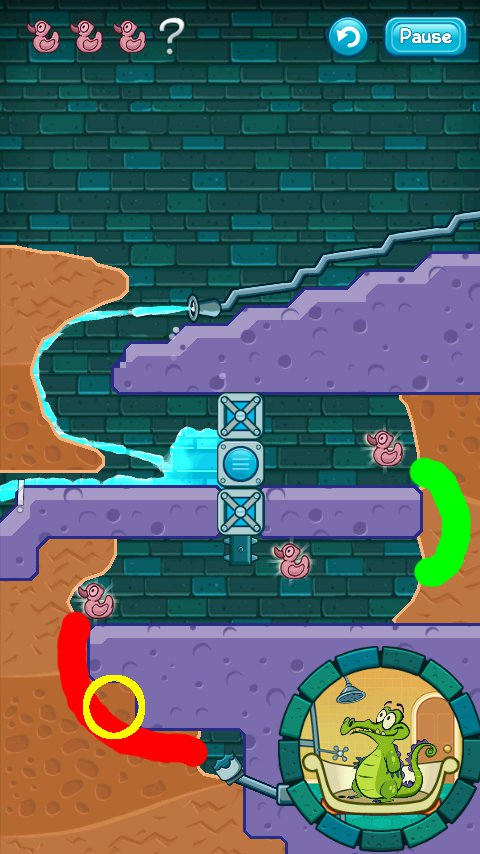
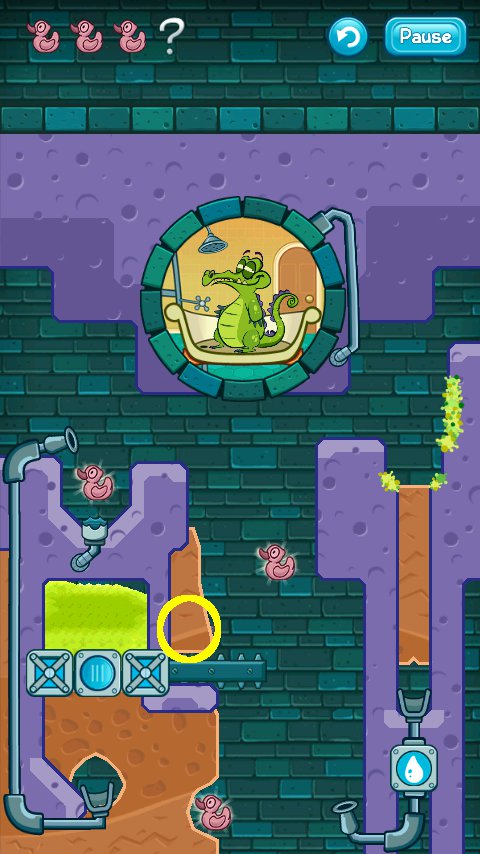
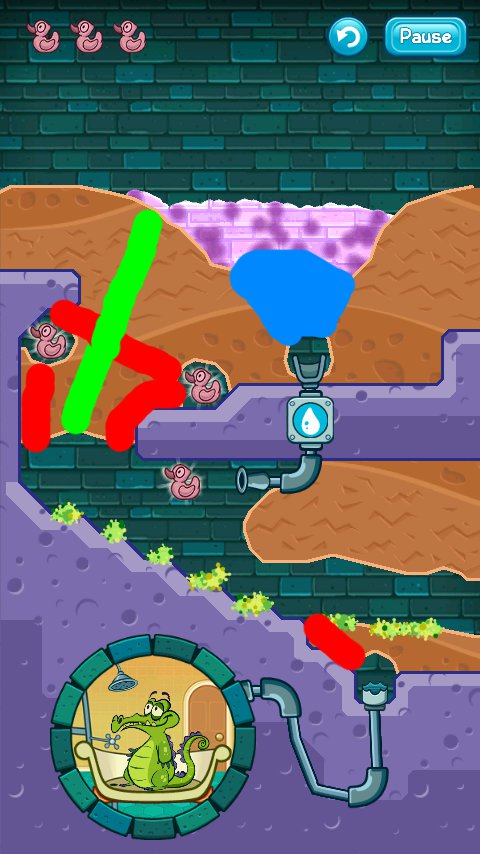
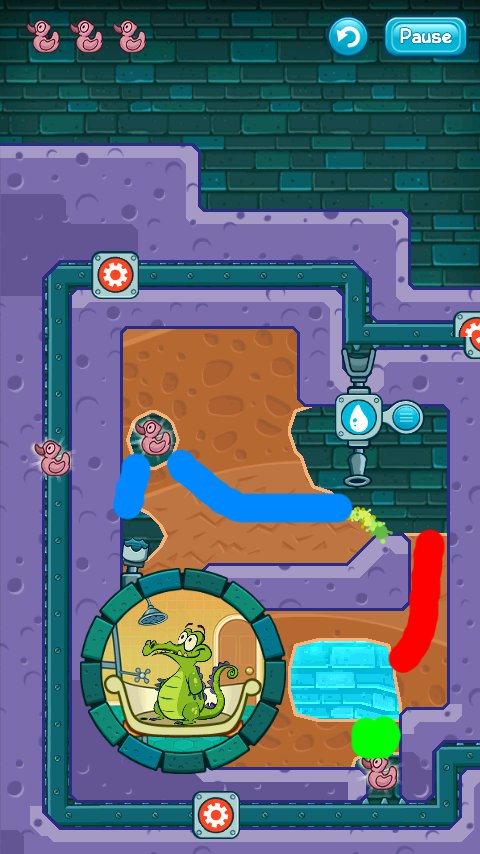
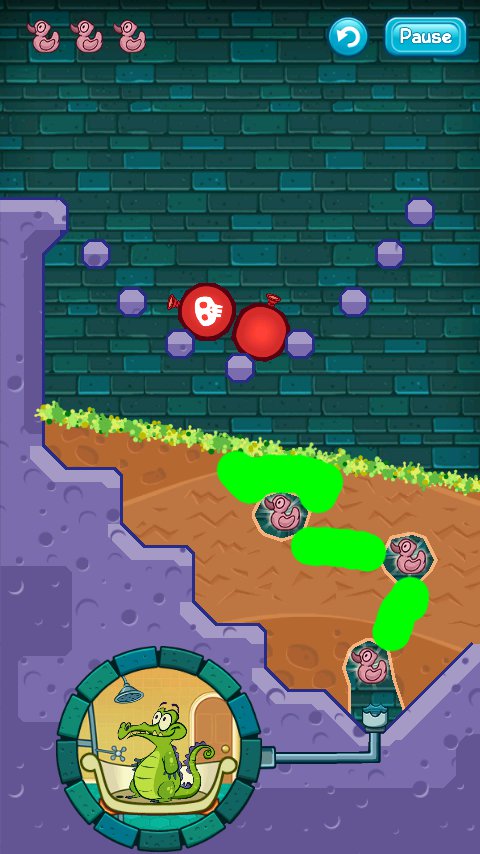
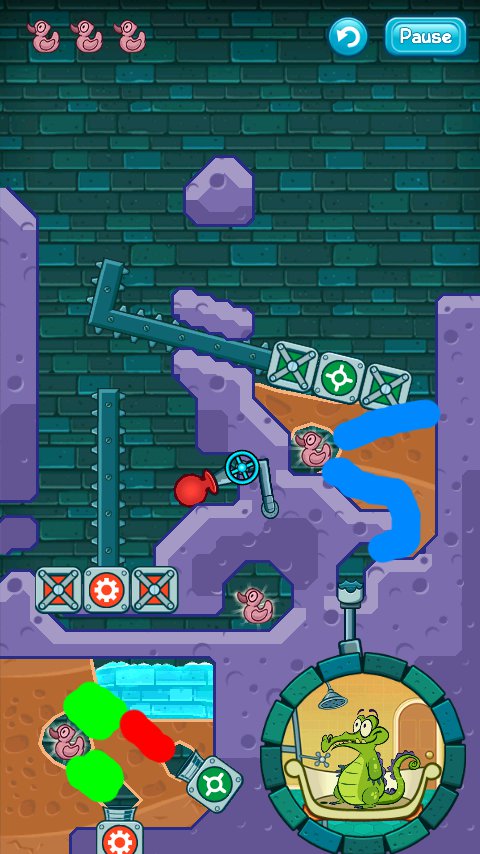
1-7: Drain It First
Screenshot
The collectible is circled in yellow.
Dig as indicated in green.
Once all the poison has drained, dig all areas indicated in red.
Now dig as indicated in blue to collect all three ducks.
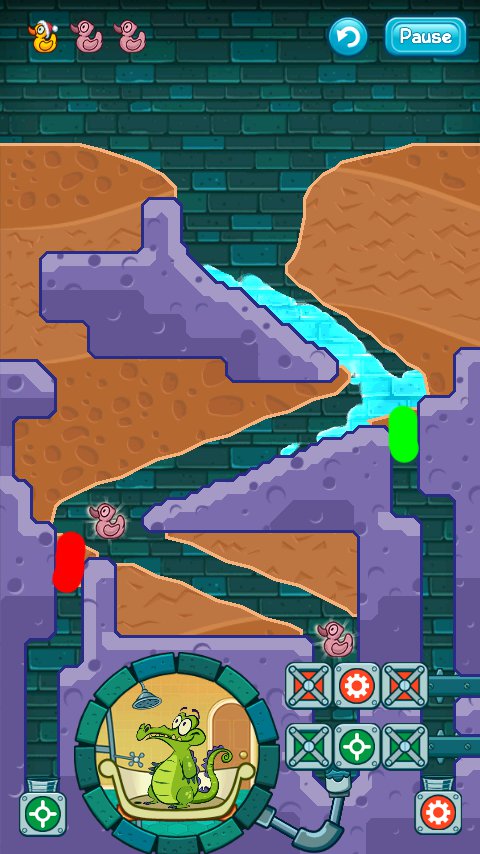
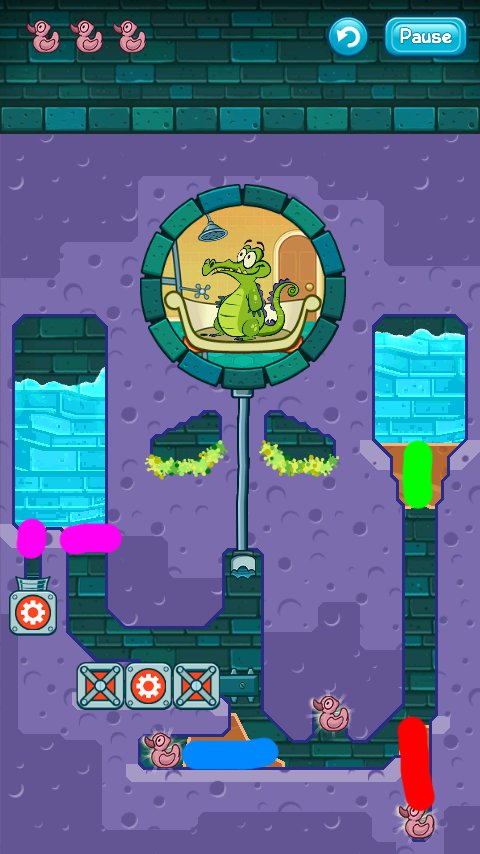
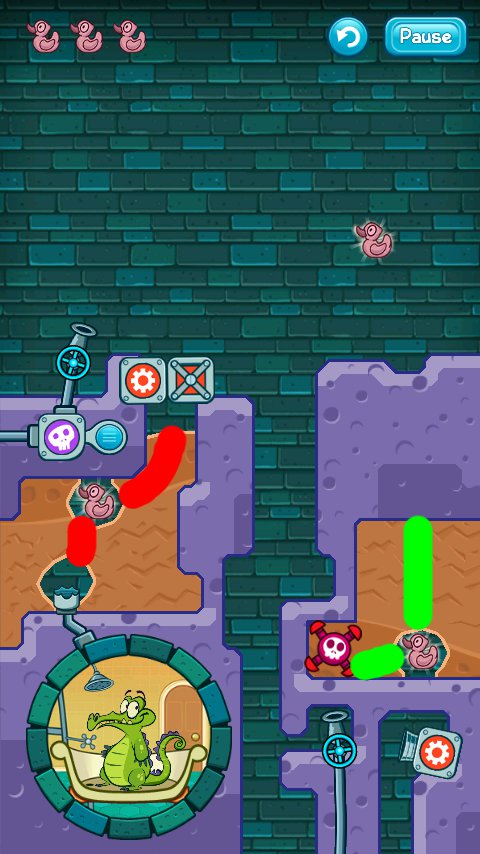
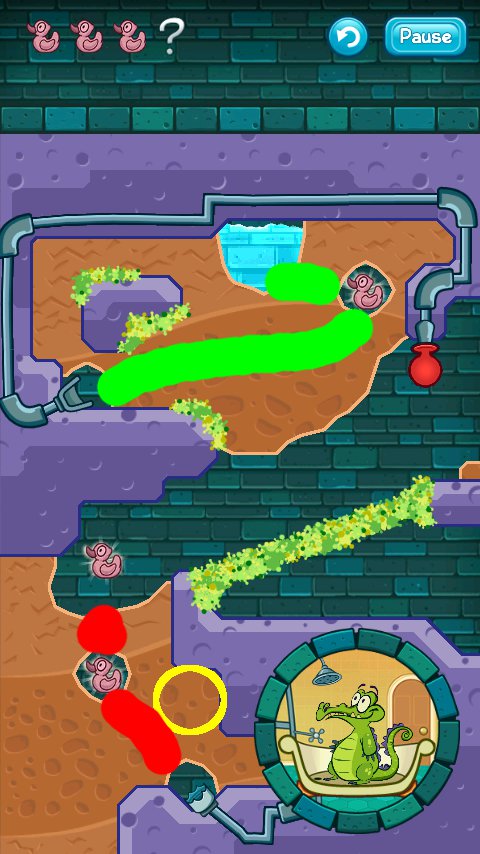
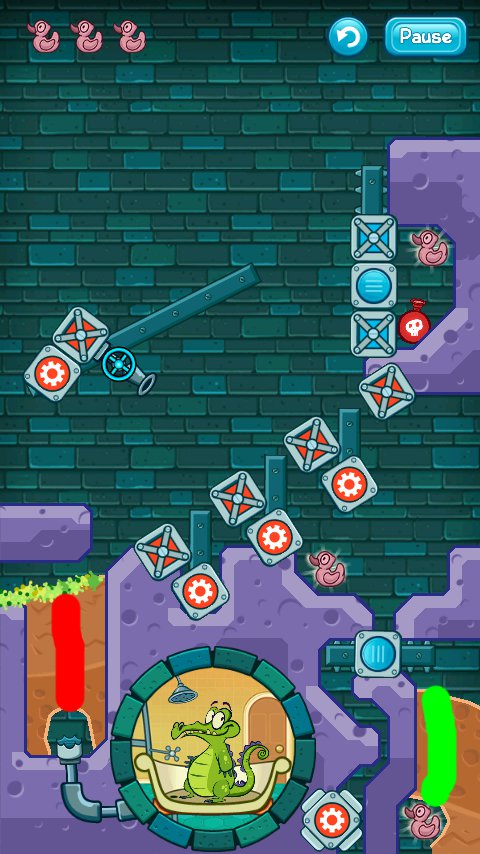
1-8: Clear the Way
Screenshot
Dig as indicated in green.
Once all the poison has drained, dig all areas indicated in red.
Now dig both areas indicated in blue to collect all three ducks.
1-9: Mixing Bowl
Screenshot
Dig as indicated in green.
Once the water's been converted, dig as indicated in red.
After all the plants are destroyed, dig as indicated in blue.
Once all the poison has drained, dig all areas indicated in purple. This should collect all three ducks.
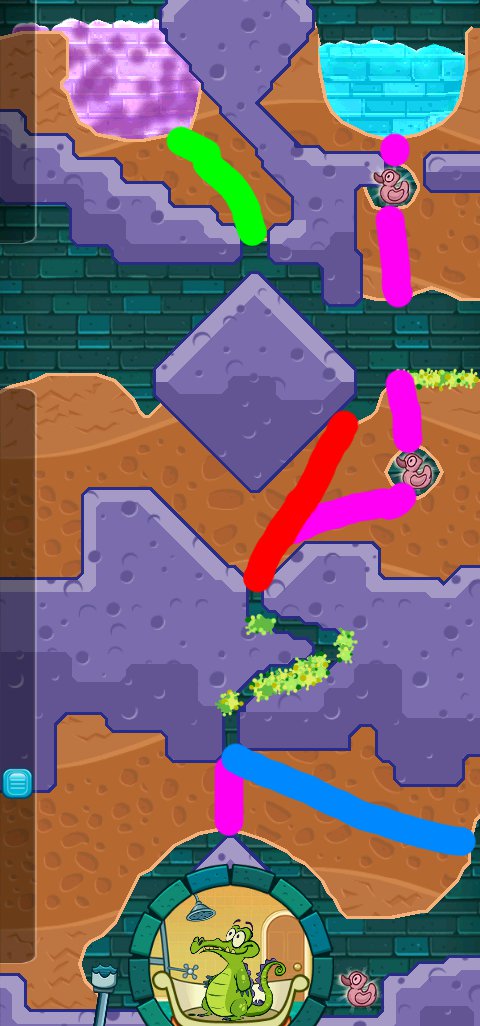
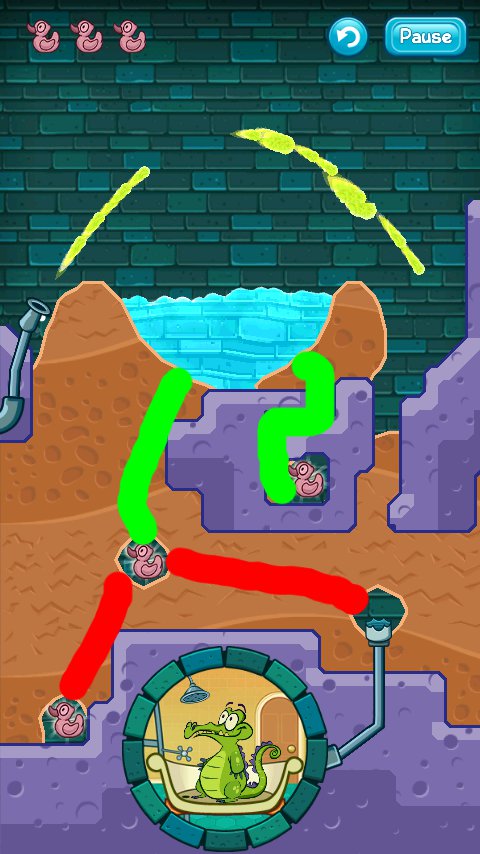
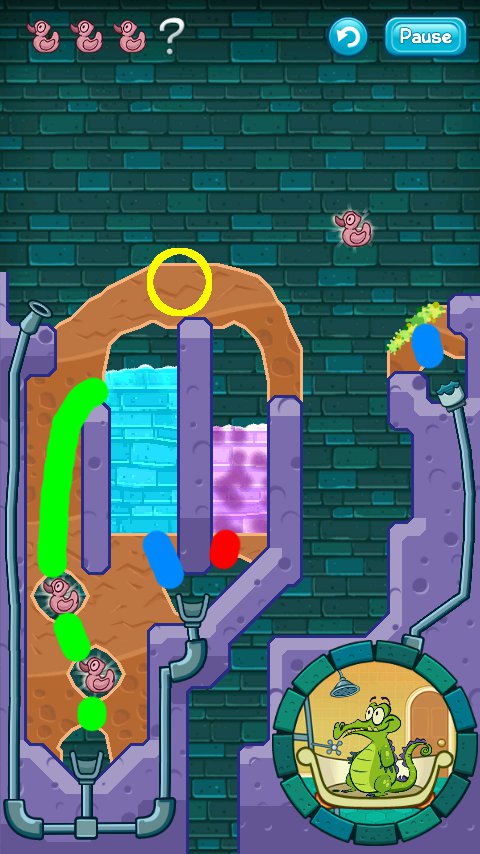
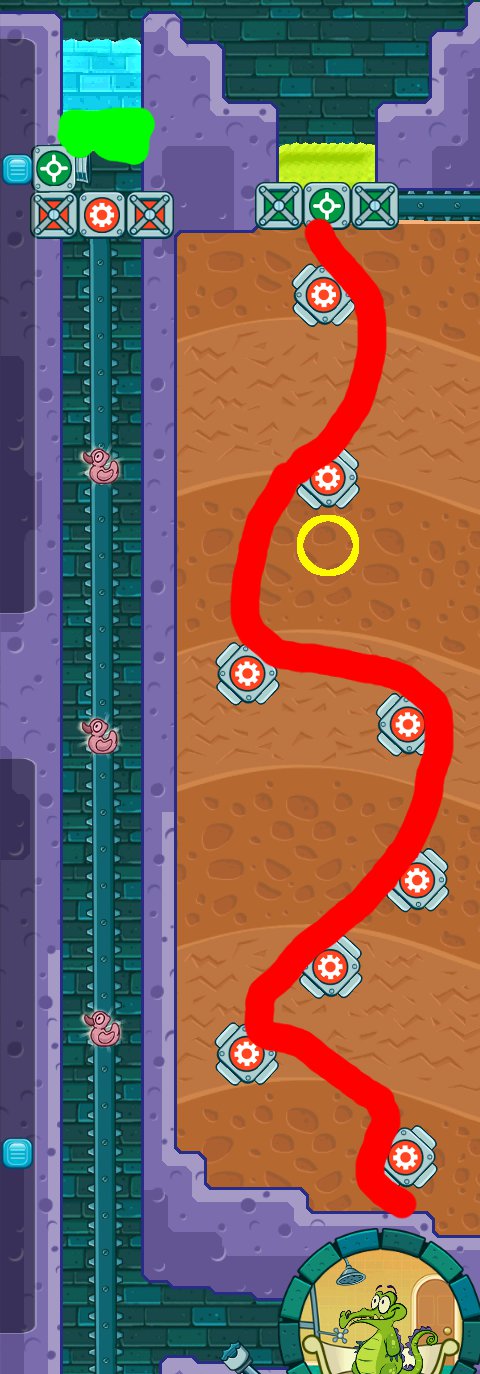
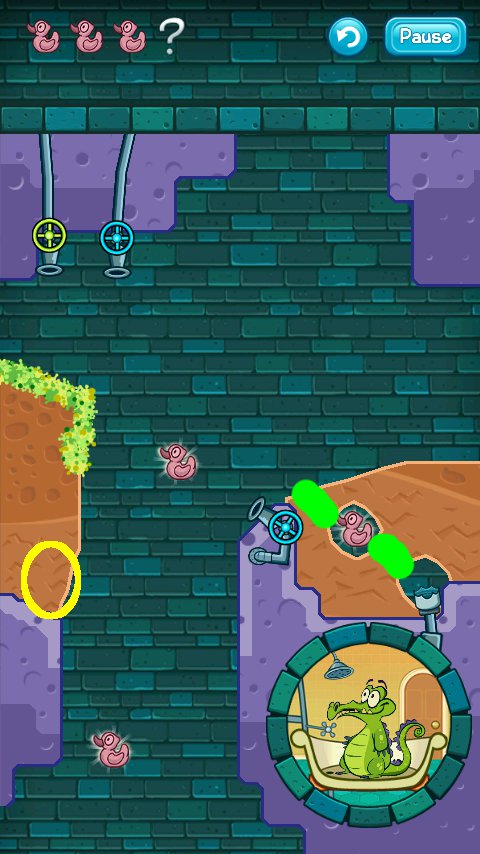
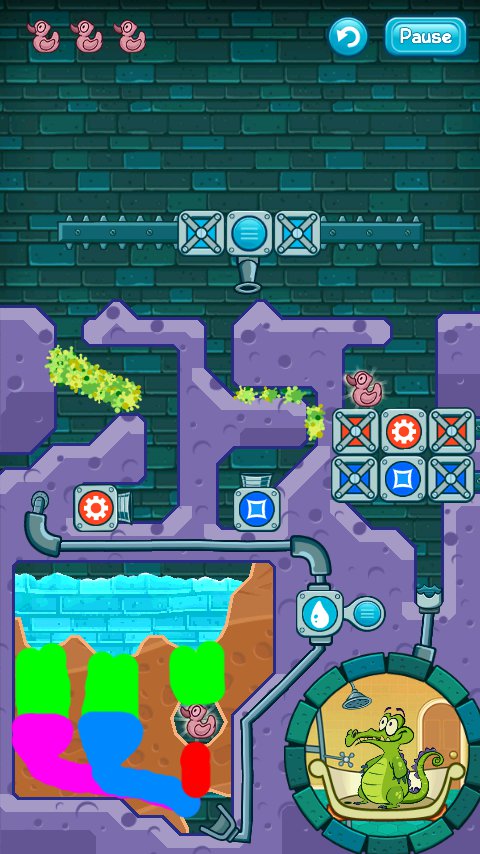
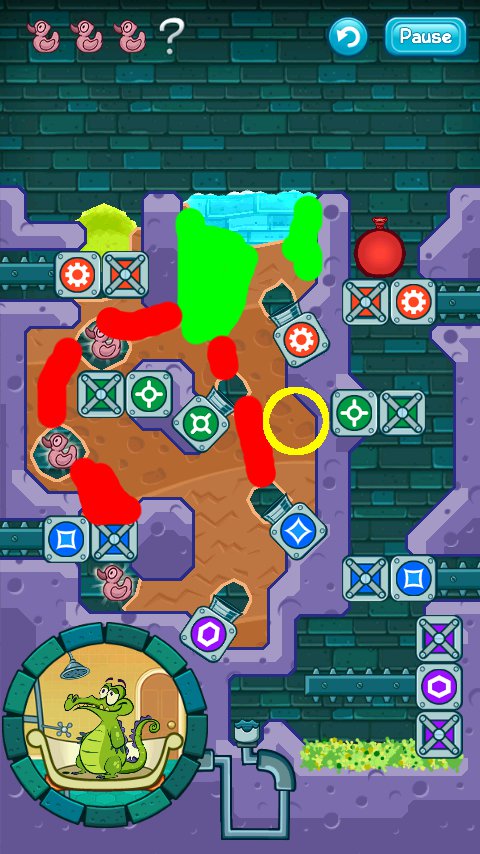
1-10: Split Decision
Screenshot
The composite image in the screenshot above has been heavily cropped for height.
The collectible is circled in yellow.
Dig as indicated in green.
As soon as the plants on top are destroyed, dig as indicated in red.
When the plants below are destroyed, dig as indicated in blue.
After all the poison has drained , dig all areas indicated in purple. This should collect all three ducks.
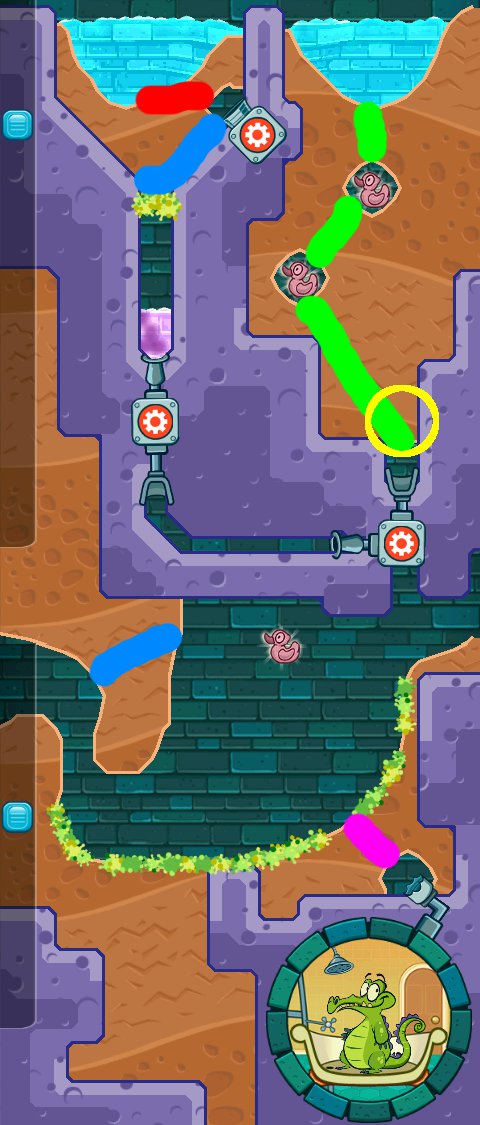
1-11: Divert
Screenshot
Dig as indicated in green, which should collect the left two ducks.
After the red gear has been activated, dig as indicated in red. This should collect the last duck.
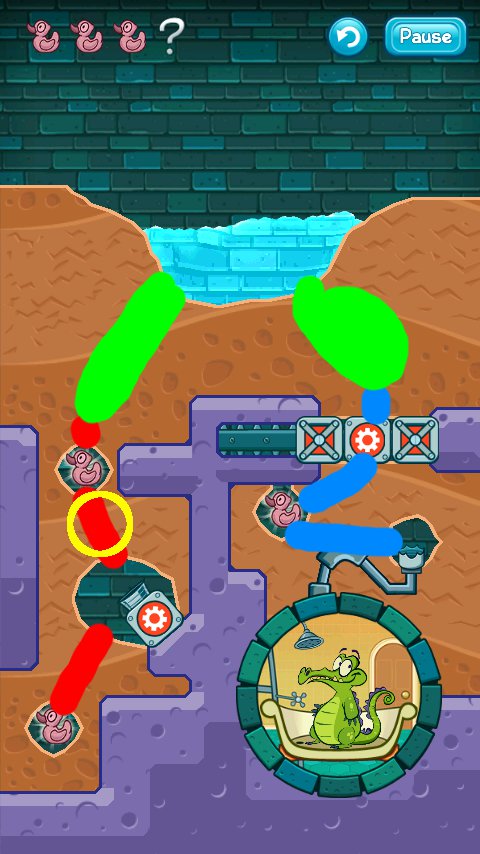
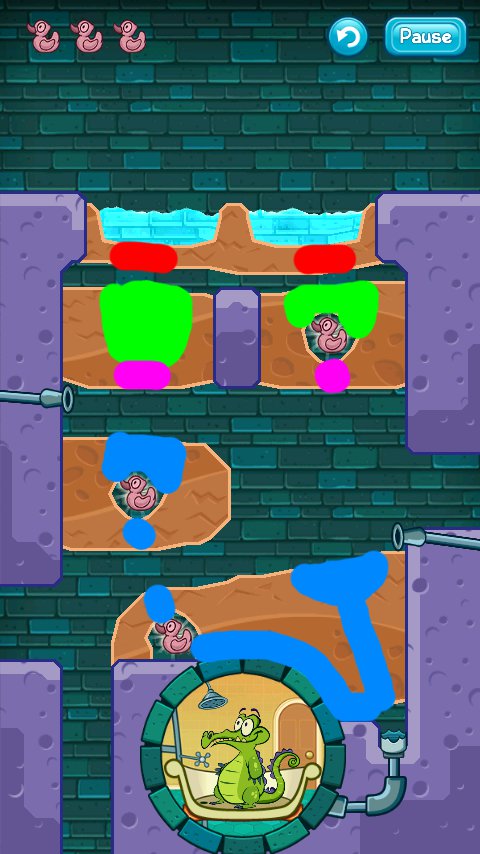
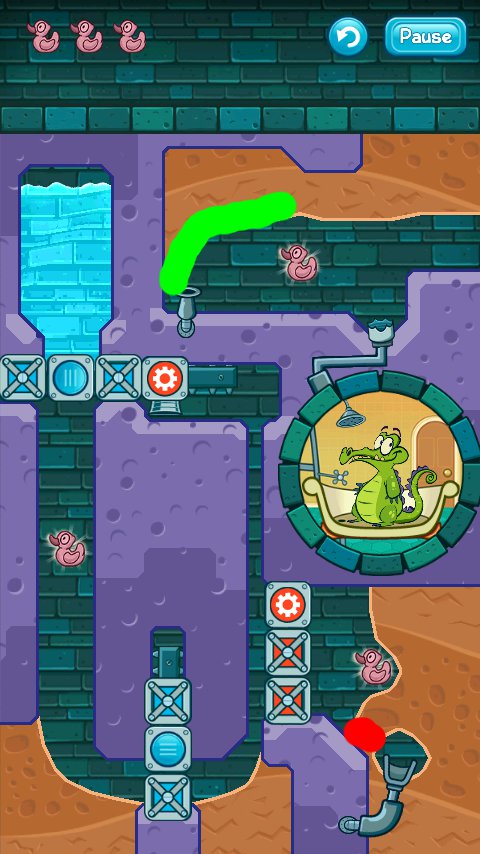
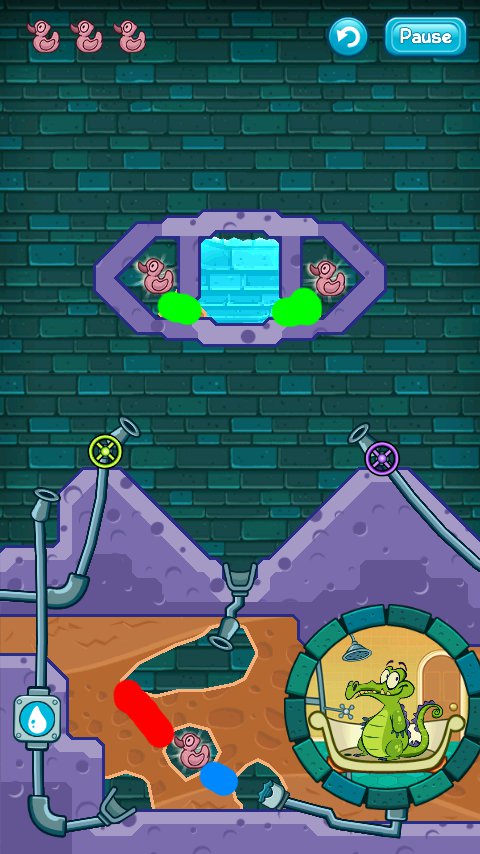
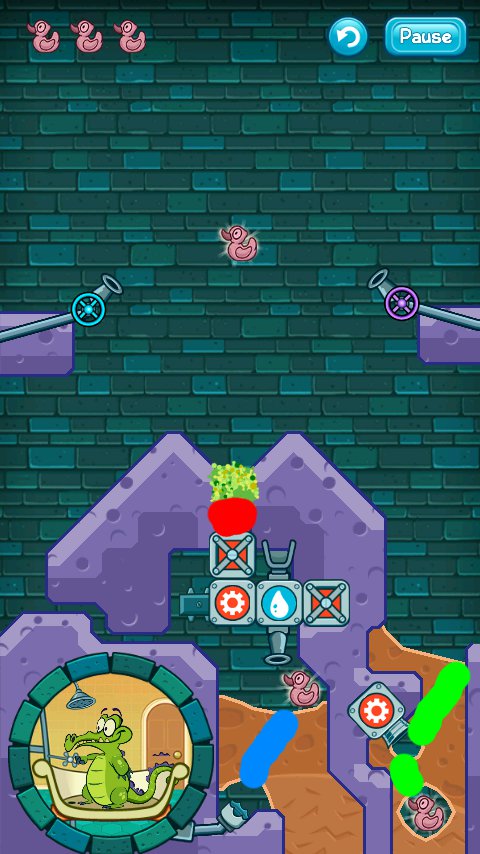
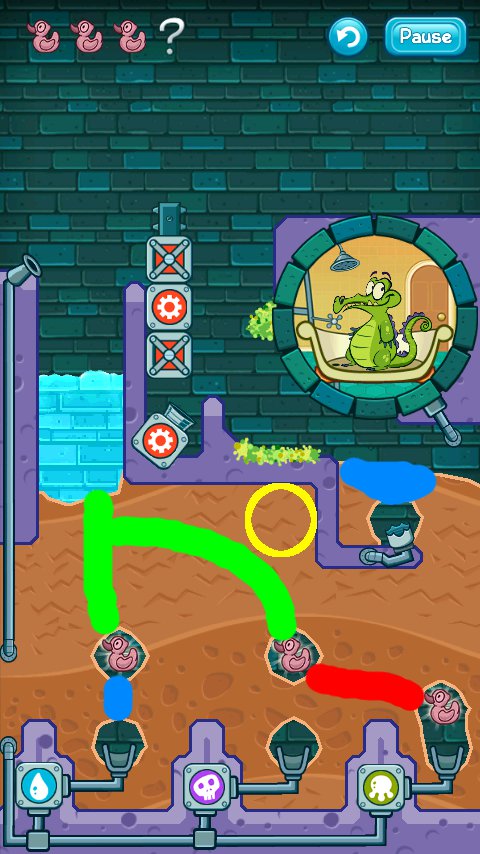
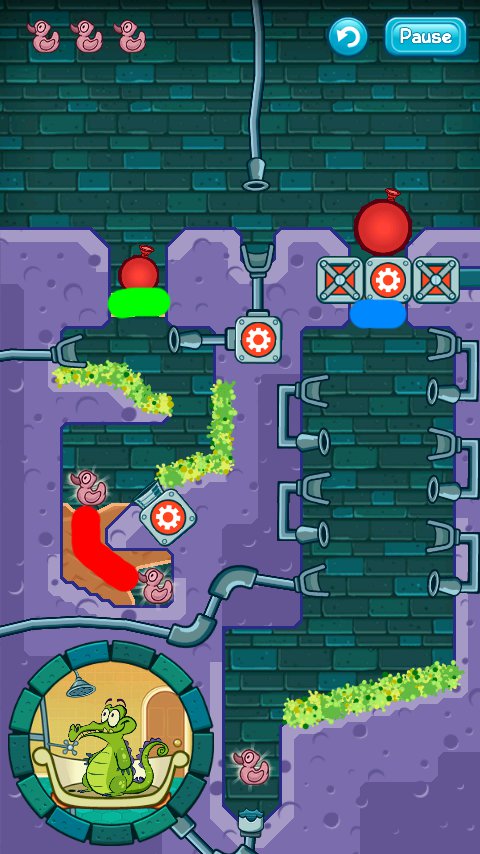
1-12: Divide & Conquer
Screenshot
The collectible is circled in yellow.
Dig as indicated in green.
Once the water has settled, dig as indicated in red. This should collect the left two ducks.
After the red gear has been activated, dig as indicated in blue. This should collect the last duck.
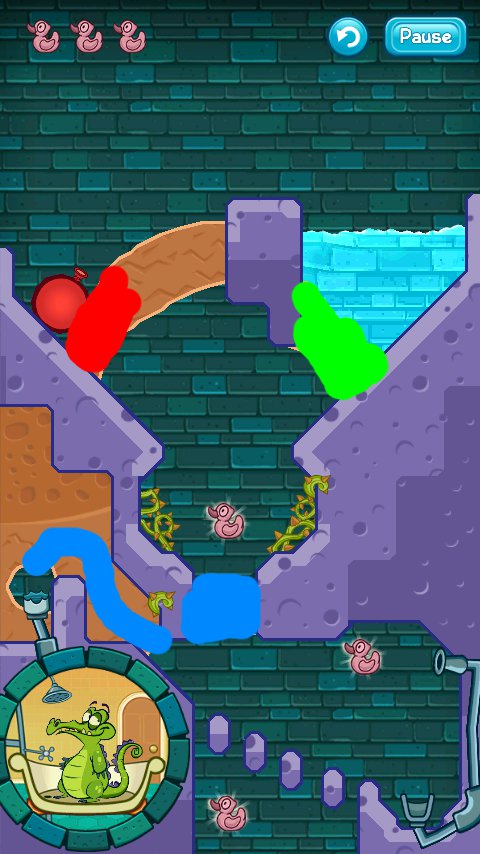
1-13: Order of Operations
Screenshot
The composite image in the screenshot has been cropped for height.
Dig as indicated in green, which should collect the top duck.
Now dig as indicated in red to activate the green gear.
Dig all areas indicated in blue to collect the last two ducks.
Timing it to slide down the blue bar, dig under each water pool to go down the drain.
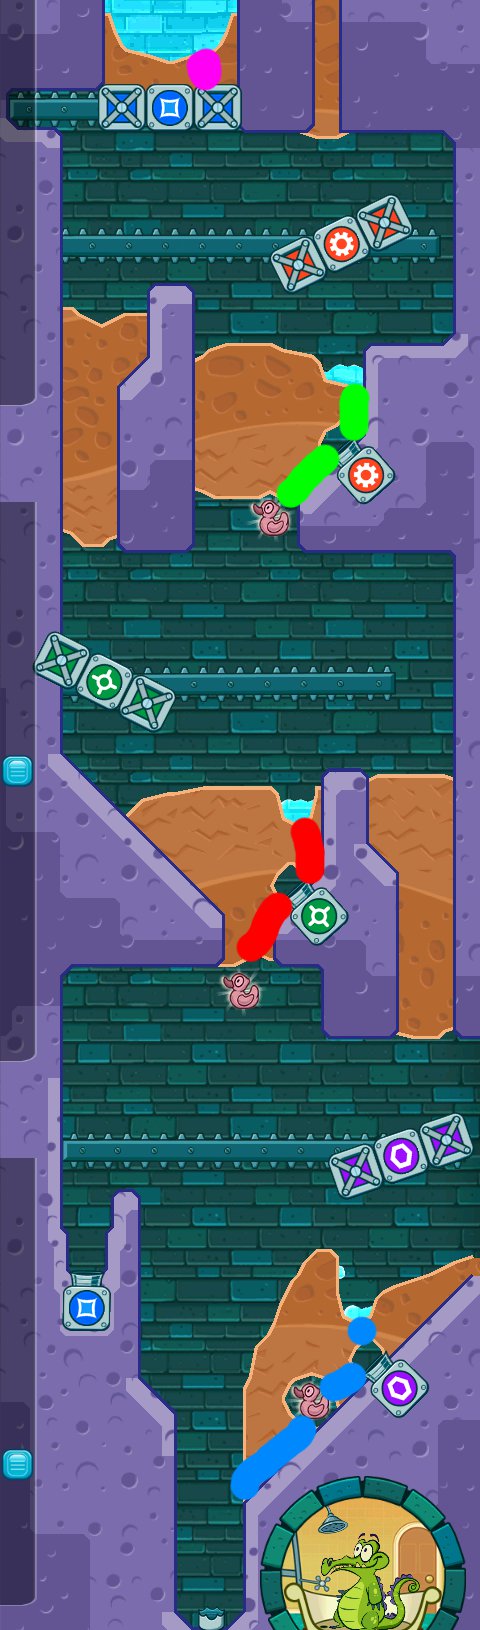
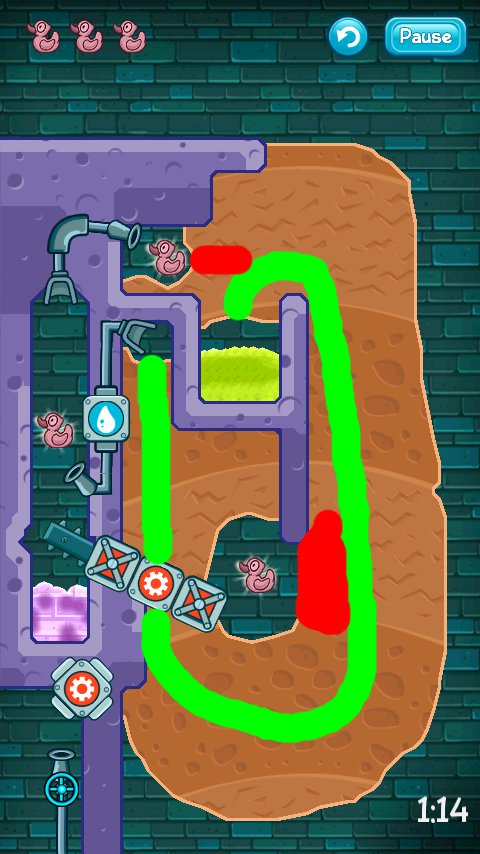
1-14: Loop the Loop
Screenshot
The composite image in the screenshot has been cropped for height.
The collectible is circled in yellow.
Dig as indicated in green, which should collect the upper left duck.
Once the water has been converted, dig as indicated in red.
After all the plants have been destroyed, dig as indicated in blue to drain the poison off the screen.
Dig all the areas indicated in purple.
Now dig as indicated in grey, which should collect the last duck.
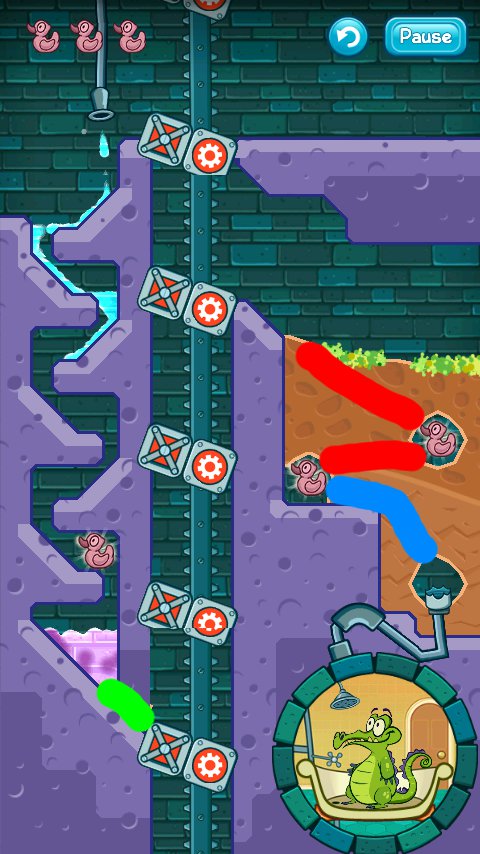
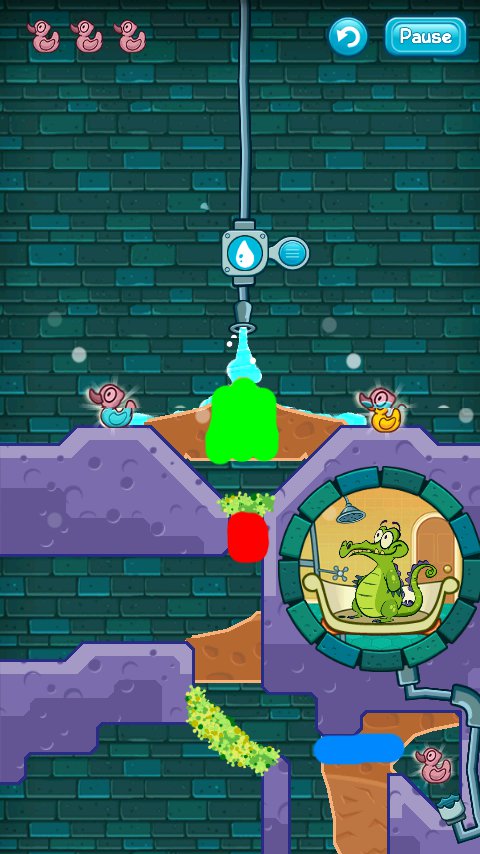
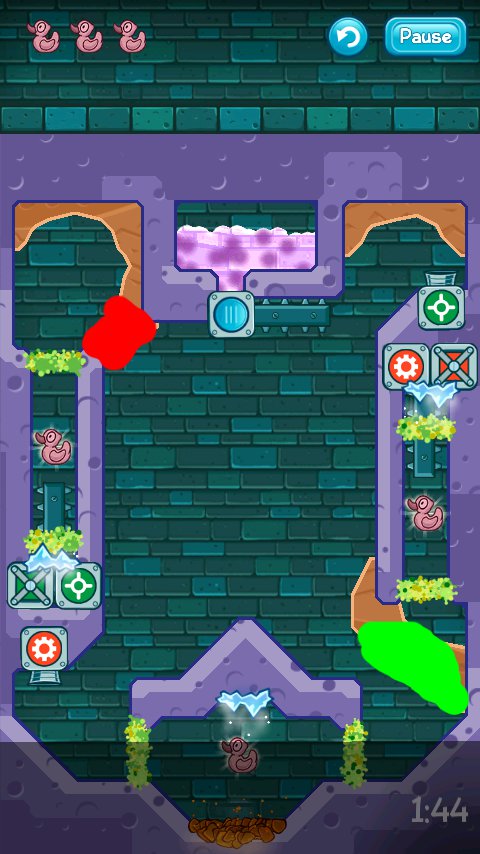
1-15: Conveyor Belt
Screenshot
Dig as indicated in green. The left duck will be automatically collected.
Once all the poison has drained off the screen, dig as indicated in red. This should collect the last two ducks.
After the ducks are done, dig as indicated in blue.
1-16: Three Scoops
Screenshot
The collectible is circled in yellow.
Dig as indicated in green.
Once the red gear is activated, dig all areas indicated in blue. This should collect all three ducks.
After the bottom duck has been collected, dig as indicated in purple.
1-17: Off Track
Screenshot
All three ducks will automatically be collected.
After almost all the water has passed, dig as indicated in green.
Again, dig as indicated in red after most of the water has passed.
1-18: Flip the Switches
Screenshot
Dig as indicated in green, which should collect the top duck.
Now dig as indicated in red.
Once the red bar has retracted, dig as indicated in blue.
When the water has settled, dig as indicated in purple, which should collect the bottom duck.
After the blue bar has finished moving, dig below the pool of water. This should collect the last duck.
1-19: Seesaw
Screenshot
The collectible is circled in yellow.
Dig as indicated in green.
After the water has settled, dig as indicated in red. This should collect all the ducks.
1-20: Drawbridge
Screenshot
Dig as indicated in green to collect the left duck.
Now dig as indicated in red, which should collect the top duck.
After the green bar has stopped, dig both areas indicated in blue.
Once the red gear has been activated, dig as indicated in purple. This should collect the last duck.
This level is very time sensitive, so it may take a few tries to get the steps done efficiently enough.
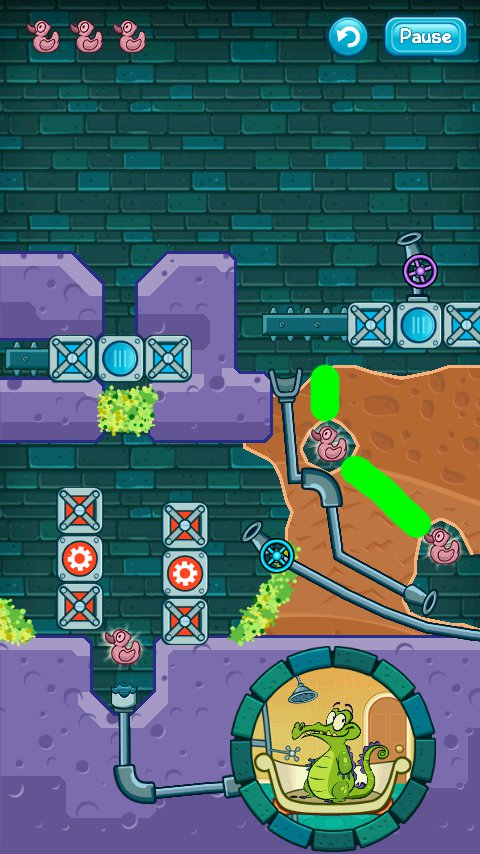
Section 2: "Troubled Waters"
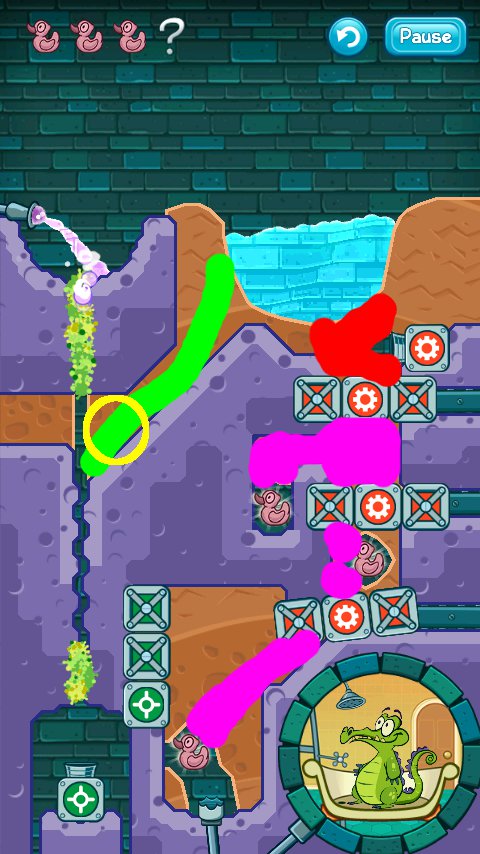
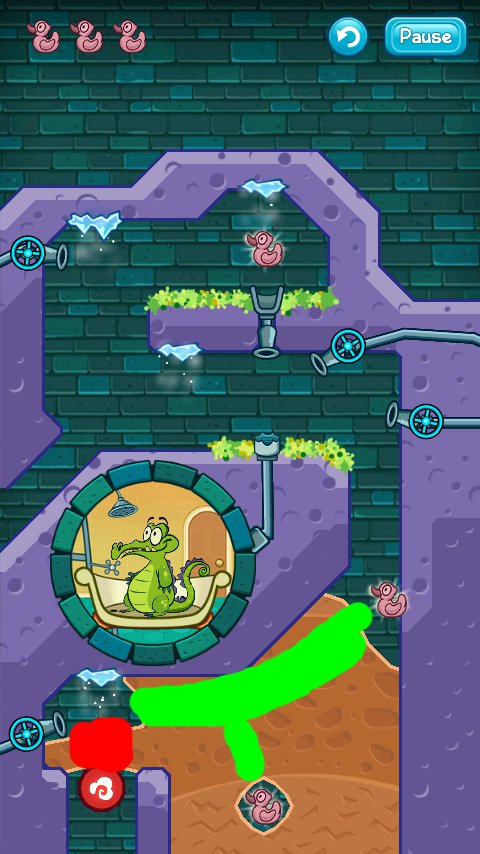
2-1: Can You Take Me Higher?
Screenshot
The composite image in the screenshot above has been cropped for height.
Dig both areas indicated in green, which should collect the bottom duck.
Once the middle duck has been collected, dig as indicated in red.
While the water works its way around the spouts, dig as indicated in blue to collect the last duck.
2-2: Smash Them Together
Screenshot
Dig as indicated in green.
Now dig both areas in red. The top two ducks should be collected as a result.
After the red gear has been activated, dig as indicated in blue to collect the bottom duck.
2-3: Before It Grows
Screenshot
Quickly dig both areas indicated in green. This should collect the right duck.
Now dig as indicated in red.
When about half the water is past the plants, dig as indicated in blue to collect the bottom duck.
The middle duck should have been incidentally collected at this point.
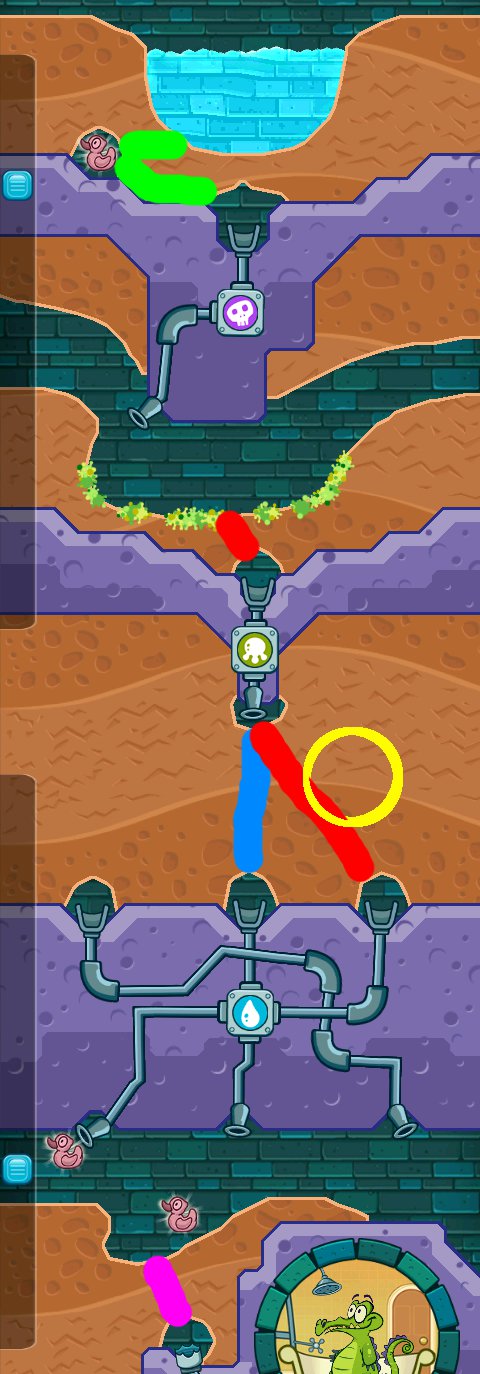
2-4: Long Journey
Screenshot
The composite image above has been cropped for height, but it's still one of the tallest levels.
The collectible is circled in yellow.
Dig as indicated in green.
Once the water has settled, dig as indicated in red to divide the water. This should collect the top duck.
Now dig both areas in blue to collect the middle duck.
Again, when the water has settled, dig as indicated in purple to collect the last duck.
2-5: There and Back Again
Screenshot
Dig as indicated in green.
After the bottom duck is collected, dig both areas indicated in red.
When the middle duck is collected, dig both areas indicated in blue.
Finally, after the last duck is done, dig both areas indicated in purple.
2-6: Act Fast!
Screenshot
Dig as indicated in green, left-to-right, which should collect the top two ducks.
Now dig as indicated in red, right-to-left, which should collect the last duck.
2-7: What Goes Up...
Screenshot
Quickly dig as indicated in green to collect all the ducks.
If you need more time, you can redirect the ooze to the plants to help slow it down.
2-8: One Stream
Screenshot
The collectible is circled in yellow.
Dig as indicated in green.
Once the left duck is collected, dig as indicated in red.
After the right duck is collected, dig as indicated in blue. This should collect the bottom duck.
Now dig as indicated in purple to activate the red gear.
2-9: One Step at a Time
Screenshot
Dig as indicated in green, timing it between ooze streams. This should collect the top two ducks.
Now dig both areas indicated in red, timing it between ooze streams. This should collect the last duck.
Finally, dig as indicated in blue, again between streams.
2-10: Make a Wave
Screenshot
The collectible is circled in yellow.
Dig as indicated in green.
Once the water has settled, dig as indicated in red, which should collect the left duck.
Dig as indicated in blue.
Now dig as indicated in purple which should collect the last two ducks.
2-11: Double Jump
Screenshot
Timing it between ooze sprays, dig as indicated in green to collect the left and bottom ducks.
Again watching for the ooze, dig as indicated in red to collect the last duck.
2-12: Bunker
Screenshot
Dig as indicated in green to collect the top duck.
Now dig as indicated in red to collect the lower right duck.
After most of the water has drained, dig as indicated in blue to collect the last duck.
If you need more time, dig below the upper right pool to activate the red gear and block the ooze.
2-13: Level It Out
Screenshot
Dig as indicated in green.
After most of the water has gone past, dig as indicated in red to collect the bottom duck.
When the top duck has been collected, dig as indicated in blue to collect the last duck.
Immediately dig as indicated in purple to activate the red gear.
2-14: Mind the Gap
Screenshot
The collectible is circled in yellow.
Dig as indicated in green, which should collect all three ducks.
Now dig as indicated in red to destroy all the plants.
Once all the poison has drained, dig both areas indicated in blue.
2-15: Boomerang
Screenshot
The collectible is circled in yellow.
Dig as indicated in green, which should collect all three ducks.
You may have to adjust the angle of the lower left corner to get the water to bounce up into the drain.
2-16: Stop, Drop, and Catch
Screenshot
Dig both areas indicated in green.
Now dig both areas indicated in red, which should collect the top duck.
Dig all areas indicated in blue.
Timing it between poison streams, dig both areas in purple. This should collect the last two ducks.
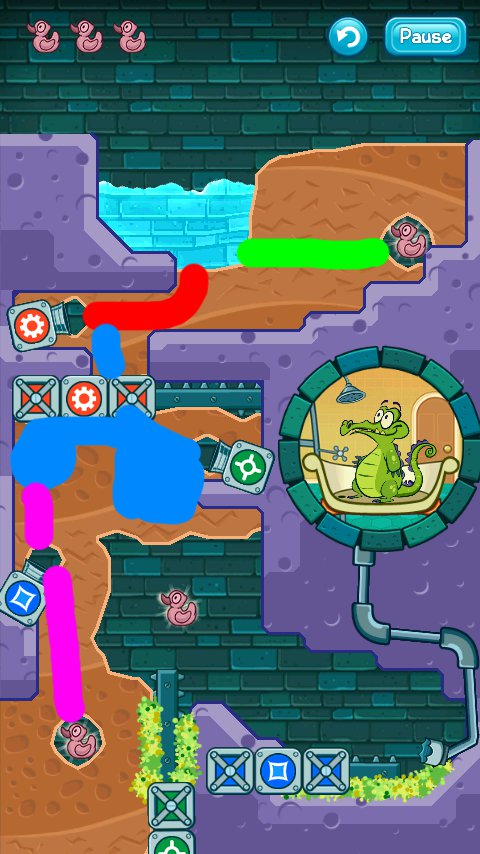
2-17: Conversion
Screenshot
Dig as indicated in green, which should collect the left duck.
Once the water has settled, dig as indicated in red.
After all the plants are destroyed, dig as indicated in blue.
Now dig as indicated in purple, then drop the pool of water to collect the last two ducks.
The trickiest angle is the one in the upper right. After the curve, it needs to come straight down.
2-18: The Unstoppable Ooze
Screenshot
The composite image above is cropped for height.
Dig all areas indicated in green.
Now dig as indicated in red, which should collect all ducks.
If any of the flung ooze gets caught in the dirt, attempt to steer it toward a corner until enough water goes down the drain.
2-19: Orbit
Screenshot
The top duck will automatically be collected.
Dig as indicated in green.
Once all the plants are destroyed and all the water has been sprayed, dig as indicated in red.
After all the poison has drained, dig all areas indicated in blue. This will collect the last two ducks once the water comes back down.
2-20: Half and Half
Screenshot
The collectible is circled in yellow.
Dig as indicated in green, which will collect the top duck.
Now dig as indicated in red to convert half the water.
Dig as indicated in blue to activate the red gear.
Once all the plants have been destroyed, dig as indicated in purple to drain all the poison.
Dig all areas indicated in grey to collect the last two ducks.
Section 3: "Under Pressure"
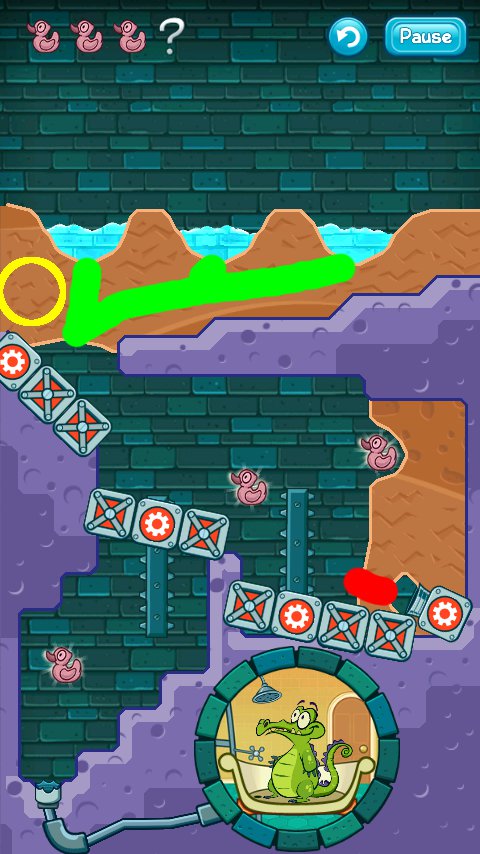
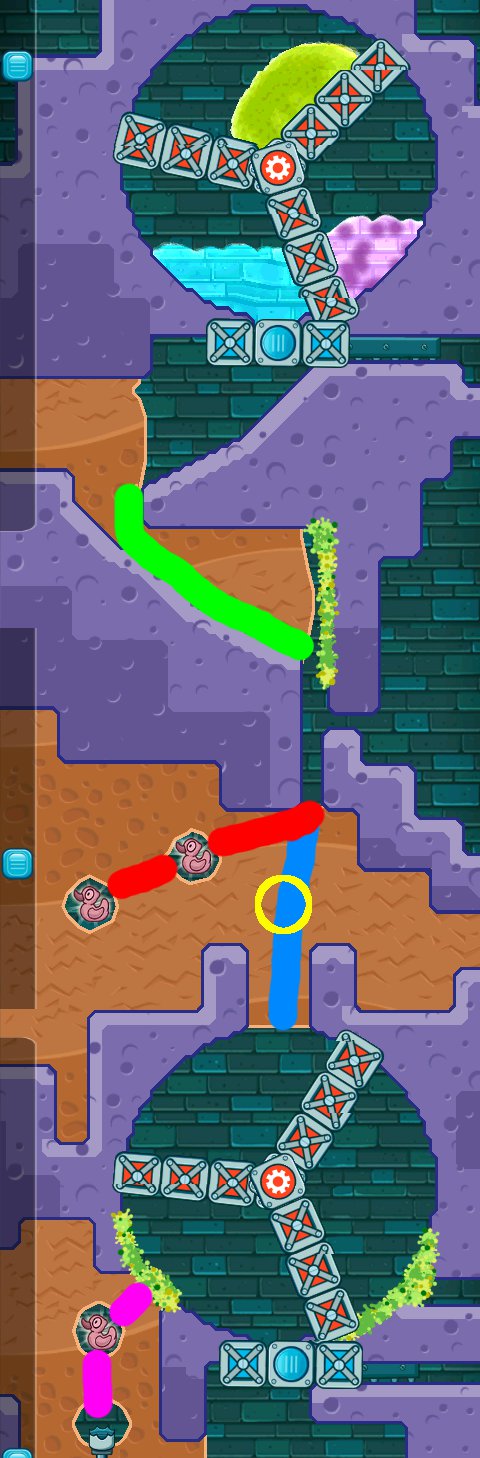
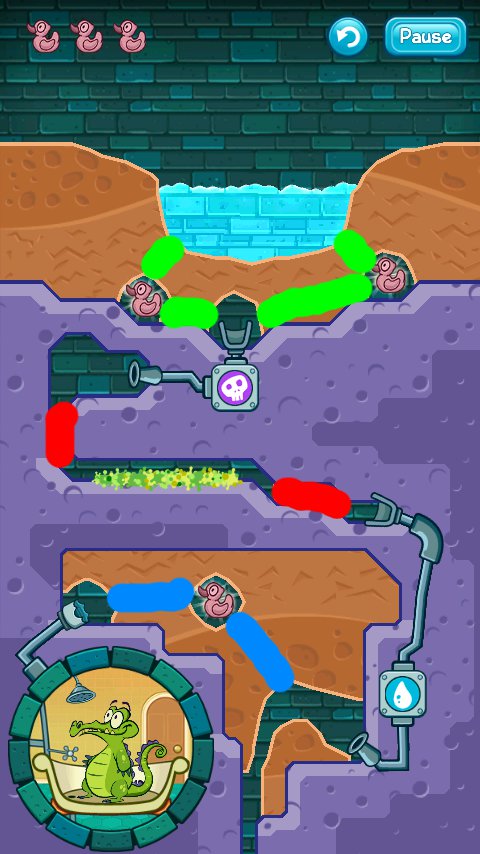
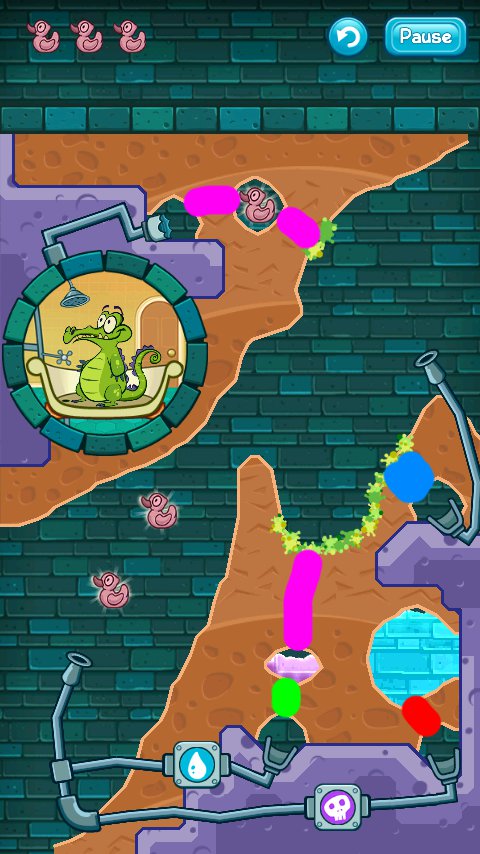
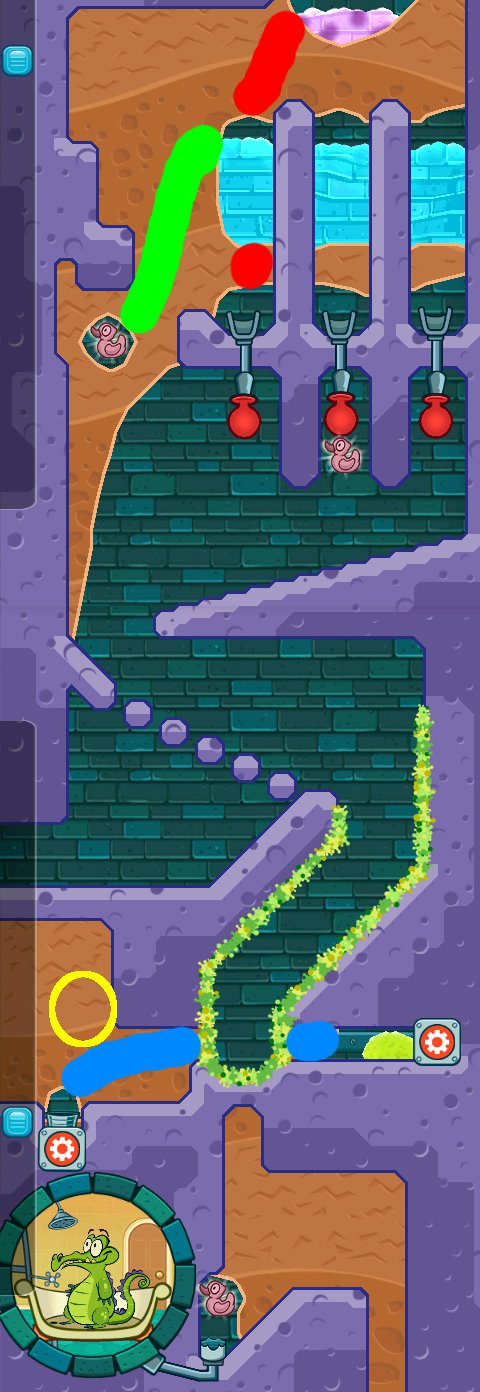
3-1: Mine Field
Screenshot
Dig as indicated in green.
Once the top duck's been collected, dig as indicated in red.
When the lower right duck is done, dig as indicated in blue.
After the last duck has been collected, dig as indicated in purple.
3-2: Around the Bombs
Screenshot
Dig as indicated in green.
Once the water has settled, dig all the areas indicated in red to collect the top two ducks.
Now dig as indicated in blue to collect the last duck.
3-3: Ooze Fall
Screenshot
The collectible is circled in yellow.
Dig as indicated in green and activate the spray to collect the left duck.
Now dig all areas indicated in red.
Activate the spray when the ooze is not falling to collect the last two ducks.
3-4: Two is Better Than One
Screenshot
Activate the right spray to collect the left duck.
Now activate the left spray to collect the right duck.
Dig as indicated in green and activate both sprays simultaneously to collect the final duck.
Now dig as indicated in red and activate both sprays.
3-5: Bomb Chain
Screenshot
The collectible is circled in yellow.
Dig as indicated in green. Once the water has settled, dig down to the bomb to collect the top duck.
As soon as the bombs go off, dig as indicated in red to collect the last two ducks.
3-6: Interruption
Screenshot
The composite image has been cropped for height in the screenshot above.
Dig as indicated in green.
Now dig as indicated in red.
Once the poison has settled, dig as indicated in blue.
If there is poison caught between the red bars (likely), dig a small path for it to the plants to dissolve.
Dig both areas indicated in purple.
Now dig as indicated in grey, but only release the water to collect the top two ducks after most of the water has fallen.
Dig below the water pool to collect the last duck.
Once the last duck is done, dig as indicated in white.
3-7: Apply Pressure
Screenshot
Dig as indicated in green.
Now dig as indicated in red, which should collect the right duck.
Dig as indicated in blue, which should collect the bottom duck.
Now dig to activate the red gear, then dig to activate the green gear. This should collect the last duck.
3-8: Let's Play Catch
Screenshot
The collectible is circled in yellow.
Dig as indicated in green.
Activate the spray when the red bars are not over it, which should collect the top duck.
Continue to spray which should collect the left duck.
While you were spraying, some of the water should have ended up in the red bars to collect the final duck.
Continue to spray as necessary until enough water has gone down the drain.
3-9: On Again, Off Again
Screenshot
Dig as indicated in green.
Once the red gear is activated, dig as indicated in red.
After the top duck has been collected, dig as indicated in blue.
When the middle duck has been collected, dig as indicated in purple.
Once the water has bypassed the green bar, dig both areas indicated in grey. This should collect the last duck.
3-10: River of Ooze
Screenshot
Timing it between the sprays of ooze, dig as indicated in green. This should collect the top two ducks.
Again keeping watch of the sprays, release the other two pools of water.
Eventually you will collect the last duck and get enough water down the drain.
3-11: Rat in a Maze
Screenshot
Dig as indicated in green.
Once both bombs have gone off, dig as indicated in red.
When that bomb has gone off, dig as indicated in blue. This should collect the left duck and activate the red gear.
After the red bar is all the way up, dig as indicated in purple.
Once both bombs have gone off, dig as indicated in grey. This should collect the middle duck.
Dig both areas indicated in white.
After both bombs have gone off, dig all areas indicated in yellow. This should collect the last duck.
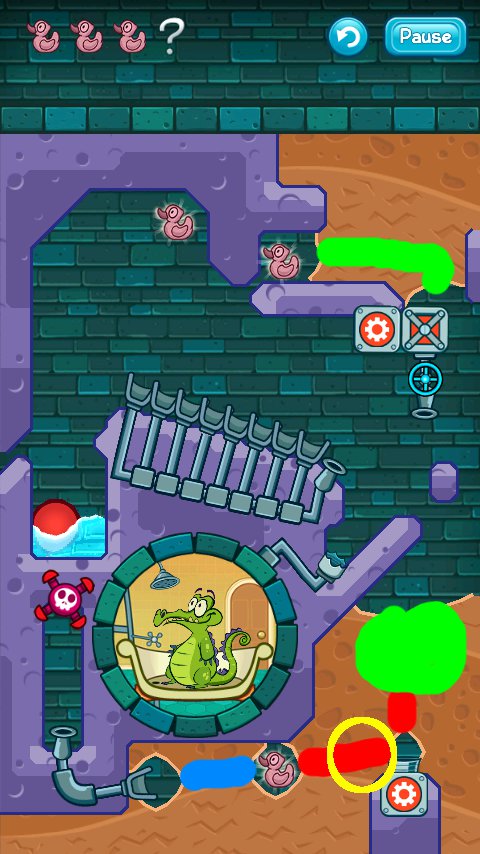
3-12: Bomb It Up!
Screenshot
The composite image has been cropped for height.
The collectible is circled in yellow.
Dig as indicated in green to drain the poison.
Now dig all areas in red, which should collect the bottom duck.
Dig all areas indicated in blue.
Once the water has settled, dig all areas indicated in purple.
Again, when the water has settled, dig all areas in grey. This should collect the last two ducks.
3-13: Redirection
Screenshot
Dig both areas indicated in green to collect the left and right ducks.
Position the green bar as indicated in red by using the lower left spray.
Now position the red bar as indicated in blue by using the lower right spray.
Dig as indicated in purple to collect the last duck.
3-14: Blow the Roof Off!
Screenshot
Dig as indicated in green to collect the right duck. Fill the ditch about halfway.
Now dig as indicated in red, which should collect the top duck and activate the red gear.
After the bombs have gone off, dig as indicated in blue. The bottom duck should have been collected by now by wayward drops.
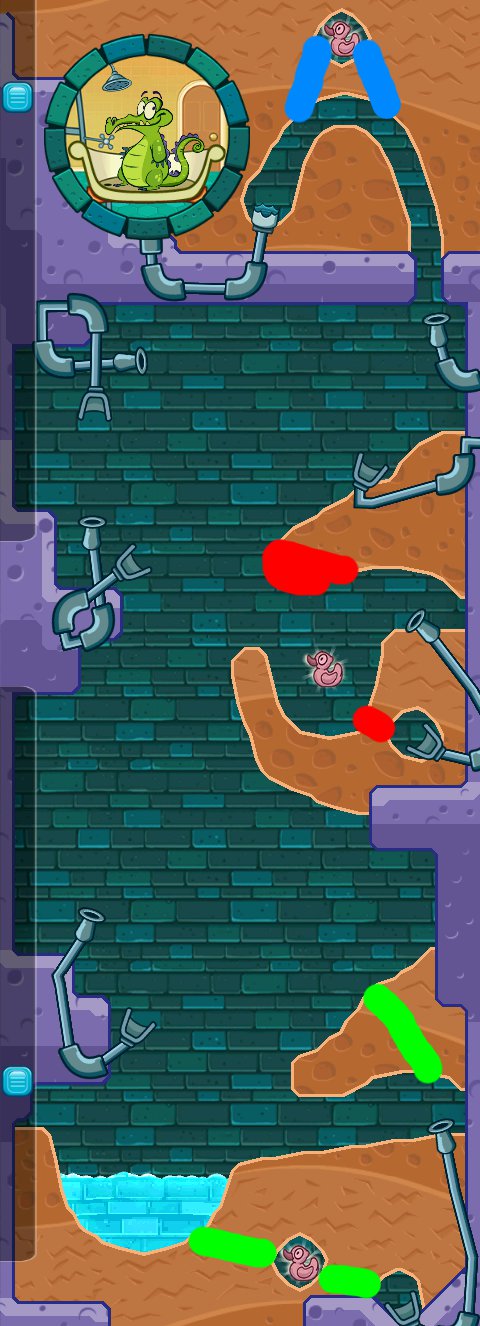
3-15: Going Down?
Screenshot
The composite image in the screenshot above has been cropped for height.
The collectible is circled in yellow.
Dig as indicated in green to activate the green gear.
Now dig as indicated in red (you can do little bits at a time) to direct the ooze so it's always on a red gear activator.
As the red bar falls, you will collect all three ducks.
3-16: Water Temple
Screenshot
Activate the spray to collect the left duck.
Dig as indicated in green and activate the spray to trigger the green gear.
Now dig as indicated in red and activate the spray to fill the space and trigger the red gear.
Dig as indicated in blue to collect the upper right duck.
Now dig both areas indicated in purple to deactivate the red gear and collect the last duck.
3-17: Back and Forth
Screenshot
The composite image in the screenshot above has been cropped for height, though it's still very tall.
Wait for the ooze to break through the dirt, then dig as indicated in green to activate the red gear.
Do the same for the green and purple gears so the ooze ends up activating the blue gear.
If any of the ooze falls off the bars other than where its supposed to, you will most likely have to restart.
Now dig as indicated in purple to get the water to fall along the path by the activators to collect all three ducks.
You may have to adjust the digging to properly direct the water.
3-18: Untimely Growth
Screenshot
The collectible is circled in yellow.
Dig as indicated in green to build the lower plants up.
Now dig as indicated in red to activate the red gear.
While waiting for the red bars to retract, dig all areas indicated in purple. This should collect all three ducks.
3-19:Moving Target
Screenshot
Activate the spray to launch the water.
Dig as indicated in green to divide the water.
After the water has settled, dig below each pool to collect all the ducks.
Now dig as indicated in red to prepare to drop the water.
As the drain falls under each pool, dig under it to get water down the drain.
3-20: Aqua Portals
Screenshot
Activate the water spray to move the receiver over the poison (bottom) spout.
Dig as indicated in green and wait for all the top plants to be killed.
Now dig as indicated in red and once the middle bunch of plants are killed, dig under the little puddle to activate the blue gear.
Activate the water spray to move the receiver over the water (top) spout, then dig as indicated in blue.
Once all the ducks are collected, dig as indicated in purple.
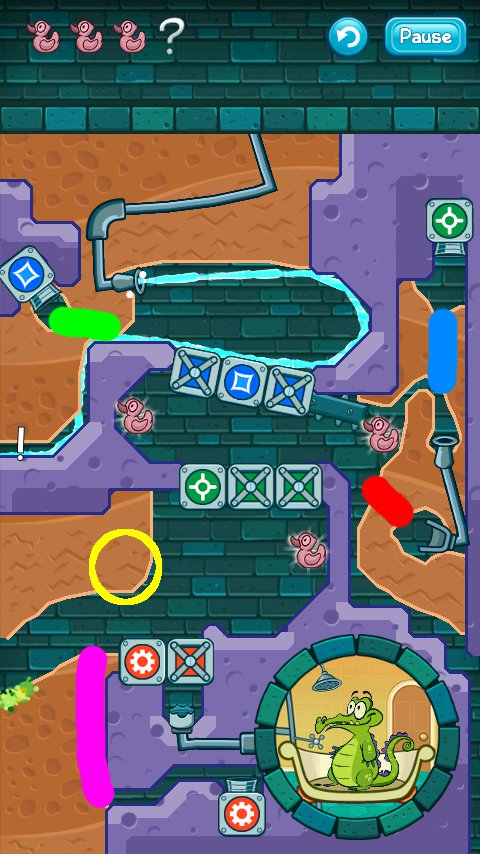
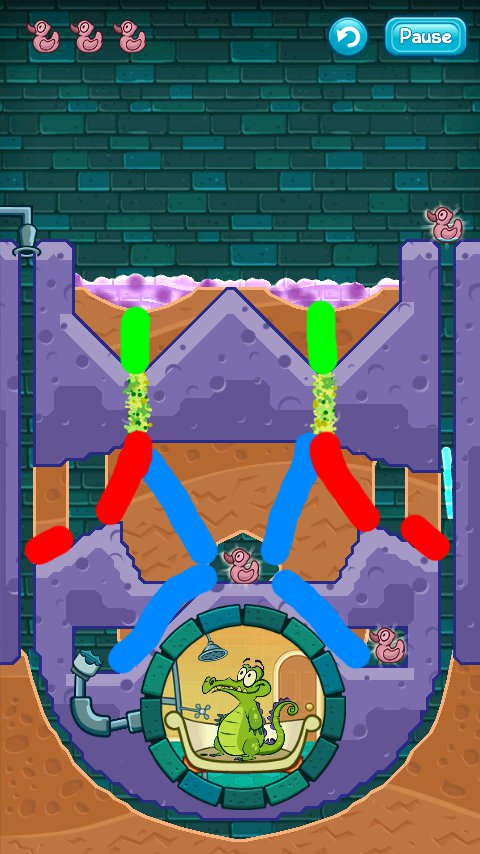
Section 4: "Sink or Swim"
4-1: Logic Gates
Screenshot
The collectible is circled in yellow.
Lower the blue bar.
Once the top duck has been collected, dig as indicated in green.
When the lower right duck has been collected, raise the blue bar.
After the last duck has been collected, dig as indicated in red.
4-2: Momentum 101
Screenshot
Dig as indicated in green.
Raise the bottom bar and move the top bar to the right. This should collect the left duck and activate the red gear.
As soon as the right duck has been collected, dig as indicated in red. this should collect the last duck.
4-3: Water Golf
Screenshot
Turn the blue bar to the right so the water goes into the upper right receiver. This should collect the right duck.
Dig as indicated in green, which should collect the top duck.
Now dig as indicated in red and raise the blue bar to the left, which should collect the last duck.
You may need to move the bar back and forth to get the water to the proper place until enough of it has gone up the drain.
4-4: Bridge Builder
Screenshot
The collectible is circled in yellow.
Activate the upper water spray (top right) to collect the bottom duck.
Now activate the righthand water spray to collect the top duck and build the plants all the way up to the spray.
Activate the ooze spray (top left) just enough to turn the plants into stone. If you have leftover ooze in the dirt to the right, neutralize it with water.
Dig as indicated in green and activate the top water spray to collect the last duck.
4-5: Fling Shot
Screenshot
Activate the upper water spray (right) until the top duck is collected.
Move the blue bar to the position indicated in green and, if necessary, activate the upper water spray until the middle duck is collected.
Activate the ooze spray to send globs of it to kill all the plants. If any ooze is remaining, activate the lower water spray to dissolve it.
Dig as indicated in red and activate the lower water spray, which should collect the bottom duck.
4-6: Ricochet
Screenshot
As is, you should collect the top duck and activate the blue gear.
Move the blue bar to the position indicated in green to acquire the middle duck and activate the red gear.
Now move the blue bar to the position indicated in red to acquire the last duck and activate the green gear.
Move the blue bar back to its original position and dig as indicated in blue.
4-7: Water Pump
Screenshot
Activate the water (right) spray until the ditch is filled. This should collect the bottom duck.
Dig as indicated in green and move the upper blue bar to the left, which should collect the other two ducks, though you may need to repeat. This will likely set off the left two bombs.
Once all the ducks are collected, move the upper blue bar to the right and use the poison spray to convert all the water.
Dig as indicated in red and move the upper bar back to the left.
Repeat as necessary until all the plants are destroyed.
Now dig as indicated in blue and move the lower blue bar right to drain the poison.
Once all the poison is drained, dig as indicated in purple and move the upper bar to the right and lower bar to the left.
Refill the ditch, then move the upper bar left. Repeat as necessary until enough water has gone down the drain.
4-8: Nice Clogs
Screenshot
As is, you should collect the bottom duck.
Raise the blue bar to collect the right duck.
Now lower the bar to collect the last duck. While waiting for this, dig as indicated in green.
As soon as the last duck is done, raise the bar.
4-9: Curse of the Algae Beard
Screenshot
The collectible is circled in yellow.
Hold the blue bar up to get the water in the bottom receiver. This should collect the top duck.
Once the red gear is activated, wait until the middle duck is collected.
Now dig both areas indicated in green. This should collect the last duck.
Hold the blue bar up to get the water into the drain.
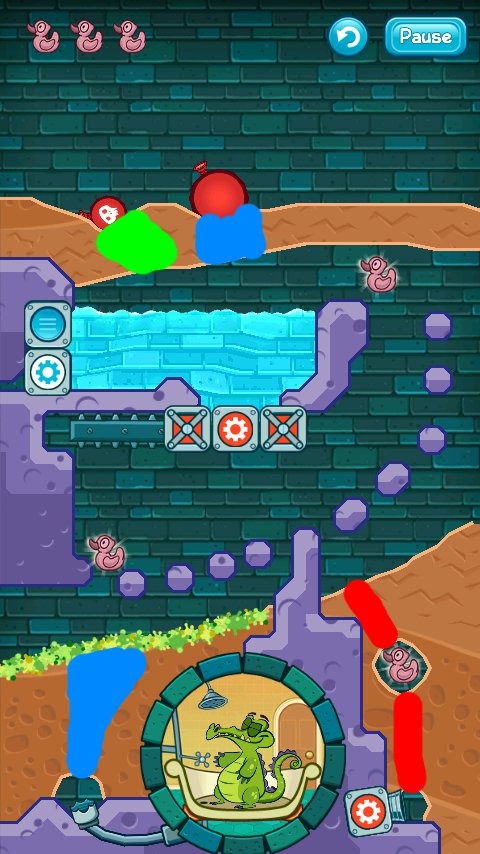
4-10: Sliders
Screenshot
The blue bars have been numbered on the screenshot above for convenience.
It will likely take two hands (or nimble fingers) to tri-duck this level.
Dig under the water to collect the top duck.
As soon as enough water has passed over to collect the right duck, lift bar 1.
Lift bar 3 and drag bar 2 to the right only long enough to collect the last duck, then drag it back to the left.
You should be able to drop bar 1 by now, so quickly lift bar 4.
4-11: They've Got Chemistry
Screenshot
Dig as indicated in green.
Now dig as indicated in red and before the red gear is activated, dig as indicated in blue.
All three ducks should be collected from this.
4-12: Skeet Shooting
This level takes some precision 'shooting' to tri-duck, so several attempts may be needed.
Point the middle spray directly at the middle duck and activate the water spray (right) just enough to collect it.
Now break through the upper left rock by activating the poison (middle) for a short time then quickly activating the ooze for a short time.
Activate the water spray to collect the upper left duck.
Point the middle spray to the far right and this time activate the poison and ooze sprays simultaneously for a short time to break through.
Activate the water spray to collect the last duck.
Point the middle spray to the far left and spray a little bit of ooze, then poison in the ditch to the left.
Drain any remaining ooze/poison to the left off screen.
Now spray water down the drain.
4-13: Sprinkler
Screenshot
Dig as indicated in green, then drag the blue bar to the right.
Once the upper left duck has been collected, dig as indicated in red, which will collect the bottom duck.
Dig as indicated in green.
Until the upper right duck has been collected, drag the blue bar to the left when the spout is pointed to the right or upper left.
4-14: Rhythm Nirvana
When the water sprays, drag the blue bar down to collect the top duck. When ooze sprays, drag the bar back up.
After the first duck is done, drag the bar below the second level to allow water to collect the middle duck. If ooze gets through the receiver, allow it to drain down.
When the middle duck is done, drag the bar to the middle level to bounce the water into the receiver.
As the water falls down the bottom layer, drag the bar all the way down to collect the last duck.
Repeat as necessary until enough water has gone down the drain.
4-15: Figure Eight
Screenshot
The collectible is circled in yellow.
Dig as indicated in green which collects the left duck.
Immediately dig both areas indicated in red to direct the ooze.
Raise the blue bar and dig both areas indicated in blue, which should collect the last two ducks.
4-16: Create and Destroy
After the initial stream of poison, activate both water sprays on the side to build the plants across the openings above.
Now activate the water spray above to collect the middle duck and continue to spray until the ditch is full. Ooze should have turned the plants to stone.
The bombs going off should have collected the top duck. If not, you'll need to restart.
Activate the top water spray to collect the final duck.
4-17: The Grid
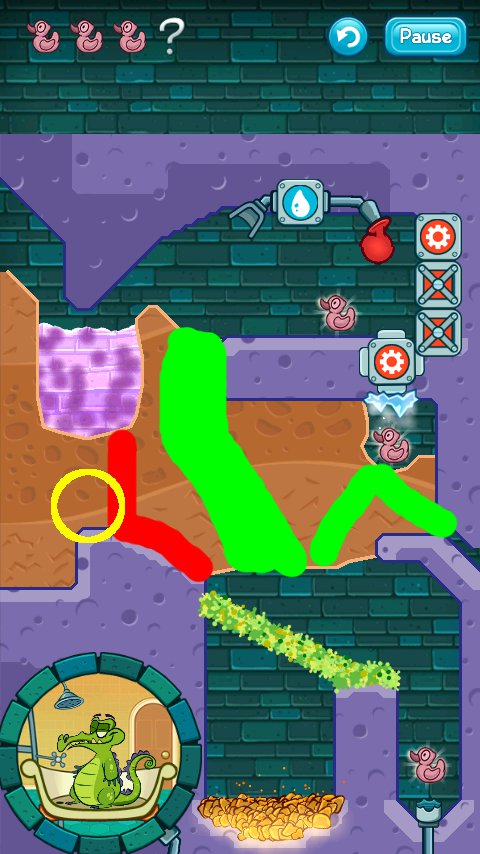
Screenshot
The collectible is circled in yellow.
Dig as indicated in green to detour the poison streams.
Now dig as indicated in red to collect the upper left duck.
Dig as indicated in blue to collect the upper right duck.
Now dig as indicated in purple to collect the last duck.
Once all the ducks are done, dig as indicated in grey.
The exact angles of the digging may have to be adjusted to get the water to bounce the way you want.
4-18: Under the Radar
Screenshot
Dig as indicated in green.
Now dig as indicated in red. Enough water should spill over on either side to collect the top two ducks.
When the bomb 'arm' reaches the down position, dig as indicated in blue. This should collect the last duck.
Dig as indicated in purple.
4-19: Dangerous Slope
Screenshot
Drag the spray to the left and activate the poison (top) spray to fill the ditch halfway only.
When the red gates close, drag the blue bar left.
Repeat as necessary until all the plants below the blue bar are destroyed.
Drag the spray to the right and dig as indicated in green.
Activate the water spray, which should collect the right two ducks.
Drag the blue bar to the right. Just before the red gates open, activate the water spray to collect the last duck.
Repeat as necessary until enough water has gone down the drain.
4-20: Rinse Cycle
Screenshot
The composite image of this especially tall level has been cropped at the top and bottom for height in the screenshot above.
The collectible is circled in yellow.
Dig as indicated in green.
Drag the top blue bar to the right to let out a very small amount of ooze to kill some of the top plants. Any leftovers will need to be drained to the right.
Dig as indicated in red and let out enough water to collect the top two ducks.
Once the ducks are done, dig as indicated in blue.
Drag the bottom bar to the right and let out a small amount of ooze.
Repeat as necessary until all of the lower right plants are destroyed.
Drag the bottom bar back to the left and let out some poison.
Repeast as necessary until all the lower left plants are destroyed. Drain any remaining poison out the bottom.
Dig as indicated in purple and release all the water left to collect the last duck and go down the drain.
Posted by: Kyh |
January 28, 2012 10:43 PM
|
January 28, 2012 10:43 PM
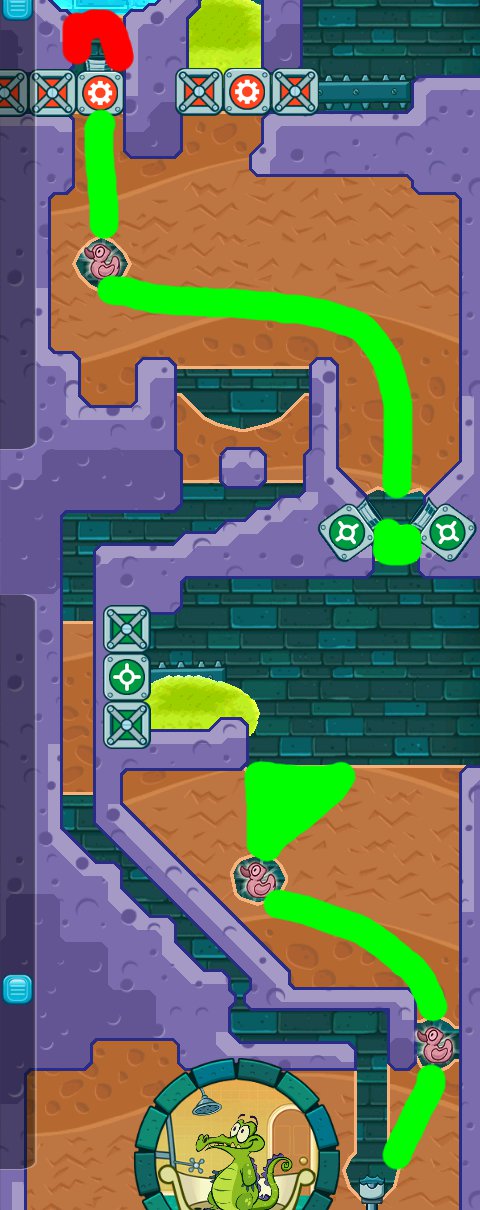
Where's My Water Walkthrough
(Sections 5-7 and Bonus Levels)
Section 5: "Change is Good"
5-1: Don't Fear the Poison
Screenshot
Dig as indicated in green, which should collect the top two ducks.
Once the ducks are done, dig as indicated in red to allow the poison to get to the water converter.
Now dig as indicated in blue, which should collect the last duck.
5-2: Recycling Works
Screenshot
The collectible is circled in yellow.
Drag the blue bar to the right. After the ooze converts to water, it should collect the bottom duck.
Once the duck is done, drag the bar to the left which should collect the other two ducks.
5-3: Ouch, My Eye!
Screenshot
Dig as indicated in green, which should collect the top two ducks.
Briefly activate both spray simultaneously to create a hole in the rock above.
If you have leftover ooze or poison, you'll need to bypass it to the left to go through the water converter.
Dig as indicated in red to collect the last duck.
Once the duck is done, dig as indicated in blue.
5-4: Test Tube
Screenshot
After the two top ducks are collected, change the spout to poison and dig as indicated in green.
When the upper plants are destroyed, dig as indicated in red and change the spout to ooze.
After the ooze has converted the lower plants to rock, change the spout to water.
Once all the ooze has drained, dig as indicated in blue, which should collect the last duck.
5-5: Bottleneck
Screenshot
The composite image has been cropped for height.
The collectible is circled in yellow.
Dig as indicated in green, which should collect the top duck.
Now dig both areas indicated in red.
Once the lower left duck has been collected, dig as indicated in blue.
When the last duck has been collected, dig as indicated in purple.
5-6: Clear and Shoot
Screenshot
Dig as indicated in green to destroy all the plants. Dig lower as needed until all the plants are gone.
Once the poison you've released is drained, dig as indicated in red.
Now dig as indicated in blue, which should collect all the ducks.
5-7: Double Launch
Screenshot
Dig as indicated in green. This should collect the bottom two ducks.
Now dig as indicated in red. As soon as the bottom plants are destroyed, dig as indicated in blue to destroy the top bunch.
Finally, dig as indicated in purple, which will convert the poison and collect the last duck.
5-8: One Way Street
Screenshot
The collectible is circled in yellow.
Dig as indicated in green, which should collect the top two ducks.
Once the top plants have been destroyed, dig as indicated in red.
After the bottom plants have been destroyed and all the poison has drained, dig both areas indicated in blue. This should collect the last duck.
When the last duck is done, dig as indicated in purple to get the water down the drain.
5-9: It Takes Two
Screenshot
Dig as indicated in green.
Activate the water (righthand) spray, which should collect the top and bottom ducks as well as activate the red gear.
Now activate both sprays simultaneously to destory the plants and fill the ditch in the middle.
Once full, dig as indicated in red to convert the poison.
After the last duck is collected, dig as indicated in blue.
5-10: Blast Miner
Screenshot
Change the spray to water.
Activate the top spray to collect the top duck.
Now change the spray to poison and activate it to create a little puddle in the ditch.
Change the spray to ooze and release small drops to blast through the rocks. If you have any remaining poison/ooze, drain it off to the right.
Again change the spray to water and dig as indicated in green.
Activate the top spray to collect the bottom duck, set off the bomb and activate the red gear.
Dig as indicated in red and activate the bottom spray to collect the last duck.
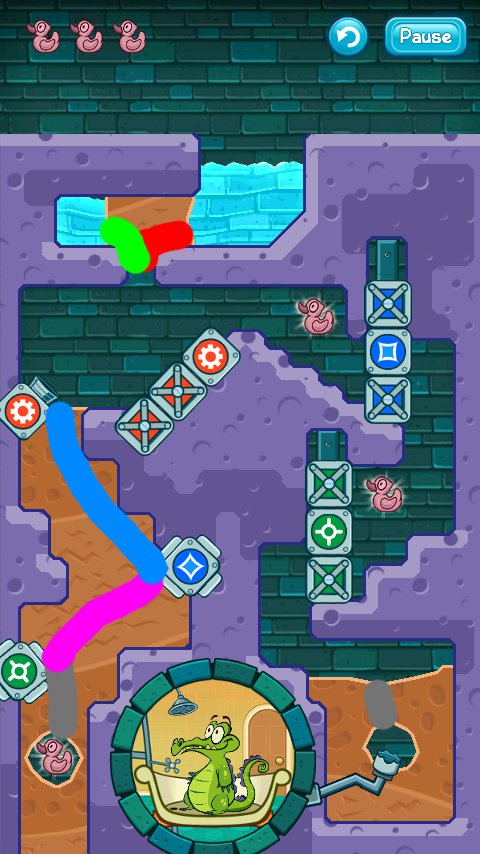
5-11: Catch 'em All!
Screenshot
Throughout the level, drag the receiver on the blue bar back and forth underneath the opening to catch the poison and ooze.
Dig as indicated in green to collect all three ducks.
If any poison/ooze gets caught on top of the blue bar instead of in the receiver, fling it off the side of the screen by quickly moving the bar in the appropriate direction.
5-12: Scaffolding
Screenshot
The collectible is circled in yellow.
Drag both blue bars to the left.
Dig as indicated in green. After the ooze has been launched, drag the bottom blue bar to the right to have the remaining ooze activate the red gear.
When the water starts to come out the spout, drag the top blue bar to the right just long enough to collect the lower right duck, then move the bar back to the left.
After the top duck has been collected, dig as indicated in red to collect the last duck.
5-13: Get on the Train
Screenshot
Dig as indicated in green, which should collect the bottom duck.
While the water is working its way around (and collecting the far left duck), change the converter to poison.
Once all the water has been converted and the plants have been destroyed, dig as indicated in red.
While the poison is working its way around, change the converter to water and dig as indicated in blue. The last duck should be collected from here.
5-14: Double Dipping
Screenshot
The collectible is circled in yellow.
Dig both areas indicated in green, then drag the blue bar down.
Once all the plants are destroyed, dig as indicated in red which should collect the top duck.
After all the poison has been converted, dig both areas indicated in blue to collect the last two ducks and activate the red gear.
5-15: Water Gate
Screenshot
Dig all areas in green to separate the water. This should collect the bottom duck.
Drag the spray to the right and dig as indicated in red to collect the top duck.
Now drag the spray to the left and change the converter to ooze.
Dig as indicated in blue to activate the red gear. This should collect the last duck.
Change the converter to poison and drag the spray to the middle.
Dig as indicated in purple to activate the blue gear and cause the water to go down the drain.
5-16: Ooze is Alright
Screenshot
When the red bar is at the top, dig as indicated in green to deactivate the red gear and collect the bottom two ducks.
Once all the ooze has been converted (and the last duck collected), dig as indicated in red to get the water to the drain.
5-17: Pick Your Poison
Screenshot
The collectible is circled in yellow.
Dig as indicated in green, which should collect the left two ducks.
Once the water has settled, dig as indicated in red. This should collect the last duck, destroy all the plants and activate the red gear.
After all the ooze has drained, dig both areas indicated in blue to get water down the drain.
This level can also be completed having half the water be converted to poison instead, which won't activate the red gear. Or you can do a combination of the two which can be more challenging.
5-18: Across the Bridge
Screenshot
Dig as indicated in green to collect the bottom duck.
Lower the right hand blue bar and activate the spray to fill the purple ditch with poison until the purple gear is activated.
Raise both blue bars and dig as indicated in red.
Activate the spray just until the green gear is activated.
Dig both areas indicated in blue, which should collect the last two ducks.
5-19: The Pot Boileth Over
Screenshot
Activate the spray (which will collect the bottom duck) until there is poison above the green gear activator.
Dig as indicated in green and activate the spray until the top duck is collected.
Now dig as indicated in red. Once the red bar reaches the top, dig as indicated in blue to collect the last duck.
5-20: Swiss Army Knife
Screenshot
Dig both areas as indicated in green.
Once the poison has settled, dig as indicated in red.
When the red bars are up, dig as indicated in blue.
After all the poison has gone through the spout, dig under the small amount of poison activating the red gear so the bars will go down.
Once the bars are down, dig as indicated in purple, which should collect the bottom duck.
After all the ooze has been converted, dig both areas indicated in yellow. This should collect the middle duck.
When the ditch above the red bars is full, dig as indicated in grey. This should collect the last duck.
Section 6: "Boiling Point"
6-1: Hot and Cold
Screenshot
Dig as indicated in green to collect the first duck and convert the water into steam.
Now dig both areas indicated in red to collect the other two ducks.
Finally dig a path to the drain.
6-2: Steam Cleaning
Screenshot
The collectible is circled in yellow.
Dig as indicated in green to destroy the plants and convert the poison to steam.
Now dig as indicated in red to convert the steam to water and collect the first two ducks.
Once both ducks have been collected, dig as indicated in blue to collect the final duck and go down the drain.
6-3: Stop Up Top
Screenshot
Dig as indicated in green to create a space for steam.
Now dig as indicated in red, which should collect the first two ducks.
Once the steam has gathered, dig both areas in blue which will collect the last duck and go down the drain.
6-4: Rise and Fall
Screenshot
The collectible is circled in yellow.
Dig as indicated in green. It's important where you break through on top!
Keept an eye on how much water goes towards the drain and, when enough has fallen, dig as indicated in red to collect the last duck.
6-5: A Cleaner Approach
Screenshot
Pull the blue bar up and drag the spout down.
Activate the spray to destroy both sets of plants.
Pull the blue bar back down and drag the spout up to the middle.
Activate the spray to collect the bottom two ducks.
Dig as indicated in green and pull the spout to the top.
Now activate the spray to collect the final duck.
6-6: Catch and Release
Screenshot
Swing the blue bar to the position indicated in green.
Activate the spray to fill the area under the bar with steam.
Now swing the blue bar downward and around to the position indicated in red.
Wait until the steam has been converted to water, then lower the bar to collect the middle duck.
Swing the blue bar upward a little to fling water to the top duck.
Wait until the remaining water collects on the bar again, then swing the bar upward and around to the green position to collect the third duck.
Repeat until all the ducks are collected.
Dig as indicated in blue, then continue to repeat the steps until enough water goes down the drain.
6-7: Branches and Loops
Screenshot
The composite image has been cropped so as not to be too tall.
Dig as indicated in green.
Once the red gear is activated, dig as indicated in red, which should collect the first duck.
When the duck is done, dig as indicated in blue, which should collect the second duck.
Once that duck is done, dig as indicated in purple, which will collect the last duck.
6-8: Through the Bridge
Screenshot
The collectible is circled in yellow.
Dig as indicated in green.
Now dig as indicated in red. This will collect the first duck and (if there's enough steam overflow to the left) the second one too.
Activate the spray just enough to turn all the plant into rock.
Dig as indicated in blue, then dig the rest of the dirt at the top. This should collect the final duck.
6-9: Forks and Funnels
Screenshot
Dig both areas indicated in green.
Now dig both areas indicated in red.
After the steam has settled, dig to release one of the steam halves so it'll condense on the ice. This should collect the top duck (and sometimes the middle duck too).
Once the steam has fully converted, dig as indicated in blue.
Make sure all the poison has drained, then dig as indicated in purple.
Dig to release the other steam half. This will collect the other two ducks.
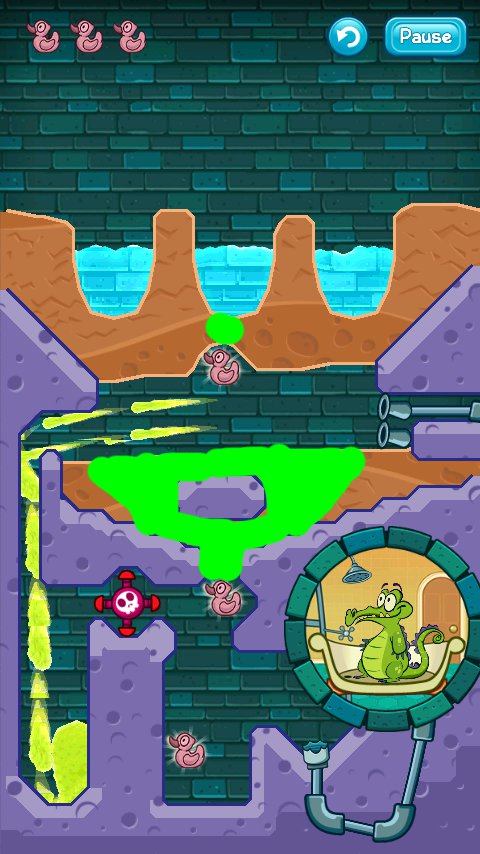
6-10: Below the BBQ
Screenshot
Dig as indicated in green and wait for the ooze to completely drain. This should collect the first duck. If the righthand duck is killed, restart.
Swing the blue bar to the left, then dig as indicated in red.
Once the second duck is collected, dig as indicated in blue, which should collect the last duck.
6-11: A Race to the Finish
Screenshot
Dig as indicated in green, then move the blue bar down. The bottom duck should be collected by the converted ooze.
Dig as indicated in red to collect the top duck. If more steam is needed, move the blue bar up and down again.
Once the second duck is done, dig as indicated in blue to activate the red gear. This should collect the last duck.
6-12: Revolving Door
Screenshot
The collectible is circled in yellow.
Dig as indicated in green.
Once all the plants are destroyed, dig both areas indicated in red, starting with the the bottom.
When all the poison has been converted to steam, dig as indicated in blue. The top two ducks should be collected through these steps.
Once the second duck is collected, dig as indicated in purple, which will collect the last duck.
6-13: Race the Ooze
Screenshot
Before the ooze reaches the bottom, dig as indicated in green. This should collect top duck.
Dig as indicated in red, which should collect the bottom duck.
Now dig as indicated in blue, which will collect the last duck.
6-14: Steam Powered
Screenshot
Change the spout to poison and activate the spray to destroy the plants.
Now change the spout to water and dig as indicated in green.
Activate the spray to collect the bottom duck.
Change the spout to steam and dig as indicated in red.
Activate the spray to trigger the red gear.
Dig as indicated in blue and change the spout back to water.
Activate the spray to collect the middle duck. If this does not also trigger the green gear, then dig under the puddle to convert it to steam.
Change the spout to steam and activate the spray to collect the last duck.
6-15: Ventilation Shaft
Screenshot
The collectible is circled in yellow.
Dig both areas indicated in green, which will collect the bottom two ducks.
Now dig as indicated in red. Some of the water should be left for later.
Once all the steam has passed above the green bars, dig under the leftover water to trigger the red gear.
Dig as indicated in blue which will collect the last duck.
6-16: Steam Quarantine
Screenshot
Dig as indicated in green.
Drag the spray to the right side of the red activator.
Activate the spray. This should turn on the red and green gears as well as collect the right hand duck.
Drag the spray to the left.
Dig as indicated in red and activate the spray. This should turn on the blue and green gears as well as collect the last two ducks.
Once all the water has collected on the red bar, drag the spray over the red activator and activate the spray.
6-17: Jumping Gigawatts!
Screenshot
Activate the spray just enough so that there's a little bit of ooze on the rock ditch in the center.
Dig all areas indicated in green. This should collect the top and bottom ducks.
When enough water has pooled where the bottom duck was, dig as indicated in red to collect the last duck.
Now dig as indicated in blue.
6-18: Up is Down
Screenshot
Dig as indicated in green.
Once the poison has settled, dig as indicated in red to get the red bar to rise.
Now dig below the main poison puddle to convert it to steam and activate the blue gear.
When most of the steam gathered below the red bar, dig as indicated in blue to activate the green bar.
Dig below the poison on the red activator to get the red bar to drop and convert the steam to water, which will collect all three ducks.
6-19: Through and Through
Screenshot
The collectible is circled in yellow.
Dig as indicated in green.
Once the steam has settled, dig all areas indicated in red. This should collect the top duck, and the water converted to poison should destroy the plants.
Release more steam as needed to destroy the plants.
Now dig as indicated in blue, which should collect the last two ducks. You may have to restart if the angle in the bottom part does not properly lead to the drain.
6-20: Steam Journey
Screenshot
Dig as indicated in green, going right to left (to ensure you activate the red gear). This collects the bottom duck.
Now dig as indicated in red and change the converter to poison.
Once the steam has gathered, dig as indicated in blue so that only some of the steam is converted and cycles through. Dig more as needed.
Once most of the plants are gone (it's okay to have a little left on the right side), change the converter to ooze.
Pass more steam through the converter, but only enough to destroy most of the hot coals (again, it's okay to have some leftover).
Dig as indicated in purple, which will collect the last two ducks.
Section 7: "Stretched Thin"
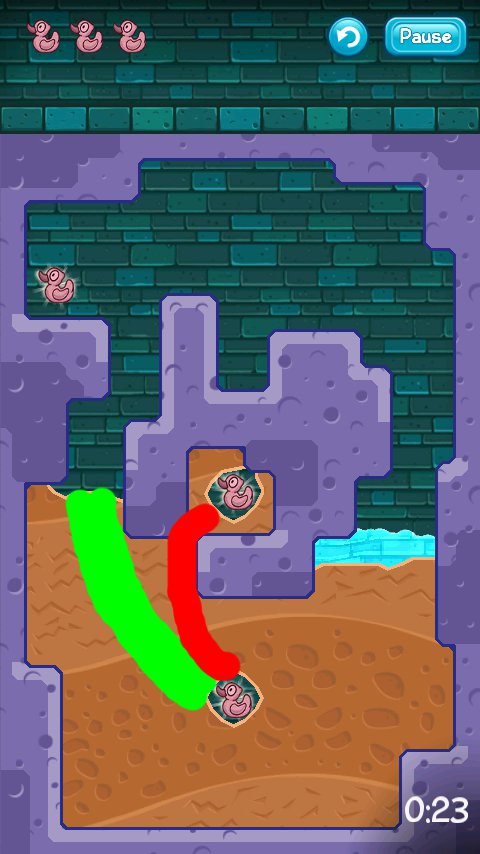
7-1: Drop and Pop!
Screenshot
Dig as indicated in green.
Pop the balloon.
7-2: Burst Your Bubble
Screenshot
Pop the poison balloon. If any poison gets stuck next to the water balloon, you have to restart.
Once all the poison has drained, dig as indicated in green.
Pop the water balloon.
7-3: Geyser
Activate the spray to get the balloon on either side.
Continue to spray as the gates open and shut to collect the third duck.
Pop the balloon.
7-4: Balloon Bridge
Screenshot
The collectible is circled in yellow.
Dig as indicated in green to collect the first duck and fill the balloon.
Once the balloon settles at the bottom, pop it to collect the second duck.
Dig as indicated in red.
7-5: Jagged Edge
Screenshot
Activate both sprays simultaneously to collect the top duck. The other two ducks will likely be collected with the excess water. Otherwise, use the left spray for the right duck and the right spray for the bottom duck.
Now activate each spray separately to create a path with the plants, using the green lines as a reference.
Release the balloon, and, once it's settled over the drain, pop it.
7-6: Down the Hatch
Screenshot
The collectible is circled in yellow.
Dig both areas indicated in green.
Now dig as indicated in red and, once the water balloon has settled, pop the poison balloon.
After the poison has drained, dig as indicated in blue, then pop the water balloon.
Two of the ducks will be collected from this. Before all the water drains, clear the dirt above the third duck so it can also be collected.
This level may take several tries. Two troublesome steps are getting the poison to completely drain and the timing for clearing the dirt to collect the third duck.
7-7: Trust Fall
Screenshot
Dig as indicated in green, timing it so the balloon doesn't get sprayed.
After the balloon has settled, pop it, then dig as indicated in red.
Now dig below the last balloon, timing it so the balloon doesn't get sprayed (when the spray is halfway down is about right).
Pop the balloon once it's reached the drain.
7-8: Waterbed
Screenshot
Dig as indicated in green, you should collect the first duck.
Once the water has settled, dig as indicated in red.
After the balloon has settled, dig both areas indicated in blue. You should collect the second duck.
Now pop the balloon, which should collect the third duck.
7-9: Up and Over
Screenshot
Activate the spray to fill the balloon.
Dig as indicated in green, which should collect the first duck.
While the balloon is in the air, dig as indicated in red.
Activate the spray to collect the second duck.
Dig as indicated in blue and pop the balloon, which should collect the last duck.
7-10: Mirror Image
Screenshot
The collectible is circled in yellow.
Dig as indicated in green. This is to leave a small amount to activate the red gear later.
Now dig as indicated in red. Only a small amount needs to activate the gears, most should go to collecting the ducks.
Dig to activate the red gear. Once the balloon reaches the bottom, dig to activate the purple gear.
Pop the balloon once it's over the drain.
7-11: Juicer
Screenshot
The composite image has been cropped so as not to be too tall.
Dig as indicated in green.
Timing it to not get squashed by the red bars, dig under the balloon. It should end up against the blue activator, which should collect the first duck.
Now dig under the balloon, timing it to not get squashed by the purple bars. Do the same for the green bars.
When the balloon is past the plants (area outlined in red), pop it, which should collect the other two ducks.
7-12: Hot Air Balloon
Screenshot
Activate the spray to fill the balloon with steam. Once it's released, continue to release steam just until water starts to fall on the middle duck.
Change the spray to water and activate it just enough to collect the second duck.
Dig as indicated in green.
Change the spray to poison and activate it to destroy the plants and trigger the red gear.
Now wait for the steam balloon to pop on the ice, collect the third duck and go down the drain.
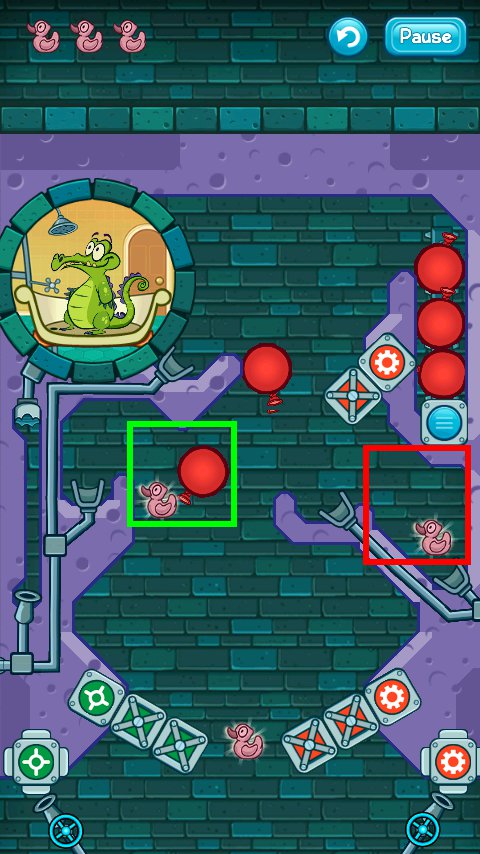
7-13: Bankshot
Screenshot
Because this level emulates a pinball machine, there is no step-by-step solution.
The area outlined in green is where you should pop a balloon to collect the left and bottom ducks.
The area outlined in red is where you should pop a balloon to collect the last duck. This is the trickly one to get too!
7-14: Pipe Organ
Screenshot
The collectible is circled in yellow.
Dig both areas indicated in green.
Activate the spray to fill the hole you dug, then dig as indicated in red, which should collect the bottom duck.
Now activate the spray to fill the ditch the balloon is in.
Dig as indicated in blue to activate the bomb and collect the upper left duck. The 'pipe organ' should collect the last duck.
Once the balloon has settled over the drain and the last duck collected, pop the balloon.
7-15: Balloon Journey
Screenshot
Swing the blue bar on the left about four times to reduce the amount of water in it. This should collect the top duck.
Dig as indicated in green, and once the poison balloon has dropped, pop it.
Now dig as indicated in red to destroy the plants and collect the bottom duck. If there's too much liquid, it may kill the left hand duck.
Now dig as indicated in blue. Once the water balloon has settled, pop it which should collect the last duck.
7-16: Be Careful Burning Bridges
Screenshot
The collectible is circled in yellow.
Dig both areas indicated in green.
Now dig as indicated in red. The opening at the bottom should be small so as not to destroy too much of the plant.
The middle duck should be collected from stray steam that condenses on the ice. The top duck should be collected from leftover water once the balloon has been filled.
Once the balloon has traveled down to the drain (hopefully skipping over the hole created by the poison), pop it to collect the last duck.
7-17: Might as Well Jump
Dig to allow the balloon to drop.
As it falls, activate the top spray. The first duck should be collected from the excess water when the balloon is agains the left wall.
Drag the bar in the middle up and left for the balloon to slide down. Once the balloon is over the middle point, drag the bar down and right.
When the balloon reaches the red gear area, activate the nearby spray to move the balloon left.
Drag the spray to the left and activate it to move the balloon again. This should also collect the middle duck.
Once the balloon settles over the drain, pop it to collect the last duck.
7-18: Booby Trap Staircase
Screenshot
Dig as indicated in green, then move the blue bar to the left.
Activate the spray to collect the bottom duck. When done, move the bottom bar back to the middle.
Again activate the spray to fill the ditch.
Once full, drag the bottom blue bar to the right.
When the red gear is activated, drag the top blue bar up.
While the poison balloon is sliding down, activate the spray to collect the top duck. After it's been collected, drag the top blue bar down.
Once the poison balloon has settled, pop it to destroy the plants.
When the poison has all drained, dig as indicated in red.
Drag the bottom blue bar back to the middle and refill the ditch.
Once full, drag the bottom blue bar to the right, and once the red gear is on, activate the spray to go down the drain.
7-19: Easily Swayed
Screenshot
Dig as indicated in green.
Activate the bottom spray to collect the first two ducks.
Dig as indicated in red, then activate the bottom spray to move the steam balloon to the right.
When the balloon rises to in front of the far right spray, activate it to move the balloon left.
Now when the balloon is below the upper middle spray, activate it to stear the balloon past the ice.
Once the balloon rises up the left, activate the top spray and allow the balloon to pop on the upper ice, which should also collect the last duck.
7-20: Balloon Gauntlet
Screenshot
The collectible is circled in yellow.
Dig as indicated in green to collect the first duck.
Now dig as indicated in red to create a poison balloon.
Dig as indicated in blue, then pop the poison balloon.
Now dig toward the lower right to get rid of any remaining poison.
Dig above the middle balloon, which should collect the second duck.
Once the balloon has settled at the bottom, dig a path to the drain and pop the balloon, which should collect the last duck.
If necessary, fill the third balloon and, once it's reached the bottom, pop it.
Bonus Levels
B-1: Hourglass
Dig under the water and have it fall straight down to collect the middle duck.
Tilt your phone to the right so the water falls to collect the right duck.
Now tilt your phone to the left to collect the last duck.
B-2: Round and Round
Screenshot
Rotate your phone to collect the top duck.
Dig as indicated in green and collect the bottom duck.
Now dig as indicated in red and rotate your phone to collect the last duck.
B-3: The Maze
Flip your phone to collect the bottom duck.
Tilt it to one side, then turn it right side up to get the water to the second level.
Turn your phone counterclockwise to collect the middle duck.
Now turn it to get the water to the outer level, then tilt it right to collect the last duck.
B-4: Golden Ratio
Screenshot
Rotate your phone to get the water through the spout. Collect the lower right duck when your water comes out.
Now tilt to activate the red gear and dig as indicated in green.
Collect the top duck, then head for the second spout.
Dig as indicated in red and collect the last duck.
B-5: Tread Carefully
Tilt your phone to the left to collect the bottom duck.
Gather the water in the nearby ditch, then quickly flip your phone to collect the middle duck.
Now tilt your phone clockwise to collect the last duck.
Setting off a bomb does not necessarily mean you have to restart.
B-6: Mouse Ears
Rotate your phone clockwise to have the ooze kill all the plants.
Once the plants are gone, let the ooze fall back into its 'ear'. It's okay if the ooze ate through the sand, as long as you didn't lose too much water.
Now let the water fall out of its 'ear' to collect the top duck.
Tilt the phone to collect the middle, then the bottom ducks. You will have to avoid the ooze, but there should be plenty of water to do so safely.
B-7: Build and Tilt
Activate the ooze spray (lower left) to get enough ooze in the square to kill the plants.
Now rotate your phone to kill the plants. If you have any leftover ooze, you'll need to neutralize it with water before collect the ducks.
Activate the lower right water spray and tilt your phone around to collect all three ducks.
The actual intention of the level is to use the middle spray to activate the red gear and point the spout at the plants to creat a corner by the ducks which is then turned to rock by the ooze. I find it quicker and easier to do it the way I described though.
B-8: Beehive
Screenshot
For ease of reference, each blue bar is number 1-4 (left-to-right, top-to-bottom) on the screenshot above.
Drag bar 3 up and gather the poison against bar 4.
Now drag both bars 1 and 3 down, then drag bar 2 up.
Tilt your phone to collect the rightmost duck.
Drag bar 1 up and flip your phone to collect the upper left duck.
Flip your phone again to gather the water where the first duck was and drag bar 2 down.
Drag bar 4 up and tilt your phone to gather in the lower right corner.
Now drag bar 4 down and gather the poison in the upper right corner, above the water.
Drag bar 2 up and gather the water in the lower right corner.
Now drag bars 3 and 4 up and collect the last duck.
B-9: Onion Peel
Screenshot
Change the converter to poison, then flip your phone to convert all the water and kill the top layer of plants.
Dig as indicated in green and change the converter to water.
Rotate your phone clockwise to change the poison into water.
Dig as indicated in red and collect the top two ducks.
Change the converter back to poison and dig as indicated in blue.
Convert all the water into poison and destroy the last of the plants.
Change the converter to water and pass all the poison through it.
Dig as indicated in purple and collect the last duck.
B-10: Never Let You Go
Screenshot
Dig as indicated in green.
For the rest of the level, you'll need to activate the spray in the lower left.
Tilt your phone to have the ooze follow the path you've dug.
When the ooze passes through the converter, you'll collect the first duck.
Dig as indicated in red and have the water pass through the spout at the top.
Tilt your phone to collect the other two ducks.
B-11: Steam It Up
The challenge of this level is that steam acts in the opposite manner to the liquids.
Hold your phone upright and to the right to go through the converter and collect the top duck.
Rotate your phone counterclockwise to have the steam go through the next converter and collect the upper right duck.
Now flip your phone to get the steam through the bottom converter to collect the final duck.
B-12: Algae Gates
Screenshot
Move the blue bar to the right just long enough to let a little poison out.
Tilt your phone to have the poison activate the green and red gears.
Dig as indicated in green.
Holding your phone upright, drag the blue bar to the right and let all the poison turn to steam on the hot coals at the bottom, which should collect the bottom duck.
Tilt your phone to the left to collect the right duck.
Dig as indicated in red and tilt your phone right to gather the remaining steam in the upper left.
Now flip your phone to collect the last duck.
B-13: Balloon Maze
This level takes (in my opinion) the most agility of the bonus levels.
Tilting your phone to the left, dig out the smallest (righthand) balloon and get it to the right most duck, then pop it.
Now tilting your phone to the right, dig out the medium (lefthand) balloon and get it to the middle duck, then pop it.
Again tilting your phone to the left, dig out the biggest (middle) balloon and send it down the long shaft.
The balloon will pop near the bottom (a hidden thorn), so direct the released water to the bottom duck to collect it.
B-14: Tilt with Caution
Tilting your phone far to the left, get the poison balloons out of the corner witout releasing the water balloons.
Now get at least one balloon in each ditch to the left of the ducks.
For each ditch, pop the poison balloon(s), then tilt your phone and activate the spray just enough to blow a hole through the rock.
When you've done this to gain access to each duck, hold your phone upright to drain any remaining poison and ooze.
Now dig from each access point to the ducks.
Tilt your phone to the left and release the water balloons.
After getting at least one balloon over each access point, pop the balloon and collect each of the ducks.
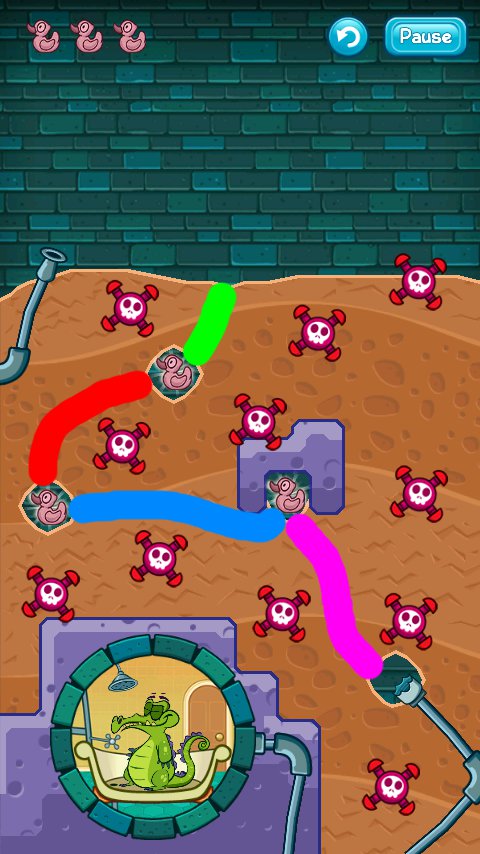
Super Secret Level!
How to find it:
Go into the Achievements menu.
Drag the screen down (scroll up).
While holding it, click the planet drawing.
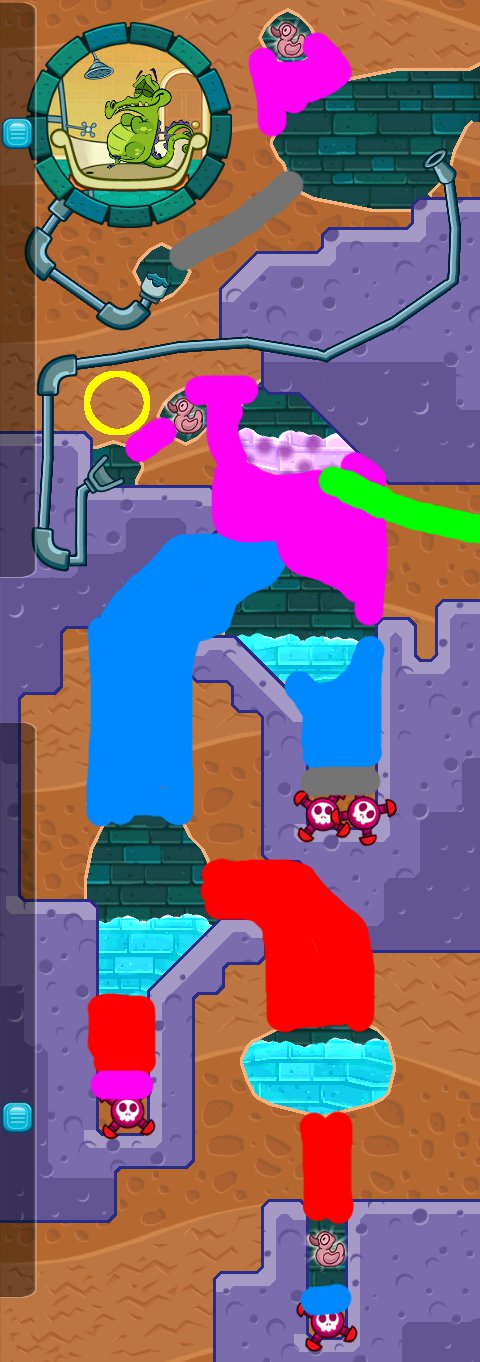
0-0: Planetarium
Screenshot
The composite image in the screenshot has been cropped for height but is still very tall.
Dig as indicated in green.
Now dig both areas indicated in red.
Dig all areas indicated in blue.
Dig as indicated in purple. This should collect the top two ducks. If you need to, you can dig at the edge of the ringed 'planet' to get more water in the duck to the left.
Now dig all areas indicated in grey. This should collect the last duck.
Dig as indicated in white.
Once the water has settled, dig as indicated in yellow.
Posted by: Kyh |
January 31, 2012 10:58 PM
|
January 31, 2012 10:58 PM