


![]() It's like pie. Is there ever such thing as too much pie? No, never. Or at least, I intend to find that out... tomorrow. What I do know for sure: there is no such thing as too much fun free online escape games. Or if a limit does exist, it's yet to be reached. Absolutely that is why they keep getting made, why we keep playing, and why Weekday Escape returns once again with four escapes for which to be thankful—Hottategoya's continuing saga of same-looking rooms, FunkyLand's 18th sugar-craving treat-seeking episode, Flash 512's glossy graphics returning in a dungeon, and Maroya's opening of another room in Marshmallow's house...
It's like pie. Is there ever such thing as too much pie? No, never. Or at least, I intend to find that out... tomorrow. What I do know for sure: there is no such thing as too much fun free online escape games. Or if a limit does exist, it's yet to be reached. Absolutely that is why they keep getting made, why we keep playing, and why Weekday Escape returns once again with four escapes for which to be thankful—Hottategoya's continuing saga of same-looking rooms, FunkyLand's 18th sugar-craving treat-seeking episode, Flash 512's glossy graphics returning in a dungeon, and Maroya's opening of another room in Marshmallow's house...
 Escape from the Similar Rooms 15 - So, you are locked in a room. Or rather, a set of rooms, each of which looking very much like the other. The goal of this game is to escape this place. It's the basic premise of the genre itself, but Hottategoya puts a unique spin on the presentation by utilizing the furnishings and decor throughout this rather tall house to hide clues and puzzles. The most trouble comes from keeping track of where you are as you navigate up and down stairs (a way to keep notes is helpful). It's what you already expect from Hottategoya. But just for kicks, try comparing this game, with its clean, minimalist design and inviting atmosphere to Escape from a Building Without Windows, the first game by Hottategoya featured on JayIsGames. A designer to watch indeed!
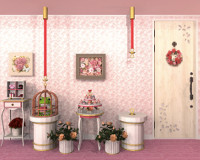 Candy Rooms No.18: Rose Pink Girly - FunkyLand is equally predictable in that, knowing you have a package and that, inside that package, there's a game from FunkyLand, you know you're getting a room so full of whimsy that looking at it is as much fun, if not more fun, as solving the puzzles and escaping. There's not many more ways to say it. And, just like Hottategoya, FunkyLand takes the basic premise and owns in uniquely with these beautiful rooms. Rose Pink Girly is no exception. When you think back to the very first time we met our illustrious sweet-toothed designer, would you say this episode is even more creatively clever?
 The Cursed Dungeon - It may as well be said: I short-changed you last week...yes, even if technically I referred you to four games...and the way I'm going to make up for it? Another new game from Flash 512. Because, admit it, I think you really do like Flash 512. Despite the "cursed" and "dungeon" part, the experience in this well-designed room is a pleasant one. To begin, select one of the three "PLAY" links found mid-way down the page, then enter a nickname when prompted. After that, you'll be finding clues, gathering needed items, employing them to open locks and (barring a little trouble finding all the active spots) working your way out in no time. It was some years ago that we first played Escape Ancient China Room from this game author: there's been improvements where improvements were needed, and yet still the same flair for adventure-like atmospheres.
 Marshmallow's New Home: 4th Room - by Maroya is so adorable although the story is completely lost on folks like me who know no Japanese. But that's why the powers that be gave us something called "imagination" after all. It goes rather nicely with this other something that I like to refer to as "inference" to make a rather pleasant escaping experience, in my own humble opinion that is of course. Not to worry—there are enough nonverbal signs to aid the matching clue to puzzle process. Last time we played in Marshmallow's house, we were in a room not unsimilar. This time around we're looking to collect 10 of some sort of plant-like fairy being, but they aren't the gregarious type. As before, the puzzles are wrought with enough vagueness to keep you thinking, just logical enough to warrant a "fair game, sir. Well done."
We love escape games, and our readers love talking about them and sharing hints! How about you? Let us know what you think, ask for clues, or help out other players in the comments below.


Walkthrough Guide
(Please allow page to fully load for spoiler tags to be functional.)
Oh wow, this is the first time I've ever shown up soon enough to actually solve one of these puzzles before anyone else commented!
Given all the help I've received from others hereabouts, it seems only proper to do up a walkthrough to mark the occasion. Let's see if I can finish that before anyone else does...
Similar Rooms 15 Walkthrough
1. Exploring
First Floor
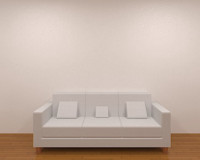
We start off facing a white couch with three cushions. Clicking around reveals... that there's nothing here to click. Navigation is by dark bars on the left and right of the screen; turn right.
Now we see a small wooden cabinet. Zoom in on that to look at the puzzly lock: it has three buttons, all the same color, but varying in width. Beside the buttons is an arrow pointing down. Obviously, we can't do much here without the code. Zoom back out and turn right again.
Ooh, stairs! Let's not go up yet, there's still some things in this room to look at, such as the bookcase next to the stairs.
Zooming in on that, we see that there are six shelves. On each is a block of five books, arranged to the left and right sides. Back out again and turn right once more.
Hum, just a blank wall with a small framed picture on it. Take a closer look at that: it's a photo of one quarter of a sunflower, with a red frame. You can click on it to rotate the picture, but once again, it doesn't accomplish much yet.
Back off from the picture, turn left and head up the stairs.
Second Floor
Well, as the name of the game promises, this seems like a very similar room. Coming up the stairs, the first thing we see is another nearly identical cabinet. Zooming in on it, we see that it has a square of four smaller squares, colored red, green, grey and blue. Unlike most such locks in escape games, these squares aren't buttons; they just sit there.
To the right, another staircase, and another bookcase -- again with six shelves and blocks of five books.
Right again, and there's a slight dissimilarity: where the first floor has a blank wall, this wall contains the stairs going back down. Next to that, though, is another flower picture, this one with a green frame.
To the right of that, it's another rather drab couch. Turn right twice more and go up the next stairway.
Third Floor
Surprise! Another nearly identical cabinet! This one has a panel of twelve buttons, in four rows of three. Each button displays a small square, and clicking on them turns it into a large square. Okay.
As expected, now we're looking at yet more stairs, and another bookshelf. Zoom in on this one, though, and it turns out that this one has blocks of different numbers of books -- two, three, or four of them. Interesting.
Turn again and it's another down staircase, and another flower picture, this one with a blue frame. One more turn to the right, and indeed, another one of those white couches.
Twirl around until you get the stairs again.
Fourth Floor
And another cabinet! This one has a little panel with indentations in three different shapes, and doesn't do anything when clicked. Back off and turn right.
Another bookshelf, and hey, something new: a door instead of a staircase. The door is locked -- of course -- so keep on turning to see a flower picture with a grey frame, and then another white couch.
Now we've seen all there is to see -- this game doesn't have any hidden spaces or sneaky selection zones, it's all pretty much WYSIWYG. So let's solve some puzzles!
2. Solving Puzzles
Third Floor: the Twelve Squares
So... where have we seen four sets of three squares each?
Maybe you're ready to sit down and have a rest?
Each couch has three square cushions, of two different sizes.
Counting (B)ig and (L)ittle cushions, stacked according to floor:
B L B
B B L
B L L
L B B
Ta-da! Now you have a blue pentagonal gem!
Second Floor: the Four Colored Squares
Okay, now where else have we seen four squares of these colors?
It might help to stop and smell the flowers...
The four framed pictures each show a quarter of a sunflower. Going up and down stairs, rotate them until they form a complete flower when arranged in the order of the squares on this cabinet -- the red frame should show the center of the flower in its lower right corner, the green one in the lower left, the grey in the upper right and the blue in the upper left.
Once you've spun the flower segments appropriately, head back to floor 2 and open the cabinet.
Cool, another gem! This one is a green diamond.
First Floor: the Buttons of Varying Width
This is probably the trickiest puzzle in this game, which honestly isn't saying a whole lot.
Remember how we noted the blocks of books being on the right and left sides of the shelves?
That's completely irrelevant.
In fact, three of the four bookshelves are completely irrelevant.
One of these things is not like the others...
The only bookshelf with an actual clue is on the third floor, the one that isn't all blocks of five. Instead it's got blocks of two, three, or four.
Or to put it another way, it's got thin, medium and thick blocks. The title of this subsection should give you the last hint.
Numbering the three buttons in order from left to right, the combination is 2,1,2,3,1,1.
And a third gem: a red triangle!
Fourth Floor: the Shape Spaces
Okay, so the cabinet on floor 4 has three indentations of different shapes.
... and you have three objects of different shape in your inventory...
Really? Well, okay: put the three gems in the appropriate slots on the cabinet door.
Now you have a key.
The Door
... is the only thing in the game with a keyhole. Key goes in hole.
And we're out!
Posted by: october.hare |
November 26, 2014 4:10 AM
|
November 26, 2014 4:10 AM
"Marshmallow's New Home: 4th Room" Walkthrough
I'll go with elle on this and assume we need to find "fairies".
Fairy #1
Zoom in on the chair and click on the chair to move it from the desk.
Pick up Fairy #1.
Fairy #2
Click on the long drawer above the space where the chair was.
Note the 2x3 grid with the chick pic above it as well as the positions of nos 1-6.
Pick up Fairy #2.
Fairy #3
Back up once and open the top drawer on the right to get a pair of pliers. The other two drawers can't be opened yet - one needs a 3-digit code and the other needs a sequence of L/R clicks.
Also, click on top the table to see some weird symbols. There are three slots at the top, but not sure yet what we need here though.
Go right once. Click into the open space directly in front.
Pick up Fairy #3 from the ground.
Fairy #4
Back up once and click on the shelves at the left of the enclosure in front of you.
Pick up the little red ball in the blue cup on the top shelf.
Note the colours of the 3 chick cubes on the bottom shelf. Also, note that they are clickable.
Back up once and turn right to face the vacuum once again. Click on the area with the vacuum and pick up the ladder on the left.
Looks like you need to help out the Fairy on top the vacuum. He's not ready to join you yet. Maybe one of his friends is stuck inside!!!
Back up once and turn right. We can't open the double doors directly ahead of us. However, we can zoom in on the wall hanging to the right. It has 4 symmetrical symbols on it. Click at the bottom of it to see two ducks back-to-back, as if they're reflected in a mirror ... what else might be a reflection? Hmmm...
Back up once and turn right. Use the ladder to access the top cupboard on the left hand side. The box in there needs a 4-digit code ... perhaps the one from the wall hanging???
5364 (it doesn't appear to be randomised)
Oh good, it worked ... but we don't get a Fairy - we get a blue sphere.
Back out of the cupboard and take back the ladder.
Open the closet underneath and take a closer look at the shapes on the 4 garments hanging in there.
Back out and look at the box at the foot of the closet. Use the shapes from the clothes to open this box.
Triangle, Diamond, Star, Circle
Back out and click on the now opened box to get a mirror.
Back out again to see the whole room and click on the Fairy in the window. Again, this one won't come just yet...
Back out and examine the book case under the aquarium(?). The red book in the left section is locked. The red book on the right seems to suggest that pounding the aquarium makes the fairies jump. In the centre, we see a chick on some coloured blocks. I think we've seen this grid before. Note the colours of the various blocks.
Back up once and click on the tall bookshelf on the right.
Pick up Fairy #4 from the structure on the top shelf.
Fairy #5
Note the colours and positions of the balls in this weird-looking structure.
In the shelf just below this, there's a one-armed robot. Zoom in on it and click to the left of it to find the slot for the other arm, which we just so happen to have already.
Back out once to the front-on view and zoom back in to the robot. Click on the left arm to make him lean left. The little fairy inside rolls down one. Click on the left arm again to straighten the robot. Now, lean the robot right and straighten, then lean left again to get the fairy out.
Back up once and pick up Fairy #5.
Fairy #6
Click on the lower shelves to see another fairy trapped in a glass case. To the left and right of this case are two flaps. Looks like we need something to push through and roll him out. But we don't have it yet.
Back up and turn right to face the desk. Zoom in twice to the table top and try placing the mirror in one of the slots. It doesn't go in the yellow or green star once. But it fits nicely in the red one. And now we have a 3-digit number ...
Zoom out once and use this code to open the second drawer.
130
Zoom out once and open the drawer to collect a battery.
Back up and turn right to the vacuum view. This time, we're using the ladder on the cupboards at the top. We can only open the one second from left. There's a chest with 4 coloured levers - green, pink, green, pink. These look familiar ...
Just like the odd structure on the tall bookshelf. The code we need is:
middle down down up
And now we can collect the toy bus inside.
Examine the bus and notice the down arrow - flip it over, open the compartment at the bottom and fit the battery inside it.
But wait ... a bus rolls ... go back to the third shelf on the tall bookcase and roll the bus through on the right hand side.
Pick up Fairy #6 to the left.
Fairy #7
Go back to the clickable blocks (where we left the ladder). Now, what order do we need to make this do something???
Using the grid from the table drawer and the blocks under the aquarium, the order is:
yellow blue red yellow red blue
Pick up Fairy #7.
Fairy #8 and #9
Now, if you haven't noticed yet, anytime you collect a fairy, it goes into the aquarium. Maybe we should head back there to see if they might give us a clue.
Click on the aquarium and notice that two of them start to jump in a sequence. One of them is on the left, one is on the right. Hmmm. Maybe it's a clue to the ...
bottom drawer by the table. The sequence is R R L R L L R.
This gives us a yellow sphere.
Back away from the table and turn left. Click between the closet and the low bookshelf to zoom in behind the left side of that shelf. Use the key to open the red book on the left side of the bookshelf and pick up the red sphere.
Go back to the vacuum and click on the fairy to shoo him away. Click on the top of the vacuum and place the three spheres in the appropriate holes (Y for yellow, etc). Now the vacuum can be opened by clicking on the top of it again. The flying fairy flew in and saved his friend.
Zoom out and pick up Fairy #8 and Fairy #9.
Fairy #10
Now we have collected all his buddies, Fairy #10 (in the window) comes willingly and gives us a key ... a key to our freedom ... or at least to the door behind the table ...
We will have to wait and see what else is in store for us ...
Posted by: stuckinabasement |
November 26, 2014 11:55 AM
|
November 26, 2014 11:55 AM
The Cursed Dungeon Walkthrough
The puzzles here mostly involve finding the right place to put things so that you can find new things to put in other places.
Some of the locations are a bit tricky to find when clicking.
Exploration
You're in a dungeon with 4 walls. Moving clockwise, starting from the opening scene, these are:
The stone bench wall
There's a polyhedron to the left, a bench in the middle, a cube on the right and a hanging metal plate of some kind on the wall.
The stone arch wall
To the left is a chain fastened by a bolt. In the middle is a big stone arch, under which is a pentagon on a plate on the wall, as well as a group of rocks.
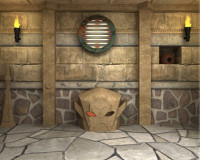
The glum-looking stone monster wall
Left is a stone pillar with a spike at the top. Middle is a one eyed glum-looking stone monster under a round metal door. Right is a hole in the wall with a brown igloo.
The yellow rainbow wall
Left is a stack of 3 stones. Middle is a set of raised stones in a semicircle, with space for one missing stone. Above this is a stone face mask thingy that looks a bit scary. Right is a pedestal with nothing on it.
Solving Puzzles
While in the stone bench view, zoom in on the bench and click to the left of it.
Pick up the scrap of paper and examine it to get the 4 digit code required for the three rocks. This is randomised and is different for each game.
Enter the code in the rocks and take the eye.
Use the eye on the glum-looking stone monster. You can now click on both eyes. The left one shows an up-facing arrow while the right points down.
Go back to the bench and click under the middle of the bench. There is a button underneath. Click it.
Zoom back out to see that clicking the button has revealed something on top of the bench. It is a sequence of up and down facing arrows.
Go back to the glum-looking stone monster and enter the correct sequence by poking the appropriate eyes ... maybe that's why he's so glum :(
The sequence is:
L R L L R R L R
Take the special object (like a not-quite-fleur-de-lis).
Also, note the L / 7 (at funny angles) patterns above the glum-looking stone monster.
Insert the not-quite-fleur-de-lis into the forehead of the stone face mask thingy.
Click on the not-quite-fleur-de-lis to get a key.
Go to the stone arch wall and zoom in twice to the bottom right-hand corner to reveal a keyhole at the base of the column.
Use the key and take the special object (I dunno how to describe this one).
Use this special object on the cube to the right of the stone bench and click on it to obtain a handle.
Use the handle on the round metal door above the glum-looking stone monster.
Open the door and take the stone key.
This key looks just like the other ones on the metal plate above the stone bench.
Place the key in the empty slot on the plate. The keys are now clickable.
Use the sequence of L / 7 (at funny angles) to find open the plate and take the flower-shaped object.
The required sequence is:
BR, TL, TR, BL, BR
Use the flower-shaped object on the empty stone pedestal (to the right of the yellow rainbow) and click on it to get the stone sheet inside.
Use the stone sheet on the polyhedron (to the left of the stone bench) and click on it to get the stone object.
Go to the yellow rainbow and install the stone object into the missing spot.
The stones are now clickable. When clicked, a stone will toggle between raised and depressed. Also, clicking on one moves others as well. The key is to get all depressed. To do this, click on them in the following order, counting from left to right:
3rd, 6th, 7th
Take the stone tower.
Use the stone tower on the pile of stone towers (to the left of the yellow rainbow) and click on the top tower to get a wrench.
Use the wrench (click once to apply and once more to turn) on the bolt and chain (to the left of the stone arch) and take the stone brick.
Go to the stone spike to the left of the glum-looking stone monster. At the base of the spike is a diamond-shaped button. Click on it to release the spike, then take the spike.
Go to the stone bench view and zoom in on the bench. Click on the right side of the bench to see a plate embedded in the stone. The plate has a star shaped print on it.
Use the spike (or cone, apparently) on the plate then use the brick to hit the spike and pry out the plate.
Install the plate in the igloo (to the right of the glum-looking stone monster) and click on the plate to reveal a special key.
Install the special key in the pentagon on the stone arch wall. It starts to glow. Click on it again ...
Congratulations. You're success!!!
Posted by: stuckinabasement |
November 26, 2014 6:59 PM
|
November 26, 2014 6:59 PM
Candy Rooms 18 Walkthrough
Candy #3
Zoom in on the right hand wall on the right.
The 3rd candy is stuck on the curtain
Candy #4
Zoom in on the center of the room, then on the cake stand.
You see 5 kiwi cakes and 3 orange cakes.
Zoom in on the left hand wall, then on the cake stand.
You see 6 strawberry cakes and 2 blueberry cakes.
Zoom in on the right hand wall, on the left.
Zoom in on the small round table.
Click on the book.
Enter the numbers corresponding to the fruits:
6, 2, 5, 3
Click OK.
Open the book.
Take the 4th candy.
Candy #5
Zoom in on the right hand wall on the right.
Zoom in on the box under the side table.
Click on the box to get a rope.
Open the box and pick up the 5th candy
Candy #2
Zoom in on the right hand wall on the left.
Zoom in on the oval hanging on the wall.
The vanes indicate the order in which to click the L and R buttons:
RLLRRL
Take the bouquet of flowers.
Zoom in on the left hand wall.
Attach the rope (see Candy #5) to the short rope to the left of the door.
Zoom in on the frog.
Take the gift box from its arms.
Place the bouquet in its arms.
Take the 2nd candy from the space that opens beneath.
Candy #1
Zoom in on the left hand wall.
Zoom in on the box on the side table on the left.
Notice the items:
Upper left: heart
Upper right: jewel box
Lower left: gift box
Lower right: shoes
Zoom in on the right hand wall on the left.
Zoom in on the box below the oval.
Place the gift box (from the frog, see Candy #2) in the opening.
Click on the curtains repeatedly until you see the same arrangement (heart, jewel box etc.) as in the box on the extreme left.
Click on the button. The gift box opens.
Take the coin from the gift box.
Zoom in on the center of the room, then on the candy machine.
Place the coin in the machine.
Turn the lever.
Take the 1st candy from the machine.
Escape
Once you have all 5 candies, they transmogrify into a key.
Take the key.
Walk to the door and use the key.
Posted by: hans.vogelaar |
November 27, 2014 11:39 AM
|
November 27, 2014 11:39 AM