JayisGames.com is now available ad-free!
Jay is Games recommends Cheat Happens with 8,000+ games and 35,000+ trainers!

Weekday Escape N°42


Comments (37) | Views (18,761)

Weekday Escape

elleI had an introduction for you, folks. It was right here, no joking. So let this be a lesson for you, which I very recently learned through my freewheeling cavalier oh-I'll-just-real-quick-step-away-for-a-phone-call—backing up your creative endeavors, no matter how small or large, is a good habit to be in. Anyways, the intro? It went something along the lines of "embrace new things, treasure old things," and all that sort of muck muck, closed with a witty (very profound and very insightful) platitude about taking the opportunities life gives you. I really have to tell you, it was some of my best work. You would've loved it. Anyhow, here are three new (and not-so-new) escape games for your Weekday Escape enjoyment...

Frog Lake Escape
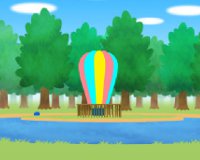
Frog Lake Escape - from Sanpoman has a sweet pastel artwork that might make you think one of Yuri's little chicks will pop up out of hiding at any moment. Although lacking an English translation, you should be able to solve your way through without knowing Japanese. Puzzles are equally cute and, with one notable exception, not too tricky. Perhaps the one thing players will most be confused by is in trying to meander through this pleasant pastoral scene and explore all possible notable spots in the landscape...and through the hidden froggy tunnels. So, because you start out already outside, you might say to yourself, "Why would I need to escape? I'm already free," and just stay put. But there's more to escaping than just being not inside. Besides, those trees are not budging. If you don't mind the discombobulating navigational trials, then there's much about Frog Lake to keep you smiling through the end.

Fresh Bathroom Escape
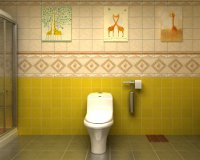
Fresh Bathroom Escape - Since Flash512 asks you to pick a nickname, for score-saving purposes, before beginning play, I suggest "ellerules" or "giveellecash". We might start a thing yeah? Besides I could use some extra cheer-up. I can't say I was absolutely happy that this escape trapped me in a bathroom again (real story, that happened; it was quite traumatic), but at least this time instead of pounding on the door and yelling for help, escape is just a matter of calling brain cells to action. Okay. This can be done. Fresh Bathroom Escape indeed has a fresh design and a well-implemented interface, with some logical puzzles to go along with it all. It's short, but enjoyable; I mean, size doesn't count for that much does it? Also, why haven't we featured Flash512 in so long? I'm not sure. But if there are more games like Fresh Bathroom upcoming, you will be seeing plenty Flash512 under the JIG spotlight in the future.

Yuk Escape 2
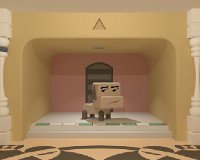
Yuk Escape 2 - I might be a little off on the translation of this title by Kamokichi (there's Search Also Toka Duck and Be Original Toka Duck to consider as well), but we can talk names and meanings later. What you'll find when you click past the title screen to begin playing is that same Sanrio-ish charm you've enjoyed in Strange Little Searching and other Kamokichi creations. Here it's not a lock with a missing key keeping you inside, but a rather disgruntled-looking doggie. What are you going to do to get out the door? Solve the series of item-use puzzles and open some codes to find the object you need to escape.

We love escape games, and our readers love talking about them and sharing hints! How about you? Let us know what you think, ask for clues, or help out other players in the comments below.

Walkthrough Guide


(Please allow page to fully load for spoiler tags to be functional.)

Walkthrough Fresh Bathroom Escape

Please note: to use items, you have to drag them from your inventory

1. Open the blinds
2. Grab piece of paper

Star 2 5

3. Examine top right corner of the giraffe painting on the left

Code: 692 (this changes with every game)

4. Enter code below fish bowl
5. Add wood panel to box on table
6. Flush toilet, note the code that appears
7. Replicate the code on the wooden box on the table

Top right, bottom left, top left, bottom right

8. Place heart below the soap box (to the right of the bath)
9. Unlock shower
10. Use the spade on the plant below the clock
11. Use the chisel on the tile to the right of the toilet
12. Add the cat on the cupboard door below the mirror
13. Use the hook below the bathtub
14. Use the tweezers to get the fishbone from the fishbowl
15. Add the fishbone to the clock and open it (click on the fishbone)
16. Use the knife on the right giraffe picture to get a hammer
17. Note the code on the upper rim of the dark-wooden mirror

Square 6 8

18. Combine the hints of steps 2, 16 and 17 at the yellow tiles to the left of the exit

The star is at coordinates x=2, y=5

I wonder where the square is

Use the hammer on the tile that is 4 tile to the right and 3 tiles below the star

19. Use the racket in the bath
20. Use the key to exit

I think the main difficulty in this game is step 3.

By the way, who has a lock on their shower? That is a bit creepy.

My first walkthrough! For Frog Lake. The game itself isn't that hard, but finding certain items can be a bit tricky, so I decided to arrange this as a guide to where everything is.

You'll need five coins to leave the lake from the center island. One coin can be found within each of the chests, which can be opened with the key of the matching color.

Key locations:
Pink Key

Right-hand drawer in the red house.

Orange Key

On the ground behind the fenced area on the center island.

Blue Key

On the back of the "tree door" in the side branch of the tunnel.

Yellow Key

Drawer in the blue house.

Green Key

Coded "lobster" container in the blue house.


Item locations:
Blue Box

Left-hand drawer in the red house.

Pink Box

Buried in a dirt pile at the back of the pond, between the two houses. You'll need the trowel.

Trowel

In the tunnel, at the far left below the ladder from the red house.

Binoculars

Coded "puffy fish" container in the red house.

Map

Coded "long fish" container in the red house.


Chest locations:
Pink Chest

On the far edge of the pond, accessible through the "tree door" in the side branch of the tunnel.

Orange Chest

In the blue house.

Blue Chest

On the center island.

Yellow Chest

Behind the blue house.

Green Chest

In the side branch of the tunnel.


Code locations:
Fish Container Codes

Use the blue and pink boxes to feed the fish in the lake, behind the signs around the back of the red and blue houses.

Lobster Container Code

There's a lobster behind the glass in the side tunnel beneath the red house. Whatever you do, don't annoy him by knocking repeatedly on the glass! Or, you know, do, if you want the code.

Tree Door Code

Printed on one of the trees behind the red house.

Blue House Codes

Printed on the backs of the two houses. Use the binoculars from a strategic position on the center island.

Since I played through Yuk Escape a bazillion times already I may as well make a walkthrough.

Yuk Escape 2 Walkthrough

Filling Your Inventory
Picture Room:

In your investigation of the pictures to comprehend clues, you may notice something strange in your peripheral vision.

On the right wall, while looking at the bunny picture, there is a small sliver of pixels. Click it to look at the wall, and discover a hidden nook where you can find the blue key.

Sink Room:

Take a close look at the plant.

You can find a note with a drop of water on it under the pot.

The top drawer is already unlocked. Inside is a note with some strange clues about something or other on it.

Dog room:

There's nothing here as far as items go!

Dining Room:

There are no items here that are immediately accessible.

Or are there~?

Time to start solving some puzzles!
The Shape Puzzle

The door on the right in the picture room has a lock with images of four shapes on some buttons. Those shapes have been seen before.

They can be seen near the top of each room. But what order do they go in?

The trick is in the pillars in each room, segments of which are colored in blue. Each room has a different number of colored segments, from one to four, giving you the order for the lock.

The order is:
Triangle-Circle-Square-Hexagon.
Hit the button at the bottom when done and move away from the lock to open the door. Grab the wire hanger inside.

The Black Square Puzzle

The middle drawer in the sink room has a lock with four buttons and an image of a raccoon and pig, with an arrow from the raccoon to the pig. You can solve this puzzle just with information in another room!

The raccoon and pig are hanging out in the picture room. The five pictures under them all have four black squares in the corners of their frames. Each picture has a single arrow pointing to one of those corners. Follow each picture in order from left to right (the direction suggested by the arrow over the lock) to find the solution.

Using ordinal directions, the solution is
Northwest-Southeast-Southwest-Northeast-Southwest
Grab the drill (not a screwdriver!) from the drawer.

The Sink Cabinet Puzzle

The sink cabinet has a lock with three numerals in blue, set to zero. With a bit of sleuthing the code can be found easily.

Look under the towel to the right of the sink. The code is on the wall.

The code is
784
Input that to the sink's lock by clicking each digit, and then open the cabinet to find a strange box that seems to need three shapes to be opened.

The Mostly Blank Paper

It's time to start using some inventory items now. What about that paper with the drop of water on it?

Try getting it wet. Look at the sink and turn on the faucet, then put the paper under the water.

The paper will now be covered in hiragana! Thankfully you won't need to be able to read it to solve the puzzle it hints at, but if you're curious it says 'runtatta runrun'. (Don't ask me what it means though!)

The Dining Room Box

The box on the dining room table has four buttons, each with a hiragana character. You don't need a working knowledge of hiragana to solve this puzzle, you just need to find a clue with the same characters.

That clue is on the water drop note, as solved above. Follow the hiragana in the order on the paper to unlock the box.

The solution, using ordinal directions, is:
Northeast-Southwest-Northwest-Southeast-Northwest-Northeast-Southwest-Northeast-Southwest
Open the box and grab the six pointed star.

Retrieving the Red Key

The tantalizing red key is behind a pane of glass. There's a hole in the space the key's trapped in, but there's no obvious way to reach in and take the key.

Do you see that brown strip on the bottom? Apparently it's really soft and easy to drill through! Use your drill to make a small hole. Now that you've done that, you need to find something that can fit through that hole.

Look at the wire hanger and click on it. You'll straighten it out into a handy pole with a hook. Use the pole on the hole and you'll snag the key and pull it free.

The Hearts Lock

Now that you have the red key, you can use it in the red keyhole that activates the lock on the bottom drawer in the sink room.

An image will appear on each of the two buttons: two hearts on the left, and a heart with wings on the right. This looks familiar.

Take a look at the note with the raccoon and pig. It suggests that vertical arrows are connected to the two hearts, and horizontal arrows are connected to the heart with wings. There's also an arrow going from the pig to the raccoon, and then the raccoon to pig. What does this all mean, though?

Remember the arrows pointing to the black squares on the picture frames? Some of them were oriented horizontally, some vertically. Translate each arrow into the picture suggested by the note. Similarly, the black square puzzle had an image of a raccoon and pig connected by an arrow. This time you'll need to read the pictures from right to left (pig to raccoon) and then once more left to right (raccoon to pig).

The solution, using right and left:
Left-Left-Right-Right-Left-Left-Right-Right-Left-Left
Open the drawer and get the thing that is probably a screwdriver. It definitely has a frog on it.

The Door Without a Lock

You've likely noticed by now that the middle door in the picture room has no puzzle lock, but is unopenable just the same. There's gotta be a way in.

Look right above the door, and you should see a close up of the shelf. There will be a hole that looks like something can fit into it and unlock it. Stick your froggy screwdriver into the hole, then open the door and grab the saw.

Cutting things up!

You have a handy little saw, but where to use it?

How about an act of vandalism? Use the saw on the chair legs in the dining room. You'll get yourself a nice bundle of sticks.

To the Alcove

The sink room has a hidden alcove in the upper left, but it is not easily reached. That metal thing below it looks like it should have something to do with it.

Insert one of the sticks you got from the chair legs into the hole of the metal thing, giving you a handle. Click the handle to crank out a ladder.

The Tile Lock *long, frustrated, defeated sigh*

Okay. So you've noticed the lock on the left door in the picture room. You've noticed that it requires a three digit number, and that the numbers are made up of green tiles with white tiles as empty space. So what now?

The first thing to notice are the strips of tiles in front of every room. However, there's only four strips of tile and the lock suggest there should be five. Where to find the other one?

The door in the alcove has all the remaining clues you need to solve the puzzle. Study it. Study it carefully. REALLY carefully. The obvious thing you'll notice is that the door has images of the shapes you used in the shape puzzle, and the circle is repeated twice. The NOT obvious thing is the small strips of color on the sides of the door, brown on the left and white on the right.

The fifth strip is found by duplicating the strip in the circle room. The color strips show the orentiation of each tile strip. Some of the tile strips have their brown strip on the right, which indicates that the order of the tiles is reversed. (In practice the triangle strip is the only one that gets reversed as the other reversed strip is symmetrical.) Open up your preferred easy text editor and record the five tile strips with the right orientation, putting each strip in its own separate line. Then cut and paste the lines to shift them around until you get something that looks like a three digit number.

The solution, at long last, is:
605
Grab the second six pointed star.

The Alcove Door

The door in the alcove is obviously meant to be opened. But it doesn't seem to want to budge. There's a small slot in the upper right of the door. Maybe that's important.

Stick the saw into the slot. (You can't get it out again, but you won't need it any further.) You can now open the alcove and retrieve the roll of tape.

The Long Reach

There's a small metal door in the left side of the dining room. It's locked, but you can open it with the blue key. Inside you'll see a long corridor and a far away button. How to reach it?

You should have a whole bunch of sticks and a roll of tape. Tape the sticks together to make an extra-long pole, then use the pole to reach in and hit the button. Grab the third six pointed star from the dispenser.

Under the Sink

If you've already opened the sink cabinet, you know about the purplish-pink box that wants some shapes to open.

Put each of the three six pointed stars into the holes to unlock it, then open it up and grab the box cutter with a frog on it.

Finally, That Dog

You've done it. There's now no more puzzles left between you and that dog. What do you think would get it to move out of your way?

Did you notice the picture of the old monarch dog in the dining room? Maybe this dog would like to feel royal.

Make a crown by using the box cutter to cut up the cardboard roll left over from the tape dispenser, then give the crown to the dog. Sure enough, this excites the dog and you are free to enter the door!

SPECIAL BONUS ENDING!!

This is the Happy Coin of this game! Find it and you'll get something nice!

At any time in the game you can look under the dispenser by the door locked with the blue key, the same one where you got the third six pointed star after poking the far off button. Under the dispenser is a ticket with a present on it. Grab it, and when you complete the game you'll get a present!

37 Comments

Has anyone gotten the blue key in Frog Lake? It must be somewhere I haven't looked, or haven't inspected enough, but I can't figure out where!

Reply
Kniggit September 24, 2014 1:45 AM replied to She5los

Took me a while to find the blue key, it's

on the back of the tree door.

Reply
She5los September 24, 2014 1:56 AM replied to Kniggit

Thanks!

Reply

Stuck hard in Yuk Escape.

I have an extended wire hanger that has gone unused, a paper involving the pig and raccoon that I kind of understand but am not sure how to use, a kinda-screwdriver that is also unused, and a card with a present on it that as far as I know is this game's Happy Coin. I've found one of the three stars to put under the sink, and opened the door with the blue key, and a few of the other cabinets. I need to open the middle cabinet under the pictures (requires a key), the tile cabinet (I get that the tiles in front of each room are related but there's only four rooms and five rows per number) and the one that needs a key to activate. I don't have an item that will let me hit the far off button or activate whatever lets me look at what's in the alcove in the dining room.

Reply

Okay, made it out, though I had to brute force a couple things.

Namely finding the right place to use the not-a-screwdriver (this would probably be easier if I could read Japanese! But it's related to something that you can see but not get), and I had to guess on the number puzzle. Though now that I know the answer I think I see the clue I missed.

Reply
Kniggit September 24, 2014 3:01 AM replied to funnyguts

It's not a screwdriver --

it's a hand drill and you use it on

the window with the red? key, to the left of the pig/raccoon wall

For the tiles --

I didn't like/get why there were only 4, but 5 needed, however once you notice that there is

an orientation to the tiles...

Reply

Okay. Okay. OKAY. I played through the first half of the game twice more to figure out what I was actually missing with the tile puzzle.

You have to notice the tiny brown strips at the ends of each set of tiles to find the correct orientation. There's an easily missable suggestion in the alcove where the rest of the tile hints are to clue you in as to how that works.

Well at least I know and can stop agonizing over how anyone was supposed to figure it out.

Kniggit:

The hint to which line you need to duplicate is given in the alcove, as one of the shapes is repeated. Though you can probably work it out based on how the tiles won't make sense with any other duplicate strip.

Reply

Walkthrough Fresh Bathroom Escape

Please note: to use items, you have to drag them from your inventory

1. Open the blinds
2. Grab piece of paper

Star 2 5

3. Examine top right corner of the giraffe painting on the left

Code: 692 (this changes with every game)

4. Enter code below fish bowl
5. Add wood panel to box on table
6. Flush toilet, note the code that appears
7. Replicate the code on the wooden box on the table

Top right, bottom left, top left, bottom right

8. Place heart below the soap box (to the right of the bath)
9. Unlock shower
10. Use the spade on the plant below the clock
11. Use the chisel on the tile to the right of the toilet
12. Add the cat on the cupboard door below the mirror
13. Use the hook below the bathtub
14. Use the tweezers to get the fishbone from the fishbowl
15. Add the fishbone to the clock and open it (click on the fishbone)
16. Use the knife on the right giraffe picture to get a hammer
17. Note the code on the upper rim of the dark-wooden mirror

Square 6 8

18. Combine the hints of steps 2, 16 and 17 at the yellow tiles to the left of the exit

The star is at coordinates x=2, y=5

I wonder where the square is

Use the hammer on the tile that is 4 tile to the right and 3 tiles below the star

19. Use the racket in the bath
20. Use the key to exit

I think the main difficulty in this game is step 3.

By the way, who has a lock on their shower? That is a bit creepy.

Reply

Made it through Frog Lake and Fresh Bathroom Escape over lunch. Frog Lake was super cute and fairly easy, there was just one puzzle that was a little tricky

because it involved a small amount of blind clicking (the tree door)

but was otherwise great. I didn't really like the Fresh Bathroom Escape as there was a lot of pixel hunting, and the final puzzle was not particularly intuitive. Anyway, Yuk Escape 2 awaits!

Reply

Stuck before I even start Bathroom Escape. Where the heck to I click on the page full of (is it Japanese?). I tried the arrow, but it's a commercial. I hate just randomly clicking on everything that looks like a link. Please help.

Reply

My first walkthrough! For Frog Lake. The game itself isn't that hard, but finding certain items can be a bit tricky, so I decided to arrange this as a guide to where everything is.

You'll need five coins to leave the lake from the center island. One coin can be found within each of the chests, which can be opened with the key of the matching color.

Key locations:
Pink Key

Right-hand drawer in the red house.

Orange Key

On the ground behind the fenced area on the center island.

Blue Key

On the back of the "tree door" in the side branch of the tunnel.

Yellow Key

Drawer in the blue house.

Green Key

Coded "lobster" container in the blue house.


Item locations:
Blue Box

Left-hand drawer in the red house.

Pink Box

Buried in a dirt pile at the back of the pond, between the two houses. You'll need the trowel.

Trowel

In the tunnel, at the far left below the ladder from the red house.

Binoculars

Coded "puffy fish" container in the red house.

Map

Coded "long fish" container in the red house.


Chest locations:
Pink Chest

On the far edge of the pond, accessible through the "tree door" in the side branch of the tunnel.

Orange Chest

In the blue house.

Blue Chest

On the center island.

Yellow Chest

Behind the blue house.

Green Chest

In the side branch of the tunnel.


Code locations:
Fish Container Codes

Use the blue and pink boxes to feed the fish in the lake, behind the signs around the back of the red and blue houses.

Lobster Container Code

There's a lobster behind the glass in the side tunnel beneath the red house. Whatever you do, don't annoy him by knocking repeatedly on the glass! Or, you know, do, if you want the code.

Tree Door Code

Printed on one of the trees behind the red house.

Blue House Codes

Printed on the backs of the two houses. Use the binoculars from a strategic position on the center island.

Reply
Patreon VIP abfdrumz September 24, 2014 10:14 AM replied to baileydonk

Yeah, this really isn't terribly clear, is it? Based on the Google translation from Chinese, it looks like we want one of the three boldface links in the center column (which are translated as "Telecommunication lines -Play", "Netcom line -Play", and "U.S. line -Play"), but all three of those links are just spinning off into oblivion for me at the moment.

Reply
richdavies73 September 24, 2014 11:41 AM replied to She5los

im stuck on Yuk. Have pulled the ladder down made a big stick out of chair legs and tape now stuck anyone there?

Reply

Fresh Bathroom Escape seems bugged, I have the

Very special wooden tile

But it won't let me add it to the

Box with the missing tile

Maybe I'm doing it wrong? Baffled.

Reply

Good job abfdrumz :)

Reply
singsurf September 24, 2014 2:39 PM replied to callmerob

callmerob to use object in in Fresh Bathroom Escape you need to

drag them from the inventory

Reply

I can't start the Bathroom Escape.
I try all the three "play" links Elle mentions and absolutely nothing happens except another window opens which looks exactly the same :(
I'm on Safari btw is that it?

Reply
stuckinabasement September 24, 2014 3:16 PM replied to funnyguts

for Yuk Escape, where on earth do I find ...

the blue key???

Reply

Since I played through Yuk Escape a bazillion times already I may as well make a walkthrough.

Yuk Escape 2 Walkthrough

Filling Your Inventory
Picture Room:

In your investigation of the pictures to comprehend clues, you may notice something strange in your peripheral vision.

On the right wall, while looking at the bunny picture, there is a small sliver of pixels. Click it to look at the wall, and discover a hidden nook where you can find the blue key.

Sink Room:

Take a close look at the plant.

You can find a note with a drop of water on it under the pot.

The top drawer is already unlocked. Inside is a note with some strange clues about something or other on it.

Dog room:

There's nothing here as far as items go!

Dining Room:

There are no items here that are immediately accessible.

Or are there~?

Time to start solving some puzzles!
The Shape Puzzle

The door on the right in the picture room has a lock with images of four shapes on some buttons. Those shapes have been seen before.

They can be seen near the top of each room. But what order do they go in?

The trick is in the pillars in each room, segments of which are colored in blue. Each room has a different number of colored segments, from one to four, giving you the order for the lock.

The order is:
Triangle-Circle-Square-Hexagon.
Hit the button at the bottom when done and move away from the lock to open the door. Grab the wire hanger inside.

The Black Square Puzzle

The middle drawer in the sink room has a lock with four buttons and an image of a raccoon and pig, with an arrow from the raccoon to the pig. You can solve this puzzle just with information in another room!

The raccoon and pig are hanging out in the picture room. The five pictures under them all have four black squares in the corners of their frames. Each picture has a single arrow pointing to one of those corners. Follow each picture in order from left to right (the direction suggested by the arrow over the lock) to find the solution.

Using ordinal directions, the solution is
Northwest-Southeast-Southwest-Northeast-Southwest
Grab the drill (not a screwdriver!) from the drawer.

The Sink Cabinet Puzzle

The sink cabinet has a lock with three numerals in blue, set to zero. With a bit of sleuthing the code can be found easily.

Look under the towel to the right of the sink. The code is on the wall.

The code is
784
Input that to the sink's lock by clicking each digit, and then open the cabinet to find a strange box that seems to need three shapes to be opened.

The Mostly Blank Paper

It's time to start using some inventory items now. What about that paper with the drop of water on it?

Try getting it wet. Look at the sink and turn on the faucet, then put the paper under the water.

The paper will now be covered in hiragana! Thankfully you won't need to be able to read it to solve the puzzle it hints at, but if you're curious it says 'runtatta runrun'. (Don't ask me what it means though!)

The Dining Room Box

The box on the dining room table has four buttons, each with a hiragana character. You don't need a working knowledge of hiragana to solve this puzzle, you just need to find a clue with the same characters.

That clue is on the water drop note, as solved above. Follow the hiragana in the order on the paper to unlock the box.

The solution, using ordinal directions, is:
Northeast-Southwest-Northwest-Southeast-Northwest-Northeast-Southwest-Northeast-Southwest
Open the box and grab the six pointed star.

Retrieving the Red Key

The tantalizing red key is behind a pane of glass. There's a hole in the space the key's trapped in, but there's no obvious way to reach in and take the key.

Do you see that brown strip on the bottom? Apparently it's really soft and easy to drill through! Use your drill to make a small hole. Now that you've done that, you need to find something that can fit through that hole.

Look at the wire hanger and click on it. You'll straighten it out into a handy pole with a hook. Use the pole on the hole and you'll snag the key and pull it free.

The Hearts Lock

Now that you have the red key, you can use it in the red keyhole that activates the lock on the bottom drawer in the sink room.

An image will appear on each of the two buttons: two hearts on the left, and a heart with wings on the right. This looks familiar.

Take a look at the note with the raccoon and pig. It suggests that vertical arrows are connected to the two hearts, and horizontal arrows are connected to the heart with wings. There's also an arrow going from the pig to the raccoon, and then the raccoon to pig. What does this all mean, though?

Remember the arrows pointing to the black squares on the picture frames? Some of them were oriented horizontally, some vertically. Translate each arrow into the picture suggested by the note. Similarly, the black square puzzle had an image of a raccoon and pig connected by an arrow. This time you'll need to read the pictures from right to left (pig to raccoon) and then once more left to right (raccoon to pig).

The solution, using right and left:
Left-Left-Right-Right-Left-Left-Right-Right-Left-Left
Open the drawer and get the thing that is probably a screwdriver. It definitely has a frog on it.

The Door Without a Lock

You've likely noticed by now that the middle door in the picture room has no puzzle lock, but is unopenable just the same. There's gotta be a way in.

Look right above the door, and you should see a close up of the shelf. There will be a hole that looks like something can fit into it and unlock it. Stick your froggy screwdriver into the hole, then open the door and grab the saw.

Cutting things up!

You have a handy little saw, but where to use it?

How about an act of vandalism? Use the saw on the chair legs in the dining room. You'll get yourself a nice bundle of sticks.

To the Alcove

The sink room has a hidden alcove in the upper left, but it is not easily reached. That metal thing below it looks like it should have something to do with it.

Insert one of the sticks you got from the chair legs into the hole of the metal thing, giving you a handle. Click the handle to crank out a ladder.

The Tile Lock *long, frustrated, defeated sigh*

Okay. So you've noticed the lock on the left door in the picture room. You've noticed that it requires a three digit number, and that the numbers are made up of green tiles with white tiles as empty space. So what now?

The first thing to notice are the strips of tiles in front of every room. However, there's only four strips of tile and the lock suggest there should be five. Where to find the other one?

The door in the alcove has all the remaining clues you need to solve the puzzle. Study it. Study it carefully. REALLY carefully. The obvious thing you'll notice is that the door has images of the shapes you used in the shape puzzle, and the circle is repeated twice. The NOT obvious thing is the small strips of color on the sides of the door, brown on the left and white on the right.

The fifth strip is found by duplicating the strip in the circle room. The color strips show the orentiation of each tile strip. Some of the tile strips have their brown strip on the right, which indicates that the order of the tiles is reversed. (In practice the triangle strip is the only one that gets reversed as the other reversed strip is symmetrical.) Open up your preferred easy text editor and record the five tile strips with the right orientation, putting each strip in its own separate line. Then cut and paste the lines to shift them around until you get something that looks like a three digit number.

The solution, at long last, is:
605
Grab the second six pointed star.

The Alcove Door

The door in the alcove is obviously meant to be opened. But it doesn't seem to want to budge. There's a small slot in the upper right of the door. Maybe that's important.

Stick the saw into the slot. (You can't get it out again, but you won't need it any further.) You can now open the alcove and retrieve the roll of tape.

The Long Reach

There's a small metal door in the left side of the dining room. It's locked, but you can open it with the blue key. Inside you'll see a long corridor and a far away button. How to reach it?

You should have a whole bunch of sticks and a roll of tape. Tape the sticks together to make an extra-long pole, then use the pole to reach in and hit the button. Grab the third six pointed star from the dispenser.

Under the Sink

If you've already opened the sink cabinet, you know about the purplish-pink box that wants some shapes to open.

Put each of the three six pointed stars into the holes to unlock it, then open it up and grab the box cutter with a frog on it.

Finally, That Dog

You've done it. There's now no more puzzles left between you and that dog. What do you think would get it to move out of your way?

Did you notice the picture of the old monarch dog in the dining room? Maybe this dog would like to feel royal.

Make a crown by using the box cutter to cut up the cardboard roll left over from the tape dispenser, then give the crown to the dog. Sure enough, this excites the dog and you are free to enter the door!

SPECIAL BONUS ENDING!!

This is the Happy Coin of this game! Find it and you'll get something nice!

At any time in the game you can look under the dispenser by the door locked with the blue key, the same one where you got the third six pointed star after poking the far off button. Under the dispenser is a ticket with a present on it. Grab it, and when you complete the game you'll get a present!

Reply
Patreon VIP abfdrumz September 24, 2014 3:34 PM replied to elle

Thanks, Elle. I was having trouble earlier at that link with a few different browsers -- the page started loading, but the game never came up -- but it's working now.

Reply
stuckinabasement September 24, 2014 4:37 PM replied to funnyguts

awesome!!! thanks man!!! finally made it out!!!

Reply

I can't follow the walkthrough well on frog lake. I hope a step by step one is in the works so it's easier to follow. :) plus I hope one for yuk escape will come soon :)

Reply

sorry. I guess yuk was just done not long ago. I apologize.

Reply
Patreon VIP abfdrumz September 24, 2014 5:04 PM replied to Paul

Sorry to hear that about the Frog Lake walkthrough, Paul! Not sure I'll have time to do a step-by-step one, but for now, there's a good video walkthrough on YouTube if you need it.

Reply

video walkthroughs go too fast for me abfdrumz. with a text one I can take my time. :) but it's no hurry on that. :)

Reply

Full walkthrough for Frog Lake Escape

1. Go left and make your way around and into the red house.

2. Take the LIGHT BLUE BOX from the left drawer.

3. Take the PINK KEY from the right drawer.

4. Hmm, looks like we need a couple four-color codes paired with two types of fish. We'll keep an eye out.

5. Open the trap door, descend into the tunnel, and take the right branch.

6. There's a green chest here, but we don't have a key, so let's take a closer look at that window instead.

7. There's a sign below the window. I don't read Japanese, so I'll just have to guess that it says something like "Konnichiwa! Please do not annoy the lobster."

8. Now that we're filled with a burning need to annoy the lobster, let's bang on the glass until he turns to flip us off, lobster-style. The joke's on him, because now we've got a four-color code.

9. To the left of the window, there's a door with a picture of a tree, but it doesn't seem as easy to annoy. Guess we'll need to find another way in.

10. Backtrack a bit and pick up the TROWEL at the far left below the ladder.

11. Now turn around and head all the way down the tunnel to the center island.

12. There's a blue chest here, but we don't have a key for it yet, so let's keep exploring.

13. Go around to the right, behind the fenced area, and pick up the ORANGE KEY.

14. There's also a gate in the fence here, but it wants five coins, and we're still way too poor for that.

15. Go back through the tunnel, exit the red house, and walk right a few times to the blue house.

16. Looks like we need a blue/red code for the door, but we don't have it yet, so let's keep walking.

17. Behind the blue house we find a sign with a long fish, and the pond behind it contains the real things. Is it me, or do they look hungry?

18. Good thing we've got some long-fish food in the LIGHT BLUE BOX! Yep, they were hungry (or at least four of them were).

19. We know where to use this code, don't we? Note the yellow chest on our way back around, but we don't have a key for it yet.

20. Go into the red house and enter the long-fish code into the matching container.

21. Red, cyan, pink, yellow. For the color blind: 7, 5, 2, and 3 clicks respectively.

22. Open the container and take the MAP. Hey, now we know why it's called "Frog Lake"!

23. Leave the red house and head around back to the left.

24. There's another sign here, and some more hungry fish, but 4 out of 5 vets recommend against feeding long fish and puffy fish the same diet. Let's see if we can find some puffy-fish food.

25. Head to the right and take a closer look at that dirt pile.

26. Looks like a perfect place to use our TROWEL! Take the PINK BOX.

27. Head back to the puffy fish and solve their hunger issues with the food from the PINK BOX to get color code number 3.

28. On the way back around toward the red house to enter the code, there's a tree with some sort of markings. Better take a closer look.

29. In the red house, enter the puffy-fish code into the appropriate container.

30. Yellow, green, purple, blue. For the color blind: 3, 1, 4, and 6 clicks respectively.

31. Open the container and take the BINOCULARS.

32. This might be a good time to use that code from the tree, and I'll bet you know just where to do it.

33. Head back into the tunnel through the trap door, and enter the code by clicking on the four corners of the tree door.

34. Upper left, lower right, lower left, upper right, lower left.

35. Head down the tunnel and out to the edge of the lake.

36. Open the chest with the PINK KEY. I'd call this a "happy coin" in tribute to Tesshi-e, but based on its expression, I'm going with STARTLED COIN #1 instead.

37. Nothing more to see here, but on our way back through the new tunnel, let's be extra careful not to miss anything.

38. Close the tree door and take the BLUE KEY from its back. Cool, we know where that goes.

39. Proceed back to the center island through the main tunnel.

40. Open the chest with the BLUE KEY and take STARTLED COIN #2.

41. While we're here, I wonder what we might be able to see on the shore with those binoculars?

42. Head to the right, past where we found the orange key, and use the BINOCULARS to read the code on the back of the blue house.

43. Click once more to the right and repeat with the red house.

44. Let's head on back to the blue house and use our newly-discovered door codes to enter.

45. Red (right button), blue (left button), blue, blue, red, red, red, blue.

46. Open the chest with the ORANGE KEY and take STARTLED COIN #3.

47. Take the YELLOW KEY from the drawer.

48. Finally, a container to match our lobster buddy! Good to know that we didn't annoy him in vain.

49. Cyan, pink, blue, green. For the color blind: 5, 2, 6, and 1 clicks respectively.

50. Open the container and take the GREEN KEY.

51. Head back behind the blue house, where we saw the yellow chest earlier.

52. Open the chest with the YELLOW KEY and take STARTLED COIN #4.

53. Only one more chest to go, and we found it earlier in the right-hand branch off the main tunnel.

54. Open the chest with the GREEN KEY and take STARTLED COIN #5.

55. Time for a balloon ride! Continue through the tunnel to the center island.

56. Go back to the gate in the fence and feed the STARTLED COINS to it one at a time.

57. Nice view from up here!

Reply

thanks abf. :)

Reply

Anyone else notice the Category tag links are broken? Clicking on "Escape" gives me a "Page Not Found" error.

Reply

Crouch -

Maybe the shower lock is a child-proofing measure? Or pet-proofing. (if you imagine that you've escaped the bathroom only to find yourself in yuk escape, as I played them in that sequence, this becomes releveant!) Our kitty loves to lick the water off the tub floor. I know, gross. He drinks from the toilet too, if you don't put the seat down. (I give him plenty of water, in my defense.) Not that children or pets are not allowed to bathe, but drowning due to lack of supervision is a serious issue. The constant reappearance of tiny footprints on your otherwise spotless tile is a less serious issue, but possibly still annoying enough to motivate a clean freak to lock up the shower.

Or, maybe the lock is to keep psycho killers out while you're vulnerable in the shower. It makes sense that you'd want to be able to lock it from the inside. Plus, if the homicidal maniac is fumbling with the lock solution, it gives you time to grab your trusty garden trowel to defend yourself. You have one of those in your shower too, right? But you need to have some way to unlock from the outside just in case of emergency or accidental lockout.

Did I think about this too much? Did I get too much enjoyment from reasoning out the answer to a completely useless question? Yes on all counts.

Reply

just finished the bathroom escape - the whole dragging the item onto the spot you want to use it concept totally messed me up. I missed many solutions thinking I had already tried using the item on the spot in question thinking all I had to do was select the item and click on the spot, as usual. I did it wrong so many times!

Reply
Patreon Supporter Scaper September 25, 2014 12:37 PM replied to callmerob

I am also unable to place the wooden tile onto the box with the missing tile.

Also, sorry to nitpick, but I think

the bony fish on the clock looks as if it would be a clue to the cabinet with the fishbowl on it. I kept entering different times into the lock, then turning the clock and doing it again. The placement of the clue was unnecessarily misleading to me.

Reply
Crouch September 25, 2014 1:28 PM replied to bavnah

bavnah: "Did I think about this too much? Did I get too much enjoyment from reasoning out the answer to a completely useless question? Yes on all counts."

You made me laugh though. That has to count for something.

Reply

Scraper, I missed it too... the instructions at the beginning, use drag and drop not point and click on the objects. Good luck!

Reply

I really liked the bathroom escape. I actually liked the background music for it too, but they have it cut and loop at the oddest point!

Reply

Funny Guts -
Great walkthrough!!! Loved the hints first.

Reply

^ Scroll Up | Homepage >

Leave a comment [top of page]

Please consider creating a Casual Gameplay account if you're a regular visitor here, as it will allow us to create an even better experience for you. Sign-up here!
  • PLEASE UNDERSTAND SITE POLICIES BEFORE POSTING COMMENTS
  • You may use limited HTML tags for style:
    (a href, b, br/, strong, em, ul, ol, li, code, spoiler)
    HTML tags begin with a less-than sign: < and end with a greater-than sign: >. Always. No exceptions.
  • To post spoilers, please use spoiler tags: <spoiler> example </spoiler>
    If you need help understanding spoiler tags, read the spoiler help.
  • Please Preview your comment before posting, especially when using spoilers!
  • No link dropping, no domains as names; do not spam, and do not advertise! (rel="nofollow" in use)
chrpa Jayisgames needs your help to continue providing quality content. Click for details Hi! Weekday Escape and Weekday Puzzle are here! First we have two new cans from tomoLaSiDo and then two small rooms from isotronic. That's all for this...  ...
6,365 Views
0 Comments
chrpa Jayisgames needs your help to continue providing quality content. Click for details Welcome to Mobile Monday! We have another beautiful game from Nicolet and it's a winter game as it should be. Tasuku Yahiro have released another of their...  ...
6,161 Views
2 Comments
chrpa Jayisgames needs your help to continue providing quality content. Click for details We've got a new game from Rinnogogo's magical world and this time it really is magical.. Not only do you get to meet cute animals that express themselves...  ...
chrpa Jayisgames needs your help to continue providing quality content. Click for details After a few weeks of patient waiting, we have been rewarded - the new game from Ichima Coffeedo is here. We got a wonderful new game - it's...  ...

HELP Jayisgames.com

Recent Comments


Display 5 more comments
Limit to the last 5 comments

Game of the week


Dark Romance: Vampire Origins Collector's Edition

Your Favorite Games edit

add
Save links to your favorite games here. Use the Favorites editor.

Monthly Archives