

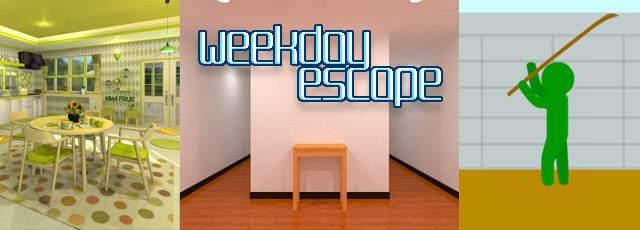
![]() Here we go again, another round of fun free escape games to get you over the hump. Game designers have been busy this week as well, encouraging us to play under the sea while bringing plenty of smiles and cheerfulness to spread around. Surely you haven't had enough, though? Come along and help us escape the weekday inside Hottategoya's maze-like minimalism, FunkyLand's hip vibe and No1Game's silly humor...
Here we go again, another round of fun free escape games to get you over the hump. Game designers have been busy this week as well, encouraging us to play under the sea while bringing plenty of smiles and cheerfulness to spread around. Surely you haven't had enough, though? Come along and help us escape the weekday inside Hottategoya's maze-like minimalism, FunkyLand's hip vibe and No1Game's silly humor...
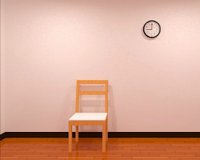 Escape from the Similar Rooms 12 - There's confusion within the maze-like layout as much as the uncanny similarity of each room in Hottategoya's latest escape. If you can figure your way around, gathering clues and collecting the pieces needed to access the door key shouldn't be much trouble. Hottategoya's clean-cut visuals make your investigations as pleasant as possible given the troublesome map. The puzzles themselves evolve into fun by the way clues are immersed in the furnishings. It sort of reminds me of my last office job—the empty hallways, the sparsely furnished rooms, the silence interrupted only by the sounds of opening cabinets and beeping codes...right down to the urgent desire to get out.
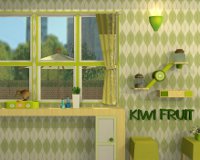 Fruit Kitchens No.08: Kiwi Green - Only a select few are able to wear and pull off this distinctively queasy shade of green, and FunkyLand is one of those so sui generis. Keeping it funky as always, the hip vibe of this flat is only the icing on a puzzleliscious cake. Gather up all seven of the sweet fruit which shares its name with that very unique New Zealand bird. Some are hidden in plain sight while a few require more steps to obtain—then, with your magically new key, make your way out the door. All this doable in five minutes or less. Who could resist?
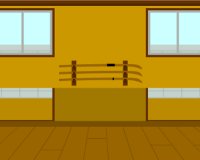 Find the Escape-Men 110: Martial Arts Dojo - Those who have played through No1Game's prolific series of escape-men titles won't find many surprises in this, the 110th search-for-ten-little-green-guys game. While still pleasantly resplendent in all EM's characteristic quirkiness and silly humor, it manages to be rather predictable all the same. Easily completed within a few short minutes, most the puzzles center on creative item use but there is a rather awkwardly inputted code to slow your progression out the door. It's not hard to envision the gamemakers hiding just around the corner, sharing a chuckle right along with you.
We love escape games, and our readers love talking about them and sharing hints! How about you? Let us know what you think, ask for clues, or help out other players in the comments below.


Walkthrough Guide
(Please allow page to fully load for spoiler tags to be functional.)
Kiwi Walkthrough
1. On the Table
a.
There’s one on the right of the plant.
b.
There’s a sealed can
2. In the Kitchen
a.
On the top shelf are 4 cups. Note their heights and symbols.
i.
Rabbit
ii.
Butterfly
iii.
Shoe
iv.
Flower
b. The Two Pans on the Wall
i.
They flip over, and there’s a fruit in the round one.
3. The Doors to the Atrium
a.
There’s a can opener in the pot on the right.
b.
Open the doors and examine the cabinet
i.
Enter the symbol code from the kitchen to get the pliers
4. The shelf near the window
a. The See Saw
i.
Use the pliers on the left jar to get a fruit
ii.
Open the little green drawers on the shelf to get another fruit and a key (to the atrium cabinet)
5. The Atrium Cabinet
a.
Use the key to open the cabinet and get the fruit. Note the code.
i.
R6L3 – Right 6 Left 3
6. The Shelf Near The Window II
a. The Animal Puzzle
i.
The animal is a Kiwi, by the way, the national animal symbol of New Zealand.
ii.
Enter the code, get the knob
b. The Cabinet Underneath
i.
Use the knob on the bottom door
ii.
Get the fruit inside
7. The Table II
a.
Use the can opener on the can, and get the fruit.
b.
Get the Key
8. The Door
a.
Fin
Posted by: Jonathan Kok |
July 2, 2014 6:43 AM
|
July 2, 2014 6:43 AM
Similar Rooms Walkthrough
There’s four rooms arranged in a ring.
In the first room there is a table between two corridors, a cabinet with 5 doors, a chair and a bookcase. Of note is the cabinet. Investigate each door to find
Locker (Tree), X, nothing, nothing, 6
Face the corridors and take the left one.
In this room, there is a lockbox on the table next to a corridor, a cabinet with five doors, a chair between the corridor you just came from and a locked door. Check out the cabinet.
Nothing, nothing, note, minus, nothing
The note says red + green
Go to the next room. Again, the cabinet is different, the two corridors are behind you, and the clock is different. Check out the cabinet and the clock.
Cabinet
Nothing, nothing, 8, nothing, locker (with a down arrow, and three offset buttons)
Clock
R=2, E=5, T=7 – these numbers are for the Tree Locker (first room)
Go to the next room
This time the bookcase is colourful and the cabinet is different.
Bookcase
add the red and green sections to determine the buttons for the locker from the last room - RMLRRM
Cabinet
71, nothing, locker, nothing, nothing
Cabinet Code
Combine the numbers and symbols from the lockers to create an equation – 71 x 8 – 6 = 562. This is for the lockbox from the second room
Go round the rooms again and use the codes on the lockers and lockbox to get the three gems.
Return to the room with the colourful bookcase and use the gems on its locker to get the key.
Go back to the room with the lockbox and use the key on the door
Posted by: Jonathan Kok |
July 2, 2014 7:16 AM
|
July 2, 2014 7:16 AM
Kiwi Green Walkthrough
Exploring
Table View
Note the kiwi sealed can.
Collect Kiwi 1/7 from behind the sunflower
Counter View
Inspect the hanging pans. Turn the circular pan to find Kiwi 2/7
Note the mugs on the high shelf- the mugs are different sizes, with different symbols
Window View
Nothing to collect yet, but things to note:
There is a little bird (a kiwi!) who needs a Left-Right Code.
There is a see-saw of a sort with a kiwi sealed in a jar.
There is a door that needs a handle to open.
Door View
Be sure to collect the Can Opener from the pot with the small tree.
With doors open, note the locked box- it needs a key, and also a combination of symbols.
Solving Puzzles & Opening Things
Kiwi Can
Use the Can Opener to receive Kiwi 3/7
4 Symbol Lock
Note the picture underneath it- it indicates that you need to go from small to large
Solution:
Flower, Shoe, Butterfly, Bunny
Receive Pliers
Kiwi See-Saw
Use Pliers to cut the wires off the jar to receive Kiwi 4/7
The see-saw will fall the other way- now the green rectangles will open.
Receive Kiwi 5/7 and Green Key
Frog Lock Box
Use Green Key to open the box.
Receive Kiwi 6/7, and see a green code.
Kiwi Bird Code
Use the hint from the Frog Lock Box- "R6L3"
Solution:
Rightx6, Leftx3
Receive Door knob
Green Cupboard
Use the Door knob on the door without one
Receive Kiwi 7/7 and your Fruit Kitchen Door Key. Congrats!
Posted by: VoxPopuli42 |
July 2, 2014 11:12 AM
|
July 2, 2014 11:12 AM
Escape-Men 110
There's no way to break this into exploring and solving, so I'm organizing by Escape man found in a rough narrative order.
I apologize for the puns. Not really. But a little bit.
Half and Half
To find this Green Man, you'll need to find an upper and lower half of the man.
Upper half:
To the left of the mats near Thirsty Man.
Lower half:
On the halberd with athletic tape- once you take the tape off, he's behind the top bit
Use the Athletic Tape on the lower half and attach the upper half for Escape Man 1
Shake It Up
There's something in the room that shakes when you click it.
The sign above the sliding door will drop a man after 5 clicks
Receive Escape Man 2
Just Chillin'
In the door view, there's a hotspot on the window in the lower right.
Receive Escape Man 3
Sliding Around
You'll need the paper hint in the door view for this, and use it with the sliding yellow door.
Solution:
The white block is the position of the yellow door- so the order is:
Middle, Left, Right, Middle, Right, Middle
Receive Escape Man 4
One More Thing
The paper hint has more than one use.
Look on the back!
Receive Escape Man 5
Thirsty Man
Let's help out our bud chilling right there, shall we?
But what can we give him to drink?
In the door view, click to the bottom left of the column to receive Juice
Give the drink to the man to receive Escape Man 6
What's the Mat-ter?
In the same view as Thirsty Man, there's a green-ish stack. Use one of the Halberds (without athletic tape).
Receive Escape Man 7
Bugging You
Spoil the green man's concentration!
After you have given Juice to the Thirsty Man, take a turn about the room and find a bunch of Ants on the bottle.
Use the Ants on the green man practicing in the courtyard (bottom-left window of the halberd view).
Receive Escape Man 8
Gi-Ant Surprise
After bugging away the concentrating man, return to the courtyard view.
Receive Anteater.
(No, I wasn't expecting that either.)
Inspect the Anteater and fluff his tail multiple times to receive Escape Man 9
Okay, What's the White Fluffy Stuff?
Turns out, it's ants. And we know what to do with ants
Use the Anteater to clear out the white ants.
Receive Escape Man 10
Hiiii-Yah! or Getting Out
Once all 10 men combine, give your escape man the Halberd
Attack the door, and it will open
Congratulations!
Posted by: VoxPopuli42 |
July 2, 2014 12:03 PM
|
July 2, 2014 12:03 PM