


![]() Blah blah. Chat about this week's assortment of featured escape games while exuding wittiness and charm. Optimal but optional: a collective theme to tie it in all neatly and make like serendipity spawned a matching set. Well, just to be contrary, I'm not going to do that. I'll just throw these games out into the jigasphere and leave it up to you to pretend I gave a whopping good intro. Aaannnd, as long as I'm rabble-rousing, let's make that not three but four games. Surely one of them will take a fondness to you and follow you home?
Blah blah. Chat about this week's assortment of featured escape games while exuding wittiness and charm. Optimal but optional: a collective theme to tie it in all neatly and make like serendipity spawned a matching set. Well, just to be contrary, I'm not going to do that. I'll just throw these games out into the jigasphere and leave it up to you to pretend I gave a whopping good intro. Aaannnd, as long as I'm rabble-rousing, let's make that not three but four games. Surely one of them will take a fondness to you and follow you home?
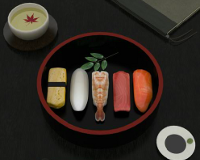 Dismantlement Sushi (Browser) - by Gam.eBB.jp is a reminder of why we looove the dismantlement games even as it leaves us wanting for so much more. Although the designer recommends Japanese language proficiency, it's actually unnecessary; figuring out the first riddle is just as fun without it. To start play, click on the orange button near the bottom of the game screen, remove the first screw, and you'll be well on your way to taking apart a five-piece sushi dinner. Next, if you enjoy this version, try the other Dismantlement SUSHI on your mobile device—while equally short and simple, it has six new puzzles to temporarily amuse as you draw curious looks from fellow queue-mates, waiting room sitters, or your dinner date.
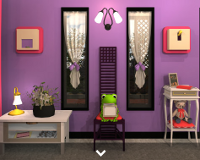 Candy Rooms Escape 6: Violet Sweet - The sweetness keeps coming from FunkyLand and we're beginning to think this infatuation is becoming an obsession. It's like Winchester's mansion but with candies instead of restless spirits. Do you want out? Earn the door key ante by collecting—through keen eyes and puzzle solving—five pieces of candy. How did you do? Violet Sweet is either the easiest or one of the most deceptive installments in the series. At least, it had me fooled for...a while. After this particular head palm moment, I wondered if I partook a tad too heartily in the festivities last St. Patty's day.
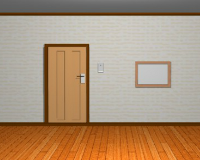 Escape from the White Picture Room - Perhaps you wonder how many variations of a basic concept can Yomino-Kagura create? The key figure in each Yomino Kagura game is always a piece of furniture or ornament while you continue as protagonist and the theme remains the same: puzzles on top of puzzles. Unless you read Japanese, you'll miss the narrative, but that's not what matters. As long as you love puzzles, then these neat and logical agents of fun are well-stocked inside this otherwise plain room. Not much else needs saying when there's the simple satisfaction of an escape game to be had.
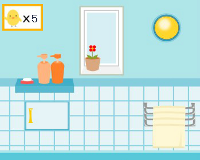 Chick Hide and Seek 16 - Too cute to resist, Yuri's brood of downy yellow peeps are more interested in playing games than having a soak in the tub. If you are hoping for cranial Calisthenics to round out your coffee break, better to seek somewhere else. Otherwise, look around this bathroom for ten adorable chicks, using items and deciphering codes, and don't be surprised if your cheek muscles contract and your smile gets a good workout. Besides, even if you didn't pull off one of the greatest wins of the decade, at least you can make a clean escape!
We love escape games, and our readers love talking about them and sharing hints! How about you? Let us know what you think, ask for clues or help out the other players with your walkthroughs in the comments below.


Walkthrough Guide
(Please allow page to fully load for spoiler tags to be functional.)
Walkthrough for Candy Rooms Escape 6: Violet Sweet:
Candy 1:
Click on the coffee table to zoom in. There is a round candy in a blue wrapper on the pink saucer next to the white cup.
Candy 2:
Click on the standard lamp to the right to zoom in. There is a spiral lollipop hanging upside-down from the lampshade.
Candy 3:
Click on the curtains in the background to the left to zoom in. There is an orange sucker sticking out of the purple vase on the white end table to the left.
Candy 4:
Click on the green frog doll in the background to zoom in. Then click on the white end table to the right to zoom in again. Take the purple pencil from the top of the end table.
Click the down arrow to zoom out one level, then click on the green frog doll to zoom in again. Use the pencil on the frog doll's board to reveal a four-digit code.
Click the back arrow twice, until you are looking at the full view again. Now click on the curtains in the background to the left to zoom in. Then click on the white end table to the left to zoom in again. Enter the four-digit code and open the door to collect the hat.
Click the back arrow twice, until you are looking at the full view again. Then click on the green frog doll in the background to zoom in. Use the hat on the lever on the wall to the right. Now you can collect the cylindrical candy wrapped in a striped green wrapper from the matching device on the left.
Candy 5:
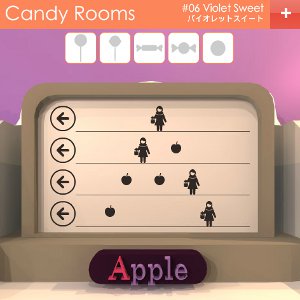
Click on the standard lamp to the right to zoom in. Then click on the white table to zoom in again. You will need to solve this puzzle to proceed.
The solution is to move the silhouettes of the girls by clicking on the arrows, until they form the shape of a letter "A" with the apples. If you move one of the silhouettes too far, just keep moving her and she will loop back around to the right.
Once the silhouettes are in the correct positions, click on the "Apple" button to open the panel. Take the apple.
Click the back arrow twice, until you are looking at the full view again. Now click on the curtains in the background to the left to zoom in. Then click on the glass tank below the window to zoom in again. Place the apple on the right-hand yellow tray to make the left-hand tray rise. Take the coin from the pedestal on the tray.
Click the back arrow twice, until you are looking at the full view again. Now click on the red gumball machine on the table in front of the couch to zoom in. Use the coin on the gumball machine, and take the purple gumball which is dispensed.
Once you have all five candies, they will merge together to form a key, which will unlock the black exit door behind the couch.
Posted by: Nezuji |
March 28, 2014 9:15 AM
|
March 28, 2014 9:15 AM
Walkthrough for Escape from the White Picture Room:
The first step is to check the shelf below the television to find a box with two buttons.
The clue to opening this box is in the picture hanging above the wooden cupboards.
Press the left button five times to open the box and get the stick.
Using the stick:
Put the stick into the hole on the wall between the exit door and the apparently empty frame. This will turn of the lights, and allow you to see the coloured circles which glow in the dark in the previously empty picture frame.
Using the glow-in-the-dark clue:
This clue is the correct sequence to press the buttons on the large white box next to the wooden cupboards: Red-Blue-Red-Red-Blue, or Left-Right-Left-Left-Right. Press the buttons to open the panel, take the key, and make a note of what is written inside the square.
Using the first key:
Unfortunately, this key won't open the door. However, it will open the leftmost wooden cupboard. Take the yellow shape, and make a note of what is written inside the circle. Also, flip the yellow shape over in your inventory, and make a note of what is written in the triangle.
Opening the wooden cupboard with the three white shapes on it:
The white shapes can be replaced with clues hidden around the room to create a simple mathematical formula which is equal to the three-digit code needed to open this cupboard. You can find the clues in the following places.
The triangle:
On the back of the yellow shape. Use the "about item" option to examine it in your inventory, then click on the large picture to flip it over.
The square:
Inside the white box with the red and blue buttons
The circle:
In the back of the leftmost wooden cupboard
The final answer is:
50 x 5 + 3 = 253
Open the cupboard and take the TV Remote Control.
Using the TV Remote Control:
Use the TV Remote Control on the TV to show five sets of right-angled lines in a row.
Using the right-angled lines clue:
This clue shows the correct order in which to press the buttons to the left of the narrow brown closet doors: Left-Right-Right-Left-Right. This will unlock the closet, revealing a second key that we can't take yet, a blue number to note on the rear wall, and a round plate with three stars sitting on a shelf to pick up.
Using the closet blue number clue:
This three-digit number is the combination needed to open the rightmost wooden cupboard. Open the cupboard and take the blue shape.
Using the round plate with stars:
Put the plate on top of the round glass table with the numbers one to six painted on the top. Make a note of which number is next to which coloured star.
Using the coloured stars clue:
This clue shows the combination needed to unlock the wooden drawer next to the glass table.
The hint on the drawer indicates to enter the numbers in the order Red, Yellow, Blue. This makes the code 512. Open the drawer and take the red shape.
Using the three coloured shapes:
The shapes are used to open the blue and white checkered box to the left of the TV. Simply put each shape into its corresponding indentation. Open the box and take the pliers.
Using the pliers:
The pliers can be used to cut the wire holding the key inside the narrow brown closet. Take the key.
Using the second key:
Open the light brown exit door and escape!
Posted by: Nezuji |
March 28, 2014 9:56 AM
|
March 28, 2014 9:56 AM
Walkthrough for Chick Hide and Seek 16:
Chick 1:
On the bathtub view, look in the bathtub; it's hiding in the lower left.
Chick 2:
On the bathtub view, zoom into the window above the bath; it's hiding behind the shampoo and conditioner.
Chick 3:
On the towel rack view, zoom in on the towels; it's hiding under the topmost towel.
Chick 4:
On the sliding door view, take the wooden pail on the floor. Turn to the mirror view, and zoom in on the sink. Put the wooden pail in the sink, fill it with water, and a chick will jump into it.
Chick 5 & screwdriver:
On the bathtub view, zoom in on the bathtub and look at the tiles behind the tub. They show a pattern which is Up-Down-Down-Up-Down-Up.
Turn to the towel rack view, and use this code on the small door below the shelf on the left to reveal a chick and a screwdriver.
Chick 6:
On the mirror view, click on the right-hand wall light to zoom in. Use the screwdriver to remove the cover, and find a hiding chick.
Chick 7 & octopus toy:
On the mirror view, click on the sink to view the mirror up close. There are four symbols: A spot, a star, a musical note, and another spot.
Turn to the towel rack view, and zoom in on the towel rack. Three of the towels can be flipped over to reveal different patterns; Yellow dots, red stars, and blue musical notes.
Turn to the sliding door view, and use these clues to open the small door below the shelf on the left and reveal a chick and an octopus toy.
The code from left to right is yellow, red, blue, yellow, or 7 clicks, 1 click, 4 clicks, 7 clicks.
Chick 8 & crowbar:
On the towel rack view, click on the outlined panel on the floor to zoom in. Use to octopus on the panel to open it, revealing a hiding chick and a crowbar.
Chick 9:
On the sliding door view, use the crowbar on the discoloured tile below the right-hand shelf to reveal a chick.
Chick 10:
On the bathtub view, use the crowbar on the drain cover in the lower-left to catch the chick sliding on the bar of soap.
Now that you have found all 10 chicks:
On the bathtub view, look inside the bathtub. Click on the rubber ducky in the center to flip it over and reveal a key. Turn to the sliding door view, and use the key to unlock the door and escape!
Posted by: Nezuji |
March 28, 2014 10:28 AM
|
March 28, 2014 10:28 AM
Walkthrough for Dismantlement Sushi (Browser):
As usual, click on the screw twice to start.
This is a bit different from the Android/iOS version. For starters, the soup bowl, side dish and chopsticks are only for decoration, and don't hide any clues.
Layer 1 - The lid:
Zoom in on the lid, and click it to reveal the first puzzle. While this looks daunting at first, you actually only need to be able to compare the symbols you can see around the outside with those on the central spindles. If you imagine the symbols on the edge as being a clock face, Then the central spindles all start on the "12 o'clock" symbol, and are moved one position clockwise by a click of the down arrow, and one position anti-clockwise by a click of the up arrow.
From the starting position, click up once on the leftmost spindle, down once on the middle spindle, and then six times in either direction on the rightmost spindle. It appears that the only way to reset the spindles is to reload the game.
After unlocking the layer, close the lid and back out to remove the top layer.
Layer 2 - Sushi:
Each piece of sushi contains a smaller puzzle. The middle (prawn/shrimp) sushi must be unlocked first.
Middle (prawn/shrimp):
Clicking on the sushi reveals a triangular symbol with two coloured squares on either side. The central symbol represents the ebi sushi itself, and the squares represent the other sushi pieces.
Change the squares to match the colours of the corresponding sushi pieces. From left to right, the colours are yellow, white, red, and orange, or 3 clicks, 1 click, 2 clicks, and 4 clicks.
Unscrew the screws, back out, and remove the ebi sushi. Now you can tackle the other sushi pieces in any order.
Outer left (egg):
There are four chicks beneath an arrow pointing from left to right. Clicking on the chicks makes them cycle through: Chicken, egg, yakitori (fried chicken skewer) shop lantern, and back to chick.
You need to use the four positions to show the passage of time, from left to right.
The correct order, from left to right, is egg, chick, chicken, and then lantern.
Inner left (squid):
Each letter panel has a matching small metal dot tracing a path above it. The dots each repeat the same shape in an endless loop. The shapes traced by the dots are letters.
The letters, from left to right, are B, P, and D.
Inner right (tuna):
Each letter panel has a matching window above it, which shows part of a letter. The letters periodically spin around, so that you can eventually see the whole of each letter.
The letters, from left to right, are D, O, and C.
Outer right (salmon):
You will see a bear head in the center of the puzzle, with a salmon swimming on a circular track around the outside. Clicking on the bear head will make it butt into the grey "GET!" area below. You need to make the bear eat the salmon.
If you're wondering how on Earth you can do this when the salmon never swims through the "GET!" area, take a note of the bear's facial expression both when your cursor is over it, and when your cursor is not over it.
Make sure that your cursor is not over the bear head, and wait for the salmon to swim into the "GET!" area. Then quickly click on the bear head to make him eat the salmon.
After removing every piece of sushi, back out and click on the empty box to remove a hidden panel, revealing the bomb.
Layer 3 - The bomb
There are three letter panels which must be set correctly before you attempt to turn the screw to disarm the bomb.
The tiles above the letter panels should indicate which letters to set on the panels, but they have been scrambled. The arrows show how to unscramble the tiles correctly.
The coloured numbers in the lower-right indicate the order in which to follow the arrows; first blue, then purple. The outer arrows are blue, while the inner arrows are purple.
The unscrambled tiles read X, Y, and Z from left to right.
Turn the screw to disarm the bomb, click on the now green panel to remove it, and remove the final screw to finish the game.
Posted by: Nezuji |
March 28, 2014 11:32 AM
|
March 28, 2014 11:32 AM