

Urban Legends: The Maze
Platform: Mac, Windows
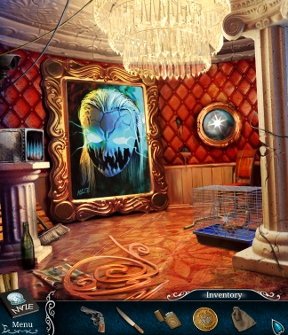
![]() They've been saying for years now that reality television rots your brain, but nobody ever really expects it to kill you. Urban Legends: The Maze is a new hidden-object adventure from Elephant Games that puts you in the spotlight... for murder! Dun dun dun! The popular reality television competition show "The Maze" comes to an abrupt end one night during the finale when one of the competitors appears to die on screen, and the rest go missing immediately afterwards. The families of the lost have hired you, but exploring the bizarre sets and traps that make up the Maze proves this is one unique investigation... especially when you realise you're not alone in the sprawling structure, and the shadowy figure doesn't have your best interests in heart. Unless, of course, you find spring-loaded crossbows, bear traps, and near-fatal plunges romantic.
They've been saying for years now that reality television rots your brain, but nobody ever really expects it to kill you. Urban Legends: The Maze is a new hidden-object adventure from Elephant Games that puts you in the spotlight... for murder! Dun dun dun! The popular reality television competition show "The Maze" comes to an abrupt end one night during the finale when one of the competitors appears to die on screen, and the rest go missing immediately afterwards. The families of the lost have hired you, but exploring the bizarre sets and traps that make up the Maze proves this is one unique investigation... especially when you realise you're not alone in the sprawling structure, and the shadowy figure doesn't have your best interests in heart. Unless, of course, you find spring-loaded crossbows, bear traps, and near-fatal plunges romantic.
 To track down the missing contestants, you'll have to venture into The Maze itself, which isn't your ordinary television studio. The tricks that were only supposed to confound the players have turned deadly, and the various sets are more than a little surreal. You'll have to solve puzzles and hidden-object scenes to earn items you'll need to proceed, keeping an eye out for danger all the while. You won't be entirely without help, however. Clicking once on an interactive area will give you a generic description, but a second click will usually net you a more direct clue about what you need to proceed, and hitting the hint button in regular gameplay will flat-out tell you what your next step should be. If you prefer to figure things out for yourself, try the map attached to your diary; it's colour-coded to indicate areas you can accomplish something in.
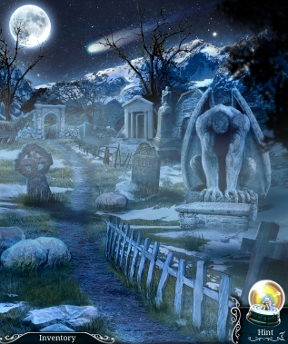
Analysis: Elephant Games is one of the most underrated hidden-object adventure developers, consistently turning out wildly creative titles that blend the surreal with the creepy to craft engaging, memorable experiences. The Maze is no different; with its strange settings, beautiful art, eclectic soundtrack, and weird plot that keeps you guessing. It's more of a straight-up mystery thriller than most games, and there are a few really clever sequences, such as a quick-sand pit, that make it stand apart from other games in the genre. The frequent use of short animated cutscenes also helps to keep you engaged in the experience, making it feel like you're in a thriller movie rather than just staring at a series of static images. Chasing down a malevolent scarecrow/jack-o-lantern dude through a series of fantastical environments, outwitting traps and performing acts of heroism? Awwwww yeah, that's the stuff.
 While the difficulty level for the actual gameplay is fairly sedate across the board, The Maze earns high marks for how often it takes you to a new location so you never get bored. In each set of areas you'll find yourself doing a fair amount of back-tracking within them, and since interactive spots aren't always immediately visually obvious you'll need to poke around with your cursor to be sure you aren't missing something from time to time, but as you progress you'll move deeper and deeper into The Maze, and each level has its own unique set of challenges and designs. You'll run into the typical mildly frustrating adventure game scenarios of having a bunch of items perfectly suited to the task at hand but needing to track down the one specific thing for each use, but largely the game remains annoyance free. (Apart from one surprisingly drawn out helicopter puzzle.) Heck, you never even repeat the same hidden-object scene twice, which is incredibly refreshing.
While we always advise you try the demo before you buy (be aware that this one ends at a predetermined point regardless of whether your hour is up), Urban Legends: The Maze should be a no-brainer purchase decision for fans of hidden-object adventures with originality and mystery. The over-the-top cheese-tastic plot might put off fans who prefer their adventures supar seeerious, but if you like a sense of humour and unique flair to your gaming, you'll never be bored with Urban Legends: The Maze, and at over five hours to finish for most players, it's significant bang for your buck. Highly recommended, and thoroughly enjoyed by your humble word monkey.
![]() Windows:
Windows:
Download the demo
Get the full version
![]() Mac OS X:
Mac OS X:
Download the demo
Get the full version


Walkthrough Guide
(Please allow page to fully load for spoiler tags to be functional.)
Urban Legends: The Maze Walkthrough Part 1 (General Information & Chapters 1-3)
General Information
Use the mouse to navigate and interact with the environment throughout the game.
When the cursor changes to a magnifying glass, it means you can zoom in to a specific area to investigate it more closely, take a snapshot, or start a puzzle.
Snapshots are photographs taken automatically that will document important information in your notebook.
Certain areas will be highlighted with sparkles to indicate you can interact with that area to start a hidden object scene.
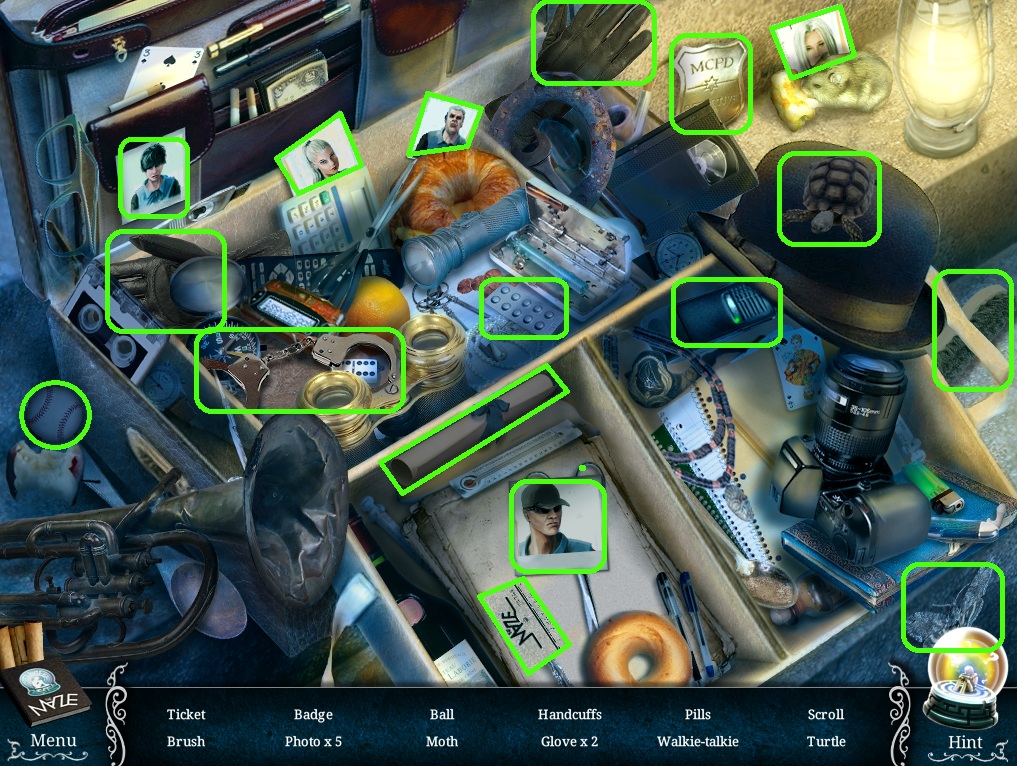
In a hidden object scene, items are listed at the bottom of the screen. Find and collect all of the items from the list in the area above to complete a hidden object scene.
At the end of a hidden object scene, one of the items found will be placed directly into your inventory.
Your inventory is a list at the bottom of the screen that contains all of the objects you've collected.
Mouse over the word "Inventory" to reveal the bar containing all of your inventory items.
Click an item in your inventory to select it, then click an area of the environment to attempt to use it.
To the right of the inventory bar is the hint button.
Click the hint button to reveal an item in a hidden object scene or to receive instructions for the next step in your adventure.
On the left side of the inventory bar is the notebook.
Snapshots, relevant information, and clues that may be used to solve future puzzles can be found inside the notebook.
Click the left and right arrows at the bottom of the notebook to navigate through the pages.
When the notebook is open, you can click the Map tab in the upper right corner to access the map.
You can also open the map by clicking the scroll in the lower left corner of the screen.
The map shows a map of the entire area and marks your current location with an "X".
Click a destination on the map to automatically travel there.
If an area on the map is shaded green, it means you have actions in that area that you can perform.
If the area is shaded yellow, it means that you are currently unable to do anything in that area, but you will have to come back later.
If an area on the map is unshaded, it means you have completed all the actions in that location.
Chapter 1
Entrance
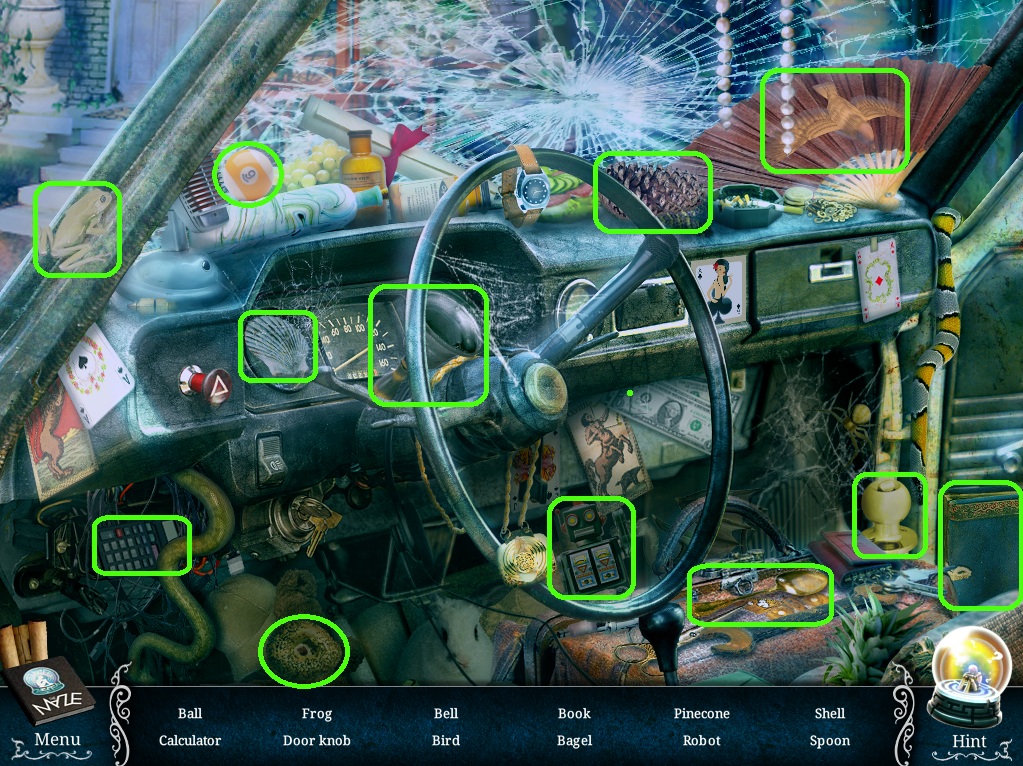
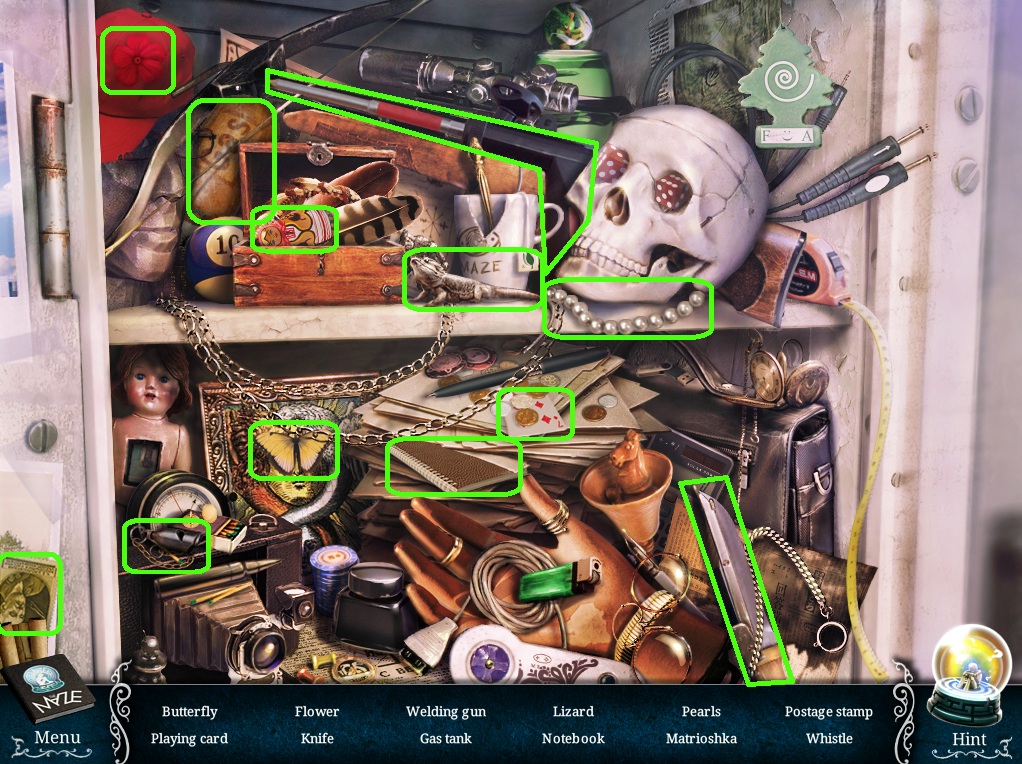
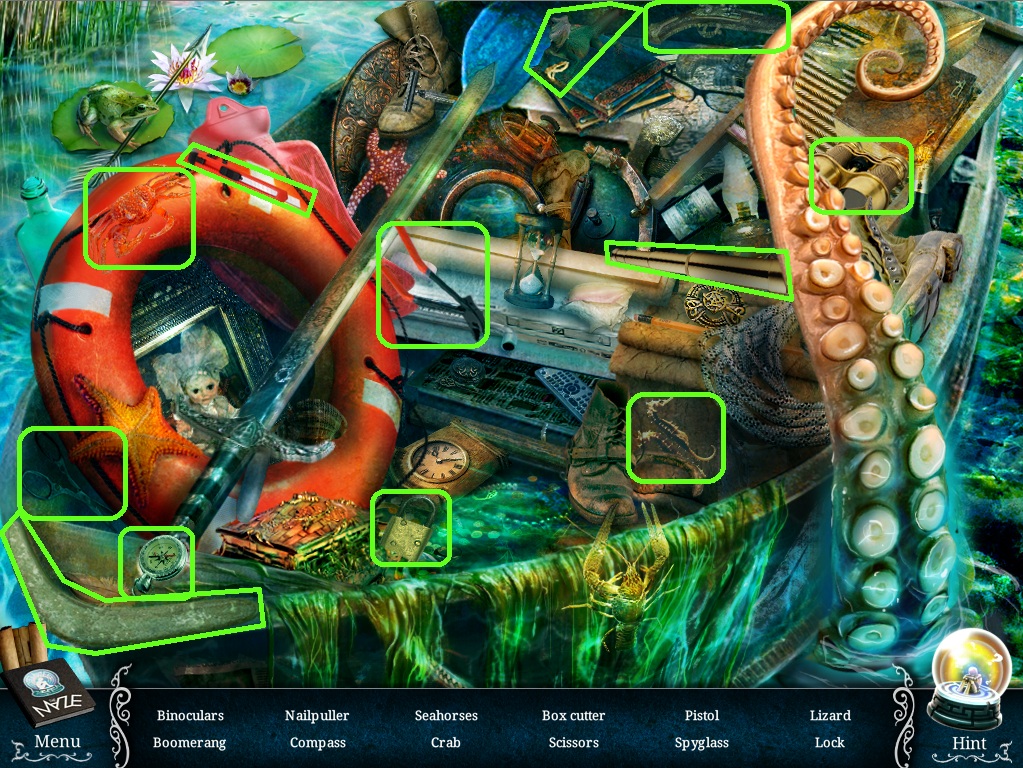
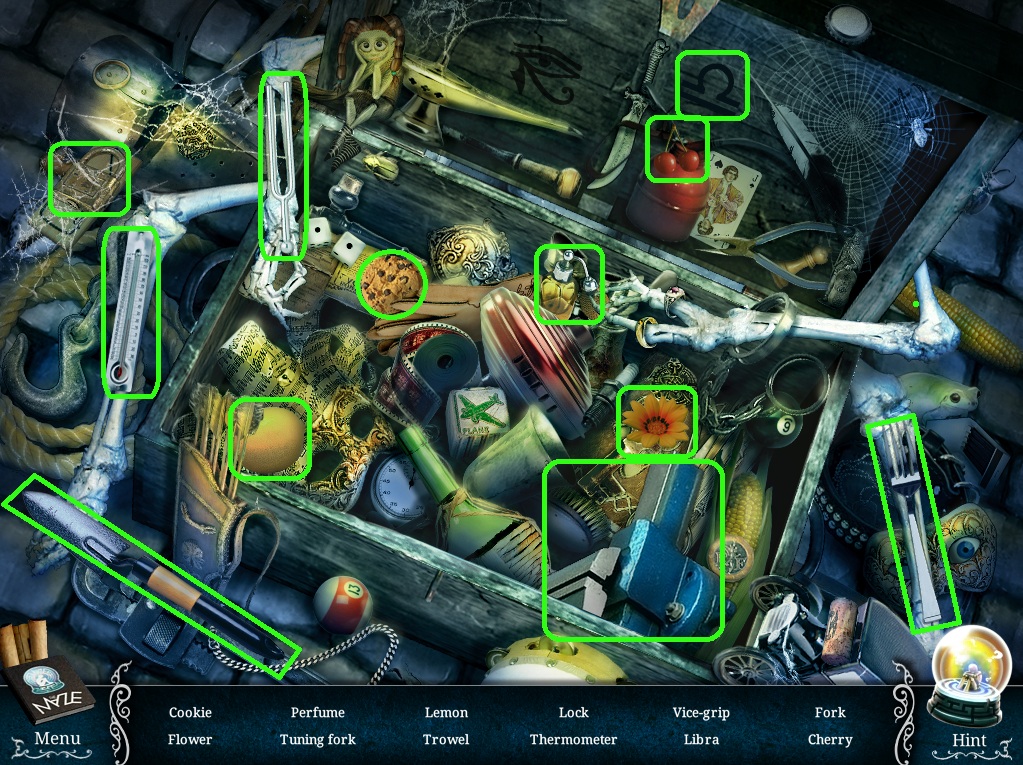
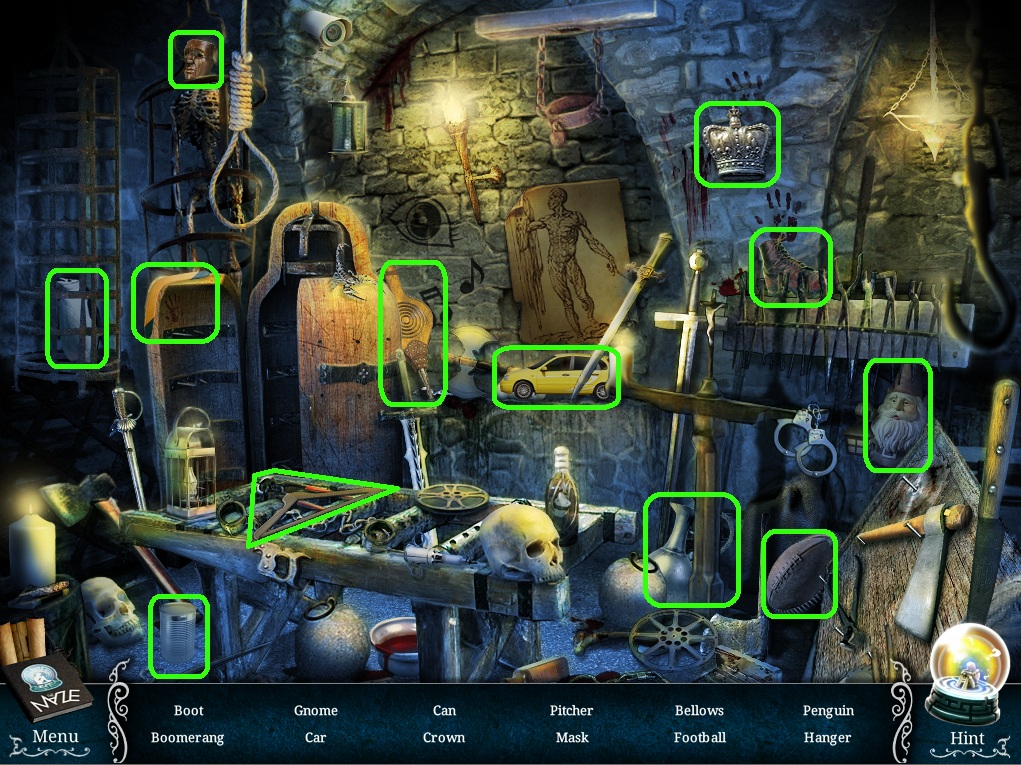
Click the bag on the stairs to start the hidden object scene.
Screenshot.
Once the hidden object scene is complete, you will receive a Ticket.
Click the door to zoom in.
Use the Ticket from your inventory on the access card slot.
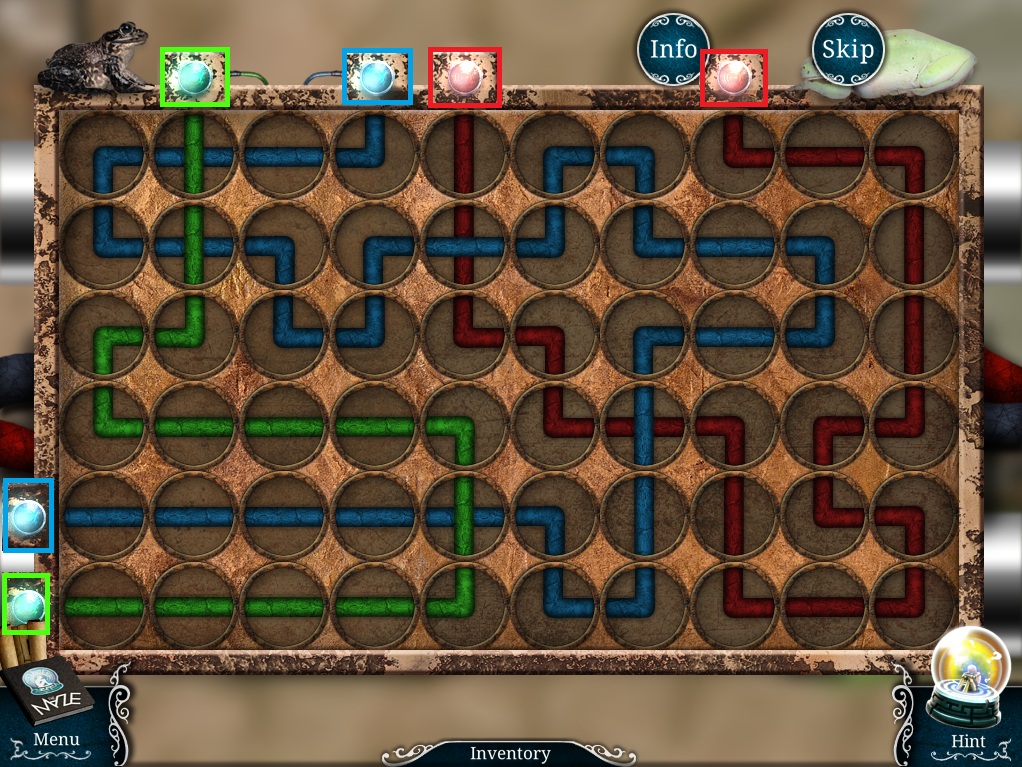
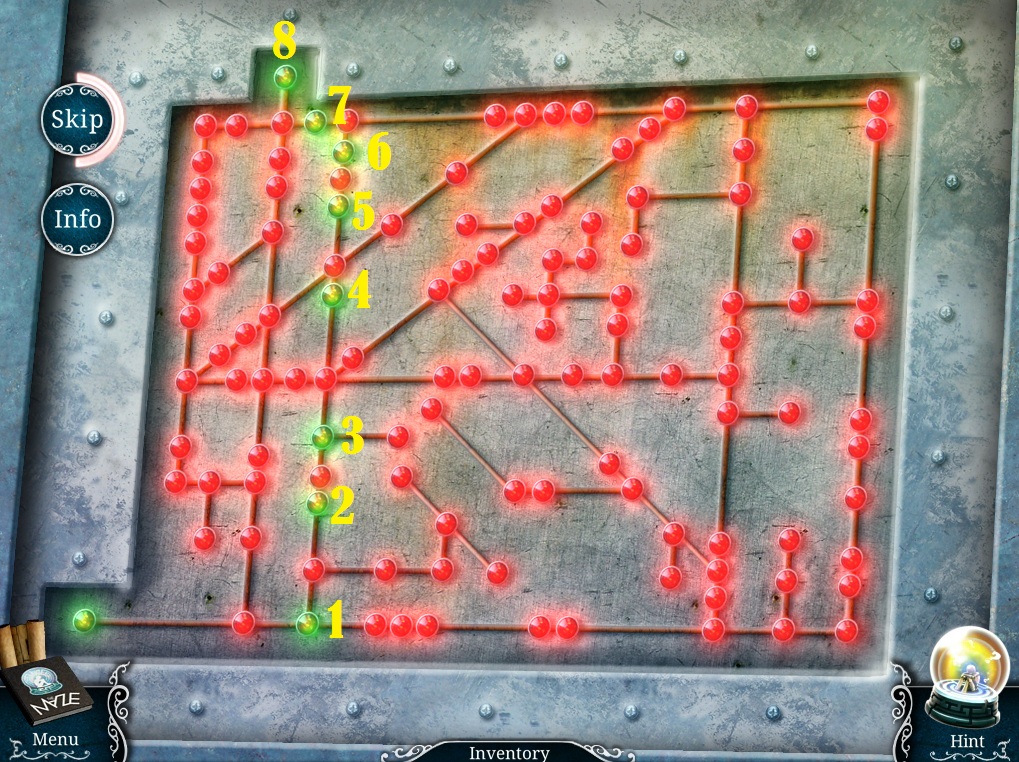
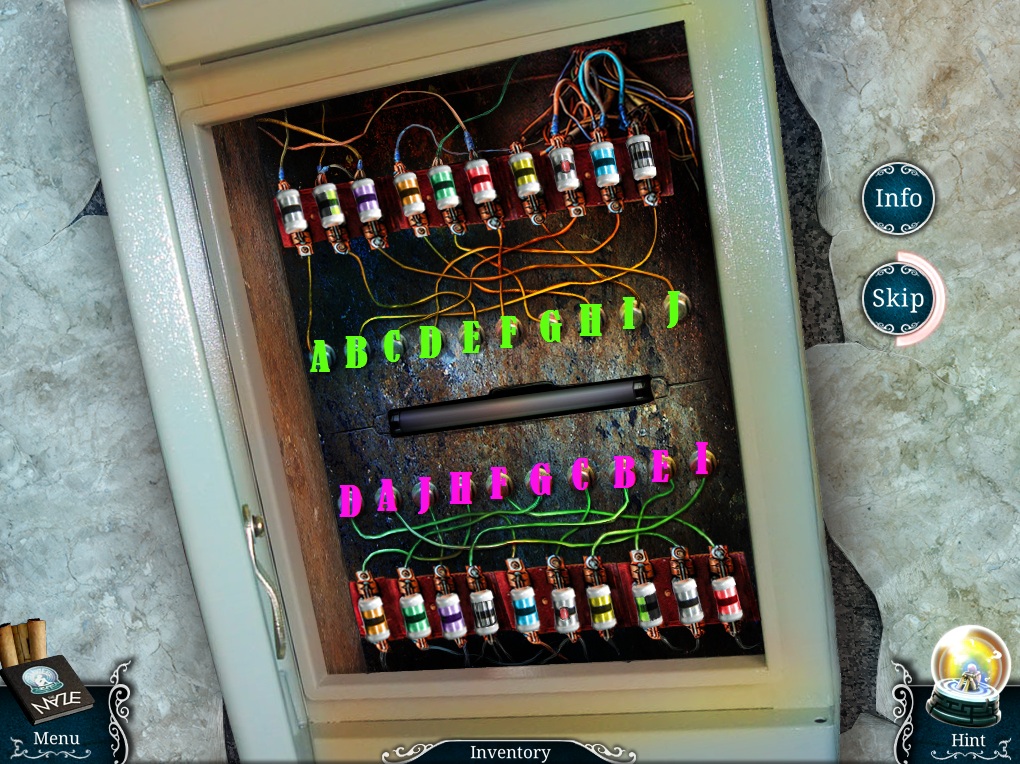
Click the wire panel to start the puzzle.
To solve this puzzle, rotate all the wire parts to connect a path between the matching colored lights.
Click a round tile to pivot the wire clockwise.
If a continuous line is formed from one light to another, the pair of lights will illuminate.
Solution.
Go through the open door into pavilion 1.
Pavilion 1
Click the seat of the folding chair to zoom in and take the Power Cord.
Click the statue to zoom in and take the Car Remote around its neck.
Click the car for a closer look.
Use the Car Remote on the door to open it.
Click the car to start the hidden object scene.
Screenshot.
Once the hidden object scene is complete, you will receive a Door Knob.
Click the white door to zoom in.
Add the Door Knob from your inventory to the socket in the door.
Go through the open door into the corridor.
Corridor
Take the Arrow lodged into the pipe on the right.
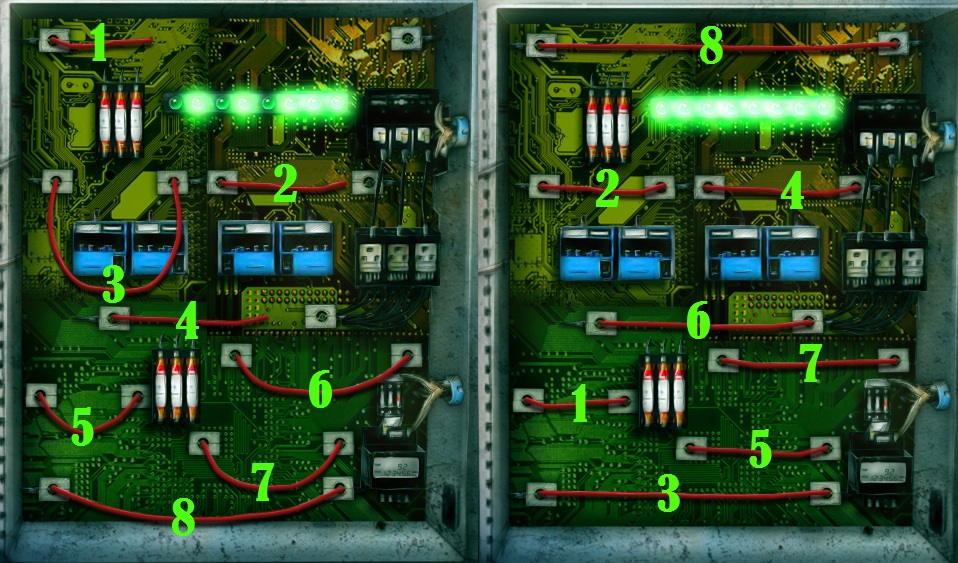
Click the electrical panel on the wall for a closer look.
Attach the Power Cord from your inventory to the cable on the box to start the puzzle.
To solve this puzzle, connect all of the posts with red wires to turn on each of the eight green lights.
Click a wire to select it, and it will stretch flat to its maximum length.
Place it between two posts to connect them, causing one of the lights to turn on.
Solution.
Go through the left door into pavilion 2.
Pavilion 2
Click the Bathysphere to zoom in.
Take the Ring above the window.
Go back to the corridor, then go through the door on the right into the bathroom.
Bathroom
Click the doll on the ground of the first stall to zoom in.
Take the Die beside the doll's severed head.
Go back to the corridor, then go through the middle door into the reception area.
Reception
Click the heads of the Cerberus for a closer look.
Give the Die to the left head, the Ring to the middle head, and the Arrow to the right head.
Click the button at the bottom of the pedestal to zoom in.
Note the symbols and their corresponding numbers carved into the pedestal, then push the button.
Click the reception desk to zoom in and take the Empty Gun.
Click the water cooler to zoom and take the Part of Valve (1/3).
Click the glass case for a closer look, then read the note stuck to the glass.
Go through the doors on the right into the lift.
Lift
Click the lift control for a closer look.
Click the flashing Lift Button to add it to your inventory.
Inspect the paper in the magazine rack next to the lift control.
Go back to pavilion 1, then go through the archway to the house.
House
Click the front door for a closer look.
Take the Stethoscope hanging from the door knocker.
Click the handle to open the door.
Click the lift to step inside.
Add the Lift Button from your inventory to the empty space on the panel, then click the up button to raise the lift.
Go through the door into the room.
Room
Click the boxes to start the hidden object scene.
Screenshot.
Once the hidden object scene is complete, you will receive a Crowbar.
Return to the reception area.
Reception
Click the lock on the gates to zoom in.
Use the Crowbar from your inventory to remove the Knife.
Go back to the house.
House
Click the cover on the wall beside the house to zoom in.
Use the Knife from your inventory to cut through the cover.
Go forward into the secret room.
Secret Room
Click the trash bin to zoom in and take the Solvent.
Click the code lock at the bottom of the wall for a closer look.
Read the paper behind the corner of the broken panel, note the 4 digit number, then take the Buttons scattered around the floor.
Click the broken lamp to zoom in and take the Part of Valve (2/3).
Go back to pavilion 1.
Pavilion 1
Click the seat of the folding chair to zoom in.
Use the Solvent from your inventory on the glue covered Key, then click it to add it to your inventory.
Return to the lift.
Lift
Click the safe to zoom in.
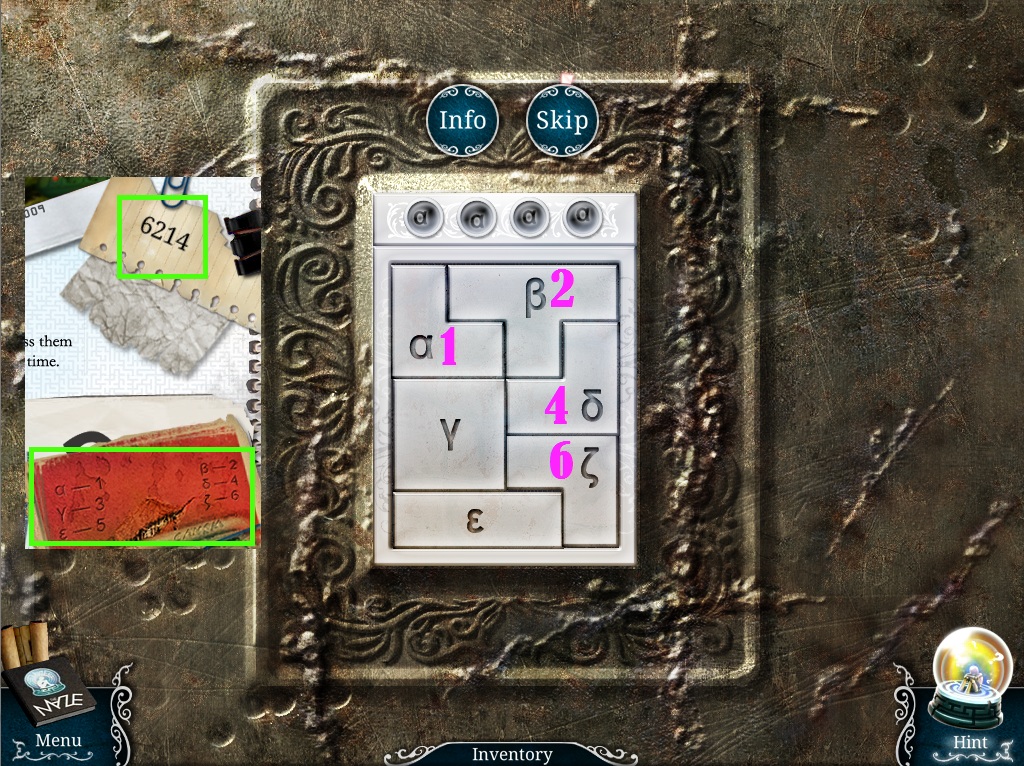
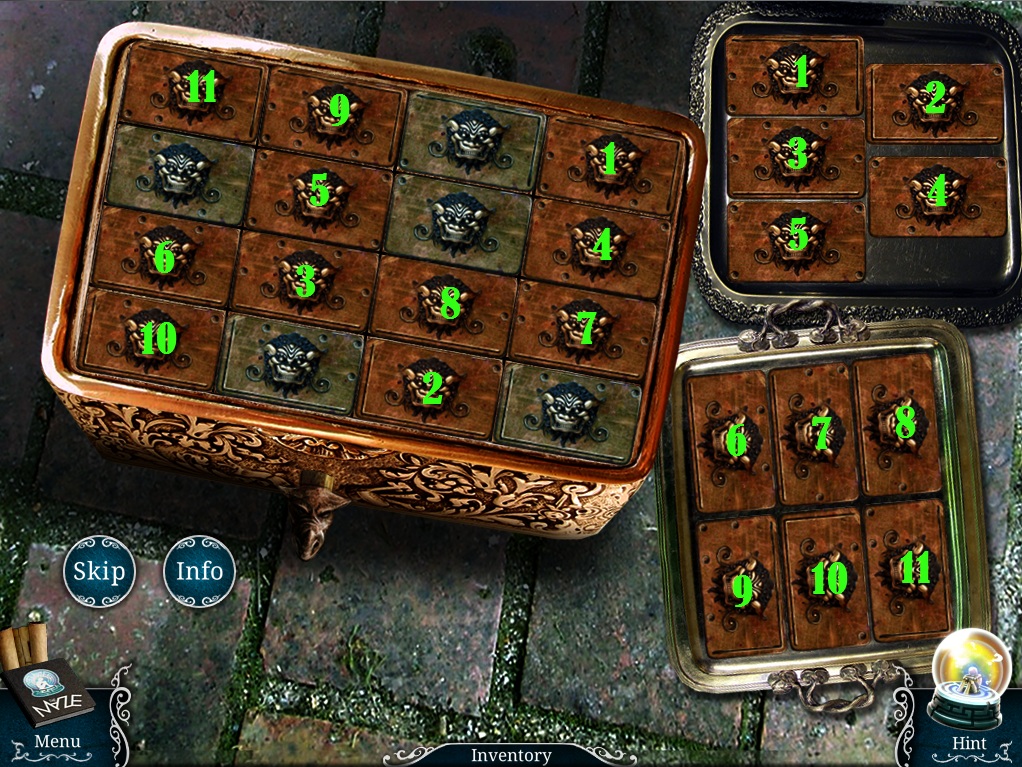
Add the Buttons from your inventory to the panel to start the puzzle.
To solve this puzzle, fit all of the tiles inside the rectangle of the panel.
Then, click the tiles in the correct order to enter the combination found in Jim's note in the secret room.
Use the Greek letter translation in the notebook, found from the carved symbols of the Cerberus pedestal in the reception area.
Solution.
Take the Ratchet Tool from the open safe.
Go back to the room behind the house.
Room
Click the dummy for a closer look.
Use the Ratchet Tool from your inventory to remove the dummy's Arm.
Return to pavilion 2.
Pavilion 2
Click the water for a closer look.
Use the Arm from your inventory to remove the Corkscrew from the water.
Click the toolbox to zoom in.
Use the Key on the padlock at the top of the toolbox.
Take the Clippers from the open box.
Go back to the house.
House
Click the mechanical hand on the ground for a closer look.
Take the Float next to the hand.
Use the Clippers from your inventory on the hand to reveal the lighter.
Click the barrel to zoom in.
Use the Corkscrew to remove the cork from the barrel tap.
Return to the bathroom.
Bathroom
Click the fire sprinkler at the ceiling to zoom in.
Use the Lighter from your inventory on the sprinkler to start the water.
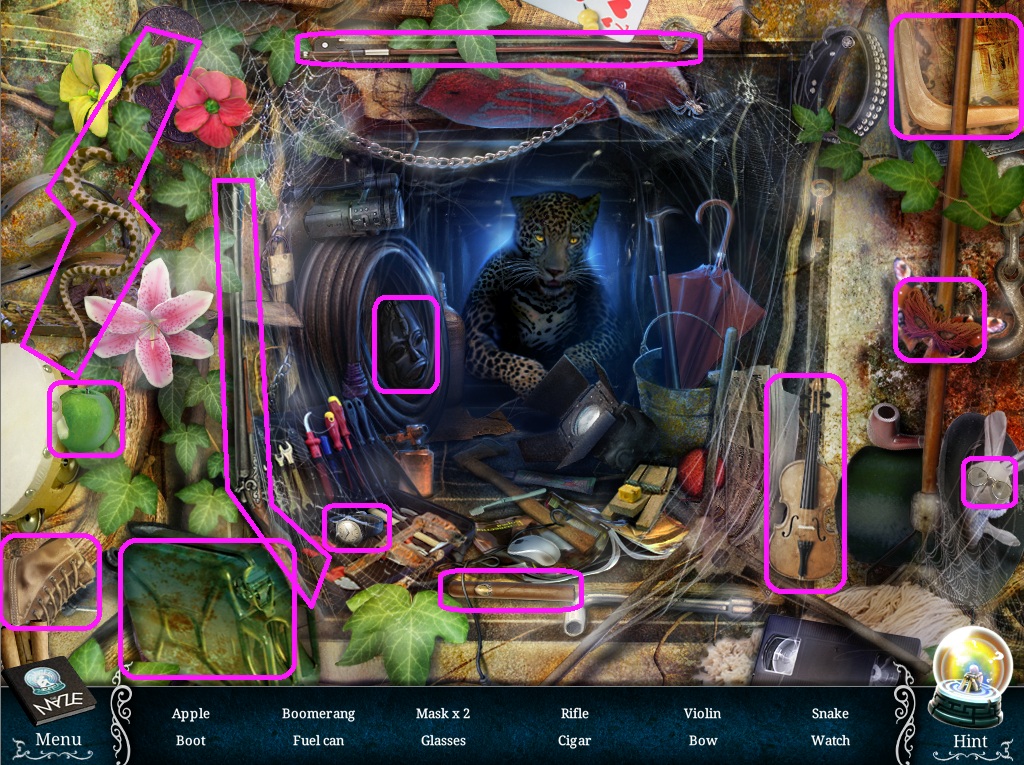
Click the vent to start the hidden object scene.
Screenshot.
Once the hidden object scene is complete, you will receive an Empty Fuel Can.
Go back to the house.
House
Click the barrel to zoom in.
Place the Empty Fuel Can from your inventory on the ground in front of the barrel.
Click the tap to pour the gas from the barrel, then take the Filled Fuel Can.
Return to pavilion 2.
Pavilion 2
Click the crane fuel tank for a closer look.
Use the Filled Fuel Can from your inventory on the funnel to fill the tank.
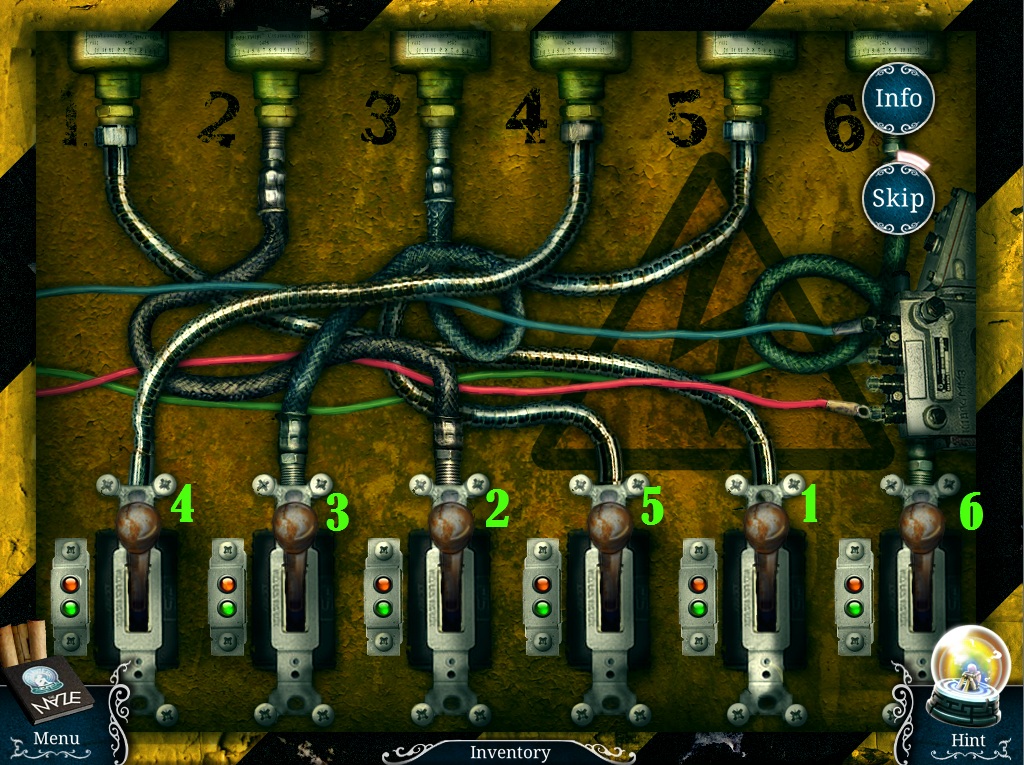
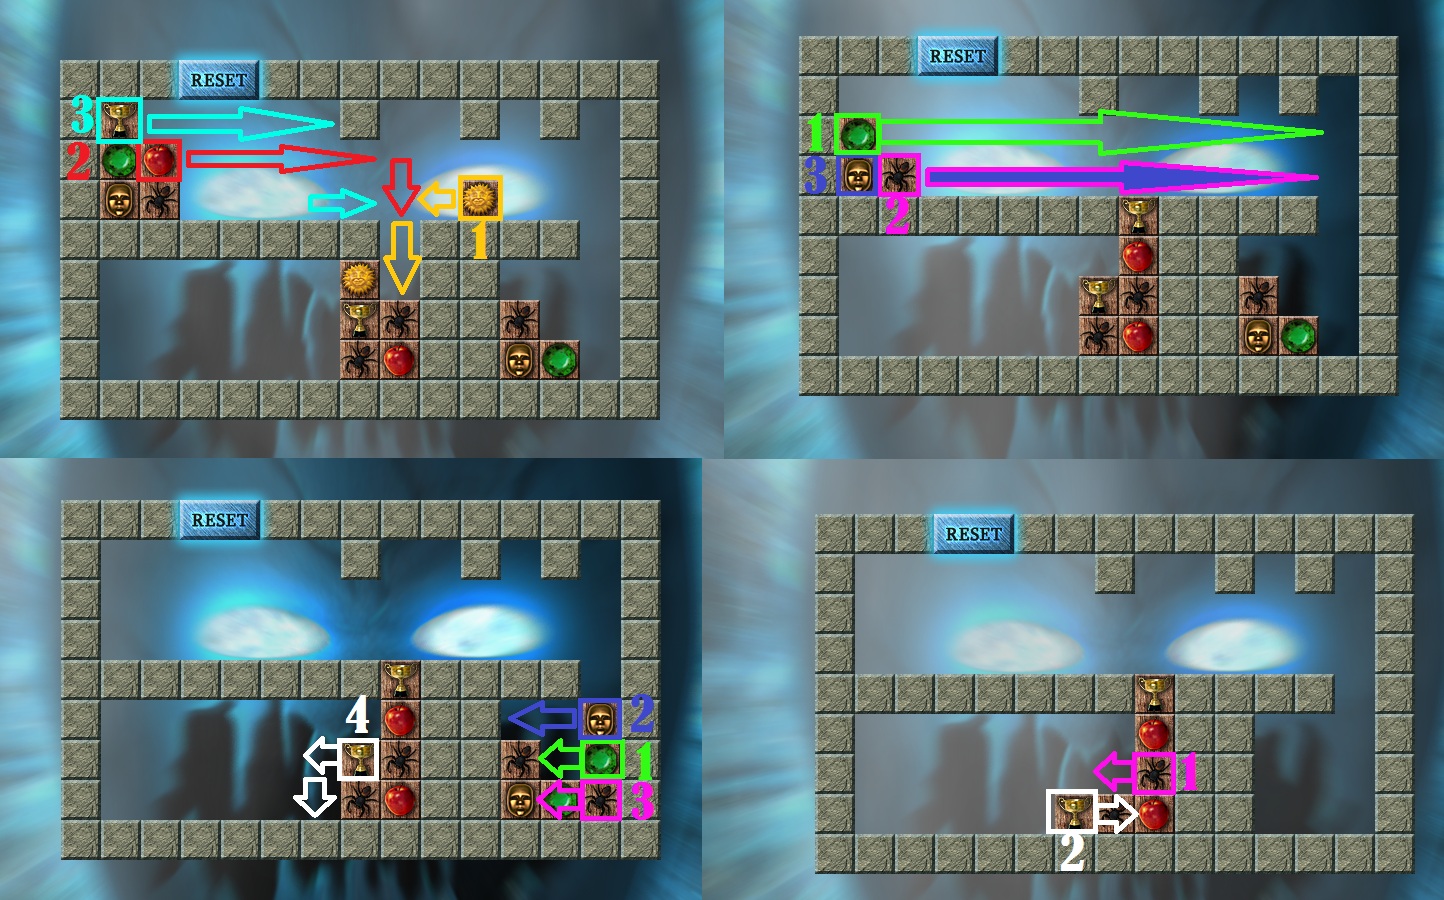
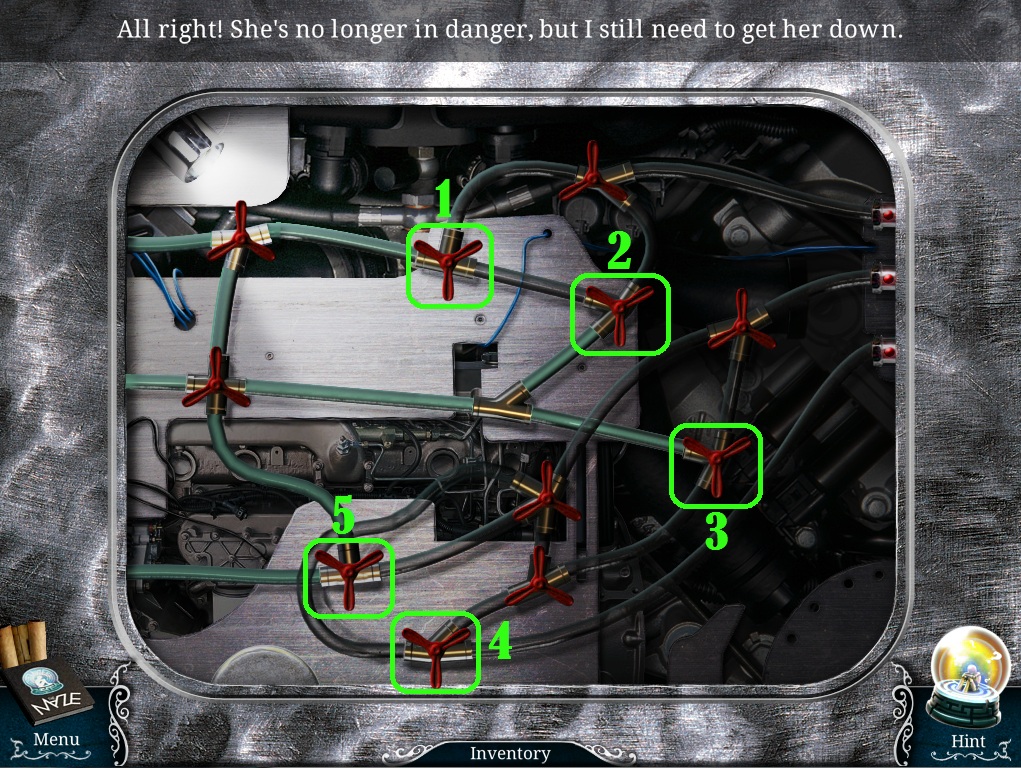
Click the crane control panel to start the puzzle.
To solve this puzzle, click the levers in the correct order from 1 to 5.
Follow the cords starting at the meters to their corresponding levers at the bottom.
Solution.
Click the bathysphere after it's placed on the ground to zoom in and take the Screwdriver.
Go back to the corridor.
Corridor
Click the lamp in the ceiling to zoom in.
Use the Screwdriver from your inventory to remove the screws around the grating.
Click the Fluorescent Bulbs to add them to your inventory.
Return to the secret room.
Secret Room
Click the lamp on the wall to zoom in.
Place the Fluorescent Bulbs from your inventory into the lamp.
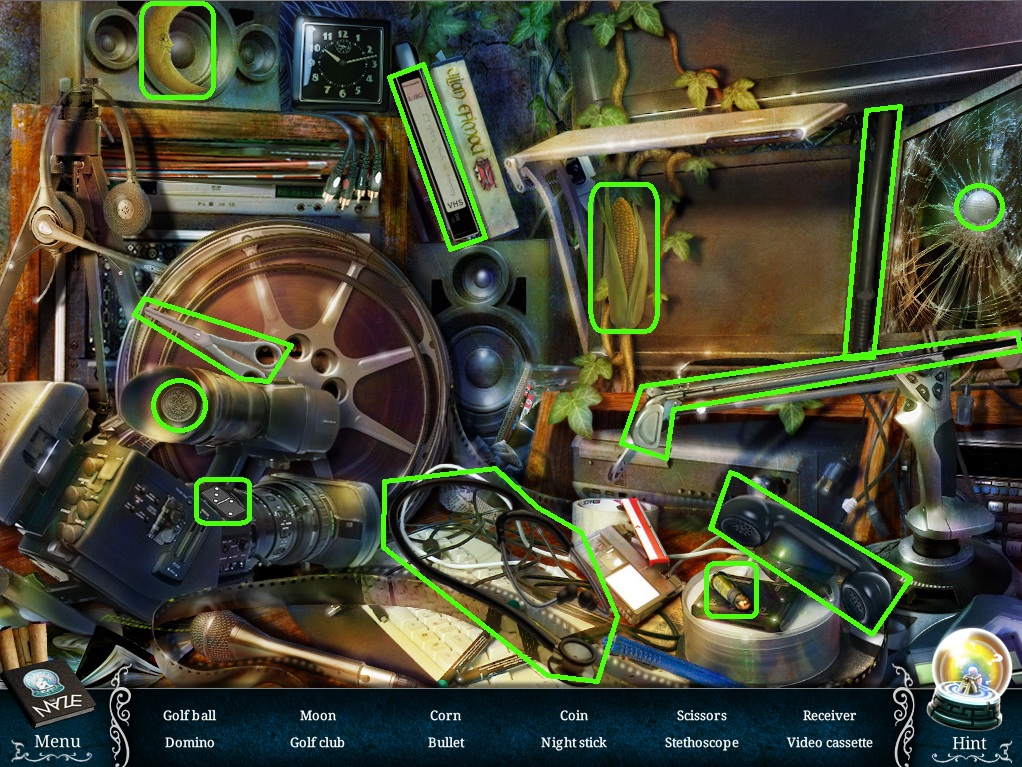
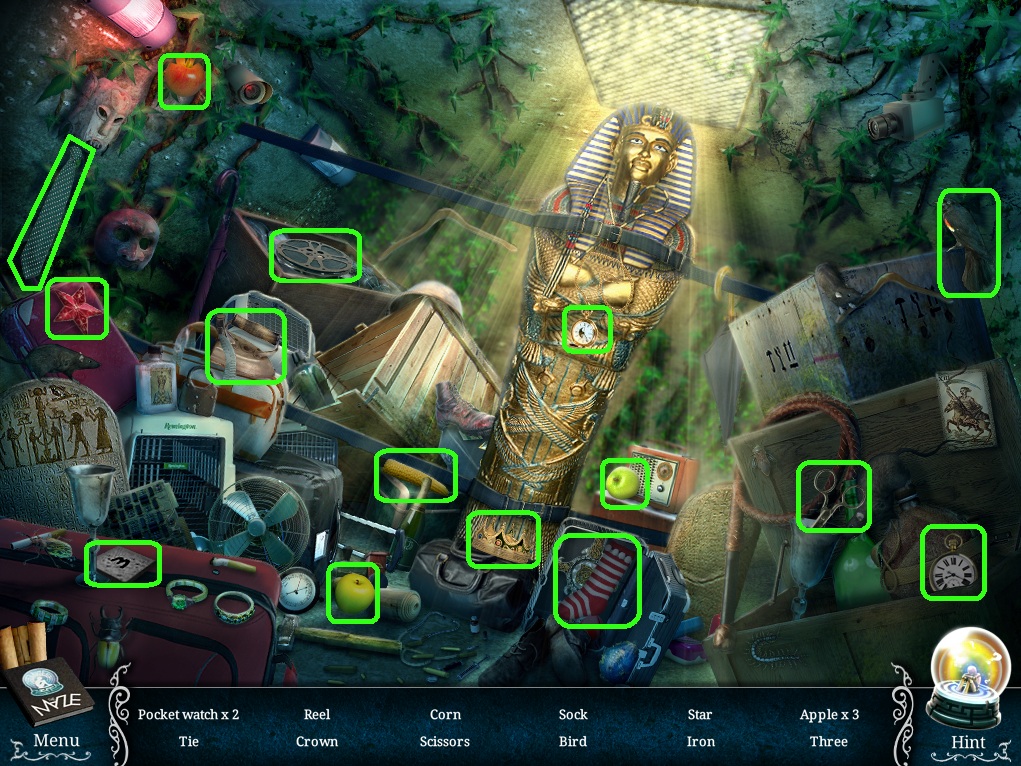
Click the table to start the hidden object scene.
Screenshot.
Once the hidden object scene is complete, you will receive a bullet which goes directly into the Loaded Gun.
Go back to the bathroom.
Bathroom
Click the third stall door to zoom in.
Use the Loaded Gun from your inventory on the door handle.
Click the stall to zoom in and take the Plant Killer.
Return to the room behind the house.
Room
Click the flower to zoom in.
Use the Plant Killer from your inventory on the carnivorous plant.
Click the Empty Watering Can to add it to your inventory.
Go back to pavilion 2.
Pavilion 2
Click the pool water to zoom in.
Use the Empty Watering Can from your inventory on the water to make it a Full Watering Can.
Go back to the reception area.
Reception
Click the Aquarium in the corner of the room for a closer look.
Use the Float and the Full Watering Can from your inventory on the glass case to receive the Magnet.
Return to the room behind the house.
Room
Click the glass case on the table to zoom in.
Use the Magnet from your inventory on the glass box, then take the Key from the opened lock.
Go back to the reception area.
Reception
Click the locker to zoom in.
Use the Key from your inventory to open the first lock.
Use the Stethoscope on the second lock to start the puzzle.
To solve this puzzle, turn the dials of the lock until the lock clicks.
The correct number is also indicated by a series of bright green bars shown on the stethoscope meter.
Click a dial to select it, then click the right or left arrows above the lock to turn the selected dial clockwise or counterclockwise.
Solution.
Click the open locker to start the hidden object scene.
Screenshot.
Once the hidden object scene is complete, you will receive the Welding Gun.
Return to pavilion 2.
Pavilion 2
Click the bathysphere to zoom in.
Use the Welding Gun on the door to the bathysphere.
Speak with Jim then take the Part of Valve (3/3) from his hand.
Click the bridge control for a closer look.
Place the three Valve Parts from your inventory on the bridge control to start the puzzle.
Starting from the button at the bottom, follow the lines all the way to the button at the top.
Click every other button to move across the line.
If you incorrectly click two adjacent buttons, the puzzle will reset.
Solution.
Go across the bridge to the deck of the ship.
Chapter 2
Deck
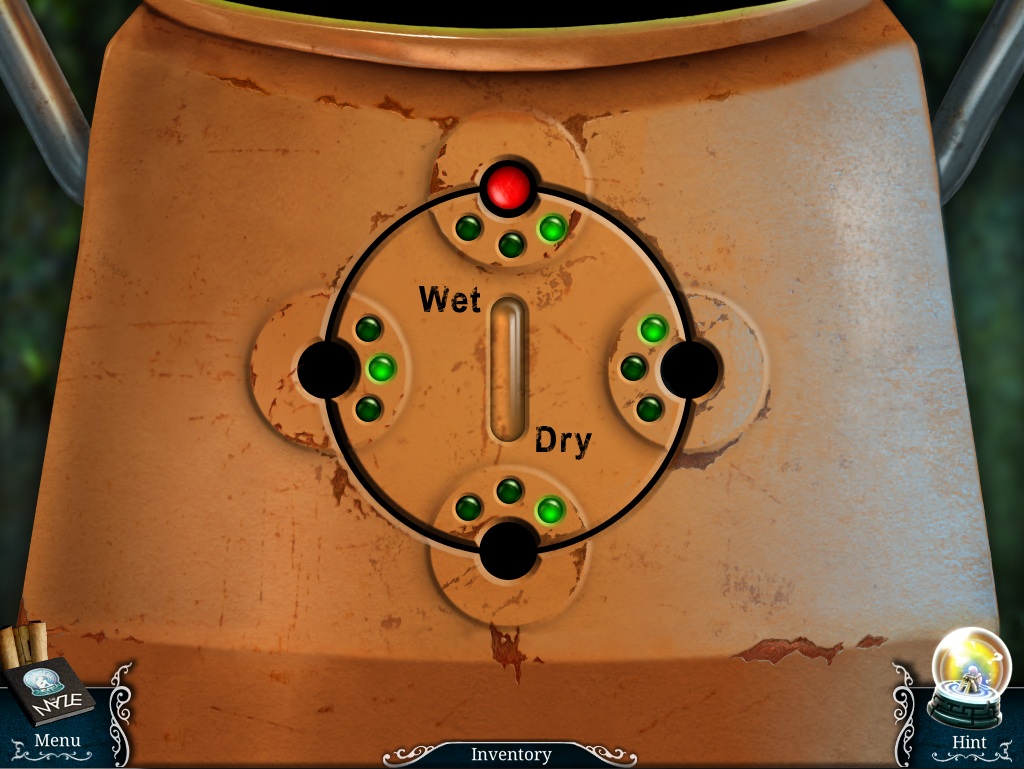
Click the weather control to zoom in to the puzzle.
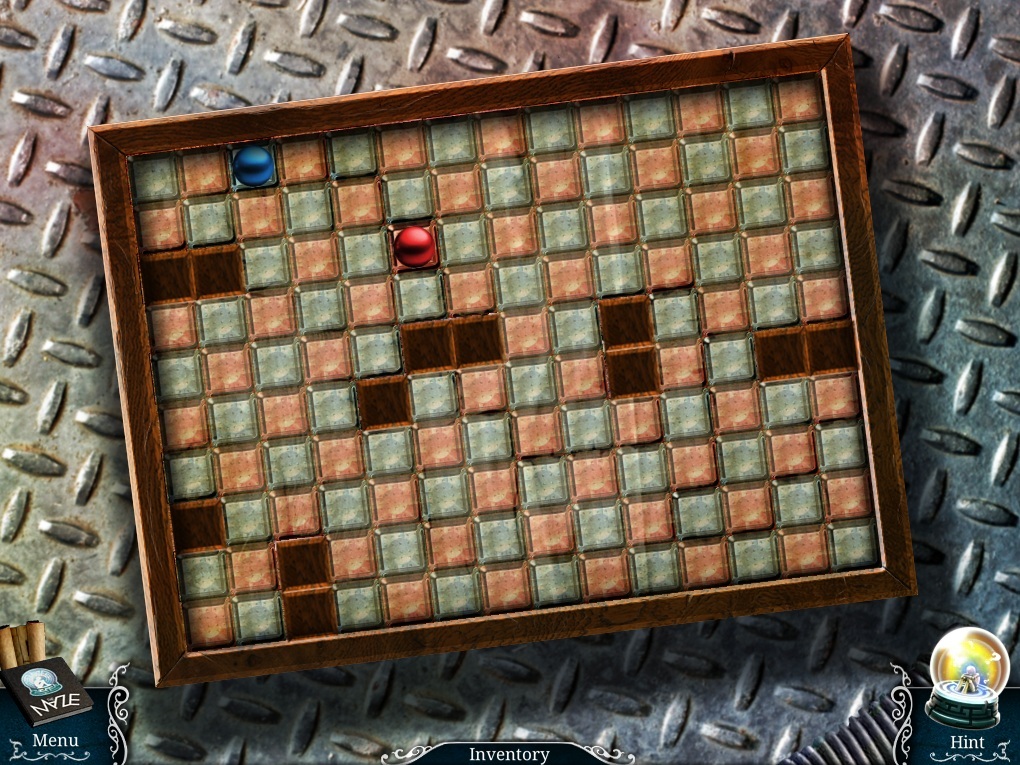
To solve this puzzle, set each of the four lights to the correct positions from wet to dry.
Click an empty round space to move the ball to that hole.
When the ball is placed in a hole, the adjacent light will move to the next one of three bulbs.
If the correct light is illuminated, the green bar in the center of the circle will lower.
Solution.
Go through the open door into the makeup room.
Makeup Room
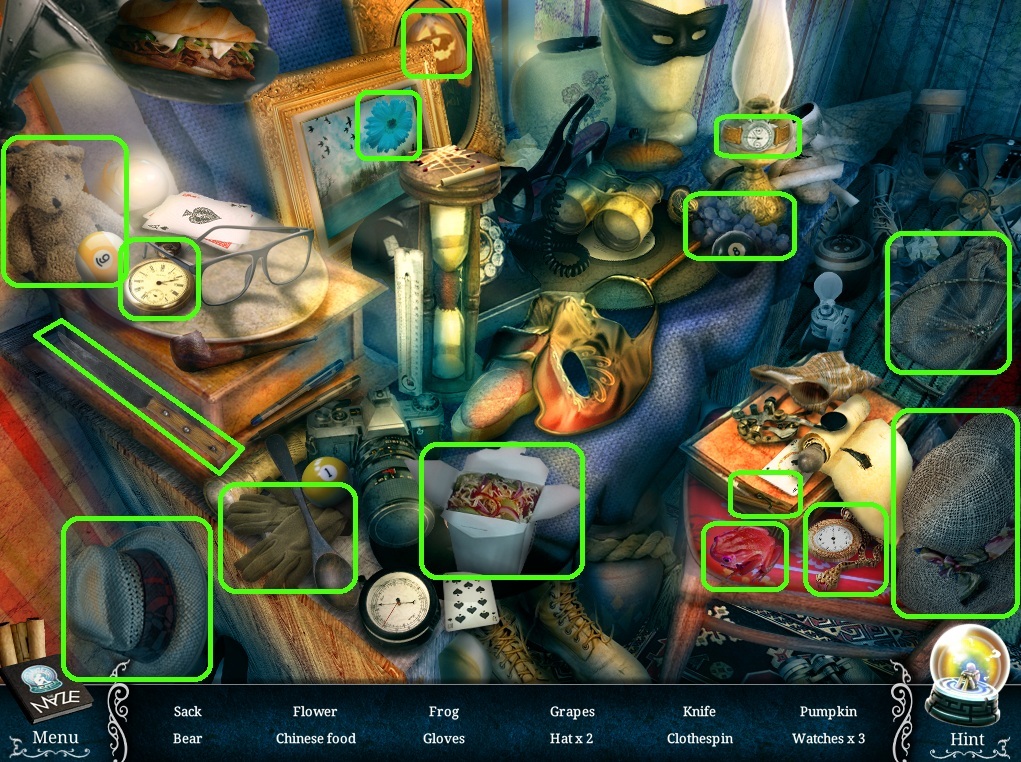
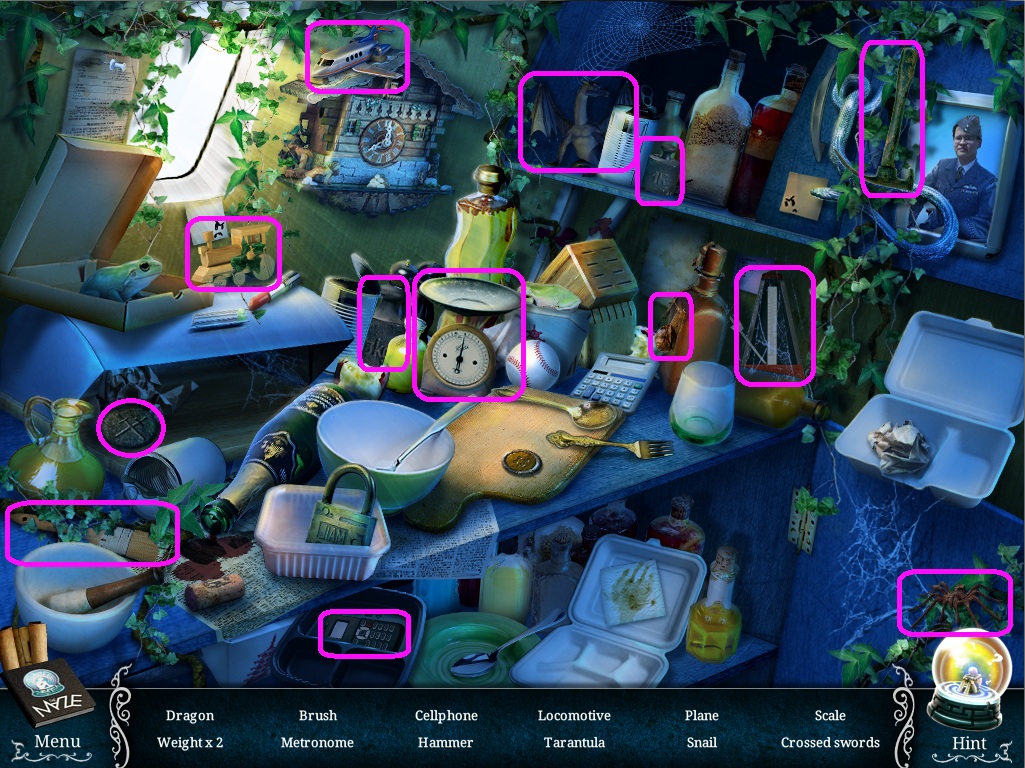
Click the table to start the hidden object scene.
Screenshot.
Once the hidden object scene is complete, you will receive a Sack.
Click the scheme on the wall to zoom in and take the Coin (1/3).
Go forward to the helicopter deck.
Helicopter Deck
Click the Spyglass to look through it.
Click the helicopter door to zoom in.
Take the Coin (2/3) on the ground underneath the helicopter.
Go down to the Main Hall.
Main Hall
Click the painting to zoom in and take the Coin (1/3) on the wooden bench.
Go through the door on the right into the boiler room.
Boiler Room
Click the hatch in the ceiling to zoom in and take the Tongs.
Click the bottom of the right furnace for a closer look.
Take the Coin (1/5) on the ground beside the hammer.
Go back to the main hall.
Main Hall
Click the flaming box on top of the pedestal to zoom in.
Use the Tongs from your inventory to pull out the Strange Figure (1/8) from behind the fire.
Click the painting for a closer look.
Place the Strange Figure (1/4) inside the space at the lower right corner.
Go back to the helicopter deck.
Helicopter Deck
Click the vending machine for a closer look.
Use three of the Coins from your inventory on the coinslot.
Take the Bottle of Water that falls down to the dispenser.
Return to the boiler room.
Boiler Room
Click the small oven to zoom in.
Use the Bottle of Water from your inventory on the red hot hammer.
Click the cooled Hammer to add it to your inventory.
Go back to the main hall.
Main Hall
Click the window for a closer look.
Use the Hammer from your inventory to smash through the glass.
Use the Sack to cover the edges of the broken glass.
Click the window to start the hidden object scene.
Screenshot.
Once the hidden object scene is complete, you will receive a Nail Puller.
Go back to the makeup room.
Makeup Room
Click the scheme on the wall to zoom in.
Use the Nail Puller from your inventory on the nail in the wooden board to receive the Propeller Key.
Return to the helicopter deck.
Helicopter Deck
Click the door to the helicopter to zoom in.
Use the Propeller Key from your inventory on the padlock.
Click the helicopter to look inside.
Take the Joystick from the control panel and the Coin (2/5) from the seat.
Go back to the deck of the ship.
Deck
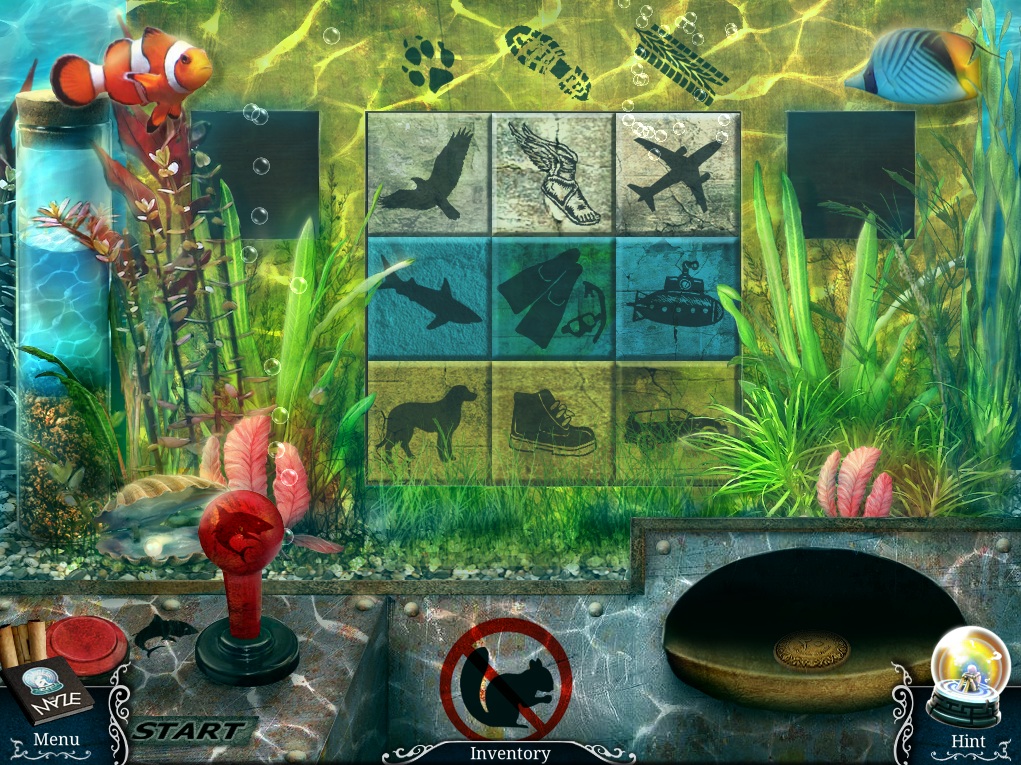
Click the aquarium for a closer look.
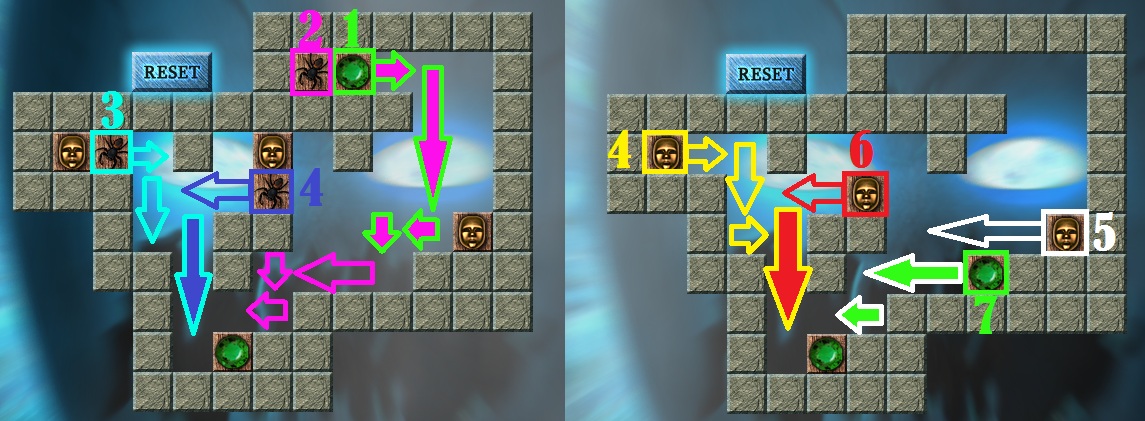
Add the Joystick from your inventory to the control panel to start the puzzle.
To solve this puzzle, organize the tiles in rows by type: air, water, or land; and in columns by category: animal, footwear, vehicle.
Click one tile to select it, then click another tile to swap positions.
The contents of the bottle on the left indicate the order of tiles: air is on the top, water is in the middle, and land is on the bottom.
Solution.
Once the puzzle is solved, take the Coin (3/5) from the coin dispenser.
Return to the boiler room.
Boiler Room
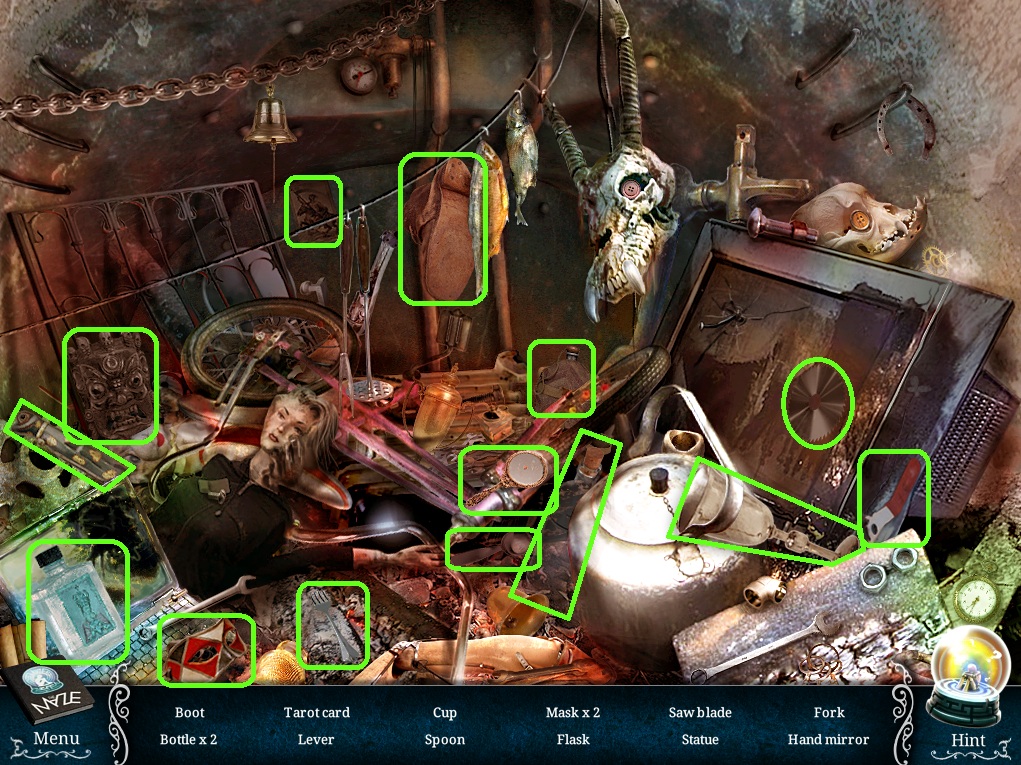
Click the big oven to start the hidden object scene.
Screenshot.
Once the hidden object scene is complete, you will receive a Tap.
Click the small oven to zoom in.
Open the oven door and take the Rock and Strange Figure (2/4) inside.
Go back to the helicopter deck.
Helicopter Deck
Click the blade to zoom in.
Use the Rock from your inventory to retrieve the Net.
Go back to the makeup room.
Makeup Room
Click the barrel to look inside.
Use the Tap from your inventory on the pipe to drain the barrel.
Take the Coin (4/5) at the bottom of the empty barrel.
Click the web in the corner of the ceiling to zoom in.
Use the Net to retrieve the Coin (5/5) from the spider web.
Go back to the deck.
Deck
Click the weathervane for a closer look.
Use the Net from your inventory on the web to receive the Coin (1/7).
Return to the helicopter deck.
Helicopter Deck
Click the vending machine to zoom in.
Use 5 of the Coins from your inventory on the coinslot.
Take the Stange Figure (3/4) from the dispenser at the bottom of the machine.
Return to the boiler room.
Boiler Room
Click the porthole window to look through it.
Use the Net from your inventory to retrieve the Gloves.
Go back to the makeup room.
Makeup Room
Click the snowflake on the pedestal to zoom in.
Use the Gloves from your inventory to pick up the Strange Figure (4/4).
Return to the main hall.
Main Hall
Click the painting to zoom in.
Place the Strange Figures from your inventory into the matching spaces at the corners of the frame.
Go through the frame into the submarine.
Submarine
Click the pipes for a closer look.
Click the large Pipe to add it to your inventory, then take the Coin (2/7) from the floor underneath the pipe.
Click the glass door to zoom in and take the Coin (3/7).
Go forward to the coast.
Coast
Take the Hook (1/3) in the sand and the Hook (2/3) on the metal sheet.
Pick up the Wires, the Glass Bottle, and the Boomerang.
Use the Glass Bottle on the rock on top of the metal sheet, then take the Glass Shard.
Use the Glass Shard to cut off and receive the Rope.
Use the Boomerang to knock the Hook (3/3) from the wooden plank, then pick it up from the sand to complete the Grappling Hook.
Toss the Grappling Hook over the pile of sand, then move forward to climb out of the pit.
Click the tree to zoom in and take the Nut and the 3 Bulbs.
Click the terminal for a closer look.
Take the Coin (4/7) above the Reset button.
Go back to the main hall.
Main Hall
Click the squirrel in the cage to zoom in.
Give the squirrel the Nut to add it to your inventory.
Return to the boiler room.
Boiler Room
Click the pipe on the right wall for a closer look.
Add the Pipe from your inventory to the pipe on the wall.
Go back to the deck of the ship.
Deck
Click the aquarium to zoom in.
Use the Squirrel from your inventory on the aquarium, then take the Coin (5/7) from the coin slot.
Click the chest for a closer look.
Add the three Bulbs from your inventory to the chest to start the puzzle.
To solve this puzzle, beat the game of Simon Says.
Watch the order in which the bulbs light up, then press the buttons underneath the bulbs in the correct sequence.
Each time a sequence is correctly mimicked, one of the five lights at the bottom will glow green.
If you make a mistake, one of the lights at the top will glow red. You can make 3 mistakes before the puzzle resets.
Take the Coin (6/7) and Coin (7/7) inside the opened chest.
Return to the helicopter deck.
Helicopter Deck
Click the vending machine to zoom in.
Use the 7 Coins from your inventory on the coinslot.
Take the Ignition Key from the dispenser.
Return to the coast.
Coast
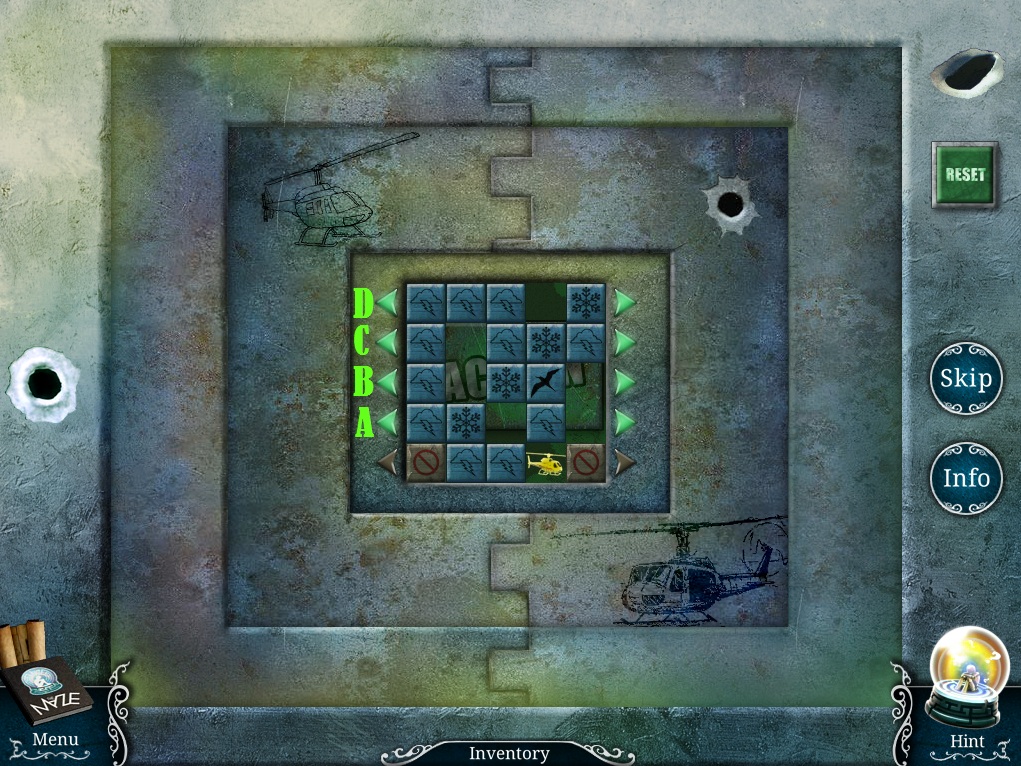
Click the terminal to zoom in.
Use the Ignition Key from your inventory on the keyhole, then turn the key to start the puzzle.
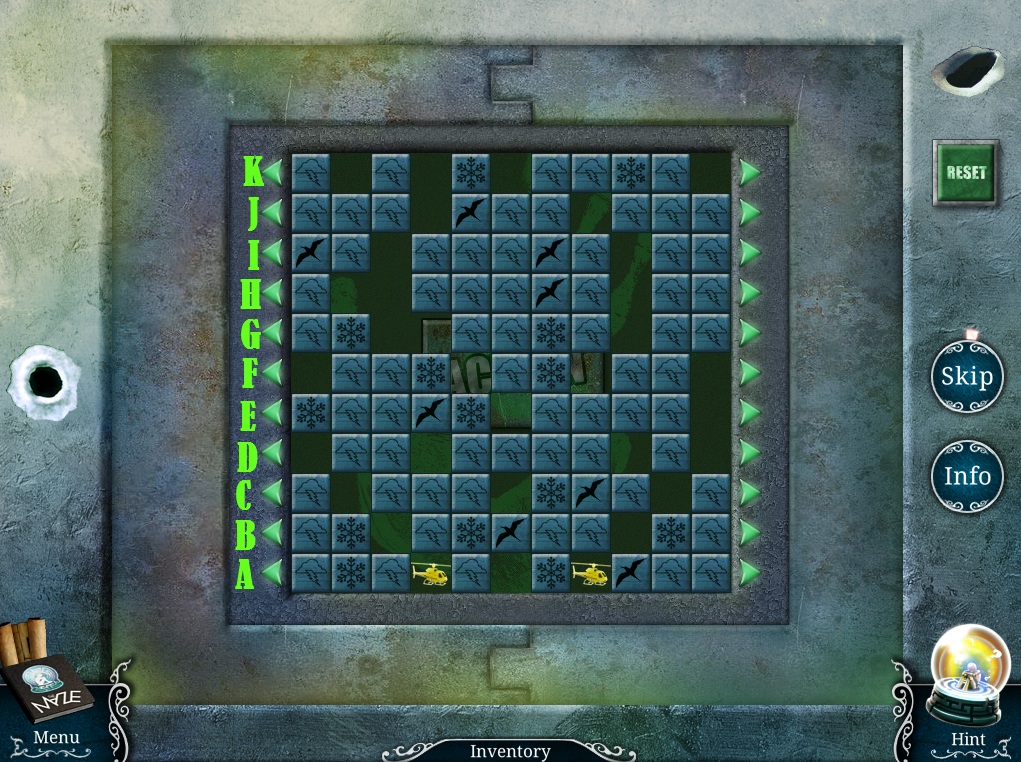
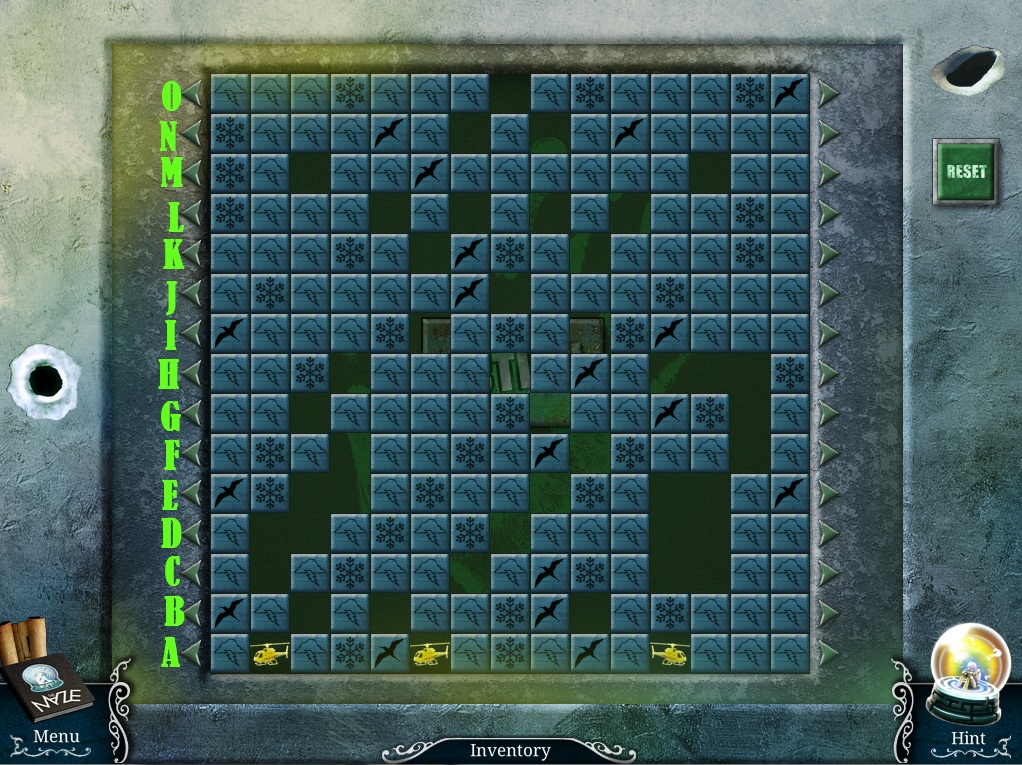
To solve this puzzle, lead the yellow helicopter to the top of the grid.
Click the left and right arrows at the sides of each row to move the tiles in that direction. The helicopter will move directly upwards into an empty space.
Click the reset button to reset the puzzle.
Screenshot #1.
A - left.
B - right x2, left x2.
C - right.
D - left.
Screenshot #2.
A- right.
B - right, right.
C - right, left x2, right x2.
D - left x2, right x3.
E - left.
F - left x2.
E - left.
J - right.
K - right.
J - left x2.
I - left x2.
Screenshot #3.
A - right, left x3.
B - left, right x3.
C - right.
D - right.
E - right x2.
F - left.
G - right, left x2.
H - right.
I - left, right x3.
H - left x3.
K - left x2.
L - right.
I - left x4, right x4, left x4.
L - left x3.
M - right x2.
N - left x2, right x3.
M - left x4.
L - right x4.
N - right, left x3.
M - right x4.
L - left x4.
N - left, right x3.
Push the action button in the center of the panel.
Click the crash to zoom in and take the Flare Gun.
Go back to the boiler room.
Boiler Room
Click the pipe on the wall to zoom in.
Use the Flare Gun from your inventory on the pipe valve.
Click the ship's hold for a closer look.
Use the Hammer to smash through the grating.
Return to the helicopter deck.
Helicopter Deck
Click the hatch for a closer look.
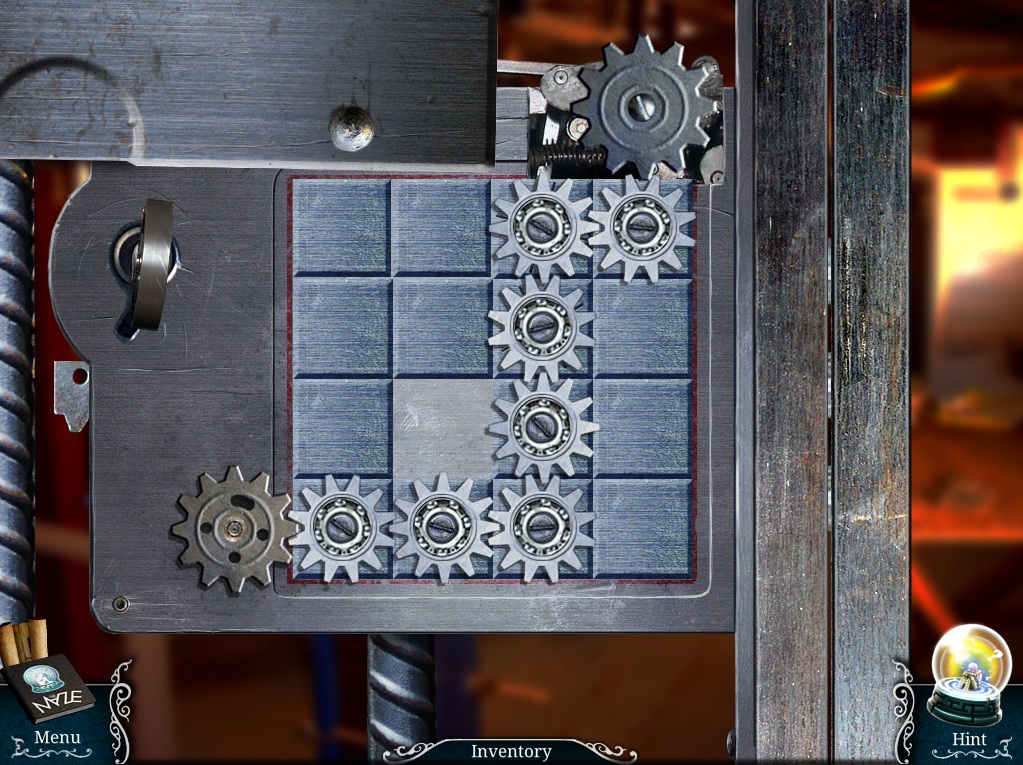
Lift the hatch, then take the Gears inside.
Return to the submarine.
Submarine
Click the glass door to zoom in.
Add the Gears from your inventory to the mechanism, then push the button to open the door.
Take the Scuba Gear inside the case.
Go back to the boiler room.
Boiler Room
Click the ship's hold to zoom in.
Use the scuba gear from your inventory on the water.
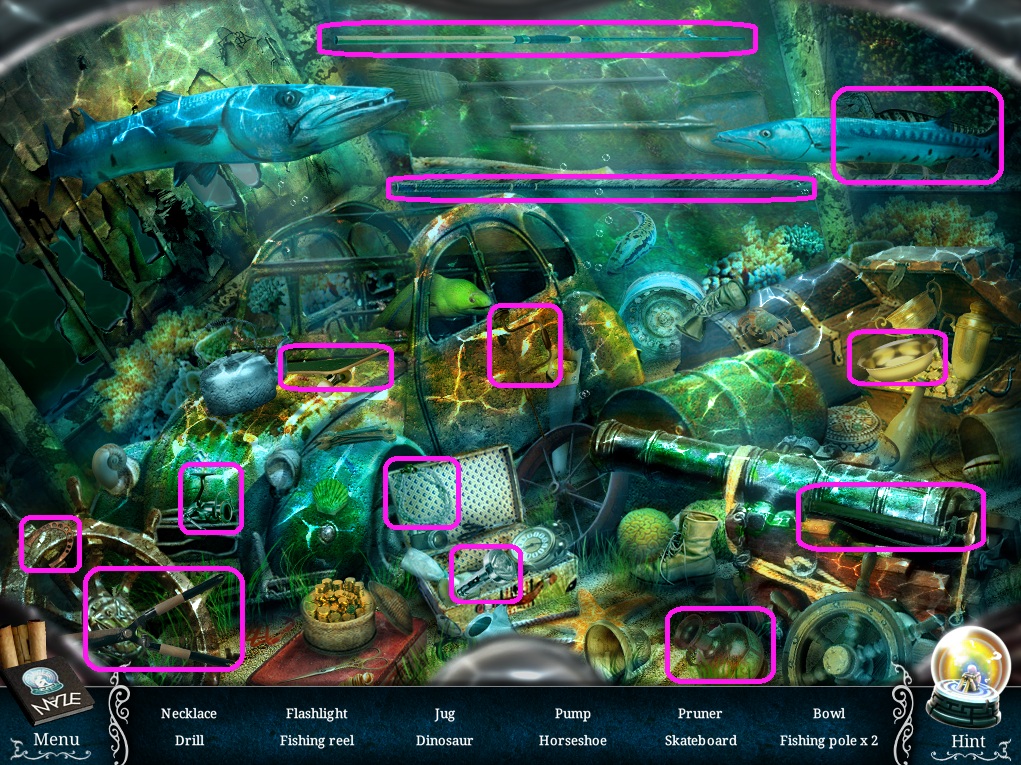
Click the hold to start the hidden object scene.
Screenshot.
Once the hidden object scene is complete, you will receive a Rod.
Return to the submarine.
Submarine
Click the pipes for a closer look.
Use the Rod from your inventory to take the Access Card from the bottom of the pipe.
Return to the coast.
Coast
Click the big door to zoom in.
Use the Access Card from your inventory on the lock.
Go forward into the cave.
Chapter 3
Path
Take the Bowl on the ground in front of the gate.
Go forward to the cemetery.
Cemetery
Click the headless statue to zoom in and take the Cord.
Go forward to the house entrance.
House Entrance
Click the door to zoom in and take the Axe Handle.
Place the Bowl from your inventory on top of the small stand.
Click the wicket for a closer look.
Use the Knife to cut through the rope.
Go through the small gate to the backyard.
Backyard
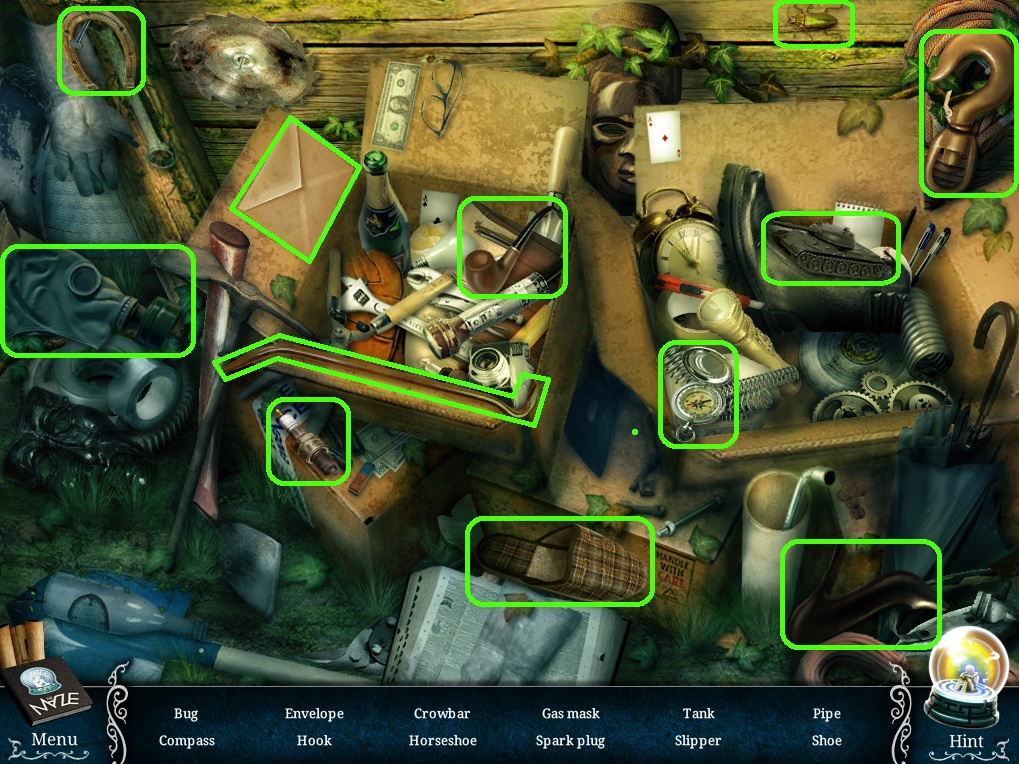
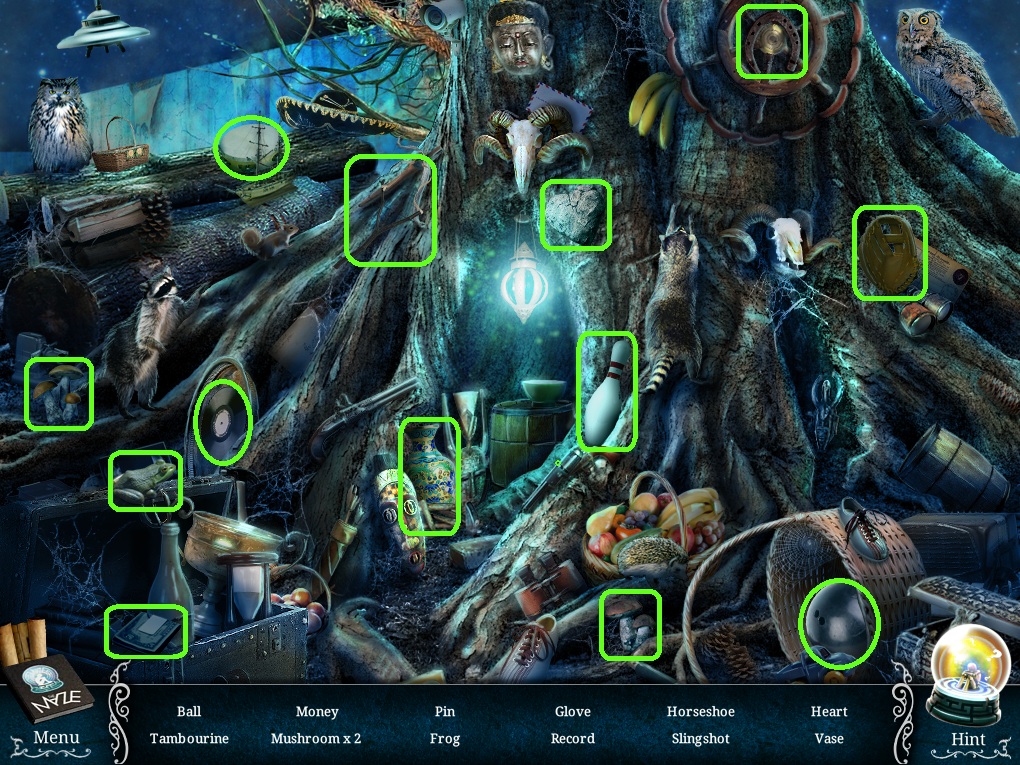
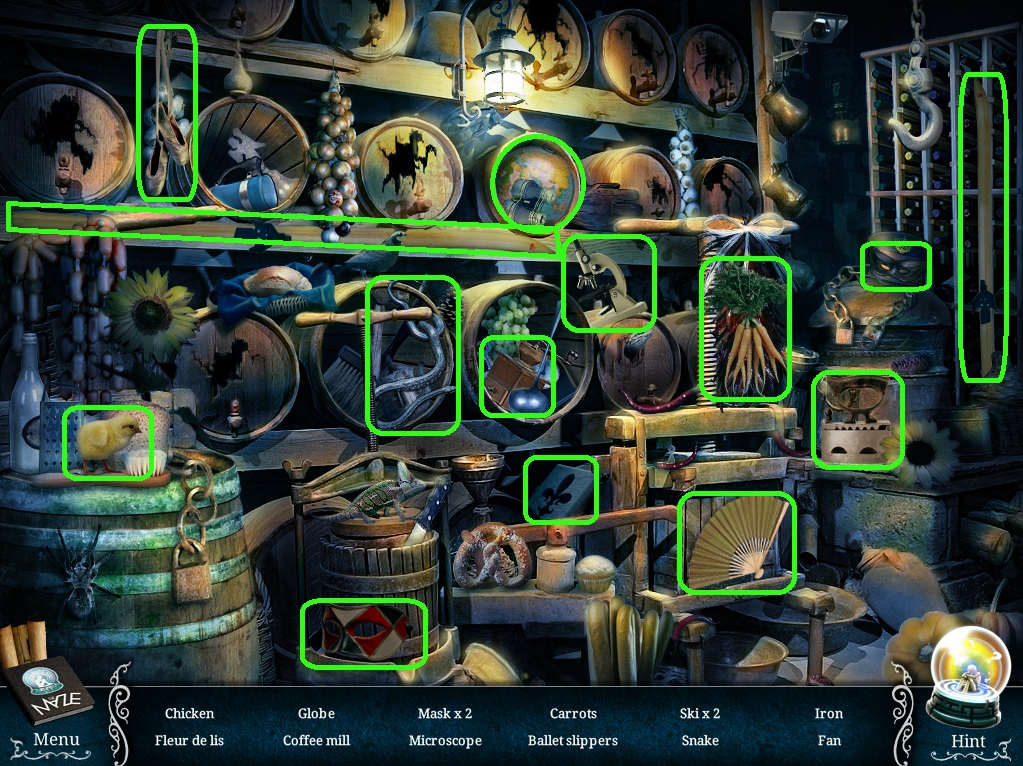
Click the roots of the tree to start the hidden object scene.
Screenshot.
Once the hidden object scene is complete, you will receive a Heart (1/2).
Click the sawmill to zoom in and take the Lighter Fluid.
Click the pile of wood to zoom in and take the Log.
Go back to the path.
Path
Click the tree for a closer look.
Use the Axe Handle from your inventory on the blade stuck in the trunk, then take the completed Axe from the tree.
Click the statue to zoom in.
Place the heart inside the space at the statue's neck./li>
Return to the backyard.
Backyard
Click the stump for a closer look.
Place the Log from your inventory on top of the stump.
Use the Axe on the log then take the pieces of Firewood (1/2) and (1/2).
Go back to the house entrance.
House Entrance
Click the door to zoom in.
Place the Firewood from your inventory into the bowls on the left and right side of the door.
Add the Lighter Fluid to both piles of wood, then ignite the wood with the Lighter.
Go through the open door into the house.
House
Click the table to start the hidden object scene.
Screenshot.
Once the hidden object scene is complete, you will receive a Key (1/4).
Go back to the cemetery.
Cemetery
Click the headstone to zoom in.
Use the Key from your inventory on the far left keyhole.
Take the Magnet from the open compartment.
Return to the house.
House
Click the puppet belly for a closer look.
Use the Magnet from your inventory on the board to operate the puzzle.
To solve this puzzle, move the block with the key to the space at the right of the board by moving the other blocks out of the way.
Select the Magnet from your inventory, click a block to select it, then drag it either vertically or horizontally around the board.
Solution.
Once the puzzle is solved, take the Key (2/4) from the block.
Go back to the cemetery.
Cemetery
Click the headstone to zoom in.
Use the Key from your inventory on the second keyhole.
Take the Belt from the open compartment.
Return to the backyard.
Backyard
Click the sawmill for a closer look.
Use the Belt from your inventory on the engine.
Take the Key (3/4) from the split log.
Go back to the cemetery.
Cemetery
Click the headstone to zoom in.
Use the Key from your inventory on the third keyhole.
Take the Knob from the open compartment.
Return to the house.
House
Click the radio above the fireplace to zoom in.
Add the Knob from your inventory to the radio.
Take the Key (4/4) from the open compartment.
Go back to the cemetery.
Cemetery
Click the headstone to zoom in.
Use the Key from your inventory on the last keyhole to start the puzzle.
To solve this puzzle, catch the skeleton within the casket.
Click a point on the path either up, down, left, right, or through the one tile diagonally to move the casket in the corresponding direction.
Every time you move the casket, the skeleton will also move.
To catch the skeleton, chase it to the tile on the opposite end of the diagonal line.
Solution.
Use the Knife to cut open the doll, revealing the Heart (2/2).
Go back to the path.
Path
Click the second statue to zoom in.
Place the Heart from your inventory into the space at the statue's neck.
Click the old tile on the ground to start the puzzle.
To solve this puzzle, arrange the tile to complete the image.
Click a tile to select it, then drag it up, down, left, or right to move it in that direction.
Tiles that are correctly positioned will turn a faint blue color, but tiles that are blue from the start of the puzzle cannot be moved.
Solution.
Go across the bridge to the mountain path.
Mountain Path
Click the crack to zoom in and take the 2 Planks and the Crank.
Place the Planks over the gap between the cliffs, then cross over them to the cage.
Cage
Click the fountain to zoom in and take the Gargoyle Head.
Go back to the cemetery.
Cemetery
Click the statue to zoom in.
Add the Gargoyle Head from your inventory to the statue, then take the Lever from the open cache.
Return to the house.
House
Click the hatch for a closer look.
Use the Crank from your inventory on the socket, then take the revealed Ornate Key.
Attach the Cord to the black wire on top of the hatch.
Return to the cage.
Cage
Click the engine to zoom in.
Place the Lever from your inventory onto the panel, then click the lever to start the puzzle.
To solve this puzzle, arrange the white pipes to create a continuous path between the two metal pipes.
Click a pipe to move it into an adjacent empty square.
Solution.
Click the lowered cage for a closer look.
Use the Ornate Key from your inventory on the padlock.
Take the Detonator from the open cage.
Click the woman to speak with her.
Go back to the house.
House
Click the hatch to zoom in.
Attach the Detonator from your inventory to the blue cord.
Click the detonator on the ground to open the back, then click it again to start the puzzle.
To solve this puzzle, rotate the fuses to connect the wires vertically.
Click a fuse to rotate it 90 degrees; rotating one fuse will also rotate all adjacent fuses.
Solution.
Click the detonator a final time to set off the dynamite.
Click the open hatch to start the hidden object scene.
Screenshot
Once the hidden object scene is complete, you will receive Climbing Gear.
Return to the cage.
Cage
Give the Climbing Gear from your inventory to the woman beside the cage.
Climb up the ladder to the observatory entrance.
Observatory Entrance
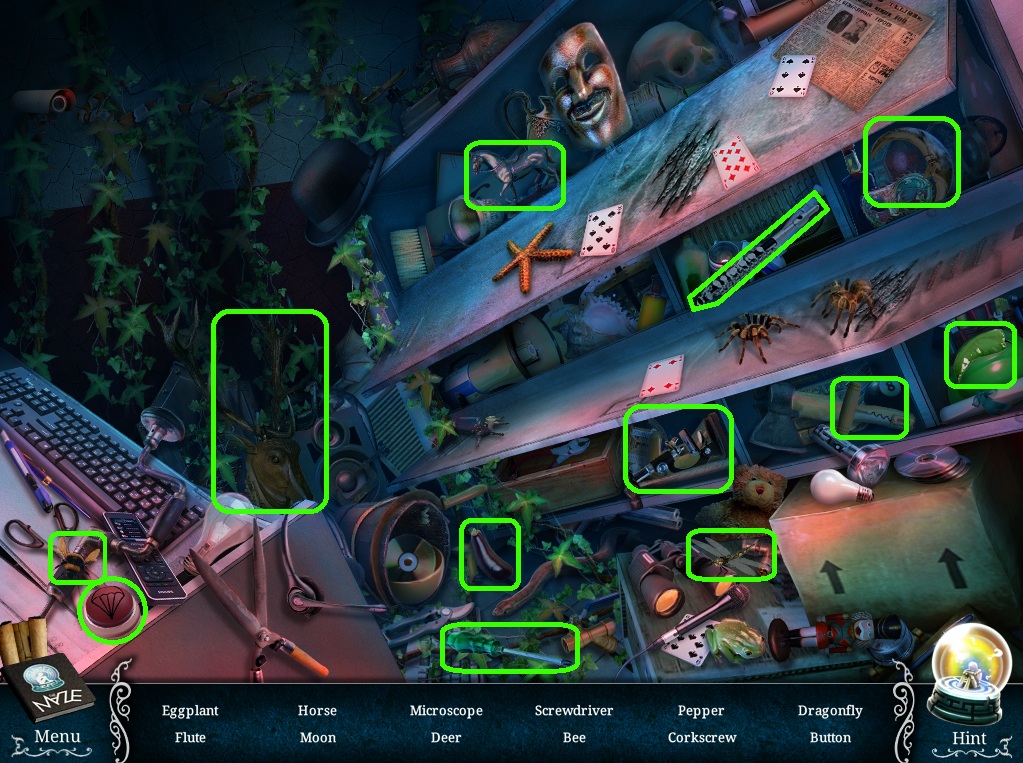
Click the cart to start the hidden object scene.
Screenshot
Once the hidden object scene is complete, you will receive an Oil Can.
Take the Mask on the ground by the broken bridge.
Click the door to zoom in.
Place the Mask on the door to start the puzzle.
To solve this puzzle, destroy the tiles by matching the identical pairs together.
Click and drag a tile left or right to move it.
You cannot move a tile up, but it can fall downward.
Solution.
Go through the open door into the observatory.
Observatory
Click the gears under the machinery on the right for a closer look.
Use the Oil Can from your inventory on the rusted gears.
Go back to the house.
House
Click the fireplace to zoom in.
Use the Mask from your inventory on the back of the fireplace to start the puzzle.
As before, to solve this puzzle, destroy the tiles by matching the identical pairs together.
Click and drag a tile left or right to move it.
You cannot move a tile up, but it can fall downward.
Solution.
Take the Lens from the revealed cache.
Return to the cage.
Cage
Click the fountain to zoom in.
Use the Mask from your inventory on the wall of the fountain to start the puzzle.
As before, to solve this puzzle, destroy the tiles by matching the identical pairs together.
Click and drag a tile left or right to move it.
You cannot move a tile up, but it can fall downward.
Solution.
Once the puzzle is solved, click the revealed surveillance room to start the hidden object scene.
Screenshot
Once the hidden object scene is complete, you will receive a Monitor.
Return to the observatory.
Observatory
Click the telescope for a closer look.
Click the small door to open it, then place the Lens from your inventory inside the compartment.
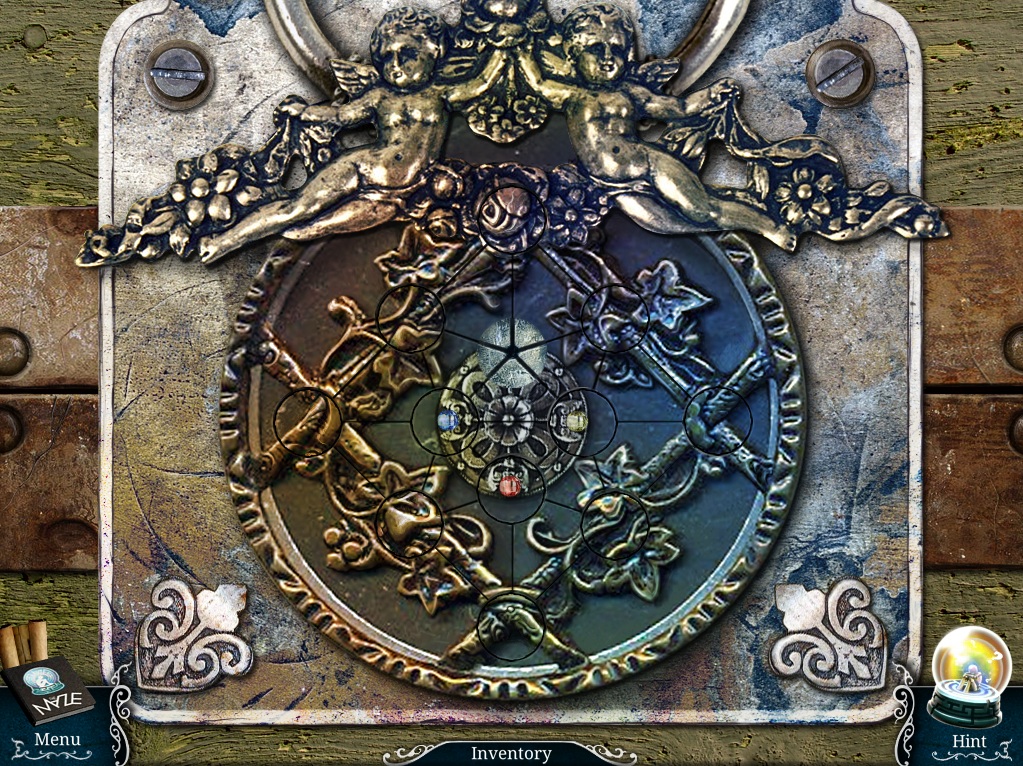
Click the control panel to zoom in.
Place the Monitor in the empty space of the control panel to start the puzzle.
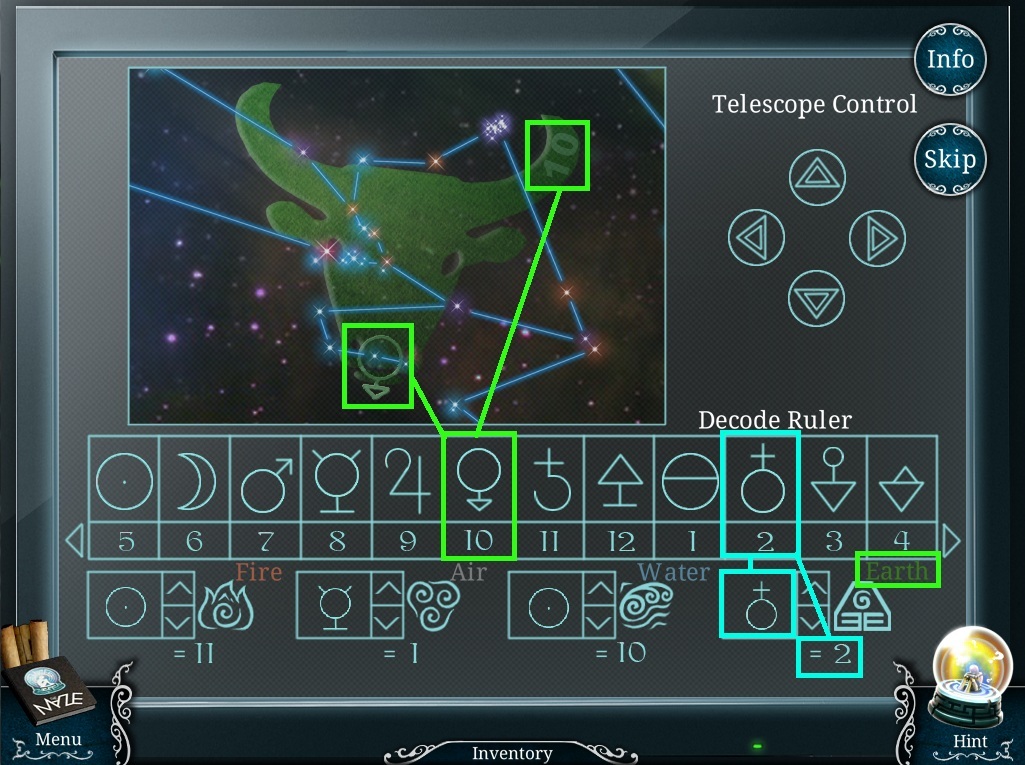
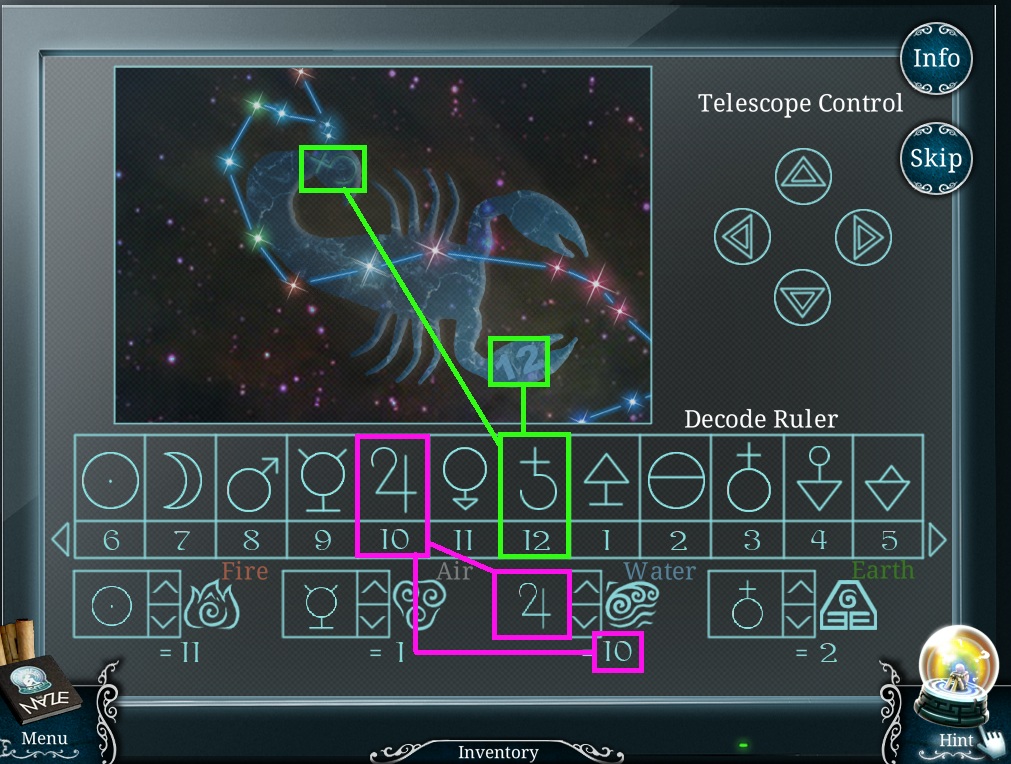
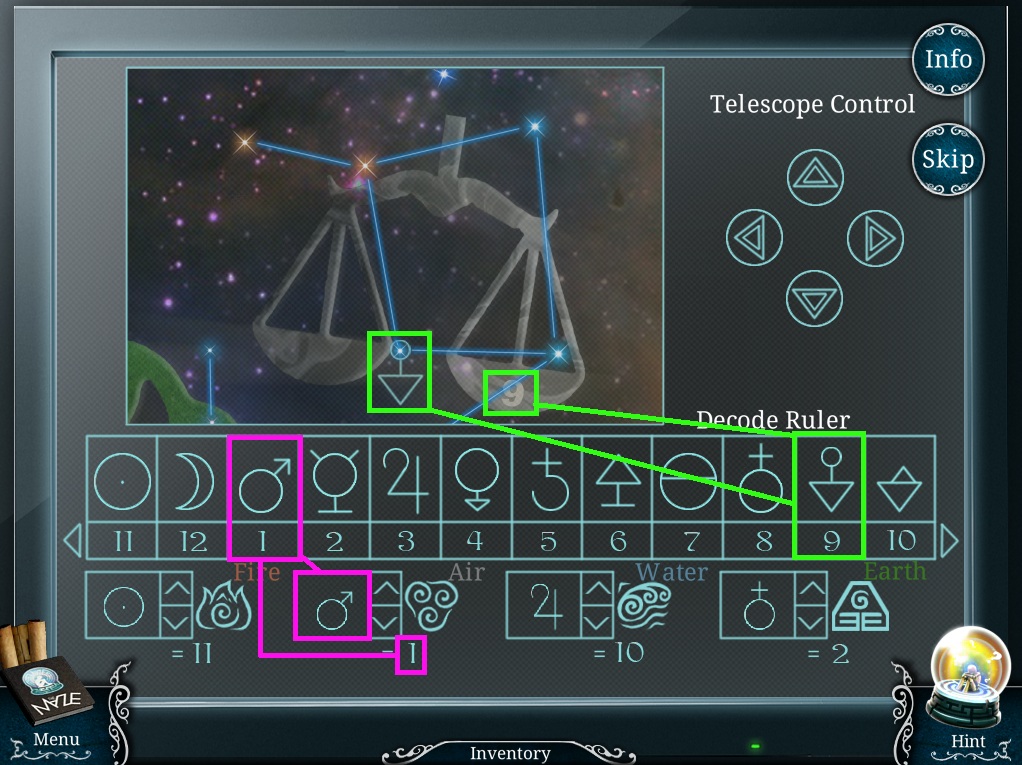
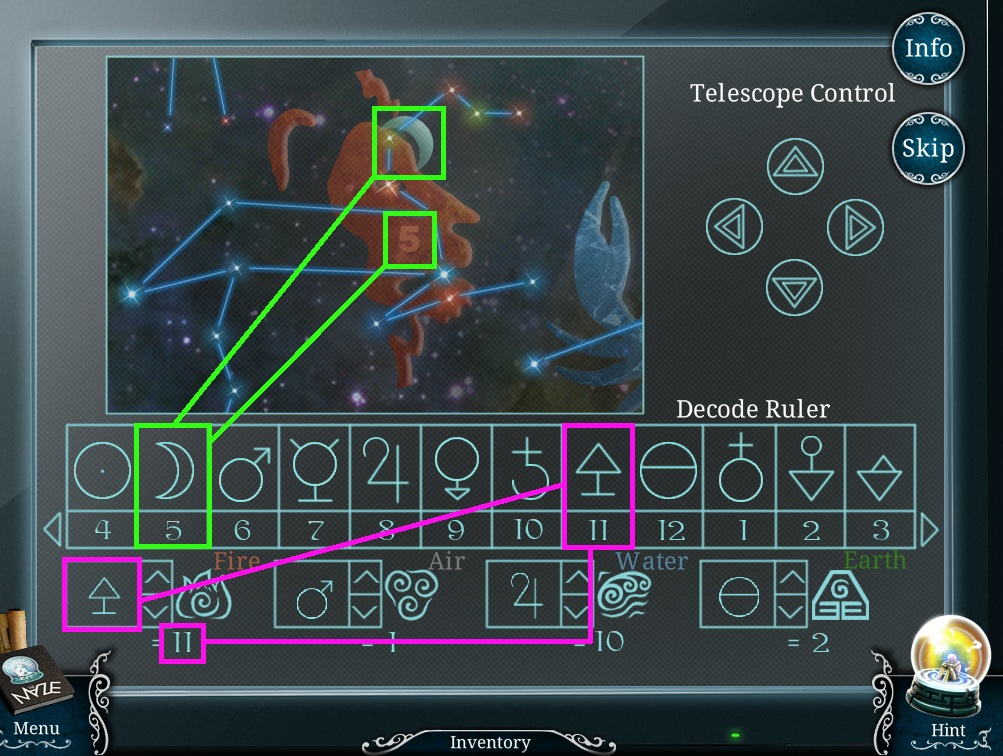
To solve this puzzle, use the telescope to find constellations to decode the elements at the bottom.
Click the up, down, left, and right arrows under the words Telescope Control to move the scope in that direction.
Find a constellation with a symbol and a number on the image.
Click the left or right arrows of the Decode Ruler so that the correct number is under the corresponding image as seen in the constellation.
The color of the constellation indicates its element: Fire - Red, Air - Grey, Water - Blue, Earth - Green.
Next to each element is a number; if the decode ruler is positioned according to the number shown on the constellation, then the number next to the element indicates the symbol on the ruler that matches that same element.
Solution #1.
Solution #2.
Solution #3.
Solution #4.
Go back to the observatory entrance.
Observatory Entrance
Go through the archway on the left.
Posted by: Trinn |
September 22, 2011 4:14 PM
|
September 22, 2011 4:14 PM
Urban Legends: The Maze Walkthrough Part 2 - Chapters 4-6
Chapter 4
Basement
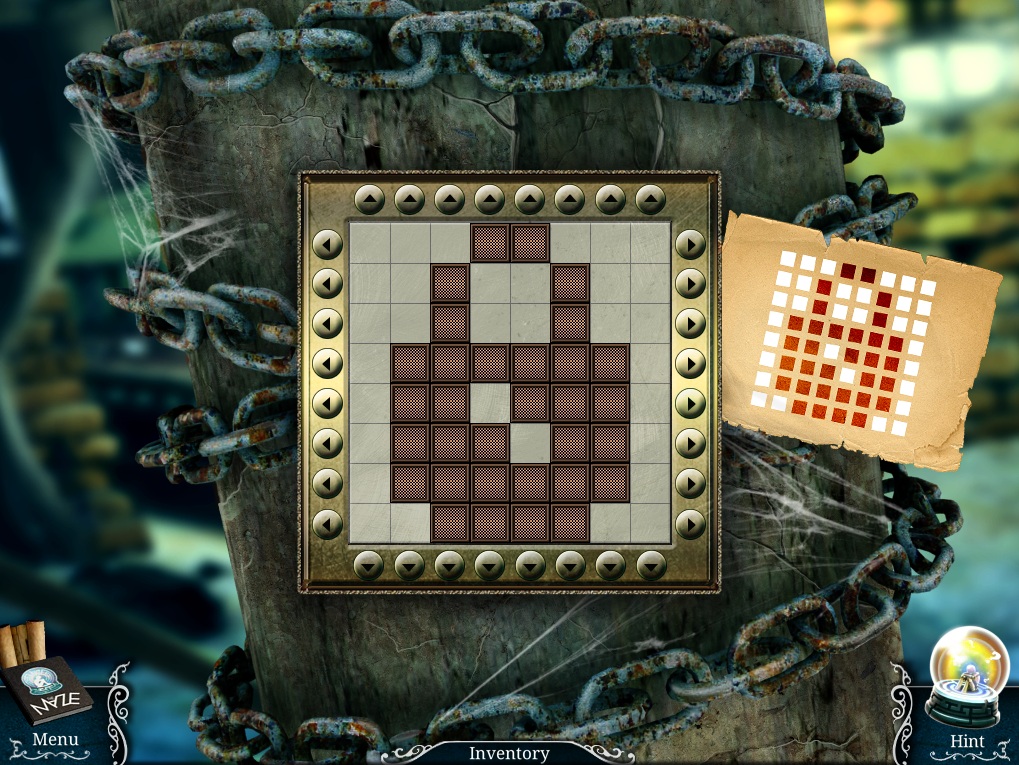
Click the up, down, left, and right arrows around the cuff to move the tiles in their corresponding rows.
Arrange all the tiles to complete the image and open the cuff.
Screenshot
Click the weak wall to zoom in and take the Rock.
Go forward to the well.
Well
Click the light corner to zoom in and take the Pouch.
Go back to the basement.
Basement
Click the table for a closer look.
Use the Pouch from your inventory on the powder on top of the table.
Click the collected Powder to add it to your inventory.
Return to the well.
Well
Click the light corner to zoom in.
Use the Powder from your inventory on the stone compartment.
Light the powder with the Rock.
Click the barrel to zoom in and take the cheese.
Click the locker for a closer look.
Open the cabinet and take the Knife inside.
Click the skeleton to zoom in and take the scroll of a map and Pickax Handle from its hands.
Go back to the basement.
Basement
Click the table to zoom in and take the Shovel and the rope.
Click the chemistry set for a closer look.
Take the Empty Vial and the Ruby.
Click the weak wall to zoom in.
Use the Knife from your inventory to pry the Lock Part (1/2) from the hole in the bricks.
Click the support beam for a closer look.
Take the Broken Gun on the beam.
Return to the well.
Well
Use the Shovel from your inventory on the dirt by the well, then take the revealed Lock Part (2/2).
Click the skeleton for a closer look, then click the chest locker to zoom in.
Add the two Lock Parts from your inventory to the lock to start the puzzle.
To solve this puzzle, complete the image by placing the circular tiles in the correct positions.
Click a tile to automatically move it to an adjacent empty space.
Tiles can only move along the paths between spaces.
Solution.
Click the open chest to start the hidden object scene.
Screenshot
Once the hidden object scene is complete, you will receive a Vice Handle.
Click the barrel to zoom in.
Use the Empty Vial from your inventory on the tap, then take the Full Vial.
Go back to the basement.
Basement
Click the table for a closer look.
Add the Vice Handle from your inventory to the vice, then take the released ax blade to complete the Pickax.
Click the chemistry set to zoom in.
Add the Full Vial of red liquid to the set.
Click the weak wall to zoom in.
Break down the wall with the Pickax.
Go right to the smithy.
Smithy
Click the lock to zoom in and take the Lighter.
Go back to the well.
Well
Click the unlit Torch for a closer look.
Use the Lighter from your inventory to light the torch.
Click the barrels to start the hidden object scene.
Screenshot
Once the hidden object scene is complete, you will receive a Mold Form.
Click the head to zoom in and take the Winch and the Dirty Ruby.
Place the Ruby from your inventory into the head's eye, then take the grapple from its mouth to complete the Grappling Hook.
Click the well for a closer look.
Place the Winch on top of the well.
Go back to the smithy.
Smithy
Click the shelf to zoom in.
Use the Grappling Hook from your inventory to retrieve the Key.
Click the lock for a closer look.
Use the Key on the lock to start the puzzle.
To solve this puzzle, arrange the gears in the tiles to connect a path between the two gears outside the square.
Click a tile to move it automatically in the adjacent empty space.
Solution.
Click the smith stuff on the floor to start the hidden object scene.
Screenshot
Once the hidden object scene is complete, you will receive a Mousetrap.
Click the craft to zoom in and take the Mortar.
Place the Mold Form into the rectangular space over the coals.
Return to the basement.
Basement
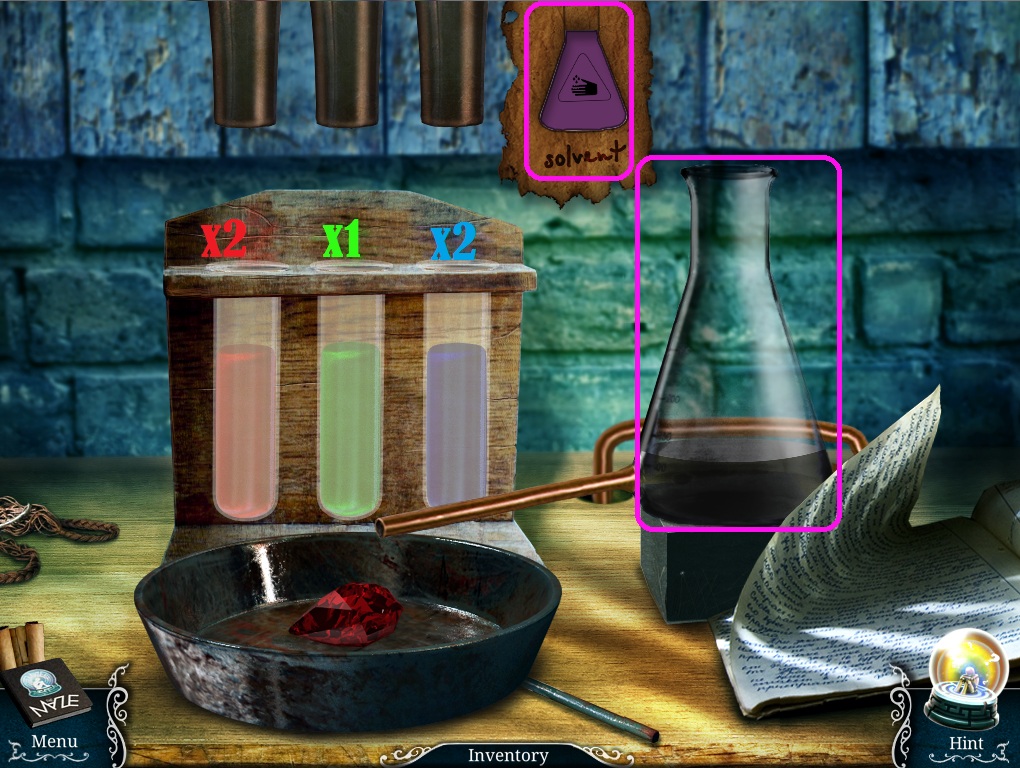
Click the chemistry set on the table to zoom in.
Place the Mortar from your inventory on top of the table.
Put the Dirty Ruby in the mortar to start the puzzle.
To solve this puzzle, combine the correct amount of fluid from the vials in the chemistry set to make the solvent.
Click a vial to select it, then click the flask to pour it in.
Combine 2 parts red liquid, 2 parts blue liquid, and 1 part green liquid.
Solution.
Take the cleaned Ruby and the Mortar from the table.
Return to the well.
Well
Click the head on the wall to zoom in.
Place the Ruby from your inventory into the empty eye socket.
Click the barrel for a closer look.
Place the Mousetrap on the floor in front of the hole in the wall.
Put the Cheese inside the mousetrap.
Take the Domino (1/4) from the mouse's back.
Go forward to the torture chamber.
Torture Chamber
Click the table to start the hidden object scene.
Screenshot
Once the hidden object scene is complete, you will receive the Bellows.
Click the bookcase to start the puzzle.
To solve this puzzle, arrange the books so the markings on the spines of the books are aligned.
The books at the end of the shelves must also match the lines carved into the wood.
Click a book to select it, then click another book to swap positions.
Solution.
Click the rope in front of the bookcase to zoom in and take the Domino (2/4).
Take the Bucket that rolls to the floor.
Go back to the basement.
Basement
Click the support beam on the far left side to zoom in.
Use the Knife from your inventory to cut the rope marked with the symbol found after the bookcase puzzle.
Take the revealed Lock solution from the support beam.
Return to the torture chamber.
Torture Chamber
Click the chain lock to zoom in.
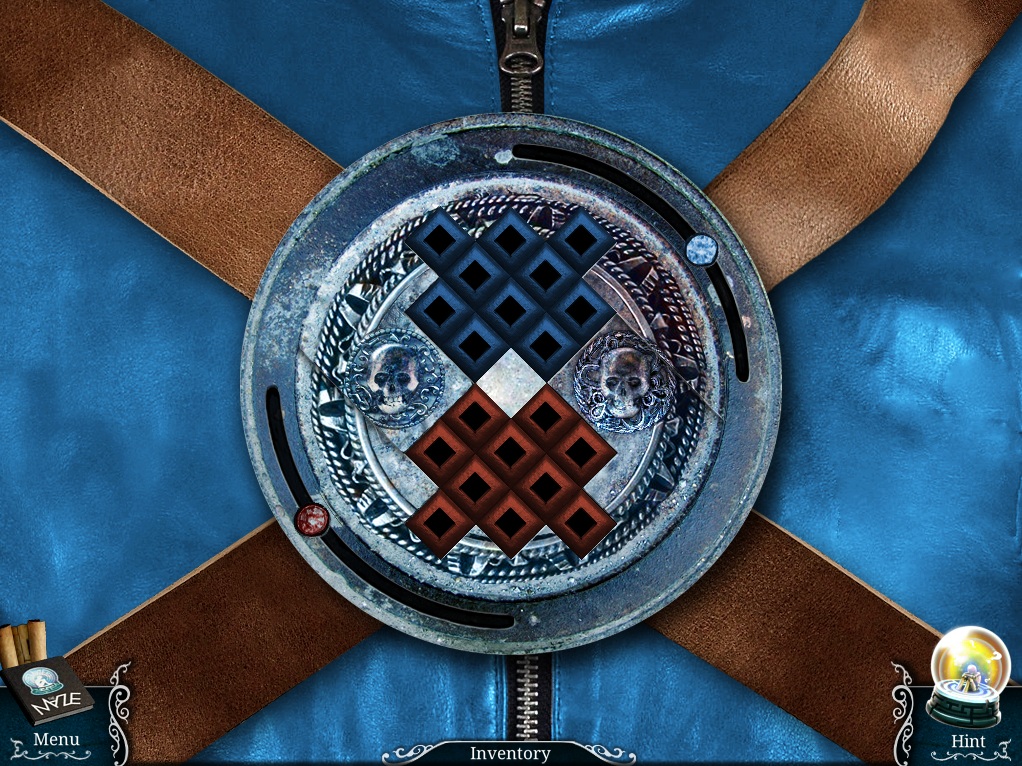
Place the Lock Solution from your inventory onto the lock to start the puzzle.
To solve this puzzle, arrange the red blocks to match the image on the solution paper.
Click the up, down, left, and right arrows outside the square to move all the blocks in the corresponding rows or columns in that direction.
Solution.
Take the Chain from the column.
Go back to the well.
Well
Click the well for a closer look.
Place the Chain from your inventory on the winch.
Attach the Bucket to the hanging chain.
Click the lever at the side of the winch to pull the bucket back up.
Take the Domino (3/4) inside, then take the Full Bucket.
Go back to the smithy.
Smithy
Click the craft in the brick oven to zoom in.
Place the Bellows from your inventory on the stand to the left of the oven.
Place the Pan in the space at the top ring, then place the Bucket in the space at the bottom ring.
Put the Broken Gun inside the pan.
After the gun melts, click the pan to turn it over into the mold.
Once the mold is set, click it to drop it into the bucket of water.
Take the Fleur de Lis from the cooled-off mold.
Return to the well.
Well
Click the locker in the corner of the room to zoom in.
Use the Fleur de Lis from your inventory on the seal lock of the drawer.
Take the Domino (4/4) inside.
Go back to the smithy.
Smithy
Click the battering ram to zoom in.
Add the four Dominoes from your inventory to the ram to start the puzzle.
To solve this puzzle, correctly place the dominoes into the empty squares of the grid.
Each 3x3 square can only have the numbers from 1-9 appear once within them.
Click a domino to select it, then click an empty space to place it.
Solution.
Go through the revealed secret passageway.
Chapter 5
Basement
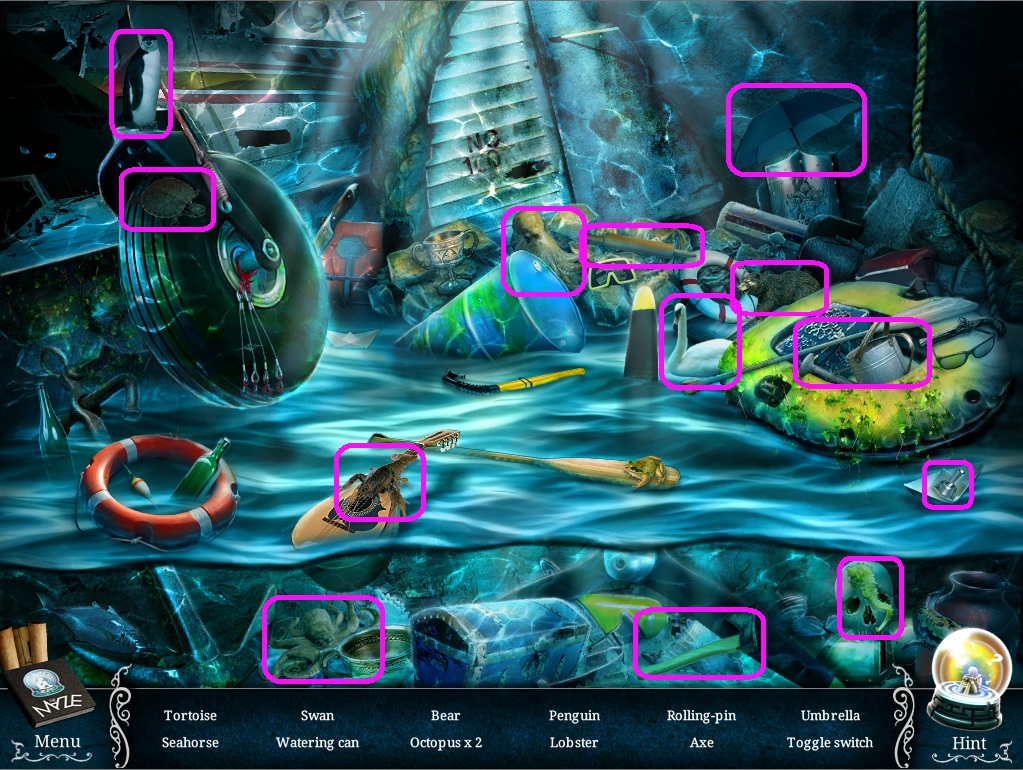
Click the aquarium to zoom in and take the Spear Gun.
Click the hole in the ground to start the hidden object scene.
Screenshot
Once the hidden object scene is complete, you will receive a Toggle Switch (1/2).
Click the statue to zoom in and take the Handle from its helmet.
Click the door of the crashed plane for a closer look.
Add the Handle from your inventory to the door.
Take the wrench-shaped Key on the ground behind the partially open door.
Click the aquarium again for a closer look.
Use the wrench-shaped Key on the bolt clamped to the cylinder.
Click the top right corner of the aquarium corner to zoom in.
Use the wrench-shaped Key again to remove the bolt.
Put the Knife inside the tank.
Zoom in at the bottom of the aquaruim again and take the Air Cylinder.
Click the statue again to zoom in and take the Mechanical Jaw beside the shield.
Click the door of the plane for a closer look.
Use the Mechanical Jaw to pry open the door then go forward into the plane.
Plane
Click the man chained to the back of the plane to speak with him.
Click the Attendants Bay to start the hidden object scene.
Screenshot
Once the hidden object scene is complete, you will receive the Crossed Swords.
Go back to the basement.
Basement
Click the statue to zoom in.
Place the Crossed Swords from your inventory in the brooch of the statue's cape.
Take the Coin from the open mouth.
Return to the plane.
Plane
Click the arcade machine to zoom in.
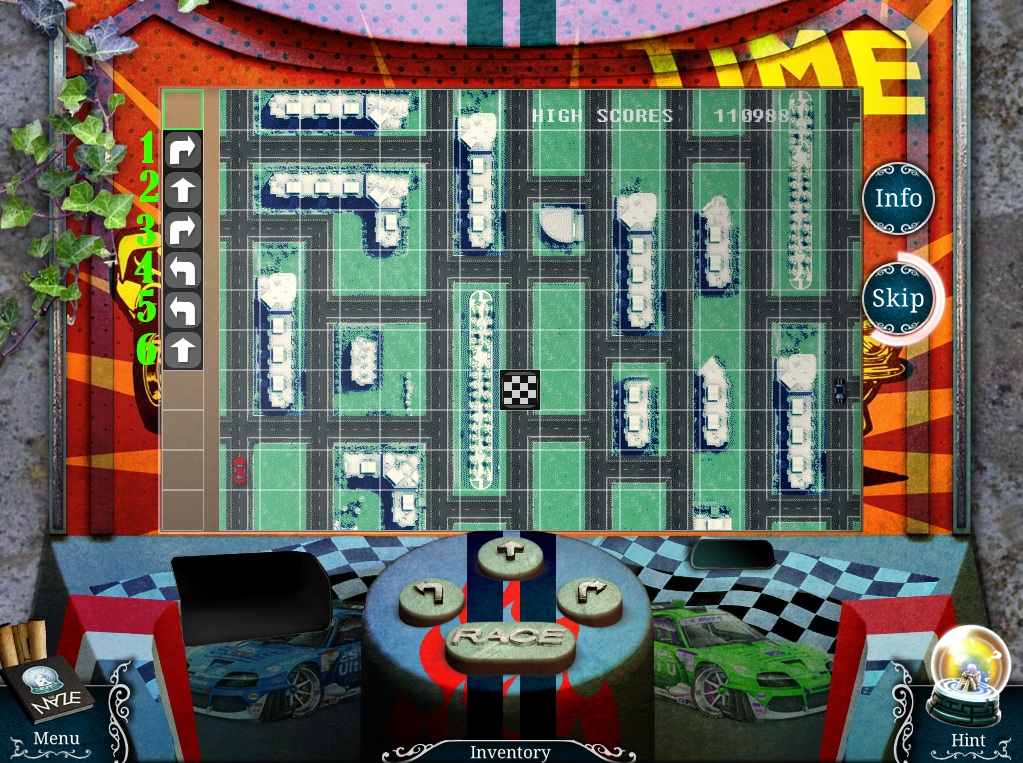
Inserd the Coin from your inventory into the coinslot to start the puzzle.
To solve this puzzle, direct the red car to the flag by selecting the correct sequence of turn arrows.
Click a button to select the direction the car will turn when it reaches a crossroads.
The order of arrow directions will be listed at the bar on the left side of the game.
Press the Race button, and the car will follow the preset turns.
Solution.
Take the Food from the prize dispenser.
Give the Food to the chained man.
Go through the door on the right into the airplane graveyard.
Airplane Graveyard
Click the Airplane Cabin to zoom in and take the Number 9 above the control panel.
Go forward to the reception area.
Reception
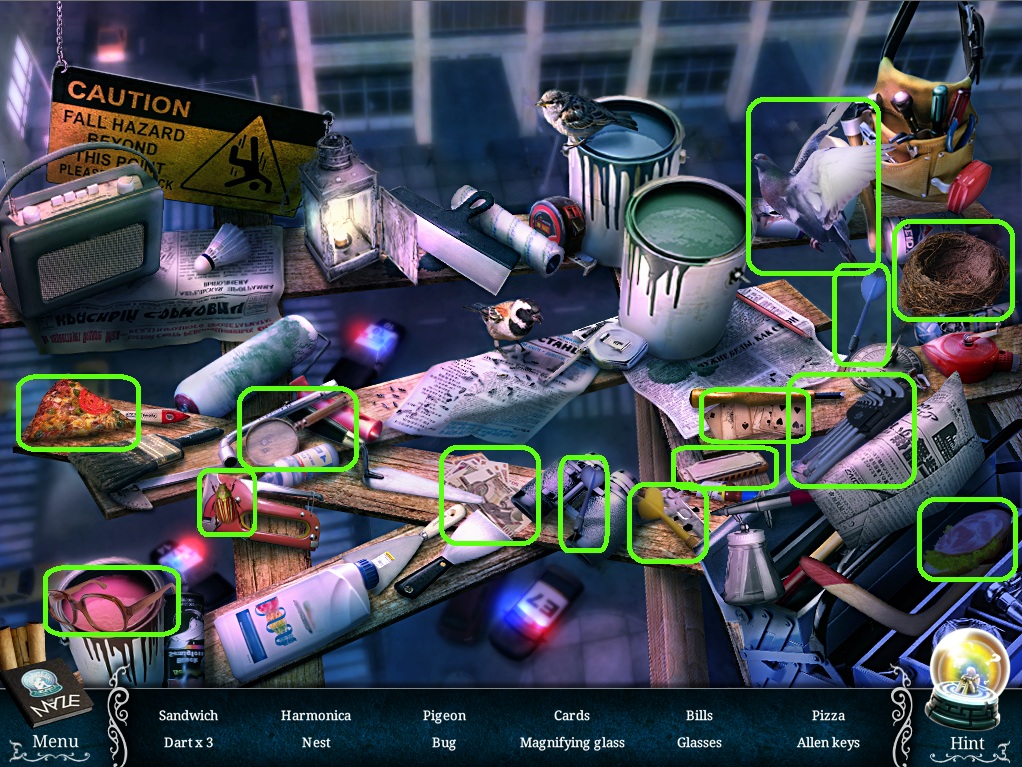
Click the lockers to start the hidden object scene.
Screenshot
Once the hidden object scene is complete, you will receive a Parachute Button.
Click the television to zoom in and take the Remote, then use the Remote on the TV.
Take the dead Batteries out of the back of the now Empty Remote.
Go back to the airplane graveyard.
Airplane Graveyard
Click the airplane cabin to go inside.
Put the Parachute Button from your inventory into the round space above the far right window.
Take the revealed Airplane Rod and Lock Part (1/2).
Click the rolled up newspaper to read it and note the special date: 09.2011.
Go back to the plane.
Plane
Click the box to the Chains on the left wall to zoom in.
Use the Airplane Rod from your inventory on the similarly shaped space at the left side of the box.
Take the Thimble from the opened compartment.
Return to the reception area.
Reception
Click the water mill for a closer look.
Use the Thimble from your inventory on the mill to repair it.
Take the Key that falls down to the grating.
Go back to the plane.
Plane
Click the first aid box for a closer look.
Use the Key from your inventory on the lock to open the box.
Take the Tweezers, Scalpel, and Capacitor (1/2) inside.
Return to the reception area.
Reception
Click the exit door to zoom in.
Use the Scalpel from your inventory to pry the square tile to the right of the door, then click the Shield tile to add it to your inventory.
Go back to the basement.
Basement
Click the statue to zoom in.
Click the shield for a closer look.
Add the shield tile from your inventory to start the puzzle.
To solve this puzzle, arrange all of the tiles so only similar tiles fill each of the four squares.
To the side of each of the quadrants is a symbol that indicates what type of tile should be in that square.
Click a shield that is surrounded by tiles to rotate its adjacent tiles clockwise.
Solution.
Once the puzzle is solved, click the square in the center to reveal the Dog Medallion inside the cache.
Return to the airplane graveyard.
Airplane Graveyard
Click the cerberus wreck to zoom in.
Use the Dog Medallion from your inventory on the inset of the box under the cerberus.
Take the Toggle Switch (2/2) and the Capacitor (2/2) inside.
Click the airplane cabin to go inside.
Add the two Toggle Switches from your inventory to the control panel.
Click the fuel supply to start the puzzle.
To solve this puzzle, close the valves to stop the flow of fuel to the three exit pipes on the right side.
Click a valve to close it, or click it a second time to open it.
Clicking one valve can also affect other valves.
When the path to an exit is closed, the section of pipe will go from green to clear and the light at the exit will change from green to red.
Solution.
Click the propeller to zoom in.
Use the wrench-shaped Key from your inventory on the Propeller, then click it to add it to your inventory.
Use the Key again to remove and take the Bolt Rod.
Go back to the plane.
Plane
Click the dynamo machine on the table to zoom in.
Add the two Capacitors from your inventory to the holes at the left and right side of the machine.
Place the Batteries into the square space in the middle.
Wait for the green bar to fill to high, then take the charged batteries, which go directly into the Remote.
Click the hatch in the floor for a closer look.
Use the Propeller on the lock in the hatch.
Click the revealed luggage compartment to start the hidden object scene.
Screenshot
Once the hidden object scene is complete, you will receive the Number 3 tile.
Click the chains box on the wall to zoom in.
Use the Bolt Rod on the similarly shaped space in the box.
Return to the airplane graveyard.
Airplane Graveyard
Click the box on the ground to zoom in.
Add the two Numbers from your inventory to the box to start the puzzle.
To solve this puzzle, arrange the tiles so that the numbers on opposite sides of the center tile add to 18.
Click a number tile to swap it with the center tile; however, the center tile itself cannot be moved.
If the sum of the center numbered tile and the two tiles directly opposite it add to a sum of 18, then their corresponding arrows will change from blue to green.
Note the paper on the right shows the center tile for the solution must be 6.
Solution.
Take the Lever, Eggshell (1/2), and the Sphere Rod inside the open box.
Click the newspaper and note the second special date inside: 03.2009.
Click the winch against the left wall for a closer look.
Add the Lever from your inventory into the device on the right side of the device.
Return to the reception area.
Reception
Click the water mill to zoom in.
Use the Tweezers from your inventory to pull the Coin out from under the grating.
Click the television for a closer look.
Use the Remote to turn on the tv, then click the bottom of the screen and note the third special date: 07.2006.
Go back to the plane.
Plane
Click the arcade machine to zoom in.
Put the Coin from your inventory into the coinslot of the machine to repeat the puzzle.
As before, direct the red car to the flag by selecting the correct sequence of turn arrows.
This time, however, there is the addition of a black car to race against and traffic lights.
Traffic lights will alternate from green to red and back before each turn.
Your car will stop at every red light; however, the black car does not have any traffic lights to stop at.
Click a button to select the direction the car will turn when it reaches a crossroads.
The order of arrow directions will be listed at the bar on the left side of the game.
Press the Race button and the car will follow the preset turns.
Solution.
Take the Eggshell (2/2) from the prize dispenser.
Click the chains box on the wall for a closer look.
Use the Sphere Rod on the matching space in the lock of the box, then take the Lock Part (2/2) from the open compartment.
Go back to the basement.
Basement
Click the Egg on the side of the plane to zoom in.
Add the two Eggshells from your inventory to the egg, then take the revealed Dragons tiles inside.
Click the aquarium for a closer look.
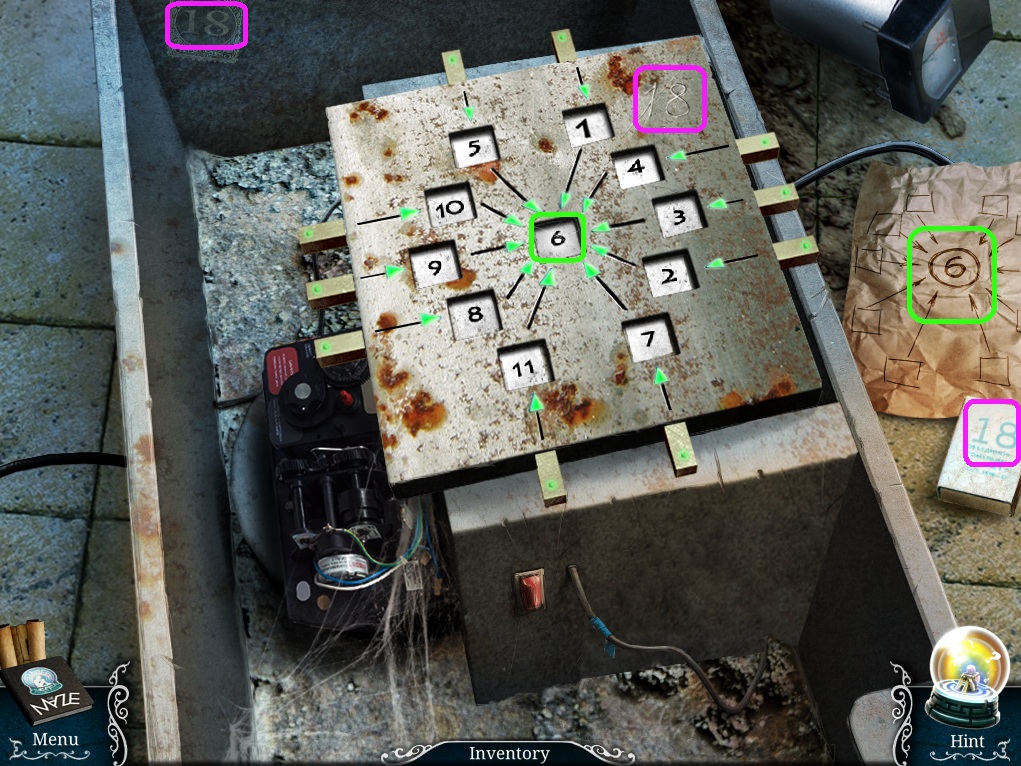
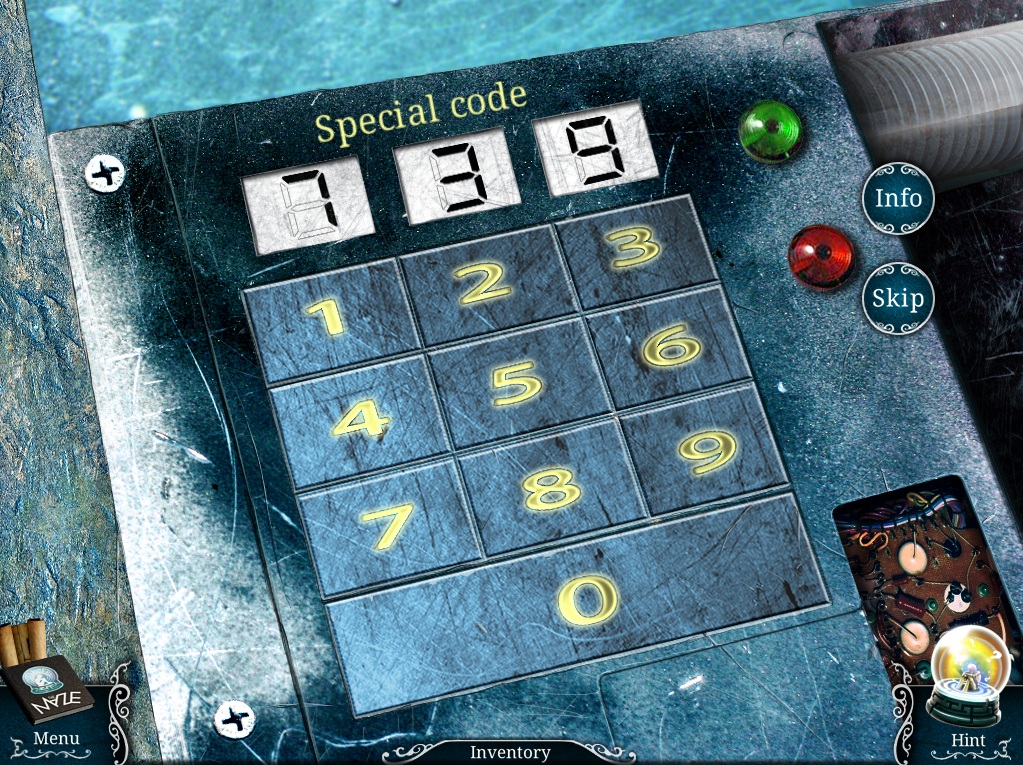
Click the code lock to start the puzzle.
To solve this puzzle, use the digits of the three special dates found earlier as a clue to enter in the correct combination.
Arrange the three dates 07.2006, 03.2009, and 09.2011 in chronological order.
Click the numbers on the keypad to enter the number of each month into code lock, 7-3-9.
Solution.
Return to the airplane graveyard.
Airplane Graveyard
Click the winch to zoom in, then click the dragon box for a closer look.
Add the Dragons tiles from your inventory to the box to start the puzzle.
To solve this puzzle, correctly place all of the dragon tiles on the board on top of the box to solve the puzzle.
Each of the tiles must be aligned so that every column and every row of tiles shares a similarity in either the number of dots or the position of the lines.
Click a tile in either of the two trays to select it, then click a square on the box to place it.
Solution.
Once the puzzle is solved, take the Dragon Rod that protrudes from the box.
Go back inside the plane.
Plane
Click the chains box to zoom in.
Place the Dragon Rod from your inventory into the last lock of the box.
Return to the reception area.
Reception
Click the lock in the middle of the straps around the girl's chest to zoom in.
Place the two Lock parts from your inventory into the circular lock to start the puzzle.
To solve this puzzle, move all the red blocks to the bottom and all of the blue blocks to the top.
Click a block to move it into an adjacent empty space.
Blocks can also jump over other blocks into an empty space.
Solution.
Once the puzzle is solved, take the Drill hanging from the pole.
Click the exit door to zoom in.
Use the Drill on the metal door to drill a hole, then use the Mechanical Jaw to pry the doors apart.
Chapter 6
Hall
Go through the window on the right to the scaffold.
Scaffold
Click the button on the right side of the scaffold to travel up to the roof.
Roof
Click the nest to zoom in and take the Piece of Paper (1/2).
Click the generator to zoom in and take the Fuses.
Go back to the hall.
Hall
Click the electric panel on the right wall beside the storage room door for a closer look.
Add the fuses from your inventory to the panel to start the puzzle.
To solve this puzzle, connect the wires at the top and bottom rows to the fuses of the same color.
Click a bolt to select a fuse, then click the bolt belonging to the matching fuse on the opposite row.
Solution.
Click the storage room door to look inside.
Take the Sack, Access Card, and Piece of Paper (2/2) from the wall shelves.
Use the Scalpel to cut off the Rope hanging from the ceiling lamp.
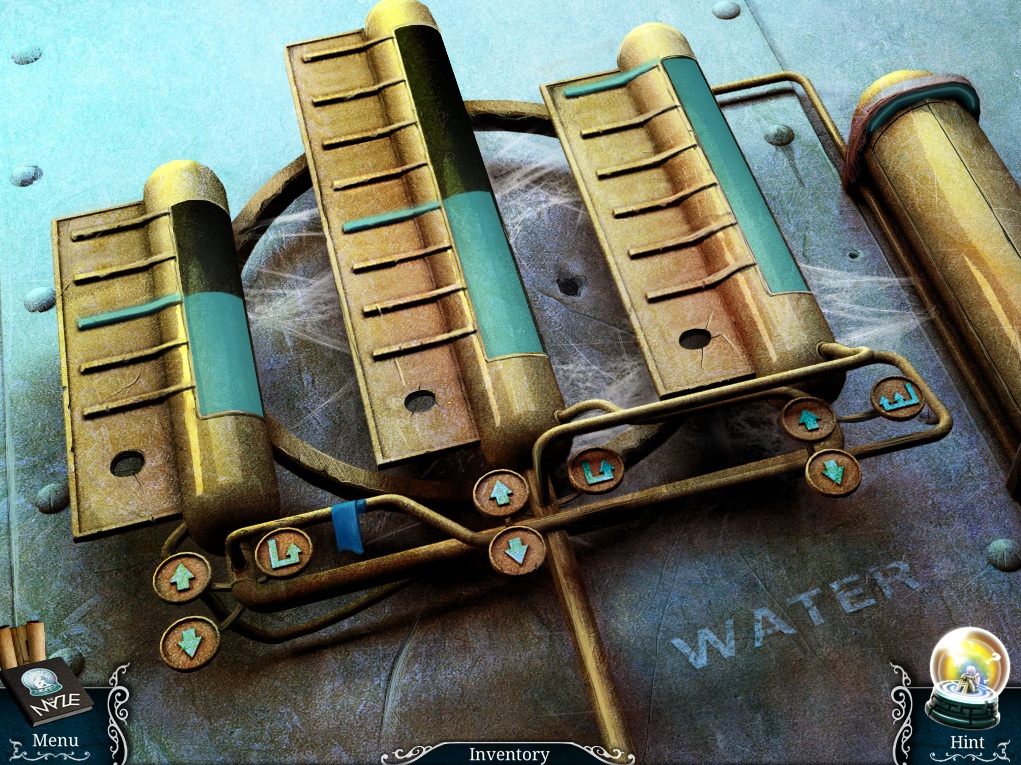
Click the pipe system on the wall to start the puzzle.
To solve this puzzle, set the fluid level in each of the tanks so that the water level reaches the blue line.
Pressing the "up" button will fill a tank to full, pressing the "next" button moves the water from one tank to another, and pressing the down button drains a tank completely.
Follow the directions in this order:
Fill the center tank.
Fill the right tank.
Press "next" button at the right tank.
Drain the left tank.
Drain the center tank.
Press the "next" button at the right tank.
Press the "next" button at the left tank.
Fill the right tank.
Press the "next" button at the right tank.
Fill the right tank.
Solution.
Take the Wrench Part (1/2) from the opened canister.
Click the stand with the crystal case to zoom in.
Use the Access card on the slot at the top of the stand, then take the revealed Blue Crystals.
Return to the scaffold.
Scaffold
Click the casket to zoom in.
Add the two Pieces of Paper from your inventory to the top of the box to start the puzzle.
To solve this puzzle, move the colored balls on to their matching colored squares.
Click a ball to select it, then click up, left, down, or right to move it in that direction.
A ball will continue to move until it hits an obstacle, such as a wall, a block, or another ball.
Solution.
Take the Crown Key inside the open box.
Go back to the hall.
Hall
Click the window to zoom in.
Use the Crown Key from your inventory on the lock in the window frame.
Click the open window to start the hidden object scene.
Screenshot.
Once the hidden object scene is complete, you will receive an Allen Key.
Return to the roof.
Roof
Click the airing vent to zoom in.
Use the Allen Key from your inventory on the bolts at the corners of the vent.
Take the revealed Can Opener and Statue Arm inside.
Go back to the scaffold.
Scaffold
Click the paint can to zoom in.
Use the Can Opener from your inventory on the lid of the can.
Take the Green Crystals inside the open can.
Go back to the hall.
Hall
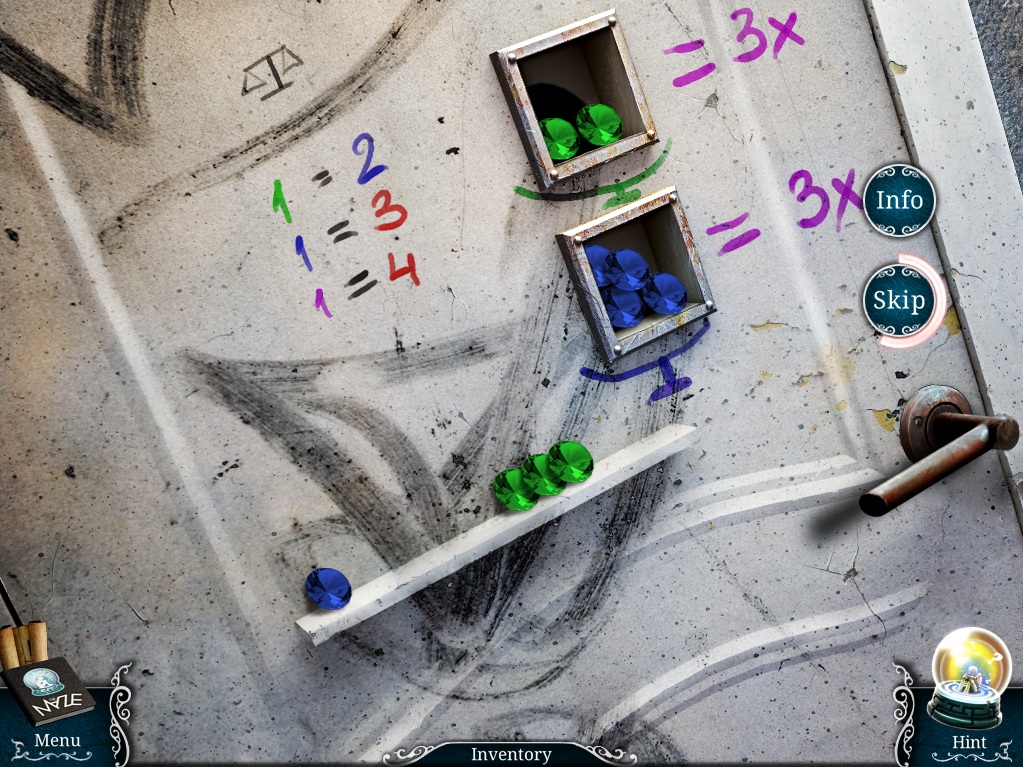
Click the white door on the left wall to zoom in.
Add the Green Crystals and Blue Crystals from your inventory to start the puzzle.
To solve this puzzle, place the correct amount of green and blue crystals into the top and bottom openings, using the formulas written on the door.
According to the information on the door, 1 Green crystal is equal to 2 Blue crystals, 1 Blue crystal is equal to 3 Red crystals, and 1 Purple crystal is equal to 4 Red Crystals.
The top opening needs an amount of Green crystals equal to 3 Purple crystals, and the bottom opening needs an amount of Blue crystals equal to 3 Purple crystals.
3 Purple crystals is equal to 12 red crystals, and 4 Blue crystals is also equal to 12 red crystals.
Put 4 Blue crystals in the bottom opening.
Since 1 Green crystal is equal to 2 Blue crystals, place 2 Green crystals into the top opening.
Solution.
Click the handle to open the door.
Click the script writer room to start the hidden object scene.
Screenshot.
Once the hidden object scene is complete, you will receive a Saw.
Click the statue for a closer look.
Place the Statue Arm from your inventory on the broken part of the statue.
Return to the scaffold.
Scaffold
Click the chain around the ladder to zoom in.
Use the Saw from your inventory to cut through the chain, then click the Ladder to add it to your inventory.
Return to the roof.
Roof
Place the Ladder from your inventory against the wall, then click the masked man at the top.
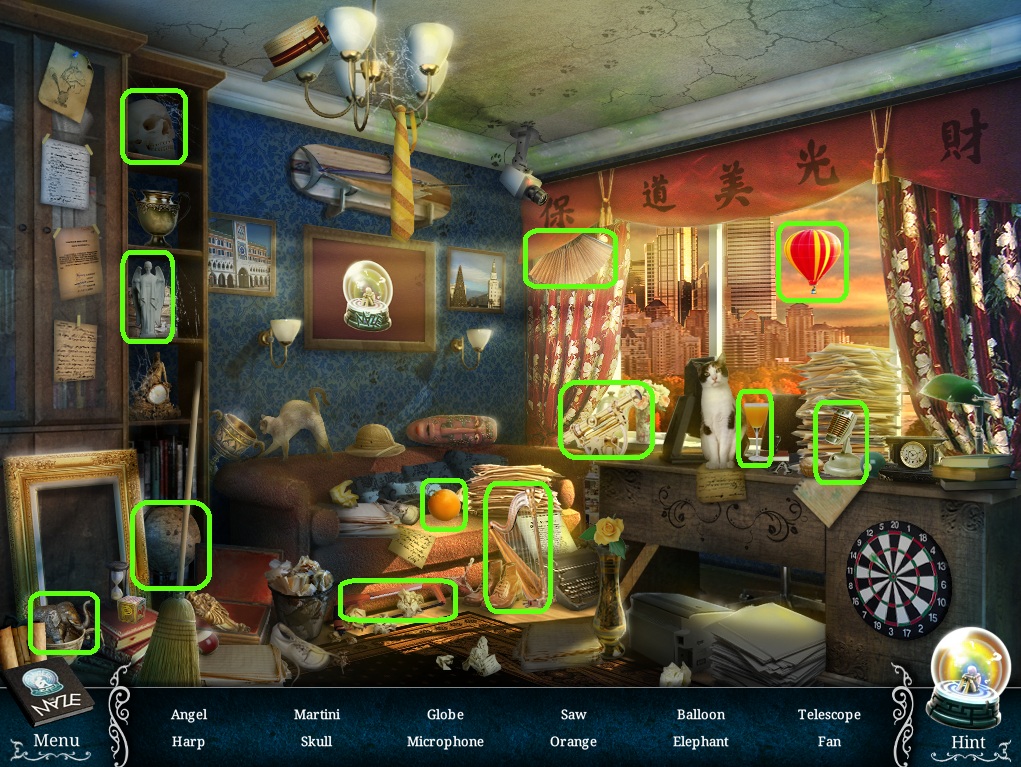
Click the boxes to start the hidden object scene.
Screenshot.
Once the hidden object scene is complete, you will receive a Thermal Camera.
Click the sandbox to zoom in and take the Glass Cutter.
Add the Sack to the inside of the box.
Click the electrical generator for a closer look.
Attach the Thermal Camera to the generator.
Go back to the hall.
Hall
Click the mirror to zoom in.
Use the Glass Cutter from your inventory on the mirror.
Click the sliced piece of Mirror to add it to your inventory.
Return to the scaffold.
Scaffold
Click the laser grid to zoom in.
Use the Mirror from your inventory on the lasers, then take the revealed Fire Alarm Handle.
Go back to the hall.
Hall
Click the fire alarm on the wall to zoom in.
Add the Fire Alarm handle from your inventory to the alarm.
Take the dispensed Shovel from the tray.
Return to the roof.
Roof
Click the sandbox to zoom in.
Use the Shovel from your inventory on the sand, then take the filled Sandbag.
Go back to the scaffold.
Scaffold
Click the block behind the scaffold to zoom in.
Use the Sandbag from your inventory on the hook.
Take the Generator Winch from the top of the bag of the other raised sack.
Return to the roof.
Roof
Click the air conditioner on top of the roof for a closer look.
Use the Allen Key from your inventory on the bolts at the four corners of the warning sign.
Use the Scalpel to cut the wire, then click the Plug to add it to your inventory.
Click the generator to zoom in.
Place the Generator Winch into the side of the generator.
Add the Rope to the winch at the side.
Attach the Plug to the broken wire looped around the top of the generator.
Pull the cord to start the generator, then click the charged thermal camera.
Click the junk blocking the boarded up doorway to move it aside.
Click the roulette lock to start the puzzle.
Click the red left and right arrows to rotate the wheel clockwise or counterclockwise.
Click one of the three faces at the bottom of the rectangle if it matches the large face at the bottom of the wheel.
The left facing arrow rotates the wheel 5 turns counterclockwise.
The right facing arrow rotates the wheel 3 turns clockwise.
The faces at the bottom of the puzzle are randomized each game.
Solution.
Go through the open door into the room.
Room
Take the second wrench part on the ground to complete the Wrench.
Go back to the hall.
Hall
Click the storage room door to look inside.
Use the Wrench from your inventory to remove the bolts at the side of the glass case.
Take the Gun Key inside the open case.
Click the armory door behind the moved statue to zoom in.
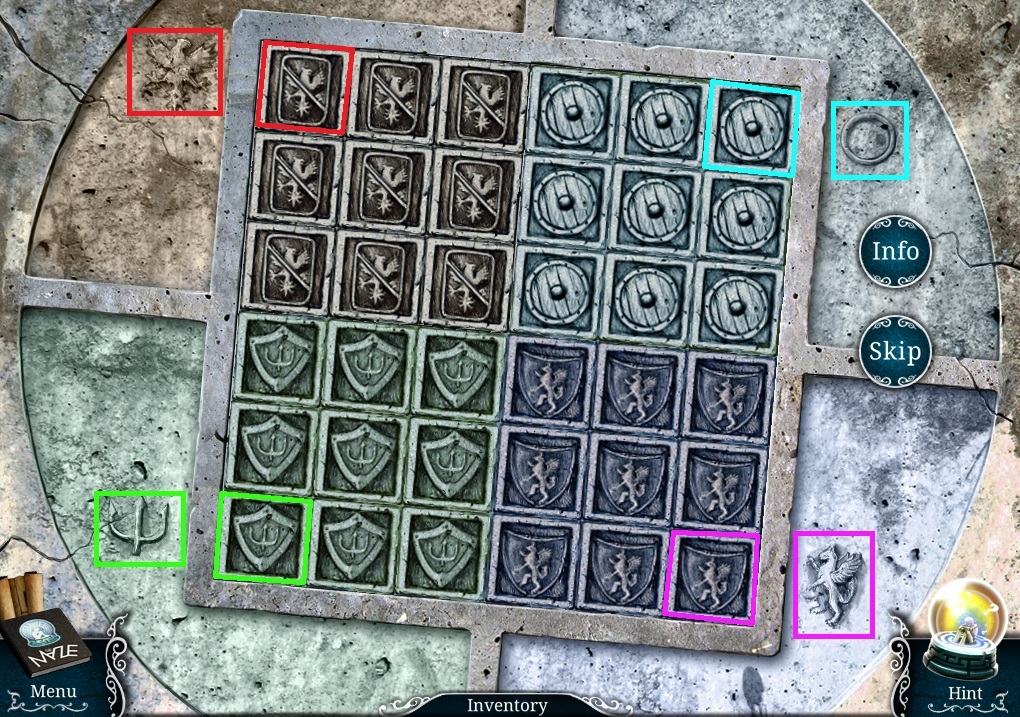
Use the Gun Key on the keyhole of the lock to start the puzzle.
To solve this puzzle, arrange the blocks to create the image of a circle in the center.
Click a block to move it into an adjacent empty space.
Solution.
Once the puzzle is solved, take the Flash Grenade from the center.
Return to the room at the roof.
Room
Use the Flash Grenade from your inventory on the masked man.
Click the masked man on the ground.
The End
Posted by: Trinn |
September 22, 2011 4:17 PM
|
September 22, 2011 4:17 PM