

Tulula: Legend Of A Volcano
Platform: Windows
![]() In the age old "does a super hero beget a super villain" debate, one has to ponder if the same counts for evil spirits and chosen ones. Let's take, for example, the opening scene in Tulula: Legend Of A Volcano, from Intenium. Here you are, standing in a cave, a shaman named Taboo telling you that everyone in the world has been frozen by an evil spirit's spell and clearly you, not being frozen, must be the chosen one. Thus you set upon a quest of restoring the tribe totem, inconveniently smashed to bits by the evil spirit and spread across several locations. It's up to you to visit each exotic spot and get those pieces together in this absolutely gorgeous hidden object adventure hybrid, with an assortment of hidden objects and puzzles standing in your way.
In the age old "does a super hero beget a super villain" debate, one has to ponder if the same counts for evil spirits and chosen ones. Let's take, for example, the opening scene in Tulula: Legend Of A Volcano, from Intenium. Here you are, standing in a cave, a shaman named Taboo telling you that everyone in the world has been frozen by an evil spirit's spell and clearly you, not being frozen, must be the chosen one. Thus you set upon a quest of restoring the tribe totem, inconveniently smashed to bits by the evil spirit and spread across several locations. It's up to you to visit each exotic spot and get those pieces together in this absolutely gorgeous hidden object adventure hybrid, with an assortment of hidden objects and puzzles standing in your way.
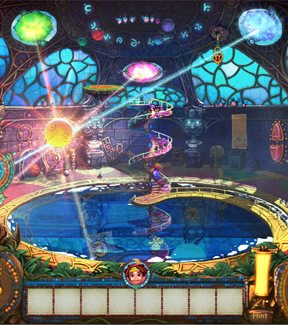 Every area, or level, in Tulula comprises of two or three screens and two main quests: collect all the totem pieces and get the portal going. To do this you need to solve various situations in the areas: getting a lift to work, finding a boat or rigging a hot air balloon. If that sounds mundane, you also get to extinguish a volcano, harness the power of dark matter and give a chief happy dreams. Tulula is a surreal ensemble of fantasy, technology and eccentricity. Even in the world of hidden object games in particular, this title stands apart with its decadently fantastic locations.
Despite the name, "casual" is anything but, especially if you descend into the more demanding stuff Big Fish dishes up. Serious hidden object game fans and Holmesian puzzle addicts can get their fixes from quite a selection in its catalog. But these are not exactly the games you use to lure people into the whole scene. Enter Tulula, an experience that is perfect for newcomers or kids. With colorful art and an interesting mix of gameplay styles, it's a perfect primer to the world of 'casual' games.
 Casual to its core, Tulula is not only beautiful to behold, it is also mostly a light and easy romp. It uses several familiar systems: finding pieces to construct something, solving puzzles to access items (and the reliable regulars at that: sliding puzzles, repeat-the-tune, etc.), using items for specific tasks, hidden object sequences, even a solid hint system – it's all there. As the story progresses, the difficulty rises noticeably, but more along the lines of strange things to find and some pedantic puzzle designs. Fortunately the hint system is extremely forgiving.
Things you don't often see in this genre hybrid are distinct levels with score summaries, achievements (in the form of medals) and statistics that level up your character. Every time you complete a section, you are scored accordingly (penalizing for skipping puzzles). This score hands you 'talents', currency you use to restore your village destroyed by the evil spirit. In another concession to newcomers, usable items and areas unlock only when you need use them, so there are no items confusing you or cluttering the inventory.
 And that's why it's an ideal stepping stone – a great way to give someone a full run of the casual puzzle game ensemble of tricks. If you can get them hooked now, they might return the favor and buy you the new Mystery Case Files game for Christmas. Tulula may not be for seasoned pros, but it's great for the casual gamer, young or old. Veterans won't be very challenged, but sometimes a challenge isn't what you're looking for in the realm of casual gameplay. A gorgeous game that is fun to play from beginning to end, and one that is quite unique even if it does stick very close to a formula that works.
![]() Windows:
Windows:
Download the demo
Get the full version
![]() Mac OS X:
Mac OS X:
Not available.
Try Boot Camp or Parallels or CrossOver Games.


Walkthrough Guide
(Please allow page to fully load for spoiler tags to be functional.)
Tulula. Walkthrough
General
When your cursor turns into a hand you can pick up objects.
When your cursor turns into gears an action is required. This can either be simply clicking to move an object or using an inventory item.
The lamp is your hint. A bright lamp can be clicked. A hint shows you either a random object you need, or a place to do something, or a text hint to look at another location.
After use, the hint needs a short period to recharge.
The menu option gives you the opportunity to choose fewer dialogues.
Each chapter contains one hidden-object scene. The objects are the same for each player, but your list may be in a different order when playing again with a second profile.
In addition, more items will be added to the list as you find others.
When complete, there will be an interactive scene to receive a reward (needed object).
Some items you will have to combine in container bubbles. Each bubble will show a silhouette. Objects have to be placed in the corresponding bubbles, not only in the main circle.
Mini games can be skipped after a short period.
Starting with Level 2, you will need to collect scrolls in order to rebuild the village.
For finishing all tasks in a level you will receive talents.
After the Tulula Village is unlocked you can return to it whenever you are in the map room to begin rebuilding with the talents you earn during game play. You do not have to go back each time.
In the village click on the different flag poles and choose the building you wish to build, then press the hammer.
If you have not picked up the scrolls or do not have enough credits, you will have to return to the game and come back later.
After beating Valco at the end you will see the credits, but you can return to the game and finish building the Village.
In each scene you will find one or more pieces of the Tulula-Totem. You will need to collect them all in order to finish a chapter. The hint will show these pieces as well.
The Notebook contains the following information:
Totem Parts (Blue button)
Tasks (Orange button. Actual and already completed)
Shamanís Cave (Purple button. Progress-information)
Scrolls (Yellow button. Scrolls you already own to build your village)
Dialogs(Green button. All dialogs encountered throughout the game)
The Start
After typing your name and choosing your hero, take the lantern and click it one time on the bonfire.
Follow the tutorial and use the tip for the notebook and the backpack.
Grab the scissors from the wall on the far right side and use it to cut the twigs inside the inventory.
Take the ladder on the left side and place it under the masks on the top right side.
Click both masks and wait until they fall down.
Click the bar that appears and learn more about Tulula's history.
Pick up both skeleton arms laying next to the masks on the floor.
Get one of the arms from your inventory and click the door on the far right side.
Use the second arm as well and enter the room.
Screenshot
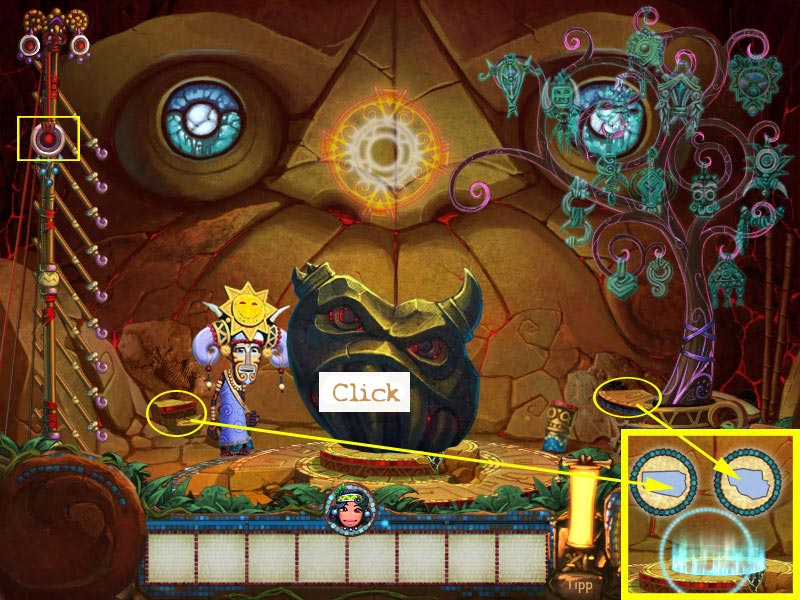
Click the black ghost quickly several times to make him raise.
Click the destroyed totem; a container opens. You want to find the two shown parts.
Place them in the corresponding bubbles.
Screenshot
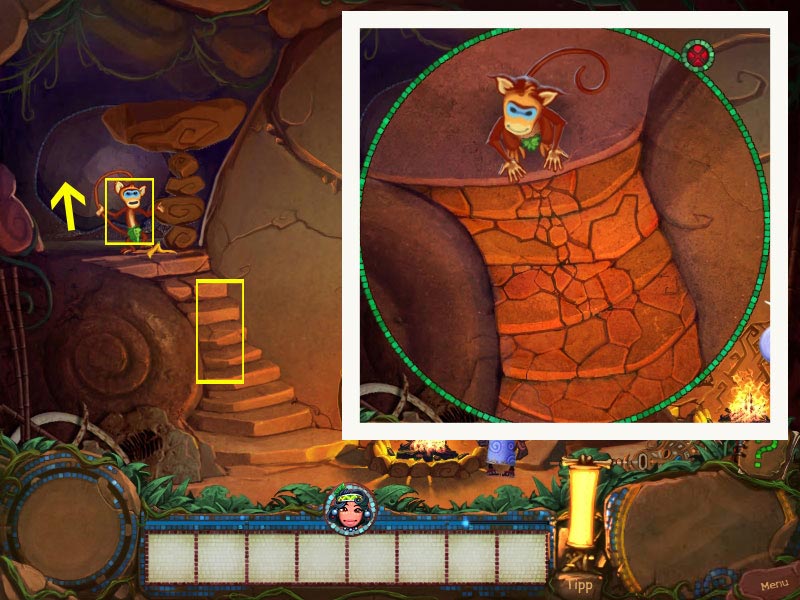
You will be automatically brought back. Click Ivan, the monkey on the top of the stairs, left side.
Click the stairs after they are destroyed and get the single tiles out of Ivan's hands.
Place them in the corresponding spots to repair the steps.
Screenshot
You will change the room again. Click the flag pole on the left.
Click the colored part of the map.
The Chief's Castle
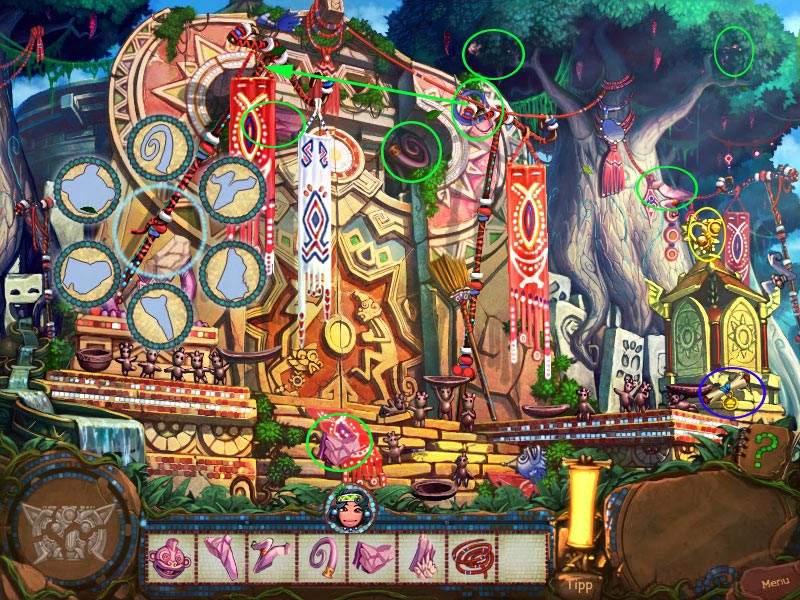
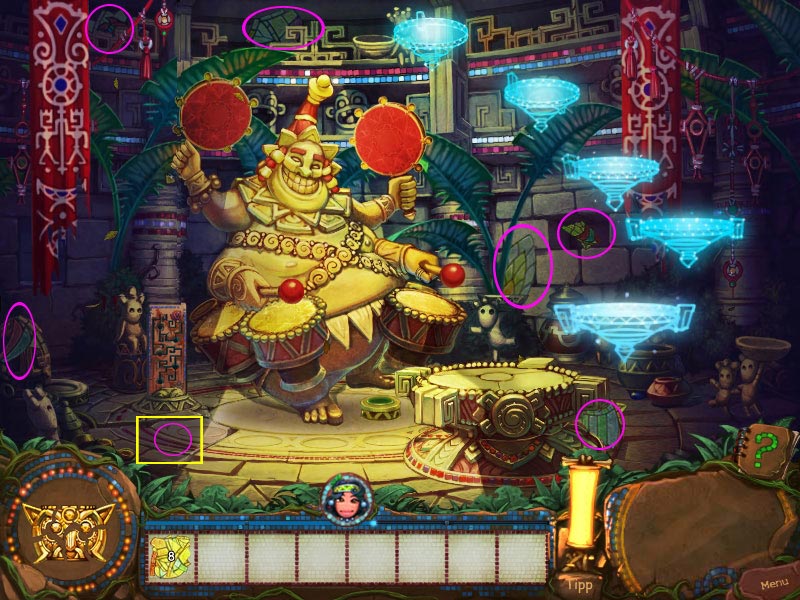
The Totem
Grab the two parts for the totem.
Click the idol in the lower middle.
A container opens.
Click the staff on the right side of the stairs. Another container opens.
Find the rope.
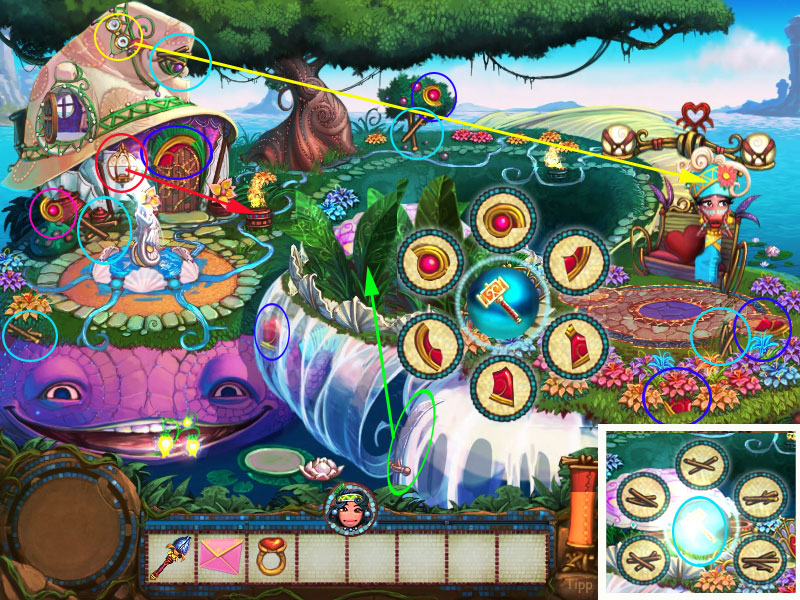
To get the feather, take the grapes from the fruit basket above the stairs on the left and give them to the peacock.
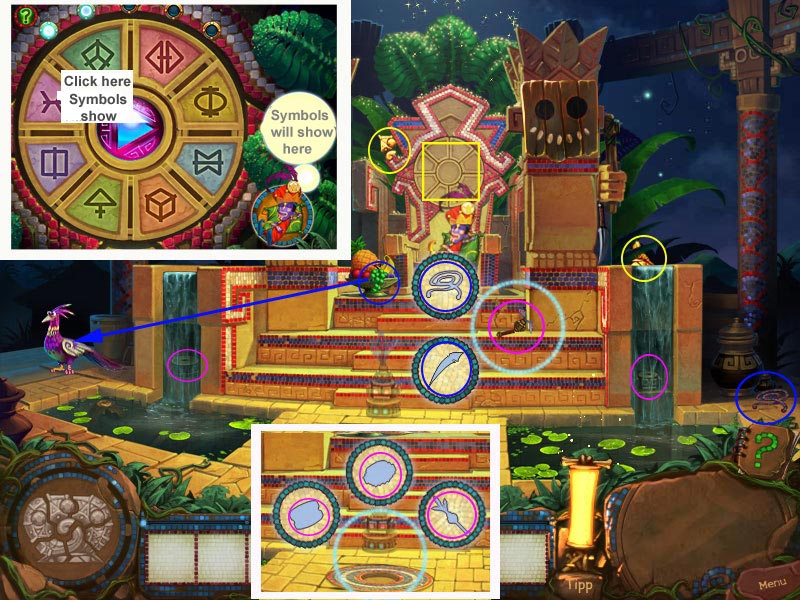
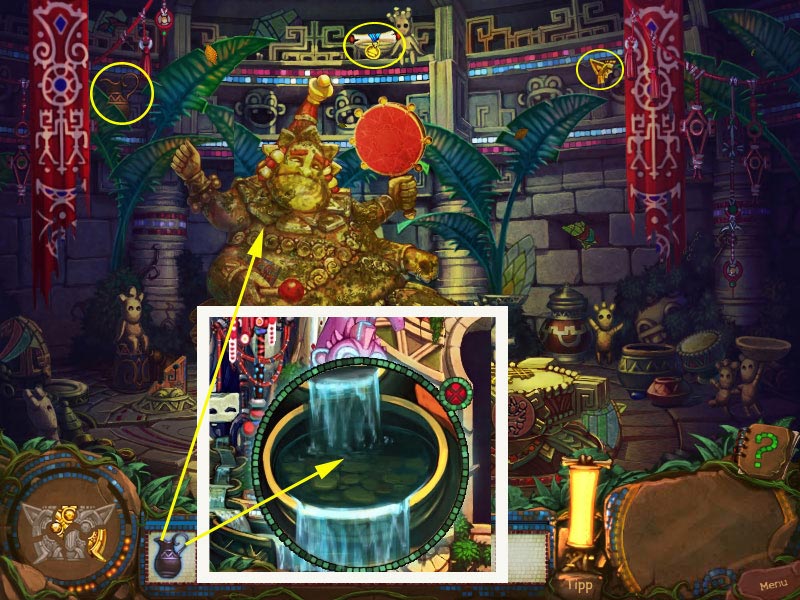
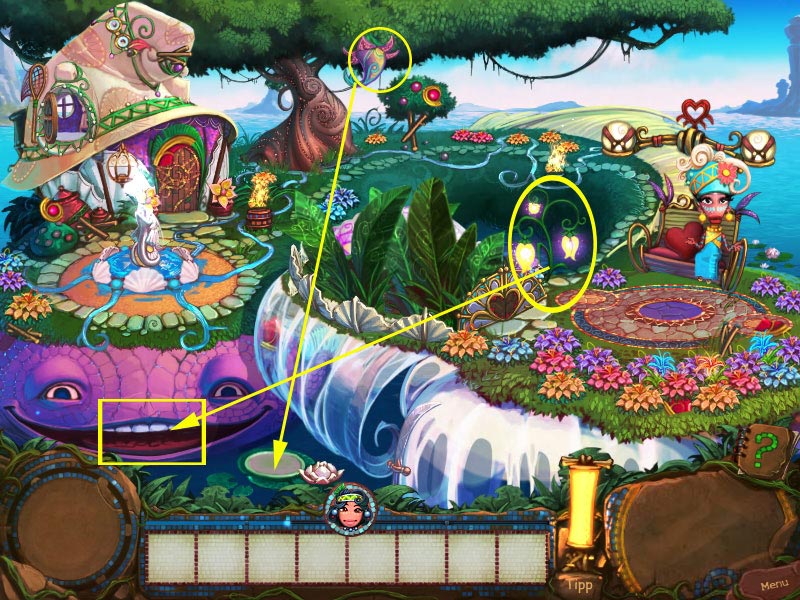
Click the two parts hidden behind the small waterfalls. Something will be highlighted at the chief's throne.
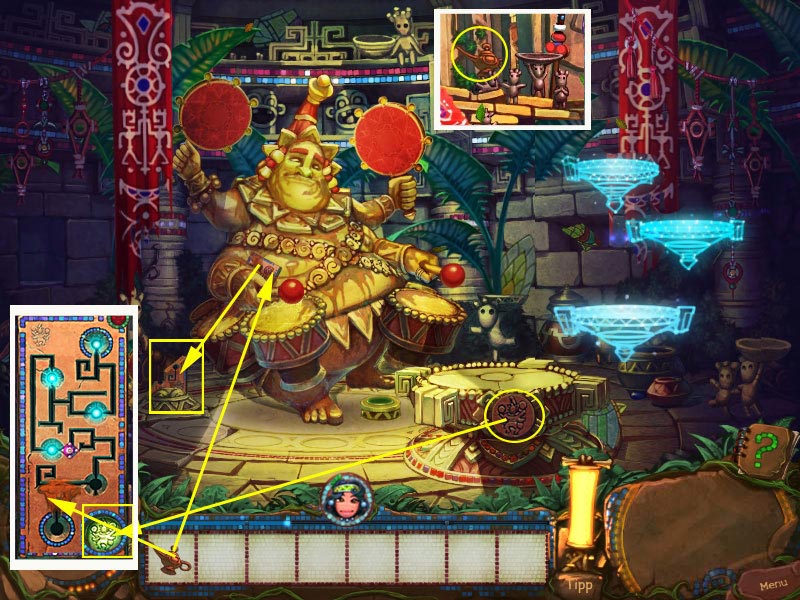
Click the throne to trigger a mini game.
You will have to repeat the chief's dream symbols.
Click the middle of the wheel and the bubble above the chief's head will show a symbol.
Find and click the symbol on the wheel. When you are right you will see the first symbol again and then a second one.
Repeat both symbols.
When you make a mistake, you will have to start all over.
You receive a part of the totem, and the water stops running.
Take the idol parts out of the compartment and place them in the container bubbles.
Screenshot
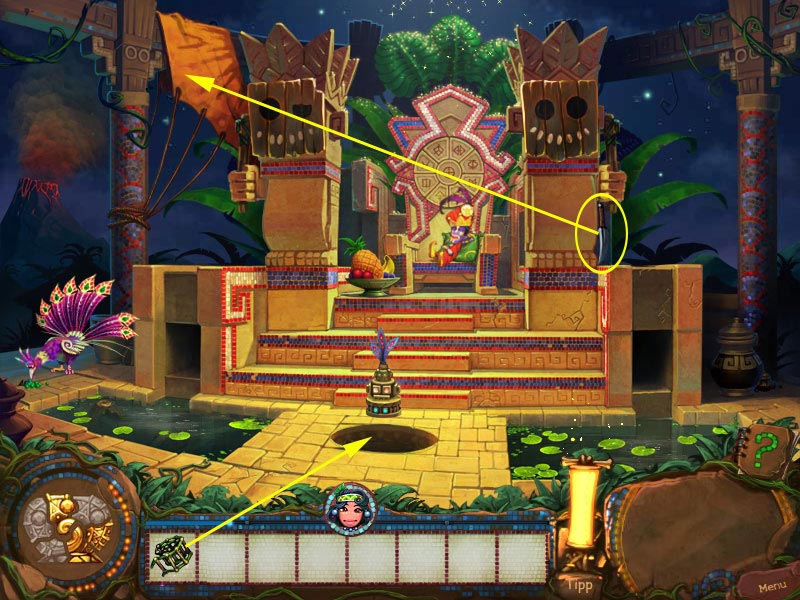
Click the arrow on the treasure room entrance to learn that you will need a ladder.
Click the sail on the top right side to find out you will need a knife.
Get the knife right next to the right statue.
Cut the ropes on the top right, take the ladder, place it at the entrance of the treasure and go down.
As it is too dark, you will have to go up again.
Screenshot
Light
Click the wooden mask of one of the two statues to lower them.
The eyes are missing. You will need to find the pearls.
Click the the vase to the left and take the plan.
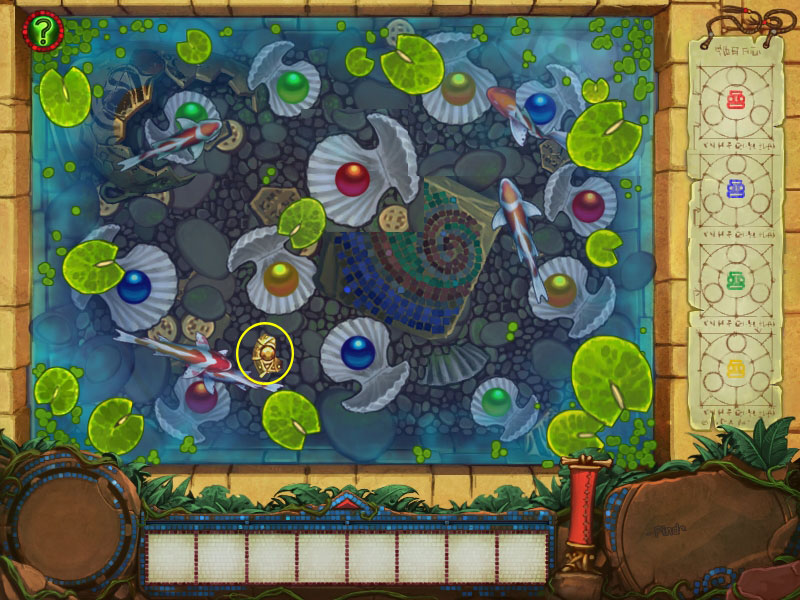
Click the water on the left side to trigger a mini game.
The right side shows the plan you just found. You will have to find three pearls of each color.
Click on the rocks repeatedly until a clam is fully revealed and opens. Grab the pearl.
You also have to find a part of the totem.
Screenshot
When you are done drag the pearls on the corresponding eye spots.
Now you can go down into the treasure room.
Screenshot
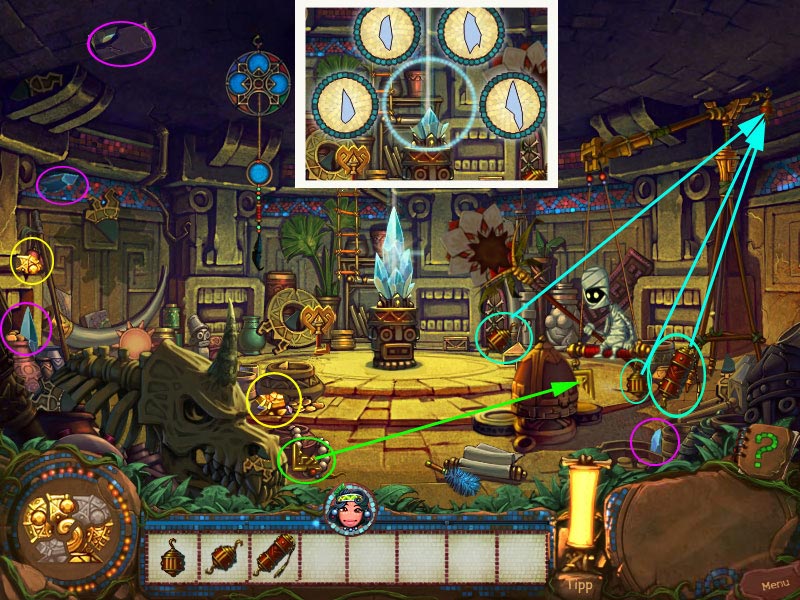
Treasure Room
Look for the last to parts of the totem.
Click the crystal in the middle of the room. Find all crystal shards for the container bubbles and place them correctly.
The light beam goes to Bush-Bush on the right.
Find the second part of his medal and and fix his broken medal.
Find the weights to get Bush-Bush's swing down and place them in the right order (small, middle, top) on the top right of the swing.
Click Bush-Bush until he is sitting in the right position.
Screenshot
The beam now points to the sun fan, but there the reflection disk is missing.
Get the sun disk and click the fan until it reflects the beam.
Click the shard on the left wall and find the missing ones to place them into the container bubbles.
Screenshot
The portal is activated. Click it to go back to the Shaman.
The Ruins of Kalamuna
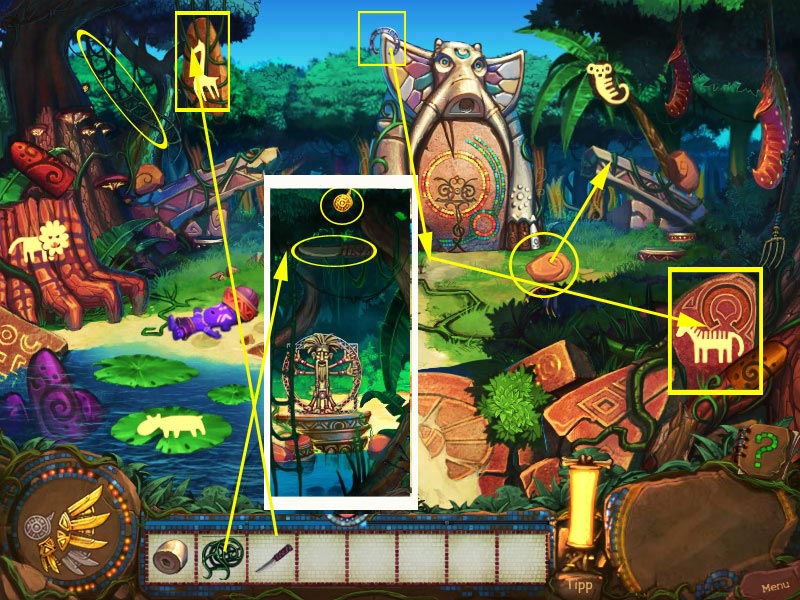
Outside the temple
Look for the part of the totem and one scroll.
Click the statue on the left to learn that you have to repair it.
Look for the parts and drag them into the container bubbles.
You will find two parts by clicking the tree on the the top right.
Get the rope from the top right of the temple and place it on the half fallen flag pole.
Find the part that was hidden behind the flags.
After finding all parts the statue raises and on the right a part of a second statue raises as well.
Screenshot
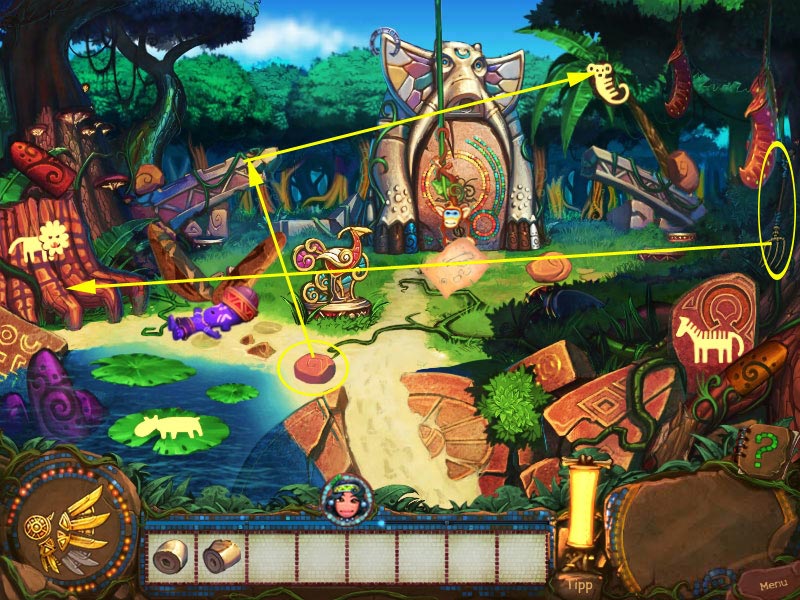
Click the second statue and find the parts for this one as well.
One part can be found by clicking the stairs in the middle. It will move.
Click the feathers above the entrance to find another part.
Drag all parts into the container bubbles to make the container rise.
The statue will rise.
Click the bell on the right to learn that the clapper is missing.
Click the water basin on the left, grab the bell clapper and drag it onto the bell.
Click the bell again. The monkeys start to dance and the temple entrance will open.
Enter the temple.
Screenshot
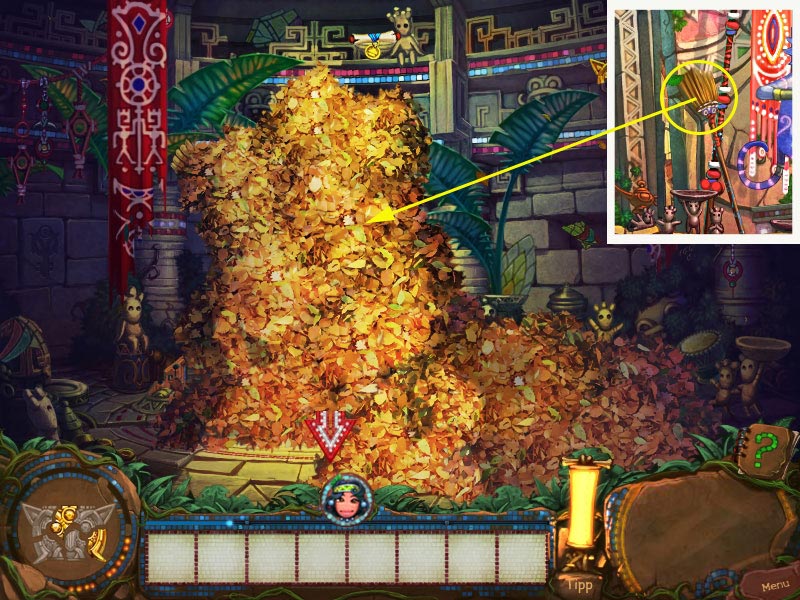
Inside the Temple. Downstairs
A huge leaf heap is waiting for you. Go back outside and grab the broom right next to the entrance.
Go back and use the broom on the leaves.
Screenshot
Take the scroll on top, next to the doll, and the part of the totem on the left, next to the right curtain.
Click the statue to learn that you need to clean it.
Click the left curtain and it will move, grab the jug.
Go outside and fill the jug at the water basin on the left.
Go back and pour the water over the statue.
Screenshot
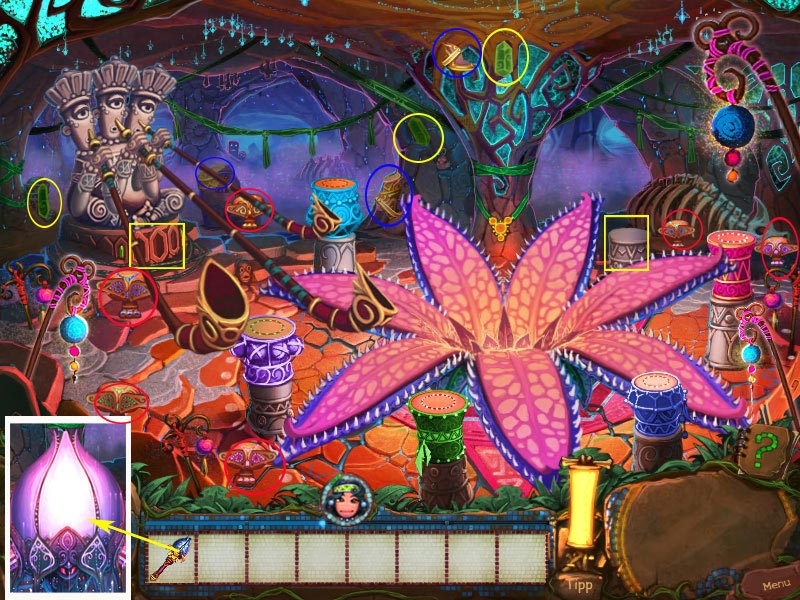
Click the statue and find the three musical instruments.
Click the column left next to the statue, get the instrument out of the opening compartment.
Click the left curtain so that it moves to the other side again.
Grab the symbol from the pedestal on the low right side.
Click into the slot on the left wall.
Take the totem part.
Click the little round stone on the floor below, click again when it starts to glow.
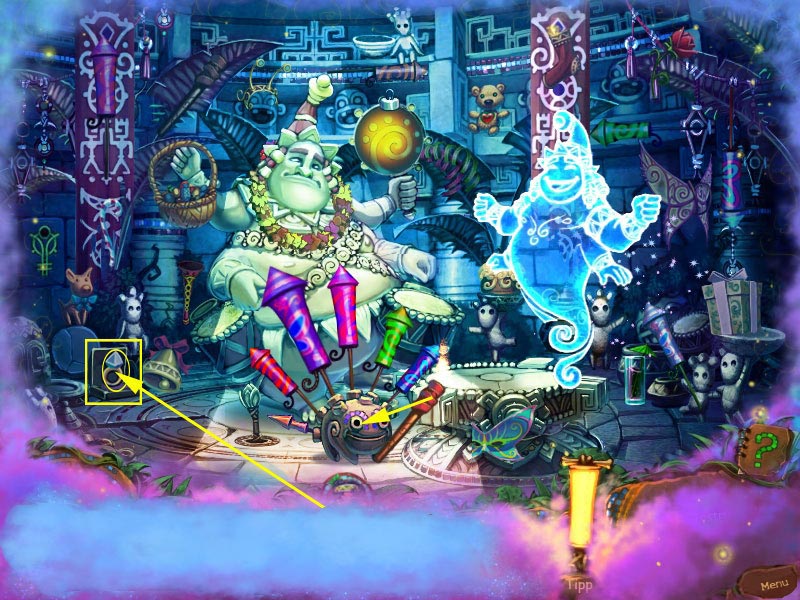
You will be brought to a hidden-object scene.
Find all items. To get the ring, click the chest on the far left.
When all objects are found, use the the torch and light the fire crackers.
Screenshot
For your help you will receive a drum stick.
Place all objects into the container bubbles and click the statue again.
Screenshot
You will need oil. Go outside and get the oiler right next to the entrance.
Go back and use it to oil the statue.
Lower the statue's arm and pick up the fallen remote control part.
Repair the broken remote and oil all of the rust spots.
Get the remote button from the pedestal on the low right side, place it and click it.
When you see a step appearing on the right side, click it again.
Do this four times.
Screenshot
Use the steps to go upstairs.
Temple upstairs and downstairs
Take the scroll and the two totem parts.
Find the shards. For 7 of them you will have to go downstairs.
For one of the shards in the lower part of the temple you will have to move the stone on the bottom left.
The left curtain should be on the left, the right curtain on the right side.
Screenshot
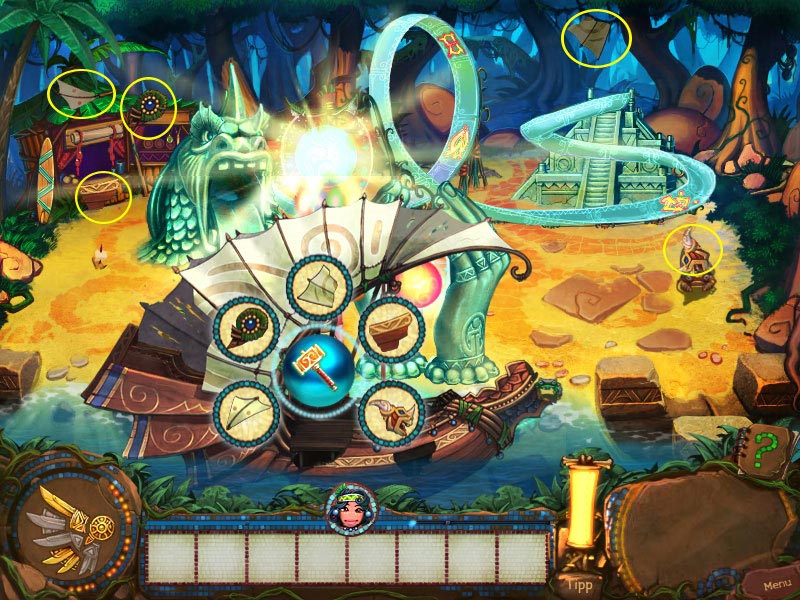
Go upstairs to assemble the glass.
Three symbols appear and will fly downstairs.
Follow them.
Screenshot
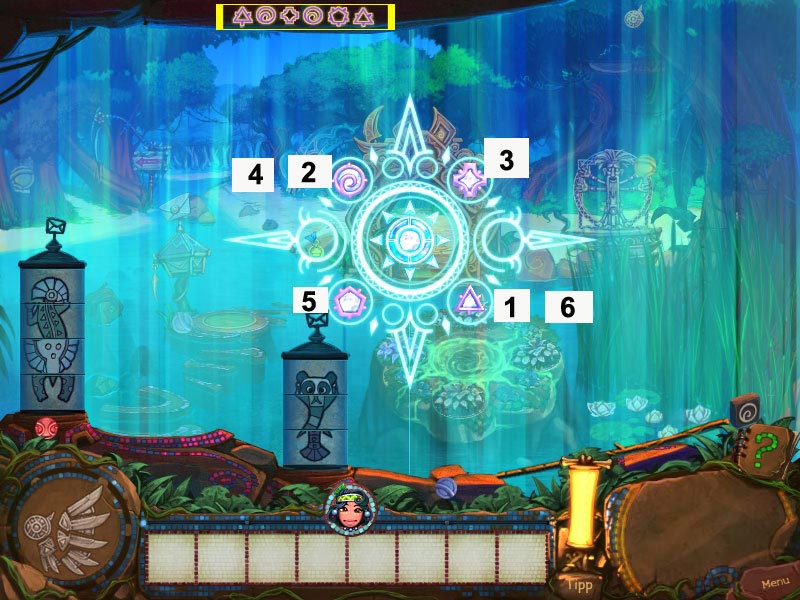
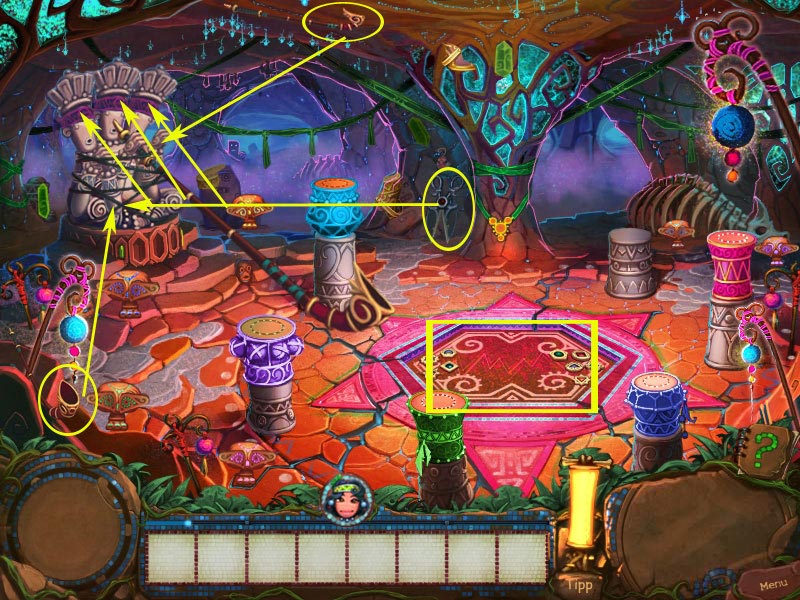
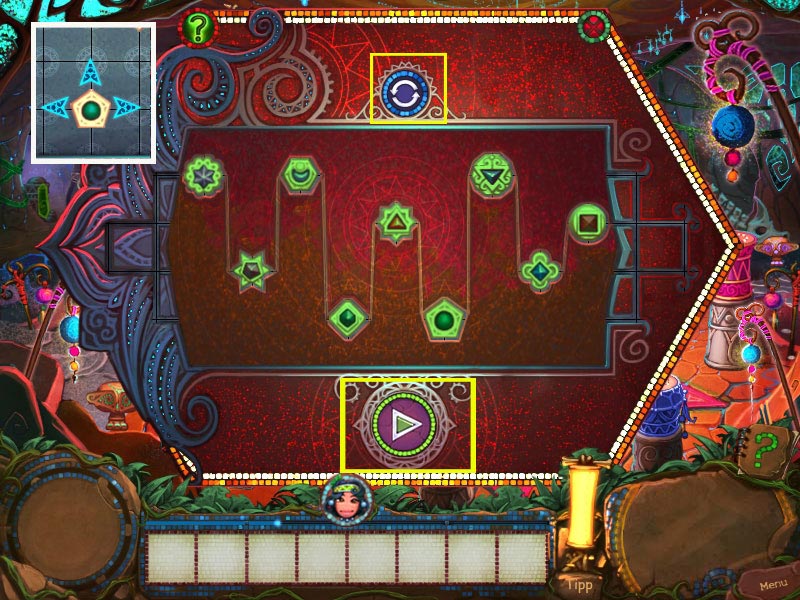
Wait until the symbol above the portal is complete.
To get enough energy, all three symbols have to be connected with the middle.
Begin with the outer ring and spin it until all three of the shown symbols have a line leading to the middle.
Continue ring by ring.
Screenshot
Enter the portal.
Village in the Trees
Outside the Hut
Find the two totem parts and the scroll.
Click the door on the tree, then the venus flytrap on the right side.
Screenshot
Click Ivan until he is right above the venus flytrap, click again when the flower opens and he will pick up the key for you.
Use the key to open the door.
Screenshot
You will need to find fuel, a flute and sticky wax.
Move the far right branch.
Pull the far left vine, the second vine, the snake tail and the far right vine to find all objects.
Charme the snake with the flute and use the sticky wax to repair the broken gear.
Pour the fuel into the tank and replace the gears and the lever.
Pull the lever to start the elevator motor.
Click the blue, down arrow on the tree to call the elevator and the arrow on top of the scene to enter Dr. Knaus' hut.
Screenshot
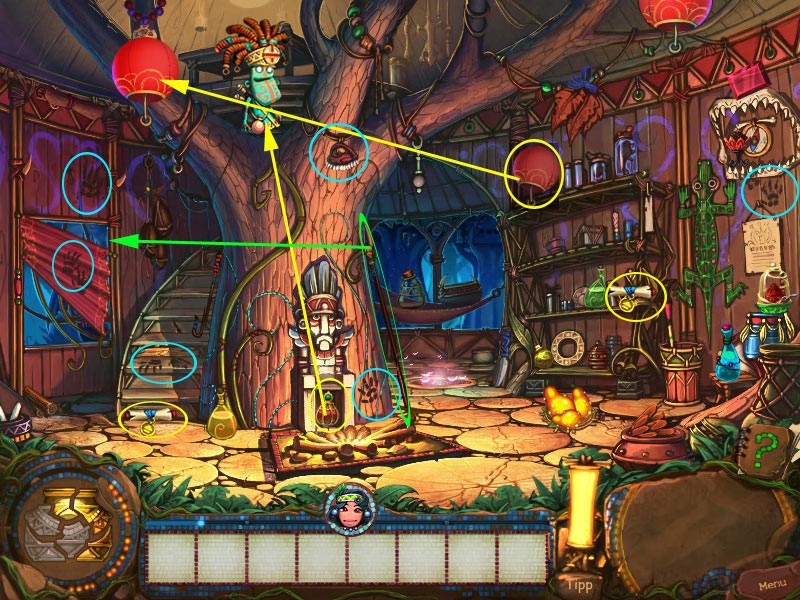
Dr. Knaus' Hut
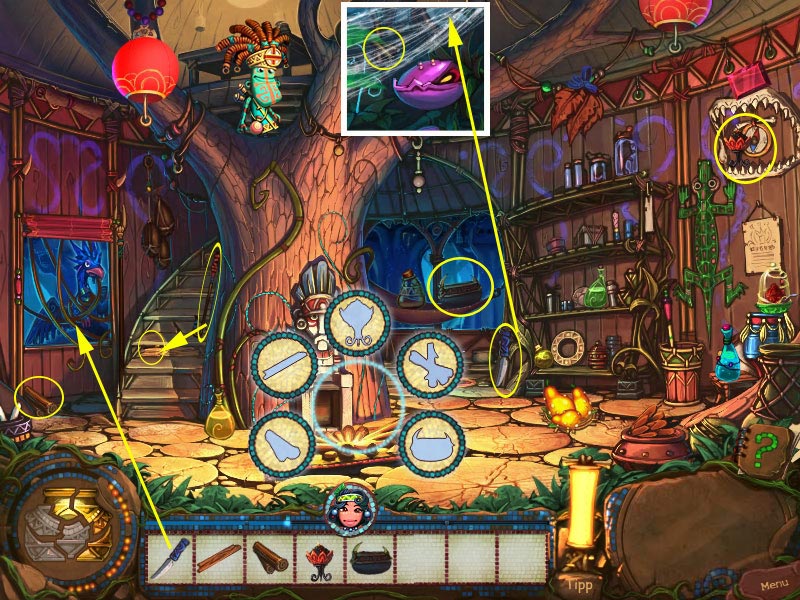
Take the lamp shade from the right shelf and click it on the lamp on the top left.
Find the two scrolls.
Click Dr. Knaus on the top of the screen to learn that he needs an energy potion.
Click the door below the mask behind the fireplace. Grab the potion and give it to Dr. Knaus.
Find the brush and clean the dirty spots.
To open the window, get to pole on the right and use it with the window blinds.
Screenshot
Click the bird on the left.
Grab the knife on the right in front of the shelf and cut the vines.
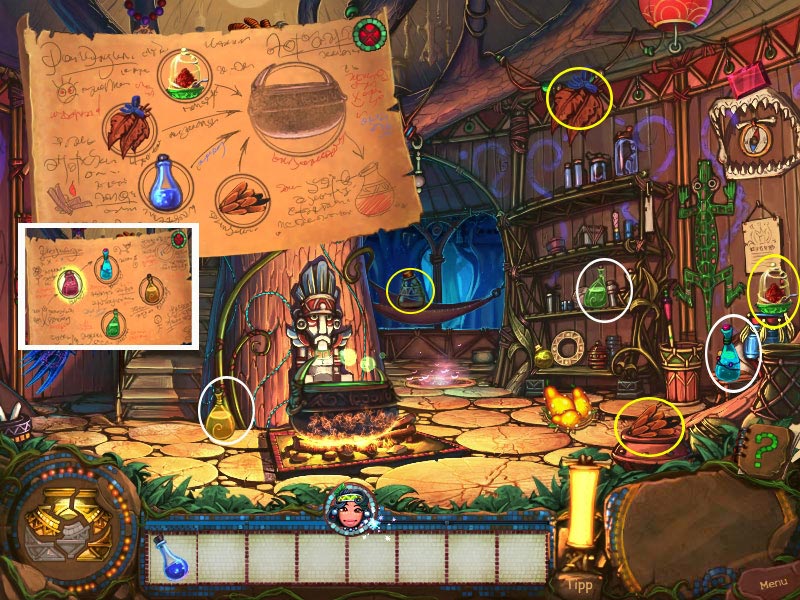
Click Dr. Knaus to learn that you will need to brew a potion.
Click the fire place and look for the items for the container bubbles.
Use the pole at the stairs to loosen the wooden plank.
The plank will go into your inventory.
Pick up the totem.
For more wood go down, use the knife to cut the web and grab the wood behind the bushes on the right side.
Screenshot
Go back and drag the objects into the container bubbles.
Click the recipe on the window on top.
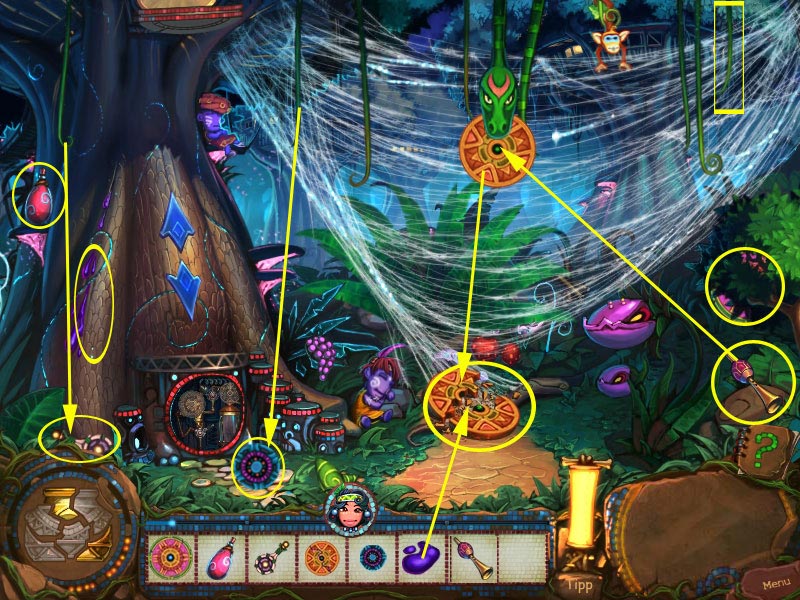
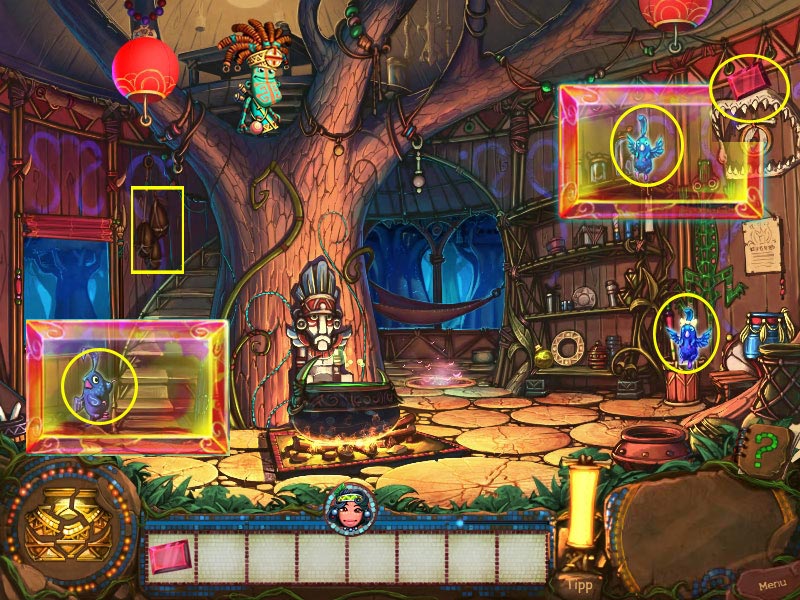
The Potion
Find all ingredients for the recipe.
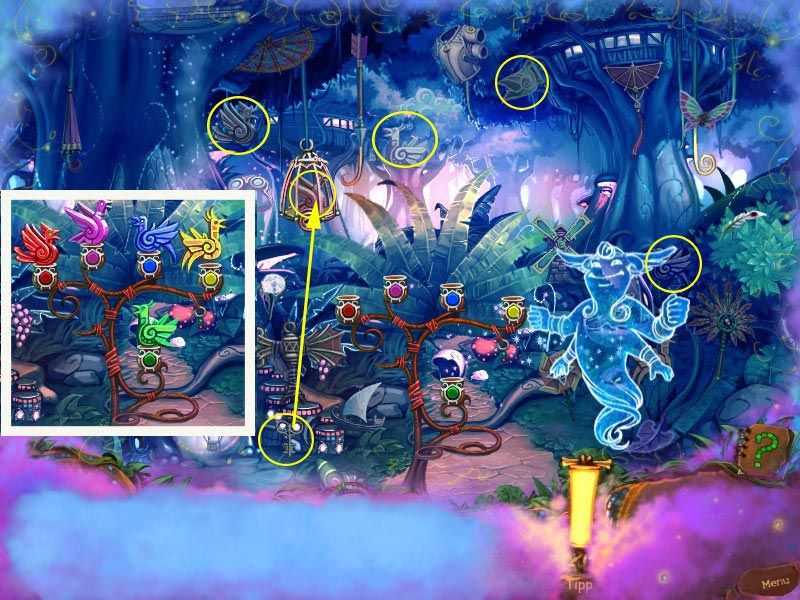
To find the living water, go outside and click the highlighted button at the tree on the far right side.
You will be brought to a hidden-object scene.
Find all items on the list. Afterwards, place the birds on the places with the corresponding colors.
You will be rewarded with a bottle of living water.
Screenshot
Go back to the hut. When you have all ingredient place them one by one in the cauldron.
Find the empty bottle and click it at the cauldron.
Find the other bottles.
Screenshot
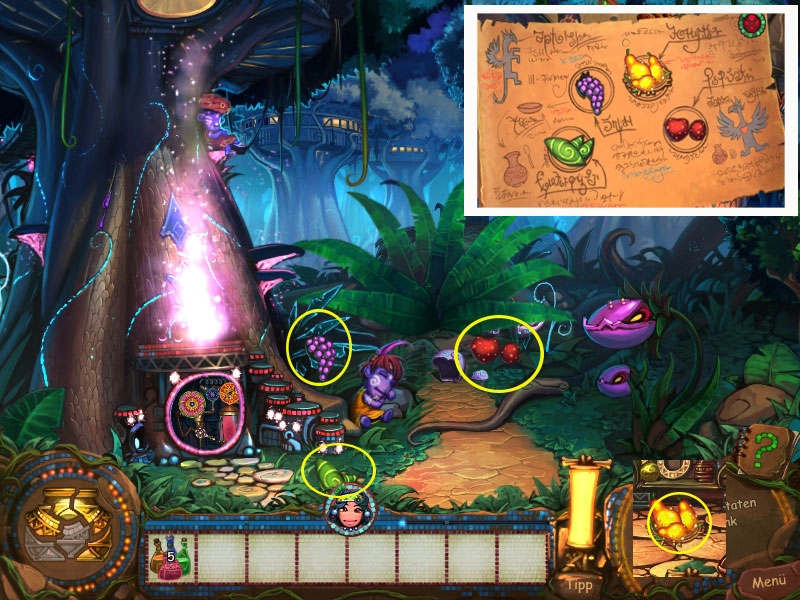
Find the fruits. The pears you will find in the hut, the rest outside.
Screenshot
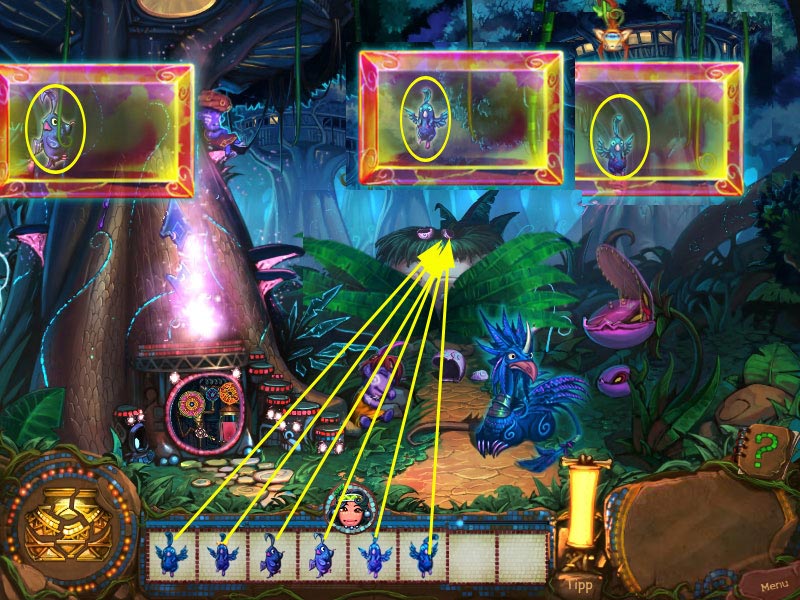
Click the bottles at the blue bird to trigger a mini game.
The bird will show you how to make the medicine.
Grab the ingredient in the shown order and place them one by one in the machine.
The machine will produce a pill and the bird will eat it.
When you make a mistake you will have to start all over.
Screenshot
After the blue bird recovers, it will fly away. Grab the totem part from the place the bird was laying.
Find the Babies
Click the boxing gloves above the stairs and pick up the totem part.
Find the magical lens and move it over the screen to find three of the baby birds.
Screenshot
Go down and find the other 3 birds.
Click the bushes in the middle twice. Place the baby birds into the nest.
Screenshot
The blue bird will turn around and show the portal.
Enter the portal.
Jungle
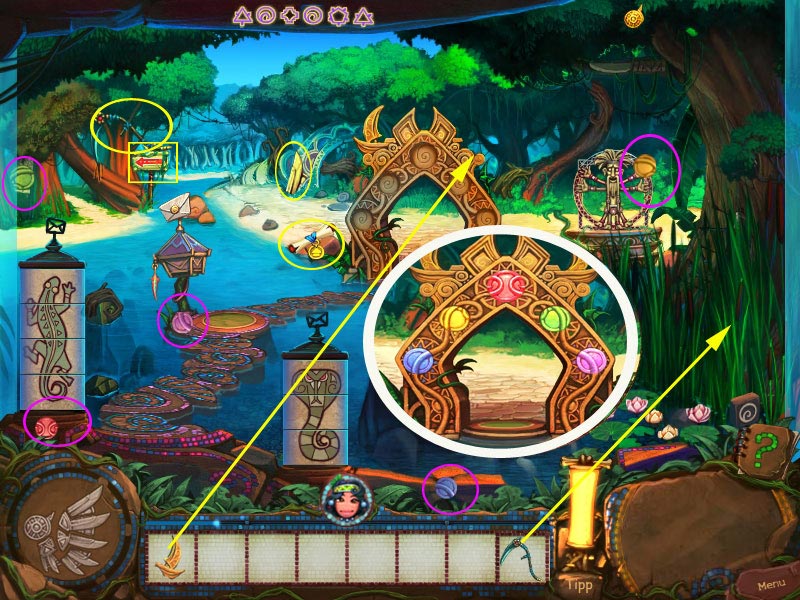
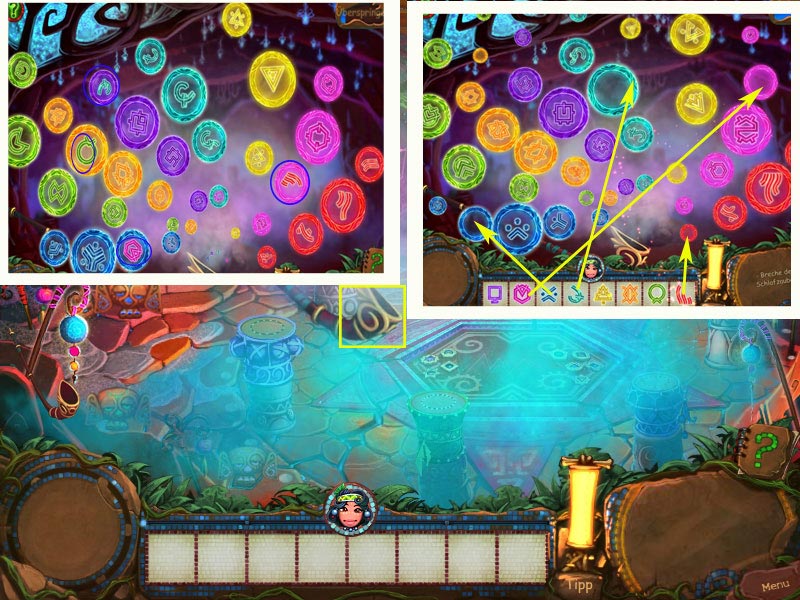
Waterfall/Bridge
Click the circle inside the water fall.
To make the water stop, you will need to click the symbols in the right order.
Click on the algae on top of the scene. The algae disappears and you see the same symbols as shown in the waterfall circle.
Click the symbols from left to right. The last one is missing, so you will have to guess.
When you make a mistake, you will have to start again.
Screenshot
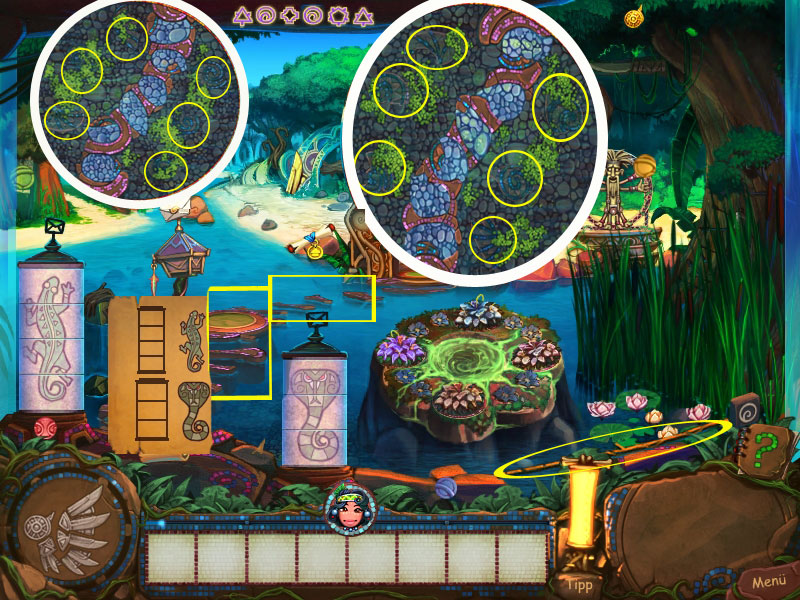
Click the lower stones in the water. In the close up view find and replace the missing pieces.
Click the mail box. Ivan will come to bring you the code.
Grab the pole on the low left side and grab the bottle with the code out of the water.
Click the bottle again when it is laying on the ground to see the code.
Click the cylinders left and right to match the images of the code.
Click the upper stones in the water and find and replace the missing pieces.
Screenshot
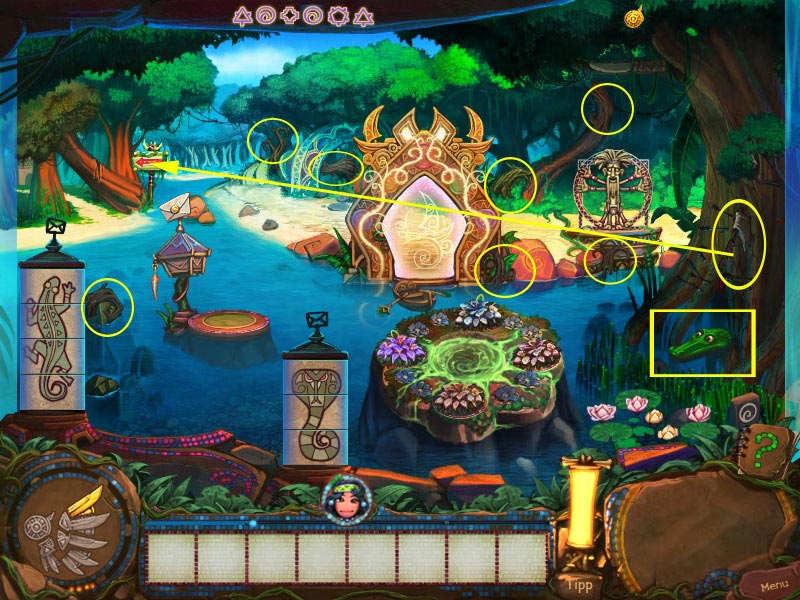
The Island
Click the ship on top of the gate.
Grab the scroll and the totem part.
Click the middle of the gate to call the boat.
Look for the missing buttons. Place and rotate them to match the pattern.
A button can be place everywhere, but if it is the wrong spot, you won't be able to rotate it.
Screenshot
Click the arrow on the far left side. You will need some to remove the log.
Grab the scythe on the far left above the arrow and use the at the reed in the low right corner.
Unfortunately the crocodile behind is not in the best mood.
Screenshot
Look for 7 logs and use them to close the entrance of the crocodile's cave.
Now grab the axe and cut the huge log.
Click the arrow to go to the elephant-gate.
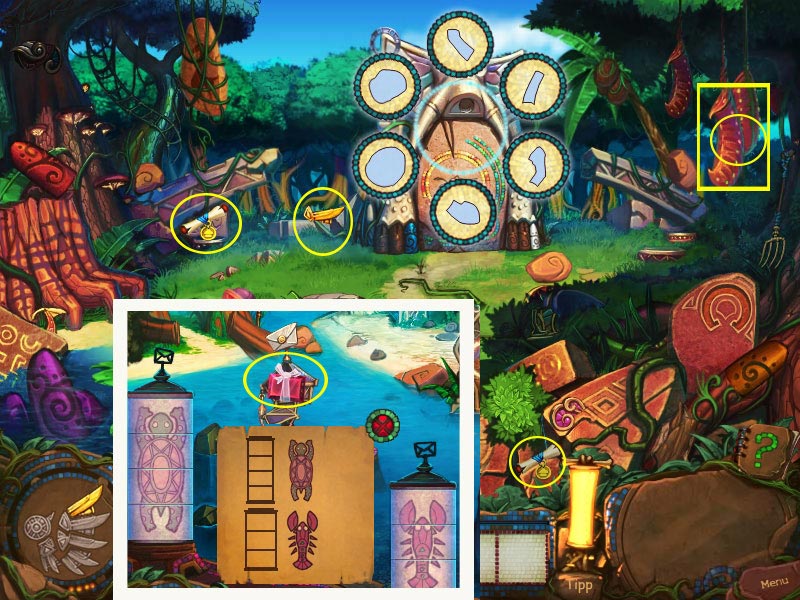
Elephant-Gate. The Animals
Take the two scrolls and the two totem parts. One you will find by clicking the strange fruits on the top right side.
Click the elephant-gate to learn that you need a crystal.
The crystal is in the mail box. Get the code for it from Ivan.
Go back and click the cylinders to match the images on the code.
Screenshot
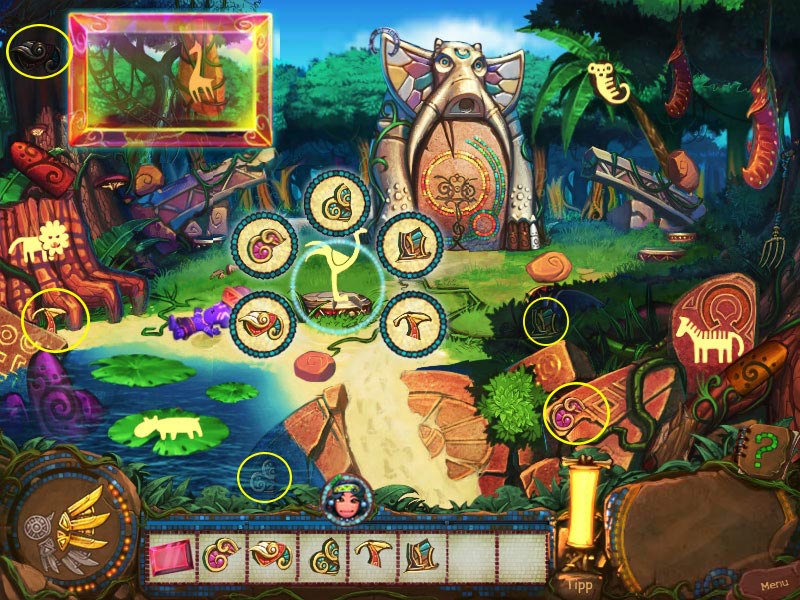
Go back and use the crystal to hover over the scene.
Click the animals. They will be highlighted when you touch them with the crystal.
Each animal hides a part of the elephant trunk. You will have to find it.
Start with the ostrich.
Click it to see the silhouettes in the container.
Find the missing items.
Screenshot
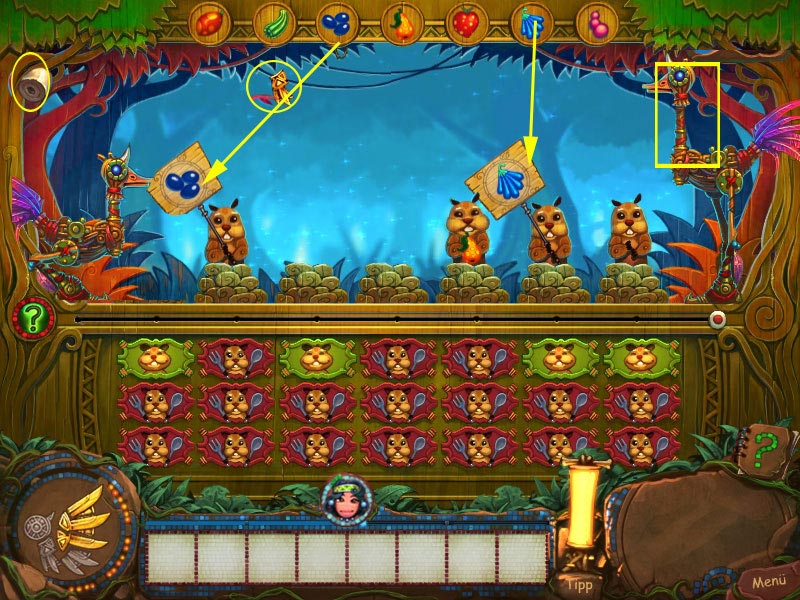
Click the ostrich after finding everything to trigger a mini game.
You will need to bring the ostrich to the apples and feed the hungry gophers before the ostrich gets to the fruits.
Click on the ostrich to begin. As a Gopher pops up, click on the fruit that matches the one on its sign.
Click on the gophers sign before it disappears.
As a gopher is fed, the boxes on the bottom will turn green.
If you miss one, you will get another chance.
When done, collect the totem part and the piece of the trunk.
Screenshot
Next is the giraffe.
Click the giraffe top left at the tree. You learn that the vines are to strong.
Grab the ladder next to the giraffe and go back to the island.
Place the ladder at the branch next to the knife.
Take the knife and the totem part.
Go back and use the knife to cut the vines.
The giraffe stone will fall and break. Take the piece of the trunk.
The next animal is the zebra on the low right side.
You will need the horseshoe hanging at the top of the gate.
Ivan will bring you a plan. Look at it.
Collect the rock and use it on the catapult on the far left side.
Grab the fallen horseshoe and place it on the zebra's stone.
Click the stone again and take the piece off the trunk.
Screenshot
Next is the lion.
Get the pitchfork from the right side and use it with the lion rock on the low left side.
The rock will rise. Grab the piece of the trunk.
Screenshot
Next is the koala.
Grab the stone on the left side and use in ton the catapult on the far left side.
The koala will fall down, pick up the piece of the trunk.
The last animal is the rhino.
Go back to the island and gather the three lotus flowers on the low right side.
Go back and place them on the leaves in the water on the left.
Now you can take the last piece of the trunk.
Click the elephant-gate and drag all pieces into the container bubbles.
Click again to learn that the organ pipes are missing.
Three organ pipes can be found in this scene.
Screenshot
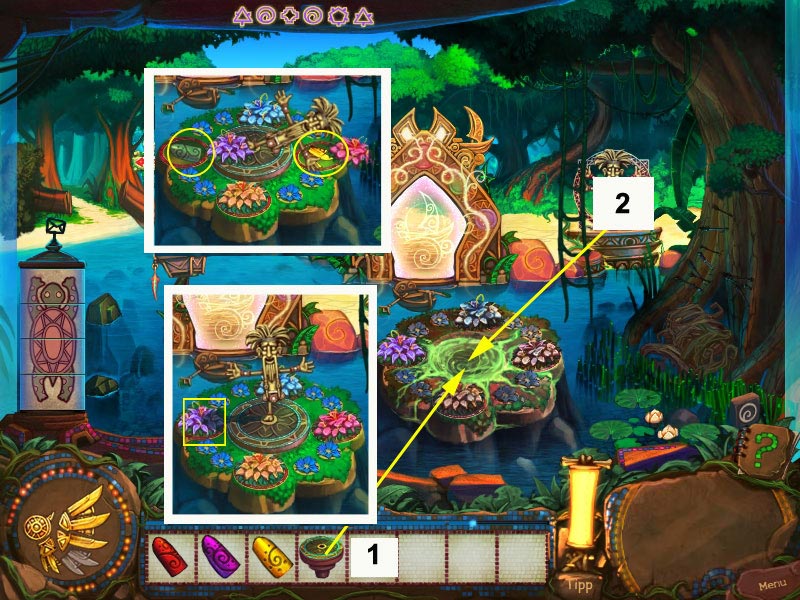
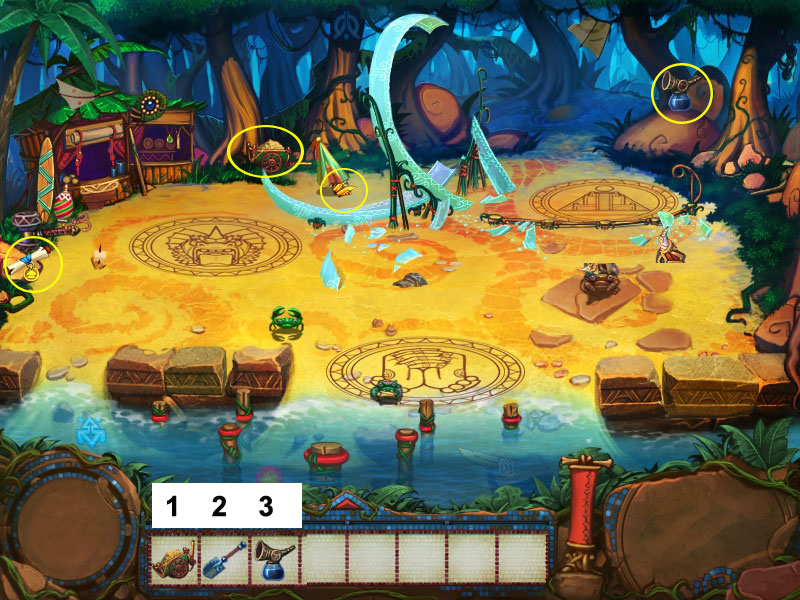
Elephant/Island
Click the symbol for the spirit world in the sky.
Find all items from your list.
Now put fertilizer into the flower pots, followed by the seeds.
Use the garden fork and water the flowers to be rewarded with a special filter.
Screenshot
Go back to the island.
Click the filter onto the flowers on the low right side.
Take the figurine on the far right side and place it into the hole of the clock.
The clock hand shadow points to one of the flowers. Click it to find the last organ pipe.
The clock hand falls and moves another flower. Take the last totem part.
Screenshot
Go back to the Elephant.
Click the gate and place the organ pipes.
Go back to the island and click the bushes in front of the tree on the right side.
Get the notes.
Go back and place the notes on the music stand.
Click the organ pipes in the shown order.
Pick up the portal symbol and place it.
Enter the portal.
Screenshot
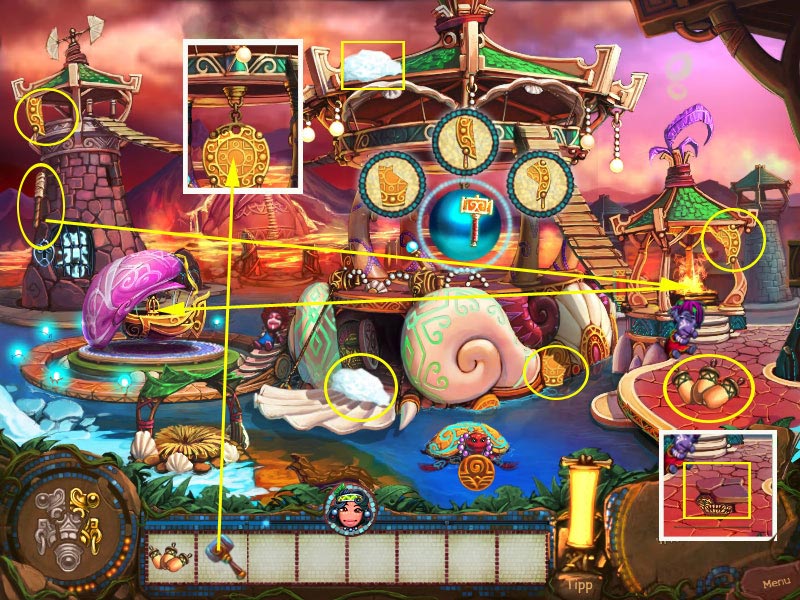
Village on the Water
The Shore
You will start with a mini game. Close the matching parasols.
They will not always match 100%, but in the basic pattern will.
There will be one parasol left over. Use the shovel on the right to dig it out.
Screenshot
Click the parasol again and take the totem part.
Find the scroll.
Find the sand cart and the sprayer.
Click the pyramid design on the top right side.
First use the sand cart, then the shovel and at last the sprayer.
Do the same with the three following designs.
Screenshot
Find the hammer and use it on the circles, in the correct order, to create the water slide.
To see the correct order again, click Ivan and he will show you.
Making a mistake you will have to start over.
Screenshot
Find the three runes for the slide.
Click the two lighter stones on the wall at the water.
On the left you will find a part of the totem, on the right one of the runes.
Screenshot
Another totem part can be found in the water.
Drag the runes onto the corresponding slots on the slide.
To find the signal sphere, you will need to first find a fishing hook.
Drag the hook onto the sphere in the water and place the sphere between the two hands.
Screenshot
To activate the light house click find the code and click the lights in the shown order.
Take care to only click the next light when the one before first showed the needed and then the light blue again.
Screenshot
Click the incoming ship and find the parts to repair it.
Screenshot
After completion, use the ship to reach the village.
The Village
Click the front left lantern to find a part of the totem.
Find the other two totem parts and the scroll.
Click the pedestal inside the water and find the parts for the container bubbles.
Screenshot
To repair the kite, click the red part on the roof on the left side. You learn that you need a ladder.
Find the ladder, place it on the red part and click it.
Click it again to get a container.
Find the parts. For one, you want to click the clam inside the hut on the right side.
It will move aside. Click the gate appearing behind.
Find the two missing parts and collect the piece of the kite after the gate opens.
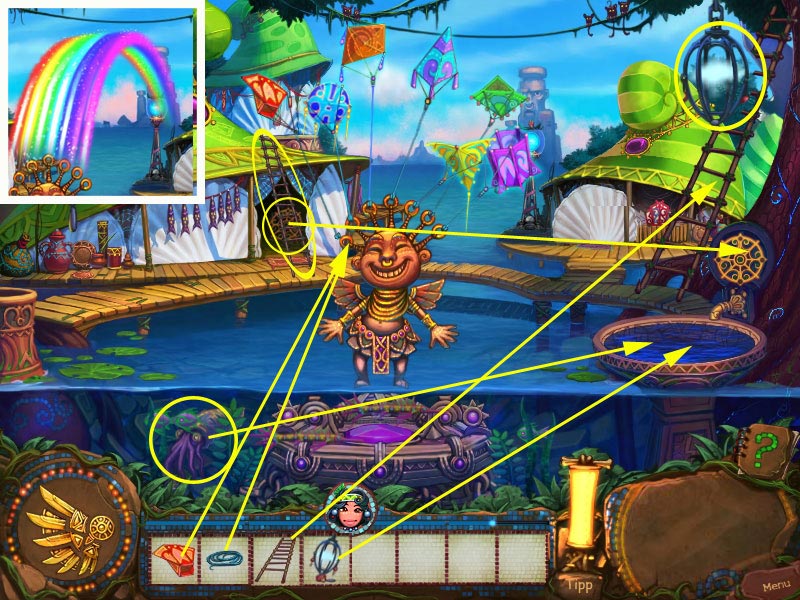
Take the completed kite and drag it on the Rainbow Keeper.
To find the missing rope, click the button to the spirit world on the roof on the left side.
Screenshot
Find the items of your list.
After completion, click the three bottles and pour the contents into the tank.
Add the fish egg and feed the with the food in the order of size: small, medium and large.
You will be rewarded with a rope.
Screenshot
First click with the rope, then the kite, on the Rainbow Keeper.
Get the ladder and use it on the cage on the top right side.
Take the cake with the cloud.
Find the tap and use it on the faucet.
Find the squid and place it in the sink. Drag the cage with the cloud in the sink.
Wait until the rainbow appears and use it to return to the shaman.
Screenshot
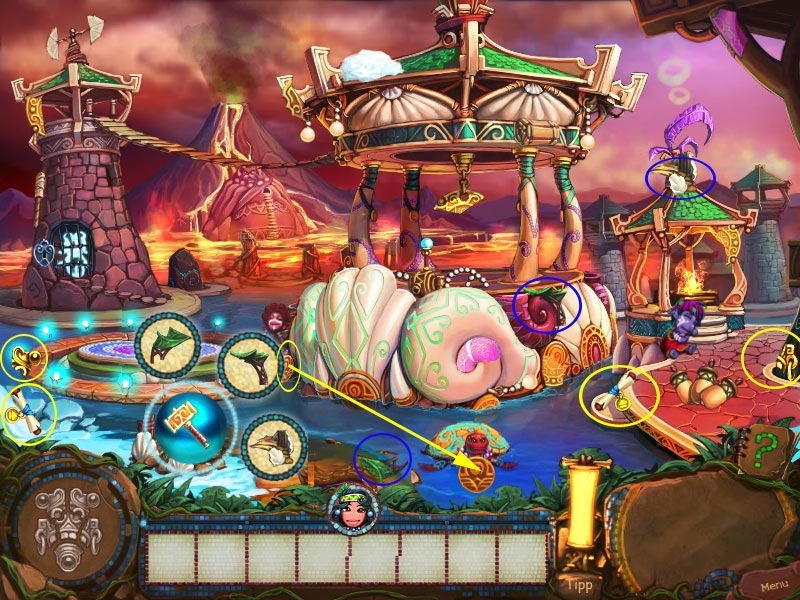
Maya's Fish House
The House
There are are no totem parts in this level.
Click Maya, then click her house and find the parts to repair it.
Get the scroll that appears in front of the house.
Screenshot
The Tree
Take shovel on the far right side and dig out the stump right next to the house.
Open the upper window of the house to find a seed.
Place it on the ground where you just did the digging.
Click the fountain in front of Maya's house and find the parts to repair it.
Screenshot
Grab the fruit from the tree and place it on Uwa's plate on the low left side.
Click Uwa to get her attention.
After Uwa's dinner, click her again to make her open the mouth.
Pick up the light flower on the right side and drag it to Uwa's mouth.
Click Uwa again to enter.
Screenshot
Inside Uwa
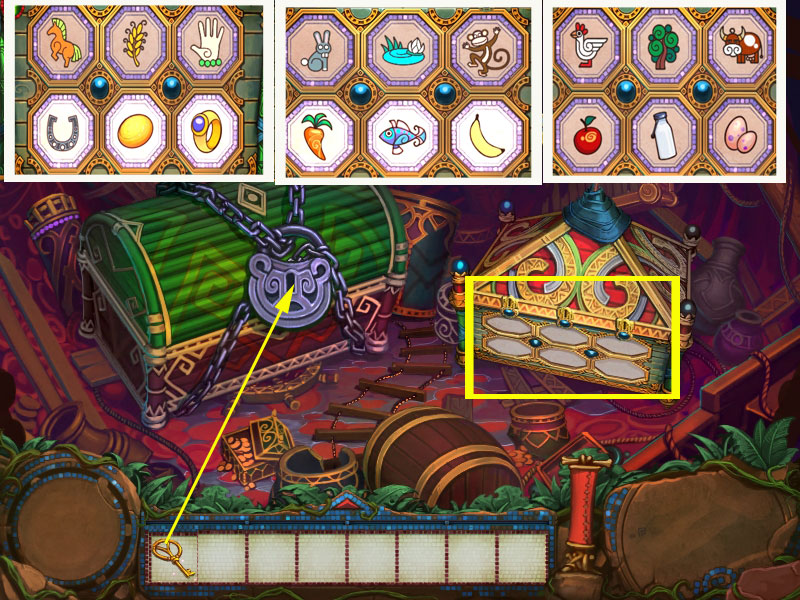
Click the mail box to trigger a mini game.
Switch the items in the bottom row, so that those that belong together are opposite each other.
You will have to play three rounds.
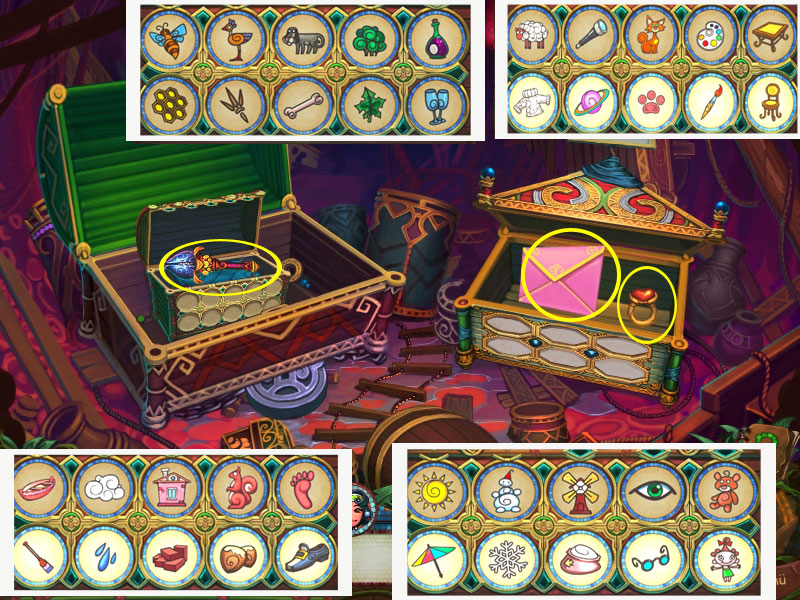
The mail box opens. Get the key, the letter and the ring.
Use the key to open the green chest.
Screenshot
Click the box inside to chest to trigger a mini game as before.
After completion, you can take the magic staff.
Screenshot
Return to Maya.
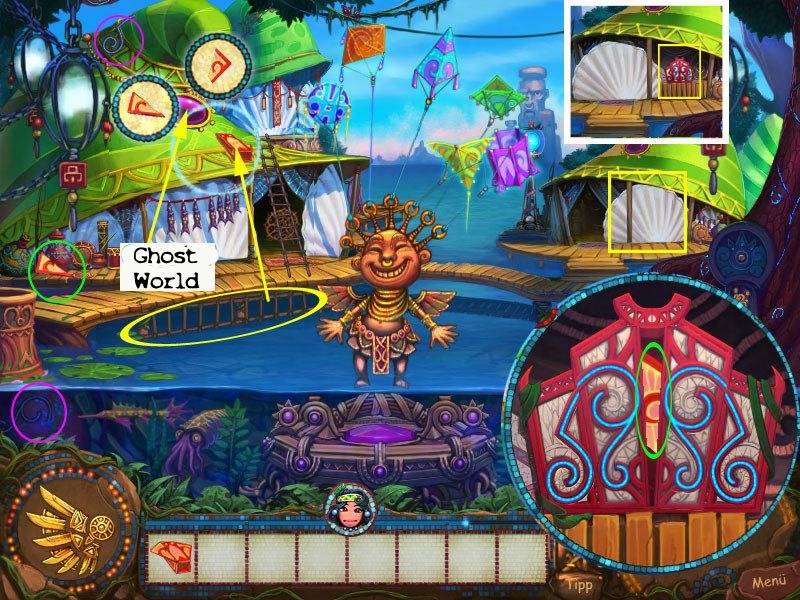
The Portal
Give Maya the magic staff, the letter and the ring, in this order.
Find her glasses on the top of the house.
Click the gate and find the parts to repair it.
Click it to open after you found all parts.
Click the gate again and find the machete.
Use the machete on the weeds.
Click the clam and find the firewood.
Use the lantern in front of the house.
First light the lantern on the fire bowl in front of the house, then use the lit lantern to light the fire bowls in front of the clam.
Click the clam again and enter the portal.
Screenshot
The Island of Loss
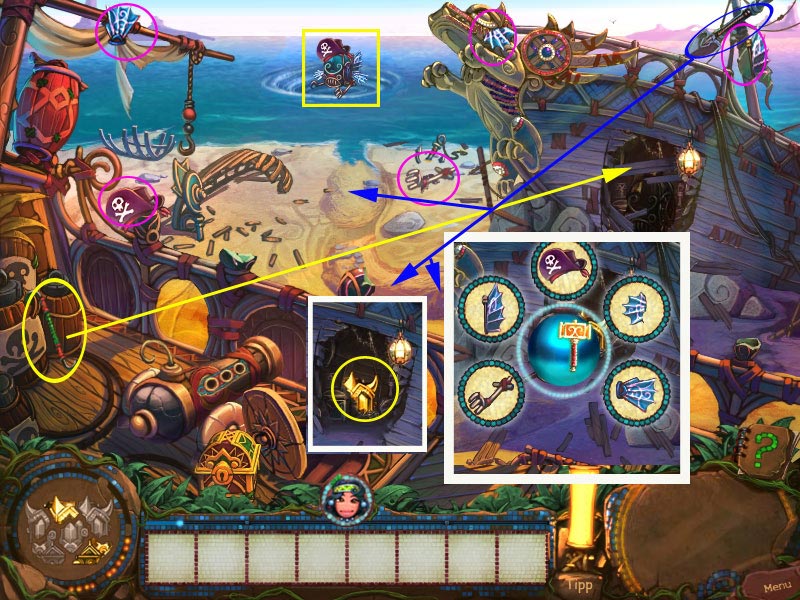
The Shore
Get the scroll and the totem part.
Move the sail to find a second totem part.
Grab the two gun powder barrels on the low left side and the fuse above.
Click the chest on the hatch three times.
Click the hatch to open and take the lit lantern.
Use the gun powder barrels on the boat skeleton on the shore.
Click the fuse on the barrels and light it with the lantern.
Screenshot
Grab the cannonballs.
Click on the cannon hatch and use the cannonballs on the cannon.
Click the cannon until it moves forward and again until the cannon ball shows in the center hole.
Use the lantern on the fuse.
The hatch from the ship on the right side will break. Use the lantern there to get light.
Screenshot
Find the crowbar and use it on the boards.
Grab the totem parts and the bathyscaphe.
Click the bathyscaphe again to learn that it needs to be repaired.
Find the parts and use afterwards the shovel on the sand.
Place the bathyscaphe on the water.
Screenshot
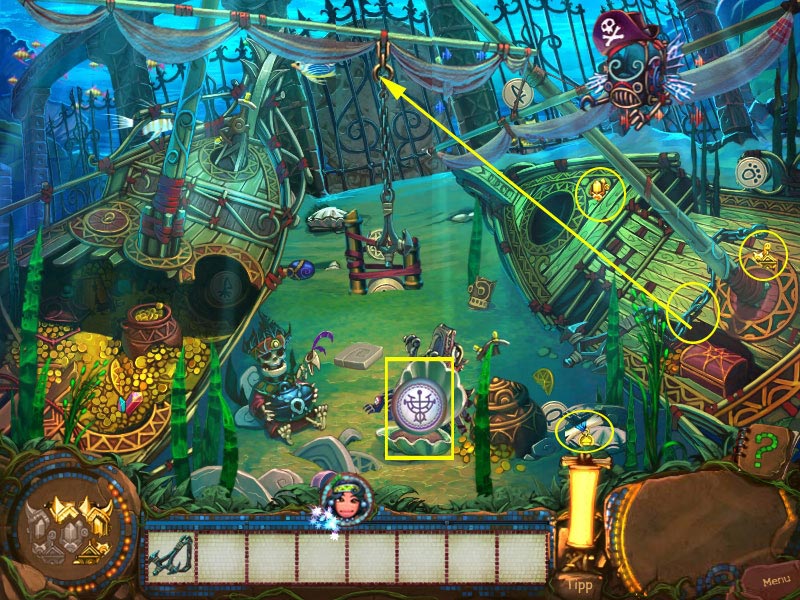
Under Water
To chase away the fishes, you will need something scary. Return to the shore.
Use the crowbar on the figurehead of the right ship and go back.
Click the figurehead somewhere on the scene.
Click the stone on the fish. When stone and fish are away, you can take a rope.
Use the rope to tie the sail on the right side.
Screenshot
Take the two totem parts and the scroll.
Take the anchor chain and click the anchor on the ring in the middle.
Click the symbol for the spirits-world.
Screenshot
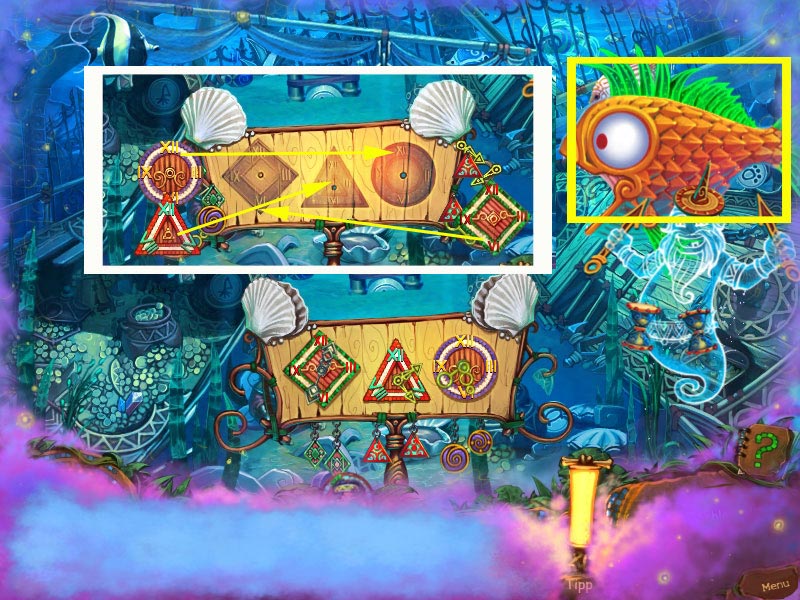
Find all items from your list.
To assemble the clock, use the diamond, triangle and circle clock faces on the board.
Place the clock hands on the matching clock faces.
Click the fish twice to get back the time. You will be rewarded with a key.
Screenshot
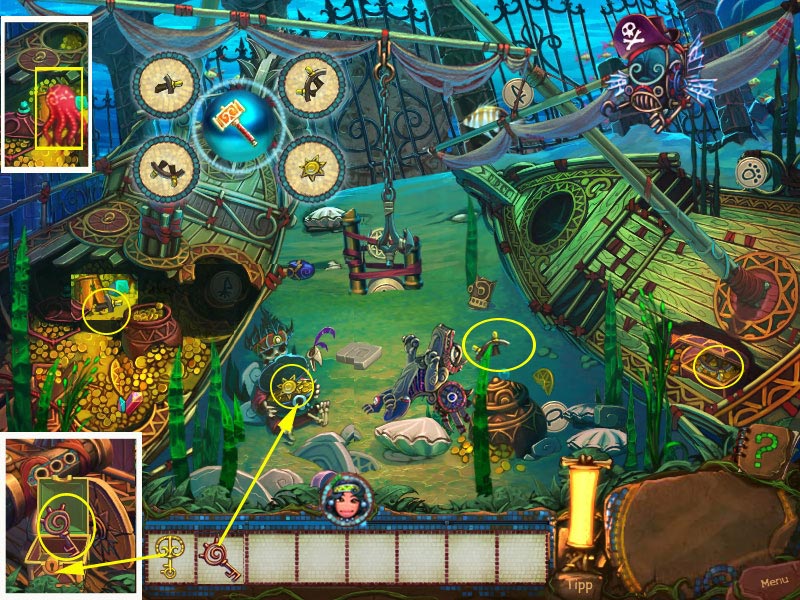
Go back to the shore and use the key to open the chest on the left ship.
You will find another key. Go back and use this key on the pirate sitting in front of the left wreck.
Grab the part you find and click the half broken ship wheel on the far left of the wrack.
Find all parts.
One is hidden in the dark place on the far left but the octopus will not let you get it.
Click the hatch above the hiding place and click the octopus again.
Now you can take the wheel part.
Screenshot
Click the wheel; the castle will rise.
Find the missing buttons and place them according to the symbols.
Wait until all the fish stop moving.
Click the symbols on the castle in the order the fishes show.
It is important that you use the exact order from left to right, no matter if the fishes are standing higher or lower.
Using a wrong symbol will make the fishes move, and you will have to start over.
When you do it right, the gate will open.
Screenshot
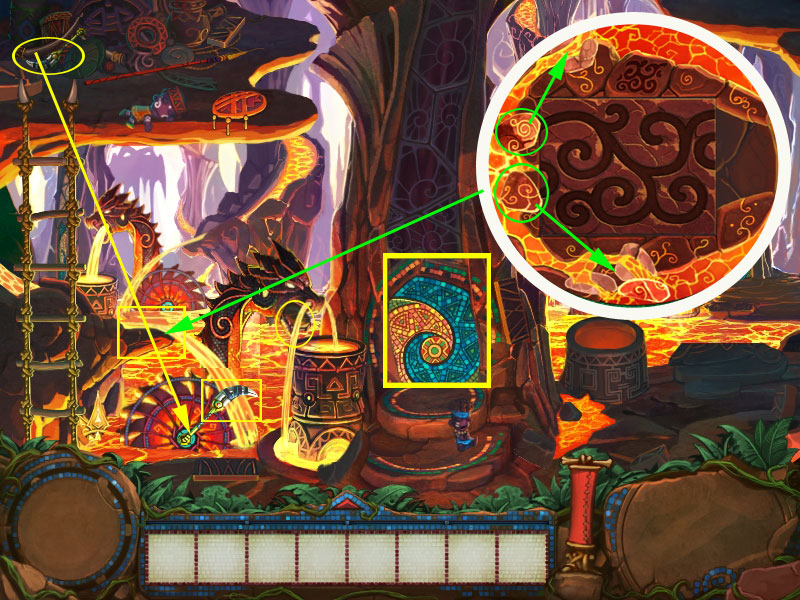
Click the portal.
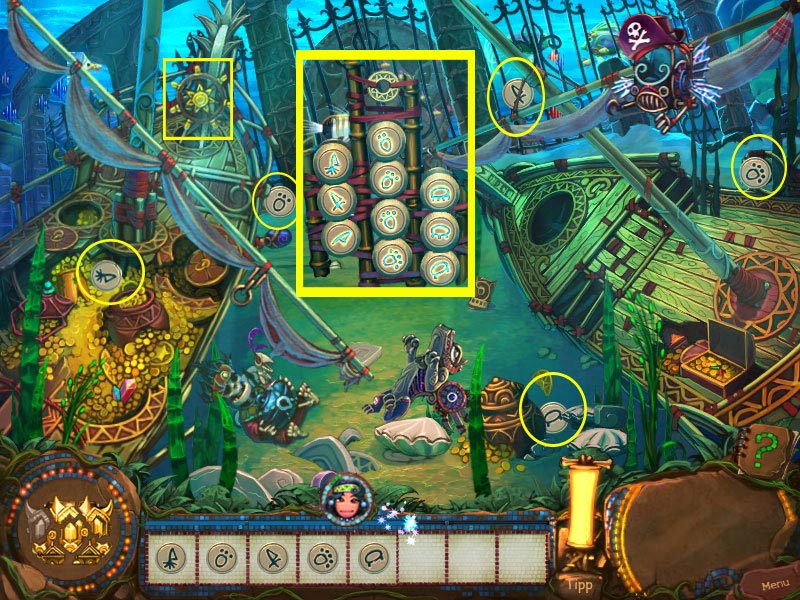
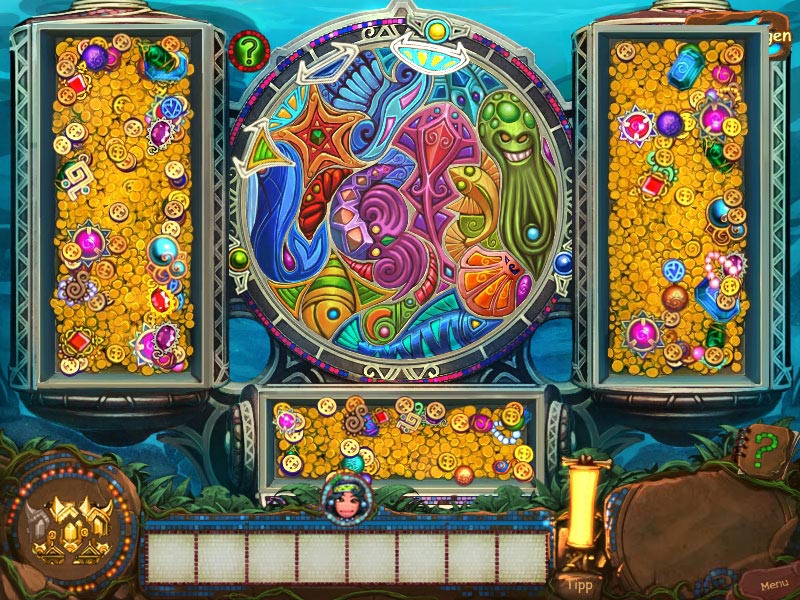
The parts are hidden in the chest which open when you rotate the mosaic.
Left-click to rotate it clockwise; right-click to rotate it counter-clockwise.
Line up the green arrow with the green sphere to open the chest on the left.
The blue arrow/blue sphere are for the chest on the right, the cyan arrow/sphere for the chest at the bottom.
Click on the coins and jewels to move them out of the way and uncover the portal parts.
Place the parts on the portal.
Take the last totem part and enter the portal.
Screenshot
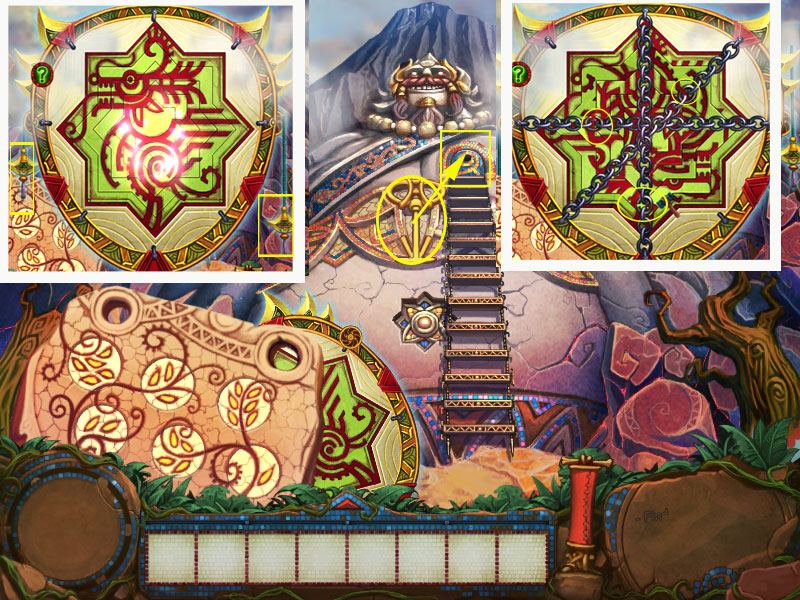
Ice Desert
Observatory-Entrance
Take the snow shovel on the right side and use it to clear the stone, the gem and the observatory entrance.
Screenshot
Click the stone several times and take the pick axe.
Take the gem, the scroll and the totem part.
Click the gate.
Click on each row to bring up the Arrow for that row.
Click on the left or right side of the arrow to shift the row left or right.
Line up all 3 images and click the gate again to enter the observatory.
Screenshot
Observatory. Generator
Collect the scrolls and the totem parts.
Use the shovel and the blue gem on the far right side.
Use the pick axe on the ice on the right side, with the green gem inside.
Click the gems on the windows.
Screenshot
Use the pick axe on the ice piles the green and blue beam is pointing on.
Click the generator and find the needed pieces.
Click the lever above the generator.
Take the red button from the stairs and click it on the wall on the right side.
Click the switch to bring the telescope down.
Screenshot
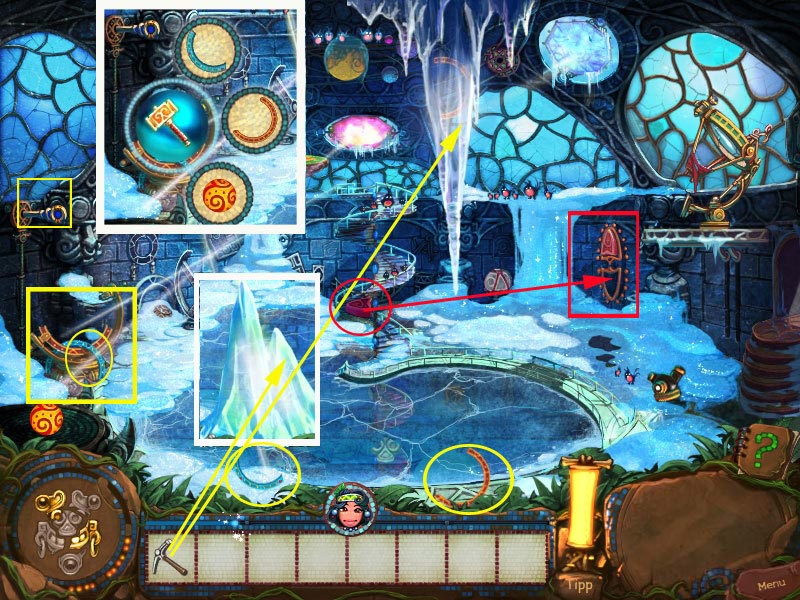
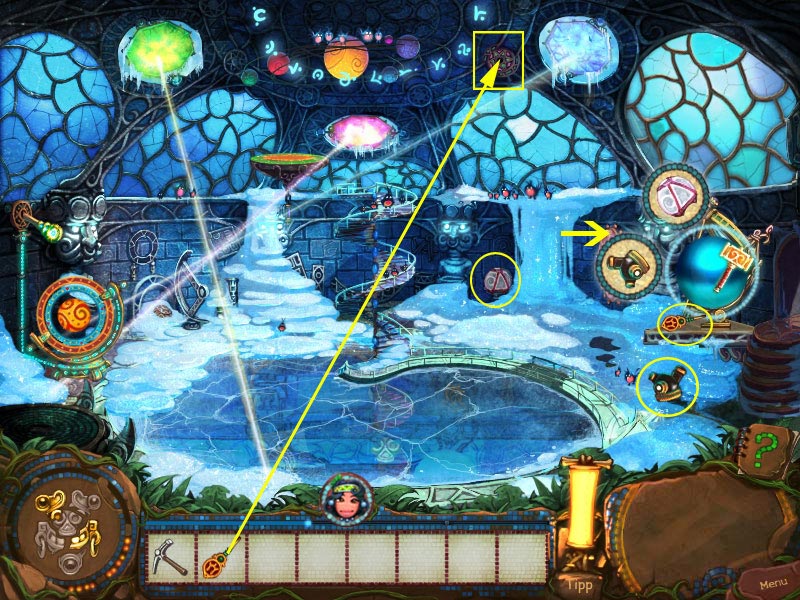
Telescope/Window/Portal
Click the telescope and find the two pieces for the container bubbles.
Take the switch from the telescope stand and place it on the round disk.
Click again and the window opens.
Use the red button to raise the telescope.
Screenshot
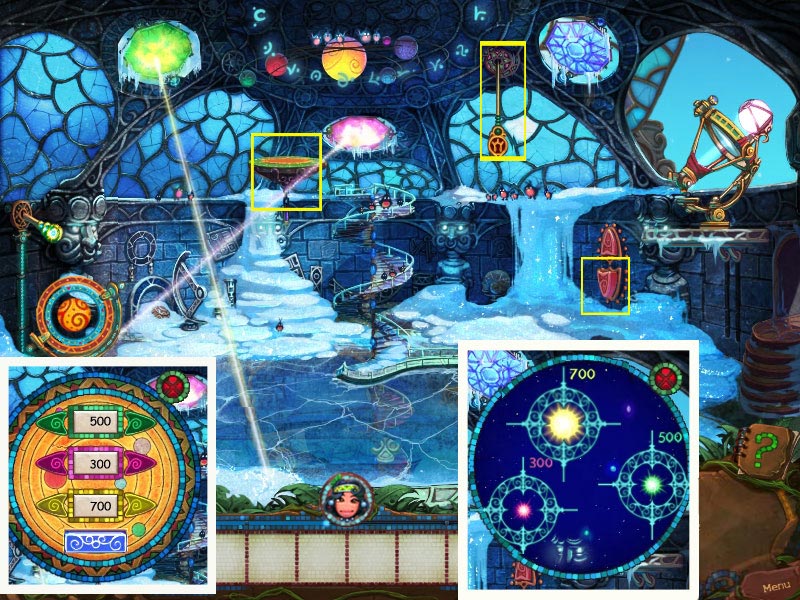
Click the telescope to trigger a mini game.
Click on each of the planets to get coordinates.
Click the moving platforms in the far back and enter the coordinates in the portal device according to their color.
Use the arrows to change the numbers and click the blue button afterwards.
Screenshot
Click the switch and the diagram and go outside.
Click the figure with the two pink heads on the left side.
The stone behind moves. Click the valve that appears.
Go back inside.
Take the totem part from the stairs and click the key hole on the hatch.
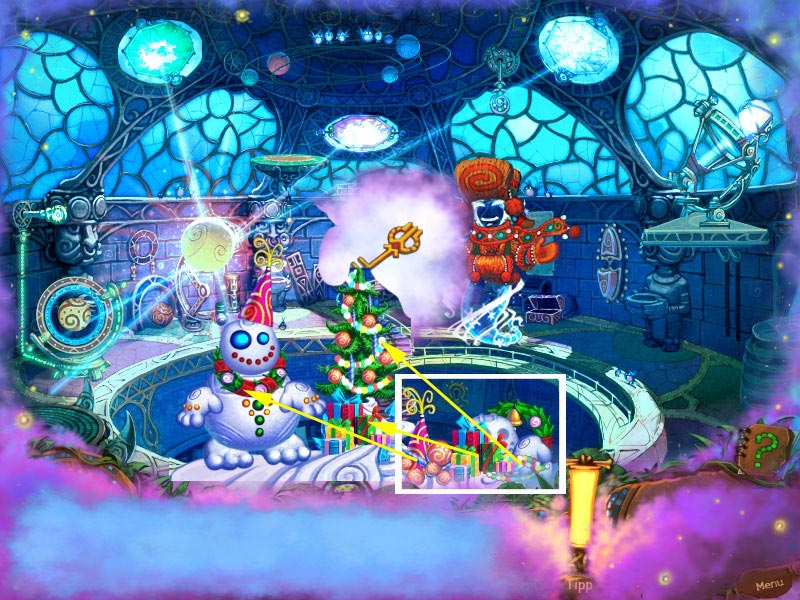
Click the symbol for the spirits-world on the left window.
Screenshot
Find all items.
Use the found items to decorate the Christmas tree and build and decorate the snow man.
You will be rewarded with a key.
Screenshot
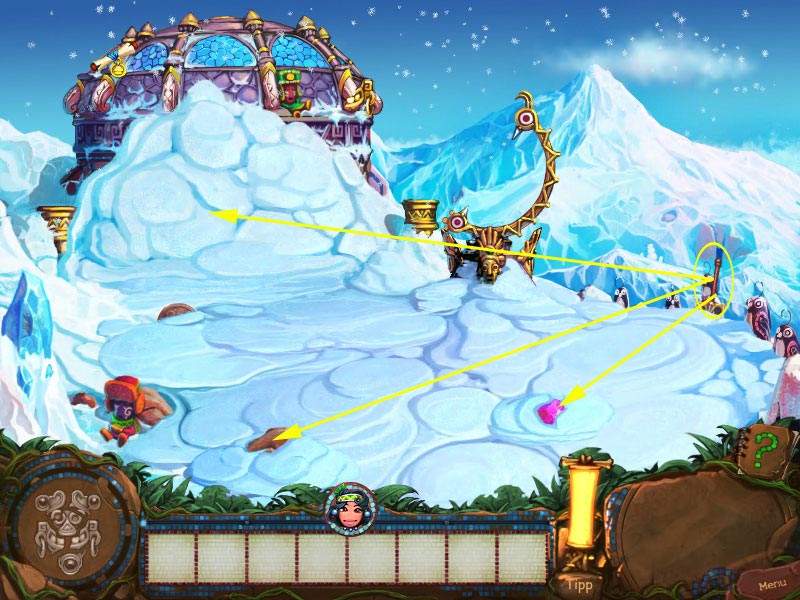
Use the key on the hatch, take the dark sphere and exit the observatory.
Use the ice pick to get the totem part on the left ice heap, if you haven't already done so.
Place the black sphere on the portal.
Go back and get the button for the zodiac pyramid.
Return and place the button at the bottom of the pyramid.
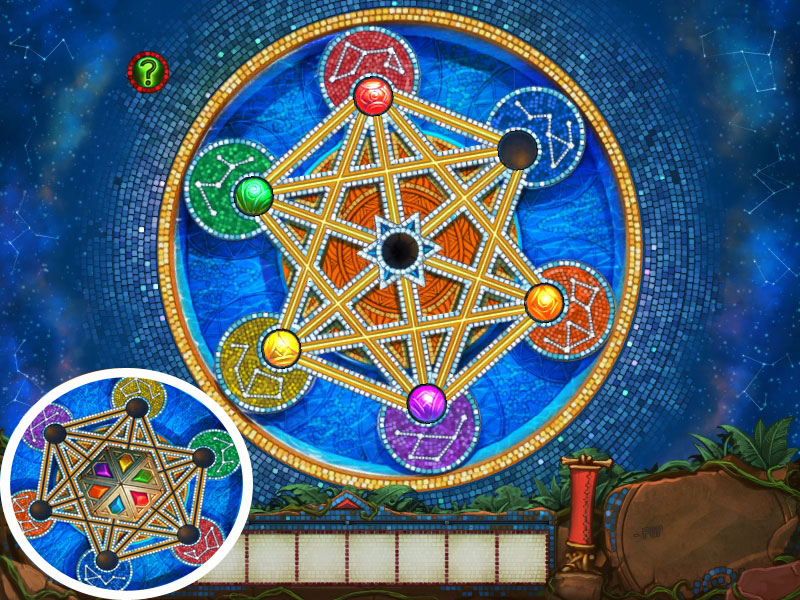
Click the pyramid guard to trigger a mini game.
Screenshot
Rote the arrows by clicking them in the middle to match the corresponding colors.
Switch the places of the spheres so they end up in the matching colored slots.
Take the totem part and click on a sphere to move it along an open path to the empty slot.
The solution is random as the spheres will always be at different positions.
Take the last totem part.
Screenshot
Enter the portal.
Watch Towers
House of the Key Guard
Take the two scrolls and the totem part.
Click the turtle.
Click the house of the key guard on the low left side and find the parts to repair it.
Find the guard's medallion and give it back.
After the guard opens the gate click it again.
Screenshot
The Hot Air Balloon
Click the lever with the blue pearl to learn that you have to complete the pearl row on the roof.
Find the two pearl chains and click them on the empty rings.
Click the lever again and a compartment will open.
Take the bottom part of the hot air balloon and place it on the starting place on the left side.
Click it again to open a container.
Find the needed items.
Click the wall left next to the bridge to trigger a mini game.
Rotate the tiles by clicking to reassemble the picture.
When done, the mouth will open and you will find a part of the hot air balloon.
Screenshot
Find all parts and drag them into the container bubbles.
Screenshot
Take the empty sacks on the left and click the snow on top of the roof.
Click the broken gong and find the missing parts.
Click the stone on the low right side to trigger a mini game.
Rotate the tiles by clicking to reassemble the picture.
When done, the mouth will open. Grab the gong clapper and the totem part.
Screenshot
Use the clapper to hit the gong and the snow will fall down.
Screenshot
Use the sacks with the snow and click them onto the hot air balloon.
Grab the torch from the tower on the left and light it with the flames on the far right.
Use the lit torch with the hot air balloon.
Click the wall of the tower to trigger a mini game.
Rotate the tiles by clicking to reassemble the picture.
When done, the mouth will open and you will find a key.
Screenshot
Use the key to open the tower. A ghost comes out and extinguishes the volcano.
The Giant
Grab the totem part on the left and the scroll and the totem part on the right side.
Click the star shaped button on the giant's chest.
Collect the stones and replace them on the board.
Rotate them by clicking into position to match the pattern on the board.
Now click the stones in the right order.
Each stone shows one to six leaves.
Click the stones in the order 1-6.
Click the symbol for the spirits-world on the low right side.
Screenshot
Find all items of your list and place the statues afterwards on the pedestals.
You will receive a hammer for this.
Screenshot
Look for the broken chain parts and smash them with the hammer.
Reassemble the picture by pulling the strings on the left and right side.
Take the key from the giant's chest and use it to open the door to the portal.
Enter the portal.
Screenshot
Volcano
The first Elevator
You are now inside the vulcano.
Click the broken wind wheel on the low left side.
You will first have to find four ladder rungs.
One rung is hidden behind the darker stone at the stairs in front of the elevator.
Place the rungs at the ladder on the left side. Get the totem part, the scroll and the part of the wind wheel.
One totem can be found at the right bottom part of the ladder, one right next to the elevator door, and one by clicking the little stone.
A part of the wind wheel can be found by removing the tap of the barrel right next to the elevator door.
Screenshot
Get the lever from the the platform and use it on the wind wheel.
Click the lever once.
Click the stone on the left next to the wind wheel to trigger a mini game.
Swap the stone tables by clicking them to reassemble the image.
Remove the stones on the right side of the images into the gaps on top and bottom.
Take the stone out of the dragons mouth and click the elevator door.
Screenshot
The second Elevator
Enter the first elevator to learn that it is missing some parts.
Exit and click the second elevator on the far right side.
Find the four stones to fix the path. One of the stones is inside the first elevator.
Click the second elevator's door. Grab the spear from the platform and remove the stone.
Enter the second elevator and take all the parts you will need for the first one.
The chest is locked. You will have to come back later.
Place all parts and click the levers into the correct positions.
When you are unsure you can always go back to elevator two to check.
At last pull the string and the elevator starts.
Screenshot
Heart of the Vulcano
Grab the two totem parts and the scroll.
Take the key from the right side of the gate.
Click the portal in the far back.
Click the small pedestal to the left next to the gate to learn that a button is missing.
Use the elevator to go down and enter the second elevator.
Use the key on the chest and take the fire extinguisher.
Use the first elevator to enter the heart of the vulcano again.
Use the fire extinguisher to extinguish the fire in the mouth of the lizard on the low left side.
Get the button out of its mouth and place it on the pedestal.
Press the button.
Click the other buttons as well, but this does not do any right now.
Click the portal gate.
Click the symbol for the spirits-world on the right side.
Screenshot
Look for the listed items.
When you find everything, you will have to set the table.
Place the table cloth first, followed by the vase.
Place the flowers into the vase.
Place the bowl on the table and the fruits into the bowl.
Place the rest of the items and you will be rewarded with a bone.
Screenshot
Drag the bone onto the gate dragon and click the gate.
It opens and you can press the buttons above the gate and left above the gate.
Click the broken dragon on the low left side and find the needed items.
Drag all items into the corresponding container bubbles and click the dragon again.
Screenshot
Click all remaining buttons.
Click the telescope on the top right side and find the hammer.
Smash all rocks and grab the last part of the totem.
Screenshot
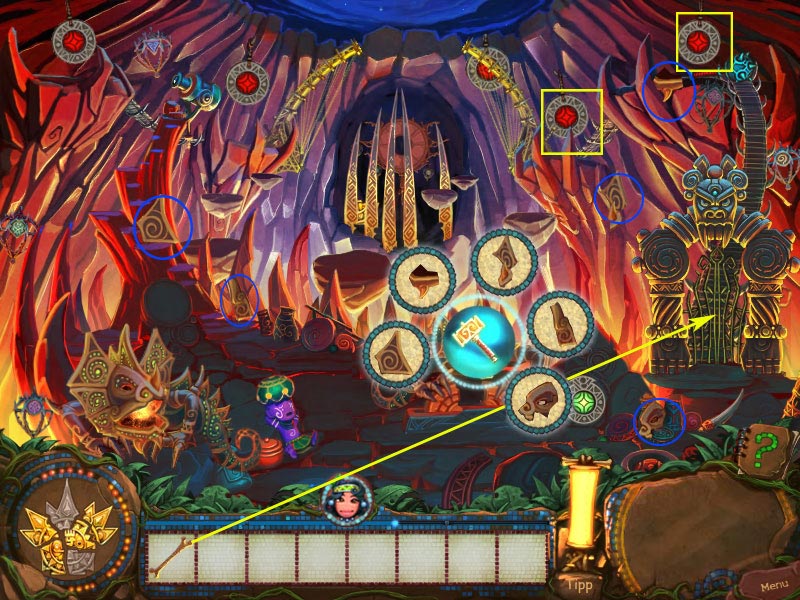
Click the portal.
Find all cages and place them onto the hooks.
Screenshot
You will have to place the symbols in the right order.
By clicking two symbols, they will swap places.
A symbol on the right spot will send its powers into the main symbol.
After all symbols give their power, you can enter the portal.
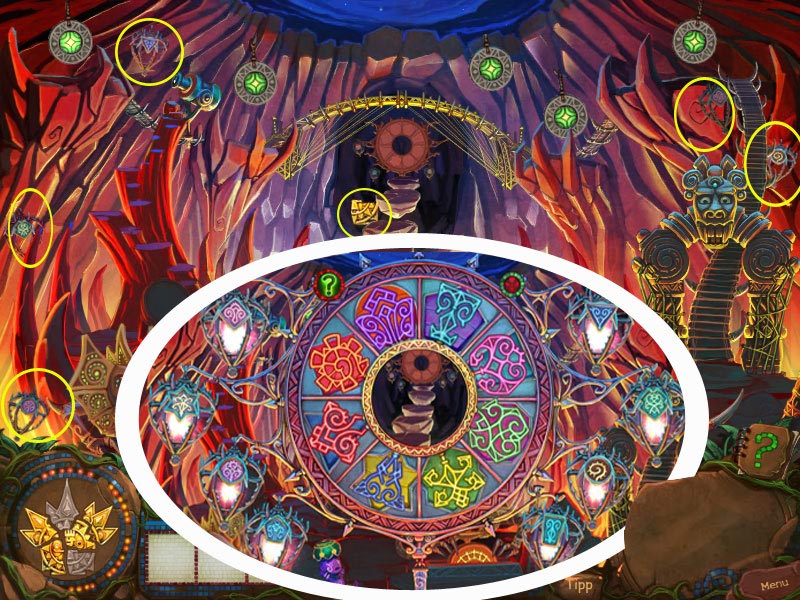
Screenshot
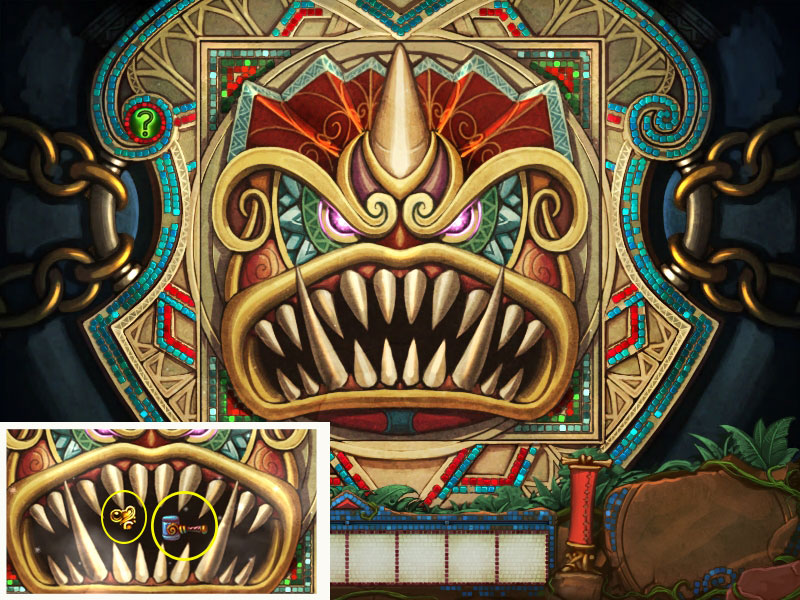
Cave of the Warlock
The Statue
Click the pipe head of the huge pipe.
Click on the eight runes that are on different colored backgrounds, then replace the runes on the correct colored backgrounds.
If you miss any, just wait for them to appear again and continue until all runes are replaced.
Screenshot
Find the scissors and cut the vines of the statue on the left side as well as the blind folds.
Find the two pipes and click them on the left and right side of the statue.
Click the lock on the floor to activate a mini game.
Screenshot
Your goal is to move the symbols to the correct spots to unlock the cave.
To move the symbol one space, click on a symbol and then click on one of the directional arrows.
Click on the ìCheckî button to see where the symbols belong and which ones are in the correct (green) or incorrect (red) spots.
The ìResetî button will let you start over.
The cave will unlock when you click the "Check" button and all symbols are placed correctly.
Screenshot
Final
Click the magic staff on the flower and it will open.
Find the three crystals and place them at the bottom of the statue on the left side.
Wait for what happens. When the clouds appear, click the matching pairs.
Click the remaining volvo until he is above the flower.
Click the drum on the far right side and find the missing items.
Drag the items into the container bubbles, collect the assistants and place each on the drum with the corresponding color.
Screenshot
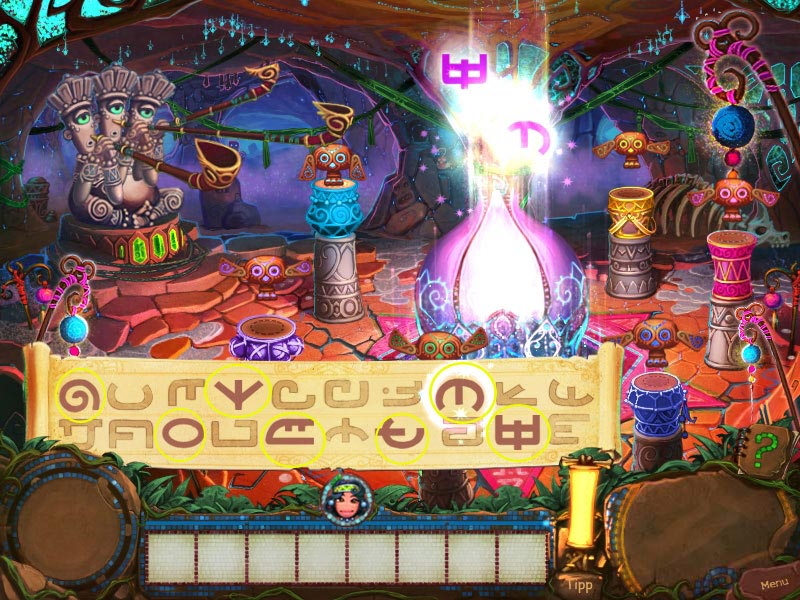
Click the magic symbols on the parchment as they enter the beam.
If you click the parchment too early or too late, you will have to start over.
Screenshot
Congratulation, you finished the game.
Enjoy the END
Thanks to Kayleigh for the walkthrough!
Posted by: Mike |
November 22, 2010 6:24 PM
|
November 22, 2010 6:24 PM