

![]() Nelly and Tom are at it again! Yes, the kids from the original Treasure Seekers: Visions of Gold have returned, and this time they're all grown up! Just like the original game, Treasure Seekers 2: The Enchanted Canvases a unique hybrid of adventure and hidden object gaming that makes use of context-sensitive actions rather than laundry lists of items to find. Add to that some much-improved visuals (which is saying a lot!) and you have another potential hit on your hands.
Nelly and Tom are at it again! Yes, the kids from the original Treasure Seekers: Visions of Gold have returned, and this time they're all grown up! Just like the original game, Treasure Seekers 2: The Enchanted Canvases a unique hybrid of adventure and hidden object gaming that makes use of context-sensitive actions rather than laundry lists of items to find. Add to that some much-improved visuals (which is saying a lot!) and you have another potential hit on your hands.
 Nelly has just arrived home from Guatemala to find a letter from her brother, Tom. He has invited her to join him at a castle in Romania to solve a mystery, just like when they were kids. When she arrives at the castle, however, Tom has disappeared! The story of the siblings takes a backseat once Nelly arrives and begins to struggle through a series of enchanted paintings, solving problems for the inhabitants as she goes along. Fans of Azada: Ancient Magic will recognize this familiar set-up, but Treasure Seekers 2 goes a step further with more tasks and mini-puzzles to solve in each painting.
Artogon's context-sensitive interface, used in the original Treasure Seekers game as well as The Mystery of the Crystal Portal, is a welcome change to the hidden object/adventure genre, and it's extremely user-friendly. Your cursor changes shape when you move over a puzzle that can be solved. Click it and a circle pops up showing what items need to be collected to complete that task. Then, simply drag the needed items into the circles and before you know it, the puzzle is solved. In some areas you can work on different tasks at the same time, while other areas require you to complete one puzzle before you can move on to the next.
Both the cursor and the menu in Treasure Seekers 2 has been tweaked to show you which actions are possible over each hotspot, such as talking to characters, moving to a new screen, or interacting with an object. Contextual clues can also be gathered from speaking with the inhabitants of each painting, eliminating one of the major frustrations of Treasure Seekers: Visions of Gold: finding yourself in a room with no clue where to begin.
 Analysis: A great feature in Treasure Seekers 2: The Enchanted Canvases the ability to choose between casual and advanced modes, allowing both novice and experienced gamers to have a good time. The mini-games scattered throughout the scenarios are varied and a nice mix of fun and challenging. And don't worry if you get stuck, they can be skipped after a certain amount of time. Also, much of the clutter of the first game has been cleaned up so you can really get a good look at those luminous backgrounds.
There are no penalties for misclicks, just a little red "X" to let you know you're in the wrong place. Hints are unlimited and on a timer that refills quickly, especially in casual mode. Skipping puzzles works in much the same way. An additional bonus in casual mode are little clues that pop up and point you in the right direction if you've taken too long to begin a task.
Since Nelly and Tom are older, some of the original sense of wonder is gone from the game, but Treasure Seekers 2 makes up for it with a healthy amount of whimsy in each scenario. Meet a trapped ghost, a forlorn werewolf, a snarky vampire, and an impatient monk amongst many other characters. Add to that the gorgeous locations and the challenging puzzles and you have yourself a winner!
![]() Windows:
Windows:
Download the demo
Get the full version
![]() Mac OS X:
Mac OS X:
Download the demo
Get the full version


Walkthrough Guide
(Please allow page to fully load for spoiler tags to be functional.)
Treasure Seekers2: The enchanted Canvases -
Walkthrough
General Tips
At the wall with the paintings, the little painting in the low left corner is the way to come to the main menu
You can't skip dialogs during the game, you have to click through them completely as you need the informations.
The text you see while loading you can skip as soon as the loading is done. It will be always the same.
At the beginning you will have to choose between "Casual Mode" and "Advanced Mode".
In "Casual Mode" the tip will recharge fast as well as the skip options for mini games.
When you can't find an object, after a little while of not moving the mouse, an object you need will be highlighted.
In "Advanced Mode" tip and skip option will need longer to recharge and there are no other hints.
For players, who are familiar with hidden object games/puzzle adventures the "Advanced Mode" is highly recommended, as it might be too easy in the "Casual Mode".
All tasks you will find in the low right corner
New tasks will be added - the position shows the importance - top has to be done first.
There are no conventional lists, you will have to look for so named containers.
Any object, that is connected to your actual list can be a container.
Clicking this object will reveal a circle with one to six bubbles around.
The objects inside the bubbles are your search objects.
Click an object you found in the circle.
Objects to find do have a grey background, already found objects do have a blue background.
After you found all objects, the container closes and a reaction will follow: Sometimes it will reveal an inventory object or an object, you need for another container, it might open a hidden compartment, start a machine or other. You should always observe the scene carefully when filling the container with the last object.
When you find more than one container, you might have to fill one of them first, before you can finish the other one.
Not all objects are hidden in the scene obviously, you will also have to open chests, boxes, barrel, closet doors and others.
Not all object are for containers, some items will go into your inventory for further use.
You wont be always told specific which item you need to find, but reading the tasks will always give you a clue.
You will find your inventory at the bottom of the screen.
To use an inventory object, click it and click it again where you want to place it.
A hand appears at your mouse pointer: You can pick up this object. It might be, that this object shows then a container, you did not find yet. Of course you can place it in there.
A magnifier appears at your mouse pointer: You should have a look inside the closet, trunk, barrel or what ever it is.
A gear appears at your mouse pointer: You have to interact with this object by using an inventory object. It is possible, that you do not have this item yet, so you might have to come back later.
A puzzle piece appears at your mouse pointer: A mini game has to be solved.
Foot appear at your mouse pointer: You can go this way, through this door and so on.
A face appears at your mouse pointer: You can talk to the people. You always have to talk to the people, when you come into the scene the first time. They will tell you, what you need to do for them in order to get informations about Tom. With most of them you will have to talk more then once. If they do not have to tell you any new, they will just recall your goal.
The game is nonlinear: Each painting has up to six different locations. You will have to move between the locations in order to solve your tasks. Sometimes you will have to do all in one room but more often you need to go pace around.
The tip you find at the bottom in the middle. Clicking will bring one of the following results:
The tip shows you the next object you have to find. In this case a highlighted line will be shown. The two ends of this line show the object and the container it belongs to. The tip will need a while before it is recharged. How long depends on the mode you chose to play.
The tip shows you a location, for example a table. You will have to click there to solve a mini game or find something you need. The tip has to recharge before you can use it again.
The tip shows you a door, you have to go through in order to solve the outstanding tasks. The tips has to recharge before you can use it again.
The tip shows tells you to go to other locations in order to find the next object or task. The tip does not have to recharge, you can use it at the next location at once, if needed.
All mini games can be skiped without influence for the rest of the game, but not at once.
Each mini game opens in a pop up window. At the bottom of this window, you will have a bar, which is slowly filling up. Is the bar full, you will have the possibility to skip the game. How long it takes depends on the mode you chose to play.
IMPORTANT: The last puzzle comprises three parts. Skipping that the first or second part will end the game at once. You will not be able to solve the next parts of the puzzle.
Mini games do sometimes need up to 20 seconds to show, that you solved them. In this time you still can move things, change places and so on. So when you are sure you did right, just be patient.
1. Canvas
Magic Tower's Yard
Click the padlock in the middle of the gate's portal. The lock reveals two bubbles
Find the key left side at the upper beam of the gate and the oil can in the right upper corner.
Place both objects into the circle.
Click the lock again to enter the gate.
Click the door of the tower in the back to enter.
Screenshot
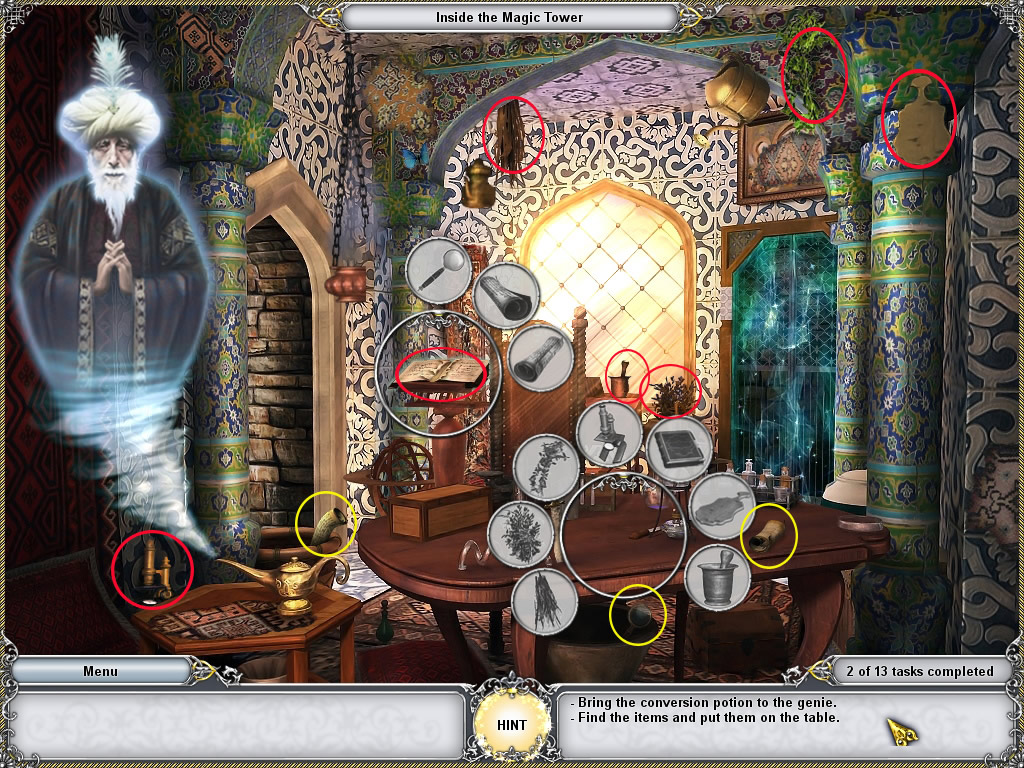
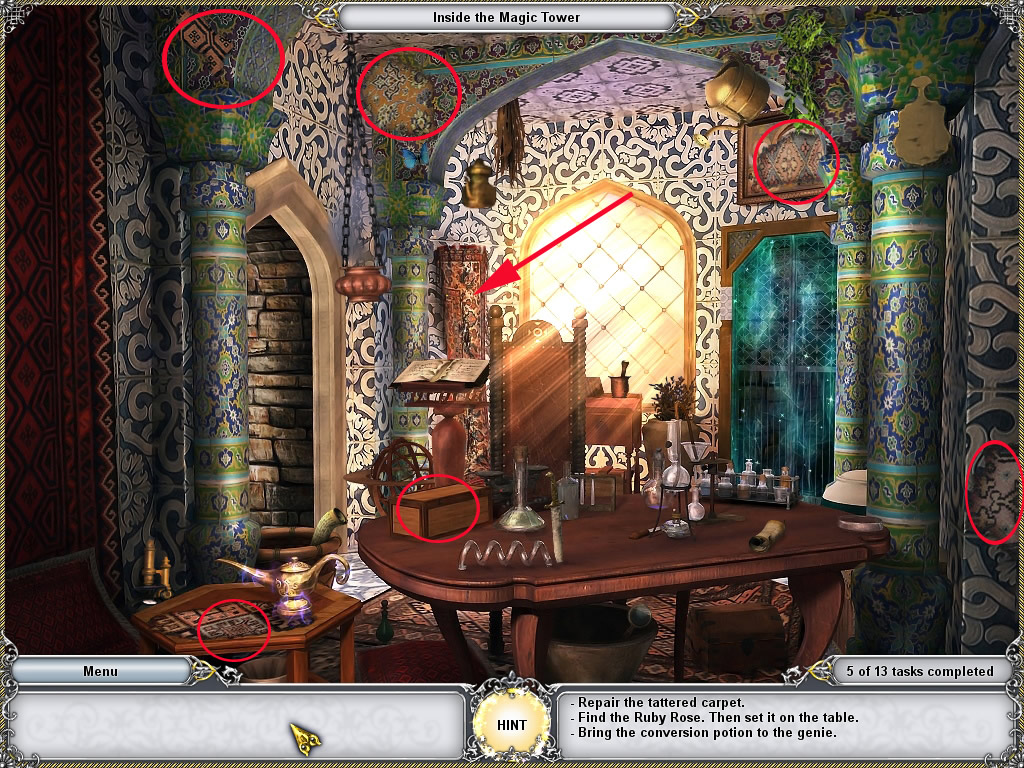
Inside the Magic Tower
Click the oil lamp in the low left corner and talk with the genie.
Click the table and the container opens.
Find the all items.
The book is located on the lectern in the left back.
Click it and it will give you another container.
After finding this items, you can pick up the book and put it on the table.
Talk again with the ghost.
Screenshot
The royal blue butterfly
Click the blue butterfly top left. It will fly away.
Follow the butterfly through the door and click on the lawn left.
A mini game opens. Match the butterflies. One will be left, click it and it will go into your inventory - inside a bottle.
Go back inside the magic tower and place the bottle on the table.
Talk with the genie.
Find the ruby rose
To find the ruby rose you first have to get the magic carpet, behind the lectern.
Go outside and lay it on the lawn.
Click it to learn, that it has to be fixed.
Go inside the magic tower and find four carpet patches and needle and thread.
Needle and thread you will find by clicking the casket on the left side of the table.
Screenshot
Go outside and click the patches at the carpet.
Click the carpet again to make it fly up.
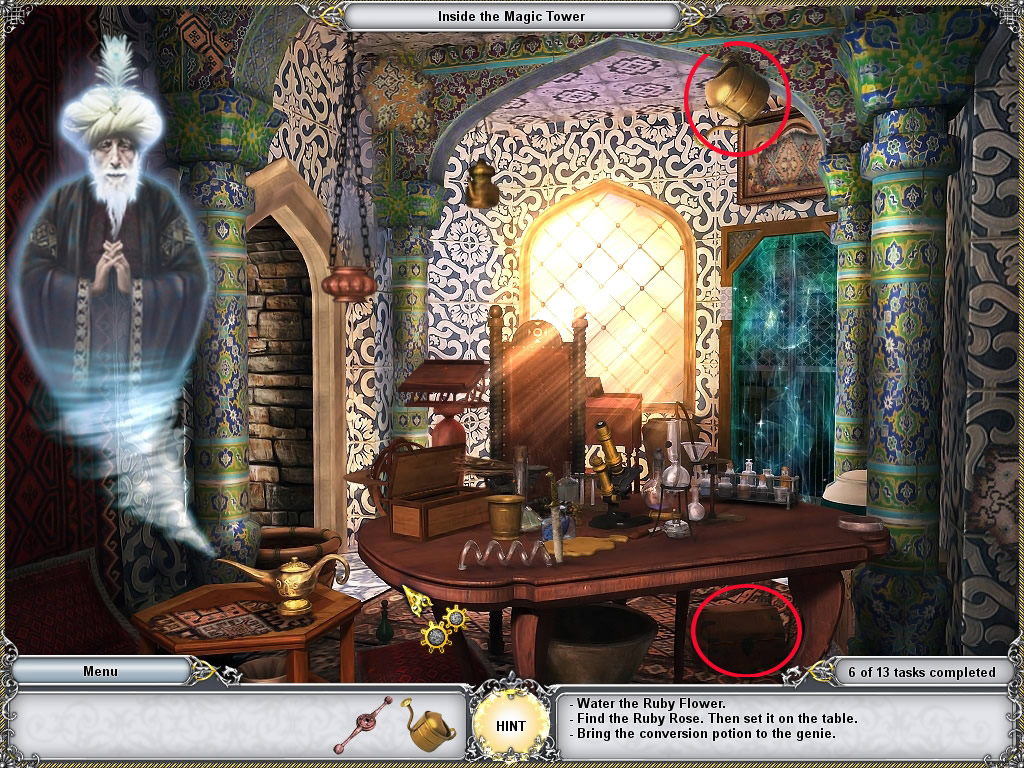
Learn that you need to water the flower first, click the carpet to fly down and enter the magic tower again.
Find the watering can in the upper right corner.
Click the casket right side under the table and get the valve out.
Screenshot
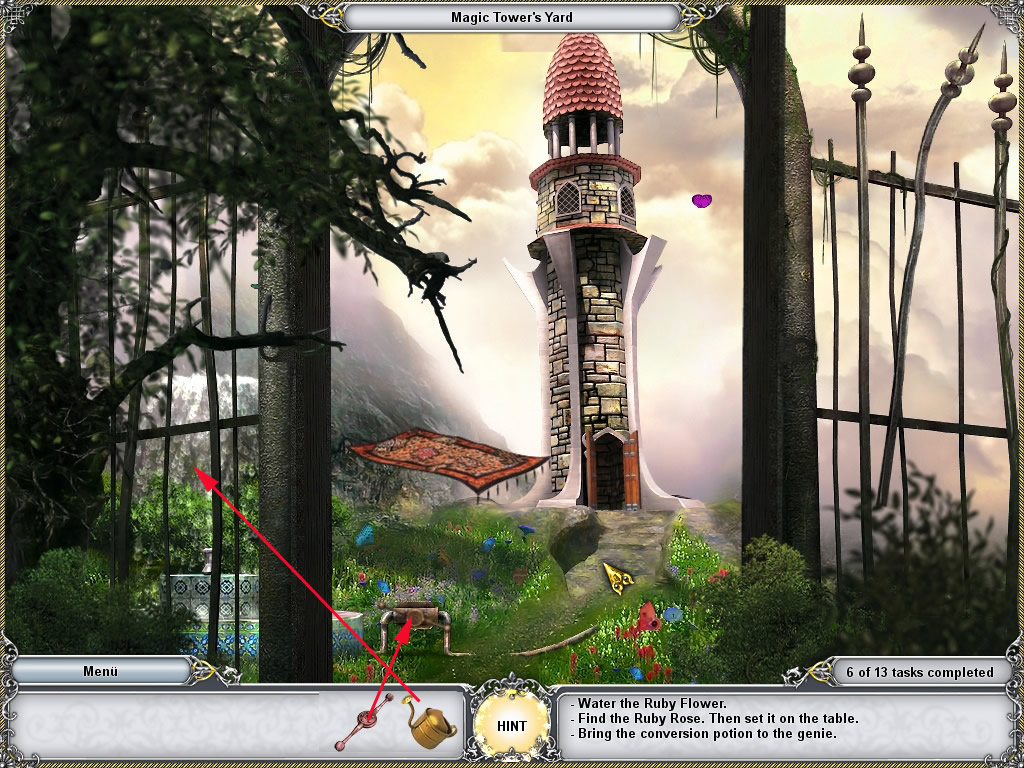
Go to the yard. You will be brought in front of the gate.
Place the valve at the pipes and click the valve again to open it.
The water from the fountain starts, place the watering can at it.
It will come back into your inventory automatically.
Screenshot
Click the carpet, fly up to the top of the tower, water the plant with the filled watering can, wait till the flower is grown and gather the blossom.
Click to fly down, enter the magic tower and set the flower on the table.
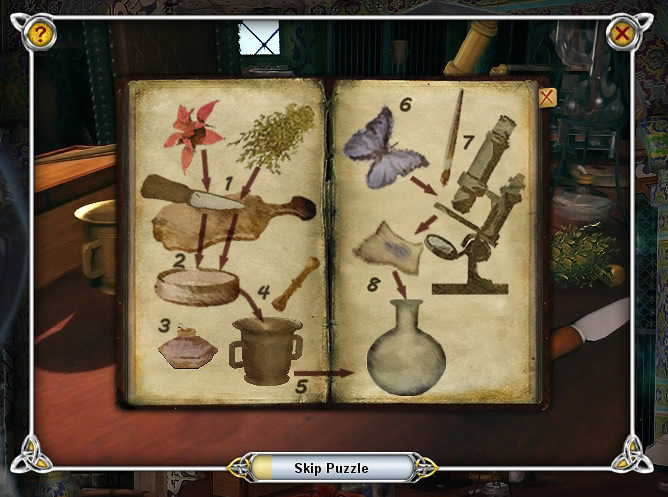
The unlocking powder
Click the table and a pop up windows opens.
Click the book left, it shows you in which order you have to prepare the unlocking powder.
You can open the book anytime again if needed.
Screenshot
The number in the brackets are according to the numbers in the screenshot.
Click the wooden board (2) and place it with another click on the table.
Place the flower (3) on the board.
Get the knife (4), located at the right side, click it on the board and click a third time to start cutting.
Place the cut parts of the flower in the glass bowl (6)
Now cut the green stuff (7) you collected and click it also into the glass bowl.
Place the burner (5) under the glass bowl and wait a moment.
Now pour the stuff into the mortar(8) and get the pestle (9), which was under the green stuff right side.
When the pestle does not move anymore, give everything into the glass bottle (10) in the back.
Get the butterfly (11) and place it on the glass plate of the microscope (12).
Pick up the brush (13) from the casket left side and click it also at the microscope.
The dust from the butterfly will go onto a paper (14) and you will find on the table, after the pop up window is closed
Pick up the paper and click it also at the glass bottle (10)
The unlock powder is ready - click it at the locked door right side.
Before you get downstairs, grab the knife, from the left side of the table.
Screenshot
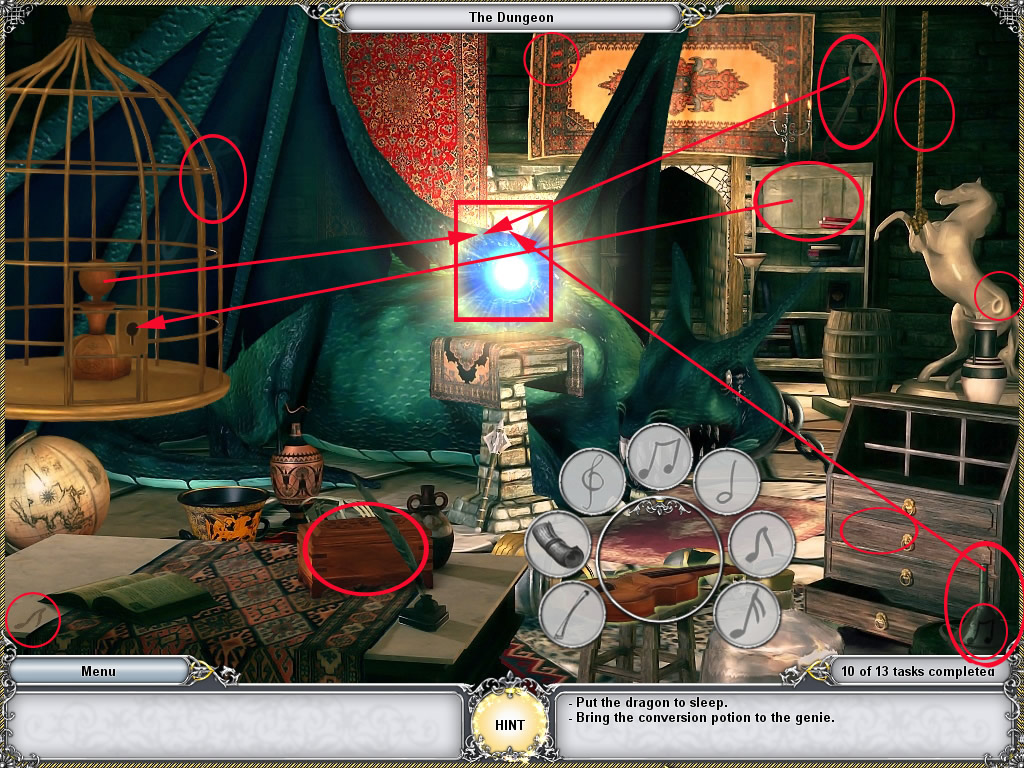
The Dungeon
Go down and use the knife to cut the rope right upper side, connected to the horse.
The cage left falls down and the dragon awakes.
To bring him back to sleep click the stool with the violin at the bottom.
Find all items for the container.
One you will find in the casket on the table, another one is in the middle drawer right side.
Click the upper right edge of the carpet above the door and you will find another item.
Screenshot
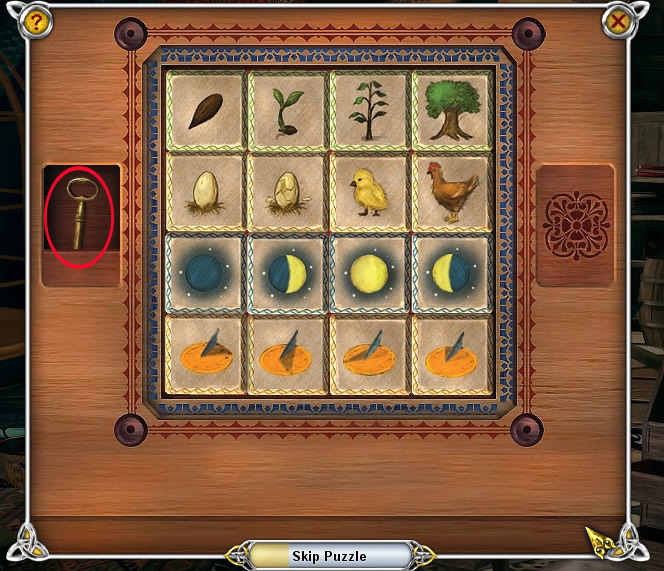
The dragon is sleeping now again - click the shelf upper right and a minigame opens.
You will have to add the tiles outside on the empty fields on the board in order to get for each row a sequence starting with the earliest moment, ending with the last.
Doing it right, will unlock an compartment in the upper left corner.
Grab the key.
Screenshot
Place the key at the cage, get out the bottle and click it at the blue shining light above the sleeping dragon.
Another container opens, find the rest of the items and take the conversion potion.
Bring it to the genie.
2. Canvas
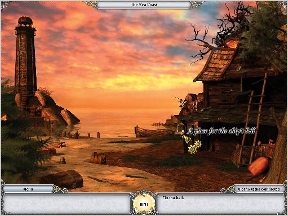
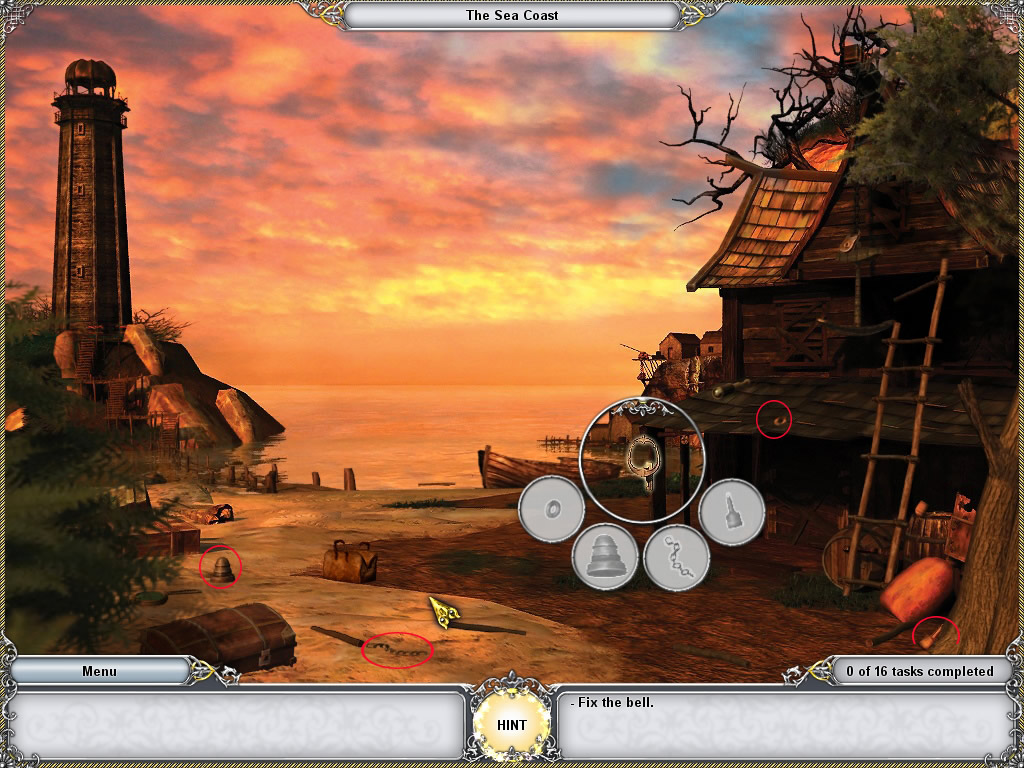
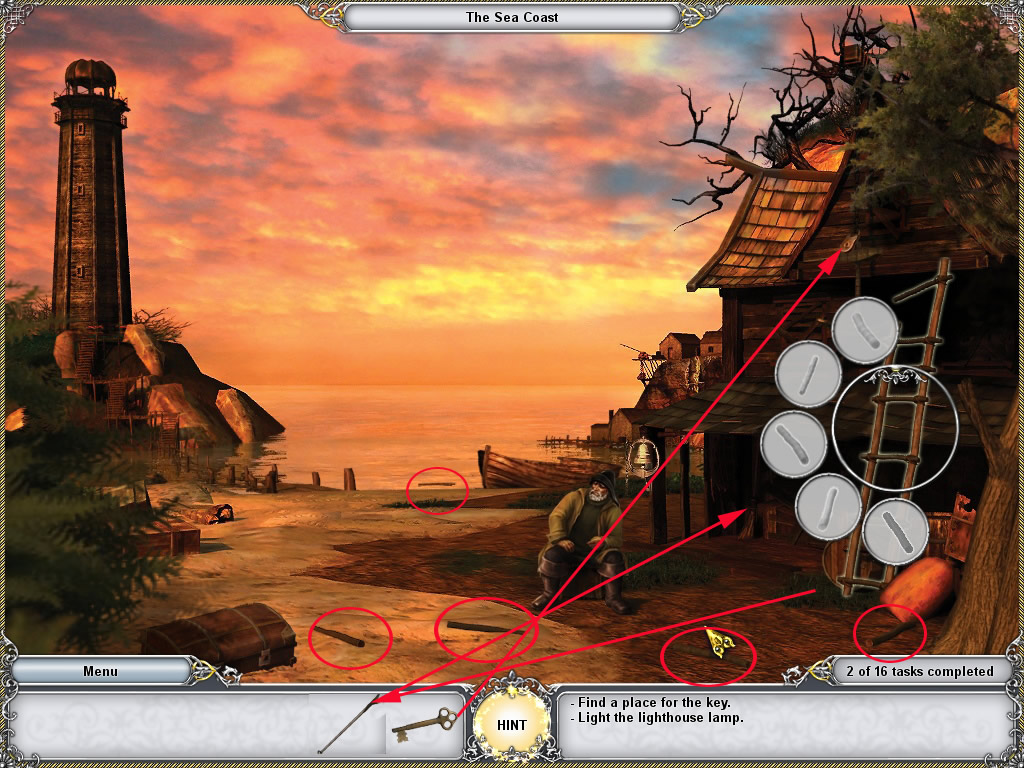
The sea coast
Click the holding ring for the bell, left side of the house, and find all the items.
Screenshot
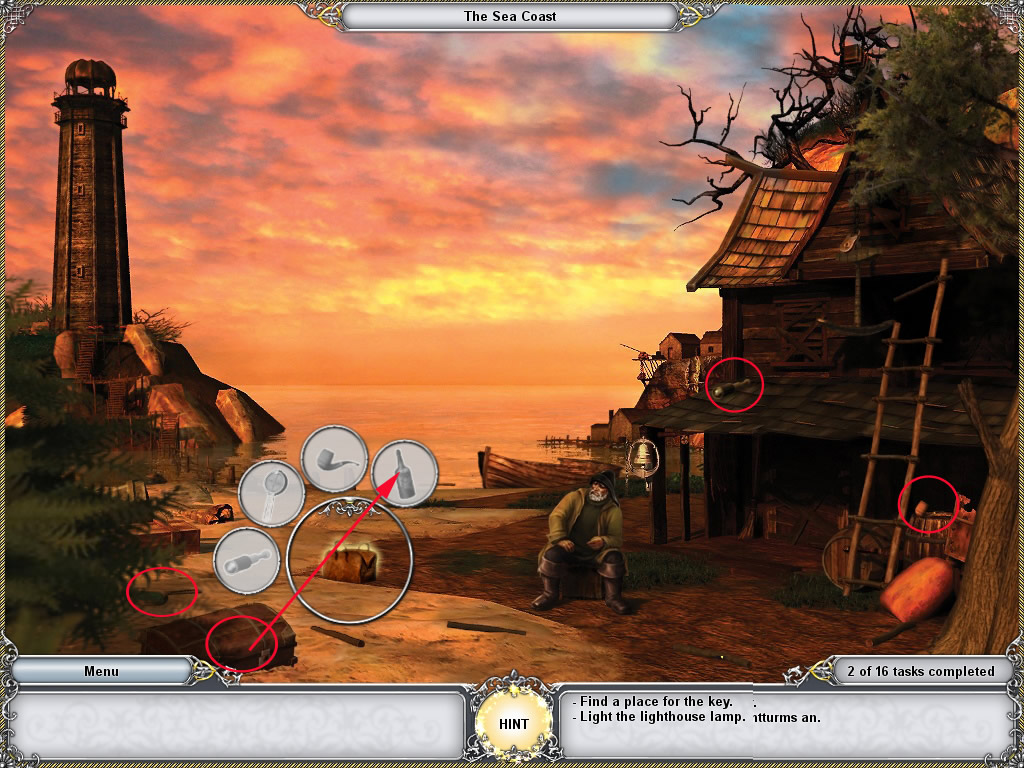
Ring the bell and talk to the fisherman.p
Click the back on the ground in front of the fisherman and find the container items.
One item you will find inside the trunk in the lower left corner.
After you found all, grab the bag and give it to the fisherman.
Screenshot
You will receive a key for an anchor chain.
The anchor is chained on the roof, but first you have to repair the ladder.
Click the ladder and find the five logs.
Then use the key at the lock, left next to the top of the ladder.
The anchor falls down, smashes the barrel and a crowbar falls out.
Grab it and use it at the wooden planks of the door.
Enter the fisherman's hut.
Screenshot
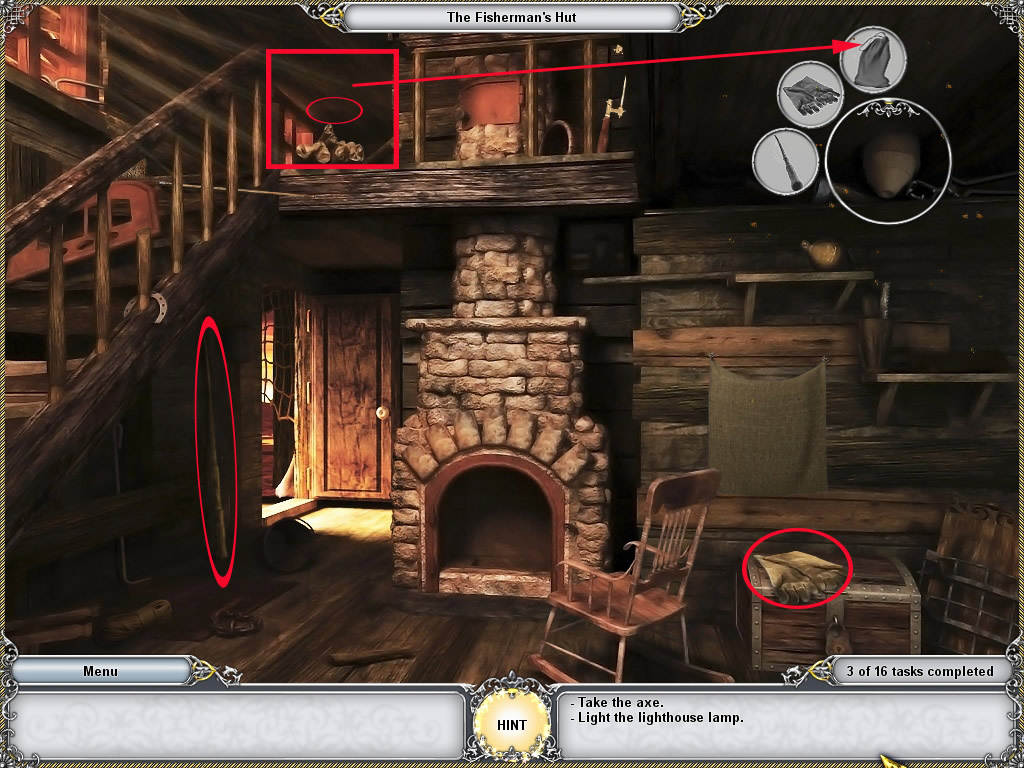
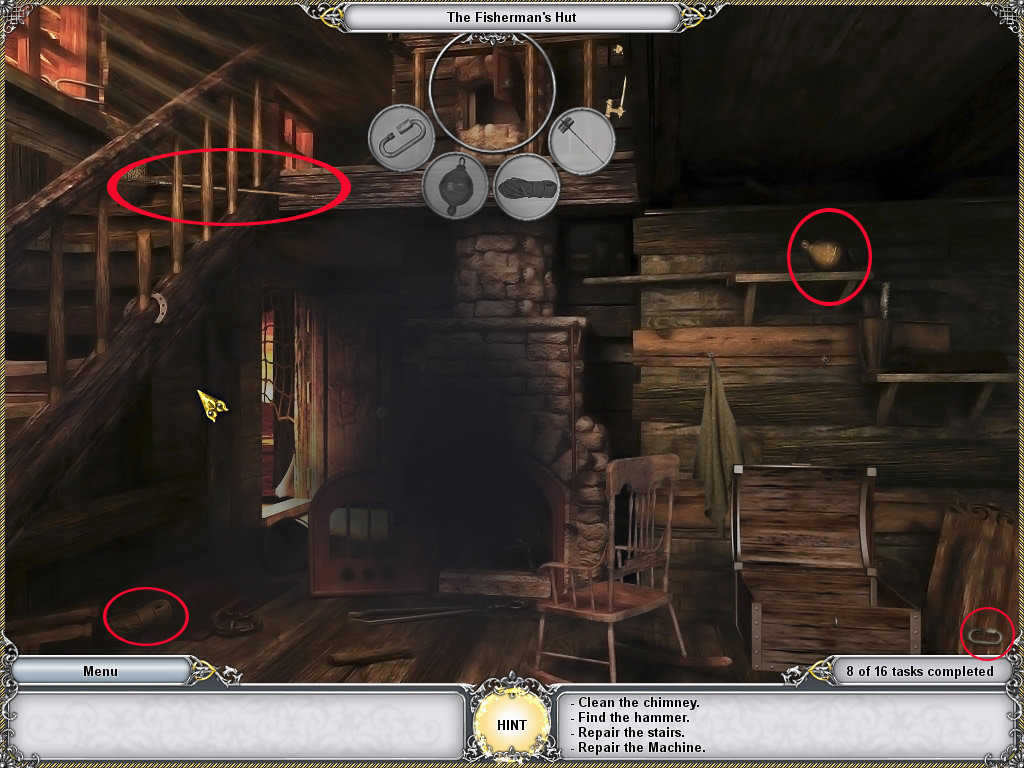
Fisherman's Hut
Try to grab the axe.
A container opens - find the items.
One item you will find by clicking left next to the fire place chimney.
A pop up window will open and you can click the object.
After finding all, you can pick up the axe.
Screenshot
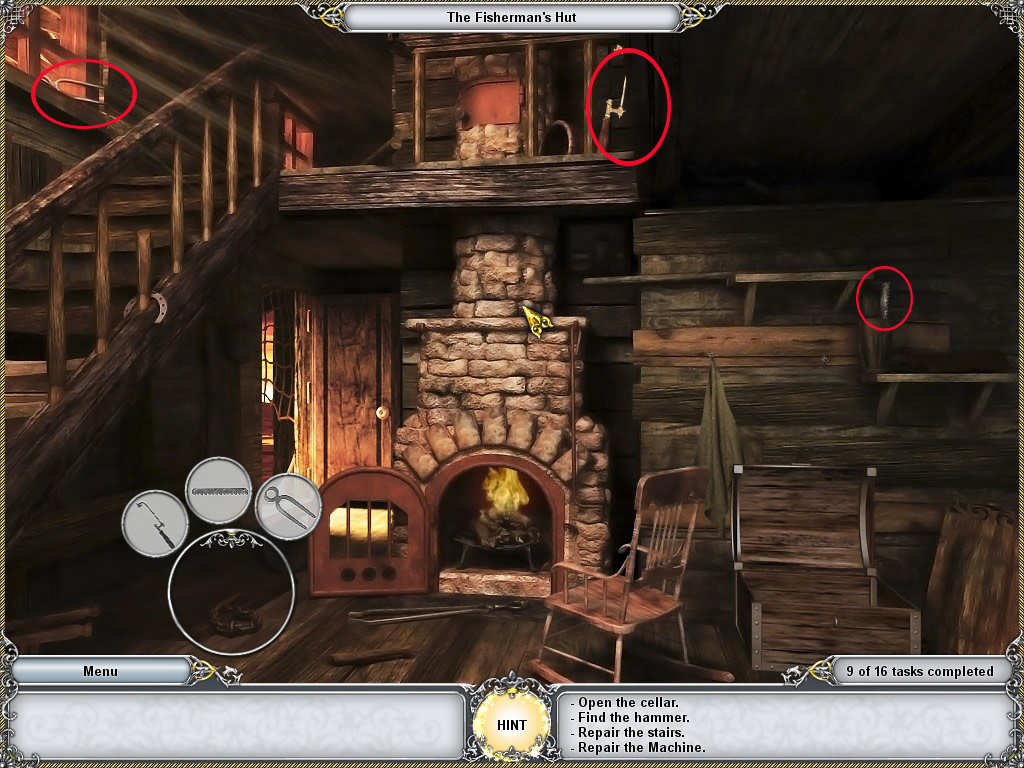
The door closed - click the fire place and find the needed items.
One you will find again in the upper pop up section.
Screenshot
The cloth right next to the fireplace was blown away.
Click the painting, you can see now.
A mini game opens.
Your goal is it to light up all lighthouse lamps. To do so, you have to embroider the right colors on the lighthouse picture.
For this, get a needle with colored thread and click it on a spot, where this color belongs to, according to the original.
When you made a mistake simply click the threader down left and click at the wrong color. It will be remove.
You only have to click one color once at one lighthouse. The other spots with the same color at this lighthouse will be filled automatically.
When all lights are lit up, a compartment on the upper right reveals a key - grab it.
Screenshot
Use it at the trunk in the lower left corner of the main scene.
Get the matches out of the trunk and light the fireplace.
The door opens.
Go outside, use the axe at the tree on the right, pick up the wood and click it at the bridge to repair it.
You can enter the lighthouse now.
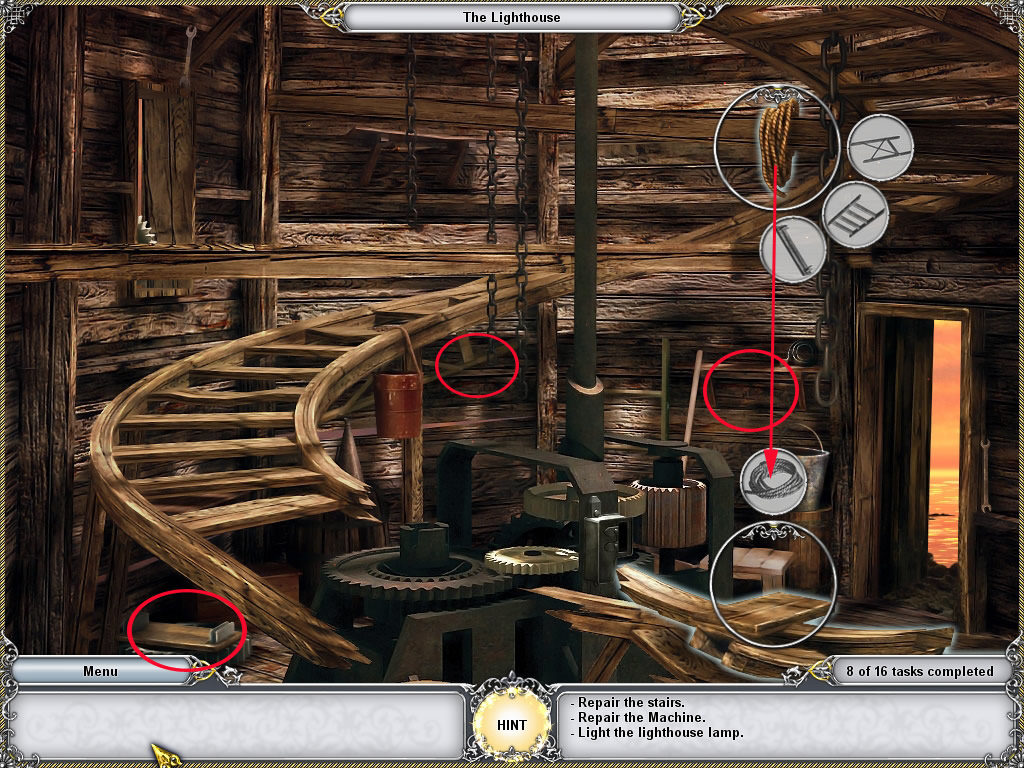
The Lighthouse
First you have to repair the stairs.
Click the wooden planks in the right lower corner and look for the rope.
You will find it above, click it to reveal another container.
Find the items for the container, after this, you can grab the rope and place it at the stair-container.
Screenshot
Now click the stairs at the left end of the rope.
A container opens, find the objects.
One you will find in the red bucket, hanging at the stairs, another one in the silver bucket, left to the door.
Screenshot
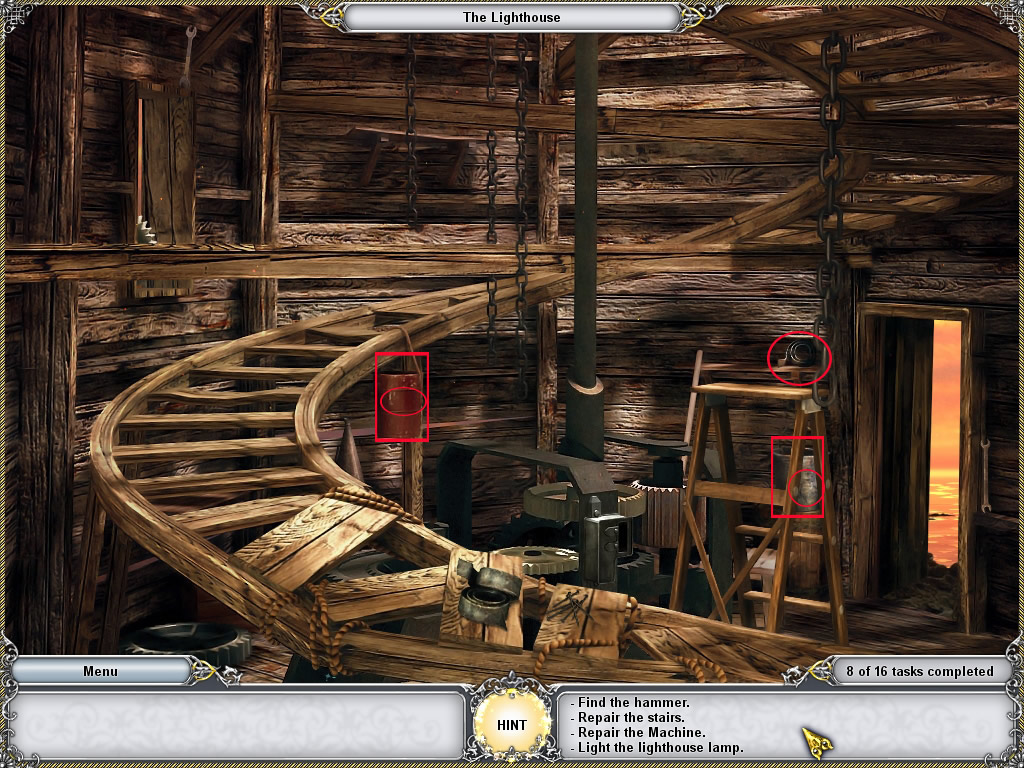
After finding all a new task is added, you will have to find a hammer.
Leave the lighthouse and go enter the fisherman's hut.
Fisherman's hut
Before you can do any else, you will have to clean the chimney.
Click the flue choke at the chimney and find the items.
Screenshot
Now click the cellar door left side on the ground.
Find all items.
Screenshot
The spirit disappears, click the cellar cover and get the hammer.
Go back to the lighthouse.
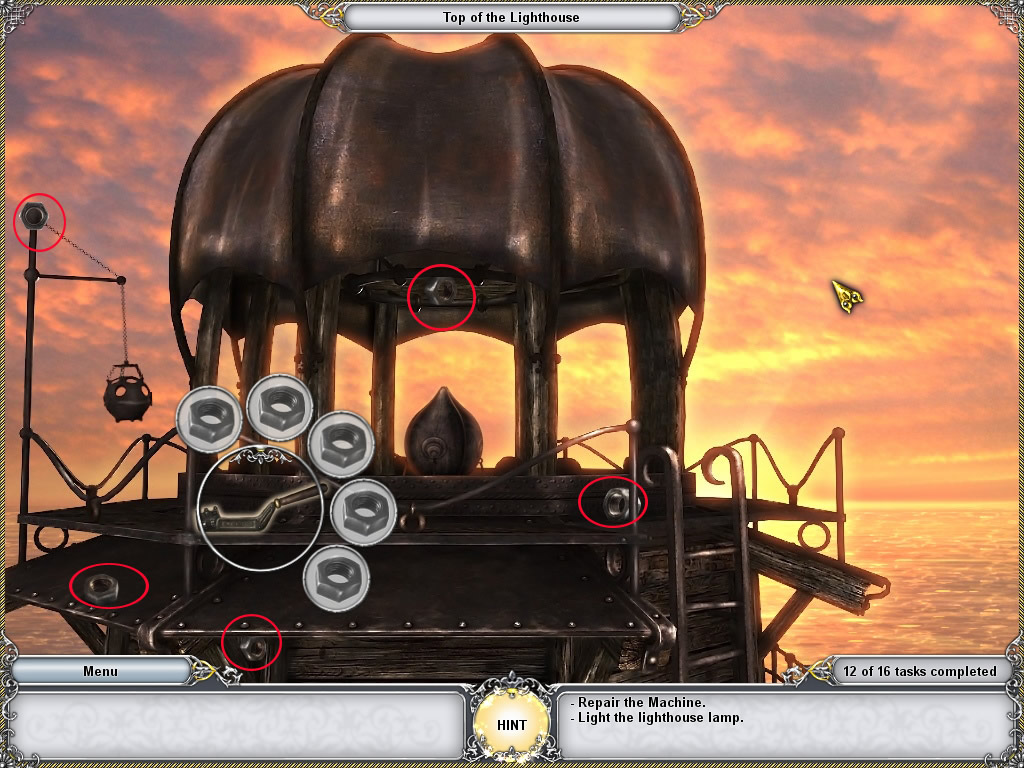
The lighthouse
Use the hammer to repair the stair and walk upstairs.
There is a handle at the left side, click it to get a container.
Find the five bolts and click then the lever.
It will go into your inventory
Screenshot
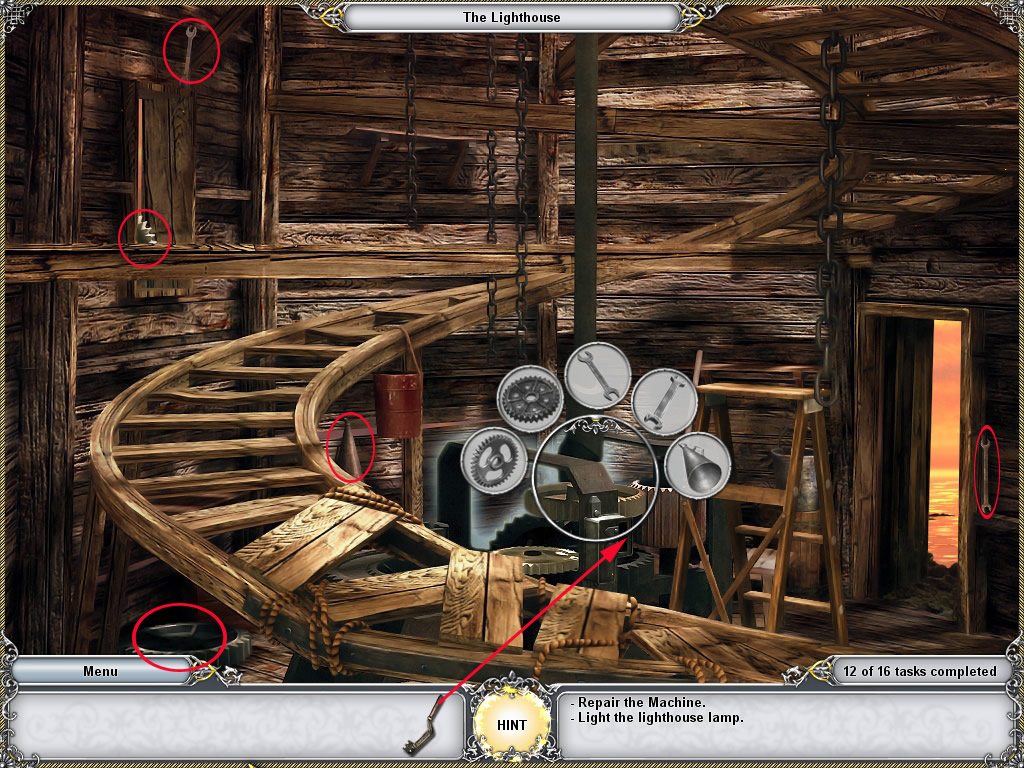
Go down again by clicking the ladder at the right.
Click the motor and find the objects for the container.
Now place the handle into the slot and click it again to start the machine.
Screenshot
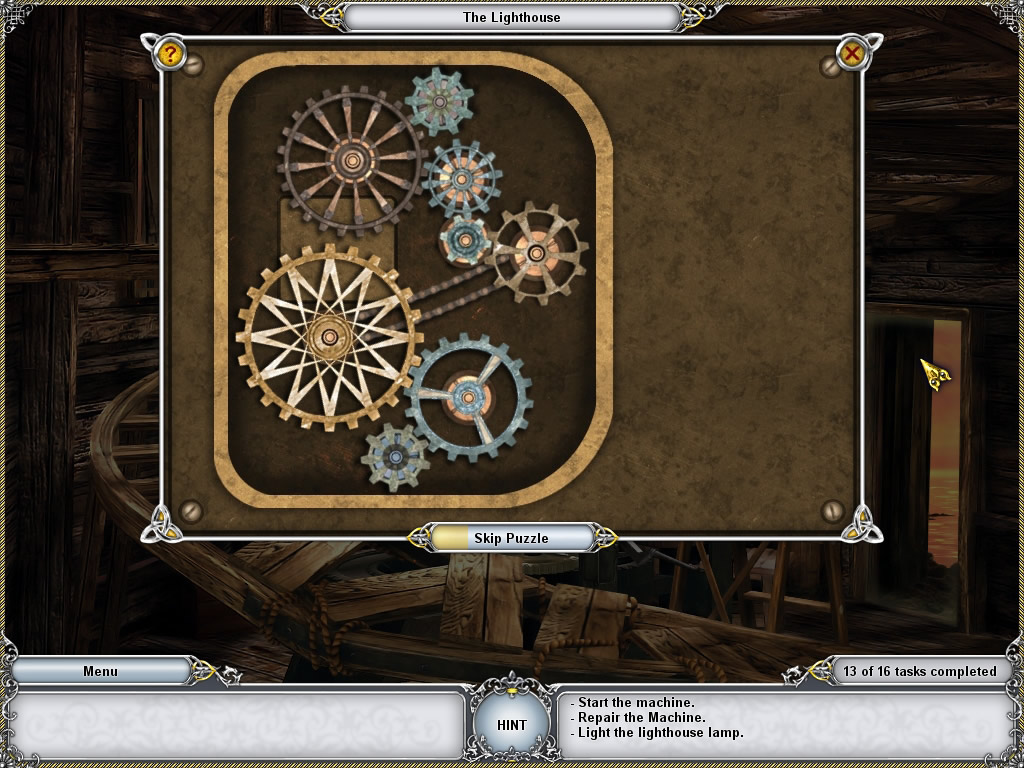
A minigame opens.
Place all the gears at the right spots to make them move.
When you did it right, the minigame closes and the motor starts.
Screenshot
Go upstairs again and grab the censer at the left.
Leave the lighthouse, go to the fisherman's hut and place the censer at the fireplace.
Go back and the light with censer the lighthouse lamp.
Leave the lighthouse and click the ghost ship to end the chapter.
3. Canvas
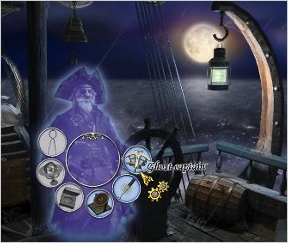
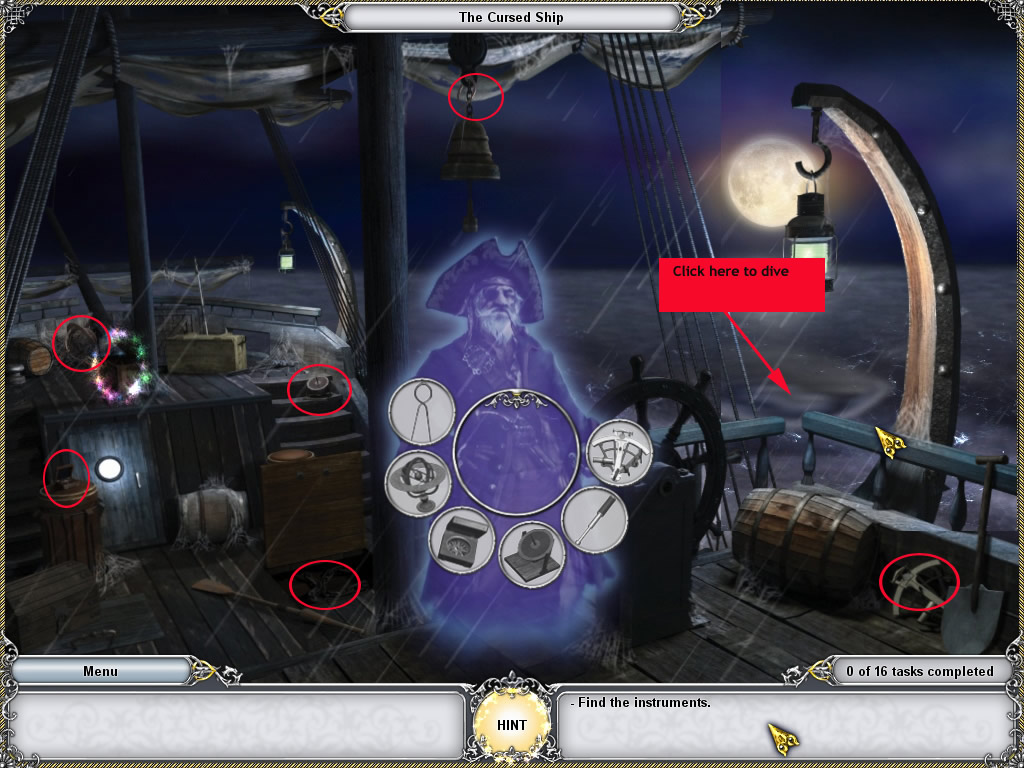
The cursed ship
Click the captain and talk to him, click him again and a container opens.
Find the objects.
One you will find by clicking the hatch on the ground left to the mast.
After finding all use the vortex to dive.
Screenshot
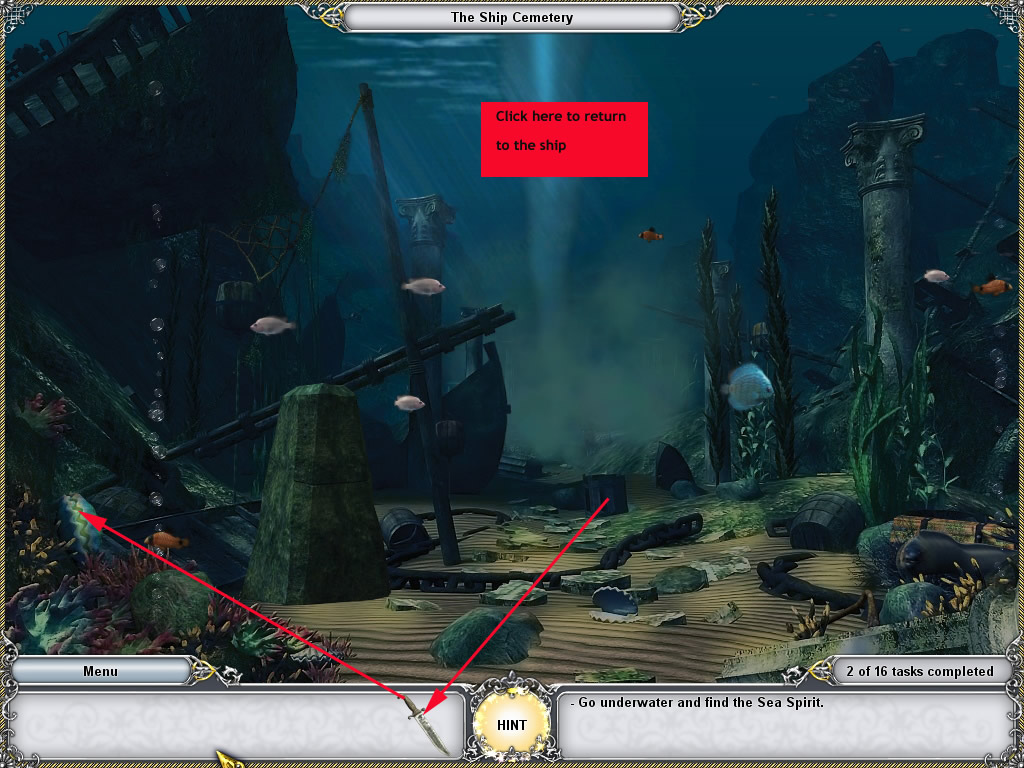
The ship cemetery
Click the barrel in the and grab the frosted knife.
Use the vortex in the back to return to the ship.
Click the box left side on the ground, left next to the mast in the back.
Inside you will find a whet stone. Place you knife there, you will get it back sharpened.
Use the vortex to dive.
Use the knife at the closed shell left lower side.
Click the shell again and get the shiny lens out.
Screenshot
Right next to the shell a stone pilar moved its top.
Click it and a minigame will open.
This minigame is random and has no logical solution. The way to solve it is by try and error.
Till the empty slots with the green pegs.
Only highlighted slots can be filled.
When you fill one slot, other will be highlighted or get dark again.
You can get a peg out of slot again with simply click it.
Try, until all slots are filled.
The dusty cloud moves to the side and you can see the the storm temple in the back.
Click it.
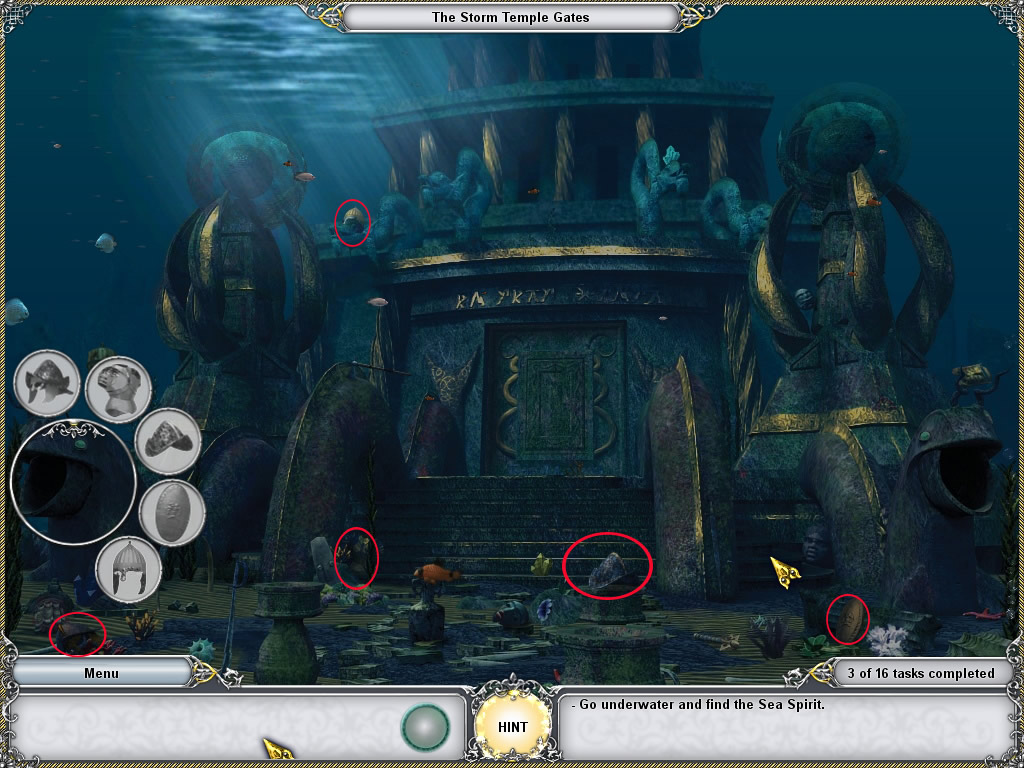
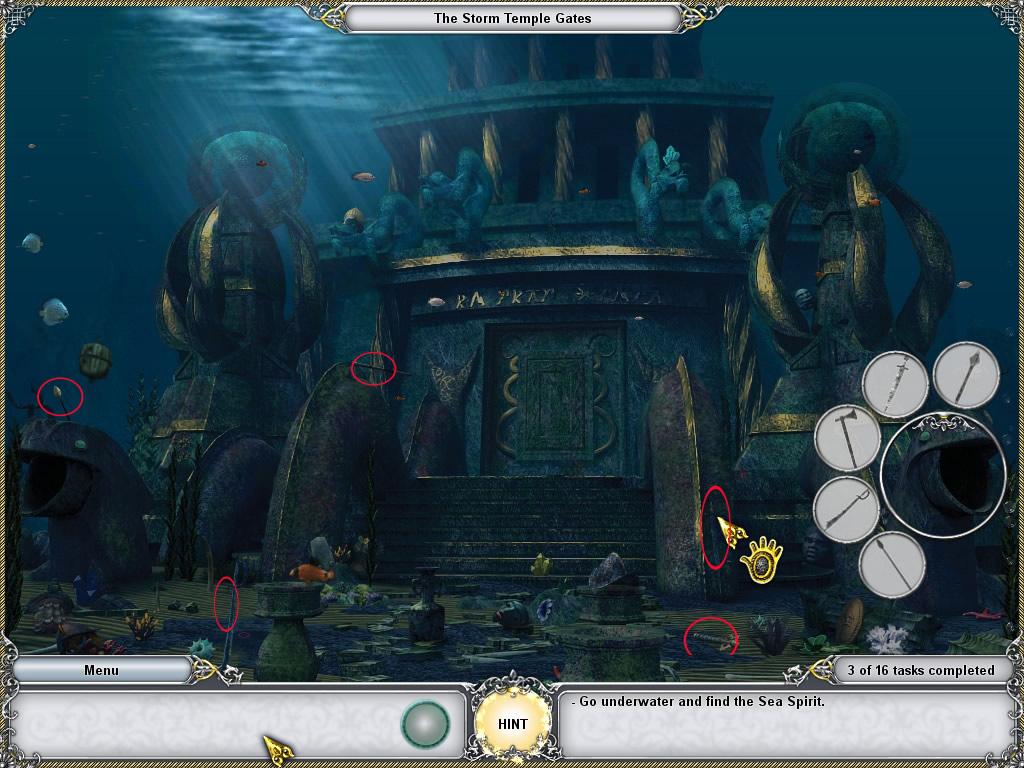
The Storm Temple Gate
Click the far left statue and find all items.
After finding all, the statue closes its mouth.
Screenshot
Now click the far right statue and find all objects.
Screenshot
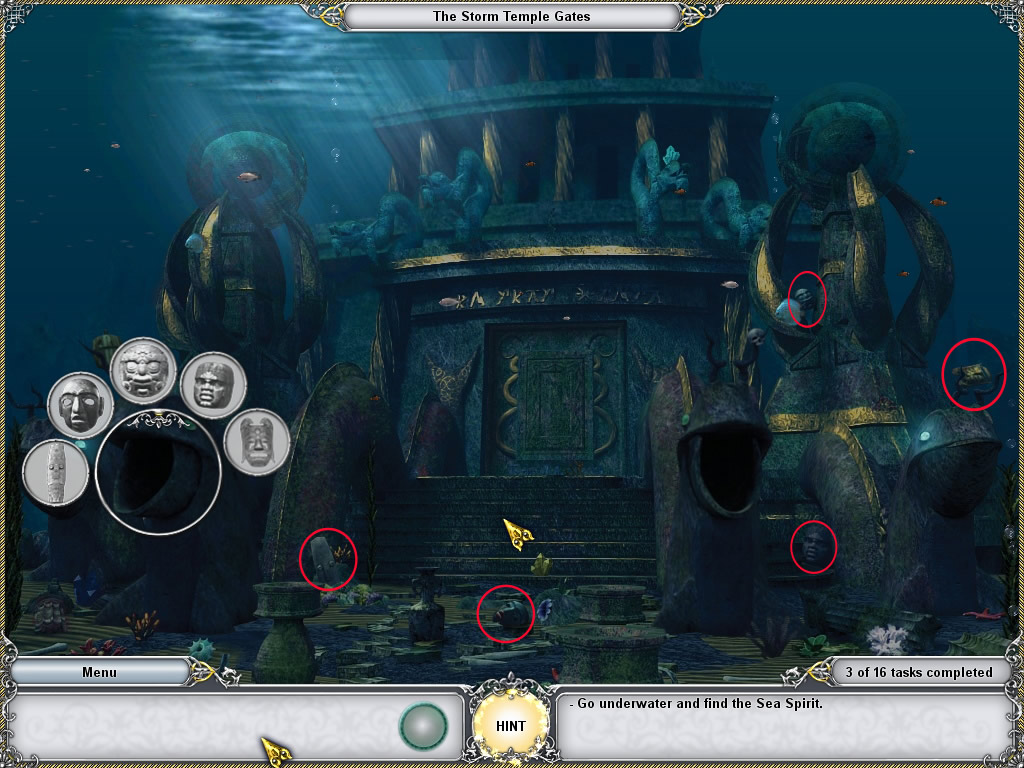
After finding all, the statue will close its mouth also and left and right a new statue will appear.
Start with the left one and do the right one after.
Screenshot
For the second statue on the right you have to finish the left one first, after this you will find one item on the left statue's head.
Another item you will find, when you click the jug on the floor in the lower middle of the scene.
Screenshot
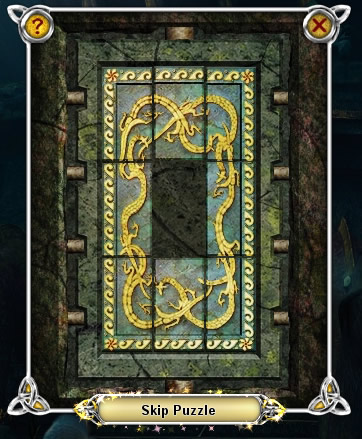
Now click the temple gate.
It is a slider puzzle.
By clicking one tile, it will move to the empty spot.
The middle has to be free at the end.
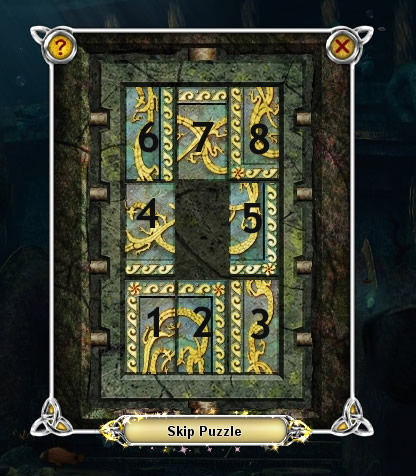
For a step by step solution please use the screenshot to understand the numbers.
Screenshot
Click the tiles in the following order:
4,2,1,4,1,2,4,3,5,1,7,8,1,7,2,6,8,1,7,2,6,8,1,7,2,6,3,4,8,3
Screenshot
Enter the storm temple
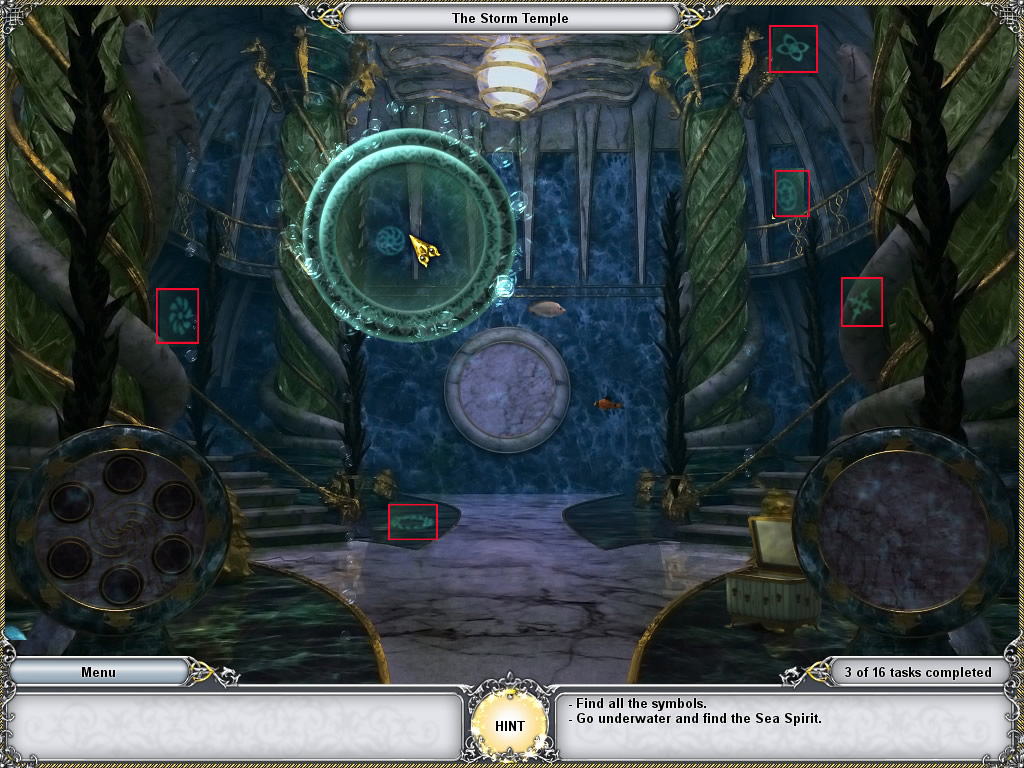
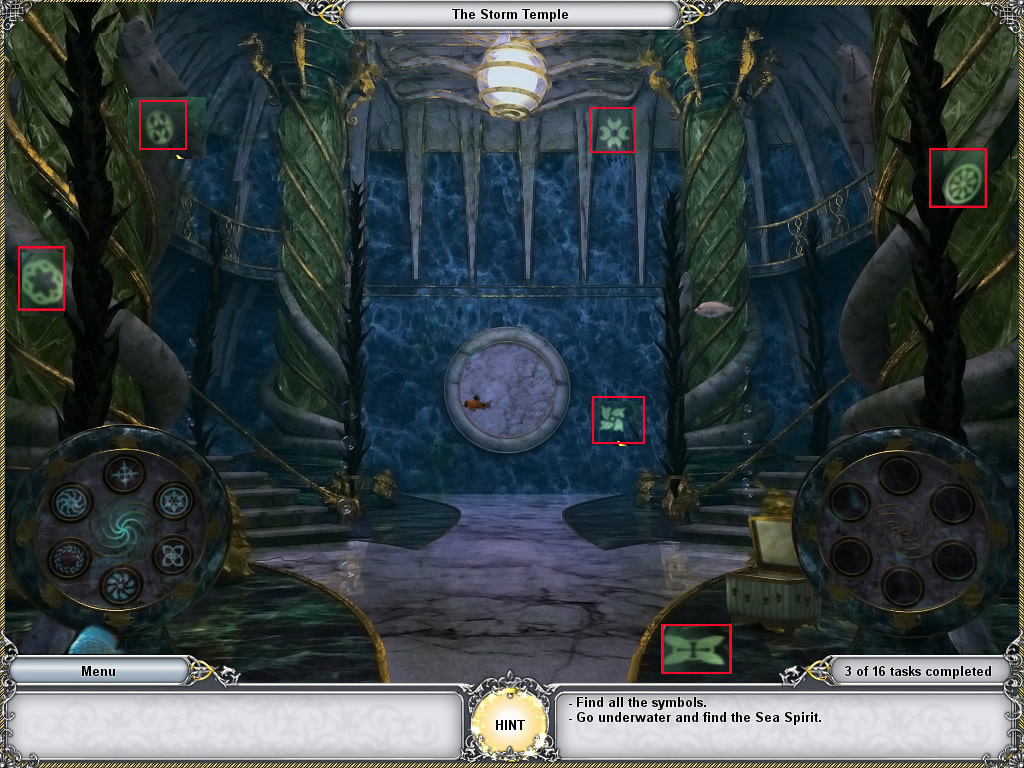
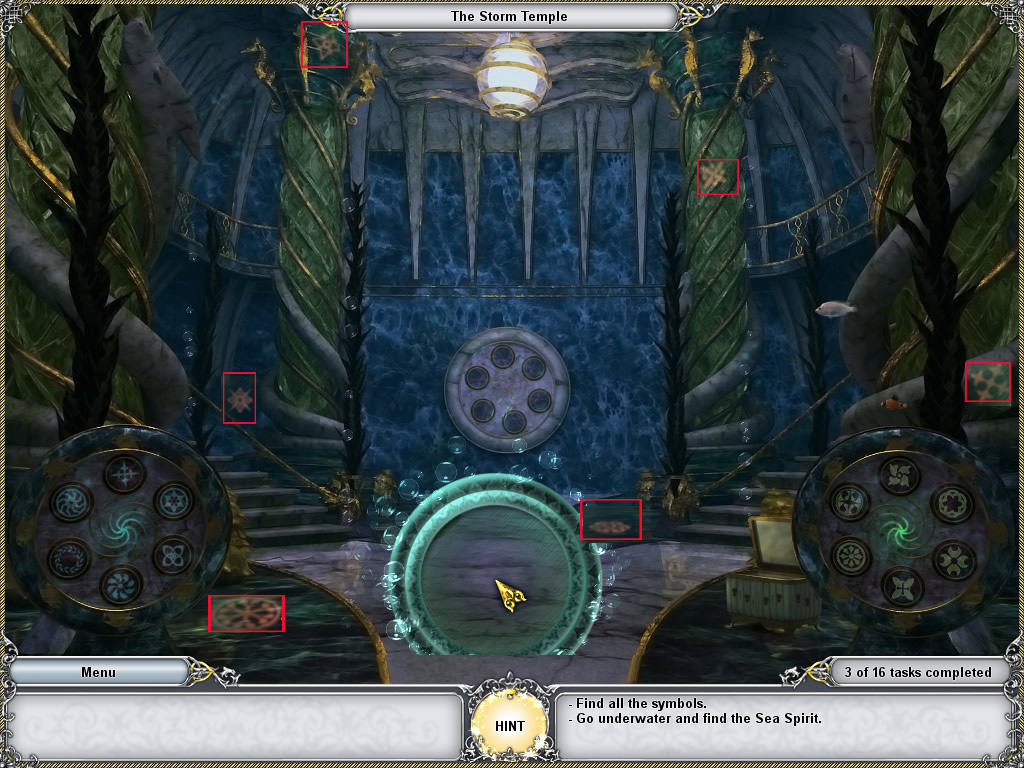
The storm temple
On the ground, left next to the first right column, a white casket is standing.
Click it to open and drag the lens from your inventory onto the frame inside that casket.
You will find it back in the scene instead of a mouse pointer.
Now drag the lens slowly over the scene. At some places you will see a highlighted symbol.
Click it and it will go into the disc in the lower left corner.
After finding all symbols for this disc, you will have to do the same first for the disc in the lower right corner and then with the one in the back middle.
Screenshot left
Screenshot right
Screenshot back
Wait a moment, till the spirit appears, then talk to him.
Go back to the ship cemetery.
In the lower right, next to the stones you will find a crowbar.
Now return to the ship.
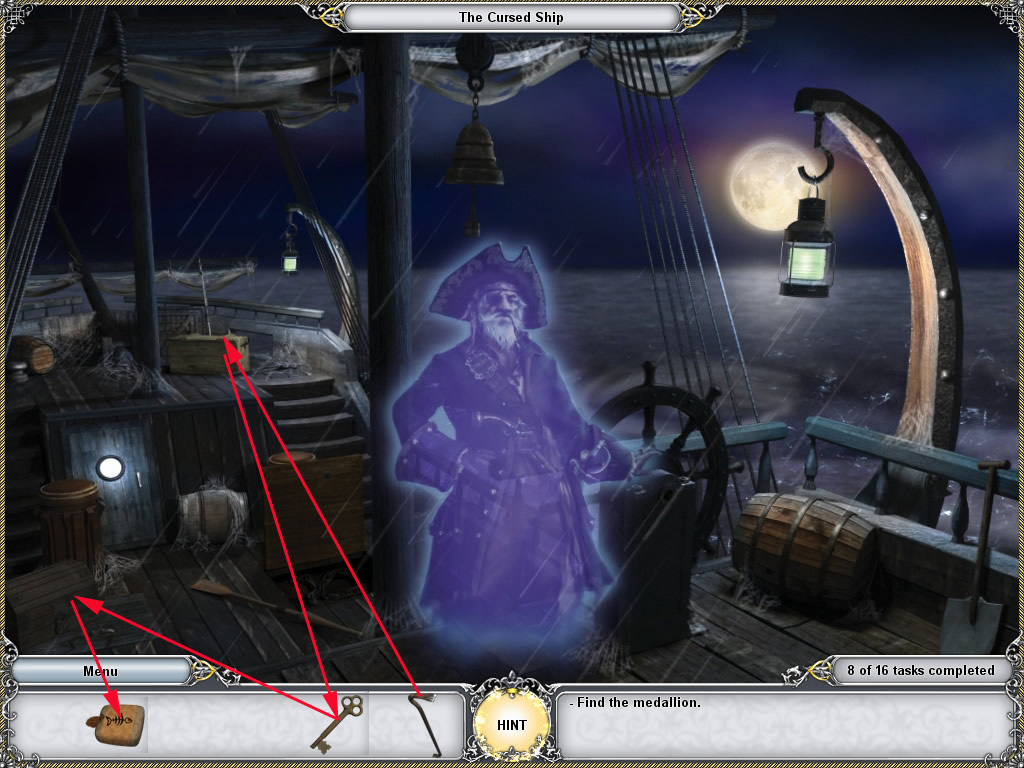
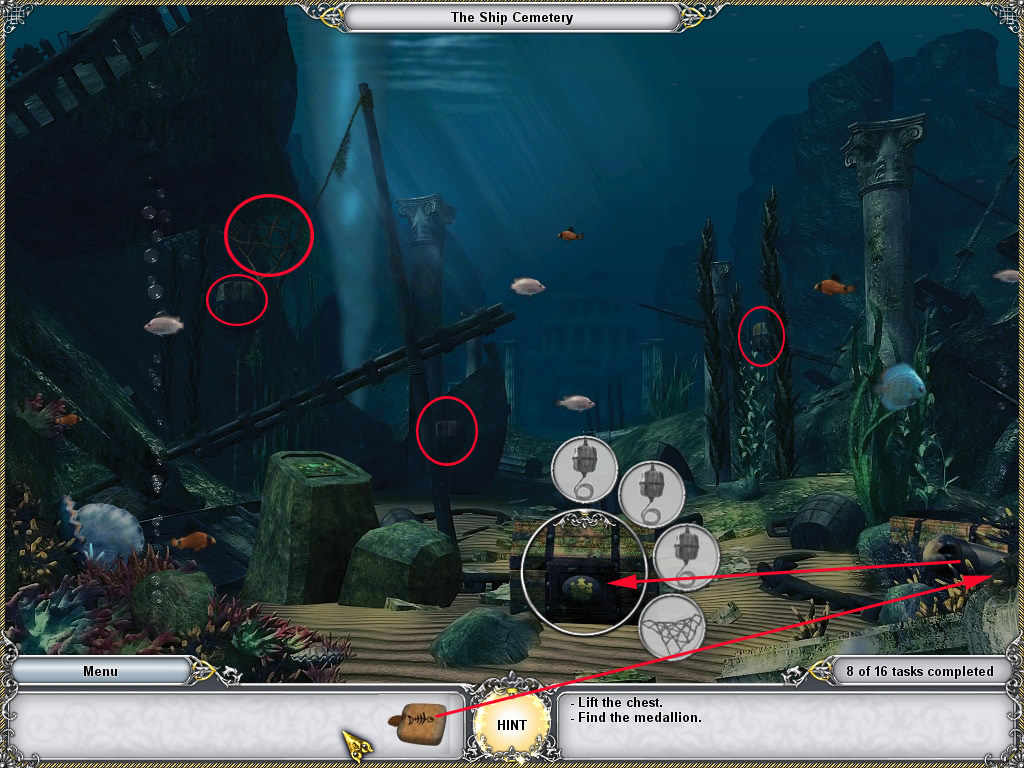
The medallion
Back on the ship, use the crowbar to open the chest in the back, right next to the mast on the ground.
Look inside and you will find a key.
Use the key to open the chest in the low left corner.
Look into it and grab the fish disappearing powder
Screenshot
Now dive down to the ship cementry again.
Use the fish powder at the ale in low right corner.
After he disappeared, click the chest, you can see now.
It will be automatically placed in the middle.
Click it and find the needed items.
Screenshot
You learn, that you need one more buoy to lift the chest.
Go to the gates of the storm temple.
In the far left you can see a buoy but you need a rope to get it.
Return to the ship.
Click the hatch left next to the mast and pick up the rope.
Return to the gates of the storm temple, click the rope at the buoy and grab the buoy, when it is standing in front of you.
Go back to the ship cemetery.
Click the bubbles in the low left corner and learn, that you will need some to push the stone away.
Dive up to the ship and get the shovel in the right lower corner, dive down to the ship cemetery and use the shovel with the stone.
Now get the buoy out of your inventory and click it at the oxygen bubbles.
Place it after at the chest and click the chest again to make it moving up to the ship.
Return to the ship.
The chest is standing on floor right to the captain.
Click it and a minigame will open.
Your goal is it, to reveal all gems hidden in the little compartments by clicking the right buttons.
Each button controls several compartments and will open and/or close different compartments by clicking it once or twice.
The following solution does only work, when you didn't already click one of the buttons.
Closing the pop up window and opening it again will not restart the minigame.
Sometimes restarting works with going to the main menu and starting to play from there again, but for what reasons ever, it does not work always.
According to the order of numbers and letters, which are shown in this screenshot you will have to click the following buttons:
3, 4, A, B, C, D
The chest opens, click it again to get a close look and grab the medallion.
Return to the sea spirit and hand over the medallion.
Pick up the magic potion, that appears on the ground in front of the sea spirit and bring it to the captain.
4. Canvas
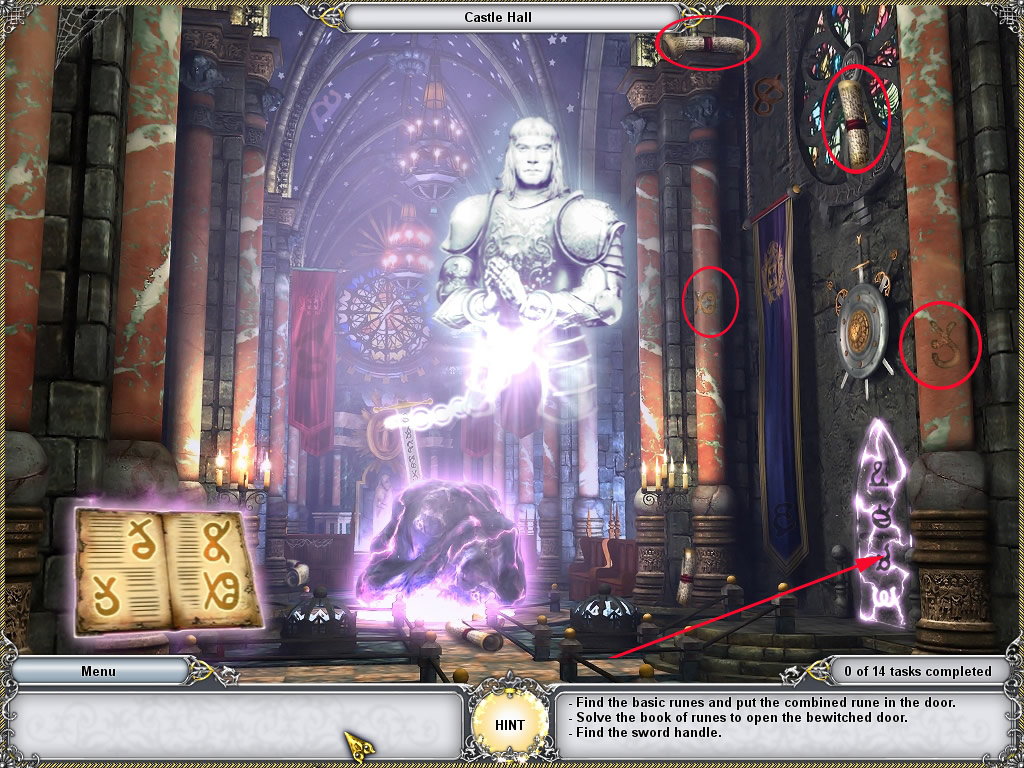
Castle Hall
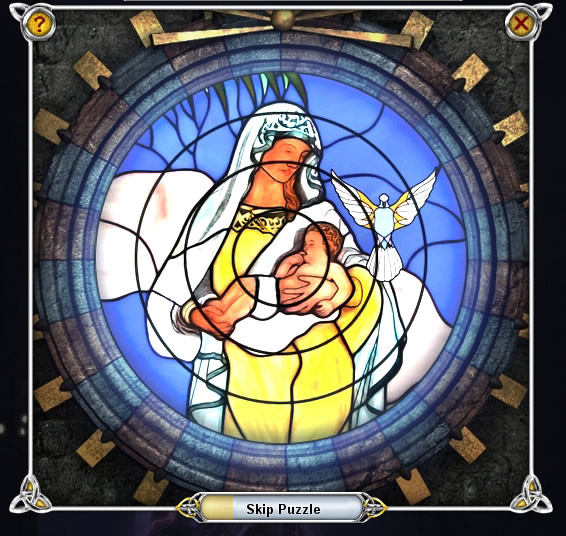
The ghost needs light, so click the stained window behind his left shoulder and solve the puzzle.
Your goal is it to restore the picture by clicking the rings.
Clicking one ring will for most also move others.
Seen from the inner ring (1) to the outer ring (4):
Ring 1: moves 1, 2 and 4
Ring 2: moves 2, 3 and 4
Ring 3: moves 1, 2 and 3
Ring 4 moves all rings
There are a lot of solutions possible and the starting position is random.
You should see, that the rings 1,2 and 3 are fitting with each other.
Then move the with ring 3 so that they do show the complete picture together with ring 4.
Now move ring 4 till the picture is in the right position.
Screenshot
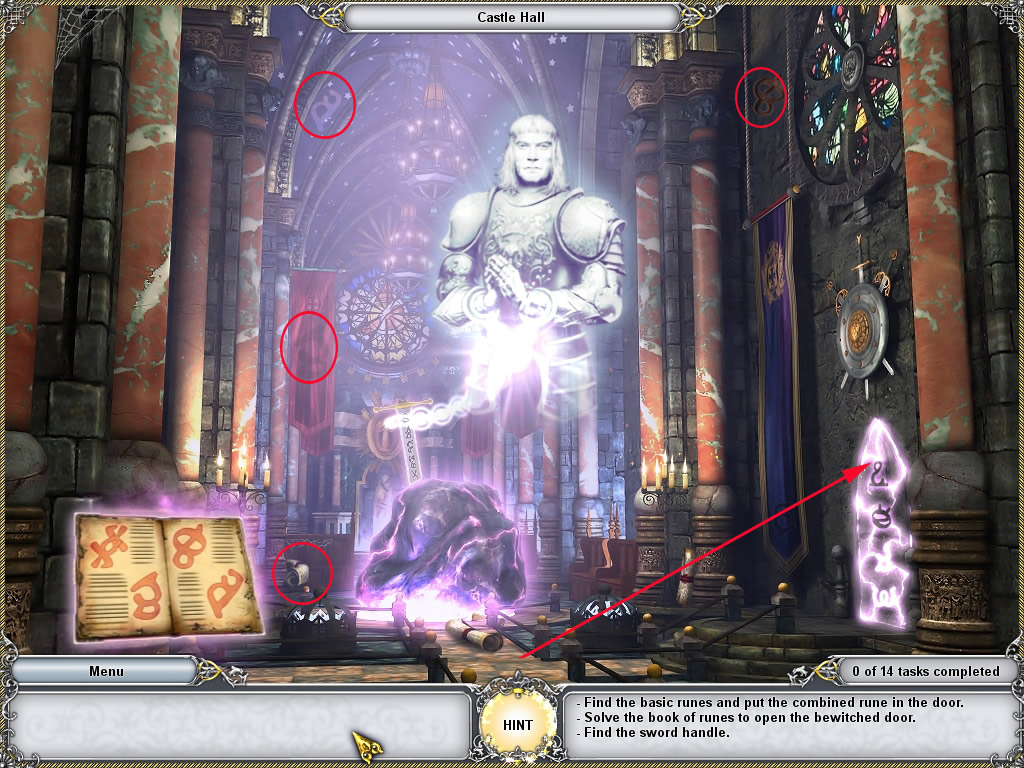
Click the door to the right - its a bewitched door and you can't open it yet.
Click the book on the chair in the low left corner.
You have to look for four runes.
Each rune you found will go into your inventory - when you found them all, they will automatically combine to one rune.
This one rune you need to click at the according rune on the bewitched door.
As soon as you place the rune at the door, the book shows new runes to find.
A fune runes can be found in the scrolls laying around.
You will have to do this four times:
Screenshot
Screenshot
Screenshot
Screenshot
After the last rune is placed at the door you can leave the castle.
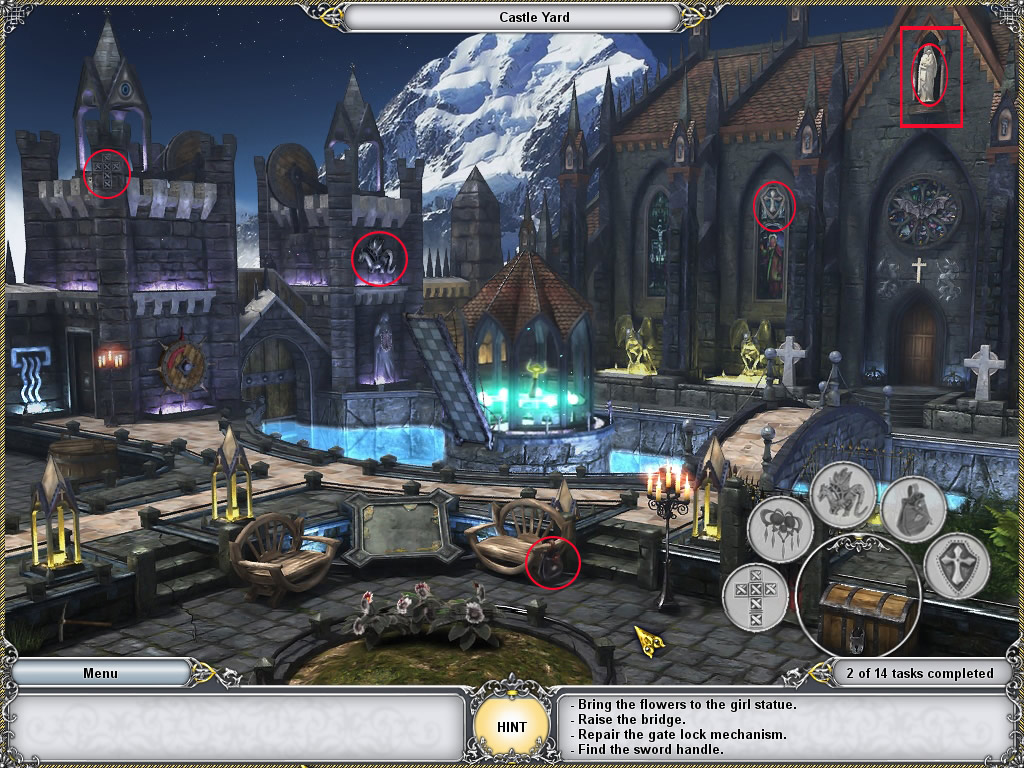
Castle Yard
Click the sword handle in the pavilion - no success.
Click the wooden wheel left middle at the wall - no success.
Now click the spider web with spider, low left and a container opens.
One object you will find by clicking the statue left from the castle door.
For another one, you will have to click the little triangle roofs you see in the lower part of the scene from left to the middle.
You will have to click them in the right order.
First click the one half hidden behind the left bench - wait a moment and a little tower will appear.
Do the same with the one, which is half hidden behind the right bench.
At last click the left triangle. When it comes up, you will an item inside it. Click it and place it in the container.
Screenshot
After finding all, you can enter the door, which was hidden behind the spider web.
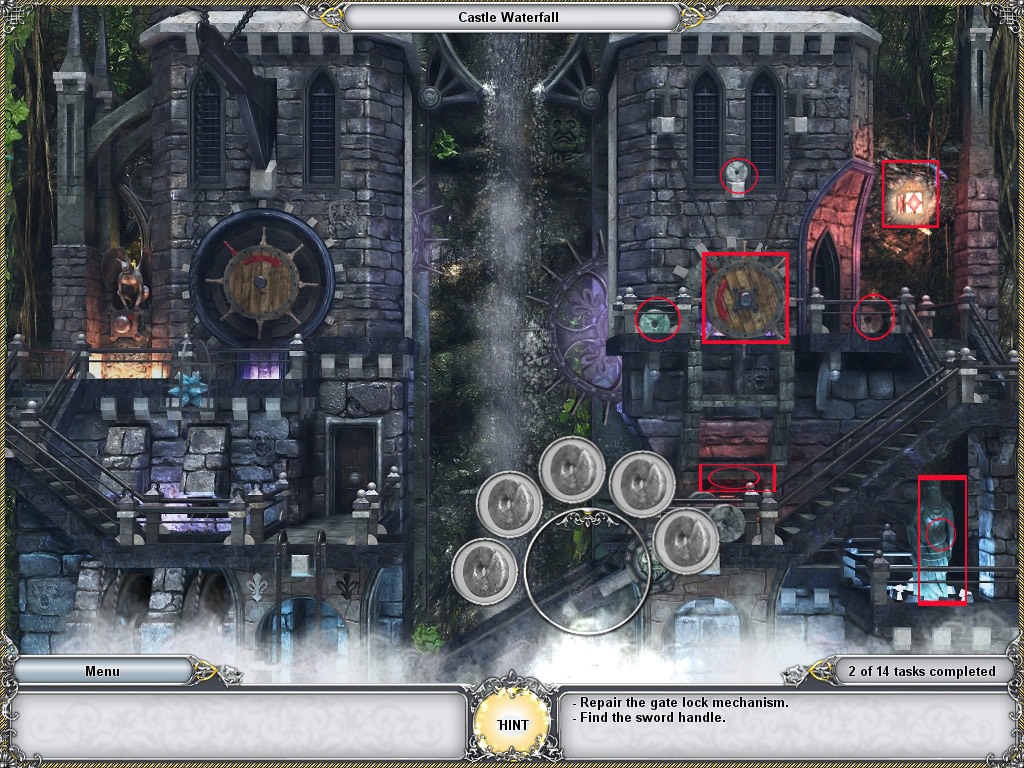
Castle Waterfall
Click the wooden on the right side - a metall disc is coming out of the wall.
Click the bridge underneath the wooden wheel and find the stone wheels to let the bridge move down.
For one of the wheels you need to click the lantern in the upper right to see it.
One wheel can't be found.
Click the statue in the low right. The girl wants to have flowers, so head back to the castle yard.
Screenshot
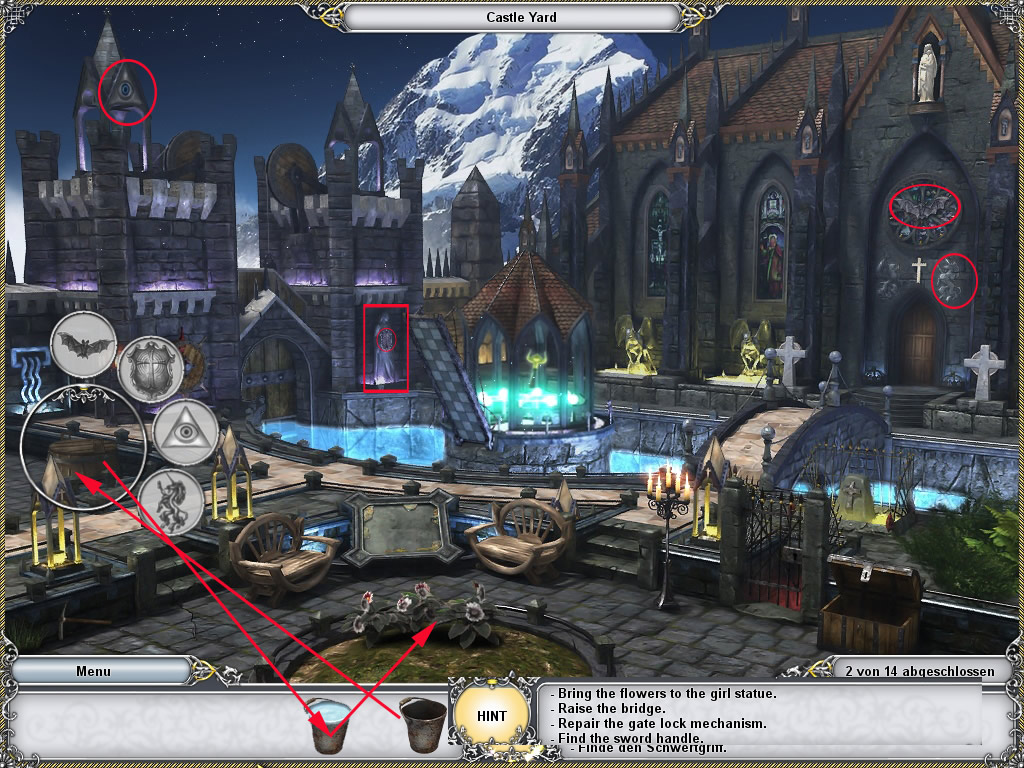
Castle Yard - Flowers
Click the chest in the low right corner and find the items.
One object you will find, when you click the white statue above the castle entrance.
Screenshot
After finding all, click the chest to have look inside and grab the bucket.
Click the water barrel in the lower left corner and find the items.
One you will find by clicking the statue at the left side, at the wall.
After finding all, the water barrel opens.
Use the bucket to fill it with water.
When you have it back in your inventory, use the filled bucket to water the flowers on the grass in the lower middle.
Click to gather some.
Go back to the waterfall.
Screenshot
Castle Waterfall - repairing the bridge
Give the flowers to the statue in the low right corner.
The statue turns around and you can grab the last wheel.
The bridge comes up, now click the left wooden wheel.
You will have to repair it, so click the wheel's mount, left next to the wooden wheel.
A container opens, find all masks.
After finding all, click the mount, get it out of your inventory again and click it in the middle of the wooden wheel.
The wooden wheel now has to be turned and the metal wheel will come out of its wall.
As soon as this has happened, a golden key appears above the door right underneath the wooden wheel.
Take it and go back to the castle's yard.
Screenshot
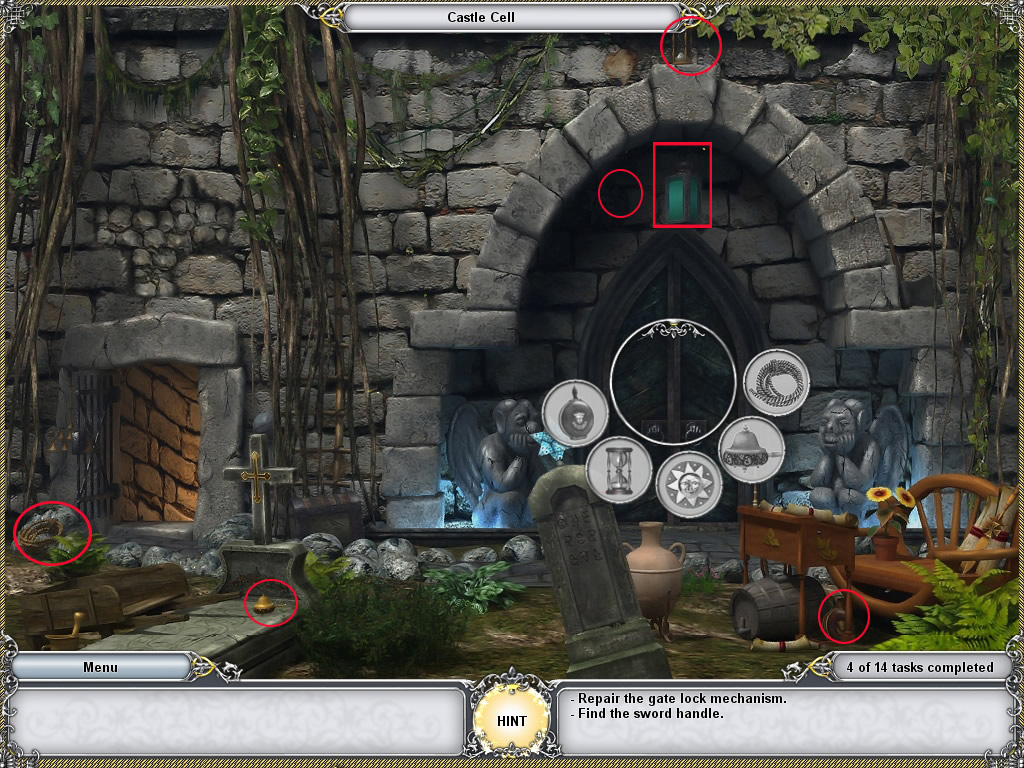
Castle Cell
Use the key to open the little gate at the right side, left to the chest and go down.
Talk to the monk till he leaves.
Click the gate and find all items.
One of the items you can only see, when you click the lantern above the gate.
Screenshot
After finding all the gate opens.
On the table you see an oil can.
Grab it and go back to the waterfall.
Castle Waterfall - repairing the mechanism
Use the oil at the door, where you found the golden key before, left side.
Click the open door again and a minigame opens.
Your goal is it, to connect the pipes, so that the water can run from the upper left to the lower right, when you open the valve.
The pipes turn by clicking. All pipes do have to be connected.
When all pipes are connected, turn the valve and let the water flow.
Go back to the castle yard.
Screenshot
Free the Knight
Click the wooden wheel at the left side and the little bridge for the pavilion is finally coming down.
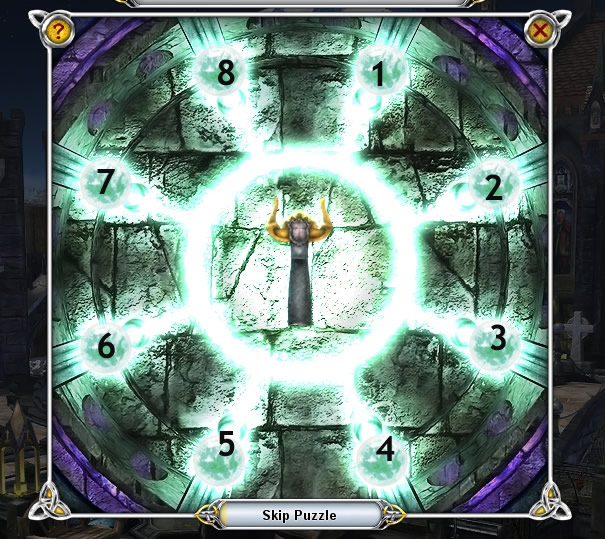
When you try to grab the sword handle, a minigame opens.
Your goal is it to deactivate all light barriers.
By clicking the points at the outside in the right order, the barriers its self and the ones right and left next to it will be deactivated or activated (depending on their state before).
I numbered the points from 1 (the one which stands at "one o'clock") to 1.
Please click in the following order:
1,3,5,7,2,4,6,8
Screenshot
Now you can take the sword handle and bring it to the knight.
You learn, that the kings spirit can only be freed with a monk's blessing.
Leave the castle hall and talk with the monk.
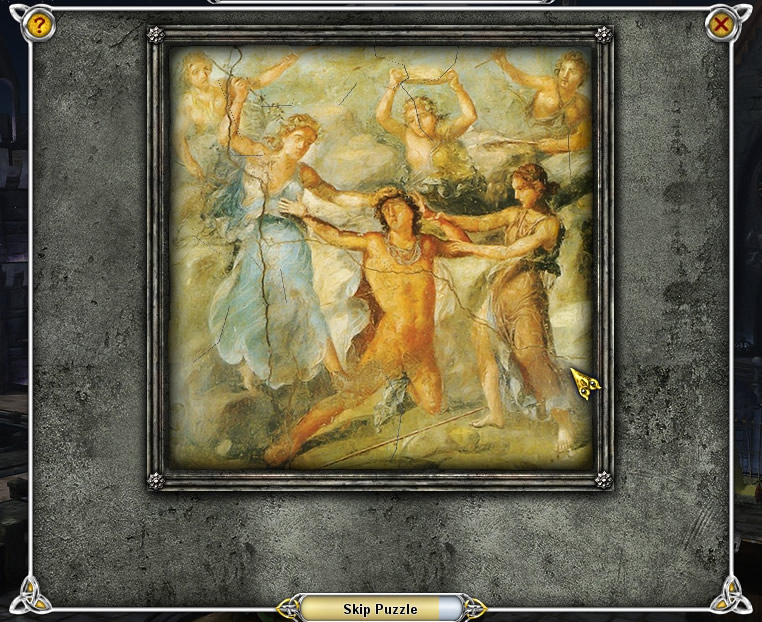
The monk needs help with the fresco left next to him on the ground.
Click it and a jigsaw puzzle will open.
Click the tiles at the place you think the belong to.
Tile will not be locked, when they are in the right place and you can't turn them.
Screenshot
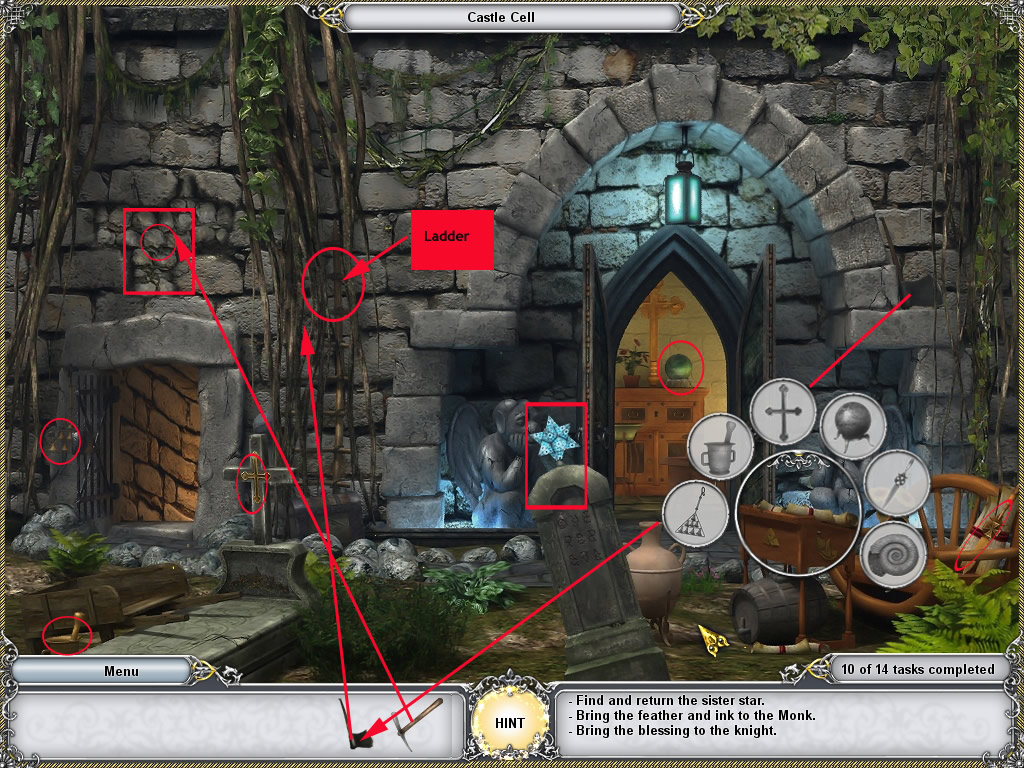
Now the monk needs ink pot and feather.
Before you go down to the cell grab the pick axe, that is laying in the lower left corner.
Now go down and click the lectern and find the items for the container.
One item you will find by using the pickaxe at the loose stones above the arch to the castle yard.
After finding all click the lectern again to get the ink pot out.
Now click the stone with the sinister star and learn, that you need a second one.
Go to the waterfall and find the star at the left side in a cage. You wont be able to reach it, without a ladder, so head back to the castle cell.
Get the axe at the wall right side of the cell entrance and use it at the branches between arch and cell entrance.
Get the ladder and go back to the waterfall.
Click the ladder at the star - now you can pick it up.
Go back to the cell and click the star at the one on the stone.
The stone will move and a chest appears.
Open it and get the feather out.
Screenshot
Feather and ink pot will be automatically combined inside your inventory.
Return to the monk and give him feather and ink pot.
Grab the scroll, that will appear on the left bench and bring it to the knight.
5. Canvas
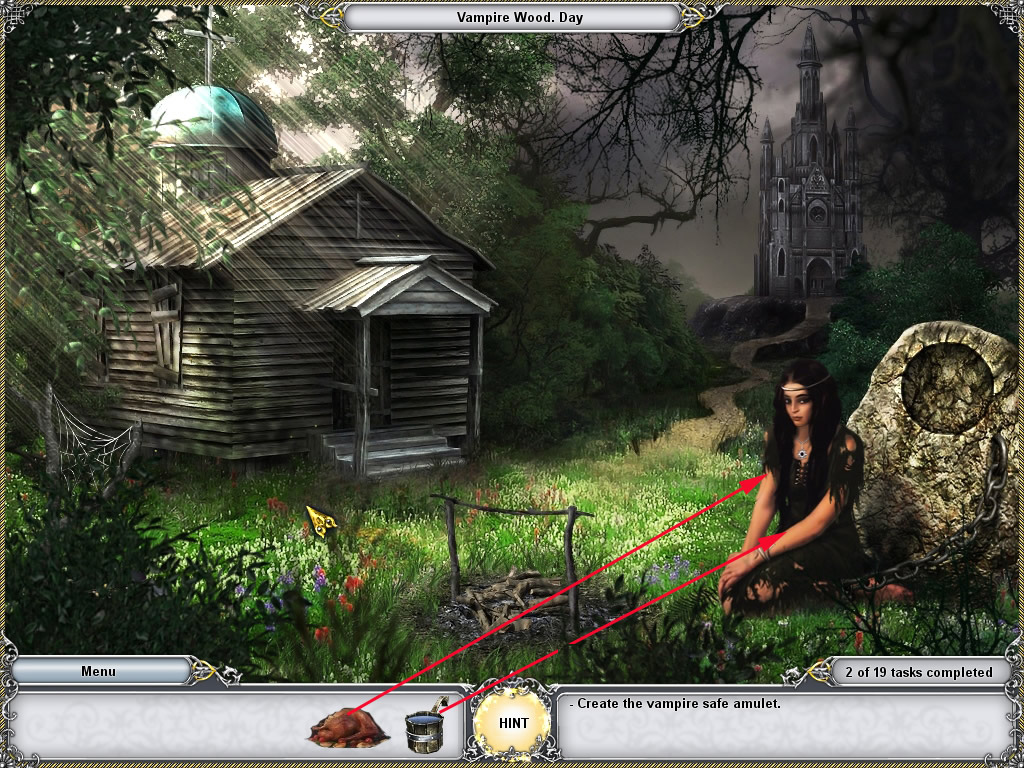
Vampire Wood. Day
Talk to the girl - she needs water.
Enter the church, grab the scoop on the top and click it at the water barrel, far left next to the altar.
Go outside, give the water to the girl and learn, that she also needs to eat.
Click the castle in the back, enter it and grab the turkey from the table and bring it to the girl.
Now you can talk to her.
To get the needed amulet you have to enter the church.
Screenshot
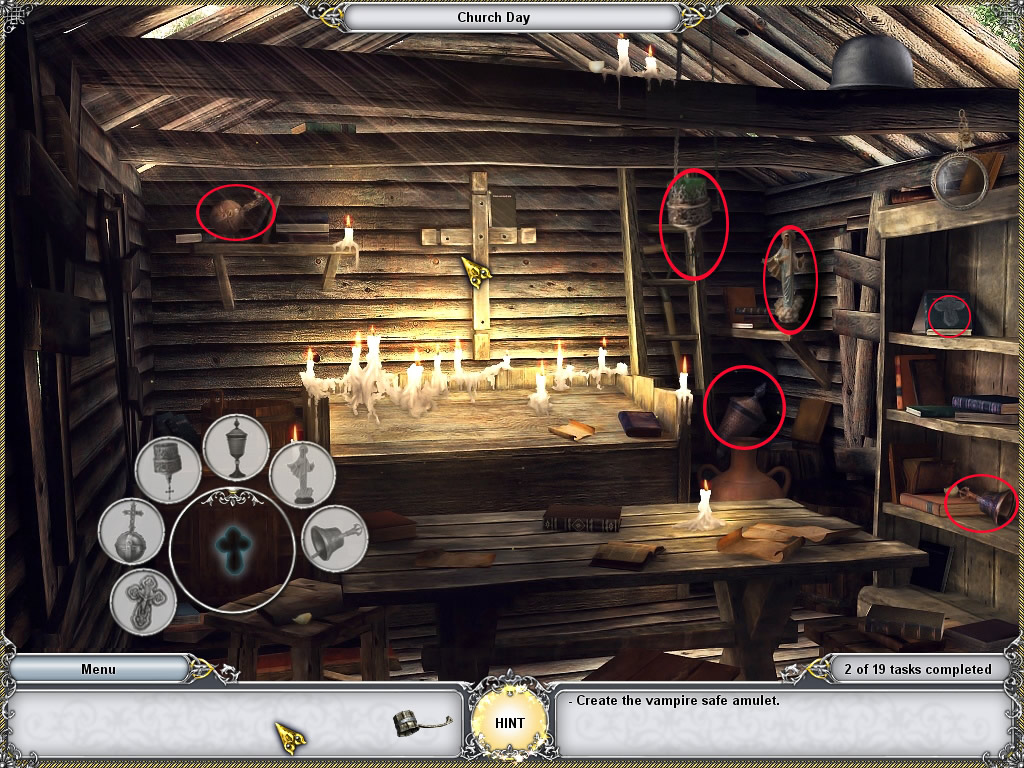
Church. Day - Amulet
First click the closet underneath the water barrel, far left.
Find all needed items
Screenshot
Now click the table and find the garlic.
One you will find, when you click the now open closet.
Another one will reveal, when you click the shelf far right.
Screenshot
The vampire safe amulet will lay on the table, when you found all.
Get the scoop out of your inventory and fill it again with water from the barrel.
Click the filled scoop at the cross in the middle of the wall.
Poor the now holy water over the amulet.
Screenshot
Leave the church
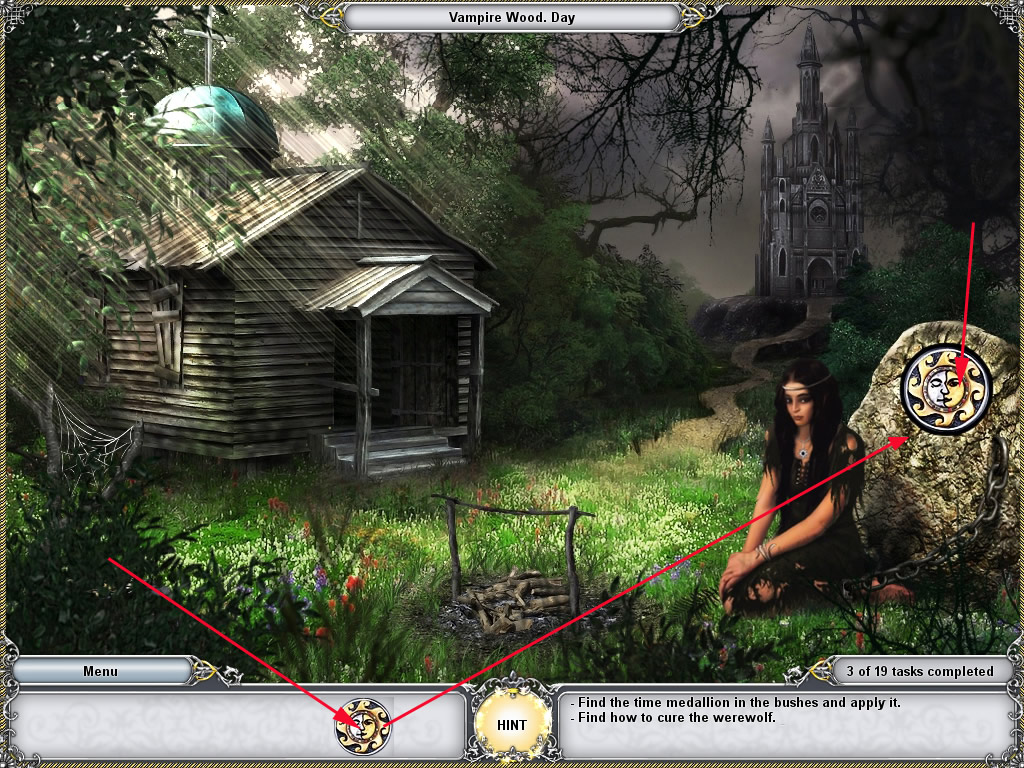
Vampire Woods. Day
Click the bush low left corner and it will move.
Pick up the medallion and place it at the empty spot on the rock right side.
Click the moon to change day to night.
Head over to the castle.
Screenshot
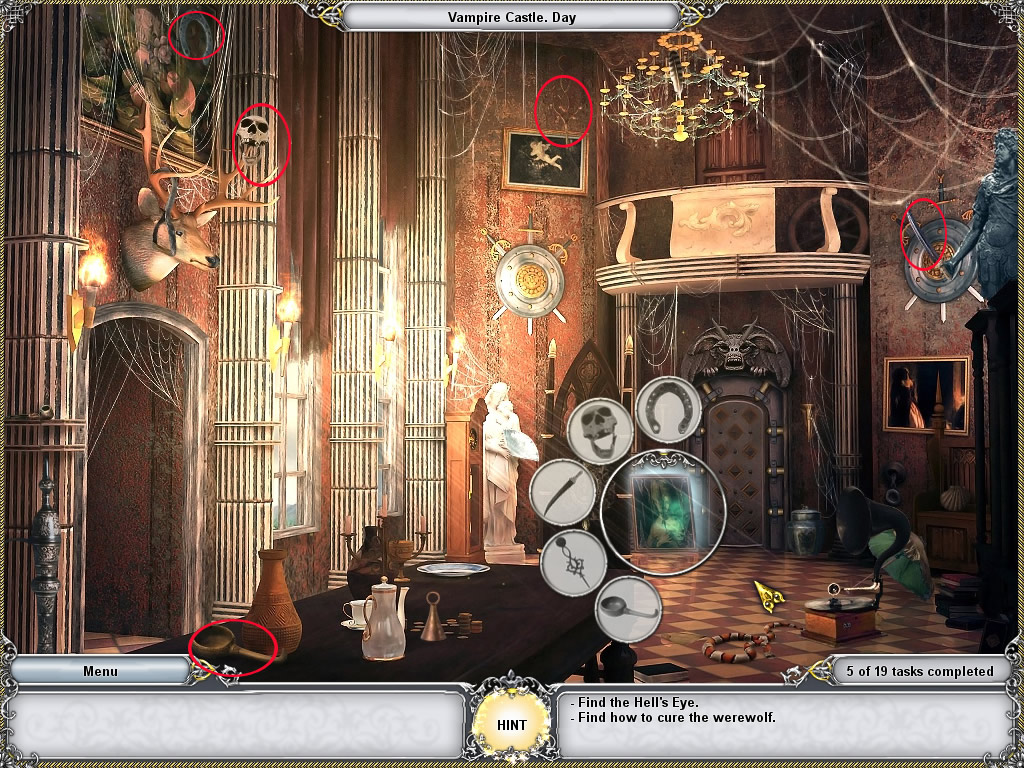
Vampire Castle. Night and Day
Talk with the vampire.
He wants to hear music, so click the gramophone on the floor right side.
Talk with the vampire again. He needs your help with a spirit that only appears by daylight.
Return to the Vampire Woods and click the medallion to raise the sun.
Go back to the Vampire Castle.
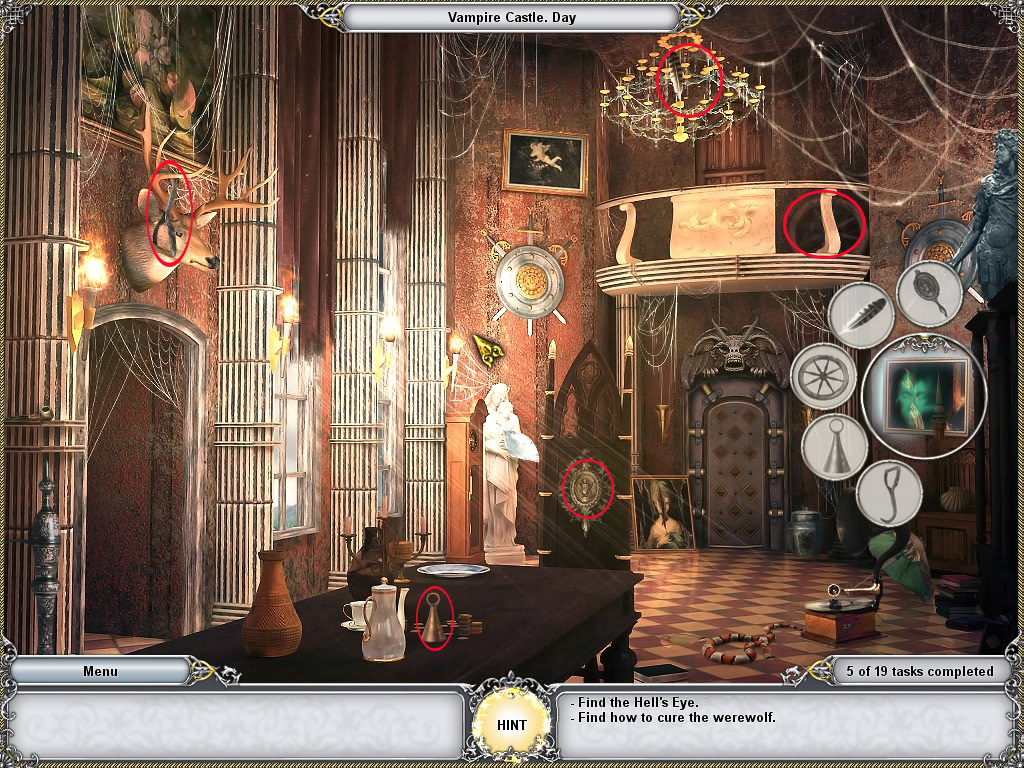
Click the mirror with face, far left and find all items.
Screenshot
After finding all items the spirit leaves the mirror and appears right side on the floor in the painting.
Click it, find the items and follow the spirit to the picture on the ground, left, next to the door.
Screenshot
Find again all items.
Screenshot
The spirit leaves.
Go, raise the sun and return to the castle.
Talk to the vampire.
You need to go back to the church, but before you enter, raise the sun.
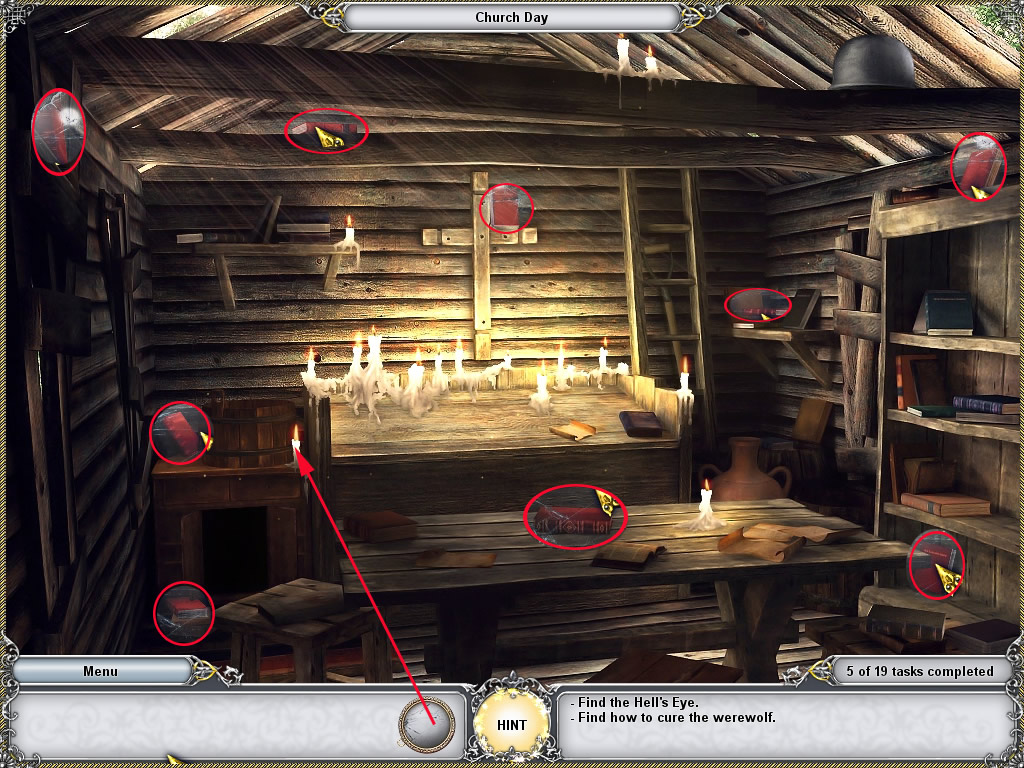
Church. Day
Click the magnifier you see top right.
Click the magnifier at the left candle.
Now move slowly over the scene.
Some of the books now appear in red.
You will have to find nine of them.
Screenshot
Leave the church, raise the moon and enter the castle again.
Vampire Castle. Night
Hand over the books to the vampire.
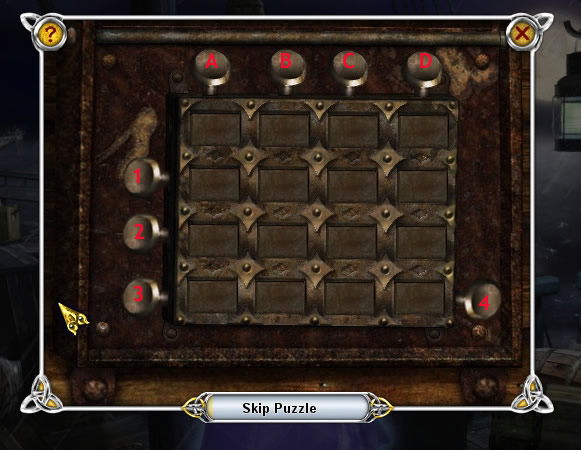
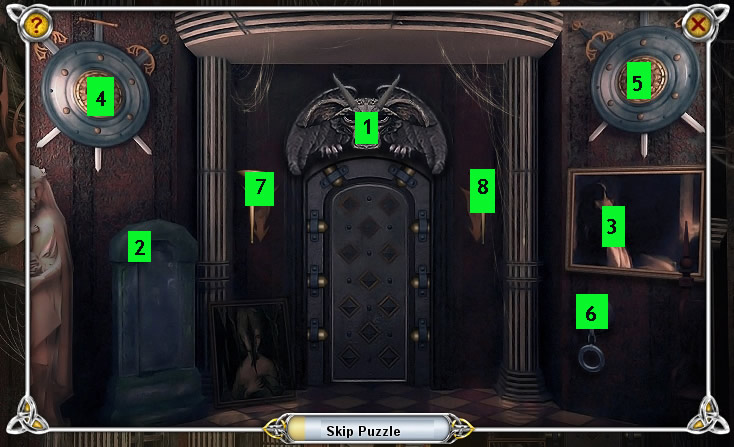
Click the door in the back - a pop up window opens.
Your goal is it to find the right sequence to open the door.
You will have to click some of the items around the door.
If you click one and it is the right one, one of the bars of the door will move back.
Click the next one. Is it wrong, the bar will lock again and you will have to click the object which opened the first bar again, before you can go on looking for next correct object.
For the right sequence and objects please have a look at the screenshot
Screenshot
Enter the door.
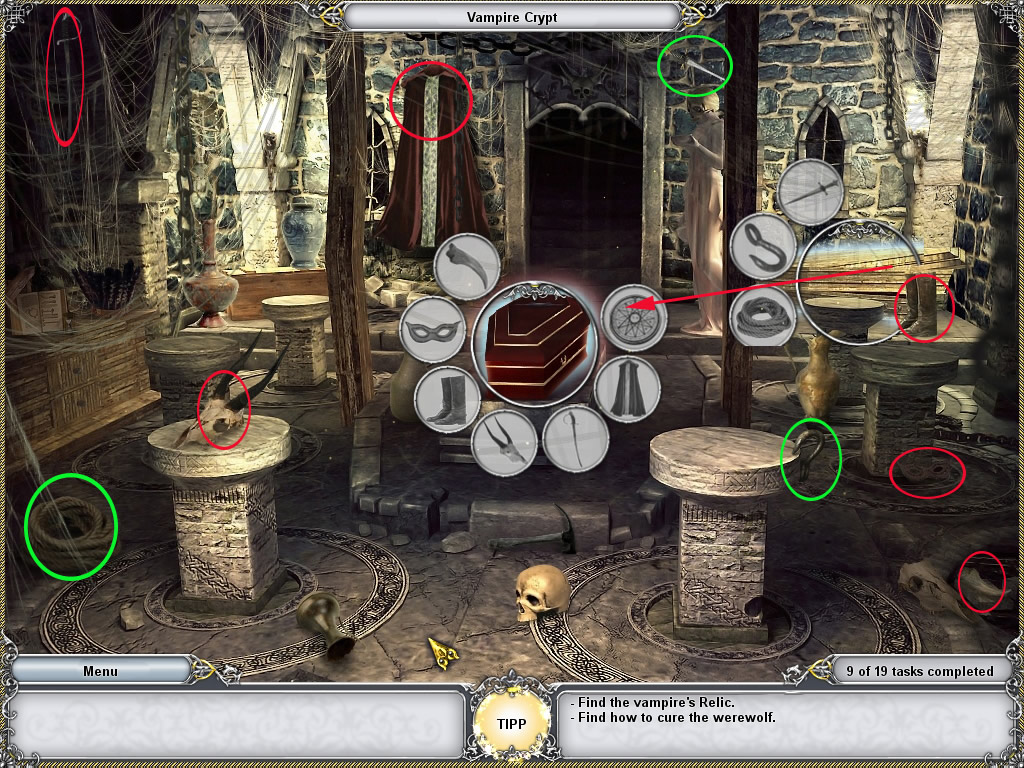
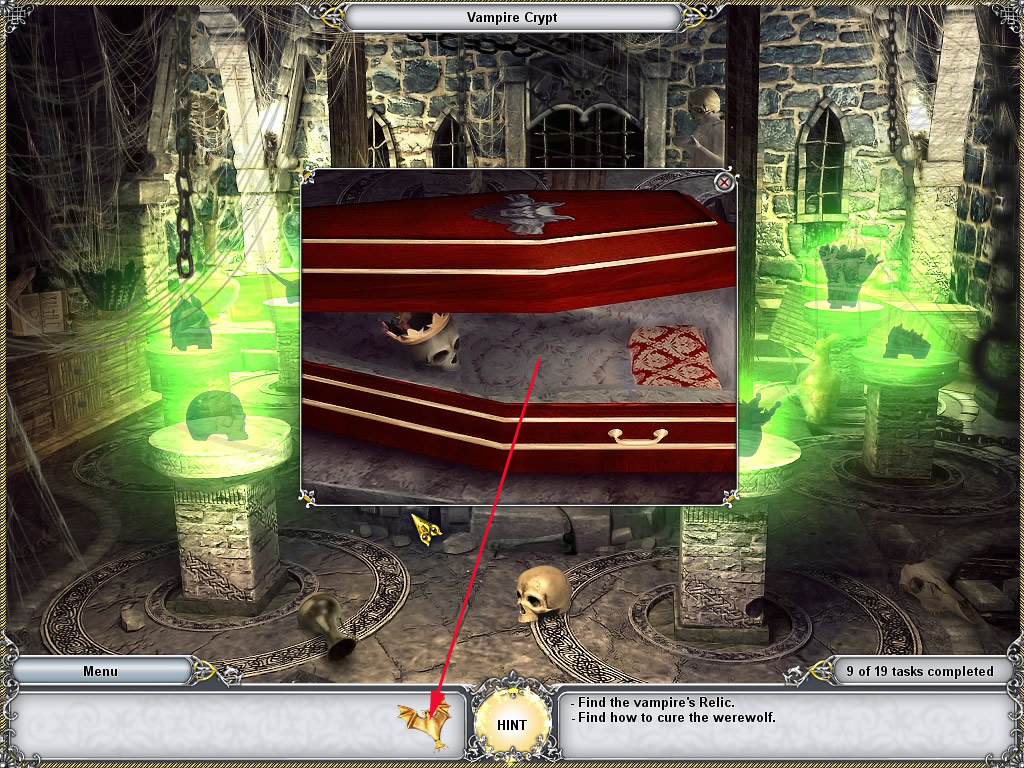
Vampire Crypt
Click the coffin in the middle and find all items for the container.
To find all items you first need to pick up the boots far right in front of the old coffin.
Now you can click the old coffin and find the three objects for the container.
After finding them, the coffin will fall apart and you can pick up one of the objects.
Screenshot
After finding all click the coffin in the middle and grab the relic.
Screenshot
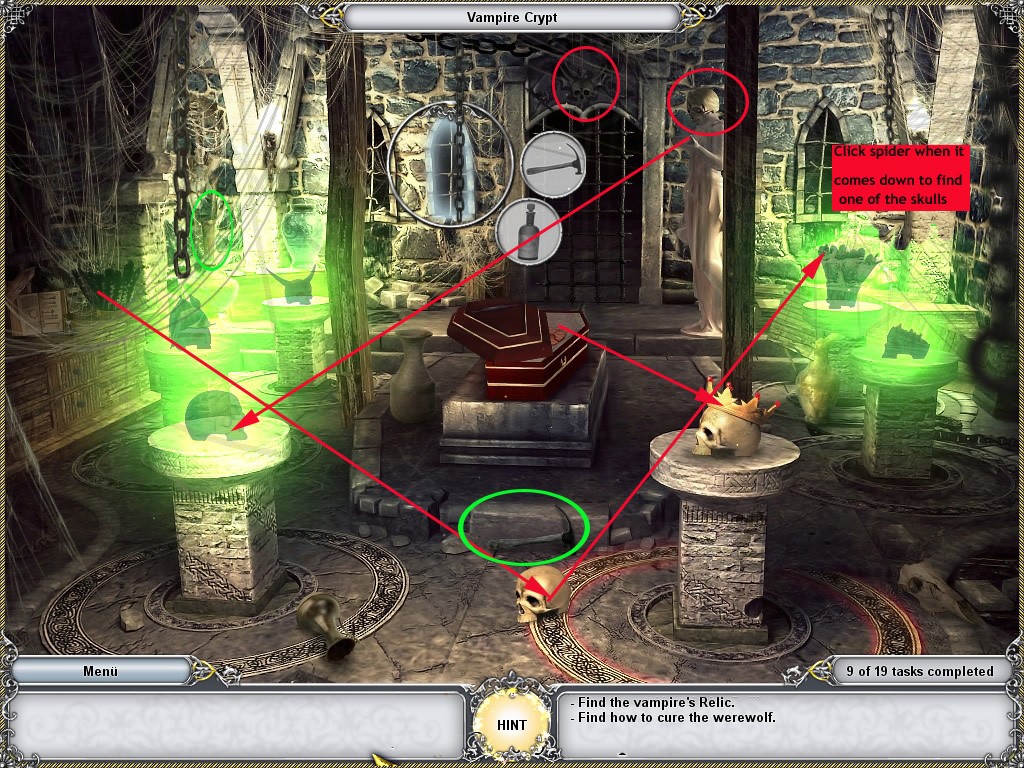
The door closes - you will first have to place all skulls onto the pillars.
The window left in he back will reveal a skull, after you found the items for the container. One of this items you will only find after placing the skull in the far left.
Clicking the spider, when it comes down will also give you a skull.
The feather at the left have to be placed on the skull in the middle on the ground. After this you can place it on the pilar.
The big coffin contains also a skull.
Screenshot
After completing this task you can go upstairs.
The vampire tells you, that the relict is not complete.
Click the paper scraps on the table.
It's a jigsaw - tiles can't be turned around and will not lock, when they are in the right place.
Screenshot
Leave the castle and go to the church.
Get the shovel from the right side, behind the ladder.
Go outside.
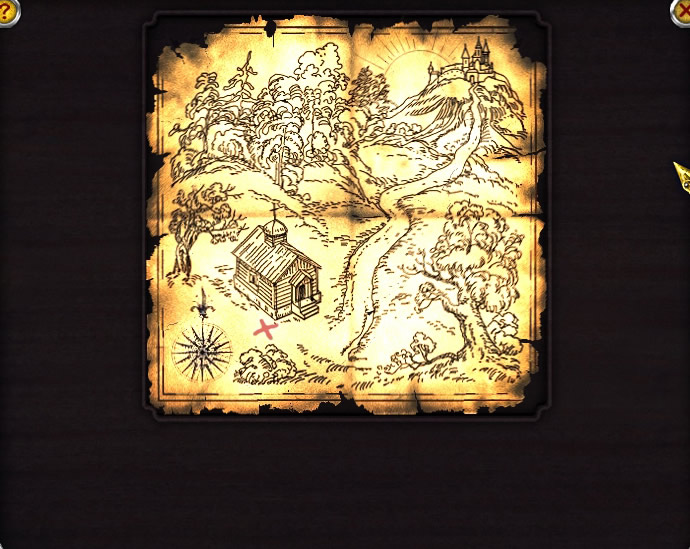
Vampire Woods. Day
According to the map, you will have to dig at the right left side of the church.
First raise the sun.
Now dig at the marked place and a chest will come up.
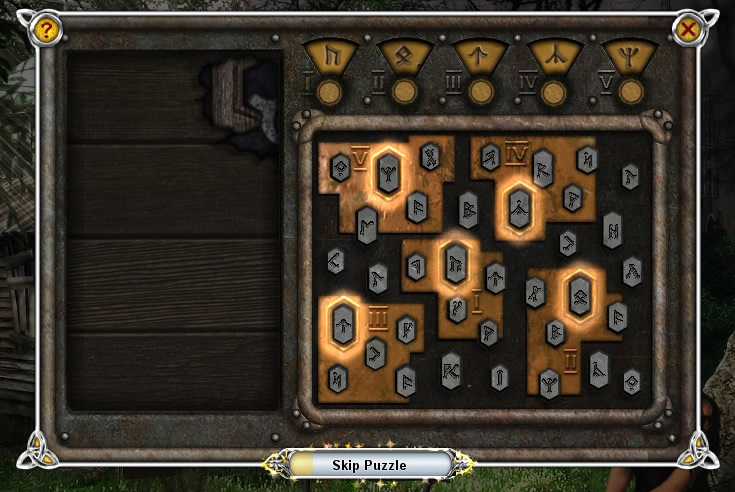
Click it and a minigame will open.
Your goal is it, to find the right code for the top.
You will have to place the metal pieces from the left onto the symbols on the right, so that the holes do exactly go over the symbols.
You will only be able to place the metal pieces at the right place.
After all pieces are placed correct, you can see, that there is one symbol highlighted for each metal piece.
You also see, that there is a roman number on each peace.
On the top the dials are numbered as this also.
By clicking the buttons underneath the dials you can change the shown symbols.
Change each symbol according to the highlighted symbol on the metal piece with the same roman number.
Screenshot
The chest opens. Click it to have a look inside and grab the second part of the relict.
Raise the moon and bring the relict to the vampire.
Cure the werewolf
Give the complete relict to the vampire.
As a reward, he will give you the recipe for the potion to cure the werewolf.
You will have to find:
The essence of ten fireflies.
Snake poison
Spider poison
Scorpion poison
Go down into the crypt and wait till the spider is coming down.
Click it and a bottle with spider poison will go into your inventory.
Leave the castle and enter the church.
Grab the cauldron on the top right.
Get the scorpion on the table.
A bottle with scorpion poison will go into your inventory.
Leave the church and get the net on the left.
Catch the ten fireflies by clicking them with the net in the right moment.
The essence will go into your inventory.
Raise the sun and head over to the castle.
Get the snake from the floor.
The bottle with the poison will go into your inventory and all bottles will combine to one.
Go back and raise the moon.
Place the cauldron onto the fireplace.
Go into the church and get a candle.
Pour the essence from the bottle into the cauldron and light the wood with the candle.
Raise the sun and get the cauldron.
Give the potion to the girl.
6. Canvas
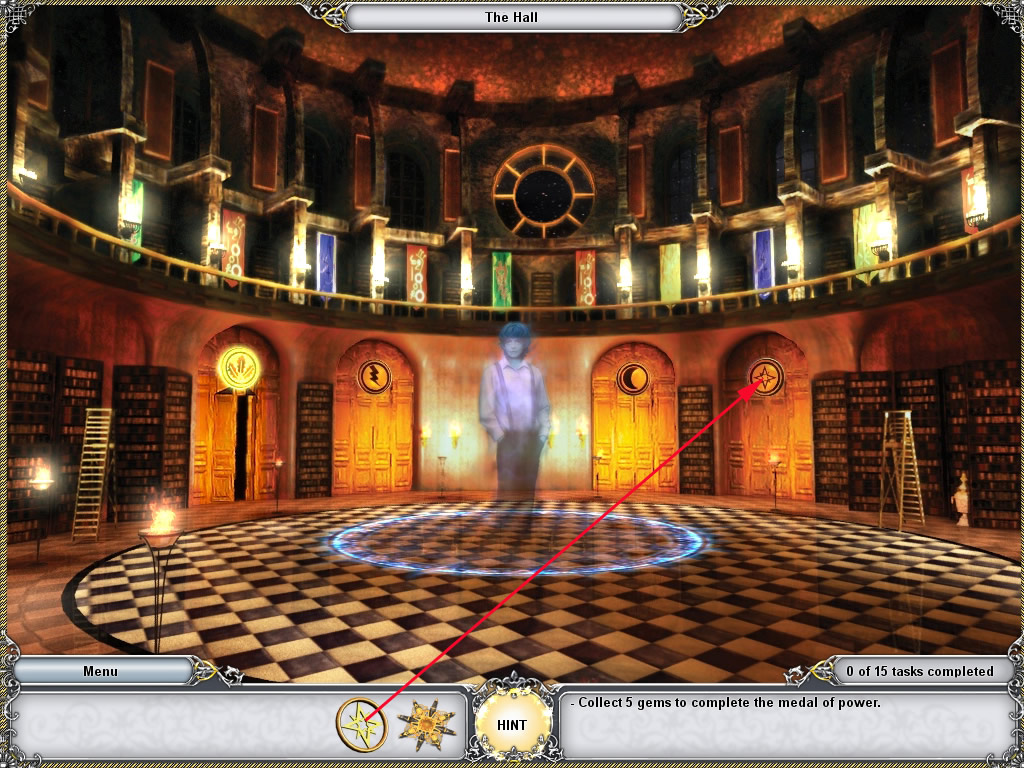
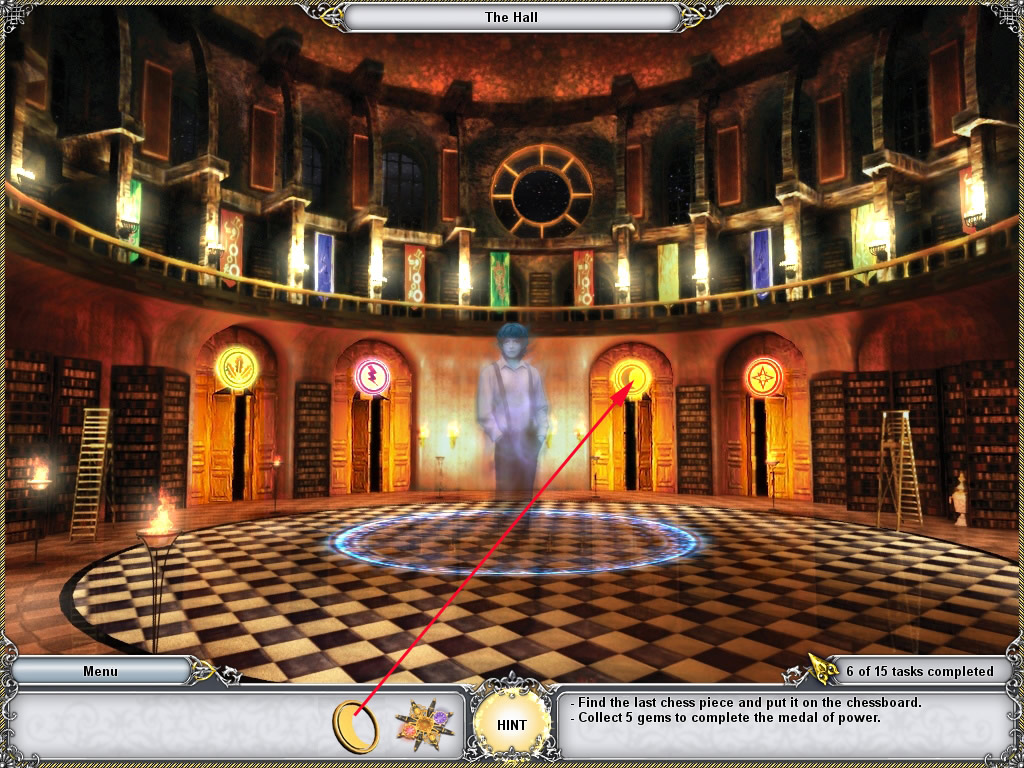
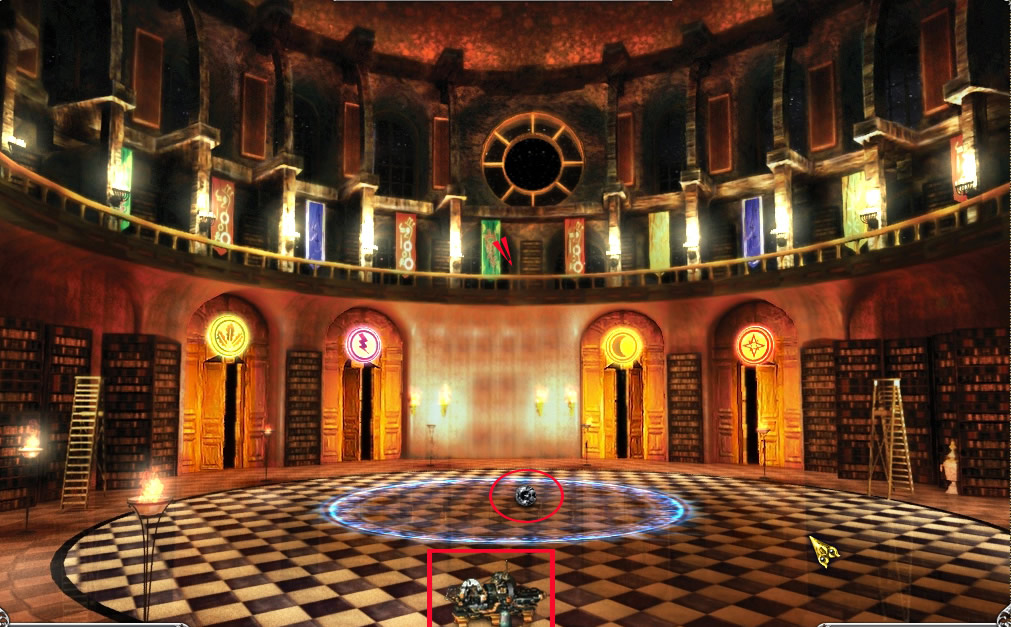
The hall
Talk to the spirit, that looks like Tom.
Click it again and you will receive a medal.
As there is only one door open, enter the green room, the first room seen from the left.
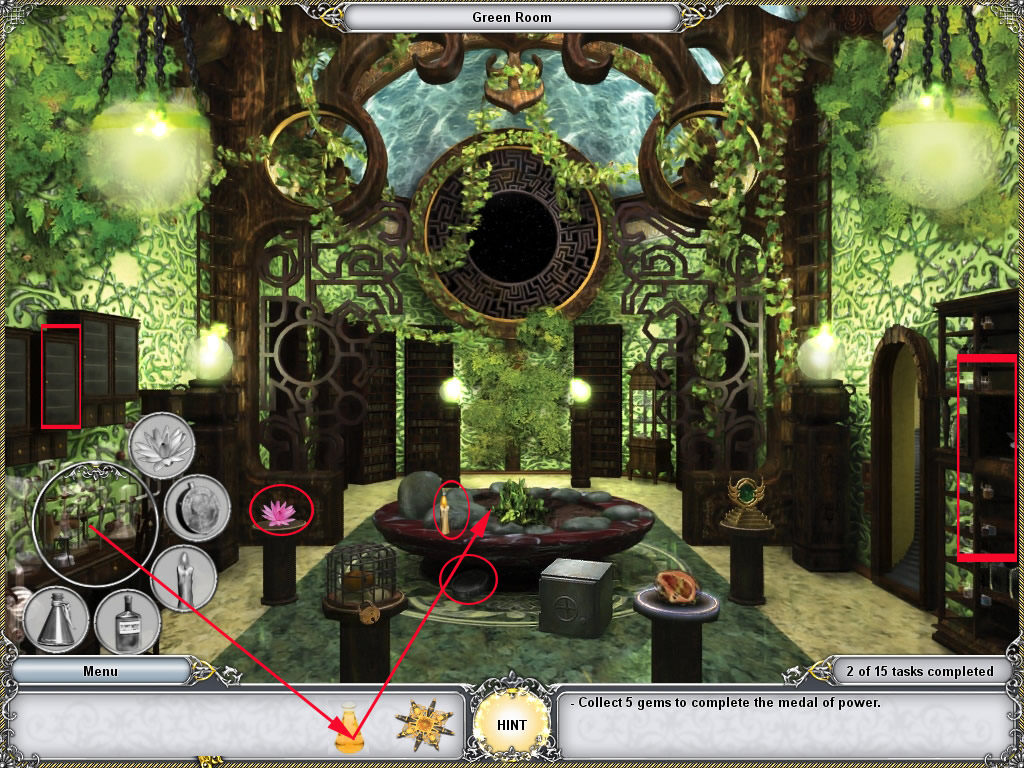
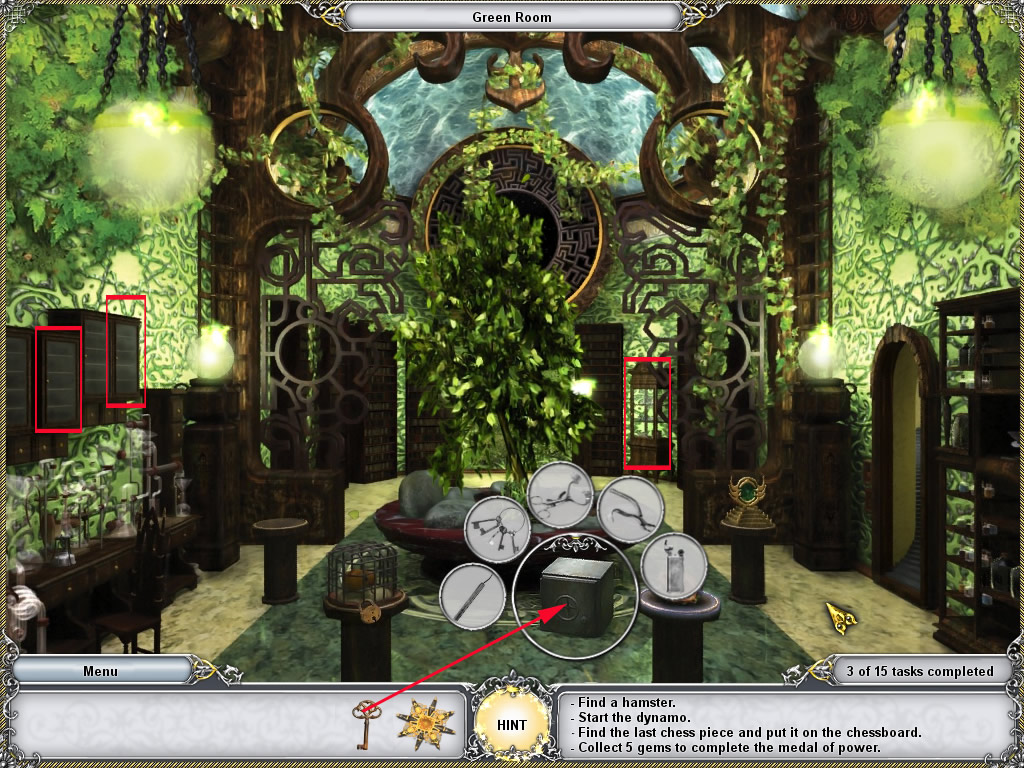
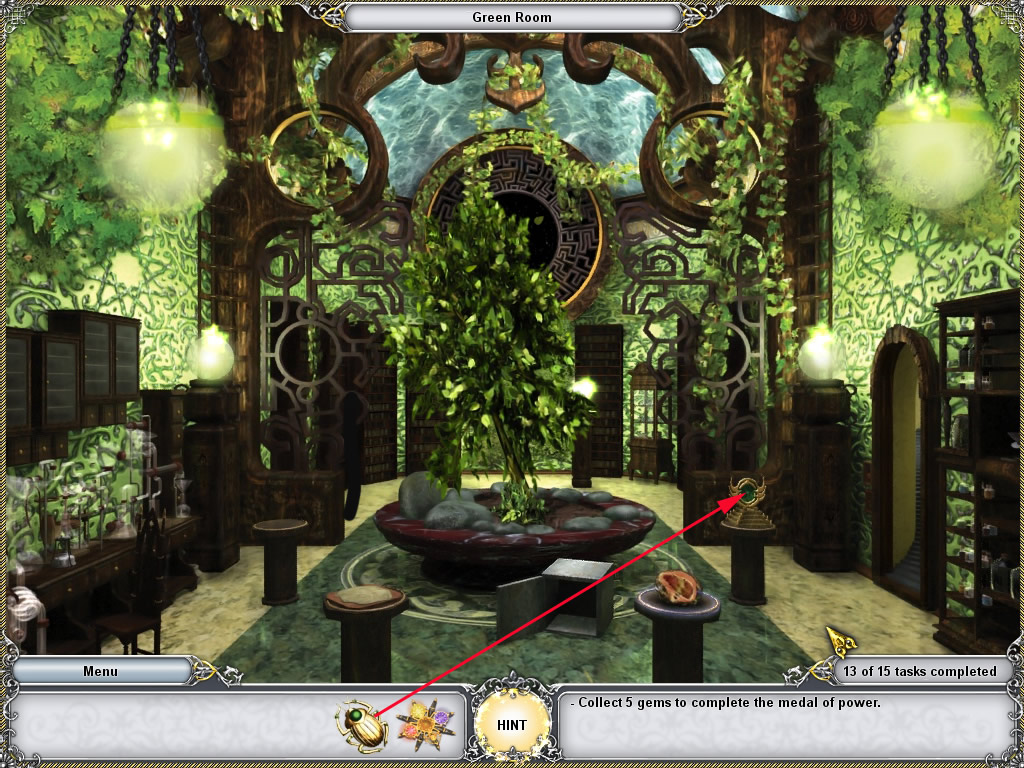
Green Room
Click the golden nut, on the pedestal low right.
Two objects for the container you will find left side in the second and fourth cupboard seen from left.
The third object you will find in the glass vitrine far right.
Screenshot
After finding all pick up the seeds from the pedestal and plant it in the soil in the middle.
Screenshotk
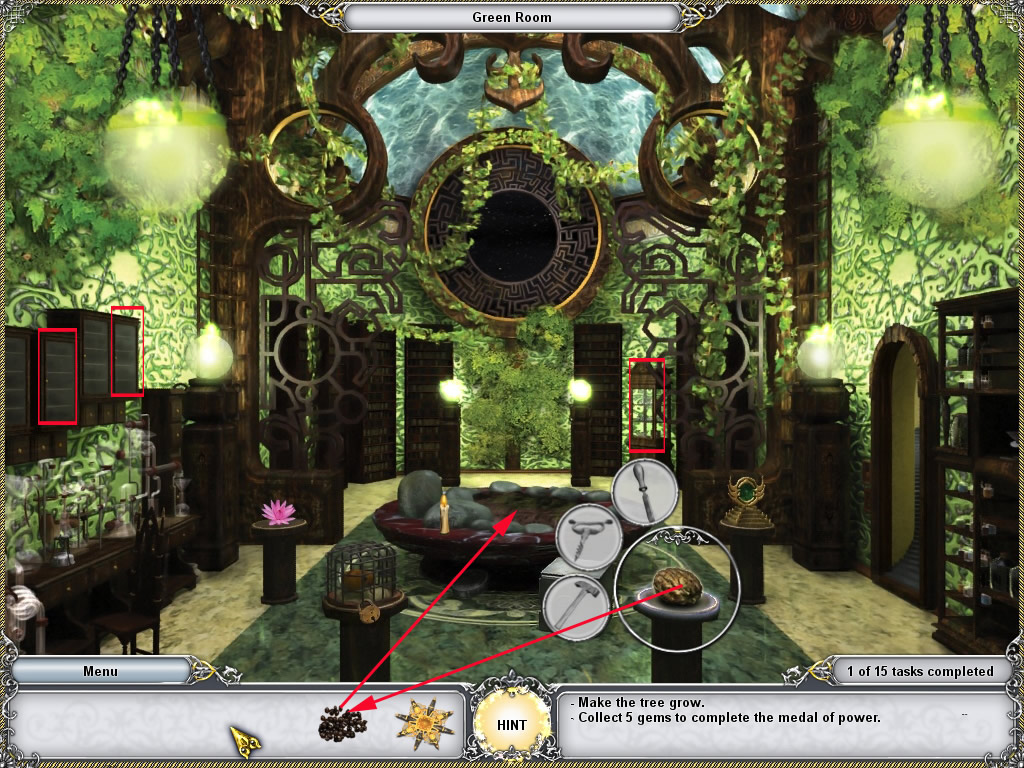
Now click the laboratory corner left and find the objects.
Behind two of the cupboard doors left you will find an object.
The shelf at the right also contains an object.
You will receive a growth potion - place on the little green in the soil.
A tree will grow, at its top, you will find a symbol.
Screenshot
Pick it up and go into the hall.
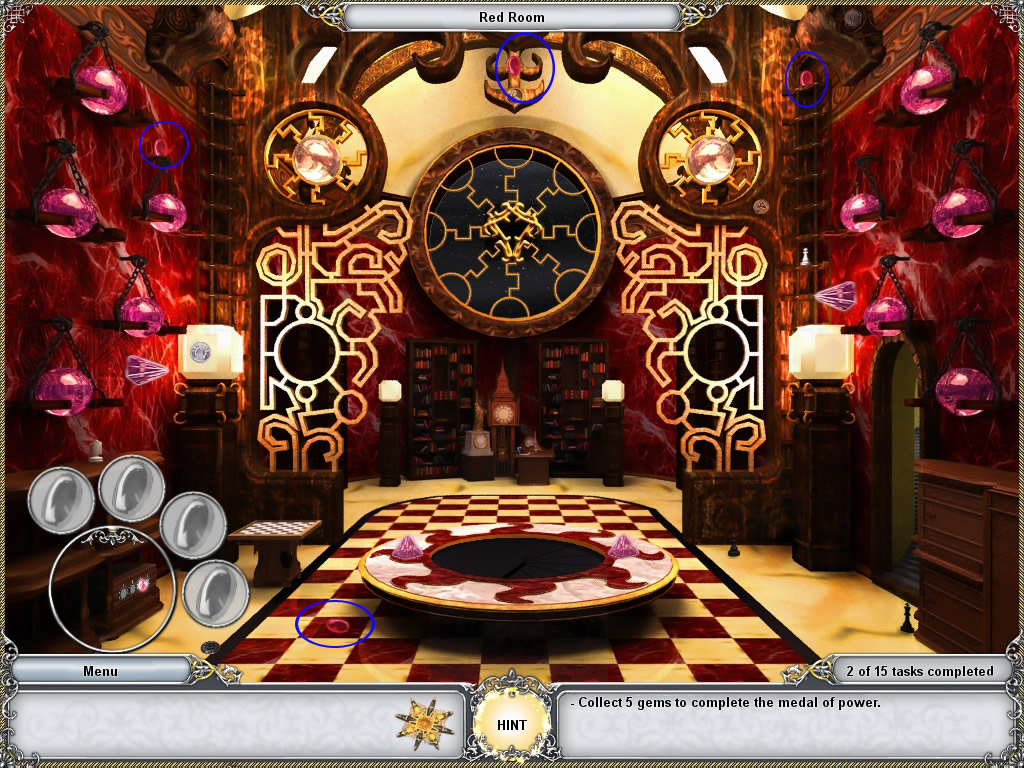
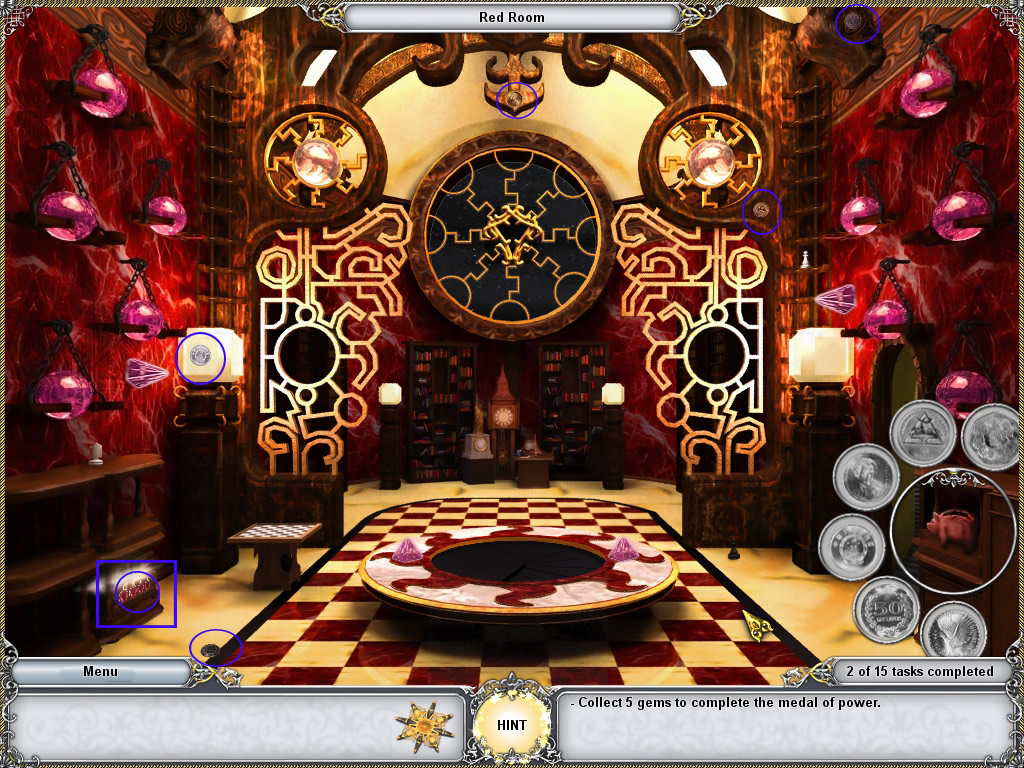
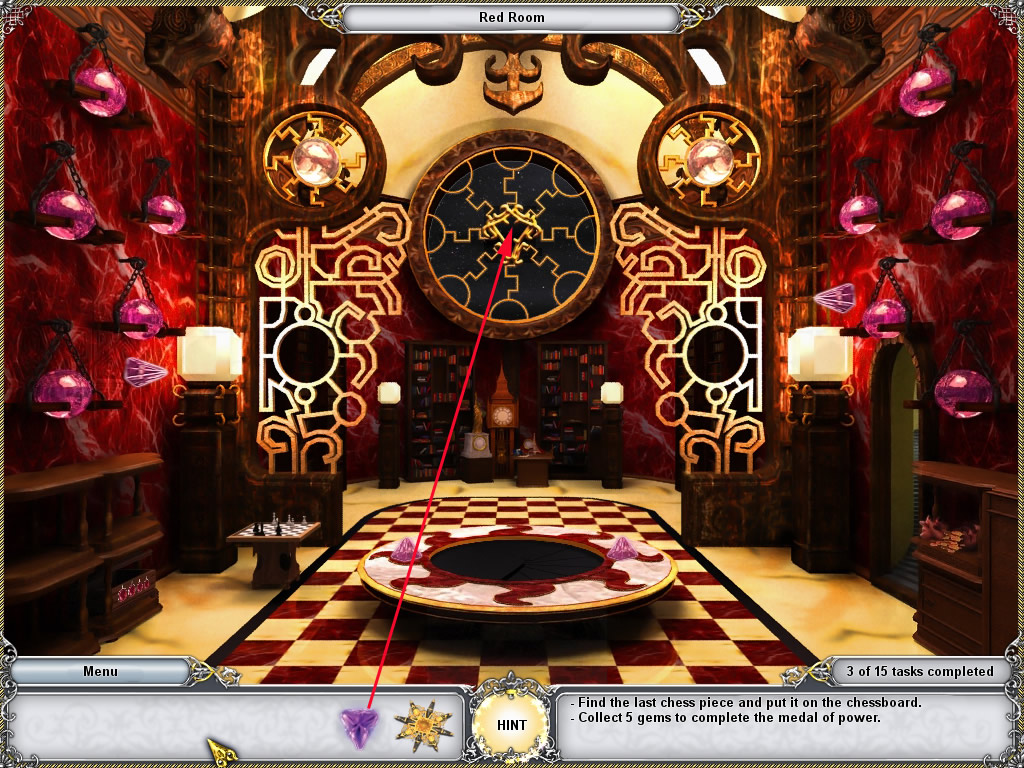
Red Room
Click the symbol you just found at the door, which shows the same symbol.
Enter the red room and click the blinking casket in the low left corner.
Find the four rubins.
Screenshot
Right side a door of the cupboard opens.
Click the piggy bank and find all coins.
One coin you will find in the casket, you solved before.
Screenshotk
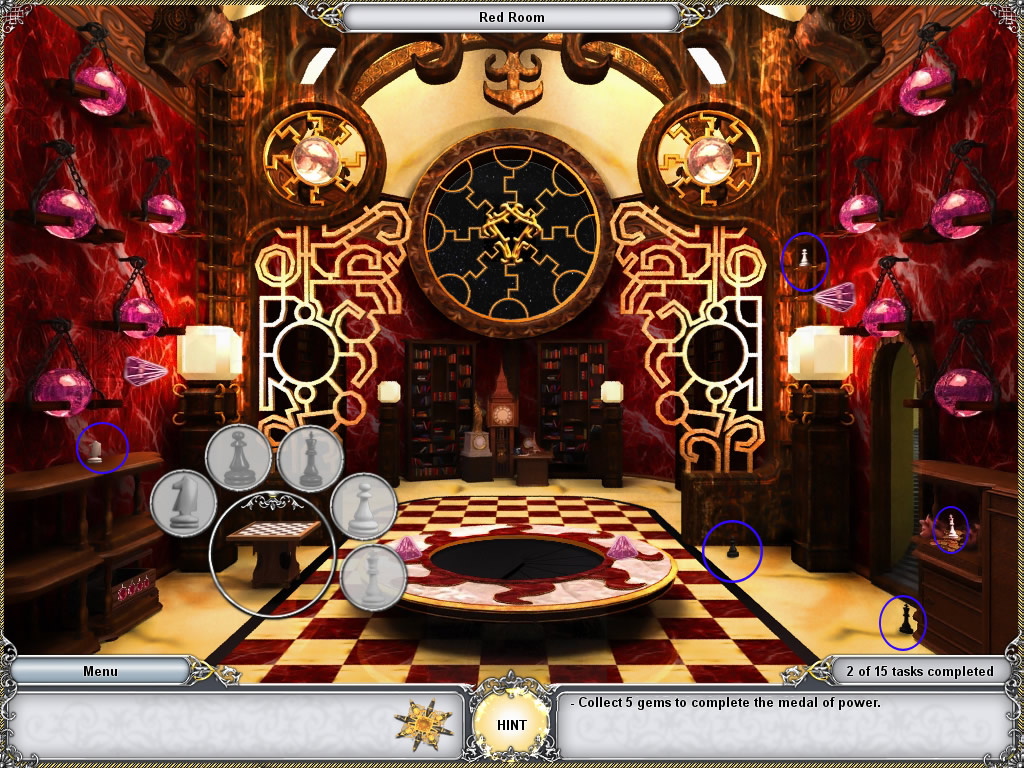
Now click the chessboard middle left side and find the needed chess pieces.
Screenshot
One chess piece is missing. You will have to come here later again, it seems.
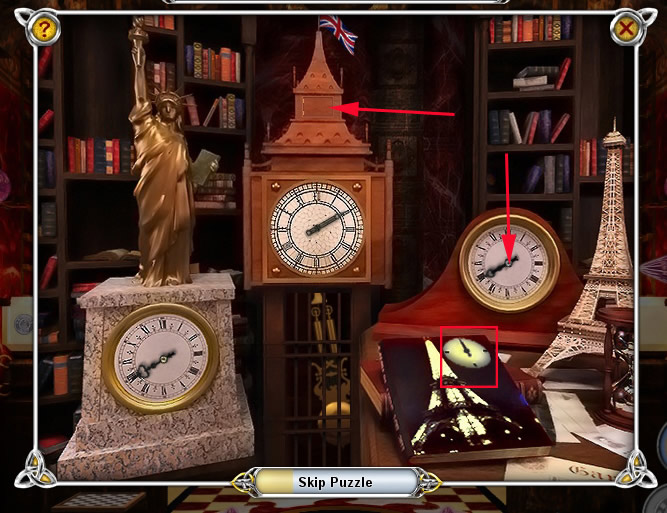
Click the clocks in the back.
Your goal is it to set each clock onto the right time.
The only clue you have it the book, showing the Eiffel Tower and 12 o'clock.
Set the clock hand of the clock right next to the Eiffel Tower to 12 by clicking it.
Screenshotk
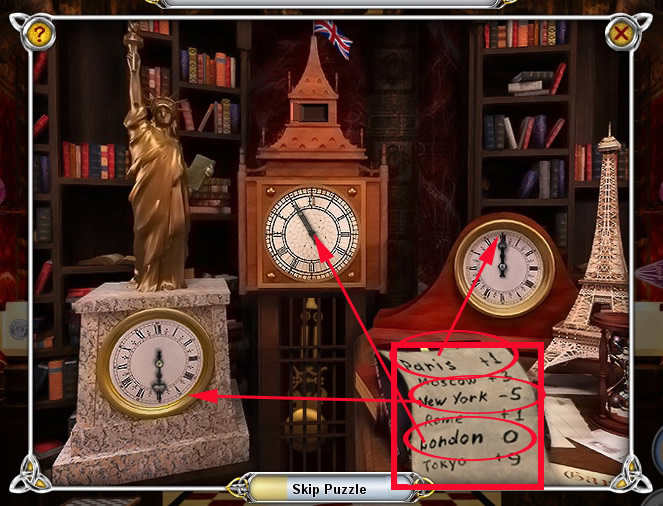
On top of the London clock in the middle a little compartment opens and reveals a note.
Click it.
It shows a few towns and behind numbers with plus or minus.
Next to London you see a 0 so this is the reference time.
When Paris is 12 with +1, then London has to be 11
Set the clock hand of the London clock to eleven.
For New York the note says - 5.
According to London time New York has to be set to 6 (11-5)
The London clock opens - get the diamond out of it.
Screenshot
The pop up window closes.
Place the diamond on at the top in the middle of the golden pattern.
Screenshot
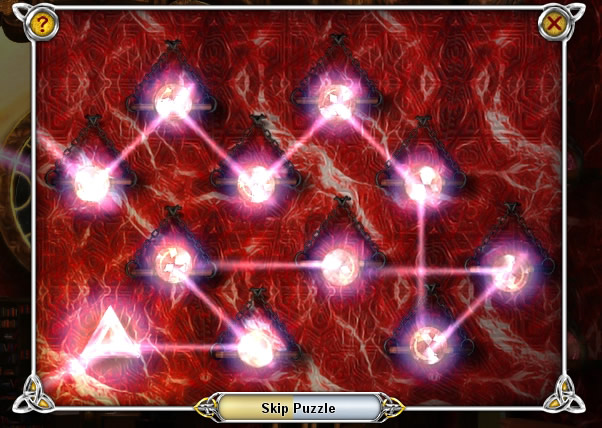
Click the shiny red balls at the right side.
A mini game opens.
You have to turn the beams, so that the beam will be guided by every ball till it meets the mirror in the low left corner.
The beam turns by clicking.
Screenshot
Do the same on the left side.
Screenshot
The beams open the middle and a symbol comes up.
Take it and a projector appears, but you need a film for it.
Leave the room.
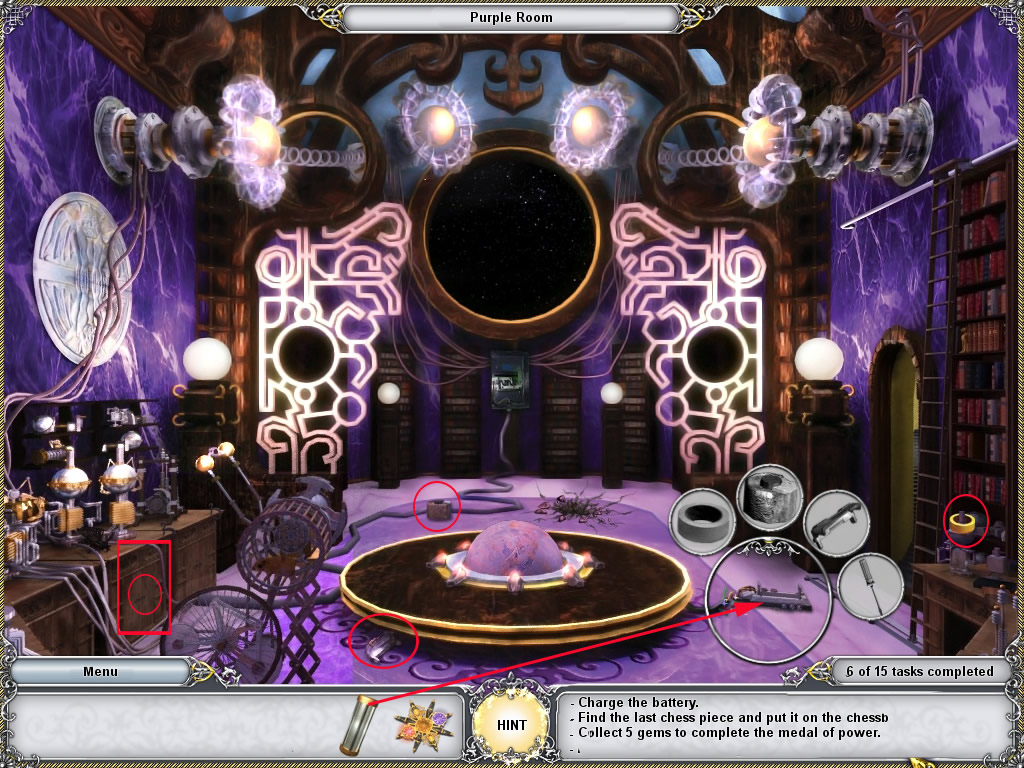
Purple Room
Place the symbol on the door with the according symbol and enter the purple room.
Screenshot
Click the broken dynamo in the low left and find the objects for the container.
One of the objects you will find behind the middle door of the drawer
Screenshot
Click the dynamo once. It looks like you need a hamster.
Back in the middle on the floor you see a crack.
Click it and find the container objects.
One you will find behind the middle door of the drawer.
Screenshot
After finding all objects, the crack is a hole, click it to have a look inside.
Right top you will find a key.
Head over to the green room
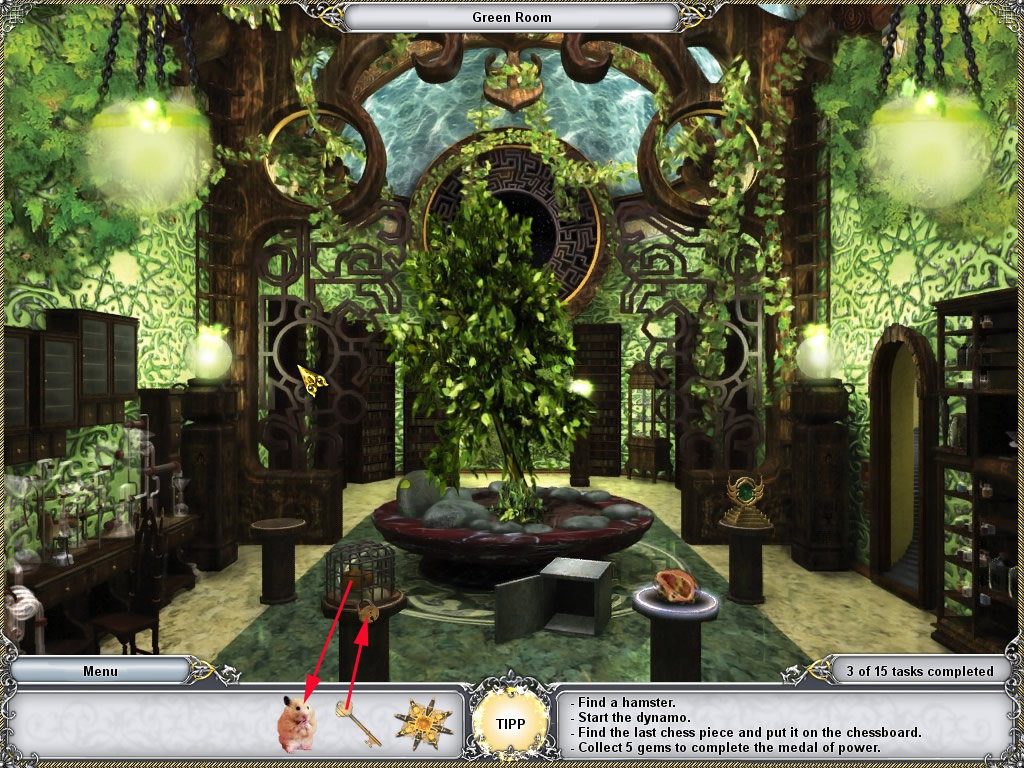
Green Room - The hamster
Use the key from your inventory to open the safe on the floor.
The key breaks - click the safe again and find the container objects.
You will find them all behind the second and fourth door of the glass cupboard left.
After finding all, the explosion will open the safe door.
Screenshot
Get the key out of the safe and open the hamster's cage with it.
Grab the hamster and head over to the purple room.
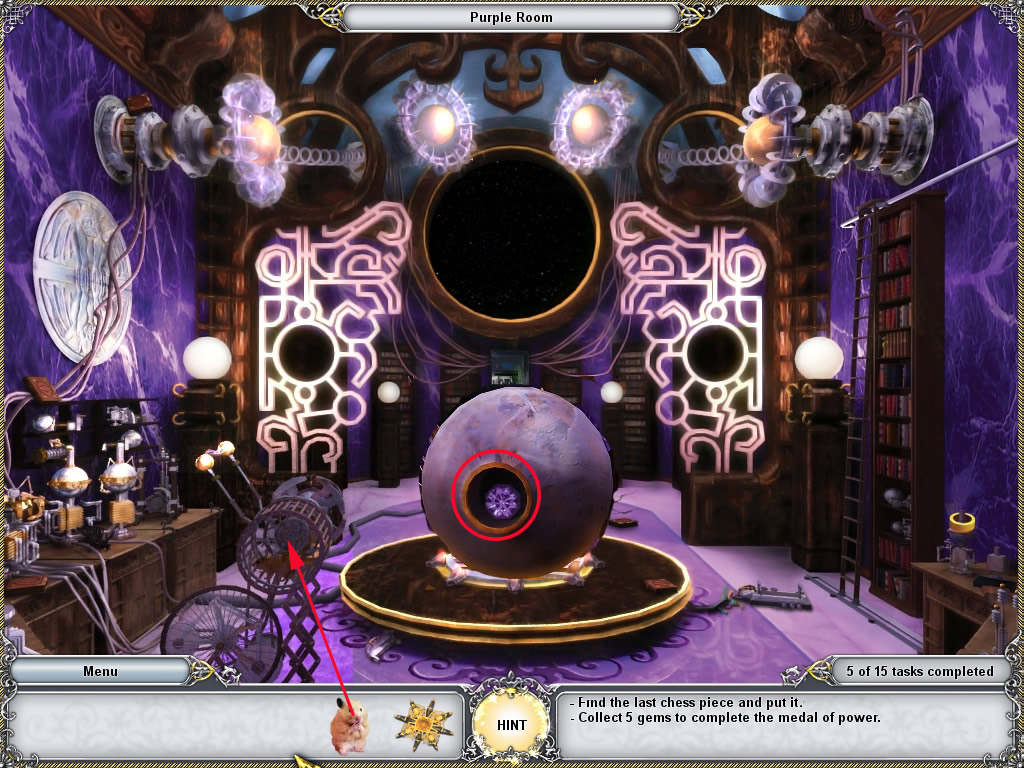
Purple Room
Put the hamster onto the dynamo.
Screenshot
The machine starts to work and in the middle a sphere is coming up.
Click it and a pop up window will open.
Click the gem in the middle and it will be brought to your inventory automatically.
Screenshot
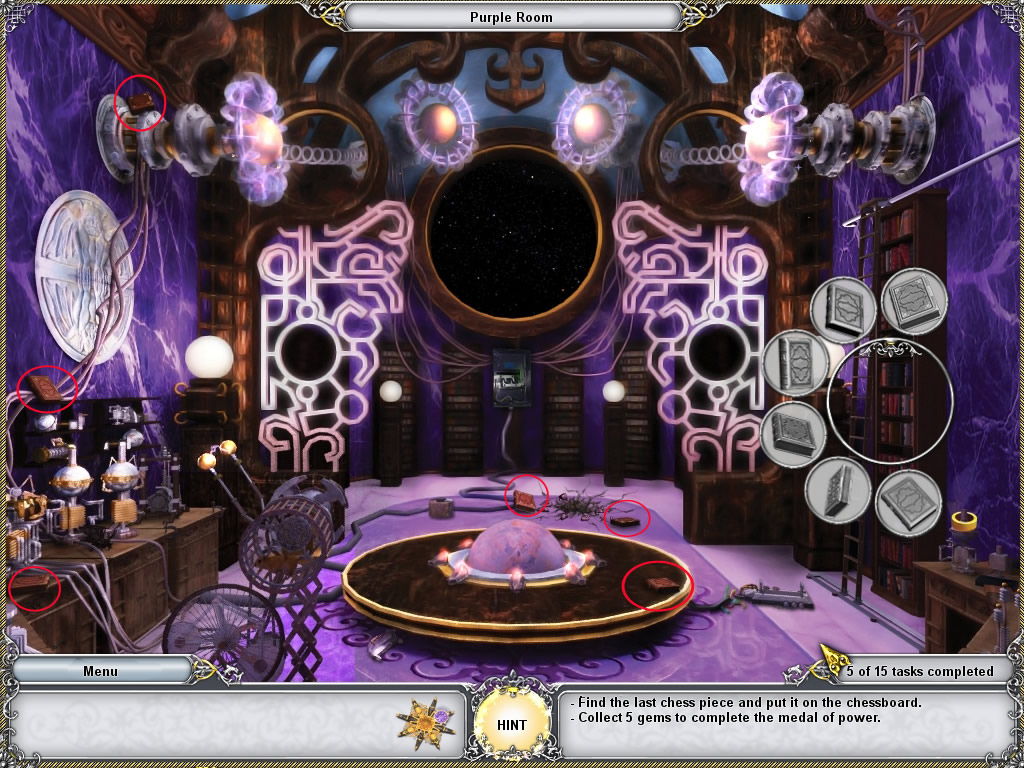
The exit is closed, so click the bookshelf right side - find all books.
Screenshot
Click the shelf again and a minigame opens.
Your goal is it to bring the books into the right order.
The order is based on a four-system.
The four - the basic number, is a square of four lines.
To come to the four you first need the four lines
So look for the books with one, two and three lines.
The fourth book is the square.
Now, that we have the basics, it simple. To come to the next square, we need the lines before.
So: 1 square 1 line, 1square 2 lines and so on.
Screenshot
Behind the books now a compartment opens.
Grab the film out, leave the room and enter the red room.
Red Room - The projector
Click the film on the projector and the projector again to activate a mini game.
You see a blurred picture.
Your goal is it to tune this image to see it clearly.
To do so, you will have to adjust the golden wheels.
Each wheels turns a part for of the image down, up, left and right.
Click the wheels, till you see the image clearly.
When you did it right, a gem will appear.
Click it and it will go into your inventory automatically.
Screenshot
The projector disappears and you can pick up another symbol at its place.
Leave the room
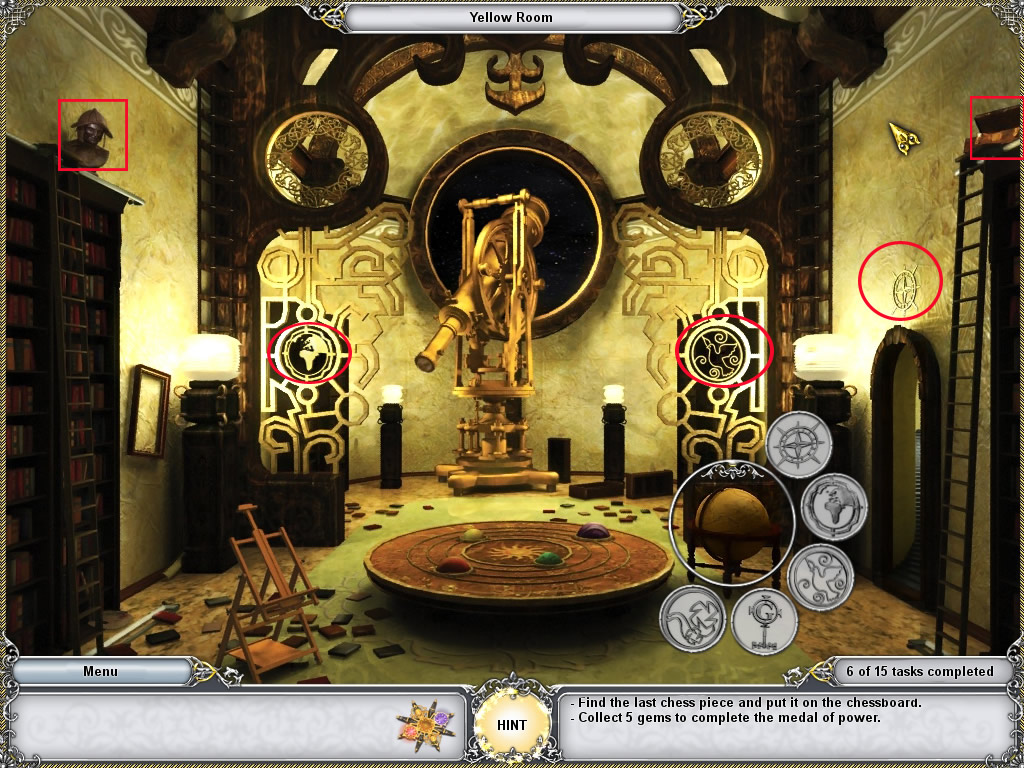
Yellow Room
Place the symbol at the last locked door and enter the yellow room.
Screenshot
Click the globe right side and find the container objects.
One object you will find, when you open the suitcase right on top.
Another one you will get by clicking the bust top left.
Screenshot
After finding all, the globe opens.
Click the easel low left and find the objects for the container.
The now open globe contains one of the objects.
Another one will be in the suitcase top right.
Screenshot
A portrait of Tom appears on the easel.
Click it, get it out of your inventory and place it into the empty frame on the left.
Click it once again to enter the secret room.
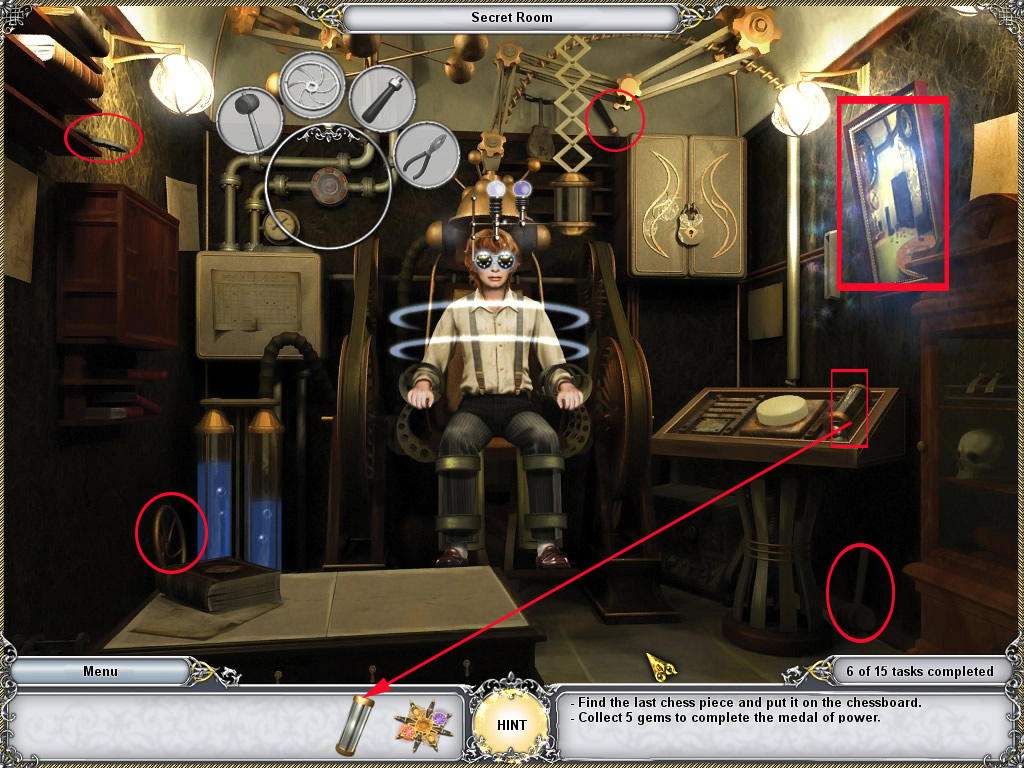
Secret Room / Save Tom
Click the valve on the pipes far left and find the objects.
Now get the battery from the table right side.
Screenshot
You need to charge it first, so go back to the hall and enter the purple room.
The charger is not working. Click it and find the objects.
One object is hidden left behind the middle door of the drawer.
Place the empty battery into the charger.
Wait till all three light show green and get the charged battery out.
Screenshot
Head back to the secret room, place the battery at its old place and click the hand button left next to it.
Now Tom is free.
Defeat Totenkraft
Behind Tom a drawer opened. Get the chess piece and bring it into the red room.
Place the chess piece on the chess board.
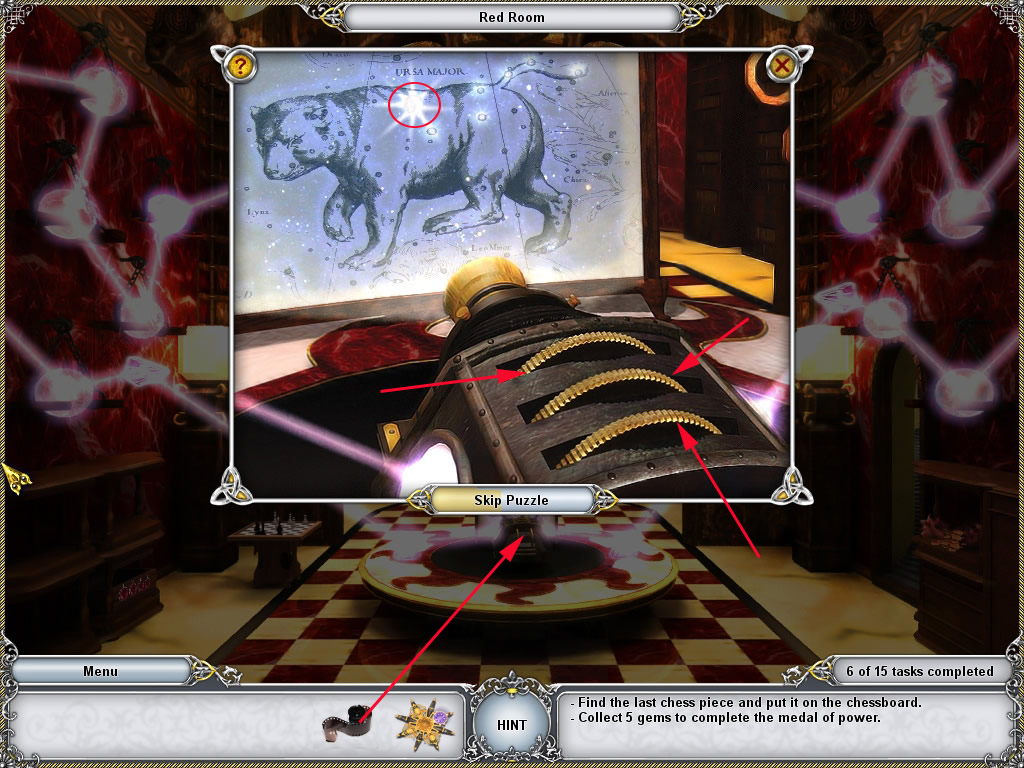
Low right on the floor a compartment opens - get the telescope lens out and go back to the yellow room.
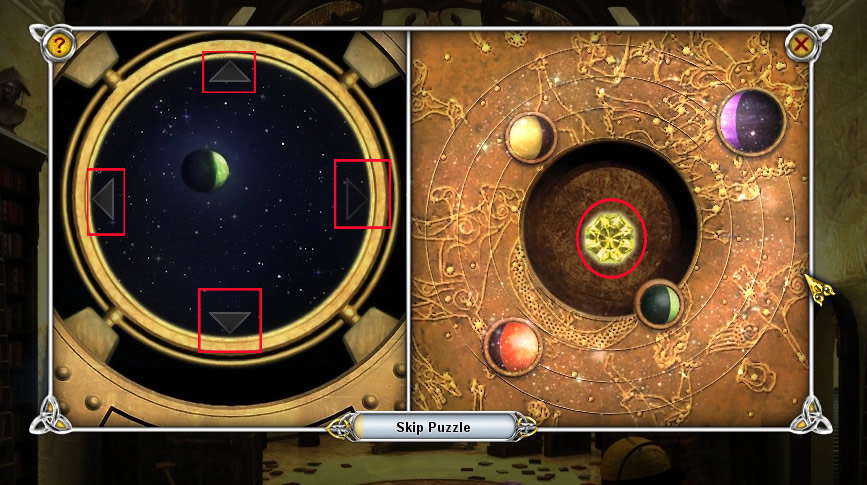
Place the lens at the telescope and a minigame opens.
By clicking the arrows at the right part of the game, you will be able to find the planets, you see on the left.
By clicking the planets on the left, you have to bring them into the same position as shown then on the right.
After all planets are in the right position, it takes a moment, but then the middle of the right side will open and you can click another gem for your medal.
Screenshot
Go back, talk with Tom and pick up the scarab from the table.
Go to the hall and enter the green room.
Place the scarab on the far right pillar.
Screenshot
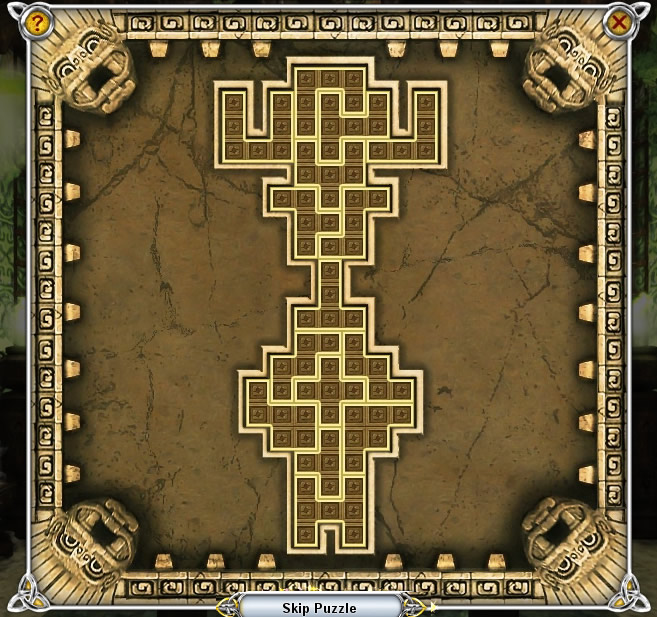
Click it again and a mini game will open.
You have to place the parts inside the shape, so that shape is completely filled.
You cannot turn the parts.
Screenshot
In the middle a gem will appear, that will be send to your medal automatically when you click it.
Go back to talk with Tom.
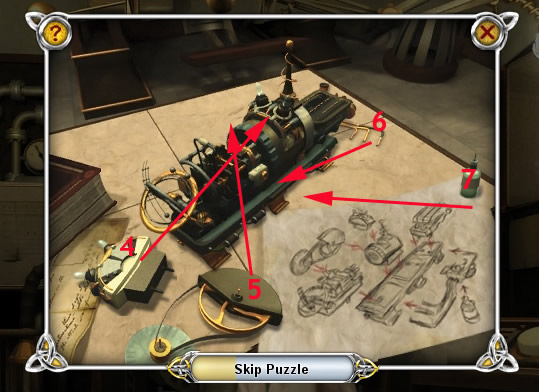
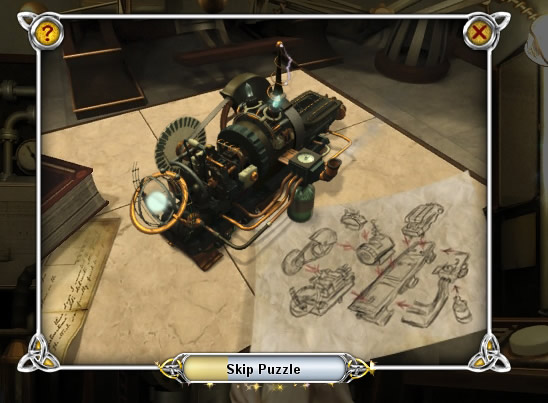
Click the table and a mini game opens.
You will have to build the machine by using the picture to see what has to go where.
To see how it has to look like please look at the screenshots.
Screenshot
Screenshot
Screenshot
Now pick up the machine, go into the hall and click the machine at Totenkraft.
After he is gone, you can click the last gem for the medal.
Screenshot
You will be automatically brought to the final.
Final
The last puzzle has three parts.
Caution: Skipping one of the parts will automatically skip the other parts also and the game will end at once.
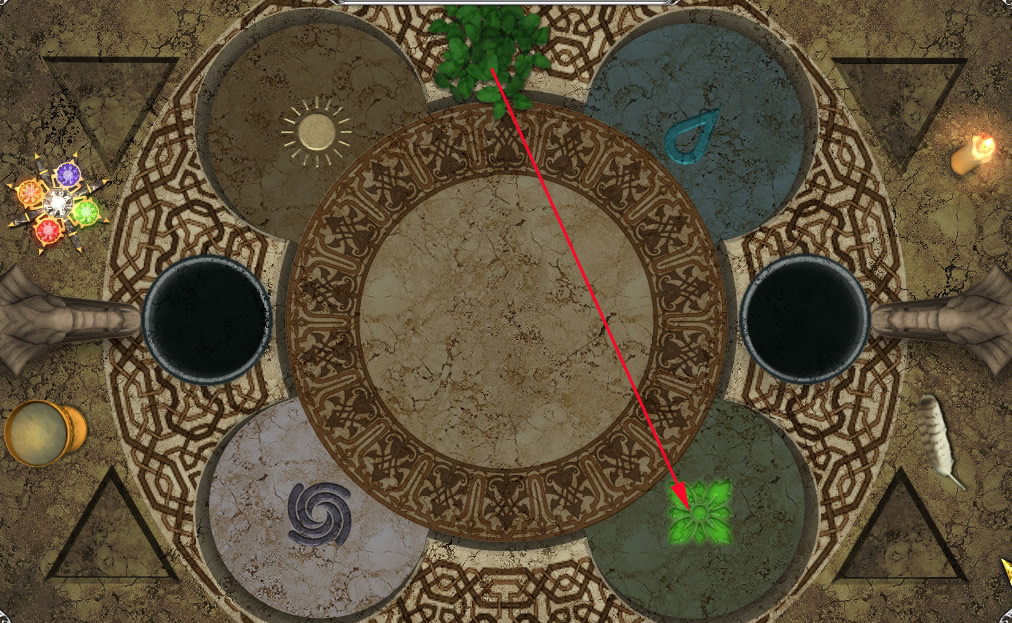
Part 1:
Apply the objects outside onto the proper symbol, that symbolizes the object.
Objects can only be placed on activated symbols.
Activated symbols are highlighted.
Each time you place an object on a symbol, there will be a reaction in the middle. When its done, the next symbol will be highlighted.
First place the green leafs form the top on the blossom right down.
Next activated symbol will be the sun upper left - place the candle from upper right there.
Third will be the wind - bottom left - place the feather - bottom right- there.
Last is the water bucket bottom left on the rain drop upper right.
Screenshot
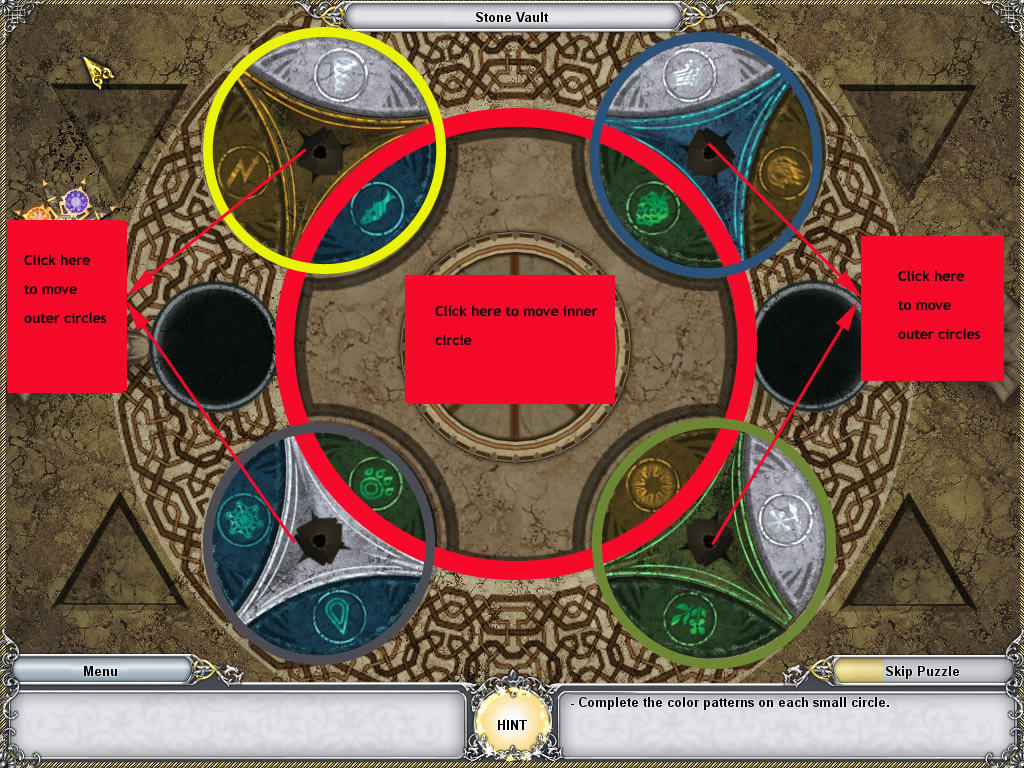
Part 2:
Your goal is it, to complete the color pattern on the small circles according to the color they do show in their middle.
Each circle has three segments, one is always in the inner circle.
When you click one of the outer circles, the three segments will rotate.
When you click the inner circle only the segments which are connected with the inner circle will rotate.
An example:
Click the green outer circle till the yellow segment is connected to the inner circle. Click the silver to connect the green segment, the yellow to connect the blue segment and the blue to connect the green segment.
No click the inner circle ones and the segments will move one step clockwise.
You now have to move all segments, till the color pattern of each outer circle is complete.
There is only one way to start over, when you are stuck: You have to go back to the main menu and choose then play.
You will have to solve the first puzzle as well again, but the second part will start from the scratch.
I'm sure, there will be more than one solution, but please find in the spoiler below the way how I solved it.
Step by step solution for Part 2
First color is the outer circle, second color the segment that has to be connected to the inner circle.
1.
green - yellow
silver - green
yellow - blue
blue - green
Click inner circle 2 times
2.
green - blue
silver - blue
yellow - silver
blue - silver
Click inner circle 2 times
3.
green - silver
silver - green
yellow - blue
blue - yellow
Click inner circle 1 time
4.
green - yellow
silver - blue
yellow - green
blue - green
Click inner circle 1 time
5.
green - green
silver - silver
yellow - yellow
blue - green
Click inner circle 1 time
6.
green - silver
silver - green
yellow - silver
blue - yellow
Click inner circle 1 time
7.
green - yellow
silver - yellow
yellow - green
blue - silver
Click inner circle 1 time
8.
green - yellow
silver - blue
yellow - green
blue - green
Click inner circle 1 time
9.
green - silver
silver - yellow
yellow - blue
blue - green
Click inner circle 1 time
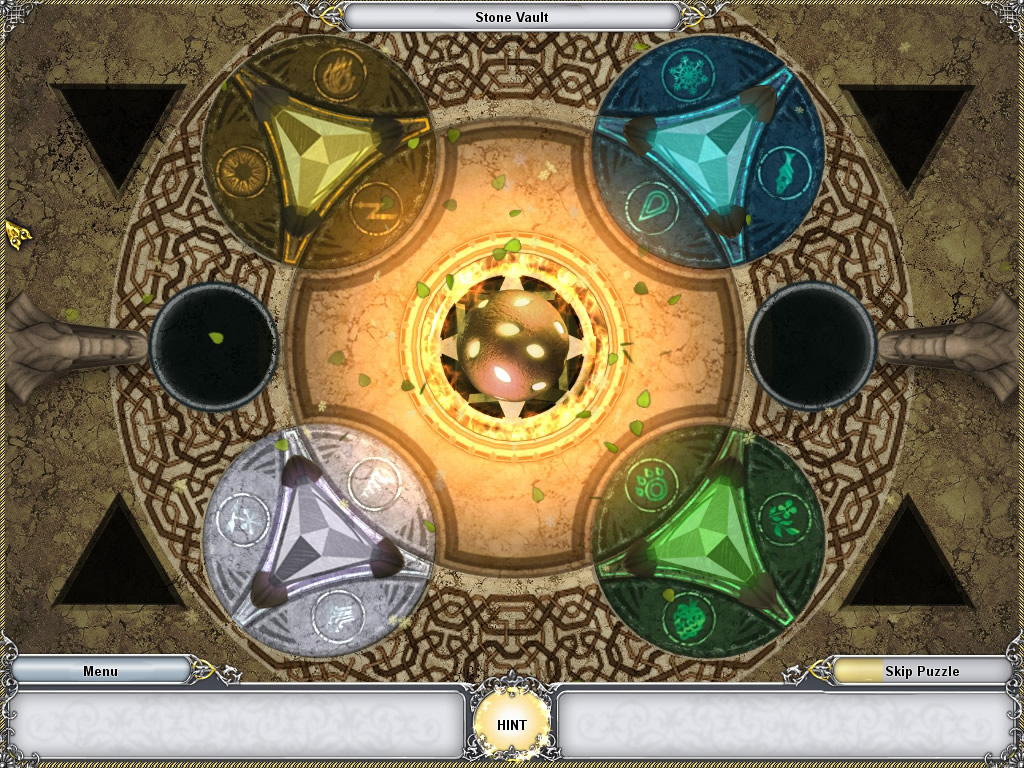
Screenshot
When you managed it, place the medal in the middle
Click the triangle gems into the middle of the according circle.
Screenshot
The middle opens and you will find the stone of the philosopher!
Screenshot
Congratulations you finished the game!
Thanks as always to Kayleigh for putting together this awesome walkthrough :D \o/!
Posted by: Kero |
June 11, 2009 1:30 AM
|
June 11, 2009 1:30 AM