

The Treasures of Mystery
Island: The Ghost Ship
Platform: Windows
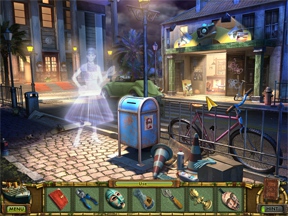
![]() What would you do for a million bucks? Thanks to the popularity of reality TV, we now know that there is relatively little people won't do (I wonder if they remained so enthusiastic when they learned how much of that will go on tax?). But stepping onto a haunted island? That's not in all of us. Fortunately it's not much of a thing for one young writer, which gives us an opportunity to experience the adventure through her in The Treasures of Mystery Island: The Ghost Ship.
What would you do for a million bucks? Thanks to the popularity of reality TV, we now know that there is relatively little people won't do (I wonder if they remained so enthusiastic when they learned how much of that will go on tax?). But stepping onto a haunted island? That's not in all of us. Fortunately it's not much of a thing for one young writer, which gives us an opportunity to experience the adventure through her in The Treasures of Mystery Island: The Ghost Ship.
 This is not a hidden object game, but instead very much a first-person adventure. There is plenty of object-hunting, but you are never presented by the standard laundry list where you have to find a dozen items, only one of which ends up being important. No, here every single thing you have to dig out of a scene has a role to play — which means at most three or four objects can be hidden, but usually there are just one or two.
To be clear, there is no treasure in this game (not unless you count a million dollar reward for clearing all the supernatural activity from the island). But there is a ghost ship and a whole lotta haunting. Your first ghost, in fact, appears in the intro movie and the spirits of the departed are all over the place. In this adventure game you have to discover why they are walking the earth, in turn preventing a much bigger disaster from happening. The clock is even against you, with regular countdowns to the inevitable eclipse that will bring something nasty to the surface. This countdown is entirely cosmetic and only rears its head when you enter certain new scenes, so there is no threat of running out of time. But it is a very nice touch.
Finding pieces of objects and then figuring out what to do with them is the core of Ghost Ship's gameplay experience. The adventure is split into four parts, each divided into multiple areas that you will revisit frequently while digging through the challenge. This is a fairly long game — even on a steady clip where you know exactly what you are doing, it takes more than four hours to complete. More salted players can up the odds by playing on the higher of the two difficulty modes. All this does is increase the hint system's reload time to two minutes and not change the cursor when over a highlighted area. That sound like little, but it really ups the challenge in an already challenging game.
 The myriad of objects you use is broad and simply going around randomly trying everything with everything else is laborious and sometimes impractical. As you progress, new areas in a scene can be activated and new objects can appear, so adventurers have to vigilantly move around the various scenes, trying to figure out their way forward. Whereas many such adventure games degenerate into a connect-the-dots affair - solving one puzzle inevitably leads to the next, etc — Ghost Ship is elaborate and expects you to do a bit of thinking. In ways it resembles the Mystery Case Files games, but without the hidden object sequences and with only a handful of traditional "puzzles". Most progress is made by finding objects and then figuring out what to do with them.
Analysis: The Ghost Ship is a gorgeous game with a beautiful soundtrack and handles its theme with enthusiasm — right down to the lack of characters you encounter. The sense of looming disaster and eerie isolation is handled brilliantly and even the interface design is great. For example, if a part of an object is hidden and requires an additional action to reach, it flashes in red — this has saved so much agony pining over a scene, trying to find a piece. The hint system is also excellent, only delayed when it reloads.
But some of the puzzles aren't as intuitive and the game doesn't always deliver clear clues. Sometimes you will be stuck until you click on a certain highlighted area, which in turn would unlock a new hidden object or activate new parts of other scenes. These events aren't always obvious and, at least in this reviewer's case, on occasion had to be highlighted through the hint system. But pixel hunters and detail hounds will revel in the challenge.
Honestly, though, the glimpses of frustration do nothing to take away from this game. It makes for a nice challenge in a game world that draws the player in from the get-go. The Ghost Ship also smartly avoids using clutter and familiar puzzles to extend its lifespan. Instead the several hours it packs feels fresh and engaging. The Treasures of Mystery Island: The Ghost Ship is one of the best adventure games we've seen this year. Sometimes I struggle through these types of games, mostly the result of boredom. This title? I played it twice — in a row.
![]() Windows:
Windows:
Download the demo
Get the full version
![]() Mac OS X:
Mac OS X:
Not available.
Try Boot Camp or Parallels or CrossOver Games.


Walkthrough Guide
(Please allow page to fully load for spoiler tags to be functional.)
The Treasures of Mystery Island: The Ghost Ship - Walkthrough
Part 1: General info, Chapters 1 and 2
General
Choose between Casual and Expert Mode:
In Casual Mode active areas will sparkle, and your hint recharges will take 1 minute.
In Expert Mode your hint recharge will take 2 minutes.
There are 56 "Beyond" objects hidden in the game.
There are notes hidden throughout the game that give you clues or journal updates: Read them, as they will give you also hints for solving puzzles.
Move your cursor around the scene - interactive areas will be shown by a change in the cursor.
The cursor will change to an eye when you can look closer at something.
Your cursor will change to a hand if you place it over a Beyond item or any other item you need to collect (excluding assemble parts).
The cursor will change to a gear if you can interact with inventory items at this spot.
You will see an arrow and footprints at spots where you can exit the actual scene to another location.
There is no restart button for puzzle, but leaving them with the "Close" button and activating them again will bring the puzzle back to the start.
The book in the lower right is your journal and map.
The map tab will show you your current location, locations still to be unlocked, and if there are current tasks in an unlocked location.
Click on the words Use/Find on the bottom inventory bar to toggle between the items to find and the items that are already assembled and available for use.
Assembled items in the Find bar will automatically be moved to the Use bar.
A piece that requires you to do an extra action to find it will glow in red in the Find bar.
To see the shape/number of the pieces to be found, hover your cursor over the item to be assembled. They will separate to show you the pieces.
List of all Beyond Objects
Bird/Hat (2) - Cave Entrance
Duck/Coffee grinder - Cave
Hat/Film Reel - Temple of Ice and Fire
Mask/Hourglass - Fiery Room
Yarn/Mouse - Death Canyon
Mailbox/Toolbox - Sea shore
Bell/Doorbell - Dock
Thermometer/Seagull - Outside the hut
Origami Crane/Crystal - Icy cave
Coffee Pot/Oil Can - Hut
Clock/Globe - Tugboat's deck
Bag pack/Shield - Tugboat's cabin
Padlock/Shell - Southern Coast
Alarm clock/Tennis ball - Fountain
Binocular/Hat - School Bus
Pineapple/Boot - Enrico's House
Cutting Board/Warm water bottle - Enrico's Room
Megaphone/Hydrant - Outside the Hotel
Separator/Clamp - Inside the Coach
Cone/Cup - Hotel Lobby
Brush/Wood plane - Outside the Translator's House
Owl/Wood - Garage
Briefcase/Book - Inside the Translator's House
Holster/Jar - Manager's Office
Flask/Football - Jenny Stone's Room
Bell/Buddha - Cellar
Frog/Stone - Bridge
Stone/Hair Dryer - Outside Pyramid
Envelope/Wall Outlet - Shaman's Room I
Skull/Vase - Shaman's Room II
Clock/Barrel - Sunset Boulevard
Pyramid/Paper Ship - Museum Entrance
Apple/Flower - Photography Studio Reception
Monkey/Pencil Holder - Photography Studio
Brick/Jewel Box - Laboratory
Pear/Duck - Museum Foyer
Bottle/Vase - Museum Archive
Baseball Glove/Bread Basket - Security
Thread/Yarn Ball - Exhibit
Bottle/Spray Can - Cellar (Chapter 3)
Mask/Helmet - Inside the Pyramid
Camera/Kitchen Scale - Descent
Brick/Box - Dungeon
Piggy Bank/Mask - Temple Hall
Ball/Tomato - Armory
Telephone/Shoe - Temple of the Sun
Helmet/Ice Pack - Well
Planks/Planks (seems they forgot to put a second item) - Construction Site
Hook/Wrench - Garage (Chapter 4)
Glove/Pole - Turtle Coast
Pen/Drill Bit - Crane
Log/Broken Log - Cursed Rock
Gas Mask/Police Hat - Submarine
Cloth Spin/Spray Can - Under the Sea
Water Kettle/Air Balloon - Cargo Hold
Dumbbell/Padlock - Steam Engine
Inventory List
The inventory list contains all items you will have to find and assemble. The first number behind the object name shows the spoiler number for finding/assembling the object; the second one the spoiler number for using the object. There is a separate list for each of the four chapters.
Chapter 1
Fishing Rod Spoiler - 1/1
Propeller - 1/1
Knife - 2/2
Axe - 2/2
X-shaped handle - 3/12
Fish - 3/20
Inkpot - 3/4
Gear - 4/4
Wooden Writer - 4/13
Glass Cleaner - 5/25
Ladder - 5/6
Air Pump - 7/20
Pick Axe - 7/9
Mug - 8/10
Oar (1/2) - 9/20
Silver Bars (5) - 10/12
Sword - 10/10
Water Symbol - 10/13
Sledge Hammer - 11/11
4-Finger-Hand - 11/12
Fire Symbol - 12/13
Oiler (empty) - 13/14
Oiler (filled) - 14/14
Fire Extinguisher - 14/18
Ships Wheel - 15/22
Broom - 15/19
Glue - 15/20
Ruby - 15/16
Key - 16/17
Scissors - 16/19
Rake - 17/18
Sea Horse - 18/20
Rubber Patch - 19/20
Oar (2/2) - 20/20
Hour Hand - 20/23
Crowbar - 22/22
Clock Face - 22/23
Minute Hand - 22/23
Sponge - 23/25
Key - 23/24
Ballet Shoes- 24/24
Wooden Ballerina - 24/24
Lever - 24/25
Chapter 2
Prop - 26/27
Rune (1/5) - 26/34
Toy car - 27/29
Rune (2/5) - 28/34
Key - 29/38
Pruning Shears - 29/30
Statue Fragments (2) - 29/37
Electrical Screwdriver - 29/45
Storage Key - 30/33
Rune (3/5) - 30/34
Rune (4/5) - 31/34
Printer Cartridges - 31/45
Magnifying Glass - 31/48
Tambourine - 32/42
Banjo - 32/42
Tire - 33/38
Trumpet - 34/42
Magnet - 35/37
Watering Can (empty) - 35/39
Ladle - 35/51
Statue Fragment - 36/37
Tire Iron - 36/38
Nuts - 37/38
Jack - 38/40
Screwdriver - 38/39
Ladder - 38/39
Valve - 38/39
Watering Can (full) 39/40
Drum - 39/42
Violin - 40/40
Wooden Violist - 40/40
Hammer - 40/40
Shovel - 40/41
Key - 40/41
Accordion - 41/42
Metal Plate (1/2)- 41/51
Butterflies - 41/47
Access Card - 42/43
Oil Lamp - 43/46
Terrarium Cover 44/44
Snakes - 44/44
Corkscrew - 44/45
Scissors - 44/45
Ballerina - 44/44
Keyboard - 45/45
Mouse - 45/45
Fan Blades - 45/45
Pliers - 46/46
Metal Plate (2/2) - 47/51
Paper Sheet - 47/49
Polynesian Dictionary - 47/used in several places
Spyglass - 48/48
Audio Tape - 48/51
Tape Recorder - 50/51
Painting - 50/50
Wooden Painter - 50/50
Key - 50/52
Microphone - 51/51
Gas Can - 52/52
Stones - 52/52
Funnel - 52/52
Taillight - 52/52
Chapter 3
Sewing Machine - 53/56
Wood (8) - 53/56
Curtain - 54/62
Boomerang - 55/56
Razor - 55/59
TV - 55/55
Wire Cutter - 56/69
Matches - 56/56
Thread - 56/56
Plank - 57/57
Mask (1/5) - 58/72
Mask (2/5) - 58/72
Hammer - 58/59
Keys - 59/59
Paint - 59/59
Paperclip - 59/59 and 63
Instant Camera - 60/66
Night Cap - 60/62
Hat - 60/62
Flash drive - 60/60
Cowboy Hat - 61/62
Spot Light - 61/62
Safety Pin - 61/62
Photo - 62/62
Bulb - 63/74
Can opener - 64/67
Cage - 64/65
Glue - 65/66
Grain - 65/65
Stethoscope - 65/68
Tweezers - 65/70
Flask - 65/70
Key - 65/65
Photo of Exhibit - 66/66
Diamond - 66/67
Fan - 66/72
Candle Stick - 66/69
Wooden Girl - 67/67
Lamp - 67/74
Mushrooms (10) - 67/68
Weights - 68/68
Shovel - 68/69
Chisel - 68/69
Mushrooms (500 grams) - 68/72
Coconut - 69/72
Mask (3/5) - 69/72
Glass Cutter - 69/71
Video Tape - 69/71
Pipe Joint - 70/70
Mask (4/5) - 70/72
Wrench - 70/70
Bucket - 70/71
Faded Piece of Paper - 70/72
Bicycle Tire - 70/70
Acid - 70/72
Mask (5/5) - 71/72
Tray - 73/74
Plunger - 73/73
Photo Negative - 73/74
Red Light Bulb - 74/74
Skull - 75/75
Wooden Shaman - 75/75
Runes - 75/75
Stakes - 75 - please see Chapter 4
Chapter 4
Stakes - 75/76
Ladder - 76/76
Nails - 77/88
Hammer - 77/88
Log - 77/78
Rope - 78/81
Broom - 79/79
Saber - 79/82
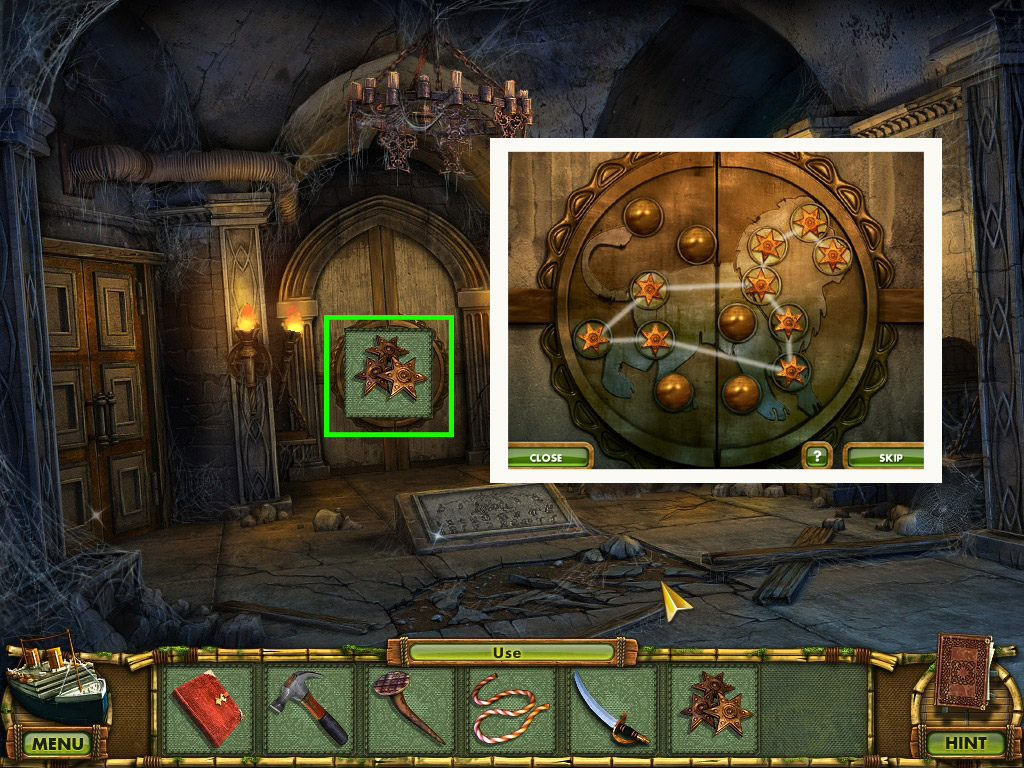
Stars - 79/80
Handle - 81/81
Pulley - 81/81
Crowbar - 81/82
Statue's Head - 82/82
Wheel - 83/83
Catapult - 83/83
Flashlight - 84/91
Gear - 84/86
Plank - 85/88
Chain - 85/88
Handle - 85/87
Key - 85/87
Triangular Key - 86/94
Hook - 86/86
Cross-Shaped Key - 86/94
Chef's Hat - 87/87
Wooden Chef - 87/87
Saw - 89/90
Manometer - 89/89
Shovel - 89/96
Empty Oxygen Tank - 89/90
Pick Axe - 90/93
Flippers - 90/91
Scuba Mask - 90/91
Truck Battery - 90/90
Pole Axe - 91/100
Crossbow - 91/101
Amulet - 92/97
Sickle - 92/92
Star-Shaped Key - 92/94
First-Aid Kit - 93/93
Wooden Nurse - 93/93
Diamond-Shaped Key - 93/94
Button (1/2) - 93/97
Button (2/2) - 94/97
Sphere-Shape Key - 95/95
Tiles - 95/97
Bow - 95/96
Wooden Archer - 96/96
Oiler - 96/96
Key - 96/96
Six Moai - 96/102
Gear - 96/99
Four-Fingered Hand - 97/98
Torch - 98/98
Grindstone - 98/100
Brush - 98/98
Bucket - 99/100
Gems - 99/102
Bucket with Gas - 100/101
Sharp Pole Axe - 100/101
Shield - 101/101
Oil Lamp - 101/102
Prologue
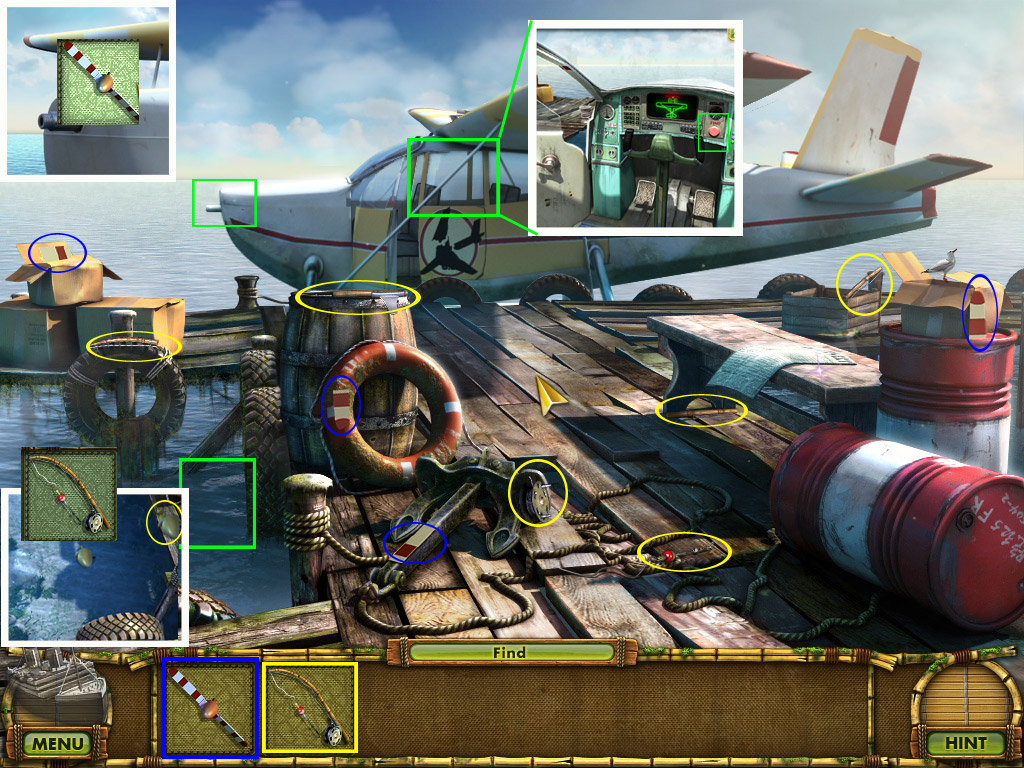
The Plane
Collect all parts of the fishing rod.
Collect all parts of the propeller - the last one will be highlighted in red.
Zoom in on the water on the left side - there you can see the last propeller part in the water.
Click it with the fishing rod. The object part will end up on the wood, right side. Click it before you exit the close up.
Zoom in on the front of the plane and place the propeller.
Zoom in on the plane and press the red start button on the right side.
Screenshot
Chapter 1: Small Island
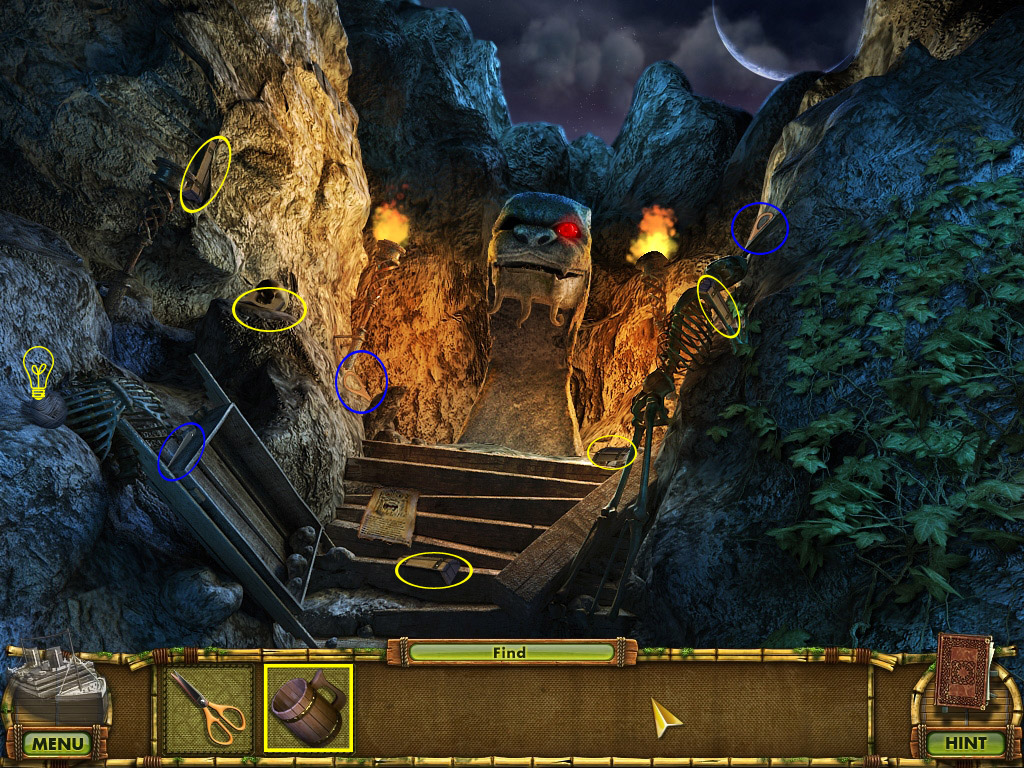
1. Cave Entrance
Zoom in on the gate on the right and read the note.
Grab the knife part and exit the close up.
Look for the remaining knife parts.
Use the knife to cut the wagon's strings.
Zoom in on the wagon to find a part of the axe.
Find all remaining parts of the axe.
The beyond item (1/56) is a bird/hat and can be found AFTER you opened the wagon on the rock right above the door to the cave.
Zoom in on the door and use the axe on the board.
Enter the cave.
Screenshot
2. Cave
Click the ghost and grab the beyond item (2/56) (Duck/Coffee Grinder) right next to the chest.
Click the note one the left - it will be copied into your journal.
Find the parts of the x-shaped handle and the rake; one part of the rake can't be found yet.
Screenshot
Enter the Temple of Ice and Fire and go left into the Fiery Room.
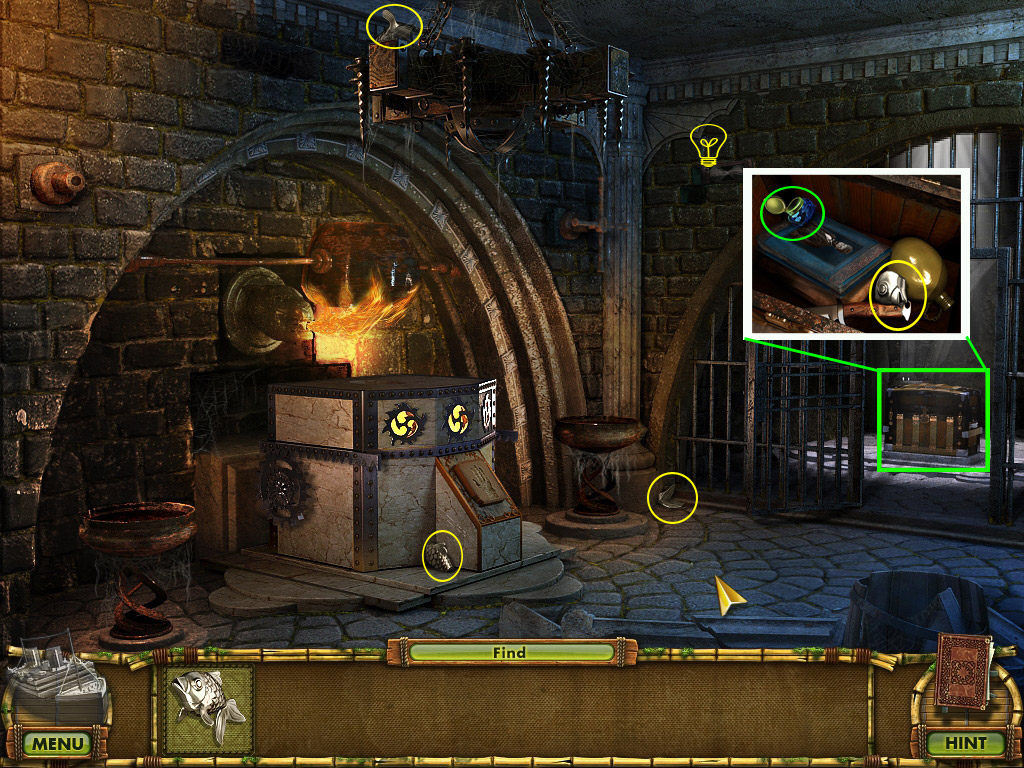
3. Fiery Room
Grab the beyond item (3/56) (Mask/Hour glass) from the wall right above the cell entrance on the right side.
Find all parts of the fish. The last part you will find by zooming into the chest inside the cell.
Also take the ink pot from the chest.
Screenshot
Go back twice to the Cave.
4. Cave/Cave Entrance
Use the ink pot (Spoiler 3) with the writer.
After he disappeared, zoom in on the note he left behind and take the gear laying on it.
A wooden writer statue will go into your inventory as well.
Go back 1x and zoom in on the gate on the right side.
Place the gear and click the crank to open the gate.
Go forward to the Seashore, and from there head right to the dock.
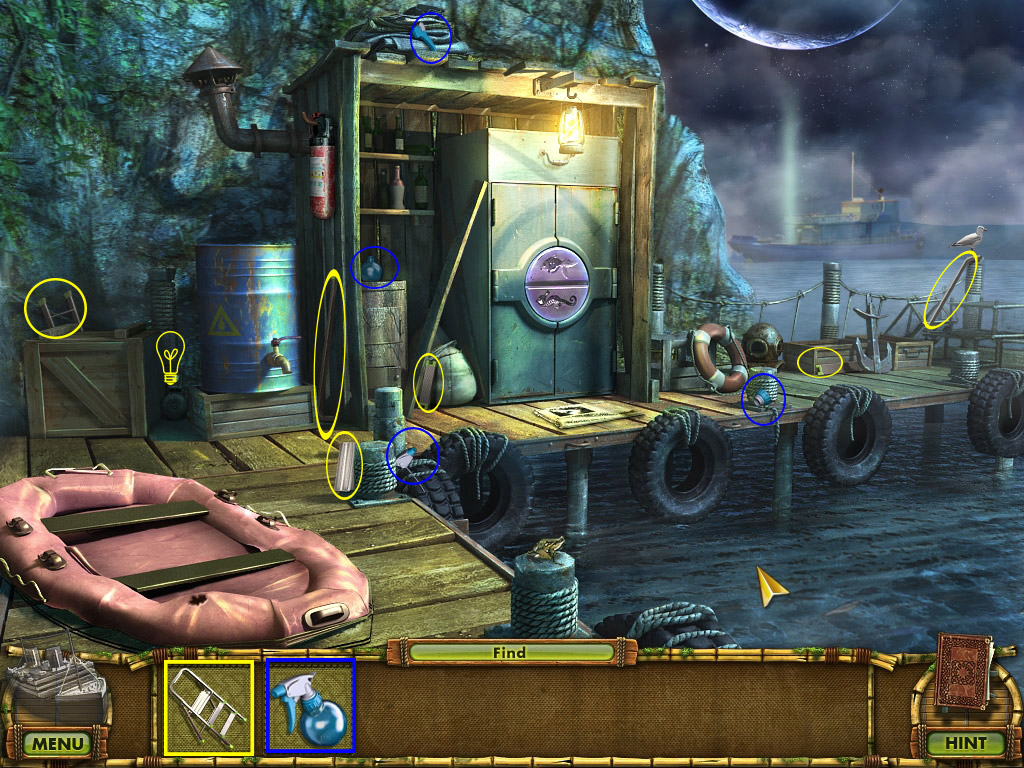
5. Dock
Grab the beyond item (4/56) (Bell/Doorbell) on the ground on the left side, between barrel and crate.
Find all parts of the ladder and the glass cleaner.
Go back once to the Sea Shore.
Screenshot
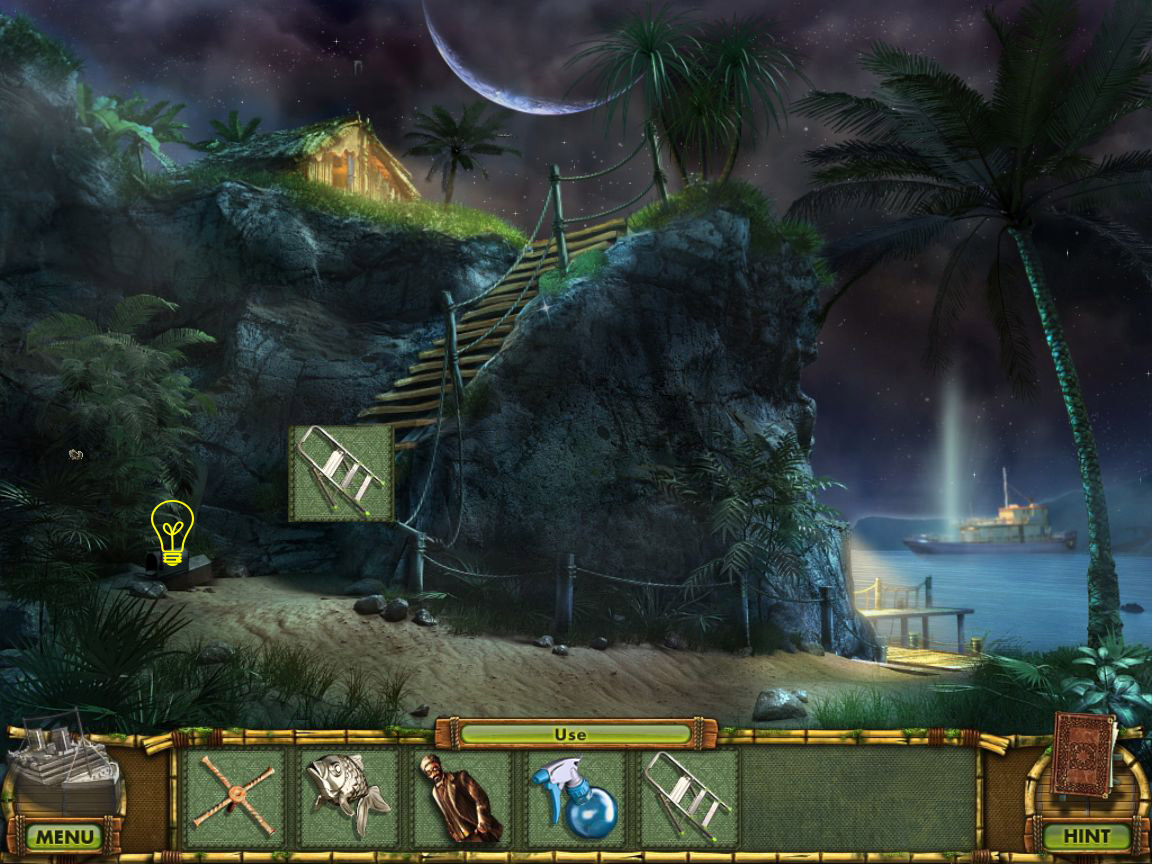
6. Sea Shore
Grab the beyond item (5/56) (Mailbox/Toolbox) on the ground, far left.
Place the ladder underneath the stairs, then go upstairs.
Screenshot
7. Outside the Hut
Grab the beyond item (6/56) (Thermometer/Seagull) on the lower right side at the fence.
Click the sea horse on the roof; it will fall down into the fire.
Click to learn that you will need something to get it out.
Click and read the note on the ground.
Click the door of the hut to learn that you will need an oiler.
Find all parts of the air pump and the pick axe.
Screenshot
Go back twice, enter the cave, and from there go up to the Dead Canyon.
8. Dead Canyon
Grab the beyond item (7/56) (Mouse/Stone) on the rock, left side.
Read the note on the stairs.
Find all parts of the mug; one part of the scissor can't be found yet.
Screenshot
Go 1x back and enter the Temple of Ice and Fire.
9. Temple of Fire and Ice
Grab the beyond item (8/56) (Film Reel/Helmet) right above the icy entrance.
Find the all parts for the oar; one part for the sledge hammer can't be found yet.
Use the pick axe (Spoiler 7) to remove the ice on the right side.
Screenshot
Enter the Icy Cave.
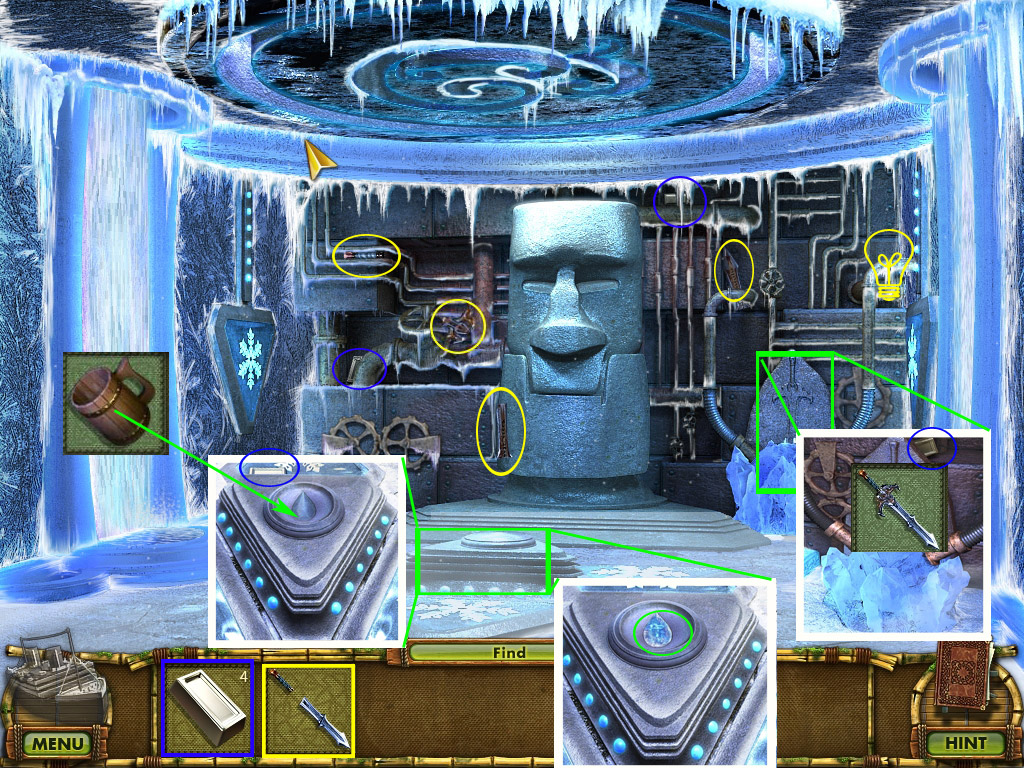
10. Icy Cave
Grab the beyond item (9/56) (Origami Crane/Crystal) from the pipe, right side.
Fill the mug (Spoiler 8) at the waterfall on the left side; it will go back into your inventory filled.
Find all parts of the sword and the 2 parts of the silver bars.
Zoom in on the small pedestal on the ground, in the middle of the room.
Take the third silver bar and use the water-filled mug at the mold.
Zoom in on the ice block on the right side.
Grab the last silver bar and place the sword in its slot.
Exit and zoom in on the pedestal again.
Grab the icy water symbol.
Screenshot
Exit the Icy Cave
11. Temple of Fire and Ice
If you haven't done already, take the last part of the sledge hammer in front of the Icy Cave entrance.
Zoom in on the wall in front of the statues on the left and use the hammer to tear down the wall.
Zoom in on the middle statue and click its left hand several times to break the stone.
Take the 4-finger-hand.
Go back down once and enter the Fiery Room on the left.
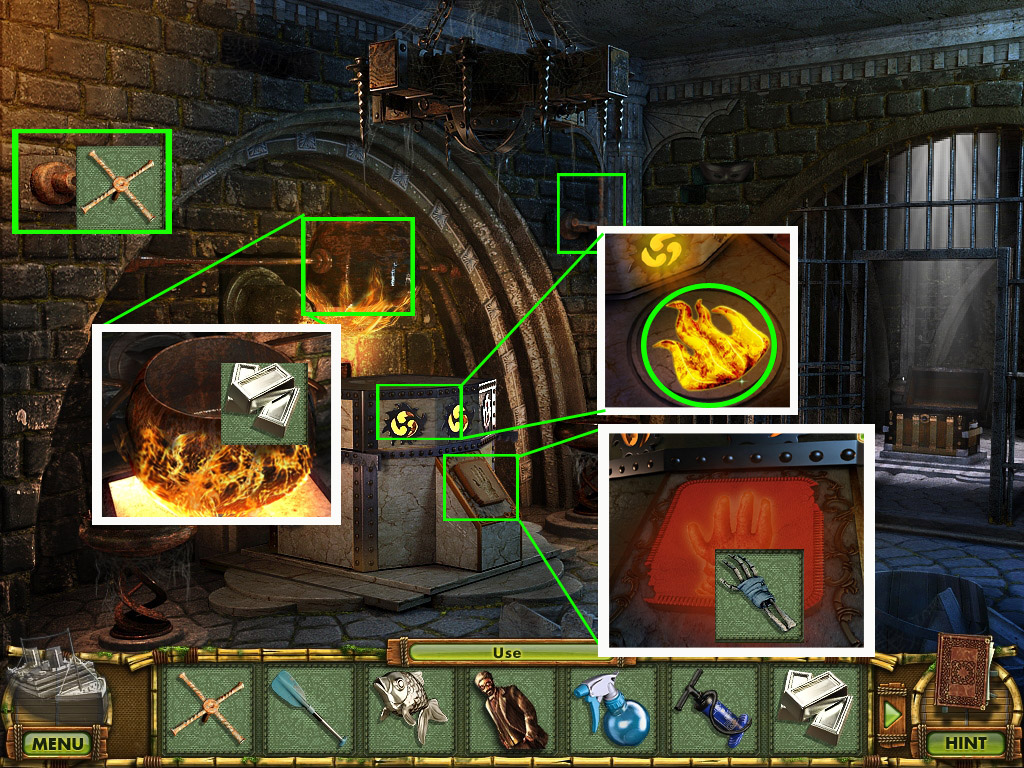
12. Fiery Room
Use the X-shaped handle (Spoiler 2) at the spot on the left wall.
Zoom in on the smelting pot and put in the silver bars (Spoiler 10).
Now click both X-shaped handles (left and right side of the wall).
Zoom in on the hand imprint in front of the smelter and place the 4-finger hand (Spoiler 11).
The smelter opens; zoom in and take the fire symbol.
Screenshot
Return to the Temple of Fire and Ice.
13. Temple of Fire and Ice
Place the fire symbol (Spoiler 12) on the left and the ice symbol (Spoiler 10) on the right at the wall between the two entrances.
The door below opens; zoom in on it and click the ship model of the Queen Margaret.
The ship will open on the screen; place the wooden writer (Spoiler 4) in his cabin (spot is highlighted).
An oiler will go into your inventory.
From now on, the ship will always automatically open up whenever you collect a wooden statue.
Back out twice, go right through the gate and then right to the dock.
14. Dock/Outside the Hut
Zoom in on the barrel on the left side, place the oiler (Spoiler 13) below the tap and click the tap to open.
The oiler will return to your inventory filled.
Grab the fire extinguisher on the left side of the closet.
Go back 1x and up to the Hut.
Zoom in on the hut's door and oil the lock.
Click again to open and enter the Hut.
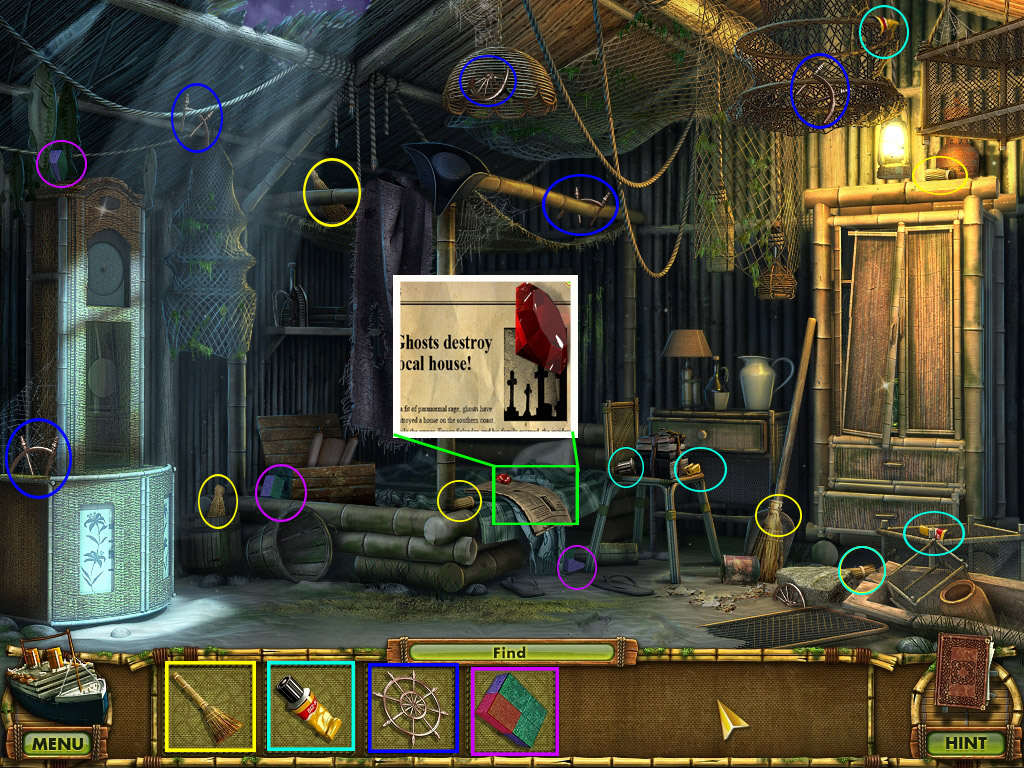
15. Hut
Grab the beyond item (10/56) (Coffee Pot/Oil Can) from the shelf on the left side.
Find the the parts to obtain a ship wheel, a broom and glue; a part of the sponge can't be found yet.
Zoom in on the newspaper on the bed and take the ruby.
Screenshot
Return to the cave and go upper right to the Dead Canyon.
16. Dead Canyon (The Scissors)
Place the ruby (Spoiler 15) into the missing eye slot of the statue.
Zoom in on the now-open mouth of the statue and take the key and last part of the scissor.
Exit to the cave.
17. Cave (The Chest)
Zoom in on the chest in the middle and use the key (Spoiler 16) to open the padlock.
Take the last part of the rake.
Return to Outside the Hut.
18. Outside the Hut (The Sea Horse)
Use the fire extinguisher (Spoiler 14) to extinguish the fire where the sea horse had fallen in.
Now zoom in on it and use the rake (Spoiler 17) with the coals until you find the sea horse.
Enter the Hut.
19. Hut
Click the closet on the right side; the door will fall out.
Zoom in on the closet and remove the cobwebs with the broom (Spoiler 15)
Now use the scissors (Spoiler 16) to cut out a patch of rubber from the rubber boots.
Go back twice and return to the dock.
20. Dock
Place the air pump (Spoiler 7) to the right, next to the boat.
Zoom in on the hole at the lower end of the boat and put glue (Spoiler 15) around it.
Put the rubber patch (Spoiler 19) onto the hole.
Click the air pump to inflate the boat.
Now zoom in on the closet and place the fish (Spoiler 3) and the sea horse (Spoiler 18).
Screenshot
The door will open; zoom in on the closet.
Your goal is to reach to rearrange the luggage so that you can access the oar on the right side of the locker. Luggage in pink cannot be moved until the above piece is moved.
There are several solutions possible. The screenshot will show you an easy to follow step-by-step-solution. The images on the left show what to do; the images on the right show where each box is after these steps.
Screenshot
Take the oar.
Click the boat to bring it into the water.
Grab the minute hand which was located under the boat.
Place both oars (Spoiler 9 and here) on the boat and hover with your cursor over the boat to see the footsteps that will bring you to the tugboat.
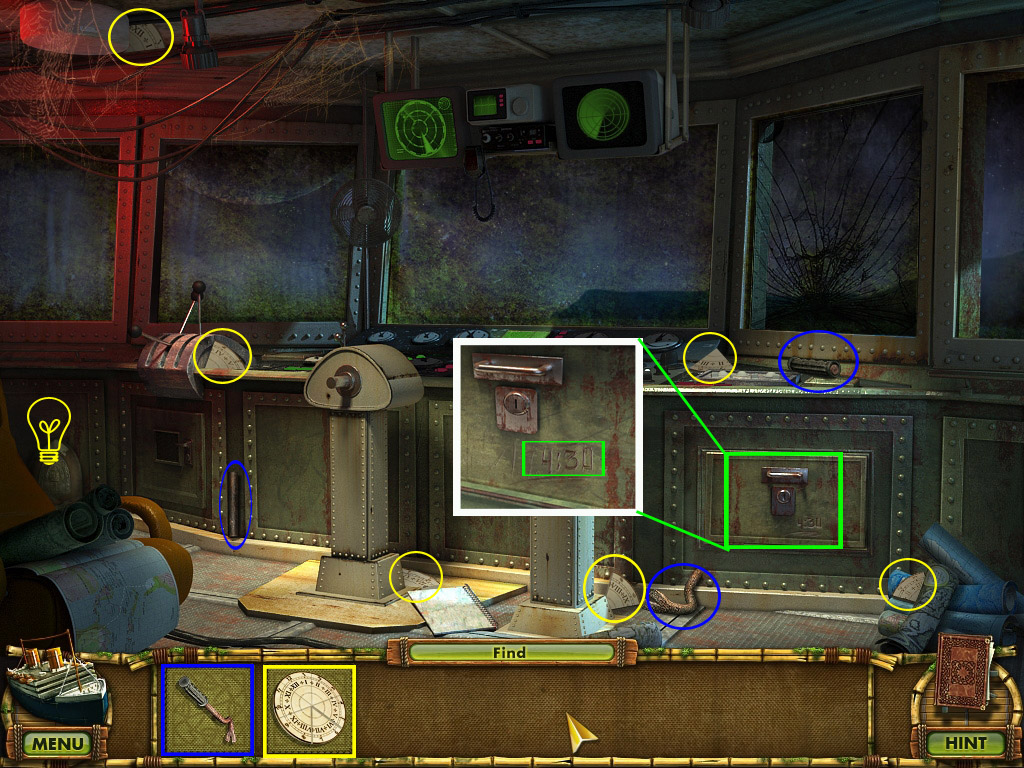
21. Tugboat - Deck
Grab the beyond item (11/56) (Clock/Globe) on the railing above the window.
Click the ghost to learn that she needs her ballet shoes.
Screenshot
Enter the Cabin.
22. Tugboat - Cabin/Dock
Grab the beyond item (11/56) (Shield/Backpack) on the floor, left side.
Click the locked compartment at the lower right side and note the engraved time: 4:30.
Use the ship wheel (Spoiler 15) with its mount.
Find all parts of the crowbar and the clock face.
Screenshot
Back out twice to reach the dock.
Zoom in on the crate on the left side and use the crowbar to open it.
Take the hour hand.
Back out once and go upstairs; enter the Hut
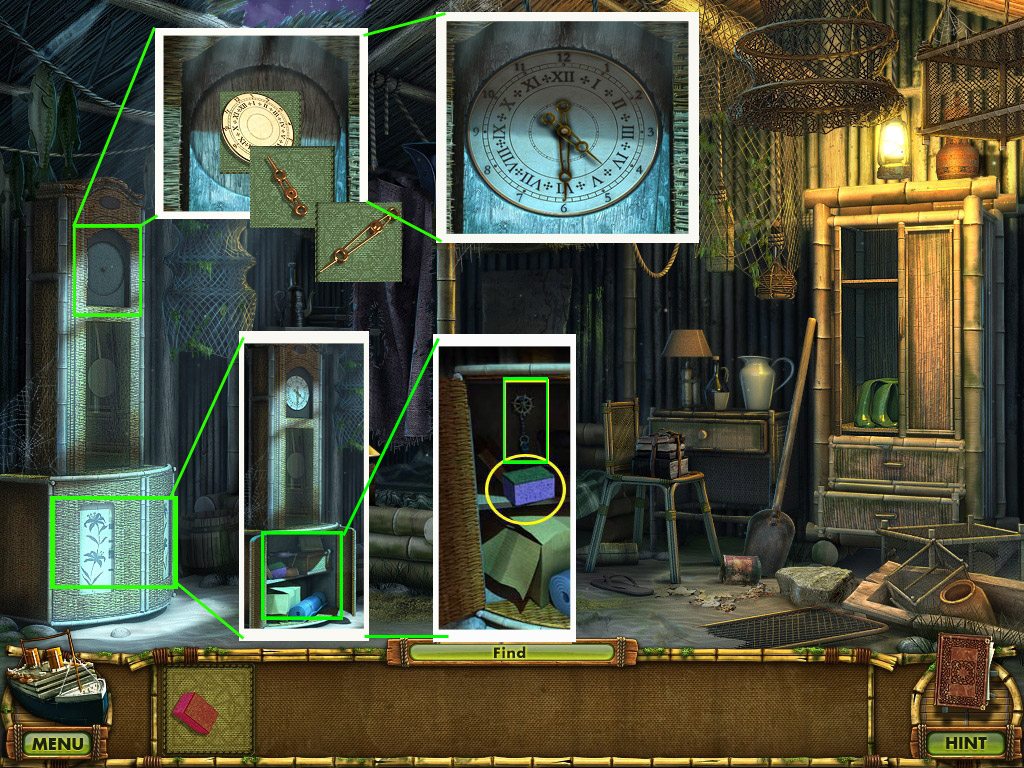
23. Hut
Zoom in on the grandfather clock on the left and place the clock face (Spoiler 22) and both clock hands (Spoiler 20,22).
Click the hour hand and move it clockwise until it shows 4:30.
Click to stop it from moving.
A drawer at the bottom of the grandfather clock opens.
Zoom in and take the last part of the sponge and key hanging above the sponge.
Screenshot
Go back 2x and then right to reach the dock.
Use the boat to head over to the tugboat and enter the cabin.
24. Tugboat - Cabin/Deck
Zoom in on the compartment at the lower right and use the key (Spoiler 23) to open it.
Grab the ballet shoes, go out side and give it to the ballet dancer.
You will receive the wooden ballet dancer for it.
Place the statue on its place to obtain a handle.
Return to the Cabin.
25. Cabin
Place the lever right next to the ship wheel.
Use the glass cleaner (Spoiler 5) at the window and clean them with the sponge (Spoiler 23)
Click the lever to start the boat.
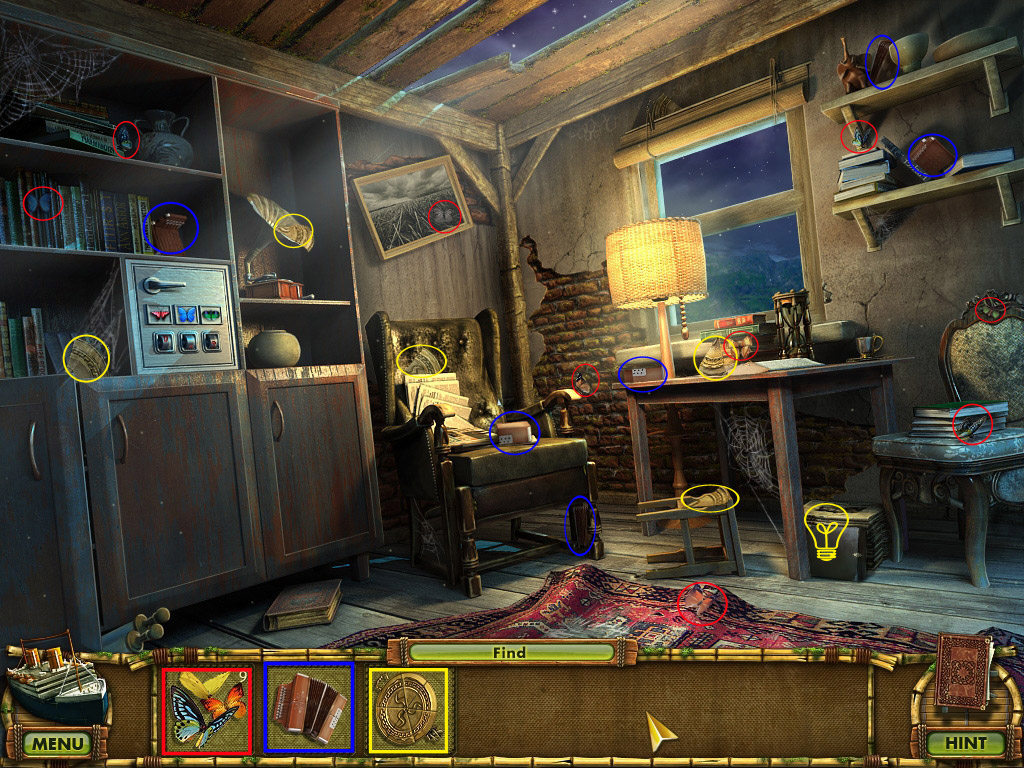
Chapter 2: Southern Coast of the Island
26. Southern Coast/Fountain
When you arrive at the southern coast, take the beyond item (13/56) on the low right side, right next to the chair (Padlock/Shell).
Go forward to the fountain.
Click the musician and read the note on the ground, right side.
Grab the rune (1/5) from the bench on the right side and the beyond item (14/56) (Alarm Clock/Tennis ball) from under the bench.
Take the prop on the left side, leaning at the trash bin.
Head left to the yellow school bus.
Screenshot
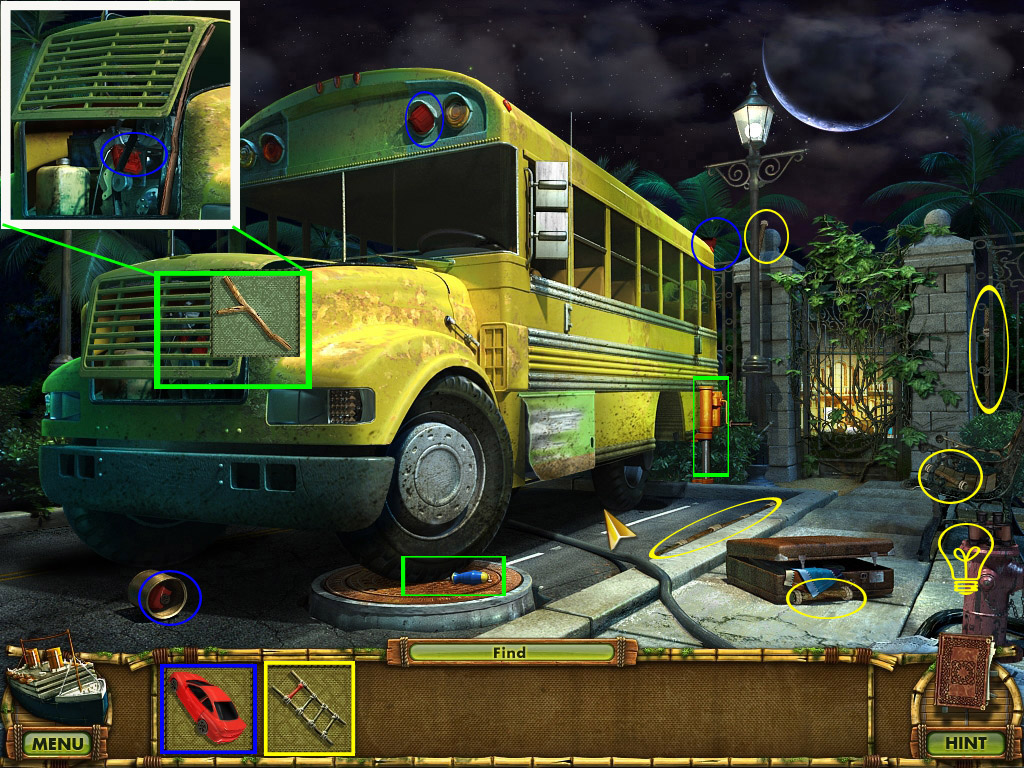
27. School Bus
Click the prop (Spoiler 26) at the head of the school bus and grab the toy car part.
Collect the other parts of the toy car.
Collect the parts of the ladder - one can't be found yet.
Take the beyond item (15/56) (Hat/ Binocular) in the low right corner.
Click the car jack at the back of the bus to learn that you need a tire.
Click the screwdriver under the right front tire of the bus to learn that you will need to move the bus.
Screenshot
Go back to the Fountain and head right to Enrico's house.
28. Enrico's House
Take the beyond item (16/56) (Pineapple/Boot) at the low left on the wood.
Find the 8 visible nuts. Click the grate on the floor to learn that you need a tool to get out the ninth nut.
Click the rope in the lower right to learn that it might come in handy later.
Take the rune (2/5) from the floor.
Screenshot
Go through the door on the far right.
29. Enrico's Room
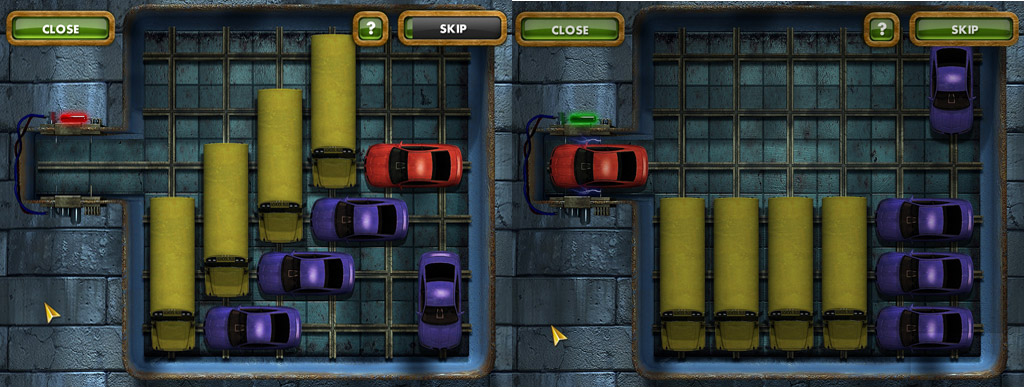
Click the toy car (Spoiler 27) on the shelf on the right wall to activate a mini game.
Your goal is to move the red car to the open spot on the left side.
Move all busses up.
Move the upper and middle purple car to the left.
Move the right school bus down.
Move the red car to the right.
Move the purple car in the low right up.
Move the red car to the left.
Move the right school bus up.
Move all three purple cars from the left to the right.
Move all busses down.
Move the red car out.
Screenshot
After finishing the puzzle, the shelf moves aside; grab the key hanging at that wall now.
Find all object parts to obtain pruning shears, an electrical screwdriver and 2 statue fragments.
Click the hole in the wall to learn that it is too dark to see anything. Click the symbols on the right wall to learn that you need something to decipher this code.
Grab the beyond item (17/56) (Cutting Board/Warm-Water Bottle) from the low left side of the drawer on the left.
Screenshot
Go back twice and then left to the yellow school bus.
30. School Bus/Outside the Hotel/Inside the Coach
Use the pruning shears (Spoiler 29) to remove the vines of the gate in the far back of the scene and go through.
Click the poster on the ground and the ghost.
Grab the rune (3/5) from the ground
Look for the parts of the hook and take the beyond item (18/56) (Megaphone/Hydrant) right next to the truck on the ground.
Screenshot
Zoom in on the truck and click the note on the trunk.
Look for the parts of the storage key and the tape recorder. One part of the tape recorder can't be found yet.
Take the beyond item (19/56) (Separator/Clamp) on the shelf in the far middle.
Screenshot
Back out once and enter the hotel.
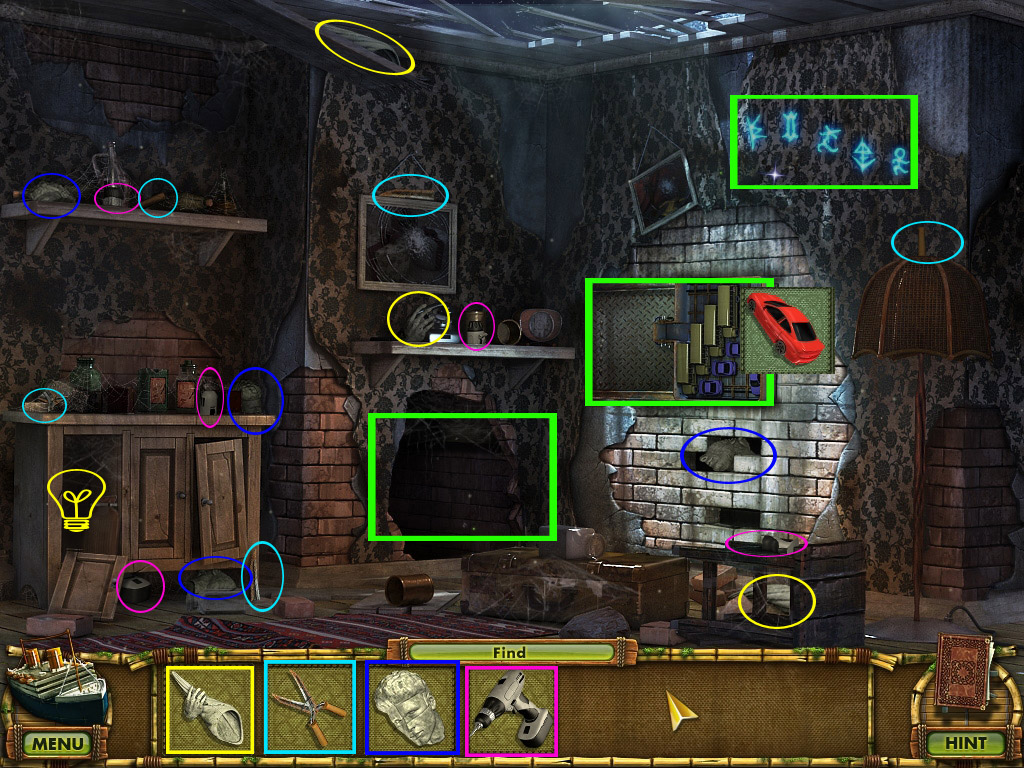
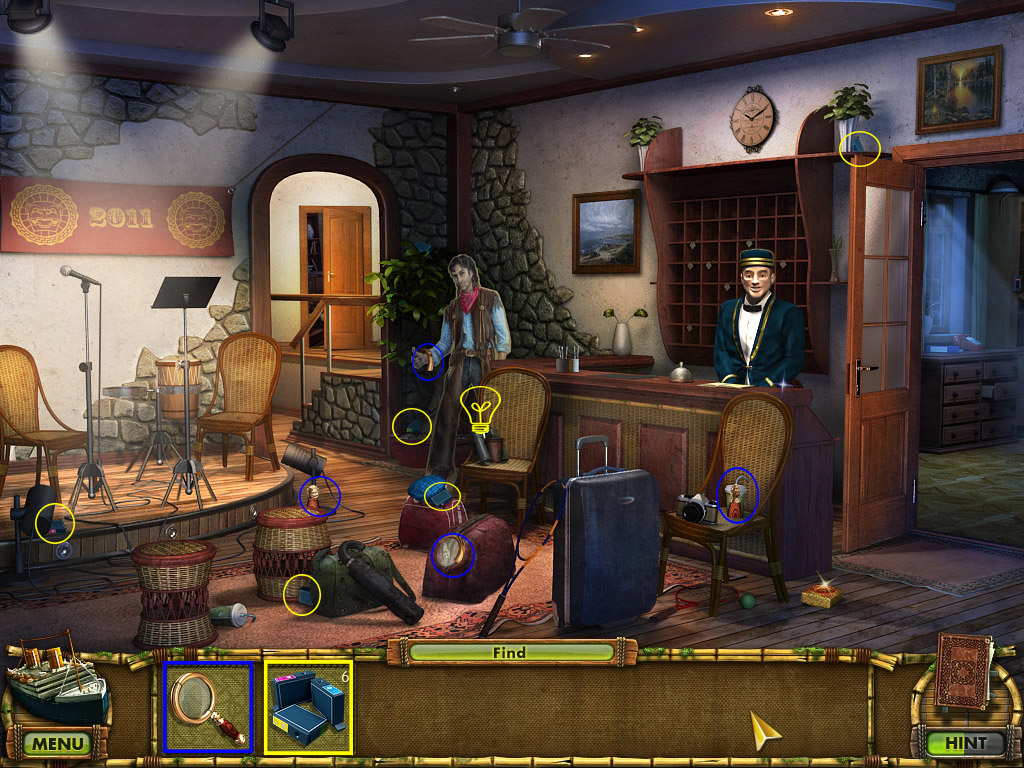
31. Hotel Lobby
Talk to the hotel clerk to learn that he needs five instruments.
Grab the rune (4/5) from the floor, low right side.
Find the 5 printer cartridges and the parts of the magnifying glass.
You will find the beyond item (20/56) (Cone/Cup) on the chair right next to the paper figure.
Screenshot
Go back 3x and to the right to Enrico's house.
32. Enrico's House/Enrico's Room
Find all parts of the tambourine.
Enter the house and find all parts of the banjo.
Screenshot
Go back once and then left to the school bus.
33. School Bus
Use the storage key (Spoiler 30) to open the storage compartment of the bus.
Zoom in on the open compartment and take the tire and the rune (5/5) out.
Screenshot
Go forward and enter the back of the truck.
34. Outside the Hotel/Truck
Find all parts of the trumpet.
Screenshot
Exit the truck and zoom in on the gate behind the ghost.
Place the 5 runes (Spoiler 26, 28, 30, 31, 33) in the empty slots.
Click the grid to activate a mini game.
Your goal is to arrange the pieces on the grid to match the pattern shown on the upper right panel. To do so, you want to click the buttons with the curved arrow.
Clicking a button will move all it surrounding runes. Please look at the screenshot to see which button you will have to click how often and in which order.
Screenshot
Enter through the now open gate.
35. Outside the Translator's House
Take the beyond item (21/56) (Brush/Wood Plane) from the roof above the left window.
Find the parts of all items; one part of the drum and one part of the shovel can't be found yet.
A magnet, watering can and ladle will go into your inventory.
Screenshot
Head right to the Garage.
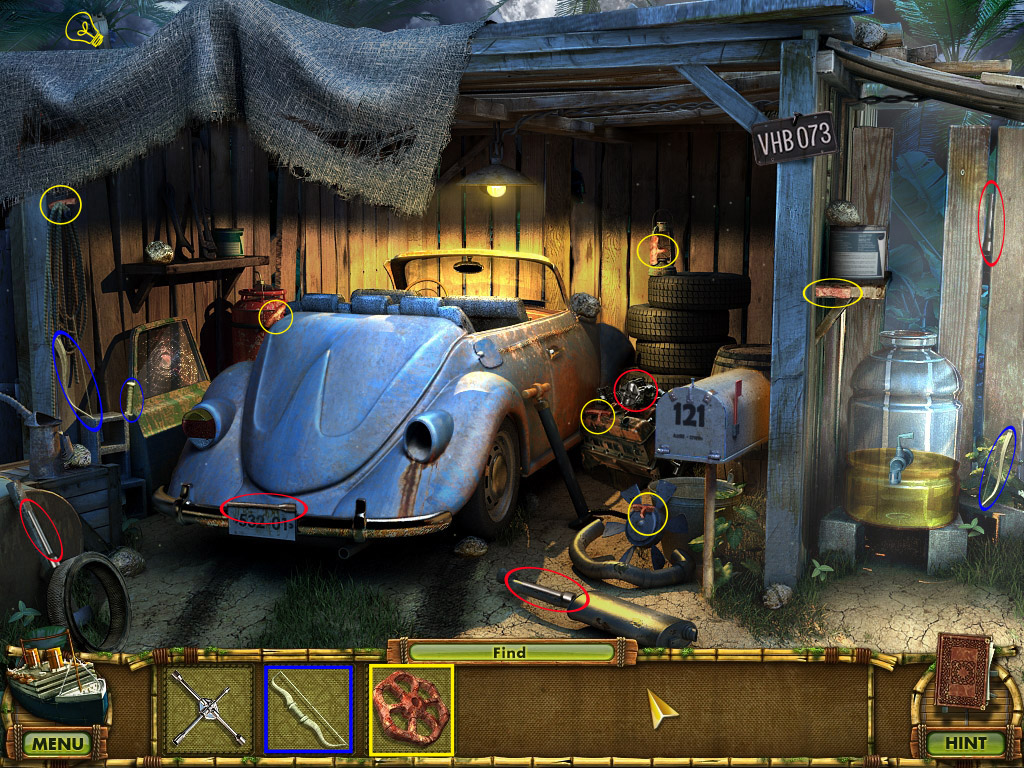
36. Garage
Grab the beyond item (22/56) (Owl/Wood) on the roof upper left side.
Find all parts of the items; one part of the valve can't be found yet.
The statue fragment and the tire iron will go into your inventory.
Screenshot
Back out four times to the Fountain.
37. Fountain/Enrico's House
Place the three Statue Fragments (Spoiler 29/36) on the Fountain and note that you will need some to turn the water on.
Head right to Enrico's House.
Place the Magnet (Spoiler 35) on the rope on the low right side - a magnet with rope will go back into your inventory.
Zoom in on the grate on the porch and use the magnet (Spoiler 35) with rope to get the nut.
You will have to remove the nut from the magnet.
Now you have nuts.
Go back to the Fountain and then left to the School Bus.
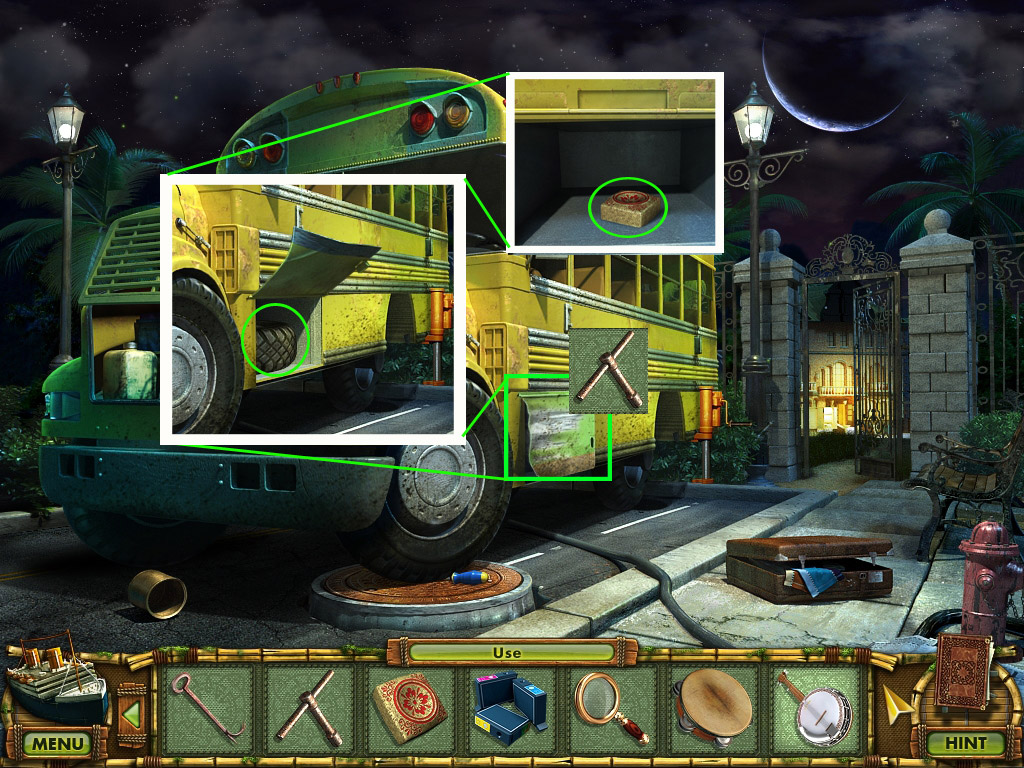
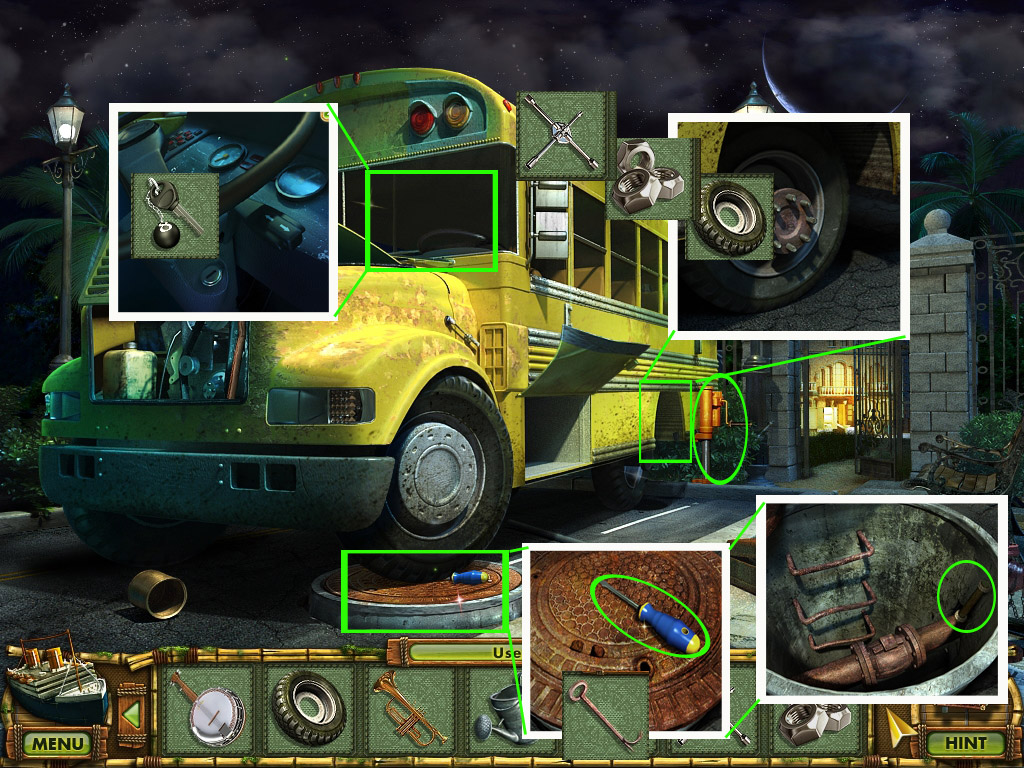
38. School Bus
Zoom in on the spot where the back tire should be.
Place first the tire (Spoiler 33), then the nuts (Spoiler 37) and fasten them with the tire iron (Spoiler 36).
Take the jack.
Zoom in on the windshield of the bus and use the key (Spoiler 29) with the ignition lock; click the key to start the bus.
Zoom in on the sewer and take the screwdriver; use the hook (Spoiler 30) to open the sewer.
Take the last part of the ladder.
Screenshot
Go forward 1x and through the gate on the right to Outside the Translator's House.
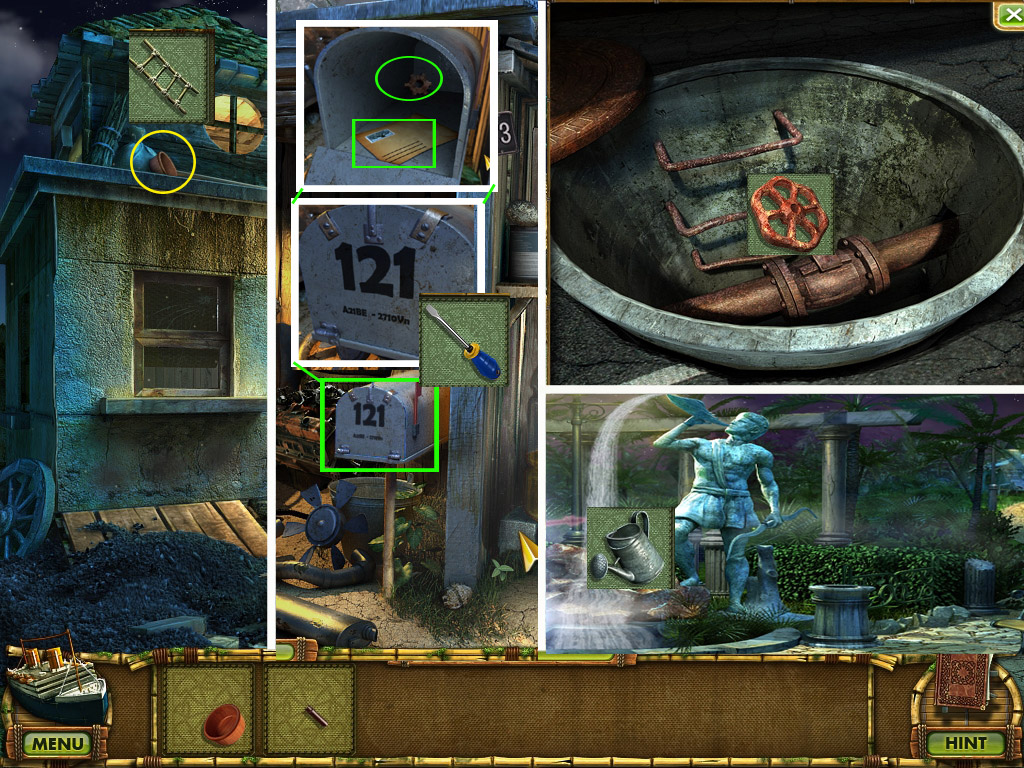
39. Outside the Translator's House/Garage/School Bus/Fountain
Place the ladder (Spoiler 38) at the upper window and grab the last part of the drum from the roof.
Go to the Garage and zoom in on the mailbox.
Use the screwdriver (Spoiler 38) to remove the screws.
Take the valve out and read the letter.
Return to the School Bus.
Zoom in on the sewer and place the valve.
Click the valve once.
Head back to the Fountain.
The fountain is working now; use the watering can (Spoiler 35) to fill it with water. The filled watering can goes back into your inventory.
Screenshot
Go right to Enrico's House.
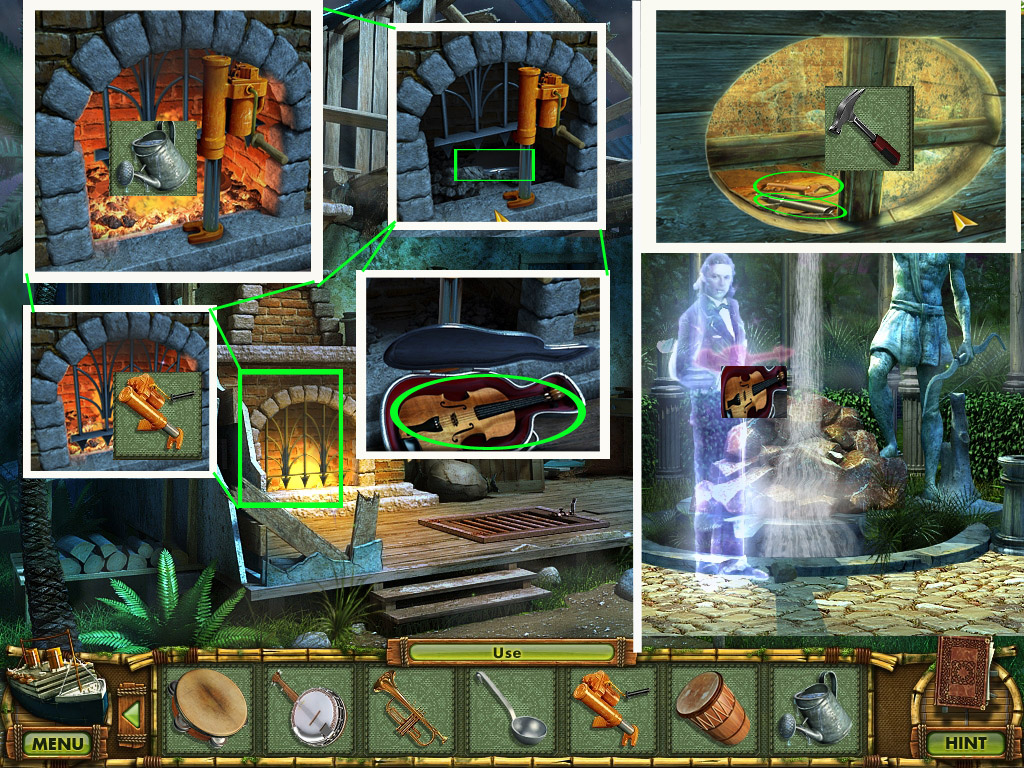
40. Enrico's House/Fountain/Outside the Translator's House
Zoom in on the fire place and use the jack (Spoiler 38) to raise the grate.
Click the jack once.
Use the filled watering can (Spoiler 39) to extinguish the fire.
Click into the ashes, then take the violin.
Return to the Fountain and hand over the violin to the ghost.
You will receive a wooden violist. Place the statue at its spot in the ship to obtain a hammer.
Go to the left and through the gate to Outside the Translator's House.
Zoom in on the upper window, use the hammer to smash the low left window part and take the key and the last part of the shovel.
Screenshot
41. Outside the Translator's House/Inside the Translator's House
Use the shovel (Spoiler 40) to remove the dirt on the cellar door, left side.
Zoom in to learn that you will need a wire cutter.
Zoom in on the door and use the key to open.
Enter the Translator's House.
Click the table lamp on the table at the window to get light.
Find all parts of the items; the butterflies, the accordion and the metal plate go into your inventory.
Screenshot
Grab the beyond item (23/56) (Briefcase/Book) from right next to the right table leg.
Exit the house and go back into the Hotel.
42. Hotel Lobby
Place the accordion (Spoiler 41), the drum (Spoiler 39), trumpet (Spoiler 34) tambourine (Spoiler 32) and the banjo (Spoiler 32) on the stage.
Talk to the clerk to get the access card.
Enter the room right to the hotel desk.
43. Manager's Office
Grab the beyond item (24/56) (Holster/Jar) on the top left shelf above the desk.
Find all parts of the oil lamp.
Zoom in on the keypad on the shelf on the far left and use the access card (Spoiler 42).
Zoom again on the shelf and note that the package is tightly knotted.
Screenshot
Exit the room and head left in the Hotel Lobby.
44. Jenny Stone's Room
Grab the beyond item (25/56) (Flask/Football)
Find the parts of the terrarium cover and all snakes.
Place the snakes into the terrarium on the right side and close it with the cover.
Screenshot
You will get two new objects.
Find the parts for the ballerina and the corkscrew.
Zoom in on the box on the table.
Place the ballerina into the slot on the box lid.
After she stops dancing, click the lid again and take the scissors.
Screenshot
Exit the room and head into the Manager's Office.
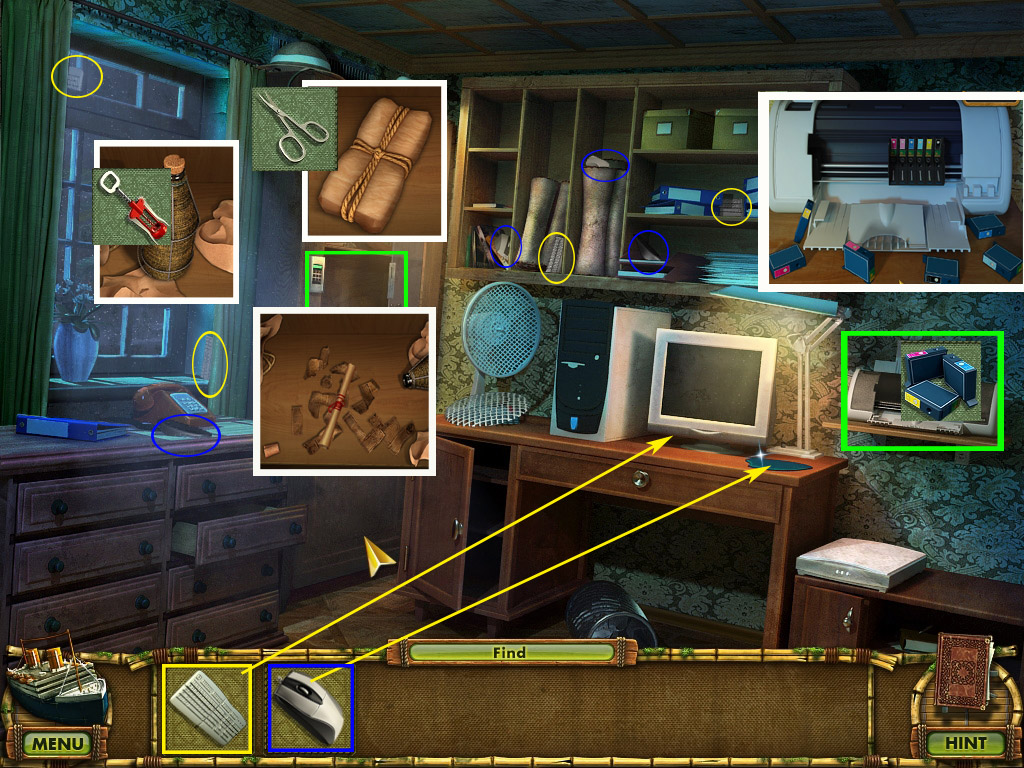
45. Manager's Office
Zoom in on the closet on the far left and open the package with the scissors (Spoiler 44).
You will find a bottle; open it with the corkscrew (Spoiler 44).
Read the scroll and take the scraps.
Get the printer cartridges (Spoiler 31) out of the inventory and use them to click the printer.
Place the cartridges in the colored slots according to the colors on the cartridges. Some players experienced a little issue here: Using the light blue cartridges last seems to make it impossible to fit. To solve this, click the "Close" button and click the printer again.
Place the cartridges again and make sure the light blue one is the first or second cartridge to place.
Click the desk in front of the monitor a couple of times to activate the search for a keyboard and a mouse.
Find all parts and place it on the desk.
Screenshot
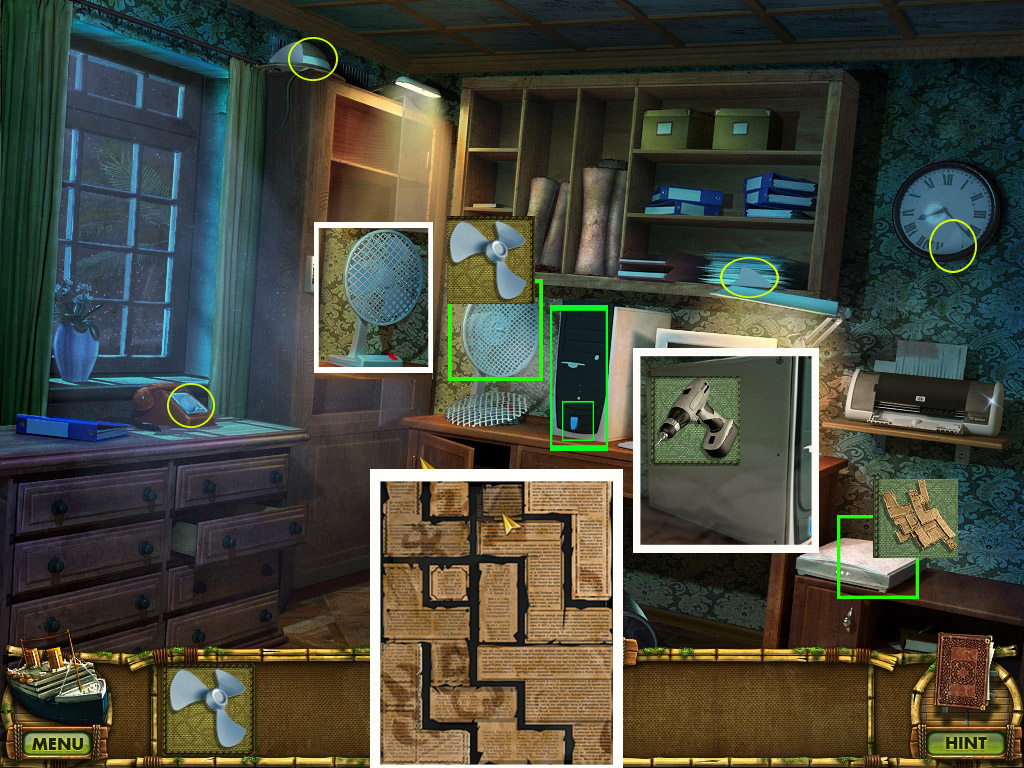
Now click the blue button at the computer to learn that it is hot.
Zoom in on the computer and remove the screws with the electric screwdriver (Spoiler 29).
Exit the close up and click the fan on the left, next to the computer.
Find all fan parts.
Use the fan blades with the fan; the cover will be placed automatically.
Click the red button of the fan; it will now cool down the PC.
Zoom in on the scanner and place the paper scraps on the right side.
Arrange the scraps on the left side so that they all fit without overlapping.
There are several solutions possible; the screenshot shows one of them.
Screenshot
Exit the hotel, go down twice to the Fountain and right to Enrico's House.
Enter Enrico's Room
46. Enrico's Room/Outside the Translator's House
Place the Oil lamp (Spoiler 43) at the hole in the wall and zoom in.
Take the pliers.
Exit to the Fountain and head left forward and then right to the Translator's House.
Zoom in on the cellar door and use the pliers to open it.
Enter the Cellar.
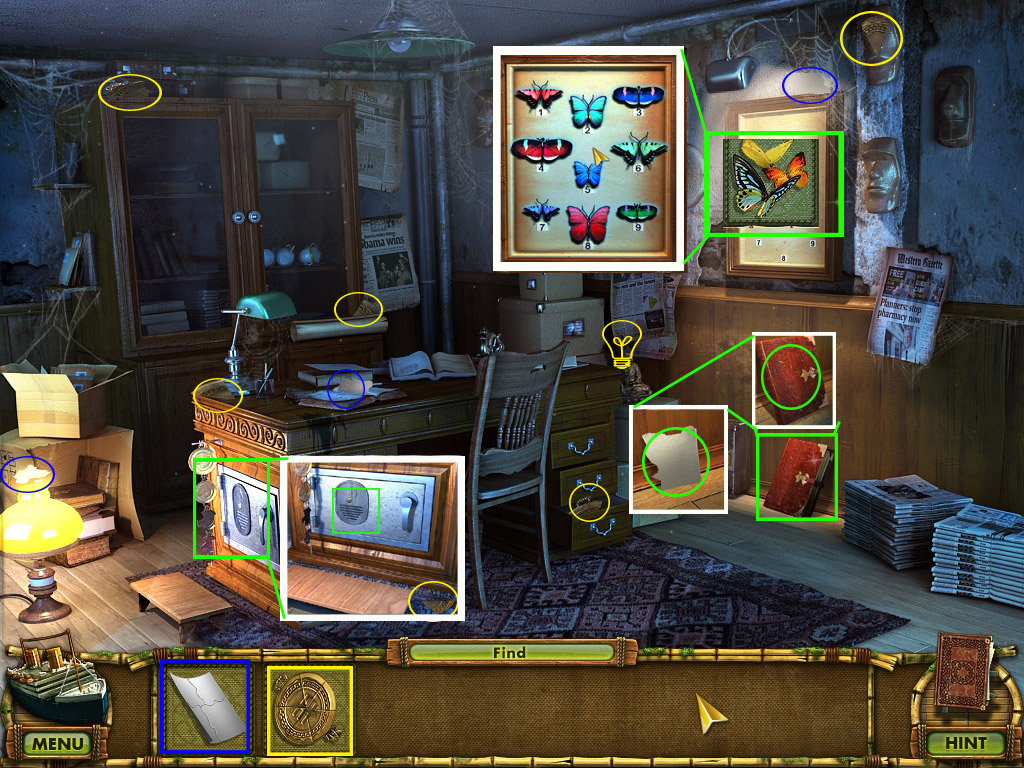
47. Cellar
Grab the beyond item (26/56) (Bell/Buddha) right next to the desk.
Find all parts to obtain a metal plate and paper.
When you zoom in on the safe on the side of the desk, you will find one part of the metal plate.
Click the safe to learn that it has an acoustic lock.
Zoom in on the book leaning against the wall right to the desk for one part of the paper.
Take the Polynesian dictionary.
Now you can see a piece of paper.
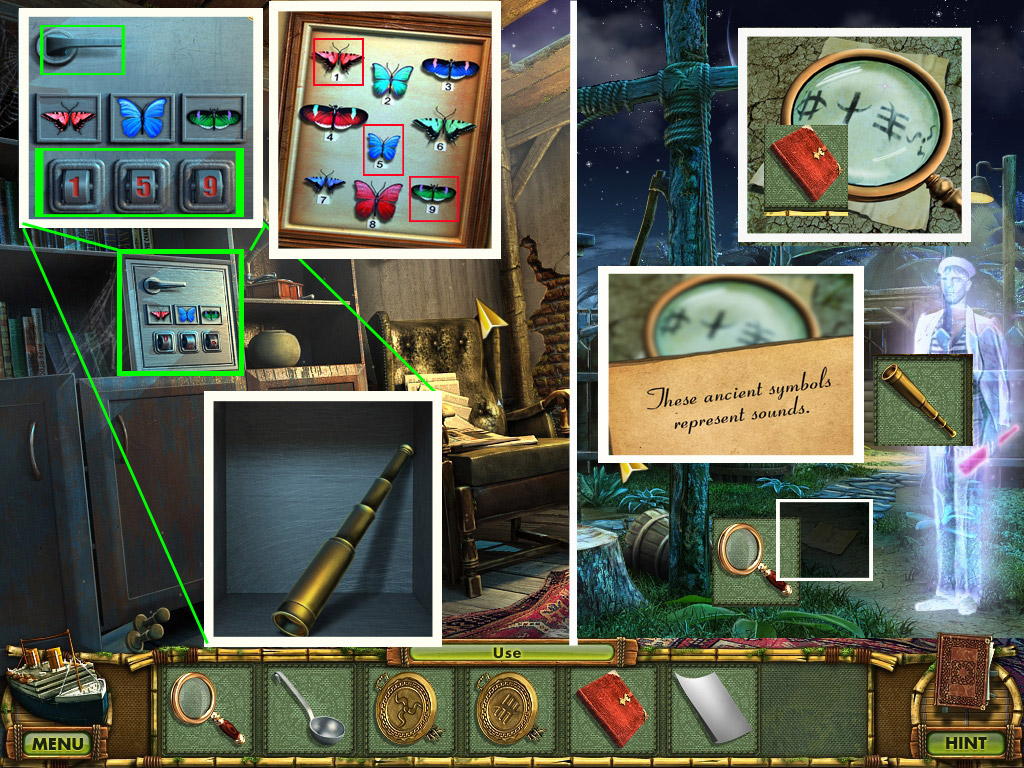
Use the butterflies (Spoiler 41) on the frame with numbers on the wall to activate a mini game.
Place the the butterflies from the left side into the according silhouettes on the left.
The result will be copied into your journal.
Screenshot
Exit the cellar and enter the Translator's House.
48. Translator's House
Zoom in on the safe on the left side and note that you have seen the butterflies before.
Look carefully at the three butterflies and open your journal.
Find the butterflies on the picture of the frame you completed in the cellar.
Note the numbers below the specific butterflies.
Change the numbers below the butterflies according to the number in your journal.
Click the handle to open the safe and take the spy glass.
Exit the house. You will now see a sailor ghost; give him the spy glass. He will drop down a note.
You will receive the wooden sailor - place it in its spot on the boat to obtain an audio tape.
Zoom in on the note on the ground and use the magnifier (Spoiler 31) to see the symbols more clearly.
Now use your Polynesian dictionary (Spoiler 47) to translate the note.
Screenshot
Exit the scene, enter the hotel and go right into the Manager's Office.
49. Manager's Office
Click the paper sheet (Spoiler 47) on the printer, then click the screen.
Press the right button to scan.
When the scanning is done, press the left button to print.
Use your dictionary to read the printed out symbols.
Leave the Hotel and enter the Truck
50. Truck/Outside the Hotel
Enter the truck and zoom in on the chest.
You will find the paper with the symbols in the upper left
Rotate the rings so that the symbols will match the note.
The chest opens. Grab the painting and the last part of the tape recorder.
Exit the scene.
Give the painting to the ghost.
Place the wooden painter into its spot on the ship to obtain a key.
Note the symbols, the painter left behind; zoom in and translate them with your dictionary (Spoiler 47).
Screenshot
Return to the Outside of the Translator's House.
51. Outside the Translator's House/Cellar
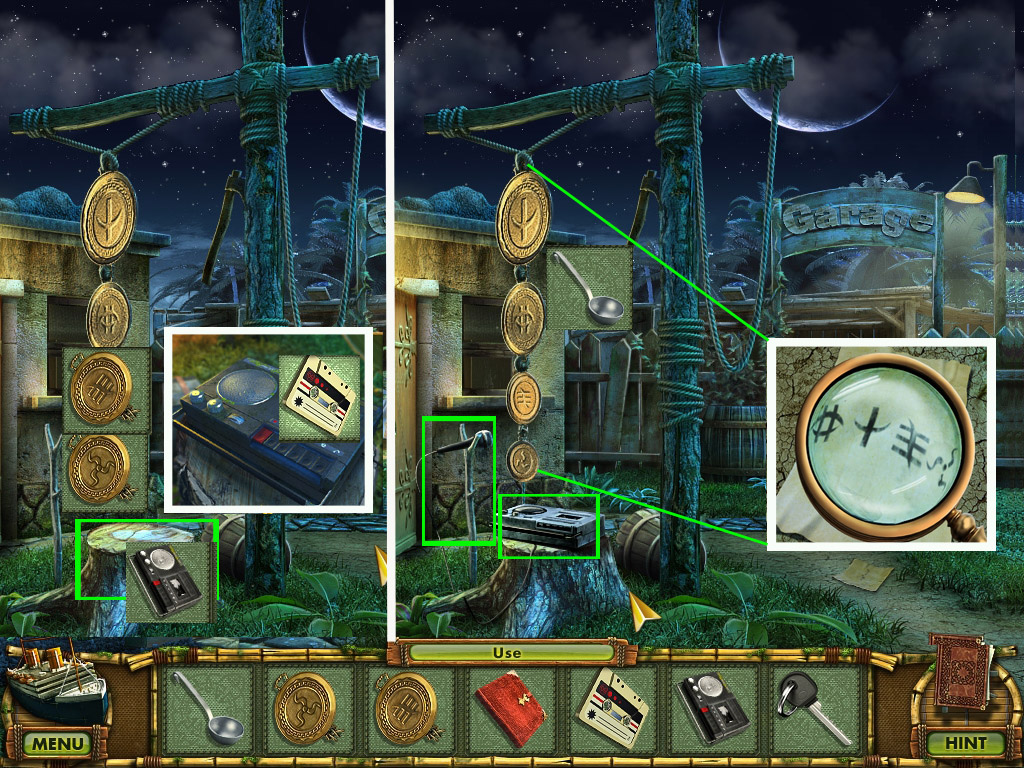
Place the two metal plates (Spoiler 41, 47) on the string with the other two plates.
Zoom in on the tree stump and place the tape recorder (Spoiler 50).
Press the very right button to open the tape compartment, place the audio tape (Spoiler 48) and click to close.
Press the red record button to learn that you will need a microphone.
Return to the Hotel Lobby and grab the microphone from the stage.
Return to Outside the Translators House and place the microphone on the left, next to the tree stump.
Zoom in on the tape recorder and press the red button to record.
Zoom in on the note on the ground the sailor left behind.
Use the ladle (Spoiler 35) to ring the metal plates in the same order the note shows.
Take the tape recorder.
Screenshot
Enter the cellar, zoom in on the safe and place the tape recorder on the foot bench.
Press the green play button and the safe will open.
Read the note to learn where you need to go next.
Screenshot
Exit the cellar and go back to the School Bus.
52. School Bus/Outside the Translator's House/Garage
Zoom in on the driver cell of the bus and click the ignition lock to learn that you need another car.
Exit the close up; look for all parts of the gas can (empty).
Go forward and left to Outside of the Translator's House and find all parts of the funnel.
Screenshot
Go right to the Garage.
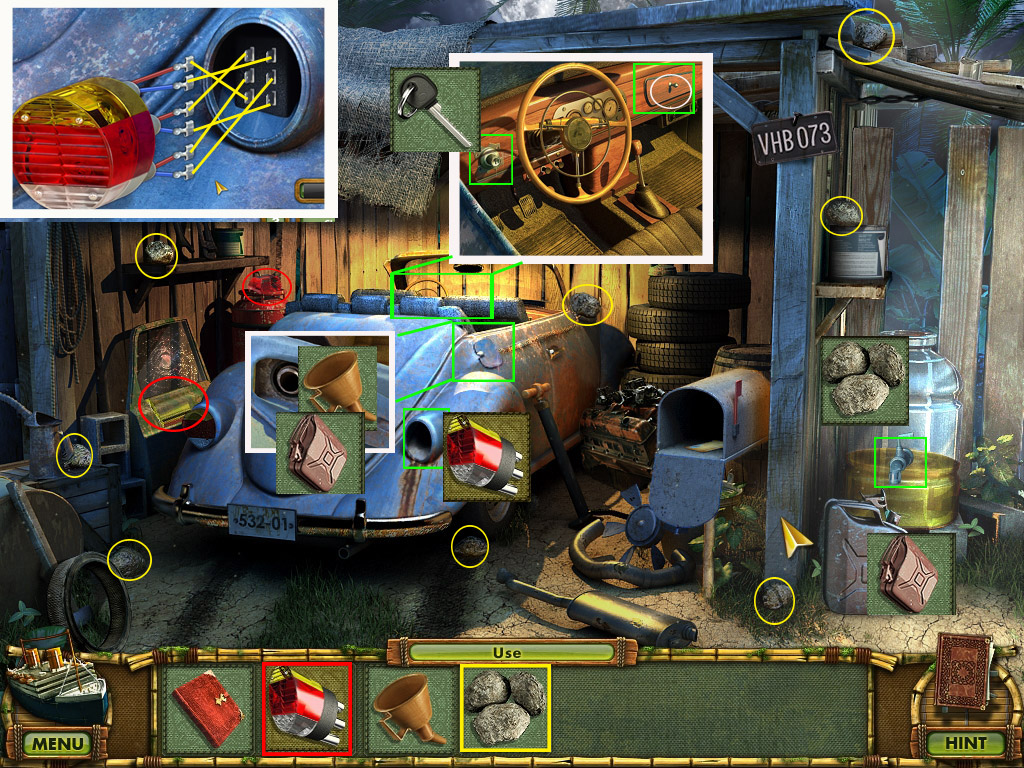
Place the empty gas can und the container on the right and click the tap to learn that you need stones to raise the gas to the right level.
Find 8 stones and use them with the gas container.
Click the tap to fill the gas can and take it into your inventory.
Zoom in on the gas cap of the car, place the funnel and use the filled gas can to fill the tank.
Look for the parts of the taillight; one part you will find if you zoom in on the car and open the glove compartment on the right.
Use the taillight with the car to activate a mini game.
Connect the wires so that all three sections of the taillight light up.
There is no hint or logic behind this puzzle; it is just trial and error.
Place wire 1 (seen from top to bottom) bottom left
top right
top left
bottom right
middle left
middle right
Screenshot
Now zoom in on the car and use the key (Spoiler 50) to start the car and end this chapter.
Posted by: Kayleigh |
April 11, 2011 12:30 PM
|
April 11, 2011 12:30 PM
Walkthrough Part 2: Chapters 3 and 4
Chapter 3: Central Part of the Island
53. Bridge
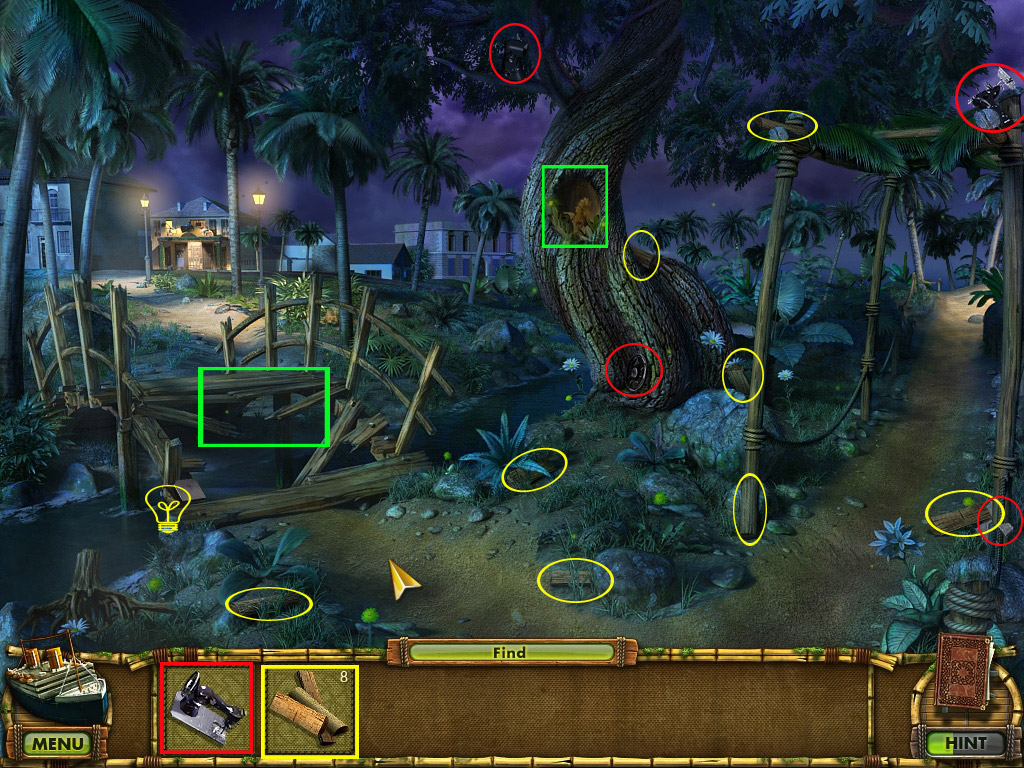
Grab the beyond item (27/56) (Frog/Stone) on the low left side.
Look for all parts of the sewing machine and for the 8 boards.
Zoom in on the hole in the tree in the middle and at the bridge.
Screenshot
Head right.
54. Outside Pyramid
Grab the beyond item (28/56) (Stone/Hair Dryer) on the low right side.
Find the parts of the curtain - one part of the wire can't be found yet.
You may look at the ghost, the cart, the top of the coconut tree and the entrance of the pyramid.
Screenshot
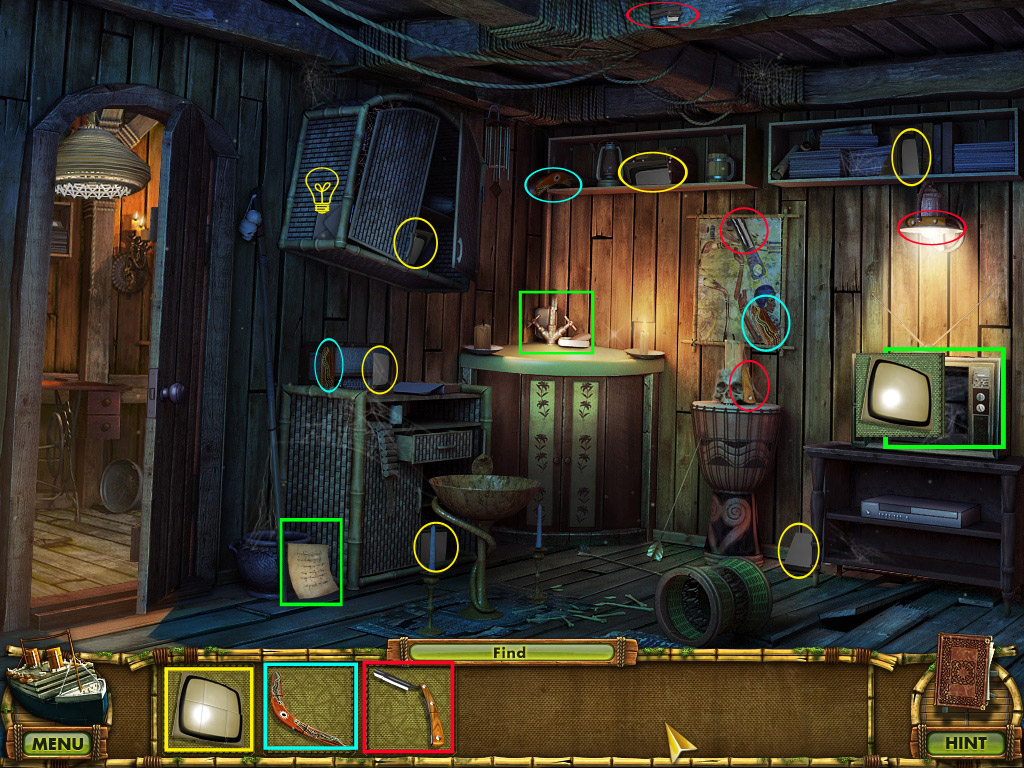
Go right to the Shaman's Room I.
55. Shaman's Room I
Grab the beyond item (29/56) (Envelope/Wall Outlet) from the left side of the hanging closet.
Find all parts of the boomerang, the TV and the razor.
Read the note on the low left side.
Place the TV on the TV rack to activate a mini game.
Screenshot
Your goal is to assemble the TV. You will have to do this in a certain order. Please look screenshot for the solution.
Screenshot
Exit the room to outside the Pyramid
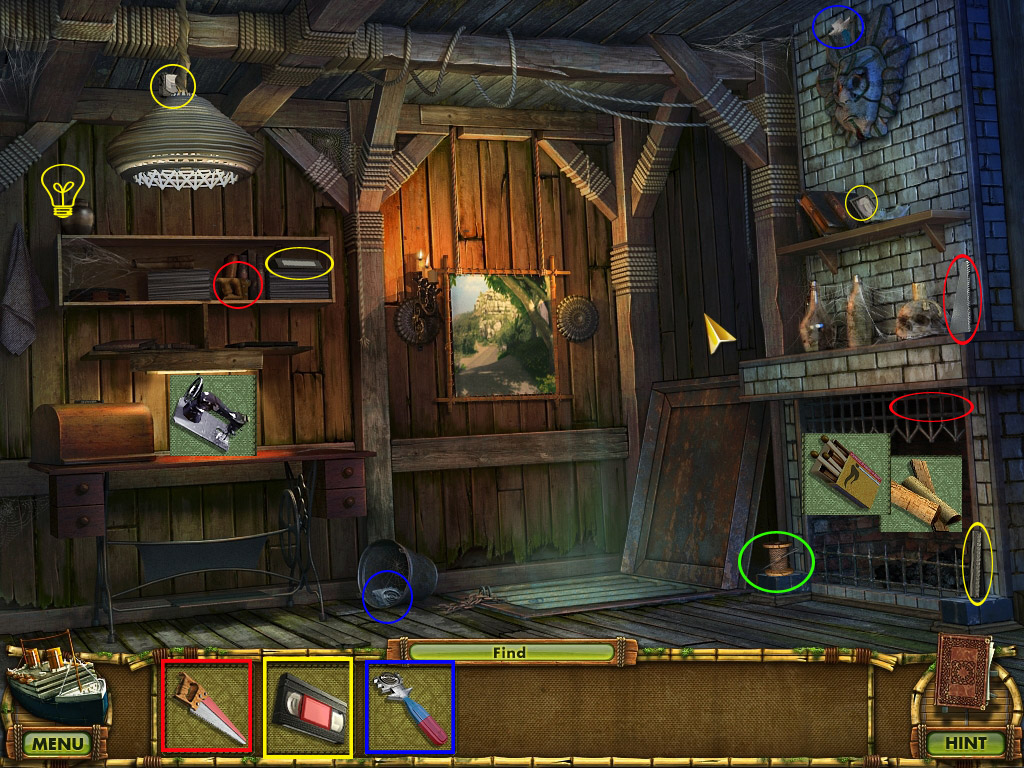
56. Outside the Pyramid/Shaman's Room II
Use the boomerang (Spoiler 55) on the top of the coconut tree.
A coconut falls down; zoom in.
Take the last part of the wire cutter and the match box.
Screenshot
Return to the Shaman's Room and go through the door on the left.
Place the wooden boards (Spoiler 53) into the fire place and light them with the matches (Spoiler 55).
Grab the thread on the floor on the left, in front of the fire place.
Place the sewing machine (Spoiler 53) on the table and use the thread with the machine.
Grab the beyond item (30/56) (Skull/Vase) on the shelf, left side.
Find all parts of the saw (last part can only be found AFTER you light up the fire). A part of the glass cutter and the last part of the video tape can't be found yet.
Screenshot
Exit to Outside the Pyramid
57. Outside the Pyramid/Bridge
Zoom in on the cart and use the saw to get a plank.
Go back to the bridge and use the plank at the bridge.
Head forward to Sunset Boulevard.
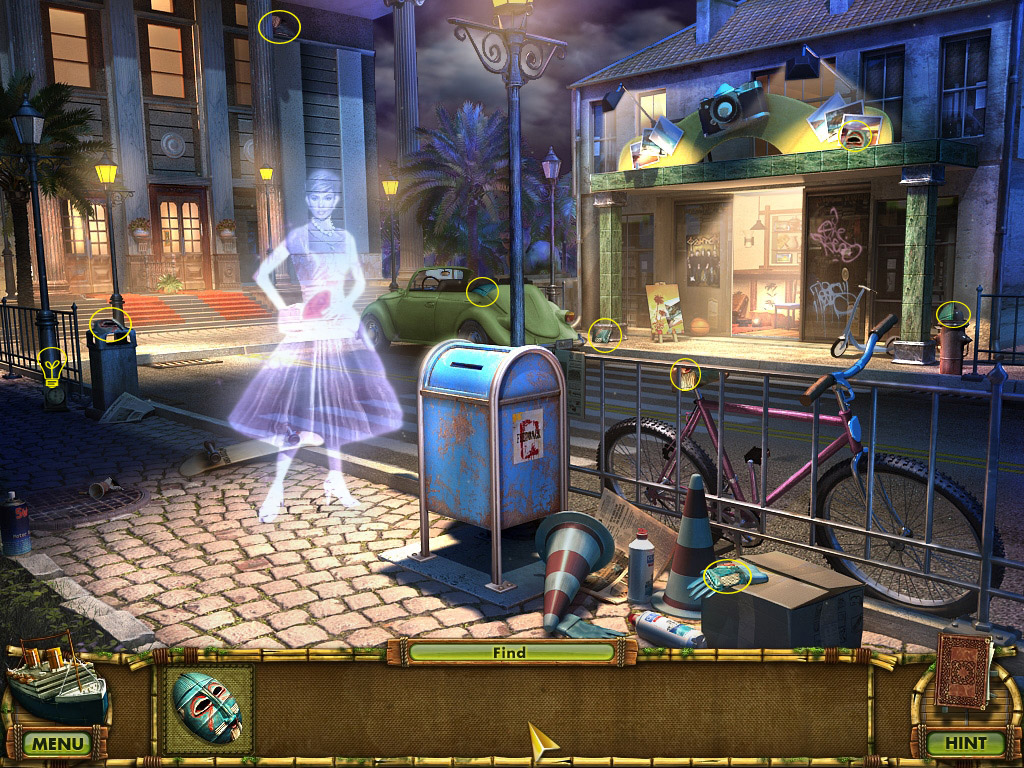
58. Sunset Boulevard/Museum Entrance
Grab the beyond item (31/56) (Clock/Barrel) at the bottom of the unlit lantern, far left.
Find all parts of the mask (1/3).
Screenshot
Go to the Museum Entrance on the far left.
Grab the beyond item (32/56) (Pyramid/Paper Ship), low right side.
Find all parts of the mask (2/3) and the hammer.
Screenshot
Exit to Sunset Boulevard and go right to the Photography Studio Reception.
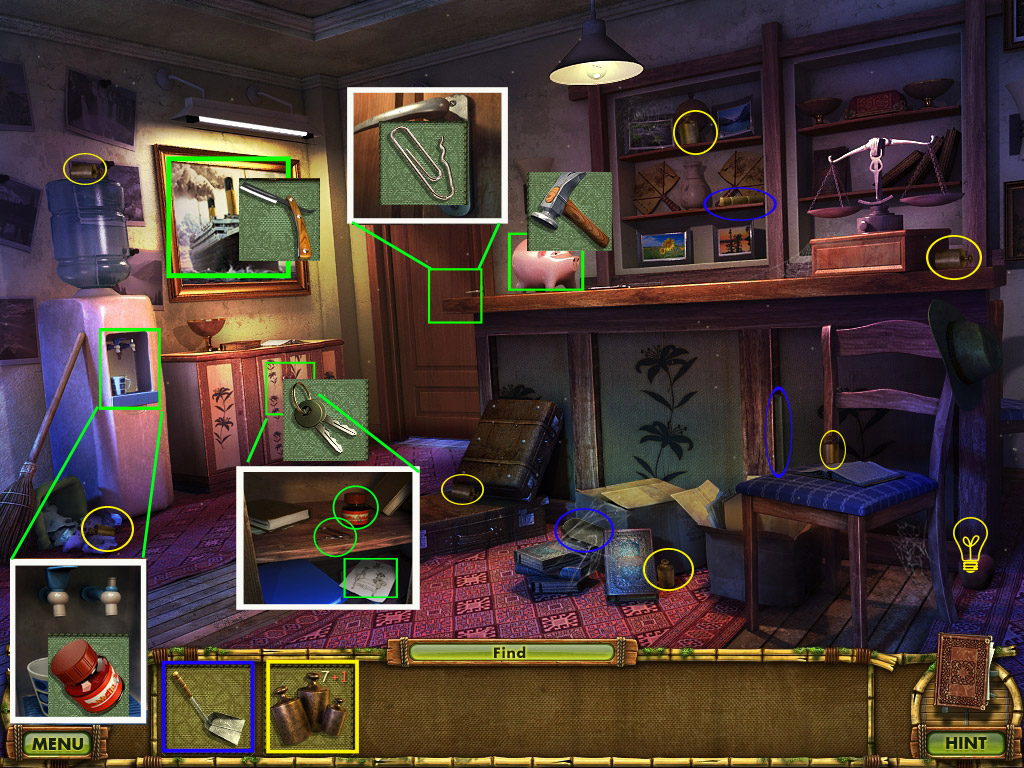
59. Photography Studio Reception
Grab the beyond item (33/56) (Apple/Flower), low right side of the reception desk.
Find the parts of the shovel and 7 weights; one weight and one shovel part can't be found yet.
Zoom in on the piggy bank on the reception desk and use the hammer to break it.
Take the key.
Use this key to open the closet on the left side.
Take look at the drawing, then take the paint and the paper clip.
Zoom in on the water dispenser on the left side and click the water tap.
When the cup is full, pour in the paint.
You can't take the cup yet, but note that there is now a cup with red paint.
Use the razor (Spoiler 55) to cut out the painting of the Queen Mary and find a safe.
Zoom in on the door on the far left and use the paper clip to pick the lock.
Screenshot
Go through the door to enter the Photography Studio
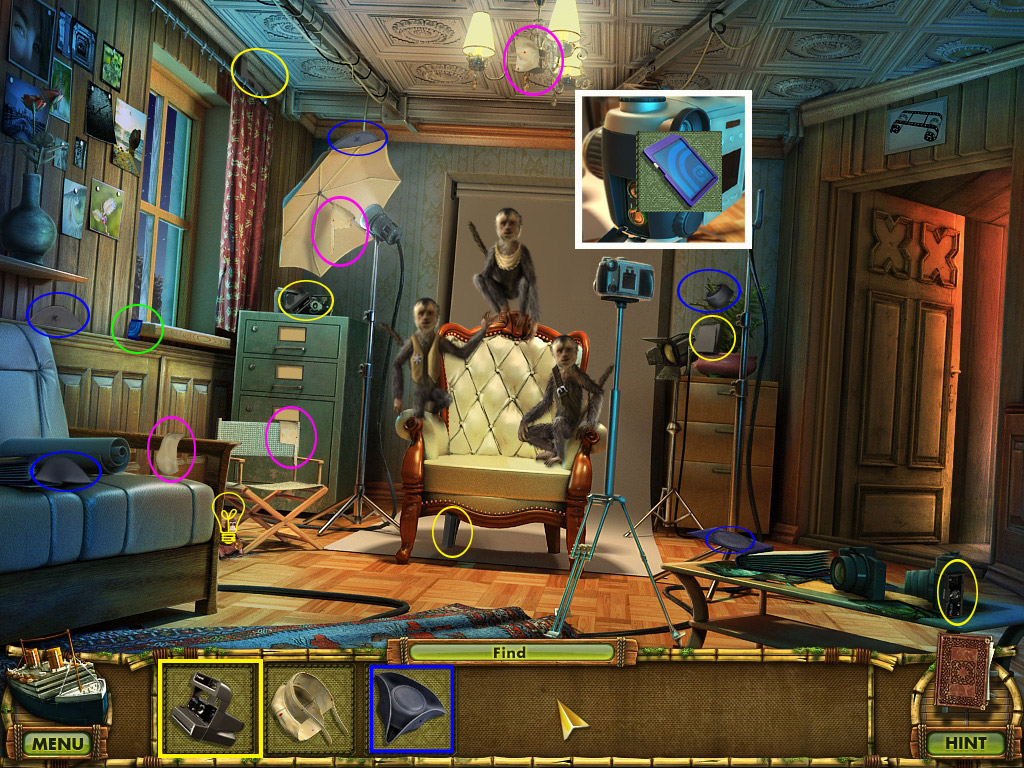
60. Photography Studio
Grab the beyond item (34/56) (Monkey/Pencil Holder) on the ground right next to the chair.
Take the flash drive from the left side of the windowsill.
Find all parts to obtain an instant camera, a night cap and a hat.
Zoom in on the camera on the right, next to the monkeys, and click on the left side to open it.
Place the flash drive.
Screenshot
Go through the right into the Laboratory.
61. Laboratory/Shaman's Room II
Grab the beyond item (35/56) (Brick/Jewel Box).
Take the safety pin from the table on the right side.
Find all parts of the cowboy hat and the spot light.
Screenshot
Place your cursor on the cowboy hat to learn that the hat is torn.
Go back 4x, then to the right, forward and left in the Shaman's Room II.
Place the torn hat on the sewing machine (if you have not done that yet, please see Spoiler 56).
The repaired cowboy hat will go into your inventory.
Return to the Photography Studio.
62. Photography Studio/Museum Entrance
Place all hats (Spoiler 60, 61) on the heads of the three monkeys according to their costumes.
If you get the message that the cowboy hat is torn, please see Spoiler 61)
Use the curtain (Spoiler 54) on the window and close both curtains with the safety pin (Spoiler 61).
Place the spot light (Spoiler 61) on the empty stand right next to the monkeys.
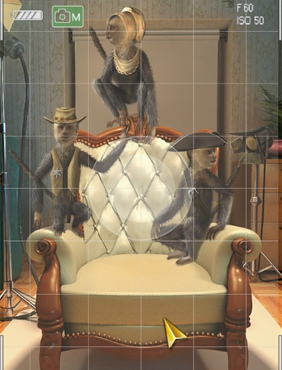
Click the camera to activate a mini game. Your goal is to make three pictures of three monkeys looking into the camera.
They will move their heads; click as soon as you see all three faces looking at you. There is no limit for wrong clicks, but at the end you will need to have three pictures.
Screenshot
One picture will go into your inventory.
Exit the house and go to the Museum Entrance on the far left.
Zoom in on the ticket booth and place the photo.
The door to the Museum will open automatically.
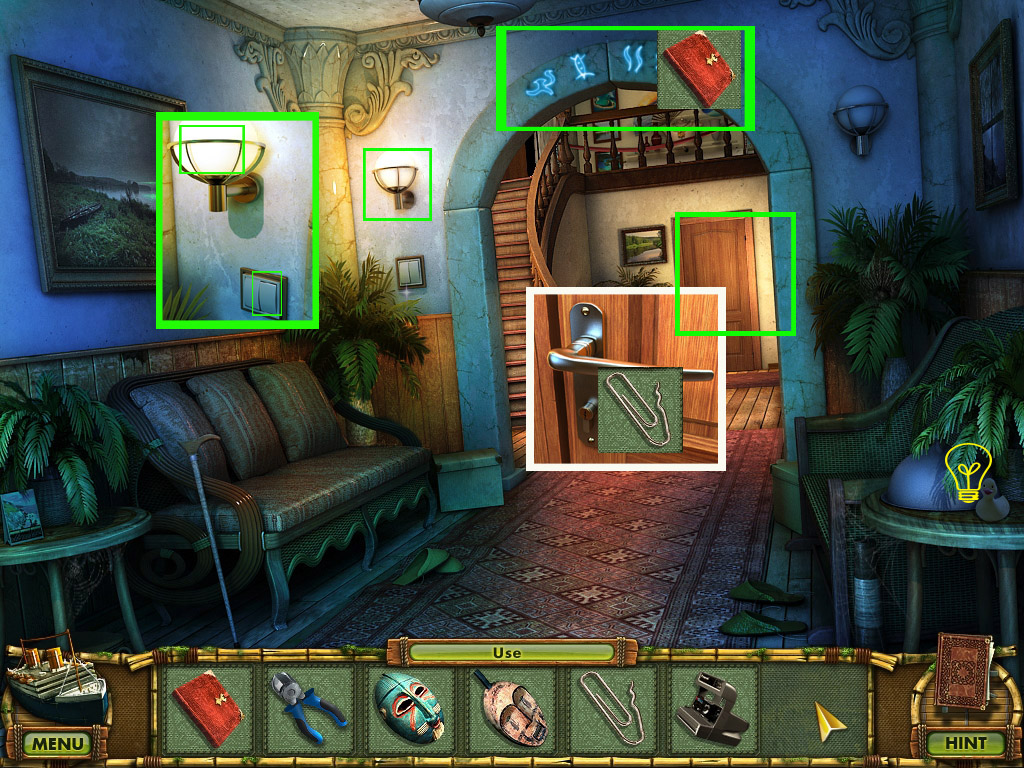
63. Museum Foyer
Grab the beyond item (36/56) (Pear/Duck) from the low right corner.
Use the dictionary on the symbols on the arch.
Zoom in on the left wall lamp.
Click the switch to turn the light off; remove the lamp shade and take the light bulb.
Zoom in on the door at the end of the hall and use the paper clip (Spoiler 59) to pick the lock.
Screenshot
Enter the Museum Archive.
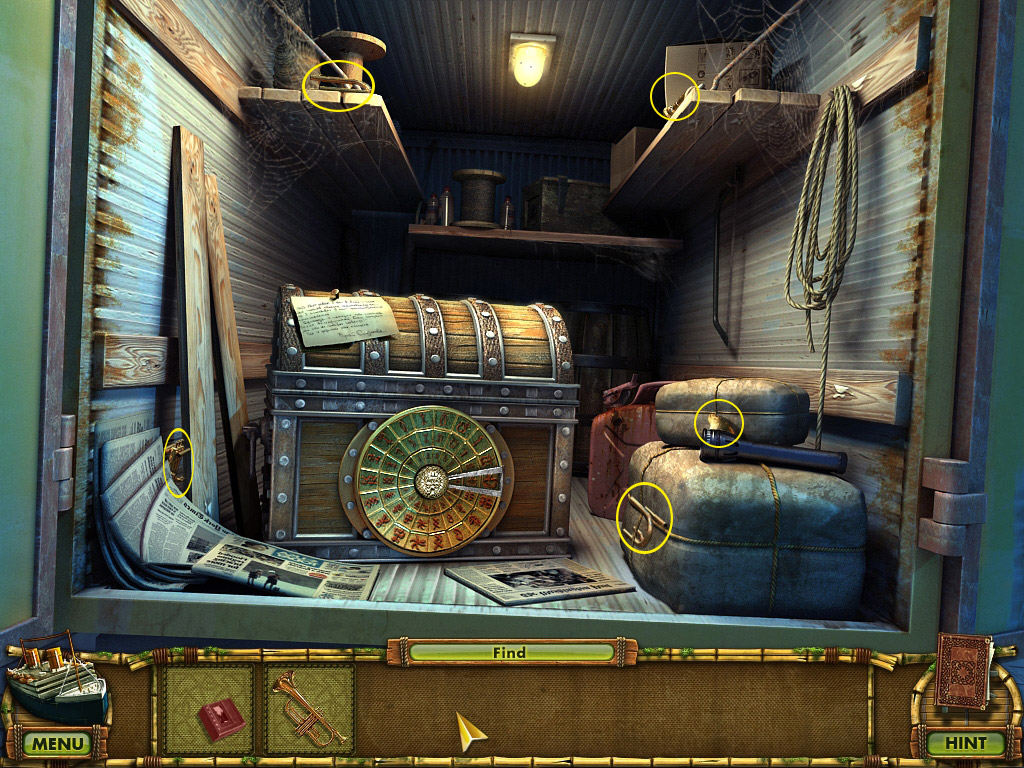
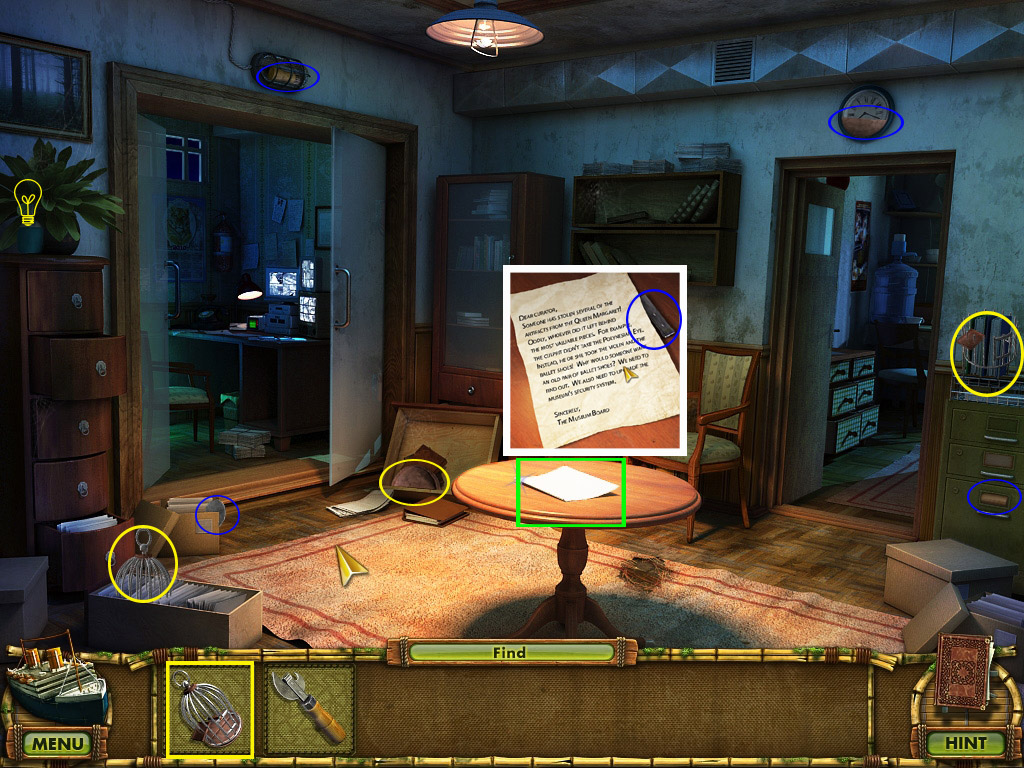
64. Museum Archive
Grab the beyond item (37/56) (Bottle/Vase) from the top of the file cabinet on the left side.
Find the parts for the bird cage.
To find the last part of the can opener zoom in on the note on the table.
Take the part and read the note.
Screenshot
Enter Security through the right door.
65. Security
Grab the beyond item (38/56) (Baseball Glove/Bread Basket) from the ground, left side under the desk.
Find the parts of the glue and the tweezers; one part of the stethoscope can't be found yet.
Place the cage on the cabinet left and click it to learn that you will need seeds.
Return to the bridge, zoom in on the hole in the tree and grab the grain.
Return to Security and place the grain in the cage.
The parrot from the cabinet on the far right will fly into the cage.
Grab the key he drops on the cabinet.
Use the key to open the cabinet on the far right.
Take the flask and the last part of the stethoscope.
Screenshot
Back out twice and head up the stairs.
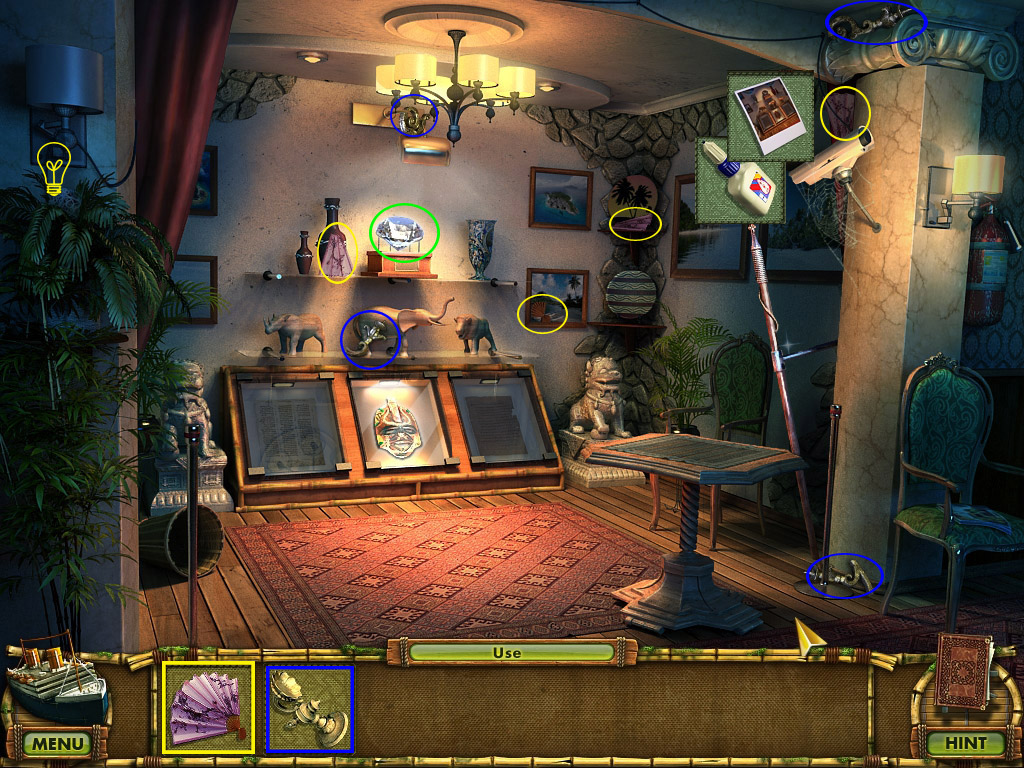
66. Exhibit
Click the instant camera (Spoiler 60) somewhere in the room; a photo of the exhibit goes into your inventory.
Use the glue (Spoiler 65) at the top of the spear in front of the security cam.
Place the photo of the exhibit at the glue.
Now you can look for the item parts.
Find all parts of the fan and the candle stick
Grab the huge diamond in the back.
Grab the beyond item (39/56) (Thread/Yarn Ball) from the plant on the left.
Screenshot
Exit the Museum to the Sunset Boulevard
67. Sunset Boulevard/Bridge
Give the diamond to the ghost. You will get a wooden girl.
Place the wooden girl in her spot on the ship to obtain a lamp.
Zoom in on the mailbox on the right side and use the can opener (Spoiler 64) to open it.
Click the note and use the dictionary to translate the symbols. The recipe will be copied to your journal.
Back out to the Bridge and find the 10 mushrooms.
Screenshot
Go forward and enter the Photography Studio Reception.
68. Photography Studio Reception
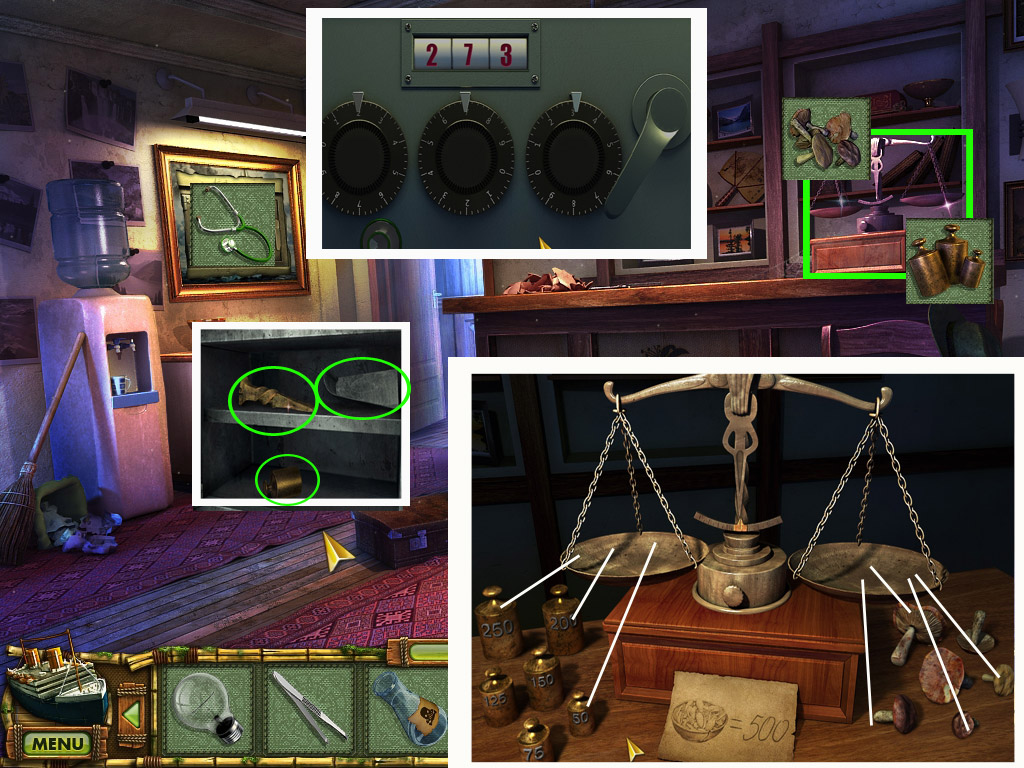
Use the stethoscope (Spoiler 65) on the safe to activate a mini game.
Your goal is to open the safe by turning the dials.
You will see the stethoscope highlight when you are on the right number; stop turning (if you play with sound you will hear a "click") and do the same with the other two dials.
The safe will open automatically when all three numbers are right (273).
Take the last weight, the last part of the coal shovel and the chisel.
Click the weights on the left side of the scale on the reception desk and the mushrooms (Spoiler 67) on the left side to activate a mini game.
Your goal is to get 500 gram of mushrooms. Place the weights of 200, 250 and 50 gram on the left scale.
Now place mushrooms on the scale until it is balanced.
500 gram mushrooms will go into your inventory.
Screenshot
Exit to the Sunset Boulevard and head back to Outside of the Pyramid
69. Outside of the Pyramid/Shaman's Room II
Give the chisel to the ghost and you will get a wooden sculptor.
Place the wooden sculptor on its spot on the ship to obtain a mask (3/5).
Zoom in on the coconut on the ground and take it.
Go right and enter Shaman's Room II.
Place the candle stick on the right, next to the painting on the wall, and click to turn it.
The painting rises; take the last part of the video tape and the last part of the glass cutter.
Use the shovel (Spoiler 68) to get some burning coal from the fire place.
Zoom in on the Cellar door and place the coal on the chain.
Now you can use the wire cutter (Spoiler 56) to break the chain.
Screenshot
Go down in the Cellar.
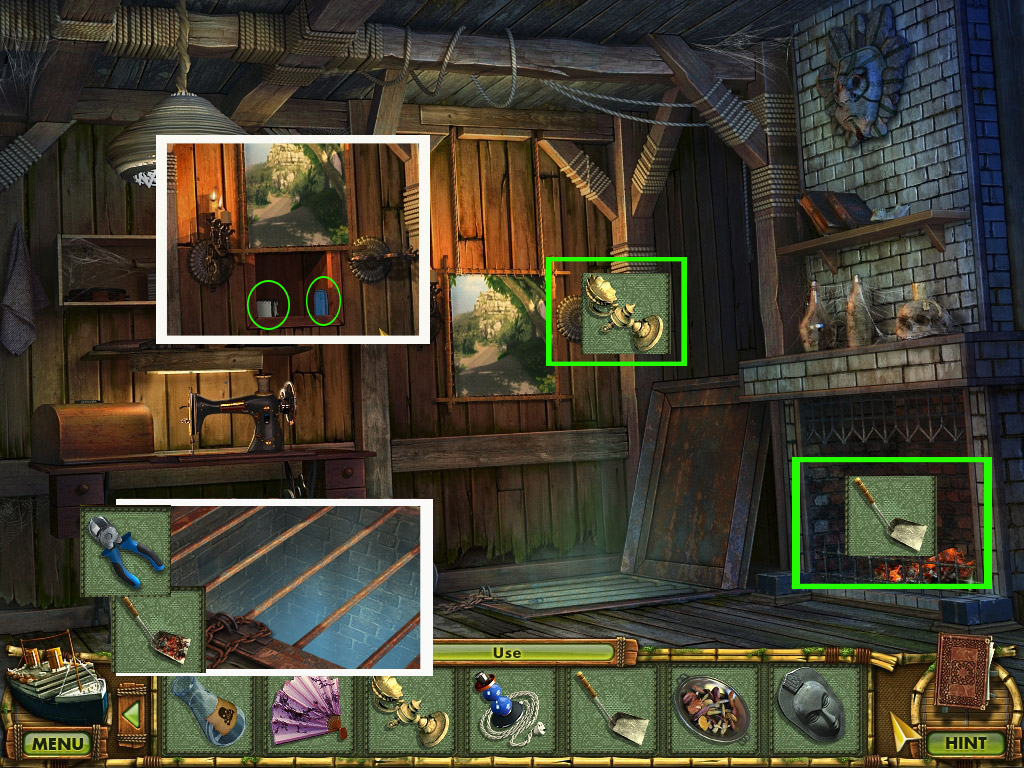
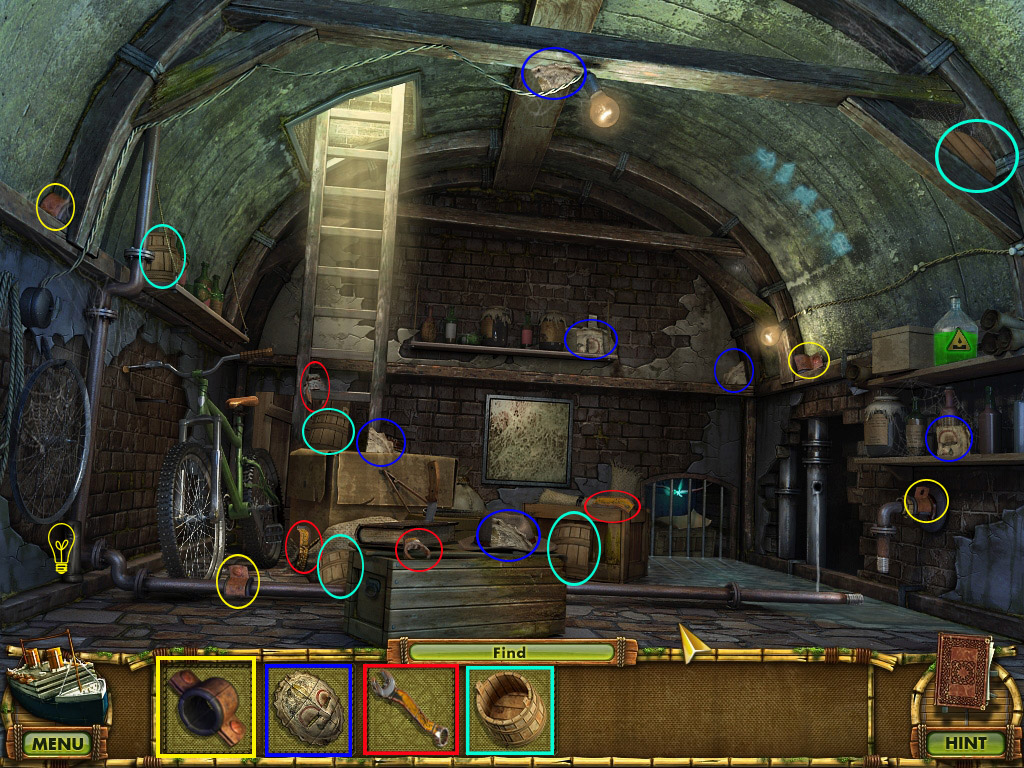
70. Cellar
Grab the beyond item (40/56) (Bottle/Spray can) from the pipe, low left side.
Find all parts to obtain a mask (4/5), a pipe joint, a bucket and a wrench.
Screenshot
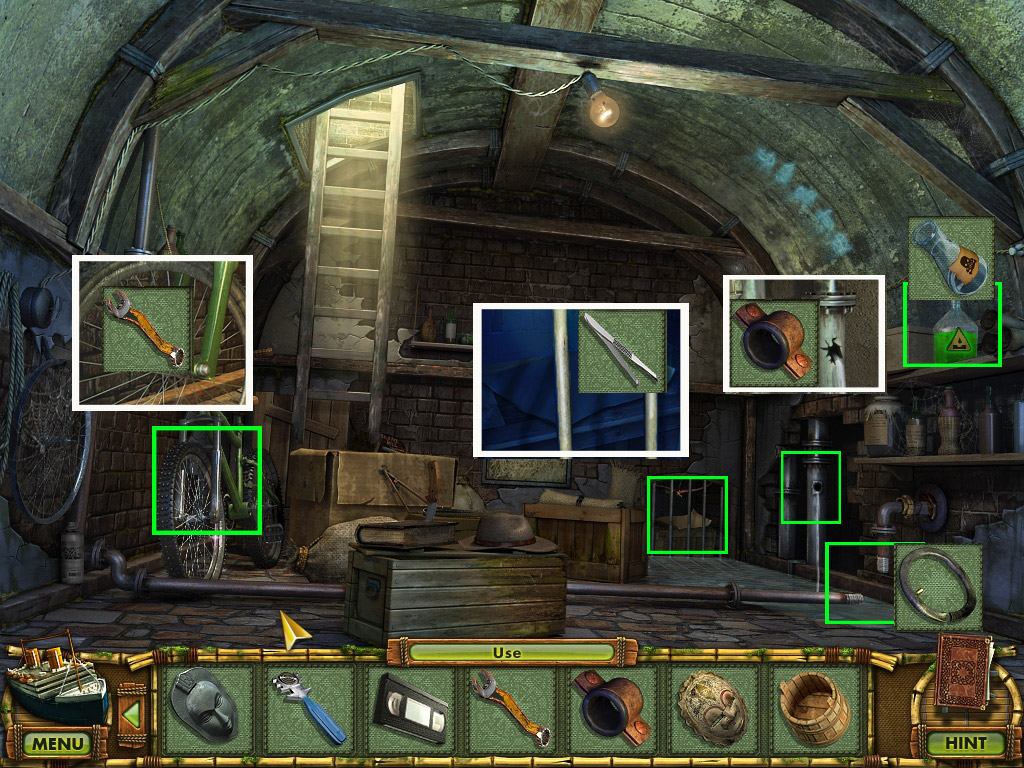
Zoom in on the bicycle on the right and use the wrench at the front axle to obtain a bicycle tire.
Zoom in on the gated compartment on the far right and use the tweezers (Spoiler 65) to get the faded piece of paper.
Zoom in on the leaking pipe on the right side and close it with the pipe joint.
Click the flask (Spoiler 65) to obtain acid.
Place the bicycle tire between the pipes to connect them.
Screenshot
Use the ladder to go upstairs and then into Shaman's Room I.
71. Shaman's Room I
Zoom in on the sink on the far left and click the faucet to let the water flow.
Place the bucket (Spoiler 70); a bucket filled with water will go automatically filled into your inventory.
Place the video tape (Spoiler 62) into the video recorder below the TV and look the video.
Go all the way back to the exhibit and use the glass cutter on the showcase with the mask, far middle.
Take the mask (5/5) and return to Outside the Pyramid
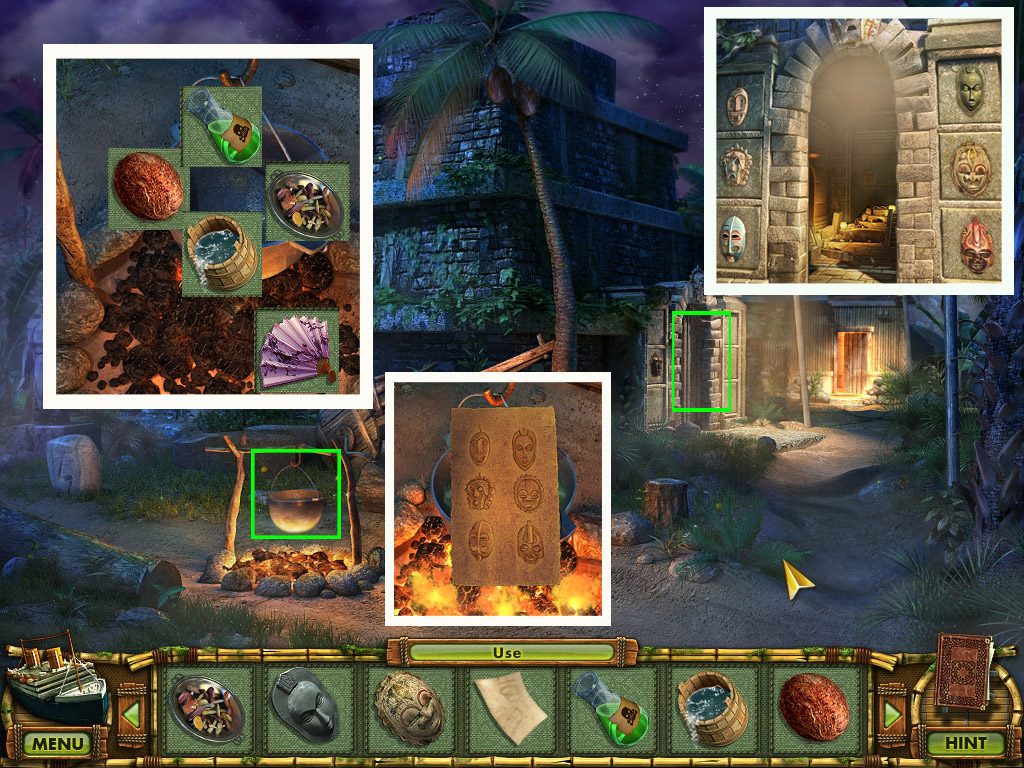
72. Outside the Pyramid
Zoom in on the cauldron on the fire place.
Pour water (Spoiler 71) into the cauldron; add coconut (will open itself for pouring the milk) (Spoiler 69), acid (Spoiler 70) and the 500 grams mushrooms (Spoiler 69) into the cauldron.
Use the fan (Spoiler 72) to heat the coals.
When the liquid is boiling, place the faded piece of paper (Spoiler 70) onto it.
A scheme of masks will appear and be copied into your journal.
Zoom in on the pyramid entrance on the left.
Place all five masks (Spoiler 58, 69, 70, 71) on the stones and arrange them according to the pattern on the paper.
Screenshot
The door opens... enter Inside the Pyramid
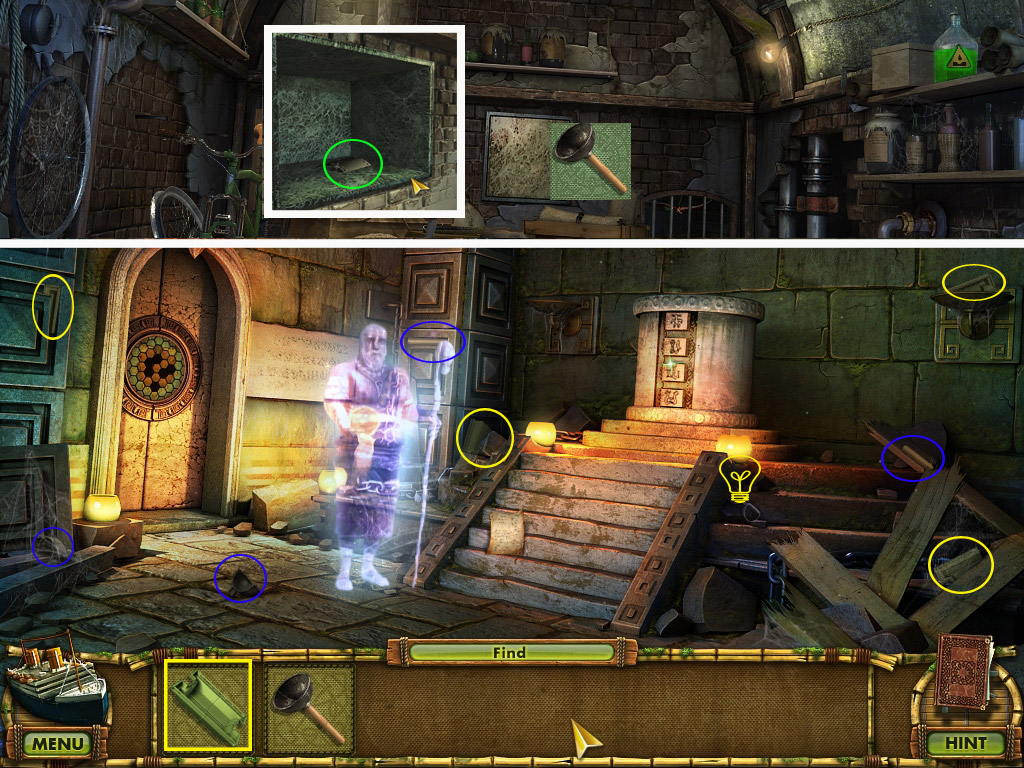
73. Inside the Pyramid/Cellar
Grab the beyond item (41/56) (Mask/Helmet) on the right, next to the stairs.
Read the note on the stairs.
Use the dictionary to translate the symbols on the wall behind the ghost.
Find all parts to obtain a tray and a plunger.
Exit the Pyramid and return to the Cellar.
Zoom in on the plate on the back wall and use the plunger to remove it.
Take the photo negative out of the compartment.
Screenshot
Go back to the Laboratory in the Photography Studio Reception.
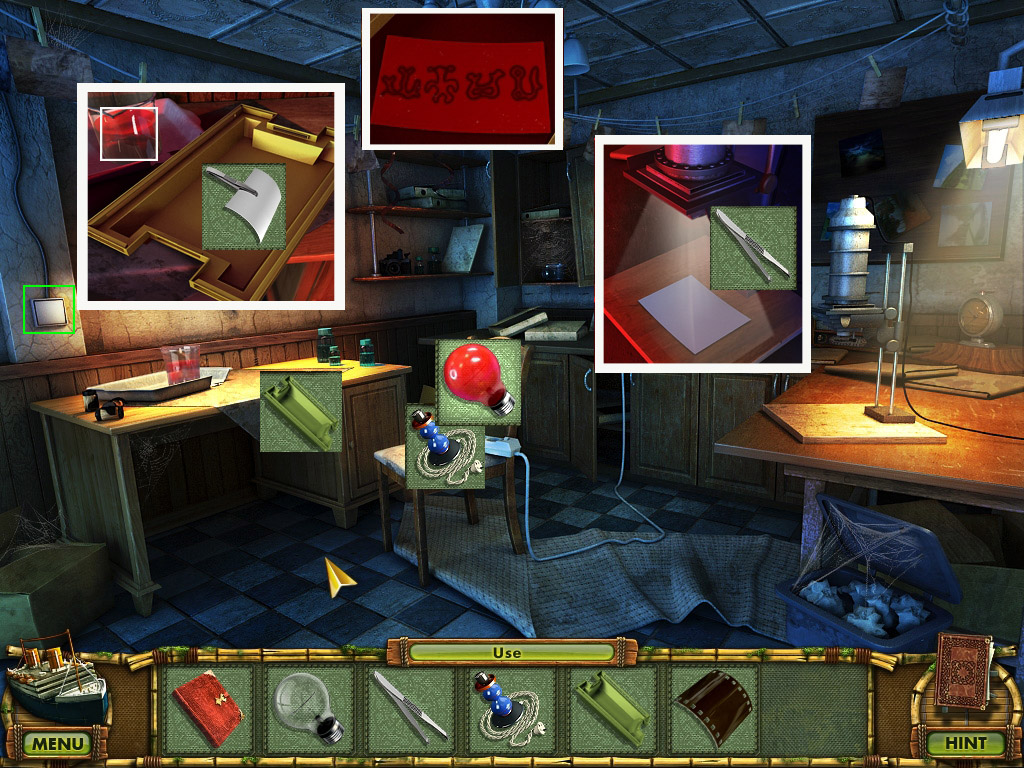
74. Photography Studio Reception/Laboratory
Zoom in on the water dispenser and dip the light bulb into the cup with red paint.
The red light bulb will go into your inventory automatically.
If you do not have a cup with red paint yet please see Spoiler 59.
Go forward and right into the Laboratory.
Place the lamp (Spoiler 67) on the power strip on the chair.
Place the red light bulb on the lamp and press the light switch on the left wall.
Put the photo negative (Spoiler 73) onto the board.
A photo will be made; use the tweezers (Spoiler 65) to take it away.
Click the tray (Spoiler 73) on the table, left side, and zoom in.
Click the jar with the red liquid and place the photo into the liquid.
The development shows symbols; the symbols will be copied into your journal.
Screenshot
Return to Inside the Pyramid
75. Inside the Pyramid
Zoom in on the pedestal on the back wall and press the buttons in the order shown on the developed photo.
A beam with a skull inside will raise above the pedestal. Take the skull and give it to the ghost.
You receive a wooden shaman. Place the wooden shaman on its spot in the ship to obtain runes.
When you exit the ship you will first have to search for two stakes.
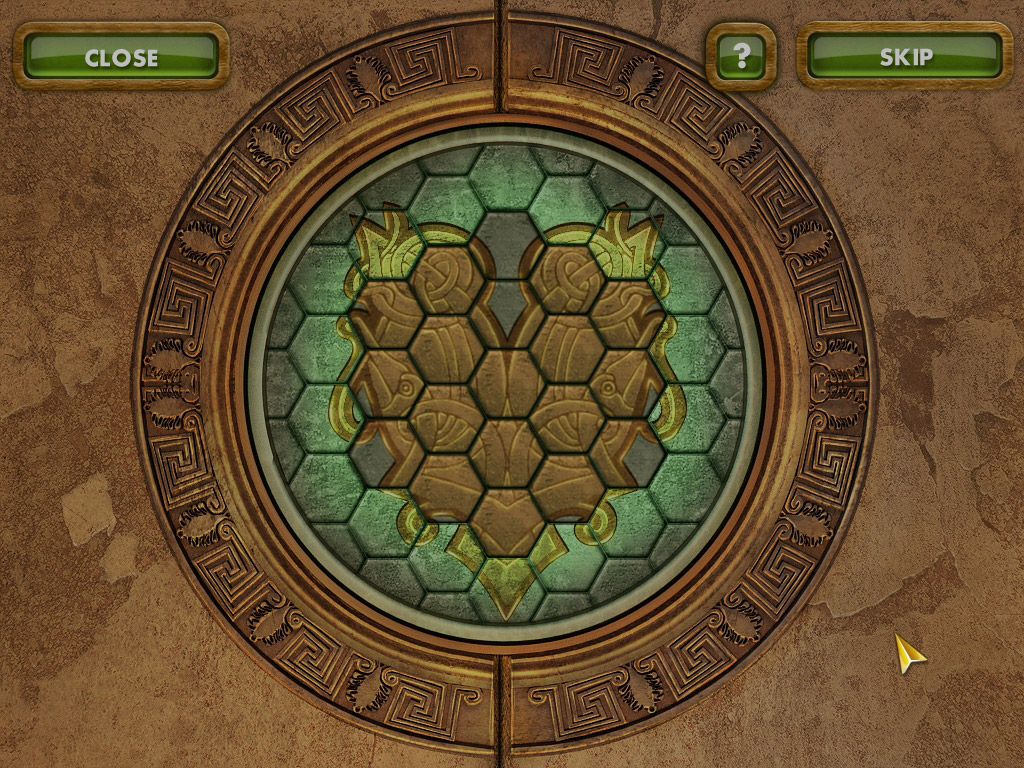
Now use the runes with the puzzle on the door, left side.
Screenshot
The goal is to rotate the runes to complete the picture. Please have a look at the screenshot to see the completed picture.
Screenshot
The door opens; go through to end this chapter.
Chapter 4: Northern Coast of the Island
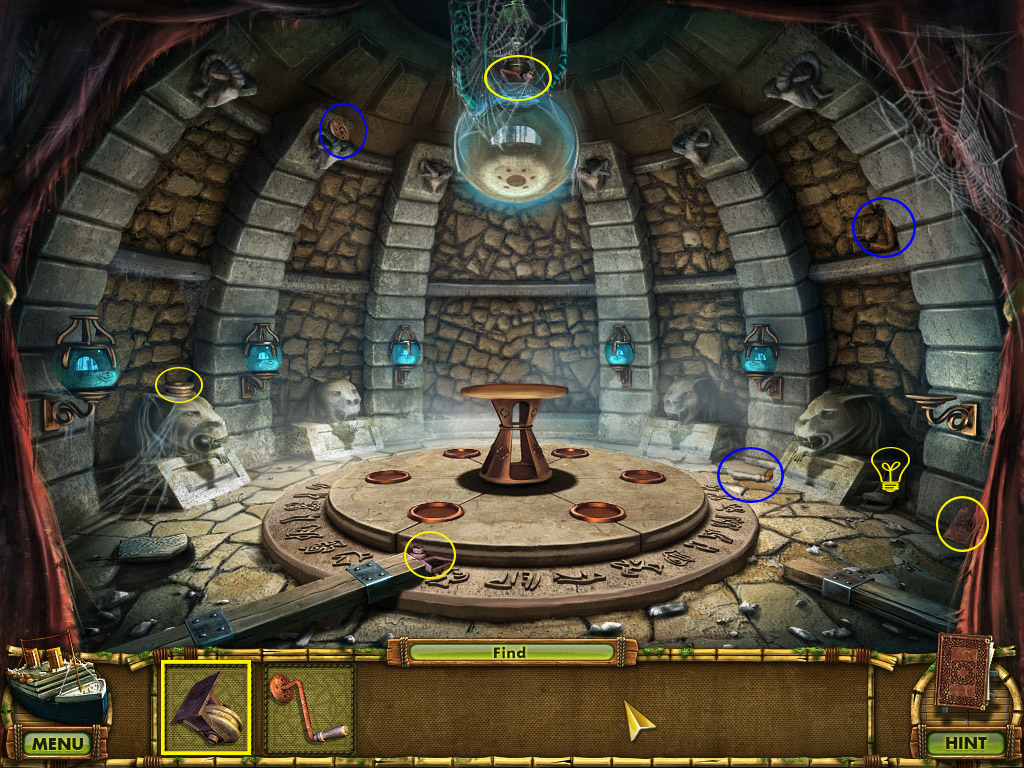
76. Descent
Grab the beyond item (42/56) (Camera/Kitchen Scale) on the ground left, next to the left statue.
Grab the stone from the lower bottom of the scene.
Find all parts of the ladder; one part you will find by zooming in on the right statue. One of the stars can't be found yet.
Zoom in on the symbols on the left wall and use the dictionary to translate.
Place the ladder in the hole and zoom in on the stone plate to the left, next to the hole.
Place the stakes (Spoiler 75) into the holes and click the ladder ends to go around the stakes.
Use the stone to secure the stakes.
Zoom in on the sand part on the right side of the hole to learn that you will need a tool to wipe the sand away.
Screenshot
Go down the hole to the Dungeon.
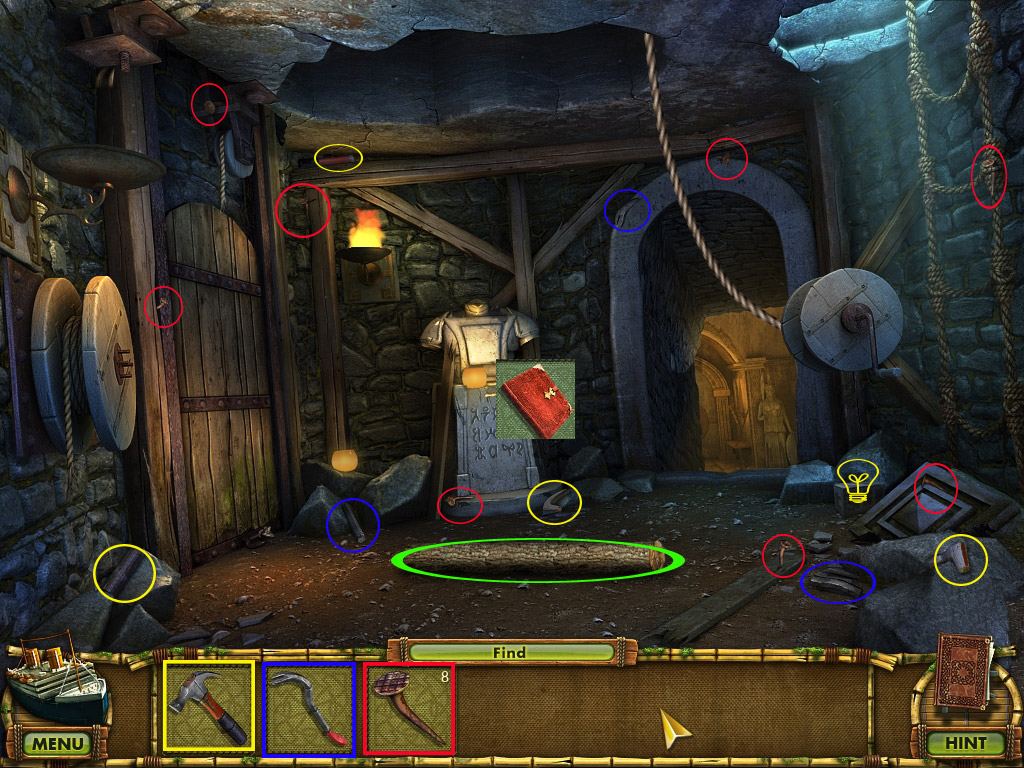
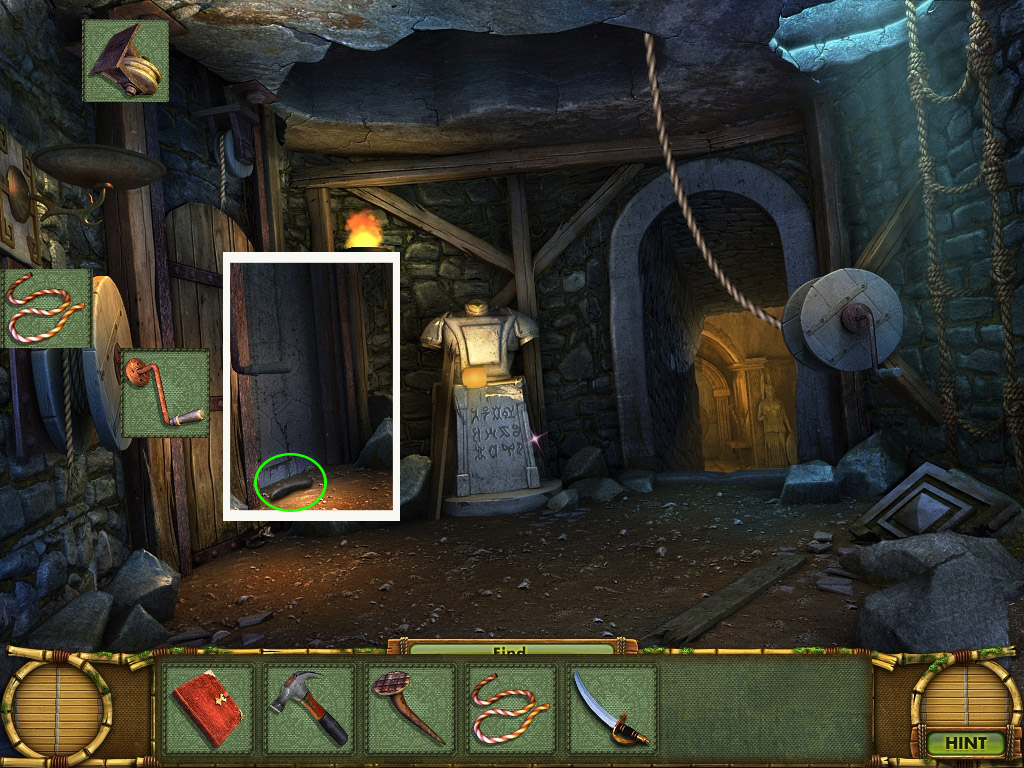
77. Dungeon
Grab the beyond item (43/56) (Brick/Box) on the lower right side.
Take the log.
Find all parts for the hammer and the nails. The last part of the crowbar can't be found yet.
Use the dictionary with the symbols at the back.
Screenshot
Go forward.
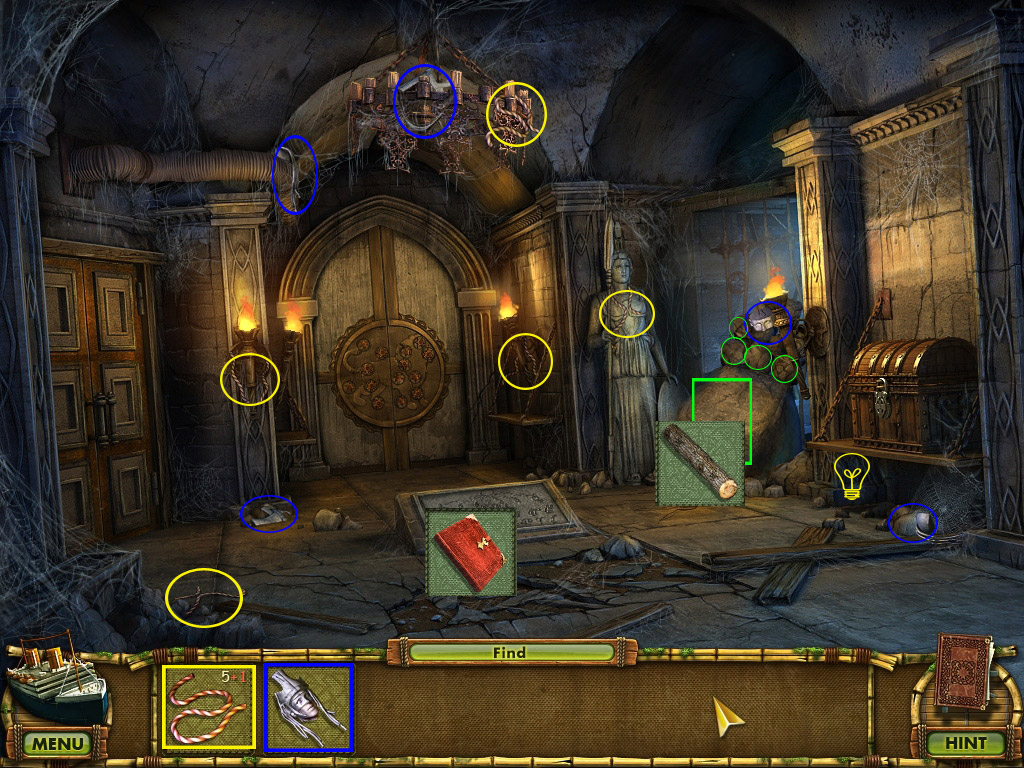
78. Temple Hall
Grab the beyond item (44/56) (Piggy Bank/Mask) under the bench on the right side.
Look for the item parts.
To find the last piece of the rope, click each of the small stones on the rock far right.
Then use the log (Spoiler 77) on the rock.
Take the last part of the rope from the ground. The last part of the statue's head can't be found yet.
Use your dictionary on the symbols in the middle of the ground.
Screenshot
Head right to the Armory.
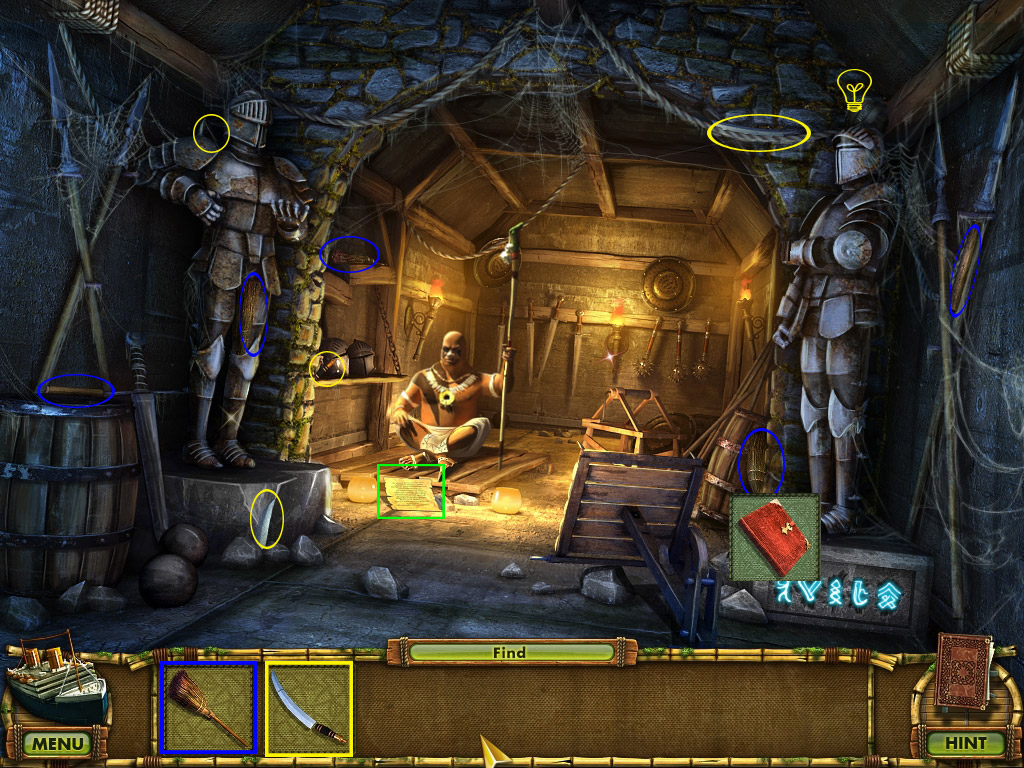
79. Armory/Descent
Grab the beyond item (45/56) (Ball/Tomato) on the left, next to the head of the right knight.
Find all parts of the broom and the saber
Translate the symbols on the pedestal of the right knight with your dictionary
Read the note in front of the Shaman.
Screenshot
Go back 2x and up through the hole to the Descent.
Zoom in on the sand on the right side of the hole.
Remove the sand with the broom and take the last star.
The picture of the lion will be copied into your book.
Screenshot
Head down the hole and go forward to the temple hall.
80. Temple Hall
Zoom in on the door on the back and place the stars.
Your goal is to click on the dots to lay a star on them to duplicate the constellation that you found under the sand in the Descent.
Screenshot
The door opens - enter the Temple of the Sun.
81. Temple of the Sun/Dungeon
Grab the beyond item (46/56) (Telephone/Shoe) from the ground on the right, next to the far right lion.
Find all parts of the pulley and the handle.
Screenshot
Back out twice to reach the Dungeon.
Place the pulley on the top left of the door.
Place the handle on the spool to the left of the door.
Use the rope (Spoiler 78) on the spool.
Click the handle to lift the door and take the last part of the crowbar.
Screenshot
Go forward to the Temple Hall.
82. Temple Hall/Dungeon
Zoom in on the chest and use the crowbar to open it.
Take the last part of the the statue's head.
Return to the Dungeon.
Place the statue's head in the back.
A ram comes down. Click the crank at the back of it to tear it back.
Use the saber ( Spoiler 79) to cut the rope.
Screenshot
Go through the now-open door to the Well.
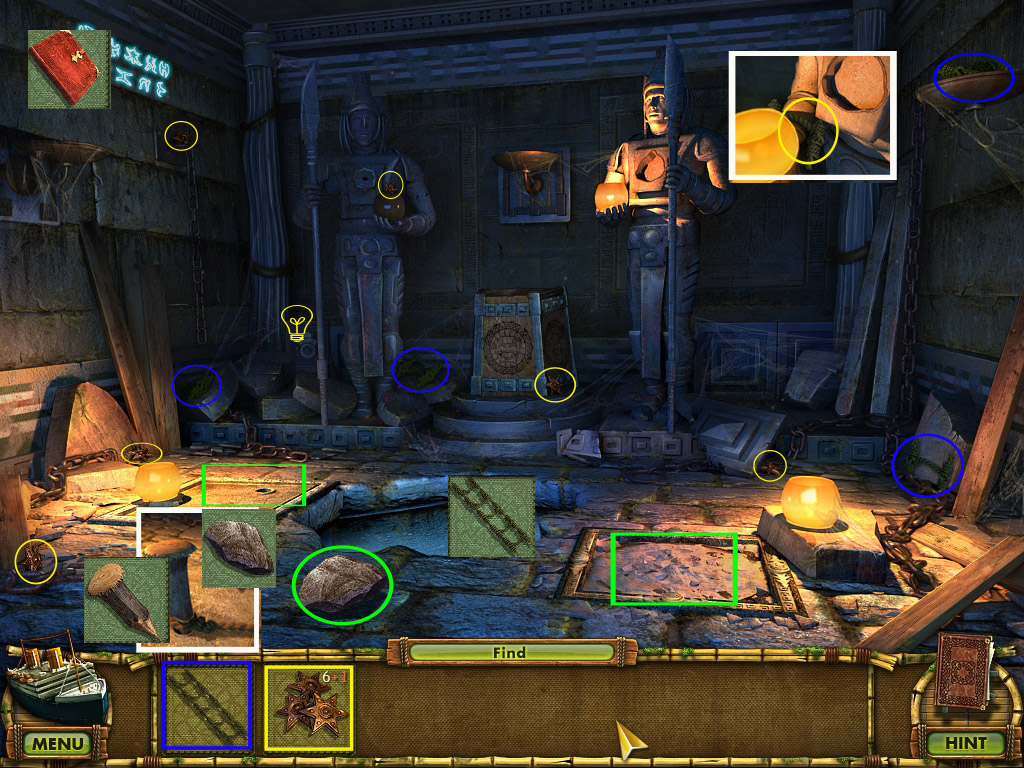
83. Well/Armory
Grab the beyond item (47/56) (Helmet/Ice Pack) from the stones in the far middle.
Take the wheel, floating in the water.
Return to the Armory.
Place the wheel on the catapult to the left to activate a mini game.
Your goal is to assemble the catapult. You will have to do this in a certain order; use the silhouettes for orientation.
Screenshot
Take the assembled catapult and return to the Well.
Place the catapult on the boards on the right side and click the crank.
A grappling hook will be shot outside the well.
Climb up to the construction site.
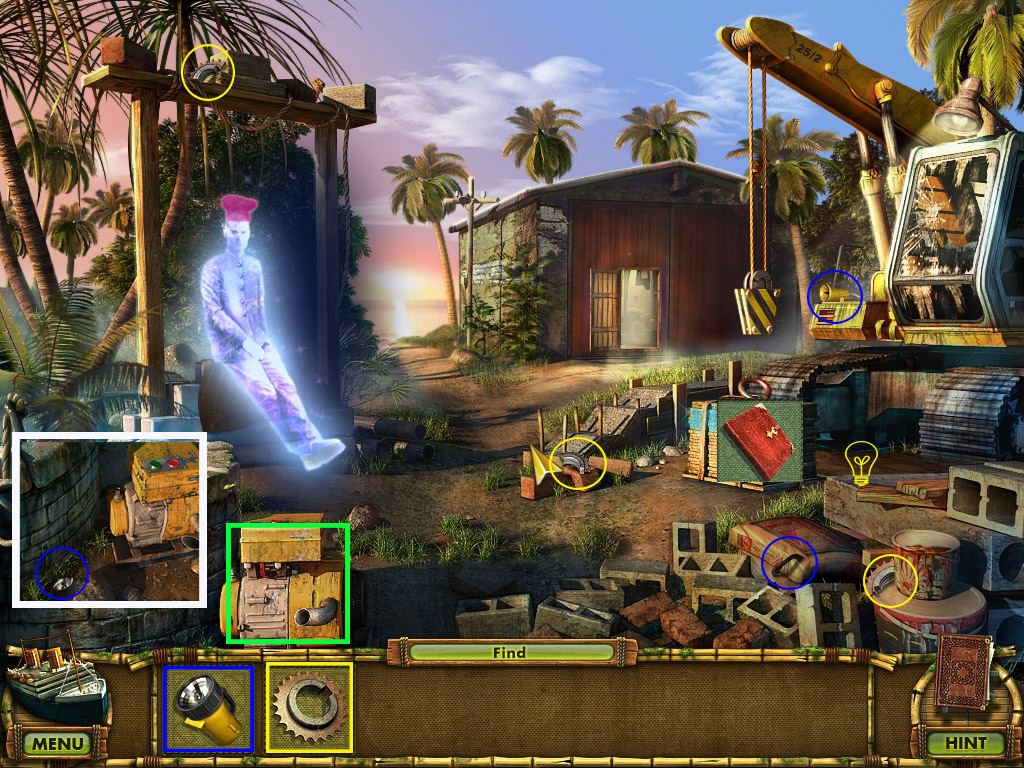
84. Construction Site
Click the ghost and use the dictionary with the symbols on the wood, left side.
Grab the beyond item (48/56) (Planks/Planks (seems they forgot to put a second item)) on the right side in front of the crane.
Find all items to obtain a flashlight and a gear.
Screenshot
Go forward to enter the Garage.
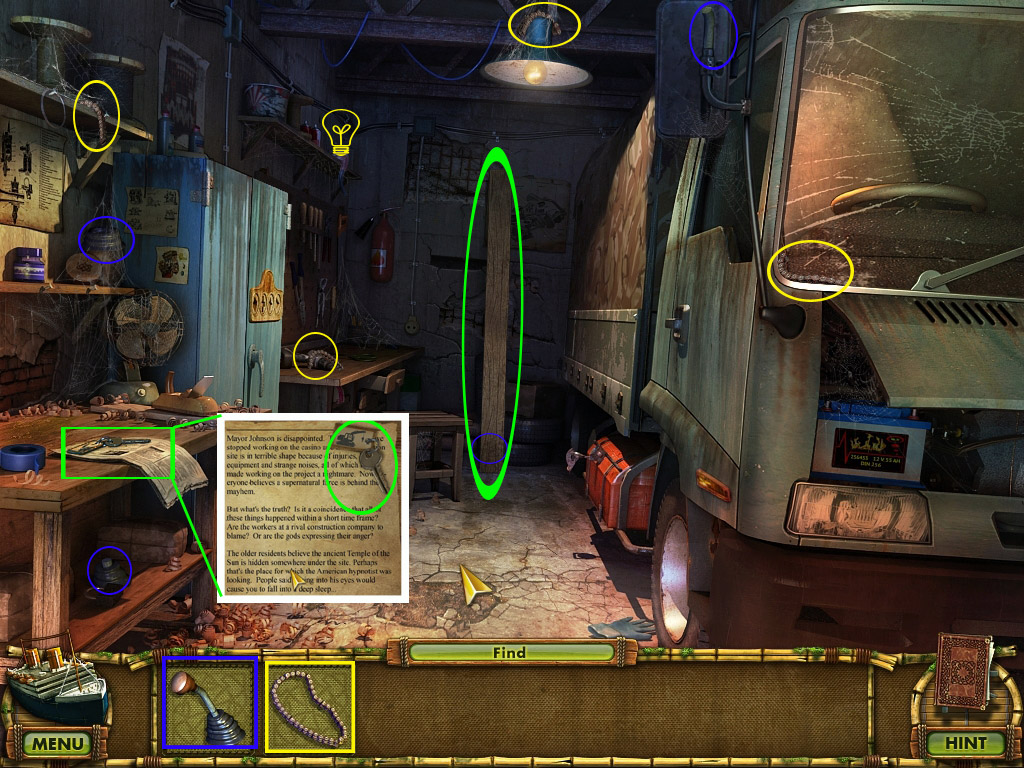
85. Garage
Grab the beyond item (49/56) (Hook/Wrench) in the far left top corner.
Zoom in on the paper clipping on the table on the left side, read the note and take the key.
Take the plank leaning against the back wall.
Find all items to obtain a chain and a handle. The last part of the handle can only be found when you already took the plank.
Screenshot
Exit the Garage and head forward to the Turtle Coast.
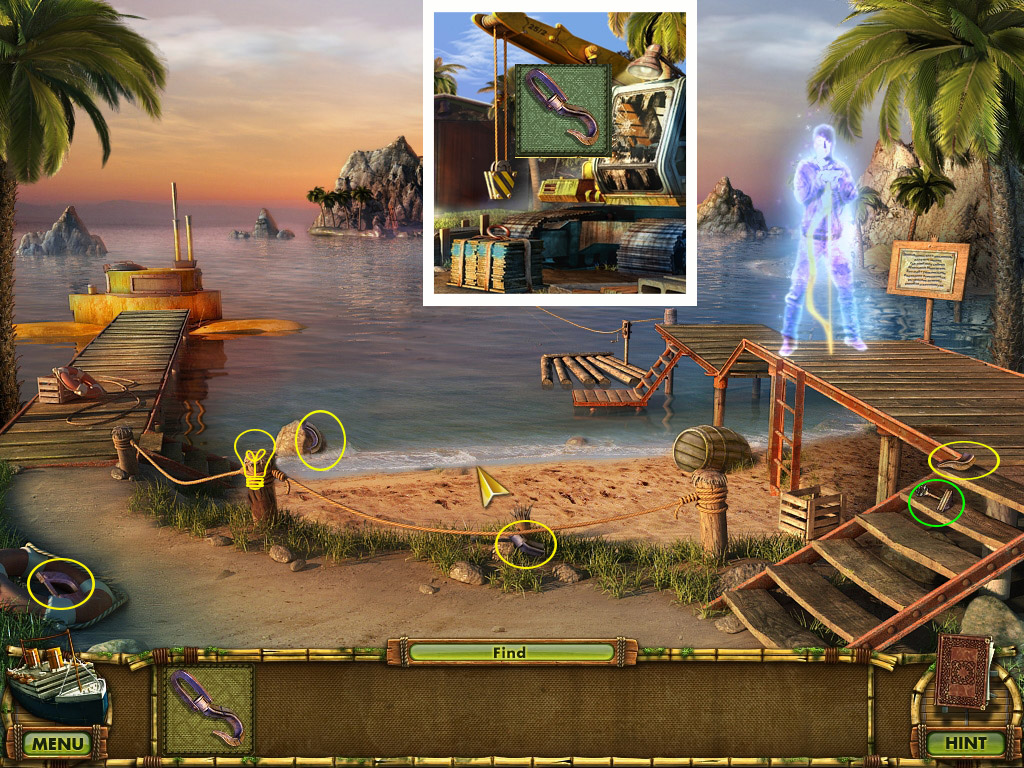
86. Turtle Coast/Construction Site
Grab the beyond item (50/56) (Glove/Pole)
Take the triangular key from the stairs on the right side.
Click the Ghost and read the sign next to him.
Find all parts of the hook.
Head back to the Construction Side and place the hook at the end of the crane arm.
Screenshot
Go right to the Crane.
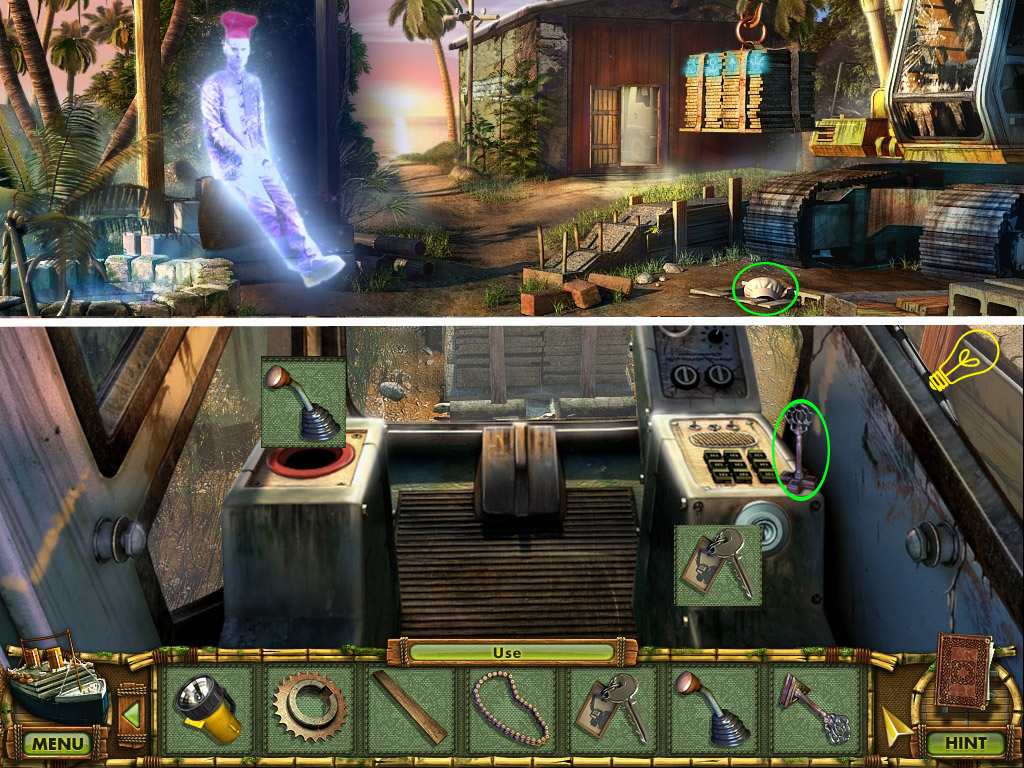
87. Crane/Construction Site
Grab the beyond item (51/56) (Pen/Drill Bit) at the right side at the bottom of the window.
Take the cross-shaped key on the right side of the crane panel.
Place the handle (Spoiler 85) in the slot on the right and the key (Spoiler 87) into the ignition slot on the right.
Click the key to start the crane and the handle to lift the weight.
Exit to Construction Site.
Take the now-free chef hat and give it the ghost.
Screenshot
You will receive the wooden chef. Place the statue at its slot on the ship to obtain a screwdriver.
Use your dictionary with the symbols at the place the chef was standing before. The code will be added to your journal.
Head forward to Turtle Coast.
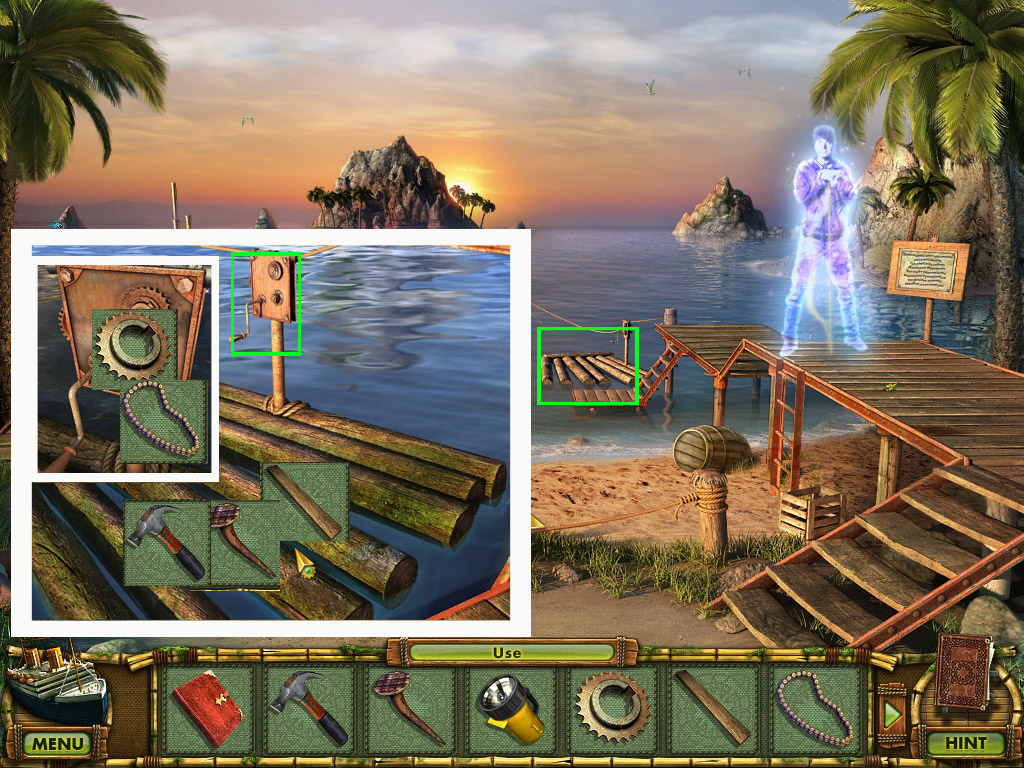
88. Turtle Coast
Zoom in on the raft on the right side and use the plank (Spoiler 85) with any spot on the raft.
Click the nails on the plank and the hammer (both Spoiler 77) on the nails.
Zoom in on the steering device, place the gear and the chain (both Spoiler 85).
Screenshot
Head forward to Cursed Rocks.
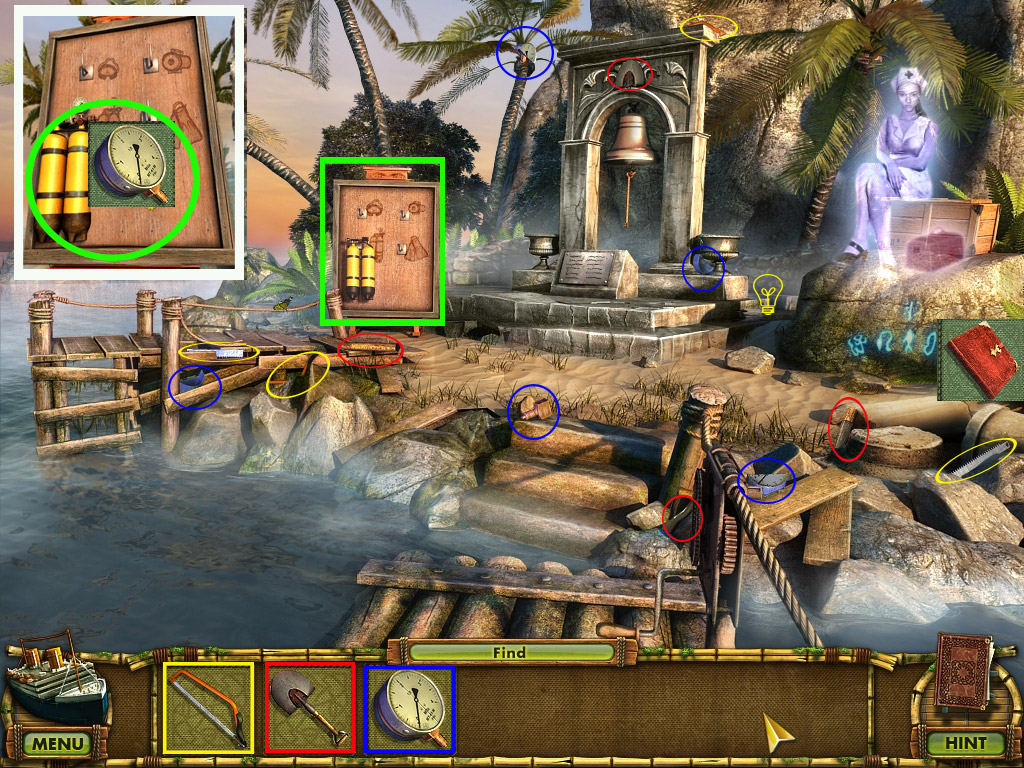
89. Cursed Rocks
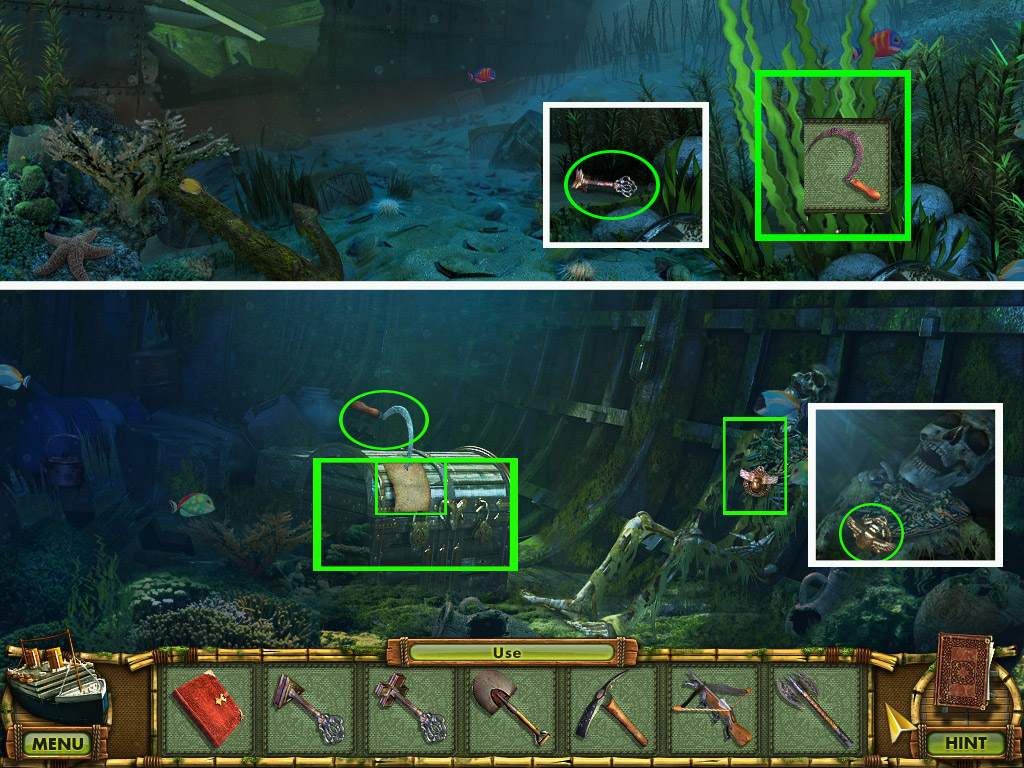
Grab the beyond item (52/56) (Log/broken Log) right next to the stairs.
Use your dictionary with the symbols below the ghost.
Find all parts for the saw, the shovel and the manometer.
Zoom in on the board with the oxygen tank.
Place the manometer on the tank and take the empty oxygen tank.
Screenshot
Return to Turtle Coast.
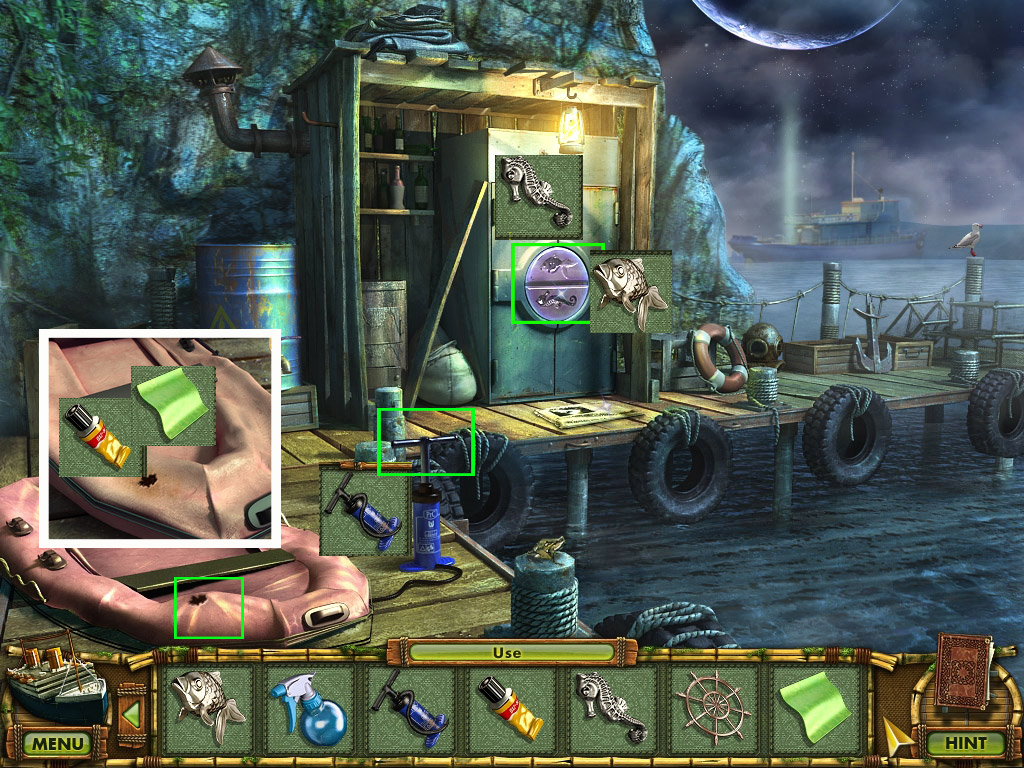
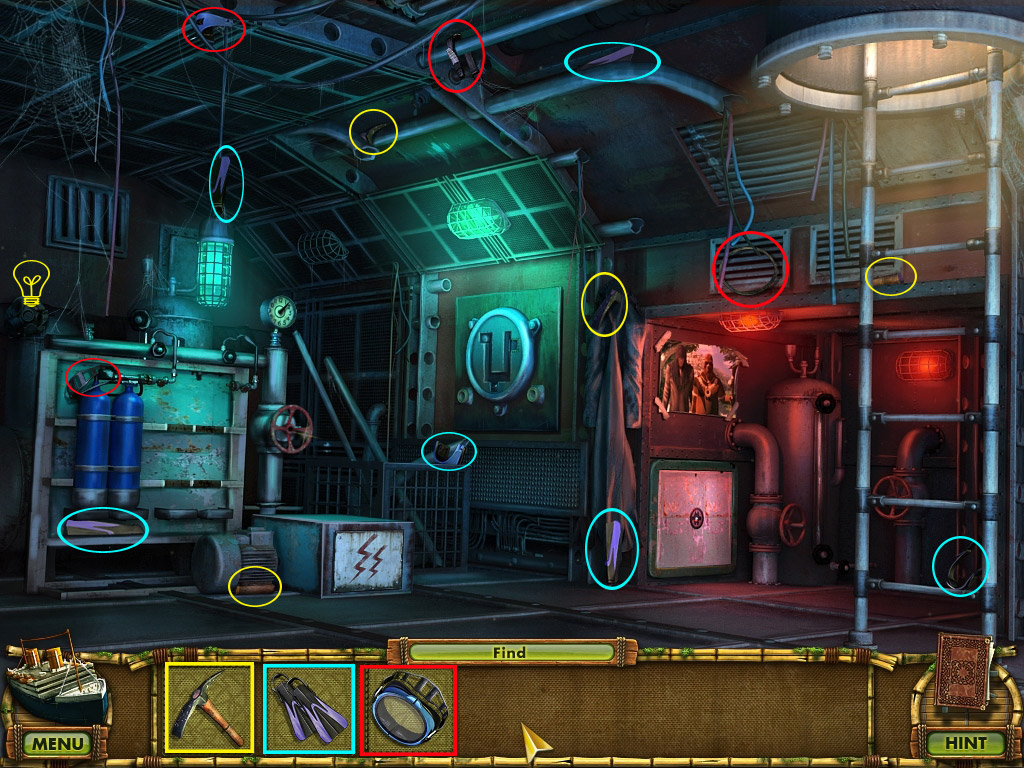
90. Turtle Coast/Submarine
Zoom in on the Submarine on the far left.
Use the saw (Spoiler 89) to open the lid and enter the Submarine.
Grab the beyond item (53/56) (Gas Mask/Police Hat) on the oxygen device, top left.
Find all parts of the flippers, scuba mask and pick axe.
Screenshot
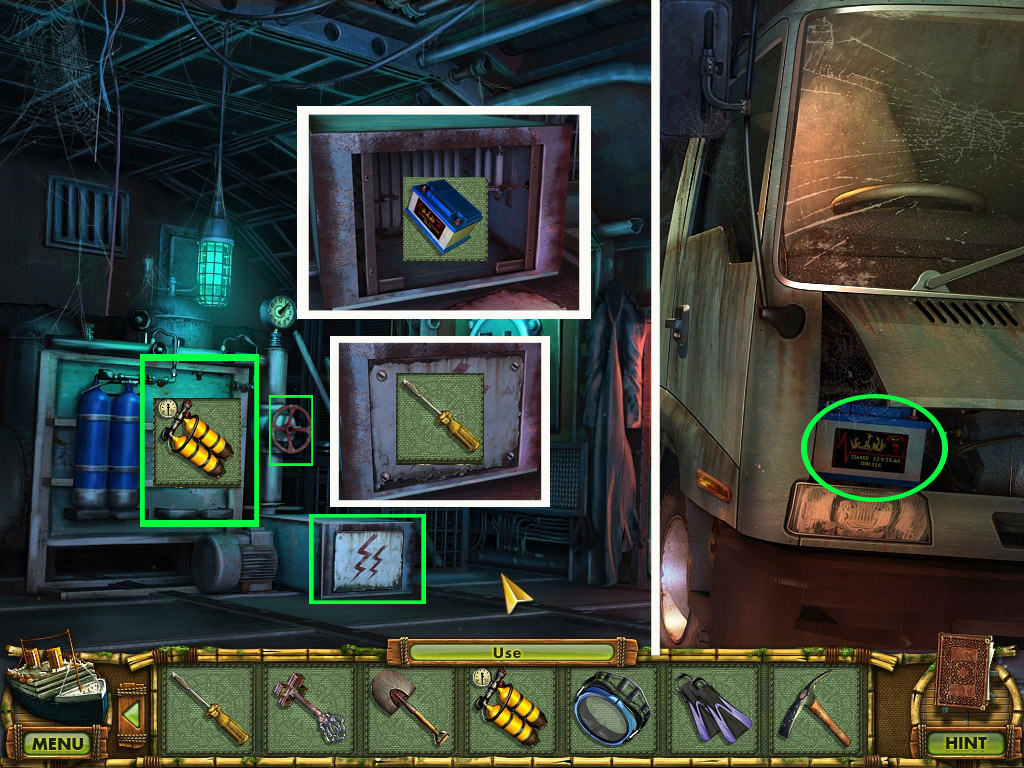
Place your empty oxygen tank (Spoiler 89) next to the blue one. Click the valve wheel on the right to learn that there is no power.
Zoom in on the power box at the bottom and use the screwdriver (Spoiler 87) to remove the screws.
There is no battery, so exit the Submarine, go back and enter the Garage.
Take the battery from the open motor part of the truck and return to the Submarine.
Place the battery in the empty power box and click the valve wheel.
Take your filled oxygen tank.
Screenshot
Exit the Submarine and head over to Cursed Rocks.
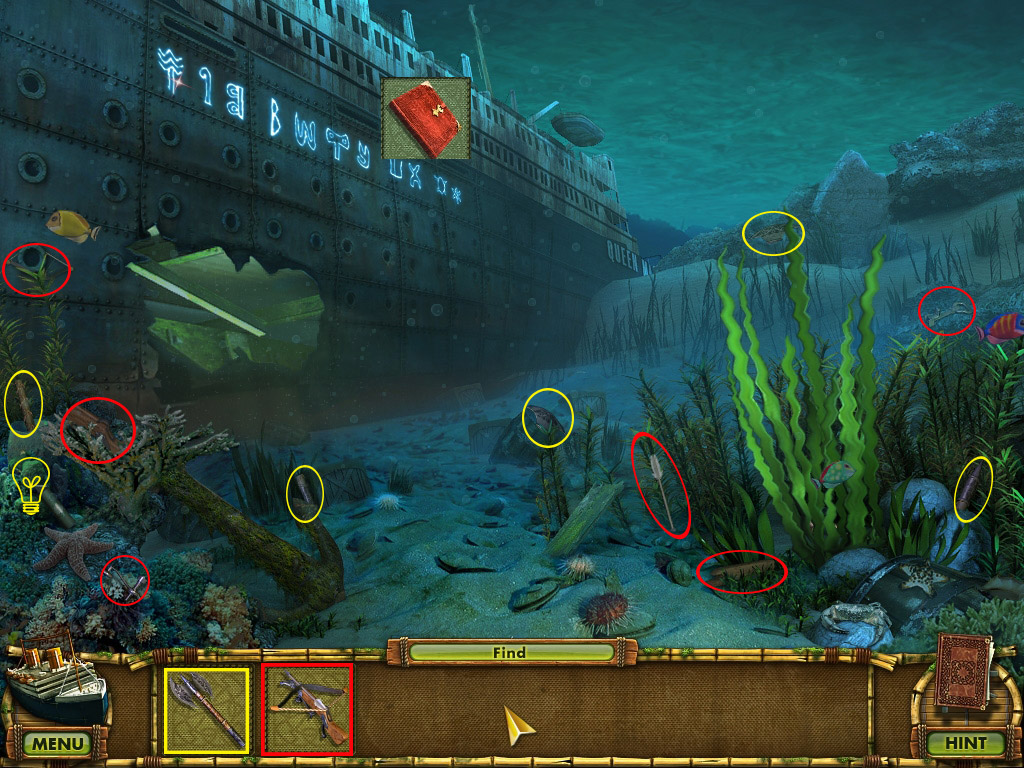
91. Cursed Rocks/Under the Sea
Zoom in on the wooden board and place the flashlight (Spoiler 84), the flippers, the scuba mask and the filled oxygen tank (all Spoiler 90) according to the pictures on the board.
Use the arrow to the low left on the water to dive Under the Sea.
Use your dictionary with the symbols on the ship.
Grab the beyond item (54/56) (Cloth spin/Spray can) from the low left.
Find all parts of the crossbow and the pole axe.
Screenshot
Go through the hole to enter the Cargo Hold.
92. Cargo Hold/Under the Sea
Grab the beyond item (55/56) (Water Kettle/Air Balloon)
Use the dictionary to translate the symbols, top right.
Zoom in on the skeleton on the right and take the amulet.
Take the sickle from the chest and read the note.
Zoom in on the chest to learn that a key is needed.
Exit to Under the Sea.
Use the sickle to remove the algae on the right side and grab the star-shaped key.
Screenshot
Exit to Cursed Rocks
93. Cursed Rocks
Zoom in on the symbols below the nurse and use the pick axe (Spoiler 90) on the stone to obtain a first-aid kit.
Give the first-aid kit to the nurse to get a wooden nurse.
Place the nurse in her spot on the ship to obtain a diamond-shaped key.
Now that the ghost is gone, zoom in on the crate.
Click the lid to open and take the button (1/2).
Screenshot
Return to the Construction Side and enter the Garage.
94. Garage
Zoom in on the blue closet on the left and place the triangular key (Spoiler 86), the cross-shaped key (Spoiler 87), the star-shaped key (Spoiler 92) and the diamond-shaped key (Spoiler 93) in any order into the according slots.
Now click the keys in the order you saw at the symbols at Construction Site: star-triangle-diamond-cross.
The closet opens and you can take the button (2/2)
Screenshot
Exit the Garage and go left to the Submarine
95. Submarine
Return to the Well, up to the Construction Site, forward and left and enter the Submarine.
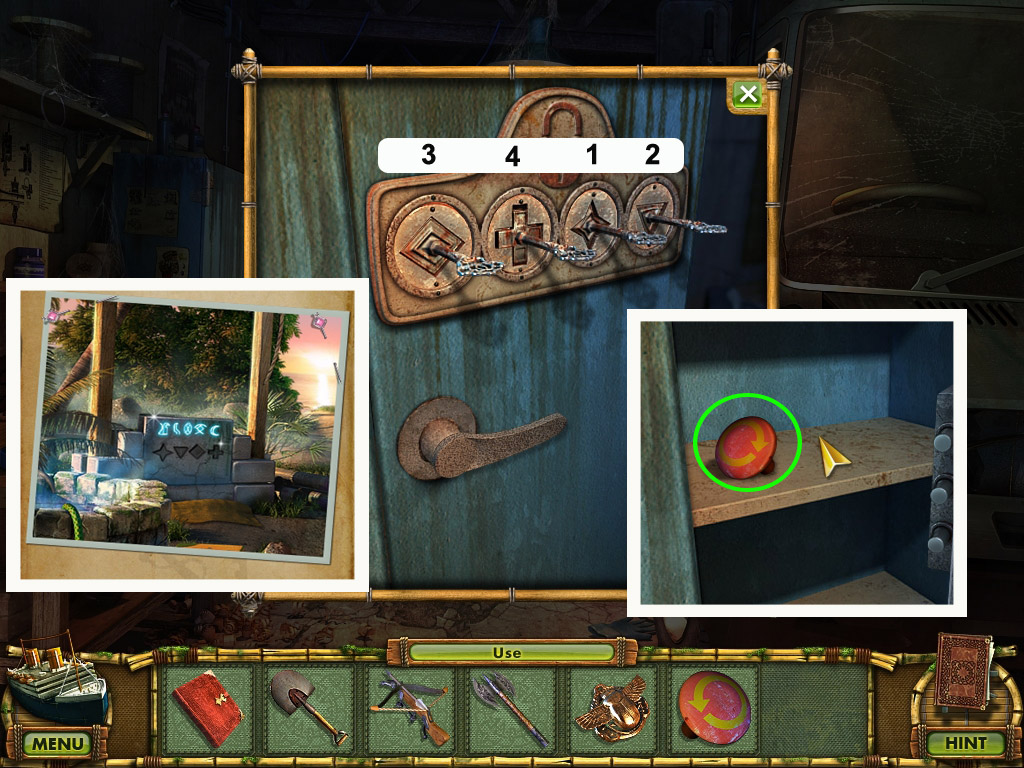
Zoom in on the far right device and place the buttons (Spoiler 93, 94) to activate a mini game.
Your goal is to move the silver ball to the spot with the stripes by pressing the arrow buttons in the right order:
Press: 1x left, 2x right, 2x left, 3x right, 1x left, 1x right, 1x left.
Your reward is a sphere-shaped key.
Zoom in on the panel on the left, next to the ladder, and place the sphere-shaped key.
Take the tiles and the bow.
Screenshot
Return to the Turtle Coast.
96. Turtle Coast/Cargo Hold
Hand over the bow to the ghost.
Before he disappears, he will shoot an arrow, then you will receive the wooden archer.
Place the wooden archer in its slot on the ship to obtain an oiler.
Zoom in on the spot the archer's arrow landed and use your shovel (Spoiler 89) to dig out a crate.
Click to open it and take the key.
Head over to Cursed Rock, go Under the Sea and enter the Cargo Hold.
Zoom in on the chest. Use the oiler and then the key to open it.
Take the six Moai and the gear.
Screenshot
Return to the Construction Side, go down the well, one time back and up to Descent.
97. Descent/Temple Hall
Zoom in on the right statue and place the amulet (Spoiler 92).
A four-fingered hand will raise on the pedestal between the statues; take it.
Go down and forward to the Temple Hall.
Zoom in on the door on the right, place the tiles (Spoiler 95) and the door will open.
Screenshot
Enter the Steam Engine.
98. Steam Engine/Temple Hall
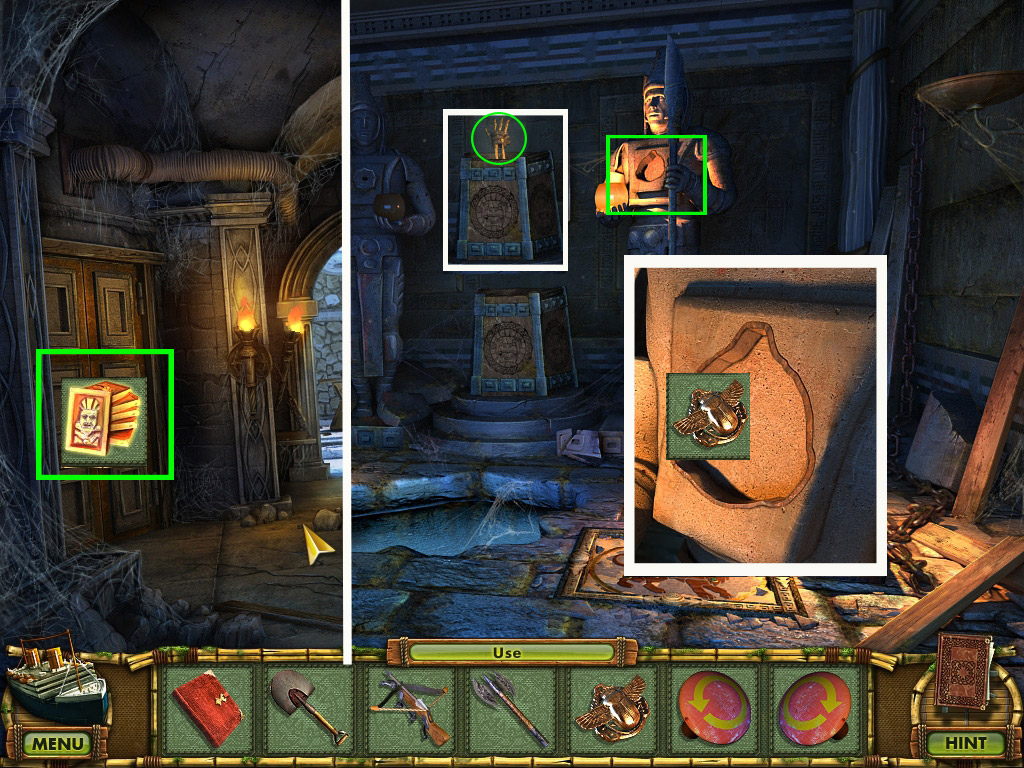
Grab the beyond item (56/56) (Dumbbell/Padlock) on the low left.
Grab the torch on the low right side.
Find all parts for the grindstone.
To find the last part of the brush, zoom in on the bars on the far right.
Note that you can't reach the last piece of the shield yet.
Zoom in on the hand print on the oven right side and place the four-fingered hand (Spoiler 97) to open the cover.
Note that you need gas.
Use the brush and then your dictionary with the stone plate on the right wall.
Screenshot
Exit the Engine Room and light the torch on one of the burning torches in the Temple Hall.
Go 1x back, left and exit the well to the Construction Site.
99. Construction Site/Well
Find all parts of the hose.
Zoom in on the generator in the low left corner, place the hose and press the green starter button.
Screenshot
Head down the now-drained well.
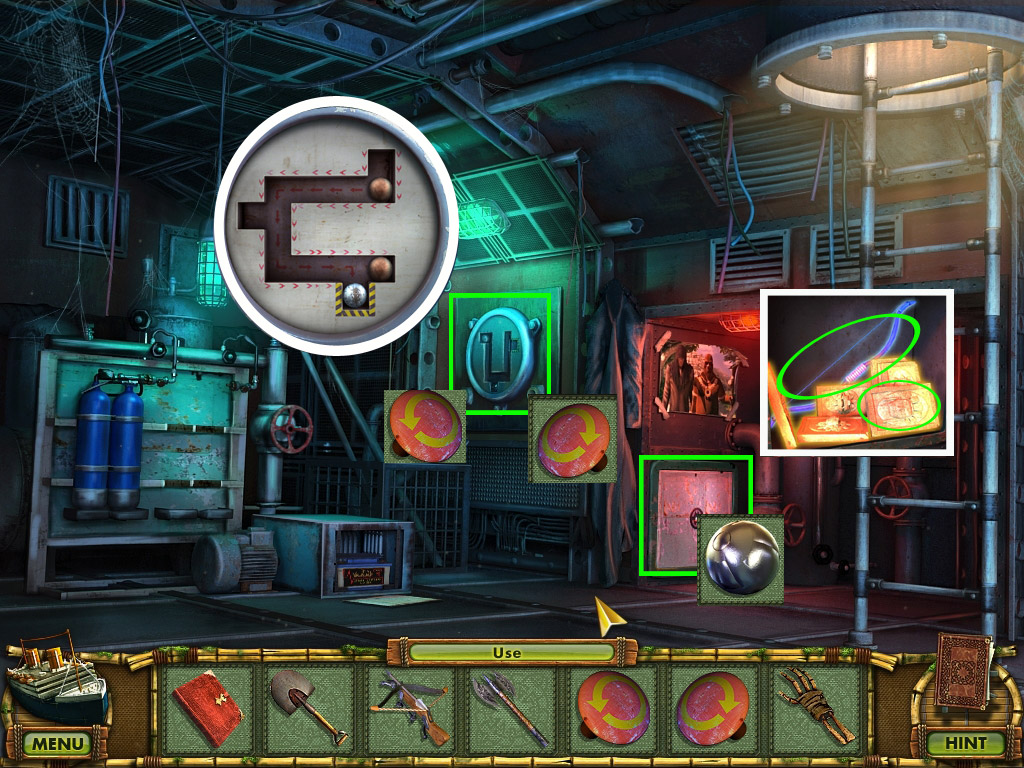
Zoom in on the colored circle in the back and click to activate a mini game.
Place the gear (Spoiler 99) on the middle circle.
Your goal is to click on the gears in a certain order and to turn the beads and get the beads to their corresponding colored spots:
Click: 2x left, 3x middle, 3x left, 3x right, 1x middle, 2x right.
The hatch will open. Take the gems and one part of the bucket.
Screenshot
Find all other parts of the bucket.
Go up to Construction Site and right to the Garage.
100. Garage/Armory
Zoom in on the orange gas tank of the truck.
Place the bucket (Spoiler 99) on the floor and click the hose.
The bucket with gas will go into your inventory.
Exit to Construction Site, down the well, exit to Temple Hall, go 1x forward and right to the Armory.
Zoom in on the rack to the right, next to the Shaman, and place the grindstone (Spoiler 98).
Use the pole axe (Spoiler 91) with the grindstone to obtain a sharp pole axe.
Screenshot
Exit and return to the Steam Engine.
101. Steam Engine/Armory
Use the sharp pole axe (Spoiler 100) with the ropes holding the red valve in the top right corner.
Use the valve with the machine to the left.
Place the bucket with gas (Spoiler 100) in the oven on the right (if the cover is not open please see Spoiler 98), then place the lit torch (Spoiler 98).
Click the valve and watch what happens.
Zoom in on the bars on the far right and take the last piece of the shield.
Screenshot
Exit the Steam Engine and head to the Armory.
Place the crossbow (Spoiler 91) on the left knight and the shield on the right knight.
Click the left knight and zoom after his shot into the pedestal of the left knight.
Take the oil lamp.
Screenshot
Exit the Armory and go forward to the Temple of the Sun.
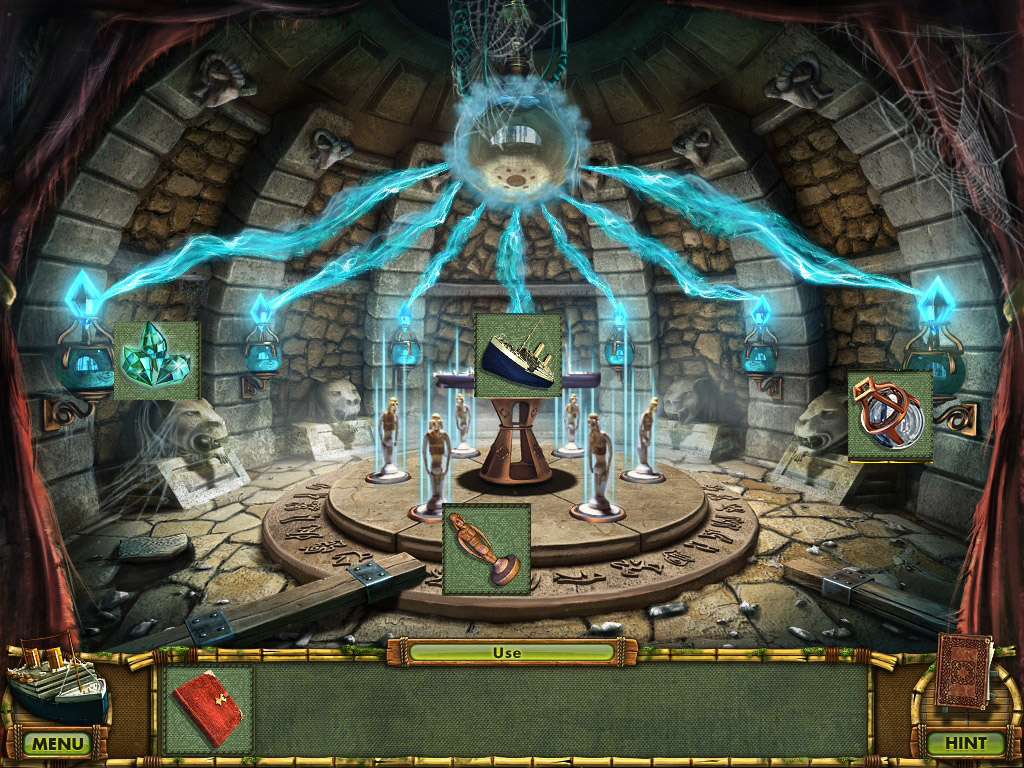
102. Temple of the Sun
Place the oil lamp (Spoiler 101) in the empty holder on the left side.
Place the gems (Spoiler 99) with the oil lamps.
Place the 6 Moai (Spoiler 96) in the empty slots in the middle.
Place the ship on the pedestal.
Enjoy the END!
Screenshot
Posted by: Kayleigh |
April 12, 2011 2:13 PM
|
April 12, 2011 2:13 PM