

The Secrets of Arcelia Island
Platform: Windows
![]() As a child, Greta fell asleep every night with her head full of stories her father told about a mythical island replete with a thriving town of peaceful villagers, a lush forest ruled by a fairy queen and king, and a beautiful palace high on a snowy mountain—the fanciful stuff of childhood dreams, but pure nonsense. Or so she thought. After a storm-tossed shipwreck, she awakes three days later to discover not only her father and crew missing but that The Secrets of Arcelia Island were true all along in this gorgeous new adventure hidden object hybrid game from HitPoint Studios. Now, as Greta, you're about to come face-to-face with (among others) an elf, a satyr, and a power-obsessed sorceress who promises you death as you try to save your father and free the island from its curse.
As a child, Greta fell asleep every night with her head full of stories her father told about a mythical island replete with a thriving town of peaceful villagers, a lush forest ruled by a fairy queen and king, and a beautiful palace high on a snowy mountain—the fanciful stuff of childhood dreams, but pure nonsense. Or so she thought. After a storm-tossed shipwreck, she awakes three days later to discover not only her father and crew missing but that The Secrets of Arcelia Island were true all along in this gorgeous new adventure hidden object hybrid game from HitPoint Studios. Now, as Greta, you're about to come face-to-face with (among others) an elf, a satyr, and a power-obsessed sorceress who promises you death as you try to save your father and free the island from its curse.
 While gathering up resources to begin your mission, an eery shadowy mist appears before you but when you step closer, it disappears. "What!" You think, "Am I losing my mind?" Very possible: you did take a pretty big thump on the head during the tempest. Everywhere you go, the shadow seems to be there, taunting you or perhaps leading you toward your next destination. There are six distinct zones in and around Arcelia Island, and to gain access to each requires completing tasks, finding key objects, and solving puzzles. Use mouse controls to click your way around, the cursor changes into a hand showing an inventory item or picture story piece to pick up, a larger arrow indicating a scene you can travel, and a magnifying glass for inspecting landmarks and starting a hidden object scene or puzzle.
The Secrets of Arcelia Island's story progression is completely textual. There are no voice overs to jar you out of contemplative reverie or studious detective work; this is a welcome feature because it further enhances your ability to become completely absorbed into the island's mystical surroundings. The story is slowly revealed through cut-scenes and your character's internal thoughts as she encounters new locations, fascinating people, and intriguing artifacts. Glints and sparkles alert you to significant areas plus the hint/skip timer is a generous 30 seconds in normal mode; advanced mode has a longer timer and no helpful alerts. On top of the main quest, after you obtain your father's journal, you'll start an optional side quest to find 42 missing story page pieces; finding every one might be tricky if you're not keen-eyed. When you reach the end of the story, you can't return to certain locations to gather up pieces you might have missed, so take care to seek them out as you go along.
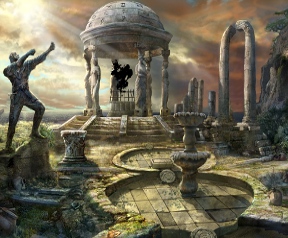
 Analysis: The talented team behind Guardians of Magic: Amanda's Awakening manage to do what too few can: draw you into a fantastical and surreal world with convincing realism. The naturalistic artistry is so good at weaving atmospheric traits into authentically believable worlds, you might be reminded of MYST: Masterpiece Edition. Each location is gorgeously rendered, blending graphics and animations to achieve such details as flies flickering about a corpse, clouds floating across the sky and a butterfly fanning its wings in the sunlight. Environmental sounds such as a breeze rustling the trees or seabirds calling in the distance fully absorb you into the magnificent world of Arcelia Island. (Be sure to turn on the high quality video in the game "settings" for the best effects.)
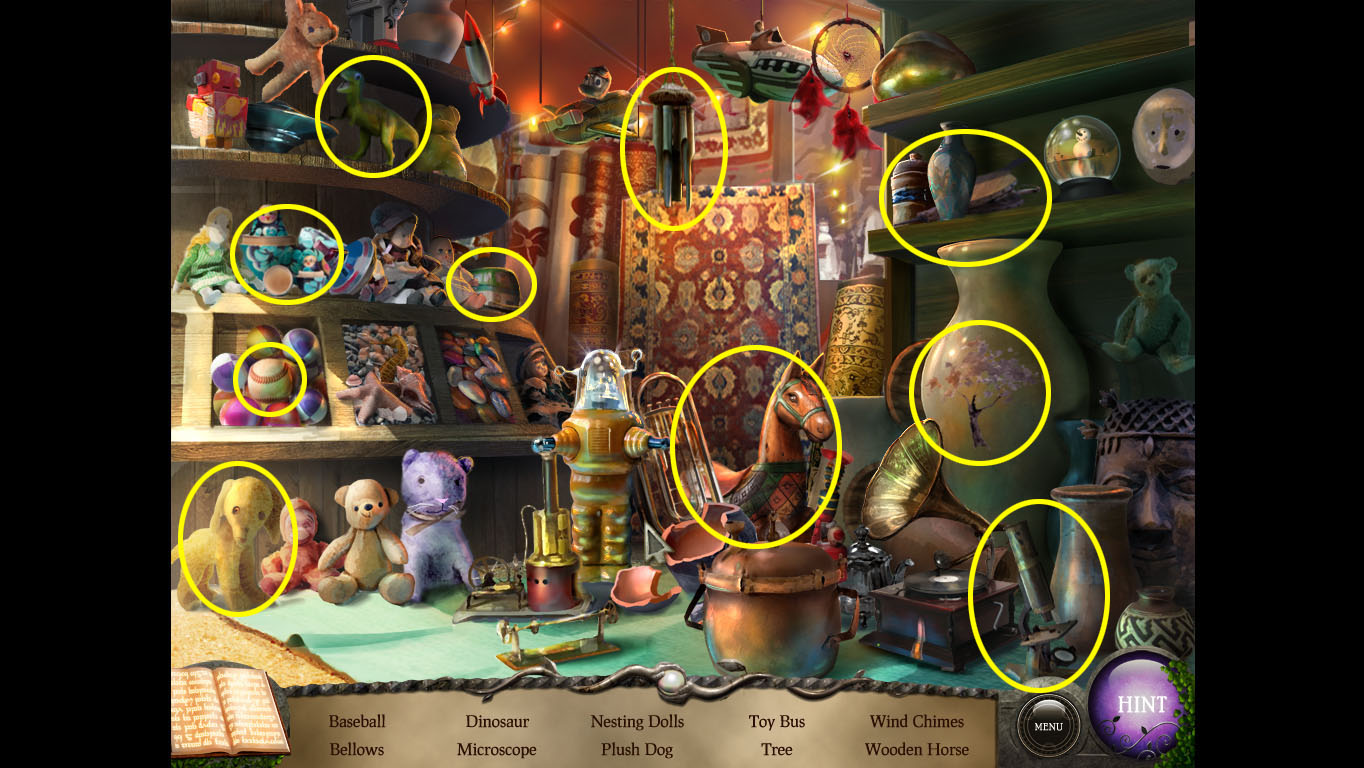
At a little over four hours for the average player, The Secrets of Arcelia Island is a good balance between puzzle solving, story, and hidden object scenes. Each hidden object scene is neatly composed, bright and clear, making the search for most objects on the easy side (although that hint button will be very tempting at times) and very pleasant. Most of the familiar puzzles pop up as well, changed slightly to fit the mystical island theme and—aside from a few puzzles that will test your deductive reasoning—both the puzzles and the hidden object scenes are on the short side. With such beautiful surroundings, though, you wouldn't want to be held up with vexing enigmas every turn you take.
 Expect to do some backtracking and crisscrossing of locations as you gain more inventory items to put to use. If you tend to click through the story scenes too quickly, you could miss a lot. That said, the story itself is a bit sketched in, which probably comes from the story's protagonist having little information herself and may make you feel in-the-dark as well. The climatic ending leaves more questions and only "To be continued" after the credits as consolation.
What might be considered a boon to some and a drawback to others, clickable areas are very precise. A great source of information, the journal keeps track of important clues and records story details as they're revealed but controls are more difficult on the journal's story pages; placing and turning the picture pieces takes deftness and patience. Even so, the addition of this side quest provides additional gameplay and is a nice treat to go back to at the end of the game. Overall, The Secrets of Arcelia Island is an experience in sumptuous environments, beguiling scenery and affable puzzles. Take time to let yourself be drawn in to a realm that mixes fantasy and mystery, surrealism and substantive locales.
![]() Windows:
Windows:
Download the demo
Get the full version
![]() Macintosh:
Macintosh:
Download the demo
Get the full version


Walkthrough Guide
(Please allow page to fully load for spoiler tags to be functional.)
The Secrets of Arcelia Island walkthrough
General Information
The controls are point-and-click with a mouse, the icon changes according to what you are interacting with. An arrow indicates a travel direction, a magnifying glass means something can be looked at and a hand indicates and object.
The solutions to a problem will usually be in the more immediate area. For example, if you are solving a problem in the palace, it is extremely unlikely that you have to do something in the Fairy Forest. It is not always the case, but if you are stuck, the answer is likely in the general area's screens.
Sometimes an event will alter the screen. Keep an eye out for such changes to find certain pieces of the story journal.
The black smoke that appears periodically usually give a clue as to what to look at. But the smoke also appears even after you have interacted with those objects. Don't read too much into it after it appears for a second or third time over a spot.
You cannot combine objects, so don't worry about that.
Keep an eye out for reactivated HOG scenes. Often you need an object to proceed.
All the information you uncover, such as codes for puzzles, is recorded in the journal and easy to find.
Main Walkthrough
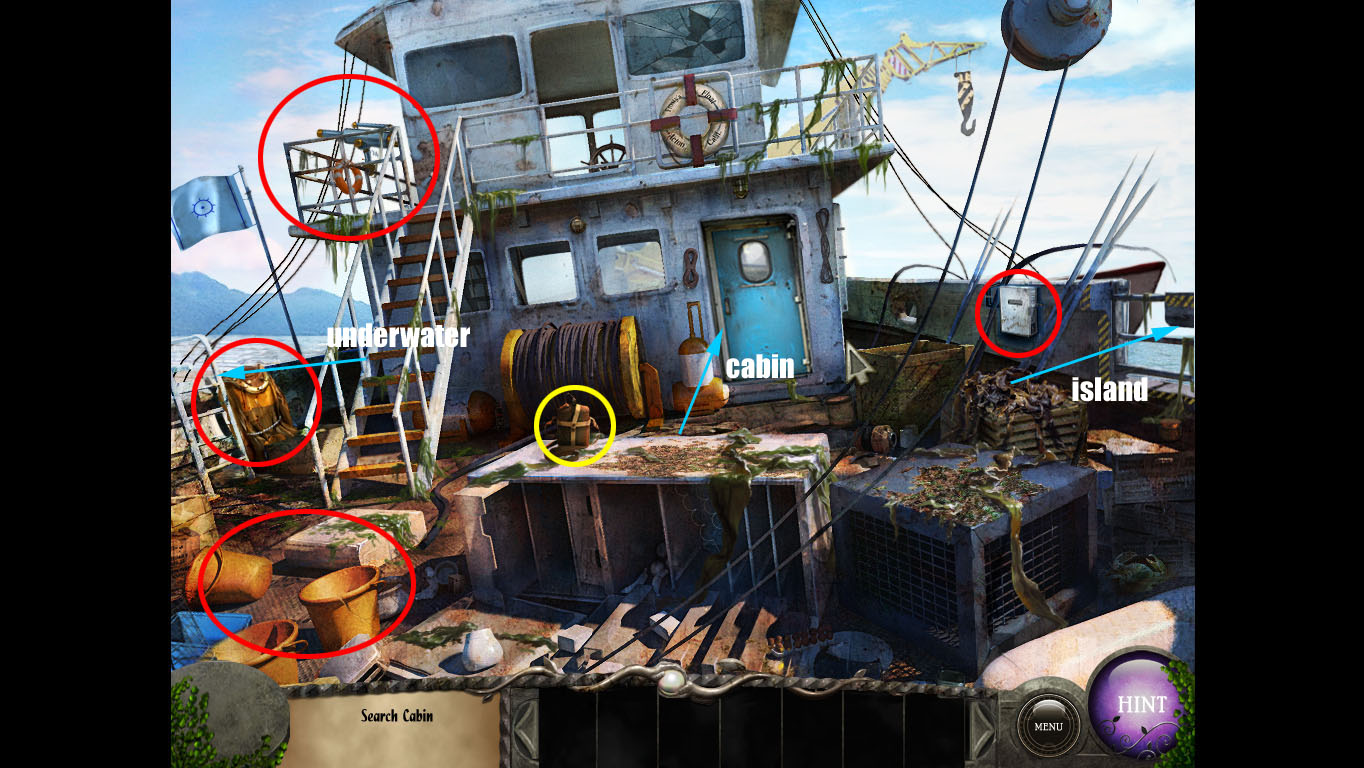
On the Boat
Boat Area Screenshot
Take the canteen on the chest.
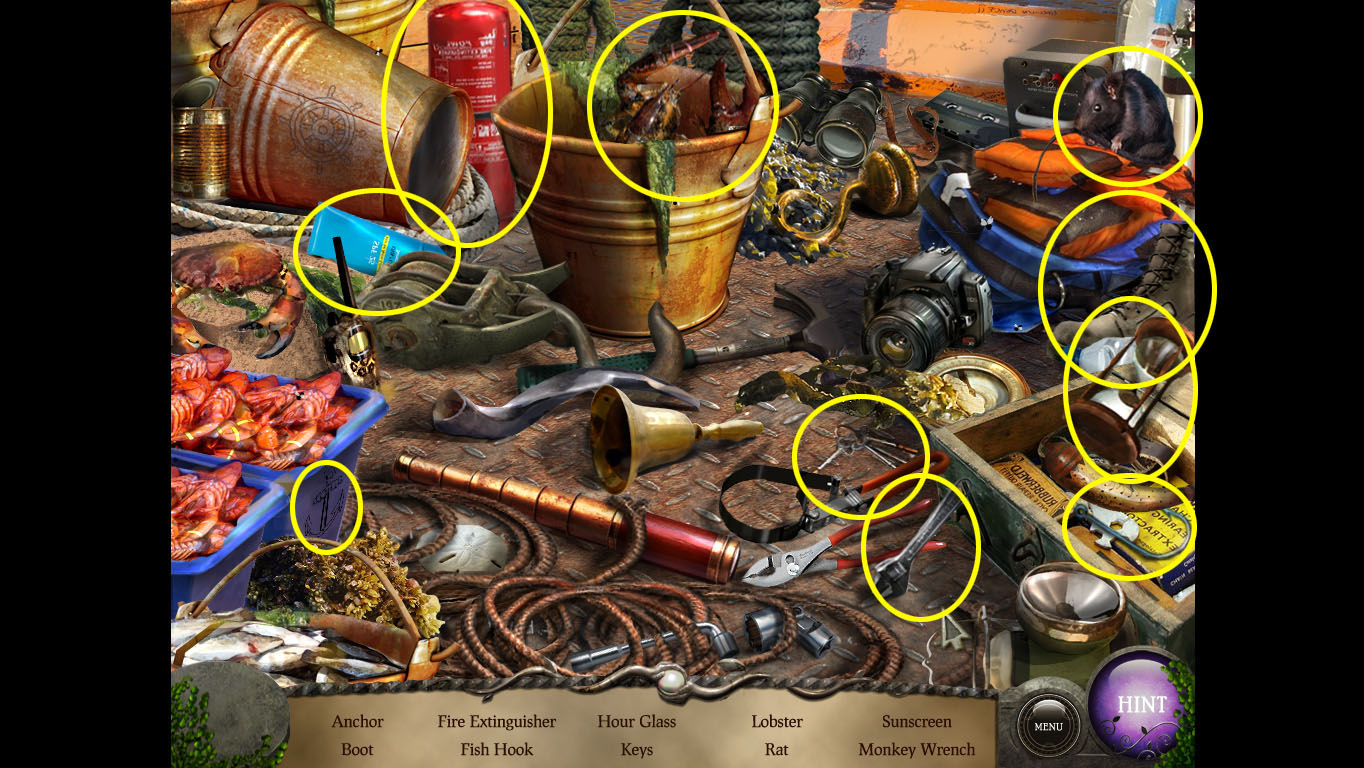
Click near the bucket at the bottom left.
It's a hidden-object screen: complete it to get the keys.
hidden-object Solution
Go to the top deck where the telescope is. Get the boat hook.
Go to the cabin door. Use the keys, then click on the handle.
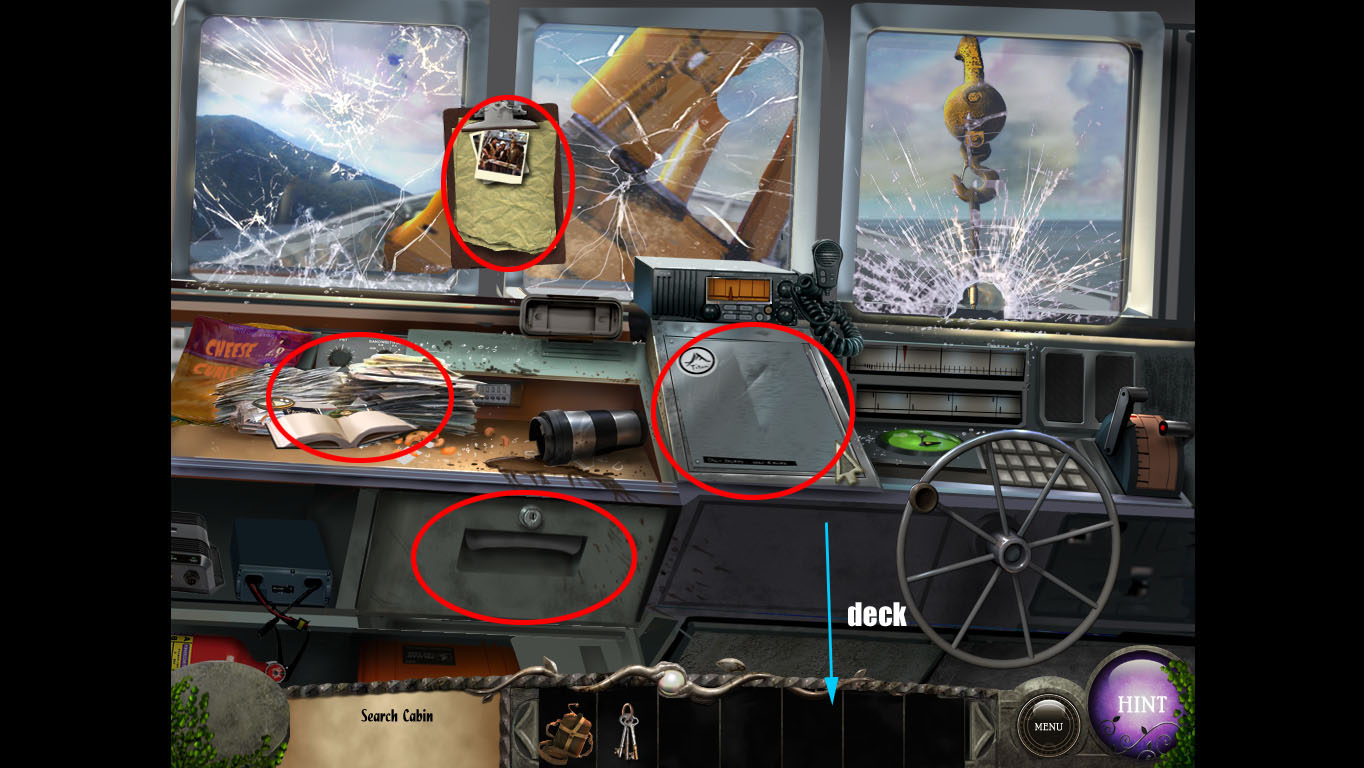
Go into the cabin.
Cabin Area Screenshot
Click on the clipboard and its photos.
Click on the pile of documents. Get the journal. Click on the photos to get the number sequence.
Click on the fuse box. It won't open.
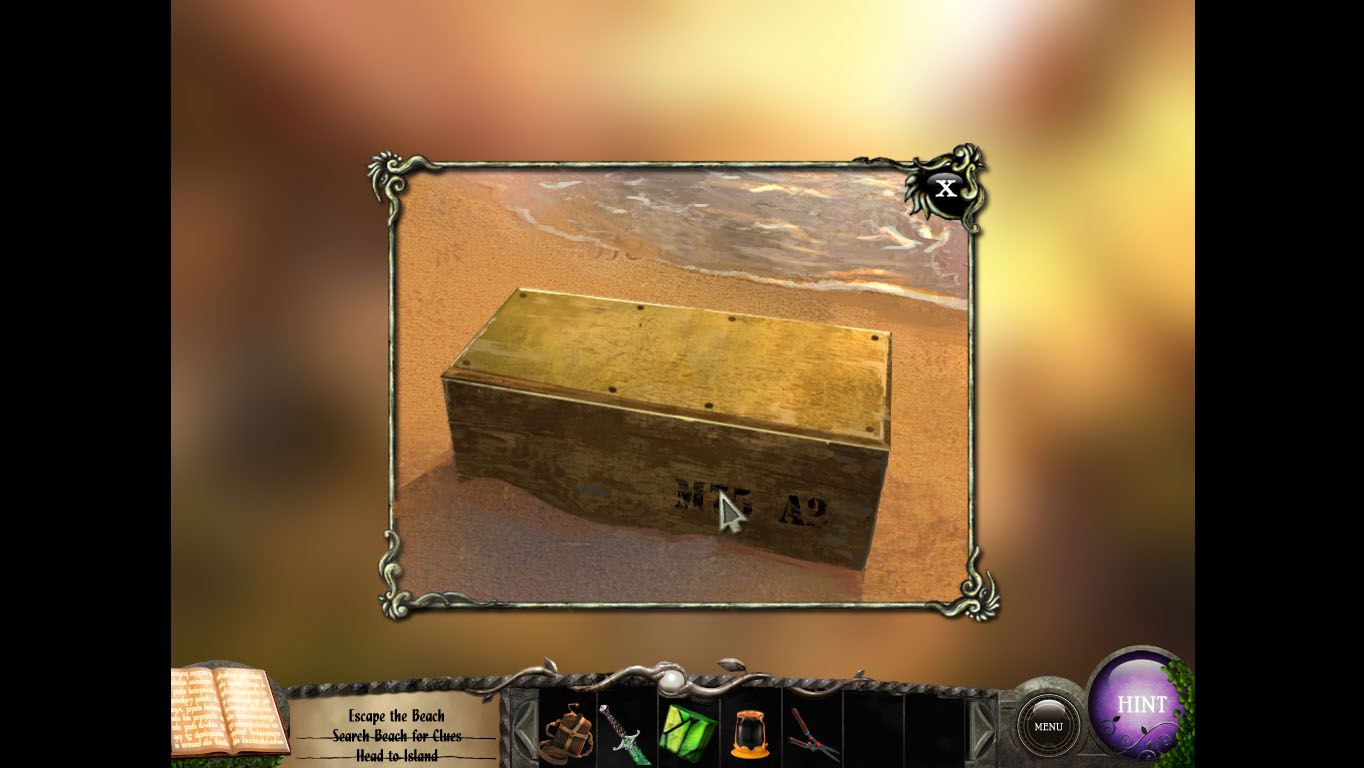
Click on the grey box at the right of the boat.
It requires a number sequence. Use the sequence from the photos by the documents (cabin).
39504
You can now leave the ship.
The Island
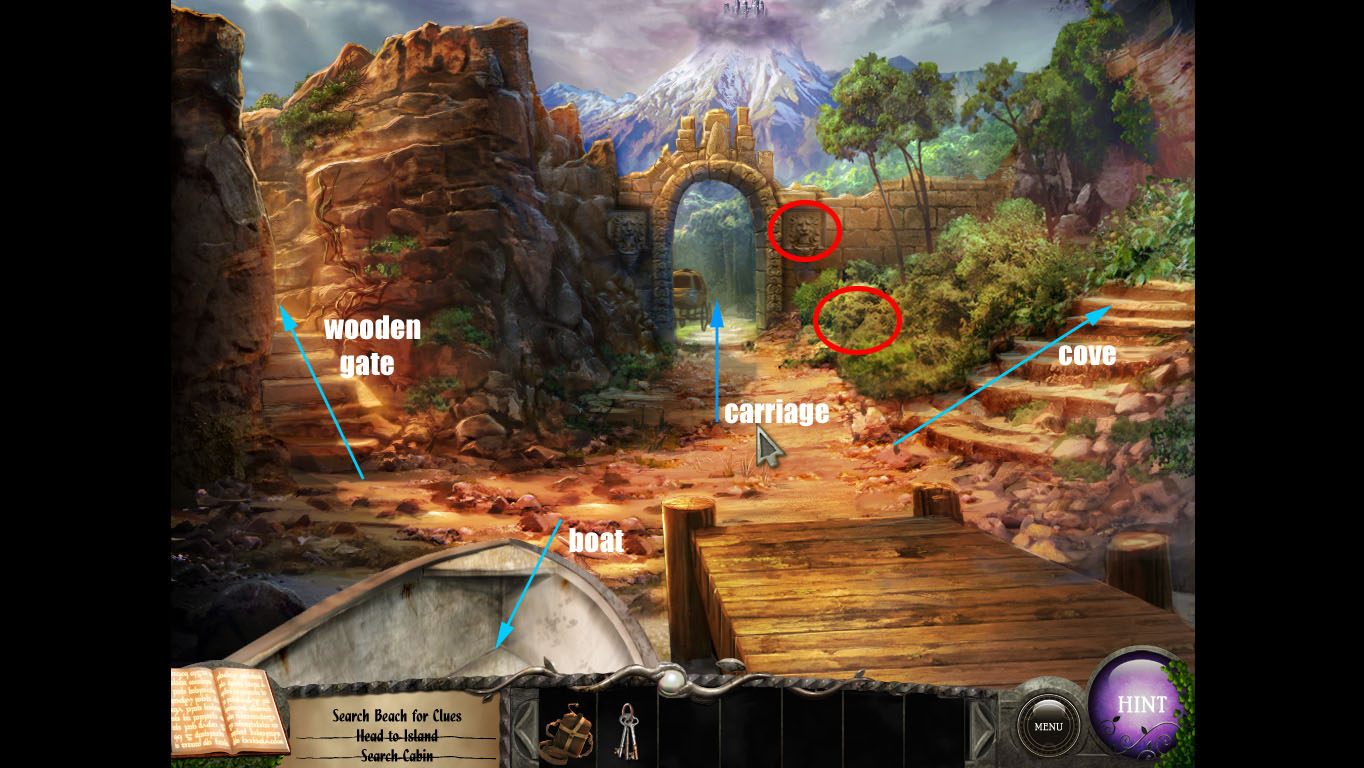
Beach Area Screenshot
Go to the island. Head to the carriage in the background.
Talk to your father. He'll mention his bag.
Head back to the beach area and find the bag in the bushes, on the right-hand side of the path.
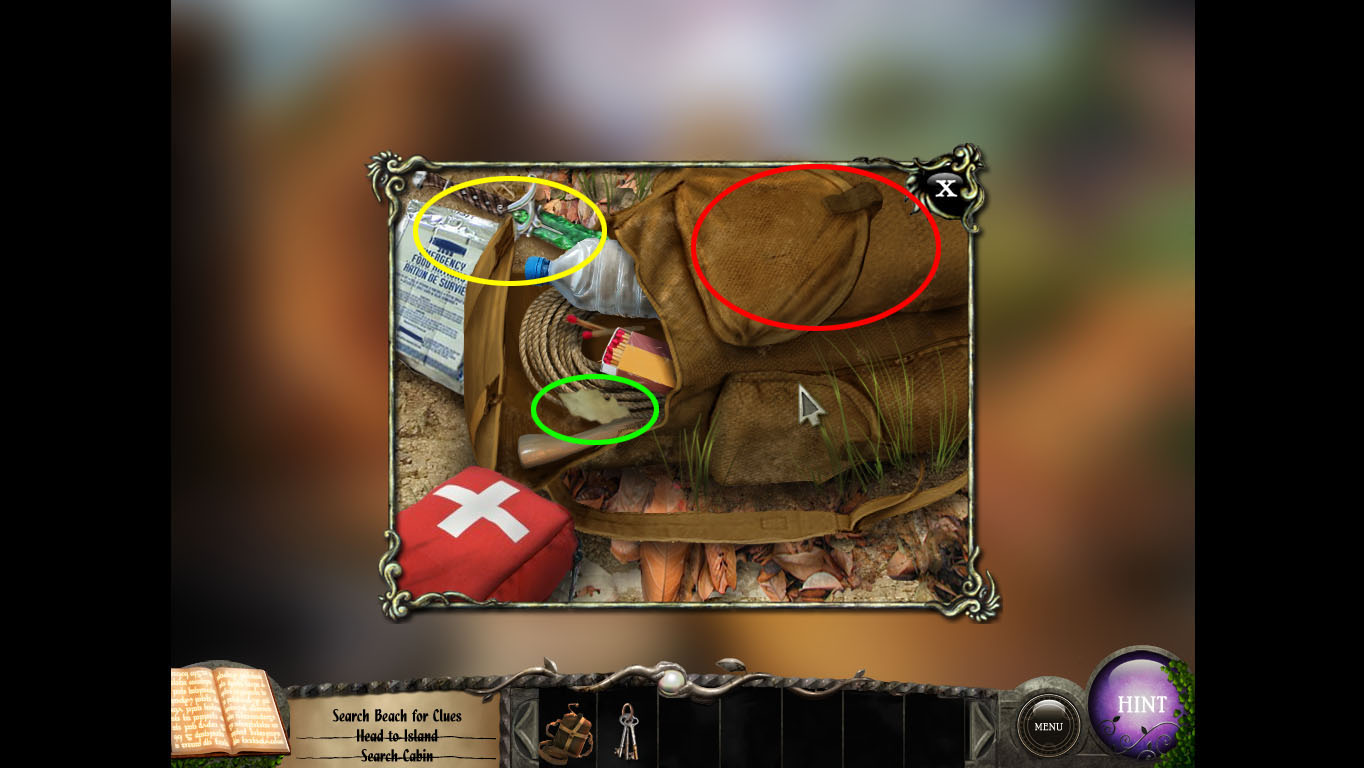
Take the dagger from the bag. Open the pocket to find a pair of pliers.
Bag Screenshot
Go back to your father. See him get taken by the sorceress.
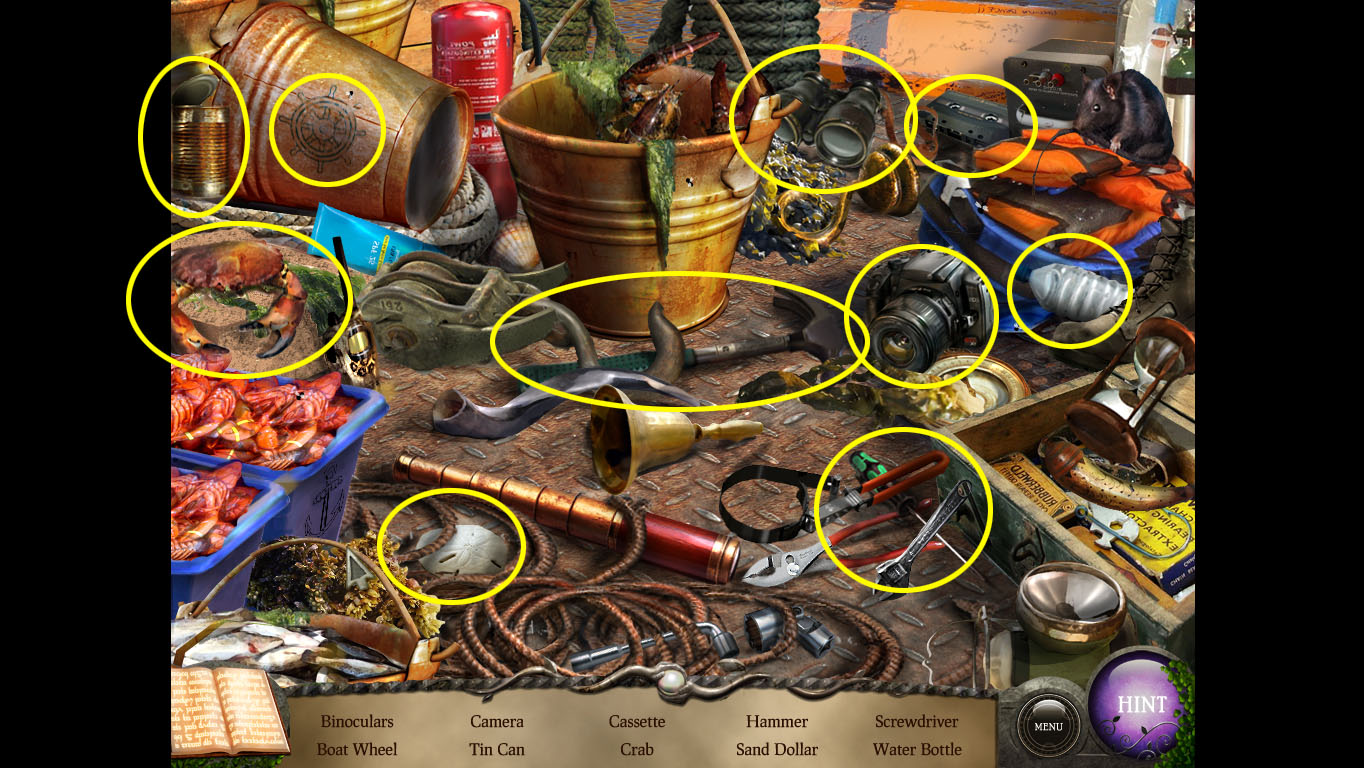
Head back to the boat. Click near the bucket at the bottom left.
It's a hidden-object scene: complete it to get a screwdriver.
hidden-object Solution
Use the keys on the locked compartment. The key will break. Use the pliers.
Open the compartment and get the fuses.
Use the screwdriver to open the fuse box. Use the fuses on the fusebox to start a puzzle.
Fuse Box Puzzle:
Rotate the fuse colors to have all the sections matching.
Use the three red lines that can't be moved as a starting point.
Remember that no lines will go off the area.
Fuse Box Solution
Once solved, click on the radio. A cryptic message will come through.
Head back to the Island.
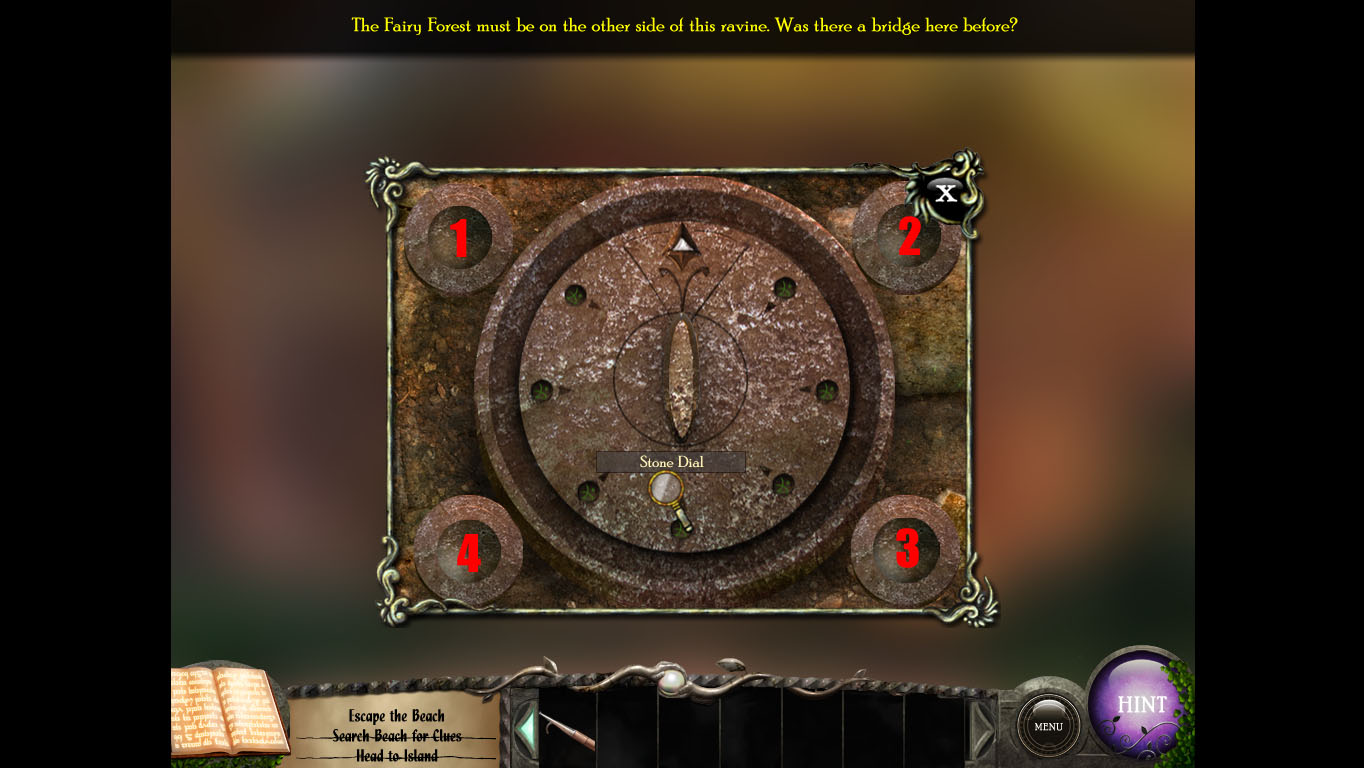
Getting To The Fairy Forest
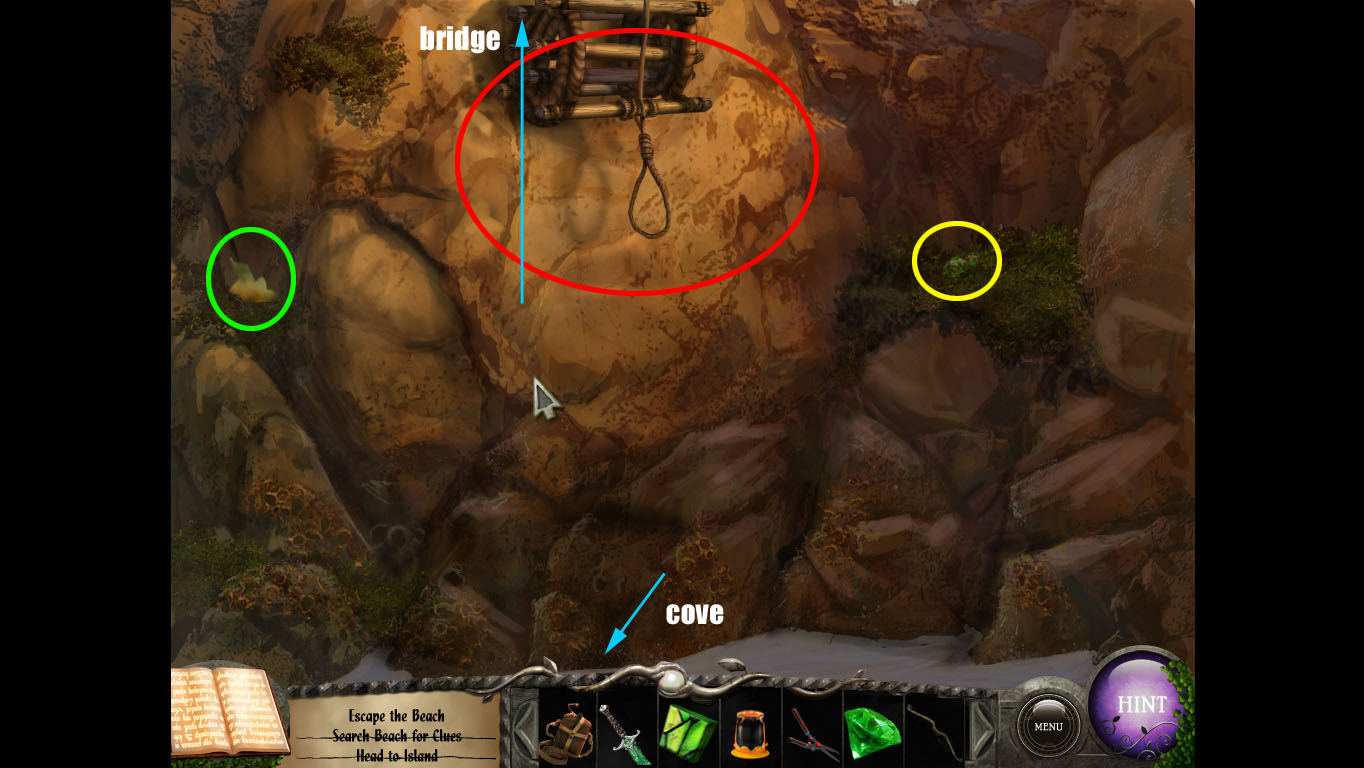
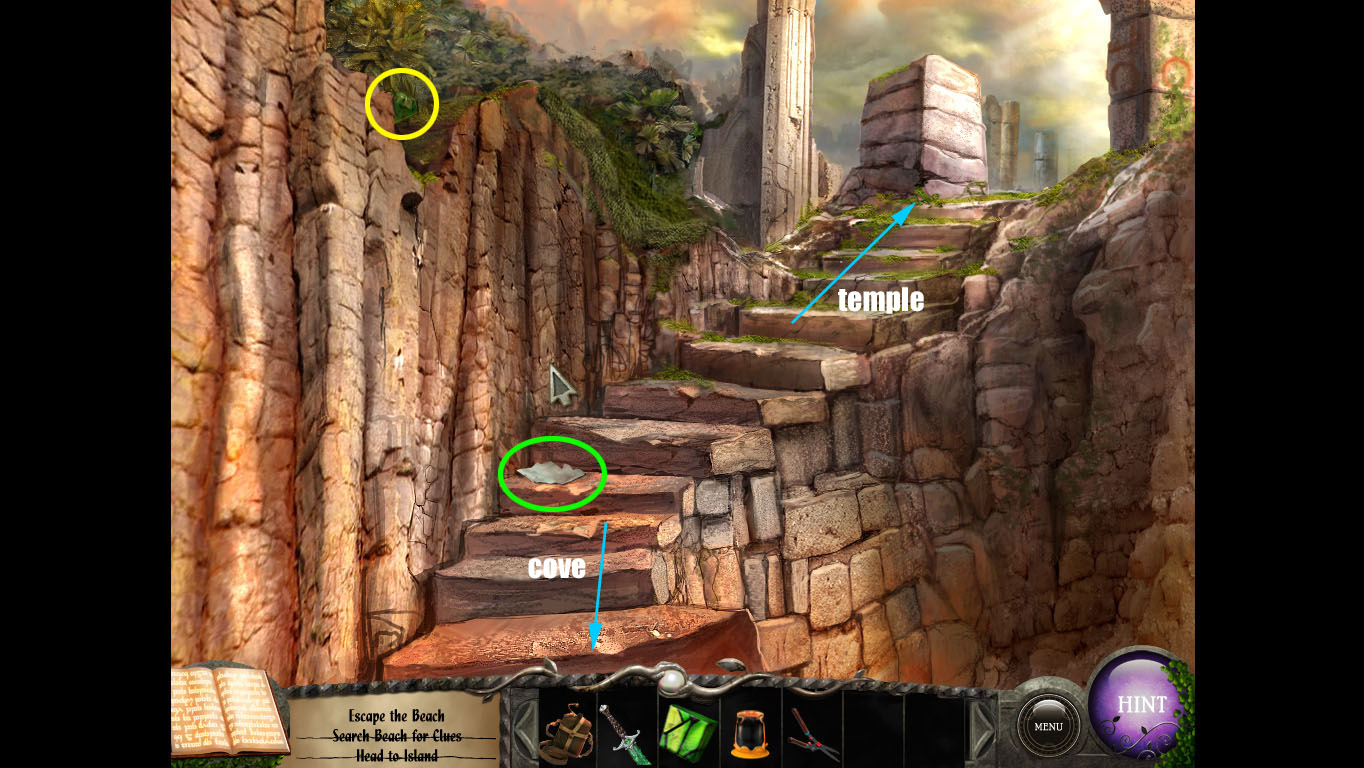
Head to the Cove (right from the beach).
Cove Area Screenshot
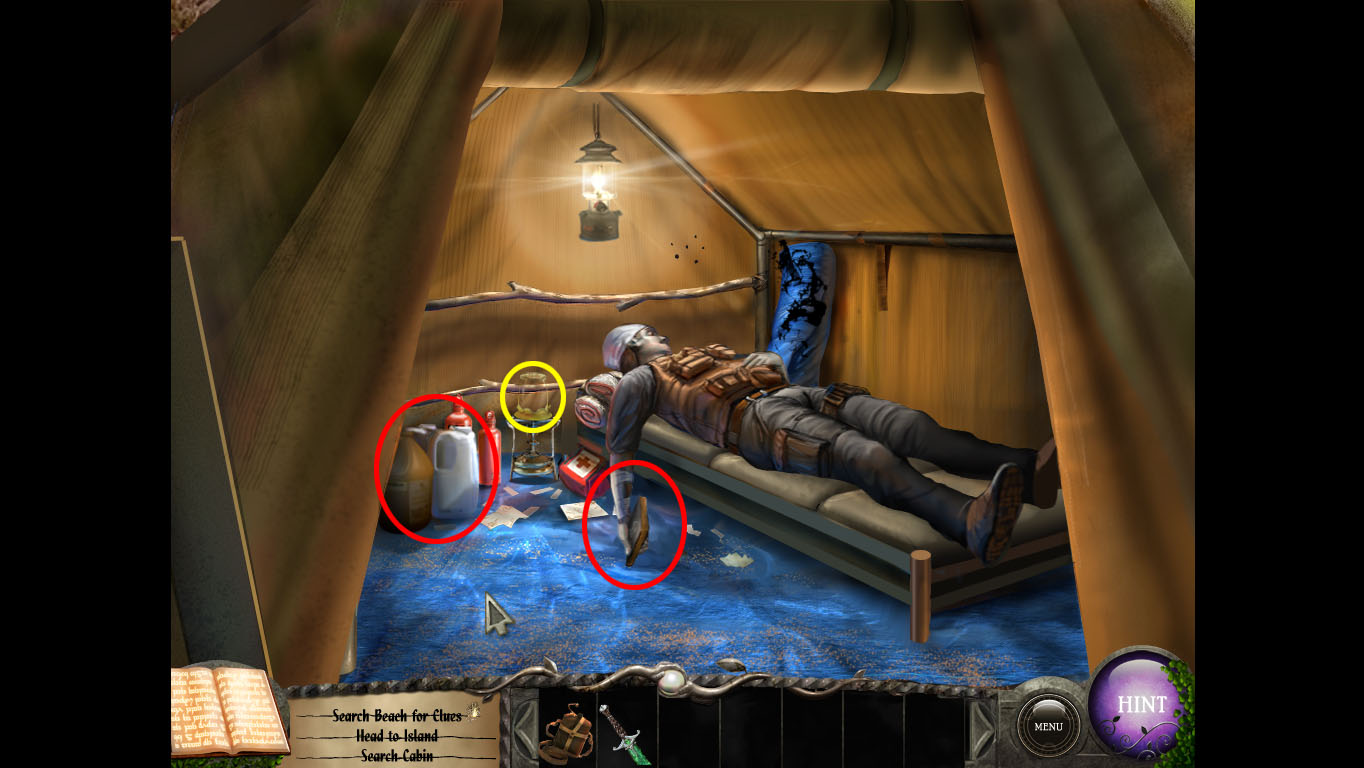
Head into the tent. Move the plastic jugs to get the green tile. Take the empty beaker next to the bed.
Tent Area Screenshot
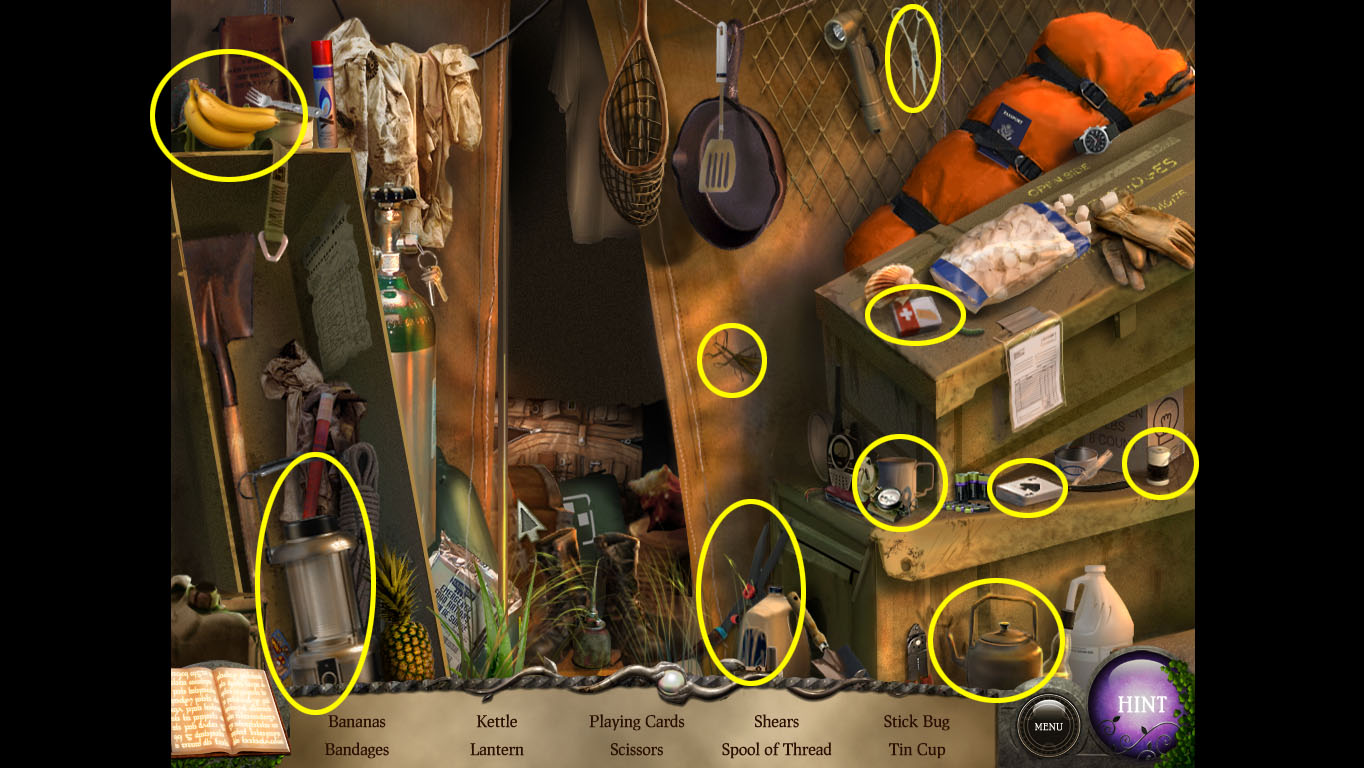
Click next to the tent for a hidden-object scene: complete it to get the shears.
hidden-object Solution
Head Towards The Temple.
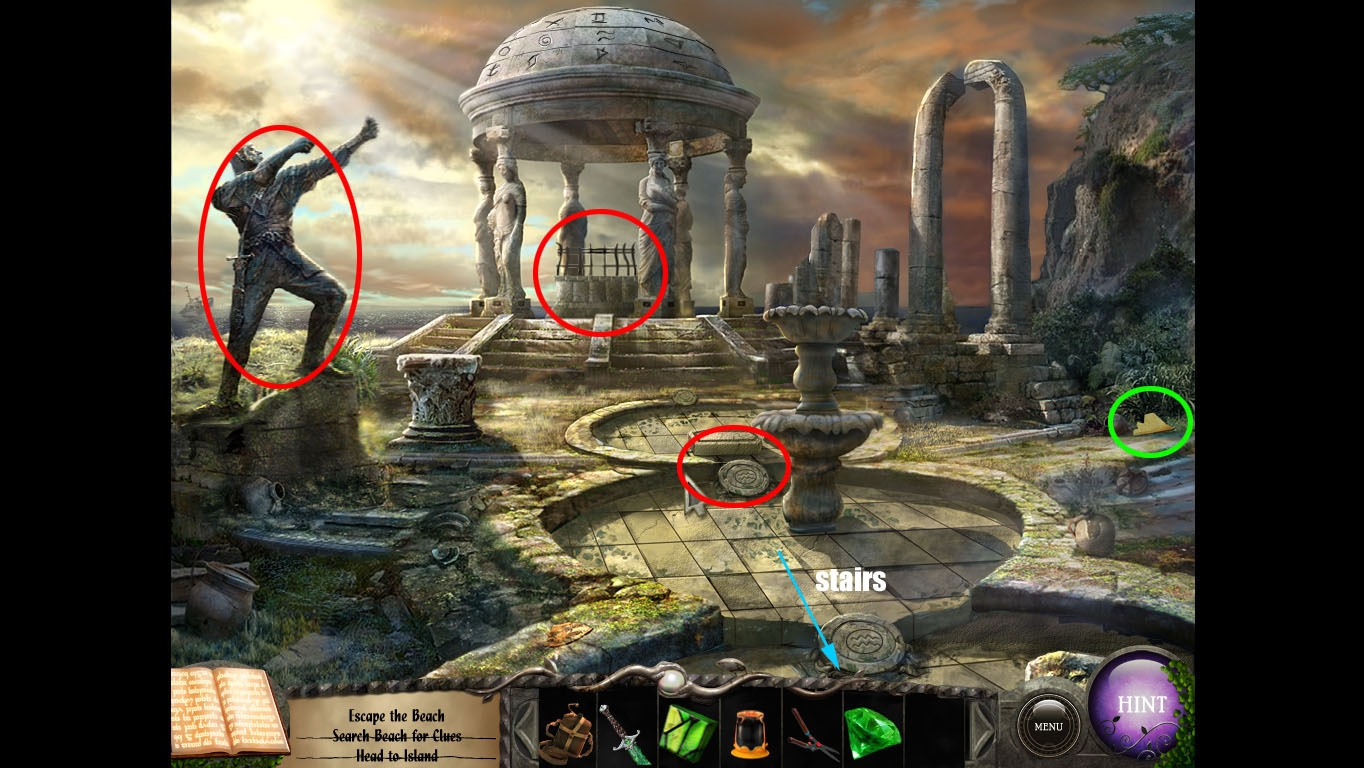
Temple Area Screenshot
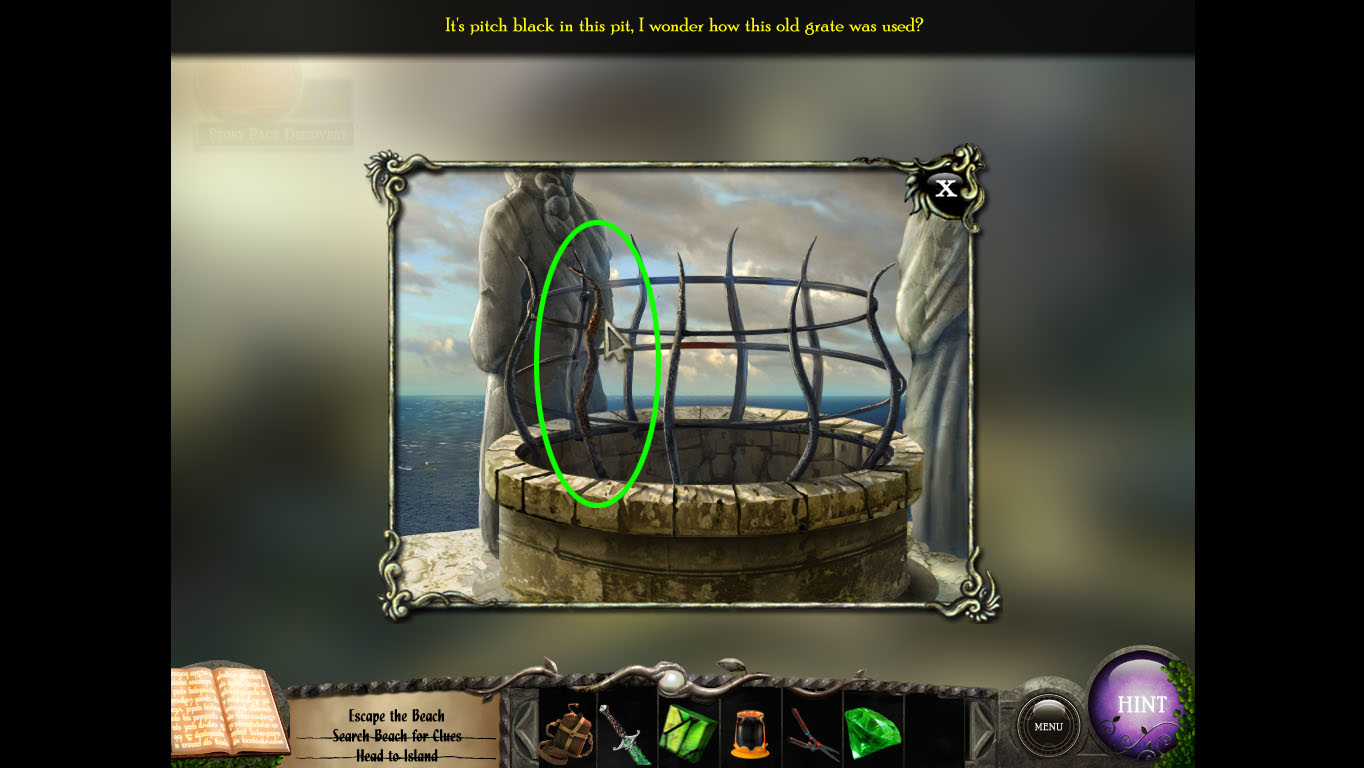
Take a closer look at the iron grate in the background. Break off the weak metal bar.
Screenshot
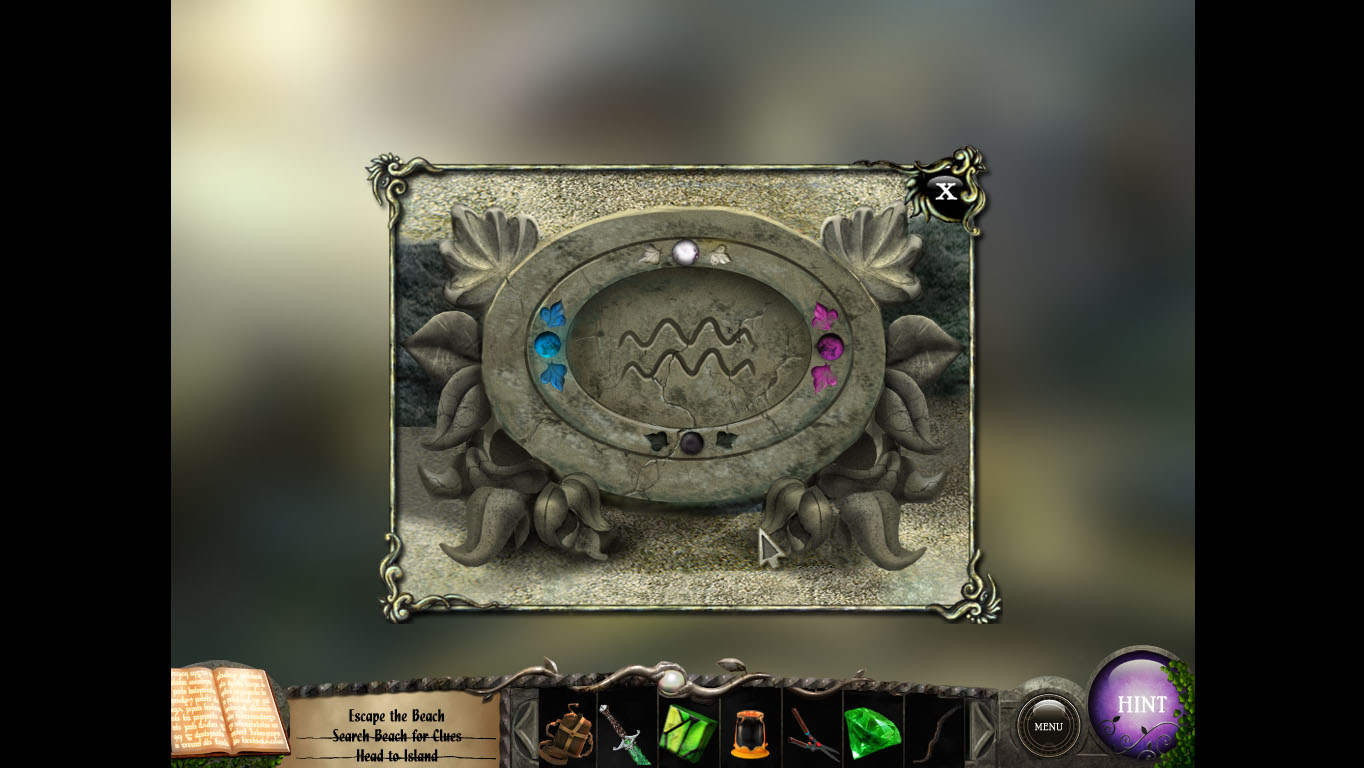
Take a closer look at the symbol on the ground.
Symbol Screenshot
Head back to the cove and click on the chest on the beach. Use the metal bar on it. Get the bow.
Chest Screenshot
Click on the light area behind the tent to find the ladder.
Ladder Area Screenshot
Use the boat hook to pull down the ladder.
Go up to find a pedestal. You need four gems to activate it.
Gem locations:
By the ladder, in the green patch to the right.
Screenshot
The stairs towards the temple, on the wall to the left where it curves down.
Screenshot
By the wooden door (left from the beach), higher up in the branches to the right.
Screenshot
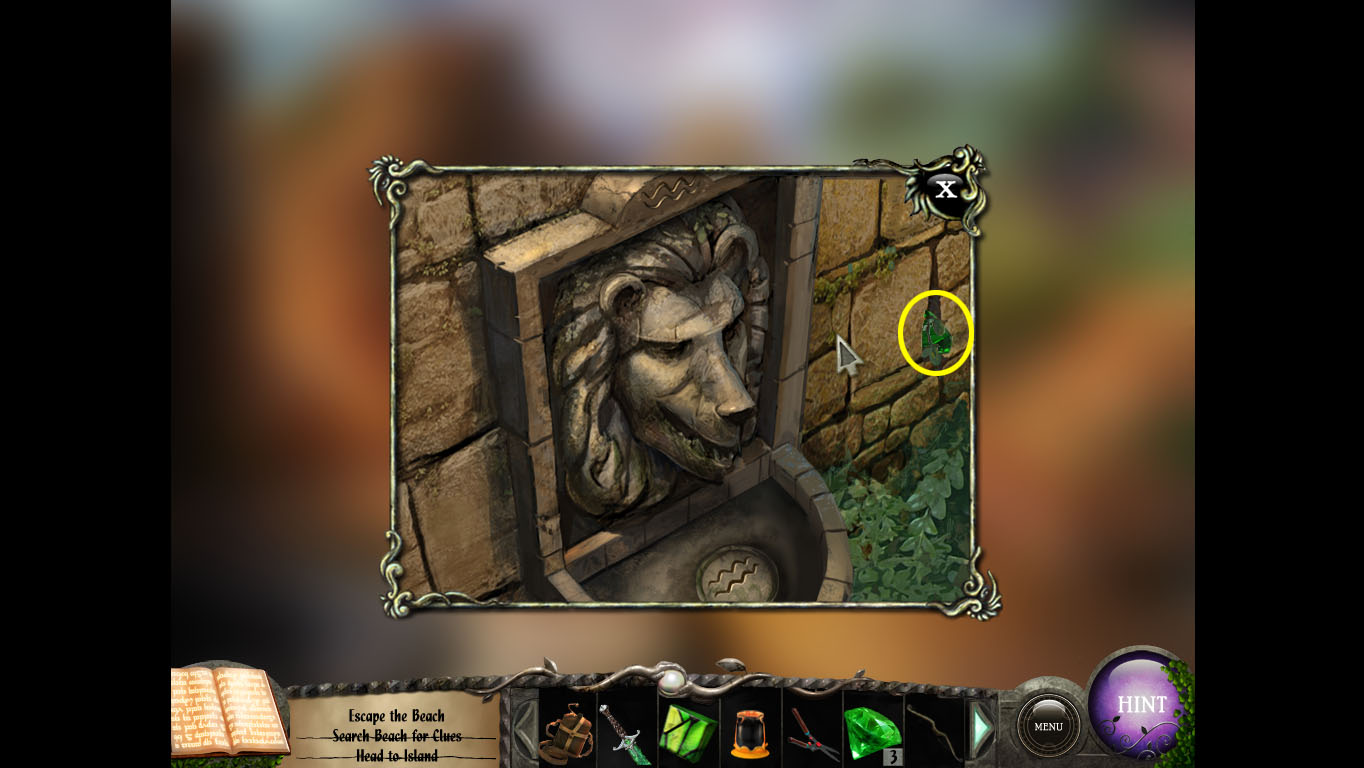
Look at the lion head to the right of the large door on the beach. The gem is to the right of the head.
Screenshot
Use the four gems on the pedestal.
The Pedestal Sequence
You have to tap a sequence that will rotate the disc all the way around. Look at the white arrows on the gems and the main white arrow for clues.
The sequence: Starting at the top left the gems are 1, 2, 3, 4.
The sequence is 4, 1, 3, 1, 3, 2, 2, 4.
Pedestal Solution
Place the Crystal Dagger (from your father's backpack on the beach) into the slit on the pedestal.
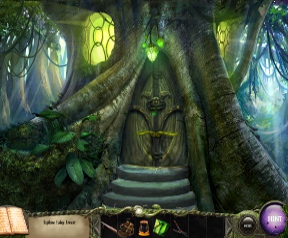
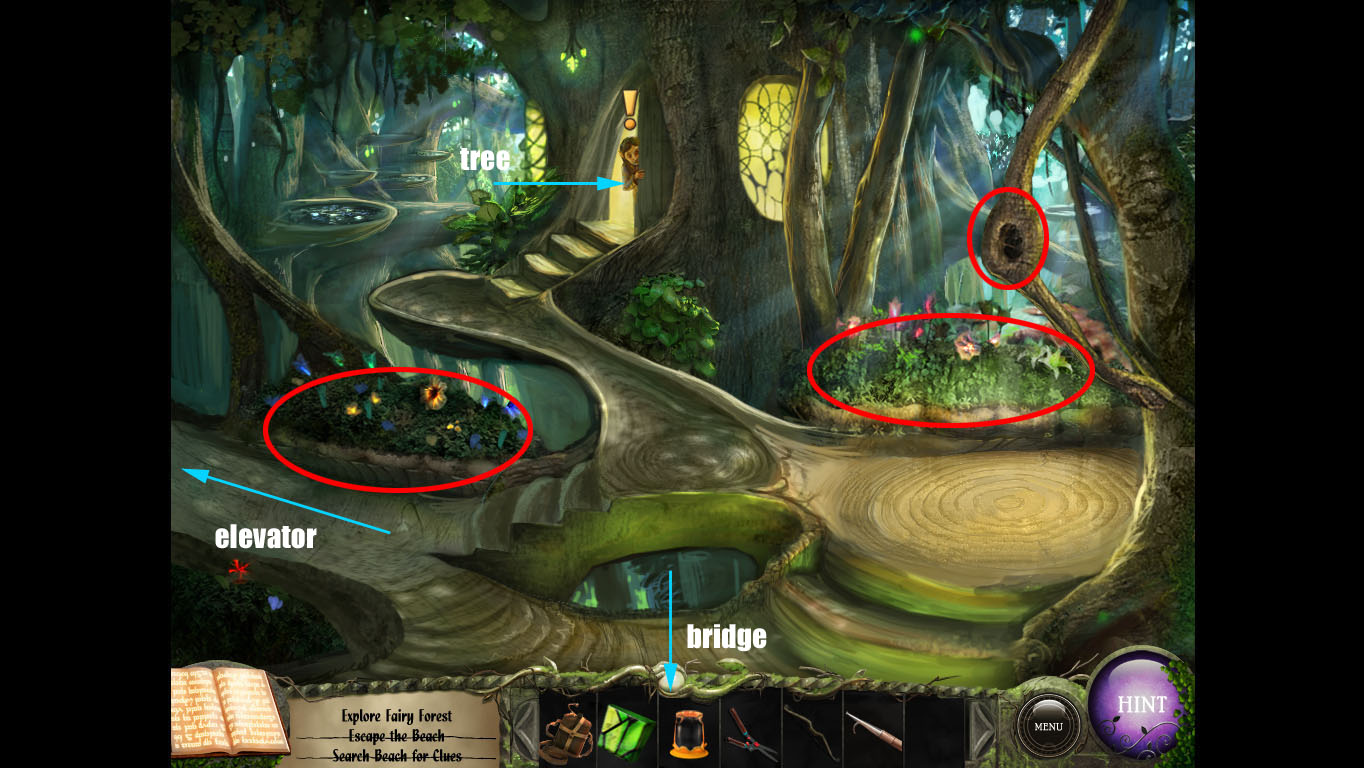
The Fairy Forest
Fairy Forest Area Screenshot
Click on the knot in the tree to the left. Pick up the slingshot.
Talk to the character peeking from the doorway at the back.
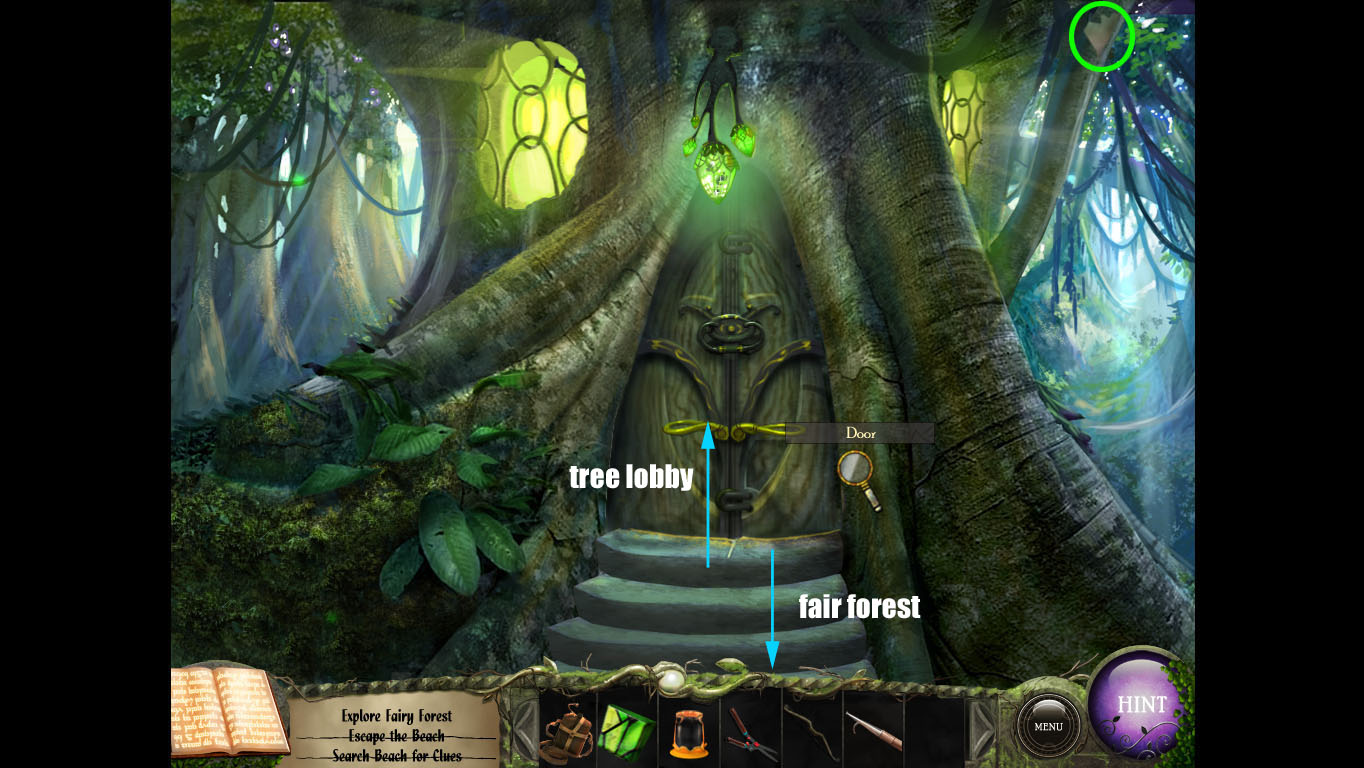
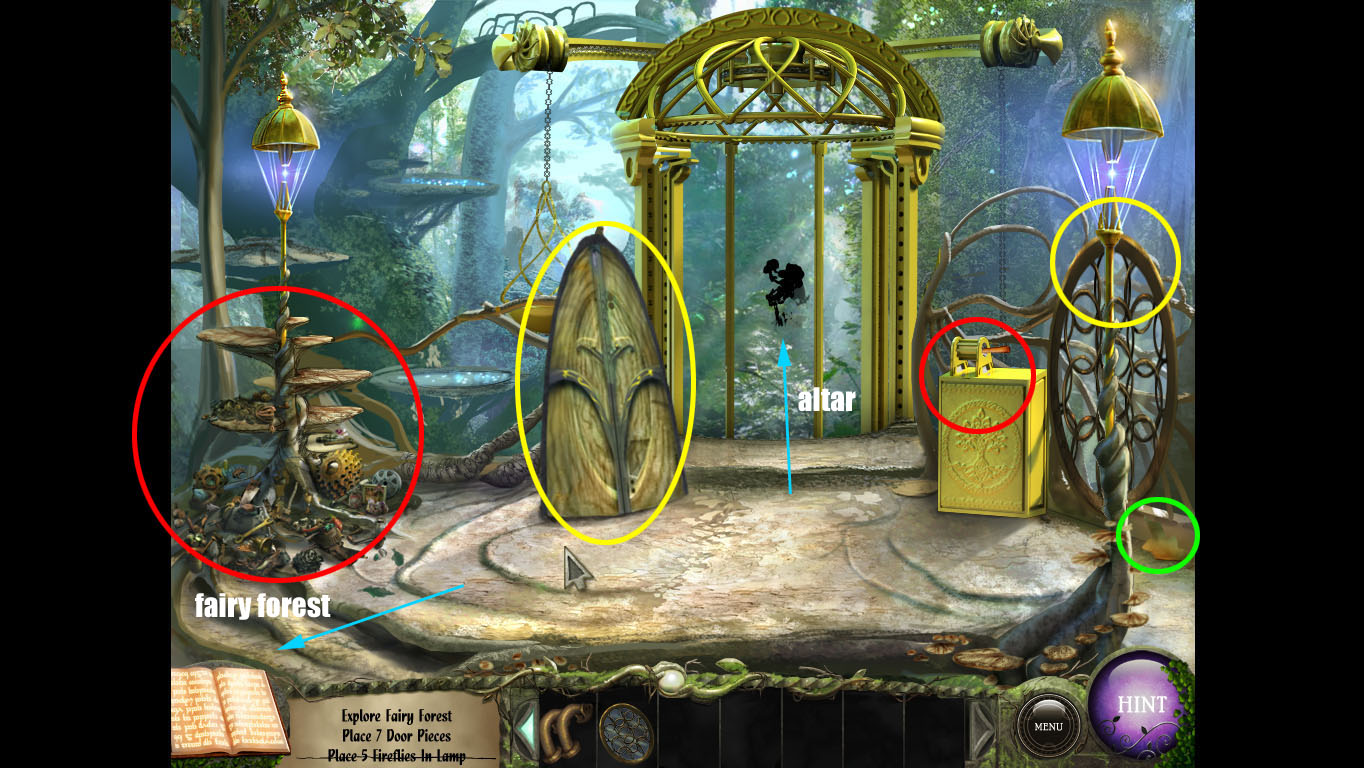
Go to the door.
Door Area Screenshot
Click on the bright spots when they appear on the screen to catch fireflies.
Once you have five, use them on the green bulbs above the door.
Click on the door again. Now the door and windows disappear.
The missing door pieces:
Door knocker: next to the tree with the missing door.
Door handles: Use the shears in the left-hand flowers at the fairy woods entrance.
Door clasp: Use the shears on the right-hand flowers at the Fairy Forest entrance.
Left window: Above the left-hand flowers at the fairy forest entrance. use the boat hook to reach it.
Right window: Right of the elevator.
Door: Left of the elevator.
Door clasp: On the weight holder of the elevator.
Place all the pieces onto the tree. It will open up.
The King & Queen
Tree Lobby Area Screenshot
Go inside the tree. Talk to the King and Queen.
Follow them up the stairs.
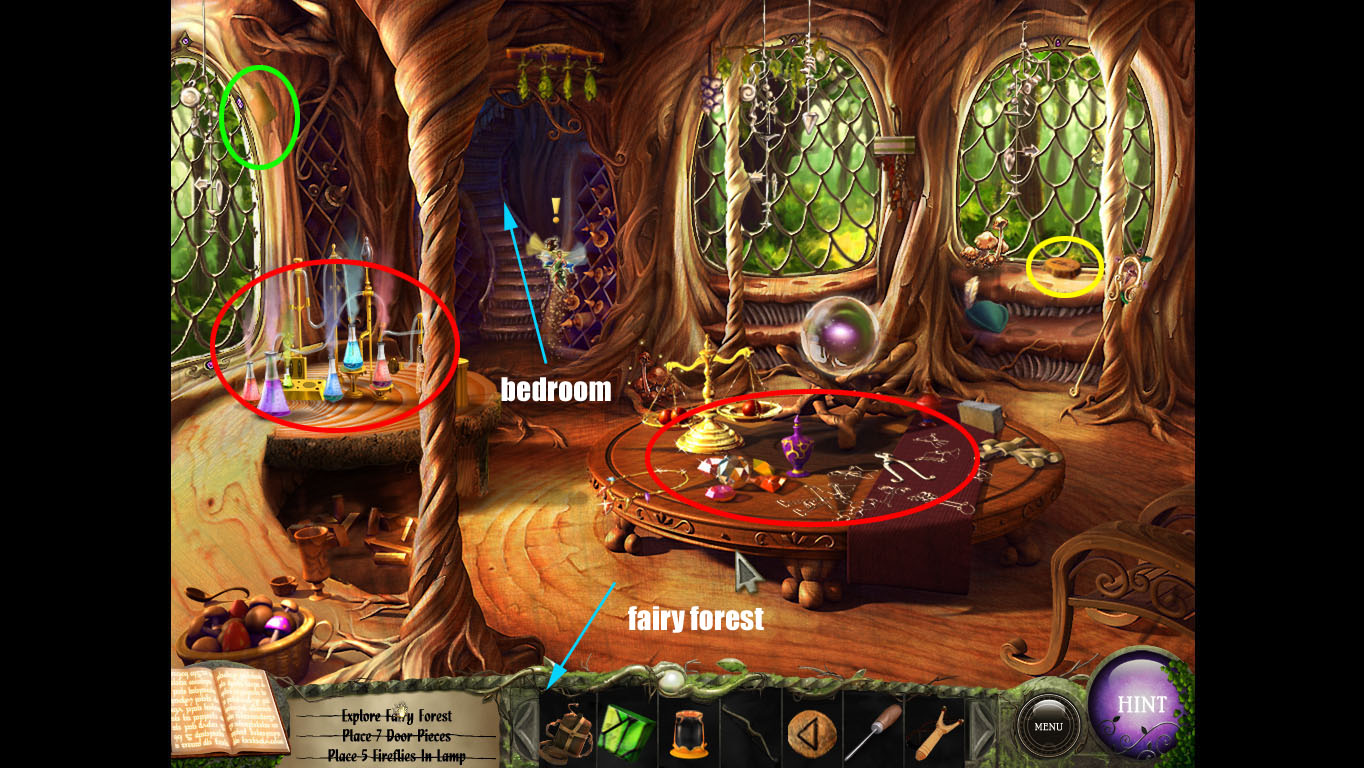
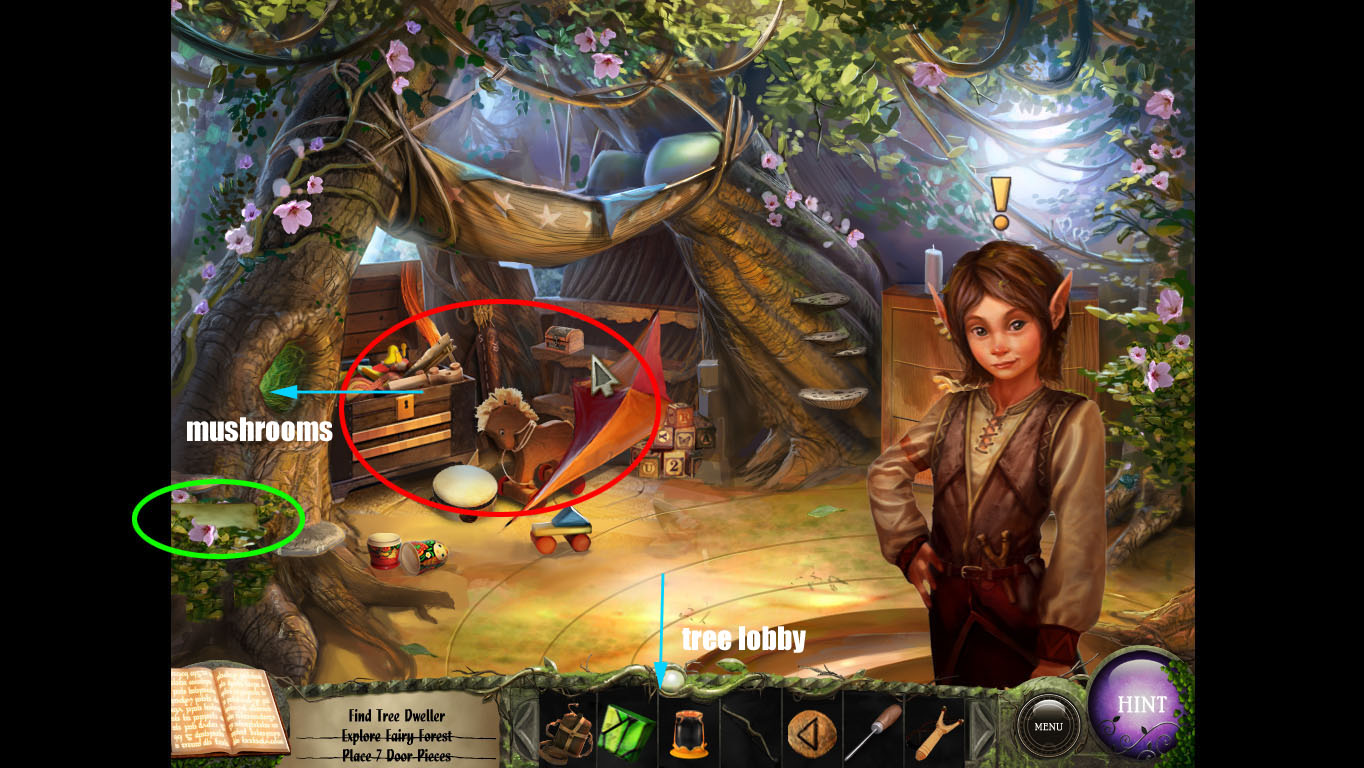
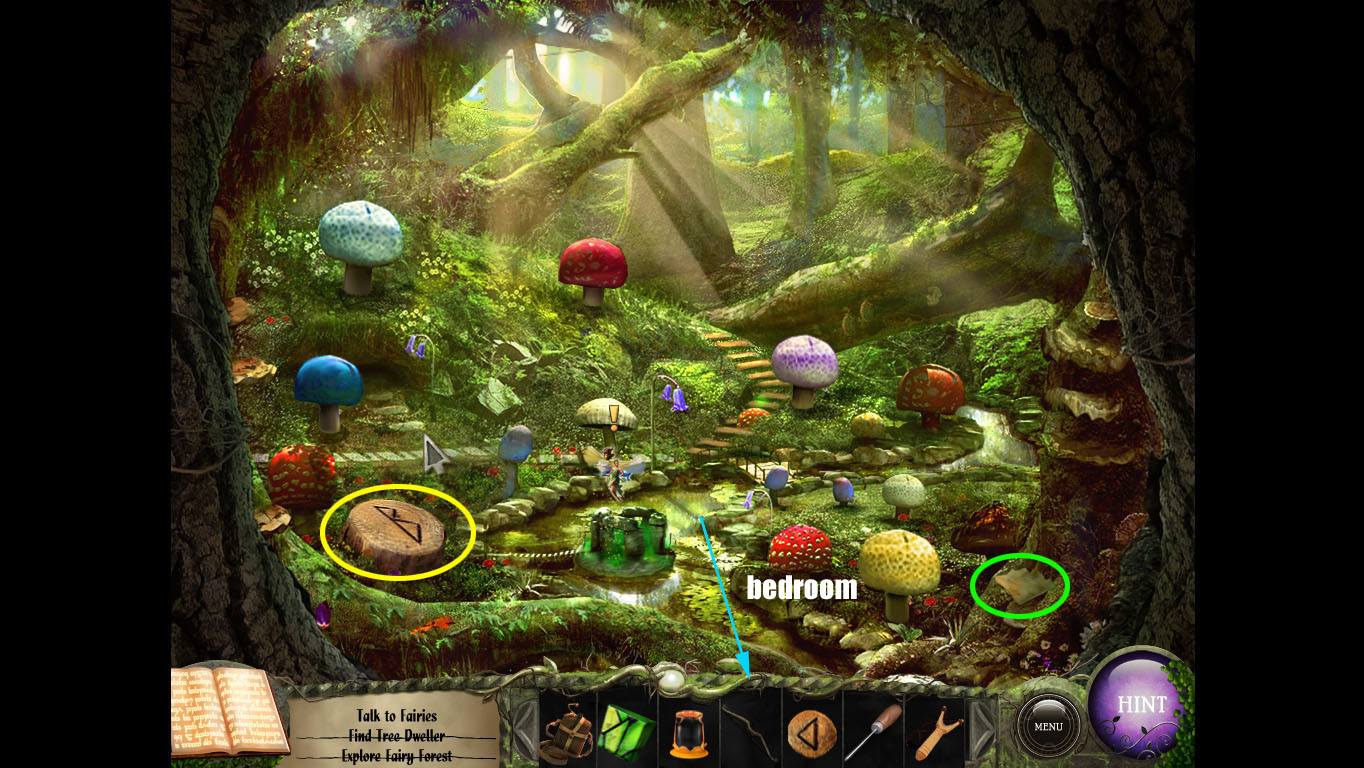
Bedroom Area Screenshot
Speak to Dariwan.
Click on the hole in the tree to the left, glowing with green light.
Mushroom Area Screenshot
Talk to the King and Queen. They want to play a game of hide and seek.
Use the slingshot to shoot at the mushrooms they are hiding behind (the slingshot can be found in the knot of the right-hand tree at the fairy forest entrace).
Fixing The Elevator
The King and Queen will give you a small weight.
Talk to the King and Queen again. They want something regal.
Go to the lobby area of the tree.
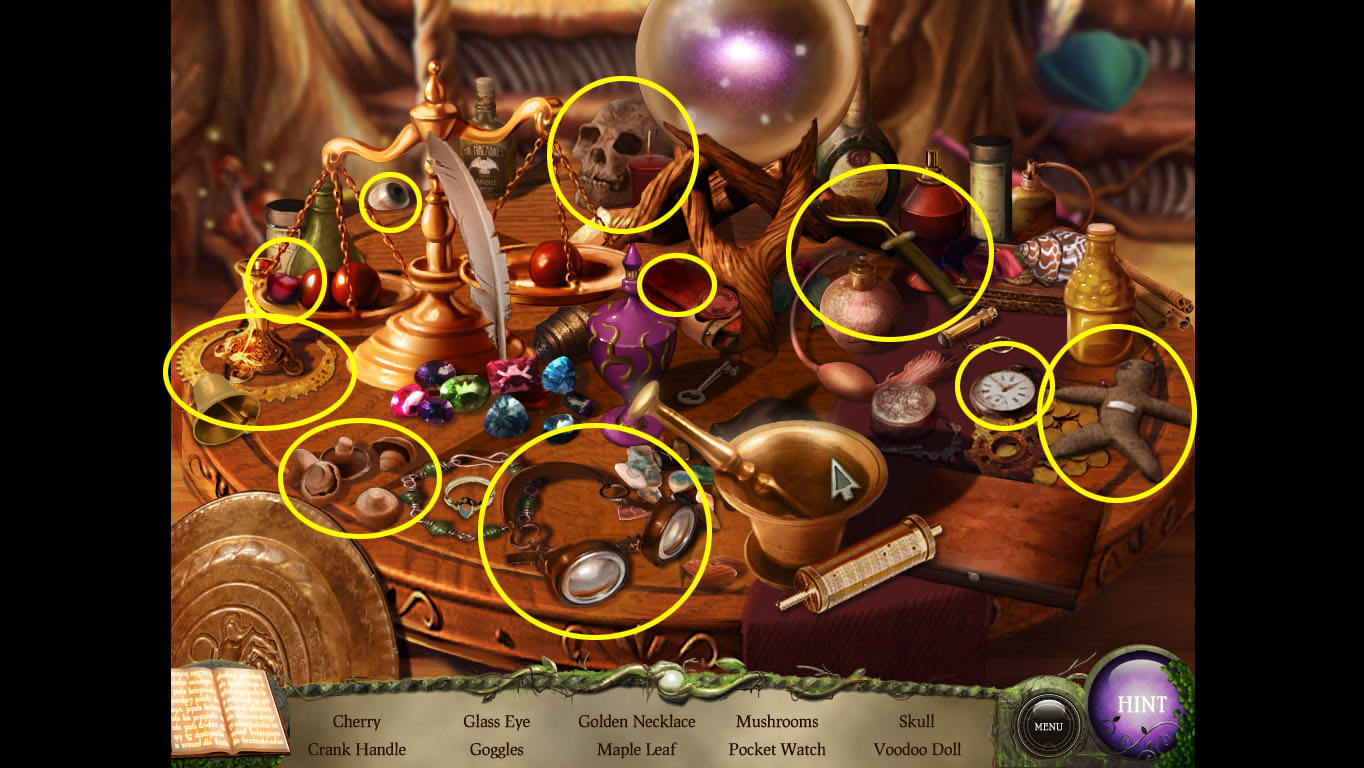
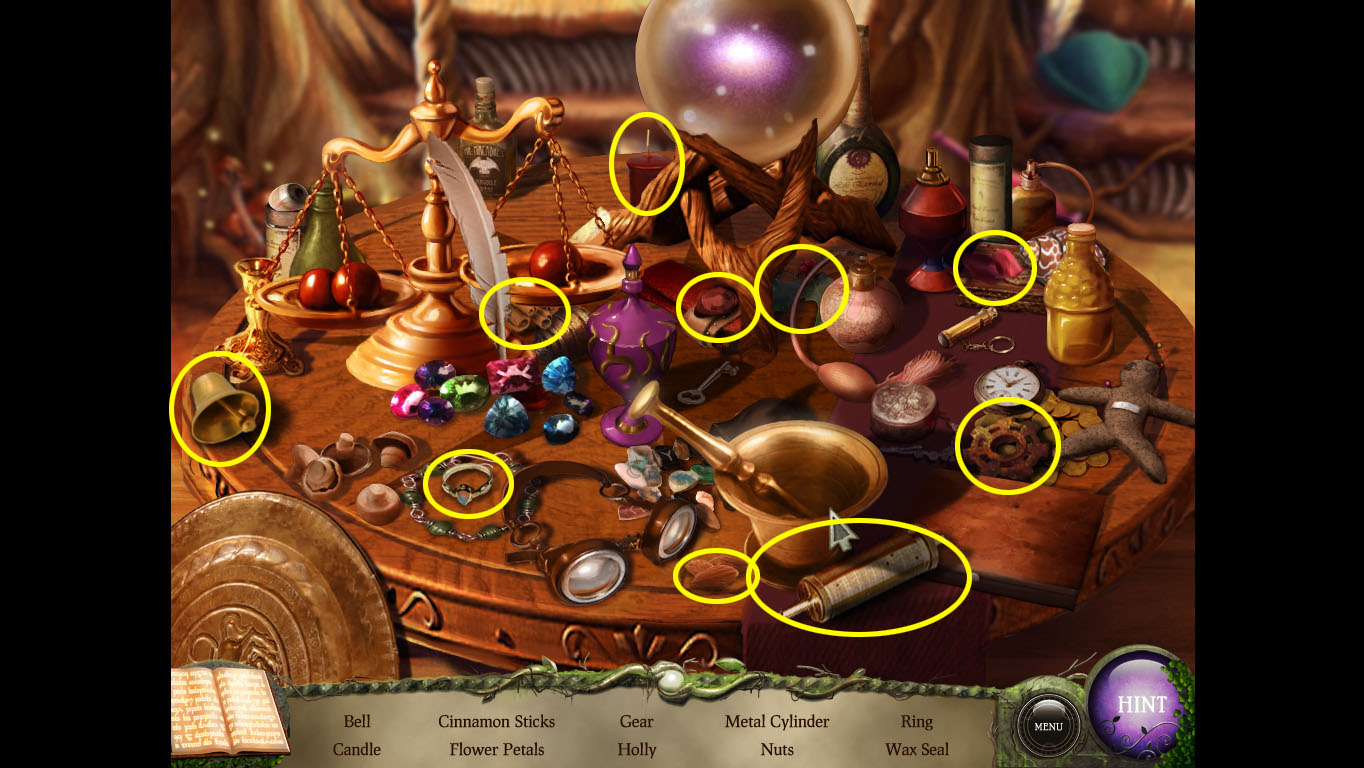
Click on the table. It's a hidden-object scene: complete to get the Crank Handle.
hidden-object Solution
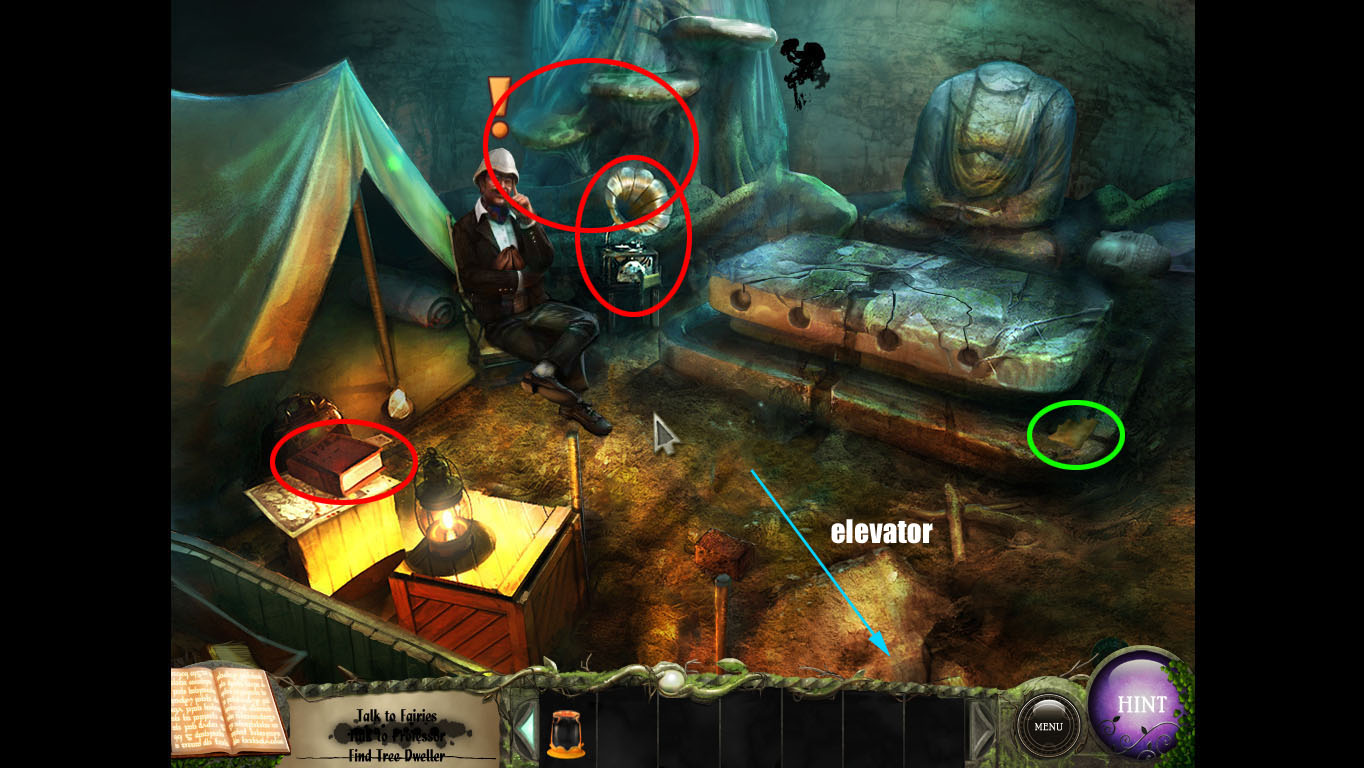
Go to the elevator.
Elevator Area Screenshot
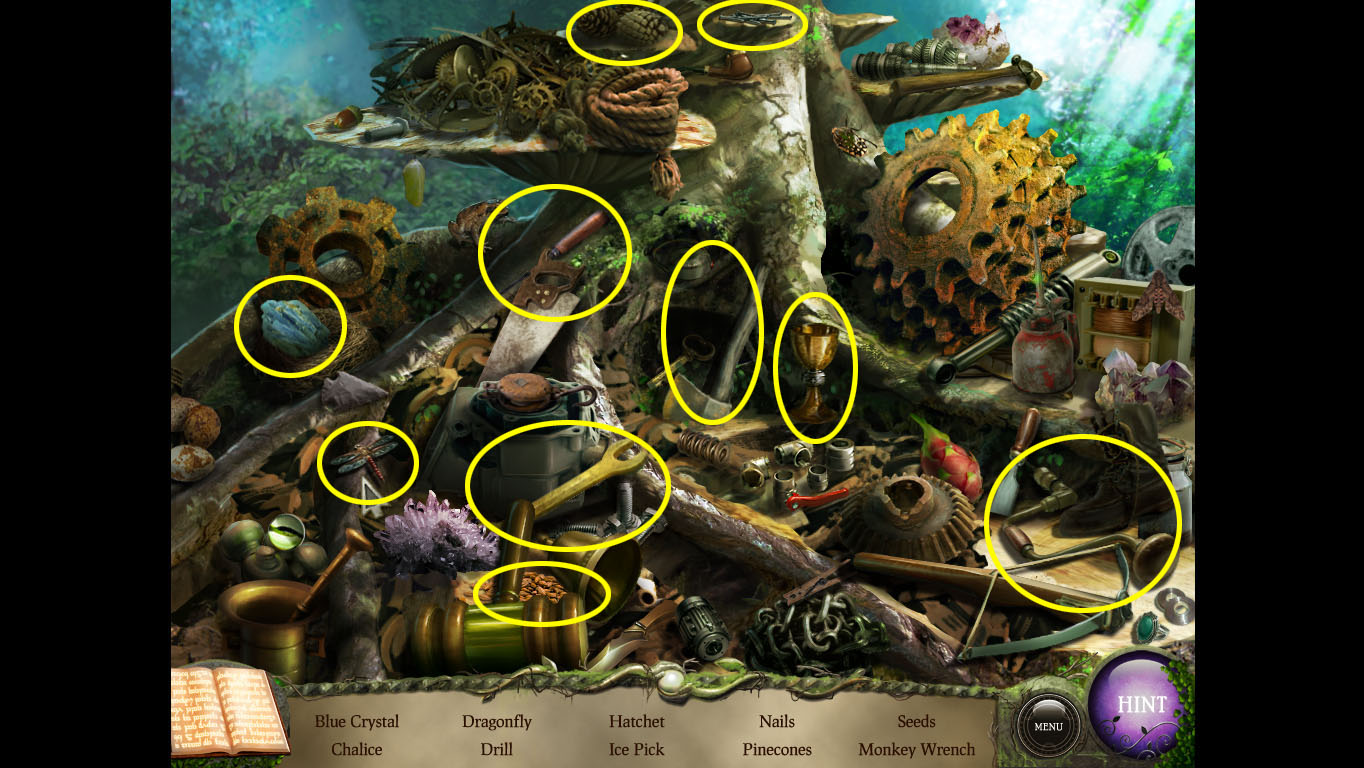
Click on the pile next to the elevator. It is a hidden-object screen: complete to get the icepick.
hidden-object Solution
Look at the box to the right of the elevator.
Take the grow potion scroll and insert the hand crank.
Head back to the tree lobby. Use the empty beaker on the chemistry set, then the grow potion scroll.
Complete the puzzle by matching the sequence of colored beakers on the chart. Tip: start by looking for the first color, then see if the second color is next to it.
Head back to the elevator.
Place the small weight on the counterweight platform.
Use the grow potion to make the weight bigger.
Use the hand crank to bring up the elevator.
The Altar And Green Pearl
Head down the elevator and towards the altar.
Altar Area Screenshot
Talk to the professor. Take the shrink potion scroll from the book on the left.
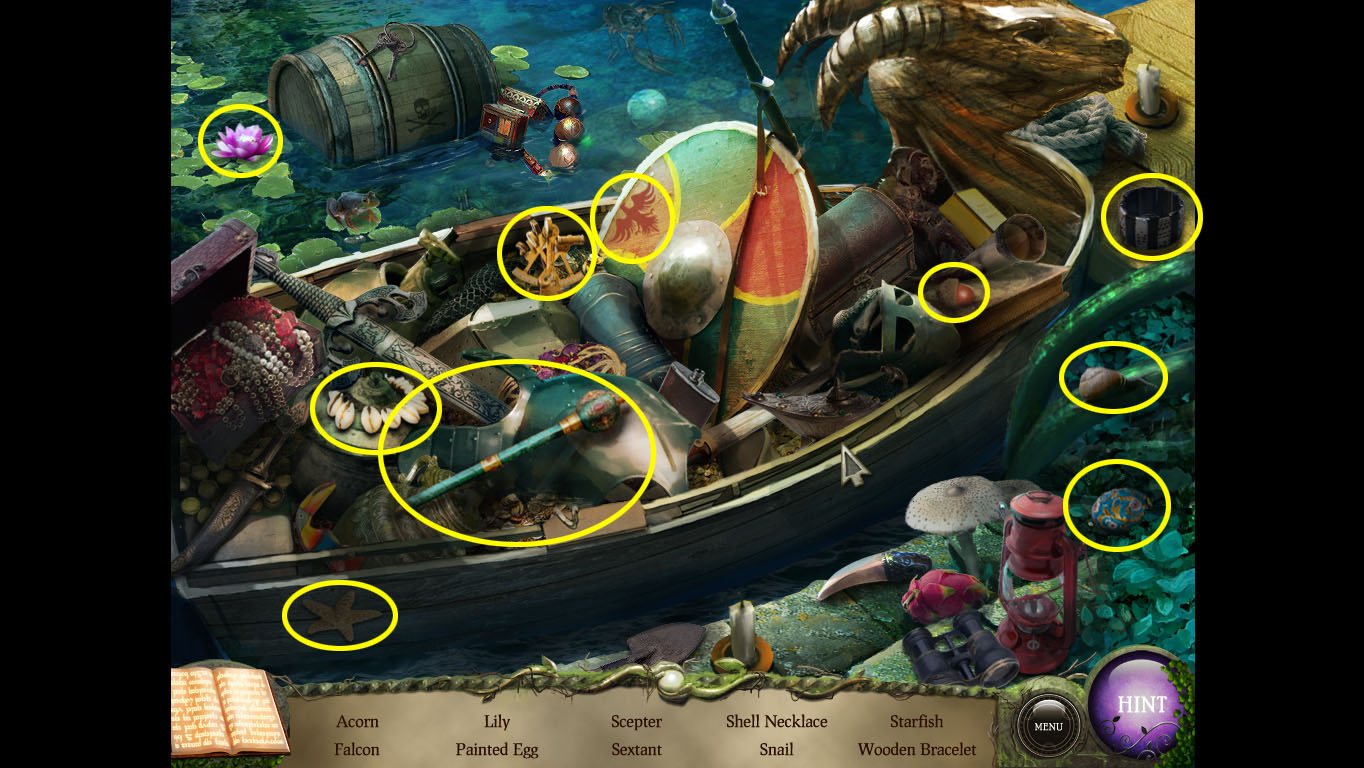
Head back to the altar entrance. Click on the boat. It is a hidden-object scene: complete to get the Scepter.
hidden-object Solution
Go to the tree lobby. Use the beaker and shrink potion scroll on the chemistry set.
Complete the puzzle by finding the sequence of colored beakers on the chart.
Go to the mushroom area where the King and Queen is. Give them the sceptre, then shrink it using the shrink potion.
They will give you the pearl.
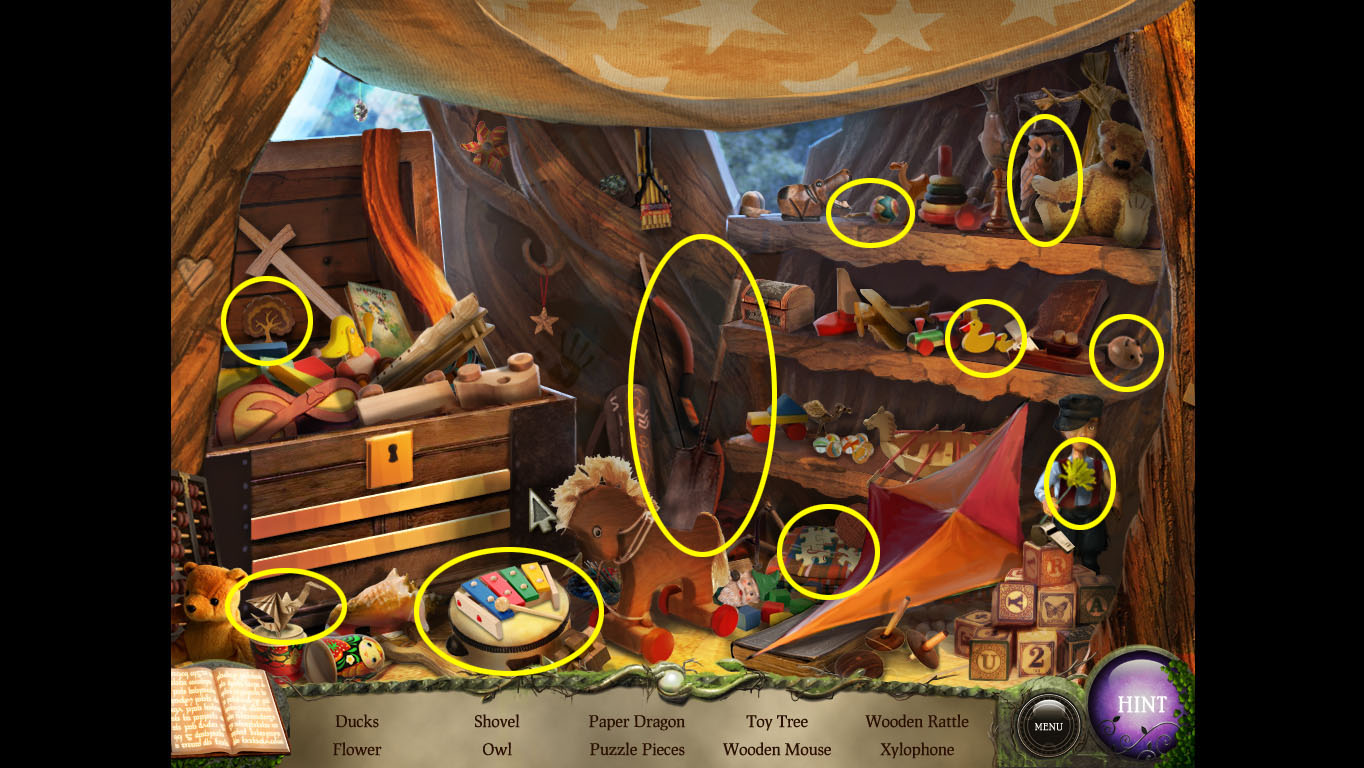
Go back to Dariwan's room and click on the pile of toys. It's a hidden-object scene: complete to get the shovel.
hidden-object Solution
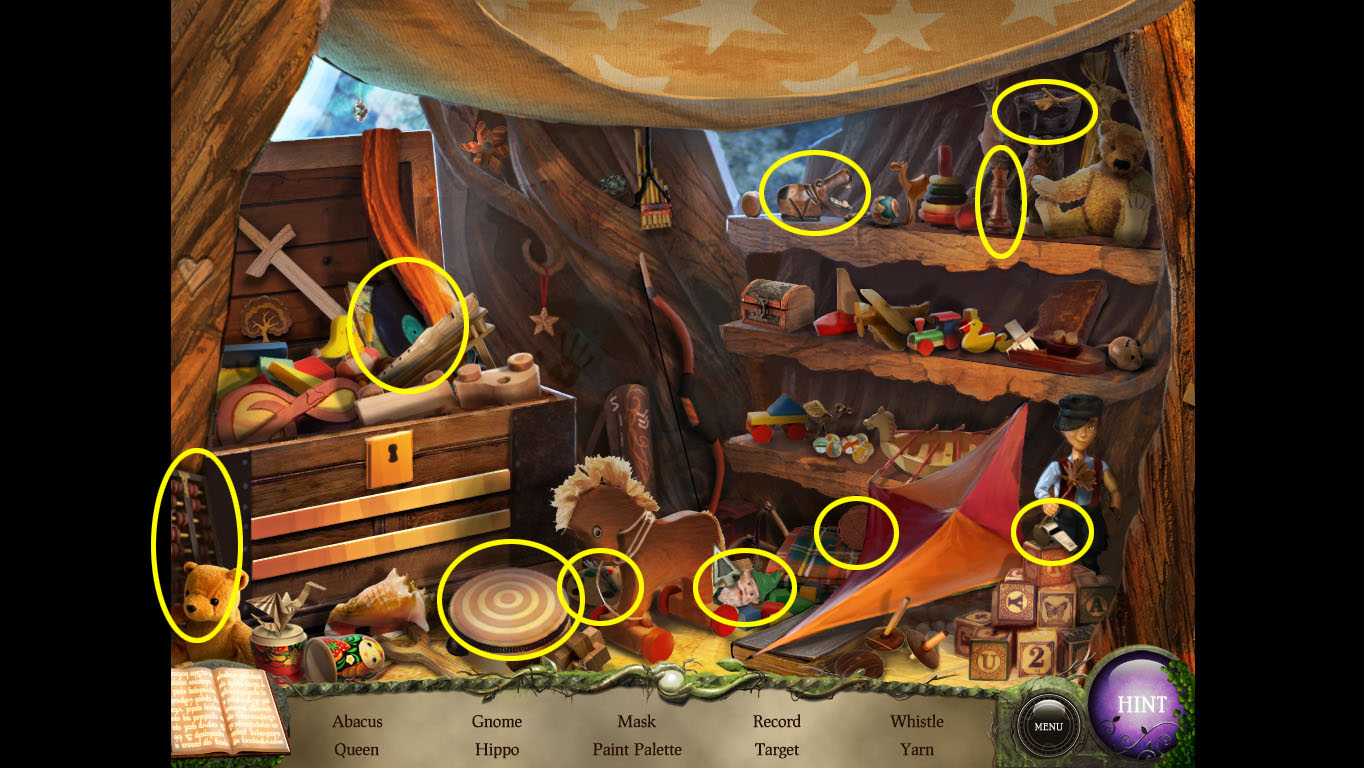
Click on the toys again. It's a hidden-object scene: complete to get the record.
hidden-object Solution
Head to the altar.
Rune locations:
In the tree lobby, on the window sill.
Use the shears on the right-hand flowers at the Fairy Forest entrance.
In the enchanted area with the mushrooms where the king and queen are.
Dig in front of the altar with the shovel (found in Dariwan's room)
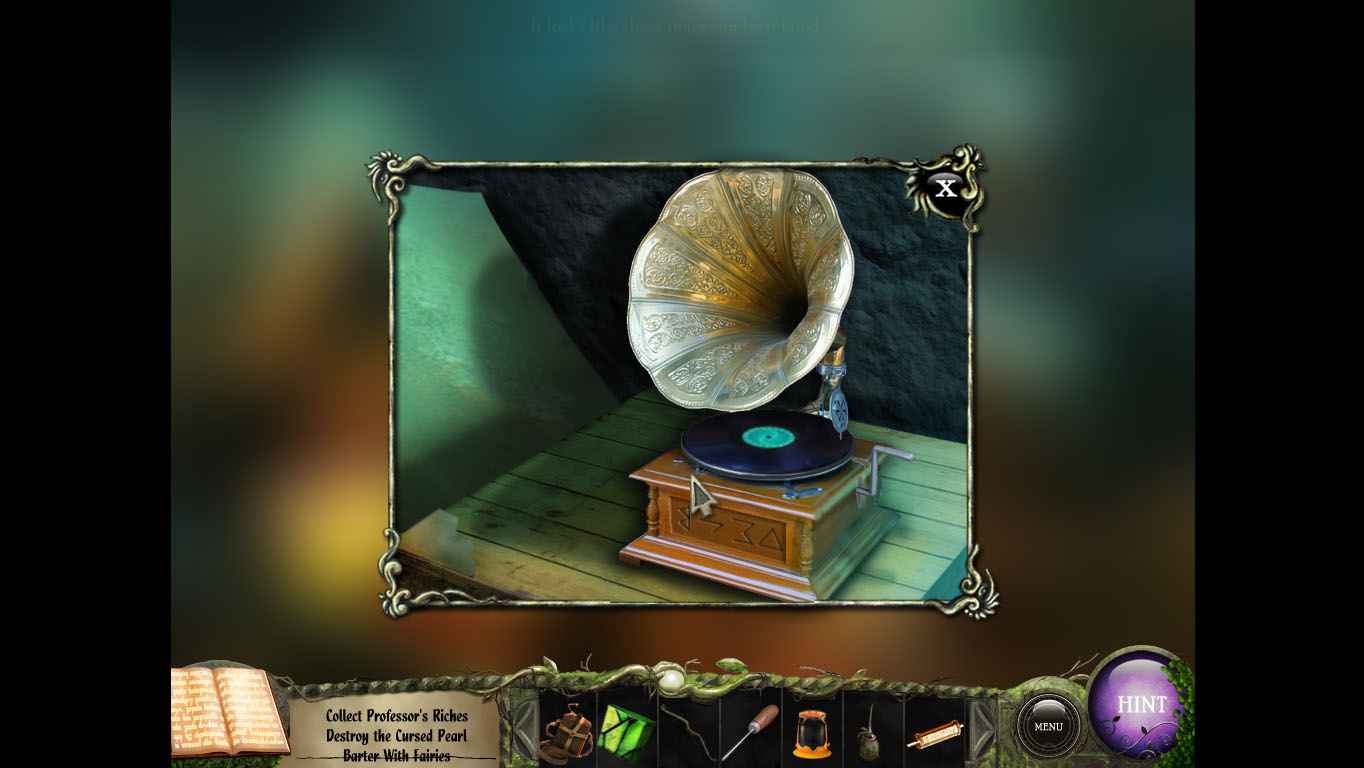
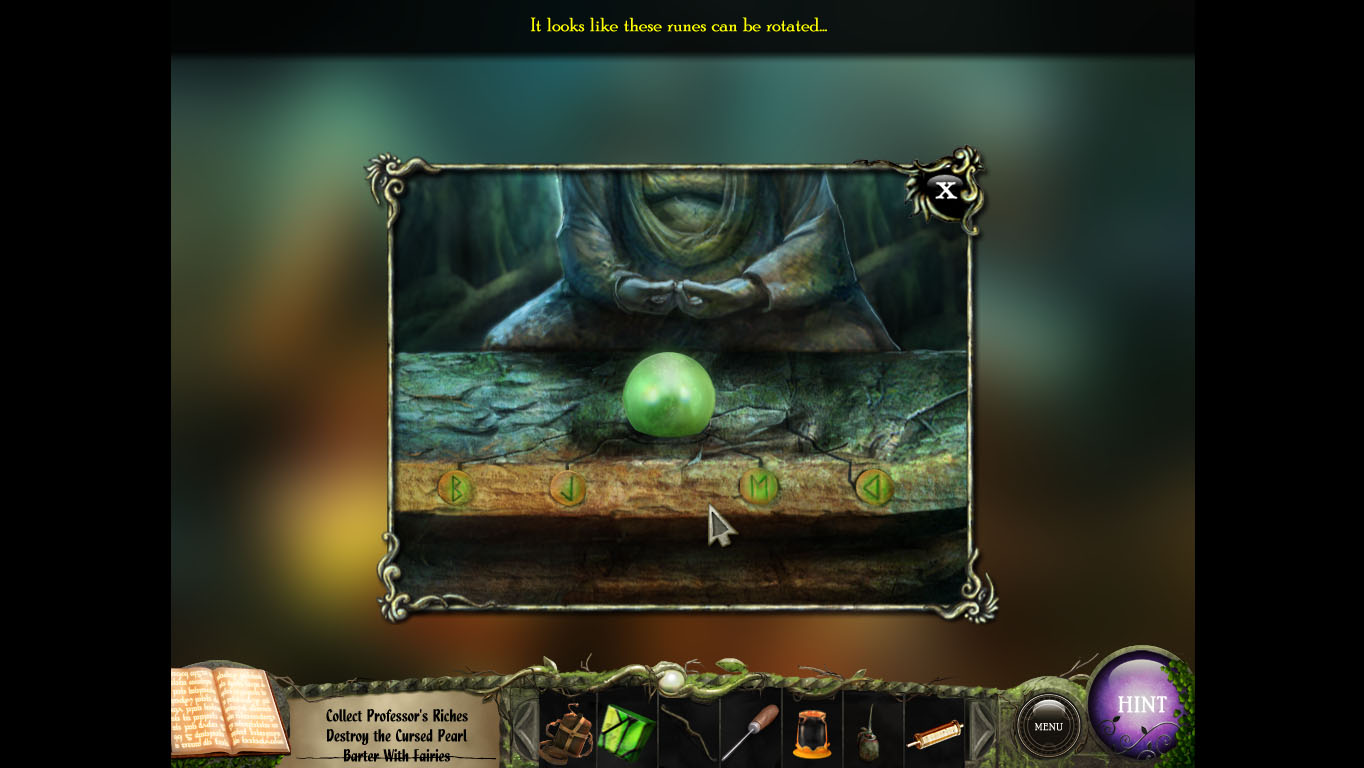
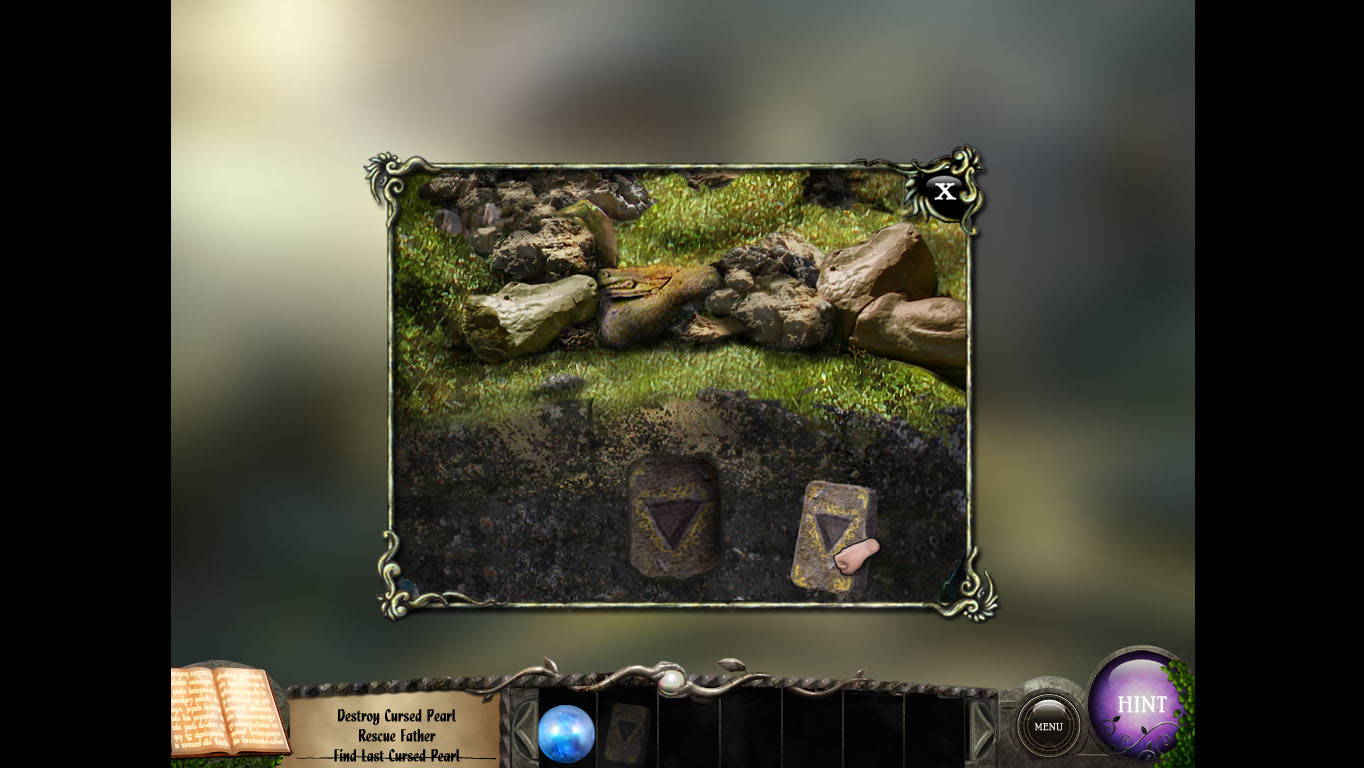
Place all four runes on the altar. Place the green pearl on the altar.
Place the record on the gramaphone player. Note the positions of the runes on the panel that appears.
Runes Screenshot
Orientate the runes on the altar to those on the gramaphone player.
Rune Solution Screenshot
Accessing the town
Once the pearl is destroyed, pick up the green liquid with the beaker.
Take the bag of stones from the chair.
Go to the altar. Click on the area just behind the professor. It is a hidden-object scene: complete to get the oil can.
hidden-object Solution
Go to the top of the elevator. Talk to Dariwan and get the arrow.
Go to the tree lobby. Click on the table. It is a hidden-object scene: complete to get the Metal Cylinder.
hidden-object Solution
Head to the cove. Use the metal bar (from the grate at the temple) to open the crate. Get the bow.
Go to the temple.
Place the bow and arrow in the hands of the statue.
After it shoots the arrow, talk to the ghost.
Click on the area near the statue's base. Get the gold lion head.
Lion Head Screenshot
Go to the cove and look in the tent. Get the red leaf.
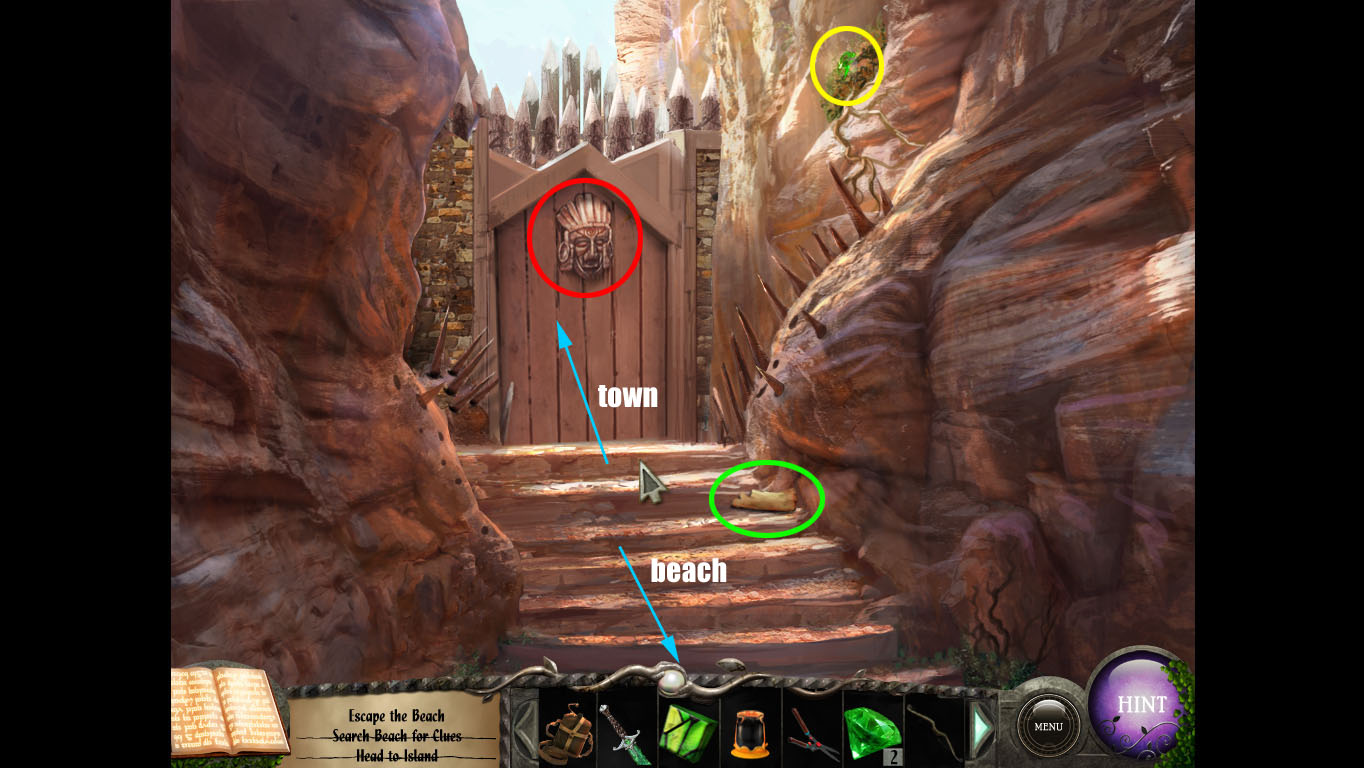
Head to the gate (left from the beach).
Click on the mask and open the door.
The Town
Town Area Screenshot
Look at the bench near the town entrance. Take the yellow leaf.
Bench Screenshot
Head down the road to the back.
Tent Area Screenshot
Talk to Mala.
Opening the well
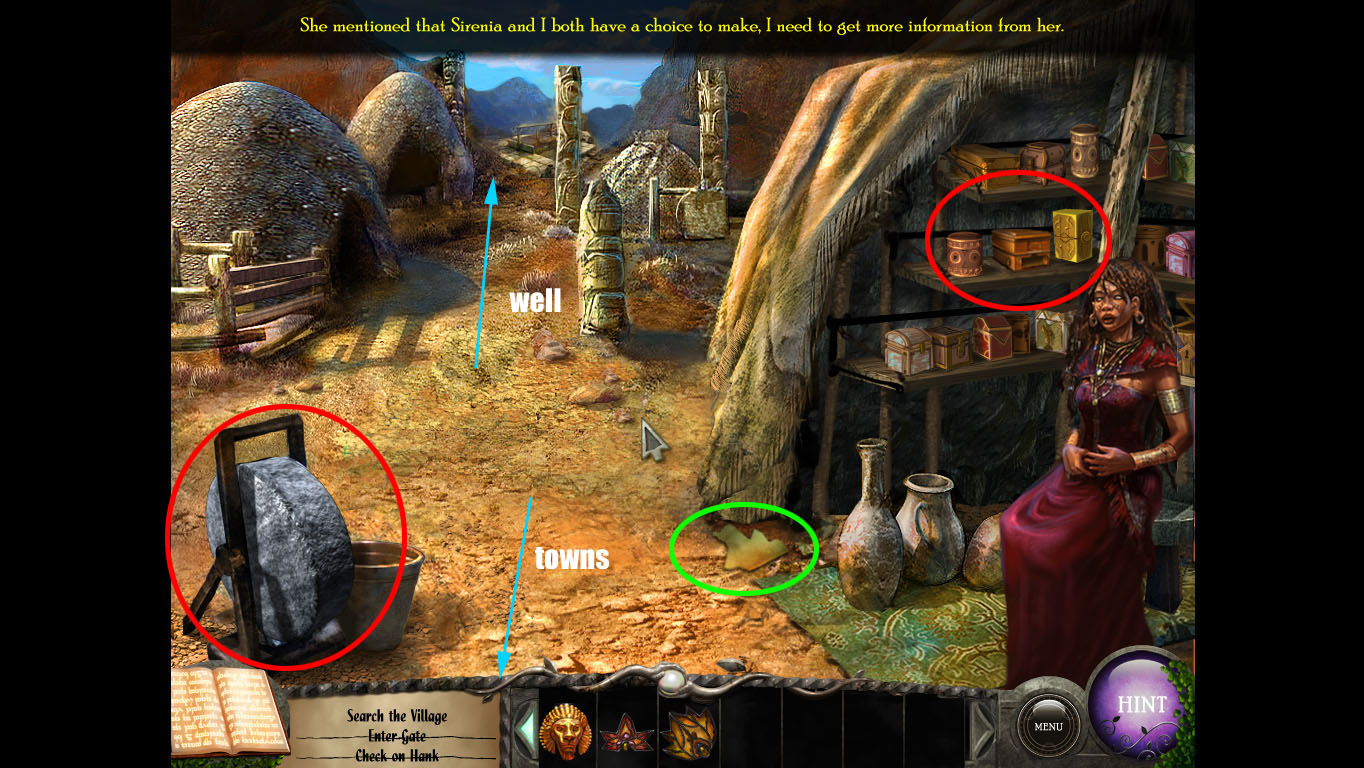
Well Area Screenshot
Head to the well.
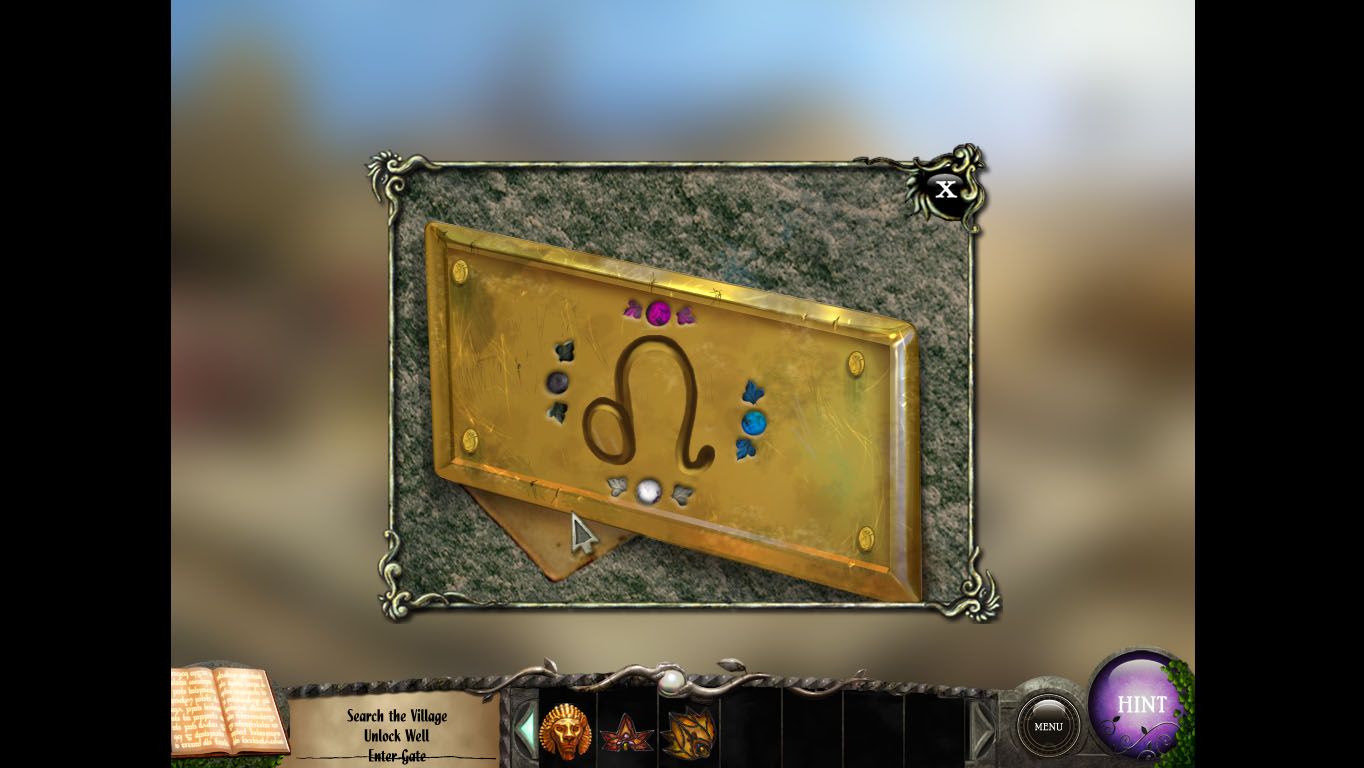
Look at the Leo plague next to the well.
Plate Screenshot
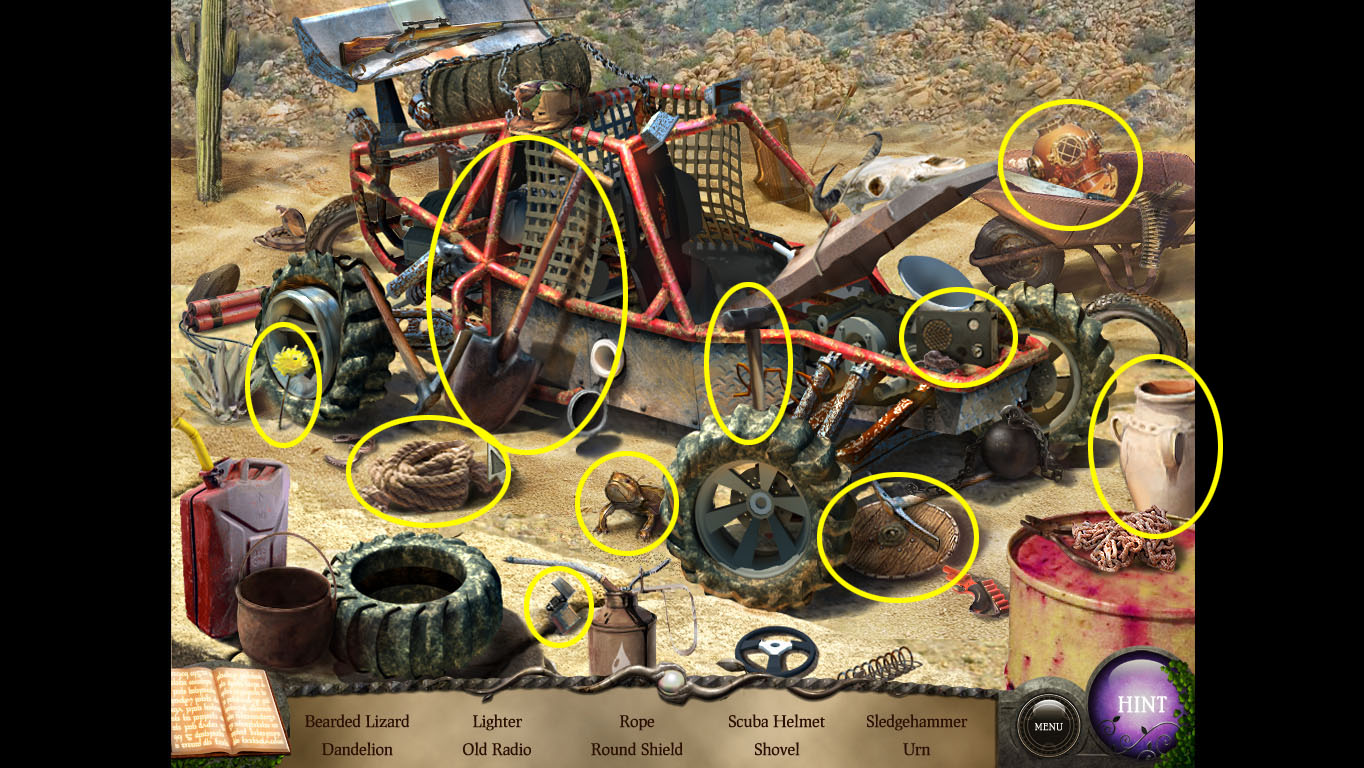
Click on the mound behind the well. It is a hidden-object scene: complete to find the scuba helmet.
hidden-object Solution
Head to the boat. Use the helmet with the scuba gear (to the left).
Enter the water.
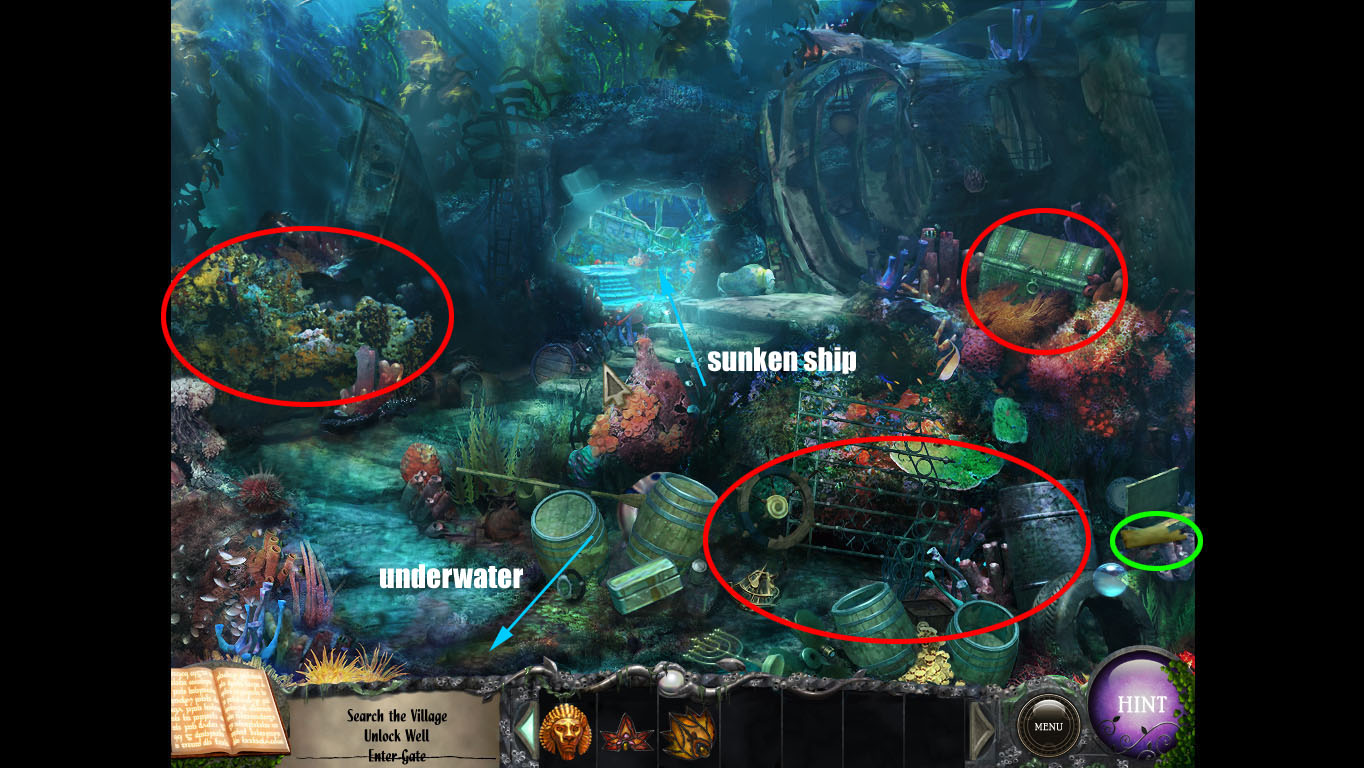
Water Area Screenshot
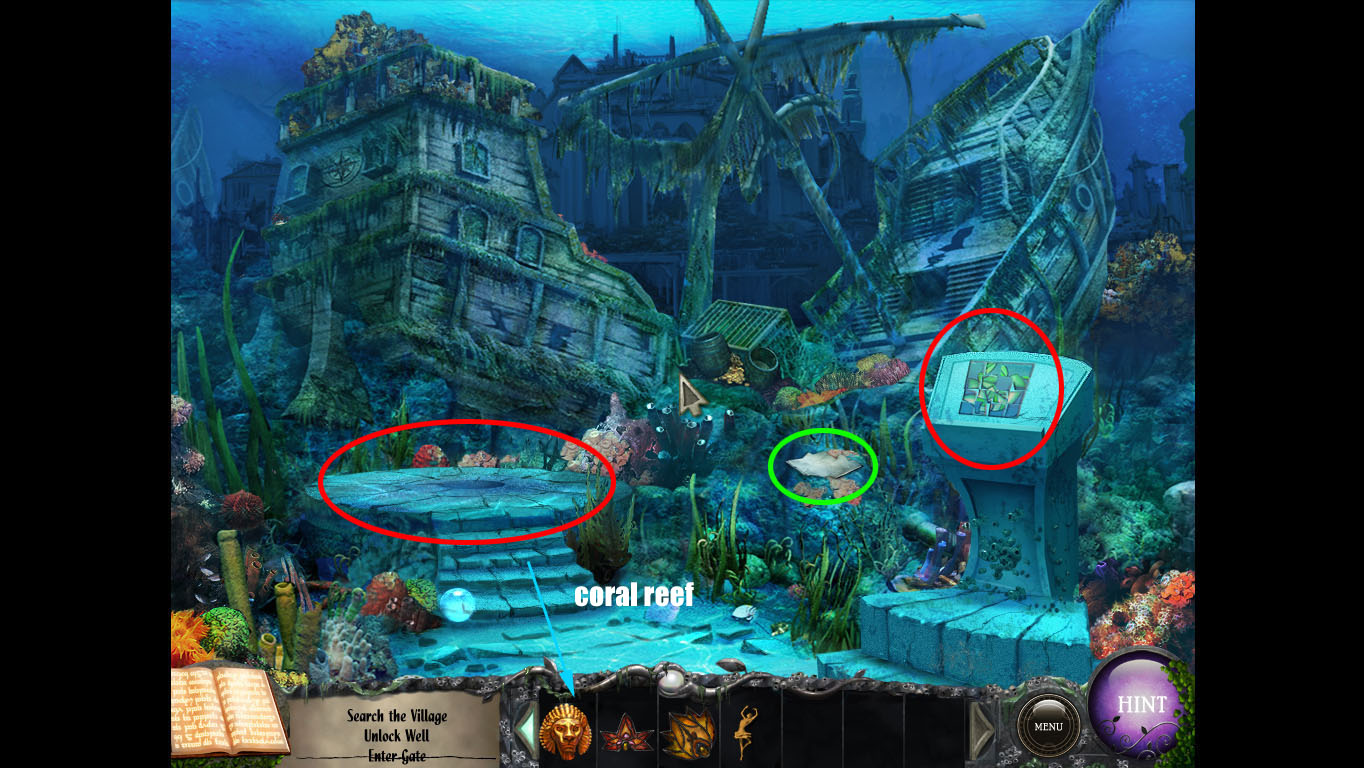
Go underwater.
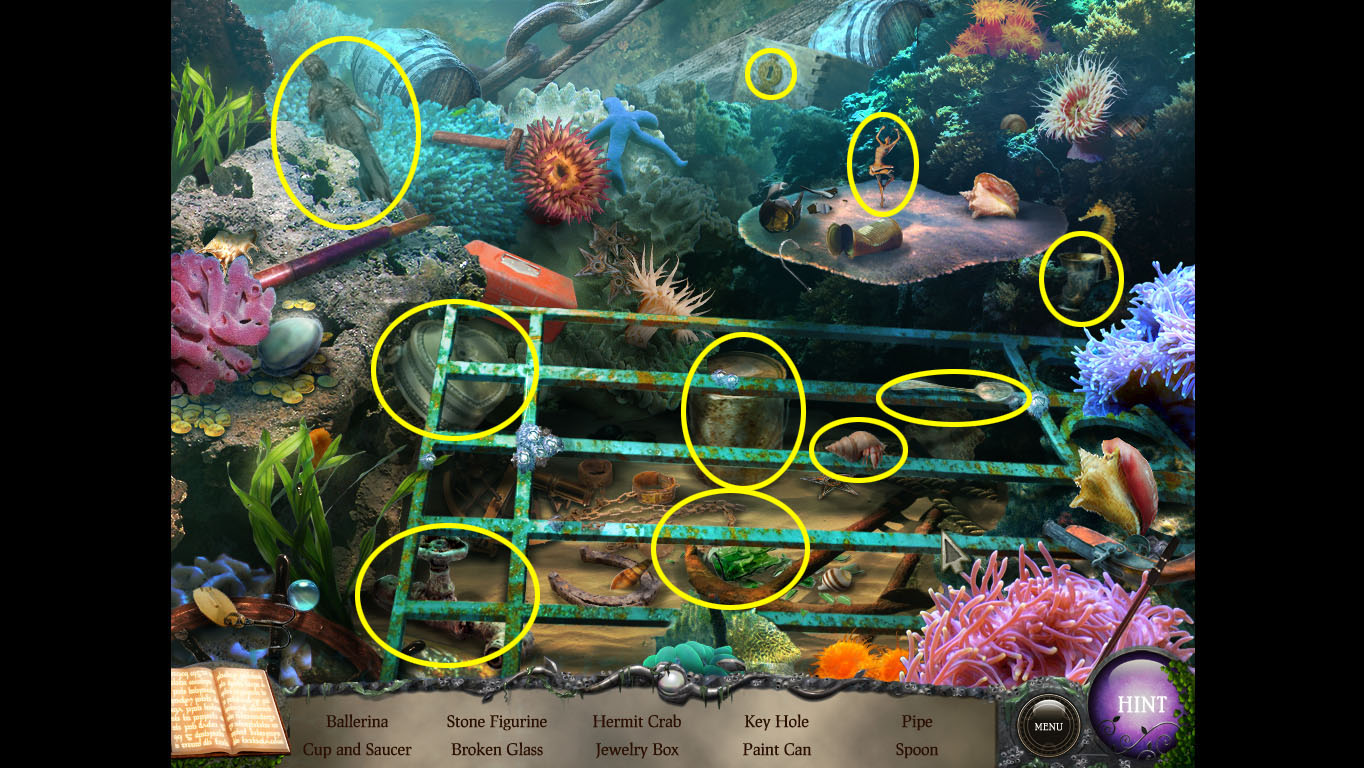
Coral Area Screenshot
Click on the coral to the right. It is a hidden-object scene: complete to get the ballerina.
hidden-object Solution
Head back to Mala.
Click behind her to find the music box.
Music Box Screenshot
Click on the button box to get the key. Use the key on the music box. Use the metal cylinder (from the table in the tree lobby) on the music box. Use the ballerina on the music box. Turn the key and get the telescope bit.
Go to the boat and go up to where the telescope is.
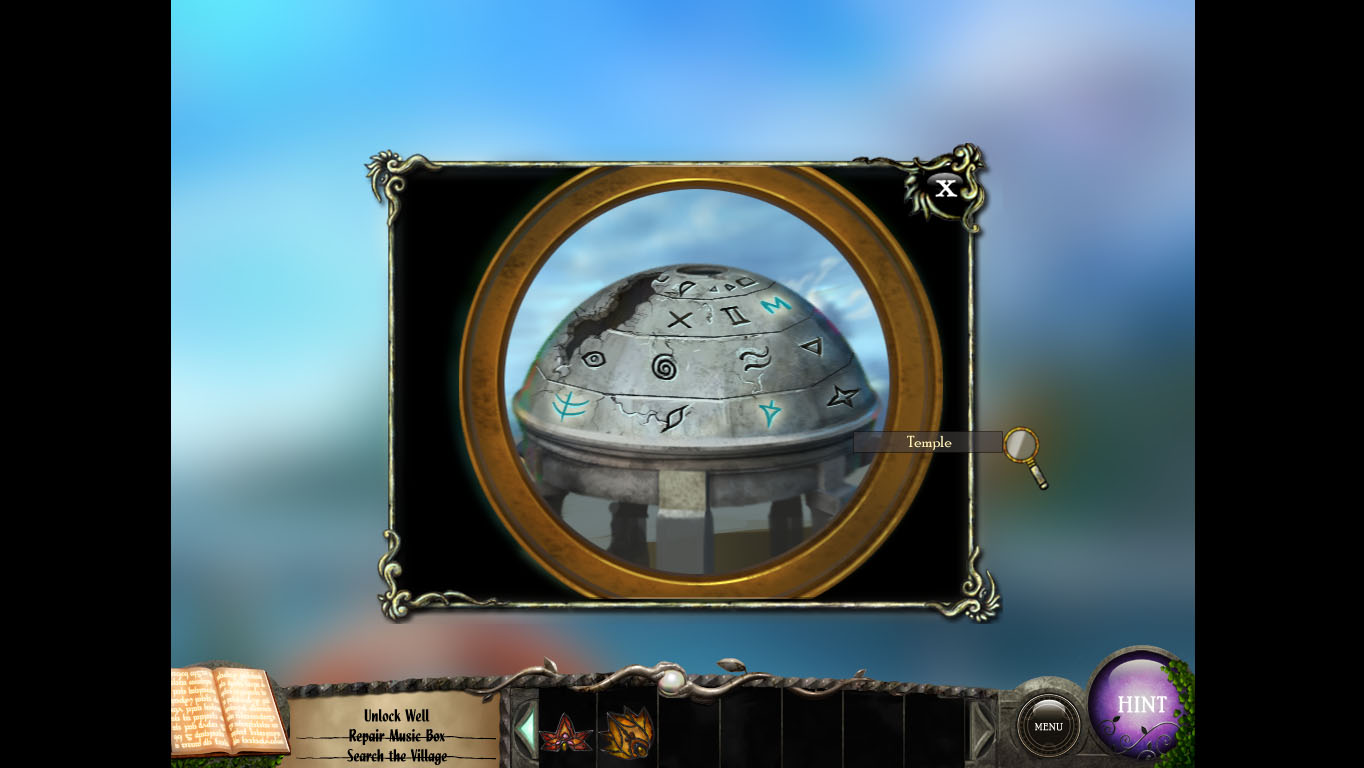
Use the lense on the telescope.
Note the highlighted patterns on the roof of the temple.
Temple Roof Screenshot
Head back to the well and click on the lock.
Turn the dials until the three symbols appear (tree, M, arrow point). Turn the screw to unlock the well.
Well Solution Screenshot
Click on the bucket. Now click on the ground next to the well.
Remove all the pieces to find the red pearl.
Destroying The Red Pearl
Go to the cove.
Click next to the tent. It is a hidden-object scene: complete to get the blunt axe.
hidden-object Solution
Go to Mala's tent. Click on the wetstone. Use the oilcan (from the hidden-object at the altar), then the axe.
Use the axe to break open the boarded up door in the town.
Enter the Market.
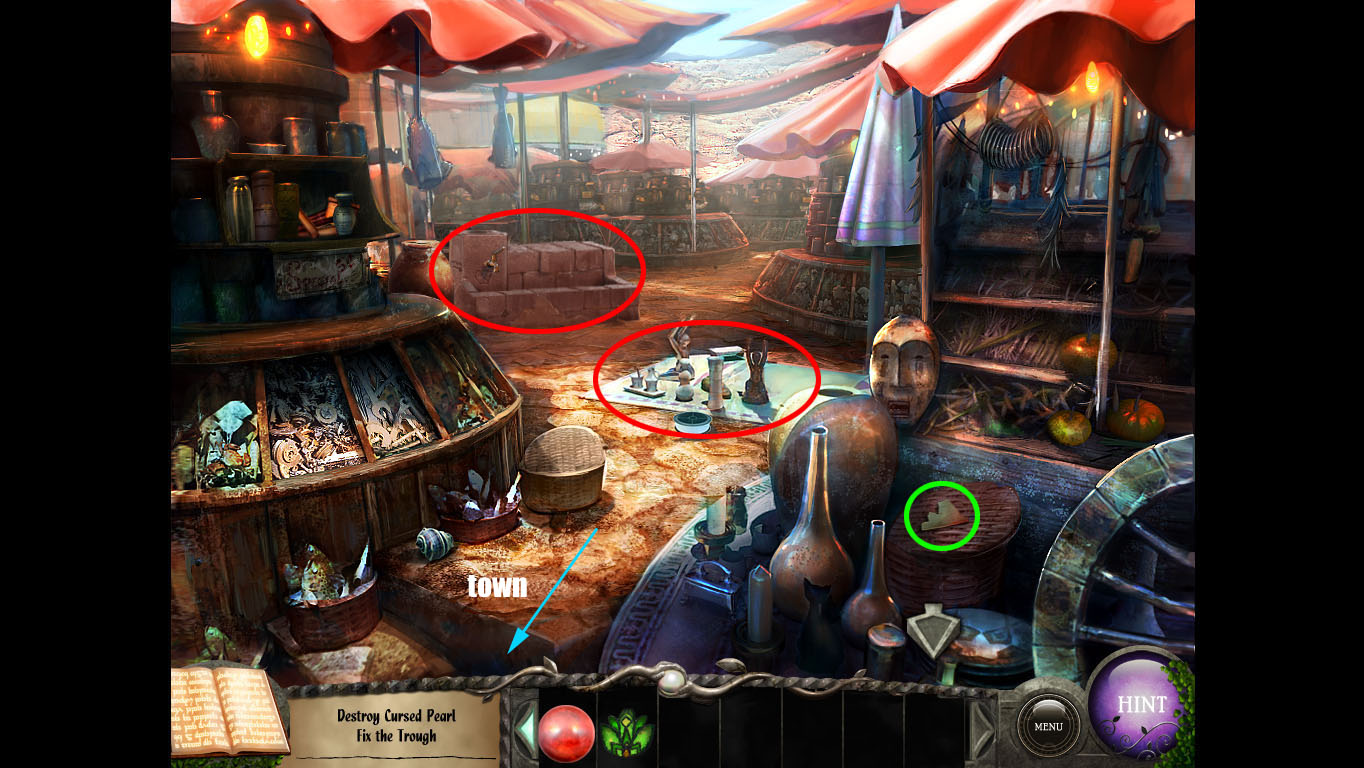
Market Area Screenshot
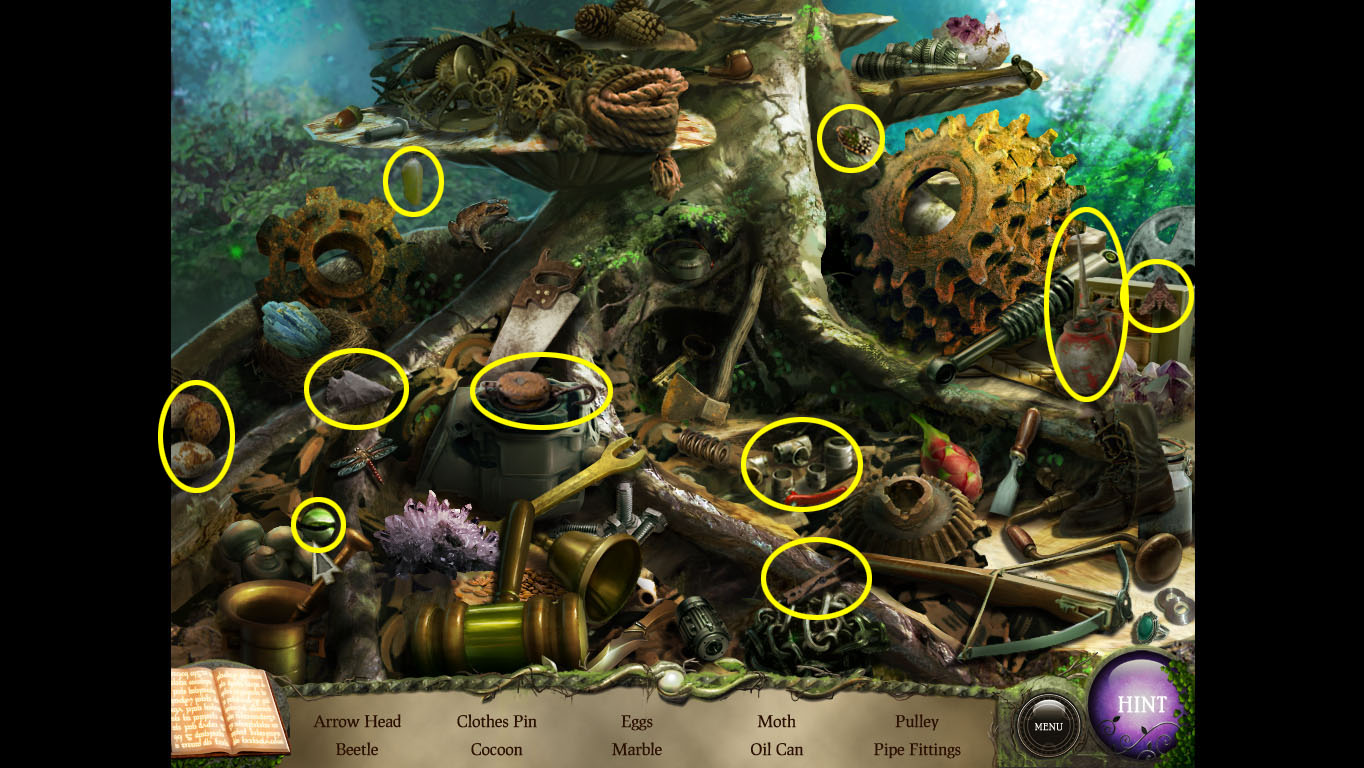
Click on the items on the ground. It's a hidden-object scene: complete to find the bellows.
hidden-object Solution
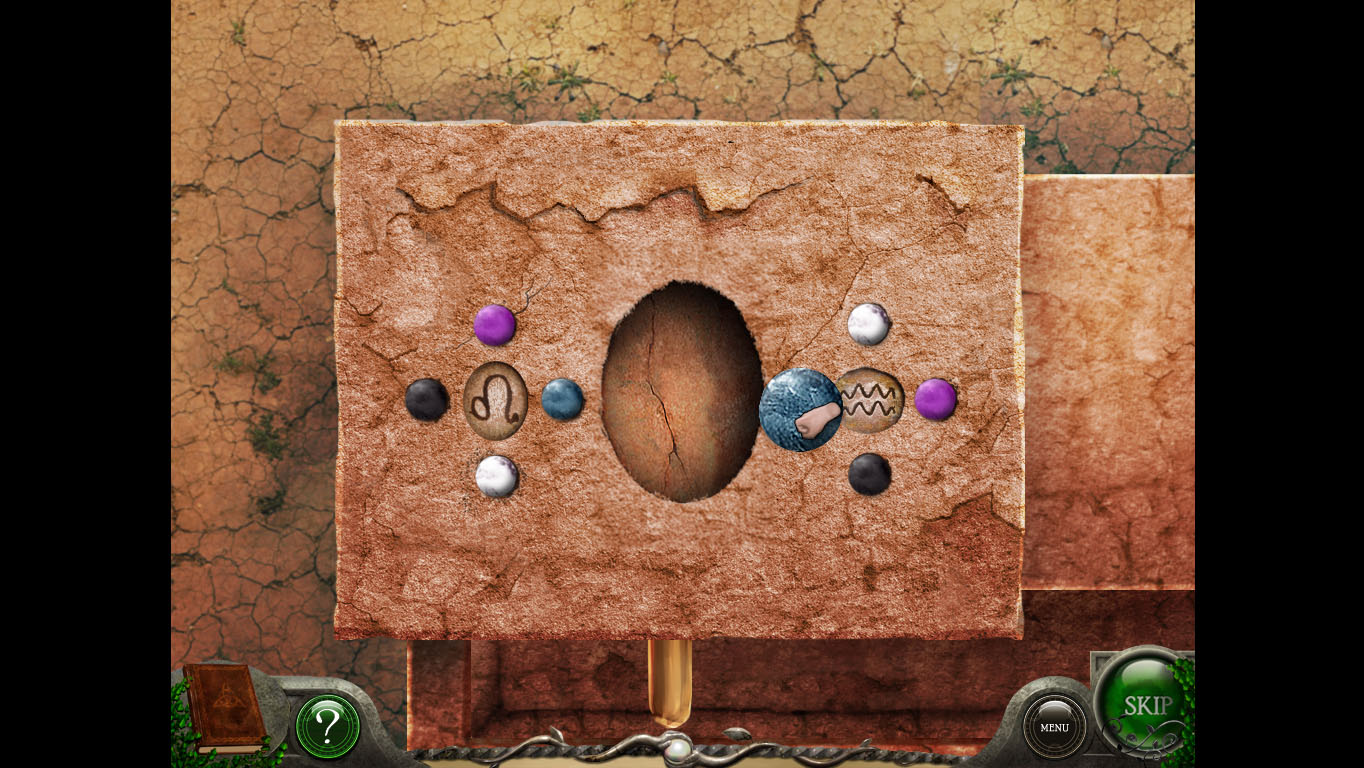
Use the bag of stones on the trough at the back.
Arrange the stones according to the plagues.
Stones Solution Screenshot
The Stone Puzzle
Complete the three patterns by rotating the stones.
Rotate the stones by clicking on the center stone of a circle.
Focus on arranging the stones on one side before moving to the other.
Place the red pearl on the stone hand.
Take the red dust.
Opening The Palace Gate
Go to the well. Use the canteen on the water.
Go to the palace gate. Click on the left lion head and use the canteen.
Go to the temple. Use the canteen on the pool of water.
Go to the palace gate. Click on the right lion head and use the canteen.
The Palace
Palace Gate Screenshot
Walk through the gate and towards the palace courtyard.
Courtyward Area Screenshot
Take a look at tha carriage - it needs to be thawed.
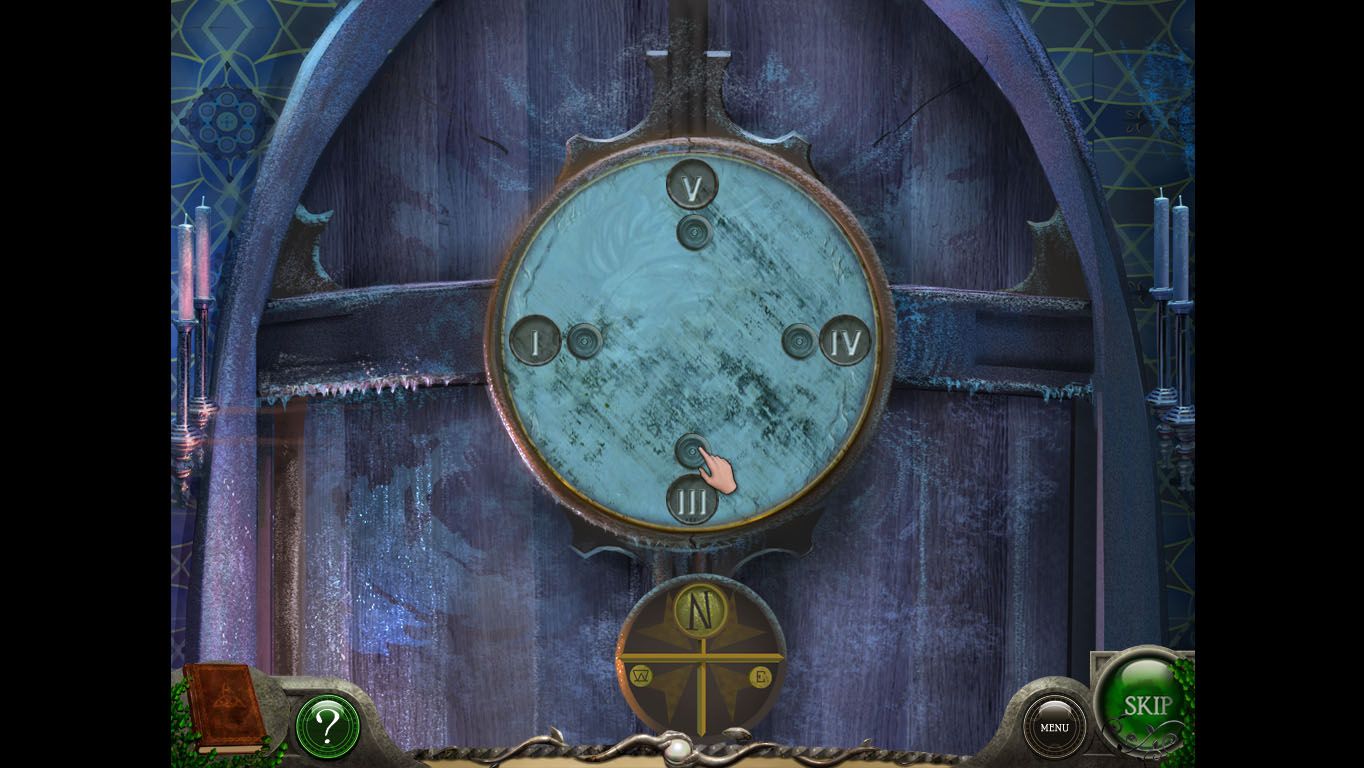
Look at the castle door. It is a puzzle. Remember the radio broadcast from early in the game? Repeat those number sequences here.
N = V, E = IV, S = III, W = 1
Palace Door Puzzle Solution Screenshot
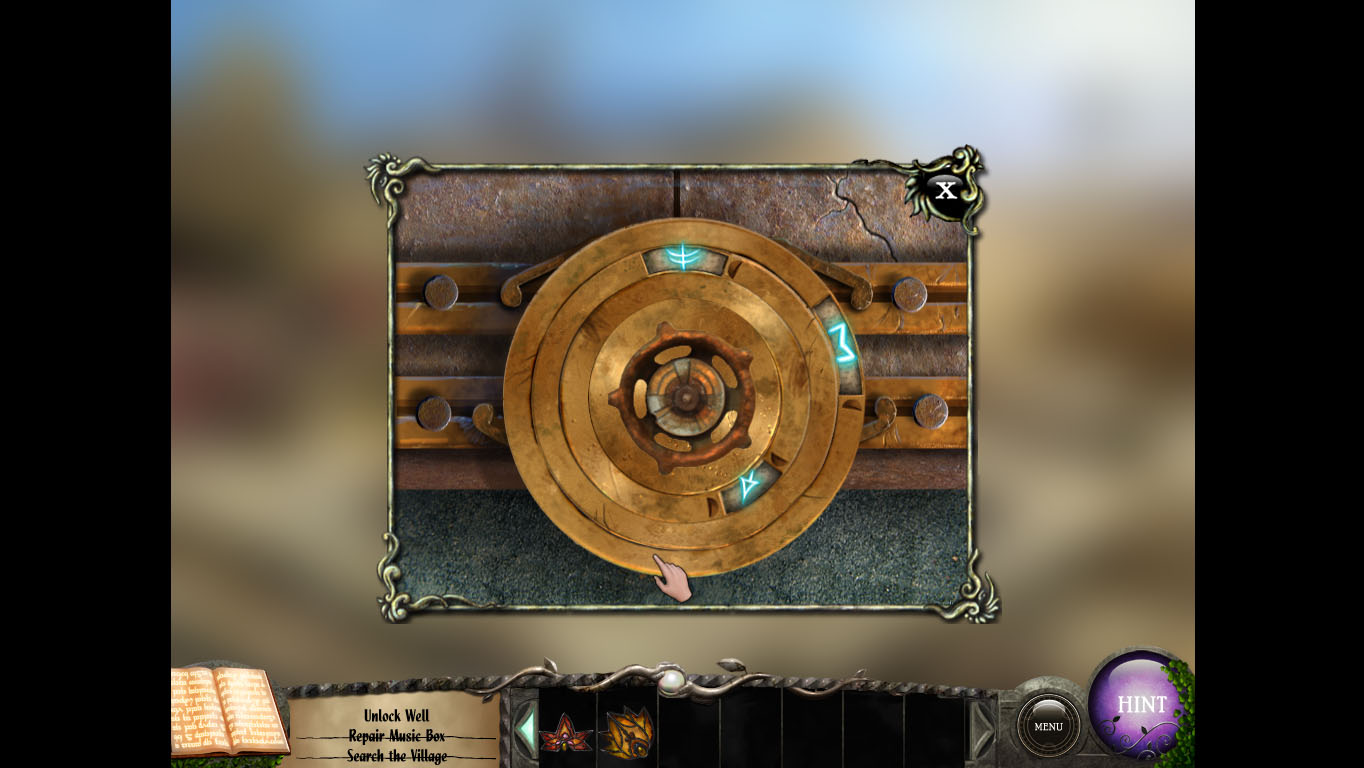
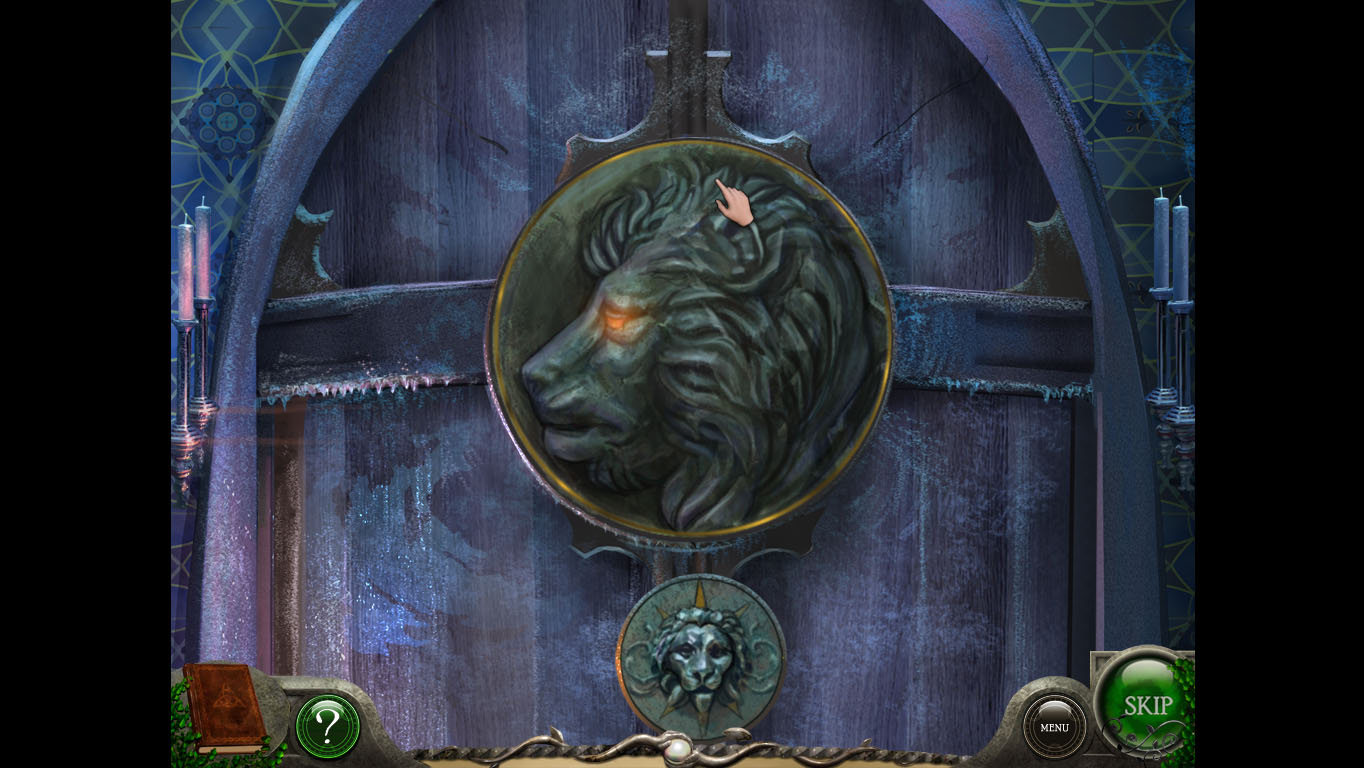
The second puzzle is a picture you have to rotate. Rotate the center piece until the arrow on the lion head below the image points up. Rotate the two other circles to match the center circle's image.
Palace Door Picture Puzzle Solution Screenshot
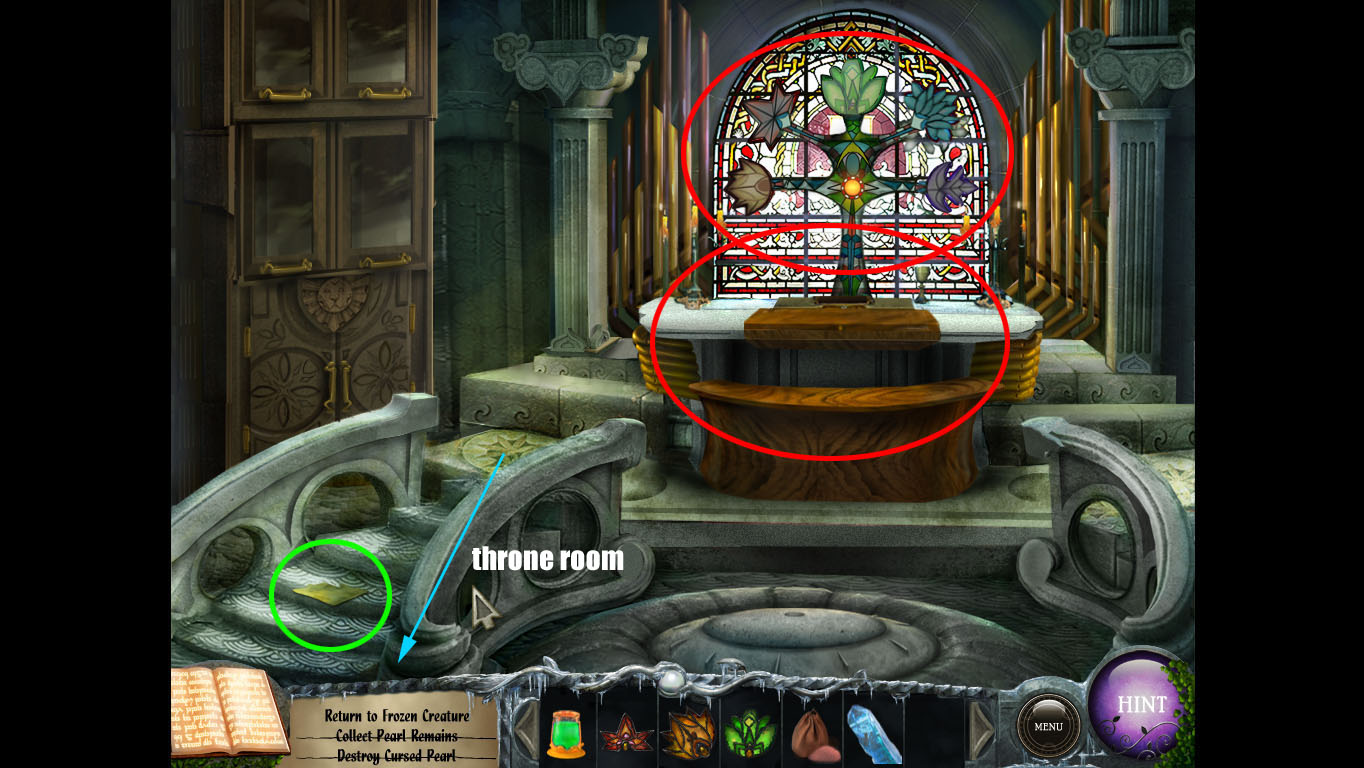
Click on the lever to open the door and enter the Throne Room.
Throne Room Area Screenshot
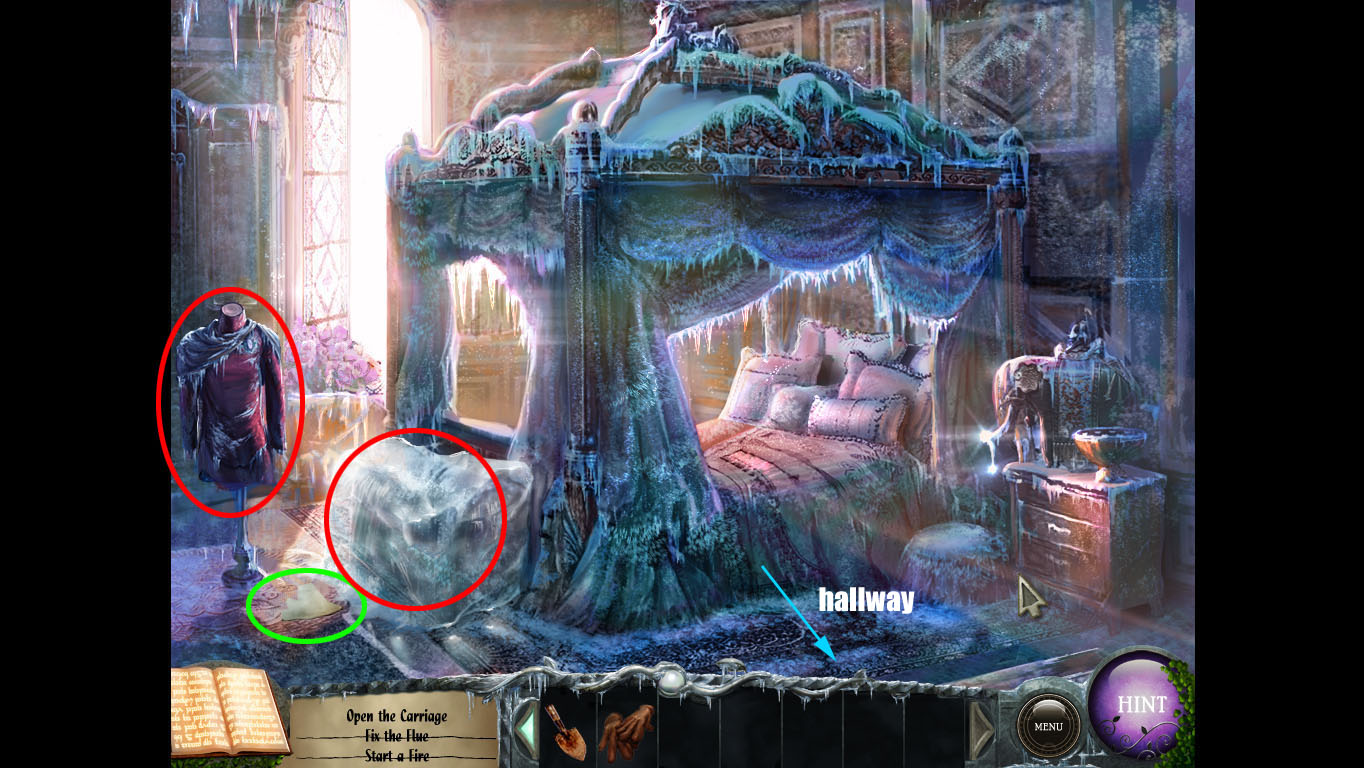
Finding The White Pearl
Go to the Hallway, and then to the kitchen.
Hallway Area Screenshot
Pick up some wood. Open the fireplace and put the wood inside. Use the bellows to start the fire.
Fire Area Screenshot
Close the flue on the chimney.
Open the door to the garden and go there.
Garden Area Screenshot
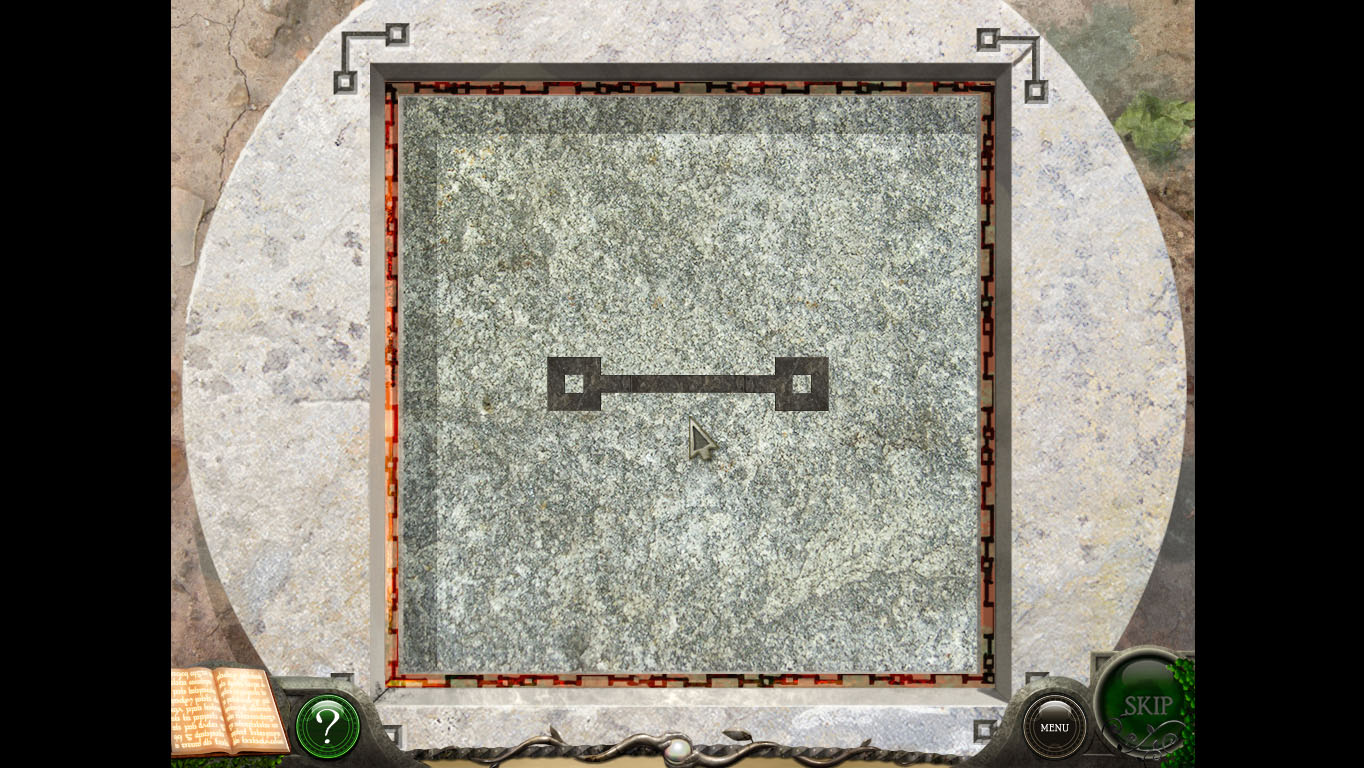
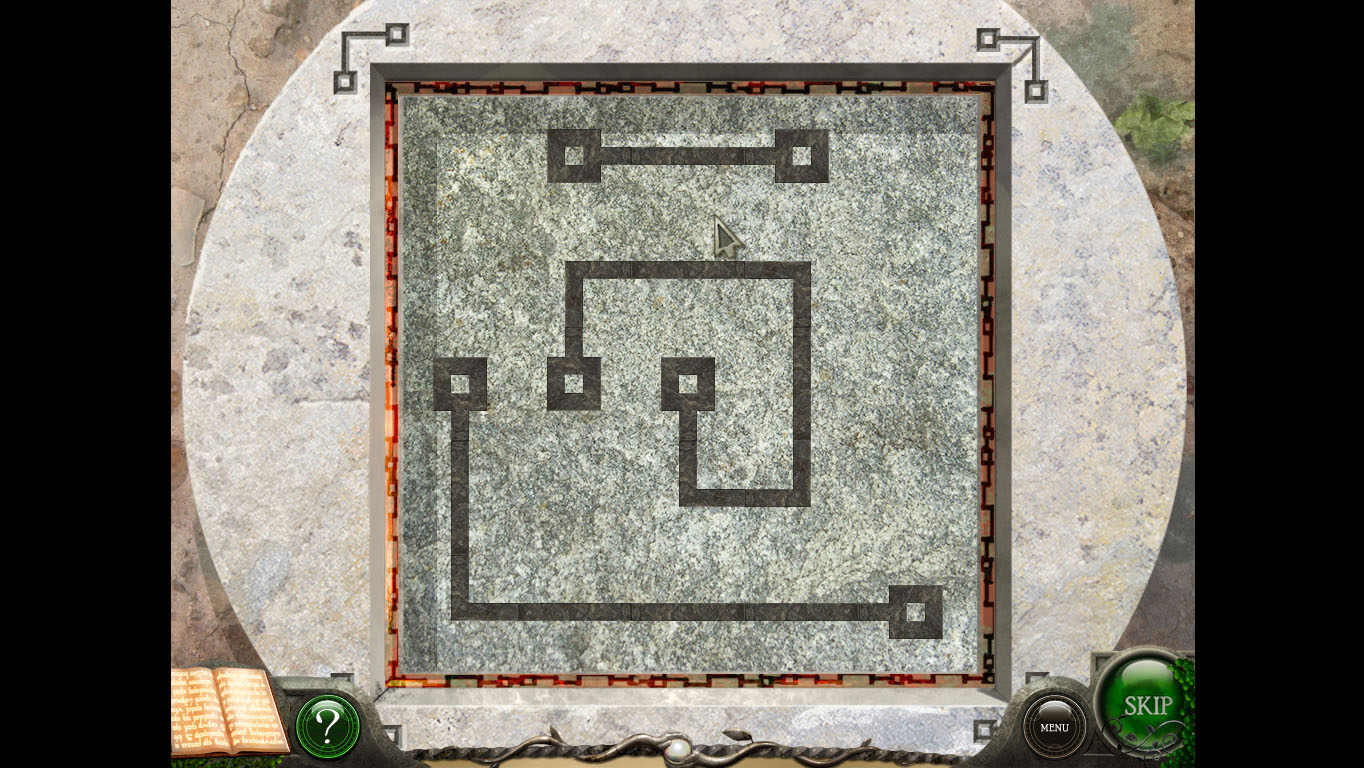
Pedestal puzzle
Rotate the pieces to connect to each other, using the blocks at the tips of the lines.
You can't have stray pieces.
All the blocks have to be at the end of a line.
Solve the puzzle to get the Lion Key.
Pedestal Puzzle 1 Solution Screenshot
Pedestal Puzzle 2 Solution Screenshot
Click on the pond. It's a hidden-object scene: complete to get the trowel.
hidden-object Solution
Go to the kitchen. Click on the pantry. It is a hidden-object scene: complete to get the gloves.
hidden-object Solution
Look at the fire. It has died down. Use the trowel to get some coals and place them in the bucket next to the fireplace. Take the bucket.
Go to the Hallway.
Look at the door and use the lion key.
Enter the bedroom.
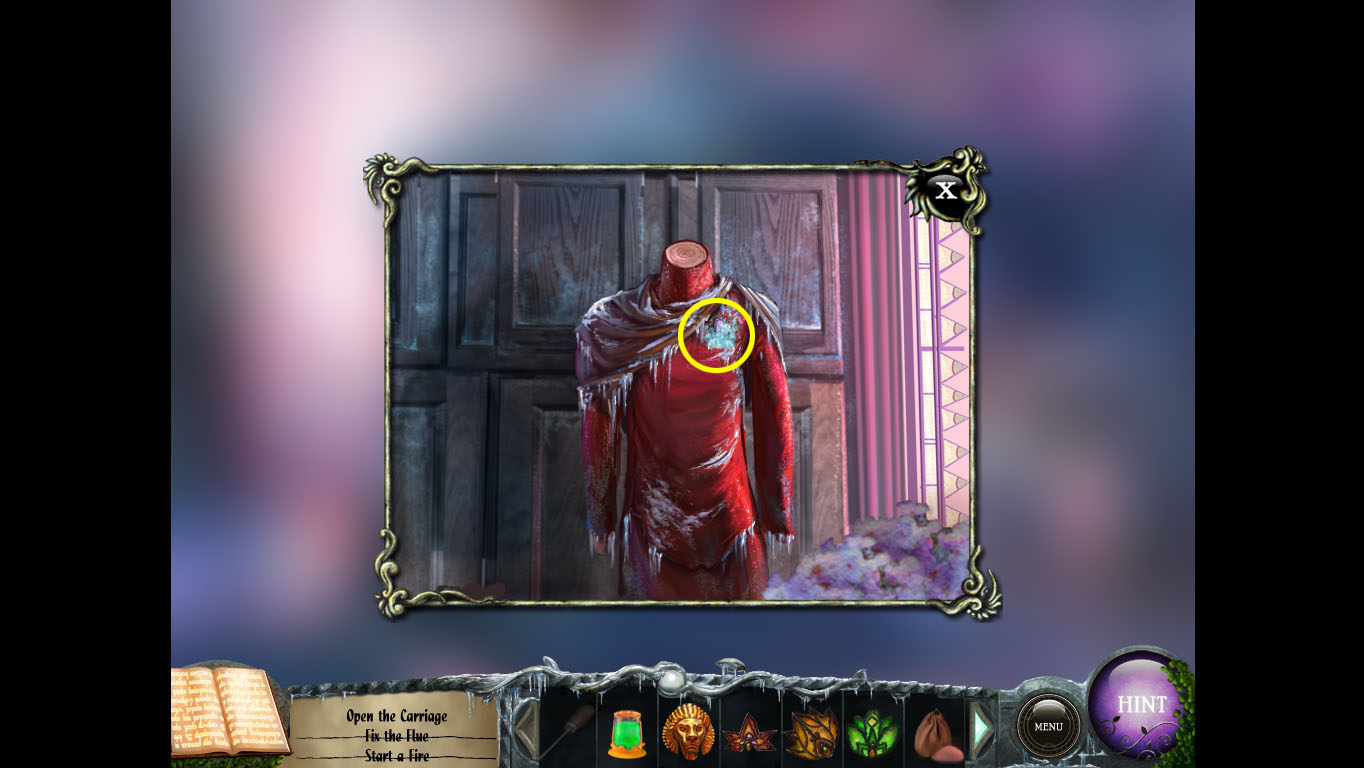
Bedroom Area Screenshot
Use the icepick on the clothes dummy. Take the brooch.
Dummy Screenshot
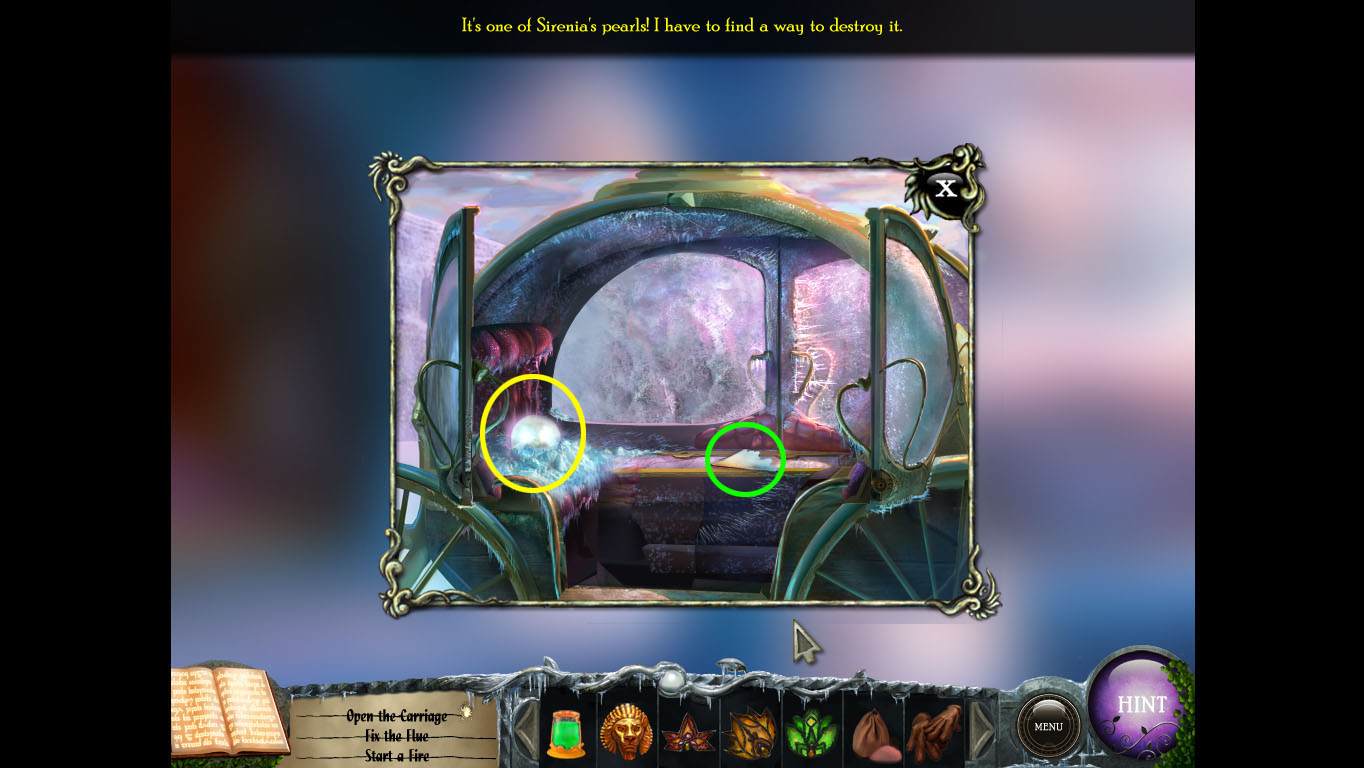
Head to the courtyard. Click on the carriage.
Use the bucket of coals to thaw the lock.
Use the brooch on the lock.
Use the gloves to pick up the white pearl.
Carriage Screenshot
Destroying The White Pearl
Go to the throne room.
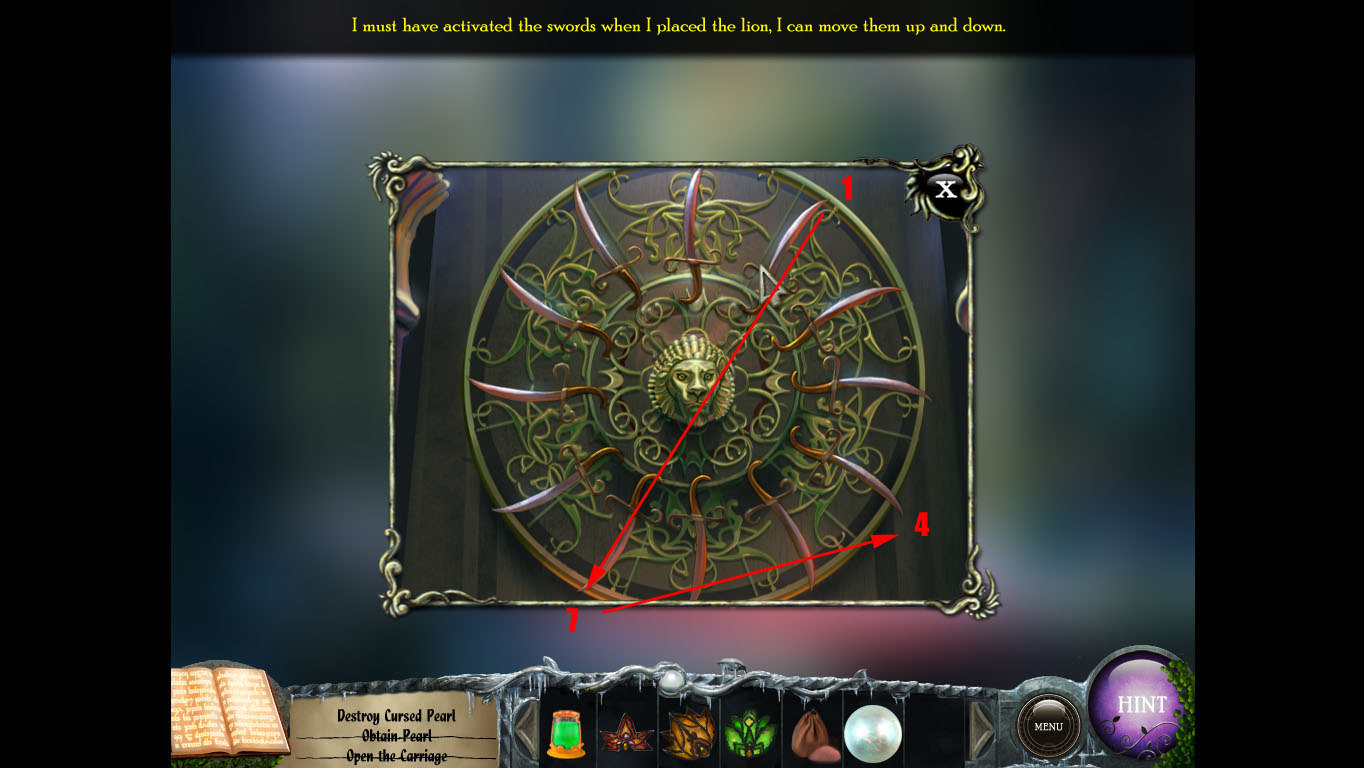
Click on the circle of swords above the thrones.
Place the golden lion head there (found at the foot of the statue at the temple).
Look at the parchment near the front of the throne room.
Parchment Screenshot
You have to open the lion's mouth. Use the parchment code to do that, matching the numbers with the positions of the swords. Look at the swords as a clock, with 12 at the top, rotating clockwise.
To open the mouth, click on 1, 7 and 4.
Lion Puzzle 1 Screenshot
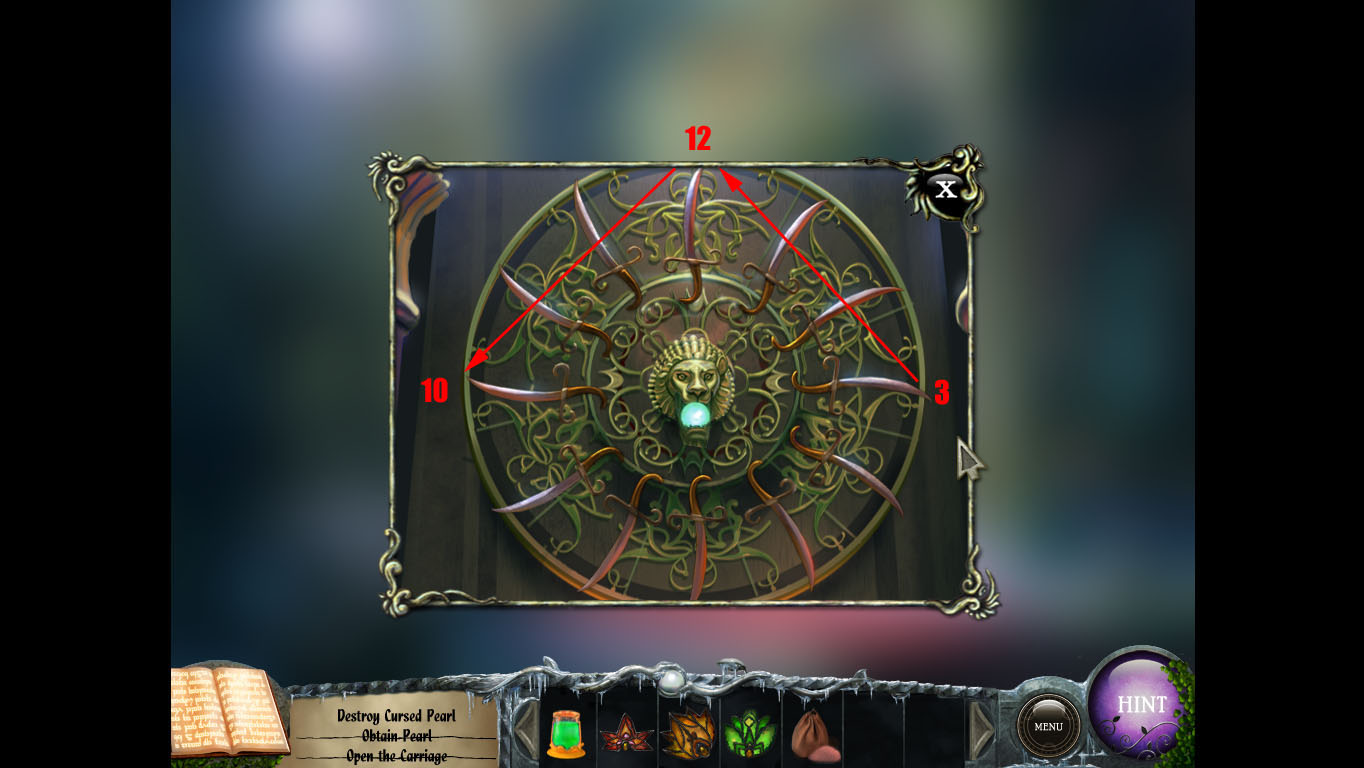
Place the White Pearl in the lion's mouth.
To close the mouth, click on 3, 12 and 10.
Lion Puzzle 2
Pick up the blue crystal at the throne feet.
New Throne Roome Area Screenshot
Playing The Organ
Go to the palace entrance and talk to the Satyr. He will give you a key.
Go to the Palace Bedroom.
Click on the thawed chest. It is a hidden-object scene: complete to get the Music Sheet.
hidden-object Solution
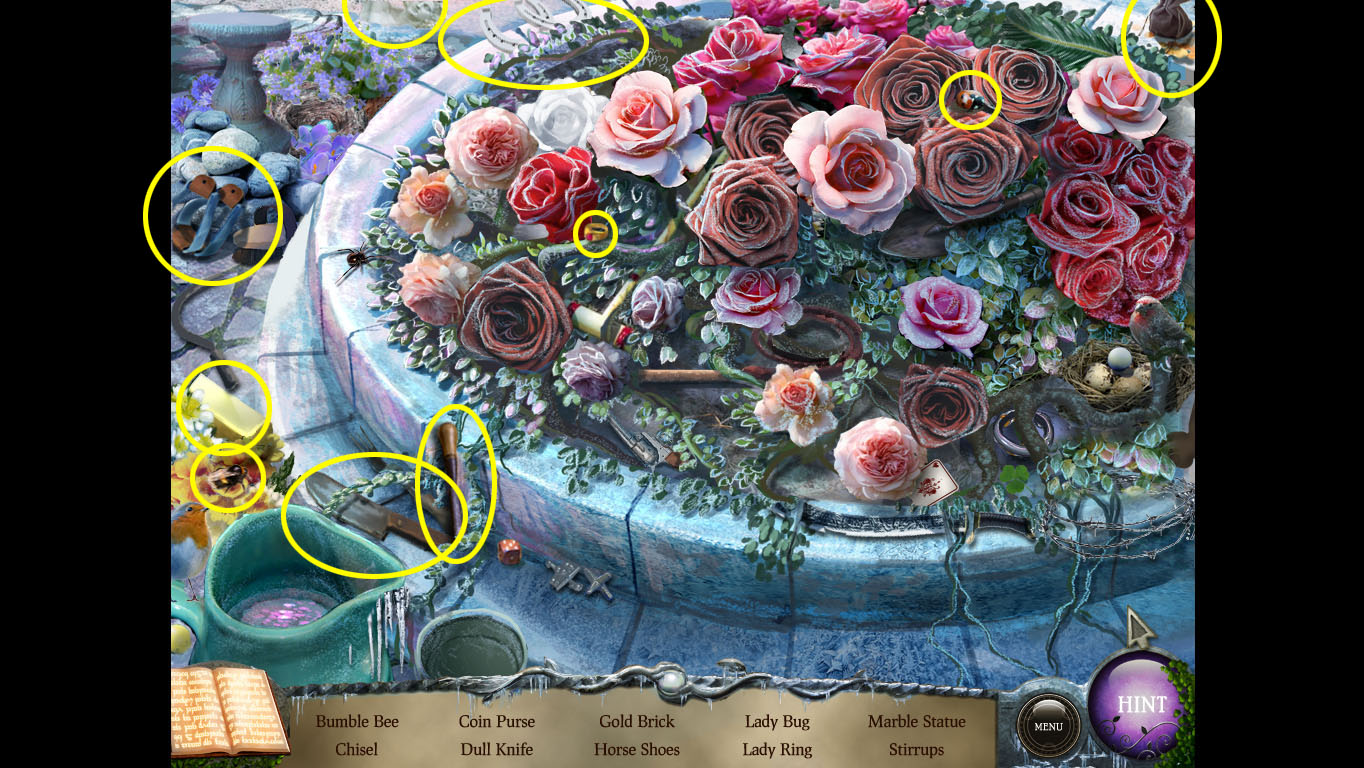
Go to the Palace Courtyard. Click on the Flower Bed. It is a hidden-object scene: complete to get the Chisel.
hidden-object Solution
Go to the Organ.
Organ Area Screenshot
Place the Glass Leaves in the matching spots above the organ.
The leaf locations:
Red Leaf: After destroying the green pearl, go to the cove and look in the tent.
Yellow Leaf: On the bench at the town entrance.
Green leaf: Use the green tile on the pedestal next to the sunken city (underwater). Complete the picture.
Screenshot
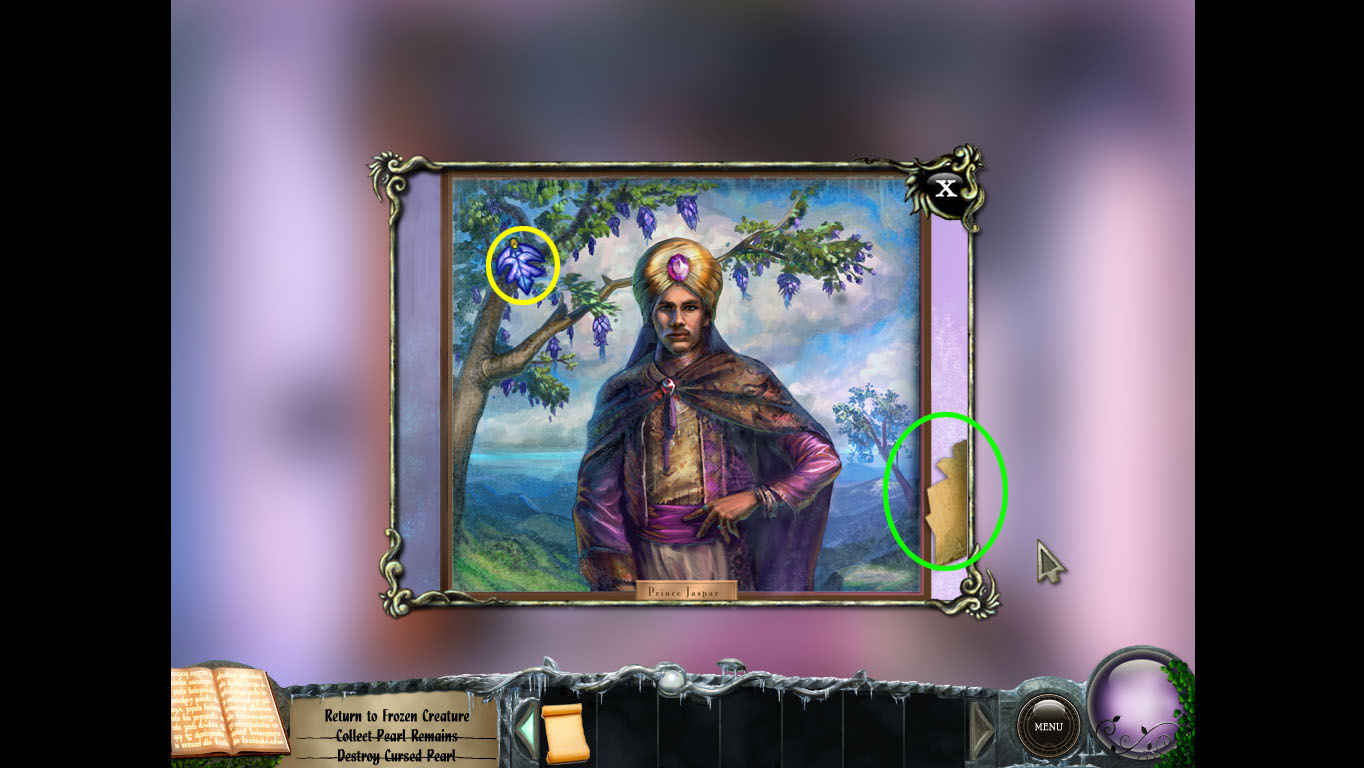
Purple Leaf: On the portrait in the palace hallway.
Screenshot
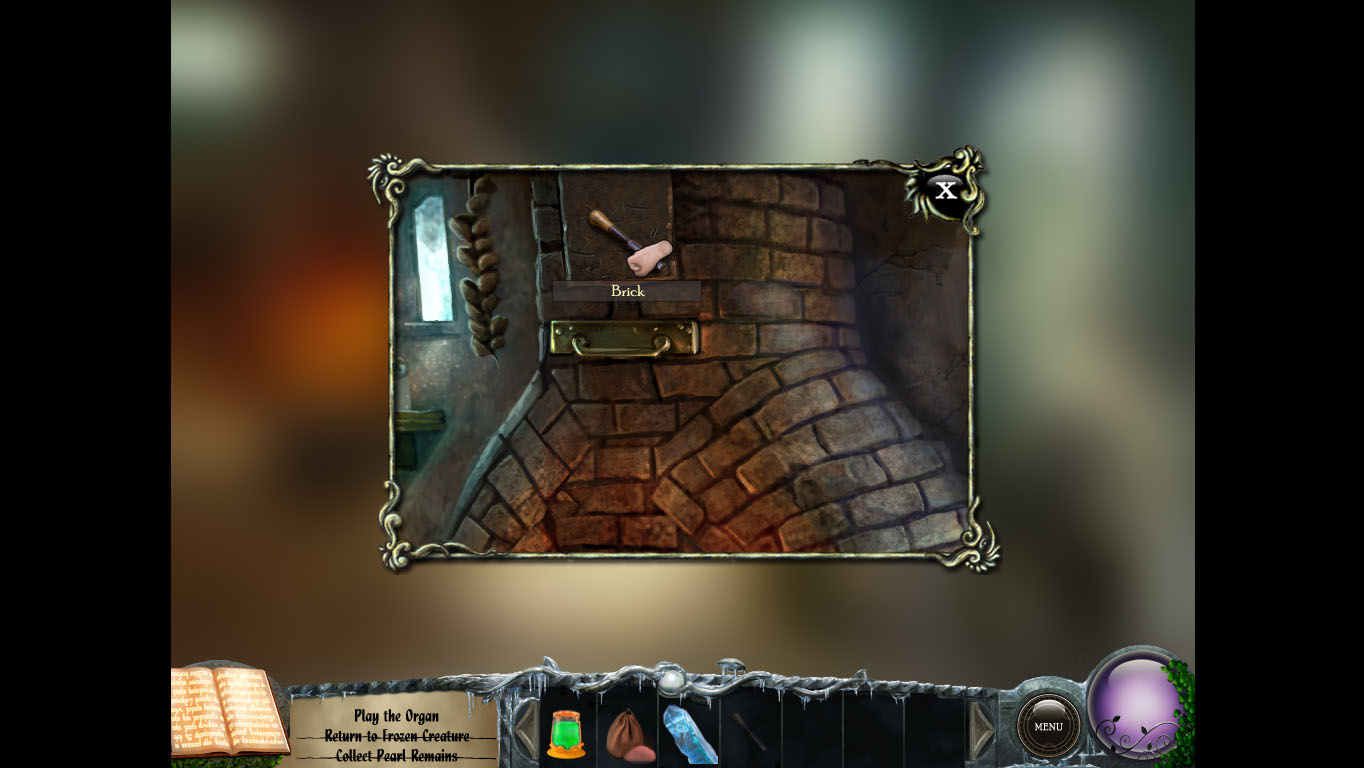
Blue Leaf: Behind the brick on the fireplace chimney in the palace kitchen. Use the chisel.
Screenshot
Use the sheet music on the organ. Unlock the keyboard with the Satyr's key.
The Organ Notes
You have to play the notes as they appear. Match the leaves with the keys on the keyboard.
The notes:
Yellow: 1
Red: 2
Green: 3
Blue: 4
Purple: 5
The Music
1st: 1, 1, 1
2nd: 1, 3, 5
3rd: 1, 5, 2, 4, 3
4th: 2, 1, 1, 4, 3, 5
5th: 3, 2, 5, 2, 3, 2, 3, 1
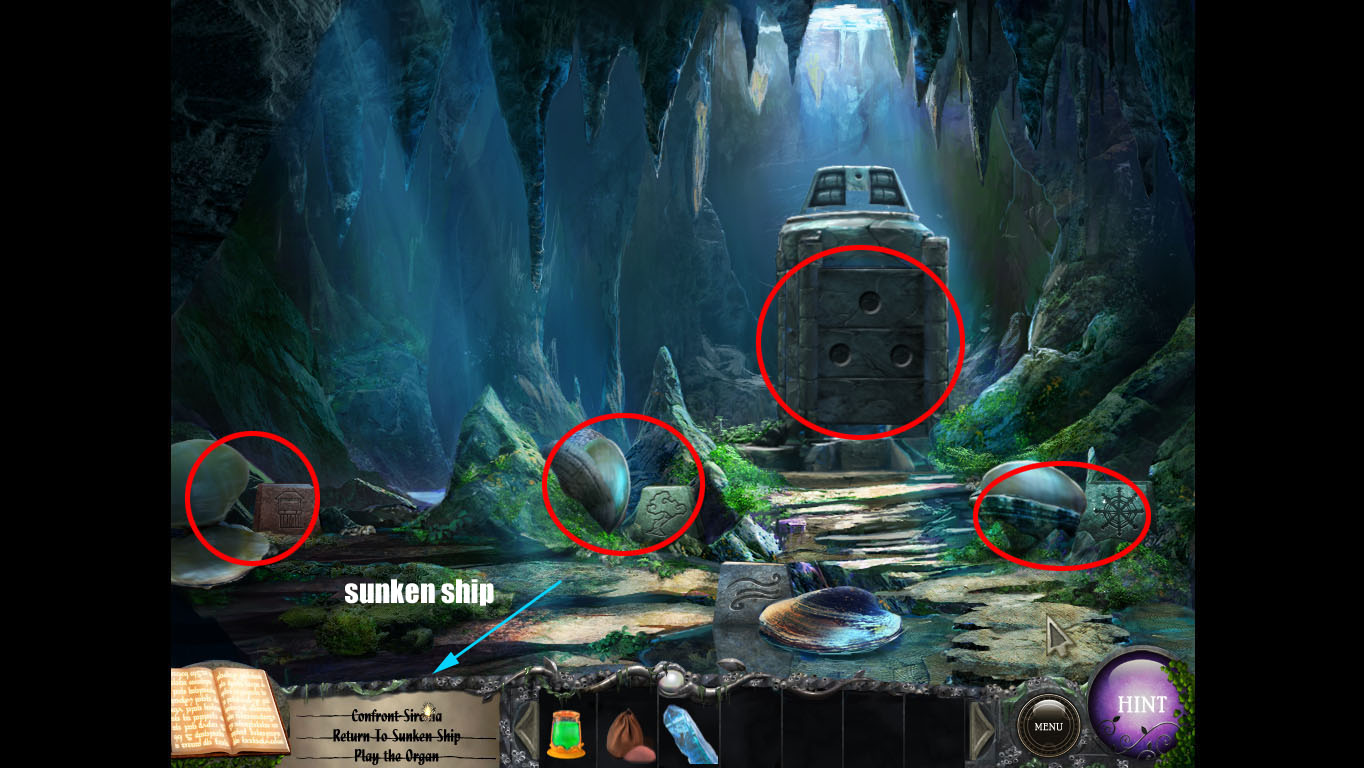
Head to the Sunken Ship
Sunken Ship Area Screenshot
The Three Emblems
Enter the portal by the Sunken Ship.
Cave Area Screenshot
Talk to the sorceress.
Give the three clams an object each:
The left clam: the bag of dirt. (At the market)
The central clam: the beaker with green liquid. (from the pool at the altar)
The right clam: The Blue crystal (at the bottom fo the thrones in the throne room)
Each clam will activate an area in the game. You have to match the patterns on each:
At the town entrace:
Screenshot
At the altar:
Screenshot
In the Organ Room:
Screenshot
Take the three emblems back to the cave and place them on the stone block.
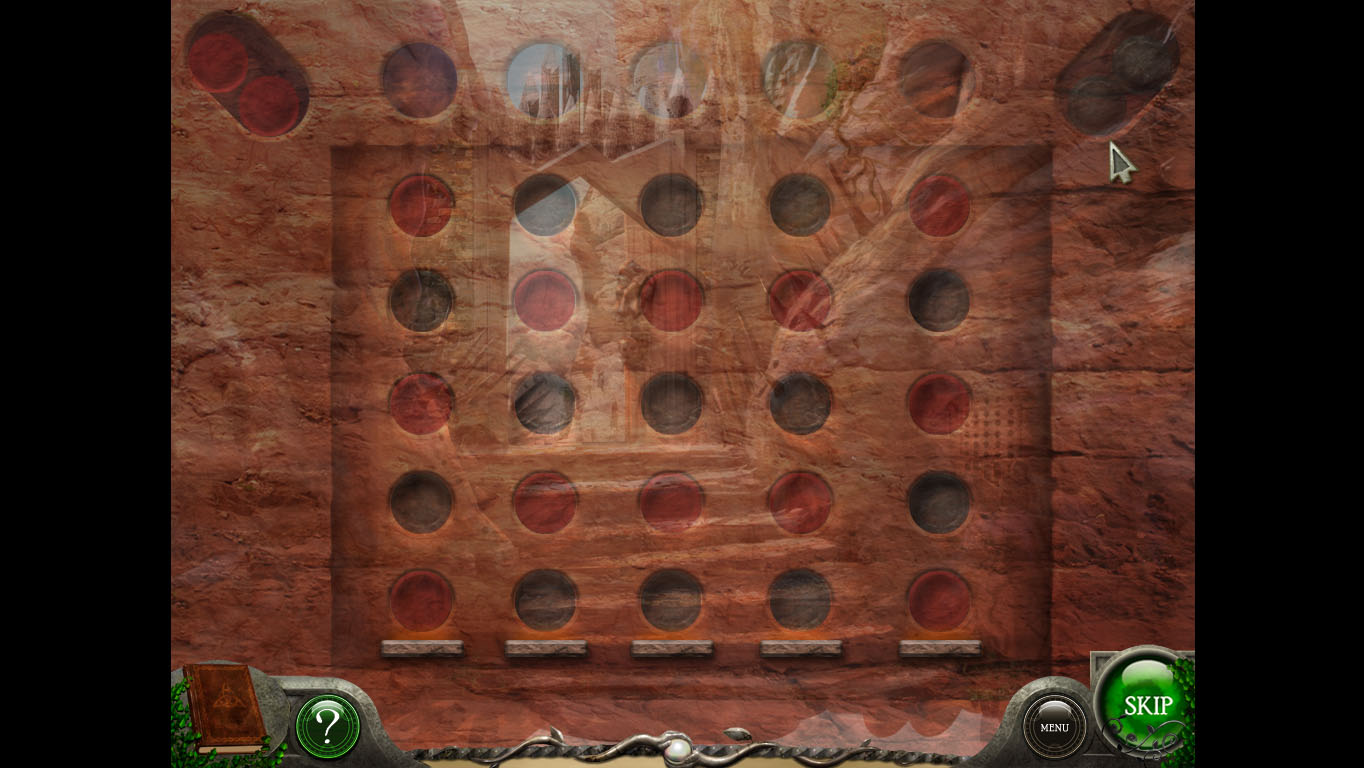
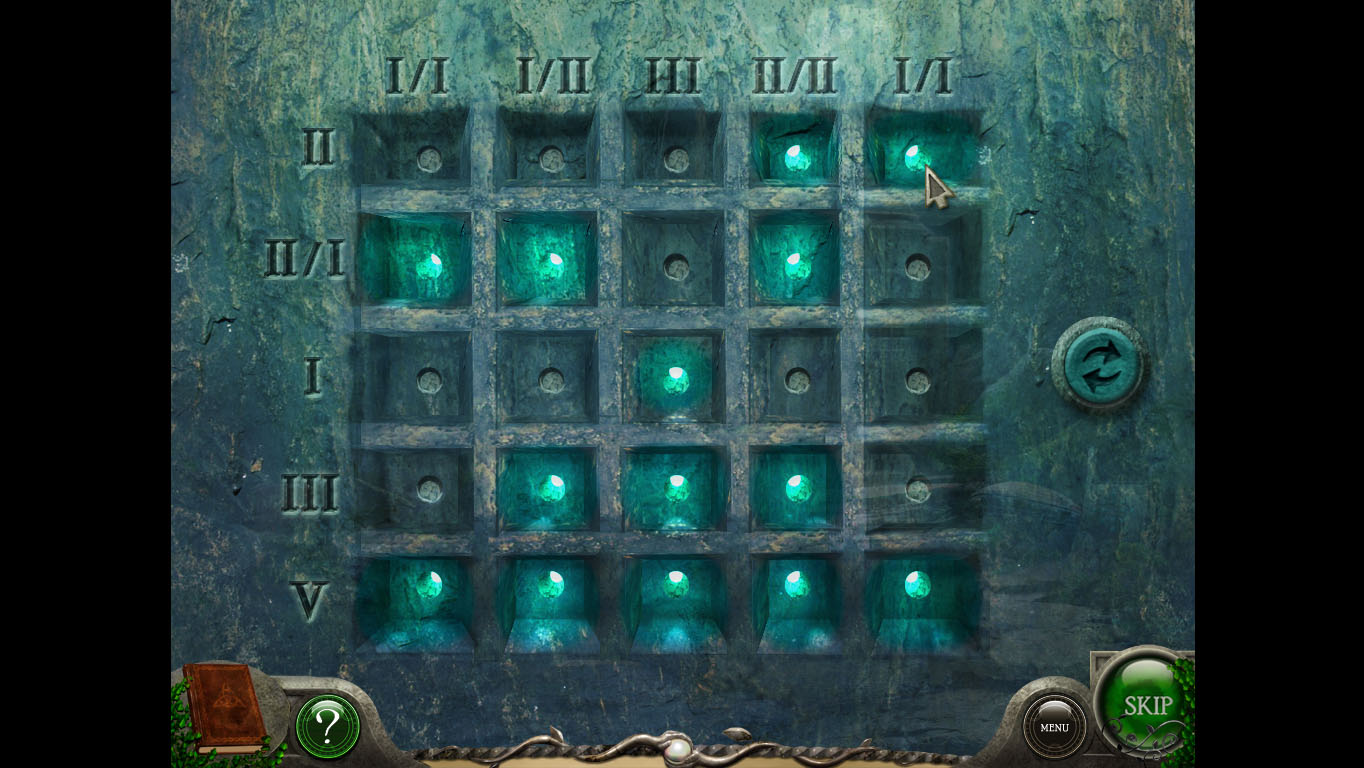
The Final Act
The Light Puzzle
You have to fill out the lights according to the row and column numbers. For example, a row markes II/I has two lights and one light (they can't touch).
The rows and columns have to balance. if a column has a I, you can't put more than one light in it - even if for a row.
Start at the bottom row - it has a V so all five lights can be lit up.
Light Puzzle Solution Screenshot
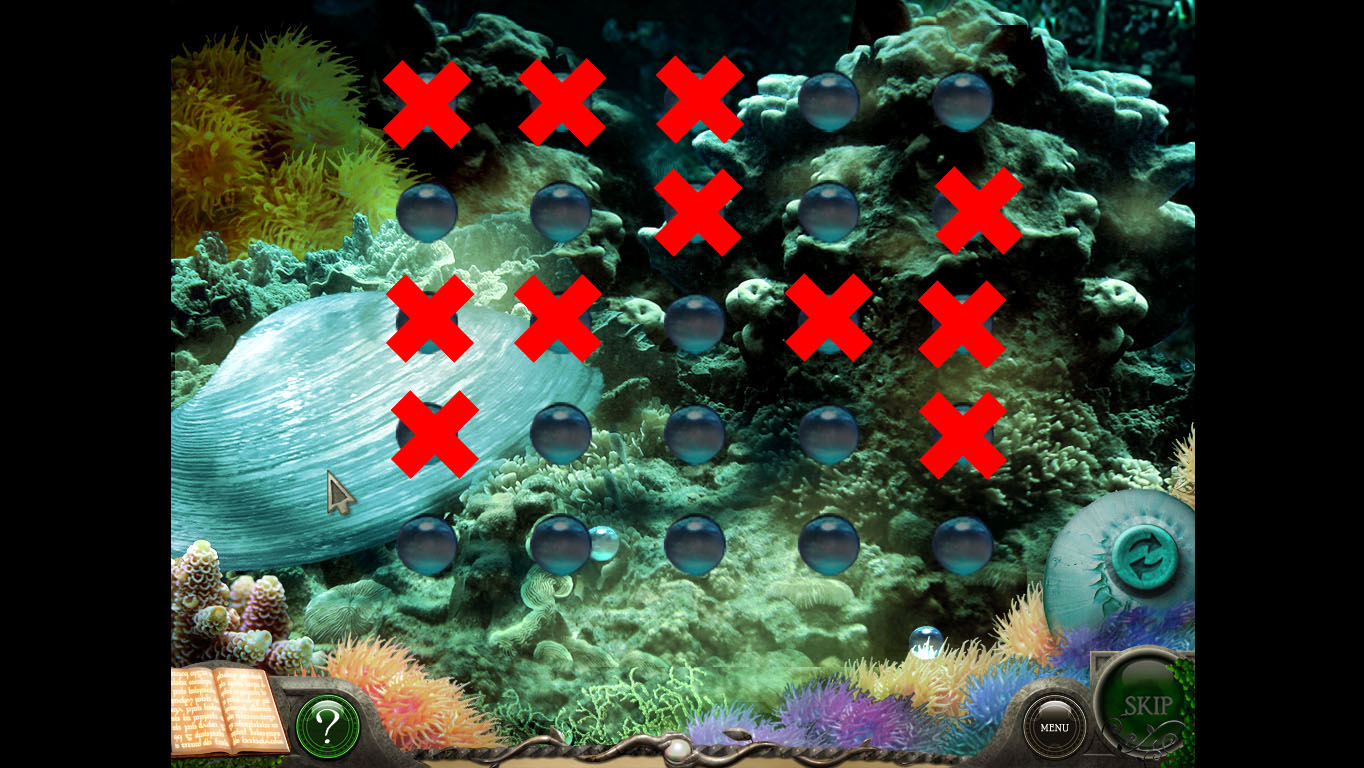
Go to the Coral Reef.
Click on the large clam.
Coral Area 2 Screenshot
Pop the bubbles to create the pattern you made on the light puzzle.
Bubble Puzzle Solution Screenshot
Take the Blue Pearl.
Go to the cave past the sunken ship. Talk to your father and take the small tablet with a triangle carved in it.
Head to the temple and use the stone tablet at the foot of the statue.
Stone Tablet Screenshot
A statue will rise from the grate. Place the blue pearl there.
Talk to your father. Get the key from him.
Return to the coral reef and use the key on the chest. Get the crown.
Return to the Temple. Wait for the movie to finish, then talk to the Satyr.
Posted by: James Francis |
September 4, 2011 3:04 PM
|
September 4, 2011 3:04 PM