


![]() Look, I'm no expert, but... maybe the next time you find an ancient mysterious book that tells you not to open it and demands a magical thumbprint before you can do so... don't? In The Curse, Mojo Bones and Toy Studios' puzzle game for iOS (Android, NOOK, and Kindle to follow!), you fail to heed the warnings and wind up unleashing the supremely sly and smug being known as The Mannequin. You can't have malicious, creepy entities running around willy-nilly, but the only way to defeat this one is to solve the puzzles contained on each page of the very book that imprisoned him... which is harder than it sounds.
Look, I'm no expert, but... maybe the next time you find an ancient mysterious book that tells you not to open it and demands a magical thumbprint before you can do so... don't? In The Curse, Mojo Bones and Toy Studios' puzzle game for iOS (Android, NOOK, and Kindle to follow!), you fail to heed the warnings and wind up unleashing the supremely sly and smug being known as The Mannequin. You can't have malicious, creepy entities running around willy-nilly, but the only way to defeat this one is to solve the puzzles contained on each page of the very book that imprisoned him... which is harder than it sounds.
 There are a whopping 100 puzzles contained in Mannequin's book, ranging from simple block-sliding puzzles, to riddles, to circuitry, and more. You can play them in whatever order you please, flipping through the pages in the book to get right to the hard stuff, or starting things off nice and gentle with a little memory game if you so choose. If you fail, you just have to try again, but succeed and you'll be granted one of the cogs you need to put Mannequin back where he belongs. Not that he's worried. Mannequin has a rather low opinion of you, but you know what? At least I have arms, buddy!
With its stellar presentation and sense of style, The Curse is absolutely perfect for casual puzzle fans who want a large variety of challenging levels on hand whenever they have a moment. It's silly, snarky, and possessed of a sleek, gorgeous design you don't often get to encounter. The puzzles are hard, too, so you'll be glad there's so many of them you can flip back and forth through in the order you like. Unfortunately, while tricky, none of these are what you'd call particularly unique, and if you play a lot of, oh, say, hidden-object adventures you've probably been exposed to most of these varieties more than once. It's a little disappointing, since the game is otherwise so extremely well put together that you just kind of expect more creativity out of it. The Curse is, however, a supremely stylish little game pure puzzle fans will love, and it heaps on the charm to boot. You don't have to break the mold to be a success, and Mannequin's challenge is a fantastic example of how to provide all the brain-teasing power of a whole library of puzzle books in one beautiful package.
NOTE: This game was played and reviewed on an iPad (1st gen). Game was available in the North American market at the time of publication, but may not be available in other territories. Please see individual app market pages for purchasing info.


Walkthrough Guide
(Please allow page to fully load for spoiler tags to be functional.)
The Curse Walkthorugh
This walkthrough is still a work in progress. Check back soon for more updates!
PLEASE NOTE: Many of the solutions to the puzzles in The Curse are completely randomized with each play-through. Because some of the correct answers are subject to change each game, the screenshots offered in this guide should be used as examples for reference, and not as exact solutions.
Levels 1-10
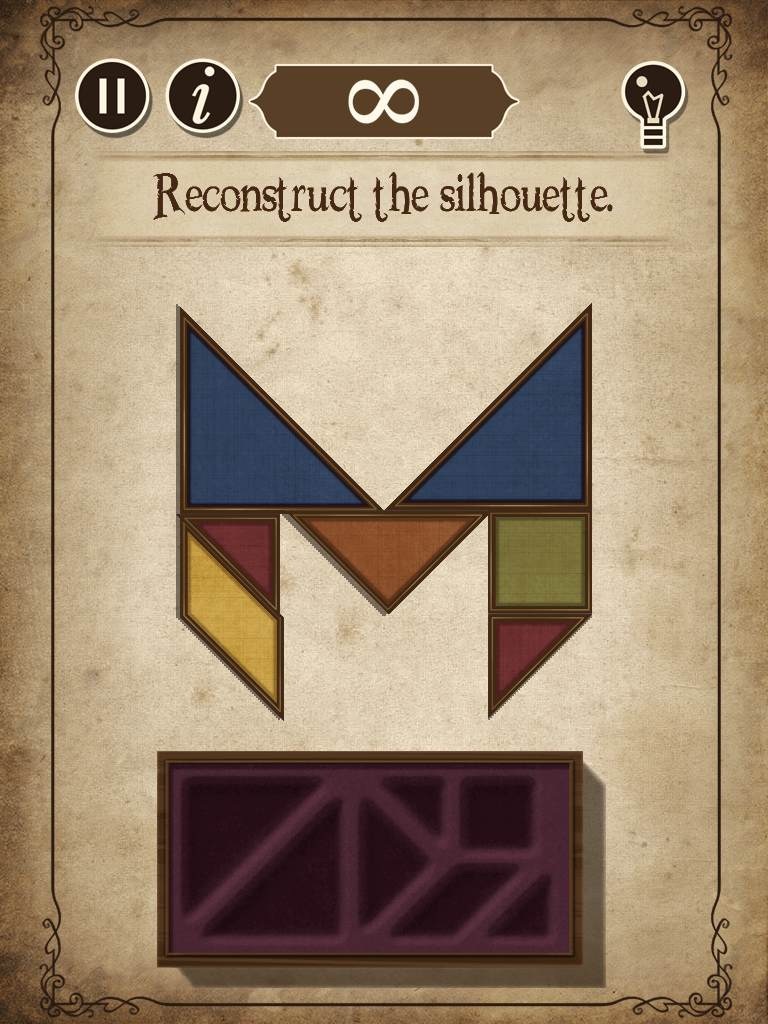
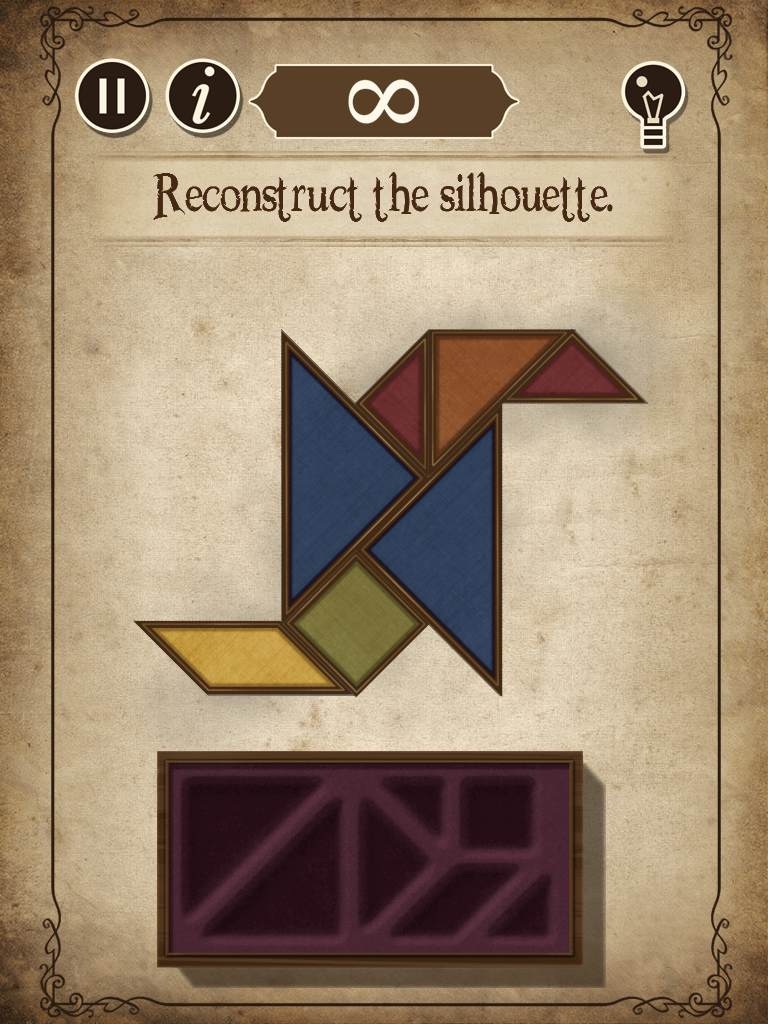
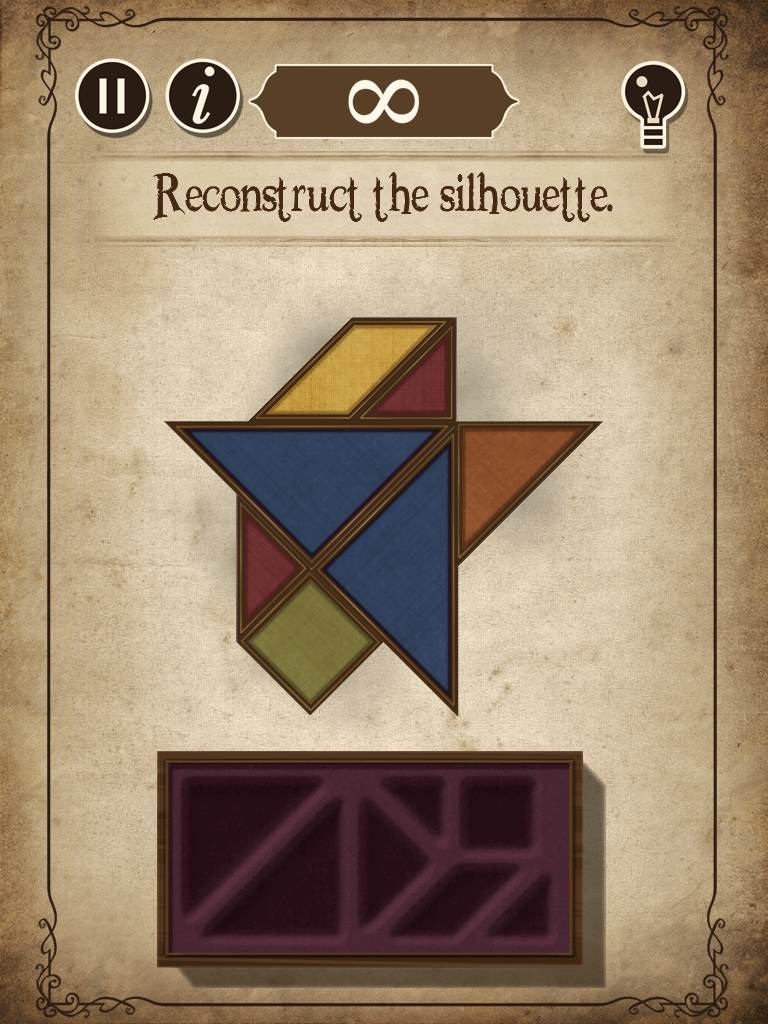
Level 1 - Tangram #1 (Easy)
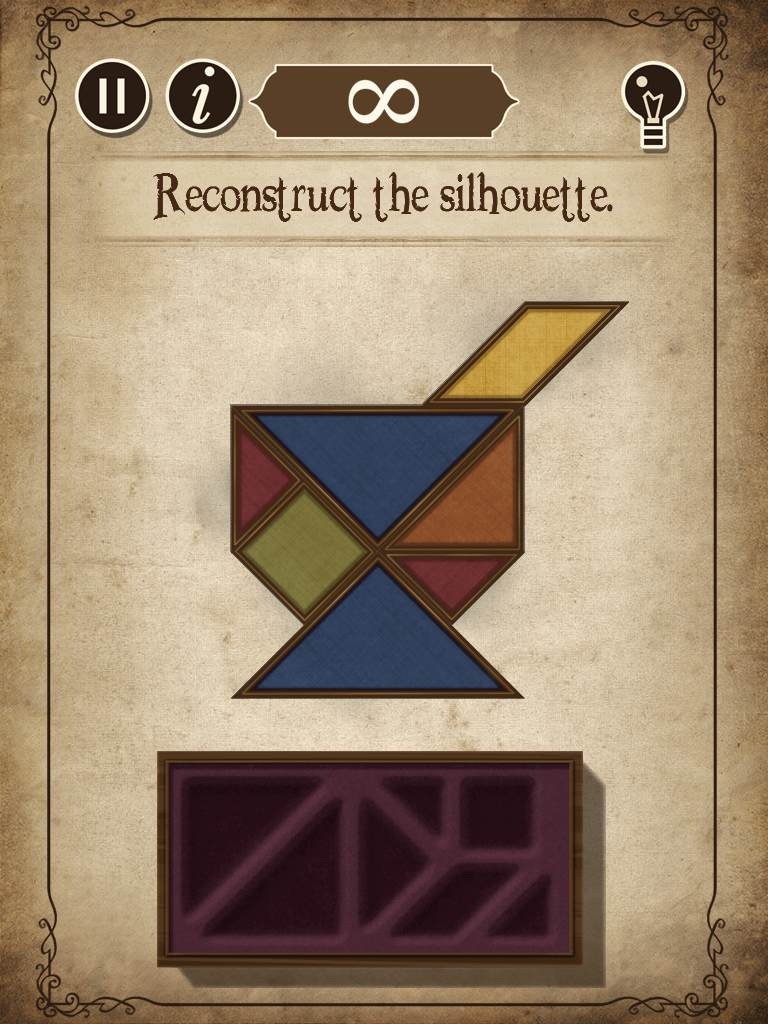
Correctly fit all seven shapes inside the outline without overlapping the pieces to solve the puzzle.
Drag and release the pieces to set them in place, or tap to rotate them 45 degrees clockwise.
HINT: Start with the more difficult pieces, then place the easier and smaller ones afterwards.
Position the large triangles first, then place the parallelogram, the square, the medium triangle, and then finally the two small triangles.
Screenshot.
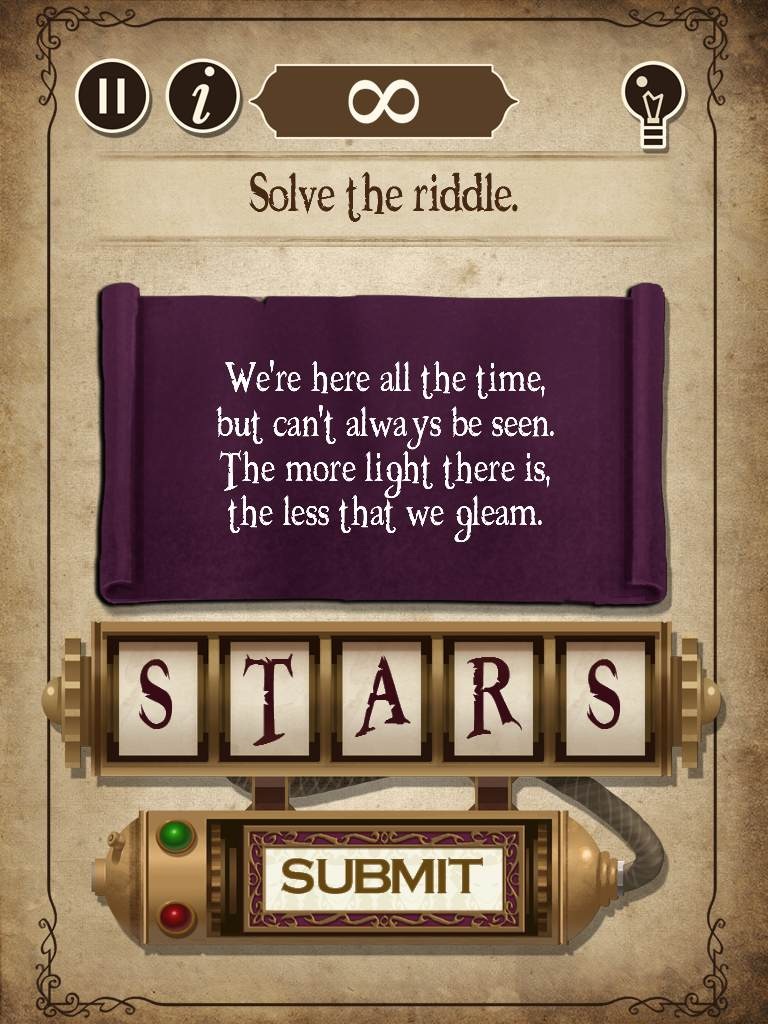
Level 2 - Riddle #1 (Easy)
Use the clues from the riddle to find the answer.
Click and drag the tiles up or down to cycle through the letters and spell the five-letter word.
HINT: What is something that gleams and can't be seen while it's light out, but is always around?
Screenshot.
Level 3 - Magic Squares #1 (Easy)
Arrange the number tiles so that the numbers in each row and column add to 15.
Drag and release a tile over an empty space to place it, or release it on top of a different tile to swap their positions.
Pay attention to the numbers around the border of the square to find the current sum for their adjacent row or column.
HINT: Start with the number 5 in the center.
Screenshot.
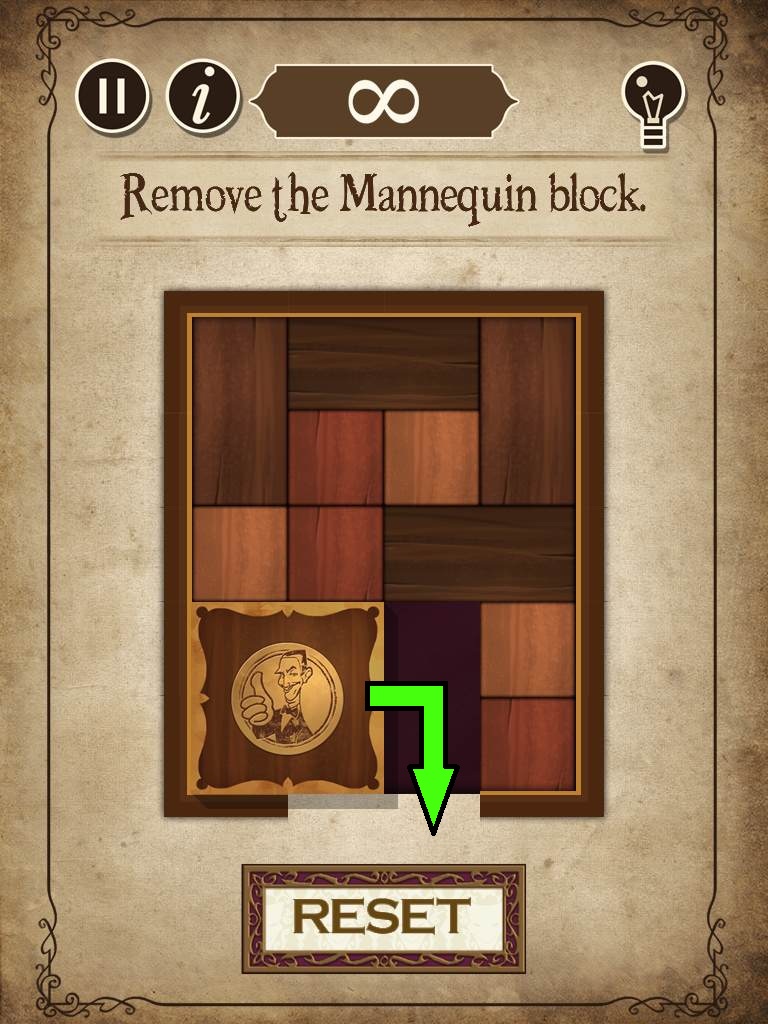
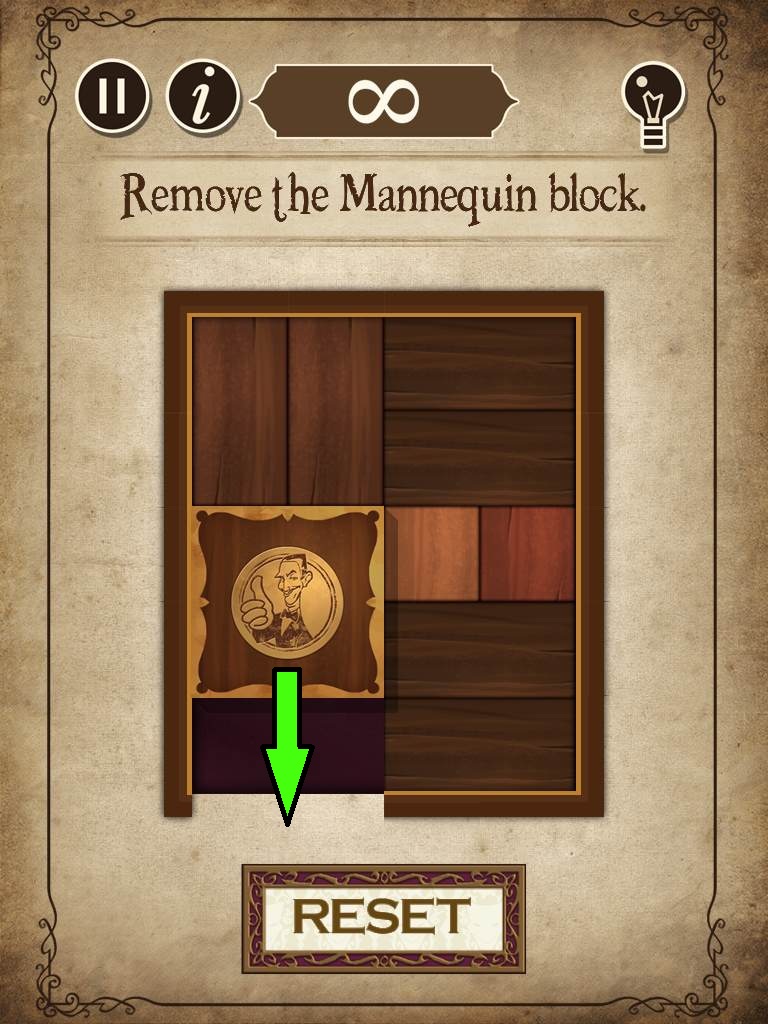
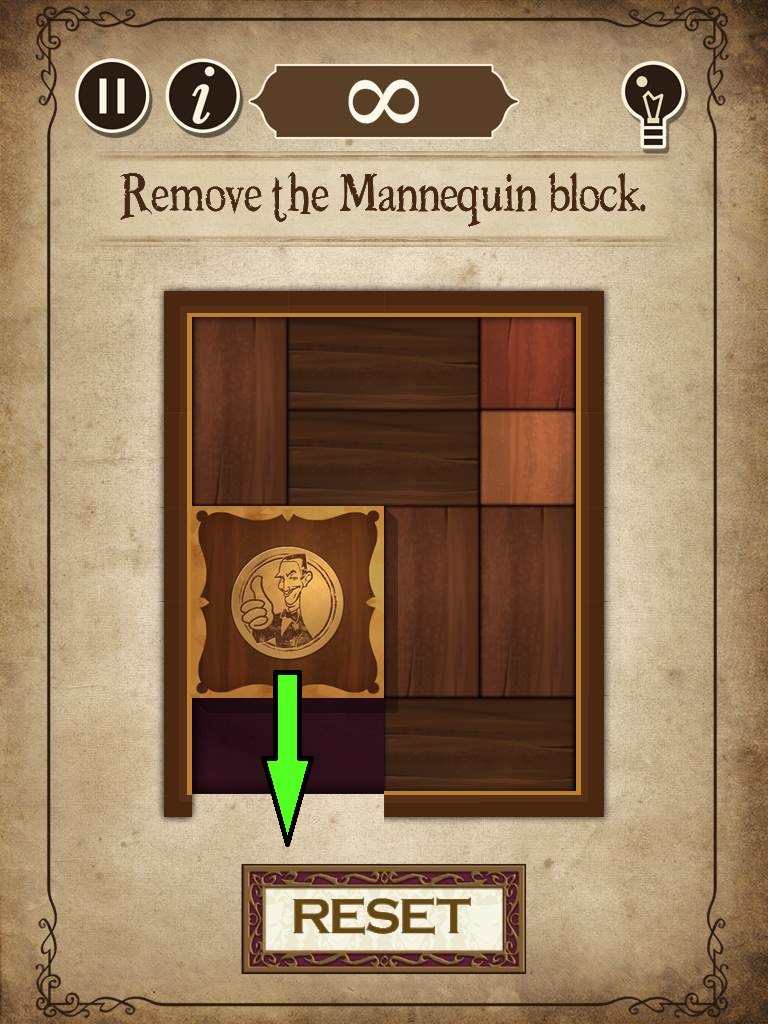
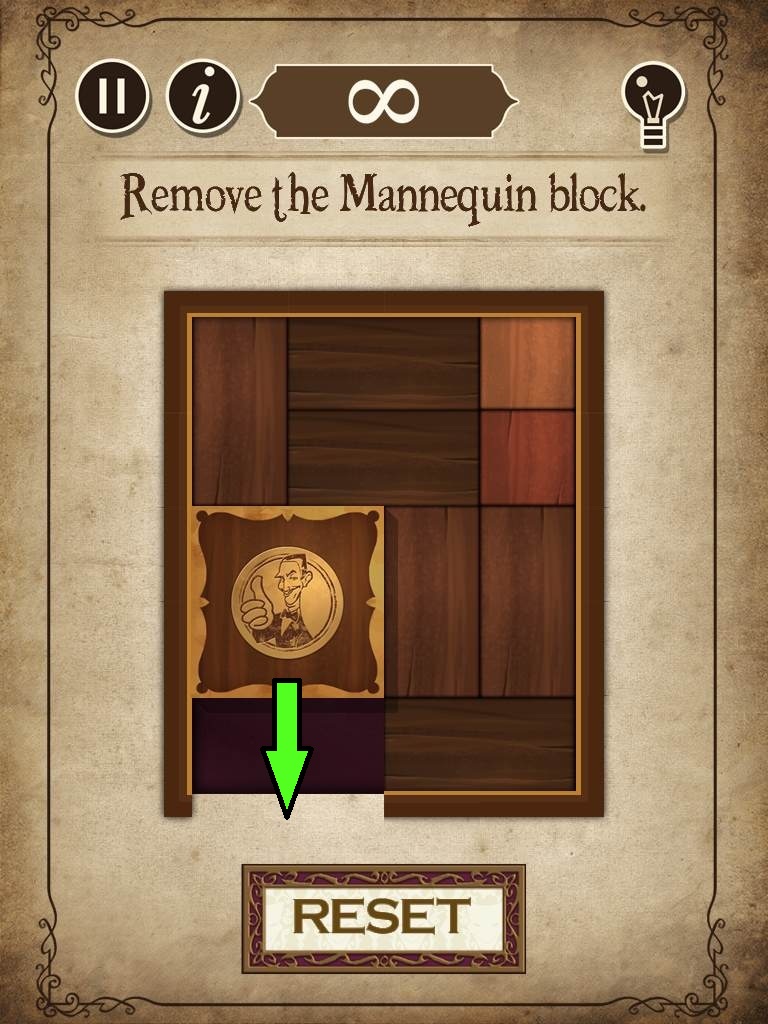
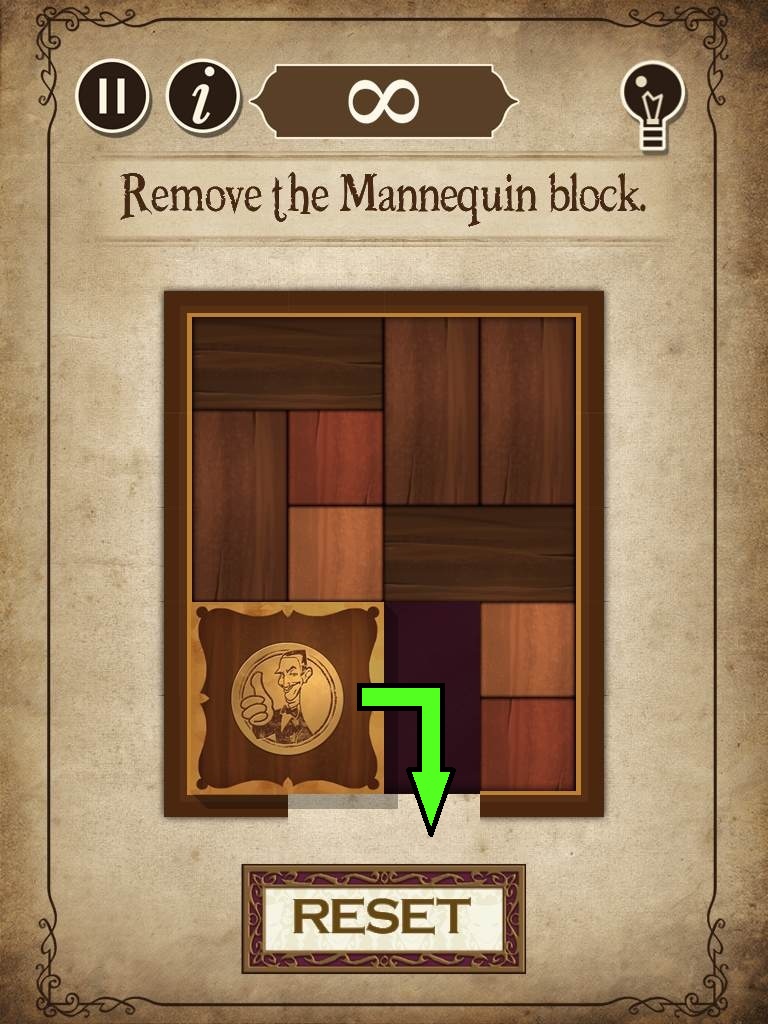
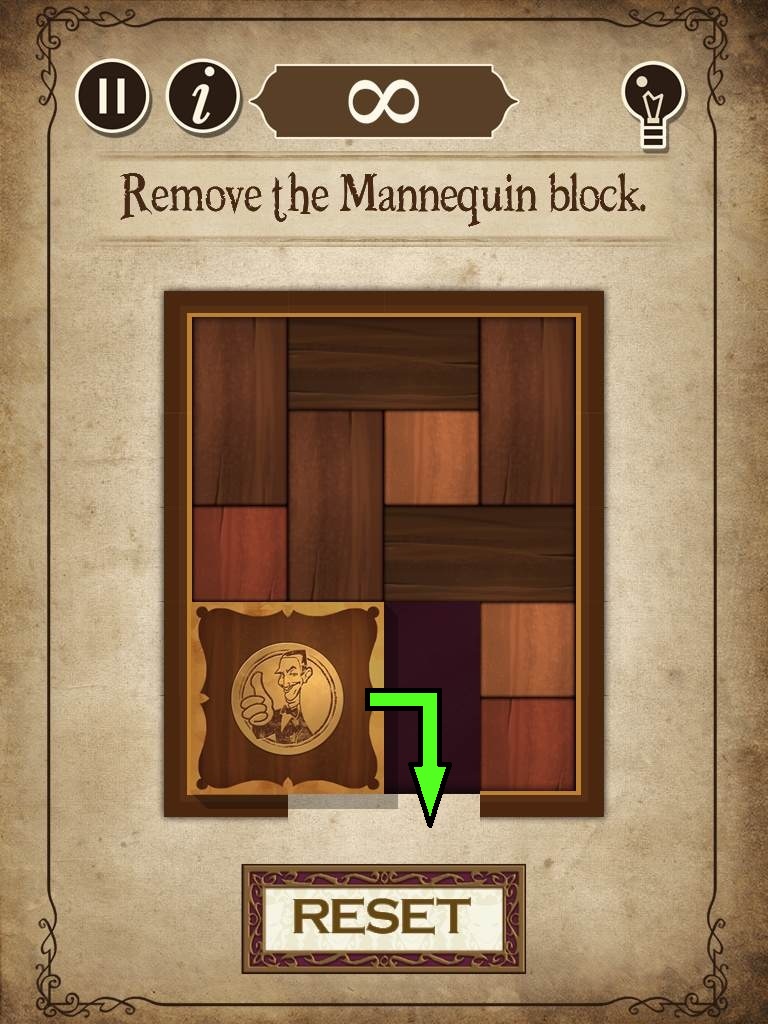
Level 4 - Sliding Blocks # 1 (Easy)
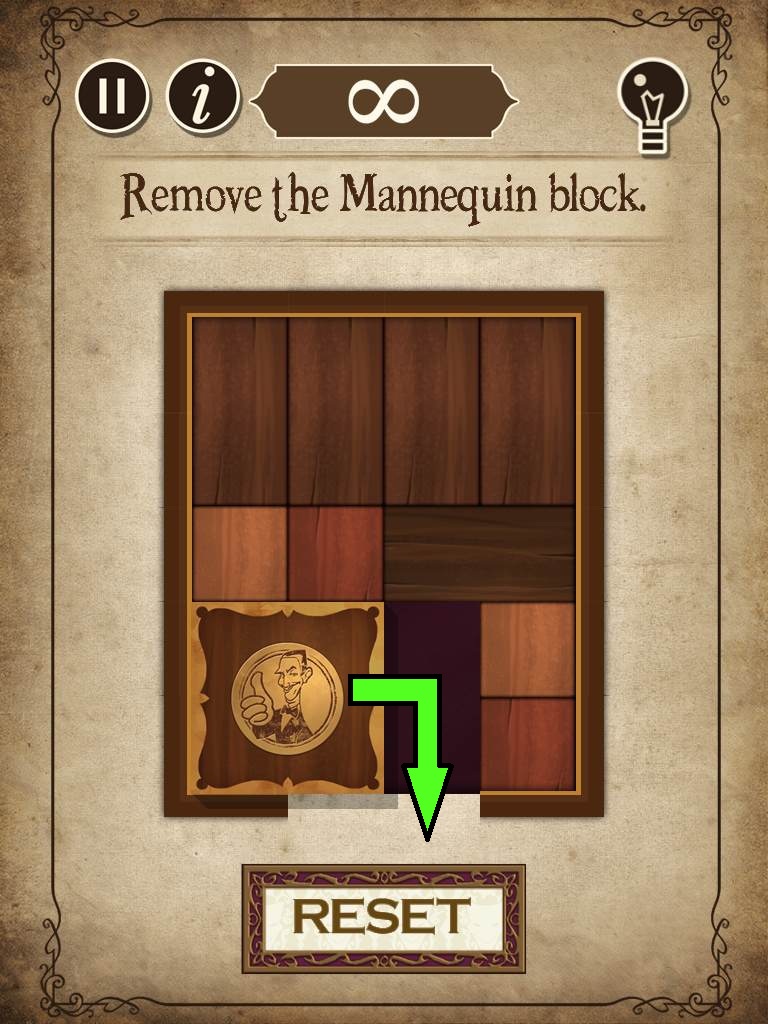
Move the Mannequin block outside of the square through the exit by sliding the other blocks out of the way.
Drag and release a block to place it in an empty space.
Blocks cannot move diagonally or pass through obstacles, and can only move into a space that has enough room for the entire block.
HINT: First try to get the Mannequin block on the left side of the board, then move the pieces around it right and up to make room for the Mannequin block to go down.
Screenshot.
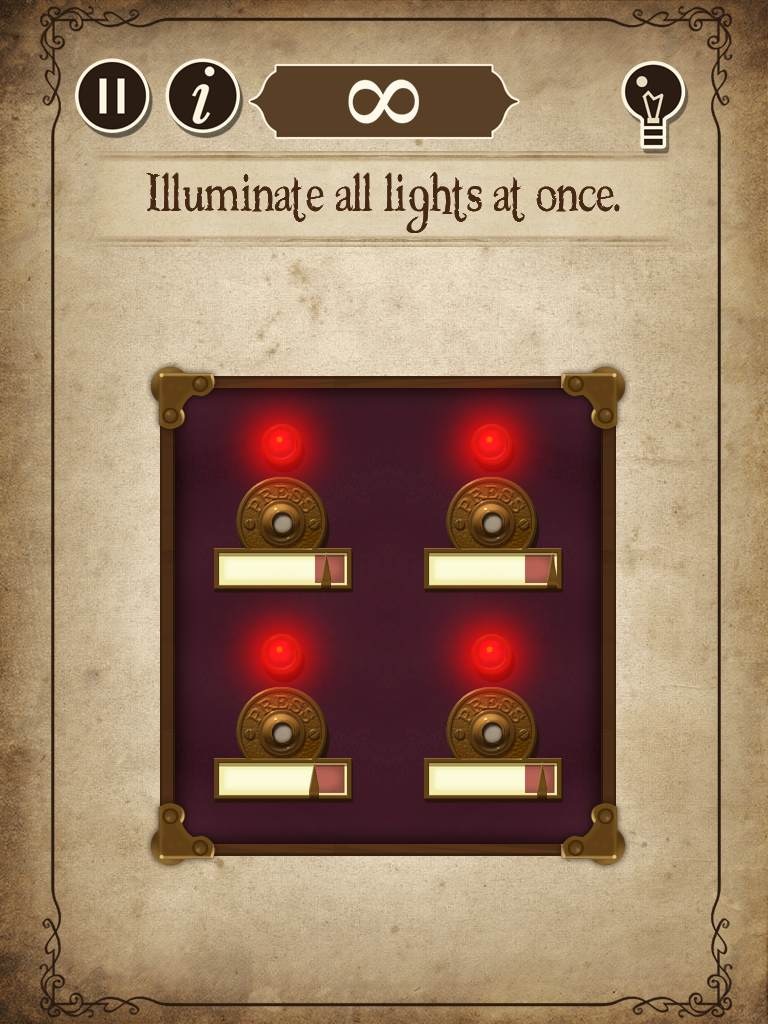
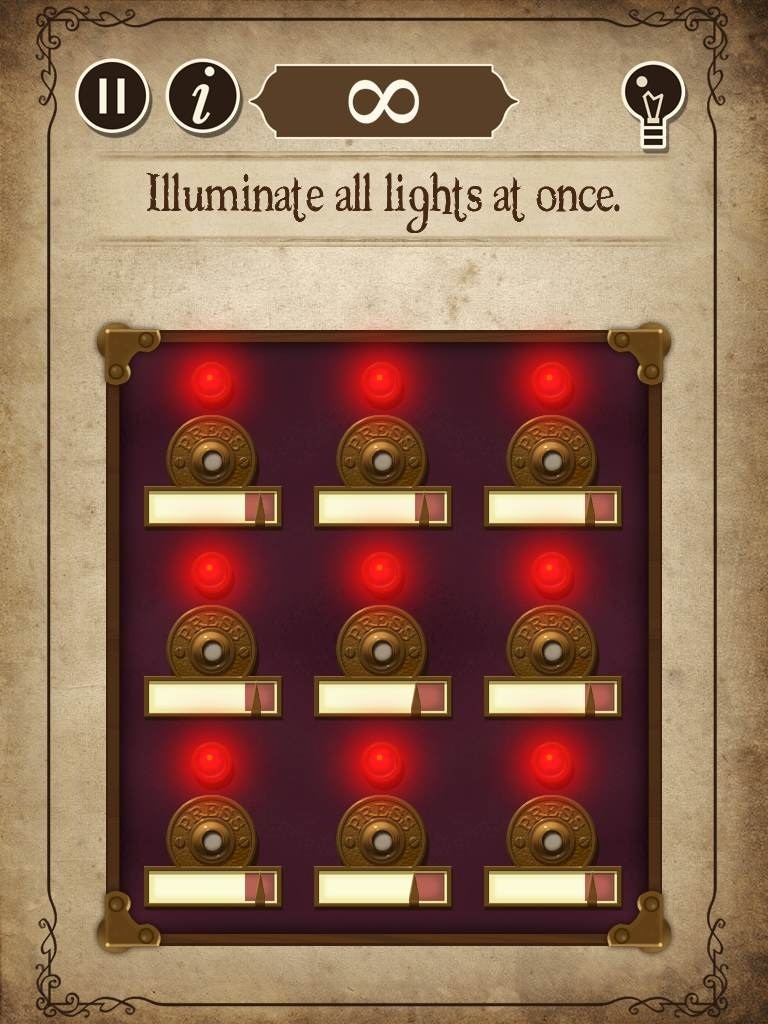
Level 5 - Button Gauge #1 (Easy)
Press the buttons at the correct time so that all of the bulbs are simultaneously lit.
Press the button to start the timer, indicated by the arrow moving across the bar.
When the arrow reaches the orange square at the end, the bulb will light up until the arrow moves through the square.
Each button has a different timer, so test the buttons to see how long it takes for the bulb to light.
HINT: Press the slowest button first, then the next fastest, and then the second fastest, etc.
In the example from my game, one button had a 4 second timer, one had a 2 second timer, and the remaining two each had a 1 second timer.
First I pressed the 4 second timer button, then I waited for it to get just about half way and pressed the button with a 2 second timer; when the two second timer was a little less than half way done, I quickly pressed the last two buttons.
There is a slight delay between activating two buttons, so give yourself a small time cushion.
Screenshot.
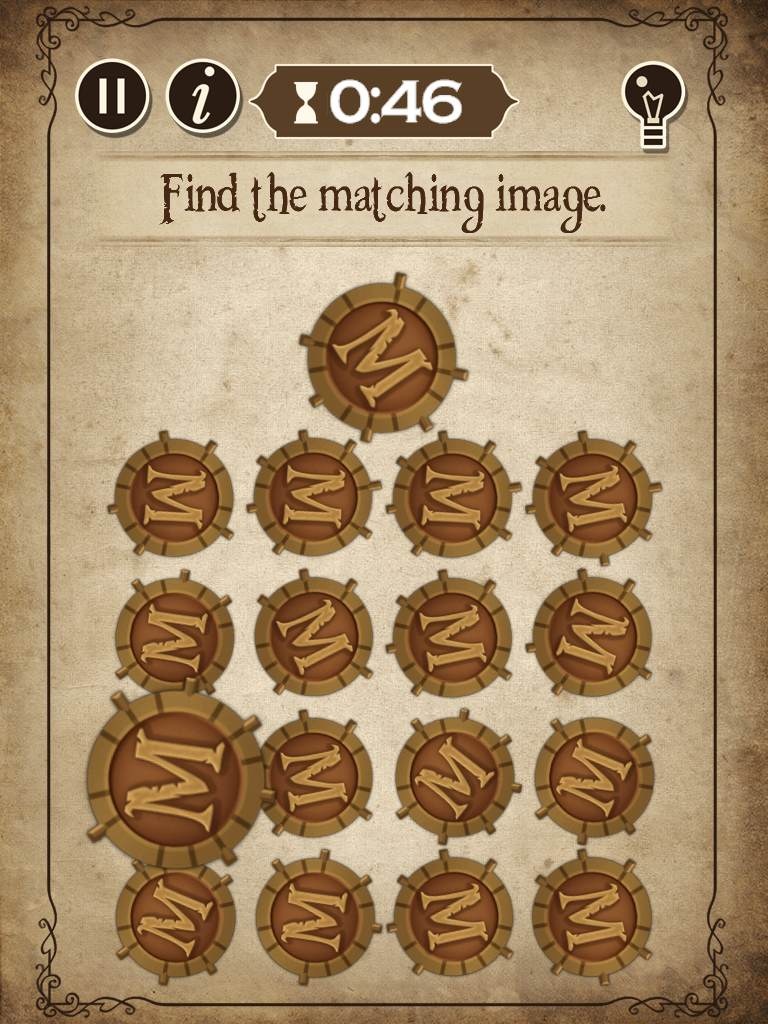
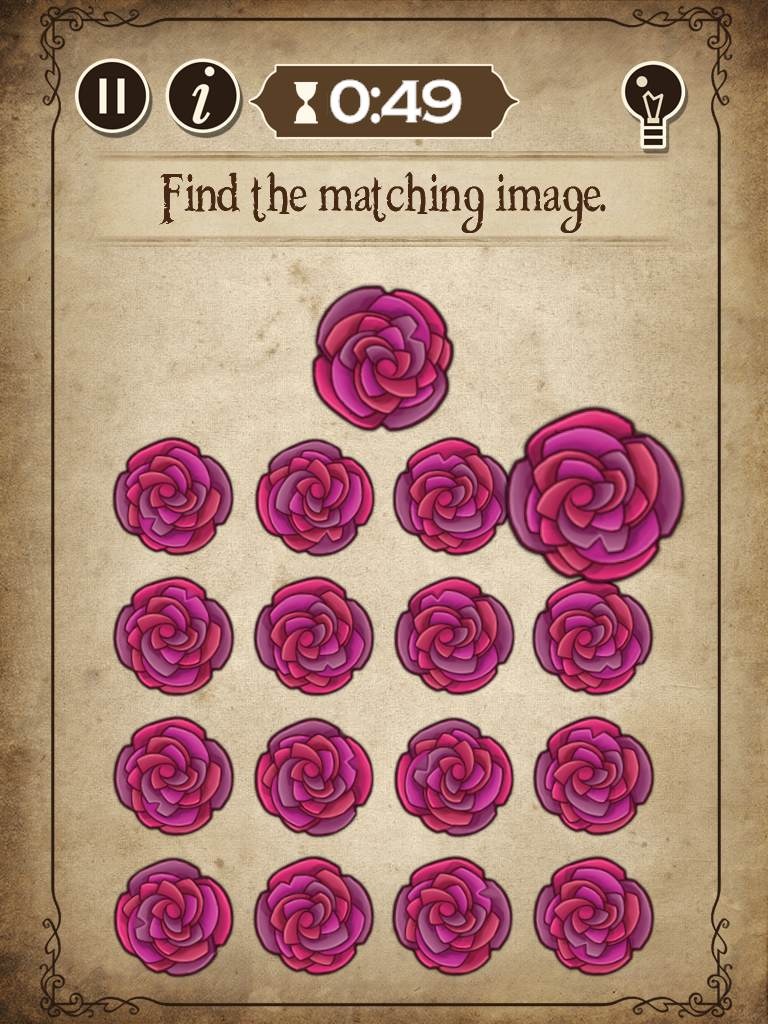
Level 6 - Match-It #1 (Easy)
Quickly study the top cog, then find its match in the rows of rotating cogs.
Pay attention to the position of the pegs and the lines around the outside of the cog.
Find the correct cog before the timer runs out.
Screenshot.
Level 7 - Bulbs #1 (Easy)
Watch the randomized order that the bulbs light up, then copy the sequence by tapping the bulbs.
The puzzle has three rounds, and the second and third rounds each add an additional bulb to the sequence.
When a round is successfully completed, one of the three red lights will illuminate.
If you incorrectly guess a bulb, the puzzle will start over at the first round.
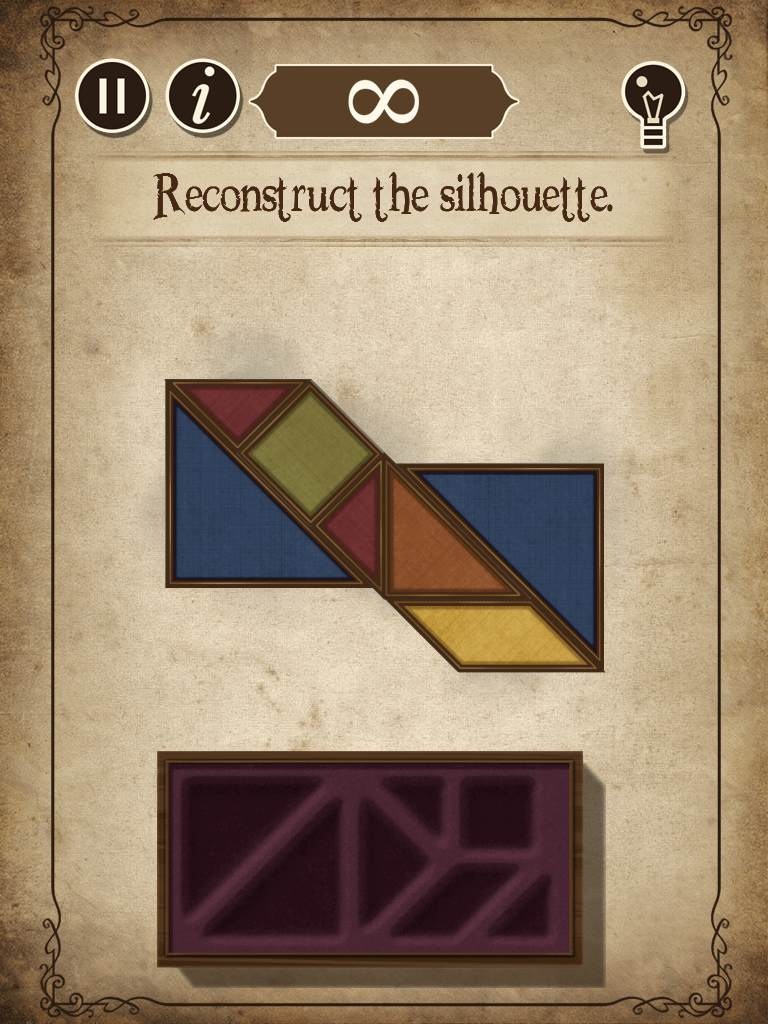
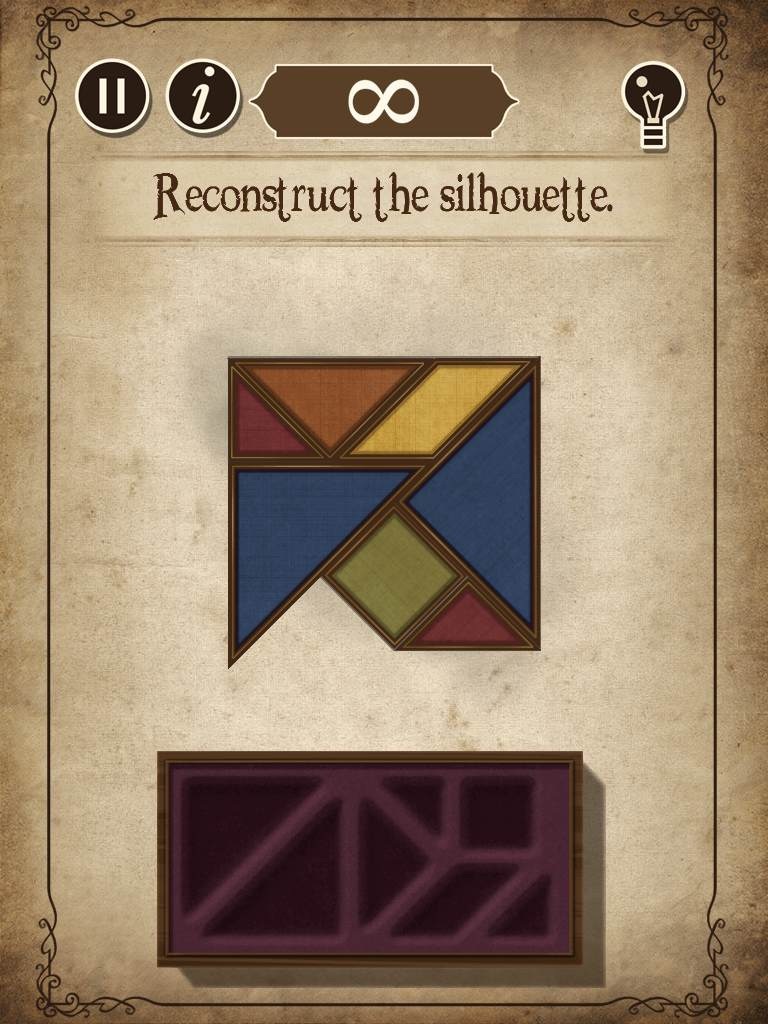
Level 8 - Tangram #2 (Easy)
Correctly fit all seven shapes inside the outline without overlapping the pieces to solve the puzzle.
Drag and release the pieces to set them in place, or tap to rotate them 45 degrees clockwise.
HINT: Start with the more difficult pieces, then place the easier and smaller ones afterwards.
Position the large triangles first, then place the parallelogram, the square, the medium triangle, and then finally the two small triangles.
Screenshot.
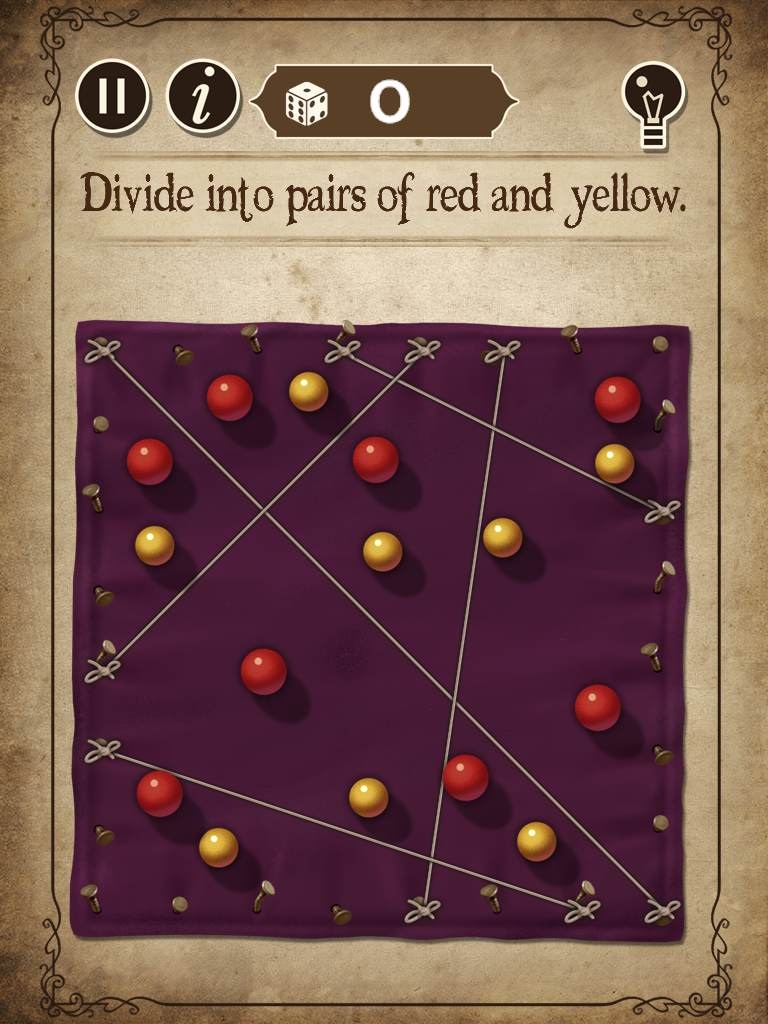
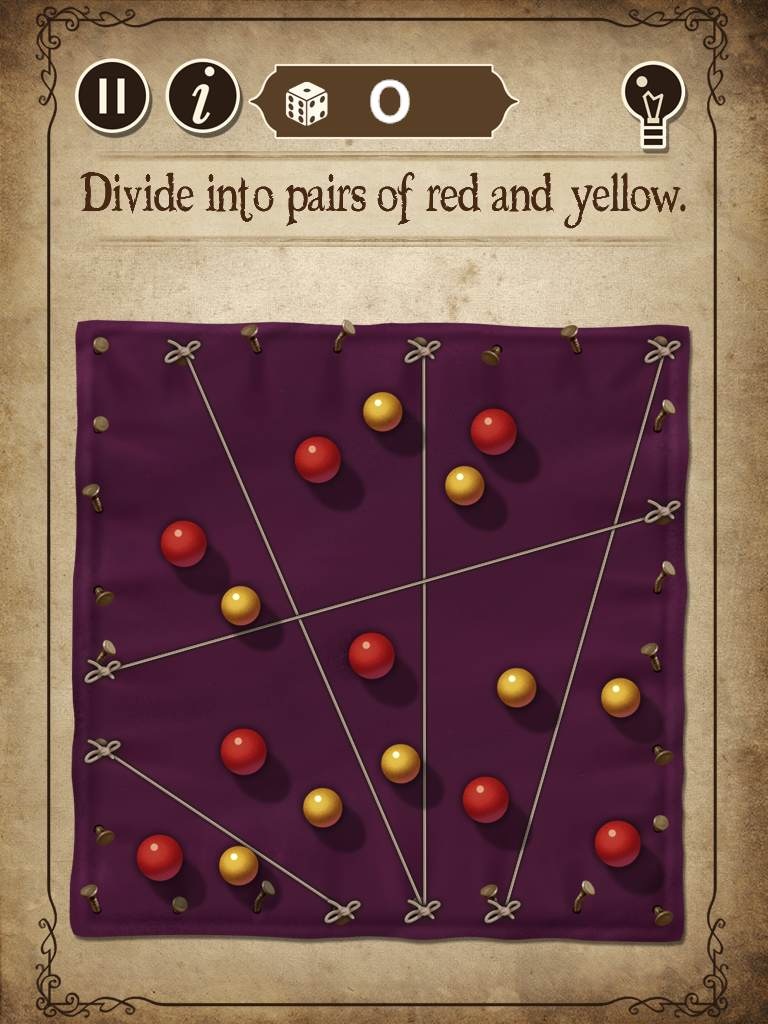
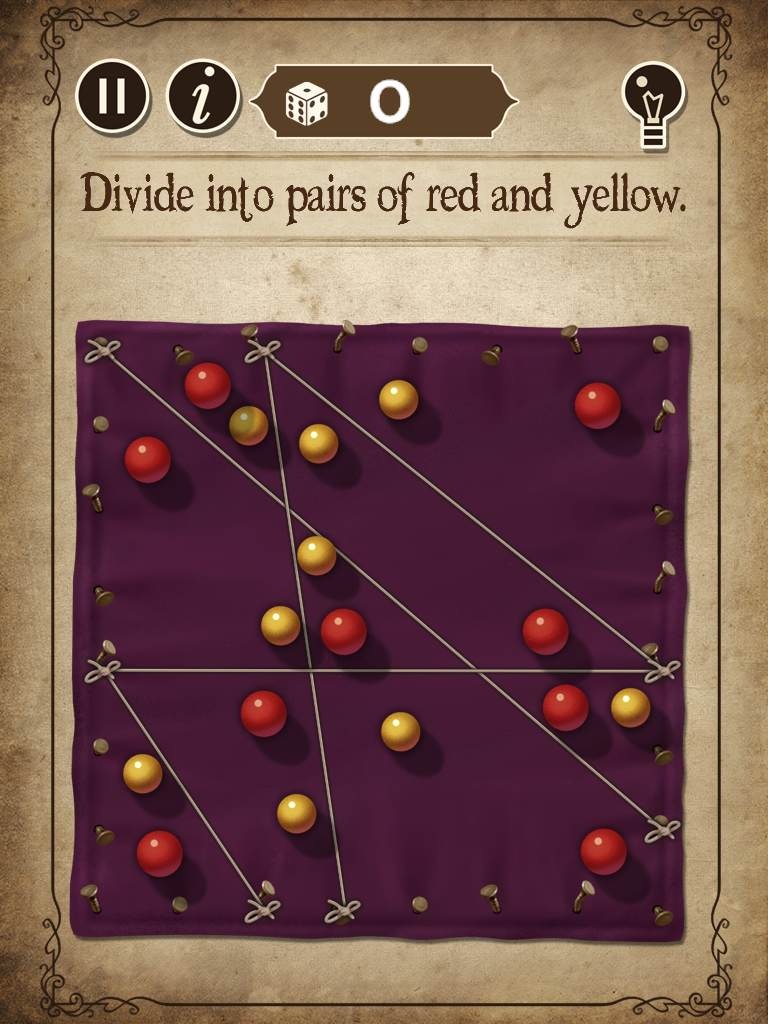
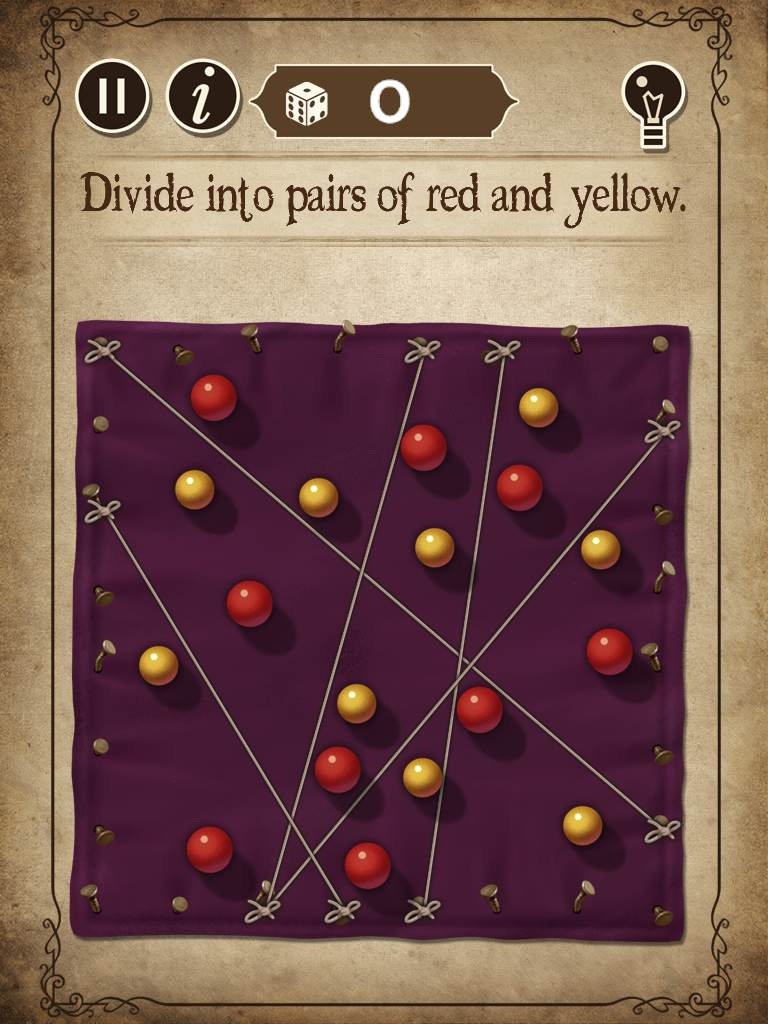
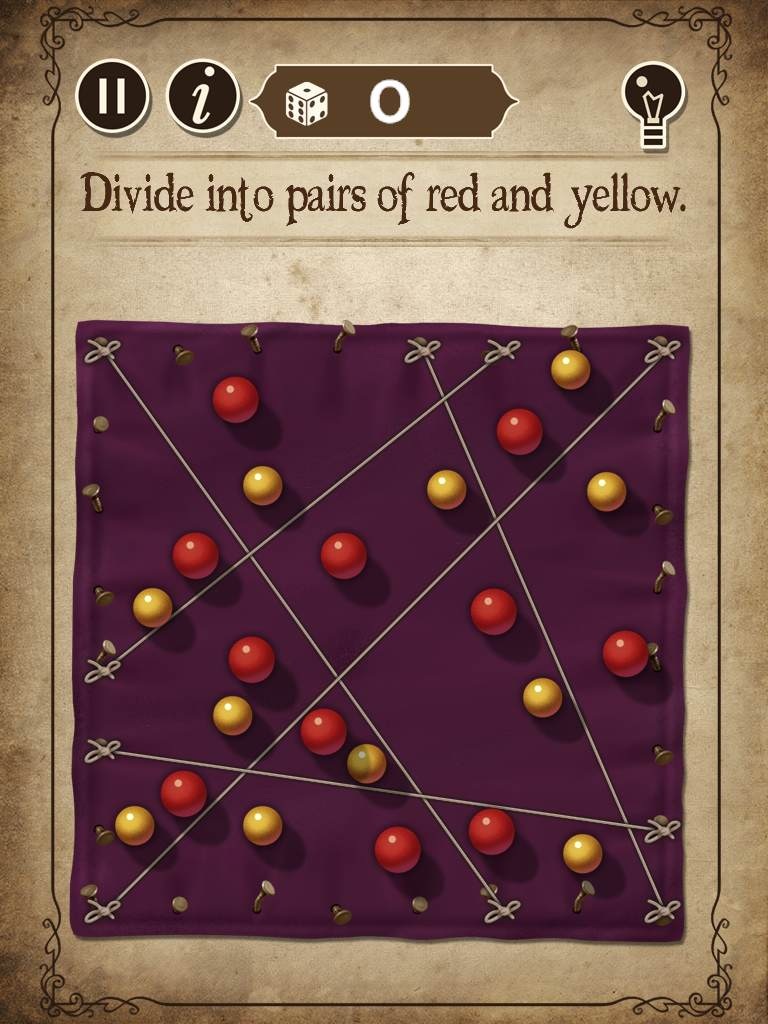
Level 9 - Draw The Line #1 (Easy)
Draw 5 lines between the balls to separate them into isolated pairs of 1 red and 1 yellow ball in each section.
Tap a nail to attach one end of the rope to it, then tap a different nail to connect the other end of the rope.
Remove a rope on the board by tapping it.
Screenshot.
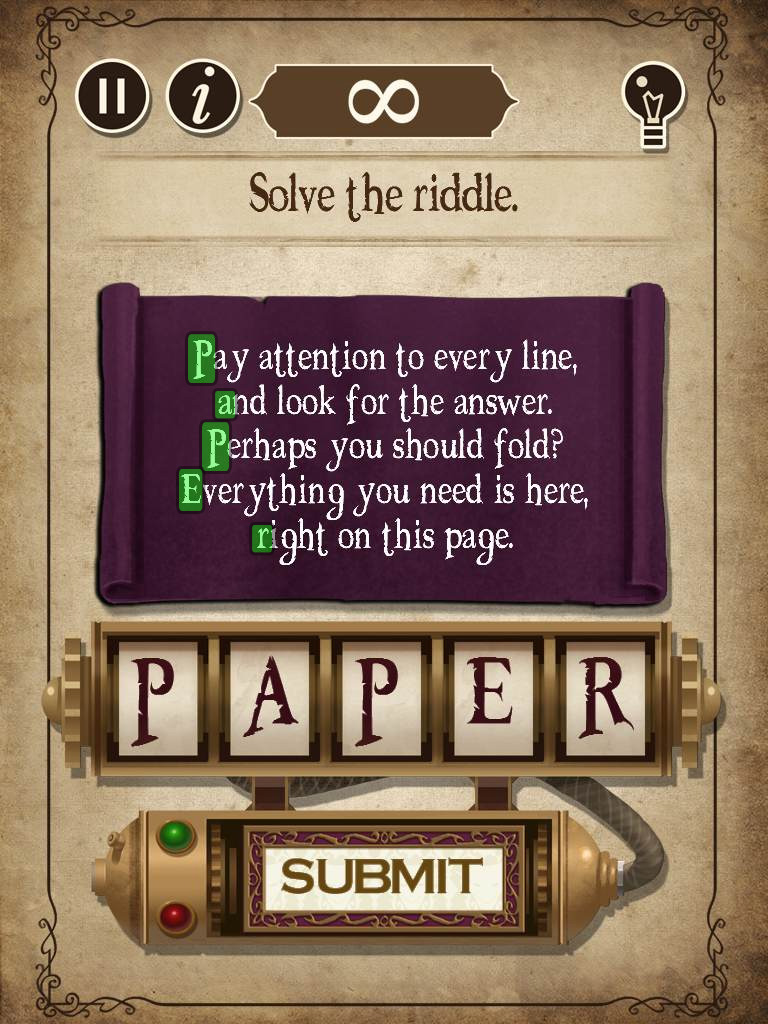
Level 10 - Riddle #2 (Easy)
Use the clues from the riddle to find the answer.
Click and drag the tiles up or down to cycle through the letters and spell the five-letter word.
HINT: Look at the start of every line and pay attention to the key words "fold" and "page".
Screenshot.
Levels 11-20
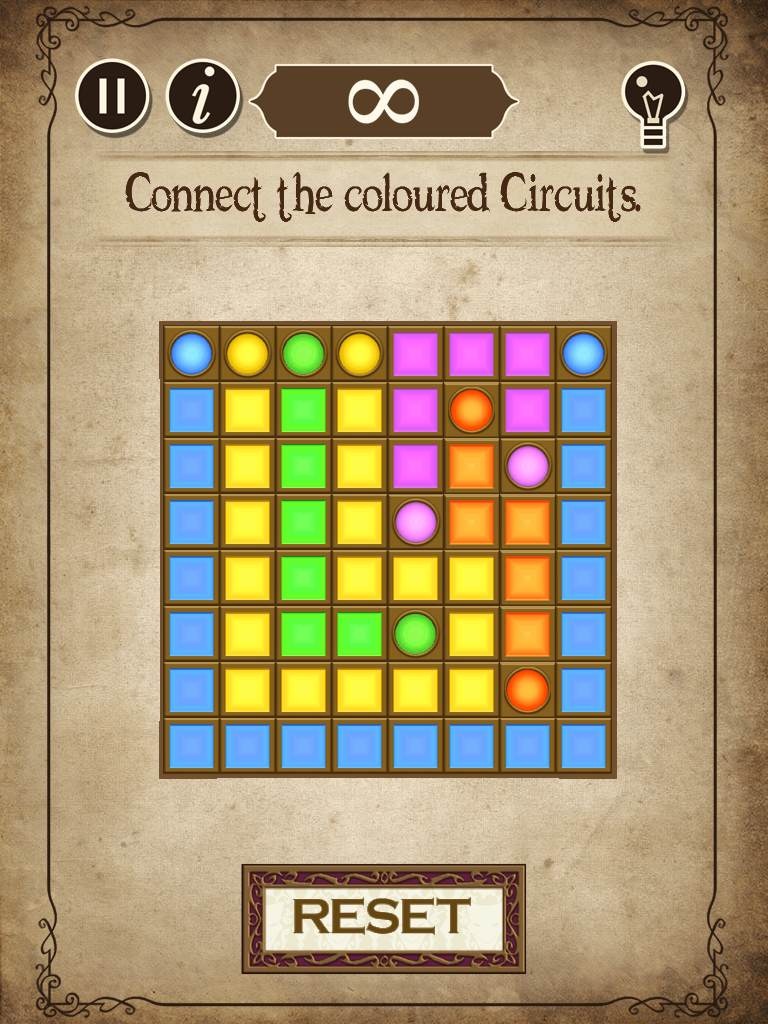
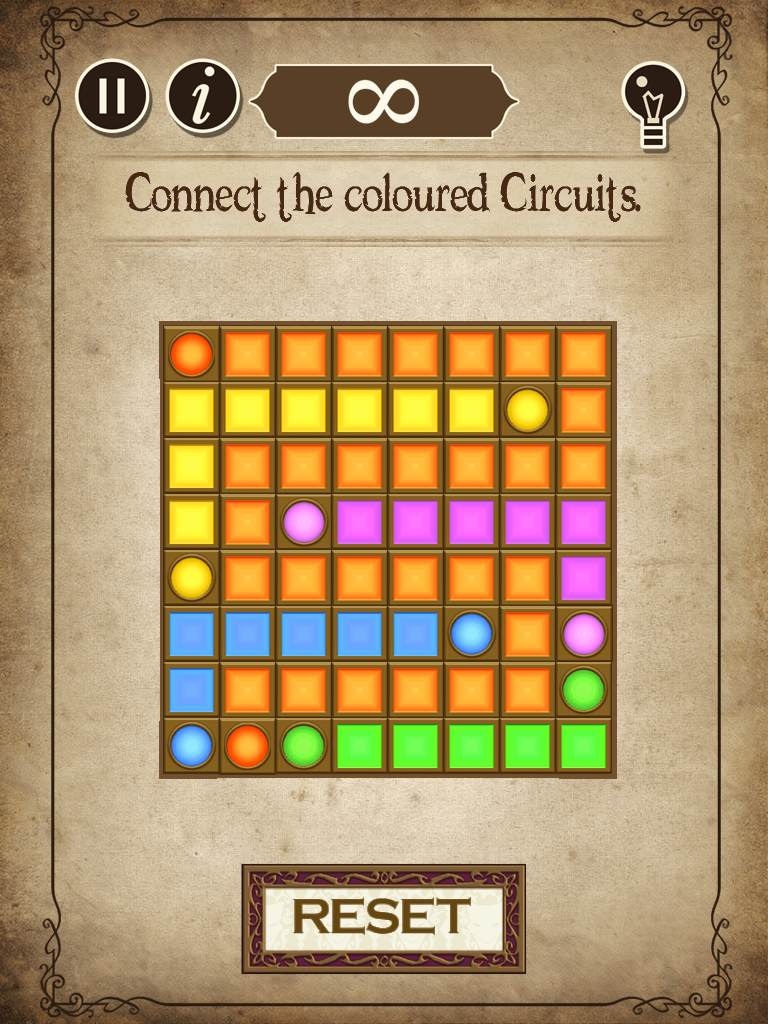
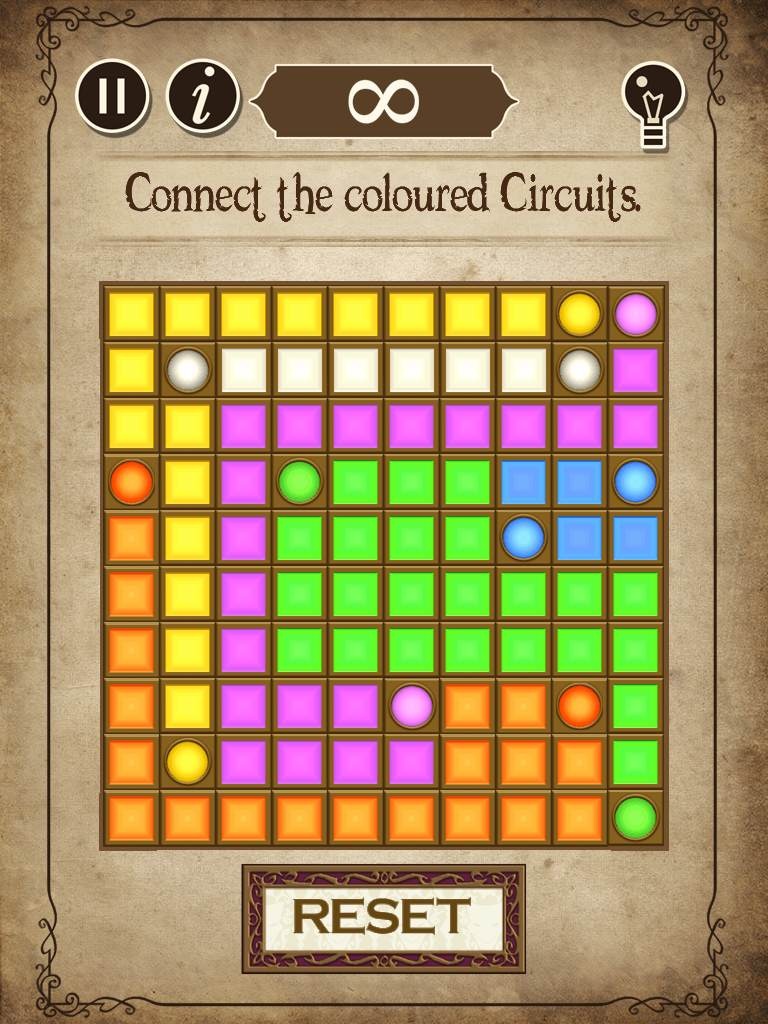
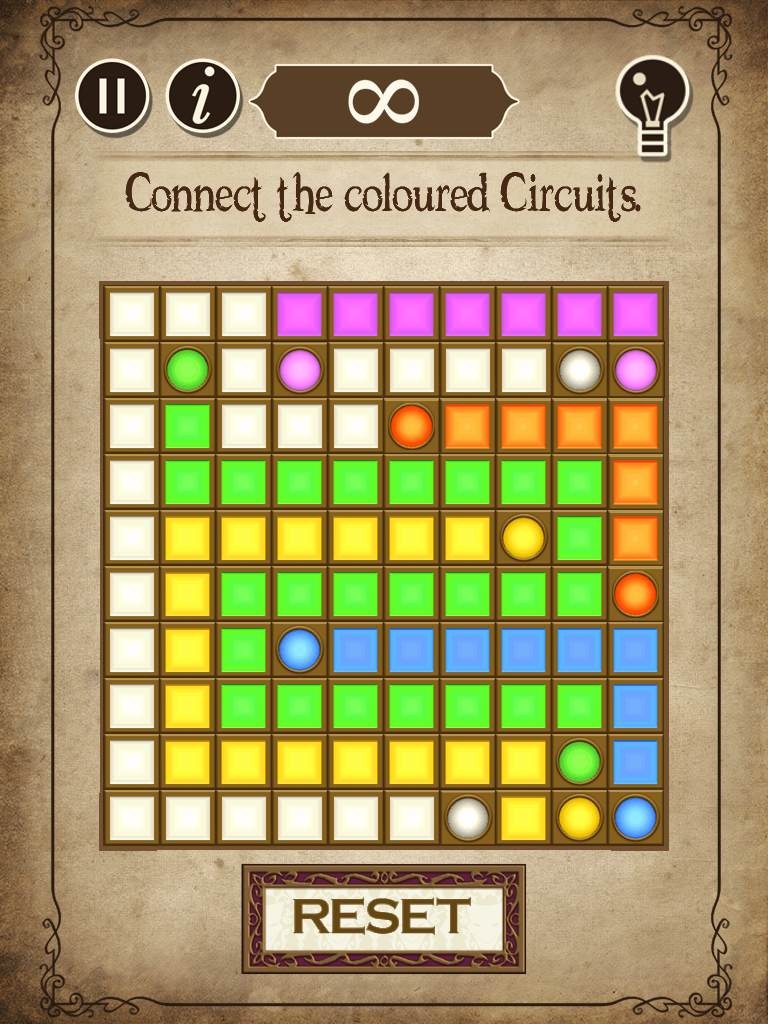
Level 11 - Circuit #1 (Easy)
Create a path from each colored node to its matching colored node.
Tap a node and drag across the squares to draw a path, then release it at the second node to complete the connection.
Two different paths cannot cross over each other.
All of the nodes must be connected and every square must be filled to complete the puzzle.
Screenshot.
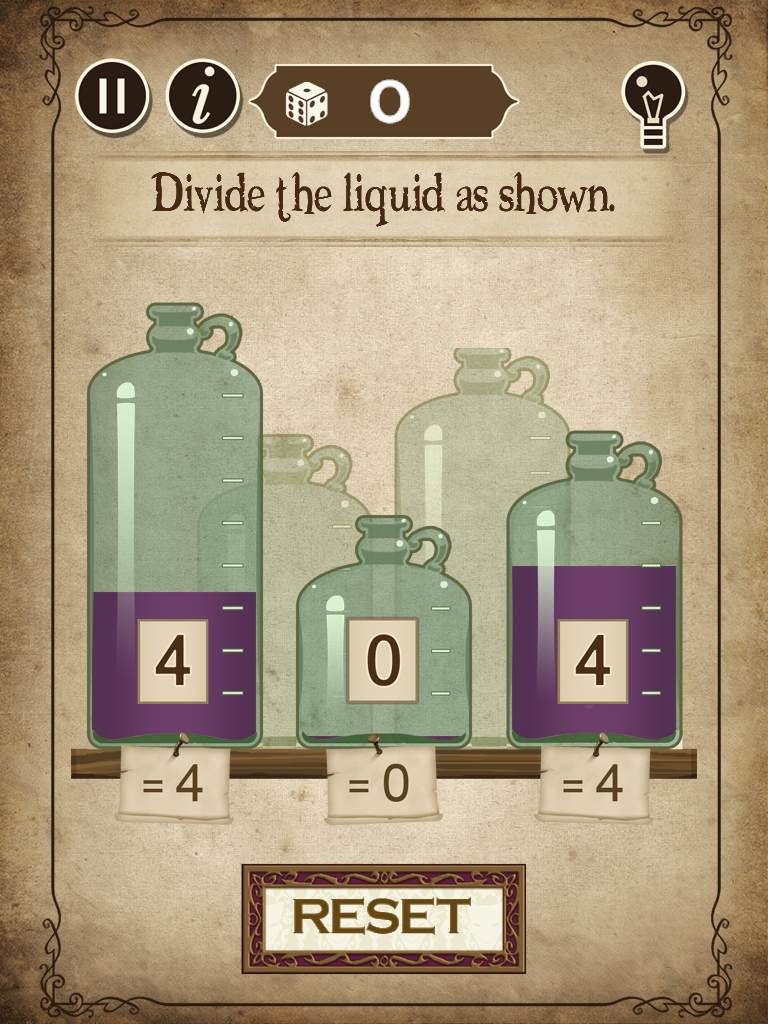
Level 12 - Jars #1 (Easy)
Pour the correct amount of liquid into each of the three jars.
Click one jar to select it, then click another jar to pour the first jar's liquid into it.
A jar can only hold a maximum amount indicated by the measurement on the right side.
In this puzzle, the left jar can hold 8 parts, the middle jar can hold 3 parts, and the right jar can hold 5 parts.
To solve the puzzle, you must fill the left jar with 4 parts, the right jar with 4 parts, and leave the middle jar empty in only 7 moves.
Pour the left jar into the right jar.
Pour the right jar into the middle jar.
Pour the middle jar into the left jar.
Pour the right jar into the middle jar.
Pour the left jar into the right jar.
Pour the right jar into the middle jar.
Pour the middle jar into the left jar.
Screenshot.
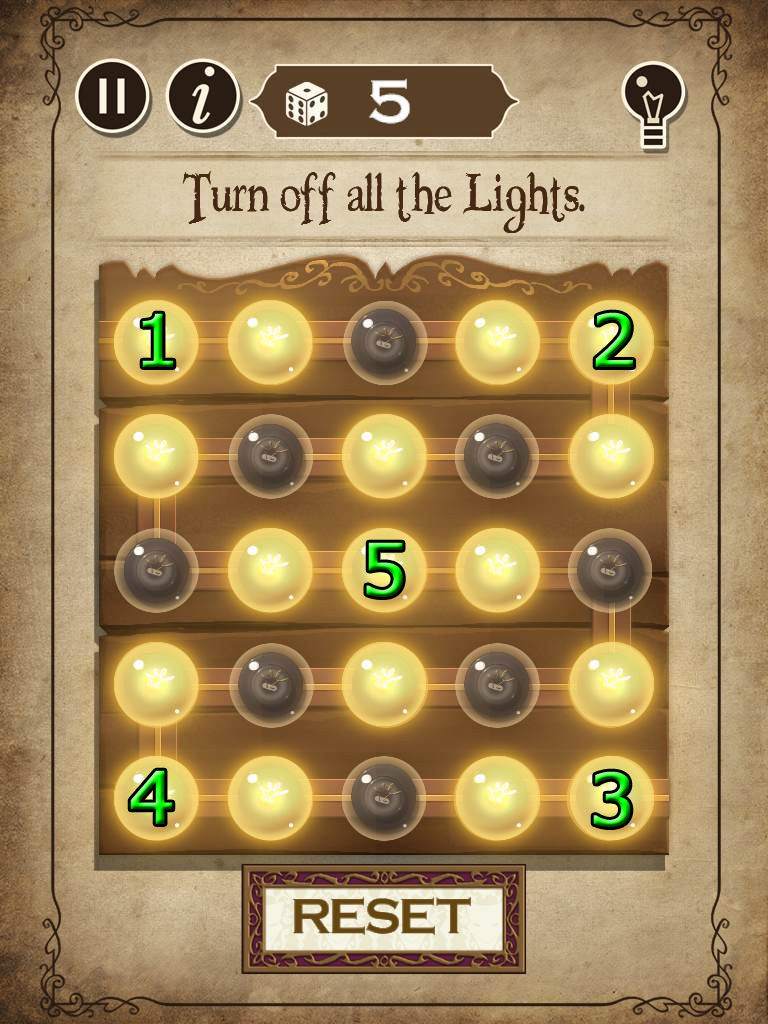
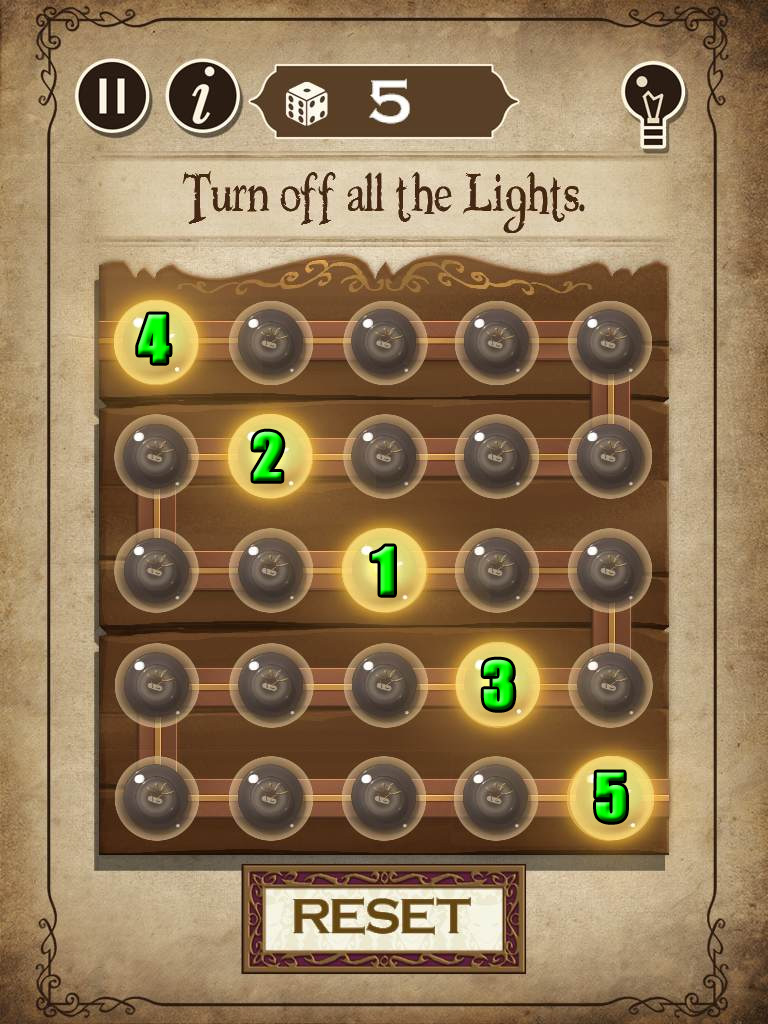
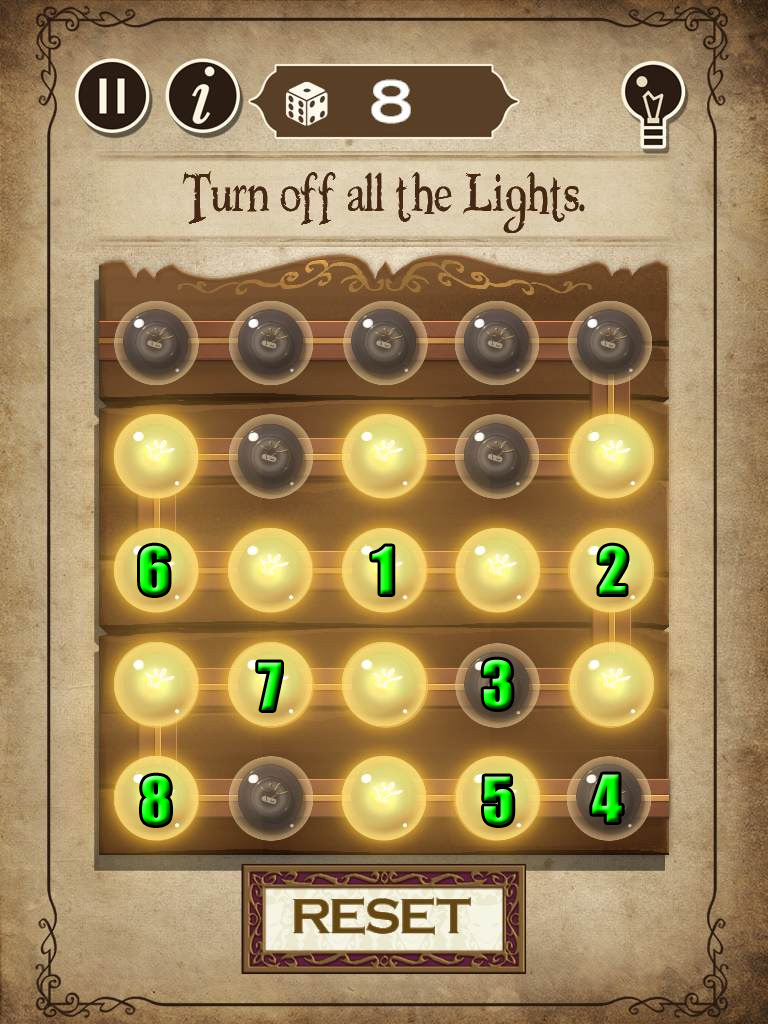
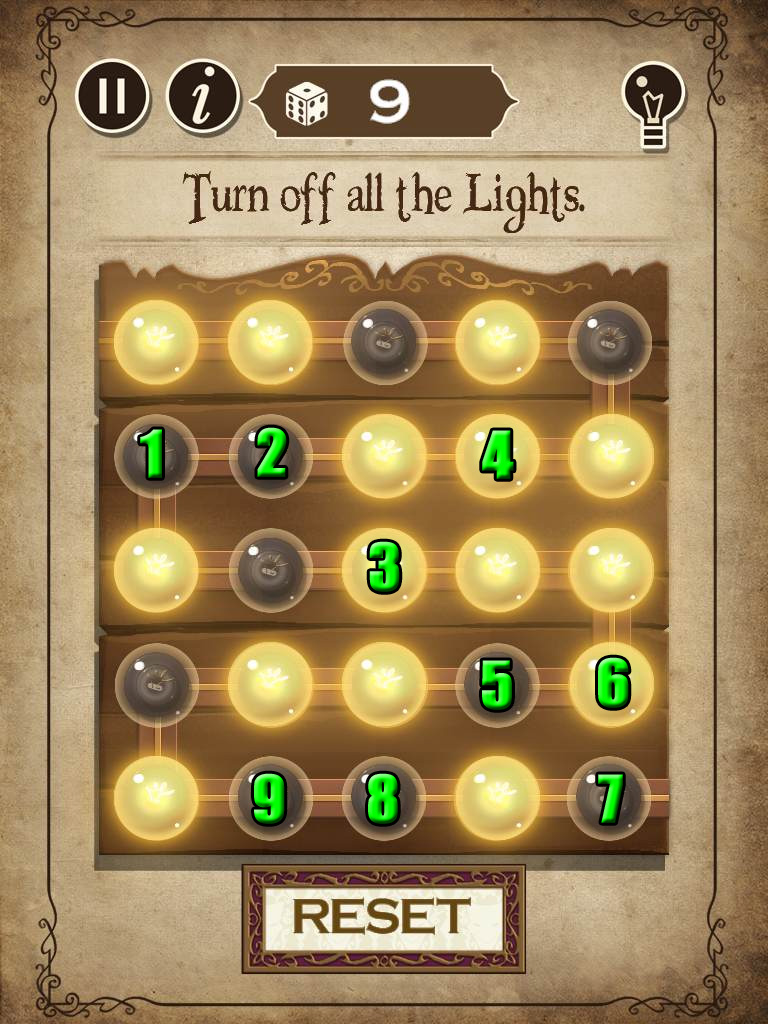
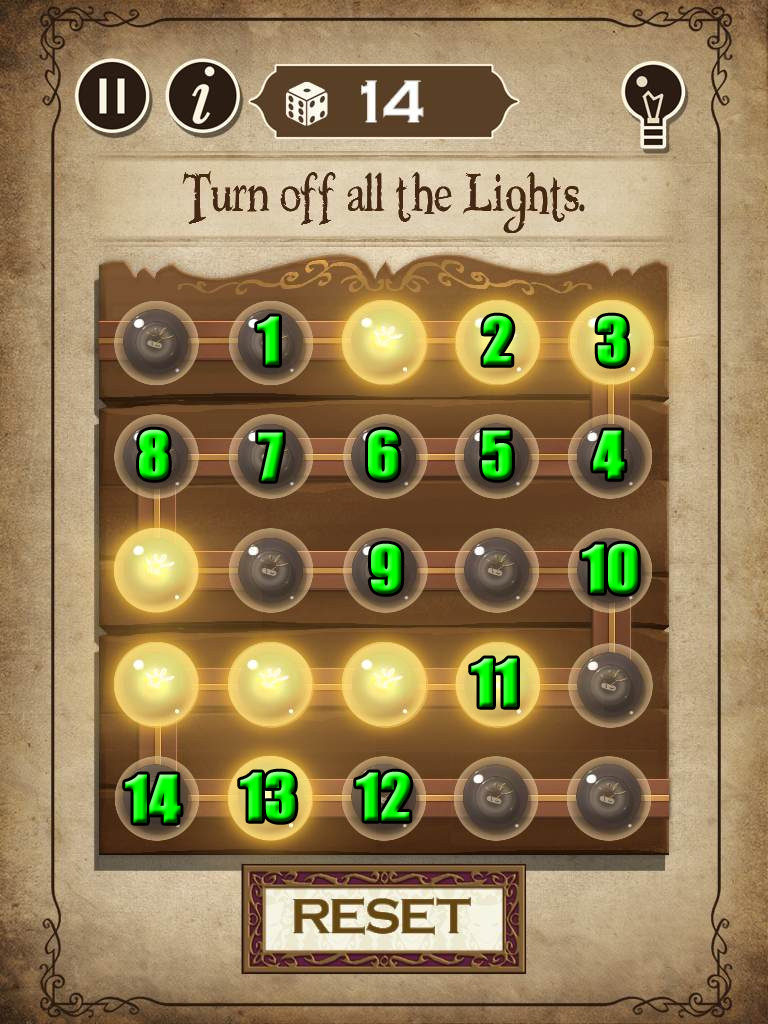
Level 13 - Lights Out #1 (Easy)
Tap the lights to turn all of them off.
Hitting one light will also affect any adjacent lights in a horizontal or vertical line, but not any lights that are diagonally touching the original bulb.
All of the bulbs must be turned off within 5 turns.
Tap the bulbs in numerical order according to the following screenshot:
Screenshot.
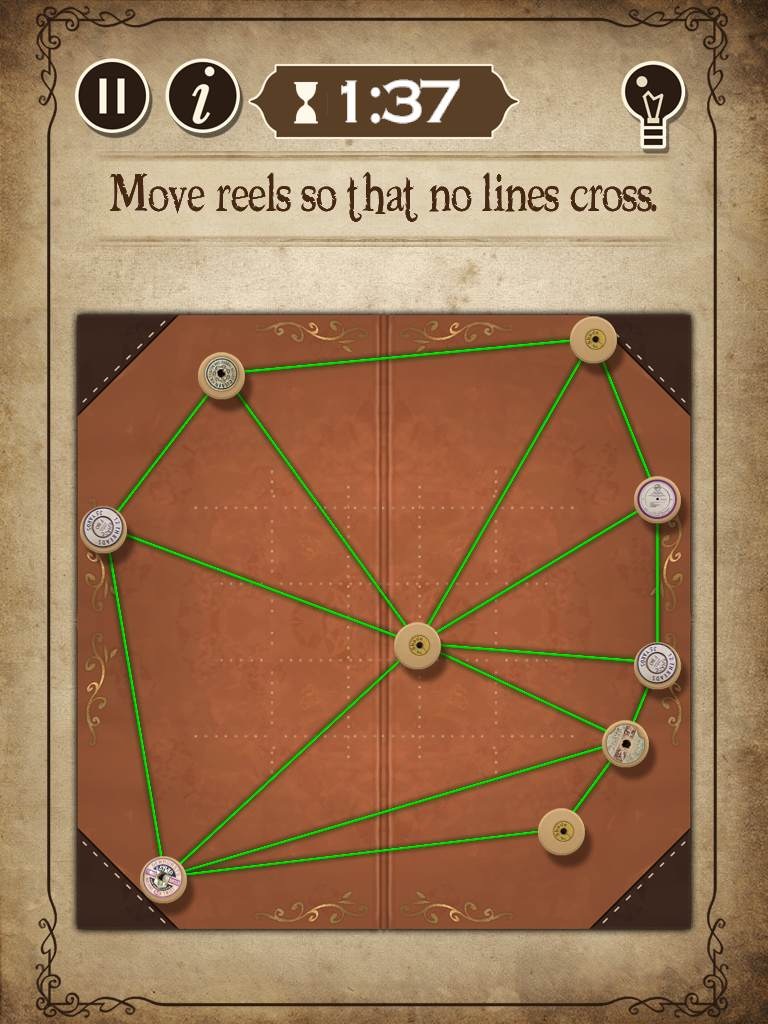
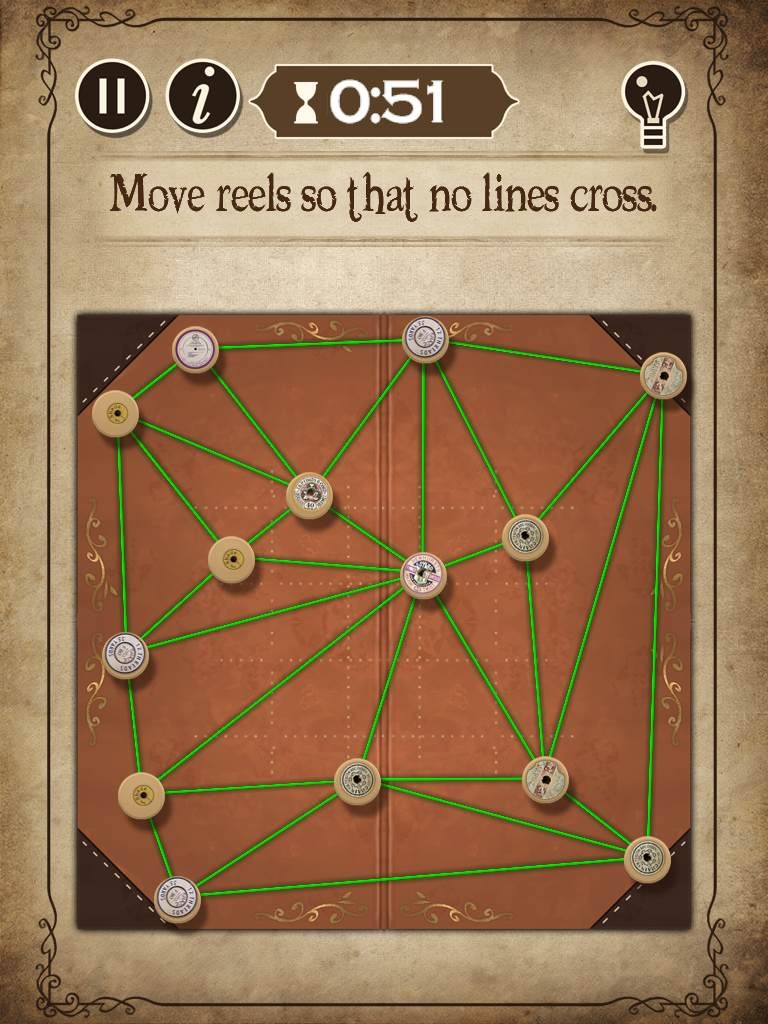
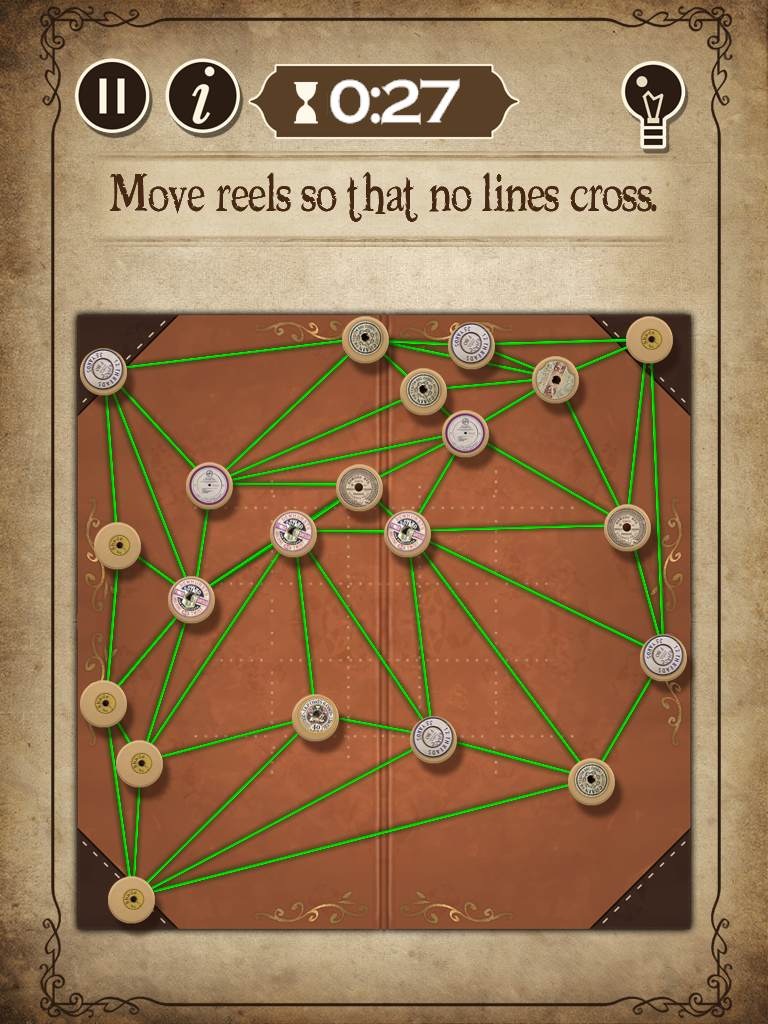
Level 14 - Un Tangle #1 (Easy)
Arrange the reels so that none of their strings cross over each other.
Drag and release a reel to move it around the board.
If two or more strings cross, they will be shaded out grey.
If the strings are free, they will be colored white.
Screenshot.
Level 15 - Sliding Blocks #2 (Easy)
Move the Mannequin block outside of the square through the exit by sliding the other blocks out of the way.
Drag and release a block to place it in an empty space.
Blocks cannot move diagonally or pass through obstacles, and can only move into a space that has enough room for the entire block.
HINT: First try to get the Mannequin block on the left side of the board, then move the pieces around it right and up (starting with two small square blocks and two vertical long blocks) to make room for the Mannequin block to go down and then right.
Screenshot.
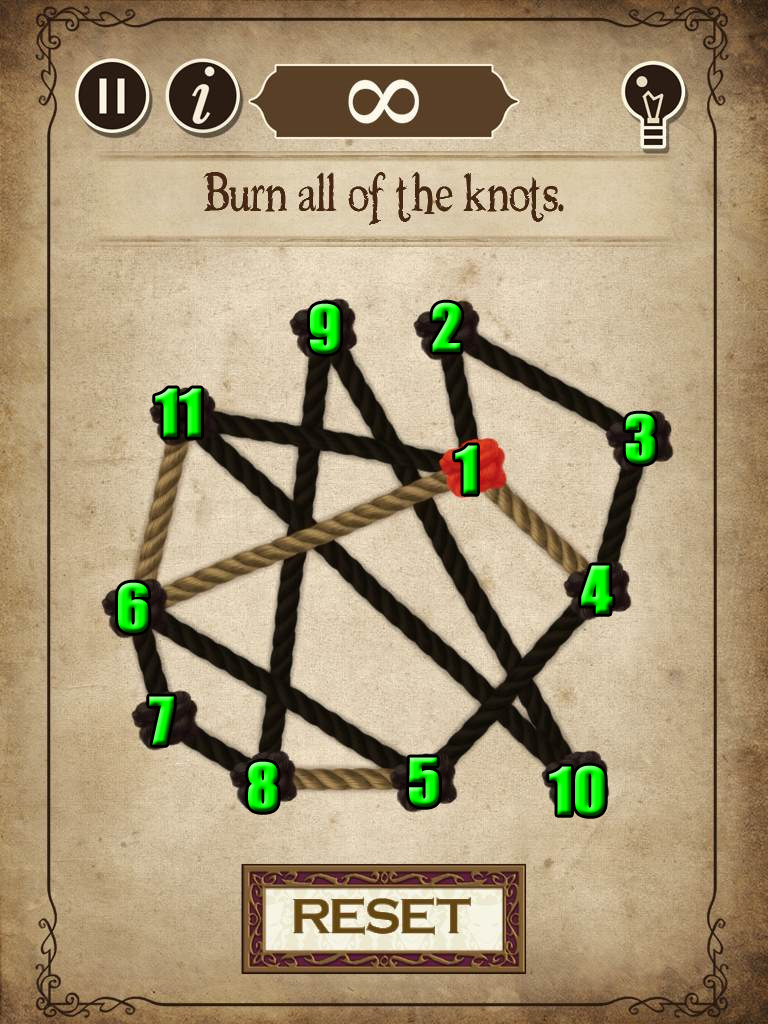
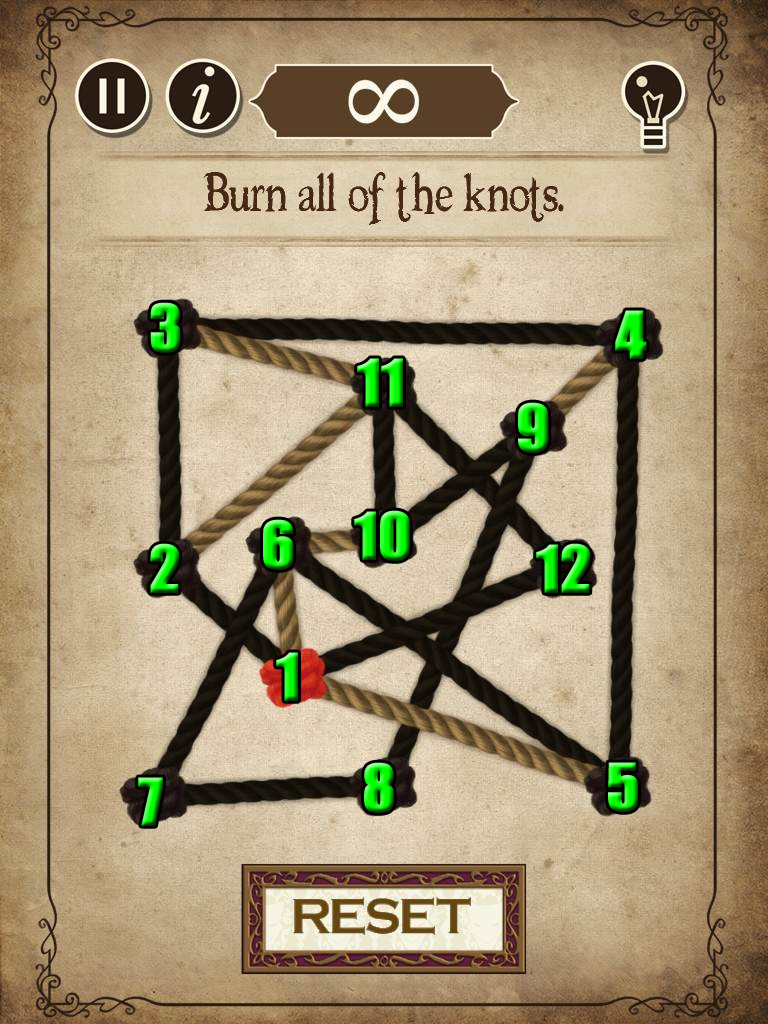
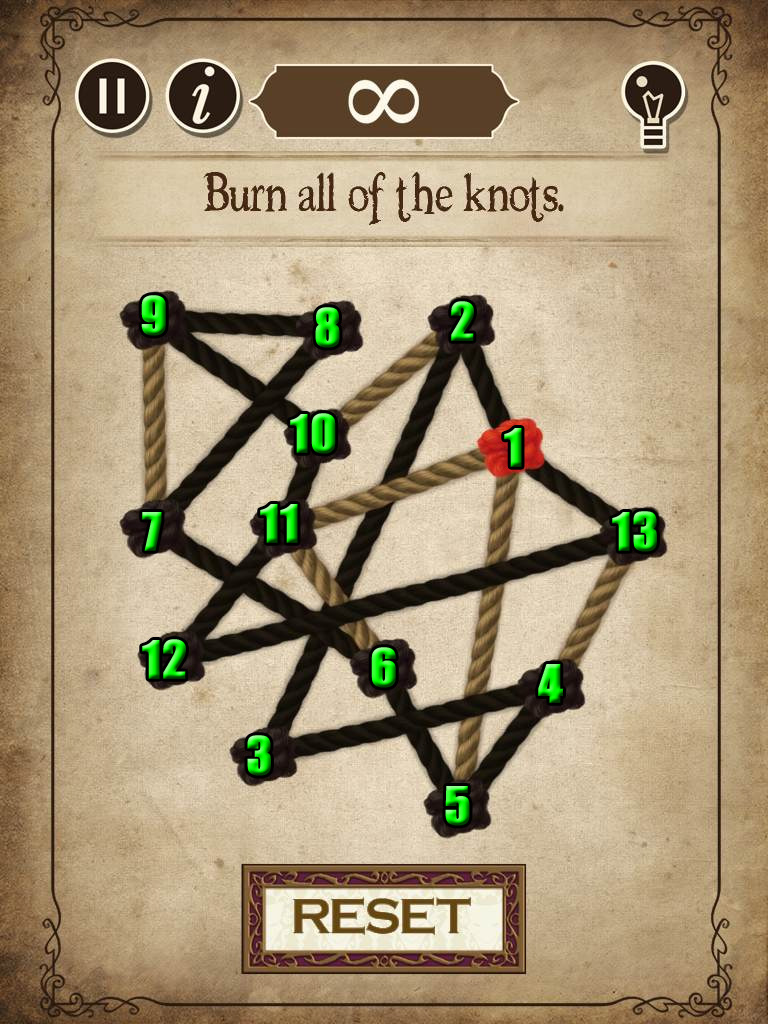
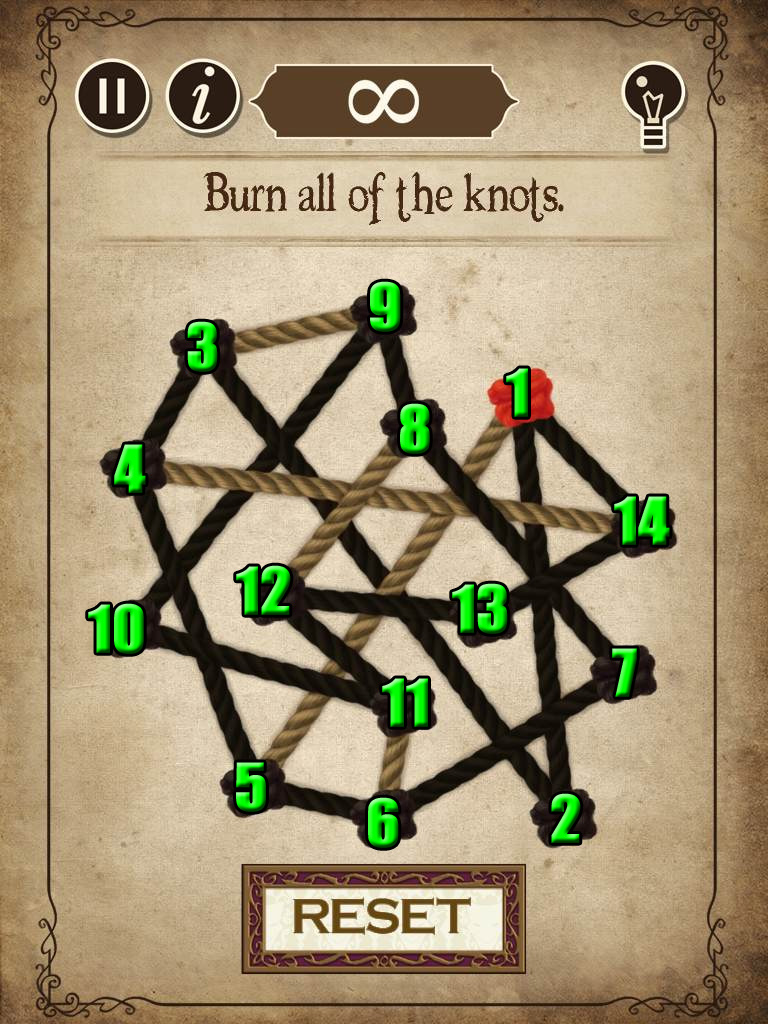
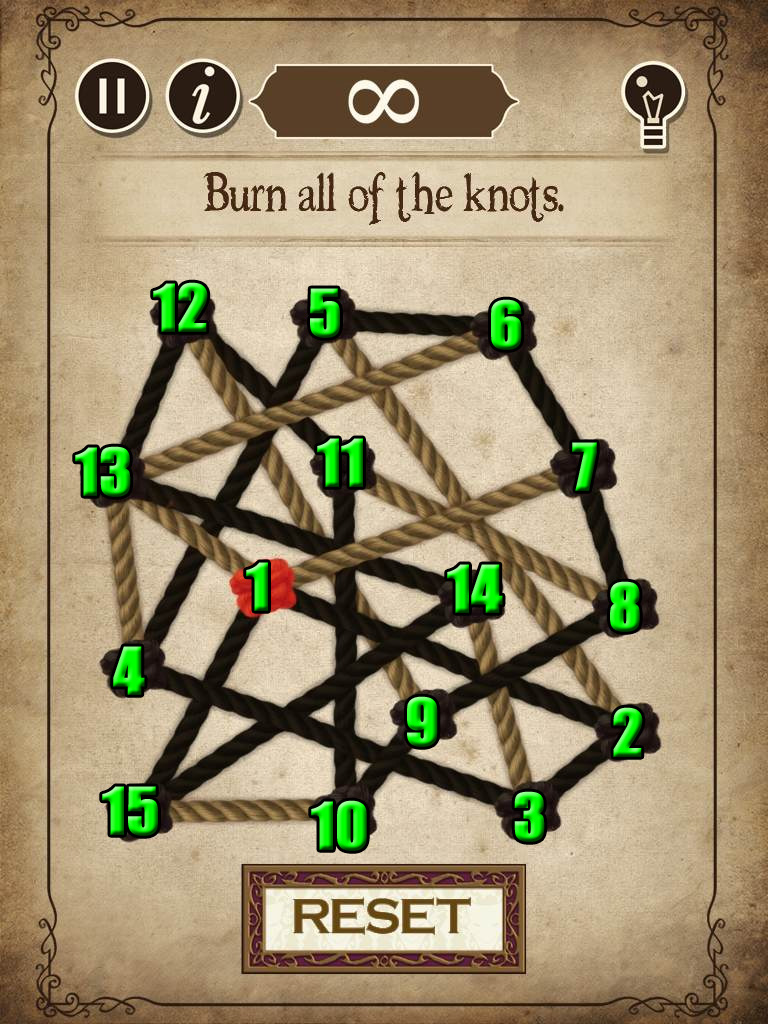
Level 16 - Burn The Rope #1 (Easy)
Burn all of the sections of rope in the correct order so that every knot is burned and you return at the end to the knot you started at.
Tap the first knot to select it as the starting point, then tap a different knot that is connected by rope to the first knot.
You can only burn connected knots, and you cannot travel over the same section of rope once it has been burned.
HINT: Look for the knot that is connected to 4 rope sections as your starting point.
Screenshot.
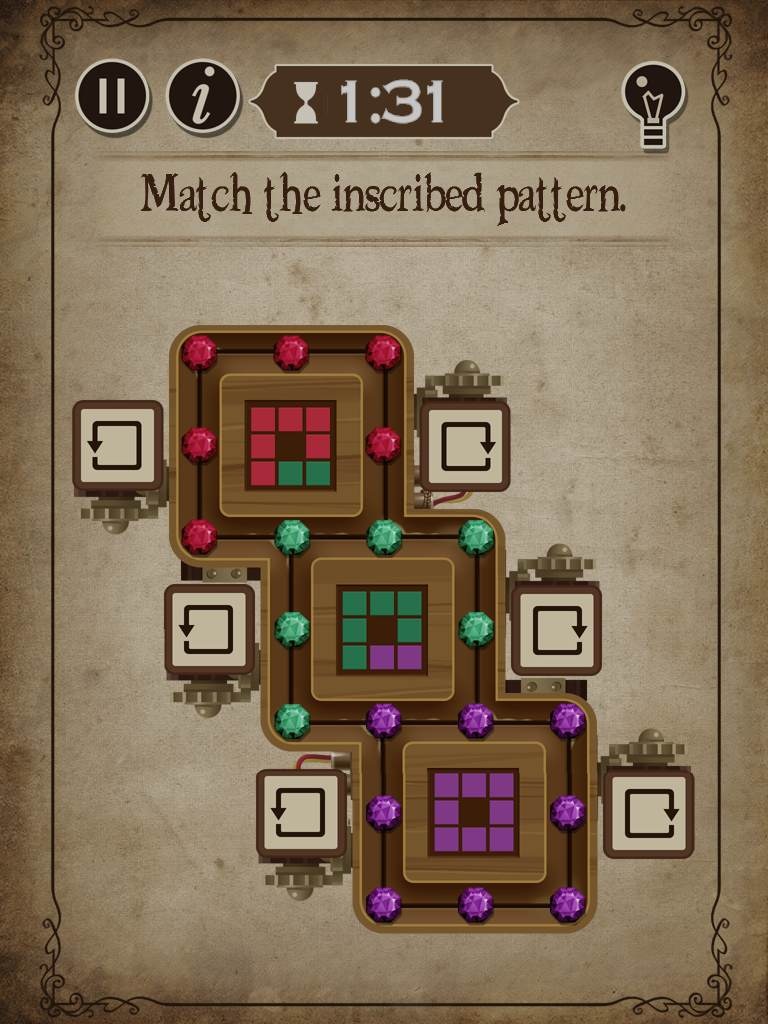
Level 17 - Logic Wheel (Easy)
Arrange the colored gems so that their order around each square matches the image in the center.
Press the buttons on the left and right side of each square to rotate the gems in that square one space clockwise or counter-clockwise.
HINT: Complete the top square first, the middle square next, and the bottom square last.
Screenshot.
Level 18 - Draw The Line #2 (Easy)
Draw 5 lines between the balls to separate them into isolated pairs of 1 red and 1 yellow ball in each section.
Tap a nail to attach one end of the rope to it, then tap a different nail to connect the other end of the rope.
Remove a rope on the board by tapping it.
Screenshot.
Level 19 - Riddle #3 (Easy)
Use the clues from the riddle to find the answer.
Click and drag the tiles up or down to cycle through the letters and spell the five-letter word.
HINT: What is inside you that is key to your survival and is also related to "chords"?
Screenshot.
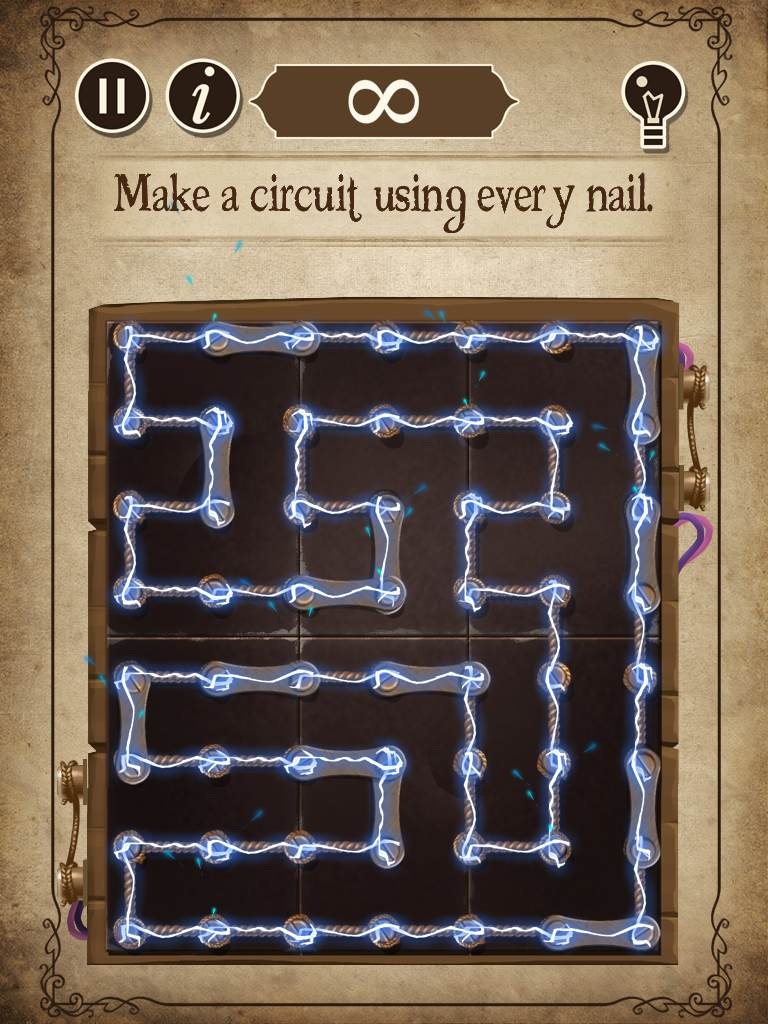
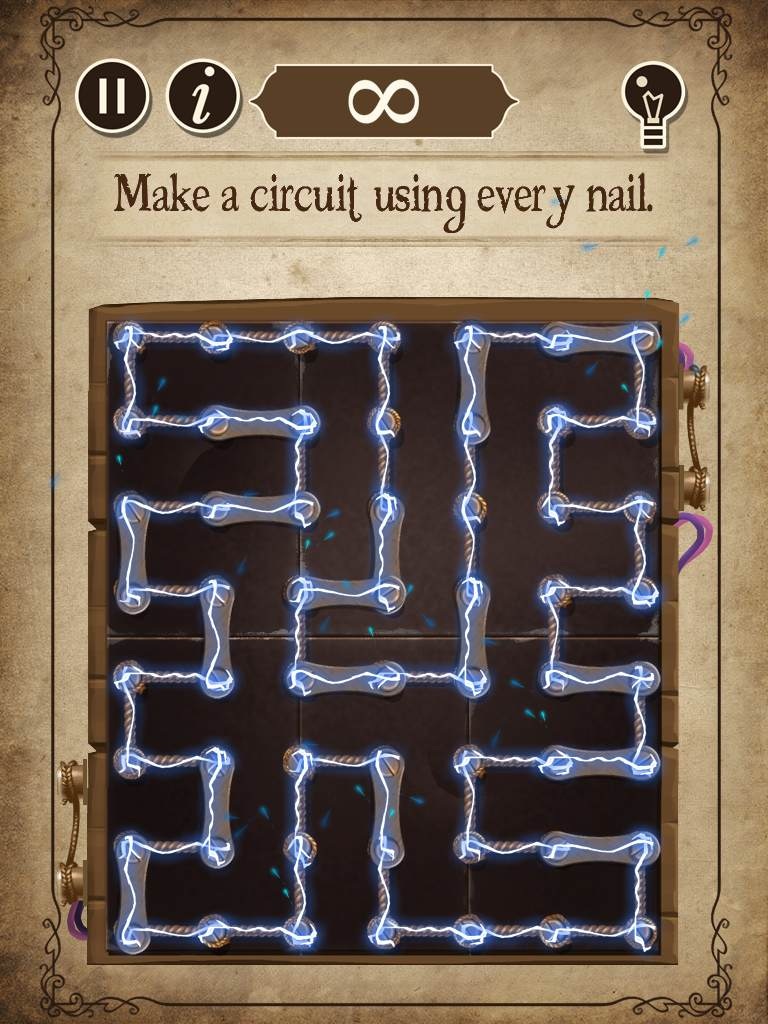
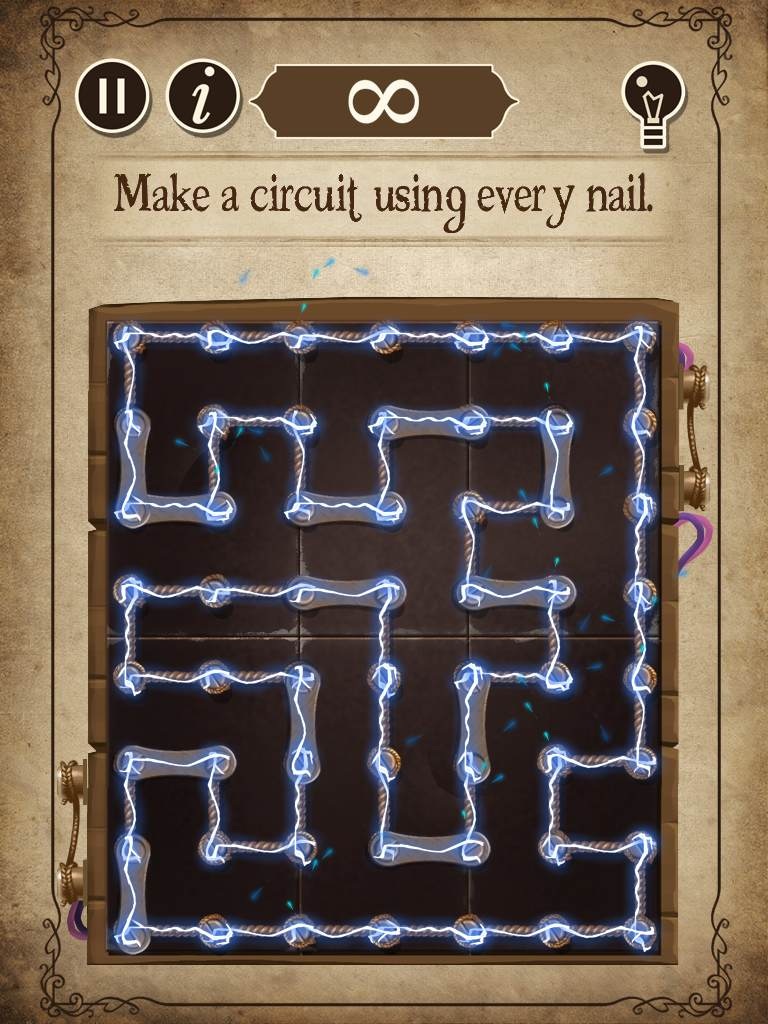
Level 20 - Hamiltonian #1 (Easy)
Create a complete circuit that connects each nail on the board.
Tap a nail to select it, then tap an adjacent nail to draw a path between them.
Some nails are attached by metal bars so that if you tap a nail on one end, you must continue the path through the nail at the other end.
HINT: Find the paths around the metal bar pieces first, as they're more difficult to connect.
Screenshot.
Levels 21-30
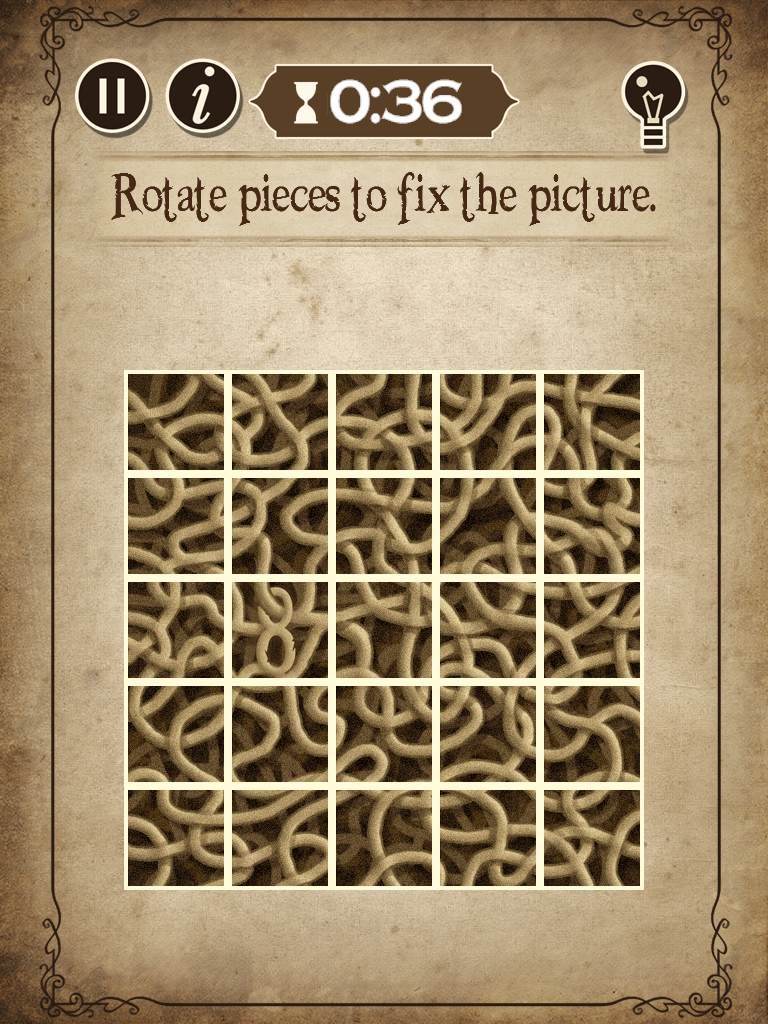
Level 21 - Rotating Picture (Easy)
Rotate the tiles to complete the picture before the time runs out.
Tap a tile to rotate it clockwise.
Look for the sections where the ropes appear to connect from one tile to another.
HINT: Start at one of the corners and work your away around the border of the image, then solve the inner section.
Screenshot.
Level 22 - Burn The Rope #2 (Easy)
Burn all of the sections of rope in the correct order so that every knot is burned and you return at the end to the knot you started at.
Tap the first knot to select it as the starting point, then tap a different knot that is connected by rope to the first knot.
You can only burn connected knots, and you cannot travel over the same section of rope once it has been burned.
HINT: Look for the knot that is connected to 4 rope sections as your starting point.
Screenshot.
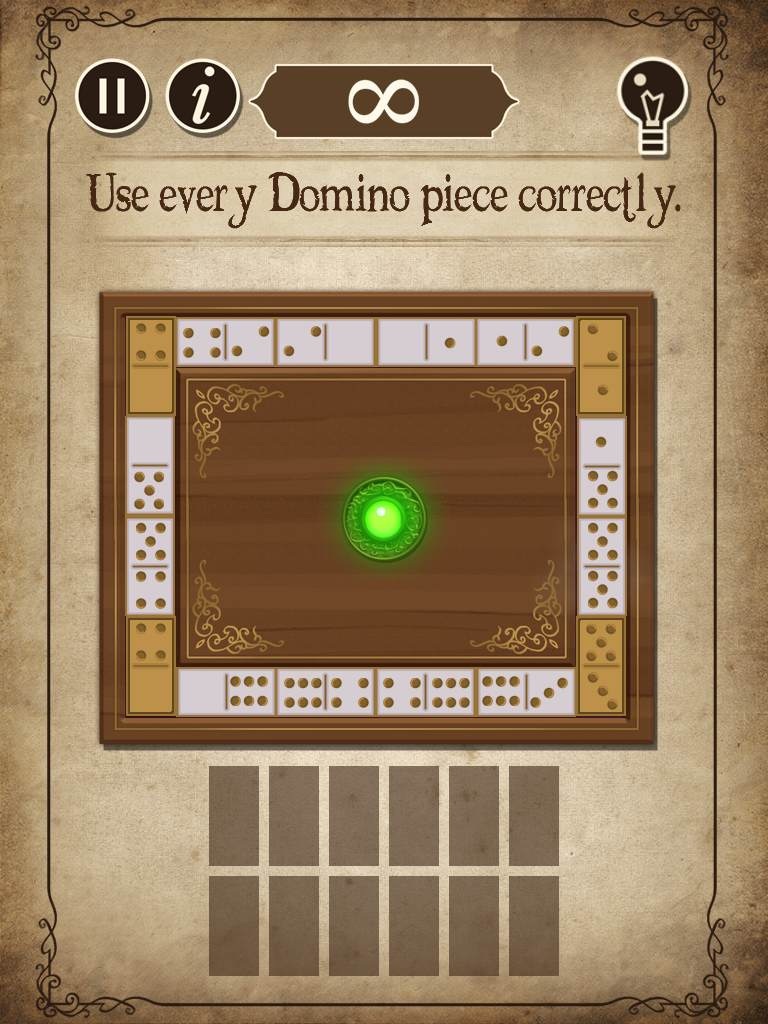
Level 23 - Dominoes #1 (Easy)
Place all of the dominoes on the board and arrange them so that only matching numbers are touching at each side.
For example, a domino with 5 dots on its side must be placed beside another domino that also has 5 dots.
This also applies to dominoes with no dots at all - each blank side must also touch another blank side.
Drag and release a domino to place it or tap a domino to flip it around.
HINT: Look for unique numbers that are only on one or two dominoes pieces as your starting point.
In this example, there is only one available domino with the 3 dots, so you know the only possible place you can go is next to the stationary domino with 3 dots in the lower right corner.
Screenshot.
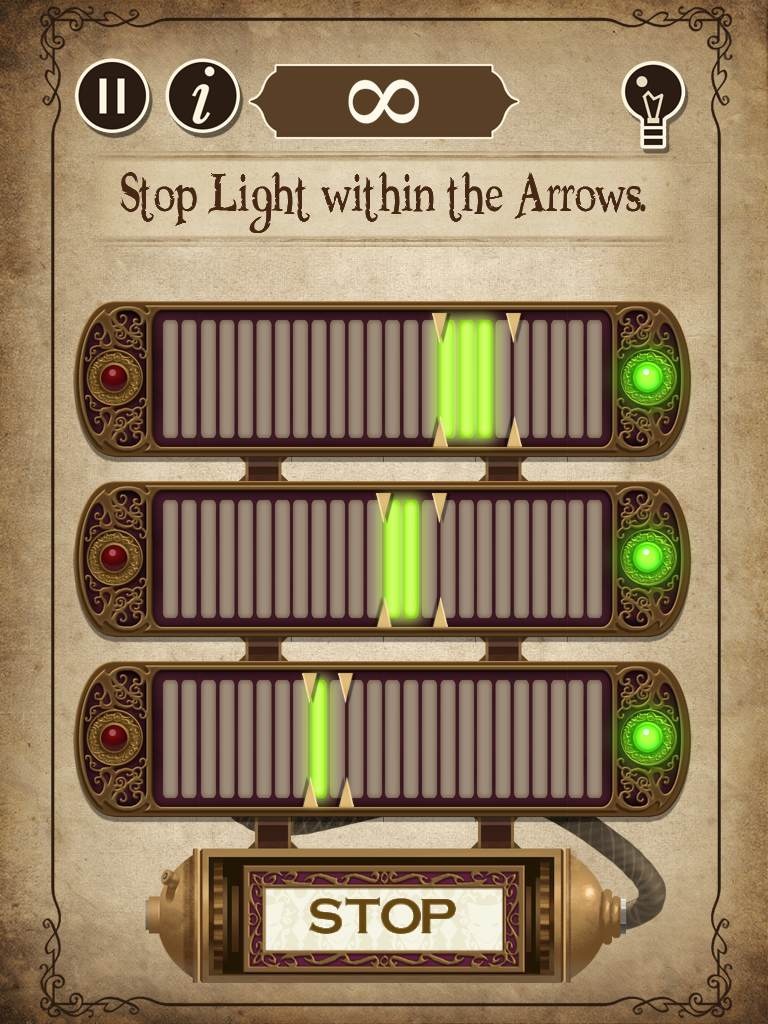
Level 24 - Stopper #1 (Easy)
Stop all of the three lights while they are within the sections between the arrows on each bar.
Wait for the light to move between the arrows, then tap the "Stop" button to stop the light.
If the light is stopped in the correct space, then the light in the next row will start to move.
The top light is the slowest, the middle light moves faster, and the bottom light is the fastest.
If you incorrectly pause the light outside of the arrows, the puzzle will reset from the beginning.
Screenshot.
Level 25 - Hamiltonian #2 (Easy)
Create a complete circuit that connects each nail on the board.
Tap a nail to select it, then tap an adjacent nail to draw a path between them.
Some nails are attached by metal bars so that if you tap a nail on one end, you must continue the path through the nail at the other end.
HINT: Find the paths around the metal bar pieces first, as they're more difficult to connect.
Screenshot.
Level 26 - Riddle #4 (Easy)
Use the clues from the riddle to find the answer.
Click and drag the tiles up or down to cycle through the letters and spell the five-letter word.
HINT: What is something that you can play and pull that involves naive people, that you would enjoy but the receiver might not?
Screenshot.
Level 27 - Lights Out #2 (Easy)
Tap the lights to turn all of them off.
Hitting one light will also affect any adjacent lights in a horizontal or vertical line, but not any lights that are diagonally touching the original bulb.
All of the bulbs must be turned off within 5 turns.
HINT: Start in the center, then move your way out to the upper left and lower right corners.
Tap the bulbs in numerical order according to the following screenshot:
Screenshot.
Level 28 - Tangram #3 (Easy)
Correctly fit all seven shapes inside the outline without overlapping the pieces to solve the puzzle.
Drag and release the pieces to set them in place, or tap to rotate them 45 degrees clockwise.
HINT: Start with the more difficult pieces, then place the easier and smaller ones afterwards.
Position the large triangles first, then place the parallelogram, the square, the medium triangle, and then finally the two small triangles.
Screenshot.
Level 29 - Circuit #2 (Easy)
Create a path from each colored node to its matching colored node.
Tap a node and drag across the squares to draw a path, then release it at the second node to complete the connection.
Two different paths cannot cross over each other.
All of the nodes must be connected and every square must be filled to complete the puzzle.
Screenshot.
Level 30 - Sliding Blocks #3 (Medium)
Move the Mannequin block outside of the square through the exit by sliding the other blocks out of the way.
Drag and release a block to place it in an empty space.
Blocks cannot move diagonally or pass through obstacles, and can only move into a space that has enough room for the entire block.
Screenshot.
Levels 31-40
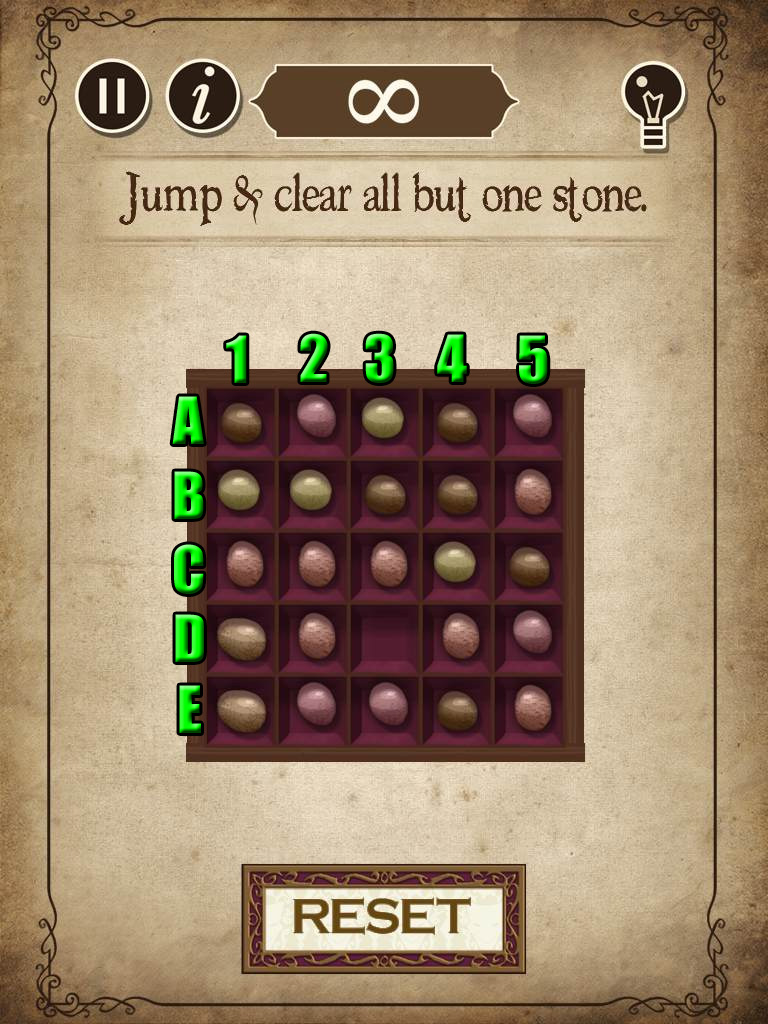
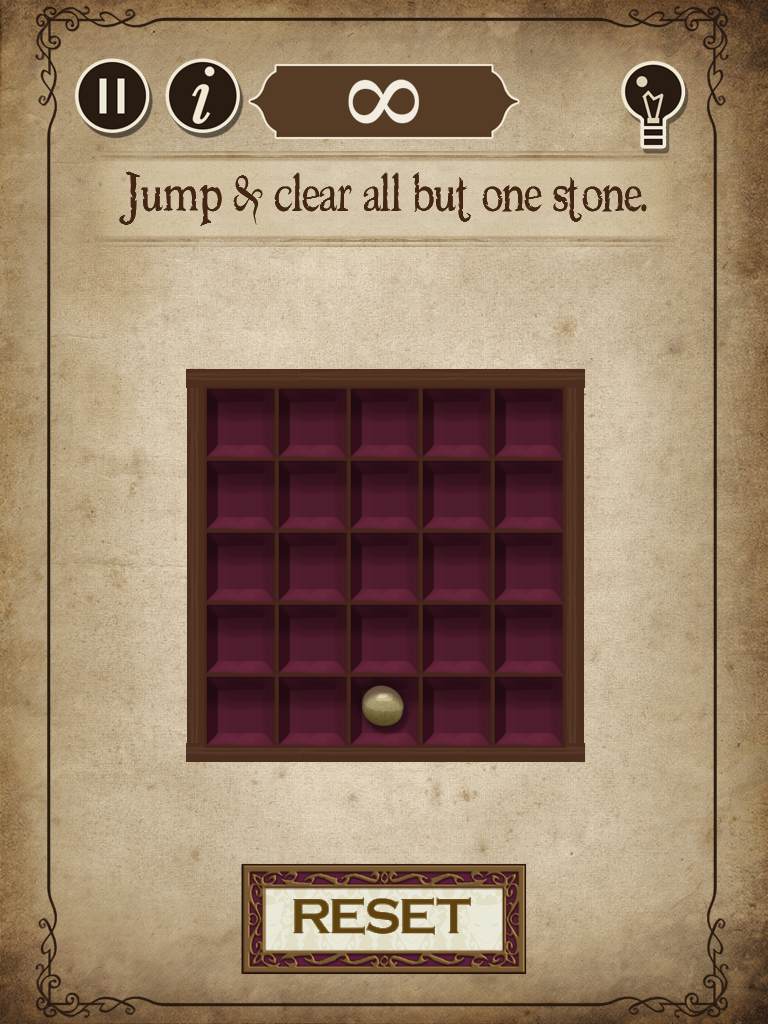
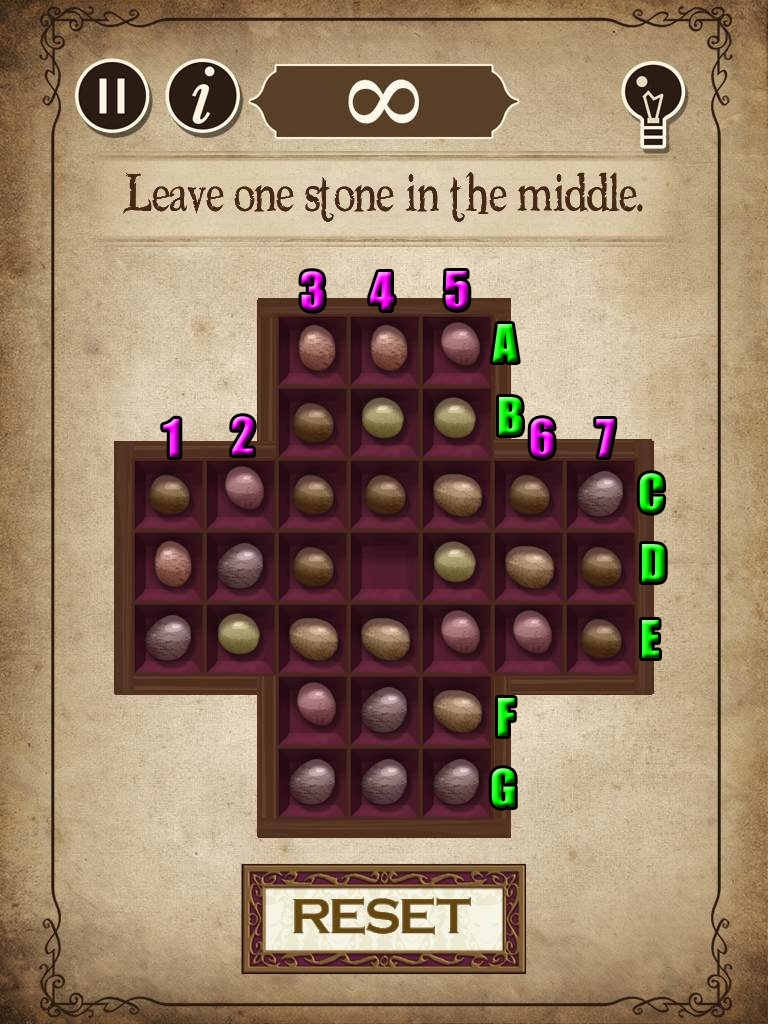
Level 31 - Solitaire #1 (Medium)
Jump and clear all of the stones except for one.
Click and drag a stone over another stone and into an empty space to place it.
The stone that was hopped over will be removed from the board.
A stone cannot move without another stone to move over, and only then in a vertical or horizontal line and not diagonally.
Refer to the instructions and screenshot below to solve the puzzle.
Screenshot.
Move the stone at C2 to C4.
Move the stone at A2 to C2.
Move the stone at C1 to C3.
Move the stone at A1 to C1.
Move the stone at D1 to B1.
Move the stone at D3 to D1.
Move the stone at E1 to C1.
Move the stone at C1 to A1.
Move the stone at A4 to A2.
Move the stone at A1 to A3.
Move the stone at C4 to C2.
Move the stone at A3 to C3.
Move the stone at C2 to C4.
Move the stone at B5 to B3.
Move the stone at C5 to C3.
Move the stone at B3 to D3.
Move the stone at E3 to C3.
Move the stone at E5 to E3.
Move the stone at E2 to E4.
Move the stone at E4 to C4.
Move the stone at C3 to C5.
Move the stone at D5 to B5.
Move the stone at A5 to C5.
Screenshot.
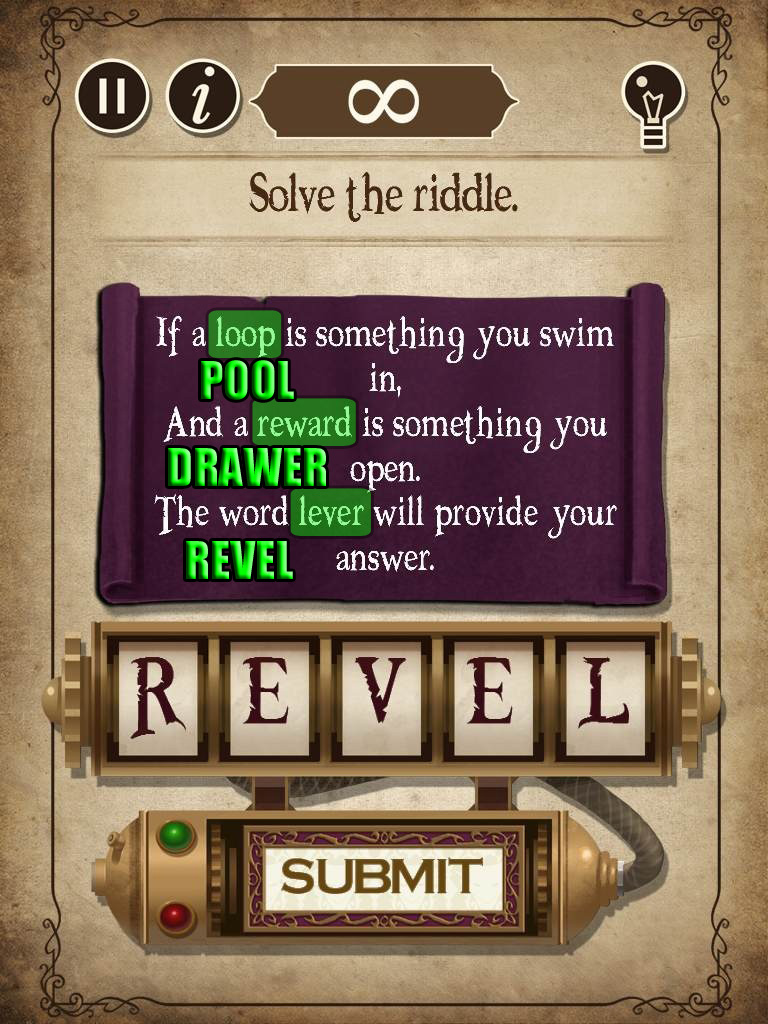
Level 32 - Riddle #5 (Medium)
Use the clues from the riddle to find the answer.
Click and drag the tiles up or down to cycle through the letters and spell the five-letter word.
HINT: Study each word carefully; solving this riddle will take some backwards thinking.
Screenshot.
Level 33 - Burn The Rope #3 (Medium)
Burn all of the sections of rope in the correct order so that every knot is burned and you return at the end to the knot you started at.
Tap the first knot to select it as the starting point, then tap a different knot that is connected by rope to the first knot.
You can only burn connected knots, and you cannot travel over the same section of rope once it has been burned.
HINT: Look for the knot that is connected to 4 rope sections as your starting point.
Screenshot.
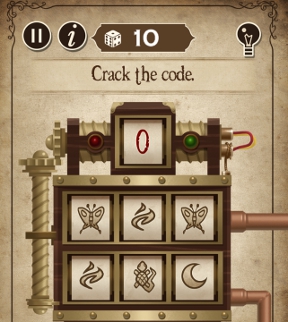
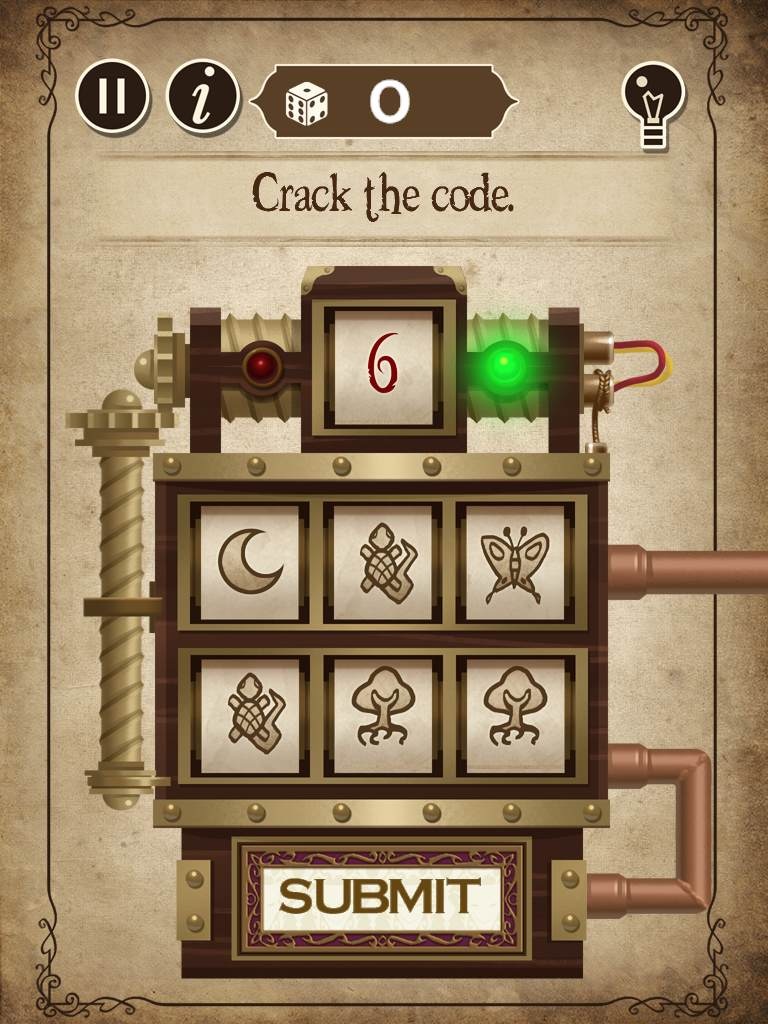
Level 34 - Code Box (Medium)
Find the correct combination of symbols in 10 turns or fewer.
Press the "Submit" button to check your solution: the dial at the top will indicate how many of the current symbols are correct, but not which ones.
Tap and drag each dial up or down to cycle through the symbols.
HINT: Use the Submit button at the start to see how many of the original symbols are correct without being changed.
Change each dial one symbol at a time and check your solution again to find which dials are correct and which need to be changed.
The correct combination is randomized each time.
Screenshot.
Level 35 - Un Tangle #2 (Medium)
Arrange the reels so that none of their strings cross over each other.
Drag and release a reel to move it around the board.
If two or more strings cross, they will be shaded out grey.
If the strings are free, they will be colored white.
Screenshot.
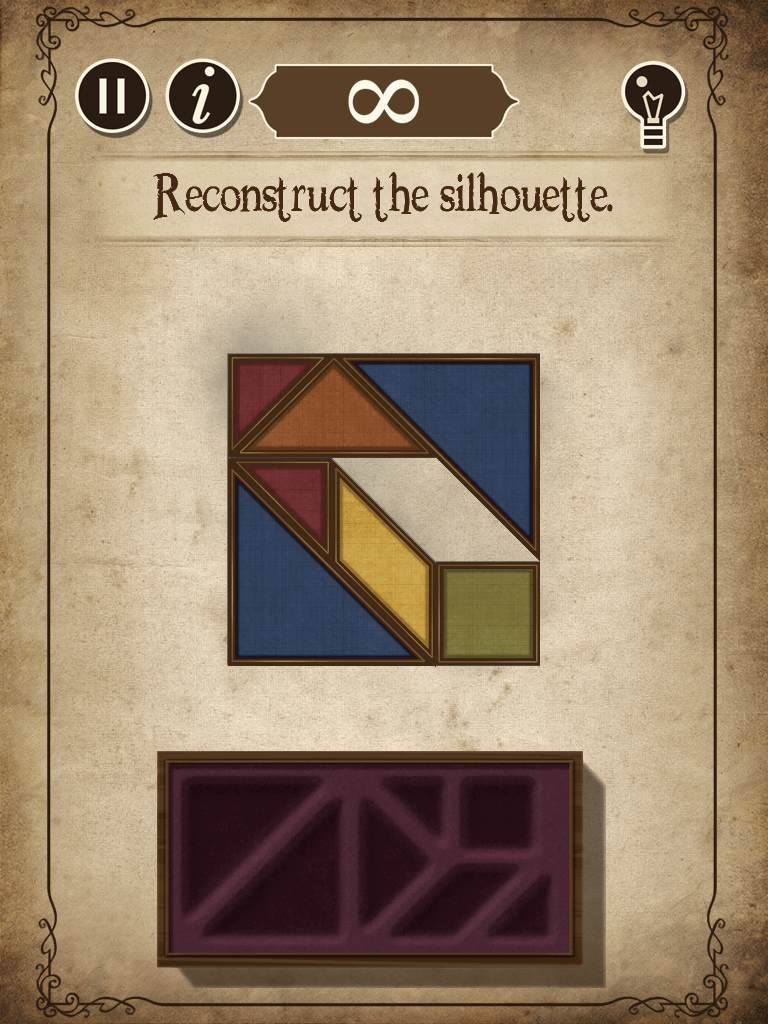
Level 36 - Tangram #4 (Medium)
Correctly fit all seven shapes inside the outline without overlapping the pieces to solve the puzzle.
Drag and release the pieces to set them in place, or tap to rotate them 45 degrees clockwise.
HINT: Start with the more difficult pieces, then place the easier and smaller ones afterwards.
Position the large triangles first, then place the parallelogram, the square, the medium triangle, and then finally the two small triangles.
Screenshot.
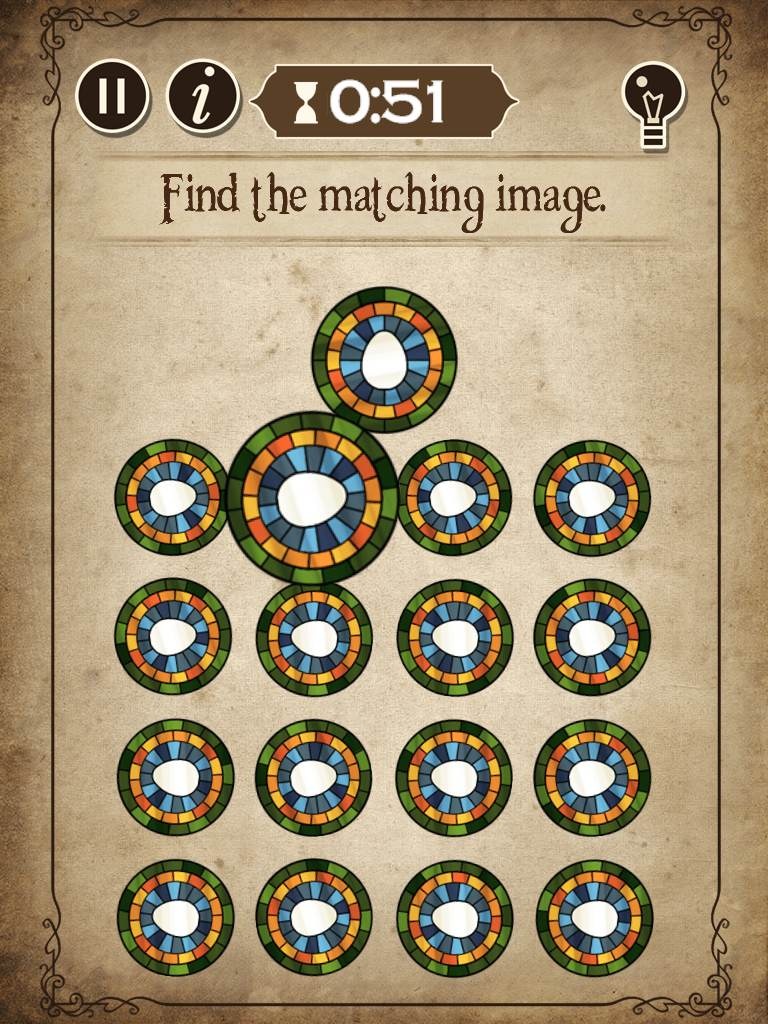
Level 37 - Match-It #2 (Medium)
Quickly study the stained-glass styled disc, then find its identical in the rows of rotating discs.
Find the correct disc before the timer runs out.
Pay attention to the colors of the tiles in each ring.
HINT: A good place to check first are the blue squares in the first ring that are around the top of the white egg shape.
Screenshot.
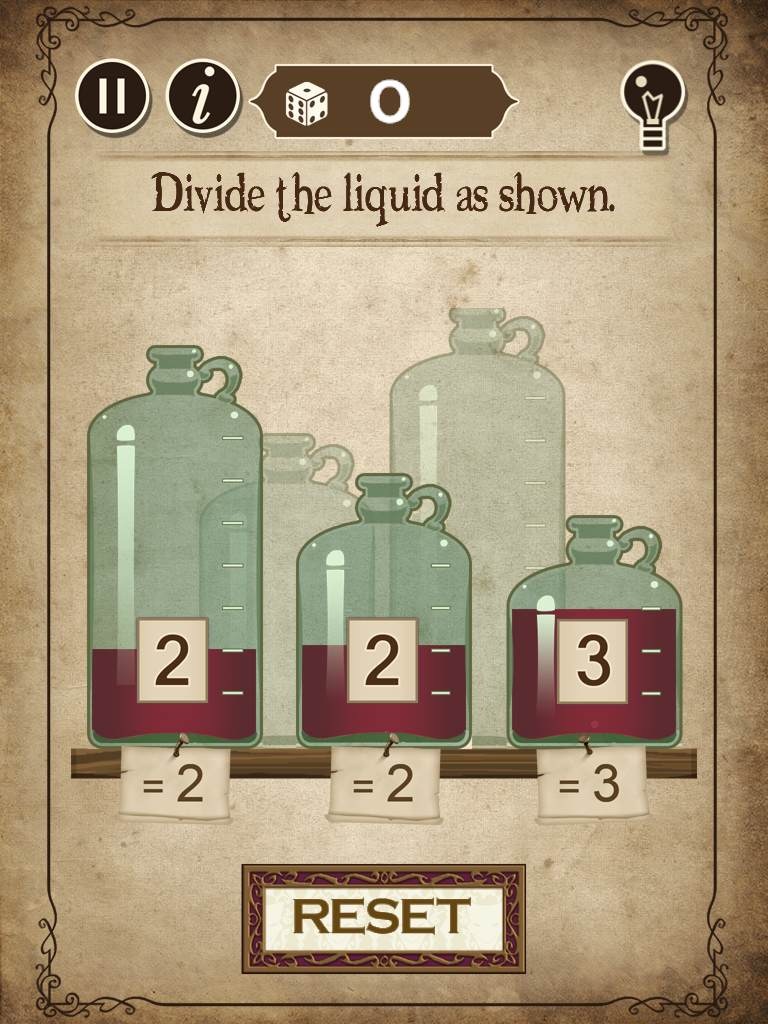
Level 38 - Jars #2 (Medium)
Pour the correct amount of liquid into each of the three jars.
Click one jar to select it, then click another jar to pour the first jar's liquid into it.
A jar can only hold a maximum amount indicated by the measurement on the right side.
In this puzzle, the left jar can hold 7 parts, the middle jar can hold 4 parts, and the right jar can hold 3 parts.
To solve the puzzle you must fill the left jar with 2 parts, the middle jar with 2 parts, and the right jar with 3 parts in only 6 moves.
Pour the left jar into the middle jar.
Pour the middle jar into the right jar.
Pour the right jar into the left jar.
Pour the middle jar into the right jar.
Pour the left jar into the middle jar.
Pour the middle jar into the right jar.
Screenshot.
Level 39 - Sliding Blocks #4 (Medium)
Move the Mannequin block outside of the square through the exit by sliding the other blocks out of the way.
Drag and release a block to place it in an empty space.
Blocks cannot move diagonally or pass through obstacles, and can only move into a space that has enough room for the entire block.
Screenshot.
Level 40 - Riddle #6 (Medium)
Use the clues from the riddle to find the answer.
Click and drag the tiles up or down to cycle through the letters and spell the five-letter word.
HINT: What is used to detect danger that sends a clear signal whether the trouble is behind it or in front of it?
Screenshot.
Levels 41-50
Level 41 - Draw The Line #3 (Medium)
Draw 5 lines between the balls to separate them into isolated pairs of 1 red and 1 yellow ball in each section.
Tap a nail to attach one end of the rope to it, then tap a different nail to connect the other end of the rope.
Remove a rope on the board by tapping it.
Screenshot.
Level 42 - Circuit #3 (Medium)
Create a path from each colored node to its matching colored node.
Tap a node and drag across the squares to draw a path, then release it at the second node to complete the connection.
Two different paths cannot cross over each other.
All of the nodes must be connected and every square must be filled to complete the puzzle.
Screenshot.
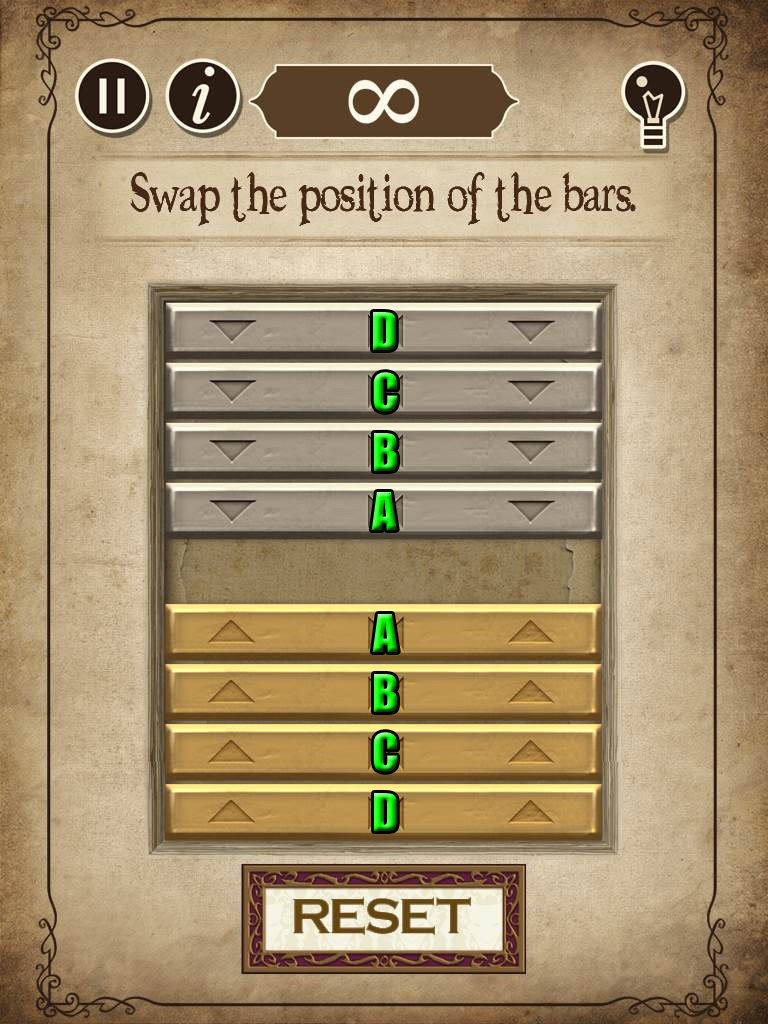
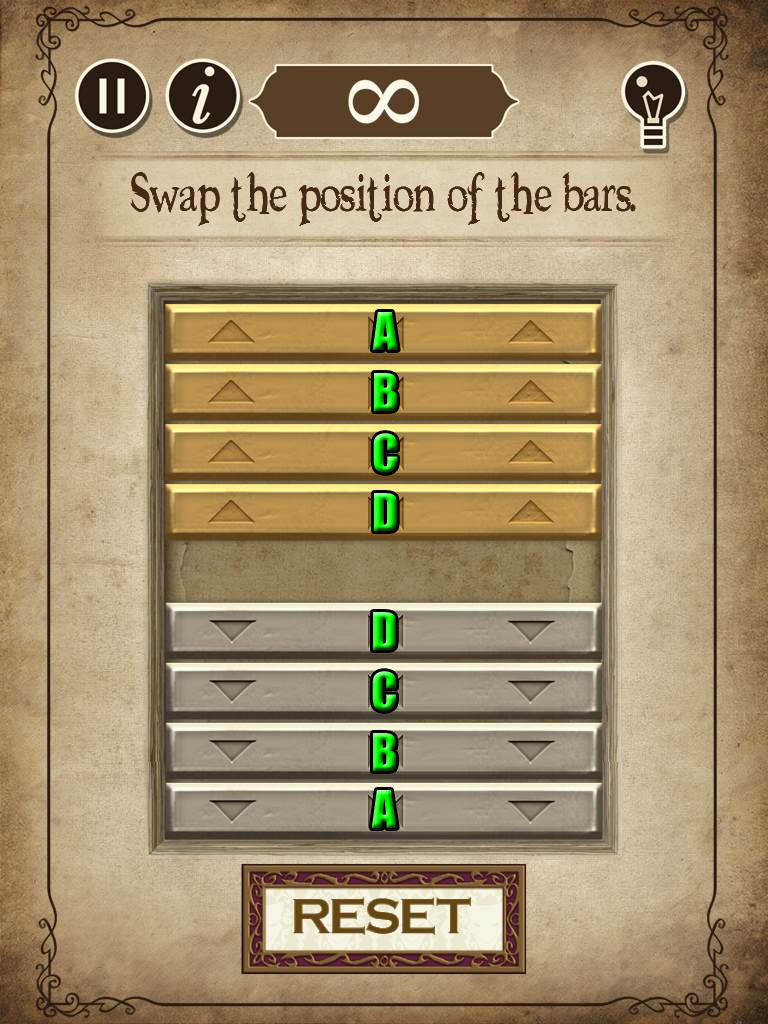
Level 43 - Lucas Problem (Medium)
In this variation of an age old puzzle, all of the silver pieces must be moved from the top to the bottom, and all the gold pieces must be moved from the bottom to the top.
Silver bars can only move down, and gold bars can only move up.
Tap a bar to move it either forward once into an empty space or to hop over a bar of the opposite color and into an empty space.
Bars cannot move into an occupied spot, nor can they jump over a bar of the same color.
Screenshot Part 1.
Move the bars in the following order to solve the puzzle:
Move Gold bar A.
Move Silver bar A.
Move Silver bar B.
Move Gold bar A.
Move Gold bar B.
Move Gold bar C.
Move Silver bar A.
Move Silver bar B.
Move Silver bar C.
Move Silver bar D.
Move Gold bar A.
Move Gold bar B.
Move Gold bar C.
Move Gold bar D.
Move Silver bar A.
Move Silver bar B.
Move Silver bar C.
Move Silver bar D.
Move Gold bar B.
Move Gold bar C.
Move Gold bar D.
Move Silver bar C.
Move Silver bar D.
Move Gold bar D.
Screenshot Part 2.
Level 44 - Bulbs #2 (Medium)
Watch the randomized order that the bulbs light up, then copy the sequence by tapping the bulbs in the same order.
The puzzle has three rounds, and the second and third rounds each add an additional bulb to the sequence.
When a round is successfully completed, one of the three red lights will illuminate.
If you incorrectly guess a bulb, the puzzle will start over at the first round.
Level 45 - Button Gauge #2 (Medium)
Press the buttons at the correct time so that all of the bulbs are simultaneously lit.
Press a button to start its timer, indicated by the arrow moving across the bar.
When the arrow reaches the square at the end, the bulb will light up until the arrow moves past the square.
Each button has a different timer, so test the buttons to see how long it takes for the bulb to light.
HINT: Watch each timer to see how long it takes to reach the end to find and then press them in order from slowest to fastest.
Screenshot.
Level 46 - Sliding Blocks #5 (Medium)
Move the Mannequin block outside of the square through the exit by sliding the other blocks out of the way.
Drag and release a block to place it in an empty space.
Blocks cannot move diagonally or pass through obstacles, and can only move into a space that has enough room for the entire block.
Screenshot.
Level 47 - Burn The Rope #4 (Medium)
Burn all of the sections of rope in the correct order so that every knot is burned and you return at the end to the knot you started at.
Tap the first knot to select it as the starting point, then tap a different knot that is connected by rope to the first knot.
You can only burn connected knots, and you cannot travel over the same section of rope once it has been burned.
HINT: Look for the knot that is connected to 4 rope sections as your starting point.
Screenshot.
Level 48 - Tangram #5 (Medium)
Correctly fit all seven shapes inside the outline without overlapping the pieces to solve the puzzle.
Drag and release the pieces to set them in place, or tap to rotate them 45 degrees clockwise.
HINT: Start with the more difficult pieces, then place the easier and smaller ones afterwards.
Position the large triangles first, then place the parallelogram, the square, the medium triangle, and then finally the two small triangles.
Screenshot.
Level 49 - Lights Out #3 (Medium)
Tap the lights to turn all of them off.
Hitting one light will also affect any adjacent lights in a horizontal or vertical line, but not any lights that are diagonally touching the original bulb.
All of the bulbs must be turned off within 5 turns.
Tap the bulbs in numerical order according to the following screenshot:
Screenshot.
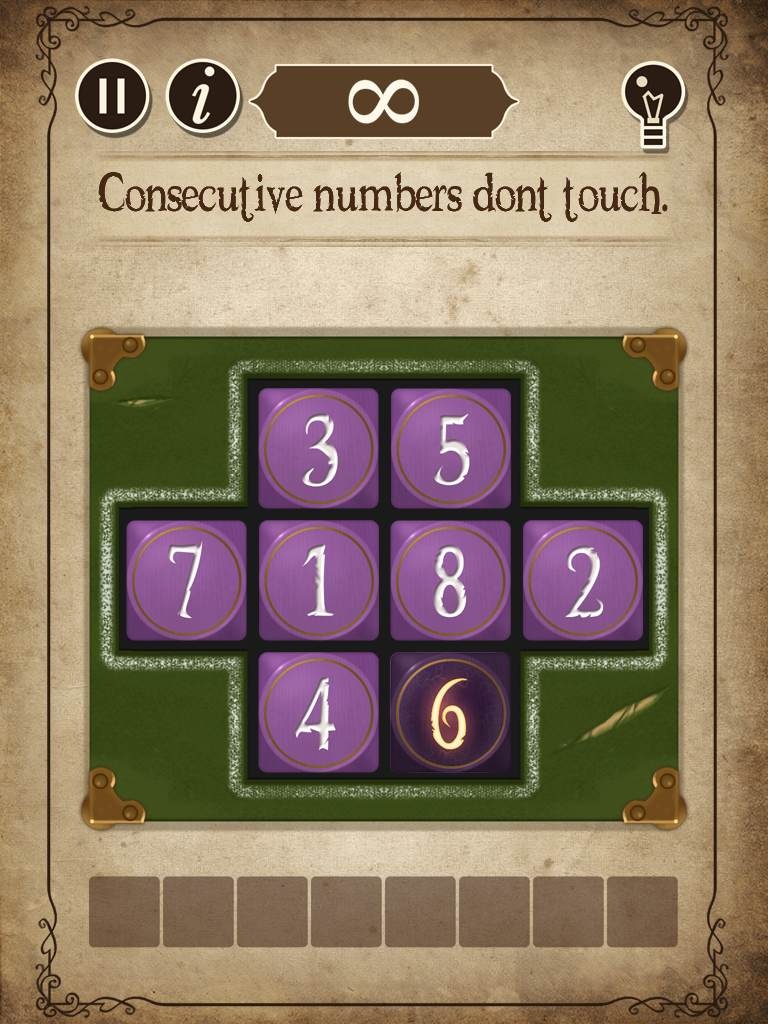
Level 50 - 1 to 8 (Medium)
Arrange the eight numbered blocks on the board so that no two blocks containing consecutive numbers are touching.
The blocks cannot touch at the sides or at the corners.
Tap and drag a block to move it, and release the block to place it.
HINT: Since 1 and 8 each only have one consecutive number (2 and 7), place them in the center first, then add the other blocks around them.
Screenshot.
Levels 51-60
Level 51 - Riddle #7 (Medium)
Use the clues from the riddle to find the answer.
Click and drag the tiles up or down to cycle through the letters and spell the five-letter word.
HINT: What's in the beginning of time, the middle of years, and the end of days? Think literally.
Screenshot.
Level 52 - Draw The Line #4 (Medium)
Draw 5 lines between the balls to separate them into isolated pairs of 1 red and 1 yellow ball in each section.
Tap a nail to attach one end of the rope to it, then tap a different nail to connect the other end of the rope.
Remove a rope on the board by tapping it.
Screenshot.
Level 53 - Hamiltonian #3 (Medium)
Create a complete circuit that connects each nail on the board.
Tap a nail to select it, then tap an adjacent nail to draw a path between them.
Some nails are attached by metal bars so that if you tap a nail on one end, you must continue the path through the nail at the other end.
HINT: Find the paths around the metal bar pieces first, as they're more difficult to connect.
Screenshot.
Level 54 - Sliding Picture (Medium)
Arrange the blocks to complete the picture before the time runs out.
Tap or drag the tile to move it into an adjacent empty space.
This puzzle can be pretty difficult to beat quickly; the best strategy I found for solving it was to start on the upper right side and end at the lower left side.
First I solved the clock at the top right corner, then I did the dog at the bottom right corner. Next I did Mannequin's right side starting from his head and solving downwards.
After the right half of the puzzle is solved, I moved on to the framed picture at the upper left corner of the board. The empty space is at the bottom left corner of the mantle, so I saved that area for last.
Screenshot.
Level 55 - Tangram #6 (Medium)
Correctly fit all seven shapes inside the outline without overlapping the pieces to solve the puzzle.
Drag and release the pieces to set them in place, or tap to rotate them 45 degrees clockwise.
HINT: Start with the more difficult pieces, then place the easier and smaller ones afterwards.
Position the large triangles first, then place the parallelogram, the square, the medium triangle, and then finally the two small triangles.
Screenshot.
Level 56 - Sliding Blocks #6 (Medium)
Move the Mannequin block outside of the square through the exit by sliding the other blocks out of the way.
Drag and release a block to place it in an empty space.
Blocks cannot move diagonally or pass through obstacles, and can only move into a space that has enough room for the entire block.
Screenshot.
Level 57 - Riddle #8 (Medium)
Use the clues from the riddle to find the answer.
Click and drag the tiles up or down to cycle through the letters and spell the five-letter word.
HINT: This one's tricky! Pay close attention to the first four letters in the sequence (STIL) and the last four words of the riddle.
Screenshot.
Level 58 - Burn The Rope #5 (Medium)
Burn all of the sections of rope in the correct order so that every knot is burned and you return at the end to the knot you started at.
Tap the first knot to select it as the starting point, then tap a different knot that is connected by rope to the first knot.
You can only burn connected knots, and you cannot travel over the same section of rope once it has been burned.
HINT: Look for the knot that is connected to 4 rope sections as your starting point.
Screenshot.
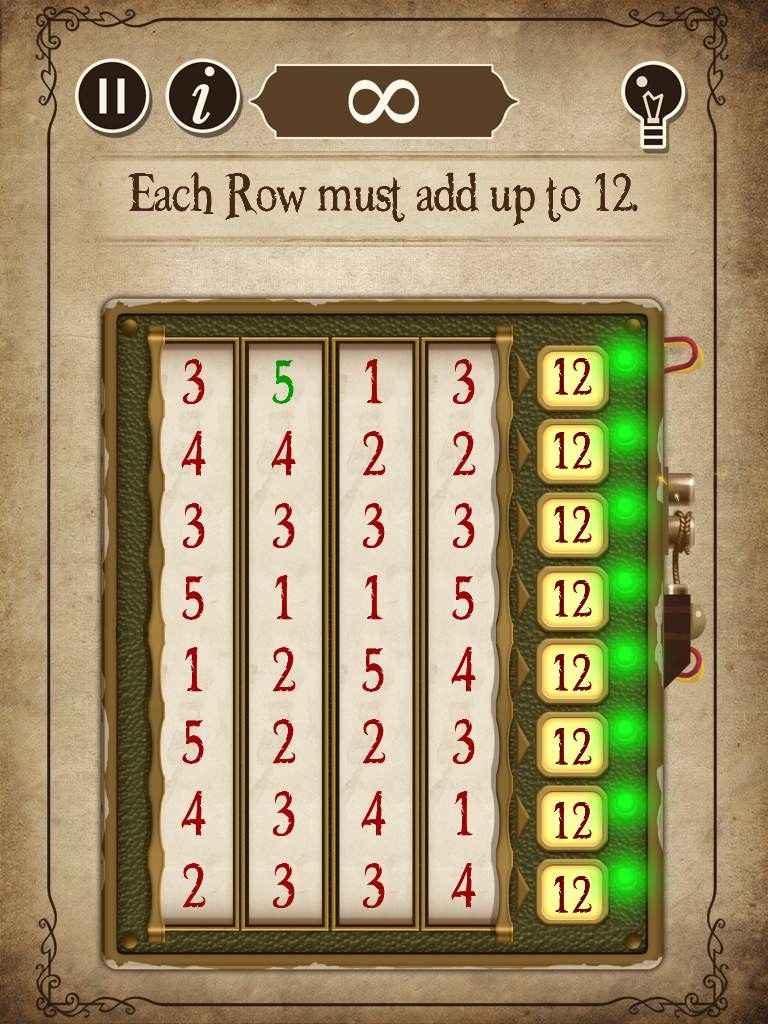
Level 59 - Combination (Medium)
Arrange the rows of numbers so that they add from left to right to the number 12.
Click and drag the bars of numbers up and down to move them.
The sum of each row of numbers is shown on the right; when they add to 12, the green bulb it will light up.
Screenshot.
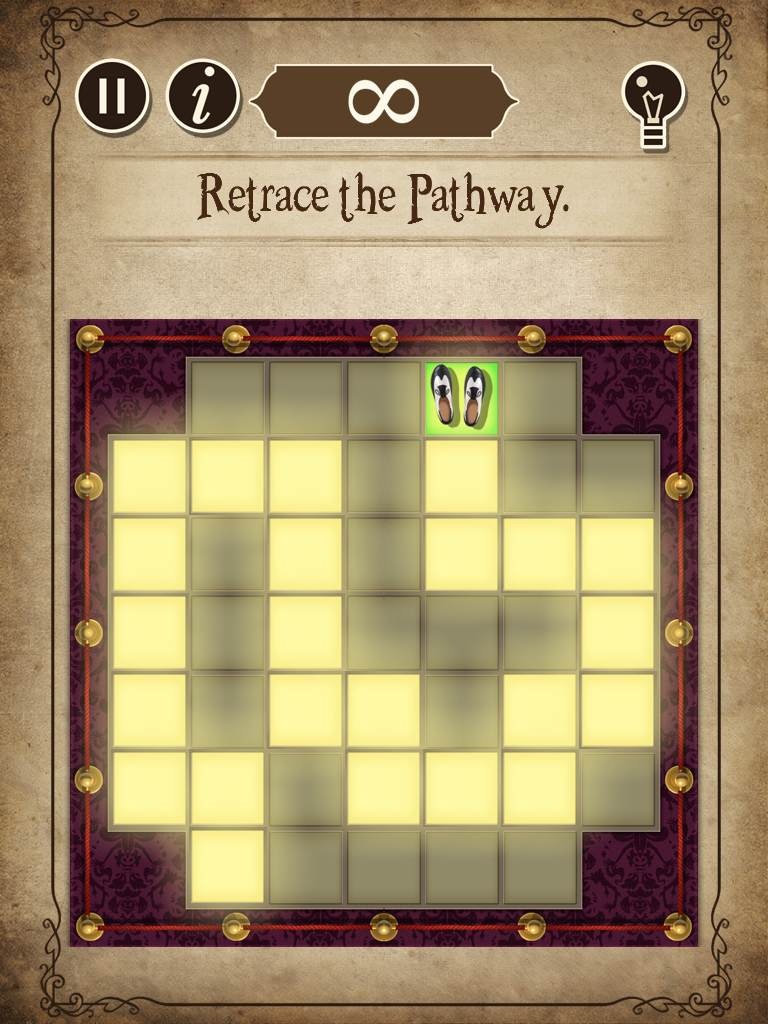
Level 60 - Pathway (Medium)
While the timer counts down, memorize the path of lit golden squares leading from the pair of shoes to the green square.
After 10 seconds, the path will disappear but you must follow it to reach the goal.
Tap an adjacent square to move the shoes in that direction.
If you move outside of the path into an incorrect square, the puzzle will end and a new randomized path will be created.
Screenshot.
Levels 61-70
Level 61 - Dominoes #2 (Medium)
Place all of the dominoes on the board and arrange them so that only matching numbers are touching at each side.
For example, a domino with 5 dots on its side must be placed beside another domino that also has 5 dots.
This also applies to dominoes with no dots at all - each blank side must also touch another blank side.
Drag and release a domino to place it or tap a domino to flip it around.
HINT: Start with the 6 dot pieces at the bottom area.
Screenshot.
Level 62 - Lights Out #4 (Medium)
Tap the lights to turn all of them off.
Hitting one light will also affect any adjacent lights in a horizontal or vertical line, but not any lights that are diagonally touching the original bulb.
All of the bulbs must be turned off within 5 turns.
Tap the bulbs in numerical order according to the following screenshot:
Screenshot.
Level 63 - Hamiltonian #4 (Medium)
Create a complete circuit that connects each nail on the board.
Tap a nail to select it, then tap an adjacent nail to draw a path between them.
Some nails are attached by metal bars so that if you tap a nail on one end, you must continue the path through the nail at the other end.
HINT: Find the paths around the metal bar pieces first, as they're more difficult to connect.
Screenshot.
Level 64 - Circuit #4 (Medium)
Create a path from each colored node to its matching colored node.
Tap a node and drag across the squares to draw a path, then release it at the second node to complete the connection.
Two different paths cannot cross over each other.
All of the nodes must be connected and every square must be filled to complete the puzzle.
Screenshot.
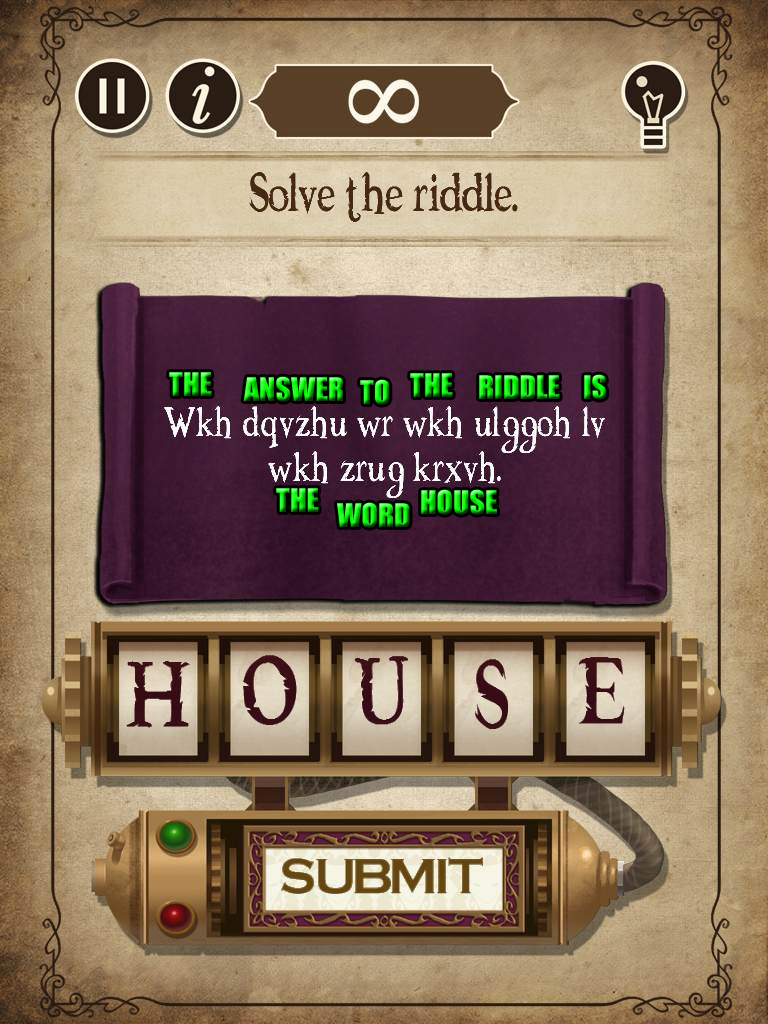
Level 65 - Riddle #9 (Medium)
Use the clues from the riddle to find the answer.
Click and drag the tiles up or down to cycle through the letters and spell the five-letter word.
HINT: This riddle is a classic cryptogram with a substitution cipher, meaning the actual letters of the words have been replaced by different letters of the alphabet.
The most common letter in the English language is E, and the most common letter in the message is H, so you can start by assuming that all the H's in the message represent the letter E.
The first word of the message is three letters long and ends in E, so you can guess that the first word is likely "THE".
Now that you know the first three letters, the pattern to the puzzle becomes clear: Each letter in the cipher is three letters ahead of the letter in the alphabet that it represents.
So D represents the real letter A, E represents the real letter B, F represents the real letter C, etc.
Continue to decipher the code until you have interpreted the complete message
Screenshot.
Level 66 - Stopper #2 (Hard)
Stop all of the three lights while they are within the sections between the arrows on the each bar.
Wait for the light to move between the arrows, then tap the "Stop" button to stop the light.
If the light is stopped in the correct space, then the light in the next row will start to move.
The top light is the slowest, the middle light moves faster, and the bottom light is the fastest.
If you incorrectly pause the light outside of the arrows, the puzzle will reset from the beginning.
Screenshot.
Level 67 - Tangram #7 (Hard)
Correctly fit all seven shapes inside the outline without overlapping the pieces to solve the puzzle.
Drag and release the pieces to set them in place, or tap to rotate them 45 degrees clockwise.
HINT: Start with the more difficult pieces, then place the easier and smaller ones afterwards.
Position the large triangles first, then place the parallelogram, the square, the medium triangle, and then finally the two small triangles.
Screenshot.
Level 68 - Solitaire #2 (Hard)
Clear all of the stones from the board until only one stone remains.
Tap and drag a stone over another stone and into an empty space to place it.
The stone that was hopped over will be removed from the board.
A stone cannot move without another stone to hop over, and only then in it can only move in a vertical or horizontal line and not diagonally.
Refer to the instructions and screenshot below to solve the puzzle.
Screenshot.
Move the stone at D2 to D4.
Move the stone at F3 to D3.
Move the stone at E1 to E3.
Move the stone at E4 to E2.
Move the stone at E6 to E4.
Move the stone at G5 to E5.
Move the stone at D5 to F5.
Move the stone at G3 to G5.
Move the stone at G5 to E5.
Move the stone at C3 to E3.
Move the stone at A3 to C3.
Move the stone at B5 to D5.
Move the stone at D5 to F5.
Move the stone at F5 to F3.
Move the stone at F3 to D3.
Move the stone at D3 to B3.
Move the stone at C1 to E1.
Move the stone at E1 to E3.
Move the stone at E3 to E5.
Move the stone at C7 to C5.
Move the stone at C4 to C6.
Move the stone at E7 to C7.
Move the stone at C7 to C5.
Move the stone at A5 to A3.
Move the stone at A3 to C3.
Move the stone at C2 to C4.
Move the stone at C4 to C6.
Move the stone at C6 to E6.
Move the stone at E6 to E4.
Move the stone at E4 to C4.
Move the stone at B4 to D4.
Screenshot.
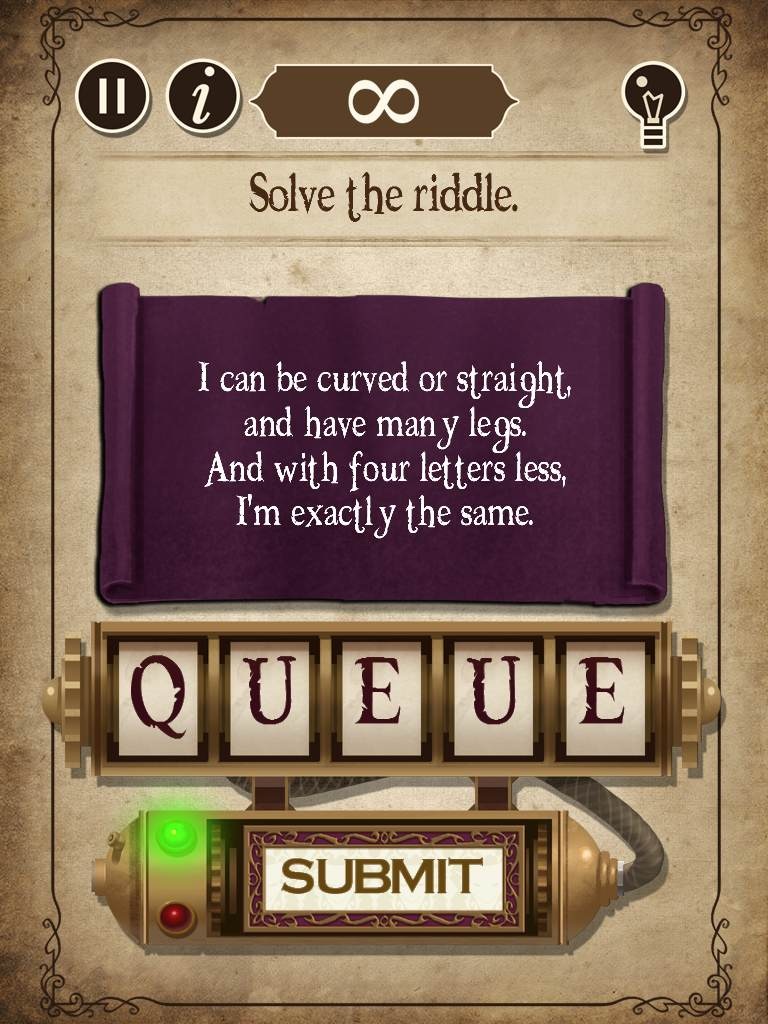
Level 69 - Riddle #10 (Hard)
Use the clues from the riddle to find the answer.
Click and drag the tiles up or down to cycle through the letters and spell the five-letter word.
HINT: What is made up of many legs and is the same with 5 letters or only 1 letter?
Screenshot.
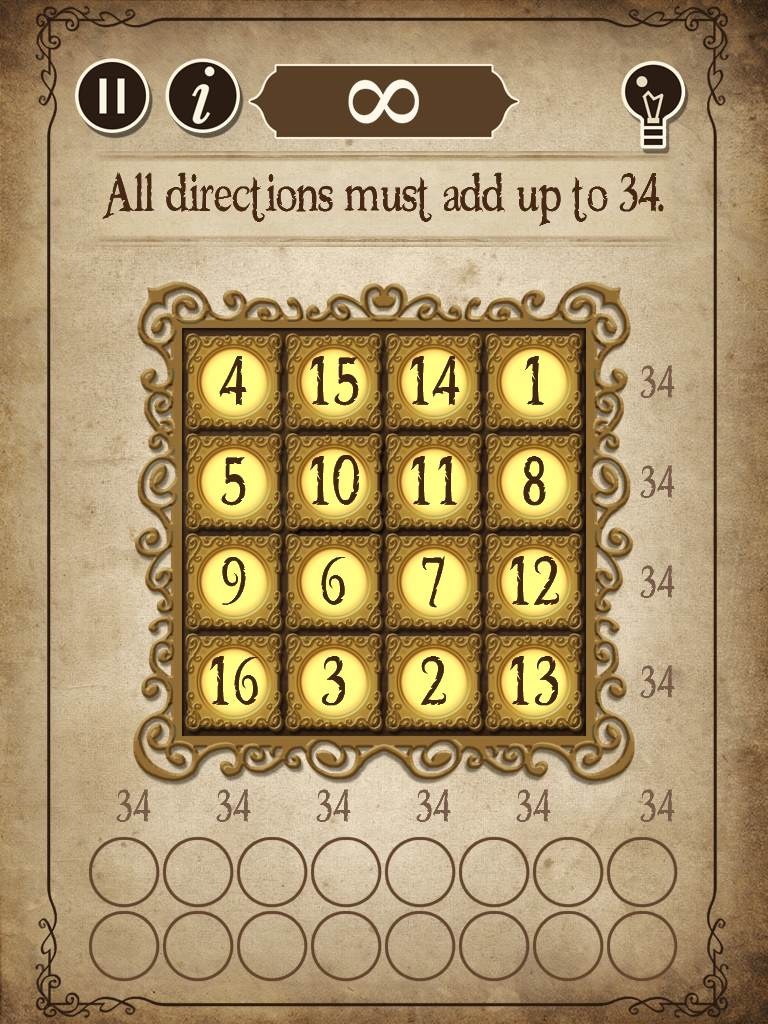
Level 70 - Magic Squares #2 (Hard)
Arrange the number tiles so that the numbers in each row, column, and diagonal line add to 34.
Drag and release a tile over an empty space to place it, or release it on top of a different tile to swap their positions.
Pay attention to the numbers around the border of the square to find the current sum for their adjacent row or column.
Screenshot.
Levels 71-80
Level 71 - Sliding Blocks #7 (Hard)
Move the Mannequin block outside of the square through the exit by sliding the other blocks out of the way.
Drag and release a block to place it in an empty space.
Blocks cannot move diagonally or pass through obstacles, and can only move into a space that has enough room for the entire block.
Screenshot.
Level 72 - Un Tangle #3 (Hard)
Arrange the reels so that none of their strings cross over each other.
Drag and release a reel to move it around the board.
If two or more strings cross, they will be shaded out grey.
If the strings are free, they will be colored white.
HINT: Try to move the reels with several connected strings into the center of the board and the reels with the fewest strings around the outside of the board.
Screenshot.
Level 73 - Match-it #3 (Hard)
Quickly study the stained-glass styled disc, then find its identical in the rows of rotating discs.
Find the correct disc before the timer runs out.
Pay attention to the colors of the tiles in each ring.
HINT: A good place to check first is the area around the center of the rose.
Screenshot.
Level 74 - Button Gauge #3 (Hard)
Press the buttons at the correct time so that all of the bulbs are simultaneously lit.
Press a button to start its timer, indicated by the arrow moving across the bar.
When the arrow reaches the square at the end, the bulb will light up until the arrow moves past the square.
Each button has a different timer, so test the buttons to see how long it takes for the bulb to light.
HINT: Watch each timer to see how long it takes to reach the end to find and then press them in order from slowest to fastest.
Screenshot.
Level 75 - Tangram #8 (Hard)
Correctly fit all seven shapes inside the outline without overlapping the pieces to solve the puzzle.
Drag and release the pieces to set them in place, or tap to rotate them 45 degrees clockwise.
HINT: Start with the more difficult pieces, then place the easier and smaller ones afterwards.
Position the large triangles first, then place the parallelogram, the square, the medium triangle, and then finally the two small triangles.
Screenshot.
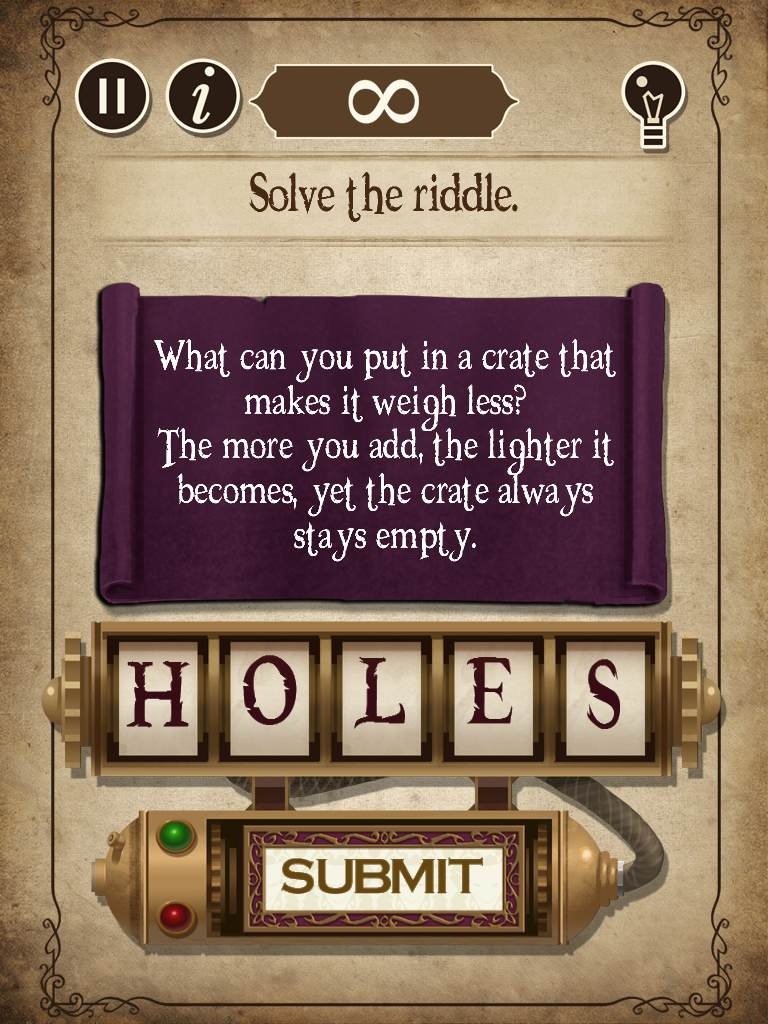
Level 76 - Riddle #11 (Hard)
Use the clues from the riddle to find the answer.
Click and drag the tiles up or down to cycle through the letters and spell the five-letter word.
HINT: How can you make the crate weigh less without putting anything into it?
Screenshot.
Level 77 - Draw The Line #5 (Hard)
Draw 5 lines between the balls to separate them into isolated pairs of 1 red and 1 yellow ball in each section.
Tap a nail to attach one end of the rope to it, then tap a different nail to connect the other end of the rope.
Remove a rope on the board by tapping it.
Screenshot.
Level 78 - Circuit #5 (Hard)
Create a path from each colored node to its matching colored node.
Tap a node and drag across the squares to draw a path, then release it at the second node to complete the connection.
Two different paths cannot cross over each other.
All of the nodes must be connected and every square must be filled to complete the puzzle.
Screenshot.
Level 79 - Sliding Blocks #8 (Hard)
Move the Mannequin block outside of the square through the exit by sliding the other blocks out of the way.
Drag and release a block to place it in an empty space.
Blocks cannot move diagonally or pass through obstacles, and can only move into a space that has enough room for the entire block.
Screenshot.
Level 80 - Bulbs #3 (Hard)
Watch the randomized order that the bulbs light up, then copy the sequence by tapping the bulbs in the same order.
The puzzle has three rounds, and the second and third rounds each add an additional bulb to the sequence.
When a round is successfully completed, one of the three red lights will illuminate.
If you incorrectly guess a bulb, the puzzle will start over at the first round.
Levels 81-90
Level 81 - Burn The Rope #6 (Hard)
Burn all of the sections of rope in the correct order so that every knot is burned and you return at the end to the knot you started at.
Tap the first knot to select it as the starting point, then tap a different knot that is connected by rope to the first knot.
You can only burn connected knots, and you cannot travel over the same section of rope once it has been burned.
HINT: Look for the knot that is connected to 4 rope sections as your starting point.
Screenshot.
Level 82 - Lights Out #5 (Hard)
Tap the lights to turn all of them off.
Hitting one light will also affect any adjacent lights in a horizontal or vertical line, but not any lights that are diagonally touching the original bulb.
All of the bulbs must be turned off within 5 turns.
Tap the bulbs in numerical order according to the following screenshot:
Screenshot.
Level 83 - Tangram #9 (Hard)
Correctly fit all seven shapes inside the outline without overlapping the pieces to solve the puzzle.
Drag and release the pieces to set them in place, or tap to rotate them 45 degrees clockwise.
HINT: Start with the more difficult pieces, then place the easier and smaller ones afterwards.
Position the large triangles first, then place the parallelogram, the square, the medium triangle, and then finally the two small triangles.
Screenshot.
Level 84 - Hamiltonian #5 (Hard)
Create a complete circuit that connects each nail on the board.
Tap a nail to select it, then tap an adjacent nail to draw a path between them.
Some nails are attached by metal bars so that if you tap a nail on one end, you must continue the path through the nail at the other end.
HINT: Find the paths around the metal bar pieces first, as they're more difficult to connect.
Screenshot.
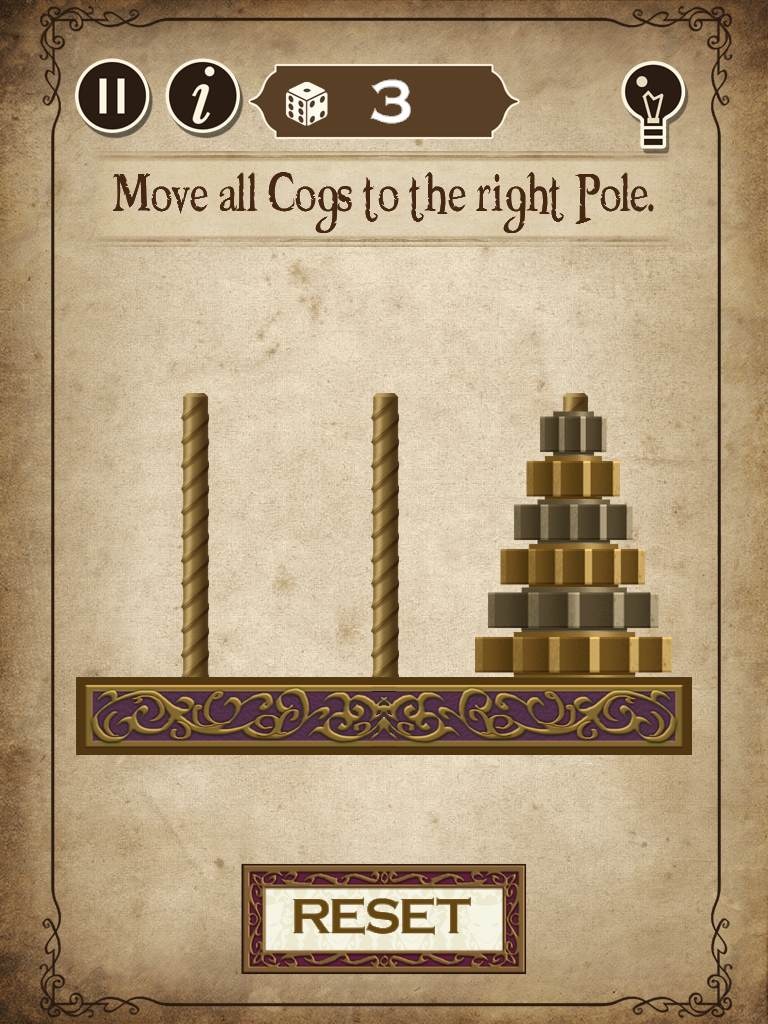
Level 85 - Hanoi (Hard)
Move all of the cogs from the left pole to the right pole.
Tap a cog to select it, then tap a pole to place it.
Larger cogs cannot go on top of smaller cogs, but smaller cogs can go above larger cogs.
Move the cogs in the following order to solve the puzzle:
Move Cog A to Pole 2.
Move Cog B to Pole 3.
Move Cog A to Pole 3.
Move Cog C to Pole 2.
Move Cog A to Pole 1.
Move Cog B to Pole 2.
Move Cog A to Pole 2.
Move Cog D to Pole 3.
Move Cog A to Pole 3.
Move Cog B to Pole 1.
Move Cog A to Pole 1.
Move Cog C to Pole 3.
Move Cog A to Pole 2.
Move Cog B to Pole 3.
Move Cog A to Pole 3.
Move Cog E to Pole 2.
Move Cog A to Pole 1.
Move Cog B to Pole 2.
Move Cog A to Pole 2.
Move Cog C to Pole 1.
Move Cog A to Pole 3.
Move Cog B to Pole 1.
Move Cog A to Pole 1.
Move Cog D to Pole 2.
Move Cog A to Pole 3.
Move Cog B to Pole 2.
Move Cog A to Pole 2.
Move Cog C to Pole 3.
Move Cog A to Pole 3.
Move Cog B to Pole 1.
Move Cog A to Pole 1.
Move Cog C to Pole 2.
Move Cog A to Pole 3.
Move Cog B to Pole 2.
Move Cog A to Pole 2.
Move Cog F to Pole 3.
Move Cog A to Pole 3.
Move Cog B to Pole 1.
Move Cog A to Pole 1.
Move Cog C to Pole 3.
Move Cog A to Pole 2.
Move Cog B to Pole 3.
Move Cog A to Pole 3.
Move Cog D to Pole 1.
Move Cog A to Pole 1.
Move Cog B to Pole 2.
Move Cog A to Pole 2.
Move Cog C to Pole 1.
Move Cog A to Pole 3.
Move Cog B to Pole 1.
Move Cog A to Pole 1.
Move Cog E to Pole 3.
Move Cog A to Pole 2.
Move Cog B to Pole 3.
Move Cog A to Pole 3.
Move Cog C to Pole 2.
Move Cog A to Pole 1.
Move Cog B to Pole 2.
Move Cog A to Pole 2.
Move Cog D to Pole 3.
Move Cog A to Pole 3.
Move Cog B to Pole 1.
Move Cog A to Pole 1.
Move Cog C to Pole 3.
Move Cog A to Pole 2.
Move Cog B to Pole 3.
Move Cog A to Pole 3.
Screenshot.
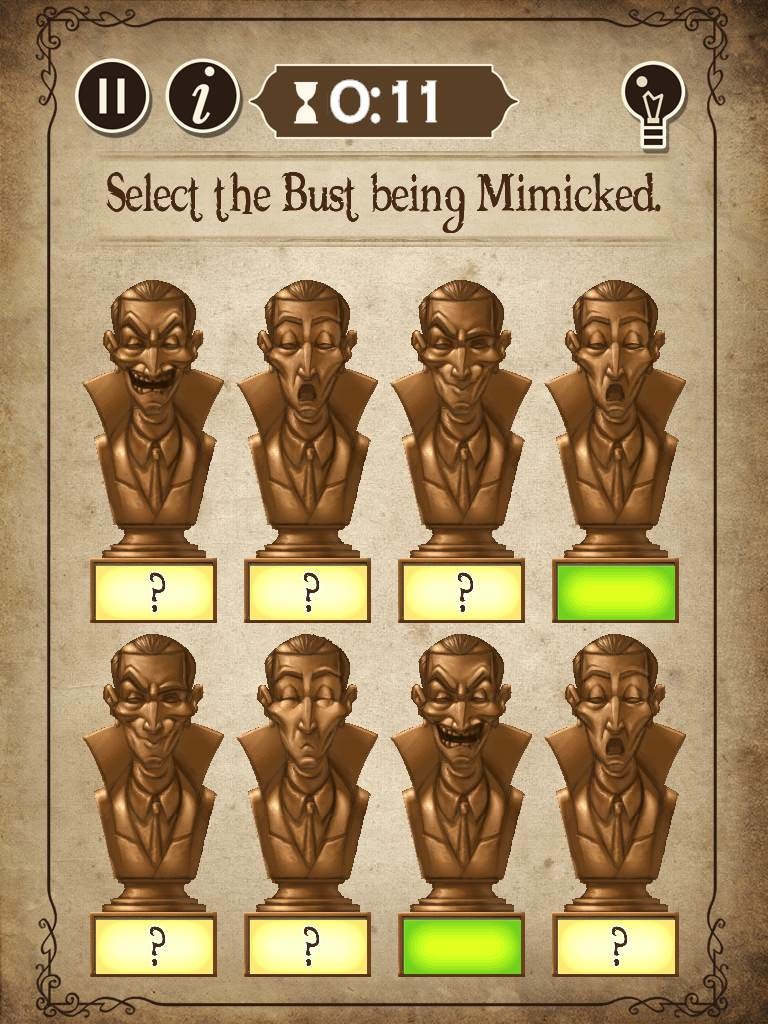
Level 86 - Mimic (Hard)
Find which one of the Mannequin busts is a mimic before the time runs out.
Each bust will constantly change facial expressions in a randomized pattern.
The mimic copies one of the other busts and will make the face that other bust made one turn ago.
For example, when the first bust smiles, the next face the mimic makes will be a smile.
To submit your solution, first tap the mimic, then tap the bust it is copying (the correct answer changes every game).
Screenshot.
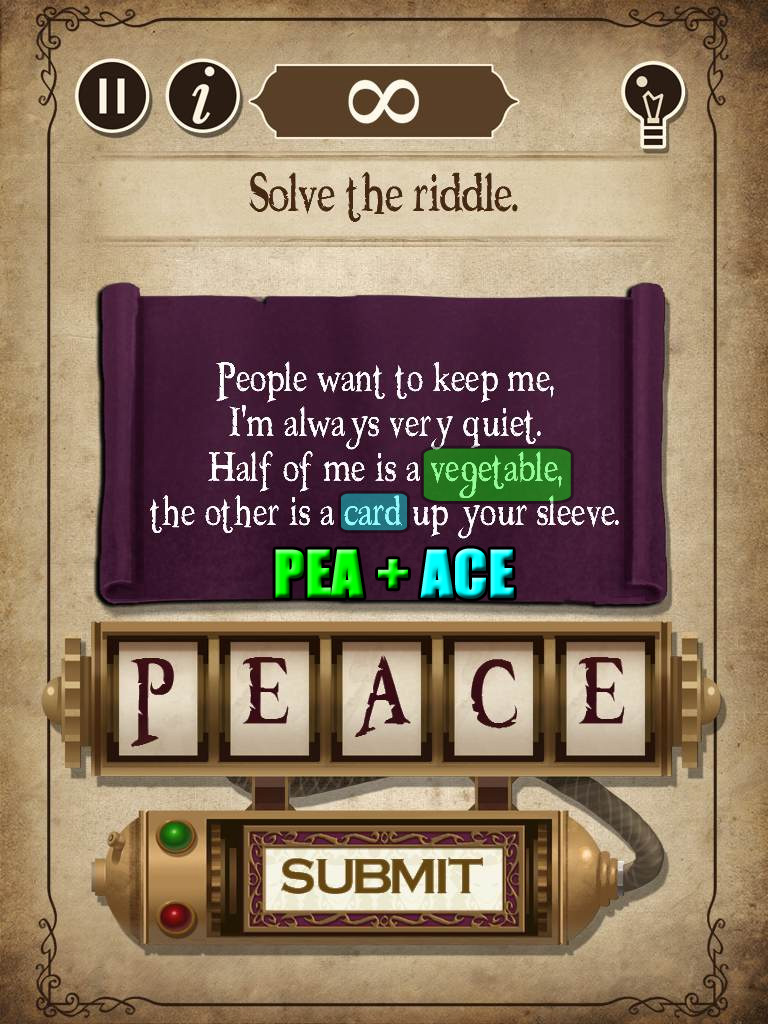
Level 87 - Riddle #12 (Hard)
Use the clues from the riddle to find the answer.
Click and drag the tiles up or down to cycle through the letters and spell the five-letter word.
HINT: The first half of the word is a 3-letter vegetable, and the last letter of that is the first letter to second half of the word, which is a 3-letter card.
Screenshot.
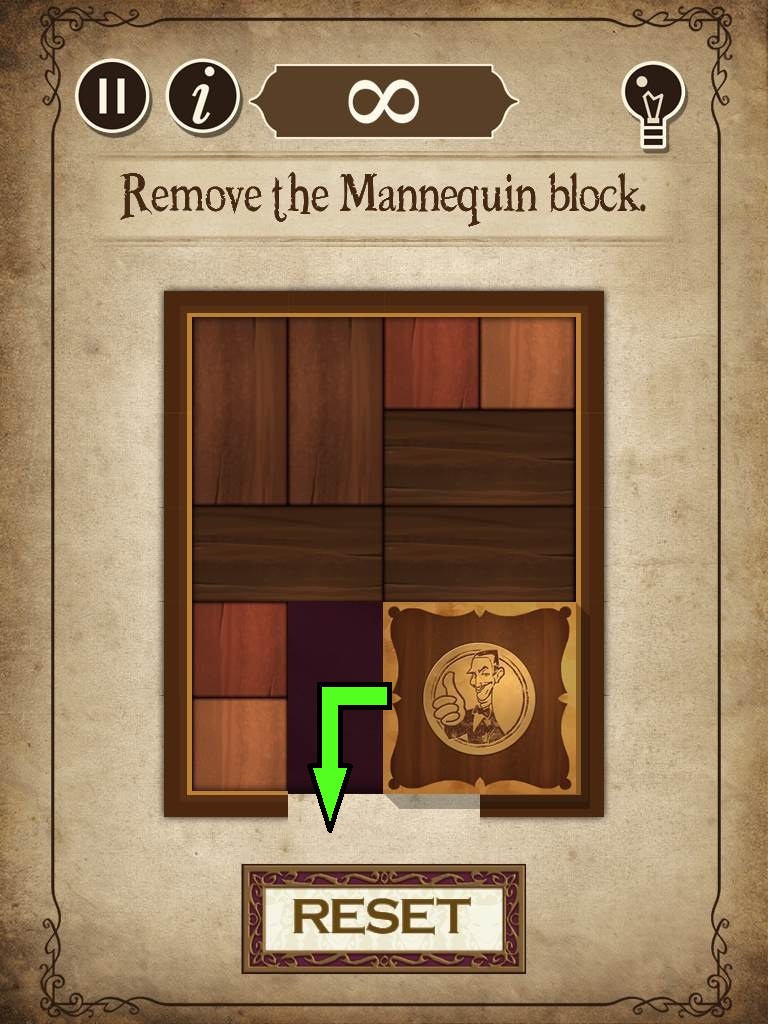
Level 88 - Sliding Block #9 (Hard)
Move the Mannequin block outside of the square through the exit by sliding the other blocks out of the way.
Drag and release a block to place it in an empty space.
Blocks cannot move diagonally or pass through obstacles, and can only move into a space that has enough room for the entire block.
Screenshot.
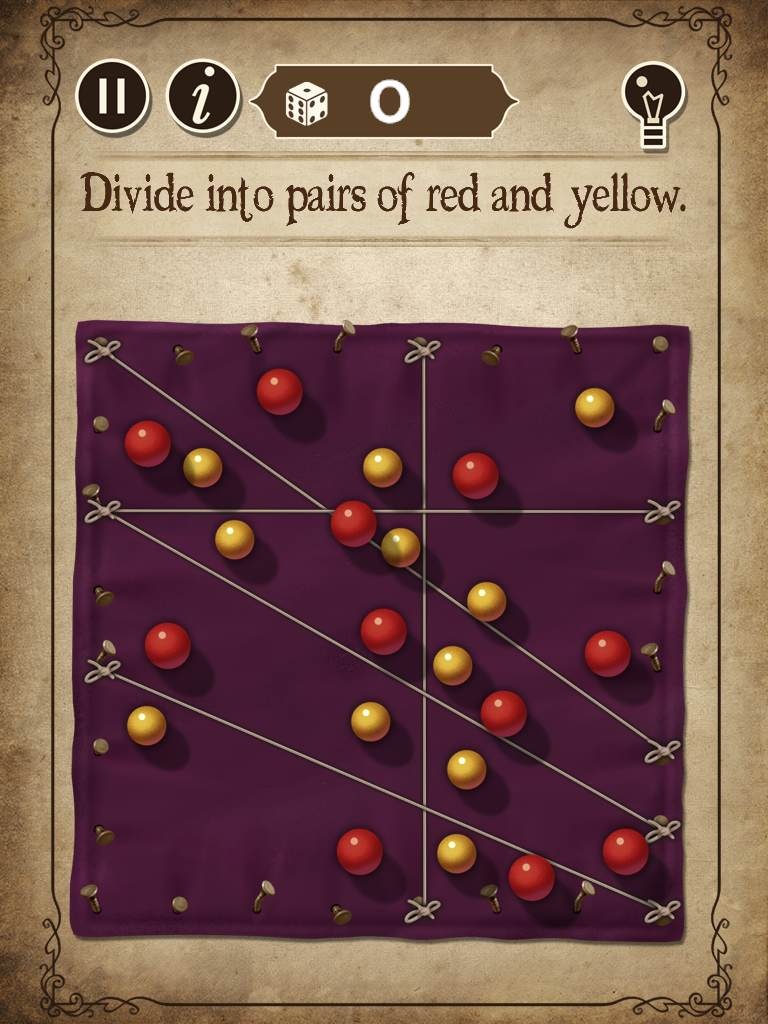
Level 89 - Draw The Line #6 (Hard)
Draw 5 lines between the balls to separate them into isolated pairs of 1 red and 1 yellow ball in each section.
Tap a nail to attach one end of the rope to it, then tap a different nail to connect the other end of the rope.
Remove a rope on the board by tapping it.
Screenshot.
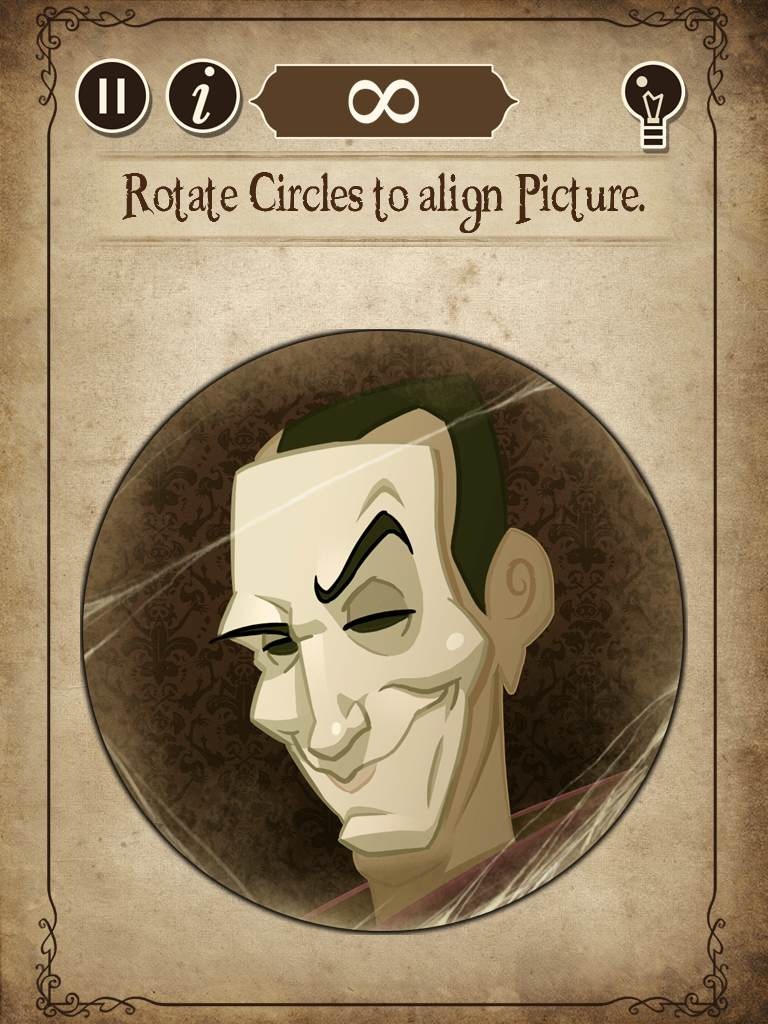
Level 90 - Circular Picture (Hard)
Align the rings to complete the picture by rotating the discs.
Tap and drag a ring to rotate it clockwise or counter-clockwise.
With the exception of the circle in the center which does not move at all, turning one disc will also affect the other rings:
Starting at the center, moving Ring 1 one space also turns Ring 2 three spaces in the opposite direction and Ring 3 two spaces in the opposite direction.
Moving Ring 2 turns Ring 1 two spaces in the opposite direction and Ring 3 three spaces in the opposite direction.
Moving Ring 3 turns Ring 1 three spaces in the opposite direction and Ring 2 two spaces in the opposite direction.
Screenshot.
Levels 91 - Cogs Puzzle
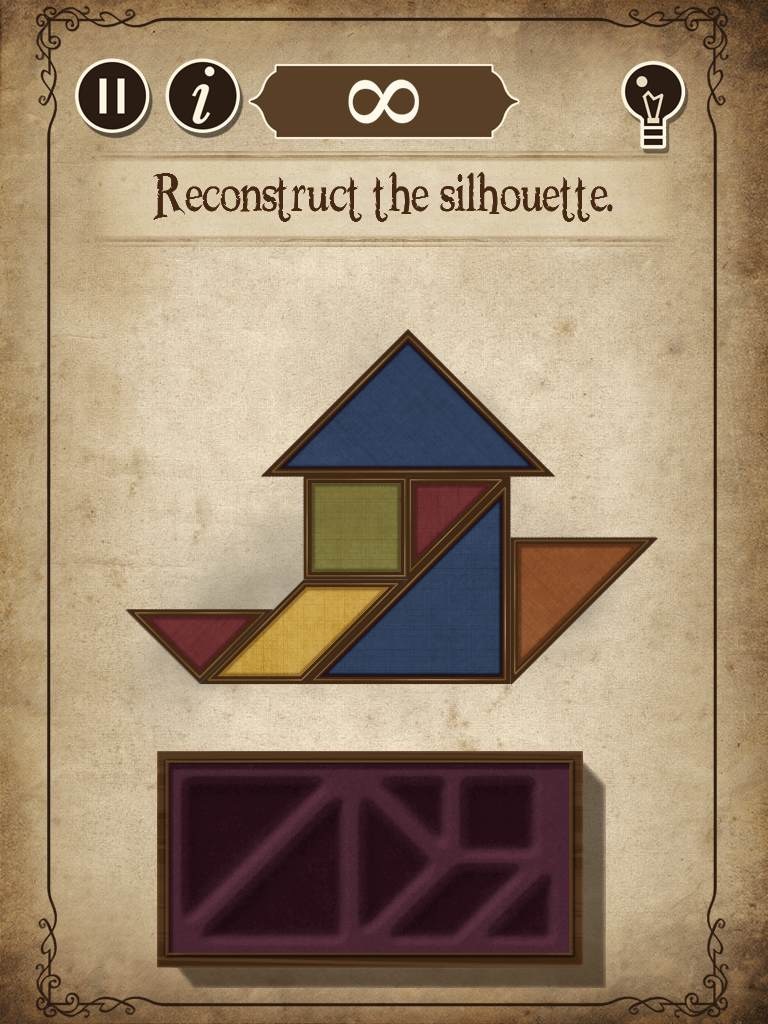
Level 91 - Tangram #10 (Hard)
Correctly fit all seven shapes inside the outline without overlapping the pieces to solve the puzzle.
Drag and release the pieces to set them in place, or tap to rotate them 45 degrees clockwise.
HINT: Start with the more difficult pieces, then place the easier and smaller ones afterwards.
Position the large triangles first, then place the parallelogram, the square, the medium triangle, and then finally the two small triangles.
Screenshot.
Level 92 - Lights Out #6 (Hard)
Tap the lights to turn all of them off.
Hitting one light will also affect any adjacent lights in a horizontal or vertical line, but not any lights that are diagonally touching the original bulb.
All of the bulbs must be turned off within 5 turns.
Tap the bulbs in numerical order according to the following screenshot:
Screenshot.
Level 93 - Circuit #6 (Hard)
Create a path from each colored node to its matching colored node.
Tap a node and drag across the squares to draw a path, then release it at the second node to complete the connection.
Two different paths cannot cross over each other.
All of the nodes must be connected and every square must be filled to complete the puzzle.
Screenshot.
Level 94 - Burn The Rope #7 (Hard)
Burn all of the sections of rope in the correct order so that every knot is burned and you return at the end to the knot you started at.
Tap the first knot to select it as the starting point, then tap a different knot that is connected by rope to the first knot.
You can only burn connected knots, and you cannot travel over the same section of rope once it has been burned.
Screenshot.
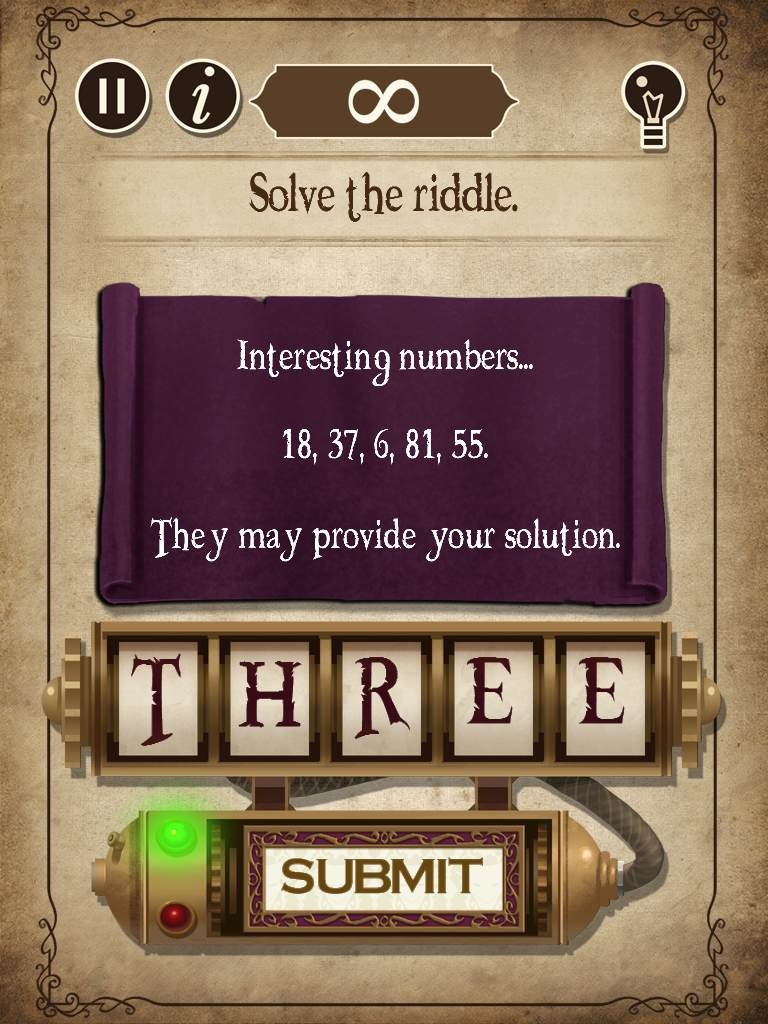
Level 95 - Riddle #13 (Hard)
Use the clues from the riddle to find the answer.
Click and drag the tiles up or down to cycle through the letters and spell the five-letter word.
HINT: You won't find the solution on just one page; note the numbers and refer to the other pages of the book.
Go to page 18 to find the letter T, page 37 to find the letter H, page 6 to find the letter R, page 81 to find the letter E, page 55 to find the letter E.
Screenshot.
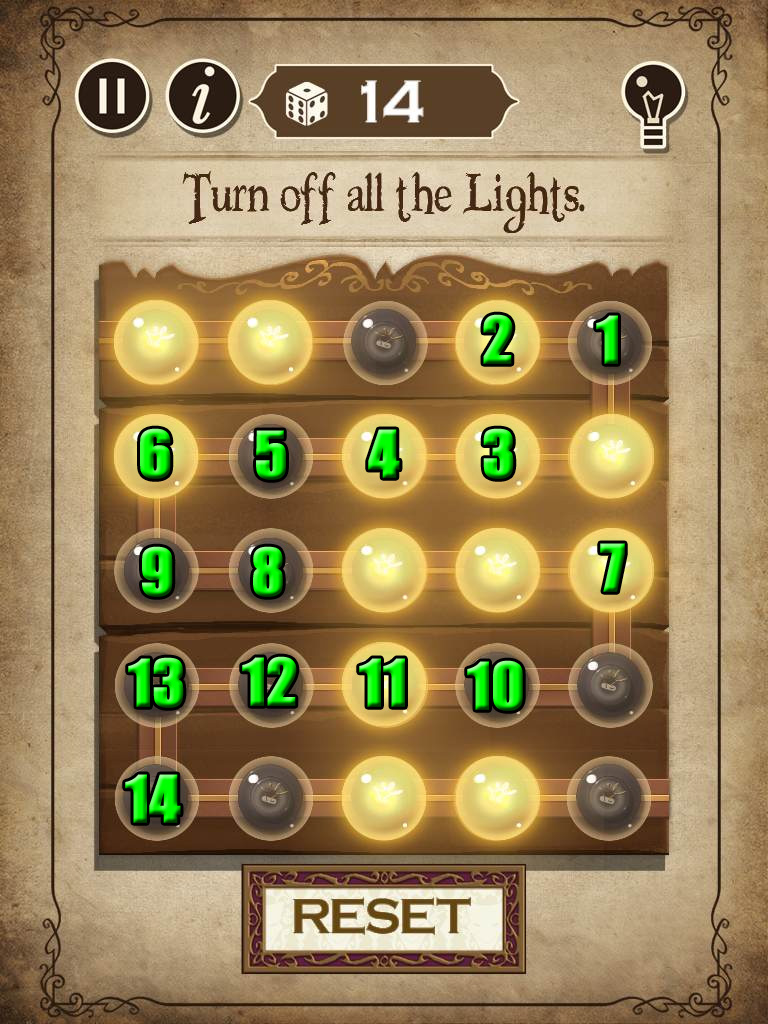
Level 96 - Lights Out #7 (Hard)
Tap the lights to turn all of them off.
Hitting one light will also affect any adjacent lights in a horizontal or vertical line, but not any lights that are diagonally touching the original bulb.
All of the bulbs must be turned off within 5 turns.
Tap the bulbs in numerical order according to the following screenshot:
Screenshot.
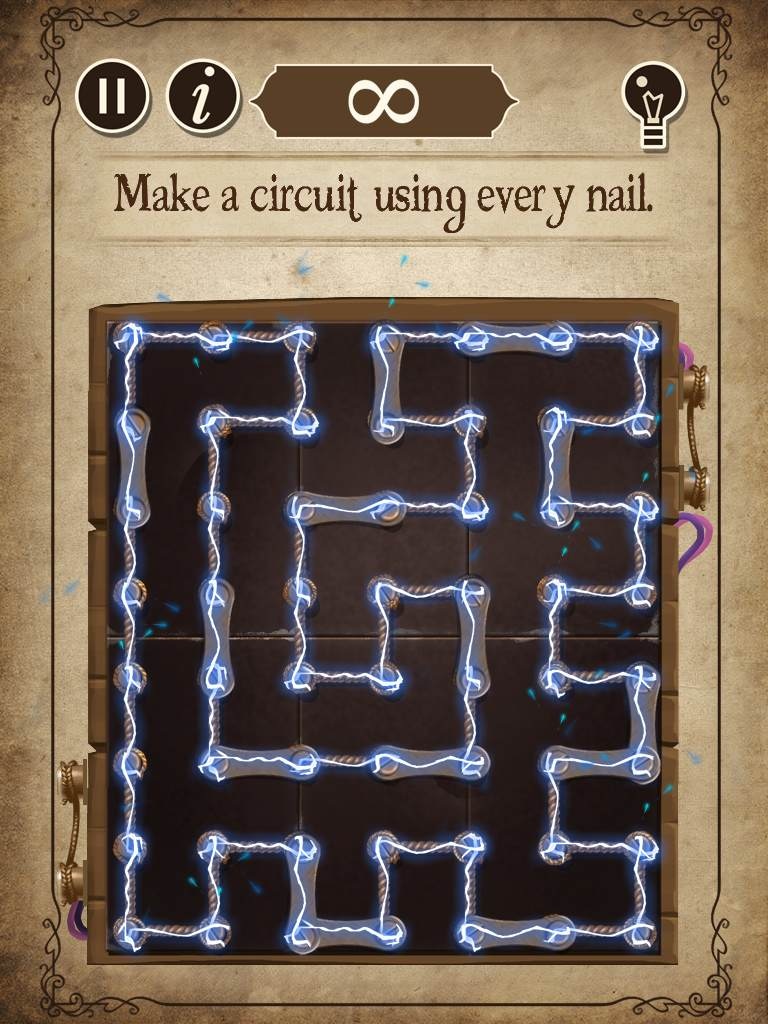
Level 97 - Hamiltonian #6 (Hard)
Create a complete circuit that connects each nail on the board.
Tap a nail to select it, then tap an adjacent nail to draw a path between them.
Some nails are attached by metal bars so that if you tap a nail on one end, you must continue the path through the nail at the other end.
HINT: Find the paths around the metal bar pieces first, as they're more difficult to connect.
Screenshot.
Level 98 - Sliding Block #10 (Hard)
Move the Mannequin block outside of the square through the exit by sliding the other blocks out of the way.
Drag and release a block to place it in an empty space.
Blocks cannot move diagonally or pass through obstacles, and can only move into a space that has enough room for the entire block.
Screenshot.
Level 99 - Burn The Rope #8 (Hard)
Burn all of the sections of rope in the correct order so that every knot is burned and you return at the end to the knot you started at.
Tap the first knot to select it as the starting point, then tap a different knot that is connected by rope to the first knot.
You can only burn connected knots, and you cannot travel over the same section of rope once it has been burned.
HINT: Look for the knot that is connected to 4 rope sections as your starting point.
Screenshot.
Cogs 20/20 Puzzle
When you have solved all other puzzles in the book and collected all 20 cogs, the final Cogs Puzzle will become available.
Fit all of the large, medium, and small sized cogs on the board.
Tap and drag a cog, then release it over a peg to place it.
HINT: Look for the space between the pegs to indicate the size of the cog that belongs there; also note that if the teeth of the cogs fit together, then it is likely that they are correctly positioned.
Start with the cogs at the left and right sides of the board, then meet them together in the middle.
Screenshot.
When the cogs puzzle is solved, tap the page to begin Puzzle 100.
Posted by: Trinn |
September 3, 2012 7:57 PM
|
September 3, 2012 7:57 PM
Final Puzzle & Mannequin's Puzzles
Level 100 - The Final Puzzle
This one is the hardest puzzle yet and will require some very careful observation to solve.
Each of the boxes (numbered 1-10) correspond to a number found in one of the 99 levels in the book: some can be found on the pages, while others are within the puzzles themselves.
Box 1 - Go to the Level 4 page. Note that Mannequin is holding up 1 finger. Change the number in box 1 to 4.
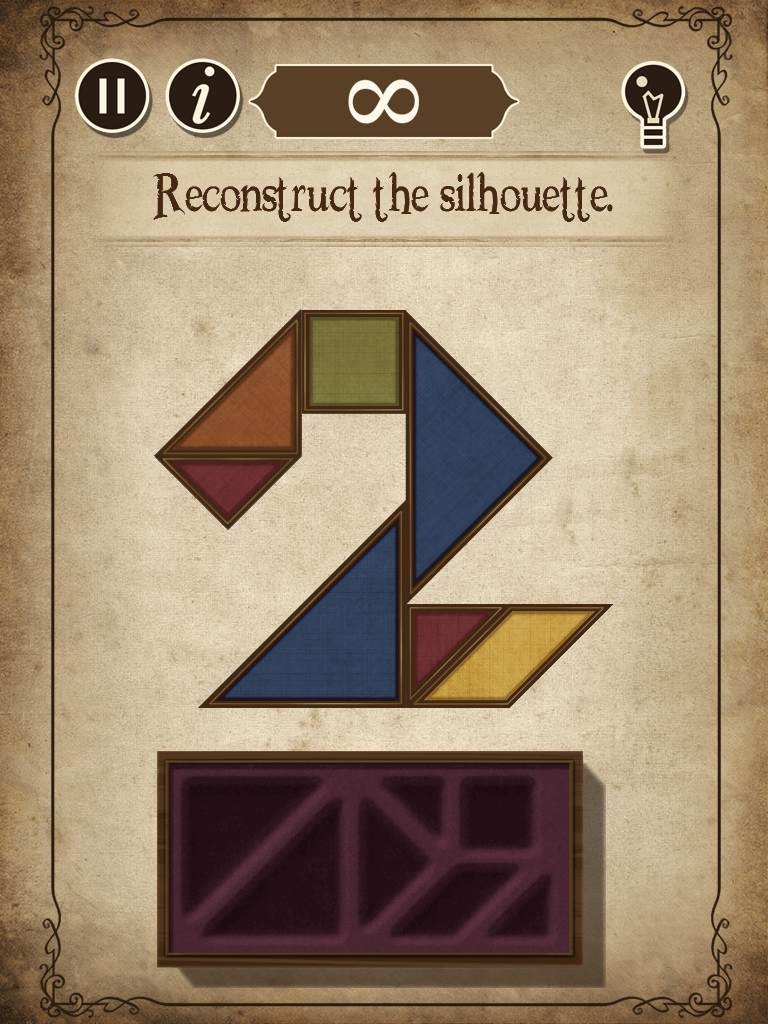
Box 2 - Look at the Solution for Level 36. If you inspect the tangram, you'll find it's shaped like the number 2. Change the number in box 2 to 36.
Box 3 - The solution to Riddle #13 at Level 95 is "THREE". Change the number in box 3 to 95.
Box 4 - Go to the Level 35 page. This time, Mannequin is holding up 4 fingers. Change the number in box 4 to 35.
Box 5 - Look at the Solution for Level 59. After solving the puzzle, note how the number 5 at the top row is lit green. Change the number in box 5 to 59.
Box 6 - Look at the Solution for Level 50. When this puzzle is solved, the number 6 is lit. Change the number in box 6 to 50.
Box 7 - Look at the Solution for Level 54. Inspect Mannequin's sleeve in the picture to find the number 7. Change the number in box 7 to 54.
Box 8 - Look at the Solution for Level 21. If you look at the second square from the left in the middle row, you'll find a shape that looks like the number 8. Change the number in box 8 to 21.
Box 9 - Look at the Solution for Level 90. Inspect the inside of Mannequin's ear in the picture to find the number 9. Change the number in box 9 to 90.
Box 10 - Solve the Magic Squares #2 puzzle at Level 70. When all of the numbers are lit at the end, the number 10 will repeatedly flash on and off. Change the number at box 10 to 70.
Solution
Mannequin's Party Riddle (50 solved)
After solving 50 puzzles, Mannequin will ask you how many candles were at his birthday party.
Use the clues from the last video clip to find the solution:
"If I host a dinner party and invite four guests...
and those guests each bring 2 more...
and half of all my guests bring a cake along...
And each cake had 13 candles...
How many candles are at my dinner party?"
The first thing you need to find is the number of guests.
Mannequin starts by inviting four guests who each bring 2 guests of their own so it would look something like:
Guest A brings 2 more.
Guest B brings 2 more.
Guest C brings 2 more.
Guest D brings 2 more.
Add all the guests to find a number of 12 total guests.
If half of all the guests bring a cake, then there are 6 cakes.
If each cake has 13 candles, then 6 x 13 = 78.
Enter in the number 78 and press the Submit button.
Mannequin's Puzzle (90 solved)
When you have successfully completed 90 puzzles, Mannequin will try to stop you by boarding up the screen.
Repeatedly tap the boards, starting at the bottom and moving up, to remove the nails and then the board.
Posted by: Trinn |
September 17, 2012 8:02 PM
|
September 17, 2012 8:02 PM