

Tearstone
Platform: Mac, Windows
![]() Tearstone, the new adventure/hidden object hybrid from newcomer DragonsEye Studio, is a fantastic tale of an epic quest that involves an absent-minded professor, goblins, floating islands, and sheep, amongst other things. Answer the professor's call for help and find yourself embarking on a long and involved journey that will end with you becoming the only one who can save the mythical land of Tearstone, mostly by solving a lot of puzzles.
Tearstone, the new adventure/hidden object hybrid from newcomer DragonsEye Studio, is a fantastic tale of an epic quest that involves an absent-minded professor, goblins, floating islands, and sheep, amongst other things. Answer the professor's call for help and find yourself embarking on a long and involved journey that will end with you becoming the only one who can save the mythical land of Tearstone, mostly by solving a lot of puzzles.
 You play a hapless homebody who gets a letter one day from his friend Professor Haise, asking the player to come at once and help with...well, the letter is rather vague on that point, really. So off you run in the Professor's old car (is that a Studebaker?) to help him excavate a ruin that leads to a fortress which leads to an infinite stair (hidden in a tree) which leads to a testy guard goblin which leads to a loooooong elevator ride which leads to a bucolic countryside which leads to...you get the picture. Eventually you'll be traveling to floating islands, talking to ghosts, and attempting to become the "Chosen One", whatever that may end up being.
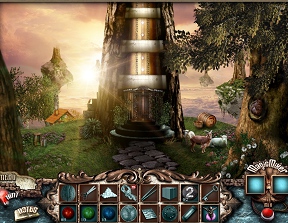
The first chapter of the story where you get the call from your professor friend plays out as a helpful tutorial, which is good because the gameplay of Tearstone is probably quite different than what you may be used to with the standard hybrids on the market today. To begin with, you will not be facing any classic hidden object scenes (with a list and a bunch of random objects to be found). In Tearstone, every item you find has a use and a purpose, everything you pick up has a function, and there are no random skateboards or gramophones to be found. Instead, the bottom of your screen serves as both your item list (with a picture of what you are looking for as well as a description) that becomes your inventory once you find the item or items. Sometimes you will be looking for a single thing, sometimes you will be looking for multiples of a thing, and sometimes you will need to combine two items together to create a "mix", a third item that is needed to accomplish a task. Fortunately you have a handy mixer machine to the right of your inventory that allows you to combine and create to your heart's content.
 Wandering around the increasingly bizarre world of Tearstone is as simple as the point and click of a mouse. The cursor will become (of all things) a weathervane to indicate areas that you can travel to. Look also for a changing cursor that becomes gears (puzzles and areas that need an object(s) added) and a hand (indicating that you can pick up and use an object but not put it in your inventory). Backtracking along your path is even easier and accomplished with a handy "back" button that is part of the inventory control structure. Also along for the ride is a handy notebook that records vital information and goals and a refilling hint timer that is very useful for both finding objects and figuring out what move to make next.
Analysis: Despite the holes in the storyline Tearstone is quite frankly a breath of fresh air in the crowded field of adventure/hidden object hybrids. Although you will be finding some objects along the way Tearstone has ditched most of the conventions of standard hidden object finding: no lists, no finding random objects, no stumbling into "scenes" of piles of junk, etc. What Tearstone does instead is emphasize the exploration and puzzle solving aspects to the point where you could say that the game has become almost pure point-and-click adventure.
 The backgrounds and graphics are beautiful and the deeper you get into the game the more fantastical and stunning they become. Adding depth to your adventures are some fun, interesting, crabby, or just downright creepy characters that you will need to interact with along the way (that fortune-teller is going to give me nightmares for weeks!). Adding to the gameplay is the atmospheric music provided by Xtruist. Best of all are the puzzles, a mix of conventional games (jigsaw and slider puzzles) and more original puzzles. The fact that you must figure out where and when to use your items means that you are looking at a lot of logic and problem solving. Well, mostly logical, although at one point you, as a guest, get to tear apart your hosts' house while they stand there and smile at you. And although you have a pretty satisfying ending, the possibility is there for your adventures to continue (DragonsEye Studio tells us that Tearstone is the first in a planned trilogy).
If there is a downside it is the length of gameplay, which is short, as are most of the adventure hybrids on the market today. The story is also lacking a bit in detail and could stand to be fleshed out a bit more. Folks might be a bit split about the amount of help available in the game: those who are not used to classic point-and-click might be a little lost as to what needs to be done next, while more advanced and adventurous gamers will appreciate the lack of hand-holding and spoon-feeding available. This means that in places Tearstone can be seriously challenging, which only adds to its appeal for those who miss the good old days when adventure games were king.
Tearstone is a fantastic first effort by a new designer on the scene. Despite the flaws in the length of gameplay and the storyline DragonsEye Studio has come up with a fantastic, challenging, fun, and entertaining point and click adventure of the old school, with a few hidden object conventions thrown in. Get excited about adventuring again and help the professor and the land of Tearstone (even if you're not sure exactly why you are doing so) and enjoy a rollicking good time.
![]() Windows:
Windows:
Download the demo
Get the full version
![]() Mac OS X:
Mac OS X:
Download the demo
Get the full version


Walkthrough Guide
(Please allow page to fully load for spoiler tags to be functional.)
Tearstone Walkthrough
General Tips
Tearstone is a hidden object adventure game with heavy focus on point-and-click puzzles and inventory management.
Your inventory consists of items found around the world that are needed to solve puzzles and progress through the story.
There are several sceenshots that show where and how to find and use items, which are indicated by color-coordinated shapes.
If an area is interactable, it will be surrounded by a purple box.
If an item is used to interact with an area, that item is indicated by a colored square surrounding the item in your inventory list, as well as a matching colored line inside the purple square where the item is used.
Items found in a scene are surrounded in a colored box and the area in which the item is found is also surrounded in a similarly colored box.
Exits are indicated by orange arrows.
Screenshot.
This game involves quite a bit of backtracking, so some screenshots may only show possible interactions at one point in time.
Tutorial
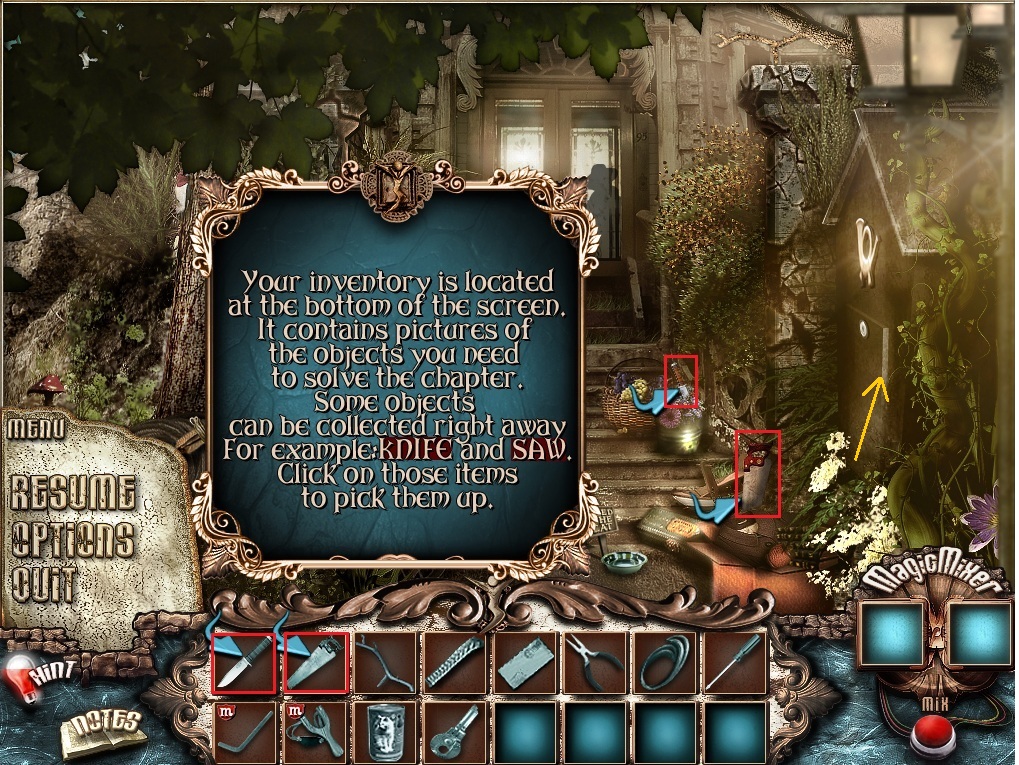
Follow the tutorial instructions in-game.
Start by picking up the knife and the saw.
Use the Knife from your inventory on the string around the rubber band, then click the band to pick it up.
Use the Saw on the tree in the upper right corner, then pick up the branch on the stair.
Put the Rubber Piece and the Branch in the magic mixer and mix them together.
Use the Slingshot on the shadowy figure in the doorway.
Go through the door on the right to the next scene.
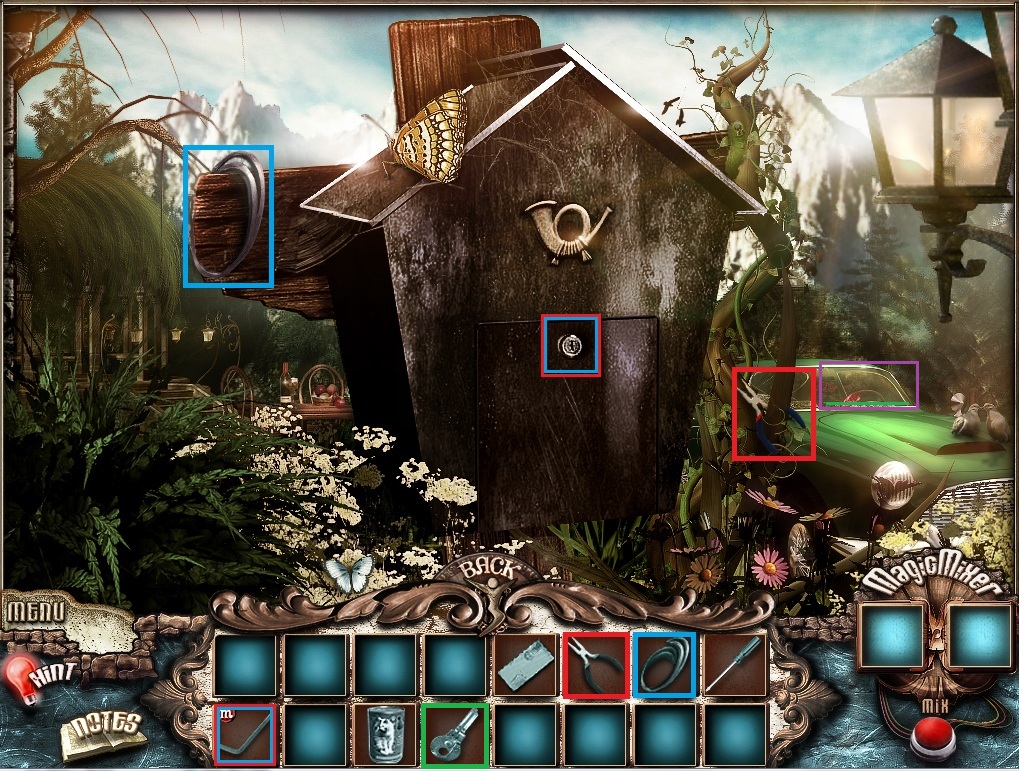
Pick up the Wire and the Pliers.
Screenshot.
Combine the Pliers and the Wire in the magic mixer to create the Lockpick.
Use the Lockpick on the small lock to the house-shaped mailbox.
Take the Cat Food and the envelope from inside the box.
Click back to go to the previous scene at the front door.
Use the Cat Food on the small dish with the sign that says "Feed The Cat"
Take the Screwdriver where the cat was laying.
Use the Screwdriver on the 95 sign.
Take the small Key from behind the sign.
Click the area to the right to return to the second scene.
Use the Key from your inventory on the green car.
Chapter 1
The Front Lawn
Click the reclining man with the "!" above his head.
Take the Pallete, the Truck Key, and the Stone Ball.
Screenshot.
Click the house to the left to move to the next scene.
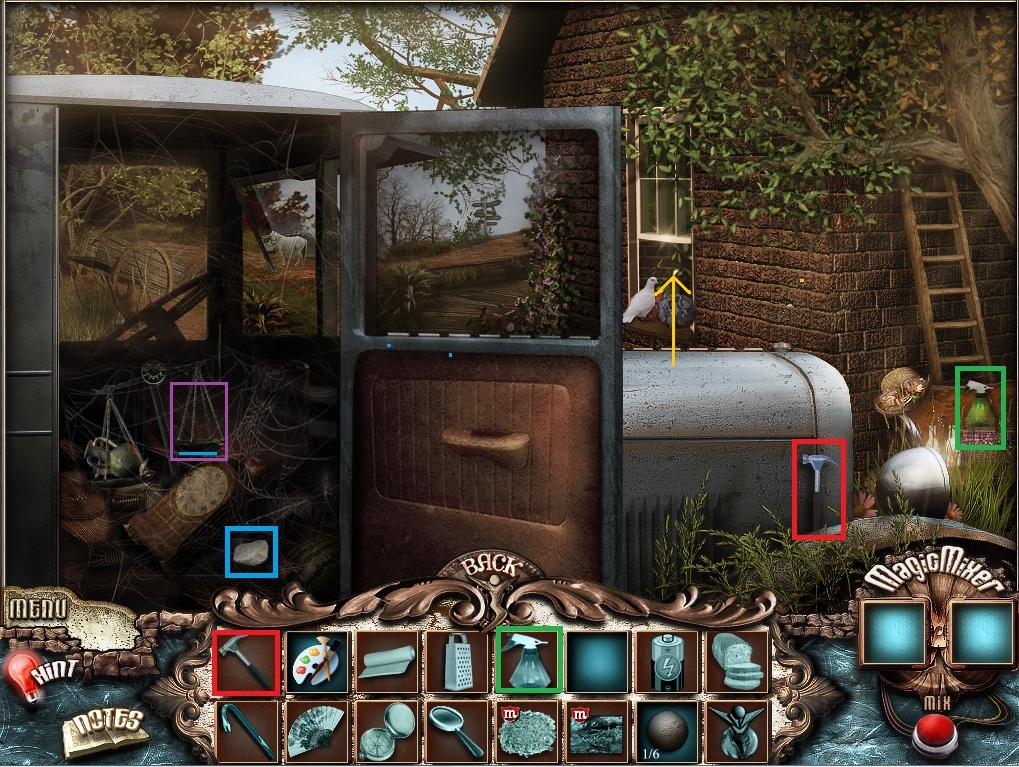
The Backyard
Use the Truck Key from your inventory on the truck's door lock.
Take the Hammer, the Bug Spray, and the Stone.
Screenshot.
Put the Stone on the right side of the scale to reveal the Battery.
Go through the window into the house.
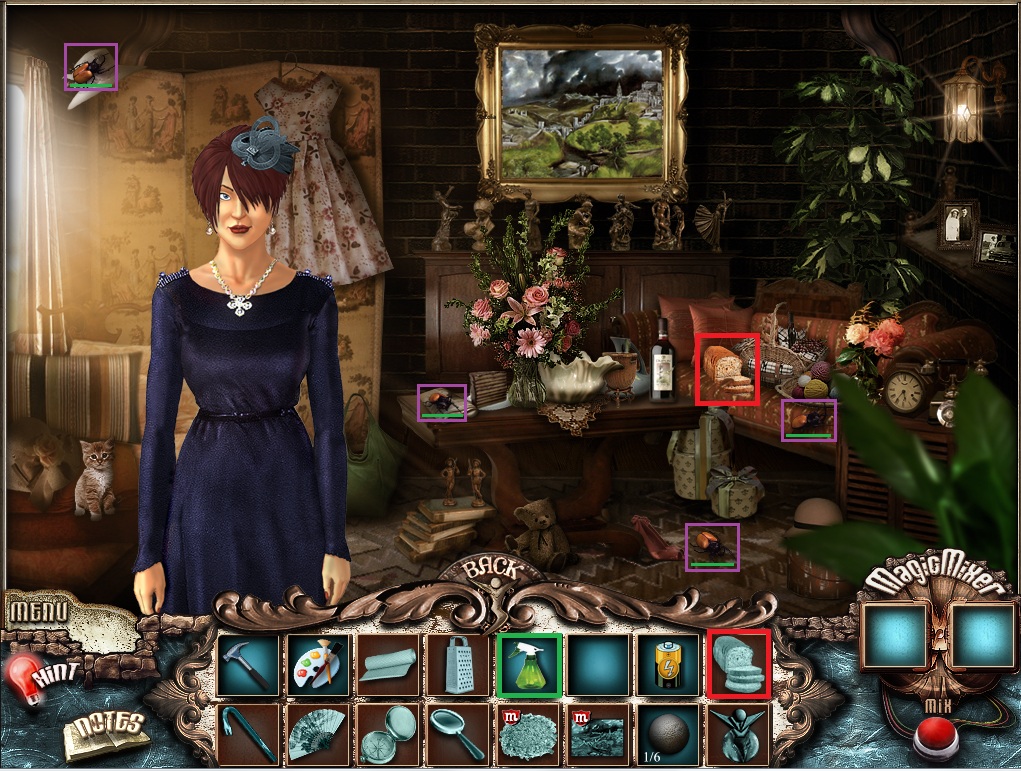
The Brick House
Click the woman with the "!" to talk to her.
Use the Bug Spray from your inventory on the four beetles around the house.
Screenshot.
Talk to the woman again and take the compass to her left.
Pick up the bread, then return to the front lawn of the hunter's cottage.
The Front Lawn
Use the Battery from your inventory on the radio to put the hunter to sleep.
Go through the door into the hunter's cottage.
The Hunter's Cottage
Take the Canvas and the Grater.
Screenshot.
Combine the Grater and the Bread in the magic mixer to make Crumbs.
Combine the Palette and the Canvas in the magic mixer to make the painting Forgery.
Click the box on the wooden bench to start the matching puzzle.
To solve this puzzle, match pairs of colored gems.
Click an octagon to reveal the colored gem underneath. Click another octagon to find a match.
If the colors are the same, both of the octagons will stay colored.
Solution.
Once the puzzle is solved, take the Stone Ball from inside the box.
Leave the cottage and go to the backyard.
The Backyard
Use the Compass from your inventory on the roadsign to find the path into the woods.
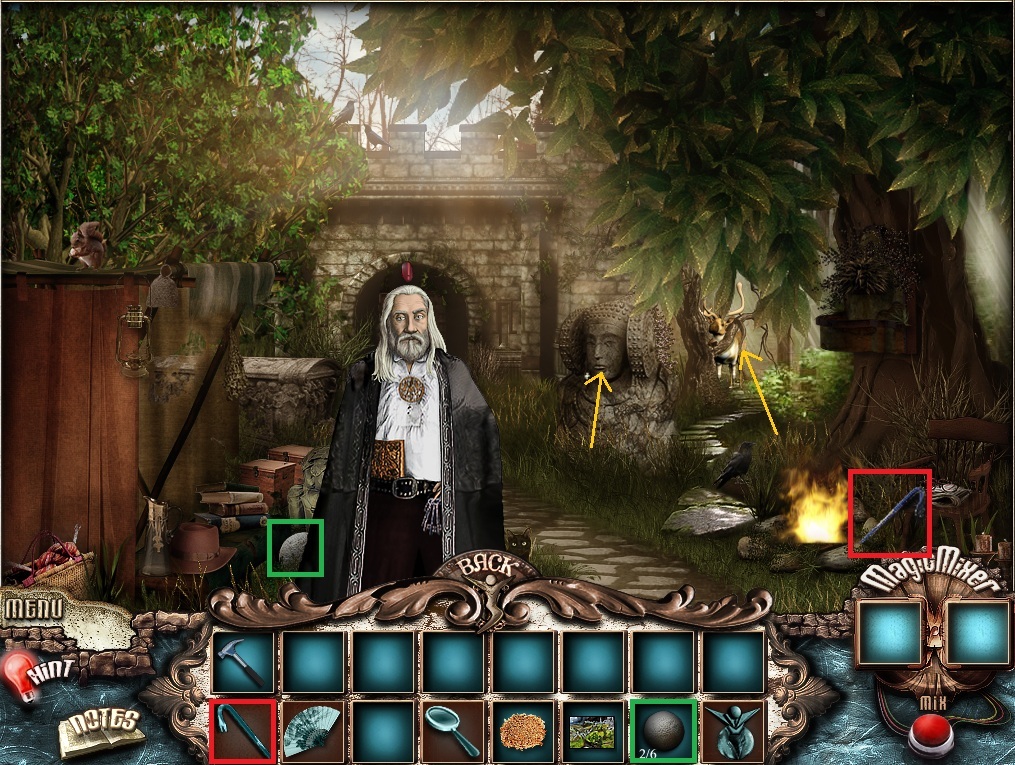
The Woods
Click the professor with the "!" to talk to him.
Take the Crowbar and the Stone Ball.
Screenshot.
Click the cobblestone path to the right to travel to the wall.
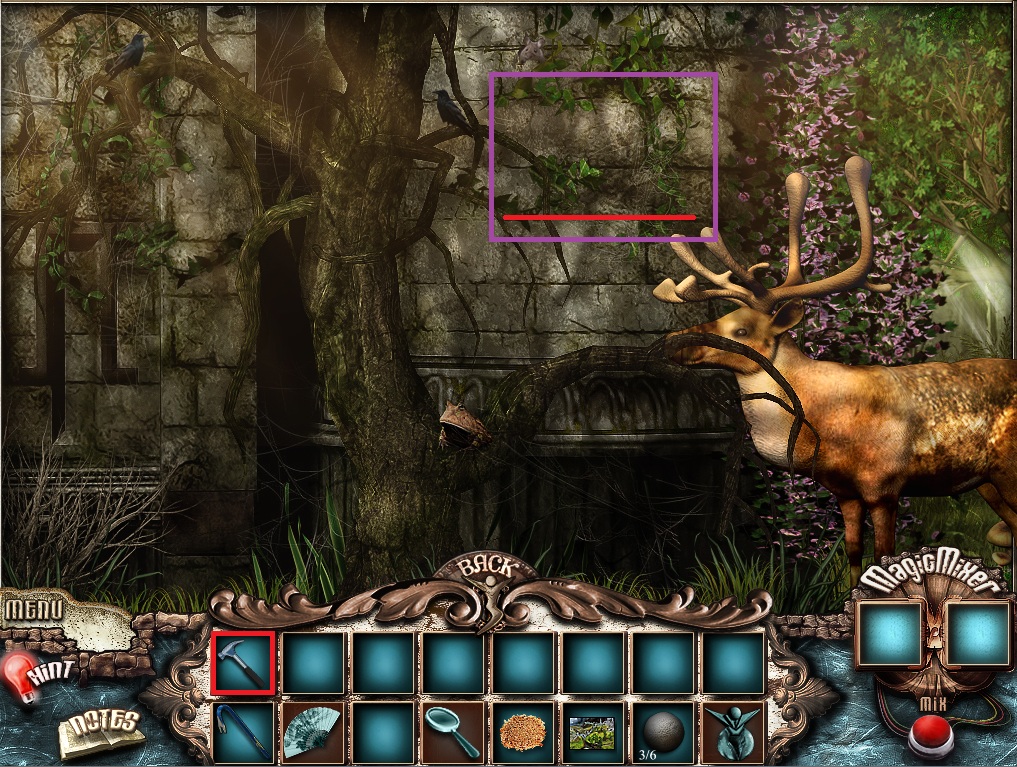
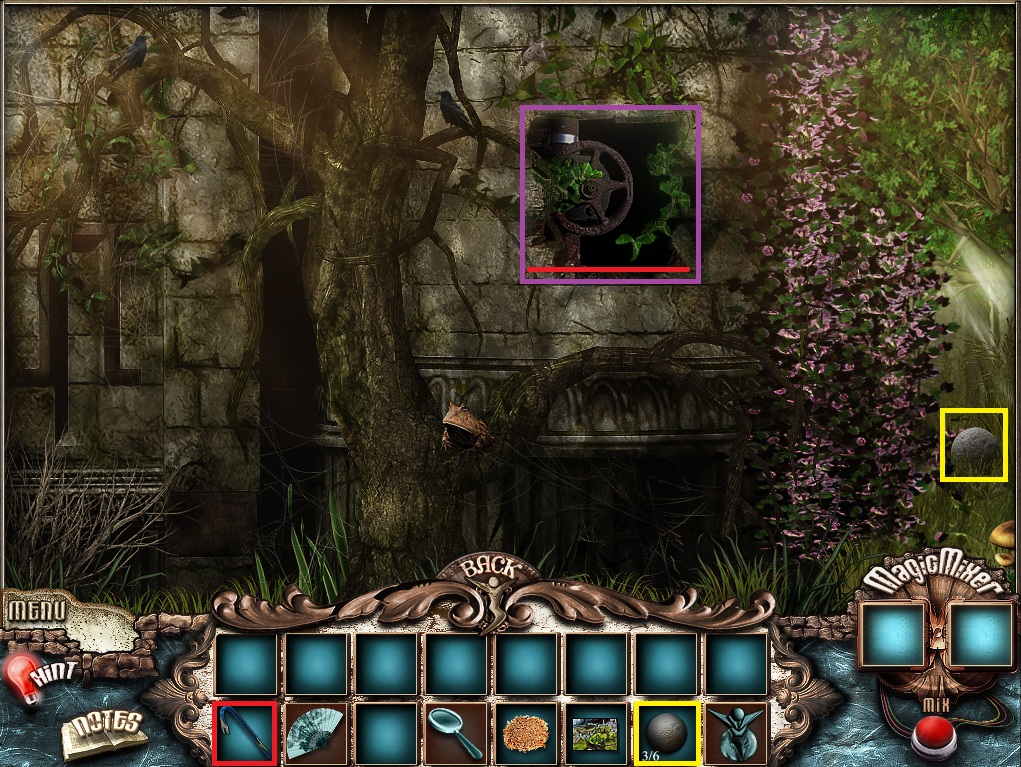
The Wall
Use the Hammer from your inventory on the stone wall.
Screenshot.
Take the Stone Ball
Use the Crowbar on the stuck valve to start the flow of water to the fountain.
Screenshot.
Leave the wall and return to the woods.
The Woods
Click the running fountain to start the picture puzzle.
To solve this puzzle, place the circular pieces in the correct spaces to complete the picture.
Correct pieces will match up perfectly to the image of its corresponding space.
Solution.
Once the puzzle is solved, click the professor to speak with him.
Take the magnifying glass he leaves you on the path.
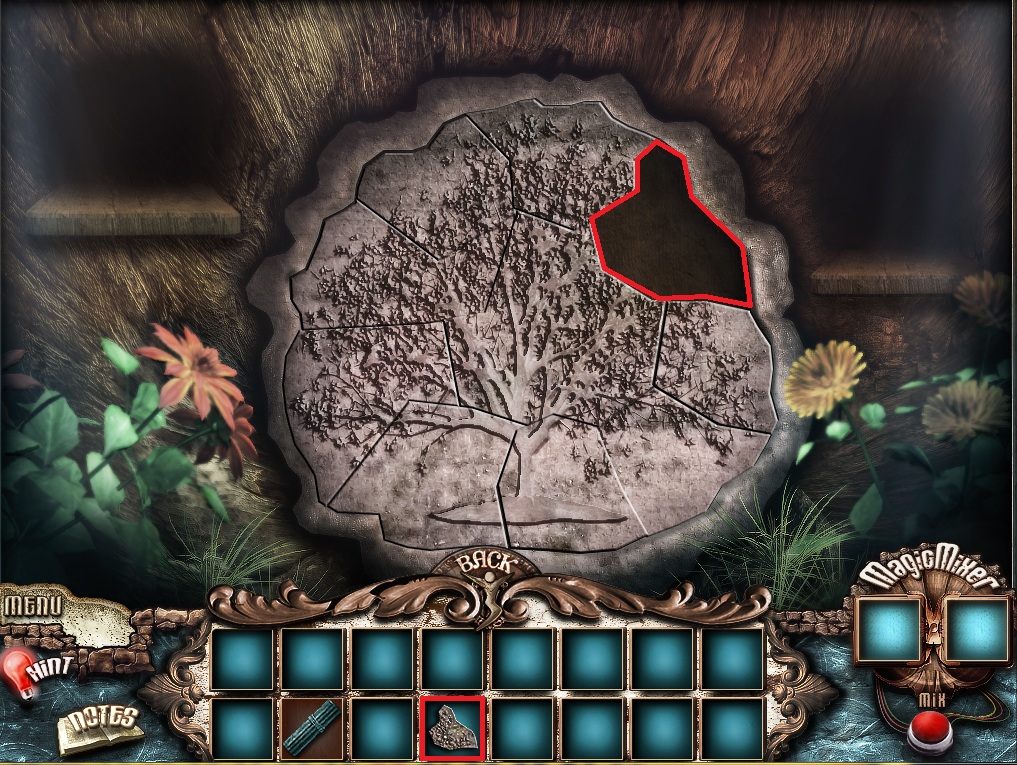
Click the statue head to take a closer look.
Pick up the Fan above the statue's shoulder.
Leave the woods and return to the front lawn of the hunter's cottage.
The Front Lawn
Use the Magnifier from your inventory on the mushroom-covered log to zoom in.
Click the grasshopper with the "!" to speak with him.
Give the grasshopper the Crumbs from your inventory.
Take the Magic Bottle from the ground and the Stone Ball from the top of the mushroom.
Leave the log scene and return to the Brick House.
The Brick House
Give the Fan from your inventory to the woman.
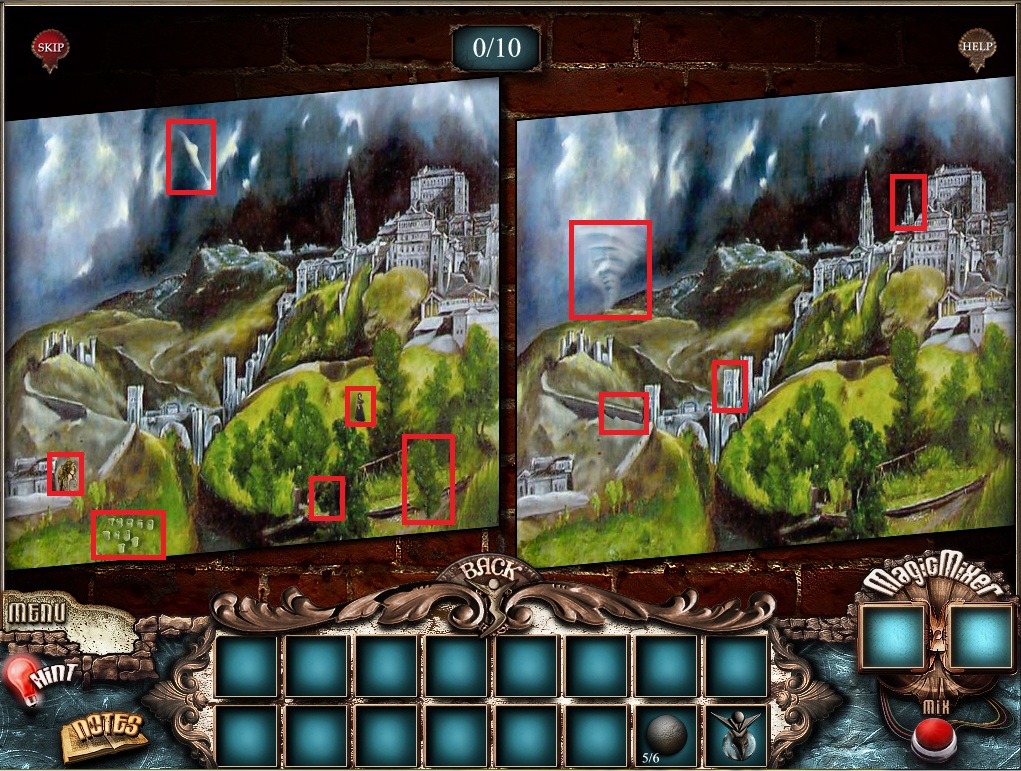
Replace the painting on the wall with the Forgery from your inventory to start the find-the-difference puzzle.
To solve this puzzle, find 10 differences between the original painting and the forgery.
Solution.
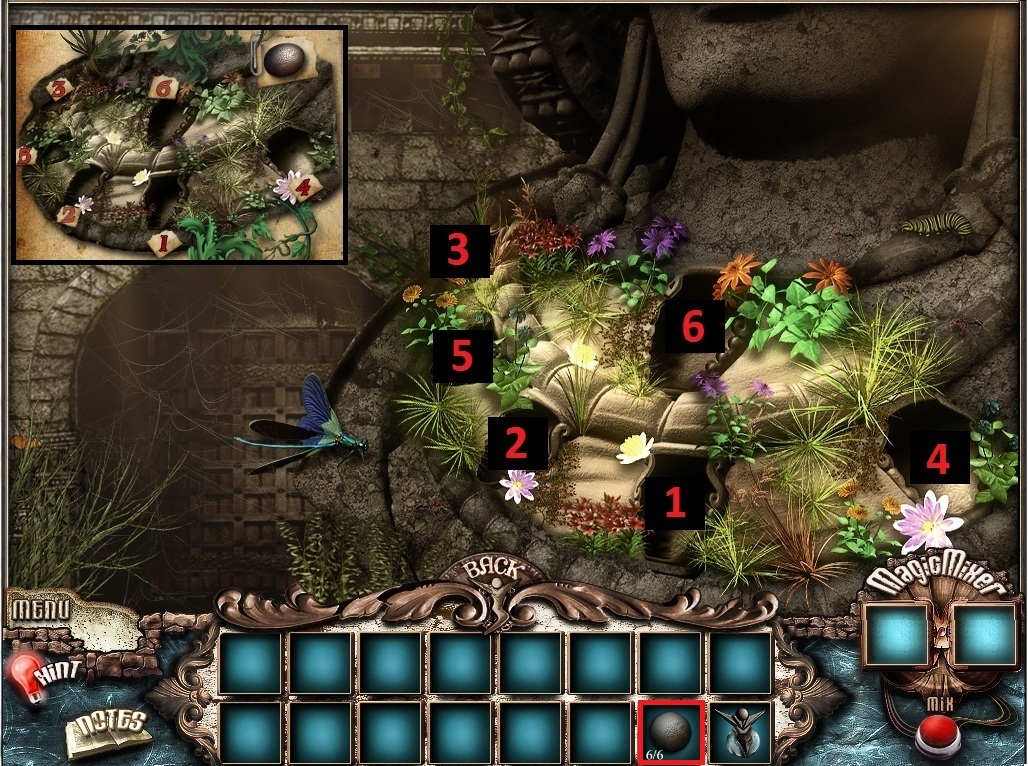
Once the puzzle is solved, a page will be added to your notebook with a picture of 6 numbers and a stone ball.
Take the last Stone Ball on the floor next to the green bag.
Leave the brick house and return to the woods.
The Woods
Use the Magic Bottle on the flowery fountain to fill it with water.
Click the large stone bust for a closer look.
Use the Magic Bottle from your inventory on the statue's neck to start the stone ball puzzle.
To solve this puzzle, place the Stone Balls from your inventory into the carved vases in the correct order.
Using the picture in your notebook as a reference, pick up a Stone Ball and drop it into each vase-shaped recess.
Solution.
Chapter 2
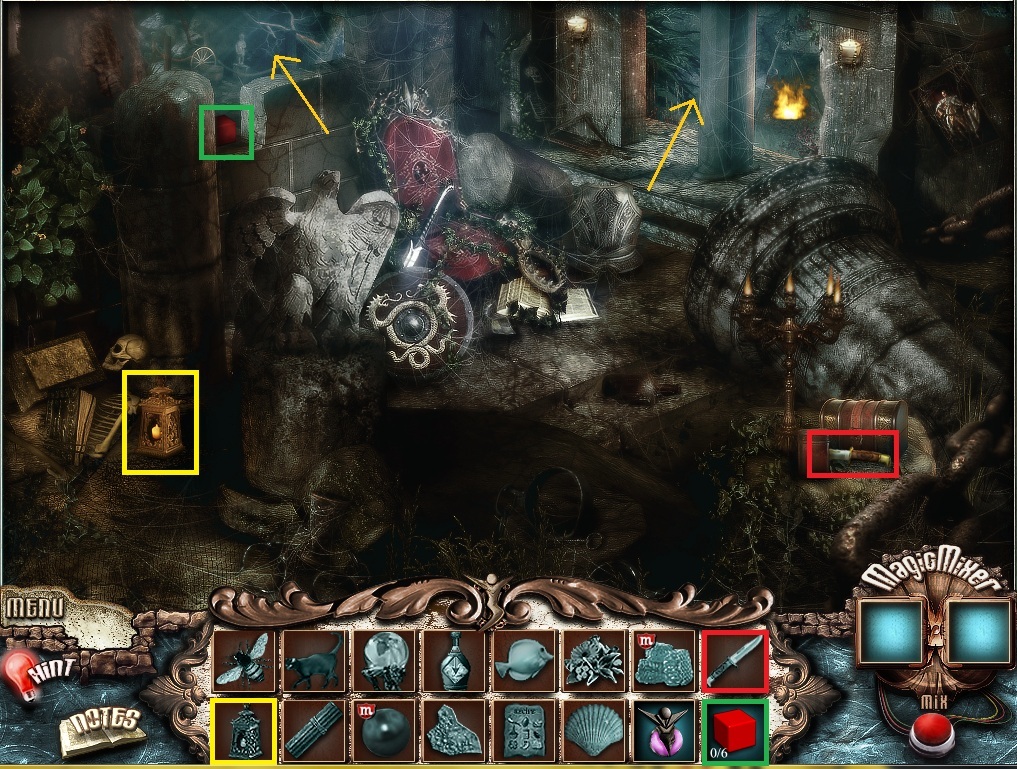
The Rubble Colonnade
Take the Red Cube, the Knife, and the Lantern.
Screenshot.
Leave through the left doorway to go to the Pathway.
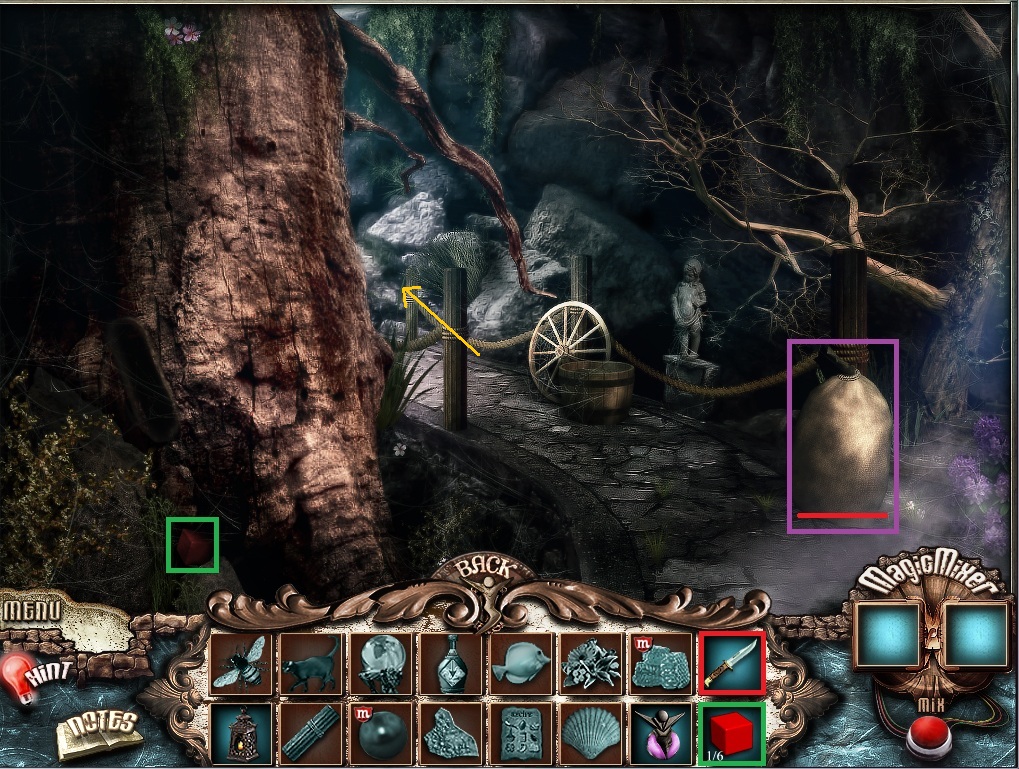
The Pathway
Take the Red Cube under the hollow of the tree.
Use the Knife from your inventory on the burlap sack to cut it open and reveal the Crystal Ball.
Screenshot.
Follow the path forward to the lake.
The Lake
Take the Red Cube and the Bee.
Screenshot.
Go back two times to return to the rubble colonnade, then take the doorway to the right to arrive at the courtyard.
The Alchemy Courtyard
Take the Red Cube.
Screenshot.
Click the fortune teller's hut to go inside.
Give the fortune teller the Crystal Ball from your inventory.
Take the recipe she drops on the counter, then talk to her again.
Back out of the hut to return to the courtyard.
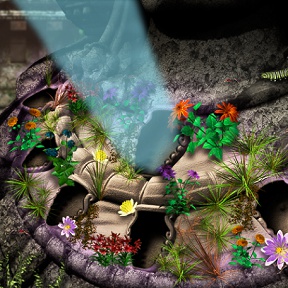
Use the Lantern from your inventory on the darkened bushes at the end of the track.
Use the Magic Bottle from your inventory on the dry flowers to the right of the squares.
Click the Flowers to pick them up.
Combine the Bee and the Flowers in the magic mixer to create the Honey Cubes.
Back up once to return to the courtyard.
Use the Recipe from your inventory on the ingredients atop the stone platform to start the alchemy puzzle.
To solve this puzzle, add the correct ingredients in order according to the recipe.
Lastly, put the Honey Cubes from your inventory into the mortar and pestle.
Solution.
Once the puzzle is solved, take the completed Elixer.
Leave the courtyard and return to the lake.
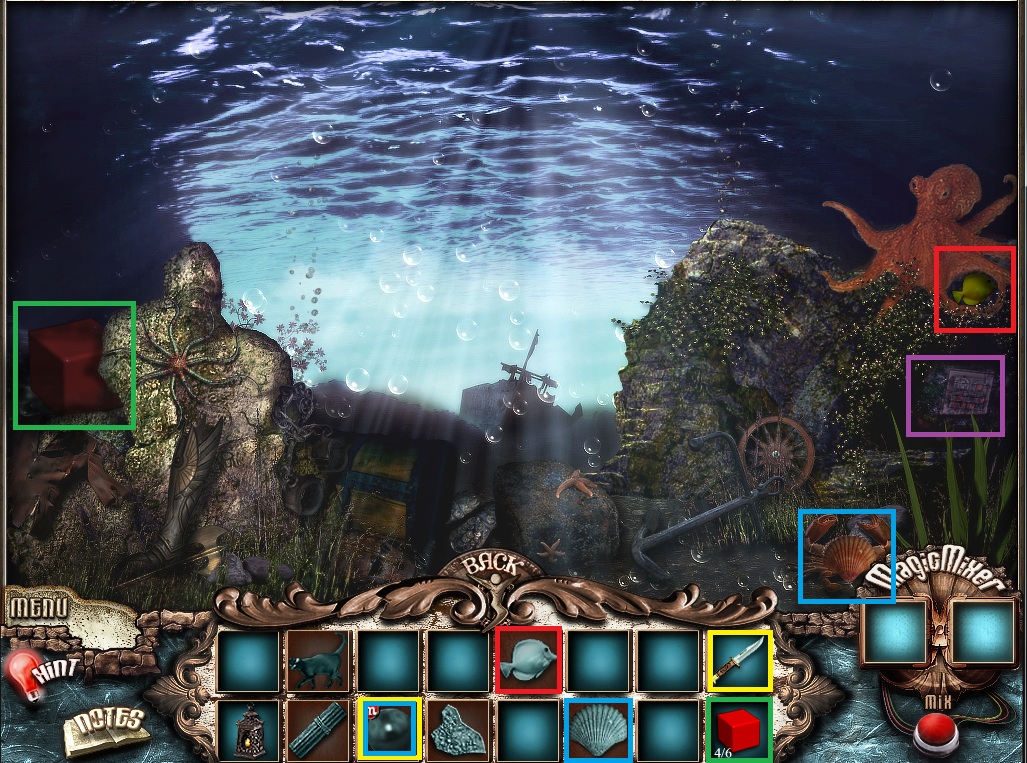
The Lake
Use the Elixer from your inventory on the lake water to dive underneath.
Pick up the Shell, the Red Cube, and the tropical Fish.
Screenshot.
Combine the Knife and the Shell in the magic mixer to create the Pearl.
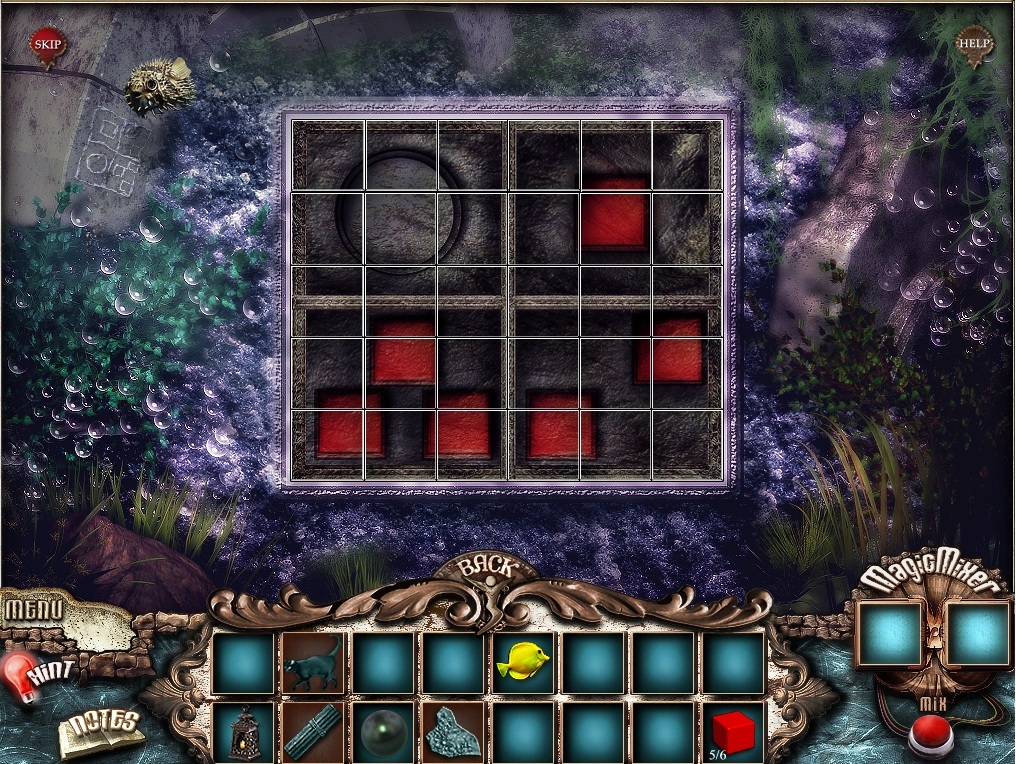
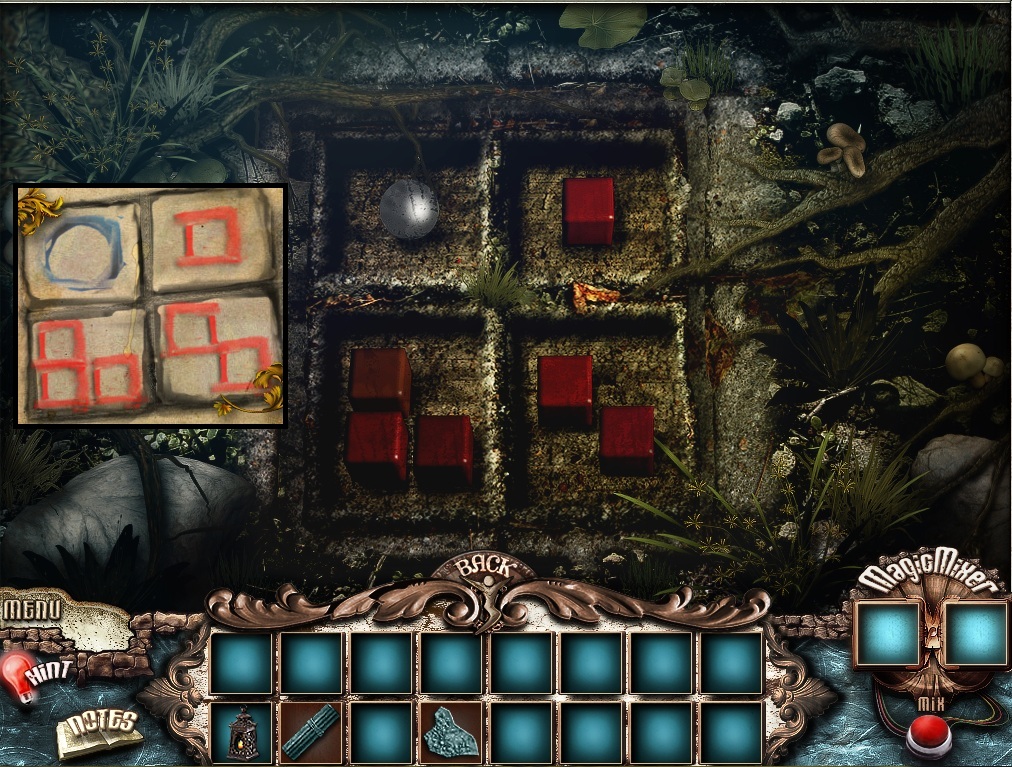
Click the plaque under the octopus to start the square picture puzzle.
To solve this puzzle, assemble the tiles to match the sketch in the upper left corner.
The sketch is actually rotated 90 degrees counter-clockwise.
The correct order is: circle in the top left, 1 square in top right, 3 squares in bottom left, 2 squares in bottom right.
Solution.
Once the puzzle is solved, a sketch of the solution will be added to your notebook.
Back up once to return to the surface of the lake.
Put the Fish from your inventory on the flat surface to lure out the black Cat.
Click the Cat to pick it up.
Leave the lake and return to the fortune teller's hut in the alchemy courtyard.
The Alchemy Courtyard
Give the Cat from your inventory to the fortune teller.
Take the last Red Cube from the counter.
Back up once to the courtyard.
Click the bushes at the end of the track to zoom in.
Place the Red Cubes and the Pearl from your inventory into the square shaped spaces in a pattern matching the picture from your notebook.
Solution.
Leave the courtyard and return to the colonnade.
The Rubble Colonnade
Replace the Lantern from your inventory at the side of the skeleton.
Pick up the illuminated Puzzle Piece.
Leave the colonnade and return to the lake.
The Lake
Click the tree stump at the side of the water to start the jigsaw puzzle.
To solve this puzzle, place the jigsaw pieces in the correct position to complete the picture.
Take a piece from the shelves on the left and right side, then place them in the matching space in the center of the stump.
Add the Puzzle Piece from your inventory to the last empty space to complete the puzzle.
Solution.
Once the puzzle is solved, the plate will slide over, revealing the Lever.
Take the Lever and go to the pathway.
The Pathway
Use the Lever from your inventory on the hollow of the tree to the left.
Click the lever to open the secret passage.
Chapter 3
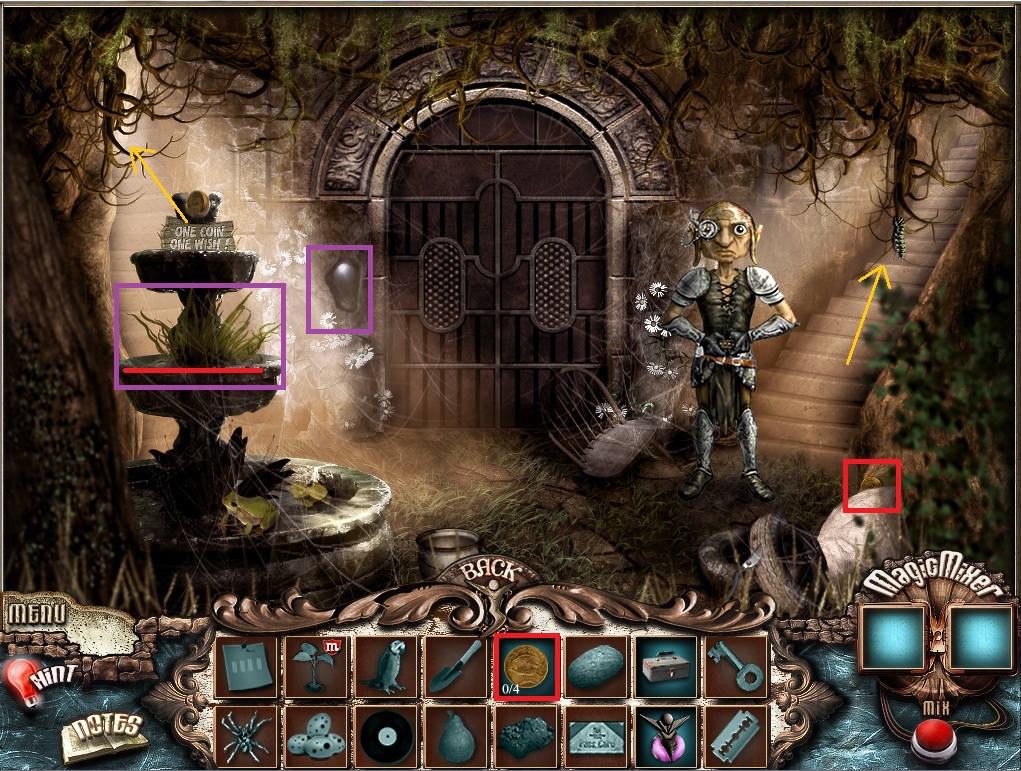
The Control Room
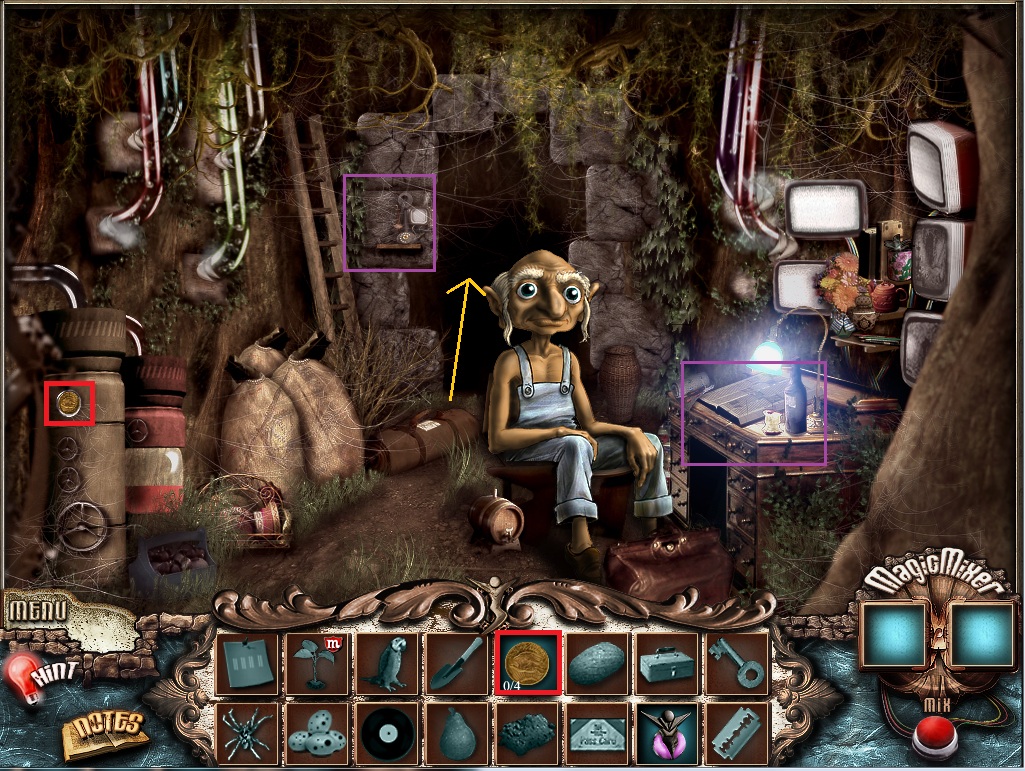
Click the goblin in the overalls to speak with him.
Take the gold Coin.
Screenshot.
Go straight ahead through the doorway to the fountain.
The Fountain
Use the Coin from your inventory on the wishing fountain.
Pick up the Toolbox from the side of the fountain.
Take the coin behind the the rock at the foot of the stairs.
Screenshot.
Toss the Coin from your inventory into the wishing fountain.
Pick up the Spider from the second tier of the fountain.
Go back to the control room.
The Control Room
Give the Toolbox from your inventory to the goblin.
Pick up the Blueprint left behind on the goblin's chair.
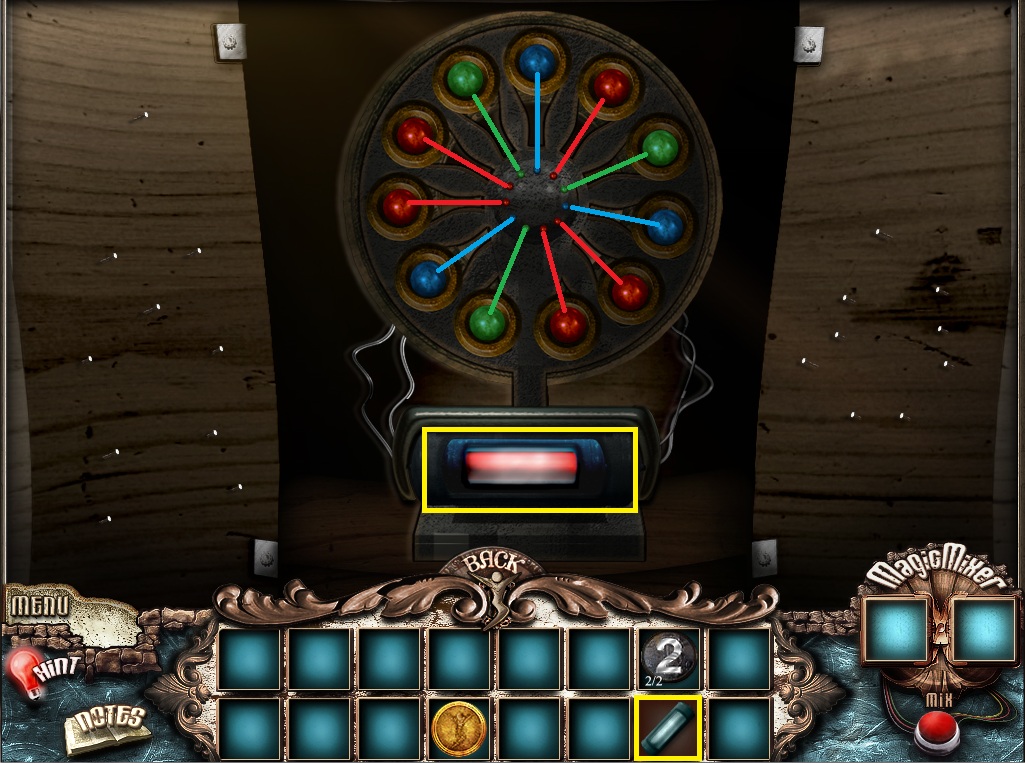
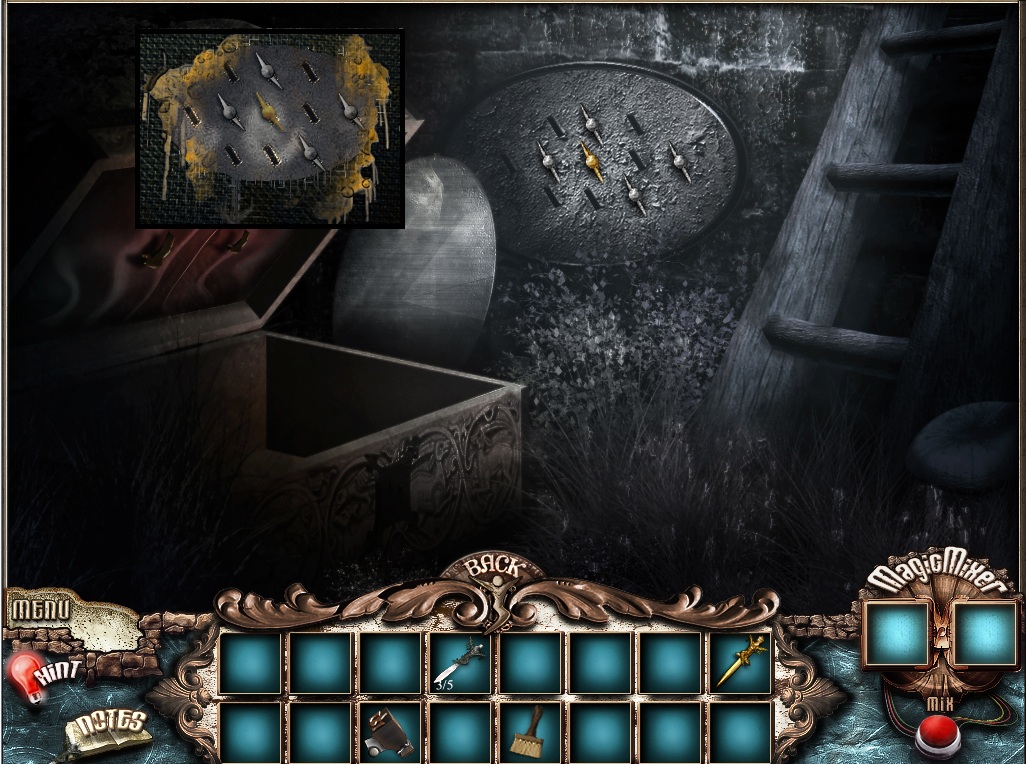
Use the Blueprint on the control panel to start the fuse puzzle.
To solve this puzzle, find all five fuses and place them into the fuse panel matching the pattern shown on the blueprints.
Solution.
Once the puzzle is solved, push the big red button to sound the alarm and distract the guard.
Leave the control room and go to the fountain and then up the right staircase to the office.
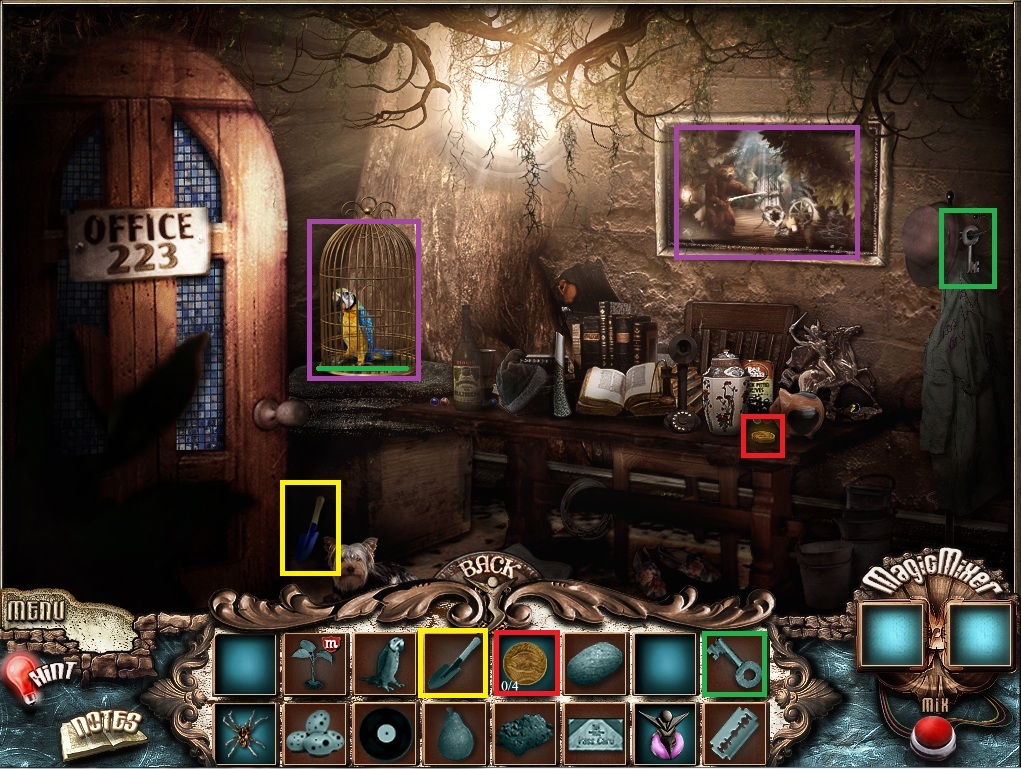
Office 223
Pick up the Coin, the Cage Key, and the Shovel.
Screenshot.
Use the Cage Key on the bird cage.
Click the Parrot to pick it up.
Back up once to return to the fountain.
The Founatain
Use the Coin from your inventory on the wishing fountain.
Pick up the eggs on the side of the fountain.
Return to the control room.
The Control Room
Use the Parrot from your inventory on the telephone next to the doorway.
Pick up the Razor blade beside the parrot.
Click the telephone to pick up the receiver.
Dial the office number from the telephone. 2-2-3
Return to the fountain and then go up the left staircase to the garden.
The Garden
Pick up the Pear at the top of the tree.
Screenshot.
Use the Razor from your inventory on the magic bean poster.
Pick up the Seed from behind the poster.
Use the Shovel from your inventory on the plot of ground in front of the statue.
Click the last gold Coin to pick it up.
Click the dug-up Soil to add it to your inventory.
Combine the Seed and the Soil in the magic mixer to create the plant.
Go back to the fountain.
The Fountain
Use the Coin from your inventory on the fountain.
Take the Record from the second tier of the fountain.
Go back once to the control room.
The Control Room
Click the control panel to zoom in.
Push the big red button again to send the guard out of the office.
Return to the office
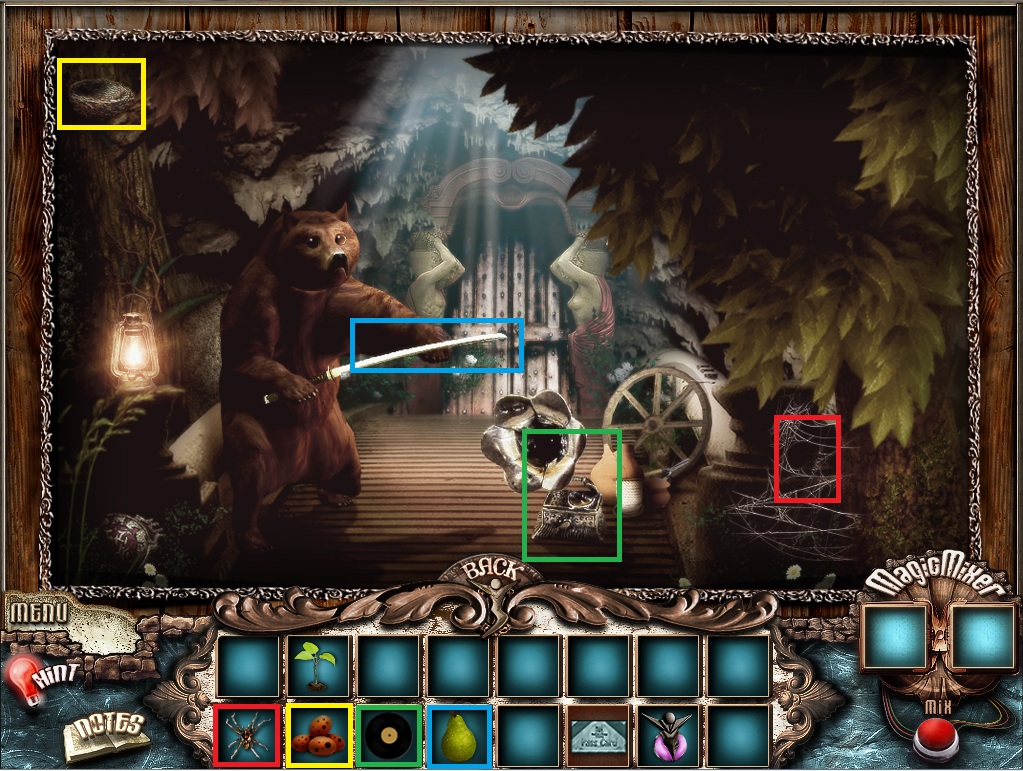
Office 223
Click the painting on the wall to start the painting puzzle.
To solve this puzzle, place the items from your inventory in their proper position on the painting.
Put the Spider on the web.
Put the Eggs in the bird nest.
Put the Record on the gramophone.
Put the Pear on the bear's sword.
Solution.
Once the puzzle is solved, a Pass Card will break through the top of the canvas.
Click the Pass Card to put it in your inventory and add an image of it to your notebook
Leave the office and return to the fountain.
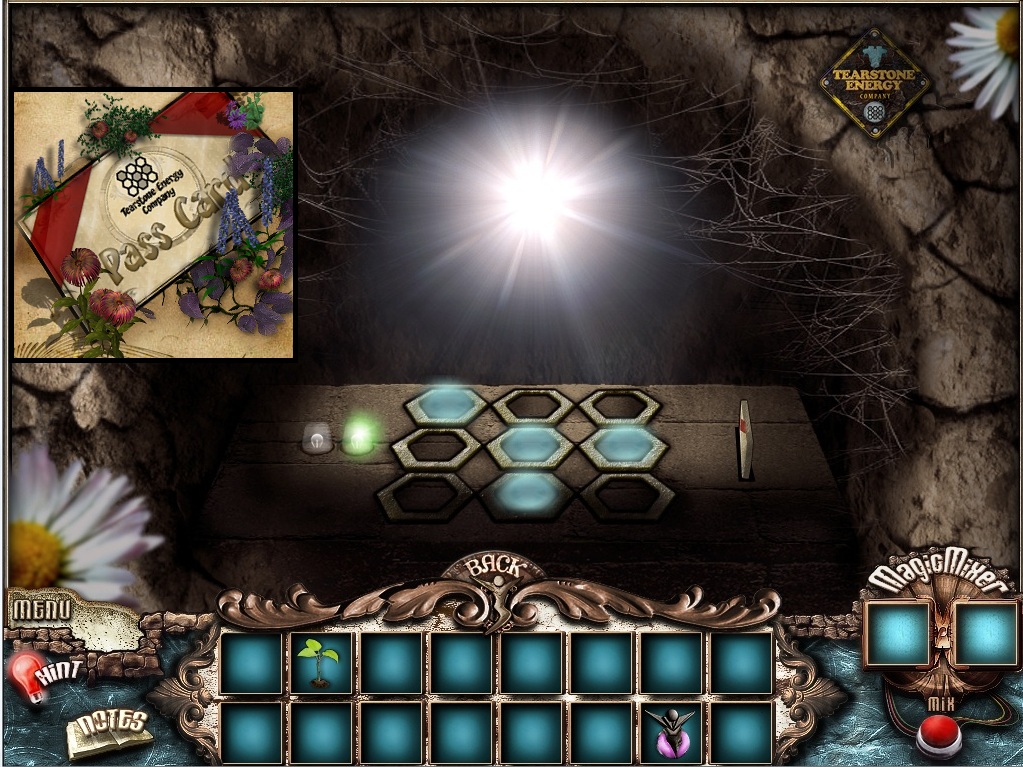
The Fountain
Use the Pass Card from your inventory on the control panel beside the door to start the passcode puzzle.
To solve this puzzle, click the hexagons to illuminate them in the correct order.
The solution is in the matching image of the passcard in your notebook.
Solution.
Once the puzzle is solved, back up once and go through the now opened double doors to the elevator.
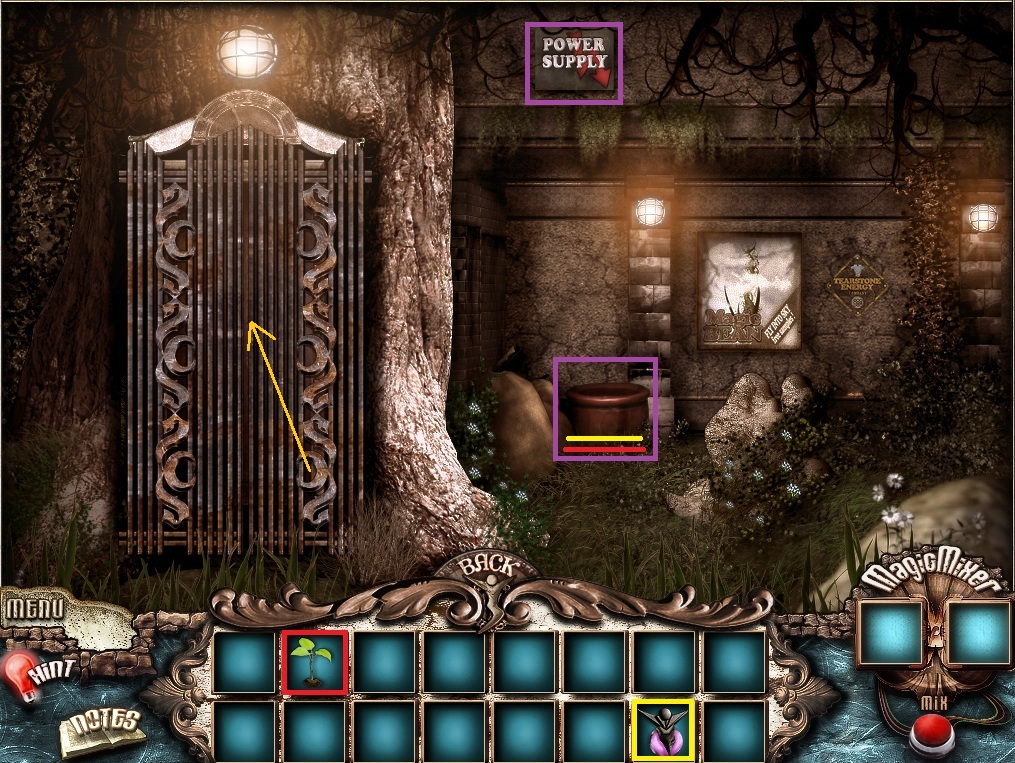
The Elevator
Put the Plant from your inventory into the flower pot.
Add the Magic Bottle from your inventory to the young plant to help it grow.
Screenshot.
Click the Power Supply sign to start the power tiles puzzle.
To solve this puzzle, fill in the grey areas of the panel with the block tiles to the right.
There are a limited number of block tiles, so place them strategically around the grid.
Solution.
Once the puzzle is solved, step into the elevator.
Chapter 4
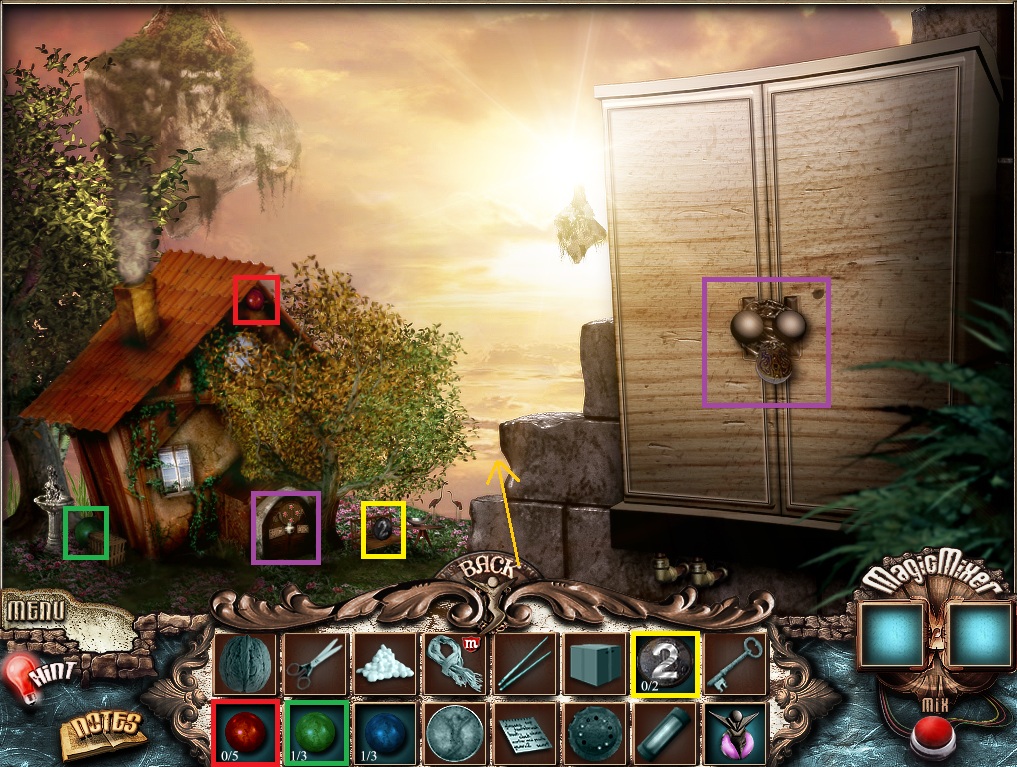
The Tower
Pick up the Green Ball and the Blue ball.
Screenshot
Go down the hill to the goblin cottage.
The Goblin Cottage
Pick up the Red Ball, the Green Ball, and the No.2 Coin.
Screenshot
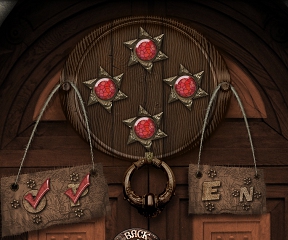
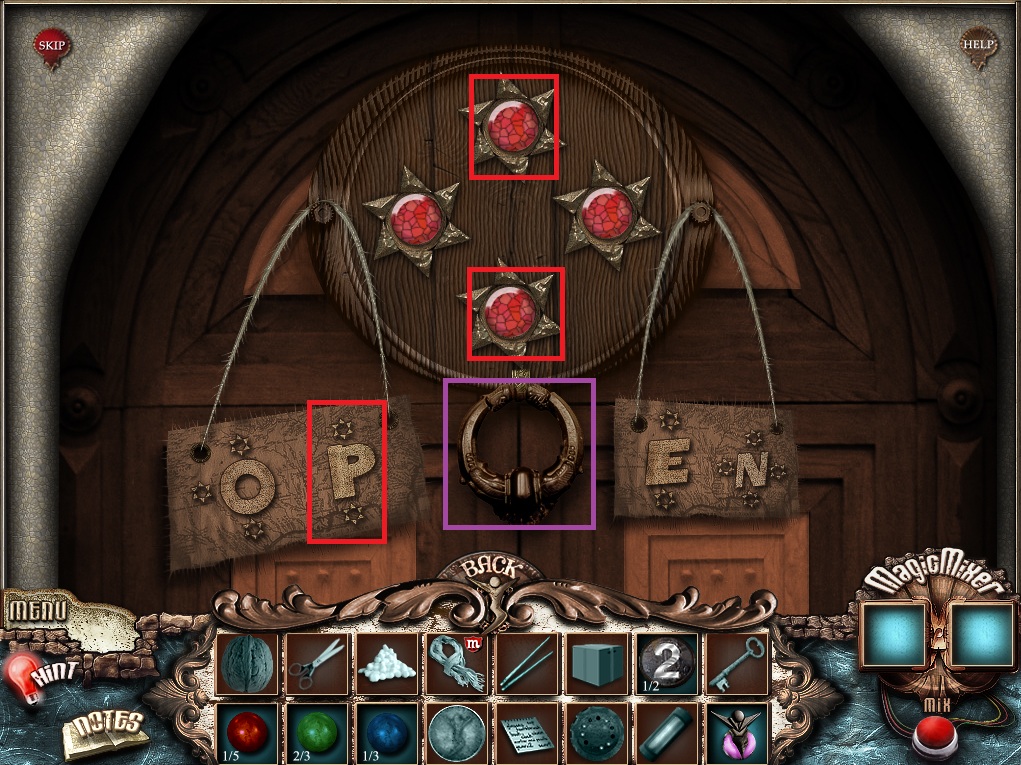
Click the cottage door to start the buttons puzzle.
To solve this puzzle, click the buttons at the top of the door in the correct order.
The combination for the buttons is shown around each letter.
Letters are separated by clicking the doorknocker.
"O"
Screenshot
"P"
Screenshot
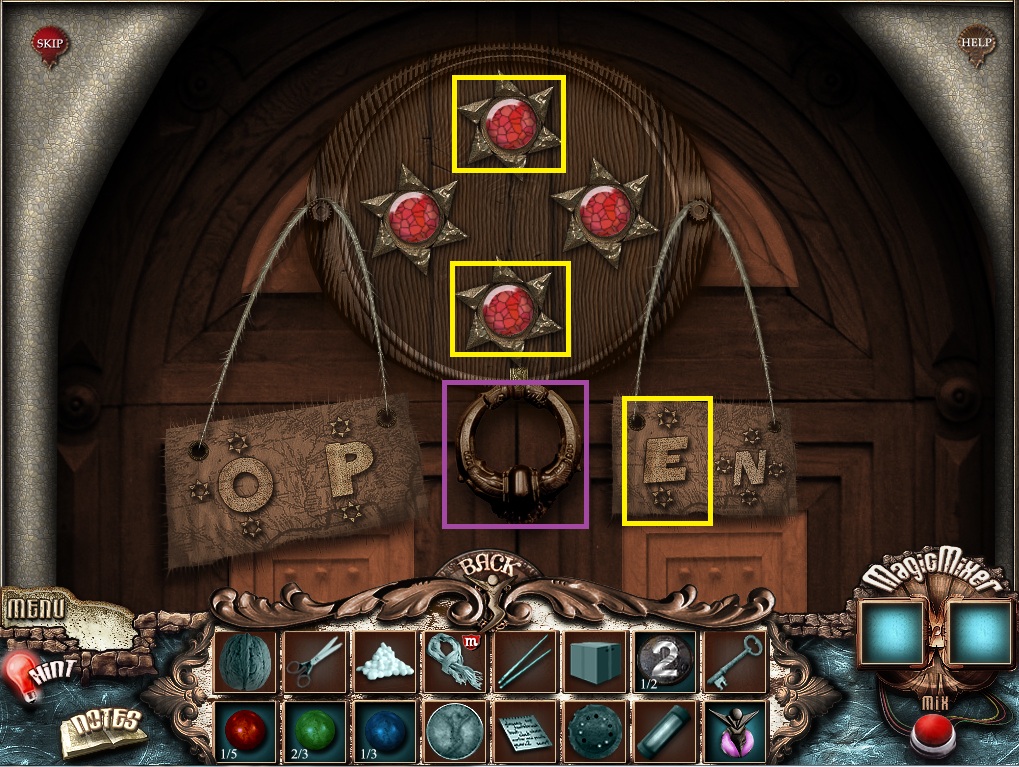
"E"
Screenshot
"N"
Screenshot
Once the puzzle is solved, click the door again to go into the cottage.
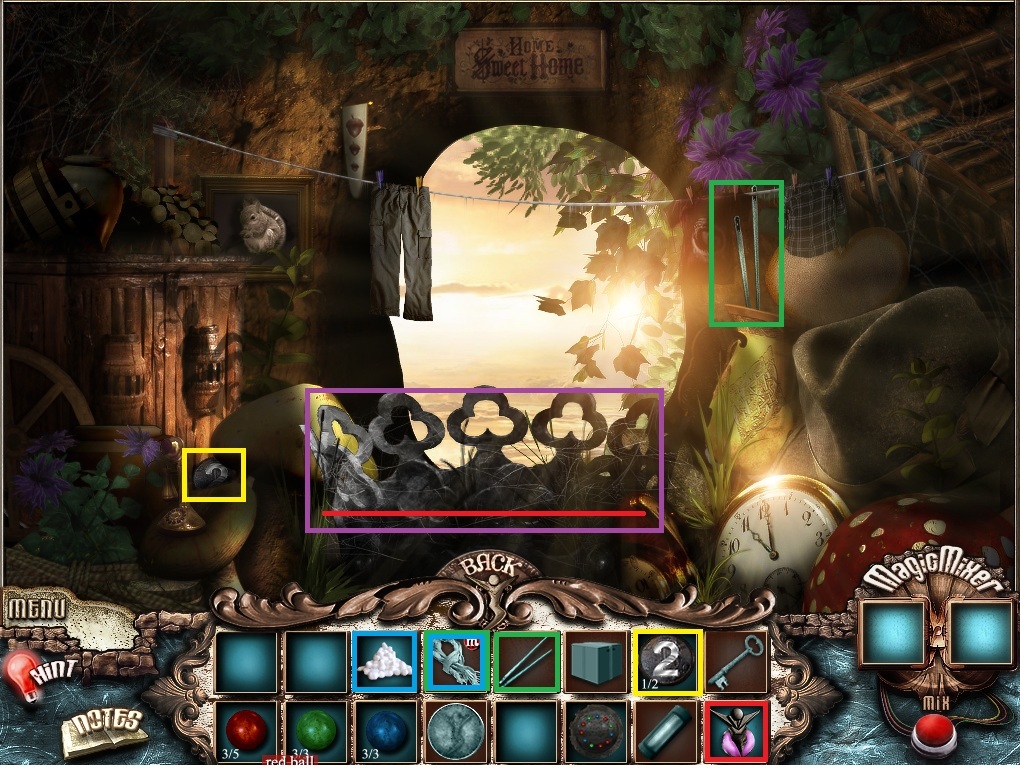
Inside the Cottage
Click the goblin woman to talk to her.
Take the note she leaves on the table.
Screenshot
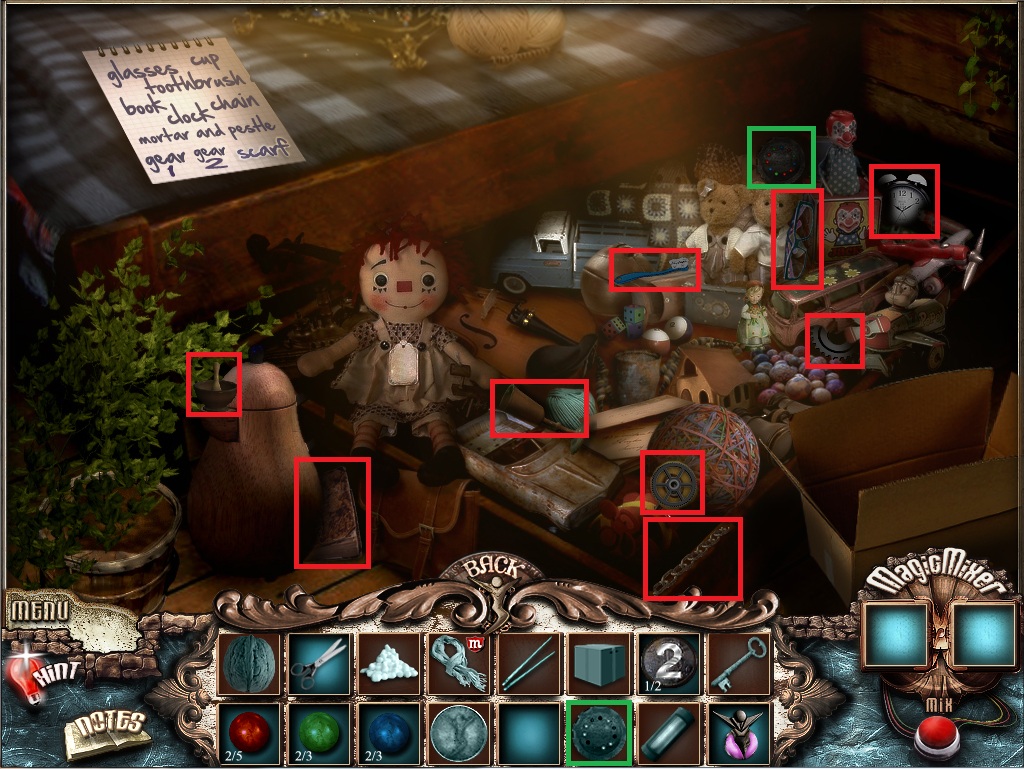
Pick up the Scissors, the Blue Ball, and the Red Ball.
Use the List from your inventory on the jewelry box.
Collect the items on the list. The scarf is still missing.
Screenshot
Take the Machine Part.
Leave the cottage and go forward to the cliffside.
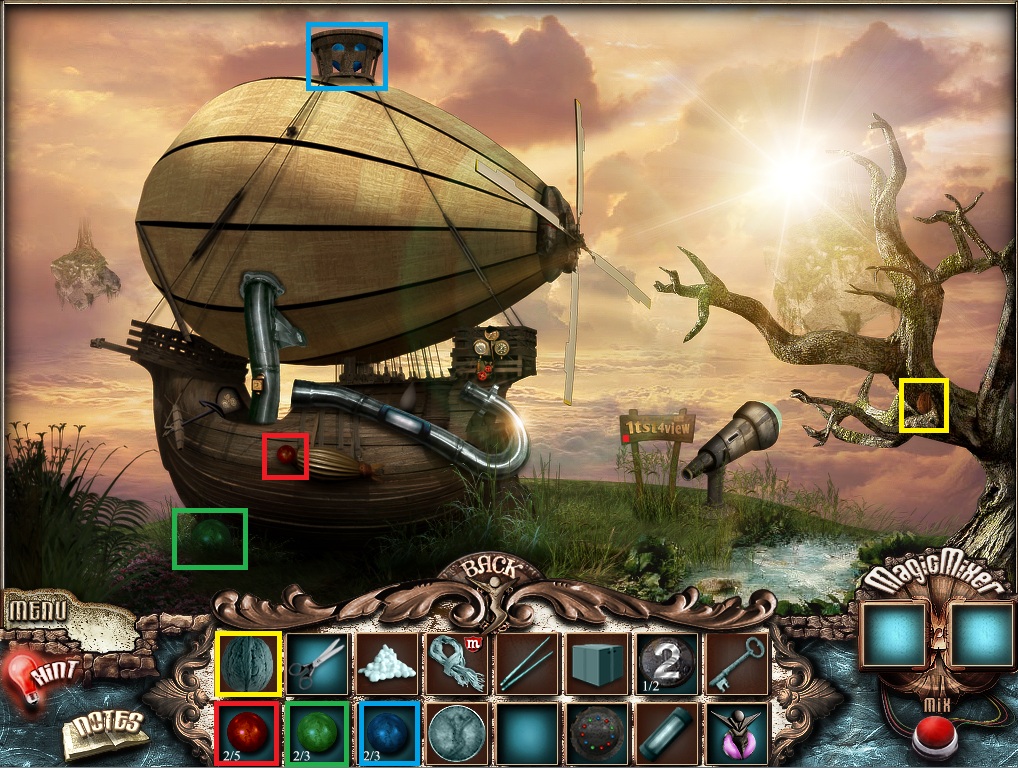
The Cliffside
Pick up the Red Ball, the Green Ball, the Blue Ball, and the Nut.
Screenshot
Leave the cliff and return to the tower.
The Tower
Use the Scissors from your inventory on the sheep.
Pick up the sheared Wool next to the wooden barrel.
Put the Nut from your inventory on the flat surface of the tree next to the squirrel in the hollow.
Go through the tree hollow into the squirrels nest.
The Squirrel Nest
Take the No.2 Coin and the sewing Needles.
Screenshot
Combine the Needles and Wool in the magic mixer to create the Scarf.
Use the Magic Bottle from your inventory on the stone crown to turn it into a golden jeweled crown.
Take the two Red Balls at the base of the crown.
Leave the nest and return to the inside of the goblin's cottage.
Inside the Cottage
Click the jewelry box to zoom in.
Add the Scarf from your inventory to the pile of things in the cardboard box on the right.
Click the box Carton to pick it up.
Take the gold TS Token that was hidden underneath the box.
Give the Carton to the goblin.
Take the Key from the arm of the goblin's chair.
Go back once to the outside of the cottage.
The Goblin Cottage
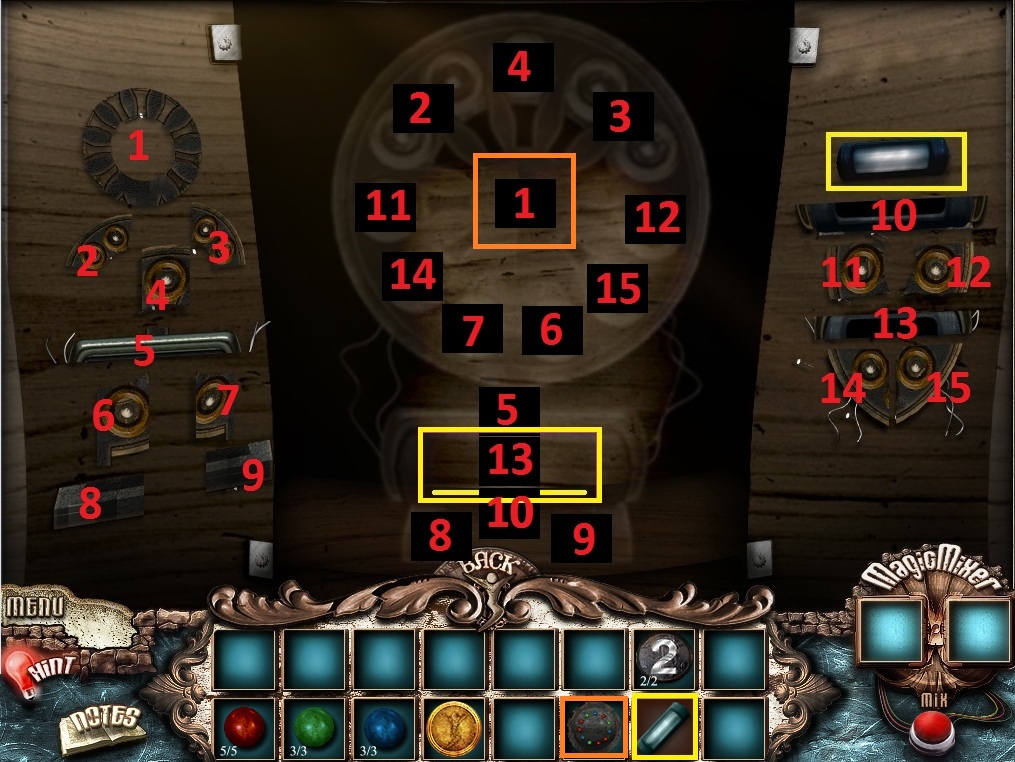
Use the Key from your inventory on the padlock of the large crate to start the turbine puzzle.
To solve this puzzle, assemble all the parts of the turbine to charge the bio-fuel canister.
Take the vial of bio-fuel and place it in the center of the diagram.
Place the parts on the left and right sides into the matching spaces in the middle diagram.
Once the device is assembled, place the Machine Part from your inventory into the circular space in the center.
Solution
Place the Red, Green, and Blue balls from your inventory into the circular spaces, matching the pattern of the center Machine Part.
Solution
Take the charged Bio-fuel canister at the bottom of the machine.
Leave the cottage area and go straight ahead to the cliff.
The Cliffside
Use the TS Token from your inventory on the telescope at the edge of the cliff to start the billboard puzzle.
To solve this puzzle, swap the panels to arrange the complete billboard picture.
The easiest method is to start at the right side with the energy company sign, then move left.
Solution
Once the puzzle is solved, the numbers on the billboard will be added to your notebook: EW 5-2-6-3
Use the Bio-fuel from your inventory on the fuel slot of the dirigible.
Click the front area of the blimp to zoom in to the numbers puzzle.
To solve this puzzle, place the coins at the top of the panel into the circular slots next to the letters "EW", matching the combination from your notebook.
Then, follow the wires to the bottom row of circular spaces and place in the connected numbers.
Solution
Once the puzzle is solved, the blimp will depart.
Chapter 5
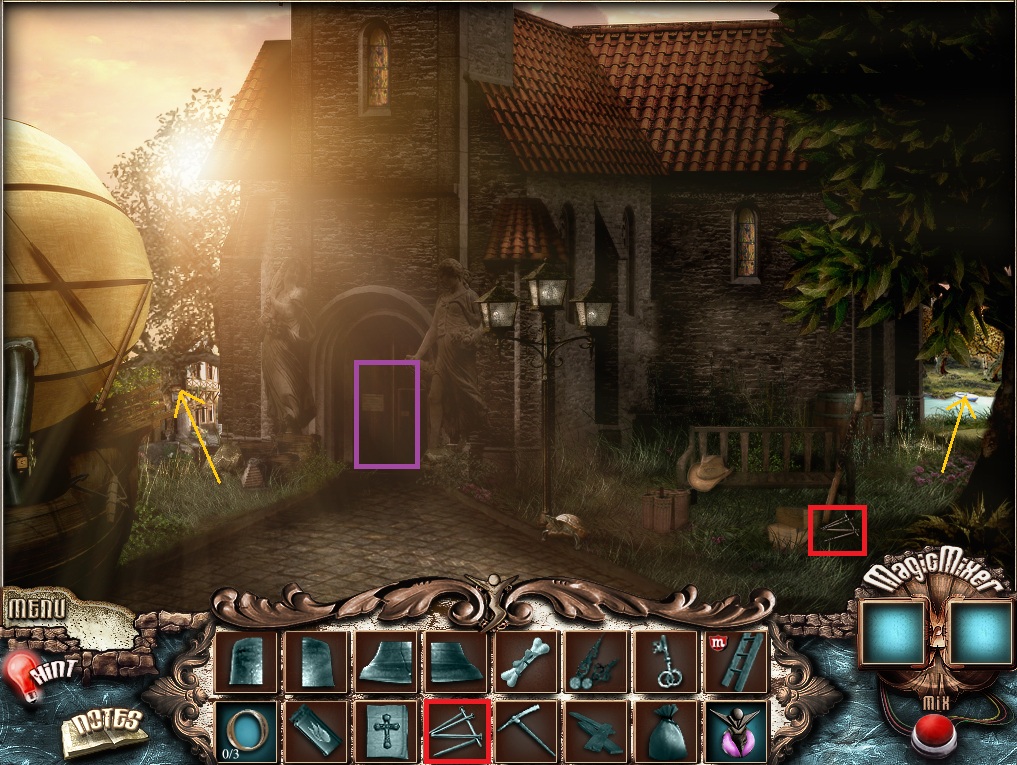
The Landing
Pick up the Nails.
Screenshot
Take the path to the left to travel to the back alleys of town.
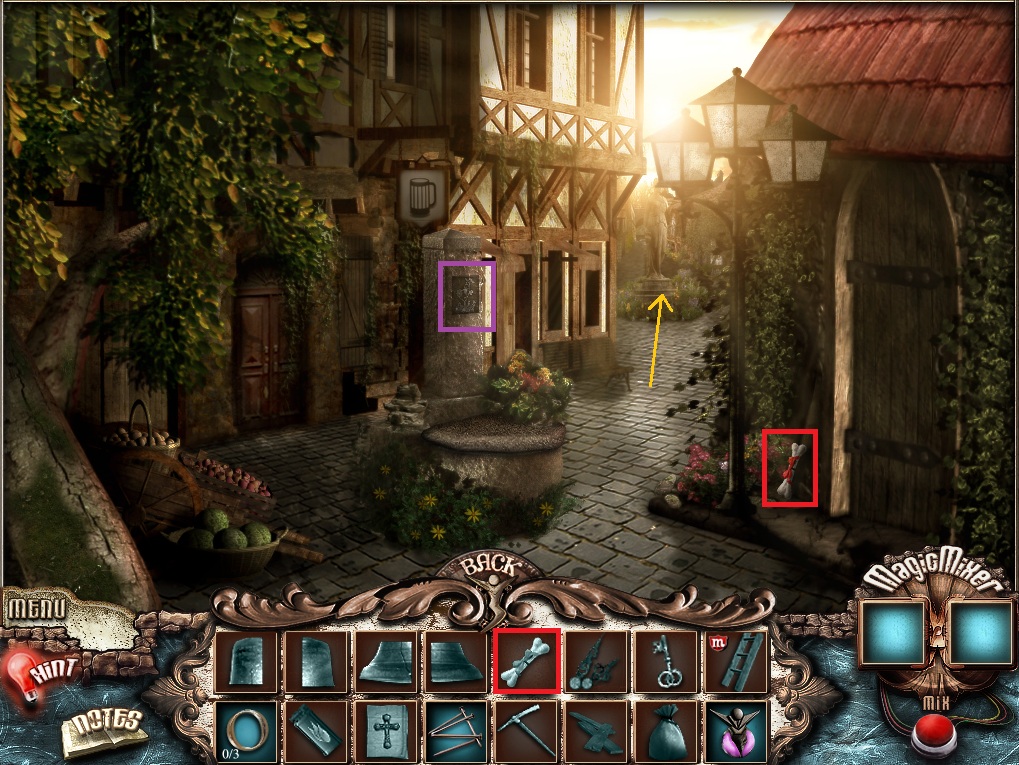
The Alley
Pick up the Bone Toy.
Screenshot
Leave the alley and return to the landing, then take the path to the right to reach the bridge.
The Bridge
Click the bass cellist to speak with him.
Give the Bone Toy from your inventory to the small dog.
Pick up the Clock Hands the cellist drops at the base of the tree.
Leave the bridge and return to the alley, then go forward into the town square.
Town Square
Talk to the man in the green coat with the "!" to speak with him.
Back up once to return to the alley.
The Alley
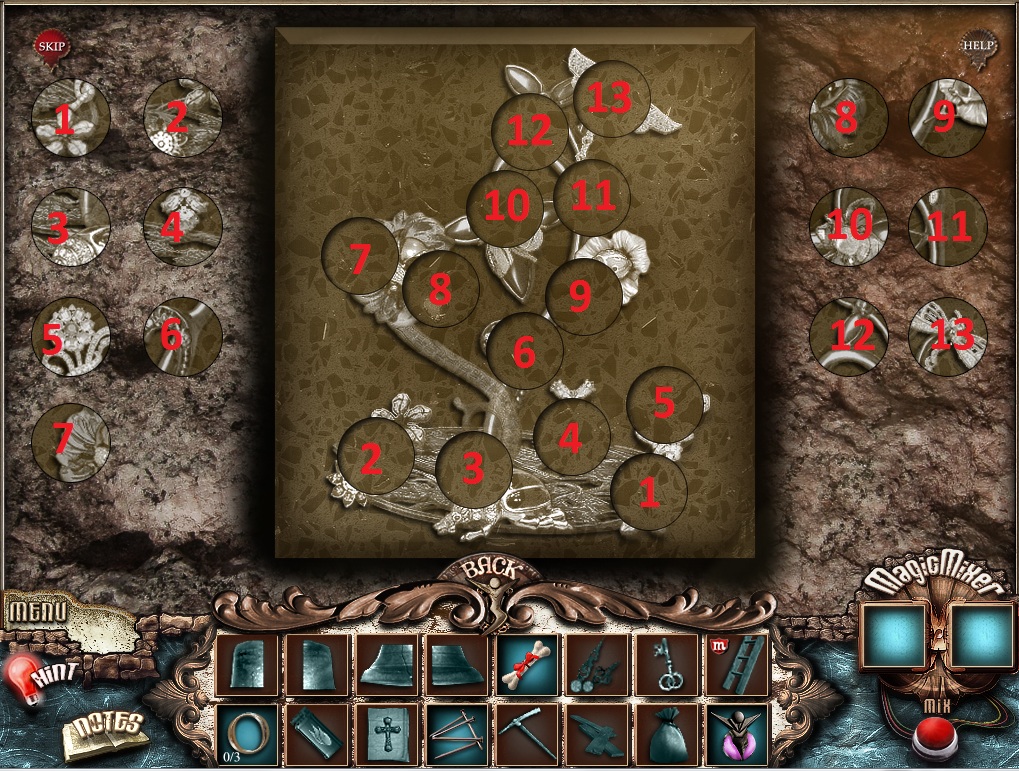
Once you reach the alley, a stone slab in the left column will move forward. Click the stone to start the picture puzzle.
This puzzle is similar to the puzzle in Chapter 1. Complete the picture by placing the circular pieces into the corresponding spaces.
Solution
Leave the alley and return to the Town Square.
Town Square
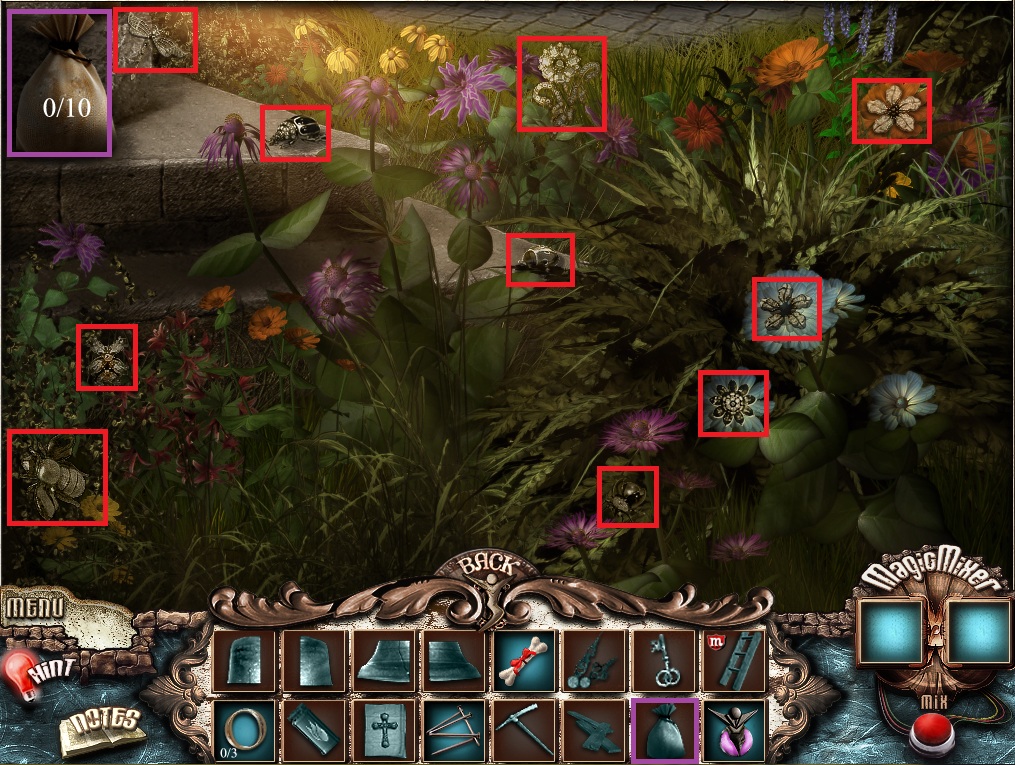
Click the base of the fountain to zoom in.
Collect all the stone fragments matching the sketch in your notebook.
Screenshot
When you have all 10 fragments, click the burlap Sack to add it to your inventory.
Click back to return to the town square view.
Use the Sack from your inventory on the head of the statue to begin the fragments puzzle.
To solve this puzzle, assemble the flower fragments in the hand of the statue to match the sketch in your notebook.
Click a fragment on the left and then click one of the spheres in the diagram to add it to the piece.
Solution
Once the puzzle is solved, back out of the statue view and talk to the man in the green coat again.
Click the door on the other end of the courtyard to go inside the man's house.
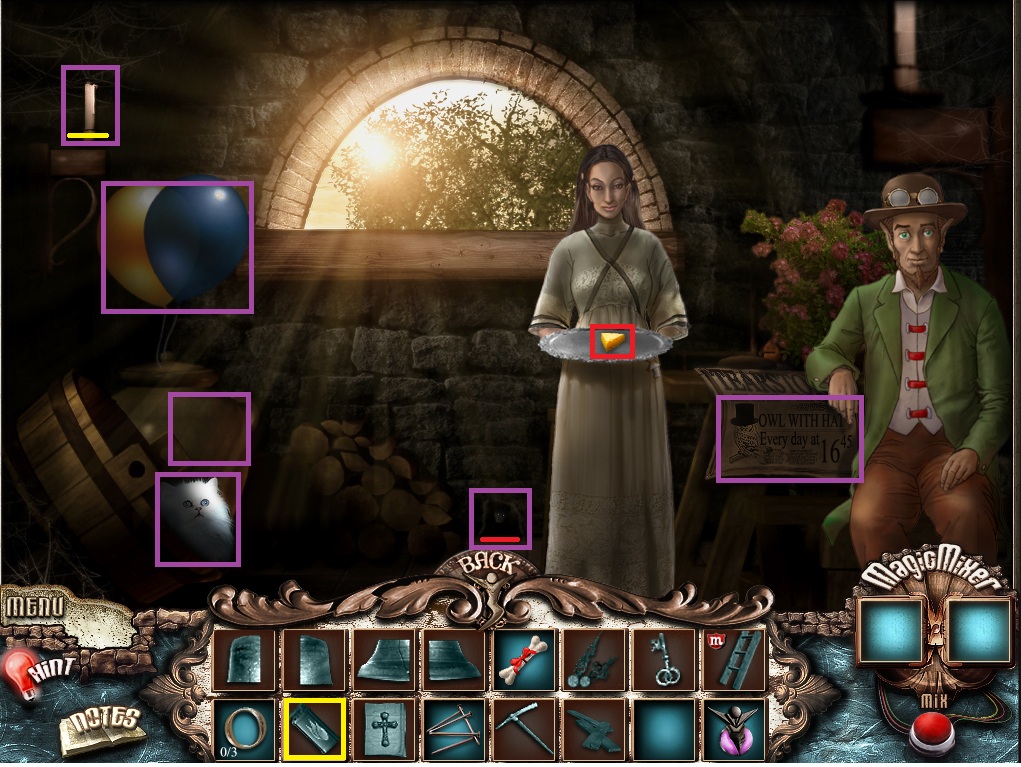
Inside the House
Talk to the woman with the tray.
Take the cheese from her and place it in front of the mouse hole in the wall.
Take the hammer from the barrel the cat was lying in and use it to smash the large vase.
Take the Lighter from inside the broken vase to add it to your inventory.
Use the Lighter on the candles above the balloons.
Take the illuminated needle and use it to pop the balloons.
Pick up the Key from behind the balloons to add it to your inventory.
Screenshot
Read the newspaper by the man's elbow to take note of the time for the owl with the hat. 16:45 (aka 4:45 PM)
Leave the house and return to the courtyard.
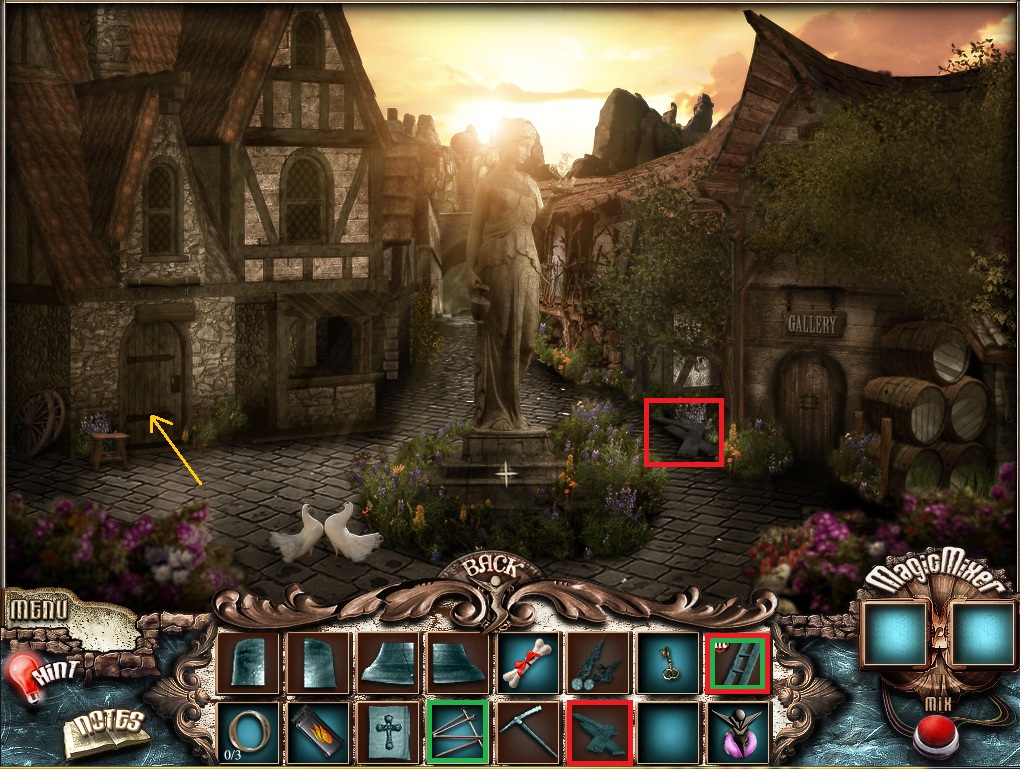
The Courtyard
Pick up the Planks of wood near the Gallery door.
Screenshot
Combine the Nails and the Planks in the magic mixer to create the ladder.
Leave the courtyard and return to the bridge.
The Bridge
Use the Key from your inventory on the locked box at the base of the tree.
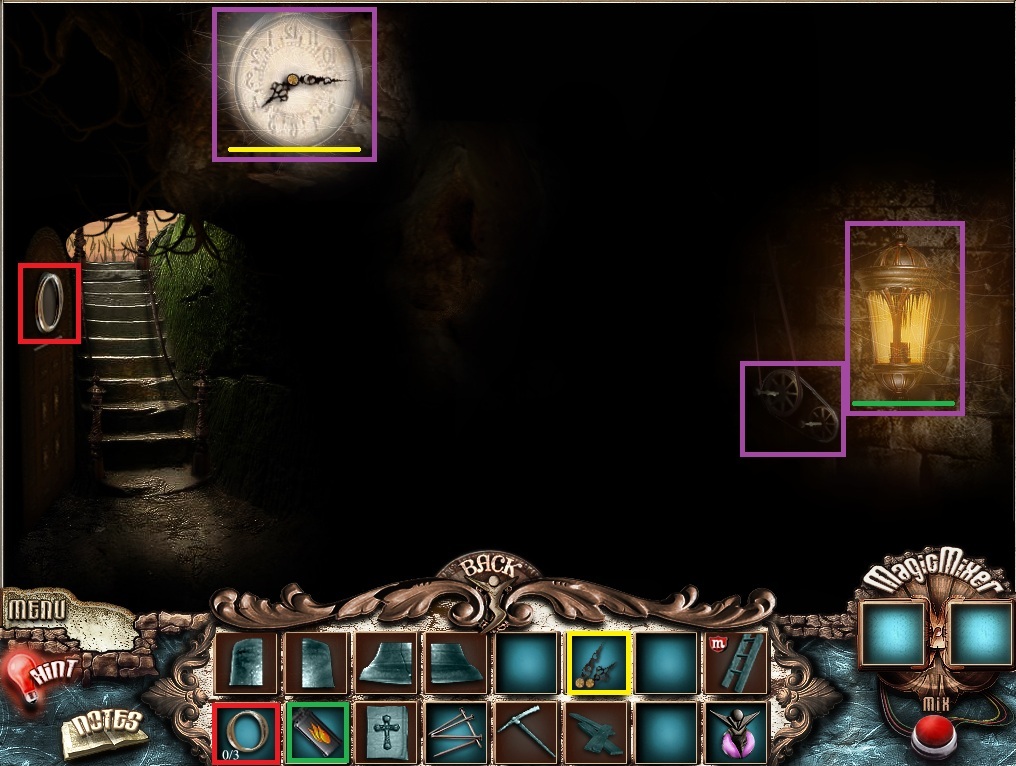
Go down into the cave under the clock.
Use the Lighter from your inventory on the lantern on the wall.
Click the panel on the left wall to take the Letter "O".
Use the Clock Hands from your inventory on the face of the clock on the wall.
Click the large wheel on the right wall to turn the hour hand; click the small wheel to turn the minute hand.
Set the clock to the time seen on the newspaper in the man's house: 4:45
Screenshot
Leave the bridge area and return to the landing.
The Landing
Click the doors to the monastery to go inside.
The Monastery
Click the hooded monk with the "!" to speak to him.
Take the note the monk drops at the foot of the stairs.
Screenshot
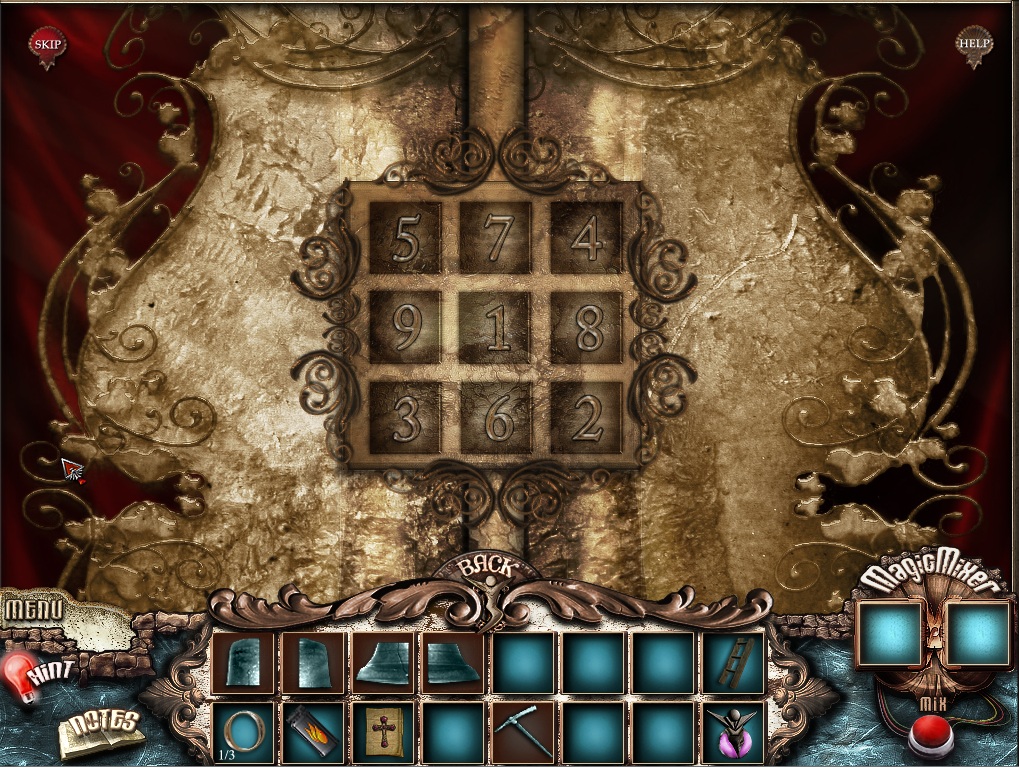
Click the frame on the left wall to start the flip numbers puzzle.
To solve this puzzle, reveal the numbers 1-9 by flipping the tiles in numerical order.
Solution
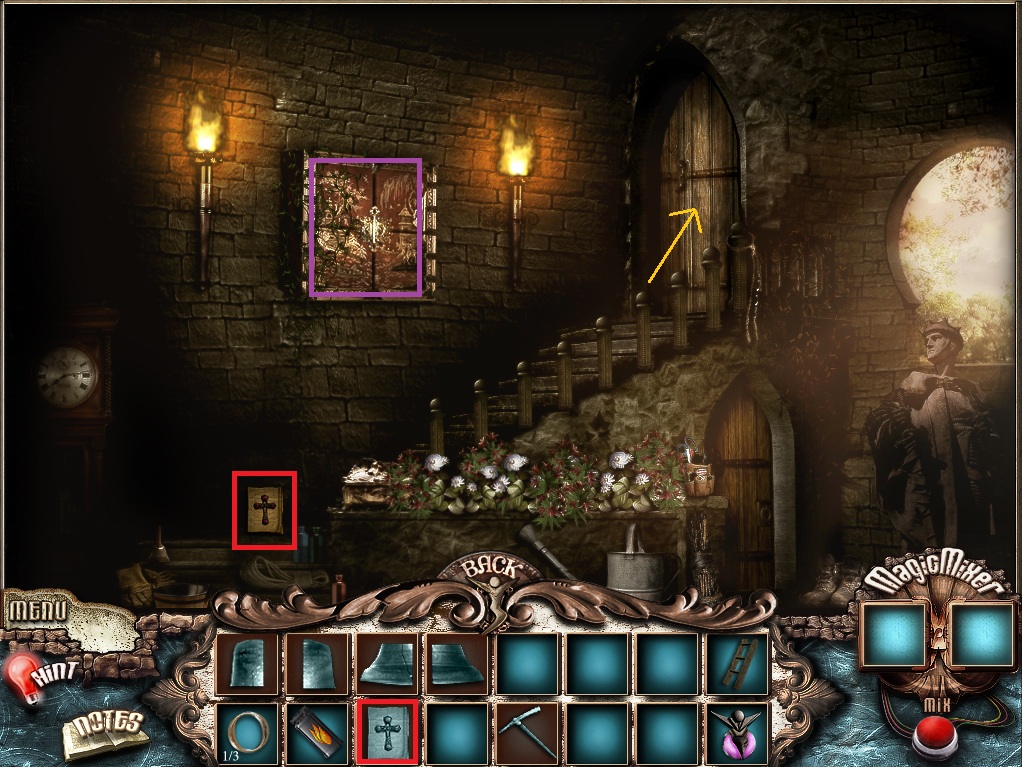
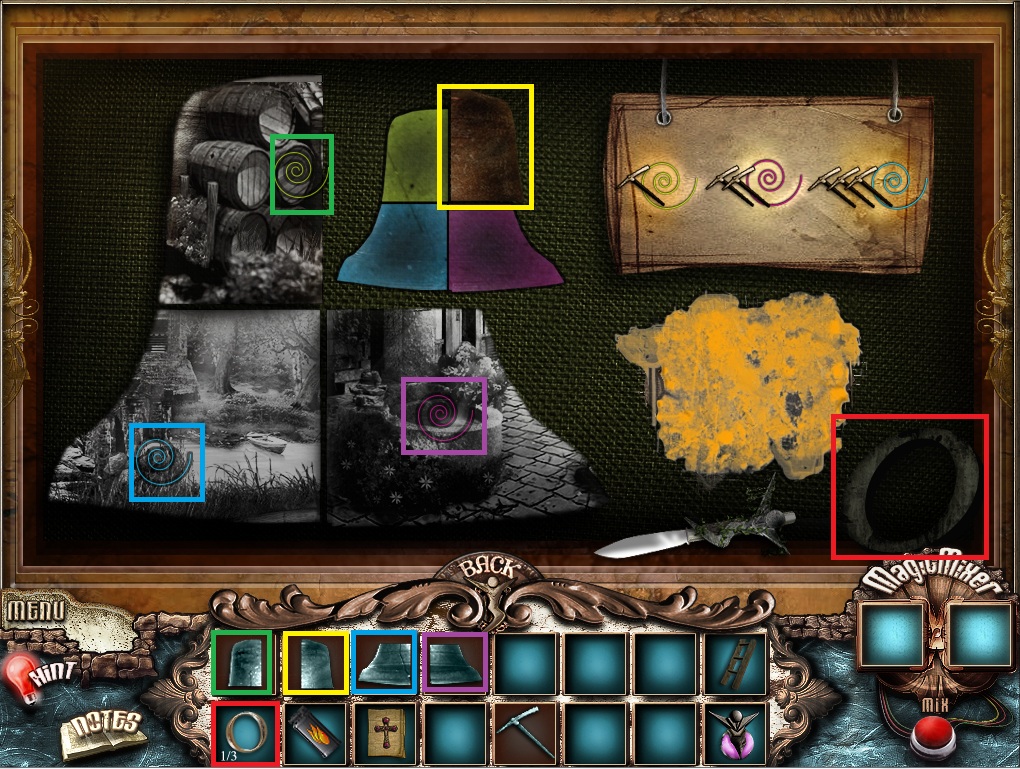
Once the puzzle is solved, click the area inside the frame to zoom in.
Pick up the Letter "O" and the Part of Bell
Screenshot
Examine the black and white images to find the location of the other three bell parts.
The top bell part is in the barrel at the courtyard.
The left bell part is underneath the bridge.
The right bell part is in the stone basin at the alley.
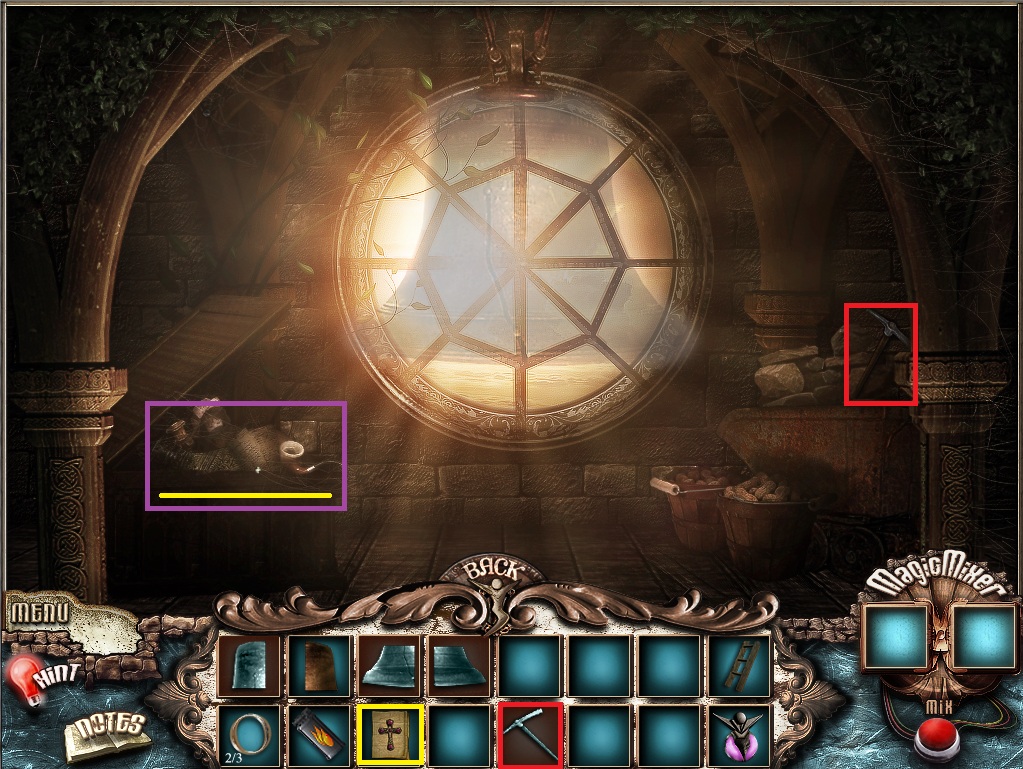
Leave the frame view and go up the stairs into the attic.
The Attic
Take the Pickaxe in the cart between the right columns.
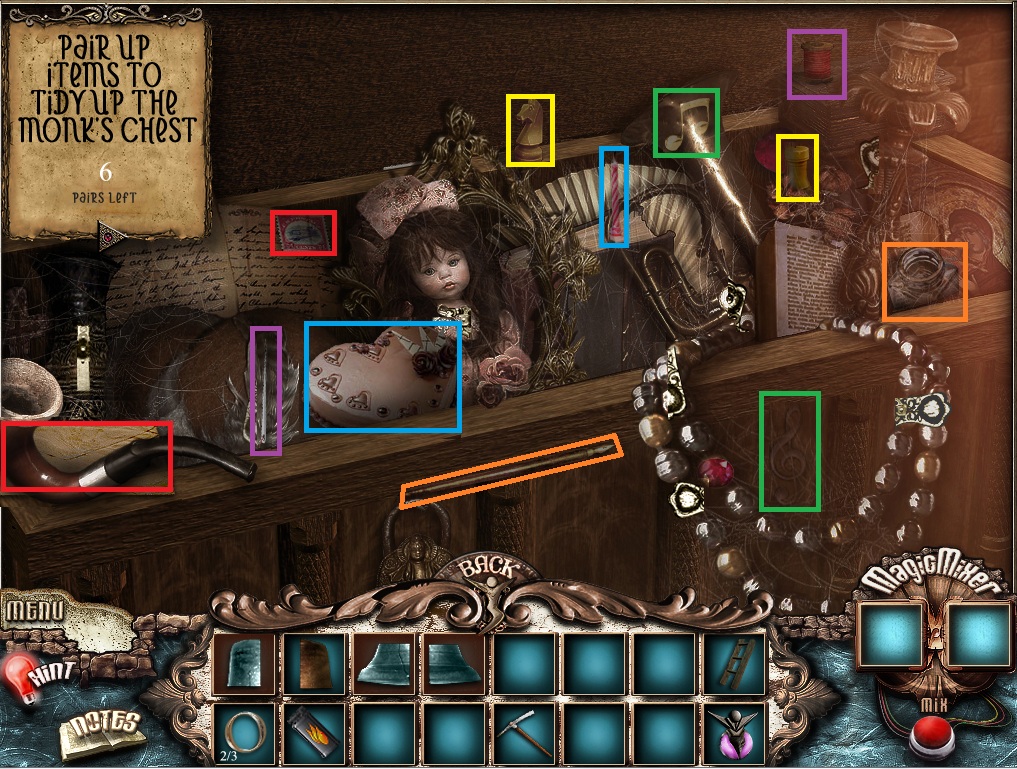
Use the Monk's Note from your inventory on the chest of items to the left of the window.
Screenshot
Collect 6 pairs of similar items inside the monk's chest.
Pair the stamp with the envelope.
Pair the knight with the rook.
Pair the pen with the pot of ink.
Pair the heart-shaped cake with the striped candle.
Pair the musical note with the treble clef.
Pair the needle with the thread.
Solution
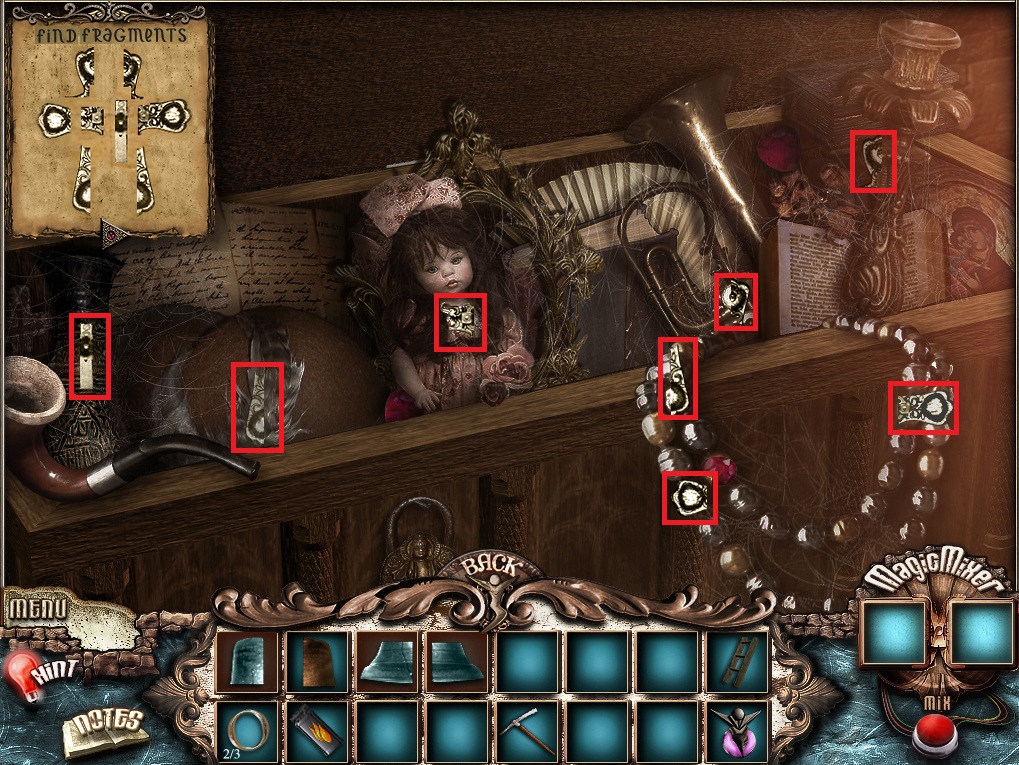
Click the triangle at the bottom of the monk's note to flip to the next page.
Find all the fragments of the cross.
Screenshot
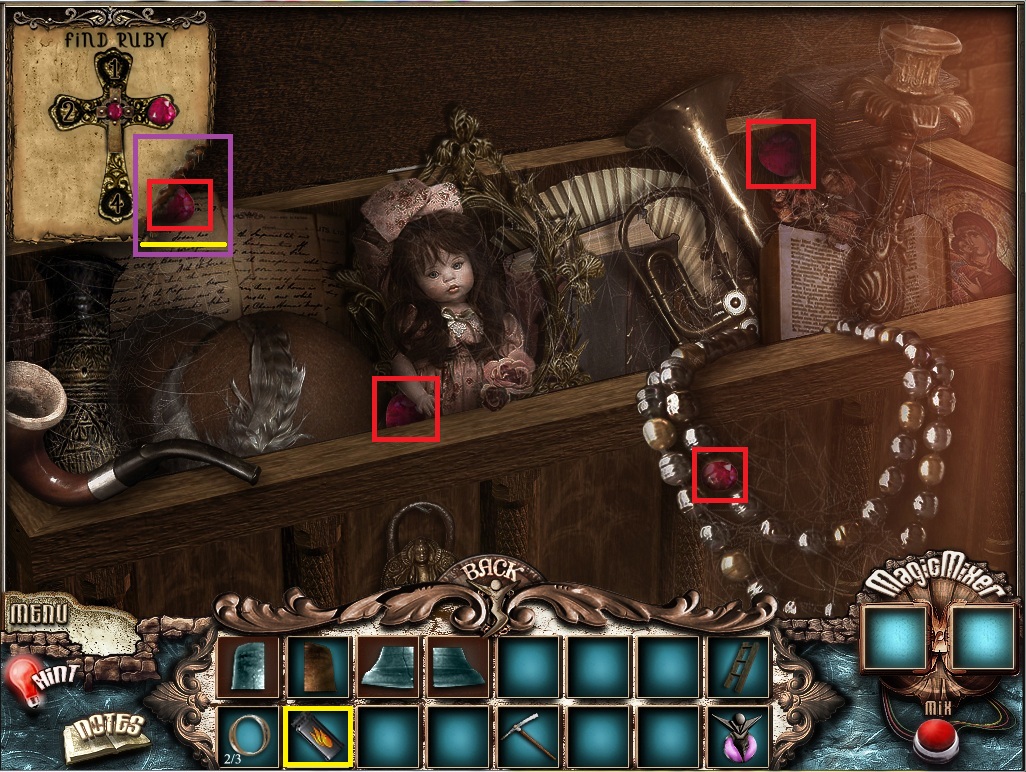
Click the triangle again to flip to the third page.
Find all four rubies.
Use the Lighter from your inventory on the bottom of the monk's note to reveal the last ruby.
Screenshot
Click the monk to speak with him.
Take the last Letter "O" in the rafters to the left of the window.
Leave the monastery and go to the bridge.
The Bridge
Use the Pickaxe from your inventory 3 times on the pile of rubble to the right of the bridge.
Pick up the left Part of Bell from beneath the rubble.
Leave the bridge and go to the alley.
The Alley
Use the Pickaxe from your inventory two times on the stone slab in the middle of the alleyway.
Use the Ladder from your inventory on the hole to climb down.
Add the three Letter O's to the words on the boulder to spell "Open the Old BOx".
Use the Magic Potion from your inventory on the old stone.
Click the stone again to pick up the right Part of Bell.
Leave the alley and go into the courtyard.
The Courtyard
Use the Pickaxe from your inventory on the wine casks stacked up next to the gallery.
Click the broken cask to pick up the last Part of Bell.
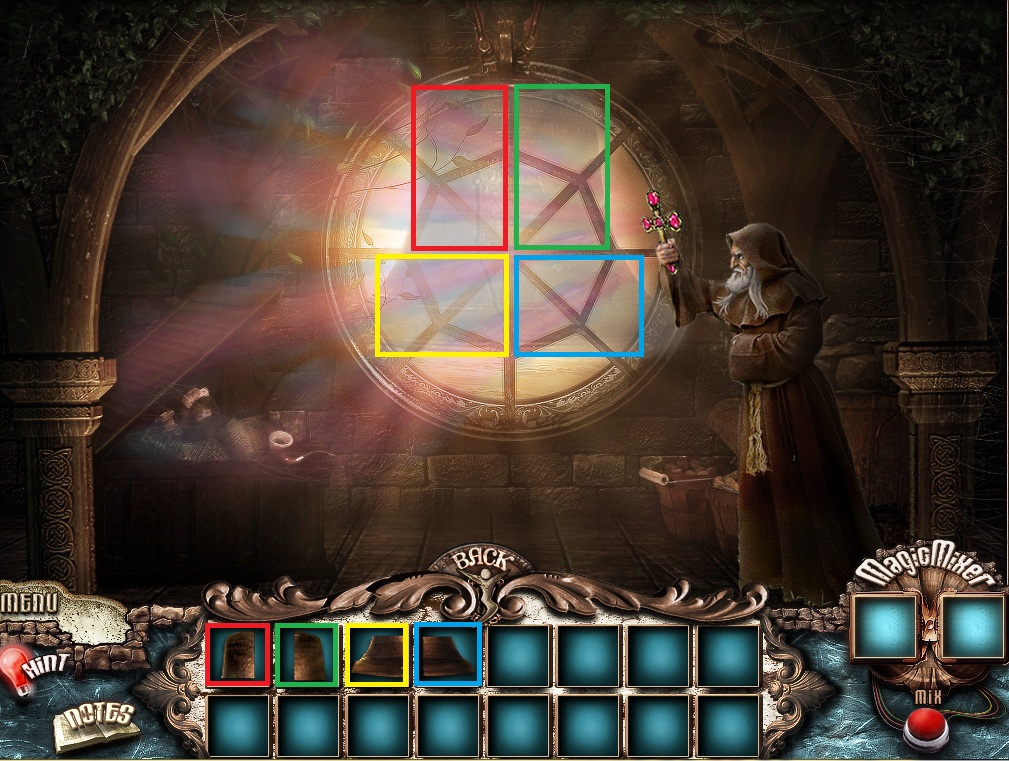
Leave the courtyard and return to the attic of the monestary.
The Attic
Place all four Parts of Bell to the open space in front of the stained glass window.
Screenshot
Chapter 6
The Landing
Click the hooded monk to speak with him.
Go right to the bridge, then straight ahead into the castle.
The Castle
Go through the door behind the red curtains.
Click the queen with the "!" to speak with her.
Head upstairs into the bedroom.
Take the crowbar and use it on the large chest at the foot of the bed.
Take the hammer from the corner of the open chest and use it to smash the goggles on the large bust.
Pick up the shard of glass from the goggles and use it to tear open the back of the red chair.
Take the small key from the hole in the chair and use it to unlock the box inside the chest.
Take the Crown from the opened lockbox.
Screenshot
Go downstairs and hand the crown to the queen to learn it's missing all the gems.
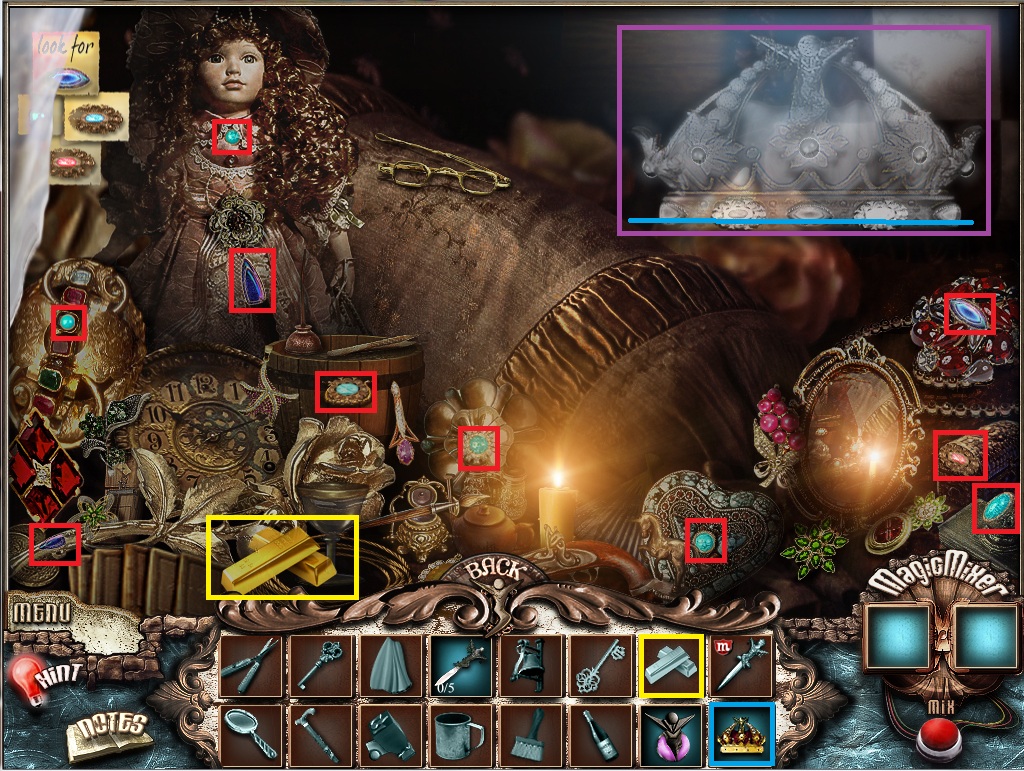
Head back upstairs and click the top of the bed to zoom in.
Take the Gold bars and all the crown jewels.
Screenshot
Once all the gems are collected, place the Crown over the image in the corner.
Go downstairs again and hand the completed crown to the queen.
Read the kings letter, take note that the bell in the castle is found between the "crown and the yellow star".
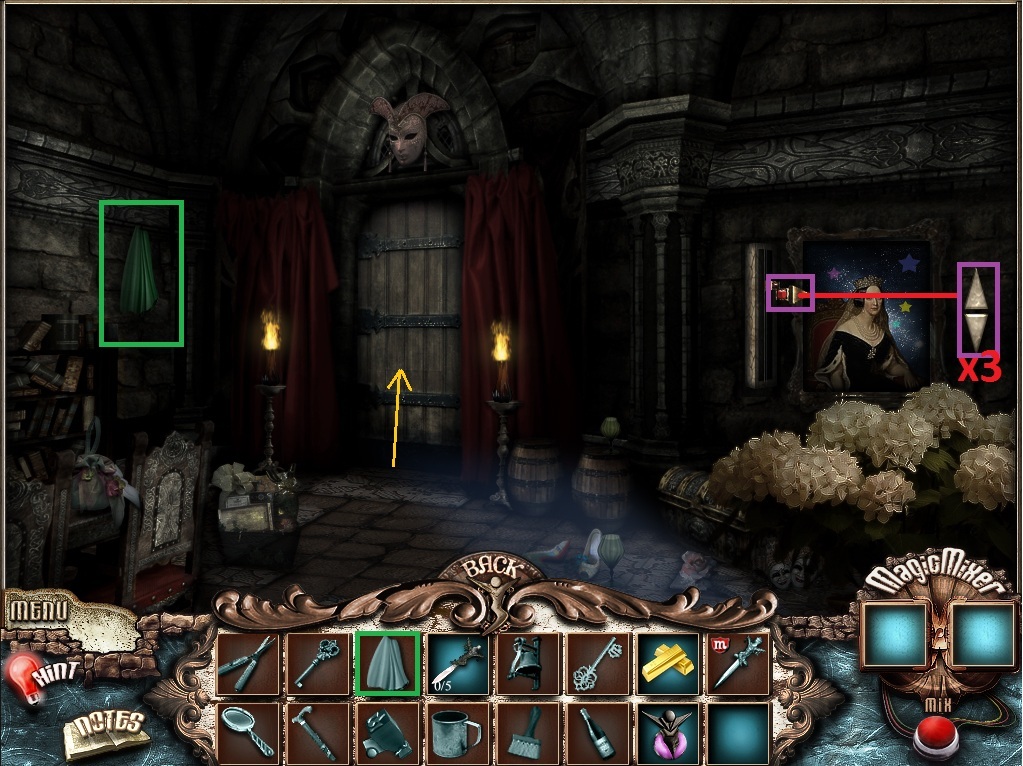
Go back once to the entrance hall of the castle.
Click the down arrow next to the portrait three times until the left arrow is pointing between the crown and the yellow star of the painting.
Pick up the green Cloth hanging from the left wall.
Screenshot
Go through the door into the queen's hall and pull the large lever beneath the miniature portrait.
Back out again to the castle entrance and the large portrait will slide down, revealing the Door Bell.
Leave the castle and travel to the alley.
The Alley
Use the Door Bell from your inventory on the wooden door in front of the large dog.
Go into the house.
The Blind Man's House
Click the blind musician to speak with him.
Take the Dagger and all the notes around the room to complete the musician's melody.
Screenshot
Talk to the musician again, then click his book on the table to zoom in.
Pick up the key behind the front cover of the book.
Turn the page and take another Dagger.
Combine the Dagger and the Gold bars in the magic mixer to create the Golden Dagger.
Screenshot
Leave the house and travel to the courtyard.
The Courtyard
Click the statue's hand to zoom in.
Take the Gallery Key from behind the vase.
Use the Gallery Key on the gallery door to go inside.
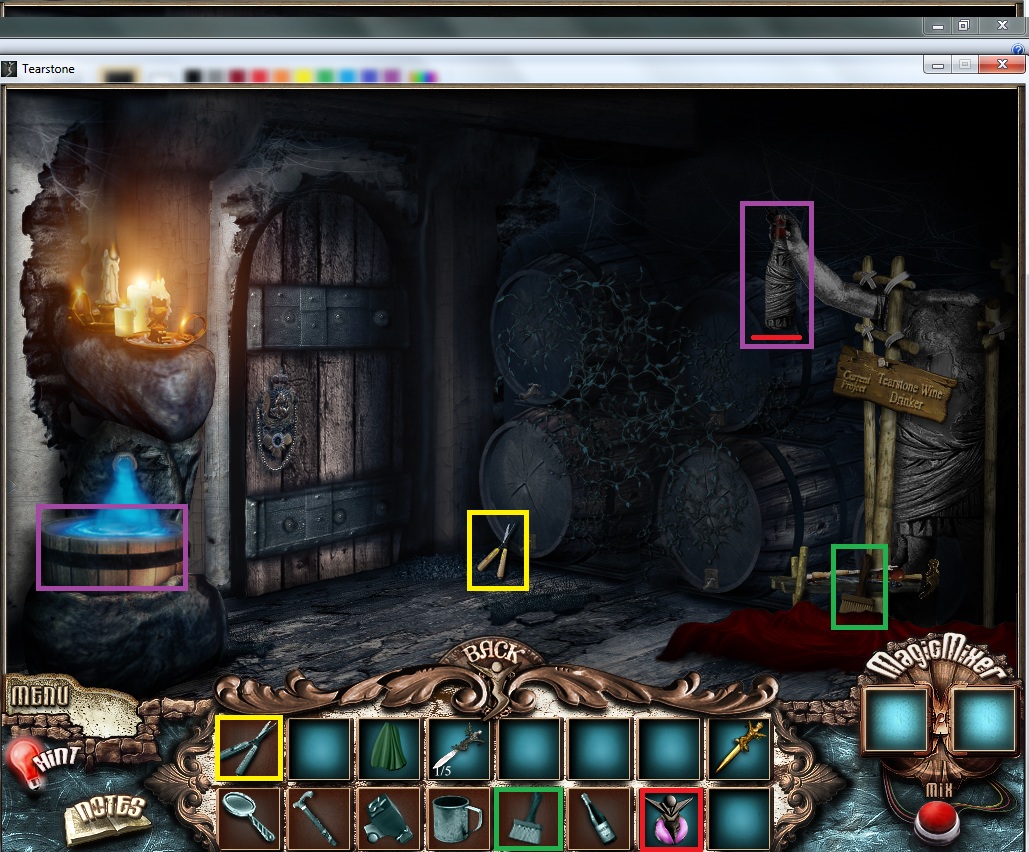
The Gallery
Click the red curtains to pull them down.
Use the Magic Bottle from your inventory on the stone wine bottle.
Take the Wine Bottle, the Shears, and the Steel Brush.
Screenshot
Leave the gallery and travel to the bridge.
The Bridge
Use the Shears from your inventory on the bush in the bottom right corner.
Pick up the mug from behind the bush.
Leave the bridge and go to the monastery.
The Monastery
Use the Basement Key on the door under the stairs.
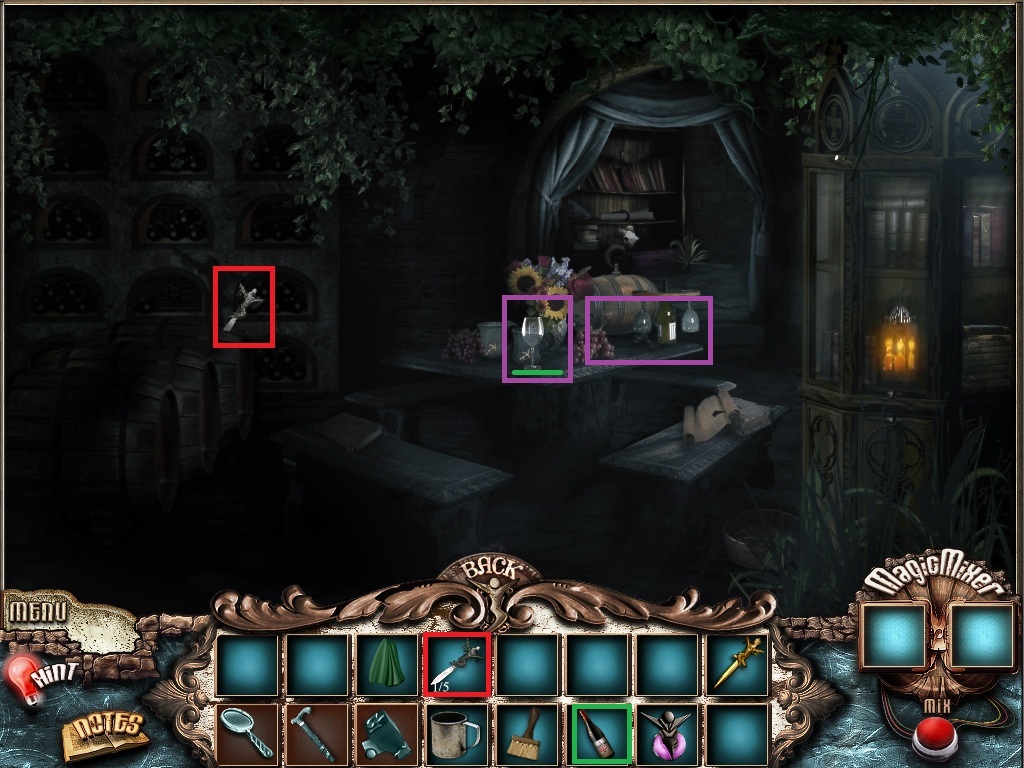
Go down into the basement.
Pick up the Dagger.
Pour the Wine Bottle from your inventory into the wine glass on the table.
Screenshot
Click the Cold One's ghost to talk to him.
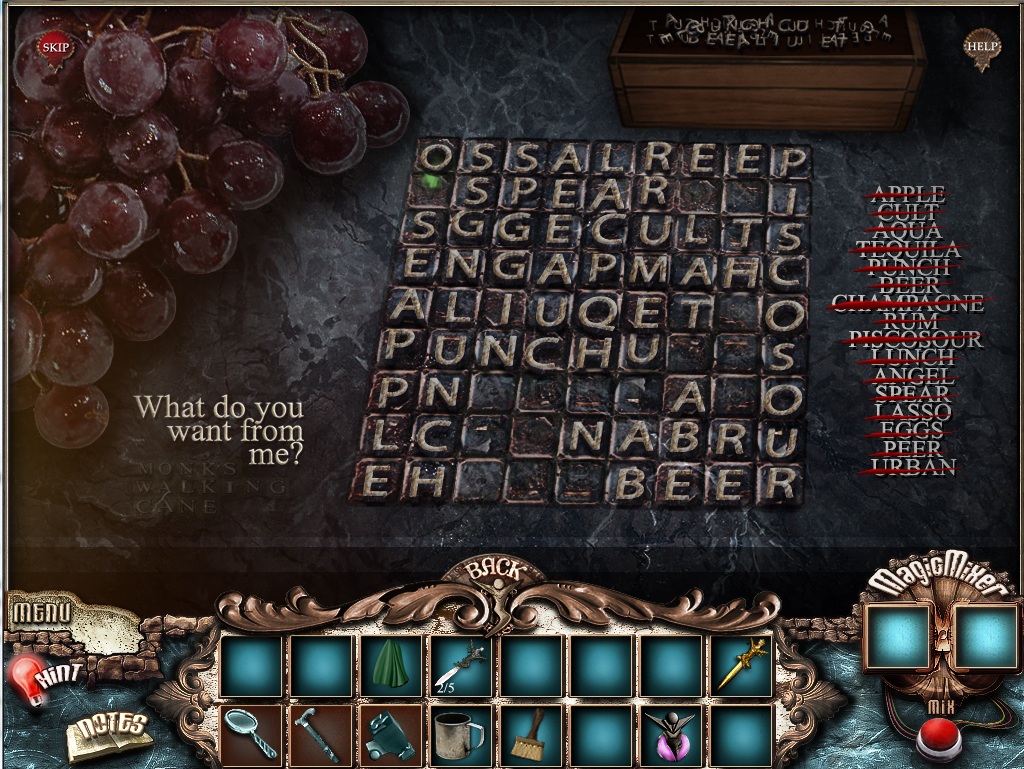
Click the table to start the words puzzle.
To solve this puzzle, arrange the groups of letters from the box to spell out the words on the right of the grid.
Click the box above the grid to pick up the letters.
Place the letters on the grid so that they spell a complete word.
Words can be spelled forwards, backwards, vertically, horizontally, and diagonally.
If correctly placed, that word will be crossed off the list on the right side.
Screenshot
Speak with Todd's ghost again.
Take the Monk's Cane he leaves for you to the left of the lantern.
Leave the monastery and return to the landing.
The Landing
Give the Monk's Cane to the hooded monk.
Take the Magnifier the monk leaves on the bench.
Leave the landing and go left to the alley.
The Alley
Use the Magnifier from your inventory on the bottom left corner of the door underneath the dog.
Click the grasshopper with the "!" to speak with it.
Give the Grasshopper the Magic Bottle from your inventory.
Pick up the Monumental Key the grasshopper leaves on the ground.
Leave the alley and return to the gallery.
The Gallery
Use the Mug from your inventory on the glowing blue fountain.
Leave the gallery and return to the monastery.
Click the panel on the left wall to zoom in.
Take the Dagger at the bottom of the frame.
Use the filled Mug from your inventory on the yellow stain.
Use the Cloth from your inventory on the wet stain to wipe it clean.
Note the pattern of the silver and gold daggers in the diagram.
Leave the monastery and return to the alley.
The Alley
Go down the ladder into the well.
Take the last dagger from the top of the chest.
Place the silver and gold daggers into the slots matching the diagram in panel at the monastery.
Screenshot
Leave the alley and go to the courtyard.
The Courtyard
Click the area near the statue's hand to zoom in.
Use the Steel Brush from your inventory on the dirty stone.
Put the Monument Key into the cleaned out keyhole.
Push the button beneath the four red circles until the picture matches the circles at the foot of the statue.
Screenshot
Push the large brown button.
Chapter 7
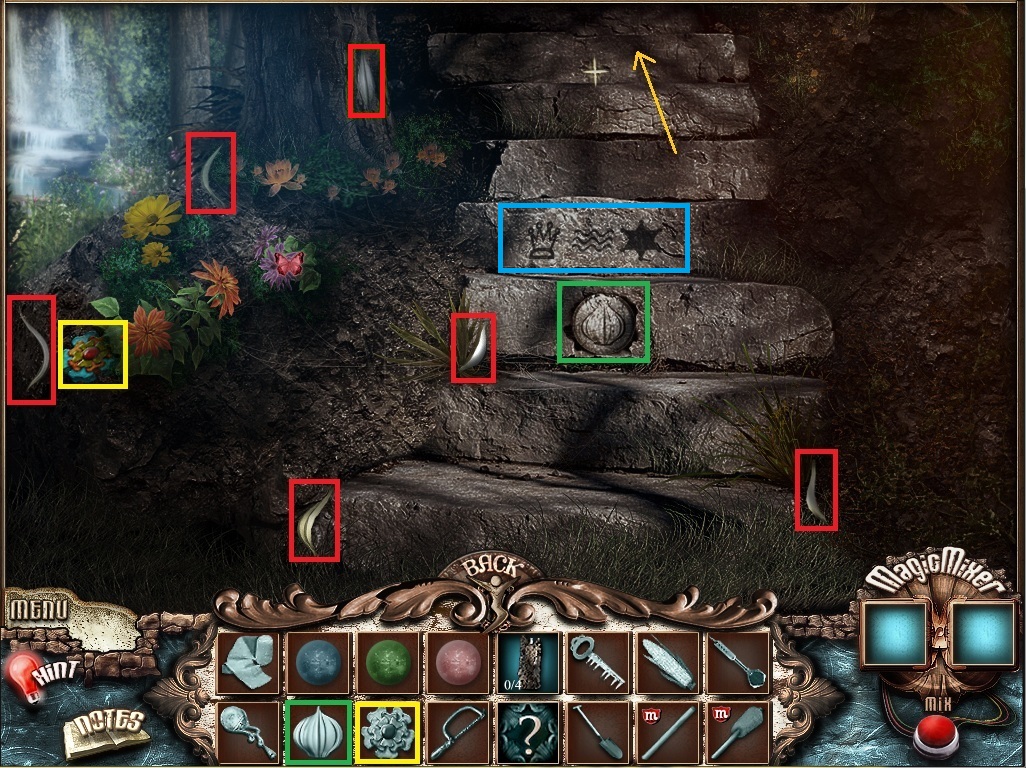
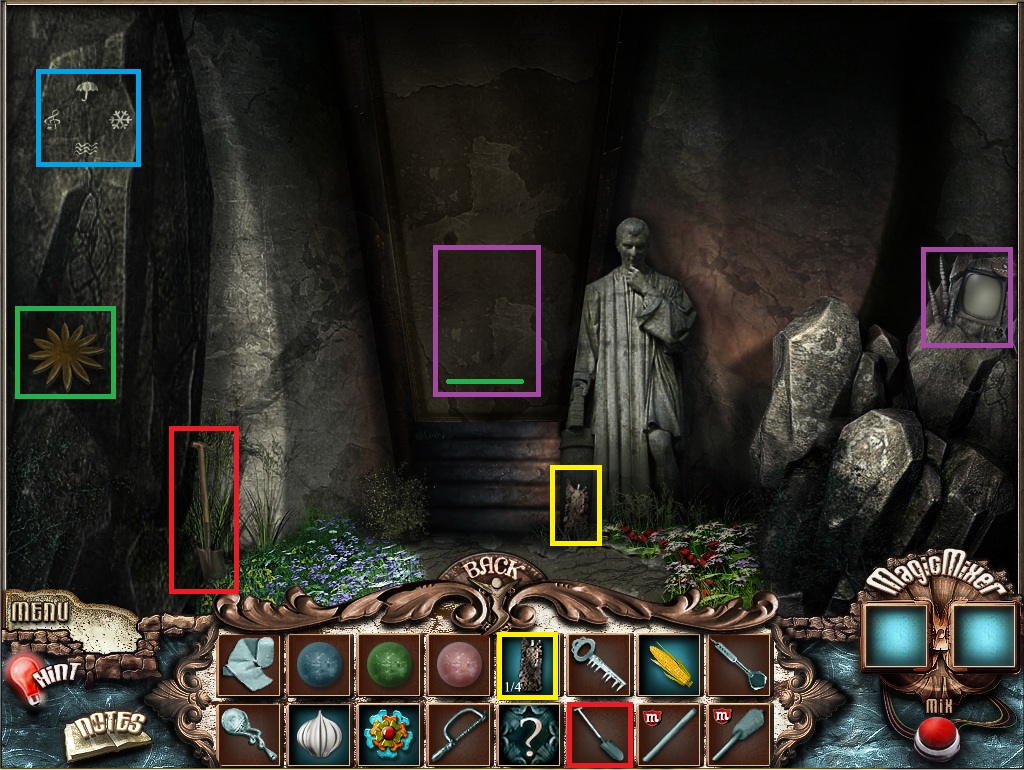
The Stairway
Click the foot of the staircase to view the bottom steps.
Click the onion in the middle step.
Note the pattern of the symbols on the step above the onion.
Take the Radio Button and collect all the onion pieces around the scene.
Screenshot
Click the Onion again to add it to your inventory.
Go up once to the middle of the staircase.
Click the corn husk on the large boulder.
Note the pattern of the symbols on the rock to the left of the corn.
Take the Stone Candle and collect all the pieces of the corn husk.
Screenshot
Click the Corn again to add it to your inventory.
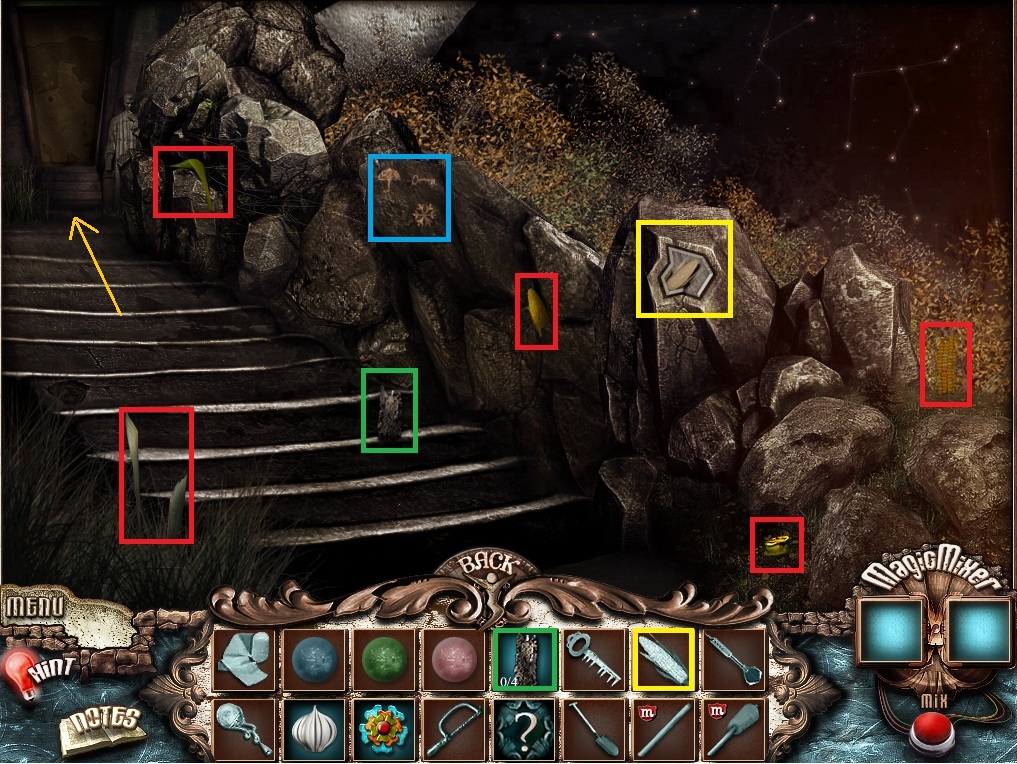
Go up one more time to reach the top of the stairs.
Note the symbol on the rock wall to the left.
Take the Stone Candle and the Shovel.
Screenshot
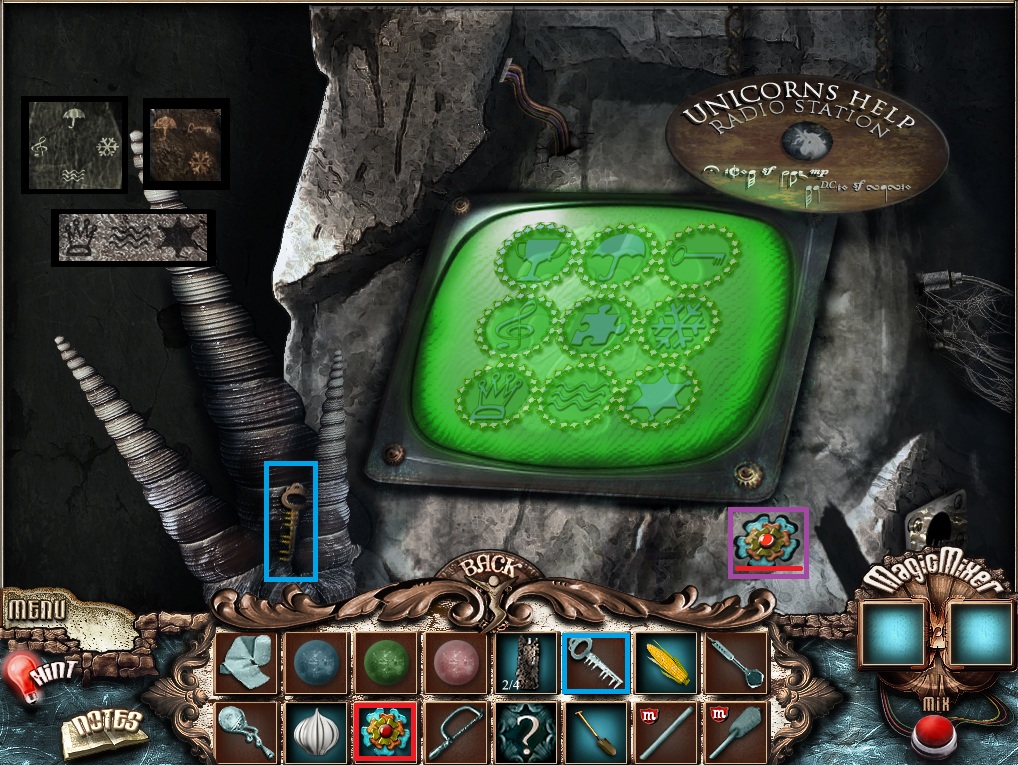
Click the terminal on the right to zoom in.
Take the key behind the large spiraled horn.
Place the Radio Button in the slot below the screen to start the radio station puzzle.
To solve this puzzle, arrange the rows of symbols in the correct order.
Pieces of the correct order of the symbols are found at the bottom, middle, and top of the staircase.
Solution
Return to the bottom of the stairway and then follow the sign to the lake.
The Lake
Click the unicorn with the "!" to speak with it.
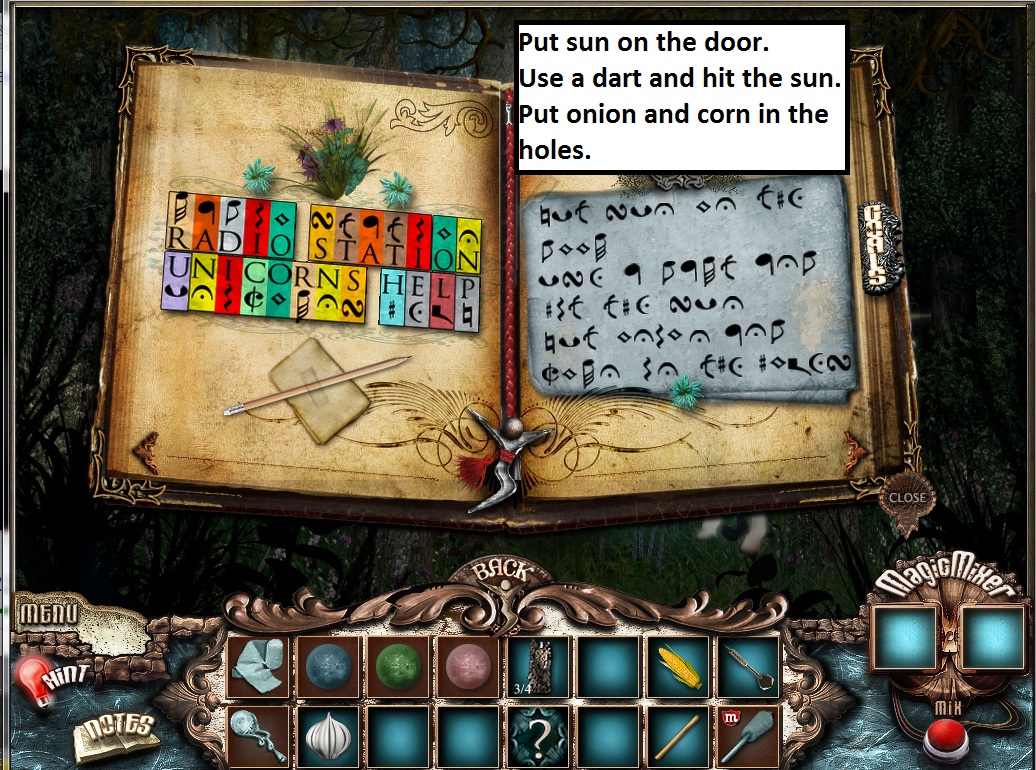
The speech is cryptic; use the guide from your notebook to translate the message.
Solution
Use the Shovel from your inventory on the plot of ground beneath the sign.
Dig 3 times to reveal the locked chest and handsaw.
Take the Saw and use the Chest Key from your inventory to unlock the chest.
Pick up the Dart from inside the chest.
Take the Stone Candle on the left side of the lake.
Leave the lake and return to the stairway, then go left once to the cabin.
The Cabin
Take the shears on the wooden beam and use them on the vines at the top of the beam.
Take the rock behind the vines and use it to smash the padlock of the fuse panel.
The panel says Power = 2/4, so light the 2nd fuse in the top row and the 4th fuse in the bottom row.
Screenshot
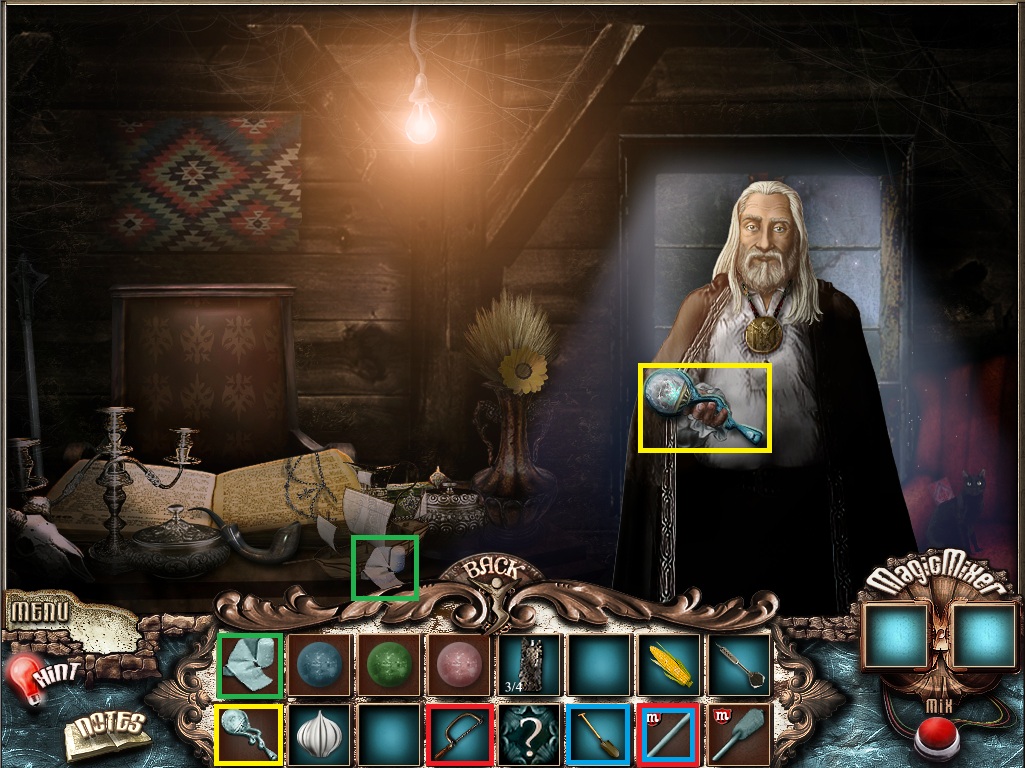
Once the power is started, go through the door into the cabin.
Click the professor to speak with him.
Take the Lightcatcher from his hand as well as the Bandage on the table next to the miniature sailboat.
Combine the Saw and the Shovel in the magic mixer to create the Stick.
Screenshot
Leave the cabin and return to the stairway.
The Stairway
Use the Lightcatcher from your inventory on the Red Light beside the stairs.
Pick up the Red Light that drops on the grass.
Go up to the top platform of the stairway.
Following the message given by the unicorn, place the sun on the door.
Use the Dart from your inventory on the sun.
Place the Onion and the Corn from your inventory into the two holes below the sun.
Screenshot
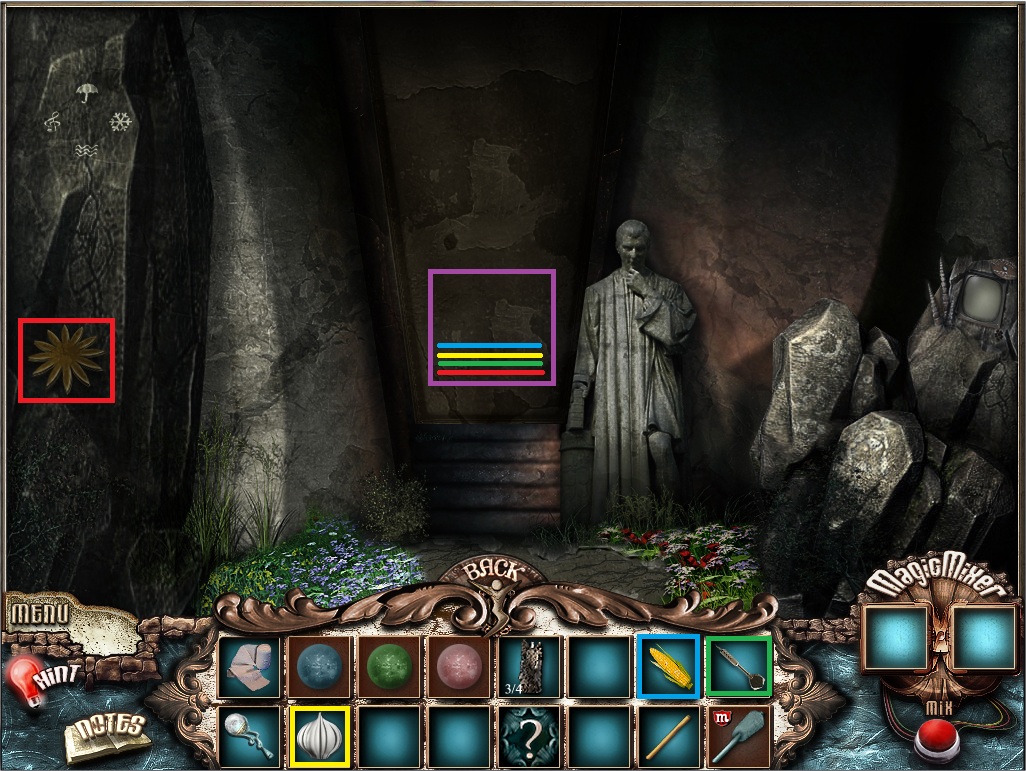
Go through the doorway to the tearstone.
The Tearstone
Take the last Stone Candle at the right edge of the walkway.
Use the Lightcatcher on the green light and the blue light.
Pick up the Green Light and Blue Light from the grass.
Screenshot
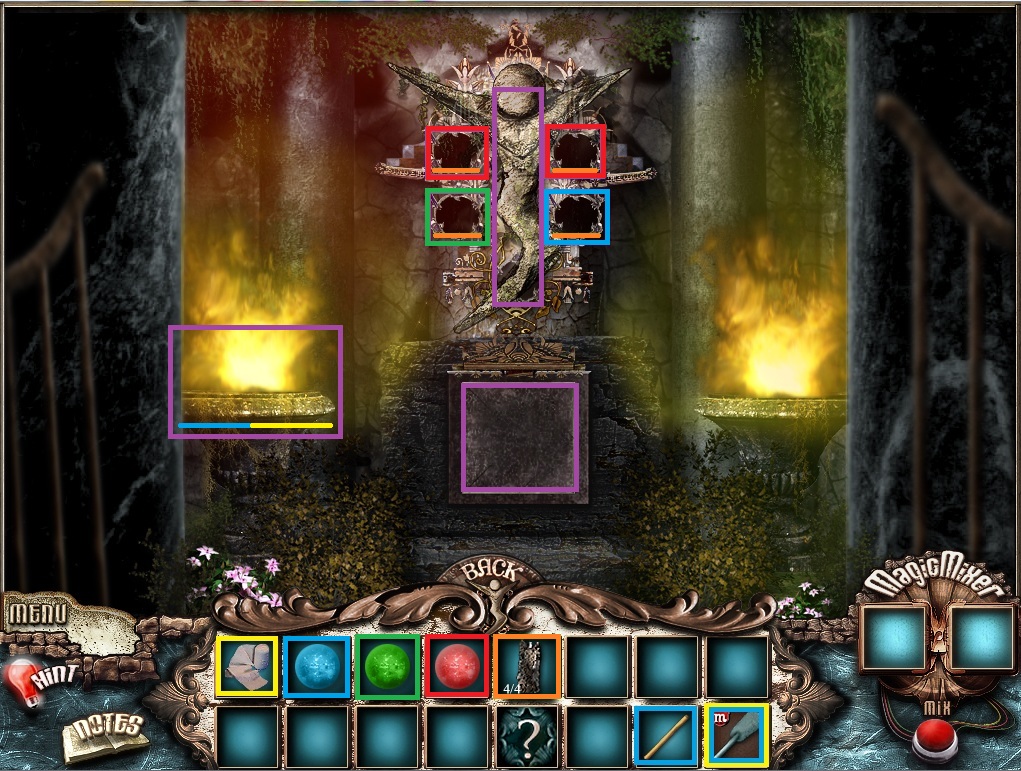
Go forward through the gate to the heart of the tearstone.
Click the square stone slab to pick up the figure and place it in the center of the heart of the tearstone.
Place the Stone Candles into the four holes of the heart.
Combine the Stick and the Bandage in the magic mixer to create the Torch.
Light the Torch in the left Brazier.
Use the Torch to light the four stone candles in the heart.
Place the Red, Blue, and Green Lights on top of the lit stone candles.
Screenshot
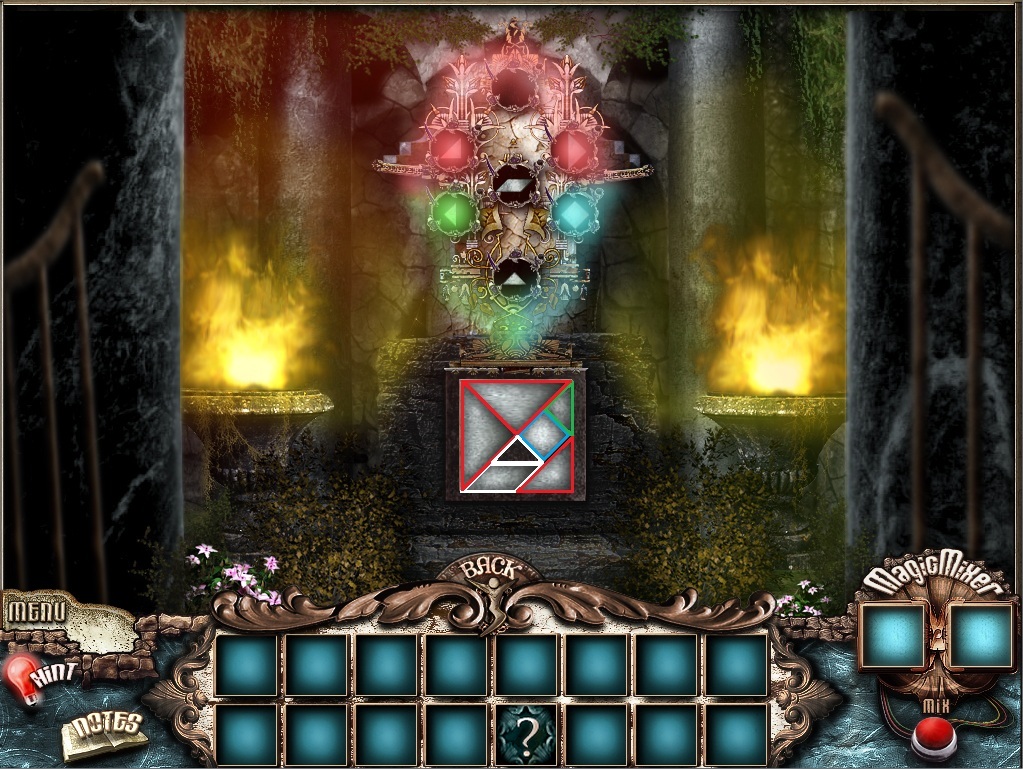
Placing all the orbs will begin the tangram puzzle.
To solve this puzzle, arrange all seven shapes so that they fit perfectly inside the square.
Click a shape in the green, red, blue, or white light to pick it up.
Click the square to place the shape inside the frame.
No shapes can overlap, and each shape is only used once.
Solution
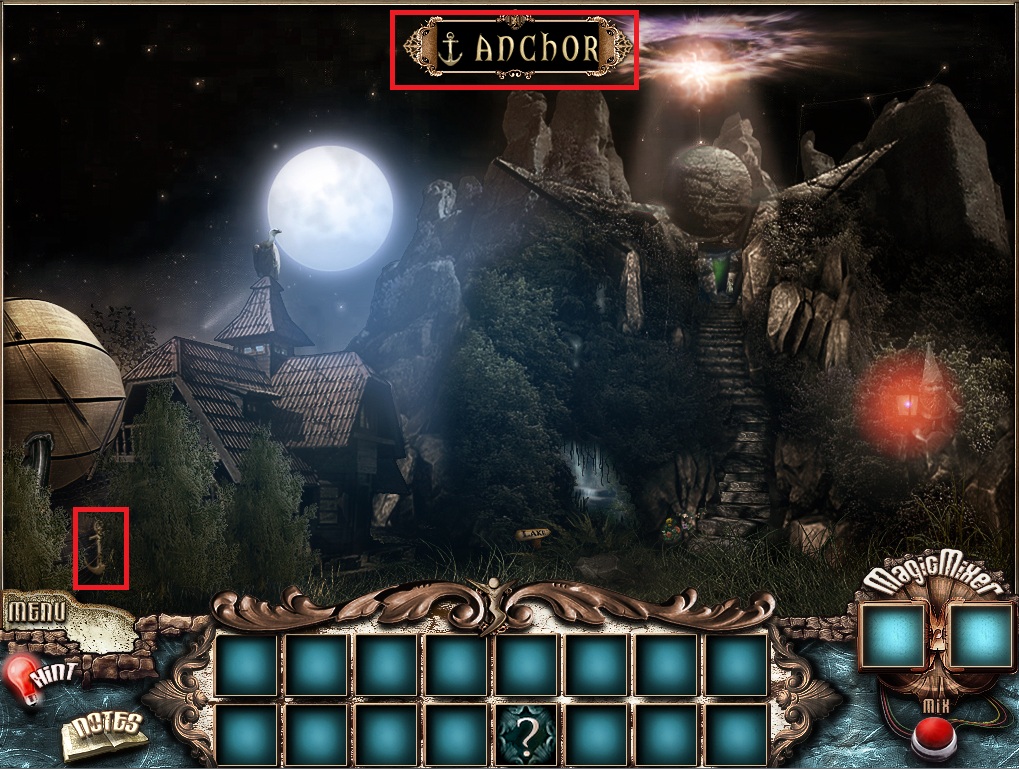
Once the puzzle is solved, click the shattered square tile to read the riddle.
"I struggle through the waves battling under the sea. I touch the bottom of a foreign land. I lie still and strong with turmoil all around me. My grip must hold. If I fail, the tumult will carry us away. Like a rock, give me support and strength in the struggle."
You can wait for the red bar to reveal the answer, or if you know it you can go and pick up the item.
The answer is an anchor.
Leave the tearstone area and return to the stairway
The Stairway
Pick up the Anchor beside the dirigible.
Screenshot
Return to the tearstone.
The Tearstone
Use the Secret Item from your inventory on the cracked stone square.
The End
Posted by: Trinn |
June 8, 2011 11:52 PM
|
June 8, 2011 11:52 PM