

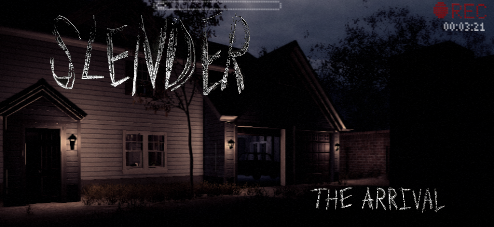
![]() When you arrive at your friend Kate's house, all alone in the middle of nowhere, you find the building empty, though not without signs of a struggle. And other kinds of signs too... the sort you find scrawled on the wall that makes you question your childhood friend's sanity. Kate, it seems, has apparently been dealing with some unsettling things... hallucinations, strange sightings in the woods... all just the result of an unstable mind, of course. Unless... they have something to do with that event both of you experienced in your childhood but had repressed until only recently. Parsec Productions, Blue Isle Studios, and Marble Hornets present Slender: The Arrival, a full-fledged indie horror action-adventure that expands on the concept of the original Slender game. Call the cops? Nah, it's cool. Just grab that flashlight and head off into the darkened woods where you heard the scream all alone. It's a great idea, and I'll have your Darwin Award all polished up for you when you get back.
When you arrive at your friend Kate's house, all alone in the middle of nowhere, you find the building empty, though not without signs of a struggle. And other kinds of signs too... the sort you find scrawled on the wall that makes you question your childhood friend's sanity. Kate, it seems, has apparently been dealing with some unsettling things... hallucinations, strange sightings in the woods... all just the result of an unstable mind, of course. Unless... they have something to do with that event both of you experienced in your childhood but had repressed until only recently. Parsec Productions, Blue Isle Studios, and Marble Hornets present Slender: The Arrival, a full-fledged indie horror action-adventure that expands on the concept of the original Slender game. Call the cops? Nah, it's cool. Just grab that flashlight and head off into the darkened woods where you heard the scream all alone. It's a great idea, and I'll have your Darwin Award all polished up for you when you get back.
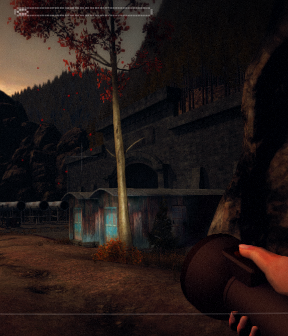 Use [WASD] to move, and hold [left shift] to run. The game is presented in a first-person view, and the mouse will let you look around, as well as aim your flashlight when you pick one up and turn it on (or off!) with [F]. Right-clicking with your flashlight turned on will cause you to focus the beam, which can temporarily stun certain enemies. If an item highlights when you mouse over it, that means you can click to interact. Many objects in your environment also have contextual actions, such as, say, clicking and holding on a window, then pushing the mouse up to lift it. Notes and papers you gather can be viewed from your scrapbook by hitting [ESC] and selecting the option from the menu. The game is broken up into stages, featuring some more typical adventure gameplay that forces you to search for keys and the like, but also hunt for items in locations that shift each time you play... along with the lay of the land itself. You can't save your game, but the stages are relatively short and stay unlocked once you've accessed them. So, you know, no big deal if you're ripped to shreds and your body is never found somewhere dank and dark because you can just start over again, right? Right!
Analysis: The mythos surrounding Slenderman (created by Eric "Victor Surge" Knudsen, with rights licensed to the team developing this game) is fear of the unknown at its most basic... something hunting you that you can't understand or escape. Slender: The Arrival plays on this expertly. The atmosphere is so heavy, so ominous, that it sucks you in regardless of what you know of the mythology behind it. Graphically, The Arrival is a huge improvement over the original, and the lush use of colour, lighting, and environmental design creates a world that pulls you in from the get-go. You dread every corner, every closed door, and the oppressive mood will have you jumping at every shadow... including your own. Its masterful use of ambient sound brings every locale to life and infuses it all with a sense of palpable dread. I was a particular fan of the way your footsteps echoed in the heavy silence of an abandoned building in the second stage as the noise of forest life faded away, and by "was a fan of" I mean of course "I whimpered and hated every second of it and cursed the name of all involved".
 Of course, setting and style will only get you so far. The gameplay itself is both simple and has its frustrating moments, mainly since mouse-guided contextual movement has always been sort of awkward. The frenetic chase sequences and "find X amount of Y" objectives for the stages means this definitely isn't one for fans of more laid-back horror, or for those who would have preferred more overall variety to the gameplay. Figuring out the mechanics of each assailant takes some experimentation, which is sort of hard to do when you're stumbling around panicked and blind in big maps that change each time you die.
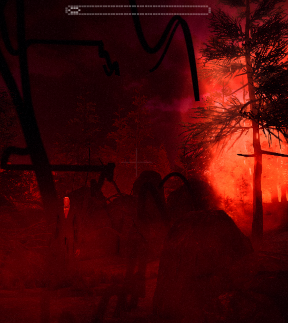
It is, in a word, harrowing, and something that's easy to put yourself into. You're not a space marine or a super soldier. You're not even armed. You're an ordinary person, lost and alone, being hunted by something unknowable. The titular menace is significantly more aggressive and feels like a more active hunter, relentlessly pursuing you through the dark no matter where you go. The appearances and accompanying video distortion are even harsher and more violent than ever before, and the new menace in later chapters is just as terrifying. This is a game that goes from slow and sinister to frantic and snarling in the span of a fingersnap, and you'll need to be fast to survive. And a fan of jump scares, naturally.
Since the story is relegated mainly to the letters and other notes you can find scattered throughout the game, the narrative definitely takes a back seat to the action. Unless you really make a point of scouring every inch of your surroundings, it's easy to miss that one vital scrap of paper that sheds more light into what's happening. Slender: The Arrival is an atmospheric and engrossing experience, though not a particularly long one, and something most players will probably charge through in a single sitting. Considering the random gameplay, however, it's replayable in the same way its predecessor was, and if you liked that, you can be certain you'll love this one. Expanding on the mystery without losing any of the important mystique, it's a gorgeous nightmare than fans will love to get wrapped up in for as long as it lasts.
![]() Windows:
Windows:
Get the full version
Get the full version (GOG.com)
Download the original freeware version (Slender: The Eight Pages)
![]() Mac OS X:
Mac OS X:
Get the full version
Download the original freeware version (Slender: The Eight Pages)


Walkthrough Guide
(Please allow page to fully load for spoiler tags to be functional.)
Slender: The Arrival Walkthrough
General Info
Controls
Navigate with the [WASD] keys.
Hold the [left shift] key while moving to run or the [left ctrl] key to crouch.
If you encounter the Slender Man or a Proxy, your run speed will briefly be increased to a sprint.
Be conservative with the amount of time you spend running or sprinting, as it quickly drains your stamina.
If your stamina is depleted, your run speed will significantly decline.
Press [F] to take out or put away your flashlight.
While the flashlight is drawn, right click to focus the beam of light.
Push and hold [E] to zoom the camera in.
Press the [tab] key to toggle the HUD on or off.
The HUD displays the camera zoom, your play time, and the flashlight battery life.
Achievements
Achievement unlocked: Playing on a slide in a horror game.
At the Prologue, go to the playground in the backyard.
Move down the slide to receive the achievement.
Cheats
While in game, press the [tilde] key which looks like (~) to open the command console.
Type "toggledebug" without the quotes and press enter to enable debug.
Enter the console commands to perform a variety of actions, including the following examples:
"god" makes you invincible to enemies. Although their attacks won't technically "kill" you if you are caught, you'll still get stuck in place as if you are dead.
"sprint" gives you permanent sprint speed while running.
"stamina" allows you infinite stamina to stay at a permanent run.
"master" toggles all three god, sprint, and stamina options on or off.
"unlockscenes" unlocks access to every stage, allowing you to skip a scene if you are stuck and select the next one from the main menu.
"lockscenes" will lock all five stages. You must either re-complete or use the unlockscenes command to open them again.
"addprogress" automatically completes only the next stage of your current goal.
"progress" automatically completes all goals in the current stage.
"unlockscrapbook" will add all the pages of collectible material to your Scrapbook.
"reload" will load the game from the start of the current stage, putting you back at the beginning.
Again, do not include the quotation marks and use only lower case letters when entering the commands.
WARNING: DO NOT enter the command "resetprefs"! This can permanently clear the license data from your system.
Prologue
Current Goal: Get to Kate's house
Walk around the fallen tree and follow the road (or go through the forest, the whole area is closed off) to get to Kate's house. The time will change from day to night as you get closer to the house.
When you reach the outer brick wall that surrounds the house, don't move towards the building just yet. Instead, follow the road just a few feet further to the right until you reach the tree in front of the picket fence; the tree is about half way between the brick wall and the road block.
Click the Missing Child Poster that's pinned to the middle of the tree to add it to your Scrapbook.
Return to the front of the house and enter through the front door, the garage door is locked.
You can close doors behind you by clicking and holding the cursor over the door and then dragging either away from you or towards you, depending on which side of the door you are standing.
Current Goal: Search for clues as to Kate's disappearance
First, search the ground floor for key items and pages that can be added to your scrapbook.
While at the foyer, move to the shelves on the wall to the left of the stairs, near the golf bag at the corner of the room.
Look at the bottom shelf to find Letter 1, then click to read it. The letter will be added to your Scrapbook.
Turn left and go through the door to enter the living room.
Look on top of the coffee table to find a Thank You Note from Kate. This note is also added to your Scrapbook.
Go through the door on the right to enter the lounge, then continue through the next door at the back of the room to reach the kitchen.
The Flashlight can be found in this room or in one of the other nearby rooms.
Its location will often change between games. Check for it in areas like the table in the kitchen, the kitchen counter next to the sink, beside the phone on the coffee table in the lounge, or on the large table in the dining room.
Examine the surface of the small table in the kitchen to find the Memorial Note. Click the note to add it to your Scrapbook.
Turn to look at the refrigerator. Click the magnetic whiteboard at the top of the fridge to add the item to your Scrapbook.
Walk through the middle doorway to reach the downstairs hallway. Note the door at the end of the hall is locked. Go through the left door instead to find a side room and a bathroom.
Check the top of the left cupboard to find Letter 2 beside the radio. Click to read it and add it to your Scrapbook.
Return to the foyer and head up the stairs. Walk towards the right hallway and immediately turn to the first door on the left.
Open the door and walk to the black table in the corner of the room to find the Keys.
Go back out to the hallway and walk all the way down to the end. With the keys in your inventory, you can unlock the door and enter Kate's bedroom.
Look on top of the wardrobe to find a drawing. Click the drawing to pick it up and wait a few seconds to hear a scream.
If you look out the broken window, you'll see the back gate is open.
Current Goal: Investigate scream beyond the back gate.
Go back to the kitchen and exit through the door on the right to go out to the backyard.
Walk towards the playground area, climb up the ramp of the small wooden structure and go across the bridge towards the slide.
Look at the top of the rear left wooden post to find Letter 3. Click the letter to read it and add the letter to your Scrapbook.
Leave the playground and go out through the back gate to continue to the next chapter.
The Eight Pages
You start this chapter at the lodge which is located at a random spot within the forest.
Before you venture out, take the Canoeing Rules page and the Oakside Park Brochure that are placed either on the walls of the lodge or around the area nearby. Once you have both papers, you're ready to start exploring the forest.
This is where things start to get dangerous. The goal here is to find and collect all 8 pages without being caught by the Slender Man.
Each page will appear in one of the following landmarks:
The map board.
The abandoned car.
The Jeep.
The watch tower.
The water tower.
The visitors center.
The portable toilet.
The canoe tied to a tree.
The tent.
The industrial area.
Remember that there are only 8 pages and a total of 10 landmarks, so 2 landmarks will be empty.
Although the forest area itself remains the same, the landmarks within the forest do not always appear at static locations.
This means that where you find the canoe on one playthrough may not be at the same place you find it at the second playthrough. It can be by the water one game, and then up on a hill the next game.
Additionally, the page found at that landmark may change locations as well.
For example, a page at the visitor's center can appear on the walls in any of the different rooms, even on the door of the bathroom stalls.
As time progresses and as you collect more pages, Slender Man will start to pursue you more aggressively.
He will appear more often and closer to you. He'll also pop out in front of you or try to corner you.
It's best to strategize your route and search for the more difficult landmarks like the vistors center and the industrial area to collect the pages there first.
The visitors center is especially dangerous because the page there often appears inside one of the rooms. If you enter the room, the Slender Man can appear in the doorway and block your exit, effectively trapping you inside (you're prety much doomed if this happens).
Try to stay as close to the doorway when entering these rooms and to turn very slowly in case he has appeared behind you.
When Slender Man does appear, do not look at him! Your camera vision becomes distorted when you are facing him or if he is standing near you. The closer he is, the worse the effects on your vision will be.
If Slender Man approaches you, turn to face a different direction and quickly move away from him.
You can hold the [shift] key to run if he gets too close, but be very careful while sprinting in case he appears ahead of you.
It's very possible to accidentally run in to him if you are rushing ahead or if you turn too quickly to look behind you.
Be especially careful while walking backwards or strafing left and right to avoid bumping into him. The safest way to move is often to keep your eyes and your steps straight ahead.
You can press [escape] at any time to view how many remaining pages you need to collect under the "Current Goal."
Once you've collected all the pages, the cut scene will begin after a few seconds.
Just keep running forward and try to avoid getting blocked by any trees. After a few flashes of running, the game will transition to the next chapter.
Into the Abyss
Current Goal: Explore the area
You start this stage at a randomized area at the back of the forest, usually behind a small, cement shed that can't be opened (sometimes you'll also start in the forest behind the building on stilts).
Run to the cement shed and stand so that your back is up against the blue door. From there, run directly forward until you reach the rock wall. Turn right and walk straight ahead to the largest.
It's difficult to see, but if you take out your flash light you can spot Letter 4 pinned to the middle of the tree trunk.
Leave the forested area and go to the road, then follow it to the bulding on stilts.
Inspect the barrel at the front of the building, a few feet to the left of the stairs.
Click Letter 5 on top of the barrel to read it and add it to your Scrapbook.
Continue to follow the road until you come to the large mine tunnel.
There, examine the cork board on the side of the left shed.
Collect the Management Notice and Letter 6 pinned to board to add both pages to your Scrapbook.
Walk to the wall outside the tunnel beside the three large pipes on stands.
Go to the corner where the fence ends beside a large rock, then turn around to find Charles' Note stuck to the side of the wall.
Click the note to read it and add it to your Scrapbook.
Enter the mine tunnel, walk all the way down to the end, then turn right and enter the doorway.
Right in front of the doorway is a fence with a Warning Notice pinned to it. Click the notice to add it to your Scrapbook.
Turn left and walk just a few feet forward. Stop when you reach the end of the control panel up against the wall.
Find Letter 7 on the surface of the machinery, beside the right set of buttons. Click to read it and add it to your Scrapbook.
Walk straight ahead to the brick wall at the end of the room.
Click the framed Newspaper Article hanging on the wall to add it to the Scrapbook.
Exit through the door on the left and walk down the hall to the generator in front of the elevator.
WARNING: You're safe to explore, wander around, and make sure you've collected everything up until this point. The moment you turn on that generator, however, the challenge begins.
Click the generator to turn it on, which will open up the gate as well as the doors on the left and right sides of the room.
Current Goal: Activate the generators to power the elevator and escape
This level is similar to The Eight Pages in the previous stage, but with a twist.
Although the Slender Man does appear in this level, there is a new threat actively pursuing you.
Now, you are being chased by a Proxy. She appears as a small hooded figure who runs towards you and lunges to attack if you let her get too close.
You must locate and turn on the 6 generators hidden around the mine in order to power the elevator that will allow you to escape.
The first generator you turned on beside the elevator counts as the generator 1/6, which leaves 5 more for you to locate.
There are two basic strategies to escape the Proxy while searching for the generators.
The first is to avoid detection by being stealthy. Press left [ctrl] to crouch, which will cause you to move slowly but also greatly reduces the noise you make with your footsteps.
Walking is louder than crouching, while running is the loudest of all. Making noise can alert the Proxy to your location. Additionally, having your flashlight drawn can also make you more noticeable to the Proxy.
If you can hear the Proxy nearby (usually indicated by a cue of creepy music or if you can hear her footsteps) but you don't see her, use this tactic to sneak away until the music stops.
The second strategy is basically a "run and stun" and is useful for when you've been spotted and are being chased.
While the Proxy is running towards you, quickly pull out your flash light and right-click the mouse to focus the beam of light on her. This will temporarily blind the Proxy and cause her to stand in place for a couple seconds.
Take advantage of that time while she's stopped and run away from her as fast as possible. Turn corners to break line of sight until you believe you have a safe distance away from her.
At that point, stop running, put away your flashlight, crouch to move quietly away and safely escape. You'll know you're home free when the music stops.
The Proxy will still be around the area nearby, so if possible, explore a different section of the mines and return later.
Many of the halls in the mine circle around, so if you're trying to get the last generator after escaping the Proxy, try reaching the same room from the opposite side to avoid bumping into her again.
Just like in the Eight Pages section, the more generators you activate, the more aggressively both the Proxy and the Slender Man will pursue you.
Strategize your route by activating the generators in the closed off rooms first so that you aren't cornered by the Proxy or Slender.
Search the rooms that are full of objects that can block your vision early as well, so you don't accidentally run headfirst into either of them.
You can press the [esc] key at any time to track the amount of remaining generators.
Once you have all six activated, return to the open room where you found the first generator, step on to the elevator, and quicky press the button panel to ride the elevator to the upper floor.
Flashback
Current Goal: Explore the area
You start this stage at the elevator. Walk straight ahead to the crates stacked in the corner at the end of the hall.
Look on top of the lowest crate for Letter 8 and then click it to add it to your Scrapbook.
Go left and exit the mine to the forest. Follow the road up the hill to the chainlink fence.
Examine the right section of the fence to find and collect Letter 9, which is also added to the Scrapbook.
Turn around and walk down the hill to the road that follows the side of the cliff. Follow the road until you reach the point where it forks. Take the right path up and around the bend to the very top of the hill.
If you look to the right, you'll see two wooden posts stuck in the ground in front of a large rock formation.
Find Letter 10 at the top of the right post, then click it to add it to your Scrapbook.
Go back down to the main road and follow it towards the right to come upon a flare on the ground at the mouth of a cave. Walk through the cave to find a building.
Pick up the note covered with the words "I want to die" pinned to the door to add it to your Scrapbook.
Enter the doorway and immediately turn to face the left wall.
Click to read Letter 11 at the top of the wall and add it to the Scrapbook as well.
Walk to the back of the room and click the television to start the next section of the stage.
Current Goal: Secure the house by locking 8 windows and doors
First, close the window in the bedroom by dragging it downward.
Head downstairs and focus on closing the three doors, ignore the other windows for now.
Note that not all of the doors count towards your objective, you need to specifically close the doors that lead to the outside.
Specifically, those are the front door at the foyer, the back door at the kitchen, and the side door that leads to the garage.
After all three doors are closed, you can go about closing the remaining four open windows.
The windows that are open are randomized each game, so you'll have to check the rooms one by one.
The safest approach is to open the door first to search the room for windows from the outside, rather than rushing inside the room which can get you trapped if Slender appears in the doorway.
Slender Man will often arrive well before you close the last window, he sometimes even appears before you can close the door to the garage.
Once he's inside the house, you don't need to worry about any open windows as the next goal will start automatically.
Current Goal: Hide
When Slender begins to pursue you, immediately run to Kate's bedroom at the end of the right hallway upstairs.
Be careful when turning corners or entering rooms, as he'll often appear in doorways ahead of you or at the end of the room.
Remember that many of the downstairs rooms loop around in a circle to the foyer, so if he blocks your path you can still go around the other side to reach the stairway.
As soon as you enter the bedroom, Slender Man will try to catch you.
Immediately run towards the window as fast as you can to jump out and escape.
The Arrival
Current Goal: Search for Kate's whereabouts
At the start of the chapter you're placed back in front of the television in the warehouse. Turn around and exit through the door on the right.
Follow the winding road up and around the hill.
About halfway up the hill where the road bends is a broken fence post where Letter 12 is pinned to the top. Click to read it and add it to your Scrapbook.
Continue up the hill, noting the red tower you see in the distance, until you reach the cave.
Enter the cave and drop down the ledges, then head towards the orange box against the back wall.
Look at the top of the box to find Letter 13; collect the letter to add it to the Scrapbook as well.
Make your way through the cave to come out to the burning forest at the other end.
Find a way out of the forest fire
As soon as you enter this area, the Slender Man will begin his pursuit.
Move up and towards the right to climb the hill, making your way to the radio tower.
Stick to the path of clear, wide areas and avoid the flames and falling trees.
Stay at a run (by holding the left [shift] key the whole time to put as much distance as possible between yourself and Slender.
He'll catch you if you allow him to get too close, so don't stop moving until you reach the safe house.
The building is right next to the radio tower. Get to the front door as fast as you can and enter the room to get to safety.
Find Kate
Search the building for the Key.
The location of the key is randomized. It can appear on the floor or on the surfaces of the barrels and crates in the main room or either of the two rooms on the right.
Use the Key to unlock the back door.
Walk down to the end of the hall and open the door on the left. From there, go to the end of the corridor until you come to another doorway.
Open the door and walk to the charred body at the end of the room.
Play the recording on the camera beside the corpse.
Posted by: Trinn |
March 27, 2013 9:18 PM
|
March 27, 2013 9:18 PM