

Royal Trouble
Platform: Mac, Windows

![]() Princess Loreen and Prince Nathaniel got off on the wrong foot. Sure, you can't blame them for being cranky. I mean, they both woke up to discover themselves captive in a dungeon. That would put a damper on anyone's mood. And the way they (inadvertently and hilariously) foiled each other's initial escape attempts doesn't seem too conducive to a happy relationship. But if you bring your point-and-clicking A-game, you should be able to ensure that these two crazy kids get their happily ever after in the Orchid Games adventure Royal Trouble.
Princess Loreen and Prince Nathaniel got off on the wrong foot. Sure, you can't blame them for being cranky. I mean, they both woke up to discover themselves captive in a dungeon. That would put a damper on anyone's mood. And the way they (inadvertently and hilariously) foiled each other's initial escape attempts doesn't seem too conducive to a happy relationship. But if you bring your point-and-clicking A-game, you should be able to ensure that these two crazy kids get their happily ever after in the Orchid Games adventure Royal Trouble.
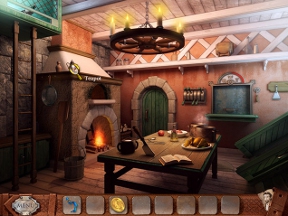 Royal Trouble switches you back and forth between Nathaniel (brown inventory) and Loreen (blue inventory). The cursor will change as you hover over various hotspots: to a hand, when it's something you can pick up; to a gear, when it's something you can manipulate with another object; and to a magnifying glass, when it's something you can examine, perhaps for a clue, perhaps to zoom in to another view, perhaps just for a bit of flavor text. Your inventory will fill up at the bottom of the screen. You can combine objects within it by clicking on one and then the other, and use objects from it on "gear" locations.
Your ultimate goal, of course, is for both Nathaniel and Loreen to escape. Most of the game consists of fairly logical inventory puzzles, with occasional mini-games. For example, you might pick up a hairpin, and in a lock-picking mini-game pick a lock to a cupboard with it, and then take the dog food within, combine it with a sedative from your inventory, and use it on a guard dog in order to sneak past him.
There are no inexplicable hidden object scenes where you are for some reason compelled to discover a rubber duck, a toothbrush, and a ladies' fan, yet only one object amongst the multitude is actually added to your inventory. Nor does the game fall into the trap of placing objects where they have no business being (why is there a hammer in the bathtub?). No, Royal Trouble has only a few hidden object scenes, and they involve things like finding unbent nails... in a chest full of nails. And a certain set of dishes... in a china cabinet. Because of this, they take a much keener eye for detail than the typical hidden object fare. If this doesn't sound appealing, don't fret; all puzzles and mini-games are skippable with no penalty. Simply wait until the skip bar fills and click it to skip. Be careful not to click outside of a puzzle window, however. This backs you out of the puzzle altogether and resets it, which is good if you're doing certain puzzles and you think you've gotten stuck, but frustrating if you were almost done.
 Analysis: If you're familiar with Orchid Games from its romantic Heartwild Solitaire series, you should know that there isn't a bit of purple prose to be found in Royal Trouble. No one swoons, no one clasps anyone to a heaving bosom, and dark and stormy nights in which white shirts cling alarmingly are right out. That said, if you don't foresee a romance between Nathaniel and Loreen from the first sparks of their bickering, you're obviously skipping the dialogue. It would be easy for the plot and character to fall into dull stereotypes. Although the game does flirt with them, from "feisty redhead" Loreen to would-be "knight in shining armor" Nathaniel, the snappy dialogue keeps things humorous, and the characters actually learn from their boneheaded mistakes and don't make them again (or at least, make new and entertainingly fresh mistakes). They actually develop believably as people and learn from their experiences.
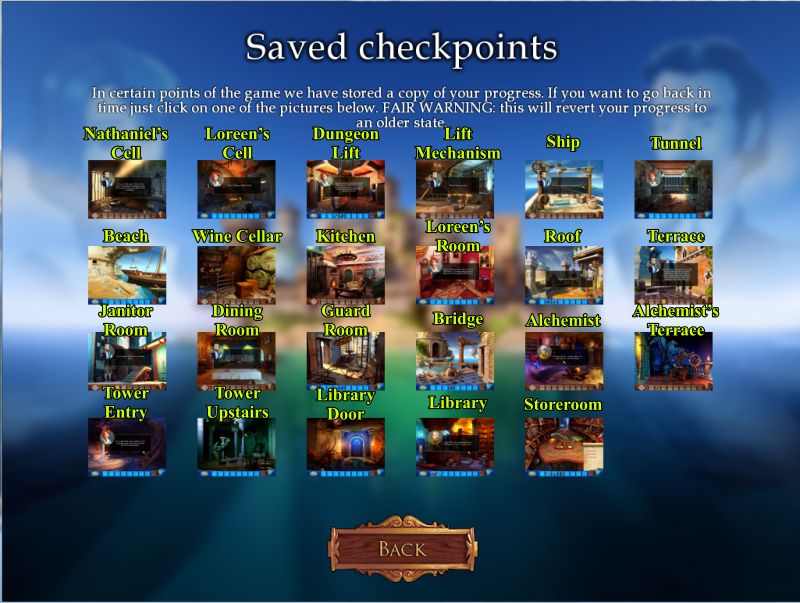
The hint system deserves particular praise. Click on the book in the lower right whenever you need a nudge. First it will tell you your immediate goal. Then, as you ask it for more help, it will gradually reveal more and more information until finally it tells you explicitly what to do next. You never have to exit the game to hunt for a walkthrough on the web, because it's all right in game. The game also includes an excellent checkpoint system. In the main menu, click on "options" and then click "load game". The game will show all the checkpoints you've passed. When you've gotten to the end of the game, there will be 23 checkpoints. You can click on any checkpoint to play from that point, if you want to relive a certain cutscene or puzzle.
Royal Trouble is a light and casual romp in the tradition of more "hardcore" point-and-click adventures like the Monkey Island series. Players in search of an amusing script with memorable characters and looking to solve some logical puzzles shouldn't miss out on this escapade.
![]() Windows:
Windows:
Download the demo
Get the full version
![]() Mac OS X:
Mac OS X:
Download the demo
Get the full version


Walkthrough Guide
(Please allow page to fully load for spoiler tags to be functional.)
Royal Trouble Walkthrough
General Information
An unlikely duo finds themselves in the dungeon of an island fortress so you will alternate playing Prince Nathaniel and Princess Loreen as they explore 23 locations of the castle in an effort to help them escape the island.
From the Main Menu you can choose up to 5 profiles, play or exit the game, and select your Options.
Options include music and sound effects volume, full screen versus window mode, and you can check the credits, select support information and load a saved checkpoint in the game.
If you want to go back in time, simply choose the picture to load that checkpoint and you will immediately go to that point in the game.
Screenshot
The game can save your progress, there is no click penalty and hints are slightly different.
You will offered a brief tutorial at the beginning of the game.
There are puzzles and mini games throughout the adventure with your choice to play or skip once the skip button is full.
The walkthrough is organized by location because you will be doing a lot of running around as both characters.
Navigation
You can access the Menu at anytime from the bottom left of the scene.
You will have your choice to resume the game, a limited options menu, a help screen with basic tips, and your choice to save and exit which will take you to the main menu once you decide if you wish your progress saved or not.
Your Inventory is shown in the bottom middle bar.
To the bottom right is the Hint Book and to the right of that you will see which character you are currently playing.
When you play as Nathaniel your colors at the bottom will be brown.
When you are Loreen your colors will be blue.
Sometimes you will need to combine one or more items in your Inventory in order to use them.
When you are in a close up you will need to click on the main scene to exit.
Cursors
If you don't want to use the Hint Book, you can just move the cursor over the scene and see what attachments what shapes appear.
When you need to check something out close up you will get a magnifying glass.
A hand will tell you to pick something up or to perform a task.
Gears mean you need to have an inventory item to help you and you may need to go find it before you can complete the task.
The Talk Balloon suggests you need to have a conversation with a person.
Hints
Hints come in the form of a Hint Book that will chart your progress in the game and tell you what percentage you have completed.
If you need help, click on the Hint Book and unravel the help you need by selecting "Tell Me More" until you get all of the information you need.
You cannot go back in the pages of the Hint Book because it only deals with where you are in the game but if you go back to a Checkpoint, it will revert to that point in time.
Nathaniel's Cell
Collect the empty flask and powder.
Touch the welcome mat to get a piece of cord and get a close up of the pillow to collect the dirty lens.
Put the dirty lens in the water to clean it.
Put the powder in the flask and use the cord as a fuse.
Place it on the cell door handle and it will go to its proper place.
Place the clean lens in the sunray to light the bomb which blows up opening the door which it turns out wasn't locked so exit.
Screenshot
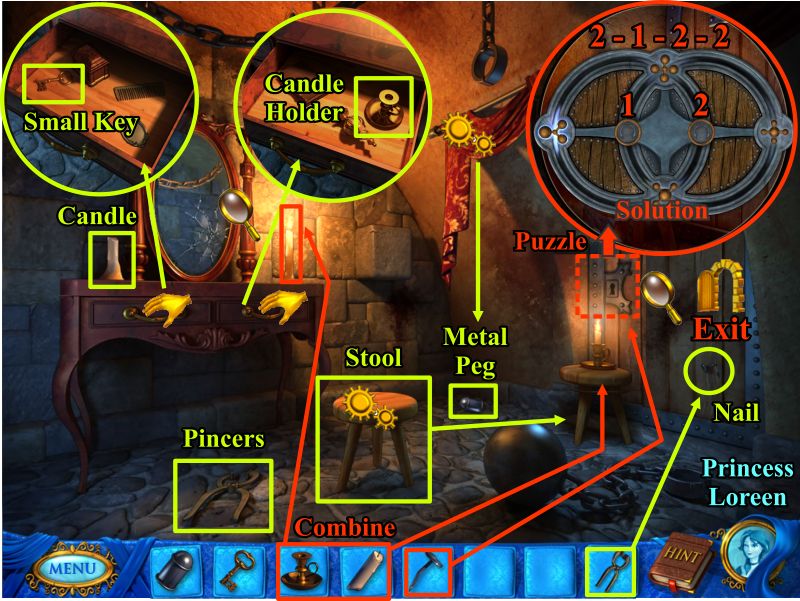
Loreen's Cell
Collect the candle and pincers.
Open the two drawers and collect a small key and the candle holder.
Place your cursor on the curtain and it will turn to a gear giving you a metal peg to collect from the ground.
Move the stool over to the door.
Use the pincers to remove the nail from the door.
Combine the candle and holder and light it with the already lit candle.
Place your lighted candle on the stool so you can see the lock to pick it with the nail which will bring up a puzzle to solve in order to open the lock.
The 4 outside pieces need to fit into their shapes so click the two rotating circles as follows: 2 - 1 - 2 - 2 and exit.
Screenshot
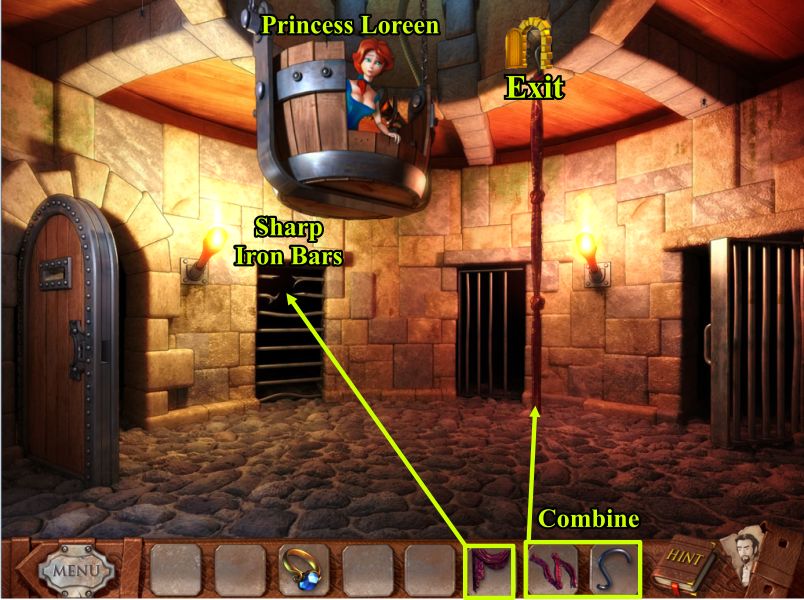
Dungeon Lift Area
Loreen and Nathaniel encounter each other and Loreen sends him off to her cell on a task while she places her key in the lift starter and gets stuck near the top of the exit.
Nathaniel comes back to find her stuck so takes the iron bar and pole and goes back to her cell.
Use the bar to move the stone and find the signet ring.
Use the pole to collect the curtain and exit back to the lift area.
Screenshot
Rip the curtain on the sharp iron bars and combine it with the now bent iron bar.
Toss the grappling hook up to the crack and exit to the level above.
Screenshot
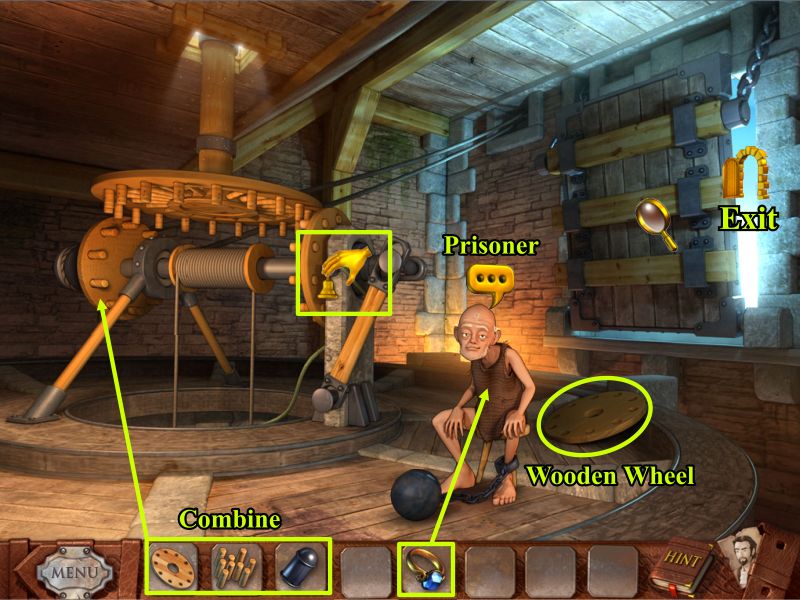
Lift Mechanism
Talk to the Prisoner in the ball and chain.
Pick up the wooden wheel and play a game of Peg Solitaire with the Prisoner who wants something valuable for the game so give him the signet ring.
After the game he will give you his pegs for the wheel but there is one missing so go ask Loreen for her metal peg.
Combine all the pegs with the wheel and place it on the lift mechanism.
Use the bell to start the lift and see what happens next.
Screenshot
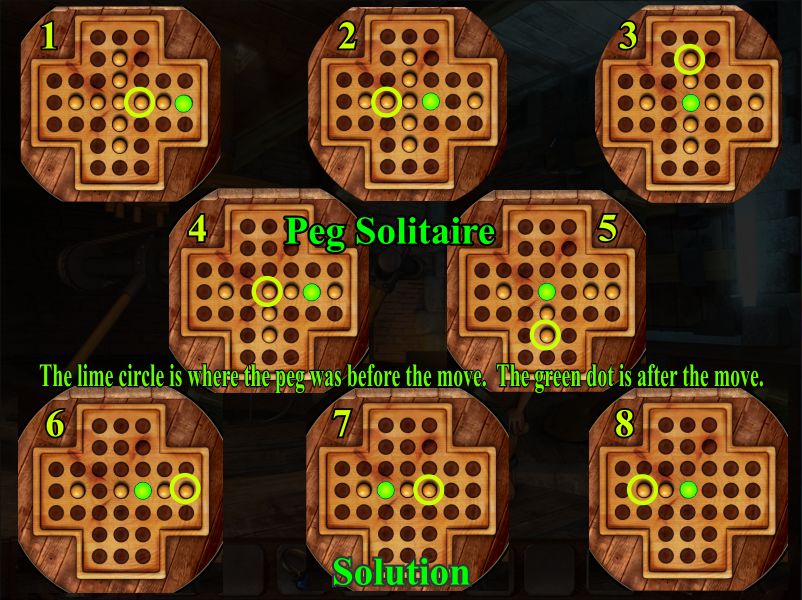
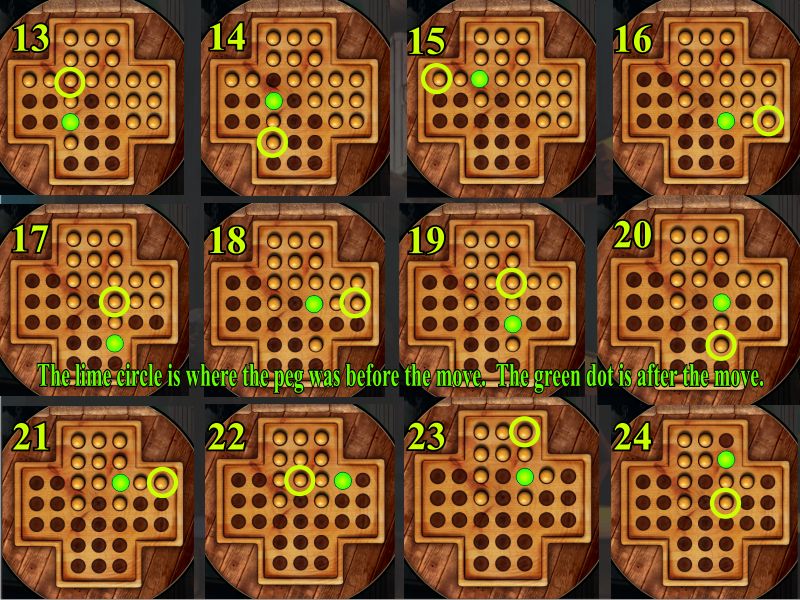
Peg Solitaire Game
The object of the game is to remove all the pegs until there is only one left in the middle.
When you jump one of the pegs it is removed.
The lime circles show where the peg was and the green dot shows where is ends up after the move.
Screenshot
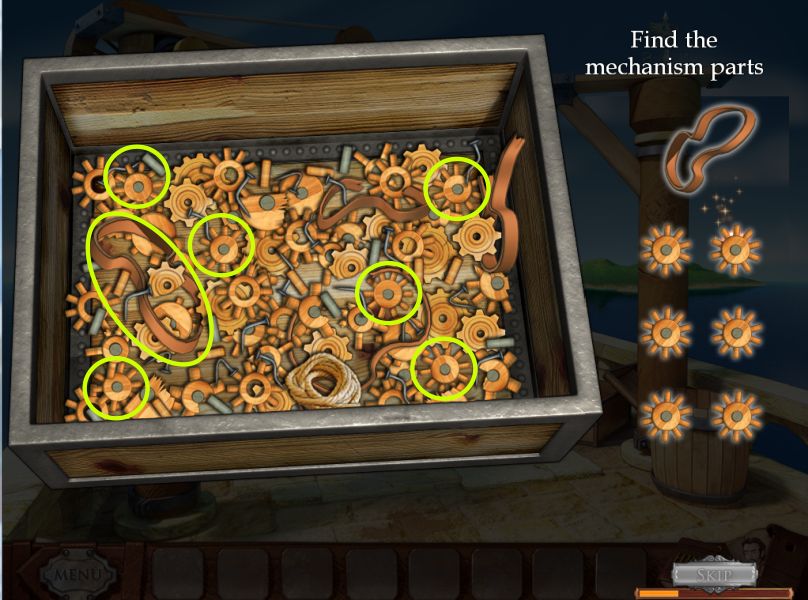
Loading Dock
Nathaniel managed to escape through the door before it closed and finds himself on a loading dock with a ship below.
Open both chests and play the hidden object games to get the lift mechanism gears and belt as well as the hammer and nails.
Pick up the crowbar on the left and use it on the barrel.
Once you have the hammer and nails place the nails on the barrel stays and hammer each nail…actually you only need to hit the thing 8 times rather than each individual nail.
Grab the rope and put the lift on it and the gears and belt in place and you will lower to the ship below.
Screenshot
Gears Parts
Pick up the marked objects.
Screenshot
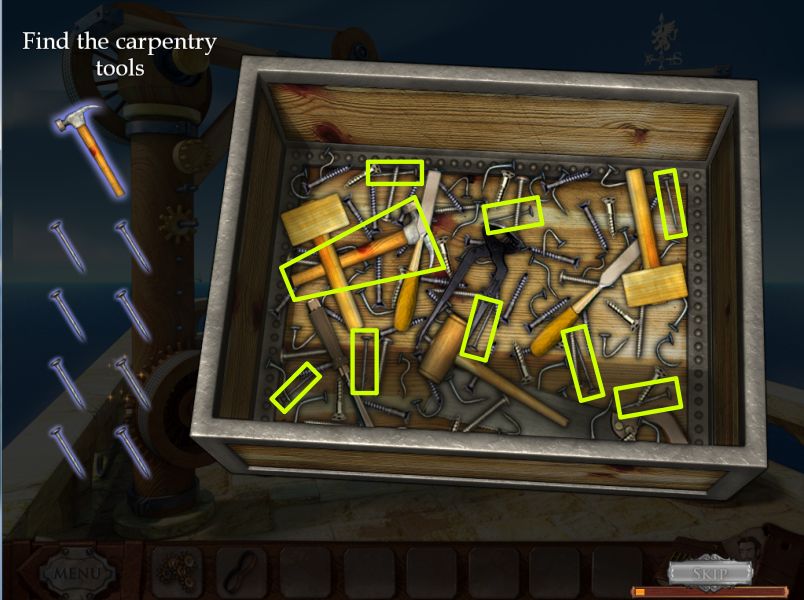
Hammer and Nails
Pick up the items marked.
Screenshot
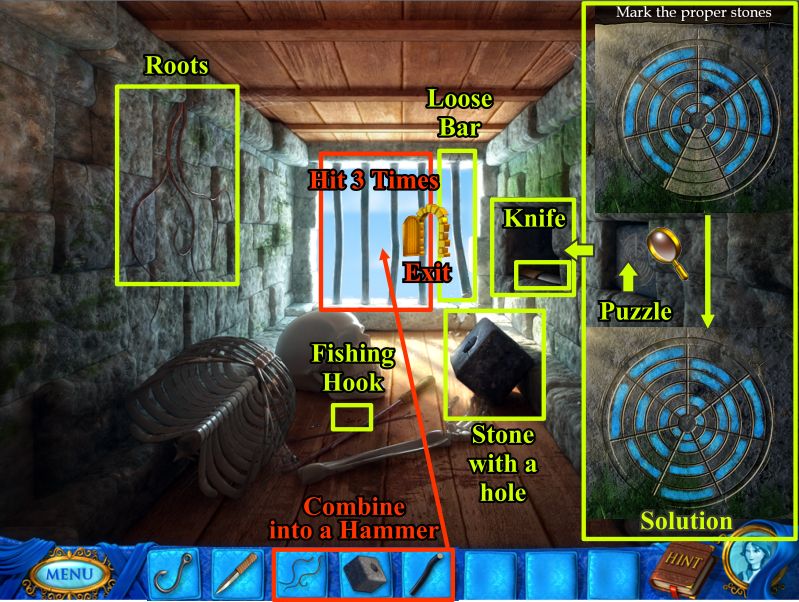
Tunnel
Loreen managed to grab hold of an opening when the dungeon lift broke apart and finds herself in a tunnel.
Take the roots off the wall, pick up the fishing hook and the loose bar.
Click on the stone indentation for a puzzle.
Mark the proper stones to follow the pattern as shown in the solution.
Collect the knife inside and the stone with a hole that falls out.
Combine the stone, bar and roots to form a hammer and hit the bars 3 times to clear the opening so you can exit.
Screenshot
Ship
Pick up a pebble, the bamboo stick and plank.
Use the knife to cut down the vine on the wall.
There is a parrot sitting on a floating plank and he doesn't seem to want to give it up.
Combine the vine, bamboo pole and fishing hook to make a fishing pole.
Throw the pebble at the parrot and grab the plank with the fishing pole before the parrot lands on it again.
If you aren't quick enough, you'll have to grab another pebble and try again.
Once you have the second plank, put both planks up to the ship to form a gangplank and go aboard.
Screenshot
Nathaniel is motioning to Loreen who doesn't understand so they are captured again.
As Loreen is being hauled off she tosses her necklace to Nathaniel.
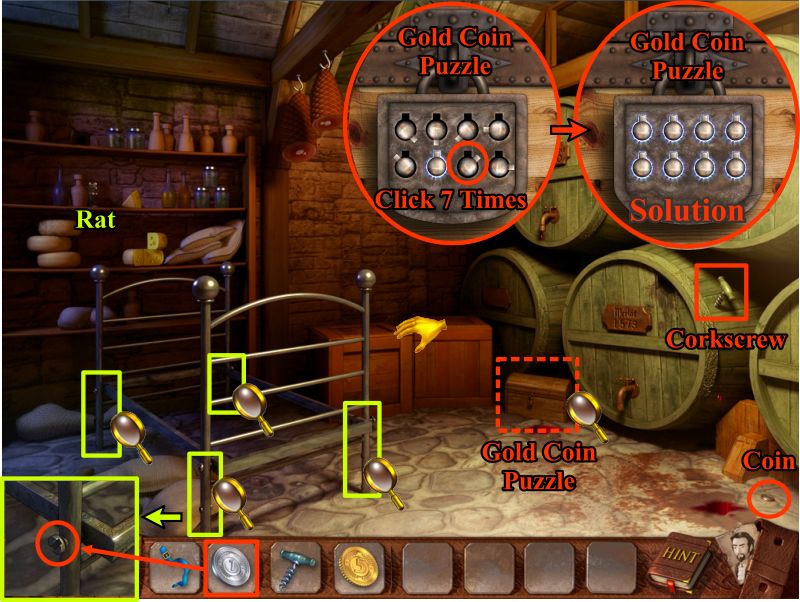
Wine Cellar
Nathaniel finds himself locked in a wine cellar with a curious rat.
Pick up the coin and corkscrew and move the boxes over so they are under the trapdoor.
Click on the small chest for a puzzle to open it.
The locks are random but your goal is to turn all the tumblers so they point up.
Each tumbler moves other tumblers but if you find the one that is pointing toward 2 o'clock and click on it 7 times, the lock will open.
Take a gold coin from the chest.
Go to a close up of each of the bed legs and use the lead silver-colored coin to unscrew the legs from the frame.
Screenshot
The bed fell apart so collect the headboard and footboard.
Combine them with the screws to form a ladder to put on the boxes so you can reach the trapdoor.
Click on the lock for a puzzle to open it.
This is a more complicated lock than the chest but it is the same idea.
Rotate the outer tumblers using the inner circles as follows: 1 - 2 - 1 - 2 - 3 - 4 - 4 and exit to the kitchen above.
Screenshot
Kitchen
Pick up the scraper, silverware and food plate.
Flip 3 times through the recipe book until you end up with a blank page.
Repair the food lift by completing the random puzzle.
Each lever moves one or more of the other levers but all of them need to end up in the "UP" position.
If you get too frustrated, you can always hit the skip button.
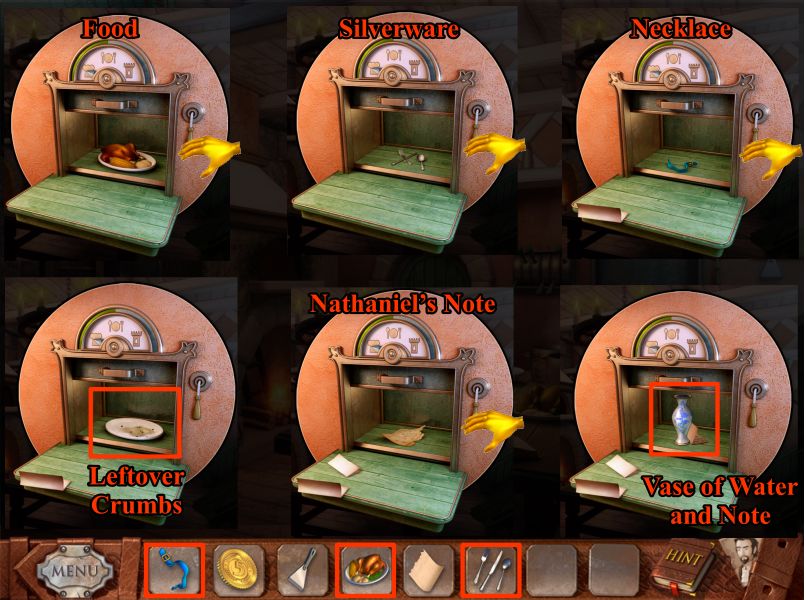
Once the lift is repaired you are ready for a series of exchanges between Nathaniel and Loreen.
When you get the plate of crumbs give it to the pigeon in the dove cote and it will drop a feather.
Use the scraper on the soot above the fireplace and put the soot in the oil to make ink.
Dip the feather in the homemade ink and write a note on the blank page to send to Loreen.
When you receive the vase of water use it on the fire and escape up the chimney.
Screenshot
Depending upon what you send up in what order you will receive a different response from Loreen in return.
Nathaniel with send the food plate, silverware, Loreen's necklace and a note.
Loreen will send back a series of notes, a plate of crumbs, and a vase of water.
Screenshot
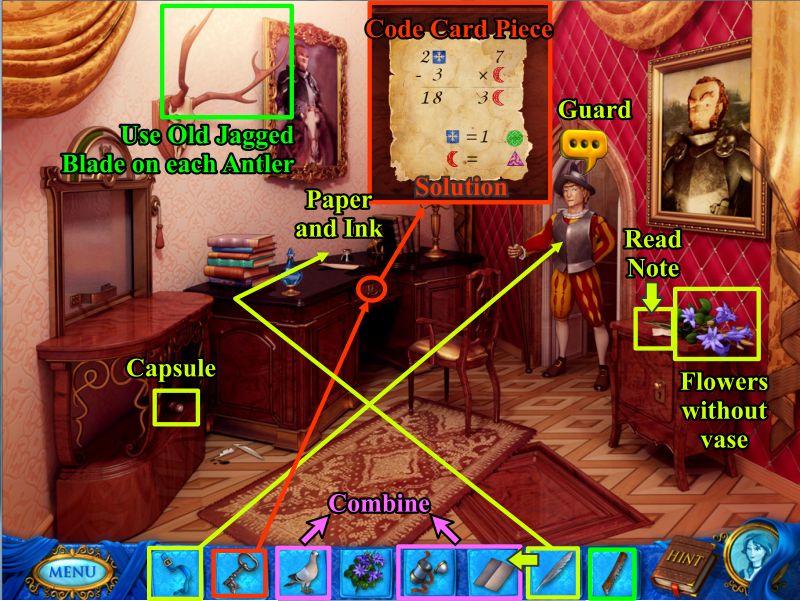
Loreen's Room
Meanwhile Loreen sent Nathaniel the vase of water so collect the flowers, paper from the desk and capsule.
Read the note on the chest and knock on the door till the Guard opens it.
Loreen wants fresh air so once she convinces the Guard follow him up to the roof.
Use the key from the Guard to open the desk and get the code pieces.
Put the jigsaw pieces together and go back to the Guard.
Once you get the pigeon and the feather, come back and dip the feather in the ink and write a note to Nathaniel on the paper.
Put the note in the capsule and combine with the pigeon.
Use the old jagged blade to cut off the two antlers and go back to the roof.
Screenshot
Roof
Pick up the old jagged blade and convince the Guard to help you escape in exchange for payment.
You will need to open the dove cote using a code of which the Guard has half so go back to your room in search of the other half using the key he gives you.
After you decipher the code, open the Dove Cote Lock and collect the pigeon and feather it drops.
Go back to your room to write Nathaniel and then come back with the pigeon and put it in the sky.
Screenshot
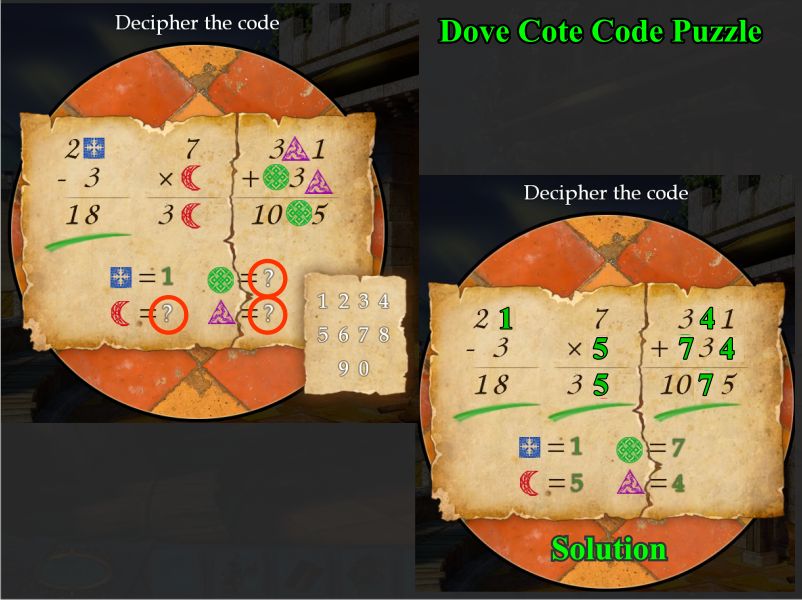
Dove Cote Code Puzzle
Get the other half of the code card from the Guard and decipher the code.
Click on the question marks and select a number from the piece of paper that completes the equation as shown in the solution.
Screenshot
Terrace
Nathaniel has climbed up the chimney and ended up on the terrace.
He takes the Carrier Pigeon and reads Loreen's note about needing money and goes through the doorway.
Once you get the wrench you can open the dove cote and take the thick stick and key to the kitchen.
Take the pole the carrier pigeon was sitting on and place it along with the broom, mop and thick stick in the holes in the wall to use as a ladder to get to the window above.
Go back to the Janitor Room.
Screenshot
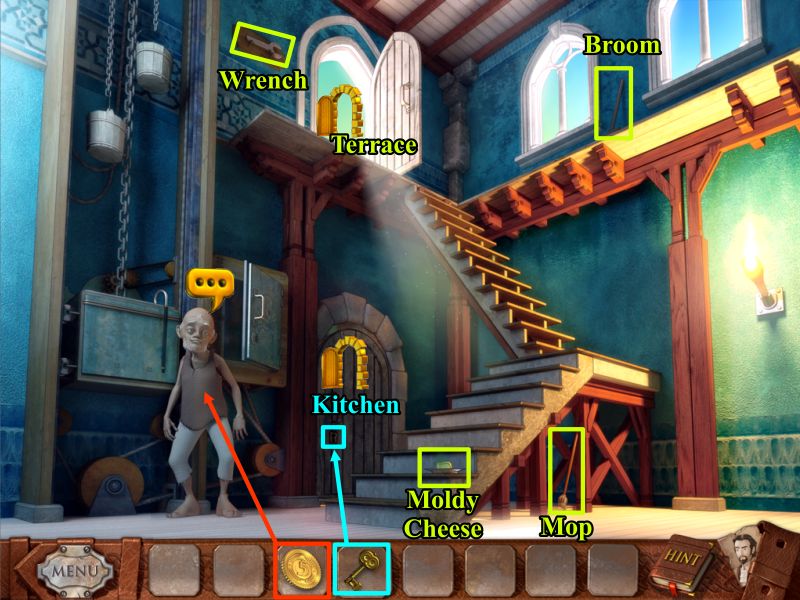
Janitor Room
Nathaniel runs into the Prisoner again who says the food lift is broken and he will fix it if you play more Peg Solitaire and find his rat friend.
Collect the wrench, broom, mop and moldy cheese.
Once you get the key in the dove cote on the Terrace, open the kitchen and go through the trapdoor to the Wine Cellar.
Screenshot
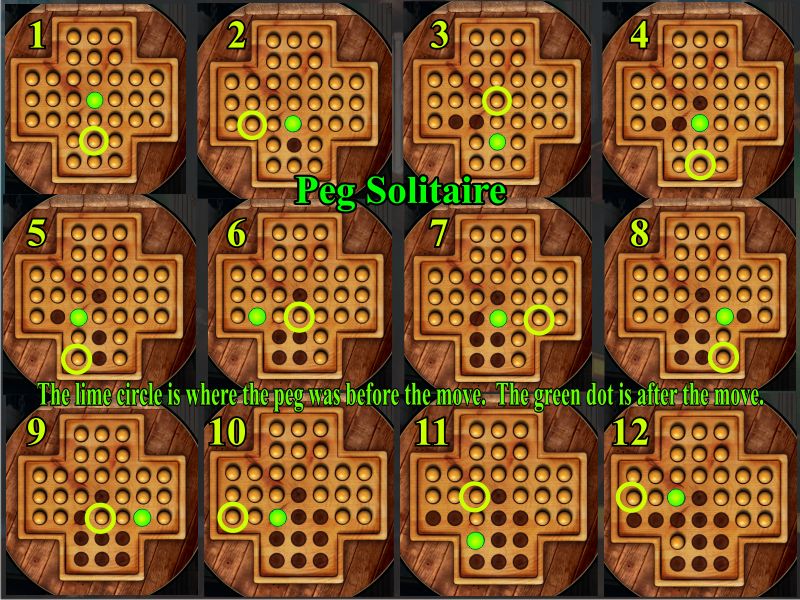
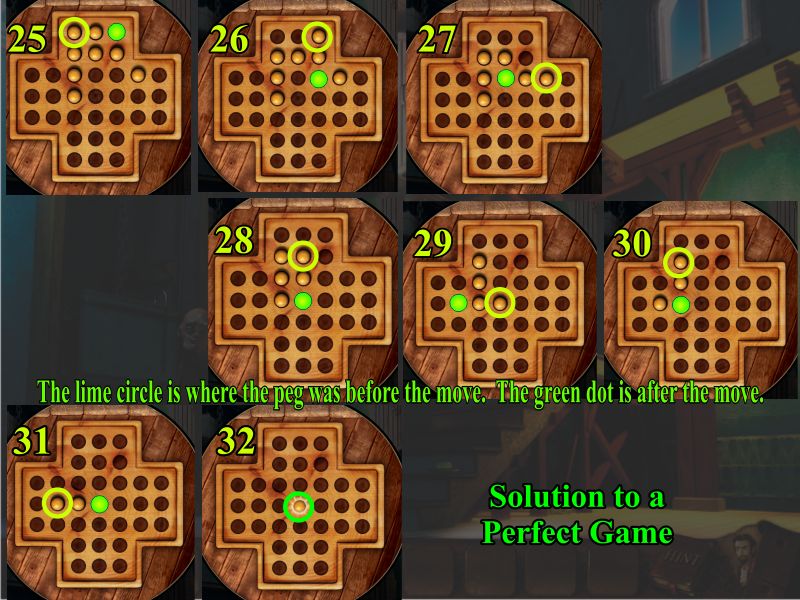
Peg Solitaire
This game is a lot more complicated in order to play a perfect game but the Prisoner says you can win with 4 or less.
He also says if you fail to win in 3 tries that he will lower the stakes.
Follow the sequences and remember the lime circle is where you start and the green dot is where you finish your move.
Screenshot
Screenshot
Screenshot
Wine Cellar
Look for the rat and give him the moldy cheese to catch him.
He moves around so all the red circles are places you may find him in addition to where he is in the screenshot.
Take the gold coins from the small chest and go back to the Janitor Room.
Screenshot
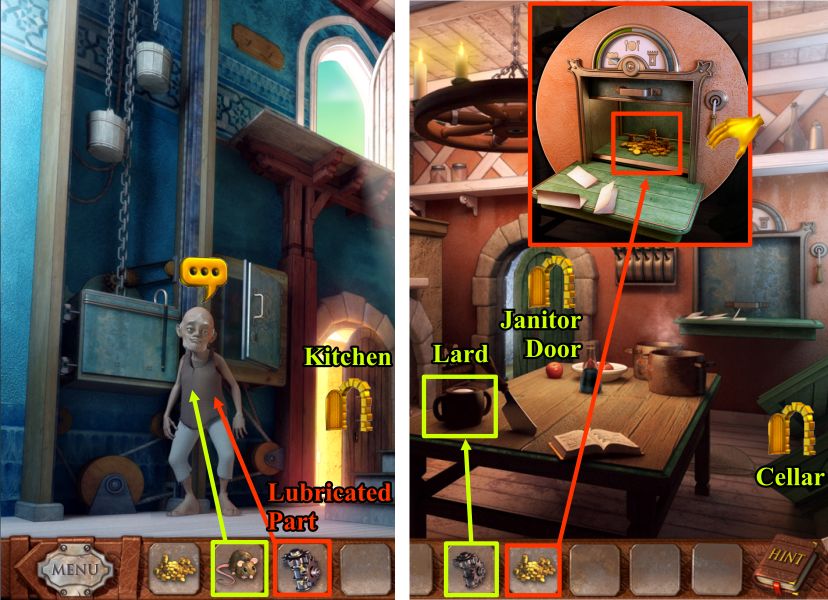
Janitor Room and Kitchen
Give the rat to the Prisoner and he will give you a lift part that needs lubrication.
Go to the kitchen and dip the part in the lard and take it back to the Prisoner.
Once the lift is fixed the Prisoner gives you his cane so go to the kitchen and send the gold to Loreen.
Screenshot
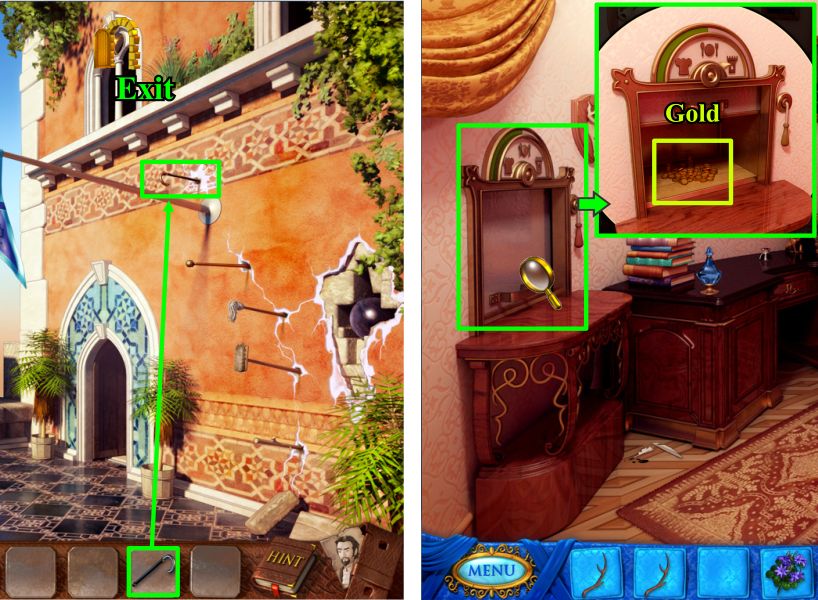
Terrace and Loreen's Room
Go back through the Janitor Room to the Terrace.
Place the prisioner's cane in the last hole in the wall and climb up.
Loreen finds the gold in the lift and takes it up to the Guard.
Screenshot
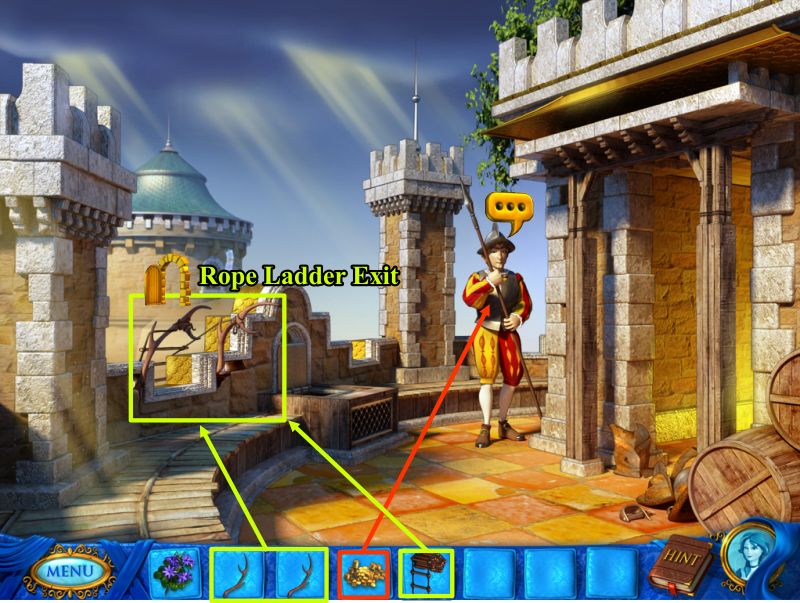
Roof
The Guard is satisfied and gives Loreen a rope ladder.
Place the 2 antlers in the holes next to the opening and hook the rope ladder up to them
Exit down the rope ladder.
Screenshot
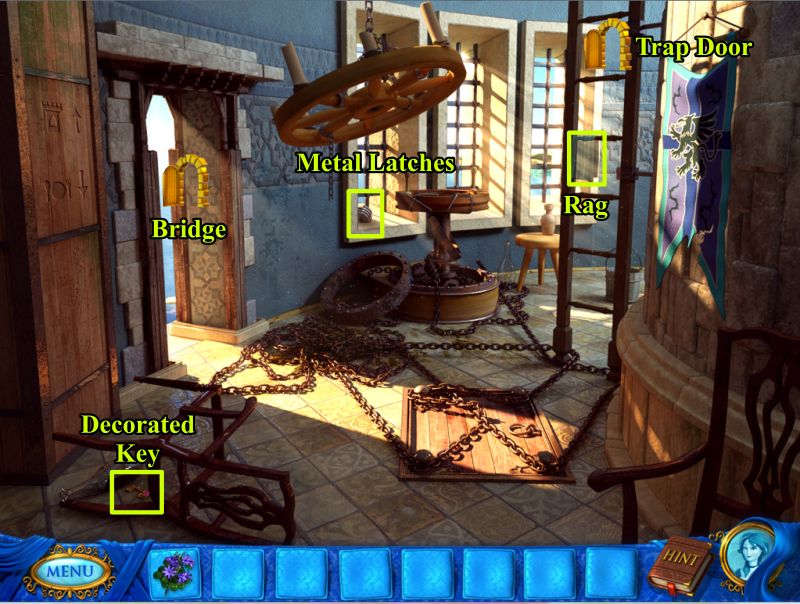
Guard Room
Loreen ends up at the bridge but the mechanism is in need of repair so take the door to the right and go into the Guard Room.
Pick up the rag, metal latches, and decorated key.
The chains are all rusty and dirty so go up the ladder to the trapdoor.
Screenshot
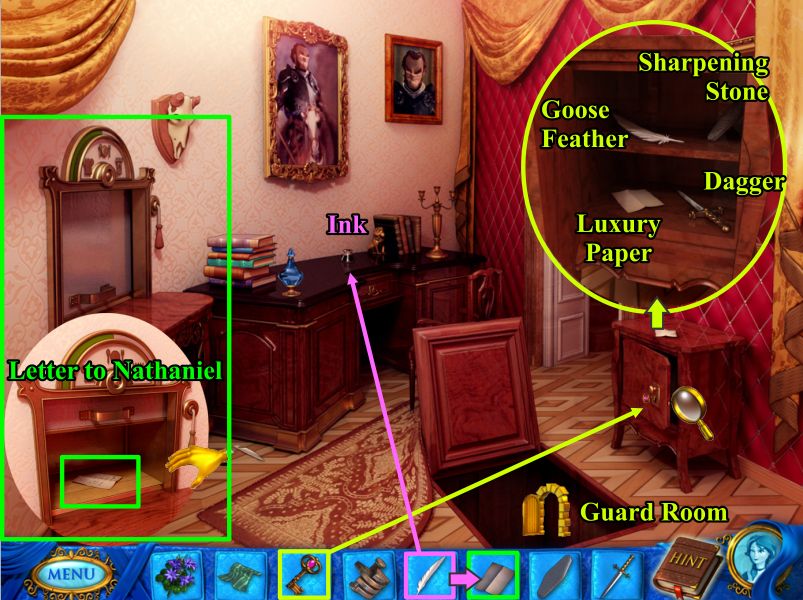
Loreen's Room
The trapdoor leads to Loreen's Room and the decorated key opens the chest at the right.
Take the goose feather, luxury paper, dagger, and sharpening stone.
Dip the feather in the ink on the desk and use the luxury paper to write a note to Nathaniel.
Place the note in the lift and send it.
Screenshot
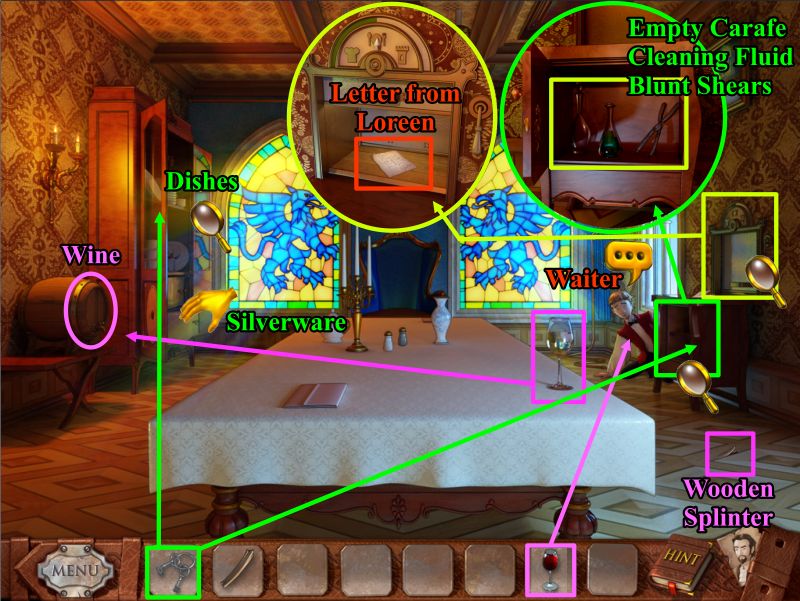
Dining Room
Nathaniel almost had another disaster climbing the make-shift ladder he constructed on the Terrace wall but managed to somehow swing into the Dining Room.
Talk to the Waiter and check the lift to find the letter from Loreen.
Pick up the wine glass, fill it with wine and give it to the Waiter in hopes of getting him to talk.
Promise to help the Waiter in exchange for his help to get you to the next level up via the trapdoor.
He gives you his keys so open the small cabinet on the right and the large cabinet on the left.
From the small cabinet collect an empty carafe, cleaning fluid and a pair of blunt shears.
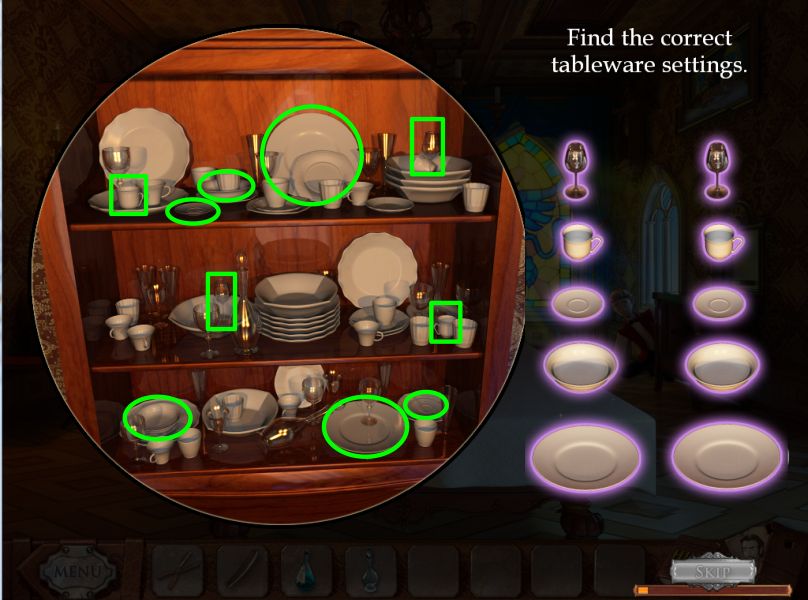
Click on the large cabinet at the left for a Hidden Object to find the correct dishes.
Also open the silverware drawer for a Hidden Object to find the silverware settings you will need.
Pick up the wooden splinter off the floor for future use.
Screenshot
Tableware Settings Hidden Object Scene
Collect the marked items to correspond to the items shown on the right.
Screenshot
Silverware Hidden Object Scene
Select the items to correspond to the correct silverware shown on the right.
Screenshot
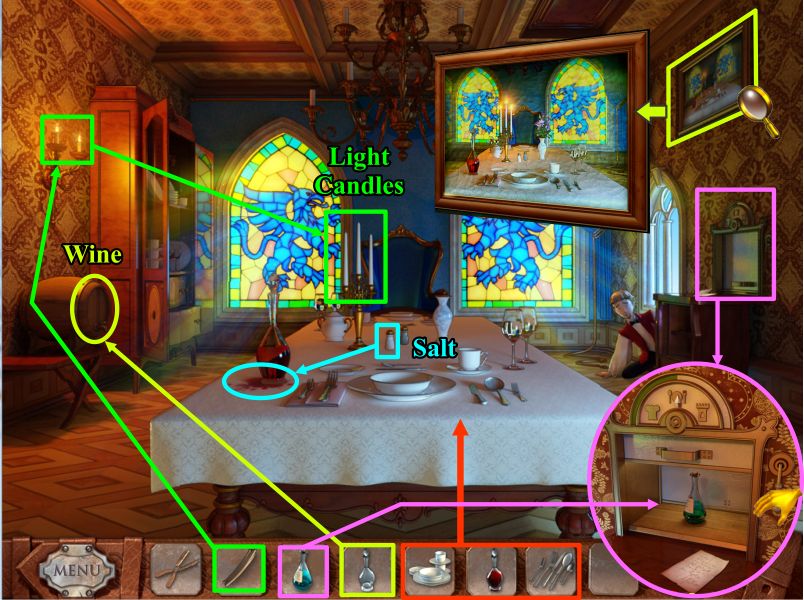
Check the picture on the wall to see exactly how the table is supposed to be set.
Set the table with the dishes, silverware and wine carafe which you need to fill with wine.
Nathaniel spills the wine and the Waiter is worried but Nathaniel puts salt on the stain and all is fine.
Use the wood splinter to get fire from the wall candles to light the table candles.
Send the cleaning liquid to Loreen via the lift.
Now all you are missing are the flowers and the table will be set.
Screenshot
Loreen's Room, Guard Room, and Dining Room
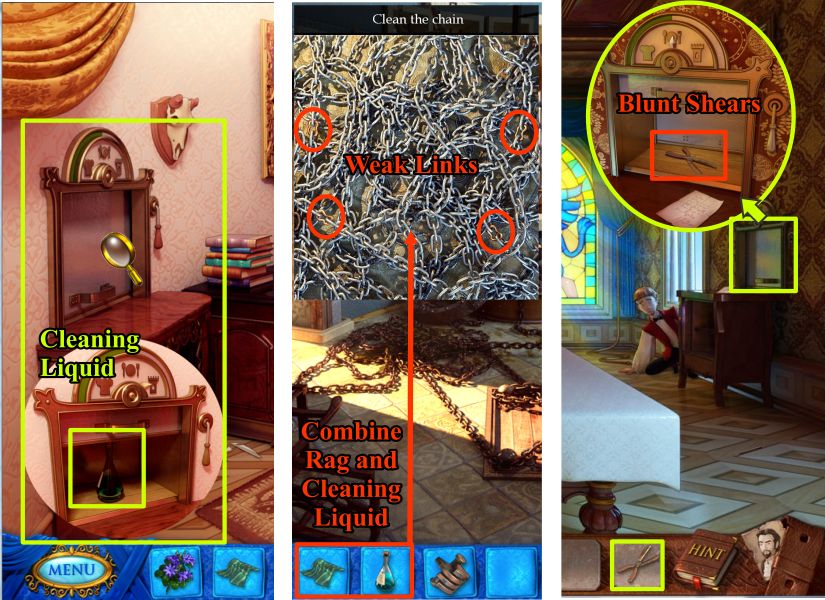
Loreen gets the cleaning liquid so goes to the Guard Room and combines it with the handkerchief to clean the chain.
She finds some weak links in the chain and Nathaniel's next sends the blunt shears in the lift.
Screenshot
Loreen's Room and Guard Room
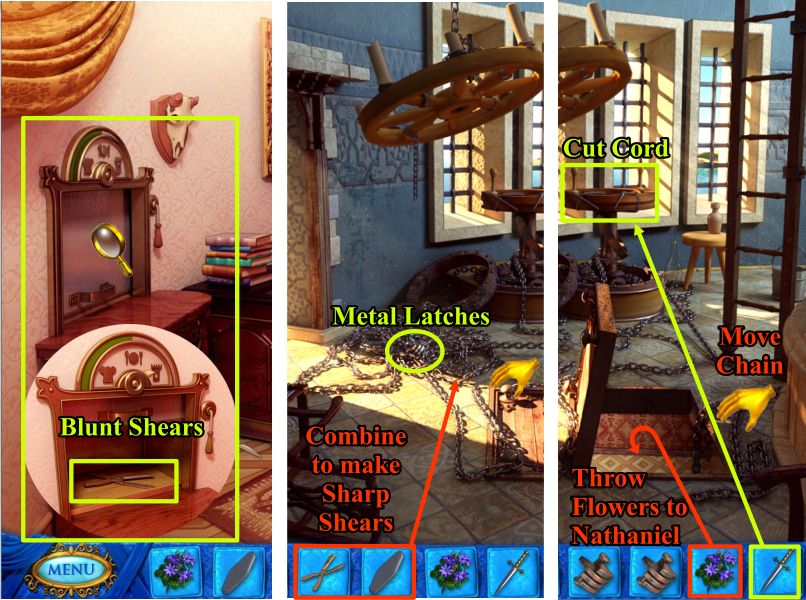
Loreen receives the blunt shears from Nathaniel and sharpens them with her sharpening stone.
She finds another set of metal latches in the chains and is able to open the trapdoor.
Move the loose chain into the trapdoor and throw the flowers down to Nathaniel.
Screenshot
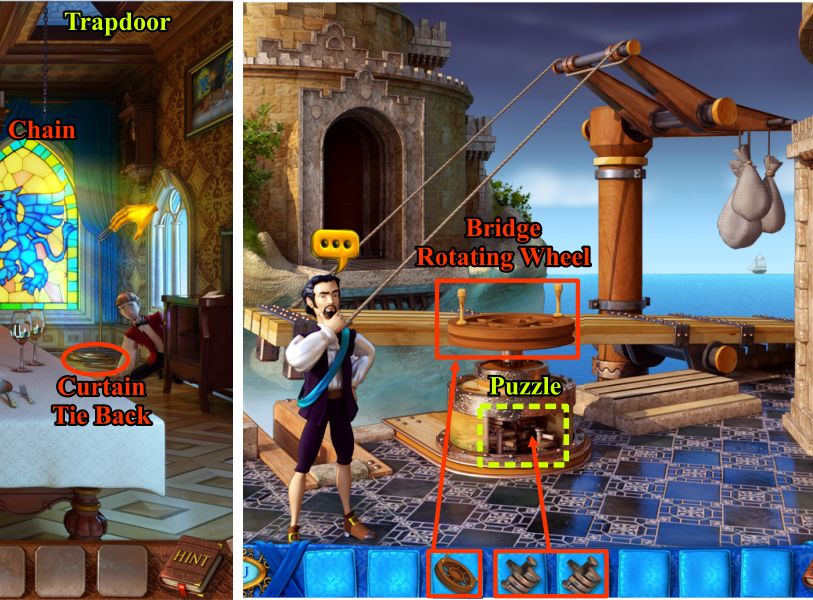
Dining Room and Bridge
Nathaniel places the flowers on the table and grabs the curtain tie back before the Waiter helps him climb up through the trapdoor.
Screenshot
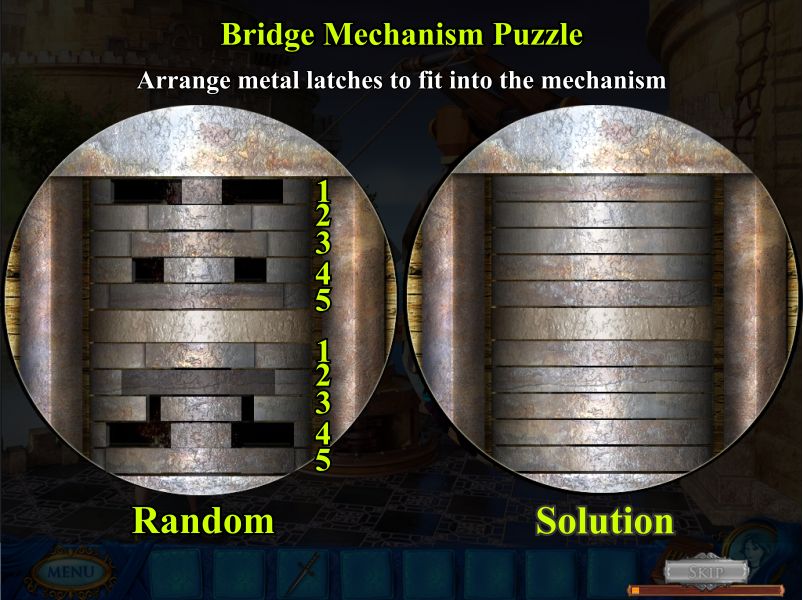
Bridge Mechanism Puzzle
The puzzle is random so each time you play or back out of it there will be a different starting configuration.
Your goal is to have no gaps in the mechanism.
Mechanism A:
Latch 1 moves only Latch 1.
Latch 2 swaps Latch 1 and 2.
Latch 3 flips Latches 1, 2, and 3 upside down.
Latch 4 flips Latches 1, 2, and 4 upside down.
Latch 5 flips all the Latches upside down.
Mechanism B:
Latch 1 moves only Latch 1.
Latch 2 swaps Latch 1 and 2.
Latch 3 flips Latches 1, 2, and 3 upside down.
Latch 4 flips Latches 1, 2, 3, and 4 upside down.
Latch 5 flips all the Latches upside down.
Screenshot
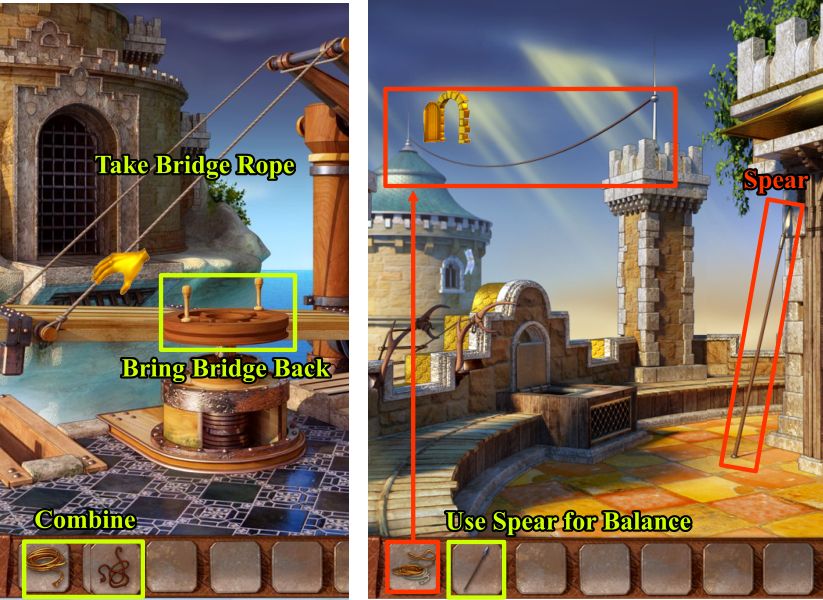
Bridge and Roof
Ask Nathaniel's help to turn the rotating wheel to move the bridge to the other side.
Loreen walks across and the gate drops behind her before Nathaniel can cross so he has to find another way to the Tower.
He turns the rotating wheel to bring the bridge back and takes the bridge rope.
Combine the bridge rope and the curtain tie back.
Exit through the door to the Guard Room and up the ladder to Loreen's Cell Room.
Go through the door and up to the roof.
Talk to the Guard and he will go off to find the Master leaving his spear behind.
Place the rope combination on the roof of the far Tower and it will form a tightrope between the spires so take the spear for balance and Nathaniel will cross to the Tower.
Screenshot
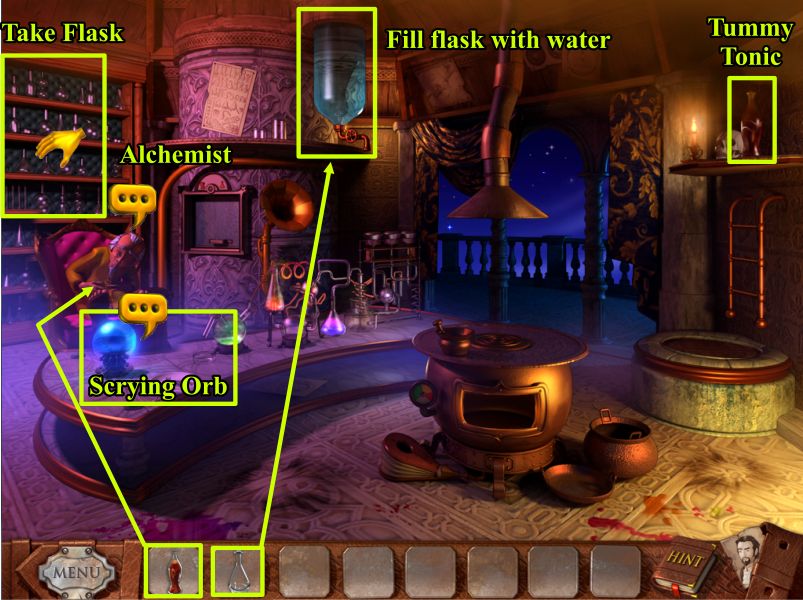
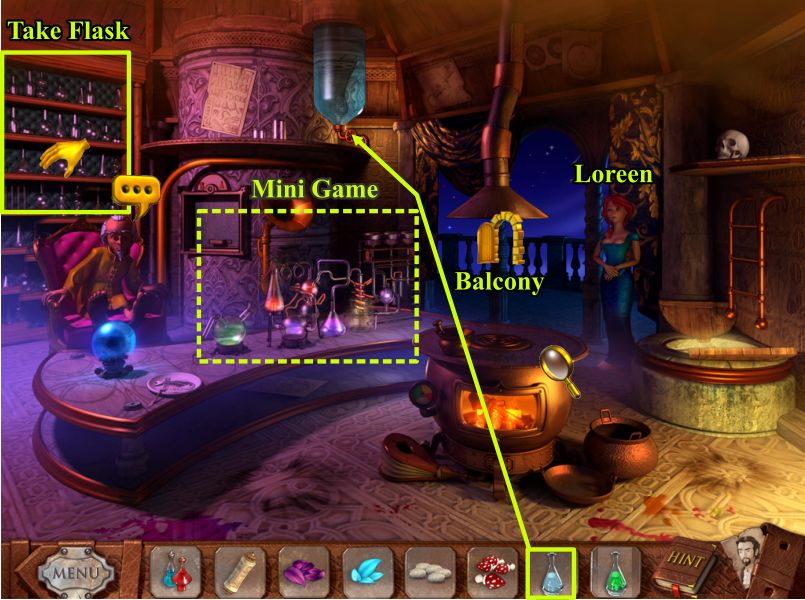
Alchemist's Room
Nathaniel meets up with the Alchemist who is feeling ill from rancid food he was served for last night's dinner so take the tummy tonic and give it to him.
Take a flask from the shelves and fill it from the water bottle.
Try talking to Loreen through the scrying orb.
Screenshot
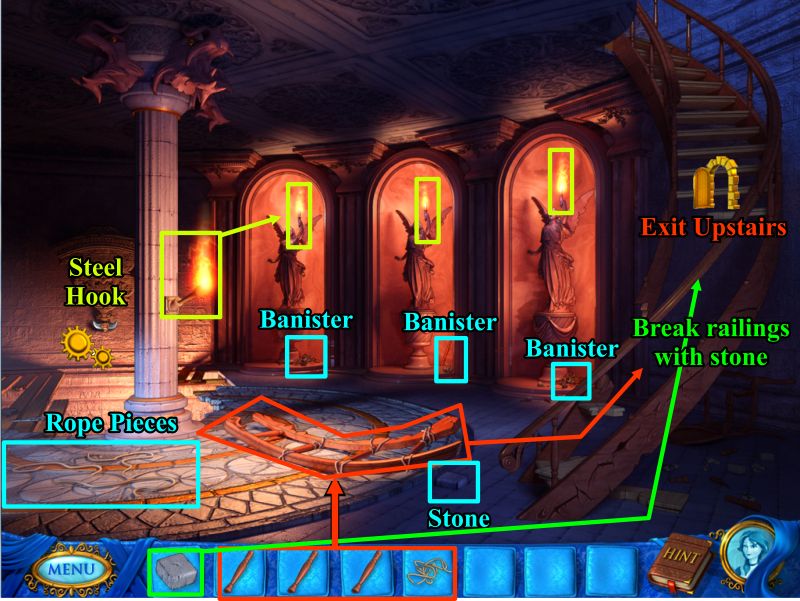
Tower Entry
Loreen finds herself in the dark so take the torch and light the torches on the statues.
Pick up the 3 banister pieces, the stone and the rope pieces.
Use the stone to break the railings and place the banister pieces in it.
Tie it with the rope pieces and place it in the vacant stair area to exit upstairs.
Screenshot
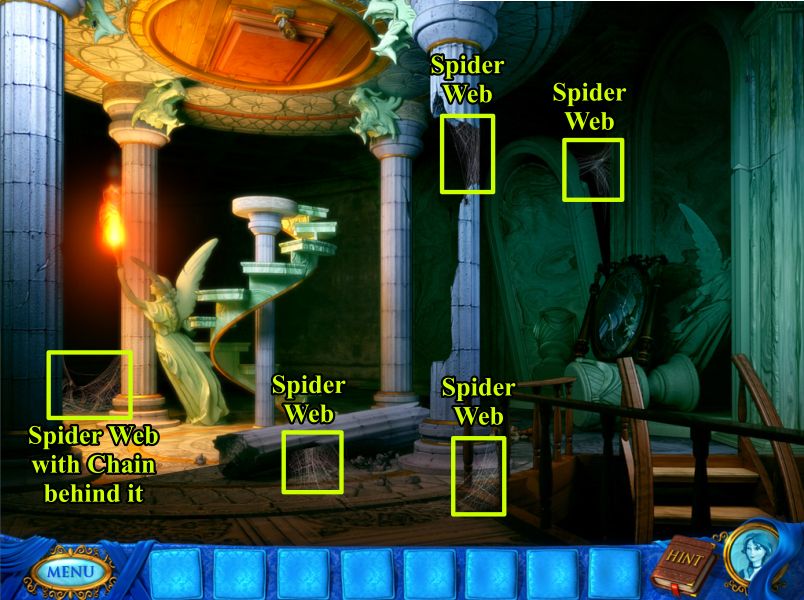
Tower Upstairs
Go downstairs and get the Torch so you can light up the room by placing the torch on the statue.
Loreen hates spider webs so get rid of them and you will find a chain behind one of them.
Take the chain and go downstairs.
Screenshot
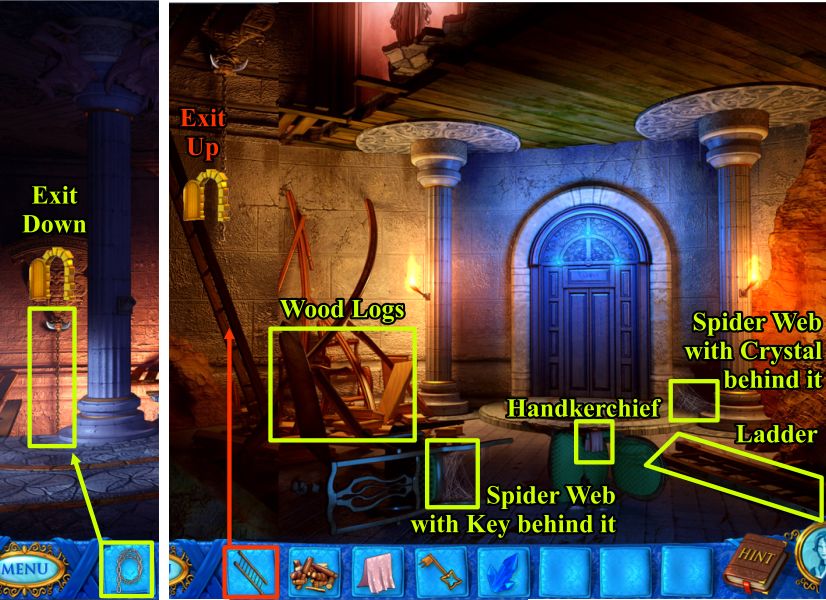
Tower Entry and Basement
Place the chain on the steel hook and go to the Basement.
Get rid of the spider webs and collect the crystal and key behind them.
Pick up the wood logs, handkerchief and ladder.
Place the ladder where you came down the chain and go back upstairs to the highest level.
Screenshot
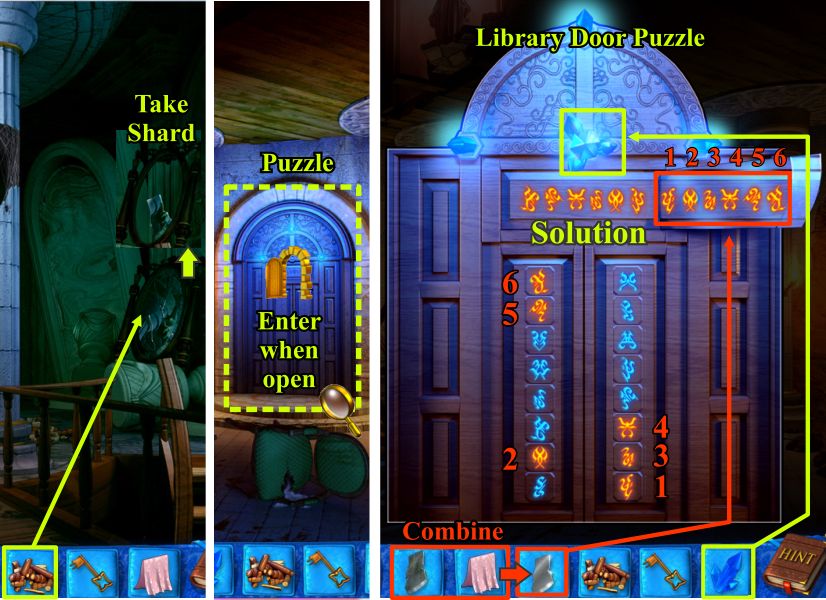
Tower Upstairs and Library Door Puzzle
Use the wood logs on the mirror and take the shard that is left.
Go back to the Basement and click on the Library Door for a puzzle.
Place the crystal in the hole and the mirror shard so that the top characters are reflected.
The reflected characters are the combination to open the door so press them in the order shown and enter the Library.
Screenshot
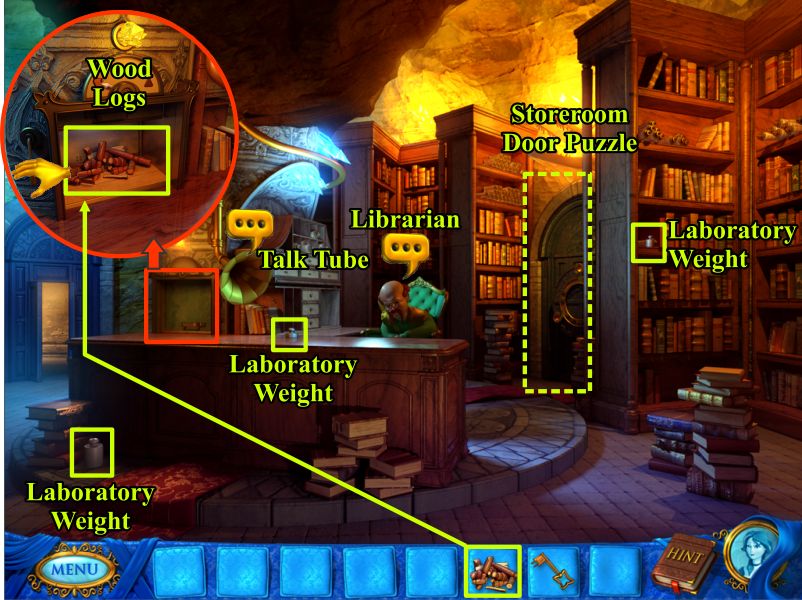
Library
The Librarian also got sick from last night's food.
Talk to Nathaniel via the talk tube and use the lift to send him the wood logs.
Collect the 3 laboratory weights and check the Storeroom door because you will need to get in it to find the ingredients for the tummy tonic to cure the Librarian.
Screenshot
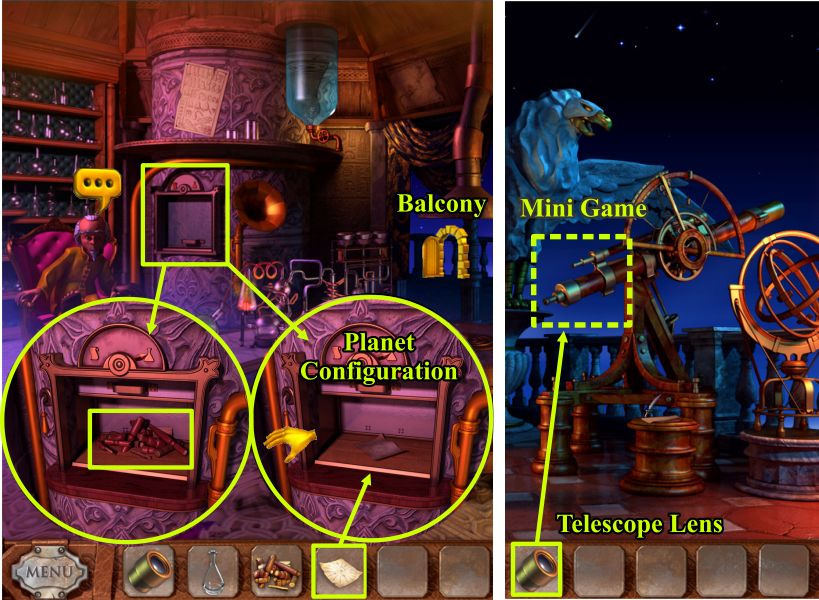
Alchemist's Room and Balcony
Talk to the Alchemist and find out that you need to get the current planet configuration for Loreen to open the Storeroom.
The Alchemist will give you a lens for the telescope so go to the balcony and place it on the telescope for a mini game to get the planet configuration.
Take the wood logs from the lift and send the planet configuration to Loreen.
Screenshot
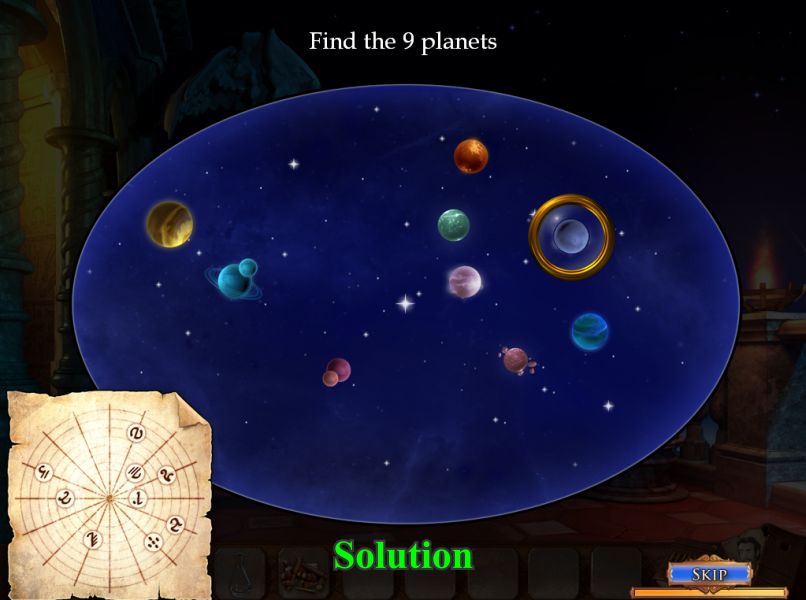
Planet Configuration Mini Game
Use the lens to slowly move around the sky until you find all 9 of the planets.
Click on each planet as you find it and then go back inside with the configuration.
Screenshot
Storeroom Door Puzzle
Take the planet configuration from the lift and use it to open the Storeroom door.
Click the planet and then click the next space to move it there.
You will need to go past where you need to ultimately place the planets so you can use the outer 3 positions to move some of the planets while you are rearranging them.
When they are in their correct positions they will turn blue.
Screenshot
Storeroom
Collect the 3 lab jars to get the list of ingredients.
There will be 5 sugars marked in green, 6 cola nuts marked in turquoise, and 8 coca leaves marked in bright pink.
You don't actually need to find all the items as long as you have enough for the proper weighing.
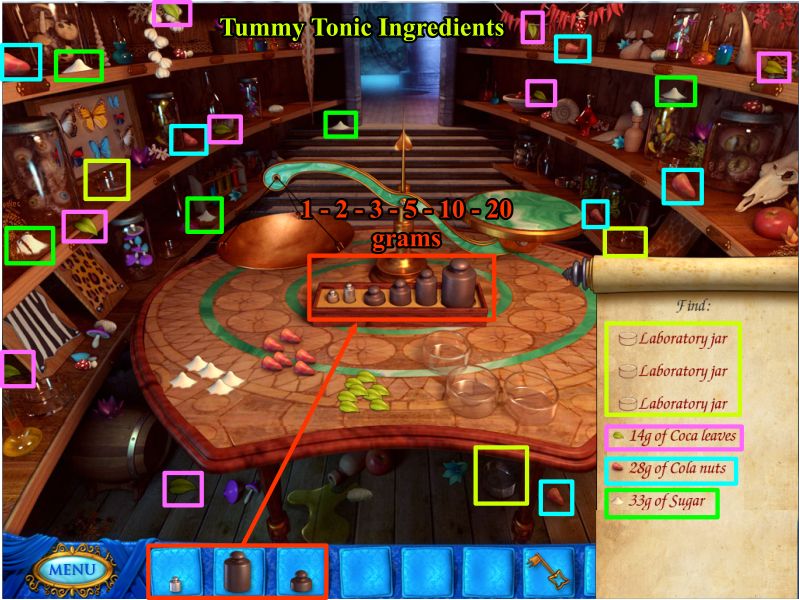
Arrange the weights in their tray so that there are 1, 2, 3, 5, 10, and 20 gram weights.
Screenshot
Tummy Tonic Ingredient Weighing
Place the 20, 10, and 3 gram weights on the right side of the scale and 3 mounds of sugar on the left to get 33 grams of sugar and collect it.
Place the 10, 3, and 1 gram weights on the right side of the scale and all but 1 of the coca leaves on the left to get 14 grams of coca leaves to collect.
Place the 20, 5, and 3 gram weights on the right side of the scale and 4 cola nuts on the left to be able to collect 28 grams of cola nuts.
Everything is now properly weighed and will go into your inventory along with the recipe.
Screenshot
Go back to the Library and send it to Nathaniel via the lift.
Nathaniel will get it from the lift and be instructed by the Alchemist to produce the tonic himself.
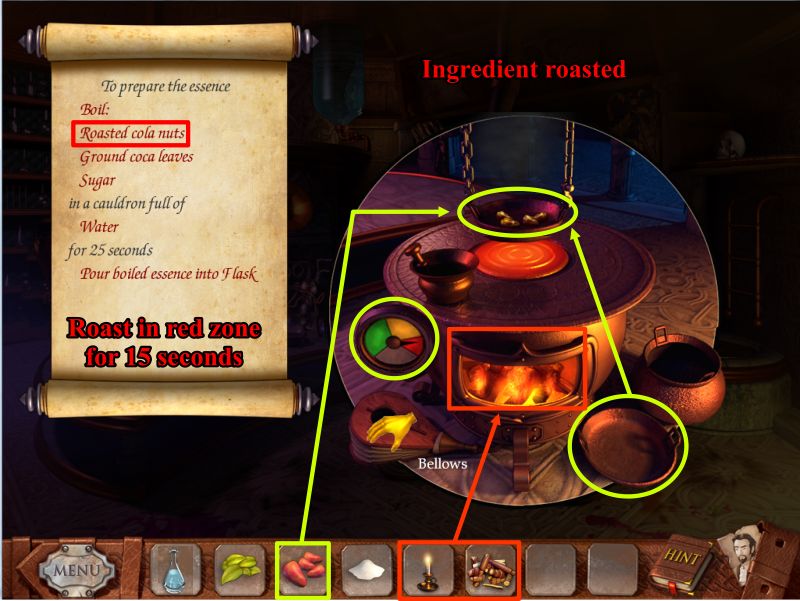
Prepare the Tummy Tonic Mini Game
Take the candle from the shelf on the right.
Click on stove for a close up view, put the logs in it and light them with the candle.
Place the roasting pan on the chain above the burner and the cola nuts on it.
Click on the fellows and pump it up to the red zone and keep it there for 15 seconds until the nuts are roasted.
Remove the nuts from the pan.
Screenshot
Place the coca leaves in the mortar and pestle and they will be returned to you ground.
Hang the caldron from the chains over the burner and pour in the flask of water.
Put in the sugar, ground coca leaves and roasted cola nuts.
Click on the bellows until it gets to the yellow zone and keep it there for 25 seconds.
Fill the now empty flask with the mixture.
Screenshot
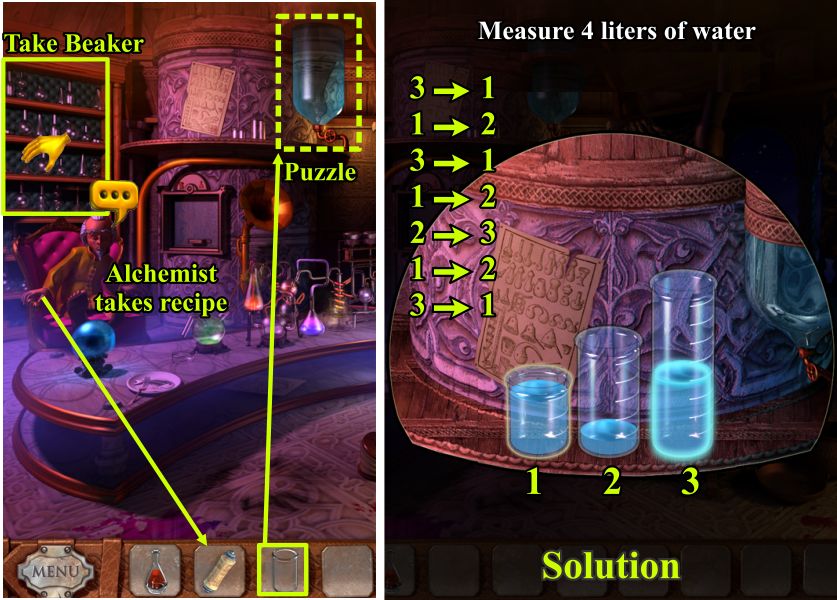
Dilute the Tummy Tonic Essence
Talk to the Alchemist who says the mixture has to be diluted with exactly 4 liters of water.
He takes the recipe because he says you will no longer need it.
Take a beaker from the shelves and fill it with water for a mini game.
To complete the mini game pour beaker 3 into beaker 1, then pour 1 into 2, 3 into 1, 1 into 2, 2 into 3, 1 into 2, and 3 into 1.
You should now have 4 liters left in beaker 3 so combine the tummy tonic essence with the water.
Screenshot
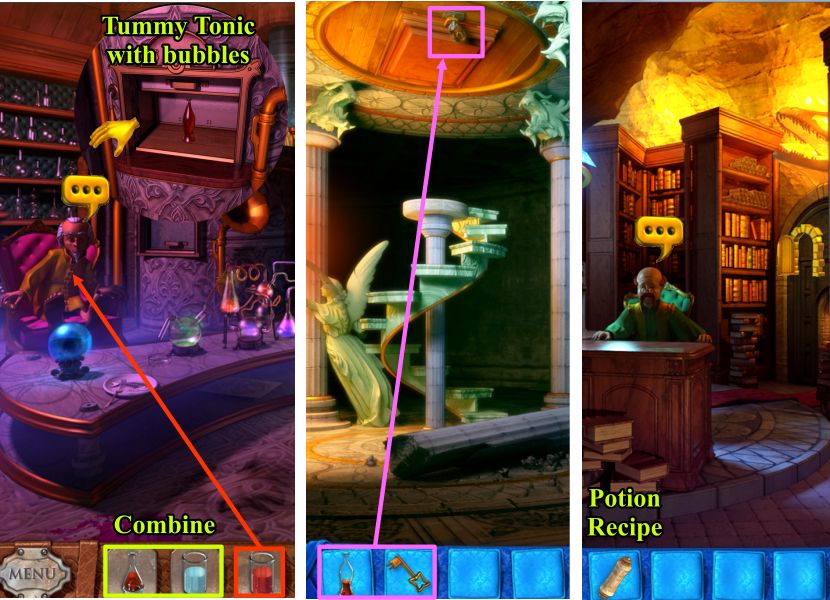
Alchemist, Lock to Alchemist's Room and Librarian
Give the tummy tonic to the Alchemist who will add the bubbles without you being able to watch.
Send the mixture to Loreen via the lift.
She gives the tonic to the Librarian who recovers from his pain and returns the portion he doesn't need to Loreen.
Go to the top level of the Tower and use the rest of the tummy tonic on the rusty lock.
It works so use the key to open the trapdoor to the Alchemist's Room.
Since the Librarian is now feeling better, he is looking for a potion to help Loreen and Nathaniel escape, after which he and the Alchemist who are now once again friends will get together to take care of their captor.
Once Loreen opens the trapdoor to the Alchemist's Room, she and Nathaniel reunite so go back to the Library to see what recipe the Librarian has found.
Screenshot
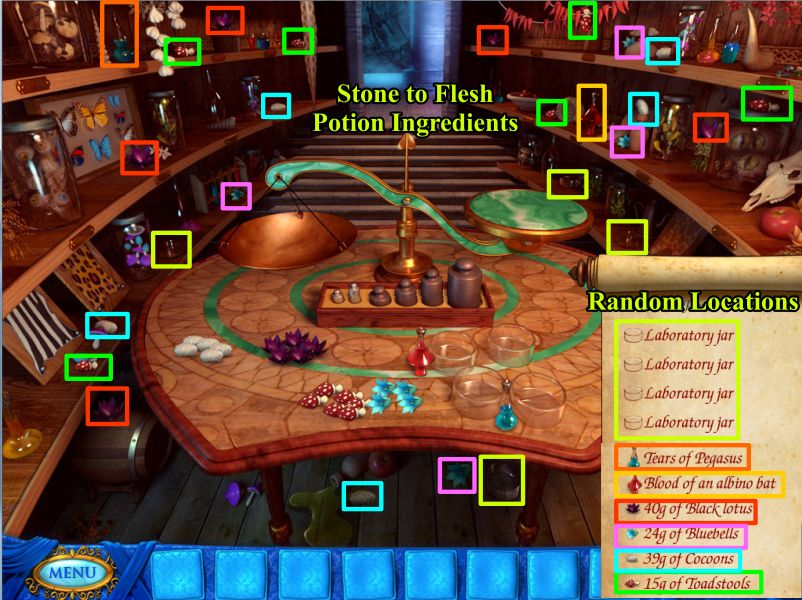
Storeroom
Although the potion choice wasn't what the Alchemist would have picked, he ultimately says it will work so Loreen must once again find the ingredients in the Storeroom.
This time the lab jars are random so there is one set marked in the screenshot…otherwise you must search for them.
Once you have the lab jars you will need to collect the rest of the ingredients which are color coded in the screenshot.
Remember that you do not have to have all of them as long as you have enough for the weigh in.
Screenshot
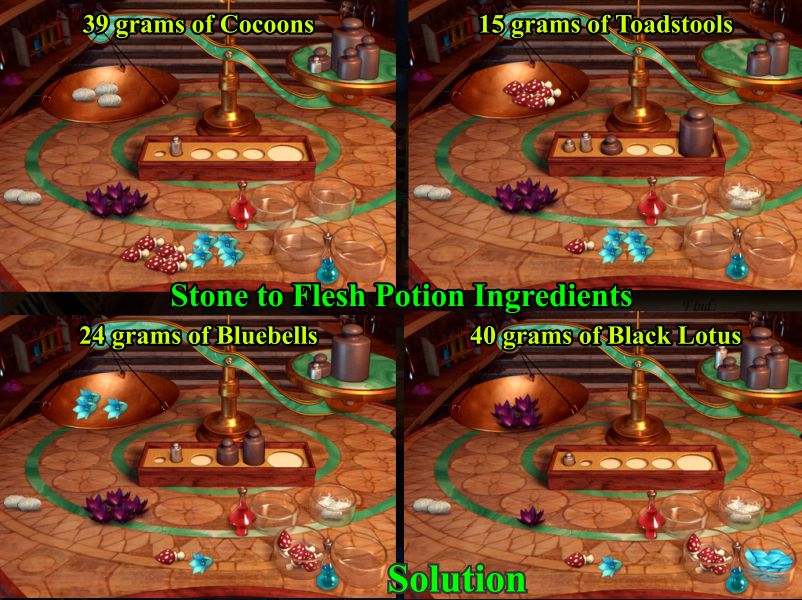
Stone to Flesh Potion Ingredient Weighing
Place 3 cocoons on the left and a 20, 10, 5, 3, and 1 gram weight on the right to get 39 grams of cocoons to collect.
Place a 10 and 5 gram weight on the right as well as 5 toadstools on the left.
To get 24 grams of bluebells you will need to place the 20, 3 and 1 gram weights on the right and 3 bluebells on the left.
For 40 grams of black lotus place 4 black lotus on the left and 20, 10, 5, 3, and 2 gram weights on the right.
All the weights of the ingredients are now perfect and once all have been collected they will end up in the lab jars and be transferred to your inventory.
Screenshot
Take the ingredients up to the very top floor to the Alchemist's Room.
Alchemist's Room
Take a flask from the shelves, and click on the stove to process the ingredients.
Once all the ingredients are processed, click on the chemical lab for a mini game.
Don't forget to fill your flask with water.
Screenshot
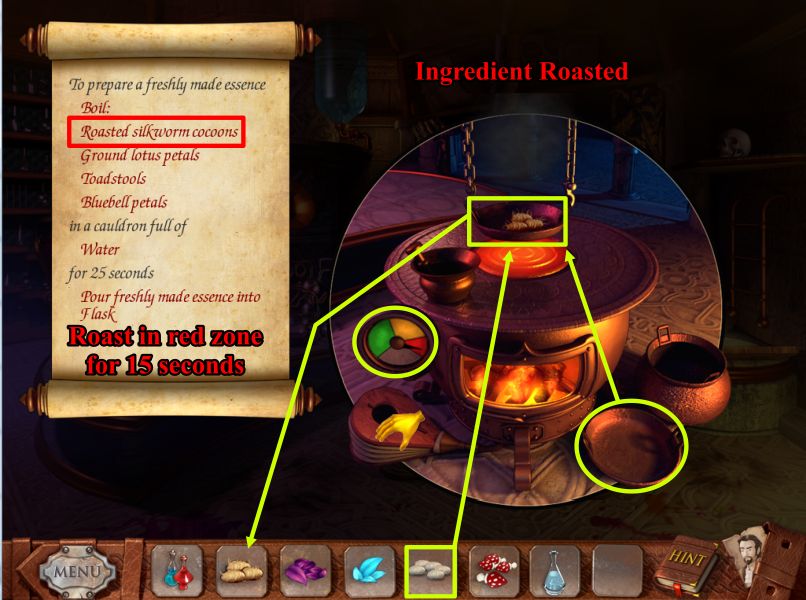
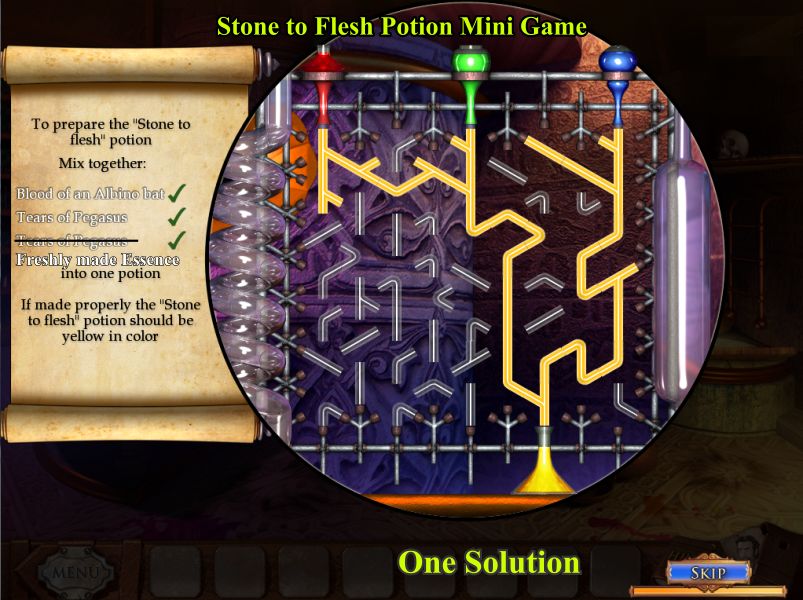
Stone to Flesh Potion Preparation
First process is to roast the cocoons so place the roasting pan on the chains and the cocoons in it.
Pump up the bellows to the red zone and keep it in that zone for 15 seconds until the roasting is completed.
Take the cocoons for your inventory.
Screenshot
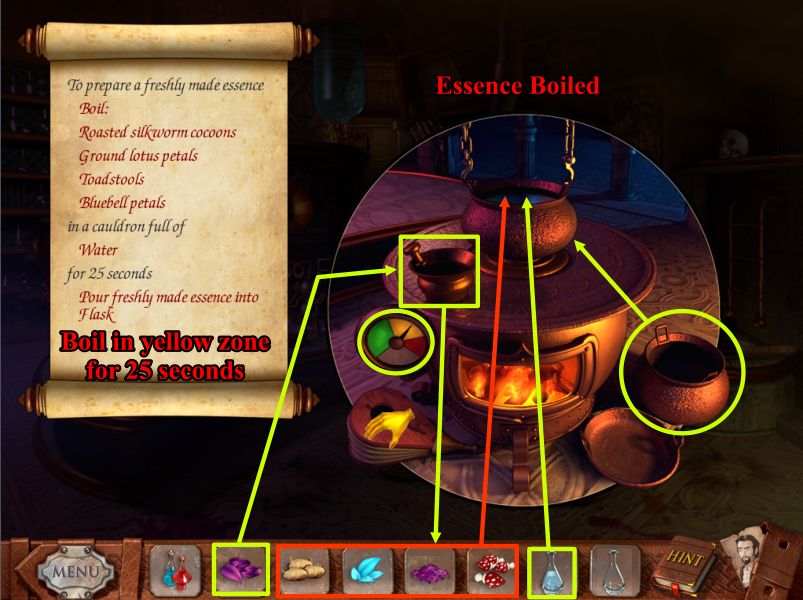
Place the caldron on the chains and the flask of water in it.
Grind the lotus in the mortar and pestle.
Place the roasted cocoons, ground lotus, toadstools, and bluebells in the cauldron.
Pump the bellows up to the yellow zone and keep it there for 25 seconds.
Collect the essence in the now empty flask.
Screenshot
Stone to Flesh Potion Mini Game
You now have everything you need for the potion so since it's success is in your hands, click on the Alchemist's lab and mix the formula.
The mini game shows 2 portions of the Tears of Pegasus but it is wrong because it does not show the most important element that the Alchemist said which is the fresh Essence you just created.
Your goal is to mix all 3 potions into one into the receptacle at the bottom of the game so go for it.
There are many solutions to the game so only one is shown in the screenshot.
Screenshot
Escape
Go to the Alchemist's Balcony with your Stone to Flesh Potion.
Loreen asks Nathaniel if she can use it on the Griffon.
You have now done your part so watch the ending scenes as Nathaniel and Loreen escape the island.
Thanks to Jazz for writing up this walkthrough :)
Posted by: Kero |
September 24, 2010 9:56 PM
|
September 24, 2010 9:56 PM