

 Life inside a 3dpi Games title is rough. If you're not being menaced by multicolour pirates, you're going through the weirdest, nastiest magical divorce the world has ever seen. In Otomaco: The Last Jade Journey you're part of a group of three adventurers ambushed in their travels and tossed into a cell. What fate awaits our strange looking heroes? Well, you'll have to play to find out, but if you don't escape soon, chances are you won't be getting a free trip to the Gumdrop Mine in Happyland. Just a hunch.
Otomaco is a mostly standard little point-and-click adventure where you use your mouse to interact with the screen. While viewing the dungeon from the center of the room, you have a 360 degree view, and nudging the cursor to either side of the screen will turn you in that direction. You can click on objects to pick them up, or to get a closer look at certain areas. Keep your eyes open for a changing cursor to let you interact.
But Otamco also has an interesting mechanic that allows you to change the time in certain areas, which you'll need to do in order to solve the puzzles. Whenever it appears, simply click on the dots arranged in a circle in the upper left of the screen to change the time to be whatever you wish. Of course, that's assuming what you wish is limited to day or night. Otomaco, I'm sorry to report, does not currently feature "peanut butter jelly time" as an option.
 Analysis: According to the game, Otomaco is not, as I had hoped, a delicious new variety of taco, but a legendary city, and everyone in your merry band of misfits is after it for a different reason. There's a bit of exposition given under the instructions and through the opening cutscene, but it doesn't feel like it's enough in this case. With its fantasy theme and oddball characters, Otomaco would have benefited greatly from a story more closely integrated with its gameplay. There's an appealingly sketchy style to Otomaco's visual design that fans of 3dpi Games's other titles will remember; something like a children's book left out in the rain. The minimal use of sound and ambient noise makes for an atmospheric and involving experience.
Otomaco is a step above 3dpi's last title, Mandrake in terms of design. The area is small and well defined rather than made up of sprawling areas that are awkward to navigate, so while puzzle solving can be fairly abstract, you know that there's a limit to where and what the solution can be. The ability to click back and forth between times at will is an interesting touch, but it feels like a strange addition. You can only affect the time on certain screens, and even if you set it to daylight, when you click anywhere else in the dungeon it's dark again. The lack of consistency makes the implementation feel a little lazy.
It feels like with a bit more tweaking and about twice as much playtime, Otomaco could have really been something amazing. As it stands, this serves more to tantalize than anything else, and feels like a prologue rather than a proper chapter. If you know what you're doing, Otomaco: Last Jade Journey is actually a pretty short game, and you'll have to wait until the next installment to find out what happens to you and your friends. What danger lies around the corner? Will you ever be safe? Will you ever find the legendary city? And why does he get a orange and I don't?! Only time, and Marek Frankowski's team at 3dpi Games, will tell.


Walkthrough Guide
(Please allow page to fully load for spoiler tags to be functional.)
Otomaco Walkthrough
General Information
When you are in the "wider" view of the jail cell, navigate by moving the cursor to either side of the screen. The scene will spin in either direction a full 360 degrees.
Watch for cursor changes to indicate hotspots.
Some hotspots do not have cursor changes, so there will be some pixel hunting.
You can control time with the little sundial looking thing in the upper right of the screen. The top, or 12 o'clock position brings the sun, the bottom, or 6 o'clock position brings the moon.
Once you are in a close up scene, you can move back simply by clicking at the bottom of the screen.
Good luck!
Exploring the Cell
Once the cut-scene is over you will find yourself in a jail cell facing a wooden door. Click on the door for a close up.
Just to the right of the stairs is some straw on the ground. Take it.
Back up.
Scroll to the left until you see a statue with its hands raised up.
Click on the statue for a close up.
Once you are in close up, click on each of the statue's eyes to take them.
Strapped to the right arm of the statue is a steel rod. Take it.
Back up.
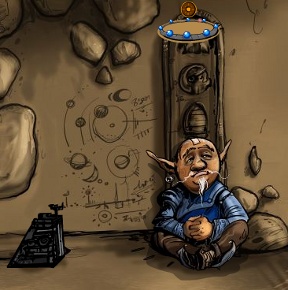
Scroll to the left until you see a sad guy (ogre? goblin?) strapped to the wall.
Click on the sad guy for a close up.
Notice that although one arm is chained, the other one is merely tied with rope.
Back up.
Scroll to the left until you see a window high up on the wall.
Click on the window for a close up.
Notice that there are three holes in the bars, each one covered. You can "open" one of these holes at a time.
Also make note of the orange thing in the tree outside. Pity you can't reach it.
Back up.
Continue scrolling left until you see an old guy (elf?) sitting up against the wall. Click on the guy for a close up.
You can scroll to a limited extent in this close up, from the window on the right to the markings on the floor on the left.
To the left of the old guy is what looks like a little altar on the ground. Notice the markings and the "path" in front of it.
Click on the lower left of the altar and you can move it to the left. Click on the lower right of the altar and you can move it to the right.
There are three markings on the floor, corresponding to the three holes in the bars. To the far left is a sun, in the middle is a moon, and on the right (covered by the altar) is a symbol that looks like fire.
Back up.
Continue scrolling to the left until you are nearly back at the door. You should see a big circular doorway and a guard. Click on the circular thing for a close up.
In the circular doorway is a ring of red symbols, and a red gem. Take the gem.
Back up.
You've now explored the entire cell. Time to try to escape.
Freeing the Big Guy
Scroll to the right until you are looking at the old guy against the wall.
Click on the old guy for a close up.
Place the red gem and the straw on top of the altar.
Scroll to the right until you can see the window, then click on the window.
Click on the bottom hole on the bars to open it (the altar is at the bottom notch on the floor, depicting fire).
Back up.
You want the sun to come through the hole, so click on the sundial at the 11 o'clock position to change the time.
Wait for the sunlight to come through, it will ignite the straw.
Back up and scroll to the right until you see the sad guy chained to the wall.
Click on the sad guy for a close up, then use the burning straw on the ropes holding his arm.
Wait for the cut-scene as he gets loose.
When the cut-scene ends, the frightened guy is sitting by a doorway that he knocked open.
Before you go through the mysterious doorway, look closely at the rubble around the opening.
There are four small rocks here: One to the right and one to the left of the base of the right column, one to the left of the middle of the right column, and one near the bottom of the left column.
Take the rocks (note: the cursor changes to a hand when you pass over them, so they are fairly easy to spot).
Now click on the doorway to enter.
Creepy, a body.
On the body's left wrist is a bracelet with a large blue gem, take the gem.
Also take the shield that is laying on the body, and the spear that is against the wall.
Back up twice.
Getting the Codes
Once you free the big guy and plunder the corpse, scroll left until you see the old guy against the wall.
Click on the old guy for a close up.
The red gem should still be in the altar.
Click on the lower left corner of the altar twice to move it to the far left position, where the sun symbol is.
Scroll to the right and click on the window.
Open the top hole in the bars and back up.
Scroll to the left until the altar is in view.
Use the sundial to get the sun shining through again (click on the 11 o'clock position).
When the sun shines through the ruby, red symbols will appear on the stones on the wall. Note the symbols. These symbols change each time you play, so write them down.
Remove the red gem from the altar.
Place the blue gem on the altar and move it to the right until it is in the center slot (where the moon symbol is).
Scroll to the right and click on the window.
Now click on the center hole to open it.
While you are here, use the spear to get the orange fruit from the tree outside.
Back up and scroll to the left until you can see the altar.
Change the time on the sundial so that the moon is shining through the window (the 5 o'clock position).
Now blue symbols appear on the wall. Write them down, they change each time you play.
Sometimes one of the symbols will appear on the wall right behind the sundial, so look closely, it can be hard to see.
Take the blue gem from the altar.
Scroll right until you see the old guy against the wall.
Give the orange to the old guy and he will jump up.
Now that the old guy has moved you will see a stele against the wall. At the bottom of the stele is a representation of a head with a feathered headdress.
Use the eyes from the statue on the head at the bottom of the stele.
Back up to the main cell view.
Time to Escape!
Scroll to the left until you see the circular door with the guards.
Click on the circular door for a close up.
Place the red gem in the bottom hole where you took it from, and place the blue gem in the top hole.
Notice the bands of symbols have appeared around the doorway.
Click the red symbols and the blue symbols that appeared earlier on the wall.
If you enter the symbols correctly the circular door will open.
Click on the open door to go through.
Icky, spiders!
Use the four rocks you picked up by the dead guy to kill the spiders. Click on the rock in your inventory, then click on a spider.
If you miss one of the spiders with a rock, you can always kill it with the spear.
Once all of the spiders are dead scroll to the left.
To the left of the swinging axe is a statue of a head with a hole where the mouth should be.
Use the steel rod on the hole in the statue to stop the axe. This may take several tries as the timing is tricky.
Once the axe is stopped click on the area behind it.
Once all your characters are in the circular area, click on the rubble above the doorway.
Ooops?!
To be continued...
Posted by: grinnyp |
April 26, 2010 5:17 PM
|
April 26, 2010 5:17 PM
Walkthrough
1. click on the stairs with door and collect "bundle of hay". return to main view.
2. go left. click on the stone statue (the one that's facing the tied up troll). collect "eyes of the monument". collect "steel rod". back to main view.
3. scroll left to the window. click on it. there are three holes in the window frame. open the bottom one. back to main view.
4. scroll past the monk to the round board on the wall in the niche. click on it and collect "ruby". go back to main view.
5. scroll to the monk. click on the monk. notice the little postument on the left. use the "bundle of hay" and "ruby" on it, and click the solar clock until a ray of sunlight lights the hay. (click one dot before noon and wait...).
6. after the "embers" collects itself, move the postument to the left twice - to the position of the sun drawn on the floor. Go back to the window and now open the top hole. back to the postument with "ruby", once again set the clock one dot before Noon (and wait a bit...).
7. write down four symbols appearing on the wall. collect "ruby". back to main view.
8. scroll to the tied troll and click on it. Use "embers" on the ropes tying his right arm.
9. after cutscene you are in the view with a frightened troll. collect four "stones" here. click on the opening in the wall.
10. take the "shield", "sapphire" and "spear" from the crypt. back to main view.
11. scroll to the window. use the "spear" to get the "orange" from the tree. also open the middle hole in the window frame. go back.
12. click on the monk and then move the statue to the middle position - marked with moon on the floor. use the "sapphire" on it. set the solar clock to one dot before 6 and wait for the symbols to appear. write them down. take the "sapphire".
13. in the same view - give the "orange" to the monk. as he moved - place the "eyes of the statue" into the skull at the bottom. back to main view.
14. scroll to the round board in the niche. use the "ruby" and "sapphire" here. click on the appriopriate symbols.
15. enter the new opening. after short cutscene - get rid of the spiders using "stones" or "spear".
16. scroll left and use the "steel rod" to hold the spinning blade in place. timing is of the essence here. Go past the blade. click on the stones above the exit.
Posted by: Paul | April 26, 2010 5:24 PM