

Mystery Trackers: Silent Hollow
Platform: Mac, Windows
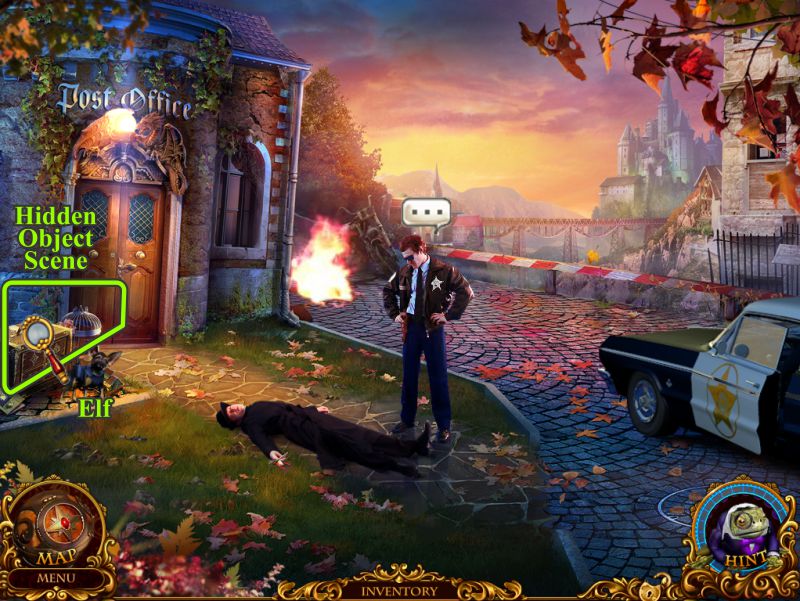
![]() Admittedly given my choice of supernatural mystery solving teams to join it'd be a hard decision between the Ghost Facers or the Scoobies, but being a Mystery Trackers detective sounds pretty sweet too. In Mystery Trackers: Silent Hollow, the latest installment in Elephant Games' fantastic hidden-object adventure game series, you're called back to headquarters only to discover both it and the entire surrounding town are under attack, and your fellow agents appear to be afflicted with some sort of paranormal mind control. You'll need to explore, gather items, and solve puzzles if you want to get to the bottom of things, but with your trusty sidekick Elf, a handy map that allows you to travel and spot objectives, and some super powers of your own, you seem ready for anything. Which is a good thing, since a terrifying foe from the agency's past is going to throw everything in your path, and even turn your friends against you.
Admittedly given my choice of supernatural mystery solving teams to join it'd be a hard decision between the Ghost Facers or the Scoobies, but being a Mystery Trackers detective sounds pretty sweet too. In Mystery Trackers: Silent Hollow, the latest installment in Elephant Games' fantastic hidden-object adventure game series, you're called back to headquarters only to discover both it and the entire surrounding town are under attack, and your fellow agents appear to be afflicted with some sort of paranormal mind control. You'll need to explore, gather items, and solve puzzles if you want to get to the bottom of things, but with your trusty sidekick Elf, a handy map that allows you to travel and spot objectives, and some super powers of your own, you seem ready for anything. Which is a good thing, since a terrifying foe from the agency's past is going to throw everything in your path, and even turn your friends against you.
 While a lot of people may prefer the more serious, dedicated approach to storytelling taken in the wonderful Mystery Case Files games, for my money, I'll take the gleeful, wildly creative and entertaining stuff you find in every Mystery Trackers game any day. Silent Hollow is, in a lot of ways, even more over-the-top than its predecessors, though in mostly good ways. It makes it look like being a Mystery Tracker is basically like being James Bond, Harry Potter, Indiana Jones, Buffy, and Myka Bering all at once... complete with your own Hogwarts Express. Heck, they even throw in some Bioshock/Galerians-y abilities via a magical syringe gun while they're at it. Although voice acting is largely fairly well done, it's sort of unintentionally hilarious combined with the way the characters stare at you without moving their mouths, especially considering it's fairly clear many performances involving more than one actor were filmed separately so reactions sometimes don't fit or are off timing. The complete absence of music most of the time is also a weird choice, which makes it all the more jarring when it does kick in.
While Silent Hollow's gameplay doesn't really deviate from the "find this, use it there" formula, it keeps things from feeling stale by wrapping all of it in imaginative settings. It isn't exactly what you call difficult, regardless of the setting you choose at the beginning, so chances are you'll fly through the game... especially given that actual puzzles are both on the simple side most of the time and relatively few and far between. Adding extras like Agent and Pet dossiers is a clever touch of world building, as is the story of the agency's founding, told through a little interactive puzzle sequence. Though the gameplay isn't anything new or even challenging enough to hold you back, Mystery Trackers: Silent Hollow earns a solid recommendation for its sheer enthusiasm, style, and charm that make it stand out head and shoulders above the lion's share of cookie cutter, unimaginative hidden-object adventures, and something you'll enjoy every step of the way.
Note: Currently, only the Collector's Edition is available. It contains a bonus chapter, art gallery, strategy guide, and more. Remember that Big Fish Game Club Members pay only $13.99 for Collector's Editions (or 2 club credits), and collector's editions count 3 card punches of 6 total needed for a free game.
![]() Windows:
Windows:
Download the demo
Get the full version
![]() Mac OS X:
Mac OS X:
Download the demo
Get the full version


Walkthrough Guide
(Please allow page to fully load for spoiler tags to be functional.)
Mystery Trackers: Silent Hollow walkthrough part 1
General info, Chapters 1-3
General Information
From the Main Menu, you can Play or Quit the game, choose your Options and your Profile, and access Bonus Content, as well as link to the previous games in the series.
Options include Music, Sound Effects, Environment and Voice volume; a Gamma adjustment; Full or Windowed screen; use of a Custom Cursor; a choice of a wide screen; and your choice of Special Effects or not.
There are 4 Difficulty Modes: Casual, Advanced, Hardcore, and Detective.
Casual Mode is for new players or those who want a more relaxed game play. All areas of interest have visible sparkles, and hints quickly recharge.
In Advanced Mode, hints take longer to recharge, and there are no sparkles.
Hardcore Mode is for those players who don't want any help, because there are no hints or skip features, nor are there any sparkles.
If you are a true detective, choose Detective Mode because you are on your own with no hints, skips, or sparkles, and the cursor doesn't change shape over active areas to show you what is wanted.
Bonus content gives you access you your Achievements, Dossiers, Pets and the Shop.
In addition, the Collector's Edition provides you with Wallpapers, Concept Art, Video, Music, Extra Game Play, and access to the Secret Room.
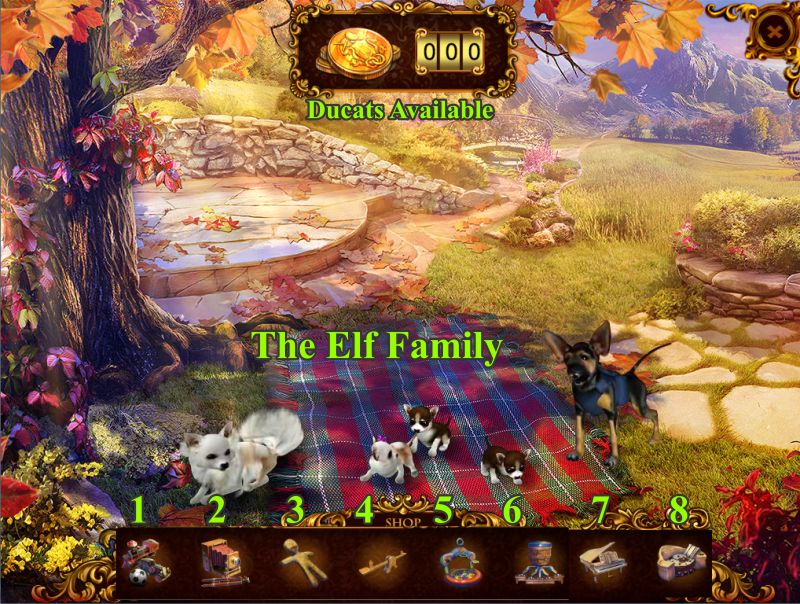
Shop gives you several choices of shopping for the Elf Family...yes, Elf now has a female companion and some pups.
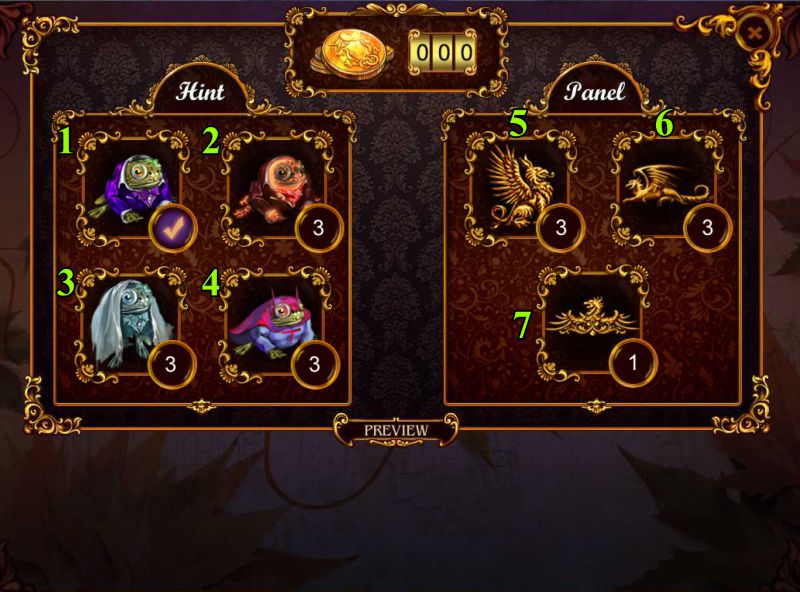
In addition, you can choose how you wish your Mr. Toad button to look, and the design of your panel.
After you begin to play the game, if you go to the Main Menu and then wish to resume gameplay, choose carefully because you will be given your choice to continue the game or reset it to the beginning.
Shopping
You will be collecting ducats throughout the game that you can use to buy items for the Elf Family or change the look of your screen.
See the screenshot for the numbered list.
Elf Family Shop
Toy Cars: 1 ducat
Camera: 2 ducats
Training Dummy: 1 ducat
Swing: 4 ducats
Ball Pool: 5 ducats
Dog Feeder: 5 ducats
Piano: 5 ducats
Pet Bed: 3 ducats
Screenshot
Interface Shop
Hints
Mr. Toad: Your standard hint button
Mr. Fire Toad: 3 ducats
Mr. Ghost Toad: 3 ducats
Super Toad: 3 ducats
Panel
Gargoyles - Keepers of Knowledge: 3 ducats
Gargoyles - Keepers of Travel: 3 ducats
Gargoyles - Keepers of Things: 1 ducat
Screenshot
Scene Navigation
In the lower left corner is your Compass Map which also gives you access the Pets, Dossiers, Achievements, and the Shops.
Inventory is in the lower center of the screen, and to the right is Mr. Toad to provide Hints and Skips.
Mystery Tracker Pets are shown in the screenshots as they appear.
You will find a list of Dossiers and Achievements at the end of the walkthrough.
Compass Map
The Map is interactive, so not only does it show you where you are, it shows those locations with tasks to complete and allows you to instantly go there.
You can also check up on your Achievements or go Shopping.
If you need a refresher course regarding any Pet or Dossier, you can access that from the Map as well.
See the screenshot for a sample map.
Screenshot
Chapter 1
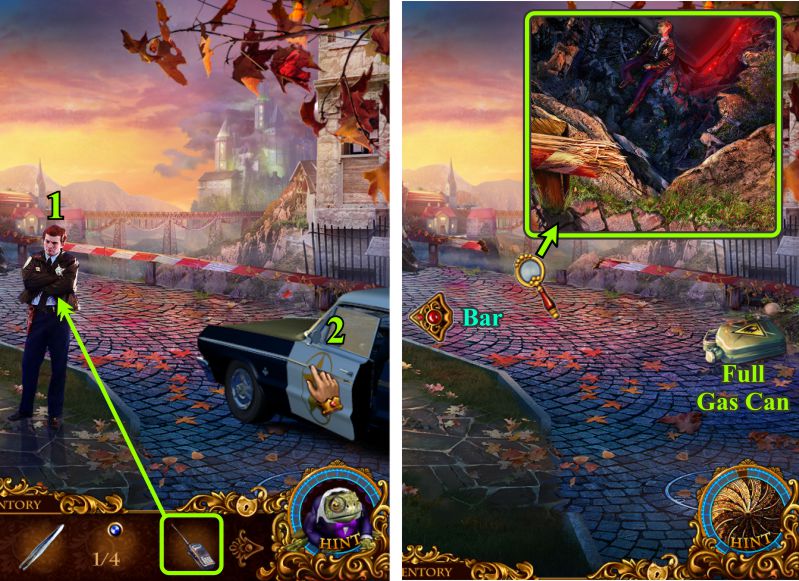
Street
Talk to the policeman, pick up Elf, and play the Hidden Object Scene.
Screenshot
Crate Hidden Object Scene
Place all the parts marked in orange on the crate, and collect the Silver Badge for your Inventory.
Press the red button on the camera to get the Picture.
Open the book to find the battery.
Screenshot
Street
Show your Mystery Tracker's Badge to the newbie.
Zoom in on the body to find out it's Agent Clyde from Mystery Trackers and that he is only unconscious.
Be sure to touch his head so a picture will be taken for the Dossier.
Grab the Post Office Key, zoom in on the door, place the Key, turn it, and enter the Post Office.
Screenshot
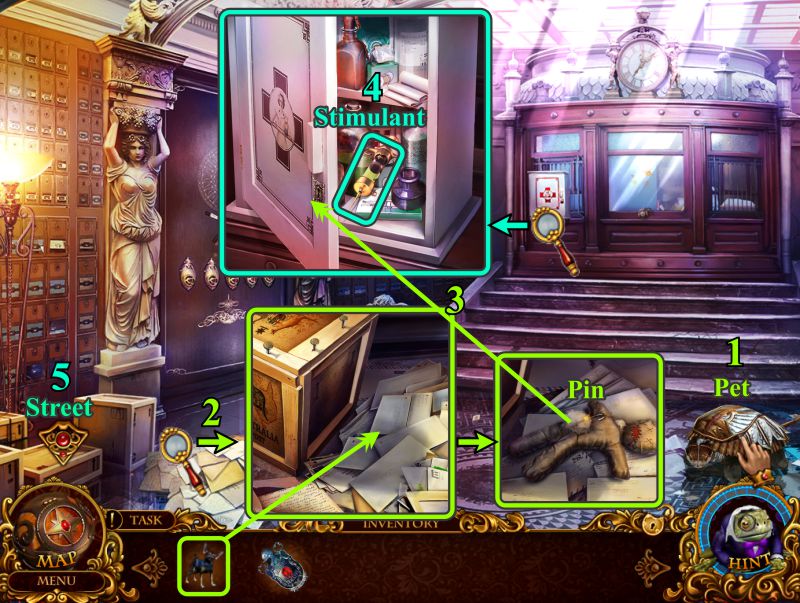
Post Office
Collect the first Mystery Tracker's Pet, other than your Elf.
Zoom in on all the papers next to the crate, ask Elf to sort it out, and take the Pin he uncovers.
Examine the locked first aid box and use the Pin to pick the lock.
Take the syringe with the Stimulant.
Return to the Street.
Screenshot
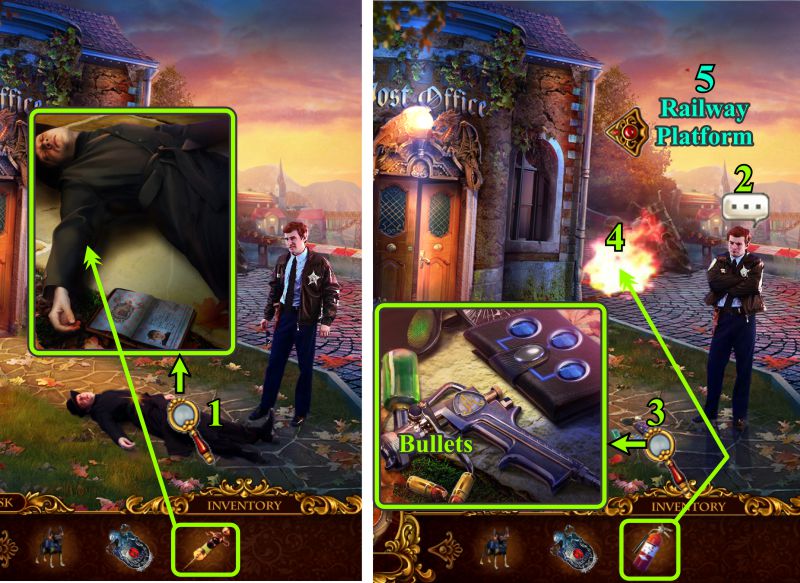
Street
Zoom in on Agent Clyde and inject him with the Stimulant.
After the cut scene, talk to the newbie who wants a walkie talkie, and gives you a Fire Extinguisher.
Examine what the agent left behind and take the Bullets.
Use the Fire Extinguisher on the flames.
Move on to the Railway Platform.
Screenshot
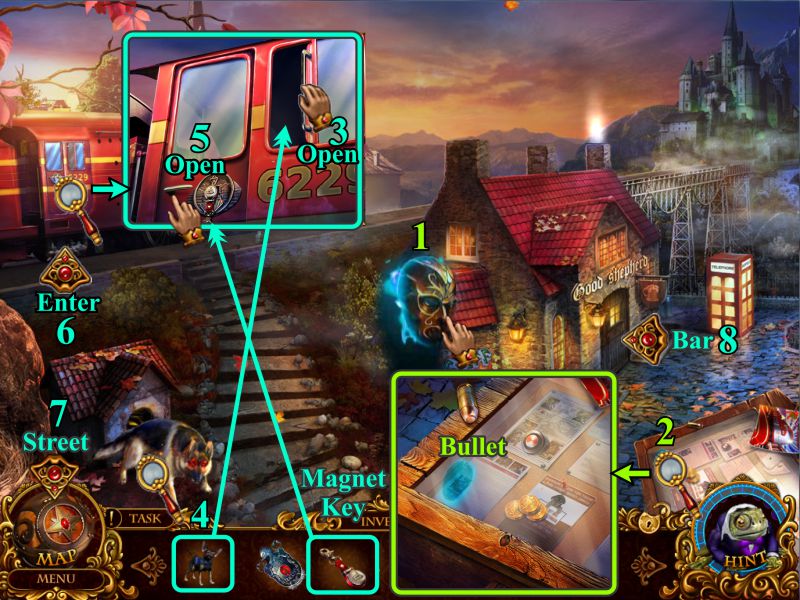
Railway Platform
Touch the levitating mask and it will head toward the Castle.
Examing the glass display at the right and collect the Bullet.
Zoom in on the train and open the sliding window next to the door.
Send Elf in to see what he can find and he returns with a Magnet Key that automatically goes into your Inventory.
Place the Magnet Key in the lock on the train door.
Click on it to open the door.
Enter the Train Engine.
When you have finished there, return to the Street.
The Bar is marked to show you where you will be returning after your visit to the Street.
Screenshot
Train Engine
Talk to the engineer.
Examine the lockpick and collect the Battery and Button.
Pick up the Walkie Talkie and read the newspaper.
Zoom in on the back bench to collect the Bullet and Button.
Return to the Street.
Screenshot
Street
Give the Walkie Talkie to the newbie.
After the cut scene, touch the police car and he will drive into the ravine.
Grab the Gas Can, peek over the edge, and go to the Bar.
Screenshot
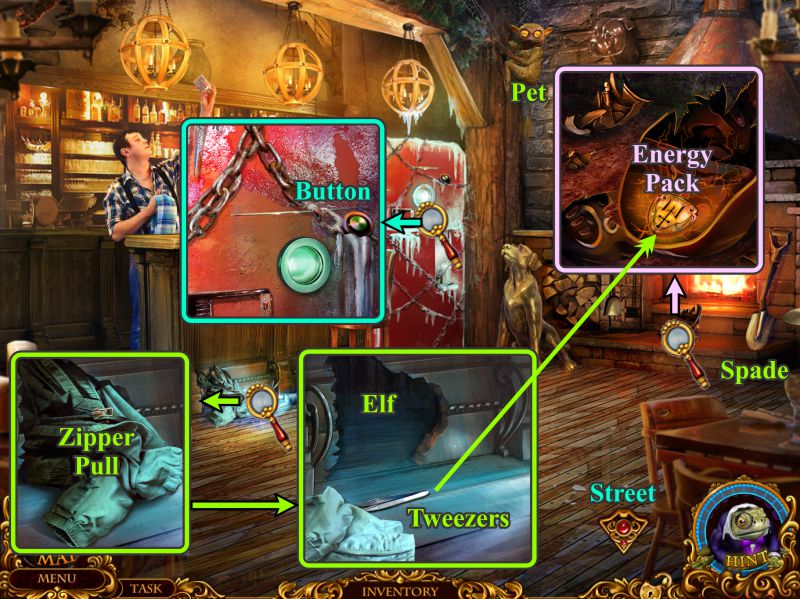
Bar
Zoom in on the jacket on the floor and take the Zipper Pull.
Send Elf into the hold for the Tweezers.
Take the Spade, and Pet.
Examine the changed up refrigerator and take the Button.
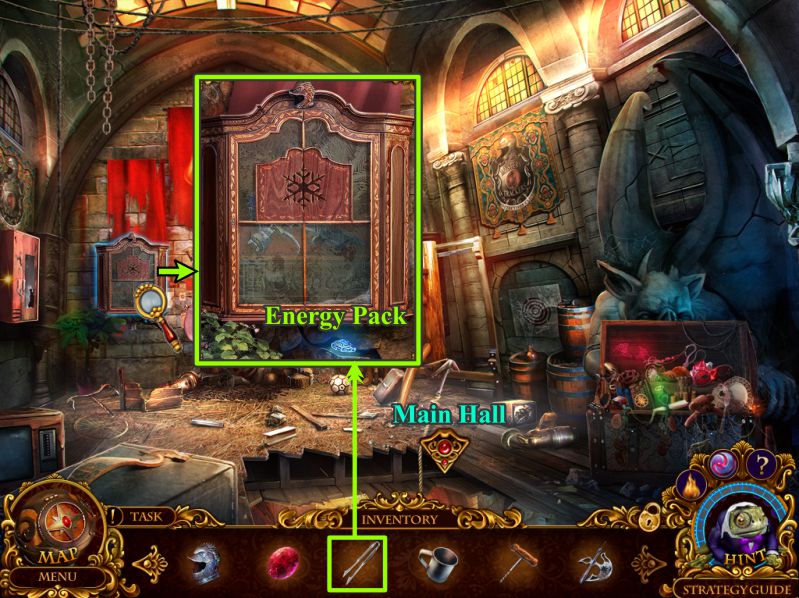
Zoom in on the fireplace hearth and use the Tweezers to remove the Energy Pack from the broken mask.
Go to the Street.
Screenshot
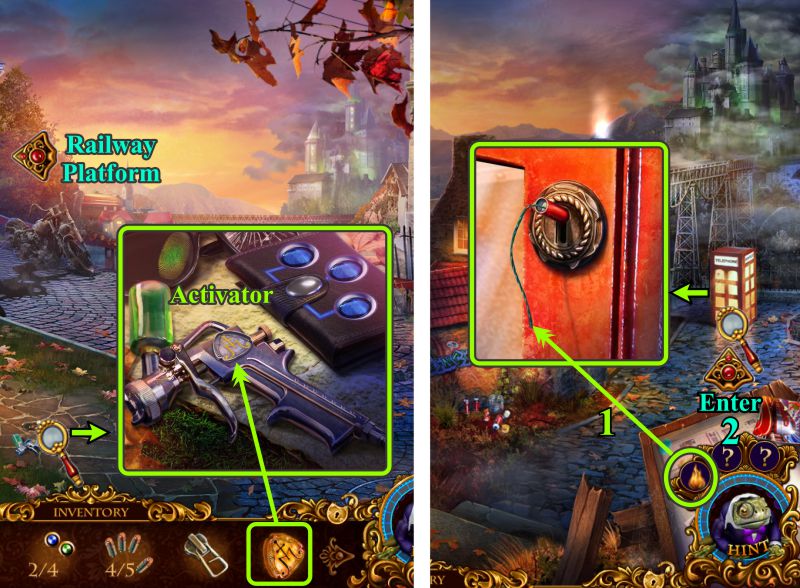
Street and Railway Platform
Zoom in on Agent Clyde's belongings and place the Energy Pak in the Activator.
Read the Dossier and take the Activator.
After the cut scene, go to the Railway Platform.
Zoom in on the Phone Booth, and use your newly activated Pyrokinesis ability to light the fuse.
Enter the Phone Booth.
Screenshot
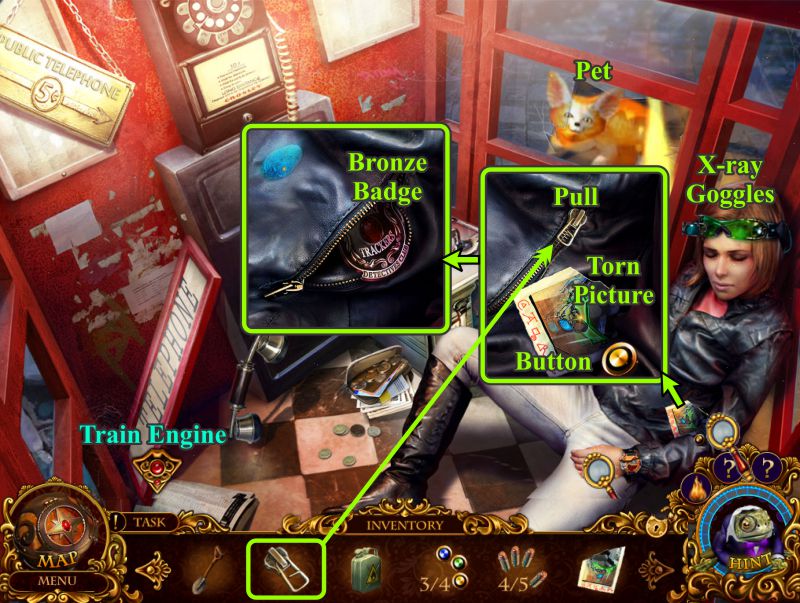
Phone Booth
Take her picture for the Dossier, collect the Pet and X-ray Goggles.
Zoom in on Agent Spade's pocket and attach the Zipper Pull.
Collect the Torn Picture and Button.
Pull open the zipper and take the Bronze Badge.
Examine the watch on her wrist, and head to the Train Engine.
Screenshot
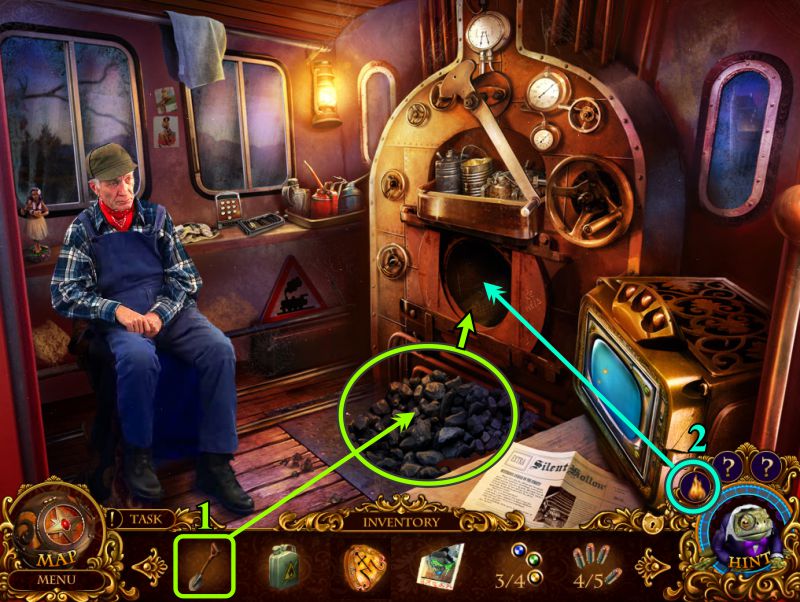
Train Engine
Use the Spade to shovel the coal into the engine.
Drag your Pyrokinesis icon to light the coal.
Off to the Castle Gate.
Screenshot
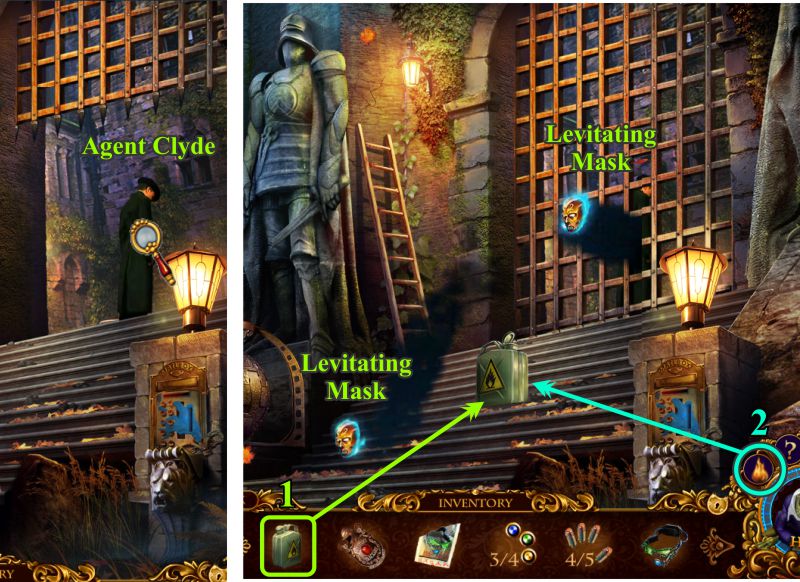
Castle Gate
Spot Agent Clyde going through the gate that closes behind him.
Two of the Levitating Marks appear, so place your Gas Can on the steps and light it with your Pyrokinensis ability.
Screenshot
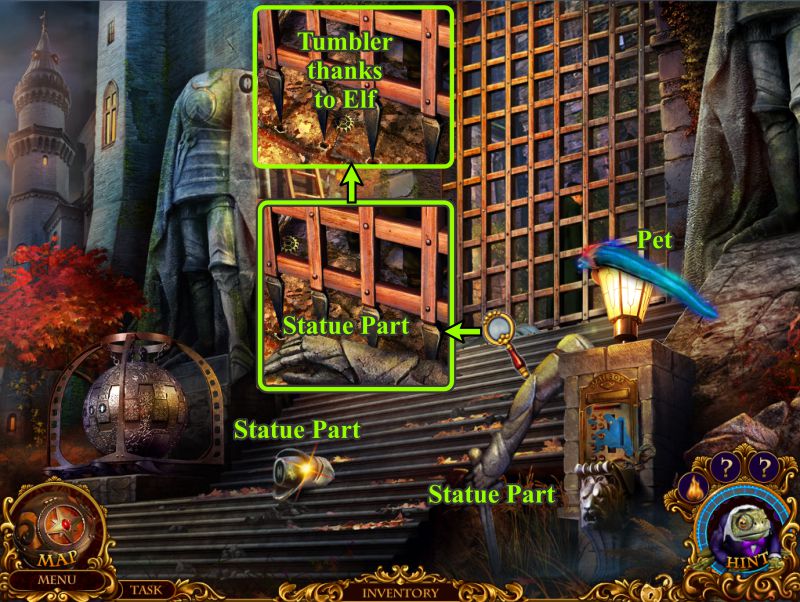
The explosion got rid of the masks but made a mess of the statue.
Collect all the Statue Parts and the Pet.
When you zoom in by the gate to get the one Statue Part, send Elf through the gate to collect the Tumbler.
Screenshot
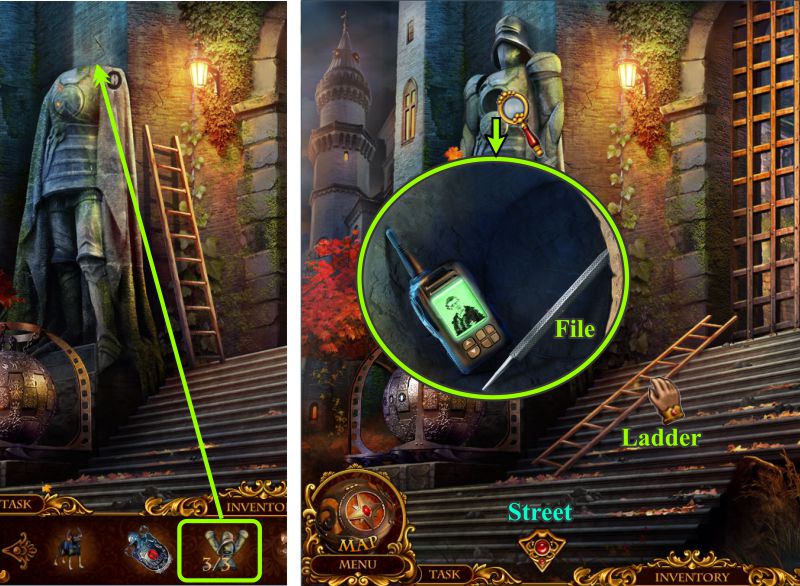
Put the statue back together and zoom in on the opening.
Pick up the File, then grab the fallen Ladder, and go off to the Street to help the newbie.
Screenshot
Street
Zoom in on the Ravine and place the Ladder.
Zoom on the area again for a Hidden Object Scene.
Screenshot
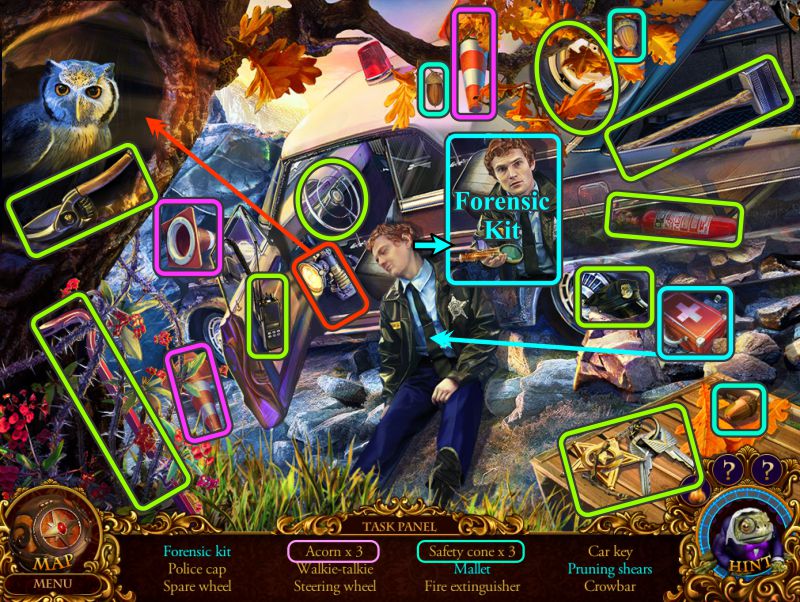
Ravine Hidden Object Scene
Collect everything marked.
Use the flashlight, marked in red, on the tree to find the Pruning Shears.
Place the first aid kit on the newbie, his leg will be bound and he will give you a Forensic Kit for your Inventory.
Screenshot
Street and Phone Booth
Back up on the Street, zoom in on Agent Clyde's belongings and use the Forensics Kit to lift the Fingerprint.
Go to the Phone Booth, zoom in on Agent Shade's jacket, and use the Forensics Kit to lift that Fingerprint.
Go to the Bar.
Screenshot
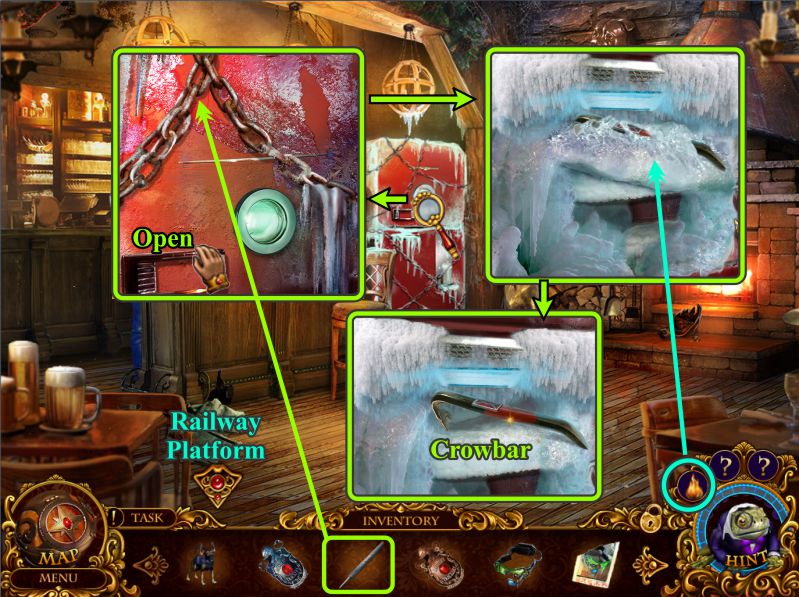
Bar
Zoom in on the refrigerator and use the File to remove the chains.
Open the freezer and use your Pyrokinensis ability to defrost whatever is on the top shelf.
Collect the Crowbar, and go outside to the Railway Platform.
Screenshot
Railway Platform and Street
Zoom in on the display case and use the Forensics Kit to life the Fingerprint.
Head back to the Street and zoom in on Agent Clyde's belongings.
Place the 3 Fingerprints on his case to open it.
Take the Tumbler and Gold Badge, and go into the Post Office.
Screenshot
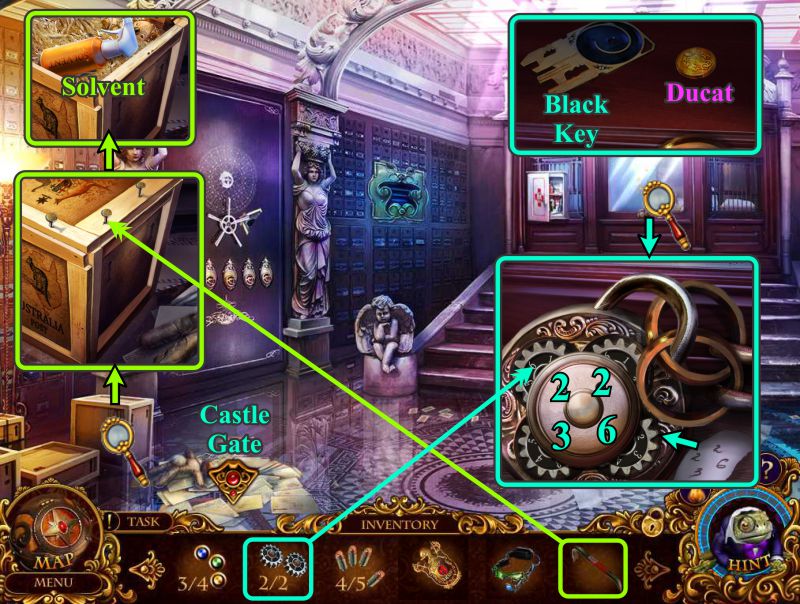
Street
Use the Crowbar to remove the nails from the crate, and take the Solvent.
Zoom in on the back window and place the Tumblers.
Turn the tumblers to the numers shown in the screenshot and on the paper next to the lock.
Collect the Black Key and Ducat.
Use the Map to go to the Castle Gate.
Screenshot
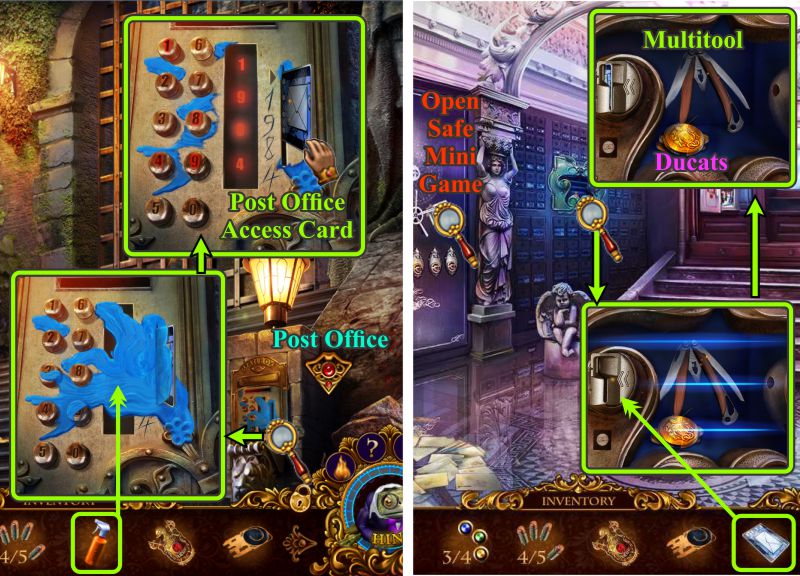
Castle Gate and Post Office
Zoom in on the mechanism and use the Solvent to get rid of the gum.
Enter the code and take the Post Office Access Card.
Return to the Post Office and zoom in on the laser niche.
Use the Access Card and take the Ducats and Multitool.
Zoom in on the safe for a Mini Game.
Screenshot
Post Office Safe
To open the safe for a Mini Game, place the X-ray Goggles anywhere in the scene and the Torn Picture with the other portion taped there.
Using the code at the bottem of the picture, press the knobs as shown in the screenshot.
Screenshot
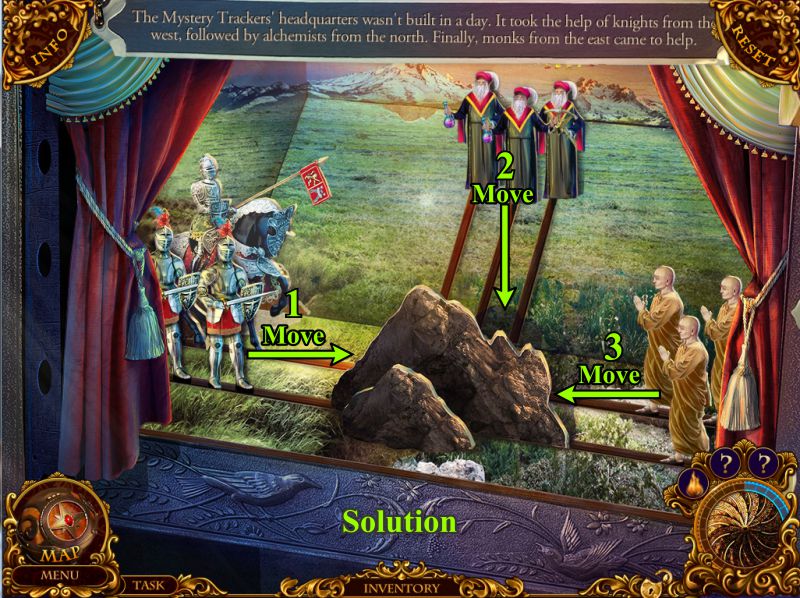
Story of Mystery Trackers Foundation Play
For Scene 1, move the characters as shown in the screenshot.
Screenshot
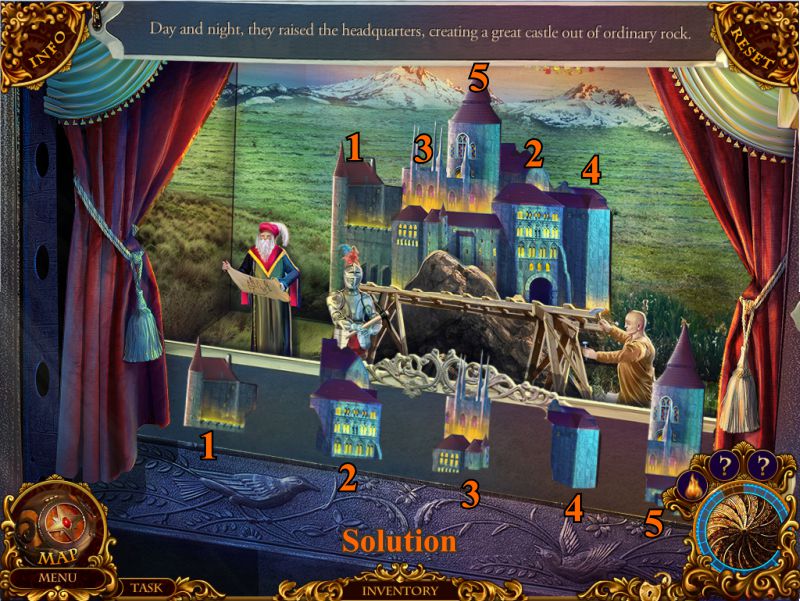
Next you have a bunch of pieces to build the castle, so see the screenshot for the numbered solution.
Screenshot
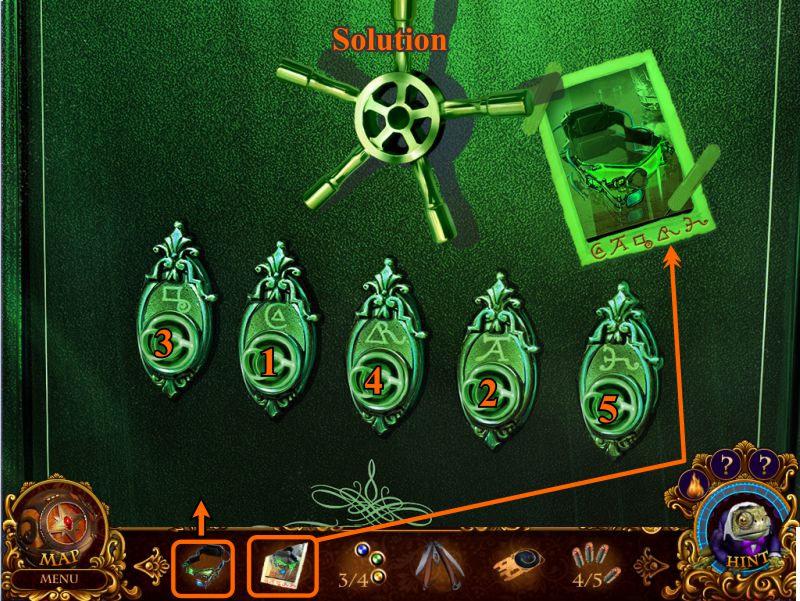
Scene 3 requires character placement on the stage, so check the screenshot for the numbered solution.
Screenshot
The stage is completely dark, so use your Pyrokinesis ability to provide some light.
Collect the Ducats and Diamond Ring.
Go to the Railway Platform.
Screenshot
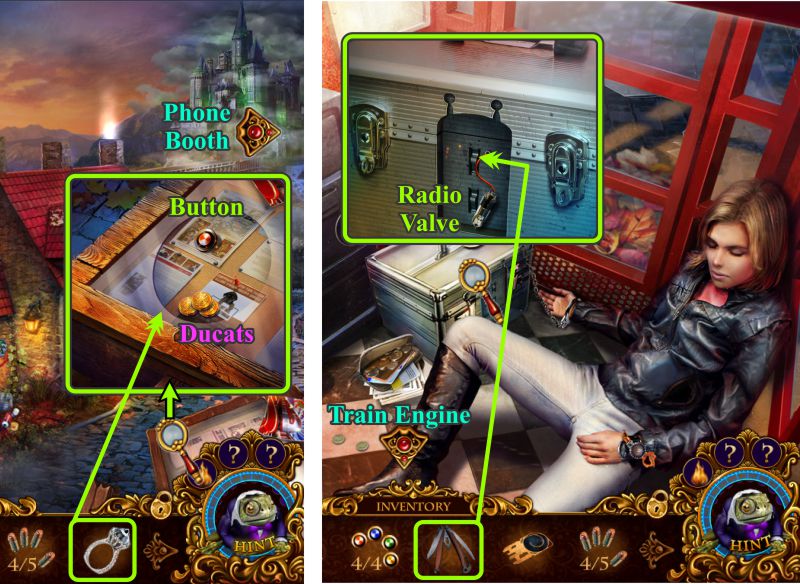
Railway Platform and Phone Booth
Zoom in on the display case and use the Diamond Ring to cut the glass.
Collect the Ducats and Button, and enter the Phone Booth.
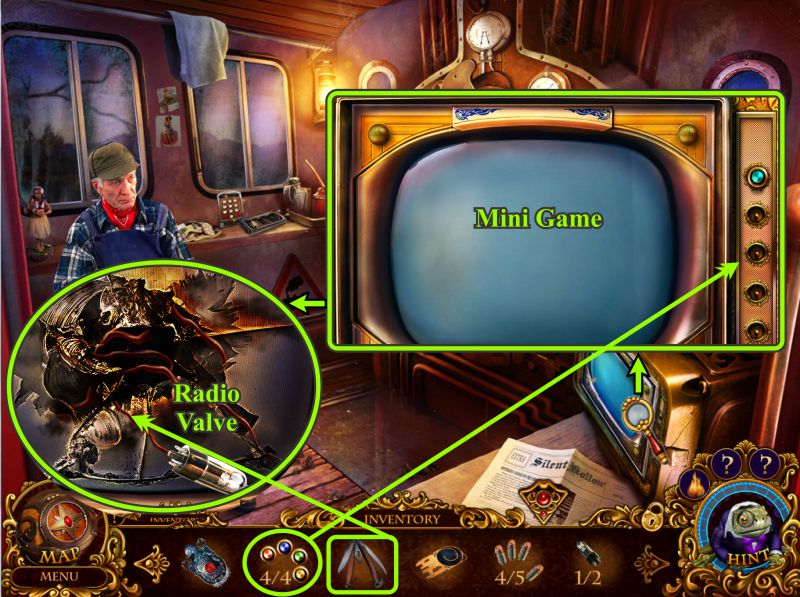
Zoom in on the case and use the Multitool to get the Radio Valve.
Screenshot
Train Engine
Zoom in on the monitor and place the 4 Buttons to trigger a Mini Game.
At the end of the game, use your Multitool to collect the Radio Valve.
Screenshot
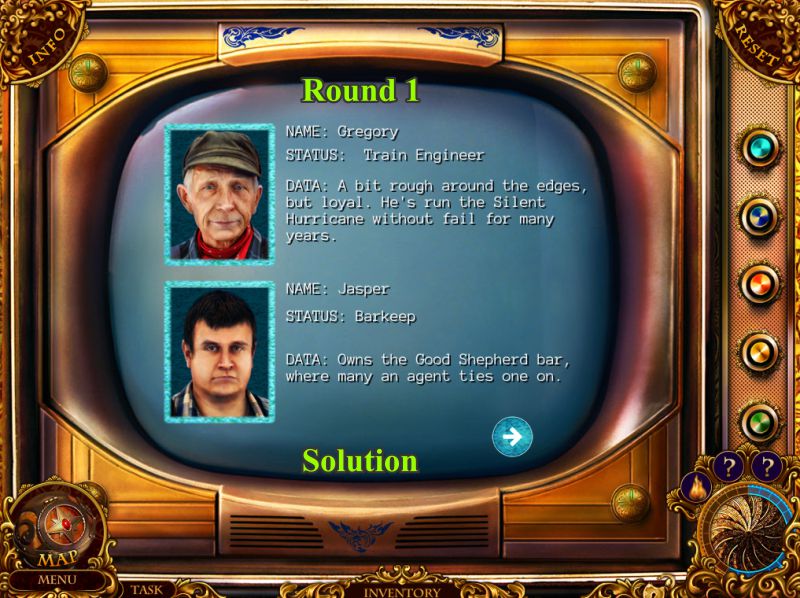
Face Matching Mini Game
The first face in this round is already completed, so your job for the Mini Game is to complete the rest of the faces.
The center strip in each face is already correct so change the top and bottom strips to identify each character.
See the screenshots for the solutions.
Screenshot
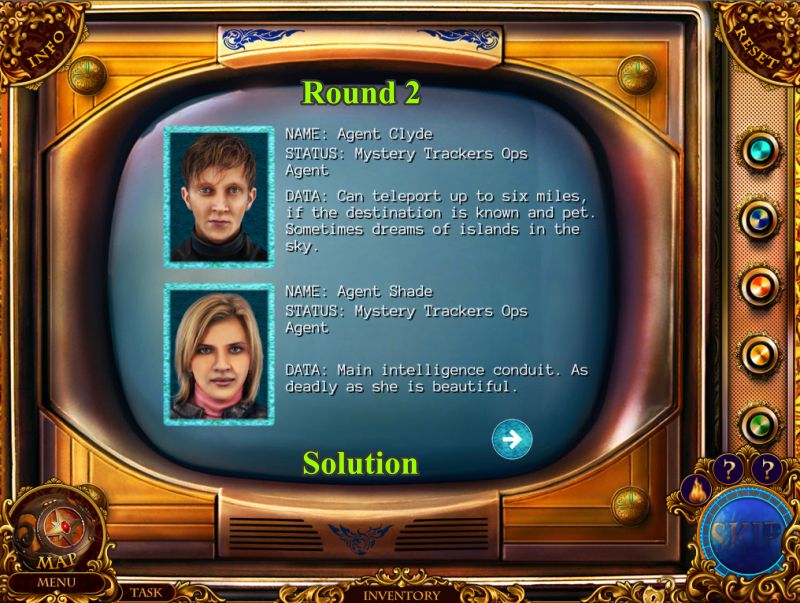
Round 2 pictures are Agents Clyde and Shade.
Screenshot
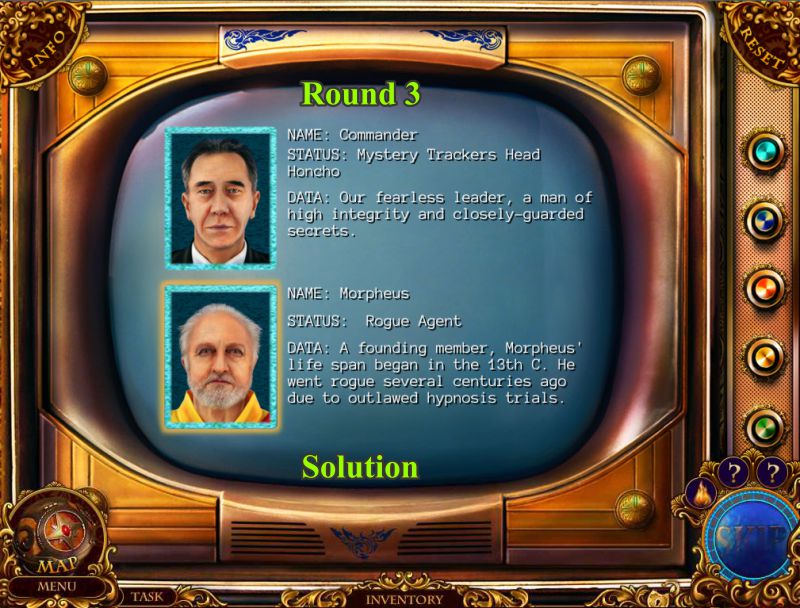
For Round 3, you get to view the Commander and the rogue agent Morpheus.
Screenshot
Train Engine
Zoom in on the counter and place the Radio Valves in the device.
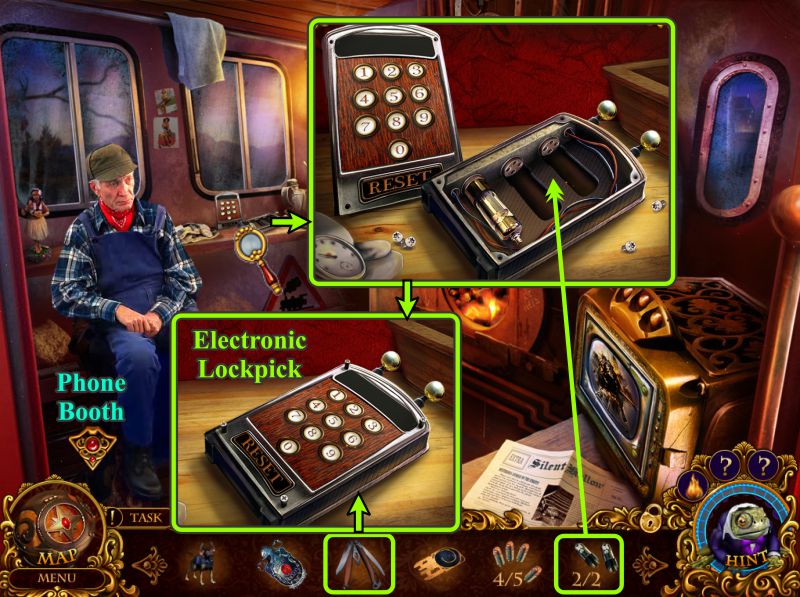
Fasten the cover using your Multitool so you can collect the Electronic Lockpick.
Go to the Phone Booth.
Screenshot
Phone Booth
Zoom in on the case and attach the Electronic Lockpick.
Watch the numbers flash and then enter 20789 to open the case.
Play the Hidden Object Scene and then go to the Castle Gate.
Screenshot
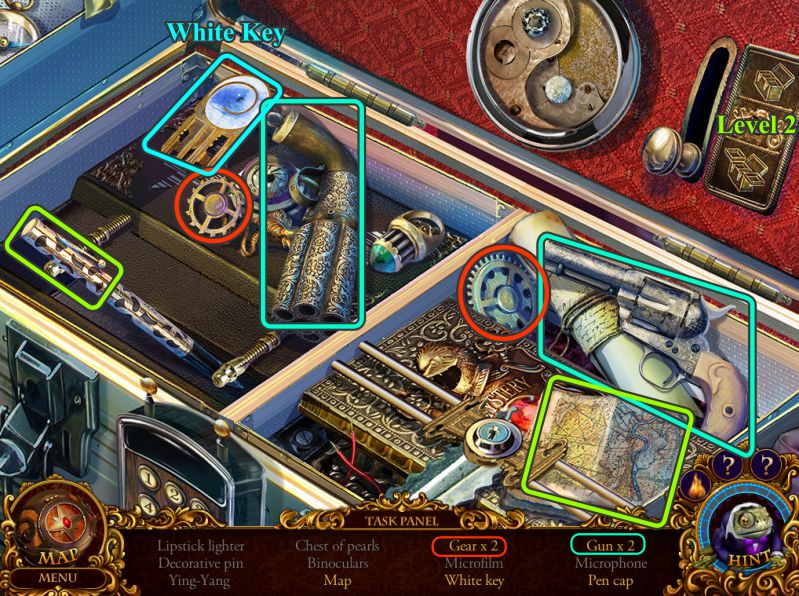
Case Hidden Object Scene
Collect the items marked for Level 1 and then move the lever to open the case to Level 2.
Place the bug on the piano so you can collect a Chest of Pearls.
Place the button on the machine and press it to collect the Microfilm.
Finish up the Ying-Yang so you can collect it.
Screenshot
Collect all the items in Level 2 and you will receive the White Key for your Inventory.
Screenshot
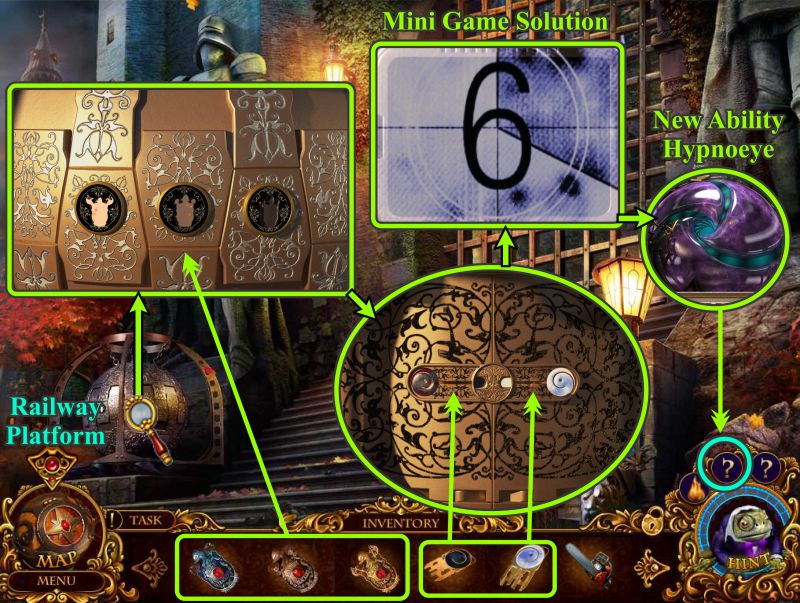
Castle Gate
Zoom in on the globe and place the 3 Badges in your Inventory.
For the next layer, use the Black and White Keys.
Rearrange the tiles in the Mini Game so the circle is in the middle...see the screenshot solution.
When the Hypnoeye appears, click on it for a Dossier photo and then collect your new ability.
Go to the Railway Platform.
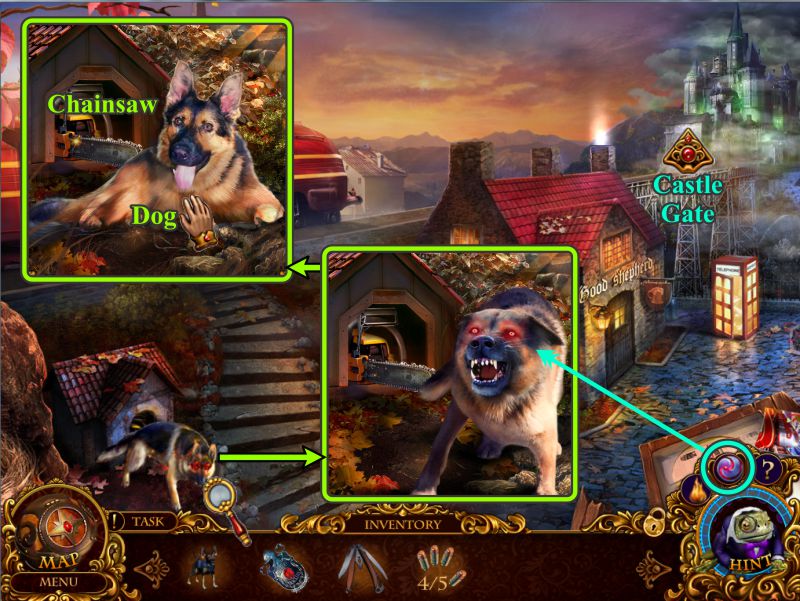
Screenshot
Railway Platform
Zoom in on Jasper's dog and try out the Hypnoeye on him.
Take both the Chainsaw and the dog.
Return to the Castle Gate.
Screenshot
Castle Gate
Zoom in on the gate and cut an opening with the Chainsaw.
Enter Bailey and watch the cut scene.
Screenshot
Chapter 2
Bailey
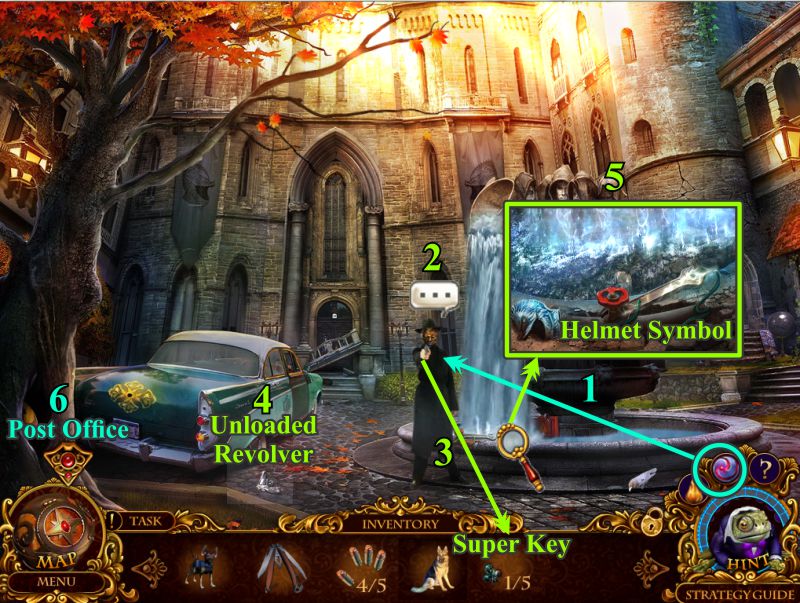
Use your Hypnosis ability on Agent Clyde.
Talk to Agent Clyde. He will give you a Super Key and disappear.
Pick up the gun he dropped, only to find it's an Unloaded Revolver.
Zoom in on the fountain and pick up the Helmet Symbol.
Use the Map to follow the white raven to the Post Office.
Screenshot
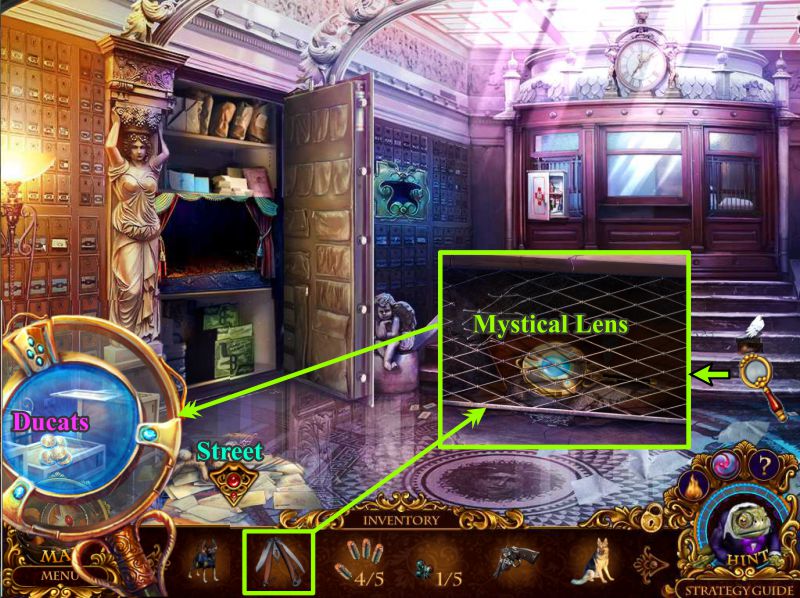
Post Office
Zoom in on the cache the white raven uncovers.
Use your Multitool to free the Mystical Lens.
Try out the lens to find the Ducats shown in the screenshot.
Go outside to the Street.
Screenshot
Street
Use the Mystical Lens to uncover a hidden area, and take the Bullet.
Now that you have all of the Bullets, they will automatically load into your Revolver.
Head to the Railway Platform.
Screenshot
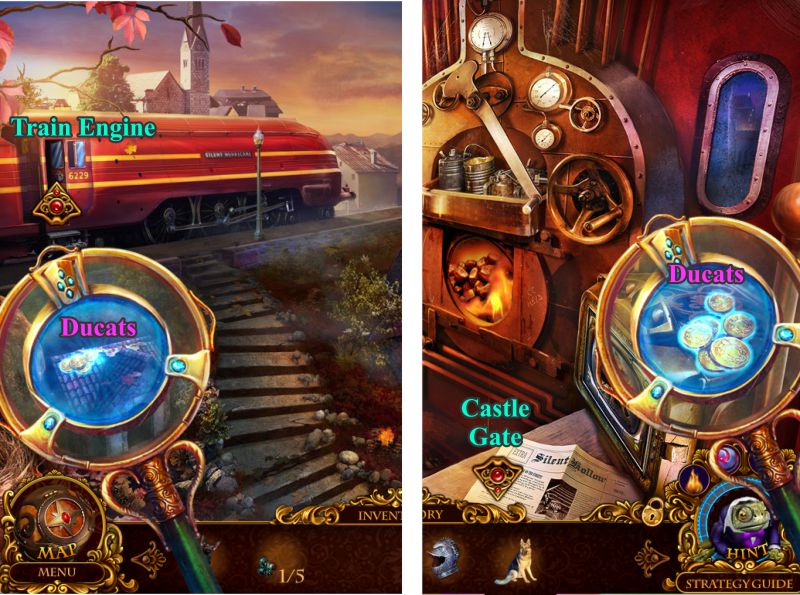
Railway Platform and Train Engine
Use your Mystical Lens to uncover Ducats on the dog house.
Enter the Train Engine and use the Lens to uncover more Ducats on top of the monitor.
Go to the Castle Gate in search of more hidden caches.
Screenshot
Castle Gate and Bailey
Keep using your Mystical Lens at these two location in order to find the Scalpel and read the Mystery Trackers Order.
Return to the Railway Platform and enter the Phone Booth.
Screenshot
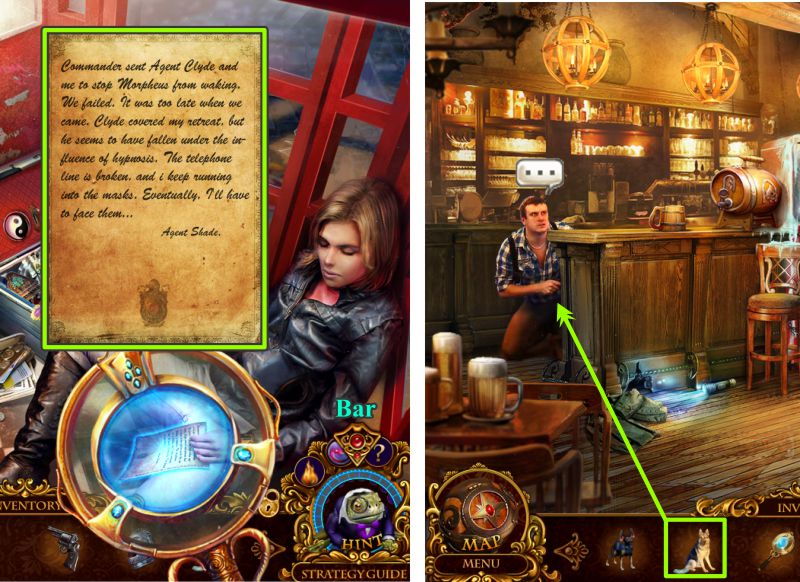
Phone Booth and Bar
Find the note from Agent Slade using your Mystical Lens.
Go to the Bar door, and place your now loaded Revolver on it.
Get ready for the shoot 'em up with the masks.
When it's all over, talk to Jason, who is scared out of his wits and needs his dog.
Give him his dog.
Screenshot
Bar
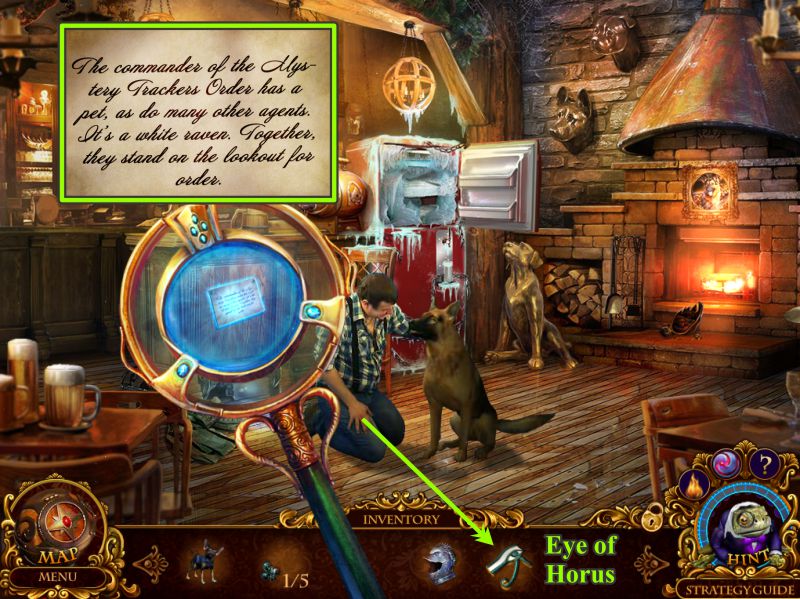
While Jason is reuniting with man's best friend, use the Mystical Lens to find a note about the Commander's white raven.
Jason will give you the Eye of Horus, so take off to the Street.
Screenshot
Street
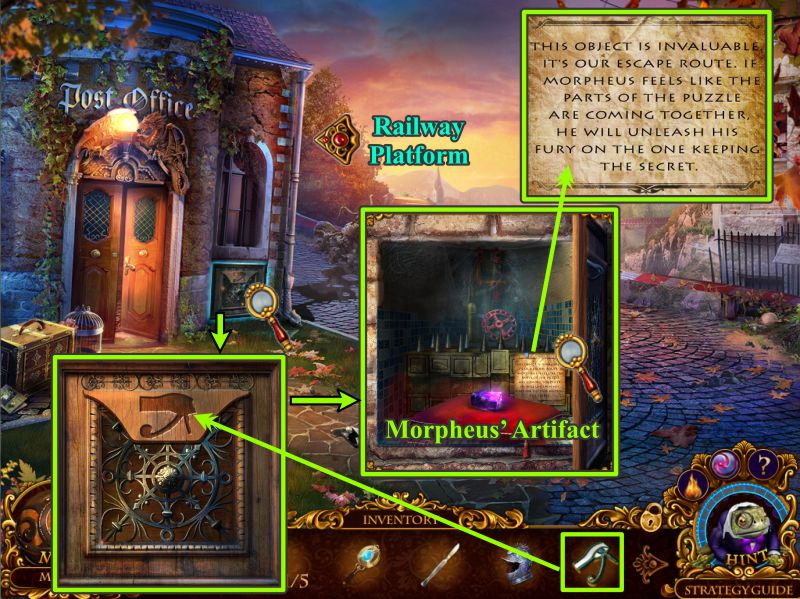
Zoom in on the hidden cache and place the Eye of Horus to open it.
Read the note about the artifact and pick up Morpheus' Artifact.
After the cut scene, go to the Railway Platform.
Screenshot
Railway Platform and Street
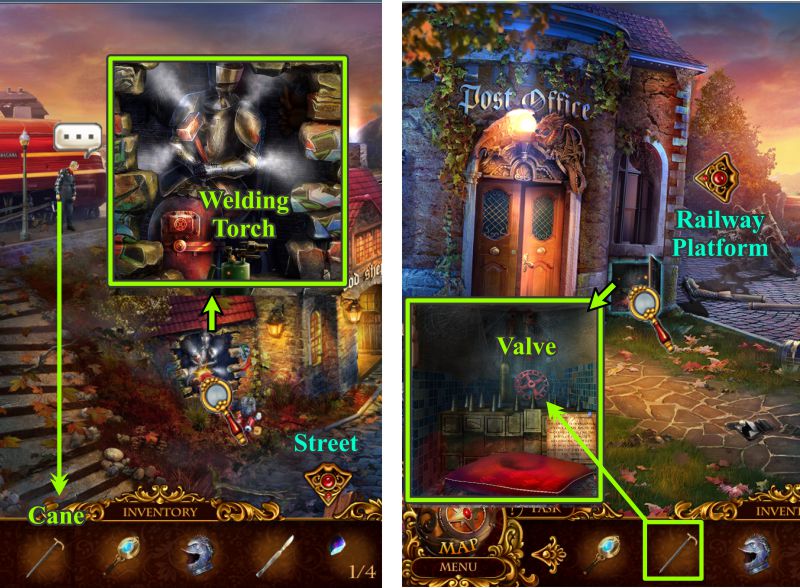
Everything has turned into chaos after you received the artifact, so talk to the train engineer and he will give you a Cane.
Zoom into the exposed part of the building and take the Welding Torch.
Return to the Street and use the Cane to help you get the Valve from the cache.
Go back to the Railway Platform.
Screenshot
Railway Platform
Zoom into the exposed part of the building and place the Valve.
Turn the Valve to shut off the steam so you can get the Sledgehammer.
Zoom in on the ripped up railway track and pound it with the Sledgehammer.
Once it is flattened, weld it together with the Welding Torch.
You are now good to go, so talk to the engineer, take the train to the Castle, and enter Bailey.
Screenshot
Bailey
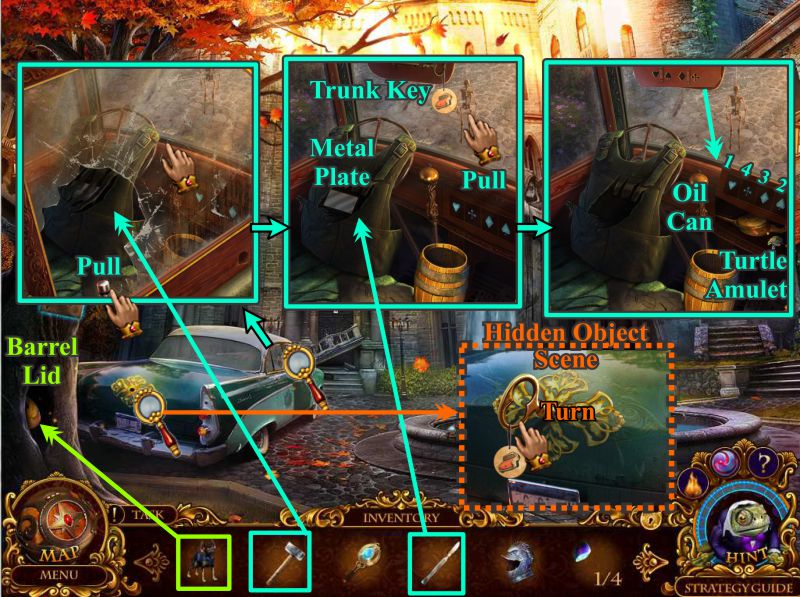
Send Elf into the tree hollow to get the Barrel Lid.
Zoom in on the car, and use the Sledgehammer to break the window.
Pull up the knob to open the door and touch the window.
Use the Scalpel on the backpack to get the Metal Plate.
Pull on the skeleton and the visor will come down. Take the Trunk Key.
Note the images on the visor and select the images on the glove compartment in that order, as shown in the screenshot.
Take the Oil Can and Turtle Amulet.
Zoom in on the trunk, place the Trunk Key, and turn to open the trunk for a Hidden Object Scene.
Screenshot
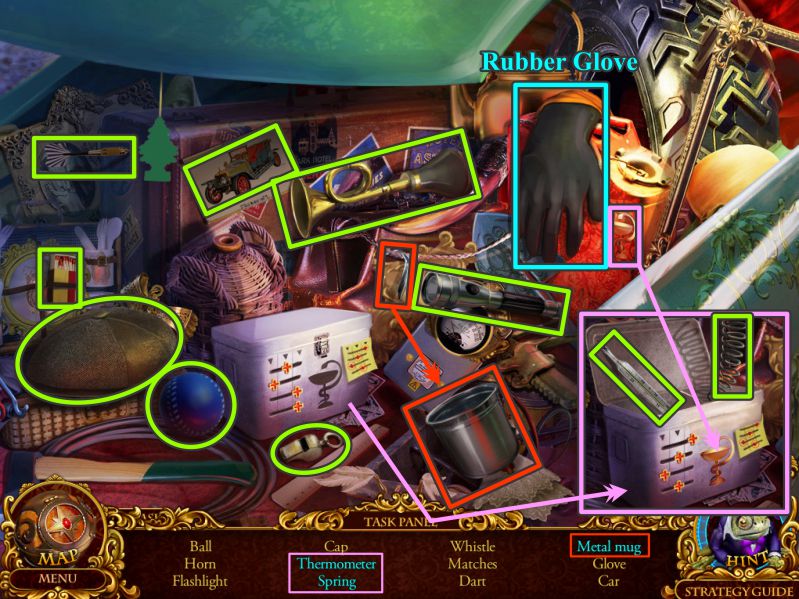
Car Trunk Hidden Object Scene
You will receive the Rubber Glove for your Inventory.
Place the handle on the Metal Mug.
Insert the snake symbol on the small chest and move the levers as shown on the post-it note. Once opened, you will find the Thermometer and Spring.
Screenshot
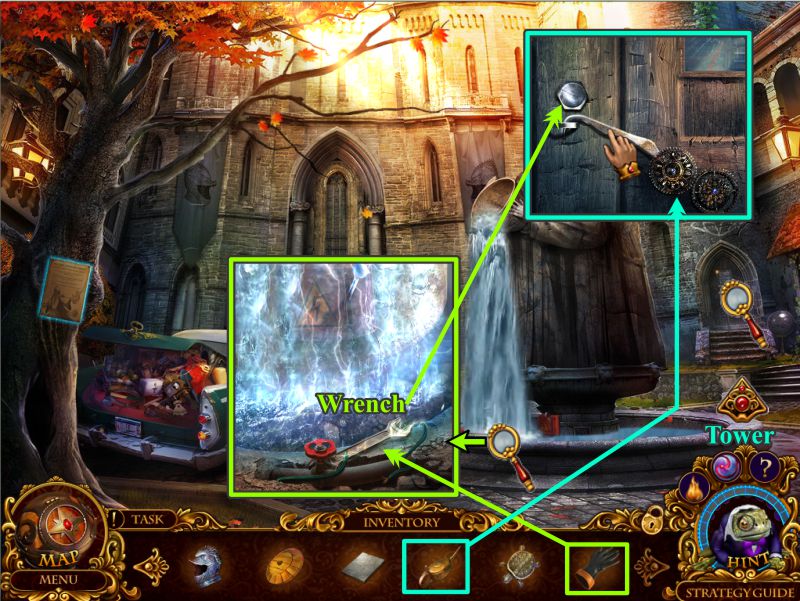
Bailey
Zoom in on the fountain and use the Rubber Glove to take the Wrench.
Examine the door to the Tower, remove the bolt with the Wrench, and oil the gears.
Enter the Tower.
Screenshot
Street
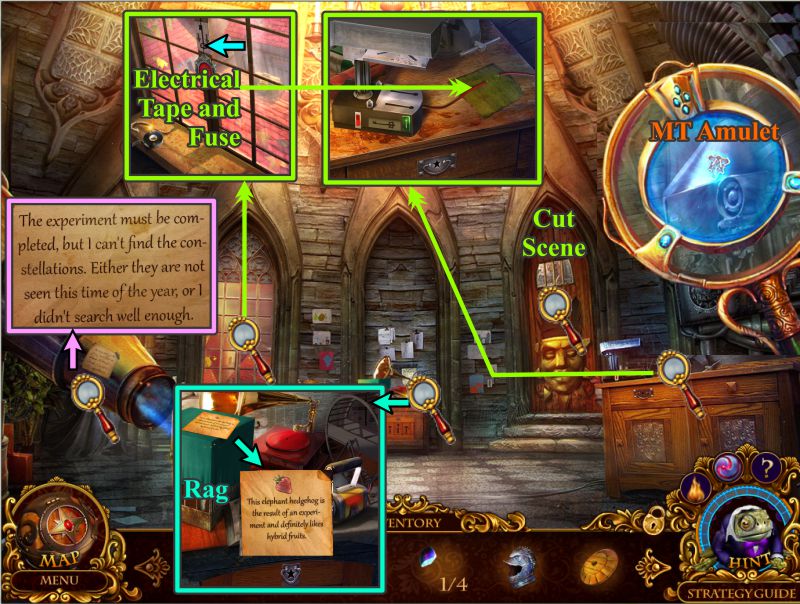
Read the note on the telescope, and zoom in on the window.
Take the Electrical Tape and Fuse, and note the shape of the key.
Zoom in on the table in the back, read the note, and take the Rag.
Examine the locked door and watch the cut scene.
Zoom in on the table at the right and use the Electrical Tape to repair the broken wires.
Use your Mystical Lens to find the MT Amulet.
Screenshot
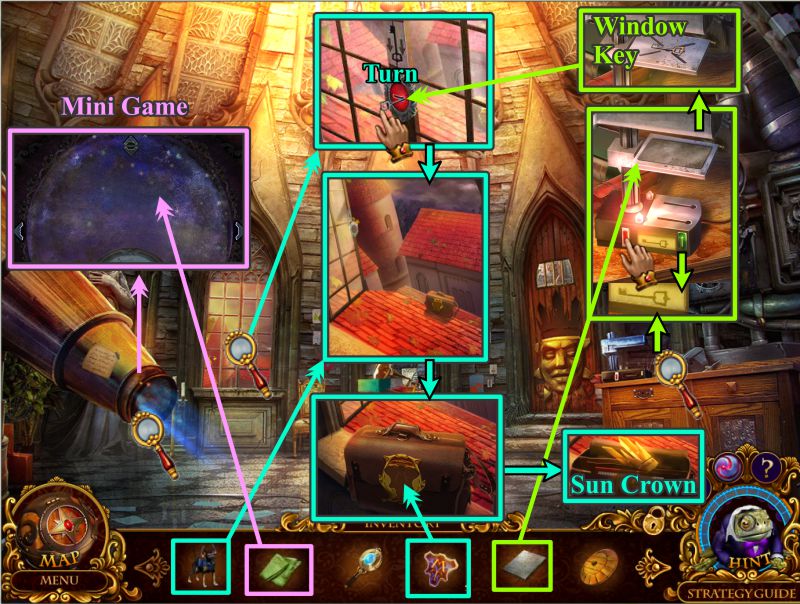
Once the wires are repaired, place your Metal Plate on the key making machine, and use the green button to select the right key as shown in the screenshot.
Press the red button to cut the key and collect the Window Key.
Zoom back in on the window, place the key and turn it.
Send Elf down to fetch the bag.
Place the MT Amulet to open the bag and collect the Sun Crown.
Zoom in on the telescope and use the rag to clean it so you can play a Mini Game.
Screenshot
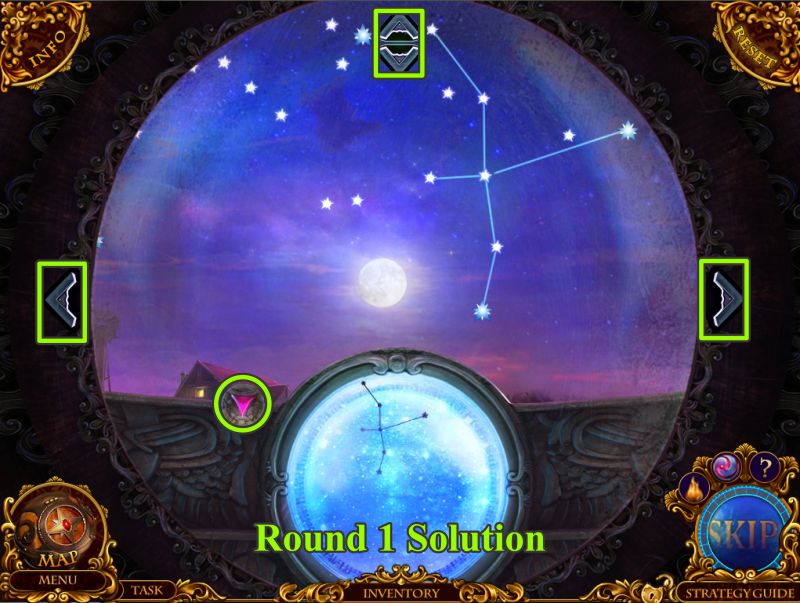
Telescope Mini Game
There are 4 rounds in the game in which you will be shown a constellation that you need to locate and draw by selecting two stars to connect.
The arrows enable you to move around in the sky to find the correct set of stars.
The red arrow just gives you a larger viewing area in the telescope if you want buildings to go along with your sky.
See the screenshot for the solution to Round 1.
Screenshot
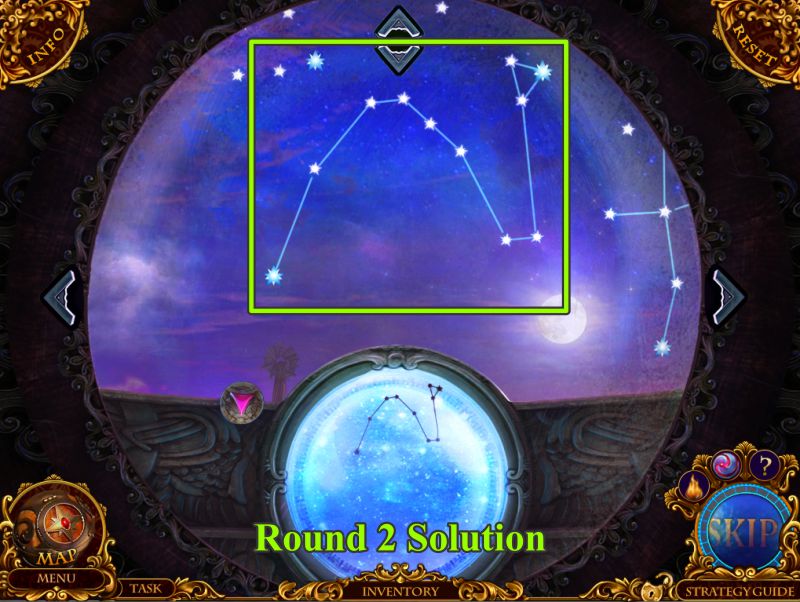
For Round 2, you will need to move the lens to the left using the right arrow.
See the screenshot for the solution.
Screenshot
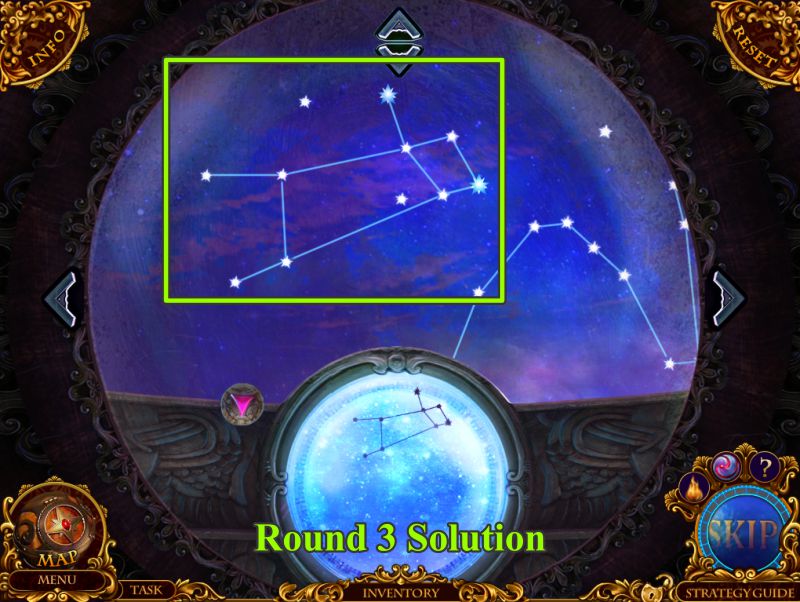
Once again you will need to move an area to the left of your last constellation.
This screenshot shows the solution to Round 3.
Screenshot
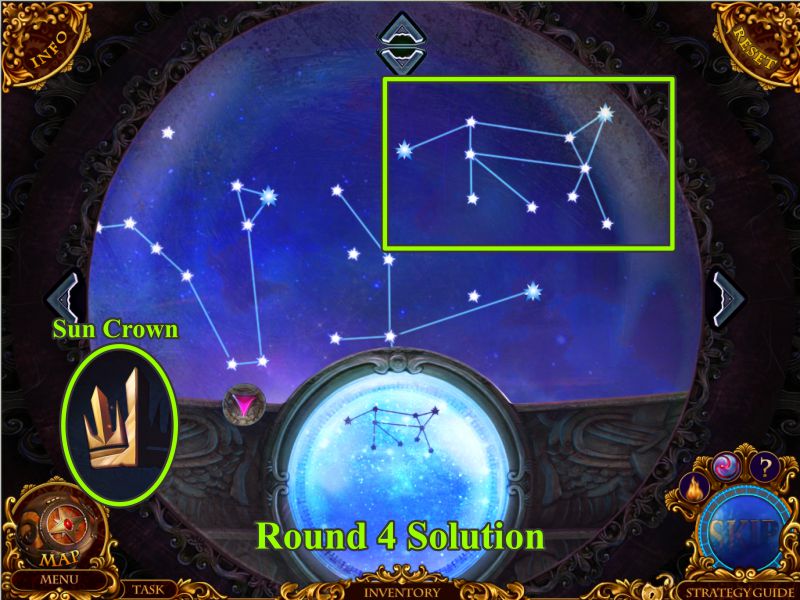
This time, you need to use the left arrow to move all the way to the right past the first constellation.
See this screenshot for the final solution. Collect the Sun Crown.
Screenshot
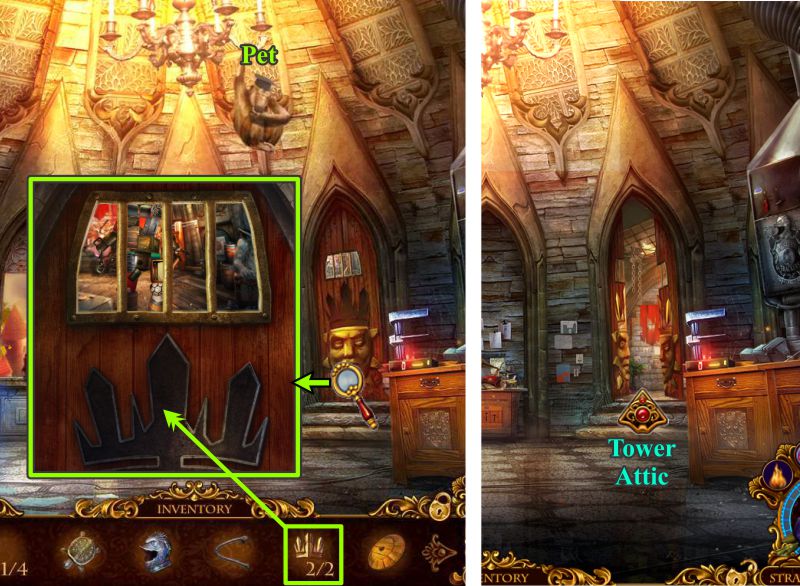
Tower
You now have both halves of the Sun Crown so place them on the attic door.
Collect the Pet hanging from the chandelier, and enter the Tower Attic.
Screenshot
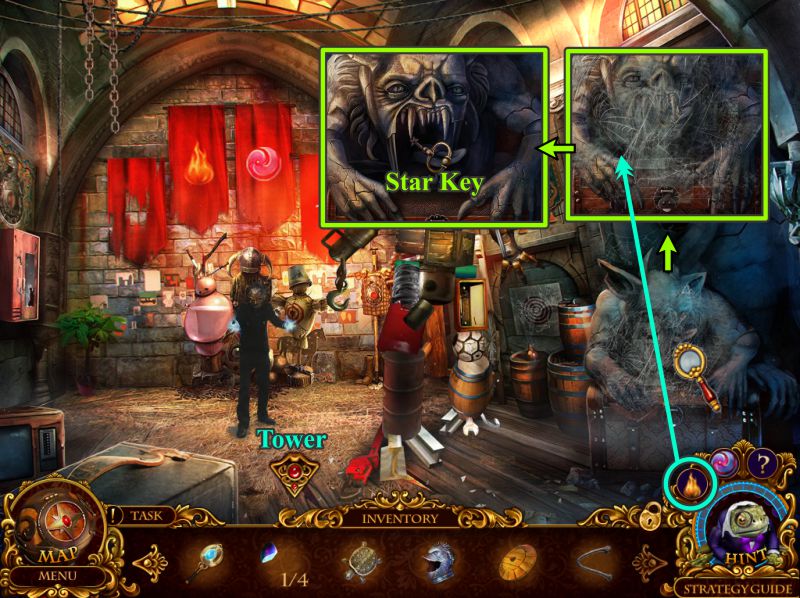
Tower Attic
Zoom in on the gargoyle to determine the cobwebs need to go. Use your pyrokinesis ability on it.
Examine the gargoyle, take the Star Key, and note what's missing before returning to the Tower.
Screenshot
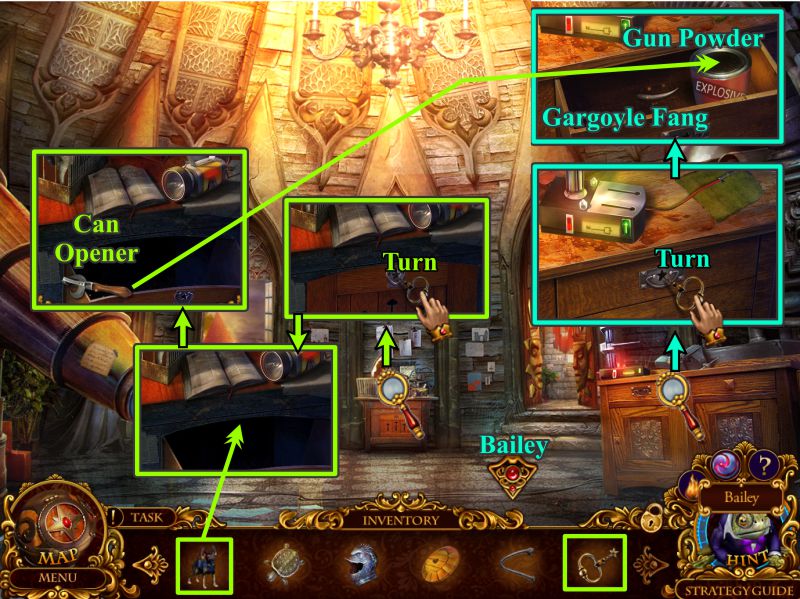
Tower
Zoom in on the table in the back, place the Star Key on the drawer, and turn it.
This is a job for Elf, so send him in to find a Can Opener.
Zoom in on the right table, insert the Star Key in the drawer, and turn it.
Take the Gargoyle Fang and use the Can Opener on the Gun Powder can before collecting it.
Go outside to the car.
Screenshot
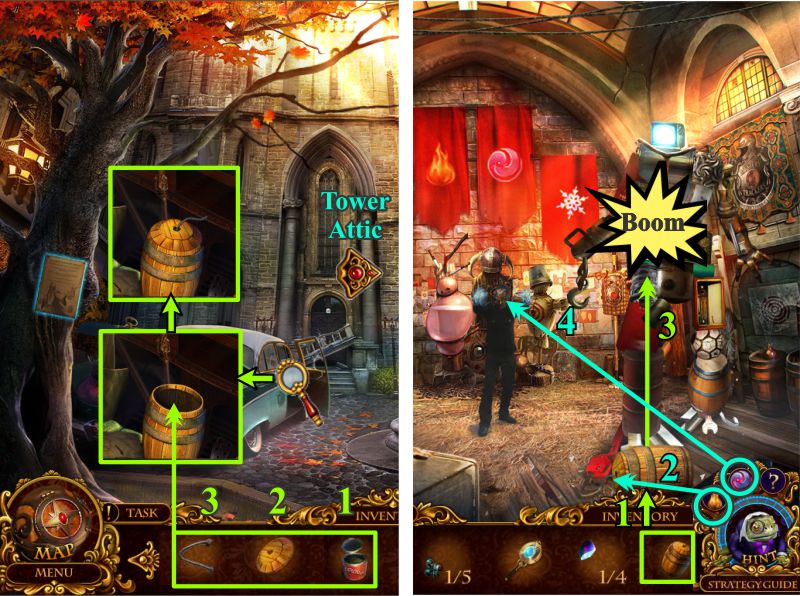
Bailey and Tower Attic
Zoom inside the car and place these object in the barrel in the order shown: Gun Powder, Barrel Lid, and Fuse.
Collect your homemade bomb and go to the Tower Attic.
Place your bomb in the scene.
Light it with your pyrokinesis ability.
The golum will pick it up and go Boom.
Now, use your Hypnoeye on the agent.
Screenshot
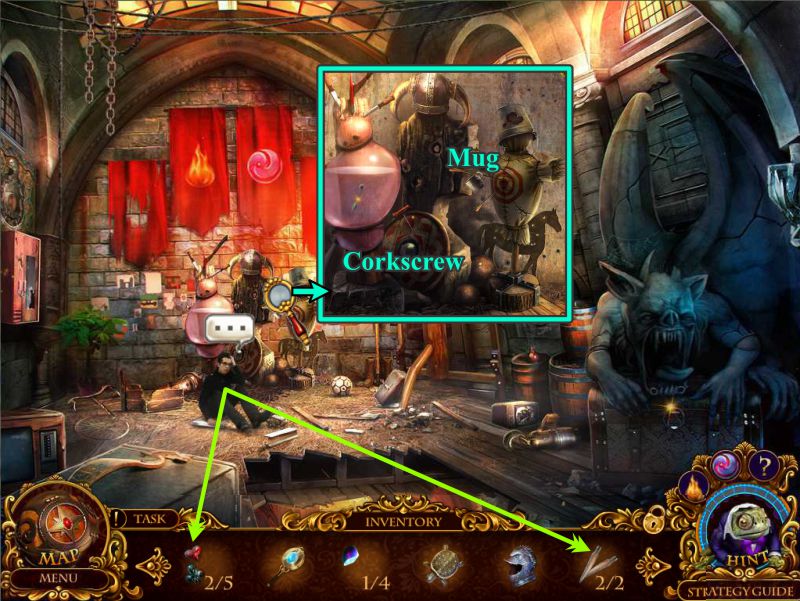
Tower Attic
Get Agent Stone's picture for the Dossier. Talk to him and he will give you a Super Key and a Gargoyle Tooth before disappearing to safety.
Examine the dummy and take the Mug and Corkscrew.
Screenshot
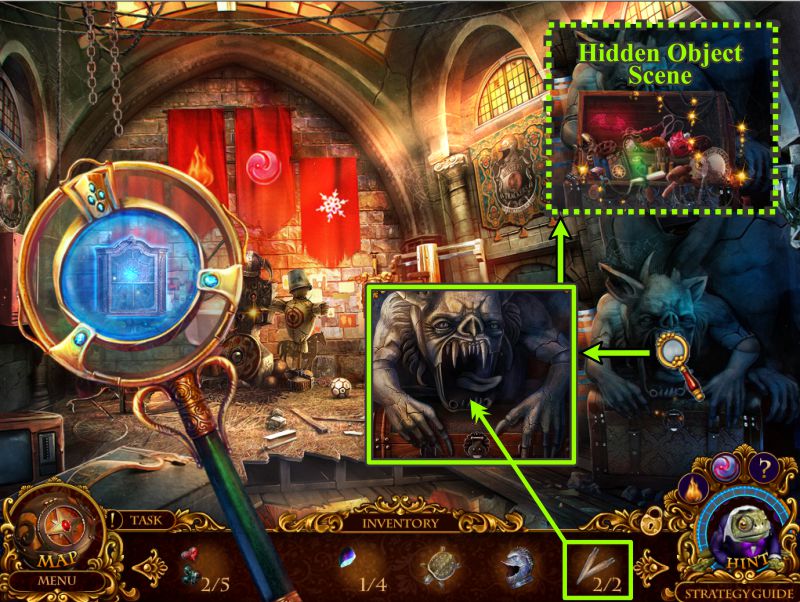
Use your Mystical Lens to find a locked cabinet, and zoom in on the gargoyle.
Give the gargoyle his Fangs to trigger a Hidden Object Scene.
Screenshot
Gargoyle Hidden Object Scene
Use the pencil to finish the drawing of the House.
Place the symbol on the box and change the numbers to read as shown in the screenshot so you can collect the Feather.
The Grappling Hook will go into your Inventory.
Screenshot
Tower Attic
Place the Grappling Hook on the hole in the floor and it will attach itself to the frame at the right.
Go down to the Main Hall.
Main Hall
Try to enter the door and the left and watch the cut scene.
Touch the Pet near and movie projector and he will disappear so collect him next to the fireplace.
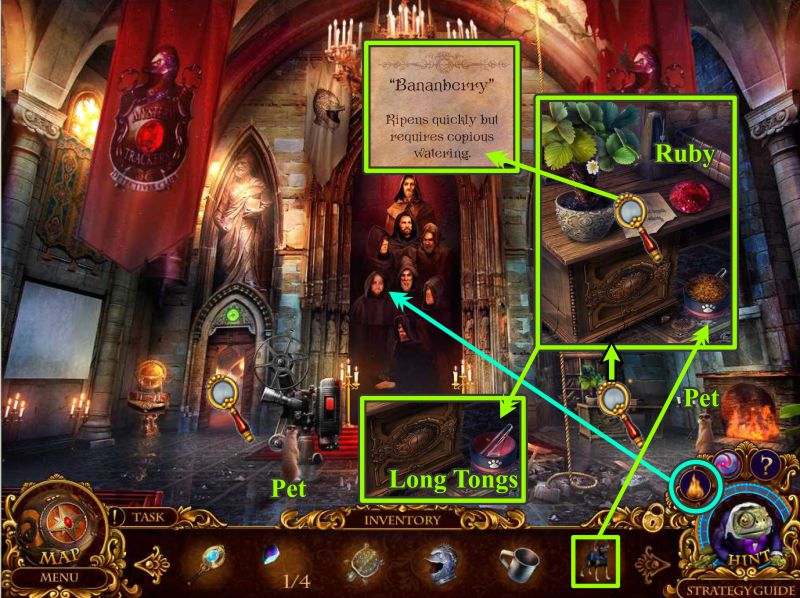
Zoom in the table in back with the plant on it.
Read the note and pick up the Ruby.
There is a bowl of dog food there; maybe Elf is hungry.
Send Elf to scarf up the food so you can collect the Long Tongs.
Use your pyrokenisis ability on the tapestry.
Screenshot
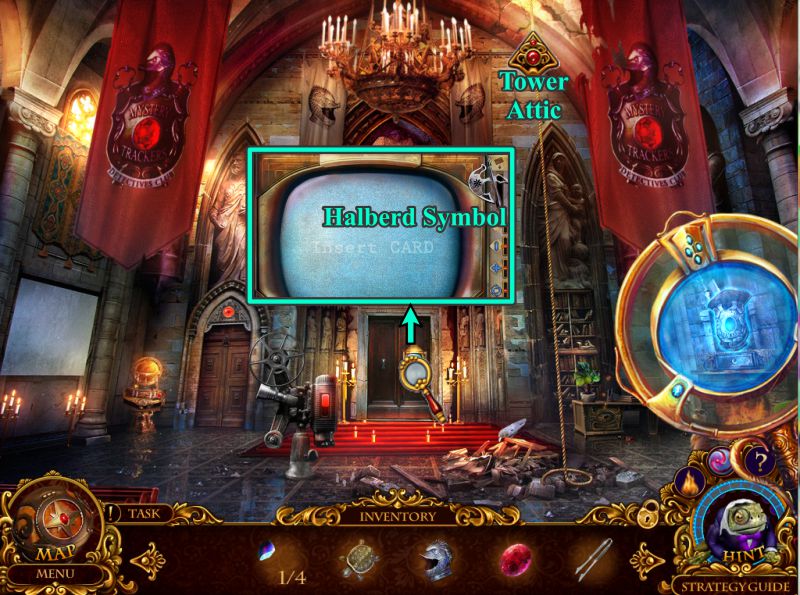
Behind the tapestry is a door with a monitor, so zoom in and take the Halberd Symbol.
Use your Mystical Lens on the room to see what you can find, and then return to the Tower Attic.
Screenshot
Tower Attic
Zoom in on the cabinet you found at the back of the room and use your Long Tongs to grab the Energy Pack.
Return to the Main Hall.
Screenshot
Main Hall
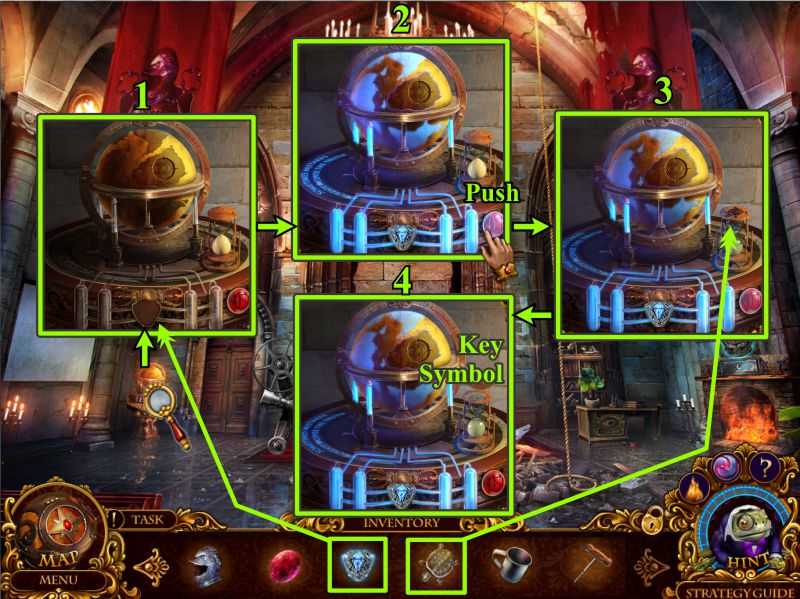
Zoom in on the globe and place the Energy Pack.
Once the globe freezes up, push the red button to turn the hourglass upside down.
There is an indentation on top of it, so place your Pack.
Once the globe freezes up, push the red button to turn the hourglass upside down.
There is an indentation on top of it, so place your Turtle Amulet.
Once the hourglass opens, take the Key Symbol.
Screenshot
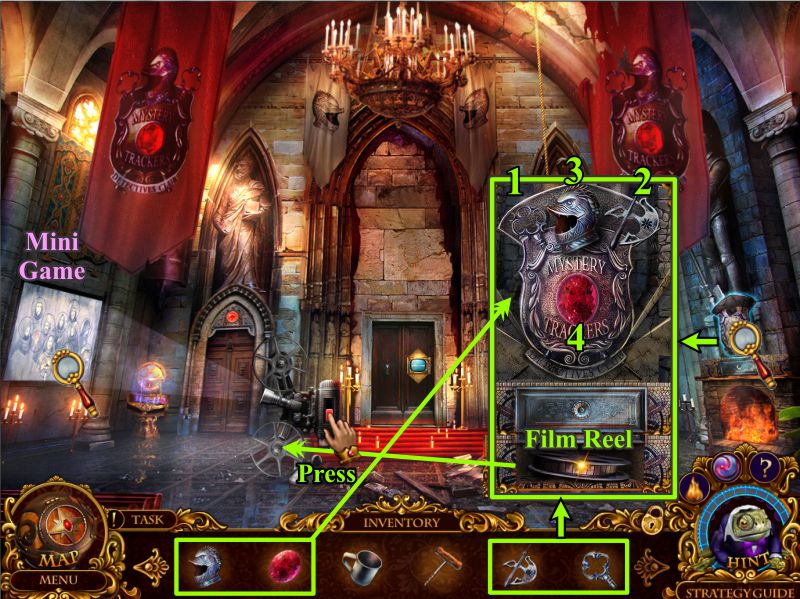
Zoom in on the large Mystery Trackers shield and put the following on it: Helmet Symbol, Halberd Symbol, Key Symbol, and the Ruby.
Press the symbols and the Ruby as shown. If you need it, see the screenshot for the numbers to press.
Take the Film Real and place it on the projector.
Click on the projection screen for a Mini Game.
Screenshot
Projection Screen Mini Game
Swap the images to complete the correct picture as shown in the screenshot.
Watch the cut scene to see what happens next.
Screenshot
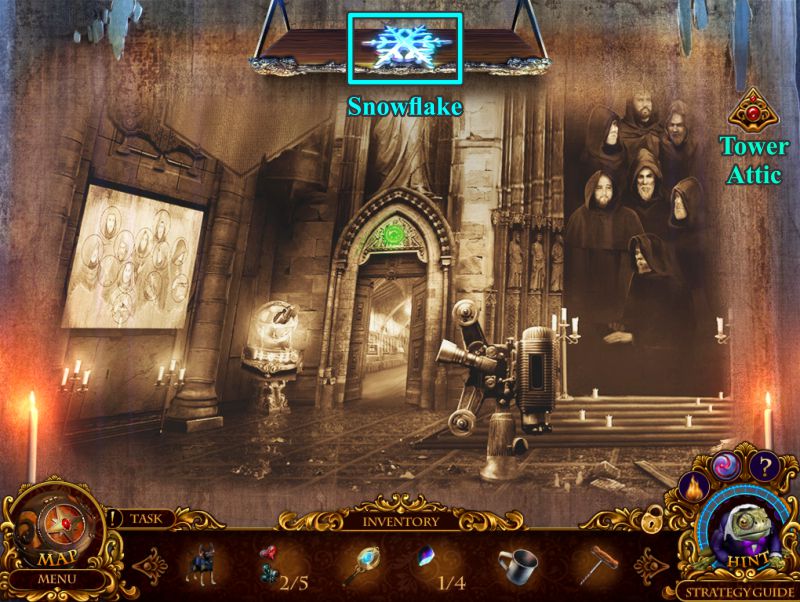
Main Hall
Take the Snowflake and go to the Tower Attic.
Screenshot
Tower Attic
Zoom in on the cabinet, place your Snowflake, take a Dossier picture of the Cryokinesis, and grab it.
After you inject yourself with it, zoom in on the dummies at the back wall and try out your new ability.
You will freeze the bubble: take the Clock Hand.
Go to Bailey.
Screenshot
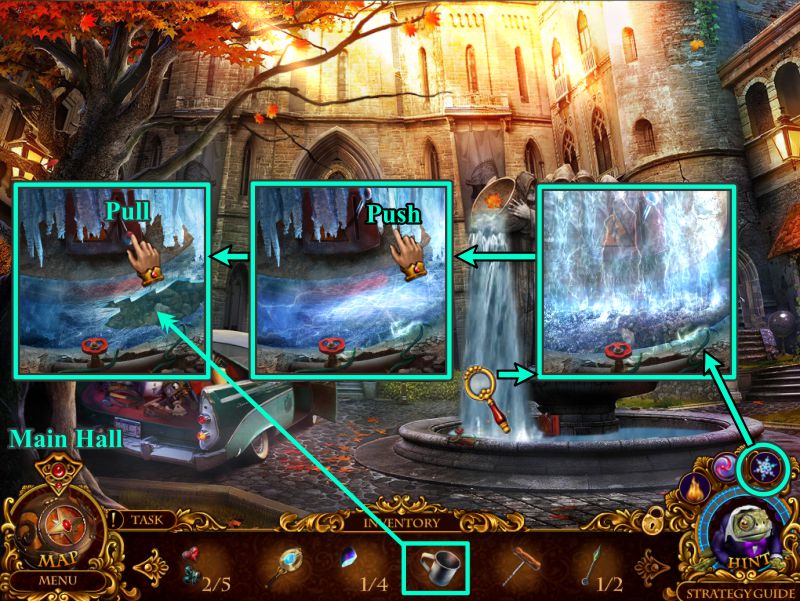
Bailey
Zoom in on the lower part to the fountain and use your new talent.
Once everything is frozen, push on the one icicle and it will fall into the fountain, making a crack in the ice.
Pull the lever to shut it off, and dip your mug in the water portion of the fountain to get some water.
Use the Map to go to the Main Hall.
Screenshot
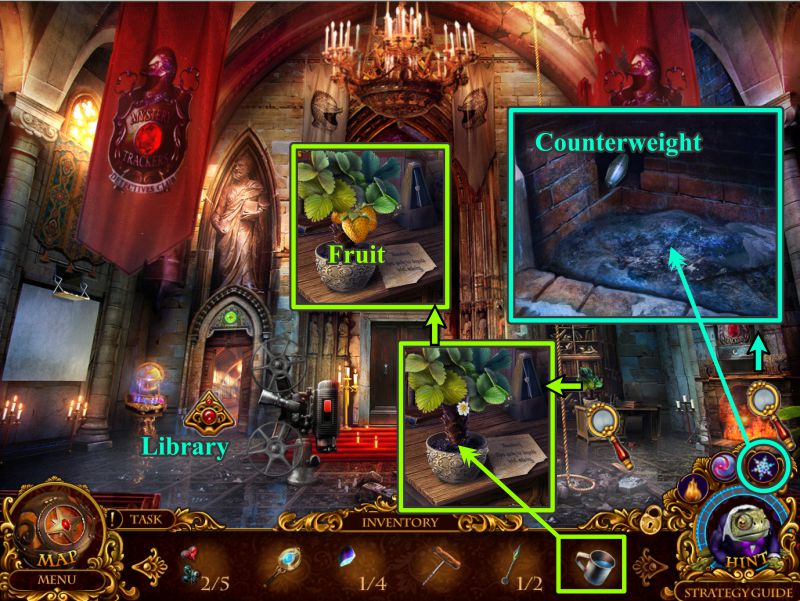
Main Hall
Zoom in on the plant and use your water to nourish it so it will grow the Fruit for you to collect.
Use your cryokenisis ability on the fireplace and take the Counterweight.
Enter the Library.
Screenshot
Chapter 3
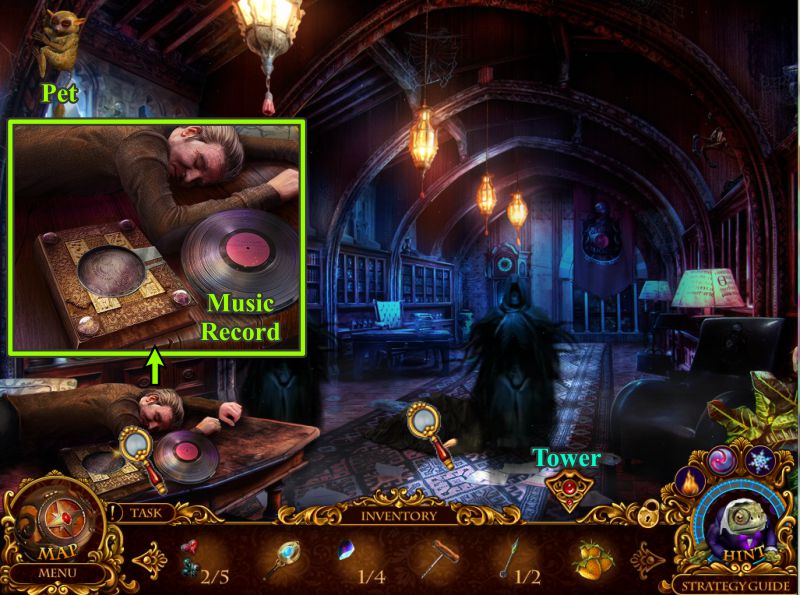
Library
Collect the Pet, zoom in on the agent on the floor and the agent on the table.
Pick up the record and go to the Tower.
Screenshot
Tower
Play the Record on the gramophone to wake up the elephant hedgehog.
Feed him the Fruit and he will go to the exercise wheel where he will recharge the Powerful Flashlight.
Collect it and return to the Library.
Screenshot
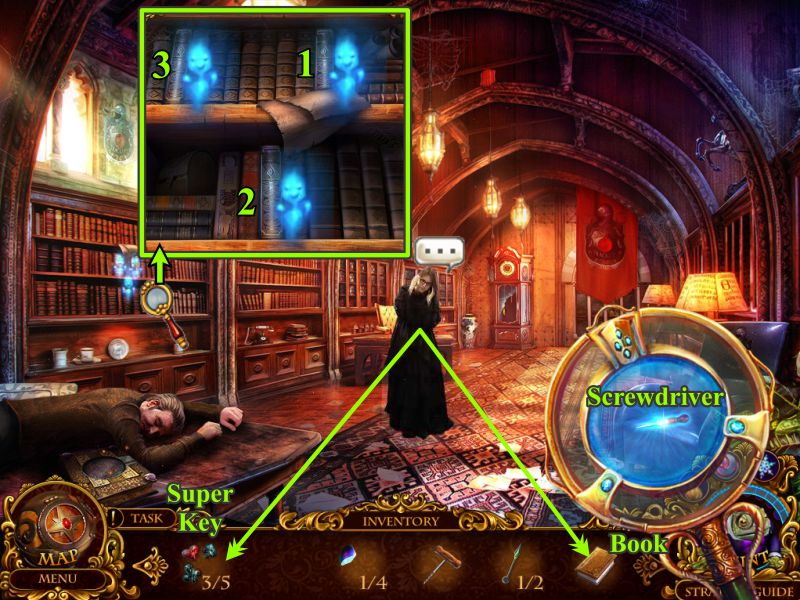
Library
Use the Powerful Flashlight to get rid of the phantoms.
Talk to Agent Paige and she will give you a Super Key and a Book.
She will also create some spirits before teleporting elsewhere.
Use your Mystical Lens to find the Screwdriver, and zoom in on the left bookcase.
Place you Book and the little spirits will align themselves next to 3 books.
Push the books back into the bookcase in the order shown in the screenshot to trigger a Hidden Object Scene.
Screenshot
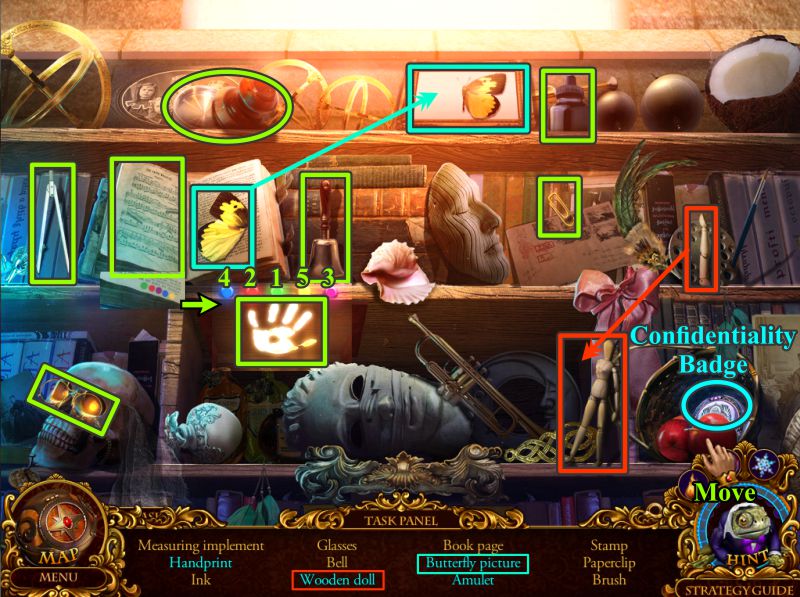
Bookcase Hidden Object Scene
Place the half of butterfly with the other wing to create a Butterfly Picture.
Attach the arm to the Wooden Doll.
Once you take the Book Page, you will reveal the code for pushing the buttons on the shelf in order to get the Handprint. See the screenshot for the correct numbering.
Move the apple to get the Confidentiality Badge for your Inventory.
Screenshot
Library
Zoom in on the table and place the Confidentiality Badge on the book to Agent Scroll.
Flip through the pages of the book that tells about previous Mystery Tracker's cases until you come to the Clock Hand.
You now have both Clock Hands, so zoom in and place them on the clock, and place the Weight.
Level the Weights so they line up with the green arrows, as shown in the screenshot.
Take the Compass and go to the Main Hall.
Screenshot
Main Hall and Tower Attic
Zoom in on the globe and place the Compass.
Use your Corkscrew to remove the cork from the bottle, and take the Handcuff Key.
Go to the Tower Attic and zoom in on the cabinet with the Handcuffs to unlock and collect them.
Open the cabinet to collect the Dog Amulet and Hand Hoe.
Note the picture of the dog house, then go to the Railway Platform.
Screenshot
Railway Platform and Main Hall
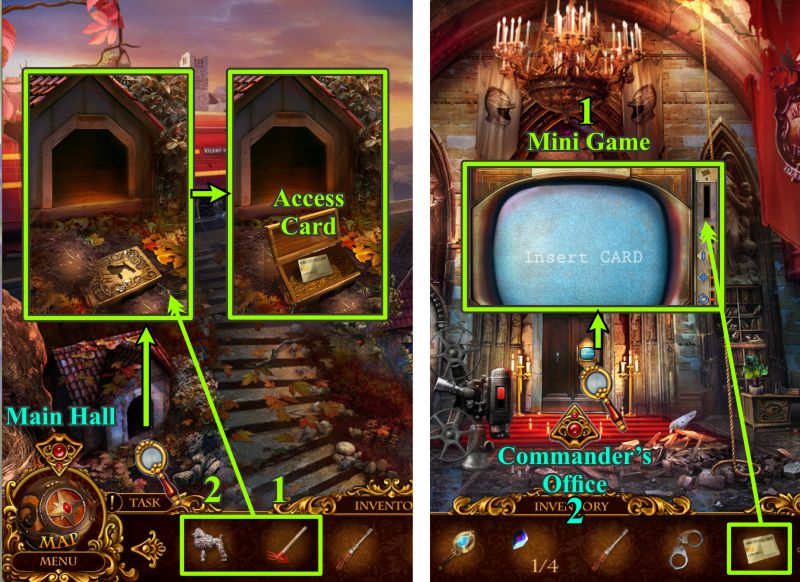
Zoom in on the dog house and use the Hand Hoe to uncover the box.
Place your Dog Amulet and take the Access Card.
Go to the Main Hall and zoom in on the door with the monitor.
Insert your Access Card and play the Mini Game.
When you have completed the Mini Game, enter the Commander's Office.
Screenshot
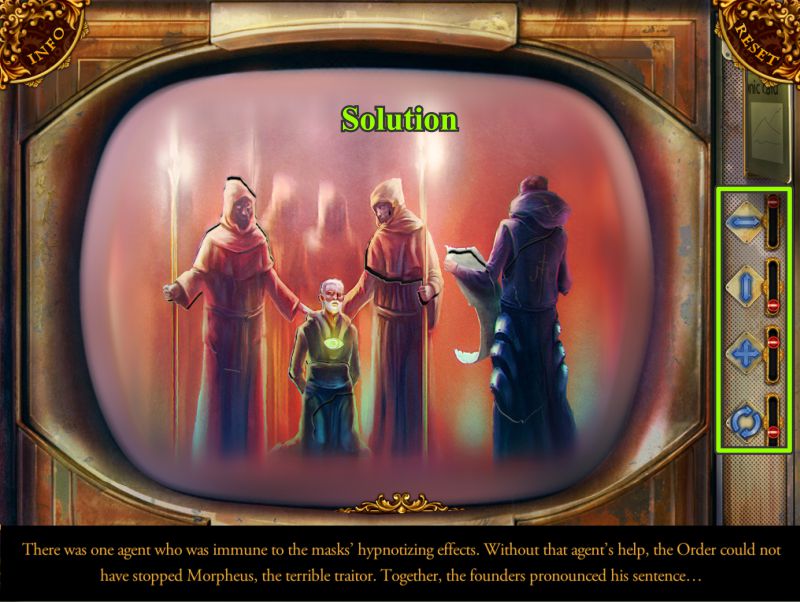
Monitor Mini Game
Your goal is to restore the pieces to make a complete scene using the control panel to make the pieces move left or right, up or down, shrink or grow, and rotate.
See the screenshot below for the solution, and note the position of the toggles on the control panel.
Screenshot
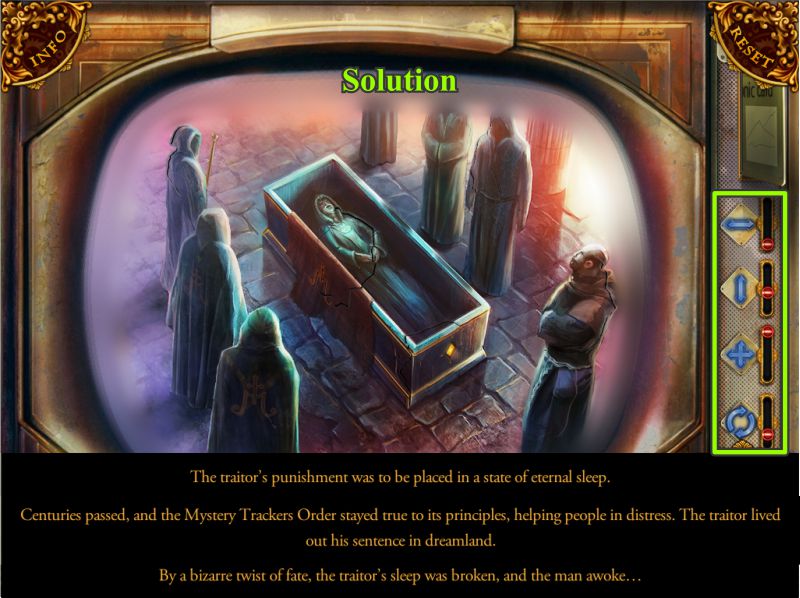
Round 2 solution is shown in the screenshot below; again, note the control panel.
Screenshot
Commander's Office
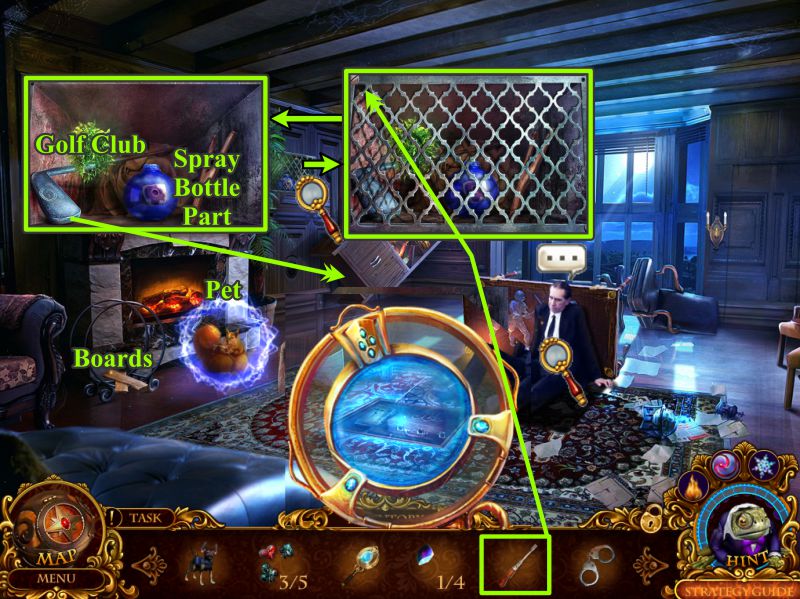
Check up on the commander, collect the Pet and Boards, and use the Mystical Lens to find the hidden cache.
Use you Screwdriver to remove the screw from the grate so you can collect the Golf Club and Spray Bottle Part.
The Golf Club is great for leverage to knock over the already tilted cabinet for a Hidden Object Scene.
Screenshot
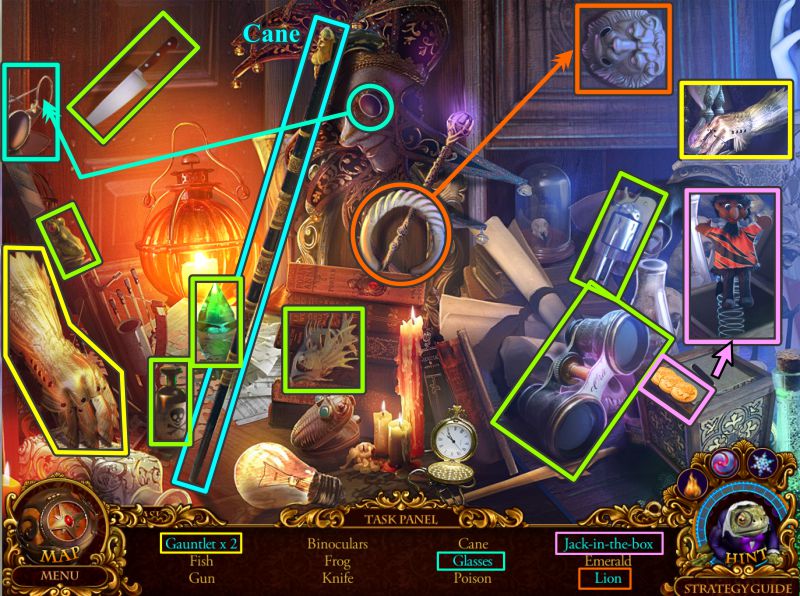
Commander's Office Hidden Object Scene
Put the lens in the Glasses.
Insert the coins in the slot to get the Jack-in-the-Box.
Place the ring on the Lion to open the cabinet and find one of the Gauntlets.
The Cane will go into your Inventory.
Screenshot
Commander's Office
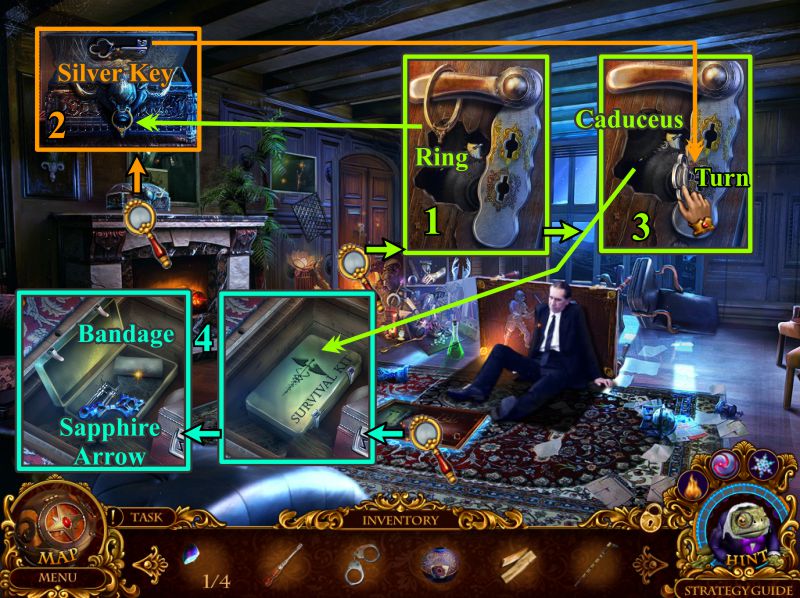
Zoom in on the door and take the Ring.
Examine the box on the mantel and put the Ring in the bull's nose to get the Silver Key.
Go back to the door and insert the Silver Key, turn it, and the Caduceus will go into your Inventory.
Zoom in on the floor cache, put the Caduceus on the box and pick up the Bandage and Sapphire Arrow.
Screenshot
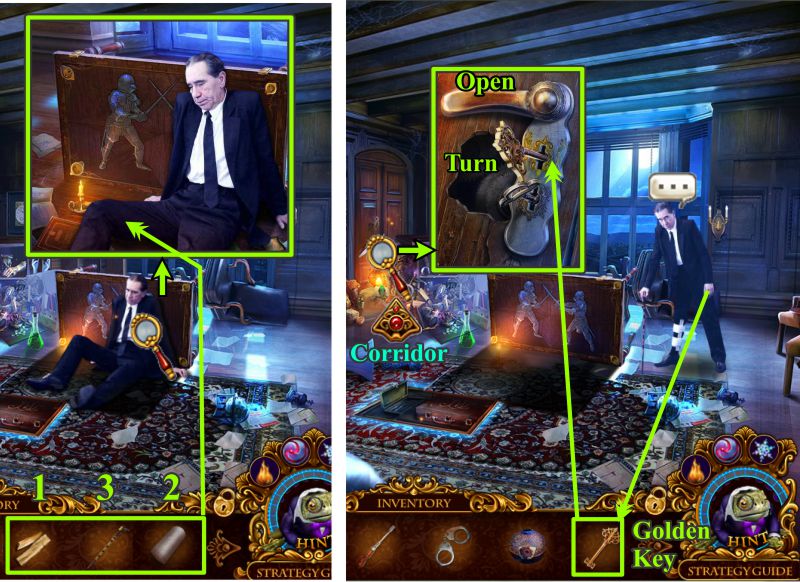
Examine the commander, place the Boards and Bandage on his leg, and give him the Cane.
Talk to him and he will give you a Golden Key before leaving.
Use the Golden Key in the other keyhole in the door and turn.
Enter the Corridor.
Screenshot
Corridor
Use the Mystical Lens to find some more Ducats, and zoom in on the peacock.
Take the Sapphire Arrow, ignore the wolf for now, and return to the Commander's Office.
Screenshot
Commander's Office and Corridor
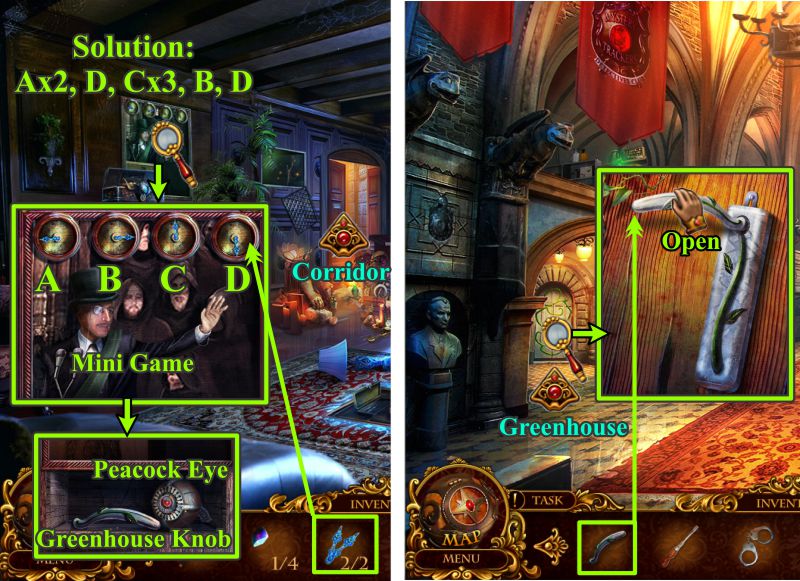
Zoom in above the fireplace mantel and place the 2 Sapphire Arrows to trigger a Mini Game.
See the screenshot for the solution.
Collect the Peacock Eye and Greenhouse Knob.
Go to the Corridor and zoom in on the Greenhouse door, place the Knob and open the door.
Enter the Greenhouse.
Screenshot
Greenhouse
Try to take the star and it will fall into the haystack.
Use the Mystical Lens to find the note and read it.
Use your Pyrokinesis ability to get to the bottom of the haystack and find the Helmet Star.
Return to the Corridor.
Screenshot
Corridor
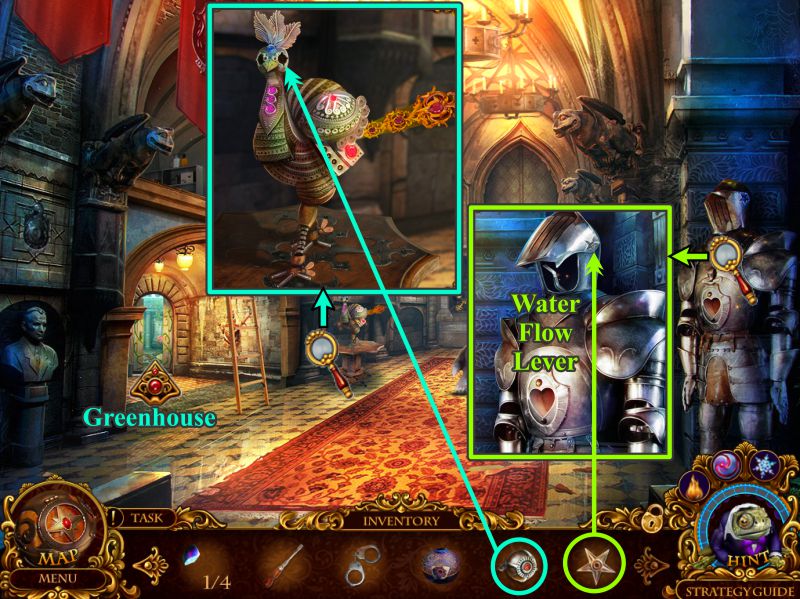
Zoom in on the peacock and give him his one Eye.
Examine the suit of armor, place the Helmet Star on the helmet, and take the Water Flow Lever when the helmet opens.
Return to the Greenhouse.
Screenshot
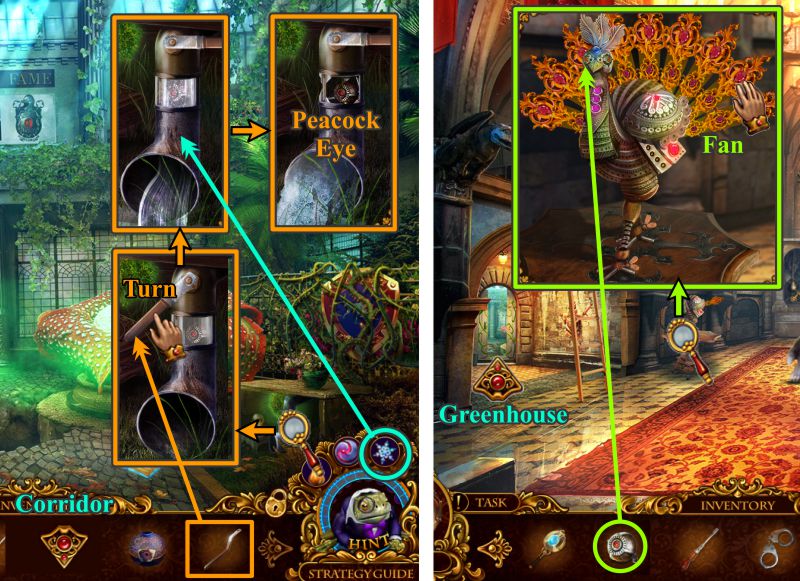
Greenhouse and Corridor
Examine the water line and install the Water Flow Lever.
Turn the lever and when the water is flowing, freeze the valve so you can collect the Peacock Eye.
Return to the Corridor, zoom in on the peacock and give him his second eye.
Take the Fan and return to the Greenhouse.
Screenshot
Greenhouse
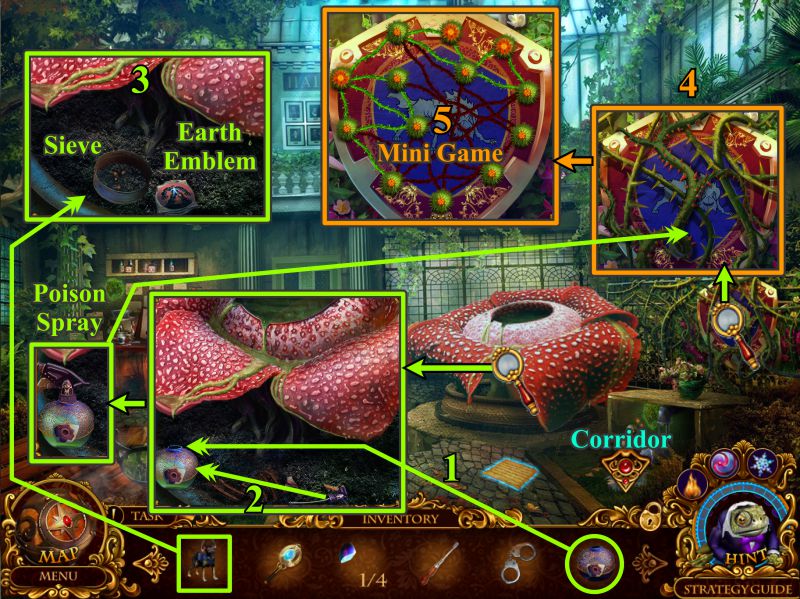
Use the fan to get rid of the poisonous green smoke.
Zoom in on the plant, place your Spray Bottle part to collect the poison from the plant, and then attach the spray top.
Give Elf a chance to stretch his legs by digging in the dirt so you can find the Sieve and Earth Emblem.
Zoom in on the shield and use the Poison Spray to get rid of the thorny vines.
Play the Mini Game.
Screenshot
Shield Mini Game
Your goal is to untangle the vines so they don't overlap. See the screenshot for a sample solution.
Collect the Tranquilizer, then go to the Corridor.
Screenshot
Corridor
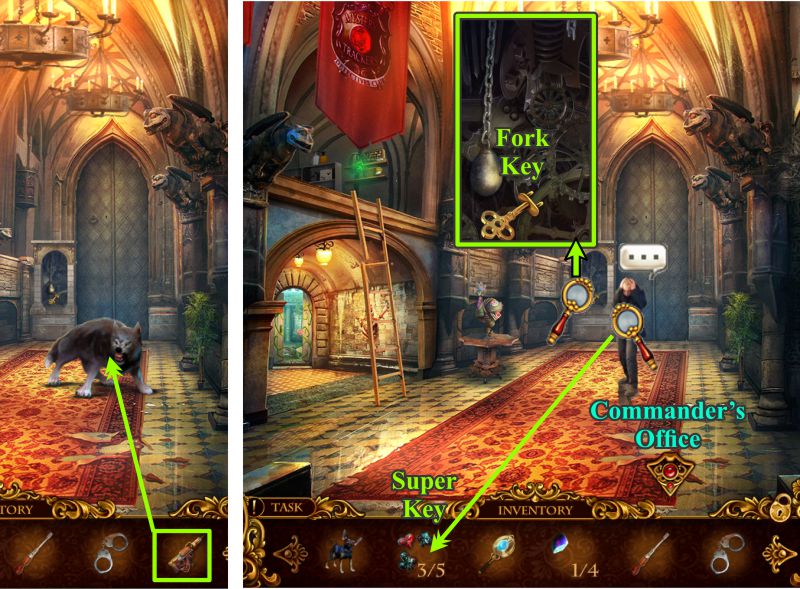
Use the Tranquilizer on the wolf, who transforms back into Agent Wulf.
Talk to him and he will give you a Super Key before teleporting away.
Zoom in on the clock at the back of the corridor and take the Fork Key.
Go to the Commander's Office.
Screenshot
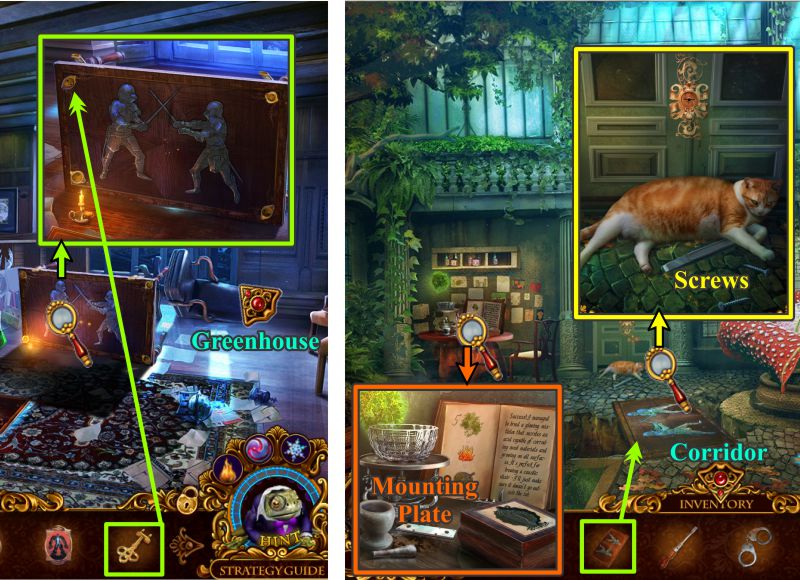
Commander's Office and Greenhouse
Zoom in on the overturned table and use the Fork Key to remove the top.
Go to the Greenhouse and place the Table Top across the gap.
Zoom into the table and take the Mounting Plate.
Ignore the irritable cat by the door, but take the Screws.
Go to the Corridor.
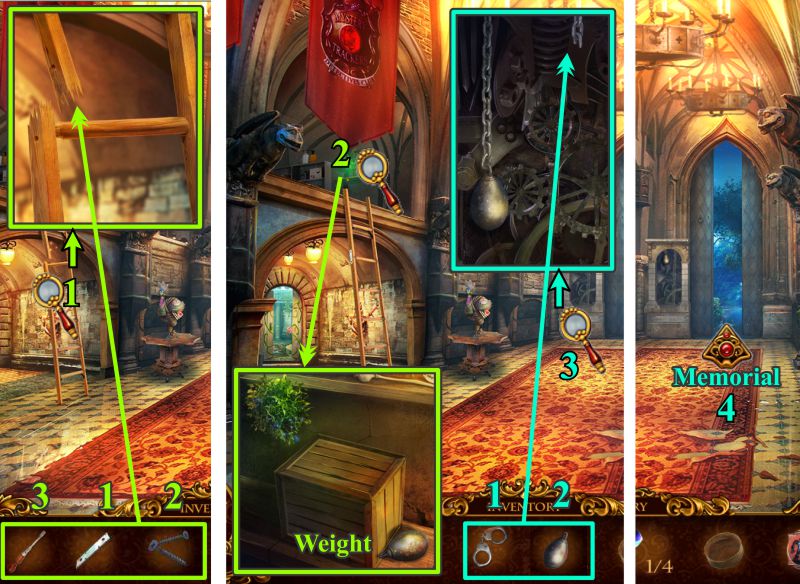
Screenshot
Corridor
Zoom in on the ladder and use the Mounting Plate, Screws, and your Screwdriver to repair it.
Climb the ladder and take the Weight.
Examine the clock. Attach the Handcuffs and the Weight to open the door in the back.
Go through the door to the Memorial.
Screenshot
Posted by: Jazz |
July 23, 2013 6:08 PM
|
July 23, 2013 6:08 PM
Mystery Trackers: Silent Hollow walkthrough part 2
Chapters 4-5, and Extras
Chapter 4
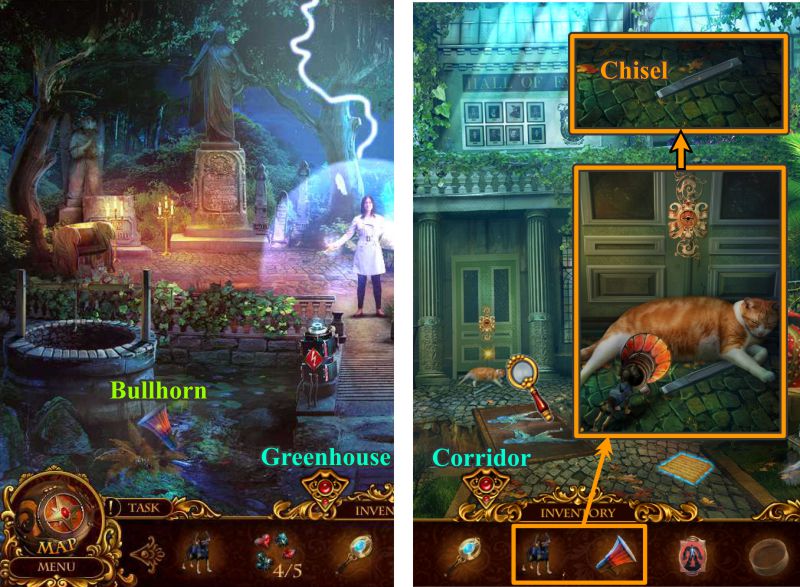
Memorial and Greenhouse
Not much you can do about the agent at the moment, so grab the Bullhorn and go to the Greenhouse.
Zoom in on the cat and place both Elf and the Bullhorn in the scene.
When the cat leaves, take the chisel and go to the Corridor.
Screenshot
Corridor and Greenhouse
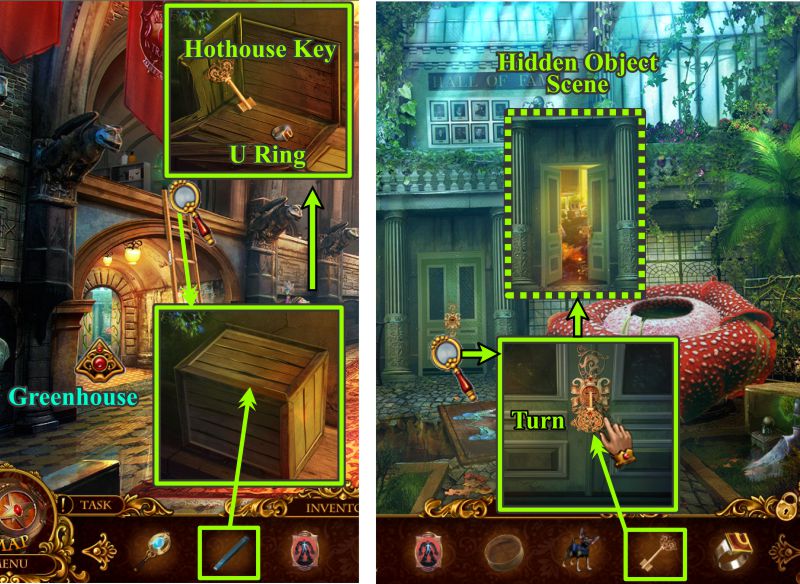
Zoom in on the top of the ladder and use the Chisel to open the box.
Collect the Hothouse Key and U Ring.
Return to the Greenhouse and zoom in on the Hothouse door.
Place the key and turn it to trigger a Hidden Object Scene.
Screenshot
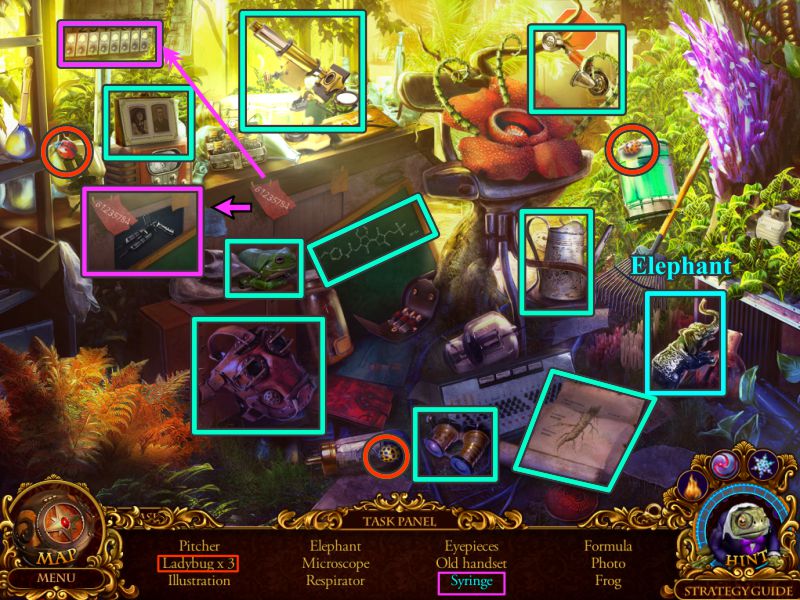
Hothouse Hidden Object Scene
Press the buttons as shown on the code to uncover a cache and the Syringe.
An Elephant will go into your Inventory.
Screenshot
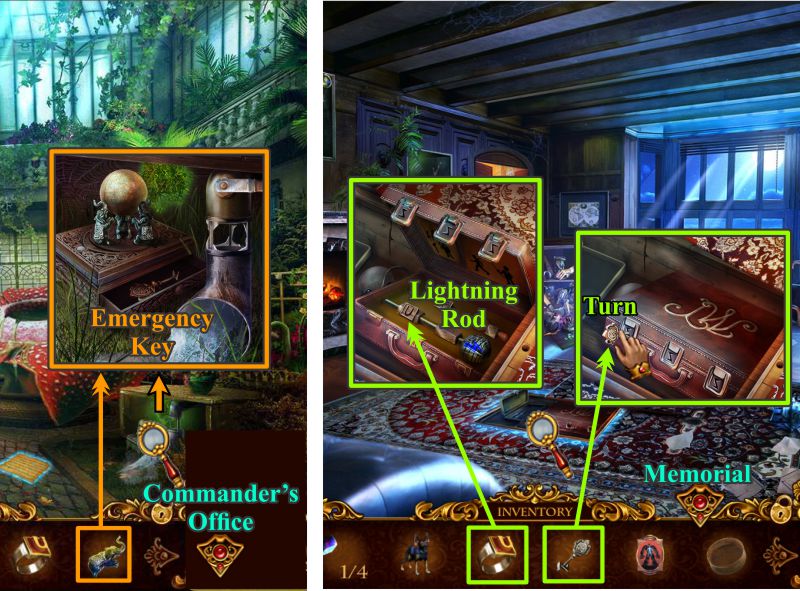
Greenhouse and Commander's Office
Zoom in under the table on the right and place the Elephant.
Collect the Emergency Key and go to the Commander's Office.
Zoom in on the floor compartment and place the Emergency Key.
When you turn it, it will automatically open all 3 locks.
Use the U Ring to detach the Lightning Rod, and go to the Memorial.
Screenshot
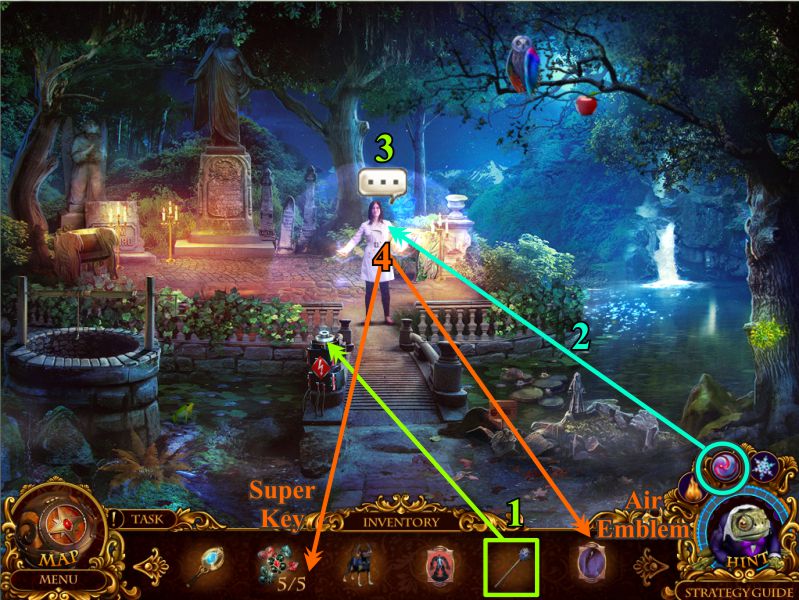
Memorial
Place the Lightning Rod as shown.
Use the Hypnoeye on Agent Rayne.
Zoom in for her dossier and to talk to her.
She will give you the final Super Key and an Air Emblem before teleporting elsewhere.
Screenshot
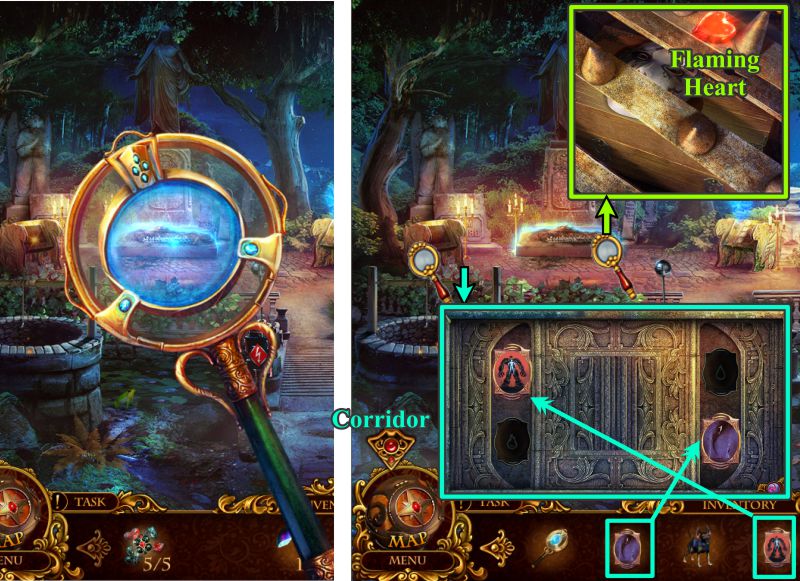
Use your Mystical Lens to uncover the grave.
Zoom in on it and collect the Flaming Heart.
Zoom in on the plaque under the left tree and place your Earth and Air Elements as shown in the screenshot.
Go to the Corridor.
Screenshot
Corridor and Memorial
Zoom in on the armor and place your Flaming Heart in exchange for a Staff.
Return to the Memorial, collect the Pet, and zoom in on the lagoon.
Give the Staff to the statue, who will raise up a Rubber Band and Water Emblem.
Collect them and go to the Commander's Office.
Screenshot
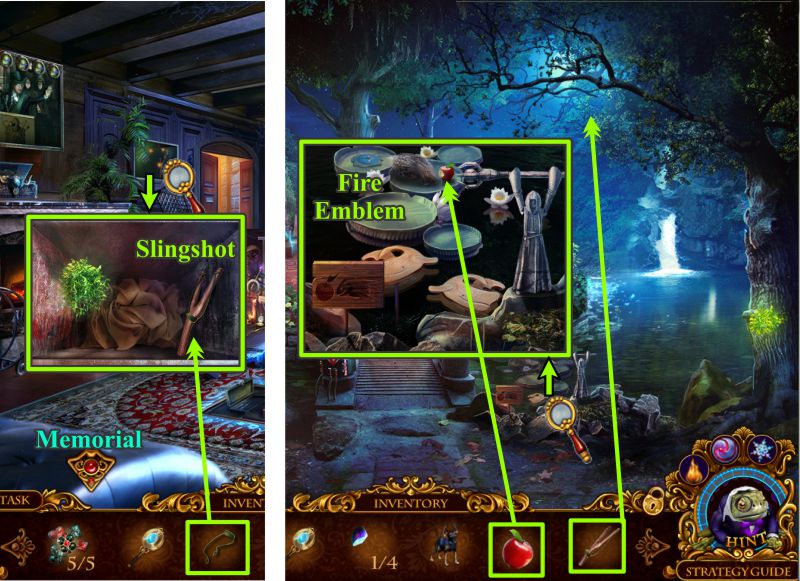
Commander's Office and Memorial
Zoom in on the vent and place the Rubber Band on the forked stick to get a Slingshot.
Return to the Memorial and use the Slingshot to get the Apple.
Pick it up off the ground and zoom in on the lagoon.
Place the Apple on the pad next to the Porcupine, and he will go for it so you can collect the Fire Emblem.
Screenshot
Zoom in on the plaque.
Place the Fire and Water Emblems as shown in the screenshot.
Collect the Cage Key.
Zoom in on the cage covering the grave.
Place the Cage Key and turn it.
Collect the Marble Mask.
Zoom in and place the Marble Mask on the plaque for a Mini Game.
Screenshot
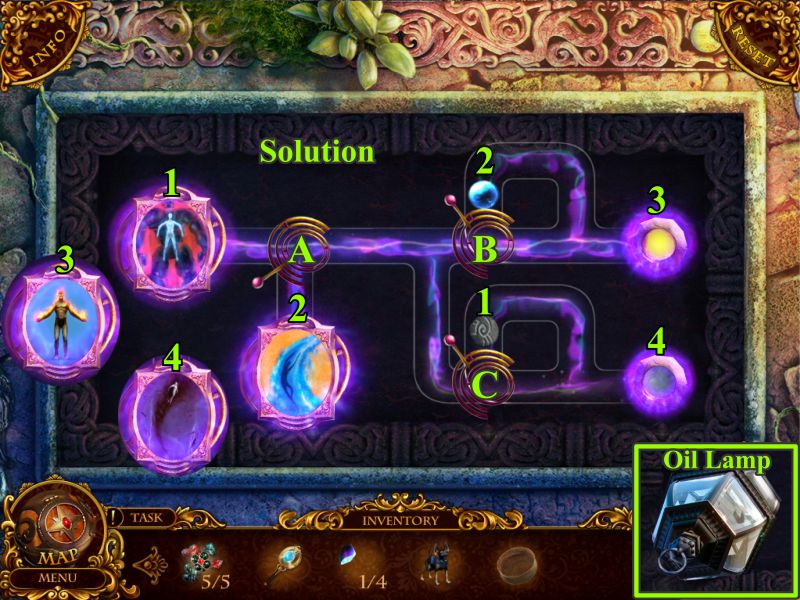
Elements Mini Game
Your goal is to guide the energy spheres to their corresponding elemental symbols by opening and closing the levers at the proper time.
When lever A is down, the sphere will go to the top symbol, and when it is up, the sphere will go to the lower symbol.
Levers B and C will release the spheres when they are down and trap them when they are up, so when you release one, be sure to put the lever up again.
Once you have guided a sphere to its destination, a new symbol will appear: see the screenshot for the numbered matching of spheres and symbols.
If you make a mistake, the game will reset itself, but you also have a reset button you can use in case of need.
Collect the Oil Lamp at the end of the game.
A door will appear in place of the plaque, but of course it is locked.
Screenshot
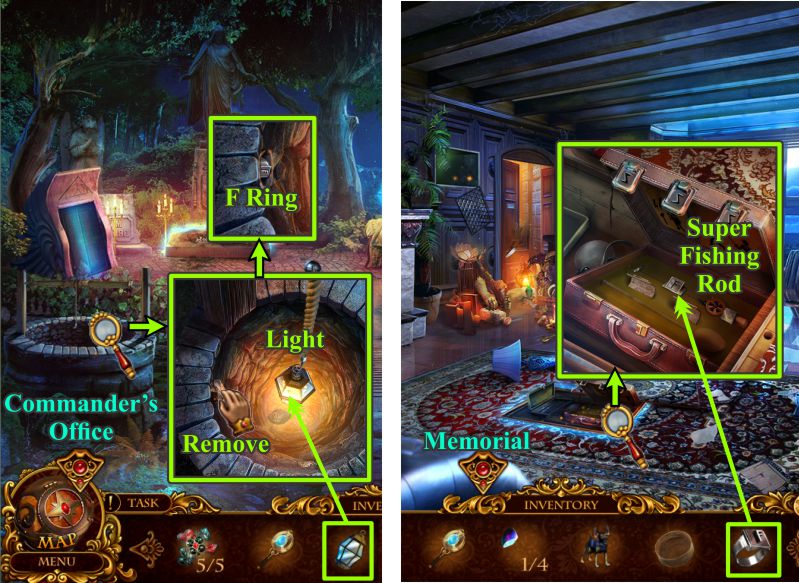
Memorial and Commander's Office
Zoom in on the well and place the Oil Lamp on the hook.
Use your Pyrokinesis ability to light the lamp.
Wiggle the loose rock at the left and take the F Ring.
Go to the Commander's Office and zoom in on the cache in the floor.
Use the F Ring to unlock the Super Fishing Rod.
Return to the Memorial.
Screenshot
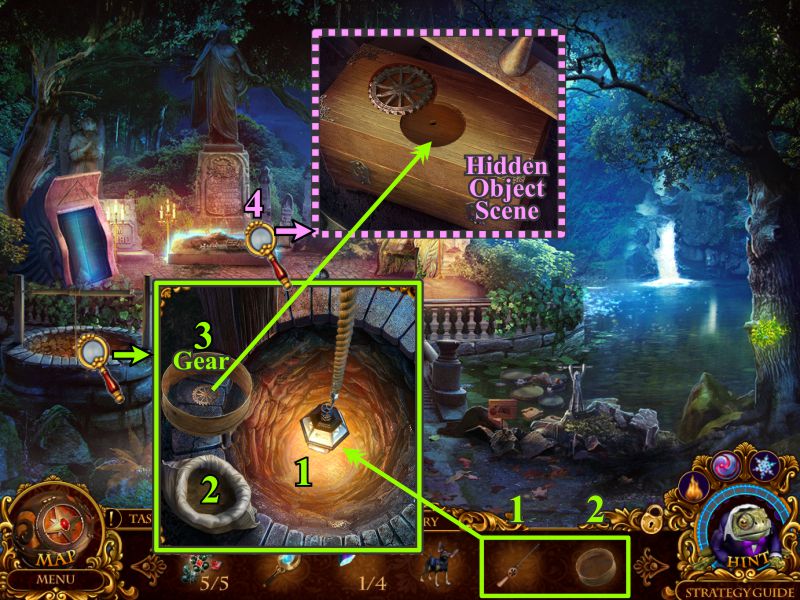
Memorial
Zoom in on the well and use your Super Fishing Rod to retrieve the object from the bottom of the well.
Use the Sieve to sift through the dirt.
Take the gear.
Examine the box in the grave and place the gear in the slot to trigger a Hidden Object Scene.
Afterwards, go to the Greenhouse.
Screenshot
Grave Hidden Object Scene
Put the head on the Lion.
Use the code to turn the arrows to open the cache to get the Snake, otherwise known as the Dryad Charm, for your Inventory.
Screenshot
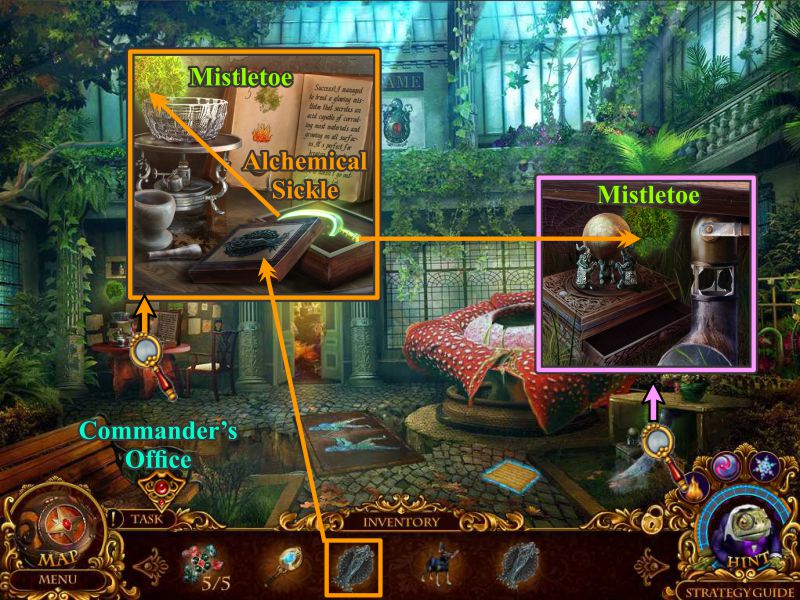
Greenhouse
Zoom in on the table at the back and place the Dryad Charm on the box.
Take the Alchemical Sickle and use it to remove the Mistletoe.
Zoom in on the drain pipe area under the table on the right and use the Sickle to remove the Mistletoe.
Go to the Commander's Office.
Screenshot
Commander's Office, Corridor, and Memorial
Zoom in on the vent and remove the Mistletoe.
Go to the Corridor, zoom in above the ladder, and remove the Mistletoe.
Next stop is the Memorial to remove the Mistletoe from the tree.
Return to the Greenhouse.
Screenshot
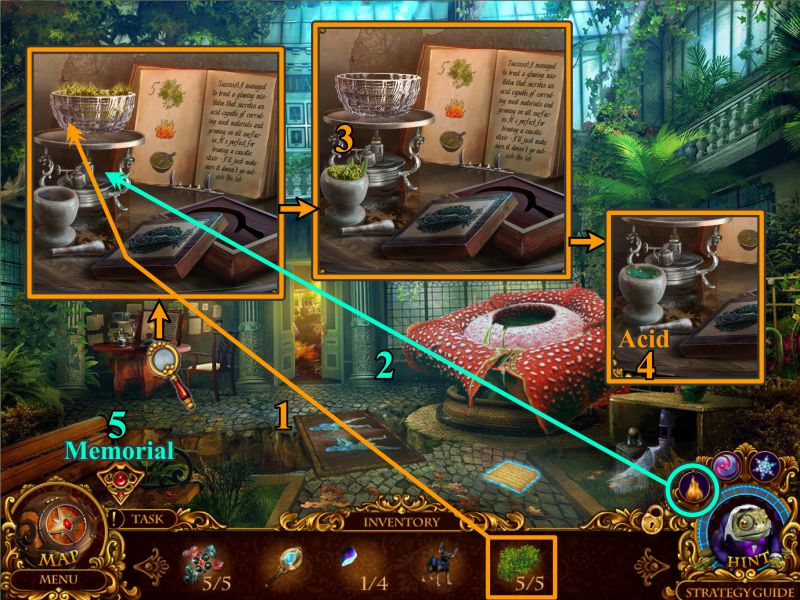
Greenhouse
Zoom in on the back table and place the Mistletoe in the container on the burner.
Use your Pyrokinesis to light the burner.
The heated Mistletoe will transfer to the mortar, so grind it up.
Take the resulting Acid.
Go to the Memorial.
Screenshot
Memorial
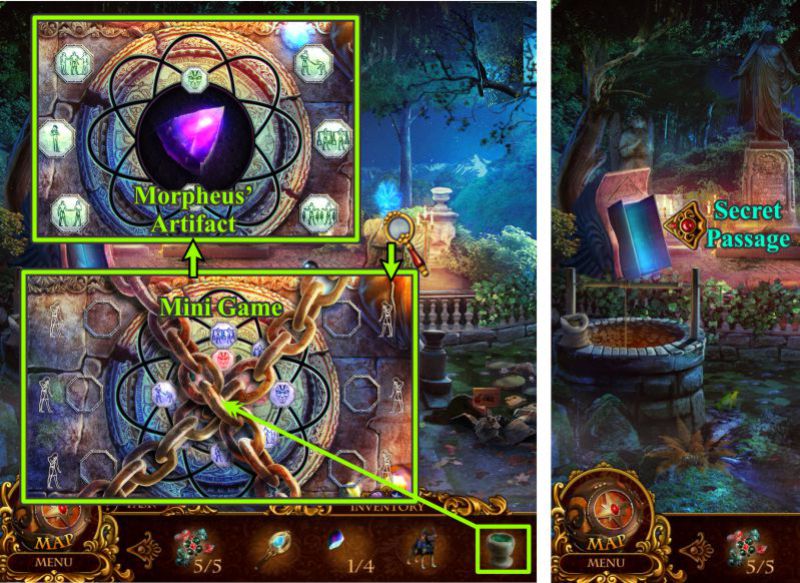
Zoom in on the bas relief at the back right and use the Acid to get rid of the chains.
Play the Mini Game to get the next Morpheus' Artifact and open the door to the Secret Passage.
Screenshot
Bas Relief Mini Game
Your goal is to move the outer symbols around to match their placement to the inner symbols.
When you select a symbol to move, it will move 2 symbols clockwise and the two symbols next to it will move counterclockwise.
Select the numbers as shown in the screenshot solution.
Screenshot
Secret Passage
Use your Mystical Lens to find the safety door at the end of the passageway.
Zoom in and touch the screen.
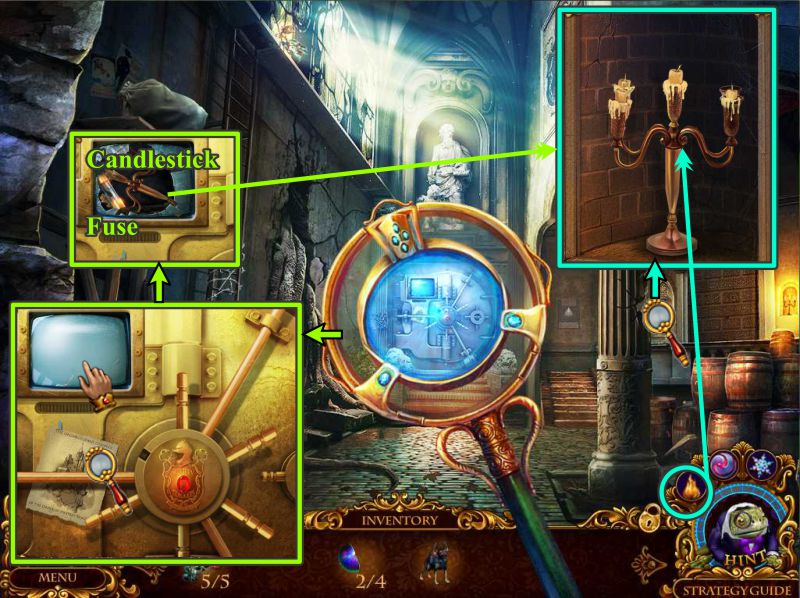
Read the map, and pick up the Candlestick and Fuse after the screen breaks.
Examine the niche on the right and place the Candlestick in it.
Use your Pyrokinesis ability to light the candles.
Screenshot
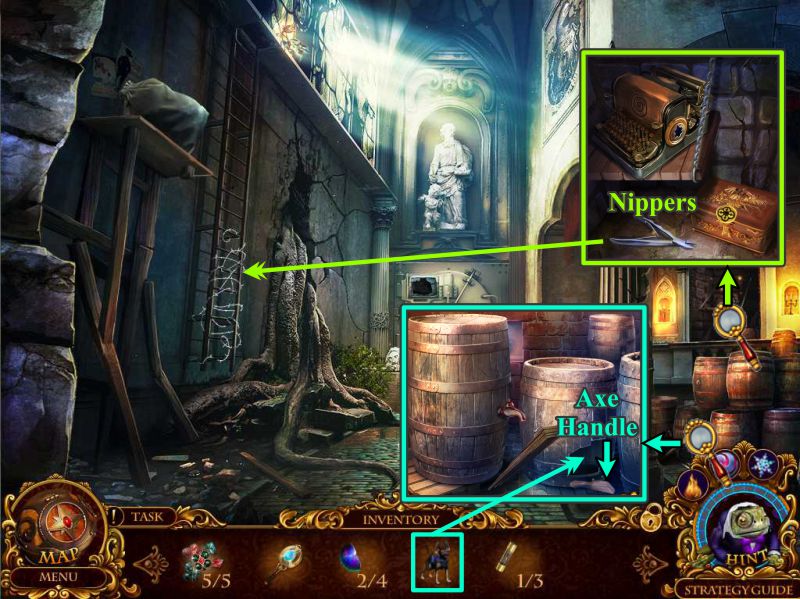
Zoom in on the panel that opens and take the Nippers.
Examine the barrels, and send Elf to find the Axe Handle.
Use the Nippers to get rid of the wire on the ladder.
Screenshot
Examine the area at the top of the ladder, place the Axe Handle on the Axe, and take it and the Fuse.
Use the Axe on the shelf support so the bag will fall down, creating a Hidden Object Scene.
Screenshot
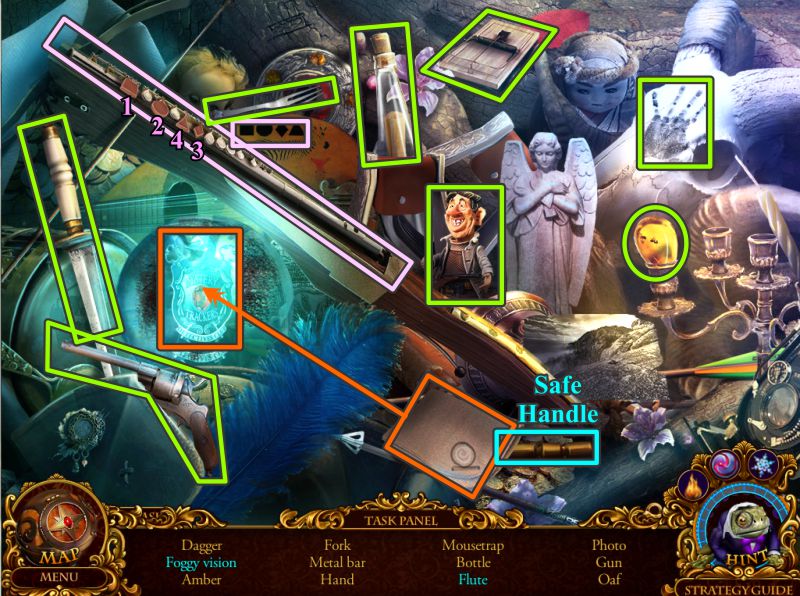
Bag Hidden Object Scene
Press the buttons on the Flute in the order shown on the code.
Use the handkerchief to clean the crystal ball so you can collect the badge.
The Safe Handle will go into your Inventory.
Screenshot
Secret Passage
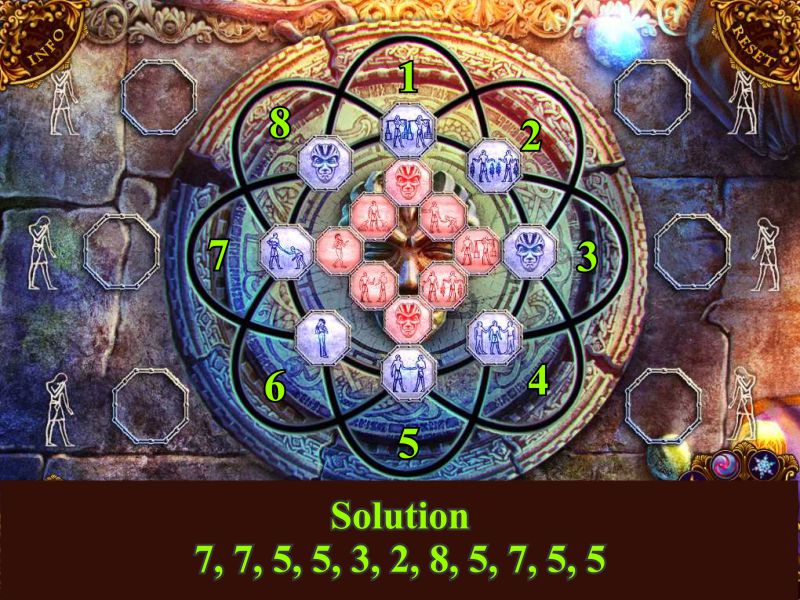
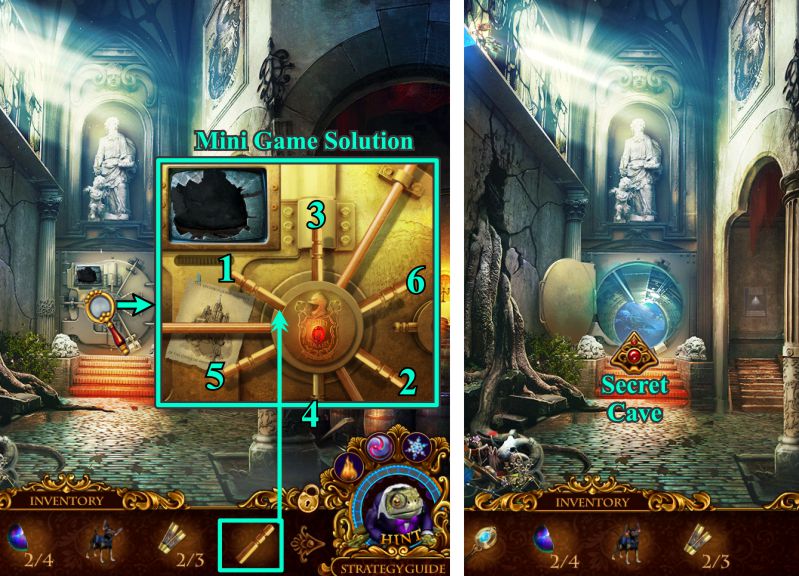
Zoom in on the passage door and place the Safe Handle for a Mini Game.
Press the handles in the order shown in the screenshot to open the entrance to the Secret Cave.
Enter the Secret Cave.
Screenshot
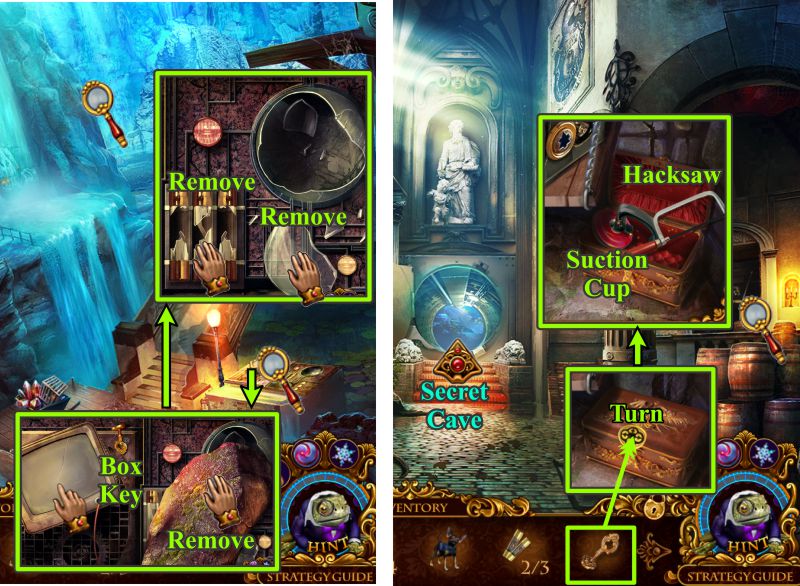
Secret Cave and Secret Passage
Touch the back wall for a cut scene.
Zoom in on the control panel, touch the screen, and collect the Box Key.
Remove the meat and then the broken fuses and lens.
Return to the Secret Passage and zoom in on the panel.
Place the Box Key, turn it, and collect the Hacksaw and Suction Cup.
Return to the Secret Cave.
Screenshot
Secret Cave
Zoom in on the cart and use the Hacksaw to open the box.
Collect the Bone and Fuse.
Examine the control panel and place the 3 Fuses.
Zoom in on the waterfall and use your cryokinesis ability to freeze the water in order to reveal the skull.
Use the Bone to prop open the jaws so you can take the Valve.
Go to the Secret Passage.
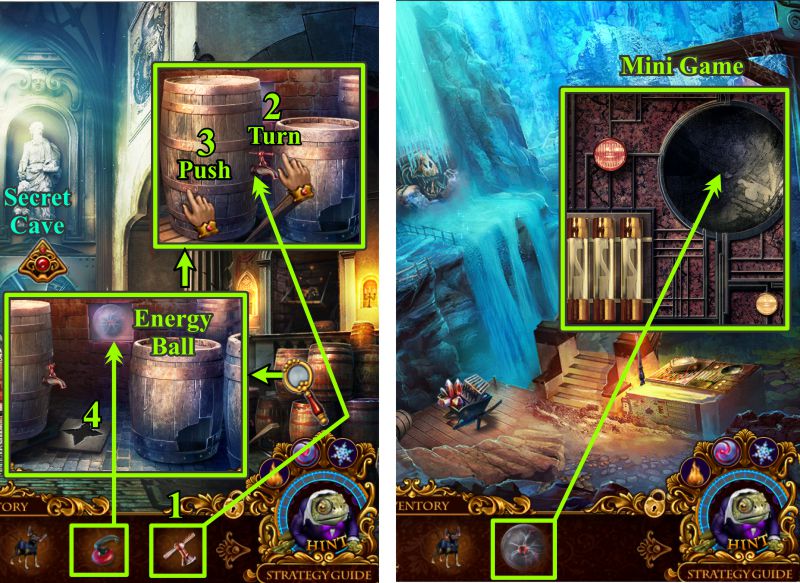
Screenshot
Secret Passage and Secret Cave
Zoom in on the barrels and place the Valve on the tap.
Turn the Valve to drain the water from the barrel.
Give the barrel a push to uncover the Energy Ball.
Collect the Energy Ball and return to the Secret Cave.
Zoom in on the control panel and place the Energy Ball to trigger a Mini Game.
Screenshot
Bridge Control Panel Mini Game
Your goal is to move the lizard along the path from start to finish by rotating it, and changing it from dark to light and vice versa, so that it matches each of the control points it passes. See the screenshot for the solution.
Once you have the path correctly set up, press the button to send the lizard on its way.
When the bridge lowers, cross over to Morpheus' Tomb Gates.
Screenshot
Chapter 5
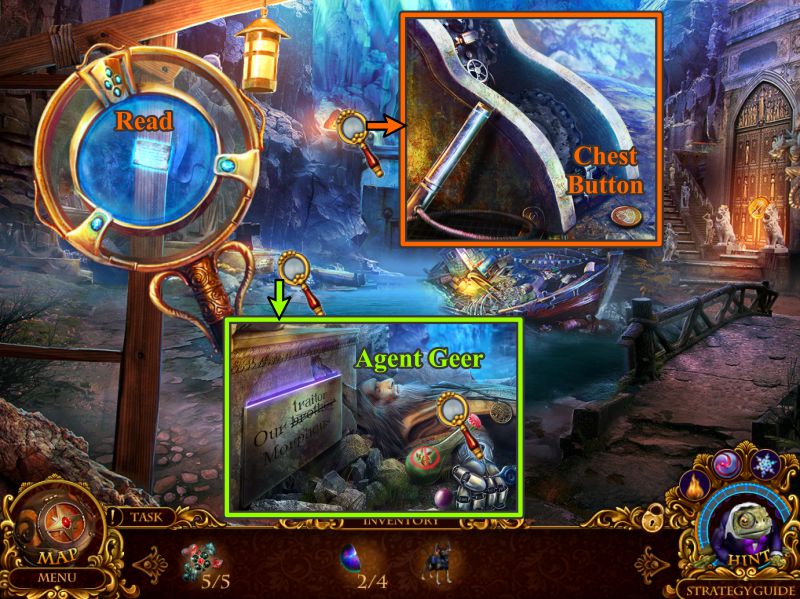
Morpheus' Tomb Gate
Use your Mystical Lens to find the note on the post and read it.
Zoom in on Agent Geer to find out he is alive but unconscious.
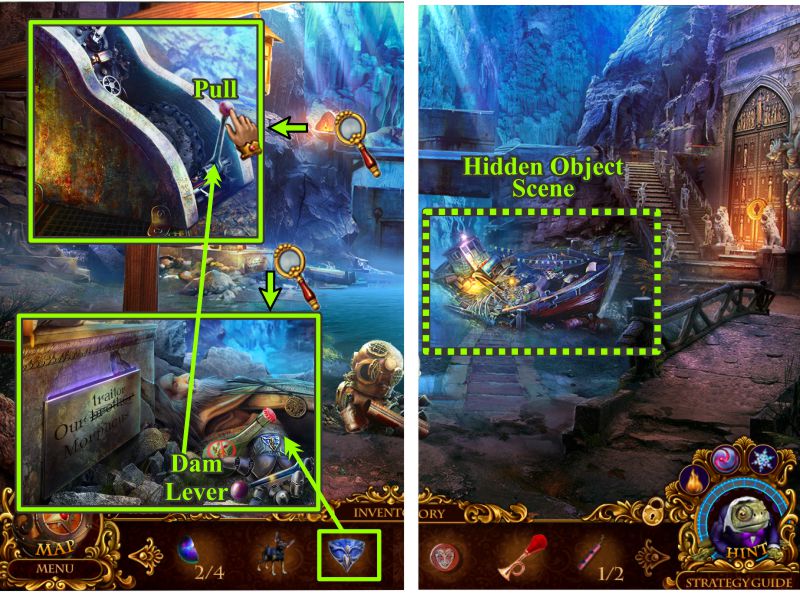
Examine the dam mechanism and take the Chest Button.
Screenshot
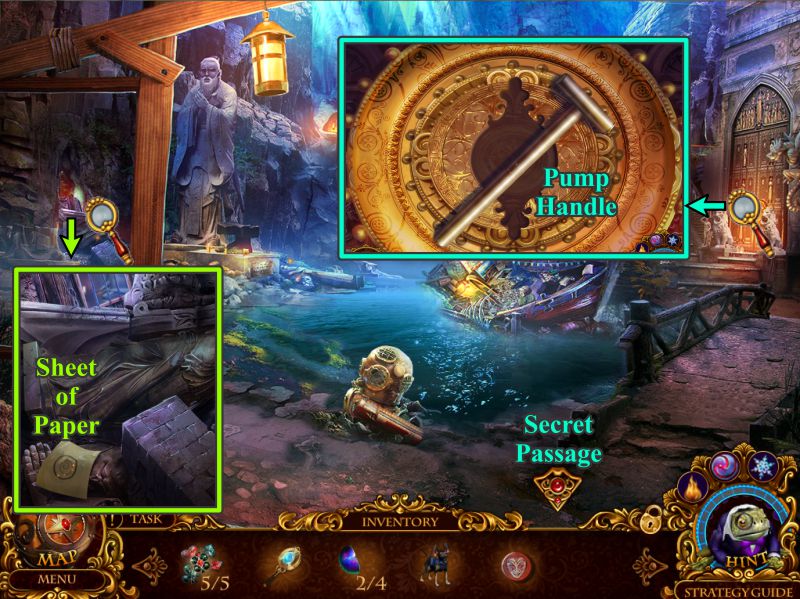
Examine the pile of rubble at the left and take the Sheet of Paper.
Zoom in on the tomb gate and pick up the Pump Handle.
Go to the Secret Passage.
Screenshot
Secret Passage and Morpheus' Tomb Gates
Zoom in on the niche and place the Sheet of Paper in the typewriter.
Return to Morpheus' Tomb Gates, look at the dam mechanism and place the Pump Handle on the Pump to collect it.
Go to the Secret Cave.
Screenshot
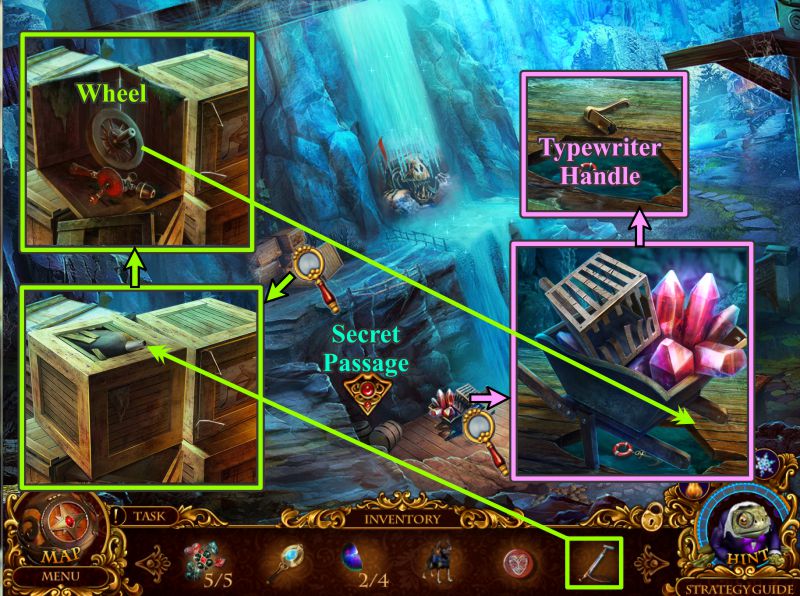
Secret Cave
Use the Pump to inflate the tire so that it breaks apart the box.
Take the Wheel and zoom in on the wheelbarrow to place the Wheel so the wheelbarrow will move out of the way.
Take the Typewriter Handle, and go to the Secret Passage.
Screenshot
Secret Passage and Morpheus' Tomb Gates
Zoom in on the niche with the typewriter and place the Typewriter Handle.
Take the Shell Amulet and go to Morpheus' Tomb Gates.
Zoom in on the diving helmet and place the Shell Amulet to get the Net.
Go to the Secret Cave.
Screenshot
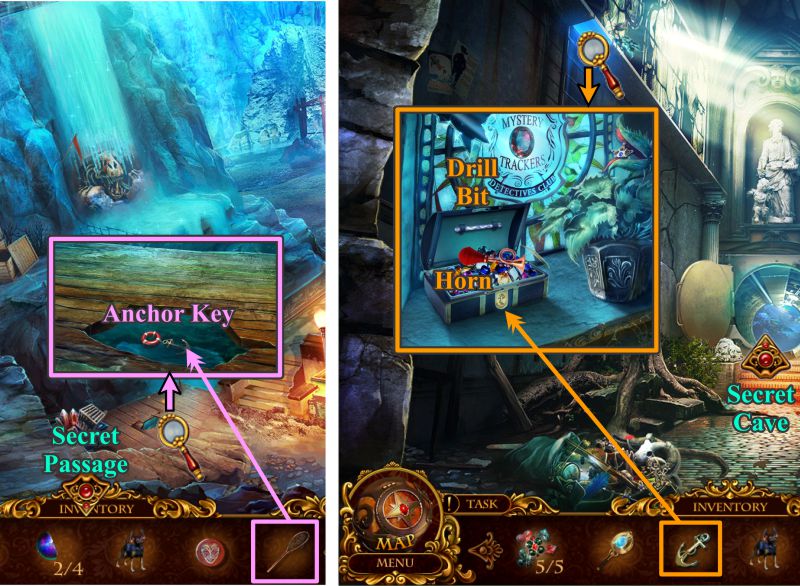
Secret Cave and Secret Passage
Zoom in on the hole in the boards and use the Net to collect the Anchor Key.
Go to the Secret Passage.
Examine the area above the ladder and place the Anchor Key.
Take the Horn and the Drill Bit.
Return to the Secret Cave.
Screenshot
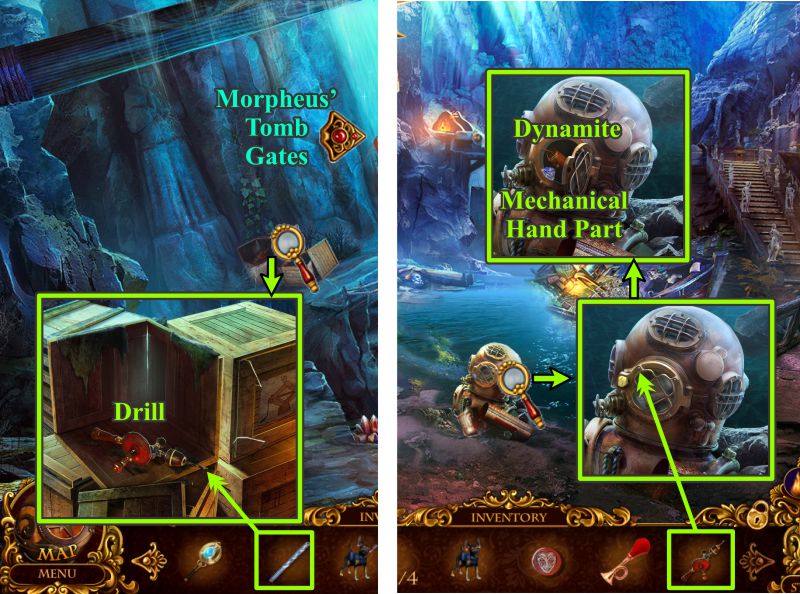
Secret Cave and Morpheus' Tomb Gates
Zoom in on the boxes, place the Drill Bit in the Drill, and collect it.
Go to Morpheus' Tomb Gates and zoom in on the diving helmet.
Use the Drill to open it so you can collect the Dynamite and Mechanical Hand Part.
Screenshot
Morpheus' Tomb Gates
Zoom in on the statue and place the Mechanical Hand Part on the gauntlet hand.
Collect the Dam Lever and zoom in on the dam mechanism.
Place the Dam Lever and pull to drain the water from the dam and gain access to the boat for a Hidden Object Scene.
Screenshot
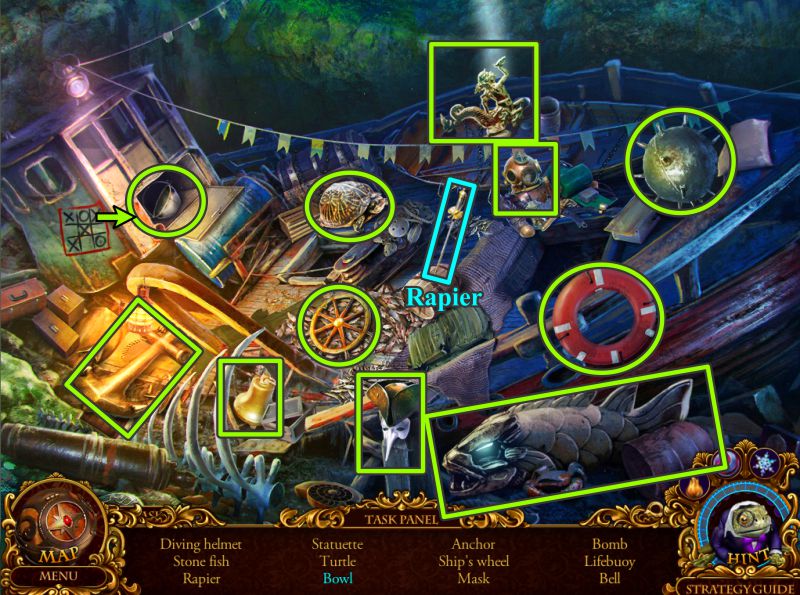
Boat Hidden Object Scene
Finish the tic tac toe game to find the Bowl.
The Rapier will go into your Inventory.
Screenshot
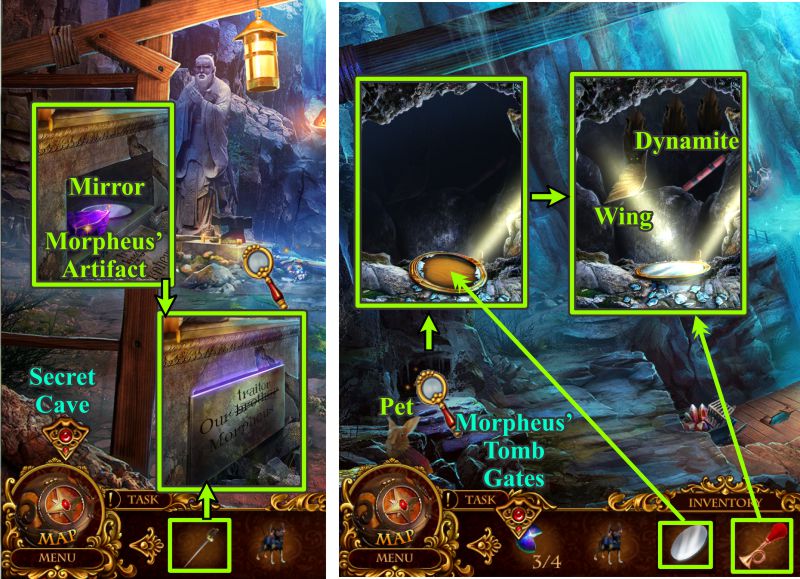
Morpheus' Tomb Gates and Secret Cave
Zoom in on the statue and use the Rapier to remove the plaque.
Collect the Mirror and Morpheus' Artifact.
Go to the Secret Cave, collect the Pet, and zoom in on the mini cave at the left.
Replace the Mirror and use your Horn to scare off the bats.
Collect the Dynamite and Wing.
Return to Morpheus' Tomb Gates.
Screenshot
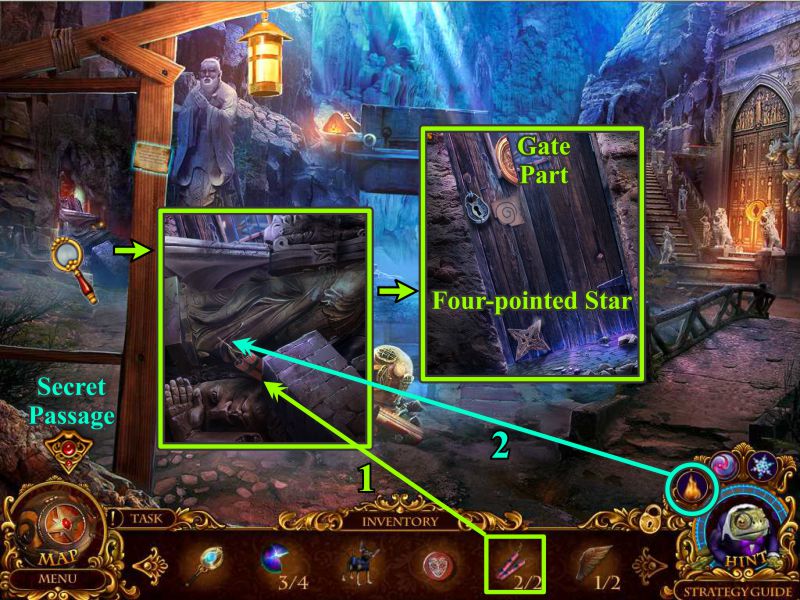
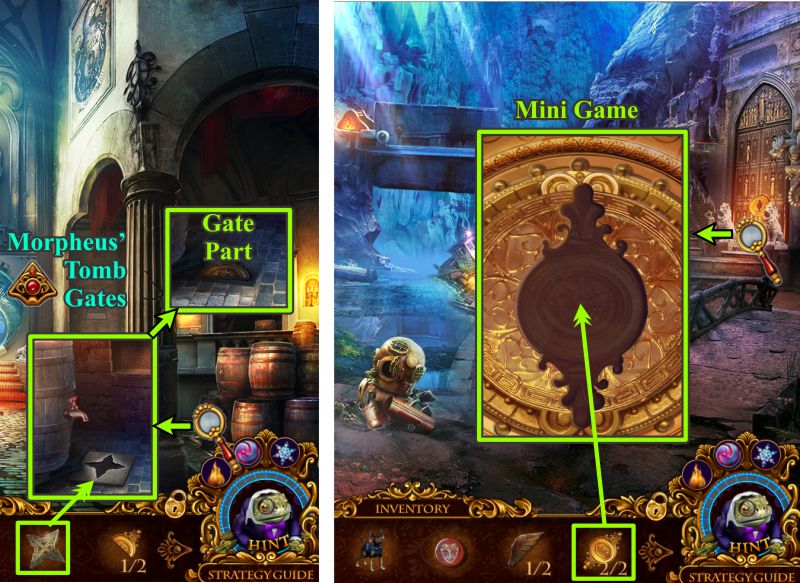
Morpheus' Tomb Gates
Zoom in on the rubble at the left, place your Dynamite, and use your Pyrokinesis ability to light it.
Collect the Gate Part and Four-Pointed Star.
Go to the Secret Passage.
Screenshot
Secret Passage and Morpheus' Tomb Gates
Zoom in on the barrels and place the Four-Pointed Star to open the cache so you can collect the Gate Part.
Return to Morpheus' Tomb Gates and zoom in on the gate.
Place your Gate Part to trigger a Mini Game.
Screenshot
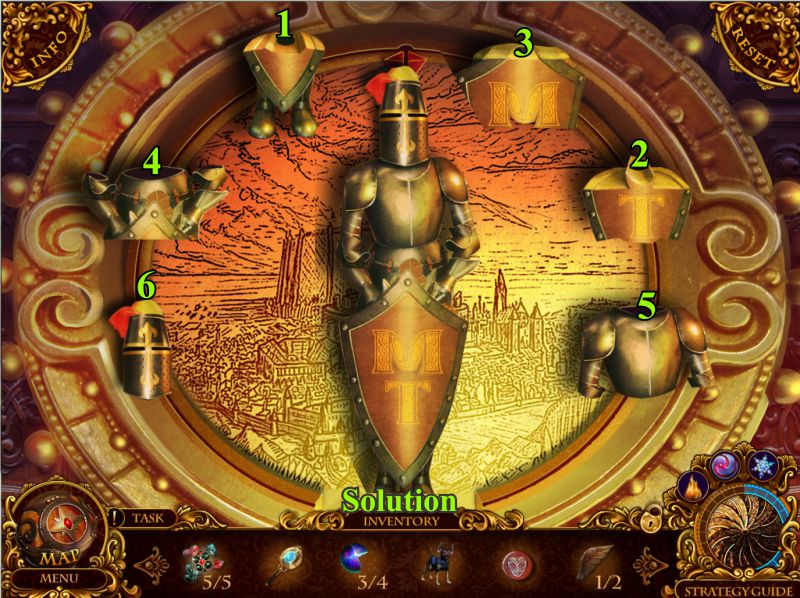
Gate Mini Game
Your goal is to complete the guardian by placing all the parts on the rod in the correct order.
See the numbered solution in the screenshot.
Enter the tomb.
Screenshot
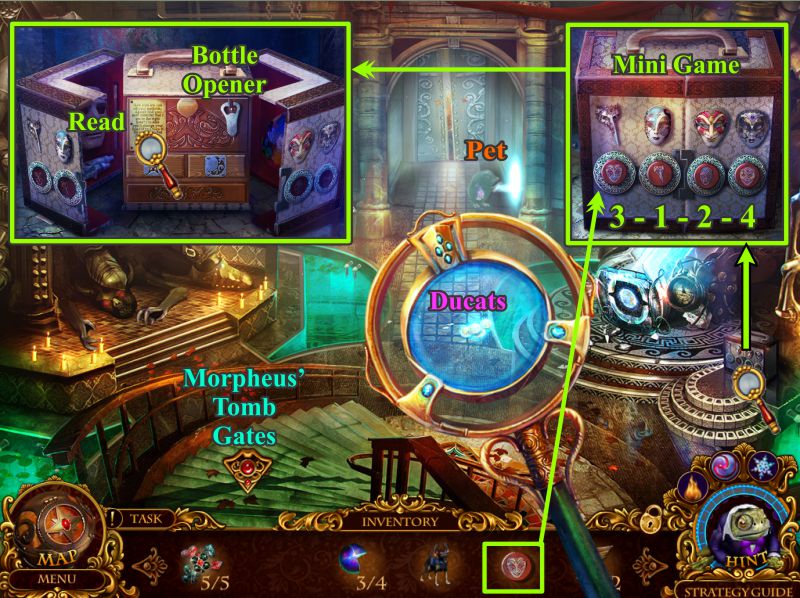
Morpheus' Tomb
Use your Mystical Lens to find the Ducats.
Collect the Mystery Trackers' Pet, and zoom in on the small chest at the right.
Place the Chest Token and press the tokens in the order shown in the screenshot.
Read the note and take the Bottle Opener.
Return to Morpheus' Tomb Gates.
Screenshot
Morpheus' Tomb and Morpheus' Tomb Gates
Examine the cryo sarcophagus and use your Pyrokinesis to defrost it.
Go to Morpheus' Tomb Gates
Use the Bottle Opener to open the bottle near the statue, and take the Weed Killer.
Go to the Secret Passage.
Screenshot
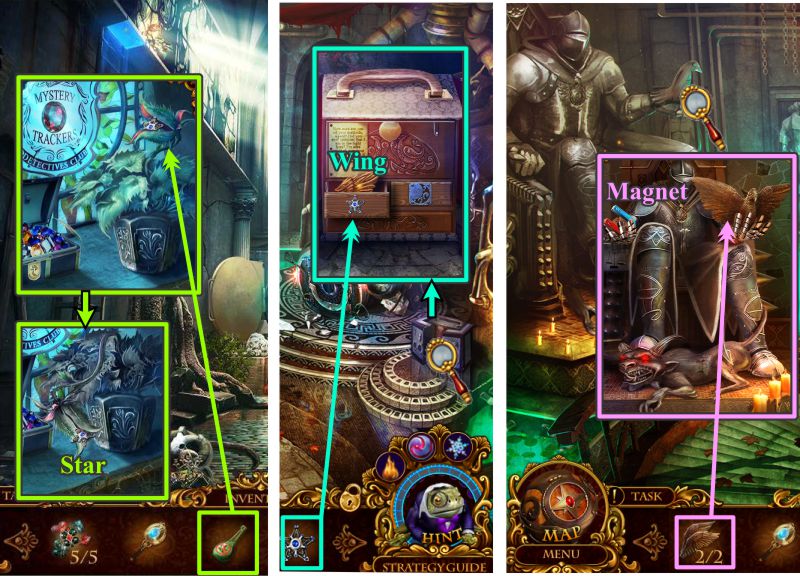
Secret Passage and Morpheus' Tomb
Zoom in on the area above the ladder and use the Weed Killer on the plant.
Take the Star and head to Morpheus' Tomb.
Examine the small chest to the right and place the Star to collect the Wing.
Zoom in on the Statue and place the Wings on the bird.
Take the Magnet.
Screenshot
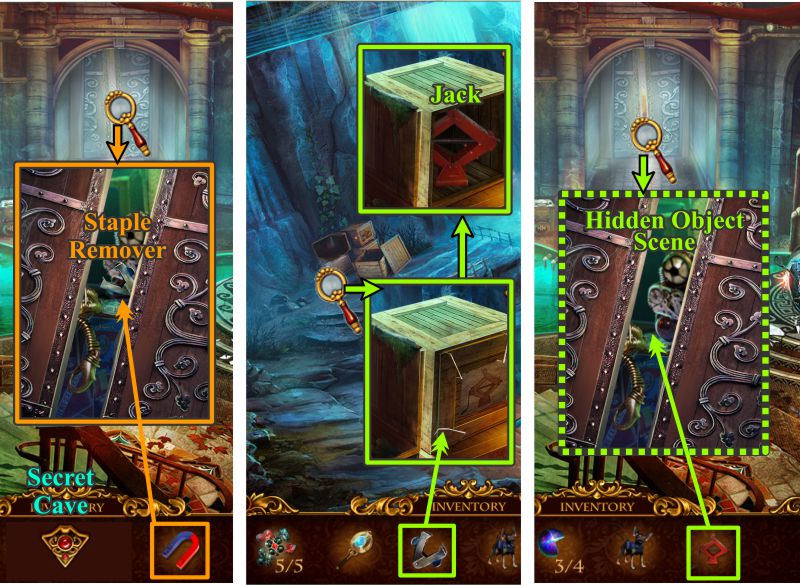
Morpheus' Tomb and Secret Cave
Zoom in on the elevator and use the Magnet to get the Staple Remover.
Go to the Secret Cave and use the Staple Remover to remove the staples from the box so you can collect the Jack inside.
Return to Morpheus' Tomb and zoom in on the elevator.
Use the Jack to open the stuck doors so you can play the Hidden Object Scene.
Screenshot
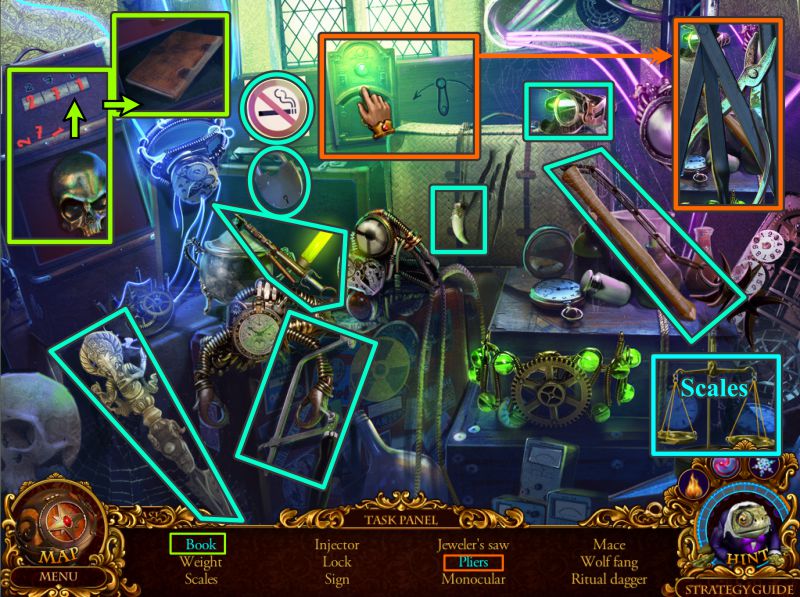
Elevator Hidden Object Scene
Place the numbers above the skull on the roller above to open the compartment and find the book.
Close the elevator door to find the Pliers, and then open them again.
The Scales will go into your Inventory.
Screenshot
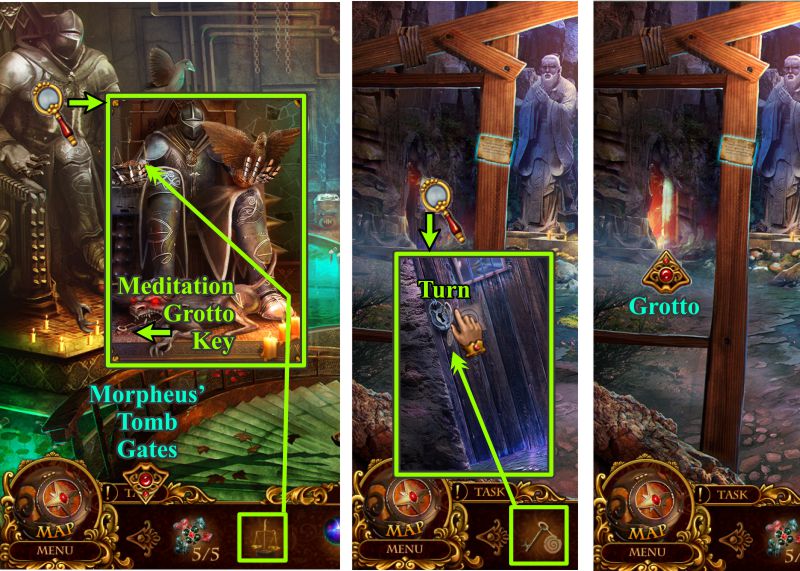
Morpheus' Tomb and Morpheus' Tomb Gates
Zoom in on the statue and place the Scale in his empty hand.
Take the Meditation Grotto Key and go to the Gates.
Zoom in on the door, place the Key, turn it, and enter the Grotto.
Screenshot
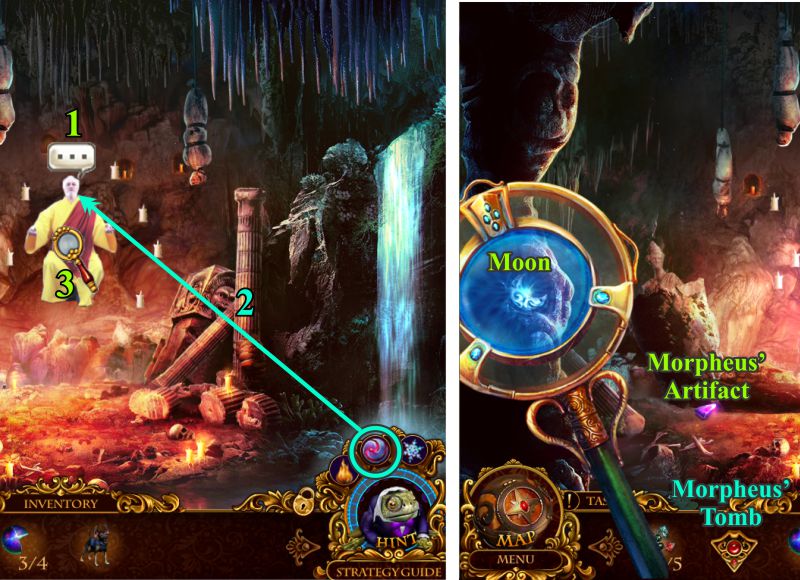
Grotto
Talk to Morpheus.
Try to use the Hypnoeye on him and he will destroy it.
Zoom in on him for his Dossier.
Use the Mystical Lens to uncover the Moon.
Pick up the last piece of the Morpheus' Artifact.
Return to Morpheus' Tomb.
Screenshot
Morpheus' Tomb
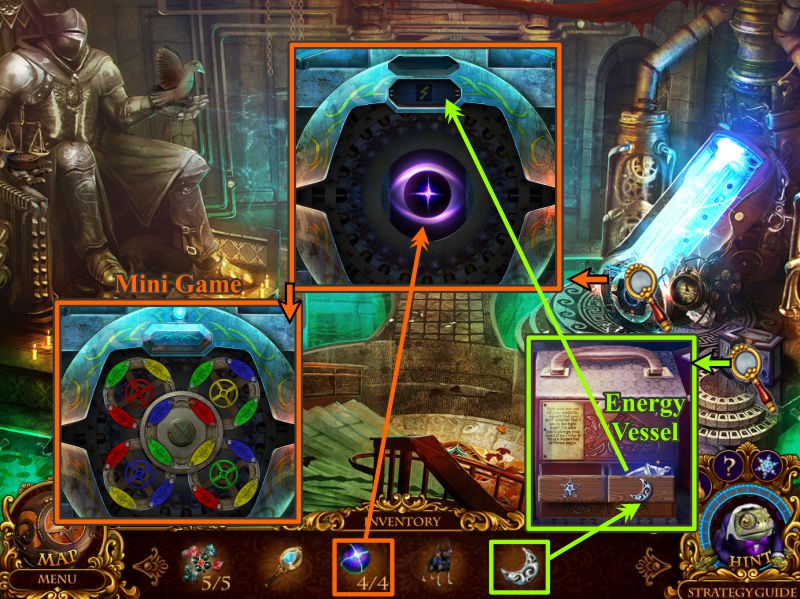
Zoom in and place the Moon on the small chest in order to get the Energy Vessel.
Examine the cryo sarcophagus and place the Morpheus' Artifact and Energy Vessel to trigger a series of Mini Games.
Screenshot
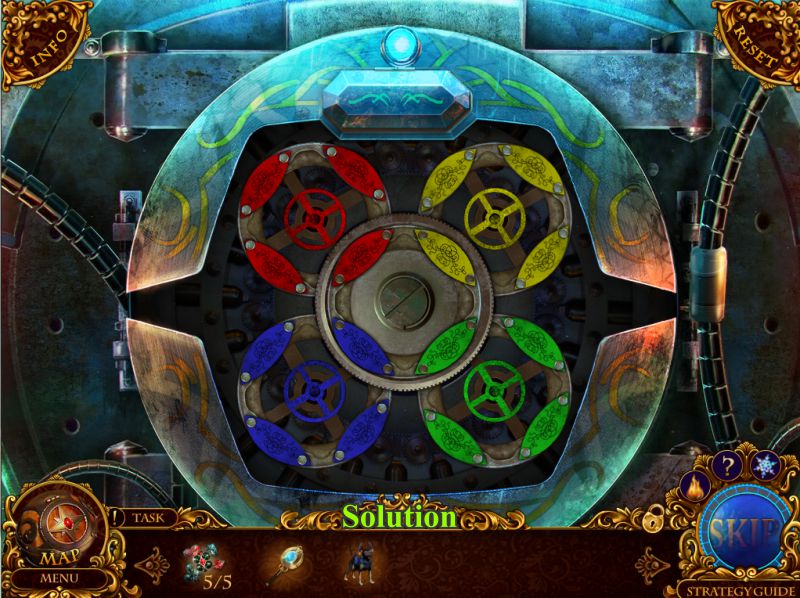
Cryo Sarcophagus Mini Game
For the first game, your goal is to match the outer colors of the rings to the wheel in the center of each ring.
See the screenshot for the solution.
Screenshot
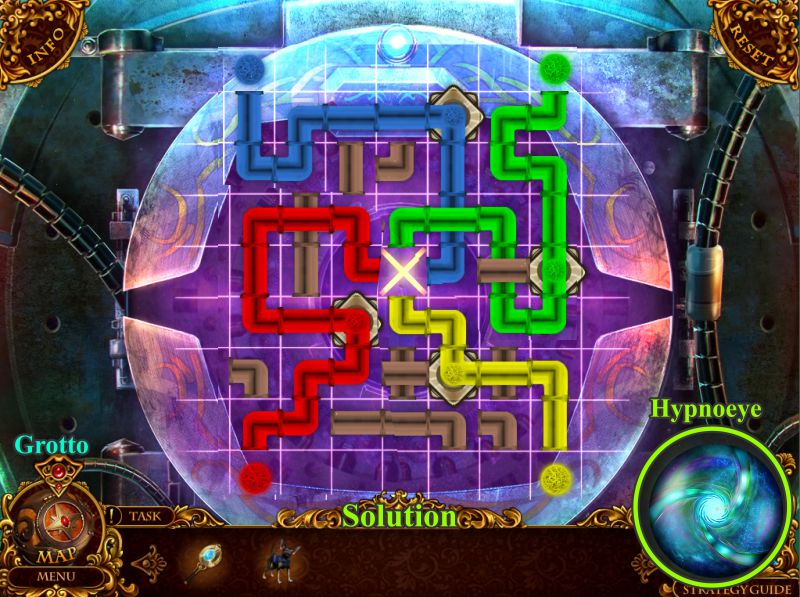
Place your Super Keys in the sarcophagus to trigger the next game.
Screenshot
For this game, you need to connect the four energy charges to the center circuit.
See the screenshot for the solution.
Collect the Hypnoeye you just created and go to the Grotto.
Screenshot
Grotto
Use your newly created and more powerful Hypnoeye on Morpheus to defeat him.
Mystery Tracker Pets
Just as Elf is our buddy, other agents have pets as well. There are 13 total but not all will be listed here because some are in the Bonus Chapter that the walkthrough is not covering.
Sargent Slow: Partner = Agent Pace; Special ability = Impenetrability; Disposition = Hard on the outside and soft in the center.
Manasnake: Partner = Agent Clyde; Special ability = Invisability; Disposition = Keeps secrets well.
Firefox: Partner = Agent Shade; Special ability = Pyrokinesis; Disposition = Scorching.
Calculape: Partner = Agent Count; Special ability = Extreme math; Disposition = Very serious, whether hacking enemy code or tabulating banana entitlement.
Multi Meerkat: Partner = Agent Twin; Special ability = Creating phantom copies; Disposition = Hard to determin which one is real.
Hypno Lemur: Partner = Agent Right; Special ability = Hypnosis; Disposition = You can be convinced.
Electrosquirrel: Partner = Agent Shocky; Special ability = Conducting electricity; Disposition = Full of spark. Pulls pranks for shock value.
Rainbow Owl: Partner = Agent Paige; Special ability = Seeing concealed objects; Disposition = A colorful soul who really gives a hoot.
Time Rabbit: Partner = Agent Alice; Special ability = Slowing down time; Disposition = Punctual with excellent time management skills.
Immermole: Partner = Agent Newton; Special ability = Creating wormholes; Disposition = The star of Mystery Trackers intelligence. He's right behind you.
Dossiers
Dossiers show the secret files of the order of Mystery Trackers. There are 28 of them, and some have information about agents and others about special objects you encounter. Those Dossiers that are not in the main game are not covered in this list.
Code Name: Agent Clyde; Status: Active; Role: Courier; Special Skills: Teleportation up to six miles from departure point, cannot teleport to an unknown place, and target location should already be pet.
Name: Activator; Description: Device created for the Mystery Trackers order to awaken hidden paranormal abilities in people.
Code Name: Agent Shade; Status: Active; Role: Intelligence safety management; Special Skills: Multiple and diverse rescources.
Name: Hypnoeye; Description: Device created by the Order to resist the traitor's hypnosis. The Order is aware of only one person capable of controlling a hypnoeye.
Name: Mystical Lens; Description: In spite of its name, it's a scientific invention. With it you can scan the electromagnetic spectrum and discover locations hidden from the naked eye.
Code Name: Agent Stone; Status: Trainee; Roll: New Reruit; Special skills: Telekinesis, the ability to move objects across distances without toughing them; Abilities are unusually strong for someone so young.
Code Name: Cryo-activator; Description: This device can awaken in humans a paranormal ability for cryokinesis, the ability to freeze objects.
Code Name: Agent Scroll; Status: Active; Roll: Archivist; Special skills: No one knows how he does it, but in mere seconds, he can locate the right information from all the library's millions of documents.
Code Name: Agent Paige; Status: Active; Role: Keeper of the Order's library; Special skills: Can create phantom companions who materialize from her thoughts.
Code Name: Commander; Status: Active; Role: Heat fo the Mystery Trackers Order; Special skills: Confidential. Only to be used in cases of extreme urgency, as these extraodianary, top secret powers are only conferred upon members of the Order of Founders.
Code Name: Agent Wulf; Status: Active; Role: Scout; Special skills: Transforms into Canis lupus due to genetic enhancements done prior to joining the Order.
Code Name: Agent Rayne; Status: Active; Role: Meteorologist; Special skills: Controls the weather; Abilities are closely tied to the agent's emotional state. She must maintain calm to prevent unintended casualities.
Code Name: Agent Geer; Status: Active; Role: Principal Alchemist; Special skills: Has a photographic memory, which allows him to invent creations far ahead of his time.
Code Name: Morpheus; Status: Inactive; Dossier entry: A founder of the Order who betrayed its principles. Possesses unparalleled psychic abilities. Extremely dangerous.
Achievements
You may encounter additional achievements if you purchased the Collector's Edition and play the bonus game.
Elementary, Watson: Finish one hidden object scene.
All Fired Up: Activate the skill of pyrokinesis.
Fire Starter: Use pyrokinesis one time.
You're Getting Warmer: Use pyrokinesis 3 times.
On Fire: Use pyrokinesis 5 times.
Pyromaniac: Use pyrokinesis 10 times.
Rail Rider: Reach the castle gate by train.
Bingo: Finish 1 mini game in less than 1 minute.
Smart Stuff: Complete 3 mini games without skips.
High Five: Complete 5 mini games without skips.
Go, Greased Lightning: Finish 1 hidden object scene in less than 1 minute.
Quick as a Wink: Finish 3 hidden object scenes in a row under 3 minutes each.
Vidi, Vici: Finish 5 hidden object scenes in a row under 3 minutes each.
Think Fast: Find 3 items in a hidden object scene in 3 seconds.
Think Faster: Find 5 items in a hidden object scene in 5 seconds.
Speed Record: Pick up 10 items in a hidden object scene in 10 seconds.
What's the Rush: Finish 1 hidden object scene in more than 10 minutes.
Eagle Eye: Finish 5 hidden object scenes without a hint.
Mesmerizer: Activate the skill of hypnosis.
Right in the Eye: Shoot the hypnoeye.
On the count of four, you will awaken. One: Use hypnosis one time.
On the count of four, you will awaken. Two: Use hypnosis 2 times.
On the count of four, you will awaken. Three: Use hypnosis 5 times.
Brrr: Use cryokinesis one time.
Chilling: Use cryokinesis 3 times.
Jack Frost: Use cryokinesis 5 times.
Cha-ching: Spend one ducat in the shop.
Posted by: Jazz |
August 1, 2013 10:48 AM
|
August 1, 2013 10:48 AM