

Mystery Trackers: Black Isle
Platform: Mac, Windows
![]() Reporters, man. They're always getting in trouble. Ben Urich, Bill Smithback, and now Sarah, who vanishes in the most dramatic fashion possible while doing a report on the famous, though apparently deserted, Black Isle. (No, not that one.) Naturally, it turns out "deserted" needs to have those quotation marks around it, since you arrive on the scene just in time to see a sinister cloaked and masked figure perform what looks like some pretty spectacular dark magic. You're all on your own as you try to unravel the mystery and rescue Sarah, but that's not the same thing as being alone, and it's soon pretty apparent someone doesn't want you to succeed. Mystery Trackers: Black Isle is the latest installment in the hidden-object adventure game series by Elephant Games and blends high drama with creativity to burn to deliver one big, explosive adventure well worth the price of admission.
Reporters, man. They're always getting in trouble. Ben Urich, Bill Smithback, and now Sarah, who vanishes in the most dramatic fashion possible while doing a report on the famous, though apparently deserted, Black Isle. (No, not that one.) Naturally, it turns out "deserted" needs to have those quotation marks around it, since you arrive on the scene just in time to see a sinister cloaked and masked figure perform what looks like some pretty spectacular dark magic. You're all on your own as you try to unravel the mystery and rescue Sarah, but that's not the same thing as being alone, and it's soon pretty apparent someone doesn't want you to succeed. Mystery Trackers: Black Isle is the latest installment in the hidden-object adventure game series by Elephant Games and blends high drama with creativity to burn to deliver one big, explosive adventure well worth the price of admission.
 With three flavours of difficulty to fit your playing style, you'll be trekking all over Black Isle, thwarting increasingly elaborate attempts on your life as you search for Sarah. While most of the gameplay is about what you'd expect in a hidden-object adventure hybrid, you will also need to use some of the items you'll gather during your wandering to solve hidden-object scenes. If an item is noted in purple on your list, that means you'll need to use something in your inventory to get to it. While there's no journal this time around to keep track of clues and plot points, the world's most adorable hint frog is back to guide you, and of course you can skip the puzzles you encounter if you get stuck.
Analysis: With Black Isle, Mystery Trackers firmly cements itself both as one of the most creative and cinematic series around. Like The Void and Raincliff, Black Isle delivers a delightfully campy mystery adventure. While some of the acting is more than a little hammy, it's one of those games that manages to really convey just how much fun everyone had making it. From its gorgeous design and environments to the constant cinematics and over-the-top plot chock full of conspiracies and the paranormal, Black Isle is simply a big, fun game. When mysterious explosions and lightning bolts and eerie warnings start popping up all over the place you don't have the option to call in Nick and Monroe, and you're going to have to put on your big kid detective pants and solve this one yourself.
 If Black Isle ever disappoints, it's that it feels like there's an awful lot of backtracking to be done, the game as a whole just isn't that challenging, and the hidden-object scenes are a little bland visually. But while the gameplay itself is mostly your standard go here, use arbitrary item there affair, Black Isle still manages to keep you engaged because of how hard it works to keep you on your toes. New plot developments are always popping up, things are always trying to kill you, store windows are foretelling your bloody death when you glance into them... you know, all that good stuff. The puzzles are mostly just variations on standard types you'll have seen before, but they are, at least, both plentiful and varied.
Players who prefer their games more on the straight-laced, serious side may find Mystery Trackers: Black Isle and its occasionally over-the-top campy drama and plot twists a bit too silly. If, however, you want something big and vibrant that works hard to entertain you every step of the way, as opposed to merely just providing four or five hours' mindless distraction, then this is definitely a game with a demo you should check out. It would be nice to see a Mystery Trackers title where the level of complexity in the gameplay matched what you get in the plot, but for fans of the genre who like a lot of flair and energy, Black Isle is easily recommended.
A Collector's Edition is also available. It contains a bonus chapter, art gallery, strategy guide, and more. Remember that Big Fish Game Club Members pay only $13.99 for Collector's Editions (or 2 club credits), and collector's editions count 3 card punches of 6 total needed for a free game.
![]() Windows:
Windows:
Download the demo
Get the full version
Also available: Collector's Edition
![]() Mac OS X:
Mac OS X:
Download the demo
Get the full version
Also available: Collector's Edition


Walkthrough Guide
(Please allow page to fully load for spoiler tags to be functional.)
Mystery Trackers: Black Isle Collector's Edition Walkthrough
Part One: East Wing
Chapter 1
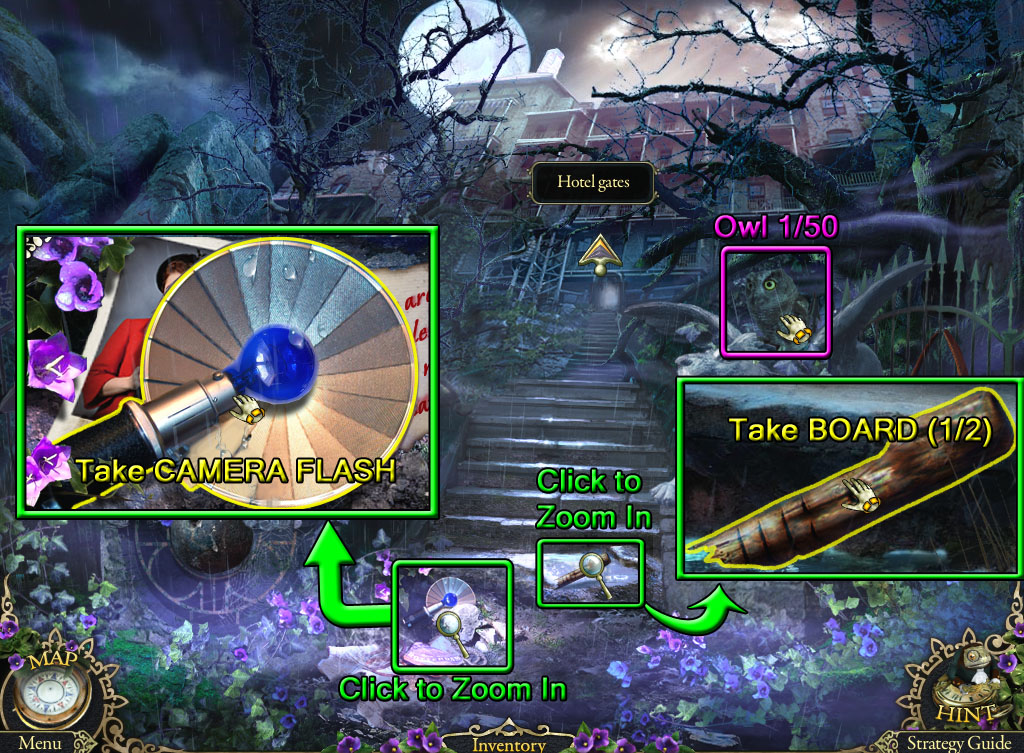
Stone Stairs
Screenshot.
Click the man sitting on the stairs.
Inspect the ground next to the base of the left lion statue.
Take the CAMERA FLASH on top of the papers.
Click the bottom step to zoom in.
Pick up the BOARD (1/2).
Find the Owl (1/50) sitting on the right lion statue.
Go up the stairs to the Hotel Gates.
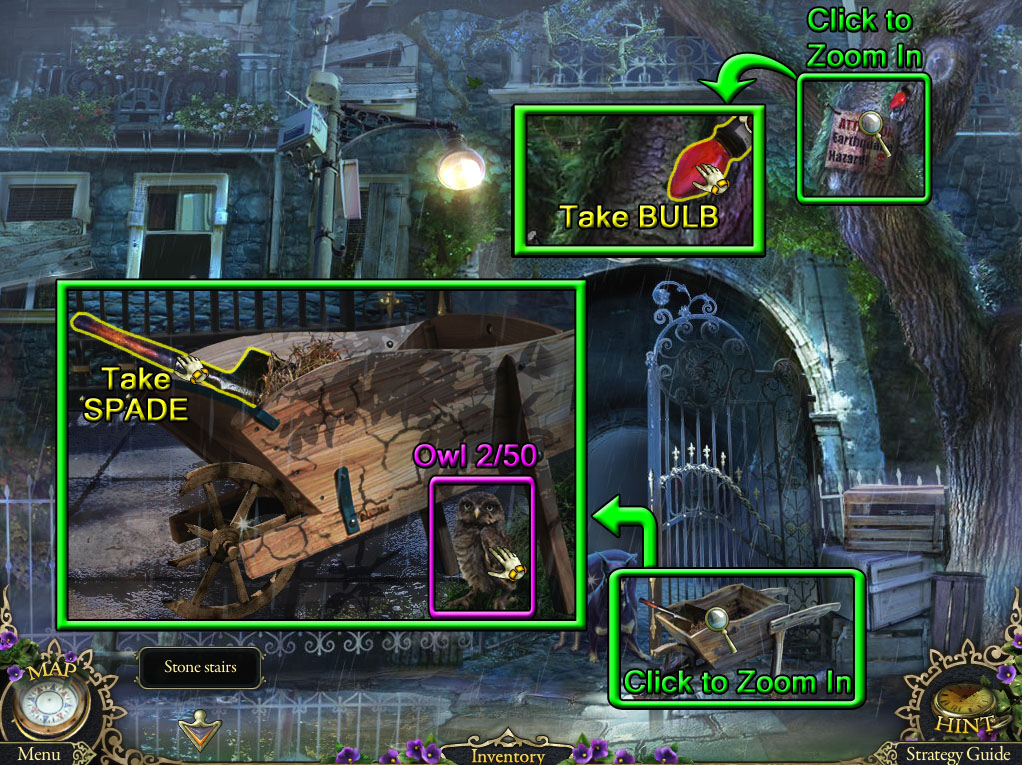
Hotel Gates
Screenshot.
Inspect the broken wheelbarrow in front of the open gate door.
Take the SPADE inside the wheelbarrow.
Find the Owl (2/50) standing underneath the cart.
Click the sign posted to the right tree for a closer look.
Take the red BULB above the sign.
Go back to the Stone Stairs.
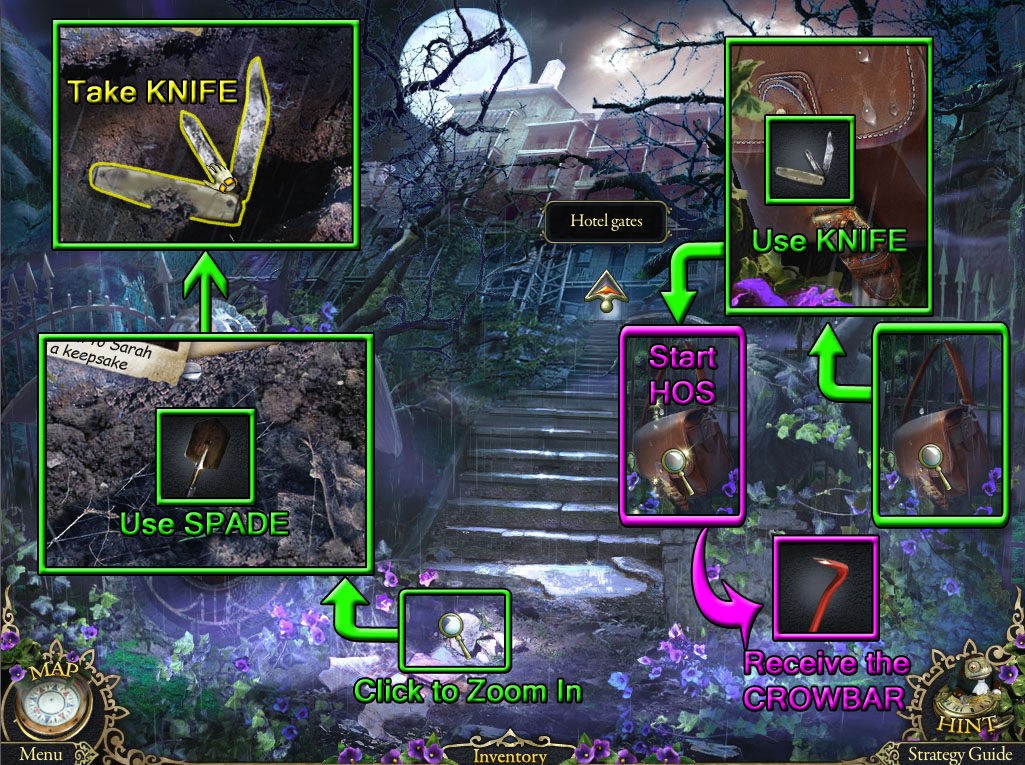
Stone Stairs
Screenshot.
Click the photograph on the ground near the base of the left lion statue to zoom in.
Use the SPADE (from the wheelbarrow at the Hotel Gates) on the dirt to dig a hole.
Take the revealed KNIFE on the ground.
Inspect the satchel hanging from the right fence.
Use the KNIFE to cut through the leather strap.
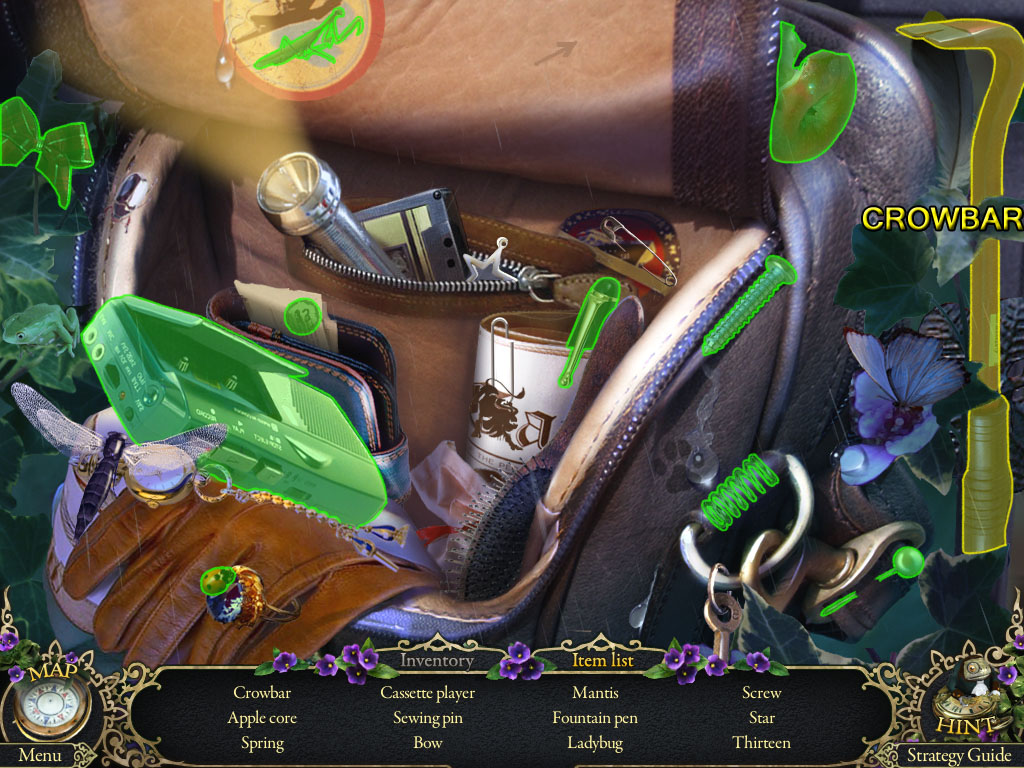
Click the open satchel to start the hidden object scene.
Screenshot.
Once the hidden object scene is complete, you will receive the CROWBAR.
Return to the Hotel Gates.
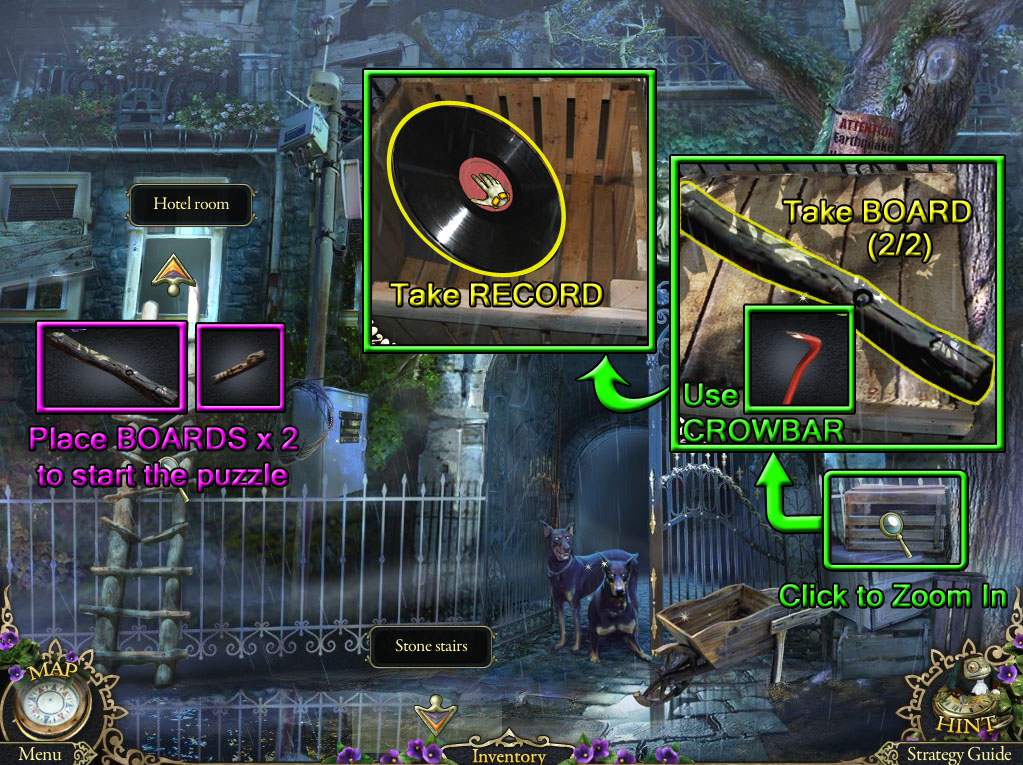
Hotel Gates
Screenshot.
Click the crate at the top of the stack of boxes for a closer look.
Use the CROWBAR (from the Stone Stairs hidden object scene) to pry the board off the top of the crate.
Pick up the loose BOARD (2/2) on top of the box.
Take the RECORD inside the open crate.
Click the ladder leaning against the building to zoom in.
Place the two BOARDS on the broken ladder rungs to start the puzzle.
Swap the broken pieces on the left side of the ladder to match the broken piece on the right side.
Click a wood piece to select it, then click another fragment to switch their places.
If a ladder fragment is correctly positioned, it will connect to the opposite half on the right side.
Screenshot.
Connect the pieces with the matching letters in the above screenshot.
Solution.
Go up the repaired ladder to the Hotel Room.
Hotel Room
Screenshot.
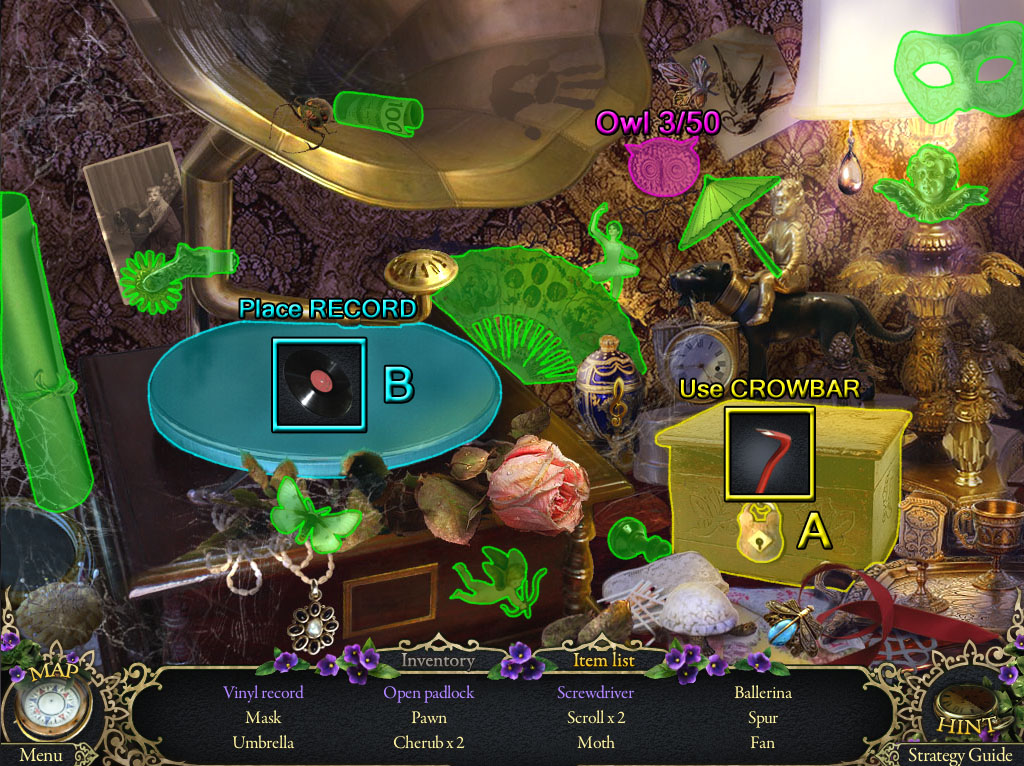
Click the gramophone on top of the dresser to start the hidden object scene.
Find the Owl (3/50) hidden in the wallpaper.
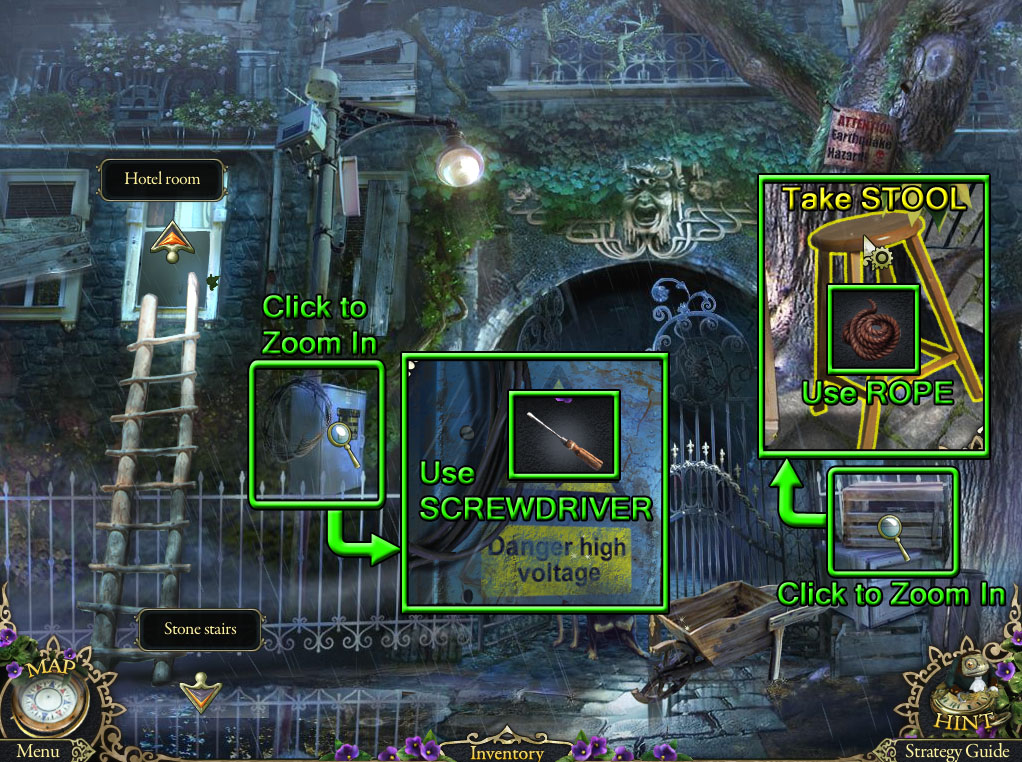
Use the CROWBAR from your inventory on the locked box to find the Screwdriver and the Open Padlock (A).
Place the RECORD from your inventory on the record player to get the Vinyl Record (B).
Screenshot.
Once the hidden object scene is complete, you will receive the SCREWDRIVER.
Click the broken window to zoom in.
Take the ROPE tied around the middle of the left drape.
Inspect the floor underneath the red sofa chair.
Read the note, then play the tape recorder.
Go back to the Hotel Gates.
Hotel Gates
Screenshot.
Click the stack of crates for a closer look.
Use the ROPE (from the drapes in the Hotel Room) to repair the broken stool leg.
Click the STOOL to add it to your inventory.
Inspect the fuse box at the bottom of the lightpost.
Use the SCREWDRIVER (from the Hotel Room hidden object scene) to remove screw on the front panel.
Return to the Hotel Room.
Hotel Room
Screenshot.
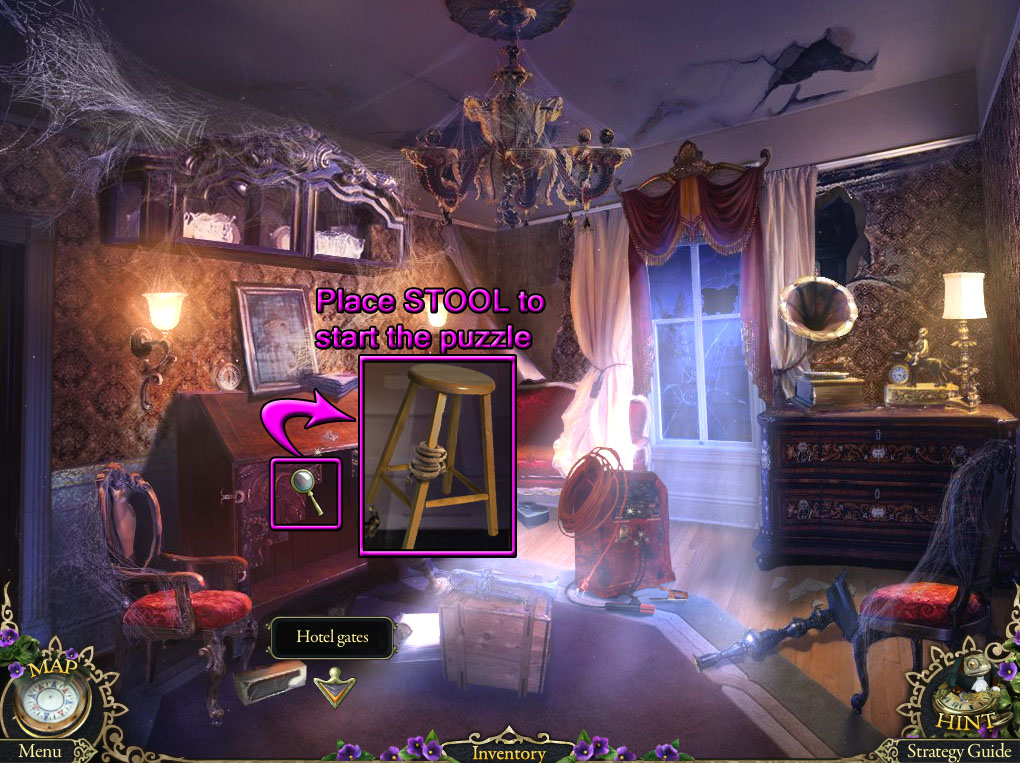
Click the cabinet against the left wall for a closer look.
Place the STOOL (repaired at the Hotel Gates) on the floor under the bottom shelf to start the puzzle.
Arrange the objects so that all of them fit within the grid inside the cabinet.
Click an object to select it, then click a position on the grid to set it in place.
When an object is placed down, the highlighted squares on the grid show the amount of space the item occupies.
Solution.
Once the puzzle is solved, take the SALT, DOG FOOD, and SKULL from the shelf on top of the cabinet.
Go back outside to the Hotel Gates.
Hotel Gates
Screenshot.
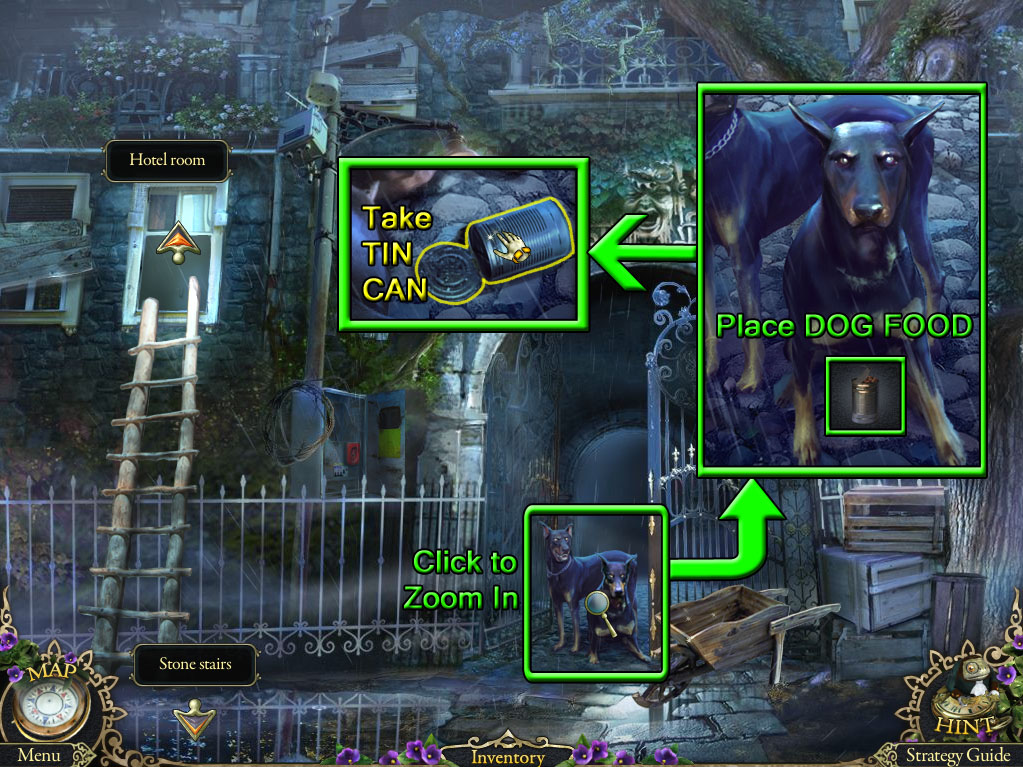
Click the dogs guarding the gate for a closer look.
Give the dogs the DOG FOOD (from the Hotel Room cabinet puzzle).
Pick up the empty TIN CAN from the ground.
Go back to the Stone Stairs.
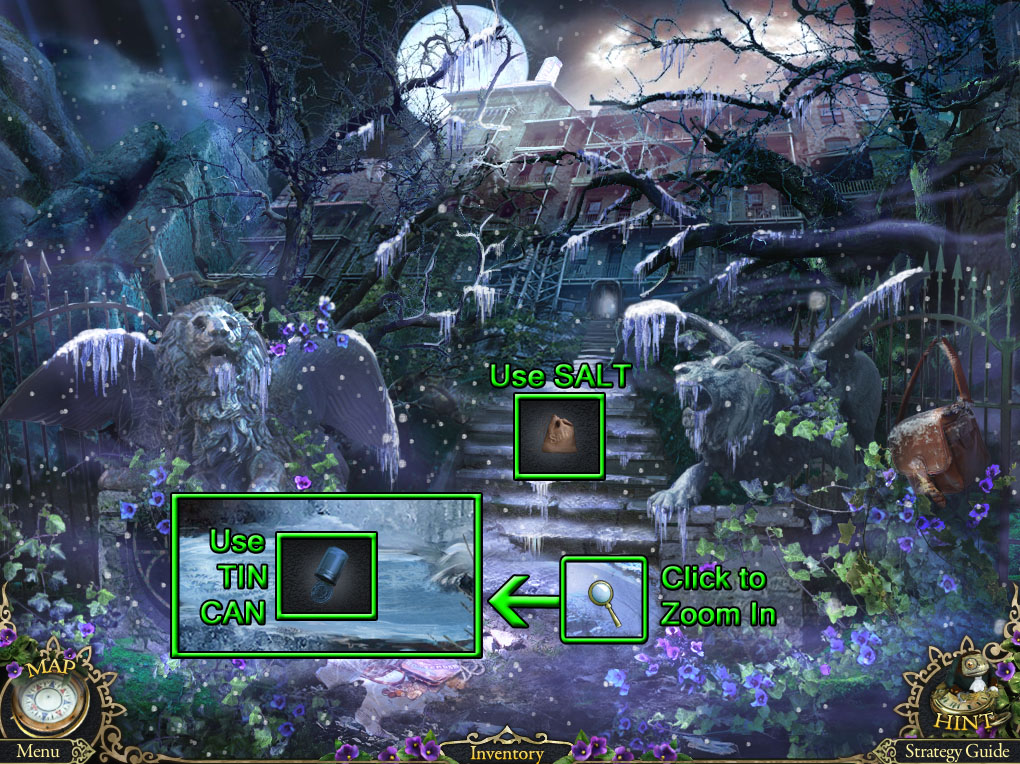
Stone Stairs
Screenshot.
Pour the SALT (from the Hotel Room cabinet puzzle) to melt the snow on the steps.
Click the puddle at the bottom of the stairs to zoom in.
Use the TIN CAN (from the fed dogs at the hotel gates) on the puddle to collect the CAN WITH WATER.
Go forward to the Hotel Gates, then continue forward to the Gates Corridor.
Gates Corridor
Screenshot.
Click the torch at the middle of the right wall for a closer look.
Find the Owl (4/50) on top of the dragon statuette.
Take the unlit TORCH from the holder.
Pick up the HOISTING JACK leaning against the left wall.
Walk forward to the Archway at the end of the tunnel.
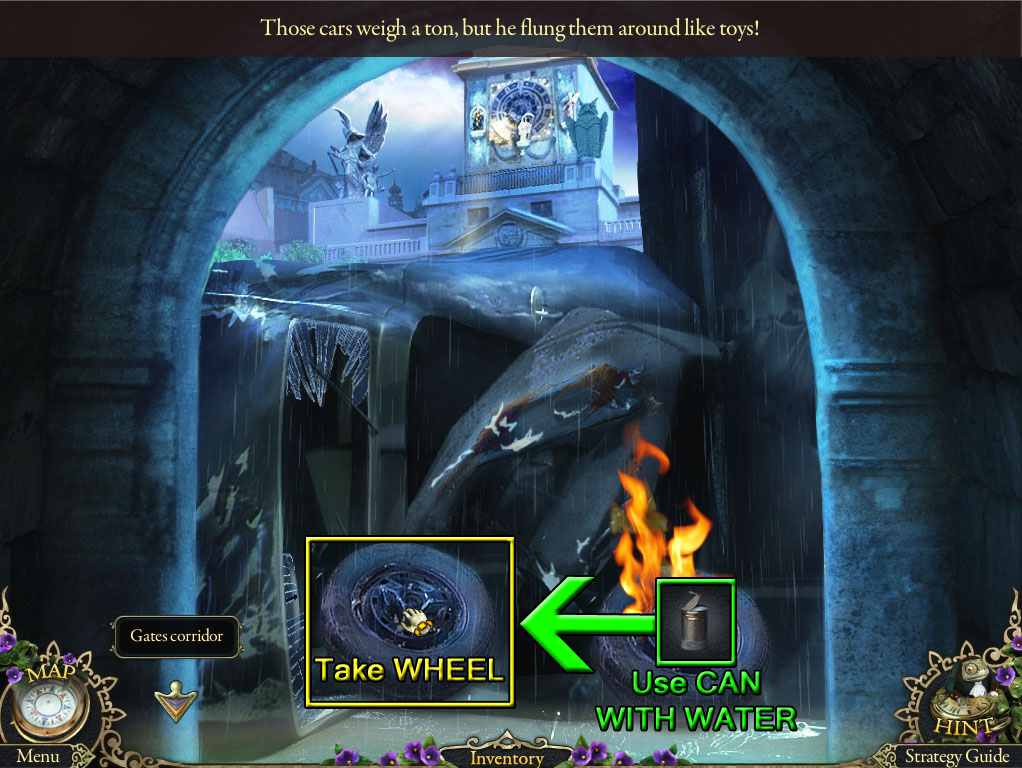
Archway
Screenshot.
Use the CAN WITH WATER (from the puddle at the Stone Stairs) to douse the burning tire.
Click the WHEEL at the bottom of the smashed car to add it to your inventory.
Go back to the Hotel Gates.
Hotel Gates
Screenshot.
Click the broken wheelbarrow to zoom in.
Place the WHEEL (from the car wreckage in the Gates Corridor) at the end of the wheelbarrow.
Click the WHEELBARROW to add it to your inventory.
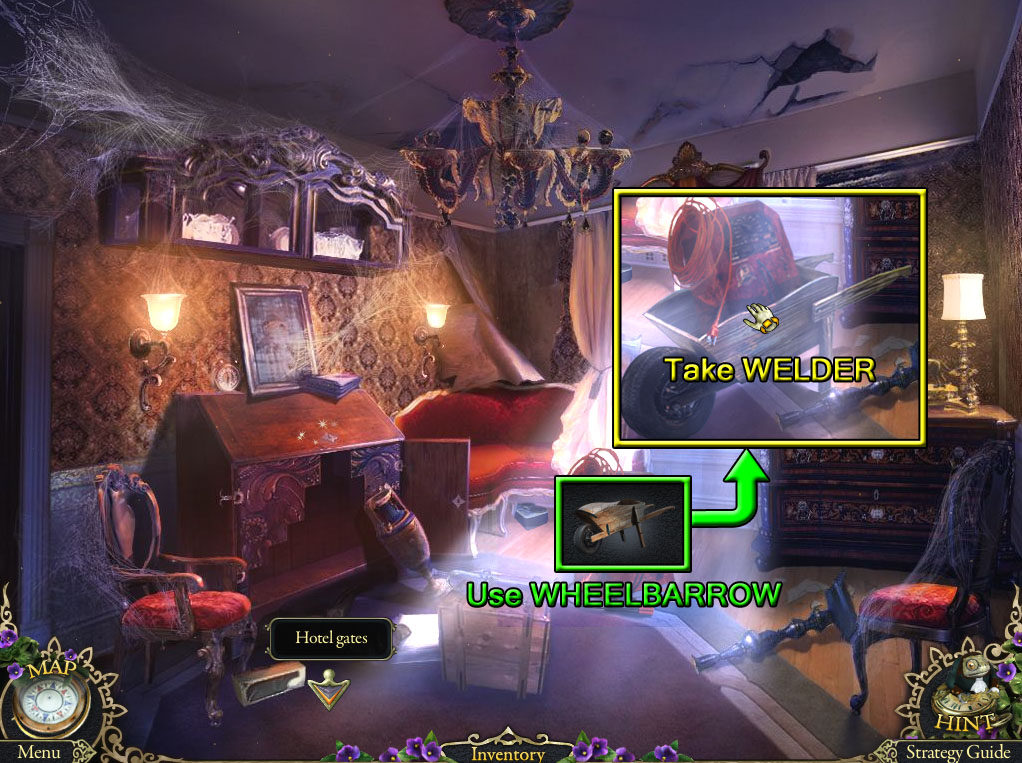
Go inside the Hotel Room.
Hotel Room
Screenshot.
Use the WHEELBARROW (repaired at the Hotel Gates) to load the WELDER into the cart.
Return to the Archway.
Archway
Screenshot.
Place the WELDER (carried in the wheelbarrow at the Hotel Room) next to the car wreckage.
Go back to the Hotel Gates.
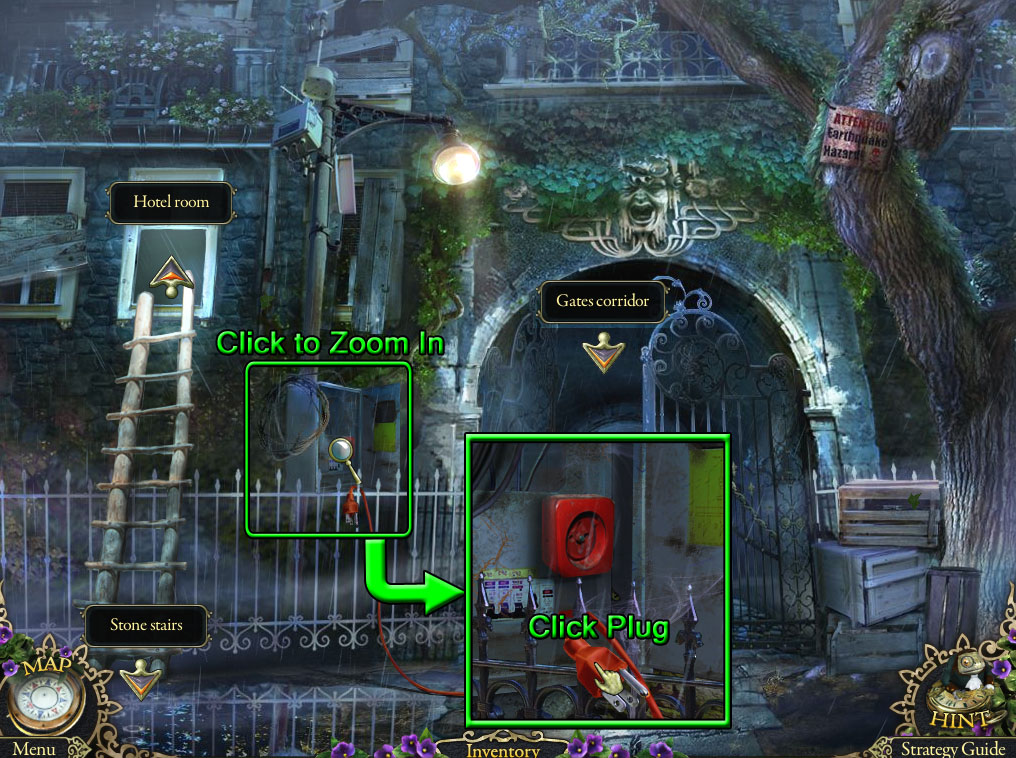
Hotel Gates
Screenshot.
Click the electric box to zoom in.
Plug the cord from the WELDER in the archway into the outlet.
Move forward twice to the Archway.
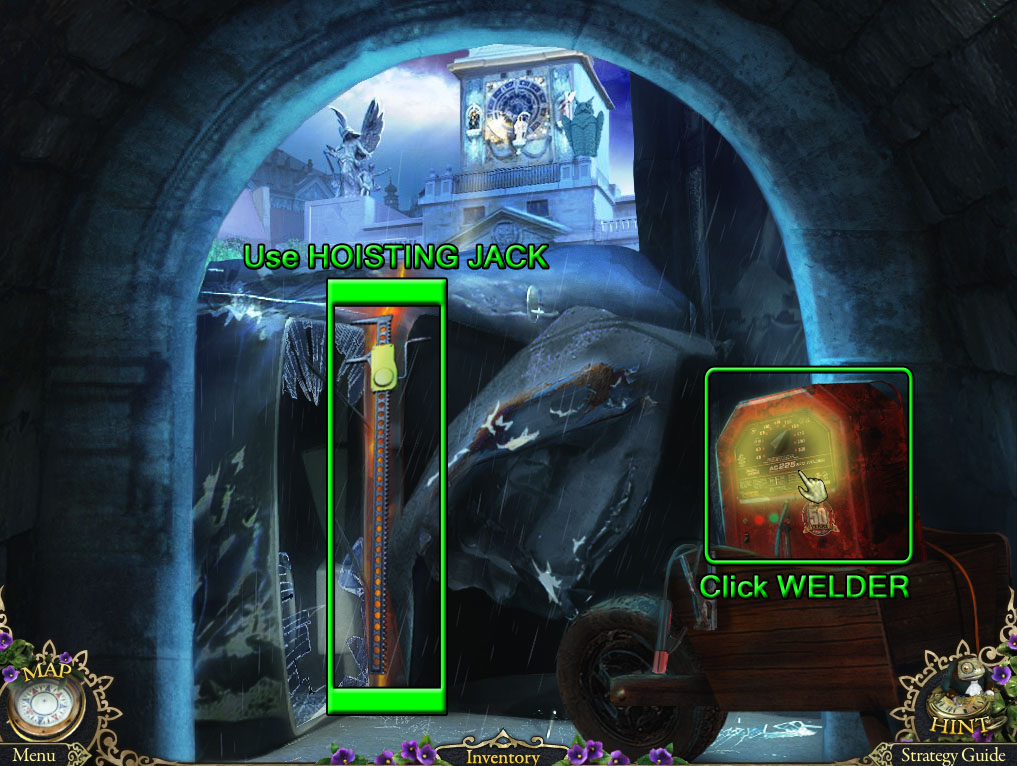
Archway
Screenshot.
Click the welder to slice through the car.
Use the HOISTING JACK (from the wall of the Gates Corridor) to separate the car halves.
Continue forward to the Hotel Courtyard.
Chapter 2
Hotel Courtyard
Screenshot.
Find the Owl (5/50) on top of the clock tower.
Click the drawing on the ground to zoom in.
Take the DART on the ground next to the note.
Move forward to the Theater Entrance.
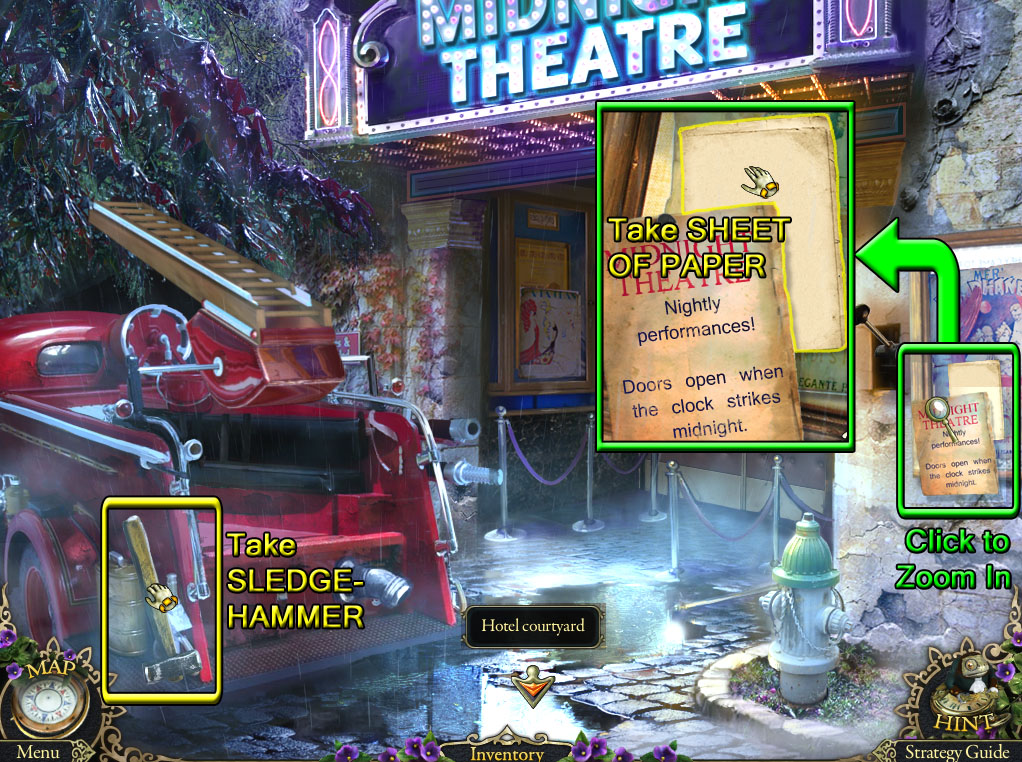
Theater Entrance
Screenshot.
Pick up the SLEDGEHAMMER beside the wheel of the firetruck.
Click the movie poster on the right wall for a closer look.
Take the SHEET OF PAPER inside the frame.
Go back to the Hotel Courtyard, then continue left to the Curiosity Shop Entrance.
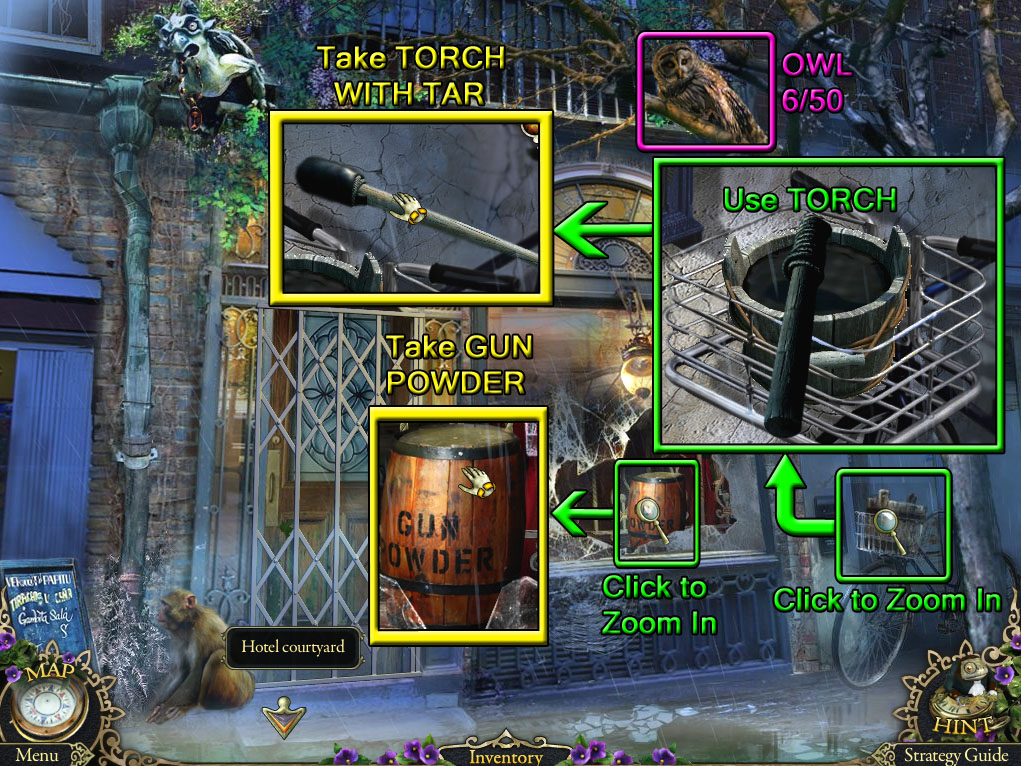
Curiosity Shop Entrance
Screenshot.
Find the Owl (6/50) on the branch of the tree.
Click the broken shop window to zoom in.
Take the GUNPOWDER on the windowsill.
Click the bicycle basket for a closer look.
Put the TORCH (from the wall holder in the Gates Corridor) in the bucket of tar.
Take back the TORCH WITH TAR.
Go back to the Hotel Courtyard, then continue through the archway to the Statue Corridor.
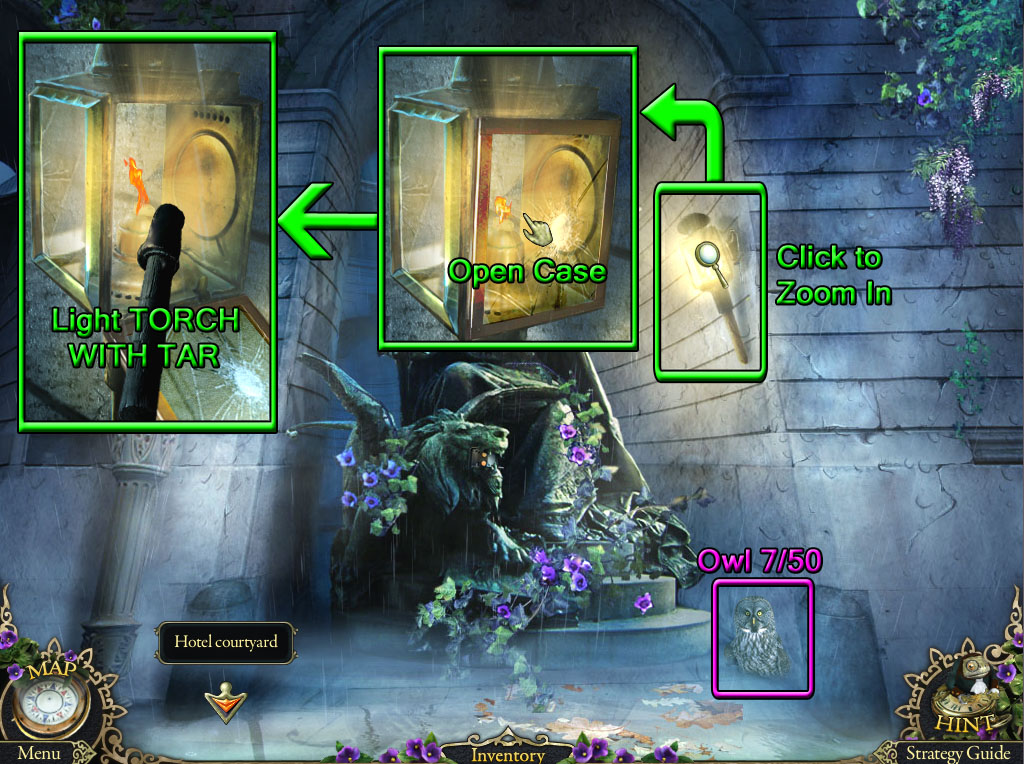
Statue Corridor
Screenshot.
Find the Owl (7/50) on the ground to the right of the base of the statue.
Click the lamp on the wall beside the statue's hand for a closer look.
Click the glass frame to remove the lamp cover.
Use the TORCH WITH TAR (from the bicycle tar bucket at the Curiosity Shop Entrance) on the flame.
You will receive the BURNING TORCH.
Go back to the Stone Steps.
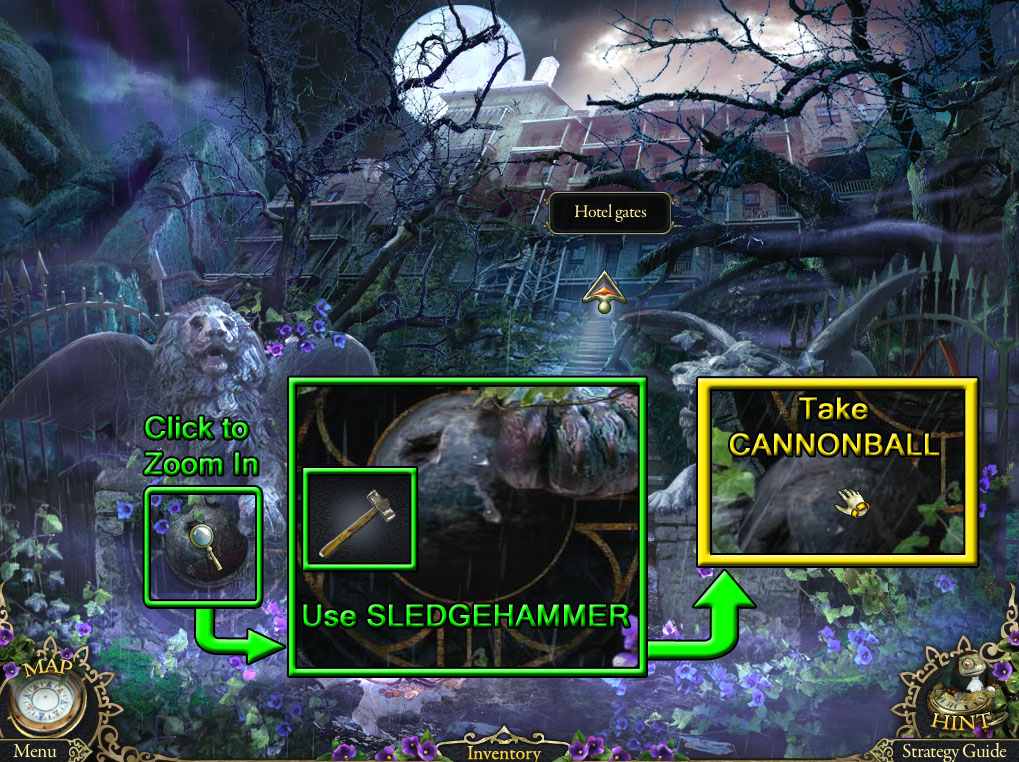
Stone Steps
Screenshot.
Click the base of the left lion statue to zoom in.
Use the SLEDGEHAMMER (from the firetruck at the Theater Entrance) three times on the cannonball under the lion's paw.
Pick up the CANNONBALL from the ground.
Return to the Gates Corridor
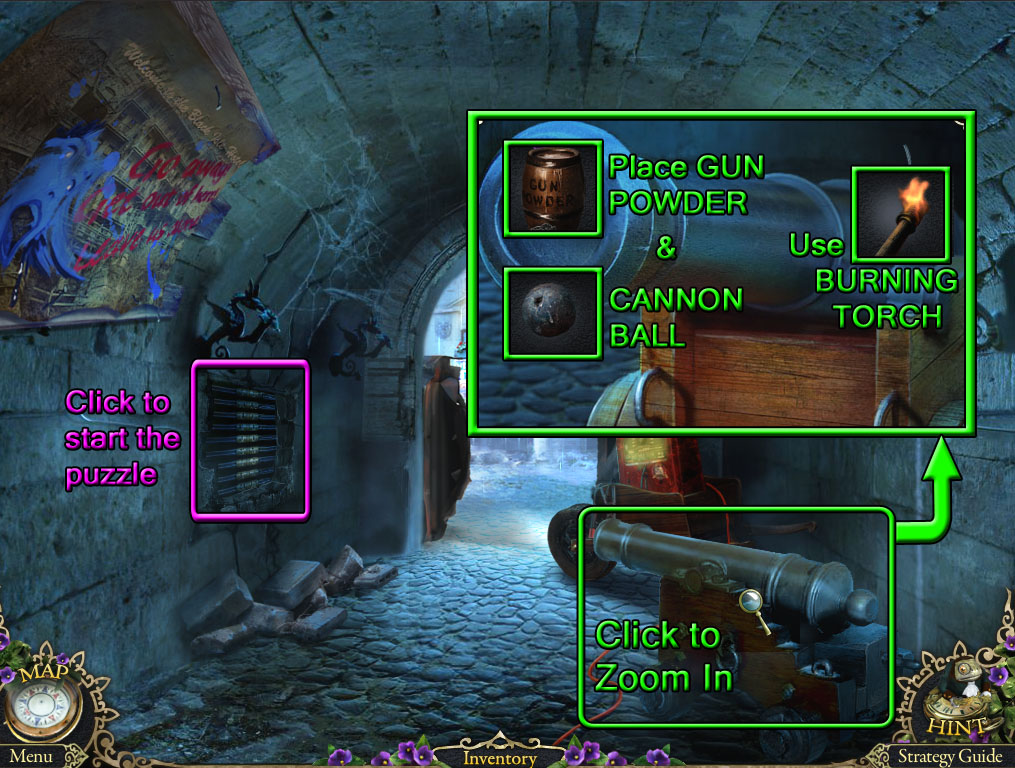
Gates Corridor
Screenshot.
Click the cannon for a closer look.
Pack the GUNPOWDER (from the broken window at the Curiosity Shop Entrance) into the barrel of the cannon.
Load the CANNONBALL (from the lion statue at the Stone Steps) into the cannon.
Light the fuse with the BURNING TORCH (lit on the lamp in the Statue Corridor).
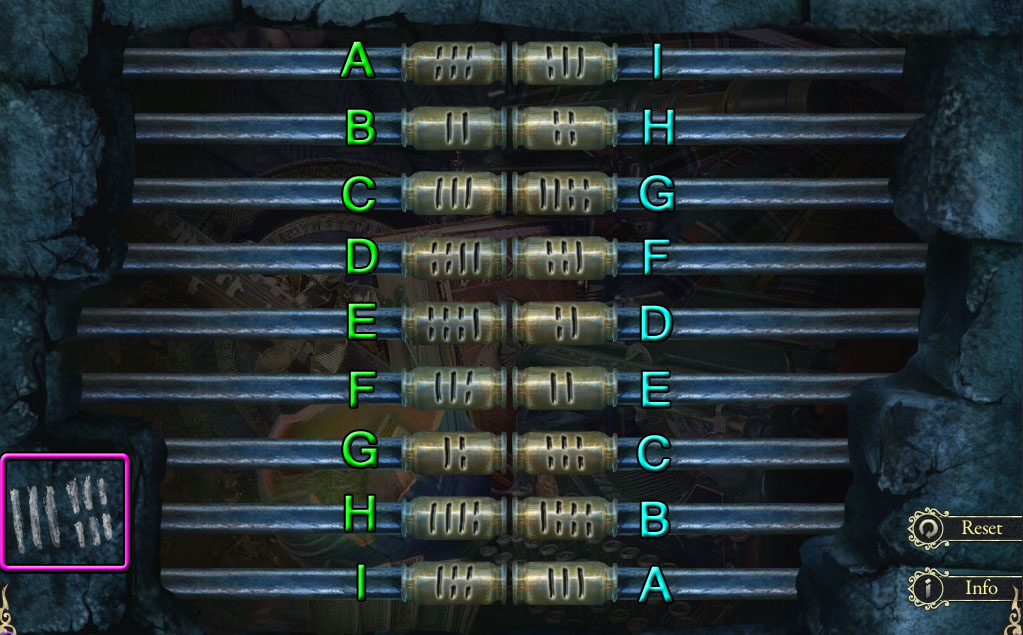
Click the hole in the left wall to start the puzzle.
Arrange the rods so that each side have a combined three dotted notches and three complete lines.
Click a rod to select it, then click a different rod to swap their positions.
Screenshot.
Connect the rods with the matching letters in the above screenshot.
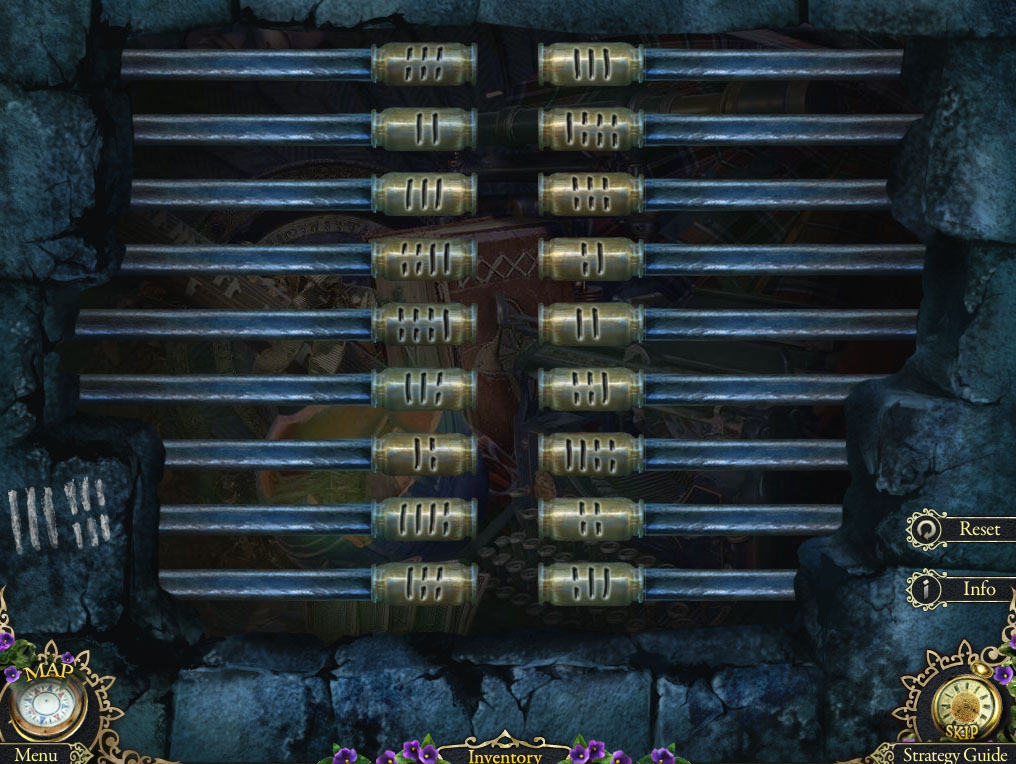
Solution.
Once the puzzle is solved, click the open cache in the wall to start the hidden object scene.
Put the BULB (from the sign at the Hotel Gates) in the flashlight to make the Lit Flashlight (A).
Place the SHEET OF PAPER (from the poster board at the Theater Entrance) into the typewriter to complete the Printout (B).
Screenshot.
Once the hidden object scene is complete, you will receive the VALVE HANDLE.
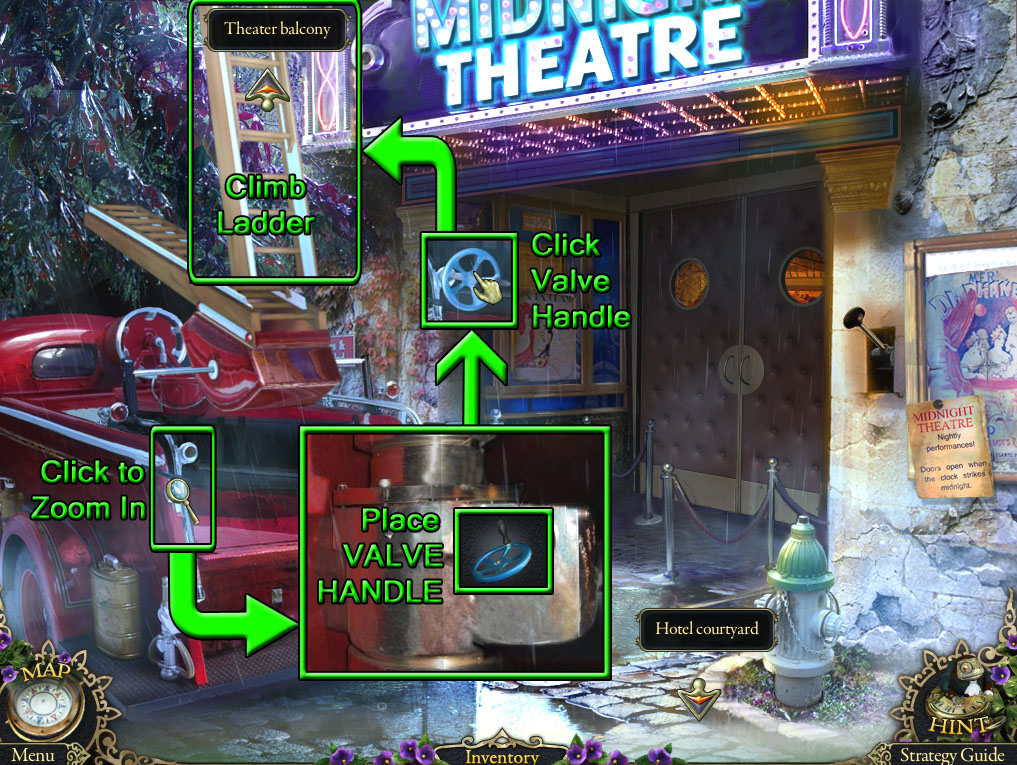
Go to the Theater Entrance.
Theater Entrance
Screenshot.
Inspect the rail on the lower left side of the firetruck.
Place the VALVE HANDLE in the metal socket.
Click the handle to lift the ladder.
Climb up the firetruck ladder to the Theater Balcony.
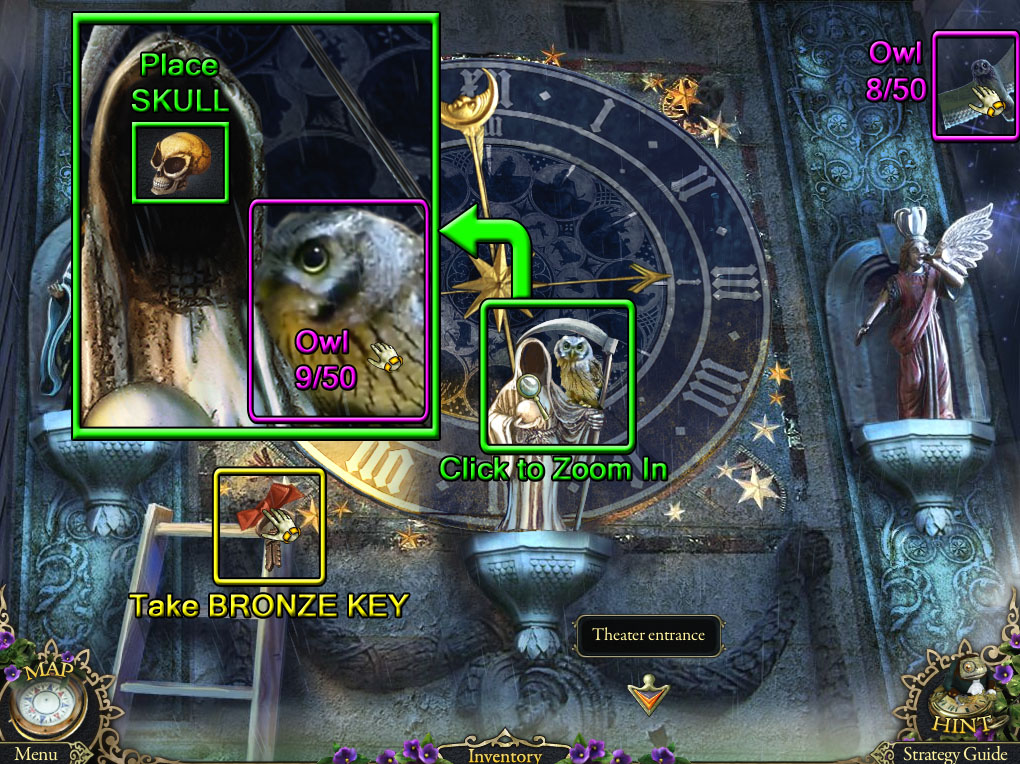
Theater Balcony
Screenshot.
Find the Owl (8/50) flying in the upper right area of the sky.
Click the head of the grim reaper statue to zoom in.
Find the Owl (9/50) on the statue's shoulder.
Put the SKULL (from the Hotel Room puzzle) inside the hood.
Pick up the BRONZE KEY at the top step of the ladder.
Go back to the Curiosity Shop Entrance.
Curiosity Shop Entrance
Screenshot.
Click the gate blocking the door to zoom in.
Use the BRONZE KEY (from the ladder at the Theater Balcony) on the padlock.
Go through the open door to the Curiosity Shop.
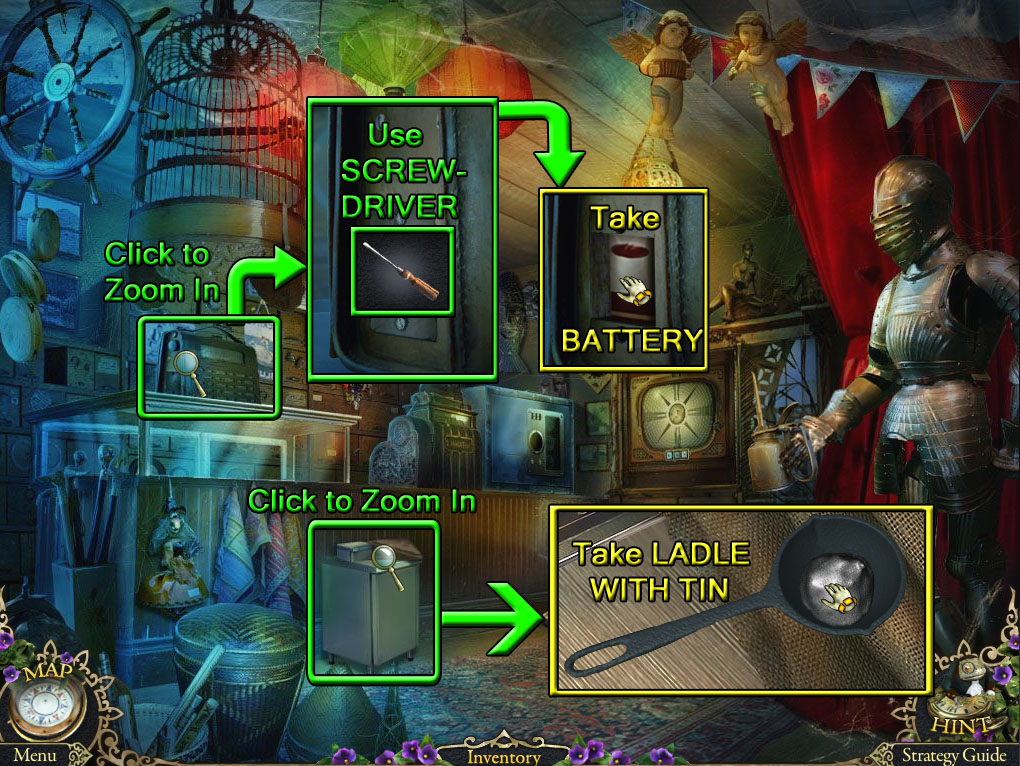
Curiosity Shop
Screenshot.
Click the radio on top of the glass case to zoom in.
Use the SCREWDRIVER (from the Hotel Room hidden object scene) to remove the panel at the side of the radio.
Take the BATTERY from the opened panel.
Click the small table below the cash register for a closer look.
Take the LADLE WITH TIN next to the key mold.
Return to the Statue Corridor.
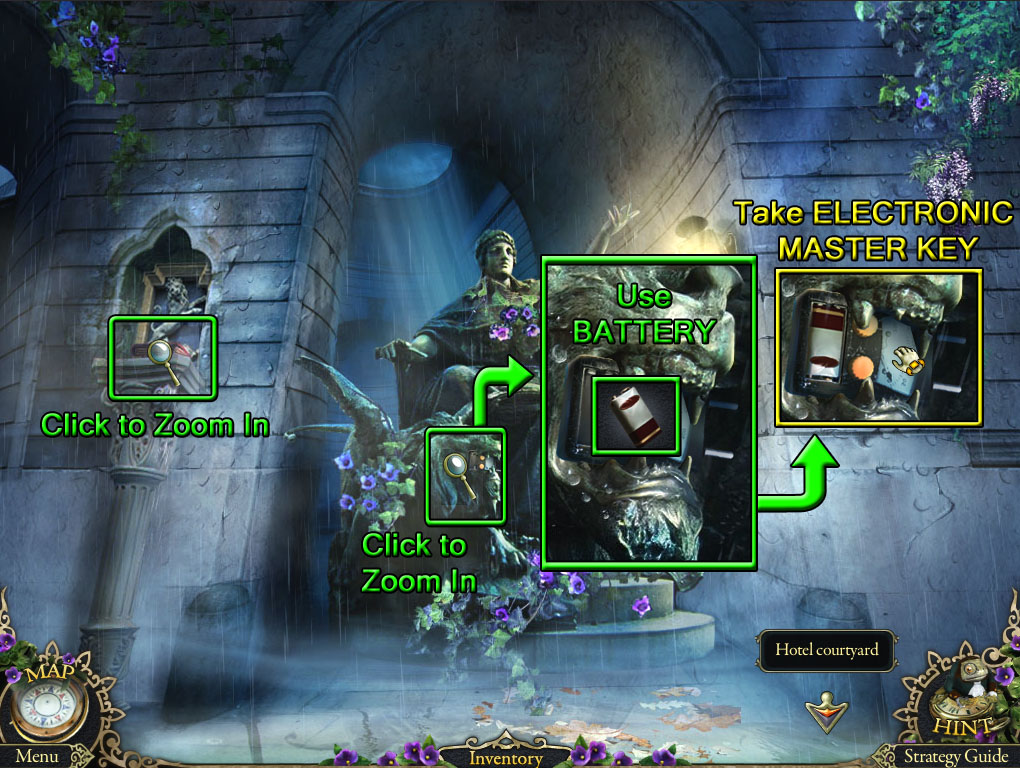
Statue Corridor
Screenshot.
Click the lion statue to zoom in.
Place the BATTERY (from the radio in the Curiosity Shop) inside the electric picklock.
Click the ELECTRONIC MASTER KEY to add it to your inventory.
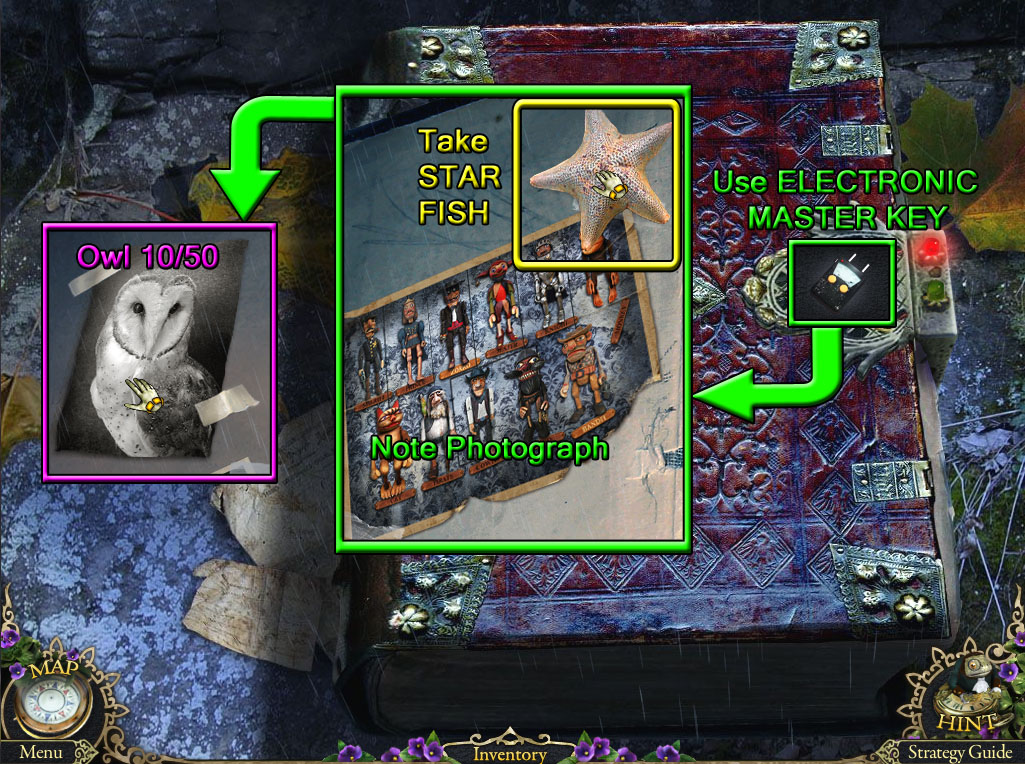
Inspect the large book on top of the pedestal.
Screenshot.
Use the ELECTRONIC MASTER KEY to open the lock on the cover.
Click the book to open it, then take the STARFISH on the inside of the cover.
Note the picture of the marionettes.
Turn to the next page to find a photograph of the Owl (10/50).
Go back to the Hotel Courtyard, then continue right to the Cafe Entrance.
Cafe Entrance
Screenshot.
Find the Owl (11/50) sitting on the back right chair.
Pick up the KETTLE on the seat of the bench.
Click the cafe window for a closer look.
Take the ACE OF SPACES on top of the black board.
Inspect the electronic lock on the wall to the right of the cafe door.
Use the ELECTRONIC MASTER KEY (from the lion statue in the Statue Corridor) to open the lock.
Go through the open door to the Cafe of Broken Dreams.
Cafe of Broken Dream
Screenshot.
Find the Owl (12/50) at the top of the red column above the bar.
Click the food tray on the table to zoom in.
Find the Owl (13/50) on the tray.
Pick up the piece of CHEESE next to the covered dish.
Click the stained glass window behind the bar counter for a closer look.
Find the Owl (14/50) at the lower left side of the window.
Take the WING beside the angel figure.
Inspect the doctor's bag on top of the chair.
Take the KEY LEVER next to the handle of the bag.
Click the toy chest on the ground to zoom in.
Pick up the TOY HORSE on the floor next to the left wheel.
Go back to the Curiosity Shop.
Curiosity Shop
Screenshot.
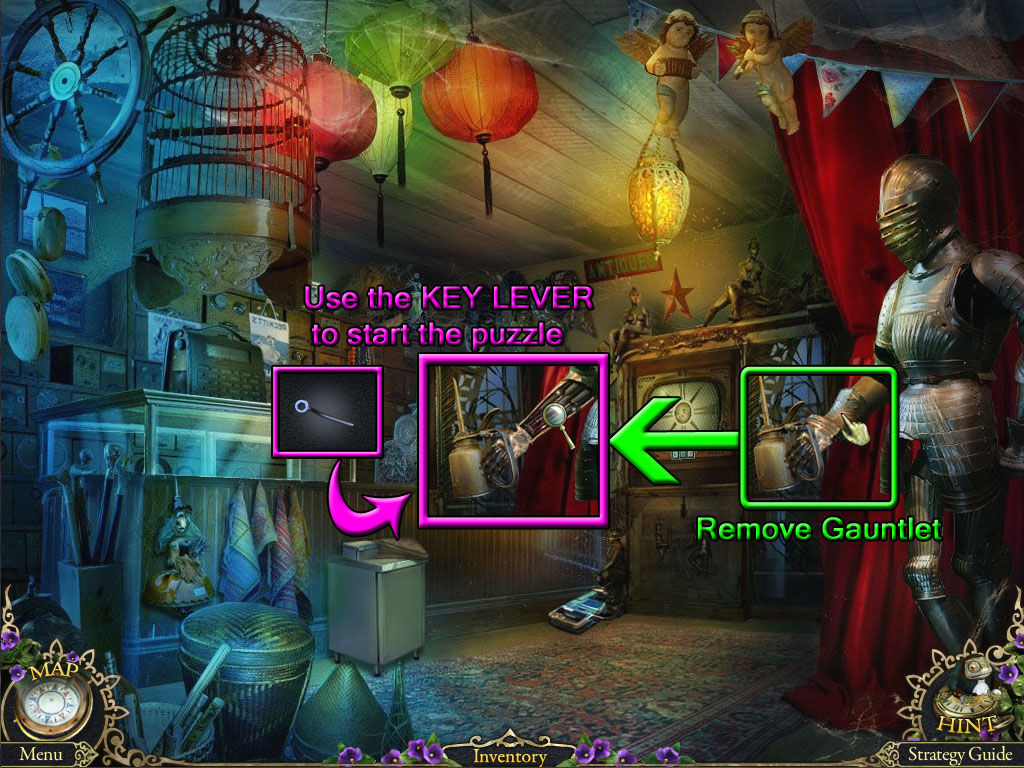
Click the suit of armor for a closer look.
Remove the gauntlet covering the knight's arm.
Use the KEY LEVER on the metallic joints to start the puzzle.
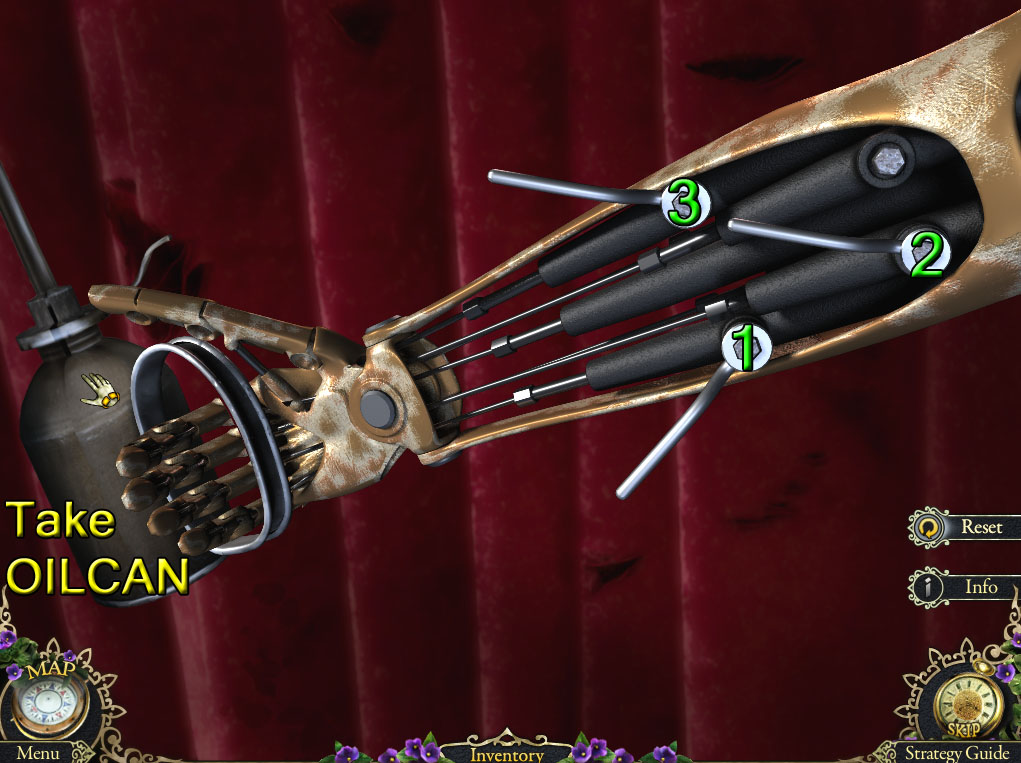
Turn the key lever to release all of the clenched fingers on the metallic hand.
Move the cursor to each of the 4 bolts to select it, then click to turn the bolt.
Clicking each bolt will raise or lower at least one finger on the metallic hand.
Solution.
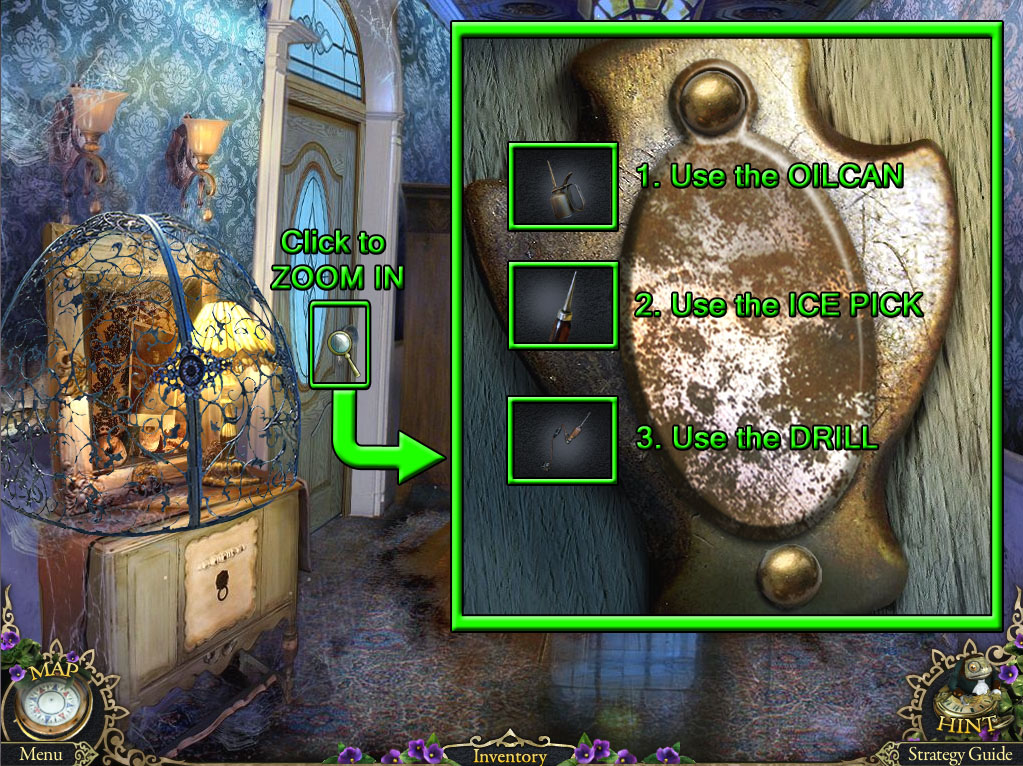
Once the puzzle is solved, take the OILCAN from the opened hand.
Return to the Cafe of Broken Dreams.
Cafe of Broken Dream
Screenshot.
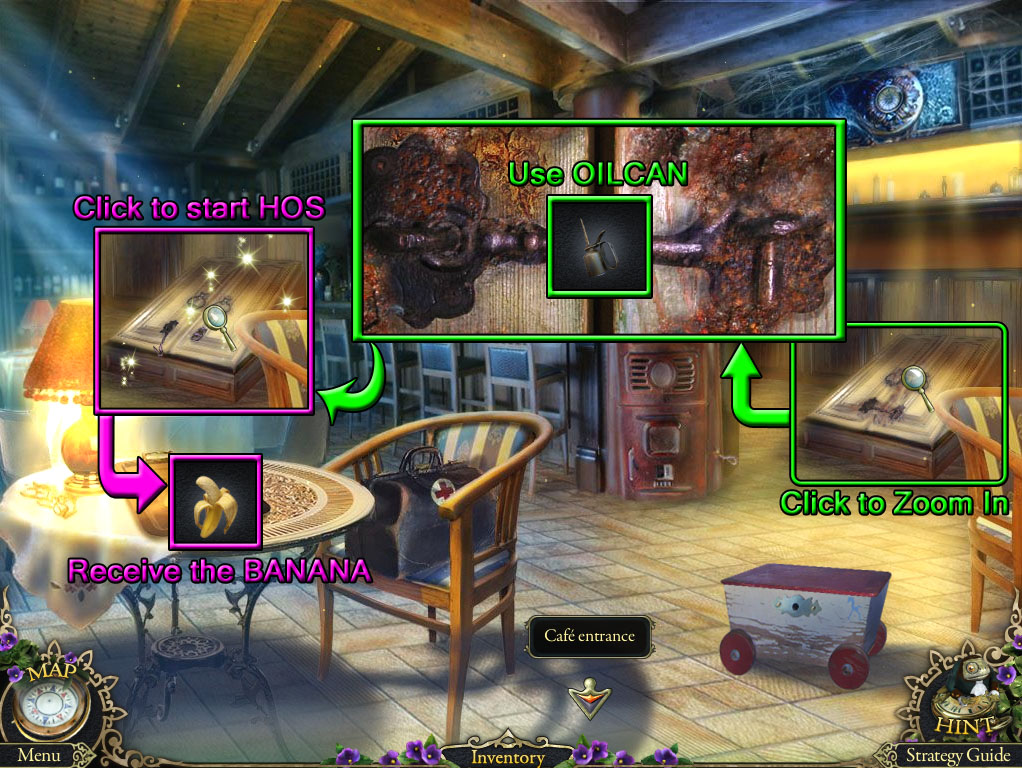
Click the doors to the cellar to zoom in.
Use the OILCAN (from the metallic hand puzzle at the Curiosity Shop) on the rusted latch.
Click the cellar door to start the hidden object scene.
Give the CHEESE (from the food tray on the table at the Cafe) to the mouse to complete the Mouse With Cheese (A).
Use the KETTLE (from the bench at the Cafe Entrance) on the empty teacup to make the Tea (B).
Screenshot.
Once the hidden object scene is complete, you will receive the BANANA.
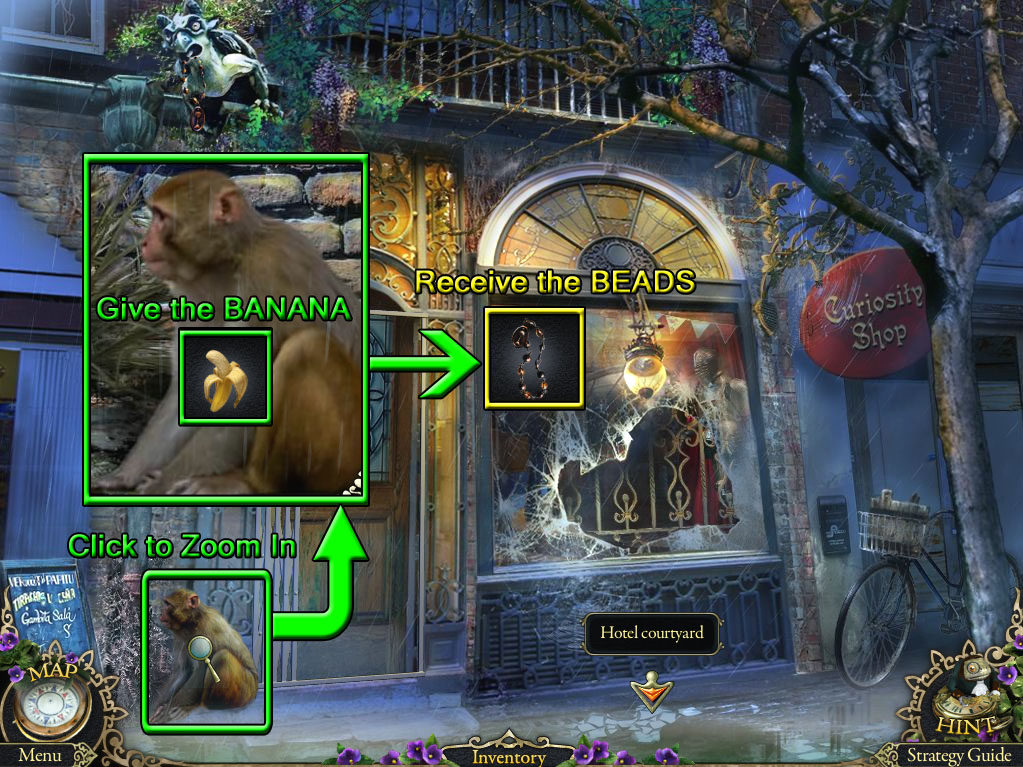
Go to the Curiosity Shop Entrance.
Curiosity Shop Entrance
Screenshot.
Click the monkey sitting in front of the door for a closer look.
Give the monkey the BANANA (from the Cafe of Broken Dreams hidden object scene).
You will receive the BEADS.
Use the map to travel to the Theater Balcony.
Theater Balcony
Screenshot.
Click the left statue to zoom in.
Put the BEADS (from the monkey at the Curiosity Shop Entrance) into the statue's empty hand.
Click the angel statue on the right side for a closer look.
Place the WING (from the stained glass window in the Cafe of Broken Dreams) on the angel's back.
Click the revealed mechanism behind the face of the clock to start the puzzle.
Move the gears into the correct slot positions according to the type of mythical creature shown on the gear.
Each gear has an image of a hybrid mythical creature, while each slot shows which two objects combined that mythical creature is composed of.
Click a gear to select it, then click a different gear to swap their positions.
The Gryphon (A) is a combination of an eagle and lion.
The Dragon (B) is a combination of a snake and fire.
The Unicorn (C) is a combination of a horse and a horn.
The Gorgon (D) is a combination of a woman and snake.
The Mermaid (E) is a combination of a fish and woman.
The Centaur (F) is a combination of a man and horse.
The Werewolf (G) is a combination of wolf and man.
The Minotaur (H) is a combination of man and bull.
Solution.
Go back down to the Theater Entrance.
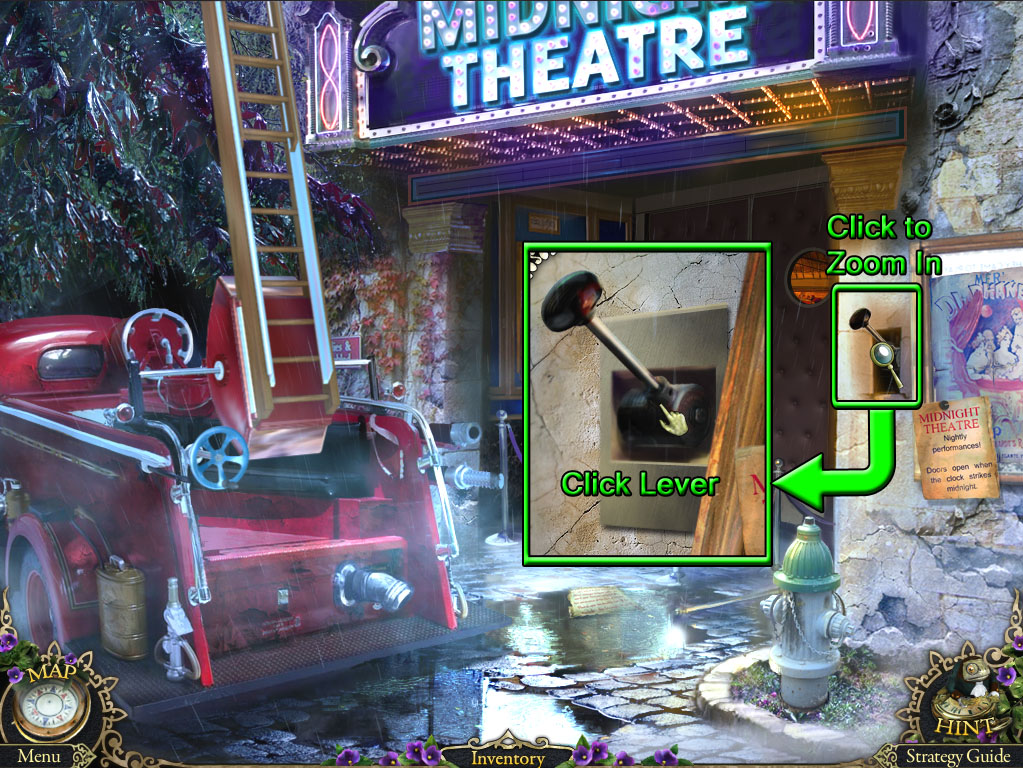
Theater Entrance
Screenshot.
Click the lever on the right wall for a closer look.
Pull the lever to open the theater doors.
Go through the open door to the Theater Hall.
Chapter 3
Theater Hall
View the cinematic to return to the Theater entrance.
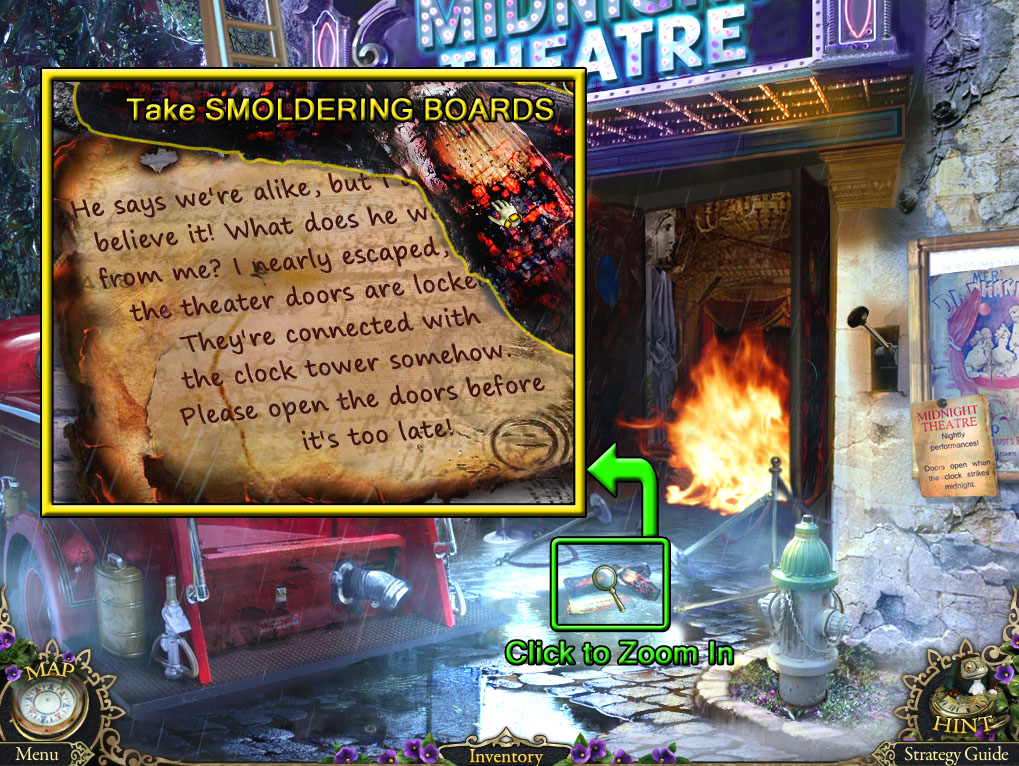
Theater Entrance
Screenshot.
Inspect the charred note beside the puddle on the ground.
Pick up the SMOLDERING BOARDS on top of the note.
Use the map to travel to the Cafe of Broken Dreams.
Cafe of Broken Dreams
Screenshot.
Click the stove at the end of the bar to zoom in.
Find the Owl (15/50) on the counter above the stove.
Open the bottom door to the stove.
Place the SMOLDERING BOARDS (from the ground at the Theater Entrance) into the stove.
Use the BURNING TORCH (from the lamp at the Statue Corridor) to light the smoldering boards.
Lift the lid at the top of the stove.
Place the LADLE WITH TIN on top of the heating plate.
Take the LADLE WITH MOLTEN TIN.
Go back to the Curiosity Shop.
Curiosity Shop
Screenshot.
Click the mold on top of the small table for a closer look.
Pour the LADLE WITH MOLTEN TIN (from the stove in the Cafe) into the mold.
Take the formed TIN KEY from the mold.
Return to the Cafe of Broken Dreams.
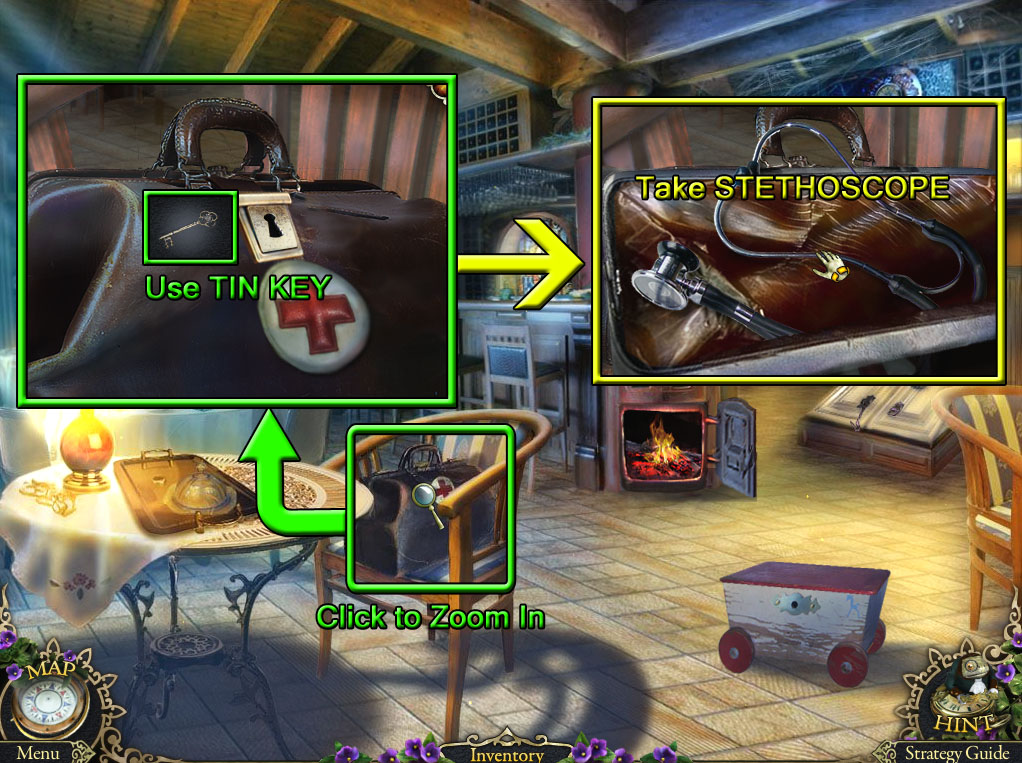
Cafe of Broken Dreams
Screenshot.
Inspect the doctors bag on top of the chair beside the front left table.
Use the TIN KEY (from the mold in the Curiosity Shop) to open the lock on the bag.
Take the STETHOSCOPE inside the bag.
Go to the Curiosity Shop again.
Curisioty Shop
Screenshot.
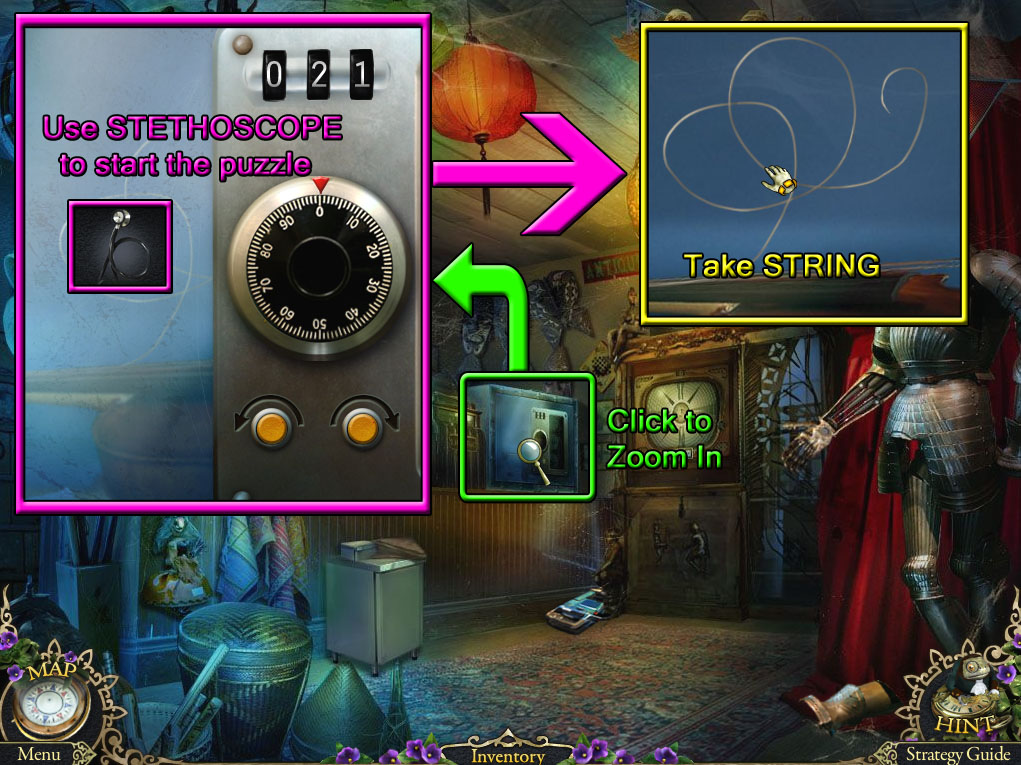
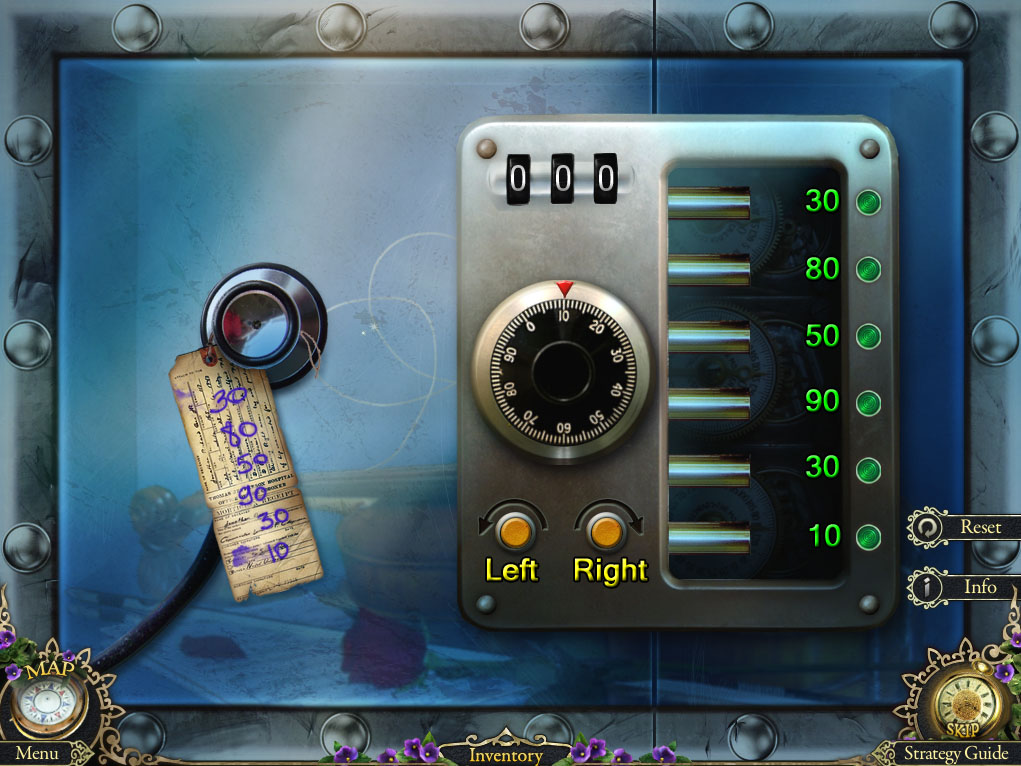
Click the large safe beside the cash register to zoom in.
Use the STETHOSCOPE (from the doctor's bag in the Cafe) on the safe to start the puzzle.
Rotate the dial on the lock to the numbers shown on the paper over the stethoscope.
Click the buttons to turn the dial clockwise or counterclockwise.
When each number is input correctly, one of the bars on the lock will be released.
You have only 21 clicks to enter in the digit combination correctly.
Press the yellow buttons in the following order: Left x 3, Left x 5, Right x 3, Left x 4, Left x 4, Right x 2.
Solution.
Once the puzzle is solved, take the broken voilin STRING from the opened safe.
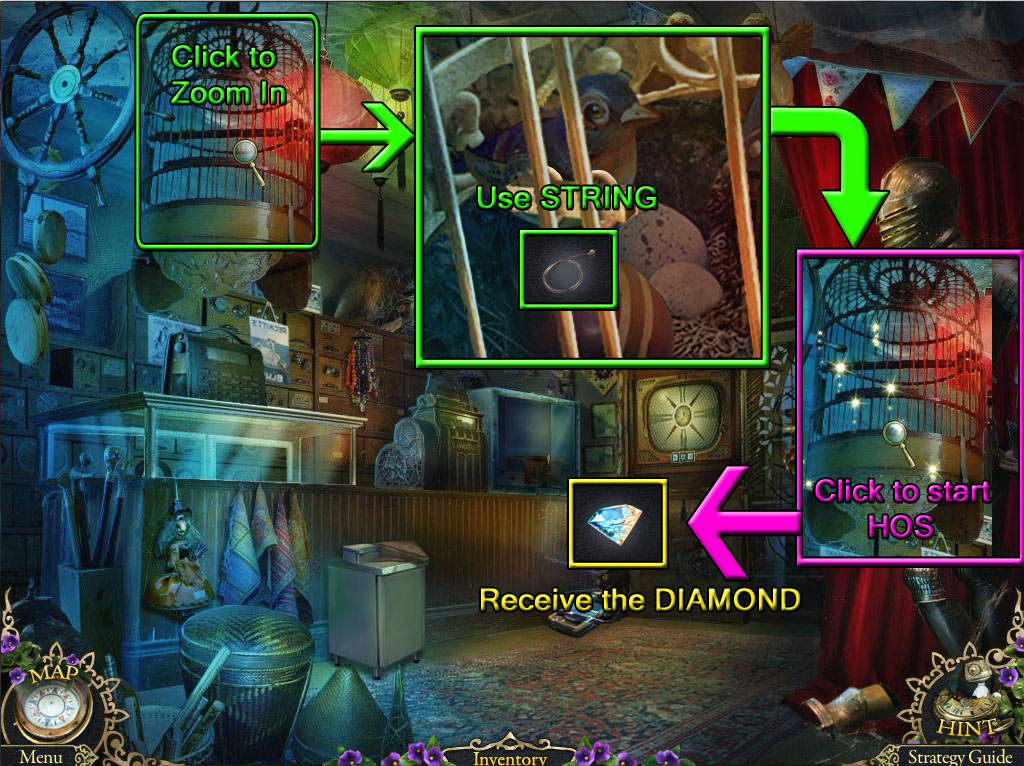
Screenshot.
Click the bird cage hanging from the ceiling for a closer look.
Use the STRING on the cage bars to saw through it.
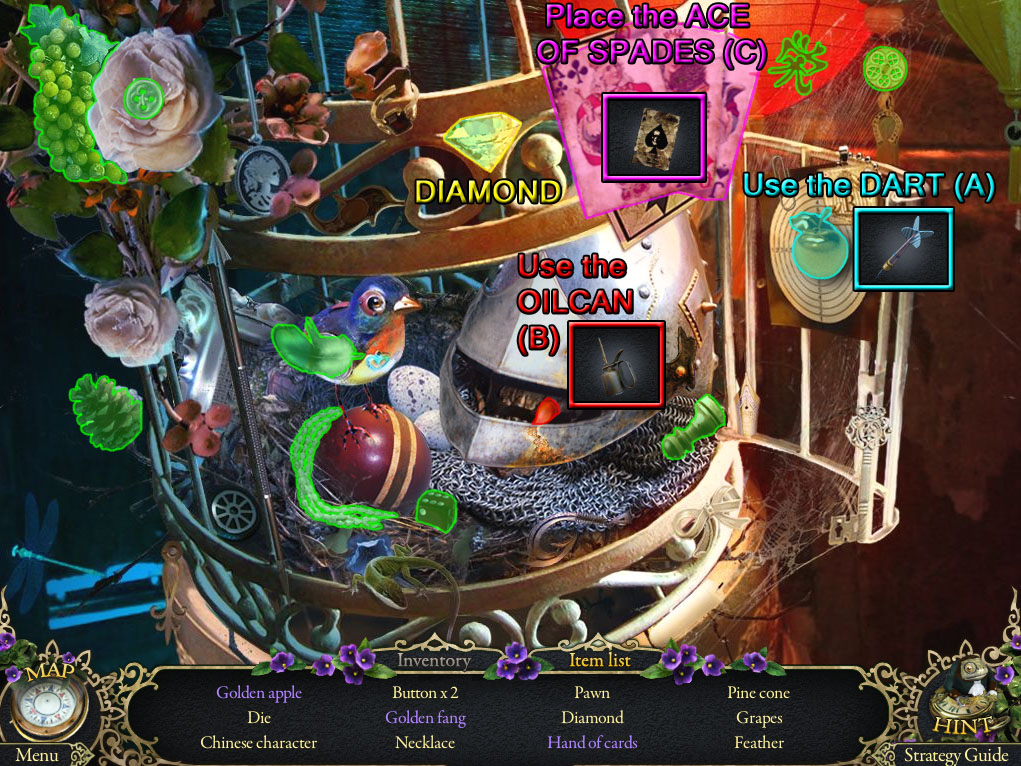
Click the open cage to start the hidden object scene.
Use the DART (from the ground of the Hotel Courtyard) on the target to pin the Golden Apple (A).
Use the OILCAN (from the knight puzzle in the Curiosity Shop) on the rusted helmet to find the Golden Fang (B).
Add the ACE OF SPADES (from the window at the Cafe Entrance) on the playing cards to complete the Hand of Cards (C).
Screenshot.
Once the hidden object scene is complete, you will receive the DIAMOND.
Use the map to travel to the Cafe Entrance.
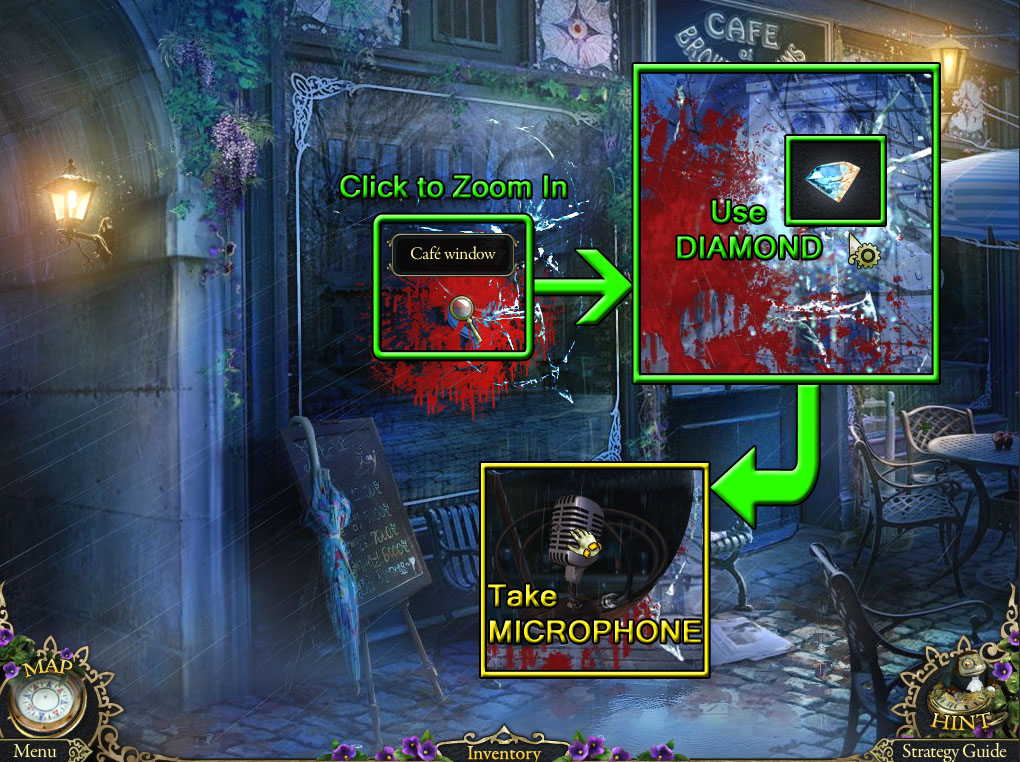
Cafe Entrance
Screenshot.
Click the paint-covered window for a closer look.
Use the DIAMOND (from the Curiosity Shop hidden object scene) to cut through the glass.
Take the MICROPHONE on top of the table behind the hole in the window.
Return to the Curiosity Shop.
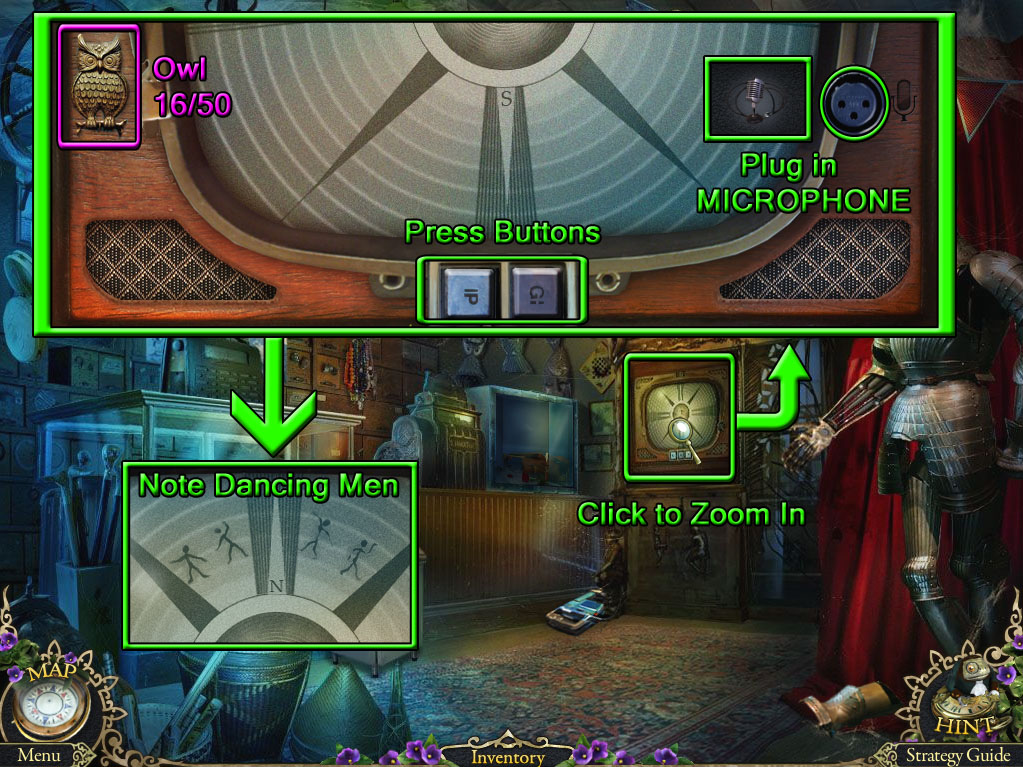
Curiosity Shop
Screenshot.
Click the television set to zoom in.
Find the Owl (16/50) to the left of the screen.
Plug the MICROPHONE (from the window at the Cafe Entrance) into the socket.
Press both of the buttons at the bottom of the screen to watch the video recordings.
After the videos are complete, note the figures of the dancing stick men at the top of the screen.
Go back outside to the Hotel Courtyard.
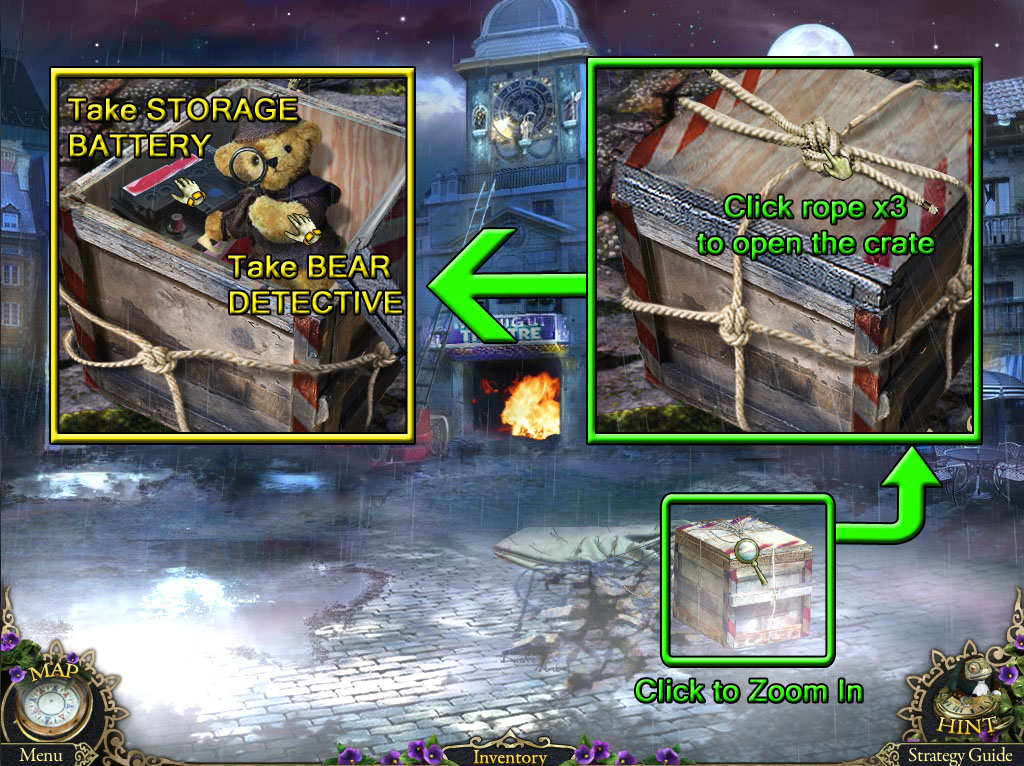
Hotel Courtyard
Screenshot.
Click the crate that falls to the ground for a closer look.
Click the rope three times to open the crate.
Pick up the BEAR DETECTIVE and STORAGE BATTERY inside the box.
Return to the Curiosity Shop.
Curiosity Shop
Screenshot.
Inspect the jackhammer on the floor underneath the safe.
Place the STORAGE BATTERY (from the crate in the Hotel Courtyard) into the battery case.
Click the JACKHAMMER to add it to your inventory.
Go back to the Hotel Courtyard.
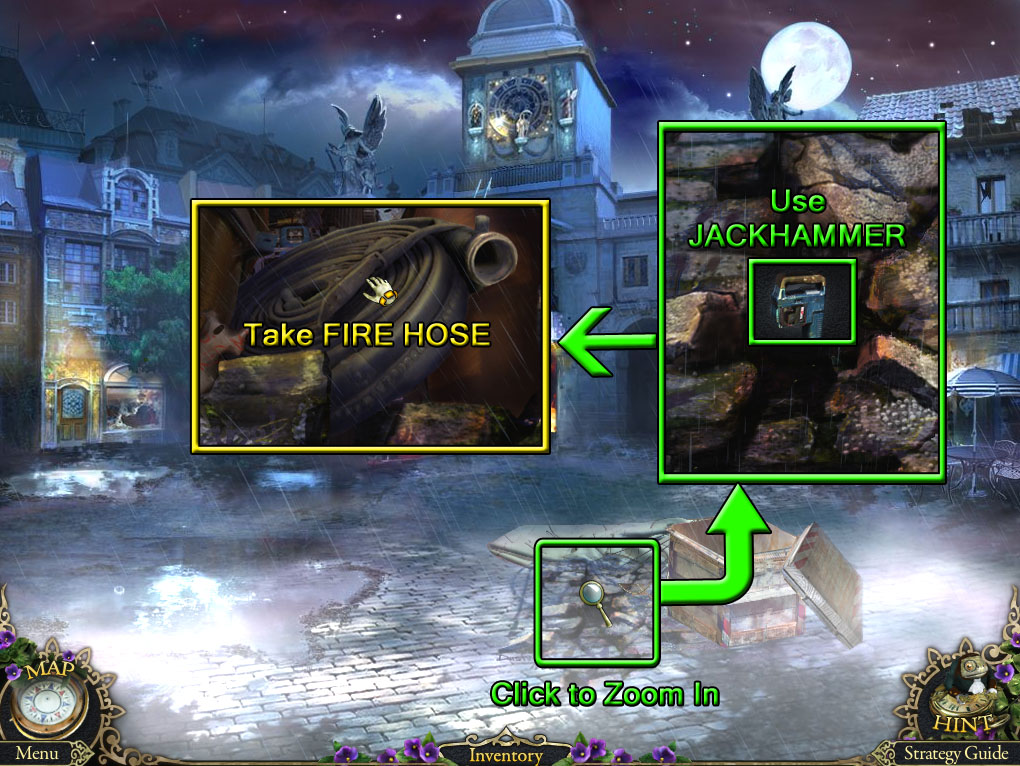
Hotel Courtyard
Screenshot.
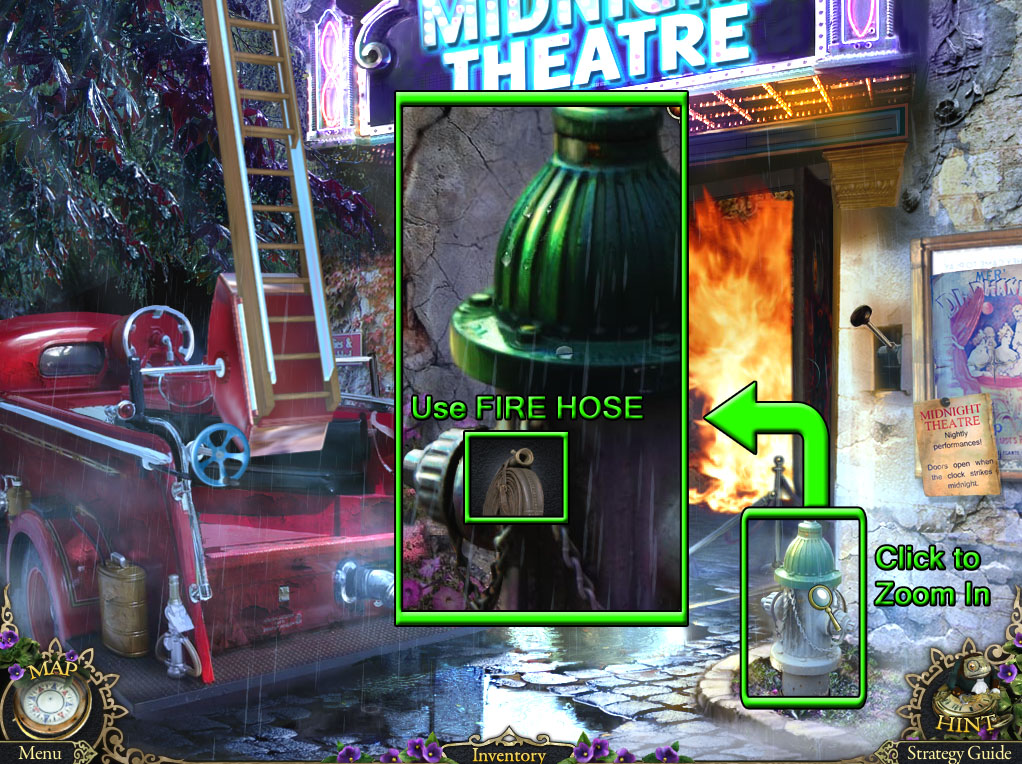
Click the cracks in the broken pavement to zoom in.
Use the JACKHAMMER (from the floor of the Curiosity Shop) on the rubble.
Take the revealed FIRE HOSE from the hole in the ground.
Move forward to the Theater Entrance.
Theater Entrance
Screenshot.
Click the fire hydrant for a closer look.
Attach the FIRE HOSE (from the hole in the Hotel Courtyard) to the hydrant.
Go forward into the Theater.
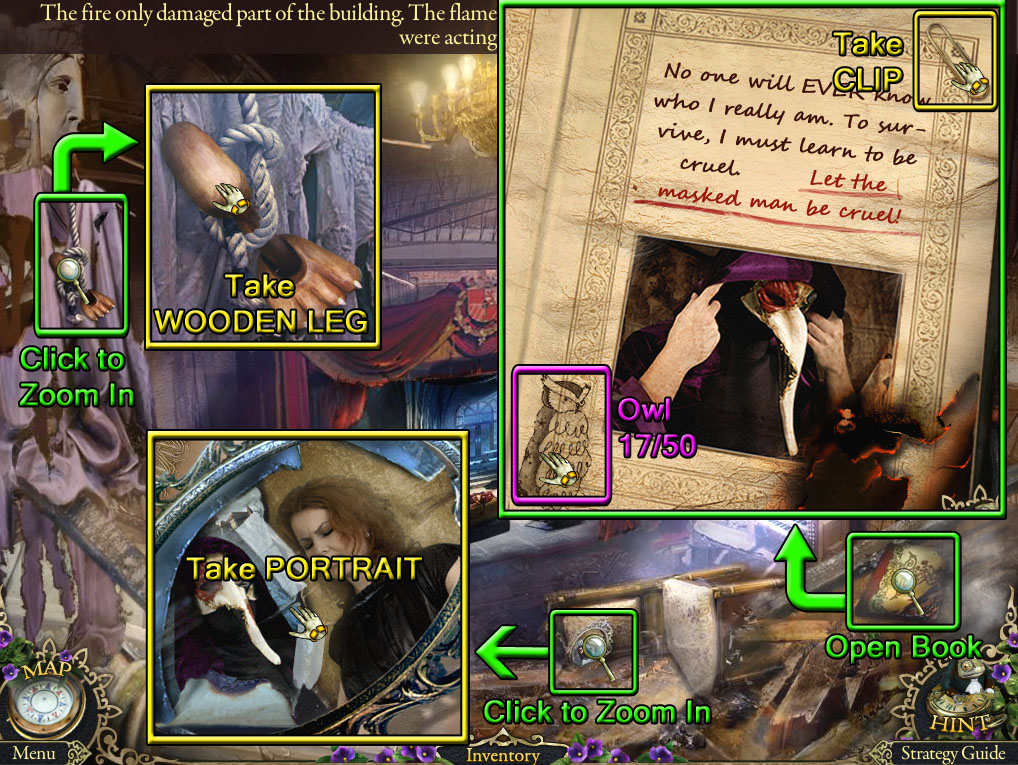
Theater
Screenshot.
Inspect the back of the overturned chair.
Pick up the PORTRAIT inside the picture frame.
Click the rope under the statue head in the upper left corner to zoom in.
Take the WOODEN LEG inside the loop of the rope.
Click the photo album on top of the charred beams in the lower right corner for a closer look.
Open the book, then turn the page.
Find the Owl (17/50) beside the photo on the right page.
Take the CLIP at the upper right corner of the right page.
Continue forward to the Theater Stage.
Theater Stage
Screenshot.
Find the Owl (18/50) inside the bird cage on the suitcase.
Click the right glass display case to zoom in.
Find the Owl (19/50) on the red curtain above the left mask.
Pick up the COMBINATION LOCK between the middle and right mask.
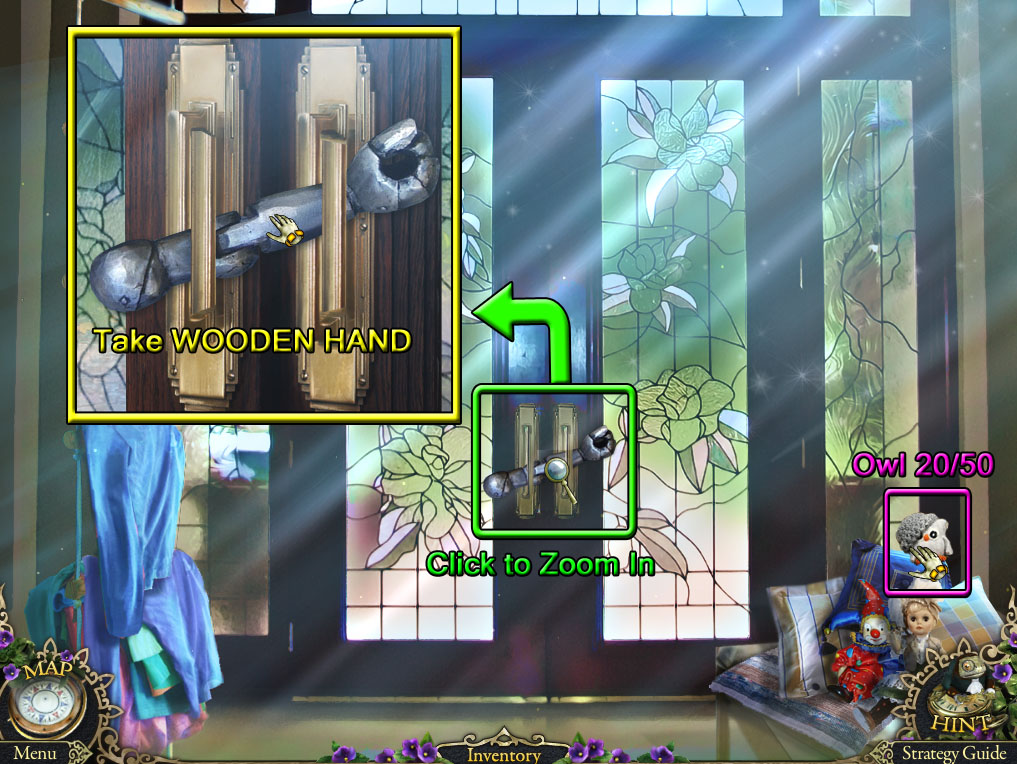
Go forward to the Balcony Doors.
Balcony Doors
Screenshot.
Find the Owl (20/50) on top of the blue throw pillow.
Click the door handles to zoom in.
Take the WOODEN HAND barring the door.
Go forward to start the cutscene.
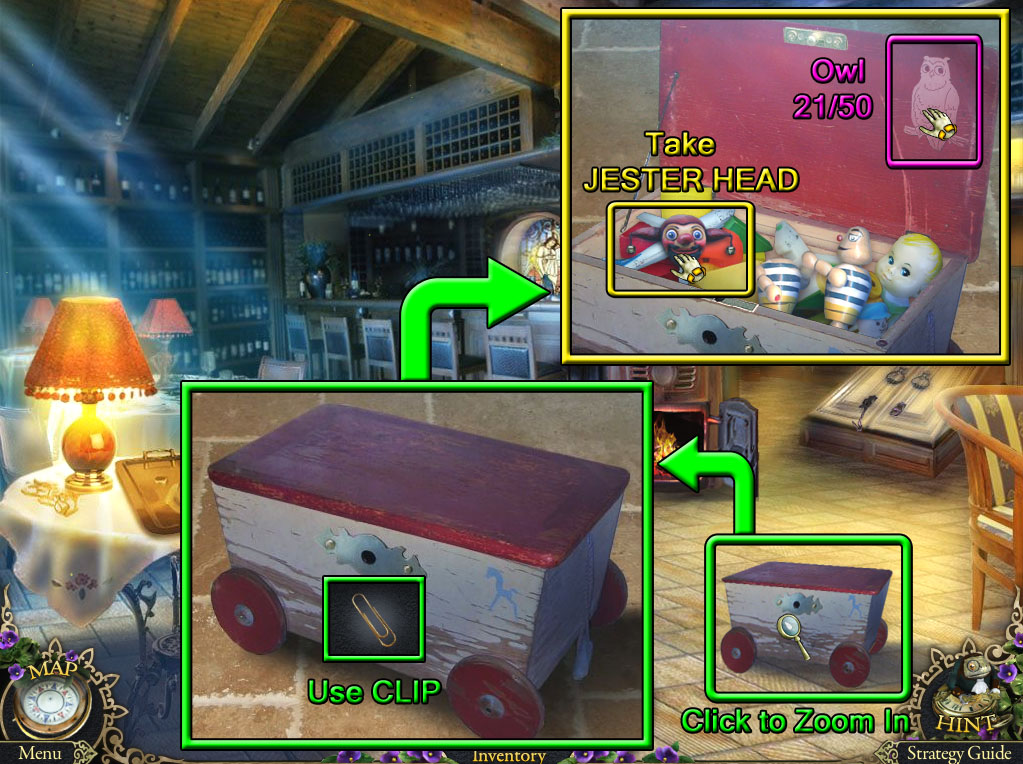
Return to the Cafe of Broken Dreams.
Cafe of Broken Dreams
Screenshot.
Click the toy chest for a closer look.
Use the CLIP (from the photo album in the Theater) to pick the lock.
Find the Owl (21/50) on the lid of the open chest.
Take the JESTER HEAD from the pile of toys.
Go back to the Theater Stage.
Theater Stage
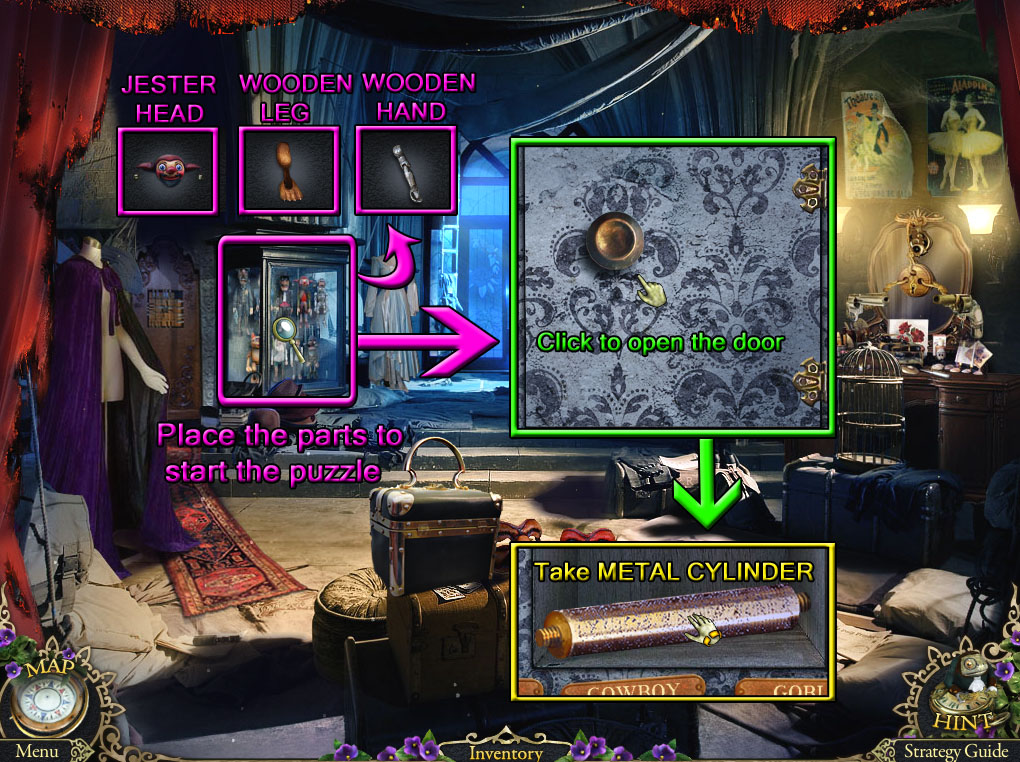
Screenshot.
Click the left glass display case to zoom in.
Add the three body parts from your inventory to the marionettes to start the puzzle.
The JESTER HEAD is from the toy chest in the Cafe.
The WOODEN HAND is from the door handles at the Balcony Doors.
The WOODEN LEG is from the looped rope in the Theater.
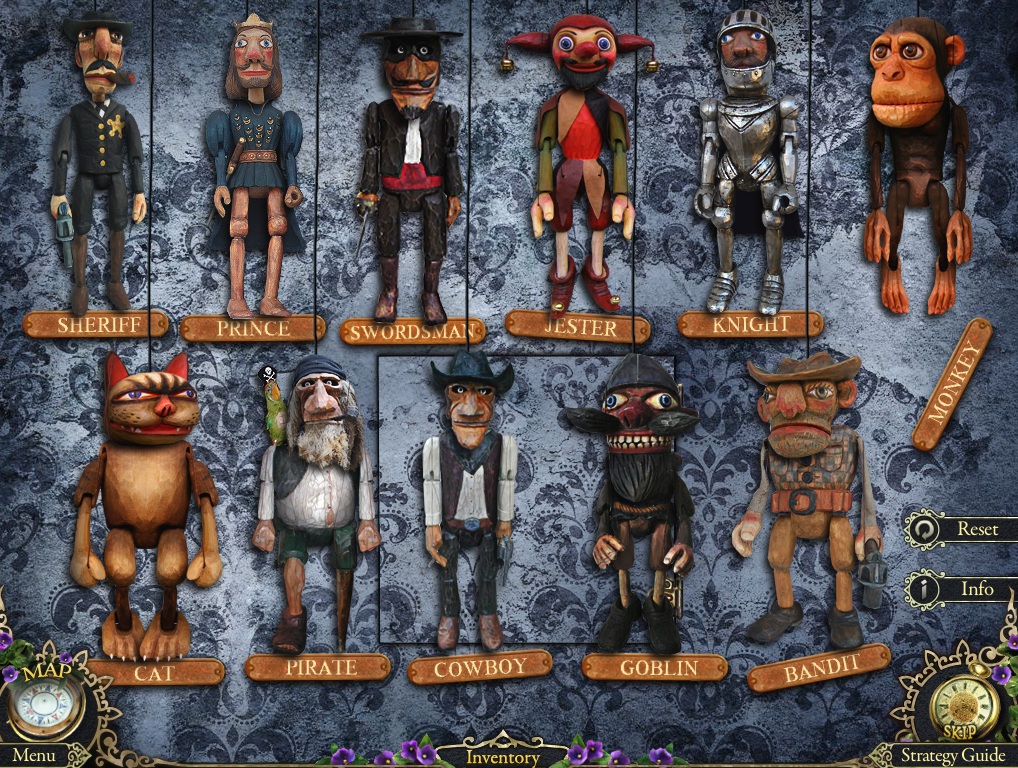
Arrange the correct body parts of each puppet according to the labels on each plaque.
Click and drag a part from one puppet to another to switch their positions.
Each puppet needs the proper head, two arms, and two legs.
When all the parts to a puppet are correctly assembled, the label on the nameplate will glow white.
Solution.
Once the puzzle is solved the puppets will lift, revealing a hidden door in the display case.
Click the door, then take the METAL CYLINDER from the cache.
Go back to the Theater Hall.
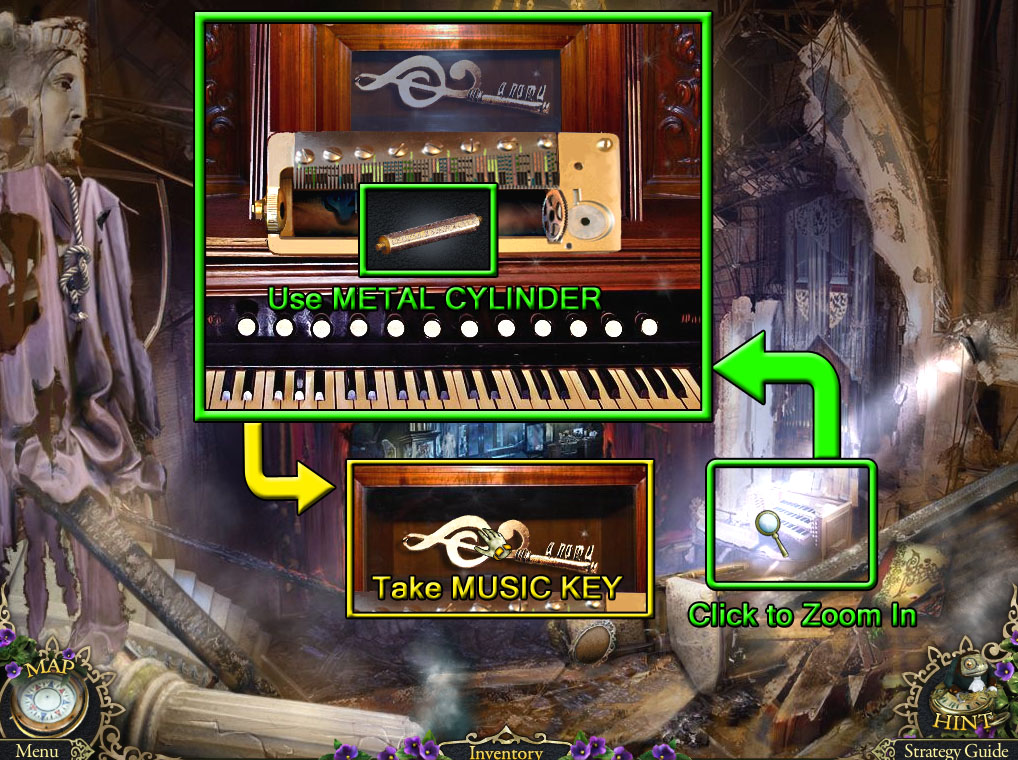
Theater Hall
Screenshot.
Click the pipe organ for a closer look.
Place the METAL CYLINDER into the space above the keyboard.
Take the MUSIC KEY from the opened glass case.
Return to the Theater Stage.
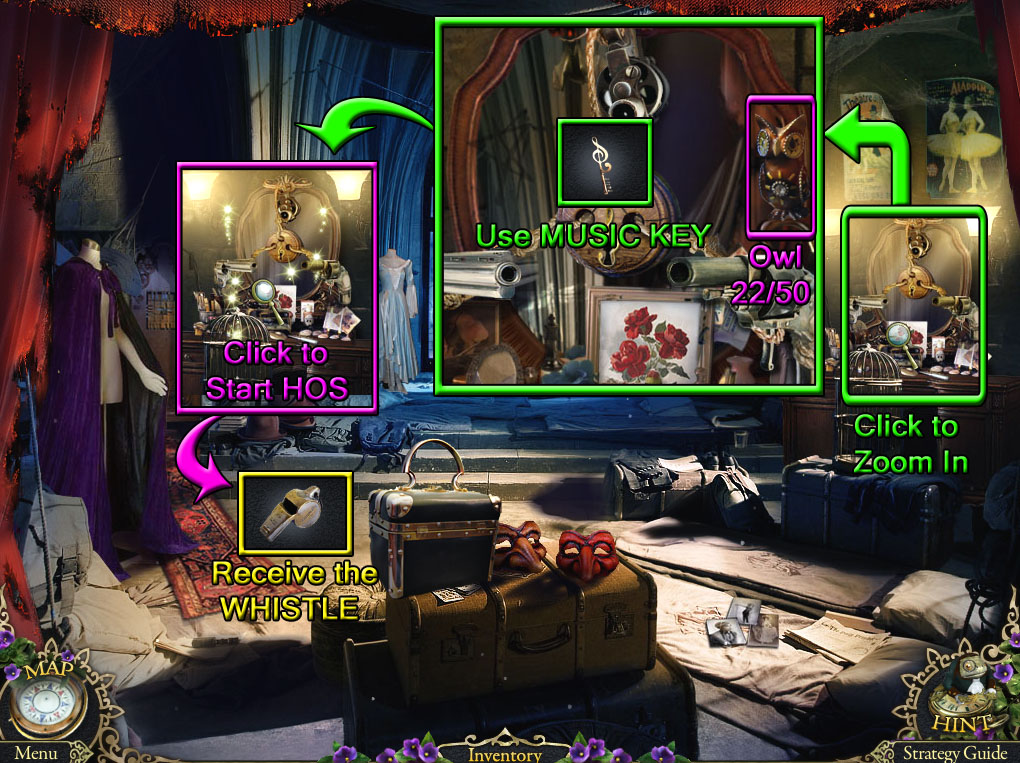
Theater Stage
Screenshot.
Click the dressing table to zoom in.
Find the Owl (22/50) on the right side of the vanity mirror.
Use the MUSIC KEY (from the organ in the Theater Hall) on the locked pulley controlling the three guns.
Click the dressing table to start the hidden object scene.
Use the COMBINATION LOCK (from the right glass display case at the Theater Stage) on the locked jewelry box (A).
Enter the combination shown above the trigger of the left gun: 8-2-5 (B) to open the box and find the Whistle.
Place the TOY HORSE (from the floor next to the toy chest at the Cafe) on the wood stand to make the Horseman (C).
Put the PORTRAIT (from the photo album in the Theater) inside the round picture frame to complete the Framed Portrait (D).
Screenshot.
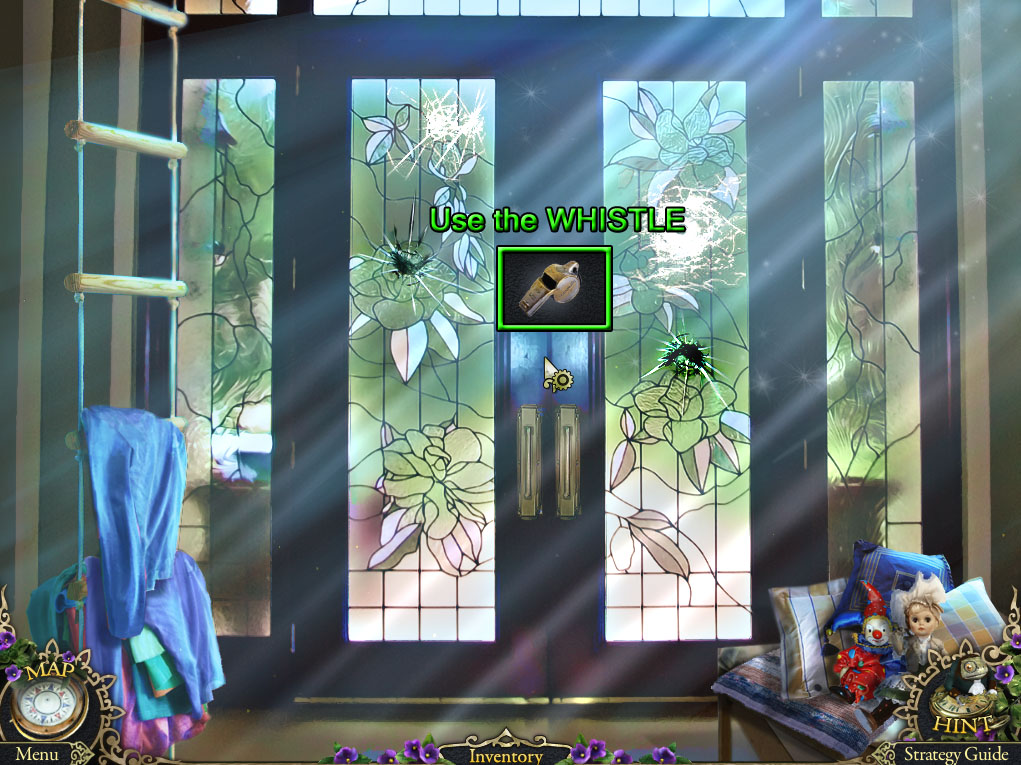
Once the hidden object scene is complete, you will receive a WHISTLE.
Continue forward to the Balcony Doors.
Balcony Doors
Screenshot.
Use the WHISTLE (from the Theater Stage hidden object scene) to scare away the ravens.
Exit through the doors to the Bridge.
Posted by: Trinn |
March 4, 2012 12:32 AM
|
March 4, 2012 12:32 AM
Mystery Trackers: Black Isle Collector's Edition Walkthrough
Part Two: West Wing
Chapter 4
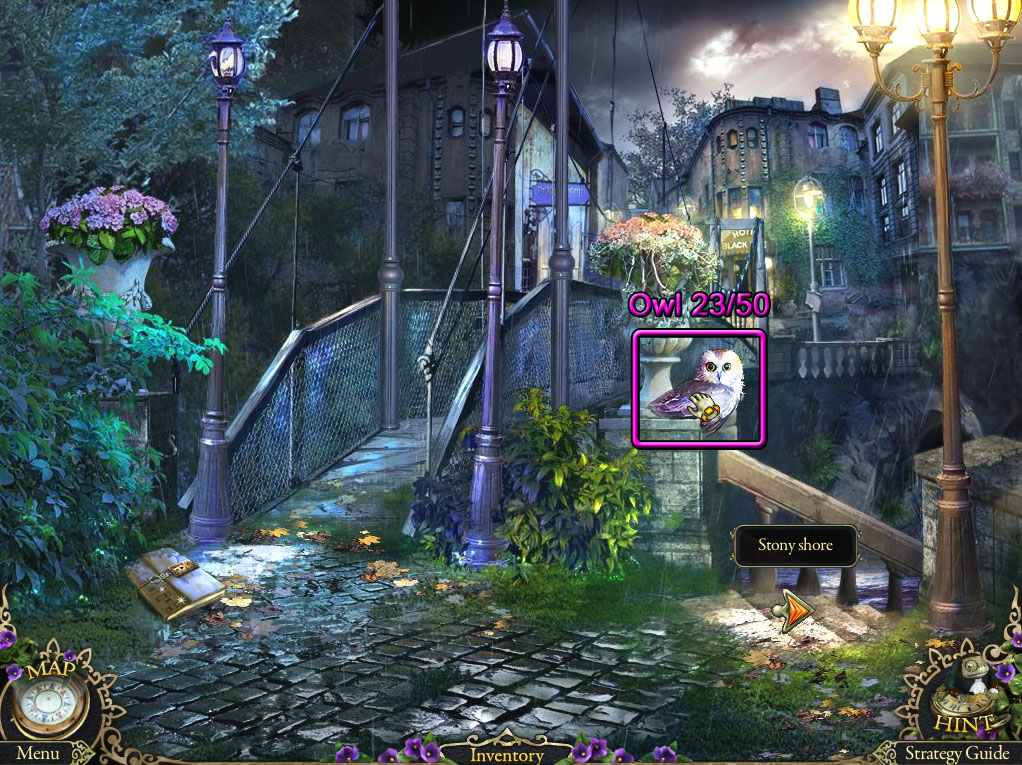
Bridge
Screenshot.
Find the Owl (23/50) next to the vase on the right pedestal.
Go down the stairs to the right to reach the Stony Shore.
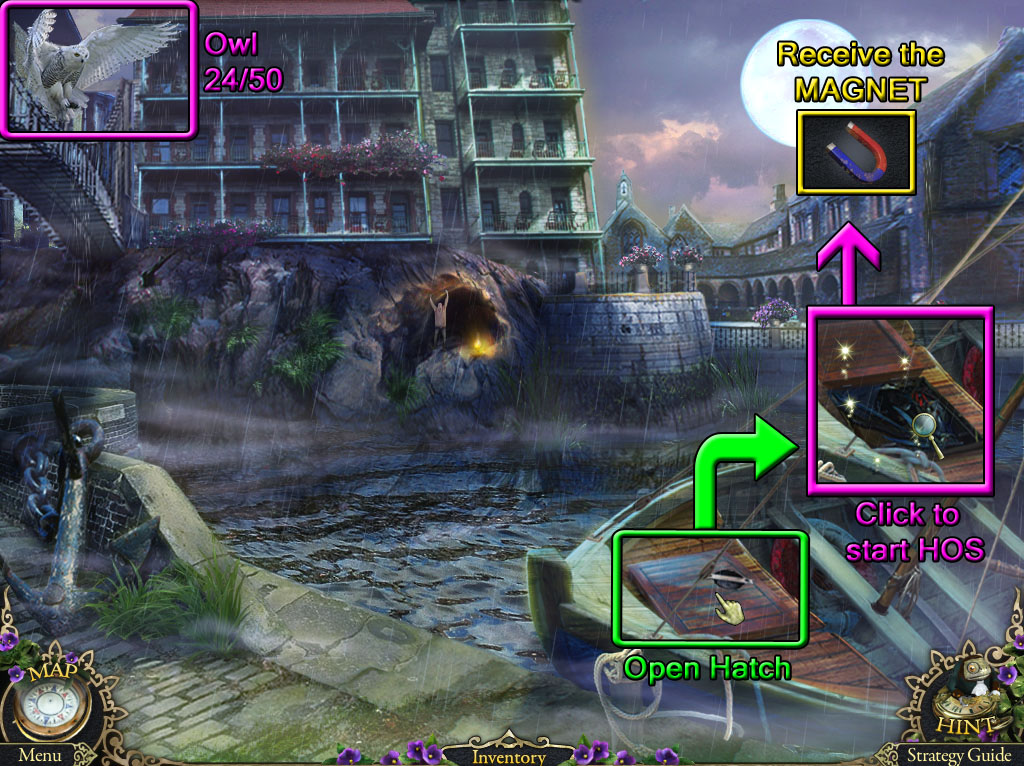
Stony Shore
Screenshot.
Find the Owl (24/50) flying over the bridge in the upper left corner.
Open the hatch at the front of the boat.
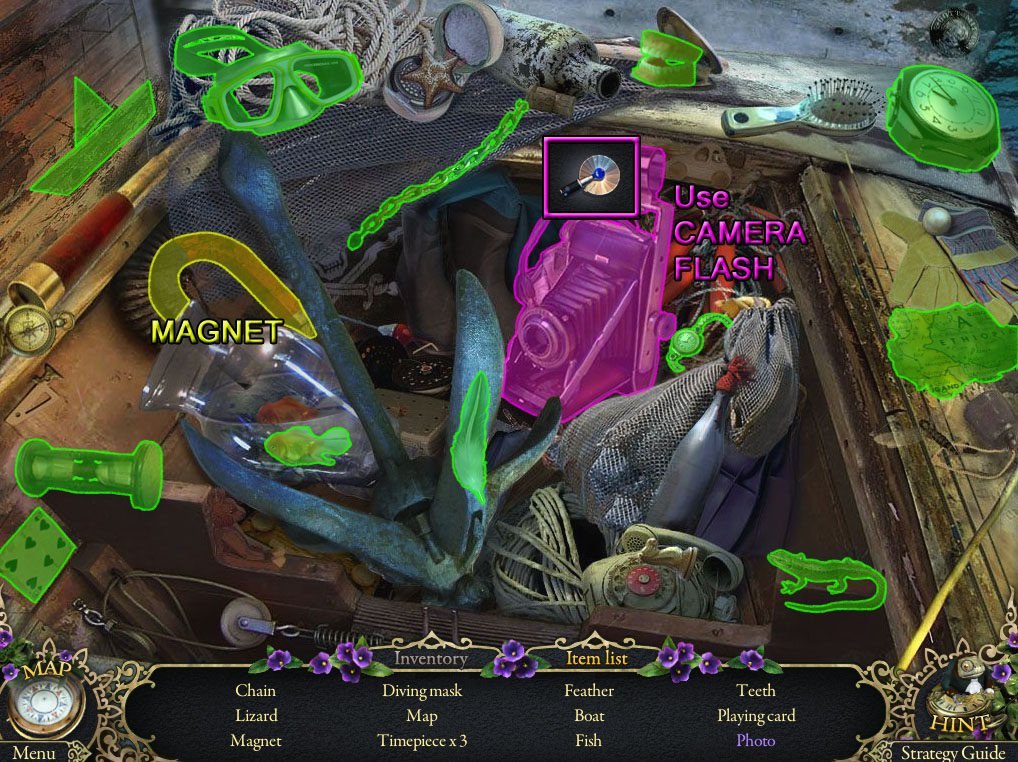
Click the open hatch a second time to start the hidden object scene.
Add the CAMERA FLASH (from the ground at the Stone Stairs) to the camera to snap the Photo (A).
Screenshot.
Once the hidden object scene is complete, you will receive the MAGNET.
Go back to the Cafe of Broken Dreams.
Cafe of Broken Dreams
Screenshot.
Inspect the clock at the end of the wine rack at the upper right corner of the screen.
Use the MAGNET (from the Stony Shore hidden object scene) on the face of the clock.
Take the NEEDLE AND THREAD from the opened clock cache.
Return to the Bridge, then continue forward to the Crossroads.
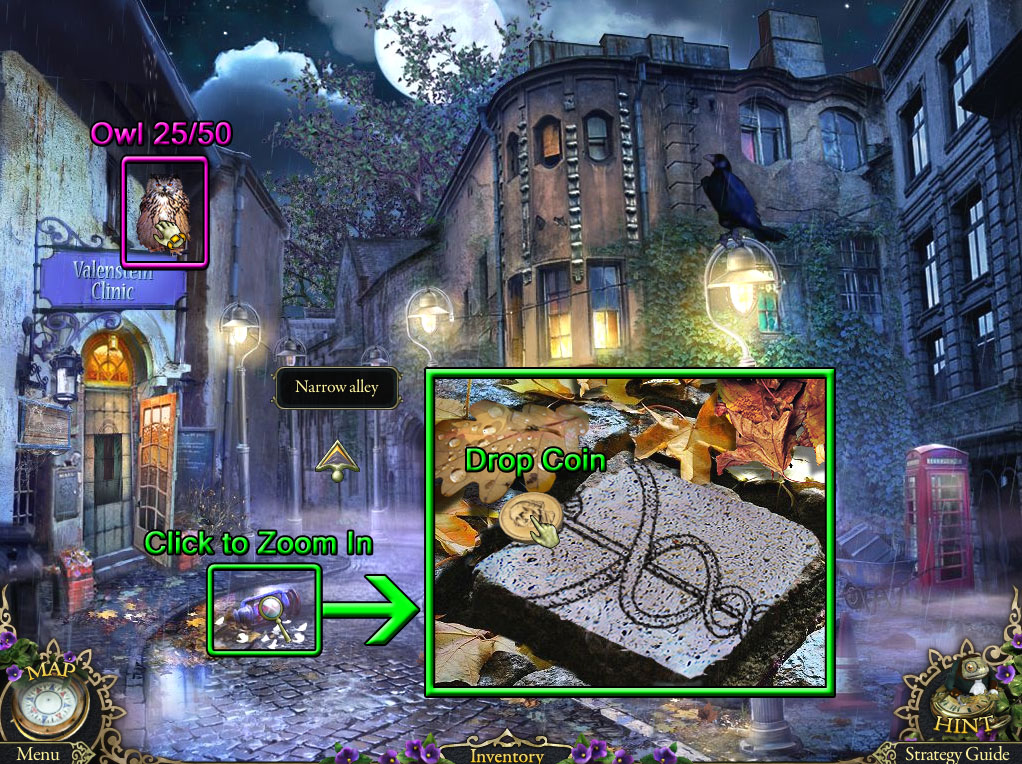
Crossroads
Screenshot.
Find the Owl (25/50) on top of the Valenstein Clinic sign.
Click the red lamp on the ground to zoom in.
Click the gold coin to drop it in the crack.
Go forward twice past the Narrow Alley and to the Dock.
Dock
Screenshot.
Click the seaplane docked on the water to look inside.
Pick up the BINOCULARS beside the aircraft control stick.
Go back to the Stony Shore.
Stony Shore
Screenshot.
Use the BINOCULARS (from the seaplane at the Dock) on the waving figure across the water.
Click the bottle Thomas throws on the ground to zoom in.
Read the note, then pick up the SHARP SPLINTER of glass beside it.
Use the map to travel to the Hotel Courtyard.
Hotel Courtyard
Click the parachute on the ground above the hole for a closer look.
Use the SHARP SPLINTER (from the broken bottle at the Stony Shore) three times to cut through the rope.
Pick up the untied PARACHUTE.
Return to the Stony Shore.
Stony Shore
Screenshot.
Attach the PARACHUTE (from the ground at the Hotel Courtyard) to the mast of the ship.
Inspect the hole in the middle of the parachute.
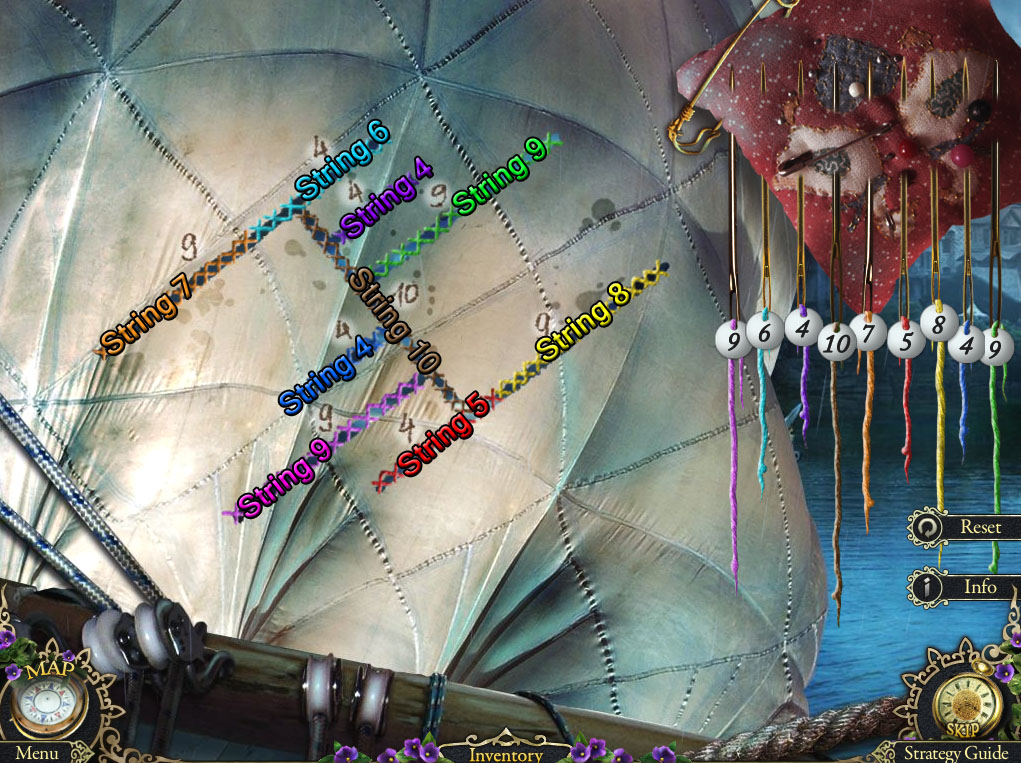
Use the NEEDLE AND THREAD (from the clock cache in the Cafe of Broken Dreams) on the sail to start the puzzle.
Sew the holes in the sail using the needles hanging from the pin cushion.
Each needle is a certain length, indicated by the number on the white ball at the top of the thread.
There are also numbers shown above the holes in the sail which indicate the length of a stich required to repair the hole.
The long tears at the top and bottom of the sail indicate the numbers 9 and 4; however, you can use any combination of strings that equal the sum of 13 (such as 6+7 or 8+5).
Solution.
Once the puzzle is solved, click the boat to sail to the Grotto.
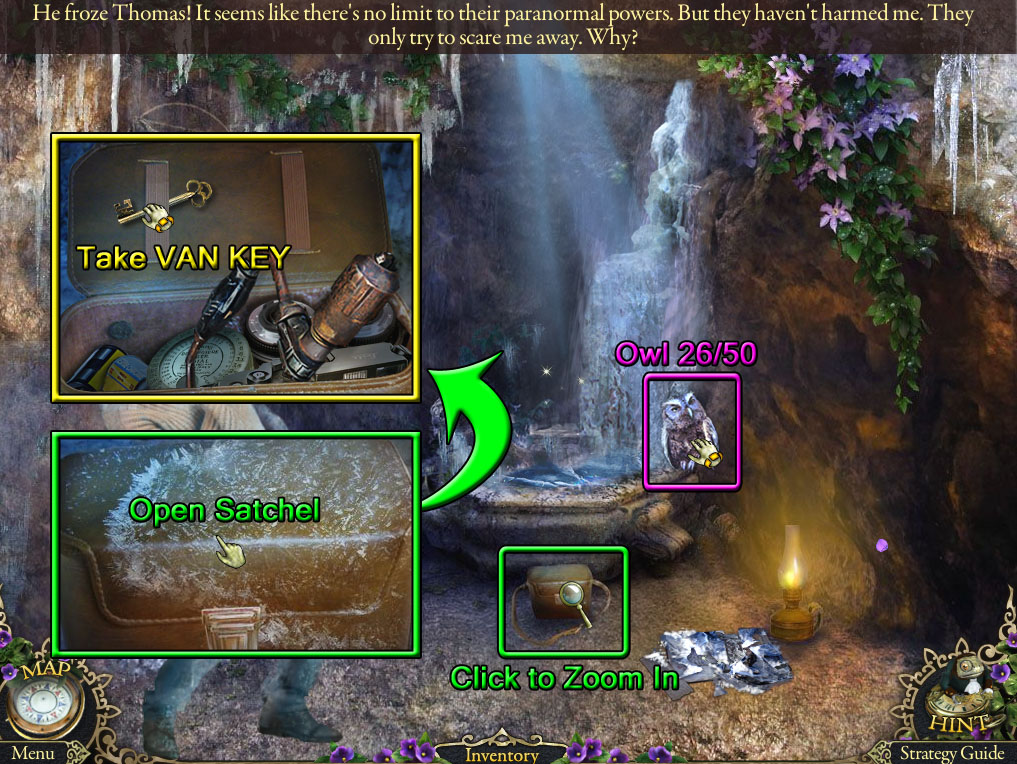
Grotto
Screenshot.
Find the Owl (26/50) at the edge of the frozen fountain.
Click the satchel at the foot of the basin to zoom in.
Click the satchel a second time to open it.
Take the VAN KEY from the straps at the top of the bag.
Use the map to travel to the Narrow Alley.
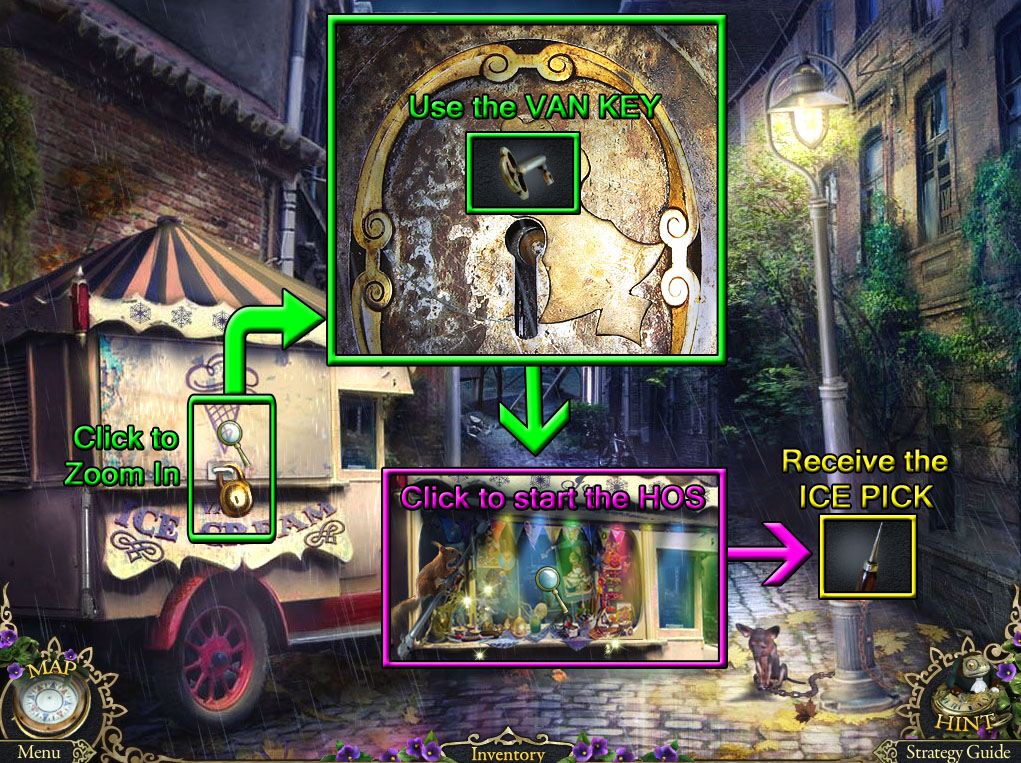
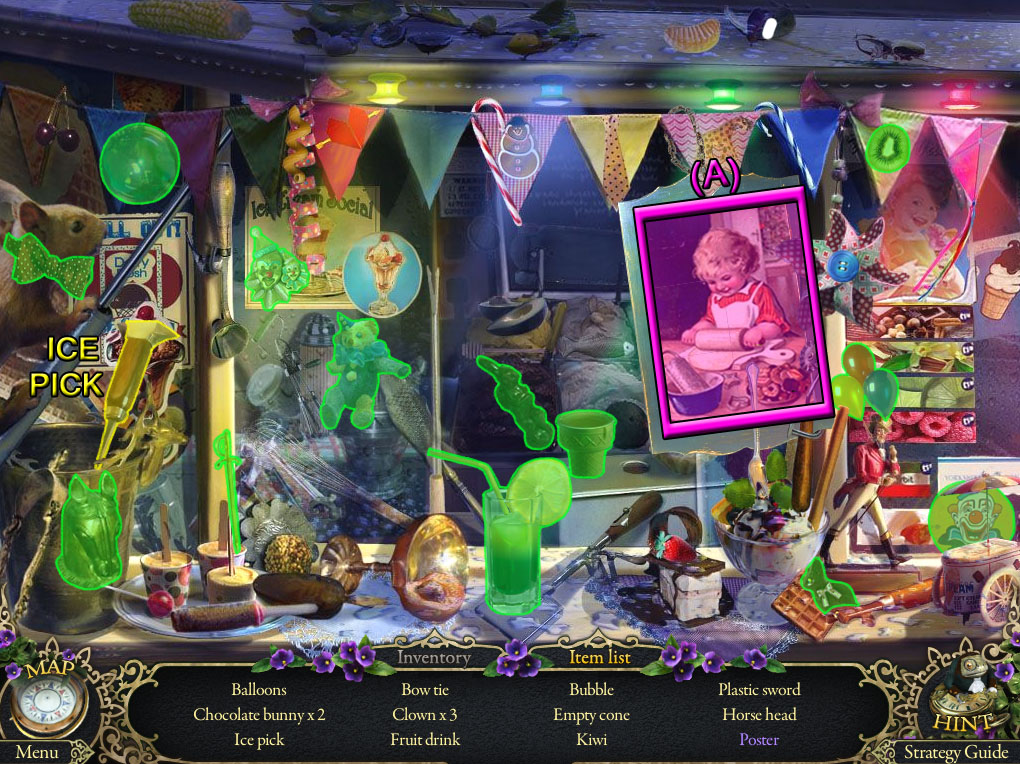
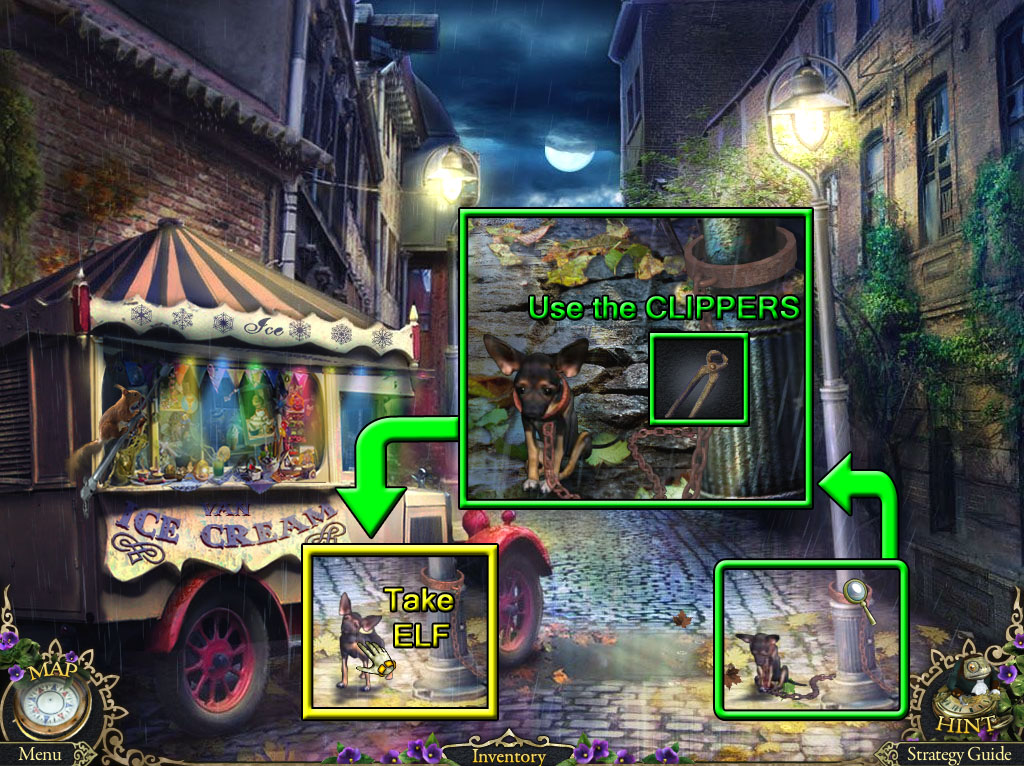
Narrow Alley
Screenshot.
Click the side of the ice cream truck for a closer look.
Use the VAN KEY (from the satchel at the Grotto) to open the padlock.
Click the open truck to start the hidden object scene.
Arrange the tile pieces in the frame to complete the Poster (A).
Screenshot.
Once the hidden object scene is complete, you will receive the ICE PICK.
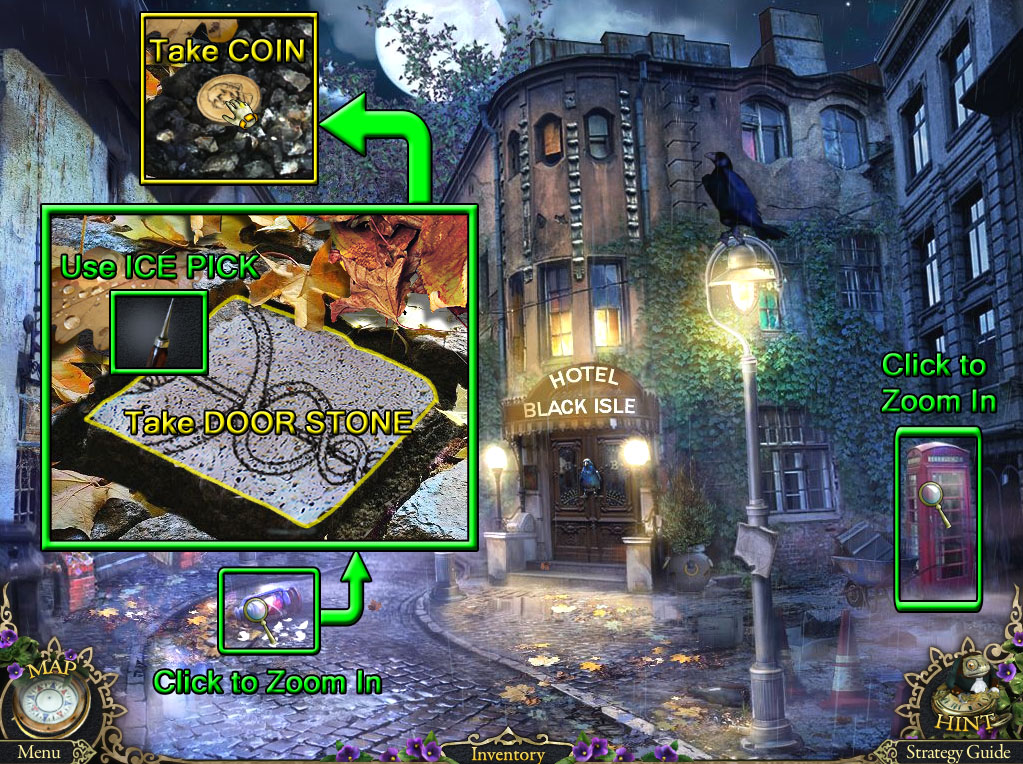
Go back to the Crossroads.
Crossroads
Screenshot.
Click the red lantern in the middle of the path to zoom in.
Use the ICE PICK (from the Narrow Alley hidden object scene) to lift the stone tile.
Click the DOOR STONE (1/2) again to add it to your inventory.
Pick up the gold COIN in the dirt underneath the stone.
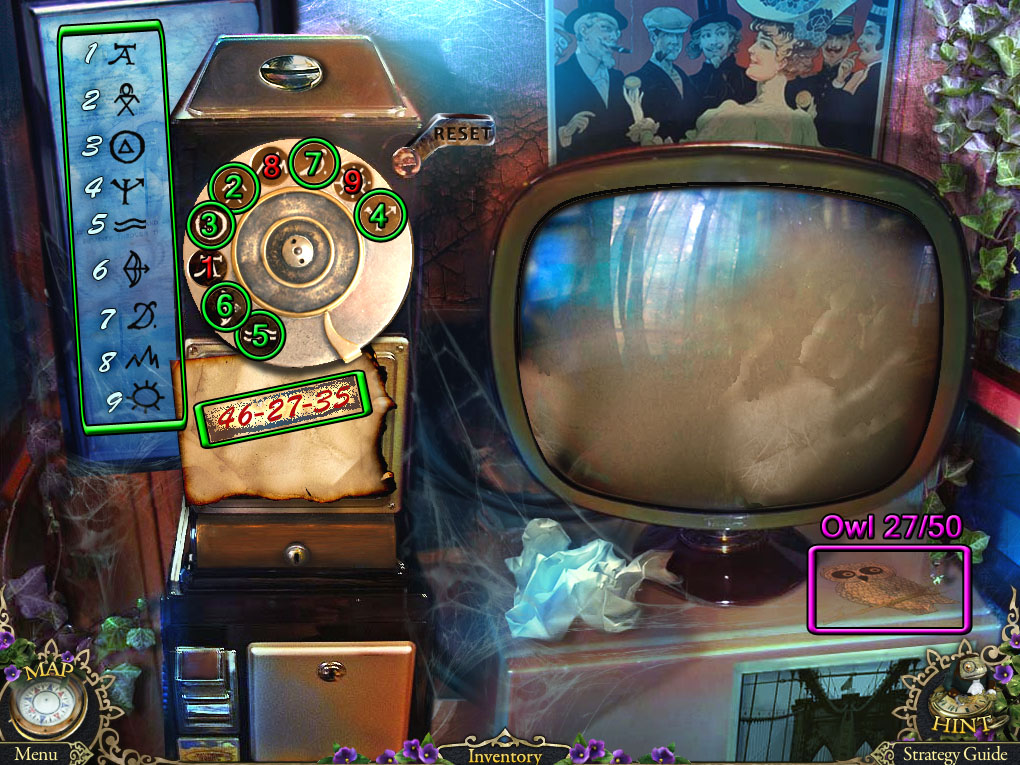
Click the phone booth for a closer look.
Screenshot.
Find the Owl (27/50) on the right side of the stand under the television screen.
Use the COIN to remove the foil on the paper underneath the dial.
Put the COIN into the coinslot at the top of the telephone.
Note the revealed combination on the paper: 46-27-35.
Click the buttons on the dial according to the cypher numeric guide on the wall.
Screenshot.
After the video clip is complete, take the RAVEN FEATHER (1/2) from the opened compartment at the bottom of the telephone.
Return to the Grotto.
Grotto
Screenshot.
Inspect the frozen notebook on the ground next to the lantern.
Use the ICE PICK (from the Narrow Alley hidden object scene) three times to remove the ice from the notebook.
Take the revealed PLATE and FEATHER FAN.
Use the map to travel to the Theater Stage.
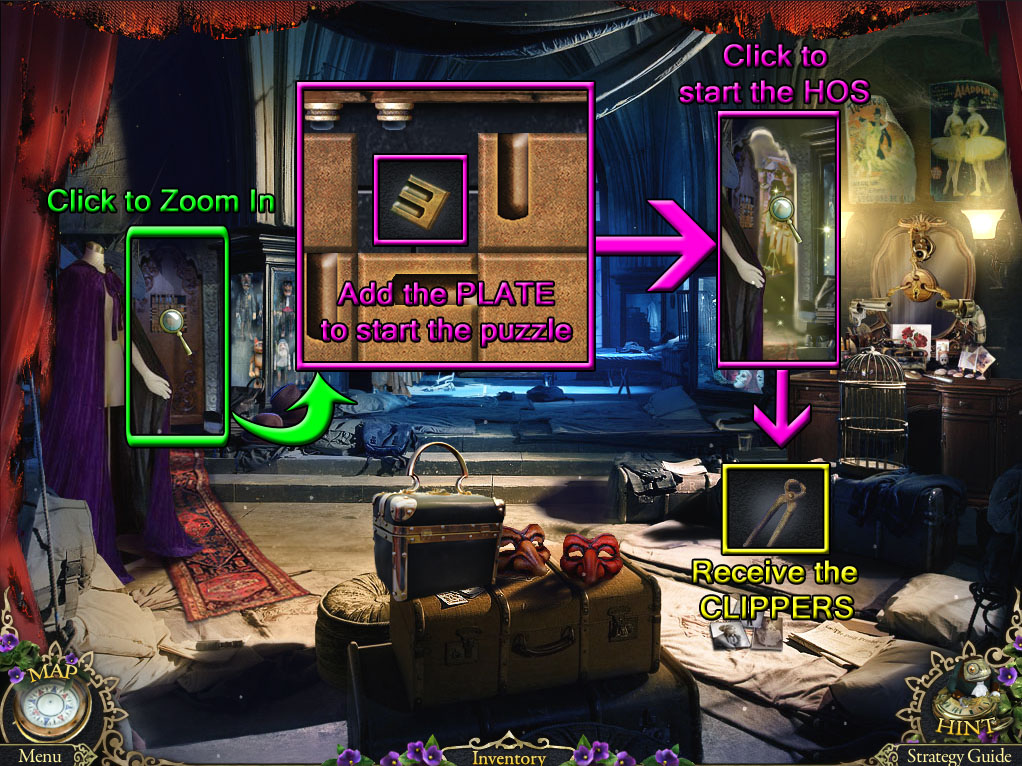
Theater Stage
Screenshot.
Click the door beside the left display case for a closer look.
Add the PLATE (from the frozen notebook in the Grotto) to the panel to start the puzzle.
Rotate the tiles to align the tubes in the squares with the slots along the edges of the panel and the hourglass tile in the center.
Click a tile to move it into an adjacent empty space.
When a tube is correctly positioned next to a slot, it will glow light blue.
Solution.
Once the puzzle is solved, click the open door to start the hidden object scene.
Find the Owl (28/50) on top of the lamp.
Add the FEATHER FAN (from the frozen notebook in the Grotto), then arrange the pieces to complete the Fan (A).
Screenshot.
Once the hidden object scene is complete, you will receive the NIPPERS.
Return to the Narrow Alley.
Narrow Alley
Screenshot.
Click the small dog chained to the lamp post to zoom in.
Use the CLIPPERS (from the Theater Stage hidden object scene) to remove the dog's collar.
Click ELF the dog to add him to your inventory.
Go back to the Crossroads.
Crossroads
Screenshot.
Use ELF (from the chained post in the Narrow Alley) on the raven standing on top of the front right street lamp to receive the RAVEN FEATHER (2/2).
Click the door to the hotel for a closer look.
Add the two RAVEN FEATHERS to the bird sitting on the door handle to start the puzzle.
The first RAVEN FEATHER is from the telephone booth at the Crossroads.
The second RAVEN FEATHER is from the raven on the street lamp.
Arrange the feathers on the wings so that they go in order from top to bottom of longest to shortest and match in pattern on both wings.
Move the cursor over either wing to view its feathers.
Click a feather to select it, then click a different feather on either wing to swap their positions.
Solution.
Once the puzzle is solved, click the handle to open the door.
Go through the open door to the Hotel Hall, then continue up the stairs to the Hotel Corridor.
Chapter 5
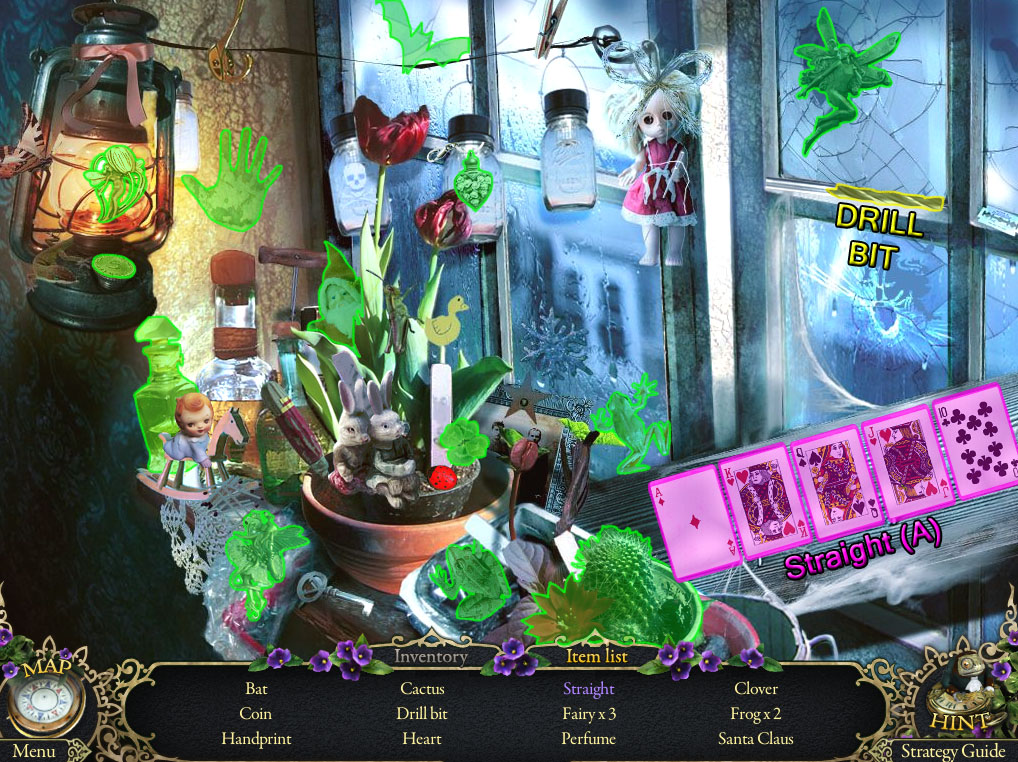
Hotel Corridor
Screenshot.
Click the back window to start the hidden object scene.
Arrange the cards from Ace to Ten to complete the Straight (A).
Screenshot.
Once the hidden object scene is complete, you will receive the DRILL BIT.
Click the open wardrobe to look inside.
Take the LADDER leaning against the left side wall.
Take the TWIN PORTRAIT from the shelf on the left door.
Use the map to travel to the Grotto.
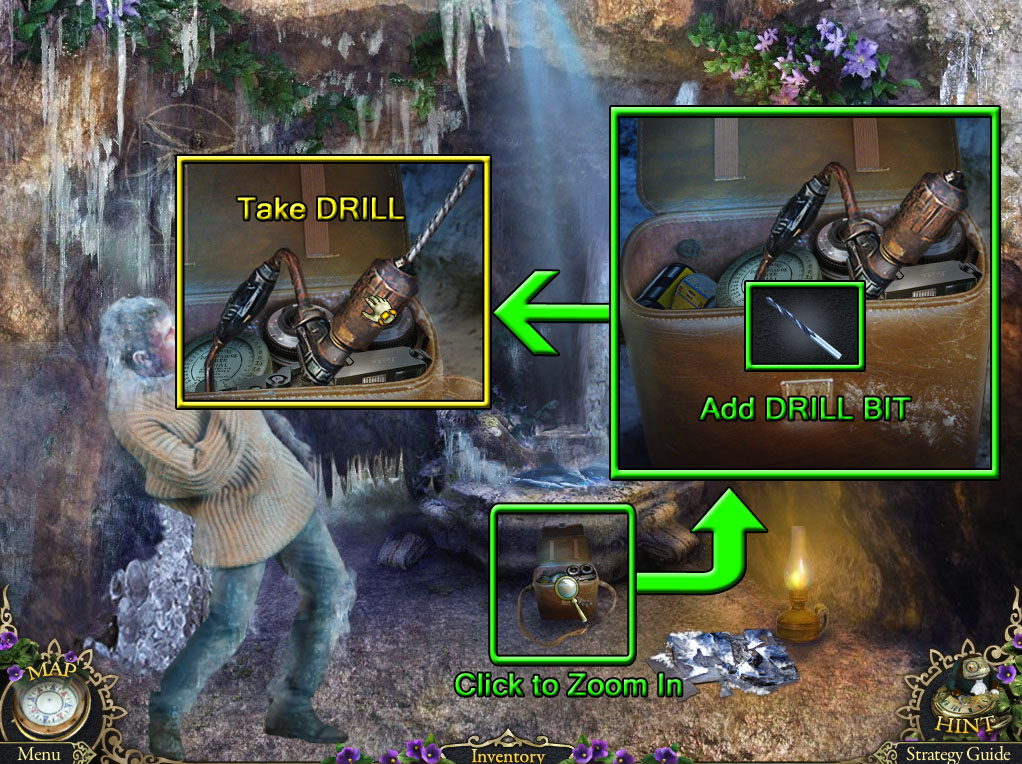
Grotto
Screenshot.
Click the open satchel on the ground to zoom in.
Add the DRILL BIT (from the Hotel Corridor hidden object scene) to the tool inside the bag.
Click the DRILL to add it to your inventory.
Return to the Hotel Corridor.
Hotel Corridor
Screenshot.
Click the left door for a closer look.
Use the OILCAN (from the knight puzzle at the Curiosity Shop) on the rusted bolt.
Pry the bolt off with the ICE PICK (from the Narrow Alley hidden object scene).
Lift the bolt to find the keyhole, then use the DRILL (from the satchel at the Grotto) to cut through the bolt.
Look through the open keyhole.
Go through the open left door to the Guest Room.
Guest Room
Screenshot.
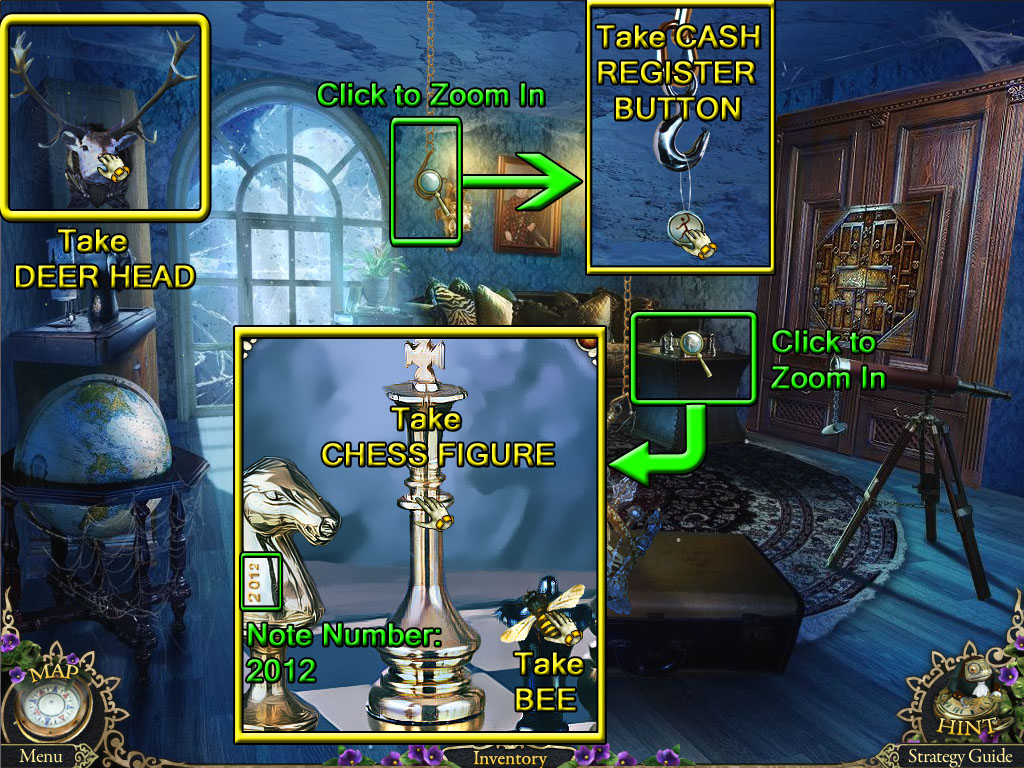
Pick up the DEER HEAD mounted on the wall to the left of the window.
Click the chess set in front of the sofa to zoom in.
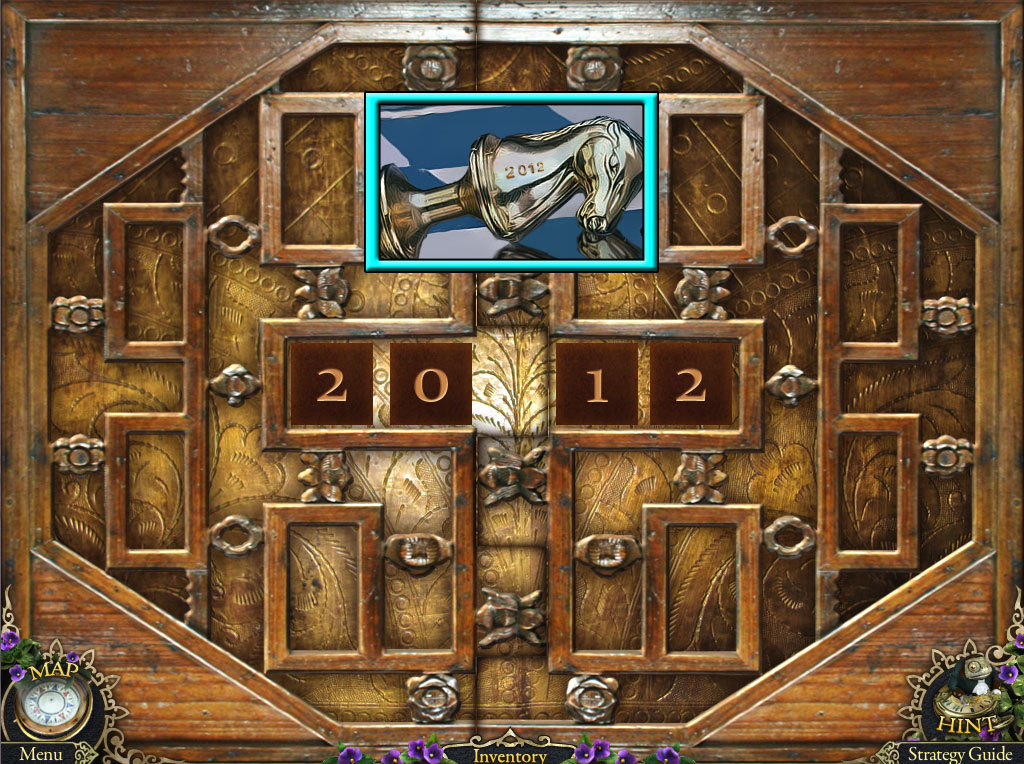
Take the BEE and the CHESS FIGURE from the chess board.
Note the four numbers engraved on the side of the knight figure: 2012
Inspect the hook at the end of the chain hanging from the ceiling.
Take the CASH REGISTER BUTTON from the string around the hook.
Go back to the Hotel Hall.
Hotel Hall
Screenshot.
Click the taxidermy animals mounted on the back wall for a closer look.
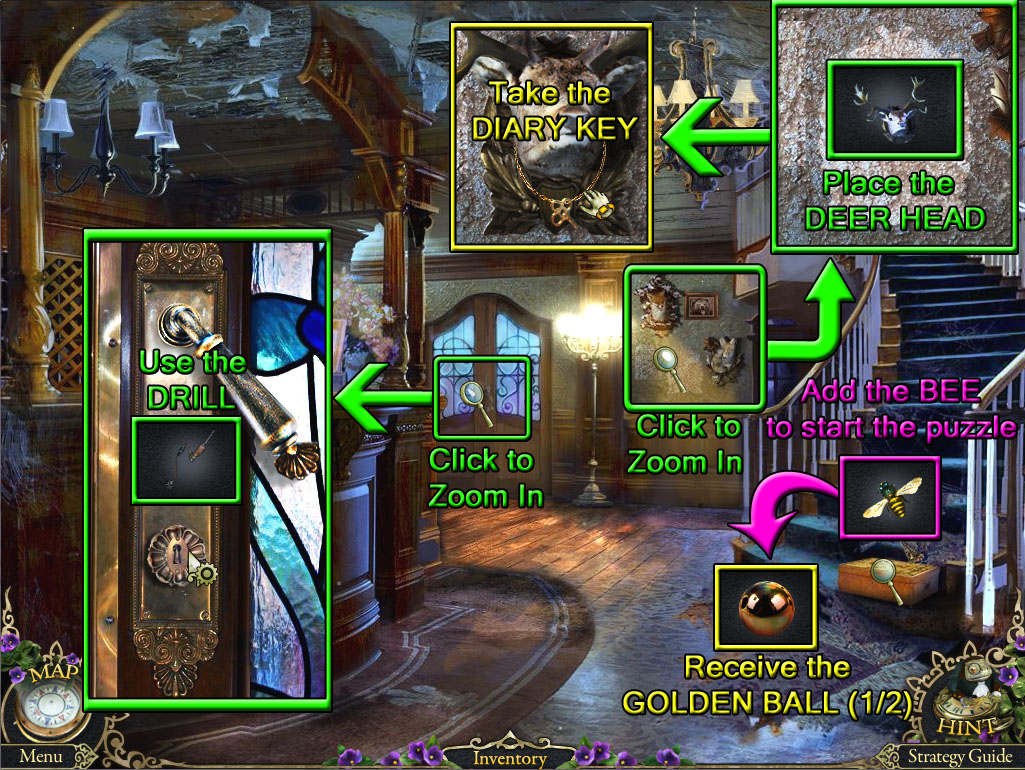
Place the DEER HEAD (from the wall at the Guest Room) onto the blank space in the middle of the wall.
Take the DIARY KEY from the necklace under the deer head.
Inspect the wood box at the bottom of the stairs.
Add the BEE (from the chess board in the Guest Room) to the board to start the puzzle.
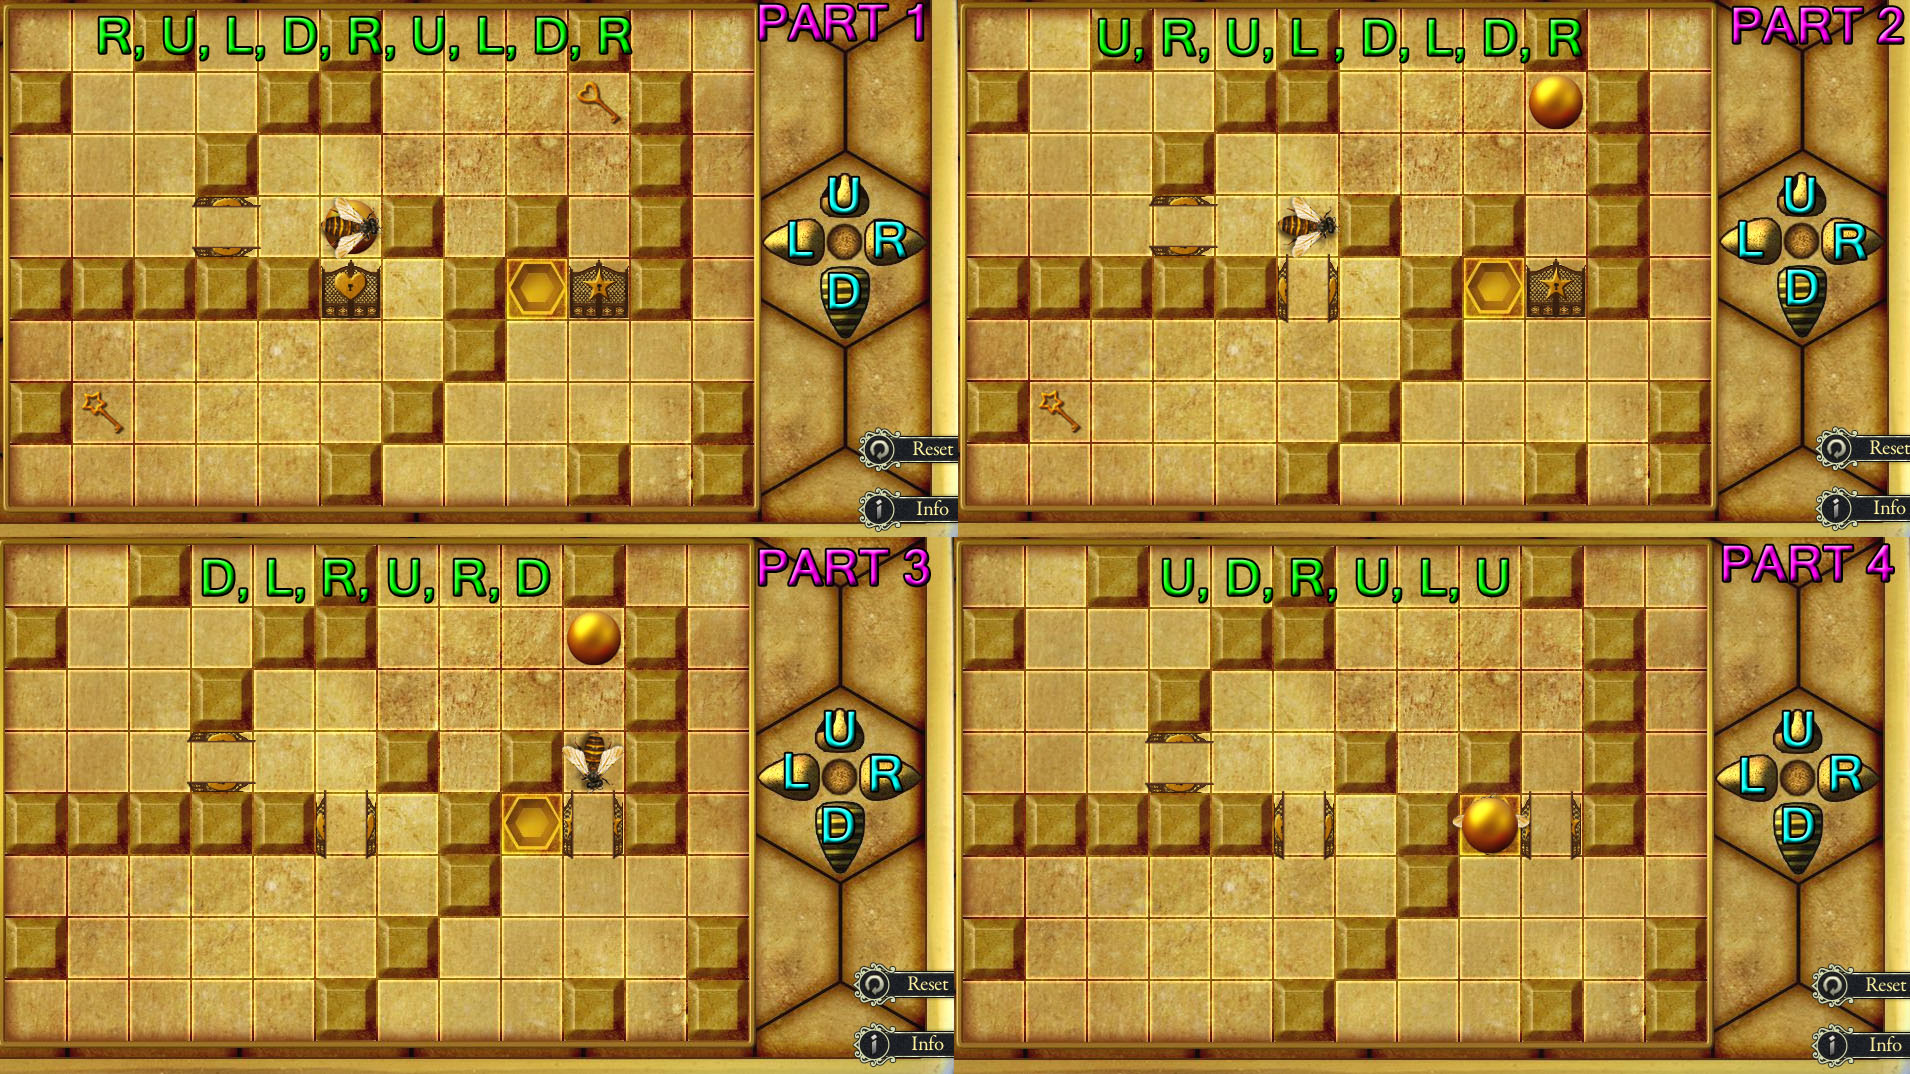
Collect all of the keys, then move the bee to the honeycomb at the end of the maze.
Click the arrows at the right side of the board to move the bee in the corresponding directions.
The bee will continue to move until it hits an obstacle or falls off the board.
If the bee leaves the board, the puzzle will reset from the beginning.
Click the arrows in the following order:
Right, Up, Left, Down, Right, Up, Left, Down, Right - Circle door opened.
Up, Right, Up, Left, Down, Left, Down, Right - Heart door opened.
Down, Left, Right, Up, Right, Down - Star door opened.
Up, Down, Right, Up, Left, Up - Honeycomb end.
Solution.
When the puzzle is solved, you will receive the GOLDEN BALL (1/2).
Click the closed doors to zoom in.
Use the DRILL (from the satchel at the Grotto) on the keyhole under the right handle.
Click the handles to open the door.
Go through the open door to the Hotel Lounge.
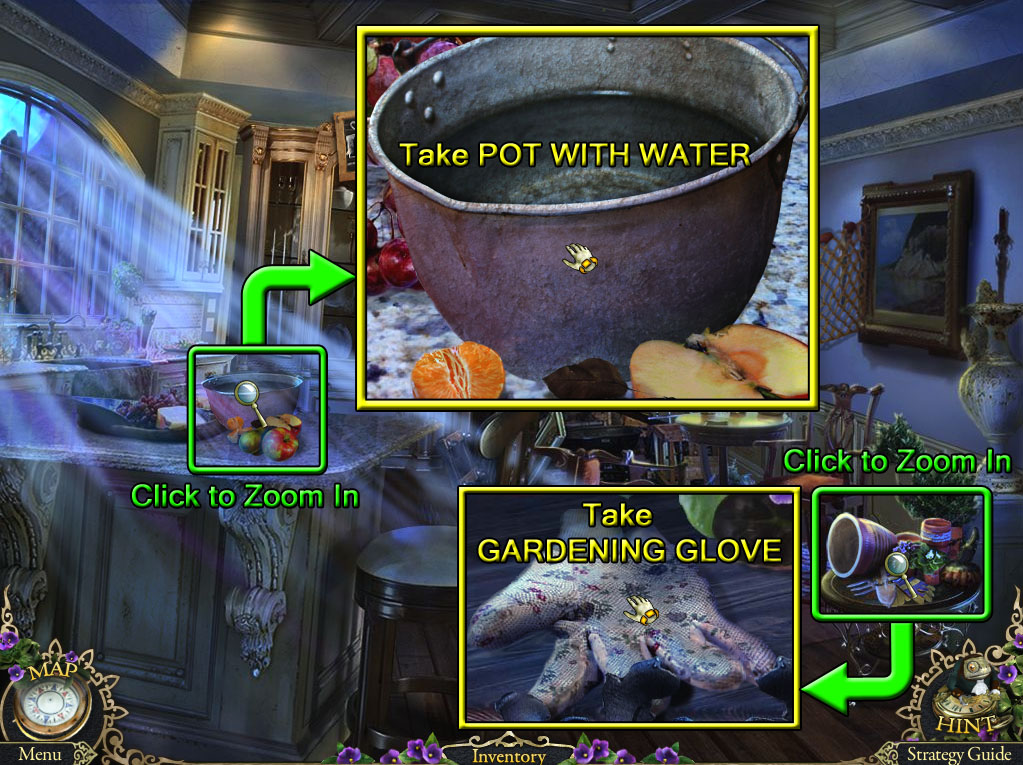
Hotel Lounge
Screenshot.
Click the marble counter to zoom in.
Pick up the POT WITH WATER between the pieces of fruit.
Click the short table in the lower left side of the room for a closer look.
Take the GARDENING GLOVE on top of the table.
Go back to the Bridge.
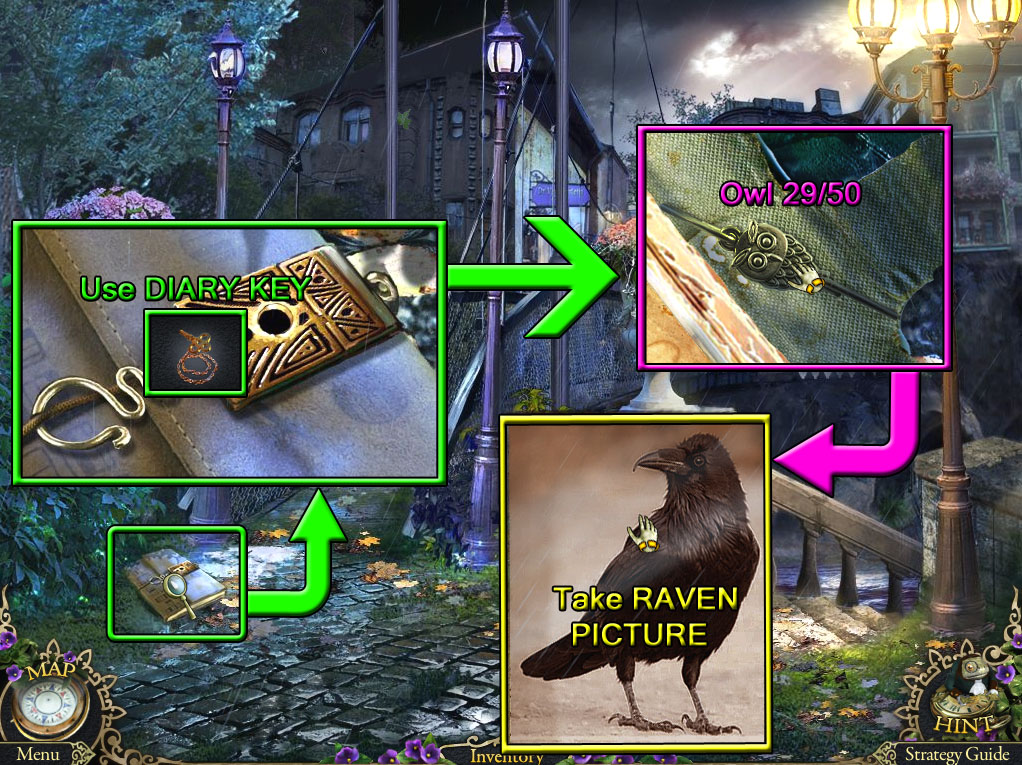
Bridge
Screenshot.
Inspect the diary lying on the ground in front of the bridge.
Use the DIARY KEY (from the deer head at the Hotel Hall) on the lock, then turn the key to open the diary.
Find the Owl (29/50) on the right side of the journal cover.
Take the RAVEN PICTURE inside the book.
Use the map to travel to the Curiosity Shop.
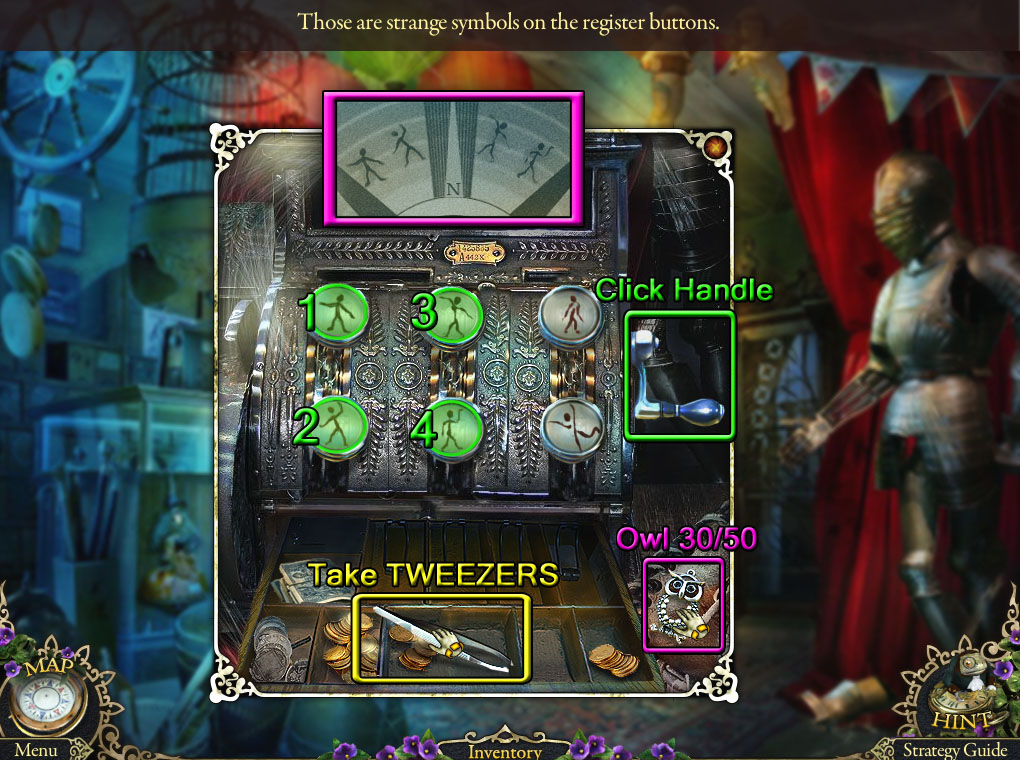
Curiosity Shop
Click the cash register on the counter for a closer look.
Find the Owl (30/50) to the right of the register drawer.
Add the CASH REGISTER BUTTON (from the hook in the Guest Room) to the register.
Press the buttons in the order shown on the television screen in the shop.
Screenshot.
Take the TWEEZERS from the open drawer.
Return to the Hotel Hall.
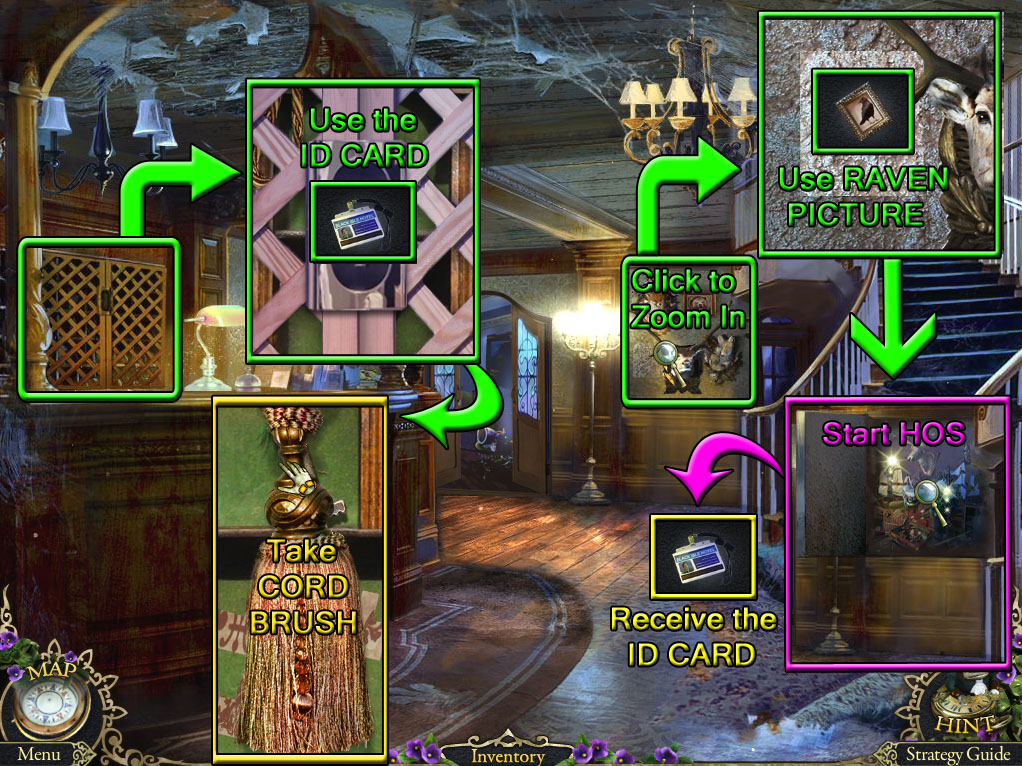
Hotel Hall
Screenshot.
Click the taxidermy animals hanging on the wall to zoom in.
Add the RAVEN PICTURE (from the diary at the Bridge) to the blank space on the wall.
Turn the raven picture to open the hidden wall cache.
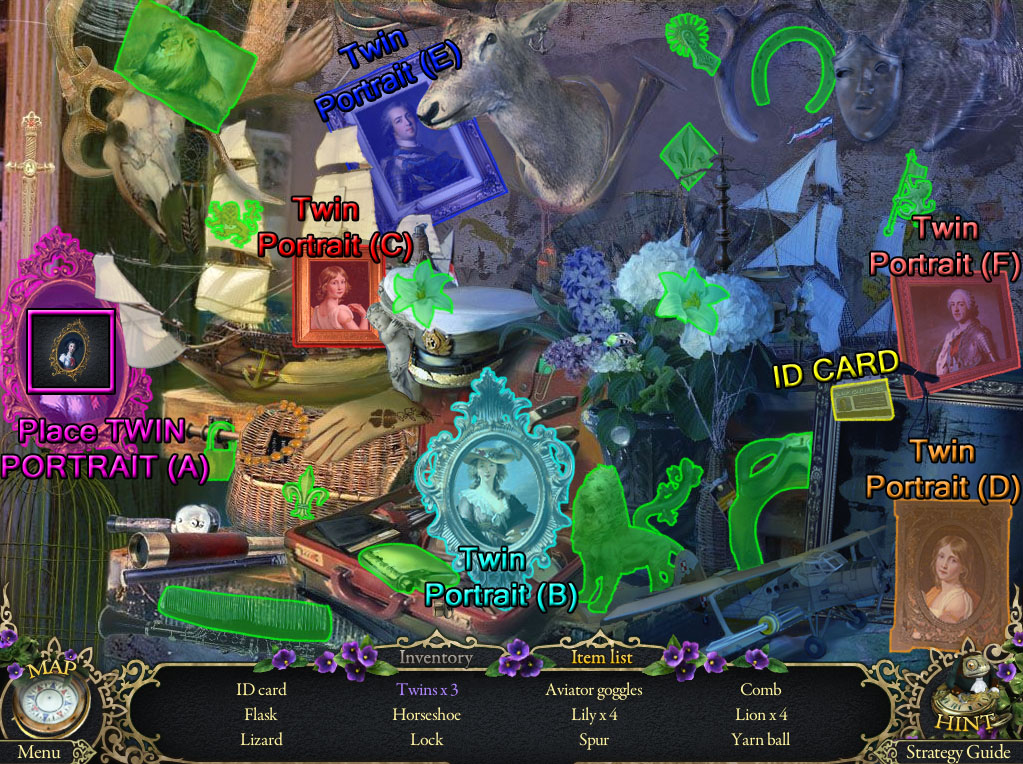
Click the revealed cache to start the hidden object scene.
Hang the TWIN PORTRAIT (from the wardrobe in the Hotel Corridor) on the space at the left side of the wall (A).
Select the three pairs of framed twin portraits to find the Twins (A+B, C+D, and E+F).
Screenshot.
Once the hidden object scene is complete, you will receive the ID CARD.
Inspect the locked cabinet behind the reception desk.
Use the ID CARD on the card slot to unlock the cabinet.
Take the CORD BRUSH hanging from the top knobs.
Go back to the Theater Stage.
Theater Stage
Screenshot.
Click the right display case to zoom in.
Add the CORD BRUSH to the rope hanging from the upper left corner.
Click the cord to drop the skeleton puppet.
Turn the skeleton around, then take the TAG stuck to its back.
Return to the Hotel Hall.
Hotel Hall
Screenshot.
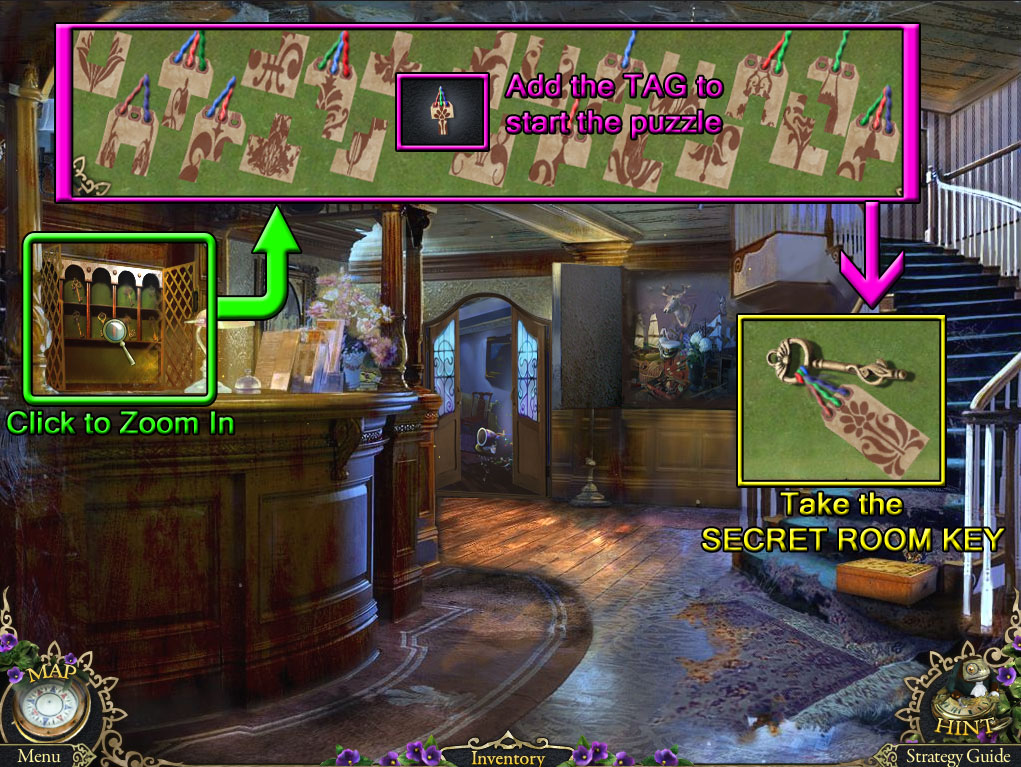
Click the key rack behind the reception desk for a closer look.
Add the TAG (from the display case at the Theater Stage) to start the puzzle.
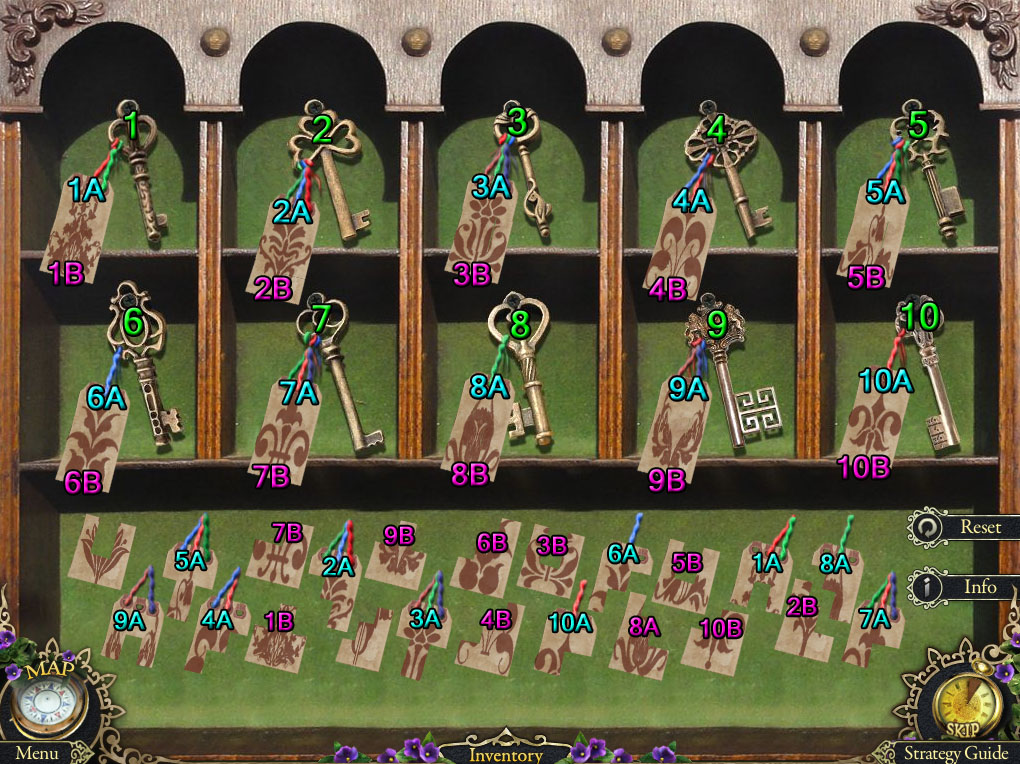
Pair the matching tag pieces with the correct keys.
Pair the top of the tag with its partner key by comparing the order and color of the strings tied around the top.
Match the bottom tag half with the top half by matching the floral pattern on each tag.
Solution.
After the puzzle is solved, take the SECRET ROOM KEY that falls to the bottom of the shelf.
Go up the stairs to the Hotel Corridor.
Hotel Corridor
Screenshot.
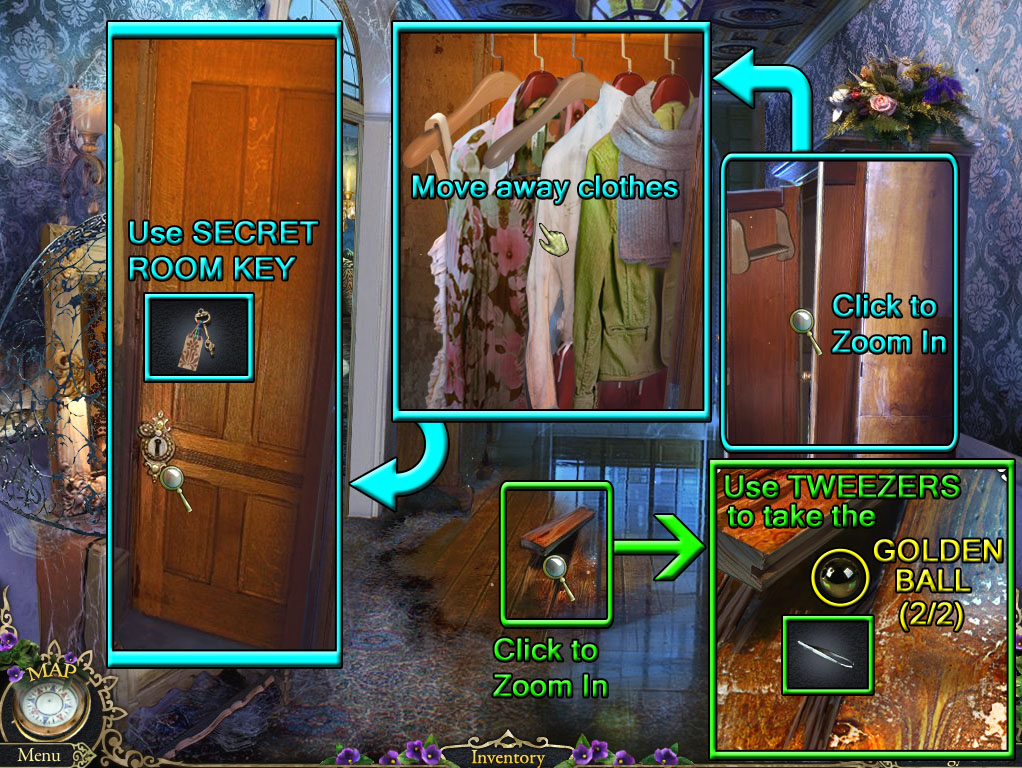
Click the loose floorboard to zoom in.
Use the TWEEZERS (from the cash register drawer in the Curiosity Shop) to pull the GOLDEN BALL (2/2).
Click the open wardrobe to look inside.
Move the clothes on the rack aside to find the hidden door.
Click the lock on the door for a closer look.
Use the SECRET ROOM KEY (from the key rack puzzle in the Hotel Hall) on the lock.
Turn the key, open the door, then continue forward to the Secret Room.
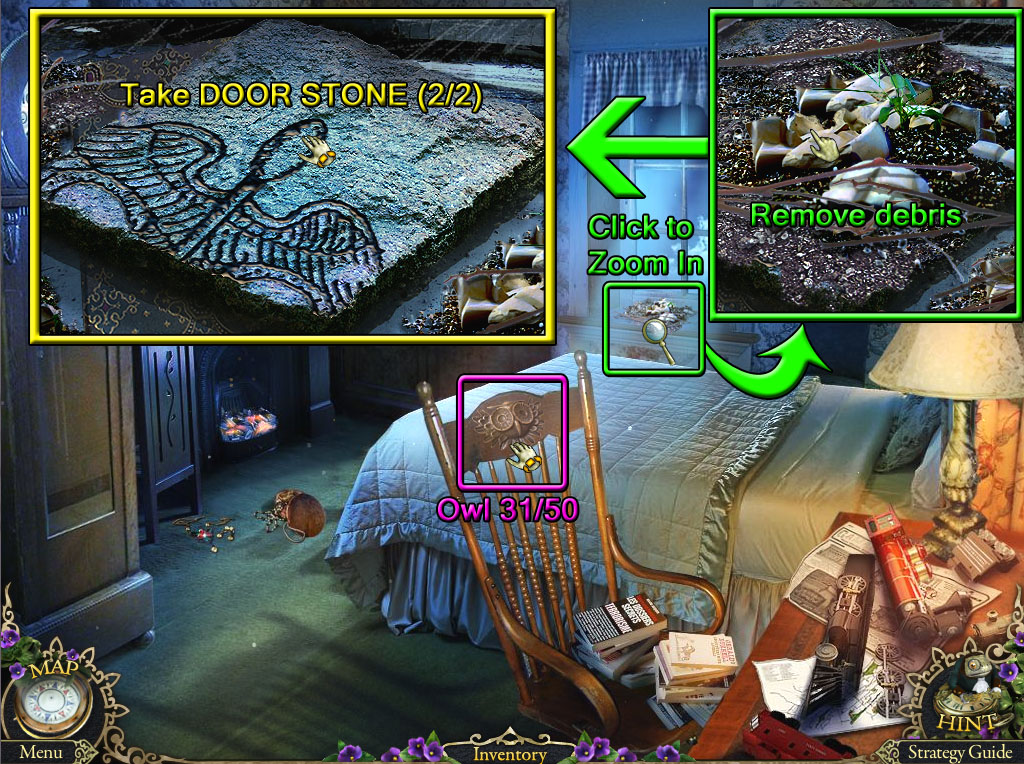
Secret Room
Screenshot.
Find the Owl (31/50) at the top of the wooden chair.
Click the windowsill to zoom in.
Click three times to remove the debris, revealing the DOOR STONE (2/2).
Go back to the Theater Stage.
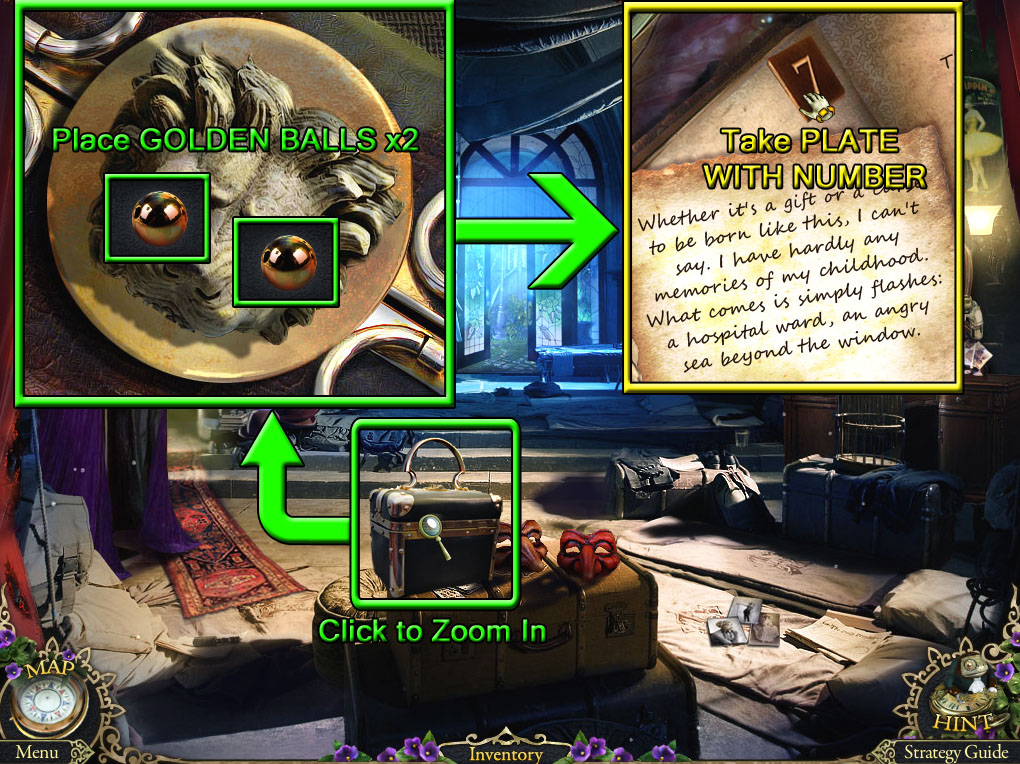
Theater Stage
Screenshot.
Inspect the black suitcase on top of the pile of luggage.
Add the two GOLDEN BALLS to the lion's eyes.
GOLDEN BALL (1/2) is from the bee puzzle in the Hotel Hall.
GOLDEN BALL (2/2) is from the hole in the floor at the Hotel Corridor.
Click the lion face to open the suitcase.
Open the book inside the suitcase to find the PLATE WITH NUMBER (1/2).
Travel to the Crossroads, then continue left to the Clinic Entrance.
Chapter 6
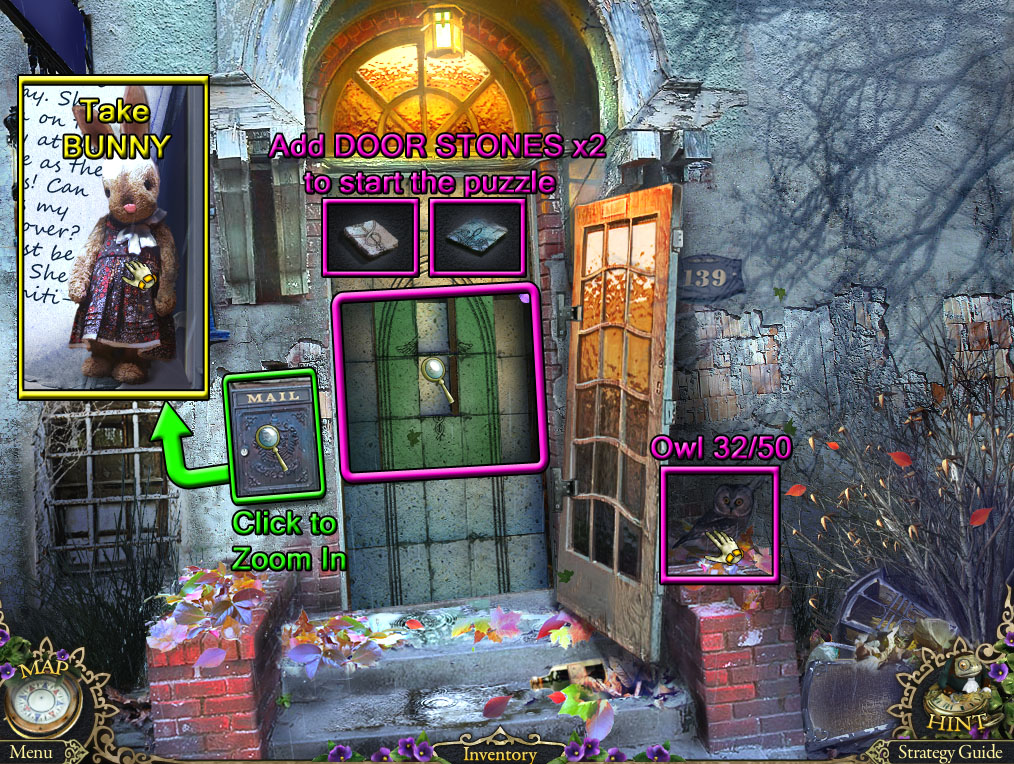
Clinic Entrance
Screenshot.
Find the Owl (32/50) on top of the right brick wall.
Click the mailbox to zoom in.
Open the mailbox and take the BUNNY inside.
Click the wall blocking the doorway for a closer look.
Add the two DOOR STONES to the space in the walls to start the puzzle.
DOOR STONE (1/2) from the ground at the Crossroads.
DOOR STONE (2/2) is on the windowsill in the Secret Room.
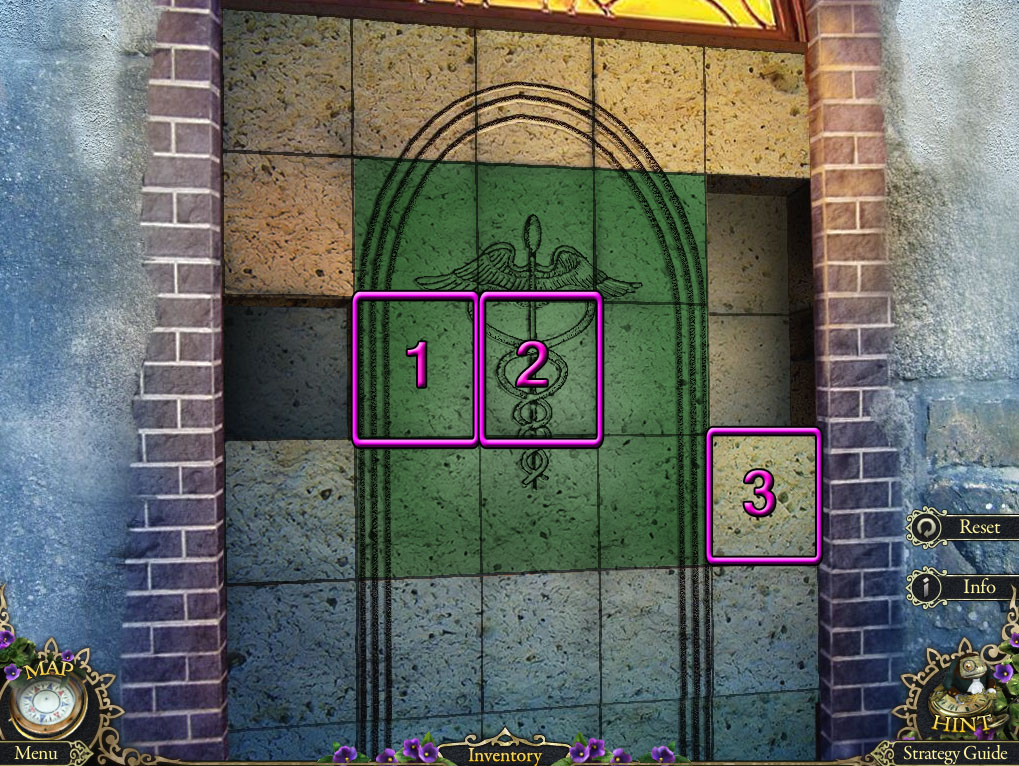
Click the blocks to raise all the green tiles with images on them.
Clicking one tile will also raise or lower other adjacent tiles.
Solution.
Open the door, then continue forward to the Clinic Office.
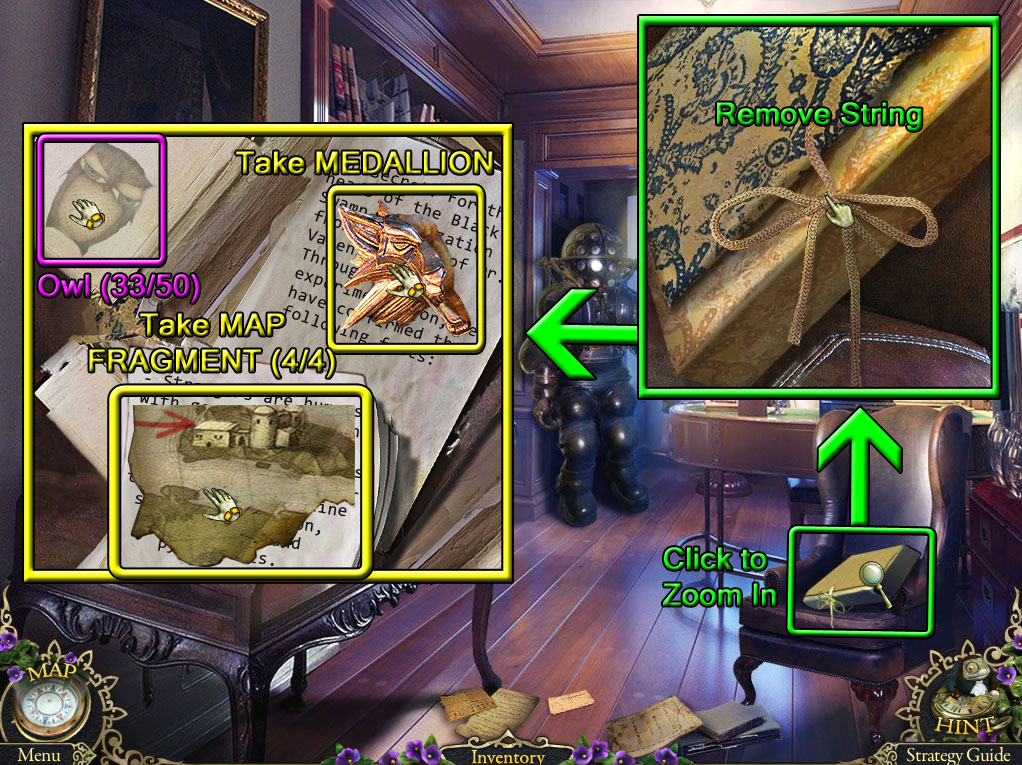
Clinic Office
Screenshot.
Inspect the book on top of the leather chair.
Click the string twice to unbind the cover.
Find the Owl (33/50) on the left page.
Take the MAP FRAGMENT (1/4) and MEDALLION inside the book.
Use the map to travel to the Cafe of Broken Dreams.
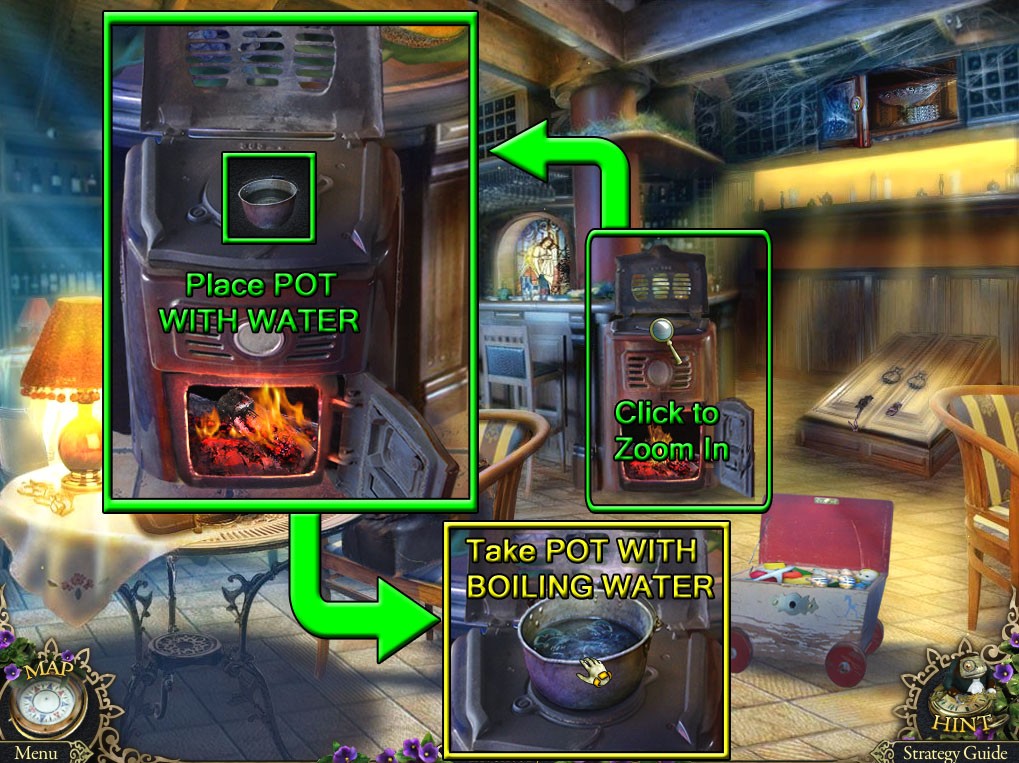
Cafe of Broken Dreams
Screenshot.
Click the stove for a closer look.
Place the POT WITH WATER (from the counter at the Hotel Lounge) on top of the hot plate.
Once the pot is heated, pick up the POT WITH BOILING WATER.
Go back to the Grotto.
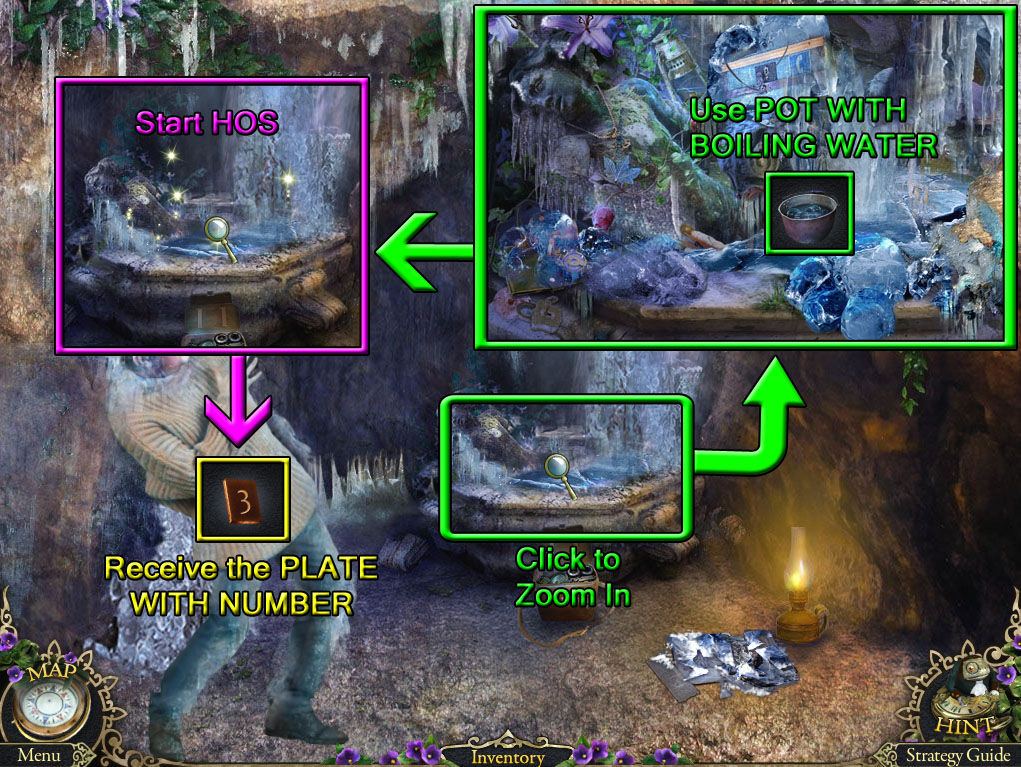
Grotto
Screenshot.
Click the frozen fountain to zoom in.
Use the POT WITH BOILING WATER (from the stove at the Cafe) to melt the ice.
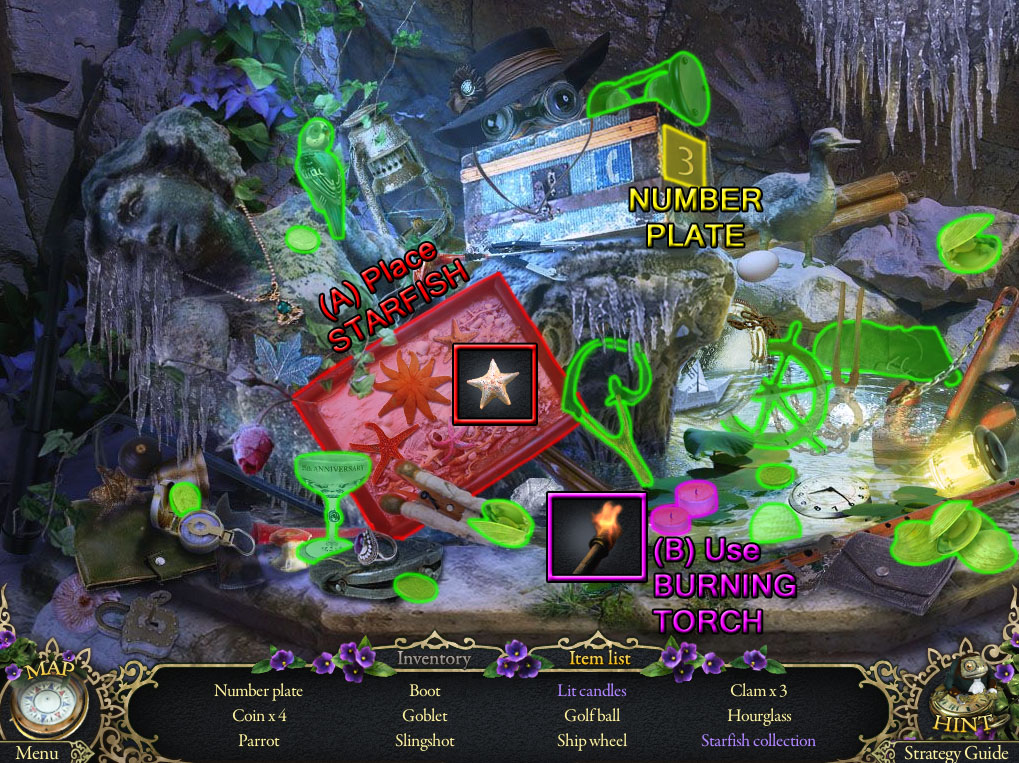
Click the melted fountain water to start the hidden object scene.
Use the BURNING TORCH (from the lamp at the Statue Corridor) on the candles to make them Lit Candles (A).
Place the STARFISH (from the book at the Statue Corridor) into the empty space on the frame to complete the Starfish Collection (B).
Screenshot.
Once the hidden object scene is complete, you will receive the PLATE WITH NUMBER (2/2).
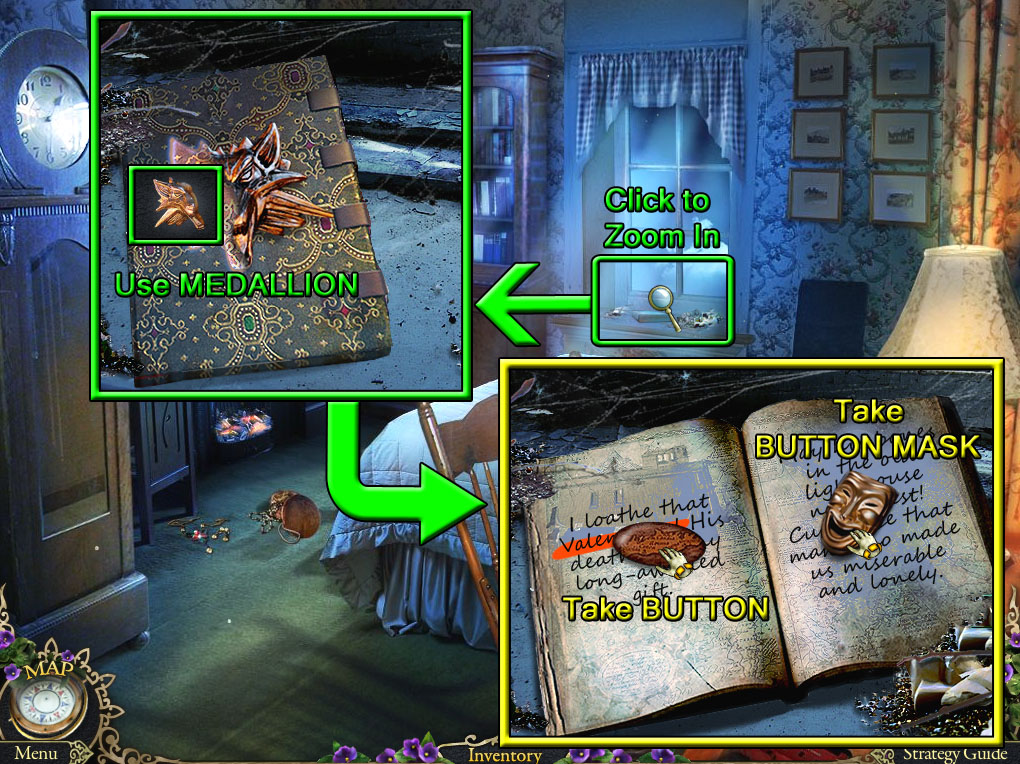
Return to the Secret Room.
Secret Room
Screenshot.
Click the windowsill for a closer look.
Add the MEDALLION (from the book in the Clinic Office) to the cover lock to open the book.
Take the BUTTON on the left page and the BUTTON MASK on the right page.
Use the map to travel to the Clinic Office.
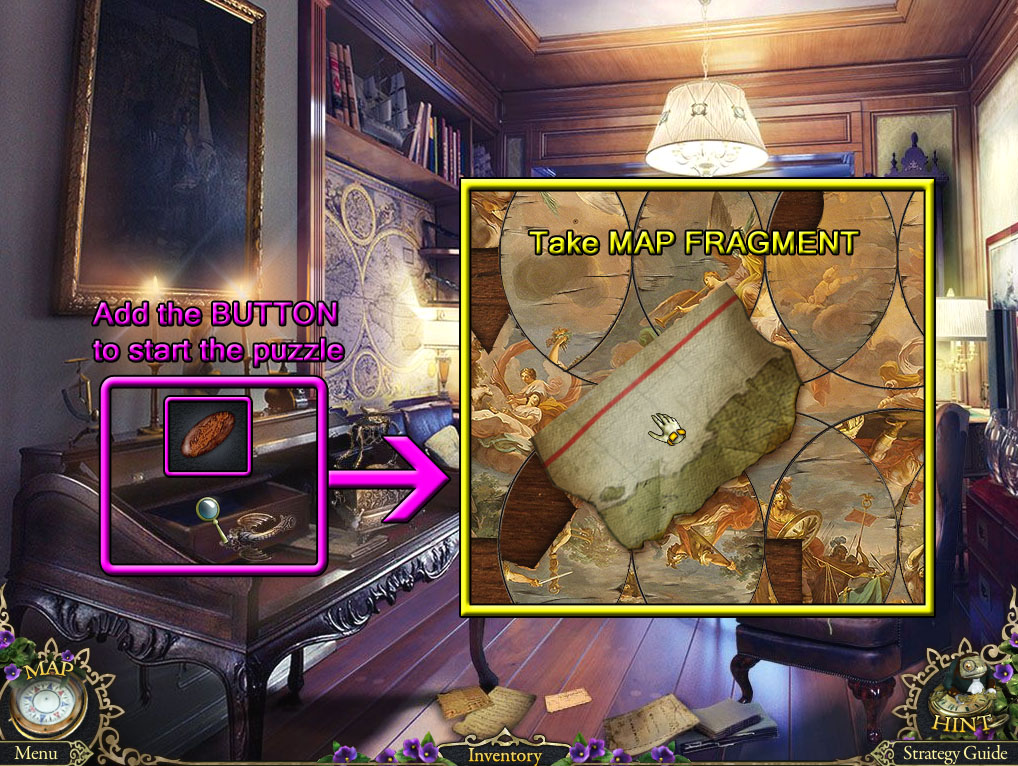
Clinic Office
Screenshot.
Open the small drawer at the top of the desk, then click the open drawer to look inside.
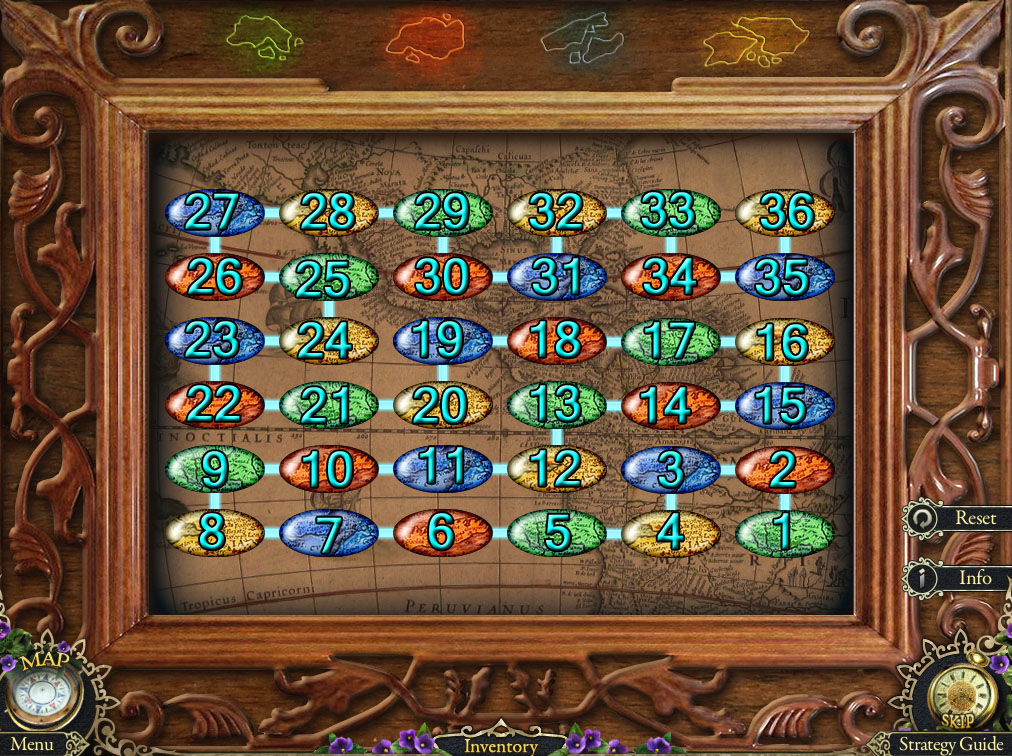
Add the BUTTON (from the book at the Secret Room) to start the puzzle.
Light all of the buttons by clicking each of them once in the color order shown at the top of the board: green - red - blue - yellow.
Click a glowing button to select it, then click the next glowing button to continue the path.
If no buttons are available to click, the puzzle will reset.
Solution.
Once the puzzle is solved, take the MAP FRAGMENT (2/4) from the revealed cardboard mural.
Go back to the Guest Room.
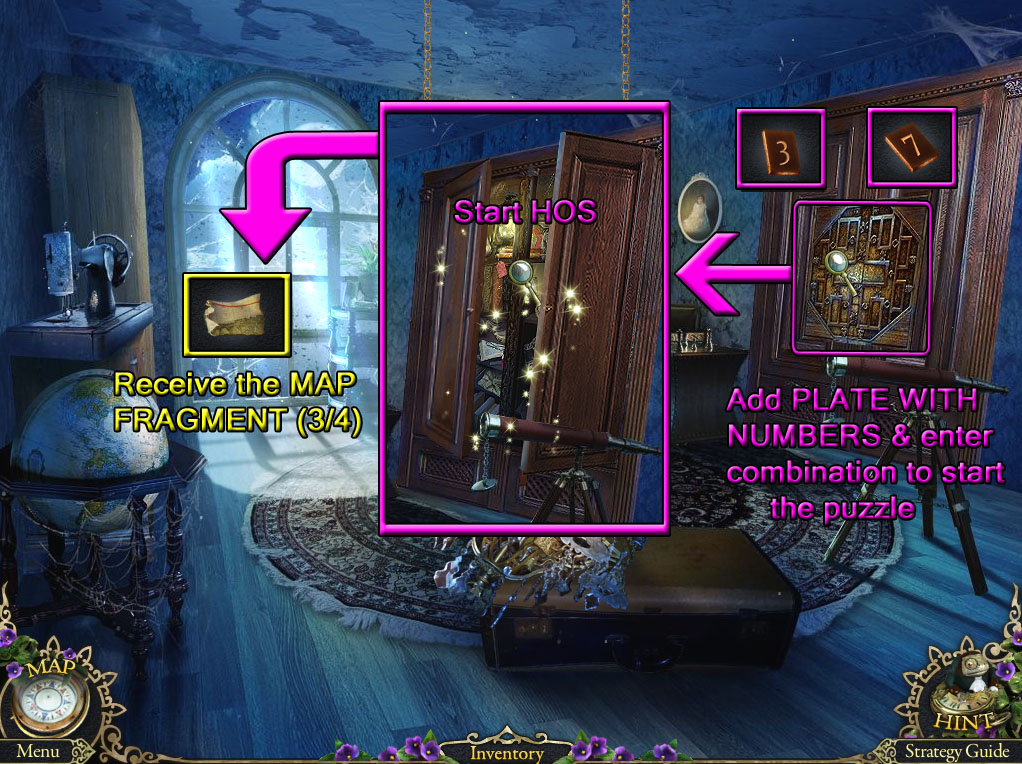
Guest Room
Screenshot.
Click the large cupboard doors to zoom in.
Add the two PLATES WITH NUMBERS to the lock.
PLATE WITH NUMBER (1/2) is from the suitcase at the Theater Stage.
PLATE WITH NUMBER (2/2) is from the Grotto hidden object scene.
Click the tiles to enter the 4 digit combination seen earlier on the side of the knight chess piece.
Screenshot.
After you've entered the combination, the next puzzle will begin.
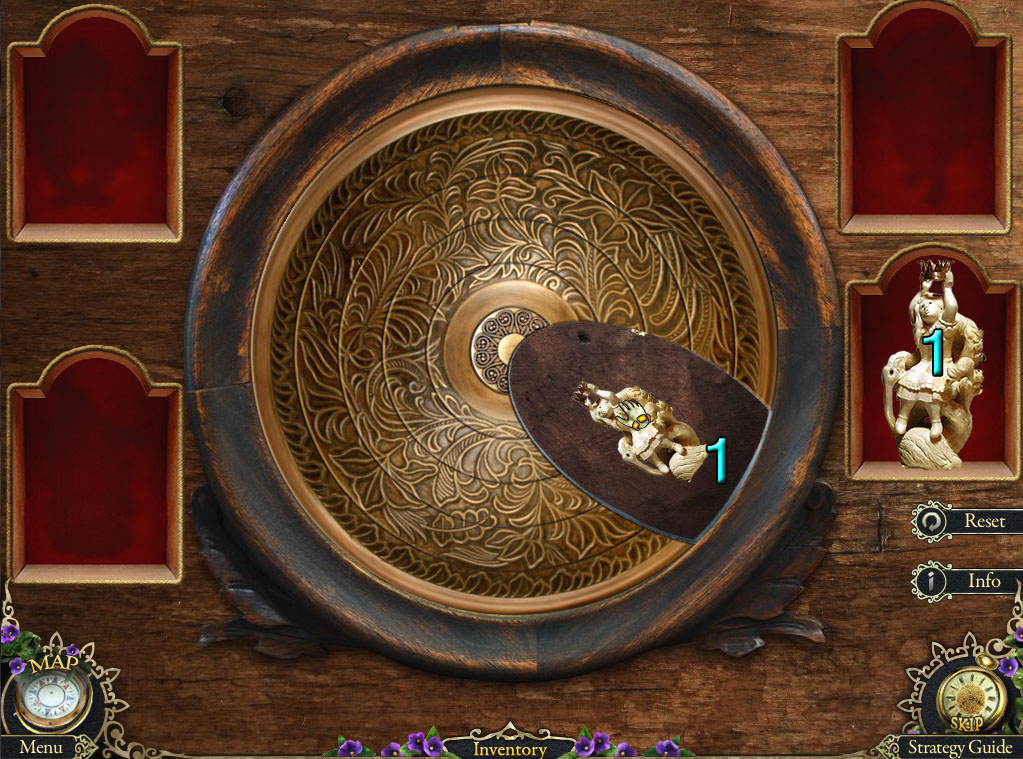
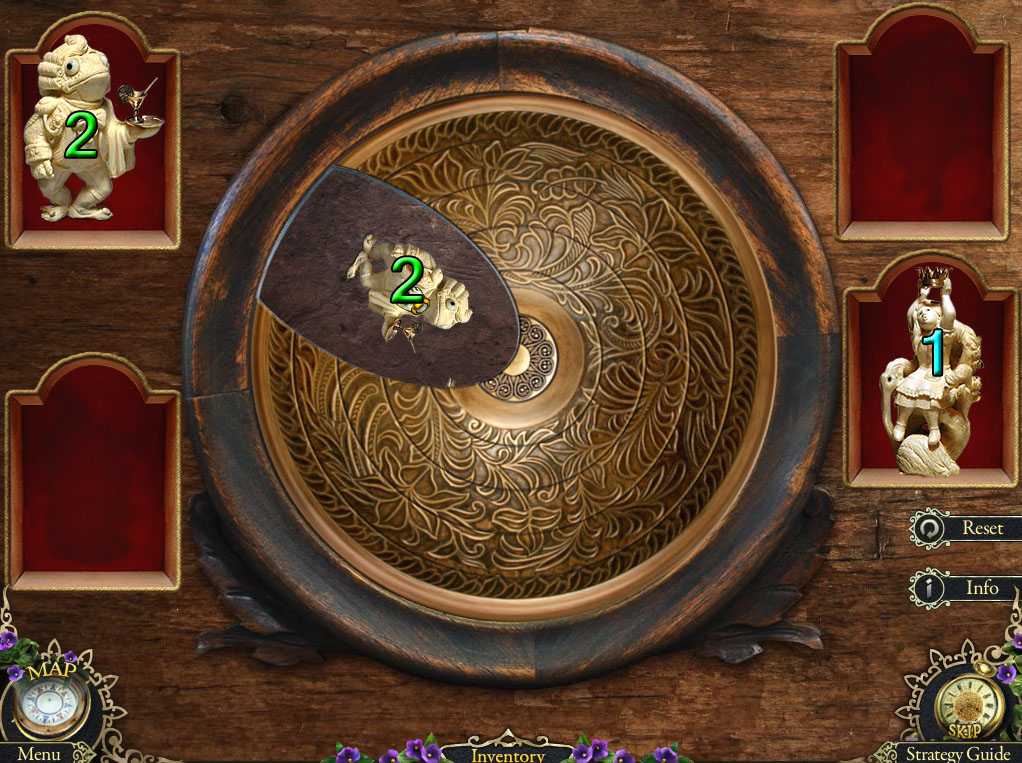
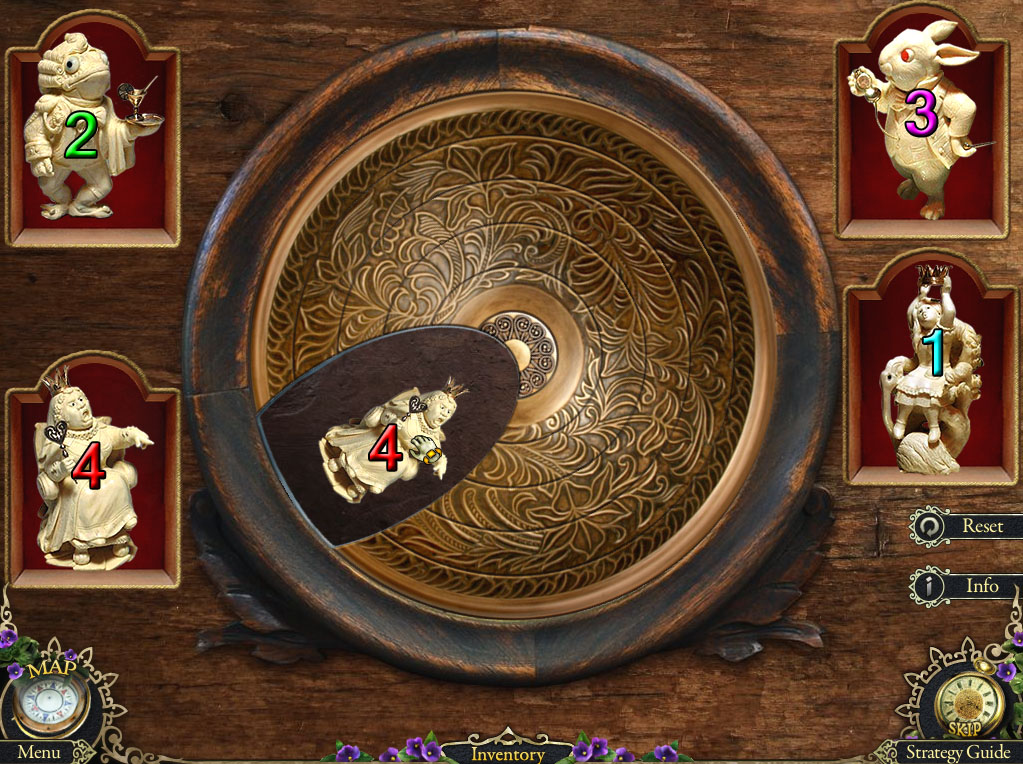
Turn the discs to align all the spaces over the four statuettes.
Rotating one ring will also rotate the adjacent ring on either side.
When a statuette is completeley uncovered, click it to place it on the shelf.
The easiest strategy to solving this puzzle is working from the inside rings to the outward rings.
Solution Part 1.
Solution Part 2.
Solution Part 3.
Solution Part 4.
After the puzzle is solved, click the open cupboard doors to start the hidden object scene.
Place the BUNNY (from the mailbox at the Clinic Entrance) next to the two stuffed rabbits to complete the Bunny Family (A).
Put the BEAR DETECTIVE (from the crate at the Hotel Courtyard) next to the teddy bears to complete the Bear Family (B).
Screenshot.
Once the hidden object scene is complete, you will receive the MAP FRAGMENT (3/4).
Use the map to travel to the Dock.
Dock
Screenshot.
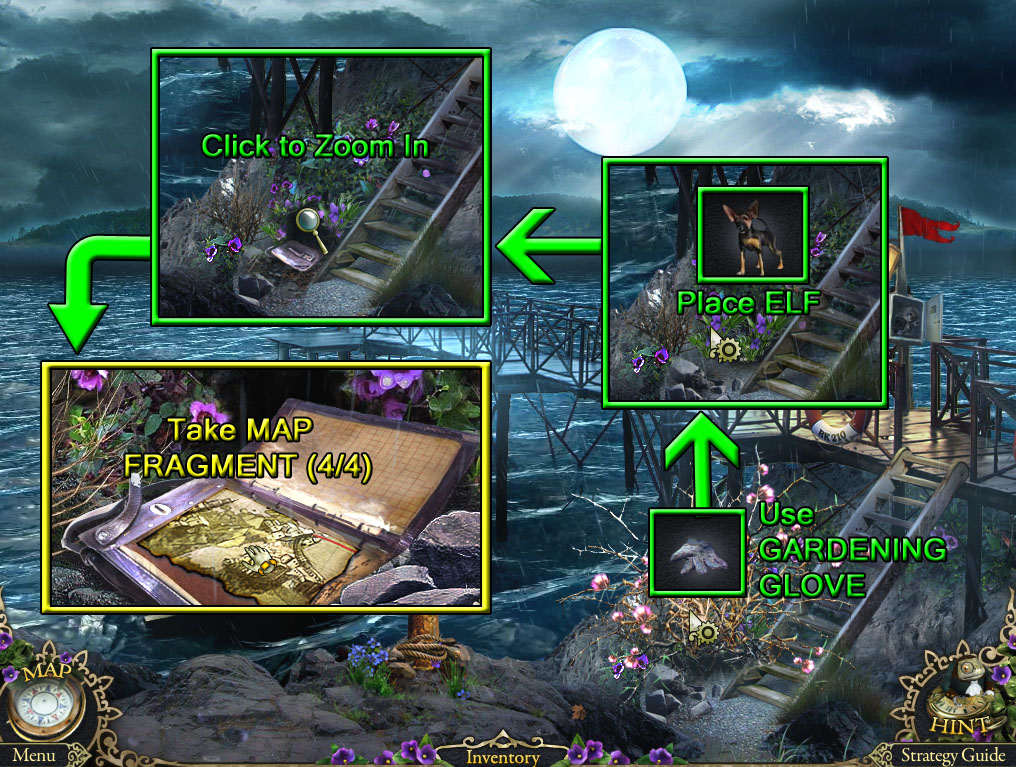
Use the GARDENING GLOVE (from the table at the Hotel Lounge) on the thorny shrub.
Place ELF the dog (from the post at the Narrow Alley) on the ground by the brushwood.
Click the hole Elf digs in the ground for a closer look.
Open the notebook and find the MAP FRAGMENT (4/4) inside.
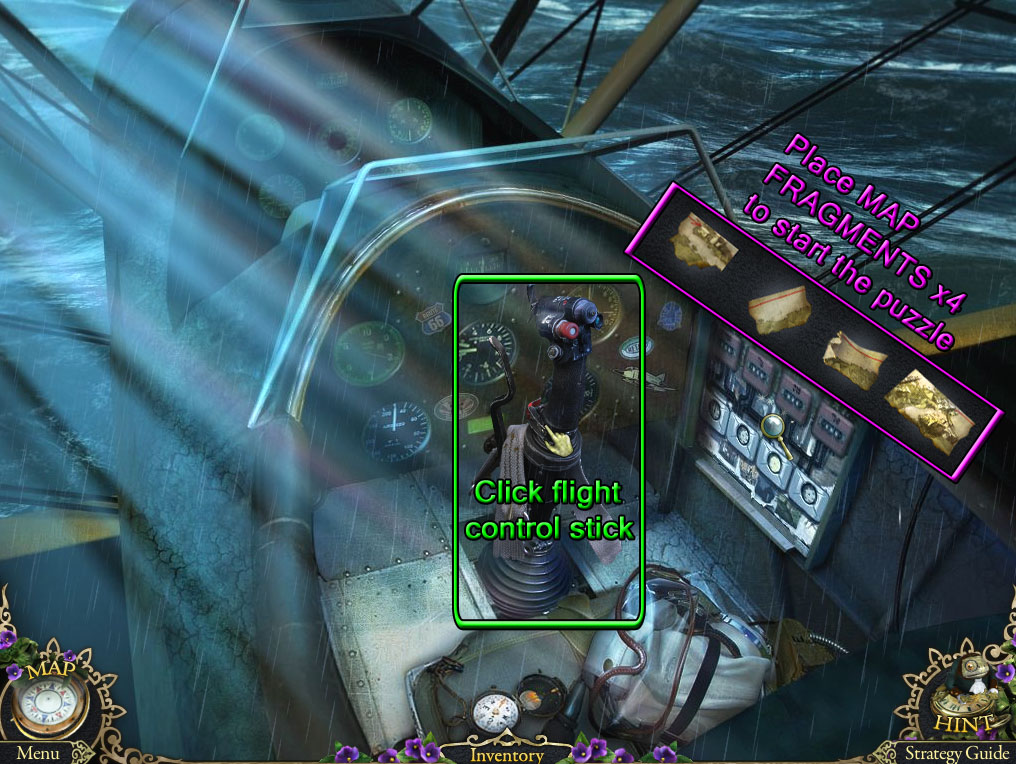
Click the Seaplane to look inside.
Screenshot.
Inspect the map under the valves on the right side of the plane.
Add the four MAP FRAGMENTS to the panel to start the puzzle.
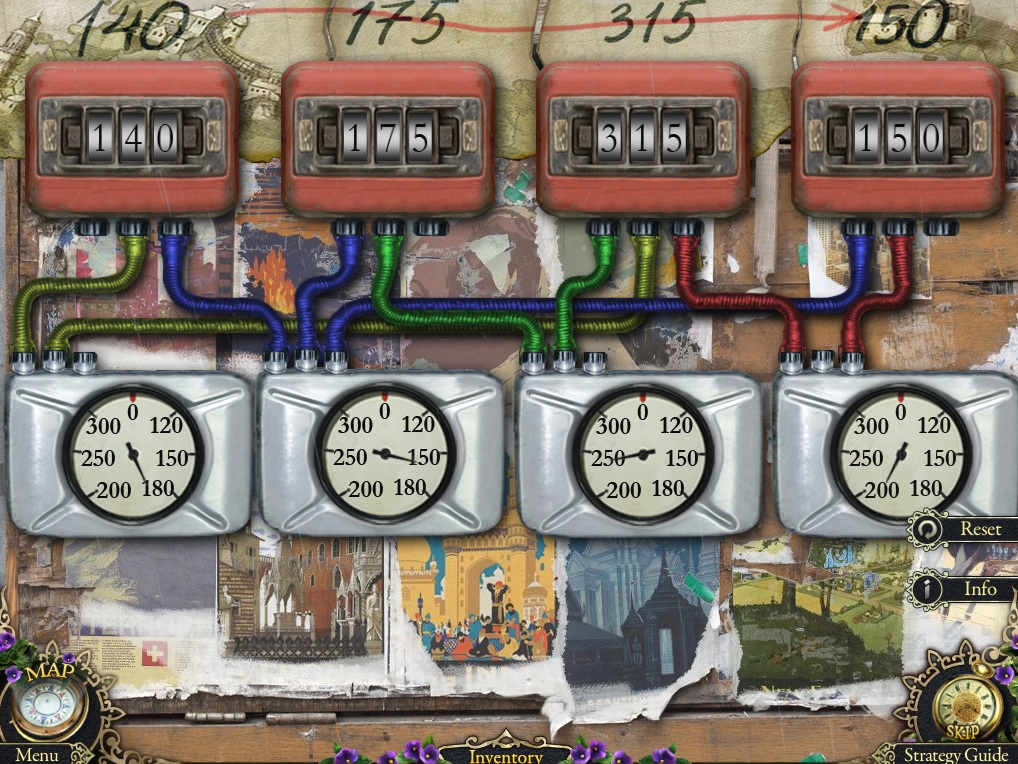
Set the dials on the pressure gauges so that the numbers in the box at the top match the numbers written on the map above them.
Click a gauge to rotate the pointer clockwise; turning one dial will also affect the gauge to its left.
Click Dial A, Click Dial B, Click Dial C, Click Dial D.
Solution.
Once the puzzle is solved, click the flight control stick to travel to the Seaside at Bluff Hospital.
Posted by: Trinn |
March 13, 2012 6:35 PM
|
March 13, 2012 6:35 PM
Mystery Trackers: Black Isle Collector's Edition walkthrough
Part Three: Bluff Hospital
Chapter 7
Seaside
Go right to the Mountain Trail.
Mountain Trail
Screenshot.
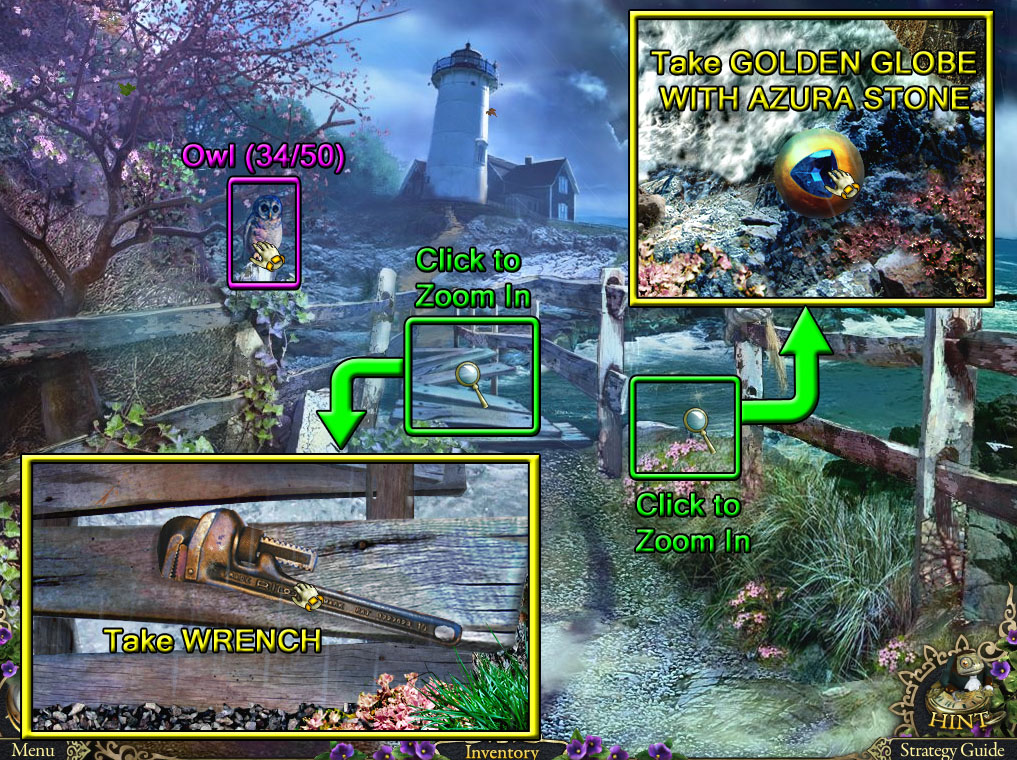
Find the Owl (34/50) sitting on top of the left fence post.
Click the planks of the old bridge to zoom in.
Take the WRENCH from the bottom boards.
Click the gap in the fence on the right to look over the cliff.
Pick up the GOLDEN GLOBE WITH AZURE STONE on the ground.
Go back to the Seaside, then continue up the stairs to the Hospital Yard.
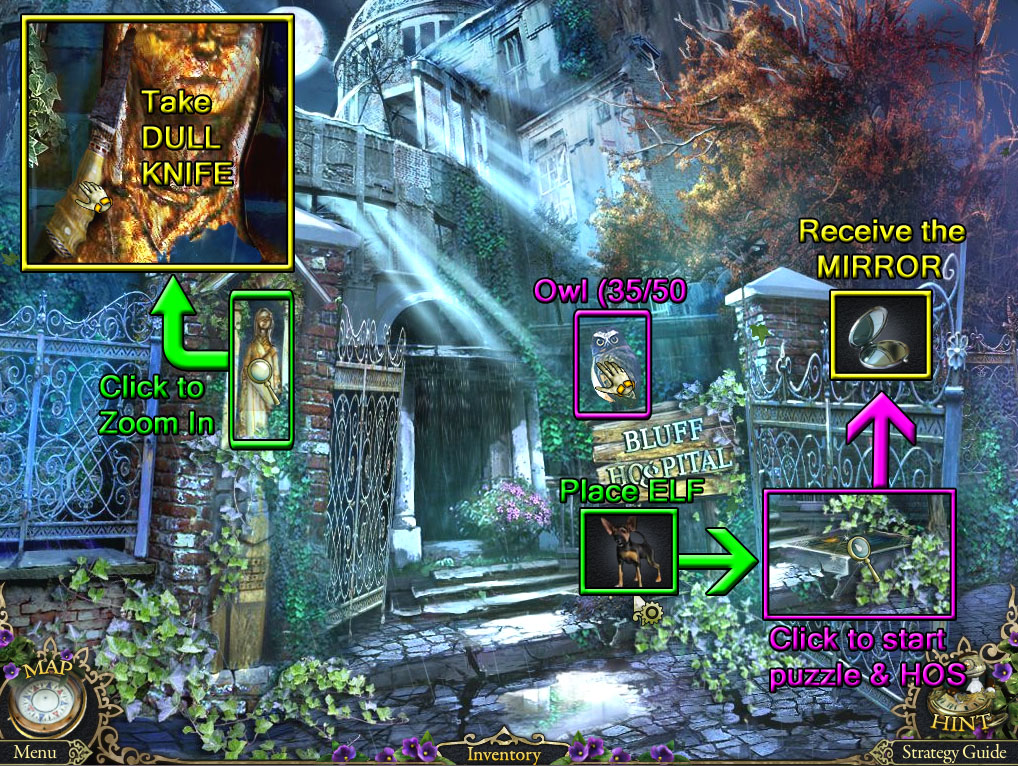
Hospital Yard
Screenshot.
Find the Owl (35/50) on top of the Bluff Hospital sign.
Click the statue for a closer look.
Take the DULL KNIFE leaning against the side of the statue's head.
Place ELF (from the lamp post at the Narrow Alley) on the mound of dirt underneath the sign.
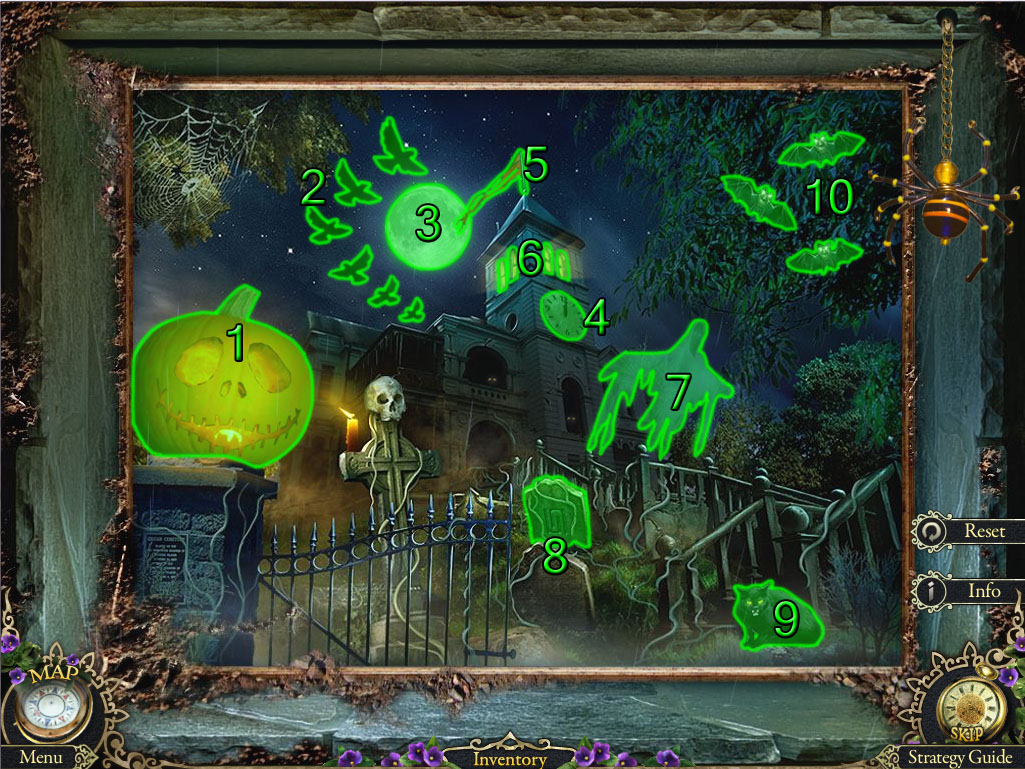
Click the revealed floor tile to start the puzzle.
Change the elements of the first picture to match the pattern of the objects in the second picture.
Click the spider at the upper right side of the frame to raise or lower the second picture.
The objects that should be changed are as follows:
The pumkin should have a Jack Skellington smile.
The bottom three flying three crows should face left, and the top three crows should face right.
The moon should be full.
The time on the clock tower should be set to midnight.
The flag at the top of the tower should be red and long.
The lights in the tower should be on.
The ghost should be blue.
The gravestone should have the swirl pattern.
The cat should be hissing.
The top and bottom bats should face left, the middle bat should face right.
Solution.
After the puzzle is solved, click the revealed floor cache to start the hidden object scene.
Find the Owl (36/50) on the metal tablet.
Click the picture pieces in the notebook to match the girl's photo to the left of the key to complete the Fashion Plate (A).
Screenshot.
Once the hidden object scene is complete, you will receive the MIRROR (1/2).
Move forward to the Hospital Gates.
Hospital Gates
Screenshot.
Find the Owl (37/50) on the upper left side of the archway.
Take the BOOK from the hole in the wall under the Bluff Hospital plaque.
Use the map to travel to the Hotel Lounge in the West Wing.
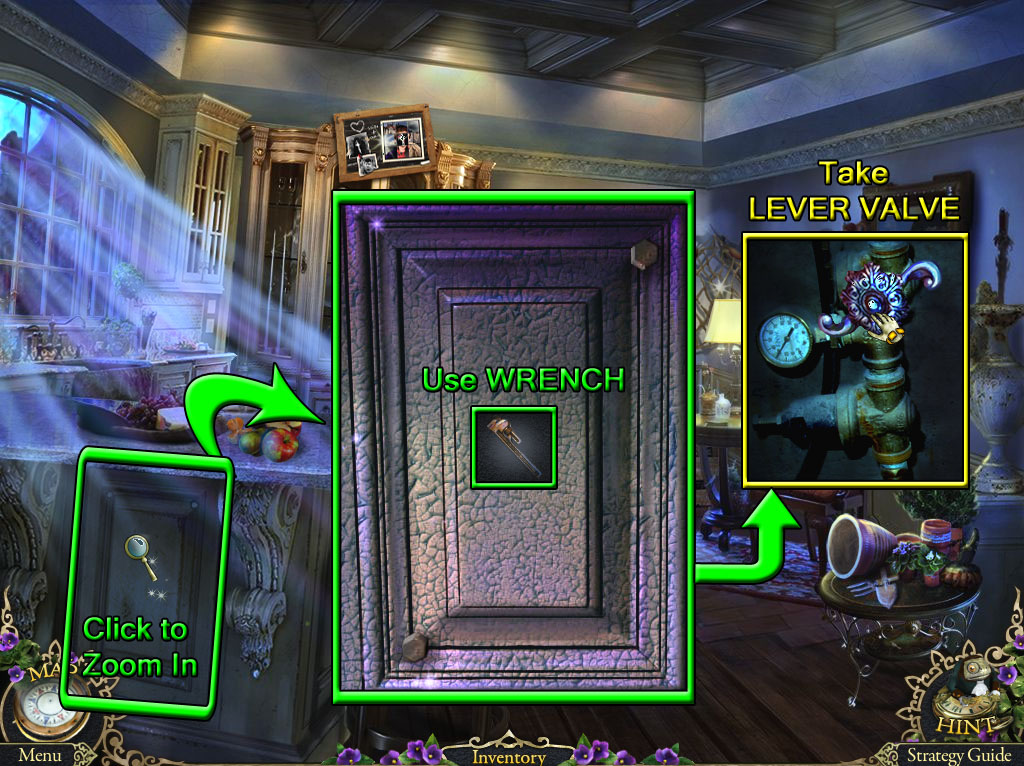
Hotel Lounge
Screenshot.
Click the wooden panel under the counter to zoom in.
Use the WRENCH (from the bridge at the Mountain Trail) to remove the bolts at the corners of the panel.
Remove the panel, then take the revealed LEVER VALVE from the pipe.
Go back to the Hotel Corridor.
Hotel Corridor
Screenshot.
Inspect the lock on the large metal grating.
Place the LEVER VALVE (from the pipe behind the panel at the Hotel Lounge) in the lock.
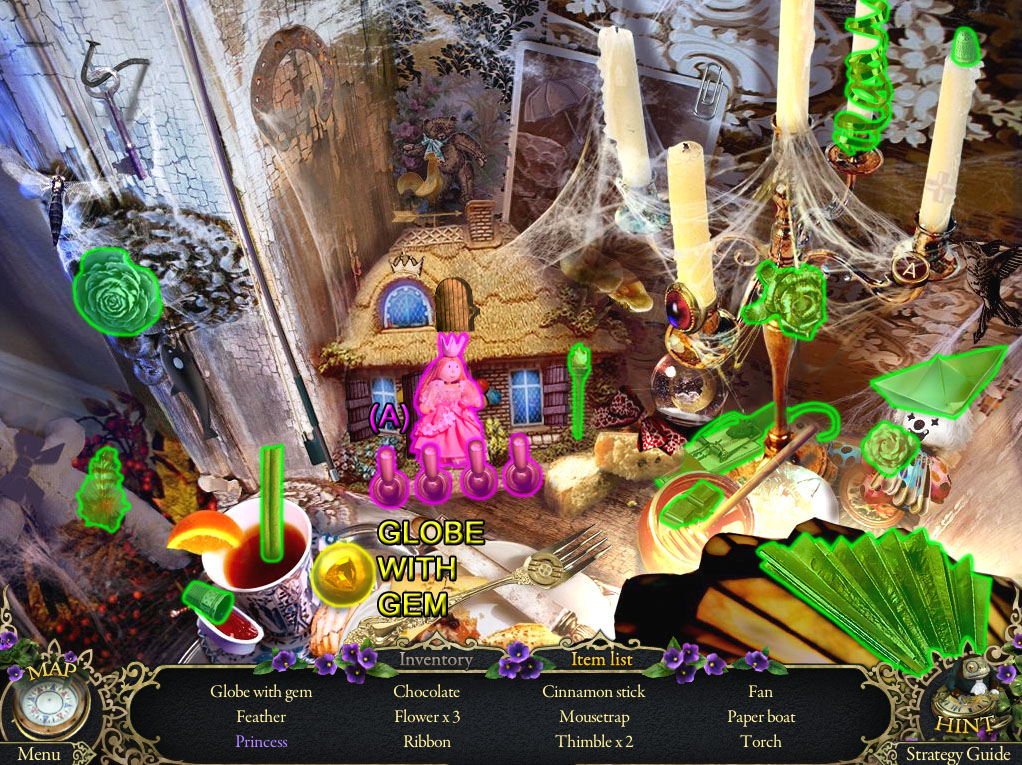
Turn the valve to open the grating, then click the unlocked area to start the hidden object scene.
Lift the second and fourth levers so that all four are pointing upwards to reveal the Princess (A).
Screenshot.
Once the hidden object scene is complete, you will receive the GOLDEN GLOBE WITH AMBER.
Use the map to travel to the Clinic Office.
Clinic Office
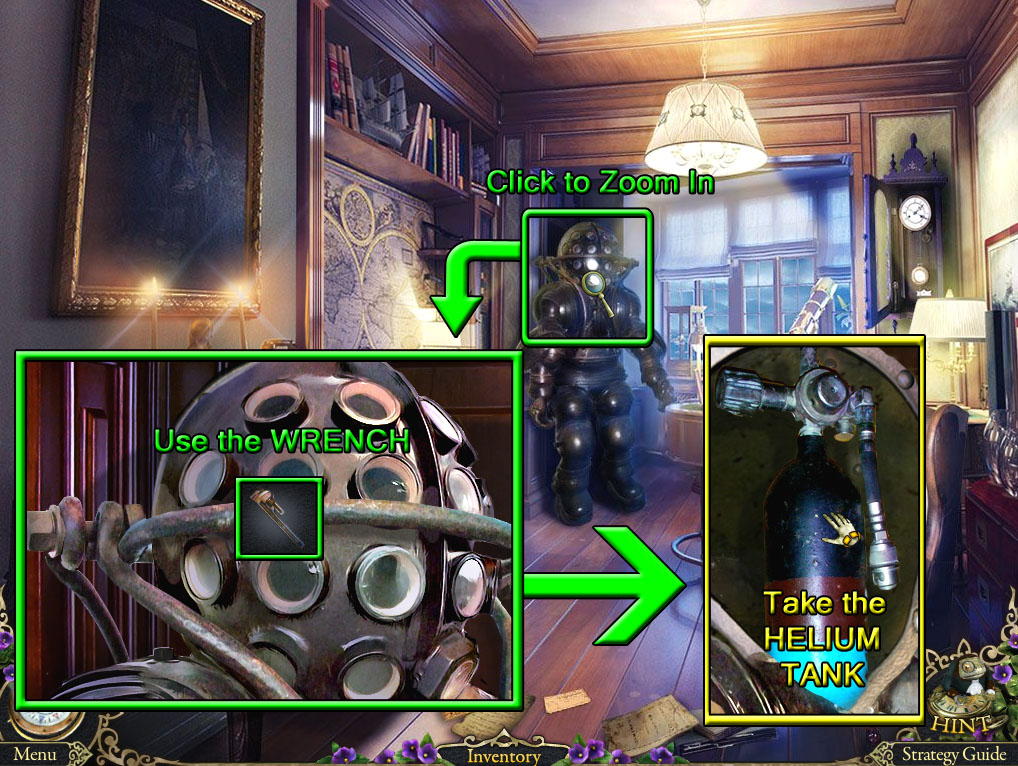
Screenshot.
Click the helmet of the diving suit for a closer look.
Use the WRENCH (from the bridge at the Mountain Trail) to remove the large bolt at the side of the helmet.
Click the helmet to remove it, then take the HELIUM TANK inside.
Go back to the Secret Room in the hotel.
Secret Room
Screenshot.
Click the bookshelf to look inside.
Add the BOOK (from the broken wall at the Hospital Gates) to the shelf to start the puzzle.
Organize the books on the shelf in numeric order under the matching symbol shown on the spine of each book with the symbol on the four plaques.
Click a book to move it to the next available open space.
If there is no room, the book will be kept outside at the bottom of the shelf, but only one book can be held there at a time.
Solution.
After the puzzle is solved, open the revealed grate above the upper right shelf and take the BALLOON.
Use the map to return to the Seaside at Bluff Hospital.
Seaside
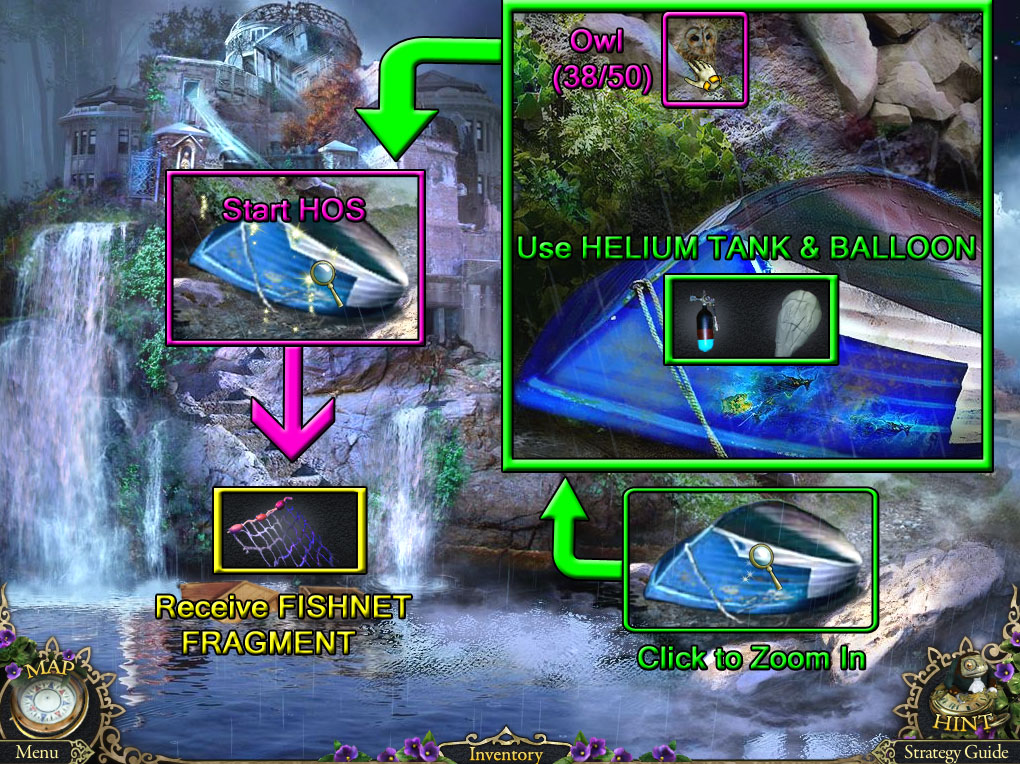
Screenshot.
Click the overturned rowboat to zoom in.
Find the Owl (38/50) on the ground beside the left rock.
Place the BALLOON (from the bookcase puzzle at the Secret Room) on top of the boat.
Use the HELIUM TANK (from the diving helmet at the Clinic Office) to inflate the balloon.
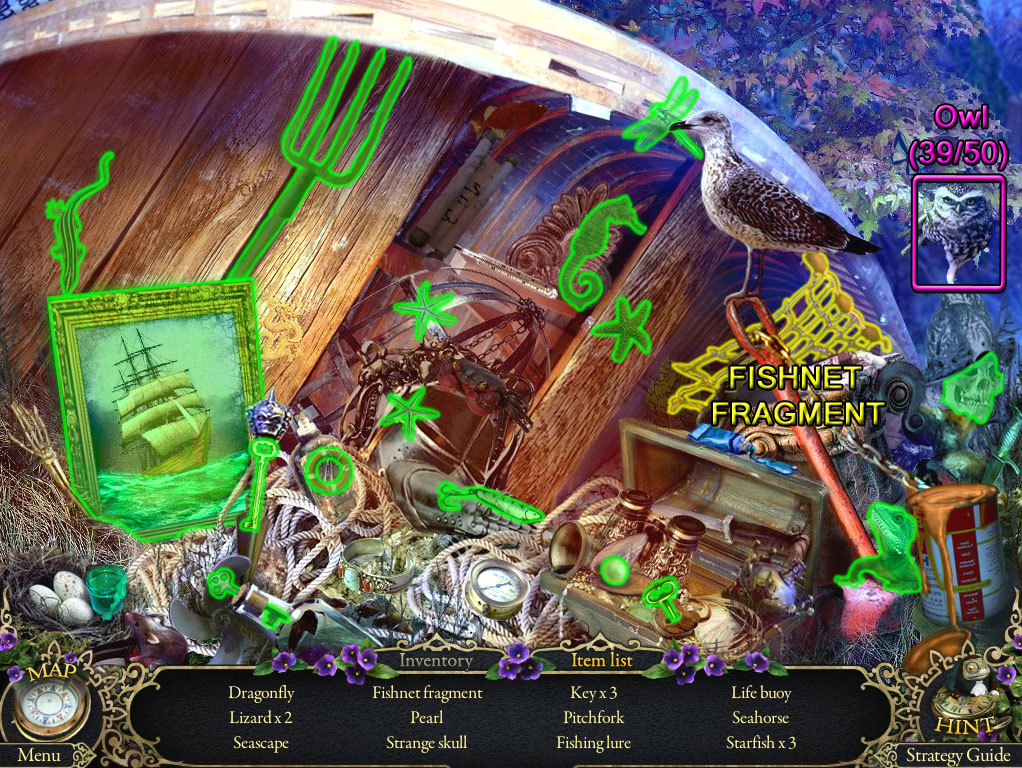
Click the area under the lifted boat to start the hidden object scene.
Find the Owl (39/50) under the leaves in the upper right corner.
Screenshot.
Once the hidden object scene is complete, you will receive the FISHNET FRAGMENT.
Travel to the Hotel Lounge in the West Wing.
Hotel Lounge
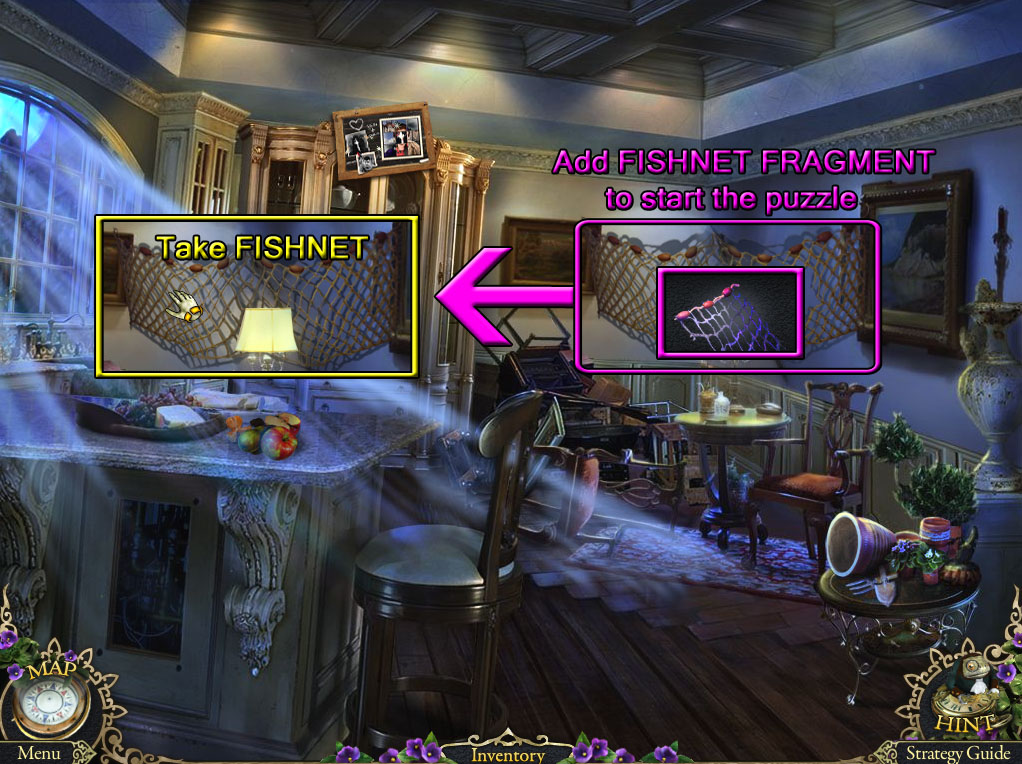
Screenshot.
Click the torn net in the corner of the room for a closer look.
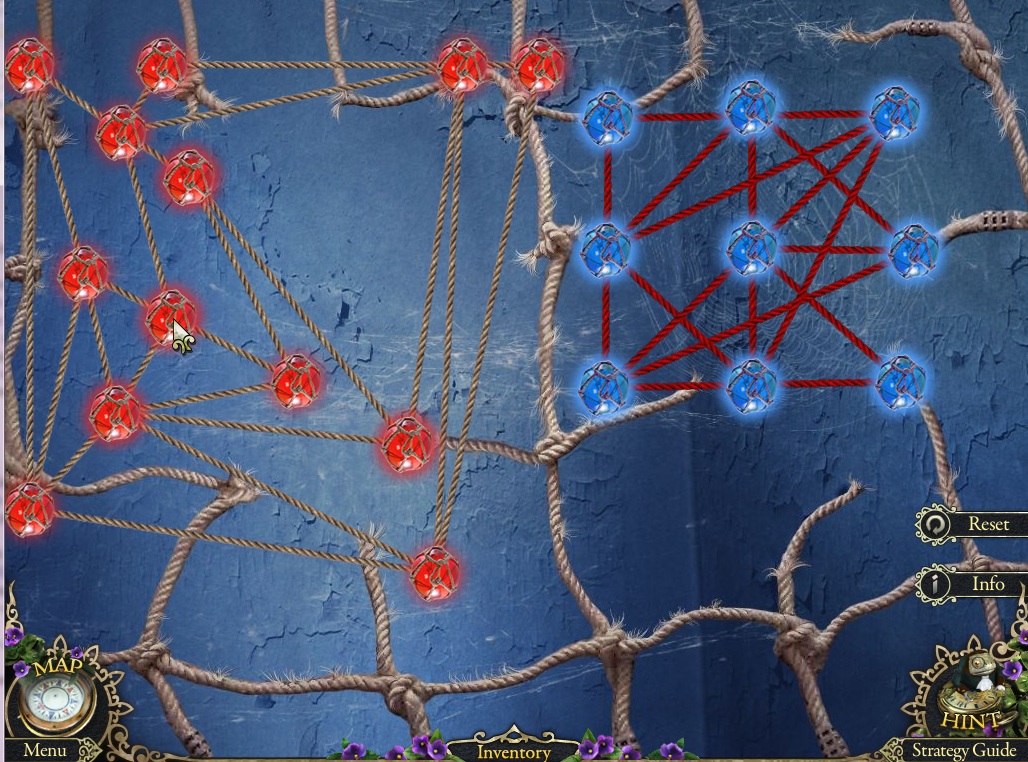
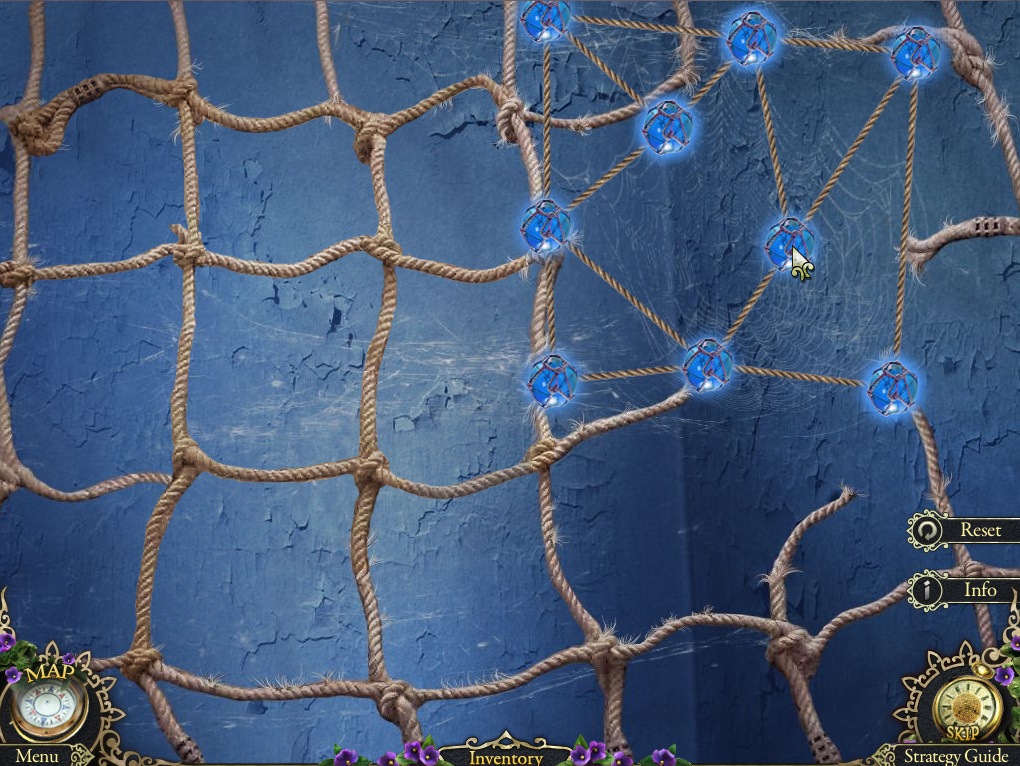
Add the FISHNET FRAGMENT (from the Seaside hidden object scene) to the hole in the net to start the puzzle.
Repair the nets so that the ropes attached to the red and blue baubles do not cross.
Click and drag the baubles to move them around the net.
Ropes that intersect will be highlighted red, and free ropes that do not cross will be light brown.
Solution #1.
Solution #2.
After the puzzle is solved, take the repaired FISHNET from the wall.
Return to the Seaside at Bluff Hospital.
Seaside
Screenshot.
Click the floating crates in the water to zoom in.
Use the FISHNET (from the Hotel Lounge net puzzle) on the crates to rope them in.
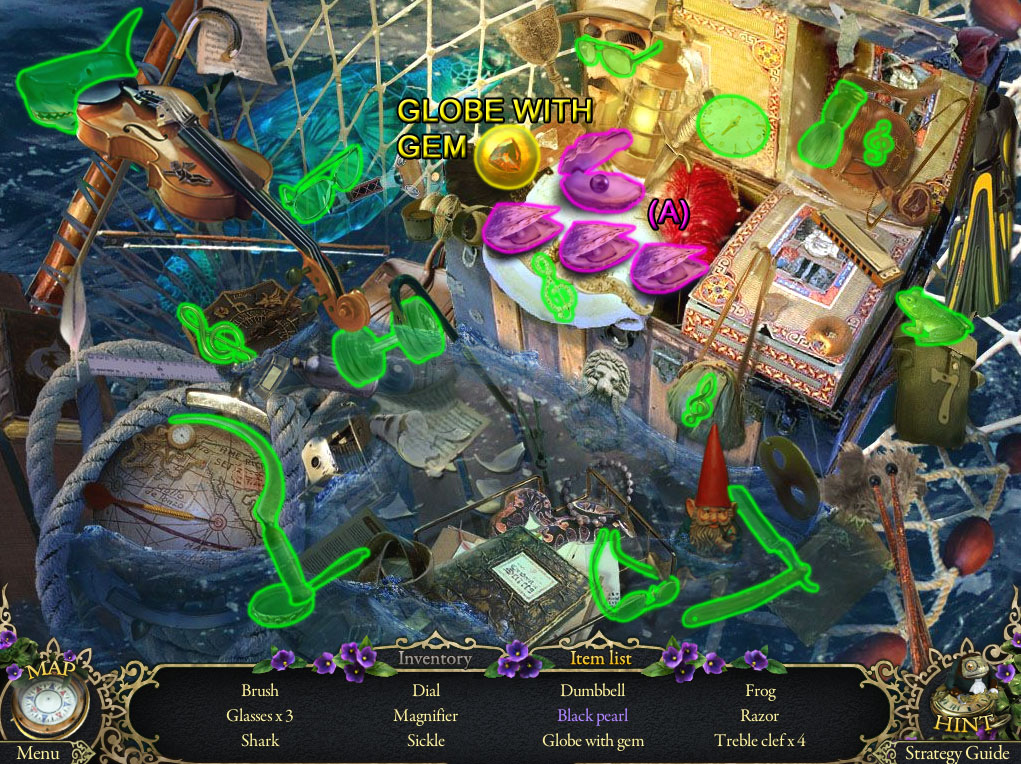
Click the fishnet to start the hidden object scene.
Open the three smaller oysters in order of right-left-middle to reveal the Black Pearl inside the large oyster (A).
Screenshot.
Once the hidden object scene is complete, you will receive the GOLDEN GLOBE WITH RUBY.
Go forward twice to the Hospital Gates.
Hospital Gates
Screenshot.
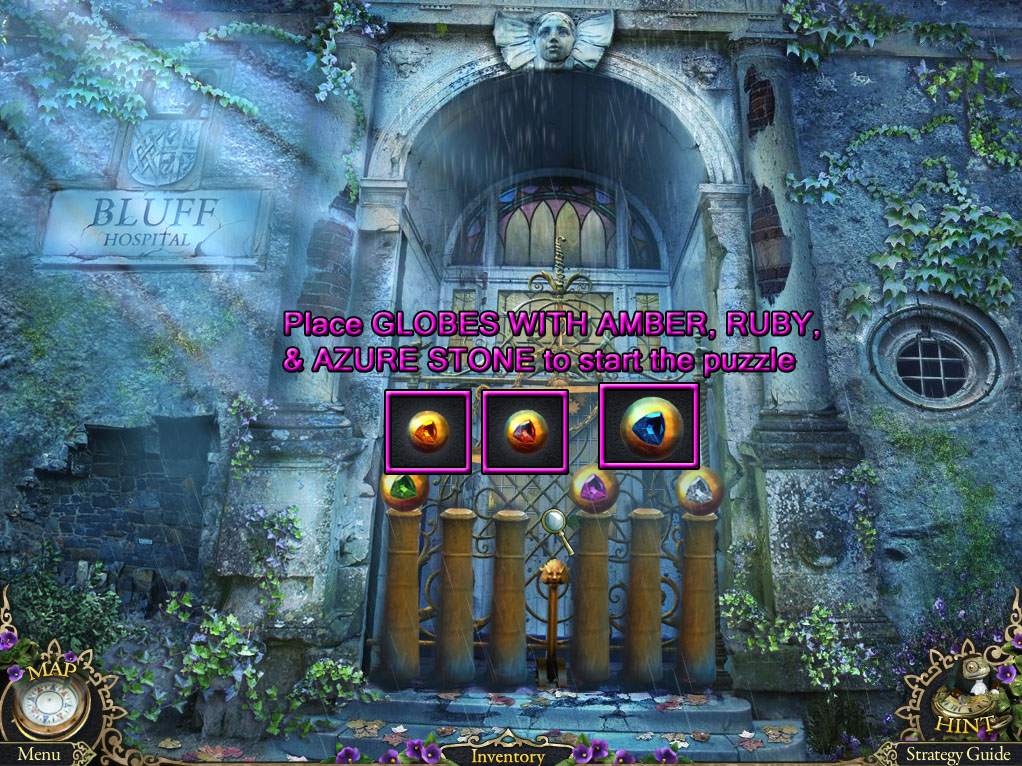
Inspect the gold pedestals in front of the gate.
Place the three gem globes on the empty pedestals to start the puzzle.
The GOLDEN GLOBE WITH AZURE STONE is from the cliff at the Mountain Trail.
The GOLDEN GLOBE WITH AMBER is from the Hotel Corridor hidden object scene.
The GOLDEN GLOBE WITH RUBY is from the Seaside hidden object scene.
Place the orbs on the correct pedestals in order by weight.
The higher the number on the pedestal, the heavier orb that needs to be placed on it.
Place the orbs on the scales above the pedestals to compare their weights.
After the orbs are in place, pull the lever in the center to test your solution.
Solution.
After the puzzle is solved, open the doors and continue forward to the Hospital Hall.
Chapter 8
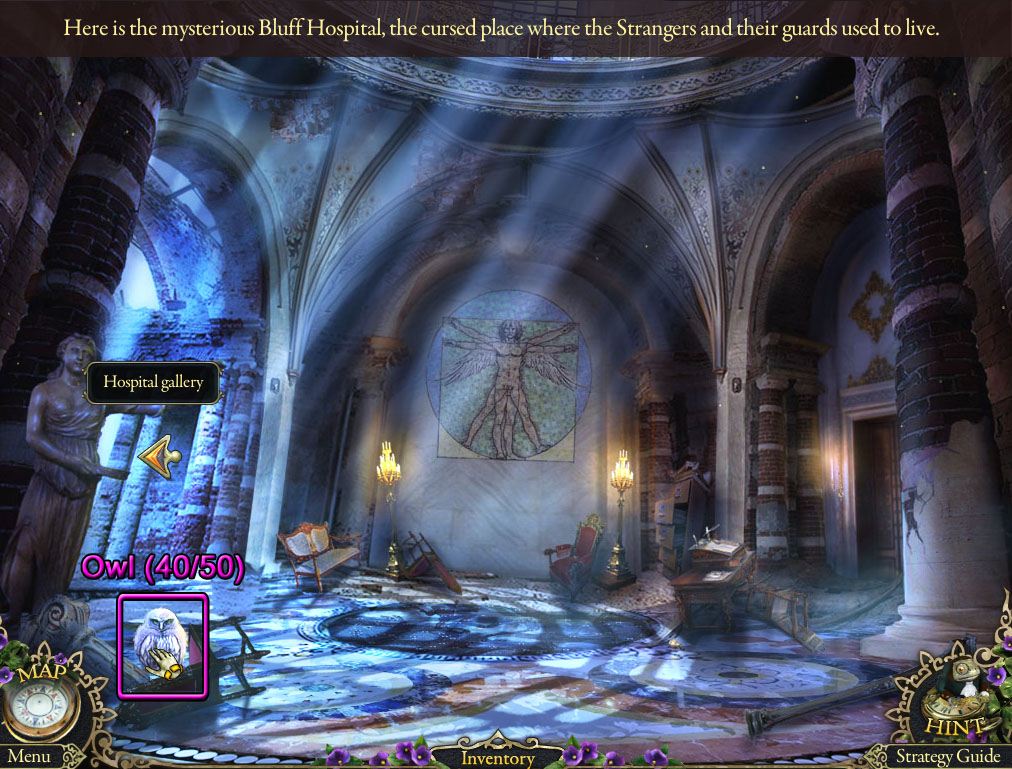
Hospital Hall
Screenshot.
Find the Owl (40/50) beside the overturned chair in the lower left corner.
Go left to the Hospital Gallery.
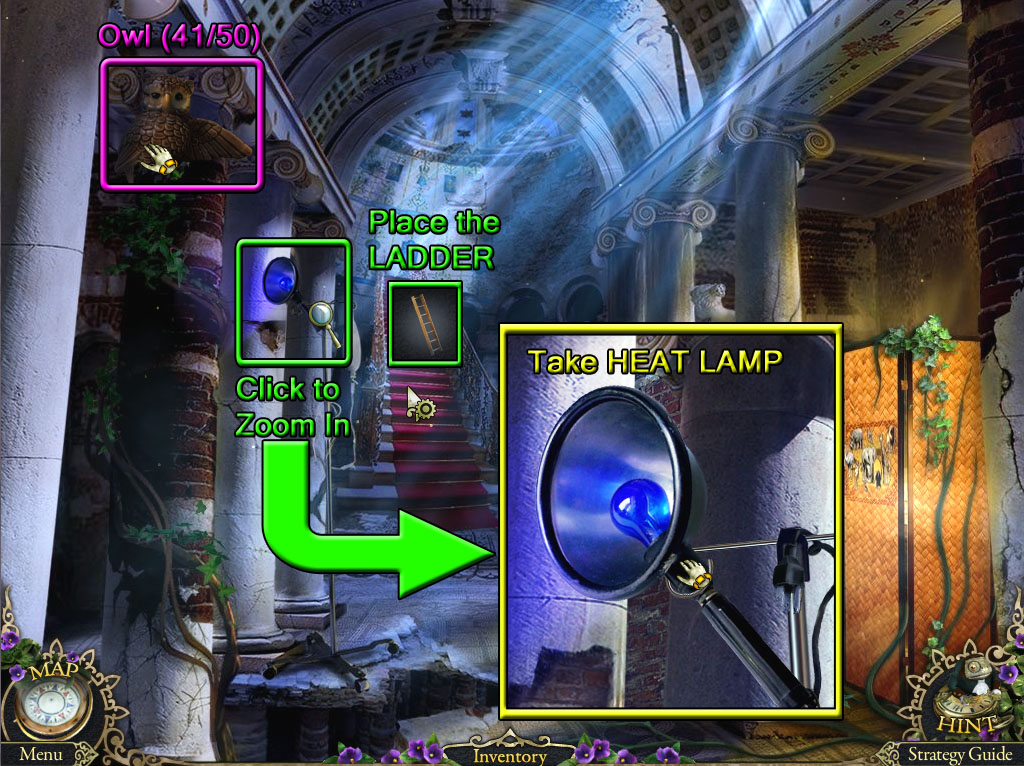
Hospital Gallery
Screenshot.
Find the Owl (41/50) at the top of the brick column.
Click the blue heat lamp on the stand to zoom in.
Click the HEAT LAMP a second time to add it to your inventory.
Place the LADDER (from the wardrobe in the Hotel Corridor) at the top of the stairs.
Go up the ladder to the Gallery Dome.
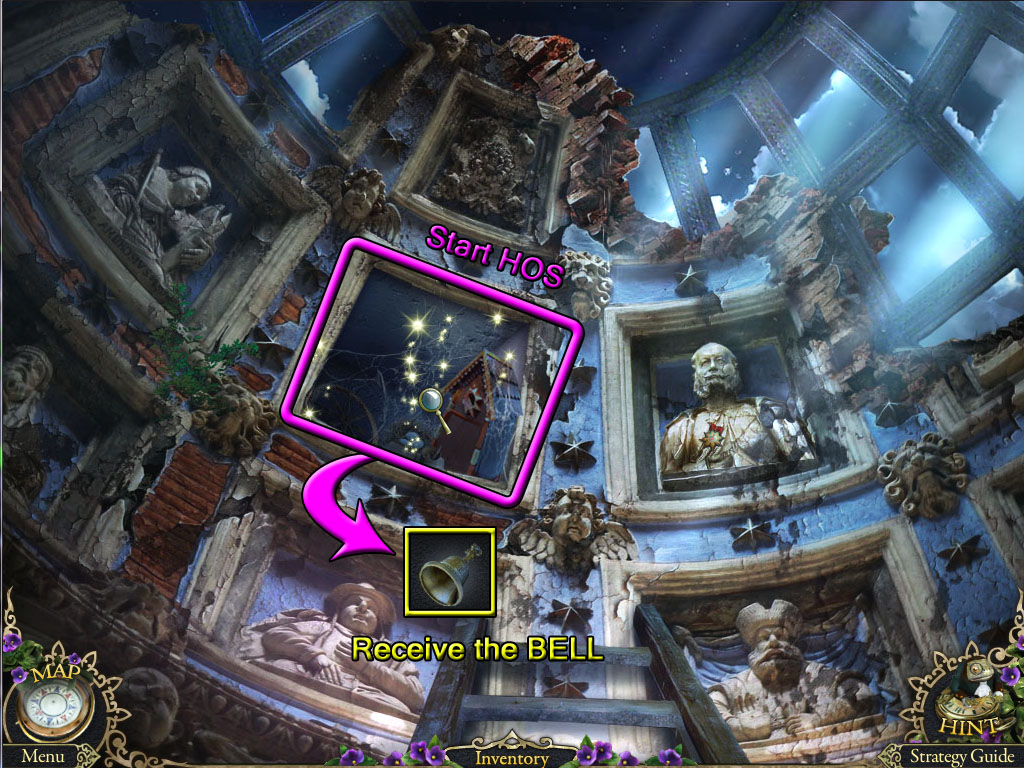
Gallery Dome
Screenshot.
Click the wall cache in the middle of the statues to start the hidden object scene.
Open the birdhouse door to find the Bird (A).
Use the HEAT LAMP (from the stand at the Hospital Gallery) on the three eggs to find the Chicken x3 (B).
Screenshot.
Once the hidden object scene is complete, you will receive the BELL.
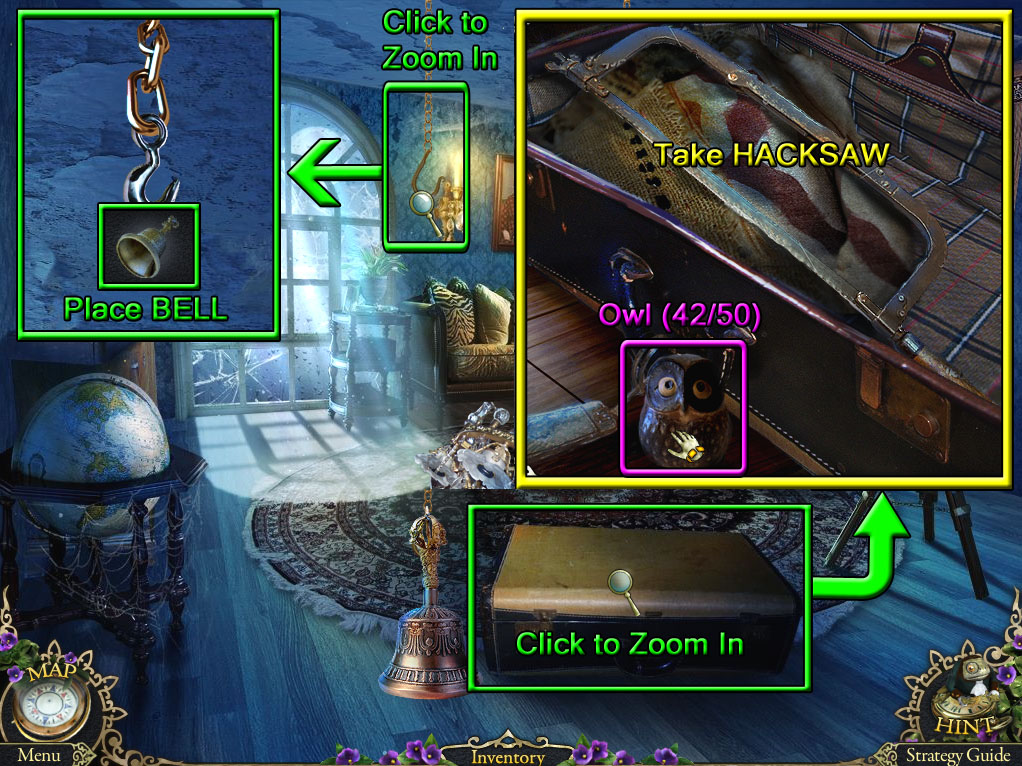
Use the map to travel to the hotel Guest Room in the West Wing.
Guest Room
Screenshot.
Inspect the hook on the edge of the chain hanging from the ceiling.
Place the BELL (from the Gallery Dome hidden object scene) on the hook to lift the chandelier.
Click the uncovered suitcase for a closer look.
Find the Owl (42/50) in front of the handle.
Open the suitcase and take the HACKSAW inside.
Return to the Hospital Gates.
Hospital Gates
Screenshot.
Click the metal grating in the right wall to zoom in.
Use the HACKSAW (from the suitcase in the Guest Room) to cut through the bars.
Place ELF inside the uncovered passage.
Pick up the PLAID BLANKET the dog retrieves from the tunnel.
Go back to the Grotto at the West Wing.
Grotto
Screenshot.
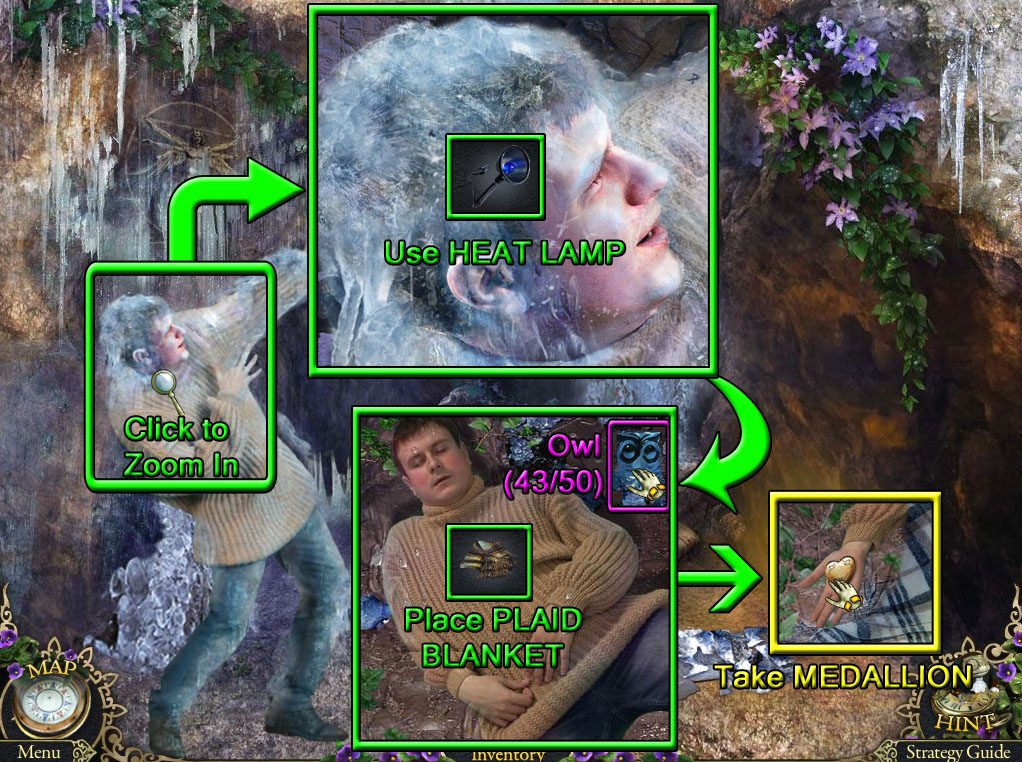
Click Thomas for a closer look.
Use the HEAT LAMP (from the stand at the Hospital Gallery) to melt the ice surrounding him.
After Thomas falls to the ground, click him to zoom in.
Find the Owl (43/50) beside his right arm.
Place the PLAID BLANKET (from the passage at the Hospital Gates) over Thomas.
Take the MEDALLION from his open hand.
Use the map to travel to the Hotel Lounge.
Hotel Lounge
Screenshot.
Inspect the chalkboard nailed to the top of the cupboard.
Place the MEDALLION (from Thomas's hand in the Grotto) in the heart-shaped chalk outline.
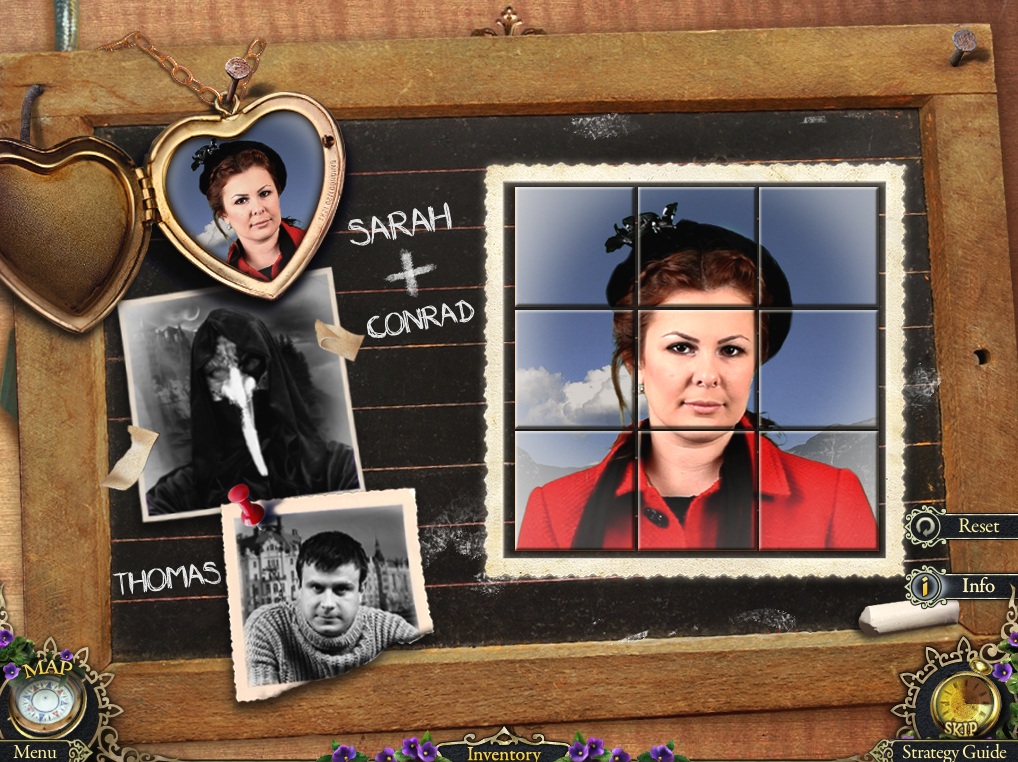
Open the locket containing the picture of Sarah to start the puzzle.
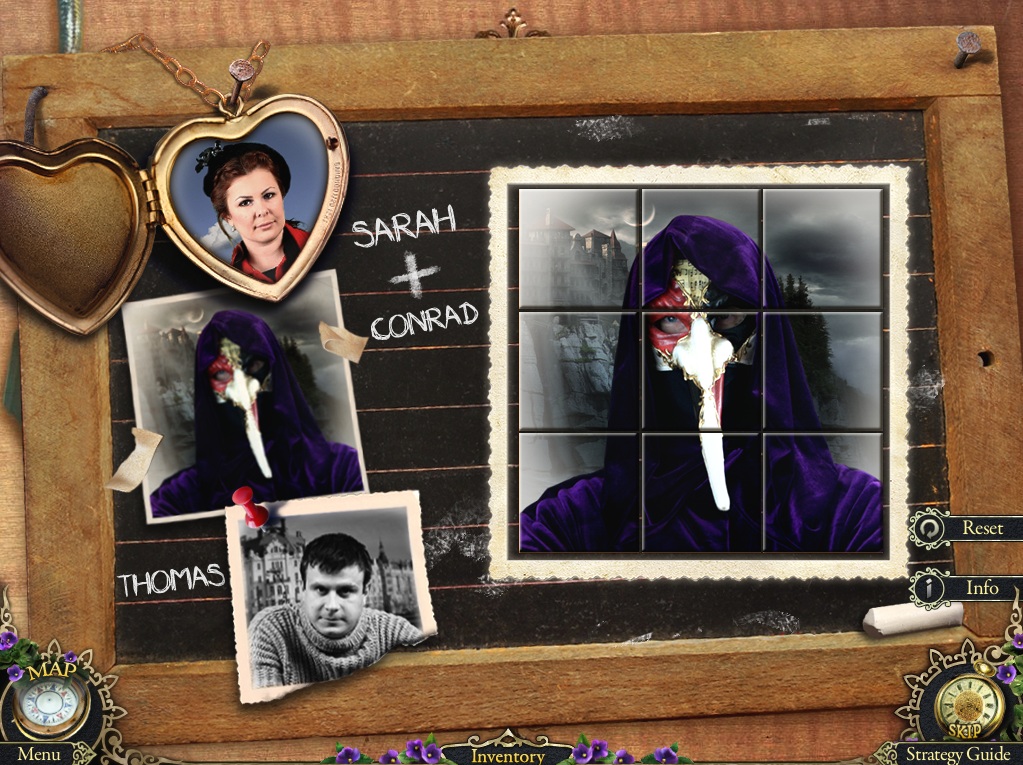
Click the tiles to assemble the portraits of Sarah, Conrad, and Thomas.
Solution #1.
Solution #2.
Solution #3.
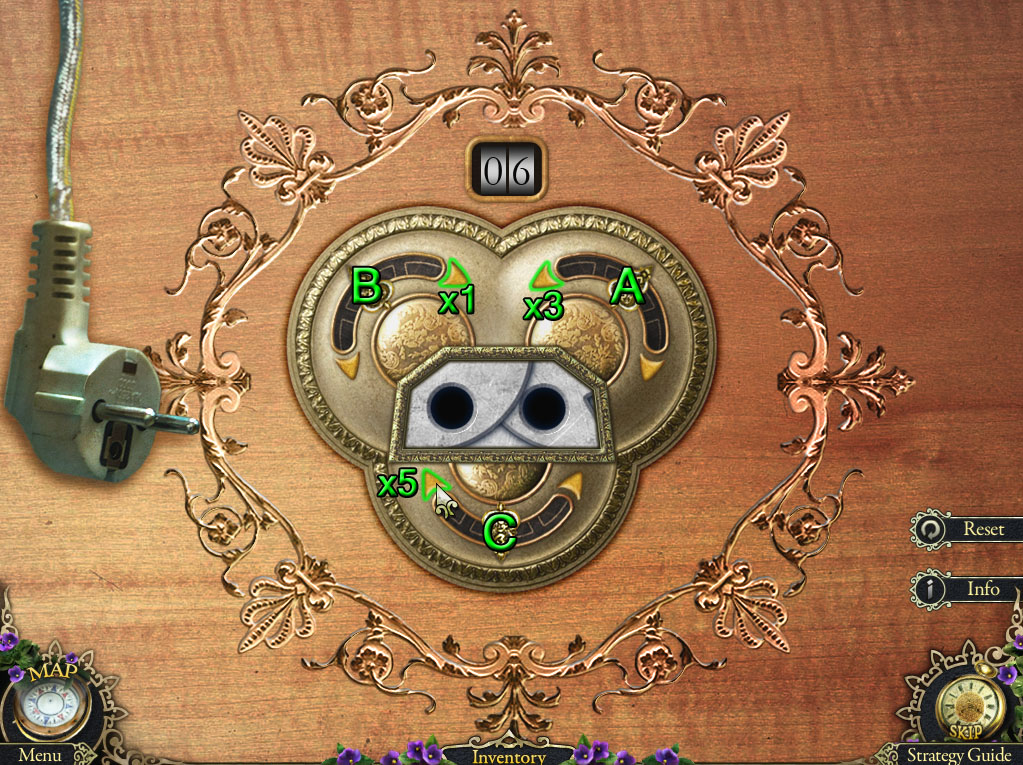
After the first puzzle is solved, the second puzzle will begin.
Turn the three dials to set two holes for the prongs of the plug to fit inside.
Click the left and right arrows to rotate the dials clockwise or counterclockwise.
Click the left arrow on dial A three times.
Click the right arrow on dial B once.
Click the left arrow on dial C five times.
Click the plug to put it inside the outlet.
Solution.
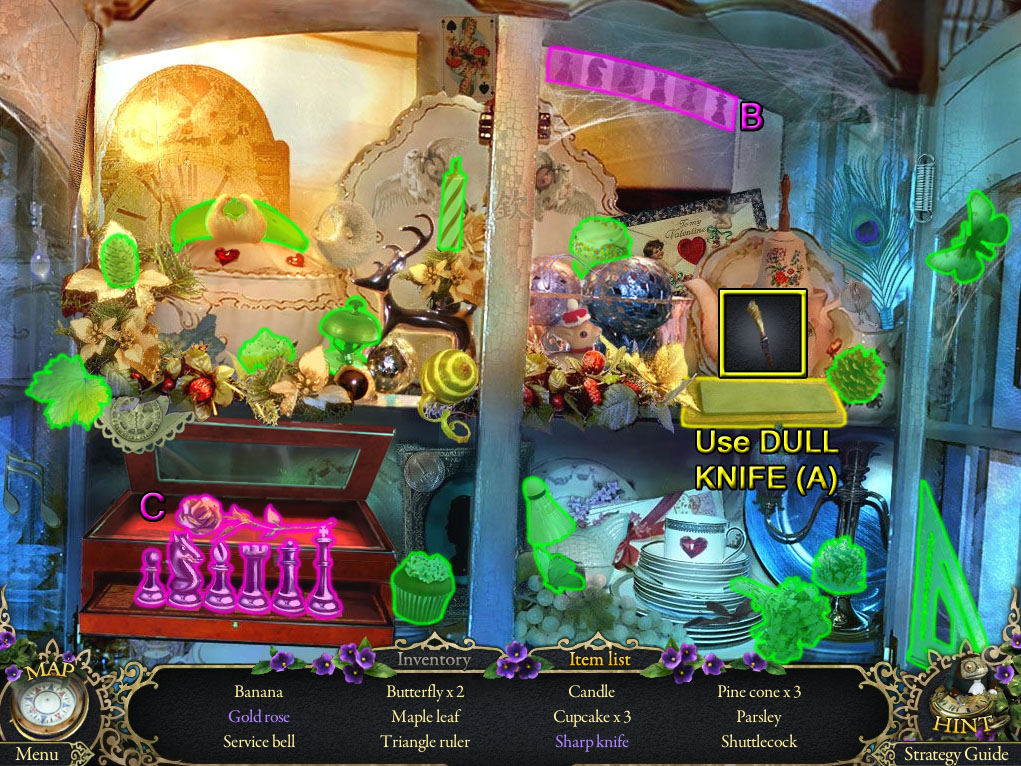
After the puzzle is solved, click the cupboard to start the hidden object scene.
Use the DULL KNIFE (from the statue at the Hospital Yard) on the grindstone to make the Sharp Knife (A).
Place the CHESS FIGURE (from the chessboard at the Guest Room) on the chessboard.
Arrange the chess pieces from left to right in order shown above the upper right shelf: Pawn - Knight - Bishop - Rook - Queen - King (B).
When the pieces are in order, the compartment containing the Gold Rose (C) will open.
Screenshot.
Once the hidden object scene is complete, you will receive the SHARP KNIFE.
Return to the Dock.
Dock
Screenshot.
Click the cable tied around the rusted pole to zoom in.
Use the SHARP KNIFE (from the Hotel Lounge hidden object scene) to cut through the rope.
Click the pieces of ROPE to add it to your inventory.
Use the map to travel to the Mountain Trail at Bluff Hospital.
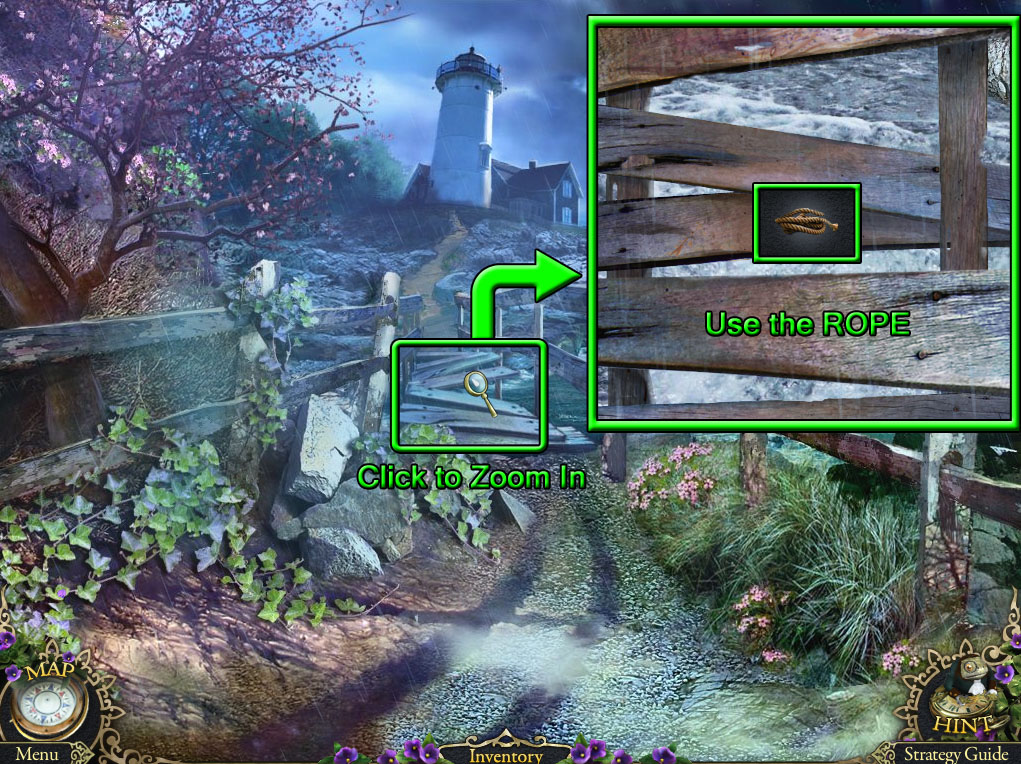
Mountain Trail
Screenshot.
Click the broken bridge for a closer look.
Use the ROPE (from the post at the Dock) to repair the boards.
Continue forward across the bridge to the Lighthouse Entrance.
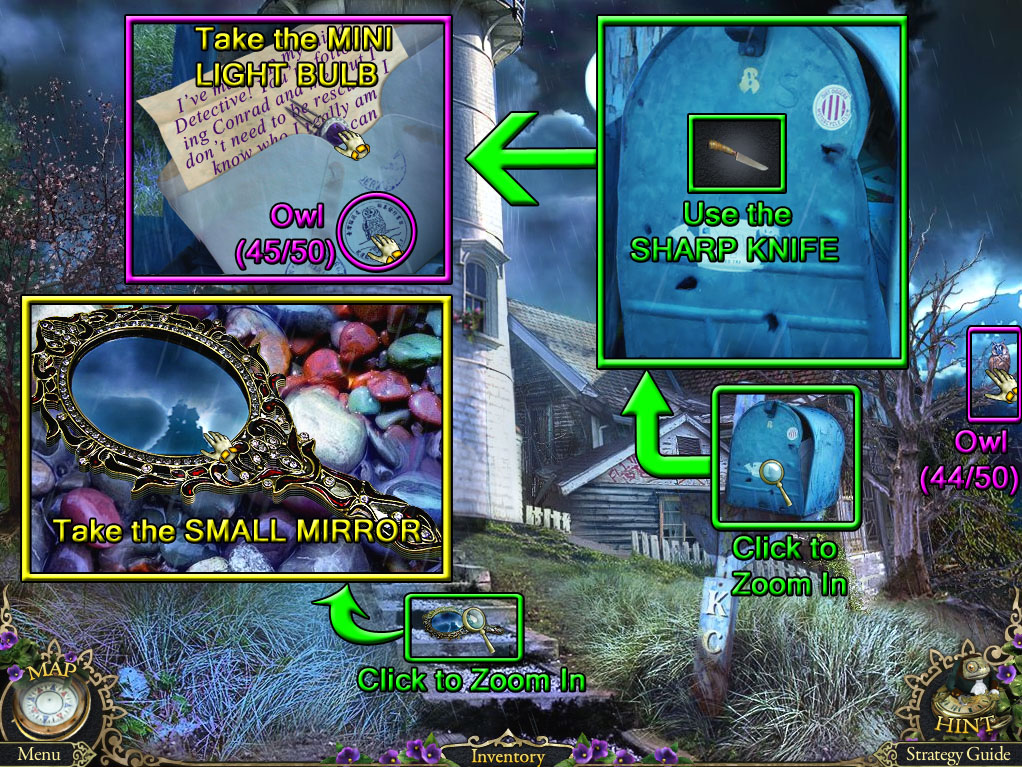
Lighthouse Entrance
Screenshot.
Find the Owl (44/50) on the branch of the right tree.
Click the stone steps to zoom in.
Take the SMALL MIRROR on top of the stair.
Click the mailbox for a closer look.
Use the SHARP KNIFE (from the Hotel Lounge hidden object scene) to open the mailbox door.
Find the Owl (45/50) in the middle stamp on the envelope.
Click the envelope to open it, then take the MINI LIGHT BULB inside.
Go back to the Hospital Hall.
Hospital Hall
Screenshot.
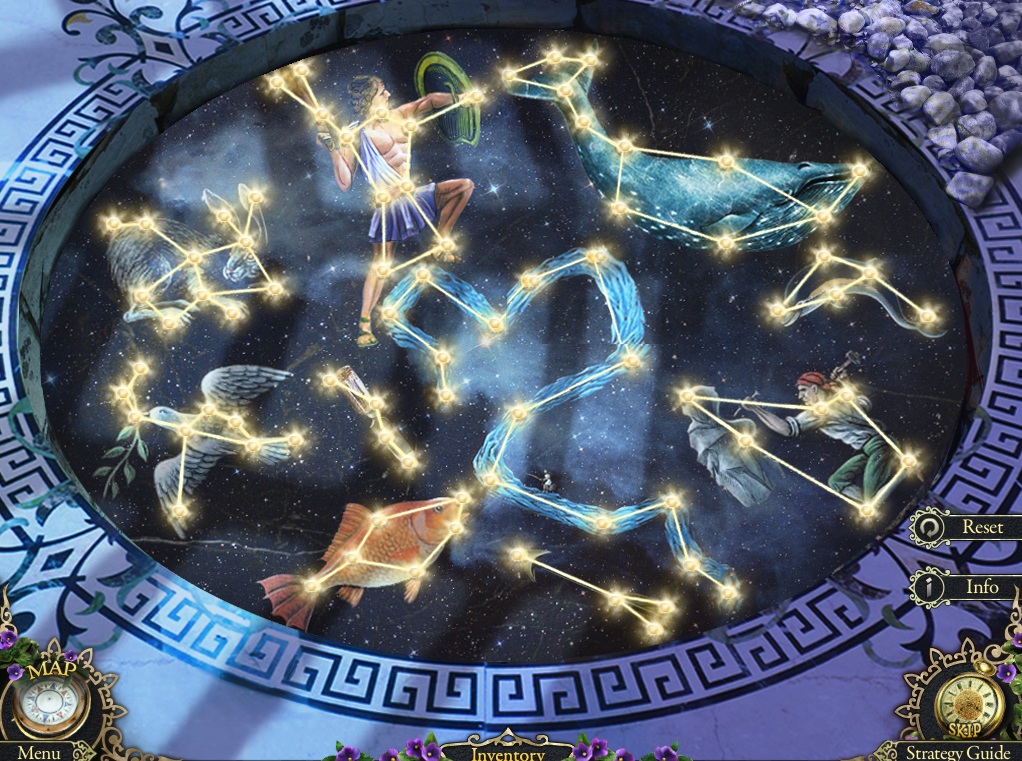
Inspect the map of constellations in the middle of the floor.
Add the MINI LIGHT BULB (from the mailbox at the Lighthouse Entrance) to the floor to start the puzzle.
Connect the bulbs to create a path of light that completes each constellations.
Click and drag the light from one socket to another to draw a path between the two sockets.
If the path is correct, the light will set in place once positioned; however, an incorrectly placed light will revert to its original socket.
Solution.
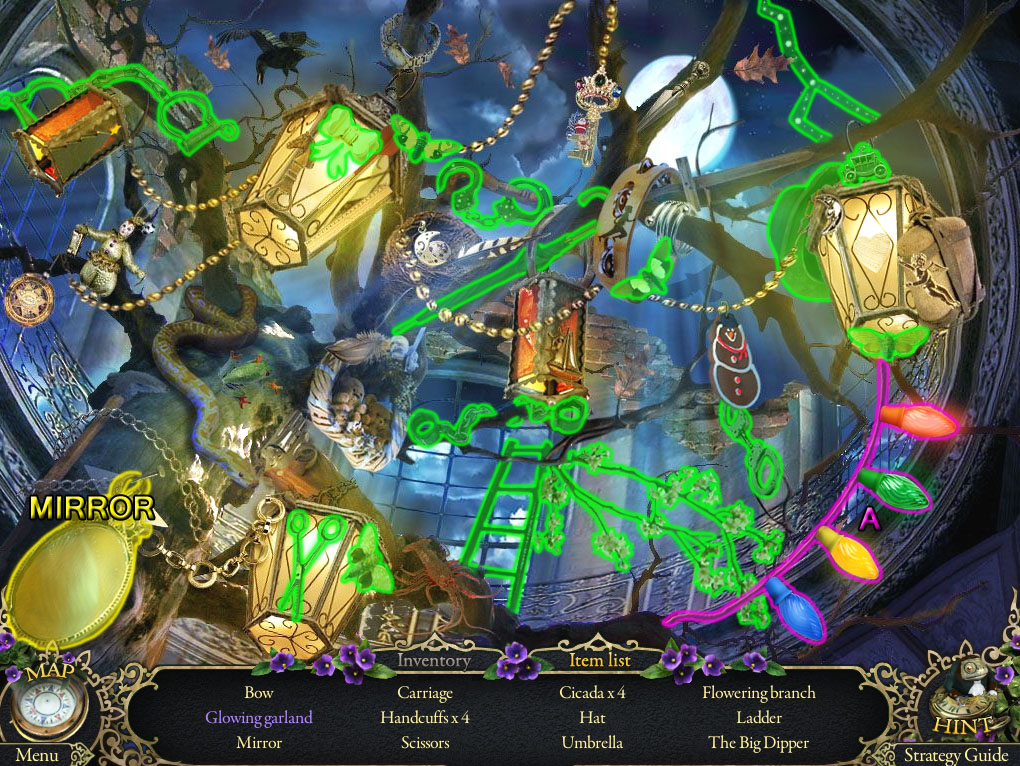
After the puzzle is solved, click the lanterns at the top of the tree to start the hidden object scene.
Place each of the colored light bulbs into its matching color socket to complete the GLOWING GARLAND (A).
Screenshot.
Once the hidden object scene is complete, you will receive the MIRROR (2/2).
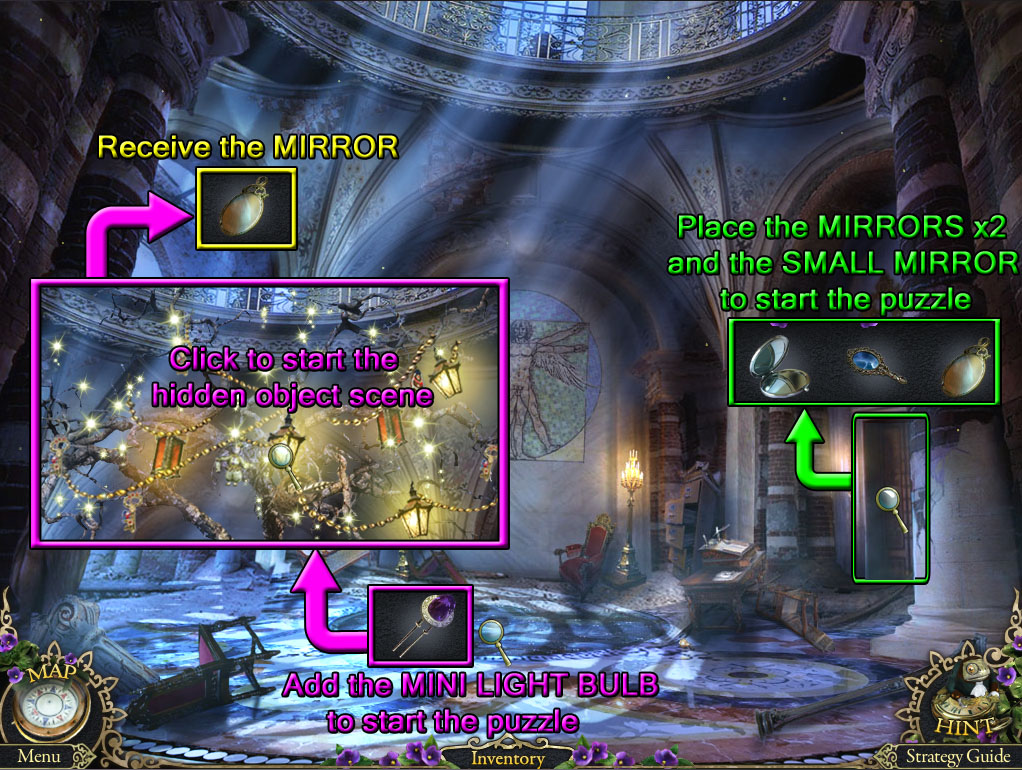
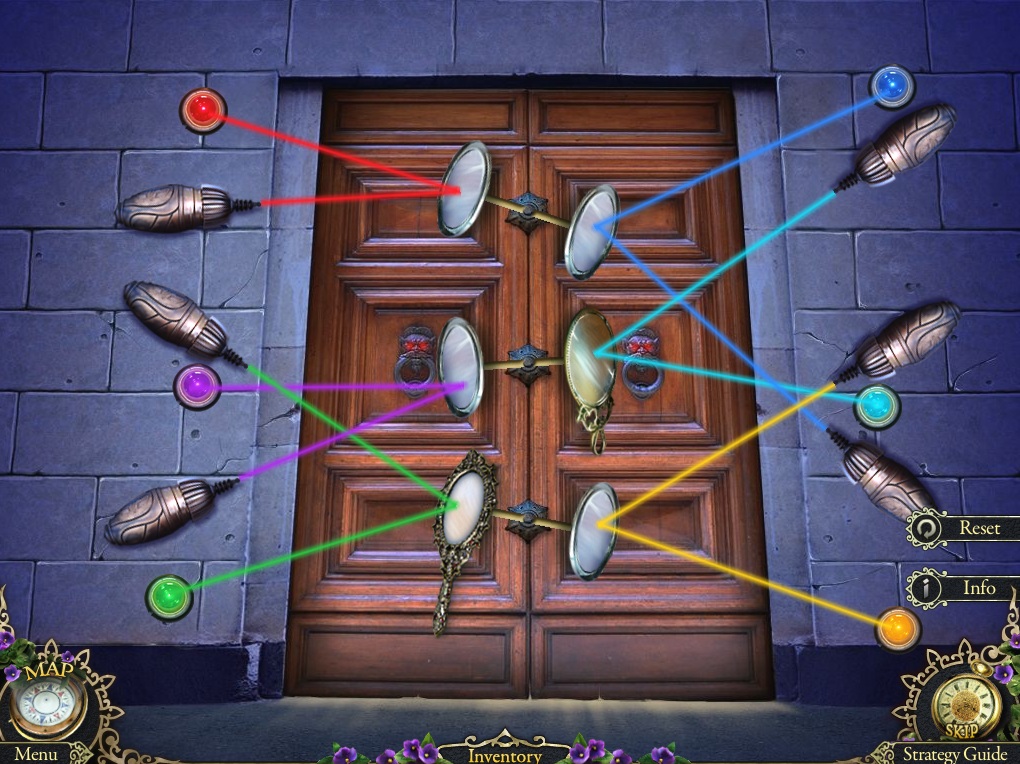
Click the right door for a closer look.
Add the two MIRRORS and the SMALL MIRROR to the door to start the puzzle.
The SMALL MIRROR is from the stairs at the Lighthouse Entrance.
MIRROR (1/2) is from the hidden object scene at the Hospital Yard.
MIRROR (2/2) is from the Hospital Hall hidden object scene.
Arrange the projectors to reflect the colored beams of light off the mirrors and into the matching colored lamps on the sides of the door.
Click a projector to select it, then click a different projector to swap their positions.
Solution.
After the puzzle is solved, continue through the right door to the Director's Office.
Chapter 9
Director's Office
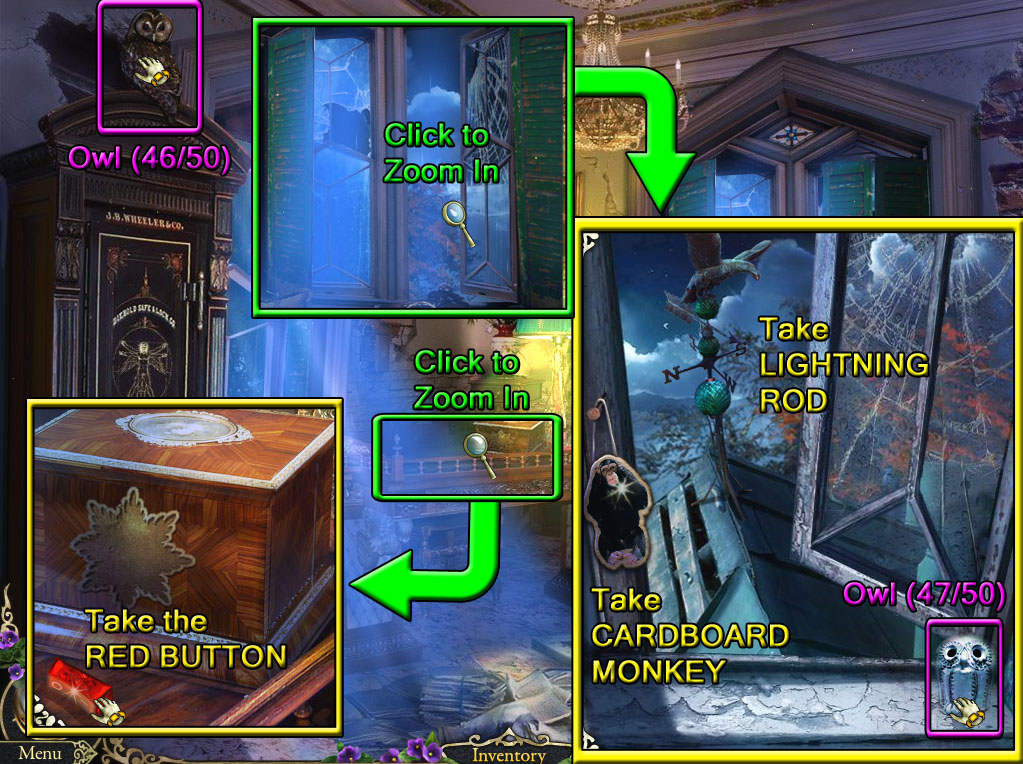
Screenshot.
Find the Owl (46/50) sitting on top of the large safe.
Open the right shutters, then click the window to zoom in.
Find the Owl (47/50) on the windowsill.
Take the CARDBOARD MONKEY hanging from the nail.
Pick up the LIGHTNING ROD from the roof of the adjacent building outside the window.
Click the desk for a closer look.
Take the RED BUTTON on the desk next to the wood box.
Go back to the Gallery Dome.
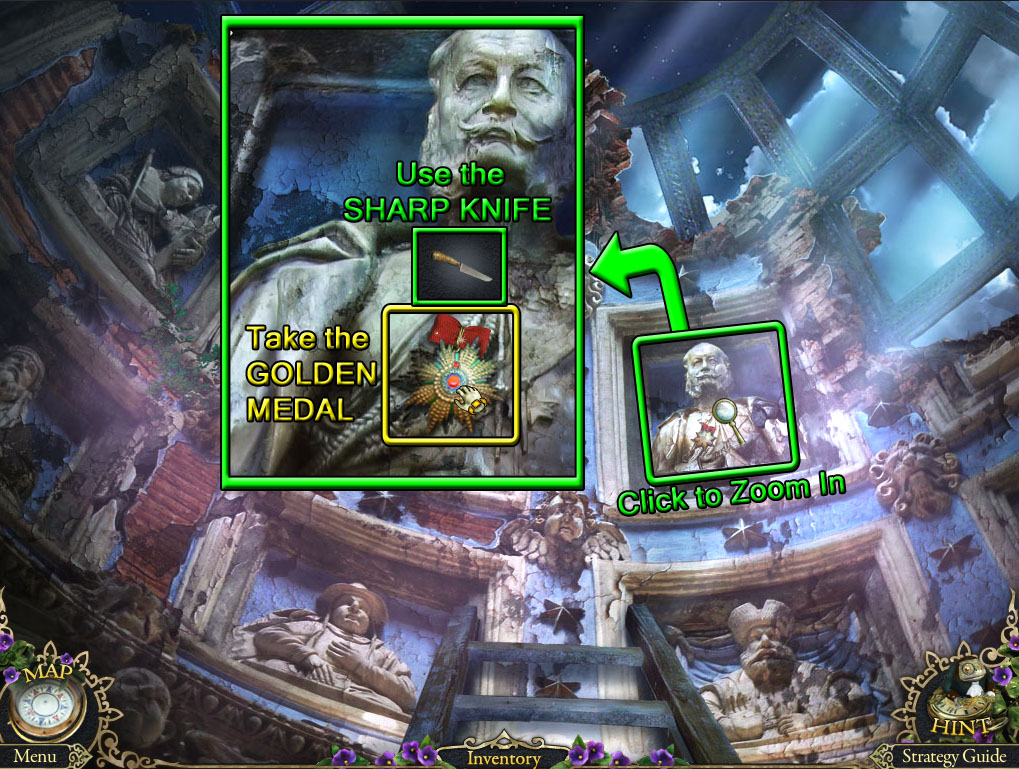
Gallery Dome
Screenshot.
Inspect the statue in the upper right alcove.
Use the SHARP KNIFE (from the Hotel Lounge hidden object scene) to remove the medallion pinned to the statue's chest.
Click the GOLD MEDAL to add it to your inventory.
Go back down the ladder to the Hospital Gallery.
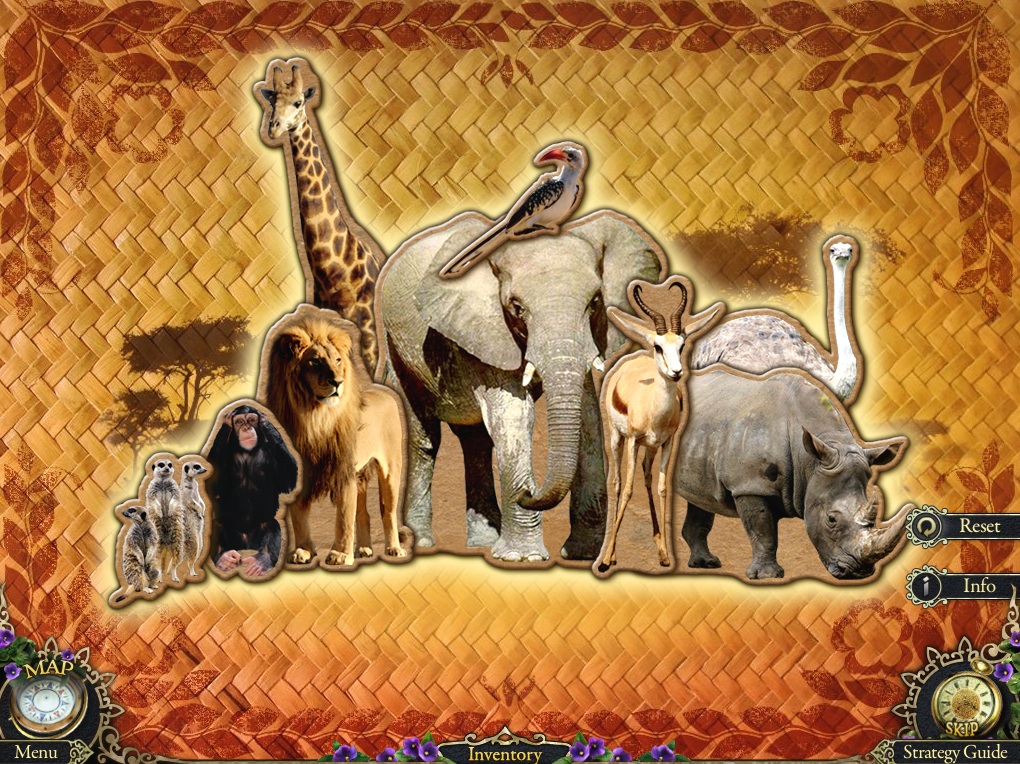
Hospital Gallery
Screenshot.
Click the dressing screen for a closer look.
Add the CARDBOARD MONKEY (from the window at the Director's Office) to the screen to start the puzzle.
Arrange the animals in the correct order from left to right, centered around the elephant.
Click the elephant to view a highlighted outline of the correct order.
Click an animal to flip it horizontally, then click and drag it to move it around the screen.
When an animal is correctly positioned it will lock in place.
Solution.
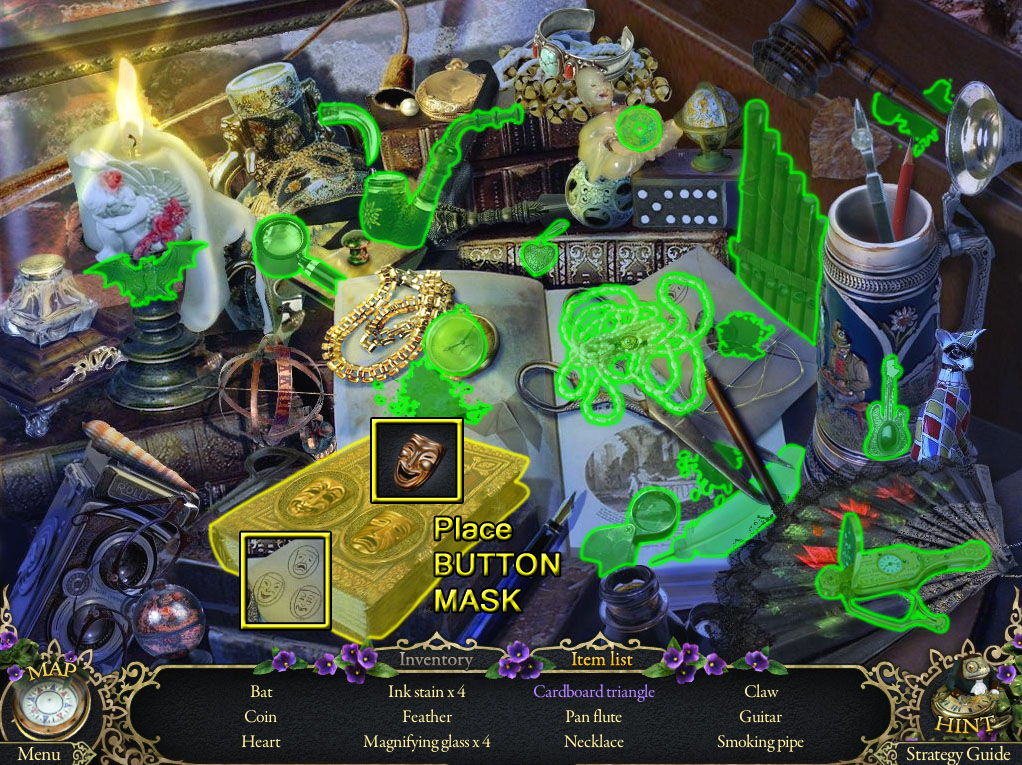
After the puzzle is solved, click the revealed display case behind the screen to start the hidden object scene.
Place the BUTTON MASK (from the book in the Secret Room) in the top seal on the book.
Pick up the Necklace to find an image of the correct order of the masks on the stained envelope.
Arrange the masks on the book to match that image to find the Cardboard Triangle.
Screenshot.
Once the hidden object scene is complete, you will receive the CARDBOARD FRAGMENT (1/4).
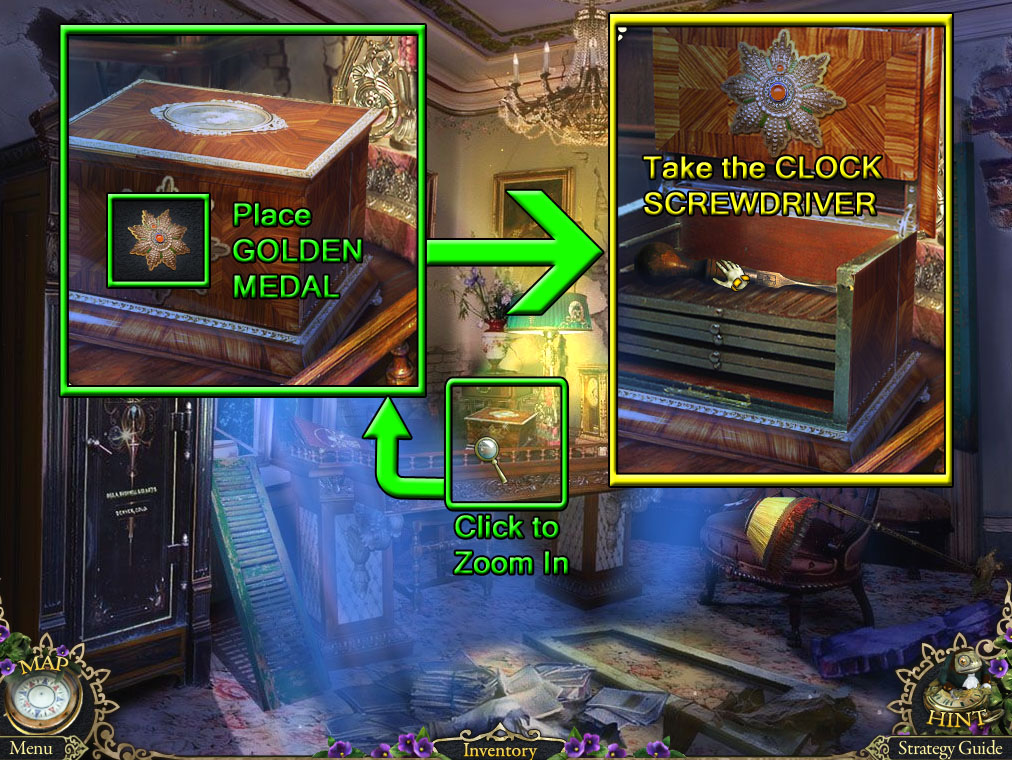
Return to the Director's Office.
Director's Office
Screenshot.
Click the desk to zoom in.
Add the GOLD MEDAL (from the statue at the Gallery Dome) to the star-shaped indent on the box.
Open the box and take the CLOCK SCREWDRIVER inside.
Use the map to travel to the Secret Room in the West Wing.
Secret Room
Screenshot.
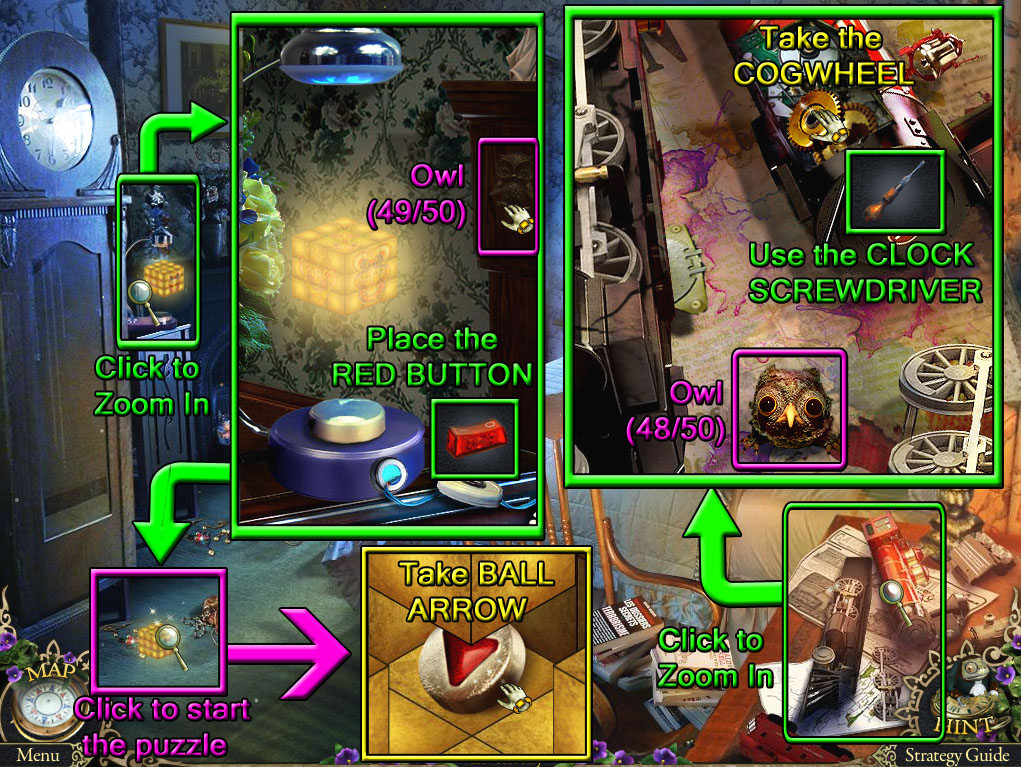
Click the toy train on the table for a closer look.
Find the Owl (48/50) beside the set of train wheels.
Use the CLOCK SCREWDRIVER (from the wood box at the Director's Office) on the gears of the red train.
Take the COGWHEEL from the mechanism.
Inspect the floating gold cube to the left of the fireplace.
Find the Owl (49/50) on the side of the fireplace mantle.
Place the RED BUTTON (from the desk at the Director's Office) onto the spring in the button device.
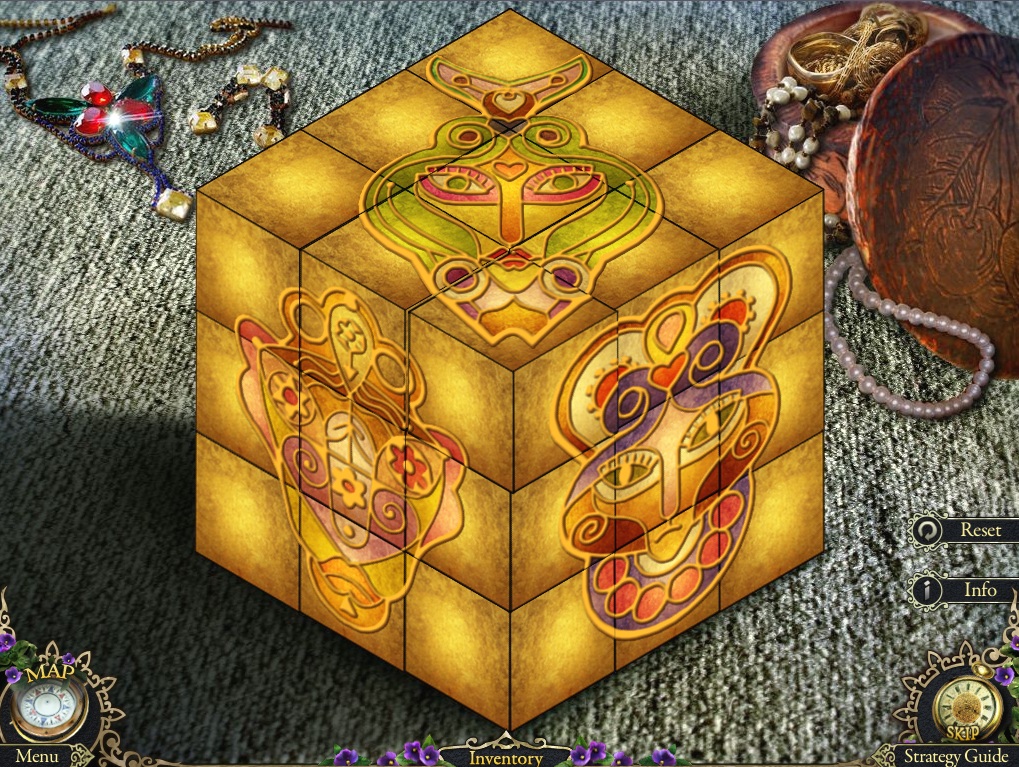
Click the red button to drop the cube, then click the cube on the floor to start the puzzle.
Arrange the tiles to complete the images on the three sides of the cube.
Click one tile to select it, then click a different tile to swap their positions.
The center tile cannot be moved and indicates which picture belongs on that side.
Solution.
After the puzzle is solved, take the BALL ARROW from the open cube.
Go back to the Dock.
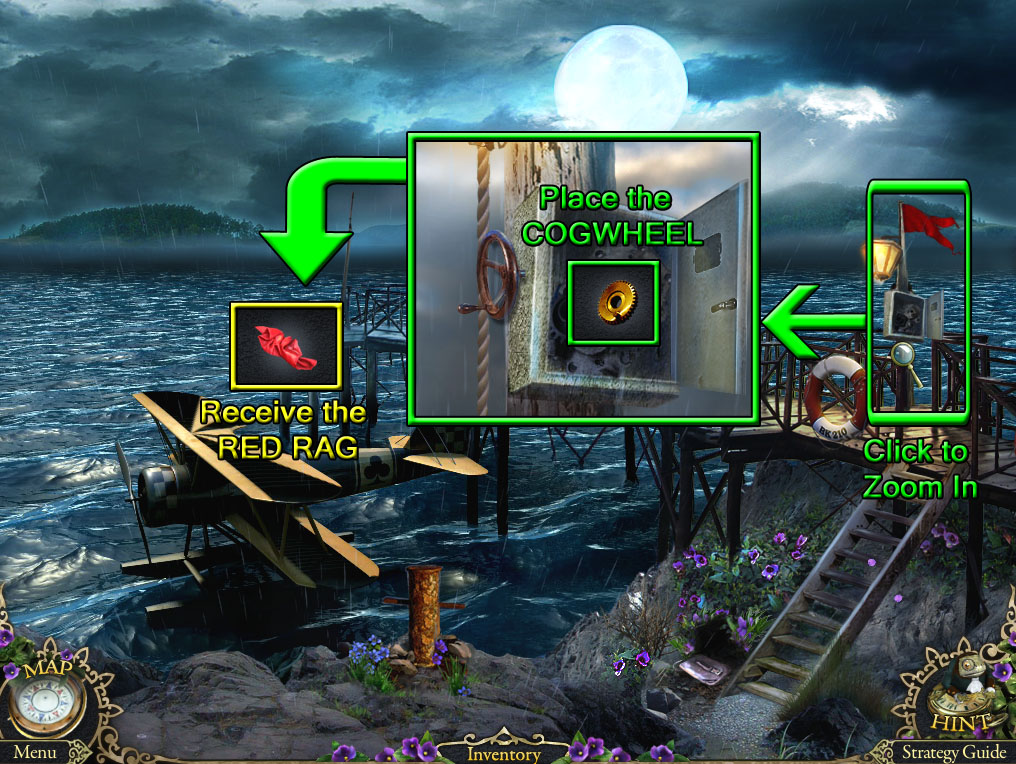
Dock
Screenshot.
Click the flag mechanism next to the lamp to zoom in.
Add the COGHWEEL (from the toy train at the Secret Room) to the mechanism.
Close the door to the panel to receive the RED RAG.
Use the map to travel to the Lighthouse Entrance at Bluff Hospital.
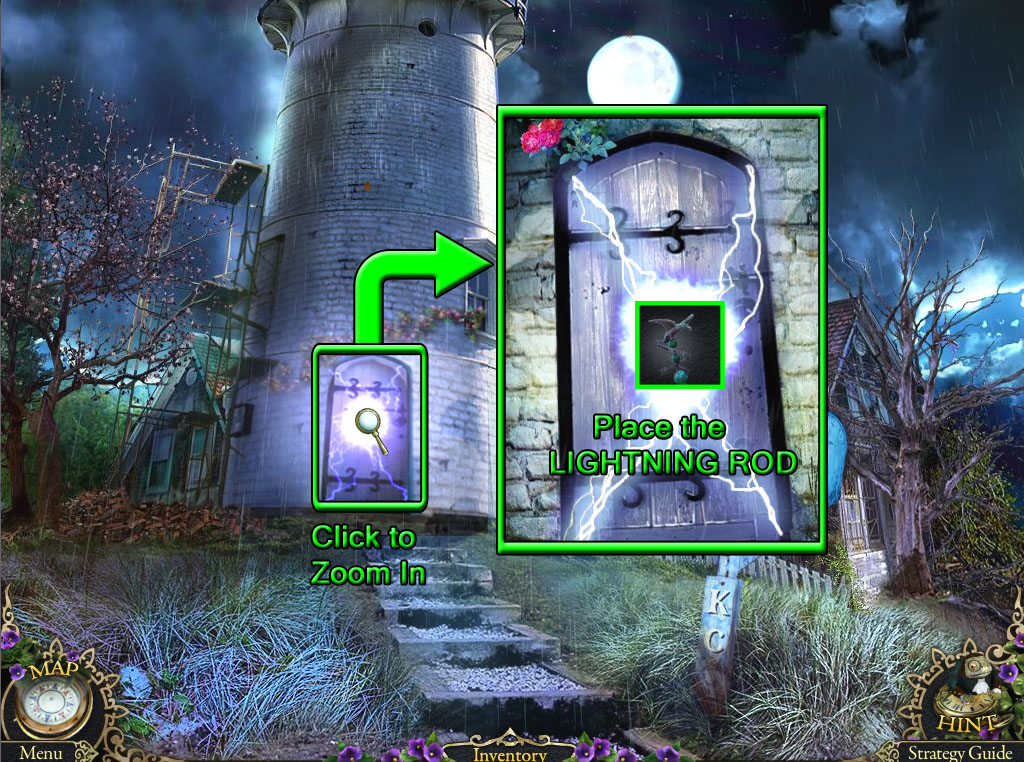
Lighthouse Entrance
Screenshot.
Click the electrified door for a closer look.
Place the LIGHTNING ROD (from the window at the Director's Office) in front of the door.
Go through the open door to the Lighthouse Tower.
Lighthouse Tower
Screenshot.
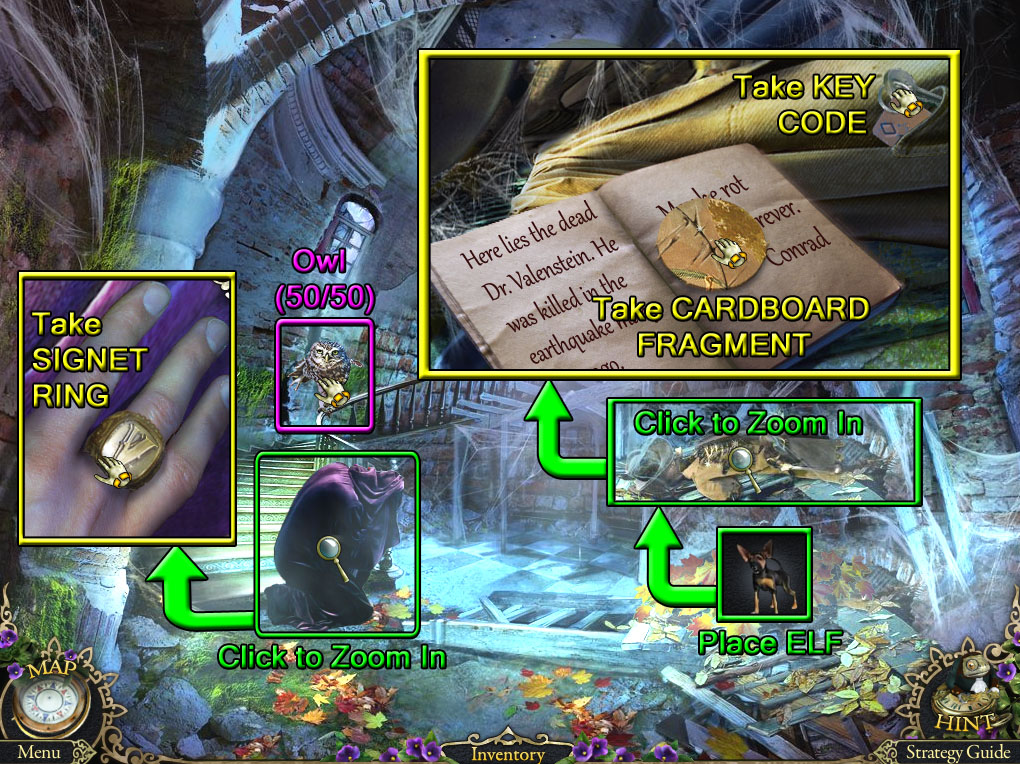
Find the Owl (50/50) on the banister above Conrad.
Click Conrad's hand to zoom in.
Take the SIGNET RING around his middle finger.
Place ELF the dog on the pile of leaves.
Inspect the uncovered skeleton on the floor.
Take the KEY CODE from the coat pocket.
Open the book next to the skeleton to find the CARDBOARD FRAGMENT (2/4).
Return to the Director's Office.
Director's Office
Screenshot.
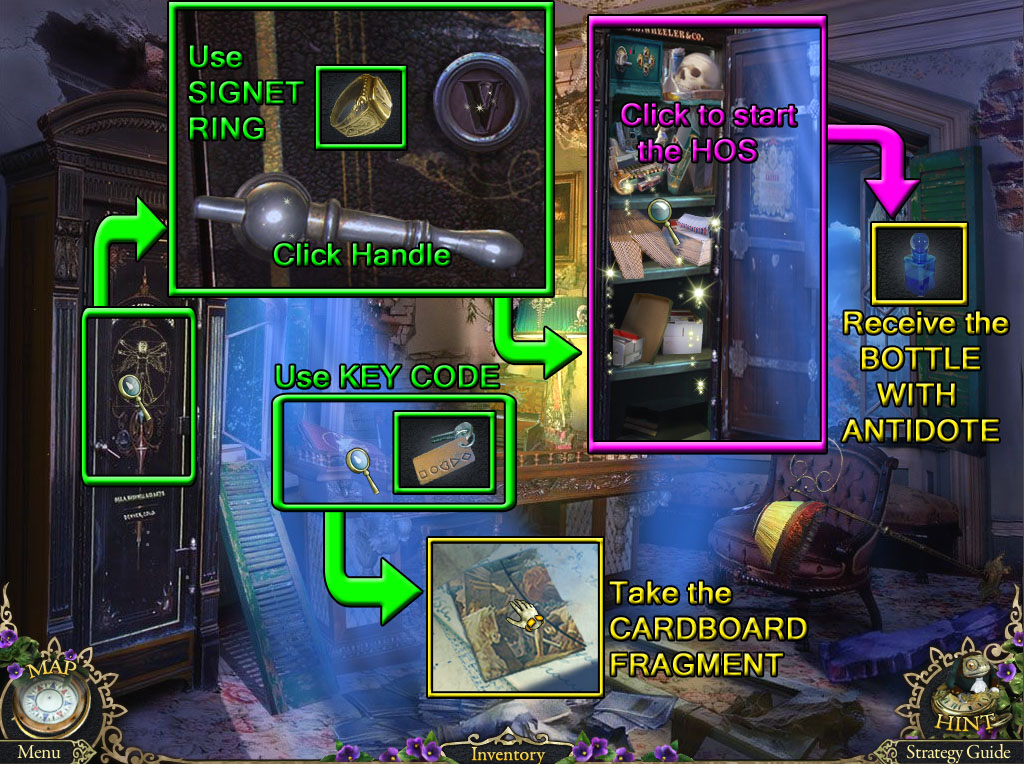
Click the large safe for a closer look.
Use the SIGNET RING (from Conrad's hand at the Lighthouse Tower) on the seal, then click the handle to open the safe.
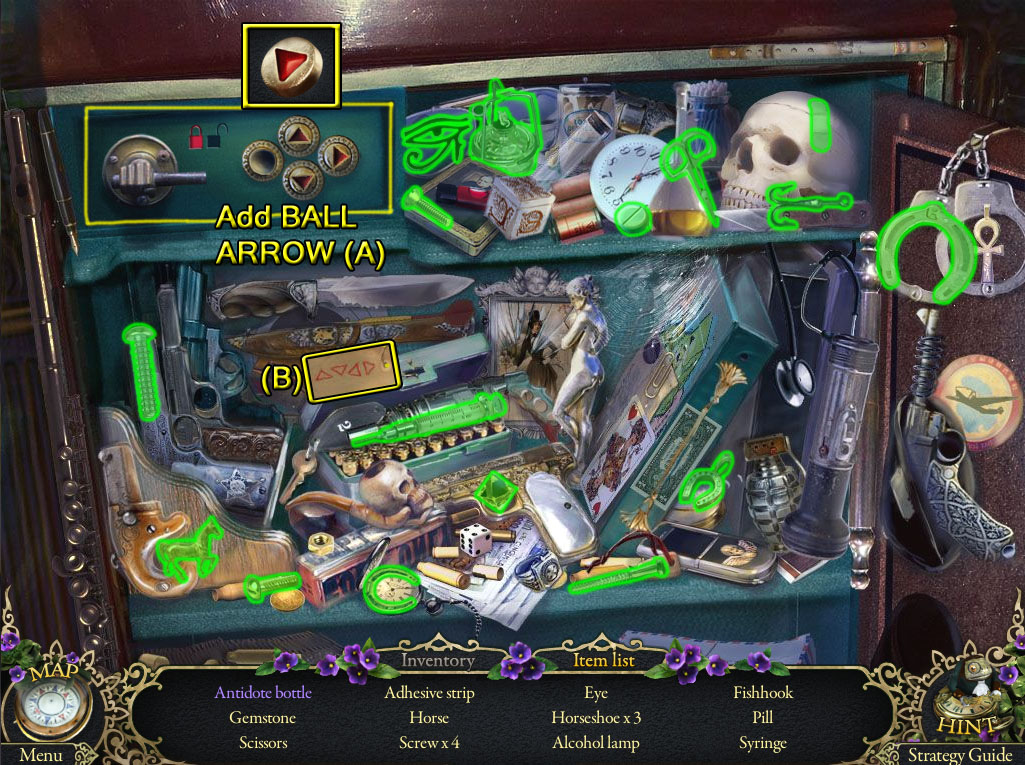
Click the open safe to start the hidden object scene.
Add the BALL ARROW (from the cube puzzle in the Secret Room) to the button panel at the side of the safe (A).
Press the buttons in the order shown on the tag: Up, Down, Left, Right (B).
Find the Antidote Bottle in the open safe.
Screenshot.
Once the hidden object scene is complete, you will receive the BOTTLE WITH ANTIDOTE.
Inspect the book on the left side of the desk.
Place the KEY CODE (from the skeleton's pocket at the Lighthouse Tower) inside the lock.
Turn the dials to enter the combination shown on the tag attached to the key.
Screenshot.
Open the journal, then uncover the pages to find the CARDBOARD FRAGMENT (3/4).
Go back to the Hospital Yard.
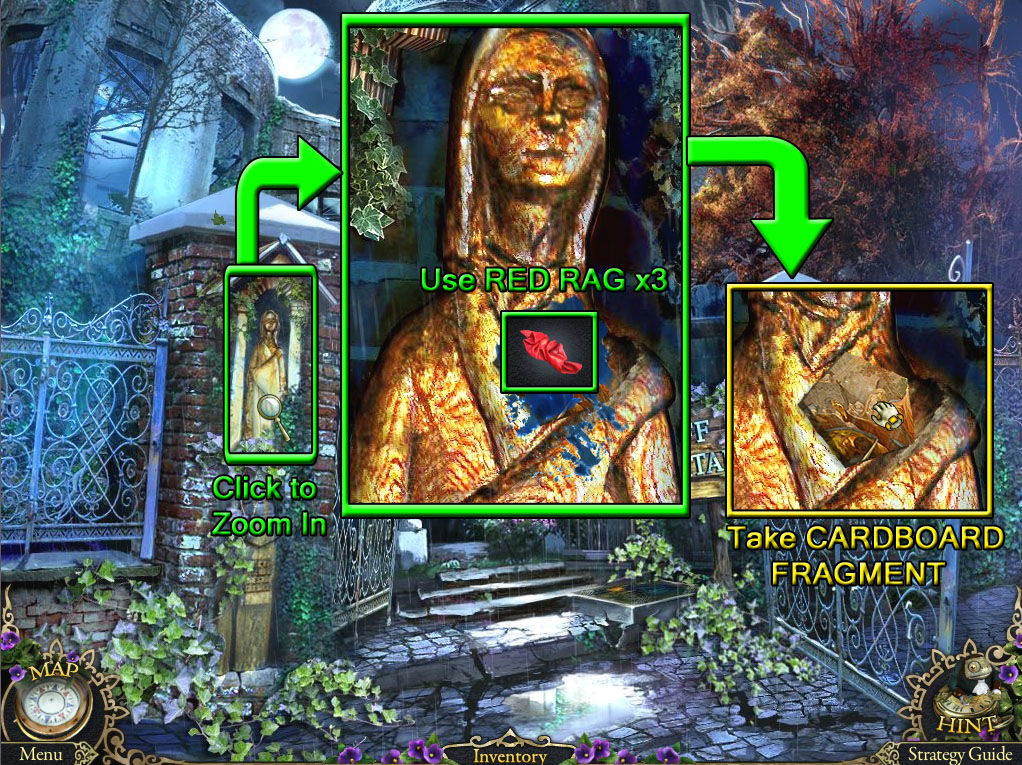
Hospital Yard
Screenshot.
Click the statue to zoom in.
Use the RED RAG (from the flag pole at the Dock) three times to remove the stain on the statue.
Take the revealed CARDBOARD FRAGMENT (4/4).
Use the map to travel to the Clinic Office in the West Wing.
Clinic Office
Screenshot.
Click the open drawer in the desk for a closer look.
Add the four CARDBOARD FRAGMENTS to start the puzzle.
CARDBOARD FRAGMENT (1/4) is from the hidden object scene at the Hospital Gallery.
CARDBOARD FRAGMENT (2/4) is from the skeleton's book in the Lighthouse Tower.
CARDBOARD FRAGMENT (3/4) is from the key code journal at the Director's Office.
CARDBOARD FRAGMENT (4/4) is from the statue stain at the Hospital Yard.
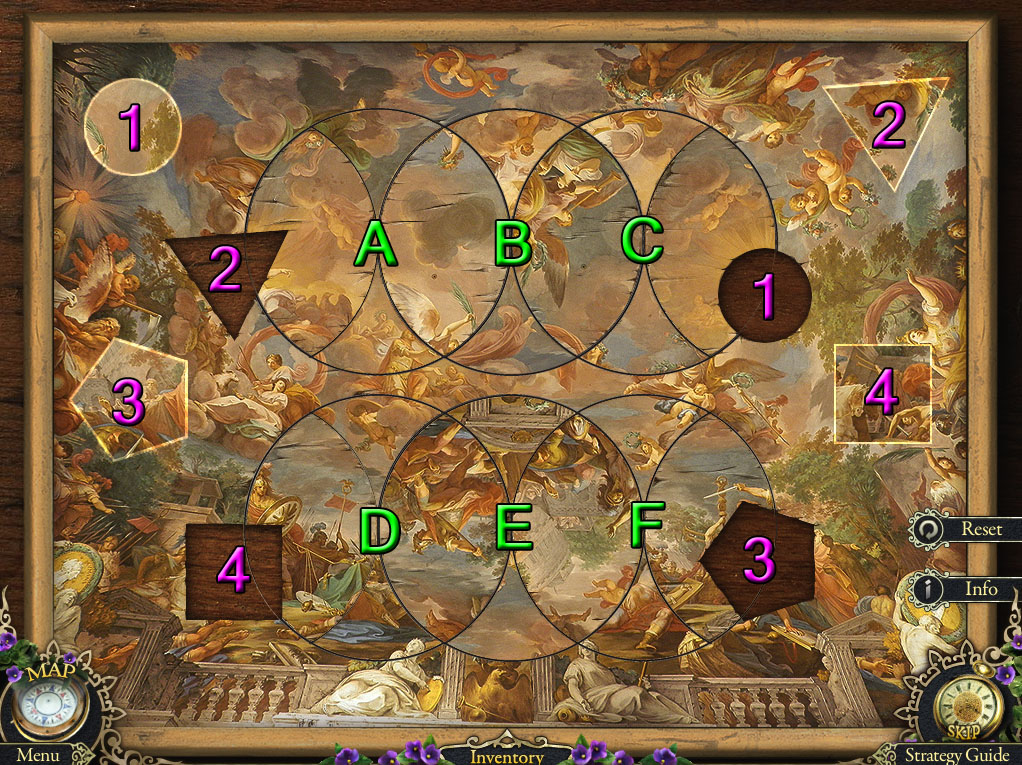
Rotate the discs to complete the geometric spaces for the cardboard fragments to fit inside.
Move the cursor over a circle to highlight the area, then click to rotate that area clockwise.
The upper left shape is for the triangle, the upper right space is for the circle, the lower left space is for the square, and the lower right space is for the pentagon.
Click the discs in the following order: C, B, A, D, E, D, F.
Place the cardboard fragments in their matching spaces to complete the puzzle.
Solution Part 1.
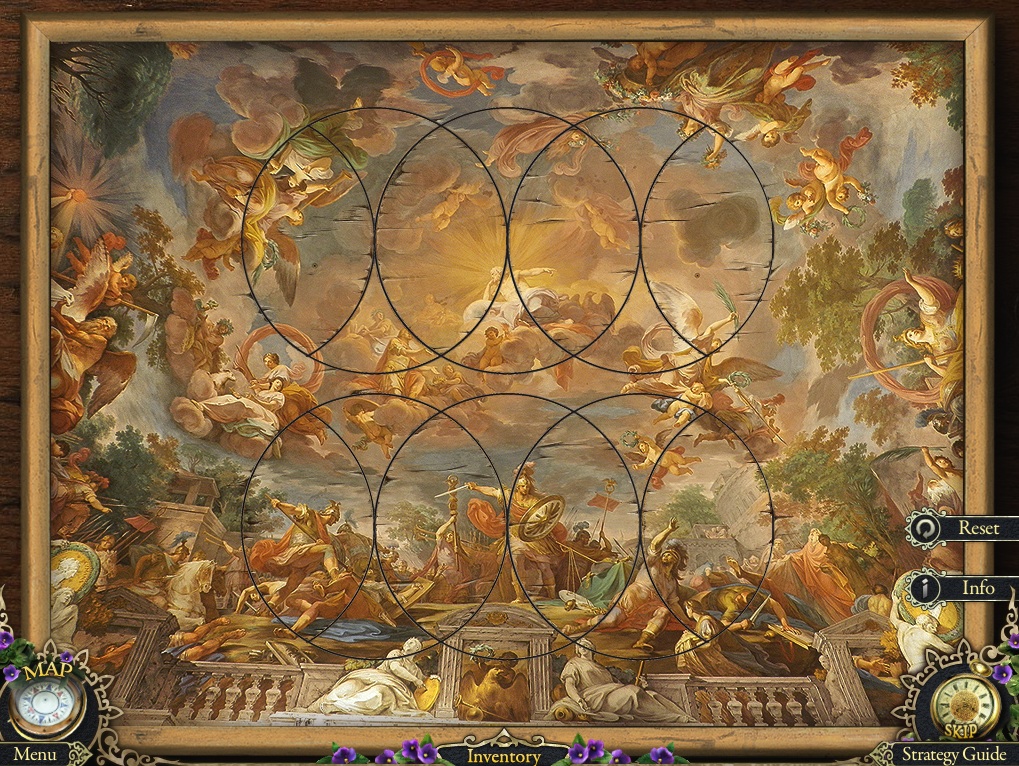
For the second part of the puzzle, rotate the discs to arrange the image.
Click the discs in the following order: B, C, B, A, B, A, D, E, D, E, C, D, C.
Solution Part 2.
After the puzzle is solved, take the syringe from the false bottom of the drawer.
The syringe will automatically combine with the BOTTLE WITH ANTIDOTE in your inventory to complete the ANTIDOTE.
Use the map to trave lto the Lighthouse Tower at Bluff Hospital.
Bluff Hospital
Screenshot.
Click Sarah's arm to zoom in.
Inject the ANTIDOTE (from the drawer puzzle at the Clinic Office) into Sarah's arm.
Click Sarah to start the cut scene.
The End!
Posted by: Trinn |
March 14, 2012 3:17 PM
|
March 14, 2012 3:17 PM