

Mystery Heritage:
Sign of the Spirit
Platform: Windows

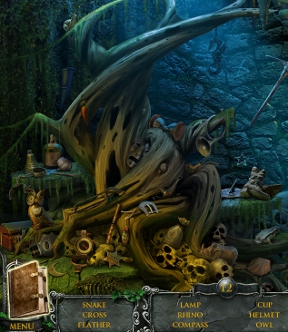
![]() Every family has dirty laundry they don't want spread around, but when yours is cursed by a vengeful witch's spirit who has been systematically murdering every male descendant, well... that's kind of hard to keep under wraps. Especially when the locals start going missing as well, and they start wondering if sacrificing the latest unfortunate fellow to move to the family estate might not work wonders for their misfortune. In the hidden-object adventure Mystery Heritage: Sign of the Spirit by Urse Games, you are a detective who has been called in to look for the Williams family's lawyer who vanished while visiting the estate. Is it supernatural murder most foul? Simple human greed? Or is the truth behind the disappearance and that family's "curse" much more complicated?
Every family has dirty laundry they don't want spread around, but when yours is cursed by a vengeful witch's spirit who has been systematically murdering every male descendant, well... that's kind of hard to keep under wraps. Especially when the locals start going missing as well, and they start wondering if sacrificing the latest unfortunate fellow to move to the family estate might not work wonders for their misfortune. In the hidden-object adventure Mystery Heritage: Sign of the Spirit by Urse Games, you are a detective who has been called in to look for the Williams family's lawyer who vanished while visiting the estate. Is it supernatural murder most foul? Simple human greed? Or is the truth behind the disappearance and that family's "curse" much more complicated?
 Well hey, luckily for us, we've got an ace detective like you around to sort things out! Boy, it sure is a good thing you're an actual, licensed detective with years of experience who's qualified to handle such a dangerous case, and not just some random berk who downloaded a casual game on the interwebs! So get cracking, ace! Click around to search for clues and items of use, and rely on your handy-dandy magical eye-gas-releasing owl (it's complicated) to get a hint or skip a puzzle if you're stuck. As a totally real and not fake detective, you should also be prepared to solve hidden-object scenes, handle dead bodies, reassemble ancient locking mechanisms, disarm rabid dogs, and not get murdered yourself. Oh, didn't we mention? Seems like there's a lot of interest in your investigation, and not all of it is helpful... or part of the physical world.
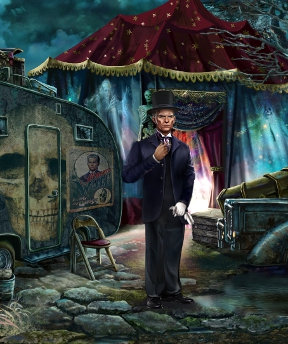 Analysis: Mystery Heritage: Sign of the Spirit is, to be frank, kinda gorgeous. The artwork and environmental design is stellar, despite consisting mostly of static images, and the use of rich, saturated colours makes each area a joy to behold. The plot, while still having a few wrinkles you'll see coming and blaring fanfare from a mile away, has a few twists and turns that mean it isn't the same old boring "ancient family curse" yadda yadda you've heard before. You'll interact with several different unique characters, and on the whole the voice acting is actually pretty darn good... which is a relief if you're painfully Canadian like me and hearing bad voice acting tends to make you feel both embarrassed on behalf of the actor and then guilty for doing so. (In Canada, this is known as the Shame Cycle.)
The downside? Back-tracking, and lots of it, complete with some repeated hidden-object scenes. Perhaps the biggest criticism you could levy against Sign of the Spirit, however, is that it's familiar. If you play a lot of these types of games, you'll recognise certain puzzle types and even plot tropes, but on the other hand, this also makes this an excellent introduction to hidden-object adventure games. It's beautifully designed, intriguing, fun, and just a little bit spooky. At around three to four hours or so for an average playthrough, you may want to try the demo to see how fast you blaze through it, though the three difficulty settings are there to forcibly slow you down if need be. Though it doesn't take any risks, Mystery Heritage: Sign of the Spirit is a beautiful and fun bit of gaming that can serve as a great springboard into the genre, or just a relaxing evening's play for fans who don't demand a whole lot of innovation.
A Collector's Edition is also available. It contains a bonus chapter, art gallery, strategy guide, and more. Remember that Big Fish Game Club Members pay only $13.99 for Collector's Editions (or 2 club credits), and collector's editions count 3 card punches of 6 total needed for a free game.
![]() Windows:
Windows:
Download the demo
Get the full version
Also available: Collector's Edition
![]() Mac OS X:
Mac OS X:
Not available.
Try Boot Camp or Parallels or CrossOver Games.


Walkthrough Guide
(Please allow page to fully load for spoiler tags to be functional.)
Mystery Heritage: Sign of the Spirit Walkthrough
Chapter 1
Martin's Car
Click the ghost woman to chase her away.
Click on Samuel to speak with him.
Open the car door, then click the interior of the car to look inside.
Take the CAR KEYS from the ignition beside the wheel, then go back to the main view of the street.
Click the trunk of the car to zoom in.
Use the CAR KEYS to open the lock at the top of the trunk.
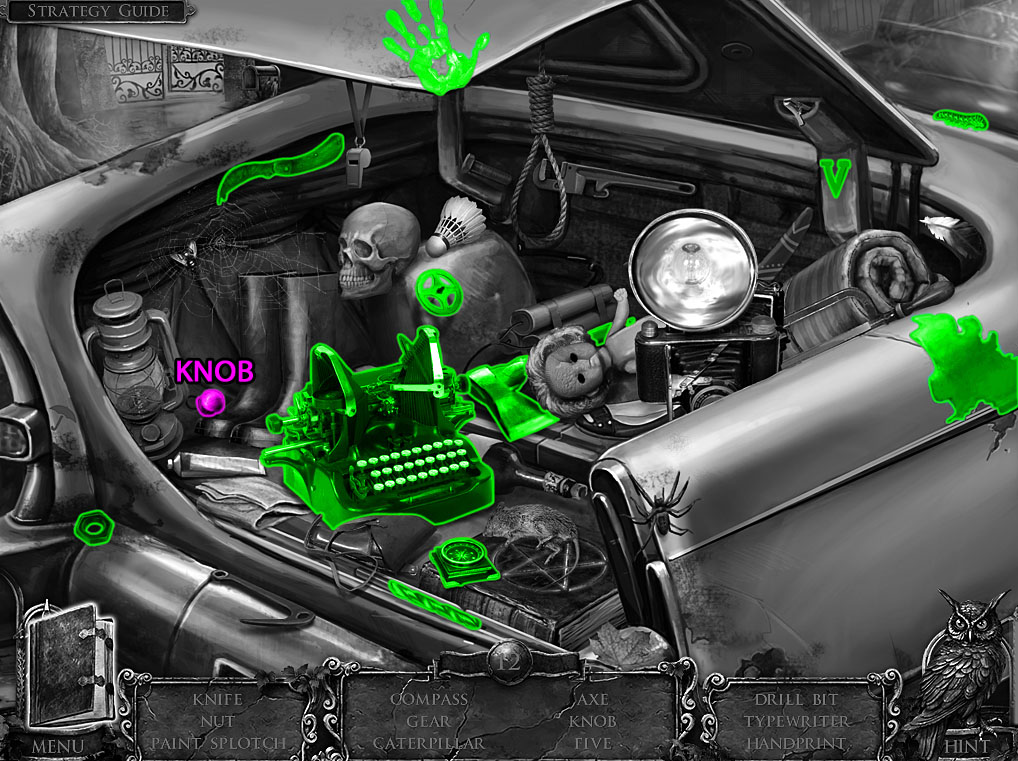
Click the opened trunk to start the hidden object scene.
Screenshot.
Once the hidden object scene is complete, you will receive the GLOVE BOX KNOB.
Pick up the LIGHTER beside the root on top of the fallen column.
Click the mailbox for a closer look.
Use the LIGHTER to burn off the spiderwebs covering the mailbox door.
Open the mailbox to find the OWL EYE.
Click the pile of newspapers to read the article.
Inspect the interior of the car again.
Add the GLOVE BOX KNOB to the bolt on the glove compartment.
Take the SUITCASE KNOB inside the opened compartment.
Lower the sun visor with the bloody hand print to find a taped note with an alphanumeric code.
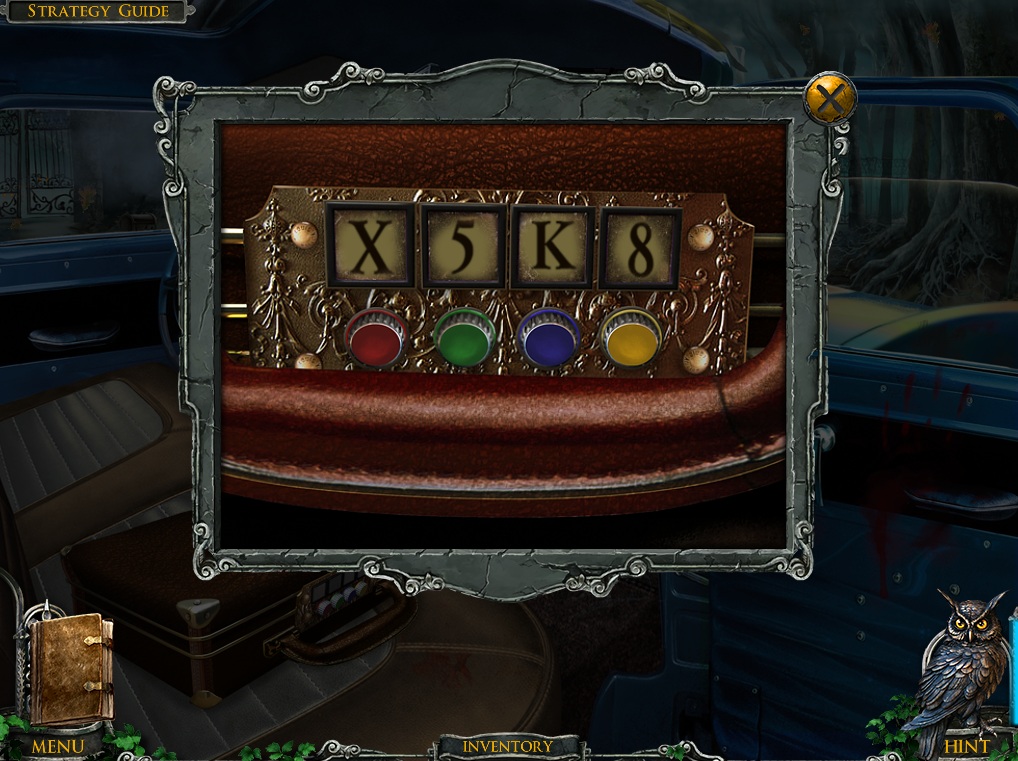
Zoom in to the briefcase, then add the SUITCASE KNOB to the green socket.
Turn the knobs to enter in the combination found on the sun visor: X-5-K-8.
Set the red knob to X, the green knob to 5, the blue knob to K, and the yellow knob to 8.
Screenshot.
Take the DOG REMOTE CONTROL from the opened suitcase.
Click the photographs and the note inside the lid of the suitcase to add them to your Diary.
Leave the car and speak with Samuel again, then follow him forward to the Mansion Stairway.
Mansion Stairway
Click the owl sitting on the left banister of the stairway.
Click the wheelbarrow to the left of the stairs to zoom in.
Take the BUCKET on the ground and pick up the poster to add it to your Diary.
Move right to the Mansion Grounds.
Mansion Grounds
After the cut scene, click the glowing green powder on the ground to add it to your Diary.
Inspect the owl statue on the pedestal beside the bent section of the fence.
Add the OWL EYE to the hole in the statue.
Take the SKULL from the revealed cache in the pedestal.
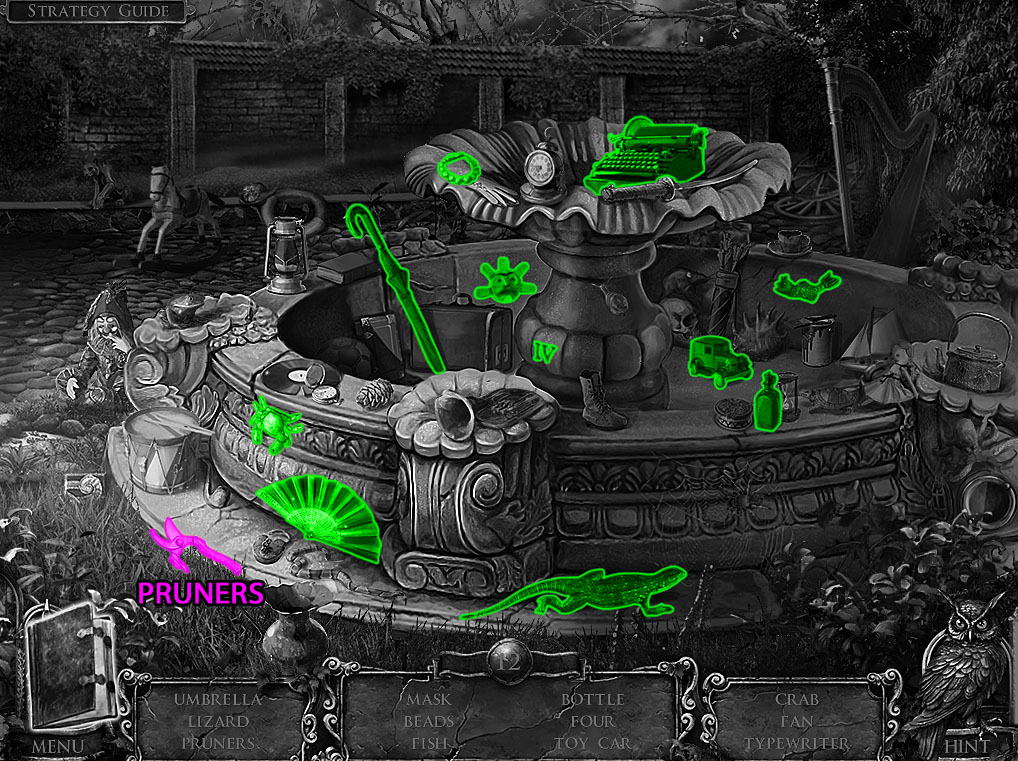
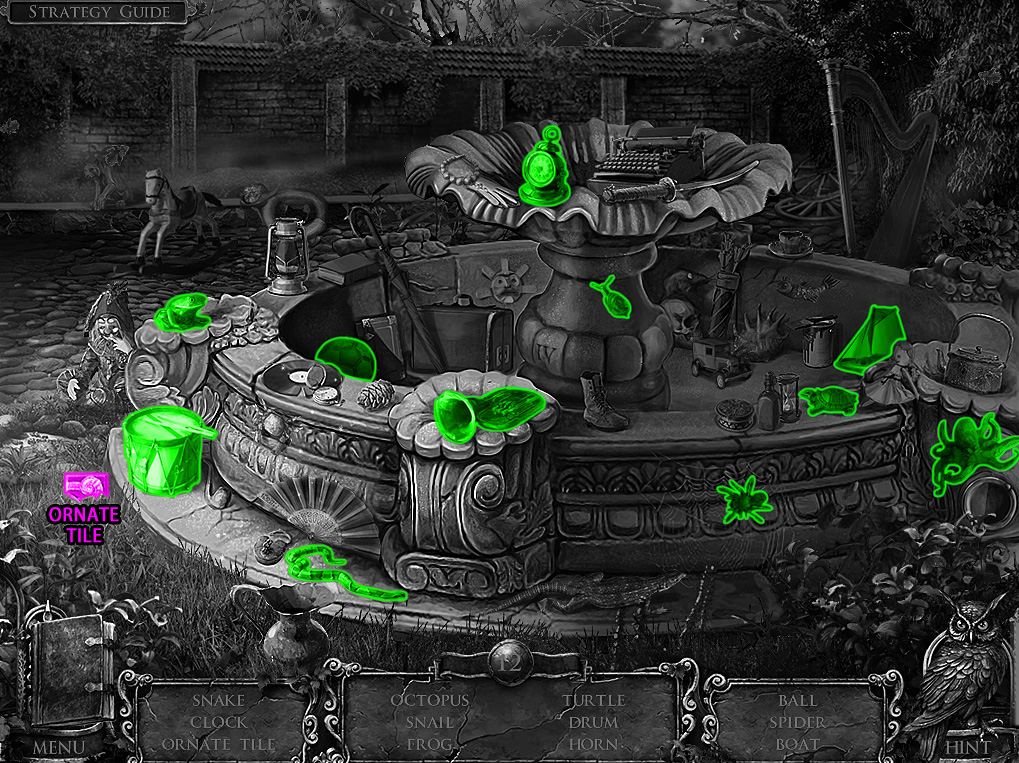
Click the fountain to start the hidden object scene.
Screenshot.
Once the hidden object scene is complete, you will receive the PRUNERS.
Go forward once and continue left to the Greenhouse Exterior.
Greenhouse Exterior
Pick up the BURNER on the ground between the two stones under the bust.
Click the side of the well to zoom in.
Use the LIGHTER on the oil soaked torch, then click the lit TORCH to add it to your inventory.
Open the Greenhouse door and continue forward into the building.
Greenhouse
Click the large open chest to look inside.
Take the KNIFE and OWL PIECE from the chest.
Inspect the books on top of the counter to the left of the statue.
Take the SEALING WAX, then click the Williams' family crest to add it to your Diary.
Go back twice to the Crossroads.
Crossroads
Click the door to the old house for a closer look.
Add the OWL PIECE to the round space at the top of the plate to start the minigame.
Move all of the red chips to the spaces at the bottom of the plate and the blue chips to the spaces at the top.
Click and drag a chip to move it along the track, then release it at one of the points to place it.
Solution.
After the puzzle is solved, go through the open door to the Cellar.
Cellar
Click the book on the floor beside the radio to add the dog remote control instructions to your Diary.
Pick up the PUZZLE TILE 1/2 on the ground by the red cloth.
Click the table under the window for a close-up view.
Place the DOG REMOTE CONTROL on the table, then attach the spark plugs from the battery to the remote control.
Take the CHARGED REMOTE CONTROL from the table.
Go back out to the Crossroads.
Crossroads
Use the CHARGED REMOTE CONTROL on the dog's collar.
Click the pile of junk on the sidewalk to zoom in and take the ROPE.
Click the owl perched in the tree behind the junk pile.
Move left to the Greenhouse Exterior.
Greenhouse Exterior
Read the note in the dead gardener's pocket to add it to your Diary.
Click the well for a closer look.
Attach the ROPE to the hook on the right side of the well.
Throw the torch down the well to light the chamber at the bottom.
Climb down into the Well.
Well
Pick up the INSULATING TAPE on the ground beside the barrel.
Use the BUCKET to collect the river water and make it a FILLED BUCKET.
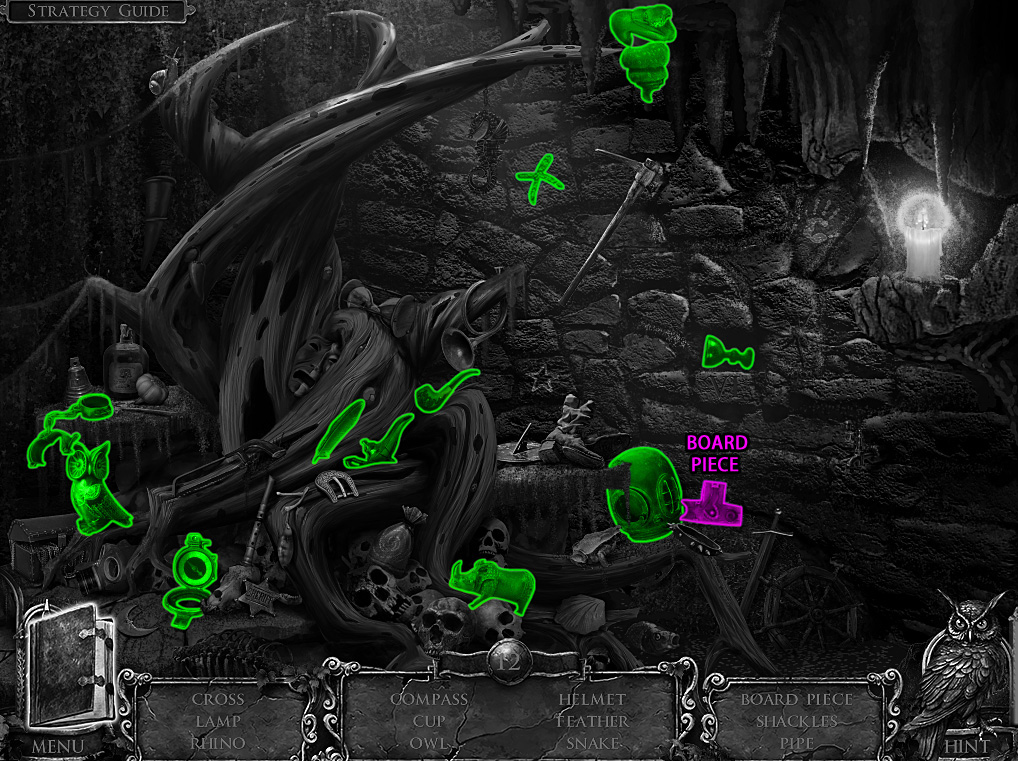
Click the dark area by the support beam at the back of the cave to start the hidden object scene.
Screenshot.
Once the hidden object scene is complete, you will receive the CIRCUIT BOARD PIECE.
Go left to return to the Greenhouse Exterior.
Greenhouse Exterior
Click the base of the street lamp to zoom in.
Use the INSULATING TAPE to repair the broken area of the sparking red wire.
When the lamp is repaired, click the hollow of the tree to start the hidden object scene.
Screenshot.
Once the hidden object scene is complete, you will receive the BULLET 1/2.
Talk to Samuel, then return to the Mansion Stairway.
Mansion Stairway
Use the FILLED BUCKET to douse the water at the bottom of the steps.
Inspect the vines by the base of the middle lamp post.
Cut away the vines with the PRUNERS three times to reveal the VALVE.
Move up the stairs to the Mansion Entrance.
Mansion Entrance
Pick up the CROWBAR beside the planter on the railing.
Return to the Crossroads.
Crossroads
Click the gate blocking the right path for a closer look.
Use the CROWBAR three times to remove the boards blocking the gate.
Open the gate and continue right to the Cemetery Gate.
Cemetery Gate
Pick up the LANTERN on the road by the branch.
Continue forward to the Chapel Entrance.
Chapel Entrance
Click the chapel door to zoom in.
Knock on the door and speak with the old man, and he will ask you for an authorization slip.
Pick up the BLANK PAPER on the roof of the hearse.
Click the back of the hearse to start the hidden object scene.
Screenshot.
Once the hidden object scene is complete, you will receive the TWEEZERS.
Move forward to Alberto's Trailer and speak with Alberto, then continue right to the Field.
Field
Click the front of the scarecrow for a closer look.
Use the KNIFE to cut through the ropes switched through the scarecrow's shirt.
Take the revealed CLUE PIECES behind the shirt.
Return to the Greenhouse.
Greenhouse
Click the lock under the gargoyle platform for a close-up view.
Add the SKULL and the five CLUE PIECES to the lock to start the minigame.
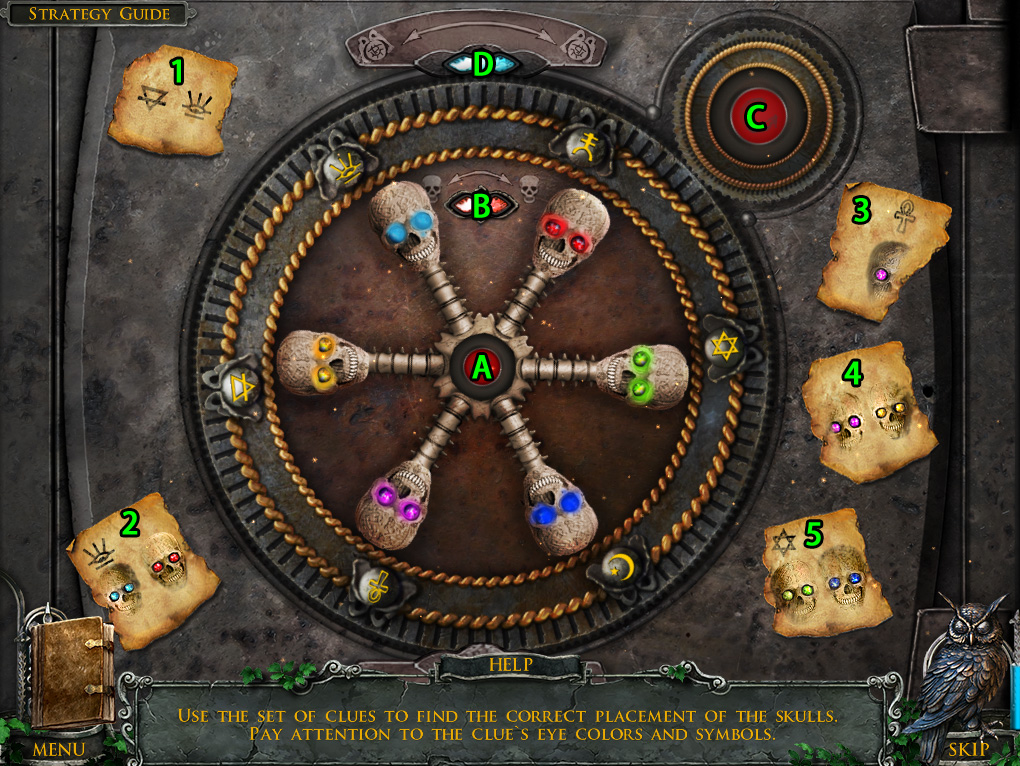
Use the clues to find the correct order of the skulls and the runes.
Press the round red button in the center (A) to rotate the skulls one space counter-clockwise.
Click the red gem button (B) to swap the two skulls at the top of the dial.
Press the round red button (C) at the upper right side of the lock to rotate the runes one space clockwise around the disc.
Click the blue gem button (D) to swap the two runes at the top of the disc.
Note the color and position of the skulls in the clues as well as the symbols written above the skulls to find the solution.
The first paper (1) shows the triangle rune is left of the eye rune.
The second paper (2) shows the eye rune is above the turquoise skull and the turquoise skull is left of the red skull.
The third paper (3) shows the ankh rune is above the purple skull.
The fourth paper (4) shows the purple skull is left of the yellow skull.
The fifth paper (5) shows the star rune is above the green skull and the green skull is left of the blue skull.
Solution.
When the puzzle is solved, look inside the opened safe to find the BOTTLE WITH GLOWING POWDER.
Go back to Alberto's Trailer.
Alberto's Trailer
Give the BOTTLE WITH GLOWING POWDER to Alberto, then speak with him to gain access to search the area.
Open the door to the trailer and click inside to start the hidden object scene.
Screenshot.
Once the hidden object scene is complete, you will receive the LATCH HANDLE.
Click the bed of the pickup truck for a closer look.
Add the LATCH HANDLE to the broken latch at the side of the case.
Open the case and take the glowing FUSE inside.
Move forward into the Illusionist's Tent.
Illusionist's Tent
Pull the lever at the side of the stand under the target to rotate the board.
Click the revealed cabinet to open it, then click the plate in the middle of the board for a close-up view.
Add the CIRCUIT BOARD PIECE to the board to start the minigame.
Assemble the pieces in the correct places so that every piece fits on the board.
Click and drag the piece to move it around the board, then release a piece to set it in place.
The sockets in the pieces must fit over the bolts on the metal plate.
Solution.
After the puzzle is solved, take the PUZZLE TILE 2/2 from the cache behind the target.
Remove the red cloth covering the crate behind Alberto's chair.
Click the lock in the middle of the crate for a close-up view.
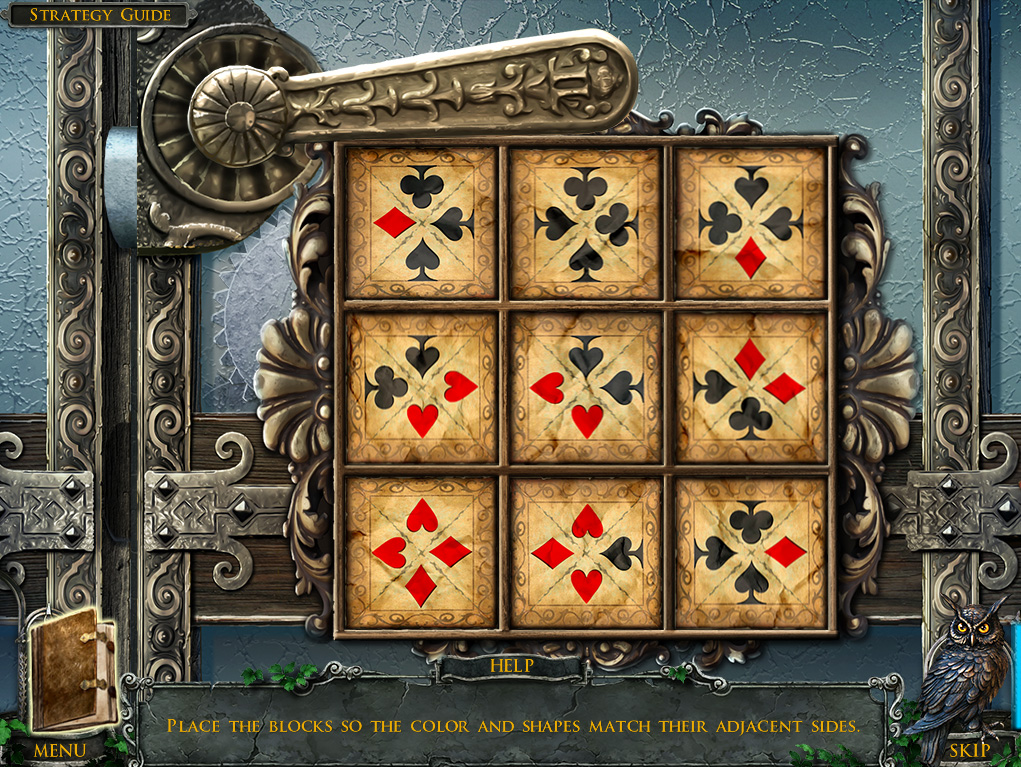
Add the two PUZZLE TILES to the lock to start the minigame.
Arrange the puzzle tiles so that the symbols on the sides of adjacent squares match in color and in suit.
This means hearts must be touching hearts, spades must touch spades, diamonds must touch diamonds, and clubs must touch clubs.
Click one tile to select it, then click another tile to swap their positions.
Solution.
Once the puzzle is solved, look inside the opened crate to find a GENERATOR.
Return to the Field.
Field
Click the machinery on the trailer for a closer look.
Add the FUSE and the GENERATOR to the spaces at the side and top of the device, then pull the switch to start the projector.
Speak with Alberto after the cut scene, then click the broken crate to zoom in.
Use the TWEEZERS to pull the BULLET 2/2 out of the target.
Go back to Alberto's Trailer.
Alberto's Trailer
Click the door to the trailer to repeat the hidden object scene.
Screenshot.
Once the hidden object scene is complete, you will receive the AIR HOSE.
Go back to the Chapel Entrance.
Chapel Entrance
Click the back of the hearse to repeat the hidden object scene.
Screenshot.
Once the hidden object scene is complete, you will receive the ORNATE TILE 1/2.
Return to the Mansion Grounds.
Mansion Grounds
Click the fountain to repeat the hidden object scene.
Screenshot.
Once the hidden object scene is complete, you will receive the ORNATE TILE 2/2.
Return to the Mansion Entrance.
Mansion Entrance
Click the front door for a closer look.
Add the two ORNATE TILES from your inventory to the empty spaces on the diamond-shaped lock to start the minigame.
Slide the tiles in the lock to arrange the tiles in the correct pattern.
Screenshot.
After the puzzle is solved, go through the open door to the Foyer.
Chapter 2
Foyer
Click the owl sitting on the railing beside the stairway.
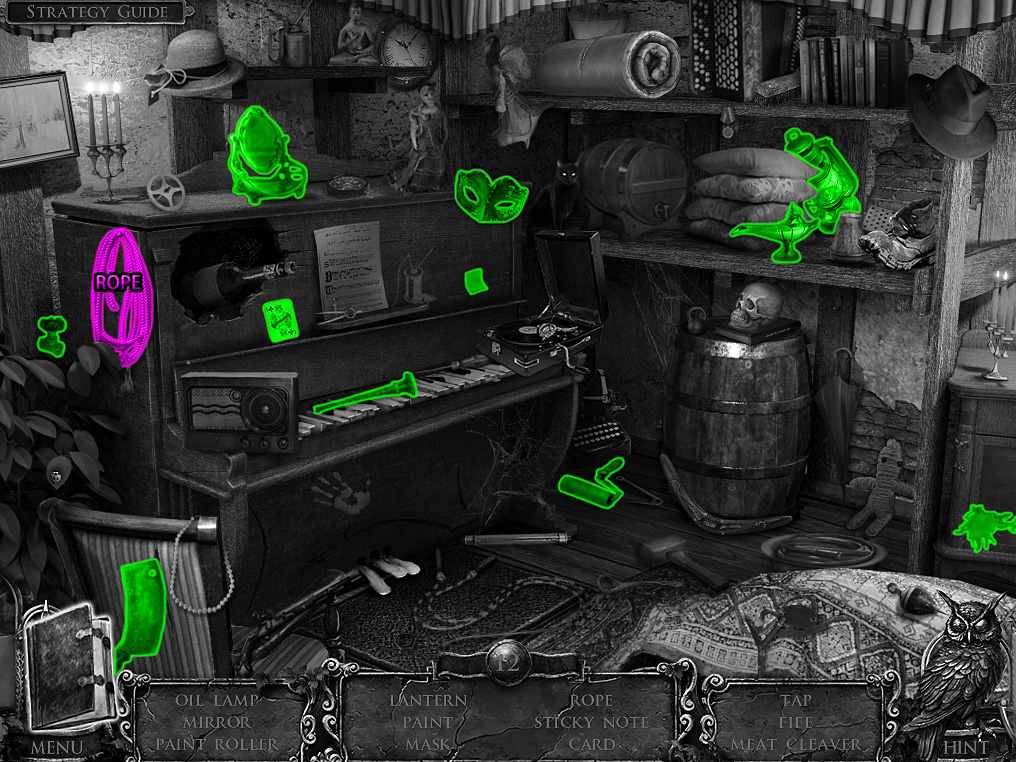
Click the alcove under the stairs to start the hidden object scene.
Screenshot.
Once the hidden object scene is complete, you will receive the ROPE.
Inspect the door opening mechanism at the upper right corner of the door.
Attach the ROPE from your inventory to the frayed rope sticking out of the drape.
Pull the repaired rope to open the door.
Continue up the stairs through the opened door to enter the Study.
Study
Click the corner of the floor above the bear rug to zoom in and find the ROUND CHIP.
Take the DIAGRAM on top of the writing desk.
Open the drawer on the left side of the desk, then click it to look inside.
Move away the objects inside the drawer to uncover the WAX SPOON.
Click the device on top of the small table by the window for a closer look.
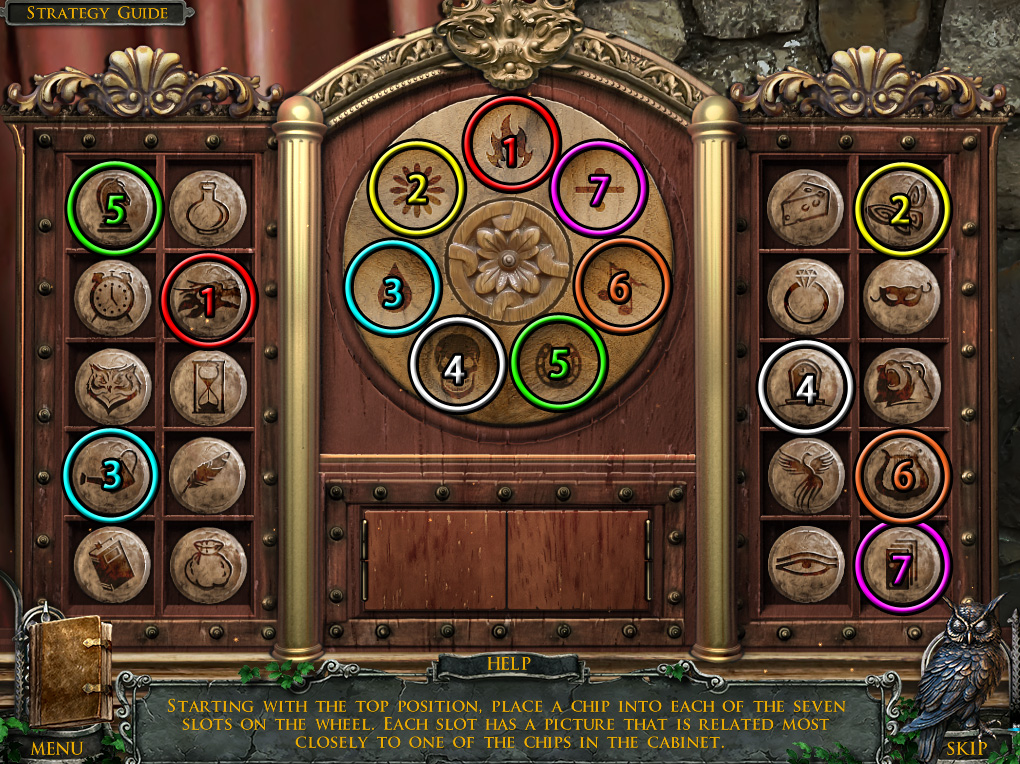
Add the ROUND CHIP to the empty space on the rack to start the puzzle.
Find the correct seven chips that closely relate to the symbols on the seven spaces in the wheel.
Inspect the symbol in the top space at the wheel, find its related pair, then click and drag the token to select it and place it inside the disc.
If the correct token is placed, the wheel will rotate and the next space will move to the top.
The first symbol is fire, and it's matched with the phoenix head token.
The second symbol is a flower, and it's matched with the butterfly token.
The third symbol is water, and it's matched with the watering can token.
The fourth symbol is a skull, and it's matched with the tombstone token.
The fifth symbol is a horseshoe, and it's matched with a knight chess piece token.
The sixth symbol is two music notes, and it's matched with the lyre token.
The seventh symbol is a division sign, and it's matched with the dominoes pieces.
Screenshot.
After the minigame is complete, take the SEAL from the opened compartment at the bottom of the wheel.
Go left to the Foyer.
Foyer
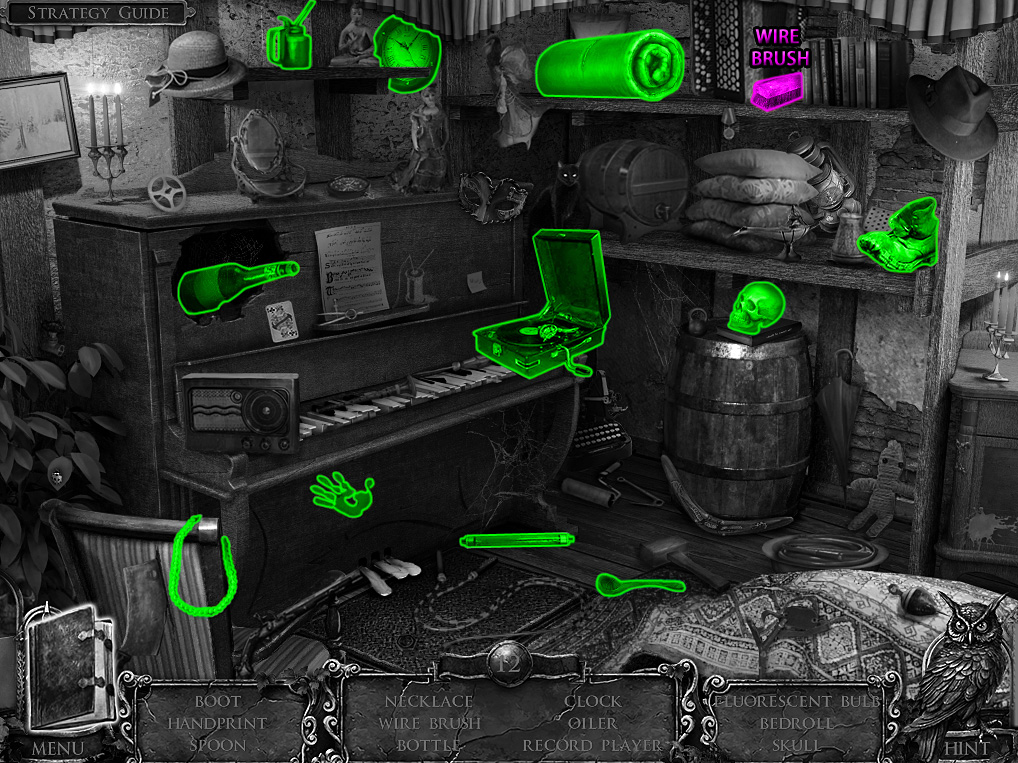
Click the area under the stairs to repeat the hidden object scene.
Screenshot.
Once the hidden object scene is complete, you will receive the WIRE BRUSH.
Click the table to zoom in.
Place the BLANK PAPER, SEAL, WAX SPOON, and SEALING WAX on top of their matching outlines on the table to start the minigame.
Use the tools on the table to create a forgery permission slip.
Start by putting the sealing wax on the dish over the candle's flame to melt it.
Collect the melted wax over the candle with the wax spoon.
Use the wax spoon on the paper to drop it onto the corner of the page.
Press the wax blot on the paper with the seal to stamp it.
After the minigame is complete, click the PERMISSION SLIP to add it to your inventory.
Return to the Chapel Entrance.
Chapel Entrance
Click the door to the chapel for a closer look.
Give the PERMISSION SLIP to the monk behind the door to gain access to the building.
Go through the opened door to the Chapel.
Chapel
Click the door hidden behind the wallpaper to open it.
Move the wood panel at the bottom of the wall to the left of the door to reveal a secret cache.
Click the cache to start the hidden object scene.
Screenshot.
Once the hidden object scene is complete, you will receive the MICROSCOPE KNOB.
Go through the opened door to the Storage Room.
Storage Room
Pick up the FAMILY HISTORY BOOK from the open box on the floor.
Click the red curtain to reveal the back side of the room.
Open the lid over the table against the back wall, then click the microscope on the table for a closer look.
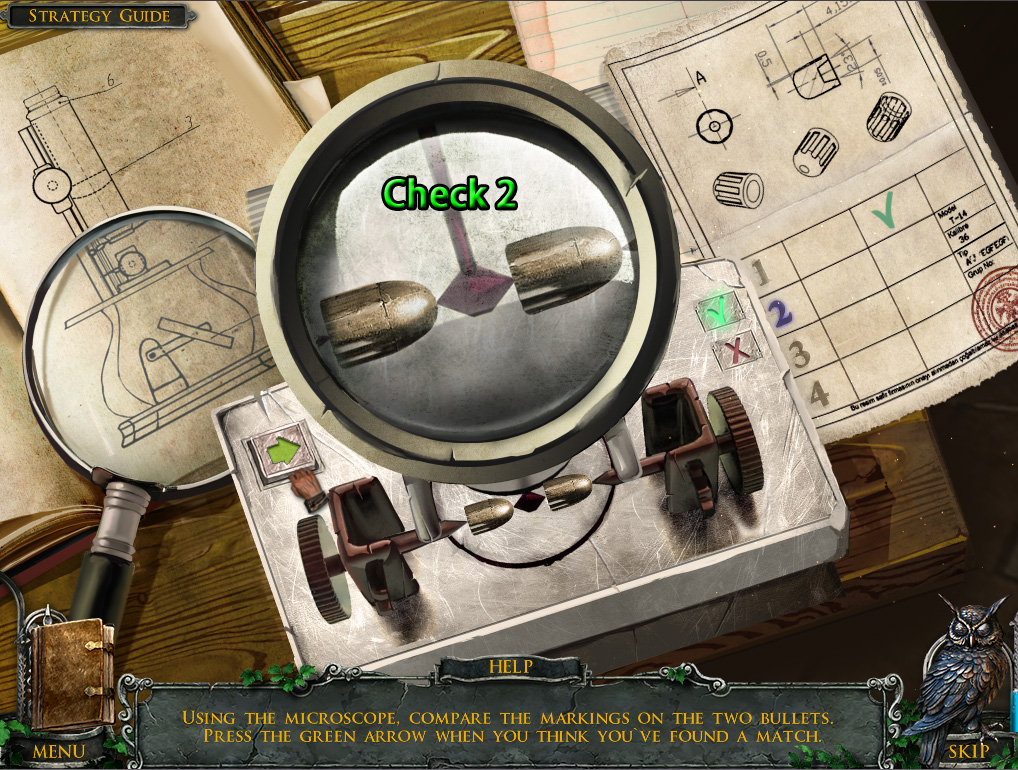
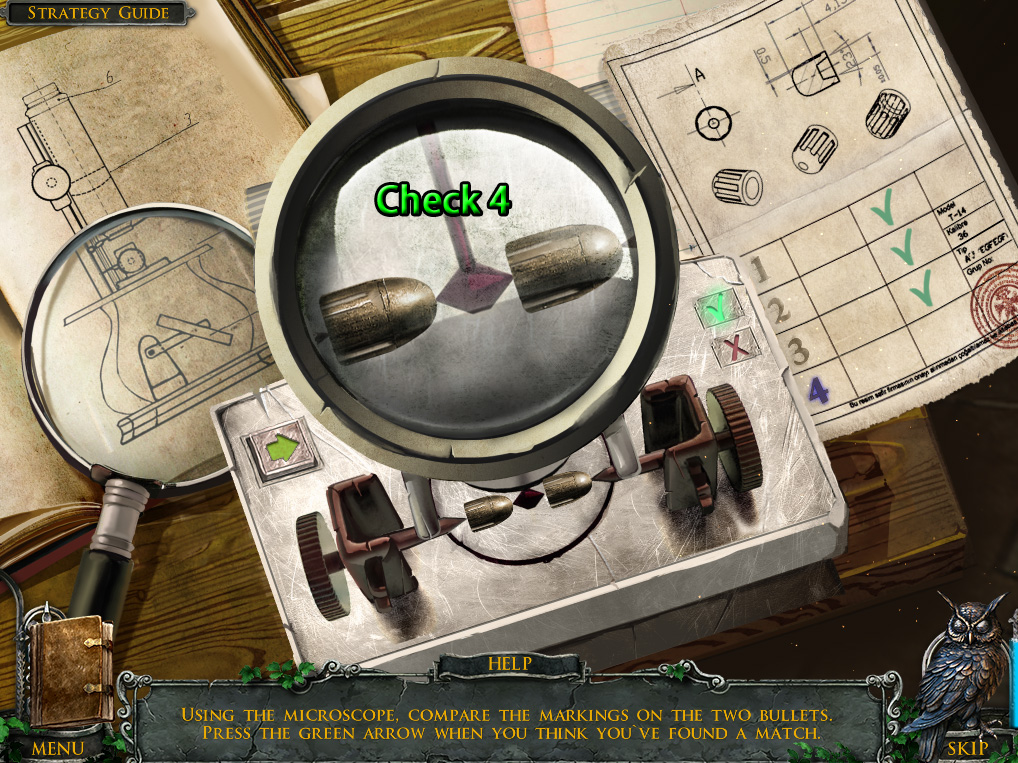
Add the MICROSCOPE KNOB to the microscope, then place the two BULLETS under the lens to start the minigame.
Click the right knob to rotate the right bullet and find the side that has identical markings to the left bullet.
When you find a match, press the green arrow button at the upper left corner of the microscope to enter that match into the check list on the piece of paper to the right.
Solution Part 1.
Solution Part 2.
Solution Part 3.
Solution Part 4.
After the minigame is complete, you will receive the BULLET COMPARISON.
Go back out to the main room of the Chapel.
Chapel
Click the book stand in the alcove to zoom in.
Place the FAMILY HISTORY BOOK on the stand.
Inspect the inside of the book and turn the page to find the CEMETERY KEY.
Return to the Illusionist's Tent.
Illusionist's Tent
Give the BULLET COMPARISON to Alberto.
Speak with Alberto to receive the REVEALING INK.
Go back to the Cemetery Gate.
Cemetery Gate
Click the lock on the gate for a closer look.
Use the WIRE BRUSH to scrape the rust off the padlock.
Put the CEMETERY KEY in the lock, then turn it to open the gate.
Continue left into the Cemetery.
Cemetery
Click the owl that's sitting on the tree branch.
Open the coffin beside the cart to find the PLANK.
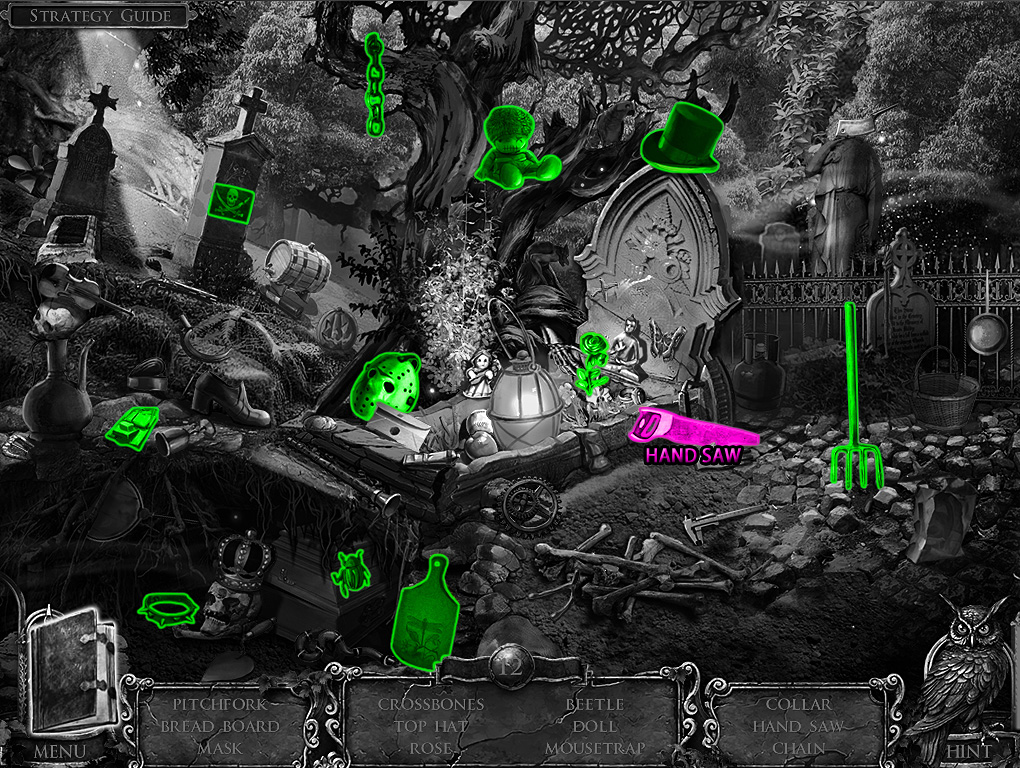
Click the graves on the grassy hill to start the hidden object scene.
Screenshot.
Once the hidden object scene is complete, you will receive the HAND SAW.
Move forward to the Lakeside.
Lakeside
Use the HAND SAW on the tree branch blocking the door to the cable car.
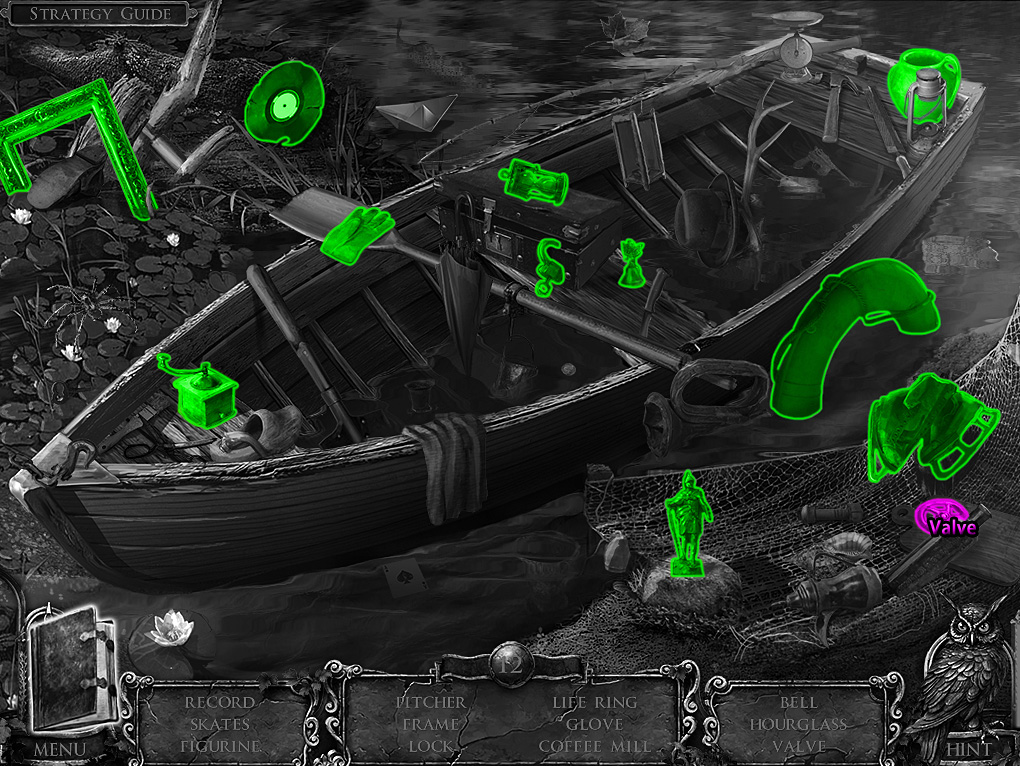
Click the boat in the water by the cabin to start the hidden object scene.
Screenshot.
Once the hidden object scene is complete, you will receive the GREEN VALVE.
Move back three times, then enter the building to return to the Cellar.
Cellar
Click the table at the back of the room to zoom in.
Place the blue VALVE on the blue socket in the middle of the left pipe.
Place the GREEN VALVE on the green socket in the middle of the right pipe.
Add the DIAGRAM to the poster on the wall.
Connect the AIR HOSE to the top of the yellow oxygen tank.
Put the BURNER on the table under the vial filled with purple fluid.
Light a fire on the burner with the LIGHTER to start the minigame.
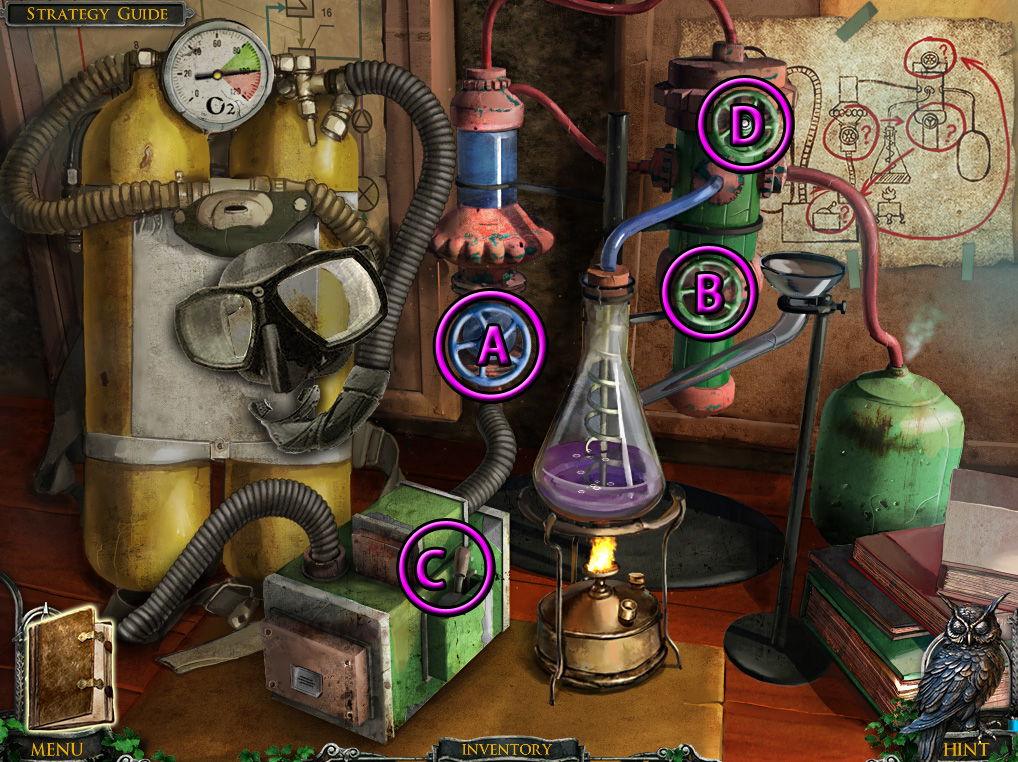
Use the components in the correct order according to the instructions on the diagram to fill the scuba tank with air.
Refer to the diagram and start at the first red circle, then follow the arrows to the next step.
First turn the blue valve (A).
Turn the green valve three times (B).
Flip the lever at the side of the green device (C).
Turn the second green valve two times (D).
Screenshot.
After the minigame is solved, take the filled SCUBA GEAR from the table.
Return to the Greenhouse Exterior.
Greenhouse Exterior
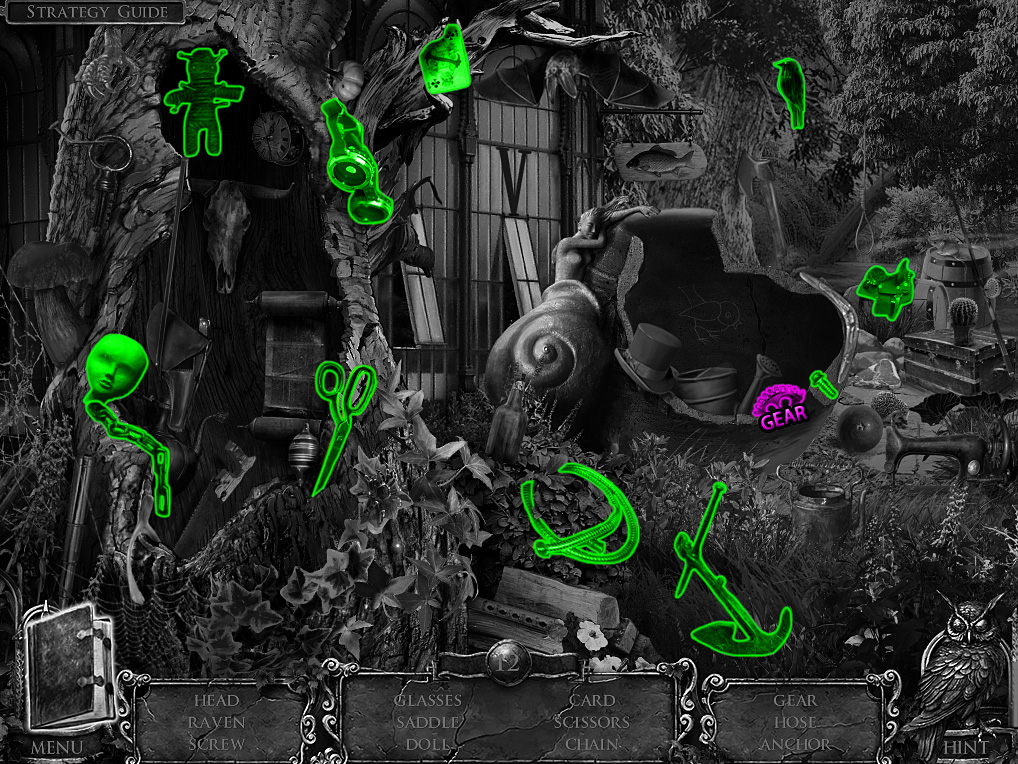
Click the hollow of the tree to start the hidden object scene.
Screenshot.
Once the hidden object scene is complete, you will receive the GEAR (1/2).
Go down into the Well.
Well
Use the SCUBA GEAR on the water at the end of the tunnel to dive under water.
Click the skull on the ground to zoom in.
Take the GEAR (2/2) from the sand.
Click the mechanism in the middle of the rock to the right of the gate for a close-up view.
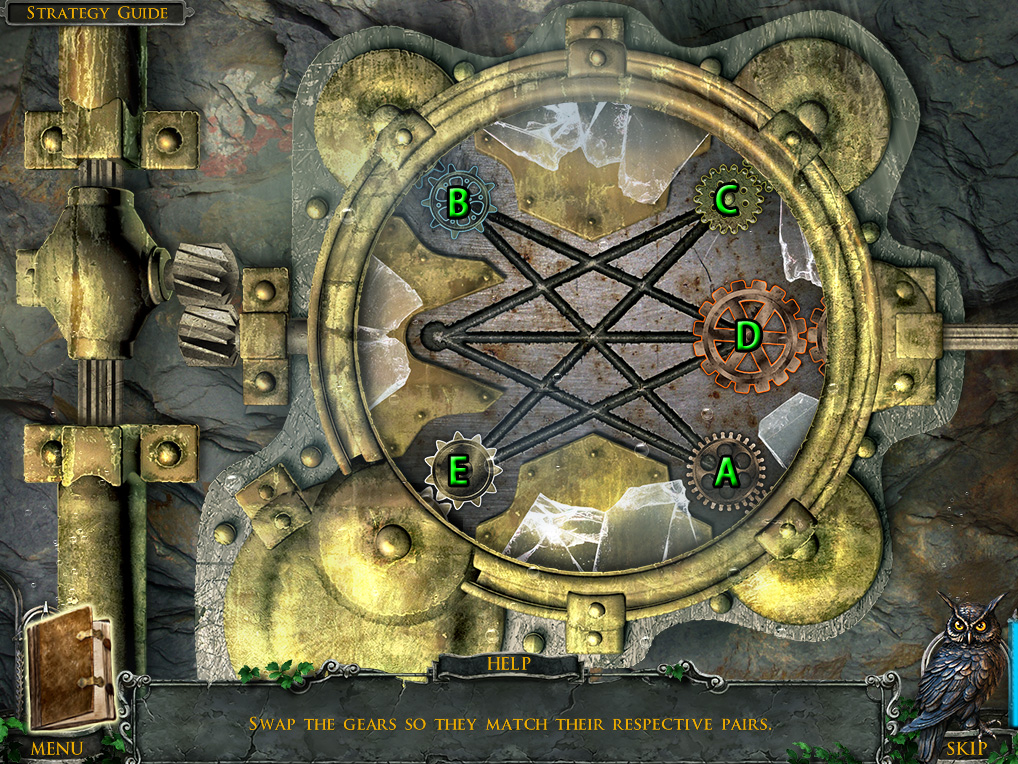
Add the two GEARS to the mechanism to start the minigame.
Place each gear in its correct place.
Click a gear to move it along the track into the empty space on the board.
Note the color or shape of a gear to find its matching pair.
To solve the puzzle, click the gears in the following order:
A, B, C, D, E, C, D, E, C.
Screenshot.
After the minigame is complete, continue forward to the Secret Chamber.
Chapter 3
Secret Chamber
Pick up the CURTAIN TIE on the floor beside the stairs.
Inspect the map on the wall to the right of the drawn red curtain.
Click the stack of books in the middle of the right cupboard to zoom in.
Use the REVEALING INK to reveal the writing on the blank piece of paper.
Note the code A3B7, then click the page to add it to your Diary.
Go up the stairs to enter the Storage Room of the chapel.
Storage Room
Inspect the locked safe in the middle of the right row of shelves.
Turn the dials to match the combination you found in the Secret Chamber: A3 on the left and B7 on the right.
After the lock is opened, click the uncovered area to zoom in and find the OPERATOR'S MANUAL.
Go back to the Chapel.
Chapel
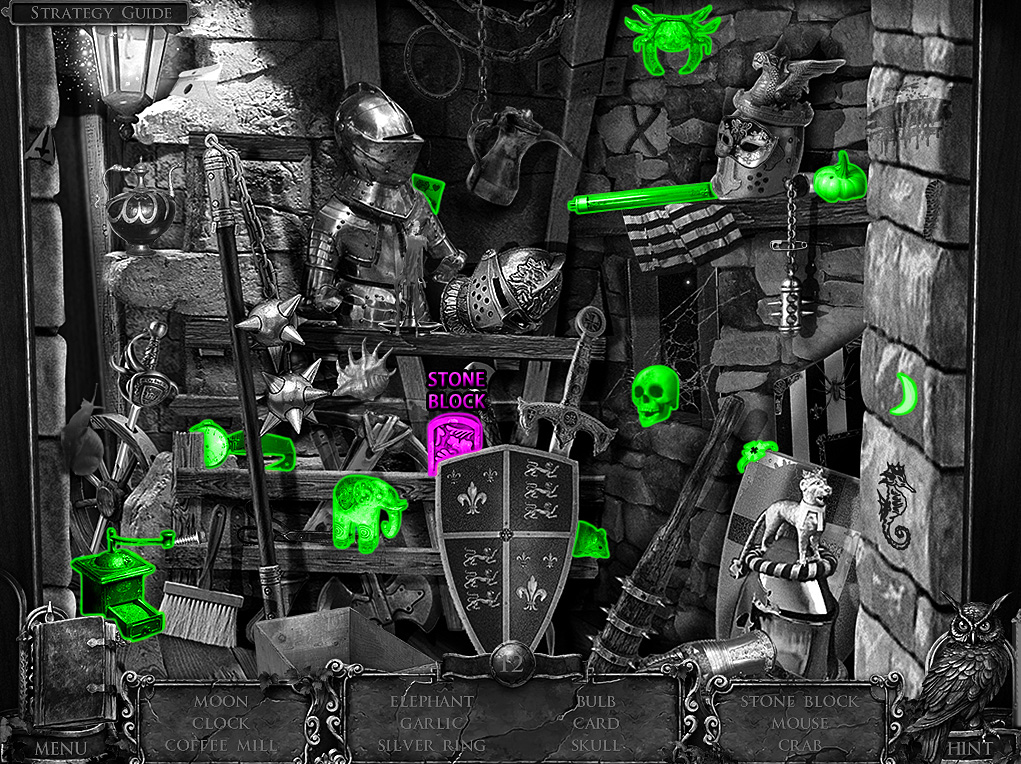
Click the cache at the bottom of the wall to repeat the hidden object scene.
Screenshot.
Once the hidden object scene is complete, you will receive the STONE BLOCK (1/3).
Go through the door up the stairs to the Corridor.
Corridor
Look inside the large open trunk to find the STONE BLOCK (2/3).
Use the CURTAIN TIE to draw back the red curtain covering the shelves on the wall.
Pick up the CRYPT CRANK on the floor beside the piano.
Return to the Illusionist's Tent.
Illusionist's Tent
Give the OPERATOR'S MANUAL to Alberto.
After speaking with Alberto, click the round table to zoom in and take the STAGE KEYS beside the crystal ball.
Click the stage door at right side of the bottom of the stage for a close-up view.
Use the STAGE KEYS to open the padlock.
Go through the opened door to the area Under the Stage.
Under the Stage
Pick up the GLASS SHARD on the ground by the patch of grass.
Use the GLASS SHARD to cut through the rope tied around the small box.
Take the SPRING from the opened jack-in-the-box.
Take the WRENCH on the ground beside Luther's foot.
Click the wire hanging at the back of the area to zoom in and take the RED BULB.
Inspect the corpse and the painted red symbol to add the notes to your Diary.
Return to the Cemetery, then continue right into the Crypt.
Crypt
Place the LANTERN on the hook hanging from the ceiling.
Pick up the BATTERY on the ground beside the stone pedestal.
Click the side of the stone coffin for a closer look.
Insert the CRYPT CRANK into the geared mechanism, then turn the crank to open the lid.
Take the CABLE CAR LEVER from the opened coffin.
Go back out to the Cemetery.
Cemetery
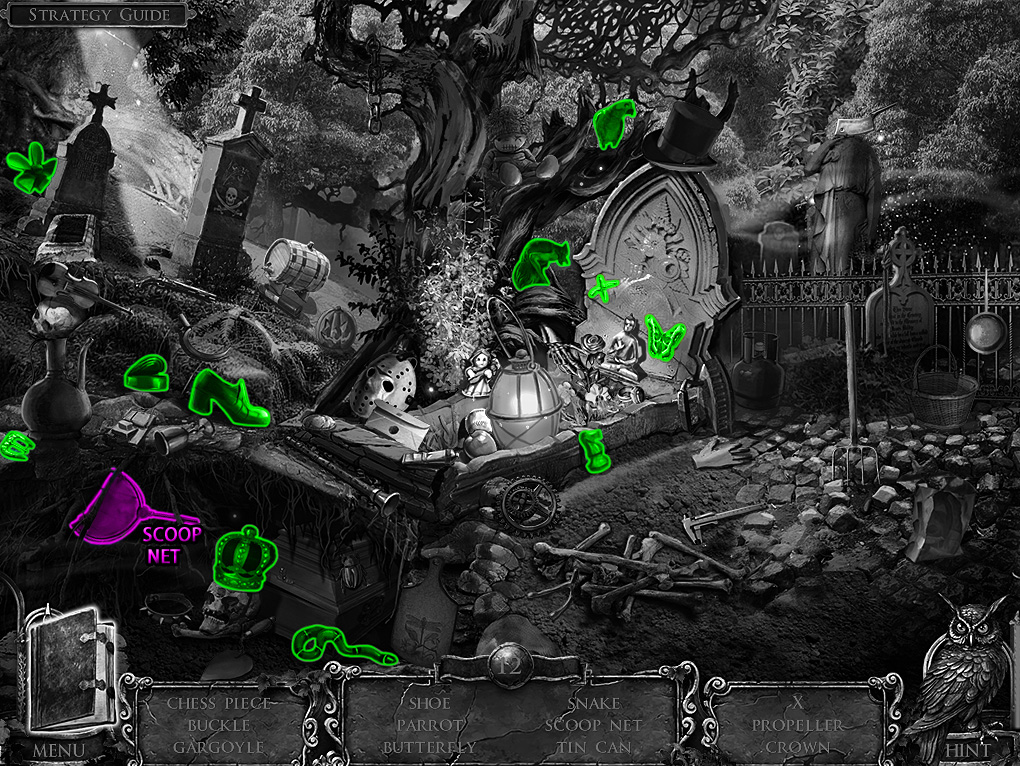
Click the graves on the grassy hills to repeat the hidden object scene.
Screenshot.
Once the hidden object scene is complete, you will receive the SCOOP NET.
Move forward once to the Lakeside, then continue forward into the Cable Car.
Cable Car
Pick up FUSE 13 on the floor beside the sparking wires on the right side of the car.
Attach the BATTERY to the robot's chest.
Take FUSE 40 from the box on the robot's lap.
Read the note taped to the right side of the window.
Put the CABLE CAR LEVER into the slot on the left side of the control panel, then pull the lever to find there is an issue outside.
Go back out to the Lakeside.
Lakeside
Click the water lilies by the small dock for a close-up view.
Use the SCOOP NET to collect FUSE 11 from the water.
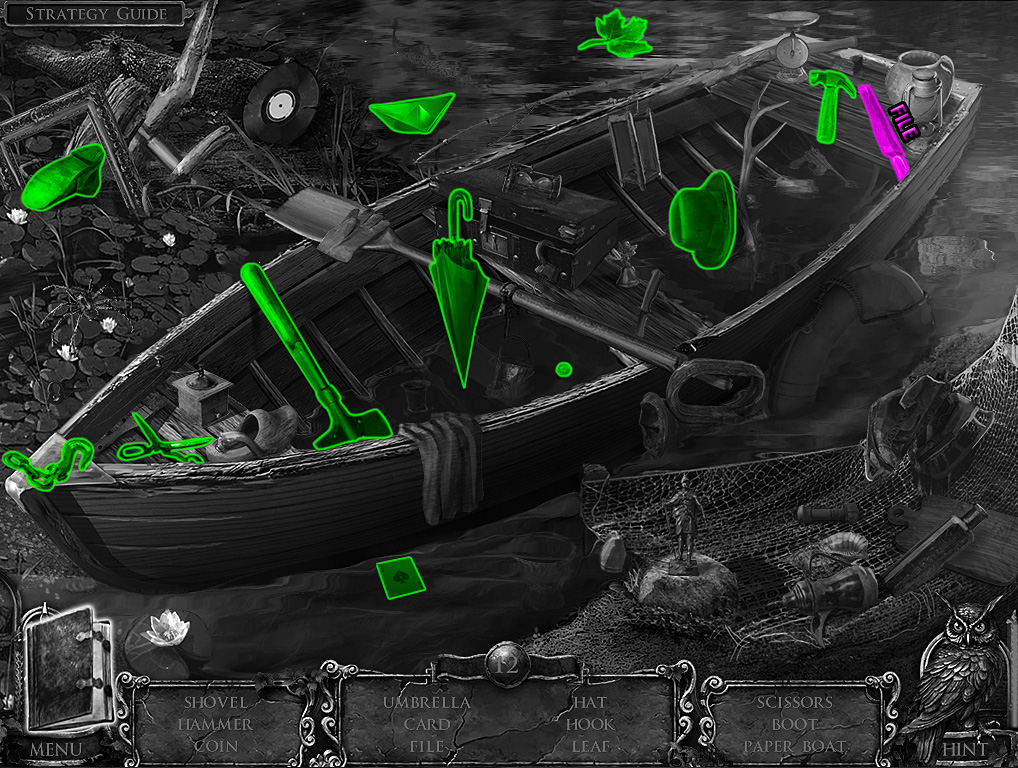
Click the boat beside the cabin to repeat the hidden object scene.
Screenshot.
Once the hidden object scene is complete, you will receive the FILE.
Open the electric panel at the back of the cable car, then click it to zoom in.
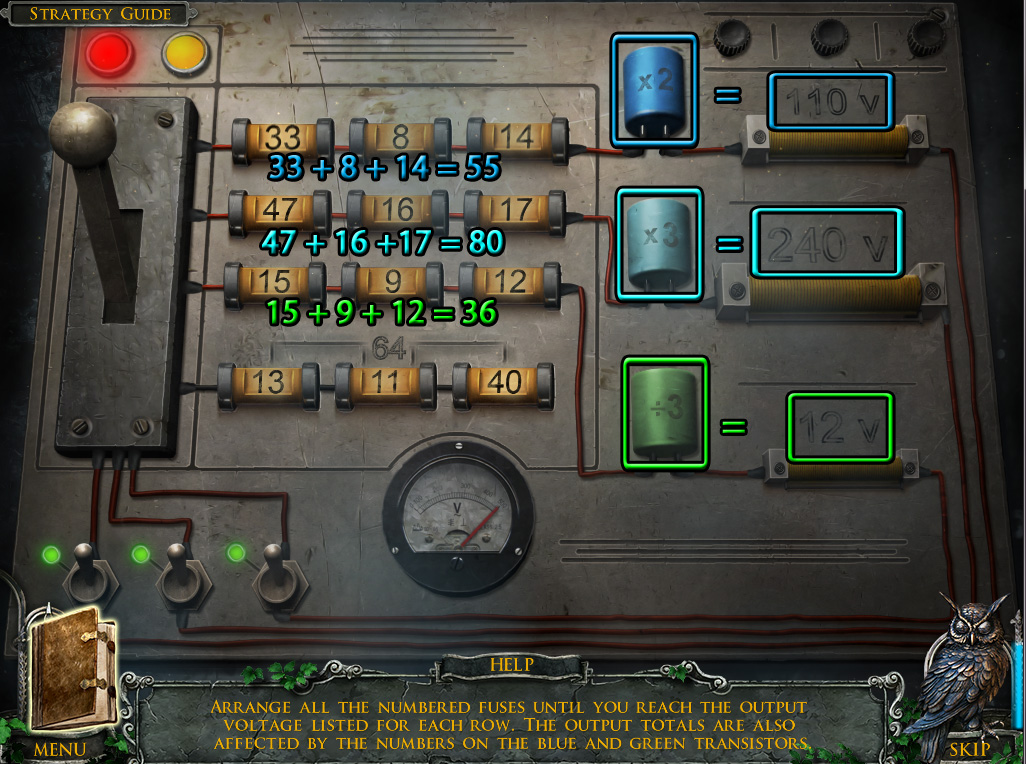
Add FUSE 11, FUSE 13, and FUSE 40 to the empty spaces on the panel to start the minigame.
Arrange the numbered fuses so that their total equals the value shown above each wire coil.
Every fuse connected by a wire is added together, then their sum is affected by the blue and green transistors.
The top transistor multiplies the top row by 2, the middle transistor multiplies the middle row by 3, and the bottom transistor divides the bottom row by 3.
Flip each switch at the bottom when you think you have the right amount for each row; if the light turns green then the answer is correct.
When you turn all of the small switches green, hit the large lever to enter your solution.
Screenshot.
Re-enter the Cable Car, then pull the large lever beside the control panel to travel to the Garson Tower Entrance.
Garson Tower Entrance
Pick up the SCREWDRIVER on the ground in front of the dog.
Click the robotic dog blocking your path to add a note to your Diary.
Go back to the Crypt.
Crypt
Click the base of the right statue to zoom in.
Use the FILE to saw through the iron bars.
Go through the hole in the left wall to travel to the Crossroads.
Crossroads
Click the owl sitting on the top of the stair railing.
Pick up the STONE HAND on the ground at the foot of the steps.
Place the plank over the gap between the small dock and the tree stump.
Click the tree stump to start the hidden object scene.
Screenshot.
Once the hidden object scene is complete, you will receive the PLIERS.
Click the bush with white flowers on the left side of the stairs to zoom in and find the ROPE.
Go through the Well to return to the Corridor in the chapel.
Corridor
Attach the ROPE to the beam sticking out of the hole in the ceiling.
Climb up the rope to travel to the Bell Tower.
Bell Tower
Inspect the red symbol and the corpse to add a note to your Diary.
Pick up the third STONE BLOCK (3/3) beside the monk's foot.
Click the left, right, and middle bells to find a series of three symbols carved on the surface of each bell.
Click the floor boards next to the split wooden beam to zoom in.
Remove the three boards to uncover the small puzzle box.
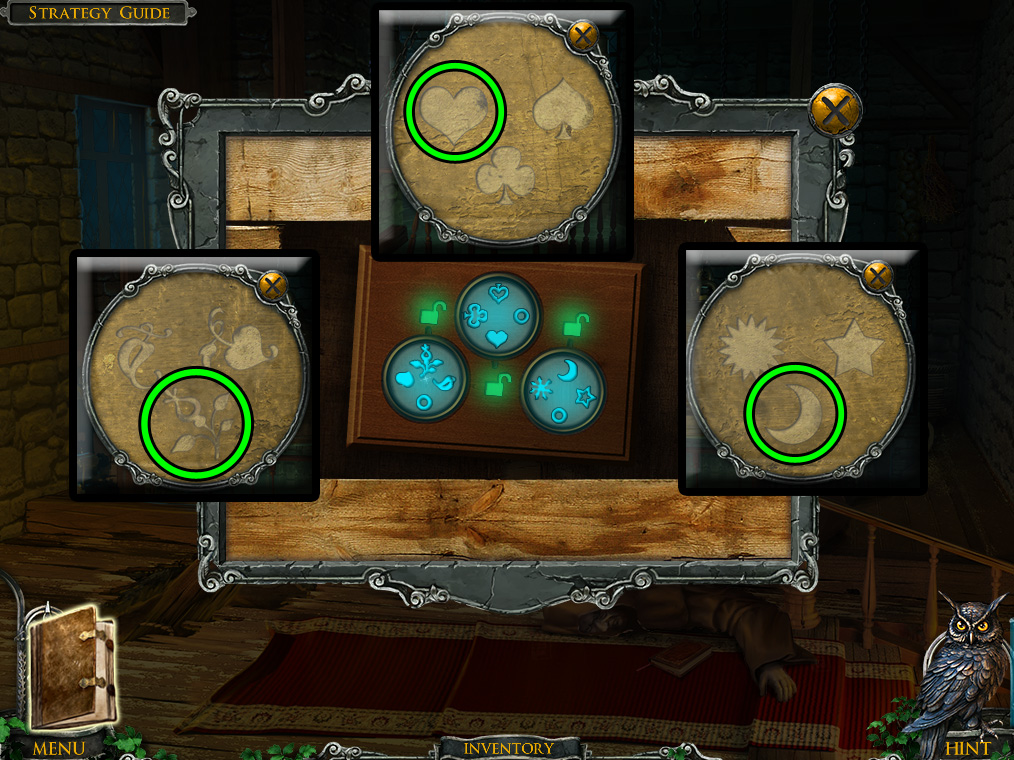
Note how each ring contains one symbol identical to the symbol also found on one of the bells.
Rotate the rings so that the line beside the padlock icon is pointing to the correct symbol inside the ring.
The left ring should point to the flower, the middle ring should point to the heart, and the right ring should point to the moon.
Screenshot.
After the box is unlocked, take the METAL BONE inside, then read the note to find it "is the key to the stairs."
Go back down to the Corridor.
Corridor
Click the metal plate in the middle of the shelves on the wall for a closer look.
Add the three STONE BLOCKS to the plate to start the minigame.
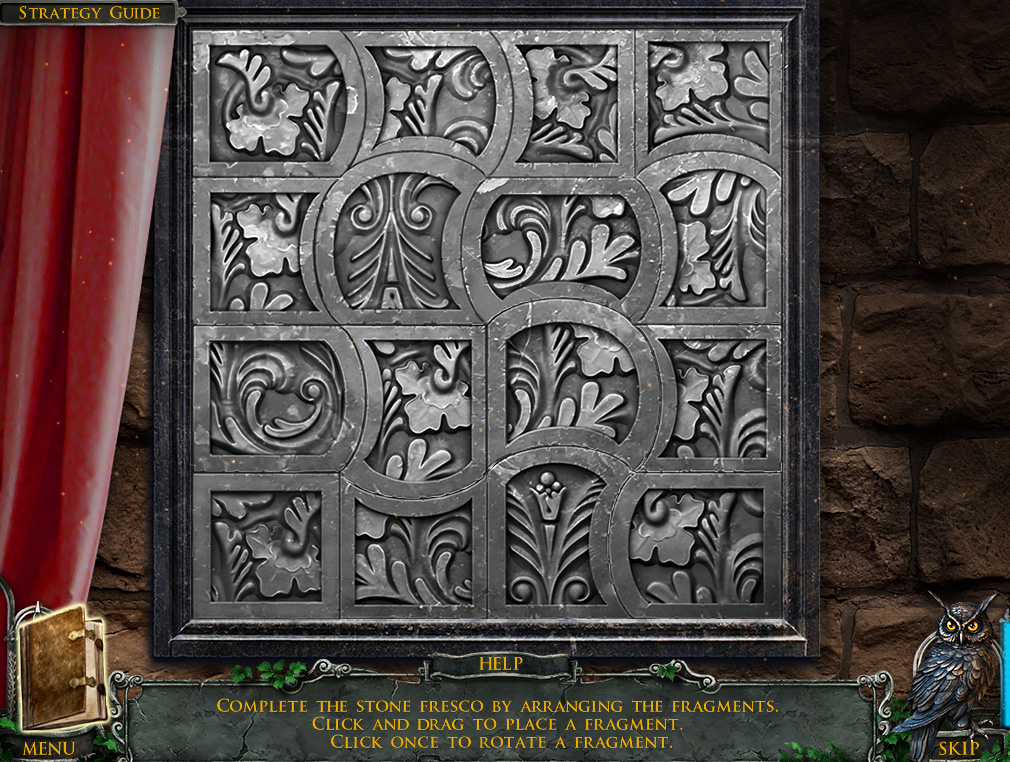
Arrange the tile pieces inside the square frame to complete the fresco.
Click and drag a tile to move it around the plate, or click a tile once to rotate it 90 degrees clockwise.
When a tile is correctly positioned, it will lock in place.
Screenshot.
After the minigame is solved, take the CANE and read the note inside the revealed cache.
Use the cable car to travel back to the Garson Tower Entrance.
Garson Tower Entrance
Give the METAL BONE to the robotic guard dog.
Go up the stairs to enter Garson Tower.
Chapter 4
Garson Tower
Inspect the corpse and the red symbol to add a note to your Diary.
Click the top of the box in the corner to zoom in and find the SCREW.
Open the door and move left into the Workroom.
Workroom
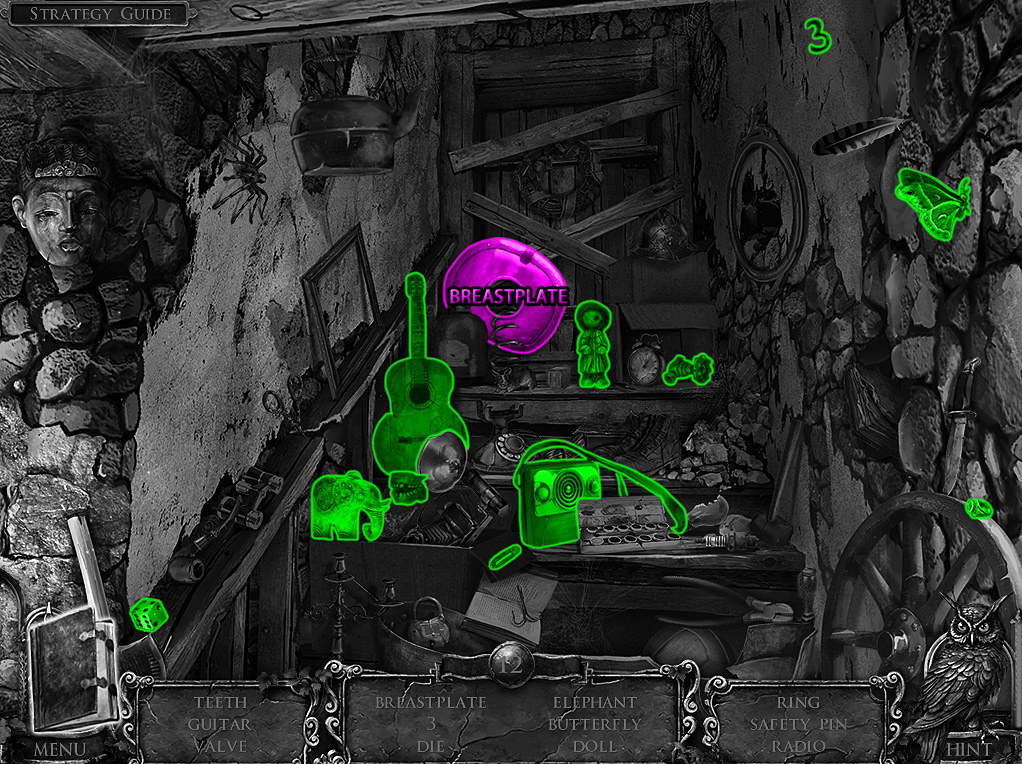
Click the steps to start the hidden object scene.
Screenshot.
Once the hidden object scene is complete, you will receive the BREASTPLATE.
Take the LADDER in front of the wall shelves.
Pick up the BLOWTORCH on the floor in front of the work bench.
Click the telescope for a close-up view.
Remove the TELESCOPE PHOTO from the slot at the side of the telescope.
Click the vise on the table for a closer look.
Put the CANE between the clamps of the vise.
Use the WRENCH to loosen the handle and receive the GATE KEY.
Return to the Crossroads, then continue up the right stairs to the Gale Front Gate.
Gale Front Gate
Click the shield bolted to the right column to zoom in.
Use the BLOWTORCH to heat all six of the metal clasps.
Remove the red hot clasps with the PLIERS, then click the SHIELD to add it to your inventory.
Go back to the Crossroads.
Crossroads
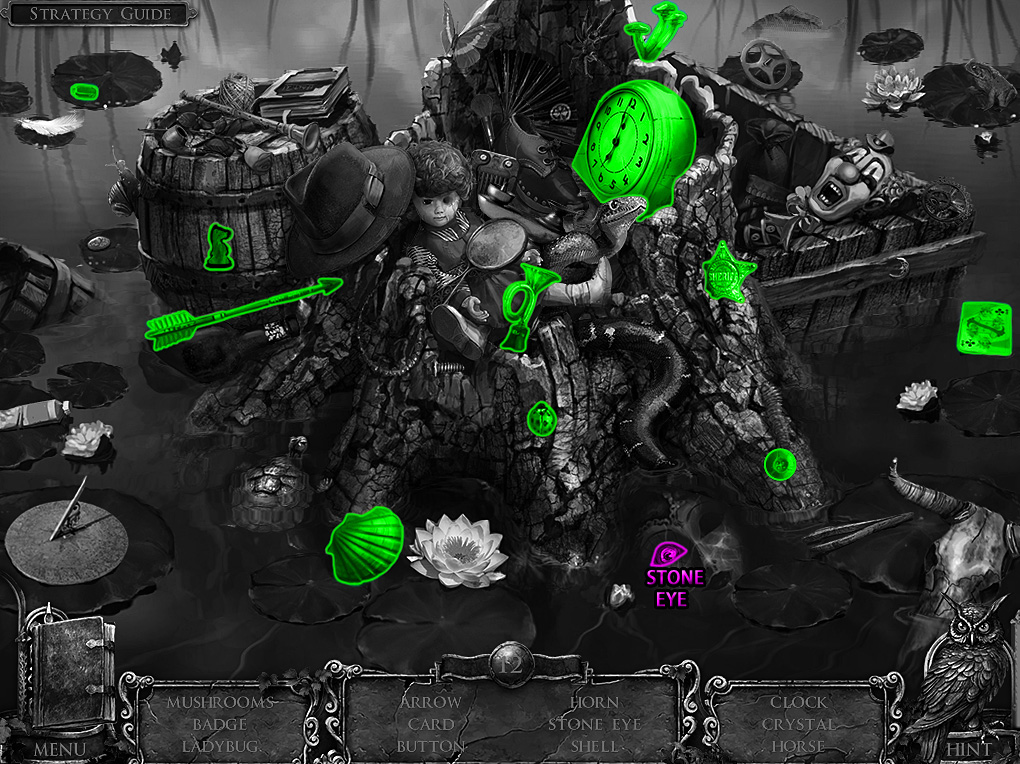
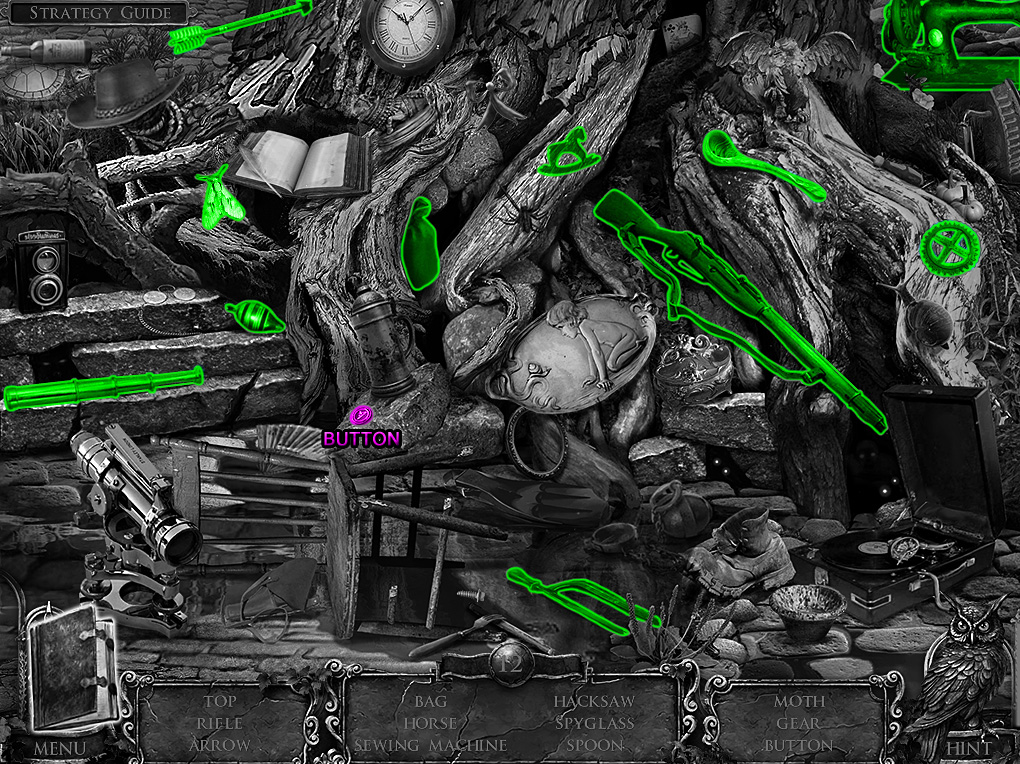
Click the tree stump to repeat the hidden object scene.
Screenshot.
Once the hidden object scene is complete, you will receive the STONE EYE.
Go all the way back to the Mansion Stairway.
Mansion Stairway
Click the gates at the end of the left path for a closer look.
Use the GATE KEY to open the lock.
Continue left to the Garden.
Garden
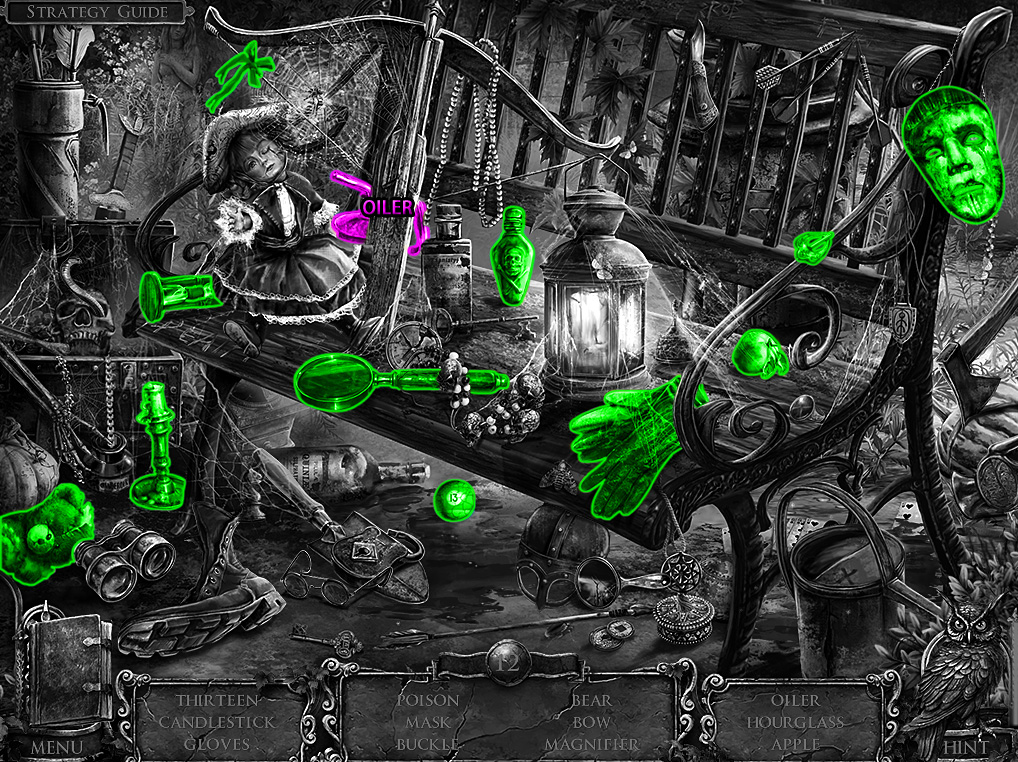
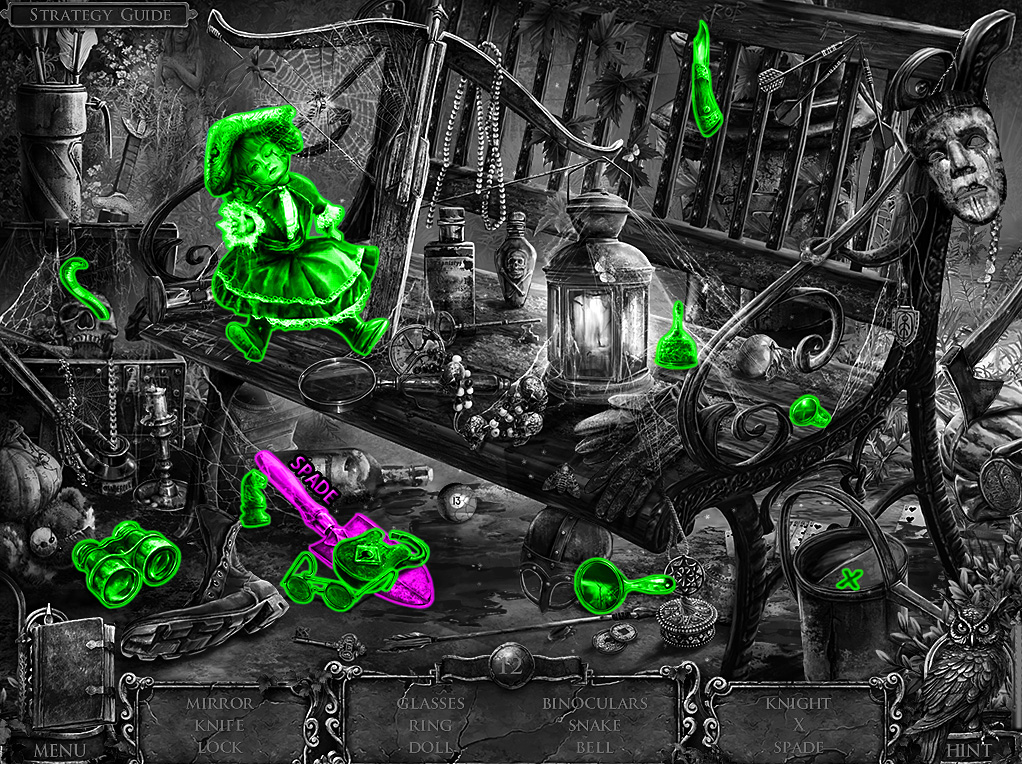
Click the park bench to start the hidden object scene.
Screenshot.
Once the hidden object scene is complete, you will receive the OILER.
Click the pointed edge of the fountain to zoom in and take the TABLE BUTTON.
Place the LADDER on the ground directly under the lit second story window.
Return to Garson Tower.
Garson Tower
Inspect the wheel in the middle of the metal door on the right.
Use the OILER to remove the rust and turn the wheel to open the door.
Continue right to enter the Laboratory.
Laboratory
Take the RAG draped over the leg of the overturned chair.
Click the chemistry equipment on the table for a closer look.
First put the RED BULB in the socket at the top of the lamp.
Place the TELESCOPE PHOTO on the table, then open the case to start the minigame.
Follow the remaining steps on the instructions diagram in the correct order to develop the photo.
The steps with a red "X" are incomplete tasks.
Note how the first step with the lit bulb is already completed and marked with a green check.
For step 2, turn the lever on the burner to light a fire under the beaker.
For step 3, pour the beaker of water on the table into the large empty tray.
For step 4, add the bottle of G139 to the water in the tray.
For step 5, pour the boiling green liquid from the beaker, then mix it with the metal stirring rod.
For step 6, use the tweezers to pick up the photo, then put it in the tray.
For step 7, use the tweezers again to take the photo out of the tray after it's finished developing.
After the minigame is solved, the photograph will be added to your Diary.
Go back to the Workroom.
Workroom
Click the stairs to repeat the hidden object scene.
Screenshot.
Once the hidden object scene is complete, you will receive the WIRE CUTTERS.
Return to the Laboratory.
Laboratory
Click the chest on top of the bench to zoom in.
Use the WIRE CUTTERS to break the chains around the chest.
Take the TELESCOPE DIAL inside the opened chest.
Go back once to Garson Tower.
Garson Tower
Inspect the right suit of armor blocking the door.
Use the RAG to clean the dust off the right pauldron.
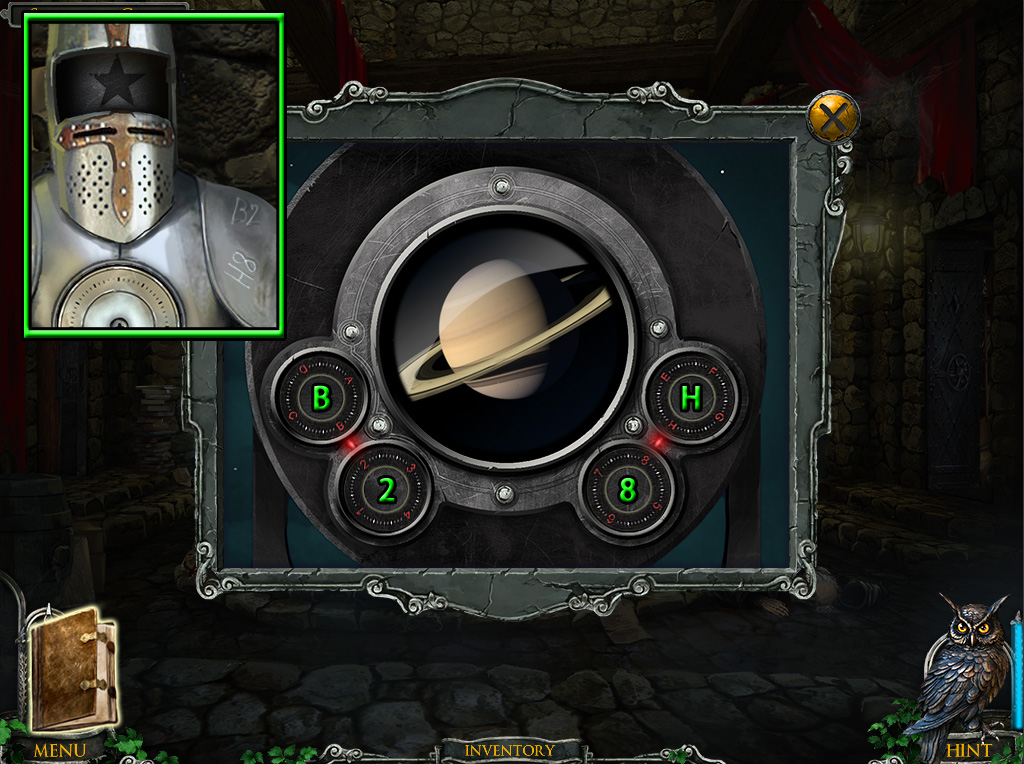
Note the letters and numbers carved into the shoulder: B2 and H8.
Place the SCREW in the hole at the center of the chest, then use the SCREWDRIVER to tighten it.
Click the telescope in the archway for a close-up view.
Add the TELESCOPE DIAL to the empty left slot, then turn the dials so that the red line between each dial points to the combination found on the right suit of armor.
Turn the first dial on the left to align B with the red line, turn the next dial to 2, the third dial to 8, and the last dial to H.
If this is done correctly, you should see an image of Saturn.
Screenshot.
Inspect the right suit of armor again.
Turn the dial in the right knight's chest to change the symbol inside the helm to Saturn.
Click the left suit of armor blocking the door to zoom in.
Add the SPRING to the mechanism in the middle of the knight's chest.
Place the BREASTPLATE over the mechanism to cover it.
Turn the dial to change the symbol inside the helm to the Sun.
Click the carving shaped like a hand in the middle of the door between the two knights for a closer look.
Insert the STONE HAND into the space, then add the STONE EYE to the round slot in the center of the hand.
Move forward through the open door to enter the Library.
Library
Take the LADDER leaning against the right door.
Pick up the DUST BRUSH on top of the small desk.
Click the book on the table to zoom in.
Turn the pages to add a note from Garson's journal to your Diary.
Inspect the drawing of the mechanical owl on the left desk.
Return to the Garden.
Garden
Add the second LADDER on top of the ladder you placed under the window earlier.
Click the park bench to repeat the hidden object scene.
Screenshot.
Once the hidden object scene is complete, you will receive the GARDEN SPADE.
Go up the ladder through the window to enter the Office.
Office
Pick up the CHESSBOARD PART (1/2) on the floor to the right of the removed drawer.
Take the BRIDGE LEVER on the middle shelf of the bookcase.
Click the bust on top of the small table for a closer look.
Use the DUST WEB to remove the cobwebs on the BUST, then click it to add it to your inventory.
Add the TABLE BUTTON to the empty space at the corner of the writing desk.
Place the BUST on top of the button to hold it down.
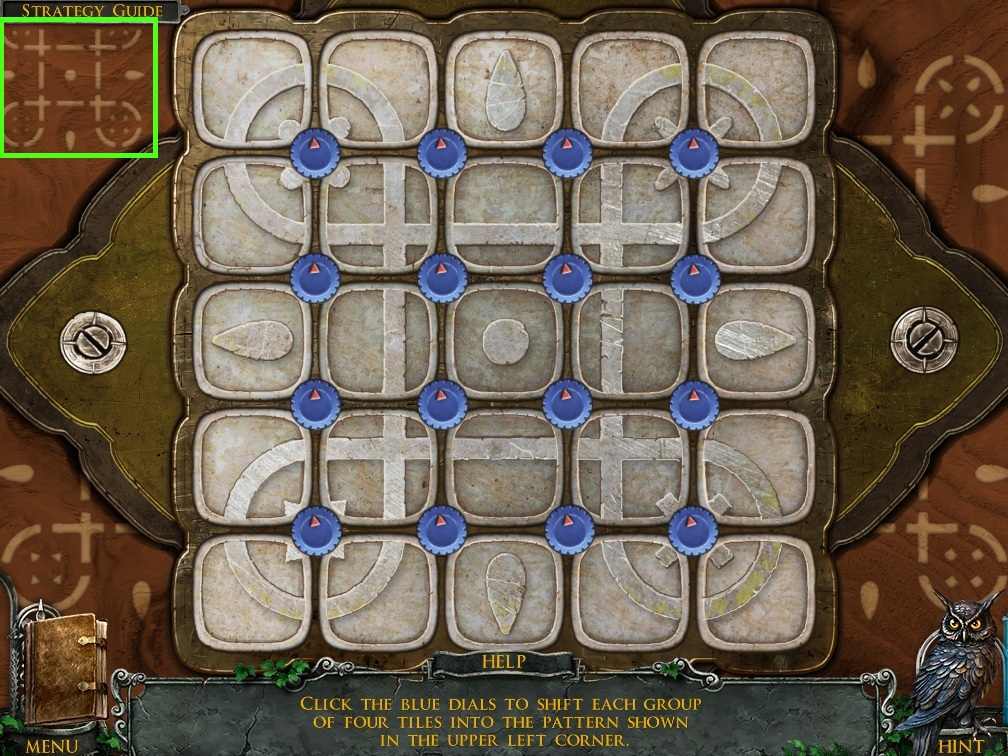
Click the opened drawer to start the minigame.
Click the blue dials to rotate the four adjacent tiles around it one space in a clockwise direction.
Arrange the tiles correctly to match the image seen at the upper left corner of the board.
Screenshot.
After the puzzle is solved, take the BAT from the space in the center of the board.
Return to the Gale Front Gate through the Crypt.
Gale Front Gate
Click the lock on the gate for a close-up view.
Add the BAT to the plate to start the minigame.
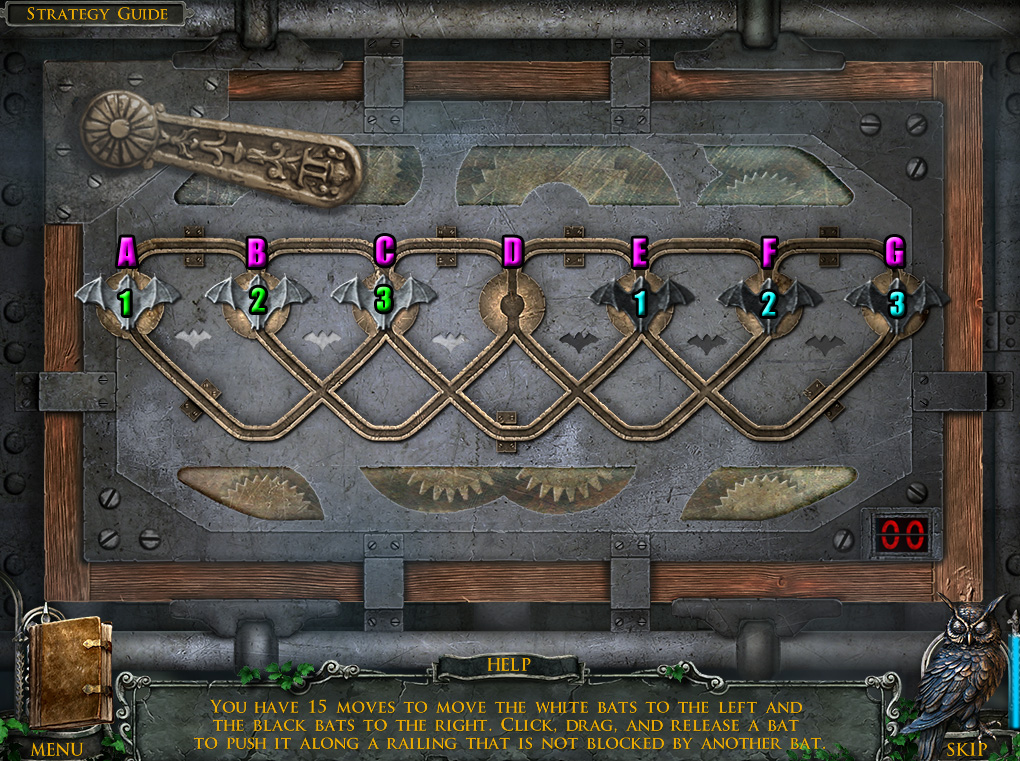
Move all three black bats from the left side to the right side and all white bats from the right side to the left side in 15 moves.
Click, drag, and release a bat to move it along the track, then release it on top of an empty round space to place it.
Refer to screenshot below and move the bats in the following order to solve the puzzle.
Move the Black Bat 3 to Space D.
Move the White Bat 1 to Space C.
Move the White Bat 2 to Space E.
Move the Black Bat 3 to Space F.
Move the Black Bat 2 to Space D.
Move the Black Bat 1 to Space B.
Move the White Bat 1 to Space A.
Move the White Bat 2 to Space C.
Move the White Bat 3 to Space E.
Move the Black Bat 3 to Space G.
Move the Black Bat 2 to Space F.
Move the Black Bat 1 to Space D.
Move the White Bat 2 to Space B.
Move the White Bat 3 to Space C.
Move the Black Bat 1 to Space E.
Screenshot.
After the minigame is solved, go through the open gate to the Castle Entrance.
Chapter 5
Castle Entrance
Pick up the PIPE in the middle of the steps.
Click the bushes on the right side of the stairs for a closer look.
Take the PINCERS on the ground behind the roots of the tree.
Use the GARDEN SPADE to dig a hole in the dirt and uncover the WEIGHT (1/3).
Click the shrubs on the left side of the stairs to zoom in and take the AXE.
Open the front door to the mansion and continue forward to enter the Lounge.
Lounge
Inspect the area left of the fireplace to zoom in.
Take the POKER from the stand.
Use the PINCER to pull the NAIL out of the piece of wood.
Open the door and continue right into the Hallway.
Hallway
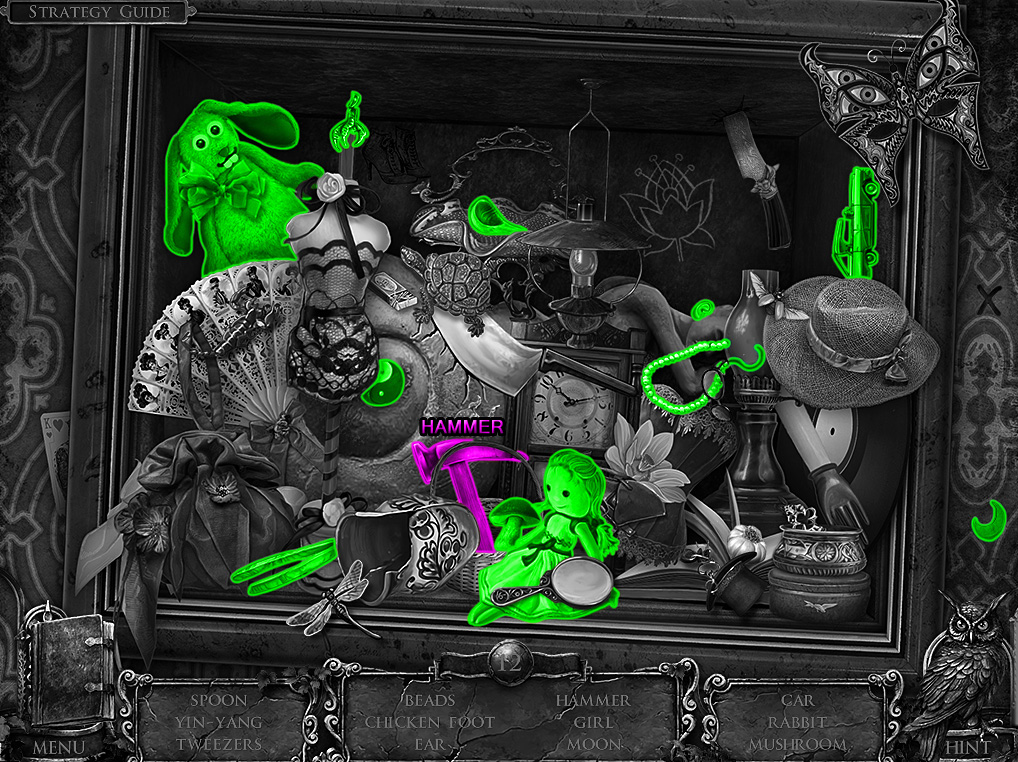
Click the framed picture on the wall to start the hidden object scene.
Screenshot.
Once the hidden object scene is complete, you will receive the HAMMER.
Pick up the WALL SCONCE on the rug.
Take the SWORD from the bottom of the front right column.
Go back to the Castle Entrance.
Castle Entrance
Inspect the drain pipe at the top of the ladder for a closer look.
Add the PIPE from your inventory to the space in the broken drain pipe.
Put the NAIL through the hole in the metal clasp, then use the HAMMER on the nail.
Go through the window to the left of the drain pipe to enter the Bedroom.
Bedroom
Add the WALL SCONCE to the space on the wall to the left of the framed painting above the bed.
Turn the sconce to find a hidden cache behind the painting.
Take the STATUE EYE from the upper shelf and CHESSBOARD PART (2/2) from the lower shelf.
Put the STATUE EYE in the hole on the head of the bust on the dresser.
Click the lowered chandelier to zoom in and find the CASTLE KEY.
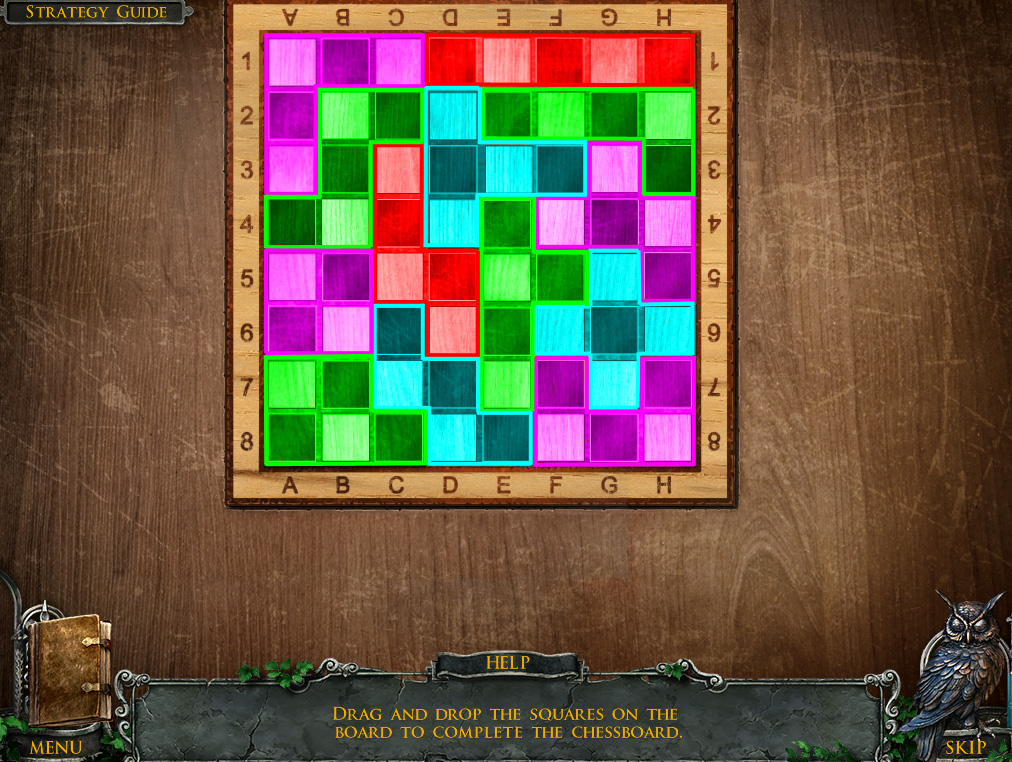
Inspect the middle of the dresser for a close-up view of a chessboard.
Add the two CHESSBOARD PARTS from your inventory to the board to start the minigame.
Arrange the pieces so that all of them fit correctly on the board.
Click and drag a chess board piece to select it, then release it inside the square to set it in place.
Screenshot.
After the minigame is solved, look inside the opened drawer below the chess board to find the WEIGHT (2/3) and a drawing to add it to your Diary.
Go back out the window, then back once again to the Gale Front Gate.
Gale Front Gate
Click the urn the right statue is holding for a close-up view.
Use the POKER to pull out the WEIGHT (3/3).
Return to the Lounge.
Lounge
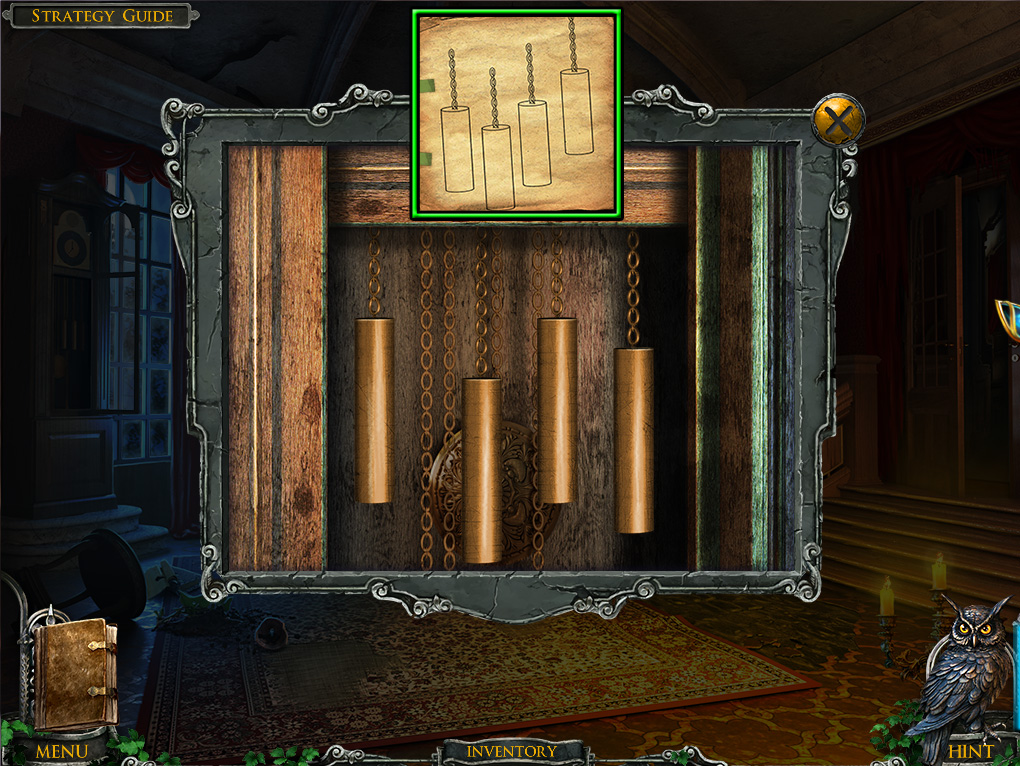
Click the grandfather clock for a closer look.
Place the three WEIGHTS inside the clock.
Click and drag the weights to arrange them in the order shown on the drawing from the chessboard puzzle.
Screenshot.
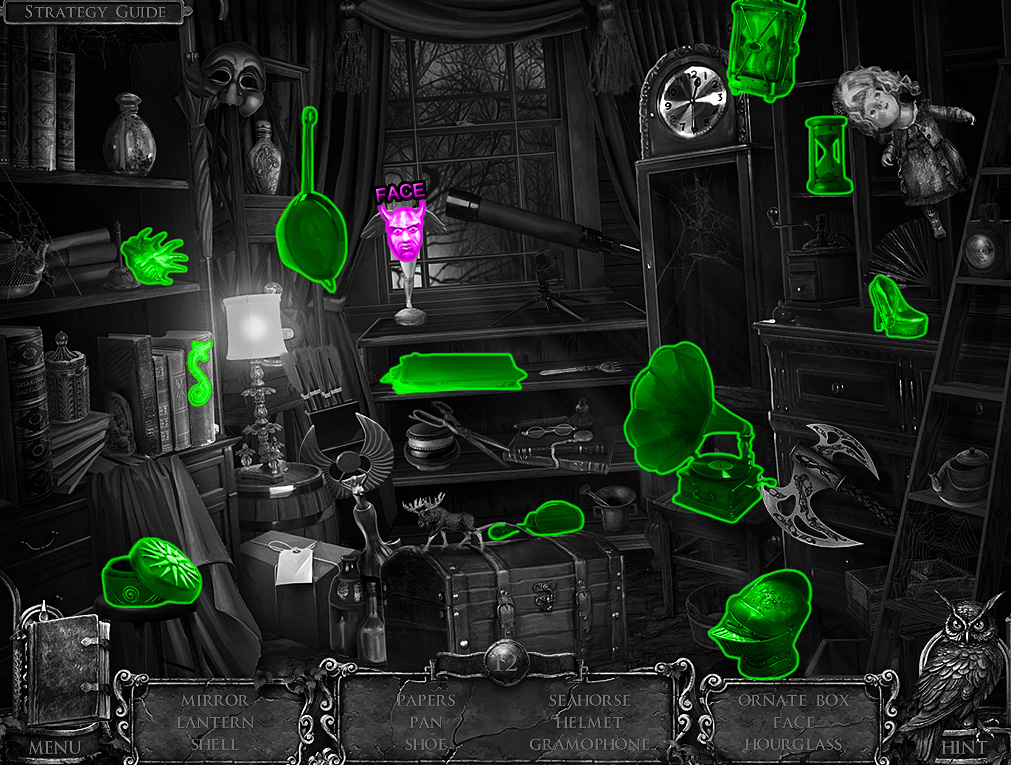
Click the secret alcove revealed behind the grandfather clock to start the hidden object scene.
Screenshot.
Once the hidden object scene is complete, you will receive the FACE.
Inspect the space for a family crest inside the frame on the right wall.
Add the AXE, the SWORD, the SHIELD, and the FACE to the outline on the wall.
Look inside the revealed compartment at the side of the fireplace to find the GALE CREST.
Move right to the Hallway.
Hallway
Click the framed picture on the wall to repeat the hidden object scene.
Screenshot.
Once the hidden object scene is complete, you will receive WULF'S KEYS.
Go back to the Gale Front Gate.
Gale Front Gate
Click the ghostly woman, then speak with Samuel.
Return to the area where Alberto Wulf had set up is camp in town to find that it is now an Abandoned Lot.
Abandoned Lot
Pick up the JACK on the ground to the right of the large puddle.
Click the briefcase on the ground for a closer look.
Use WULF'S KEYS to open the lock.
Read the note inside the briefcase to add it to your Diary.
Pick up the PLANK in front of the large tree.
Return to the Hallway in the castle.
Hallway
Click the door at the end of the hall for a closer look.
Put the GALE CREST inside the indentation in the door to open it.
Continue forward into the Parlor.
Parlor
Pick up the overturned CHAIR in the middle of the floor.
Take the PIANO WHEEL on top of the piano bench.
Click the castle on top of the cabinet for a close-up view.
Use the CASTLE KEY to open the lock at the bottom of the castle.
Take the LETTER OPENER and read the paper to add a note to your Diary.
Click the bottom of the piano to zoom in.
Place the JACK on the floor, then turn the crank to lift the piano.
Put the PIANO WHEEL at the bottom of the piano leg.
Click the piano to roll it to the right side of the room.
Place the CHAIR on top of the piano.
Click the hole in the ceiling for a closer look.
Use the LETTER OPENER twice to break away the cracked plaster around the small hole.
Take the uncovered BRIDGE ROPE, then inspect the diagram to add a note to your Diary.
Go back twice to the Lounge.
Lounge
Click the alcove to repeat the hidden object scene.
Screenshot.
Once the hidden object scene is complete, you will receive the SCISSORS.
Go back three times to the Crossroads, then continue left to the Swamp.
Chapter 6
Swamp
Click the bridge mechanism for a closer look.
Add the BRIDGE LEVER to the mechanism.
Place the BRIDGE ROPE around the wheel.
Click the lever to lower the bridge.
Continue forward to the Courtyard.
Courtyard
Click the area on the right side of the dead tree to start the hidden object scene.
Screenshot.
Once the hidden object scene is complete, you will receive the RED STONE.
Throw the RED STONE at the owl sitting on the tree branch.
Pick up the GENERATOR KEY the owl drops onto the ground.
Inspect the small door at the bottom of the left building.
Open the lock with the GENERATOR KEY.
Go left to the Generator Room.
Generator Room
Click the crate beside the lit candle to zoom in and find the CAT LEVER and the LIGHTER.
Place the PLANK over the large puddle.
Open the back door, then click the room to start the hidden object scene.
Screenshot.
Once the hidden object scene is complete, you will receive the DYNAMITE.
Go back out to the Courtyard.
Courtyard
Click the right door to zoom in.
Turn the statue around, then insert the CAT LEVER into the slot in the statue's back.
Go right into the Cell.
Cell
Pick up the BELT on top of the planks.
Go back once, then continue left to the Generator Room.
Generator Room
Add the BELT to the front of the generator to repair it.
Return to the Cell.
Cell
Click the mechanism in the middle of the left wall to start the minigame.
Arrange the tiles so that they are organized by row according to the pattern at the top and bottom of the tile and by column according to the shape of the gem.
Click a tile to move it into an adjacent empty space.
The symbol at the end of each row or column will glow when it is occupied by all of the correct tiles.
Screenshot.
After the puzzle is solved, use the SCISSORS twice to cut the ropes tied around Martin.
Speak with Martin, then look behind the boards he was tied against to find the CROWBAR.
Click the back wall to zoom in.
Use the CROWBAR to remove the loose brick.
Place the DYNAMITE inside the hole in the wall and light the fuse with the LIGHTER.
After the explosion, inspect the destroyed wall and pull out the locked chest.
Go back to the Courtyard.
Courtyard
Click the area beside the dead tree to repeat the hidden object scene.
Screenshot.
Once the hidden object scene is complete, you will receive the BUTTON (1/2).
Move left to re-enter the Generator Room.
Generator Room
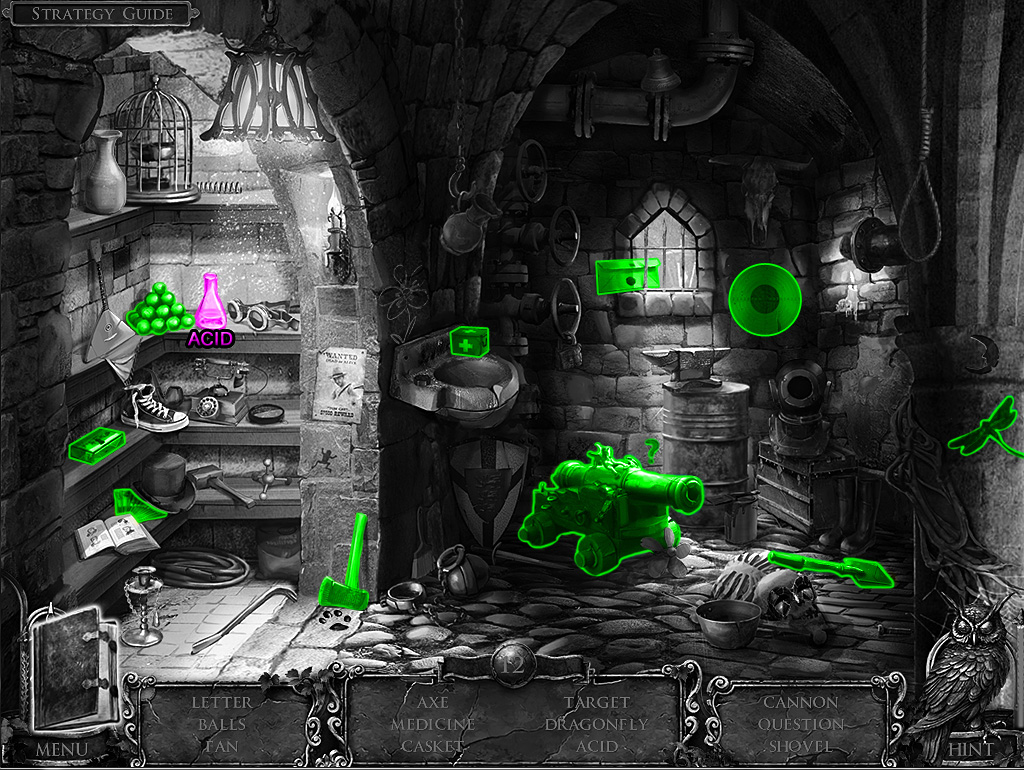
Click the back room to repeat the hidden object scene.
Screenshot.
Once the hidden object scene is complete, you will receive the ACID.
Return to the Cell.
Cell
Click the locked chest to zoom in.
Use the ACID to burn through the padlock.
Open the chest and take the BUTTON (2/2) inside.
Go back to the Courtyard.
Courtyard
Inspect the stone slab to the left of the door at the back of the courtyard.
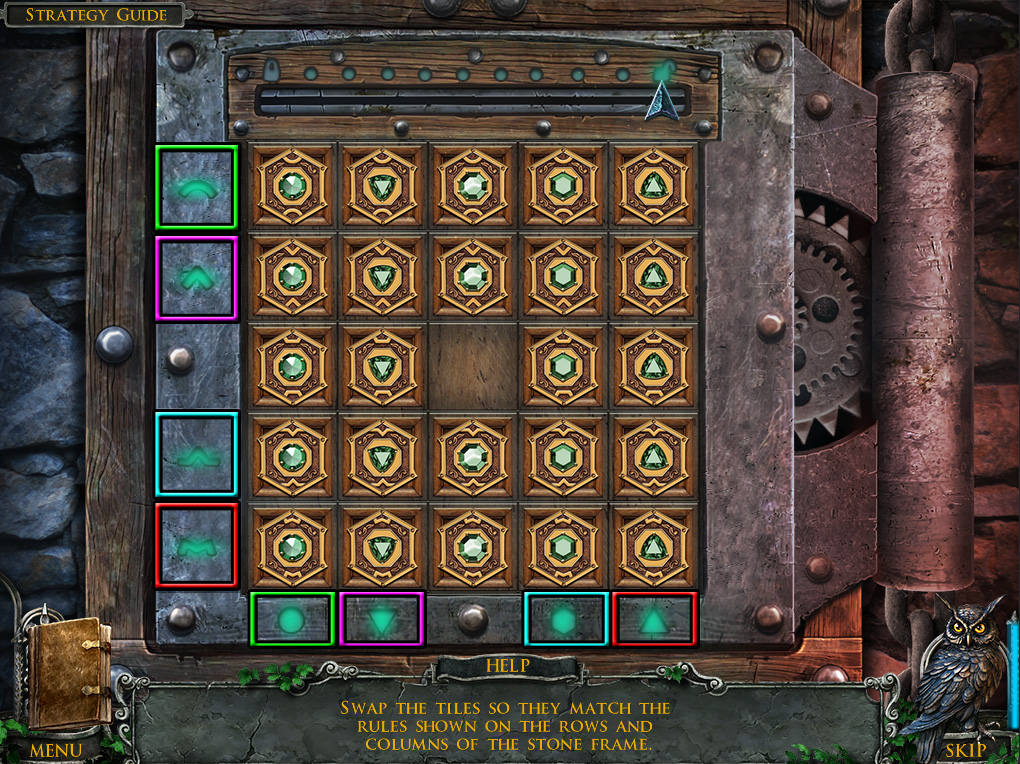
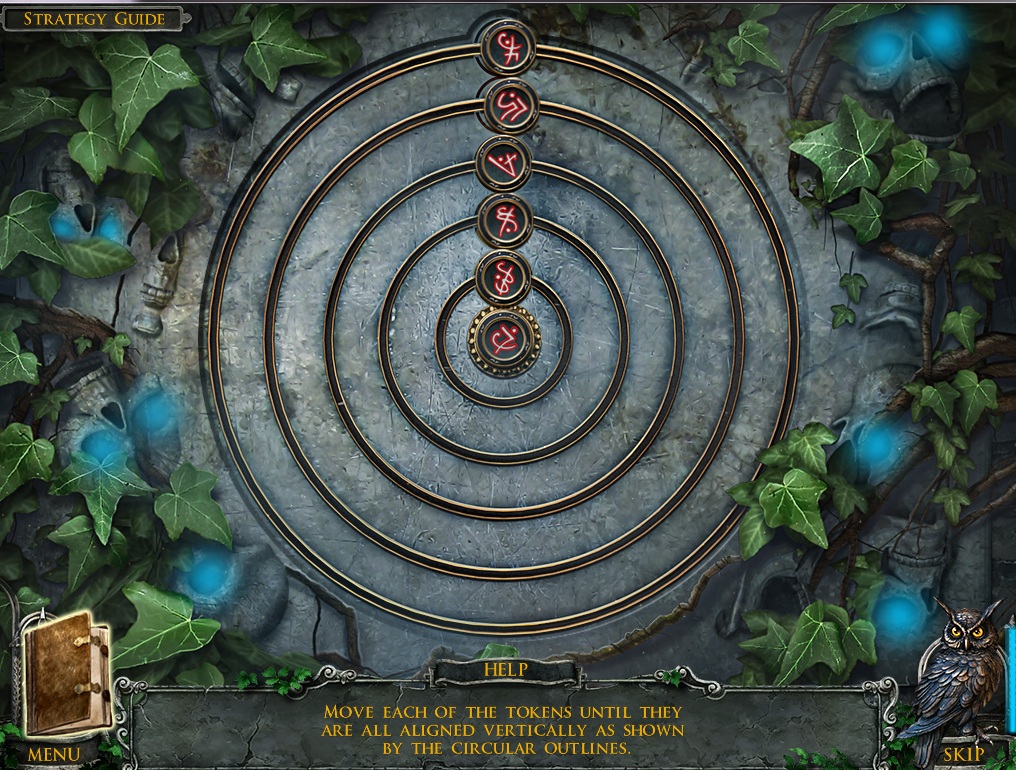
Add the two BUTTONS to the disc to start the minigame.
Rotate the tokens along the round tracks until they are all arranged in a vertical line inside the small circles.
Click and drag each token to move it, then release it to set it in place.
Moving one token will also rotate at least one adjacent token in a different ring.
Screenshot.
After the puzzle is solved, go through the open middle door to the Altar.
Altar
Speak with the man inside the prison cell.
Click the mechanical owl after it falls to zoom in.
Inspect the photographs beside the owl on the haystack.
After viewing the photographs, talk to Thomas again.
Posted by: Trinn |
August 25, 2012 2:10 PM
|
August 25, 2012 2:10 PM